

Page 1
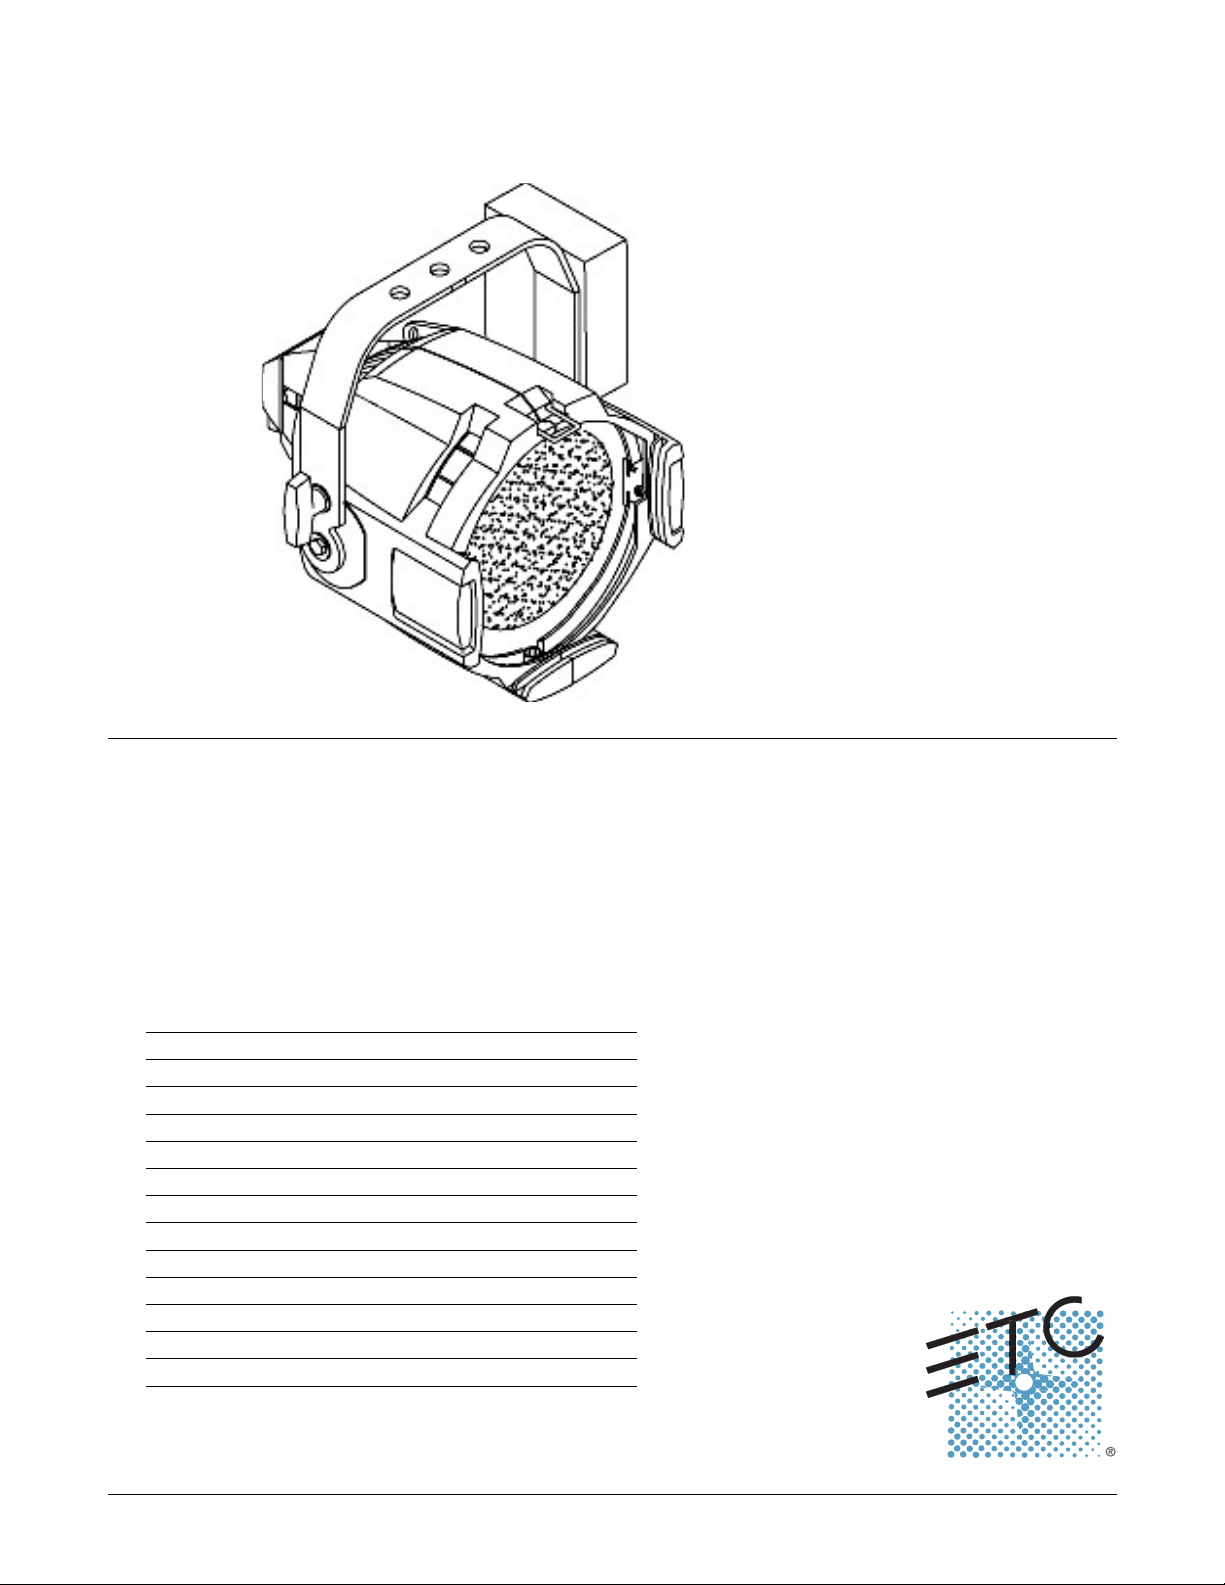
Source Four HID PARNel™ User Guide
Source Four HID PARNel guidelines
Please note the following precautions prior to use:
• Do not mount the Source Four HID PARNel on or near combustible surfaces.
• Do not recess mount the Source Four HID PARNel.
• The Source Four HID PARNel can be canopy mounted from the ceiling.
• Always hang the Source Four HID PARNel with the color frame retaining clip in the
locked position.
• The Source Four HID PARNel is NOT dimmable. Dimming or regulated voltage will
damage the ballast and void the warranty.
Accessories
ETC Part #
Color frame 7.5 in. sq.(6.7 in. inside diameter) 7061A3047
Safety cable (31 in.) 7061A1022
C-clamp 7060A2009
Top hat, 3” PSF1022
Top hat, 6” PSF1023
Half hat PSF1027
Cross-baffle top hat PSF1031
Egg-crate louver PSF1028
Weighted base PSF1032
Gel Extender 3” PSF1030
Gel Extender 6” PSF1029
Barn door PSF1019
Source Four HID PARnel • 1
Page 2
HID Lamp type and general information:
Do not use lamps other than the following types in the Source Four HID PARNel. Use
of lamps other than specified below will void UL/cUL safety compliance and your warranty.
Lamp Type Manufacturing Codes Watts Base Bulb LCL Ave.
CDM-T 150W/830 150 G12 T6 56mm 9000 14000 3000°K
Ceramic
Metal
Halide
CDM-T 150W/942 150 G12 T6 56mm 9000 12700 4000°K
MD150T6/U/G12/
830
MBI150/T/30 150 G12 T7 57mm 6000 11500 3000°K
MBI150/T/40 150 G12 T7 57mm 6000 11250 4000°K
150 G12 T6 56mm 9000 14000 3000°K
Hrs.
Initial
lumens
Installing the lamp
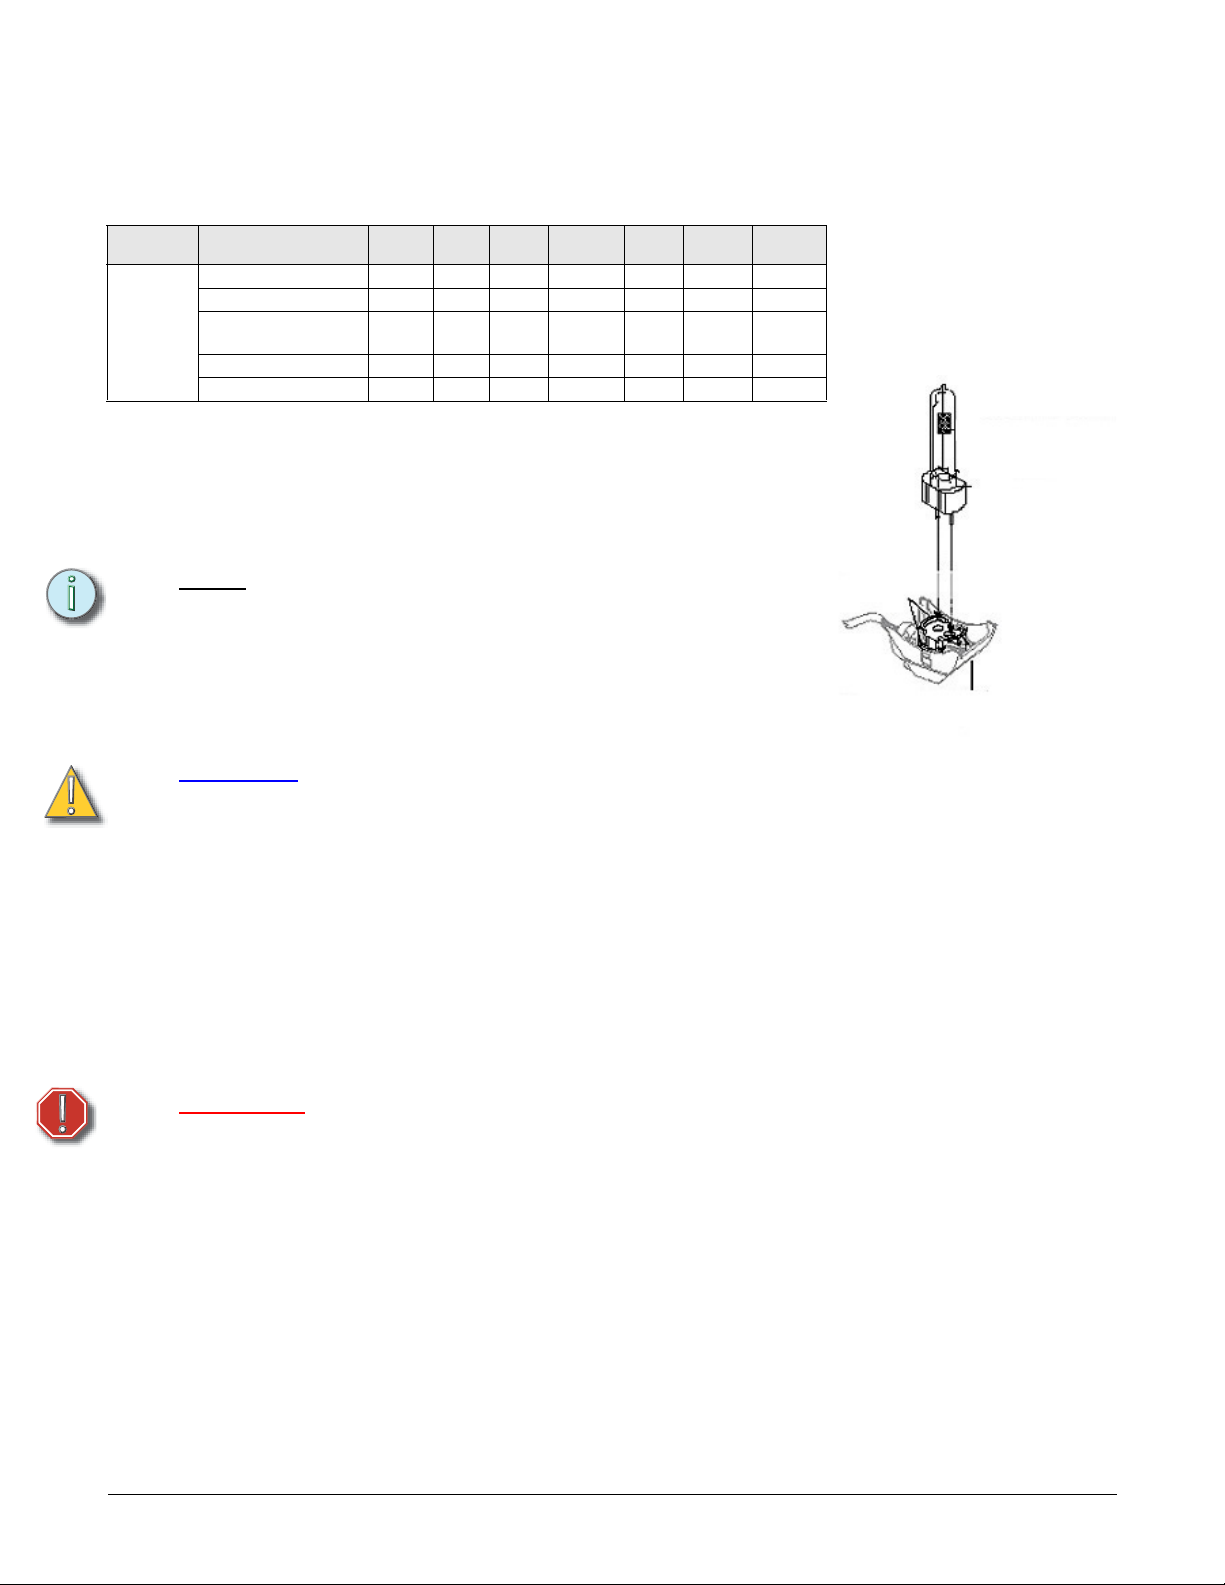
1. Disconnect power to the Source Four HID PARNel before installing the lamp.
2. Loosen the knurled bolt on the back of the lamp housing and pull the housing out.
3. Holding it by the base, remove the lamp from its box.
Note:
4. Insert lamp base into socket assembly. (Figure 1)
5. Push down on the lamp base until the lamp seats firmly.
6. Reinstall the lamp housing by aligning the bolt hole and tightening the knurled bolt.
CAUTION:
To avoid premature lamp failure, do not touch the lamp glass
with your fingers. If you touch the lamp during installation, clean
it carefully with rubbing alcohol and a clean, lint-free cloth before
operation.
Replace the lamp if it becomes damaged or thermally
deformed.
Color
temp
Figure 1
Improperly installed lamps will cause
premature lamp and socket failures.
Ballast information
• The only acceptable voltage is 120V (+/- 10%) 50/60HZ.
• The standard operating current is 1.5 Amps.
• The standard inrush current is <14 Amps.
• Room ambient temperature should not exceed 104ºF (40ºC).
• The lamp ignition voltage is 4.5Kv, non-hot restrike.
• The ballast case temperature should not exceed 167ºF (75ºC).
WARNING: DO NOT power the Source Four HID PARNel with a
dimmable power supply. Dimming will damage the
ballast and void the warranty.
2 • Source Four HID PARnel
Page 3
Color frame retaining clip usage
n
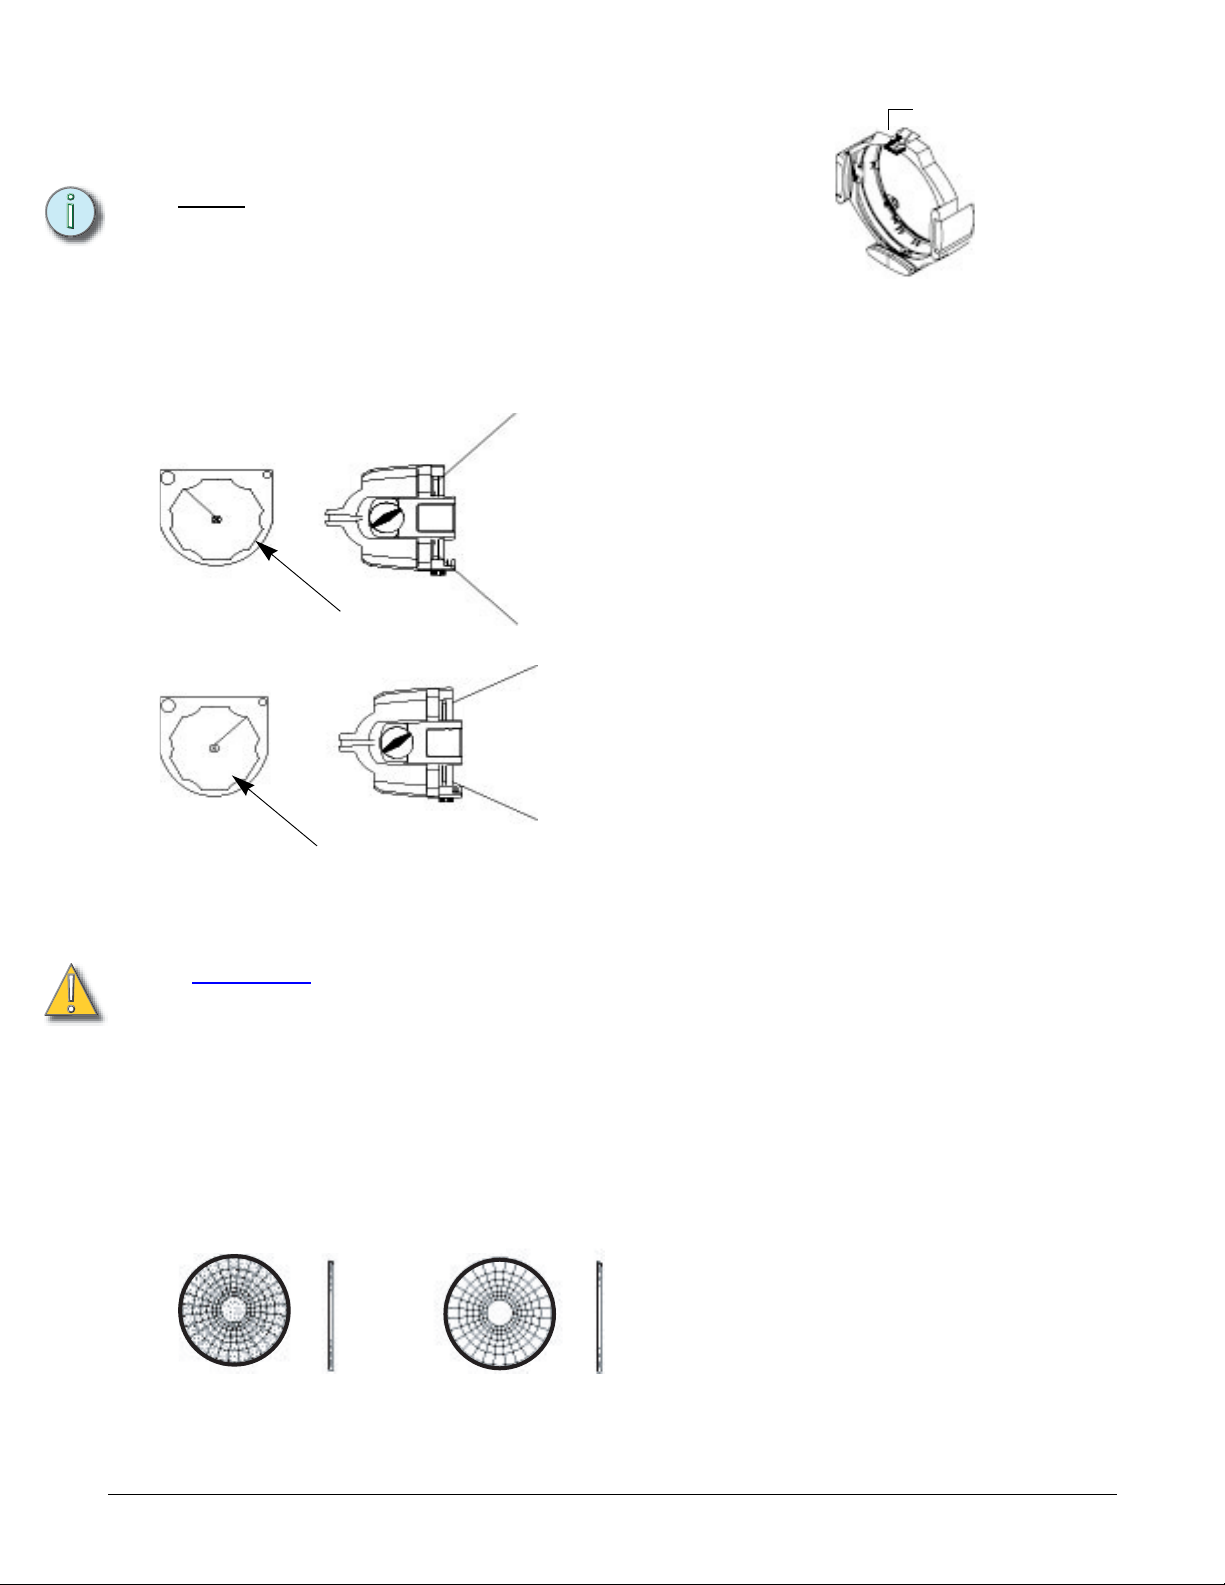
The color frame holder is equipped with a spring-loaded retaining clip that prevents
color frames and accessories from falling out. Make sure the Source Four HID PARNel has the color frame retaining clip in the locked position when hanging.(Figure 2)
Retaining clip in
the locked positio
Note:
Make sure to use colorframes or accessories with a 6.7 inch
inside diameter.
1. Release the retaining clip by pushing it sideways. The retaining clip opens.
2. Insert the color frame.
3. Press the retaining clip down until it locks.
Focus Knob Positioning
45º field angle
Focus knob in
flood position
Focus knob screw
25º field angle
Figure 2
Focus knob in
spot position
To adjust the Focus knob tension, loosen or tighten the Focus knob screw.
CAUTION:
Focus knob screw
The focus knob does not rotate 360º. Do not attempt
to exceed rotational limit. Overtightening may result in
damage or breakage of the knob.
Lens identification
The Source Four PARNel comes equipped with two types of lenses; Wave/Stippled
(WS) and Wave/Clear (WC). The type can be identified by the lens texture.
The WC rear lens is in a “fixed” position inside the fixture. The WS lens is in the
rotating ring at the front of the fixture. The wave surfaces face each other.
WS
Wave / Stippled lens
WC
Wave / Clear lens
Source Four HID PARnel • 3
Page 4
Changing Source Four PARNel lenses
Change lenses if they become cracked or badly scratched.
CAUTION:
Never operate the Source Four PARNel without a lens in
place.
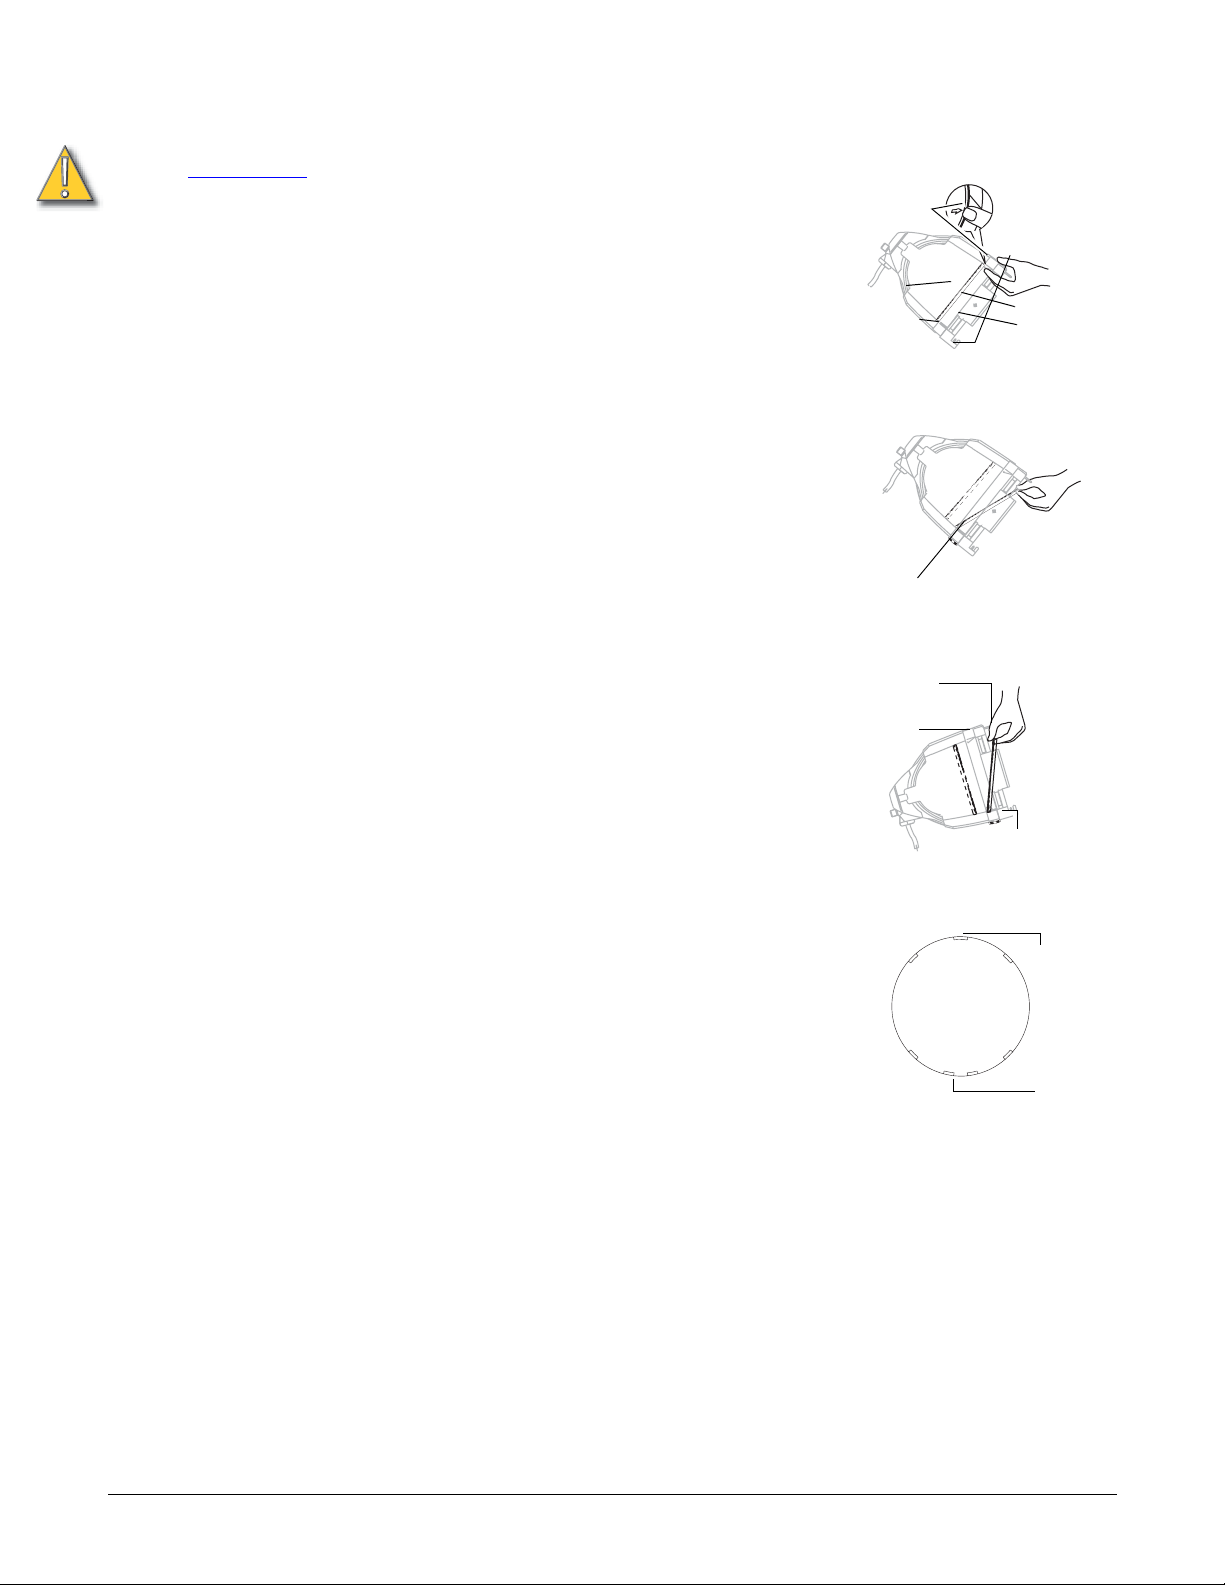
Removing a wave/stippled front lens
1. Source Four PARNel lenses get hot while the unit is in operation. Let the fixture cool
before handling the lens.
2. Disconnect power from the fixture.
3. Place the fixture on a flat, stable work surface. Do not install or remove lenses with
the unit hanging.
4. Rotate the focus knob to full spot position.
5. Tilt the front of the fixture down at least 45 degrees.
6. Press the spring clip with your finger to release the lens (Figure 3).
7. Allow the lens to drop forward from under the clip.
8. When the lens drops, remove your finger, allowing the lens to slide forward until it
rests on the lens catchers
9. Carefully remove the lens from the fixture.
(Figure 4).
Installing a wave/stippled lens (front)
1. Position the fixture with the front of the unit (the lens side) facing you, and tilted
slightly (Figure 3).
2. Rotate the focus knob to full spot position.
3. Hold the lens by the edge, and position it so the wave side faces the back of the
fixture (Figure 5).
4. From the top of the fixture, slide the lens behind the lens catchers and position its
base behind the tabs on the bottom of the lens rotation ring. See Positioning the
wave/stippled lens below.
5. Gently push the top of the lens inward until it snaps behind the spring clip.
Spring clip
WC lens
Focus Knob
Retaining clip
Lens catcher
Retaining clip
Spring clip
WS lens
Tab
Figure 3
Figure 4
Tab
Figure 5
Positioning the wave/stippled lens (front)
• There are seven “notches” cut into the stippled side of the lens. Position the lens so
that the cluster of three notches is on top. The center notch of the cluster coincides with
the spring clip on the lens retaining ring. (Figure 6)
• The bottom of the lens has a cluster of four notches. Place the two center notches
behind the tabs at the bottom of the lens rotating ring.
4 • Source Four HID PARnel
(Figure 5)
Top center notch
Bottom two
center notches
Figure 6
Page 5

Cleaning the reflector
1. Unplug the fixture before attempting to clean the reflector.
2. Remove the lamp before attempting to clean the reflector.
3. Remove the lenses so you can access the reflector from the front of the fixture.
4. Remove dust with a blast of oil free air, or wipe with a clean, soft, lint-free cotton cloth.
If this is sufficient to remove dust, go to step 7. Otherwise, continue to step 5.
5. Dampen a clean, soft, lint-free cotton cloth with a mild, soapy water solution and
gently wipe the reflector.
6. Remove any soapy water residue with a clean, soft, lint-free cotton cloth dampened
with water.
7. Reinstall the lenses before using the fixture.
CAUTION:
Do not use glass or window cleaners on the reflector.
Chemicals in the cleaners will harm the reflective coating.
Do not use paper towels or harsh materials to wipe the
reflector. These materials can scratch the surface of the
reflector.
Housing assembly instructions
If you take apart the Source Four HID PARNel for any reason, please use the following
steps for reassembly. Improper reassembly will result in void of warranty and loss of per
formance.(See parts list on page 7)
Tools required: Phillips screwdriver.
1. Install the reflector mount silicon pads (11) and lens pad (15) in the left barrel (7 or 8).
2. With the wave side of the lens facing toward the front of the fixture, install the wave/
clear lens (21) into the rear lens track.
3. Assembly items 16, 17, 18, and 19 (Focus knob assembly). Rotate the focus knob full
spot position. The arrow on the focus knob will point approximately to the 11 O’clock
position.
4. Place the focus knob assembly into the left barrel.
5. Install the lens stop (14) and the rotator spring clip (12) into the lens rotator (12 or 13).
6. Install the lens rotator into the left barrel.
7. Install the rotator pressure clip (9) into the left barrel with screw (23).
8. Install the gel retainer clip (1) and the spring (22) into the right barrel (5 or 6).
9. Attach the right barrel to the left barrel using screws (3) in three places.
10. Check that the gel clip retainer (1) moves easily into position.
11. Check for smooth rotation of the lens rotator (12 or 13).
12. With the wave side facing inward, install the wave/stippled lens (20) into the lens
rotator.
-
Source Four HID PARnel • 5
Page 6
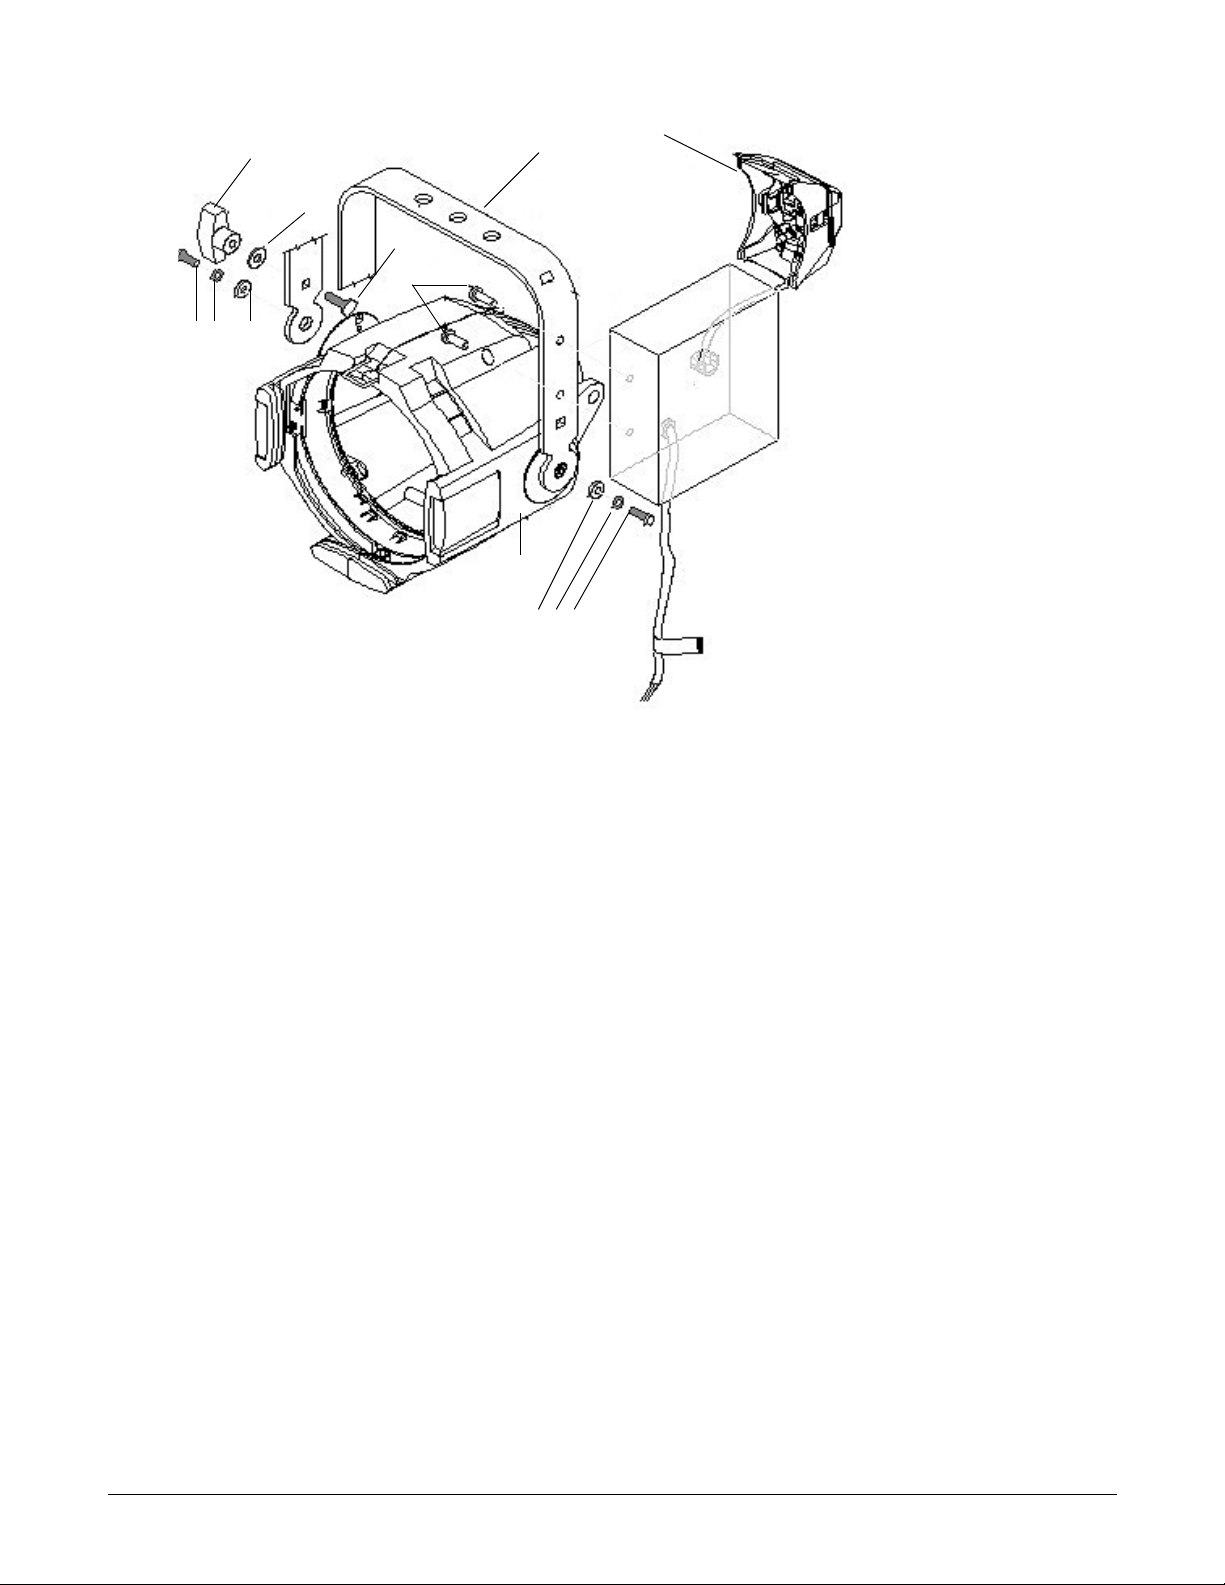
Spare parts list
13,14
10 9 12
5,6
3,4
8
7
11
1,2
12 9 10
Source Four HID PARNel Final Assembly
Reference
Number
1 7061A2022
2 7061A2022-1
3 7061A2024-0X
4 7061A2024-1X
5 7061A3039
6 7061A3039-1
7 HW5125 Bolt, carriage 1
8 HW5126 Washer, flat 1
9 HW5139 Washer, split ring lock 2
10 HW5172 Bolt, hex 2
11 HW5270 Bolt, spinlock 2
12 HW522 Washer, flat 2
13 HW8144
14 HW8144-1
Part Number Description Quantity
Required
S4 HID PAR base
assembly (black)
S4 HID PAR base
assembly (white)
120V HID PAR Lamp
socket assembly (black)
120V HID PAR Lamp
socket assembly (white)
HID PAR yoke bracket
(black)
HID PAR yoke bracket
(white)
Handle, yoke knob
(black)
Handle, yoke knob
(white)
1
1
1
1
1
1
1
1
6 • Source Four HID PARnel
Page 7
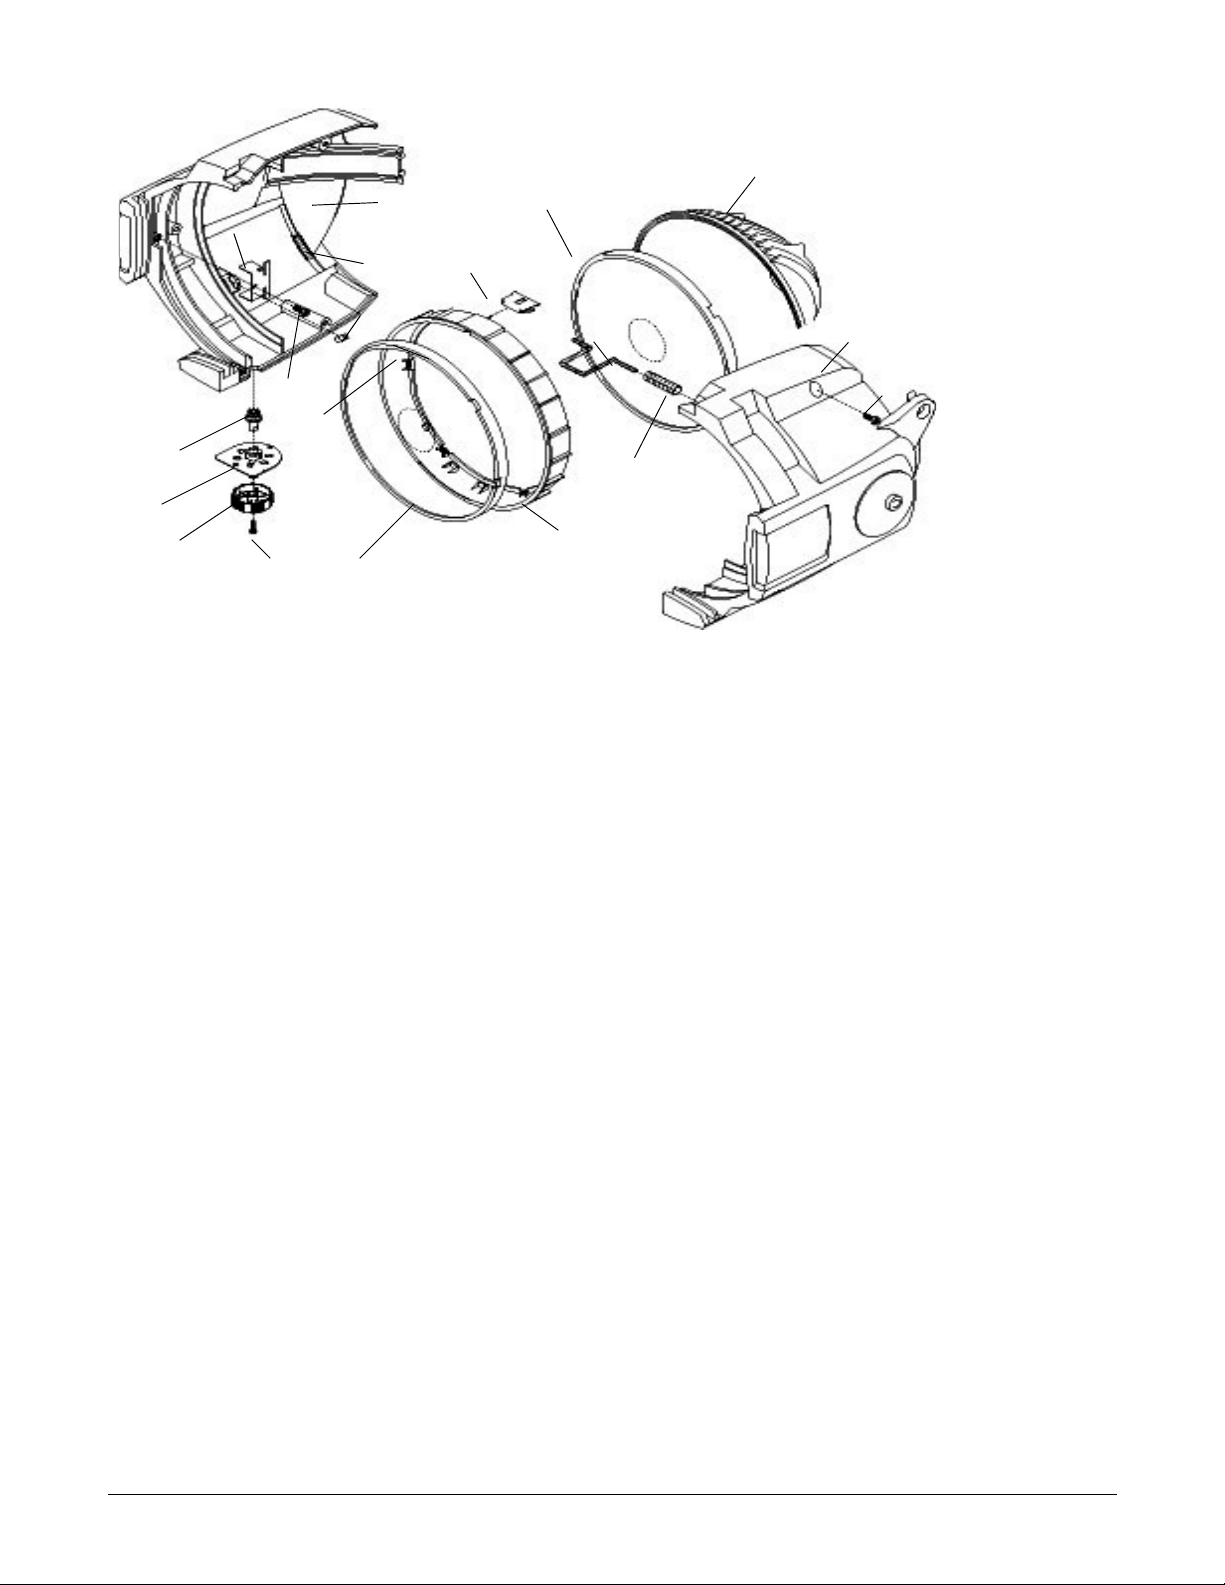
Spare parts list
9
3
7
8
11
2
21
4
15
1
23
14
17
22
16
12
18
19
20
13
Source Four HID PARNel Housing Assembly
Reference
Number
1 7061A3005 Gel retainer clip 1
2 7061A3013 Spring clip rotator 1
3 7061A3014 Reflector, painted black 1
4 7061A3014-1 Reflector, painted white 1
5 7061A3025 Barrel, painted black 1
6 7061A3025-1 Barrel, painted white 1
7 70612019 Source Four PAR rivet assembly, black 1
8 70612019 Source Four PAR rivet assembly, white 1
9 70613029 Rotator pressure clip 1
10 HW492 Screw, 10-32 X 5/8, PhPH Taptite 3
11 7061A4001 Pad, silicon reflector mount 2
12 70614012 Lens rotator, black 1
13 70614012-1 Lens rotator, white 1
14 7061A4029 Lens stop 1
15 7061A4020 PARNel lens pad 4
16 7061A4013 Focus knob bushing 1
17 7061A4014 Focus knob gear 1
18 7061A4015 Focus knob 1
19 HW2154 Screw, PPH, 6-19 X 1/2L, 48-2 Plastite 1
20 7061A4010-2 PAR zoom wave/stippled lens 1
21 7061A4010-1 PAR zoom wave/clear lens 1
22 HW750 Spring, retainer 1
23 HW4145 Screw, 10-32 X 3/8, PhPH Taptite, BO 1
Part Number Description Quantity
5
6
10
Required
Source Four HID PARnel • 7
Page 8

Americas
3030 Laura Lane, P.O. Box 620979, Middleton, Wisconsin 53562-0979 USA Tel: +608 831 4116 +800 688 4116 Fax: +608 836 1736
+800 555 8912
Europe
Unit 4, Victoria Industrial Estate, Victoria Road, London W3 6UU, UK Tel: +44 (0)20 8896 1000 Fax: +44 (0)20 8896 2000
Asia
Room 605-606, Tower III Enterprise Square, 9 Sheung Yuet Road, Kowloon Bay, Kowloon, Hong Kong Tel: +852 2799 1220 Fax: +852 2799 9325
W
eb: www.etcconnect.com Email: (US) [email protected] (UK) [email protected] (Asia) [email protected]
Service: [email protected]
Toll free: 800 775 4382 Comments about this document: [email protected]
Copyright © 2003 Electronic Theatre Controls, Inc. All Rights Reserved. Product information and specifications subject to change.
7061M1013
Rev A Released 4/03
 Loading...