

Page 1
Selador CE Series by ETC
Lustr – Paletta – Vivid – Vivid-R –
Vivid Fire – Vivid Ice– Pearl
User Manual
2010-09
The Selador series of fixtures are intended for professional use only.
Read entire User Manual before using equipment.
Copyright © 2013. Electronic Theatre Controls, Inc.
Product information and specifications subject to change.
All rights reserved.
Part Number: 7401M1210 Rev D
Released: 2013-02
Page 2

ETC intends this document, whether printed or electronic, to be provided in its entirety.
ETC and Selador are registered trademarks of Electronic Theatre Controls, Inc. in the United
States and other countries.
Other product and company names mentioned herein may be trademarks and/or service marks
of their respective owners.
ETC permits the reproduction of materials in this manual only for non-commercial purposes.
All other rights are reserved by ETC.
This product is protected by one or more of the following U.S. Patents: 6,016,038, 6,150,774,
6,788,011, 6,806,659, 6,683,423 and 7,023,543
Page 3
DECLARATION OF CONFORMITY
London, United Kingdom Mr Adam Bennette
(Place of issue) (Name of authorised person)
18th August 2010
(Date of Issue) (signature of authorised person)
Printed 18 Aug. 10 Page 1
Decl # 93
\\lon-file2\Shares\RND\DofC\Master declaration.doc
Version # C
We, Electronic Theatre Controls Limited
declare under sole responsibility that the product:
Product name: Selador LED luminaire
Product type/model: Vivid, Vivid-R, Lustr, Pearl, Paletta, Vivid Fire & Vivid
Ice
Item numbers: All sizes
to which this declaration relates is in conformity with the following Standards:
EN 60598-1:2004 Luminaires. General requirements and tests
EN 60598-2-17:1989 Luminaires. Particular requirements. Specification for luminaires
for stage lighting, television, film and photographic studios
(outside and indoor)
following the provisions of EU LV Directive(s) 2006/95/EC
EN 55015:2006 Limits and methods of measurement of radio disturbance
characteristics of electrical lighting and similar equipment
EN61000-6-2:2005 Electromagnetic compatibility (EMC). Generic standards.
Immunity for industrial environments
Including:
EN61000-4-2:1995 ESD requirements
EN61000-4-3:2006+A1:2008 Radiated susceptibility
EN61000-4-4:2004 Electrical fast transients
EN61000-4-5:2006 Surges
EN61000-4-6:2007 Conducted susceptibility
EN61000-4-11:2004 Voltage dips and interruptions
EN61000-3-2:2006 Electromagnetic compatibility (EMC). Limits. Limits for harmonic
current emissions (equipment input current up to and including
16 A per phase) Class A
EN61000-3-3:1995 Electromagnetic compatibility (EMC). Limits. Limitation of
voltage fluctuations and flicker in low-voltage supply systems for
equipment with rated current <= 16 A
following the provisions of EU EMC Directive(s) 2004/108/EC
Page 4

Page 5

Table of Contents
Specifications . . . . . . . . . . . . . . . . . . . .1
Maximum Power Consumption at Full Intensity . . . . . . . . . .2
Dimensions and LEDs . . . . . . . . . . . . . . . . . . . . . . . . . . . . .3
Note About LED Fixtures. . . . . . . . . . . . . . . . . . . . . . . . . . . .3
Overview . . . . . . . . . . . . . . . . . . . . . . . .4
Applications . . . . . . . . . . . . . . . . . . . . . . . . . . . . . . . . . . . . .5
Document Conventions . . . . . . . . . . . . . . . . . . . . . . . . . . . . .6
Safety . . . . . . . . . . . . . . . . . . . . . . . . . . . . . . . . . . . . . . . . . .6
Installation. . . . . . . . . . . . . . . . . . . . . . .7
Power and Data Cabling Requirements . . . . . . . . . . . . . . . .7
Power . . . . . . . . . . . . . . . . . . . . . . . . . . . . . . . . . . . . . . .7
Data . . . . . . . . . . . . . . . . . . . . . . . . . . . . . . . . . . . . . . . .7
Installation Procedures . . . . . . . . . . . . . . . . . . . . . . . . . . . . .8
Installing Mounting Hardware . . . . . . . . . . . . . . . . . . . . .8
Installation Notes . . . . . . . . . . . . . . . . . . . . . . . . . . . . . .8
Safety Cable . . . . . . . . . . . . . . . . . . . . . . . . . . . . . . . . 10
Fixture Weight. . . . . . . . . . . . . . . . . . . . . . . . . . . . . . . .10
Installing Secondary Lenses. . . . . . . . . . . . . . . . . . . . 11
Connections and Addressing . . . . . . . . . . . . . . . . . . . 12
Control . . . . . . . . . . . . . . . . . . . . . . . . . . . . . . . . . . . . 13
Routine Maintenance . . . . . . . . . . . . .15
General Fixture Cleaning . . . . . . . . . . . . . . . . . . . . . . . . . .15
Cooling Fan Filter Cleaning . . . . . . . . . . . . . . . . . . . . . . . . 16
Fuse Capacities. . . . . . . . . . . . . . . . . . . . . . . . . . . . . . . . . .16
i
Page 6

Specifications
Note:
Vivid-R replaces the original Vivid fixture as of February 2010. The manufacturer of the
K2 LED emitter is phasing out these emitters over the next year. Vivid-R maintains
photometrics equivalent to the original Vivid with higher intensity and uses less power.
Physical
• Rugged extruded anodised aluminum construction • Yoke, trunnion (floor stand), or pipe-hanger mounting
options
• Advanced thermal management systems for long LED
life
• 0 to 40°C ambient operating temperature • See Dimensions and LEDs, page 3
• Available in 279, 546, 1080 and 1613mm lengths • See Fixture Weight, page 10
• On-board fan speed control for no-noise operation
unless in high ambient temperature situations.
(Fixtures built January 2010 and after)
• Available in black
Electrical
• 100V to 240V 50/60 Hz internal power supply • 1.5m power lead supplied
•Neutrik
®
PowerCon® input connector
• Requires power from non-dim source
LEDs
• Luxeon® Rebel™ 2.5W LED emitters (Lustr, Paletta,
Vivid-R, Vivid Fire, Vivid Ice, and Pearl)
• Luxeon K2 3.5W LED emitters (original Vivid fixtures
manufactured before February 2010.)
• 50,000 hr. LED life
• See Note About LED Fixtures, page 3
Optical
• Integral 16° field angle optic (Pearl)
• Integral 18° field angle optic (original Vivid)
• Integral 19° field angle optic (Vivid-R)
• Integral 26° field angle optic (Lustr, Paletta, Vivid Fire
and Vivid Ice)
• Slots for secondary lenses
Colour
• Selador Seven-color x7 LED products for superior
broad spectrum colour mixing
– Lustr – Optimized for highest output in white and
light tints in a 7-color fixture
– Paletta – Optimized for strong, saturated colours
– Vivid, Vivid-R – Optimized for strong, saturated
colours at maximum brightness
• Selador special purpose LED fixtures
– Vivid Fire – Optimized for high-intensity saturated
colours on the red end of the spectrum
– Vivid Ice – Optimized for high-intensity saturated
colours on the blue end of the spectrum
– Pearl – High output warm and cool white LEDs for
variable colour temperature white (only) light output
• Combine secondary lenses for desired beam spread
• Interacts seamlessly with conventional sources
• Achieves excellent 3200° or any other Correlated
Colour Temperature white light from 800 to 20,000°K
(except Vivid Fire, Vivid Ice, and Pearl)
• Beautifully illuminates skin tones and other objects
• Deeply saturated colours across an exceptionally wide
gamut
• Colour rendering as high as 90 CRI (except Vivid Fire,
Vivid Ice, and Pearl)
1 Selador Series User Manual
Page 7
Control
• DMX512-A compliant • Internal control electronics for smooth low-end dimming
at 15-bit resolution
• DMX in and thru via 5-pin XLR connectors • 21 fixture provides 2 independently controllable cells
• 8-channel (7 colour plus intensity) • 42 fixture provides 4 independently controllable cells
• Intensity channel minimises colour shift during
dimming
• Digital LED display for address assignment
• 63 fixture provides 6 independently controllable cells
Optional Secondary Lenses
• Beam-spreading lenses available from 20 to 80° in
horizontal and vertical axis
• Combine up to 2 secondary lenses at a time
• Easily interchangeable
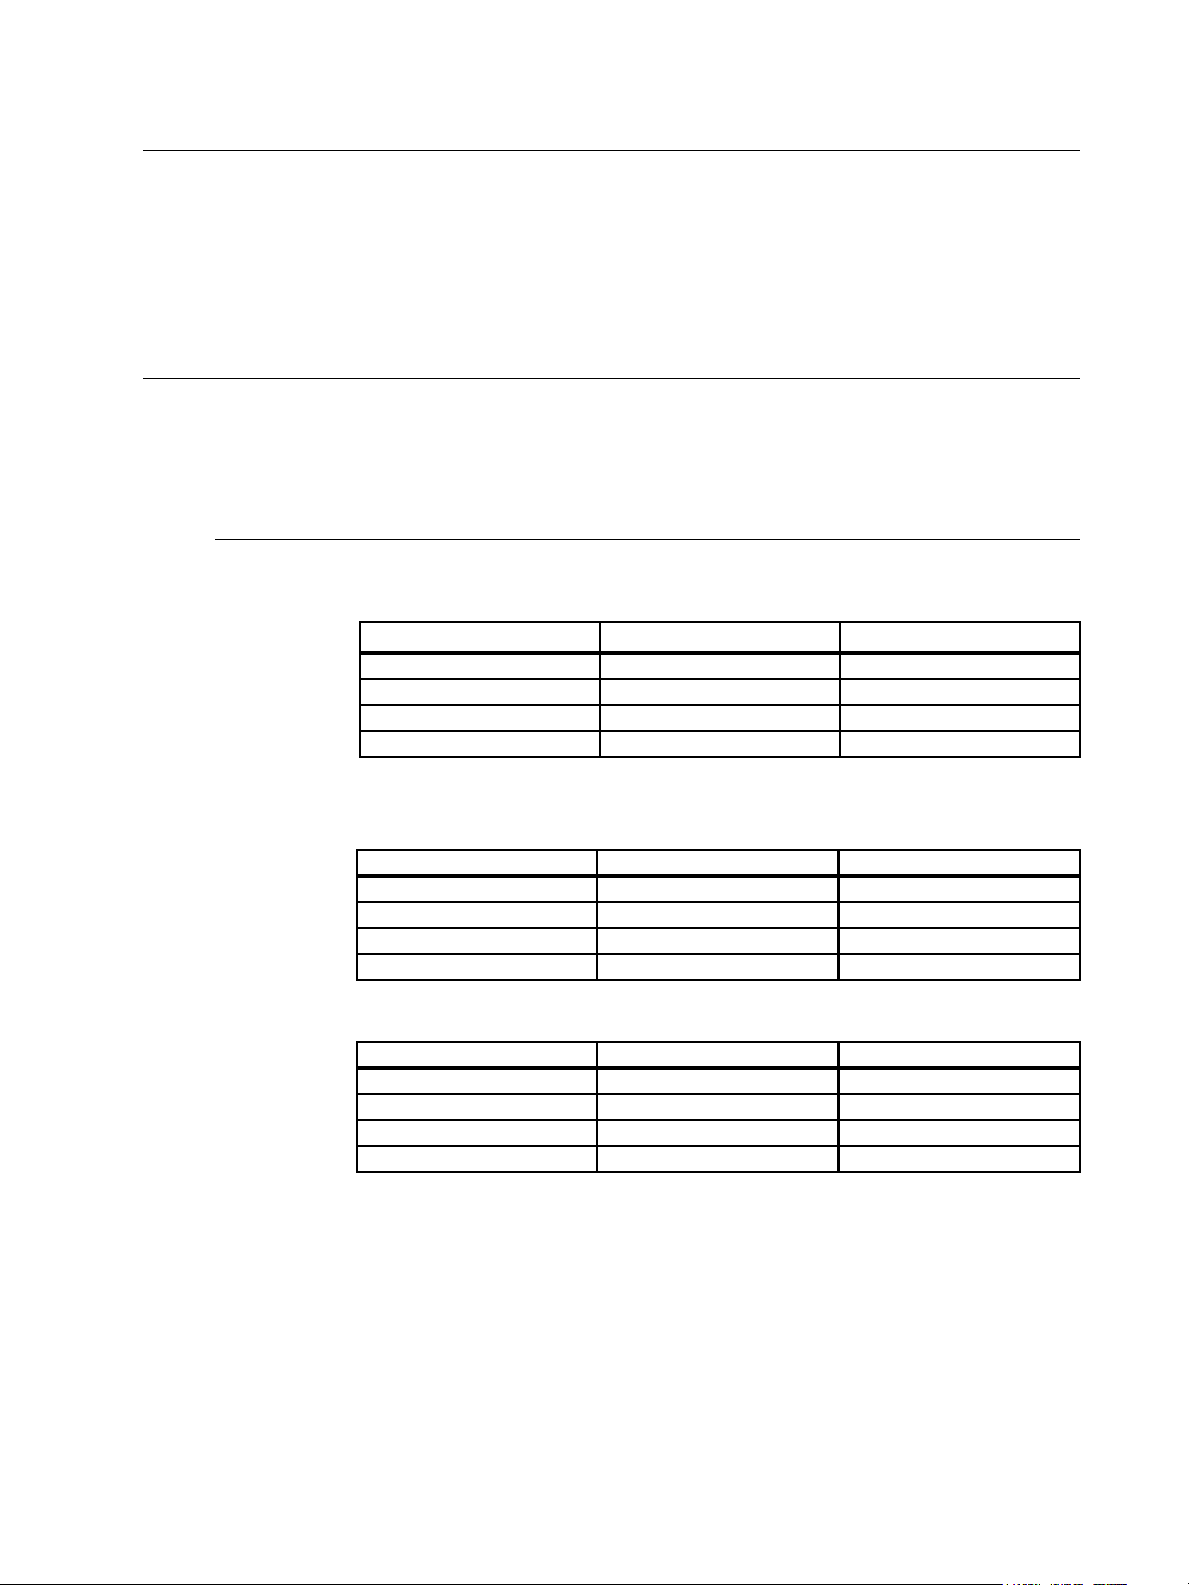
Maximum Power Consumption at Full Intensity
Lustr, Vivid-R, Vivid Fire, Vivid Ice, and Pearl
a
Model
11 0.6 144
21 1.2 288
42 2.4 576
63 3.6 864
a) Vivid Fire and Vivid Ice are available in 11 and 21 versions only.
Current (A) Watts
Paletta
Model Current (A) Watts
11 0.5 120
21 1.0 240
42 2.0 480
63 3.0 720
Vivid (Manufactured January 2010 or before)
Model Current (A) Watts
11 0.74 178
21 1.48 356
42 2.96 715
63 4.44 1068
2
Page 8
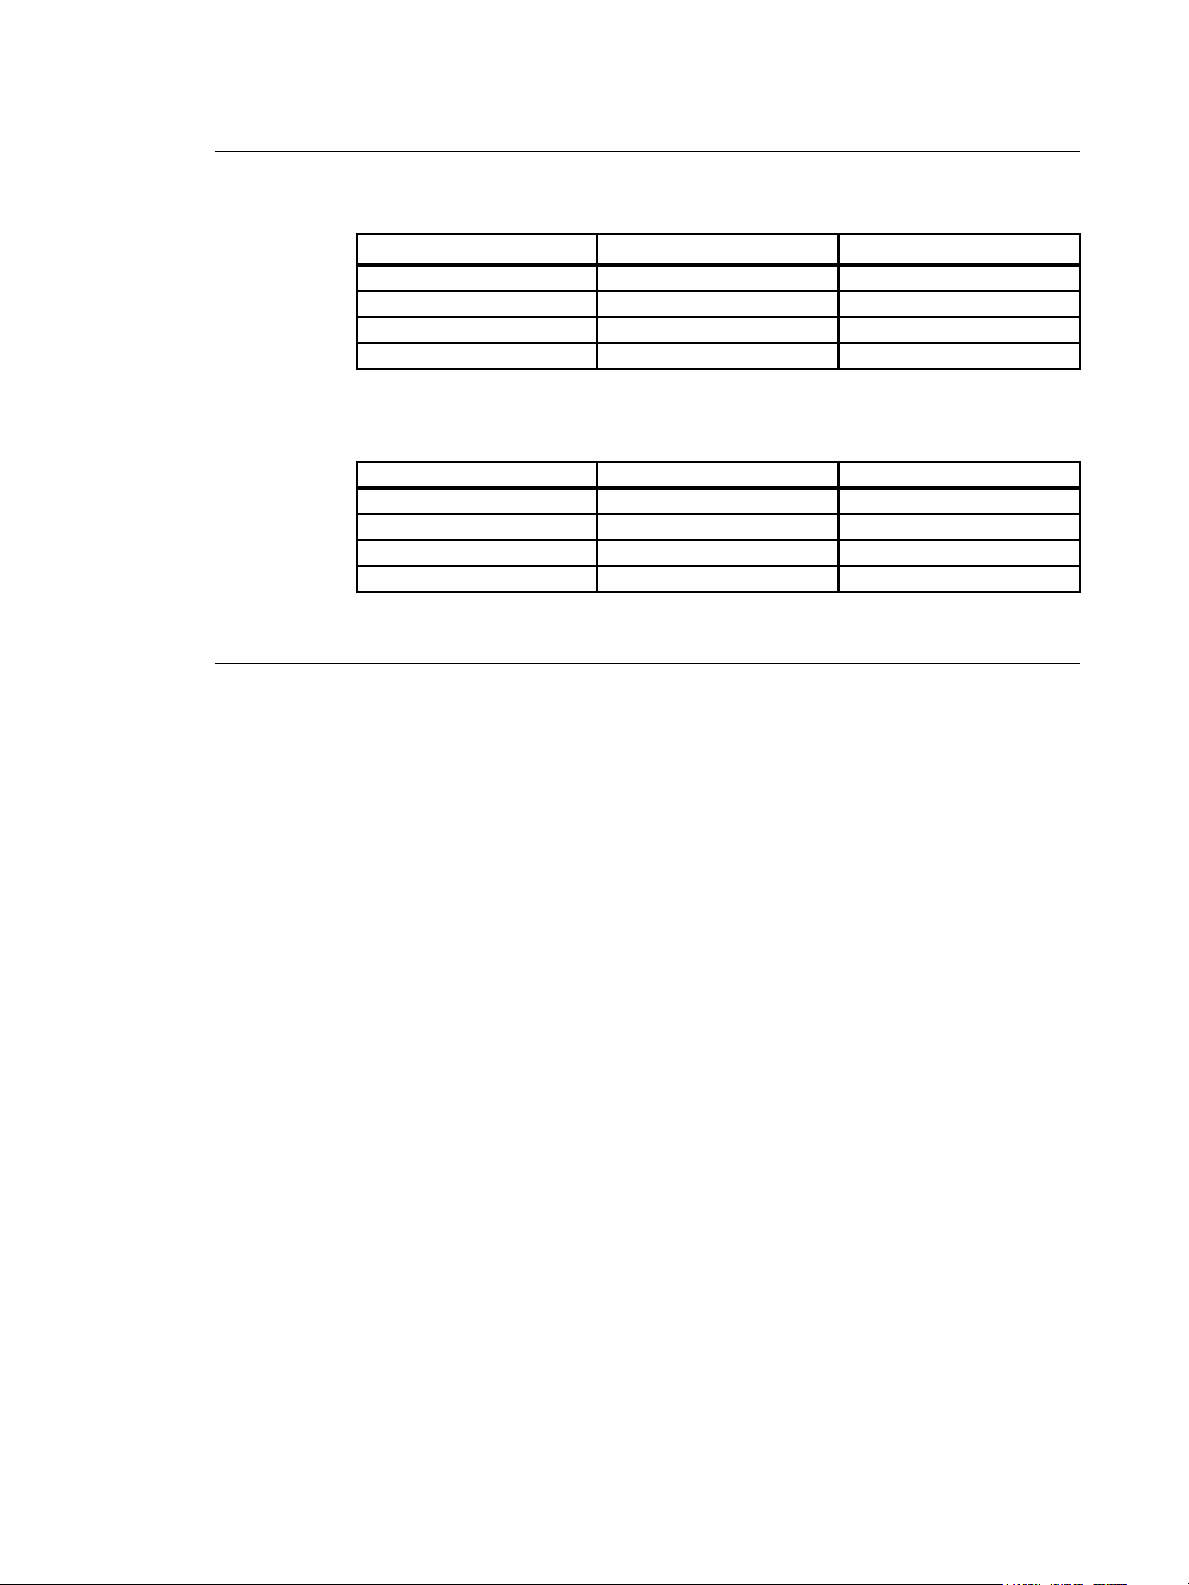
Dimensions and LEDs
Lustr, Vivid, Vivid-R, Vivid Fire, Vivid Ice, and Pearl
a
Model
11 279 x 180 x 180 40
21 546 x 180 x 180 80
42 1080 x 180 x 180 160
63 1613 x 180x 180 240
a) Vivid Fire and Vivid Ice are available in 11 and 21 versions only.
Paletta
Model Size in millimeters Number of LEDs
11 279 x 180 x 160 40
21 546 x 180 x 160 80
42 1080 x 180 x 160 160
63 1613 x 180 x 160 240
Note About LED Fixtures
All LED sources experience some lessening of light output and some colour shift over time.
Selador Series fixtures have complex thermal management systems to minimise these
changes. With typical usage, a Selador fixture will still achieve 70% of its initial output after
50,000 hours of use. In individual situations, LEDs will be used for different durations and
different levels. This can eventually lead to minor alterations in colour performance,
necessitating slight adjustment to presets, cues, or programs.
All LEDs exhibit a slight colour shift as their temperature rises from ambient to operating
temperature. This may or may not be visible to the eye. If this is a concern, a five to ten
minute warm up cue (all colour channels at 100%, intensity channels at 50%) prior to
production can minimise this effect.
Size in millimeters Number of LEDs
3 Selador Series User Manual
Page 9

Overview
Congratulations on your purchase of a Selador Series by ETC product.
Selador's x7 Color System™ seven-hue technology produces a light and colour quality that
conventional LED systems cannot duplicate. This unique colour system produces bright,
broad-spectrum whites and intense colours equally well, rendering pigments, objects, and
skin tones in a natural way. Vivid Fire and Vivid Ice fixtures use elements of the x7
Color System for superior performance in deep saturated colours.
Each member of the Selador Series product line is unique and optimized for a specific
lighting task:
Lustr
• Luxeon Rebel 2.5W LED emitters
• Optimized for the best white light across the entire CCT range
• Beautifully illuminates skin tones and other objects
Paletta
• Luxeon Rebel 2.5W LED emitters
• Optimized for deep, pure pastels and saturated colours
• Interacts seamlessly with conventional sources
Vivid-R
• Luxeon Rebel 2.5W LED emitters
• Optimized for high-output deep pastels and strong saturated colours
• Narrow optics for the longest throws
Vivid Fire
• Luxeon Rebel 2.5W LED emitters
• Optimized for saturated colours at the red end of the spectrum
• Strong output for high-intensity theatrical environments
Vivid Ice
• Luxeon Rebel 2.5W LED emitters
• Specialized LED array
• Optimized for saturated colours at the blue end of the spectrum
• Strong output for high-intensity theatrical environments
Pearl
• Luxeon Rebel 2.5W LED emitters
• Specialized LED array
• High output warm and cool white LEDs for variable colour temperature white (only) light
output from 3200 to 5700K.
Information in this manual is applicable to all Selador Series by ETC products unless stated
otherwise.
4
Page 10

Applications
• Theatres
•Studios
• Churches
• Hotels
• Convention Centers
•Schools
Application 11 21 42 63
Truss warmer
Front light
Side light
Key light
Fill light
Specials
Downlight
Backlight
Stagewash
Cyc light
If you have questions about your Selador series fixture that are not answered in this
manual, please contact the supplier of your ETC equipment or ETC Technical Services.
Americas United Kingdom
Electronic Theatre Controls Inc. Electronic Theatre Controls Ltd.
Technical Services Department Technical Services Department
3031 Pleasant View Road 26-28 Victoria Industrial Estate
Middleton, WI 53562 Victoria Road,
800-775-4382 (USA, toll-free) London W3 6UU England
+1-608 831-4116 +44 (0)20 8896 1000
service@etcconnect.com service@etceurope.com
Asia Germany
Electronic Theatre Controls Asia, Ltd. Electronic Theatre Controls GmbH
Technical Services Department Technical Services Department
Room 1801, 18/F Ohmstrasse 3
Tower 1, Phase 1 Enterprise Square 83607 Holzkirchen, Germany
9 Sheung Yuet Road +49 (80 24) 47 00-0
Kowloon Bay, Kowloon, Hong Kong techserv-hoki@etcconnect.com
+852 2799 1220
service@etcasia.com
Please email comments about this manual to: TechComm@etcconnect.com
5 Selador Series User Manual
Page 11

Document Conventions
Throughout this manual, the following are used to alert you to notes and safety notices.
Note:
CAUTION:
WARNING:
WARNING:
Safety
Notes are helpful hints and information that is supplemental to the main text.
A Caution statement indicates situations where there may be undefined or
unwanted consequences of an action, potential for data loss or an equipment
problem.
A Warning statement indicates situations where damage may occur,
people may be harmed, or there are serious or dangerous consequences
of an action.
RISK OF ELECTRIC SHOCK! This warning statement indicates situations
where there is a risk of electric shock.
The Selador series fixtures are intended for professional use only. Read entire User
Manual before using equipment.
Please note the following safety notices before use:
WARNING:
• Do not mount the Selador series fixture on or near a flammable surface.
• Use the fixture in dry locations only, where humidity does not exceed 90 percent (noncondensing). Fixture is not intended for outdoor use.
• Mount and support the fixture only by the primary suspension holes in the enclosure.
• Suspend the fixture from a suitable structure using only the hardware rated for the
weight of the fixture.
• In addition to primary suspension, attach a safety cable to the fixture housing.
Appropriate attachment points (holes) are provided in the protruding tabs on either end
of the fixture housing.
• Disconnect the unit from power and from DMX before all cleaning and maintenance.
• Maximum ambient temperature: Ta=40°C
• Maximum exterior surface temperature: Tmax=80°C
• External Temperature after 5 minutes of full-brightness operation and 23°C ambient:
38°C
• External Temperature (steady state achieved) at 23°C: 70°C
Note the following safety warnings before use:
6
Page 12

Installation
Push
1
2
3
4
5
Power and Data Cabling Requirements
Power
The Selador series fixture operates on AC power, 100 to 240VAC/50-60Hz. You may use
a circuit powered through an SCR dimmer, as long as the dimmer is set to unregulated
non-dim (switched) operation.
Power is supplied through a standard 1.5m power-input cable with Neutrik PowerCon
locking pigtail with bare ends for attachment of your desired connector.
Data
The Selador series fixtures operate on a DMX control signal. The unit is supplied with a
5-pin XLR DMX input connector and a 5-pin DMX Thru connector. DMX cables should be
acceptable for DMX data transmission (not microphone cable) and should follow the
standard pinout. The optional secondary data pair is not used by the Selador series fixtures.
The maximum DMX data run from any DMX source to the last fixture in a chain is 300m.
Termination is required in the data thru port of the last fixture in each data chain.
DMX512 pinout for five-pin XLR female
1 Common (Shield)
2Data –
3Data +
4 not connected
5 not connected
See Control, page 13 for additional information on DMX addressing of Selador Series
fixtures.
7 Selador Series User Manual
Page 13

Installation Procedures
Installing Mounting Hardware
Four different options are provided for mounting Selador fixtures.
• Yoke for 11 and 21 fixtures
• Double yoke for two 11 or two 21 fixtures (over/under configuration)
• Floor trunnions for all fixtures
• Pipe hanging brackets for all fixtures
Note:
Trunnions should be installed with the feet inward so that fixtures can be lined up end to
end if needed.
Installation Notes
Cooling and Duty Cycle
Selador Series fixtures are equipped with ultra-quiet cooling fans. These fans are
automatically controlled. They permit fan-free operation when possible and turn on only
when needed to provide low-noise, predictable service for extended periods of time in
ambient temperatures up to 40°C. When the fan turns on, its speed ramps up slowly in
order to minimise the noise differential.
CAUTION:
LED life is adversely affected by high temperature operation. Whenever possible, avoid
turning all channels to 100% for extended periods, such as channel checks or focusing.
Duty Cycle
Operating the fixtures in higher ambient temperatures or low airflow situations may
cause the power supply to shut down. Following a cool down period, the power
supply will automatically reset and the fixture will return to operation.
It is good practise to power down any device with on-board electronics to limit
unnecessary wear on the devices and eliminate residual use of electricity. When
not in use, Selador fixtures should be powered down by disconnecting from power
either at the breaker or by unplugging.
8
Page 14

180mm
180mm
255mm
235mm
290mm
180mm
265mm
180mm
180mm
290mm
180mm
(160mm Paletta)
315mm
345mm
235mm
(225mm Paletta)
Hanging bracket
235mm
(225mm Paletta)
27.9cm
54.6cm
108cm
161.3cm
Floor trunnion dimensions
Front view dimensions
Rear view to show power, data connections, and repeating addressing and fan locations
Hanging dimensions
9 Selador Series User Manual
Page 15

Safety Cable
Safety cable attachment points
The safety cable (or other approved safety device) should be attached to the fixture housing
and wrapped around the hanging structure (pipe). Appropriate attachment points (holes)
are provided in the protruding tabs on either end of the fixture housing. Take care to leave
as little slack as possible in the safety cable to avoid the cable catching the yoke of the
fixture.
Fixture Weight
Total weight depends on how the individual fixture is configured. Weights shown do not
include secondary lenses.
Lustr, Vivid -R, Vivid Fire, Vivid Ice, and Pearl
Paletta
Model
a
Weight
Kg. Kg.
Shipping Weight
11 5.2 6. 9
21 9.1 11.4
42 15.9 19.1
63 24.1 28.2
a) Does not include mounting hardware.
Model
a
Weight
Kg. Kg.
Shipping Weight
11 4.7 6. 4
21 8.2 10.5
42 14.6 17.7
63 22.1 26.4
a) Does not include mounting hardware.
10
Page 16

Installing Secondary Lenses
Loosen screw
Raise panel
Lens slot
Up to two secondary lenses can be installed in the slots towards the front of the fixture. The
stacking order and distance from the LED array are not important to the function of the
lenses. To avoid lenses being too loose and potentially overlapping each other, use the
narrower slots for thinner lenses.
To install secondary lenses:
Step 1: Loosen the screw on the end of the access panel that has the slot in it.
Step 2: Raise the panel out of the way, but leave it attached to the fixture.
Step 3: Slide the secondary lenses into the slots above the LEDs.
Step 4: Lower the panel and tighten the screw.
11 Selador Series User Manual
Page 17

Connections and Addressing
DMX Thru
Power
DMX Input
Addressing
Fuse
Data connections
Addressing and fans repeat per cell
Power connection
and fuses
Connect AC input power and DMX data cables to the appropriate ports as shown below.
Connect the incoming DMX data cable to the DMX Input connector. If you are
daisy-chaining the data to other fixtures or DMX-controlled devices, connect the next DMX
cable to the DMX Thru connector. The Selador Series fixtures require that the last fixture
on a DMX line be terminated with a 120 resistor between pins 2 and 3.
Connect the AC Input cable:
Align and insert the power connector. Twist the connector clockwise until it locks into place.
Disconnect the AC Input cable:
Slide back the locking tab, twist the connector counterclockwise and pull to unlock and
disconnect the power connector.
Fuse
The quarter-turn fuse-holder requires a straight blade screwdriver to remove and reinstall
a fuse. Refer to Fuse Capacities, page 16 for information about fuse types.
12
Page 18

Control
Increase
push button
LED
display
Decrease
push button
Use the two push buttons on the bottom of the fixture to set the starting address for the
fixture. View the LED display with the push buttons on the left. The top push button
increases the number and the bottom push button decreases the number. Pressing and
holding the push button increases the rate of change. When fixtures are powered up,
they may temporarily respond to DMX address 001 for the first few seconds of
operation. New address settings take effect after the LED display turns off.
CAUTION:
Up and down address buttons are recessed to avoid inadvertent address changes. Use a
Phillips screwdriver or other blunt device to lightly push the switches. To avoid damaging
the switches, do not use sharp objects or excessive force when changing fixture address.
Addresses must be set between 1 and 505. Selador fixtures are manufactured based on an
11" LED array, or cell. Each cell can be addressed individually. Eleven inch fixtures have
one cell, 21 fixtures have two cells, 42 fixtures have four cells, and 63 fixtures have six cells.
A 42 fixture can be addressed as four individual cells, one cell, or any combination.
Each Selador fixture must be considered a separate DMX device for the purpose of
DMX line-loading calculations, with the exception of 63 fixtures. These 63 fixtures
must each be considered 1.5 DMX devices for line loading.
Do not push the up and down address buttons simultaneously, or internal fixture
software settings can be inadvertently compromised and performance affected.
Fixture Number of Cells Number of DMX Devices
11 1 1
21 2 1
42 4 1
63 6 1.5
DMX line-loading practice dictates that no more than 31 devices can be daisy-chained
together. Consequently, no combination of Selador fixtures totaling more than 31 DMX
devices should be configured in one DMX line. For example, twenty 6-cell units (30 DMX
devices) are okay. Twenty-one 6-cell units (31.5 DMX devices) are not acceptable. For runs
of fixtures totaling more than 31 DMX devices, split the DMX runs by using a DMX splitter.
Note:
13 Selador Series User Manual
A fixture with a starting address higher than 505 will not have control of all parameters.
Therefore, 505 is the highest address shown on the address display.
Page 19

Each cell of a Selador Series fixture occupies eight DMX channels. Seven are individual
colours and the eighth is the master intensity. The table below describes the order and
function of each address.
Lustr, Paletta, and Vivid-R
Data Channel Colour Value Function
1
Fixture address Red
2
Fixture address + 1 Red-orange
3
Fixture address + 2 Amber
4
Fixture address + 3 Green
5
Fixture address + 4 Cyan
6
Fixture address + 5 Blue
7
Fixture address + 6 Indigo
8
Fixture address + 7 Master intensity control
0-255 Intensity 0-100%
0-255 Intensity 0-100%
0-255 Intensity 0-100%
0-255 Intensity 0-100%
0-255 Intensity 0-100%
0-255 Intensity 0-100%
0-255 Intensity 0-100%
0-255 Overall intensity 0-100%
Vivid Fire
Data Channel Colour Value Function
1
Fixture address Red
2
Fixture address + 1 Red-orange
3
Fixture address + 2 Amber
4
Fixture address + 3 Green
5
Fixture address + 4 Not used
6
Fixture address + 5 Not used
7
Fixture address + 6 Indigo
8
Fixture address + 7 Master intensity control
0-255 Intensity 0-100%
0-255 Intensity 0-100%
0-255 Intensity 0-100%
0-255 Intensity 0-100%
——
——
0-255 Intensity 0-100%
0-255 Overall intensity 0-100%
Vivid Ice
Data Channel Colour Value Function
1
Fixture address Red
2
Fixture address + 1 Not used
3
Fixture address + 2 Not used
4
Fixture address + 3 Green
5
Fixture address + 4 Cyan
6
Fixture address + 5 Blue
7
Fixture address + 6 Indigo
8
Fixture address + 7 Master intensity control
0-255 Intensity 0-100%
——
——
0-255 Intensity 0-100%
0-255 Intensity 0-100%
0-255 Intensity 0-100%
0-255 Intensity 0-100%
0-255 Overall intensity 0-100%
Pearl
Data Channel Colour Value Function
1
Fixture address Warm white (3200K)
2
Fixture address + 1 Cool white (5700K)
3
Fixture address + 2 Master intensity control
Note:
Use individual colour channels to create colour mix. Use Master Intensity Control to set
fixture intensity. Master Intensity Control (Channel 8) must be above 0% for the fixture to
output.
0-255 Intensity 0-100%
0-255 Intensity 0-100%
0-255 Intensity 0-100%
14
Page 20

Routine Maintenance
General Fixture Cleaning
To ensure optimum performance of your Selador series fixture, you should perform the
following inspections and cleanings at least once a year. You may need to inspect or clean
the fixture more often, depending on the type and amount of use your fixture experiences
during the year.
CAUTION:
A can of compressed air or oil-free air from an air compressor set at a low setting can
Remove the secondary lenses (if used) and clean out any dust and debris. All
Inspect all mounting hardware for wear and, if necessary, clean using compressed,
Allow fixture to cool down completely prior to cleaning.
Disconnect all power and DMX cables prior to cleaning.
Check for excessive dust or debris in the heat-dissipating fins around
the entire fixture enclosure. Clean using compressed air or a soft cloth.
Keeping the heat sink components of the enclosure clean facilitates
efficient cooling and extends LED longevity.
NEVER spray liquids into the fixture.
NEVER spray compressed air into a fixture that is powered-up.
be used to blow through the vent holes and remove dust or other debris from the
interior of the fixture. Dust build-up can cause overheating and premature shutdown.
components, including the secondary lenses, can be cleaned using compressed,
oil-free air as described above or a clean micro-fiber cloth. The use of any liquid
cleaning solution is not recommended for Selador fixtures.
oil-free air or a soft, lint-free cloth.
15 Selador Series User Manual
Page 21

Cooling Fan Filter Cleaning
Cooling fan filters should be inspected at a minimum every six months; more frequently
if fixtures are powered on for more than four hours per day
Use a vacuum cleaner to remove dust from each fan filter
In dusty environments or conditions involving the use of smoke machines, clean the
filters as follows:
• Using fingernail or small flat-blade screwdriver, remove fan filter cover by prying
under one of the two locking tabs
• Carefully remove foam fan filter from fan assembly
• Gently wash foam fan filter in a solution of mild dishwashing solution and water
• Thoroughly rinse each foam fan filter in clear water
• Pat dry or air-dry filters
• After filters are completely dry, reinstall by inserting them into fan assembly
• Reattach the filters to the fixture
Note:
No user-serviceable parts are inside.
Fuse Capacities
All Selador Fixtures use 3AG 250V 32mm x 6mm fuses. Use the following capacity fuses
for all Selador fixtures.
Fixture Size Fuse Value
11 2 A
21 4 A
42 8 A
63 10 A
16
Page 22

Page 23

Page 24

Corporate Headquarters
London, UK
Rome, IT
Unit 26-28, Victoria Industrial Estate, Victoria Road, London W3 6UU, UK Tel +44 (0)20 8896 1000 Fax +44 (0)20 8896 2000
Via Pieve Torina, 48, 00156 Rome, Italy Tel +39 (06) 32 111 683 Fax +44 (0) 20 8752 8486
Holzkirchen, DE
3031 Pleasant View Road, P.O. Box 620979, Middleton, Wisconsin 53562-0979 USA Tel +608 831 4116 Fax +608 836 1736
Ohmstrasse 3, 83607 Holzkirchen, Germany Tel +49 (80 24) 47 00-0 Fax +49 (80 24) 47 00-3 00
Hong Kong Rm 1801, 18/F, Tower 1 Phase 1, Enterprise Square, 9 Sheung Yuet Road, Kowloon Bay, Kowloon, Hong Kong Tel +852 2799 1220 Fax +852 2799 9325
Service:
(Americas) service@etcconnect.com
Web:
www.etcconnect.com
7401M1210
Rev D Released 2013-02
Copyright © 2013 ETC. All Rights Reserved. Product information and specifications subject to change.
(UK) service@etceurope.com (DE) techserv-hoki@etcconnect.com
(Asia) service@etcasia.com
 Loading...