

Page 1
ETC® Setup Guide
NET3 RVI
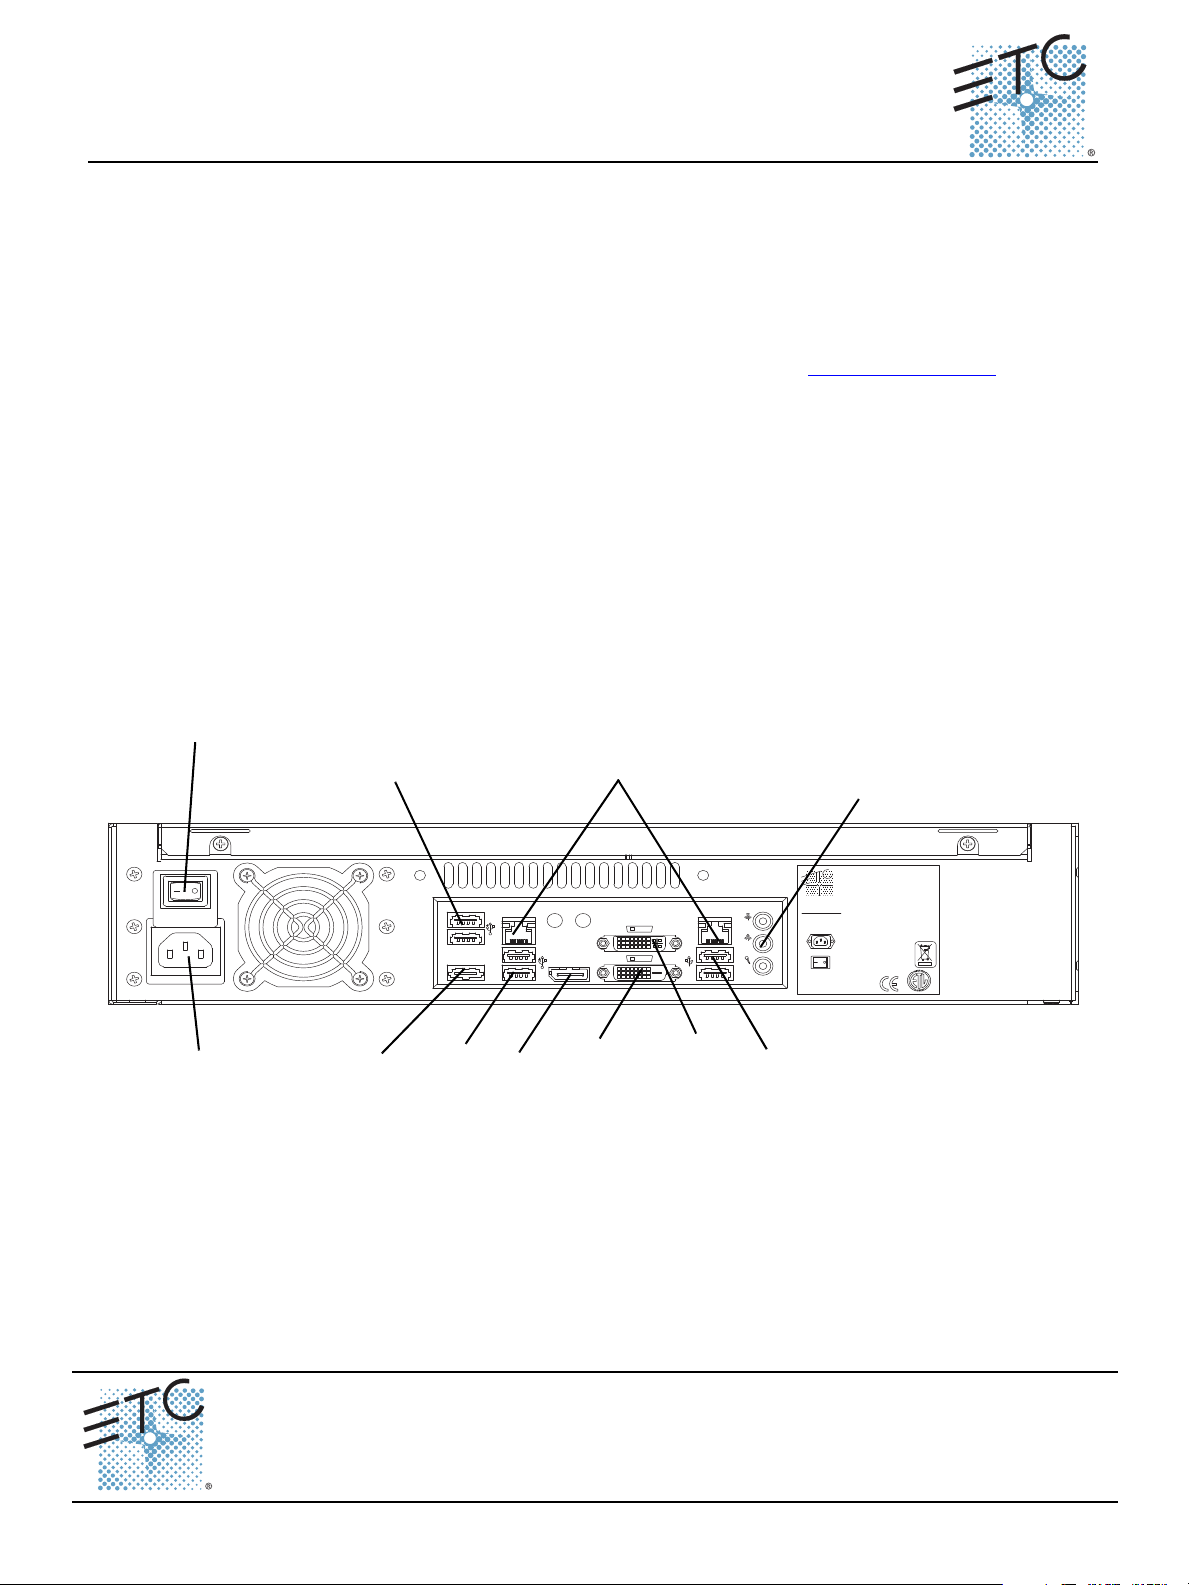
AC Input
100-240VAC
50/60Hz 2A
Electronic Theatre Controls, Inc.
Middleton, WI Made in USA
CUS
www.etcconnect.com
DisplayPort
ETHERNET
e-SATA
ETHERNET
SS
MIC OUT IN
/DVI-D
/DVI-I
100-240VAC
50/60 Hz
2A@120VAC
Hard Power Switch
Audio Ports
(Not Currently Enabled)
IEC Receptacle
Ethernet Ports 1 & 2
DVI-I
Port
DVI-D
Port
Display
Port
eSATA
Port
USB
Ports
USB
Ports
USB
Ports
Net3 Remote Video Interface
This guide outlines the setup and configuration of your Net3™ Remote Video Interface (RVI). The RVI
functions as a remote user interface to access and modify the contents of an entire Eos
®
Cobalt
or “Offline” mode. When configured with Eos software, the RVI can also run in mirror mode.
This guide outlines the setup and simple configuration of your Remote Video Interface (RVI) for use
with the Eos Family and Cobalt Family controls systems. For information on using the Eos or Cobalt
client software installed on your RVI, please refer to the associated console operations manual that
shipped with your console, or you may download it from our website at www.etcconnect.com
Net3 RVI ships with the following:
• Remote Video Interface
• USB Keyboard
• USB Mouse
• Rack Mount Hardware Kit
• IEC Power cords with varying connectors
• Label Sets
• This Setup Guide
• Current Release Note Documentation for Eos Family and Cobalt Family consoles
Setup
Connect Cables
®
Family or
Family show file. You may configure the RVI to run either the Eos or Cobalt software in “Client”
.
Net3 Remote Video Interface Setup Guide Page 1 of 4 Electronic Theatre Controls, Inc.
Step 1: Attach the appropriate IEC power cord to the power connector, then to the IEC receptacle.
Corporate Headquarters
London, UK
Rome, IT
Holzkirchen, DE
Hong Kong Rm 1801, 18/F, Tower I Phase 1 Enterprise Square, 9 Sheung Yuet Road, Kowloon Bay, Kowloon, Hong Kong Tel +852 2799 1220 Fax +852 2799 9325
Service:
Web:
4250M2210
Unit 26-28, Victoria Industrial Estate, Victoria Road, London W3 6UU, UK Tel +44 (0)20 8896 1000 Fax +44 (0)20 8896 2000
Via Pieve Torina, 48, 00156 Rome, Italy Tel +39 (06) 32 111 683 Fax +44 (0) 20 8752 8486
(Americas) service@etcconnect.com
www.etcconnect.com
Rev C Released 2014-06 ETC intends this document to be provided in its entirety.
3031 Pleasant View Road, P.O. Box 620979, Middleton, Wisconsin 53562-0979 USA Tel +608 831 4116 Fax +608 836 1736
Ohmstrasse 3, 83607 Holzkirchen, Germany Tel +49 (80 24) 47 00-0 Fax +49 (80 24) 47 00-3 00
QSF 4.1.9.1
(UK) service@etceurope.com (DE) techserv-hoki@etcetcconnect.com.com
Copyright © 2014 ETC. All Rights Reserved. Product information and specifications subject to change.
(Asia) service@etcasia.com
Page 2
ETC Setup Guide
Display Port
Display Port
DVI-I Port
DVI-D Port
DVI VGA
Yes
No
Yes
with Adapter
Yes
Yes
No No
Yes
with Adapter
Yes
with Active
Adapter
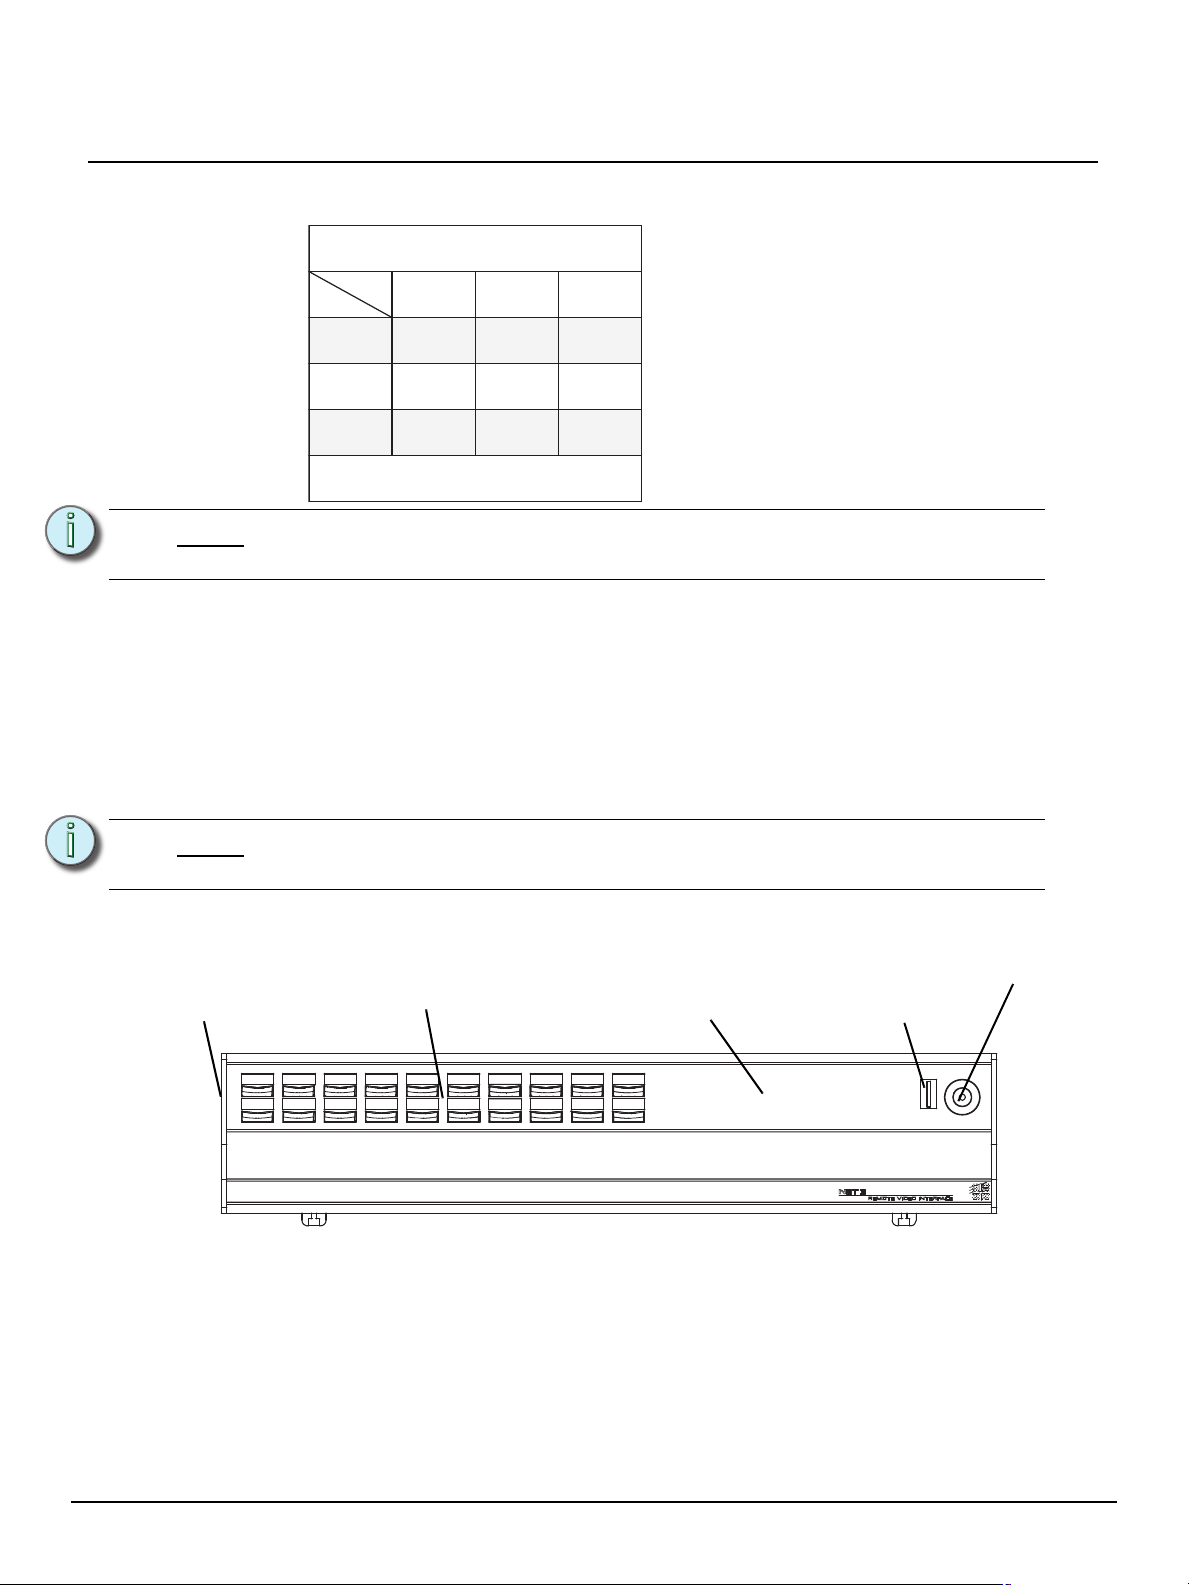
Net3 RVI supports up to 2 monitors using the
following combinations:
Multitouch monitors need to be Windows 7 or 8 Compatible.
Physical
Port
Signal
Type
Live
Blind
Tab
Escape Select
Scroll Lock
M001 M002 M003 M004
Stop/Back
M005 M006 M007 M008
GO
Primary
Master
Backup
Sync
Client
Offline
Backlit
indicators
Soft Power
Switch
Removable
label strip
USB
20 command
keypad buttons
Step 2: Connect any monitors to the proper ports on the back of the RVI.
Net3 Remote Video Interface
Note:
Step 3: Connect the USB mouse and keyboard to the USB connectors.
Step 4: Attach a network ethernet cable to the Ethernet port. All communications to the
Step 5: When all connections are made, switch on the hard power switch
Step 6: Press the soft power switch, on the front of the unit, to power up the RVI.
Note:
Front Panel
The RVI requires monitors that are at least compatible with Windows 7 and have
a minimum resolution of 1280x1024.
associated control console are made over this Ethernet connection.
• Connection to the console may be made either directly using a Cat5 or better nullmodem cable or through an Ethernet hub or Ethernet switch using standard Cat5 or
better patch cables.
If the unit does not power up, check the hard power switch, on the rear panel, to
ensure it is switched on.
Step 1: Press the soft power switch to activate the RVI (check rear panel to ensure power is
connected and hard power switch is on).
Step 2: Backlit indicators identify the operating status (master, backup, client, and so on) of the
Net3 Remote Video Interface Setup Guide Page 2 of 4 Electronic Theatre Controls, Inc.
Step 3: USB port is provided for easy show loading to or from a USB storage device.
Step 4: 20 buttons are configurable from the Eos Configuration Utility (ECU). They are set to a
unit.
default configuration. The label strips for these buttons are removable and reversible. Any
changes to the button configuration can be written on the opposite side in pencil.
Page 3

ETC Setup Guide
Start Up
At initial startup, the RVI will display the Eos and the Cobalt logos. Use the mouse to select the Eos
Family or Cobalt Family as per the connected system. The RVI will initialize to this mode of operating
each time the power is cycled, unless you choose to change the operating system in the related settings
menu.
Switch to Eos from Cobalt Operating Mode:
Step 1: From the Cobalt login screen, select {System Settings}. The “System settings” dialog
will display.
Step 2: Locate and select the {Switch to Eos} button from within the “System settings” dialog.
“Enable Eos Mode” will display along with a new screen display.
Step 3: Click the green check mark in the bottom right hand corner of the screen to commit to the
change or click the red X to cancel the operation. When you have committed to the
change, the RVI will reboot to the newly selected operating mode.
Switch to Cobalt from Eos Operating Mode:
Step 1: From the Eos Configuration Utility startup screen, select {Settings}. System settings
dialog displays.
Step 2: Select the {Maintenance} button from the options on the right side of the dialog. A
complete list of maintenance options will display.
Step 3: Locate and select the {Switch to Cobalt Client} button from within the maintenance
dialog. The Cobalt logo will display in a new dialog and you will be requested to confirm
whether you would like to “Enable Cobalt Mode”.
Step 4: Click the green check mark in the bottom right hand corner of the dialog to commit to the
change or click the red X to cancel the operation. When you have committed to the
change, the RVI will reboot to the newly selected operating mode.
Net3 Remote Video Interface
Net3 Remote Video Interface Setup Guide Page 3 of 4 Electronic Theatre Controls, Inc.
Page 4

ETC Setup Guide
Button Configuration
Eos
Settings for the RVI can be altered in the Eos Configuration Utility (ECU). The 20 buttons on the front
panel of the RVI are configurable from the Buttons section of the ECU.
Net3 Remote Video Interface
Note:
To configure the RVI buttons:
Step 1: In the Eos browser, select File>Exit and confirm the selection. Eos will close and you will
Step 2: Click on the {Settings} button. This will open the ECU.
Step 3: On the right side of the screen, click on {Buttons} to enter the RPU/RVI button setup. A
Step 4: Click on a button you wish to alter. A button popup window will open.
Step 5: Click on the type of button you want it to be (Macro or Hard Key).
Step 6: Repeat this process for any other buttons you wish to reconfigure.
Step 7: To restore the default buttons at any time, click the {Restore Defaults} button.
To import a button configuration:
You may import an RVI button configuration file from a USB device.
Step 1: Click the {Import} button in the RPU/RVI area of the Buttons section of the ECU. The
Step 2: If a valid file is found, the ECU will ask you if you want to import the settings. Click {Yes}.
Step 3: Click {Ok}.
The buttons section of the ECU has two different areas, the RPU/ RVI face panel
buttons, and Gio face panel buttons. You will want to make sure you are in the
RPU face panel buttons area.
enter the Eos welcome screen.
virtual display of the RPU/RVI buttons is displayed with the current button settings labeled
on each button.
• If Macro - Click on the Macro # box and enter the desired macro number from the keyboard and press enter. Then click {Accept}.
• If Hard Key - Click on the {HardKey} drop down menu and select the hard key you
wish to use. Then click {Accept}.
ECU will search for a valid RVI button file.
The settings will be imported.
To export a button configuration:
You may export your RVI button configuration to a USB device.
Step 1: Click the {Export} button in the RPU/RVI area of the Buttons section of the ECU.
Step 2: If a USB drive is available, the ECU will ask you to choose the desired drive from the drop
down menu. Click on the desired USB drive.
Step 3: Click {Accept}. The button configuration will be saved to the USB drive.
Step 4: Click {Ok}.
For more information on settings in the ECU, please see Appendix A: Eos Configuration Utility (ECU) in
the Eos or Ion Operations Manual.
Cobalt
Settings for the RVI buttons cannot be changed.
Net3 Remote Video Interface Setup Guide Page 4 of 4 Electronic Theatre Controls, Inc.
 Loading...