

Page 1
ETC Setup Guide
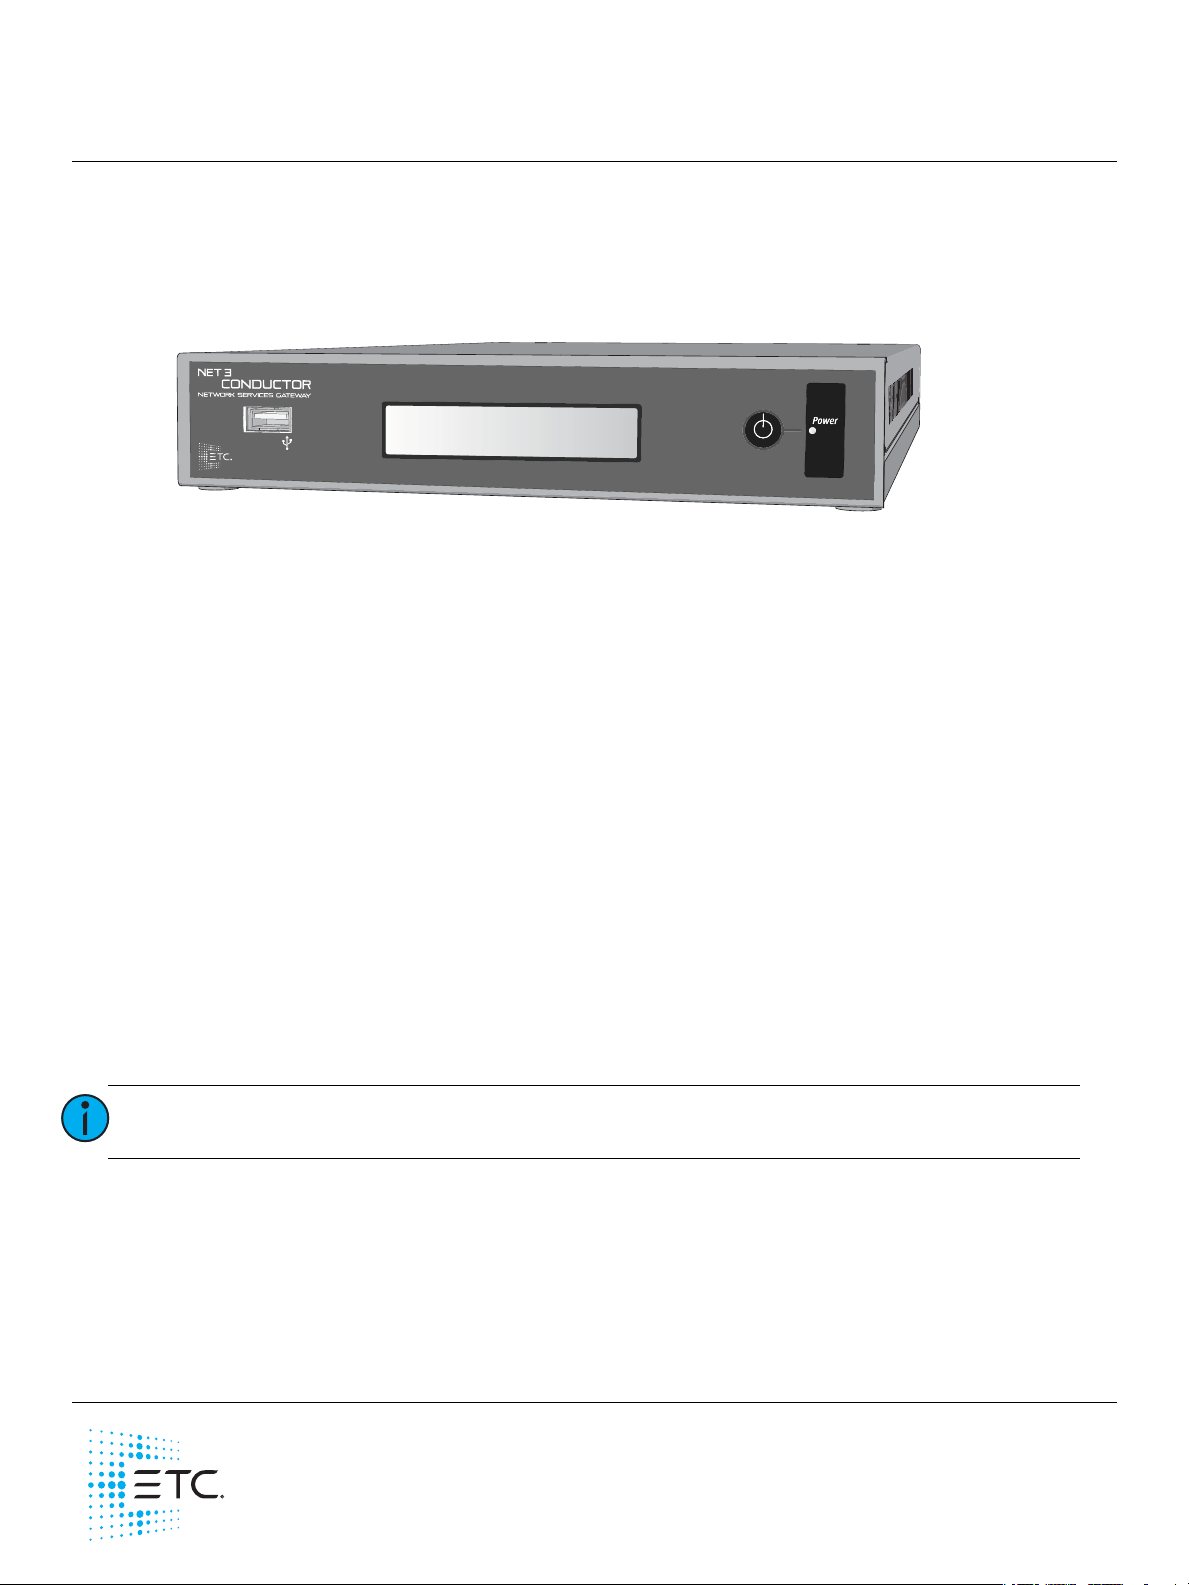
Net3 Conductor Network Services Gateway
Overview
Net3 Conductor Network Services Gateway provides powerful and flexible control for integrated lighting
systems. This setup guide will guide you through the setup of the Net3 Conductor including hardware,
electrical and data connections, unit power up, and connection to the built-in web interface.
Features
Net3 Conductor provides the following features:
• A central repository for all system configurations.
• Multiple network services for simple network lighting system integration.
• Logging of real-time errors.
• Reporting tools providing access to historical errors using user defined filters.
• Real-time logging and notification of system errors using e-mail or SMS messaging.
• Configured using the built-in web interface or its companion software, Net3 Concert.
• On board LCD displaying information including the firmware version number, current date, time and
time zone, IP address and system uptime. Additional displays include indication of firmware update
processing.
Help from ETC Technical Services
If you experience difficulty during setup or installation of the Net3 Conductor, additional information is
available from
etcconnect.com
or by contacting ETC Technical Services at the nearest office to you; contact
information is listed below.
Setup and Connect
General Use
Note:
Net3 Conductor may be used as a tabletop device or be installed into a 19” equipment rack using the
optional rack mount kit (ETC part number 4260K1011). Conductor requires 1 rack mount unit (1U) of
space. The kit provides accommodations to mount an ETC gateway adjacent to Net3 Conductor, or to use
a blank plate to fill the space. Contact ETC for ordering details.
The Net3 Conductor unit must be mounted in a rack in a horizontal flat orientation, or
flat on a table top.
Corporate Headquarters Middleton, WI, USA Tel +608 831 4116 Service: (Americas) service@etcconnect.com
London, UK
Rome, IT
Holzkirchen, DE
Hong Kong
Web: etcconnect.com
Product information and specifications subject to change. ETC intends this document to be provided in its entirety.
4266M2200
Tel +44 (0)20 8896 1000 Service: (UK) service@etceurope.com
Tel +39 (06) 32 111 683 Service: (UK) service@etceurope.com
Tel +49 (80 24) 47 00-0 Service: (DE) techserv-hoki@etcconnect.com
Tel +852 2799 1220 Service: (Asia) service@etcasia.com
© 2018 Electronic Theatre Controls, Inc.
Rev E Released 2018-02
Page 2
ETC Setup Guide
Net3 Conductor
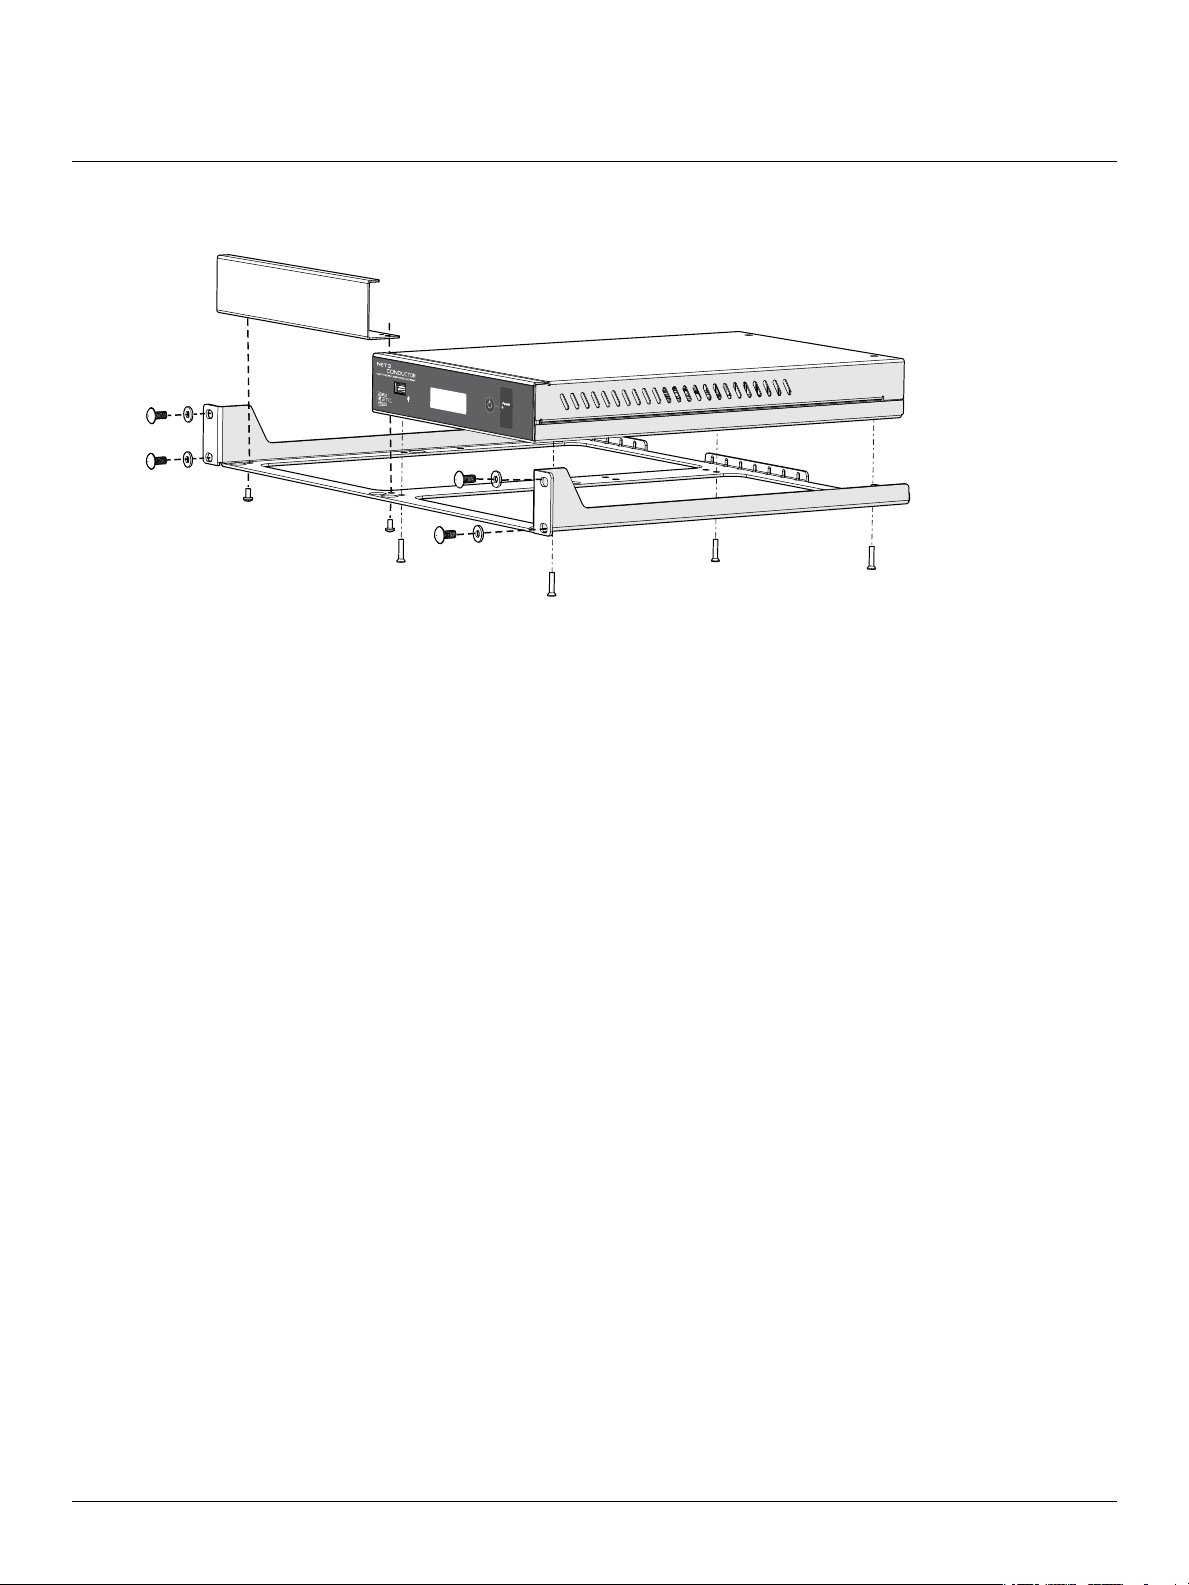
Rack Mount Kit Installation
When the rack mount kit (ETC part number 4260K1011) is ordered separately from the Net3 Conductor,
follow these instructions.
1: Lay your Net3 Conductor upside down on the table top. Position the rack tray over it, and secure it
using four of the provided 6-32 screws.
2: When mounting an ETC gateway adjacent to the Conductor, secure the gateway in the same
manner. If not, secure the provided blank plate using two of the remaining 6-32 screws from the kit.
3: Mount the assembled unit to your 19" rack using the provided 10-32 rack screws and washers. If
required, rack nuts are also included.
Rack Mount Considerations
• Elevated Operating Ambient - If installed in a closed or multi-unit rack assembly, the operating
ambient temperature of the rack environment may be greater than room ambient. Care should be
taken to not operate the processor in an enclosed environment above 104°F.
• Reduced Air Flow - When installing the processor in an equipment rack, the rack must be vented and
have adequate airflow to maintain an operating temperature below 104°F.
• Mechanical Loading - Mounting of the equipment in an equipment rack should only be accomplished
with the ETC rack hardware kit in a horizontal orientation to assure even mechanical loading in the
rack to avoid hazardous or dangerous loading conditions.
• Circuit Overloading - Use only a supplied ETC power supply of 12V DC / 5A. When installed in an
equipment rack, consideration should be given to the connection to the rack power source to avoid
overloading of the rack circuit or supply wiring. Appropriate consideration of the rack or power
distribution in the equipment rack should be applied during installation.
• Reliable Grounding - Reliable earthing of rack-mounted equipment should be maintained. Particular
attention should be given to any supply connections other than directions to the branch circuit (e.g.
use of power strips).
Net3 Conductor Setup Guide Page 2 of 5 Electronic Theatre Controls, Inc.
Page 3

ETC Setup Guide
DC Power Input
• 12Vdc, 5A max
NET3 Network input
• 10/100 Mbps
• Auto-sensing
• RJ45 compatible
Secondary Network
• External Time Synch
• 10/100 Mbps
• Auto-sensing
• RJ45 compatible
Net3 Conductor
Connect
Complete the Net3 Conductor unit connections as defined below:
4: Connect an Ethernet cable (not provided) between the ETC Net3 Ethernet network and the Net3
Network input connector on the unit.
5: Plug the provided DC power input cable into the power input receptacle on the rear panel of the unit
and tighten the locking ring for a secure connection.
A regional-specific power supply kit has been provided. For EU regions, select the appropriate
connector from the power supply kit and assemble the cable to the power supply then connect to
the power source. Tie back the power supply in the rack, taking care to ensure the power supply is
supported independently of the power connections.
6: When using an external network (external of the ETC lighting network) to access the Net3 Conductor
for SMS and e-mail messaging of log reports and error data, connect the external network to the
Secondary Network interface connector on the unit.
a
Note:
Do not connect the Net3 Conductor directly to the Internet without an appropriate
firewall or network address translation system in place. When working in a corporate
environment or building network system, consult your network system administrator for
assistance in setting up a secured connection.
Net3 Conductor Setup Guide Page 3 of 5 Electronic Theatre Controls, Inc.
Page 4

ETC Setup Guide
USB port
Power button
• Press and release to power up or shut down
• Solid LED indicates power on
Display
• Cycles information related to the
Net3 Conductor and the network
ETC NET3 CONDUCTOR
v#.#.#.#.#.##
2nd: 10.101.50.65
UP dd: hh: mm
Day Month Year hour:min
Time zone +- offset , DST
Pri: 10.101.50.60
UP dd: hh: mm
Net3 Conductor
displays the full software version number
displays, only when enabled, the secondary network port IP Address
and displays the total UP time for the unit.
displays the primary ETC Net3 IP Address for this device
and displays the total UP time for the unit.
current date and time (honors 12/24 hour preference setting)
DST displays after the time zone offset when enabled.
Net3 Conductor
Initial Power Up and Status
The power button and LED on the front of the unit provide information about the power state of the
device. During normal operation, the indicator remains lit.
Apply power to the unit and it will immediately power on.
Note:
In case of a power loss, the Net3 Conductor restores to the previous power state when
power is restored.
The power indicator will illuminate in blue when the unit is powered on and the display will begin cycling
through the available status screens.
During the power up and shut down cycles, the power indicator flashes.
Note:
During a firmware update, the power LED will flash progressively. When the update is
complete, the power LED returns to a solid state.
Display
The backlit display cycles through the following screens in two second intervals:
Net3 Conductor Setup Guide Page 4 of 5 Electronic Theatre Controls, Inc.
Firmware Update
When updating firmware to the Net3 Conductor, the display will show progress of the firmware retrieval
and the installation.
Page 5

ETC Setup Guide
Net3 Conductor
Web Interface
Net3 Conductor is provided with a built-in web interface, accessible only through the use of a web
browser. The web interface allows for:
• access to view and set the network IP and mode
• access to set up a secondary network connection as well as SMTP server settings
• ability to configure Windows File Sharing
• access to set and monitor the services provided over the ETC Net3 network; such as DNS server, NTP
time server, File Sharing access, and the DHCP server
• ability to configure logging features, including saving and clearing data and setup of log backup
destinations
• ability to generate a backup of the current configuration and upload a configuration
• ability to upgrade Net3 Conductor software
• ability to reboot, shutdown, or restore the factory defaults to the Net3 Conductor
• ability to set up email alerts, set up rules, and post HTTP actions for system error events
• ability to view Paradigm and Net3 projects that have energy management enabled
• ability to back up and restore energy management data
1: To view this web interface, physically connect and configure a computer to the same network as the
Net3 Conductor.
2: Launch the desired web browser (Internet Explorer 7 or newer, Firefox, etc).
3: Enter the Net3 Conductor IP address in the address line of the web browser. The factory default IP
address is 10.101.50.60.
For further configuration information, reference the Net3 Conductor built-in help system by clicking on the
“Help” tab at the left side of the web interface screen.
Net3 Conductor Setup Guide Page 5 of 5 Electronic Theatre Controls, Inc.
 Loading...