

Page 1

g
i
n
s
Lighting control system
Version 2.0
i
h
t
2x
Page 2

Page 3

i
n
s
Lighting control system
Version 2.0
i
g
h
t
2x
User Manual
Copyright 1994-96 Electronic Theatre Controls
4071M1002 Revised May 1996
Page 4

Limited Warranty
Electronic Theatre Controls (ETC) warrants to the original
owner or retail customer that for a period of one year
from date of delivery of a portable system or energization
of a permanently installed system (up to a maximum of
18 months from delivery) its products will be free from
defects in materials and workmanship under normal use
and service. Warranty is limited to 90 days for rental
equipment.
Warranty does not cover any product or part of a product
subject to accident, negligence, alteration, abuse or
misuse or any accessories or parts not supplied by ETC.
Warranty does not cover “consumable” parts such as
fuses, lamps, color media or components warranted
directly to the owner by the original manufacturer. ETC’s
warranty does not extend to items not manufactured by
us. Freight terms on warranty repairs are FOB ETC factory or designated repair facility. Collect shipments or
freight allowances will not be accepted.
The owner’s obligations during the warranty period under
this warranty are to notify ETC at ETC’s address within
one week of any suspected defect, and to return the
goods prepaid to ETC at their factory or authorized service center.
THIS WARRANTY IS CONTINGENT ON THE CUSTOMER’S FULL AND TIMELY COMPLIANCE WITH THE
TERMS OF PAYMENT SET FORTH IN THE “TERMS
AND CONDITIONS”. THIS WARRANTY IS EXPRESSLY
IN LIEU OF ANY AND ALL OTHER WARRANTIES
EXPRESSED OR IMPLIED INCLUDING THE WARRANTIES OF MERCHANTABILITY AND FITNESS FOR A PARTICULAR PURPOSE AND OF OTHER OBLIGATIONS
AND LIABILITIES ON OUR PART. THE OWNER
ACKNOWLEDGES THAT NO OTHER REPRESENTATIONS WERE MADE TO HIM OR RELIED UPON HIM
WITH RESPECT TO THE QUALITY AND FUNCTION OF
THE GOODS SOLD.
ETC’s sole responsibility under this warranty shall be to
repair or replace at ETC’s option such parts as shall be
determined to be defective on ETC’s inspection. ETC will
not assume any responsibility for any labor expended or
materials used to repair any equipment without ETC’s
prior written authorization. ETC shall not be responsible
for any incidental, general or consequential damages,
damages to property, damages for loss of use, time, profits or income, or any other damages.
Declaration of Conformity
Manufacturer’s Name:
Manufacturer’s Address:
declares that the product
Product name:
Model:
Expression 2 lighting control console
Expression 2x, Concept 2x, Insight 2x, Insight 2, Impression 2,
Lighting Playback Controller
Product Options
This declaration covers all options of the above products.
conforms to the following product specifications:
Electronic Theatre Controls, Inc.
3030 Laura Lane
Middleton, WI 53562 USA
This written warranty is intended as a complete and
exclusive statement of the terms thereof. Prior dealings
or trade usage shall not be relevant to modify, explain or
vary this warranty. Acceptance of, or acquiescing in, a
course of performance under this warranty shall not
modify the meaning of this agreement even though
either party has knowledge of the performance and a
chance to object.
Safety: EN 60950
EMC: CISPR 22/EN55022 Class B
IEC 801-2:1984/IEC 1000-4-2:1995-01 8KV AD
IEC 801-3:1984/ENV 50140, ENV 50204:1993 3 V/M 26-1000 MHz
IEC 801-4:1988/IEC 1000-4-4:1995-01 .5kV Sig. Lines 1kV power line
Supplementary information:
The products herewith comply with the requirements of the Low Voltage Directive 73/23/EEC and the EMC
Directive 89/336/EEC, as amended by Directive 92/31/EEC.
Middleton, Wisconsin, USA 25 April 1995_ _ _ _ _ _ _ _ _ _ _ _ _ _ _ _ _ _ _ _ _ _ _ _ _ _ _ _ _ _
European contact: Your local ETC Technical Services office, or ETC Ltd, 5 Victoria Industrial Estate,
Victoria Road, London W3 6UU, UK, Tel: (+44) 181 896 1000 Fax: (+44) 181 896 2000
Jonathan R. Ide/Vice President of Research and Development
Page 5

table of contents
Chapter 1
Introduction
Chapter 2
Monitor displays
. . . . . . . . . . . . . . . . . . . . . . . . . . . . . . . . . . . . . . . . . . . . . . . . . . 1
Troubleshooting . . . . . . . . . . . . . . . . . . . . . . . . . . . . . . . . . . . . . . . . 2
Using this manual . . . . . . . . . . . . . . . . . . . . . . . . . . . . . . . . . . . . . . . 3
Using Help. . . . . . . . . . . . . . . . . . . . . . . . . . . . . . . . . . . . . . . . . . . . . 3
Text conventions. . . . . . . . . . . . . . . . . . . . . . . . . . . . . . . . . . . . . . . . 3
Output level conventions . . . . . . . . . . . . . . . . . . . . . . . . . . . . . . . . . 3
About Show . . . . . . . . . . . . . . . . . . . . . . . . . . . . . . . . . . . . . . . . . . . 4
. . . . . . . . . . . . . . . . . . . . . . . . . . . . . . . . . . . . . . . . . . . . . . 5
Channel colors. . . . . . . . . . . . . . . . . . . . . . . . . . . . . . . . . . . . . . . . . . 6
Changing pages. . . . . . . . . . . . . . . . . . . . . . . . . . . . . . . . . . . . . . . . . 6
Stage . . . . . . . . . . . . . . . . . . . . . . . . . . . . . . . . . . . . . . . . . . . . . . . . . 7
Blind . . . . . . . . . . . . . . . . . . . . . . . . . . . . . . . . . . . . . . . . . . . . . . . . . 8
Fader . . . . . . . . . . . . . . . . . . . . . . . . . . . . . . . . . . . . . . . . . . . . . . . . . 9
Flexichannel . . . . . . . . . . . . . . . . . . . . . . . . . . . . . . . . . . . . . . . . . . 10
Tracksheet. . . . . . . . . . . . . . . . . . . . . . . . . . . . . . . . . . . . . . . . . . . . 11
Patch . . . . . . . . . . . . . . . . . . . . . . . . . . . . . . . . . . . . . . . . . . . . . . . . 12
Park . . . . . . . . . . . . . . . . . . . . . . . . . . . . . . . . . . . . . . . . . . . . . . . . . 13
Playback . . . . . . . . . . . . . . . . . . . . . . . . . . . . . . . . . . . . . . . . . . . . . 14
Chapter 3
System settings
Setting number of dimmers . . . . . . . . . . . . . . . . . . . . . . . . . . . . . . 16
Setting number of channels . . . . . . . . . . . . . . . . . . . . . . . . . . . . . . 16
Setting default fade times. . . . . . . . . . . . . . . . . . . . . . . . . . . . . . . . 17
Setting default Level . . . . . . . . . . . . . . . . . . . . . . . . . . . . . . . . . . . . 18
Setting default fader clear time. . . . . . . . . . . . . . . . . . . . . . . . . . . . 18
Setting default Sneak time . . . . . . . . . . . . . . . . . . . . . . . . . . . . . . . 19
Setting Designer’s Worksheet options . . . . . . . . . . . . . . . . . . . . . . 20
Enable/disable Blackout key . . . . . . . . . . . . . . . . . . . . . . . . . . . . . . 21
Enable/disable Flexichannel . . . . . . . . . . . . . . . . . . . . . . . . . . . . . . 22
Updating Flexichannel. . . . . . . . . . . . . . . . . . . . . . . . . . . . . . . . 22
Set Master type . . . . . . . . . . . . . . . . . . . . . . . . . . . . . . . . . . . . . . . 23
Set Channels/Submasters 1-to-1. . . . . . . . . . . . . . . . . . . . . . . . . . . 23
Setting time format . . . . . . . . . . . . . . . . . . . . . . . . . . . . . . . . . . . . . 24
Record Lockout . . . . . . . . . . . . . . . . . . . . . . . . . . . . . . . . . . . . . . . . 24
Enable/disable Bump keys . . . . . . . . . . . . . . . . . . . . . . . . . . . . . . . 25
Setting clock . . . . . . . . . . . . . . . . . . . . . . . . . . . . . . . . . . . . . . . . . . 26
Naming show . . . . . . . . . . . . . . . . . . . . . . . . . . . . . . . . . . . . . . . . . 27
. . . . . . . . . . . . . . . . . . . . . . . . . . . . . . . . . . . . . . . . . . . . . 15
Page 6

Chapter 4
Patch
. . . . . . . . . . . . . . . . . . . . . . . . . . . . . . . . . . . . . . . . . . . . . . . . . . . . . . . . 29
Selecting one-to-one patch . . . . . . . . . . . . . . . . . . . . . . . . . . . . . . . 30
Creating custom patch . . . . . . . . . . . . . . . . . . . . . . . . . . . . . . . . . . 30
Patching dimmers to channels . . . . . . . . . . . . . . . . . . . . . . . . . . . . 31
Proportional patching . . . . . . . . . . . . . . . . . . . . . . . . . . . . . . . . . . . 32
Labeling dimmers . . . . . . . . . . . . . . . . . . . . . . . . . . . . . . . . . . . . . . 34
Assigning a profile to a dimmer . . . . . . . . . . . . . . . . . . . . . . . . . . . 35
Capturing channels in Patch . . . . . . . . . . . . . . . . . . . . . . . . . . . . . . 36
Dimmer check. . . . . . . . . . . . . . . . . . . . . . . . . . . . . . . . . . . . . . . . . 37
About. . . . . . . . . . . . . . . . . . . . . . . . . . . . . . . . . . . . . . . . . . . . . . . . 38
About Dimmer . . . . . . . . . . . . . . . . . . . . . . . . . . . . . . . . . . . . . 38
About Dimmer with ETCLink . . . . . . . . . . . . . . . . . . . . . . . . . . 39
Multiplexed dimmers . . . . . . . . . . . . . . . . . . . . . . . . . . . . . . . . . . . 40
Patching to a Strand CD80 dimmer rack . . . . . . . . . . . . . . . . . . . . . 41
Chapter 5
Setting channel levels
Channel modes . . . . . . . . . . . . . . . . . . . . . . . . . . . . . . . . . . . . . . . . 44
Captured channels . . . . . . . . . . . . . . . . . . . . . . . . . . . . . . . . . . 44
Selected channels. . . . . . . . . . . . . . . . . . . . . . . . . . . . . . . . . . . 44
Recorded channels . . . . . . . . . . . . . . . . . . . . . . . . . . . . . . . . . . 44
Moving channels. . . . . . . . . . . . . . . . . . . . . . . . . . . . . . . . . . . . 44
Tracked channels . . . . . . . . . . . . . . . . . . . . . . . . . . . . . . . . . . . 44
Channel Attributes display . . . . . . . . . . . . . . . . . . . . . . . . . . . . . . . 45
Independent channels . . . . . . . . . . . . . . . . . . . . . . . . . . . . . . . 46
Flipped channels. . . . . . . . . . . . . . . . . . . . . . . . . . . . . . . . . . . . 47
Labeling a channel . . . . . . . . . . . . . . . . . . . . . . . . . . . . . . . . . . 48
Selecting channels . . . . . . . . . . . . . . . . . . . . . . . . . . . . . . . . . . . . . 49
Selecting channels in Flexichannel mode. . . . . . . . . . . . . . . . . 49
Setting channel levels . . . . . . . . . . . . . . . . . . . . . . . . . . . . . . . . . . . 50
Level wheel . . . . . . . . . . . . . . . . . . . . . . . . . . . . . . . . . . . . . . . 50
Full . . . . . . . . . . . . . . . . . . . . . . . . . . . . . . . . . . . . . . . . . . . . . . 50
Level . . . . . . . . . . . . . . . . . . . . . . . . . . . . . . . . . . . . . . . . . . . . . 50
Flash . . . . . . . . . . . . . . . . . . . . . . . . . . . . . . . . . . . . . . . . . . . . . 50
Sneak . . . . . . . . . . . . . . . . . . . . . . . . . . . . . . . . . . . . . . . . . . . . 51
Channel check. . . . . . . . . . . . . . . . . . . . . . . . . . . . . . . . . . . . . . . . . 52
About. . . . . . . . . . . . . . . . . . . . . . . . . . . . . . . . . . . . . . . . . . . . . . . . 53
About Channel . . . . . . . . . . . . . . . . . . . . . . . . . . . . . . . . . . . . . 53
. . . . . . . . . . . . . . . . . . . . . . . . . . . . . . . . . . . . . . . 43
Chapter 6
. . . . . . . . . . . . . . . . . . . . . . . . . . . . . . . . . . . . . . . . . . . . . . . . . . . . . . . . . 55
Cues
Cue types . . . . . . . . . . . . . . . . . . . . . . . . . . . . . . . . . . . . . . . . . . . . 56
Crossfade . . . . . . . . . . . . . . . . . . . . . . . . . . . . . . . . . . . . . . . . . 56
Allfade. . . . . . . . . . . . . . . . . . . . . . . . . . . . . . . . . . . . . . . . . . . . 56
Subroutine . . . . . . . . . . . . . . . . . . . . . . . . . . . . . . . . . . . . . . . . 56
Effects . . . . . . . . . . . . . . . . . . . . . . . . . . . . . . . . . . . . . . . . . . . 56
Record functions . . . . . . . . . . . . . . . . . . . . . . . . . . . . . . . . . . . . . . . 57
Creating cues . . . . . . . . . . . . . . . . . . . . . . . . . . . . . . . . . . . . . . . . . 58
Viewing cues. . . . . . . . . . . . . . . . . . . . . . . . . . . . . . . . . . . . . . . . . . 58
Working with cues in Stage mode . . . . . . . . . . . . . . . . . . . . . . . . . 59
Recording a cue in Stage . . . . . . . . . . . . . . . . . . . . . . . . . . . . . . . . 60
Working with cues in Blind mode . . . . . . . . . . . . . . . . . . . . . . . . . . 61
Recording a cue in Blind . . . . . . . . . . . . . . . . . . . . . . . . . . . . . . . . . 62
Recording a cue with a single fade time . . . . . . . . . . . . . . . . . . . . . 63
ii Insight 2x user manual
Page 7

Chapter 7
Track
. . . . . . . . . . . . . . . . . . . . . . . . . . . . . . . . . . . . . . . . . . . . . . . . . . . . . . . . 79
Recording a cue with split fade times. . . . . . . . . . . . . . . . . . . . . . . 64
Recording a cue with a wait time . . . . . . . . . . . . . . . . . . . . . . . . . . 65
Recording cues with Link and Follow . . . . . . . . . . . . . . . . . . . . . . . 66
Link . . . . . . . . . . . . . . . . . . . . . . . . . . . . . . . . . . . . . . . . . . . . . . 66
Follow . . . . . . . . . . . . . . . . . . . . . . . . . . . . . . . . . . . . . . . . . . . . 66
Combining Link and Follow to create playback loops. . . . . . . . 67
Using Link to link a macro to a cue. . . . . . . . . . . . . . . . . . . . . . 67
Recording a cue using Solo. . . . . . . . . . . . . . . . . . . . . . . . . . . . . . . 68
Labeling cues . . . . . . . . . . . . . . . . . . . . . . . . . . . . . . . . . . . . . . . . . 69
Modifying a recorded cue live . . . . . . . . . . . . . . . . . . . . . . . . . . . . . 70
Modifying channels in a cue . . . . . . . . . . . . . . . . . . . . . . . . . . . 70
Modifying cue attributes. . . . . . . . . . . . . . . . . . . . . . . . . . . . . . 70
Using Update to modify channels in a cue . . . . . . . . . . . . . . . . 71
Using Update to add channels to a cue . . . . . . . . . . . . . . . . . . 72
Using Update to modify fade rate . . . . . . . . . . . . . . . . . . . . . . . . . . 73
Deleting cues . . . . . . . . . . . . . . . . . . . . . . . . . . . . . . . . . . . . . . . . . 74
Copying cues. . . . . . . . . . . . . . . . . . . . . . . . . . . . . . . . . . . . . . . . . . 74
Inserting cues . . . . . . . . . . . . . . . . . . . . . . . . . . . . . . . . . . . . . . . . . 75
Cue List . . . . . . . . . . . . . . . . . . . . . . . . . . . . . . . . . . . . . . . . . . . . . . 76
Track record . . . . . . . . . . . . . . . . . . . . . . . . . . . . . . . . . . . . . . . . . . 80
Using record to create tracks . . . . . . . . . . . . . . . . . . . . . . . . . . 81
Recording modified cues . . . . . . . . . . . . . . . . . . . . . . . . . . . . . 82
Inserting cues . . . . . . . . . . . . . . . . . . . . . . . . . . . . . . . . . . . . . . 84
Blackout cues and tracking. . . . . . . . . . . . . . . . . . . . . . . . . . . . 86
Tracksheet. . . . . . . . . . . . . . . . . . . . . . . . . . . . . . . . . . . . . . . . . . . . 88
Chapter 8
Multipart cues
. . . . . . . . . . . . . . . . . . . . . . . . . . . . . . . . . . . . . . . . . . . . . . . 91
Recording a multipart cue . . . . . . . . . . . . . . . . . . . . . . . . . . . . . . . . 92
Converting a standard cue to a multipart cue . . . . . . . . . . . . . . . . . 93
Wait times in multipart cues . . . . . . . . . . . . . . . . . . . . . . . . . . . . . . 94
Editing a multipart cue . . . . . . . . . . . . . . . . . . . . . . . . . . . . . . . . . . 94
Deleting a part from a multipart cue. . . . . . . . . . . . . . . . . . . . . 94
Adding, deleting and modifying channels. . . . . . . . . . . . . . . . . 95
Modifying fade and wait times . . . . . . . . . . . . . . . . . . . . . . . . . 96
Chapter 9
Playing back cues
Selecting cues. . . . . . . . . . . . . . . . . . . . . . . . . . . . . . . . . . . . . . . . . 98
Timed faders and LED displays. . . . . . . . . . . . . . . . . . . . . . . . . . . . 99
Clearing faders . . . . . . . . . . . . . . . . . . . . . . . . . . . . . . . . . . . . . 99
Playback Cue List . . . . . . . . . . . . . . . . . . . . . . . . . . . . . . . . . . . . . 100
Fader Status display . . . . . . . . . . . . . . . . . . . . . . . . . . . . . . . . . . . 101
Selecting and playing a cue. . . . . . . . . . . . . . . . . . . . . . . . . . . . . . 102
Go . . . . . . . . . . . . . . . . . . . . . . . . . . . . . . . . . . . . . . . . . . . . . . 102
Hold . . . . . . . . . . . . . . . . . . . . . . . . . . . . . . . . . . . . . . . . . . . . 102
Back . . . . . . . . . . . . . . . . . . . . . . . . . . . . . . . . . . . . . . . . . . . . 103
Go to a different cue. . . . . . . . . . . . . . . . . . . . . . . . . . . . . . . . 103
Controlling fades manually . . . . . . . . . . . . . . . . . . . . . . . . . . . . . . 104
Manual override . . . . . . . . . . . . . . . . . . . . . . . . . . . . . . . . . . . 104
Rate override . . . . . . . . . . . . . . . . . . . . . . . . . . . . . . . . . . . . . 105
Quickstep . . . . . . . . . . . . . . . . . . . . . . . . . . . . . . . . . . . . . . . . . . . 106
. . . . . . . . . . . . . . . . . . . . . . . . . . . . . . . . . . . . . . . . . . . . 97
iii
Page 8

Chapter 10
Groups
. . . . . . . . . . . . . . . . . . . . . . . . . . . . . . . . . . . . . . . . . . . . . . . . . . . . . . 107
Creating groups. . . . . . . . . . . . . . . . . . . . . . . . . . . . . . . . . . . . . . . 108
Displaying groups on stage . . . . . . . . . . . . . . . . . . . . . . . . . . . . . . 110
Working with groups in Blind . . . . . . . . . . . . . . . . . . . . . . . . . . . . 111
Modifying groups . . . . . . . . . . . . . . . . . . . . . . . . . . . . . . . . . . . . . 112
Labeling groups. . . . . . . . . . . . . . . . . . . . . . . . . . . . . . . . . . . . . . . 116
Deleting groups. . . . . . . . . . . . . . . . . . . . . . . . . . . . . . . . . . . . . . . 117
Copying groups . . . . . . . . . . . . . . . . . . . . . . . . . . . . . . . . . . . . . . . 117
Using cues or submasters as groups . . . . . . . . . . . . . . . . . . . . . . 118
Using groups to modify cues or submasters in Blind . . . . . . . . . . 119
Only. . . . . . . . . . . . . . . . . . . . . . . . . . . . . . . . . . . . . . . . . . . . . . . . 120
Group List . . . . . . . . . . . . . . . . . . . . . . . . . . . . . . . . . . . . . . . . . . . 121
Creating a group from the look on stage . . . . . . . . . . . . . . . . 108
Creating a group using Solo . . . . . . . . . . . . . . . . . . . . . . . . . . 109
Group mode . . . . . . . . . . . . . . . . . . . . . . . . . . . . . . . . . . . . . . 111
Group Editing mode . . . . . . . . . . . . . . . . . . . . . . . . . . . . . . . . 111
In Blind . . . . . . . . . . . . . . . . . . . . . . . . . . . . . . . . . . . . . . . . . . 112
In Stage. . . . . . . . . . . . . . . . . . . . . . . . . . . . . . . . . . . . . . . . . . 113
Using Update to modify groups . . . . . . . . . . . . . . . . . . . . . . . 114
Chapter 11
Submasters
Submaster types . . . . . . . . . . . . . . . . . . . . . . . . . . . . . . . . . . . . . . 124
Submaster pages . . . . . . . . . . . . . . . . . . . . . . . . . . . . . . . . . . . . . 126
Playback Submaster List . . . . . . . . . . . . . . . . . . . . . . . . . . . . . . . . 127
Submaster LEDs . . . . . . . . . . . . . . . . . . . . . . . . . . . . . . . . . . . . . . 128
Submaster bump buttons . . . . . . . . . . . . . . . . . . . . . . . . . . . . . . . 129
Recording submasters . . . . . . . . . . . . . . . . . . . . . . . . . . . . . . . . . 131
Creating inhibitive submasters . . . . . . . . . . . . . . . . . . . . . . . . . . . 136
Modifying submasters in Blind . . . . . . . . . . . . . . . . . . . . . . . . . . . 137
Modifying submasters in Stage . . . . . . . . . . . . . . . . . . . . . . . . . . 137
Using Update to modify submasters . . . . . . . . . . . . . . . . . . . . . . 138
Live control of a submaster’s rate. . . . . . . . . . . . . . . . . . . . . . . . . 139
Controlling submaster fades manually . . . . . . . . . . . . . . . . . . . . . 139
Labeling submasters . . . . . . . . . . . . . . . . . . . . . . . . . . . . . . . . . . . 140
Copying submasters . . . . . . . . . . . . . . . . . . . . . . . . . . . . . . . . . . . 140
Loading cues or groups to submasters. . . . . . . . . . . . . . . . . . . . . 141
Copying cues or groups to submasters . . . . . . . . . . . . . . . . . . . . 141
Clearing submasters . . . . . . . . . . . . . . . . . . . . . . . . . . . . . . . . . . . 142
Submaster List . . . . . . . . . . . . . . . . . . . . . . . . . . . . . . . . . . . . . . . 143
. . . . . . . . . . . . . . . . . . . . . . . . . . . . . . . . . . . . . . . . . . . . . . . . . 123
Pile-on submaster. . . . . . . . . . . . . . . . . . . . . . . . . . . . . . . . . . 124
Inhibitive submaster . . . . . . . . . . . . . . . . . . . . . . . . . . . . . . . . 124
Effect submaster . . . . . . . . . . . . . . . . . . . . . . . . . . . . . . . . . . 124
Changing type. . . . . . . . . . . . . . . . . . . . . . . . . . . . . . . . . . . . . 125
Bump button status . . . . . . . . . . . . . . . . . . . . . . . . . . . . . . . . 129
Bump button mode. . . . . . . . . . . . . . . . . . . . . . . . . . . . . . . . . 130
Fade and dwell times for submasters . . . . . . . . . . . . . . . . . . 131
Adding a rate to a submaster . . . . . . . . . . . . . . . . . . . . . . . . . 134
Specifying a submaster’s page. . . . . . . . . . . . . . . . . . . . . . . . 134
Using Except to record a submaster
without another submaster’s channels . . . . . . . . . . . . . . . . . 135
iv Insight 2x user manual
Page 9

Chapter 12
Effects
. . . . . . . . . . . . . . . . . . . . . . . . . . . . . . . . . . . . . . . . . . . . . . . . . . . . . . 145
Steps . . . . . . . . . . . . . . . . . . . . . . . . . . . . . . . . . . . . . . . . . . . . . . . 146
Creating steps . . . . . . . . . . . . . . . . . . . . . . . . . . . . . . . . . . . . . . . . 147
Controlling effects. . . . . . . . . . . . . . . . . . . . . . . . . . . . . . . . . . . . . 150
Modifying effects . . . . . . . . . . . . . . . . . . . . . . . . . . . . . . . . . . . . . 155
Running an effect cue . . . . . . . . . . . . . . . . . . . . . . . . . . . . . . . . . . 158
Using an effect submaster . . . . . . . . . . . . . . . . . . . . . . . . . . . . . . 158
Chapter 13
Subroutines
Steps . . . . . . . . . . . . . . . . . . . . . . . . . . . . . . . . . . . . . . . . . . . . . . . 160
Cue steps . . . . . . . . . . . . . . . . . . . . . . . . . . . . . . . . . . . . . . . . . . . 160
Style steps . . . . . . . . . . . . . . . . . . . . . . . . . . . . . . . . . . . . . . . . . . 161
Subroutine attributes. . . . . . . . . . . . . . . . . . . . . . . . . . . . . . . . . . . 161
Creating subroutines . . . . . . . . . . . . . . . . . . . . . . . . . . . . . . . . . . . 162
Editing a subroutine . . . . . . . . . . . . . . . . . . . . . . . . . . . . . . . . . . . 164
Deleting a step . . . . . . . . . . . . . . . . . . . . . . . . . . . . . . . . . . . . . . . 164
Inserting a step . . . . . . . . . . . . . . . . . . . . . . . . . . . . . . . . . . . . . . . 164
Default element assignment . . . . . . . . . . . . . . . . . . . . . . . . . 149
Attributes . . . . . . . . . . . . . . . . . . . . . . . . . . . . . . . . . . . . . . . . 150
Effect fade times . . . . . . . . . . . . . . . . . . . . . . . . . . . . . . . . . . 152
Using a random rate . . . . . . . . . . . . . . . . . . . . . . . . . . . . . . . . 154
Inserting steps . . . . . . . . . . . . . . . . . . . . . . . . . . . . . . . . . . . . 155
Deleting steps. . . . . . . . . . . . . . . . . . . . . . . . . . . . . . . . . . . . . 156
Editing step characteristics. . . . . . . . . . . . . . . . . . . . . . . . . . . 156
. . . . . . . . . . . . . . . . . . . . . . . . . . . . . . . . . . . . . . . . . . . . . . . . . 159
Crossfade . . . . . . . . . . . . . . . . . . . . . . . . . . . . . . . . . . . . . . . . 160
Allfade. . . . . . . . . . . . . . . . . . . . . . . . . . . . . . . . . . . . . . . . . . . 160
Chapter 14
Macros
. . . . . . . . . . . . . . . . . . . . . . . . . . . . . . . . . . . . . . . . . . . . . . . . . . . . . . 165
Creating macros . . . . . . . . . . . . . . . . . . . . . . . . . . . . . . . . . . . . . . 166
Using Learn. . . . . . . . . . . . . . . . . . . . . . . . . . . . . . . . . . . . . . . 166
Using Macro display mode . . . . . . . . . . . . . . . . . . . . . . . . . . . 168
Next macro . . . . . . . . . . . . . . . . . . . . . . . . . . . . . . . . . . . . . . . 169
Macro wait . . . . . . . . . . . . . . . . . . . . . . . . . . . . . . . . . . . . . . . 169
Linking macros . . . . . . . . . . . . . . . . . . . . . . . . . . . . . . . . . . . . 170
Using submasters in macros . . . . . . . . . . . . . . . . . . . . . . . . . 171
Playing macros . . . . . . . . . . . . . . . . . . . . . . . . . . . . . . . . . . . . . . . 172
Canceling a macro . . . . . . . . . . . . . . . . . . . . . . . . . . . . . . . . . 172
Powerup macro. . . . . . . . . . . . . . . . . . . . . . . . . . . . . . . . . . . . . . . 172
Modifying macros . . . . . . . . . . . . . . . . . . . . . . . . . . . . . . . . . . . . . 173
Clearing macros . . . . . . . . . . . . . . . . . . . . . . . . . . . . . . . . . . . . . . 173
Copying macros . . . . . . . . . . . . . . . . . . . . . . . . . . . . . . . . . . . . . . 174
Sample macros . . . . . . . . . . . . . . . . . . . . . . . . . . . . . . . . . . . . . . . 175
Chapter 15
Diskette functions
Diskette management. . . . . . . . . . . . . . . . . . . . . . . . . . . . . . . . . . 178
Formatting diskettes . . . . . . . . . . . . . . . . . . . . . . . . . . . . . . . . . . . 179
Recording a show on diskette. . . . . . . . . . . . . . . . . . . . . . . . . . . . 180
Reading a show from diskette . . . . . . . . . . . . . . . . . . . . . . . . . . . 181
. . . . . . . . . . . . . . . . . . . . . . . . . . . . . . . . . . . . . . . . . . 177
v
Page 10

Chapter 16
Printing
. . . . . . . . . . . . . . . . . . . . . . . . . . . . . . . . . . . . . . . . . . . . . . . . . . . . . 183
Printer options. . . . . . . . . . . . . . . . . . . . . . . . . . . . . . . . . . . . . . . . 184
Stage display . . . . . . . . . . . . . . . . . . . . . . . . . . . . . . . . . . . . . . . . . 184
Cues . . . . . . . . . . . . . . . . . . . . . . . . . . . . . . . . . . . . . . . . . . . . . . . 185
Groups. . . . . . . . . . . . . . . . . . . . . . . . . . . . . . . . . . . . . . . . . . . . . . 186
Submasters . . . . . . . . . . . . . . . . . . . . . . . . . . . . . . . . . . . . . . . . . . 187
Cue List . . . . . . . . . . . . . . . . . . . . . . . . . . . . . . . . . . . . . . . . . . . . . 188
Group List . . . . . . . . . . . . . . . . . . . . . . . . . . . . . . . . . . . . . . . . . . . 188
Submaster List . . . . . . . . . . . . . . . . . . . . . . . . . . . . . . . . . . . . . . . 189
Macros . . . . . . . . . . . . . . . . . . . . . . . . . . . . . . . . . . . . . . . . . . . . . 190
Patch . . . . . . . . . . . . . . . . . . . . . . . . . . . . . . . . . . . . . . . . . . . . . . . 191
Channel Attributes . . . . . . . . . . . . . . . . . . . . . . . . . . . . . . . . . . . . 191
Real Time Programs . . . . . . . . . . . . . . . . . . . . . . . . . . . . . . . . . . . 192
SMPTE events . . . . . . . . . . . . . . . . . . . . . . . . . . . . . . . . . . . . . . . 192
Tracksheet. . . . . . . . . . . . . . . . . . . . . . . . . . . . . . . . . . . . . . . . . . . 193
Chapter 17
Clear functions
Clear functions . . . . . . . . . . . . . . . . . . . . . . . . . . . . . . . . . . . . . . . 196
Show . . . . . . . . . . . . . . . . . . . . . . . . . . . . . . . . . . . . . . . . . . . . . . . 197
Cues . . . . . . . . . . . . . . . . . . . . . . . . . . . . . . . . . . . . . . . . . . . . . . . 197
Groups. . . . . . . . . . . . . . . . . . . . . . . . . . . . . . . . . . . . . . . . . . . . . . 198
Submasters . . . . . . . . . . . . . . . . . . . . . . . . . . . . . . . . . . . . . . . . . . 198
Show and Patch . . . . . . . . . . . . . . . . . . . . . . . . . . . . . . . . . . . . . . 199
Designer’s Worksheet . . . . . . . . . . . . . . . . . . . . . . . . . . . . . . . . . 199
Macros . . . . . . . . . . . . . . . . . . . . . . . . . . . . . . . . . . . . . . . . . . . . . 200
Reset 1-to-1 Patch. . . . . . . . . . . . . . . . . . . . . . . . . . . . . . . . . . . . . 200
Channel Attributes . . . . . . . . . . . . . . . . . . . . . . . . . . . . . . . . . . . . 201
Real Time Programs . . . . . . . . . . . . . . . . . . . . . . . . . . . . . . . . . . . 201
SMPTE . . . . . . . . . . . . . . . . . . . . . . . . . . . . . . . . . . . . . . . . . . . . . 202
Reset system . . . . . . . . . . . . . . . . . . . . . . . . . . . . . . . . . . . . . . . . 202
. . . . . . . . . . . . . . . . . . . . . . . . . . . . . . . . . . . . . . . . . . . . . . 195
Chapter 18
Accessories
vi Insight 2x user manual
. . . . . . . . . . . . . . . . . . . . . . . . . . . . . . . . . . . . . . . . . . . . . . . . . 203
Remote Focus Unit (RFU) . . . . . . . . . . . . . . . . . . . . . . . . . . . . . . . 204
Infrared Remote Focus Unit (IRFU). . . . . . . . . . . . . . . . . . . . . . . . 205
Designer’s Worksheet . . . . . . . . . . . . . . . . . . . . . . . . . . . . . . . . . 207
Using the Designer’s Worksheet . . . . . . . . . . . . . . . . . . . . . . 207
Programming regions . . . . . . . . . . . . . . . . . . . . . . . . . . . . . . . 208
Macro Wait . . . . . . . . . . . . . . . . . . . . . . . . . . . . . . . . . . . . . . . 209
Copying regions . . . . . . . . . . . . . . . . . . . . . . . . . . . . . . . . . . . 210
Clearing regions . . . . . . . . . . . . . . . . . . . . . . . . . . . . . . . . . . . 211
Alphanumeric keyboard. . . . . . . . . . . . . . . . . . . . . . . . . . . . . . . . . 212
Naming cues, submasters, groups, and shows . . . . . . . . . . . 212
Naming shows . . . . . . . . . . . . . . . . . . . . . . . . . . . . . . . . . . . . 212
Full Tracking Backup . . . . . . . . . . . . . . . . . . . . . . . . . . . . . . . . . . . 213
Full Tracking Backup with an LPC. . . . . . . . . . . . . . . . . . . . . . 214
Page 11

Chapter 19
Sensor dimming
Enabling ETCLink . . . . . . . . . . . . . . . . . . . . . . . . . . . . . . . . . . . . . 216
Monitoring dimmers . . . . . . . . . . . . . . . . . . . . . . . . . . . . . . . . . . . 217
Sensor dimming system status . . . . . . . . . . . . . . . . . . . . . . . . . . 223
Dimmer rack status. . . . . . . . . . . . . . . . . . . . . . . . . . . . . . . . . . . . 224
Dimmer status . . . . . . . . . . . . . . . . . . . . . . . . . . . . . . . . . . . . . . . 225
Setting and unsetting dimmers. . . . . . . . . . . . . . . . . . . . . . . . . . . 226
Working with Sensor backup looks. . . . . . . . . . . . . . . . . . . . . . . . 227
Error messages . . . . . . . . . . . . . . . . . . . . . . . . . . . . . . . . . . . . . . . 229
. . . . . . . . . . . . . . . . . . . . . . . . . . . . . . . . . . . . . . . . . . . . 215
Enabling ETCLink messages. . . . . . . . . . . . . . . . . . . . . . . . . . 216
Recording dimmer loads. . . . . . . . . . . . . . . . . . . . . . . . . . . . . 218
Checking dimmer loads . . . . . . . . . . . . . . . . . . . . . . . . . . . . . 219
Clearing dimmer loads . . . . . . . . . . . . . . . . . . . . . . . . . . . . . . 221
Load errors . . . . . . . . . . . . . . . . . . . . . . . . . . . . . . . . . . . . . . . 222
Recording a backup look. . . . . . . . . . . . . . . . . . . . . . . . . . . . . 227
Playing a backup look . . . . . . . . . . . . . . . . . . . . . . . . . . . . . . . 228
Chapter 20
Control interfaces
MIDI . . . . . . . . . . . . . . . . . . . . . . . . . . . . . . . . . . . . . . . . . . . . . . . 232
ETC MIDI . . . . . . . . . . . . . . . . . . . . . . . . . . . . . . . . . . . . . . . . 232
MIDI Show Control (MSC) . . . . . . . . . . . . . . . . . . . . . . . . . . . 236
Real time clock . . . . . . . . . . . . . . . . . . . . . . . . . . . . . . . . . . . . . . . 240
DMX512 input . . . . . . . . . . . . . . . . . . . . . . . . . . . . . . . . . . . . . . . . 244
SMPTE . . . . . . . . . . . . . . . . . . . . . . . . . . . . . . . . . . . . . . . . . . . . . 246
Enabling SMPTE input . . . . . . . . . . . . . . . . . . . . . . . . . . . . . . 247
Creating SMPTE programs . . . . . . . . . . . . . . . . . . . . . . . . . . . 248
Editing SMPTE programs . . . . . . . . . . . . . . . . . . . . . . . . . . . . 253
Playing back the SMPTE program . . . . . . . . . . . . . . . . . . . . . 259
Remote macros. . . . . . . . . . . . . . . . . . . . . . . . . . . . . . . . . . . . . . . 262
Remote trigger . . . . . . . . . . . . . . . . . . . . . . . . . . . . . . . . . . . . . . . 263
. . . . . . . . . . . . . . . . . . . . . . . . . . . . . . . . . . . . . . . . . . . 231
Chapter 21 moving lights
Link List overview . . . . . . . . . . . . . . . . . . . . . . . . . . . . . . . . . . . . . 266
Setting up a link. . . . . . . . . . . . . . . . . . . . . . . . . . . . . . . . . . . . . . . 267
Using a link . . . . . . . . . . . . . . . . . . . . . . . . . . . . . . . . . . . . . . . . . . 268
Linking two moving lights . . . . . . . . . . . . . . . . . . . . . . . . . . . . . . . 269
Flipped channels . . . . . . . . . . . . . . . . . . . . . . . . . . . . . . . . . . . . . . 270
Mirroring two moving lights . . . . . . . . . . . . . . . . . . . . . . . . . . . . . 270
Using groups and Only with Link List . . . . . . . . . . . . . . . . . . . . . . 272
Inserting a link . . . . . . . . . . . . . . . . . . . . . . . . . . . . . . . . . . . . . . . . 273
Moving a link . . . . . . . . . . . . . . . . . . . . . . . . . . . . . . . . . . . . . . . . . 274
Merging two links . . . . . . . . . . . . . . . . . . . . . . . . . . . . . . . . . . . . . 275
Deleting a link . . . . . . . . . . . . . . . . . . . . . . . . . . . . . . . . . . . . . . . . 276
. . . . . . . . . . . . . . . . . . . . . . . . . . . . . . . . . . . 265
Chapter 22
. . . . . . . . . . . . . . . . . . . . . . . . . . . . . . . . . . . . . . . . . . . . . . . . . . . . . . . . . 277
Park
Parking dimmers . . . . . . . . . . . . . . . . . . . . . . . . . . . . . . . . . . . . . . 278
Unparking dimmers. . . . . . . . . . . . . . . . . . . . . . . . . . . . . . . . . . . . 279
Parking channels . . . . . . . . . . . . . . . . . . . . . . . . . . . . . . . . . . . . . . 280
Unparking channels. . . . . . . . . . . . . . . . . . . . . . . . . . . . . . . . . . . . 281
Parking groups, cues and submasters . . . . . . . . . . . . . . . . . . . . . 282
Unpark a group, cue or submaster . . . . . . . . . . . . . . . . . . . . . 283
Park display . . . . . . . . . . . . . . . . . . . . . . . . . . . . . . . . . . . . . . . . . . 284
vii
Page 12

Appendix A
Installation
Insight 2x back panel. . . . . . . . . . . . . . . . . . . . . . . . . . . . . . . . . . . 286
DIP switches and jumpers . . . . . . . . . . . . . . . . . . . . . . . . . . . . . . 287
Circuit boards . . . . . . . . . . . . . . . . . . . . . . . . . . . . . . . . . . . . . . . . 288
Installing console and monitors. . . . . . . . . . . . . . . . . . . . . . . . . . . 290
Connecting dimmers. . . . . . . . . . . . . . . . . . . . . . . . . . . . . . . . . . . 292
Replacing the auxiliary fuse. . . . . . . . . . . . . . . . . . . . . . . . . . . . . . 292
System configuration . . . . . . . . . . . . . . . . . . . . . . . . . . . . . . . . . . 293
Updating Insight 2x software . . . . . . . . . . . . . . . . . . . . . . . . . . . . 295
Installing an alphanumeric keyboard . . . . . . . . . . . . . . . . . . . . . . . 296
Installing a printer . . . . . . . . . . . . . . . . . . . . . . . . . . . . . . . . . . . . . 297
Installing Designer’s Worksheet . . . . . . . . . . . . . . . . . . . . . . . . . . 298
Installing Remote Focus Unit . . . . . . . . . . . . . . . . . . . . . . . . . . . . 302
Installing MIDI . . . . . . . . . . . . . . . . . . . . . . . . . . . . . . . . . . . . . . . . 303
Installing SMPTE . . . . . . . . . . . . . . . . . . . . . . . . . . . . . . . . . . . . . . 305
ETCNet . . . . . . . . . . . . . . . . . . . . . . . . . . . . . . . . . . . . . . . . . . . . . 306
Installing Remote Interfaces . . . . . . . . . . . . . . . . . . . . . . . . . . . . . 309
Installing Remote Video Interface . . . . . . . . . . . . . . . . . . . . . . . . . 311
Installing remote unit software . . . . . . . . . . . . . . . . . . . . . . . . . . . 314
Installing remote video monitors. . . . . . . . . . . . . . . . . . . . . . . . . . 315
Installing Full Tracking Backup . . . . . . . . . . . . . . . . . . . . . . . . . . . 316
Installing Infrared Remote Focus Unit. . . . . . . . . . . . . . . . . . . . . . 317
Installing remote macros. . . . . . . . . . . . . . . . . . . . . . . . . . . . . . . . 318
. . . . . . . . . . . . . . . . . . . . . . . . . . . . . . . . . . . . . . . . . . . . . . . . . . 285
Older console DIP switch settings . . . . . . . . . . . . . . . . . . . . . 291
Setting DMX512 starting numbers. . . . . . . . . . . . . . . . . . . . . 293
Setting Multiplex mode . . . . . . . . . . . . . . . . . . . . . . . . . . . . . 294
Setting DMX512 speed . . . . . . . . . . . . . . . . . . . . . . . . . . . . . 294
Installing the Kurta XGT . . . . . . . . . . . . . . . . . . . . . . . . . . . . . 298
Installing the Kurta IS/ONE . . . . . . . . . . . . . . . . . . . . . . . . . . . 300
Appendix B
Error Messages
Full Tracking Backup messages . . . . . . . . . . . . . . . . . . . . . . . 321
Diskette error messages . . . . . . . . . . . . . . . . . . . . . . . . . . . . 322
Other error messages. . . . . . . . . . . . . . . . . . . . . . . . . . . . . . . 322
ETCLink errors . . . . . . . . . . . . . . . . . . . . . . . . . . . . . . . . . . . . 323
Appendix C
Specifications
. . . . . . . . . . . . . . . . . . . . . . . . . . . . . . . . . . . . . . . . . . . . . . . 325
Appendix D
Reference
. . . . . . . . . . . . . . . . . . . . . . . . . . . . . . . . . . . . . . . . . . . . . . . . . . . 329
Appendix E
Softkeys
Index
. . . . . . . . . . . . . . . . . . . . . . . . . . . . . . . . . . . . . . . . . . . . . . . . . . . . 365
. . . . . . . . . . . . . . . . . . . . . . . . . . . . . . . . . . . . . . . . . . . . . . . . . . . . . . . 369
. . . . . . . . . . . . . . . . . . . . . . . . . . . . . . . . . . . . . . . . . . . . . 321
viii Insight 2x user manual
Page 13

chapter 1
introduction
This chapter includes information to orient you to the console and the
manual
• Troubleshooting
• Using this manual
• Using Help
• Text conventions
• Output level conventions
• About Show
.
It includes the following sections:
Page 14

Troubleshooting
If you have problems with your console, please refer to the manual or the
console’s
using Help, see page 3.)
If you do not find the answer in the manual, call your local dealer or ETC
Technical Services
you call:
• Console model and serial number (located on back panel)
• Software version (displayed on Setup menu)
• Options installed
• Dimmer installation type
• Dimmer manufacturer
To reach the ETC Technical Services department, call one of the numbers
shown below. After hours and weekend calls are answered electronically
and forwarded to a service representative.
Help function for instructions. (For more information about
.
Please have the following information available before
U.S.
Electronic Theatre Controls, Inc.
Technical Services Department
3030 Laura Lane
Middleton, WI 53562
Monday through Friday, 8:00 AM to 6:00 PM CST
800/775-4382
608/831-4116
Europe
ETC Europe Ltd.
Technical Services Department
5 Victoria Industrial Estate
Victoria Road, London W3 6UU
(+44) 181 896 1000
Asia
ETC Asia, Ltd.
Technical Services Department
Room 1619-20, Metro Centre II, 21 Lam Hing Street
Kowloon Bay, Kowloon, Hong Kong
(+852) 2799 9325
2 Insight 2x user manual
Page 15

Using this manual
This manual provides instructions for using Insight 2x’s features and
optional accessories.
Setting up Insight 2x
If you are setting up the system for the first time, chapters 4 and 5 and
appendix A instruct you in installing and configuring Insight 2x
system is already in place, you may not need to refer to these chapters.
New users
If you are new to lighting consoles, or to Insight 2x
ters 5 through 11 for instructions on setting channel levels and using cues,
groups, and submasters. These are the building blocks for creating and
running any show. Once you are comfortable with these functions, chap-
ters 12 through 22 provide more advanced information on effects, subrou-
tines, macros, and the Link List.
Experienced users
Once you are familiar with the system, refer to
the console’s Help function for answers to any remaining questions you
may have.
.
If the
in particular, read chap-
Appendix D, Glossary
, and
Using Help
Help screens are available for all Insight 2x keys, including softkeys and
wheels
console.
.
To display help screens, press [Help], then press any key on the
Text conventions
In this manual, console keys are indicated by square brackets, such as
[Enter]
.
Messages that appear on the console displays are printed in boldface, such as Select channel
are printed in italics, such as
.
References to other sections of the manual
Chapter 1, Introduction
Output level conventions
In almost every case, Insight 2x uses a highest level, or pile-on, convention to determine levels for channels affected by more than one output
Insight 2x reads all output levels it receives for a specific channel and sets
that channel to the highest one
however, takes priority over almost any other input.
For example, if a channel is included in both a submaster
has played back and is in a fader, Insight 2x sets the channel at the higher
of the two levels. You may then use the keypad to select that channel and
set it to any level, regardless of the levels set by the cue and the submaster.
.
A level setting entered on the keypad,
.
and a cue that
.
chapter 1 introduction 3
Page 16
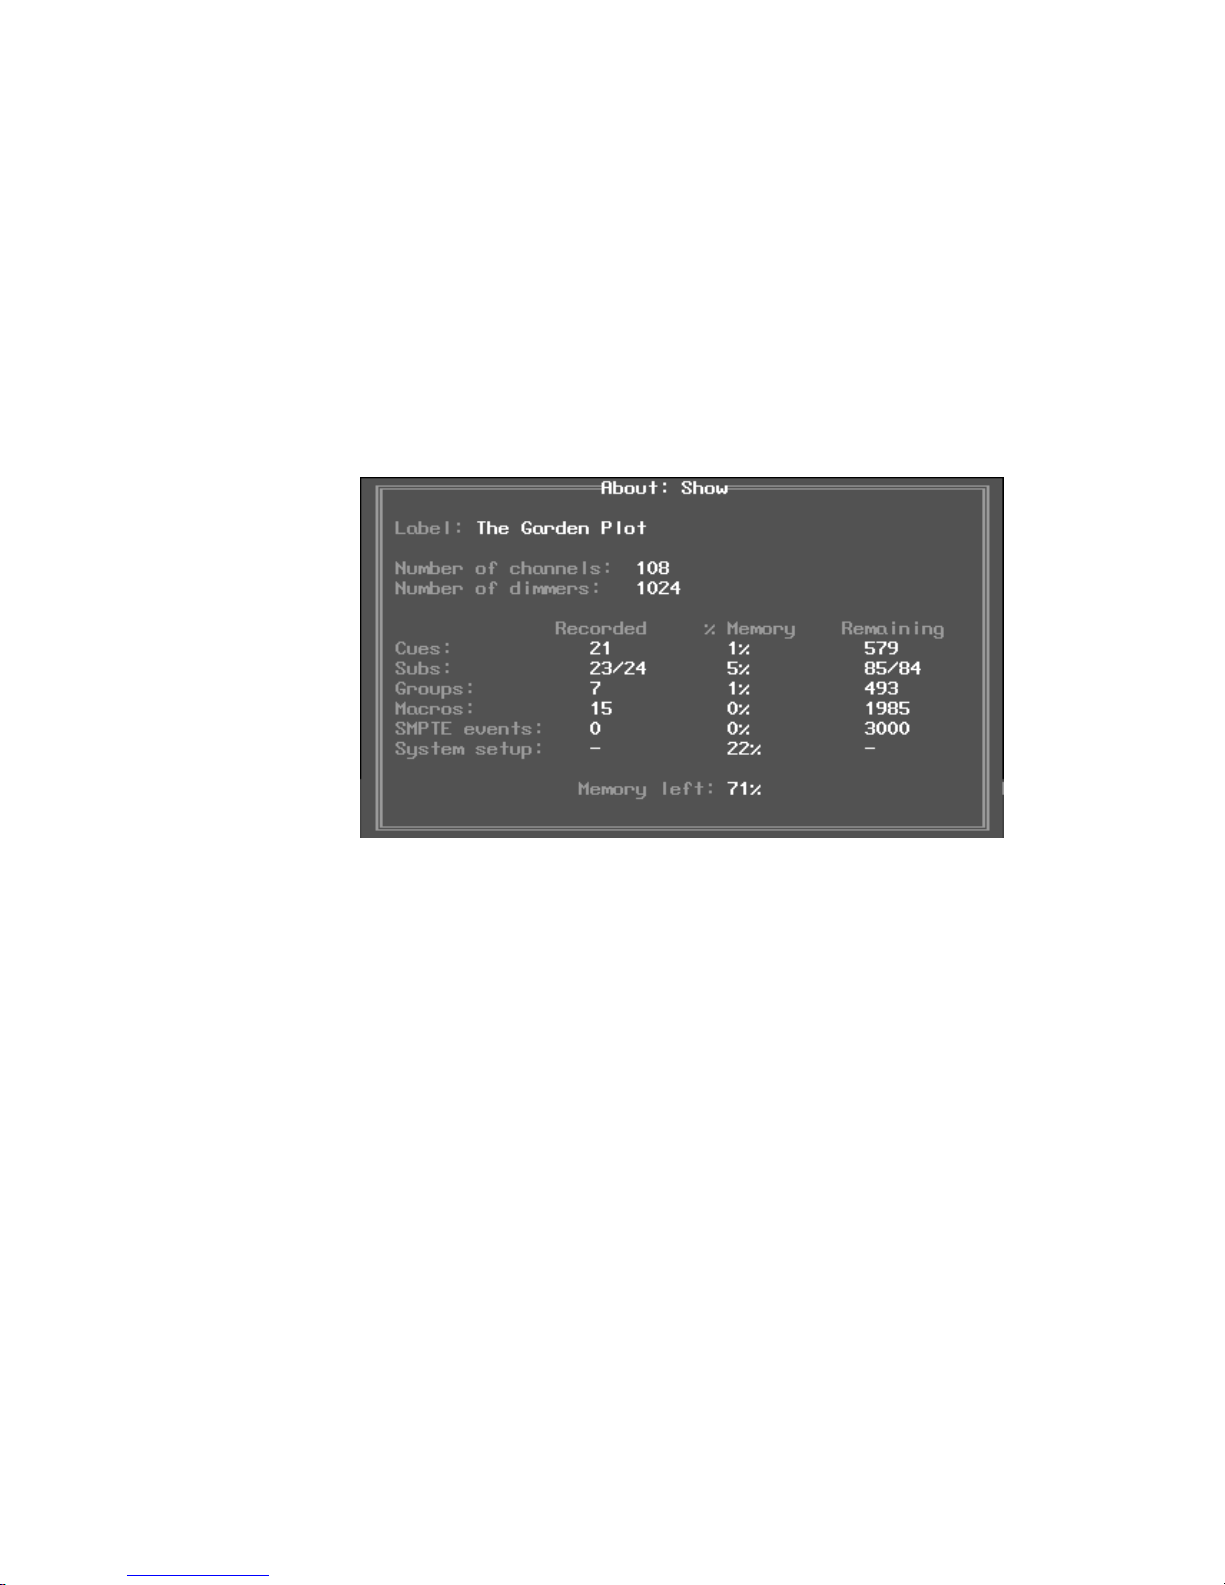
About Show
About Show provides you with memory usage information regarding the
currently loaded show. It tells you how many channels and dimmers your
show is configured for, and how many of the available cues, submasters,
groups,macros and SMPTE events you are using. It also indicates the percentage of the console’s available memory used for each function.
Press [About] [Enter] to display the About Show window.
Note: There is not enough memory to record the maximum number of all
functions at the same time. Use About Show to monitor your memory
usage as the complexity of your show increases. If you fill the available
memory, you can reclaim it by clearing cues, groups, subs, macros, or
events that you are no longer using.
The Memory left indicator shows you how much console memory is still
available to record additional functions. Insight 2x allows you to record up
to 600 cues, 500 groups, 2,000 macros, and 3,000 SMPTE events as available memory permits.
Note: The console software uses approximately 10-15 percent of the
available memory to store setup options and other console information,
shown above as System setup .
4 Insight 2x user manual
Page 17

chapter 2
monitor displays
Insight 2x provides two color video monitors. The Playback display
appears on one monitor. This display provides information regarding your
show, including a cue list, submaster list and the current status of the console’s two fader pairs. The Command display appears on the other monitor. It provides a variety of displays, which you may choose from the
console. These displays allow you to create and run shows and to configure your console and your lighting system.
Note: Press [Swap] to reverse the monitor each display appears on. Press
the [Expand] key to extend the information appearing on the Command
display onto the Playback display. For example, if you have a screen displaying channels on the Command display, [Expand] allows you to view up
to an additional 125 channels on the Playback display.
If your system includes an ETCNet network, additional monitors may be
installed at other locations, such as backstage or in the sound booth.
These remote monitors show the same displays as the console’s monitors. See
monitors.
This chapter includes descriptions of the following displays:
• Stage
• Blind
• Fader
• Flexichannel
• Tracksheet
• Patch
• Park
• Playback
Appendix A, Installation
, for information about installing remote
Page 18

Channel colors
The colors in which channel numbers and output levels are displayed on
screen provide information about the channels. The following chart shows
the meaning of colors in Stage, Blind, Fader, and Tracksheet display
modes. Information on the use of colors in other display modes are
included in their sections of this chapter.
Channel numbers
Gray ................. Unselected channel.
Yellow ............. Selected channel. Controlled by the level wheel when
White ............... Channel not selected by Only function.
Green .............. Selected channel. Controlled by the X wheel through a
Channel output levels
White on Red .. Selected channel. Level instructions from the keypad or
Yellow ............. Channel output level was set by a submaster.
White ............... Channel output level was set by an effect.
Gray ................. Channel was recorded into a multipart cue, but not in the
Red .................. Channel has been de-selected, but its current level was
Green .............. Channel output level is changed from what it was in the
Magenta .......... Channel output level is the same as it was in the previous
Blue ................. In Tracksheet and Blind only, channel output level is
[Enter] is pressed, or when you move the wheel.
link created in the Link List.
the level wheel affect this channel’s level.
In Tracksheet and Blind, white channel levels were set by
an Allfade cue.
currently displayed part (Blind only).
established using the keypad.
previous cue. In Tracksheet and Blind only, channel
output is lower than it was in the previous cue.
cue (tracking).
higher than it was in the previous cue.
Changing pages
[S4], Previous Page, and [S5], Next Page, softkeys allow you to change
pages on many displays. The arrow keys may also be used to switch from
page to page. Pressing [←] takes you to the first page, pressing [↑] takes
you to the previous page, pressing [↓] takes you to the next page, and
pressing [→] takes you to the final page.
6 Insight 2x user manual
Page 19
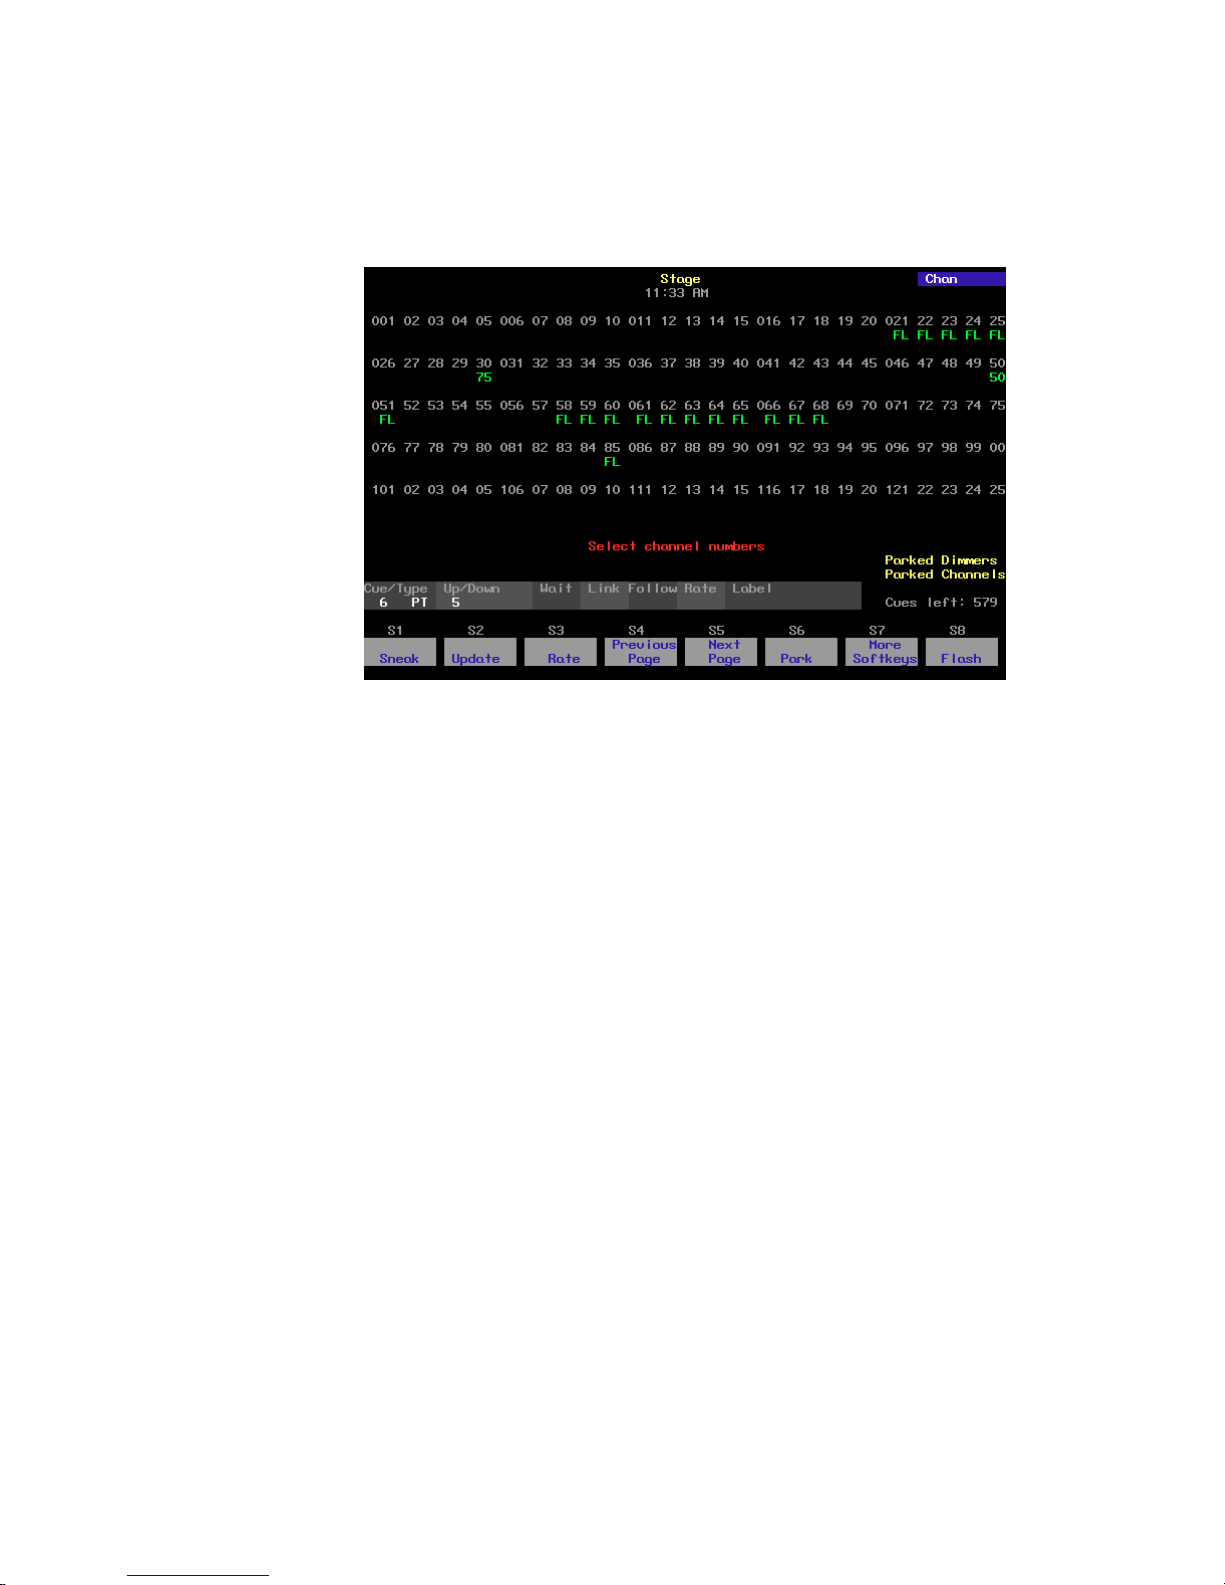
Stage
The Stage display shows you the current levels of all active channels. Up
to 125 channels appear on the display at a time.
Channel
level
display
Prompt
area
Attribute bar
Softkeys
Display mode
Keypad corner
Display mode
Current display mode and time
Keypad corner
Indicates how the console will interpret the next number entered from the
keypad. For example, if you press [Channel], the corner displays Chan,
indicating that the console will read the next number as a channel number.
If you enter a range, only the last number in the range will appear.
Channel level display
Current level of all channels.
Prompt area
Information and prompts appear here.
Attribute bar
Shows current settings for selected cue, group or submaster.
Softkeys
Stage functions for [S1] through [S8].
chapter 2 monitor displays 7
Page 20
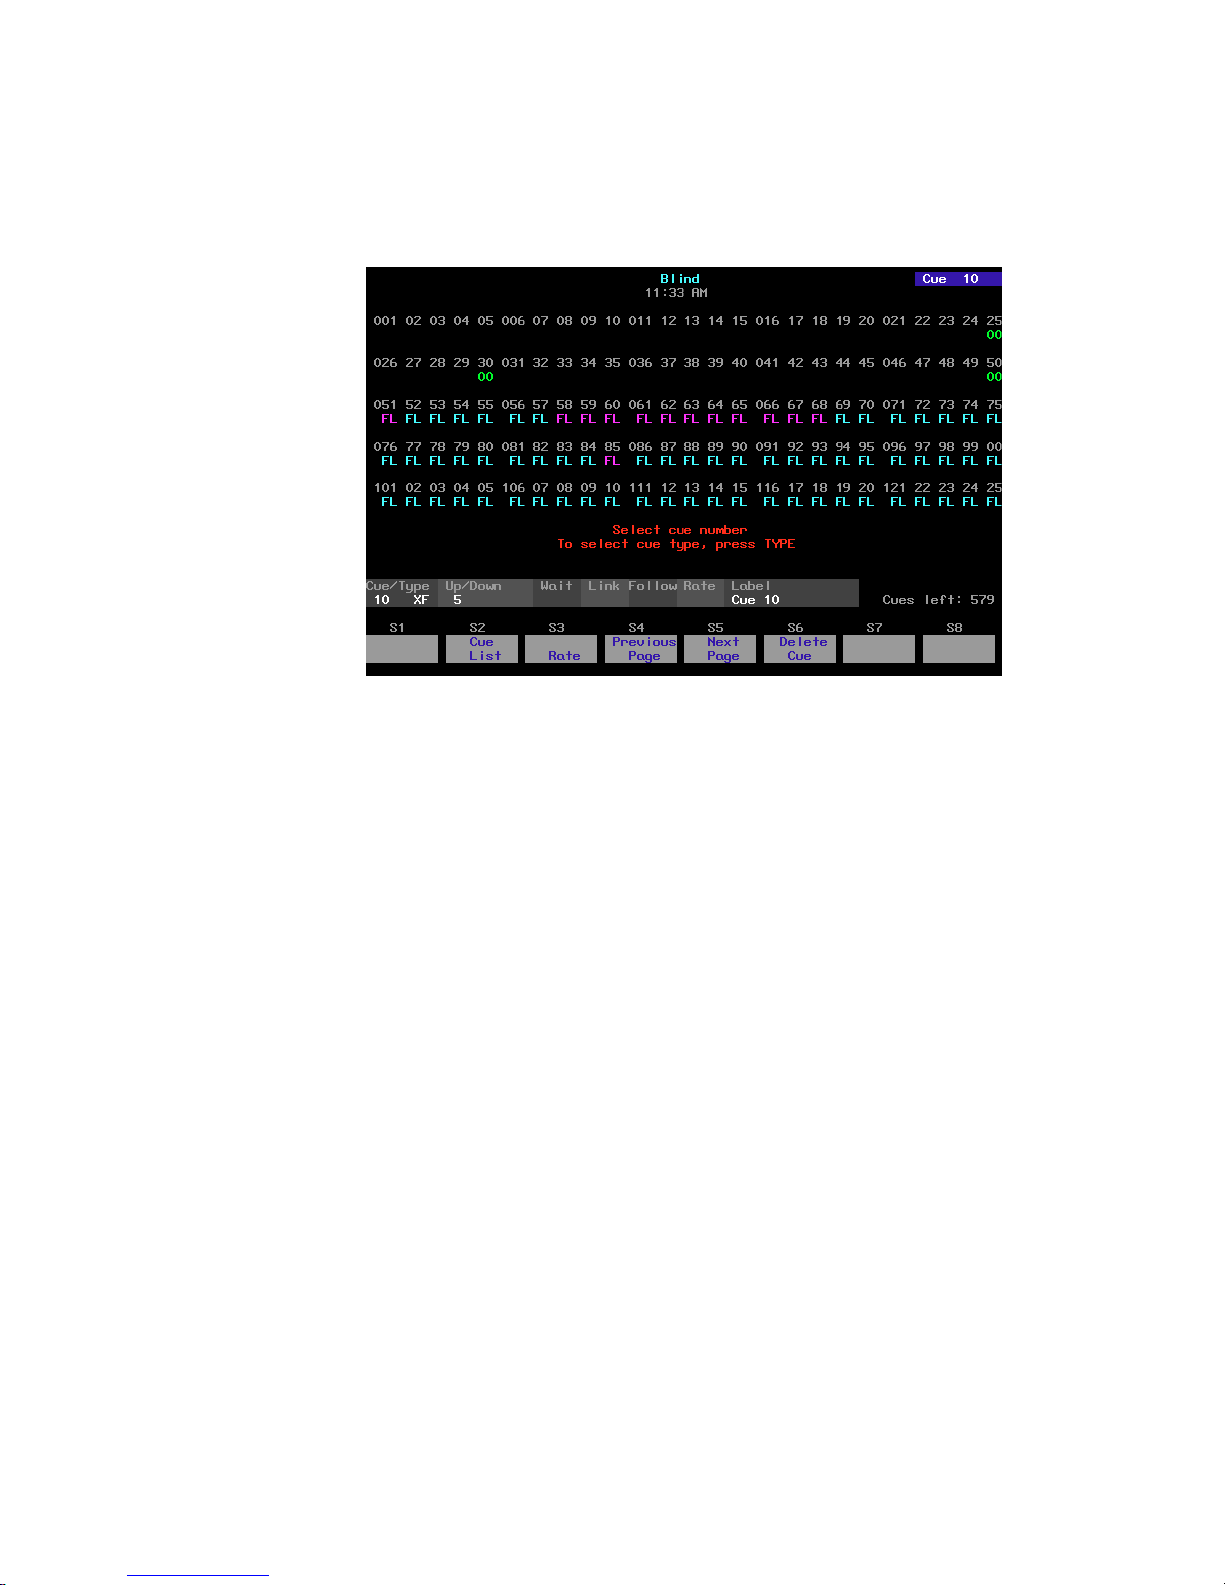
Blind
The Blind display lets you work on cues, groups and submasters without
affecting the look on stage.
Channel
level
display
Prompt
area
Attribute bar
Softkeys
Display mode
Keypad corner
Display mode
Current display mode and time
Keypad prompt corner
Indicates how the console will interpret the next number entered from the
keypad. For example, if you press [Channel], the corner displays Chan,
indicating that the console will read the next number as a channel number.
If you enter a range, only the last number in the range will appear.
Channel level display
Level of channels in the selected cue, group or submaster.
Prompt area
Information and prompts appear here.
Attribute bar
Shows current settings for selected cue, group or submaster.
Softkeys
Blind functions for [S1] through [S8].
8 Insight 2x user manual
Page 21
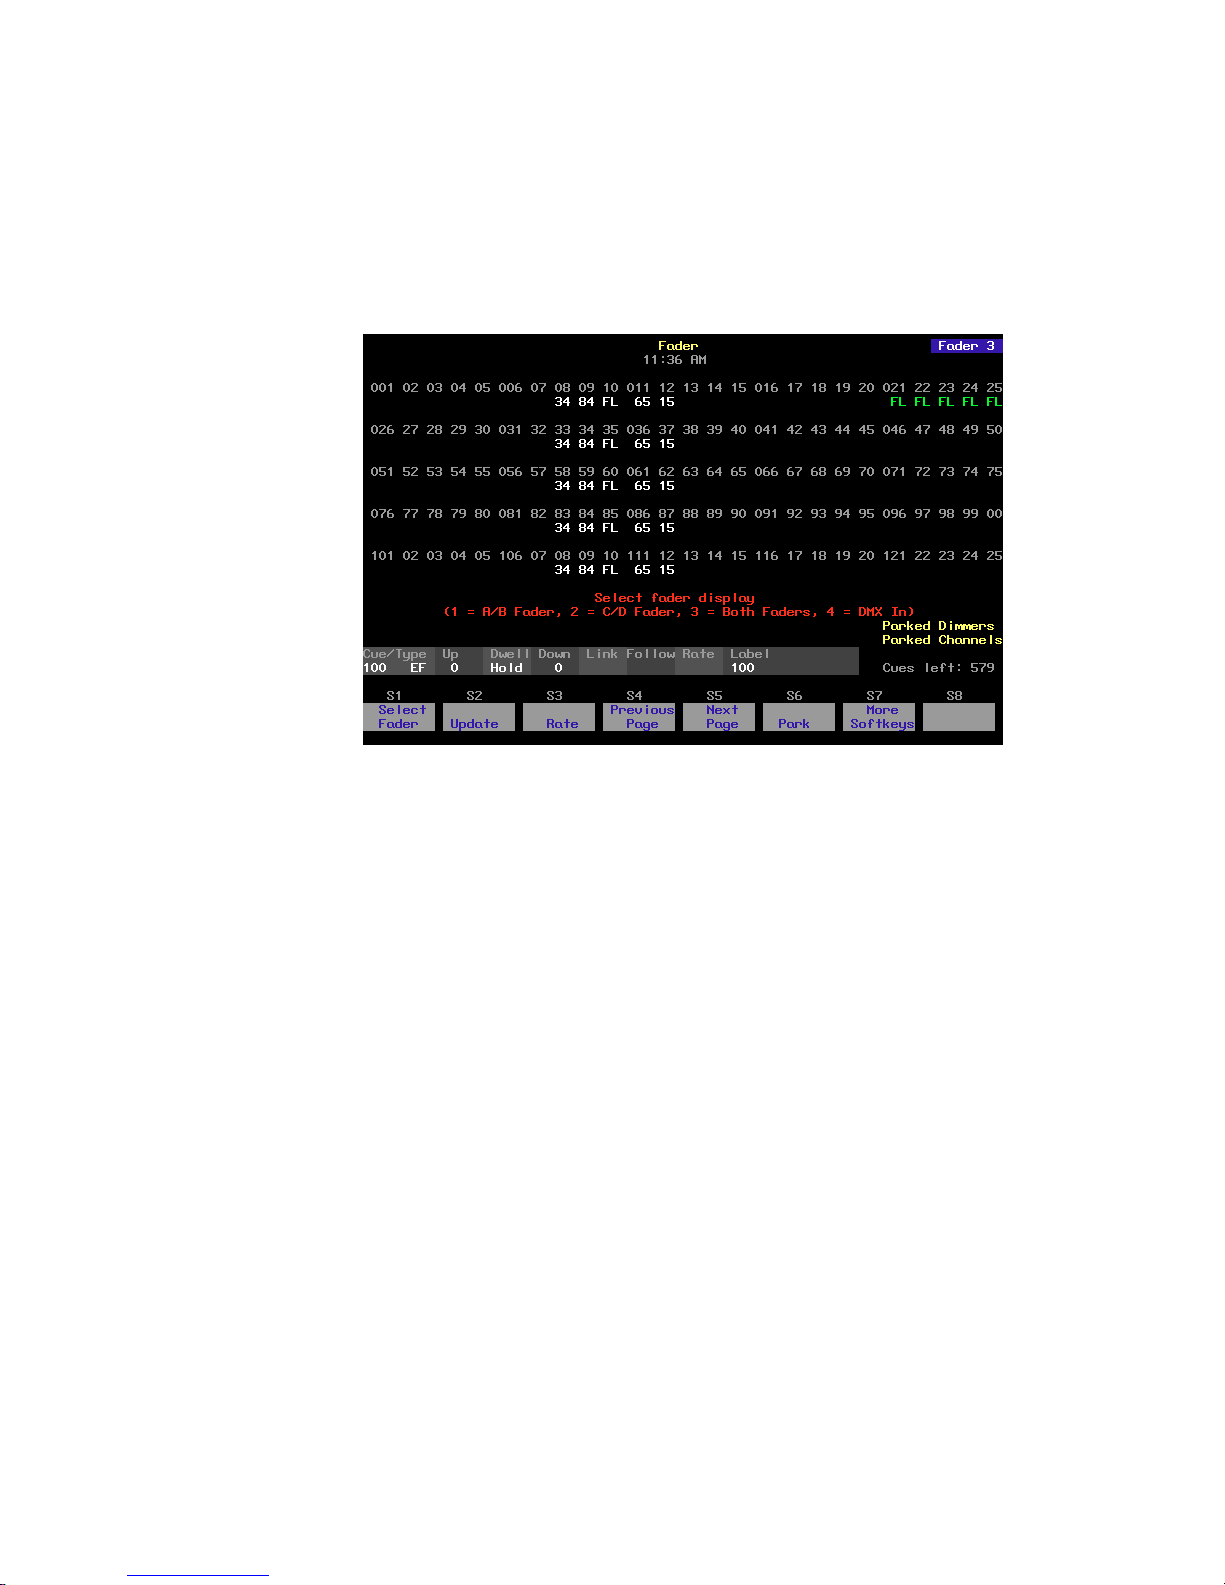
Fader
The Fader display shows you only the levels on stage that have been set
by one or both fader pairs or DMX In. Fader displays do not reflect the
influence of the Grandmaster or inhibitive submasters. The Fader display
shows all levels as they would appear if the Grandmaster and any inhibitive submasters were at Full.
Channel
level
display
Prompt
area
Attribute bar
Softkeys
Display mode
Keypad corner
Display mode
Current display mode and time.
Keypad prompt corner
This window indicates how the console will interpret the next number
entered from the keypad. For example, if you press [Channel], the corner
displays Chan, indicating that the console will read the next number as a
channel number. If you enter a range, only the last number in the range
will appear.
Channel level display
Current level of all channels set by either or both faders.
Prompt area
Information and prompts appear here.
Attribute bar
Shows current settings for selected cue, group or submaster.
Softkeys
Fader functions for [S1] through [S8].
chapter 2 monitor displays 9
Page 22

Flexichannel
If your system has the Flexichannel feature enabled, only channels used
somewhere in the show appear on the display screens. These channels
may be in cues, Link List, submasters or groups, or may be channels you
have selected recently. By only displaying channels used in the show, you
can reduce the amount of time you spend moving from page to page to
find channels. All other screen elements are unchanged.
Working with Flexichannel active differs from working without Flexichannel in only one respect, selecting channels. See
Flexichannel mode
Note: In Tracksheet and Patch modes, channels are highlighted if they
appear in the Flexichannel list, or are grayed out if they do not.
See
Enable/disable Flexichannel
Flexichannel.
on page 49 for more information.
Updating Flexichannel
When channels that were used in a show are removed from the show,
they remain on the channel list until it is updated. The Purge Flexi softkey
on the System Settings display updates the list of used channels. The list
is also updated when you load a show from diskette, or when you first
turn Flexichannel on. Press [Setup] [1] [Enter] [S1], Purge Flexi, to update
Flexichannel
displays.
Selecting channels in
on page 22 for information on enabling
10 Insight 2x user manual
Page 23
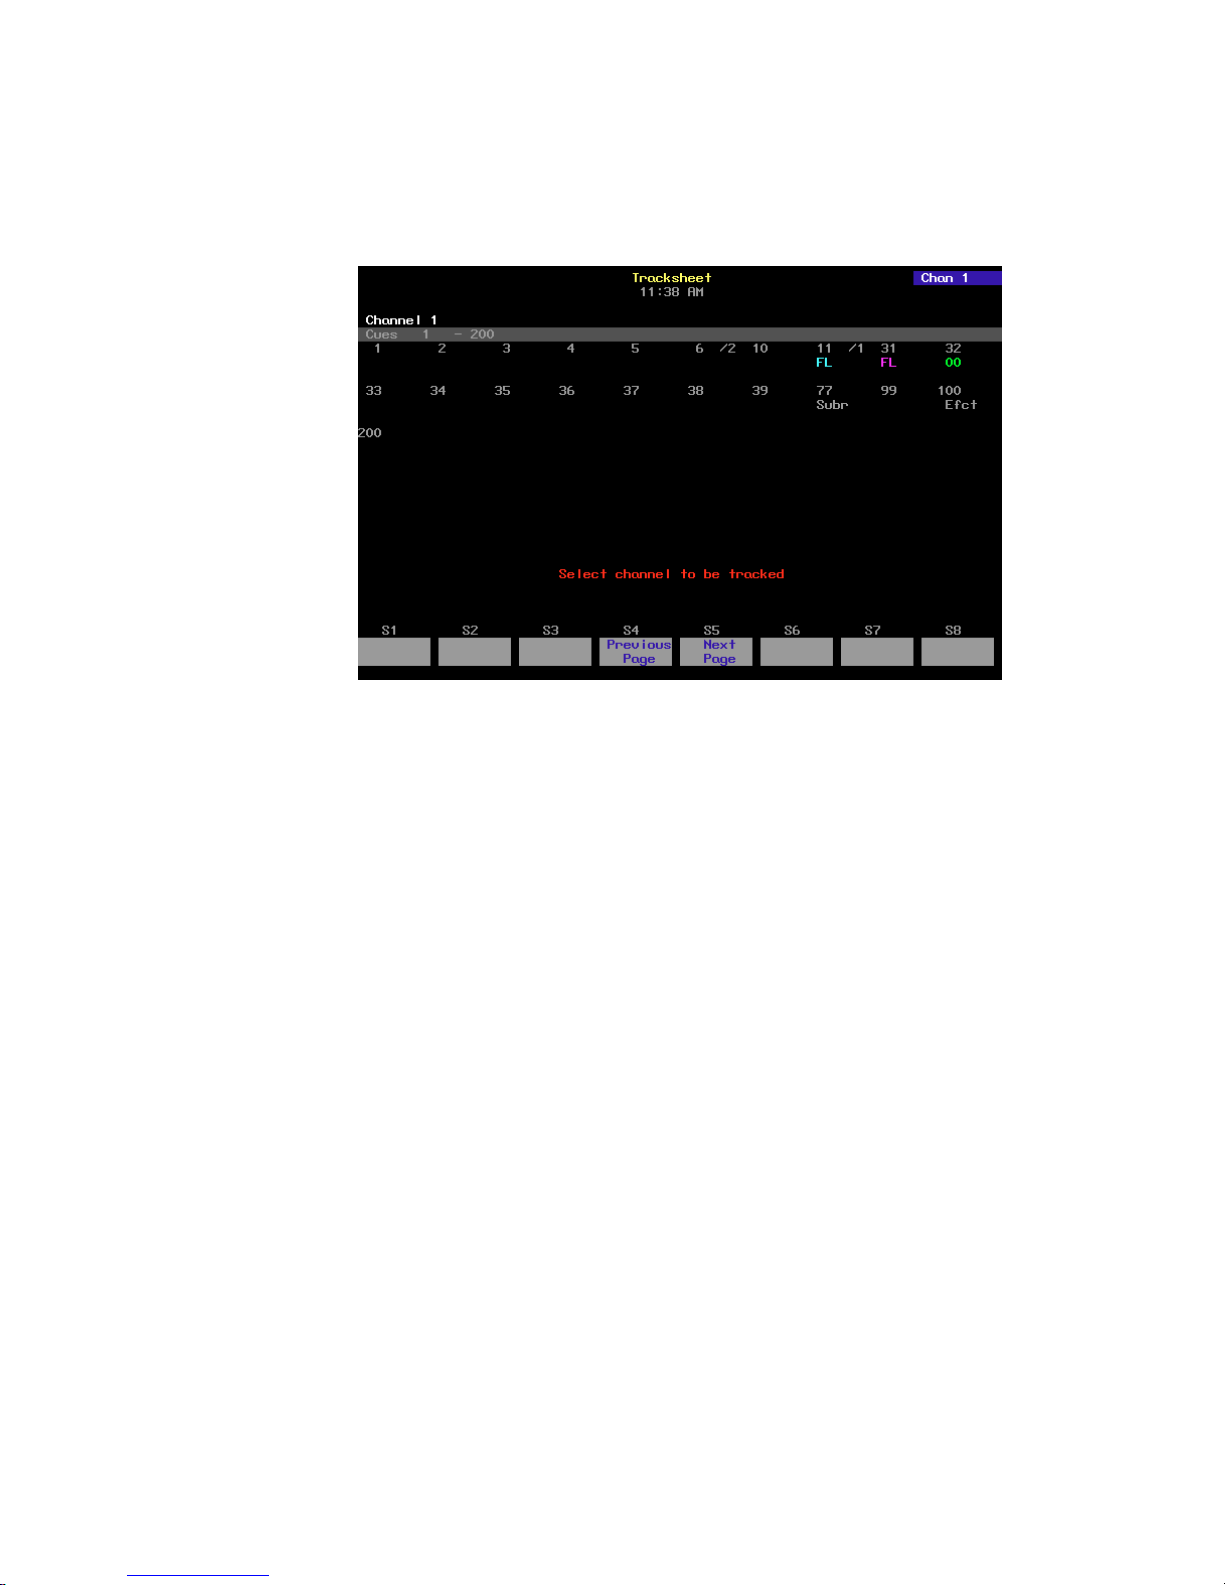
Tracksheet
The Tracksheet display shows you how your channel levels are tracking
through your cues.
Channel
display line
Cue display
Prompt
area
Softkeys
Display mode
Keypad corner
Display mode
Current display mode and time.
Keypad corner
This window indicates how the console will interpret the next number
entered from the keypad. For example, if you press [Channel], the corner
displays Chan, indicating th at the console will read the next number as a
channel number.
Channel display line
This line displays the current channel number being tracked. In Flexichannel mode, used channels are marked with an asterisk (*).
Cue display
The cue display lists the cues the channel tracks through and the level
recorded in each.
Prompt area
The operator prompt displays messages to guide you through Tracksheet
functions.
Softkeys
Tracksheet functions for [S1] through [S8].
chapter 2 monitor displays 11
Page 24
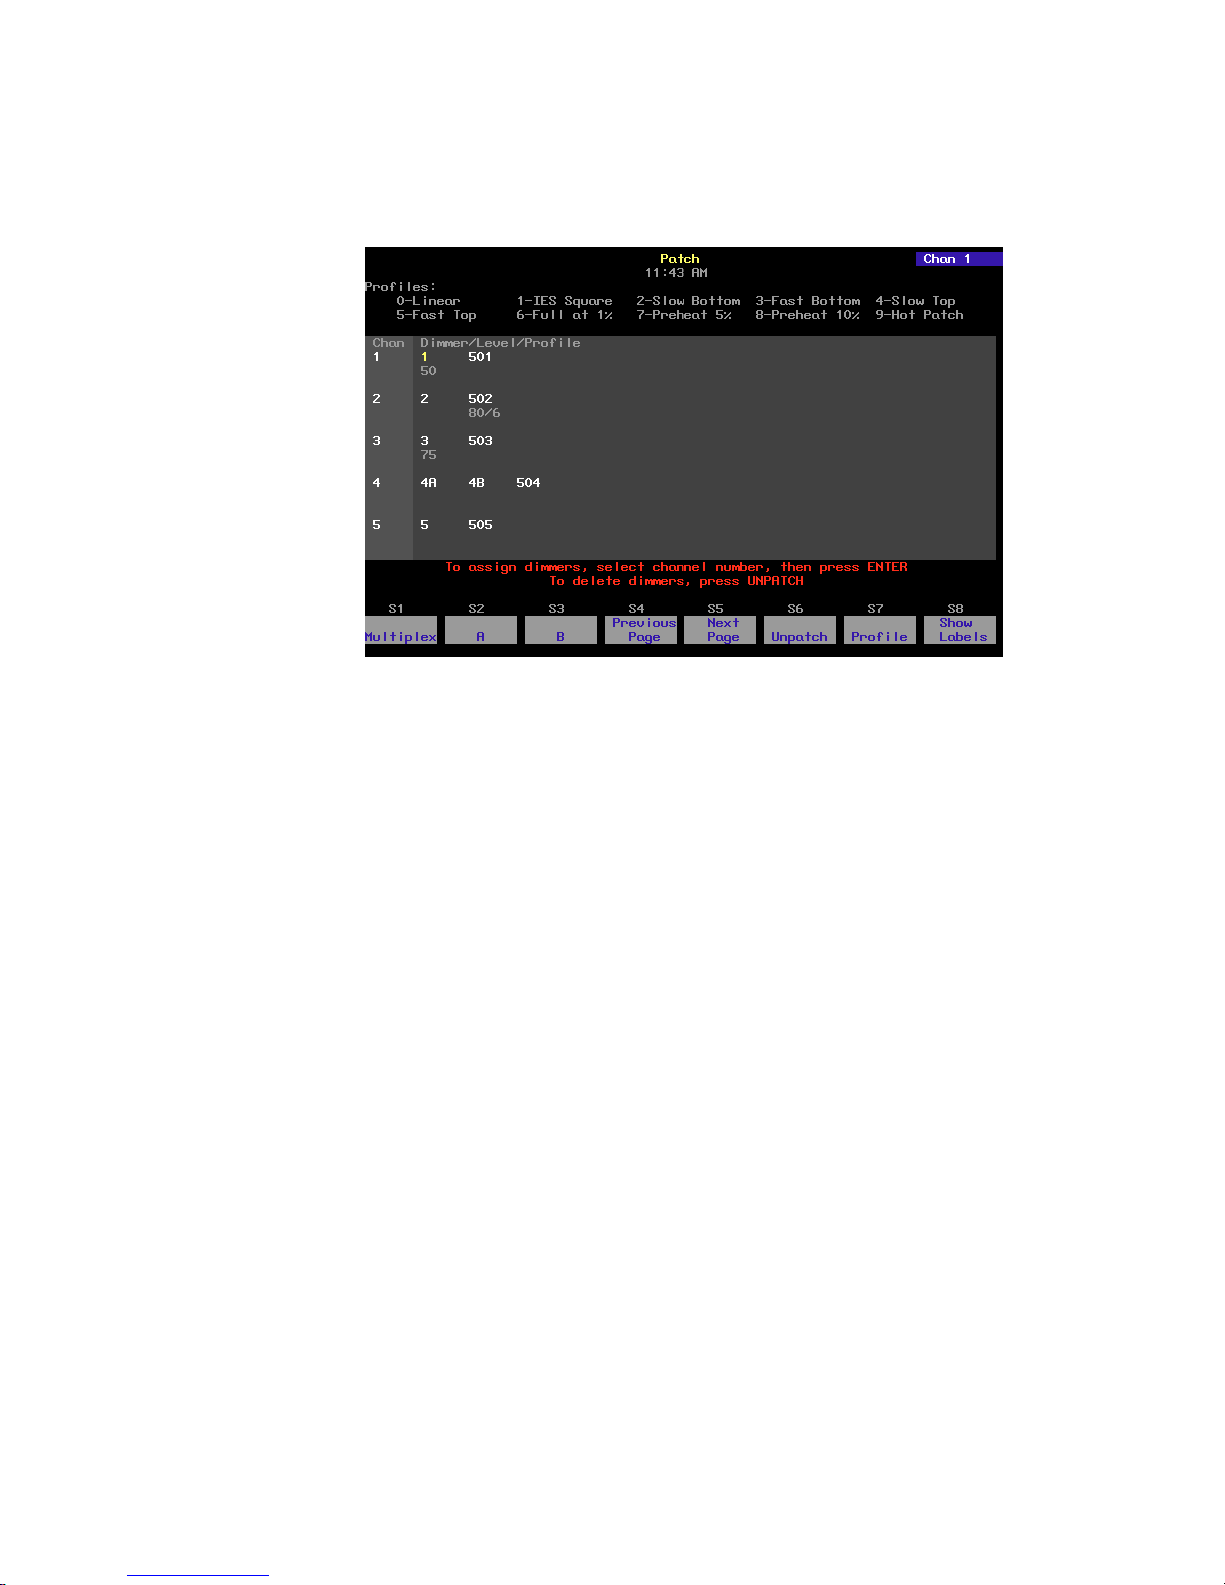
Patch
The Patch display allows you to create and modify your patch.
Profile
menu
Patch window
Prompt
area
Softkeys
Display mode
Keypad corner
Display mode
Current display mode and time.
This window indicates how the console will interpret the next number
entered from the keypad. For example, if you press [Channel], the corner
displays Chan, indicating that the console will read the next number as a
channel number. If you enter a range, only the last number in the range
will appear.
Keypad corner
Profile menu
Displays the profiles available to assign to dimmers.
Patch window
Lists channels, dimmers patched to channels, and levels and/or profiles
assigned to the dimmers. In Flexichannel mode, channels that are used
are marked with an asterisk (*).
Prompt area
The operator prompt displays messages to guide you through Patch functions.
Softkeys
Patch functions for [S1] through [S8].
12 Insight 2x user manual
Page 25
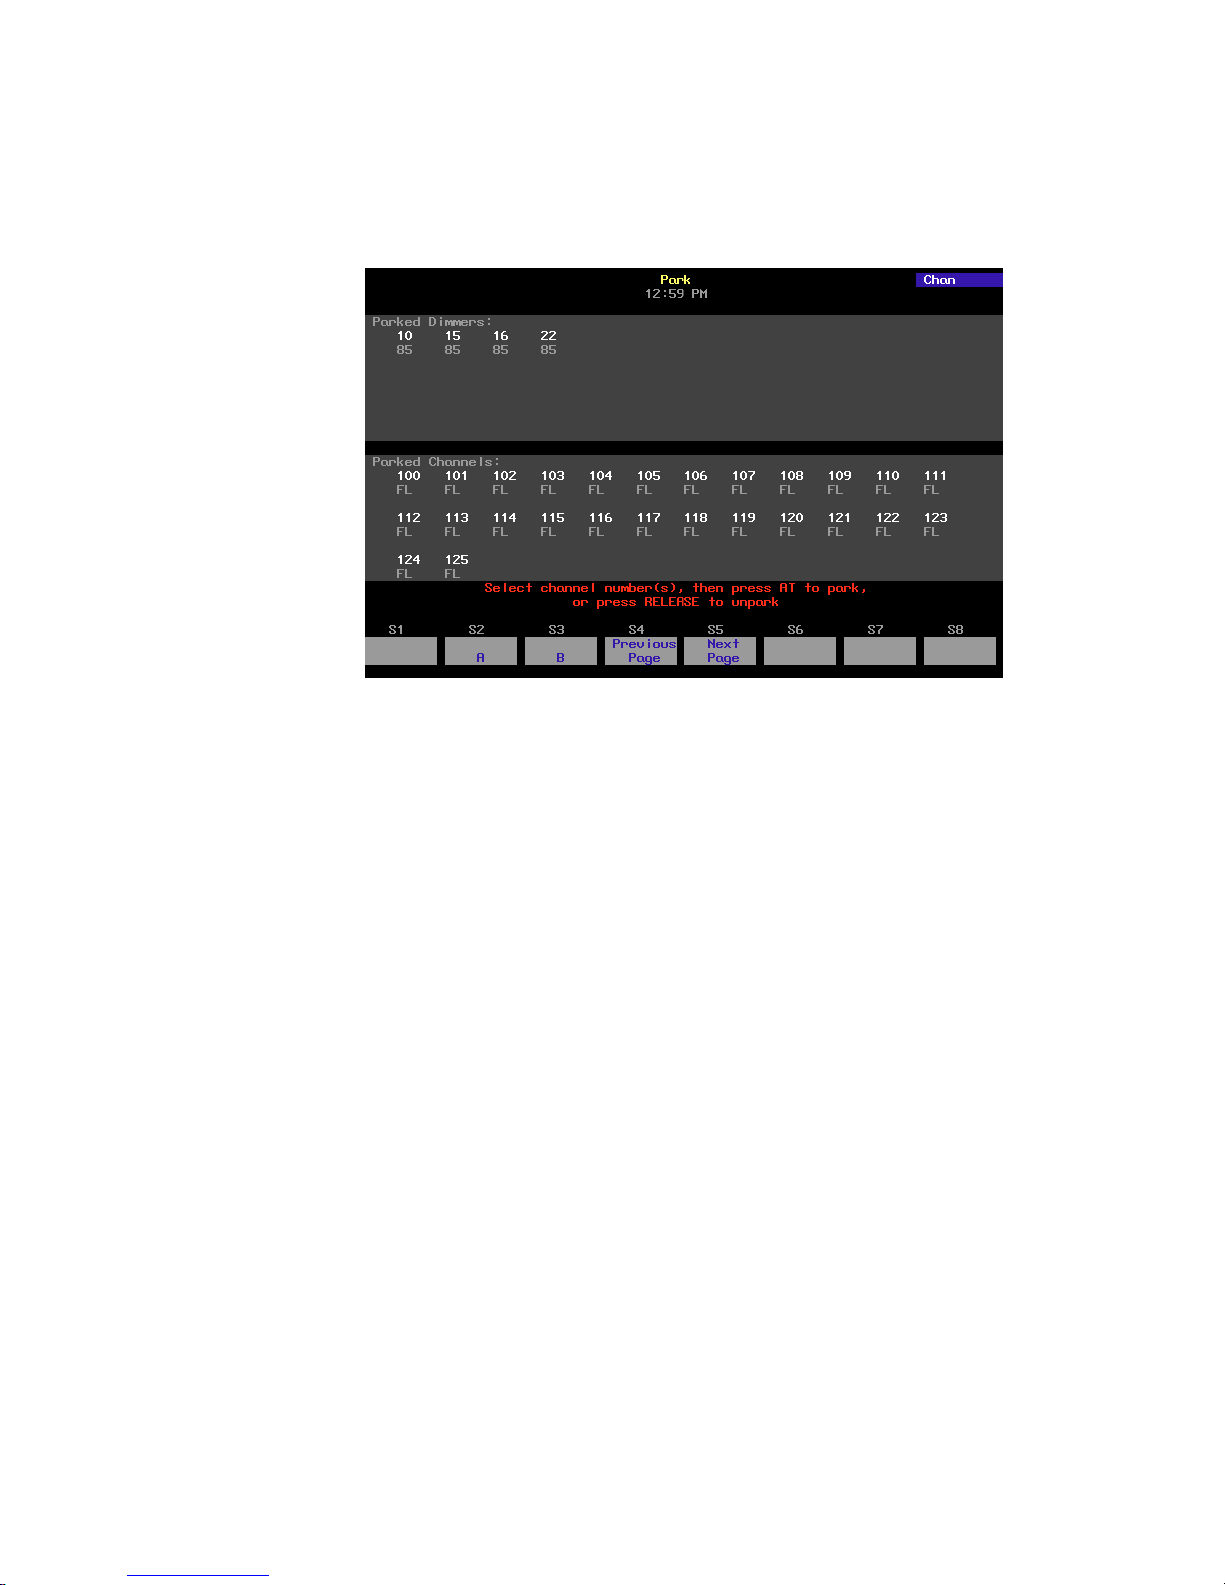
Park
The Park display lists parked dimmers on the top half of the screen, and
parked channels on the lower half, along with their parked levels.
Parked
Dimmer
window
Parked
Channel
window
Prompt
area
Softkeys
Display mode
Keypad corner
Display mode
Current display mode and time.
Keypad corner
This window indicates how the console will interpret the next number
entered from the keypad. For example, if you press [Channel], the corner
displays Chan, indicating that the console will read the next number as a
channel number. If you enter a range, only the last number in the range
will appear.
Parked Dimmer window
Lists up to 36 parked dimmers and their levels.
Parked Channel window
Lists up to 36 parked channels and their levels.
Operator prompt line
The operator prompt displays messages to guide you through Park
functions.
Softkeys
Park functions for [S1] through [S8].
chapter 2 monitor displays 13
Page 26
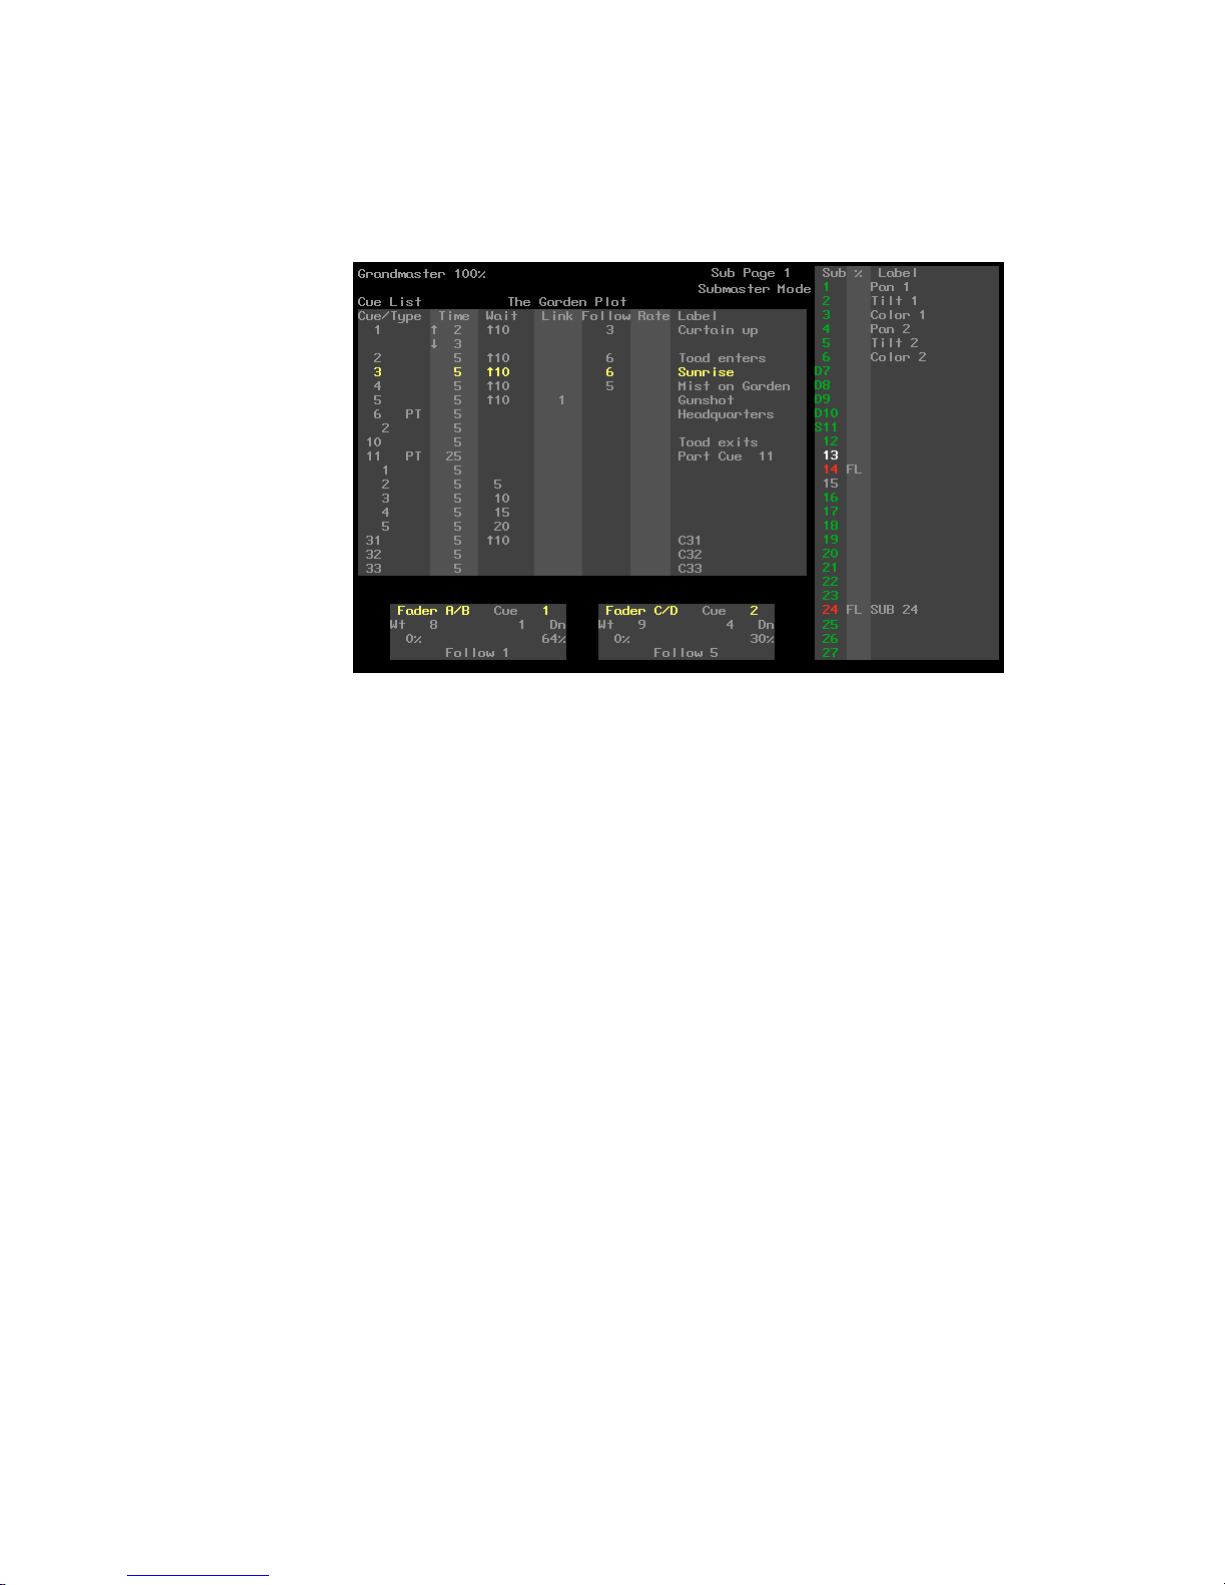
Playback
The Playback display shows you a Cue List, a Submaster List and the current status of the faders.
Cue List
Fader
status
Grandmaster
Show name
Grandmaster
Current Grandmaster setting and Blackout alert.
Show name
Name of the show currently loaded in the console.
Submaster List
Playback Submaster List
Submaster page, mode and Submaster List. List includes submasters,
labels, and current submaster slider settings. The color of submaster
numbers identifies the type of submaster. Grey is unprogrammed, green
is pile-on, red is inhibitive and white is effect. If a submaster’s rate is controlled by the rate wheel, its number turns blue. A blue R appears at the
top of the list, next to the submaster’s current rate.
Playback Cue List
Lists all cues along with their attributes. The pending cue is highlighted
in yellow. This can be changed from Stage mode, but not from Blind.
Fader status
Indicates current status of both fader pairs. Shows cue running in fader,
fade times, percentage of completion, and follow times.
14 Insight 2x user manual
Page 27
chapter 3
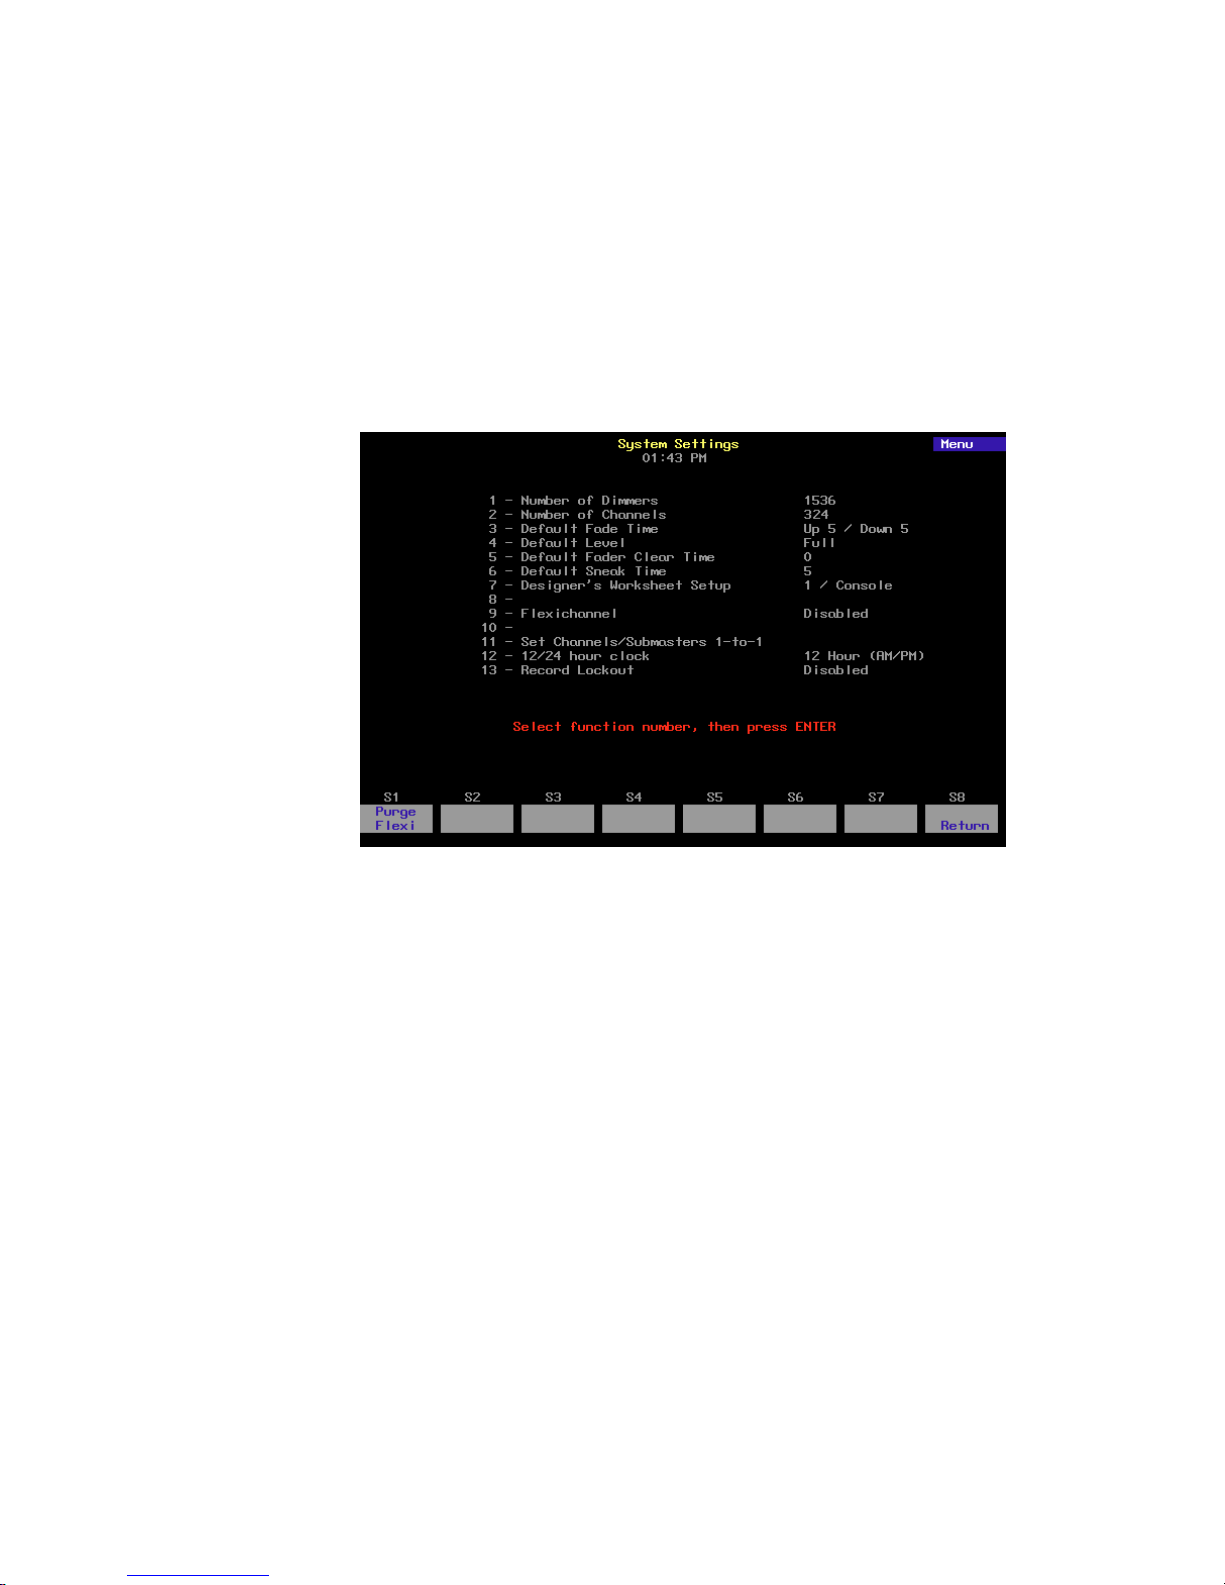
system settings
System settings allow you to customize Insight 2x for the number of dimmers and channels in your system, set system modes and screen formats, and choose default settings for a variety of console functions. The
following illustration shows default settings.
This chapter includes the following sections:
• Setting number of dimmers
• Setting number of channels
• Setting default fade times
• Setting default Level
• Setting default fader clear times
• Setting default Sneak time
• Selecting Designer’s Worksheet option
• Blackout key
• Selecting Flexichannel mode
• Master Type
• Set Channels/Submasters 1-to-1
• Selecting time format
• Record Lockout
• Bump keys
• Setting clock
• Naming show
Page 28

Setting number of dimmers
One of the first steps in configuring Insight 2x is to enter the number
of dimmers in your system. Insight 2x defaults to 1,536 dimmers, the
maximum number of dimmers the console can address.
Follow these steps to select up to 1,536 dimmers:
Keystrokes:
1. Press [Setup].
2. Select [1], System Set-
tings, and press [Enter].
3. Select [1], Number of
Dimmers, and press
[Enter].
4. Press [8][0][0] to enter the
desired number of dimmers.
5. Press [Enter].
Note: If you increase the number of dimmers, the additional dimmers are
initially patched to channel zero. From there, you can assign them to the
channel of your choice.
Action:
Selects Setup display
Selects System Settings menu
Prompt reads:
Select number of dimmers,
then press ENTER
Corner reads:
Dim 800
Number of dimmers is set to
800
Setting number of channels
Insight 2x allows you to control your dimmers with control channels.
Insight 2x defaults to 324 channels, the maximum number of channels the
console can address.
Follow these steps to select the number of channels:
Keystrokes:
1. Press [Setup].
2. Select [1], System Set-
tings, and press [Enter].
3. Select [2], Number of
Channels, and press
[Enter].
4. Press [4][5] to enter the
desired number of channels.
5. Press [Enter].
16 Insight 2x user manual
Action:
Selects Setup display
Selects System Settings menu
Prompt reads:
Select number of channels,
then press ENTER
Corner reads:
Chan 45
Number of channels is set to 45
Page 29

Setting default fade times
Insight 2x allows you to assign default upfade and downfade times to
cues or to control fade times manually. Default fade times are five seconds.
Fade times may be expressed in minutes and seconds, or as fractions of
seconds (in decimal format). Fade times can be programmed from .1
second to 99:59 minutes. Acceptable time values include: .2 (.2 seconds),
00:12 (12 seconds), 5.5 (5.5 seconds), or 5:30 (five minutes, 30 seconds).
Follow these steps to assign your desired fade times:
Keystrokes:
1. Press [Setup].
2. Select [1], System Settings,
and press [Enter].
3. Select [3], Default Fade
Time, and press [Enter].
4. Press [6] to enter a six second
upfade time.
5. Press [Enter].
6. Press [3] to enter a three
second downfade time.
7. Press [Enter].
Action:
Selects Setup display
Selects System Settings menu
Prompt reads:
Enter default up fadetime
Corner reads:
UpTime 6
Prompt reads:
Enter default down fadetime
Corner reads:
DnTime 3
Fade times are reset
Note: If the upfade and downfade times are the same, both will change
when you change the upfade time.
chapter 3 system settings 17
Page 30

Setting default Level
Insight 2x allows you to assign a value to the [Level] key. The default value
is 100 percent. You may assign [Level] any value between zero and 100.
Follow these steps to assign a value to [Level]:
Keystrokes:
1. Press [Setup].
2. Select [1], System Set-
tings, and press [Enter].
3. Select [4], Default Level,
and press [Enter].
4. Use the keypad to enter
the two-digit value (00-99)
you wish to assign to
[Level], or press [Full].
Note: To enter a level between one and nine percent, you must press zero
then the number. For example, to set the default level to five percent,
press [0][5] in step 4.
Action:
Selects Setup display
Selects System Settings menu
Prompt reads:
Enter default level
(Press FULL button for 100%)
New default for [Level] is set
Setting default fader clear time
Pressing the [Clear] key above one of the fader pairs clears the cue from
the fader, fading all channels in that fader to zero. The default fader clear
time determines the fade time for both [Clear] keys. Channels black out
immediately when clear time is zero.
Fade times may be expressed in minutes and seconds, or as fractions of
seconds (in decimal format). Fade times can be programmed from .1
second to 99:59 minutes. Acceptable time values include: .2 (.2 seconds),
00:12 (12 seconds), 5.5 (5.5 seconds), or 5:30 (five minutes, 30 seconds).
Follow these steps to set a new default fade time:
Keystrokes:
1. Press [Setup].
2. Select [1], System Set-
tings, and press [Enter].
3. Select [5], Default Fader
Clear Time, and press
[Enter].
4. Press [9] to enter the time
value you wish to assign.
5. Press [Enter].
Action:
Selects Setup display
Selects System Settings menu
Prompt reads:
Enter default fader clear time
Corner reads:
Time 9
New default time is set to nine
seconds
18 Insight 2x user manual
Page 31

Setting default Sneak time
Sneak allows you to fade or restore channel levels on stage in a
specified time.
The console allows you to assign a default Sneak time. For more information about the Sneak function, see page 51. Default time is five seconds
for a Sneak.
Follow these steps to set a new Sneak time:
Keystrokes:
1. Press [Setup].
2. Select [1], System Set-
tings, and press [Enter].
3. Select [6], Default Sneak
Time, and press [Enter].
4. Enter the time you wish to
assign as the Sneak time
and press [Enter].
Action:
Selects Setup display
Selects System Settings menu
Prompt reads:
Enter default sneak time
Sets the new default Sneak time
chapter 3 system settings 19
Page 32

Setting Designer’s Worksheet options
The Designer’s Worksheet options display allows you to choose the
template you wish to use and enable the sliders on either the console or the digitizer.
Note: The Grandmaster, fader and submaster sliders may only be
enabled on the console or the digitizer, not both.
For more information about the Designer’s Worksheet, see page 207.
Follow these steps to set Designer’s Worksheet options:
Keystrokes: Action:
1. Press [Setup]. Selects Setup display
2. Select [1], System Set-
tings, and press [Enter].
3. Select [7], Designer’s
Worksheet Setup, and
press [Enter].
Selects System Settings menu
Prompt reads:
Select Designer’s Worksheet setup,
then press ENTER
The following display appears:
4. Press [2] to select a 12x12
template without submasters.
5. Press [S1], Sheet Sliders,
to disable the slider controls on the console, or
[S1], Console Sliders, to
disable the slider controls
on the digitizer (if any).
6. Press [Enter]. Designer’s Worksheet option is set
20 Insight 2x user manual
Corner reads: Menu 2
Display indicates which option is
selected; softkey indicates which
option is not
selected
Page 33

Enable/disable Blackout key
Insight 2x’s [Blackout] key may be enabled or disabled. Insight 2x defaults
to enabled.
Follow these steps to enable or disable [Blackout]:
Keystrokes: Action:
1. Press [Setup]. Selects Setup display
2. Select [1], System Set-
tings, and press [Enter].
3. Select [8], Blackout Key,
and press [Enter].
4. Press [1] or [0]. Corner reads:
5. Press [Enter]. [Blackout] is enabled or disabled
Selects System Settings menu
Prompt reads:
Enable/disable blackout key
(1 = Enable, 0 = Disable)
Black 1
Or...
Black 0
chapter 3 system settings 21
Page 34

Enable/disable Flexichannel
Insight 2x’s Command display can be set to operate in full display mode
or in Flexichannel mode. In full display mode, channel displays show all
channels and their current status. In Flexichannel mode, only channels
with a recorded level or that are on the Link List appear. Insight 2x defaults
to full channel display.
Follow these steps to enable or disable Flexichannel:
Keystrokes: Action:
1. Press [Setup]. Selects Setup display
2. Select [1], System Set-
tings, and press [Enter].
3. Select [9], Flexichannel,
and press [Enter].
4. Press [1] or [0]. Corner reads:
5. Press [Enter]. Flexichannel mode is enabled or dis-
Updating Flexichannel
When channels that were used in a show are removed from the show,
they remain on the channel list until it is updated. The Purge Flexi softkey
on the System Settings display updates the list of used channels. The list
is also updated when you load a show from diskette, or when you first
turn Flexichannel on. Press [Setup] [1] [Enter] [S1], Purge Flexi, to update
Flexichannel displays.
Selects System Settings menu
Prompt reads:
Enable/disable flexichannel
(1 = Enable, 0 = Disable)
Flexi 1
Or...
Flexi 0
abled
22 Insight 2x user manual
Page 35

Set Master type
You may set the Master slider (labeled Grandmaster on older Expression
2 line consoles) to one of three control options.
• Disabled
Master slider does nothing.
• Grandmaster
Master slider controls all levels on stage except parked channels and
independent channels.
• Sub Grandmaster
Master slider controls all levels on stage set by submasters.
To configure your Master slider, follow these steps:
Keystrokes: Action:
1. Press [Setup].
2. Press [1], System Settings,
[Enter].
3. Press [1][0], Master Type,
[Enter].
4. Press [1] [Enter].
Displays Setup menu
Displays System Settings menu
Prompt reads:
Select master type and press
ENTER (0 = Disabled,
1 = Grandmaster,
2 = Sub Grandmaster)
Master is set as Grandmaster
Set Channels/Submasters 1-to-1
Set Channels/Submasters 1-to-1 sets your console’s channels to a one-toone match with your submasters. Thus, channel 1 is patched to submaster 1, channel 2 to submaster 2, and so on. Channel levels are set to Full
and up/dwell/down times are set to 1/Manual/1.
To reset your channels and submasters, follow these steps:
Keystrokes: Action:
1. Press [Setup].
2. Press [1], System Settings,
[Enter].
3. Press [1][1], Set Channels/
Submasters 1-to-1, [Enter].
4. Press [Enter].
Displays Setup menu
Displays System Settings menu
Prompt reads:
Select page to default, then press
ENTER (1 = Page 1, 2 = Page 2,
0 = All pages)
Channels are assigned to submasters.
The display returns to Setup menu
chapter 3 system settings 23
Page 36

Setting time format
Insight 2x consoles allow you to display time in either 12 or 24 hour format.
Follow these steps to choose your preference:
Keystrokes:
1. Press [Setup]. Selects Setup display
2. Select [1], System Set-
tings, and press [Enter].
3. Select [1][2], 12/24 hour
clock, and press [Enter].
4. Enter [0] or [1] and press
[Enter].
Record Lockout
You may set the console to disable the Record function. This protects a
finished show from inadvertent changes.
To disable the Record function in your system, follow these steps:
Keystrokes:
1. Press [Setup].
2. Select [1], System Set-
tings, and press [Enter].
3. Select [1][3], Record Lock-
out.
4. Press [1] [Enter] to lock out
the record function.
Action:
Selects System Settings menu
Prompt reads:
Enter 12 or 24 hour clock
(0 = 12 hour, 1 = 24 hour)
Sets the clock mode
Action:
Selects Setup display
Selects System Settings menu. Menu
indicates current status of Record
Lockout
Prompt reads:
Enable/Disable record lockout
(1 = Enable, 0 = Disable)
Record is locked out. If you attempt to
record anything, the prompt reads:
Record is locked out
(Press CLEAR to continue)
Note: As always, the best way to safeguard your show is to make backups. See Chapter 17, Diskette functions, for instructions on backing up a
show to diskette.
24 Insight 2x user manual
Page 37

Enable/disable Bump keys
Insight 2x’s submaster bump buttons may be enabled or disabled. Insight
2x defaults to enabled.
Follow these steps to enable or disable all submaster bump buttons:
Keystrokes:
1. Press [Setup].
2. Select [1], System Set-
tings, and press [Enter].
3. Select [1][4], Bump keys,
and press [Enter].
4. Press [1] or [0].
5. Press [Enter].
Action:
Selects Setup display
Selects System Settings menu
Prompt reads:
Enable/disable bump keys
(1 = Enable, 0 = Disable)
Corner reads:
BpStat 1
Or...
BpStat 0
Submaster bump buttons are enabled
or disabled
chapter 3 system settings 25
Page 38

Setting clock
To set the current time and date in your system, follow these steps:
Keystrokes:
1. Press [Setup].
2. Press [S2], Set Clock.
3. Enter the current time in
hours and minutes. Time
entry format corresponds
to your clock mode setting
in System Settings. (In 24hour format, 930 = 9:30
AM, 1625 = 4:25 PM) (In
12-hour format, use [+] to
select AM or PM.
4. Press [Enter].
5. Enter the day of the month
(1-31) and press [Enter].
6. Enter the month (1-12) and
press [Enter]
7. Enter the year (00-99) and
press [Enter]
8. Enter the day of the week
(1-7) and press [Enter]
9. Press [Record] to reset
Real Time Clock with the
new settings.
Action:
Selects Setup display
The following screen appears:
New time appears on screen
Time is set; Date is highlighted
New date is set; Month is highlighted
New month is set; Year is highlighted
New year is set; Day is highlighted
New day is set; Time is highlighted
Returns to Setup display
Note: You may use [+] and [–] to scroll through the options in any of the
fields on this screen.
26 Insight 2x user manual
Page 39

Naming show
You can use an alphanumeric keyboard to name the show currently
loaded in the console. The names you give shows can consist of letters,
numbers or the symbols: #, %, &, *, (, ), +, ‘, –, [, ], / as well as the comma
and period. You may enter the name using overwrite or insert mode. In
overwrite, you type over any previously entered characters; in insert
mode, each new character pushes the previously entered characters one
space to the right. Press [Insert] on the keyboard to switch between insert
and overwrite mode. See page 296 for information about installing an
alphanumeric keyboard.
To name the show in your system, follow these steps:
Keystrokes:
1. Press [Setup].
2. Press [S1], Show Name.
3. Enter the name you want
to give the show on the
alphanumeric keyboard.
The show name can have
up to 20 characters.
4. Press [Enter] on the alpha-
numeric keyboard to
record the name, or press
[Esc] to quit and return to
Setup display.
Action:
Selects Setup display
Prompt reads:
Type show label
(F6 = clear to end)
New name appears in corner of screen
Show is named
chapter 3 system settings 27
Page 40

28 Insight 2x user manual
Page 41

chapter 4
patch
Before you begin creating cues for a show you should first create your
patch. The patch assigns individual dimmers to control channel numbers.
The Insight 2x Patch display allows you to assign up to 1,536 DMX512
dimmers to up to the maximum number of control channels your console
can address.
You can use Insight 2x's default one-to-one patch, or you may create a
custom patch. In addition, Insight 2x's proportional patching capability
allows you to set dimmer output levels and assign one of ten output profiles to dimmers.
If you are patching dimmers in a Strand CD80 dimmer rack, see page 41
for special instructions.
Before patching, be certain that the system settings reflect the total
number of available dimmers and channels. See
system settings,
mers and channels.
on page 16 for information on setting the number of dim-
Chapter 3, Entering
This chapter includes the following sections:
• Selecting one-to-one patch
• Creating custom patch
• Proportional patching
• Labeling dimmers
• Assigning a profile to a dimmer
• Capturing channels in Patch
• Dimmer check
• About Dimmer
• Multiplexed dimmers
• Patching to a Strand CD80 dimmer rack
Page 42

Selecting one-to-one patch
The one-to-one patch assigns dimmer 1 to channel 1, dimmer 2 to channel
2 and so on. If there are more dimmers than channels, the one-to-one
patch assigns the first extra dimmer to channel 1, the second extra
dimmer to channel 2, and so on.
Follow these steps to select Insight 2x's default one-to-one patch:
Keystrokes:
1. Press [Setup] to display
the Setup menu.
2. Press [4], Clear Functions
[Enter].
3. Press [9], Reset Patch
1 to 1 [Enter].
4. Press [Enter] to confirm
your selection of one-toone default patch, or
press [Clear] to cancel the
operation.
Creating custom patch
Insight 2x's custom patching capability allows you to create virtually any
dimmer to channel configuration you like. (Groups of dimmers may be
assigned to single channels, but only one channel may be patched to a
dimmer.)
Hint: If you use the same patch for several shows, create the patch, and
record it on a disk before you record any cues. Label the disk Standard
patch. When you start your next show, read the Standard patch show into
the console, then begin writing cues to avoid reentering the patch.
Action:
Selects Setup display
Prompt reads:
Select function number, then press
ENTER
Prompt reads:
To reset patch, press ENTER
To cancel, press CLEAR
Sets patch to default one-to-one patch
30 Insight 2x user manual
Page 43

Patching dimmers to channels
Follow these steps to patch a dimmer(s) to a control channel:
Keystrokes:
1. Press [Patch].
2. Press [Dim]. (If the LED in
the [Dim] key is lit, you
may omit this step.)
3. Use the keypad to enter
the numbers of the dimmers you want to patch.
Use [And] and [Thru] if you
want to select more than
one dimmer.
4. Press [Enter].
5. Enter the channel number
to which you want to patch
the selected dimmers and
press [Enter].
6. Repeat steps 2 through 4
to patch additional dimmers.
Action:
Selects Patch display
Prompt reads:
Select dimmer numbers, then press
ENTER to assign to a channel, or
press AT to assign a level, or press
PROFILE to assign a profile
Prompt reads:
To assign dimmers, select channel
number, then press ENTER
To delete dimmers, press
UNPATCH
Dimmer(s) are patched to the channel
chapter 4 patch 31
Page 44

Proportional patching
Insight 2x allows you to proportionally inhibit the output of individual
dimmer levels from the Patch display. Dimmers output at 100 percent
unless you patch them at a lower level.
Dimmer intensity levels set in Patch function at full level on all other
screens. For example, if you enter a level of 60 for a dimmer on the patch
screen, when you set that channel to full in a cue or submaster, the
dimmer will output at 60 percent.
Follow these steps to assign a proportional dimmer output level:
Keystrokes:
1. Press [Patch].
2. If the [Dim] LED is unlit,
press [Dim] to indicate that
the next number entered
will be a dimmer.
3. Use the keypad to enter
the desired dimmer number(s). Use [And] and
[Thru] if you want to select
more than one dimmer.
4. Press [At]
5. Use the keypad to enter
the desired maximum
output level for the dimmer(s). Full is displayed
until a new level is entered.
Enter a zero before singledigit levels (i.e., 08).
Action:
Selects Patch display
Prompt reads:
Select dimmer numbers, then press
ENTER to assign to a channel, or
press AT to assign a level, or press
PROFILE to assign a profile
Prompt reads:
Select dimmer numbers, then press
ENTER to assign to a channel, or
press AT to assign a level, or press
PROFILE to assign a profile
Prompt reads:
Select dimmer level
Dimmer’s proportional level is set
Note: If the dimmer’s level is highlighted, white on red, you may use [+]
and [–] to adjust the level. Press [Enter] to record the edited level.
32 Insight 2x user manual
Page 45

Unpatching individual dimmers
Channel zero is not an actual control channel. It functions as a holding area
in which you may store dimmers not included in your patch. Before you
begin creating a custom patch, you may find it helpful to assign all dimmers to channel zero. Then, when you begin patching, you can select dimmers from channel zero and patch them to channels as you like.
Dimmers assigned to channel zero are listed at the end of channel list
under “- -.” These dimmers are not assigned to any channel, but remain
on the patch screen.
Follow these steps to assign dimmers to channel zero in By Dimmer
mode:
Keystrokes:
1. Press [Patch].
2. If the [Dim] LED is unlit,
press [Dim] to indicate that
the next number entered
will be a dimmer.
3. Use the keypad to enter
the desired dimmer number(s) Use [And] and [Thru]
if you want to select more
than one dimmer.
4. Press [S6], Unpatch.
Action:
Selects Patch display
Prompt reads:
Select dimmer numbers, then press
ENTER to assign to a channel, or
press AT to assign a level, or press
PROFILE to assign a profile
Prompt reads:
Select dimmer numbers, then press
ENTER to assign to a channel, or
press AT to assign a level, or press
PROFILE to assign a profile
Selected dimmers are unpatched and
assigned to channel zero (- -)
chapter 4 patch 33
Page 46

Labeling dimmers
Insight 2x allows you to assign alphanumeric labels to your dimmers.
Dimmer labels may be up to five characters long and may consist of any
combination of characters, including letters, numbers and symbols.
In the Patch display, Insight 2x allows you to view labels you have
assigned to dimmers. Press [S8], Show/Hide Labels, to reveal or hide
the labels. Hiding labels provides space to show additional dimmers.
This example demonstrates how to assign a label to a dimmer:
Keystrokes:
1. Press [Patch].
2. Press [5] [Label].
3. Use the alphanumeric key-
board to type “House.”
4. Press [Enter] on the Insight
2x keypad.
Action:
Selects Patch display
Selects dimmer 5 to label
Prompt reads:
Type dimmer label
(F6 = clear to end,
F7 = last dimmer label,
F8 = next dimmer label)
Corner reads: Label House
Dimmer 5 is labeled “House”
Note: In step 4, if you wish to label another dimmer, press [F7] or [F8]
instead of [Enter]. Insight 2x records the current dimmer’s label, and
brings up the previous or next dimmer to be labeled.
34 Insight 2x user manual
Page 47

Assigning a profile to a dimmer
Dimmer profiles allow you to select one of ten output curves (profiles) and
assign it to a dimmer. These profiles allow you to compensate for nonlinear light outputs from certain types of fixtures or incorporate a preferred
response in a fade. The ten curves are listed below.
If you do not select a profile, all dimmers use profile zero; a linear fade.
Follow these instructions to assign a profile to a dimmer:
Keystrokes:
1. Press [Patch].
2. If the [Dim] LED is unlit,
press [Dim] to indicate that
the next number entered
will be a dimmer.
3. Use the keypad to enter
the desired dimmer number(s) Use [And] and [Thru]
if you want to select more
than one dimmer.
4. Press [S7], Profile, then
use the keypad to enter
the number of the desired
profile. Profile numbers are
listed on menu at the top
of the Patch screen
Note: To reset profile to a linear fade, assign profile zero to the dimmer.
Dimmer profiles
0 - Linear
1 - IES square
2 - Slow bottom
3 - Fast bottom
4 - Slow top
5 - Fast top
6 - Full at 1%*
7 - Preheat 5%
8 - Preheat 10%
9 - Hot patch
†¶
†¶
‡¶
Action:
Selects Patch display
Prompt reads:
Select dimmer numbers, then press
ENTER to assign to a channel, or
press AT to assign a level, or press
PROFILE to assign a profile
Prompt reads:
Select dimmer numbers, then press
ENTER to assign to a channel, or
press AT to assign a level, or press
PROFILE to assign a profile
Prompt reads:
Select dimmer profile number
.
* Dimmer intensity jumps from 0% to 100% at 1% output.
† Dimmer at 5% or 10% whenever console power is on. Dimmer inten-
sity increases when output exceeds 5% or 10%.
‡ Dimmer at full whenever console power is on.
¶ Affected by [Blackout] but not by Grandmaster.
chapter 4 patch 35
Page 48

Capturing channels in Patch
Insight 2x lets you select and capture channels without returning to Stage
mode. This allows you to bring channels up on stage to view the proportional settings of dimmers assigned to a channel while you set them
To select channels from the patch screen, follow these steps:
.
Keystrokes:
1. Press [Patch].
2. Press [Channel].
3. Use the keypad to enter
the desired channel num-
ber(s) Use [And] and [Thru]
if you want to select more
than one channel.
4. Press [Full] to set channel
level at 100 percent,
[Level] to set channel at
the default level, or press
[At] and enter a level set-
ting.
5. Press [Rel] to release
channel(s).
Action:
Selects Patch display
Prompt reads:
Select channel numbers
Prompt reads:
Select channel numbers
Selected channels are set at the
indicated level
36 Insight 2x user manual
Page 49

Dimmer check
A dimmer check allows you to raise your dimmers to a specified level on
stage, one at a time. Insight 2x allows you to select the starting dimmer
and set it at a level. Once you select the dimmer, use [+] to check each
consecutive dimmer.
Follow these steps to run a dimmer check:
Keystrokes: Actions:
1. Press [Dim].
2. Press [1] to start dimmer
check with dimmer 1.
3. Press [At].
4. Press [7][5] to set the dim-
mer’s level at 75 percent.
You may also press [Full]
or [Level] to set the
dimmer at 100 percent or
at the [Level] setting.
5. Press [Enter].
6. Press [+] to select dimmer
2. Repeat as necessary.
Press [Clear] to end
dimmer check.
Prompt reads:
Enter dimmer number(s), then
press AT to select level
Keypad corner reads:
Dim 1
Prompt reads:
Select dimmer level
(Press FULL button for 100%)
Prompt reads:
To unpatch dimmer for dimmer
check, press ENTER
To park or unpark dimmer(s), press
PARK
Dimmer 1 is set at 75 percent
Dimmer Check window appears
Prompt reads:
Press [+] or [–] to step through
dimmers. Press [Clear] to cancel
dimmer check.
Dimmer 1 returns to zero, dimmer 2 is
set at 75 percent
Note: If a dimmer is parked, the Dimmer Check window displays the level
at which it is parked. The Dimmer Check does not change its level on
stage.
Note: To check a multiplexed B dimmer, enter the number, selecting the
A dimmer, then press [+] to select the B dimmer.
chapter 4 patch 37
Page 50

About
[About] provides you with information about dimmers. The following
pages describe the use of About Dimmer and the information available in
the About Dimmer window.
Note: See page 53 for information on using About Channel.
About Dimmer
About Dimmer provides attribute and status information for a selected
dimmer. To display the About Dimmer window, follow these steps:
Keystrokes: Action:
1. Press [About] [Dimmer]. Prompt reads:
2. Press [6]. Keypad corner reads:
3. Press [Enter]. About Dimmer window is displayed
About: Select dimmer number, then
press ENTER
Dim 6
• Label: The dimmer’s label.
• Channel: The channel to which the dimmer is assigned.
• Proportion: The dimmer’s assigned proportional level.
• Profile: The dimmer’s assigned profile.
• Console dimmer level: The dimmer output level the Insight 2x
sole is sending to the dimmer.
• Parked: Whether or not the dimmer is parked.
Note: Press [Clear] to remove the About window.
con-
38 Insight 2x user manual
Page 51

About Dimmer with ETCLink
If your console uses ETCLink to monitor dimmers in an ETC Sensor dimming system, the About Dimmer window displays additional dimmer
monitoring information. The following expanded About Dimmer window
appears if dimmer monitoring is enabled.
• Label: The dimmer’s label.
• Channel: The channel to which the dimmer is assigned.
• Proportion: The dimmer’s assigned proportional level.
• Profile: The dimmer’s assigned profile.
• Console dimmer level: The dimmer output level the Insight 2x
sole is sending to the dimmer.
• Parked: Whether or not the dimmer is parked.
• Rack/Slot number: The rack and slot in which this dimmer is located.
• Rack dimmer level: The actual output level at which the dimmer is
set.
• Dimmer level source: The source of the control signal which set the
dimmer’s level. Possible sources include:
DMX A
DMX B
Rack #
con-
The following information is available on Sensor Advanced Features dimming systems.
• Recorded lamp load: The load at which the selected dimmer was re-
corded.
• Load at full: The estimated load on the dimmer when the level is at
Full.
• Actual load: The actual load currently on the dimmer.
• Boost: The dimmer’s boost level, if any.
• Dimmer error: Current dimmer errors, if any.
chapter 4 patch 39
Page 52

Multiplexed dimmers
ETC’s Multiplex dimming technology can increase the capacity of your
dimming system. The ETC Multiplexer converts the output of a single ETC
Sensor or L86 dimmer into two separate signals. Both signals then provide discrete levels for two ETC Source Four lighting fixtures.
Warning: The DMX512 port that serves the dimmer must be in multiplex
mode. Setting the port to multiplex mode erases your current patch. Set
the port mode BEFORE you create your patch. To set the port’s mode,
see Setting Multiplex mode on page 294.
Before you create your patch, you must identify any dimmers whose signals are multiplexed. Insight 2x indicates the split by adding an A or B to
the dimmer number.
Follow these steps to multiplex a dimmer:
Keystrokes:
1. Press [Patch].
2. If the [Dim] LED is unlit,
press [Dim] to indicate that
the next number entered
will be a dimmer.
3. Use the keypad to enter
the desired dimmer num-
ber(s) Use [And] and [Thru]
if you want to select more
than one dimmer.
4. Press [S1], Multiplex.
Action:
Selects Patch display
Prompt reads:
Select dimmer numbers, then press
ENTER to assign to a channel, or
press AT to assign a level, or press
PROFILE to assign a profile
Prompt reads:
Select dimmer numbers, then press
ENTER to assign to a channel, or
press AT to assign a level, or press
PROFILE to assign a profile
Selected dimmers are identified as
Multiplexed
Note: Use [S2], A, and [S3], B, along with the numeric keypad, to enter
dimmer numbers as you create your patch. If you select a multiplexed
dimmer without specifying A or B, the system defaults to A.
40 Insight 2x user manual
Page 53

Patching to a Strand CD80 dimmer rack
Strand CD80 dimmer racks have 48 dimmer slots. Each dimmer slot holds
either two 2.4kW dimmers or one 6kW or 12kW dimmer. The console
requires that you include all 96 possible dimmer numbers per rack in the
patch
.
Refer to the charts below to determine dimmer numbers for each slot on
each rack. When patching 6kW or 12kW dimmers, enter the slot’s odd
dimmer number under the desired channel number. Enter the slot’s even
dimmer number under channel zero
For example, to patch a 6kW dimmer into the last dimmer slot on the first
rack, enter dimmer 95 in the desired channel number and dimmer 96 in
channel zero.
.
chapter 4 patch 41
Page 54

42 Insight 2x user manual
Page 55

chapter 5
setting channel levels
Setting channel levels is the first step in recording cues, submasters and
groups. Setting channel levels in Stage mode brings light levels up on
stage. Setting channel levels in Blind mode does not affect stage lights.
This chapter includes the following sections:
• Channel modes
• Channel attributes
• Selecting channels
• Setting channel levels
• Channel check
• About Channel
Page 56

Channel modes
Channels may be in any of the following modes. Each responds differently
to commands.
Captured channels
Captured channels are channels that you have selected and are live on
stage. They remain live until you press [Rel] to release them. Captured
channels override all other channel settings. For example, if a channel
is in a fader at 100 percent and you capture it and set it to 50 percent,
Insight 2x sets the captured channel at 50 percent. Press [Rel] twice to
release captured channels.
Selected channels
Selected channels are channels over which you have immediate keypad
.
control
fader wheel. Selected channels are displayed in yellow, and their levels
are red on white. You can select channels in all display modes
You can modify selected channels with [Full], [At], [+], [–], or the
.
Selected, captured
keypad control. Channels can be
modes. You can select channels in Blind, but they won’t be captured since
Blind mode is not live. Press [Rel] once to release selected channels.
channels are
Recorded channels
Recorded channels are channel levels that have been recorded in a cue,
group or submaster. In Stage mode, recorded levels are displayed in
green or magenta. Recorded channels may be either moving or tracked in
Blind mode (see below). Channel levels controlled by effects are displayed
in white. Channel levels controlled by submasters other than effect submasters are displayed in yellow.
Moving channels
Moving channels are channel levels that change from one cue to the next
In Stage mode, all moving channels are displayed in green. In Blind and
Tracksheet, moving channels are displayed in green if they are moving
down or blue if they are moving up.
Tracked channels
A tracked channel is a channel whose level is unchanged from the preceding cue. Tracked channels are displayed in magenta.
live
channels that are under immediate
selected and captured
only in Stage
.
44 Insight 2x user manual
Page 57

Channel Attributes display
The Channel Attributes display allows you to assign attributes to specific
channels, including:
• Independent
Allows a channel to be unaffected by Grandmaster, Flash, Release,
Solo, and Blackout. (Release requires an extra keypress.)
• Flip
Allows a channel’s output to be reversed. A flipped channel outputs
at full when set to zero and at zero when set to full.
• Label
Allows you to assign labels to channels.
To go to the Channel Attributes display, follow these steps:
Keystrokes: Action:
1. Press [Setup]. Selects Setup menu
2. Press [1][1] [Enter]. Selects Channel Attribute display
chapter 5 setting channel levels 45
Page 58

Independent channels
An independent channel is not affected by the Grandmaster, Blackout,
Solo, or Flash. Otherwise, independent channels function normally. Use
[S1], Independent, to make a channel independent. Press [Rel] three
times to release all independent channels.
Channels that control movement of moving lights or color scrollers will
often be set as Independent. This assures that in the case of a blackout or
change in the Grandmaster setting, the position of the moving light or
color scroller will not change.
To mark a channel as independent, follow these steps:
Keystrokes: Action:
1. Press [Setup]. Selects Setup menu
2. Press [1][1] [Enter]. Selects Channel Attributes display
Prompt reads:
Select channel number(s)
3. Enter channel number(s)
to be independent and
press [S1], Independent.
Use [Thru], [And] and
[Except] to select multiple
channels.
4. Press [1], then press
[Enter].
Selects channel
Prompt reads:
Enable/disable independent
channel(s) (1 = Enable, 0 = Disable)
Channel is independent
46 Insight 2x user manual
Page 59

Flipped channels
The Flip command inverts the output of the channel to which it is applied.
A flipped channel outputs at full when set to zero and at zero when set to
full.
Use [S2], Flip, to mark a channel flipped. The flipped channels will have
their outputs inverted. The levels will not appear inverted on the Stage display, but the level sent to the channel is inverted. This is particularly useful
for some moving light functions.
For example, flip the output of the channel controlling the pan of one of
two moving lights. If you then record both lights’ pan control channels to
a submaster, the two lights’ movements mirror each other.
To mark a channel as flipped, follow these steps:
Keystrokes:
1. Press [Setup].
2. Press [1][1] [Enter].
3. Enter channel number(s)
to flip and press [S2], Flip.
Use [Thru], [And] and
[Except] to select multiple
channels.
4. Press [1], then press
[Enter].
Action:
Selects Setup menu
Selects Channel Attributes display
Prompt reads:
Select channel number(s)
Selects channel
Prompt reads:
Enable/disable flipped channel(s)
(1 = Enable, 0 = Disable)
Channel is flipped
chapter 5 setting channel levels 47
Page 60

Labeling a channel
The Channel Attributes display’s Label function allows you to assign an
alphanumeric label of up to 16 characters to a channel.
To label a channel, follow these steps:
Keystrokes:
1. Press [Setup].
2. Press [1][1] [Enter].
3. Enter channel number(s)
to label and press [Label].
Use [Thru], [And] and
[Except] to select multiple
channels.
4. Use an alphanumeric key-
board to enter the chan-
nel’s label, then press
[Enter].
Action:
Selects Setup menu
Selects Channel Attributes display
Prompt reads:
Select channel number(s)
Selects channel to label
Prompt reads:
Type channel label
(F6 = clear to end,
F7 = last channel label,
F8 = next channel label)
Channel is labeled
48 Insight 2x user manual
Page 61

Selecting channels
Using the keypad to set channel levels involves two steps: selecting the
channels whose levels you want to modify, then entering output levels.
• To select a single channel, enter the channel number.
For example, [Channel] [1] selects channel 1.
Note: When selecting channels, you only need to press [Channel] if the
[Channel] LED is not lit.
• To select two channels that are not consecutively numbered, enter
the number of the first channel, then press [And] and enter the
number of the second channel.
For example, [Channel] [1] [And] [7] selects channels 1 and 7.
• To select a group of consecutively numbered channels, enter the
number of the first channel, then press [Thru] and enter the last num-
ber.
For example, Channel] [1] [Thru] [9] selects channels 1, 2, 3, 4, 5, 6, 7,
8, and 9.
• To exclude channels from a selected group of consecutively num-
bered channels, enter the first channel, press [Thru], enter the last
channel, then press [Except] and enter the channels to leave out.
For example, [Channel] [1] [Thru] [1][5] [Except] [5] [Thru] [1][3] selects
channels 1, 2, 3, 4, 14, and 15.
• Use [And], [Except] and [Thru] to select multiple, non-consecutive
groups of channels.
For example, [Channel] [1] [Thru] [5] [And] [8] [Thru] [1][2] [Except] [9]
selects channels 1, 2, 3, 4, 5, 8, 10, 11, and 12.
Hint: If no channels are selected, press [Enter] to select all channels currently at a level above zero.
Once you have entered your channel selections, you are ready to set channel levels.
Selecting channels in Flexichannel mode
In Flexichannel mode, only channels that are used in the show appear on
the Stage, Blind and Fader displays. When Flexichannel mode is enabled,
the [Thru] key functions slightly differently. For example, in normal mode,
pressing [1] [Thru] [5] selects all channels from 1 to 5. In Flexichannel
mode, pressing [1] [Thru] [5] selects all visible channels from 1 to 5.
To select all channels from 1 to 5, including channels that haven’t been
used in the show so far, press [1] [Thru] [Thru] [5]. Pressing [Thru] a
second time alerts the system to ignore Flexichannel for that channel
selection.
Note: When channels that were used in a show are removed from the
show, they remain on the channel list until it is updated. The Purge Flexi
softkey on the System Settings display updates the list of used channels.
The list is also updated when you load a show from diskette, or when you
first turn Flexichannel on. Press [Setup] [1] [Enter] [S1], Purge Flexi, to
update Flexichannel displays.
chapter 5 setting channel levels 49
Page 62

Setting channel levels
You assign output levels to channels using the basic format [Channel] [#]
[At] [#] where the first number is the channel and the second is the level.
For example, [Channel] [4] [At] [7][5] sets channel 4 at 75 percent. If you
enter a single digit for the level, Insight 2x multiplies it by ten and you
must follow it with [Enter]. In other words, [Channel] [4] [At] [1] [Enter]
sets channel 4 to 10 percent. To set channel 4 to 1 percent, enter [Channel] [4] [At] [0][1]. You can also use the level wheel, [Full], [Level], or [S8],
Flash, to set channel levels.
Level wheel
To set channel levels with the level wheel, select the channels whose
levels you want to modify, then use the wheel (labeled Level Y) to set the
desired output level. You can also use the wheel to adjust output levels
for all active channels.
To set selected channel levels, enter [Channel] [1] [Thru] [5] then move the
level wheel to set levels.
To modify all channels currently at a level above zero, press [Enter] then
move the level wheel to set levels.
Full
[Full] sets selected channel levels to 100 percent. For example, press
[Channel] [1] [Thru] [5] [Full] to set channels 1, 2, 3, 4, and 5 to 100 percent.
Level
Flash
[Level] sets selected channel levels to the output level assigned to the
[Level] key. The default value for [Level] is 100 percent. (See
Entering system settings
settings.) For example, if [Level] is set at 75 percent, press [1] [Thru] [5]
[Level] to set channels 1, 2, 3, 4, and 5 to 75 percent.
Flash sets the selected channel’s level to 100 percent if the channel is currently at a level at or below 50 percent. If the channel’s level is above 50
percent, Flash sets it to zero. Levels set by Flash are only maintained
while the key is pressed. For example, press [Channel] [5], then press and
hold [S8], Flash, to set channel 5 to either 100 or zero.
, page 18 for instructions on changing default
Chapter 3,
50 Insight 2x user manual
Page 63

Sneak
Sneak is a softkey that you can use to fade channels on stage to a level
you choose, in a specific time or to restore channels to the last level at
which they were set with a fader or submaster. For example, if you bring
up a cue, then change the look, you can use sneak to go back to the look
created by the original cue. If you do not indicate a time, the sneak occurs
in the default sneak time, set in System Settings.
Follow these steps to use Sneak to set a channel level:
Keystrokes: Action:
1. Press [Stage].
2. Press [S1], Sneak.
3. Select the channel(s) you
4. Press [Time] and enter the
5. Press [Enter].
want to sneak and the
level to which you want it
to fade. For example,
press [5] [At] [5].
time for the sneak. For
example, press [Time]
[1][0].
Selects Stage display mode
Selects Sneak mode
Prompt reads: Sneak mode - Select
channels, then press ENTER to
sneak, or AT to select sneak level,
or TIME to select sneak time
Selects channel 5. Sets level at 50
percent
Prompt reads:
Sneak mode - Select level
Selects Sneak time of ten seconds
Prompt reads:
Sneak mode - Select time
Fades channel 5 to 50 percent over
ten seconds
Follow these steps to restore a channel to its last fader or submaster level:
Keystrokes: Action:
1. Press [Sneak] and select
the channel(s) you want to
restore. For example,
press [5].
2. Press [Enter].
Selects channel 5 to sneak
Prompt reads: Sneak mode - Select
channels, then press ENTER to
sneak, or AT to select sneak level,
or TIME to select sneak time
Fades channel 5 back to its most
recent cue or sub level
Note: Press [Sneak] [Enter] to restore all channels to their current fader or
submaster levels.
chapter 5 setting channel levels 51
Page 64

Channel check
Use a Channel Check to check which channel controls which light. Insight
2x allows you to check channels by selecting a single channel and setting
it at a level. Once you have selected a channel you can then advance
sequentially through the channels, checking one at a time.
Follow these steps to run a channel check:
Keystrokes:
1. Press [Stage].
2. Press [Channel] [1].
3. Press and hold [S8], Flash.
4. While holding [S8], press
[+] or [–] to select the next
or previous channel.
5. Once you have checked all
the channels, release [S8],
Flash.
Actions:
Selects Stage display
Prompt reads:
Select channel numbers
Corner reads: Chan 1
Sets channel 1’s level to 100 percent if
its current level is at or below 50
percent
or...
Sets channel 1’s level to zero if its
current level is above 50 percent
Flashes each channel in turn
Note: You may start a channel check with any channel. Substitute the
desired channel in step 2.
Note: If a channel is Independent, it will not Flash.
52 Insight 2x user manual
Page 65

About
[About] provides you with information about channels. The following
pages describe the use of [About] and the information available in the
About channel window.
Note: See page 38 for information on using About Dimmer.
About Channel
About Channel provides attribute and status information for a selected
channel. To display the About Channel window, follow these steps:
Keystrokes: Action:
1. Press [About] [Channel]. Prompt reads:
2. Press [6]. Keypad corner reads:
3. Press [Enter]. About Channel window is displayed.
About: Select channel number, then
press ENTER
Chan 6
Press [Clear] to remove the window
• Label: The channel’s label.
• Link: The channel’s link number on the Link List.
• Attributes: Whether or not the channel is flipped or independent.
• Wheel: The wheel on which the channel is linked.
• First used: The first cue in which this channel appears.
• Last used: The highest numbered cue in which this channel appears.
• Number of cues: The total number of cues in which this channel
appears.
• Number of moves: The total number of cues in which this channel
moves.
• Level: The channel’s current level.
• Source: The control device that is providing the channel’s level.
Possible sources include: Captured, Fader #, Sub #, DMX In
• Parked: Whether or not the channel is parked.
• Inhibited: The inhibitive submaster, if any, which is controlling the
level of the channel.
• Dimmers: The dimmers assigned to the channel, as space permits.
chapter 5 setting channel levels 53
Page 66

54 Insight 2x user manual
Page 67

chapter 6
cues
This chapter includes instructions on recording, modifying and deleting
cues.
After you select channels and set their intensity levels, you can store the
resulting look as a cue. You can play cues back in a timed fader. Insight 2x
allows you to record up to 600 cues per show.
This chapter contains the following sections:
• Cue types
• Record functions
• Creating cues
• Viewing cues
• Working with cues in Stage mode
• Recording a cue in Stage
• Working with cues in Blind mode
• Recording a cue in Blind
• Recording a cue with a single fade time
• Recording a cue with split fade times
• Recording a cue with a wait time
• Recording cues with Link and Follow
• Recording a cue using Solo
• Labeling cues
• Modifying a recorded cue live
• Modifying cue attributes
• Using Update to modify a cue
• Deleting cues
• Copying cues
• Inserting cues
• Cue List
Page 68

Cue types
[Type] displays the fade type options described below. The menu that
appears in Stage omits the effect and subroutine options. Effects and subroutines are explained in their own chapters.
To select a cue fade type in Stage, Blind or Fader modes, press [Type], and
enter an option number. If you change a cue’s fade type, you must rerecord the cue. For example, [Cue] [2] [Type] [2] [Record] [Enter] records
cue 2 with an allfade.
If you do not enter a fade type, cues default to crossfade.
Crossfade
In a crossfade cue, channel levels that increase fade to their new level in
the assigned upfade time. Channel levels that decrease fade to their new
level in the assigned downfade time. The cue starts when you press [Go].
You may use a wait time to delay the start of the upfade or downfade.
Allfade
An allfade cue forces all unused channels to zero intensity when you press
[Go] and clears the other fader. Allfade is useful for forcing an end cue
when tracking channels. For more information on using allfade cues for
tracking, see
Chapter 7 Track
.
Subroutine
A subroutine is a cue that controls the playback of a series of recorded
cues. Subroutines are similar to linked cues, except that you have more
playback options. For more information on using subroutines, see
13, Working with subroutines
Effects
An effect cue contains an effect. Effects allow you to assign channels to
a series of steps. When you play back the effect, the steps run in assigned
chase patterns, or in random order. For more information on using effects,
see
Chapter 12, Working with effects
Chapter
.
.
56 Insight 2x user manual
Page 69

Record functions
Insight 2x has two record functions; Record and Track. Record saves all
channels as they appear on the screen (what you see is what you get) in
the cue, group or submaster you specify. When you use Record to record
a cue, levels are recorded in only one cue.
Track is a record function that works only with cues. It allows you to build
a new cue from the previous cue’s channel settings. Tracked channels are
channels whose levels do not change from one cue to the next. A
often runs through several cues for the length of a scene or an act.
Track also allows you to add tracked channels through existing cues. For
example, if you have created all cues for a scene, and then decide to add
a few new channels to all cues, or adjust the level of a channel throughout
the cues, Track lets you do so with one short record command
same thing with Record would require you to add the new channels to
each cue individually.
Note: When a channel level that tracks through a series of cues reaches
an Allfade cue, the track ends.
We use the standard Record function for all cues in this chapter. Instructions for using the Track function are included in
.
To do the
Chapter 7, Track.
track
chapter 6 cues 57
Page 70

Creating cues
Insight 2x allows you to save up to 600 cues per show. A cue is a look you
have created and recorded, and can replay in a timed fader pair. If your
show requires more than 600 cues, you can read a second show from diskette during a break, or between cues. See
tions,
for more information about recording shows on diskette
This chapter includes instructions and examples for creating and modifying cues using several different methods. If you follow the examples, you
will have several cues recorded. You will also know how to modify, copy
and delete cues.
If you have several cues already stored, you may want to use the look
from one cue and modify it to create another
may want to enter all channel levels manually.
There are several ways you can go about creating any one look. The following instructions give examples of how you
Note: Before you clear cues, as described below, make sure that the
show currently in the console memory is saved on diskette.
The examples in this chapter assume there are no cues stored in the console. To erase any cues, press [Setup] [4] [Enter] [2] [Enter] [Enter].
Chapter 17, Diskette func-
.
.
In other circumstances, you
could
generate each cue.
Viewing cues
You can view stored cues in two ways, live in Stage mode, or just on the
screen in Blind mode.
To view cues live, you must select the cue and play it back in a fader. See
Chapter 9, Playing back cues,
To view a cue only on the screen, select Blind mode and enter the desired
cue number. To view a different cue, press [Cue] and the new cue number
that you want to see
In Blind mode you can also use [+] and [–] to move through recorded cues,
and cue parts, one at a time. Press [Cue]; then press [+] to display the next
cue or part; press [–] to display the previous cue or part.
for instructions.
.
58 Insight 2x user manual
Page 71

Working with cues in Stage mode
Stage mode display appears on the Command display monitor. A sample
Stage mode display is shown below.
The examples in this chapter demonstrate how to create a variety of cues
in Stage display mode. Cues consist of channel levels and cue attributes.
Each example in the text illustrates a different cue attribute. However,
multiple attributes can be applied to one cue.
chapter 6 cues 59
Page 72

Recording a cue in Stage
In this cue, you will only set channel levels. Default settings will determine
all other attributes of the cue. You can change most default settings from
the System Settings menu. See
information about setting and changing defaults.
Follow these steps to record cue 1:
Keystrokes: Action:
1. Press [Stage]. Selects Stage display mode
2. Press [1] [Thru] [1][0]. Selects channels 1 through 10
3. Press [At]. Prompt reads: Enter intensity
4. Press [5][0]. Sets a level of 50 percent for channels
5. Press [Record]. Prompt reads:
6. Press [1]. Selects cue 1
Chapter 3, Entering system settings
Prompt reads:
Select channel numbers
1 through 10
To record cue, select number and
press ENTER
To cancel, press CLEAR
, for
Note: The keypad defaults to cue mode when you press [Record].
7. Press [Enter]. Records cue 1 containing channels 1
through 10 at 50 percent
8. Press [Rel]. Releases captured channels
60 Insight 2x user manual
Page 73

Working with cues in Blind mode
Blind mode allows you to create, preview or modify cues without affecting the current look on stage. If you prefer to work with live looks, you
should work in Stage mode.
When you press [Blind], Insight 2x displays the following screen on the
Command display:
chapter 6 cues 61
Page 74

Recording a cue in Blind
This example creates a cue in Blind mode. Blind allows you to work on
cues without affecting the look on stage. Insight 2x automatically enters
00 for channels used in cue 1 to indicate that they will downfade in cue 2.
Follow these steps to record cue 2 in Blind mode:
Keystrokes:
1. Press [Blind].
2. Press [2].
3. Press [Channel] [1][3].
4. Press [And] [1][5].
5. Press [Full].
Action:
Selects Blind display mode
Prompt reads:
Select cue number
To select cue type, press TYPE
Selects cue 2
Selects channel 13
Prompt reads:
Select channel numbers
Adds channel 15 to your selected
channels. Selected channels are
displayed in yellow
Sets channels at full intensity level
Note: When using [Full], you do not have to press [At] first.
6. Press [Record].
7. Press [Enter].
When you record the cue, channel levels set by a fader change from red
(indicating a channel level set on the keypad) to colors based on the channels’ level movements from cue to cue. See page 6 for more information
on what channel level colors mean.
Prompt reads:
To record cue, select number and
press ENTER
To cancel, press CLEAR
Records cue 2 with channels 13 and
15 at Full
62 Insight 2x user manual
Page 75

Recording a cue with a single fade time
Unless you tell it otherwise, Insight 2x assigns default fade times to any
cue you record. If you prefer, you may record cues with custom fade
times instead.
Fade times can be zero seconds to 99:59 minutes long. They may be
expressed in minutes and seconds, or as fractions of seconds (in decimal
format). Acceptable time values include: .2 (.2 seconds), 00:12 (12 seconds), 5.5 (5.5 seconds), or 5:30 (five minutes, 30 seconds).
Follow these steps to record a cue with a custom fade time:
Keystrokes: Action:
1. Press [Stage] or [Blind]. Selects display mode
2. Press [Cue] Prompt reads:
Select cue number
To select cue type, press TYPE
3. Press [3] Selects cue 3
4. Press [Time]. Prompt reads:
Enter upfade time
5. Press [8]. Enters a fade time of 8 seconds.
Corner reads: UpTime 8
6. Press [Enter] [Enter]. Enters matching downfade time
7. Press [Record]. Prompt reads:
To record cue, select number and
press ENTER
To cancel, press CLEAR
8. Press [Enter] Records cue 3 with fade time of eight
seconds
Note: If the cue already exists, you may omit steps 7 and 8.
chapter 6 cues 63
Page 76

Recording a cue with split fade times
Insight 2x allows you to record cues with different upfade and downfade
times. These cues are said to have
play, the time to the left of the / refers to the upfade time; the number to
the right refers to the downfade time.
Follow these steps to record a cue with split upfade and downfade times:
Keystrokes: Action:
1. Press [Stage] or [Blind]. Selects display mode
2. Press [Cue] Prompt reads:
3. Press [4] Selects cue 4
4. Press [Time]. Prompt reads:
5. Press [1][0]. Enters an upfade time of ten
6. Press [Enter]. Prompt reads:
split
fade times. On the Insight 2x dis-
Select cue number
To select cue type, press TYPE
Corner reads: Cue 4
Enter upfade time
seconds
Corner reads: UpTime 10
Enter downfade time
7. Press [1][5]. Enters a downfade time of 15 seconds
Corner reads: DnTime 15
8. Press [Record]. Prompt reads:
To record cue, select number and
press ENTER
To cancel, press CLEAR
9. Press [Enter]. Records cue 4 with upfade time of ten
seconds and downfade time of 15
seconds
Note: If the cue already exists, you may omit steps 8 and 9.
64 Insight 2x user manual
Page 77

Recording a cue with a wait time
Wait time is the time that elapses between when you press [Go] and
when the actual fade begins. You can record Insight 2x cues with a wait
time of up to 99:59 minutes. Insight 2x allows you to program a wait time
for either the upfade or the downfade; not both. If you do not enter a wait
time, Insight 2x assigns the cue a wait time of zero.
Follow these steps to record a cue with a downfade wait time:
Keystrokes: Action:
1. Press [Stage] or [Blind]. Selects display mode
2. Press [Cue] Prompt reads:
Select cue number
To select cue type, press TYPE
3. Press [5] Selects cue 5
4. Press [Wait] once
or...
Press [Wait] twice.
5. Press [6]. Enters a wait time of six seconds
6. Press [Enter]. Records cue 5 with wait time of six
Prompt reads:
Enter upfade wait time
or...
Enter downfade wait time.
Corner reads:
UpWait 6
or...
DnWait 6
seconds
chapter 6 cues 65
Page 78

Recording cues with Link and Follow
When you record a cue, it automatically becomes part of the Cue List. The
Cue List is a list of all cues, organized in numeric sequence. Normally,
when you press [Go] to execute cues, Insight 2x plays them back in the
sequence in which they appear in the Cue List. [Link] allows you to modify
the sequence in which cues play back. [Follow] allows you to play back
multiple cues automatically.
Link
Normally, pressing [Go] plays back cues in the sequence indicated on the
Cue List. [Link] allows you to play back cues out of sequence by linking
them together. For example if you link cue 6 to cue 2, then play cue 6,
pressing [Go] plays cue 2.
Follow these steps to record a linked cue.
Keystrokes: Action:
1. Press [Stage] or [Blind]. Selects display mode
2. [Cue] [6]. Selects cue 6
3. Press [Link]. Prompt reads:
To link to cue, select cue number
To link to macro, press ENTER
MACRO
4. Press [2] [Enter]. Links cue 6 to cue 2. After you play
Note: You can also link cues to macros. For more information on linking
cues to macros, see page 170 in Chapter 15, Working with macros.
Follow
[Follow] allows you to play a series of cues automatically. The [Follow]
time indicates how long the console waits after the cue starts before the
next cue runs. [Follow] plays back the next cue on the Cue List unless you
use [Link] to specify a different sequence.
Follow times may be expressed in minutes and seconds, or as fractions
of seconds, up to 99:59 minutes.
Follow these steps to record a cue with [Follow].
Keystrokes: Action:
1. Press [Stage] or [Blind]. Selects display mode
2. Press [Cue] [7]. Selects cue 7
3. Press [Follow]. Prompt reads:
back cue 6, press [Go] to play back cue
2
Enter follow time (or press ENTER
to confirm default time)
4. Press [5] [Enter]. Records cue 7 with a Follow time of
66 Insight 2x user manual
five seconds. After you start cue 7,
the next cue in the Cue List plays
automatically five seconds later
Page 79

Combining Link and Follow to create
playback loops
Insight 2x allows you to use Link and Follow to create cue playback
sequences in which a group of cues plays back automatically and repeats.
Follow these steps to create a five-cue sequence:
Keystrokes:
1. Create five cues numbered
1, 2, 3, 4, and 5.
2. Press [Cue], then press [1],
the number of the first cue
you want to include in the
playback loop.
3. Press [Follow] [5] [Enter].
4. Repeat steps 2 and 3 for
cues 2 through 5.
5. Press [Cue], then press [5],
the number of the last cue
in the playback loop.
6. Press [Link], then press [1],
the number of the first cue
in the playback loop. Press
[Enter].
Note: You may also use effects to create loops. See Chapter 12, Effects,
for more information.
Action:
Cue list displays cues 1 through 5
Selects the first cue
Assigns a follow time of five seconds
to the first cue
Assigns a follow time of five seconds
to the remaining cues
Selects the last cue in the playback
loop
Creates a loop by linking the last cue to
the first cue
Using Link to link a macro to a cue
[Link] allows you to automatically run a macro when a cue runs. If you
want the macro to delay before running, start the macro with a Macro
Wait of the desired length. See
creating macros.
Chapter 14, Macros
, for information about
Follow these steps to link a macro to a cue:
Keystrokes:
1. Press [Stage] or [Blind].
2. [Cue] [6].
3. Press [Link].
4. Press [Enter Macro]
5. Press [7] [Enter].
chapter 6 cues 67
Action:
Selects display mode
Selects cue 6
Prompt reads:
To link to cue, select cue number
To link to macro, press ENTER
MACRO
Prompt reads:
To link to macro, select macro
number
To link to cue, press CUE
Records cue 6 linked to macro 7.
When you press [Go] to play cue 6,
macro 7 will run at the same time
Page 80

Recording a cue using Solo
[Solo] lets you record a cue that contains some of the channels that make
up the current look, but not others. Often you will create cues by adding
to, subtracting from and modifying previously recorded cues.
Follow these steps to create a cue using Solo:
Keystrokes:
1. Press [Stage] or [Blind].
2. Press [Channel].
3. Press [2][0].
4. Press [Thru].
5. Press [3][0]
6. Press [Solo]
7. Move fader wheel; press
[Full], [Level], [+], or [–]; or use
[At] and numeric keypad to
set levels for selected chan-
nels.
8. Press [Record].
9. Press [7].
10. Press [Enter].
11. Press [Solo].
.
Action:
Selects display mode
Prompt reads:
Select channel numbers
Enters channel number to mark the
start of the selected range
Indicates you are selecting a range of
channels
Selects channels 20 through 30
S
ets all channels other than 20
through 30 to zero
Prompt reads:
(To restore levels, press SOLO)
Select channel numbers
Sets channels 60 through 70 to a new
level
Prompt reads:
To record cue, select number and
press ENTER
To cancel, press CLEAR
Corner reads: Cue 7
Records cue 7 with channels 60
through 70
Restores channels other than 60
through 70 to previous levels
Warning: If you press [Solo] in Stage mode, unselected channels controlling lights on stage will go to zero.
68 Insight 2x user manual
Page 81

Labeling cues
Insight 2x allows you to use an alphanumeric keyboard to assign labels to
cues. Labels can consist of any combination of letters, numbers and symbols and may be up to 16 characters long. See page 296 for information
on installing an alphanumeric keyboard.
Follow these steps to label a cue:
Keystrokes: Action:
1. Press [Stage] or [Blind]. Selects display mode
2. Press [Cue] [1][2] [Label]. Selects Cue 12
Prompt reads:
Type cue label
(F6 = clear to end,
F7 = last cue label,
F8 = next cue label)
3. Use the alphanumeric key-
board to type the desired
label. For example, call cue
12 “Toad exits.”
4. Press [Enter]. Records Cue 12 with label “Toad exits”
Enters cue label
Corner reads: Label Toad exits
Note: If the cue did not previously exist, press [Record] [Enter] in step 4.
This will create the cue and label it as indicated, all in one step.
chapter 6 cues 69
Page 82

Modifying a recorded cue live
All the preceding examples have involved creating a new cue. In Stage, if
you want to add, remove or modify channel levels, you must play back the
cue, make your changes, then re-record the cue. If you are changing cue
attributes, you do not need to play back the cue.
Modifying channels in a cue
If you are not familiar with procedures for playing back cues, see
9 Playing back cues
. Follow these steps to modify cues in Stage mode:
Chapter
Keystrokes:
1. Press [Stage].
2. Press [Cue], enter cue
number and press [Go].
3. Select channels and set
channel levels to make the
desired changes to the
cue.
4. Press [Record] [Enter].
or...
Press [Record] [8] [Enter].
Note: If you re-record as the same cue, modifications affect the look on
stage. If you record the cue with a new number, modifications are not
reflected in the fader; you may want to run the cue through a fader before
you release channels if you don’t want to lose the look from stage.
Modifying cue attributes
Follow these steps to modify cue attributes:
Keystrokes: Action:
1. Press [Stage] or [Blind]. Selects display mode
Action:
Selects Stage display mode
Plays back selected cue
Modifies cue channel levels
Re-records cue with desired
modifications
or...
Records the modified cue as cue 8
2. Press [Cue] then enter the
number of the desired cue.
3. Press the key that corre-
sponds to the attribute you
want to modify. Options
include: Type*, Time,
Wait, Link,Follow, and
Label.
4. Enter the new setting for
the attribute.
5. Press [Enter]. Re-records cue with modifications
*
Note: if you change the cue’s type, press [Record] [Enter] in step 5. Type
changes will not take effect unless recorded.
70 Insight 2x user manual
Selects the desired cue
Modifies cue attribute
Page 83

Using Update to modify channels in a cue
The Update feature allows you to easily record changed levels on Stage
into a selected cue. You may record all levels on Stage into the cue, or you
may record only changes to channels that were previously recorded in the
cue. This allows you to modify the channel levels in the active cue, then
re-record the cue without recording the entire stage look.
Note: Levels provided by submasters aren’t updated. Only channel levels
set on the keypad are recorded.
Follow these steps to use Update to modify a cue in Stage mode:
Keystrokes:
1. Press [Stage].
2. Press [Cue], enter cue
number and press [Go].
3. Modify channel levels as
desired.
4. Press [S2], Update.
(If you wish to update the
levels in a cue other than
the active cue, enter the
desired cue number.)
5. To record changes only to
channels that are already in
the cue, press [Only].
6. Press [Enter]
or...
Press [Track] [Enter].
Action:
Selects Stage display mode
Plays back selected cue, bringing up
its current levels
Prompt reads:
To update cue, select number and
press ENTER
(TRACK + ENTER for tracking)
(Press ONLY + ENTER to update
only those channels already in cue)
Limits update to channels in cue
Updates and re-records the active cue
Note: Press [Track] after you press [S2], Update, if you wish changes to
track into subsequent cues.
chapter 6 cues 71
Page 84

Using Update to add channels to a cue
Normally when you re-record a cue, you record all the channel levels currently on stage. Insight 2x’s Update feature allows you to record only
those channels that you specify.
This allows you to add specific channels to the active cue, then re-record
the cue without recording the entire stage look.
Follow these steps to use Update to modify a cue in Stage mode:
Keystrokes:
1. Press [Stage].
2. Press [Cue], enter cue
number and press [Go].
3. Modify or add channel
levels as desired.
4. Press [S2], Update.
(If you wish to update the
levels in a cue other than
the active cue, enter the
desired cue number.)
5. Press [Channel].
6. Enter the channel num-
ber(s) you wish to add to,
or update in, the cue.
7. Press [Enter]
or...
Press [Track] [Enter].
Action:
Selects Stage display mode
Plays back selected cue, bringing up
its current levels
Prompt reads:
To update cue, select number and
press ENTER
(TRACK + ENTER for tracking)
To cancel, press clear
Prompt reads:
To update channel(s), select
number(s) and press ENTER
To cancel, press clear
Updates and re-records the active cue
Note: Press [Track] instead of [Enter] in step 7 if you wish changes to track
into subsequent cues.
72 Insight 2x user manual
Page 85

Using Update to modify fade rate
You may also use the Update function to record manually modified fade
rates into cues.
Follow these steps to update a rate for a cue running in a fader:
Keystrokes:
1. Press [Rate] key for the
fader in which the cue is
running.
2. Move rate wheel to adjust
fade rate.
3. Press [S2], Update.
4. Press [Enter].
Action:
Activates rate control
Fades are placed under control of the
rate wheel. The Fader Status window
shows the current rate
Prompt reads:
To update cue, select number and
press ENTER (TRACK + ENTER for
tracking) (Press ONLY + ENTER to
update only those channels already
in cue)
New rate is recorded into cue
chapter 6 cues 73
Page 86

Deleting cues
Follow these steps to delete a cue in Stage or Blind mode.
Keystrokes:
1. Press [Stage] or [Blind]. If
you press [Stage], press
[S7], More Softkeys.
2. Press [S6], Delete in
Stage, Delete Cue in
Blind).
3. Enter number of cue to
delete. This is optional if
you wish to delete the currently selected cue.
4. To delete just the current
cue, press [Enter].
To delete the current cue
and any channels that track
from that cue, press
[Track] [Enter]
5. Press [Enter]
For more information on tracking, see
.
Action:
Selects display mode
Prompt reads:
To Delete cue, press ENTER - Delete
cue and tracking, press TRACK +
ENTER
To cancel, press CLEAR
Selects cue to delete
Prompt reads:
To confirm, press ENTER
To cancel, press CLEAR
Deletes cue
Chapter 7, Track
, page 79.
Copying cues
In some cases, you may want to copy a cue’s channel levels and use them
as the foundation for a new cue. To copy cue, follow these steps:
Keystrokes:
1. Press [Stage] or [Blind].
2. Press [Cue] [1].
3. If you are in Stage display,
press [Go].
4. Press [Record].
5. Press [Cue] [2].
6. Press [Enter].
Note: You may also copy a look from a cue to a submaster or a group. To
do so, press [Sub] or [Group] in place of [Cue] in step 5.
Actions:
Selects display mode
Prompt reads:
Select cue number
To select cue type, press TYPE
Prompt reads:
To record cue, select number and
press ENTER
To cancel, press CLEAR
Corner reads: Cue 2
Cue copy is complete. Channel levels
have been copied from cue 1 to cue 2.
You can now modify the new cue
74 Insight 2x user manual
Page 87

Inserting cues
You may want to insert a cue between recorded cues. For example, you
may want to modify cue 1 slightly and insert it between cues 1 and 2. You
can number cues with a one-digit decimal. Therefore, you can insert up to
nine cues between 1 and 2 (1.1, 1.2, etc.).
Follow these steps to insert a cue between existing cues:
Keystrokes:
1. Press [Blind] or [Stage].
2. Press [Cue] and enter the
number of the cue to modify, then press [Enter].
3. If you are working in Stage
mode, press [Go].
4. Add or modify channels
and cue attributes.
5. Press [Record].
6. Enter cue number with
a decimal to insert it
between cues (e.g.,
[1][.][5]). If you do not
enter a new cue number,
you will overwrite the
existing cue.
7. Press [Enter].
Action:
Selects display mode
Selects the desired cue
Brings up cue on stage and on the
display
Cue is modified
Prompt reads:
To record cue, select number and
press ENTER
To cancel, press CLEAR
Corner reads: Cue 1.5
New cue 1.5 is recorded between
cues 1 and 2
chapter 6 cues 75
Page 88

Cue List
The Blind Cue List displays a list of the cues in your show. Up to 18 cues
are displayed on screen at any time. The Cue List includes the cue number
and type, its upfade, downfade and wait times, its link and follow settings,
its rate, and its label.
Press [S2], Cue List, in Blind mode to display the Cue List. A sample Cue
List display is shown below:
Follow this example to modify a cue in Cue List display:
Keystrokes:
1. Press [Blind].
2. Press [S2], Cue List.
3. Use the keypad to enter
the cue(s) to modify. Use
[And], [Except] and [Thru]
to select multiple cues.
4. Press [→] until the cursor
reaches the attribute you
wish to edit.
5. Enter the new setting for
the attribute and press
[Enter].
Action:
Selects Blind display mode
Displays Cue List
Selects desired cue(s)
Prompt reads:
Select cue number(s)
The prompt indicates your options or
prompts you to enter a new setting
Setting change is reflected on cue list
76 Insight 2x user manual
Page 89

Editing cue attributes in Cue List
The Cue List allows you to edit attributes across a range of cues simultaneously.
For example, if you wanted cues 1 through 5 to have upfade wait times of
ten seconds, you could set them all in one command. Follow these steps
to do so:
Keystrokes:
1. Press [Blind] [S2], Cue
List.
2. Press [1] [Thru] [5].
3. Press [Wait].
4. Press [1][0] [Enter].
Actions:
Displays Cue List
Prompt reads:
Select cue number(s)
Selects cues 1 through 5
Prompt reads:
Enter upfade wait time
Sets upfade wait time for cues 1
through 5 to 10
chapter 6 cues 77
Page 90

78 Insight 2x user manual
Page 91

chapter 7
track
Track record function
Track record allows you to record cues and modify recorded cues. Additionally, it allows you to designate whether or not the levels in the displayed cue should track into subsequent cues until a new level instruction
is encountered.
It also allows you to modify groups of cues quickly and add channels to
cues. You can also use it to create a new cue from the previous one, by
pulling all levels forward into the Blind display of the new cue.
Tracksheet mode
Tracksheet displays one channel’s level settings for all cues in which it
appears. From it, you can follow the track of that channel quickly. You can
then select a cue or a group of cues from the Tracksheet and modify that
channel’s level throughout
channels through allfade cues.
.
Tracksheet provides one means for tracking
Page 92

Track record
When you record a series of cues, you typically record the first cue, then
build the second cue from the first. Some of the channels change, but
many remain the same. The third cue is built from the second and so on.
This procedure results in many channels being set to a level in one cue
and staying at that level for several cues.
A channel whose level does not change through a series of consecutive
cues is said to “track” from cue to cue. That same sequence of
unchanged levels is also referred to as a “track.” The [Track] key creates
tracks by pulling channel levels from the previous cue (in Blind mode), or
by adding tracks to existing cues (in either Blind, Stage or Tracksheet).
Rising channel levels are displayed in blue in the Blind display
channel levels are displayed in green. Channel levels displayed in magenta
indicate that the channel is tracking, i.e., that its level is the same as in the
previous cue.
The following examples demonstrate how Track works. They include five
cues, each with five channels. In these examples, when a channel
changes level from one cue to the next it is printed in bold; tracked channels are printed normally. This corresponds to how Blind displays levels –
channels that rise or fall are displayed in blue or green; tracked channels
are displayed in magenta.
.
Falling
80 Insight 2x user manual
Page 93

Using record to create tracks
In Stage mode, the following keystrokes create the five cues illustrated
below. Each cue adds channels to the previous cue. The example uses
[Record] to record the cues
Cue 1 [Chan] [1] [Full] [Record] [1] [Enter]
Cue 2 [Chan] [2] [Full] [Record] [2] [Enter]
Cue 3 [Chan] [3] [Full] [Record] [3] [Enter]
Cue 4 [Chan] [1] [At] [2][5] [Chan] [4] [Full] [Record] [4] [Enter]
Cue 5 [Chan] [1] [Thru] [4] [At] [0][0] [Record] [5] [Enter]
These keystrokes produce the results illustrated in Figure 1.
Chan 1 Chan 2 Chan 3 Chan 4 Chan 5
Cue 1 FF
Cue 2 FF FF
Cue 3 FF FF FF
Cue 4 25 FF FF FF
Cue 5 00 00 00 00
.
Figure 1
Notice the vertical tracks that develop when a channel remains at the
same level through a number of cues. For example, channel 1 tracks from
cue 1 to cue 3. When a channel is not set at any level (such as channel 5
above) it is considered tracked at clear.
chapter 7 track 81
Page 94

Recording modified cues
The difference between Record and Track is apparent when you modify a
cue or insert a new cue between two existing cues. Record and Track produce different results.
The following keys were pressed to release captured channels and play
back cue 1
[Stage] [Rel] [Rel] Release captured channels.
[Cue] [1] [Go] Play back cue 1.
[Chan] [1] [At] [5][0] Modify channel 1 to 50 percent.
With cue 1 in a fader, channel 1 is modified to 50 percent
channel level that affects only the cue you modify, use [Record]. Modify
the cue; press [Record]; enter the cue number, and press [Enter]. Only the
current cue is modified. The track that encompasses the channel is interrupted but continues in the following cues at the originally tracked level.
The results of modifying cue 1 and using [Record] are illustrated in Figure
2.
Cue 1 50
.
Chan 1 Chan 2 Chan 3 Chan 4 Chan 5
.
To change a
Cue 2 FF FF
Cue 3 FF FF FF
Cue 4 25 FF FF FF
Cue 5 00 00 00 00
Figure 2
Note that channel 1 is not affected in cues 2 and 3. Also note that when
you record a modified cue that is in a playback fader, the changes are
reflected in the fader. That is, when you release the channels you have
modified, they remain on stage.
82 Insight 2x user manual
Page 95

If you change the level in the beginning or middle of a track, you may want
the change to continue through the remainder of the original track. To
track the level modification we just recorded in the example above, use
[Track] instead of [Record] to modify channel 1. Press [Track], enter cue
number, and press [Enter]. If you use [Track] rather than [Record] to record
the changes made to the cue illustrated in Figure 1, the results will be as
illustrated in Figure 3 (versus the results from using [Record] illustrated in
Figure 2).
Chan 1 Chan 2 Chan 3 Chan 4 Chan 5
Cue 1 50
Cue 2 50 FF
Cue 3 50 FF FF
Cue 4 25 FF FF FF
Cue 5 00 00 00 00
Figure 3
The modified level is recorded in the current cue and carries through the
entire track (cues 1 through 3).
chapter 7 track 83
Page 96

Inserting cues
If you insert a cue in this sequence, Record and Track produce different
results. Record saves changes only in the cue you insert; Track saves the
changes you make and tracks them through the following cues
The following keys were pressed to release captured channels and play
back cue 1. With cue 1 in a fader, channel 4 is added at 50 percent. The
new look is inserted as cue 1.1.
[Stage] [Rel] [Rel] Release captured channels.
[Cue] [1] [Go] Play back cue 1.
[Chan] [4] [At] [5][0] Add channel 4 at 50 percent.
[Record] [1][.][1] [Enter] Inserts new look as cue 1.1.
Figure 4 displays the result inserting the cue using [Record]
new channel is not added to the cues that follow it.
Chan 1 Chan 2 Chan 3 Chan 4 Chan 5
Cue 1 50
Cue 1.1 50 50
Cue 2 50 FF 00
.
.
Notice the
Cue 3 50 FF FF
Cue 4 25 FF FF FF
Cue 5 00 00 00 00
Figure 4
Note that Insight 2x enters a level of 00 percent for channel 4 in cue 2
This fades channel 4 out when cue 2 is played.
.
84 Insight 2x user manual
Page 97

When you insert a cue with [Track], new channels track through the cues
after it until Insight 2x encounters a cue with a level previously recorded
for that channel.
Pressing [Track] (rather than [Record] as in the previous example) then
[1][.][1] [Enter] to insert and record the same cue 1.1 as above produces
the results illustrated in Figure 5. Compare it to the results illustrated in
Figure 4, in which the same cue was inserted using [Record] rather than
[Track].
Chan 1 Chan 2 Chan 3 Chan 4 Chan 5
Cue 1 50
Cue 1.1 50 50
Cue 2 50 FF 50
Cue 3 50 FF FF 50
Cue 4 25 FF FF FF
Cue 5 00 00 00 00
Figure 5
Channel 4 creates a track from the cue after 1.1 until a pre-recorded level
interrupts it.
chapter 7 track 85
Page 98

Blackout cues and tracking
Sometimes you may add a channel to a sequence of cues that has not
used that channel yet. For example, you may want to add a channel to all
cues in a scene. To do this, add the channel to the first cue in the
sequence, and use Track to track the change through the remaining cues
However, the last cue in sequence may be a blackout cue. When you track
the channel, the new channel tracks until it runs into a different recorded
level. To ensure that channels are not tracked through a blackout cue,
make the blackout cue an allfade cue. An allfade cue assigns a level of
zero to any unused channels. This blocks any potential tracks. An allfade
cue also clears the opposite fader.
Figure 6 displays what happens when we track channel 5 through the
sequence when cue 5 is a regular crossfade cue.
Chan 1 Chan 2 Chan 3 Chan 4 Chan 5
Cue 1 50 FF
Cue 1.1 50 50 FF
Cue 2 50 FF 00 FF
Cue 3 50 FF FF FF
.
Cue 4 25 FF FF FF FF
Cue 5 00 00 00 00 FF
Figure 6
Channel 5 tracks through cue 5 and ruins the blackout cue.
86 Insight 2x user manual
Page 99

If cue 5 is an allfade, Insight 2x records all unused channels at 00 percent
In the example below, an allfade enters 00 in channel 5, cue 5. When you
track channel 5 through the sequence, it won’t track through the blackout
cue.
To select the allfade type for cue 5, enter these keystrokes:
[Blind] [Cue] [5] [Type] [2] Selects allfade fade type.
[Record] [5] [Enter] Re-records cue.
Now when we track channel 5 through the sequence, cue 5 blocks the
.
The result is illustrated in Figure 7.
track
Chan 1 Chan 2 Chan 3 Chan 4 Chan 5
Cue 1 50 FF
Cue 1.1 50 50 FF
Cue 2 50 FF 00 FF
Cue 3 50 FF FF FF
Cue 4 25 FF FF FF FF
Cue 5 00 00 00 00 00
.
Figure 7
For more information on cue fade types, see
Cue types
on page 56.
chapter 7 track 87
Page 100

Tracksheet
Tracked channels are channels whose levels do not change from one cue
to the next. Tracksheet allows you to display one channel’s settings for all
recorded cues. At a glance you can see which cues have tracking levels
for that particular channel. You can also use Tracksheet to add or modify
a tracked channel through recorded cues.
To display Tracksheet, press [Tracksheet]. Step-by-step instructions for
using Tracksheet are on the following pages. If more cues are recorded
than fit on one screen, press [S5], Next Page, to display the next screen
of cues.
Channel
display line
Cue display
Prompt
area
Softkeys
Display mode
Keypad corner
Keypad corner
This window indicates how the console will interpret the next number
entered from the keypad. For example, if you press [Channel], the corner
displays Chan, indicating that the console will read the next number as a
channel number.
Channel display line
This line displays the current channel number and the range of cues displayed.
Cue display
The cue display lists recorded cues and the level recorded in each.
Prompt area
The operator prompt displays messages to guide you through Tracksheet
functions.
88 Insight 2x user manual
 Loading...