

Page 1
ETC Quick Guide
A
D
G
F
E
I
J
K
H
A
B
D
C
fos/4 Fresnel
Overview
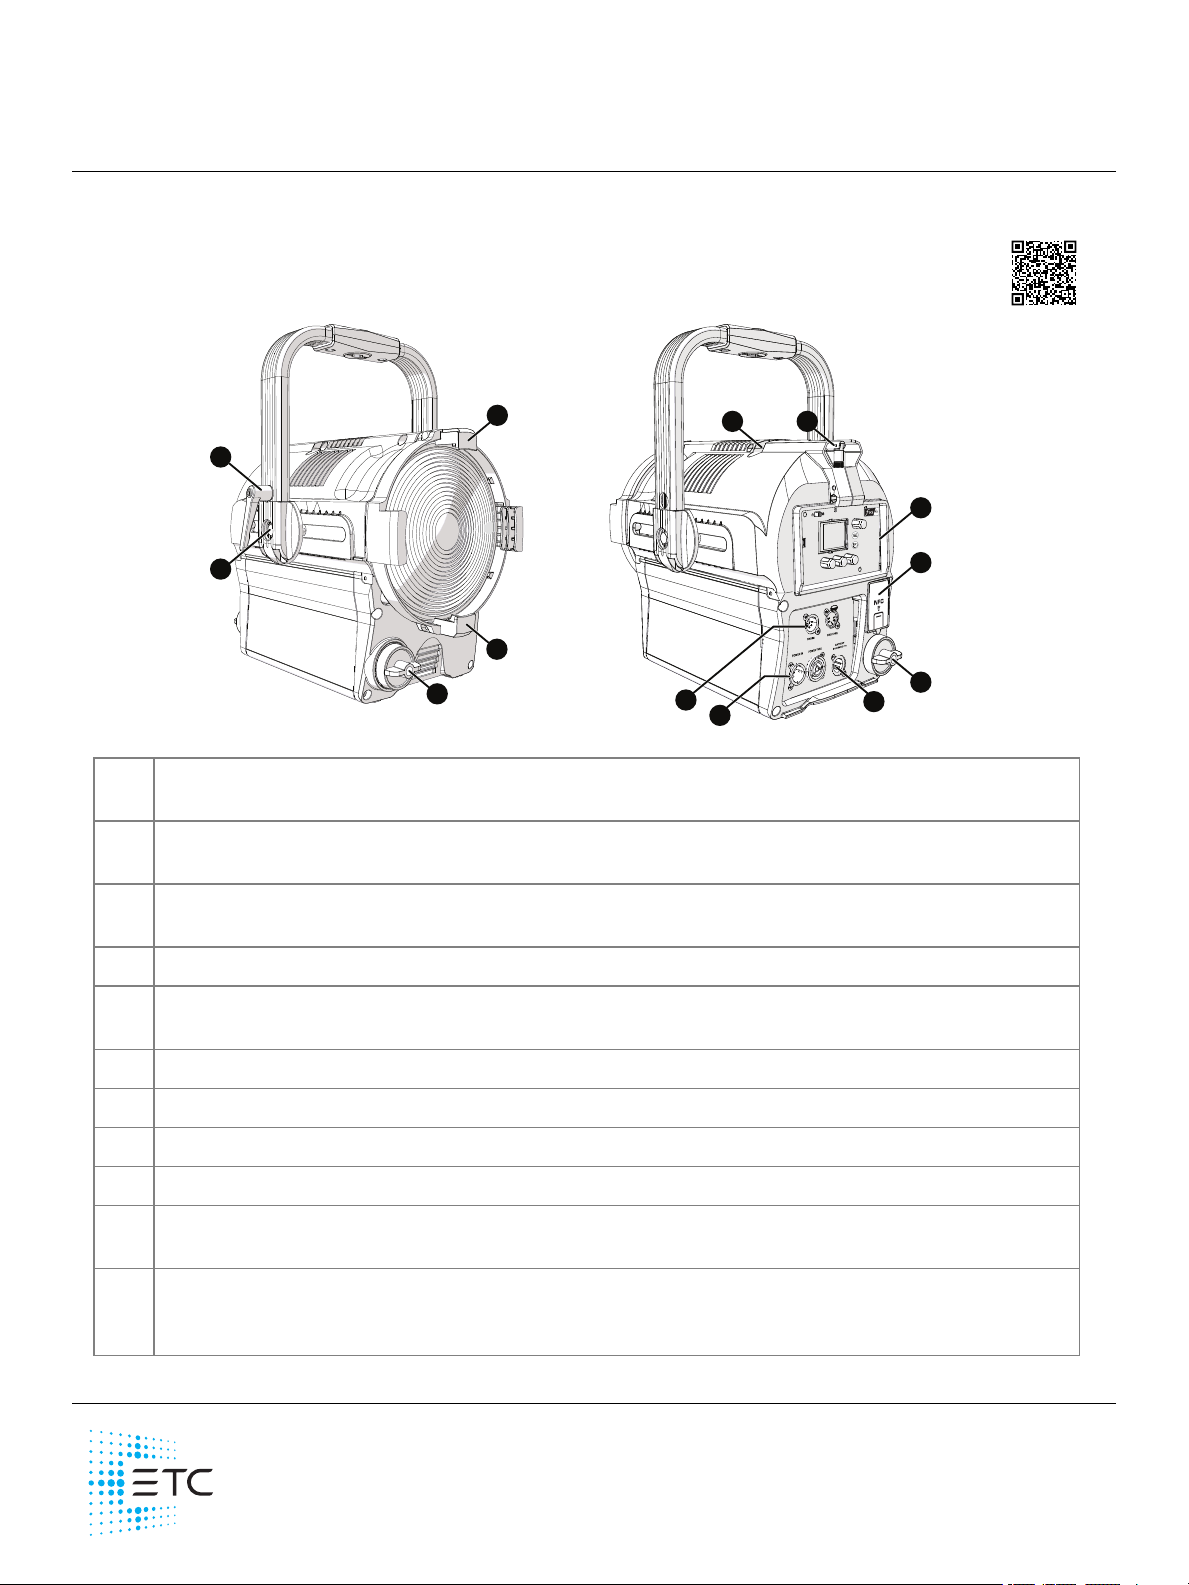
Use the images below as a guide to connect power and data a nd to na vigate the basic features of
the fixture. For complete information, see the
fos/4 Fresnel User Manual
at etcconnect.com.
Accessory holder:
A
then lock the holder. See
Yok e tilt-lock :
B
Insert a cce ssories into the two available slots from either side of the holder, and
Add Accessories on page4
.
Tilt the fixture as needed, and then turn the tilt-lock clockwise to lock the position. If
necessary, press the center button on the tilt-lock to adjust the tilt-lock position.
Adjustable yok e:
C
neede d to ba lance the fixture. T ighten the bolts to secure. See
Zoom knob:
D
NFC(Near F ield Communication) tag: Use the
E
Loosen the bolts, and then shift the adjustable yoke forward or backward as
Add Accessories on page4
Rotate the zoom k nob on either side of the fixture to adjust from spot to flood.
Se t Light
app to wirelessly configure the fixture , with
.
or without power applied to the fixture .
User interfa ce :
F
Antenna: For use when controlling the fixture using wireless DMX.
G
Safety cable attachment point:
H
DM X In and DMX Thru connectors:
I
Powe r In a nd Power Thru connectors:
J
View the fixture status, set the DMXaddress and mode, or set stand-alone options.
Se e
Mounting and Safety Cables on page4
.
Five-pin XLRconnectors for DMX/RDM in and thru.
powerCO N®TRUE1 TOP connectors for power in and power
thru.
Batte ry connector: Three-pin XLRconnector for battery power.
K
only when AC power is not available. Maximum fixture output may be reduced when powered by
Conne ct the fixture to ba tte ry power
battery.
Corpora te Hea dquarte rs Middleton, WI, USA +1 6 08 831 4116 London, UK +44 (0)20 8896 100 0
Holzk irchen, DE +49 (80 24) 47 0 0- 0 Rome , IT +39 (06 ) 32 111 683 Hong K ong +852 2799 122 0 Paris, FR +33 1 42 43 3535
We b etcconne ct.c om Support support.etcc onnec t.com Conta ct etcconnect.com /contactETC
© 2 02 0 Electronic T heatre Controls, Inc . Trade ma rk and patent info:etcc onnect.com /ip
Product information a nd specifications subject to change. ET Cintends this doc ume nt to be provided in its entirety.
74 70M13 00- 1.1 .1 Rev A Relea sed 2020 -1 0
Page 2
ETC Quick Guide
Effects
Effect Flicker
Rate 200
Min 0%
Max Int 100%
DMX
B
A
E
F
G
C
D
•
•
•
•
•
•
•
•
fos/4 Fresnel
User Interface
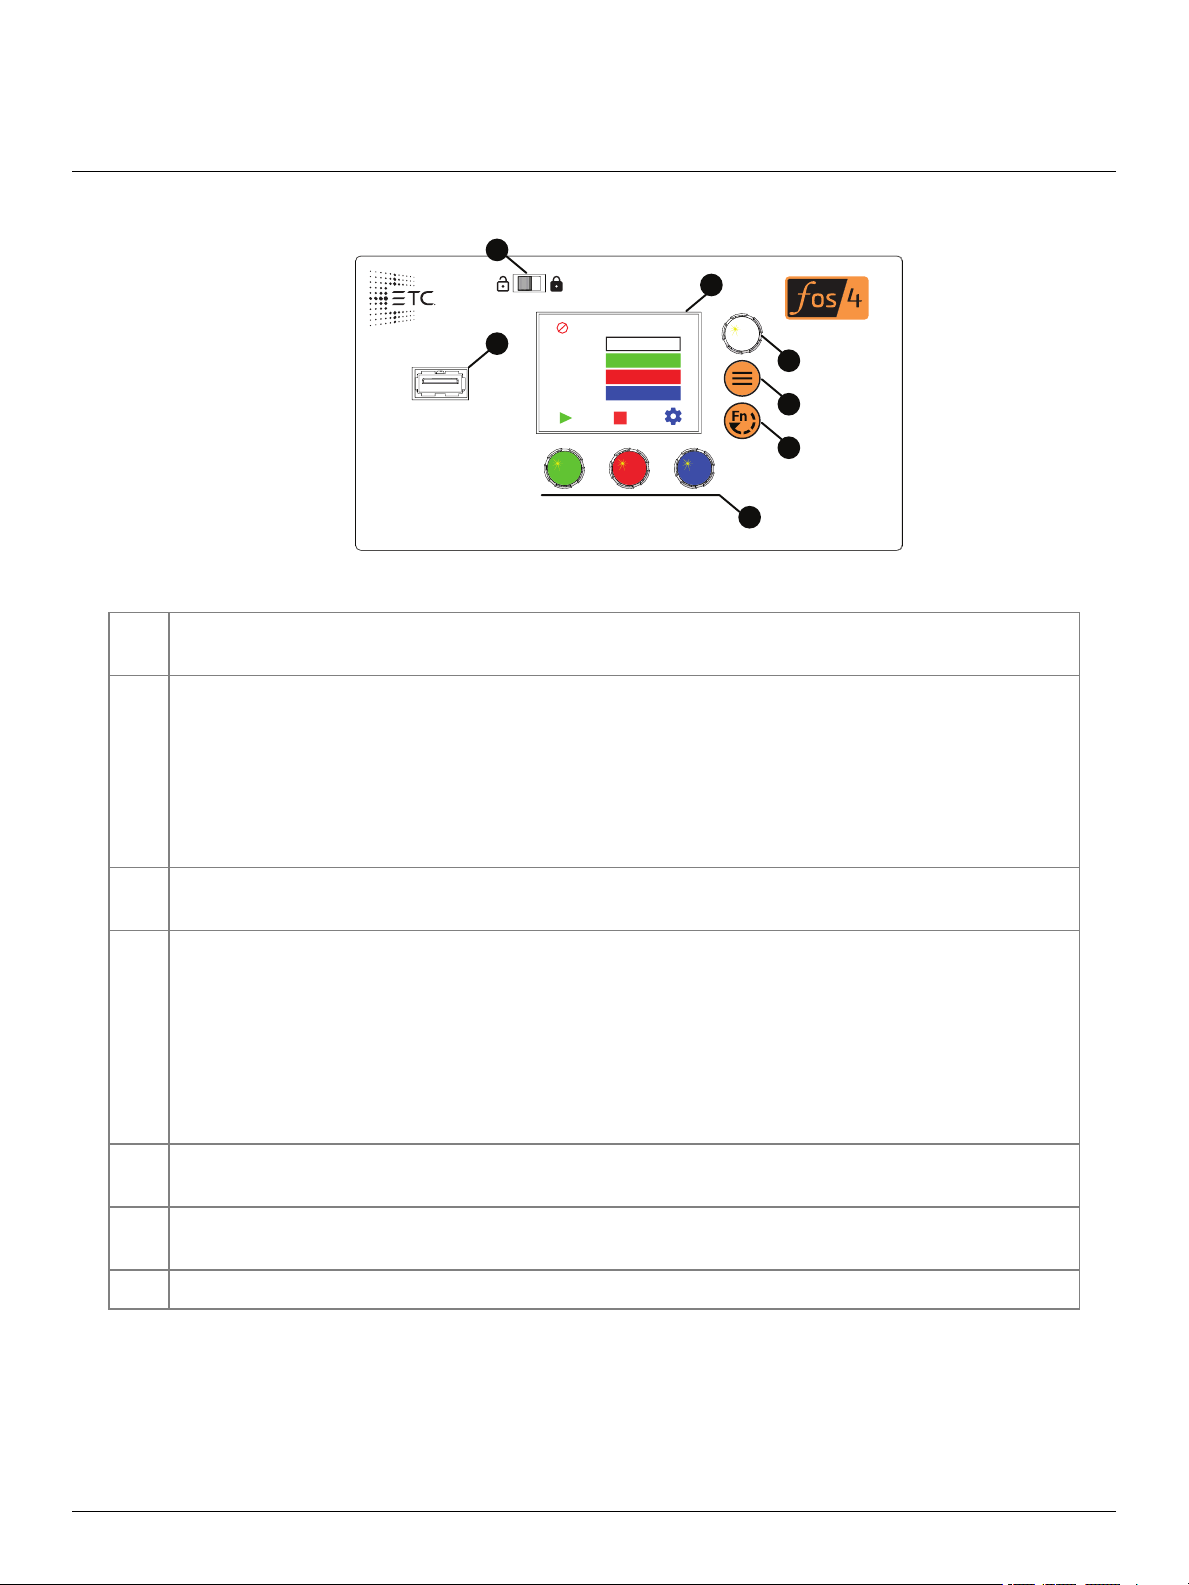
Display:
A
display (E) and the Intensity encoder to the right of the display(B).
The colors of options on the display correspond to the colors of the encoders below the
B Intensity encoder
:
When in DMX mode, press the Intensity encoder to enter Focus mode when focusing the fixture.
When configuring the fixture in one of the stand-alone modes, press the Intensity encoder to
toggle between the current intensity and 0, or turn the Intensity e ncoder to modify the white
fields on the display. See
Use Fixture in Stand-aloneMode on page7
.
When navigating from the Main Menu screen, turn the Intensity encoder to scroll through menu
options, and then press the Intensity e ncoder to select a menu option.
Me nu button:
C
Press to view the Main Menu screen and configure the fixture. Press the button again
to return to the previous screen when you are setting configuration options.
Function button: Press re peatedly to toggle through the following modes:
D
Studio: Use one of three studio (white light) pre sets, or customize the presets.
Color: Use one of 12 color presets, or customize the presets.
Preset: Use one of 12 presets (color preset + fade time), or customize the presets.
Effects: Use one of 12 effects, or customize the e ffe cts.
DMX: View and se t DMX parameters for the fixture.
Se e
Use Fixture in Stand-aloneMode on page7
Encode rs( Red, Green, Blue ) :
E
The colors of encoders correspond to options on the display. Pre ss to
and
Use Fixture in DMX Mode on page6
activate the options a t the bottom of the display, or turn to modify the values on the display.
US B port:
F
Use for updating firmware, saving and loading fixture configuration settings, or saving
error logs via a flash drive.
UI lock:
G
Se t this switch to lock the UI. This prevents inadvertent changes to the UI.
.
fo s/4 Fresnel Page 2 of 8 ETC
Page 3
ETC Quick Guide
•
•
•
•
•
•
•
•
•
•
•
•
•
•
•
•
fos/4 Fresnel
Safety
IMPORTANT SAFEGUARDS
When using electrical equipment, basic safety precautions should alwa ys be followed including the
following:
READ AND FOLLOW ALL SAFETY INSTRUCTIONS
Do not use outdoors.
Do not let power supply cords touch hot surfaces.
Do not mount near gas or electric heaters.
Equipment should be mounted in locations and at
heights where it will not rea dily be subjected to
tampering by unauthorized personnel.
SAVE THESE INSTRUCTIONS
Note:
only by a qualified technician. Contact ETC Customer Support for assistance.
WARNING: Note the following sa fety warnings be fore use:
The light source in this luminaire is not user-repla ceable , and must be re placed
Use the fixture in dry loca tions only, where humidity doe s not exceed 90
percent (non- conde nsing).
Connect the fixture to a non-dimmable power source in order to avoid
damage to the fixture's internal powe r supply and other electrical
compone nts. Using a dimmable power source can damage the fi xture and
will void the warranty.
Di sconne ct the fixture from power and DMX and allow it to cool be fore
insta lling a ccessories or performing a ny cle a ning and mainte nance .
Only use mounting hardware that is ra ted for the tota l weight of the
fixture and accessories.
In addition to prima ry suspe nsion, attach a safety cable (or other approve d
safe ty de vi ce) to the fixture. Safety cables must be ra ted to support ten
time s the fixture we ight. Consul t local standards to e nsure that safety
ca bles mee t all re quire me nts. See
page
.
Che ck tha t the a ccessory holde r is lock ed and tha t any acce ssory sa fety
ca bles are connected be fore mounting the fixture .
Do not mount the fixture on or ne a r a flamma ble surface .
Do not ope rate the fixture without the lens installed.
Do not use this fixture with a damaged power lead. If the powe r lea d
(cord set) is damage d, it must be replaced.
Do not use this fixture if the lens is dee ply scratched or cra cke d. You must
repla ce the lens whe n it is damaged.
The use of acce ssory equipment not
recommended by the manufacturer
may cause an unsafe condition.
Do not use this equipme nt for other
than intended use.
Mounting and Sa fety Cables on the ne xt
fo s/4 Fresnel Page 3 of 8 ETC
Page 4

ETC Quick Guide
•
•
•
•
•
•
•
•
B
A
D
C
C
fos/4 Fresnel
AVERTISSEMENT : Prendre connaissa nce de s avertisse ments de sécurité
suivants avant toute utilisation :
Dé bra nchez le proje cteur de son alime nta tion et du DMX e t laissez-le
refroidir avant d’installer des acce ssoires ou d’effe ctuer un nettoya ge ou
un entretien.
N’ utilisez que de la quinca illerie de monta ge a daptée a u poids total de s
proje cteurs et de s acce ssoires.
En plus de l a suspe nsion principale, fixez une chaîne de sécurité (ou tout
autre dispositif de sécurité homologué) au projecteur. Les chaînes de
sécurité doive nt être en me sure de supporte r dix fois le poids du
proje cteur. Consultez les norme s locales pour vous assure r que le s câbles
de sécurité re spectent toutes le s e xige nces.
Vé rifiez que le porte-a ccessoires est verrouillé e t que les élingues de tous
le s accessoires sont bien atta ché es ava nt de monte r le proje cte ur.
Ne pa s installer le projecteur sur ou à côté d’une surface infl a mmable .
N’ utilisez pas le projecteur sa ns que la lentil le soit installée.
Ne pa s utiliser ce projecteur avec un cordon d’alime nta tion endomma gé.
Si le cordon d’alime nta tion (câ ble) e st abîmé, il doit être remplacé .
N’ utilisez pas ce proje cte ur si la l e ntille prése nte des rayures ou des
fissures profonde s. Il fa ut remplacer la lentille si elle e st abîmé e.
Mounting and Safety Cables
You can mount the fixture using a cla mp, baby-pin (16mm) receiver, or
spigot on the yoke(A), or you can set the fixture on the floor or another
flat surface. When suspending the fixture, make sure to secure the
fixture with an appropriate safety cable at the safety cable attachment
point (B) .
If necessary, move the adjustable yoke (D in ima ge below) to balance
the fixture. Use a 13 mm socket wrench to loose n the bolt and shift the
yoke position, and then tighten the bolt to secure the yoke .
Add Accessories
You can use up to two standard accessories (one scrim and
one a dditional accessory, such as a barn door) in the
accessory holder.
1. Unlock the accessory holder on either side by pressing
2. Slide an accessory into one of the acce ssory slots. Add a
3. Lock the accessory holder by rotating the acce ssory
4. If necessary, move the adjustable yoke (D) to ba lance
the spring-release and rotating the accessory holder lock
(C).
second accessory in the other slot, if needed.
holde r lock back into place.
the fixture when using heavier accessories.
fo s/4 Fresnel Page 4 of 8 ETC
Page 5

ETC Quick Guide
•
•
•
•
•
•
•
fos/4 Fresnel
Connect Power and Data
1. Attach five-pin XLR cable to the
DMX In conne ctor (if using external
control).
2. Plug the XLR cable (if using) into the
DMX source or data daisy-chain.
3. Use the DMX Thru connectors to
conne ct up to 32 device loads on
the DMX daisy chain.
4. Are you using AC power or battery
power?
AC power: Continue to step5.
Battery power:Continue to step6.
5. Use the Powe r Thru connectors to
conne ct other fixtures using the
following recommended guidelines,
and then continue to step 6:
Power Thru: Link up to 6 additional
fixtures (12A max) via Power Thru
conne ctor when using an R20 Relay Module (consult break er-trip curves when using other
equipment).
6. Supply power to the fixture in one of these ways:
Attach the power cable to the Powe r In connector, and then plug the power cable into AC
power (100–240VAC, 50/60 Hz) on a non-dimmable circuit.
Attach the three-pin XLR cable to the Ba tte ry connector, and then plug the cable into the
battery (24–36VDC). Cable must be rate d for 10A or greater.
CAUTION:
Maximum fixture output may be reduced when the fixture is connected to battery
power.
Do not connect the fixture to the battery when AC power is present.
Focus the Fixture
1. Apply power to the fixture, and wait until the fixture has booted up(the ETC splash screen
displays during boot up).
2. Press any encoder to "wake " the display.
3. W hat screen is currently displayed?
DM X:Press the Intensity e ncoder to turn on the LED a rra y. The display shows a timeout
countdown to indicate how long the LED array will remain on at 100% intensity. You can
turn the Intensity encoder to reset the timeout countdown to 5minutes.
All othe r screens (S tudio, Pre set, etc.): Press the Intensity encoder to turn on the
LEDarra y, and turn the Intensity encoder to adjust the intensity.
4. Adjust the fixture to the de sired position.
5. Rotate the zoom knob on either side of the fixture to adjust from spot to flood.
6. Press the Intensity encoder to turn off the LEDarray.
fo s/4 Fresnel Page 5 of 8 ETC
Page 6

ETC Quick Guide
DMX
Address
Mode
DMX Loss
1/3 Red
DMX
Address
Mode
DMX Loss
1/3 Red
001
3 Ch RGB
HLL
001
3 Ch RGB
HLL 2 Min
Press any encoder to wake the display... ...and then turn an encoder to modify the value in
the matching field. Press an encoder again to save
the value and return to the view-only screen.
fos/4 Fresnel
Use Fixture in DMX Mode
After you connect power and data to the fixture and provide DMX, press the Function button ( )
repea te dly to toggle to the DMX screen, where you can set the DMX address, DMXmode, and
DMXloss behavior. (You ca n also set these values using RDM.)
The DMX screen displays the current DMX values. Press any of the encoders to "wak e" the display
and edit the values. The colors of the encoders correspond to options on the display. Turn an
encoder to modify the corresponding value, and then press the encoder to save the ne w value .
DMXModes
RDMPerson alit y ID
DMXChann el
Direct
(Day light HDR)
1 1 2 3 4 5
1 Int ensity Int ensity Int ensity Intensity Red Int ensity
2 Deep Red Deep Red CCT CCT Gr een
3 Red Red Tint Tint Blue
4 Mint Amber Tuning Tuning
5 Cyan Lime Mix Strobe
6 Blue G r een Red Cur ve
7 Indigo Cyan Gr een F an
8 Strobe Blue Blue
9 Cur v e In digo Strobe
10 Fan St r obe Cur ve
11 Cur v e Fan
12 Fan
Direct
(Lust r X8)
Expanded Studio 3 Ch RGB 1 Channel
fo s/4 Fresnel Page 6 of 8 ETC
Page 7

ETC Quick Guide
•
•
•
•
•
Studio
3200K 4500K 5600K
CCT 3200 K
Tint 0.0 Green
Tune Brightest
Int 100%
Studio
3200K 4500K 5600K
CCT 3125 K
Tint 0.0 Green
Tune Brightest
Int 100%
Press an encoder to play that
studio preset...
...or turn an encoder to modify the
value in the matching field.
Turn to adjust intensity, or press to
toggle between current intensity and 0.
DMX
DMX
•
•
•
fos/4 Fresnel
Use Fixture in Stand-aloneMode
After you connect power to the fixture, press the Function button ( ) repe atedly to toggle through
the following modes:
Studio: Use one of three studio (white light) pre sets, or customize the presets.
Color: Use one of 12 color presets, or customize the presets.
Preset: Use one of 12 presets (color preset + fade time), or customize the presets.
Effects: Use one of 12 effects, or customize the e ffe cts.
DMX: View and se t DMX parameters for the fixture.
The colors of options on the display correspond to the colors of the encoders below the display and
the Intensity encoder to the right of the display. Turn an encoder to modify the corre sponding value
on the display, or pre ss an encoder to activate the corresponding option at the bottom of the display.
Press the Intensity encoder to toggle between the current intensity and 0%.
If the fixture is connected to other fos/ 4 Fresnel fixture s that a re in the same stand-alone mode, the
conne cted fixtures will play the same prese t or effect.
Select a Color Temperature
1. Press the Function button ( ) until the display shows the Studio screen.
fo s/4 Fresnel Page 7 of 8 ETC
2. Press the color encoder that matches the studio preset you want to use (Blue = 3200K,
Gree n= 4500K, Re d= 5600K).
More Options
Turn off the preset: Press the Intensity encoder to toggle the intensity value from the current
value to 0. Press the Intensity encoder again to toggle back to the previous intensity value.
Modify the prese t:Turn the encoders to change the corresponding values. For example , turn
the Intensity encoder to change the intensity value, or turn the blue encoder to change the
color temperature value.
Revert to the original pre set:Press the encoder that corresponds to the preset again to restore
the original values.
Page 8

ETC Quick Guide
•
•
•
•
•
•
•
•
•
•
fos/4 Fresnel
Save the modified preset:Press and hold the encoder that corre sponds to the preset that you
want to re-record. The display shows a three-second countdown before re-recording the
preset.
Select a Color
1. Press the Function button ( ) until the display shows the Color screen.
2. Turn the encoders to change the corresponding value s. For exa mple, turn the Intensity
encoder to change the intensity value, or turn the green encoder to change the hue value . The
crosshairs on the display indicate the approximate color.
You can use a preset as a starting point for a color by pressing the color encode r tha t matches
the preset. T urn the red encoder to move to another page of presets.
More Options
Turn off the color: Press the Intensity encoder to toggle the intensity value from the current
value to 0. Press the Intensity encoder again to toggle back to the previous intensity value.
Revert to the original color of a pre set: Press the encoder that corresponds to the preset aga in
to restore the original value s.
Save the color to a preset:Press and hold the encoder that corresponds to the preset that you
want to re-record. The display shows a three-second countdown before re-recording the
preset. Changes that you make to pre sets in the Color screen also affect presets in the Effects
scree n and the Pre set scre en.
Select a Preset
1. Press the Function button ( ) until the display shows the Preset screen.
2. Turn the green encoder to select a preset, and then press the encoder to play the preset.
More Options
Pause the preset fade: Press the green encoder to toggle between play and pause.
Stop the pre set: Press the red encoder.
Modify the prese t:Turn the Intensity e ncoder to change the intensity, or turn the red encoder
to change the fa de value.
Ca pture the current DMX look: P ress and hold the blue encoder (for the S na pshot icon ).
The display shows a 3-second countdown before re-recording the preset. Capture is limite d to
three DMX modes: 3 Ch RGB, Studio, and Expanded.
Modify the prese t color:Press the blue e ncoder (for the Edit icon ). In the Edit Preset Color
scree n, turn the encoders to change the corresponding values. The crosshairs on the display
indica te the a pproximate color. P re ss the green encoder (for the Save icon ) to save the
new color to the prese t.
Push the preset to connected fixtures:Press the Menu button ( ), and then use the Intensity
encoder to navigate through the menu: Local Settings>Push Presets. W he n the scree n
prompts you to confirm, press the green encoder (for the OK icon ) to continue.
fo s/4 Fresnel Page 8 of 8 ETC
 Loading...