

ESX VS-200W BMW operation manual

VS 200C BMW
3-WAY SEMI-ACTIVE COMPONENT SYSTEM
VS 200W BMWVS100C BMW
10cm (4”) 2-WAY COMPONENT SYSTEM 20 cm (8”) BASS SPEAKERS

ENGLISH
IMPORTANT INFORMATIONS
VS200C BMW (VS100C BMW + VS200W BMW)
The VS200C BMW is a partially active 3-way sound system that must be operated by a 4-channel amplifier or two 2-channel amplifiers! These amplifiers must have an adjustable low-pass filter on 2 channels and an adjustable high pass filter on the other 2
channels. Please refer to the instructions in section „6. Amplifier Interconnection“.
VS100C BMW: VS200W BMW:
• 10 cm (4”) 2-Way Component-System
• 60 Watts/RMS, 120 Watts/MAX
• Impedance 4 Ohms
• Frequency Response 75 - 22000 Hz
• 102 mm Poly Cone Woofer
• 25 mm Silk Dome Neodymium Tweeters
• Mounting Depth 41 mm
• Mounting Diameter 92 mm
Passive mode also possible (replacement speakers)
• 20 cm (8”) Bass-Speakers
• 100 Watt RMS / 200 Watt MAX.
• Impedance 3 Ohms
• Frequency Response 30 - 300 Hz
• 217 mm Poly Cone Woofer
• Mounting Depth: 44 mm
• Mounting Diameter: 204 mm
Passive mode also possible (replacement speakers)
Compatibility:
BMW E 60/61/70/71/81/82/83/84/87/88/89/90/91/92/93
BMW F 01/02/03/04/06/10/11/12/13/20/21/22/25/30/31/32
The enclosed adapter rings are required for some models.
Important Notes:
This guide is an installation aid for a proper installation of the sound system.
Please read the following instructions:
• Please treat all parts of the sound system and the components of your vehicle with caution.
• Follow under all circumstance the regulations of the vehicle manufacturer and do not make
any modifications on the vehicle, which could interfere the driving safety.
• Always ensure the correct polarity of all connections.
Warranty:
To maintain your warranty coverage upright, keep your original purchase receipt to prove the date of purchase. Any damage of the product,
based on incorrect or improper use, accident, incorrect and improper installation, modification of the barcode, natural disaster or any nonappropriate interventions, repairing or alteration outside our factory or authorized service centers, and caused by other acts, which are unauthorized, because have been made in an incompetent manner, is excluded from the warranty. This warranty is limited only to defective parts
and especifically excludes all incidental or consequential damages and those who are associated with. Please return the defective product
along with a copy of your purchase receipt and a detailed malfunction description to the dealer from whom you purchased the product.
Legal Note:
• ESX or Audio Design GmbH is in no way affiliated with the Bayerische Motoren Werke AG or any
of its subsidiaries or affiliated companies connected to, or is acting on its behalf or with its authorization.
• All registered product names, trade marks and brands are the property of their respective owners.
• The compatibility with the specified types of vehicles reflects the information available on January 2015.
• Technical changes and errors reserved.
Customer Service:
In general, the assembly and installation of the sound system should be made by a trained and technically skilled specialists. If you nonetheless choose the self-assembly and you have any problems, contact your specialist dealer or the Audio Design Service Department under Tel.
+49 (0) 7253 - 94 65 93 or by E-Mail to speakers@audiodesign.de
2
ENGLISH
MOUNTING EXAMPLE
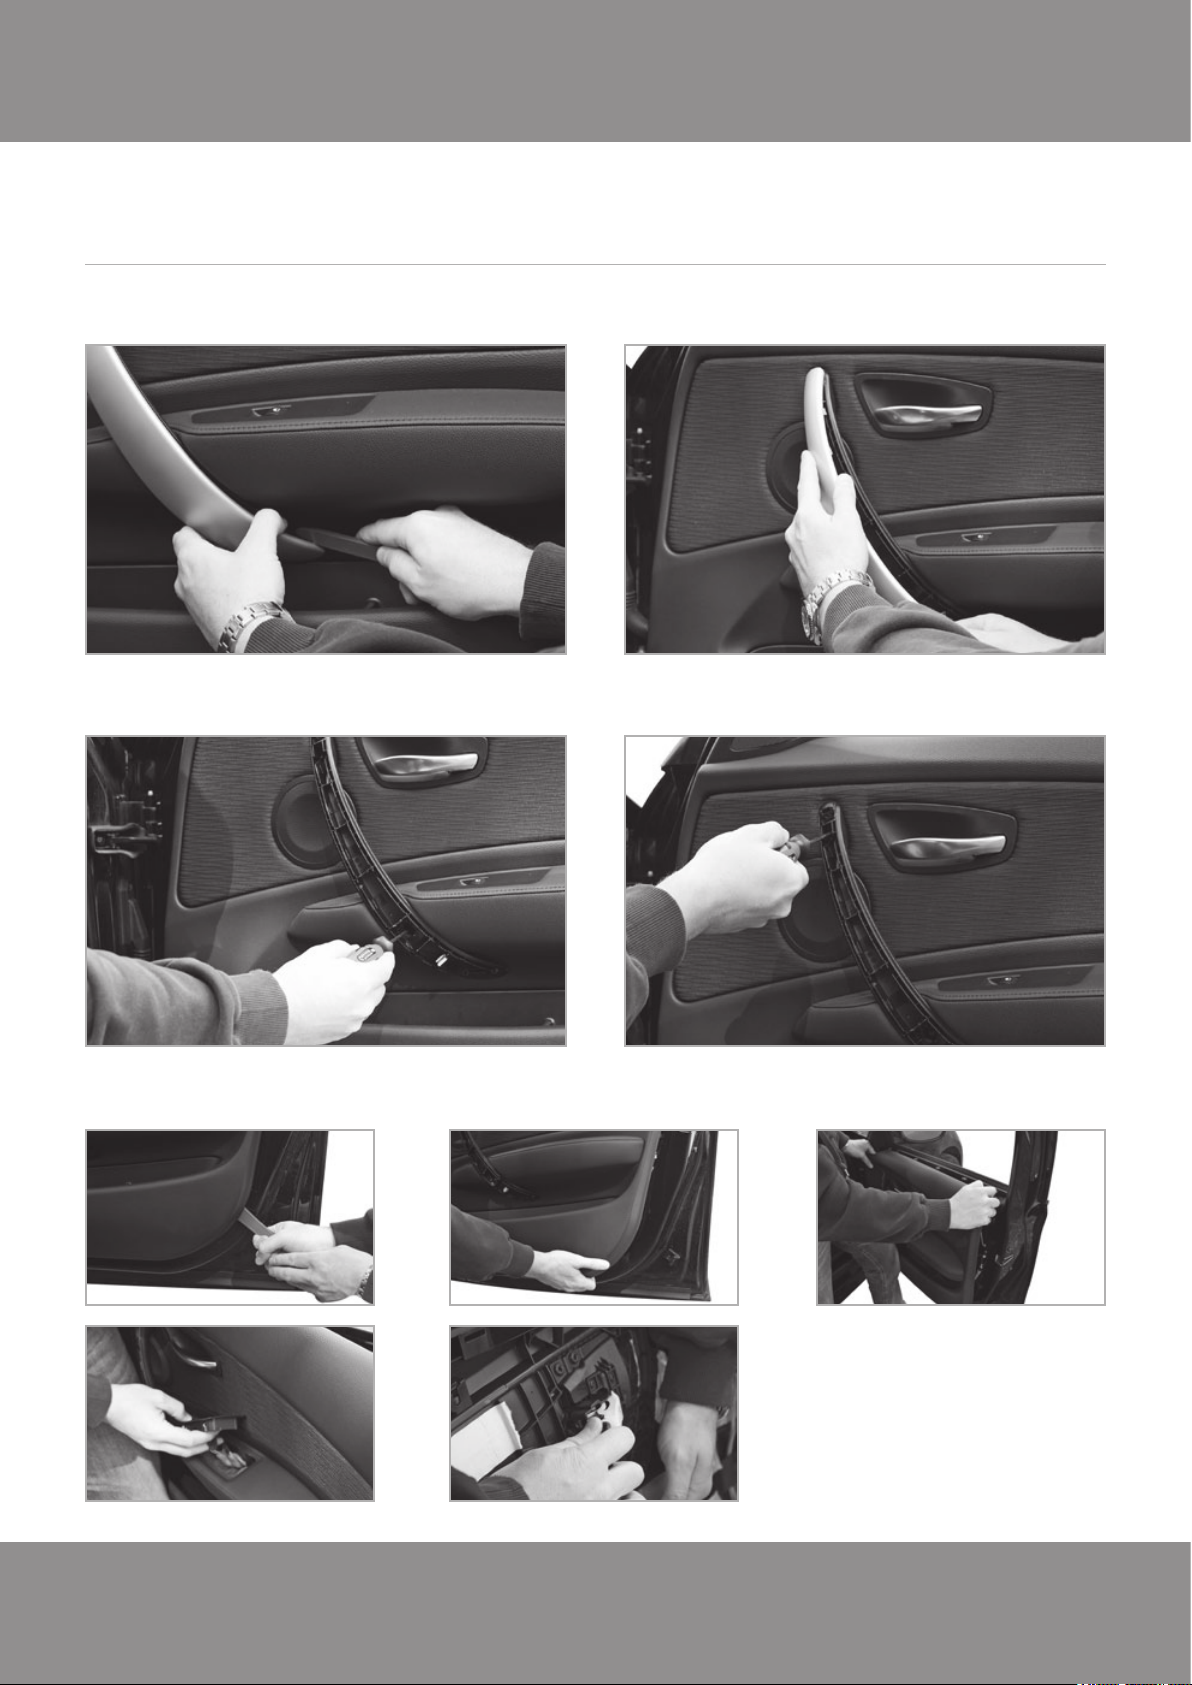
1. Removing the bar of the handle
2. Removing the screws of the handle
BMW SERIES 1 / 5-Door
3. Removing the door trim
To be continued on next page!
3
ENGLISH
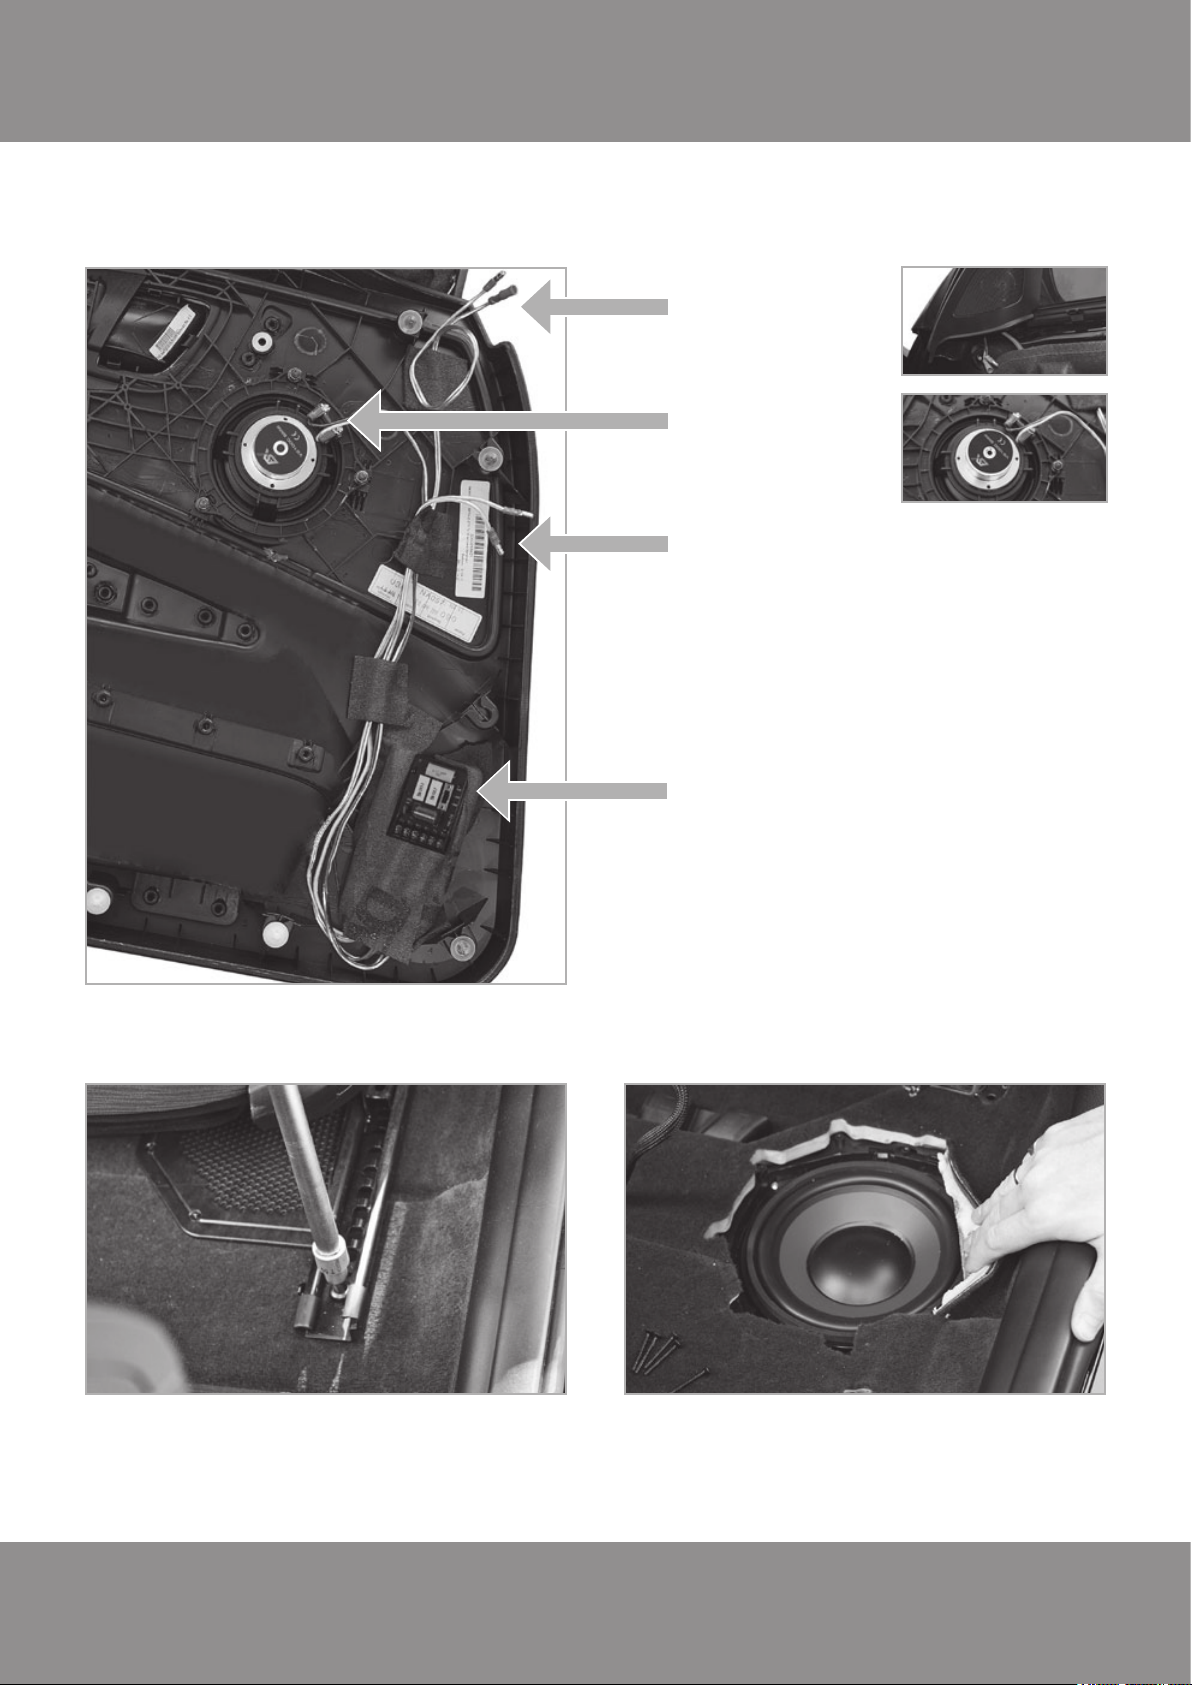
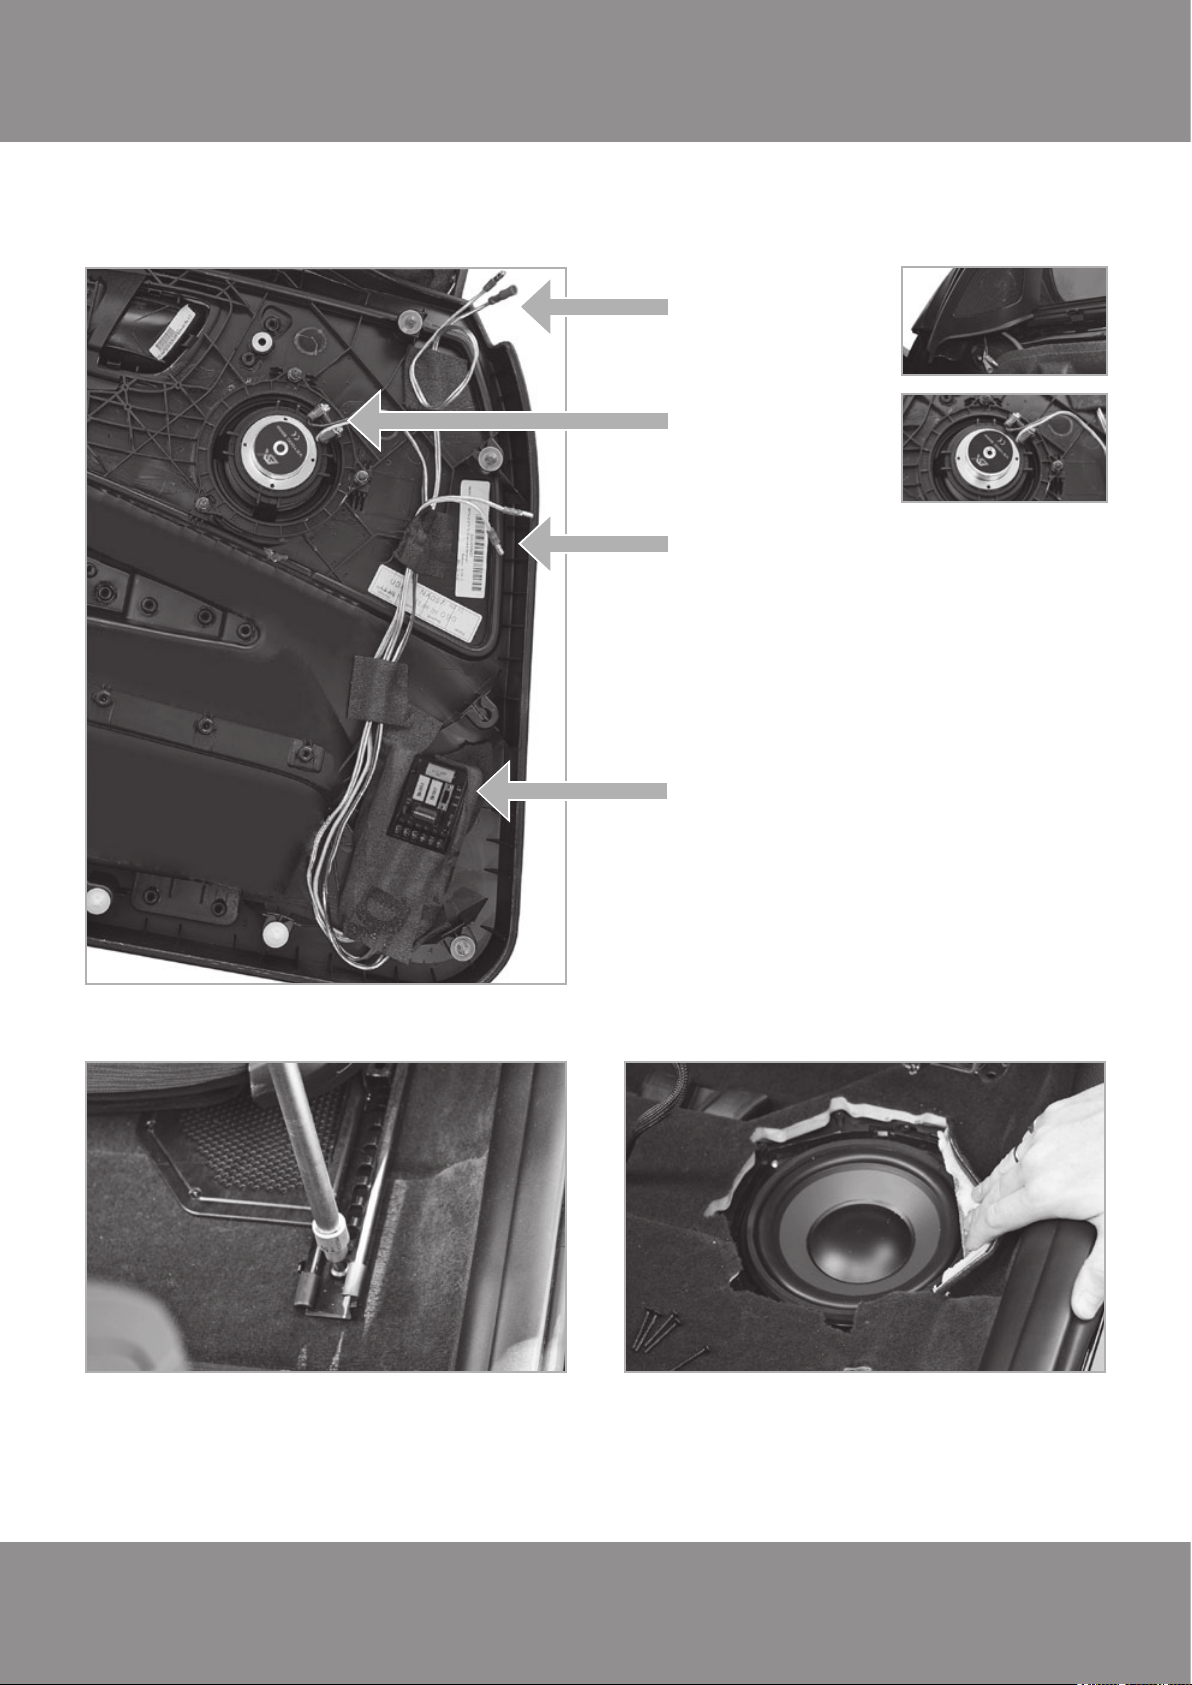
4. Mounting of the speakers (Tweeters & Midwoofers)
Tweeter interconnection
to the mirror triangle
(Cable color red/silver)
Midwoofer interconnection
(Cable color blue/silver)
Interconnection/signal input
to the amplifier
(Cable color yellow/silver)
5. Mounting of the subwoofers
Installation option of the crossover housing
with the level adjustment switch for the tweeter.
The switch is located under the crossover cover.
Crossover interconnection:
E +/- signal input to the amplifier
TW +/- tweeter
WF +/- midwoofer
To install the subwoofers, the front seats have to be removed,
which are secured with 4 screws. Loosen these screws and then
remove the standard speaker grille. Then replace the original
loudspeakers with the new ESX subwoofers.
4
To ensure a optimal and a free movement stroke of the speaker,
you may need to remove a portion of the foam. Set then the
speaker cover back to its location, and re-tighten the screws of the
seat, but please take care that these are tight.
ENGLISH
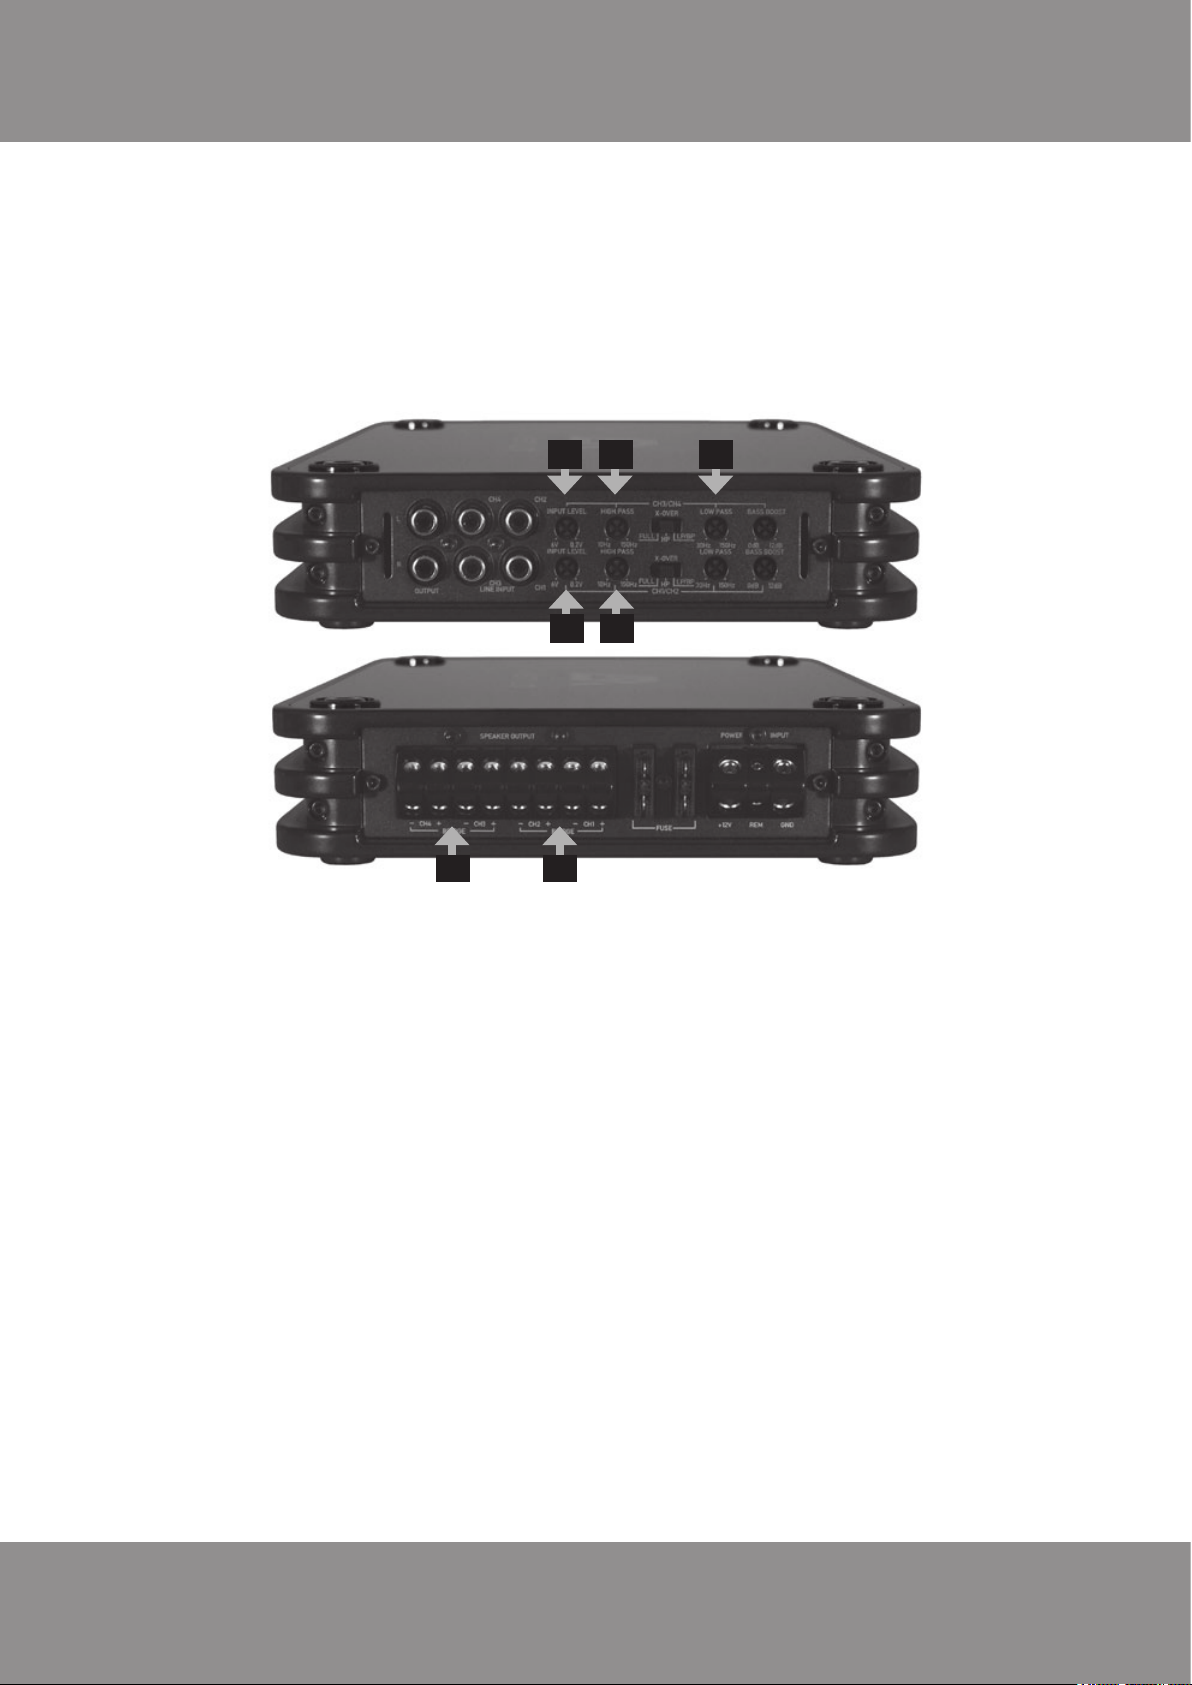
6. Amplifier Interconnection (only VS200C BMW)
The following example shows the interconnection of a 4-channel amplifier. A suitable amplifier for the VS200C BMW sound system, is e.g.
the ESX XENIUM X-FOUR with 4 x 75 Watts RMS and a matching filter section.
Please refer to the owner‘s manual of the amplifier to ensure the correct connection and operation.
Frontpanel
of X-FOUR
Rearpanel
of X-FOUR
F
G
C B
E
A
The channel pair CH3 / 4 must be operated in low pass-/band pass mode. After connecting the two bass speakers to the speaker outputs
CH3 & CH4 of the amplifier [ A ], set the controller of the low pass filter [ B ] to about 130 Hz. In order to use the optimum volume of the bass
speakers, it is important to use a high-pass filter and subsonic filter as well. Now set the controller of the high pass filter [ C ] on channel pair
CH3/4 to about 40 Hz.
After the installation of the midwoofers and tweeters in the doors and the connection of the crossovers, the signal inputs of the crossover
must be connected to the speaker outputs CH1 & CH2 of the amplifier [D]. Now set the controller of the high pass filter [E] on the amplifier to
150 Hz.
IMPORTANT NOTE:
The midwoofers and tweeters must be driven in any case by a high pass filtered channel pair, otherwise the speakers could be damaged
with too low frequencies. To be on the safe side, set first the crossover frequency of the highpass filter [ E ] of CH1 & CH2 on the amplifier, if
possible, slightly higher than 150 Hz and then regulate down slowly and carefully.
At the crossovers, you are able to adjust the tweeter level in following steps:
-6dB for a lower tweeter level, -3dB for a standard tweeter level and 0dB for a high tweeter level
HINTS FOR SETTING THE LEVEL INPUT OF THE AMPLIFIER:
First, turn the two input level controllers [ F or G ] at the amplifier counterclockwise to the MIN. position. Now turn up the volume of the head
unit (car radio) to 80% - 90% of its maximum volume. Then turn slowly and carefully the input level controller [ F ] at the amplifier back in
clockwise direction, until you hear some distortions, then back a bit, until no distortions are audible. Then proceed accordingly with the other
input level controller [ G ]. The right volume balance between the channel pairs CH1/2 and CH3/4 should be selected according to your taste
and listening habits, but you should set the level controller [ F ] of the two bass speakers on CH3/4 a little higher than CH1/2, so the bass
develops a better performance.
D
Always make absolutely sure, that the audio signal of both channel pairs is not overdriven or distorted, when you turn up the volume controller on your head unit (car radio), because this could damage the speakers permanently.
5

DEUTSCH
WICHTIGE INFORMATIONEN
VS200C BMW (VS100C BMW + VS200W BMW)
Das VS200C BMW ist ein teilaktives 3-Wege Soundsystem und muss mit einem 4-Kanal-Verstärker oder mit zwei 2-Kanal-Verstärkern
betrieben werden! Diese Verstärker müssen auf 2 Kanälen einen regelbaren Tiefpass-Filter und auf 2 Kanälen einen regelbaren
Hochpass-Filter besitzen. Beachten Sie dazu die Hinweise im Abschnitt „6. Anschluss am Verstärker“.
VS100C BMW:
• 10 cm (4”) 2-Wege Komponenten-System
• 60 Watt/RMS, 120 Watt/MAX
• Impedanz 4 Ohm
• Frequenzbereich 75 - 22000 Hz
• 102 mm Polycone Mitteltöner
• 25 mm Neodym Gewebe-Hochtöner
• Einbautiefe 41 mm
• Einbauöffnung 92 mm
Passiv-Betrieb auch möglich (Ersatzlautsprecher)
VS200W BMW:
• 20 cm (8”) Bass-Lautsprecher
• 100 Watt RMS / 200 Watt MAX.
• Impedanz 3 Ohm
• Frequenzbereich 30 - 300 Hz
• 217 mm Polycone Tieftöner
• Einbautiefe: 44 mm
• Einbauöffnung: 204 mm
Passiv-Betrieb auch möglich (Ersatzlautsprecher)
Kompatibilität:
BMW E 60/61/70/71/81/82/83/84/87/88/89/90/91/92/93
BMW F 01/02/03/04/06/10/11/12/13/20/21/22/25/30/31/32
Bei einigen Modellen werden die beiliegenden Adapterringe benötigt.
Wichtige Hinweise:
Die Ihnen vorliegende Anleitung ist eine Einbauhilfe zur fachgerechten Montage. Beachten Sie dazu die folgenden Hinweise:
• Behandeln Sie bitte alle Teile des Soundsystems und die Komponenten Ihres Fahrzeugs grundsätzlich mit Vorsicht.
• Beachten Sie unter allen Umständen die Vorschriften des Fahrzeugherstellers und nehmen Sie keine Veränderungen
am Fahrzeug vor, welche die Fahrsicherheit beeinträchtigen könnten.
• Achten Sie unbedingt beim Anschließen auf die korrekte Polarität.
Garantie:
Um Ihren Garantieschutz aufrecht zu erhalten, bewahren Sie bitte zwecks Nachweis des Kaufdatums Ihren Originalkaufbeleg auf. Jeglicher
Schaden an dem Produkt, der auf falsche bzw. unsachgemäße Verwendung, Unfall, falschen Anschluss, ungeeignete Installation, Veränderung der Strichcodekennzeichnung, Naturkatastrophen oder jegliche zweckfremden Eingriffe, Reparatur oder Abänderung außerhalb unseres
Werkes oder autorisierter Service-Zentren, sowie alle anderen Handlungen zurückzuführen ist, die unberechtigter, weil inkompetenter Weise
vorgenommen wurden, ist von der Garantie ausgeschlossen. Diese Garantie ist auf defekte Teile beschränkt und schließt insbesondere alle
zufälligen bzw. eventuellen Folgeschäden aus, die damit einhergehen. Retournieren Sie das Produkt bei einem Defekt zusammen mit einer
Kopie des Kaufbelegs und einer detaillierten Fehlerbeschreibung an Ihren Fachhändler, von dem Sie das Produkt gekauft haben.
Rechtlicher Hinweis:
• ESX bzw. die Audio Design GmbH sind in keiner Weise mit der Bayerische Motoren Werke (BMW) AG oder einer ihrer
Tochtergesellschaften oder Partner-Unternehmen verbunden, oder handeln in deren Auftrag oder mit deren Autorisierung.
• Alle geschützten Produktnamen und Markennamen sind das Eigentum ihrer jeweiligen Inhaber.
• Die Kompatibilität mit den angegebenen Fahrzeugtypen entspricht dem Informationsstand vom Januar 2015.
• Technische Änderungen und Irrtum vorbehalten.
Kundenservice:
In der Regel ist die Montage und Installation des Soundsystems von einem geschultem und technisch versierten Spezialisten vorzunehmen. Sollten Sie sich dennoch für eine Selbstmontage entscheiden, wenden Sie sich bei Problemen an Ihren Fachhändler oder an die
Serviceabteilung von Audio Design unter Tel. +49 (0) 7253 - 94 65 93 oder per E-Mail an speakers@audiodesign.de
6

DEUTSCH
MONTAGEBEISPIEL
1. Leiste des Handgriffs entfernen
2. Schrauben des Handgriffs entfernen
BMW 1er / 5-Türer
3. Demontage der Türverkleidung
Fortsetzung auf der nächste Seite!
7
DEUTSCH
4. Montage der Lautsprecher (Hochtöner & Mitteltöner)
Hochtöner-Verkabelung
zum Spiegeldreieck
(Kabelfarbe rot/silber)
Mitteltöner-Verkabelung
(Kabelfarbe blau/silber)
Zuleitung/Signaleingang
vom Verstärker
(Kabelfarbe gelb/silber)
5. Montage der Basslautsprecher
Einbaumöglichkeit der Frequenzweiche mit Schalter zur
Lautsstärkeanpassung des Hochtöners. Der Schalter
befindet sich unter der Gehäuseabdeckung der Frequenzweiche.
Frequenzweichenbelegung:
E +/- Zuleitung/Signaleingang vom Verstärker
TW +/- Hochtöner
WF +/- Mitteltöner
Zum Einbau der Tieftöner müssen die vorderen Sitze ausgebaut
werden, welche mit jeweils 4 Schrauben befestigt sind. Lösen Sie
diese und entfernen die dann die serienmäßige Lautsprecherabdeckung. Tauschen Sie dann den Original-Lautsprecher gegen
den neuen ESX Tieftöner aus.
8
Um einen optimalen und bewegungsfreien Hub des Lautsprechers zu gewährleisten, müssen Sie gegebenenfalls ein Teil des
Schaumstoffs entfernen. Setzten Sie dann wieder die Lautsprecherabdeckung ein, schrauben wieder die Schrauben des Sitzes
ein, aber achten Sie bitte darauf, dass diese fest angezogen sind.
 Loading...