

Page 1
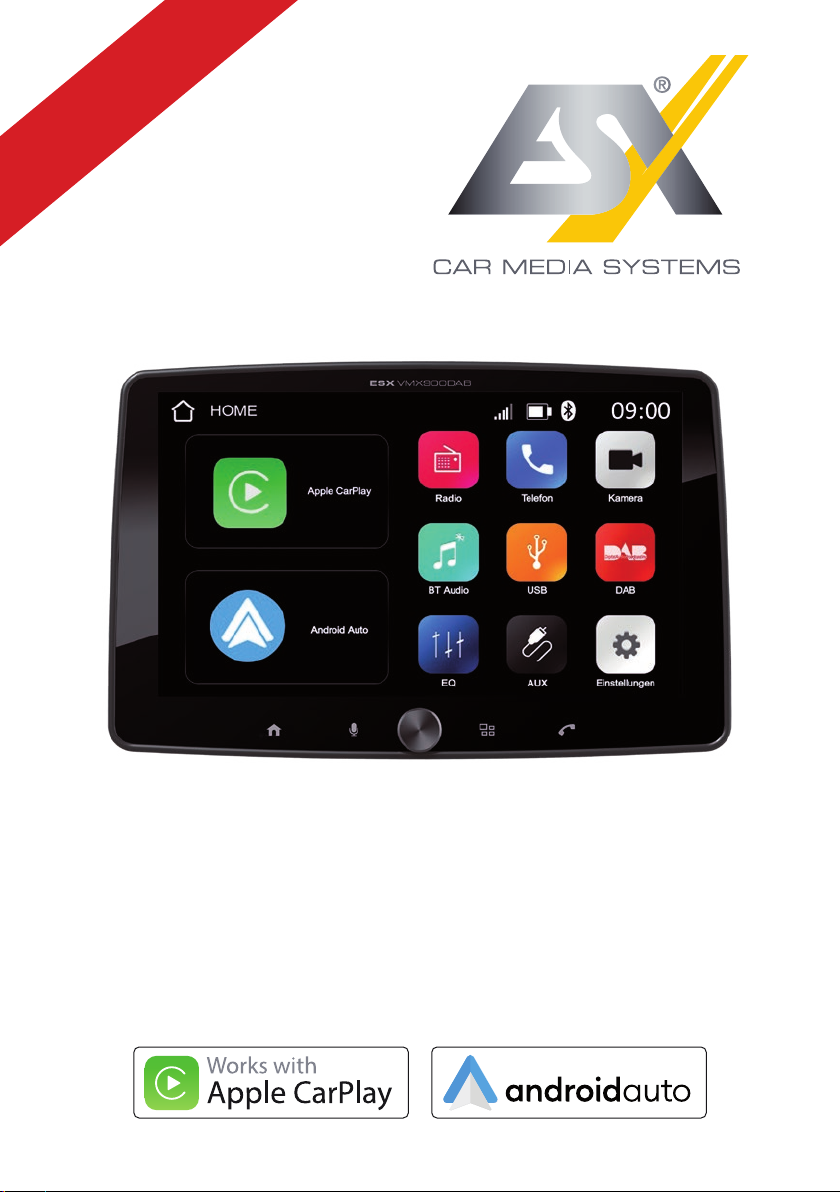
V1.1
OWNER’S
MANUAL
VMX900DAB
1-DIN 22,8 CM (9”) MULTI-ANGLE MEDIA MONICEIVER
works with
Page 2

2
Page 3

CONTENT
General information .............................................................................................................................4
Scope of delivery .................................................................................................................................. 4
Safety instructions ............................................................................................................................... 5
Specications ....................................................................................................................................... 6
Specications radio type ..................................................................................................................... 6
Disposal / recycling .............................................................................................................................. 7
Intended use of the device ..................................................................................................................7
Declaration of conformity .................................................................................................................... 7
1. Connections & installation .............................................................................................................. 8
2. Control elements ............................................................................................................................ 12
2.1 Function keys & controls ....................................................................................................12
2.2 Home menu ........................................................................................................................ 13
2.3 Status bar ........................................................................................................................... 13
3. Settings ...........................................................................................................................................14
3.1 General ............................................................................................................................... 14
3.2 Audio ..................................................................................................................................16
3.3 Display ................................................................................................................................ 17
3.4 Wi-Fi .................................................................................................................................. 18
3.5 Camera ............................................................................................................................... 19
3.6 Radio .................................................................................................................................. 20
3.7 About .................................................................................................................................. 20
4. Applications & functions ...............................................................................................................21
4.1 Apple CarPlay® & Android Auto™ ....................................................................................... 21
4.2 Radio .................................................................................................................................. 21
4.3 Handsfree ........................................................................................................................... 22
4.4 BT Audio ............................................................................................................................. 22
4.5 Camera ............................................................................................................................... 23
4.6 USB .................................................................................................................................... 23
4.7 DAB .................................................................................................................................... 23
4.8 AUX .................................................................................................................................... 23
IMPORTANT NOTE:
Always follow the instructions in this manual before using the device. Keep this manual in the vehicle
for future reference.
3
Page 4

GENERAL INFORMATION
Legal notice
• All registered product names, trade marks and brands are the property of their respective owners.
• This owner‘s manual was made with the utmost care.
• Technical changes and errors reserved.
Due to the ongoing development of this device, it is possible that the information in this manual is incomplete or is not matching to the delivery status.
Please visit periodically www.esxnavi.de on the internet, to check if additional information and updates
are available.
Care and maintenance
This device is equipped with high precision and sensitive technique and should always be treated with caution.
Please note the following tips to avoid endangering the warranty and extend the life of the appliance.
• Children under 12 should not operate the device. Keep the device and all accessories away from small
children.
• Keep the device and its components dry. The effects of water, liquid or moisture can cause damage
to the vehicle, the device itself or injury.
• Keep the device and its components away from excessive heat. High temperatures may shorten the life of
appliance of the electrical components.
• Keep the device and its components away from excessive cold. Extreme temperature changes and
moisture inside the device may cause the breaking of certain components. Do not to drop the device
and avoid violent shocks or excessive shaking.
• Do not use strong chemical cleaners, solvents or water to clean the device. Use a slightly moistened
cotton cloth.
• Replace a blown fuse only with a new one with the same values. However, before replacing a defec-
tive fuse, rst check what the cause of the short circuit is. Start with the power cable. If the fuse blows
again, there is a malfunction in the device. In this case, you should contact your authorized dealer.
SCOPE OF DELIVERY
1 x Main device with attachable display
1 x 1-DIN metal installation frame including screw set and mounting rail
2 x Metal bracket
2 x Unlocking tool
1 x 20-pin system plug with ISO connection
1 x 16-pin ISO double connector with open cable ends
1 x Analog steering wheel remote control adapter
1 x External microphone including holder
1 x DAB Antenna
1 x GPS antenna including adhesive pad
2 x User Manual (English/German)
4
Page 5

SAFET Y INSTRUCTIONS
• Note any time the trafc regulations of the country in which the device is operated.
• Please ensure, that with the engine turned off the vehicle‘s battery does not discharge fully. The device is another electrical consumer which must be operated with the engine running, other-wise the
vehicle‘s battery will be discharged and the vehicle can not be started.
• Set the volume of the device only as loud, that you are still be able to hear warning signals (e.g. police
sirens) and trafc noise inside the vehicle.
• Operate the device as driver only if it‘s absolutely necessary and in the driving safety is not compromised. The same stands for looking at the screen. If necessary, better park your vehicle at a safe and
appropriate location.
• The trafc rules of the EU prohibit to view moving pictures or movies while driving, if the screen of the
device is installed within sight of the driver, as he may be distracted. View the screen as driver only
for the navigation function, and then only briey that you will not be distracted. Note at any time the
local trafc regulations. In an accident, regress claims could be made by the car insurance company.
• This device is not a substitute for your personal judgment or perception. All suggested routes from the
navigation system should never be taken as a reason to disregard the local trafc rules. Your personal
assessment of trafc or your knowledge of safe driving practices is paramount. Always match your
driving with the current trafc situation.
• Do not follow the suggested routes, if the navigation system instructs you to take an unsafe or illegal
way, puts you in an unsafe situation, or directs you into an area which you consider unsafe.
• If problems occur while driving, park the vehicle in a safe and appropriate place to continue before
you operate.
• Please use only the included original accessories. Ensure a sufcient mounting of the device by using
the included installation accessories, as in the event of an accident enormous accelerations may
occur. Poorly installed devices and equipment in accidents could represent a severe risk to the driver
and the other passengers of the vehicle.
• Note under all circumstances the regulations and advice of the vehicle manufacturer and do not make
any modications to the vehicle, which could interfere with safe driving. Please treat all parts of the
device and the components of your vehicle always with caution.
• Please avoid short circuits and make sure that no metal objects can get inside the device. Also make
sure that all connections are properly connected and avoid the interchanging of the polarity of all
connections. Complete the installation only while the ignition is turned off.
• In the event of a defect or malfunction, do not attempt to repair it by yourself or open the device, this is
dangerous and could cause injury or damage to the equipment or vehicle. A repair should be done by
trained and authorized personnel only. The device uses a Class 1 laser to read the disk. Eye contact
with a laser is very dangerous to the human eye.
• If you connect an external device, you should rst read the instruction manual of the external device
and make sure that it is compatible. Avoid connecting an incompatible external device.
• Do not damage or scratch the screen with sharp objects. Do not operate the screen with hard objects.
5
Page 6

SPECIFICATIONS
• Universal 1-DIN multi-angle media moniceiver with 22.8 cm (9”) touchscreen display
• Large rotary knob for volume and four function buttons on the control panel
®
• Compatible with Apple CarPlay
• GPS receiver for optimized position determination in navigation applications
• Media player for audio, video and photo
Compatible le formats: AVI, FLV, MOV, MKV, WMV, WMA, MP3, FLAC, JPEG, PNG, BMP
• DAB digital radio (incl. DAB antenna)
• FM/AM radio with RDS function
®
• Bluetooth
hands-free function including audio streaming
• USB-A port for media with charging function (1.5 A)
• USB-A port for Apple CarPlay
• 4 x 80 watts max. music output
• RCA preamplier outputs with 4 V (FL/FR/RL/RR/SUB1/SUB2)
• RCA AUX inputs (L/R/VIDEO)
• RCA camera inputs (FRONT/REAR)
• Custom boot logo
• Selectable RGB key panel illumination with animation effect
• External microphone
• Compatible with analog steering wheel remote control (can be learned)
• Supported menu languages: GER, ENG, SWE, ITA
or Android Auto™ (wireless and USB)
®
or Android Auto™ with charging function (1.5 A)
SPECIFICATIONS RADIO TYPE
Function Band information Frequency Maximum emitted power
Satellite system GPS 1575 MHz –
AM Radio Medium wave band 522 - 1620 kHz –
FM Radio Band II 87,5 - 108 MHz –
DAB Radio Band III (5A – 13F) 174,9 - 239,2 MHz –
Bluetooth Version 5.0 2402 - 2480 MHz 10,0 dBm
WiFi / W-LAN IEEE802.11b/g/n/a/ac 2412 - 2484 MHz
5180 - 5825 MHz
6
12,0 dBm
18,0 dBm
Page 7

DISPOSAL / RECYCLING
If you have to dispose the device and its components, please note that no electronic devices
must be disposed in the household waste. Dispose the device and its components at a suitable recycling facility in accordance with local waste regulations. If necessary, consult your
local authority or dealer.
More information at www.audiodesign.de/english/disposal
INTENDED USE OF THE DEVICE
This device is only suitable for operation in a vehicle with an on-board voltage of 12 volts with negative
ground. In the event of misuse, incorrect installation or modication, the operating license and the warranty expire.
DECLARATION OF CONFORMIT Y
Distribution:
Audio Design Lautsprecher Vertriebs GmbH
Am Breilingsweg 3, DE-76709 Kronau/Deutschland
The Audio Design Lautsprecher Vertriebs GmbH hereby declares that the device VMX900DAB com-
plies with Directive 2014/53/EU. The full text of the EU declaration of conformity is available at the
following Internet address: www.esxnavi.de/ce
7
Page 8

1. CONNECTIONS & INSTALLATION
The following instructions are an installation aid for professional installation of the device.
Please note the following information before installation:
• Always handle all parts of the device and the components of your vehicle with care.
• Under all circumstances observe the regulations of the vehicle manufacturer and do not make any
changes to the vehicle which could impair driving safety.
• For safety reasons, disconnect the vehicle battery’s ground connection before installation.
• Please always pay attention to the correct polarity of the connections.
• Please do not modify any harnesses or connections of the device or the vehicle as this may affect
the warranty.
• Make sure that no cables are squashed or cause a short circuit.
• Do not lay cables in front of the airbags, e.g. in the dashboard or in a way that affects their function.
IMPORTANT NOTE:
For many vehicle models, a vehicle-specic 1-DIN installation set is required for professional installation. In order to be able to use the existing steering wheel remote control of your vehicle, a vehicle-spe-
cic adapter may also be required. You can obtain information about this on the Internet or from your
specialist dealer.
Please note the following steps when installing the device:
Original radio / navigation system
1
If available, rst remove the original radio / navigation device. Use suitable unlocking tools to pull
the device out of the dashboard. Then pull the cable plug from the device and leave it accessible
in the radio slot.
Cabling of the ESX main device
2
Lay the supplied cable sets and antennas in the vehicle. Please note the information on the next
page. Then connect all cable sets, antennas and dongles to the ESX main device as described
on page 6. Then plug in the cable plug from the radio slot of the vehicle on the ESX main unit or
on its vehicle-specic system cable set.
Installation of the ESX main device
3
Now the ESX main device can be inserted into the 1-DIN installation slot of the vehicle.
Functional test
4
Before you complete the installation, you should perform a function test. Check all functions of
the ESX Naviceiver including the steering wheel remote control of the vehicle.
8
Page 9
1. CONNECTIONS & INSTALLATION
+12V
DAB
Erdungsblatt*
+12V
DAB
Erdungsblatt*
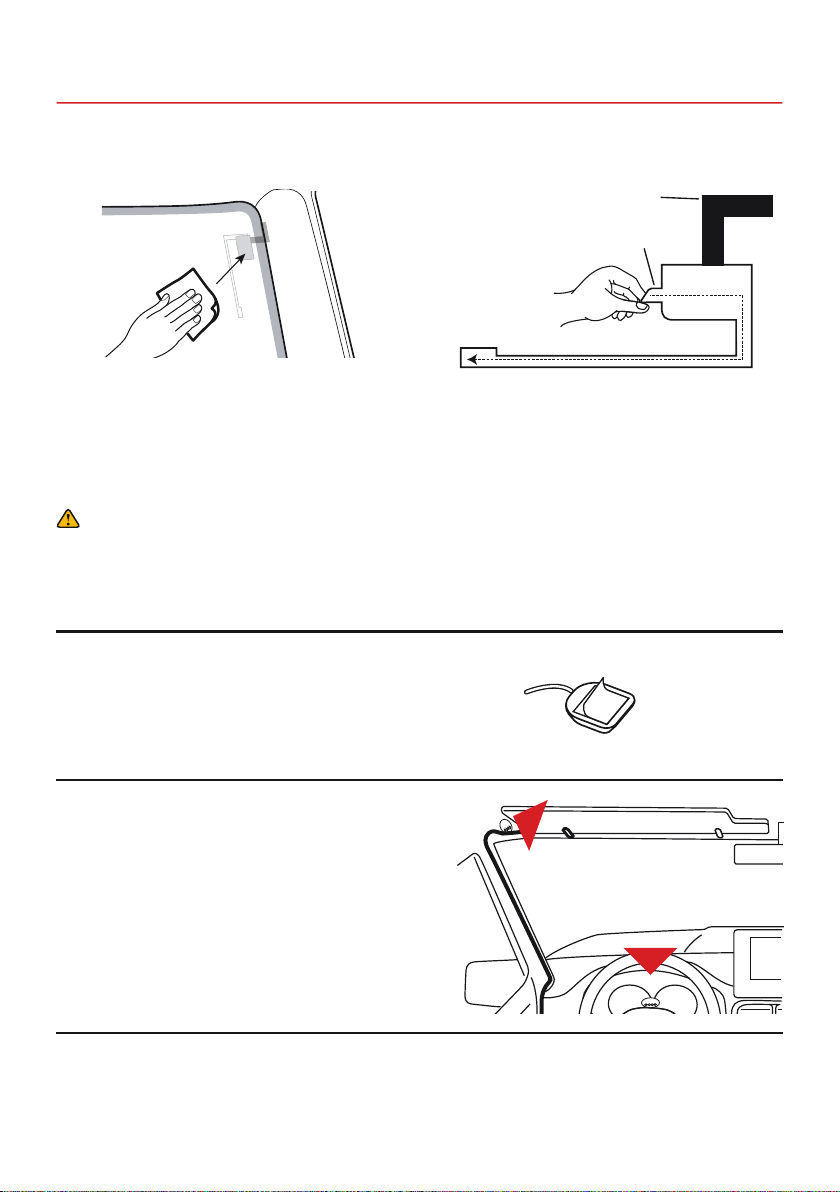
DAB antenna
Route the DAB antenna to the windshield and attach it there.
Grounding sheet
Carrier sheet
Clean the windshield with a suitable cleaning
cloth.
IMPORTANT NOTE:
In newer vehicles, the original vehicle antenna can usually be used for both analogue (FM/AM) and
digital radio reception (DAB). If it does not have separate connections for FM/AM and DAB, a separately
available antenna splitter must be used so that both connections on the ESX device can be used.
Remove the carrier sheet from the black am-
plier unit and the foil antenna and stick the
antenna onto the window.
Glue the copper-colored metal surface of the
grounding blade to a bare metal part of the vehicle.
GPS antenna
The GPS antenna should be glued horizontally to the dashboard with the adhesive side down. Reception is not possible
with a metal-coated pane. Choose a level spot with a clear view
of the sky.
External microphone
The external microphone should be positioned
in an easily accessible place, e.g. next to the
sun visor or on the steering column.
USB port
Route the USB ports to the desired location, such as the glove box.
Remove the foil
on the bottom of
the GPS antenna
9
Page 10
1. CONNECTIONS & INSTALLATION
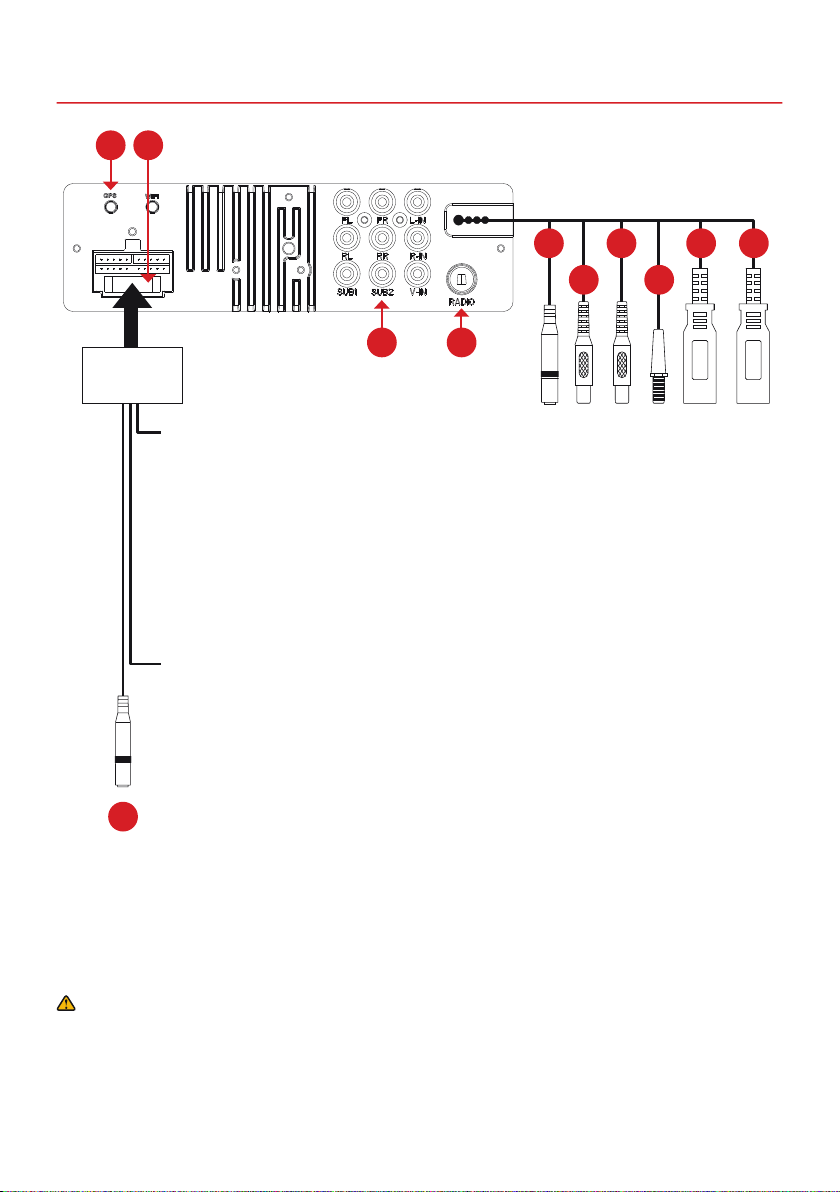
A B
Power connections (ISO standard)
Yellow Power supply (+12V)
Red ACC ignition (+12 V)
Black Ground (–)
Orange Connection for headlights
Purple/White Connection for reverse gear signal
Blue +12 V for electrical antenna (500 mA)
Blue/White +12 V remote signal REM (500 mA)
Green Connection for handbrake signal
Red/Purple +12 V for front camera (500 mA)
Red/White +12 V for rear camera (500 mA)
E G JI
HF
DC
Speaker outputs 4 - 8 Ω
White front / left (+)
White/Black front / left (–)
Grey front / right (+)
Grey/Black front / right (–)
Green rear / left (+)
Green/Black rear / left (–)
Purple rear / right (+)
K
Purple/Black rear / right (–)
If your vehicle does not have a suitable ISO system plug, you must
use the included 16-pin ISO double plug and connect the corresponding connections to the open cable ends as described above.
IMPORTANT NOTE:
The handbrake signal must be connected to the device and must be grounded when the handbrake is
applied. According to legal regulations, the device may only display a video signal on the main screen
when the handbrake is applied. The connection cable must therefore not be permanently connected to
ground.
10
Page 11

1. CONNECTIONS & INSTALLATION
Connection for the included GPS antenna
A
Fuse 15A (In the event of a defect, only exchange it for an equivalent one)
B
AV-Anschlüsse
C
If necessary, connect the appropriate RCA plugs here:
FL (white) Pre-amplier output front / left
FR (red) Pre-amplier output front / right
RL (white) Pre-amplier output rear / left
RR (red) Pre-amplier output rear / right
SUB1 (blue) Pre-amplier output subwoofer
SUB2 (blue) Pre-amplier output subwoofer
L-IN (white) Audio input AUX / left
R-IN (red) Audio input AUX / right
V-IN (yellow) Video input AUX
Connection for the vehicle’s antenna plug (an adapter may be required)
D
Ø 3.5 mm jack for the included external microphone
E
RCA connection for the input signal of the rear camera
F
RCA connection for the input signal of the front camera
G
Connection for the included DAB antenna
H
USB port for Apple CarPlay
I
USB port for media with charging function 1.5A
J
Ø 3.5 mm jack for the included steering wheel remote control adapter
K
If necessary, connect the appropriate cables to the adapter here:
SWC Gnd (yellow) Ground connection of the analog steering wheel remote control
SWC 1 (grey) Connection of the analog steering wheel remote control / left
SWC 2 (red) Connection of the analog steering wheel remote control / right
You can then teach the corresponding function keys on your analogue steering wheel remote
control in the device. More about this on page 15.
®
, Android Auto™ and media with charging function 1.5A
11
Page 12
2. CONTROL ELEMENTS
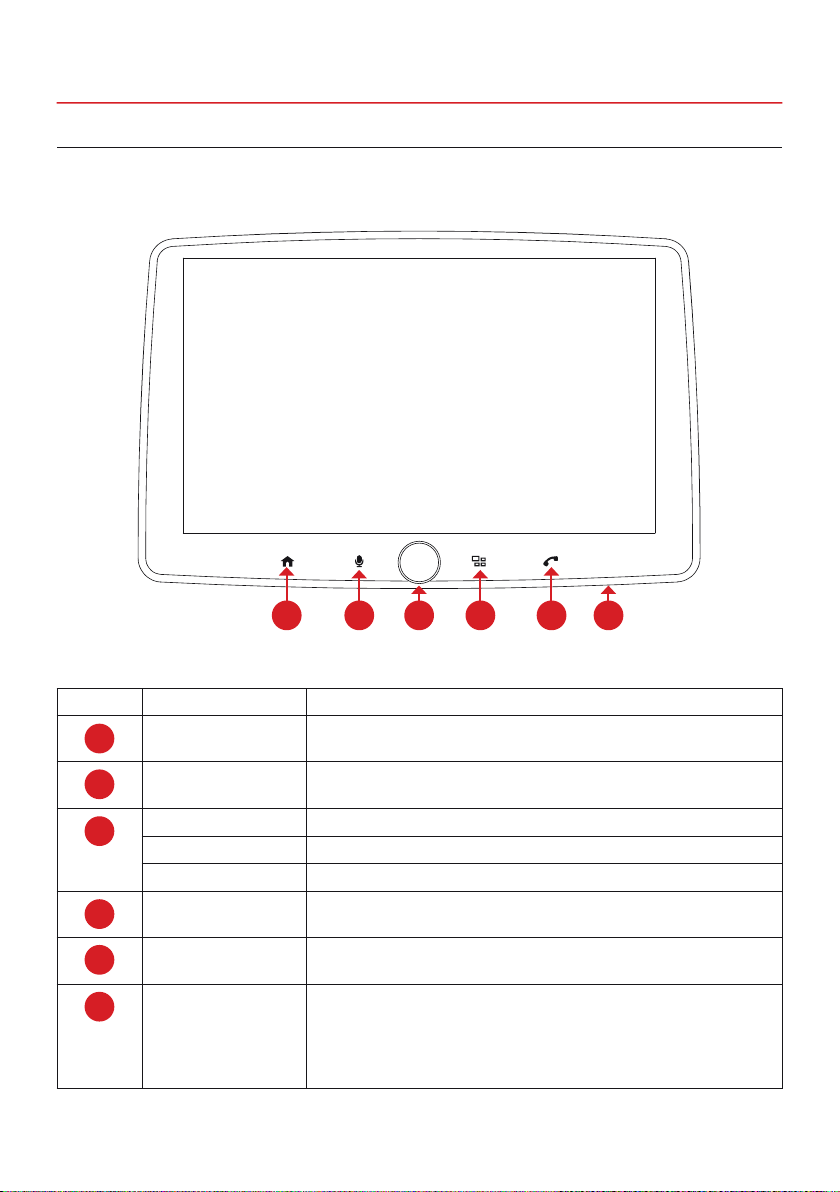
2.1 FUNCTION BUT TONS & CONTROLS
ESX VMX900DAB
1 2 3 4 5 6
Number Function Description
Home menu Press short to go to the home menu.
1
Voice assistant Press here to activate the voice assistant of your connected
12
2
Volume Turn the knob to adjust the volume.
3
Mute Press short to activate mute.
Stand-by Press and hold the button to switch the device to standby mode.
Source Press here to switch between applications.
4
Phone Press here to open the phone application or to answer an incom-
5
Reset If the device no longer responds to inputs, you can reset the de-
6
smartphone.
ing call.
vice using the small opening below the display. Press the button
for more than 3 seconds to restart the system and reset it to factory settings. All your settings will be lost during the reset. Use a
suitable pointed object, such as a paper clip, to do this.
Page 13
2. CONTROL ELEMENTS
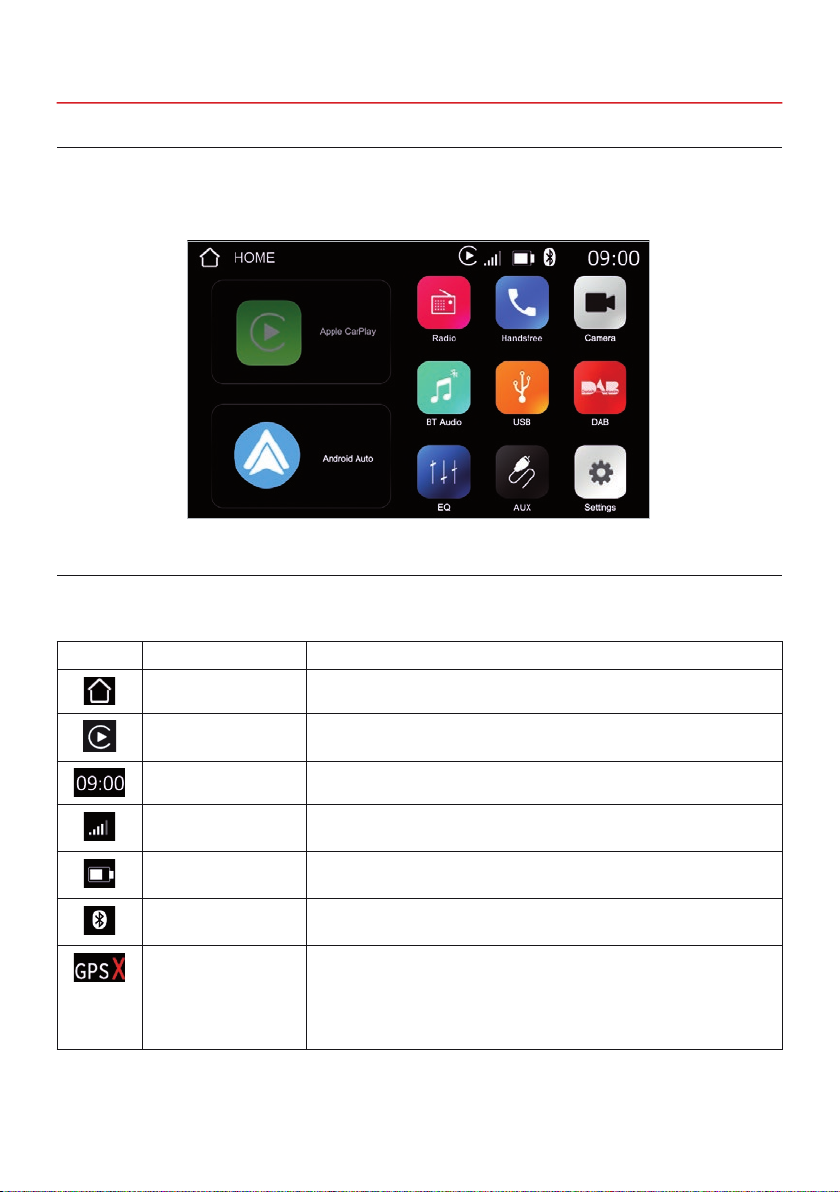
2.2 HOME MENU
This device has a very clear home menu, which you can operate by simply tapping the touchscreen
screen. You can nd more information about the individual applications and functions of the device
starting on page 21.
2.3 STATUS BAR
At the top of the screen is the device’s status bar. The information and symbols shown there have the
following meaning:
Symbol Function Description
Home menu Tap it to go back to the Home menu.
CarPlay or
Android Auto
Tap it to open CarPlay or Android Auto if the device is connected
to a smartphone.
Time Current time.
Signal strength The current signal strength of the cellular connection of the smart-
phone connected to the device is displayed here.
Battery level The current battery level of the smartphone connected to the de-
vice is displayed here.
Bluetooth As soon as the device is connected to a smartphone via Blue-
tooth, this symbol will be displayed.
GPS This symbol only appears if the device has no or very weak GPS
reception, which can occur in tunnels or in remote areas. The
symbol disappears again as soon as a sufciently strong GPS
signal is received again. If the symbol continues to appear, the
connection and function of the GPS antenna must be checked.
13
Page 14
3. SET TINGS
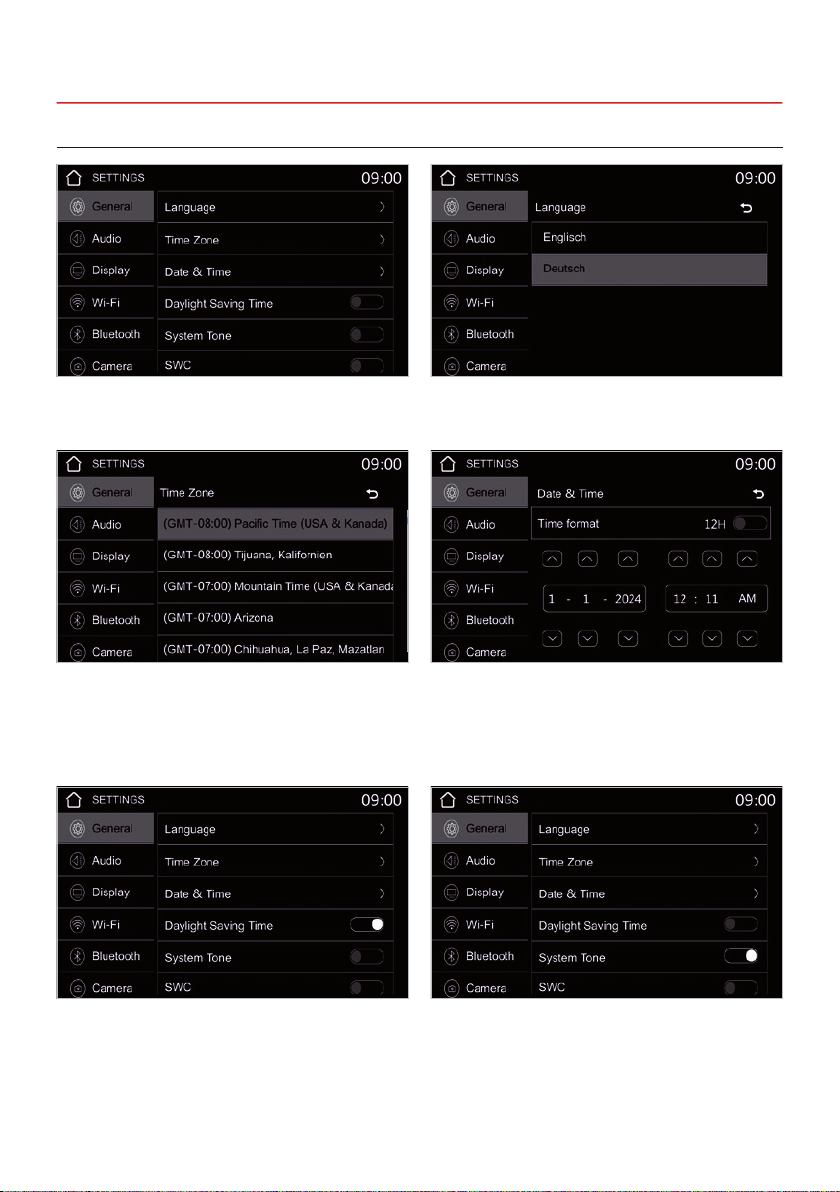
3.1 GENERAL
Under General you can make various settings for
the device.
Under Time Zone you can set the desired
time zone if you want to change the time zone
automatically determined by GPS.
You can set the menu language under Language.
Under Date & Time you can set the desired time
format (12H/24H) as well as the date and time
manually if you want to change the time and date
display determined by GPS.
The slider next to Daylight Saving Time activates
the daylight saving time display and the current
time is advanced by 1 hour.
14
The slider next to System Tone activates the
acoustic conrmation tone that sounds as soon as
you tap one of the controls.
Page 15
3. SET TINGS
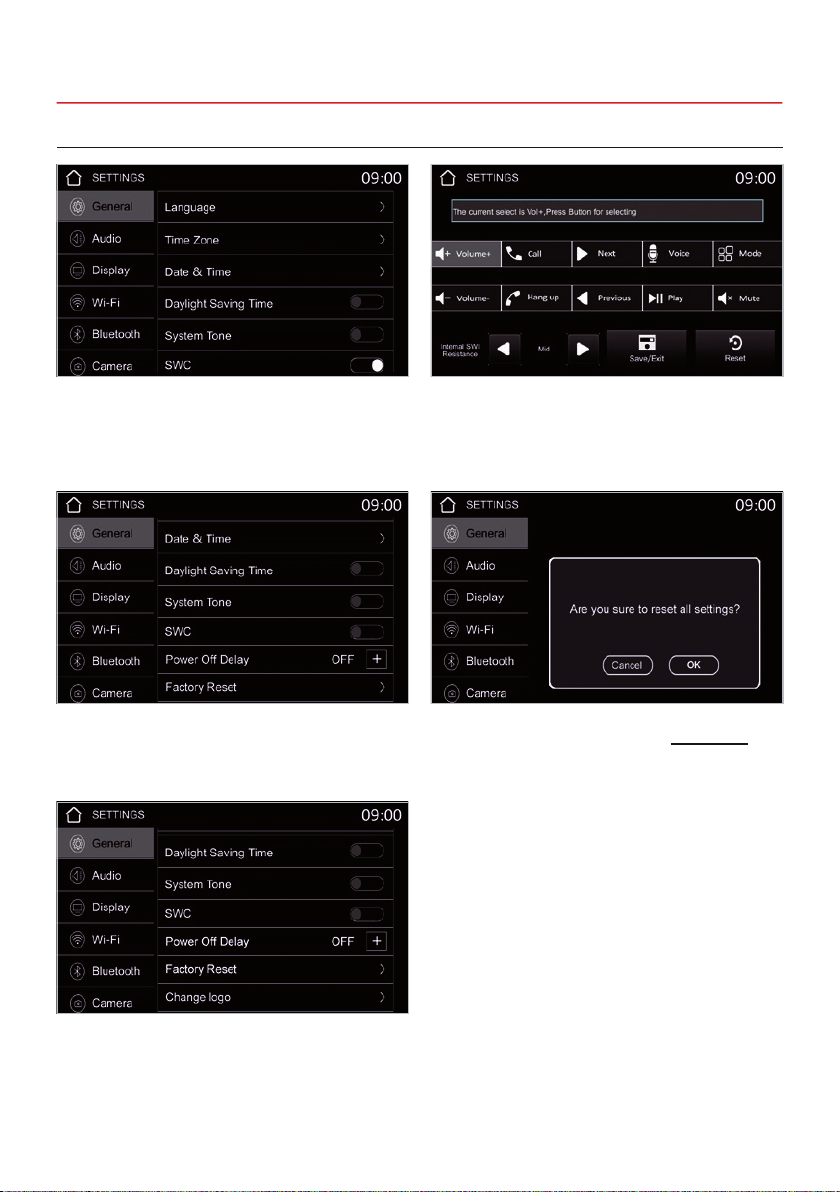
3.1 GENERAL
The slider next to SWC opens the steering wheel
remote control learning menu.
Under Power Off Delay you can use – / + to
set the seconds for how long the device should
remain switched on after the ignition has been
switched off.
If your steering wheel remote control has been
correctly connected to the device, you can teach
the individual functions to the device here. As
soon as you have assigned all functions, leave the
menu with Save/Exit.
Under Factory Reset you can reset all settings of
the device to the factory settings. Be careful, this
will delete all your saved settings.
Under Change logo you can save your own boot
logo. To do this, save a JPG with the le name
changelogo.jpg in the root directory of the
connected USB stick.
15
Page 16
3. SET TINGS
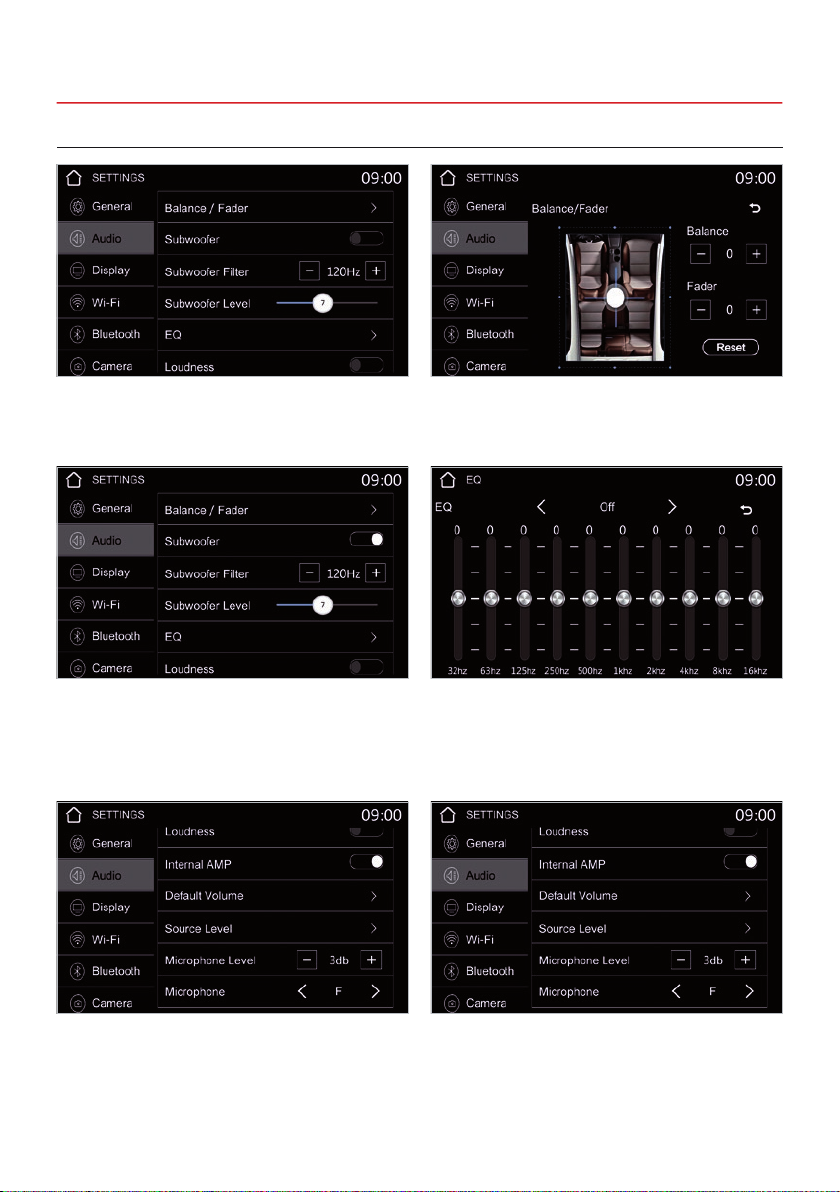
3.2 AUDIO
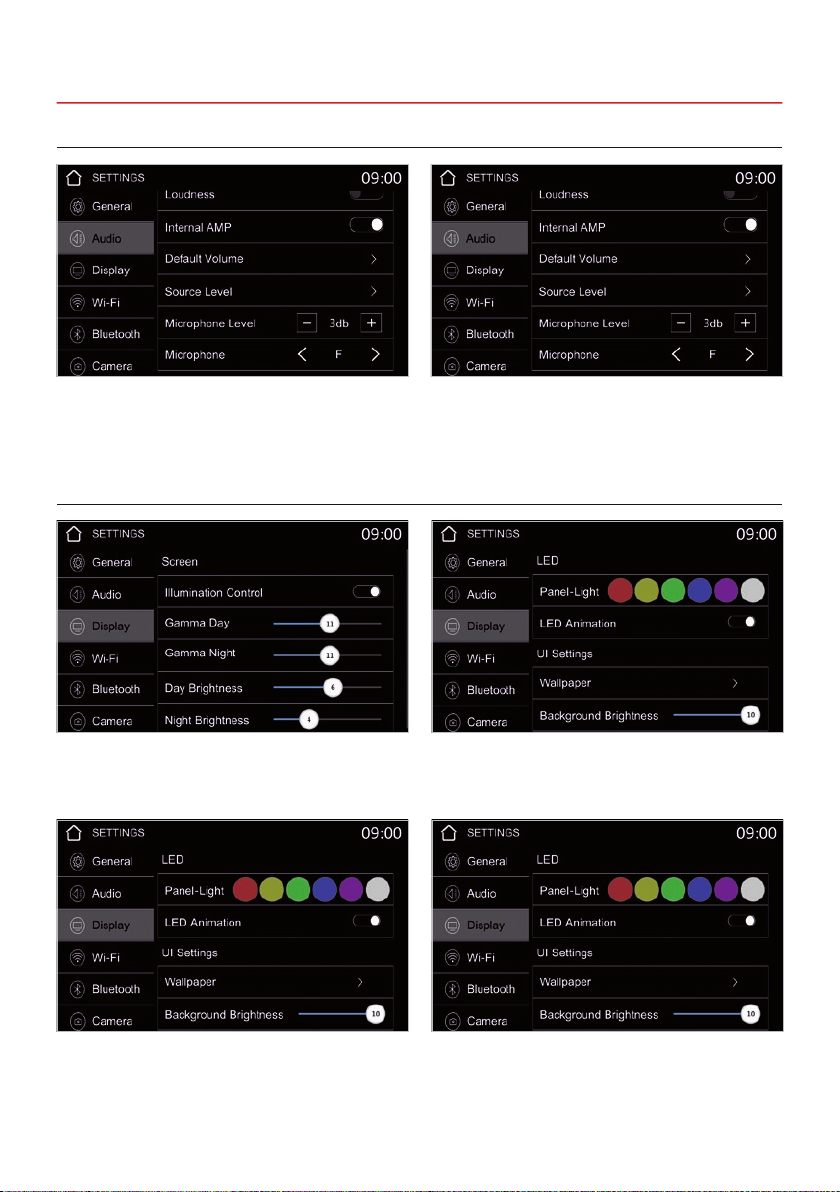
Under Audio you can make various audio settings.
Subwoofer activates the SUB1/SUB2 preamp
outputs. Thea cut-off frequency can be set
under the Subwoofer Filter, i.e. all frequencies
above are ltered out. Below you can adjust the
Subwoofer Level.
Under Balance/Fader you can adjust the balance
of the acoustic stage between left and right and
front and back.
Under EQ you can adjust the equalizer settings
manually or use the < / > buttons to select one of
the presets. Loudness increases the highs and
mids to make the sound louder and more powerful.
Under Internal AMP you can switch the device’s
integrated audio amplier on or off. If you are using
the device’s preamp outputs to drive an external
audio amplier, turn off the amplier.
16
With Default Volume and Source Level, you can
tune and adjust the levels for each application and
signal source as desired.
Page 17
3. SET TINGS
3.2 AUDIO
Under Microphone Level you can adjust the
volume of the hands-free microphone with – / +.
3.3 DISPLAY
With Illumination Control you can activate the
control function for the day and night light mode
via the connected headlight signal.
Under Microphone you can choose which
microphone should be used for the hands-free
function. F is the internal microphone on the
control panel and R is the external microphone
connected to the back of the device.
With LED Animation you activate the changing,
colored LED illumination of the function keys on
the control panel.
If LED Animation is deactivated, you can select
the color that should light up permanently under
Panel-Light.
Under UI Settings you can set a different
wallpaper color for the home menu as well as its
brightness.
17
Page 18
3. SET TINGS
3.3 WI-FI
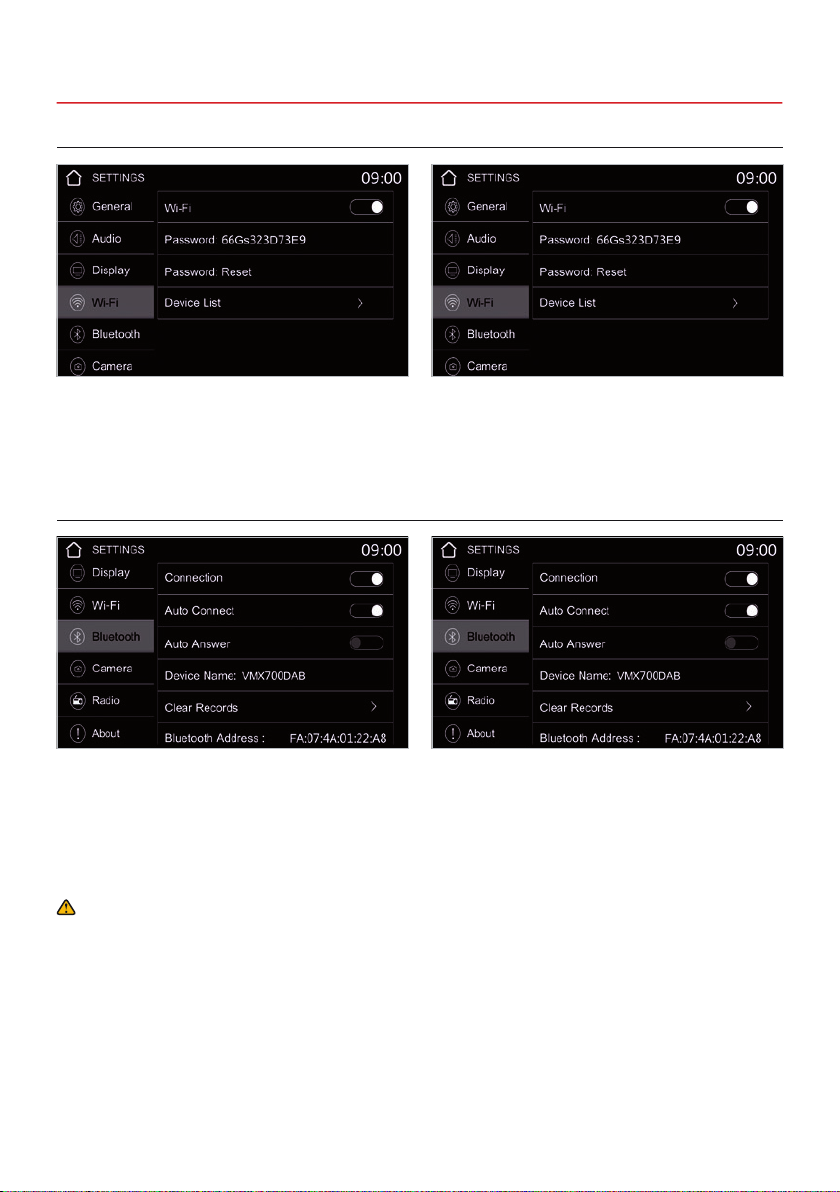
Under Wi-Fi you can turn the Wi-Fi function on or
off. This function is required for Apple CarPlay and
Android Auto.
With Password Reset you can delete the device’s
password and reassign it. Under Device List you
can select a connectable smartphone that you
would like to connect to the device. You can also
delete devices that have already been registered
there.
3.4 BLUETOOT H
Under Bluetooth, you can connect your
smartphone to the device for hands-free calling.
This function is also required for Apple CarPlay
and Android Auto.
Under Auto Connect and Auto Answer you
can specify whether your smartphone should
be automatically connected to the device after
a restart and whether calls should be answered
automatically. Under Clear Records, you can
delete devices that have already been registered.
IMPORTANT NOTE:
1. To ensure a secure Bluetooth connection, you should be in a safe and non-public location.
2. Do not start the initial connection while driving, otherwise the driver could be distracted.
18
Page 19
3. SET TINGS
3.5 CAMERA
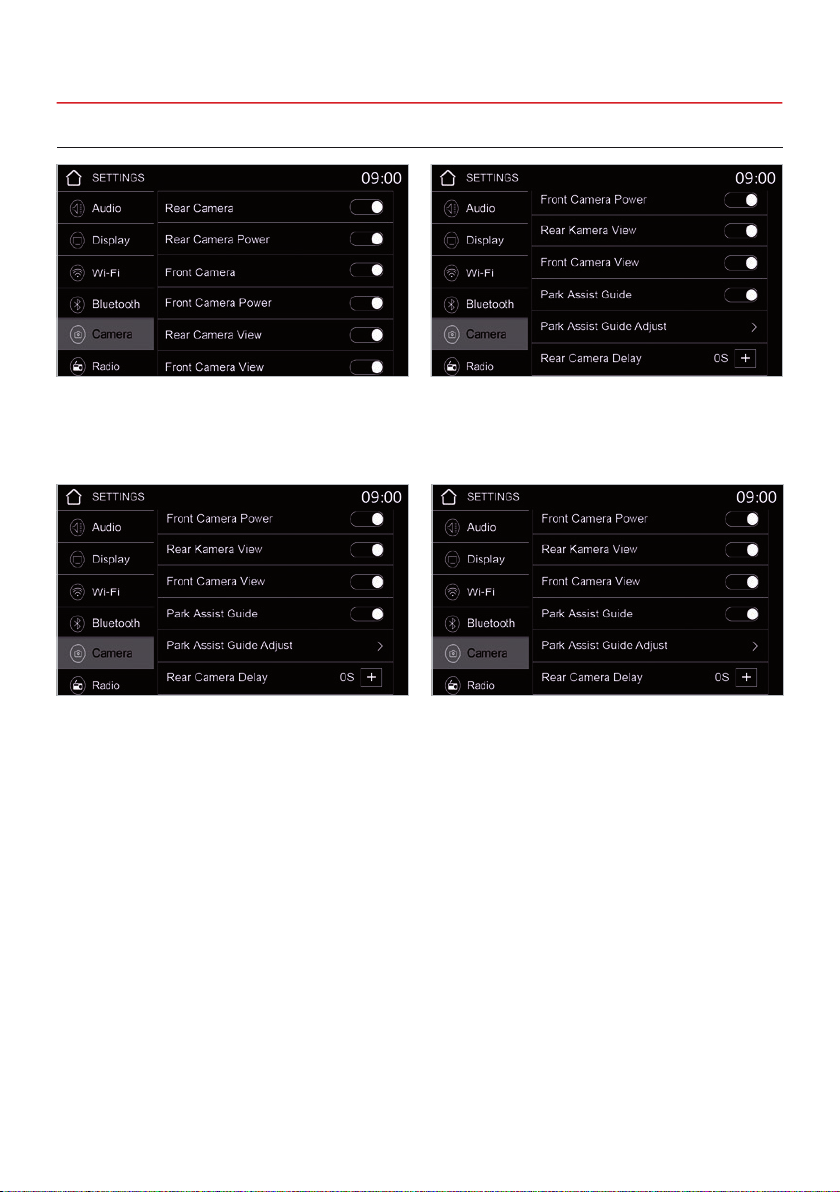
Under Camera you can make various settings for
the connected cameras.
You can use the Park Assist Guide slider to
turn on the rear view camera guidelines. With
Park Assist Guide Adjust you can adjust the
guidelines.
Here you can switch on the rear or front camera,
switch on the respective power supply via the
device and activate the respective view in the
camera menu.
Under Rear Camera Delay you can set the
delay in seconds with + with which the rear
camera should be displayed on the monitor when
engaging reverse gear.
19
Page 20
3. SET TINGS
3.6 RADIO
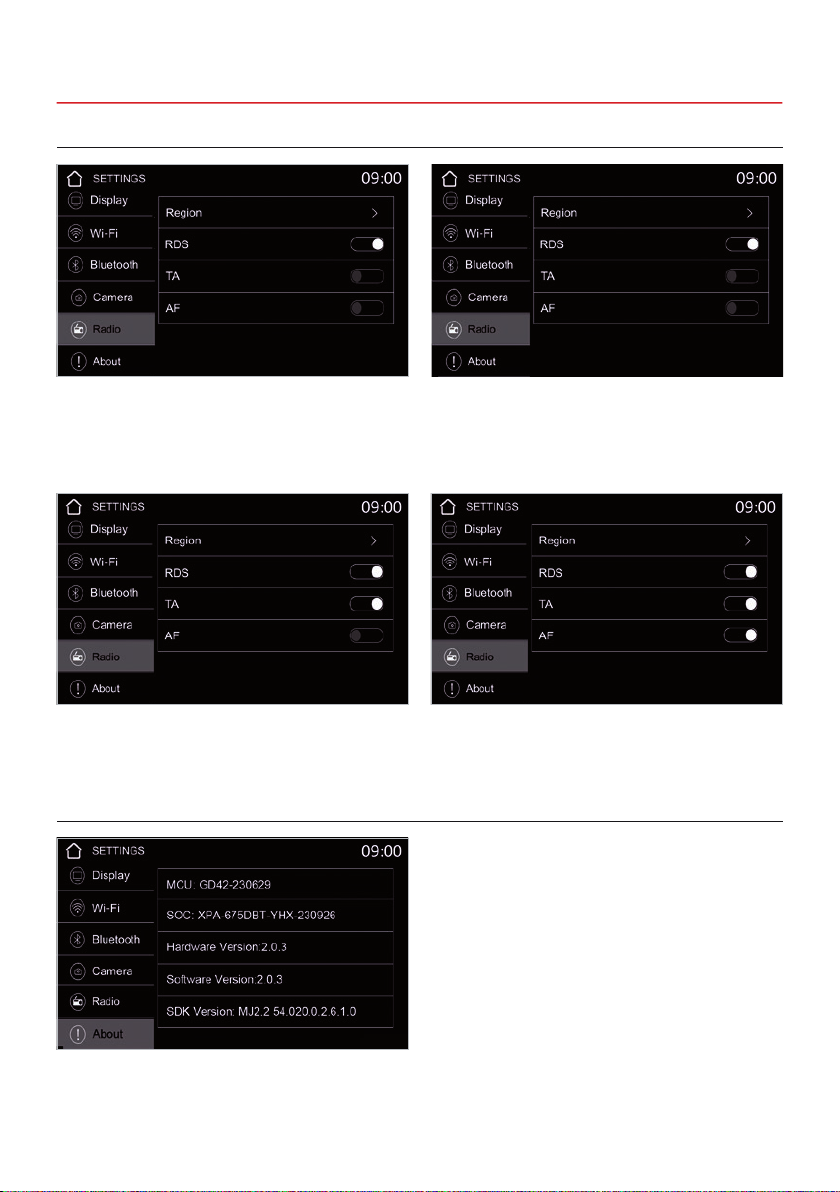
Under Radio you can set various settings for
analogue radio reception.
With TA you allow trafc announcements from the
most recently listened to FM station while playing
other media.
3.7 ABOUT
Under Region you can set the reception area.
With RDS you activate the transmission of
additional digital information such as station
names or messages from FM radio stations.
With AF, the radio switches to an alternative,
better frequency of the station in the network if
the reception signal is too weak and an alternative
frequency is available.
Under About you will nd information about the
software version of the device
20
Page 21
4. APPLICATIONS & FUNCTIONS
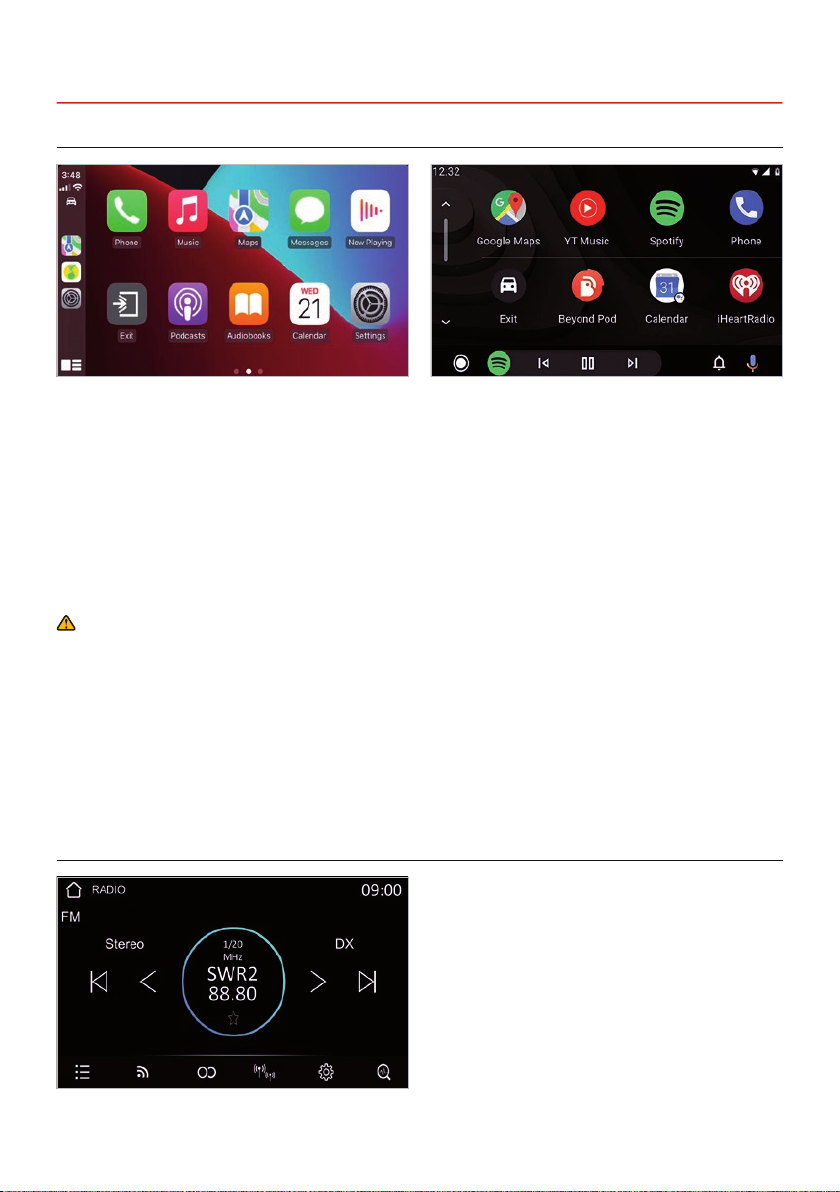
4.1 APPLE CARPLAY & ANDROID AUTO
In order to use Apple CarPlay, you must rst
connect your iPhone to the device using a USB
charging cable or Bluetooth (see page 18).
Bluetooth and Wi-Fi must be activated on both
devices. You may still need to activate the CarPlay
function for this connection in your iPhone.
If you have enabled Auto Connect in the
Bluetooth settings (see page 18), your iPhone will
connect automatically every time until you delete
the iPhone’s registration or turn off CarPlay. To
exit the CarPlay menu, tap Exit.
In order to use Android Auto, you must rst
connect your smartphone to the device using a
USB charging cable or Bluetooth (see page 18).
Bluetooth and Wi-Fi must be activated on both
devices. You may still need to install the Android
Auto app and activate it for this connection.
If you have enabled Auto Connect in the Bluetooth
settings (see page 18), your smartphone will
connect automatically every time until you delete
the phone’s registration or turn off Android Auto.
To exit the Android Auto menu, tap Exit.
IMPORTANT NOTE:
Please note that using some apps requires a mobile internet connection and may result in high data
consumption.
4.2 RADIO
By tapping on Radio in the home menu you open
the menu for analog radio reception.
First, carry out a channel search, which you can
start with the magnifying glass symbol at the
bottom right. You can mark the current station as a
favorite using the star symbol below the frequency
display.
Below you will nd further controls such as station
list, FM/AM switching, stereo/mono switching, DX/
local switching and radio settings.
21
Page 22
4. APPLICATIONS & FUNCTIONS
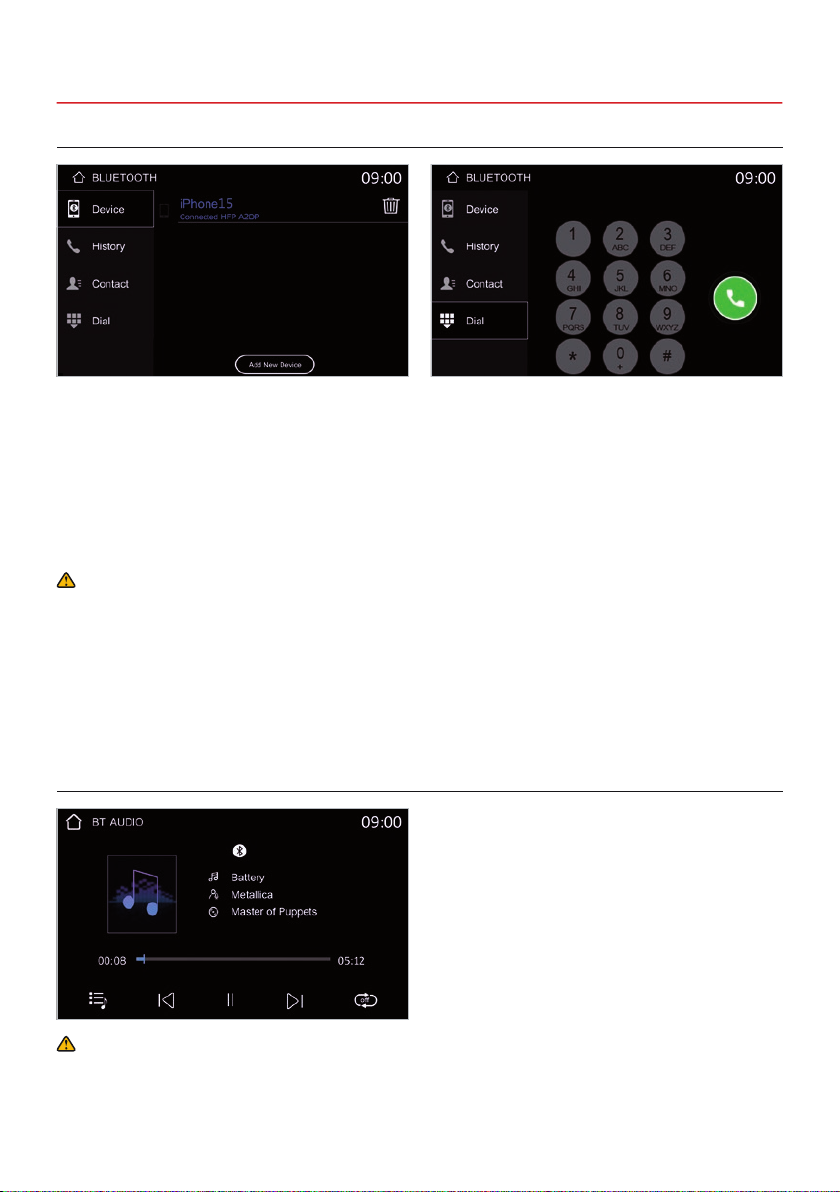
4.3 HANDSFREE
By tapping on Handsfree in the home menu you
open the phone menu. Please make sure that the
corresponding microphone must be activated for
the hands-free function (see page 17).
It is not possible to operate Apple CarPlay or
Android Auto and the handsfree function at the
same time. One of the two functions must be
deactivated if necessary.
If your cell phone is not yet connected to the
device via Bluetooth, please follow the instructions
on page 18.
Once the device is connected to your phone, you
can tap History, Contact and Dial on the left
panel.
If necessary, agree to download your contacts
from your phone.
IMPORTANT NOTE:
1. To ensure a secure Bluetooth connection, you should be in a safe and non-public location.
2. Do not start the initial connection while driving, otherwise the driver could be distracted.
4.4 BT AUDIO
By tapping on BT Audio in the home menu, you
open the Bluetooth audio streaming application.
If your cell phone is not yet connected to the
device via Bluetooth, please follow the instructions
on page 18.
The controls and playback options of the audio
player are located on the bottom control bar.
IMPORTANT NOTE:
Some cell phones require you to manually start your music player and manually select the playlist and
tracks.
22
Page 23
4. APPLICATIONS & FUNCTIONS
4.5 CAMERA
4.6 USB
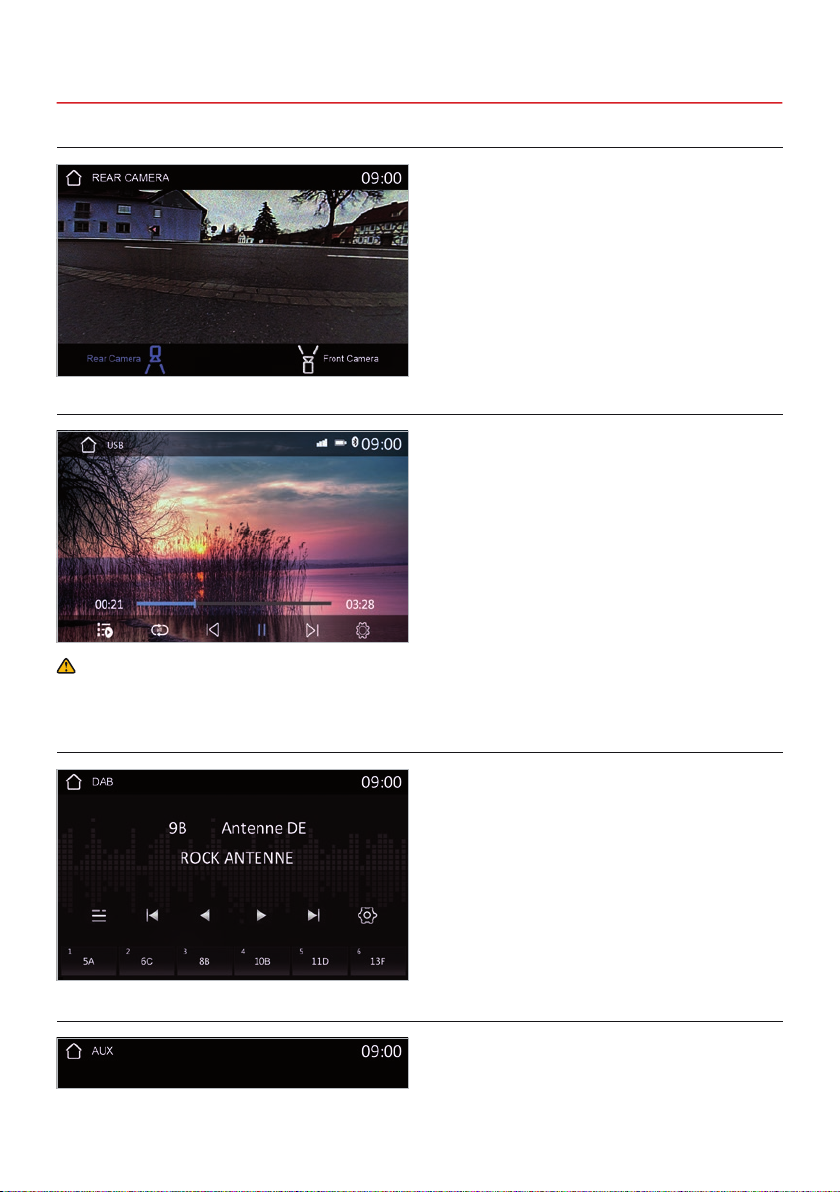
By tapping on Camera you open the camera
display if you have connected a rear camera or a
front camera to the device.
If you have two cameras connected, you can
select the respective view on the control bar at the
bottom.
Please note the information about the camera
settings on page 19.
If no camera is connected, this view will show No
Signal.
By tapping on USB in the home menu, you open
the USB media player, which you can use to play
compatible media such as music, videos and
photos that are on a USB medium connected to
the device.
The controls and playback options of the media
player are located on the bottom control bar.
Compatible le formats: AVI, FLV, MOV, MKV,
WMV, WMA, MP3, FLAC, JPEG, PNG, BMP
IMPORTANT NOTE:
No videos or moving images may be played while driving, otherwise the driver could be distracted.
4.7 DAB
By tapping on DAB in the home menu you open
the menu for digital radio reception.
The station search starts automatically.
The controls and the DAB settings are located on
the bottom control bar and the frequency band
selection below.
4.8 AUX
By tapping on AUX In in the home menu you
open the view of the external playback device
connected to the AUX inputs.
23
Page 24

D E S I G N
ESX Car Media Systems · Audio Design GmbH
Am Breilingsweg 3 · D-76709 Kronau/Germany
Tel. +49 7253 - 9465-0 · Fax +49 7253 - 946510
www.esxnavi.de - www.audiodesign.de
© All rights reserved, technical changes and errors reserved
 Loading...