

Page 1
User manual
EG-Pellet
Page 2

Page 3

Table of contents
Chapter 1. General information 4
1.1 Introduction................................................................................................................................................... 4
1.2 Safety.............................................................................................................................................................. 4
1.3 Disposal of Waste of Electrical and Electronic Equipment ...............................................................5
Chapter 2. Basic controller operation 6
2.1 Main screen................................................................................................................................................... 6
2.1.1 DATE AND TIME - SETTING........................................................................................................7
2.1.2 TURNING THE BOILER ON/OFF................................................................................................7
2.1.3 TURNING ON/ OFF the boiler, water, heating........................................................................7
2.1.4 SUMMER (only water heating)......................................................................................................7
2.1.5 SETTING THE TARGET BOILER TEMPERATURE (program) ...............................................8
2.1.6 FUEL FILLING (setting the fuel level)..........................................................................................8
2.2 Menu structure............................................................................................................................................. 9
Chapter 3. Detailed description of screens/functions 10
3.1 Boiler............................................................................................................................................................ 10
3.1.1 SET TARGET TEMPERATURE AND OPERATING MODE..................................................10
3.1.2 SETTINGS........................................................................................................................................10
3.2 Schedules..................................................................................................................................................... 11
3.3 Heating and hot water operation modes............................................................................................. 12
3.4 Heating......................................................................................................................................................... 12
3.4.1 SETTINGS........................................................................................................................................12
3.5 Hot water..................................................................................................................................................... 13
3.5.1 SETTINGS........................................................................................................................................13
3.6 Burner........................................................................................................................................................... 13
3.6.1 SETTINGS........................................................................................................................................13
3.7 Buffer............................................................................................................................................................ 14
3.7.1 SETTINGS........................................................................................................................................14
3.8 Solar heating............................................................................................................................................... 14
3.8.1 SETTINGS........................................................................................................................................14
3.9 Alarms........................................................................................................................................................... 14
www.estyma.pl 3
EGP-EN 20171024
Page 4
IGNEO touch user manual
Chapter 1. General information
Thank you for choosing our product and congratulations on the best decision. We are happy to hear your comments
about the device.
ESTYMA electronics Team
1.1 INTRODUCTION
The boiler regulator IGNEO Touch is a modern microprocessor system, which manages not only the boiler, but
also the heating system. In the full configuration, the regulator can manage:
4 central heating circuits
1 hot water circuit.
1 buffer
1 solar heating system
1 additional fuel storage system
Thanks to advanced algotithm and the possibility to regulate multiple parameters, the system can be well adjusted
to the heating system needs.
1.2 SAFETY
ATTENTION! Electrocution risk!
Turn off power on the electric switchboard before assembly or disassembly.
Carefully read the instruction before use.
Keep the instruction manual and consult it when using the device.
Abide by the rules of use and warnings written in the instruction manual.
Check if the device isn't dammaged. When in doubt, don't use the device and contact the retailer.
If you encouter situations not mentioned in the instruction manual, or you are in doubt about safe usage
of the device, please contact the retailer.
Pay attention to any warning symbols on the device or packaging.
The device must be used in accordance with intended use.
The device is not a toy, keep out of childrens reach.
Under no circumstances allow children to play with any part of the packaging.
Keep small parts (screws, wall plugs etc.) away from children. Small elements supplied with the device can
be a choking hazard.
Do not modify mechanical or electrical parts of the device. It can result in abnormal functioning, malfunctions,
errors and failure to comply with regulations.
Do not put anything into any openings in the device. It can cause short circuits, electric shock, fire or
complete destruction of the device.
Do not allow the device to come in contact with water, moisture or dust. It can cause short circuits,
electric shock, fire or complete destruction of the device.
4 www.estyma.pl
EGP -EN 20171024
Page 5

Chapter 1. General information
After turning off the device using touch panel, it can still be under power.
This regulator is designed as a part of a boiler, not a standalone device.
This device requires a proper ventilation. Do not cover any ventilation holes to assure a proper air circulation.
For inside use only, unless stated otherwise.
Do not expose to impacts or vibrations.
Before installing verify if electrical grid parameters are within specifications.
To ensure electric shock protection, verify that the device is grounded. It must be connected with a 3 pin
socket. The power socket must be installed by an authorized electrician.
Verify if the device will not cause power grid overload. Do not connect the device to a circuit containing
electric motors and other impulse disruption sources (freezers, washing machines etc.)
Before connecting any wires or external devices, turn off mains supply.
To completely turn off the device, pull the plug out of the socket. Especially if it will not be used for an
extended ammount of time.
The power cord must be protected from damage. It must not be stepped on and no objects should be
placed on it.
The regulator must be installed by the boiler producer. Any electrical connections must comply with
circuit diagrams and local standards and regulations.
Additional safety devices must be used to protect the boiler and heating elements from eventual regulator
malfunctions or software errors.
This device has no replaceable parts. All servicing and repair, apart from cleaning and circuit breaker replacement
(electrical grid disconnected) and changing settings must be performed by an authorized profesionals.
Before any service activity disconnect the device from any power sources.
Do not use gasoline, solvents or other chemicals for cleaning. It can damage the panel. Use soft cloth instead.
If the power cord is damaged, do not use the device. Damaged cable must be replaced with one with the
same parameters by the service department.
Settings must be adjusted to a type of boiler and fuel, accomodating for all other conditions. Incorrect
settings can result in failure. In extreme cases it can lead to life threatenig situations.
The regulator is ment to be installed by a boiler producer. Before using it in a device, the producer must
verify that it's compatible with the boiler type, and its use will not cause any danger or malfunctions.
1.3 DISPOSAL OF WASTE OF ELECTRICAL AND ELECTRONIC EQUIPMENT
This electronic device consists of partly recycleable materials. It has to be disposed of by taking it to a designated used
electric and electronic equipment collection point or a retailer. It should not be mixed with general household waste.
www.estyma.pl 5
EGP-EN 20171024
Page 6
IGNEO touch user manual
Chapter 2. Basic controller operation
2.1 MAIN SCREEN
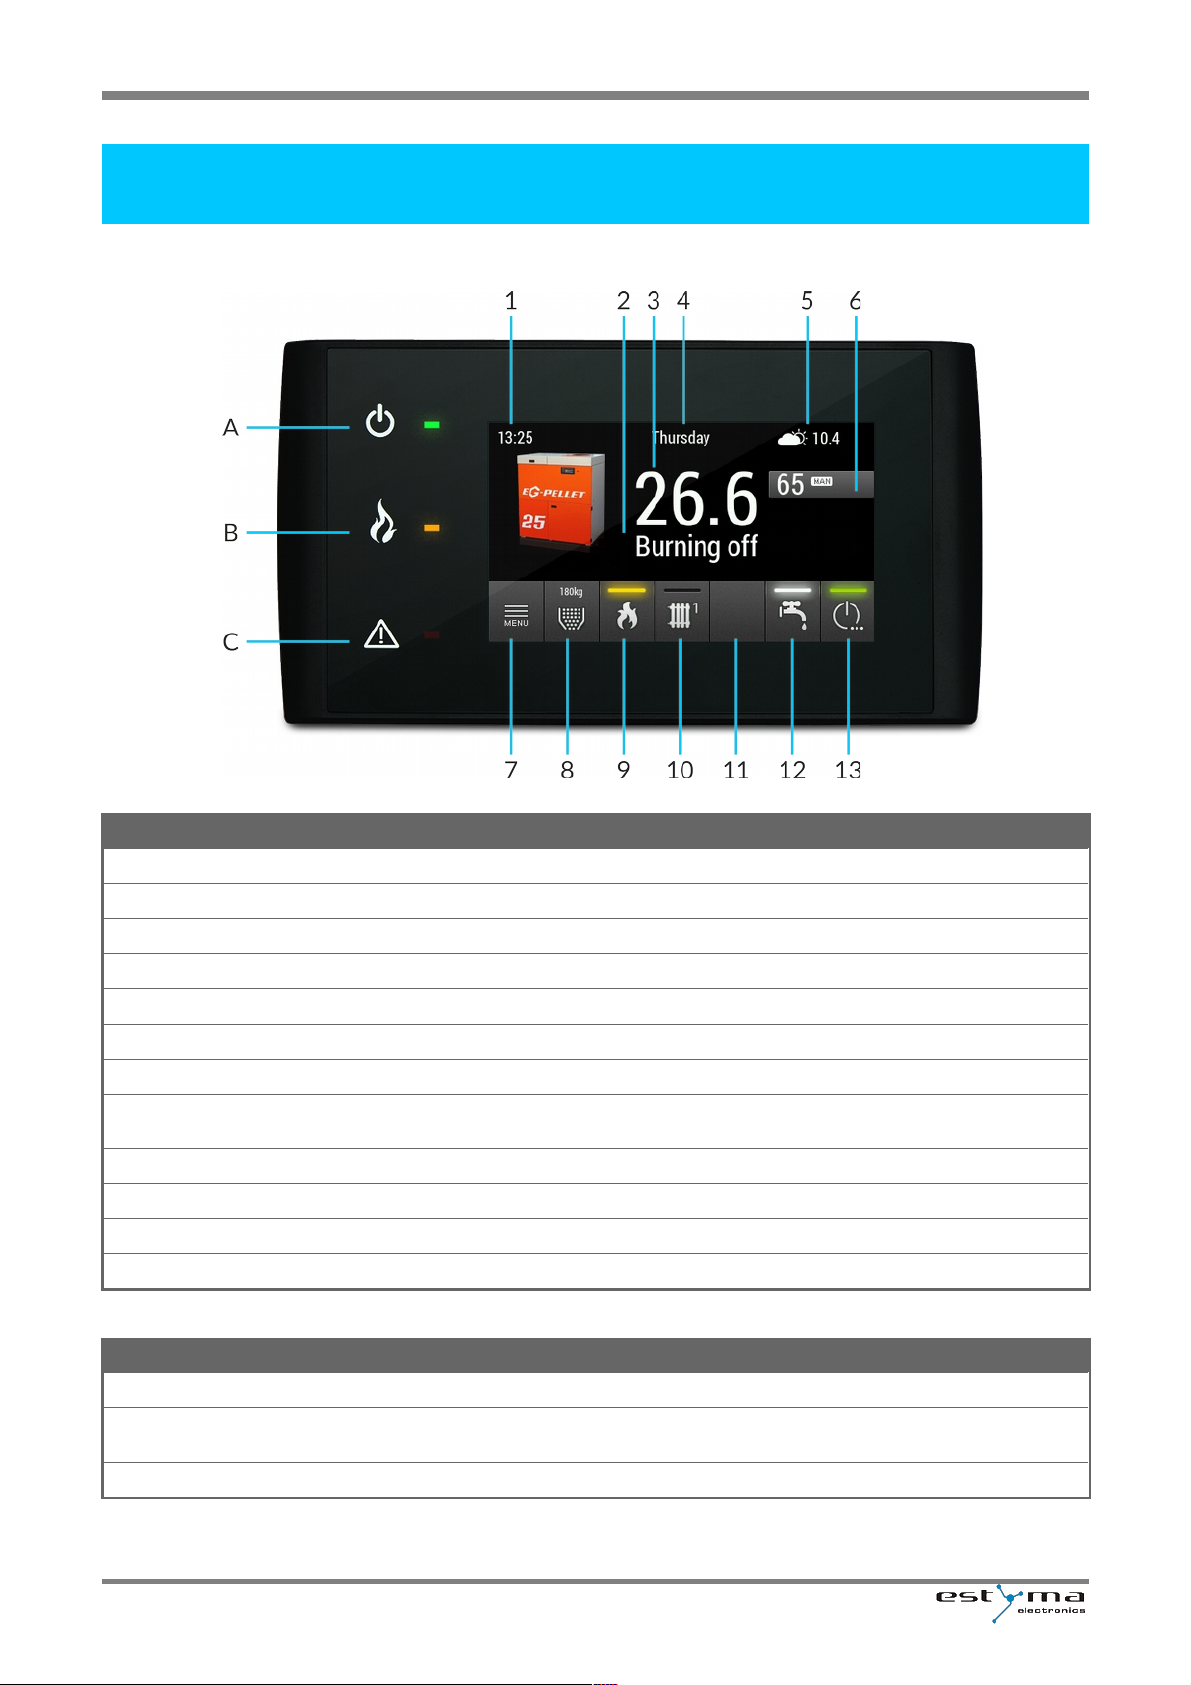
Screen settings:
NUMBER DESCRIPTION
1
Current time. On pressing, the change of hour screen is displayed.
2
Burner status.
3
Measured boiler temperature.
4
Day of the week. On pressing, the change of date screen is displayed.
5
Measured outside temperature.
6
Set target temperature of the boiler and boiler mode. On pressing it changes.
7
Enter the menu button.
8
Enter the fuel level settings button. The button also displays the rest of the fuel and informs about the
reserves.
9
Quick enter the burner menu button. Lit lamp means the burner is working.
10,11
Quick enter the heating menu button. Lit lamp means the circuit is working.
12
Quick enter the hot water menu button. Lit lamp means that the water preparation is working.
13
Advanced button. Long press (>3 sec) turns the boiler off. Lit lamp means that the boiler is working,
LED description:
LETTER DESCRIPTION
A (green)
Boiler. It is lit if the boiler is working.
B (yellow)
Burner. It is lit if there is a flame, it is flashing if the burner is working but there is no flame (eg. inflaming,
putting out). It is not lit if the burner is not working and there is not flame.
C (red)
Alarm. It is flashing if the alarms are active. It is lit if there are unconfirmed alarms.
6 www.estyma.pl
EGP -EN 20171024
Page 7
Chapter 2. Basic controller operation
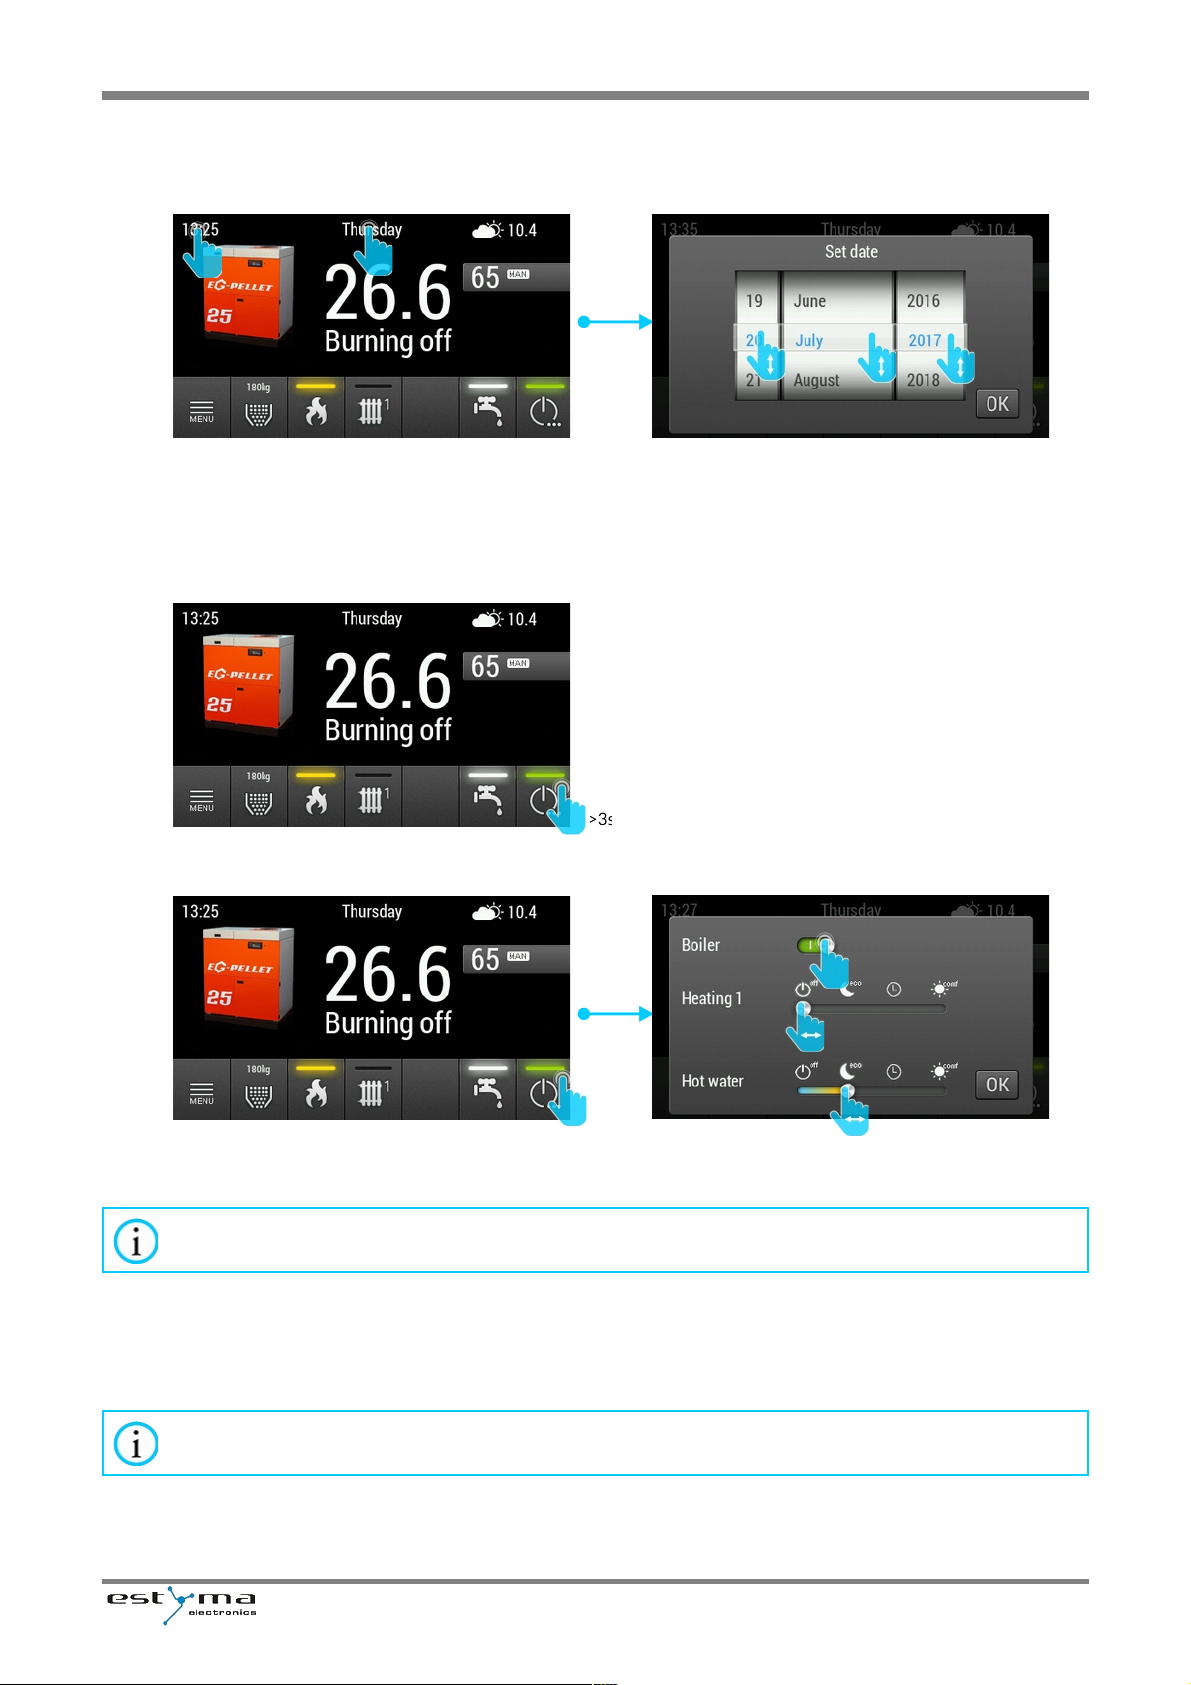
2.1.1 DATE AND TIME - SETTING
To set the date or time on the main screen, press the date or the hour. The window to set the date or hour will appear.
2.1.2 TURNING THE BOILER ON/OFF
In order to turn the boiler on or off, press the button on
the main screen for 3 seconds.
2.1.3 TURNING ON/ OFF the boiler, water, heating
On pressing the button on the main screen it is possible to quickly turn on/off (change of the operating mode) of
certain heating system elements.
ATTENTION! If there are more than two heating system circuits, you should enter the menu, and
then go to the circuit number 3 and 4 to change the heating program.
2.1.4 SUMMER (only water heating)
To turn on summer mode (heating only hot water circuit), press the On/Off button and move all the ''Heating''
sliders to ''off''.
ATTENTION! If there are more than two heating circuits in the system you should enter the
menu and then go to the circuit number 3 and 4 to turn off the heating.
www.estyma.pl 7
EGP-EN 20171024
Page 8
IGNEO touch user manual
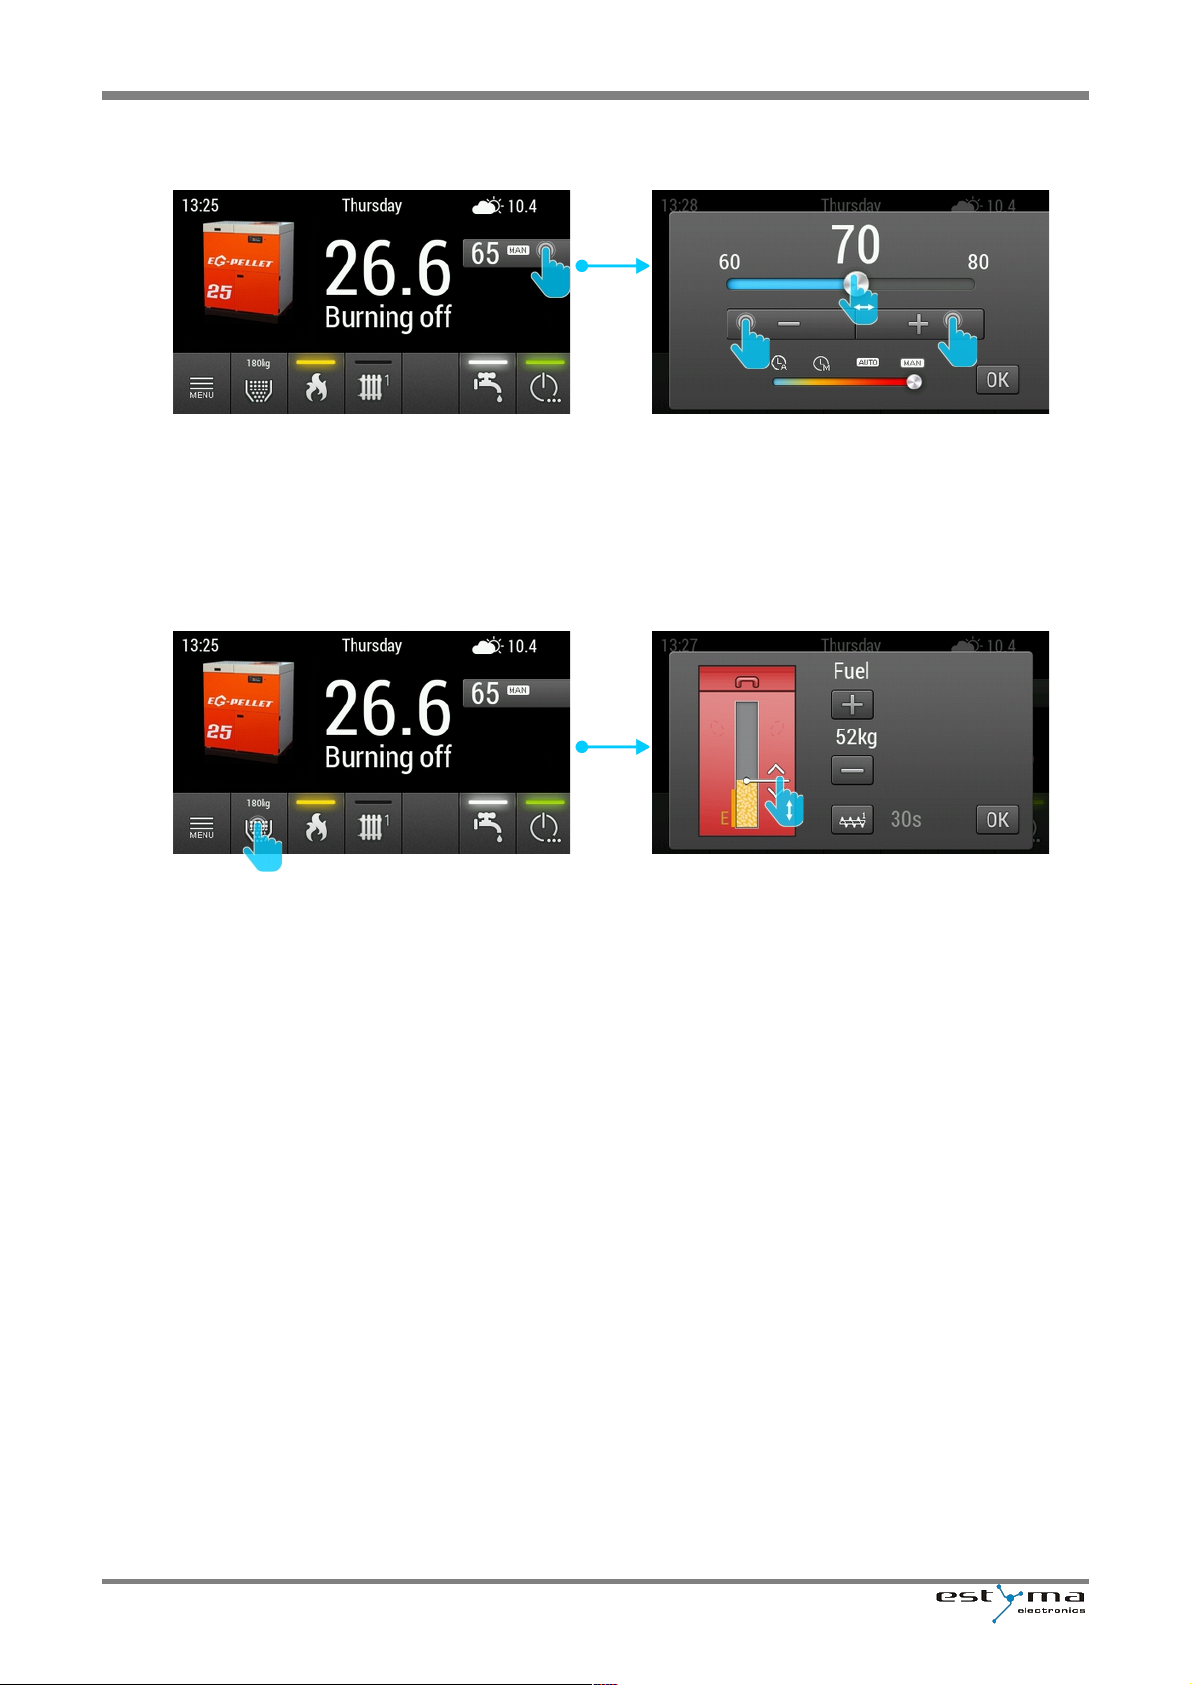
2.1.5 SETTING THE TARGET BOILER TEMPERATURE (program)
To change the boiler target temperature or the boiler working program you should press the button with the
target temperature and the current program on the main screen, and then set the temperature or change the
program.
The programs are described in 3.1.1.
2.1.6 FUEL FILLING (setting the fuel level)
The regulator was equipped with the ability to calculate the remaining fuel in the tank. To make calculating
possible, each time after adding fuel you should set the amount of the fuel in the tank. The amount is set by the
buttons ''+'' and ''-'' or by the slider.
This screen also allows to turn on the fuel conveyor manually. In case of comlete fuel depletion it allows to fill the
conveyor tube again.
To enter the fuel level menu, press the ''8'' button on the main screen.
8 www.estyma.pl
EGP -EN 20171024
Page 9
Chapter 2. Basic controller operation
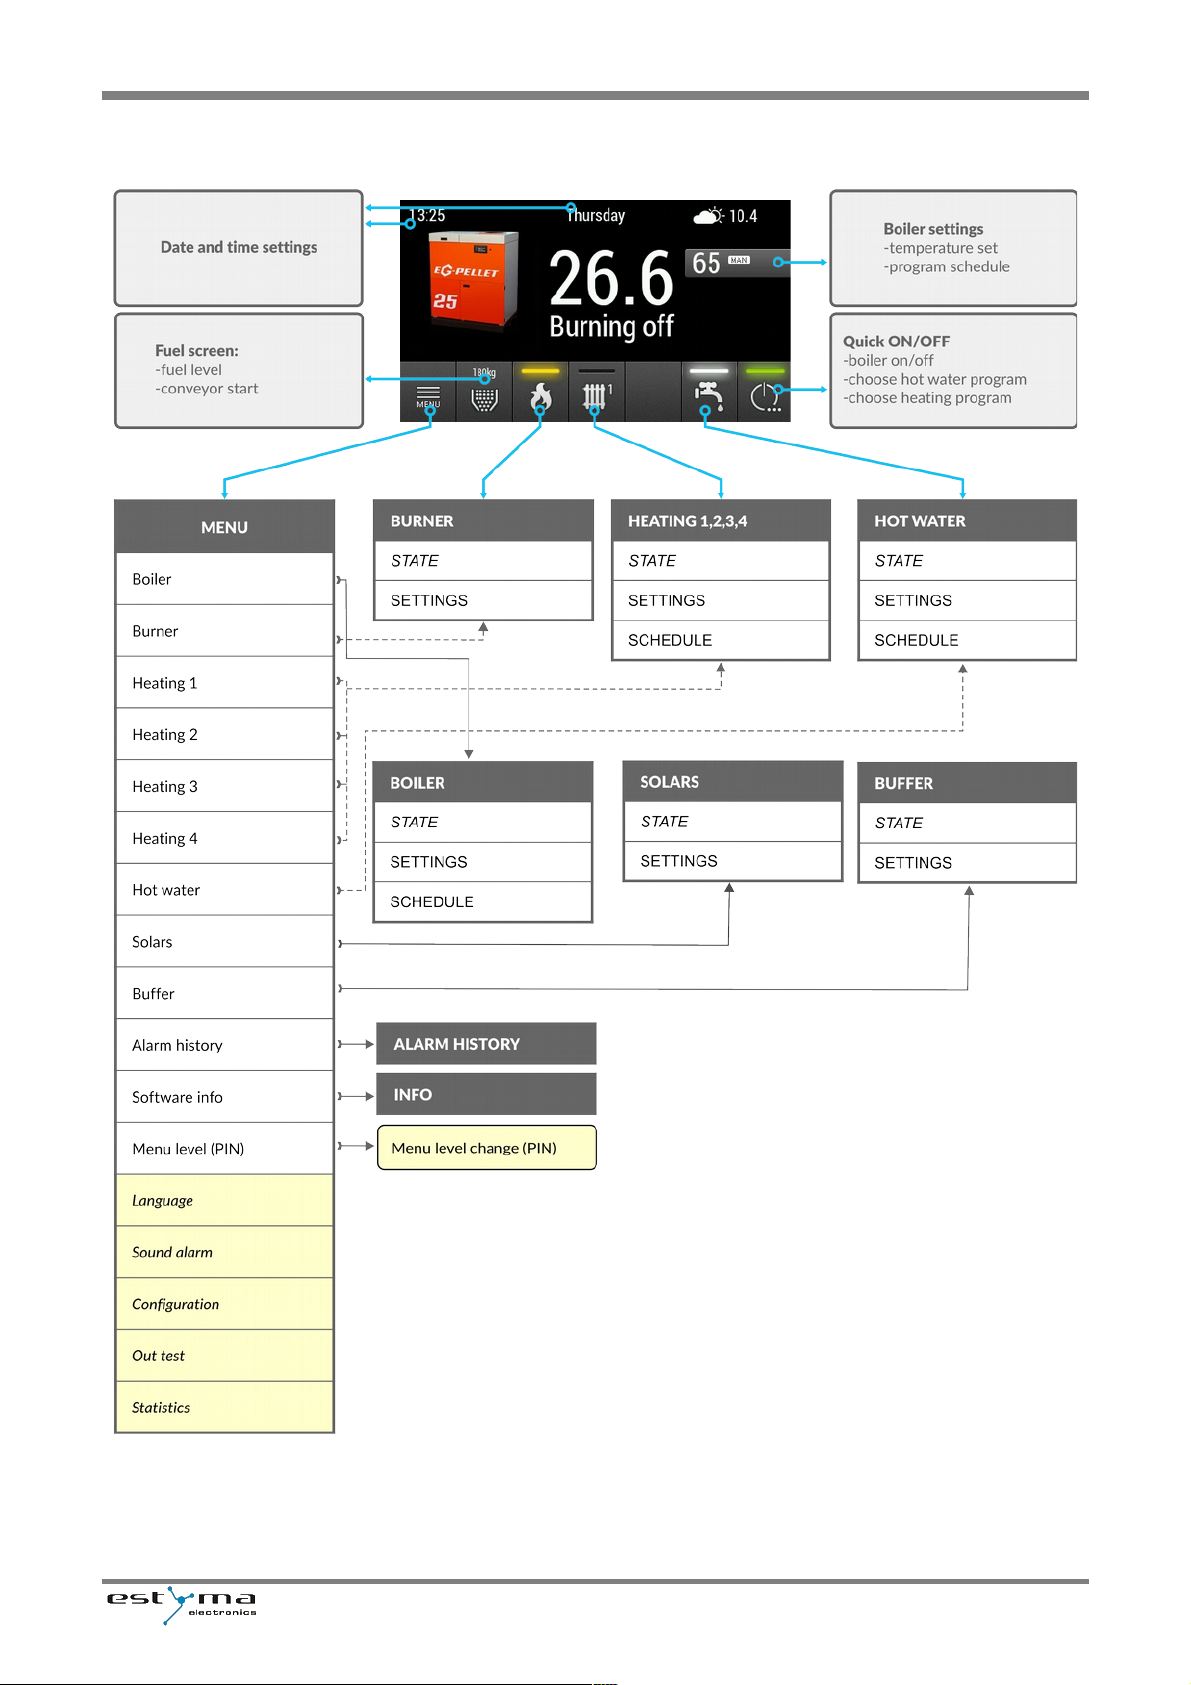
2.2 MENU STRUCTURE
www.estyma.pl 9
EGP-EN 20171024
Page 10
IGNEO touch user manual
Chapter 3. Detailed description of screens/functions
3.1 BOILER
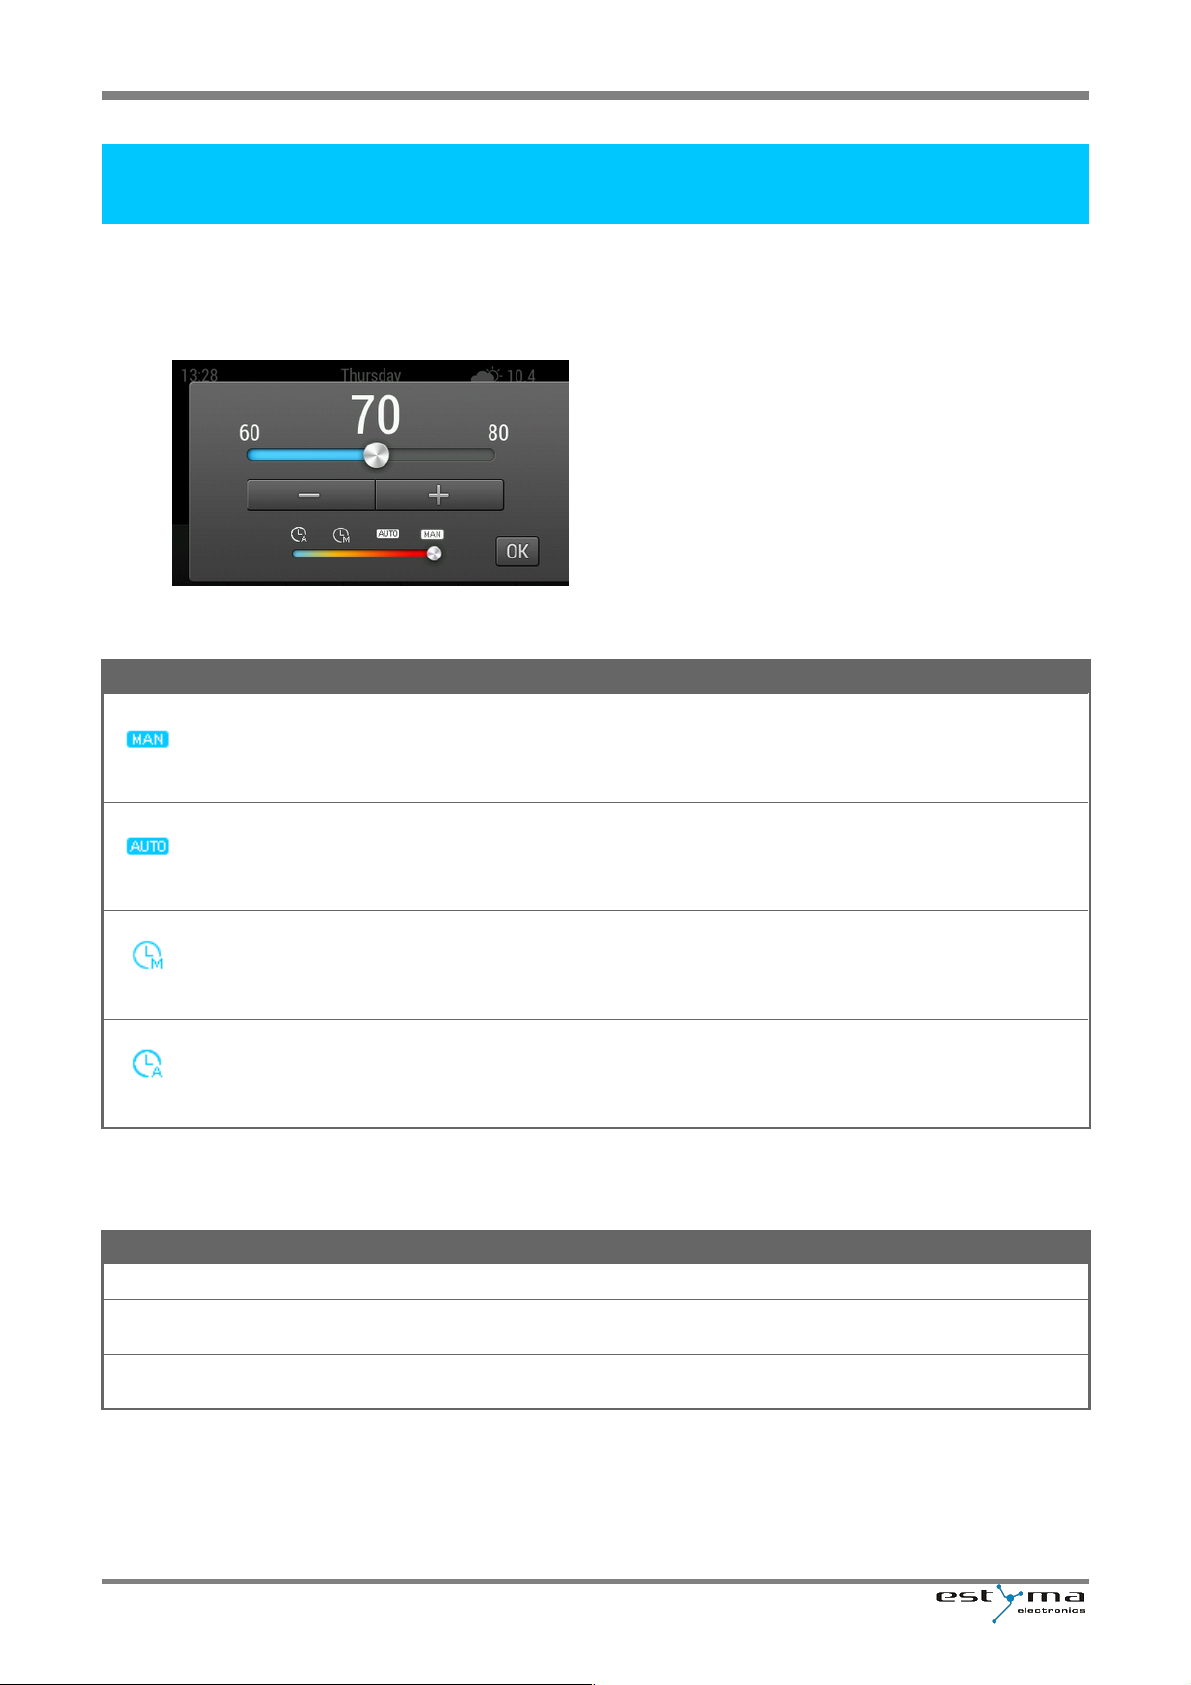
3.1.1 SET TARGET TEMPERATURE AND OPERATING MODE
Boiler target set temperature and operating mode can be
regulated after pressing number ''6'' on the main screen.
The following table presents available boiler operating modes.
SYMBOL NAME DESCRIPTION
manual
The boiler temperature is set directly by the user. The boiler works to maintain the
set target temperature.
automatic
The boiler temperature is set automatically on the basis of the current need of the
heating circuits, hot water circuits or the buffer.
When there's no need to heat the water, the temperature will be set to minimum
of 7°C (antifreeze mode), and the boiler will turn on only when needed.
time- manual
The boiler temperature is set as in the manual mode, but the boiler can work only
in set time limits.
time- automatic
The boiler temperature is set as in the automatic mode, but the boiler can work
only in set time limits.
3.1.2 SETTINGS
NAME DESCRIPTION
Set temperature [°C]
The set temperature in manual or time manual mode.
Switching hysteresis [°C]
The burner is turned on when the temperature in the boiler is lower than the set
temperature, minus the switching hysteresis.
Hysteresis exemption [°C]
The burner is turned off if the temperature in the boiler is higher than the set
temperature plus hysteriesis exemption.
10 www.estyma.pl
EGP -EN 20171024
Page 11
Chapter 3. Detailed description of screens/functions
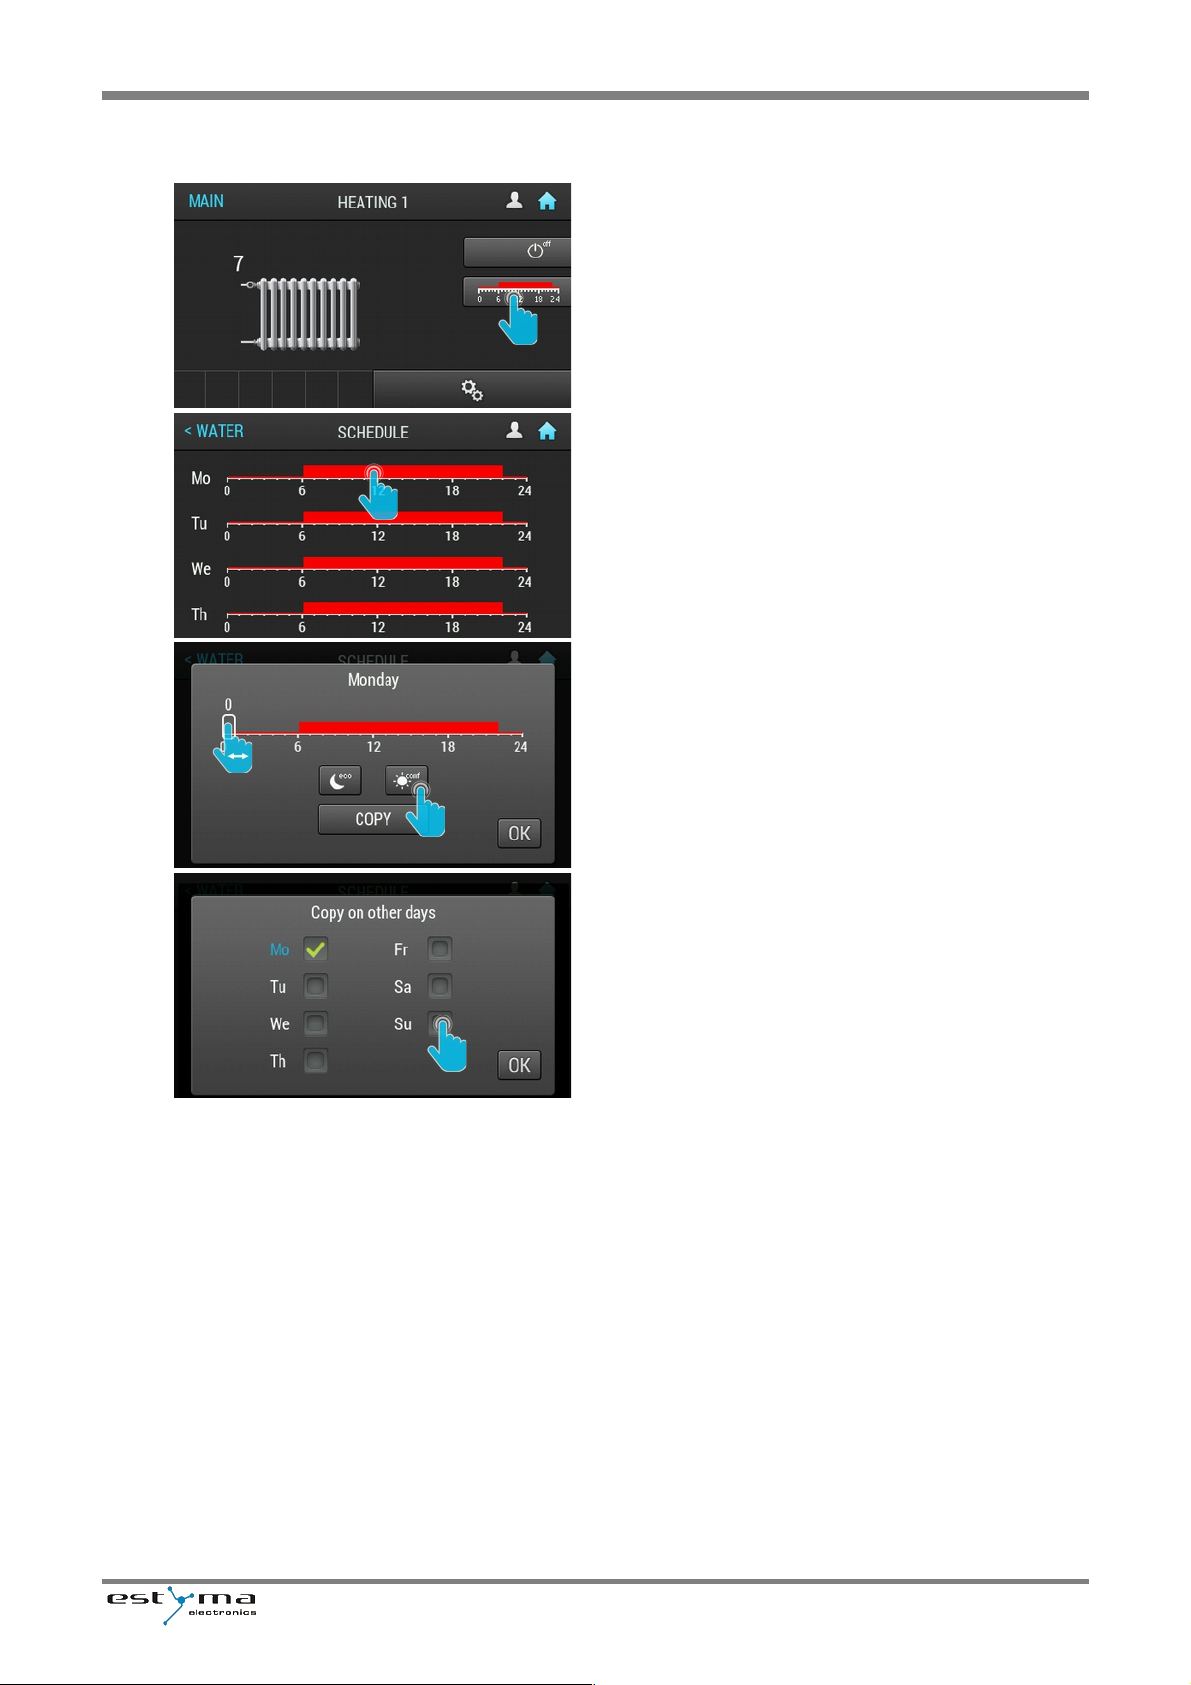
3.2 SCHEDULES
To enter the schedule menu, press the schedule button
on the boiler, heating or hot water menu.
The regulator allows for the work of the boiler, heating
and hot water according to the set schedules for each
day of the week separately.
After selecting a day, the window with daily schedule will
appear.
To select a program for a certain hour, click or slide the
hour dial, setting the time and press the ''eco'' or ''comf''
button.
After setting the program, slider moves to another hour.
The regulator is equipped with a convenient function of
copying the mode for other days of the week.
www.estyma.pl 11
EGP-EN 20171024
Page 12
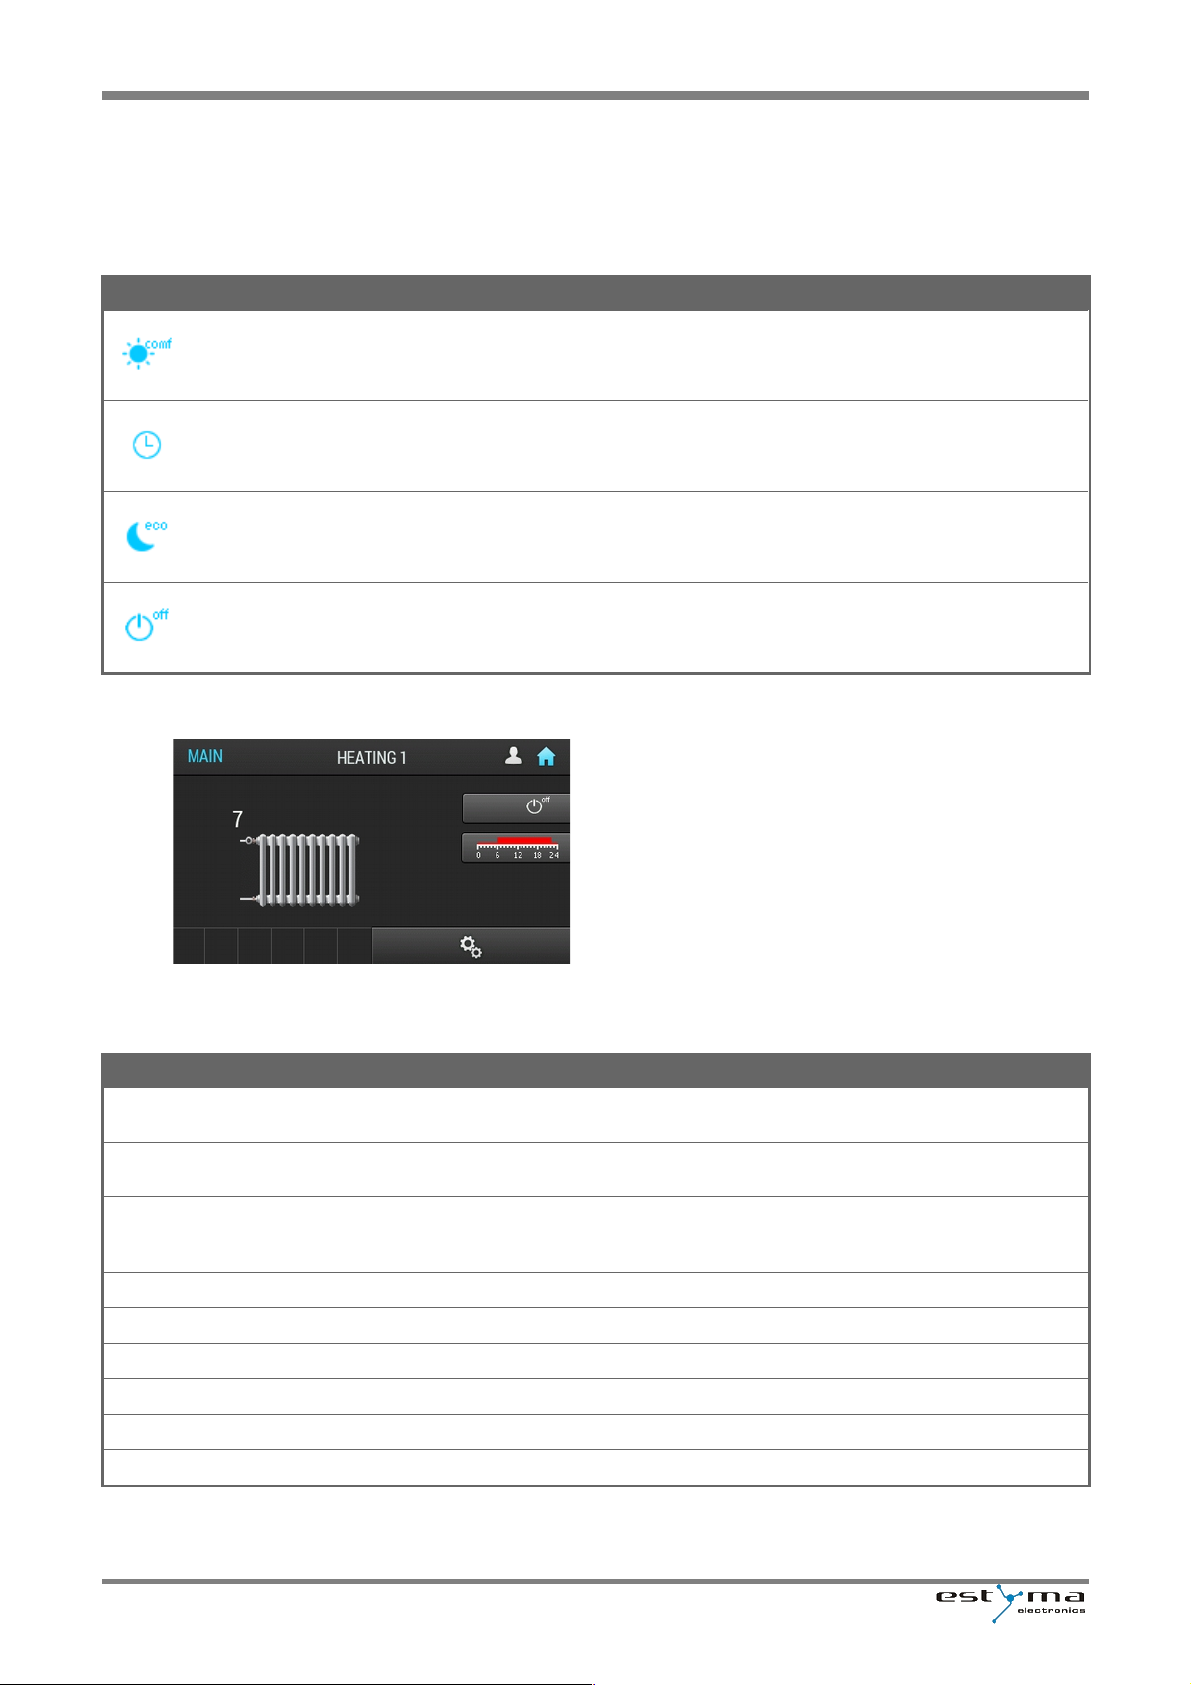
IGNEO touch user manual
3.3 HEATING AND HOT WATER OPERATION MODES
Both heating and the hot water can be prepared in several modes.
The meaning of the modes is analogical to both cases and it is presented in the table.
SYMBOL NAME DESCRIPTION
comfort
The comfort temperature is maintained all the time.
time
Works according to the time limit.
economic
The ecomomy temperature is maintained all the time.
turned off
The circuit is turned off. Only protection functions work.
3.4 HEATING
To enter the heating menu on the main screen, press
buttons ''10'' or ''11''.
There are current and set temperatures, as well as the
mode, displayed on the screen.
Also symbols for currently working system elements are
visible.
3.4.1 SETTINGS
NAME DESCRIPTION
Comfort temperature [°C]
Set temperature in the room in the comfort range, with the time mode or the
comfort mode.
Economical temperature [°C]
Set temperature in the room in the economic range, with the time mode or the
economic mode.
Hysteresis [°C]
The accuracy of maintaining the set target temperature in the room. It may also
affect the frequency of the boiler inset. If the hysteresis is higher the burner turns
on with lower frequency for a longer period of time.
Room sensor calib. [°C]
Calibrating the chosen sensor.
Work mode
Chosen operating mode of the circuit.
HC temp. set manually [°C]
Set temperature for the instalation when the weather steering is not chosen.
Temp. HC for -20°C [°C]
Set temperature for the instalation when the outside temperature is below -20°C
Temp. HC for 0°C [°C]
Set temperature for the instalation when the outside temperature is below 0°C
Temp. HC for 10°C [°C]
Set temperature for the instalation when the outside temperature is above 10°C
12 www.estyma.pl
EGP -EN 20171024
Page 13
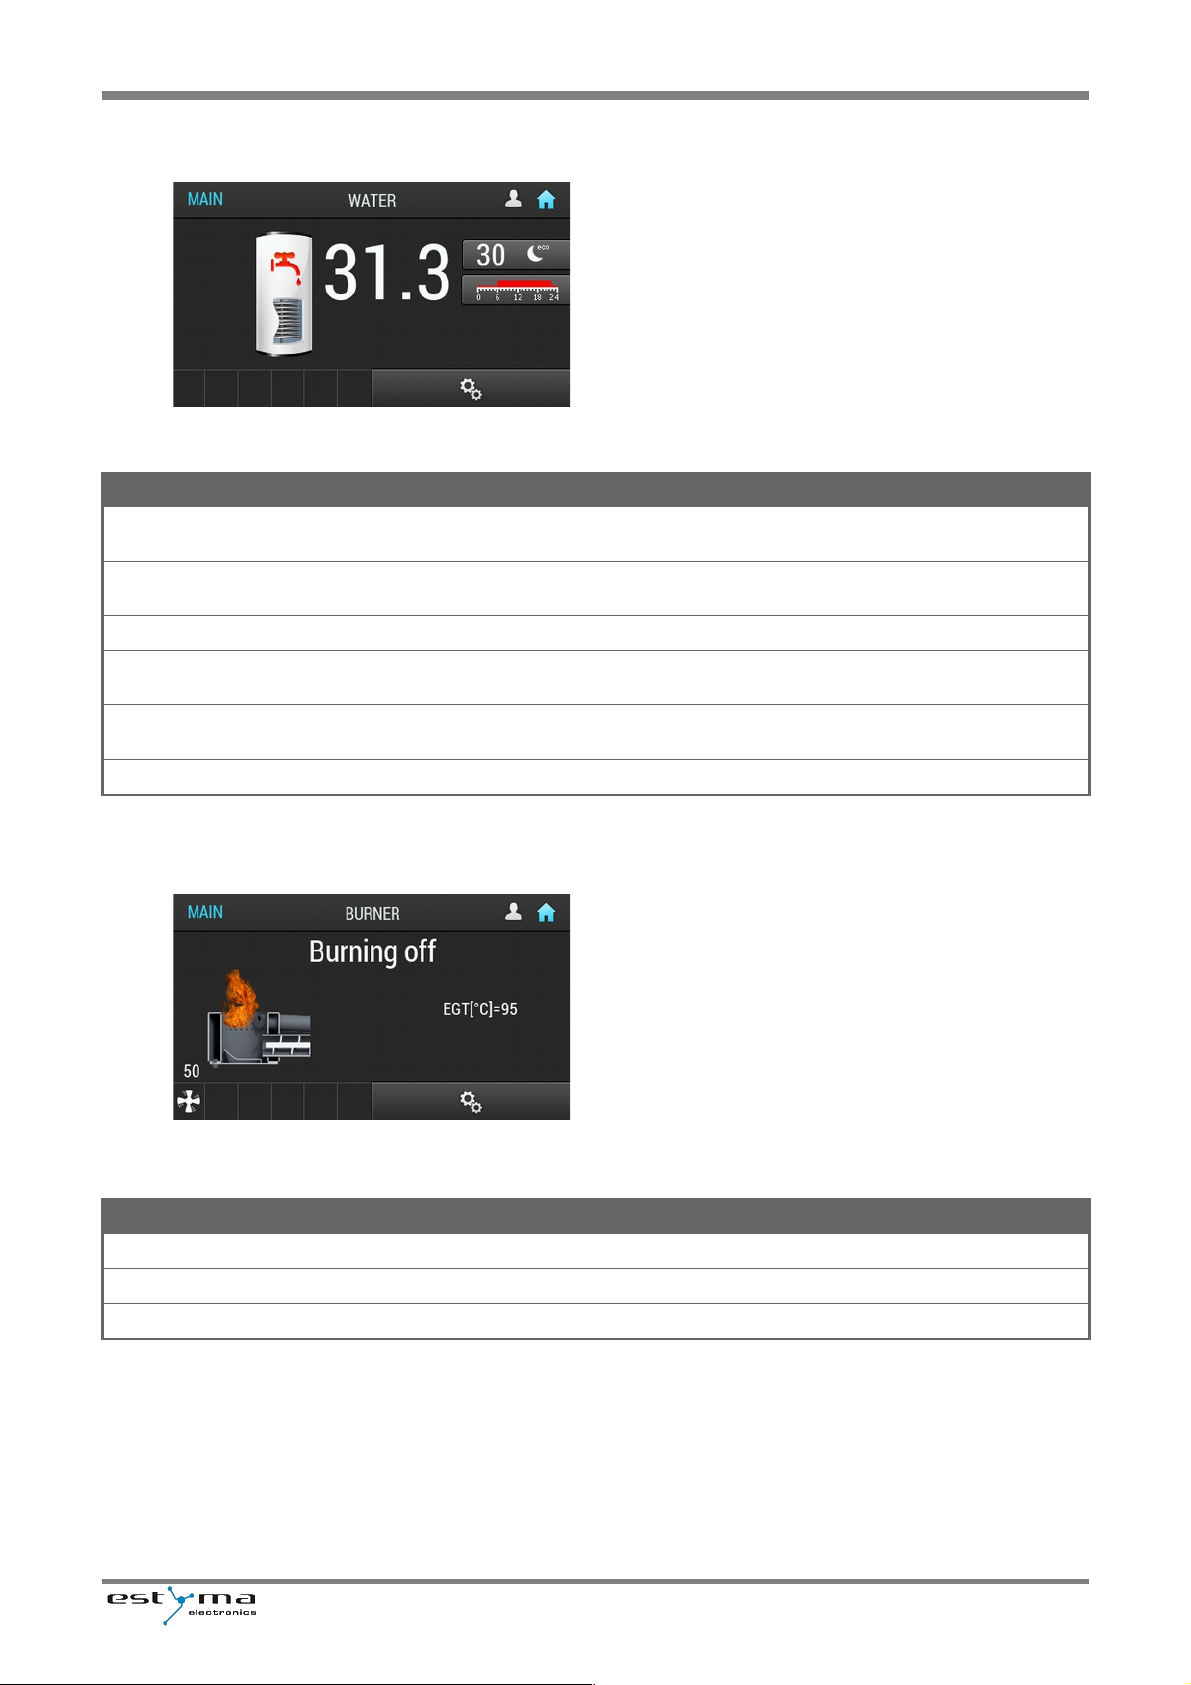
Chapter 3. Detailed description of screens/functions
3.5 HOT WATER
To enter the hot water menu on the main screen, press
number ''12''.
There is current temperature and set target temperature,
as well as the chosen mode, displayed on the screen.
Also symbols for currently working system elements are visible.
3.5.1 SETTINGS
NAME DESCRIPTION
Comfort temperature [°C]
The set hot water temperature in the comfort range in the time mode or the
comfort mode.
Economical temperature [°C]
The set hot water temperature in the economic range in the time mode or the
economic mode.
Heat now
One time hot water heating to the comfort temperature, regardless of the mode.
Hysteresis [°C]
The hot water heating starts when the temperature in the tank is lower than the
set temperature minus hysteresis.
Antilegionella
Enables weekly water heating to decrease the risk of legionella infection. The
heating process starts at 1 a.m every wednesday.
Hot water priority
Sets Hot Water priority. C/H pump is not engaged when H/W is heated.
3.6 BURNER
To go to the burner menu on the main screen, press ''9''.
Symbols for currently working system elements and the
burner status should appear.
3.6.1 SETTINGS
NAME DESCRIPTION
Air correction [%]
Correction of air programmed by the instrallator for the burning process.
Min power [%]
Lower limit for burner power modulation.
Max power [%]
Upper limit for burner power modulation.
www.estyma.pl 13
EGP-EN 20171024
Page 14
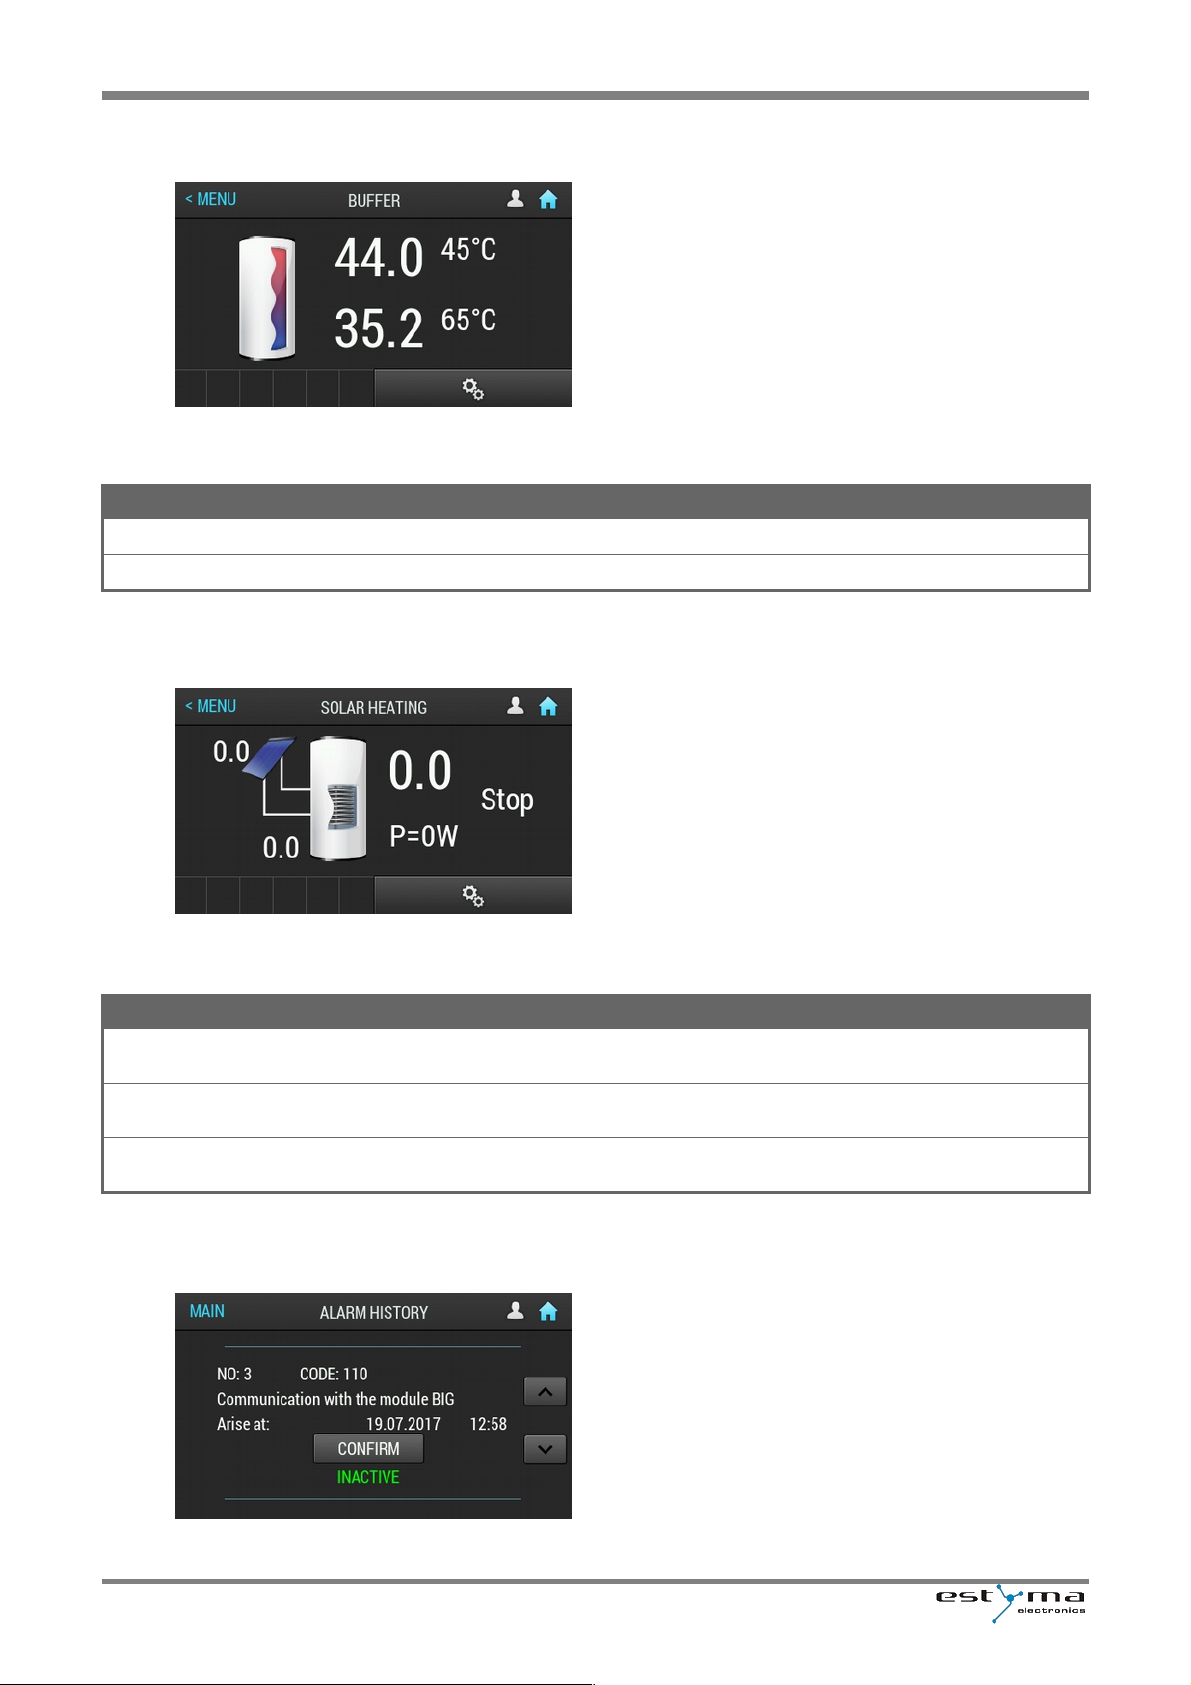
IGNEO touch user manual
3.7 BUFFER
To enter the buffer menu, press the button number ''7''
on main menu and choose ''BUFFER''
3.7.1 SETTINGS
NAME DESCRIPTION
Min. temp. (top) [°C]
Start heating the buffer if temperature drops below this point.
Max. temp. (bottom) [°C]
Stop heating the buffer if temperature raises above this point.
3.8 SOLAR HEATING
To enter the solar heating menu, press the button number
''7'' on main menu and choose ''SOLAR HEATING''.
3.8.1 SETTINGS
NAME DESCRIPTION
Flow (l/min)
Flow rate in solar installation. This parameter is used to correctly calculate the
power.
Delta switch on [°C]
Solar heating pump is turned on when the temperature difference between the
solar collector and the water tank exceeds this value.
Delta switch off [°C]
Solar heating pump is turned off when the temperature difference between the
solar collector and the water tank falls below this value.
3.9 ALARMS
The driver includes the history of alarms which is saved in
the memory. If there are any active or unconfirmed
alarms, on the main screen alarm icon will appear. On
pressing it, the history will be displayed, where the last 20
alarms are stored.
14 www.estyma.pl
EGP -EN 20171024
Page 15

Page 16

Produced by:
estyma electronics
al. Lipowa 4
11-500 Giżycko
POLAND
tel. +48 87 429 86 75
fax +48 87 429 86 75
[email protected]
www.estyma.pl
 Loading...