

Page 1

Safety
Assembly
Operation
Care
Parts
Español, p.15
Françias, p.29
READ AND SAVE THESE INSTRUCTIONS
CONSOLE
EVAPORATIVE
HUMIDIFIER
MODEL:
MA0800 Contemporary Styling
• Humidifies up to 1,700 sq. ft
• 8 gallons of output per day
• Easy bottle fill
• 3-speed Digital Control
SAVE THE ENVIRONMENT
RECYCLE APPROPRIATE MATERIALS
To order parts and accessories call 1-800-547-3888
Part No. 1B72131 5/11 Printed in China
`
OWNER’S
CARE
&
USE
MANUAL
1
Page 2

General Safety Instructions
READ BEFORE USING YOUR HUMIDIFIER
DANGER: means if the safety information is not followed someone will be
seriously injured or killed.
WARNING: means if the safety information is not followed someone could be
seriously injured or killed.
CAUTION: means if the safety information is not followed someone may be
injured.
1. To reduce the risk of fire or shock hazard, this humidifier has a polarized
plug (one blade is wider than the other.) Plug humidifier directly into a 120V,
A.C. electrical outlet. Do not use extension cords. If the plug does not fully fit
into the outlet, reverse plug. If it still does not fit, contact a qualified
electrician to install the proper outlet. Do not change the plug in any way.
2. Keep the electric cord out of traffic areas. To reduce the risk of fire hazard,
never put the electric cord under rugs, near heat registers, radiators, stoves
or heaters.
3. Always unplug the unit before moving, cleaning or removing the fan
assembly section from the humidifier, or whenever it is not in service.
4. Keep the humidifier clean.
5. Do not put foreign objects inside the humidifier.
6. Do not allow unit to be used as a toy. Close attention is necessary when
used by or near children.
7. Never use your humidifier while any part is missing or damaged in any
manner.
8. To reduce the risk of electrical hazard or damage to humidifier, do not tilt, jolt
or tip humidifier while unit is running.
9. To reduce the risk of damage to humidifier, unplug when not in use.
10. To reduce the risk of accidental electrical shock, do not touch the cord or
controls with wet hands.
11. To reduce the risk of fire, do not use near an open flame such as a candle or
other flame source.
12. Note the warning label shown below.
WARNING: To reduce risk of fire, electric shock, or injury always unplug
before servicing or cleaning.
2
Page 3

Description
MA0800
*Output per 24 hrs
8 gallons/30.2 Litres
Capacity of Bottle
1.2 gallons/4.54 Litres
Capacity of Base
1.2 gallons/4.54 Litres
*Sq. ft. coverage
1,700
Fan Speeds
3
Replacement Wick
MAF2
Auto Humidistat
Yes
Auto Shut Off
Yes
Controls
Digital
Rubber feet
6
ETL Listed
Yes
Volts
120 A.C.
Hertz
60
Amps (High Speed)
1.2
Watts (High Speed)
81
Know Your Humidifier
* Based on an area with average insulation and an 8 foot ceiling height.
Parts and accessories may be ordered by calling 1-800-547-3888.
Please have model number of humidifier available when calling.
3
Page 4
For Reference Only
When Outdoor
Temperature is:
F C
Recommended
Indoor Relative
Humidity (RH) is
-10°
2°
10°
20°*
-24°
-18°
-12°
-6°*
20%
25%
30%
35%*
* or higher
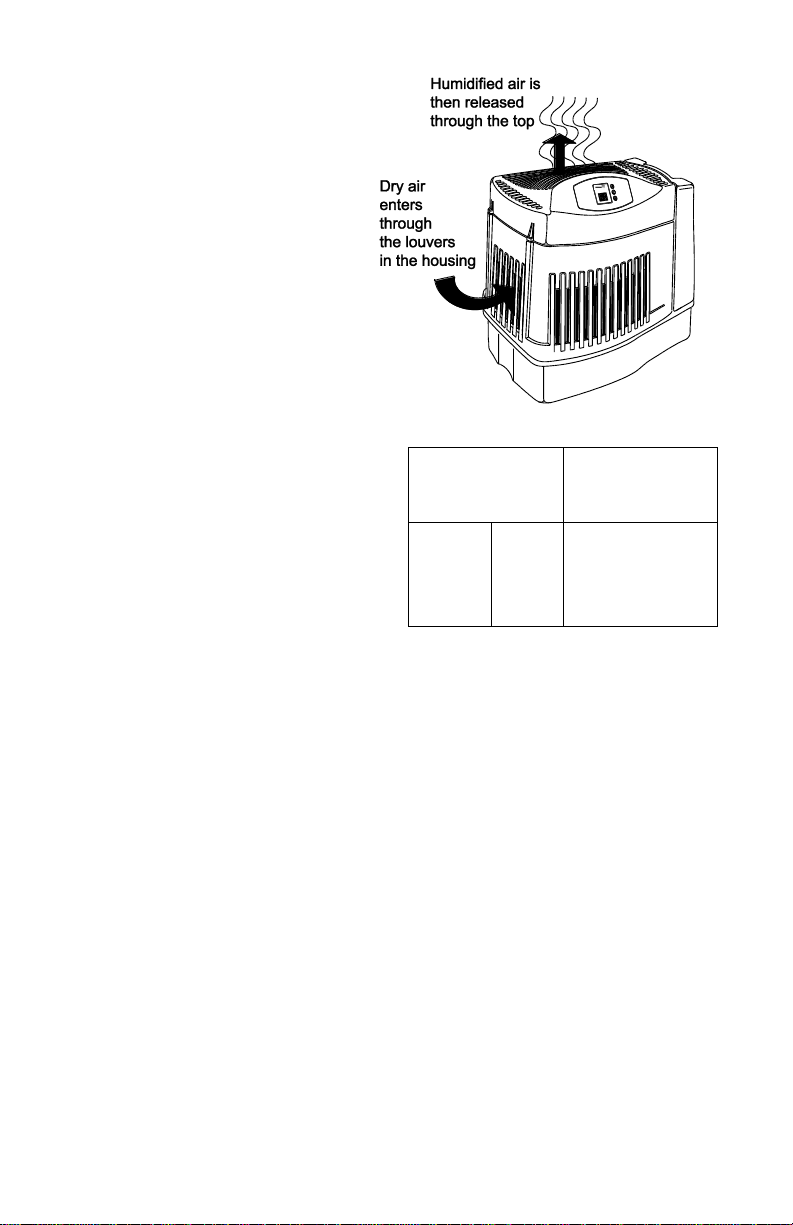
How Your Humidifier Works
Your new Essick Air® Evaporative
humidifier is designed to satisfy home
humidity requirements through the
principle of evaporation of water into
the air.
Once the wick becomes saturated, air
is drawn in, passes through the wick
and moisture is absorbed into the air.
All evaporation occurs in the
humidifier so any residue remains in
the wick. This natural process of
evaporation creates no white dust like
some other humidifiers.
Set Up and Location
1) Unpack humidifier from carton and
remove all packaging material,
wick, etc. from box.
2) Place humidifier on a flat level
surface. Position the humidifier
where the most humidity is needed
or where the most air will be
circulated throughout the house
such as near a cold air return. If the
unit is positioned close to a window,
condensation may form on the
window pane. If this occurs the unit
should be repositioned in another location.
CAUTION: Do NOT position the unit directly in front of a hot air duct or radiator. Do
NOT place on soft carpet.
NOTE: Due to release of cool, moist air from humidifier, it is best to direct air away
from thermostat and hot air registers, and to position humidifier next to an inside
wall. Unit should not be placed where cold air from outside walls or warm air from a
hot air register blows directly on it.
3) Place the humidifier at least 4 inches from the wallor curtains.
Filling
CAUTION: Disconnect power before filling, cleaning or servicing unit. Keep grille
dry at all times.
WARNING: To reduce the risk of fire or shock hazard, DO NOT pour or spill water
into control or motor area. If controls get wet, let them dry completely and have unit
checked by authorized service personnel before plugging in.
4
Page 5

After the humidifier is positioned where
it will be operating you are ready to fill the
humidifier. The bottle lifts straight up and
away from the base. Take care not to
bump or damage fill valve assembly on
the bottom of the bottle.
Invert the bottle. Press the valve stem
button into the bottle and turn clockwise
to lock in open position. Place bottle
under the faucet. Fill the bottle, being
careful not to allow any debris to get in
the bottle. Debris may interfere with the
valve seating. Once the bottle is full,
press the valve stem button and turn
counter clockwise to release and close.
CAUTION: Use only EPA Registered
Bacteriostat. Under no circumstances
should you use water treatment
products designed for Roto belt or
Ultrasonic humidifiers.
We recommend using only EPA
registered bacteriostat treatment such
as Essick Air Bacteriostat, Part Number
1970 whenever you refill the humidifier
base to eliminate bacterial growth. Add
bacteriostat according to the instructions
on the bottle.
Place the water bottle back into the
humidifier base. When positioned
properly, the plunger will open and the
water will flow into the base. The base
will hold the entire contents of the water
bottle. Once the bottle is empty, remove it
and repeat the filling process. The
humidifier is now filled to capacity. To
benefit from less frequent filling let the
humidifier exhaust both the water from
the bottle and the base before filling.
Controls and Operation
NOTE: The humidifier should be placed at least FOUR inches away from any walls
and away from heat registers. Do not place on soft carpet. Unrestricted airflow
into the unit will result in the best efficiency and performance.
Where you set your desired humidity levels depends on your personal comfort
level, outside temperature and inside temperature. A starting set point of 30%
to 40% ROOM humidity is recommended but there may be conditions that require
a different setting.
NOTE: If excessive condensation occurs, reduce fan to a lower speed setting.
5
Page 6
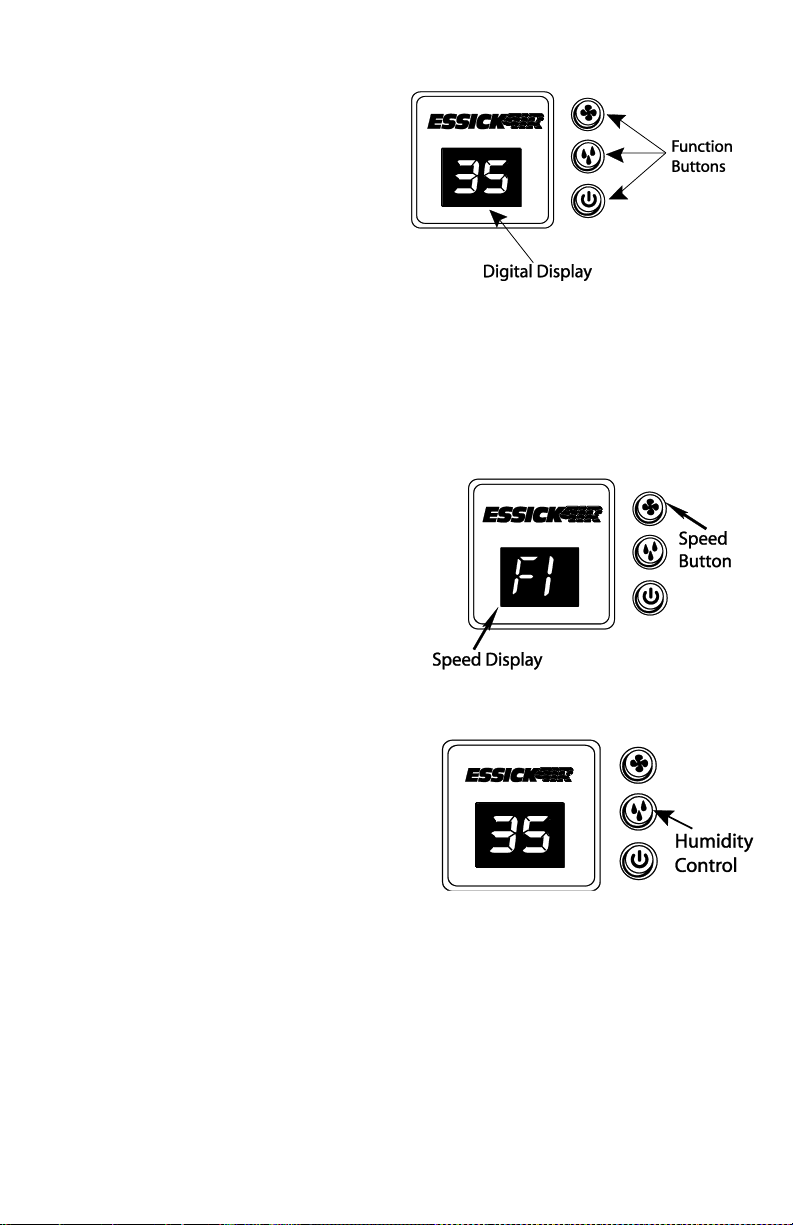
To Operate the Controls
Digital Display
Press the power button once to turn
the unit on*. Initially there is a slight
delay while the electronics calibrate.
Two bars (- -) appear during this time.
Once calibration is complete a ROOM
humidity reading between 20% - 95%
will be displayed. A flashing 20 display
indicates that the room humidity is less
than 20%.
NOTE: The default settings at initial startup are (LOW) F1 fan speed and 65%
SET humidity. After desired settings are selected by the user, they remain as long
as the unit remains plugged in and there is no power interruption. When the unit is
unplugged, the original default settings are reinstated.
* Humidifier fan should operate at initial start up. If it does not, refer to “Fan not operating
(digital display is illuminated)” in the “Trouble Shooting” section on page 10 of this manual.
Speed Button
This humidifier is equipped with a 3-speed
fan control. Initially depressing the speed
button will display the current speed
setting. Each push of the speed button
advances the mode through the settings of
(HIGH) F3, (MEDIUM) F2 and (LOW) F1.
The selected setting is displayed on the
digital readout. The higher the setting, the
faster water is evaporated and released into the air. F1 (LOW) is the quietest
setting and is provided for conditions that
do not require a rapid evaporation rate.
Humidity Control
This button allows you to adjust the
humidity to suit your needs. This
humidifier will automatically cycle on
and off as required to maintain the
selected setting.
The readout displays both actual (ROOM)
and desired (SET) humidity percentage (%) settings when humidity control button
is pressed. The ROOM readout has a range of 20% to 95% RH. If the room
humidity level is equal to or less than 20% RH the display will show a flashing 20.
The SET readout has a range of 25% to 65% RH and is adjusted in increments of
5%. Initially depressing the humidity button will display the current humidity setting.
Each additional press of the button increases the setting by 5%. A SET point of
65% RH operates the humidifier continuously regardless of the ROOM reading.
The humidistat that senses the readings is located on the power cord. Insure that it
is free from obstruction.
6
Page 7

Using Your Humidifier
Refill Display
For maximum run time both the bottle and the
base should be filled. When both the bottle and
the base are empty, the display alternates the
room humidity reading and “F” (FILL), indicating
additional water is required.
Check Filter Indicator
The ability of any humidifier to efficiently supply
humidity output relies heavily on the condition of
the filter. As the filter loads with impurities it
gradually loses its wicking capability. When this
happens, moisture output is reduced and the
humidifier has to work longer to satisfy the selected
setting.
This humidifier has a check filter reminder timed to
appear after 720 hours of operation. When the
display shows an alternating “CF” and “room
humidity” setting at 5 second intervals it is a
reminder to check the filter condition.
NOTE: Some areas have high water mineral content causing the need for more
frequent filter changes.
Reset the Check Filter “CF” function each time you replace a filter by unplugging
the unit from the power source, then plug it in again.
Refer to Replacement and Care of Filter on page 8. If a build-up of deposits or
severe discoloration is evident replace the filter to restore maximum efficiency.
Control lock
To avoid unwanted tampering with the humidifier
settings the controls can be locked.
Activation Procedure
After the humidifier functions have been set up, hold
the power button down for 5 seconds. The display
will show “CL” for 2 seconds; release the power
button and the control will resume the display of the
room humidity. The humidifier will continue to
function with the locked in settings. If buttons are
operated while “CL” is active, the “CL” is displayed and settings are unaffected.
Deactivation Procedure
To deactivate the “CL” function simply
press and hold the power button for 5
seconds. “CL” will flash at the rate of 1
second on and 1 second off for a period of 2
seconds and then resume the display of
room humidity.
Humidistat
The humidistat located on the power cord
senses the percentage of humidity in the
air. It causes the humidifier to cycle on
7
Page 8
and off to maintain the selected humidity SET point. The fan will turn on if the
“ROOM” reading falls 3% below the SET point and will continue to run the
humidifier until a reading of 1% above the SET point is achieved. The fan will turn
off until the ROOM reading falls 3% below the SET point again.
NOTE: Be sure that the humidistat, which is located on the power cord, is free from
obstruction and away from any hot air source.
Replacement and Care of Filters
WARNING: To reduce the risk of shock
or injury from moving parts, always unplug
humidifier before removing or replacing
any parts.
CAUTION: To help retard bacteria growth
and keep maximum efficiency, the filter
should be replaced at least once per
season, or more often under hard water
conditions. Use Essick/MoistAIR
MAF2 replacement filter.
Replace the evaporative wicking filter at
least once per humidification season or
more depending on water conditions in
your area.
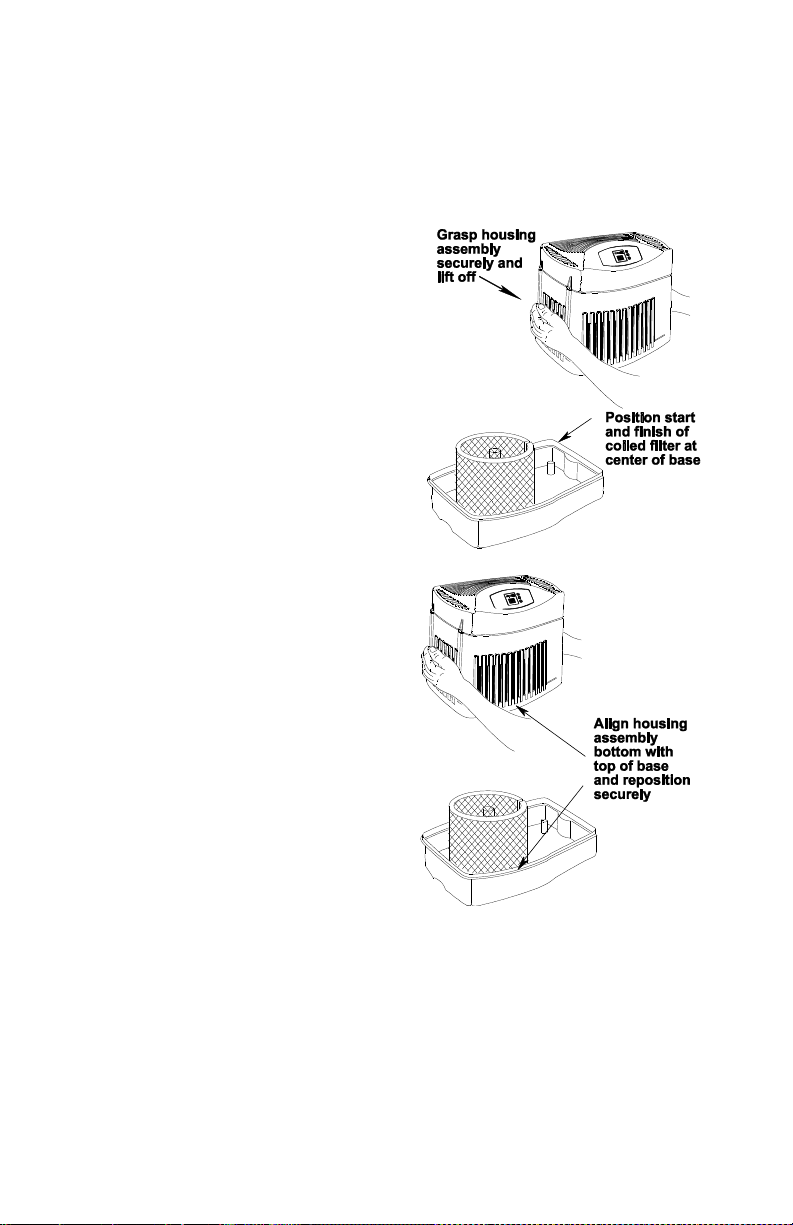
Filter Replacement
1. Unplug humidifier. Before removing
the filter, we recommend moving the
humidifier to an area where floor
coverings are not susceptible to water
damage (i.e. kitchen or bath areas.)
2. Remove the water bottle and set aside.
Be sure not to bump or damage the fill
valve.
3. Grasp the housing assembly and lift
straight up and away from the base
and set aside. The filter is now
accessible.
4. Take note of the filter position.
Remove the filter. You may want to
clean the base at this time. See the
"Cleaning and Maintenance" section
of this manual.
5. Install a new filter (MAF2) into the base. Coil the filter and position it between the
uprights in the bottom of the base. The start and finish of the coil should be
captured at the center of the base (see diagram) and the filter should be resting
on the floor of the base.
6. Return the housing assembly to the top of the base. Reposition the
humidifier to its operating position.
7. The humidifier is now ready to be filledfor operation.
8
Page 9
Care and Maintenance
Cleaning your humidifier regularly helps eliminate odors, bacterial and fungal
growth. Ordinary household bleach is a good disinfectant and can be used to wipe
out the humidifier base after cleaning.
We recommend cleaning your humidifier at least once a week to maintain optimum
environmental conditions from your humidifier.
We also recommend using Essick Air Bacteriostat Treatment each time you
refill your humidifier to eliminate bacterial growth. Add bacteriostat according
to the instructions on the bottle. Please call 1-800-547-3888 to order Bacteriostat
Treatment, reference part number 1970.
Cleaning Instructions
WARNING: To reduce the risk of injury, fire or damage to humidifier, use only
cleaners specifically recommended for humidifiers. Never use flammable,
combustible or poisonous materials to clean your humidifier. To reduce the risk
of scalds and damage to humidifier, never put hot water in humidifier.
CAUTION: Local water purity varies from area to area and under certain
conditions water impurities and airborne bacteria may promote the growth of
microorganisms in the reservoir of the humidifier. To retard bacteria growth that
may cause odors and be harmful to your health, use only MAF-2 replacement
filters. We also recommend using EPA approved bacteriostat, and humidifier
cleaner, available at your local retailer.
Step 1
To make cleaning easier, the humidifier base should be empty and completely
dried out. To accomplish this, use the following method:
a. Allow the humidifier to run until the REFILL message “F” illuminates and
the automatic shutoff has stopped the humidifier fan.
b. Unplug humidifier.
WARNING: To reduce the risk of shock, always unplug humidifier before cleaning
or servicing. If humidifier is not un-plugged, fan could start after housing is removed
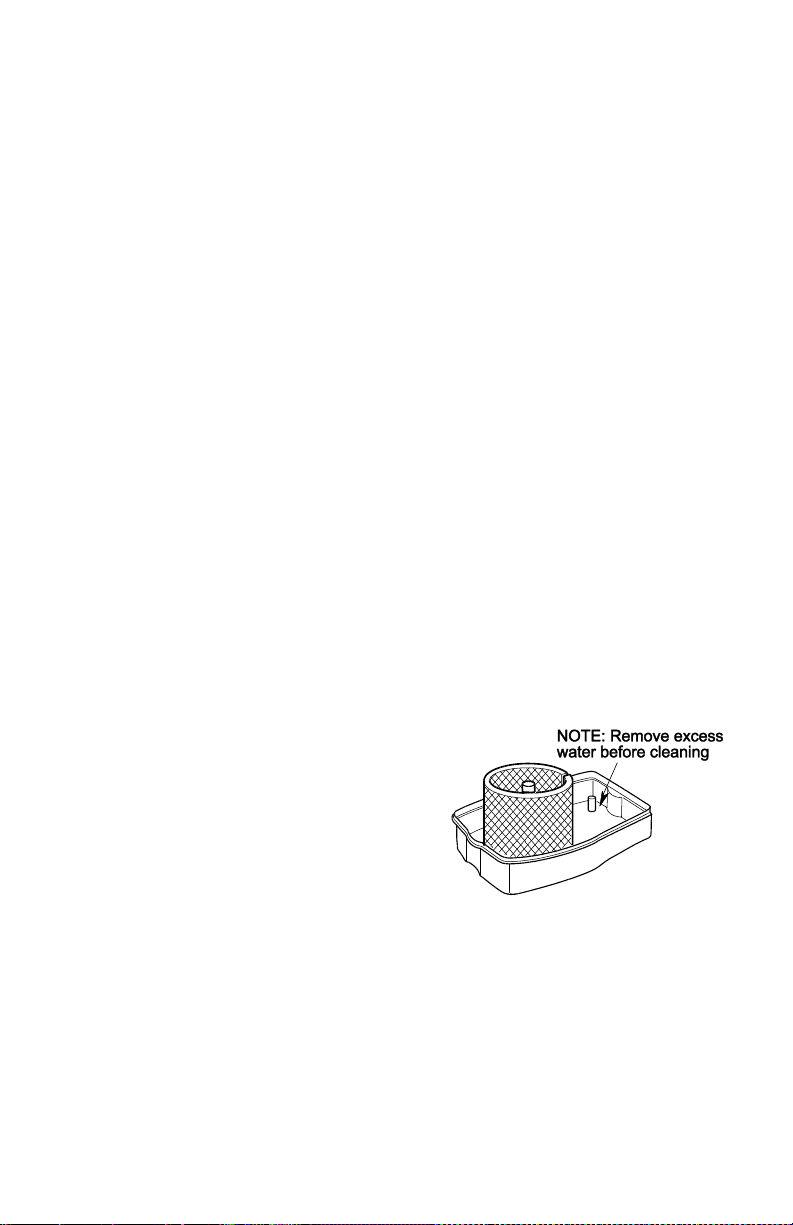
Step 2
To Remove Parts
See “Replacement and Care of Filters”
page 8.
NOTE: There may be a little water still in the
base. Carefully dump the water out or remove
with a sponge.
Step 3
Bi-Weekly Maintenance
Removing Scale
1. Fill the humidifier base with one 8 oz. cup (236 milliliters) of white vinegar. Let
solution stay 20 minutes.
2. Clean all interior surfaces with a soft brush. Dampen a soft cloth with white
vinegar and wipe out the base to remove scale.
3. Rinse thoroughly with clean warm water to remove scale and cleaning solution.
9
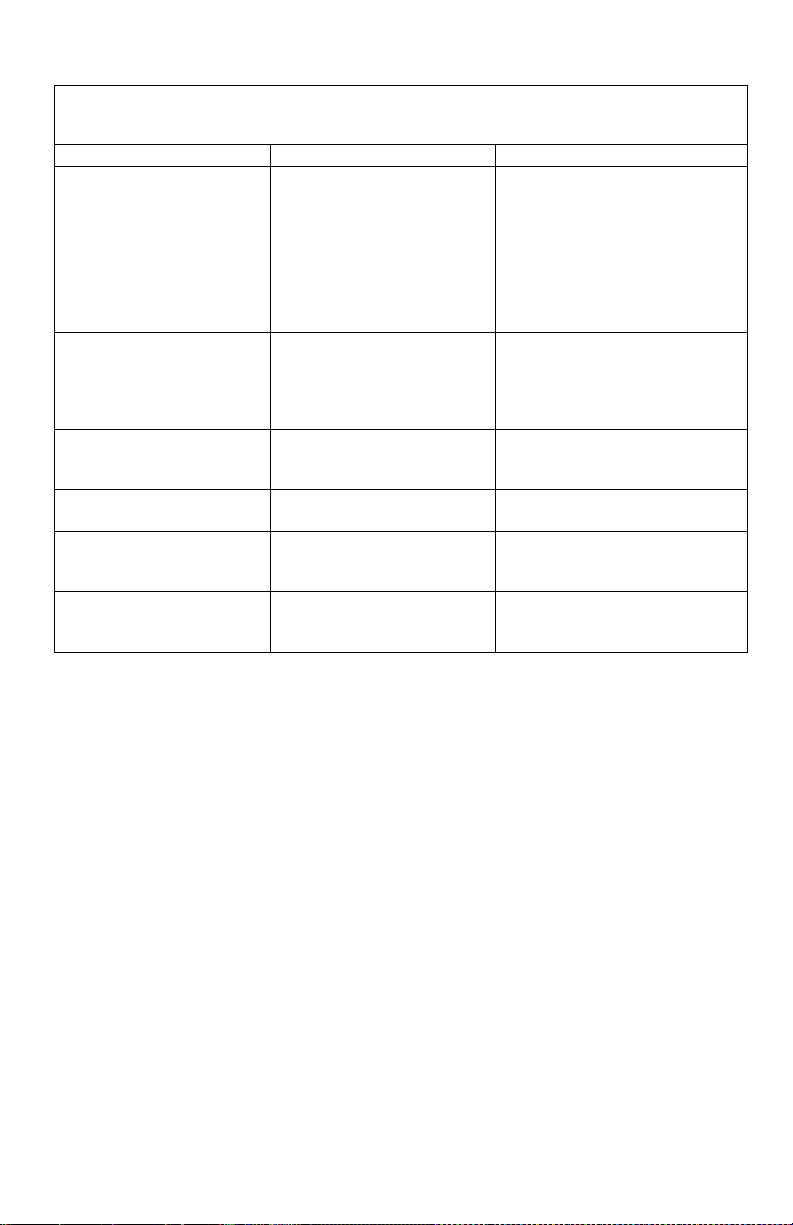
Page 10

Trouble
Probable Cause
Remedy
Digital display not
illuminated.
• No Power.
• Power button has not been
depressed.
• Check 120 volt power
source.
• Press power button once to
turn on.
Fan not operating (digital
display is illuminated).
• ROOM humidity level is not
3% or more below SET
humidity level.
• Reservoir is empty.
• Raise SET humidity level if
desired.
• Increase fan speed.
• Fill humidifier with water.
Fan running
continuously.
• SET humidity level is 65%.
• ROOM humidity level has
not reached 1% or more
above SET humidity level.
• A SET humidity percentage
of 65% operates fan
continuously. Adjust SET
level between 25% - 60%.
• Continue to run until
desired humidity level is
achieved. This may take
up to 48 hours initially.
Poor evaporation of
water.
• CHECK FILTER (CF)
message flashing.
• Mineral buildup on filter.
• Change to a fresh new
filter.
• NOTE: Local water varies
from area to area and
under certain conditions
minerals will build up more
rapidly in the filter.
Bottle empties
completely
• This is normal for initial
filling
• Refill bottle for maximum
run time.
Bottle continues to empty
after complete filling.
• Air is entering water bottle.
• Check for leak in water
bottle.
• Ensure fill valve position is
turned to closed and valve
has no interfering debris.
Disinfecting Base
1. Pour 1/2 gallon (1.89 litres) of water and 1/2 teaspoon (2.5 millilitres) chlorine
bleach into the base. Let solution stay for 20 minutes, carefully swishing every
few minutes. Wet all surfaces normally exposed to water.
2. Empty base after 20 minutes. Rinse with water until bleach smell is gone.
Allow unit to dry out completely.
NOTE: The water bottle should be cleaned in the same manner as the base.
Rinse thoroughly with clean water after all steps are complete
End of Season Maintenance
1. Follow “Bi-Weekly Maintenance” instructions at end of humidification season.
2. Remove filter.
3. Let humidifier dry completely before storing.
4. Store in cool, dry location.
5. Install a new filter in clean humidifier before next season begins.
NOTE: “Bi-Weekly Maintenance” procedure is also recommended if you do not
plan to run the humidifier for one week or more.
Troubleshooting
10
Page 11
Troubleshooting (con’t)
Trouble
Probable Cause
Remedy
Bottle not emptying.
• Spring Valve Assembly
damaged
or
missing post in bottom of
base.
• Base full of water.
• Check position of bottle.
Reposition so that fill valve on
bottom of bottle is depressed
by post in bottom of base.
• The base will hold the contents
of water bottle (1.2
gallons). Continue to run
humidifier to deplete water
from base.
“CF” message does not
appear even when filter is
dirty or humidifier
performance is clearly
reduced.
• Loss of power or a power
failure has caused the CF
message to prematurely
reset.
• Replace filter.
Display blinks or fan
moves slightly when
humidifier is plugged in.
• Normal
• No action required.
Alternating “F” and room
humidity displayed.
• Reservoir is empty.
• Fill humidifier with water.
Alternating “CF” and room
humidity displayed.
• Filter may be dirty.
• Replace filter.
• Unplug unit for 30 seconds
and replug in to clear display.
Controls are unresponsive
or CL is displayed
CONTROL LOCK (CL)
feature has been activated.
Hold power button down for 5
seconds. Control Lock function
will deactivate.
11
Page 12

Repair Parts
Parts List for Essick Air Humidifier
Model No. MA 0800
12
Page 13

Key No.
Part No.
Description
1
1B71997
Top Assembly
2
MAF2
† Filter
3
831188-1
Support, Float
4
831189
Float, Reservoir
5
831187-1
Base
6
831190
Foot Rubber
7
831199
Bottle Assembly
8
831207
Cap, Screw
9
1B71996
Owner’s Manual (not shown)
Parts List for Essick MA0800 Evaporative Humidifier
Model No. MA0800
Always order by part number - Not by key number
† Stock item - Purchase locally or call 1-800-547- 3888 from the USA
or 1-888-744-4689 from Canada to order.
• Any attempt to repair the control assembly or motor voids the
warranty and may create a hazard unless repair is done by a
qualified service technician.
To order parts, call: USA 1-800-547 3888
in Canada: 1-888-744-4687
13
Page 14
ESSICK AIR PRODUCTS
HUMIDIFIER WARRANTY POLICY
EFFECTIVE APRIL 1, 2010
SALES RECEIPT REQUIRED AS PROOF OF PURCHASE
FOR ALL WARRANTY CLAIMS.
This product is warranted against defects in workmanship and materials as listed below:
One year from the date of sale on factory installed components.
Two years from the date of sale on motor.
Thirty (30) days on replacement components.
This warranty does not apply to filters or wicks which are customer replaceable parts.
This warranty applies only to the original purchaser of the product when it is purchased from a
reputable retailer/dealer.
This warranty does not apply to damage from accident, misuse, alterations, unauthorized repairs,
unauthorized use, mishandling, unreasonable use, abuse, including failure to perform reasonable
maintenance, normal wear and tear, nor where the connected voltage is more than 5% above
the nameplate voltage, nor to the equipment or products being improperly installed or wired or
maintained in violation of this Owner’s Manual.
Alterations include the substitution of name brand components including, but not limited to wicks
and bacteria treatment.
THIS PRODUCT IS NOT INTENDED FOR COMMERCIAL USE. THIS IS THE SOLE AND
EXCLUSIVE WARRANTY GIVEN BY MANUFACTURER WITH RESPECT TO THE PRODUCTS
AND, TO THE MAXIMUM EXTENT PERMITTED BY LAW, IS IN LIEU OF AND EXCLUDES ALL
OTHER WARRANTIES AND CONDITIONS, EXPRESS OR IMPLIED, ARISING BY
OPERATION OF LAW OR OTHERWISE. INCLUDING WITHOUT LIMITATION,
MERCHANTABILITY AND/OR FITNESS FOR A PARTICULAR PURPOSE.
No employee, agent, dealer or other person is authorized to give any warranties or conditions on
behalf of the manufacturer. The customer shall be responsible for all costs incurred in the
removal or reinstallation and shipping of the product for repairs.
Within the limitations of this warranty, purchaser with inoperative units should contact
customer service @ 800-547-3888 for paperwork and instructions on the return of the unit
for repair.
Notice:This warranty will be null & void if purchaser attempts to repair or replace any
parts which are mechanical or electrical.
A copy of the sales receipt is required before authorization to return a unit for repair is approved.
The manufacturer will repair or replace the product, at its discretion, with return freight paid by
the manufacturer. It is agreed that such repair or replacement is the exclusive remedy available
from the manufacturer and that TO THE MAXIMUM EXTENT PERMITTED BY LAW, THE
MANUFACTURER IS NOT RESPONSIBLE FOR DAMAGES OF ANY KIND, INCLUDING
INCIDENTAL AND CONSEQUENTIAL DAMAGE OR LOSS OF PROFITS OR REVENUES.
The warranty gives the customer specific legal rights, and the customer may also have other
rights which vary from province to province, or state to state.
14
Page 15

Seguridad
Ensamblaje
Funcionamiento
Mantenimiento
Partes
Anglaise, p.1
Français. p. 29
LEER Y GUARDAR ESTAS INSTRUCCIONES
HUMIDIFICADOR
VAPORIZADOR
DE ESTILO CONSOLA
MODELO:
MA0800 – Estilo Contemporáneo
• Humidifica hasta 1,700 pies cuadrados
• 8 Galones por dia
• Botella de agua faciles de llenar
• Control Digital de 3 velocidades
CUIDE EL MEDIOAMBIENTE
RECICLE LOS MATERIALES APROPIADOS
Para encomendar piezas y accesorios, llame al
1-800-547-3888
No. de repuesto 1B72131 05/11 Impreso en China
MANUAL DE
CUIDADOS Y
USO DEL
PROPIETARIO
15
Page 16

Instrucciones generales de seguridad
LEER ANTES DE USAR SU HUMIDIFICADOR
PELIGRO: significa que si no se respeta la información de seguridad, alguien
puede resultar seriamente herido o muerto.
ADVERTENCIA: significa que si no se respeta la información de seguridad, alguien
podría resultar seriamente herido o muerto.
PRECAUCIÓN: significa que si no se respeta la información de seguridad, alguien
puede resultar herido.
1. Para reducir el riesgo de incendio o descarga eléctrica, este humidificador
posee un enchufe polarizado (una espiga es más ancha que la otra). Enchufe
el humidificador directamente a un tomacorriente eléctrico de 120 V de CA. No
utilice extensiones. Si el enchufe no encaja completamente en el
tomacorriente, inviértalo. Si aún así no encaja, contacte a un electricista
calificado para que instale el tomacorriente adecuado. No cambie el enchufe
de ninguna manera..
2. Mantenga el cable fuera de las áreas de tránsito. Para reducir el riesgo de
peligro de incendio, nunca coloque el cable debajo de alfombras, cerca de
fuentes de calor, radiadores, cocinas o calentadores.
3. Siempre desenchufe el humidificador antes de moverlo, antes de limpiarlo o
cada vez que el humidificador no esté funcionando.
4. Mantenga el humidificador limpio.
5. No coloque objetos extraños dentro del humidificador.
6. No permita que la unidad se utilice como un juguete. Se debe prestar atención
cuando lo utilizan niños o cuando se lo utiliza cerca de niños
7. Nunca utilice su humidificador cuando le falte una parte o una parte esté
dañada en alguna forma.
8. Para reducir el riesgo de peligro eléctrico o daño al humidificador, no lo
mueva, sacuda ni incline mientras la unidad esté en funcionamiento.
9. Para reducir el riesgo de daños en el humidificador, desenchúfelo cuando no
lo esté utilizando.
10. Para reducir el riesgo de descargas eléctricas accidentales, no toque el cable
ni los controles con las manos húmedas.
11. Para reducir el riesgo de incendio, no lo utilice cerca de una fuente de fuego
abierta, como una vela u otra fuente.
12. Preste atención a la etiqueta de advertencia que aparece adjunta.
ADVERTENCIA: para reducir el riesgo de incendio, descargas eléctricas o
lesiones siempre desenchúfelo antes de efectuar reparaciones o de limpiarlo.
16
Page 17

Descripción
MA0800
* Producción en galones /24 h
8 (30 litros)
Capacidad de la botella
1,2 galones (4,5 litros)
Capacidad de la base
1,2 galones
* Cobertura en pies cuadrados
1700 (158 m2)
Velocidades del ventilador
3
Filtro de repuesto
MAF2
Higrostato automático
Sí
Apagado automático
Sí
Controles
Electrónicos (pulsadores)
Pies de goma
6
Catalogado por ETL/CETL
Sí
Voltaje
120 V C.A.
Frecuencia
60 Hz
Intensidad (alta velocidad)
1,2 A
Potencia (alta velocidad)
81 W
Conoce Su Humidificador
Basado en una superficie con aislamiento promedio y una altura de cielorraso de 8 pies
Para encomendar piezas y accesorios, llame al 1-800-547-3888 o
1-888-744-4687 en Canada.
Si decide llamar por teléfono, tenga disponible el modelo y el número de serie
del humidificador.
17
Page 18

Sólo Como Referencia
Cuando la
temperatura
exterior es de:
La humedad
relativa interior
recomendada es del:
- 10˚F -24˚C
20%
2˚F -18˚C
25%
10˚F -12˚C
30%
>20˚F -6˚C*
35%*
* y superior
Funcionamiento de su
humidificador
Su nuevo humidificador está diseñado
para satisfacer los requisitos de humedad
del hogar por medio del principio de
evaporación de agua en el aire.
Una vez que el filtro se satura, el aire
ingresa, pasa a través del filtro y la
humedad es absorbida y liberada en el
aire. Toda la evaporación se produce en el
humidificador para que cualquier residuo
permanezca en el filtro.
Este proceso natural de evaporación
elimina prácticamente todo el polvo
blanco.
Instalación y Ubicación
1) Saque el humidificador de la caja y
retire todos los materiales de
embalaje, mechas, etc. de la caja.
2) Coloque el humidificador sobre una
superficie plana. Ubique el
humidificador donde se requiera la
mayor cantidad humedad o donde
circulará la mayor parte de aire en
la casa, como cerca de un conducto
de aire frío. Si se coloca la unidad
cerca de una ventana, se puede formar condensación en el vidrio de la
ventana. Si esto ocurre, se debe colocar la unidad en otro lugar.
PRECAUCIÓN: NO dejar la unidad directamente frente a tuberías de aire caliente
o radiadores. NO ubicar sobre moquettes blandas. Sugerimos que ponga el
aparato sobre una mesa o sobre un estante.
OBSERVACIÓN: Debido a que el humidificador libera aire húmedo frío, es mejor
dirigir el flujo de aire lejos del termostato y de las fuentes de calor, y colocarlo junto
a una pared interior. La unidad no se debe colocar donde el aire frío proveniente
de paredes externas o el aire tibio proveniente de una fuente de aire caliente la
alcancen directamente.
3) Ubique el humidificador a una distancia de 4 pulgadas (10 cm) de la pared.
Llenado
PRECAUCIÓN: Desenchufar la unidad antes de llenarla, limpiarla o efectuar
reparaciones en ella. Siempre mantener la rejilla seca.
ADVERTENCIA: Para reducir el riesgo de peligro de incendio o descargas
eléctricas no derrame agua sobre el motor del ventilador. Los componentes
eléctricos deben mantenerse secos.
18
Page 19

Después de que el humidificador esté posicionado en el lugar donde vaya a utilizarse,
habrá llegado el momento de llenarlo. La
botella se levanta directamente hacia arriba
y alejándose de la base. Tenga cuidado de
no golpear ni dañar el conjunto de la válvula
de llenado ubicada en la parte inferior de la
botella.
Invierta la botella. Oprima el botón del vástago
de la válvula hacia el interior de la botella y
gírelo en el sentido de las agujas del reloj para
bloquear la válvula en la posición abierta. Coloque la botella bajo una llave de agua. Llene la
botella, teniendo cuidado de no permitir que
entren residuos en ella. Los residuos pueden
interferir con el asiento de la válvula. Una vez
que la botella esté llena, oprima el botón del
vástago de la válvula y gírelo en sentido contrario al de las agujas del reloj para desbloquear la válvula y cerrarla.
PRECAUCIÓN: Utilice únicamente un bacteri-
ostato registrado por EPA . Recomendamos
usar el Tratamiento Bactericida 1970 de
Essick Air cada vez que rellene su humidificador para eliminar el crecimiento bacteriano
En ninguna circunstancia debe usted usar
productos de tratamiento de agua diseñados
para humidificadores de disco de impulso o
ultrasónicos.
Coloque la botella de agua de vuelta en la
base del humidificador. Cuando esté colocada
correctamente, el émbolo se abrirá y el agua
fluirá al interior de la base. La base albergará
todo el contenido de la botella de agua. Una
vez que la botella esté vacía, retírela y repita
el proceso de llenado. El humidificador está
ahora lleno a su máxima capacidad. Para
beneficiarse de tener que llenar el humidificador con menos frecuencia, deje que el
humidificador agote el agua tanto de la botella
como de la base antes de llenarlo.
Controles y Operación
El punto en el que ajuste los niveles de humedad deseados depende de su nivel de
confortpersonal, la temperatura exterior y la temperatura interior. Se recomienda un
punto de ajuste inicialde humedad AMBIENTE del 30 al 40 por ciento, pero puede
haber condiciones que requieran unajuste distinto.
OBSERVACIÓN: Si ocurre una condensación excesiva, reduzca la velocidad del
ventilador a una velocidad más baja.
19
Page 20

Pantalla digital
Oprima el botón de alimentación una vez
para encender la unidad*. Inicialmente, hay
una ligera demora mientras los componentes
electrónicos se calibran. Dos barras (- -)
aparecen durante este tiempo. Una vez que
la calibración se haya completado, se
mostrará una lectura de humedad
AMBIENTE entre el 20 y el 95 porciento. Una
visualización de un 20 que parpadea indica que la humedad ambiente es inferior al
20%.
NOTA: Los ajustes preestablecidos en la
puesta en marcha inicial son la velocidad
del ventilador F1 (BAJA) y la humedad de
AJUSTE del 65%.Después de que el
usuario seleccione los ajustes deseados,
dichos ajustes permanecerán mientras la
unidad se mantenga enchufada y no haya
interrupciones del suministro eléctrico. Si
sedes enchufa la unidad, se emplean los
ajustes preestablecidos originales.
*El ventilador del humidificador debe funcionar en la puesta en marcha inicial. Si no funciona,
consulte “El ventilador no funciona (la pantalla digital está iluminada)” en la sección
“Resolución de problemas” de la página 25 de este manual.
Botón de velocidad
Este humidificador está equipado con un control de ventilador de 3 velocidades.
Inicialmente, al oprimir el botón de velocidad se visualizará el ajuste de velocidad
actual. Cada pulsación del botón de velocidad hace avanzar el modo a través de
los ajustes de F3 (ALTA), F2 (INTERMEDIA), F1 (BAJA).
El ajuste seleccionado se muestra en la lectura digital. Cuanto más alto sea el
ajuste, más rápida-mente se evaporará y liberará el agua al aire. F1 (BAJA) es el
ajuste más silencioso y se proporciona para condiciones que no requieran una
tasa de evaporación rápida.
Control de humedad
Este botón le permite ajustar la humedad para
adaptarla a sus necesidades. Este humidificador
se encenderá y apagará cíclicamente de modo
automático según se requiera para mantener el
ajuste seleccionado. La lectura muestra tanto los
ajustes de porcentaje de humedad (%) real
(AMBIENTE) como deseado (AJUSTE) cuando
se oprime el botón de control de humedad. La
lectura AMBIENTE tiene un intervalo del 20 al
95 por ciento. Si el nivel de humedad ambiente
es igual o inferior al 20%, la pantalla mostrará
un 20 que parpadea.
20
Page 21

La lectura del AJUSTE tiene un intervalo del 25 al 65 por ciento y se ajusta en
incrementos de 5%. Al oprimir inicialmente el botón de humedad, se visualizará el
ajuste de humedad actual. Cada pulsación adicional del botón aumenta el ajuste
en un 5%. Un punto de AJUSTE de 65% hace funcionar continuamente el
humidificador, independientemente de la lectura AMBIENTE. El higrostato que
detecta las lecturas está ubicado en el cordón de alimentación. Asegúrese de que
esté libre de obstrucciones.
Visualización de relleno
Para obtener el máximo tiempo de functionamiento,se deben llenar tanto la botella como
la base. Cuando tanto la botella como la
base se vacíen, la lectura de humedad
ambiente y “F” (LLENAR) alternarán en la
pantalla, informando que se requiere agua
adicional. También en este momento, la
unidad cambiará automaticmente al MODO
DE RESECACIÓN y continuará funcionando
a la velocidad más baja hasta que el filtro esté seco.
NOTA: Durante este tiempo, el nivel de humedad ambiente seguirá siendo
supervisado y el humidificador encenderá y apagará cíclicamente el ventilador
hasta que el filtro esté completamente seco. El ventilador se apagará, dejando un
humidificador seco que es menos propenso al crecimiento de moho y verdín. Si no
se desea el MODO DE RESECACIÓN, rellene el humidificador con agua y el
ventilador regresará a la velocidad de ajuste.
NOTA: El ventilador cambia automáticamente a la velocidad más baja durante el
MODO DE RESECACIÓN.
Indicador de comprobación del filtro
La capacidad de cualquier humidificador para
suministrar eficientemente humedad depende
en gran medida del estado del filtro. A medida
que el filtro se carga con impurezas, pierde
gradualmente su capacidad de mecha. Cuando
esto ocurre, la producción de humedad se
reduce y el humidificador tiene que trabajar
más tiempo para satisfacer el ajuste seleccionado. Este humidificador tiene un
recordatorio de comprobación
del filtro temporizado para aparecer después de
720 horas de funcionamiento. Cuando la pantalla muestre un ajuste que alterna
entre “CF” y “humedad ambiente” a intervalos de 5 segundos, eso es un
recordatorio de comprobar el estado del filtro.
NOTA: Algunas zonas tienen un alto contenido de minerales en el agua, lo cual
causa la necesidad de hacer cambios más frecuentes del filtro.
Restablecer la comprobación de la función de filtro cada vez que cambia un filtro
de desconectar la unidad de la fuente del poder, a continuación, conectarlo de
nuevo.
Consulte la sección “Reemplazo y cuidado del filtro” en la página 22. Si es
evidente que hay una acumulación de depósitos o una descoloración intensa,
reemplace el filtro para restablecer la máxima eficiencia.
21
Page 22

Bloqueo de los controles
Para evitar que se modifiquen por error los valores del
humidificador, se pueden bloquear los controles.
Procedimiento de activación
Después de que se configuren las funciones del
humidificador, mantenga presionado el botón de
encendido durante 5 segundos. El visor mostrará “CL”
durante 2 segundos. Suelte el botón de encendido y el
control reanudará el visor de la humedad del ambiente. El humidificador de
ambiente continuará funcionando con los valores bloqueados. Si se presionan los
botones mientras "CL" está activado, aparecerá "CL" en el visor y los valores no
se verán afectados.
Procedimiento de desactivación
Para desactivar la función “CL”, simplemente presione y mantenga presionado el
botón de encendido durante 5 segundos. “CL” parpadeará encendiéndose por un
segundo y apagándose por un segundo durante 2 segundos y luego se reanudará
el visor de humedad del ambiente.
Higrostato
El higrostato ubicado en el cordón de
alimentación detecta el porcentaje de
humedad presente en el aire. Hace que el
humidificador se encienda y apague
cíclicamente para mantener el punto de
AJUSTE de humedad seleccionado. El
ventilador se encenderá si la lectura
“AMBIENTE” desciende un 3% por debajo
del punto de AJUSTE y seguirá haciendo
funcionar el humidificador hasta que se
logre una lectura de un 1% por encima del
punto de AJUSTE. El ventilador se apagará
hasta que la lectura AMBIENTE descienda
de nuevo un 3% por debajo del punto de
AJUSTE.
NOTA: Asegúrese de que el higrostato ubicado aproximadamente a 10 cm (4
pulgadas) fuera del cuerpo del humidificador en el cordón de alimentación esté
libre de obstrucciones y esté alejado de todas las salidas de aire caliente.
Reemplazo y cuidado de los filtro
ADVERTENCIA: Para reducir el riesgo de descargas eléctricas o lesiones
causadas por las piezas móviles, desenchufe siempre el humidificador antes de
quitar o reemplazar cualquier pieza.
PRECAUCIÓN: Para ayudar a retardar el crecimiento de bacterias y mantener la
maxima eficiencia, se debe reemplazar el
filtro al menos una vez por estación, o
más a menudo en condiciones de agua
dura. Use el filtro de repuesto
recomendado Essick/MoistAir MAF2.
Reemplace el filtro de mecha vaporizador
al menos una vez por temporada de
humidificación o más, dependiendo de las
condiciones del agua de su zona.
22
Page 23

Reemplazo del filtro
1. Desenchufe el humidificador. Antes de quitar el filtro, recomendamos trasladar
el humidificador a un lugar donde los revestimientos delpiso no estén
propensos a sufrir daños por causa del agua (por ejemplo, zonas de cocina o
de baño.)
2. Quite la botella de agua y póngala a un lado. Asegúre se de no golpear ni
dañar la válvula de llenado.
3. Agarre el conjunto de la carcasa,
levántelo directamente hacia arriba,
alejándolo de la base, y póngalo a un
lado. Una vez hecho esto, tendrá
acceso al filtro.
4. Fíjese en la posición del filtro.
Quite el filtro. Puede que quiera
limpiar la base en este momento.
Consulte la sección “Limpieza del
humidificador” de este manual.
5. Instale un filtro nuevo (MAF 2) en
la base. Enrolle el filtro y colóquelo
entre los postes ubicados en el fondo
de la base. El comienzo y el final del
arrollamiento deben quedar capturados
en el centro de la base (vea el diagrama) y el filtro debe estar
descansando en el piso de la base.
6. Retorne el conjunto de la carcasa a
la parte superior de la base. Coloque
de nuevo el humidificador en su
posición de functionamiento.
7. Una vez hecho esto, el humidificador
Estará listo para ser llenado con el fin
de utilizarlo.
Cuidados y Mantenimiento
Limpiar su humidificador regularmente ayuda a eliminar olores y el crecimiento de
bacterias y hongos. El blanqueador doméstico común es un buen desinfectante y
se puede usar para repasar la base del humidificador y la botella después de
limpiarlos.
Recomendamos limpiar su humidificador por lo menos una vez por semana para
mantenerlo con las condiciones ambientales ideales.
También recomendamos usar el Tratamiento Bactericida Essick Air cada vez
que rellene su humidificador para eliminar el crecimiento bacteriano. Añadir
el bactericida de acuerdo a las instrucciones de la etiqueta. Para encomendar el
Tratamiento Bactericida, llamar al 1-800-547-3888 y solicitar el número de
repuesto 1970.
ADVERTENCIA: Para reducir el riesgo de lesiones, incendio o daños al humidificador,
utilice únicamente limpiadores recomendados específicamente para humidificadores.
No utilice nunca materiales inflamables, combustibles o tóxicos para limpiar el
humidificador. Para reducir el riesgo de quemarse y de dañar el humidificador, no
ponga nunca agua caliente en el humidificador.
23
Page 24

PRECAUCIÓN: La pureza del agua local varía de una zona a otra y en ciertas
condiciones las impurezas contenidas en el agua y las bacterias suspendidas en
el aire pueden fomentar el crecimiento de microorganismos en el depósito del
humidificador. Para retardar el crecimiento de bacterias que pueden causar olores
y ser perjudiciales para la salud, utilice únicamente filtros de repuesto
Essick/MoistAIR MAF 2. También recomendamos utilizar un bacteriostato
aprobado por la EPA y un limpiador para humidificadores, los cuales se pueden
conseguir en su tienda local.
Limpieza Instrucciones
Paso 1
Para facilitar la limpieza, la base del humidificador debe estar vacía y
completamente seca. Para lograr esto, utilice el método siguiente:
1. Deje que el humidificador funcione hasta que el mensaje de RELLENAR “F”
se ilumine y el apagado automático haya parado el ventilador del
humidificador.
2. Desenchufe el humidificador.
ADVERTENCIA: Para reducir el riesgo de descargas eléctricas, desenchufe
siempre el humidificador antes de limpiarlo o hacerle servicio de ajustes y
reparaciones. Si el humidificador no está desenchufado, el ventilador podría
ponerse en marcha después de quitar la carcasa.
Paso 2
Para quitar piezas
Consulte la sección “Reemplazo y
cuidado de los filtro” en la página 22.
NOTA: Es posible que aún haya un
poco de agua en la base. Vierta
cuidadosamente el agua para sacarla
de la base o quítela con una esponja.
Paso 3
Mantenimiento cada dos semanas
Remoción de costra
1. Llene la base del humidificador con una taza de 240 ml (8 onzas) de vinagre
blanco. Deje que la solución permanezca en la base durante 20 minutos.
2. Limpie todas las superficies interiores con un cepillo blando. Humedezca un
paño suave con vinagre blanco y limpie la base con el paño para quitar la
costra.
3. Enjuague a fondo con agua templada y limpia para quitar la costra y la
solución limpiadora.
Desinfección de la base
1. Eche 1,9 litros (1/2 galón) de agua y ½ cucharadita de blanqueador de cloro
en el interior de la base. Deje que la solución permanezca en la base durante
20 minutos, agitándola cuidadosamente cada pocos minutos. Moje todas las
superficies que normalmente estén expuestas a agua.
2. Vacíe la base después de 20 minutos. Enjuáguela con agua hasta que el olor a
blanqueador haya desaparecido. Deje que la unidad se seque completamente.
NOTA: La botella de agua se debe limpiar de la misma manera que la base.
Enjuáguela a fondo con agua limpia después de completar todos los pasos.
Mantenimiento de final de temporada
1. Siga las instrucciones de “Mantenimiento cada dos semanas” al final de la
temporada de humidificación.
2. Quite el filtro.
24
Page 25

Problema
Causa probable
Remedio
Pantalla digital no iluminada.
• No hay corriente eléctrica.
• No se ha oprimido el botón
de alimentación.
• Compruebe la fuente de alimentación de 120 V.
• Oprima una vez el botón de alimentación para
encender la unidad.
El ventilador no funciona
(la pantalla digital está
iluminada).
• El nivel de humedad
AMBIENTE no está un 3% o
más por debajo del nivel de
AJUSTE de humedad.
• El depósito está vacío.
• Suba el nivel de AJUSTE de humedad si lo
desea.
• Aumente la velocidad del ventilador.
• Llene el humidificador con agua.
El ventilador está en marcha
continuamente.
• El nivel de AJUSTE de
humedad es del 65%.
• El nivel de humedad
AMBIENTE no ha alcanzado
un 1% o más por encima del
nivel de AJUSTE de
humedad.
• Un porcentaje de AJUSTE de humedad del
65% hace que el ventilador funcione
continuamente. Gradúe el nivel de AJUSTE
entre 25% y 60%.
• Continúe haciendo funcionar la unidad hasta
que se logre el nivel de humedad deseado.
Esto podría tomar hasta 48 horas inicialmente.
Mala evaporación de agua
• El mensaje de COMPROBAR
FILTRO está parpadeando.
• Acumulación de minerales
en el filtro.
• Cambie el filtro con un filtro totalmente nuevo.
Nota: La pureza del agua local varía de una
zona a otra.
La botella se vacía
completamente.
• Esto es normal para
el llenado inicial.
• Rellene la botella para lograr el máximo tiempo
de funcionamiento.
La botella continúa vaciándose
después de llenarla
completamente.
• Está entrando aire en
la botella de agua.
• Compruebe si hay un escape en la botella de
agua.
La botella no se vacía.
• El conjunto de la válvula de
resorte está dañado
o
falta un poste en el fondo de
la base.
• La base está llena de agua.
• Compruebe la orientación de la botella.
Reposiciónela de modo que la válvula de
llenado ubicada en la parte interior de la
botella esté opriida por el poste ubicado en el
fondo de la base.
• La base albergará el contenido de la botella de
agua (4,5 litros ó 1,2 galones). Continúe
hacienda funcionar el humidificador para
agotar el agua de la base.
La visualización parpadea o el
ventilador se mueve
ligeramente al enchufar el
humidificador.
• Normal
• No se requiere tomar ninguna medida.
El ventilador funciona más
despacio que la velocidad
registrada en la pantalla digital.
• El humidificador está en el
“MODO DE RESECACIÓN”.
• El humidificador cambia automáticamente el
ventilador a F1 (BAJA) cuando se visualizan
“F” y humedad ambiente alternante.
El humidificador no se apaga
durante el “MODO DE
RESECACIÓN”.
• El filtro no está seco.
• Durante el “MODO DE RESECACIÓN”, el
humidificador continuará funcionando a
velocidad “BAJA” según se requiera durante
hasta 2 horas o hasta que el filtro esté
completamente seco.
Se visualizan alternativamente
“F” y la humedad ambiente.
• El depósito está vacío.
• Llene el humidificador con agua.
3. Deje que el humidificador se seque completamente antes de guardarlo.
4. Guarde el humidificador en un lugar fresco y seco.
5. Instale un filtro nuevo en el humidificador limpio antes de que comience la
próxima temporada.
NOTA: El procedimiento de “Mantenimiento cada dos semanas” también se
recomienda si usted no piensa utilizar el humidificador durante una semana o más.
Resolución de problemas
25
Page 26

Se visualizan alternativamente
“CF” y la humedad ambiente.
• El filtro podría estar sucio.
• Reemplace el filtro.
• Desenchufe la unidad durante 30 segundos y
reenchúfela para borrar la pantalla.
Los controles no responden
o "CL"en la pantalla
CONTROL BLOQUE se has
activado
• Mantenga pulsadoel botón de alimentación
durante 5 segundos.CONTROL BLOQUE se
desactivará.
Piezas de repuesto
Lista de piezas del humidificador
Essick No. de modelo MA0800
26
Page 27

No. De
Clave
No. de Pieza
Descripción
1
1B71997
Conjunto superior
2
MAF2
†Filtro
3
831188-1
Soporte del flotador
4
831189
Depósito del flotador
5
831187-1
Base
6
831190
Pie de goma
7
831199
Conjunto de la botella
8
831207
Tapa de tornillo
9
1B71996
Manual del usuario (no mostrado)
Lista de piezas del humidificador
Essick No. de modelo MA0800
Pida siempre por número de pieza, no por número de clave
† Artículo de existencias. Compra de forma local o llame a 1-800-547 - 3888 de los
EE.UU. o 1-888-744-4687desde Canadá hasta el fin.
Todo intento de reparar el conjunto de los controles o el motor puede
crear un peligro y anula la garantía a menos que la reparación sea realizada por un
técnico de servicio calificado.
Para encomendar piezas y accesorios,
llame al 1-800-547-3888 en EEUU,
o 1-888-744-4687 en Canadá .
Si decide llamar por teléfono, tenga disponible el modelo y el número de serie del
humidificador.
27
Page 28

GARANTÍA DEL ESSICK AIR PRODUCTS HUMIDIFICADOR
VÁLIDA AL 1 DE ABRIL DE 2010:
SE REQUIERE EL RECIBO DE VENTA COMO PRUEBA DE LA COMPRA
PARA TODOS LOS RECLAMOS DE GARANTÍA.
PARA CUALQUIER RECLAMO RELACIONADO CON LA GARANTÍA ES NECESARIO
PRESENTAR EL RECIBO COMO PRUEBA DE COMPRA.
Este producto posee garantía por defectos en la fabricación y en los materiales según se detalla a
continuación:
Un año desde la fecha de venta para los componentes instalados en fábrica.
Dos años desde la fecha de venta para el motor.
Treinta (30) días para las piezas de repuesto.
Esta garantía no es aplicable a filtros o mechas que el cliente pueda reemplazar.
Esta garantía es aplicable solamente al comprador original del producto siempre que haya adquirido
el producto en una tienda o un distribuidor de buena reputación.
Esta garantía no es aplicable a productos que se hayan dañado como consecuencia de accidentes,
uso indebido, alteraciones, reparaciones no autorizadas, uso no autorizado, manipulación incorrecta,
uso no razonable, abuso, incluida la falta de mantenimiento razonable, el desgaste normal o cuando
la tensión de conexión supera en más de 5% aquélla especificada en la placa del fabricante.
Asimismo, esta garantía tampoco es aplicable al equipo o a los productos que fueran instalados,
conectados o sometidos a mantenimiento de forma incorrecta sin seguir las especificaciones de este
Manual del Usuario.
Las alteraciones que puede sufrir el producto incluyen la sustitución de componentes de marca,
incluido el tratamiento de bacterias y mechas.
ESTE PRODUCTO NO FUE DISEÑADO PARA USO COMERCIAL. LA PRESENTE ES LA ÚNICA
GARANTÍA QUE OFRECE EL FABRICANTE CON RESPECTO A LOS PRODUCTOS Y, HASTA EL
GRADO MÁXIMO PERMITIDO POR LA LEY, REEMPLAZA A CUALQUIER OTRA GARANTÍA,
POR ESCRITO O TÁCITA, QUE OPERE DE PLENO DERECHO O DE OTRA FORMA. SE
INCLUYE, SIN LIMITACIONES, LA COMERCIABILIDAD Y/O APTITUD PARA UN PROPÓSITO EN
PARTICULAR.
Los empleados, agentes, distribuidores u otras personas no se encuentran autorizados a brindar
garantías o condiciones en nombre del fabricante. El cliente será responsable por todos los costos
relacionados con el retiro o la reinstalación y el envío del producto para su reparación.
Dentro de las limitaciones de esta garantía, el comprador que posea unidades que no
funcionen correctamente debe contactarse con el servicio de atención al cliente al 800-5473888 para recibir los documentos y las instrucciones a fin de realizar la devolución de la
unidad para su reparación.
Aviso: Esta garantía se anulará si el comprador intenta reparar o reemplazar cualquier pieza
mecánica o eléctrica.
Es necesario presentar una copia del recibo de compra para que se apruebe la autorización de
devolución de la unidad para su reparación. El fabricante reparará o reemplazará el producto, según
lo crea conveniente, y se hará cargo de los gastos de envío de la devolución al cliente. Se acuerda
que la reparación o el reemplazo son las únicas soluciones que el fabricante tiene disponibles.
ASIMISMO, HASTA EL GRADO MÁXIMO PERMITIDO POR LA LEY, EL FABRICANTE NO SE
HACE RESPONSABLE POR LOS DAÑOS DE CUALQUIER TIPO, INCLUIDOS DAÑOS
INCIDENTALES Y EMERGENTES, O LA PÉRDIDA DE GANANCIAS O INGRESOS.
Esta garantía le confiere al cliente derechos específicos. Además, el cliente puede gozar de otros
derechos que varían según la provincia o el estado.
28
Page 29

Pièce nº. 1B72131 05/11 Imprimé en Chine
LISEZ ATTENTIVEMENT CES DIRECTIVES ET CONSERVEZ-LES
MODÈLE :
MA0800 – Style contemprain
Ventilateur à 3 vitesses
8 gallons débit por jour
Boutella D’eau facile a remplir
Commande numerique de 3 vitesses
PENSEZ À L’ENVIRONNEMENT.
RECYCLEZ LES MATIÈRES APPROPRIÉES.
Pour commander des pièces et accessoires, appelez le
1-800-547-3888
Sécurité
Montage
Fonctionnement
Entretien
Pièces
English, p.1
Espagnol, p.11
Humidificateur à
Évaporation - Console
GUIDES
D’UTILISATION
&
D’ENTRETIEN
DU
PROPRIÉTAIRE
29
Page 30

Instructions Générales De Sécurité
À LIRE AVANT D’UTILISER VOTRE HUMIDIFICATEUR
DANGER: Signifie que si les informations de sécurité ne sont pas suivies, des blessures
graves ou fatales s'ensuivront.
AVERTISSEMENT: Signifie que si les informations de sécurité ne sont pas suivies, des
blessures graves ou fatales pourraient survenir.
ATTENTION: Signifie que si les informations de sécurité ne sont pas suivies, des
blessures pourraient survenir.
1. Afin de réduire le risque d’électrocution, cet humidificateur a une prise à deux
têtes (l'une des fiches est plus large que l'autre). Brancher directement
l’humidificateur dans une prise de courant alternatif 120 V. Ne pas utiliser de
rallonges électriques. Si la prise ne rentre pas, la brancher en sens inverse.
Si cela ne rentre toujours pas, contacter un électricien pour installer la prise
murale adéquate. Ne pas modifier la prise.
2. Èloignez le cordon électrique d’une zone de passage. Pour diminuer le risque
d’incendie, ne mettez jamais le cordon électrique sous un tapis, à proximité
d’une bouche d’air, d’un radiateur, d’un four ou d’un appareil de chauffage.
3. Toujours débrancher l’humidificateur avant de le déplacer. Enlever le système
de ventilation avant de nettoyer ou de faire réparer l’humidificateur.
4. L’humidificateur doit toujours rester propre.
5. N’introduisez pas de corps étrangers dans l’humidificateur.
6. Cet appareil n’est pas un jouet. Une surveillance est nécessaire si cet appareil
est utilisé par ou près d’un enfant.
7. Ne vous servez en aucun cas de votre humidificateur en cas de pièce
manquante ou endommagée.
8. Pour réduire le risque d’électrocution ou d’endommagement de
l’humidificateur, ne l’inclinez pas, ne le secouez pas et ne le faites pas
basculer tant qu’il est en marche.
9. Pour réduire les risques d’endommagement, débranchez l’humidificateur
lorsque vous ne vous en servez pas.
10. Pour réduire le risque de choc électrique accidentel, ne touchez pas le cordon
ou les commandes avec les mains mouillées.
11. Pour réduire le risque d’incendie, ne l’utilisez pas près d’une flamme, comme
une bougie ou autre source de flamme.
12. Observez l’étiquette en dessous.
AVERTISSEMENT : Pour diminuer le risque d’incendie, de choc électrique ou de
blessure, débranchez toujours l’appareil avant l’entretien ou le nettoyage.
30
Page 31

Description
MA0800
*Débit par 24h
8 gallons/30,2 litres
Capacité du bidon
1,2 gallons/4,54 litres
Capacité de la base
1,2 gallons/4,54 litres
* Couverture en pi
2
1 ,700
Vitesses de ventilation
3
Filtre de rechange
MAF2
Humidostat automatique
Oui
Fermeture automatique
Oui
Commandes
Électroniques (bouton-poussoirs)
Pieds en caoutchouc
6
Classification ETL/CETL
Oui
Volts
120 (c.a.)
Hertz 60
60
Ampères (haute vitesse)
1,2
Watts (haute vitesse)
81
Familiarisez-vous avec votre humidificateur
* Chiffres basés sur une aire avec isolation standard et un plafond de
8 pieds de hauteur
Vous pouvez commander les pièces détachées et accessoires au
1-800-547-3888 o 1-888-744-4687 en Canada
Veuillez avoir le numéro de série de l’humidificateur lors de votre
appel.
31
Page 32

À titre de référence seulement
Quand la
température
extérieure est :
F C
L’humidité relative
(HR) recommandée à
l’intérieur d’une
habitation est :
-10°
2°
10°
20°*
-24°
-18°
-12°
-6°*
20%
25%
30%
35%*
AVERTISSEMENT: NE PAS mettre l’unité devant un radiateur soufflant. NE
PAS mettre sur de la moquette. Mettre l’unité sur une table ou une étagère.
AVERTISSEMENT : Couper l'alimentation électrique de remplissage, de
nettoyage ou d'entretien. Grille garder à tout moment.
*ou plus
Fonctionnement de l’humidificateur
Votre nouvel humidificateur a été
conçu pour satisfaire les
exigences d’humidité domestique
au moyen du principe
d’évaporation d’eau dans l’air.
Une fois que le filtre est saturé,
l’air est aspiré, passe à travers le
filtre et l’humidité est absorbée
dans l’air. Toute l’évaporation a
lieu dans l’humidificateur ainsi
aucun résidu ne reste dans le
filtre. Ce procédé naturel
d’évaporation élimine
virtuellement la poussière
blanche.
Installation et location
1) Déballer l’humidificateur du
carton et sortir tous les
composés, mèche etc.
2) Poser l’humidificateur sur une
surface plane. Placer l'appareil
où il y a le plus besoin
d’humidification, ou à l’endroit
où l’air circule le plus, comme
près d’une bouche d’aération.
Si l’unité est mise près d’une
fenêtre, de la buée pourrait se
former sur le carreau.
NOTE: Comme l’appareil rend de l’air froid et humide, il vaut mieux le placer
loin des thermostats ou indicateurs de température, le mettre par exemple près
d’un mur. L’unité ne devrait pas être placée à un endroit où de l'air froid ou
chaud arrive.
3) Mettre l’humidificateur à au moins 4 pouces d’un mur.
Remplissage
AVERTISSEMENT : pour réduire le risque d’incendie ou de choc électrique, ne
versez pas (et ne renversez pas) d’eau sur les commandes ou sur le moteur. Si
les commandes sont mouillées, laissezles sécher complètement et faites
inspecter l’appareil par un réparateur agréé avant de le rebrancher..
32
Page 33

Une fois que l’humidificateur aura été
positionné à l’emplacement où il sera
utilisé, vous devrez alors le remplir. Le
bidon doit être soulevé tout droit pour
être retiré de la base. Prenez soin de ne
pas heurter ou endommager le
capuchon de remplissage à valve situé
sur le dessous du bidon.
Renversez le bidon. Poussez le bouton
de la tige de soupape dans le bidon et
faites-le tourner dans le sens des
aiguilles d’une montre pour le verrouiller
dans la position ouverte. Placez le bidon
sous un robinet. Remplissez le bidon en
prenant soin de ne pas laisser de débris
pénétrer dans le bidon, car les débris
risquent d’empêcher la valve de
s’asseoir correctement. Une fois que
vous aurez rempli la bouteille, appuyez
sur le bouton de la tige de soupape et
faites-le tourner dans le sens inverse des
aiguilles d’une montre pour le libérer et
le fermer.
MISE EN GARDE : utilisez uniquement
un bactériostatique agréé par l’EPA.
Vous ne devez en aucun cas utiliser des
produits de traitement de l’eau conçus
pour des humidificateurs d’air
ultrasoniques ou de type « Roto Belt ».
Placez le bidon rempli d’eau sur la base.
Quand le bidon est bien positionné, le
plongeur s’ouvre et l’eau coule dans la
base. La base est assez grande pour
contenir toute l’eau du bidon. Une fois
que le bidon est vide, retirez-le et
remplissez-le encore une fois.
L’humidificateur est maintenant rempli au
maximum. Pour avoir à remplir le bidon lemoins fréquemment possible, laissez
l’humidificateur vider l’eau du bidon et celle de la base avant de le remplir à
nouveau.
Commandes et Mode Opératoire
Vous pouvez régler le niveau d’humidité en function de vos préférences
personnelles, de la temperature extérieure et de la température intérieure. Il est
recommandé de commencer avec un point de réglage de 30 % - 40 % d’humidité
pour la pièce (ROOM), mais les réglages devront être modifiés selon les
conditions.
IMPORTANT : des dégâts causés par l’eau peuvent se produire si de la
condensation commence à se former sur les fenêtres ou sur les murs. Le point de
réglage (SET) de l’humidité doit être réduit jusqu’à ce que la condensation cesse
de se former. Nous recommandons que les niveaux d’humidité d’une pièce ne
dépassent pas 50 %.
33
Page 34

Comment utiliser les commandes
Affichage numérique
Appuyez une fois sur la touche de mise
en marche pour mettre l’appareil en
marche*. Initialement, le calibrage des
elements électroniques cause un léger
délai. Deux tirets (- -) sont affichés
pendant ce processus. Une fois le
calibrage terminé, un pourcentage
d’humidité de la pièce (ROOM) situé entre
20 % et 95 % est affiché. Par exemple, si
le chiffre 20 clignote sur l’affichage, cela indique que l’humidité de la
pièce est inférieure à 20 %.
REMARQUE : les réglages par défaut à la mise en marche initiale sont (« LOW »
[bas]) F1 pour la vitesse de ventilation et 65 % (SET) pour l’humidité. Une fois que
les réglages sont établis par l’utilisateur, ils restent tant que l’appareil reste branché
et qu’il n’y a pas de panne de courant. Si l’appareil est débranché, les réglages par
défaut sont utilisés.
* Le ventilateur de l’humidificateur devrait fonctionner dès la mise en marche initiale. Si ce
n’est pas le cas, veuillez vous reporter à la page 39, rubrique « Le ventilateur ne fonctionne
pas (l’affichage numérique est illuminé) » de la section de ce mode d’emploi intitulée «
Dépannage ».
Bouton de réglage de la vitesse de ventilation
Cet humidificateur d’air est équipé d’une
commande de ventilateur à trois vitesses.
Initialement, la vitesse déjà choisie sera
affichée quand vous appuierez sur le
bouton de réglage de la vitesse. Chaque
fois que vous appuierez une fois de plus
sur le bouton, vous passerez d’un mode
de ventilation à un autre : (HIGH) F3
[vitesse élevée], (MEDIUM) F2 [vitesse
moyenne], (LOW) F1 [vitesse basse].
Le réglage choisi est affiché sur l’affichage numérique.Plus la vitesse est élevée,
plus l’eau est évaporée et libérée dans l’air rapidement. F1 (LOW) est le réglage le
plus silencieux et il est utile dans les conditions qui ne nécessitent pas un taux
d’évaporation rapide.
Bouton de réglage de l’humidité
Ce bouton vous permet d’ajuster ’humidité
selon vos préférences. L’humidificateur se
mettra en marche et s’arrêtera
automatiquement selon les besoins pour
maintenir l’humidité sélectionnée.
L’affichage montre le pourcentage (%)
d’humidité reel(ROOM) et celui qui a été programmé (SET) quand vous appuyez
sur le bouton de réglage de l’humidité. L’affichage du pourcentage d’humidité
relative de la pièce (ROOM) comprend des valeurs entre 20 % et 95 %. Par
exemple, si l’humidité relative de la pièce est inférieure ou égale à 20 %, le chiffre
20 clignote sur l’affichage. La plage d’humidité programmée (SET) est de 25 % à
65 %, et le réglage peut se faire en incréments de 5 %.
34
Page 35

Initialement, l’humidité déjà choisie sera affichée quand vous appuierez sur le
bouton de réglage de l’humidité. Chaque fois que vous appuierez une fois de plus
sur le bouton, vous augmenterez le réglage de 5 %. Un point de réglage (SET) de
65 % fait fonctionner l’humidificateur en continu, quel que soit le pourcentage
d’humidité reel (ROOM). L’humidostat qui étecte
l’humidité est situé sur le cordon d’alimentation.
Veillez à ce que rien ne l’empêche de fonctionner
correctement.
Affichage du remplissage nécessaire
Pour un temps de fonctionnement maximal, vous
devez remplir le bidon et la base. Quand les deux
(la base et le bidon) seront vides, la lettre « F »
(pour FILL –REMPLISSAGE) et l’humidité réelle
de la pièce clignoteront en alternance sur l’affichage numérique pour vous informer
qu’il est temps de rajouter de l’eau.
Indication du besoin de vérifier le filtre
La capacité d’un humidificateur à produire
efficacement de l’humidité dépend beaucoup de la
condition de son filtre. Au fur et à mesure que le filtre se
charge d’impuretés, il perd graduellement sa capillarité.
Quand cela se produit, la production d’humidité est
réduite et l’humidificateur doit travailler plus longtemps
pour atteindre l’humidité programmée. Cet
humidificateur est équipé d’un mécanisme qui vous
rappellera de vérifier le filtre après 720 heures
d’utilisation. Quand les letters « CF » et l’humidité de la
pièce (Room Humidity) apparaissent en alternance
toutes les cinq secondes sur l’affichage numérique, c’est pour vous rappeler de
vérifier la condition du filtre.
Réinitialiser le filtre de fonction chaque fois que vous remplacez un filtre en
débranchant l'appareil de la source d'alimentation, puis rebranchez-le.
REMARQUE : dans certaines régions l’eau a une forte teneur en minéraux qui
entraîne le besoin de changer le filtre plus fréquemment. Veuillez vous reporter à la
section intitulée « Remplacement et entretien du filtre » de la page 36. Si vous
remarquez la présence de dépôts ou une décoloration, remplacez le filter pour
restaurer l’efficacité maximale de l’humidificateur.
Verrouillage de contrôle
Pour éviter des manipulations indésirables, les
commandes de l’humidificateur peuvent être
verrouillées.
Procédure d’activation
Une fois que les fonctions de l’humidificateur ont été
mises au point, maintenez le bouton d’alimentation
enfoncé pendant 5 secondes. L’affichage montrera
“CL” pendant 2 secondes; relâchez le bouton d’alimentation et l’affichage
reviendra à l’humidité de la pièce. L’humidificateur de la pièce continuera à
fonctionner avec les réglages verrouillés. Si l'on fait fonctionner les boutons
pendant que “CL” est actif, “CL” s’affiche et les réglages ne sont pas affectés.
35
Page 36

Procédure de désactivation
Pour désactiver la fonction “CL” il suffit d’appuyer et de maintenir le bouton
d'alimentation enfoncé pendant 5 secondes. “CL” clignotera pendant 2 secondes
et ensuite l’humidité de la pièce s’affichera à
nouveau.
Humidostat
L’humidostat situé sur le cordon d’alimentation
détecte le pourcentage d’humidité dans l’air.
Il entraîne des cycles de mise en marche et d’arrêt
de l’humidificateur afin de maintenir le point
d’humidité programmé (SET). Le ventilateur se
mettra en marche si l’humidité réelle de la pièce
(ROOM) tombe de 3% au-dessous du point de
réglage (SET) et continuera à faire fonctionner l’humidificateur jusqu’à ce qu’une
humidité de 1% au-dessus de l’humidité programmée (SET) soit atteinte. Le
ventilateur s’éteindra jusqu’à ce que l’humidité réelle de la pièce (ROOM) tombe à
nouveau de 3 % en dessous du point de réglage (SET).
REMARQUE : veillez à ce que l’humidostat, situé sur le cordon électrique, soit loin
de toute source d’air chaud et de tout objet susceptible de faire obstruction à la
circulation de l’air.
Entretien et Réparation
AVERTISSEMENT : pour réduire le risque de choc électrique ou de blessure
causé par des pièces en mouvement, débranchez toujours l’humidificateur avant
de retirer ou de remplacer des pièces.
MISE EN GARDE : pour aider à ralentir la croissance de bactéries et préserver
l’efficacité maximale du filtre, ce dernier doit être remplacé au moins une fois par
saison, ou plus souvent dans les régions où l’eau est particulièrement dure.
Utilisez le filtre de remplacement Essick/MoistAir MAF2 recommandé.
Remplacez le filtre capillaire évaporatif au moins une fois par saison, ou plus
souvent selon la qualité de l’eau dans votre région.
36
Page 37

Remplacement du filtre
1. Débranchez l’humidificateur. Avant de
retirer le filtre, nous recommandons de
déplacer l’humidificateur jusqu’à un endroit
où le revêtement de sol n’est pas
susceptible
aux dommages causés par l’eau (par
exemple
jusqu’à la cuisine ou à la salle de bain).
2. Retirez le bidon d’eau et mettez-le de côté.
Veillez à ne pas heurter ou endommager le
capuchon de remplissage.
3. Saisissez le bâti et soulevez-le tout droit
pour le séparer de la base, puis mettez-le
de côté. Le filter est maintenant accessible.
4. Remarquez bien la position du filtre avant
de le retirer. Ceci est un moment opportun
pour nettoyer la base. Veuillez vous
reporter à la section de ce mode d’emploi
intitulée
« Nettoyage et maintenance ».
5. Installez un filtre neuf (MAF2) dans la base.
Comprimez le filtre et positionnez-le entre
les montants au fond de la base. Les deux
Extrémités des spires du filtre doivent être
capturées au centre de la base (cf.
diagramme) et le filtre doit reposer sur le
fond de la base.
6. Remettez l’ensemble de bâti sur le dessus
de la base. Placez à nouveau
l’humidificateur dans sa position de
fonctionnement.
7. L’humidificateur est maintenant prêt à être
rempli.
AVERTISSEMENT : pour réduire le risque de
vous blesser, de causer des incendies ou
d’endommager l’humidificateur, n’utilisez que des detergents spécialement
recommandés pour les humidificateurs. N’utilisez jamais de matériaux
combustibles, inflammables ou toxiques pour nettoyer l’humidificateur. Pour réduire
le risque de vous ébouillanter et d’endommager l’humidificateur, ne mettez jamais
d’eau chaude dans l’humidificateur.
MISE EN GARDE : la pureté de l’eau varie d’unerégion à une autre et dans
certaines conditions les impuretés dans l’eau et les bactéries en suspension dans
l’air peuvent promouvoir la croissance de microorganismes dans le réservoir de
l’humidificateur.
Pour ralentir la croissance de bactéries qui susceptibles de causer des odeurs et
de nuire à votre santé, utilisez uniquement des filtres de rechange Essick/
MoistAIR. Nous recommandons également l’utilisation d’un bactériostatique
homologue par l’EPA et d’un détergent pour humidificateur que vous pouvez vous
procurer dans un magasin local.
37
Page 38

Nettoyage et Maintenance
Première étape
Pour faciliter le nettoyage, la base de l’humidificateur doit être vidée et séchée
complètement. Pour ce faire, vous pouvez utiliser la méthode suivante:
a. Laissez l’humidificateur fonctionner jusqu’à ce que le message de
REMPLISSAGE (« F ») s’allume et que le mécanisme automatique arête le
ventilateur de l’humidificateur.
b. Débranchez l’humidificateur.
AVERTISSEMENT : pour réduire le risque de choc électrique débranchez toujours
l’humidificateur avant de le nettoyer ou de le réparer. Quand l’humidificateur est
toujours branché, le ventilateur risque de se mettre en marche après le retrait du
bâti.
Deuxième étape
Retrait des éléments
Cf. la section « Remplacement du
filtre » à la page 36.
REMARQUE : il restera peut-être un
peu d’eau dans la base. Videz
soigneusement cette eau ou retirezla à l’aide d’une éponge.
Troisième étape
Maintenance bihebdomadaire
Retrait du tarter
1. Remplissez la base de l’humidificateur à l’aide de 236 ml de vinaigre blanc.
Laissez la solution reposer pendant 20 minutes.
2. Nettoyez toutes les surfaces intérieures à l’aide d’une brosse souple. Humectez
un chiffon doux de vinaigre blanc et essuyez la base pour en retirer le tartre.
3. Rincez abondamment avec de l’eau chaude et propre pour retirer le tartre et la
solution de nettoyage.
Désinfection de la base
1. Versez 1,89 litres d’eau et 2,5 ml de produit à blanchir au chlore dans la base.
Laissez la solution pendant 20 minutes en prenant soin de remuer toutes les
deux minutes. Mouillez toutes les surfaces normalement exposées à l’eau.
2. Videz la base après 20 minutes. Rincez à l’eau jusqu’à ce que l’odeur du chlore
ait disparu. Laissez l’appareil sécher complètement.
REMARQUE : le bidon d’eau doit être nettoyé de la même façon que la base.
Rincez abondamment avec de l’eau propre une fois que toutes les étapes
auront été complétées.
Maintenance de fin de saison
1. À la fin de la saison d’utilisation de l’humidificateur, réalisez la maintenance
bihebdomadaire.
2. Retirez le filtre.
3. Laissez l’humidificateur sécher complètement avant de le ranger.
4. Rangez-le dans un endroit frais et sec.
5. Installez un filtre neuf dans l’humidificateur proper avant que la saison suivante
ne commence.
REMARQUE : il est aussi recommandé de suivre la procédure de maintenance
bihebdomadaire si vous n’avez pas l’intention de faire fonctionner l’humidificateur
pendant une semaine ou plus.
38
Page 39

Problème
Cause probable
Solution
L’affichage numérique ne
s’allume pas.
• Pas de tension.
• Vous n’avez pas appuyé
sur le bouton de mise en
marche.
• Inspectez la source
d’alimentation 120 V.
• Appuyez une fois sur le
bouton de mise en marche.
Le ventilateur ne
fonctionne pas (l’affichage
numérique est allumé).
• Le niveau d’humidité réel
de la pièce (ROOM) n’est
pas de 3 % inférieur au
niveau d’humidité
programmé.
• Le réservoir est vide.
• Augmentez le niveau
d’humidité programmé (SET)
si vous le souhaitez.
• Augmentez la vitesse de
ventilation.
• Remplissez l’humidificateur
avec de l’eau.
Le ventilateur fonctionne
sans arrêt.
• Le niveau d’humidité
programmé
SET) est de 65 %.
• L’humidité réelle de la
pièce (ROOM) n’a pas
atteint un niveau supérieur
de 1 % ou plus au niveau
d’humidité programmé
(SET).
• Un pourcentage d’humidité
programmé (SET) de 65 %
force le ventilateur à
fonctionner en continu.
Choisissez un niveau de
réglage entre 25 % et 60 %.
• Laissez le ventilateur
fonctionner jusqu’à ce que le
niveau d’humidité
souhaité soit atteint. Cela peut
prendre jusqu’à 48 heures
initialement.
Mauvaise évaporation de
l'eau.
• Le message indiquant qu’il
faut vérifier le filtre (CF)
clignote.
• Accumulation de minéraux
sur le filtre.
• Mettez un filtre neuf.
• REMARQUE : dans
certaines régions l’eau a une
forte teneur en minéraux qui
entraîne le besoin de
changer le filtre plus
fréquemment.
Le bidon se vide
complètement.
• Ceci est normal pendant le
premier remplissage.
• Remplissez le bidon pour un
temps de fonctionnement
maximal.
Le bidon continue à se
vider meme après avoir été
complètement rempli.
• De l’air pénètre dans le
bidon
• Vérifiez qu’il n’y a pas de
fuites dans le bidon.
• Veillez à ce que la valve de
remplissage soit dans la
position de fermeture et que
des debris n’encombrent
pas la valve.
Le bidon ne se vide pas.
• L’ensemble de valve à
ressort est endommagé,
ou il manque un montant
sur le fond de la base.
• La base est remplie d’eau.
• Vérifiez l’orientation du
bidon. Repositionnez-le de
façon à ce que la valve de
remplissage sur le
dessous du bidon soit
enfoncée par le montant au
fonde de la base.
• La base contiendra le
contenu du bidon d’eau (1,2
gallon/4,5 litres).
Continuez à faire fonctionner
l’humidificateur pour vider
l’eau de la base.
Dépannage
39
Page 40

Les lettres « CF »
n’apparaissent pas, même
si le filtre est sale ou la
performance de
l’humidificateur est
significativement réduite.
• Une perte de puissance ou
une panne d’alimentation a
causé la désactivation
prématurée du message
CF.
• Remplacez le filtre.
L’affichage numérique
clignote ou le ventilateur se
déplace légèrement quand
l’humidificateur est
branché.
• Normal
• Aucune action n’est
nécessaire.
La lettre « F » et l’humidité
réelle de la pièce clignotent
en alternance sur
l’affichage numérique.
• Le réservoir est vide.
• Remplissez le réservoir
d’eau.
Les lettres « CF » et
l’humidité réelle de la pièce
clignotent en alternance
sur l’affichage numérique.
• Il est possible que le filtre
soit sale.
• Remplacez le filtre.
• Débranchez l’appareil
pendant 30 secondes et
rebranchez-le.
Les contrôles sont insensibles
ou "CL" est affiché
Verrouillage des commandes a
été activé
Maintenez le bouton
d'alimentation pendant 5
secondes pour désactiver la
fonction de verrouillage des
commandes.
Dépannage (suite)
40
Page 41

Pièces de rechange
Liste des pièces de rechange pour l’humidificateur d’air
Modèle N° MA 0800 0
41
Page 42

No. de
légende
No. de
pièce
Description
1
1B71997
Ensemble supérieur
2
MAF2
† Filtre
3
831188-1
Support de flotteur
4
831189
Flotteur de réservoir
5
831187-1
Base
6
831190
Pied en caoutchouc
7
831199
Ensemble de bidon
8
831207
Vis de blocage
9
1B71996
Mode d’emploi (non illustré)
Liste des pièces de rechange pour l’humidificateur d’air
Modèle N° MA 0800 0
Commandez toujours par numéro de pièce et non pas par numéro de legend
* Article de quincaillerie standard qu’il est possible de se procurer localement.
† Article en stock – achetez localement ou commandez en appelant le
1-800-547-3888 depuis les États-Unis ou le 1-888-744-4687 depuis le Canada.
• Toute tentative de réparation de l’ensemble de commande ou du moteur par une
personne autre qu’un technicien agréé peut créer un danger et annule la garantie.
Pour commander des pièces par téléphone :
États-Unis : 1-800-547-3888
Canada : 1-888-744-4687
42
Page 43

Essick Air Products
POLITIQUE DE GARANTIE SUR LES HUMIDIFICATEURS
– EN VIGUEUR À COMPTER DU 1ER AVRIL 2010 :
RÉCÉPISSÉ DE VENTE REQUIS COMME PREUVE D’ACHAT POUR TOUTES LES
RÉCLAMATIONS AU TITRE DE LA GARANTIE.
Ce produit est garanti contre les défauts de main-d’œuvre et de matériaux de la façon indiquée cidessous :
Un an à compter de la date de vente sur les composants installés en usine.
Deux ans à compter de la date de vente sur le moteur.
Trente (30) jours sur les composants de remplacement.
La présente garantie ne s’applique pas aux filtres ou aux mèches qui sont des pièces remplaçables
par le client.
La présente garantie ne s’applique qu’à l’acheteur d’origine du produit lorsqu’il est acheté auprès
d’un détaillant / revendeur réputé.
La présente garantie ne s’applique pas aux dommages provenant d’un accident, d’une mauvaise
utilisation, de modifications, de réparations non autorisées, d’une utilisation non autorisée, d’une
manipulation incorrecte, d’une utilisation déraisonnable, d’un abus, y compris un manquement à
effectuer l’entretien raisonnable, de l’usure normale, ni là où la tension se de branchement dépasse
de plus de 5 % la tension indiquée sur la plaque d’identification, ni à un équipement ou des produits
installés, câblés ou entretenus incorrectement en violation de ce mode d’emploi.
Les modifications comprennent la substitution de composants de marque, y compris de façon non
limitative les mèches et les traitements antibactériens.
CE PRODUIT N’EST PAS DESTINÉ À UN USAGE COMMERCIAL. CECI EST LA SEULE ET
EXCLUSIVE GARANTIE DONNÉE PAR LE FABRICANT EN CE QUI CONCERNE LES PRODUITS
ET, DANS TOUTE LA MESURE AUTORISÉE PAR LA LOI, REMPLACE ET EXCLUT TOUTES
AUTRES GARANTIES ET CONDITIONS, EXPRESSES OU IMPLICITES, QU’ELLES DÉCOULENT
PAR VOIE DE DROIT OU AUTREMENT,. Y COMPRIS DE FAÇON NON LIMITATIVE LA QUALITÉ
MARCHANDE ET/OU L’ADAPTATION À UN USAGE PARTICULIER
Aucun employé, agent, revendeur ou autre personne n’est autorisé à donner une garantie ou
condition quelconque au nom du fabricant. Le client sera responsable de tous les coûts encourus
pour le retrait ou la réinstallation et l’expédition du produit pour réparations.
Dans les limites de la présente garantie, un acheteur dont un appareil ne fonctionne pas doit
contacter le service clientèle au 800-547-3888 pour obtenir les documents et les instructions
pour envoyer l’appareil pour réparations.
Nota :La présente garantie sera nulle et non avenue si l’acheteur tente de réparer ou de
remplacer toute pièce qui soit mécanique ou électrique.
Une copie du récépissé de vente est requise avant qu’une autorisation de renvoi d’un appareil pour
réparations ne soit approuvée. Le fabricant réparera ou remplacera le produit, à sa seule discrétion,
avec les frais de port de renvoi à l’acheteur payés par le fabricant. Qu’il est convenu que cette
réparation ou ce remplacement constitue le recours exclusif est disponible auprès du fabricant et
que, DANS TOUTE LA MESURE AUTORISÉE PAR LA LOI, LE FABRICANT N’EST PAS
RESPONSABLE DES DOMMAGES D’AUCUNE SORTE, Y COMPRIS LES DOMMAGES
ACCESSOIRES ET INDIRECTS OU LA PERTE DE PROFITS OU DE REVENUS.
La garantie donne au client des droits juridiques spécifiques et ce dernier peut également avoir
d’autres droits qui varient d’une province à l’autre ou d’un état à l’autre.
43
Page 44

Essick Air Products
5800 Murray St.
Little Rock AR., 72209
www.essickair.com
44
 Loading...