

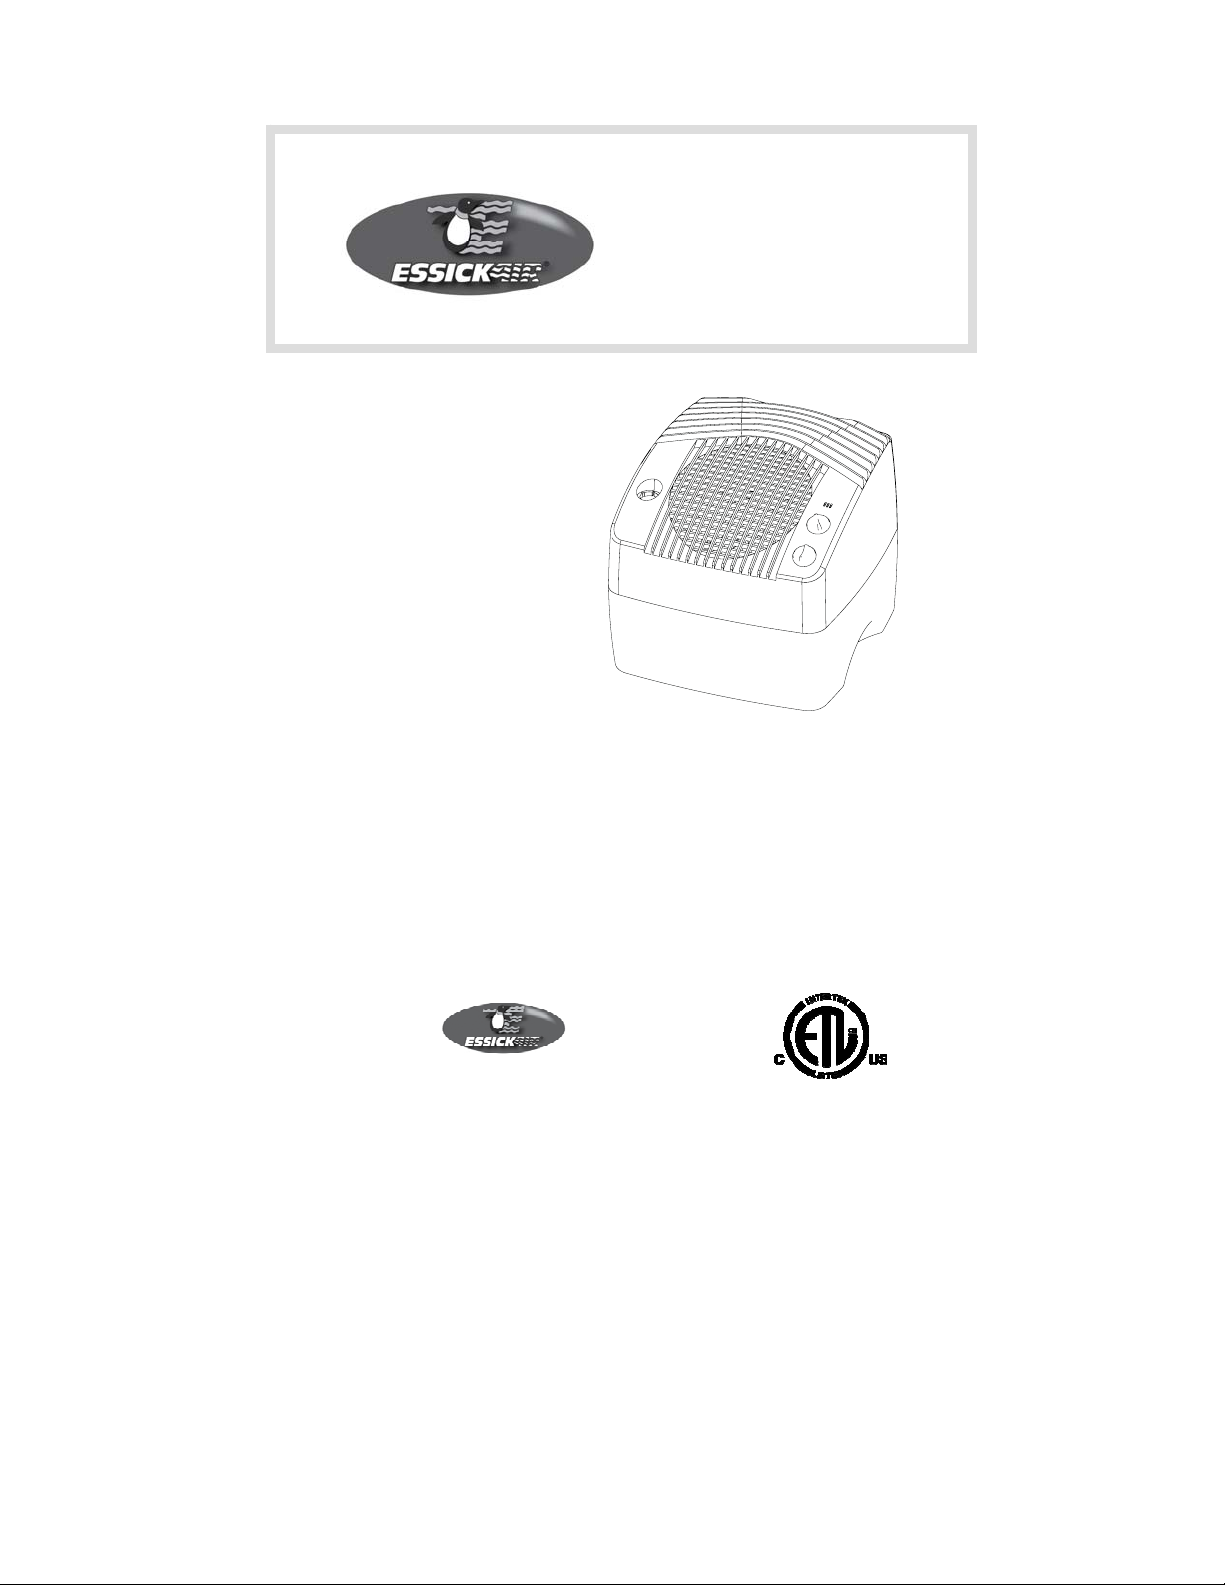
Page 1
READ AND SAVE THESE INSTRUCTIONS
EVAPORATIVE
TABLETOP
HUMIDIFIER
OWNERS
CARE
&
USE
MANUAL
E35 000 – European Styling
2-speed Fan
Portable for Versatility
Ideal for Home, Office, Dorms, or
Vacation Spots
Easy to Clean
Built-in Analog Hygrometer
Bucket Fill Design
Removable Dishwasher Safe Base
MODEL:
Safety
Assembly
Operation
Care
Parts
Español, p.11
Françias, p.17
SAVE THE ENVIRONMENT
RECYCLE APPROPRIATE MATERIALS
Patents: 5,037,583; 5,110,511; 5,133,904
Other Patents Pending
To order parts and accessories call 1-800-547-3888
Part No. 1B71933 7/09 Printed in China
1
Page 2

General Safety Instructions
READ BEFORE USING YOUR HUMIDIFIER
DANGER: means if the safety information is not followed someone will be seriously injured
or killed.
WARNING: means if the safety information is not followed someone could be seriously
injured or killed.
CAUTION: means if the safety information is not followed someone may be injured.
1. To reduce the risk of fire or shock hazard, this humidifier has a polarized plug (one
blade is wider than the other.) Plug humidifier directly into a 120V, A.C. electrical outlet.
Do not use extension cords. If the plug does not fully fit
into the outlet, reverse plug. If it still does not fit, contact a qualified electrician to install
the proper outlet. Do not change the plug in any way.
2. Keep the electric cord out of traffic areas. To reduce the risk of fire hazard, never put
the electric cord under rugs, near heat registers, radiators, stoves or heaters.
3. Always unplug the unit before moving, cleaning or removing the fan assembly section
from the humidifier, or whenever it is not in service.
4. Keep the humidifier clean.
5. Do not put foreign objects inside the humidifier.
6. Do not allow unit to be used as a toy. Close attention is necessary when used by or
near children.
7. Never use your humidifier while any part is missing or damaged in any manner.
8. To reduce the risk of electrical hazard or damage to humidifier, do not tilt, jolt or tip
humidifier while unit is running.
9. To reduce the risk of damage to humidifier, unplug when not in use.
10. To reduce the risk of accidental electrical shock, do not touch the cord or controls with
wet hands.
11. To reduce the risk of fire, do not use near an open flame such as a candle or other
flame source.
12. Note the warning label shown below.
WARNING: To reduce risk of fire, electric shock, or injury always unplug before
servicing or cleaning.
2
Page 3
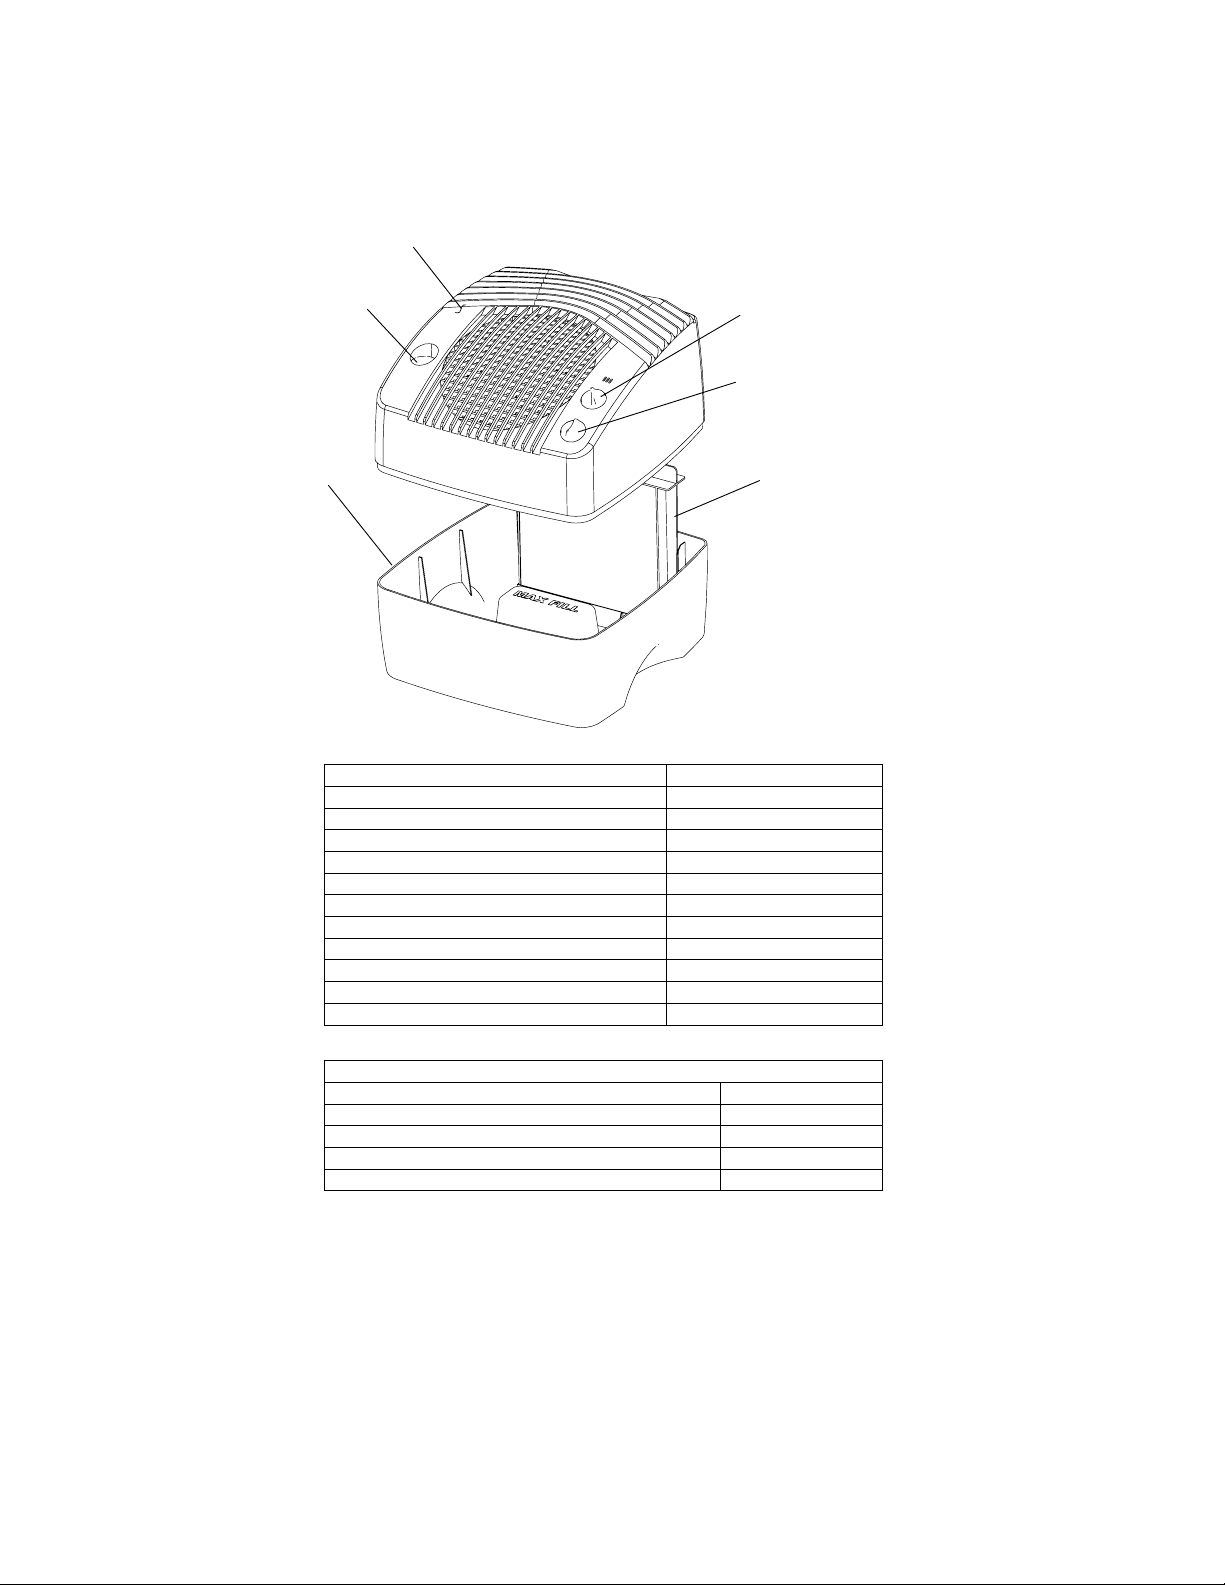
Know Your Humidifier
CHASSIS
ANALOG
HYGROMETER
BASE
HUMIDITY
CONTROL
KNOB
FAN
SPEED
KNOB
1040 WICK
Description E35 000
*Output per 24 hrs 3.5 gallons
Capacity of Unit 2 gallons
Sq. ft. coverage 800
Fan Speeds 2
Replacement Wick 1040
Built-in Hygrometer Yes
Controls Analog
ETL Listed Yes
Volts 120
Hertz 60
Watts 90
* Based on an area with average insulation and an 8’ ceiling height.
Replacement Parts Available For Purchase
Description Part Number
Chassis (Entire top portion of unit) 1B71890
Base 1B71891
Knob 1B71892
Wick 1040
Parts and accessories may be ordered by calling 1-800-547-3888.
Please have model number of humidifier available when calling.
3
Page 4
r
How Your Humidifier Works
Your new Essick Air® Evaporative humidifier is
designed to satisfy home humidity
requirements through the principle of evaporation
of water in the air.
Once the wick becomes saturated, air is drawn in,
passes through the wick and moisture is absorbed
into the air. All evaporation occurs in the
humidifier so any residue remains in the wick.
This natural process of evaporation creates no
white dust like some other humidifiers.
When Outdoor
Temperature is
F C
-10°
20°*
* or highe
2°
10°
-24°
-18°
-12°
-6°*
Recommended
Indoor Relative
:
Humidity (RH) is
20%
25%
30%
35%
Humidified air is
expelled out the
front louvers
IMPORTANT: Water damage may
result if condensation starts to form
on windows or walls. Humidity SET
point should be lowered until
condensation no longer forms. We
recommend room humidity levels do
not exceed 50%.
Air is drawn
in through
the vents
in the back
WARNING:
For your own safety, do not use humidifier if any parts are damaged or missing
Set Up and Location
1) Unpack humidifier from carton and remove all packaging material, wick, etc. from box.
2) Place humidifier on a flat level surface. Position the humidifier where the most humidity is
needed or where the most air will be circulated throughout the house such as near a cold
air return. If the unit is positioned close to a window, condensation may form on the
window pane. If this occurs the unit should be repositioned in another location.
CAUTION: Do NOT position the unit directly in front of a hot air duct or radiator.
Do NOT place on soft carpet. We suggest placing the unit on a table or on a
bookshelf.
NOTE:
thermostat and hot air registers, and to position humidifier next to an inside wall. Unit
should not be placed where cold air from outside walls or warm air from a hot air register
blows directly on it.
3) Place the humidifier at least 4 inches from the wall.
Due to release of cool, moist air from humidifier, it is best to direct air away from
4
Page 5
y
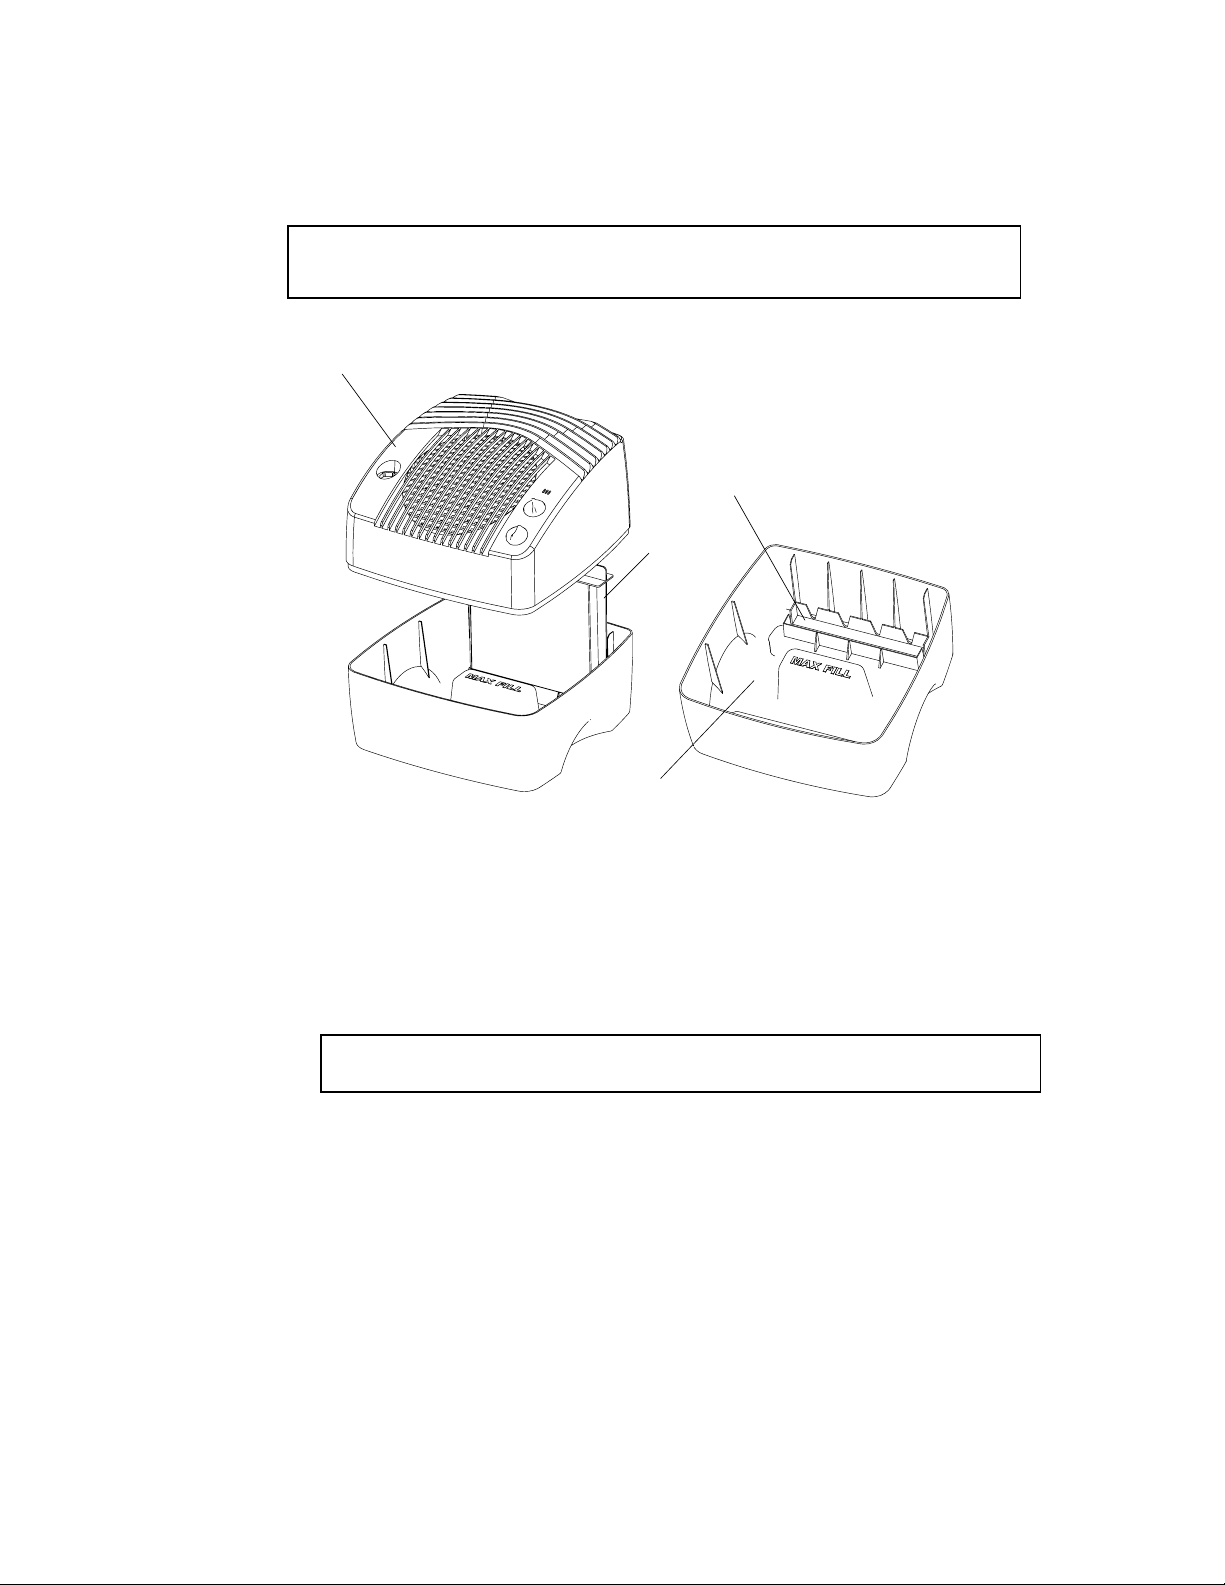
Filling
CAUTION: Disconnect power before filling, cleaning or servicing unit. Keep grille
dry at all times.
1) Lift chassis (top section) off base. Position wick in the notch at the back of the base.
CHASSIS
INSERT WICK HERE
1040 WICK
POUR WATER HERE
2) Before replacing the chassis, fill the base with unsoftened water. DO NOT POUR
WATER OVER THE ELECTRICAL CHASSIS. Fill the base only through the opening
provided (See illustration), to the level marked “MAX FILL” on the center bottom of the
base. If water spills on the chassis, it must be allowed to dry completely before
turning on the humidifier. If you have only softened water available in your home, you
can use it, but you will notice a build up of minerals on the evaporative wicks much
sooner. Base capacity is 2.0 gallons. DO NOT OVERFILL.
CAUTION: Do not spill water on fan motor. Electrical components must be kept
.
dr
3) We recommend using only EPA registered bacteriostat treatment such as Essick Air
Bacteriostat, Part Number 1970 whenever you refill the humidifier base to eliminate
bacterial growth. Add bacteriostat according to the instructions on the bottle.
4) Reposition the chassis on the base and the unit is ready for operation.
5) Plug cord into wall receptacle.
5
Page 6
Controls and Operation
NOTE: The humidifier should be placed at least FOUR inches away from any walls and away
from heat registers. Do not place on soft carpet. Unrestricted airflow into the unit will result in
the best efficiency and performance.
ANALOG
HYGROMETER
GAUGE
1) This unit has two fan speeds controlled by the lower right hand knob.
2) The humidity level knob is located above the fan speed knob. Increase humidity by turning
the upper knob from left to right.
3) The analog hygrometer in the upper left hand section displays the room humidity.
NOTE: If excessive condensation occurs, reduce fan to a lower speed setting.
HUMIDITY
CONTROL
KNOB
2 SPEED
FAN KNOB
Care and Maintenance
Cleaning your humidifier regularly helps eliminate o dors, bacterial and fungal growth. Ordinary
household bleach is a good disinfectant and can be used to wipe out the humidifier base after
cleaning.
We recommend cleaning your humidifier at least once a week to maintain optimum
environmental conditions from your humidifier.
We also recommend using Essick Air Bacteriostat Treatment each time you refill your
humidifier to eliminate bacterial growth. Add bacteriostat according to the instructions on
the bottle. Please call 1-800-547-3888 to order Bacteriostat Treatment reference part number
1970.
6
Page 7

Cleaning Instructions
1) Turn unit off at switch then unplug electrical cord from the wall outlet.
2) Lift off chassis from base and set aside. Carry base to cleaning basin/sink.
3) Lift wick from base, allow water to drain from wick into base and then set aside.
4) Empty base into sink. Remove any remaining water from base with a sponge.
5) Fill base to “MAX FILL” line with water and then add 8oz. (1cup) of white vinegar. Let
solution stay 20 minutes, then empty.
6) Clean all interior surfaces of base with a soft brush. Dampen soft cloth with white vinegar
and wipe out base to remove scale.
7) Rinse base thoroughly with fresh water and remove scale and cleaning solution.
Disinfecting Base
8) Fill base with water to “MAX FILL” line and add 3 teaspoons of chlorine bleach. Let
solution stand for 20 minutes.
9) Empty and rinse thoroughly. Refill base with water and reassemble unit
.
Summer Storage
1) Clean unit as outlined in Care & Maintenance section.
2) Discard used wicks and any water in the base and allow unit to
dry thoroughly before storage. Do not store with water inside unit.
3) Do not store unit in an attic or other high-temperature area.
4) Install new wick at beginning of season.
7
Page 8
ESSICK AIR PRODUCTS
This product is warranted against defects in workmanship and materials for one year
from the date of sale except for motors, which are warranted for two years. This warranty
does not apply to filters or wicks which are customer replaceable parts.
This warranty applies only to the original purchaser of the product when it is purchased
from a reputable retailer/dealer.
This warranty does not apply to damage from accident, misuse, alterations, unauthorized
repairs, unauthorized use, mishandling, unreasonable use, abuse, including failure to
perform reasonable maintenance, normal wear and tear, nor where the connected
voltage is more than 5% above the nameplate voltage, nor to the equipment or products
being improperly installed or wired or maintained in violation of this Owner’s Manual.
Alterations include the substitution of name brand components including, but not limited
to wicks and bacteria treatment.
THIS PRODUCT IS NOT INTENDED FOR COMMERCIAL USE. THIS IS THE SOLE
AND EXCLUSIVE WARRANTY GIVEN BY MANUFACTURER WITH RESPECT TO THE
PRODUCTS AND, TO THE MAXIMUM EXTENT PERMITTED BY LAW, IS IN LIEU OF
AND EXCLUDES ALL OTHER WARRANTIES AND CONDITIONS, EXPRESS OR
IMPLIED, ARISING BY OPERATION OF LAW OR OTHERWISE. INCLUDING
WITHOUT LIMITATION, MERCHANTABILITY AND/OR FITNESS FOR A PARTICULAR
PURPOSE.
No employee, agent, dealer or other person is authorized to give any warranties or
conditions on behalf of the manufacturer. The customer shall be responsible for all costs
incurred in the removal or reinstallation and shipping of the product for repairs.
Within the limitations of this warranty, purchaser with inoperative units should
contact customer service @ 800-547-3888 for paperwork and instructions on the
return of the unit for repair. A copy of the sales receipt is required before authorization
to return a unit for repair is approved. The manufacturer will repair or replace the product,
at its discretion, at no charge to the customer with return freight paid by the manufacturer.
It is agreed that such repair or replacement is the exclusive remedy available from the
manufacturer and that TO THE MAXIMUM EXTENT PERMITTED BY LAW, THE
MANUFACTURER IS NOT RESPONSIBLE FOR DAMAGES OF ANY KIND,
INCLUDING INCIDENTAL AND CONSEQUENTIAL DAMAGE OR LOSS OF PROFITS
OR REVENUES.
This warranty will be null & void if purchaser attempts to repair or replace any
parts which are mechanical or electrical.
The warranty gives the customer specific legal rights, and the customer may also have
other rights which vary from province to province, or state to state.
SALES RECEIPT REQUIRED AS PROOF OF PURCHASE
HUMIDIFIER WARRANTY POLICY
EFFECTIVE APRIL 1, 2008
FOR ALL WARRANTY CLAIMS.
8
Page 9

LEER Y GUARDAR ESTAS INSTRUCCIONES
HUMIDIFICADOR
EVAPORADOR
DE MESA
MANUAL DE
CUIDADOS Y
USO DEL
PROPIETARIO
Ventilador de 2 velocidades
Portátil para mayor Versatilidad
Ideal para el Hogar, Oficina,
Dormitorios y Locales de
Vacaciones
Fácil de Limpiar
Higrómetro Analógico Incorporado
Diseño de llenado del depósito
Base segura para lavavajillas
removible
RECICLE LOS MATERIALES APROPIADOS
Patentes: 5,037,583; 5,110,511; 5,133,904
Para encomendar piezas y accesorios, llame al
MODELO:
E35 000 – Estilo Europeo
CUIDE EL MEDIOAMBIENTE
Otras patentes pendientes
1-800-547-3888
No. de repuesto 1B71933 07/09 Impreso en China
Seguridad
Ensamblaje
Funcionamiento
Mantenimiento
Partes
Anglaise, p.1
Français. p.17
9
Page 10

Instrucciones generales de seguridad
LEER ANTES DE USAR SU HUMIDIFICADOR
PELIGRO: significa que si no se respeta la información de seguridad, alguien puede resultar
seriamente herido o muerto.
ADVERTENCIA: significa que si no se respeta la información de seguridad, alguien podría
resultar seriamente herido o muerto.
PRECAUCIÓN: significa que si no se respeta la información de seguridad, alguien puede
resultar herido.
1. Para reducir el riesgo de incendio o descarga eléctrica, este humidificador posee un
enchufe polarizado (una espiga es más ancha que la otra). Enchufe el humidificador
directamente a un tomacorriente eléctrico de 120 V de CA. No utilice extensiones. Si el
enchufe no encaja completamente en el tomacorriente, inviértalo. Si aún así no encaja,
contacte a un electricista calificado para que instale el tomacorriente adecuado. No
cambie el enchufe de ninguna manera..
2. Mantenga el cable fuera de las áreas de tránsito. Para reducir el riesgo de peligro de
incendio, nunca coloque el cable debajo de alfombras, cerca de fuentes de calor,
radiadores, cocinas o calentadores.
3. Siempre desenchufe el humidificador antes de moverlo, antes de limpiarlo o cada vez que
el humidificador no esté funcionando.
4. Mantenga el humidificador limpio.
5. No coloque objetos extraños dentro del humidificador.
6. No permita que la unidad se utilice como un juguete. Se debe prestar atención cuando lo
utilizan niños o cuando se lo utiliza cerca de niños
7. Nunca utilice su humidificador cuando le falte una parte o una parte esté dañad a en
alguna forma.
8. Para reducir el riesgo de peligro eléctrico o daño al humidificador, no lo mueva, sacuda ni
incline mientras la unidad esté en funcionamiento.
9. Para reducir el riesgo de daños en el humidificador, desenchúfelo cuando no lo esté
utilizando.
10. Para reducir el riesgo de descargas eléctricas accidentales, no toque el cable ni los
controles con las manos húmedas.
11. Para reducir el riesgo de incendio, no lo utilice cerca de una fuente de fuego abierta,
como una vela u otra fuente.
12. Preste atención a la etiqueta de advertencia que aparece adjunta.
ADVERTENCIA: para reducir el riesgo de incendio, descargas eléctricas o lesiones siempre
desenchúfelo antes de efectuar reparaciones o de limpiarlo
.
10
Page 11

Conoce Su Humidificador
CHASSIS
HIGRÓMETRO
ANALÓGICO
PERILLA DE NIVEL
DE HUMEDAD
PERILLA DE VELOCIDAD
DEL VENTILADOR
BASE
Descripción
1040 WICK
E35 000
Rendimiento de galones durante 24 horas 3.5 galones
Capacidad de la humidificador 2 galones
Cobertura en pies cuadrados 800
Velocidades del ventilador 2
Meche de reemplazo 1040
Hygrómetro analógica Si
Controles Manual
Registrado por ETL Si
Voltios 120
Hertz 60
Watts 90
Basado en una superficie con aislamiento promedio y una altura de cielorraso de 8 pies
Piezas De Repuesto Disponibles Para Compra
Descripción
Chasis (toda la parte superior excepto por la botella) 1B71890
Base 1B71891
Perilla
Meche 1040
Para encomendar piezas y accesorios, llame al 1-800-547-3888.
Si decide llamar por teléfono, tenga disponible el modelo y el número de serie del
humidificador.
No. de Parte
1B71892
11
Page 12

Funcionamiento de su
humidificador
Su nuevo humidificador está diseñado
El aire ingresa a
través de las
aberturas posteriores.
para satisfacer los requisitos de humedad
del hogar por medio del principio de
evaporación de agua en el aire.
Una vez que el filtro se satura, el aire
ingresa, pasa a través del filtro y la humedad
El aire humidificado
es liberado
a través de
la rejilla frontal.
es absorbida y liberada en el aire. Toda la
evaporación se produce en el
humidificador para que cualquier residuo
permanezca en el filtro. Este
proceso natural de evaporación elimi na
prácticamente todo el polvo blanco.
Cuando la
temperatura
exterior es de:
- 10˚F -24˚C 20%
2˚F -18˚C 25%
10˚F -12˚C 30%
>20˚F -6˚C* 25%
* y superior
La humedad
relativa interior
recomendada es del:
IMPORTANTE: El agua puede producir
daños si se comienza a formar condensación en las ventanas o paredes. Se
debe disminuir el punto de ajuste de
humedad hasta que no se forme más
condensación. Recomendamos que los
niveles de humedad del ambiente no
excedan el 50%.
ADVERTENCIA: Por su propia seguridad, no utilice el humidificador si están dañadas o
faltan algunas de las partes.
Instalación y Ubicación
1) Saque el humidificador de la caja y retire todos los materiales de embalaje, mechas, etc.
de la caja.
2) Coloque el humidificador sobre una superficie plana. Ubique el humidificador donde se
requiera la mayor cantidad humedad o donde circulará la mayor parte de aire en la casa,
como cerca de un conducto de aire frío. Si se coloca la unidad cerca de una ventana, se
puede formar condensación en el vidrio de la ventana. Si esto ocurre, se debe colocar la
unidad en otro lugar.
OBSERVACIÓN: Debido a que el humidificador libera aire húmedo frío, es mejor dirigir
el flujo de aire lejos del termostato y de las fuentes de calor, y colocarlo junto a una pared
interior. La unidad no se debe colocar donde el aire frío proveniente de paredes e xternas
o el aire tibio proveniente de una fuente de aire caliente la alcancen directamente.
3) Ubique el humidificador a una distancia de 4 pulgadas (10 cm) de la pared.
PRECAUCIÓN: NO dejar la unidad directamente frente a tuberías de aire caliente o
radiadores. NO ubicar sobre moquettes blandas. Sugerimos que ponga el aparato sobre
una mesa o sobre un estante.
12
Page 13

PRECAUCIÓN: Desenchufar la unidad antes de llenarla, limpiarla o efectuar
reparaciones en ella. Siempre mantener la rejilla seca.
Llenado
1) Levante el chasis (sección superior) de la base. Coloque la mecha en la hendidura
ubicada en la parte posterior de la base.
LEVANTE CHASIS
INSERTE LA MECHA AQUÍ
1040 MECHA
VIERTA AGUA AQUÍ
2) Antes de volver a colocar el chasis, llene la base con agua sin ablandar. NO DEJAR
CAER AGUA SOBRE EL CHASIS ELÉCTRICO. Llene la base únicamente a través de la
abertura provista (ver ilustración) hasta el nivel “MAX FILL”, en la parte inferior central de
la base. Si se derrama agua sobre el chasis, hay que dejarla secar completamente
antes de conectar el humidificador a la toma eléctrica. Si sólo tiene agua blanda en
su casa, puede usarla, pero notará una acumulación más rápida de minerales en las
mechas evaporadoras. La capacidad de la base es de 2 galones. NO EXCEDA EL
LÍMITE DE LLENADO.
PRECAUCIÓN: No derrame agua sobre el motor del ventilador. Los componentes
eléctricos deben mantenerse secos
3) Cada vez que rellene el humidificador, recomendamos usar únicamente tratamientos
bactericidas registrados en EPA, como Essick Air, para eliminar el crecimiento
bacteriano. Añadir el bactericida de acuerdo a las instrucciones de la etiq ueta.
4) Vuelva a colocar el chasis sobre la base y la unidad estará lista para su funcionamiento.
5) Enchufar el cable al receptáculo de la pared.
13
Page 14

Controles y Operación
El humidificador debe ubicarse a por lo menos CUATRO pulgadas de las paredes y lejos de
fuentes de calor. NO ubicarlo sobre moquettes blandas. El flujo de aire irrestricto en la
unidad mejora su eficiencia y el desempeño.
RÓMETRO
ALÓGICO
PERILLA DE NIVEL
DE HUMEDAD
PERILLA DE VELOCIDAD
DEL VENTILADOR
1) Esta unidad cuenta con un ventilador de dos velocidades controlado por la perilla de la
esquina inferior derecha.
2) La perilla de nivel de humedad está ubicada sobre la perilla de velocidad del ventilador.
Aumente la humedad girando la perilla superior de izquierda a derecha.
3) El higrómetro analógico ubicado en la sección superior izquierda muestra la humedad del
ambiente.
OBSERVACIÓN: Si ocurre una condensación excesiva, reduzca la velocidad del ventilador a
una velocidad más baja.
Cuidados y Mantenimiento
Limpiar su humidificador regularmente ayuda a eliminar olores y el crecimiento de bacterias y
hongos. El blanqueador doméstico común es un buen desinfectante y se puede usar para
repasar la base del humidificador y la botella después de limpiarlos.
Recomendamos limpiar su humidificador por lo menos una vez por semana para mantenerlo
con las condiciones ambientales ideales.
También recomendamos usar el Tratamiento Bactericida Essick Air cada vez que
rellene su humidificador para eliminar el crecimiento bacteriano. Añadir el bactericida de
acuerdo a las instrucciones de la etiqueta. Para encomendar el Tratamiento Bactericida,
llamar al 1-800-547-3888 y solicitar el número de repuesto 197 0.
14
Page 15

Instrucciones de limpieza
1) Apague la unidad desde el interruptor y desconecte el cable del tomacorriente eléctrico.
2) Levante y saque el chasis de la base y déjelo a un costado. Lleve la base a la pileta de
limpieza.
3) Levante y saque la mecha de la base, permita que el agua de la mecha caiga dentro de la
base y después déjela a un costado.
4) Vacíe la base en la pileta. Retire el resto de agua de la base con una esponja.
5) Llene la base hasta el nivel “MAX FILL” con agua y luego agregue 8 onzas (1 taza) de
vinagre blanco. Dejar la solución durante 20 minutos y después vaciar.
6) Limpie todas las superficies interiores de la base con un cepillo blando. Humedezca un
paño suave con vinagre blanco y frote la base para retirar el sarro.
7) Enjuague la base cuidadosamente con agua limpia y retire el sarro y la solución de
limpieza.
Desinfección de la base
8) Llene la base con agua hasta el nivel “MAX FILL” y agregue 3 cucharaditas de té de
blanqueador clorado. Dejar reposar durante 20 minutos.
9) Vaciar y enjuagar bien. Llene la base nuevamente con agua y vuelva a armar la unidad.
Almacenamiento Durante El Verano
1) Limpiar la unidad como se describe en la sección Cuidados y Mantenimiento.
2) Desechar los filtros/mecha usados y el agua del depósito y dejar secar bien el gabinete
antes de guardarlo. No guardarlo con agua dentro del depósito.
3) No almacenar la unidad en sótanos o áreas con alta temperatura.
4) Instalar un nuevo meche al comienzo de la temporada.
15
Page 16

GARANTÍA DEL ESSICK AIR PRODUCTS
HUMIDIFICADOR.
EN VIGENCIA AL 1º DE ABRIL DE 2008:
SE REQUIERE EL RECIBO DE VENTA COMO PRUEBA DE LA COMPRA
Este producto se encuentra garantizado contra defectos en la mano de obra y
materiales por un término de un año a partir de la fecha de compra exceptuando
los motores, que están garantizados por dos años. Esta garantía no se aplica a
filtros o mechas que son piezas que puede reemplazar el cliente.
Esta garantía se aplica sólo al comprador original del producto cuando lo adquiere
de un distribuidor/comerciante con buena reputación.
La presente garantía no se aplica a daños como consecuencia de accidentes, mal
uso, alteraciones, reparaciones no autorizadas, uso no autorizado, mal manejo,
uso no razonable, abuso incluyendo el hecho de no efectuarle un mantenimiento
razonable, el desgaste normal, ni tampoco en aquellos casos en que el voltaje de
conexión supere el 5% del voltaje mencionado en la marca de fabricación, ni los
equipos o productos instalados, conectados o que se mantengan
inadecuadamente en incumplimiento de este Manual del Usuario.
Las alteraciones incluyen la sustitución de componentes de la marca incluyendo,
entro otros, los filtros y tratamiento de bacterias.
ESTE PRODUCTO NO ESTA DESTINADO A USO COMERCIAL. ESTA ES LA
ÚNICA Y EXCLUSIVA GARANTÍA QUE OTORGA EL FABRICANTE RESPECTO
DE LOS PRODUCTOS Y, CON EL MAYOR ALCANCE PERMITIDO POR LEY,
EXCLUYE Y REEMPLAZA TODA OTRA GARANTÍA Y CONDICIONES,
EXPRESAS O IMPLÍCITAS QUE SURJAN DE ALGÚN PROCESO LEGAL O DE
OTRO ORIGEN, INCLUYENDO ENTRE OTRAS, LA COMERCIABILIDAD Y/O
APTITUD PARA UN FIN ESPECÍFICO.
Ningún empleado, agente, representante u otra persona está autorizada a otorgar
garantías o condiciones en nombre del fabricante. El cliente será responsable de
todos los gastos en los que se incurra como consecuencia de la remoción o
reinstalación y envío del producto para su reparación.
Dentro de las limitaciones de la presente garantía, el comprador que tanga
unidades fuera de funcionamiento debe comunicarse con el servicio de
atención al cliente al 800-547-3888 para los trámites e instrucciones
relacionados con el envío de la unidad para su reparación.
Se requiere una copia del recibo de venta antes de aprobar la autorización para
enviar la unidad a reparación. El fabricante reparará o reemplazará el producto, a
su criterio, sin cargo alguno para el cliente y con gastos de flete a cargo del
fabricante. Se acuerda que dicha reparación o reemplazo es la única solución
disponible por parte del fabricante y que CON EL MAYOR ALCANCE QUE
PERMITE LA LEY, EL FABRICANTE NO ES RESPONSABLE POR DAÑOS DE
NINGÚN TIPO INCLUYENDO DAÑOS DIRECTOS E INDIRECTOS O PÉRDIDA
DE GANANCIAS O INGRESOS.
La presente garantía será considerada nula en caso que el comprador
intente reparar o reemplazar cualquier pieza mecánica o eléctrica.
Esta garantía le otorga al comprador derechos legales específicos, el mismo
también puede tener otros derechos que varían de una provincia a otra o de un
estado a otro.
PARA TODOS LOS RECLAMOS DE GARANTÍA.
16
Page 17

LISEZ ATTENTIVEMENT CES DIRECTIVES ET CONSERVEZ-LES
HUMIDIFICATEUR DE
ÉVAPORATION
GUIDES
D’UTILISATION
&
D’ENTRETIEN
DU
PROPRIÉTAIRE
MODÈLE :
E35 000 – Style européen
Ventilateur à 2 vitesses
Portable pour une plus grande versatilité
Idéal pour la maison, le bureau, les résidences
universitaires ou les lieux de vacances
Facile à nettoyer
Hygromètre analogique intégré
Conception à remplissage de la base
Base amovible lavable au lave-vaisselle
TABLE À
Sécurité
Montage
Fonctionnement
Entretien
Pièces
English, p.1
Espagnol, p.11
PENSEZ À L’ENVIRONNEMENT.
RECYCLEZ LES MATIÈRES APPROPRIÉES.
Brevets : 5,037,583 ; 5,110,511 ; 5,133,904
Pour commander des pièces et accessoires, appelez le
Pièce nº. 1B71933 0709 Imprimé en Chine
Autres brevets en instance
1-800-547-3888
17
Page 18

Instructions Générales De Sécurité
À LIRE AVANT D’UTILISER VOTRE HUMIDIFICATEUR
DANGER: Signifie que si les informations de sécurité ne sont pas suivies, des blessures graves ou
fatales s'ensuivront.
AVERTISSEMENT: Signifie que si les informations de sécurité ne sont pas suivies, des blessures
graves ou fatales pourraient survenir.
ATTENTION: Signifie que si les informations de sécurité ne sont pas suivies, des blessures
pourraient survenir.
1. Afin de réduire le risque d’électrocution, cet humidificateur a une prise à deux têtes (l' une
des fiches est plus large que l'autre). Brancher directement l’humidificateur dans une
prise de courant alternatif 120 V. Ne pas utiliser de rallonges électriques. Si la prise ne
rentre pas, la brancher en sens inverse. Si cela ne rentre toujours pas, contacter un
électricien pour installer la prise murale adéquate. Ne pas modifier la prise.
2. Èloignez le cordon électrique d’une zone de passage. Pour diminuer l e risque d’incendie,
ne mettez jamais le cordon électrique sous un tapis, à proximité d’une bouche d’air, d’un
radiateur, d’un four ou d’un appareil de chauffage.
3. Toujours débrancher l’humidificateur avant de le déplacer. Enlever le système de
ventilation avant de nettoyer ou de faire réparer l’humidificateur.
4. L’humidificateur doit toujours rester propre.
5. N’introduisez pas de corps étrangers dans l’humidificateur.
6. Cet appareil n’est pas un jouet. Une surveillance est nécessaire si cet appareil est utilisé
par ou près d’un enfant.
7. Ne vous servez en aucun cas de votre humidificateur en cas de pièce manquante ou
endommagée.
8. Pour réduire le risque d’électrocution ou d’endommagement de l’humidificat eur, ne
l’inclinez pas, ne le secouez pas et ne le faites pas basculer tant qu’il est en marche.
9. Pour réduire les risques d’endommagement, débranchez l’humidificateur lorsque vous ne
vous en servez pas.
10. Pour réduire le risque de choc électrique accidentel, ne touchez pas le cordon ou les
commandes avec les mains mouillées.
11. Pour réduire le risque d’incendie, ne l’utilisez pas près d’une flamme, comme une bougie
ou autre source de flamme.
12. Observez l’étiquette en dessous.
AVERTISSEMENT : Pour diminuer le risque d’incendie, de choc électrique ou de blessure,
débranchez toujours l’appareil avant l’entretien ou le nettoyage.
18
Page 19

Familiarisez-vous avec votre humidificateur
CHÀSSIS
HYGROMÈTRE
ANALOGUE
BOUTON POUR DEGRÉ
D'HUMIDITÉ
BOUTON DE VITESSE
DU VENTILATEUR
BASE
1040
MÈCHE
Description E35 000
*Débit par 24h 13,2L
Capacité totale 7.6 L
*Portée en m² 74,3
Vitesses du ventilateu 2
Mèche de rechange 1040
Hydromètre Analogue Oui
Commandes Analogiques
ETL mentionnés Oui
Volts 120
Hertz 60
Watts 90
*Basée sur un espace à isolation moyenne et une hauteur de plafond de 2,50m.
Pièces détachées disponibles à l’achat
Description
Châssis (sauf bouteille d’eau) 1B71890
Base 1B71891
Bouton 1B71892
Mèche 1040
Vous pouvez commander les pièces détachées et accessoires au
1-800-547-3888.
Veuillez avoir le numéro de série de l’humidificateur lors de votre appel.
Nº de piece
19
Page 20

Fonctionnement de l’humidificateur
Votre nouvel humidificateur a été
conçu pour satisfaire les exigences
d’humidité domestique au moyen du
principe d’évaporation d’eau dans l’air.
Une fois que le filtre est saturé, l’air est
aspiré, passe à travers le filtre et l’humidité
est absorbée dans l’air. Toute
l’évaporation a lieu dans l’humidificateur
ainsi aucun résidu ne reste dans le filtre.
Ce procédé naturel d’évaporation élimine
virtuellement la poussière blanche.
Installation et location
IMPORTANT : des dégâts causés
par l’eau peuvent se produire si de la
condensation commence à se
former sur les fenêtres ou sur les
murs. Le point de réglage (SET) de
l’humidité doit être réduit jusqu’à ce
que la condensation cesse de se
former. Nous recommandons que
les niveaux d’humidité d’une pièce
ne dépassent pas 50 %.
L’air humidifié
ressort par
la grille avant
Quand la
température
extérieure est :
F C
-24°
-10°
-18°
2°
-12°
10°
-6°*
20°*
*et températures supérieures
L’humidité relative
(HR) recommandée à
l’intérieur d’une
L'air est dessiné
dansles
ventilateurs arrière
habitation est :
20%
25%
30%
35%
AVERTISSEMENT: NE PAS mettre l’unité devant un radiateur soufflant. NE PAS mettre
sur de la moquette. Mettre l’unité sur une table ou une étagère
1) Déballer l’humidificateur du carton et sortir tous les composés, mèche etc.
2) Poser l’humidificateur sur une surface plane. Placer l'appareil où il y a le plus besoin
d’humidification, ou
d’aération. Si l’unité est mise près d’une fenêtre, de la buée pourrait se former sur le
carreau. Si cela arrive, mettre l’appareil ailleurs.
à l’endroit où l’air circule le plus, comme près d’une bouche
NOTE: Comme l’appareil rend de l’air froid et humide, il vaut mieux le placer loin des
thermostats ou indicateurs de température, le mettre par exemple près d’un mur. L’unité
ne devrait pas être placée
3) Mettre l’humidificateur à au moins 4 pouces d’un mur.
AVERTISSEMENT: NE PAS mettre l’unité devant un radiateur soufflant. NE
PAS mettre sur de la moquette. Mettre l’unité sur une table ou une étagère.
à un endroit où de l'air froid ou chaud arrive.
20
Page 21

A
V
Remplissage
AVERTISSEMENT : Couper l'alimentation électrique de remplissage, de nettoyage ou
d'entretien. Grille garder à tout moment
1) Enlever le châssis (section supérieure) de la base. Mettre la meche dans le cran derrière
la base.
LEVER LES
CHÂSSIS
.
INSÉRER LA MÈCHE ICI.
1040 MÈCHE
VERSER L’EAU ICI
2) Avant de remettre le châssis, remplir le base d’eau du robinet. NE PAS RENVERSER
D’EAU SUR LE CHASSIS ELECTRIQUE. Remplir la base uniquement via l’ouverture
adéquate (voir illustration) jusqu’au niveau indiqué MAX FILL en bas de la base. Si de
l’eau gicle sur le châssis, laissez sécher avant de rebrancher. Si l’eau du robinet est
adoucie, vous remarquerez la formation d’un mas de minéraux sur les méche. La
capacité du base est de 2.0 gallons. NE PAS DEPASSER CE NIVEAU.
3) Nous vous recommandons d’utiliser un traitement antibactérien comme Essick Air
Bacteriostat N.1970 lorsque vous remplissez la bouteille, pour éliminer les bactéries.
Suivre les instructions indiquées sur la bouteille.
4) Remettre le châssis sur la base et l’unité sera opérationnelle.
5) Brancher dans le réceptacle mural.
ERTISSEMENT: Ne pas faire gicler d’eau sur le moteur. Les composants
électriques doivent rester secs.
21
Page 22

È
Commandes et Mode Opératoire
NOTE: L’humidificateur devrait être placé a au moins QUATRE pouces de distance des murs
ou des indicateur de température. NE PAS mettre sur de la moquette.
L’air devrait circuler librement pour de meilleurs résultats.
HYGROM
ANALOGUE
TRE
BOUTON POUR
DEGRÉ
D'HUMIDITÉ
BOUTON DE
VITESSE DU
VENTILATEUR
1) Cette unité a deux vitesses de ventilation contrôlées par la touche en bas à droite.
2) La touche pour le niveau d’humidité est située dessus la touche de vitesse du ventilateur.
Augmenter le niveau d’humidité en tournant la touche supérieure dans le s ens des
aiguilles d’une montre.
3) L’hygromètre analogue en haut à gauche affiche le taux d’humidité.
NOTE: Si la condensation est excessive, réduire la vitesse de ventilation.
22
Page 23

Entretien et Réparation
Nettoyer régulièrement l’humidificateur permet d’éliminer les odeurs, bactéries et autres
fongus. De l’eau de javel ordinaire est très efficace et peut être utilisée pour nettoyer la base
et la bouteille.
Nous vous recommandons de nettoyer votre humidificateur au moins une fois par semaine
pour maintenir les conditions optimales de fonctionnement.
Nous vous recommandons d’utiliser un traitement antibactérien comme Essick Air Bacteriostat
N.1970 lorsque vous remplissez le réservoir, pour éliminer les bactéries. Suivre les
instructions indiquées sur la bouteille. Appelez le 1-800-547-3888 pour commander.
Instructions pour nettoyer
1) Éteindre l’unité et la débrancher.
2) Enlever le châssis de la base. Amener la base vers l’évier.
3) Enlever les méche et laisser l’eau s’égoutter dans le réservoir.
4) Vider le contenu de la base dans l’évier. Sécher avec une éponge.
5) Remplir la base au niveau maximum « MAX » et ajouter 8 onces (1 tasse) de vinaigre
blanc. Laisser tremper pendant 20 minutes, puis vider.
6) Brosser délicatement les parois du base. Mettre du vinaigre blanc sur un chiffon et
enlever le tartre restant.
7) Rincer soigneusement le base à l’eau, pour enlever toute trace de tartre.
Désinfecter la base
8) Remplir la base d’eau jusqu’au niveau « MAX »et ajouter 3 cuillères de javel pure.
Laisser agir pendant 20 minutes.
9) Vider et rincer soigneusement. Remplir la base avec de l’eau et remonter l’unité.
Entreposage l’été
1) Nettoyez l’appareil tel qu’indiqué dans le chapitre portant sur les « Soins et l’entretien ».
2) Jetez les filtres à mèche usés et toute eau dans le récipient. Laissez le boîtier sécher
complètement avant de le ranger. N’entreposez pas l’appareil avec de l’ eau dans le
récipient.
3) N’entreposez pas l’appareil dans un grenier ou dans un endroit où la température est
élevée.
4) Installez un nouveau filtre à mèche avant le début de la saison.
23
Page 24

REÇU DE VENTES EXIGÉ COMME PREUVE D'ACHAT POUR TOUTES LES
POLITIQUE DE GARANTIE D'HUMIDIFICATEUR
Ce produit est garanti contre les défauts de matériel ou de fabrication pendant un an à
compter de la date de la vente, sauf pour les moteurs, qui sont garantis deux ans. Cette
garantie ne s'applique pas aux filtres ou aux mèches qui sont des pièces remplaçables par
le client.
Cette garantie s'applique uniquement à l'acheteur original du produit lorsqu'il est acheté
auprès d'une détaillant/distributeur reconnu.
Cette garantie ne s'applique pas aux dommages causés par un accident, à une mauvaise
utilisation, à des modifications, des réparations non autorisées, une utilisation non
autorisée, une mauvaise manipulation, une utilisation peu raisonnable, abusive,
notamment l'absence de maintenance raisonnable, à l'usure normale, ni où il y a une
tension connectée de plus de 5% au-dessus de la tension indiquée sur la plaque, ni à
l'équipement ou produits étant mal installés ou câblés ou entretenus en violation du
présent Manuel Propriétaire.
Les changements incluent la substitution de composants de marque y compris, mais non
limité au traitement de bactéries et mèches.
CE PRODUIT N'EST PAS DESTINÉ À UNE UTILISATION COMMERCIALE. C'EST LA
SEULE ET UNIQUE GARANTIE FOURNIE PAR LE FABRICANT EN CE QUI
CONCERNE LES PRODUITS ET, DANS LA MESURE MAXIMALE PERMISE
CONFORMÉMENT À LA LOI, ET EST EN LIEU ET PLACE ET EXCLUT TOUTES LES
AUTRES GARANTIES ET CONDITIONS, EXPRESS OU IMPLIQUÉES, DÉCOULANT DE
L'EFFET DE LA LOI OU AUTREMENT. Y COMPRIS SANS LIMITATION, LA VALEUR
COMMERCIALE ET/OU L'ADÉQUATION À UN USAGE PARTICULIER.
Aucun employé, agent, distributeur ou toute autre personne n'est autorisé à donner
n'importe quelles garanties ou conditions de la part du fabricant. Le client est responsable
de tous les coûts occasionnés par l'enlèvement ou la réinstallation et l'expédition du
produit pour réparations.
Dans le cadre des limites de cette garantie, l'acheteur avec des unités inopérantes
devra entrer en contact avec le service après-vente au 800-547-3888 pour toutes
formalités et instructions concernant le retour de l'unité pour réparation. Une copie
du reçu de vente est nécessaire avant que l'autorisation de retourner un appareil pour
réparation ne soit approuvée. Le fabricant s'engage à réparer ou remplacer le produit, à
sa discrétion, sans frais pour le client avec frais de réexpédition payés par le fabricant. Il
est convenu que ce type de réparation ou de remplacement est le seul recours disponible
chez le fabricant et que DANS LES LIMITES PRÉVUES PAR LA LOI, LE FABRICANT
N'EST PAS RESPONSABLE DE DOMMAGES D'AUCUNE SORTE, Y COMPRIS DES
DÉGÂTS FORTUITS ET CONSÉCUTIFS OU PERTES DE PROFITS OU DE REVENUS.
Cette garantie sera nulle et sans effet si l'acheteur essaye de réparer ou de
remplacer des pièces qui sont mécaniques ou électriques.
La garantie donne des droits légaux spécifiques aux clients, et le client peut aussi avoir
d'autres droits qui varient d'une province à une autre, ou d'un état à un autre.
Essick Air Products
ENTREE EN VIGUEUR LE 1 ER AVRIL 2008:
REVENDICATIONS DE GARANTIE.
Essick Air Products
5800 Murray St.
Little Rock AR., 72209
www.essickair.com
24
 Loading...