

Page 1
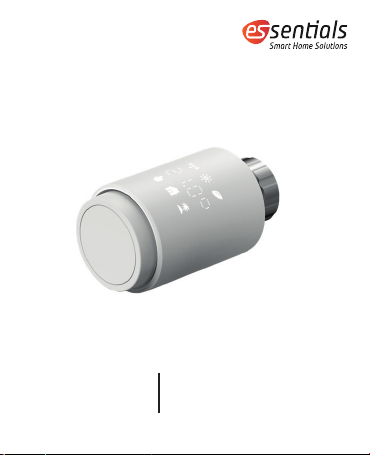
Bedienungsanleitung
essentials Heizkörperthermostat
Bluetooth Round
wesmartify GmbH
TecCenter 1
31162 Bad Salzdetfurth
wesmartify.de
+49 5063 799 4024
[email protected]
Page 2
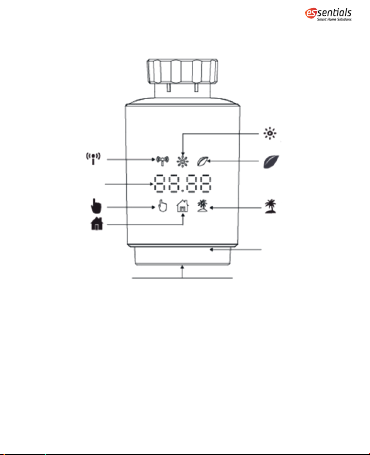
1 Übersicht
A
B
C
D
E F
A: Bluetooth-Signal
B: Temperaturanzeige
C: Manueller Modus
D: Automatik Modus
E: Koppeln (gedrückt halten)
F: Moduswechsel
G: Temperaturanpassung
H: Urlaubsmodus
I: Eco Modus
J: Komfort-Temperatur
J
I
H
G
Page 3
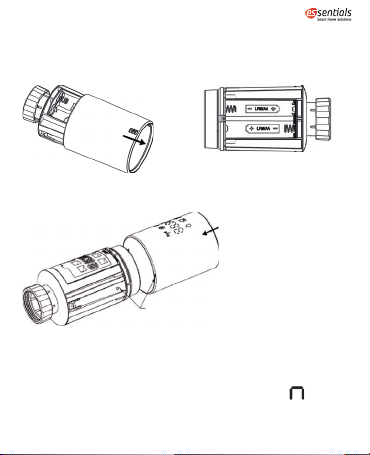
2 Erste Schritte
1. Öffne das Batteriefach.
3. Schließe das Batteriefach.
2. Setze zwei neue Batterien ein.
Dreiecksmarkierung entsprechend ausrichten.
3 Adaptierfahrt
Die Anzeige von „InS“ (Install) mit dem rotierenden zeigt an,
dass der Motor noch zurückfährt. Wenn im Display „AdA“ (Adaptierfahrt) angezeigt wird, kann das Heizkörperthermostat am
Page 4

Ventil montiert werden. Drücke nach der Installation die Kopplungstaste, um die Adaption zu starten.
Die Anzeige von „AdA“ (Adaptierfahrt) mit dem rotierenden
zeigt an, dass ein Adaptierfahrt zur Anpassung des Thermostats an das Ventil durchgeführt wird.
Wenn die Adatierfahrt vor der Installation eingeleitet wird,
musst Du die Kopplungstaste (E) drücken und der Motor fährt
in die Position „InS“ (Install) zurück. Wenn eine Fehlermeldung
(F1,F2,F3) angezeigt wird, drücke die Kopplungs-/Boost-Taste und der Motor fährt in ähnlicher Weise in die Position „InS“
(Install) zurück.
4 Installation
Das Heizkörperthermostat ist einfach zu installieren und kann
ohne Ablassen von Heizungswasser oder Eingriff in die Heizungsanlage erfolgen. Es werden weder Spezialwerkzeuge benötigt, noch muss die Heizung ausgeschaltet werden. Die am
Heizkörperthermostat angebrachte Ringmutter ist universell
und ohne Zubehör für alle Ventile mit einer Gewindegröße von
M30 x 1,5 verwendbar. Die gängigsten Hersteller sind:
Danfoss, Heimeier, MNG, Junkers, Landis&Gyr (Duodyr),
Honeywell-Braukmann, Oventrop, Schlösser, Comap,
Valf Sanayii, Mertik Maxitrol, Watts, Wingenroth (Wiroflex),
Idmar54, R.B.M, Tiemme, Jaga und Siemens.
Page 5
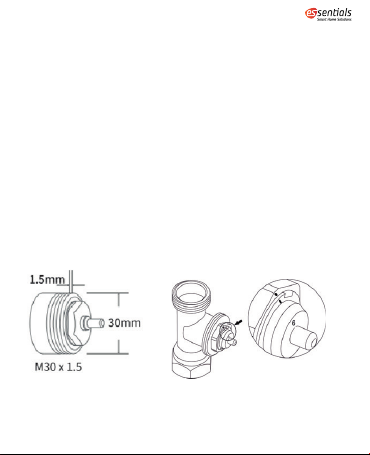
Mithilfe der mitgelieferten Adapter kann das Gerät auf Heizkörperventile vom Typ Danfoss RA, Danfoss RAV und Danfoss RAVL
montiert werden.
4.1 Steckertyp M30 x 1,5
1. Löse das bereits vorhandene Thermostat.
2. Wenn der Steckertyp M30 x 1,5 ist, kannst Du das essentials
Heizkörperthermostat Bluetooth Round direkt auf den Heiz körper schrauben (Abbildung unten). Richte das Heizkörper thermostat so aus, sodass die LED-Anzeige gut sichtbar ist.
3. Drehe den Thermostatregler auf den Höchstwert.
4. Überprüfe, ob das Ventil (© siehe Abbildung) aktiv/beweglich
ist.
5. Installiere das Gerät.
Page 6
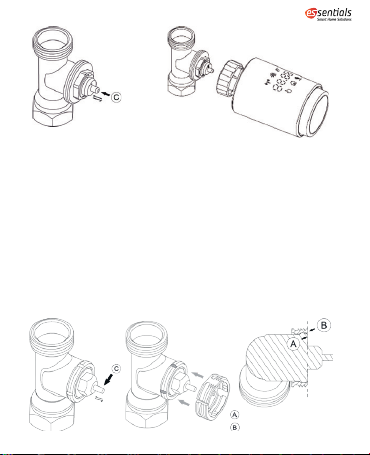
4.2 Danfoss RAVL-Ventil
1. Schraube das bereits vorhandene Thermostat ab.
2. Überprüfe, ob das Ventil (©) aktiv/beweglich ist.
3. Die Ventilkörper haben rundum längliche Kerben, die ge währleisten, dass der Adapter beim Einrasten richtig sitzt:
Lasse den Adapter vollständig einrasten, sodass die Stifte im
Inneren des Adapters auf die Kerben am Ventil ausgerichtet
sind.
4. Installiere den Adapter. Ebene A ist auf Ebene B ausgerichtet.
5. Setze den Kunststoffring zwischen Adapter und Gerät.
6. Installiere das Gerät.
Ebene A
Ebene B
Page 7
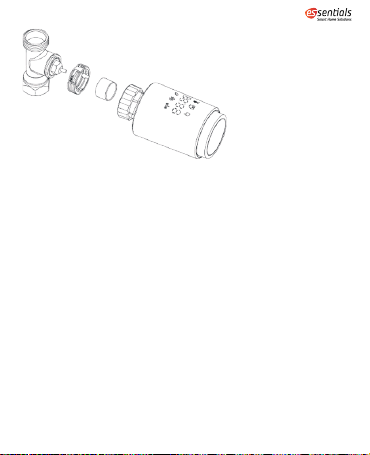
4.3 Danfoss RAV-Ventil
1. Drehe den Thermostatregler auf den Höchstwert.
2. Überprüfe, ob das Ventil (©) aktiv/beweglich ist.
3. Die Ventilkörper haben rundum längliche Kerben, die ge währleisten, dass der Adapter beim Einrasten richtig sitzt:
Lasse den Adapter vollständig einrasten, sodass die Stifte
im Inneren des Adapters auf die Kerben am Ventil ausgerich tet sind.
4. Installiere den Adapter. Ebene A ist auf Ebene B ausgerichtet.
5. Fixiere den Adapter mit der mitgelieferten Schraube und
Mutter (siehe Abbildung).
6. Installiere das Gerät.
Page 8
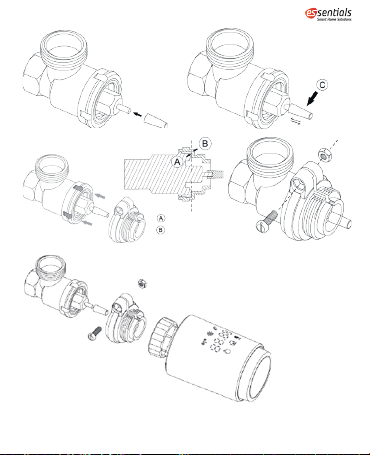
Ebene A
Ebene B
Page 9
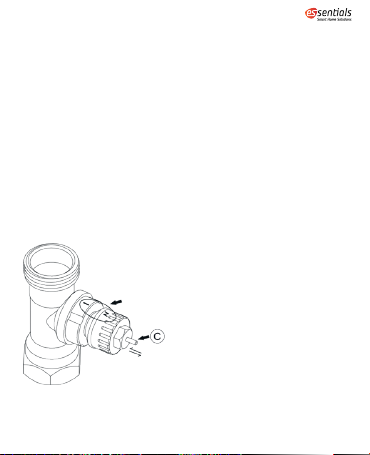
4.4 Danfoss RA-Ventil
1. Richte den Thermostatregler auf den maximalen Wert „N“
Ausrichtungsregler (siehe Abbildung) aus.
2. Überprüfe, ob das Ventil (©) aktiv/beweglich ist.
3. Die Ventilkörper haben rundum längliche Kerben, die gewähr
leisten, dass der Adapter beim Einrasten richtig sitzt: Lasse
den Adapter vollständig einrasten, so dass die Stifte im Inne ren des Adapters auf die Kerben am Ventil ausgerichtet sind.
4. Installiere den Adapter, Ebene A ist auf Ebene B ausgerichtet.
5. Fixiere den Adapter mit der mitgelieferten Schraube und
Mutter (siehe Abbildung).
6. Setze den Kunststoffring zwischen Adapter und Gerät.
7. Installiere das Gerät.
„N“ Ausrichtungsregler
Page 10
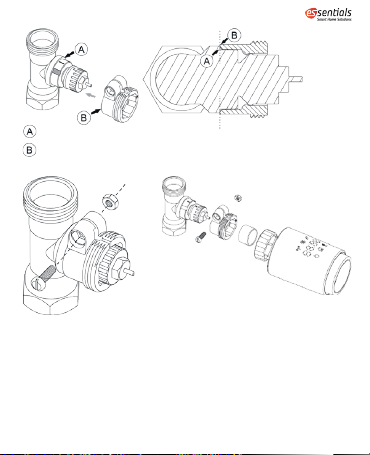
Ebene A
Ebene B
Ebene A ist auf Ebene B ausgerichtet
Siehe Abbildung.
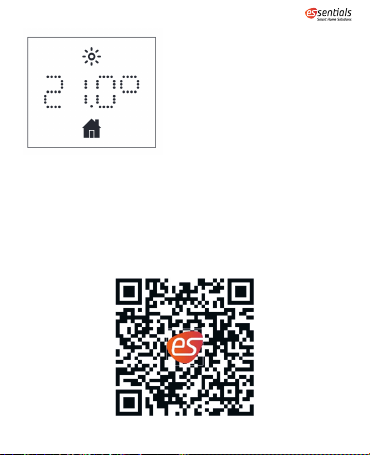
5 Schnittstellen-Display
Wenn die LED folgende Informationen anzeigt, ist das Heizkörperthermostat bereit für die Konfiguration. Wenn nicht,
nimm die Batterien heraus, setze sie erneut ein und wiederhole
Schritt 4.
Page 11
6 Inbetriebnahme
6.1 Download App
Scanne den unten dargestellten QR-Code. Lade und installiere
anschließend die essentials App für IOS- oder Android-Systeme.
Page 12

6.2 Heizungsventil für Thermostat anbringen
Halte die Kopplungstaste am Heizkörperthermostat 5 Sekunden
lang gedrückt, bis das Bluetooth-Signalsymbol ( ) blinkt. Das
befindet sich nun im Kopplungsmodus.
Aktiviere die Bluetooth-Funktion Deines Smartphones. Tippe
oben rechts auf +, wähle das essentials Heizkörperthermostat
Bluetooth Round aus und folge den Anweisungen in der App.
7 Produkteigenschaften
7.1 Automatik-Modus
Im Automatikbetrieb wird die Temperatur entsprechend dem
eingestellten Heizprofil geregelt.
Manuelle Änderungen werden bis zum nächsten Punkt aktiviert,
an dem sich das Profil ändert. Danach wird das vordefinierte
Heizprofil wieder aktiviert.
Um den Automatik-Modus zu aktivieren, gehe bitte wie folgt
vor:
Drücke die Kopplungstaste, um das -Symbol auszuwählen.
Standardtemperatur: 17 °C und 21 °C
Temperaturbereich: 5 bis 30 °C, Schritt: 0,5 °C
App-Bedienung: Klicke in der App auf das Symbol für den Automatik-Modus.
Page 13

7.2 Manueller Modus
Im manuellen Modus wird die Temperatur entsprechend der
aktuell über den Drehknopf eingestellten Temperatur geregelt.
Die Temperatur bleibt bis zur nächsten manuellen Änderung aktiviert. Um den manuellen Modus zu aktivieren, gehe bitte wie
folgt vor:
Drücken die Kopplungstaste, um das -Symbol auszuwählen.
7.3 Urlaubsmodus
Wenn Du in den Urlaub fährst oder unterwegs bist, kannst Du
den Urlaubsmodus nutzen. Der Urlaubsmodus startet automatisch zum eingestellten Startzeitpunkt und stellt die Urlaubstemperatur ein.
Um Dir die Urlaubsmodus-Einstellungen anzeigen zu lassen,
drücke die Kopplungstaste. Das Urlaubsmodus-Symbol ( )
blinkt 5 Sekunden lang und kehrt dann automatisch in den Automatik-Modus zurück. Wenn Du den Urlaubsmodus früher beenden möchtest, drücke zum Abbrechen die Kopplungstaste.
App-Bedienung: Klicke in der App auf das Symbol und wechsel
in einen anderen Modus, um den Urlaubsmodus zu beenden.
Page 14

7.4 Offenes-Fenster-Erkennung
Das Gerät stoppt automatisch die Heizung, wenn es einen plötzlichen Temperaturabfall erkennt (standardmäßig 5 °C in 5 Minuten). Dies wird normalerweise durch ein geöffnetes Fenster
oder eine geöffnete Tür verursacht und das Symbol für offene
Fenster ( ) wird auf dem Gerät angezeigt. Das Gerät arbeitet
gemäß den voreingestellten Rahmenwerten. Drücke die Kopplungstaste, um den Vorgang abzubrechen.
App-Bedienung: Klicke in der App auf das Offenes-Fenster-Symbol, um die Offenes-Fenster-Funktion zu deaktivieren.
Die Offenes-Fenster-Erkennung funktioniert nur im AutomatikModus und im manuellen Modus.
7.5 Offset-Wert
Da die Temperatur am Heizkörperthermostat gemessen wird,
kann die Temperaturverteilung im Raum variieren. Zur Anpassung kann ein Offset-Wert von ±5 °C eingestellt werden. Wenn
eine Solltemperatur von beispielsweise 20 °C eingestellt ist aber
im Raum nur 18 °C herrschen, muss ein Offset von -2°C eingestellt werden. In den App-Einstellungen beträgt die Offset-Temperatur standardmäßig 0 Grad. Um den Offset-Wert einzustellen, gehe bitte wie folgt vor:
App-Bedienung: Klicke in den Einstellungen auf das Offset-Symbol (±).
Page 15

7.6 Öko- und Komfort-Temperatur
Das Symbol für die Öko- und Komfort-Temperatur macht das
Umschalten zwischen Komfort- und Öko-Temperatur einfach
und benutzerfreundlich. Diese sind werkseitig auf 21 °C (Komfort-Temperatur) und 17 °C (Öko-Temperatur) eingestellt.
App-Bedienung: Klicke in der App auf das Symbol für die Komfort- ( )/Öko ( )-Temperatur, um den entsprechenden Temperaturmodus auszuwählen.
Auch im Automatik-Modus kann die Temperatur jederzeit mit
dieser Taste geändert werden. Sie bleibt dann bis zum nächsten
Programmwechsel unverändert.
7.7 Kindersicherung
Die Bedienung des Gerätes kann gesperrt werden, um ein unbeabsichtigtes Ändern von Einstellungen (z. B. durch versehentliches Berühren) zu verhindern. Um die Kindersicherung zu aktivieren/deaktivieren, gehe bitte wie folgt vor:
App-Bedienung: Klicke in der App auf das Symbol für die Kindersicherung. Das Gerät zeigt „LOC“ (gesperrt) an.
7.8 Gefrierschutzmodus
Den Gefrierschutzmodus kannst Du nutzen, wenn Du im Winter
Page 16

längere Zeit unterwegs bist. Wenn diese Funktion aktiviert ist,
wird die Temperatur im Haus auf 8 °C gehalten, das Gerät zeigt
„AF“ (Gefrierschutz) an. Drücke die Kopplungstaste, um den Gefrierschutzmodus zu deaktvieren.
App-Bedienung: Klicke auf das Frostschutzsymbol ( ), um die
Funktion in der essentials Smart Home App ein- oder auszu-
schalten.
Hinweis: Sobald diese Funktion aktiviert ist, stehen Dir andere
Funktionen nicht mehr zur Verfügung, bis die Funktion wieder
deaktiviert wird.
7.9 Energiesparmodus
Die Batterielebensdauer kann durch Abschalten der Heizung
verlängert werden. Dazu wird das Ventil vollständig geschlossen. Zum Aktivieren des Heizungsstopps zeigt das Gerät „HS“
(Heizungsstopp) an. Drücke dann zum Abbrechen die Kopplungstaste. Bitte gehe folgendermaßen vor:
App-Bedienung: Klicke auf das Heizungsstopp-Symbol ( ), um
die Funktion in der App ein- oder auszuschalten.
Hinweis: Sobald diese Funktion aktiviert ist, stehen Dir andere
Funktionen nicht mehr zur Verfügung, bis die Funktion wieder
deaktiviert wird.
Page 17

7.10 Antikalkschutz (Entkalkung)
Das Gerät läuft jede Woche automatisch für einen bestimmten
Zeitraum, um eine Verkalkung des Ventils zu vermeiden.
7.11 Boost
Die Boost-Funktion ermöglicht Dir ein schnelles Aufheizen, um
eine angenehme Raumtemperatur zu erreichen. Bei Aktivierung
wird das Ventil für 5 Minuten vollständig geöffnet. Das Aufheizen eines Raumes dauert länger als 5 Minuten, aber die Wärmeabgabe des Heizkörpers ist sofort spürbar.
Die Boost-Funktion ist aktiviert. Die verbleibende Zeit der Funktion wird in Sekunden heruntergezählt (von „299“ bis „000“).
Nach Ablauf dieser 5 Minuten wechselt der Antrieb in den zuvor
aktiven Modus (Automatik/Manuell) mit der zuvor eingestellten
Temperatur.
Beende diese Funktion vorzeitig, indem Du zum Abbrechen die
Kopplungstaste drückst.
App-Bedienung: Wähle den entsprechenden Modus ( ) in der
App, um die Boost-Funktion zu aktivieren oder deaktvieren.
8 Einstellung
Klicke in der essentials Smart Home App auf das EinstellungenSymbol ( ).
Page 18

8.1 Datum
Wenn das Gerät erfolgreich mit dem Telefon gekoppelt ist, wird
die Gerätezeit mit der Smartphone-Zeit synchronisiert.
8.2 Wochenprogrammstufe
In diesem Menüpunkt kannst Du ein Heizprofil mit Heiz- und
Ruhephasen nach Deinen persönlichen Bedürfnissen erstellen.
Standardmäßig sind fünf Zeitprofile hinterlegt. Du kannst täglich bis zu zehn Zeitprofile einstellen.
Klicke in der App auf das Symbol für die wöchentliche Programmierstufe ( ).
Wähle einzelne Wochentage, alle Wochentage, das Wochenende
oder die ganze Woche für Dein Heizprofil.
Klicke auf „Zeit“, um die Endzeit jedes Zeitraums auszuwählen,
und klicke auf „Temperatur“, um die gewünschte Temperatur
auszuwählen.
Zeitspanne: 00:00-24:00, Schritt: 10 Minuten
Temperaturbereich: 5 - 30 °C, Schritt: 0,5 °C.
8.3 Offenes Fenster
Klicke im Einstellungsbildschirm der App auf das Offenes-Fenster-Symbol ( ). Stelle die Zeit und Temperatur ein
Page 19

Temperaturbereich: 5 - 30 °C, Schritt: 0,5°C.
Zeitspanne: 0 - 120 Minuten, Standard: 60 Minuten
8.4 Komfort-Temperatur
Klicke in der App auf das Komfort-Temperatur-Symbol ( ).
Wähle die gewünschte Temperatur aus.
Temperaturbereich: 5 - 30 °C, Schritt: 0,5 °C.
8.5 Öko-Temperatur
Klicke im Einstellungsbildschirm der App auf das Öko-Temperatur-Symbol ( ).
Wähle die gewünschte Temperatur aus.
Temperaturbereich: 5 - 30 °C, Schritt: 0,5 °C.
8.6 Offset
Klicke im Einstellungsbildschirm der App auf das Offset-Temperatur-Symbol (±).
Wähle die gewünschte Temperatur aus.
Temperaturbereich: -5 - 5 °C, Schritt: 0,1 °C.
8.7 Urlaubsmodus
Klicke im Einstellungsbildschirm der App auf das UrlaubsmodusSymbol ( ).
Page 20
Wähle das Enddatum und die gewünschte Temperatur aus.
Temperaturbereich: 5 - 30 °C, Schritt: 0,5 °C
9 Schwache Batterie
Wenn die Akkuleistung weniger als 12 % beträgt, wird das
Symbol für eine schwache Akkuleistung ( ) angezeigt. Bitte
wechsel die Batterie aus, da das Gerät mit schwacher Batterie
nicht funktioniert.
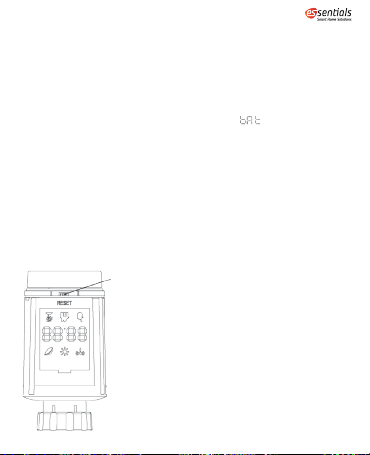
10 Zurücksetzen
Drücke für 5 Sekunden die Reset-Taste. Das Gerät zeigt „FAC“
(Werkseinstellungen) an. Das Gerät wird zurückgesetzt.
Wenn das Gerät zurückgesetzt wird, werden die Daten nicht gespeichert.
5 Sekunden drücken
Page 21
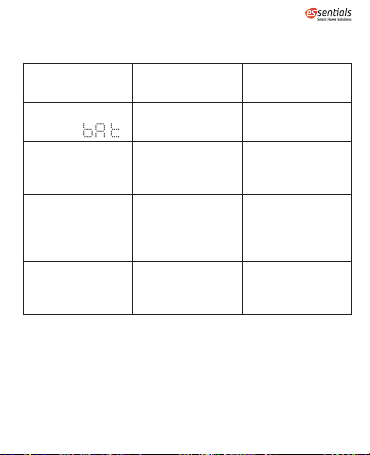
11 Problembehebung und Wartung
Fehlercode auf
dem Display
Schwache
Batterie
F1 Ventilantrieb
F2 Betätigungsbe-
F3 Einstellbereich
Problem Lösung
Batterieleistung
zu schwach
träge
reich zu groß
zu klein
Batterien auswechseln
Installation
prüfen, Heizungsventil prüfen.
Bitte überprüfe
die Befestigung
des Heizkörperthermostats
Bitte überprüfe,
ob die Ventilnadel
klemmt.
Page 22
12 Technische Daten
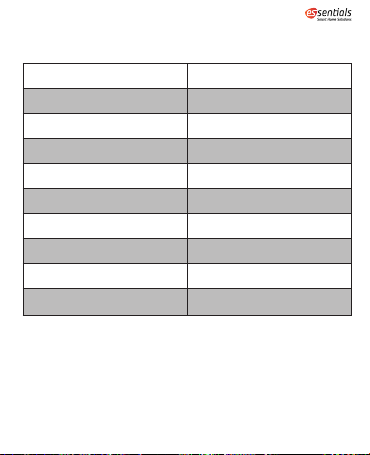
Versorgungsspannung 2 x 1,5 V AA
Ventilweg 5 mm (±0,3 mm)
Stellkraft >70 N
Laufgeräusch <40 dB(A)
Batterielebensdauer bis zu 1,5 Jahre (typ.)
Schutzklasse IP 20
Umgebungstemperatur -10 °C bis 40 °C
Abmessungen (B x H x T) 56,5 x 56,5 x 100 mm
Gewicht 190 g (inkl. Batterien)
Kommunikationsprotokoll Bluetooth
13 Anweisungen für die Entsorgung
Entsorge das Gerät nicht im normalen Hausmüll! Elektronische
Geräte müssen an den örtlichen Sammelstellen für elektronische Altgeräte in Übereinstimmung mit der Richtlinie über Elektro- und Elektronik-Altgeräte entsorgt werden.
Page 23

Das Gerät ist kein Spielzeug, lasse Kinder nicht damit spielen.
Lasse kein Verpackungsmaterial herumliegen. Plastikfolien/beutel, Styroporstücke usw. können für Kinder gefährlich sein.
Gebrauchte Batterien gehören nicht in den Hausmüll! Bringe sie stattdessen zu der örtlichen Batte-
Dieses Gerät entspricht EN62368/EN300328/EN301489 der
CE-Richtlinien. Dieses Gerät entspricht den ROHS 2.0-Regeln.
rieentsorgungsstelle.
14 Konformitätserklärung
Hiermit erklärt der Hersteller, dass das Gerät der Richtlinie
2014/53/EU entspricht. Der vollständige Text der EU-Konformitätserklärung ist unter der folgenden Internetadresse verfügbar: www.wesmartify.de
Page 24
User Manual
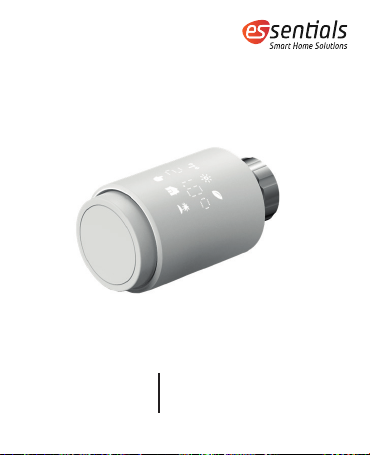
essentials Radiator Thermostat
Bluetooth Round
wesmartify GmbH
TecCenter 1
31162 Bad Salzdetfurth
wesmartify.de
+49 5063 799 4024
[email protected]
Page 25
1 Overview
A
B
C
D
E F
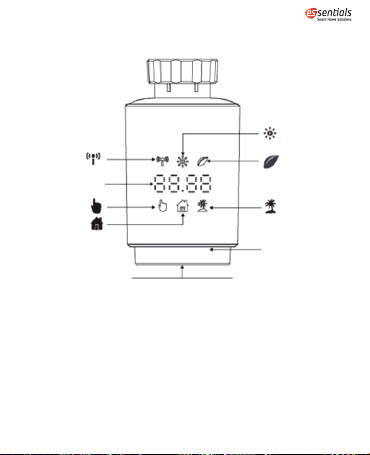
A: Bluetooth signal
B: Temperature display
C: Manual mode
D: Auto mode
E: Pair (hold press)
F: Switching auto/manual/holiday mode (press)
G: Adjust temperature
H: Holiday mode
I: ECO temperature
J: Comforable temperature
J
I
H
G
Page 26
2 First steps
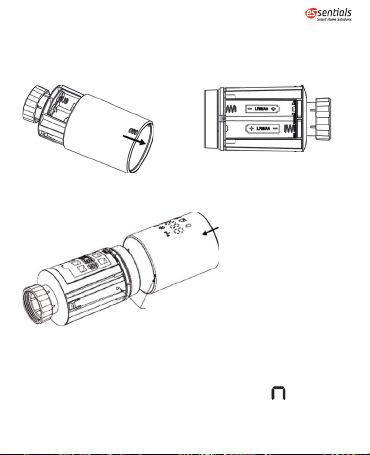
1. Open the battery compartment.
3. Close the battery compartment.
Align the traingle mark.
2. Insert two new batteries.
3 Run adaptive
The display of „InS“ (Install) with the rotating shows that
the motor is still travelling back. When „AdA“ (adapting run) is
shown in the display, the radiator thermostat can be installed
Page 27

on the valve. After installation, press the pair button to run adaptive.
The display of „AdA“ (adapting run) with the rotating shows
that an adapting run to adapt the thermostat to the valve.
If the adapting runs is initiated before installation, press pair
button and the motor travels back to the „InS“ (Install) position.
If an error message(F1,F2,F3) is displayed, press the Pair/Boost
button and the motor similarly travels back to the „InS“ (Install)
position.
4 Installation
The radiator thermostat is easy to install and can be done without draining heating water or intervening in the heating system. No special tools are required, nor does the heating have
to be switched off.
The ring nut attached to the radiator thermostat can be used
universally and without accessories for all valves with a thread
size of M30 x 1.5 from the most popular manufacturers such as:
Danfoss, Heimeier, MNG, Junkers, Landis&Gyr (Duodyr),
Honeywell-Braukmann, Oventrop, Schlösser, Comap,
Valf Sanayii, Mertik Maxitrol, Watts, Wingenroth (Wiroflex),
Idmar54, R.B.M, Tiemme, Jaga and Siemens.
By means of the adapters in the delivery, the device can be installed on radiator valves of type Danfoss RA, Danfoss RAV and
Danfoss RAVL.
Page 28
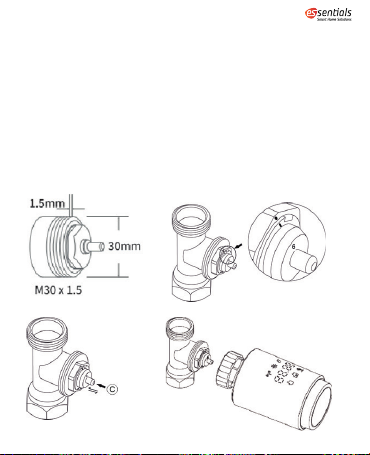
4.1 M30 x 1.5
1. Unscrew your existing radiator thermostat.
2. Screw the TV02 smart radiator thermostat directly onto
the radiator if the connector type is M30 x 1.5 (picture shown
as below). You can adjust the angle to make the led facing
the viewer properly.
3. Rotate the thermostat dial to the maximum value.
4. Check, if the valve (©) is active.
5. Install the device
Page 29
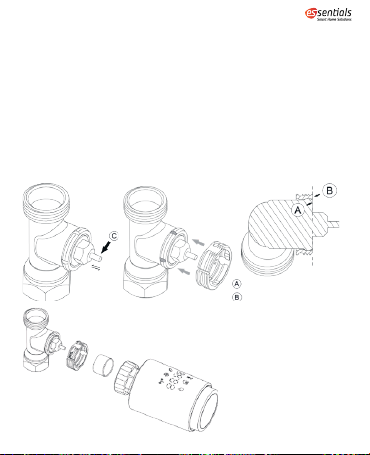
4.2 Danfoss RAVL Valve
1. Check, if the valve (©) is active.
2. The valve bodied have elongated notches around their
circumference, which ensure that the adapter is properly
seated when it snaps on: snap on the adapter completely,so
that the pins inside the adapter are lined up with the notches
on the valve.
3. Install the adapter, Plane A is aligned with Plane B.
4. Install the round tube into the device.
5. Install the device.
Plane A
Plane B
Page 30
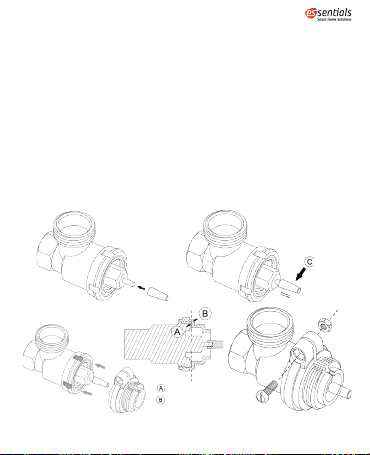
4.3 Danfoss RAV Valve
1. Rotate the thermostat dial to the maximum value.
2. Check, if the valve (©) is active.
3. The valve bodied have elongated notches around their
circumference, which ensure that the adapter is properly
seated when it snaps on: snap on the adapter completely,so
that the pins inside the adapter are lined up with the notches
on the valve.
4. Install the adapter,Plane A is aligned with Plane B.
5. Union nut.
6. Install the device.
Plane A
Plane B
Page 31
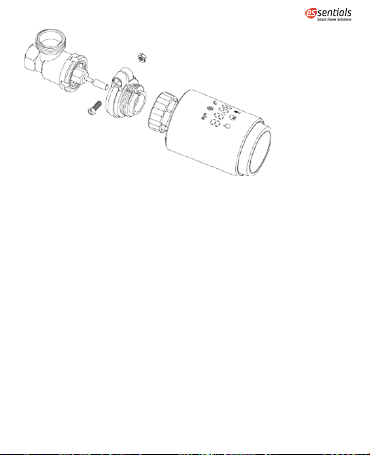
4.3 Danfoss RA Valve
1. Rotate the thermostat dial to the maximum value, „N“ Align
Dial.
2. Check, if the valve (©) is active.
3. The valve bodied have elongated notches around their
circumference, which ensure that the adapter is properly
seated when it snaps on: snap on the adapter completely,so
that the pins inside the adapter are lined up with the notches
on the valve.
4. Install the adapter,Plane A is aligned with Plane B.
5. Union nut.
6. Install the round tube into the device.
7. Install the device.
Page 32
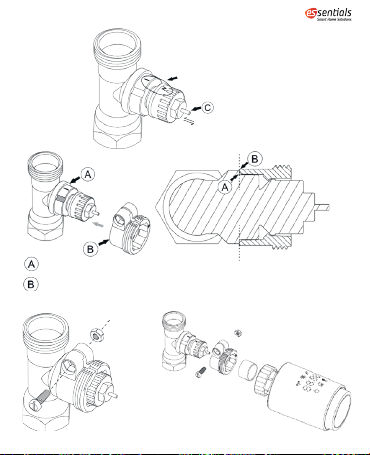
Plane A
Plane B
Plane A is aligned with plane B
See figure
Page 33
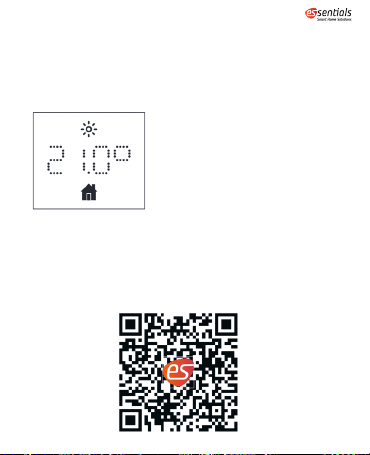
5 Interface display
When you see the LED is showing information as below, the
radiator thermostat is ready for configuration. If not, please uninstall and re-install the batteries and redo step 4.
6 Interface display
6.1 Download App
Scan the QR-Code as below, get and install essentials Smart
Home App for iOs and Android System.
Page 34

6.2 Add Thermostat Radiator Valve
Long press pairing button on the radiator thermostat for 5 seconds until the Bluetooth signal icon ( )flashed, which means
the device has entered the pairing mode.
Tap + on the top right, choose Radiator Thermostat Bluetooth
Round and simply follow the inbuilt setup wizard for device
installation and configuration. If the phone’s Bluetooth is not
turned on, the essentials Smart Home App will asking to turn
on Bluetooth.
7 Product features
7.1 Auto Mode
In automatic mode, the temperature is controlled in accordance
with the set heating profile. Manual changes are activated until the next point at which the profile changes. Afterwards, the
defined heating profile will be activated again. To activate the
automatic mode, please proceed as follows:
Press the pair button to select icon.
Default temperature: 17 °C and 21 °C.
Temperature range: 5-30 °C, step: 0.5 °C
App operation: Click the auto mode icon in the App control panel.
Page 35

7.2 Manual Mode
In manual mode, the temperature is controlled in accordance
with the current temperature set via knob button. The temperature remains activated until the next manual change. To activate
the manual mode, please proceed as follows:
Press the pair button to select icon.
Default temperature: 20°C
Temperature range: 5-30 °C, step: 0.5 °C
App operation: Click the manual mode icon in the App control
panel.
7.3 Holiday Mode
When you go out or go to a party, you will use the holiday mode.
The holiday mode will automatically start at the set time starting point and run the holiday temperature.
When the holiday mode is not activated, and you want to view
the holiday mode settings, please press the pair button to view,
the holiday mode icon ( ) will flash for 5 seconds and then it
will automatically return to the auto mode. If you want to end
your holiday mode earlier, press the pair button to cancel.
App operation: Click the Mode icon in the App control panel, and
switch to any other mode to cancel holiday mode.
Page 36

7.4 Holiday Mode
The device automatically stop heating when it detects a sudden
temperature drop(5 °C in 5 minutes as default). This is usually caused by an opened window or door and the open window
icon will display ( ) on the device. The device will operate
according to the preset window. Press the pair button to cancel.
App operation: Click the open window icon in App to cancel the
window opening function.
The open window detection only operates in automatic mode
and manual mode.
7.5 Offset Temperature
As the temperature is measured on the radiator thermostat,
the temperature distribution can vary throughout a room. To
adjust this, a temperature offset of ±5 °C can be set. If a nominal temperature of e.g. 20 °C is set but the room presents with
only 18 °C, an offset of -2 °C needs to be set. In app settings, the
offset temperature is 0 degrees by default. To adjust the offset
temperature, please proceed as follows:
App operation: Click the offset icon (±) in settings.
Page 37

7.6 Eco and Comfortable Temperature
The comfort and Eco temperature icon makes switching between comfort and Eco temperature simple and user friendly.
These have been set at the factory at 21 °C (comfort temperature) and 17 °C (Eco temperature).
App operation: Click the Comfortable( )/Eco ( )temperature
icon in the App control panel to select the corresponding temperature mode.
Even in auto mode, the temperature can be changed at any time
using the button. It will then remain the same until the next
point at which the program changes.
7.7 Child Lock
Operation of the device can be locked to avoid settings being
changed unintended(e.g. through involuntary touch). To activate/deactivate the child lock, please proceed as follows:
App operation: Click the child lock icon in the App settings
screen. The device display „LOC” (locked).
7.8 Anti-Freezing Mode
You can use this function when you go out in winter or when you
are not at home for a long time. When this function is activated,
the temperature in the house is kept at 8 °C,the device display
Page 38

„AF“ (Anti-Freezing Mode). Press the pair button to cancel.
App operation: Click the anti-freezing icon( ) to turn on/off the
function in the App settings screen.
Note: Once this function is activated, other functions are not
available unless the function is deactivated.
7.9 Heating Stop (Power Saving) Mode
Battery life can be prolonged by switching the heating off. To
achieve this, the valve is closed fully. To activate the heating
stop, the device display „HS” (Heating stop), press the pair button to cancel. please proceed as follows:
App operation: Click the Heating stop icon( )to turn on/off the
function in the App settings screen.
Note: Once the function is activated, other functions are not
available unless the function is deactivated.
7.10 Anti-Calcification (Descaling) Protection
The equipment will automatically run for a period of time every
week to prevent calcification of the valve.
Page 39

7.11 Boost
Sometimes people go home earlier than usual, and the rapid
heating function will make you feel the warmth of the room faster. When activated, the valve will be fully opened for 5 minutes.
The heating of a room takes longer than 5 minutes, but the heat
given off by the radiator can be felt immediately.
The boost function is activated . The remaining time for the function will be counted down in seconds(‘299’ to ‘000’).
After these 5 minutes have elapsed, the actuator changes to the
mode which was previously active(auto/manual) with the previously set temperature.
End this function ahead of time, press the pair button to cancel.
App operation: Select the mode of APP interface to activate the
boost. Click the Boost icon ( )in the App control panel to cancel
the boost function.
8 Setting
Click the settings icon( ) in the App control panel.
8.1 Date
When the device is successfully paired with the phone, the device time is synchronized with the phone time.
Page 40

8.2 Week Programming Stage
In this menu item, you can create a heating profile with heating
and cooling phases according to your personal needs. You can
set up to ten stages of temperature every day. The factory default is five stages.
Click the week programming stage icon ( ) in the App control
panel.Select single days of the week, all weekdays, the weekend
or the entire week for your heating profile.
Click time to select the end time of each period, and click temperature to select the required temperature.
Time range: 00:00-24:00, step: 10 minutes
Temperature range: 5-30 °C, step: 0.5 °C
8.3 Open Window
Click the open window icon( ) in the App settings screen set the
time and temperature
Temperature range: 5-30 °C, step: 0.5 °C
Time range: 0-120 minutes, default: 60 minutes
8.4 Comfortable Temperature
Click the comfortable temperature icon ( ) in the App settings
screen.
Select the desired temperature
Temperature range: 5-30 °C, step: 0.5 °C
Page 41

8.5 ECO Temperature
Click the ECO temperature icon ( ) in the App settings screen.
Select the desired temperature
Temperature range: 5-30 °C, step: 0.5 °C
8.6 Offset
Click the Offset temperature icon (± )in the App settings screen.
Select the desired temperature
Temperature range: -5-5 °C, step: 0.1 °C
8.7 Holiday Setting
Click the holiday mode icon ( )in the App settings screen.
Select the end date
Select the desired temperature
Temperature range: 5-30 °C, step: 0.5 °C
9 Low Battery
When the battery power is less than 12 %, the low power prompt
icon ( ) will be displayed. Please replace the battery as soon
as possible,When the the device only displays ( )the device
is not available.
Page 42
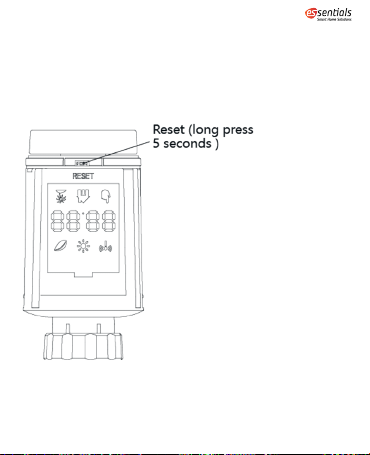
10 Reset
Press the reset buttons for 5 seconds, the device will display
„FAC” (Factory setting). The device run reset.
After the device runs reset, the data will not be saved, the device
needs to be repaired.
Page 43
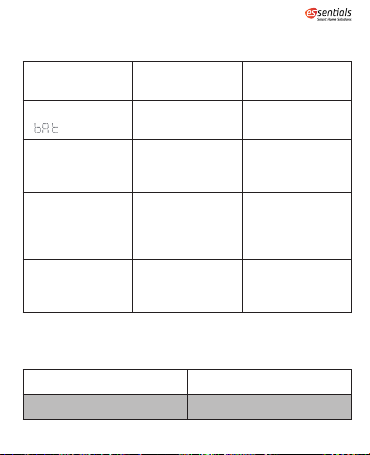
11 Troubleshooting and Maintenance
Fehlercode auf
dem Display
Low Battery Battery output
F1 Valve drive
F2 Actuating range
F3 Adjustment range
Problem Lösung
too low
sluggish
too wide
too small
12 Technical Data
Supply voltage 2 x 1.5 V AA
Valve travel 5 mm (±0.3 mm)
Adjustment range
too small
Check installation,check the
heating valve
Please check
the fastening
of the radiator
thermostat
Please check
whether the valve
pin is stuck
Page 44
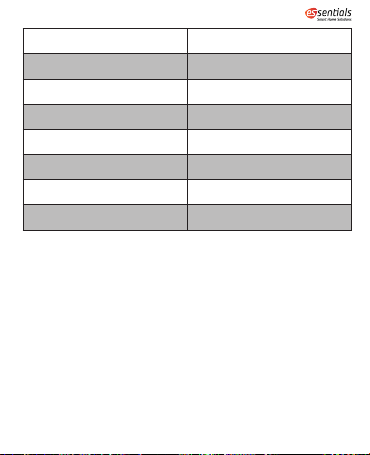
Actuating force >70 N
Running noise <40 dB(A)
Battery life bis zu 1.5 Jahre (typ.)
Protection class IP 20
Ambient temperature -10 °C to 40 °C
Dimensions (W × H × D) 56.5 x 56.5 x 100 mm
Weight 190 g (incl. batteries))
Communication protocol Bluetooth
13 Instructions for Disposal
Do not dispose of the device with regular domestic waste! Electronic equipment must be disposed of at local collection points
for waste electronic equipment in compliance with the Waste
Electrical and Electronic Equipment Directive.
The device is not a toy, do not allow children to play with it. Do
not leave packaging material lying around. Plastic films/bags,
pieces of polystyrene, etc. can be dangerous in the hands of a
child.
Page 45

Used batteries should not be disposed of with regular
domestic waste! Instead, take them to your local bat-
tery disposal point.
This device complies with the EN62368/EN300328/ EN301489
of the CE Rules. This device complies with the ROHS 2.0 Rules.
14 Declaration of Conformity
The manufacturer herewith declares that the product complies
with the stipulations of the Directive 2014/53/EU of the European union. For complete text of this declaration go to the following internet address: www.wesmartify.de
 Loading...