

Page 1
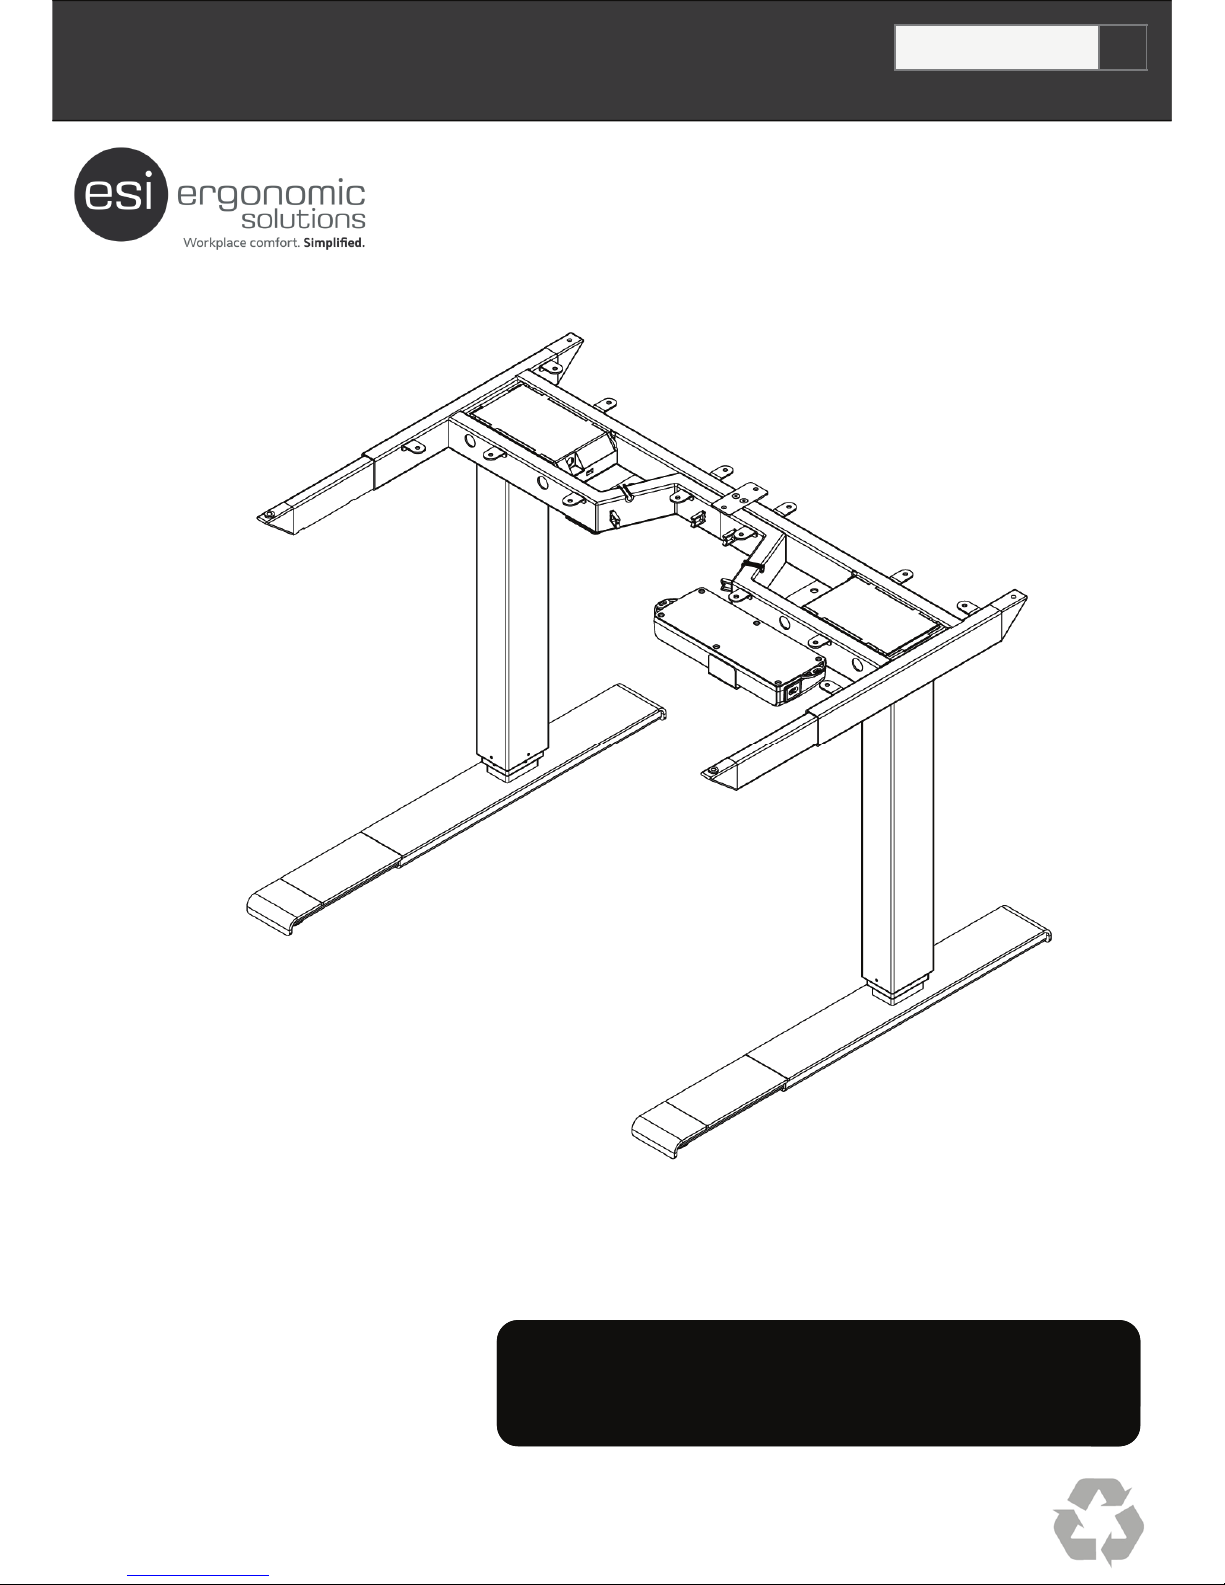
FLEXRISE2
2 LEG / 2 MOTOR ELECTRIC TABLE BASE (36” to 72”)
VERSION A
INSTRUCTION MANUAL
Reduce.Reuse.Recycle
MAX Load 265 lbs (120 KG) Equally Divided
MAX Load 175 lbs (80 KG) Per Column
CAUTION: DO NOT EXCEED MAXIMUM LISTED WEIGHT CAPACITY.
SERIOUS INJURY OR PROPERTY DAMAGE MAY OCCUR!
FLEXRISE2 = Manual-ESI-1510-01-160328vA (A4)
**PATENT PENDING**
CONTENTS:
• FLEX-MU-2L3S-C3672-K4#
• FEET-ADJ-UNV-2430#
Page 2

IMPORTANT INFORMATION
P2
Always make sure all screws are tightened before use of the frame for desk.
Duty cycle of the frame for desk is 10%, max. 2 minutes operating / min. 18 minutes stop.
Maximum load of the frame for desk is 265 lbs (120 kg), equally divided. Ensure the loading on each
column is less than 175 lbs (80 kg). Otherwise it might cause permanent damage to the column(s)
during operation.
When the motor cable is connected to the control box, the columns can maintain an adequate locking
force up to 265 lbs (120 kg), load on the table top. However, when the cable is damaged or is
disconnected from the control box, it will cause the desk sliding to the bottom within hours, if the load
on either columns are larger than 130 lbs (60 kg).
Make sure that no persons or items will collide with the frame for desk, when adjusting upwards and
downwards.
Damaged cords must to be replaced before connecting the main cable.
Keep at least .80 inches (20 mm) free space around the edge of whole frame/tabletop.
Do not operate the system where the temperature is outside the specified limits.
The frame for desk is not intended to be used as a person lift.
Do not pull or push the frame if moving. Make sure to avoid twisting the columns, by lifting the frame
above the floor when moving.
Min Max
Frame Height 24.8 in (630 mm) 50.4 in (1280 mm)
Frame Width 34.0 in (864 mm) 64.0 in (1626 mm)
Foot Length 22.0 in (559 mm) 28.0 in (711 mm)
Anti Collision (Drive Back 40 mm) Upwards +55 lbs (+25 kg) Downwards +77 lbs (+35 kg)
Ambient Temperature 32 F (0 C) 113 F (45 C)
Column Height 23.2 in (590 mm)
Stroke 25.6 in (650 mm)
Max Load = Equally Divided 265 lbs (120 kg)
Max Load = Per Column 175 lbs (80 kg)
Speed = 0-100 Kg Load 1.42 in / sec (40 mm / sec)
Speed = 100 -120 Kg Load 1.57 in / sec (36 mm / sec)
Noise Level 39 dB
Duty Cycle Max 2 min. run /18 min. stop - 10%
Rated Input AC 100 - 240V 50Hz, 3A
Rated Output 32 V, Max 10A
Power Consumption In Standby < 0.1 W
Power Consumption In Use 280 W
Lifetime 10,000 cycles
Safety functions
Overload protection
Overheat protection
Timeout/unbalance protection
Page 3

TROUBLE SHOOTING GUIDE
P3
ISSUE INSPECT SOLUTIONS
The Frame / Column is not running.
Is the power cable connected
to the main power supply with
correct voltage?
Connect plug to main power
supply to make sure the
voltage is ok.
If not then try to connect
another device (ex lamp) to
check.
Make sure that all plugs are
mounted correctly in the
control box and to the
columns.
Check all connections
One or more columns/cables
are defective.
Perform resetting and run a
bit upwards. If a column will
not run upwards after
resetting, it is defective.
Look for visible damages on
cables, control box and
columns.
Damaged parts must be
exchanged - contact supplier.
The Frame / Column operates
irregularly or is tilted.
Visual observation. Perform Resetting.
The Frame / Column stops and can
only run downwards.
Is the frame in highest
position?
When the frame has reached
the maximum height, it can
only run downwards.
The frame could be
overloaded.
Remove some of the load
and perform again.
The Frame / Column will only run
downwards even though the frame is
not overloaded.
Visual observation. Perform Resetting.
The Frame / Column always stops at
the same position, before reaching
maximum height.
Has the system been
programmed to this specific
height?
Perform Resetting.
Not all Columns run when you run
the frame downwards.
The column that does not run
could be defective or the
cable connection for the
column is not ok.
Check all connections, then
Perform resetting. If a column
will not run upwards after
resetting, it is defective.
Page 4
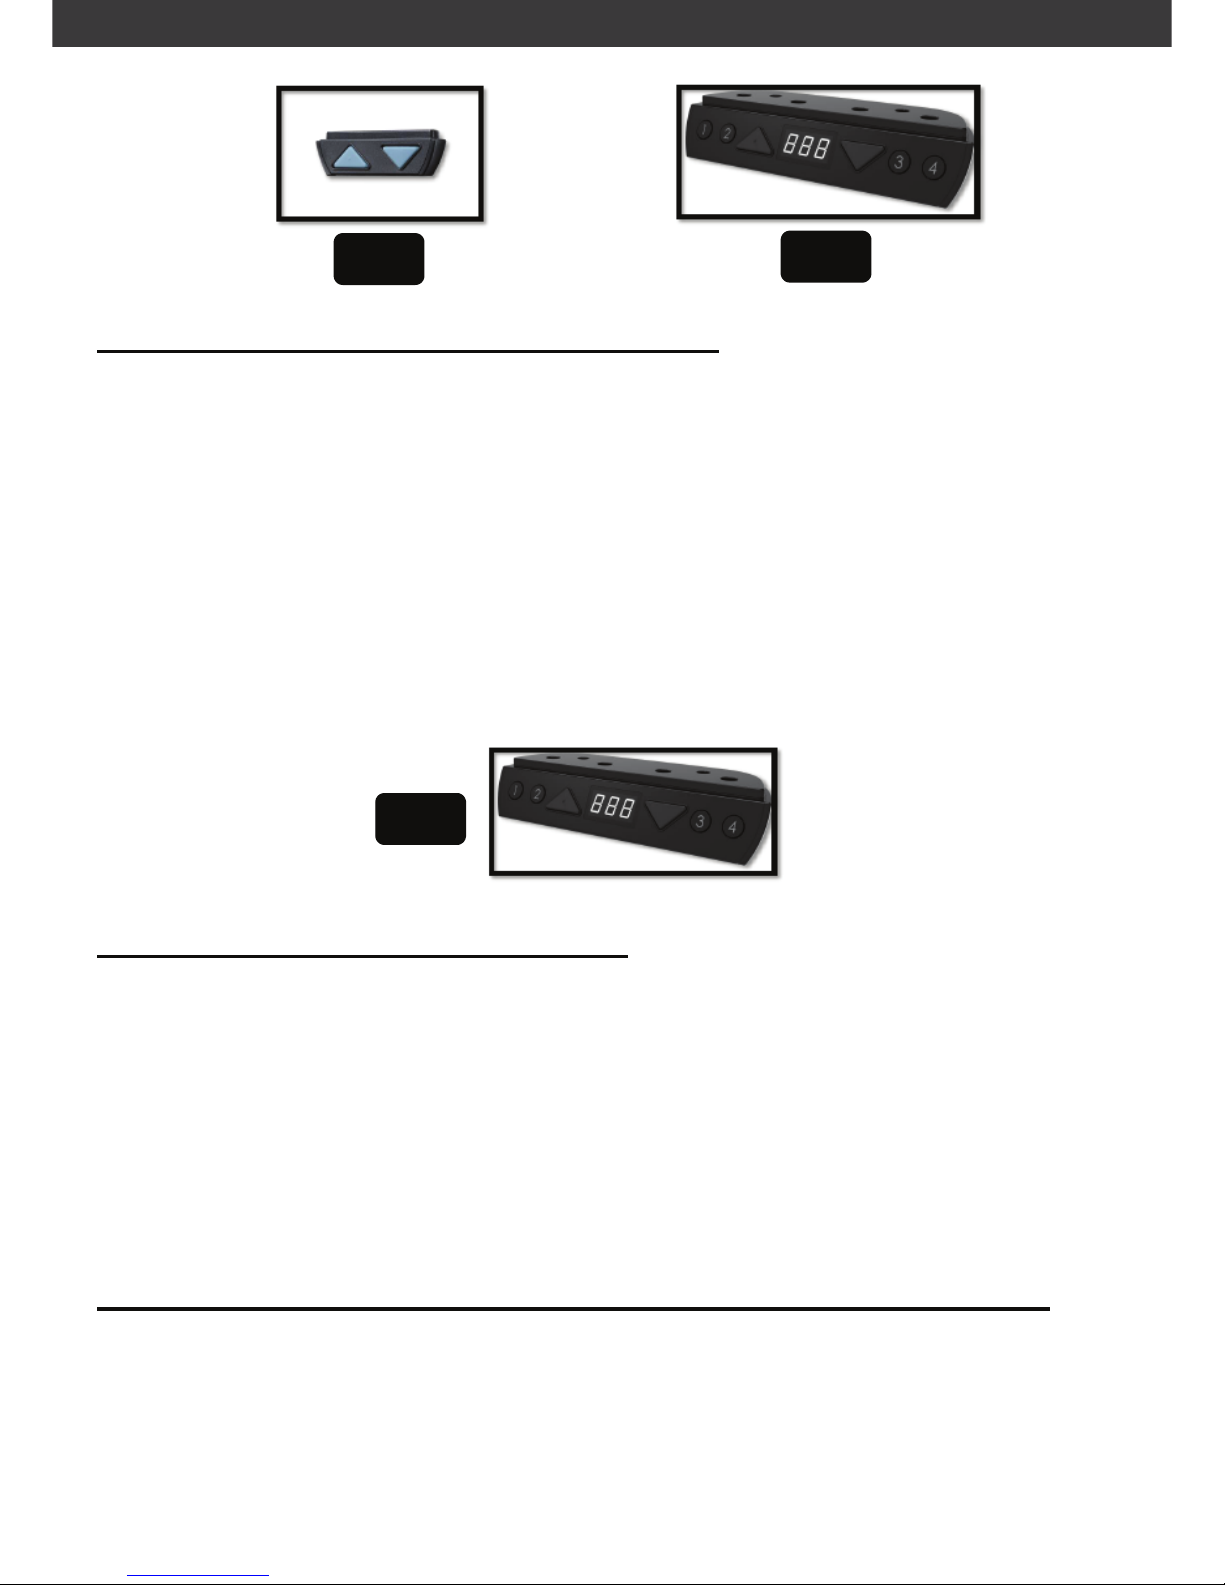
HANDSET PROGRAMMING
P4
SET UP SYNCHRONIZATION (KY0 and KY4)
1. Once you have fully assembled your desk. It needs to be synchronized at the
lowest position.
2. Ensure there are not obstructions for the desk to move vertically
3. Press and hold the “UP and DOWN” arrow buttons at the same time.
4. Continue to hold the “UP and DOWN” arrow buttons, the desk will lower until it
reaches the bottom (lowest point).
5. Release the buttons once the system beeps
1. If it does not beep, continue to hold the buttons for 3 seconds after the desk
reaches the lowest point.
6. The system has now been synchronized. KY0 version is now ready for use.
MEMORY SET POSITIONS (KY4 only)
1. To be performed after “Set up Synchronization”
2. Move the desk to the desired memory position
3. Press and hold the “UP” button and memory # button at the same time. (3 to 5
seconds)
4. Display will flash “P#” when programmed
5. For example, pressing “UP” and the number 1 for 3 to 5 seconds, the display with
flash “P1”
6. Repeat for programming positions 2, 3 and 4.
MOVING TO A MEMORY PRESET POSITION (KY4 HANDSET ONLY)
1. Ensure there are not obstructions for the desk to move vertically
2. Press and hold the memory button #
3. The desk will move to the preset position
NOTE: The memory preset button must be pressed and held with the desk is
moving to the preset position.
KY0
KY4
KY4
Page 5
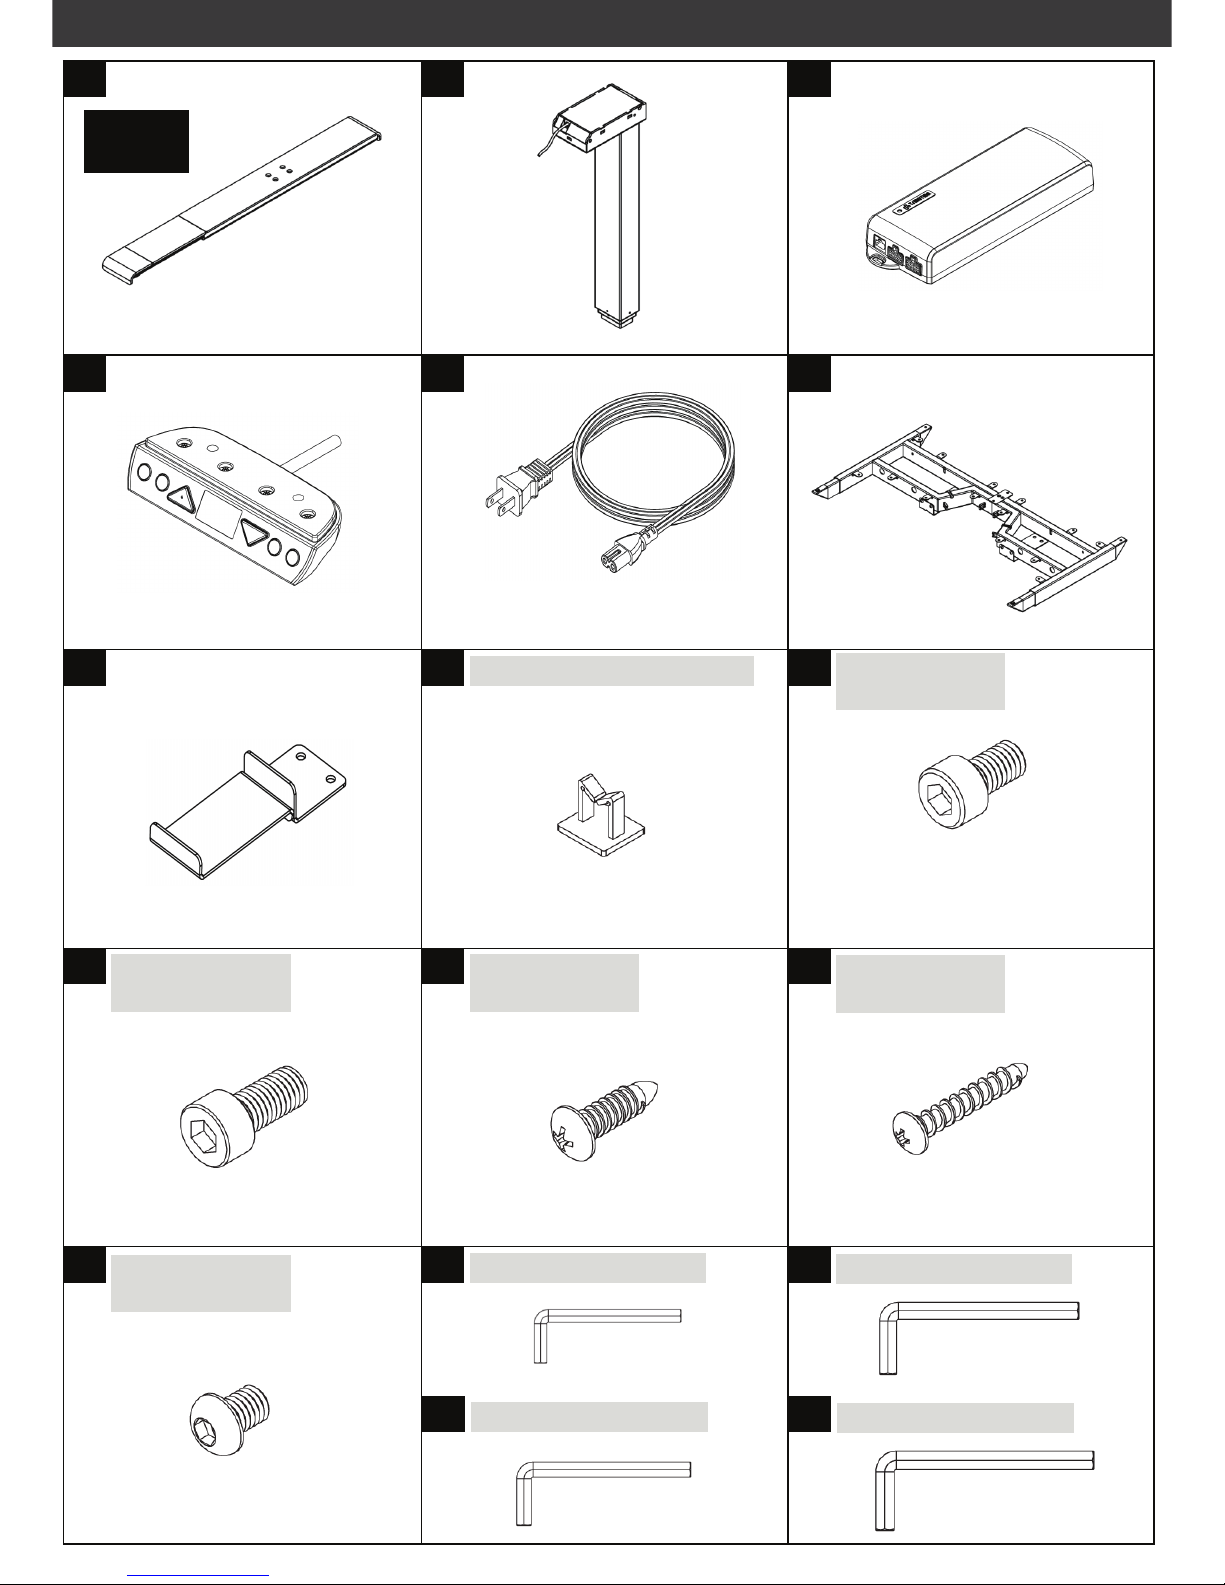
PARTS LIST
P5
Qty: 2 Qty: 2 Qty: 1
A B C
D E F
G H I
Cable Management Clip
Machine Screw
M6 x 10mm
Machine Screw
M10 x 20mm
J K L
Wood Screws
M5 x 18mm
Qty: 1 Qty: 4 Qty: 8
Qty: 8 Qty: 22 Qty: 2
Qty: 2
Qty: 1 Qty: 1
M N P
Allen Wrench: 4mm
O Q
Wood Screws
M4 x 25mm
Machine Screw
M6 x 8mm
Allen Wrench: 5mm
Allen Wrench: 6mm
Allen Wrench: 8mm
Qty: 1 Qty: 1
Qty: 1 Qty: 1 Qty: 1
Ships in
Box 2
Page 6

STEP 2 – CROSS BAR WIDTH
P6
34 in to 64 in
34 in
44 in
44 in
54 in
64 in
64 in
54 in
19.5 in to 23.5 in
MAX
MAX
MIN
Page 7

STEP 1-3 – CROSS BAR and END SUPPORT BARS
P7
N
P
STEP 1
STEP 2
Unscrew Side Leveling Screws with
Allen Wrench (P) to Expand Cross Bar and
Tighten once Adjusted to Correct Width
STEP 3
STEP 3
Unscrew Bottom Cross Bar Machine
Screws and Adjust to Length
Unscrew End Support Machine
Screws and Extend from
19.3 in to 23.5 in
Page 8

STEP 4-5 – LEG COLUMN
P8
B
F
B
N
I
I
O
B
I
I
I
O
I
I
I
Secure with Machine
Screws on Cross Bar
with Allen Wrench (N)
Secure Leg Column (B) with
Machine Screws (I) using
Allen Wrench (O)
STEP 5
STEP 4
Page 9

STEP 6-7 – FEET LENGTH
22 in (559 mm)
28 in (711 mm)
O
Remove Machine
Screws and Secure After
Adjusting Length
Remove Adjustable Plate for
22 in (559 mm) Length
STEP 6
STEP 7
STEP 9
STEP 9
Adjust Leveling Pads
P9
Page 10

STEP 8 – FEET INSTALLATION
P10
A
A
Q
J
J
B
B
STEP 8
STEP 8
Secure Feet to Leg Column (B)
Page 11

STEP 9 – ADJUSTABLE FEET PLATE STORAGE
P11
STEP 9
Store Extension Plate
On Storage Rack
STEP 9
Page 12

STEP 10-11 – WORK SURFACE / ROUTE CABLE
K
STEP 10
Route Cable Wire Underneath
Work Surface
STEP 11
Secure Work Surface with
Wood Screw (K) x 20 pcs
P12
Page 13

STEP 12-14 – CONTROL UN IT
P13
OPTION 1
RIGHT SIDE
STEP 12
Insert Control Box (C)
to Control Box Bracket (G)
K
L
G
M
N
K
OPTION 1 or OPTION 2
and Secure with
Machine Screws (M)
Secure with
Wood Screws (K)
x 2 pcs
STEP 14
Work Surface
C
STEP 13
OPTION 2
LEFT SIDE
Page 14

STEP 15 – HANDSET
P14
D
D
L
L
STEP 15
Install Handset (D) onto
Work Surface with
Wood Screws (L)
Work Surface
Do Not Over Tighten
Page 15

STEP 16-17 – CONTROL BOX WIRES / CABLE MANAGMENT
P15
E
Plug in all Wires to
Control Box (C)
Make Sure All
Connections are
Secure
H
Pre-Installed
STEP 16
STEP 17
STEP 17
Route Wires to Cable
Management Clips
Route Wires to Cable
Management Clips
Page 16

ESI Ergonomic Solutions
NEED HELP? PLEASE CONTACT
Phone: 1-800-833-3746
Email: customerservice@esiergo.com
Web: www.esiergo.com
 Loading...