


ESI Phone
User’s Guide
FOR ESI Communications Servers
ESI-1000 • ESI-600 • ESI-200 • ESI-100 • ESI-50
Covering these current ESI phone models:
ESI 60 Business Phone • ESI 40 Business Phone 48-Key Feature Phone • 24-Key Feature Phone • ESI Cordless Handset II
. . . and these legacy ESI phone models:
12-Key Feature Phone • [Original] ESI Cordless Handset
0450-1047 Rev. N
For on-line help, visit www.esi-estech.com/users.
About ESI
ESI (Estech Systems, Inc.) is a privately held corporation based in Plano, Texas. Founded in 1987, ESI designs and builds innovative telecommunications products for businesses like yours. Because of their powerful combination of value and features, ESI products are consistently recognized by industry publications and leaders.
Copyright © 2011 ESI (Estech Systems, Inc.).
Esi-Dex, Quick Groups, Quick Moves, Virtual Mailbox Key, AutoPage, Quick Page and Verbal User Guide are trademarks, of ESI. Act! is a registered trademark of Symantec Corporation. Goldmine is a trademark of Goldmine Software Corporation. Ethernet is a registered trademark of Xerox Corporation. Microsoft, Windows, NT and Outlook are registered trademarks of Microsoft Corporation. Intel is a registered trademark of Intel Corporation. Panasonic and DBS are registered trademarks of Matsushita Electric Corporation of America. Bluetooth is a registered trademark of the Bluetooth Special Interest Group (S.I.G.), Inc. Information contained herein is subject to change without notice. ESI products are protected by various U.S. Patents, granted and pending. Visit ESI on the Web at www.esi-estech.com.
Introduction ..................................................................................................................................................................................................................................... |
A.1 |
ESI 60 Business Phone ........................................................................................................................................................................................................... |
A.2 |
ESI 40 Business Phone ........................................................................................................................................................................................................... |
A.3 |
48-Key Feature Phone............................................................................................................................................................................................................. |
A.4 |
Optional Expansion Consoles .................................................................................................................................................................................................. |
A.5 |
24-Key Feature Phone............................................................................................................................................................................................................. |
A.6 |
12-Key Feature Phone (legacy product) ................................................................................................................................................................................... |
A.7 |
ESI Cordless Handset II........................................................................................................................................................................................................... |
A.8 |
Connecting your ESI phone ..................................................................................................................................................................................................... |
A.9 |
Help mode (Verbal User Guide) ...................................................................................................................................................................................................... |
B.1 |
User programming: An introduction............................................................................................................................................................................................... |
C.1 |
Voice mail operation........................................................................................................................................................................................................................ |
D.1 |
VOICE MAIL key ..................................................................................................................................................................................................................... |
D.1 |
Personal greetings................................................................................................................................................................................................................... |
D.1 |
Leaving messages . . .............................................................................................................................................................................................................. |
D.2 |
AutoPage ................................................................................................................................................................................................................................ |
D.3 |
Moving and deleting a message............................................................................................................................................................................................... |
D.3 |
Off-premises “reach-me”.......................................................................................................................................................................................................... |
D.3 |
Message retrieval .................................................................................................................................................................................................................... |
D.4 |
Live recording.......................................................................................................................................................................................................................... |
D.8 |
Off-premises message delivery ................................................................................................................................................................................................ |
D.9 |
Message Recycle Bin (un-delete)........................................................................................................................................................................................... |
D.10 |
Status indicator lamp ............................................................................................................................................................................................................. |
D.10 |
Setting up ESI Mobile Messaging........................................................................................................................................................................................... |
D.11 |
Setting up twinning................................................................................................................................................................................................................. |
D.14 |
Optional voice mail feature: Guest mailboxes ......................................................................................................................................................................... |
D.15 |
Optional voice mail feature: Group/broadcast mailboxes......................................................................................................................................................... |
D.17 |
Optional voice mail feature: Cascade notification mailboxes.................................................................................................................................................... |
D.18 |
Optional voice mail feature: Q & A mailboxes ......................................................................................................................................................................... |
D.20 |
ESI phone operation........................................................................................................................................................................................................................ |
E.1 |
Display .................................................................................................................................................................................................................................... |
E.1 |
Caller ID .................................................................................................................................................................................................................................. |
E.1 |
Keys........................................................................................................................................................................................................................................ |
E.2 |
Dial tone.................................................................................................................................................................................................................................. |
E.4 |
Basic phone use...................................................................................................................................................................................................................... |
E.5 |
Direct station selection............................................................................................................................................................................................................. |
E.6 |
Transferring an outside call . . .................................................................................................................................................................................................. |
E.6 |
Transferring an internal call . . . ................................................................................................................................................................................................ |
E.8 |
Conference calling................................................................................................................................................................................................................... |
E.9 |
Call forwarding....................................................................................................................................................................................................................... |
E.10 |
Call waiting............................................................................................................................................................................................................................ |
E.13 |
Hold/exclusive hold operation................................................................................................................................................................................................. |
E.14 |
Paging................................................................................................................................................................................................................................... |
E.16 |
Call pickup............................................................................................................................................................................................................................. |
E.16 |
Optional features ................................................................................................................................................................................................................... |
E.17 |
Special keys...................................................................................................................................................................................................................................... |
F.1 |
Esi-Dex .................................................................................................................................................................................................................................... |
F.2 |
Override ring............................................................................................................................................................................................................................. |
F.9 |
Message monitor mode (live call screening)............................................................................................................................................................................ |
F.10 |
Personal greeting reminder..................................................................................................................................................................................................... |
F.10 |
Headset operation .................................................................................................................................................................................................................. |
F.10 |
Outside dial tone preference ................................................................................................................................................................................................... |
F.13 |
Line keys................................................................................................................................................................................................................................ |
F.13 |
Optional features .................................................................................................................................................................................................................... |
F.14 |
Using an ESI desktop IP phone remotely....................................................................................................................................................................................... |
G.1 |
Using Esi-Link ................................................................................................................................................................................................................................. |
H.1 |
Network numbering.................................................................................................................................................................................................................. |
H.1 |
Location Keys.......................................................................................................................................................................................................................... |
H.1 |
Programmable feature keys and Esi-Link: an introduction......................................................................................................................................................... |
H.2 |
Dialing an Esi-Link location ...................................................................................................................................................................................................... |
H.3 |
Using feature keys with Esi-Link............................................................................................................................................................................................... |
H.5 |
Other Esi-Link features ............................................................................................................................................................................................................ |
H.8 |
ACD agent operation......................................................................................................................................................................................................................... |
I.1 |
Programming the agent log-on/off key........................................................................................................................................................................................ |
I.1 |
Wrap mode................................................................................................................................................................................................................................ |
I.2 |
LED indicator............................................................................................................................................................................................................................. |
I.2 |
Display indications ..................................................................................................................................................................................................................... |
I.3 |
While logged on: no DND, monitor mode, call forward, or programming..................................................................................................................................... |
I.4 |
Call waiting................................................................................................................................................................................................................................ |
I.4 |
ACD administrator key ............................................................................................................................................................................................................... |
I.5 |
Analog stations ................................................................................................................................................................................................................................ |
J.1 |
Caller ID ................................................................................................................................................................................................................................... |
J.1 |
Placing calls ............................................................................................................................................................................................................................. |
J.1 |
Transferring calls ...................................................................................................................................................................................................................... |
J.2 |
Conference calling.................................................................................................................................................................................................................... |
J.2 |
Call waiting............................................................................................................................................................................................................................... |
J.3 |
Call hold................................................................................................................................................................................................................................... |
J.3 |
Paging...................................................................................................................................................................................................................................... |
J.3 |
Call pick-up............................................................................................................................................................................................................................... |
J.3 |
Voice mail operation from an analog station .............................................................................................................................................................................. |
J.4 |
Analog station programming ..................................................................................................................................................................................................... |
J.6 |
Index

User’s Guide |
Introduction |
Introduction
Accessing the rich ESI feature set is simple and easy through the straightforward design of each of the various ESI phones. Each feature has been designed for ease of use while providing capabilities needed in an advanced business phone.
You will be able to learn many of the features by simply using your phone; and this ESI Phone User’s Guide will introduce you to the wide variety of features offered by your ESI Communications Server1 and how to use your phone effectively to achieve maximum benefits.
What it covers
This User’s Guide covers the use of the following with your ESI Communications Server:
•ESI 60 Business Phone (digital and IP versions)
•ESI 40 Business Phone (digital and IP versions)
•48-Key Feature Phone (Digital and local/remote IP Feature Phone II)
•24-Key Digital Feature Phone
•60-Key Expansion Console and Second Expansion Console
•ESI Cordless Handset II (digital, local IP, and remote IP versions)
•[Legacy] 12-Key Digital Feature Phone
•Analog station
How it’s arranged
•Section A — Phone illustrations
•Section B — User help
•Section C — User programming
•Section D — Voice mail operation
•Section E — Phone operation
•Sections F through I — Special keys and features
•Section J — Analog stations
Important: If you’re using a 48-Key Feature Phone, please note that this phone has separate PROGRAM and HELP keys, rather than the combo PROG/HELP key found on the other models supported by your ESI Communications Server. Therefore, you should press PROGRAM if programming your phone and the instructions tell you to press PROG/HELP; or, similarly, you should press HELP if the instructions tell you to press PROG/HELP to obtain assistance from the Verbal User Guide described herein (see page B.1).
1 ESI-1000, ESI-600, ESI-200, ESI-100, or ESI-50.
A.1

User’s Guide |
Introduction |
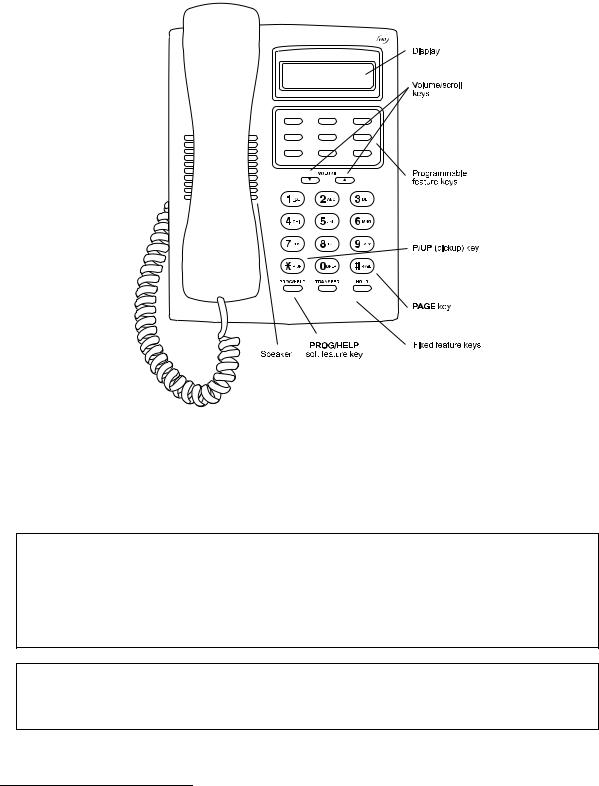
ESI 60 Business Phone
The ESI 60 Business Phone has a variety of programmable and built-in features. It comes in three models: ESI 60D, a digital phone; and two versions (Gigabit Ethernet and 10/100 Ethernet) of ESI 60IP, an IP phone. Additionally, it supports up to two optional Expansion Consoles (see page A.5). All ESI 60 Business Phone models offer the same basic features which are described throughout this User’s Guide. The ESI 60 Business Phone’s built-in voice mail features and voice prompts make it easy to program and use.
Note: Depending on your angle of view, you will notice differences in the contrast levels of the upper and lower displays. This is normal.
Items referenced elsewhere
Item |
Page |
PROG/HELP soft feature key |
C.2 |
P/UP (pickup) key |
E.16 |
Fixed feature keys |
E.2 |
VOICE MAIL key |
D.1 |
Programmable feature keys |
C.2 |
|
|
|
|
|
|
|
|
|
|
|
|
|
|
|
|
|
|
|
|
|
|
|
|
|
|
|
|
|
|
|
|
|
|
|
|
|
|
|
|
|
|
|
|
|
|
|
|
|
|
|
|
|
|
|
|
|
|
|
|
|
|
|
|
|
|
|
|
|
|
|
|
|
|
|
|
|
|
|
|
|
|
|
|
|
|
|
|
|
|
|
|
|
|
|
|
|
|
|
|
|
|
|
|
|
|
|
|
|
|
|
|
|
|
|
|
|
|
|
|
|
|
|
|
|
|
|
|
|
|
|
|
|
|
|
|
|
|
|
|
|
|
|
|
|
|
|
|
|
|
|
|
|
|
|
|
Item |
|
|
|
|
Page |
||||||
Verbal User Guide and tutorial |
|
|
|
|
B.1 |
||||||
Status indicator lamp |
|
|
|
|
D.10 |
||||||
ESI-DEX soft feature key |
|
|
|
|
F.2 |
||||||
RECORD key |
|
|
|
|
D.8 |
||||||
PAGE key |
|
|
|
|
E.16 |
||||||
Hint: On any of these ESI phone varieties (including the Expansion Consoles), you can perform direct programming by holding down a programmable feature key for at least two seconds (similar to how you might program a car radio button). This isn’t applicable to the fixed-feature keys which, as their name implies, are already programmed.
A.2

User’s Guide |
Introduction |
ESI 40 Business Phone
The ESI 40 Business Phone has a variety of programmable and built-in features. It comes in two models: the ESI 40D, a digital phone; and the ESI 40IP, a 10/100 Ethernet IP phone. Additionally, it supports up to two optional Expansion Consoles (see page A.5). All ESI 40 Business Phone models offer the same basic features which are described throughout this User’s Guide. The ESI 40 Business Phone’s built-in voice mail features and voice prompts make it easy to program and use.
Items referenced elsewhere
Item |
Page |
PROG/HELP soft feature key |
C.2 |
P/UP (pickup) key |
E.16 |
Fixed feature keys |
E.2 |
VOICE MAIL key |
D.1 |
Programmable feature keys |
C.2 |
|
|
|
|
|
|
|
|
|
|
|
|
|
|
|
|
|
|
|
|
|
|
|
|
|
|
|
|
|
|
|
|
|
|
|
|
|
|
|
|
|
|
|
|
|
|
|
|
|
|
|
|
|
|
|
|
|
|
|
|
|
|
|
|
|
|
|
|
|
|
|
|
|
|
|
|
|
|
|
|
|
|
|
|
|
|
|
|
|
|
|
|
|
|
|
|
Item |
|
|
Page |
||||
Verbal User Guide and tutorial |
|
|
B.1 |
||||
Status indicator lamp |
|
|
D.10 |
||||
ESI-DEX soft feature key |
|
|
F.2 |
||||
RECORD key |
|
|
D.8 |
||||
PAGE key |
|
|
E.16 |
||||
Hint: On any of these ESI phone varieties (including the Expansion Consoles), you can perform direct programming by holding down a programmable feature key for at least two seconds (similar to how you might program a car radio button). This isn’t applicable to the fixed-feature keys which, as their name implies, are already programmed.
A.3

User’s Guide |
Introduction |
48-Key Feature Phone
The 48-Key Feature Phone has a variety of programmable and built-in features. It has two versions: 48-Key Digital Feature Phone and 48-Key IP Feature Phone II. Additionally, it supports up to two optional Expansion Consoles (see page A.5). All versions of the 48-Key Feature Phone offer the same basic features which are described throughout this User’s Guide. The 48-Key Feature Phone’s built-in voice mail features and voice prompts make it easy to program and use.
Items referenced elsewhere
Item |
Page |
PROGRAM soft feature key |
C.2 |
P/UP (pickup) key |
E.16 |
Fixed feature keys |
E.2 |
VOICE MAIL key |
D.1 |
Programmable feature keys |
C.2 |
|
|
|
|
|
|
|
|
|
|
|
|
|
|
|
|
|
|
|
|
|
|
|
|
|
|
|
|
|
|
|
|
|
|
|
|
|
|
|
|
|
|
|
|
|
|
|
|
|
|
|
|
|
|
|
|
|
|
|
|
|
|
|
|
|
|
|
|
|
|
|
|
|
|
|
|
|
|
|
|
|
|
|
|
|
|
|
|
|
|
|
|
|
|
|
|
|
|
|
|
|
|
|
|
|
|
|
|
|
|
|
|
|
|
|
|
|
|
|
|
|
|
|
|
|
|
|
|
|
|
|
|
|
|
|
|
|
|
|
|
|
|
|
|
|
|
|
|
|
|
|
|
|
|
|
|
|
|
|
|
|
|
Item |
|
|
Page |
|||||
HELP key for Verbal User Guide and tutorial |
|
|
B.1 |
|||||
Status indicator lamp |
|
|
D.10 |
|||||
ESI-DEX soft feature key |
|
|
F.2 |
|||||
RECORD key |
|
|
D.8 |
|||||
PAGE key |
|
|
E.16 |
|||||
Hint: On any of these ESI phone varieties (including the Expansion Consoles), you can perform direct programming by holding down a programmable feature key for at least two seconds (similar to how you might program a car radio button). This isn’t applicable to the fixed-feature keys which, as their name implies, are already programmed.
A.4

User’s Guide |
Introduction |
Optional Expansion Consoles
Note: Your Installer or System Administrator must enable Expansion Console support for your extension before you can use one or both Expansion Consoles.
The ESI 60 Business Phone, ESI 40 Business Phone, and 48-Key Feature Phone each can support up to two optional Expansion Consoles, for a possible total of 120 additional programmable feature keys.
The 60-Key Expansion Console connects directly to the phone, while the Second Expansion Console connects to the first Console.
You program each Expansion Console’s keys just as you do the programmable feature keys on your ESI phone, using either direct or traditional programming (see page C.2).
Note: Only one key can exist per extension, feature or operation. If you program a second key for the same extension, feature or operation, this automatically erases the first key so programmed, thus making it available for a new extension, feature or operation.
Hint: You may find it easier to write in the names on the overlay before you program the keys and attach the overlay to the Console.
60 programmable feature keys
(pg. C.2)
in two banks of 30 each
Hint: On any of these ESI phone varieties (including the Expansion Consoles), you can perform direct programming by holding down a programmable feature key for at least two seconds (similar to how you might program a car radio button). This isn’t applicable to the fixed-feature keys which, as their name implies, are already programmed.
A.5

User’s Guide |
Introduction |
24-Key Feature Phone
The 24-Key Feature Phone has features similar to those of the ESI desktop phones mentioned earlier. However, the 24-Key Feature Phone is available only as a digital model and doesn’t support IP or the Expansion Consoles. As is true for the ESI phones mentioned earlier, the 24-Key Feature Phone has built-in voice mail features and voice prompts that make it easy to program and use.
Items referenced elsewhere
Item |
Page |
PROG/HELP soft feature key |
C.2 |
P/UP (pickup) key |
E.16 |
Fixed feature keys |
E.2 |
VOICE MAIL key |
D.1 |
Programmable feature keys |
C.2 |
|
|
|
|
|
|
|
|
|
|
|
|
|
|
|
|
|
|
|
|
|
|
|
|
|
|
|
|
|
|
|
|
|
|
|
|
|
|
|
|
Item |
|
Page |
||
Verbal User Guide and tutorial |
|
B.1 |
||
Status indicator lamp |
|
D.10 |
||
ESI-DEX soft feature key |
|
F.2 |
||
RECORD key |
|
D.8 |
||
PAGE key |
|
E.16 |
||
Hint: On any of these ESI phone varieties (including the Expansion Consoles), you can perform direct programming by holding down a programmable feature key for at least two seconds (similar to how you might program a car radio button). This isn’t applicable to the fixed-feature keys which, as their name implies, are already programmed.
A.6
User’s Guide |
Introduction |
12-Key Feature Phone (legacy product)
The legacy 12-Key Feature Phone, still in use on many installed ESI systems, includes the basic, most commonly used phone features. This simplified model is available only as a digital model and doesn’t support IP, ESI’s VIP family of software applications1, the Expansion Consoles, speakerphone operation2, or Esi-Dex.
Items referenced elsewhere
Item |
Page |
PROG/HELP soft feature key |
C.2 |
P/UP (pickup) key |
E.16 |
Fixed feature keys |
E.2 |
Programmable feature keys |
D.1 |
Item |
Page |
PROG/HELP key for Verbal User Guide, tutorial |
B.1 |
Status indicator lamp |
D.10 |
PAGE key |
E.16 |
Note: The following features aren’t available on a 12-Key Feature Phone:
•Certain special keys and features (see “Special keys,” page F.1).
•Esi-Dex.
•ACD operation.
Additionally: to use voice mail, conference calling and mute/DND on a 12-Key Feature Phone, you must program these features into programmable feature keys (see “Programmable feature keys,” page C.3, and “Optional features,” page F.14).
Hint: On any of these ESI phone varieties (including the Expansion Consoles), you can perform direct programming by holding down a programmable feature key for at least two seconds (similar to how you might program a car radio button). This isn’t applicable to the fixed-feature keys which, as their name implies, are already programmed.
1For information concerning these software applications, see the ESI Web site at www.esi-estech.com.
2The 12-Key Feature Phone lacks a hands-free microphone, and therefore can’t serve as a true two-way speakerphone. Its speaker plays pages.
A.7

User’s Guide |
Introduction |
ESI Cordless Handset II
ESI’s Digital Cordless Handset II gives you most of the same features found in the 24-Key Feature Phone, but in a compact, portable form. Note that it does not have the following features found on some ESI desktop phones: Esi-Dex support (or ESI-DEX key), Caller ID key, Virtual Mailbox Key support, or Verbal User Guide.
Each ESI Cordless Handset II comes with a charger/AC adapter, base station, belt clip, battery pack, and wall mount.
Depending on your installation, your location may have one or more optional ESI Cordless Handset Repeaters so you can more easily stay in communication with your ESI system while you travel throughout the facility. If you are unsure about whether your location has this capability, contact your System Administrator.
Items referenced elsewhere
Item |
Page |
Programmable feature keys |
C.2 |
VOICE MAIL key |
D.1 |
Fixed feature keys |
E.2 |
A.8
User’s Guide |
Introduction |
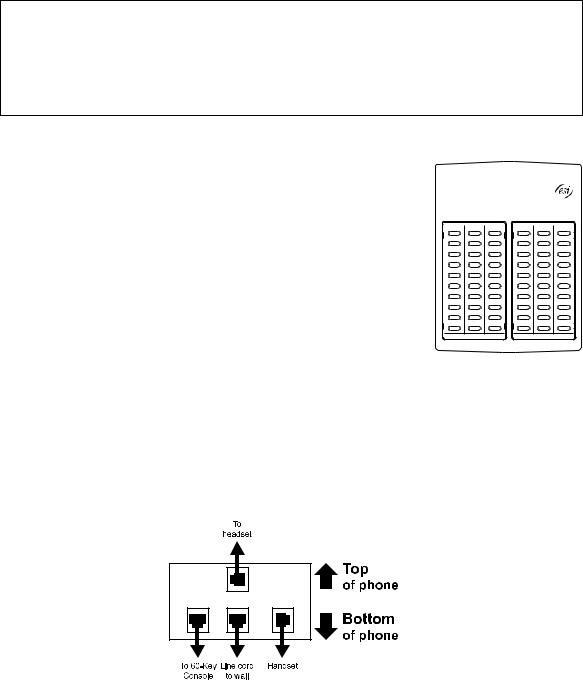
Connecting your ESI phone
Depending on which ESI phone you have, use the appropriate diagram (below) to connect it. Each diagram represents the panel on the phone’s underside.
Notes: The “Top of phone” and “Bottom of phone” references in these diagrams show the correct vertical orientation of the phone — i.e., the part with the display is the top.
When the phone is in the highest upright position, use the wall-mount hook located under the handset to secure the handset when you’re not using the phone.
24-Key Feature Phone
12-Key Feature Phone (legacy product)
• Connects like a basic phone.
•Handset plugs into right-side jack.
• Line cord plugs into left-side jack.
ESI 60 Business Phone (digital version)
ESI 40 Business Phone (digital version)
In addition to how the 24-Key Feature Phone connects to the handset and line cord, note that each phone in this group accepts a 60-Key Expansion Console cable (included with each Console) which uses standard RJ-11 telephone connectors.
ESI 60 Business Phone (either IP version)
ESI 40 Business Phone (IP version)
In addition to the details mentioned previously for the ESI 60 Business Phone and ESI 40 Business Phone, each IP phone model includes an Ethernet cable which connects the phone to a PC (or, if no PC is present, directly to a router, switch, or hub) to achieve connectivity to a local area network (LAN). These phones are Power Over Ethernet (POE) models, and thus require no AC wall cord or AC adapter.
A.9

User’s Guide |
Introduction |
48-Key Digital Feature Phone
In addition to how the 24-Key Feature Phone connects to the handset and line cord, note that this phone accepts a 60-Key Expansion Console cable (included with each Console) which uses standard RJ-11 telephone connectors.
48-Key IP Feature Phone II
In addition to the details mentioned previously for
the 48-Key Digital Feature Phone, the 48-Key IP Feature Phone II includes:
•A power supply that is unswitched (i.e., always-on AC
outlet) and plugs into the phone.
• An Ethernet cable, which connects the phone to a PC (or, if no PC is present, directly to a router, switch or hub) to achieve connectivity to a local area network (LAN).
A.10
User’s Guide |
Introduction |
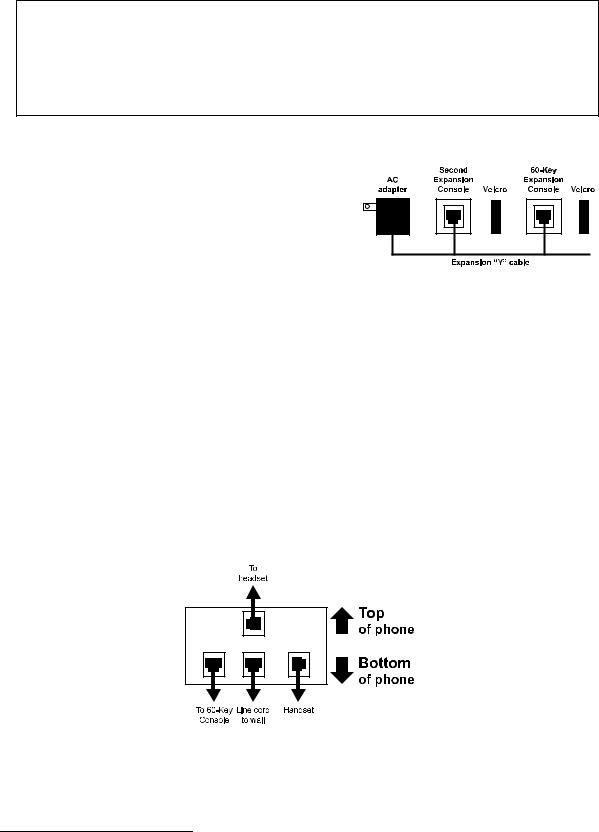
60-Key Expansion Console connection
Notes: Your Installer or System Administrator must enable Expansion Console support for your extension before you can use one or both Expansion Consoles.
The 60-Key Expansion Console can be connected to an ESI 60 Business Phone (any model), ESI 40 Business Phone (any model), or a 48-Key Feature Phone (any model).
If connecting both a 60-Key Expansion Console and a Second Expansion Console to a phone, see “Second Expansion Console connection,” page A.12.
1.Unplug the line cord or Ethernet cable from your ESI phone.
If it’s an ESI IP phone with a power supply plugged into it, unplug the power supply, too.
2.The 60-Key Expansion Console (right) includes a six-conductor
expansion cable. Connect one end of the expansion cable to the appropriate connector on the bottom of the ESI phone (below). Then, connect the other end of the expansion cable to the 60-Key Expansion Console.
3. To keep cabling out of the way, thread the expansion cable into the slots on the bottom of the phone and 60-Key Expansion Console.
4. Program the keys on the 60-Key Expansion Console using the same procedure as with the phone (press PROG/HELP 2).
5. If necessary, remove the clear plastic overlay from the keys on the Expansion Console.
6.For maximum convenience, label the paper overlay to show how
the keys are programmed (your Installer or System Administrator can do this with ESI software).
7.Install the labeled paper overlay on the 60-Key Expansion Console.
8.Install the clear plastic overlay over the paper overlay, to protect it.
9.Use the provided Velcro® tape to attach the left side of the 60-Key Expansion Console to the right side of the ESI phone.
10.Plug the line cord or Ethernet cable back into your phone.
If you unplugged a power supply in step 1, plug it back in, as well.
Connectors on bottom of phone
A.11
User’s Guide |
Introduction |
Second Expansion Console connection
Notes: Your Installer or System Administrator must enable Expansion Console support for your extension before you can use one or both Expansion Consoles.
The Second Expansion Console can be connected to a 60-Key Expansion Console that is connected to an ESI 60 Business Phone (any model), ESI 40 Business Phone (any model), or a 48-Key Feature Phone (any model). If connecting only one Expansion Console to one of these phone models, see “60-Key Expansion Console connection,” page A.11; the Second Expansion Console connects to the 60-Key Expansion Console and cannot connect directly to the ESI phone.
1.Unplug the line cord or Ethernet cable from your ESI phone.
If it’s an ESI IP phone with a power supply plugged into it, unplug the power supply, too.
2. The Second Expansion Console1 includes an expansion “Y” cable (right)2. Lay out the cable across the back of the equipment so that the AC adapter is on left and the end of the cable is on the right.
3. Connect the right end of the expansion “Y” cable to the appropriate connector on the bottom of your ESI phone
(below).
4. Then, connect the expansion “Y” cable’s middle plug to the 60-Key Expansion Console, the left plug to the Second Expansion Console, and the AC adapter to an appropriate 110 VAC outlet to provide power to the Second Expansion Console (above).
5.To keep cabling out of the way, thread the expansion “Y” cable into the slots on the bottom of the phone and the two Expansion Consoles.
6.Program the keys on the two Expansion Consoles using the same procedure as with the phone (press
PROG/HELP 2).
7.If necessary, remove the clear plastic overlay from the keys on the two 60-Key Expansion Consoles.
8.For maximum convenience, label the paper overlay to show how the keys are programmed (your Installer or System Administrator can do this with ESI software).
9.Install the labeled paper overlays on the two 60-Key Expansion Consoles.
10.Install the clear plastic overlays over the paper overlays, to protect them.
11.Use the provided Velcro® tape to attach the left side of the 60-Key Expansion Console to the right side of the phone, and the right side of the 60-Key Expansion Console to the left side of the Second Expansion Console).
12.Plug the line cord or Ethernet cable back into your ESI phone.
If you unplugged a power supply in step 1, plug it back in, as well.
Connectors on bottom of Console-compatible ESI digital phone
1It’s physically identical to a 60-Key Expansion Console; consult your Installer if you have trouble determining which one it is.
2This diagram shows the backs of the Expansion Consoles.
A.12

User’s Guide |
Introduction |
ESI Cordless Handset II connection
Each ESI Cordless Handset II comes with:
•A charger/cradle to charge the Handset.
•An AC adapter for use with only the charger.
•A base station to provide a digital interface between the ESI phone system and ESI Cordless Handset II. This base station is line-powered and thus needs no AC power.
•Wall-mount(s), a belt clip, and a Quick Reference Guide.
Base station installation
Due to each site’s unique characteristics, the range and distance information we’ll provide herein is only approximate.
Characteristics that positively affect performance:
•The base station should be installed so it has a clear line-of-sight with the Cordless Handset.
•The base station antenna should always be pointed in its uppermost vertical position.
Characteristics that negatively affect performance:
•Large amounts of metal shelving (such as in manufacturing or warehouse areas).
•Close proximity to (within one mile of) a radio tower.
•Concrete walls that divide spaces where Cordless Handsets are used (assuming the base stations are in one location).
Don’t install the base station:
•Close to a wall with metal studs.
•On a metal wall.
•Next to a device that emits RFI or EMI1 — e.g., a television, radio, computer, computer printer, fluorescent light fixture, or fax machine.
•In a ceiling that has foil-backed insulation.
•Behind doors that typically are closed, tinted windows, one-way glass, or other areas that limit or cut off transmission to the Cordless Handset.
Base stations must be installed at least 10 feet apart, regardless of whether the base station is for the smallmodel or large-model Cordless Handset. Don’t install more than six base stations in one area (such as a network room). Choose a location at least 30 feet away if more than six base stations are needed in a building.
Note: Your facility may be equipped with one or more optional Cordless Handset II Repeaters. For more information about this, consult your System Administrator or your Certified ESI Reseller.
A Digital Cordless Handset II base station requires only a line cord to the phone system; AC power isn’t needed because the base station receives power from the phone system via the line cord.
An IP Cordless Handset II base station receives PoE. If PoE isn’t already being supplied, you’ll need to install the separately purchased PoE adapter (sold in five-packs as ESI part # 5000-0437).
Notes: If the PoE equipment plugs into AC outlets and a power failure occurs, all IP Cordless Handsets II on the system will be unable to originate or receive phone calls. Therefore, either: (a.) use an appropriately sized uninterruptible power supply (UPS) to power all the IP equipment (base station, PoE adapter, router, etc.) involved in making phone calls or (b.) have a traditional phone available for originating and receiving analog CO calls.
Feedback may result if the Cordless Handset is within three inches of an ESI desktop phone.
1 RFI is radio frequency interference. EMI is electromagnetic interference.
A.13

User’s Guide |
Help mode (Verbal User Guide) |
Help mode (Verbal User Guide)
Your ESI phone system’s Help mode (also called the of spoken information, display readouts and even key you learn how to use the system’s many features.
Verbal User Guide) — a carefully conceived combination illumination when appropriate — is a powerful tool to help
Notes: As explained on page A.1, your ESI phone has a combo PROG/HELP key unless it is a 48-Key Feature Phone (which has separate PROGRAM and HELP keys). Under the circumstances described in this section, the PROG/HELP key will invoke Help mode.
The ESI Cordless Handsets have no access to the Verbal User Guide (and, thus, no key to invoke it).
Tutorial
When your station is idle, press PROG/HELP, and then follow the spoken Help menu to:
• |
Learn how to use the phone |
• |
Hear a description of how any key is used |
• |
Learn how to use voice mail features |
• |
Hear a complete tutorial on phone operation |
Help during station programming
To hear a detailed description of a function you wish to program, press PROG/HELP while programming it.
Help during a call
Press PROG/HELP while on a call and this will place the call on hold, whereupon you can use Help mode to hear a description of the function you wish to perform. When you exit Help mode, you will be reconnected to the call.
While you are either in Help mode or programming your phone, your station will be temporarily placed in DND (see “MUTE/DND,” page E.4). Anyone calling your station while you are in DND will be forwarded to your mailbox (or other destination set by the Installer).
Exiting Help mode
To exit Help mode, simply hang up.
For on-line help, visit www.esi-estech.com/users.
B.1

User’s Guide |
User programming: An introduction |
User programming: An introduction
Voice prompts will play menu and sub-menu options to access the desired feature. You don't have to wait for the entire prompt to be played. Therefore, once you’ve become familiar with the prompts (consult “User programming menu overview,” below), you can quickly set any frequently used feature.
Programming help
During any of the programming steps, press PROG/HELP to hear a more detailed description of the feature and related programming options.
Exiting programming mode
To exit programming mode, simply hang up.
User programming menu
Overview
1 Select personal greeting
1Record
2Delete
3Hear
2 Programmable feature keys
(Station keys, line keys, speed-dial keys, other feature keys)
3 Station options
1Call waiting/background announce
2Personal greeting reminder
4Outside dial tone preference
5Hands-free answer
6Message monitor
7Power-saving mode1
4 Station audibles
1Station ring tone
2Station ring volume
3Message ring
5 Password
1Enter
2Delete
3Play back
4Security level
6 External message notification
1Delivery options
2Phone delivery
3Pager notification
4Urgent message
5ESI Mobile Messaging
1Active e-mail setting
2Main e-mail setting
3Alternate e-mail setting
6Twinning programming 1 Enable/disable
2 Select destination
7 Personal Call Routing
1ESI Presence Management settings2 1 Entry settings
2Exit settings
3Quiet time settings
2ESI Cellular Management settings3 1 PIN setting
2 Voice mail setting
3 Cell phone audibles
4Shared line setting
5Bluetooth settings
9 Message Recycle Bin
Note: Selections 3, 5 and 6, as well as the background announce function under “Station options” (see page E.13), are not available on a legacy 12-Key Feature Phone. In addition, selection 6 6 (twinning programming) is not available on an ESI Cordless Handset.
1For use with only ESI Cordless Handsets.
2Available only if your phone system is using ESI Presence Management. If you’re not sure whether it is, consult your System Administrator. For more information about ESI Presence Management, visit www.esi-estech.com/presence.
3Available only if your phone system is using ESI Cellular Management. If you’re not sure whether it is, consult your System Administrator. For more information about ESI Cellular Management, visit www.esi-estech.com/BT.
C.1

User’s Guide |
User programming: An introduction |
1 Select personal greeting
Select the desired greeting — 1, 2 or 3. The system will play the current greeting, followed by prompts to rerecord, delete or hear again — or select the current greeting by pressing #.
1 Record personal greeting
Begin recording at the tone. Press 1 to stop. The new personal greeting automatically replaces the previous greeting.
2 Delete personal greeting
When prompted, press 2 again to confirm deletion.
Warning: Your mailbox is disabled if no personal greeting exists. Never delete all of your existing personal greetings before you record at least one new one.
3 Hear current personal greeting
2 Programmable feature keys
There are two methods for performing programming of your phone’s programmable feature keys:
•Direct programming — Select the key you want to program, and hold it down for at least two seconds. This not only initiates programming but also lets you immediately program that specific key.
•Traditional programming — Press PROG/HELP. The Verbal Help Guide will speak to you, walking you through the full menu, during which you can choose the appropriate option.
Direct programming example:
You wish to set one of the keys to dial a co-worker, whose extension is 105. Hold down the key for at least two seconds. This automatically puts you in feature key programming. Follow the prompts to enter 1 0 5. (This has allowed you to skip two steps — pressing PROG/HELP and selecting a menu option — that you’d have had to perform if using traditional programming.)
(Continued)
C.2

User’s Guide |
User programming: An introduction |
How the programmable feature keys can be set
•Line keys — Programming a line number into a programmable feature key makes it a line key, which provides the appropriate lamp information and manual outside-line access.
•Station keys — If you program a programmable feature key with any of the following, it becomes a station key, providing the appropriate lamp information and easy access or transfer:
— User extensions |
— Group mailboxes |
— Department pilot numbers |
— Cascade paging mailboxes |
— Guest/info mailboxes |
— System speed dial numbers |
—Q & A mailboxes
•Speed-dial keys — In addition to programming a programmable feature key with a system speed-dial number, you can create personal speed-dial keys for automatic dialing of frequently called outside numbers. The speed-dial number can be up to 24 characters long. If you program 9 (or 8 or 71–76) plus a phone number, the programmable feature key becomes a speed-dial key. When you program a speed-dial key, there's no need to insert a pause after the 9 (or 8 or 71–76). Use the scroll key to enter special characters for dialing:
–P = Three-second pause
–F = Hook-flash
–# = # (pound) key
–= (star) key
Notes: You can also program Location Keys for use with Esi-Link. See page H.1 for more information.
Speed-dial keys cannot be programmed for emergency services, such as 9 1 1.
•Other feature keys — If you enter a feature code, the programmable feature key will serve as an enable/disable key for that feature. The Installer may have programmed certain stations for accessing additional features (see “Optional features,” page F.14); consult your System Administrator to determine your access.
Keys’ LED activity during programming
|
Key type and LED indication |
|||
Mode |
Station key or |
|
Feature key |
|
Virtual Mailbox Key |
Line key |
or speed-dial key |
||
Currently being programmed and |
Flashing red |
Flashing green |
Flashing amber |
|
previously assigned |
||||
|
|
|
||
|
|
|
|
|
Currently being programmed and |
Flashing red |
Flashing red |
Flashing red |
|
previously unassigned |
||||
|
|
|
||
Programming mode — Was assigned or |
Blinking red |
Blinking green |
Blinking amber |
|
viewed in current session |
||||
|
|
|
||
Assigned in a previous programming session |
Solid red |
Solid green |
Solid amber |
|
and not yet viewed in current session |
||||
|
|
|
||
|
|
|
|
|
Never assigned and not yet viewed in current |
Off |
Off |
Off |
|
session |
||||
|
|
|
||
|
|
|
|
|
|
||||
Note: Each ESI Cordless Handset has only one LED color — red — with similar blinking rates. |
||||
|
|
|
|
|
C.3

User’s Guide |
User programming: An introduction |
3 Station options
The station options sub-menu (PROG/HELP 3) lets you activate or deactivate several features your station can provide. At each option sub-menu, 1 enables the option and 0 disables it. (Each option listed below is explained elsewhere in this manual, as noted.)
1 Call waiting/background announce
See page E.13 for call waiting and page E.13 for background announce.
Note: Background announce is not available on a legacy 12-Key Feature Phone.
2 Personal greeting reminder
See page F.10.
3[Unused]
4Outside dial tone preference
See page F.13.
5 Hands-free answer
Note: With an ESI Cordless Handset, use of this feature requires a headset.
See page E.3.
Note: Not available on a legacy 12-Key Feature Phone.
6 Message monitor
See page F.10.
Note: Not available on a legacy 12-Key Feature Phone.
7 Power-saving mode
Note: Applicable to only an ESI Cordless Handset.
Allows you to enable or disable an ESI Cordless Handset’s power-saving mode. Enabling this mode helps achieve full battery life. However, if full-time status monitoring is required, you can disable this mode. In power-saving mode, the phone system blocks all status updates1 to the Cordless Handset when the Handset has been idle for 30 seconds. Pressing the Cordless Handset’s keys or receiving an incoming call on it will discontinue power-saving mode.
Note: When the handset has received no calls or status updates1 for five minutes, the Cordless Handset enters deep-sleep mode. During it, the display is blank and the LEDs don’t light up. If the system sends any updates to the Cordless Handset, it will discontinue deep-sleep mode.
1For example: If you have a programmable feature key set as a station key for someone’s extension, the system updates your Cordless Handset based on that extension’s current status (busy, idle, do-not-disturb, or — with optional ESI Presence Management — off-premises).
C.4
User’s Guide |
User programming: An introduction |
4 Station audibles
The station audibles programming provides control of the following audible items.
Note: Only the third setting, message ring, is applicable to the ESI Cordless Handset.
1 Station ring tone
You can select from six possible tones to help distinguish it from other nearby ringing phones. Press or to select a tone, then press # to accept it.
2 Station ring volume
Press or to set the desired ringer volume (range: off to high), then press # to accept it.
Note: On an ESI desktop phone with a status indicator lamp, if the ringer volume is turned off, the status indicator lamp will not “flutter” when an incoming or recalled call is presented to the phone (see “Status indicator lamp,” page D.10).
3 Message ring
When enabled, this feature will periodically generate a short ring tone at your station as an additional alert that you have new messages.
5 Password
1 Enter new password
Your password may consist of 2–8 digits followed by # (0 cannot be the first digit). Entering only 0 as the password will turn off the password requirement.
2 Delete current password
Resets the password to the default password.
3 Play back current password
Displays and plays back the current password.
4 Password security level
Selection |
Result |
0 |
No password required for access from any phone |
|
|
1 |
Password required only for remote access, either off-premises or from other stations within the system |
|
|
2 |
Password always required |
|
|
C.5

User’s Guide |
User programming: An introduction |
6 External message notification
Note: To use this feature, a legacy 12-Key Feature Phone must have a voice mail key assigned.
1Delivery options
1 Delivery to phone number only
2 Notify pager only
3 Call first and then page
4 Call and page at the same time
0 No off-premises delivery
2Phone delivery
1 Enter phone number
Enter the phone number (24 digits, maximum) followed by #. Do not include an outside line access code (i.e., don’t add 9, 8 or 71–76) before the number.
Use the scroll key to enter special characters; use the scroll key to backspace. You also can use the scroll keys to view the number after it’s saved. To change the number, you must delete it and then re-enter it as desired.
2 Delete phone number
Deletes the currently programmed phone number.
3 Display current phone number
Displays the currently programmed phone number.
3 Pager notification
1 Enter pager number
Enter the pager number (24 digits, maximum) followed by #. Do not include an outside line access code (i.e., don’t add 9, 8 or 71–76) before the number.
Use the scroll key to enter special characters; use the scroll key to backspace. You also can use the scroll keys to view the number after it’s saved. To change the number, you must delete it and then re-enter it as desired.
2 Delete pager number
Deletes the currently programmed pager number.
3 Display current pager number
Displays the currently programmed pager number.
(Continued)
C.6

User’s Guide |
User programming: An introduction |
4 Urgent message activation
1 Urgent messages only
Only urgent messages will be delivered.
Note: Remember to say in your personal greeting that callers should press 2 to mark a message as urgent. (For more on personal greetings, see page D.1.)
2 All new messages
Any new message will be delivered.
5 ESI Mobile Messaging options
Note: This feature is available only if your ESI system is using ESI Mobile Messaging. If you’re not sure whether it is, consult your System Administrator
1Active e-mail settings
2Main e-mail settings
3Alternate e-mail settings
6 Twinning programming
Note: This feature is not available on an ESI Cordless Handset.
1Enable/disable
2Twinning destination
C.7

User’s Guide |
User programming: An introduction |
7 Personal Call Routing
1 ESI Presence Management settings
For additional details, consult the ESI Presence Management User’s Guide (ESI part # 0450-0793).
Note: This function is available only if your phone system is using ESI Presence Management. If you’re not sure whether it is, consult your System Administrator. For more information about ESI Presence Management, visit www.esi-estech.com/presence.
1 Entry settings
1Select personal greeting
2Set message delivery
2 Exit settings
1Call handling (voice mail/call forwarding)
2Select personal greeting
3Set message delivery
3 Quiet time settings
1Select day
2Select quiet “on” time
3Select quiet “off” time
2 ESI Cellular Management settings
For additional details, consult the ESI Cellular Management User’s Guide (ESI part # 0450-1189).
Note: This function is available only if your phone system is using ESI Cellular Management. If you’re not sure whether it is, consult your System Administrator. For more information about ESI Cellular Management, visit www.esi-estech.com/BT.
1PIN setting
2Voice mail setting
3Cell phone audibles
1Ring tone setting
2DTMF playback setting
4Shared line setting
5Bluetooth settings
1Cell phone pairing
2Delete setting
3Cell phone line setting
4Auto-Connect setting
9 Message Recycle Bin (un-delete)
The most recently deleted message will be played first. Press 9 to move to the next message. Press 8 to restore the message to your mailbox as a new message.
C.8

User’s Guide |
Voice mail operation |
Voice mail operation
Your ESI system provides accurate and timely messages. Others will become more comfortable leaving you voice messages if you promptly retrieve and respond to your messages.
VOICE MAIL key
For direct access to all voice mail features, such as picking up messages or transferring directly to mailboxes:
•On an ESI 60 Business Phone — Use the blue VOICE MAIL key. It will blink whenever you have one or more new messages, and the upper display will show you how many new and old messages are stored for you on the ESI system. Once you press VOICE MAIL, the lower display will update to show your eight most recent messages, with each new message appearing in a bold font. Use the scroll keys below the lower display to see the next eight messages (press the left scroll key to scroll down and the right scroll key to scroll up).
•On an ESI 40 Business Phone, 48-Key Feature Phone, or 24-Key Feature Phone — Use the blue VOICE MAIL key. It will blink whenever you have one or more new messages, and the display will show you how many new and old messages are stored for you on the ESI system.
•On a legacy 12-Key Feature Phone — Assign key code 579 to a programmable feature key (see “Programmable feature keys,” page C.2, and “Optional features,” page F.14). Until this has been done for your phone, your mailbox is disabled. (When you try to access a disabled mailbox, the system will notify you that it’s disabled.) You still can retrieve previously left messages and access user programming, but the mailbox won’t be able to receive new voice messages. Therefore, to enable the mailbox, assign key code 579 to a programmable feature key.
•On an ESI Cordless Handset, use the blue-outlined VOICE MAIL key. The display, directly above the VOICE MAIL key, will show an “envelope” icon when you have one or more new messages.
Personal greetings
To program your personal greetings, press PROG/HELP 1. Initially, your mailbox has a generic greeting: “You have reached the mailbox for extension xxx. Dial 0 to reach the operator or begin recording at the tone.” You can record up to three different personal greetings in your own voice indicating your availability to return calls.
Examples
Sample greeting 1:
Hi, this is [name]. I’m away from my desk or on the phone right now; so please either dial zero to reach our operator, or leave me your name, number and message at the tone and I’ll get back to you as soon as I can.
Sample greeting 2:
Hi, this is [name]. I’m out of the office. You may dial 1 2 2 now for my assistant or, if you prefer, you may leave me a voice message at the tone — I’ll check in regularly — or, if it’s important, either dial 4 now to reach me on my cell phone or dial 2 now to leave me an urgent message that will page me automatically.1
Sample greeting 3:
Hi, this is [name]. I’m away from my desk at the moment. To have me paged, dial 3 now.To reach the operator, dial zero. Otherwise, leave your name and phone number at the beep so I can return your call.1
(Continued)
1These sample greetings refer to certain features which may not be activated for your extension; consult your System Administrator for additional information, if necessary.
D.1

User’s Guide |
Voice mail operation |
Depending on auto attendant usage and your personal preferences, you may wish to include one or more of these options in your personal greetings (each option must be pressed during greeting playback, before the beep, to be activated):
Option |
Instruction |
0 |
To reach the operator |
1 |
To skip directly to the record tone (or “beep”) |
2 |
To mark this message as urgent (see “Urgent messages,” page D.10) |
3 |
To page (internally) the person for whom the caller is leaving a voice mail message |
4 |
To perform off-premises “reach-me” (see “Off-premises ‘reach-me,’” page D.3)1 |
8 |
To the main greeting (if your system is using the auto attendant) |
XXX |
An extension number of another user |
Note: Option 3 is available only when personal greeting 3 has been recorded and is active; and option 4 is available only when personal greeting 2 has been recorded and is active.
You can change any personal greeting as often as necessary, by just recording over a previously recorded greeting.
Warning: DON’T delete all of your personal greetings; make sure at least one always remains. Deleting all the greetings not only doesn’t revert to the initial default greeting, it also will turn off your mailbox.
Personal greeting keys
You can program a programmable feature key as a personal greeting key for any one of the three personal greetings (see page F.16). Once created, this shortcut can then be used to activate the associated personal greeting (the key’s LED will glow green and the greeting played as confirmation).
Note: To re-record this greeting, press RECORD while the confirmation is playing and follow the prompts (on a legacy 12-Key Feature Phone, which has no RECORD key, press PROG/HELP 1 while the phone is idle).
Leaving messages . . .
If you call another station that is DND, busy or does not answer — or if you call a special mailbox (such as a guest or group mailbox) — you will be transferred to the mailbox. You can skip the mailbox’s personal greeting by pressing 1; this takes you directly to the record tone.
. . . directly in another user’s mailbox
The procedure for going directly to another user’s mailbox2 without ringing his/her extension depends upon whether you have that user’s extension set as one of your station keys:
•If you do, press VOICE MAIL and then the person’s station key.
•If you don’t, press VOICE MAIL and TRANSFER and then dial the extension number.
Either will connect you directly to that user’s personal greeting.
. . . in several users’ mailboxes using a Quick Group
You can leave a direct message in several users' mailboxes at the same time by pressing VOICE MAIL and entering the desired extensions — thus creating a Quick Group. You can also move messages or recordings to a Quick Group in the same manner. A Quick Group can contain up to 65 extensions, including those within a department. To enter each extension into a Quick Group, use your ESI phone’s dialpad or press a programmable feature key to which the extension has been assigned.
Note: If you have a department programmed as a station key, pressing VOICE MAIL and then the department’s station key will leave a message for all members of the department.
1If your system is using ESI Presence Management, consult the ESI Presence Management User’s Guide (ESI part # 0450-0793) to learn about additional, special functionality that may be available to you. If you’re not sure whether your system is using
ESI Presence Management, consult your System Administrator. For more information about ESI Presence Management, visit www.esi-estech.com/presence.
2You also can leave messages in mailboxes (such as guest mailboxes) that don’t have extensions associated with them.
D.2

User’s Guide |
Voice mail operation |
AutoPage
This feature lets you have outside callers internally page you after they’ve been forwarded to your voice mailbox and are listening to your personal greeting (see “Personal greetings,” page D.1). You must have personal greeting 3 selected and it must tell callers to press 3 for this feature. If the caller dials 3 during the personal greeting, he/she is placed on hold; the system then pages you by name, followed by the phrase “You have a call on line” and the line on which the call is on hold (e.g., “John Doe, you have a call on line 21”). If you don’t answer the page within a programmed interval, the caller is forwarded back to your extension/voice mailbox.
Note: This feature is active if your administrator authorizes your station for it, you have set your mailbox to play personal greeting 3, and a directory name is recorded for your station.
Sample personal greeting 3 for AutoPage:
“Hello. This is Rick. I’m currently unable to receive your call. To have me paged throughout the building, please press 3 now. Otherwise, please leave me a message after the tone and I will return your call as soon as possible.”
Moving and deleting a message
When you move a message, the system accesses another submenu to determine whether you want to move and delete a message, or move and save it. After you press 6 to move a message, the prompt will ask whether you wish to:
•Move the message but also save a copy of it in your voice mailbox or
•Move the message and delete it from your mailbox.1
Off-premises “reach-me”
After a caller has been forwarded to your voice mailbox and is listening to your personal greeting, this feature gives the caller the choice of being forwarded to a number outside the system — i.e., a regular phone number rather than an extension.
Note: This feature is activated only if your System Administrator enables it on your station.
To use this feature, follow these steps:
1.From your ESI phone, press PROG/HELP 6 2 1 and enter the telephone number to which you want calls forwarded when you’re off-premises.2
2.Record and activate personal greeting 2. Be sure to tell the caller to press 4 during the greeting to be connected to your alternate phone. (See the sample greeting, below.)
When you receive a call forwarded in this fashion, you’ll be prompted to “press any key” to accept the call.
If you don’t answer the call, the caller is returned to your voice mailbox on the ESI phone system. Off-premises “reach-me” is available on guest mailboxes, as well.
Sample personal greeting 2 for off-premises “reach-me”:
“Hello. This is Rick. I’m currently out of the office. To attempt to reach me on my mobile phone, please press 4 now. Otherwise, please leave me a message after the tone and I will return your call as soon as possible.”
1This feature is activated only if the Installer enables it on your system.
2This is also the same number used for message notification phone delivery (see “Off-premises message delivery,” page D.9).
D.3

User’s Guide |
Voice mail operation |
Message retrieval
Message(s) waiting display
If you have at least one new message, your ESI desktop phone’s VOICE MAIL key will blink (except on a legacy 12-Key Feature Phone) and your display will show the number of new and old messages in your mailbox.1
On an ESI Cordless Handset, an “envelope” icon on the display also appears when you have at least one new message.
Note: Message status information (shown in the example above as NEW 3 OLD 1) appears on an ESI desktop phone (except on a legacy 12-Key Feature Phone) only when new messages exist.
Retrieving voice mail messages from your ESI phone
If using an ESI phone other than the ESI 60 Business Phone
1.Press VOICE MAIL.
2.Enter your password if required (you may change the requirement for a password in user programming menu 5; see "Password,” page C.5).
3.The ESI system will start playback of messages with the oldest new message and continue until all messages are played. The display will show the origination of the message, the countdown duration of the message, whether new or old, and the time/date of when the message was left.
|
|
|
|
|
|
|
|
ESI phone with two-line display |
ESI phone with three-line display (also shows |
||
|
|
running playback time in reverse) |
|
4.At the end of each message, the ESI system prompts you for instructions (see the chart, “Keys’ functions during voice mail message retrieval,” page D.6). Once you’ve learned these prompts, you can proceed more rapidly by pressing one of the appropriate keys any time during a message or during a prompt.
5.To exit playback of messages, simply hang up your phone.
Note: If you hang up during playback of a message, the system saves that message as new and all others not deleted.
1 A 12-Key Feature Phone will display only the date and time.
D.4

User’s Guide |
Voice mail operation |
If using an ESI 60 Business Phone
Note: If you’re using an ESI 60D (digital) phone, there will be a twoto three-second delay in display performance when you enter or exit the visual voice mail feature described below. (There is no such delay in display performance in using visual voice mail on an ESI 60IP phone.)
1.Press VOICE MAIL.
The first time you press VOICE MAIL (or whenever you press the scroll keys to move to a different page of voice mail messages or recordings), the upper display will show:
2.Enter your password if required (you may change the requirement for a password in user programming menu 5; see "Password,” page C.5).
3.You’ll see that the phone’s lower display has updated to
display your eight most recent voice mail messages, with each new message highlighted.
Use the scroll keys below the lower display to see the next eight messages (press the left scroll key to scroll down and the right scroll key to scroll up).
4. You’ll also notice that each message is associated with two programmable feature keys — one on the left side and one on the right side.
For each message, pressing either programmable feature key updates the upper display’s first two lines with the message’s full Caller ID information.
What else happens will depend on which of the two programmable feature keys you press:
•Pressing the right-side programmable feature key causes the message’s time stamp to appear on the upper display’s third line.
• Pressing the left-side programmable feature key causes the message to begin playing.
5. To select the next voice mail message, press the appropriate programmable feature key.
D.5

User’s Guide |
Voice mail operation |
New message skip
When listening to new messages, press 9 twice (within two seconds) to save a message as new. This message will be played again as a new message the next time you access your voice mail.
Note: When you press 9 once to save the message as old, there is a short delay before the system tells you it has saved the message. To bypass this delay after pressing 9, just press # to hear the next message.
Keys’ functions during voice mail message retrieval from an ESI phone
Key |
Function name |
Description |
1 |
Pause |
Pauses for one minute or until you press 1 again. |
|
|
|
2 |
Time and date/ |
Toggles the bottom line of the display between the message’s time/date and the |
|
number toggle1 |
caller’s number. |
|
|
(Not available from an analog phone or off-premises location.) |
|
|
|
3 |
Reply |
Replies to the originator of a message (possible only if message came from another |
|
|
user in the system). Record your reply at the tone and then press 1 to stop, after which |
|
|
the system returns you to your mailbox and the message to which you were replying. |
|
|
|
4 |
Back up |
• If pressed during message playback, rewinds 4 seconds for each key-press. |
|
(rewind) |
• If pressed after the playback has finished, returns to beginning of message. |
|
|
|
5 |
Fast forward |
Advances playback 4 seconds for each key-press. |
|
|
(Not available from an analog phone or off-premises location.) |
6 |
Move |
Moves a copy of the message to other users’ mailboxes. |
|
|
You may move the copy with or without an introduction. |
|
|
After the move, the system returns you to your mailbox and the original message. |
|
|
|
7 |
Delete |
Deletes the message from the mailbox (see “Message Recycle Bin,” page D.10). |
|
|
|
8 |
Fast-forward |
Fast-forward to end of message. |
|
|
|
9 |
Save |
Saves the message (it will play as an old message the next time you |
|
|
retrieve messages). [See also the Note above this table.] |
|
|
|
9 9 |
Save as new |
Skips over a new message and leaves it as a new message (i.e., it will be played as a |
|
|
new message the next time you pick up messages). You must press the 9 key twice |
|
|
within two seconds. |
REDIAL |
Auto-callback |
Exits your mailbox without erasing the message, and then automatically dials |
|
|
the number.2 (Not available from an analog phone or off-premises location.) |
|
|
|
ESI-DEX |
Store |
If Caller ID is present, saves to your Personal Dex for later use. |
|
|
(Not available from an ESI Cordless Handset, legacy 12-Key Feature Phone, analog |
|
|
phone, or off-premises location.) |
|
|
|
# |
Leave |
Lets you record a message in one or more mailboxes. At the prompt, enter the desired |
|
a message |
mailbox number. Press # and then enter up to 65 mailbox numbers, using the phone’s |
|
|
dialpad and programmable feature keys. Mailboxes in a department count toward the |
|
|
maximum of 65. |
|
Check |
Checks messages in another mailbox (may require a password, depending on the |
|
other box |
mailbox’s setting; see “Password,” page C.5). |
|
|
|
Retrieving voice mail messages using another user’s ESI phone
1.Press VOICE MAIL and then .
2.Dial your extension number.
3.Follow the procedures described in “Retrieving voice mail messages from your ESI phone” (page D.4).
1Applicable to 24-Key Feature Phone only.
2A local call may not be dialed correctly depending on the limitations of the local dialing plan. You may need to dial some of these calls manually.
D.6
 Loading...