

Page 1
ESRTP5
Programmable Room
Thermostat
User Instructions
Page 2

Thank you for choosing ESi Controls.
All our products are tested in the UK so we are
confident this product will reach you in perfect
condition and give you many years of service.
However, for additional peace of mind, we
recommend you register your product online at
www.esicontrols.co.uk/warranty for your
extended warranty.
2
Page 3

User Instructions
1. Quick Operating Guides
1.1 Display and Button Functions 6
1.2 Quick Command Guide 7
2. Setting the Time and Date (tInE) 8
3. Operation Modes
3.1 Auto 9
3.1.1 Manual 10
3.1.2 Off / Frost Protection 10
3.2 All Day Mode (AL) 10
3.3 Holiday Mode (HOLI) 11
4. Main Menu
4.1 Copy Function (CoPy) 12
4.2 Backlight On/Off (LiGH) 12
4.3 Resetting the Unit (rESE) 13
5. Programme Settings (ProG)
5.1 Pre-Set Temperatures 14
5.1.1 5/2 Day 14
5.1.2 7 Day 15
5.1.3 24 Hours 15
5.2 Setting the Operation Mode (ProG) 15
5.3 Setting the Programme (ProG) 15
5.3.1 5/2 Day 16
5.3.2 7 Day 16
5.3.3 24 Hour 17
Contents
3
Page 4

4
Page 5

5
User Instructions
Page 6
6
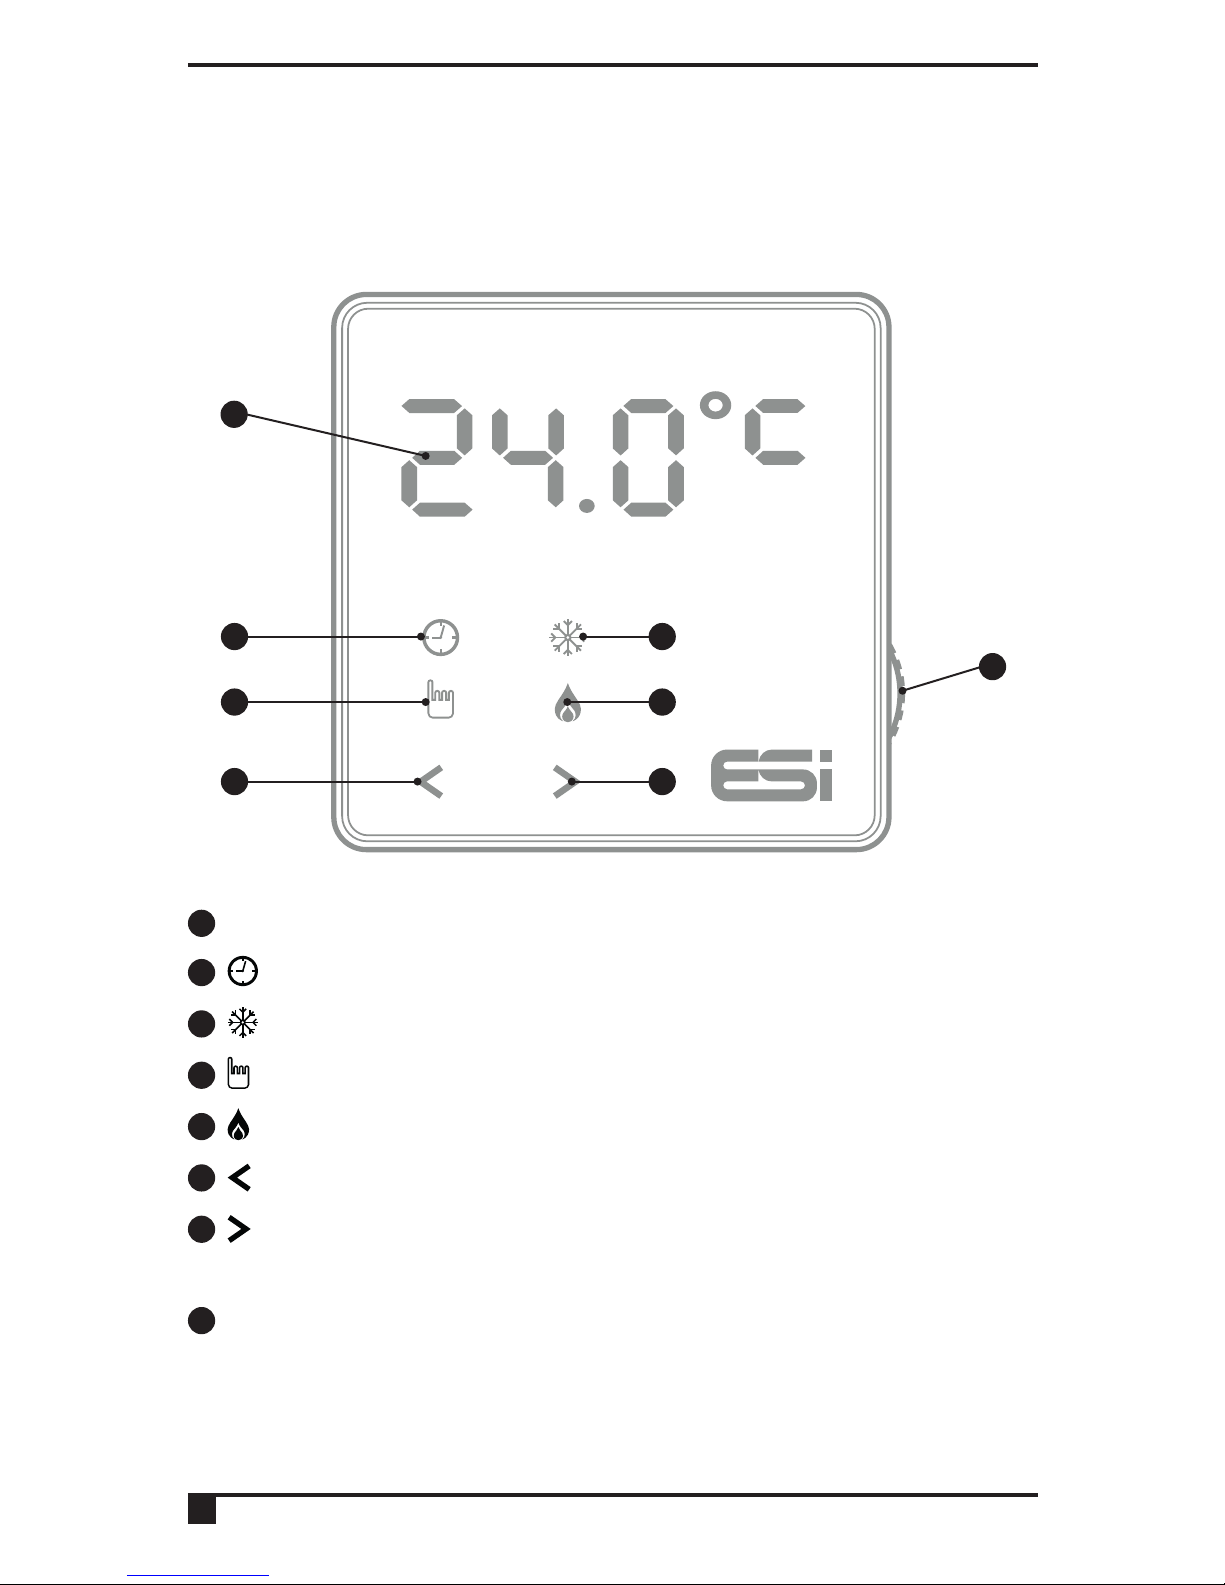
1. Quick operating guide
1
2 3
4
6 7
8
5
1
Temperature, time and data display
2
Auto operation mode
3
Off / Frost protection mode
4
Manual operation mode
5
Flame symbol when system calling for heat
6
Cancels and returns to the previous menu
7
Either confirms and saves the setting, or moves you to
next option within a function
8
Dial to adjust temperature and parameters
1.1 Display and Button Functions
Page 7
7
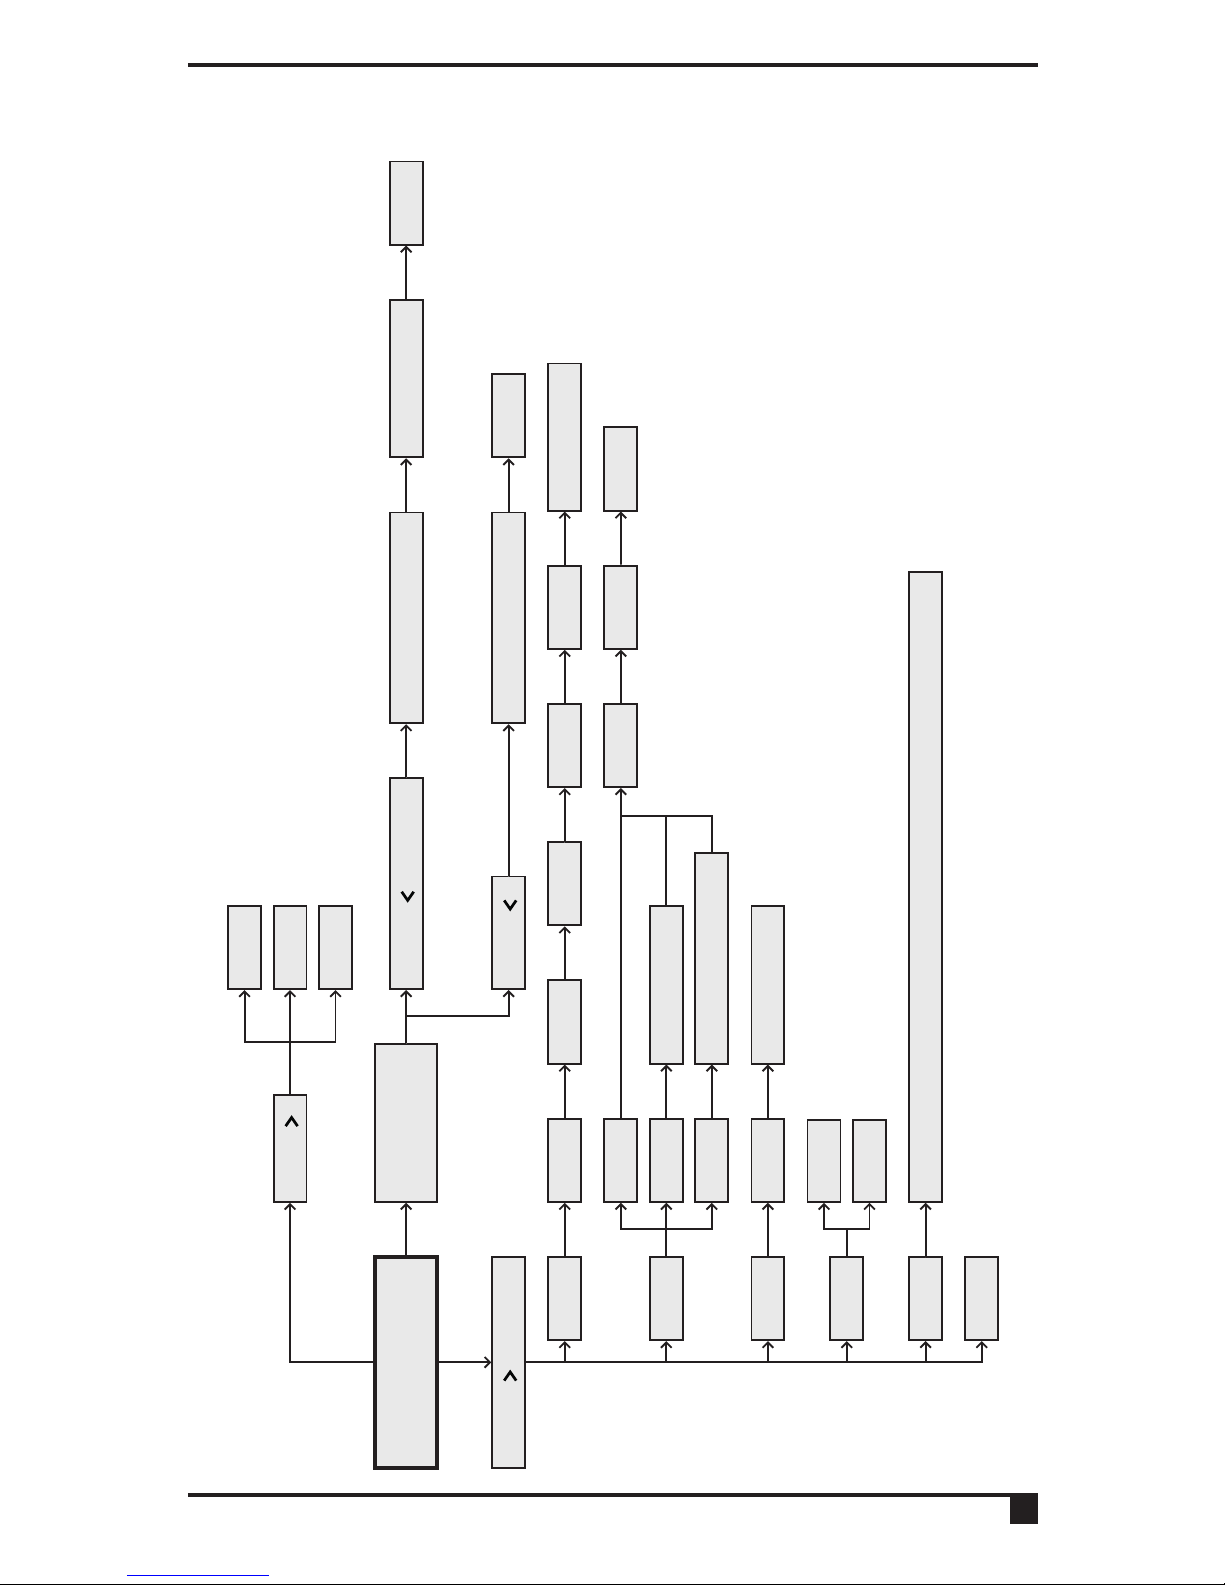
1.2 Quick Command Guide
Press
Off
Man
Auto
When in
auto mode
HOME Press for 3 sec Holiday mode No. of days Temp
Press for 3 sec
Time
Prog
Copy
Light
Tech
Reset
Off
On
Please refer to Command Guide in Installer Settings
24hr
7 day Mon-Sun
Mon-Fri/Sat/Sun5/2 day
Source Target
Hour Min Day Mon Year
P1-P6 Days
24/12hr
Press All day mode Temp
Temp
Page 8

2. Setting the time and date (tInE)
N.B. Please note, when first powered or in the event of a
power loss the time will be flashing and the time and date
will need to be set. Follow steps 2-6 to set the time on first
setup. Changes between summer and winter time are handled
automatically by the unit.
1. Press and hold
until the display shows tInE then press .
2. Turn the dial to adjust the hour then press
.
3. Turn the dial to adjust the minute then press
.
4. Turn the dial to adjust to the current day then press
.
5. Turn the dial to adjust to the current month then press
.
6. Turn the dial to adjust to the current year then press
.
7. Turn the dial to select between 12 or 24 hour format.
Press
to confirm and return to step 2. Press to return to
previous menu or leave for 1 minute to automatically return
to homescreen.
8
Page 9

9
3. Operation modes
Operation Modes: AUTO, MAN, OFF.
Press
in homescreen to choose operation mode.
3.1 AUTO
• In Auto mode, choose All Day mode.
See section 3.2 for details.
• In Auto mode, choose Holiday mode.
See section 3.3 for details.
• Auto mode, if All Day mode or Holiday mode is not
selected, Auto mode will be used. In Auto mode,
the thermostat will work as per the user’s previous
programming setting. See section 5 for details.
Temporary manual override of set temperature. In Auto
mode, the user can turn the dial to adjust the set temperature
as below:
1. In homescreen, turn dial to temporarily adjust
temperature - Display will flash.
2. After approximately 3 seconds the display will alternate
between current room temperature and the time left until
the next programmed event. The temporary override will
end when the next programmed event starts.
3. Press
at anytime to cancel the temporary override.
Page 10
Temporary set temperature range: 5°C-35°C.
N.B: The temporary set temperature will not replace the
original program event’s set temperature. When the
program event ends, it will return to the default heating
program automatically.
3.1.1 MAN
Permanent manual override of set temperature.
1. In Homescreen, press
to select MAN.
2. Turn the dial to adjust temperature.
3.1.2 OFF
Turn the heating off permanently.
1. In Homescreen, press
to select OFF .
When room temperature drops to 5°C, heating is turned on;
when room temperature reaches 7°C, heating is turned off.
3.2 All Day Mode (AL)
1. In homescreen, press
to select Auto mode .
2. Press
once to enter All Day mode temperature setting
and the screen will display AL.
3. Turn the dial to adjust the set temperature.
4. Press
to confirm the set temperature and automatically
return to the Homescreen. The display will alternate
between AL and current room temperature.
To adjust the temperature in All Day mode, turn the dial to
desired temperature then press
to confirm and automatically
return to the homescreen.
Press
in the homescreen to exit All Day mode and return to
Auto mode.
10
Page 11

11
Heating under All Day mode will be on until 23:59 that day. At
23:59, the unit will exit All Day mode and return to Auto mode.
Set temperature range: 5°C-35°C.
3.3 Holiday Mode (HOLI)
1. In homescreen, press
to select Auto mode .
2. Press and hold
for 3 seconds until HOLI is displayed
then release.
3. Turn the dial to adjust holiday days, press
to confirm.
4. Turn the dial to adjust set temperature, press
to
confirm and return to the homescreen. The display will
alternate between: HOLI-Days(Holiday)-HOLI-Current
room temperature.
To adjust the settings in Holiday mode, turn the dial to
adjust holiday days, press
to confirm. Then turn the dial to
adjust set temperature, press
to confirm and return to the
homescreen.
Press
in the homescreen to exit Holiday mode and return to
Auto mode.
Holiday mode days setting range: 1-99 days. Default: 1 day.
Set temperature range: 5°C-35°C. Default: 7°C.
N.B: The Days (Holiday) will numerically countdown. Once the
countdown has finished normal operation will resume. It
may be advisable to to set the Holiday mode 1 day less so
the house is back up to temperature for your return.
Page 12
12
4. Main menu
In the homescreen, press and hold until the displays shows
tInE then release to enter main menu. Use the dial to choose
between tInE, ProG, CoPy, LiGH, tEcH and rESE. Press
to
enter desired setting. Press
to return to Homescreen.
4.1 Copy Function (CoPy)
The unit is provided with a copy function which allows an
adjusted programme to be copied to another day.
N.B. This function only works in 7 Day setting.
To operate the copy function:
1. Press and hold
until the display shows tInE. Turn the
dial until display shows CoPy then press
.
2. Use the dial to select the day to be copied then press
to confirm.
3. Use the dial to select the day to be copied to then
press
. The display will show SAuE to confirm and then
return to step 2. Press
to return to previous menu or
leave for 1 minute to automatically return to homescreen.
4.2 Backlight On/Off (LiGH)
The backlight can be turned permanently on/off.
1. Press and hold
until the display shows tInE. Turn the
dial until display shows LiGH then press
.
2. Use the dial to choose between turning the light
permanently ON or OFF. When OFF, the LED will display
only with user interaction and turn off again when there
is no operation for 2 minutes. Press
to confirm and
Page 13

13
return to previous menu LiGH setting range: Off/On.
Default: Off.
N.B. It is recommended to leave this setting in the default
OFF mode as heat generated by the thermostat’s power
supply and LED will affect temperature measurement.
A deviation of up to 3.5°C may occur, which will be
calibrated automatically by the unit within 30 minutes
of first connecting the thermostat. It is recommended
to leave the thermostat to climatise for 40 minutes
before user operation. If set permanently ON, the light
will automatically switch to a lower light setting and be
dimmer.
4.3 Resetting the Unit (rESE)
Resetting the unit will return the thermostat to default
setting. The time, date and landlord service settings will all be
maintained.
1. Press and hold
until the display shows tInE. Turn the
dial until display shows rESE then press
.
2. The display will show - - - -. Press
again to confirm and
the display will show LOAd. If the reset is successful, the
unit will return to the homescreen after 2 seconds. If the
reset is unsucessful, the unit will display FAIL. Either
press
to attempt again or press to return to the
previous menu.
Page 14
14
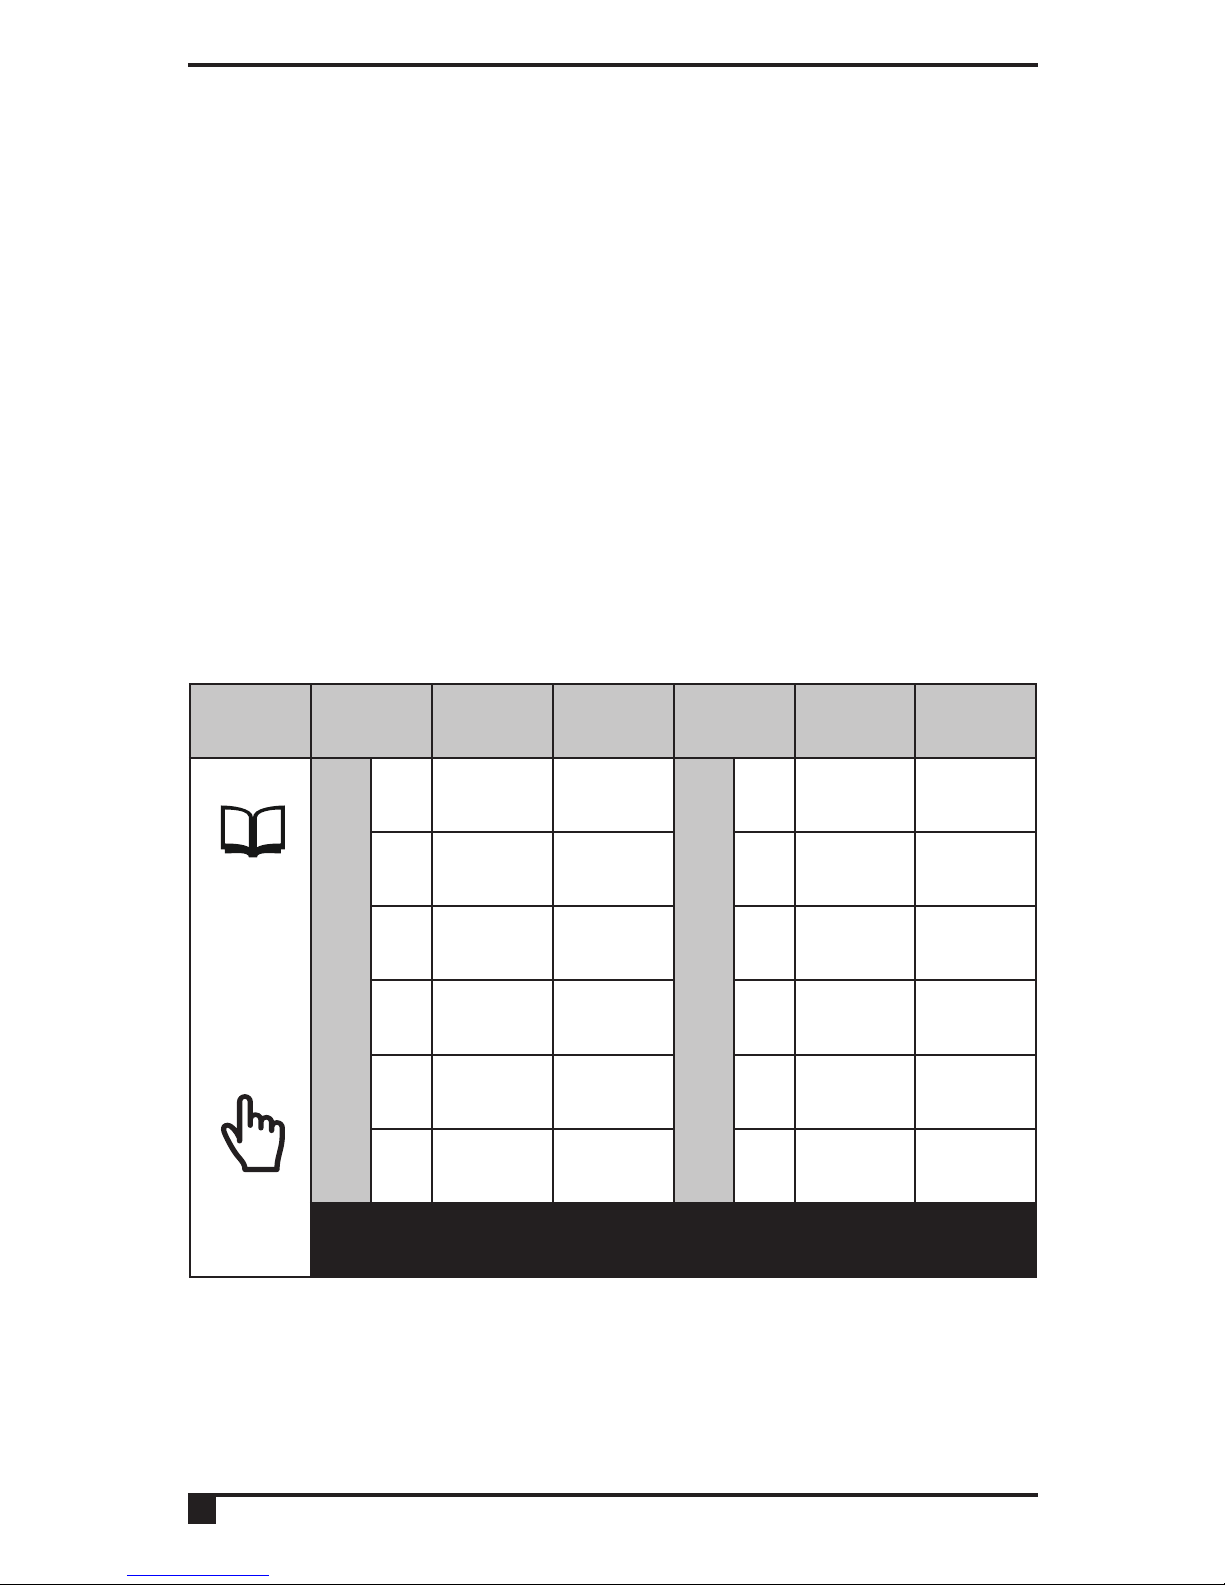
5.1 Factory Pre-Set Programme
This unit has been designed to be a simple to use thermostat,
requiring minimal user intervention with a pre-programmed
heating profile. The pre-set heating times and temperatures will
suit most people (See table below).
Operation setting range:
5/2 day, 7 day, 24 Hour. Default: 5/2 Day.
Events setting range: 6 events or 4 events. Default: 4 events.
5.1.1 Pre-Set Temperatures: 5/2 Day
5. Program settings
Key Event Time Temp Event Time Temp
Week Days
1 06:00 20°C
Weekdays
1 07:30 20°C
2 08:00 15°C 2 09:30 20°C
3 12:00 15°C 3 11:30 20°C
4 14:00 15°C 4 13:30 20°C
5 17:00 21°C 5 16:30 21°C
6 22:00 15°C 6 22:30 15°C
N.B. If 4 events is chosen the events 3 & 4 are skipped
Page 15

15
5.1.2 Pre-Set Temperatures: 7 Day
In 7 day setting, the pre-set settings are the same as the 5/2
Day programme.
5.1.3 Pre-Set Temperatures: 24 Hours
In 24hr setting, the pre-set settings are the same as Mon-Sun
of the 5/2 Day programme.
5.2 Setting the Operation Mode (5/2 day, 7 day, 24hr)
(ProG)
1. Press and hold
for 3 seconds until the display shows
tInE. Turn the dial until display shows ProG then press
.
2. Use the dial to move between 24hr, 7 day or 5/2 day
operation.
24 hr operation is shown by 24Hr.
7 day operation is shown by 7day.
5/2 day operation is shown by 5-2d.
3. Press
to set the programme (See section 5.3 for details)
or press
to return to previous menu or leave for 1
minute to automatically return to homescreen.
5.3 Setting the Programme (ProG)
5.3.1 5/2 Day
1. Choose 5/2 day operation (See section 5.2 for details).
Then press
.
2. Turn the dial to select the days to programme, either 1-5
for weekdays or 6-7 for weekends then press
.
3. Turn the dial to choose the program (P1-P6).
Then press
to enter time setting.
4. Turn the dial to adjust the time (10 minutes increments).
Then press
to enter temperature setting.
Page 16
16
5. Turn the dial to adjust temperature (increments of 0.5°c).
Then press
to save and return to program choice
(P1-P6).
6. Repeat steps 3-5 for all time and temperature programs.
Then press
to return to step 2. Repeat steps 2-6 until
all desired days have been programmed then
press
to return to previous menu or leave for 1 minute
to automatically return to homescreen.
5.3.2 7 Day
1. Choose 7 day operation (See section 5.2 for details).
Then press
.
2. Turn the dial to select the day to programme (Mon-Fri)
then press
.
3. Turn the dial to choose the program (P1-P6).
Then press
to enter time setting.
4. Turn the dial to adjust the time (10 minutes increments).
Then press
to enter temperature setting.
5. Turn the dial to adjust temperature (increments of 0.5°c).
Then press
to save and return to program choice
(P1-P6).
6. Repeat steps 3-5 for all time and temperature programs.
Then press
to return to step 2. Repeat steps 2-6 until
all desired days have been programmed then
press
to return to previous menu or leave for 1 minute
to automatically return to homescreen.
Page 17

17
5.3.3 24 Hour
1. Choose 24 hour operation (See section 5.2 for details).
Then press
.
2. Turn the dial to choose the program (P1-P6).
Then press
to enter time setting.
3. Turn the dial to adjust the time (10 minutes increments).
Then press
to enter temperature setting.
4. Turn the dial to adjust temperature (increments of 0.5°c).
Then press
to save and return to program choice
(P1-P6).
5. Repeat steps 2-4 for all time and temperature programs.
Then press
to return to previous menu or leave for 1
minute to automatically return to homescreen.
Page 18

18
We are continuously developing our products to
bring you the very latest in energy saving
technology and simplicity. However, should you
have any questions setting up your controls
please email us at [email protected] or for
technical queries call us on our dedicated technical
helpline 07539 117468.
Page 19

19
WARNING: Interference with sealed parts renders the
guarantee void.
In the interests of continuous product improvement we reserve
the right to alter designs, specifications and materials without
prior notice and cannot accept liability for errors.
Page 20

Version 6.10.1
 Loading...