

Page 1
ESI Cellular Management
User’s Guide
0450-1189
Rev. E
For on-li n e he lp , vi sit www.esiusers.com.
About ESI
ESI (Este c h Syst em s, Inc. ) i s a priv at el y hel d cor porati on bas e d in Pla no, Texas. Fo und ed i n 1987, ESI desi g ns and
builds innovative telecommunications products for businesses like yours. Because of their powerful combination of
value and features, ESI products are consistently recognized by industry publications and leader s.
Copyright © 2010 ESI (Estech Systems, Inc.).
Personal Call Routing is a trademark of ESI. Bluetooth is a registered trademark of the Bluetooth Special
Interest Group (SIG). TouchTone is a registered trademark of AT&T, Inc. Information contained herein is subject to
change without notice. ESI products are protected by various U.S. Patents, granted and pending. Visit ESI on the
Web at www.esi-estech.com.
Contents
Introduction................................................................................................................................................................................................ .........2
About the ESI Cellular Management Access Device....................................................................................................................................2
Basic features...............................................................................................................................................................................................3
Quick set-up and use..........................................................................................................................................................................................4
Programming ESI Cellular Management routing...........................................................................................................................................4
Setting up a Cellular Access key..................................................................................................................................................................7
Answering incoming calls.............................................................................................................................................................................7
Using voice dialing to place an outgoing call.................................................................................................................................................8
Using the Cellular Acces s key to che ck cellula r voi ce mail...........................................................................................................................8
Leaving the area with cell phone call and Auto-Connect enabled.................................................................................................................8
Using the Cellular Speed-Dial key................................................................................................................................ ................................8
Special lamping indications..........................................................................................................................................................................9
Cautions............................................................................................................................................................................................................10
Addendum: Adminis tra tor pro gra mmin g ................................ ................................ ........................... .............................................................12
Index
Page 2
ESI Cellular Management User’s Guide
Introduction
The cell ph on e is ra pidly becom in g the bu si n ess c omm unicati on s device of choi ce. ESI is embr a ci ng t he market
with ESI Cellular Management — unique hardware and features to bridge the gap between cellular handsets
and ESI ’s lin e of Feat ure Phones. The user of a Bluetooth
her office, and the ESI Cellular Management Access Device automatically syncs up with the Bluetooth cellular
phone an d star ts r e cei vi ng cel l p ho ne c all s on th e user ’ s de sktop phone. Out going call s are j u st as ea sy — one
just presses a button on the desktop phone to select the cell ph one and either dial th e telephone number or use
the cell phone’s voice dialing
1
feature t o com pl et e the ca l l.
®
-com patible cel l ular ph on e simp l y wal k s int o his or
Note: Cellula r netwo rks don’ t suppo rt sendi ng to ne -di ale d dig its to a cell phon e (see “ No true tone -d ia ling, ” pag e 10 ).
This means an outside caller on an incoming cell call can’t perform functions that require the caller to dial —
some examples include dial-on-hold, dialing out of the auto attendant, and accessing an ESI voice mailbox.
About the ESI Cellular Management Access Device
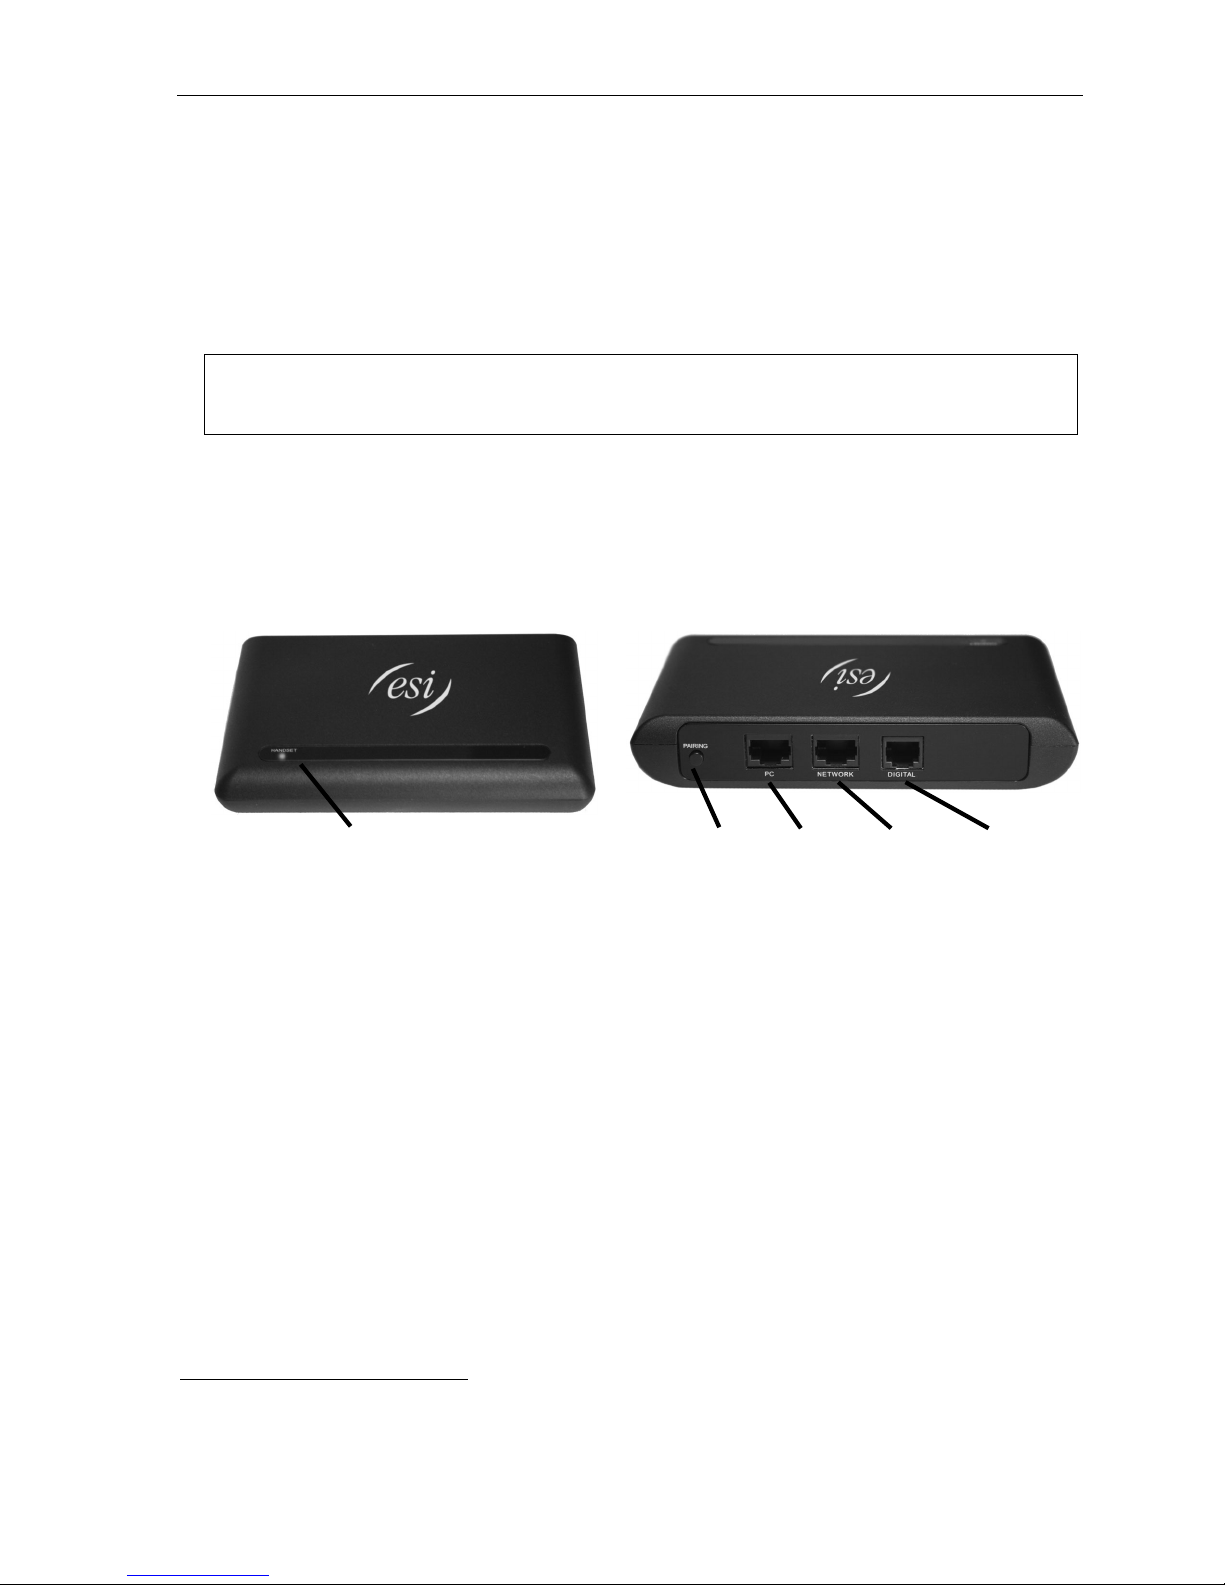
The ESI Cellular Management Access Device (see Figs. 1 – 2, below) is housed in a small, ergonomic plastic case,
which connects to a digital phone port. Al though the Access Device is intended for desktop placement near the
host ES I Feature Phon e
The ESI Cellular Management Access Device is powered by the digital port.
HANDSET LED
Figure 1: Fr ont pa nel.
2
, it can be att ached t o any sur face by using the included Velcro® strip s.
PAIRING
button
PC
jack
NETWORK
3
jack3
Figure 2: Back panel.
DIGITAL
jack
1
As supported by the cell phone manufacturer and carrier.
2
While it is possible to program ESI Cellular Management from a 24-Key Feature Phone, the use of certain ESI Cellular Management features is
possible only through the soft keys under a 48-Key Feature Phone’s display.
3
Reserved for possible future use.
2
Page 3

Basic features
ESI Cellular Management User’s Guide
• Incoming call destination — With ESI Cellul ar Management, incomi ng cell phone calls can be routed t o an
ESI voice mail box (MB), extension (EXT), or department (also abbreviated EXT).
1
• Ring tone — You can select a distinctive ring tone to override the station’s usual ring tone, clearly identi fying
calls coming i nto t he ESI phone via t he cell phon e. To enable this, select one of fi ve avail able di sti nct ive ring t ones.
• Voice mail routing — Choose the voice mailbox to which unanswered cellular calls are forwarded: the ESI
Communications Server’s or t he cellular provider’s.
• Cellul ar Acc ess ke y — This k ey, when progra mm ed on a 48 - Ke y ESI Feature Phon e (Di gi tal or IP) , of f er s
the sam e functionality as a line key (“CO line key” ) along with some additional features. However, since the
ESI Cellular Managem ent Access Device is connected to a station port, the Cellular Access key is assigned
with the actual extension number of the ESI Cellular Management Access Device. The ESI system translates
the extension number to a “ virt ual” tr unk number that is used t o retr ieve cel lul ar call s that have been placed on
system-wi de hold.
Note: ESI strongly recommends that a Cellular Access key be assigned on at least one extension. This key
provides connection status to the cell phone using unique lamping indications. The lamp status lets the
user see immediately whether the Access Device and the cell phone are connected properly. For
information on the lamping indications and their meaning, see “Special lamping indications,” page 9.
• Cellular Spe ed -Dial key — This key, when programmed on a 48-Key ESI Feature Phone (Digita l or IP),
allows you to dial a p hone number usi ng the cellular phone line.
1
Reminder: cellular networks don’t support sending tone-dialed digits to a cell phone (see “No true tone dialing,” page 10).
3
Page 4
ESI Cellular Management User’s Guide
Quick set-up and use
Programming ESI Cellular Management routing
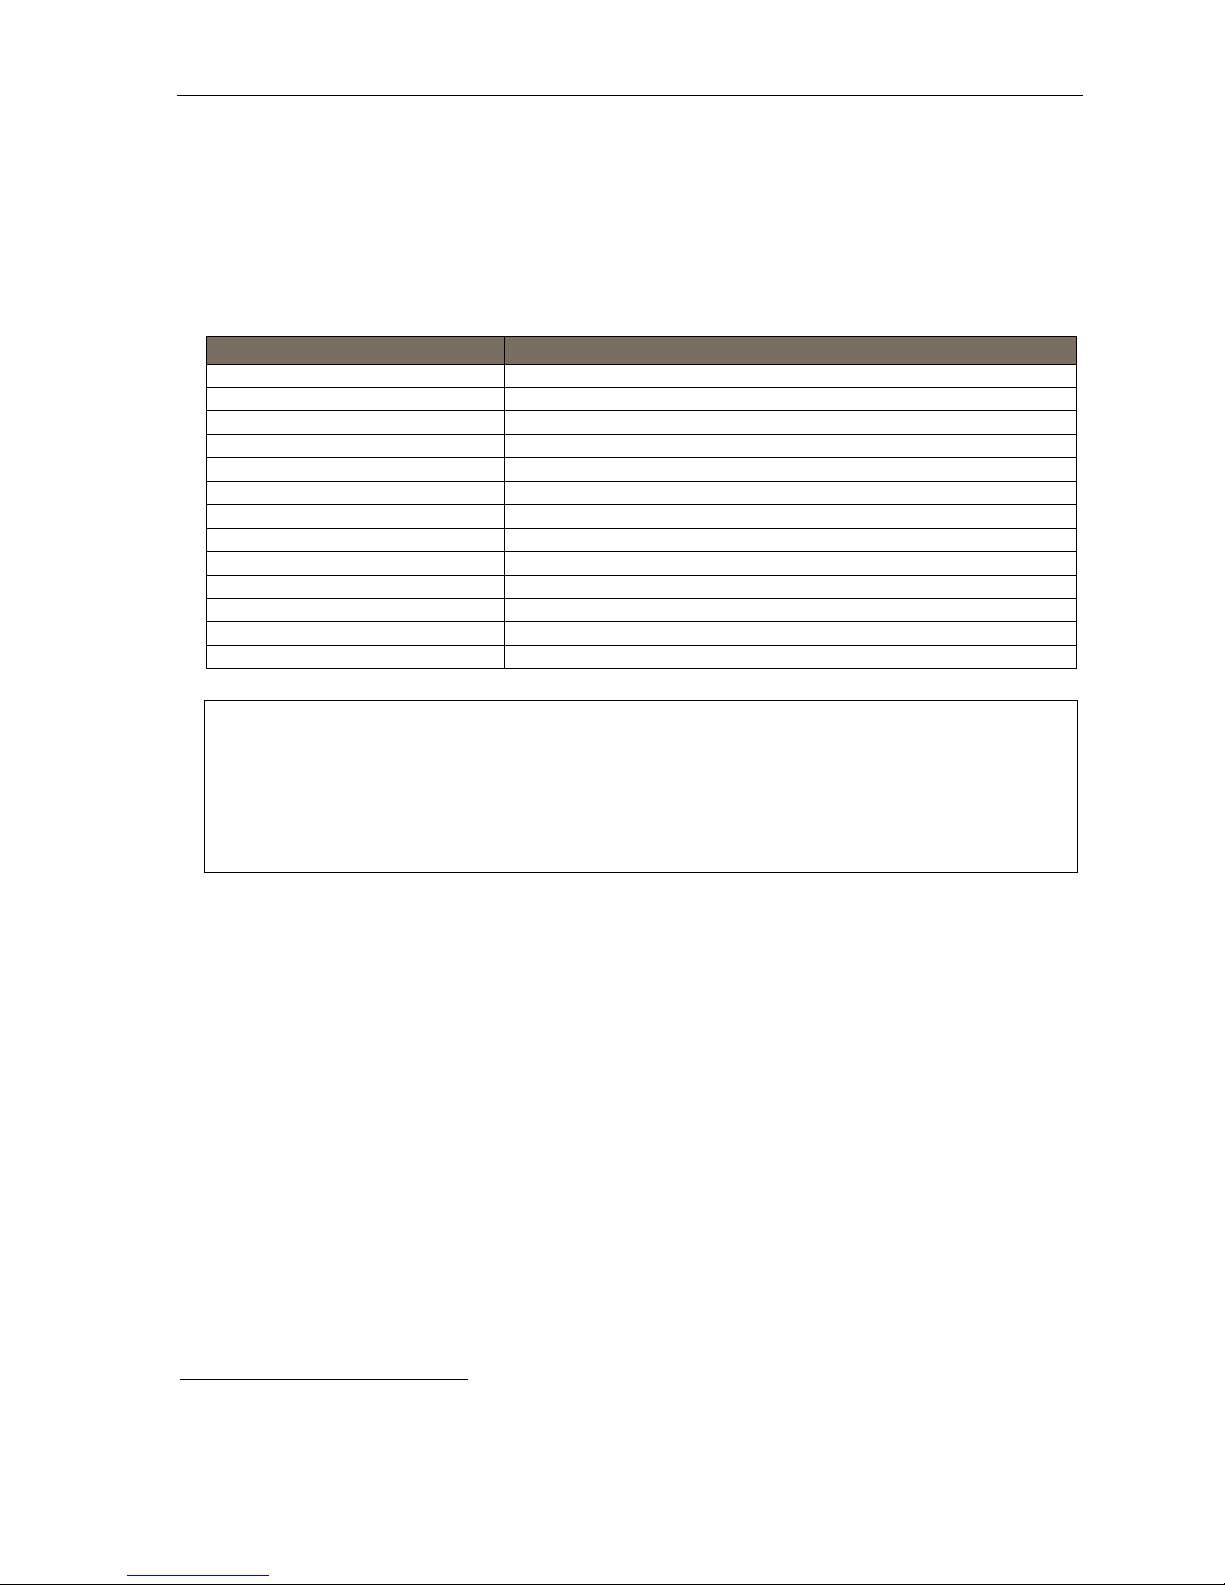
On your ESI 48- Key1 Feature Phone (DI git al or IP), press PROGRAM 7 to access user progr amm ing menu 7 —
Personal Call Routing
settings
2
and ESI Cellul ar Manag ement. Here is a menu outline showing only the items related to ESI Cellular
™
settings. This will give you a sub-menu offering two choices: ESI Presence Management
Management:
Keys pressed Item
PROGRAM 7 Personal Call Routing settings
PROGRAM 7 2 ESI Cellular Management
PROGRAM 7 2 1 PIN setting
PROGRAM 7 2 2 Voice mail setting
PROGRAM 7 2 3 Cell phone audibles
PROGRAM 7 2 3 1 Ring tone setting
PROGRAM 7 2 3 2 DTMF playback setting
PROGRAM 7 2 4 Shared line setting
PROGRAM 7 2 5 Bluetooth settings
PROGRAM 7 2 5 1 Cell phone pairing
PROGRAM 7 2 5 2 Delete setting
PROGRAM 7 2 5 3 Cell phone line setting
PROGRAM 7 2 5 4 Auto-Connect setting
Important: This programming requires scroll keys, so you must use an ESI desktop phone (and not an ESI Cordless
Handset, which lacks scroll keys) to perform this programming. Moreover, the phone must be either a 48Key Feature Phone (Digital or IP) or a 24-Key Feature Phone, because of the need for at least two lines on
the phone display during programming.
To program these settings from any other ESI desktop phone on your system, go to that phone, press
PROGRAM and the number of the extension you wish to program, and then 7 to enter Personal Call
Routing programming.
An explanation of the five types of ESI Cellular Management settings begins on the next page.
1
While it is possible to program ESI Cellular Management from a 24-Key Feature Phone, the use of certain ESI Cellular Management features is
possible only through the soft keys under a 48-Key Feature Phone’s display.
2
Not applicable unless ESI Presence Management is installed on your ESI system. For more information concerning ESI Presence Management,
consult your ES I Reseller or visit www.esi-estech.com/presence.
4
Page 5

ESI Cellular Management User’s Guide
PIN setting
The PIN (personal id entifi cation number) is a security code that yo u enter into a Bluetooth-enabled cell
phone when pairing that cell phone with the ESI Cellular Management Access Device. You may choose any
fou r - d i git num ber fr om 0000 through 9999. To pr ogram the ESI Cellular Management PIN:
1. On your ESI Feature Phone, pr ess PROG RAM 7 2 to reach the Cellular Management settings.
2. Press 1 to rea ch the Bluetoot h PIN sett ing.
3. Enter the four-digit PIN used for cell phone verification during handset pairing. Press # to confirm.
4. Either (a.) hang up to complete programming or (b.) skip to step 2 of “Voice mail setting” (next item).
Voice mail setting
This determines how the ESI system handles unanswered incoming cell phone call s. To program the ESI
Cellul ar Mana gement v oice mail setting:
1. On your ESI Feature Phone, pr ess PROG RAM 7 2 to reach the Cellular Management settings.
2. Press 2 to rea ch the cell line call -forwarding setting.
3. Using the scroll key, select the destination to which the ESI system will forward unanswered incoming
cell phone calls:
• CELL V-MAIL — Handled by cell phone carrier voice mail.
• SYSTEM V-MAIL — Handl ed by ESI vo i ce mai l
Press # to confirm.
Notes: When this is set to SYSTEM V-MAIL , the ESI system answers (i.e., seizes) each incoming cell
When this is set to CELL V-MAIL, the ESI system doesn’t answer (seize) an incoming cell phone
4. Either (a.) hang up to complete programming or (b.) ski p to step 2 of “Ri ng tone setting” (next item).
phone call immediately, signaling the cellular carrier to start billing.
call until an extension retrieves the incoming call. If the call isn’t answered by an extension, the
system “assumes” the call was routed to, and answered by, the cellular carrier’s voice mail
system following the carrier’s timeout.
Cell phone audi ble s setti n gs
These settings contr ol two audibl e features on your ESI Feature Phone to make i ts use with a cell phone, via
ESI Cell ular Management, more convenient for you.
Ring tone setting
You can choose one of six available distinctive ring tones that you’ll hear when your ESI Feature Phone
receives an incoming cell phone call. You also can choose not to enable this f eature.
1. On your ESI Feature Phone, press PROGRAM 7 2 to reach the Cellular Management settings.
2. Press 3 to rea ch the cell phone audibles set tings.
3. Press 1 to reach the ring tone setting.
4. Use the scroll keys to select one of the six available distinctive ring tones (or NORMAL to disable
the feature). Each time you press the scroll key, you will hear the selected distinctive ring tone.
When you’ re sat isfi ed wit h t he sel e ction, pre ss # to confirm.
5. Either (a. ) hang up to com plete programm ing or (b.) skip to step 3 of “DTMF playback s etting”
(next item).
(Continued)
5
Page 6

ESI Cellular Management User’s Guide
DTMF playback setting
DTMF1 playback tones are th e sounds you hear when dialing a number on the keypad of your ES I
Feature Phone. Some cel l phones play DTMF to nes when dialed. If both the ESI Feature Phone and the
cell phone perform playback of DTMF tones, it can sound as if the number dialed is bein g repeated
(“echoed”). If this happens, use this set ting t o disable DTMF playback. If DTM F playback is enabled, the
ESI Feature Phone will play DTMF tones whenever a number is dialed. If DTMF playback is disabled, t he
ESI Feature Phone will play no tones when a number is dialed.
1. On your ESI Feature Phone, press PROGRAM 7 2 to reach the Cellular Management settings.
2. Press 3 to rea ch the cell phone audibles set tings.
3. Press 2 to rea ch the D TM F playback setting.
4. Use the scroll keys to select wh ether DTM F playback is ENABLED or DISABLED.
When you’ re sat i sf i ed wi th t he s ele ct i on, pre s s # to confi rm.
5. Either (a. ) hang up to com plete programming or (b.) press # again to return to ESI Cellular
Management settings.
Shared line setting
The shared line setti n g let s yo u ch oose wh et her ot her st ati on s in the ESI pho ne s yst em ca n as sig n a Cel lul ar
Acces s key (see “Cellular Access key,” page 7) to select the cell phone for placin g outbou nd calls.
1. On your ESI Feature Phone, press PROG RAM 7 2 to reach the Cellular Management settings.
2. Press 4 to reach the shared line setting.
3. Use the scroll keys to select whether cell phone line sharing i s ALLOWED or DENIED.
When you’ re sat i sf i ed wi th the s ele ct i on, pre s s # to confi rm.
4. Either (a.) hang up to complete programming or (b.) skip to step 2 of “Bluetooth setup settings” (next it em).
Bluetooth setti ngs
Cell phone pa iring (a nd link delet i on)
This pairs a Bluetooth-enabled cell phone with the ESI Cellular Management Access Device.
1. On your ESI Feature Phone, press PROGRAM 7 2 to reach the Cellular Management settings.
2. Press 5 to rea ch the Bluetooth setup settings.
3. Press 1 to create a new Bluetoot h li nk to a cell phone or pr ess 2 to del ete a pr evi ously est abli shed li nk.
Note: If you have a previously paired phone already connected, you must first delete the previously
4. Press # to confirm.
5. Either (a.) hang up to complete programming or (b.) skip to step 3 of “Cell phone line setting”
(next item).
Cell phone li ne name setting
This display s the Bluetooth link connecti on information — i.e., the cell phone line name.
1. On your ESI Feature Phone, press PROGRAM 7 2 to reach the Cellular Management settings.
2. Press 5 to rea ch the Bluetoot h setup settin gs.
3. Press 3 to vi ew the cell phone line name.
4. Press # to confirm.
5. Either (a.) hang up to complete pr ogr amming or (b. ) skip t o step 3 of “ Auto-Connect set ti ng” ( next item ).
established link before creating a new one.
1
Dual-tone/multi-frequency.
6
Page 7

ESI Cellular Management User’s Guide
Auto-Connect setting
The Auto-Connect setting l ets you choose when and h ow the Bluetooth connection is m ade with t he
cell phone.
If Auto-Connect is enabled, the Bluetooth lin k between the cell phone and the ESI Cellular Management
Access Device will be automatically re-established every time the cell phone is in close proximity to the
Access Device. If AutoConnect is disabled, the Bluetooth link must be manually re-established each time
by either using the Cellular Access key (see “Cellular Acces s key,” below) or selecting the cel l phone’s
Blueto oth s et ti ngs or opt i on.
1. On your ESI Feature Phone, press PROGRAM 7 2 to reach the Cellular Management settings.
2. Press 5 to rea ch the Bluetoot h setup settin gs.
3. Press 4 to reach the Auto-Connect setting.
4. Use the scroll keys to select whether Auto-Connect is ENABLED or DISABLED.
When you’ re sat i sf i ed wi th t he s ele ct i on, pre s s # to confirm.
5. Press # to confirm.
6. Hang up to complete programming.
Setting up a Cellular Access key
Programming a Cellular Access key
T o program a Cellular Access key on an ESI Feature Phone:
1. Press PROGRAM 2 to enter programmable feature key programming.
2. Press the s ele cte d pr o gram ma bl e feature key.
3. Enter the extension number of the ESI Cellular Man agement Access Device.
4. Press the s ele cte d pr o gram ma bl e feature key ag ai n to c ompl ete progr ammi ng t he k ey .
5. Press RELEASE to exit programming.
Using a Cellular Access key
T o place an outgoing call:
1. Press the Cellular Access key.
2. Dial the desi r ed ph on e num ber.
Notes: If the cell phone isn’t available (roaming, out of range, etc.), the Cel lu l ar Access key glow s amber.
If the user presses the key and the cell phone is available, the system will try to re-establish a connection
with the cell phone.
Using the Cellular Access key with Auto-Connect disabled
1. Make sure the Cellular Access key is glowing steadily amber.
2. Press and rel ease the Cellular Access key.
3. The ESI phone’s display will show “CONNECTING.”
When the Acce ss Device has suc ce s sful l y co nn ect e d wit h a Bluetooth-ena bl ed ce l l pho ne, th e ESI
phone’s display will return to normal, and the Cellular Access key will cease glowing.
Answering incoming calls
You ans wer a call that comes in via ESI Cellular Management as you would any usual call: either pick up the ESI
Feature Phone handset, press SPEAKER on the ringing phone, or (if using a heads et) press a programmed
headset k ey.
7
Page 8

ESI Cellular Management User’s Guide
Using voice dialing to place an outgoing call
If your cell ular service provides voice di aling, ESI Cell ular Management lets you use your ESI Feature Phone,
too, to make calls in this fashion.
1. Lift the ESI phone’s handset (or press SPEAKER).
2. Press the Cell ul ar Access key.
3. Press the VOICE DIAL soft key that ap p ear s in th e ESI pho ne di splay.
4. As you would when usi ng y our cel l pho ne, s ay the a ppr opr i at e word(s) to dial th e desi re d num ber.
Using the Cellular Access key to check cellular voice mail
T o access your cellular ser vice voic e mai lb o x:
1. Press the Cell ul ar Acce ss ke y on yo ur ESI Feat ur e Ph o ne.
2. Dial the cell p hone’s number.
3. When you hear the cellular voice mailbox’s personal greet ing, follow y our cell ular ser vice provider’s norma l
steps for re mot el y c he cki n g voi ce mai l.
Leaving the area with cell phone call and Auto-Connect enabled
When Auto-Connect is enabled, use t he following procedur e if you must take the cell phone out of the range of
the Access Devi ce but are on a call on the cell phone at the time and don’t wish to hang up at that tim e:
1. While on an acti ve cel l phone c al l, pres s t he USE CELL soft key that appears in the ESI phone display.
Auto-Connect is now disabled for 10 minutes. The Access Device’s blue HANDSET LED will begin
blinking, and the phone’s Cellular Access key will glow (not blink) amber.
1
2. On the cell pho ne, resume the conversation.
3. To end th e call, hang up normally usin g the cell phone.
After 10 minutes, Auto-Connect is re-enabled. At that time . . .
• If there is no active call on the cell phone but it is in range, the Access Device will re-establish the
Bluetooth link to the cell phone.
• However, if there is an active call on the cell phone and it is in range, the call will be disconnected.
Note: While Auto-Connect is disabled, the Cellular Access key will continue to glow (not blink) amber.
To re-establish the Bluetooth connection, press the Cellular Access key.
Using the Cellular Speed-Dial key
Press the Cellular S peed-Dial key to dial out using the cellular phone line. To program this key on a 48- Key
Feature Phone (Digital or IP):
1. Enter feature key programming by selecting a programmabl e feature key to program and either . . .
• Pressing PROGRAM 2 an d th en pr es si ng t he pro gr a mma ble f eat ur e key.
. . . or . . .
• Holdi ng down the programmabl e feature key.
2. Press ESI-DEX. The display will show:
ESI-DEX
PER STA SYS LOC KEYS
(Continued)
1
On some cell phones, you can actively switch the phone’s audio source during a call. For more information abou t this, refer to the cell phone’s
User’s Guide .
8
Page 9

ESI Cellular Management User’s Guide
3. Under the display, pr ess KEYS, and then pres s the left-side scroll key (). The display will show:
FEATURE KEY
CELL SPEED DIAL
BACK STOR
4. Under the displ ay , press ST OR . The display will show the associated ESI Cellular Management Access Device
or you can scr ol l to s ee a li st of the s yst em’s instal l ed Acce s s Devi c es wit h a Shar e Lin e set ting of “YES” :
CELL SPEED DIAL
CELL:
5. Using the scrol l k ey s, sel ect th e Acce ss De vi ce yo u wis h to use for dial i n g the cel l ul ar sp e ed-di al n umb er,
and press the programmable feature key once again. The display will show:
CELL SPEED XXXXX
6. Use the dialpad to enter the desired phone num ber (without a line acc es s co de of 9, 8, or 71–76), and
press the programmable feature ke y once mor e to complete program m ing. To insert special characters
(P, F, #, and
left-side scroll key (
)1, use the right-side scroll key () to enter them. To move back durin g this entry, use the
).
Special lamping indications
Cellular Access key
A programmed Cellular Acces s key provides additional lamping indication to show the status of the ESI
Cellul ar Mana gement Access Device’s connection via Bluetooth to the cell phone.
Blinki ng am ber — Not paired to a cell phone.
• A cell phone must be paired t o the ESI Cellular Management Access Device.
• This indication normally appears before the cell pho ne is paired to t he Access Device.
On (glowing amber) — Paired, but not connected to a cell phone.
The followin g conditions can cause this indicati on:
• The cel l phone is out of range of t he ESI Cellular M anagement Access Device.
• The cell phone i s alr e ad y conn ected via Bluetooth t o another device (e.g., a Bluet oot h he ad set ) .
• The cell phone’s Bluet o oth con ne ct i vit y ha s been t ur ne d of f.
• The cell phone i s pow ere d of f .
Off — Paired an d conn ected to a cell ph on e.
HANDSET LED on Access Device
The HANDSET LED on the ESI Cellular Management Access Device provides the following indications:
• Off — Unpaired with a cellular phone.
• Blinking slowly — Not connected (Auto-Connect disabled).
• Blinking moderately — Searching for cell pho ne (not connected).
• Blinking rapidly — In pairing mode.
• On — Cell phone is paired and connected.
1
If necessary, consult your ESI Feature Phone User’s Guide (or visit www.esiusers.com) to learn more about using spe cial cha racte rs when dialing.
9
Page 10

ESI Cellular Management User’s Guide
Cautions
In general
Blueto oth is an i ndu str i al s pe cif i cation for low - p ower e d, sh or t -range wir el e ss net wor ki n g. It pr o vid e s a way to
conne ct and exchange information between devices. Bluetooth i s used not only in cell ular phones but also
persona l comp ut er s, as wel l as other devices su ch as vi d eo gam e cons ol es. It us e s a sec ure, glo ba ll y
unlicensed, short-range radio frequency.
Bluetooth compatibility
Not all Bluetooth- e n abl ed c ell phon es ar e alike, bec ause di f f er ent cel l phone ma nufactur er s im pl eme nt Blu eto oth
slightly differently. Not all cell phones support all capabilities (e.g., voice m ail). Cell phones manufactured prior to
2006 are more likely to have Bluetooth compatibility issues. To minimize such issues, a cell phone should
compl y with th e Bluetooth 1.2 (or higher) specif icatio n and offer both headset and hands-free “profiles.”:
Still, even then, there can be difficulty making Bluetooth devices interact with each other. In particular, a
Bluetooth-enabled cell ph one may:
• Fail to pair with the ESI Cellular Management Access Device.
• Always prom pt you to pair it with the Acces s Device, even when this has already occurr ed.
• Always prom pt you to connect to the Access Device, even though the pho ne has an “ Alway s connect” setting.
• Turn off its Bluet ooth capabi l it y by it self, due to eit her it s power -savi ng sett ings or i nterf erence fr om other devi ces.
• Suffer nois y or bad con ne ct io n s wit h call s. Thi s can o cc ur for a variety of rea so n s. The ce l l pho ne ma y be too
far fr om the Access Dev ice, or it may encounter interference from other Bluetooth devices (or ev en other
objects such as walls, appliances, and cordless phon es).
Remember: Bluetooth is LOW-powered, SHORT-range
If a cel lular call is in progress, and the cell p hone is moved more than 30 feet away from the ESI Cellular
Management Access Device and/or encounters interference, audio quality will degrade and the connection can
drop between the cell phone and the Access Device. If eit her of these occurs, move the cell phone closer to t he
Acces s Device.
Incoming cellular calls
The clock is r unnin g
Your cellular plan minutes will be used if incoming cellular calls are either (a.) answered by the ESI
Communications Server’s voice mail or (b. ) directed to an ACD depar tment and placed in ACD queue.
Becaus e the cellular carrier starts timi ng the call as soon as it ’s connected — i.e., an sw er ed. And, of co ur se,
both outg oi ng an d i ncom i ng cal l s con sum e cel l ul ar plan m in ut es.
No true tone-dialing
One character istic of incoming ce ll calls is that they don’t carry DTMF (commonly known as TouchTones®).
The tones you h e ar when pressing a cell phone’s keys are mere simulations intended to make the diali ng
process more familiar to you; they don’t go over cell ph one networks, whi ch ar e n’t designed to re peat d i al ed
digit s but, instead, ha ndl e di al ed c alls in other w ays. In fa ct , cel l ular net works’ audi o com pr e s sio n distorts
such tones, m aking them useless eve n if they could somehow be transmitted. As a result of this
characteristic, incomi ng cell phone c allers cannot:
• Dial menu selecti ons from the ESI sy st em’ s a uto at te nd a nt, such as “To reach Acco unting, pre s s 2.”
• Dial out of a voice mailbox, or off a message -on-hold.
• Use “dial-by-name.”
• Acces s the ESI system’s AutoPage or off- premises “reach-me” features.
1
Why?
1
Not applic able to the ESI-50L doesn’t support ACD.
10
Page 11

ESI Cellular Management User’s Guide
Enabling Auto-Connect
If the Auto-Connect optio n is ena ble d, be awar e t hat:
• You can’t “pull” a cell call fro m the system bac k to the cell ph one hands et. Instead, use the USE C ELL soft
key you’ll see on the ESI Feature Phone display.
• You can’t a nswer an incomi ng cellular call usi ng the cell phone hand set (but must, instead, answer it u sing
the ESI Feature Phone).
• If you’re on a cell ular handset call as you near your office, the call may be switched automatically to the ESI
Cellul ar Mana gement Access Device.
If either of these are attempted, the call will be switched from the cell phone handset to the Access Device.
To the person on the other end, it will seem as if the call had been disconnected. If this happens, move the cell
phone away from the Access Device, so the call will automatically reconnect to the cell phone handset.
To prevent this from occurring, do one of the followi ng:
• Complete the call before you enter your wor k ar ea ( i.e., where the Access Device is).
• Change the cell phone’s Bluetooth access settings to “Always ask” to connect.
• When away from the office, use a Bluetooth headset with the cell phone (but turn off the headset when in
the off ice) .
• Disable Auto-Connect.
Using the Cellular Access programmable feature key
Don’t use the Cellular Acce ss programmable feature key if you’re already o n a call using t he cell phone handset.
If you do this when the cell phone is in range of the Access Device, it will disconnect the call.
Outgoing cellular calls
Important: If your cell phone has a key lock feature, make sure the keys are unlocked (or, if it’s a “clamshell”-type cell
Using the Voice Dial soft key
Use your ESI ph one’s Voi ce Dial soft key only if your cel l pho ne su ppor t s voice comma nd s.
If your cell phone lacks this support and you press the Voice Dial key, the system will automatically “cut
through” to the cell phone, and digits dialed will be ignored. If this happens:
1. Hang up the ESI ph one (eit her place its handset back on t he cr adle or press RELEASE).
2. Press the Cellular Access key.
3. Dial the desi r ed num b er.
ESI Cellular Management voice mail settings
ESI Cellular Management voice mail settings are overridden if ESI Cellular Management cell call routing is set
to any of the following:
• Voice mail or an ACD
• An extension which is ca l l -f orw ar d ed to voi c e mai l or an ACD
• A ring-all, i n -order, or UCD department (this one ap plies o nly if (a.) the d epartment call forwarding is s et to
an auto att end ant bra n ch, voice mail , or an ACD
busy or in do-not-disturb [DND] mod e).
phone, keep it open); many cell phones won’t make outgoing calls if their keys are locked.
1
department.
1
department and (b.) all department members are either
1
departm ent .
1
The ESI-50L doesn’t support ACD.
11
Page 12

ESI Cellular Management User’s Guide
Addendu m: Administ rator progra mming
T o program an ESI Cellular Mana gem ent Acce ss Device usin g System Admi ni st r ator pr ivi l e ges:
1. Press PROGRAM
The ESI system will prompt for a password.
2. Enter the correct Administrator password.
and then the extension num ber of the Access Device.
Note: This must be provided by your installing Certified ESI Reseller. Because this password allows
administration of many ESI system parameters, only authorized individuals should receive and use it.
3. To change the name of the selected extension, press 1 — or, to confirm, press #.
4. To program where the cell phone l ine is t o be answered, press 2.
T o select a station, department, or branch ID, press a scroll k ey and enter the new value.
T o confirm, press #.
5. Either (a.) hang up to complete programming or (b.) skip to step 2 of “PIN setting” (page 5).
Index
Access Device, 2, 3, 9, 10, 11
Auto-Connect, 7, 9
Bluetooth, 2, 5, 9, 10, 11
Cell phone
Audibles, 5
Line name, 6
Link deletion, 6
Pairing, 6
Cellular Access key, 3, 7, 9, 11
Cellular Speed-Dial key, 3, 8
DIGITAL jack, 2
DTMF, 2, 3, 6
HANDSET LED, 2, 9
Lamping indications, 9
Link deletion, 6
NETWORK jack, 2
Pairing, 6
PAIRING button, 2
PC jack, 2
Personal Call Routing, 4
PIN, 5
PROGRAM key, 4
Ring tone, 5
Shared line, 6
Voice Dial key, 11
Voice mail, 5, 11
www.esi-estech.com
12
 Loading...