

Page 1

1. Introduction to Audioterminal 010 .................................................................................3
Features................................................................................................................................................ 4
2. Hardware Installation.............................................................................................................6
1. System Requirements.........................................................................................................................6
2. Preparation for Hardware Installation.............................................................................................6
3. Installing Audioterminal 010 PCI card.............................................................................................8
3. Audioterminal 010 Software Installation..................................................................10
4. Input/Output of the Audioterminal 010 .....................................................................18
5. Audioterminal 010 Control Panel..................................................................................21
1. Output Level Fader/Level Meter ..............................................................................................22
2. Input Level Fader .........................................................................................................................24
3. Master Mixer Fader......................................................................................................................24
4. Pull Down Menu ...............................................................................................................................25
6. Working with Applications .................................................................................................28
1. Cubase VST.......................................................................................................................................28
2. Sonar..................................................................................................................................................29
3. Nuendo...............................................................................................................................................32
4. Wave Lab...........................................................................................................................................33
Specification ..........................................................................................................................................34
2
Page 2

1. Introduction to Audioterminal 010
Thank you for choosing Audioterminal 010. The Audioterminal 010 is a 100% full digital I/O Audio
Interface card different from other EGO-SYS product.
This card adopts ADAT format and the entire major digital format available in the market.
It is the first card that supporting TDIF of TASCAM and R-BUS of Roland.
The Audioterminal 010 has various features.
It supports various digital format converting, 24-bit 96kHz Hard disc recording and MIDI
Interface and Synchronization.
Professional users will be satisfied with powerful functions of the Audioterminal 010.
The Audioterminal 010 adapts the ‘E-WDM’ driver model to provide superior data processing and
compatibilities. Until now, Windows native drivers such as MME, Direct Sound and the WDM
driver did not have enough performance for serious music production. Furthermore, Steinberg’s
ASIO and Nemesys’ GSIF drivers do not support fully. Audioterminal 010 employs the E-WDM
driver to provide a new solution for users in to take advantage of newer Windows versions and
concentrate on their work, not their system.
The E-WDM supports MME, ASIO, GSIF, and Direct X taking all the merits of these drivers. One
of its advantages is OS support that range from Windows 98 SE and Windows ME to Windows
2000 and XP, thus allowing the users to choose the OS of his or her preference.
Audioterminal 010 is the hard disk recording card suitable for professional musicians rather than
beginners. Audioterminal 010 is compatible with multi-track recording software such as Cakewalk,
Sonar, Cubase, Nuendo; mastering software such as Sound Forge and Wave Lab; software
sampler and most virtual synthesizers and virtual Instrument.
3
Page 3

Features
ADAT 8 channel interface support
Audioterminal 010 supports ADAT format. You can use it with various digital mixer, digital
recorder and hard disk recording devices which supporting ADAT format of Alesis.
TDIF Digital Interface Support
Audioterminal 010 supports TDIF, which adapts DSUB 25-pin cable of TASCAM. You can use it
with various digital mixer, digital recorder and hard disk recording devices of TASCAM.
R-BUS Digital Interface Support
Audioterminal 010 supports R-BUS from Roland. You can also use it with various multitrack
recorders and digital mixers of Roland.
SPDIF Optical, Coaxial digital Input/Output
Audioterminal 010 has SPDIF digital input and output ports in optical and coaxial connections.
You can easily switch ADAT, TDIF, R-BUS 8 channel Interface and SPDIF 2 channel Interface
and can mix down your work to 2 channel SPDIF.
CD-ROM Digital Input
Audioterminal 010 provides an on-board 2-pin port that can be used to connect directly with CD-
ROM that has digital audio output pins. Most CD-Rom drives have a 2-pin digital output port.
You can connect it with CD In port of Audioterminal 010 easily. This allows you to transfer CD
digital audio directly to your PC with ease, and you can play back your CD audio with
Audioterminal 010.
Multiple Sample Rate / Bit support
The Audioterminal 010 supports all denominations of 44.1kHz or 48kHz standards sample rates
from 32kHz to 96kHz. It supports 16~24bit also.
4
Page 4

32bit PCI Bus Mastering
Usually, a PCI card and a PC system exchange data via a 32-bit PCI bus. The Audioterminal 010
adapts PCI bus mastering that makes a low-CPU load possible to enable faster data processing
and optimized CPU performance. PCI bus mastering allows more plug-ins to be used in the audio
software.
1 in /1 out 16 channel MIDI interface
The Aduioterminal 010 supports 1 in/1 out MIDI interface using external connection cable. You
can use it for MIDI works using synthesizer, sound module and Sync function such as MTC or
MMC.
5
Page 5

2. Hardware Installation
If you follow the instructions on this section in the sequence that it is written, you will have
properly installed all components.
1. System Requirements
To take advantage of the Audioterminal 010 and its full capacity, the computer specifications
are very important. Even though the Audioterminal 010 is built to have low-CPU
dependability, the computer needs to meet some requirements in order to get maximum
performance. The Audioterminal 010 is not just a simple sound card, but also a multimedia
digital audio device with various functions. Therefore, the performance of the Audioterminal
010 is affected by the computer specs that are required to process the vast amount of digital
data. A faster CPU, faster hard disk, and larger amounts of RAM are recommended.
Minimum System Requirement
1. Intel Pentium II CPU 450MHz
2. Main board with Intel chipsets
3. 128MB of RAM
4. One available PCI slot
5. Microsoft Windows 98SE/ME/2000/XP
Recommended System Requirement
1. Intel Pentium III CPU or higher
2. Motherboard with Intel series chipsets (BX, 815, 845,850 and so on)
3. More than 256MB of RAM
4. One available PCI slot
5. Microsoft Windows 98SE/ME/2000/XP operating system
6. UDMA 66/100 7200 rpm hard disk drive
2. Preparation for Hardware Installation
The Audioterminal 010 PCI card and other components in the computer can be easily damaged by
electrical shock. You need to use an anti-static device that can discharge the static electricity of
your body to avoid potential static damage to the cards.
6
Page 6
1. The Audioterminal 010 PCI card is placed into the anti-static plastic pouch as it is
packaged. Do not open the pouch before you install the card.
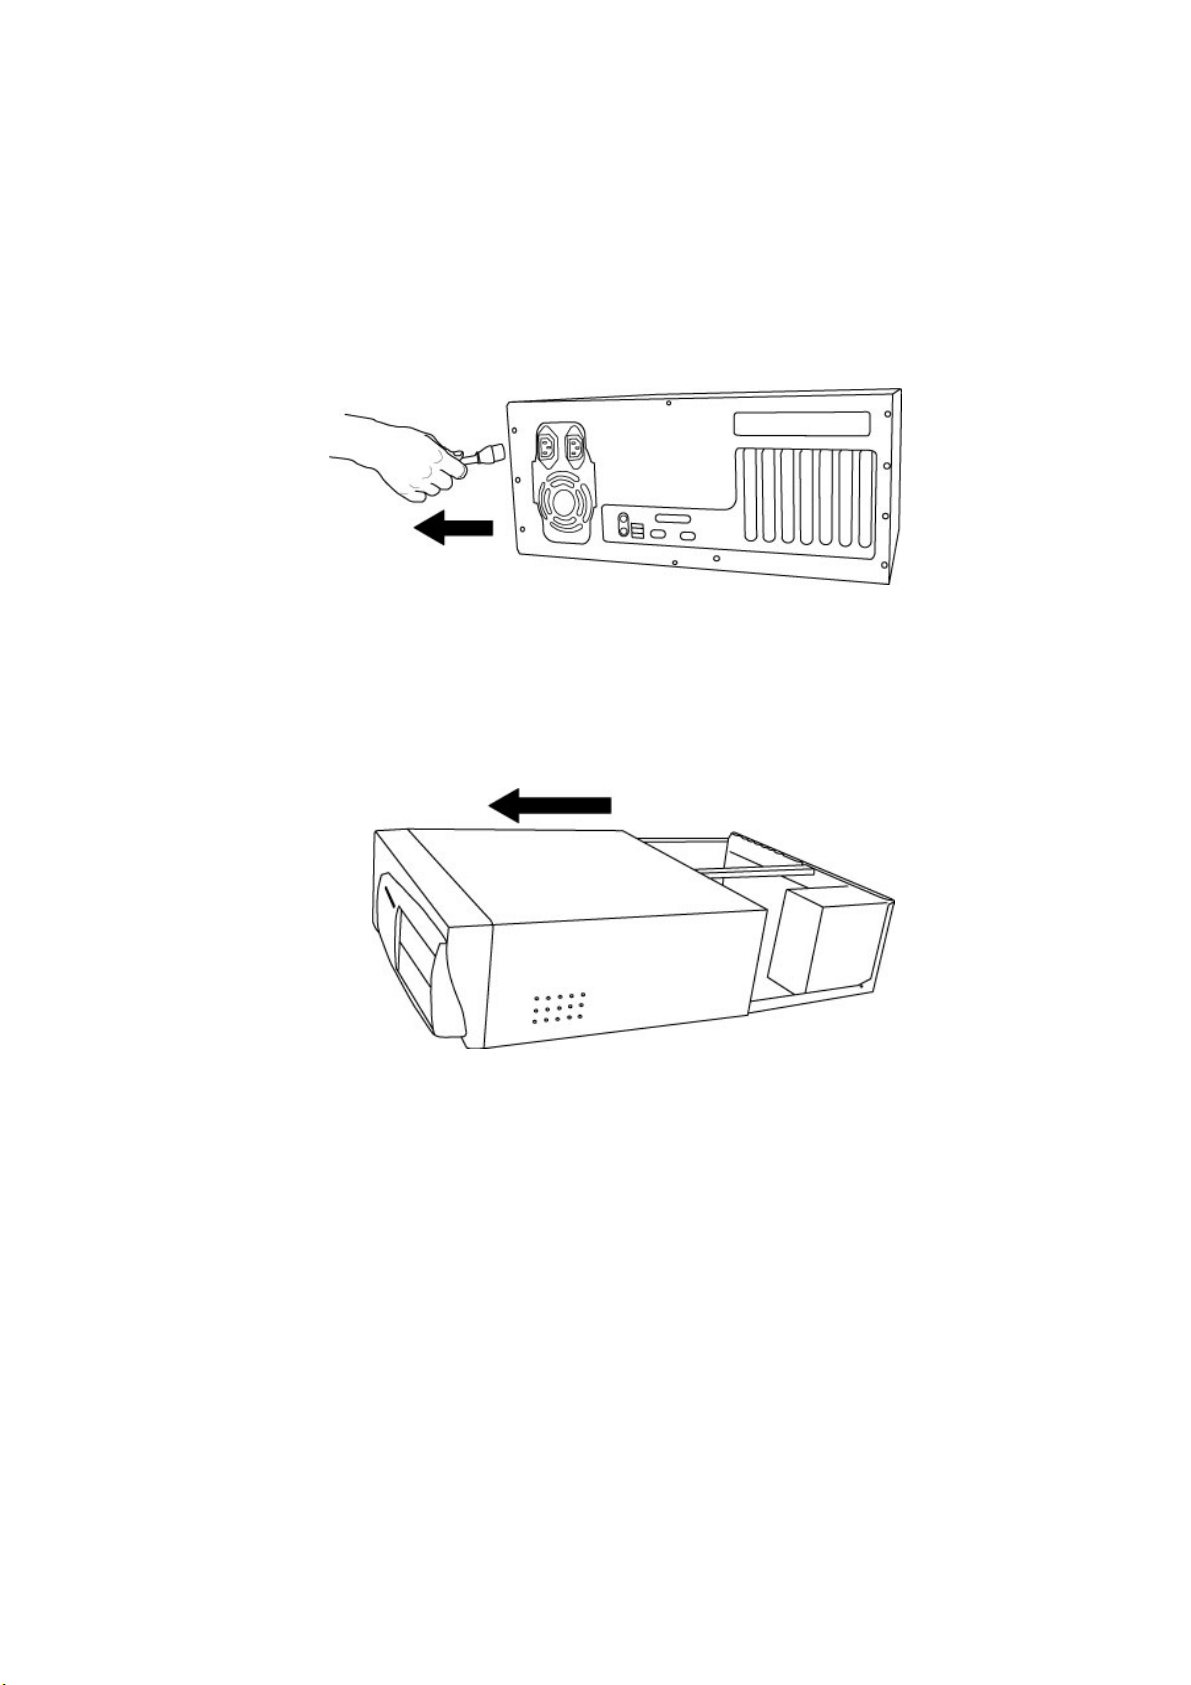
2. Turn off the computer power and remove the power cable from your computer power
supply.
3. Remove the computer cover. Make sure that you have an available PCI slot in your
motherboard to install the Audioterminal 010. Please refer to user’s manual of your
computer to remove the cover.
4. To avoid possible static shock to the computer parts, discharge it by touching the
computer case or grounded ports. We recommend you to use an anti static device such
as anti-static wristband.
5. When you need to hold the Audioterminal 010 PCI card, please, hold it on the guide. Do
not grab the card by the board.
7
Page 7
3. Installing Audioterminal 010 PCI card
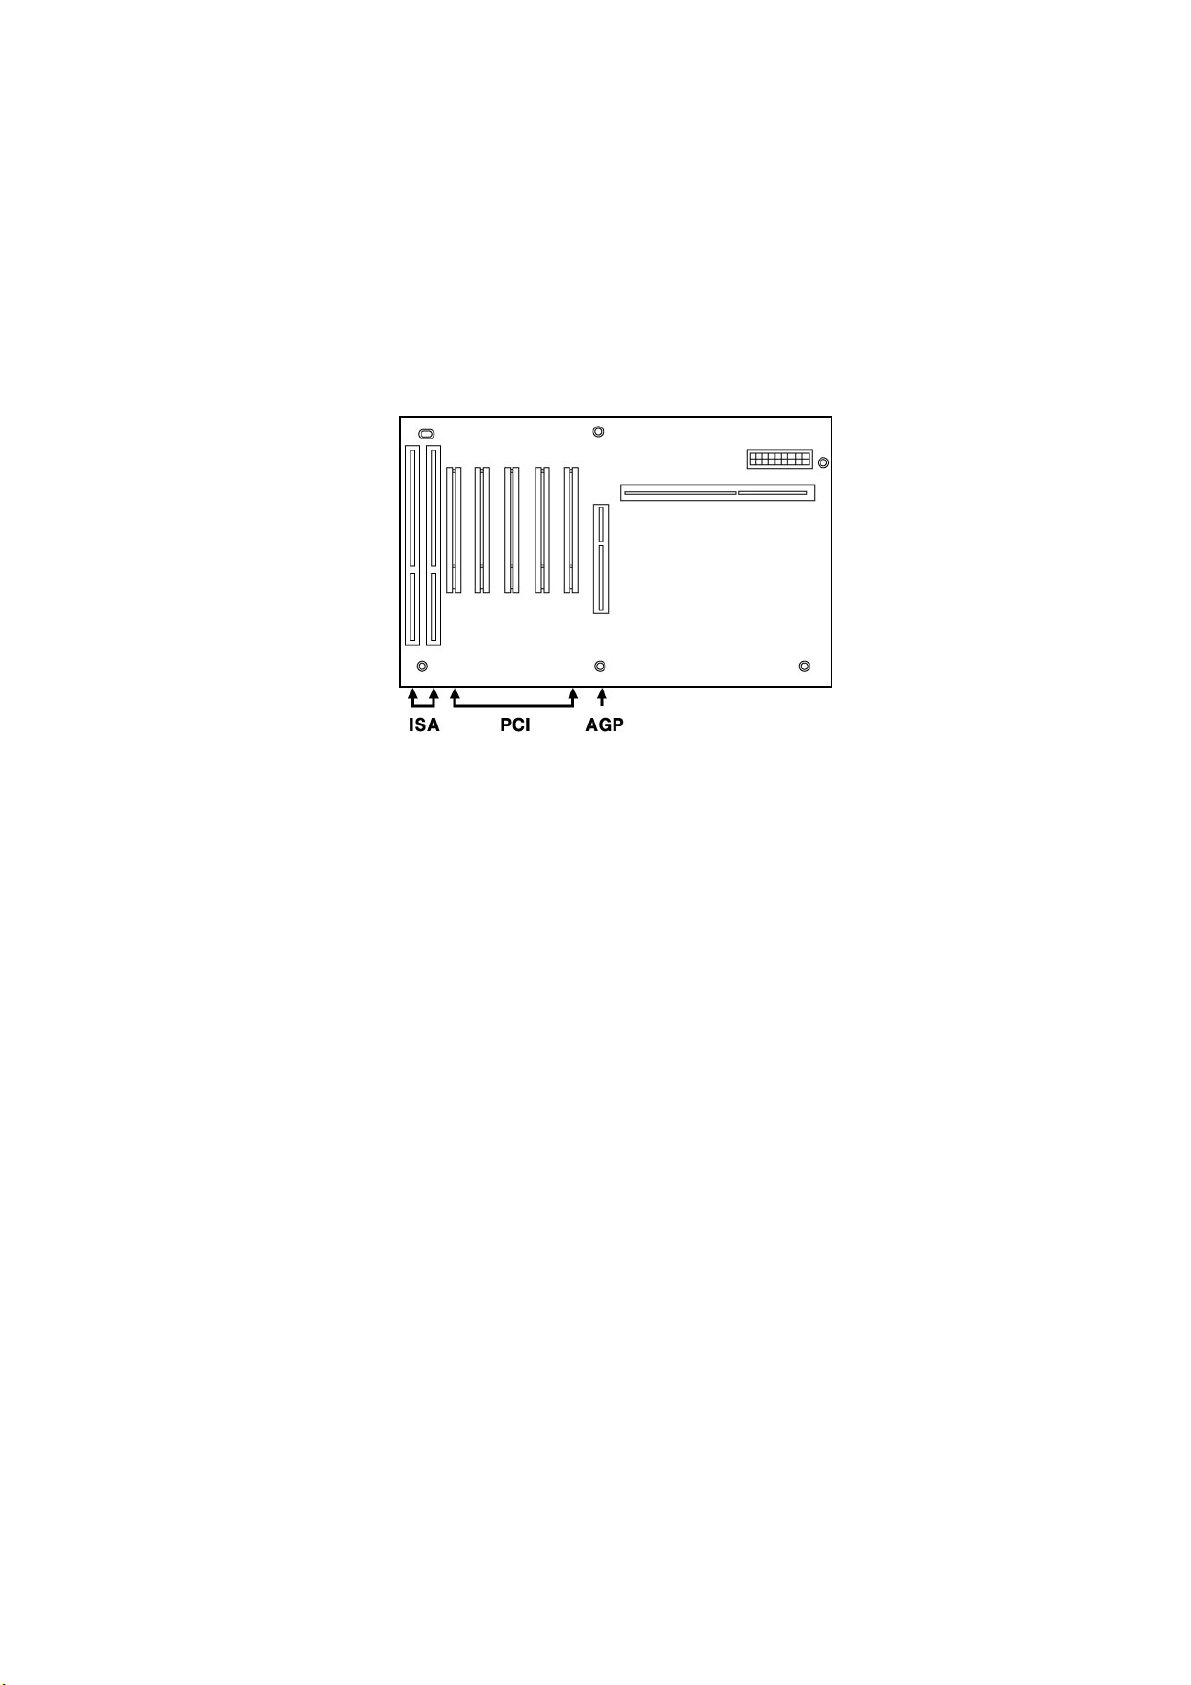
1. Please look for an empty PCI slot. IF you do not know which one is an actual PCI slot,
Please read the following;
There are 3 kinds of slots in recent computers. The PCI slot is most common and is used for
different types of devices from soundcard to the modem. Usually, the PCI slot is the white-
colored slot. The ISA slot is used in older computers and it is marked with a black slot. The
AGP slot is only for the video card and is the most recent type of slot.
It is marked with a brown slot and is located close to the CPU. It will be not too hard to find
the PCI slot for the Audioterminal 010.
2. If there is a guide next to the empty slot, please remove the guide using the proper
screwdriver.
8
Page 8
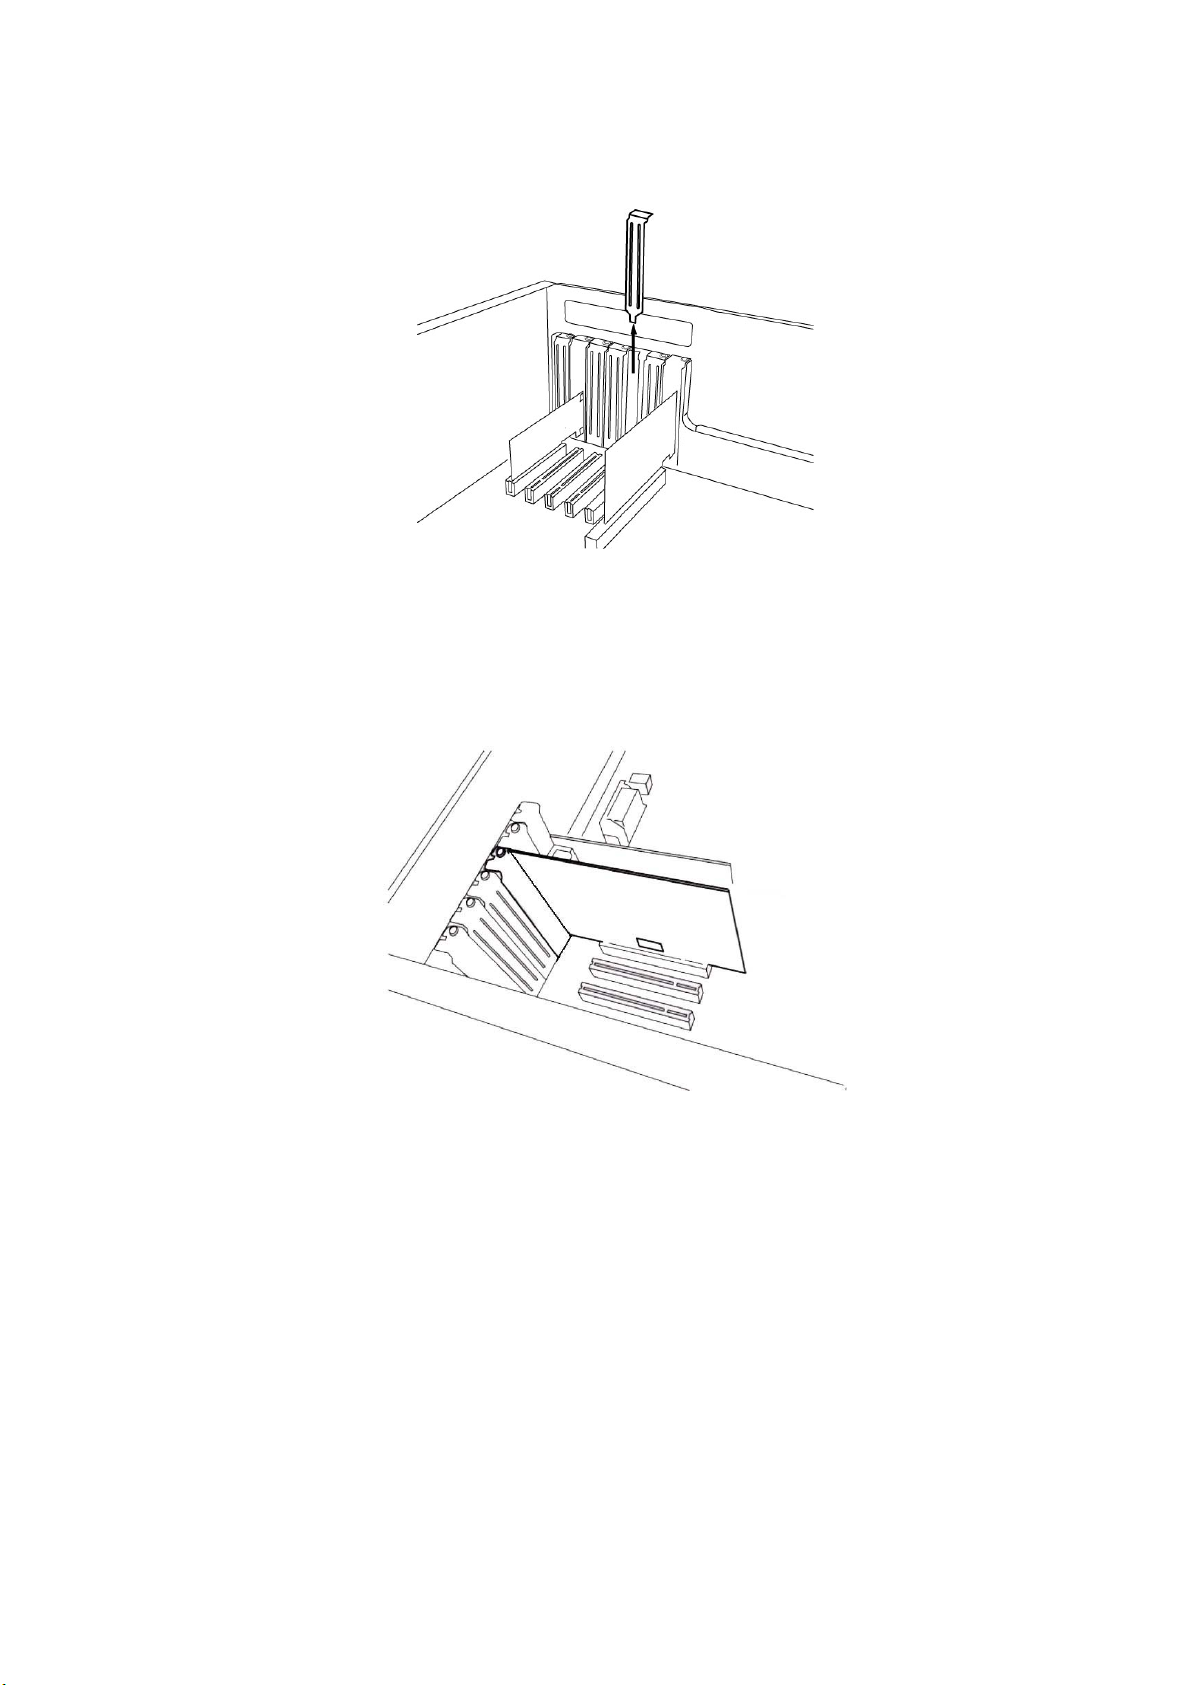
3. Next, Put the Audioterminal 010 PCI card into the slot and make sure it is placed in the
slot correctly. The card will fit into your slot and then tighten the screw.
4. Close the computer case.
9
Page 9

3. Audioterminal 010 Software Installation
After completing the installation of hardware for the Audioterminal 010, you need to install its driver’s
software to use it under Windows. The software installation is not too hard, even for computer beginners.
Just follow the steps below and you will complete it without any problems.
*** Caution – The Main board, which adapts new chipset, have to be install patch provided by
Main Board Company or Chipset manufacturer.
First, You have to check the company, model number, chipset of your main board and then download
patch from below links.
http://support.intel.com/support/chipsets/
http://www.amd.com/support/software.html
http://www.viatech.com/jsp/en/dr/driver.jsp
The installation steps under Windows 98SE, Windows Me, Windows 2000 and XP are a
little bit different from each other.
Below installation is the case of Windows 2000.
However, Driver installation procedure is similar to other Windows version.
1. After the hardware installation, turn on your computer. Windows will automatically recognize the AT
010 showing the message that it detected a ‘PCI Multimedia Audio Device.’
10
Page 10
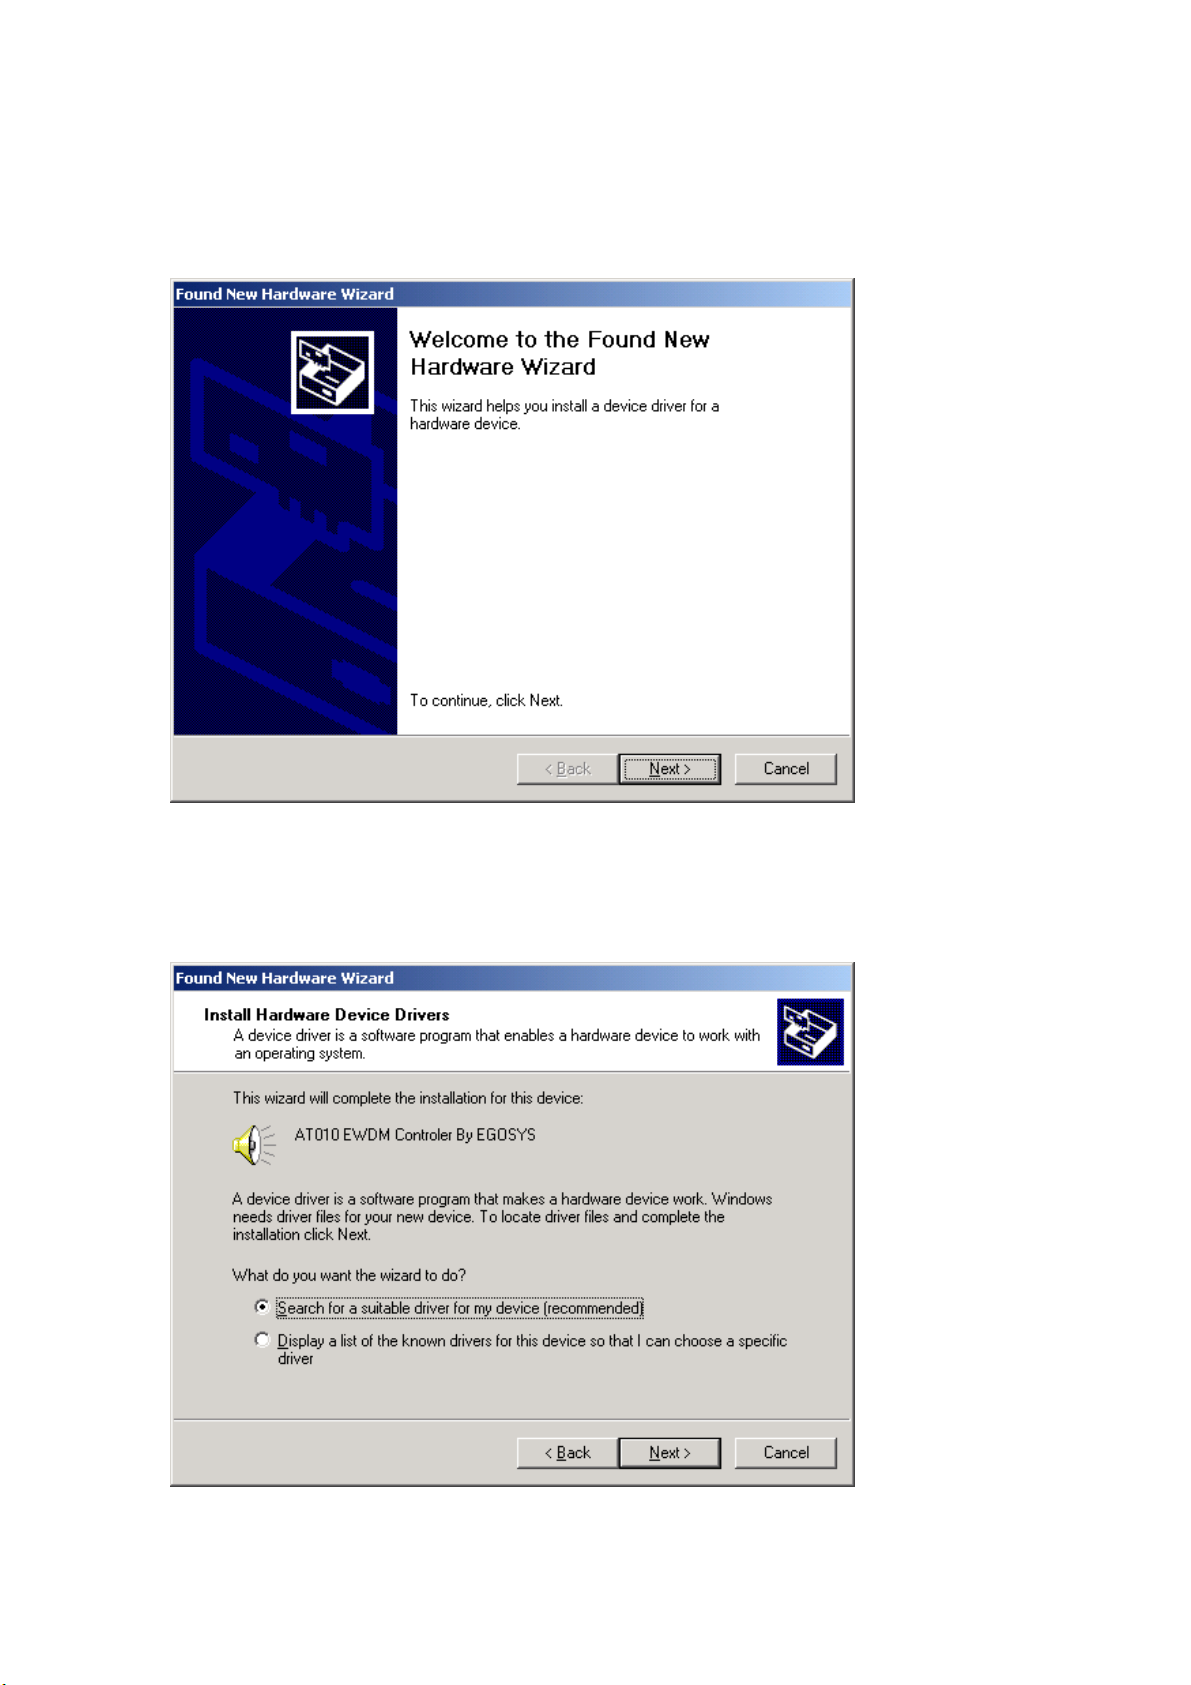
2. The ‘Found New Hardware Wizard’ will pop up in the following windows. Press Next.
3. Select ‘Search for a suitable driver for my device (recommended)’.
11
Page 11

4. Specify the location of the driver. Insert the provided diskette into the floppy disk drive and select
‘floppy disk drives.’
5. Now Windows will recognize the AT010 after searching for the installation files in drive A: and copy
them to the system.
12
Page 12

6. When you see this kind of messages, simply ignore it and just select ‘Yes’.
13
Page 13

7. Please follow Windows instruction, step by step.
Even your computer keep asking restart your computer, Keep going to install it step by step.
You need to install the rest of drivers.
When you see this kind of messages, simply ignore it and just select ‘No’.
14
Page 14

8. When you see this kind of messages again, simply ignore it and just select ‘No’.
Even your computer keep asking restart your computer, Keep going to install it step by step.
15
Page 15

16
Page 16

9. After install AT010 EWDM Midi1,2 , Finally You need to Reboot your computer.
10. After rebooting, Go to ‘My computer -> Control Panel -> System -> Device Manager’.
Check the devices under ‘Sound, video and game controllers’.
17
Page 17

4. Input/Output of the Audioterminal 010
Audioterminal 010 supports various multiple digital formats such as ADAT, TDIF, and R-BUS.
These formats support multi-channel (8 channel In/Out) via only one cable different from analog
type.
You can connect the Audioterminal 010 with external devices via Optical cable, TDIF cable or R-
BUS cable.
Please read carefully this manual and manuals of each relative devices such as multi-channel
recorder, digital mixer and digital mastering recorder.
Then you can use variety functions of the Audioterminal 010.
The Audioterminal 010 consists of a PCI card and an external connection cable.
In the PCI card, there are some connectors for important connection.
There are ADAT Optical In/Out port, 25-pin connector for TDIF, R-BUS and external connection
cable port.
Inside of the card, there are 2-pin connectors for word clock and CD digital Input.
The external connection cable has 1In/1Out MIDI interface and SPDIF digital In/Output (Coaxial).
18
Page 18

1. External Connection Cable Port
This port is connecting for the exclusive external connection cable that has 1In/1Out 16 channels
MIDI Interface and SPDIF (Coaxial) connection. This cable is provided with the Audioterminal 010.
As below picture, the cable consists of total 5 connectors. In the one side, there is an 8-pin
connector to Audioterminal 010. The other side, there are two small connectors for SPDIF digital
In/Out port and large connectors for MIDI interface In/Out. These 4 cables are labeled for
distinction.
2. Optical IN-ADAT 8 channel/ SPDIF 2 channel Input
This Optical Input port is used two different ways. You can select it on the Audioterminal 010
control panel.
- You can connect from external devices supporting ADAT format (ADAT multi
channel recorder or digital mixer)’s output to this port.
- You can connect from external device supporting SPDIF format (CD, MD, DAT)’s
output to this port.
3. Optical OUT-ADAT 8 channel/SPDIF 2 channel out
This Optical Output port also supports two different formats. You can select it on the Audio
terminal 010 control panel.
- You can connect from this port to external device supporting ADAT format (ADAT
multi channel recorder or digital mixer)’s input.
- You can connect from this port to external device supporting SPDIF format (CD, MD,
DAT)’s input.
19
Page 19

4. 25pin Dsub-TDIF/R-BUS Connection port
In this port, you can connect TDIF and R-BUS format. You can select it on the Audioterminal 010
control panel.
- You can connect external devices that adapting TDIF format from TASCAM via this
port. It’s possible to playback and recording 8 channel digital In/out in same time
using this one connector.
- You can connect external devices that adapting R-BUS format from Roland. It’s
possible to playback and recording 8 channel digital In/out in same time using this
one connector.
♦ Caution – You cannot use TDIF and R-BUS format at the same time.
5. The Audioterminal 010 Interface connection port
This port is made for the upgrade in the future. Don’t connect anything in this port because there
are no functions until now.
6. 7. WORD-IN/OUT
This port is for the matching Word Clock with other audio card/device. You can set Word Clock
between other card (ex.Waveterminal 2496) and Audioterminal 010 in this port. Word Clock Out
becomes a Master Word Clock and Word Clock In will be a Slave Word Clock.
8.9. EXT-IN/OUT
This port is for the matching Digital Clock with other audio card/device. Digital Clock Out
becomes a Master and Digital Clock In will be a slave.
10. CD-ROM Digital Audio Input
Audioterminal 010 provides an on-board 2-pin port that can be used to connect directly with CD-
ROM that have 2-pin digital output port. This allows you to transfer CD digital audio directly to
your PC with ease, and you can playback and recording your CD audio with Audioterminal 010.
20
Page 20

5. Audioterminal 010 Control Panel
If you complete the Audioterminal 010 hardware installation and software setup, you need to learn more
about the Audioterminal 010 Control Panel. This control panel is where you to control your setup for the
Audioterminal 010.
The Audioterminal 010 Control Panel is built for easy to use. However, it could give a complicated look
since there are many inputs and outputs. All input and output controls are the same. So, if you learn about
one control, you can use the others easily.
After successfully installing the Audioterminal 010 hardware and software, you can see the AT010 icon in
the system tray. This is the Audioterminal 010 control panel icon and the control panel will be launched as
you click on this icon.
1. Output Level Fader / Level Meter
2. Input Level Fader / Level Meter
3. Master Mixer Fader
4. Pull Down Menu
21
Page 21

1. Output Level Fader/Level Meter
These faders are the output volume control faders that controls 10 outputs of the Audioterminal
010.
10 outputs consist of 5 Stereo channels and you can adjust 8 Multi channels and SPDIF 2 channel.
Each faders act the same so you need to learn only one.
a. MUTE – Channel Mute button
Press these buttons to mutes the selected channel. When you press middle of this button, 2
channels become muted. If you press left or right of this button, selected channel becomes muted.
* This function only works when the Master Fader selected as ‘MAIN’.
b. SOLO – Channel SOLO Button
Press these buttons to output only the sound of a selected channel. When you press middle of this
button, 2 channels become muted. If you press left or right of this button, selected channels
becomes SOLO mode.
* This function only works when the Master Mixer Fader selected as ‘MAIN’.
c. Level Fader
Level Faders would change the level of the output volume. Each fader consists of stereo pairs.
However, you can control outputs individually or stereo pairs. You need to move the mouse
pointer over the specific port fader to adjust it individually or move the mouse pointer over the
middle of the two ports to adjust it as a stereo channel. If the port fader is selected, it will turn
into a brighter color.
You can move the fader in three different ways. Basically, the volume level can be adjusted by
±1.5dB.
- Drag the fader as you press the left mouse button.
- Select the fader with the mouse cursor and adjust with the mouse wheel. You can
select the steps from the pull down menu, ‘Config’ -> ‘Mouse Wheel’
- Select the fader with the mouse cursor and use the up and down arrows of your
keyboard.
* This function only works when the Master Mixer Fader selected as ‘MAIN’.
22
Page 22

d. Level Meter
The Level meter displays the signal level of the wave signal. You can see the level of each output
to compare them and adjust the level on the basis of these meters. If you wish to send out a wave
file to an external device, refer to the level meters to adjust the signal to the proper level.
e. Output Level Indicator
The Output Level Indicator shows the current level setting for each of the outputs. You can
compare the output levels based on this indicator in order to adjust the output level to a desired
level. Move the output level fader in order to set it to the proper level.
f. Channel Name display
It displays the function of each channel.
‘Out 1~8’ are output of multi channel port and ‘SPDIF’ are output of SPDIF port.
g. Group – fader group select button
You can make a group of 10 faders of the Audioterminal 010. Initial mode display ‘Group’. In this
mode, you can adjust level independently. When you press this button, it is changed from A to D.
Same groups are adjusted simultaneously.
23
Page 23

2. Input Level Fader
Input Level Fader’s functions are same as Output Level fader. See the ‘output level fader’ part for
reference.
3. Master Mixer Fader
a. MUTE – Master channel mute
Press this button to mute the sound of Mater Mixer
b. Sample Rate Display
It display selected sample rate. When you check ‘Lock’, you can set sample rate only in AT010
control panel and you cannot change sample rate in your applications. In this case, AT010 control
panel becomes the master clock provider.
c. Master Level Fader
Master Level Faders would change the level of the Master output.
d. Level Meter
The Level meter displays the signal level of whole signals.
e. Output Level Indicator
The Output Level Indicator shows the current level setting for Master output.
f. Master Mixer Mode select button
Master Mixer mode has three different modes.
-Mute – Master Mixer doesn’t work. 20 In/Out channels send signal directly without Master Mixer.
-MAIN- Send 20 channel’s signals to Multi channel 1,2. You can adjust each volume in each
channel’s fader. Multi channel 1,2 will adjusted in Master Mixer level fader.
-SPDIF – Same function as MAIN mode. Instead of Multi channel 1,2 send master output to SPDIF
Output port.
24
Page 24

4. Pull Down Menu
The Audioterminal 010 control panel includes a pull down menu bar that contains the
configuration for the Control Panel.
1. File - Exit
File – Exit will close the Audioterminal 010 Control Panel window but it will not shut down the Control
Panel. You can launch the Control Panel by clicking on the Audioterminal 010 icon in the system tray.
2. Config – Mouse Wheel
The Config –Mouse Wheel will control the mouse wheel adjustment. When you use the mouse wheel to
adjust the volume level, the adjustment step is set to ±1.5dB. You can configure the adjustment steps to
your preference.
- Step 1 : When you move the mouse wheel one step, the fader will move by ±1.5dB.
- Step 2 : When you move the mouse wheel one step, the fader will move by ±3.0dB.
- Step 4 : When you move the mouse wheel one step, the fader will move by ±6.0dB.
- Step 8 : When you move the mouse wheel one step, the fader will move by ±12.0dB.
3. Config – Latency
This will decide the latency of the Audioterminal 010. The Audioterminal 010 provides 7 different
sample buffer size; 48 sample ~2048 sample.
You must close your applications before change latency.
In case of Sonar, after change latency you need to click ‘Wave profiler’ again.
If the latency is changed, all your applications will be affected.
4. Config – Factory Default
This returns all the Audioterminal 010 configurations to their default setting.
5. Config - Always On Top
This will set the Audioterminal 010 control panel to always over other Windows. If this is not
selected, the active windows will be set over the Audio terminal 010 Control Panel.
7. Mapper
In case of using Direct Sound or MME driver, you can make selected 2 channel from 10 output
port of the Audioterminal 010 to stereo out. Driver device’s name is ‘AT010 STEREO Wave’. You
need to set it up in Multimedia Setup or system setup of applications and you can select Multi
25
Page 25

channel in this ‘Mapper’ menu.
8. Bus I/O
In this menu, you can make specific setting of the Audioterminal 010. Select multi channel port
such as ADAT, TDIF, R-Bus, Optical Port and digital clock.
<Audio I/O>
You need to select multi channel port in this menu.
You can select one format from ADAT,TDIF and R-Bus.
<Optical Port is.. >
You need to choose Optical port using as either ADAT format or SPDIF format.
<SPDIF In Option (RCA only)>
This will set the Audioterminal 010’s SPDIF input from RCA Coaxial port of external connection
cable or internal CD_IN port.
When you want to record or playback music CD of CD-Rom drive, you need to connect digital
output of your CD-Rom and CD_In of the Audioterminal 010. Then, select ‘Capture Digital (CD) In’.
26
Page 26

<SPDIF Mode>
This will set 2 channel digital output format of the Audioterminal 010.
- Consumer: (IEC 958 Type II)
- Pro: (IEC 958 type I)
<TDIF Emphasis>
When you select TDIF, you can select Emphasis function of TDIF in this menu.
<Clock Src>
Select this menu for choosing digital clock source of the Audioterminal 010.
- Internal: Selecting Internal makes the Audioterminal 010 as the master digital clock.
- TDIF : Selecting TDIF makes external TDIF device as the master digital clock.
- R-Bus: Selecting R-Bus makes external R-Bus device as the master digital clock.
- WORD [Fs]: Accept clock from external Word Clock [Fs] device via internal Word Clock of the
Audioterminal 010.
- ADAT: Selecting ADAT makes external ADAT device as the master digital clock.
- Digital (CD) In: When you accept input signal via CD_IN port of the Audioterminal 010, selecting
‘Digital In’ makes CD-Rom the master digital clock
- External In: Using when you accept digital clock of the other Audio card via EXT_IN port of the
Audioterminal 010.
- WORD [Fs256]: Using when you accept digital clock of external Word Clock device [Fs256] via
Word Clock port of the Audioterminal 010.
<TDIF Clock>
Using when you choose TDIF or set clock format of TDIF.
27
Page 27

6. Working with Applications
1. Cubase VST
After launching Cubase, go to ‘Option’ -> ‘Audio setup’ -> System.
Select ‘ASIO2.0-AT010’ for the ASIO device.
28
Page 28

2. Sonar
After launching Sonar, go to ‘Option’ -> ‘Audio’. Check ‘AT010 Stereo wave’ or ‘AT010 8channel
wave’.
Go to ‘Option’ -> ‘Audio’. Choose ‘AT010 Stereo wave’ or ‘AT010 8channel wave’.
29
Page 29

Go to ‘Option’ -> ’MIDI Devices’. Choose ‘AT010 Midi’ for MIDI port.
After set Latency you must click ‘Wave Profiler’ again.
When you work in 24bit mode, you must set ‘32bit PCM, left justified’
30
Page 30

31
Page 31

3. Nuendo
Go to “Device” -> Device Setup” -> VST Multitrack
Select ‘ASIO2.0 – AT010 for the ASIO Driver.
32
Page 32

4. Wave Lab
Go to ‘Option’ -> Preference -> Audiocard.
Choose ‘AT010 Stereo wave’ or ‘AT010 8 channel wave’.
24bit play works only on Win ME and 98SE+QFE(patch from Microsoft.).
In Win XP and 2000+Service Pack 2 doesn’t work.
However, recording has no problem.
33
Page 33

Specification
1ADAT Toslink I/O (8 channels)
1 TDIF/R-BUS I/O (25pin D-sub)
Supports 16 and 24 bit resolution
32, 44.1, 48, 64, 88.2, 96 kHz sampling rate support
1 in/ 1 out MIDI port, 16 MIDI channels
S/PDIF Digital Coaxial I/O
MIDI I/O can be usd for MTC sync and MMC devices
On-Board S/PDIF CD Digital In
On-Board Word Clock I/O (Fs)
On-Board External Clock I/O (256Fs) for multiple card
34
 Loading...