

Page 1
ThermoCheck
ThermoCheckThermoCheck
ThermoCheck
Windows
WindowsWindows
Windows
USER MANUAL
USER MANUALUSER MANUAL
USER MANUAL
Revision 1.6
Copyright © 2000-2004 Escort Data Logging Systems Ltd.
Page 2

Page ii
Page 3

Page iii
Contents
Introduction 1
Getting Started 3
ThermoCheck Keypad Overview 3
What You Will Need, to Use the Software 5
Installing the Software 5
Navigating the Software 6
Configuration Options 7
Connection 8
Battery Replacement 9
Setting Up a Database 10
Products 11
Processes or Locations 12
Database Orientation 15
Database Item Order 16
Product Specifications, Alarms and Delays 18
Templates 19
Uploading a Database 19
Command Summary 20
Setting Up Corrective Actions 22
Introduction 22
Creating Corrective Actions 22
Assigning Corrective Actions 23
Command Summary 24
Setting Up a User List 25
Adding and Removing Users 26
User Options 27
Command Summary 28
Customising the ThermoCheck 29
Customising With the Software 29
Customising Without Using the Software 32
Using the ThermoCheck 33
Using the ThermoCheck for the First Time 33
Selecting a Product and Process/Location 33
Taking and Storing a Temperature Reading 35
Logging On and Logging Off 36
Accessing Data Stored in the ThermoCheck 37
Downloading Readings 37
Viewing Listed Readings 37
Graphing Readings 38
Viewing a Graph 38
Printing Readings 39
Saving Readings to a File 40
Page 4

Page iv
Page 5

Page 1
Introduction
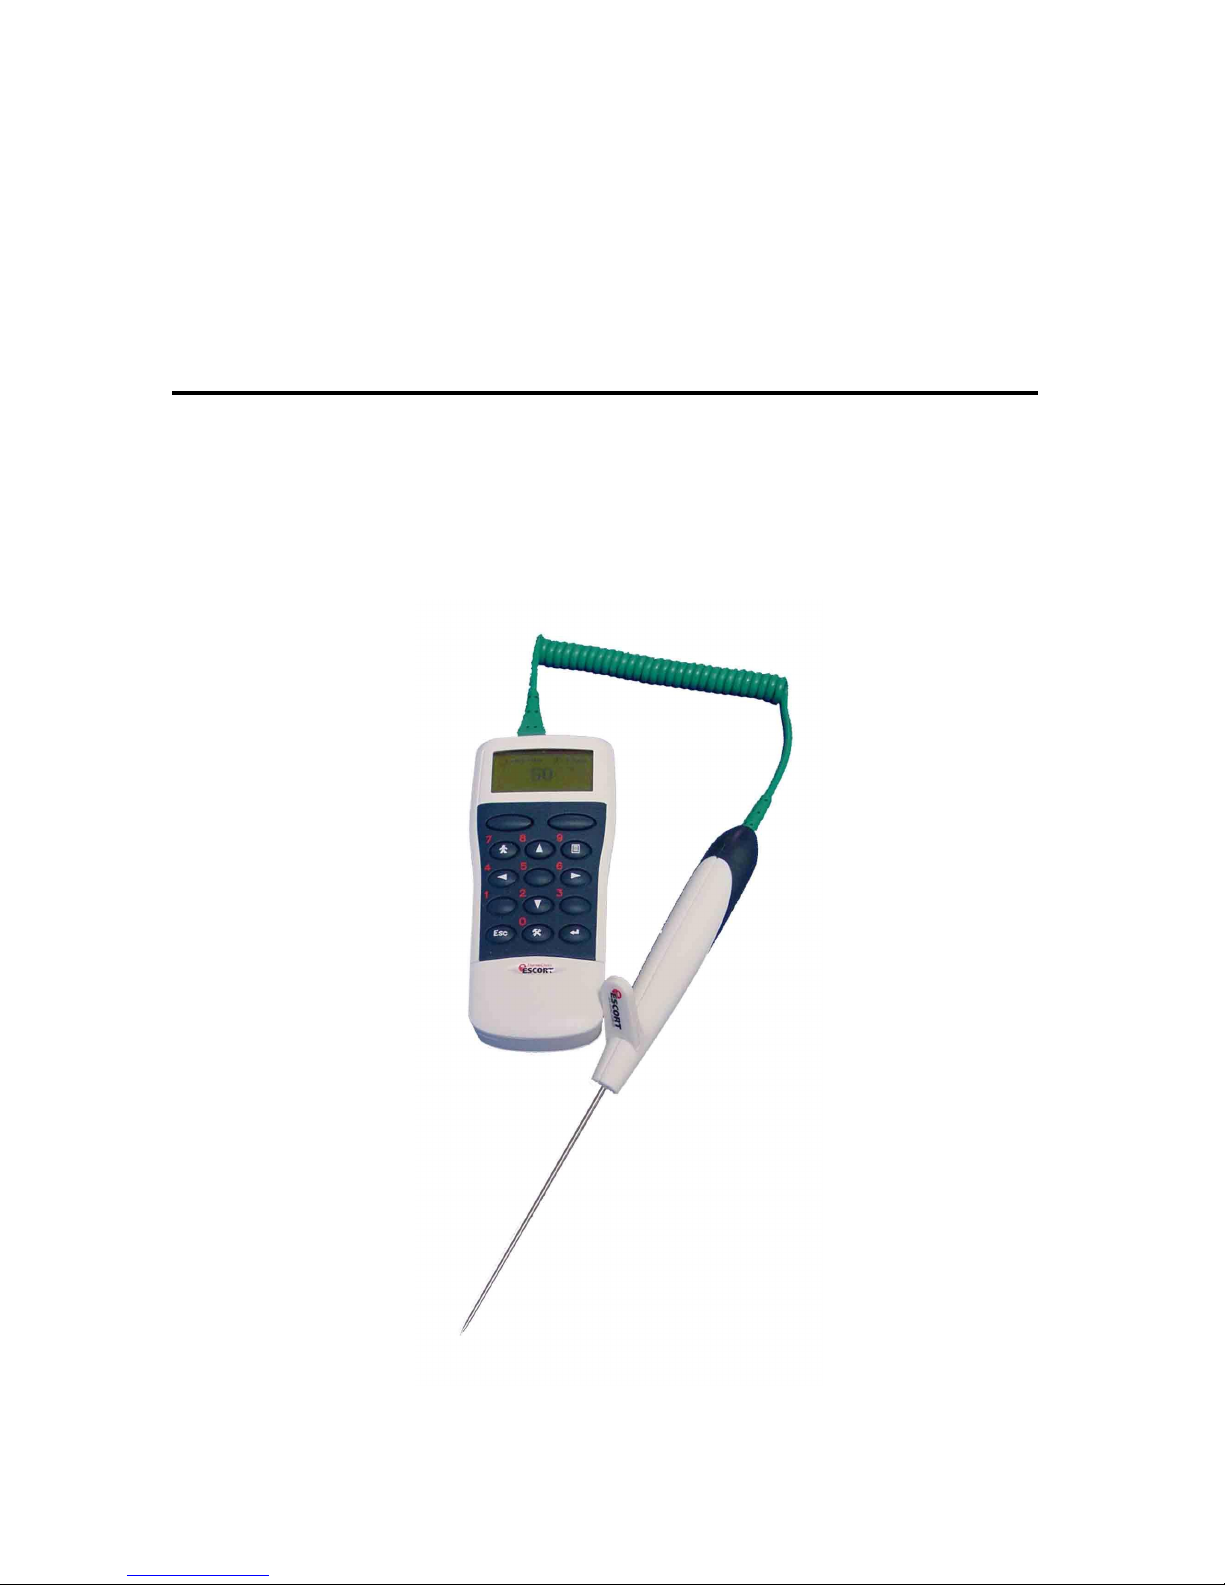
The ThermoCheck is a portable, handheld temperature meter and temperature measurement
storage device that facilitates the validation of quality control specifications for temperatures of
products at various stages of production and storage.
Product descriptions and process/location descriptions can be stored in a database within the unit.
Maximum and minimum temperature specifications for each process/location of products are stored
in the database. Such databases must be created and uploaded to the unit with the ThermoCheck
for Windows software.
Stored temperature readings include the temperature measured, the product name, the
process/location name and the date and time information for each temperature reading recorded.
Optional user identification (by unique PIN codes) is supported as a standard feature of the
ThermoCheck. The information that allows the identity of each user to be unique is controlled
through the ThermoCheck user software. If the tracking of unique user identification has been
enabled and the relevant information has been uploaded and stored in the ThermoCheck unit, then
each stored reading will also identify the name of the user that took the reading.
The user software provides the facility for the download (retrieval) and viewing of stored readings.
Readings are classified based on the product specifications for each process/location as stored in
the database. Downloaded data reading(s) can also be saved to disk files and/or printed to hard
copy through the user software.
Additionally, the software provides the facility to save database configurations to ‘template’ files on
disk. These files can be edited or uploaded to one or more units at a later date.
Page 6

Page 2
To use the ThermoCheck you will need to install the ThermoCheck software (please refer to Chapter
2, Installing the Software for more information about installing the software) onto a computer so that
a ThermoCheck can be configured.
To configure a ThermoCheck so that it will be able to take readings a Database will need to be
uploaded in to the ThermoCheck (please refer to Chapter 3, Setting Up a Database for further
information about creating and uploading a Database to a ThermoCheck). To configure a
ThermoCheck so that it records the user (or operator) that recorded the reading along with the
reading, a User List will need to be created and uploaded into the ThermoCheck. A User List can be
uploaded to a ThermoCheck before, after or at the same time as the Database is uploaded to the
ThermoCheck (please refer to Chapter 4, Setting Up a User List, for further information about
creating and uploading a user list to a ThermoCheck).
Once a Database and the optional user list has been uploaded to a ThermoCheck, the ThermoCheck
is ready to record readings (please refer to Chapter 6, Using the ThermoCheck, for further
information about recording readings with a ThermoCheck).
After one or more users have recorded readings, the readings can be downloaded to the computer
with the ThermoCheck software so that the readings can be viewed and analysed (please refer to
Chapter 7, Accessing Data Stored in the ThermoCheck, for further information about recording
readings with a ThermoCheck).
Page 7
Page 3
Getting Started
To use the ThermoCheck to record temperature readings, the unit will need a database configured,
linking products, process/location and product specifications. You can configure a database in the
unit with the user software.
To turn on the ThermoCheck press any key on the ThermoCheck's Keypad. Additionally, the
connection of external power, and connection to a computer's serial port will turn the ThermoCheck
on.
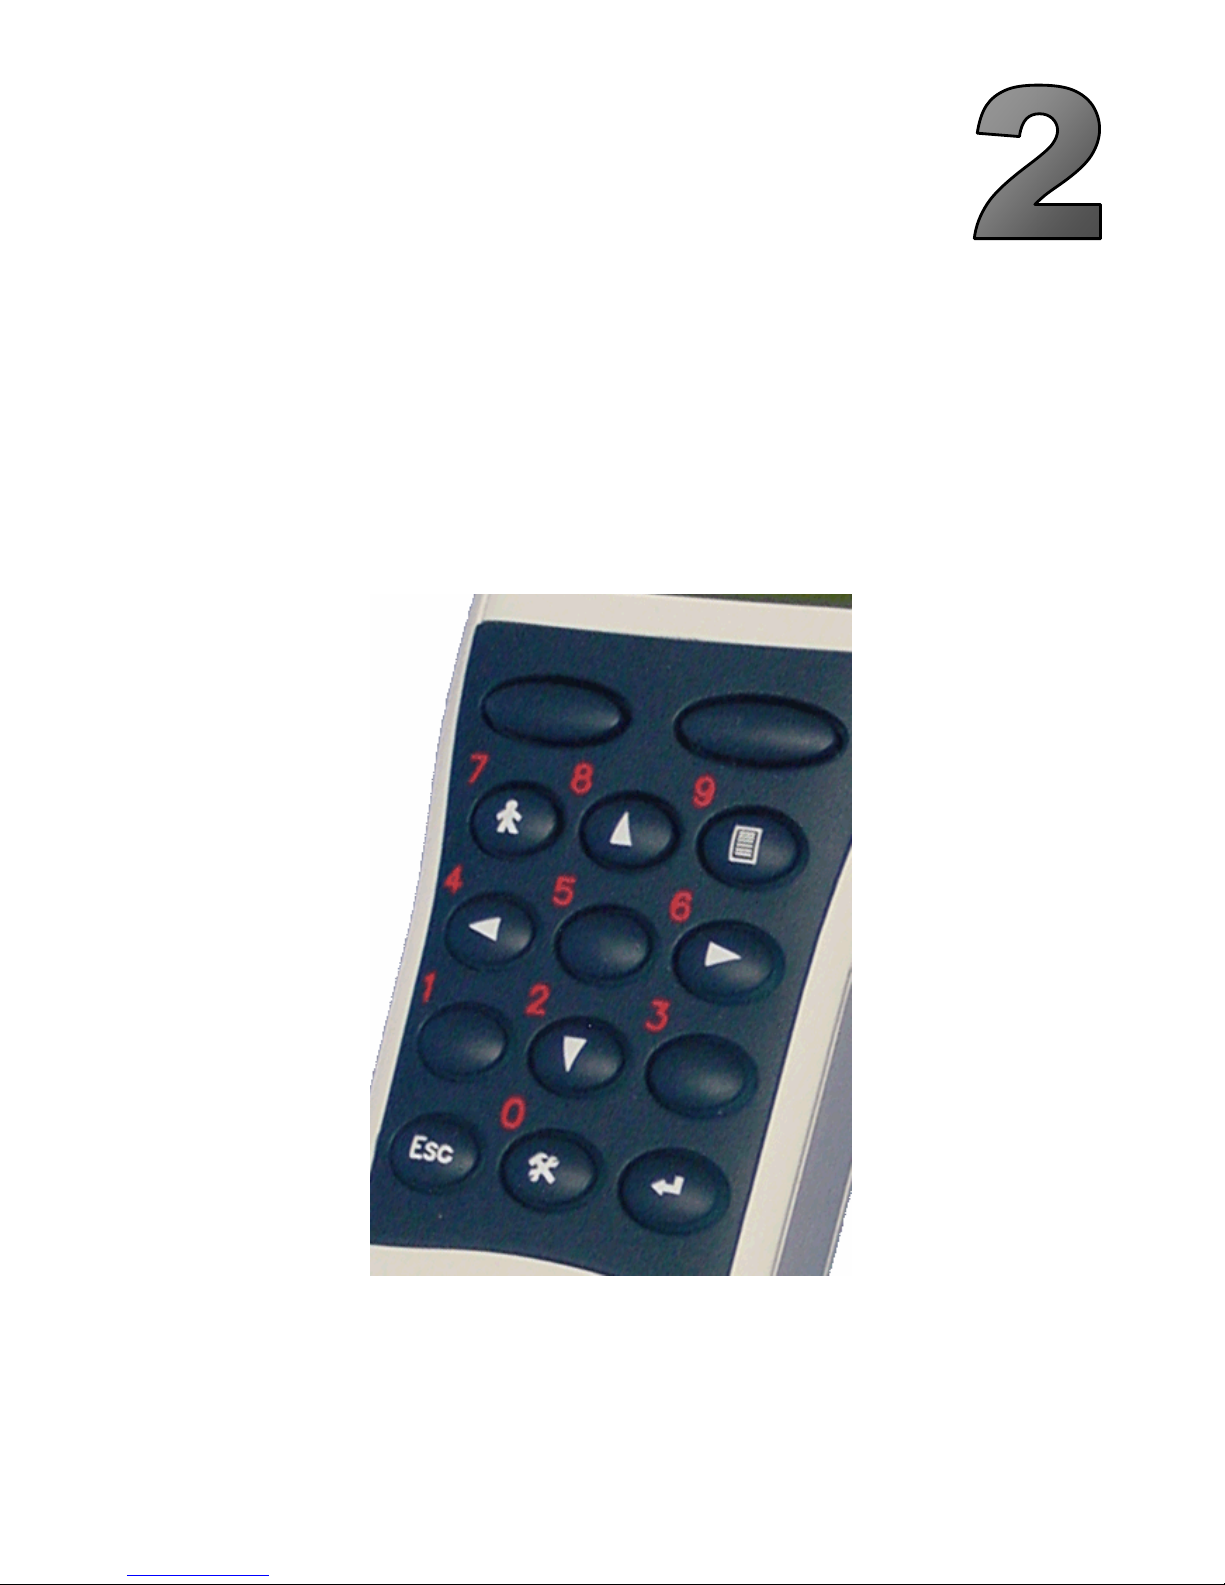
ThermoCheck Keypad Overview
ThermoCheck Keypad
Page 8

Page 4
OFF
Turns the ThermoCheck off (unless the ThermoCheck is currently off, in which
case pressing any button will turn the ThermoCheck on).
STORE
Instructs the ThermoCheck to record a reading for the currently selected product
at the currently selected process/location
“ENTER” Selects the current item (product, process / location or setup option)
on the display.
Deselects the last item selected (from pressing ENTER). Also used for deleting
the last data entry key pressed when providing data entry to the ThermoCheck.
“USER” Used for Logging a user on to (or off) a ThermoCheck, when the
ThermoCheck has been configured to support users.
“LIST” Used for selecting a product and process/location, so that a reading can
be stored. (See Selecting a Product and Process/Location in Chapter 6, Using
the ThermoCheck, for further information.)
Used for scrolling down through a list of products or a list of processes/locations
for selection.
Used for scrolling up through a list of products or a list of processes/locations for
selection.
Used for scrolling left through a list of products, a of list processes/locations for
selection. In the Setup options this is used for adjusting the values of the
settings.
Used for scrolling right through a list of products, a list of processes/locations for
selection. In the Setup options this is used for adjusting the values of the
settings.
“SETUP” Displays the options of the ThermoCheck for viewing and/or
modification. (See Customising Your ThermoCheck without the Software in
Chapter 5, Customising the ThermoCheck, for further information.)
Page 9
Page 5
What You Will Need, to Use the Software
Installation of the software requires 9.4 megabytes of free disk space, plus an additional 5.8
megabytes of free hard disk space during the installation process.
In order to use the ThermoCheck for Windows software, you will need an IBM-compatible PC with at
least one free serial communications (COM) port, a 386, or better, processor and at least 8
megabytes of memory, running the Windows 9x, NT, 2000 (or later) operating system.
Installing the Software
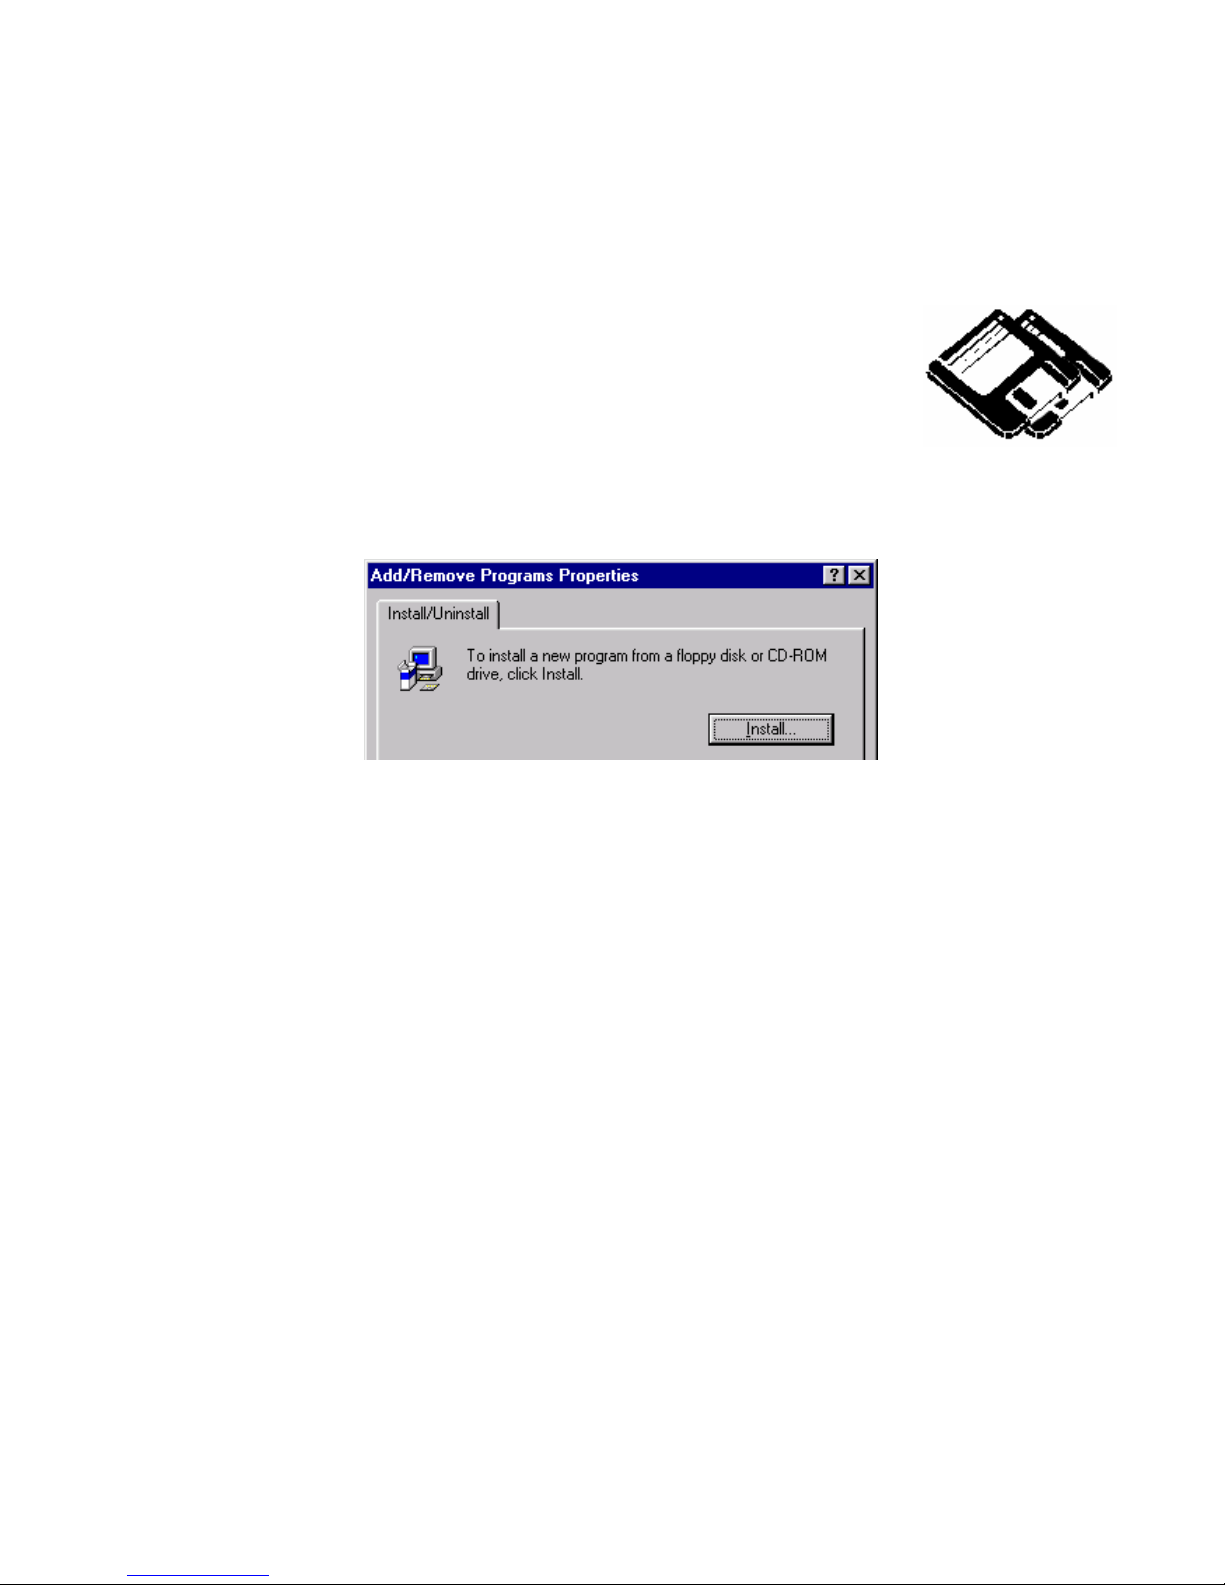
1. Ensure that Microsoft Windows is started.
2. Insert the ThermoCheck for Windows installation CD-ROM into your CDROM drive or the installation floppy disk into a disk drive.
For users using Microsoft Windows 95, NT 4.0, or later if the installation program does not
automatically start:
a. Start the Control Panel and choose the “Add/Remove Programs” icon.
b. Select the Install button and follow the instructions.
3. Once the ThermoCheck installation program has started, follow the instructions on the screen.
During the installation process you may change the directory you want the software to install to if
you want the software installed to a location different to the default. The installation program will
also create a ThermoCheck program group, which will also contain a ThermoCheck for Windows
icon so that the software can be started.
4. To run ThermoCheck for Windows, select the ThermoCheck for Windows icon from the
ThermoCheck program group on the Start menu. Alternatively, if you enabled the “Add a
shortcut to the desktop” option, you can start the software by opening the ThermoCheck for
Windows icon on your desktop.
5. The first time you run ThermoCheck for Windows, you may need to adjust the default
configuration. In particular, you may need to redefine the serial port the interface is plugged into.
See Configuration Options, later in this chapter, for further instructions.
After installing the software, we recommend you store the floppy disks or CDROM in a safe place.
WARNING: Keep magnets away from floppy disks as strong magnetic fields can damage data held
on such media.
Page 10

Page 6
Navigating the Software
When the software starts, there are five items on the menu bar. These five menus will give you
access to the various functions of the software:
File Allows opening, saving, closing and printing of ThermoCheck data reading files
and opening and saving of database configuration files.
Edit Provides commands for editing database information, such as product and
process/location details, and some selection commands for readings information.
Also provides access to software configuration options (see Configuration
Options, later in this chapter).
ThermoCheck Allows access to the configuration (refer to Chapters 3, 4 and 5) or the stored
readings (refer to Chapter 7, Accessing Data Stored in the ThermoCheck), in a
ThermoCheck connected to the PC.
Window Provides common commands for manipulating the position and size of windows.
Also provides a way to switch between currently open windows.
Help Provides access to distributor contact details, and an exact definition of the
software version.
Page 11
Page 7
Configuration Options
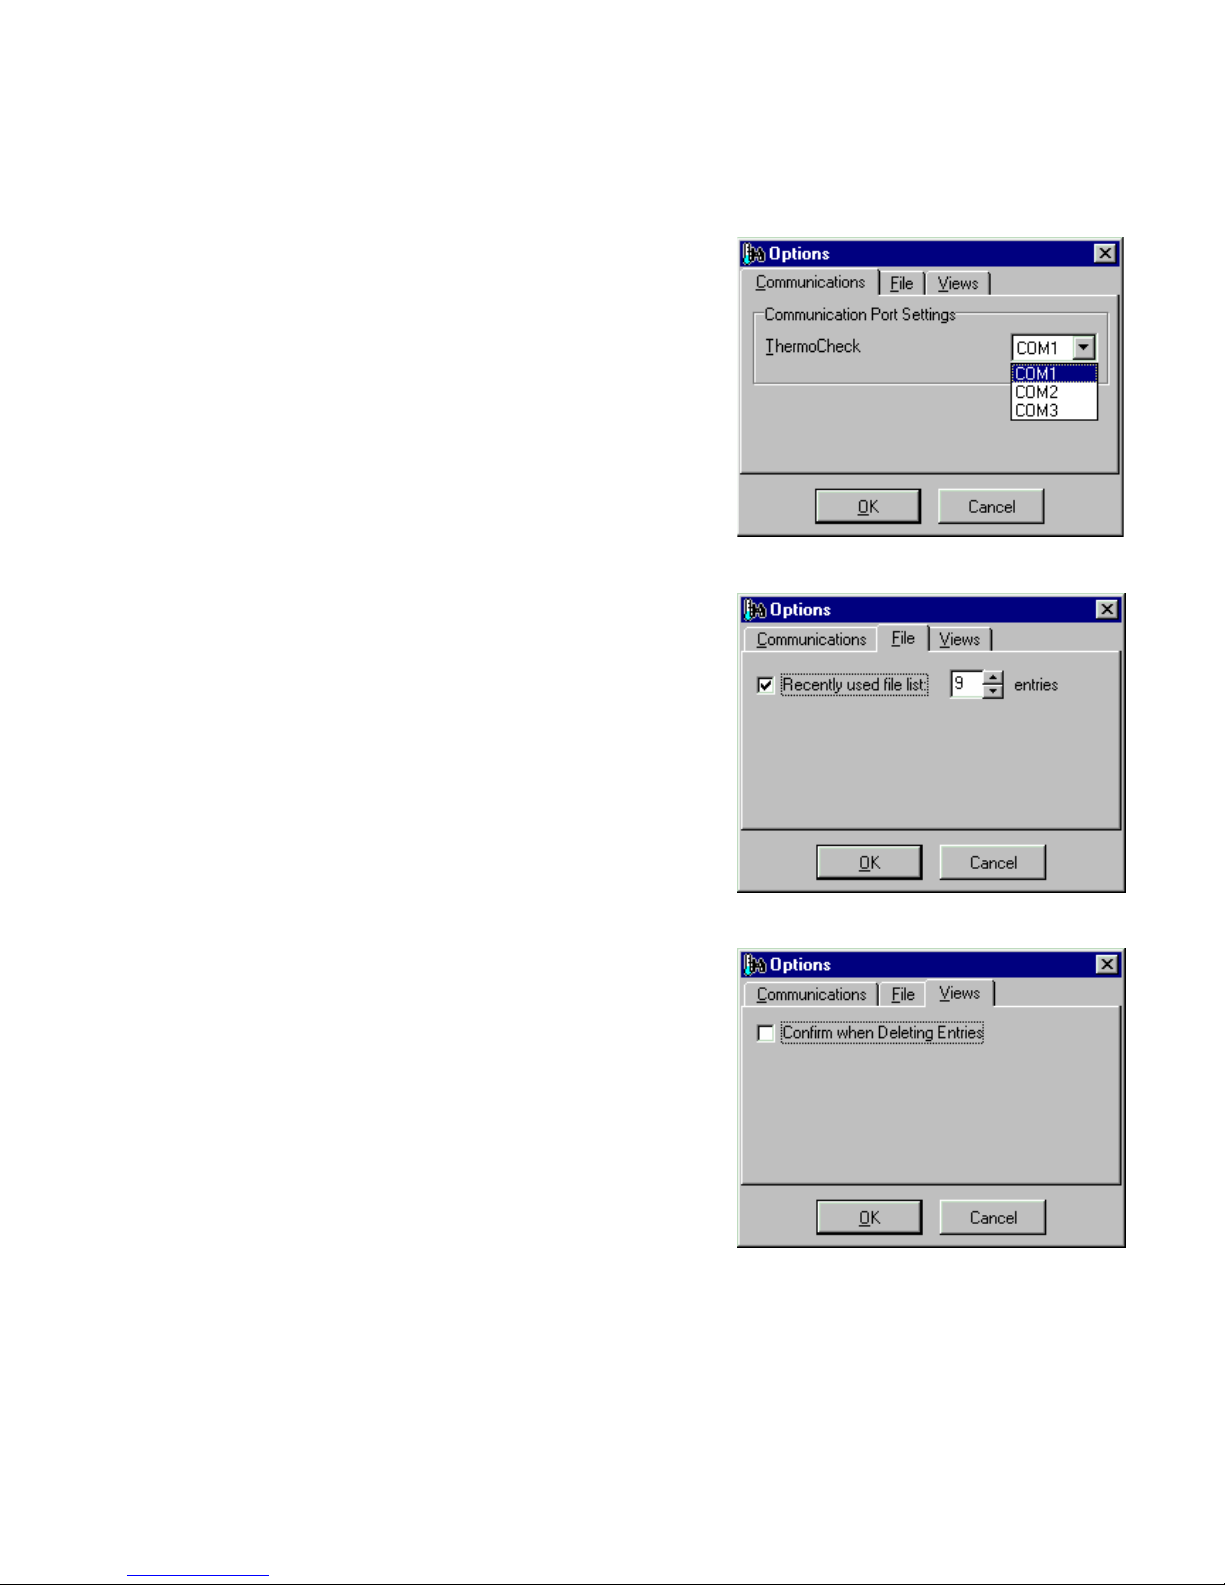
It is recommended that you first configure the software to ensure that the communications port that
the ThermoCheck is connected to matches the communications port that the software communicates
with. The default is the first serial communications port, COM1.
You can change the communications port setting by selecting
Options from the Edit menu. This will launch the Options
dialog box. You can now select the appropriate port from the
drop-down list ThermoCheck, in the Communications tab.
If you do not know which communications port to use,
contact your network administrator or computer vendor.
There are other options available in this dialog box:
On the File tab:
• Recently used file list. If this option is enabled, a list of
the most recently used files will be included in the file
menu, allowing you to quickly load recently used files.
You can specify how many files to display in the list by
changing the value in the box labelled entries.
On the Views tab:
• Confirm when Deleting Entries. If this option is
enabled, you will be asked to confirm the deletion of
entries in a database window, for example products or
users. If not enabled, items will be deleted immediately,
without confirmation. For more information about
database windows and entries, see Chapter 3, Setting Up
a Database.
Page 12

Page 8
Connection
To get the ThermoCheck to successfully communicate with the software, you will need to connect the
interface cable to a serial communications port on your PC. If you select Get Database from the
ThermoCheck menu, you will see a progress bar at the bottom of the program window, indicating
how far through the process the software is. When the process is complete, a database window will
appear on the screen. This window allows you to:
• Create and upload a database in the unit (Products and Processes/Locations). Please refer to
Chapter 3, Setting Up a Database, for further information.
• Create and upload a user list (Users). Please refer to Chapter 4, Setting Up a User List, for
further information.
• View and modify configuration settings of the ThermoCheck (Settings). Please refer to Chapter
5, Customising the ThermoCheck, for further information.
Page 13
Page 9
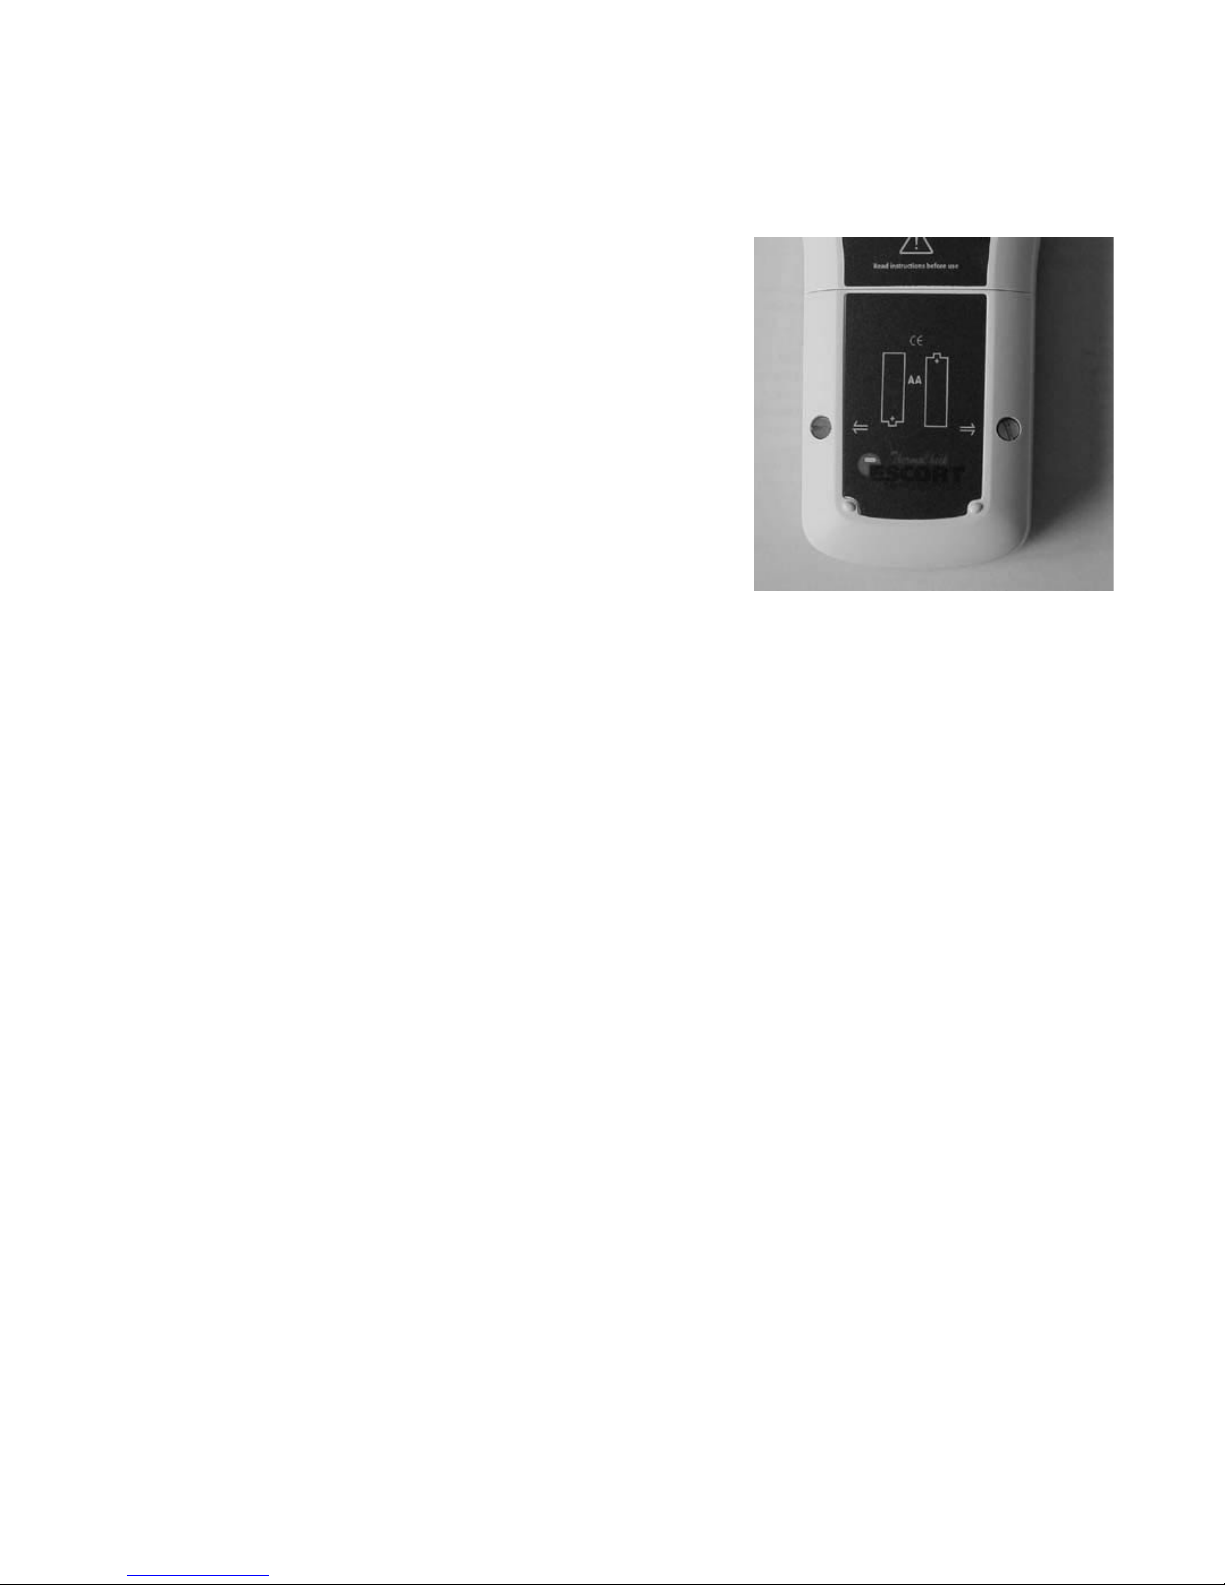
Battery Replacement
Your ThermoCheck requires two (2) AA batteries to operate. You can use either alkaline or rechargeable (for example, NiCd or NiMH) batteries, however please remember that you must NEVER
attempt to charge alkaline batteries.
To insert the batteries:
1. Remove the ThermoCheck battery cover by placing the
unit face down, removing the two screws, and then lifting
the cover free.
2. Insert the two batteries with the correct polarity (as marked
inside the compartment and also on the label) into the
battery compartment.
3. Before replacing the lid, ensure that the batteries are fully
inserted. If the batteries are not inserted correctly, the lid
will not fit properly, and could consequently damage the
seal or the batteries.
4. Carefully place the cover of the battery compartment back
on, and gently tighten the two screws.
5. Your ThermoCheck is now operational.
Remember, do not attempt to charge non-rechargeable batteries. If you are using non-rechargeable
batteries with your ThermoCheck, ensure that the Recharge option is disabled (see Chapter 5,
Customising the ThermoCheck, for more information).
If you take less than two minutes for this procedure, the internal time clock will keep running.
Otherwise it may revert to midnight on 1 Jan 2000, and will need to be set next time a database is
sent to the unit. In the Settings panel (see Chapter 5), ensure the radio button labelled “Match
computer date and time” is selected.
Page 14
Page 10
Setting Up a Database
In order to use the ThermoCheck, you need to create a product database. Databases link individual
products with the processes/locations of their production at which you may want to monitor
temperature. In addition, you can define upper and lower specification limits and alarm conditions, at
each of the processes/locations involved in a product’s production, to match quality control
specifications. Databases can only be created and modified by using the ThermoCheck software.
You can define an empty database by selecting New from the File menu, or download the settings
from the unit to start from by selecting Get Database from the ThermoCheck menu. Alternatively,
you can work from a pre-defined template by selecting Open from the File menu, to open a template
file (see Templates, later in this chapter). Either method will display a database window in the main
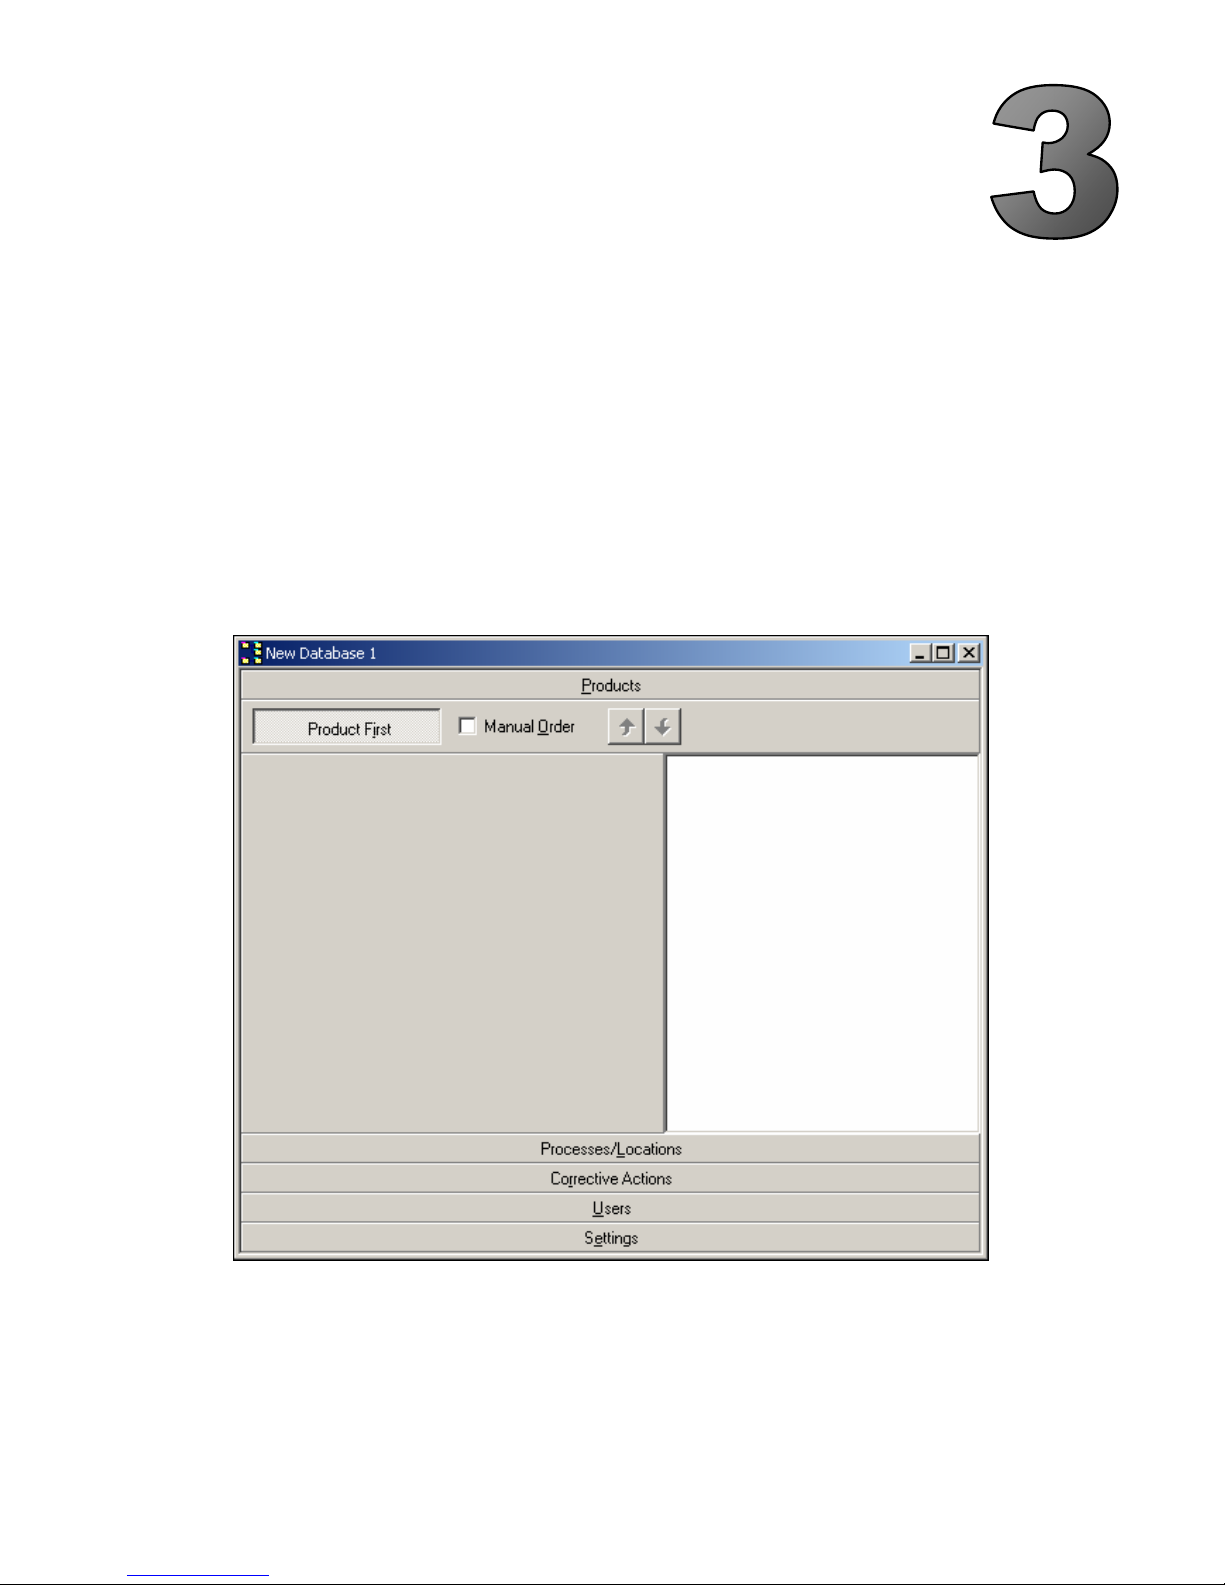
application window.
An empty Database Window
Page 15

Page 11
The database window has panel buttons for products, processes/locations, users, and the
ThermoCheck’s settings. When you click on each one of these panel buttons, you will be able to
change the settings for that category in the panel that is revealed. Note that you can select a
product, process/location, or user in the Products, Processes/Locations or Users panels by either:
• left-clicking once on the product, process/location, or user’s name,
• or using the arrow keys to move the current selection up and down the list displayed in the current
panel.
Products
Products represent the physical items or objects whose temperature needs monitoring. If you click
on the Products button in a new database window, or a database window downloaded from a
ThermoCheck without a database already in it, you will see a blank panel. You can add new
products, and add new processes/locations to a product, as follows:
• Select New, or New Product, from the Edit menu to add a new product.
• Select New Process/Location from the Edit menu to add a new process/location to the current
product. Note that you cannot add a process/location in the product view if there are no products.
• If there is no current selection, no products are currently defined or a product is currently
selected, press [Insert] to add a new product. You can then type the product’s name.
• If a process/location is selected, press [Insert] to add another process/location. You can then
type the process/location name.
Products Panel in the Database Window
Page 16

Page 12
All product names must start with a capital letter and the software will ensure that each product does
start with a capital letter. Product names can not be blank (empty) and therefore the software will
ensure that no products are created without a valid name.
The Products panel lists products, displaying each product’s available processes/locations in a list
under the product name. You can display a product’s process/location list:
• by pressing [+] when the product is selected,
• or by left clicking with the mouse on the plus symbol beside the product’s name.
You can hide the list, if it is visible, by clicking on the minus symbol beside the product’s name. If a
product is currently selected, you can hide the list of processes/locations under it by pressing the [-]
key.
You can change a product or process/location name by:
• typing the new name directly into the appropriate field on the left,
• selecting the current name, clicking on it with the mouse, and typing the new name,
• or pressing [F2] when a product or process/location is selected, and typing the new name.
When you are editing a product or process/location name, and you wish to revert back to the original
name, you can press [Esc], and the original name will be restored. If the product or process/location
has just been created, and you are naming it for the first time, pressing [Esc] will delete the new
product or process/location.
You can delete an existing product by selecting it and pressing the [Delete] key, or selecting Delete
from the Edit menu. If the Confirm when Deleting Entries option is enabled in the Configuration
Options (see Chapter 2, Configuration Options, for further information) then you will need to confirm
the deletion operation before the product is deleted.
Processes or Locations
Processes or locations represent the stages in the production of a product at which the temperature
needs monitoring. A process/location can apply to more than one product; for example, a “cooking”
process could apply to both mince pies and sausage rolls. Such a process/location (that applies to
multiple products) does not have to represent the same physical process/location. For example, the
cooking of sausage rolls and mince pies may occur in different ovens, in different parts of the factory;
but the conceptual process of cooking can be used to represent both cooking processes in the
ThermoCheck’s database if you so wish.
If you click on the Processes/Locations button in a new database window, or a database window
downloaded from a ThermoCheck without a preloaded database, you will see a blank panel. By
default, the Processes/Locations panel lists processes/locations in alphabetical order, and displays
under each process/location a list of products. For example, if you have added products and
processes/locations with the Products panel, as above, you will see a list of the processes/locations
you previously entered in the Processes/Locations panel.
Page 17

Page 13
Process/Locations Panel in the Database Window
You can expand the list of processes/locations to show the different products under each
process/location:
• by pressing [+] when the process/location you want to expand is selected,
• or by left clicking with the mouse on the plus symbol beside the process/location name.
As with the products panel, you can hide a list of products under a process/location, if it is visible, by
clicking on the minus symbol beside the process/location name. If a process/location is currently
selected, you can hide its list of products by pressing the [-] key.
You can delete a process/location by selecting it and pressing the [Delete] key, or selecting Delete
from the Edit menu. If the Confirm when Deleting Entries option is enabled in the Configuration
Options (see Chapter 2, Configuration Options, for further information) then you will need to confirm
the deletion operation before the process/location is deleted.
Page 18

Page 14
You can change a product or process/location name by:
• typing the new name directly into the appropriate field on the left,
• selecting the current name, clicking on it with the mouse, and typing the new name,
• or pressing [F2] when a product or process/location is selected, and typing the new name.
When you are editing a product or process/location name, and you wish to revert back to the original
name, you can press [Esc], and the original name will be restored. If the product or process/location
has just been created, and you are naming it for the first time, pressing [Esc] will delete the new
product or process/location.
The Products panel and the Processes/Locations panel both display the same information of the
products and processes/locations for the current database. However, they organise the information
differently: the products panel lists products, with available processes/locations listed under each
product, whereas the processes/locations panel lists processes/locations, with the applicable
products for each process/location listed under each process/location. You do not need to update
each panel manually when you alter the information in one. Any product or process/location added,
modified or deleted in one panel will be automatically updated in the other panel.
As with the products panel, you can add new processes/locations and products in the
Processes/Locations panel:
• Select New, or New Process/Location, from the Edit menu to add a new process/location.
• Select New Product from the Edit menu to add a new product to the current process/location.
Note that you cannot add a product in the Processes/Locations panel if there are no
processes/locations.
• If there is no current selection, press [Insert] to add a new process/location. Type the
process/location name, and press the [Enter] key.
• If a process/location is selected, press [Insert] to add a new process/location. Type the
process/location name, and press the [Enter] key.
• If a product is selected, press [Insert] to add a new product to the process/location. Type the
product’s name, and press the [Enter] key.
All process/location names must start with a capital letter and the software will ensure that each
process/location does start with a capital letter. Process/location names can not be blank (empty)
and therefore the software will ensure that no process/location is created without a valid name.
Page 19

Page 15
Database Orientation
In addition to entering product and process/location details, the software allows you to specify
whether the database is to be primarily oriented around products, or processes/locations. This
setting determines whether the operator of the ThermoCheck chooses the product first, and then the
process/location, or alternatively, the process/location and then the product. Note that some
versions of the ThermoCheck do not support modification of the database orientation. If your
ThermoCheck does not support this feature, or you are unsure if this feature is supported by your
ThermoCheck, please contact your local distributor for information on upgrading your ThermoCheck.
For example, if the operator of the ThermoCheck is to take readings by visiting each process/location
in turn, taking readings for each of the products at the process/location, before moving on to the next
process/location, Process/Location first orientation would suit best. You can choose this orientation
by clicking the Process/Location first button at the top of the Processes/Locations panel. This will set
processes/locations as the primary key into the database, and Processes/Locations can be referred
to as the primary items. When operating the ThermoCheck, this means that process/location items
will be selected by the user first, and then products. Products, in this case, can be referred to as
secondary items. For information on how database orientation affects the use of the ThermoCheck
unit, see Chapter 6, Using the ThermoCheck.
However, if the operator of the ThermoCheck were to collect readings for each product, at various
processes/locations, before moving on to the next product, then Product first orientation would be an
appropriate choice. You can choose this orientation by clicking the Product first button at the top of
the Products panel. This orientation sets product items to be the primary items, and consequently
the processes/locations will be the secondary items.
When uploading a database to the ThermoCheck, or saving a database to a template file, any
secondary items that are not associated with a primary item will be lost. For example, when Product
first is selected, any processes/locations in the Processes/Locations panel that do not have any
associated products will be lost when the database is uploaded or saved. In the opposite case, when
Process/Location first is selected, any products that are not associated with a process/location will be
lost when the database is saved or uploaded. In general, any secondary items must be included (by
association with a primary item) in the primary panel in order to be preserved after the database is
saved or uploaded.
Page 20

Page 16
Database Item Order
The software allows you to:
• manually define the order of each of the items in the database, or
• have the database items automatically sorted in alphabetical order.
These options are controlled via the Manual Order checkbox in the Products and
Processes/Locations panels.
Please note that not all versions of ThermoCheck support these options. If your ThermoCheck does
not support these options, or you are unsure if your ThermoCheck supports these options, then
please contact your local distributor for information on upgrading your ThermoCheck.
To enable manual ordering:
If a database has Process/Location first enabled, check the Manual Order checkbox in the
Processes/Locations panel, or
If a database has Product first enabled, check the Manual Order checkbox in the Products panel.
If manual ordering is disabled, the items in the primary panel will be alphabetically sorted
automatically. Note that the items in the secondary panel will always be sorted alphabetically.
When manual ordering is enabled, only database items in the primary panel can be manually
reordered. The order of the items in the primary panel will represent the order that items will be
displayed to the user during use of the ThermoCheck. For example, if a database has Product first
enabled, and manual ordering is enabled, the items in the product panel can be manually ordered.
Alternatively, if a database has Process/Location first enabled, and manual ordering is enabled, the
items in the Process/Location panel can be manually ordered.
Note that if Manual Order is checked, the ThermoCheck will treat the database as manually ordered
regardless of whether or not the items in the database are in alphabetical order or not. Please refer
to Chapter 6, Using the ThermoCheck, for more information on how Manual Order affects the
operation of the ThermoCheck unit.
When manual ordering is enabled, items in the primary panel can be ordered
using the Move Up and Move Down buttons, the Move Up and Move Down
commands on the Edit menu, or by dragging with the mouse.
Page 21

Page 17
To move a product up or down within the list of products:
Ensure that the products panel is currently displayed and the Product first button is down.
Ensure that manual order is enabled, by checking Manual Order.
Select the product you wish to move.
Move the product to the desired position by:
• clicking the Move Up or Move Down buttons,
• selecting Move Up or Move Down from the Edit menu,
• using keyboard shortcuts [Ctrl-Page Up] and [Ctrl-Page Down], or
• dragging the product to the desired position in the list.
To move a process/location up or down within a list of processes/locations under a product:
Ensure that the product panel is currently displayed and the Product first button is down.
Ensure that manual order is enabled, by checking Manual Order.
Select the process/location you wish to move.
Move the process/location to the desired position by:
• clicking the Move Up or Move Down buttons,
• selecting Move Up or Move Down from the Edit menu,
• using keyboard shortcuts [Ctrl-Page Up] and [Ctrl-Page Down], or
• dragging the process/location to the desired position.
To move a process/location up or down within the list of processes/locations:
Ensure that the Process/Location panel is currently displayed and the Process/Location first button is
down.
Ensure that manual order is enabled, by checking Manual Order.
Select the process/location you wish to move.
Move the process/location to the desired position by:
• clicking the Move Up or Move Down buttons,
• selecting Move Up or Move Down from the Edit menu,
• using keyboard shortcuts [Ctrl-Page Up] and [Ctrl-Page Down], or
• dragging the process/location to the desired position in the list.
To move a product up or down within a list of products under a process/location:
Ensure that the process/location panel is currently displayed and the Process/Location first button is
down.
Ensure that manual order is enabled, by checking Manual Order.
Select the product you wish to move.
Move the product to the desired position by:
• clicking the Move Up or Move Down buttons,
• selecting Move Up or Move Down from the Edit menu,
• using keyboard shortcuts [Ctrl-Page Up] and [Ctrl-Page Down], or
• dragging the product to the desired position.
Page 22

Page 18
Product Specifications, Alarms and Delays
You can enter specification limits for each of the products you have defined, at each critical
process/location, in either the Products panel, or the Processes/Locations panel. An upper
specification is the maximum allowable temperature for a product at a given process/location, and a
lower specification is the lowest allowable temperature at the given process/location.
The software will indicate when and which readings have been recorded that are above or below
these values when viewing the reading data. For information on viewing readings, and how the
specification values affect the display of readings in the software, see Chapter 7, Accessing Data
Stored in the ThermoCheck.
Additionally, you can set alarms for a product at a process/location for the upper and/or lower
specification values. When alarm condition has been violated (when a reading is above the upper
specification value or below the lower specification value) the unit will beep and display an alarm
symbol on the display.
You can set specification values to match your organisation's quality control specifications. Note that
the specifications for a product may vary widely between processes/locations, for example:
• mince pies, in the freezer, might have an upper and lower specification of –20°C to –15°C
respectively,
• but during cooking, the upper and lower specification may be 160°C to 180°C.
The unit also supports a probe reading storage delay at each process/location for a product. A
reading storage delay is useful in situations where the temperature of the product may require time to
stabilise to ensure a fair and accurate reading is recorded. Setting a reading storage delay value
ensures that when a reading is taken, whoever the operator is, the sensor is given enough time to
record an accurate reading. If a reading storage delay is configured for a product at a
process/location, the display will flash WAIT, and the unit will sound a series of beeps, for the
configured reading storage delay, before storing the reading.
To set up the specifications for a product, in the Products panel:
• Select the appropriate process/location, under the chosen product.
• Enter the upper and lower specification values in the Upper and Lower boxes, in the
Specifications group, in the panel to the left of the tree view.
• If you require an alarm on the upper or lower specification, tick the appropriate checkbox(es) in
the Alarms group.
• If the probe will need a reading storage delay, enter this in Reading Storage Delay. This delay is
specified in seconds.
The process is the same for setting specifications in the Processes/Locations panel, except that the
first step involves selecting the product under the chosen process/location (as opposed to the other
way around).
Page 23

Page 19
Templates
When you have set up a database, you can also save it to a Template file, for future use. To do this,
select Save or Save As from the File menu. Type in the name of the file you want to save the
template database as, and click Save. Template files typically have a .tlf extension. You can open
these files by selecting Open from the File menu. Once a file is opened, you can alter it to the
present requirements. You can then upload a template into the ThermoCheck, replacing its current
database information, in the normal manner. Templates also include user information (see Chapter
4, Setting Up a User List, for information on users). You can use a template to set up more than one
ThermoCheck with the same database and user list.
Uploading a Database
When you have set up the database to your requirements, you can upload it to the ThermoCheck by
selecting Set Database from the ThermoCheck menu. If the ThermoCheck contains readings that
have not yet been saved to a file, you will be prompted for a file name to save the reading information
to. Note that uploading a blank database (with no products or processes/locations) will not remove
any current product-process/location database in the ThermoCheck. For information on using the
reading data in the ThermoCheck, refer to Chapter 7, Accessing Data Stored in the ThermoCheck.
Page 24

Page 20
Command Summary
Below follows a summary of useful commands available for setting up and editing a product and
process/location database. The keyboard shortcuts for menu items are included.
Products Panel
[Left-mouseclick] Selects a product or process/location.
[Ctrl-P], [Ctrl-N] Adds a new product.
[Ctrl-L] Adds a new process/location.
[Insert] If there is no selection, or a product is selected, a new product will be added.
[Insert] If a process/location is currently selected, a new process/location to the current
product will be added.
[Delete] If a product is currently selected, then this selected product will be deleted.
[Delete] If a process/location is selected, then the selected process/location will be
removed from the current product. Note that the process/location will remain in
the Processes/Locations panel until it is deleted directly from the
Process/Locations Panel.
[F2] Allows the name of a selected product or process/location to be changed.
[+] If a product is selected, and it has a list of process(es)/location(s), which is
hidden, the list of processes/locations for the selected product will become
visible.
[-] If a processes/locations list is visible under the selected product, then this key
will hide the list of processes/locations.
[*] Expands all products to show all the processes/locations of all the products.
[/] Hides any visible processes/locations lists visible under products, causing only
the products to remain visible.
[Esc] When editing a product or processes/locations name, restores the original name.
If the item (product or process/location) has just been added, deletes the item.
[Ctrl-Page Up] If a product is selected, moves the product up the tree.
[Ctrl-Page Up] If a process/location is selected, moves the process/location up within the list of
processes/locations under the parent product.
[Ctrl-Page Down] If a product is selected, moves the product down the tree.
[Ctrl-Page Down] If a process/location is selected, moves the process/location down within the list
of processes/locations under its parent product.
Page 25

Page 21
Processes/Locations Panel
[Left-mouseclick] Selects a product or process/location.
[Ctrl-L], [Ctrl-N] Adds a new process/location.
[Ctrl-P] Adds a new product.
[Insert] If there is no selection, or a process/location is selected, a new process/location
will be added.
[Insert] If a product is currently selected, a new product to the current process/location
will be added.
[Delete] If a process/location is currently selected, then this selected process/location will
be deleted.
[Delete] If a product is selected, then the selected product will be removed from the
current process/location. Note that the product will not be removed from the
Products panel until it is deleted directly from the Products Panel.
[F2] Allows the name of a selected product or process/location to be changed.
[+] If a process/location is selected, and it has a list of product(s), which is hidden,
the list of products for the selected process/location will become visible.
[-] If a product list is visible under the selected process/location, then this key will
hide the list of products.
[*] Expands all processes/locations to show all the products of all the
processes/locations.
[/] Hides any visible product lists visible under locations, causing only the locations
to remain visible.
[Esc] When editing a product or process/location name, restores the original name. If
the item (product or process/location) has just been added, deletes the item.
[Ctrl-Page Up] If a process/location is selected, moves the process/location up the tree.
[Ctrl-Page Up] If a product is selected, moves the product up within the list of products under its
parent process/location.
[Ctrl-Page Down] If a process/location is selected, moves the process/location down the tree.
[Ctrl-Page Down] If a product is selected, moves the product down within the list of products under
the parent process/location.
Page 26

Page 22
Setting Up Corrective Actions
Introduction
Corrective actions are used to prompt the user to perform certain actions when the readings to be
stored are not within specification and records which action the user has selected to perform.
Creating Corrective Actions
To include corrective actions for various products, first add the corrective action meanings to the
“Corrective Action” panel. You press the [Insert] key in the Corrective Actions panel, and then type
the name (or other descriptive text) of the corrective action. You can also add a user by selecting
New or New Corrective Action from the Edit menu. Corrective action names can not start or finish
with spaces, so if a corrective action name is created with leading spaces, for example, then the
software will remove all the leading spaces. Also each corrective action created must have a
corrective action name and therefore blank (empty) corrective action names are not supported and
the software will prevent these from being created.
You can delete corrective actions by selecting their name in the Corrective Actions panel and
pressing the [Delete] key, or by selecting Delete from the Edit menu. If the Confirm when Deleting
Entries option is enabled in the Configuration Options (see Chapter 2, Configuration Options, for
further information) then you will need to confirm the deletion operation before the user is deleted.
In order for any changes you make to the Corrective Actions list to take effect in the ThermoCheck
you assign the corrective actions to the appropriate products and must upload the database with the
Set Database command.
Page 27

Page 23
Corrective Actions Panel in the Database Window
Assigning Corrective Actions
Once you have created the corrective actions to be assigned to various products, select the Products
panel or the Processes/Locations panel. Select the product and process/location that you want to
assign one or more corrective actions to and you will notice that now the corrective actions are listed
in the corrective actions list box for each item. Placing a tick for the appropriate corrective action(s)
will assign the corrective action to the product for each process/location. Removing the tick for the
appropriate corrective action(s) will disassociate the corrective action from the selected products.
Only corrective actions that are assigned to products and their process/location will be stored within
the memory of the ThermoCheck when the new/modified database is uploaded, through the Set
Database command.
Page 28

Page 24
Assigning Corrective Actions to Database items
Command Summary
[Left-mouseclick] Selects a corrective action.
[Ctrl-R] Adds a corrective action.
[Insert] If there is no selection, or a corrective action is selected, a new corrective action
will be added.
[Delete] If a corrective action is currently selected, then this selected corrective action will
be deleted.
[F2] Allows the name of a selected corrective action to be changed.
[Esc] When editing a corrective action name, restores the original name. If the
corrective action has just been added, deletes the item.
Page 29

Page 25
Setting Up a User List
Setting the ThermoCheck up to include user information is optional. The advantage of setting up a
user list in the unit is that reading information stored in the ThermoCheck will also include the name
of the user who performed each reading. When a user list is defined in the unit, a user must be
logged on before any readings can be taken. Only one user may be logged on at any one time.
Enabling a user list also allows you to protect the database from unauthorised tampering and also
restrict viewing of the stored readings to those that can authenticate, with a password, that they are
authorised to do so. Note that all users defined in the unit are authorised to take readings for all
products defined in the unit.
For example, if your application is security-conscious, you may wish to set up a single user in the
unit, so that only one person is able to configure and use the ThermoCheck. Alternatively, you may
want to set up multiple users. For example, you could set up a single operator to be responsible for
taking readings for each product, and allow another person to be responsible for downloading the
reading data and setting up the database.
You can add and remove users from the Users panel in a database window. You can view this panel
by clicking the Users button in a database window.
The user list can be uploaded to the unit, along with the product/location database and configuration
settings, via the Set Database command. See Uploading a Database in Chapter 3, Setting Up a
Database, for more information.
Page 30

Page 26
Users Panel in the Database Window
Adding and Removing Users
The method for adding users is much the same as that for adding products or processes/locations.
You press the [Insert] key in the Users panel, and then type the name (or other descriptive text) of
the user. You can also add a user by selecting New or New User from the Edit menu. User names
can not start or finish with spaces, so if a user name is created with leading spaces, for example,
then the software will remove all the leading spaces. Also each user created must have a user name
and therefore blank (empty) user names are not supported and the software will prevent these from
being created.
You can delete users by selecting their name in the Users panel and pressing the [Delete] key, or by
selecting Delete from the Edit menu. If the Confirm when Deleting Entries option is enabled in the
Configuration Options (see Chapter 2, Configuration Options, for further information) then you will
need to confirm the deletion operation before the user is deleted.
In order for any changes you make to the user list to take effect in the ThermoCheck you must
upload the database with the Set Database command.
Page 31

Page 27
User Options
When a user is selected, their password and PIN code are shown in the panel next to the user list.
For security and privacy reasons, PIN codes and passwords are displayed as a series of asterisks.
The PIN code identifies the user currently operating the ThermoCheck. Therefore PIN codes must
be unique to each user and no two users may have the same PIN code. A PIN code is made up of
up to eight digits. Other characters, for example alphabetic characters, are not allowed to be any
part of a PIN code, as the unit only allows for the entry of numbers through its keypad.
The software uses a user’s Password to prevent unauthorised usage of the ThermoCheck, including
modification of the database and the retrieval and viewing of the stored readings. Passwords are
optional and can consist of up to 16 characters, including both letters and numbers. In addition, the
password is case-sensitive and therefore lowercase characters are identified as being different to
upper case characters. Passwords can not start or finish with spaces, so if a password contains
leading spaces, for example, then the software will remove all the leading spaces.
Page 32

Page 28
Command Summary
[Left-mouseclick] Selects a user.
[Ctrl-U] Adds a new user.
[Insert] If there is no selection, or a user is selected, a new user will be added.
[Delete] If a user is currently selected, then this selected user will be deleted.
[F2] Allows the name of a selected user to be changed.
[Esc] When editing a user name, restores the original name. If the user has just been
added, deletes the item.
Page 33

Page 29
Customising the ThermoCheck
Customising With the Software
If you click the Settings button in the database window, the configuration settings panel will become
visible. Any changes you make to these settings will not take effect until the database is uploaded to
the ThermoCheck.
Settings Panel in the Database Window
Page 34

Page 30
General Information
This box displays general information about the ThermoCheck, including the serial number, product
code and battery status. Note that the serial number, product code and battery status will only be
displayed if the database was downloaded from a ThermoCheck. You can also type in a description
here, which will be displayed at the top of the screen when the unit is powered up (once the database
has been uploaded to the ThermoCheck).
Display Settings
You can set up how you want the display to show dates and temperatures in the Display Settings
box. Choose your preferred temperature units from the Temperatures in drop-down menu and your
preferred date format from the Format of date drop-down menu. There are other options for the
time format. The effect of changing any options in this box is shown at the bottom of the box, with an
example of the computer’s current date and time.
Display Controls
These slider controls in the Display Controls box allow you to set up the properties of the display.
All of the settings in this box can also be set in the unit directly; see Setup Screen below.
You can choose an appropriate contrast setting by moving the Contrast slider. Increasing the
Contrast setting will cause the characters on the ThermoCheck's display to darken. Please
remember that changing the Contrast value will not have any affect on the display until the (new)
settings are uploaded.
The number of seconds the LCD backlight will wait, when no keys are pressed, before turning off,
can be set with the Backlight slider.
You can also set the auto power off delay with the Auto off slider. This value is the number of
minutes that the unit will wait, when idle, before turning the power off itself. The Backlight and Auto
Power Off features can be disabled by moving their sliders all the way to the left, to their lowest
settings.
High values of the Auto off and/or Backlight controls will reduce the battery life of the unit.
Page 35

Page 31
Date and Time
You can adjust the ThermoCheck’s internal time clock with the options in this box. If you click Match
computer date and time, the unit’s time clock will be set to match your PC’s internal clock. Note
that this will only occur if the settings are uploaded to the unit (with the Set Database command).
Select the No change option if you do not want to have the ThermoCheck’s clock updated.
Power Settings
• If the unit has rechargeable batteries installed, check the Re-chargeable batteries installed box
to enable charging of the batteries.
This option must not be enabled if your ThermoCheck has non-rechargeable batteries
installed. Therefore, only enable this option if your ThermoCheck has rechargeable batteries
installed.
WARNING: If you enable this option, the ThermoCheck will try to charge the batteries whenever it is
externally powered. If the batteries installed in your unit are non-rechargeable they may explode or
cause damage.
Page 36

Page 32
Customising Without Using the Software
If you press the SETUP key when the unit is turned on, the current state of the configuration options
will be shown on the display. This setup screen gives access to some of the options available in the
Configuration Settings panel of the database window of the software.
The available configuration options are:
Contrast This is the same as the Contrast setting in the Display Controls box.
Light Backlight off time delay. This is the same as the Backlight setting in the Display
Controls box.
Auto off Auto power off time delay. This is the same as the Auto off setting in the Display
Controls box.
Recharge This is the same as Re-chargeable batteries installed in the Power Settings box.
You can change the values of these options by using the up and down arrow keys to select the
option, and then pressing the ENTER key. The cursor will now point to the current value of the
selected option. You can change the value with the left and right arrow keys.
When you are satisfied with a value, you can press the ENTER key to set the value, or you can press
the ESCAPE key to cancel, to cause the value to revert back to its original setting. When the cursor
points to one of the options, you can press the ESCAPE or SETUP key to exit the setup screen. The
display will briefly show the power-up screen, including the firmware version and battery voltage, and
then revert to displaying the unit’s current date, time and temperature reading.
For example, to change the contrast setting:
Press the SETUP key. The display will show the setup screen.
The cursor is already pointing at the “Contrast” setting.
Press ENTER to move the cursor to the contrast value.
Use the left and/or right arrow keys to change the setting.
When you are satisfied with the setting, press ENTER again to set the value, or ESCAPE to cancel.
The cursor will move back to the left.
Press ESCAPE to exit the setup screen.
Page 37

Page 33
Using the ThermoCheck
Using the ThermoCheck for the First Time
If your ThermoCheck is turned off, you can turn it on by pressing any key on the keypad, or by
attaching external power, or by connecting a computer. When a ThermoCheck is powered up, the
battery voltage, along with the firmware version, will be shown on the display. This power-up screen
is shown every time the unit is turned on, or the configuration settings are viewed or changed (see
Customising Without Using the Software, in Chapter 5, Customising the ThermoCheck, for
information on updating the unit’s settings).
“No database” is also displayed on the power-up screen if the unit does not have a database
installed. If a database has been preloaded in the unit, the number of free readings will be displayed.
In addition, there may be a description of the ThermoCheck at the top of the screen. You can set or
change this description in the software (see Customising With the Software, in Chapter 5,
Customising the ThermoCheck).
After two and a half seconds, the display will show the ThermoCheck’s current date and time along
with the current temperature, if the sensor probe is plugged in. If a user is logged on, this screen will
also display the name (or description) of the user that is currently logged on.
When the unit’s battery requires charging or replacement, an empty battery symbol will flash in the
top right-hand corner of the display screen. If the batteries are rechargeable, you can charge them
by connecting external power and by ensuring that the Recharge option is enabled (see Customising
Without Using the Software, in Chapter 5, Customising the ThermoCheck). While the battery is
charging, the battery symbol in the top right of the display screen will repeatedly fill with black. When
the battery has completely charged the symbol will disappear.
A ThermoCheck requires a database before it is able to take any readings. Please refer to Chapter 3,
Setting Up a Database, for further information about creating and uploading databases to the
ThermoCheck.
Selecting a Product and Process/Location
Before taking a product’s reading, you first need to install a database in the unit to store the different
products and processes/locations. Processes/locations refer to the various stages in the production
of a product at which you are interested in monitoring the product’s temperature, to ensure (for
example) that quality control guidelines are met.
For information on defining a product and process/location database, refer to Chapter 3, Setting Up a
Database. Once you have a database relating products and processes/locations stored in the unit,
you can select products and processes/locations and then record temperature readings.
In addition, if you want to store an operator’s name with a reading, you will need to install a user list
in the unit. For information on user lists, refer to Chapter 4, Setting Up a User List. If a user list has
Page 38

Page 34
been installed in the unit, a user will need to log on before a reading can be recorded (see Logging
On and Logging Off below).
The database orientation affects the process of selection of products and processes/locations for
recording readings. If the database process/location oriented, a process/location (the primary key) is
selected first and then a product under that process/location (the secondary key) is selected before a
reading is taken. Alternatively, if the database is product oriented, a product (the primary key) is
selected first and then a process/location (the secondary key) under that product is selected before a
reading is taken.
If a database is not manually ordered, a letter of the alphabet is chosen before a list of primary key
items is displayed, centred around items beginning with the chosen letter. For example, if the
database is process/location oriented, a list of processes/locations will be displayed, centred around
the letter previously chosen. Alternatively, if the database is product oriented, a list of products is
displayed, centred around the letter previously chosen. If the database is not automatically sorted
alphabetically, the primary items are presented in the order specified when the database was
created.
To begin taking readings, first press the PRODUCT button. If there is a user list installed in the unit
and no user is currently logged on, a user will have to log on, via the log-on screen, before continuing
(see Logging On and Logging Off, later in this chapter, for more information). Then a primary item is
selected (as above), and then a secondary item is selected, after which a reading can be taken.
The following examples illustrate the selection of a product and process/location in order to take a
reading.
For example, if the database is product oriented, manual ordering is disabled, and there is no user
list installed in the unit:
Press
Select, using the arrow buttons, the letter of the alphabet corresponding to the initial of the product
you wish to measure the temperature of, and press ENTER.
Select a product, using the up and down arrow buttons, and press ENTER.
Select a process/location, using the up and down arrow buttons, and press ENTER.
Alternatively, if the database is process/location oriented, manual ordering is enabled, and there is a
user list installed:
Press
Enter a valid user PIN code, using the digit keys, and press ENTER (see Logging On and Logging
Off, later in this chapter, for more information).
Select a process/location, using the up and down arrow buttons, and press ENTER.
Select a product, using the up and down arrow buttons, and press ENTER.
Page 39

Page 35
Once you have made a selection of a product and a process/location, the screen will display:
• the currently selected product and process/location,
• the current date and time,
• the current reading of the temperature probe,
• and, if a user list is installed in the unit, the current user’s name.
If at this stage you want to select a different secondary item, under the current primary item, you can
do so with the left and right arrow keys. For example, if the database is process/location oriented,
you can select a different product under the current process/location by using the arrow keys.
Alternatively, if the database is product oriented, you will be able to select different
processes/locations under the current product by using the arrow keys.
Taking and Storing a Temperature Reading
Once a product and process/location has been selected, the unit will display the current reading
registered by the sensor probe.
• If the reading is above specification, HIGH will be displayed next to the reading.
• If the reading is below specification, LOW will be displayed next to the reading.
• In addition to the above, if the alarms has been enabled for the upper and/or lower specifications,
an alarm symbol will be displayed next to the temperature reading, if the temperature reading
violates the alarm conditions.
• If the reading is within specification, OK will be shown next to the value.
To store the reading, press the STORE button.
• If there is a reading storage delay specified for the currently selected product and
process/location, WAIT will be displayed next to the reading, and beeps will sound from the
ThermoCheck, until the reading storage delay has passed. Note that it is advisable that the
temperature probe sensor remains motionless during the reading storage delay to ensure
accuracy of the stored reading.
• If alarms are enabled for upper and/or lower specifications, and the reading violates the alarm
conditions, beeps will sound as the reading is stored.
For information on setting specification values, alarms and reading storage delays, refer to Chapter
3, Product Specifications, Alarms and Delays.
The reading is then stored, and the unit will briefly display the number of free readings available and
then return to displaying the current reading. You can now:
• take another reading for the currently selected product and process/location
• select another process/location for the current product,
• or press right/left arrow, LIST or ESCAPE to select another product.
Page 40

Page 36
Logging On and Logging Off
If there is a user list installed in the unit, you will need to log on to identify yourself before a reading
can be taken. If no users are currently logged on, you can do this by pressing the key or
the key, which will bring up the log-on screen. Only one user may be logged onto a single
ThermoCheck at one time, therefore logging a new user on to a ThermoCheck will log the previous
user off. It is optional to install a user list to the ThermoCheck.
You can log a user off by pressing the key and then pressing the key. If no PIN
code is entered, any user currently logged on is logged off.
The log-on screen prompts for a user PIN code by displaying “ENTER PIN:”. Type in valid user PIN
and press the key. If the PIN is recognised, the display will show the user’s name on the
screen.
If you pressed the key, the product selection screen will be displayed and you can select a
product and process/location as above. If you pressed the key, you can now select a
product and process/location in the normal way by pressing the key. The process of taking
readings is the same as when there is no user list installed in the unit, but the reading data stored will
always include the name of the user who was logged onto the ThermoCheck when the reading was
recorded.
You can continue taking readings without having to log on for each new product. When you have
finished, remember that you can log off by pressing the key and then pressing the
key. For information regarding users, refer to Chapter 4, Setting Up a User List.
Page 41

Page 37
Accessing Data Stored in the ThermoCheck
Downloading Readings
To download the reading information stored in the unit, select Get Readings from the ThermoCheck
menu. If users are defined in the unit, you will be prompted to enter a username and password. If
the user name and the password are valid, the reading information will be downloaded from the
ThermoCheck. The retrieved data will be displayed and listed in a new window.
Viewing Listed Readings
The list window displays each reading as a row in a list. There is a column for each aspect of the
reading, including:
• the date and time the reading was stored
• the product name and/or description
• the process/location of the product that the reading refers to
• the recorded temperature
• whether the reading of the product was above, below or within the specification range for the
process/location
• the name of the user that was logged on and performed the reading, if a user list was defined in
the unit at the time of the reading.
The list can be sorted by any of these categories by clicking on the column header. Clicking again
on the header will reverse-sort the list with respect to that category.
Page 42

Page 38
At the top of the list window is a menu, which allows you to specify how data is grouped. There are
five options:
View ungrouped Select this option to view the values in a list, which can be sorted
by any of the column headings.
Group by Product Select this option to display a separate sub-list of readings for
each product.
Group by Process/Location Select this option to display a separate sub-list of readings for
each process/location.
Group by User Select this option to display a separate sub-list of readings
performed by each user.
Group by Year:Month Select this option to display a separate sub-list of readings for
each month.
Graphing Readings
You can create a graph of the readings with the Graph button at the top of the list window (next to
the grouping menu). First choose a grouping of the data with the grouping menu, and then click the
Graph button. The graph is displayed in a new graph window. The grouping you choose affects the
units of the x-axis. For example, if you graphed readings that were grouped by process/location, the
x-axis would include all of the processes/locations in the graphed data.
You can graph a subset of the data by clicking and dragging the mouse over the data you want to
graph, or clicking on individual rows, in the list window, before clicking Graph.
Viewing a Graph
When viewing a graph, you can zoom in on a certain part of the graph by clicking and dragging a
rectangle. The area inside the rectangle you defined will enlarge to fill the window.
The Y-axis can display either numbers of readings, or alternatively, percentages. The
button in the top left of the graph view determines whether the percentages or number of
readings will be displayed on the (vertical) Y-axis. When this button is down percentages
will be displayed; otherwise numbers of readings will be displayed.
Page 43

Page 39
At the top of the graph window there are three buttons, which allow you to control whether out of
specification readings are shown on the graph:
• the button with the red arrow determines whether above-specification readings are
included: if it is down, above-specification readings will be shown on the graph; if it is up,
they will not be displayed.
• the button with the green arrow determines whether within-specification readings are
included: if it is down, within-specification readings will be shown on the graph; if it is up,
they will not be displayed.
• the button with the blue arrow determines whether below-specification readings are
included: if it is down, below-specification readings will be shown on the graph; if it is up,
they will not be displayed.
These buttons are only available when the Y-axis shows numbers of readings. If the graph shows
percentages of total readings, all readings will be displayed.
Printing Readings
You can print readings by selecting the Print command from the File menu.
If the topmost window is a graph, the graph will be printed using patterns for filling of the bars.
Patterns are used for printouts to support monochrome printers. The use of patterns also aids the
readability of some forms of electronic transmission, for example facsimile transmission.
Print dialog
Page 44

Page 40
If the topmost data window is a list, the Print dialog will be launched, allowing you to specify exactly
what data you want to print, and how to print it. The options available in the Print dialog box are:
• If there are multiple printers available on your PC, you can choose from available printers with the
drop down Printer menu.
• You can specify a certain type of grouping of the readings on the printout, or choose to print the
data ungrouped, with the drop-down View to print menu. The option you select will also affect
the grouping of the data in the window.
• The orientation of the data on the page can be specified by selecting an option from the Paper
Orientation box. Select Landscape for a page that is wider than it is tall, or select Portrait for a
page that is taller than it is wide.
• If you have chosen to print the data grouped, you can specify whether to expand each group by
selecting an option from the Group control box: you can expand all groups, collapse all groups,
or use the current expansion as displayed in the list window on the screen.
• If a subset of the data is selected, you can enable the Print only selected items option to print
only these readings.
Saving Readings to a File
You can save readings to a file by selecting Save or Save As from the File menu. If the data has not
been saved already, or you selected Save As, you will be prompted for a filename to save the
readings to. All of the data will be saved, irrespective of the grouping settings or the current
selection. ThermoCheck data files typically have a .tcf extension.
You can view data files at a later date by selecting Open from the File menu. This will launch the
Open dialog box, which will allow you to specify a filename, or locate a file on your computer’s hard
disk or a network. The software will only open files of the ThermoCheck data format (usually with a
.tcf extension). You can view and print data that has been saved to a file in the same ways as data
downloaded from the ThermoCheck directly, in graph or list format.
 Loading...