

Page 1
USER GUIDE
TM
Escape
P9
USER GUIDE
Page 2

CONTENTS
1 Electrical safety advisory..........................................................................4
■ Important safety information ...........................................................................4
■ LiFeP04 batteries safety instructions ........................................................... 5
2 USA and Canada compliance.................................................................... 6
■ FCC and Industry Canada ................................................................................. 6
■ European Union .................................................................................................... 7
■ Warnings................................................................................................................ 7
■ EU WEEE................................................................................................................ 7
3 Introduction ................................................................................................8
4 Items included ............................................................................................ 8
5 Getting started........................................................................................... 9
■ Keypad control buttons ..................................................................................... 9
■ Charging the internal battery...........................................................................9
■ Power LED - battery status indicator ........................................................... 10
■ Turning the Escape™ P9 on and off............................................................... 11
■ Track controls ...................................................................................................... 11
■ Volume control ....................................................................................................11
6 Bluetooth® pairing.....................................................................................11
■ Connecting an Android™ and Apple® device .............................................. 11
■ Clearing the Bluetooth® memory................................................................... 12
■ Disconnecting an Apple® (iOS®) device ....................................................... 12
■ Disconnecting an Android™ device............................................................... 12
■ Bluetooth® Twin mode...................................................................................... 13
2
Page 3

7 Connecting external audio sources.........................................................16
■ Priority .................................................................................................................. 16
■ Aux 1: universal 3.5mm auxiliary input ......................................................... 16
■ USB flash drive ....................................................................................................17
■ Aux 2: universal 3.5mm auxiliary input inside the compartment located
underneath the keypad18
8 Additional features .................................................................................. 18
■ Standby mode .................................................................................................... 18
■ Locking the keypad........................................................................................... 19
■ Anti-theft anchor point .................................................................................... 19
■ Replacing the battery .......................................................................................20
9 App..............................................................................................................21
10 Frequently Asked Questions ...................................................................21
11 Specifications ............................................................................................21
■ Full-range drivers............................................................................................... 21
■ Amplifier............................................................................................................... 21
■ Dual 24-bit DSP processor ..............................................................................22
■ Subwoofer ........................................................................................................... 22
■ Rechargeable lithium iron phosphate battery............................................22
■ Bluetooth® ...........................................................................................................22
■ Dimensions .......................................................................................................... 22
■ Weight..................................................................................................................22
■ Additional audio inputs.................................................................................... 22
■ Design...................................................................................................................22
12 Cleaning instructions and fabric care....................................................23
13 Warranty ..................................................................................................23
■ Limited warranty for the unit .........................................................................23
■ Limited warranty for the battery...................................................................23
■ Returning a device for repairs ........................................................................23
14 Copyright information.............................................................................24
■ Patents .................................................................................................................24
■ Directives .............................................................................................................24
■ Declaration of conformity................................................................................24
■ Brand information ..............................................................................................25
■ Images ..................................................................................................................25
3
Page 4

User guide
1 Electrical safety advisory
1.1 Important safety information
Read all safety information in this document and in the quick-start guide before using this product.
Read and keep these instructions so that you can consult them if necessary.
Heed all warnings and follow all instructions.
Do not submerge the unit in water or other liquids. The product is weather-resistant but not
water-resistant. Place the speaker inside if you are not using it for a long period of time.
Clean the unit as recommended by the manufacturer. For more details, see Cleaning
instructions and fabric care in the online user guide and on the Escape website
www.escapespeakers.com
Do not block any ventilation openings (for example on the underside of the product). Use in
accordance with the manufacturer’s instructions.
Do not install near any heat sources such as radiators, heating registers, stoves, or other
devices that produce heat. Do not place open flames, such as lighted candles, on or near
the product.
Do not defeat the safety purpose of the polarized or grounding-type plug. A polarized plug
has two blades with one wider than the other. A grounding type plug has two blades and a
third grounding prong. The wide blade or the third prong is provided for your safety. If the
provided plug does not fit into your power outlet, consult an electrician to replace the
obsolete outlet.
Only use attachments and/or accessories specified by the manufacturer.
Only let qualified service personnel do repairs. Repairs are required when the unit or parts
of it are damaged, such as power-supply cord or plug, an object has fallen into the unit, the
unit does not function normally, liquid has been spilled inside the unit, or if the unit has
been dropped.
User guide
Electrical safety advisory
4
Page 5
To stop using electricity to charge the unit, disconnect the unit’s power cord from the
power outlet. To reconnect, plug the unit’s power cord into the power outlet following all
safety instructions and guidelines.
The unit contains magnetic material. Contact your physician if you have questions on
whether this might affect possible implanted medical devices.
Do not make unauthorized alterations to the unit.
Polyester and plastic bags can be dangerous. To avoid danger of suffocation, keep the unit's
packaging away from babies and children.
Be careful when placing the Escape™ P9 outdoors and directly exposed to sunlight. The
aluminum handle absorbs and disperses heat. Make sure to take the necessary precautions
to prevent injuries and dangerous situations.
To reduce the risk of electric shock, do not remove the cover (or bottom section).
Leave repairs to qualified service personnel.
Dispose of the used battery according to the instructions of the battery
manufacturer and applicable environmental guidelines. Do not open, puncture or
burn the battery, or expose it to conducting materials, moisture, liquid, fire or heat
above 54°C or 130°F.
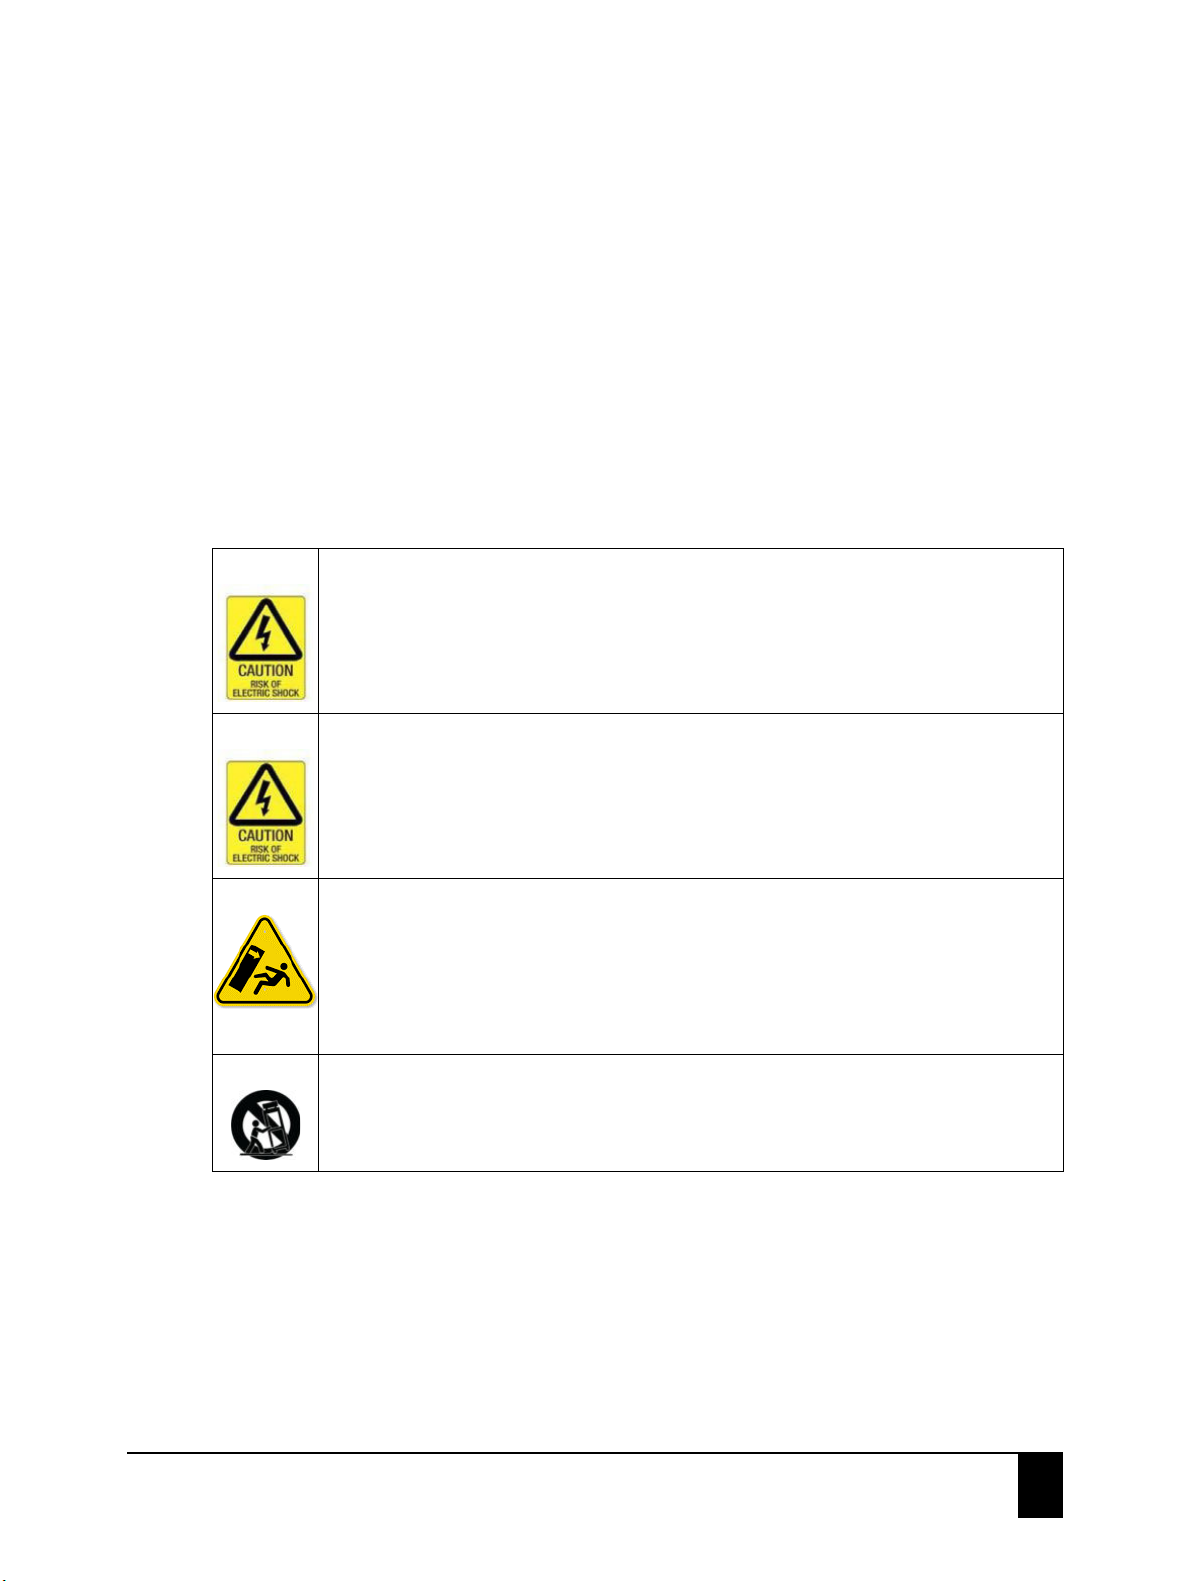
To help prevent tip-over:
• Always place the unit on a firm, flat and level surface.
• Never allow children to climb or hang on the unit.
• Do not put any heavy objects on top of the unit.
• Use of tip-over restrains may only reduce, but not eliminate, the risk of tip-over.
Use only a cart, stand, tripod, bracket, or table specified by the manufacturer or sold
with the apparatus. When a cart is used, use caution when moving the
cart/apparatus combination to avoid injury from tip-over.
1.2 LiFeP04 batteries safety instructions
To prevent the battery from leaking, heating up and exploding, please pay attention to the following
precautions:
Do not immerse the core in water.
Do not use or store the battery near a heat source (such as fire, heater, etc.).
Do not throw the battery into a fire or heater.
User guide
Electrical safety advisory
5
Page 6

Do not reverse the positive and negative terminals.
Do not connect the positive and negative terminals directly to metal objects.
Do not connect the electrode directly to the power socket.
Do not transport and store the battery with metal objects such as necklaces or hairpins.
Do not throw or step on the battery.
Do not pierce the battery with a nail or other sharp objects.
Do not use or store the battery in high temperatures (for example, strong direct sunlight or
a vehicle in extremely hot conditions).
If the battery terminals get dirty, clean them with a dry cloth before use.
Only use the built-in charger of the Escape™ P9 to charge the battery.
If the battery leaks and the electrolyte gets into your eyes, do not rub them, instead,
thoroughly rinse the eyes with clean running water for at least 15 minutes, and immediately
seek medical attention to avoid eyes injury.
If the battery gives off an odor, generates heat, becomes discolored or deformed, or in any
way appears abnormal during use, recharging or storage, immediately remove it from the
device and dispose of it.
If the battery's useful life expires, wrap the fully discharged battery in insulating tape and
put the battery in the specialized recycle bin.
2 USA and Canada compliance
2.1 FCC and Industry Canada
This device complies with part 15 of the FCC rules and Industry Canada ICES-003. Operation is
subject to the following two conditions: (1) this device may not cause harmful interference, and (2)
this device must accept any interference received, including interference that may cause undesired
operation.
Compliance of this equipment is confirmed by the following label that is placed on the equipment:
Important: Any changes or modifications not expressly approved by the party responsible for
compliance could void the user’s authority to operate this equipment.
Le présent appareil est conforme aux CNR d’Industrie Canada applicables aux appareils radio
exempts de licence. L’exploitation est autorisée aux deux conditions suivantes : (1) l’appareil ne doit
pas produire de brouillage, et (2) l’utilisateur de l’appareil doit accepter tout brouillage
radioélectrique subi, même si le brouillage est susceptible d’en compromettre le fonctionnement.
Important: Tous les changements ou modifications pas expressément approuvés par la partie
responsable de la conformité ont pu vider l’autorité de l’utilisateur pour actionner cet équipement.
6
User guide
USA and Canada compliance
Page 7
2.2 European Union
Escape bvba hereby declares that this product is in compliance with the essential requirements and
other relevant provisions of Directive 2014/53/EU and all other applicable EU directive requirements.
2.3 Warnings
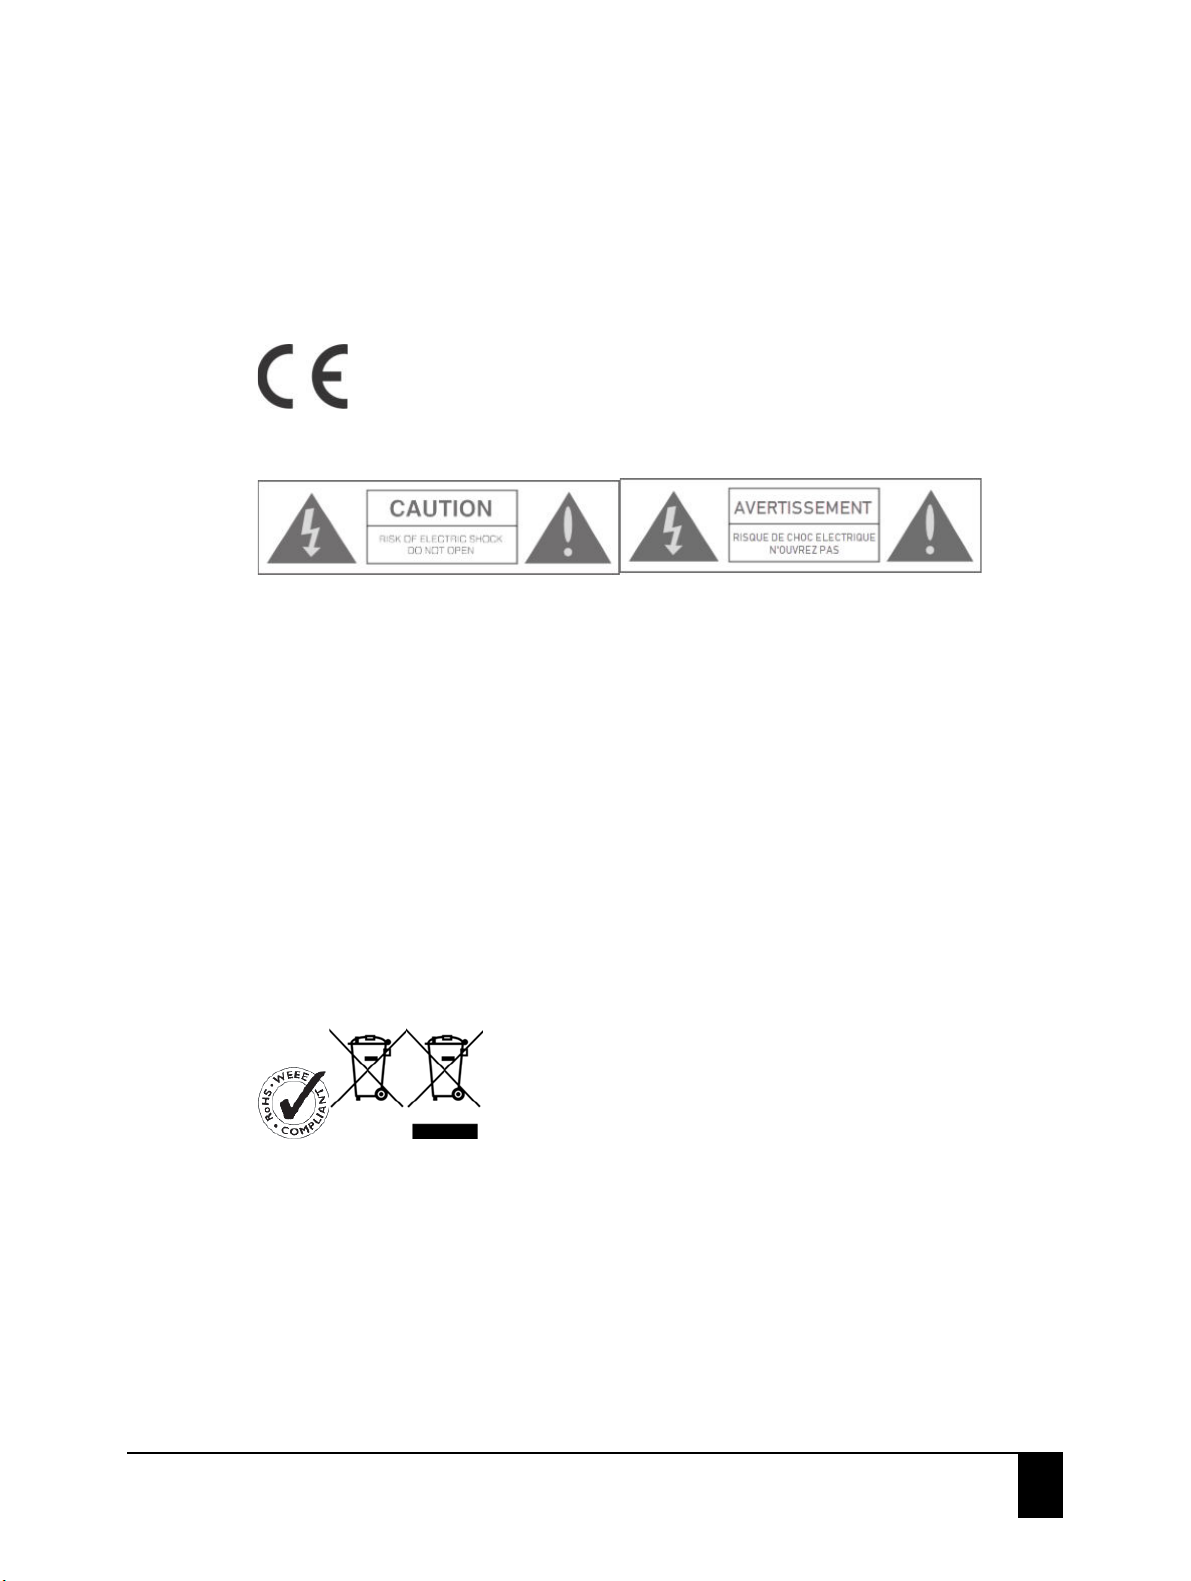
The lightning flash with arrowhead symbol, within an equilateral triangle, is intended to
alert the user to the presence of uninsulated dangerous voltage within the product’s
enclosure that may be of sufficient magnitude to constitute a risk of electric shock to
persons.
The exclamation point within an equilateral triangle is intended to alert the user to the
presence of important operating and maintenance (servicing) instructions in the literature
accompanying the appliance.
Ce symbole représentant un éclair à l'intérieur d'un triangle équilatéral, a pour but d'avertir
l'utilisateur de la présence d'une tension dangereuse non isolée dans le corps de l'appareil
pouvant être suffisante pour constituer un risque de choc électrique.
Le point d'exclamation dans un triangle équilatéral est destiné à alerter l'utilisateur de la
présence d'instructions importantes de maintenance (entretien) dans la documentation
accompagnant l'appareil.
2.4 EU WEEE
In accordance with the European Union WEEE (Waste Electrical and Electronic Equipment) directive
effective August 13, 2005, we would like to notify you that this product may contain regulated
materials which upon disposal, according to the WEEE directive, require special reuse and recycling
processing. When disposing of packaging and other related shipping materials we encourage you to
recycle these items through the normal channels.
Escape™ P9 battery meets the UN38.3 regulations.
User guide
USA and Canada compliance
7
Page 8
3 Introduction
Thank you for choosing the Escape™ P9 portable loudspeaker. It will transform your outdoor space
into one of the most popular places in your home. Every aspect of its design and development has
been studied carefully to find better ways of engineering and to build a product that results in an
incredible audio experience.
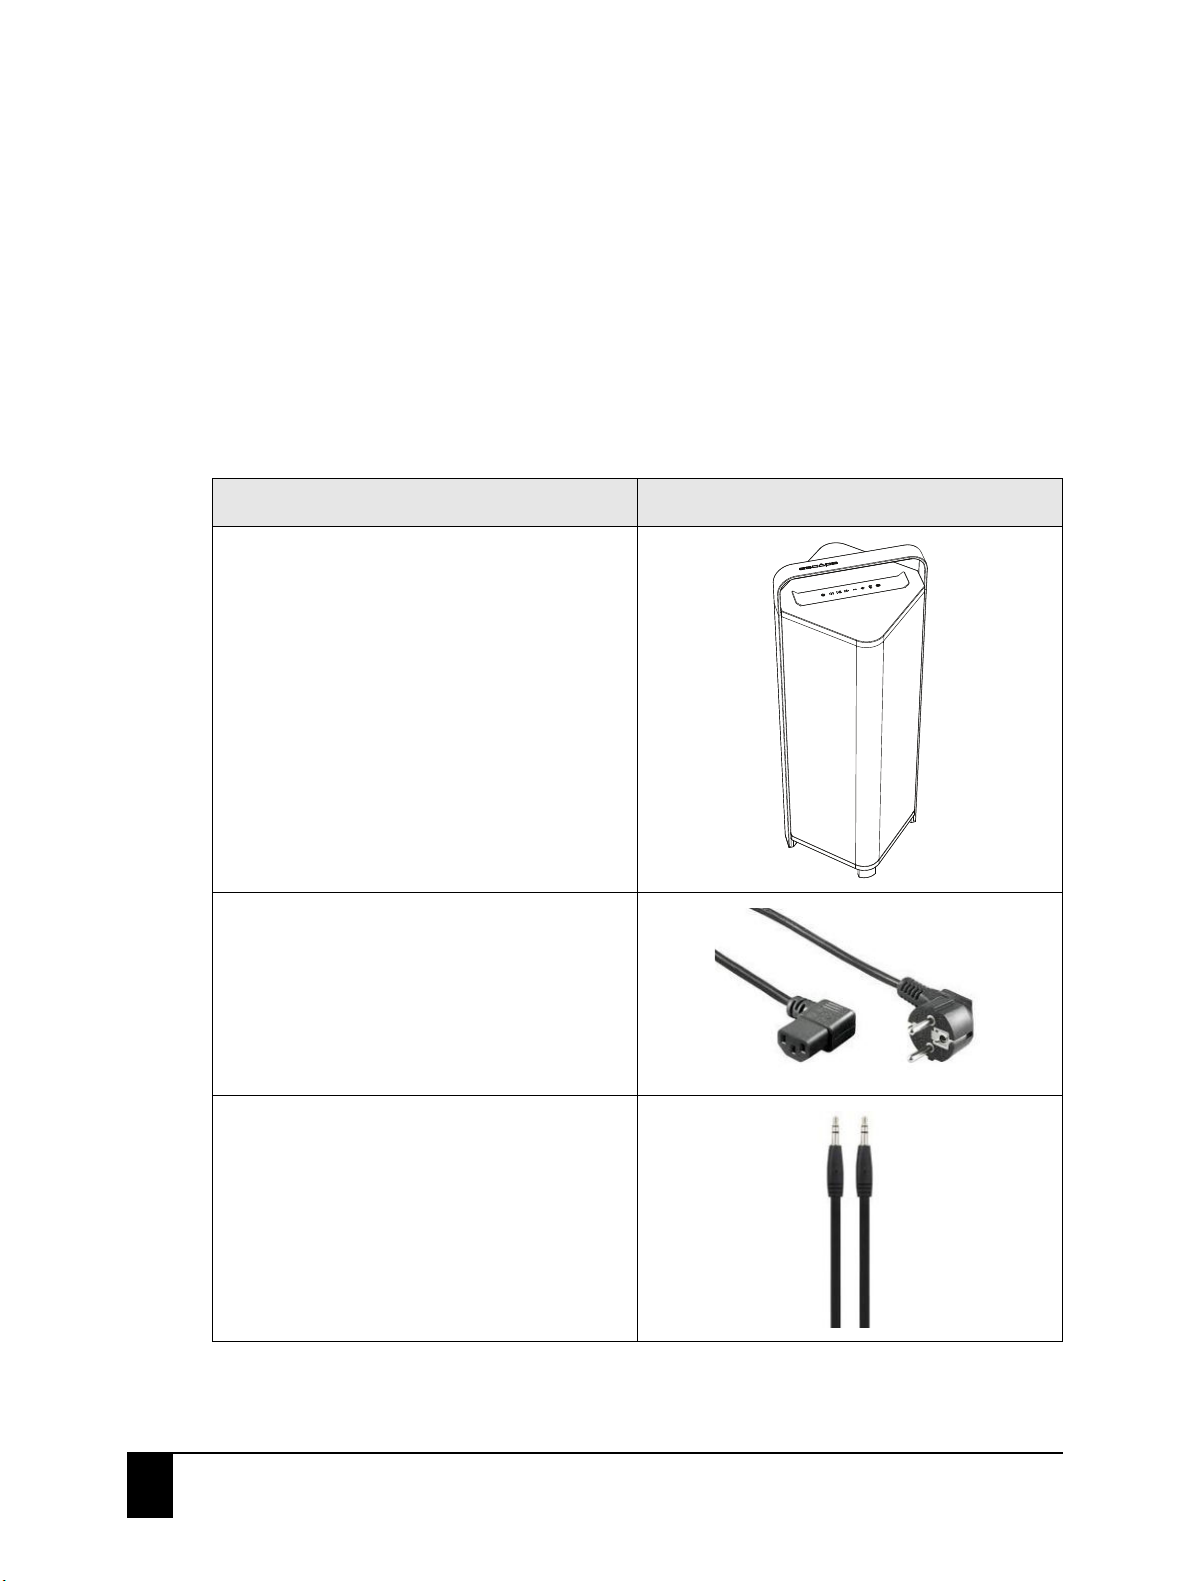
4Items included
Item Image
Escape™ P9
Country-specific right-angle AC power cord:
• length: 1.5 meters (5 feet)
3.5mm stereo jack cable:
• length: 50cm (20 inch)
8
User guide
Introduction
Page 9
5 Getting started
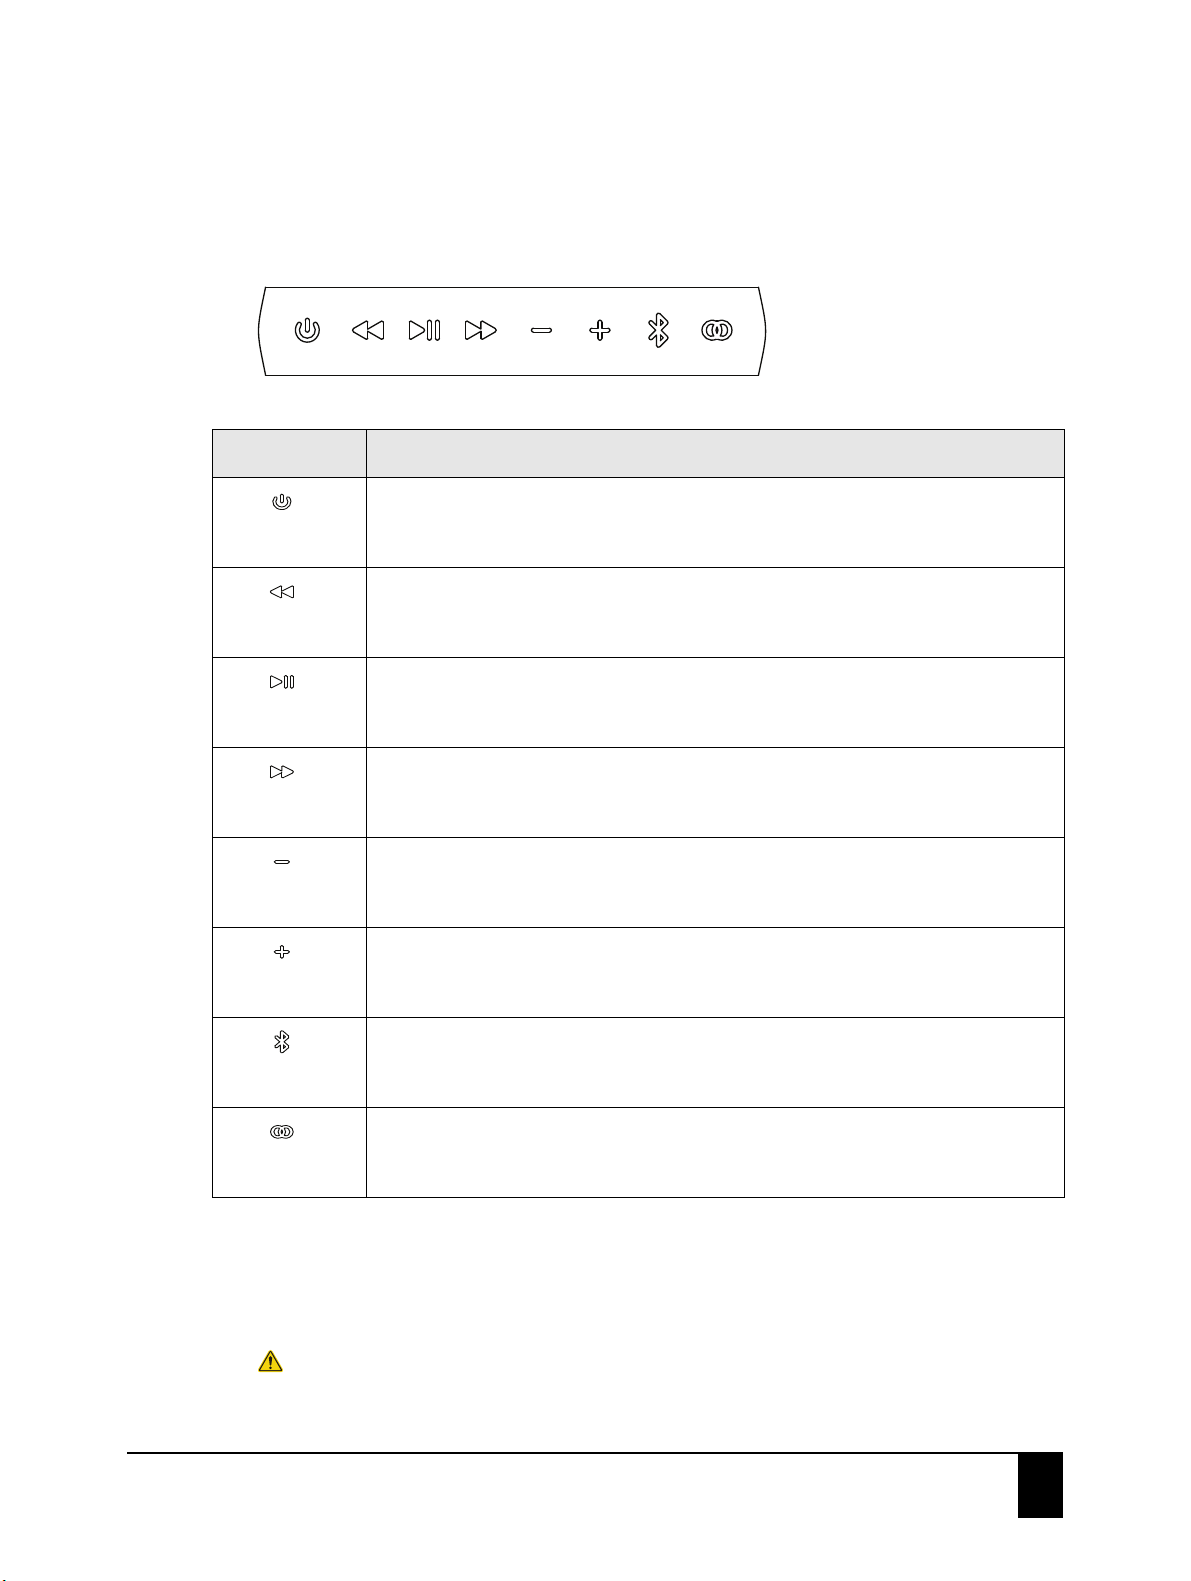
5.1 Keypad control buttons
Control button Function
Turn the Escape™ P9 on and off
Power
Play the previous song
Previous track
Start or pause a song
Play/pause
Play the next song
Next track
Decrease the volume
Volume down
Increase the volume
Volume up
Connect a device using Bluetooth®
Bluetooth®
Connect a second Escape™ P9 using Twin mode
Twin mode
5.2 Charging the internal battery
A complete charging cycle takes between two and three hours. You can use the Escape™ P9 during
the charging process.
Never leave the unit unattended while charging.
User guide
Getting started
9
Page 10
The built-in battery is partially charged in the factory for the purpose of testing. Before using the
1
2
Escape™ P9 for the first time, you have to completely charge the internal battery.
The battery will slowly discharge if:
it is not connected to the AC power
it is not used for several weeks
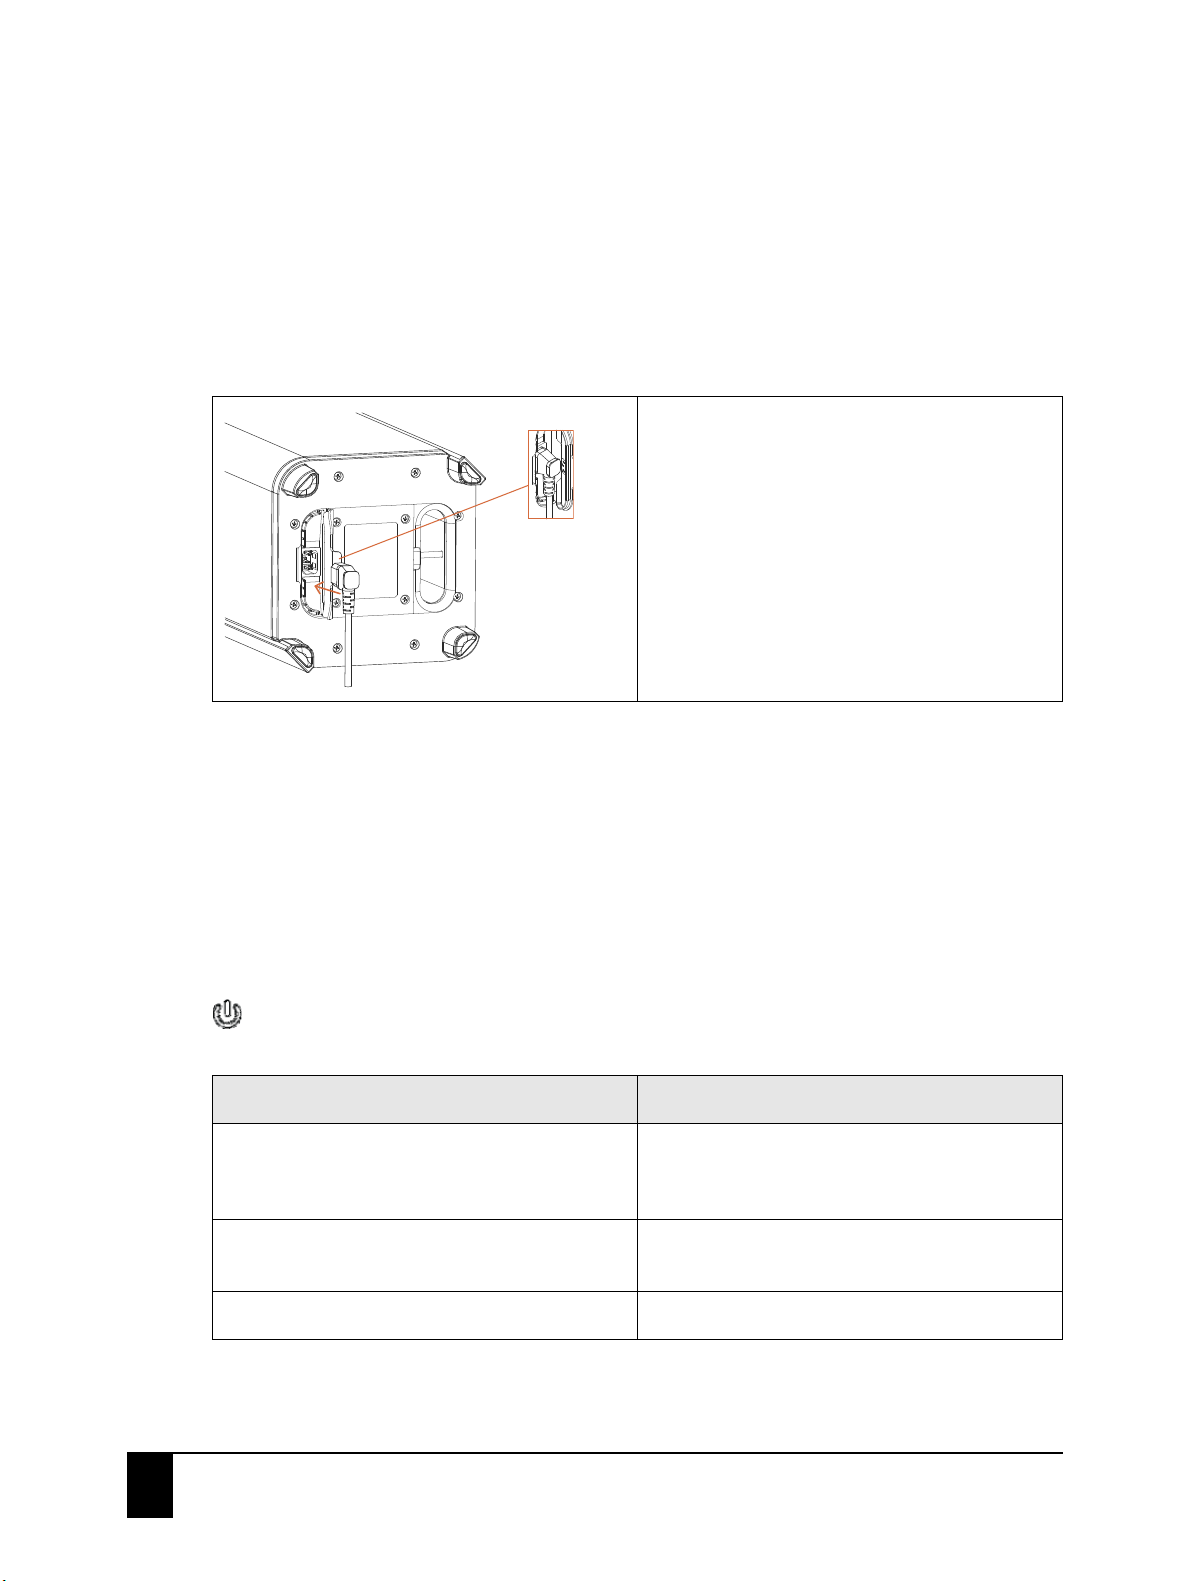
Important: If you place the device on its
side to connect the AC power cord make
sure it is on a flat, clean surface. Placing the
unit on uneven surfaces or objects may
damage the grill.
1. Open the protective cover from the AC power socket located at the bottom of the unit.
2. Connect the right-angle AC power cord to the three-prong outlet and insert the power cord
plug into an AC outlet.
The power LED light will be red, indicating that the unit is charging. The battery is fully charged
when the red LED is off.
3. Remove the right-angle AC power cord from the three-prong outlet and close the protective
cover.
5.3 Power LED - battery status indicator
The power LED light indicates the status of the internal battery.
LED appearance Battery status
flashing red for 3 seconds and white for 0.5
seconds
solid red The unit is connected to a power outlet and is
white The battery is fully charged.
The battery charge has reached approximately
20%. The unit is not connected to a power
outlet and the battery needs to be charged.
charging.
10
User guide
Getting started
Page 11

LED appearance Battery status
rapidly flashing red for 10 seconds Battery error, for example when the power
5.4 Turning the Escape™ P9 on and off
1. Press and hold down the power button on the keypad for one second.
The power LED will light up and turn green. After 3 seconds, all keypad LEDs will turn white.
2. To turn the unit off, shortly press the power button again.
5.5 Track controls
You can navigate through tracks, pause and play using:
the Escape™ P9 keypad control buttons
the music app of your choice
the Escape™ P9 app
5.6 Volume control
cable is connected to a power outlet but no
battery has been installed.
You can increase or decrease the volume using:
the Escape™ P9 keypad control buttons
the music app of your choice
the volume buttons on your device (in Bluetooth® mode only)
the Escape™ P9 app
6 Bluetooth® pairing
6.1 Connecting an Android™ and Apple® device
The Escape™ P9 memory can hold up to 8 different Bluetooth® devices. If a new device is paired after
the maximum of 8 has been reached, the new one will replace the paired device with the oldest
connection.
1. Press and hold down the power button on the keypad for one second.
The power LED will light up and turn green. After 3 seconds, all keypad LEDs will turn white.
2. To start the Bluetooth® pairing sequence, shortly press the Bluetooth® button.
The white LED will start flashing blue and white for 2 minutes.
3. Go to Settings on your Apple® (iOS®) or Android™ device and turn on Bluetooth®.
User guide
Bluetooth® pairing
11
Page 12
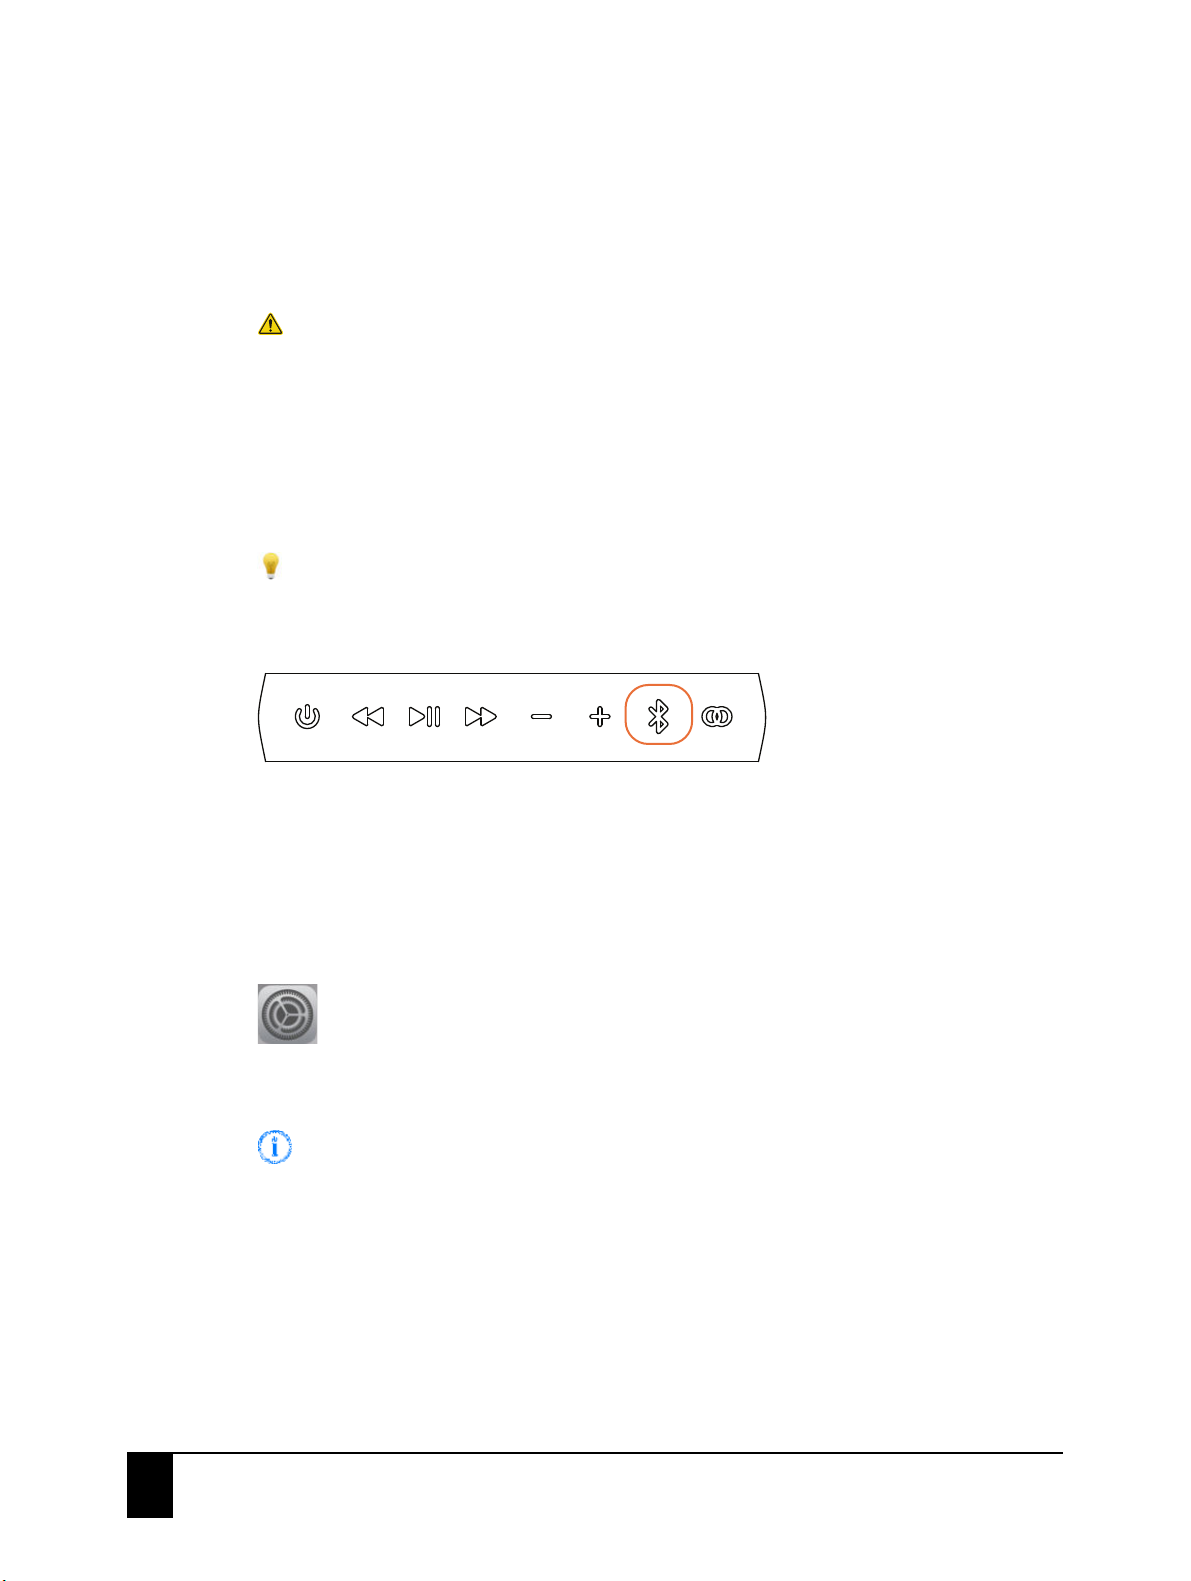
4. Select Escape™ P9 xxxx from the device list.
The xxxx represents the last 4 digits of the device name and is a unique combination that is
also part of the serial number. You can find the complete serial number on the label next to the
battery compartment, located on the bottom of the unit or on the shipping box.
Do not select Escape™ P9 xxxx App on your device if listed. You will not be able to stream
music if you do.
Once the connection has been established, the Bluetooth® symbol on the Escape™ P9 keypad
will be solid blue.
5. Adjust the volume and navigate through tracks using your device or the buttons on the
keypad.
Important: If the Escape™ P9 is not listed the first time please turn Bluetooth® off and on
again.
Tip: Learn more about the Escape™ P9 app.
6.2 Clearing the Bluetooth® memory
Press and hold down the Bluetooth® button on the Escape™ P9 keypad for 10 seconds until you hear
a short confirmation tone.
All Bluetooth® devices stored in the memory will be erased.
6.3 Disconnecting an Apple® (iOS®) device
1. On your device, go to Settings > Bluetooth®.
2. In the My Device list, select the Escape™ P9 and tap the information symbol next to
Connected.
3. Select either Disconnect or Forget This Device.
The Bluetooth® button on the keypad will start flashing blue and white. The device is no longer paired
with the Escape™ P9.
6.4 Disconnecting an Android™ device
1. On your device, go to Settings > Connections.
12
User guide
Bluetooth® pairing
Page 13
2. Select Bluetooth®.
Unit A Unit B
3. Select the Escape™ P9 in the list of paired devices.
4. Select Unpair.
The Bluetooth® button on the keypad will start flashing blue and white. The device is no longer paired
with the Escape™ P9.
6.5 Bluetooth® Twin mode
Bluetooth® audio streaming has been limited to one speaker for many years. Now you can connect
two Escape™ P9 speakers via Bluetooth® thanks to Twin mode.
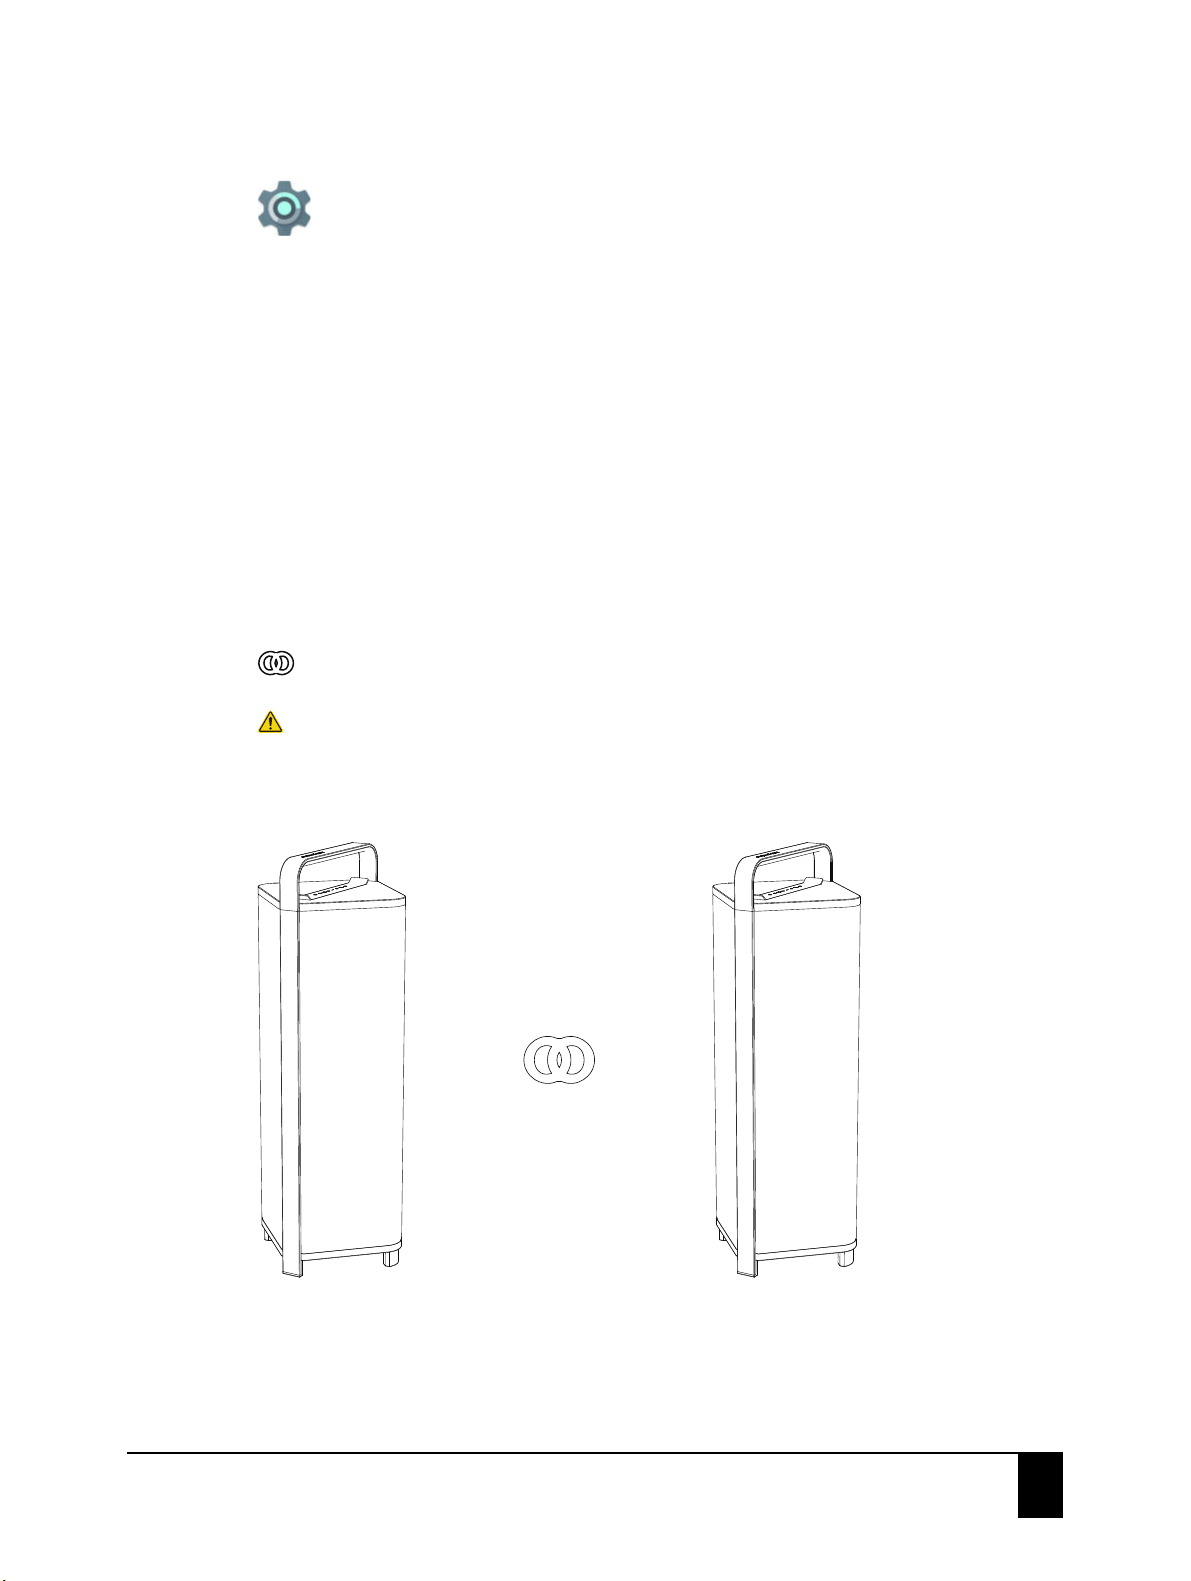
Setting up Bluetooth® Twin mode
Make sure that both units are in close range during setup. The maximum range (5 to 10
meters) between the two speakers may vary depending on environmental factors and the
presence or absence of shields and obstacles. During setup, make sure that the Bluetooth®
symbol on the Escape™ P9 keypad is not green. No external audio input should be activated
(Aux 1, Aux 2 or USB Flash Drive) on any of the two devices.
1. Turn on unit A and connect your music device via Bluetooth®.
The Bluetooth® LED on the keypad of unit A needs to be solid blue.
Important: Do not stream music during Twin setup.
User guide
Bluetooth® pairing
13
Page 14
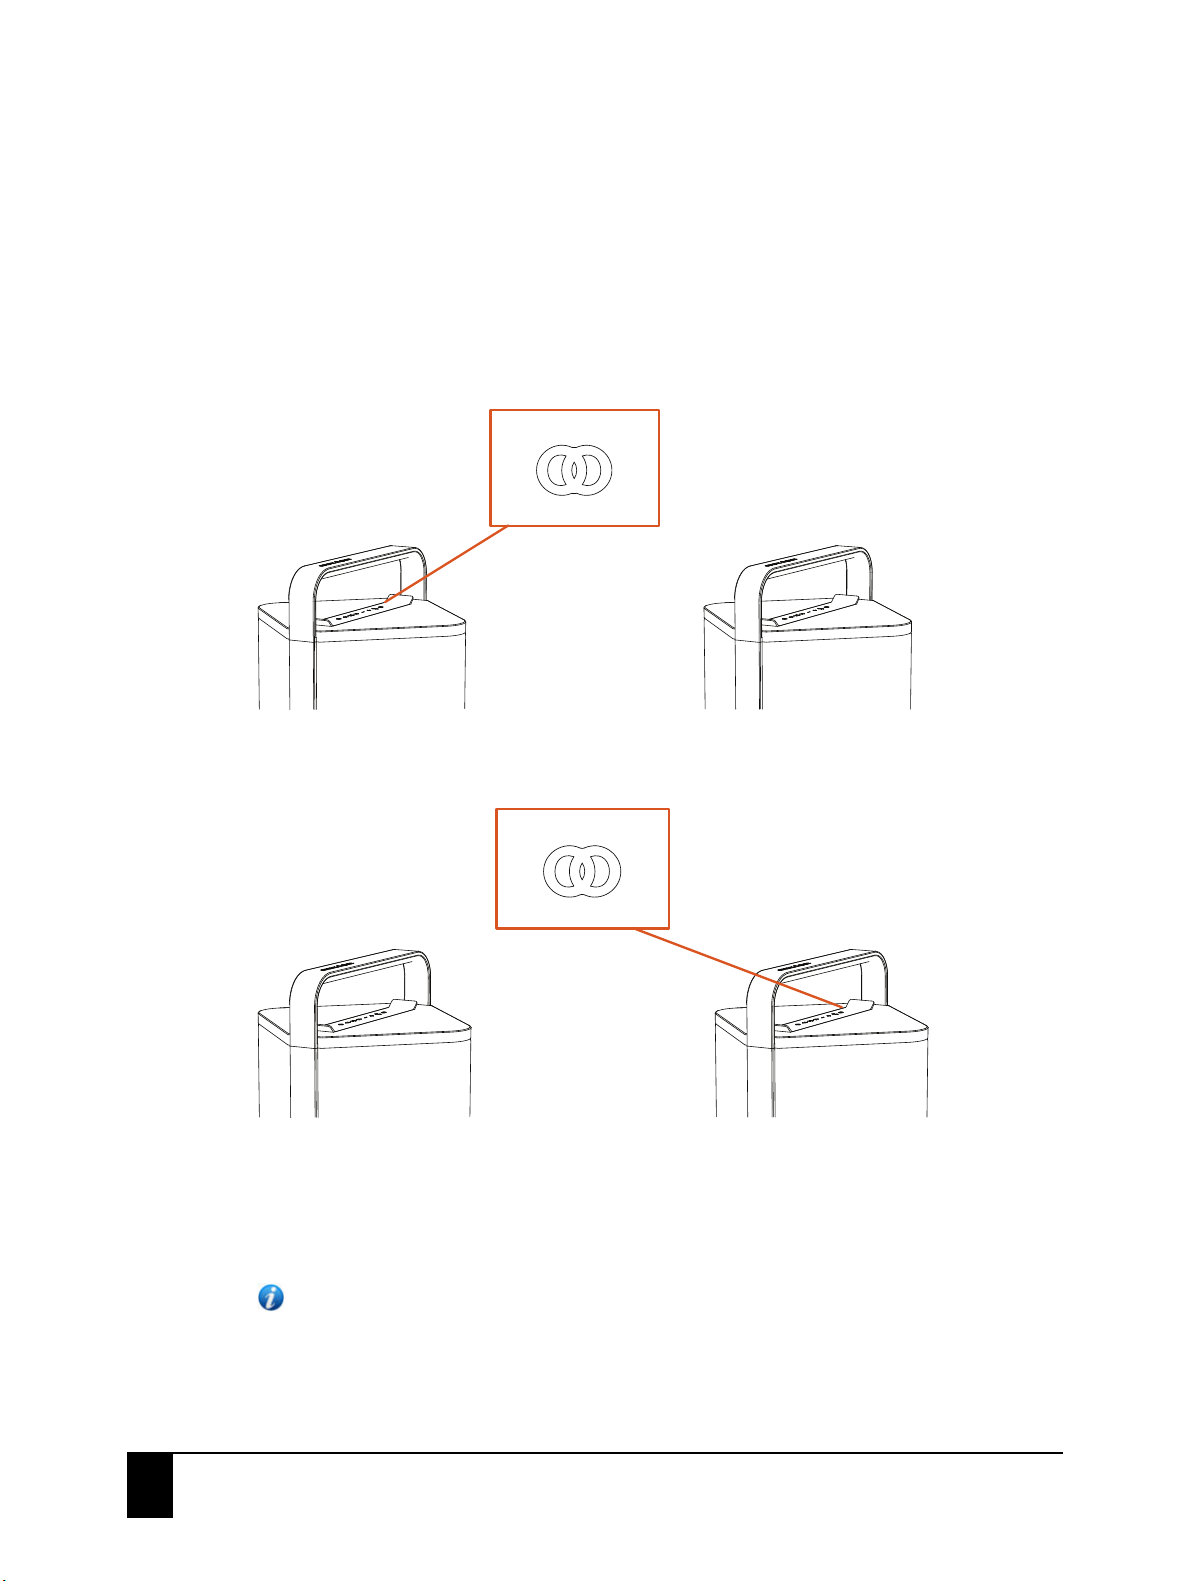
2. Turn on unit B.
Unit A Unit B
Unit A Unit B
All keypad LEDs must be white. If the Bluetooth® LED is blue, unit B is connected to another
audio device than unit A. Disconnect the Bluetooth® link on this other device (see Disconnecting
an Apple® (iOS®) device and Disconnecting an Android™ device) or reset the Bluetooth®
memory on unit B (see Clearing the Bluetooth® memory). Make sure that unit A and unit B are
in close proximity.
3. Press the Twin button on unit A twice within a very short time. The Twin button on unit A will
be flashing blue and white every 2 seconds.
Unit A will act as the master device.
4. Press and hold the Twin button on unit B until you hear a confirmation tone.
The pairing sequence between unit A and B will start. Both Twin buttons will start flashing blue
and white every 2 seconds. Unit B will act as the Twin device.
The pairing sequence between unit A and B is successful when the Twin button LEDs on unit A and
B are solid blue. Both units will now play the same stereo signal.
Note: If you accidentally activate the Twin mode, you must switch the P9 off and on again
to end the activation or wait until the Twin mode search function automatically ends after
2 minutes.
14
User guide
Bluetooth® pairing
Page 15
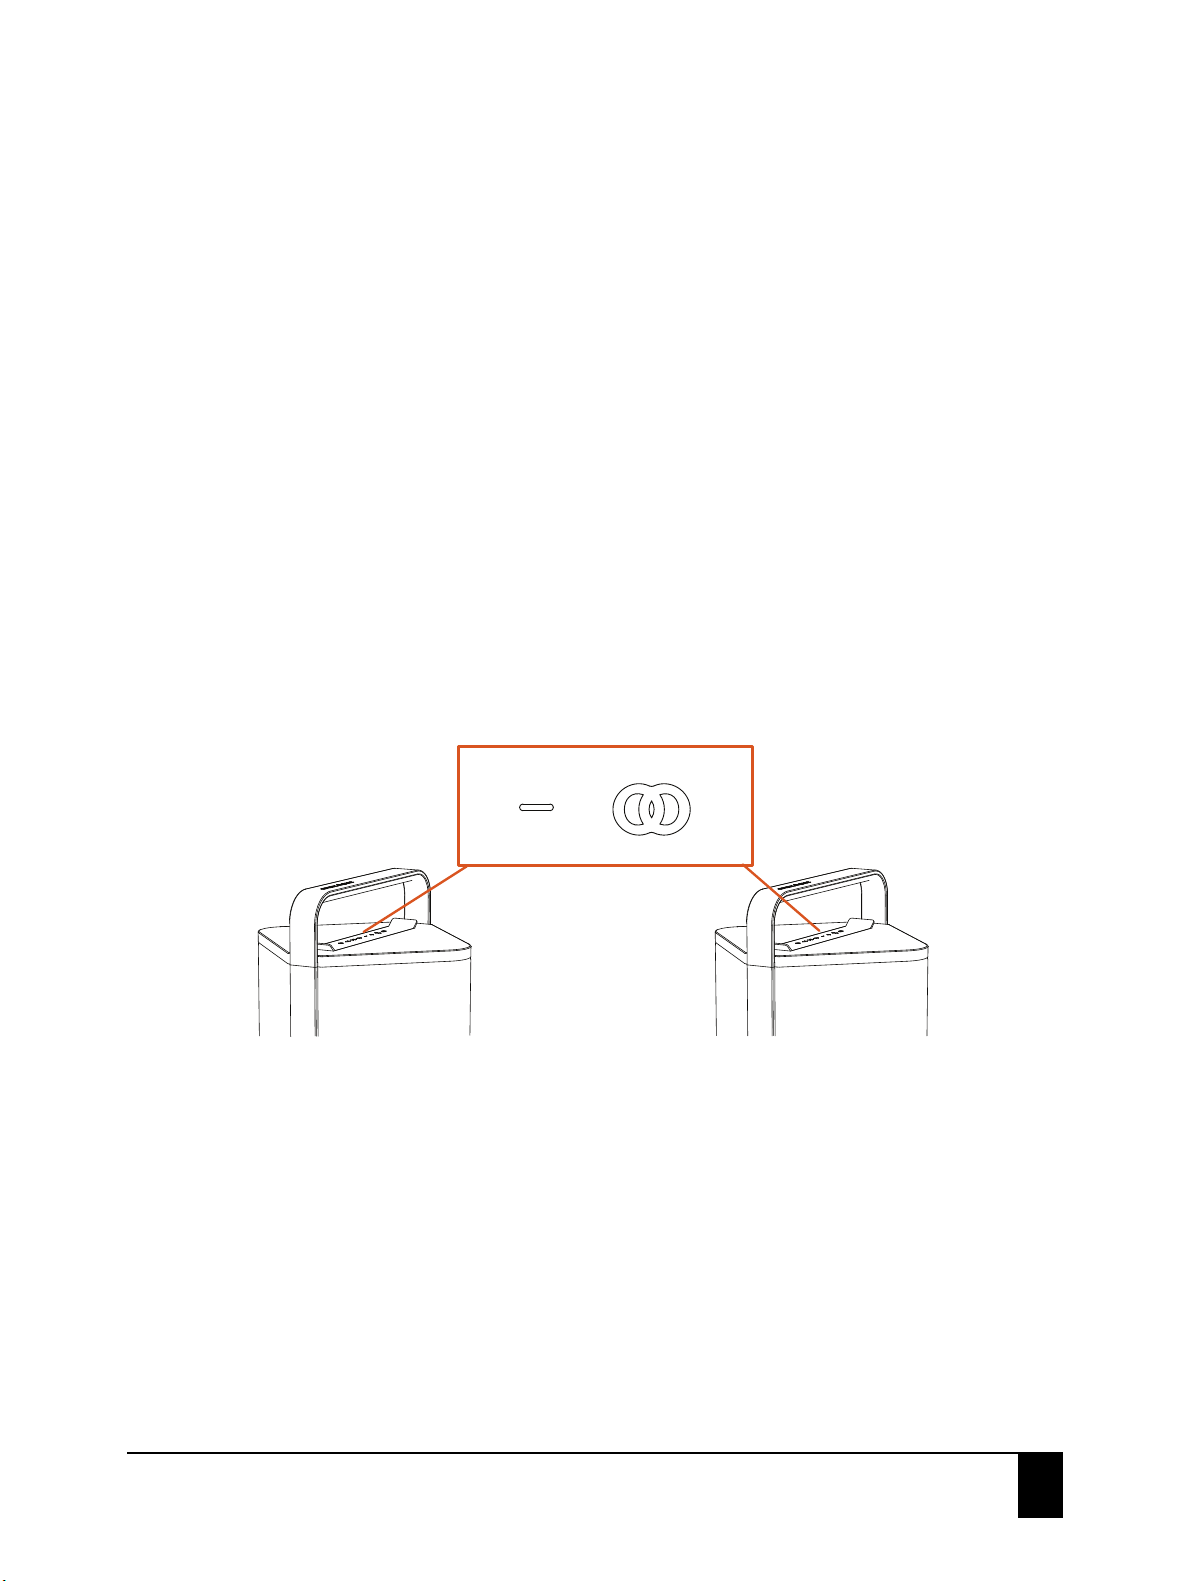
Keypad functions in Twin mode
Unit A Unit B
or
When streaming music from an Apple® or Android™ device using Bluetooth®, the control buttons will
work on both units. Volume up and down is synchronised and can be controlled on the device and
on the Escape™ P9 keypad.
Turning off one of the speakers in Twin mode
The master device will remain active when the twin unit is turned off. Music will be paused first in
Bluetooth® mode. When the master is turned off, the twin unit will no longer receive an audio signal.
External audio sources connected to the master speaker
Once the Twin mode has been set up, you can connect external audio sources to the master device,
such as MP3 players or a USB flash drive. (For more details see external audio sources). External
sources connected to the master will also play on the twin unit.
Disabling the Twin mode between devices
Press and hold down the Twin and the volume down button simultaneously for 2-3 seconds on either
master or twin speaker until you hear a short confirmation tone.
The blue LEDs on master and twin unit will turn white, indicating that Twin mode has been disabled
on both units.
User guide
Bluetooth® pairing
15
Page 16
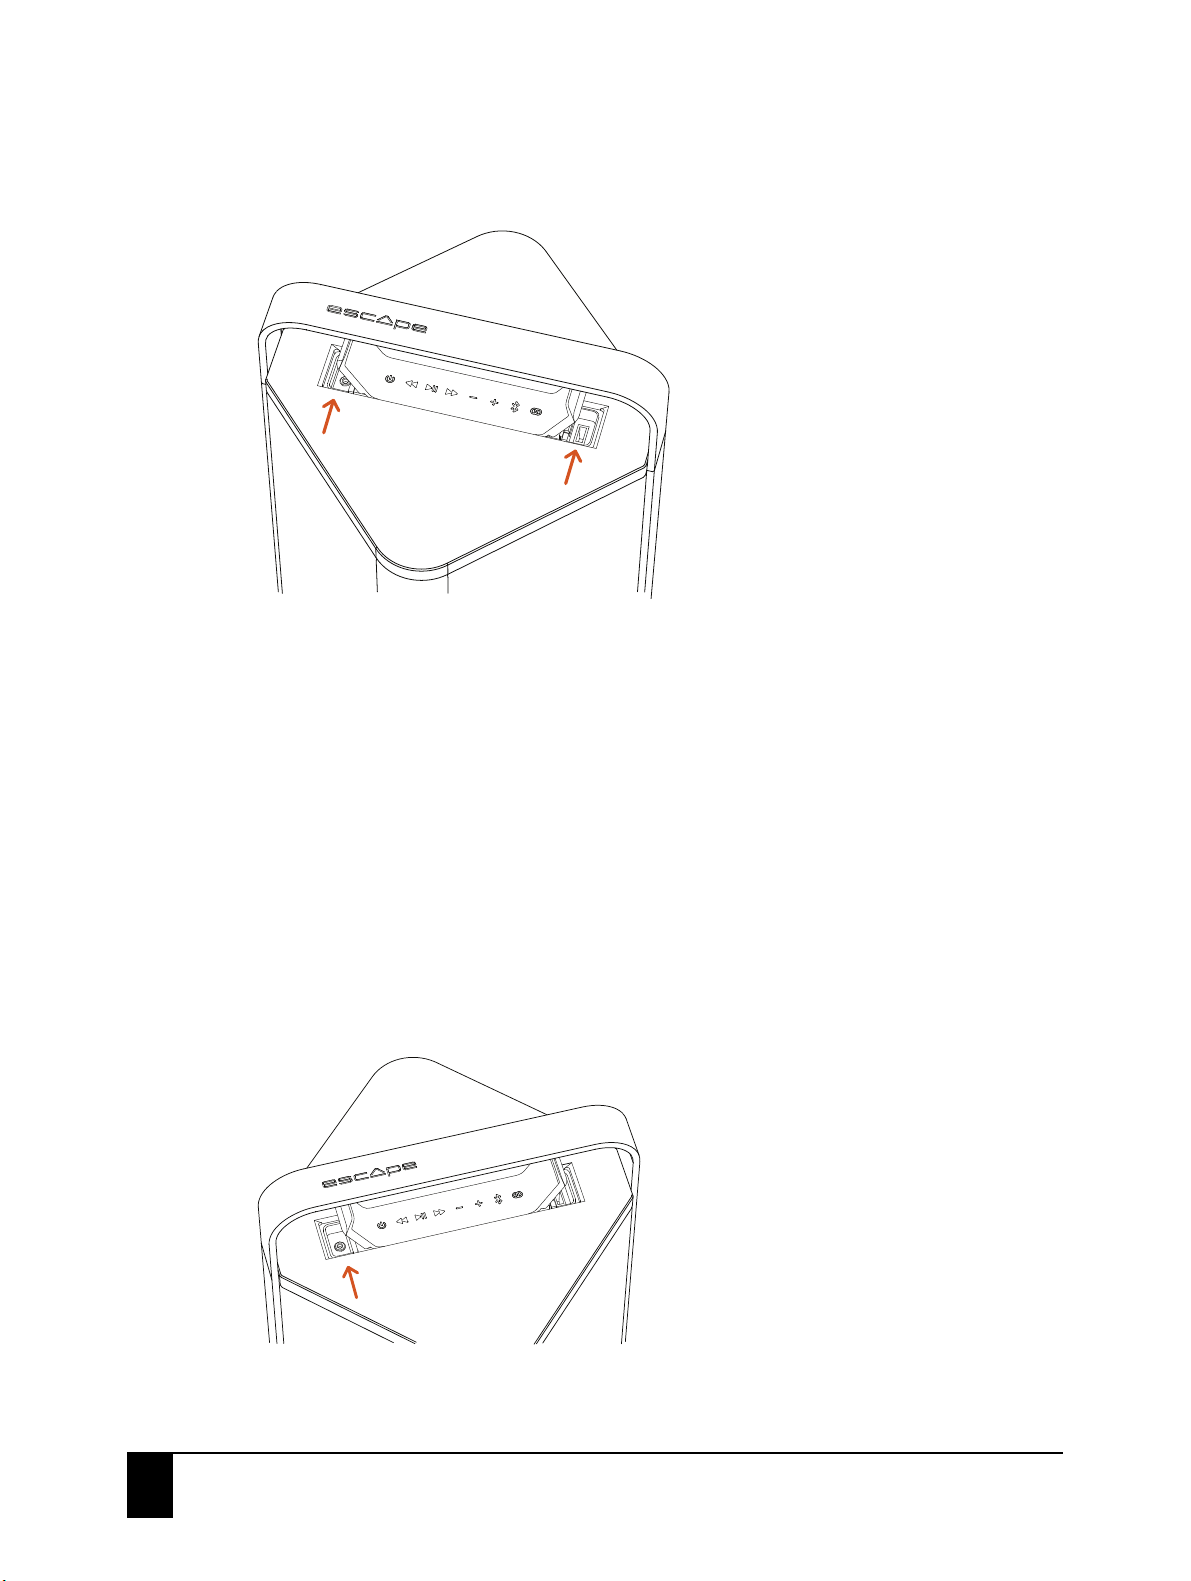
7 Connecting external audio sources
1
2
You can connect the Escape™ P9 to the following external audio sources:
1. Aux 1: universal 3.5mm auxiliary input
2. USB flash drive
3. Aux 2: universal 3.5mm auxiliary input inside the compartment located underneath the keypad
7.1 Priority
External audio sources are listed in order of priority. Lower priority audio sources will be deactivated
when an audio input of a higher priority is activated. When one of the 3 external source inputs is
activated, the Bluetooth® button on the Escape™ P9 keypad will change from solid blue to green.
Important: Please observe all warnings in this section that may void warranty.
7.2 Aux 1: universal 3.5mm auxiliary input
The 3.5mm aux input has the highest priority.
16
User guide
Connecting external audio sources
Page 17
IMPORTANT WARRANTY INFORMATION: Do not expose the Escape™ P9 to rain or
moisture while using the aux cable. Any damage to the aux input or other internal parts
caused by water infiltration via the keypad lid is never covered by the warranty. In cases where
the internal keypad has been exposed to water, it is important that the aux input is completely
dry before a 3.5mm connector is inserted into it.
1. Lift up the left side of the keypad.
2. Connect any portable music player to the aux input using the 3.5mm stereo jack cable
provided with the unit.
The volume controls on the external player and the keypad are no longer synchronized and the
track control buttons will not function.
3. For optimum playback quality, set the volume of the external audio player to approximately
80%.
4. Adjust the desired output volume of the Escape™ P9 via the control buttons on the keypad.
7.3 USB flash drive
IMPORTANT WARRANTY INFORMATION: Make sure to use a USB Flash Drive small enough
to be able to close the lid of the keypad again. The total height of the Flash Drive should
not exceed 27mm. USB port damage and/or other circuitry caused by water infiltration via the
keypad lid are never covered by the warranty. In cases where the keypad has been exposed to
water, it is important that the USB port is completely dry before a USB cable or USB Flash Drive
is inserted into the port.
The Escape™ P9 can read audio files in MP3 and WMA formats. Files in DRM (Digital Rights
Management) copyright protection or files downloaded from an online music store cannot
be played.
The USB input will not work as a playback input for Apple® devices.
The input is in compliance with USB 2.0 (Full Speed).
The USB flash drive input is not a charging port.
1. Lift up the right side of the keypad.
2. Plug a USB flash drive into the USB port.
3. Adjust the volume and navigate through tracks with the control buttons of the keypad.
User guide
Connecting external audio sources
17
Page 18
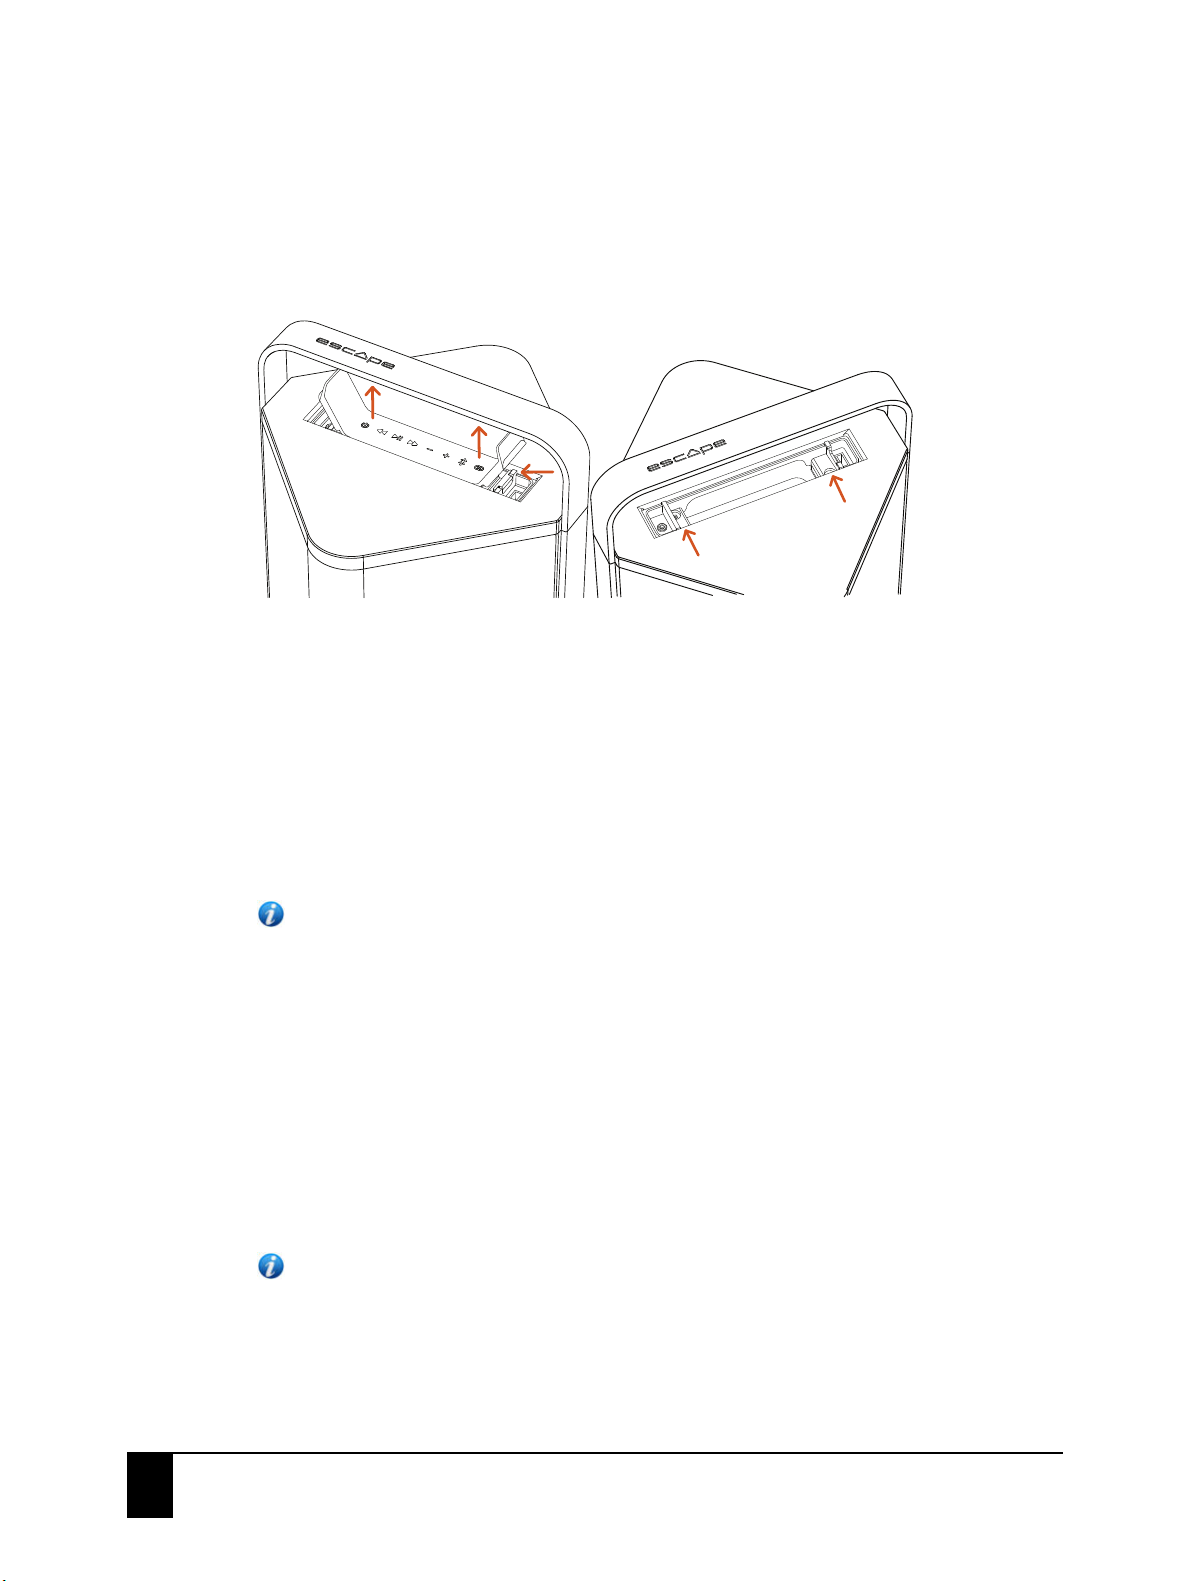
7.4 Aux 2: universal 3.5mm auxiliary input inside the compartment located underneath
1
2
2
3
4
the keypad
The Escape™ P9 has a weather-proof compartment underneath the keypad with a 3.5mm auxiliary
input and USB power supply output to accommodate future generation receivers.
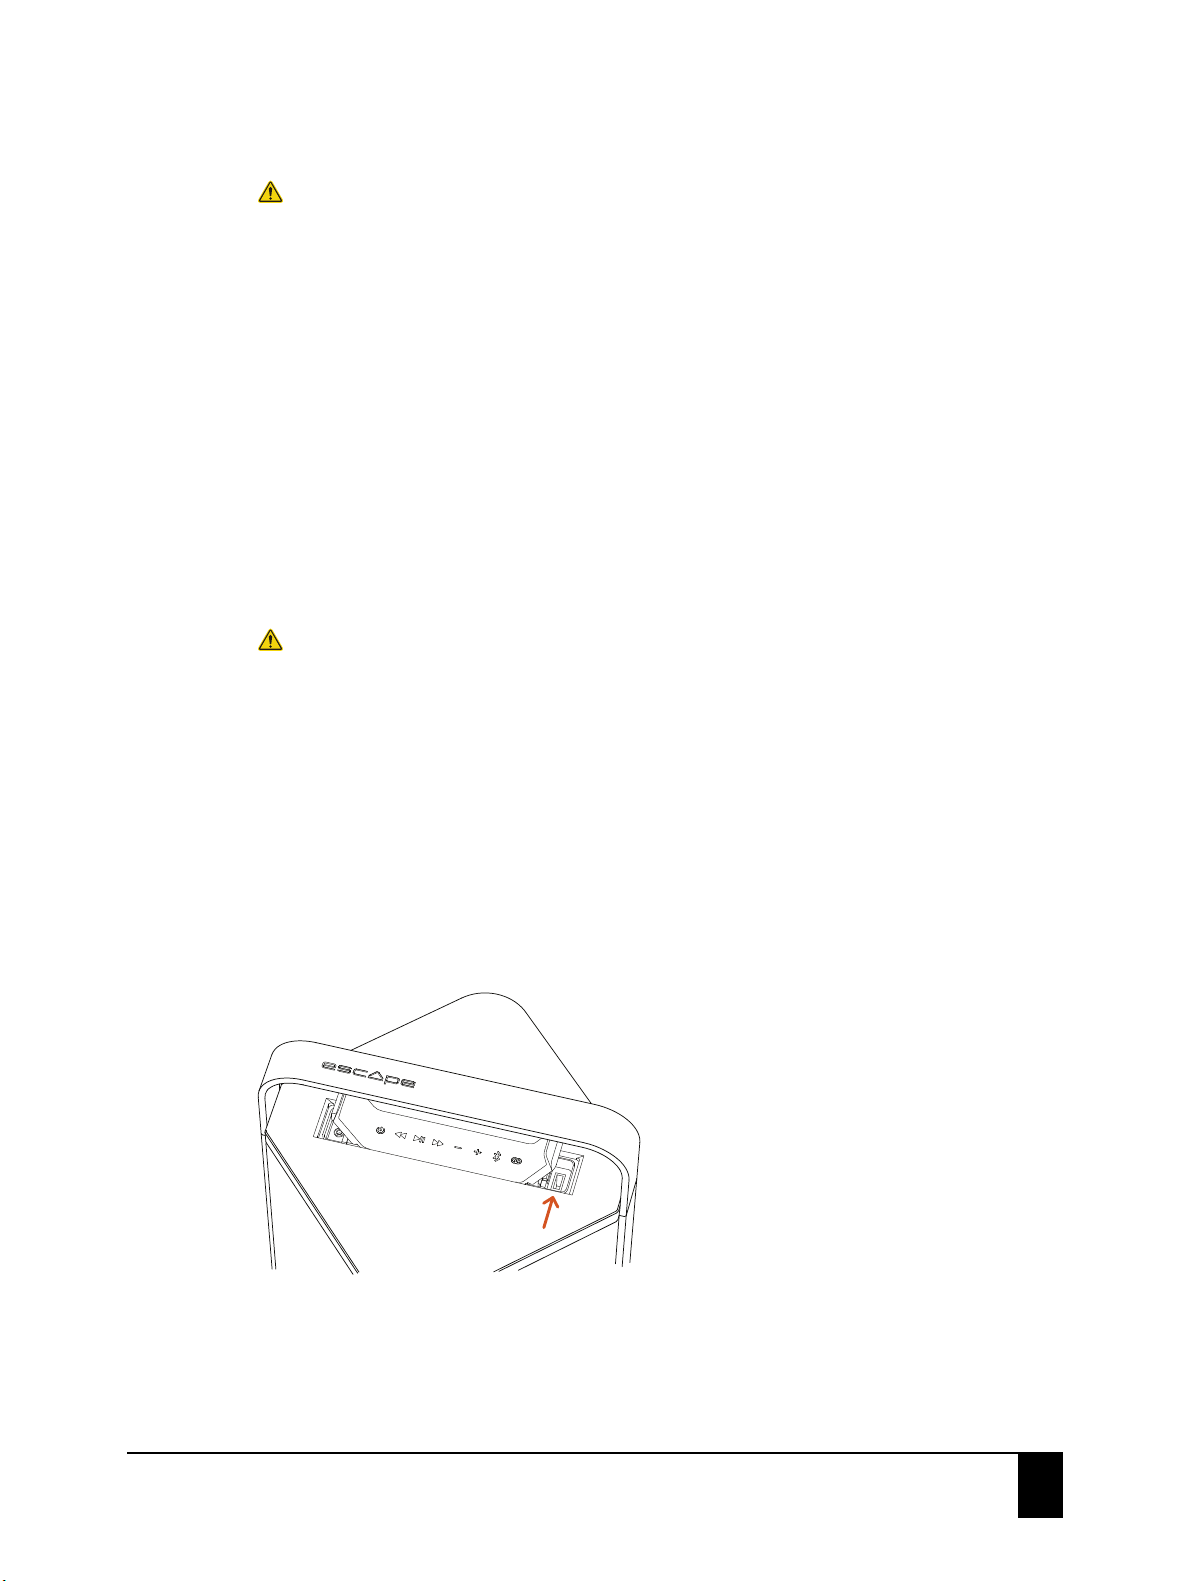
1. Open the keypad lid from the USB input and press against the snap-lock mechanism to release
the keypad out of the compartment.
2. Remove the keypad from the top cover completely. Do not disconnect the keypad from the
wire connector.
3. To re-install the keypad, slide it into the locking hook (3) next to the auxiliary input and gently
press the keypad back into the snap-lock (4) mechanism.
8 Additional features
Note: To perform a factory reset, turn on the P9 and press the Play/pause button for 10
seconds until the unit switches off.
8.1 Standby mode
When the unit is connected to a mains outlet and switched on, it will automatically switch off after
20 minutes of inactivity (no audio signal). To turn the unit back on, press the power button on the
keypad and hold it down for one second.
When the unit is not connected to a mains outlet and is using the internal battery, the Escape™ P9
will automatically switch off completely after 20 minutes of inactivity (no audio signal).
Important: At the lowest volume setting, the standby mode might be triggered while playing music
with a small dynamic range.
Note: In a Twin mode configuration (see Bluetooth Twin mode), the Twin device will
automatically switch off after 20 minutes and the master device after 40 minutes.
18
User guide
Additional features
Page 19
Auto turn-on in standby mode
When the unit is connected to a mains outlet and turned off in standby mode, the Escape™ P9 will
automatically turn back on when it detects an audio signal.
When the unit is not connected to a mains outlet and turned off in standby mode, the Escape™ P9
can only be turned on via the keypad.
8.2 Locking the keypad
When the Escape™ P9 is used in a professional setting (bars, restaurants, hotels), it may be advisable
to disable the buttons of the keypad.
1. To lock the keypad, press and hold down the previous track button for 5 seconds until you
hear a confirmation tone.
The previous track button LED will blink white three times and stay white to confirm that the
keypad is locked. The LED will blink three times every time one of the keypad buttons is pressed
in keypad lock mode, except for the Twin button. (That button needs to be pressed twice
shortly or once longer before the track button LED will blink white three times.)
2. To unlock the keypad, press and hold down the next track button for 5 seconds until you
hear a confirmation tone.
Note: You will only hear a confirmation tone if the unit is in Bluetooth® mode.
3. Once the unit is turned off, the keypad will be unlocked automatically.
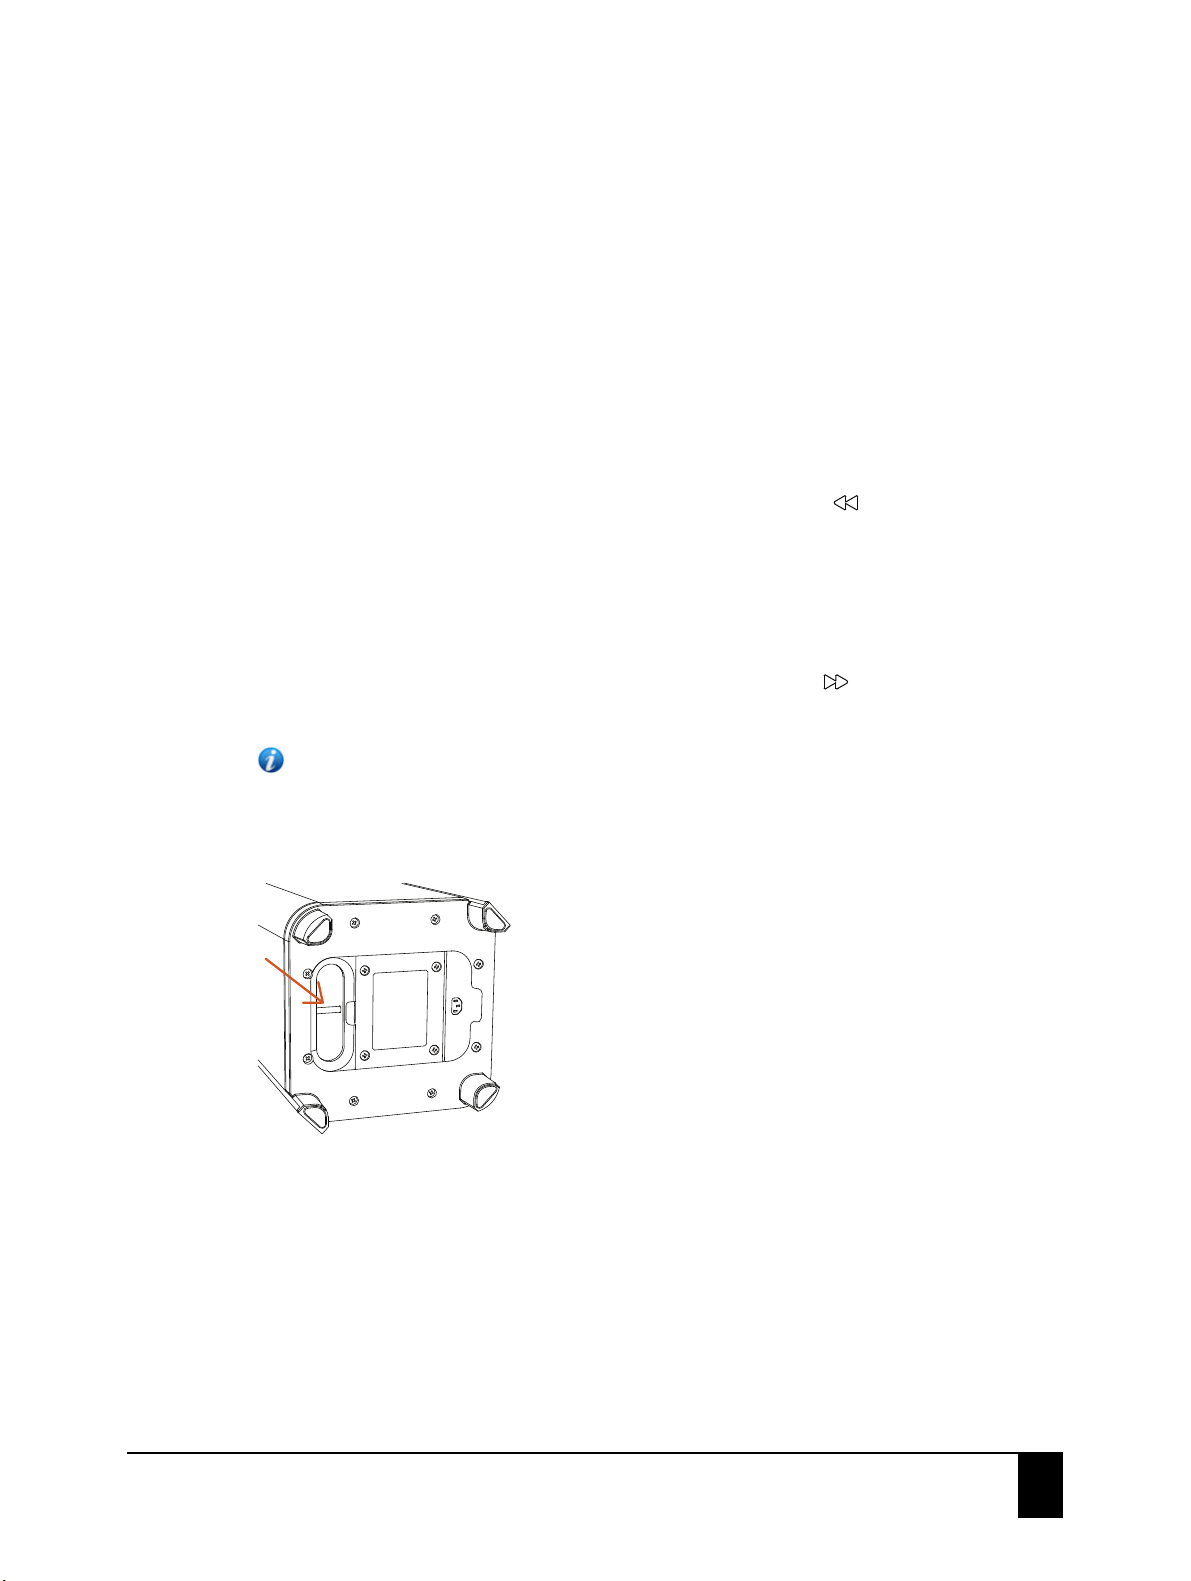
8.3 Anti-theft anchor point
An anti-theft anchor point is located in the bass reflex port at the bottom to secure your unit with a
steel cable.
User guide
Additional features
19
Page 20
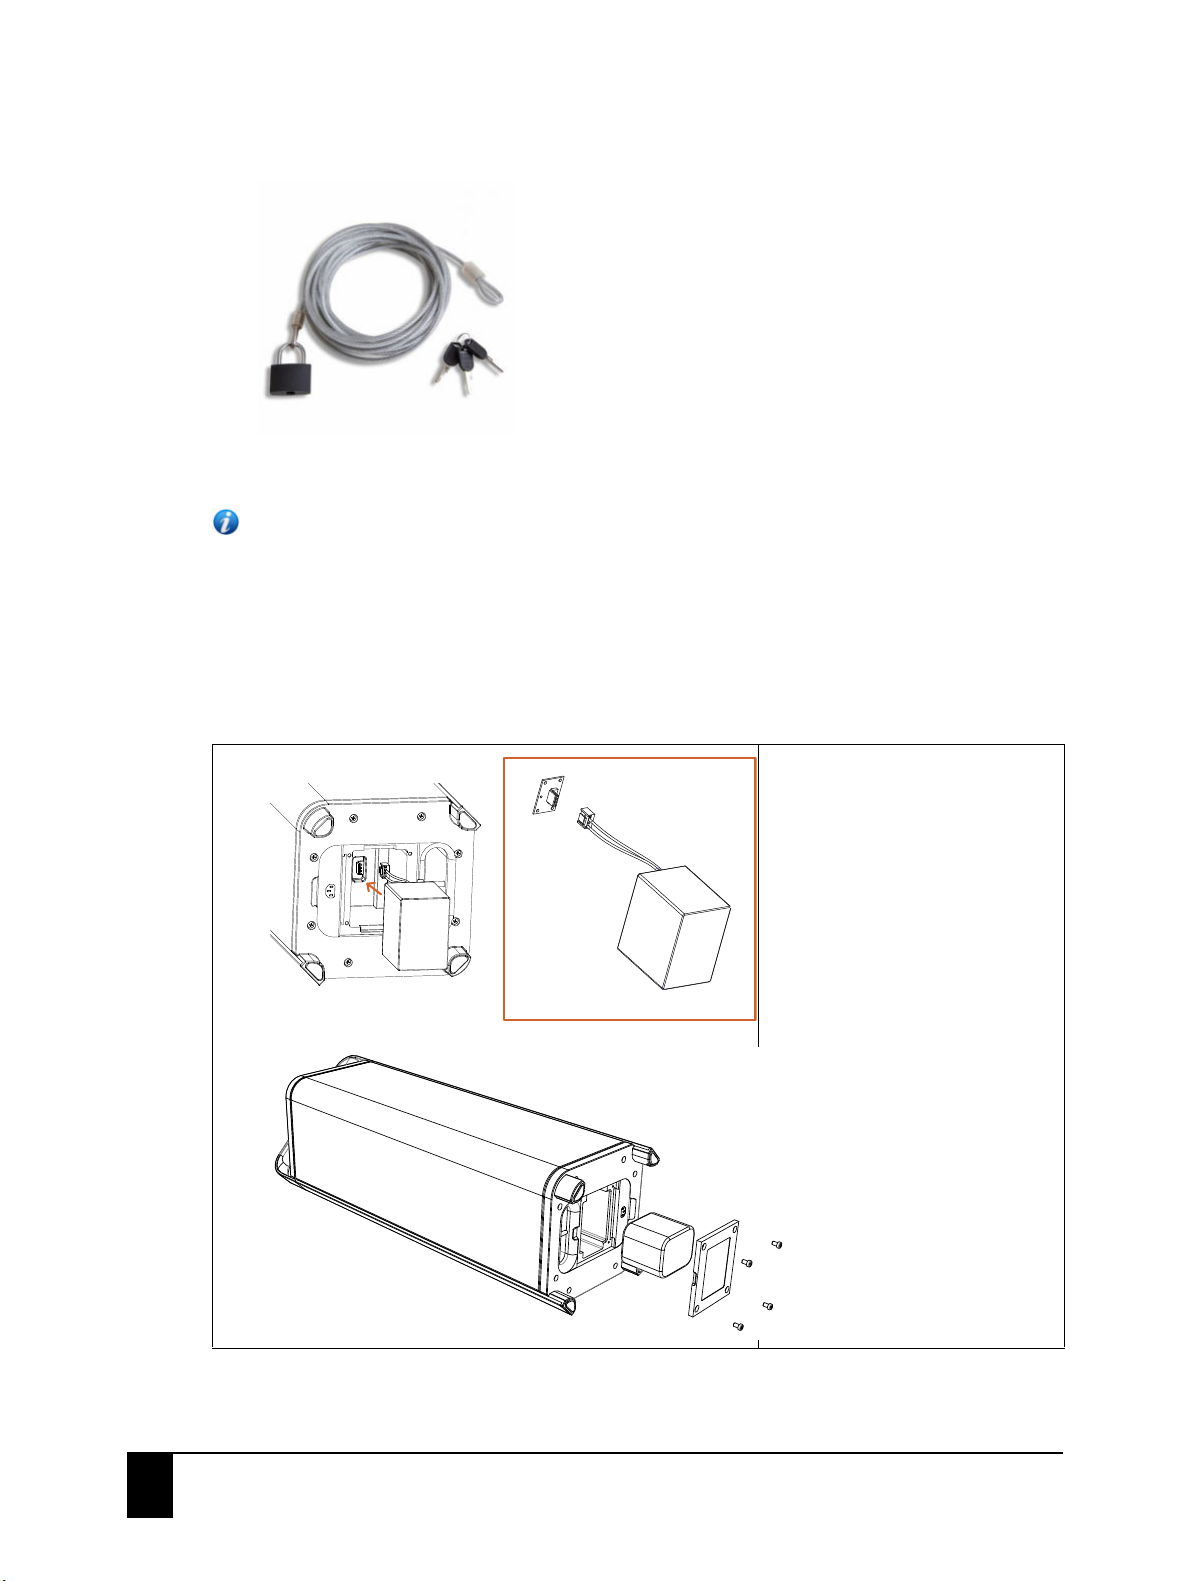
Figure 1-1: Example of a 4mm steel cable
Attention: As a manufacturer, we or any of our affiliates, partners or retailers accept no liability
for any losses or damages of the product (whether direct, indirect, special, consequential or
otherwise).
8.4 Replacing the battery
1. Disconnect the Escape™ P9 from the power outlet.
2. Carefully place the Escape™ P9 on its side on a flat, clean surface.
To remove the battery, press the
locking tab and pull the battery
connector from the internal male
connector.
20
3. Remove the battery cover screws and remove the battery cover.
User guide
Additional features
Page 21

4. Pull out the battery and disconnect the female battery wiring harness connector from the
internal male connector.
5. Reinstall the female wire harness connector from the replacement battery into the male
connector. To plug in this type of connector correctly, ensure that the molex connector is
oriented correctly. Do not force the plug. Gently apply pressure.
The connector can only be connected in one direction. Make sure not to reverse the polarity.
This may cause permanent damage to the internal electronics and repair costs will not be
covered under warranty.
6. Reinstall the battery cover and the screws.
Caution: Only replace the battery with an original Escape™ P9 battery. As with all
batteries, there is a risk of explosion or personal injury if the battery is replaced with an
incorrect type.
9App
Dedicated Escape™ P9 app for iOS® and Android™. Select different audio sources, adjust the start-up
volume, choose between 3 different optimized DSP and equalizer pre-settings (standard, indoor,
outdoor) and 1 custom setting via a 5-band graphic equalizer to create a responsive curve more
appealing to your personal taste. Thanks to the dual 24-bit DSP processor you can switch between
a direct or wide soundstage. Adjust the balance between two speakers in Twin mode and lock the
keypad control buttons (useful in professional settings such as bars and restaurants).
The Escape™ P9 App can be downloaded on the Apple App Store or the Google Play Store. The
separate user manual for the app can be downloaded on the website.
10 Frequently Asked Questions
Please consult the website www.escapespeakers.com to read the troubleshooting section.
11 Specifications
11.1 Full-range drivers
Detailed 360° omnidirectional sound. The Escape™ P9 delivers the most detailed sound reproduction
with its 4 individual 3” full-range drivers with aluminum dust caps and optimized deep polypropylene
(PP) cones, linear flat spider and vented voice coil.
11.2 Amplifier
100 Watt RMS Digital Amplifier with a frequency response of 20Hz-20KHz.
User guide
App
21
Page 22

11.3 Dual 24-bit DSP processor
Two powerful 24 bit DSP processors offers music enthusiasts the ultimate audio sensation.
11.4 Subwoofer
8-inch subwoofer with a custom designed fiberglass composite reinforced basket, oversized magnet,
linear flat spider and vented voice coil for both powerful and deep accurate bass response.
11.5 Rechargeable lithium iron phosphate battery
LiFePo4 19.2 V 3Ah 57.6Wh battery for 8 hours of play time at normal listening level. Internal power
supply (240 V/50 Hz, 110 V/60 Hz) for easy and convenient recharging of the battery.
Do not expose the battery to temperatures above 60°C.
11.6 Bluetooth®
Bluetooth® 4.2 (CSR 8670)
Powered by Qualcomm® aptX™ audio
Supports Advance Audio Coding (AAC™), SBC audio codecs and A2DP 1.3.1
11.7 Dimensions
220 x 220 x 731,5mm
11.8 Weight
Net weight = 12,30 kg - 27.12 lbs
Gross Weight = 12,95 kg - 28.55 lbs
11.9 Additional audio inputs
1. universal 3.5mm auxiliary input (Aux 1)
2. USB flash drive input
3. universal 3.5mm auxiliary input (Aux 2) located in a weather-resistant compartment
underneath the keypad with a USB power output to accommodate future generation receivers.
11.10 Design
Designed for the outdoors. Waterproof grill made out of a multi-filament, high-tenacity polyester
yarn with a soft feel and natural material effect. Optimized weave openness for a crystal clear sound.
Elegant and well-balanced powder-coated die cast aluminum handle and extruded side trims.
22
User guide
Specifications
Page 23

12 Cleaning instructions and fabric care
1. Dampen the grille fabric manually with clear cool or moderately warm water or add a diluted
solution of non-aggressive liquid soap using a soft sponge.
Do not use a pressure washer. This will damage the speaker.
2. Leave to act for 2 or 3 minutes depending on the amount of dirt on the unit.
3. Use a natural bristle soft brush to brush out towards the edges.
4. Rinse with clear water to remove all traces of the soapy solution.
Note: If the product comes into contact with other materials, rinse immediately.
5. Repeat the cleaning process if necessary.
The fabric may show irregularities in the weaving. Do not pull on any loose threads, but cut and
remove carefully with small scissors.
Clean the other parts of the unit with a soft sponge and a mixture of moderately warm water and
non-aggressive liquid soap.
Caution: Do not spray or poor water into the woofer port located at the bottom of the P9
13 Warranty
13.1 Limited warranty for the unit
The unit is covered by a 1-year limited warranty (*) from the date of invoice when used in accordance
with the Escape™ P9 user manual. The warranty includes any spare parts and labor required to repair
the product. This warranty does not cover damage caused by abuse, accident, misuse, negligence,
or improper operation or installation, products that have been modified or products whose
identifying number or serial number have been altered, defaced, or removed. For this warranty to
apply, you must use the unit according to the instructions.
13.2 Limited warranty for the battery
The battery is covered by a 6-month warranty worldwide.
13.3 Returning a device for repairs
1. Pack the speaker in the original shipping box or a corrugated container with at least 3 inches /
7.5cm of resilient material to protect the unit from damage in transit.
Note: Escape™ is not responsible for any damage during transportation.
2. Bring the unit and proof of purchase to your retail store, along with a note explaining the
nature of service required.
User guide
Cleaning instructions and fabric care
23
Page 24

3. If the store of purchase's personnel cannot help you, please send an email to
[email protected] with a description of the defect, proof of purchase and serial
number for a Return Merchandise Authorization number before returning the unit for repair.
4. Write the RMA number on the shipping label and ship to: Escape™ - Ter Heidelaan 50a - 3200
Aarschot - Belgium or an authorized service center.
Escape™ sells products only through authorized channels to ensure that customers obtain proper
support and service. Any Escape™ product purchased from an unauthorized dealer or source will not
be honored or repaired under the existing warranty policy. Any sale of products by an unauthorized
source or other manner not authorized by Escape shall void the warranty on the applicable product.
Please check our website for the list of authorized Escape™ retailers.
Note: (*) Escape™’s limited warranty does not modify, affect or substitute the rights under
statutory consumer protection laws that may vary from country to country.
14 Copyright information
Designed in Europe and manufactured in China
The Bluetooth® word mark and logos are registered trademarks owned by the Bluetooth SIG, Inc. and
any use of such marks by Escape™ under license.
Qualcomm® is a trademark of Qualcomm Incorporated, registered in the United States and other
countries, used with permission. aptX™ is a trademark of Qualcomm Technologies International, Ltd.,
registered in the United States and other countries, used with permission.
iOS® operating system is a trademark of Apple Inc., registered in the U.S. and other countries.
Android™ is a trademark of Google LLC.
The AAC™ logo is a trademark of Dolby Laboratories. Other trademarks and trade names are those
of their respective owners.
14.1 Patents
European Union Design Patent No 003162122-0001
China Model Design Patent No 201630320579.X
United States Design Patent No US D805,499 S
14.2 Directives
This product is in compliance with directives of relevance, including RoHS directive.
14.3 Declaration of conformity
The declaration of conformity for the Escape™ P9 can be found and downloaded on the website.
24
User guide
Copyright information
Page 25

See also the product label for more regional regulatory approvals.
14.4 Brand information
Escape™ is a brand of:
Escape bvba
Ter Heidelaan 50a
3200 Aarschot
Belgium
www.escapespeakers.com
14.5 Images
Images of the Escape™ products are the intellectual property of Escape bvba.
Any reproduction, modification, distribution or other use, even partial, of this document is prohibited
without prior written permission.
User guide
Copyright information
25
 Loading...