


MODEL NOS.
T8420, 527.26328
TOURNAMENT
CHAMP
TABLE TENNIS TABLE
O W N E R ' S M A N U A L
1.Read this manual carefully before starting assembly. Read each step completely before beginning each step.
2.Some smaller parts may be shipped inside larger parts. Check inside all parts and cartons before assembling or ordering parts.
3.To make assembly easier, use the Hardware Identifier on page 8 to identify and sort all fasteners. Check all cartons for kits. All hardware may not be located in one kit.
4.Do not tighten hardware until instructed to do so. If hardware is tightened too soon, mounting holes may not align and parts may not easily fit together. Leave locknuts slightly loose until you are instructed to tighten them.
5.Tools required for assembly: Phillips screwdriver, tape measure, two 7/16” wrenches, two 1/2” wrenches and two 9/16” wrenches (adjustable wrenchs may be substituted for the wrenches).
Please Do Not Return This Product To The Store!
Contact Escalade® Sports customer service department at:
Phone: |
1-866-873-3528 |
Toll – Free ! |
Fax: |
1-866-873-3533 |
Toll – Free ! |
E-mail: |
tabletennis@escaladesports.com |
|
Mailing Address (correspondence only):
Escalade Sports
PO Box 889
Evansville, IN 47706
Please visit our World Wide Web site at: www.escaladesports.com
ON-LINE TROUBLE SHOOTING |
TECHNICAL ASSISTANCE |
ON-LINE PARTS REQUESTS |
FREQUENTLY ASKED QUESTIONS |
ADDITIONAL ESCALADE®SPORTS PRODUCT INFORMATION
2L-6821-00
Escalade® Sports products may be manufactured and/or licensed under the following patents. 6120397, 5816957, 5769744, 5119741, 4911085, 4717157, D460140, D420563
Additional patents may be pending. One or more of the listed patents and/or pending patents may cover specific product.
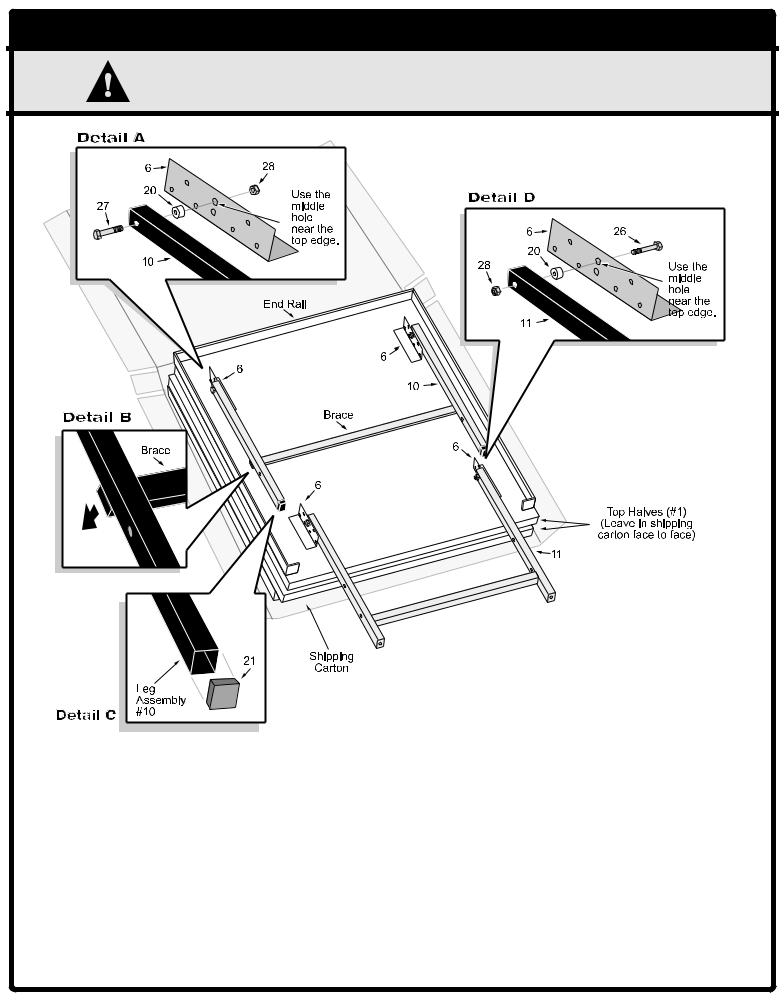
1. ATTACHING LEGS TO TABLE TOPS
CAUTION AT LEAST TWO ADULTS ARE NEEDED TO COMPLETE THE FOLLOWING STEPS!
1.Leave top halves #1 in shipping carton as shown above or lay them on a carpeted floor (to protect them from damage and scratches ).
2.Attach leg assembly #10 to brackets #6 located on the bottom of the first top half #1 closest to end rail. (See above). Use bolts #27, spacers #20 and locknuts #28. (See Detail A).
NOTE: Be sure brace on leg assembly #10 is against table. (See Detail B).
Tighten these locknuts snug but DO NOT OVERTIGHTEN THEM. JOINT MUST MOVE!
3.Put caps #21 on bottom end of leg assembly #10. (See Detail C).
4.Attach upright assembly #11 to remaining brackets #6 on the bottom of the first top half #1. (See above). Use bolts #26, spacers #20, and locknuts #28. (See Detail D). Tighten locknuts snug but
DONOTOVERTIGHTENTHEM.JOINTMUST MOVE!
5.With a helper, set the first top half #1 on its side against a wall. (Be sure to put a piece of cardboard, cloth, or carpeting on the floor first to protect the top's edges. ) Turn the second top half #1 over and repeat steps 2-4 to assemble it.
2

2. ATTACHING NAME PANELS TO LEGS
AT LEAST TWO ADULTS ARE NEEDED TO COMPLETE THE FOLLOWING CAUTION STEPS! DO NOT LEAVE TABLE UNATTENDED UNTIL ASSEMBLY IS
COMPLETE!
6.With a helper, hold top halves about 14 ½ inches apart. Attach only one half of name panels #8 to upright assemblies #11 as shown above. Use ONLY TWO bolts #26 and locknuts #28 on each name panel.
Do not tighten these locknuts completely tight yet. (Two other bolts #27 and nuts #28 will be used in the next section to attach the other half of the name panels and linkages #24 at the same time. See next page. )
HELPFUL HINT: Start at the bottom and insert two bolts #26 UPWARD through upright assemblies #11 and name panel #8. Then attach the upper name panel #8. Insert bolts #26 DOWNWARD.
7.Attach safety latches #9 to name panels using one screw #29, flat washer #30 and locknut #31. (See Detail E). Attach a safety latch to one name panel to hold one table half and the other safety latch to the other name panel to hold the other table half.
3
 Loading...