

Page 1

Product:
Model Code/s:
Benchtop
Dishwasher
User Manual
EBTDW2D
Exctly wht
you need
Version:
V2 1021
Online:
esatto.house
Page 2

User Manual
02
Page 3

esatto.house
03
Contents
04
Welcome
06
Safety
Information
09
Operation
Instructions
05
Quick
Start Guide
08
Disposal
10
Getting
Started
12
Loading the
Dishwasher
16
Maintenance
& Cleaning
23
Troubleshooting
15
Starting a
Wash Program
19
Installation
Instructions
25
Technical
Information
26
Purchase
Details
28
Warranty
Information
Page 4

User Manual
Welcome
04
Residentia Group
—
Head Office
165 Barkly Avenue
Burnley, Victoria
Australia 3121
—
ACN
600 546 656
—
Online
residentia.group
www.esatto.house
@esatto.house
—
Postage
PO Box 5177
Burnley, Victoria
Australia 3121
—
Telephone
1300 11 4357
Congratulations on purchasing your new dishwasher. The Esatto brand is proudly
distributed within Australia by esidentia Group Pty Ltd.
Please refer to the warranty card at the rear of this manual for information regarding
your product’s parts and labour warranty, or visit us online at: www.residentia.group
At Residentia Group, we are customer obsessed and our Support Team are there to
ensure you get the most out of your appliance. Should you want to learn more about
your dishwasher such as the various programs or importantly taking care
of the appliance, our Support Team are here to help.
You can use our online Support Centre at anytime by visiting:
http://support.residentiagroup.com.au
Or you can contact us via phone by dialing: 1300 11 HELP (4357).
It is important that you read through the following use and care manual thoroughly to
familiarise yourself with the installation and operation requirements of your appliance
to ensure optimum performance.
Again, thank you for choosing an Esatto appliance and we look forward to being of
service to you.
Kind Regards,
The Residentia Team
Page 5
esatto.house
05
B::
.
QQuuiicckk ooppeerraattiioonn gguuiiddee
For detailed operating method read the corresponding content on the instru ction manual.
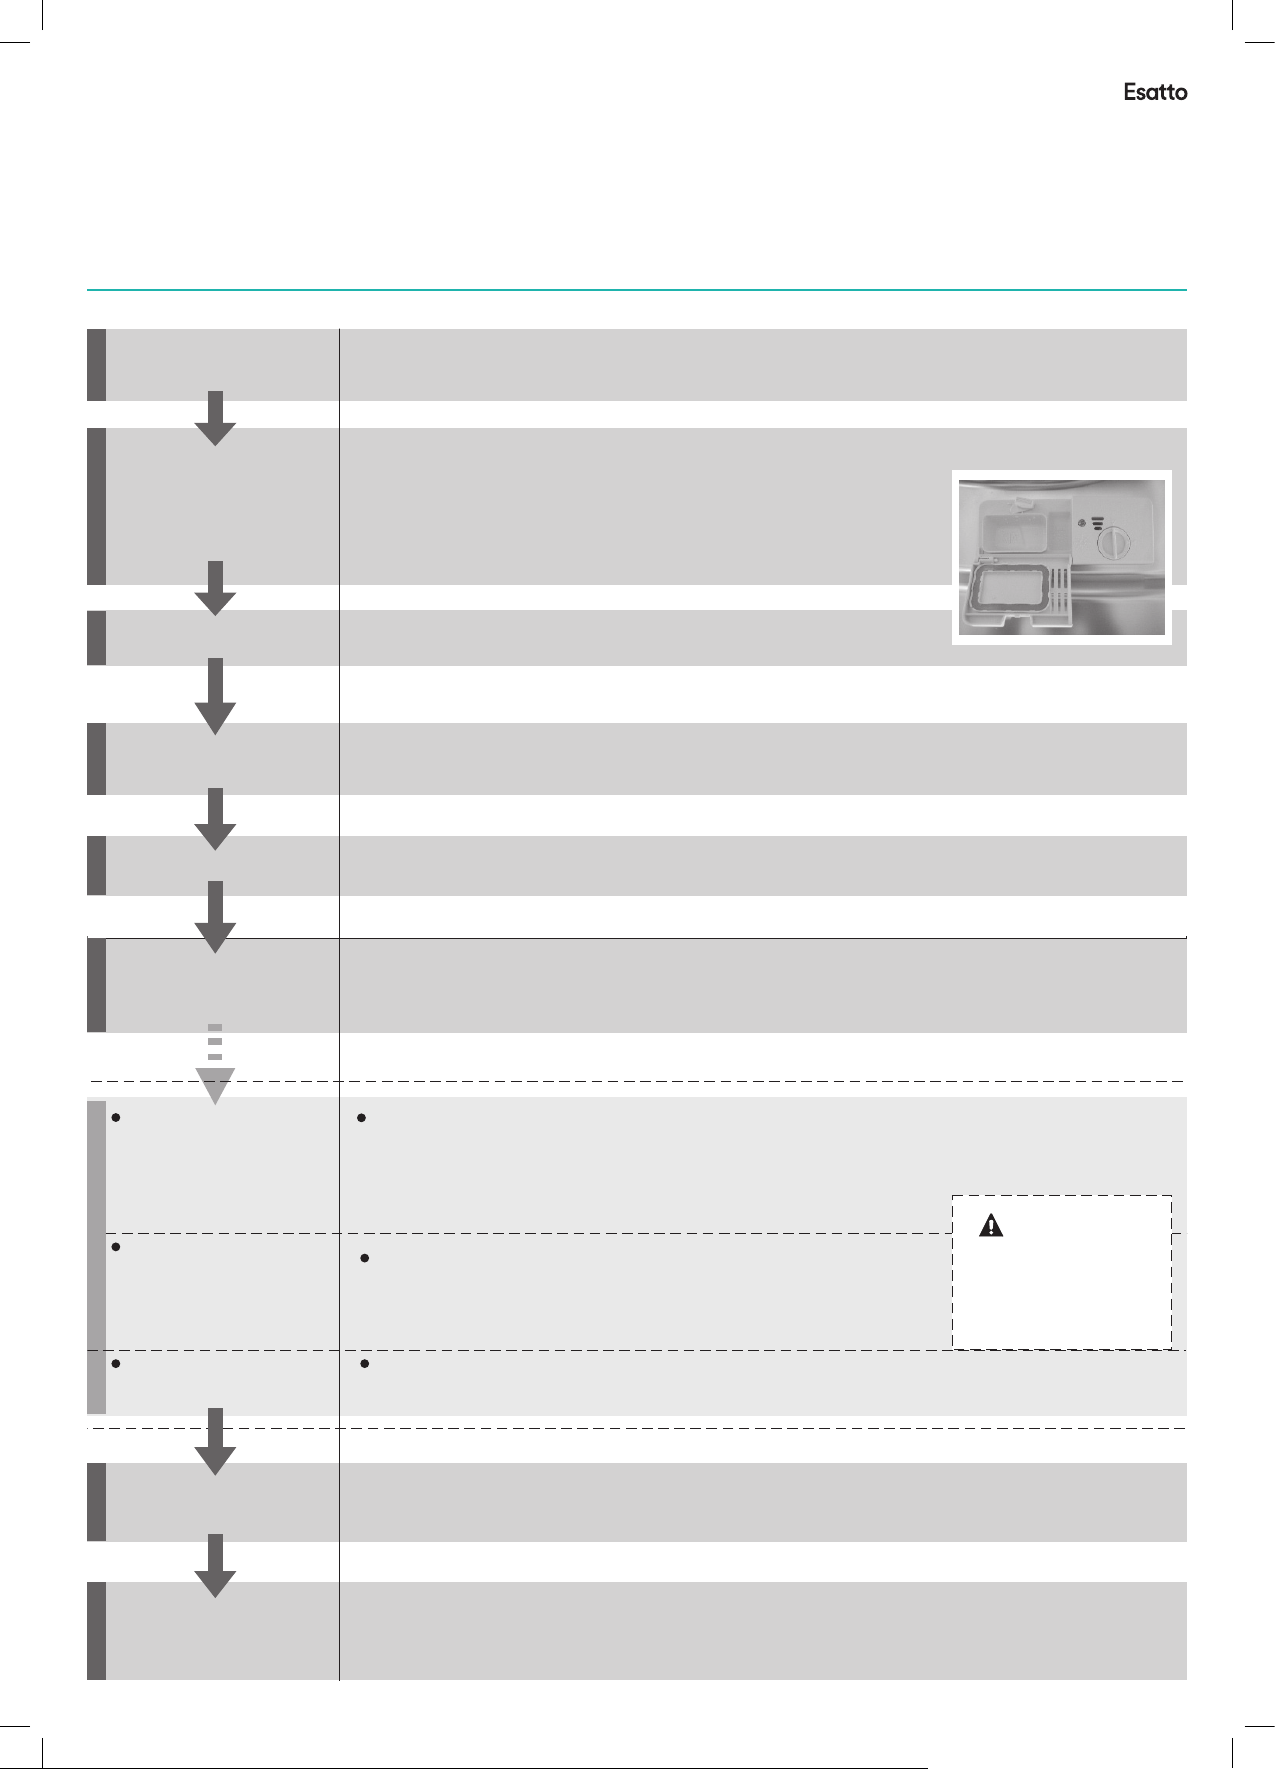
Quick Start Guide
For more details on operation, please read the relevant content in this manual.
Switch on the appliance
Press the Power switch button to switch on the appliance, Open the door.
CCoommppaarrttmmeenntt AA::
With each wash cycle.
Fill the detergent dispenser
Check the rinse aid level
Load the baskets
Select a program
Compartment B
For programmes with pre-wash only.
(Follow the user instructions!)
MMeecchhaanniiccaall iinnddiiccaattoorr CC.
Electric indicator on control panel (if provided).
Scrape off any large amount of leftover food. Soften remnants of burnt food in pans,
then load the baskets. Refer to the dishwasher loading instructions.
Close the door
( See the section entitled“Operation instruction”)
,Press the program button until the selected program lights up.
C
B
A
Running the dishwasher
Changing the programme
Add forgotten dishes in the
dishwasher.
If the appliance is switched
off during a wash cycle.
Switch off the appliance
T urn on the water tap and press the Start/Pause button. The machine will start working after about
10 seconds.
1. A running cycle can only be modified if it has been running for a short time. Otherwise the detergent
may have already been released and the water already drained. If this is the case, the detergent
dispenser must be refilled.
2. Press the Start/Pause button ,than press the program button more than 3 seconds to cancel the
running programme.
3. Select a new programme.
4. Restart the dishwasher.
1.Press the start/pause button to stop the machine.
2.Open the door.
3.Add the forgotten dishes.
4.Close the door, then press the start/pause button, the dishwasher will
start running again .
If the appliance is switched off during a wash cycle, when switched
on again, please re-select the washing cycle and operate the dishwasher
according to the original Power-on state ).
When the working cycle has finished, the buzzer of the dishwasher will sound 8 times, then stop.
Turn off the appliance using the Power button.
Since the appliance is standing by, it will power off automaticly after 30 minutes without any operation.
WARNING!
Open t he do or care fully.
Hot st eam m ay esca pe
when the do or is ope ned!
Turn off the water tap,
unload the baskets
Warning: wait a few minutes (about 15 minutes) before unloading the dishwasher to avoid handling
the dishes and utensils while they are still hot and more susceptible to break.
They will also dry better.Unload the appliance, starting from the lower basket.
Page 6
User Manual
Safety Information
11..IIMMPPOORRTTAANNTT SSAAFFEETTYY IINNFFOORRMMAATTIIOONN
WWAARRNNIINNGG!!
Do not abuse, sit on, or stand on the door or dish rack of the dishwasher.
Do not operate your dishwasher unless all enclosure panels are properly in place.
Open the door very carefully if the dishwasher is operating, there is a risk of water
squirting out.
Do not place any heavy objects on or stand on the door when it is open. The
appliance could tip forward.
When loading items to be washed:
1) Locate sharp items so that they are not likely to damage the door seal;
2) Warning: Knives and other utensils with sharp points must be loaded in the
basket with their points down or placed in a horizontal position.
Check that the detergent powder is empty after completion of the wash cycle.
Do not wash plastic items unless they are marked dishwasher safe or the
equivalent. For plastic it ems n check th e m anufacturer's
ot so marked,
recommendations.
Use only det ergent and rins e add itives des igned for an aut omatic dish washer.
Never use soap, laundry detergent, or hand washing detergent in your dishwasher.
Children should be supervised to ensure that they do not play with the appliance.
The door should not be left open, since this could increase the risk of tripping.
If the supply cord is damaged, it must be replaced by the manufacturer or
its service agent or a similarly qualified person in order to avoid a hazard.
During installation, the power supply must not be excessively or dangerously
bent or flattened.
Do not tamper with controls.
The appliance is to be connected to the water mains using new hose sets and
that old hose-sets should not be reused.
The maximum number of place settings to be washed is 8.
The maximum permissible inlet water pressure is 1MPa.
The minimum permissible inlet water pressure is 0.04MPa.
06
This appliance is intended to be used in household and similar
applications such as:
-staff kitchen areas in shops, offices and other working environments;
-farm houses;
-by clients in hotels, motels and other residential type environments;
-bed and breakfast type environments.
This appliance can be used by children aged from 8 years and above and
persons with reduced physical, sensory or mental capabilities or lack of
experience and knowledge if they have been given supervision or
instruction concerning use of the appliance in a safe way and understand
the haza
and user maintenance shall not be made by children without supervision.
(For EN60335-1 )
This appliance is not intended for use by persons(including children )with
reduced physical, sensory or mental capabilities, or lack of experience and
knowledge ,unless they have been given supervision or instruction
concerning use of the appliance by a person responsible for their safety.
(For IEC60335-1 )
This appliance is for indoor use only, for household use only. To protect
against the risk of ele
water or other liquid.
Please unplug before cleaning and maintenance the appliance .Use a soft
cloth moisten with mild soap, and then use a dry cloth to wipe it again .
rds involved. Children shall not play with the appliance. Cleaning
EARTHING INSTRUCTIONS
When using your dishwasher,
follow the precautions listed below:
ctrical shock, do not immerse the unit, cord or plug in
This appliance must be earthed. In the event of a malfunction or breakdown,
earthing will reduce the risk of an electric shock by providing a path of least
resistance of electric current. This appliance is equipped with a cord having
an equipment-earthing conductor and a earthing plug.
The plug must be plugged into an appropriate outlet that is installed and
earth ed in accordance with all local codes and ordinances.
Improper connection of the equipment-earthing conductor can result
in the risk of an electric shock. Check with a qualified electrician or service
representative if you are in doubt whether the appliance is properly earthed.
Do not modify the plug provided with the appliance; If it does not fit the outlet.
Have a proper outlet installed by a qualified electrician.
Page 7
esatto.house
07
Do not abuse, sit on, or stand on the door or dish rack of the dishwasher.
Do not operate your dishwasher unless all enclosure panels are properly in place.
Open the door very carefully if the dishwasher is operating, there is a risk of water
squirting out.
Do not place any heavy objects on or stand on the door when it is open. The
appliance could tip forward.
When loading items to be washed:
1) Locate sharp items so that they are not likely to damage the door seal;
2) Warning: Knives and other utensils with sharp points must be loaded in the
basket with their points down or placed in a horizontal position.
Check that the detergent powder is empty after completion of the wash cycle.
Do not wash plastic items unless they are marked dishwasher safe or the
equivalent. For plastic it ems n check th e m anufacturer's
ot so marked,
recommendations.
Use only det ergent and rins e add itives des igned for an aut omatic dish washer.
Never use soap, laundry detergent, or hand washing detergent in your dishwasher.
Children should be supervised to ensure that they do not play with the appliance.
The door should not be left open, since this could increase the risk of tripping.
If the supply cord is damaged, it must be replaced by the manufacturer or
its service agent or a similarly qualified person in order to avoid a hazard.
During installation, the power supply must not be excessively or dangerously
bent or flattened.
Do not tamper with controls.
The appliance is to be connected to the water mains using new hose sets and
that old hose-sets should not be reused.
The maximum number of place settings to be washed is 8.
The maximum permissible inlet water pressure is 1MPa.
The minimum permissible inlet water pressure is 0.04MPa.
Page 8
User Manual
DDiissppoossaall
!
33..OOppeerraattiioonn IInnssttrruuccttiioonn
DDiisshhwwaasshheerr FFeeaattuurreess
before us ing i t for the first t ime.
To get the be st performanc e fro m your dishw ash er, read all op era ting instruct ions
IIMMPPOORRTTAANNTT
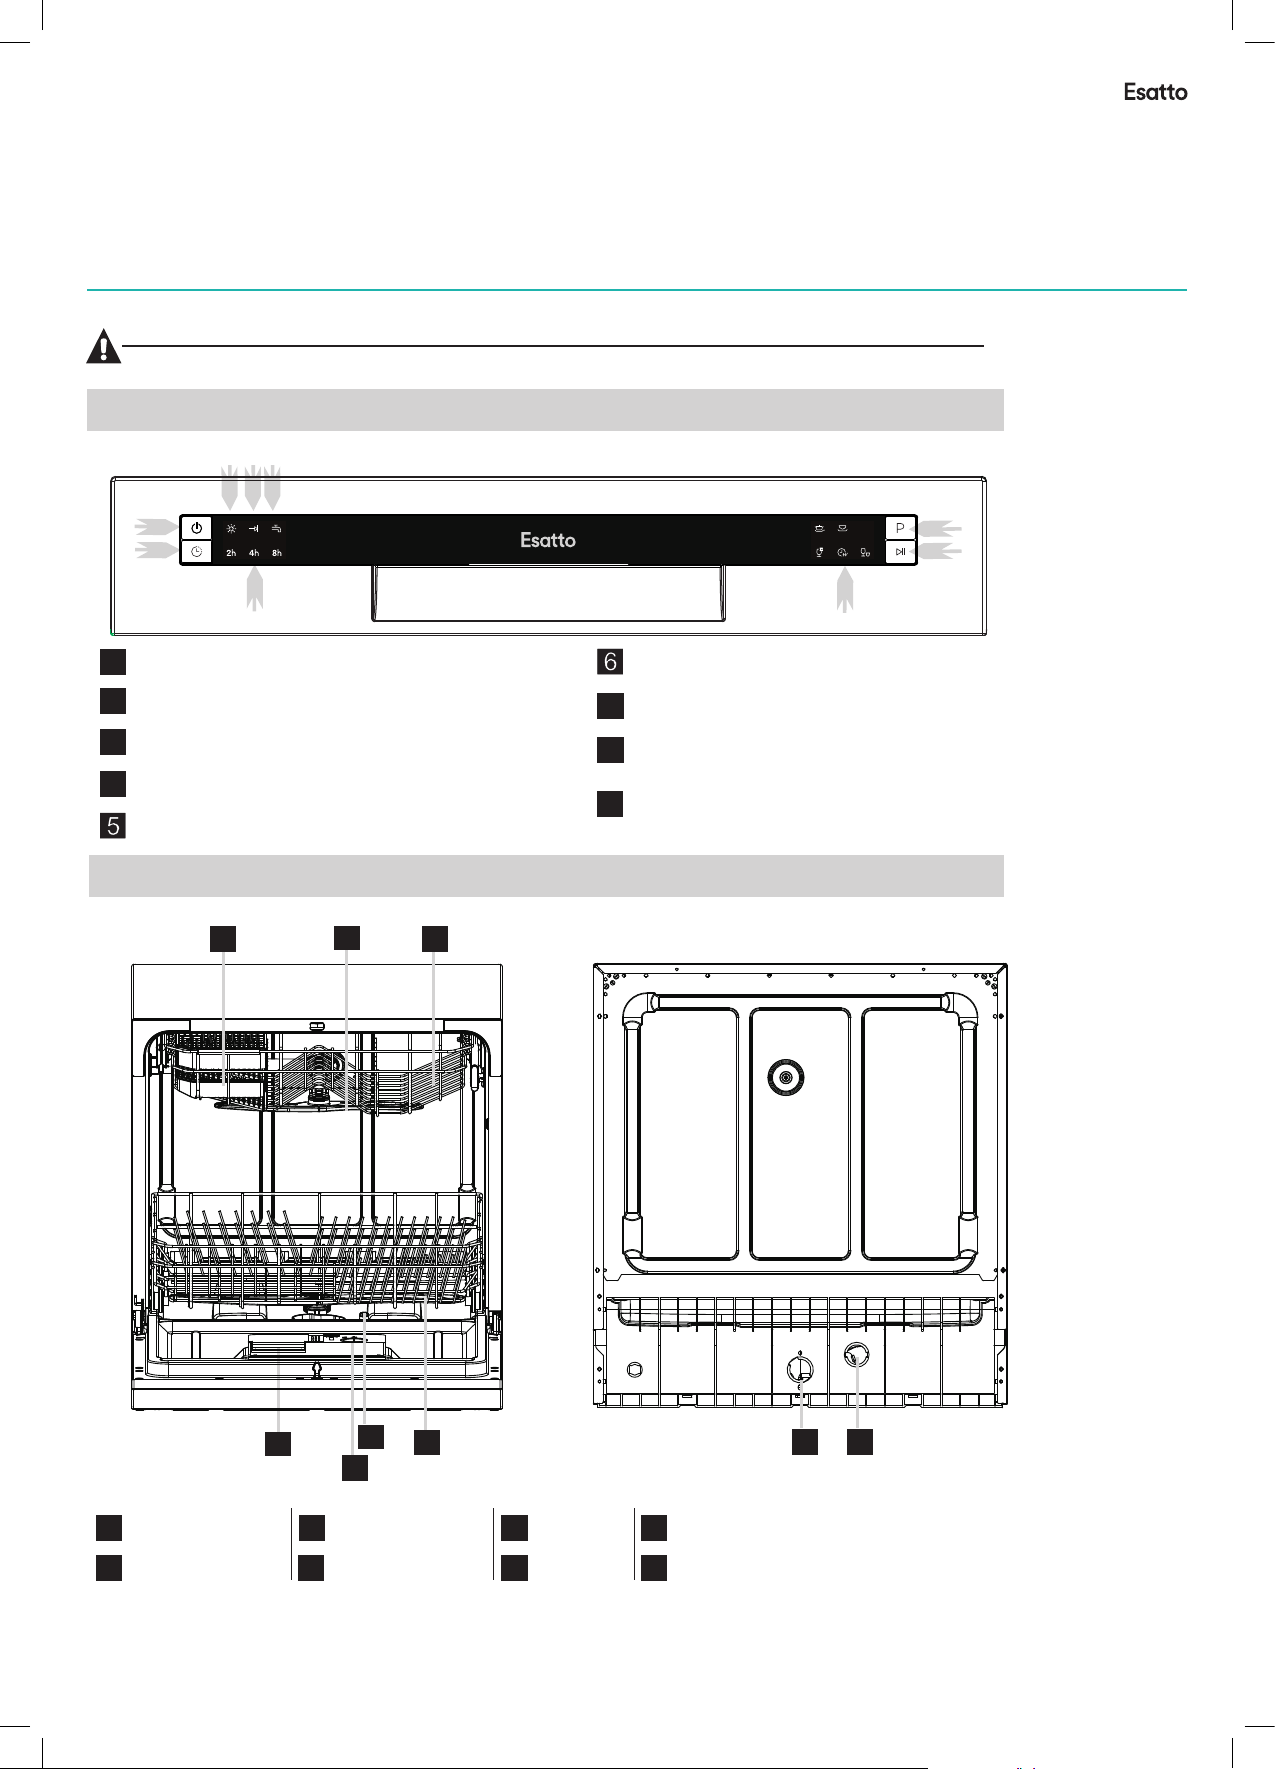
Bac k View
Filt er assemb ly
Dete rgent Dis penser
Cup Sh elf
Rins e Aid Dispen ser
Inle t pipe
conn ector
Drai n pipe
conn ector
Spra y Arms
Bask et
1
5
6
7
8
3
2
4
7
8
Fro nt view
1
3
5
2
4
4
6
CCoonnttrrooll PPaanneell
11
2
3
4
7
Powe r Button: To turn o n/ off the pow er s upply.
Dela y setting i ndicati ons
Prog ram Selec tor: Pres s the butto n to sele ct
wash c ycles
Dela y Button : To press t he b utton t o de lay.
Wat er failur e indic at ion, th e fa ucet ma yb e not ope n
Rins e Aid War ni ng Ligh t : To be on w he n the
rins e aid dispe nser ne ed s to be ref il led..
.
8
9
Prog ram endin g Light : To be on when t he wash in g
prog ram is fini shed.
Star t/Pause B utton: Pr ess this bu tton to sta rt
or pau se the dish washer
.
Prog ram indic ations.
.
3
4
5
1
2
6
9
7
8
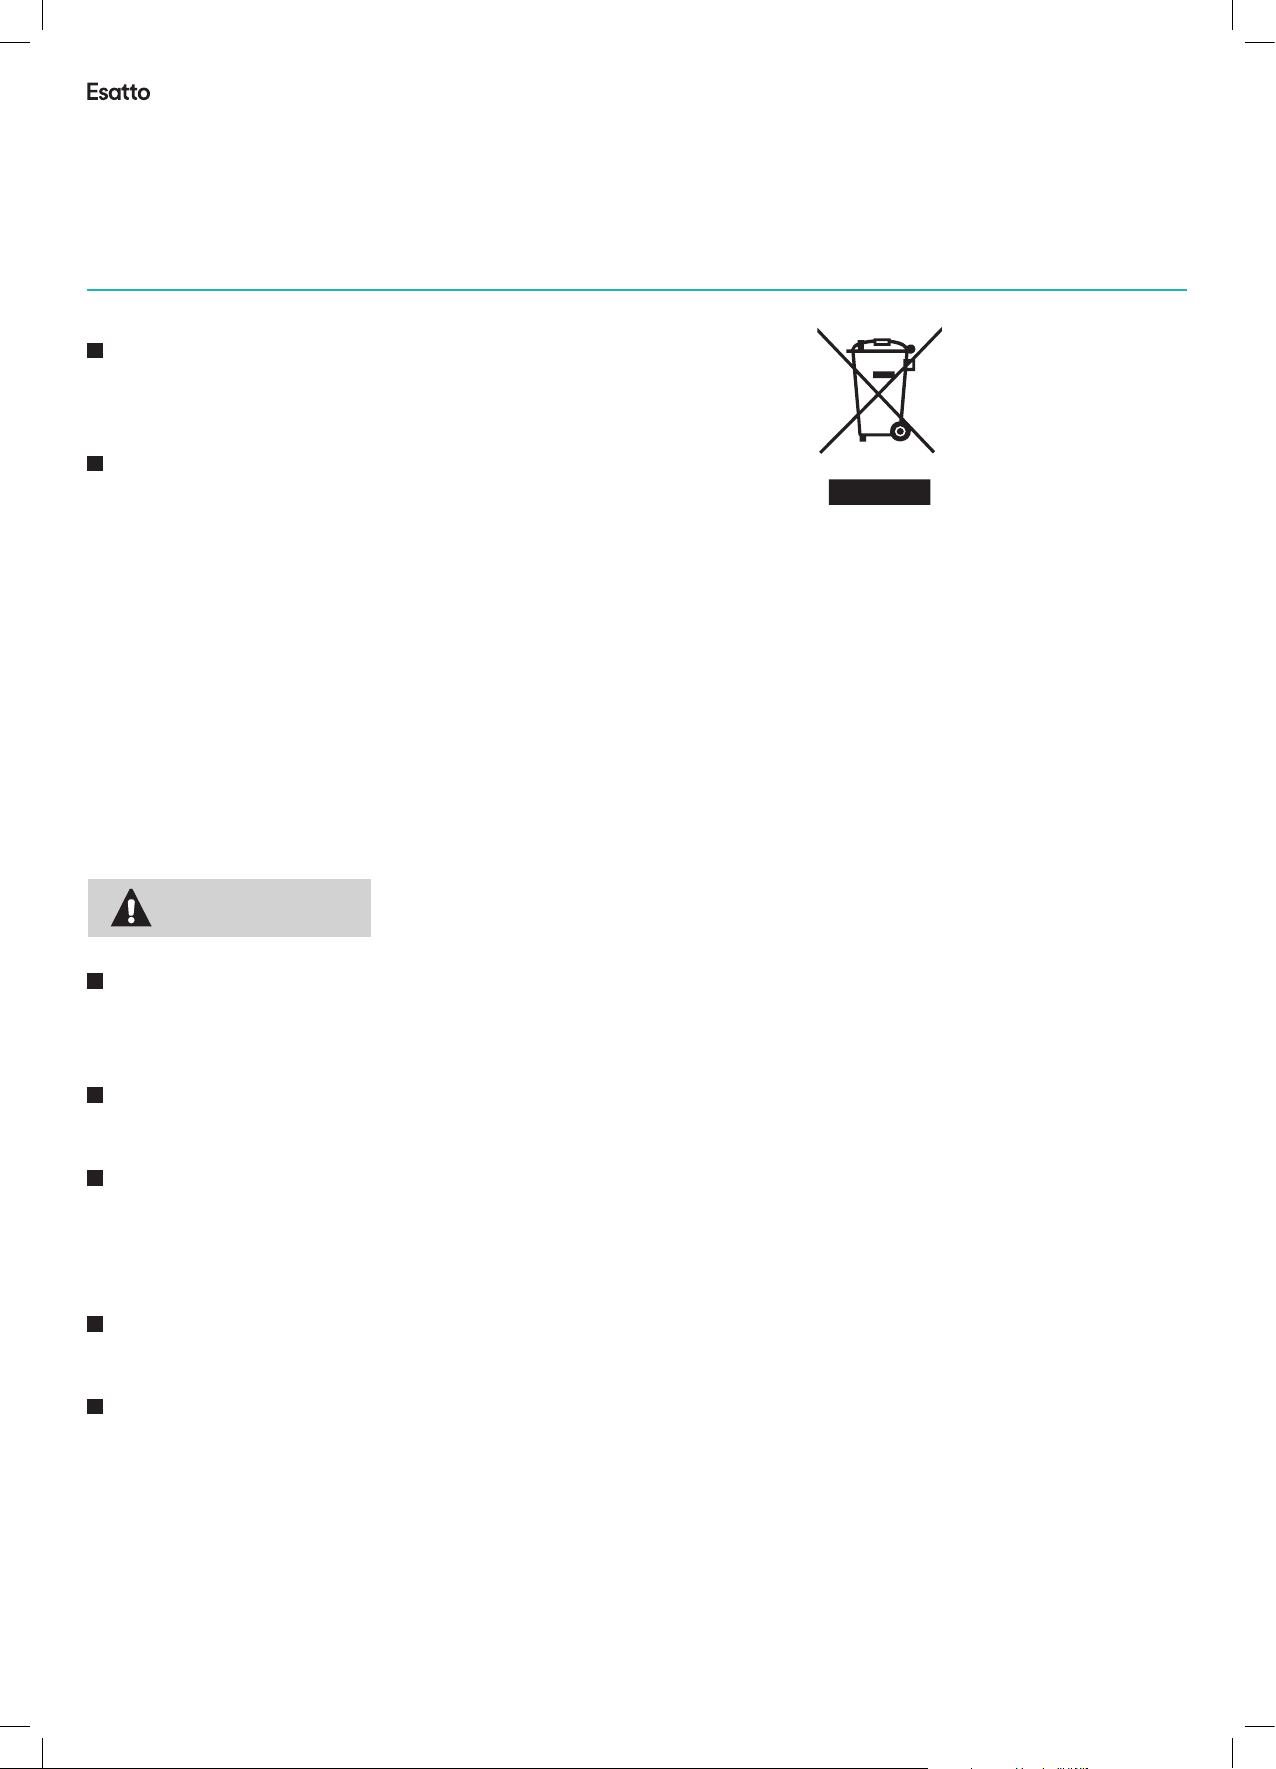
Disposal
This appliance's packaging materials are recyclable.
Dispose of the packaging into a suitable waste collection
container to recycle it.
It is prohibited to dispose of this appliance as household
product or in its packing indicates that this product may not be treated as
waste.Correct Disposal of this product: this symbol on the
household waste. Instead, it should be taken to the appropriate waste
collection point for the recycling of electrical and electronic equipment. By
ensuring this product is disposed of correctly, you will help prevent
potential negat
which could otherwise be caused by the inappropriate waste handling of
this product.For more detailed information about the recycling of this
product, please contact your local council your household waste disposal
service, or the shop where you purchased the product.
ive consequences for the environment and human health,
08
WWAARRNNIINNGG!
For disposing of package and the appliance please go to a recycling
centre. Therefore cut off the power supply cable and make the door
closing device unusable.
Cardboard packaging is manufactured from recycled paper and should be
disposed in the waste paper collection for recycling.
By ensuring this product is disposed of correctly, you will help prevent
potential negative consequences for the environment and human health,
which could otherwise be caused by inappropriate waste handling of this
product.
For more detailed information about recycling of thi
contact your local city office and your household waste disposal service.
DISPOSAL: Do not dispose this product as unsorted municipal waste.
Collection of such waste separatelyfor special treatment is necessary.
s product, please
Page 9
esatto.house
09
33..OOppeerraattiioonn IInnssttrruuccttiioonn
s
T
conn ector
l
1
Operation Instruction
IIMMPPOORRTTAANNT
To get the be st performanc e fro m your dishw ash er, read all op era ting instruct ions
before us ing i t for the first t ime.
CCoonnttrrooll PPaanneel
1
2
4
3
5
6
Powe r Button: To turn o n/ off the pow er s upply.
1
Dela y Button : To press t he b utton t o de lay.
2
Rins e Aid War ni ng Ligh t : To be on w he n the
3
rins e aid dispe nser ne ed s to be ref il led..
.
Prog ram endin g Light : To be on when t he wash in g
4
prog ram is fini shed.
.
Wat er failur e indic at ion, th e fa ucet ma yb e not ope n
DDiisshhwwaasshheerr FFeeaattuurrees
Fro nt view
5
4
ECO
7
8
9
Dela y setting i ndicati ons
Prog ram Selec tor: Pres s the butto n to sele ct
7
wash c ycles
Star t/Pause B utton: Pr ess this bu tton to sta rt
8
or pau se the dish washer
Prog ram indic ations.
9
Bac k View
.
6
Dete rgent Dis penser
1
Filt er assemb ly
2
1
3
Rins e Aid Dispen ser
3
Spra y Arms
4
2
4
5
6
Cup Sh elf
Bask et
Inle t pipe
7
conn ector
Drai n pipe
8
7
8
Page 10
User Manual
Getting Started
PPrriioorr uussiinngg ffoorr tthhee ffiirrsstt ttiimmee
r
PPrriioorr uussiinngg ffoorr tthhee ffiirrsstt ttiimmee
Befo re usin g your di shwas her for t he firs t time:
A. Rin se ai d di spe ns er
B. Det ergen t
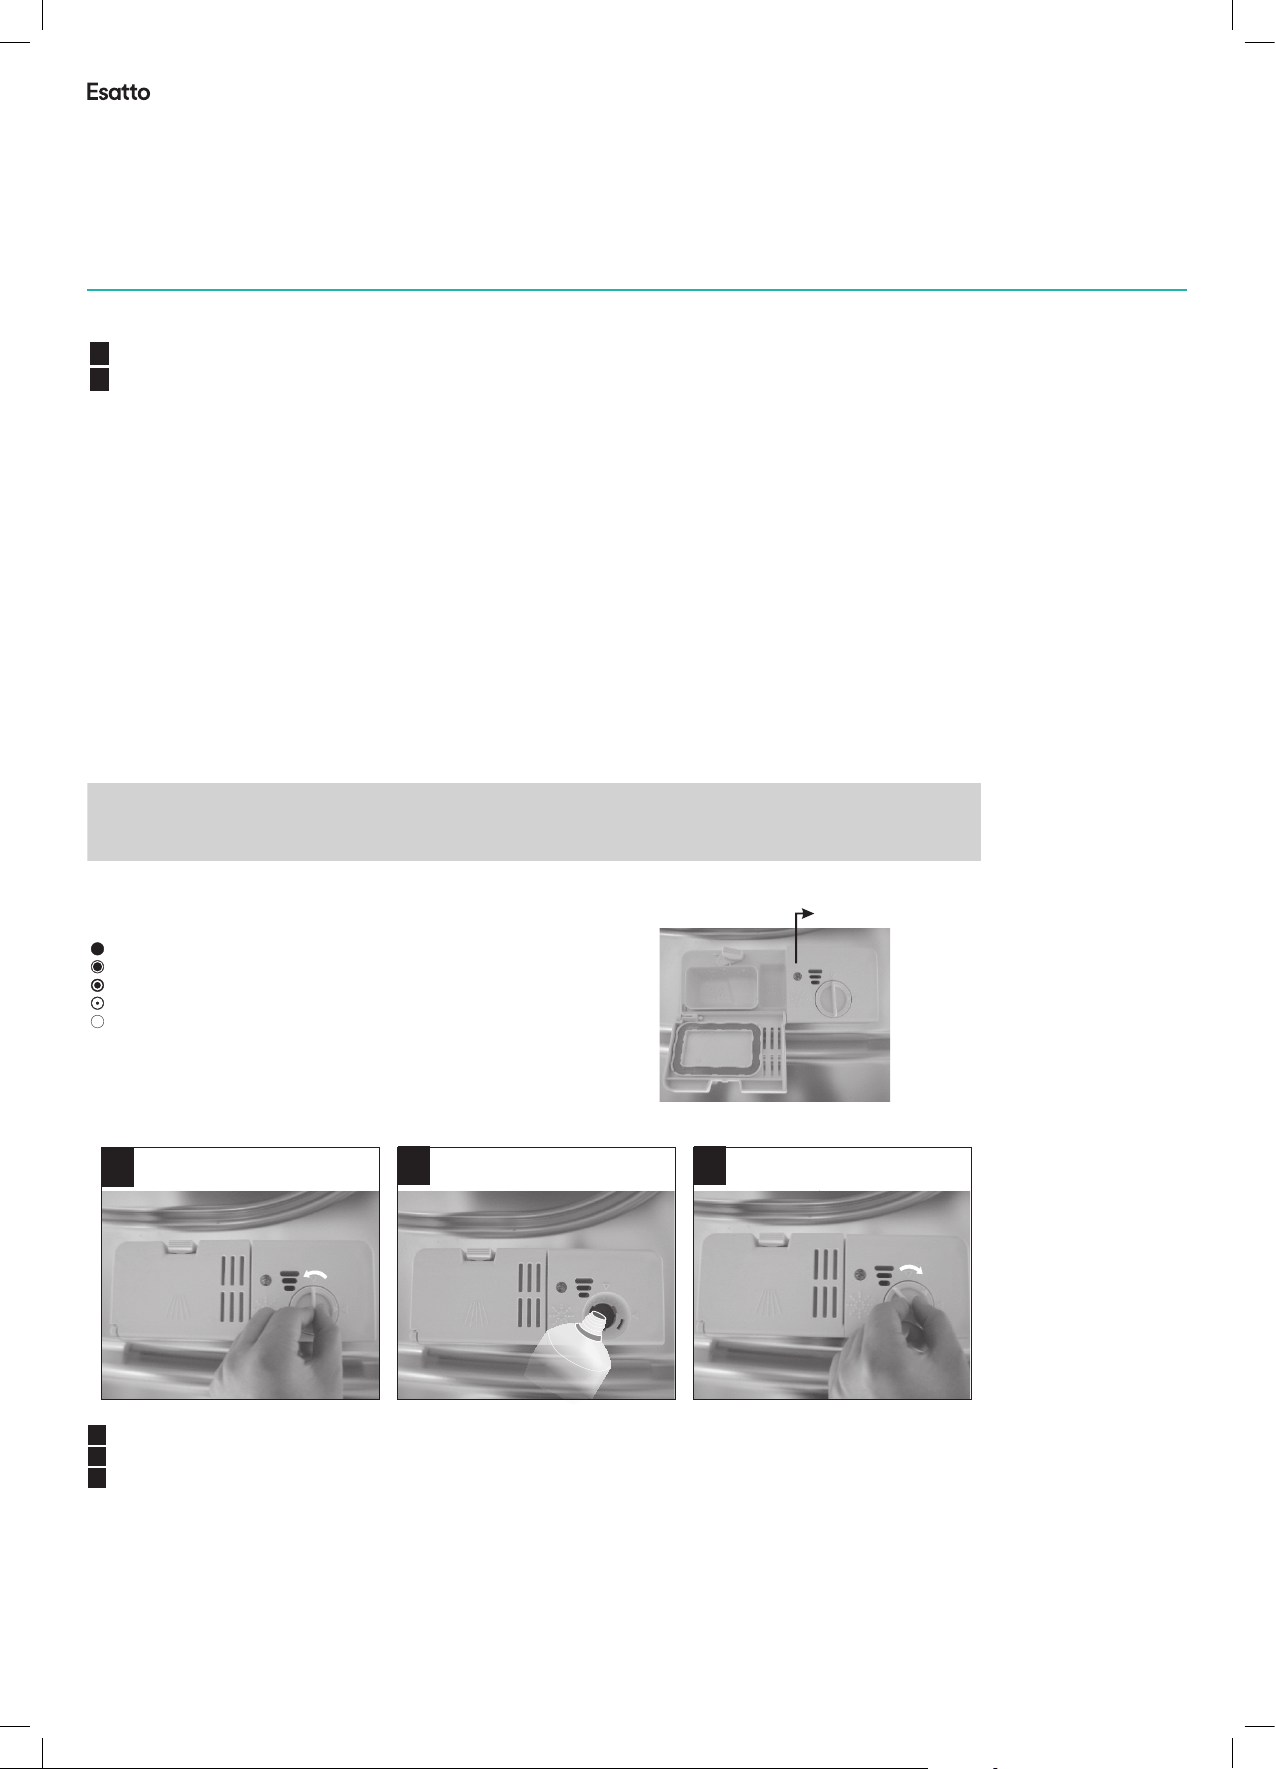
AA.. RRiinnssee AAiidd DDiissppeennsseerr
The ri nse a id i s rel ea sed d ur ing t he f ina l ri nse t o preve nt wate r from fo rm ing d rople ts o n you r dishe s, whic h can
leav e spots a nd stre aks. It a lso i mp roves d rying b y all ow ing w at er to r ol l off the d is hes . Your dish washe r is
desi gned to u se li qu id ri ns e aid s. T he r ins e aid dis pense r is loca ted ins ide the d oor nex t to the de terge nt disp enser.
To fil l the dis pense r, open th e cap and p our the r inse ai d into th e dispe nser un til the l evel in dicat or turn s compl etely
blac k. The vo lu me of t he r i
nse ai d con ta iner is a bou t 110 ml .
Rinse Aid Dispenser
Function of Rinse Aid
Rins e aid i s au tom at icall y added d uring t he last r inse, e nsuri ng thor ough ri nsing , and spo t and s tr eak f re e dry in g.
Attention!
Only u se br an ded r in se ai d fo r dis hw ash er. N eve r fi ll th e rinse a id disp enser w ith any o ther su bstan ces
(e .g . Dis hw asher c leani ng agen t, liqu id dete rgent ). This wou ld dama ge the ap plian ce.
If the re is n o ri nse -a id wa rn ing l ig ht in t he c ont ro l pan el , you c an j udg e the amo unt of ri nse-a id by the c olor of t he
opti cal lev el indi cator " C" loca ted nex t to the ca p. When t he ri ns e-aid c ontai ner is fu ll, the w hole in dicat or will b e
dark . As the ri nse-a id dimi nishe s, the si ze of t he d ark d ot d ecr ea ses . You shoul d never l et the ri nse aid g et belo w
1 / 4 fu ll .
When to Refill the Rinse Aid Dispenser
How to fill the Rinse Aid Dispenser
CC (Rins e- Aid ind ic ator)
1
2
3
PPrriioorr uussiinngg ffoorr tthhee ffiirrsstt ttiimmee
Befo re usin g your di shwas her for t he firs t time:
A. Rin se ai d di spe ns er
B. Det ergen t
AA.. RRiinnssee AAiidd DDiissppeennsseerr
The ri nse a id i s rel ea sed d ur ing t he f ina l ri nse t o preve nt wate r from fo rm ing d rople ts o n you r dishe s, whic h can
leav e spots a nd stre aks. It a lso i mp roves d rying b y all ow ing w at er to r ol l off the d is hes . Your dish washe r is
desi gned to u se li qu id ri ns e aid s. T he r ins e aid dis pense r is loca ted ins ide the d oor nex t to the de terge nt disp enser.
To fil l the dis pense r, open th e cap and p our the r inse ai d into th e dispe nser un til the l evel in dicat or turn s compl etely
blac k. The vo lu me of t he r i
nse ai d con ta iner is a bou t 110 ml .
Rinse Aid Dispenser
Function of Rinse Aid
Rins e aid i s au tom at icall y added d uring t he last r inse, e nsuri ng thor ough ri nsing , and spo t and s tr eak f re e dry in g.
Attention!
Only u se br an ded r in se ai d fo r dis hw ash er. N eve r fi ll th e rinse a id disp enser w ith any o ther su bstan ces
(e .g . Dis hw asher c leani ng agen t, liqu id dete rgent ). This wou ld dama ge the ap plian ce.
As the r ins e ai d dim in ish es , the s iz e of th e black d ot
on t he r ins e ai d lev el i ndi ca tor c ha nge s, a s ill us tra te d bel ow.
Full
3 / 4 fu ll
1 / 2 fu ll
1 / 4 fu ll - S hou ld refi ll to eli minat e spott in
g
Empt y
If the re is n o ri nse -a id wa rn ing l ig ht in t he c ont ro l pan el , you c an j udg e the amo unt of ri nse-a id by the c olor of t he
opti cal lev el indi cator " C" loca ted nex t to the ca p. When t he ri ns e-aid c ontai ner is fu ll, the w hole in dicat or will b e
dark . As the ri nse-a id dimi nishe s, the si ze of t he d ark d ot d ecr ea ses . You shoul d never l et the ri nse aid g et belo w
1 / 4 fu ll .
When to Refill the Rinse Aid Dispenser
How to fill the Rinse Aid Dispenser
Befo re usin g your di shwas her for t he firs t time:
A. Rin se ai d di spe ns er
B. Det ergen t
10
AA.. RRiinnssee AAiidd DDiissppeennsseer
Rinse Aid Dispenser
The ri nse a id i s rel ea sed d ur ing t he f ina l ri nse t o preve nt wate r from fo rm ing d rople ts o n you r dishe s, whic h can
leav e spots a nd stre aks. It a lso i mp roves d rying b y all ow ing w at er to r ol l off the d is hes . Your dish washe r is
desi gned to u se li qu id ri ns e aid s. T he r ins e aid dis pense r is loca ted ins ide the d oor nex t to the de terge nt disp enser.
To fil l the dis pense r, open th e cap and p our the r inse ai d into th e dispe nser un til the l evel in dicat or turn s compl etely
blac k. The vo lu me of t he r ins e ai d con ta ine r is a bou t 110 ml.
Function of Rinse Aid
Rins e aid i s au tom at icall y added d uring t he last r inse, e nsuri ng thor ough ri nsing , and spo t and str eak fre e dryin g.
Attention!
Only u se br an ded r in se ai d fo r dis hw ash er. N eve r fi ll th e rinse a id disp enser w ith any o ther su bstan ces
(e .g . Dis hw asher c leani ng agen t, liqu id dete rgent ). This wou ld dama ge the ap plian ce.
When to Refill the Rinse Aid Dispenser
If the re is n o ri nse -a id wa rn ing l ig ht in t he c ont ro l pan el , you c an j udg e the amo unt of ri nse-a id by the c olor of t he
opti cal lev el indi cator " C" loca ted nex t to the ca p. When t he ri ns e-aid c ontai ner is fu ll, the w hole in dicat or will b e
dark . As the ri nse-a id dimi nishe s, the si ze of t he d ark d ot d ecr ea ses . You shoul d never l et the ri nse aid g et belo w
1 / 4 fu ll .
As the r ins e ai d dim in ish es , the s iz e of th e black d ot
on t he r ins e ai d lev el i ndi ca tor c ha nge s, a s ill us tra te d bel ow.
Full
3 / 4 fu ll
1 / 2 fu ll
1 / 4 fu ll - S hou ld refi ll to eli minat e spott in g
Empt y
CC (Rin se-Aid in dicator )
1
2
3
To open th e dispe nser, tu rn the ca p to the "o pen" (l eft) ar row and l ift it ou t.
1
Pour t he ri ns e aid i nt o the d is pen se r, bei ng c are fu l not t o overf il l.
2
Repl ace t he c ap by i ns ert in g it al ig ned w it h "op en " arr ow a nd tu rning i t to the cl osed (r ight) a rrow.
3
Be c ar eful no t to ov er fill th e dis pe nser, be cau se t his c ou ld ca us e ove r sudsi ng . Wip e away an y spill s
with a d amp c lo th. D on 't fo rg et to r ep lac e th e cap b ef ore y ou c los e dishw as her d oo r.
Atte ntion !
Clea n up an y ri nse a id s pil l durin g filli ng w ith a n absor bent cl oth to av oid exc ess foa ming
duri ng the ne xt wa sh .
Page 11
esatto.house
11
r
)
:
:
t
M
A
X
NNOOTTEE:
Clea n up any rins e aid spill ed whil e du ring fi ll ing wit h an absorb ent cloth t o avoid exc essiv e fo aming
duri ng the next w ash. Don' t forge t to r eplac e th e cap bef or e you clo se d ishwa sher door.
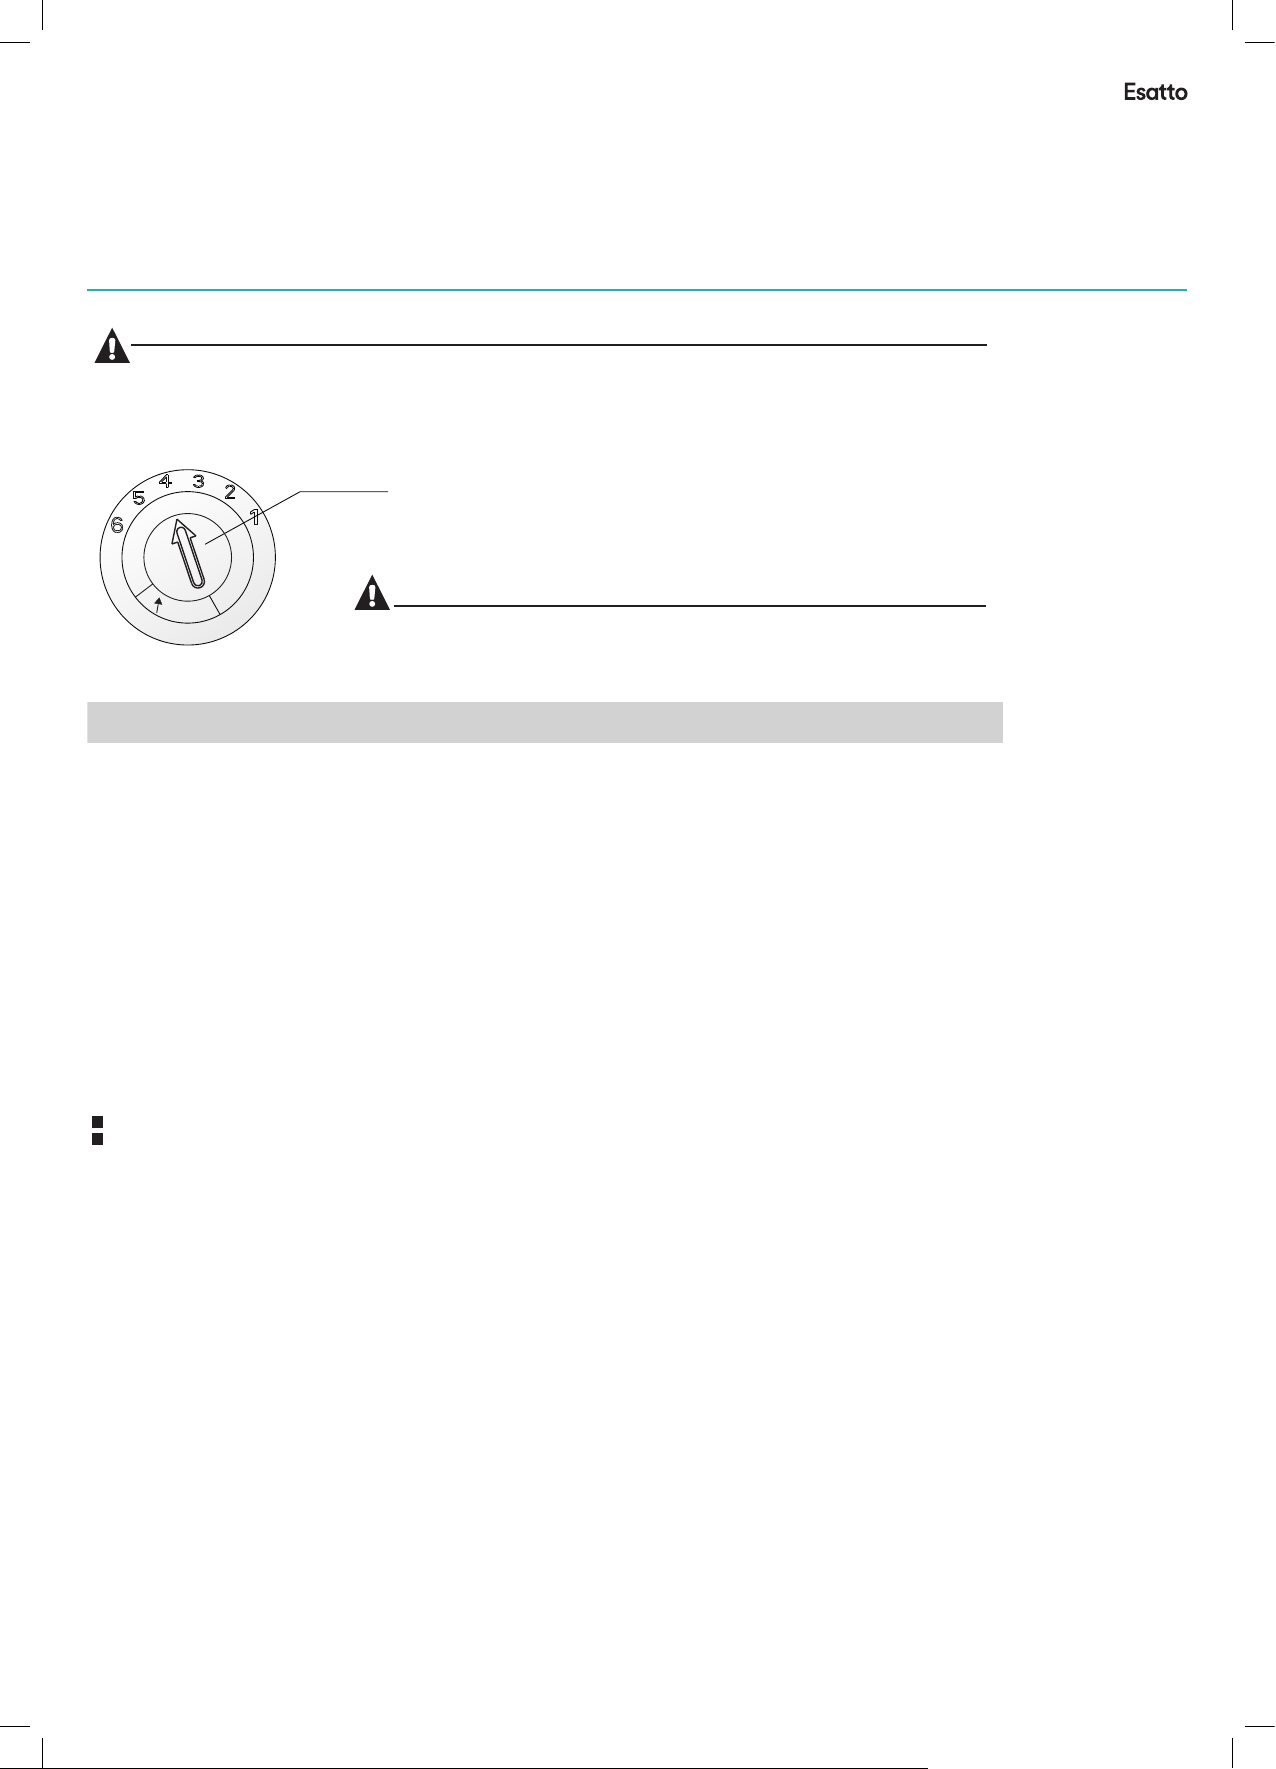
Adjusting Rinse Aid Dispenser
M
A
X
BB.. DDeetteerrggeennt
Dete rgents ha ve chemic al ingr ed ients t ha t are nec es sary to r emove dir t, crush di rt and tran sport i t ou t of the di sh washe r.
Most o f the comme rcial qua lity de te rgent s ar e suita bl e for thi s pu rpose .
AAddjjuusstt lleevveer
((RRiinnssee)
Incr ease the do se if there a re drop s of w ater or l im e spots o n th e dishe s af ter was hing.
Redu ce it if ther e are stick y whiti sh s tains o n yo ur dis
knif e blades.
The ri nse aid dis penser ha s six or fo ur s ettin gs . Always s ta rt with t he d ispen se r
set on " 4". If spot s and poor dr ying are a pr oblem , in creas e th e amoun t of r inse
aid di spensed b y removin g the dis pe nser li d an d rotat in g the dia l to "5". If th e
dish es still ar e not dryin g prope rl y or are sh ow s pots, a dj ust the d ial to the ne xt
high er lever un til your di shes ar e sp ot-fr ee . Th e recom me nded se tt ing is "4 ".
(Fac tory valu e is "4".)
NNOOTTEE:
hes or a b luish fil m on glassw are or
Detergents
Ther e are 3 sorts o f deterge nts
1.Wit h phospha te and with c hlori ne
2.Wit h phospha te and with out chlor ine
3.Wit hout phos phate and w ithout ch lorin e
Norm ally new pu lveri se d deter ge nt is wit ho ut phos ph ate. Thus t he w ater so ft ener fu nc tion of
phos phate is no t given. If d etergen ts with ou t phosp ha te are us ed i n the cas e of h ard wat er
ofte n white spo ts appear o n dishe s an d glass es . In this c as e pleas e ad d more de tergent t o reach
bett er result s. Deterg ents with out chlor ine do on ly b leach a l it tle. St ro ng and co lo ured sp ots will no t
be rem oved comp letely. In thi s case plea se choose a p rogra m wi th a high er t emper at ure.
Concentrated Detergent
Base d on their ch emical co mposi ti on, det er gents c an b e split i n tw o basic t yp es:
Conv entiona l, alkali ne dete rg ents wi th c austi c co mpone nt s
Low al kaline co ncentra ted det er gents w it h natur al e nzyme s
The us e of“normal” w ashing pr ogram s in c ombin at ion wit h co ncent rated det ergents
redu ces pollu tion and is g ood for y ou r dishe s; t hese wa sh p rogra ms are spec ificall y match ed
to the d irt-dis solving p roper ti es of the e nz ymes of t he c oncen tr ated de tergent . For this re ason
“norm al”wash pro grams i n wh ich con ce ntra te d d ete rgents ar e use d can achi e ve t he sa me
resu lts that ca n otherwi se only b e ac hieve d us ing “int en sive” pr ograms.
Detergent Tablets
Dete rgen
dete rgent tab lets cann ot dissol ve and de ve lop the ir f ull cle an ing pow er during s hort
prog rams. There fore plea se use long p rogra ms w hen usi ng d eterg ent table ts, to
ensu re the comp lete remo val of de te rgent r es idual s.
t tabl ets of differ en t brand s di ssolv e at differen t sp eeds. F or this rea son some
Detergent Dispenser
The di spenser m ust be refi lled be fo re the st ar t of each w as h cycle f ol lowin g th e instr uctions
prov ided in the w ash cycle t able . Your d is hwash er uses les s deterge nt and rins e aid tha n
Conv entiona l dishwas her. Gen er ally, only one t ables po on of det er gent is n ee ded fo
a norm al wash loa d. More hea vily so il ed item s ne ed more d etergen t. Always ad d the
dete rgent jus t before st arting th e dishw as her, oth er wise it c ou ld get da mp a nd will n ot
diss olve prop erly.
r
Proper Use of Detergent
Use on ly deterg ent speci fical ly m ade for t he u se in dis hw asher s. Keep you r deterge nt f resh and dr y.
Don' t put powde red deter gent in to t he disp en ser unt il y ou're r ea dy to was h dishes.
Page 12
User Manual
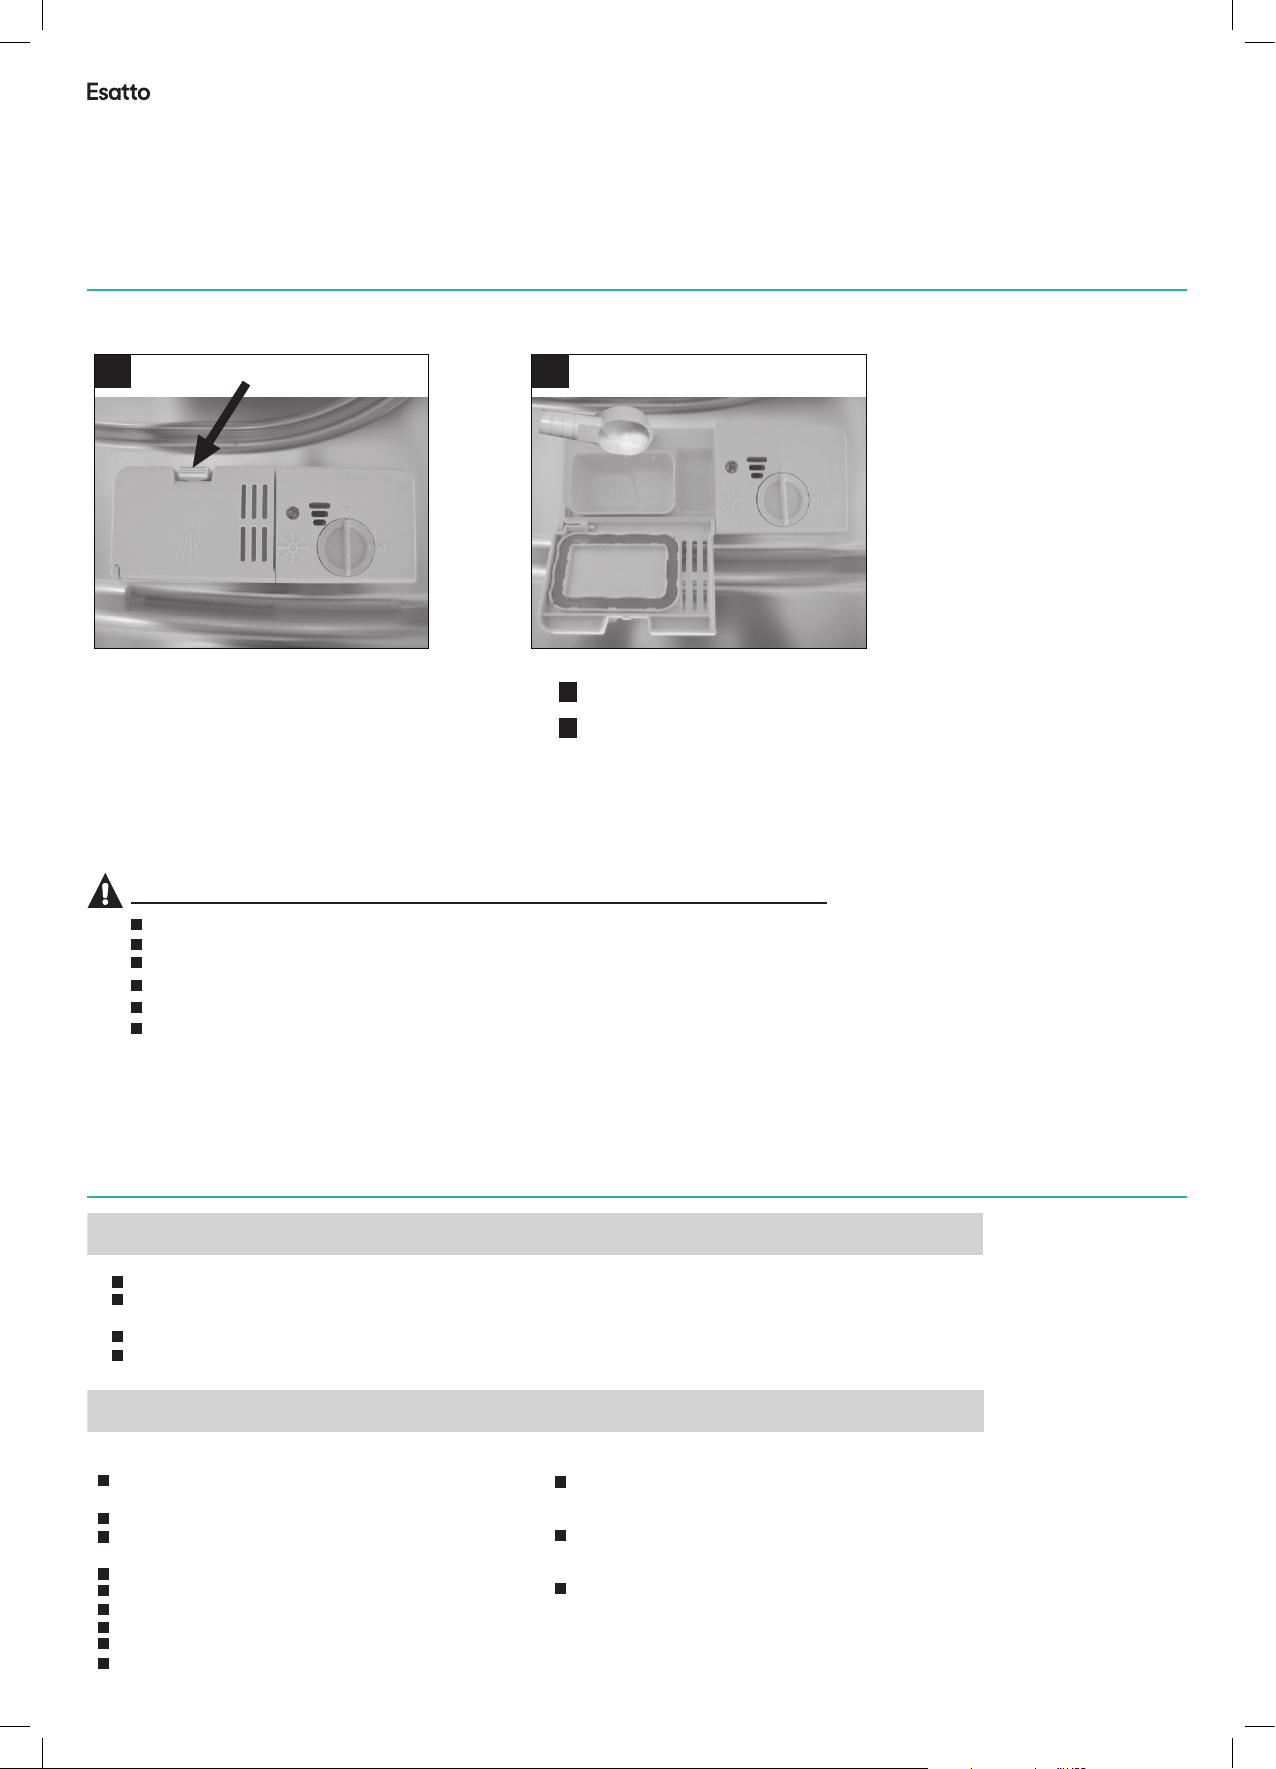
Adding detergent to dispenser
:
Plea se observ e the manuf actur er 's reco mm endat io ns on the d etergen t packagi ng.
1
2
n
B
Dishwasher detergent is corrosive!
Take care to keep it out of reach of children.
Alwa ys add the de tergent j ust befor e start in g each wa sh c ycle.
Only u se brande d deterge nt and ri ns e aid for d is hwash er.
If the l id is close d: push the l atch to ope n.
NNOOTTEE::
For ma in wash det ergent.
For pr e-wash de tergent .
A
B
You se e infor ma tion ab ou t the amo un t of dete rg ent for t he single p rogramm e on the la st p age.
Plea se be aware t hat soili ng leve ls a nd wate r ha rdnes s ca n effect wa sh r esult s.
Plea se observ e the manuf actur er 's reco mm endat io ns on the d etergen t packagi ng.
n
s
11 22
PPuusshh llaattcchh ttoo ooppeenn
AA BB
12
1
PPuusshh llaattcchh ttoo ooppeen
2
AAB
Fill in Detergent
Fill t he deterg ent dispe nser wi th d eterg en t.
The ma rking ind icates th e dosin g le vels , as
illu strated o n the right :
Plea se observ e the manuf actur er s dosin g an d stora ge
Reco mmendat ions as sta ted on the de terge nt p ackag in g.
Clos e the lid and p ress unti l it lock s in p lace.
If the d ishes are h eavily so iled, p la ce an add it ional
dete rgent dos e in the pre- wash de te rgent c ha mber. This d et ergen t wi ll take e ffec t durin g th e pre-w as h phase .
For ma in wash det ergent.
A
For pr e-wash de tergent .
B
NNOOTTEE:
If the l id is close d: push the l atch to ope n.
Alwa ys add the de tergent j ust befor e start in g each wa sh c ycle.
Only u se brande d deterge nt and ri ns e aid for d is hwash er.
You se e infor ma tion ab ou t the amo un t of dete rg ent for t he single p rogramm e on the la st p age.
Plea se be aware t hat soili ng leve ls a nd wate r ha rdnes s ca n effect wa sh r esult s.
Loading the Dishwasher
RReeccoommmmeennddaattiioon
Cons ider buyi ng utensi ls whic h ar e ident if ied as di sh washe r-proof .
Use a mi ld deterg ent that is d escri be d as 'kin d of d ishes '. I f neces sa ry, seek fur th er
info rmation f rom deter gent manu facture rs.
For pa rticula r items, se lect a prog ramme w it h as low a te mp eratu re .
To prevent d am age, do n ot take gla ss and cutl ery out of th e dishw as her imm ed iatel y
afte r th e progr amme has en ded.
FFoorr wwaasshhiinngg iinn tthhee ddiisshhwwaasshheerr tthhee ffoolllloowwiinngg ccuuttlleerryy//ddiisshhees
Are not suitable
Cutl ery with wo oden, hor n china o r
moth er-of-p earl hand les
Plas tic items t hat are not h eat resis tant
Olde r cutlery w ith glued p arts that i s not
temp erature r esistan t
Bond ed cutler y items or di shes
Pewt er or coppe r items
crys tal glass
Stee l items sub ject to rus ting
Wooden p la tters
Item s ma de from s yntheti c fibres
6
Are of limited suitability
Some t ypes of gla sses can be come
dull a fter a larg e number of w ashes
Silv er and alum inium p ar ts have a
tend ency to dis colour du ring wa sh ing
Glaz ed patter ns may fade i f machine
wash ed freque ntly
Page 13
esatto.house
13
:
s
:
2
.
L
o
w
e
r
b
a
s
k
e
t
:
6
4
5
4
3
2
1
1
2
1
f
f
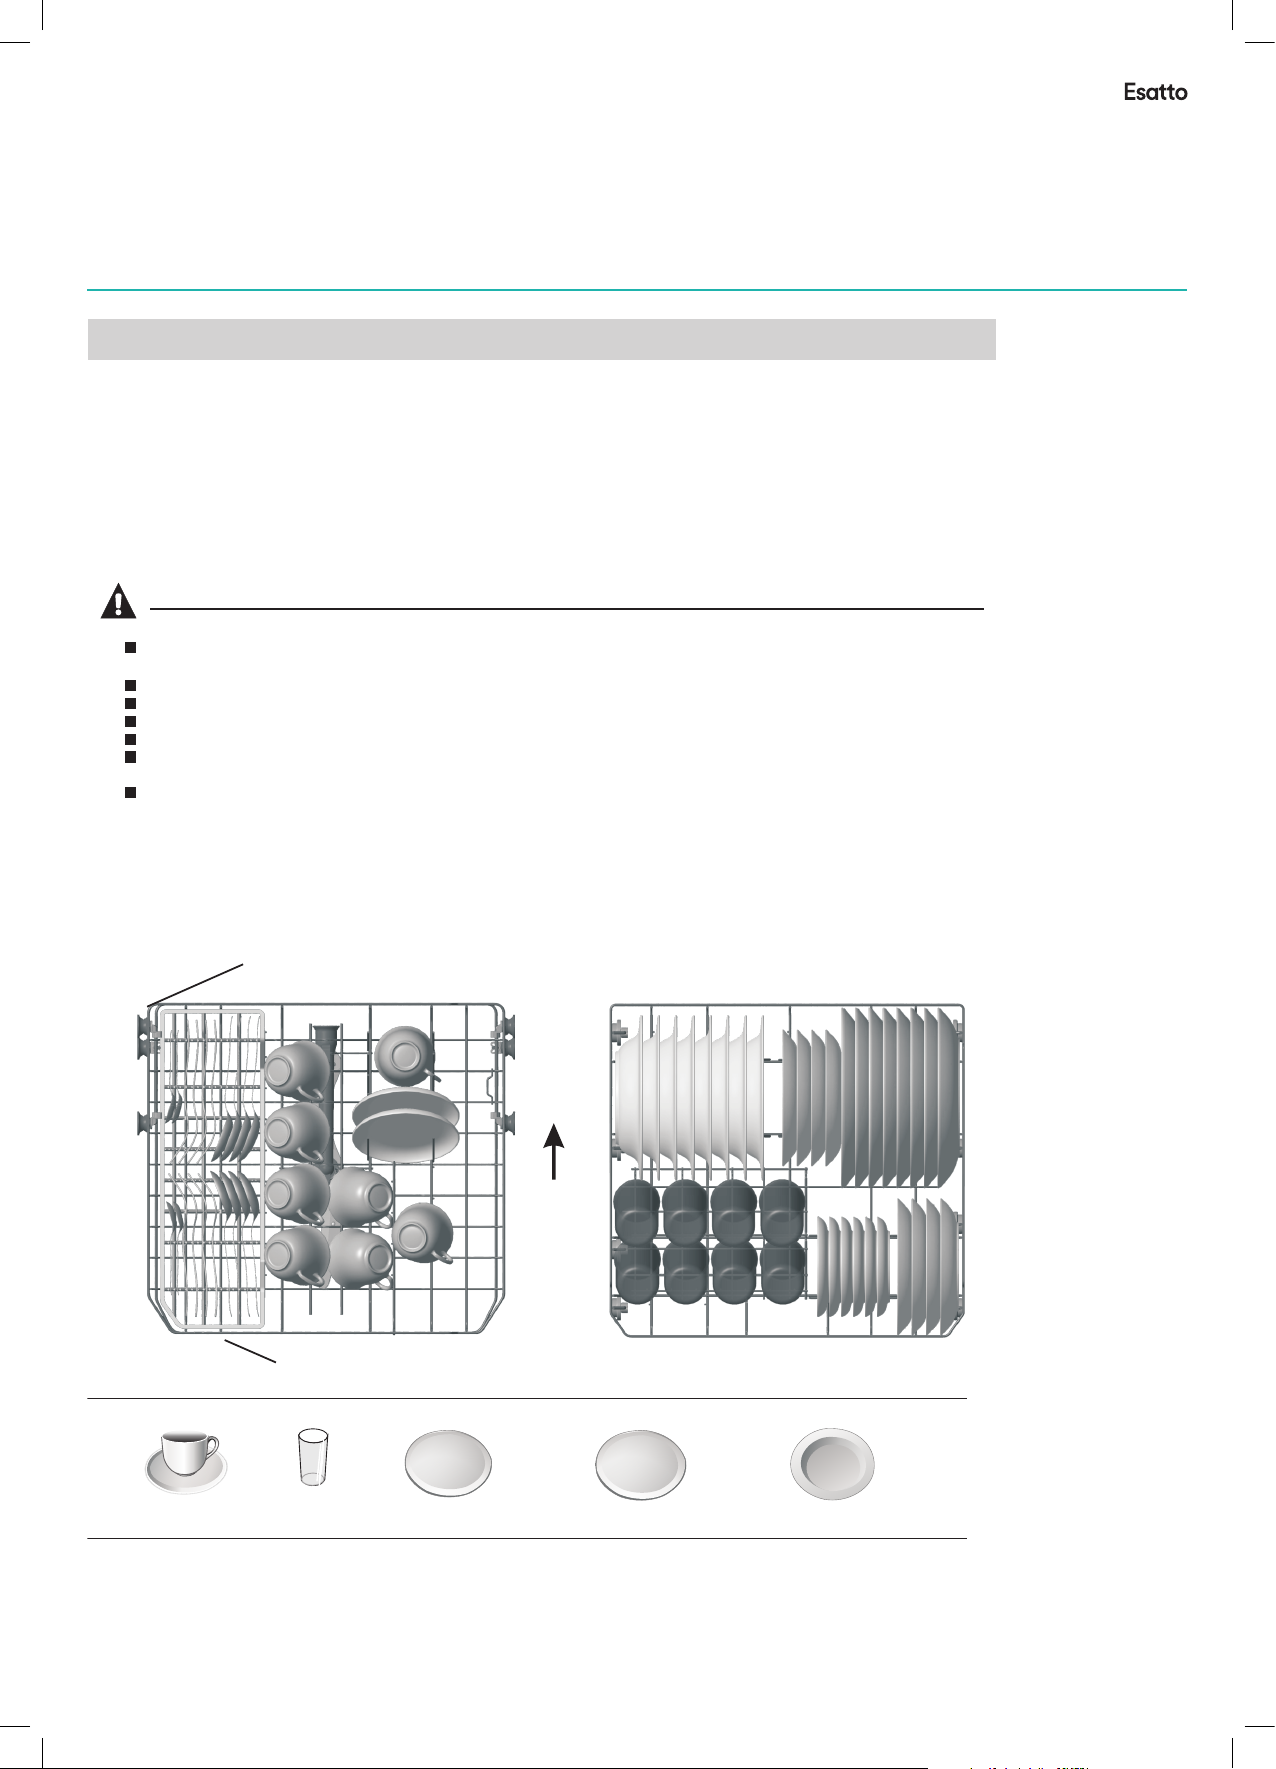
AAtttteennttiioonn bbeeffoorree oorr aafftteerr llooaaddiinngg tthhee DDiisshhwwaasshheerr BBaasskkeetts
(For b est perfo rmance of t he dishwa sher, fo ll ow thes e lo ading g ui delin es.
Feat ures and ap pearanc e of bask et s and cut le ry bask et s may var y fr om your m od el.)
Scra pe off a ny larg e amounts o f leftove r food. Sof ten remna nts of burn t food in p an s
It is no t ne cessa ry to rinse t he dishes u nder ru nn ing wat er.
Plac e objects i n the dishw asher i n fo llowi ng w ay:
1.Ite ms such as cu ps, glass es, pots/ pans, etc . are face do wn.
2.Cur ved items , or those wi th rece ss es, sho ul d be load ed a t a slant s o th at wate r ca n run off.
3.All u tensils a re stacke d secur el y and can n ot t ip over.
4.All u tensils a re placed i n the w
ay tha t the spray a rms can rot ated free ly duri ng w ashin g.
NNOOTTEE:
Load h ollow ite ms such as cu ps, gla ss es, pan s et c. With t he o penin g do wnwar ds so that
wate r cannot co l
Dish es and item s of cutler y must not li e insid e on e anoth er, o r cover e ac h other.
To avoid dam ag e to glas ses, they m ust not tou ch.
Load l arge item s which are m ost difficu lt to clean i nto the bas ket.
Long b laded kni ves store d in an upr ig ht posi ti on are a po te ntial h az ard!
Long a nd/or sha rp items of c utlery su ch as carvi ng kniv es m ust be po si tione d
hori zontall y in the bask et.
Plea se do not ove rload you r dishw as her. This is i mp ortan t fo r good re su lts and f or
reas onable en ergy cons ume.
Very sm all items s hould not b e washe d in t he dish wa sher as t he y could e as ily fal l out of the ba sket.
lect i n the conta iner or a dee p base.
LLooaaddiinngg tthhee bbaasskkeettss aaccccoorrddiinngg ttoo AASS//NNZZSS 22000077::11::
11..UUppppeerr bbaasskkeett:
DDoowwnn SShheellf
2
.
L
o
w
e
r
b
a
s
k
e
t
:
1
1
2
IN
6
4
5
Cups
1
2
Sauc ers
UUpp SShheellf
Glas ses
1
3
3
4
Dess ert dishe s
5
Dinn er plates
2
6
Soup p lates
4
Page 14
User Manual
N
o
t
e
:
P
l
e
a
s
e
p
l
a
c
e
t
h
e
l
i
g
h
t
f
l
a
t
w
a
r
e
s
o
n
t
h
e
u
p
s
h
e
l
f
.
T
h
e
t
o
t
a
l
w
e
i
g
h
t
i
s
l
e
s
s
t
h
a
n
2
k
g
.
f
f
:
.
.
V
o
l
t
a
g
e
:
2
2
0
~
2
4
0
V
/
5
0
H
z
C
a
p
a
c
i
t
y
:
8
p
l
a
c
e
s
e
t
t
i
n
g
s
P
r
o
g
r
a
m
m
e
:
E
C
O
R
i
n
s
e
a
i
d
s
e
t
t
i
n
g
:
6
D
e
t
e
r
g
e
n
t
(
P
r
e
/
m
a
i
n
)
:
5
g
/
2
0
g
D
o
o
r
i
s
o
p
e
n
a
t
t
h
e
e
n
d
o
f
t
h
e
d
r
y
i
n
g
c
y
c
l
e
f
o
r
t
h
e
d
r
y
i
n
g
p
e
r
f
o
r
m
a
n
c
e
t
e
s
t
(
D
o
o
r
p
o
s
i
t
i
o
n
:
O
p
e
n
5
0
m
m
)
14
e
h
T
.
f
l
e
h
s
p
u
e
h
t
n
o
s
e
r
a
w
t
a
l
f
t
h
g
i
l
e
h
t
e
c
a
l
p
e
s
a
e
l
P
:
e
t
o
N
.
g
k
2
n
a
h
t
s
s
e
l
s
i
t
h
g
i
e
w
l
a
t
o
t
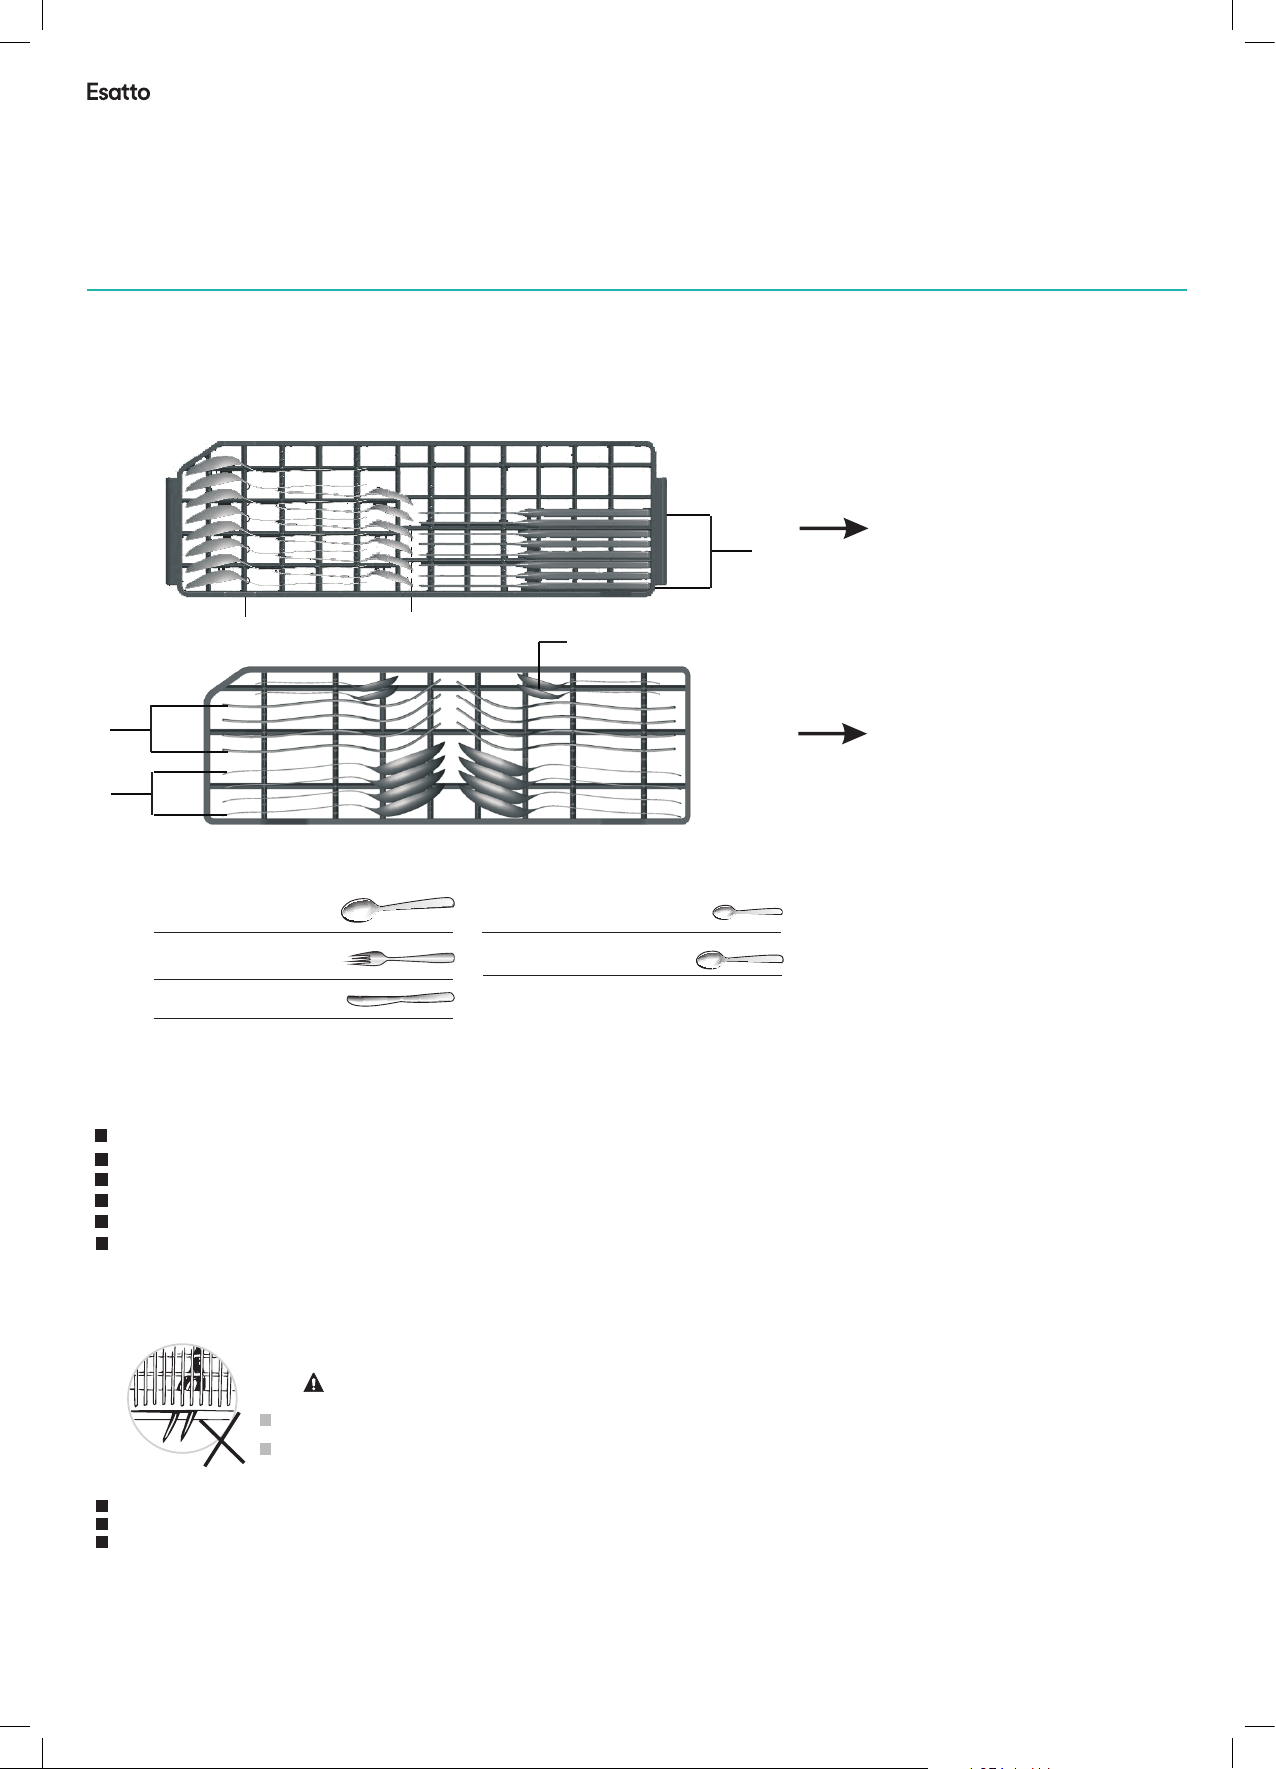
UUpp SShheellf
IN
3
5
2
1
Soup spoo ns
1
Forks
2
Knives
3
Infor mation for compar ability test s in
accor dance with
g
a
t
l
o
V
c
a
p
a
C
a
r
g
o
r
P
g
r
e
t
e
D
e
s
n
i
R
i
r
o
o
D
g
n
i
y
r
d
e
s
(*AS/NZS 200 7.1 )
4
2
~
0
2
2
:
c
a
l
p
8
:
y
t
i
m
e
i
a
o
p
C
E
:
e
m
/
e
r
P
(
t
n
n
i
t
t
e
s
d
t
a
n
e
p
a
m
r
o
f
r
e
z
H
0
5
/
V
0
s
g
n
i
t
t
e
s
e
O
2
/
g
5
:
)
n
i
a
m
6
:
g
t
f
o
d
n
e
e
h
t
D
(
t
s
e
t
e
c
n
WARNING!
Do not let any item extend through bottom.
Always load sharp utensils with the sharp point down!
4
Teaspoons
4
Dessert s poons
5
g
0
e
l
c
y
c
g
n
i
y
r
d
e
h
O
:
n
o
i
t
i
s
o
p
r
o
o
4
DDoowwnn SShheellf
e
h
t
r
o
f
)
m
m
0
5
n
e
p
IN
FFoorr ppeerrssoonnaall ssaaffeettyy aanndd aa ttoopp qquuaalliittyy cclleeaann,, ppllaaccee tthhee ssiillvveerrwwaarree iinn tthhee bbaasskkeett:
TThheeyy ddoo nnoott nneesstt ttooggeetthheerr.
PPllaaccee ssiillvveerrwwaarree wwiitthh hhaannddlleess--ddoowwnn.
BBuutt ppllaaccee kknniivveess aanndd ootthheerr ppootteennttiiaallllyy ddaannggeerroouuss uutteennssiillss hhaannddlleess--uupp..
Page 15
esatto.house
15
66..SSttaarrttiinngg aa wwaasshhiinngg pprrooggrraammmmee
e
:
Rinse
e
:
Starting a Wash Program
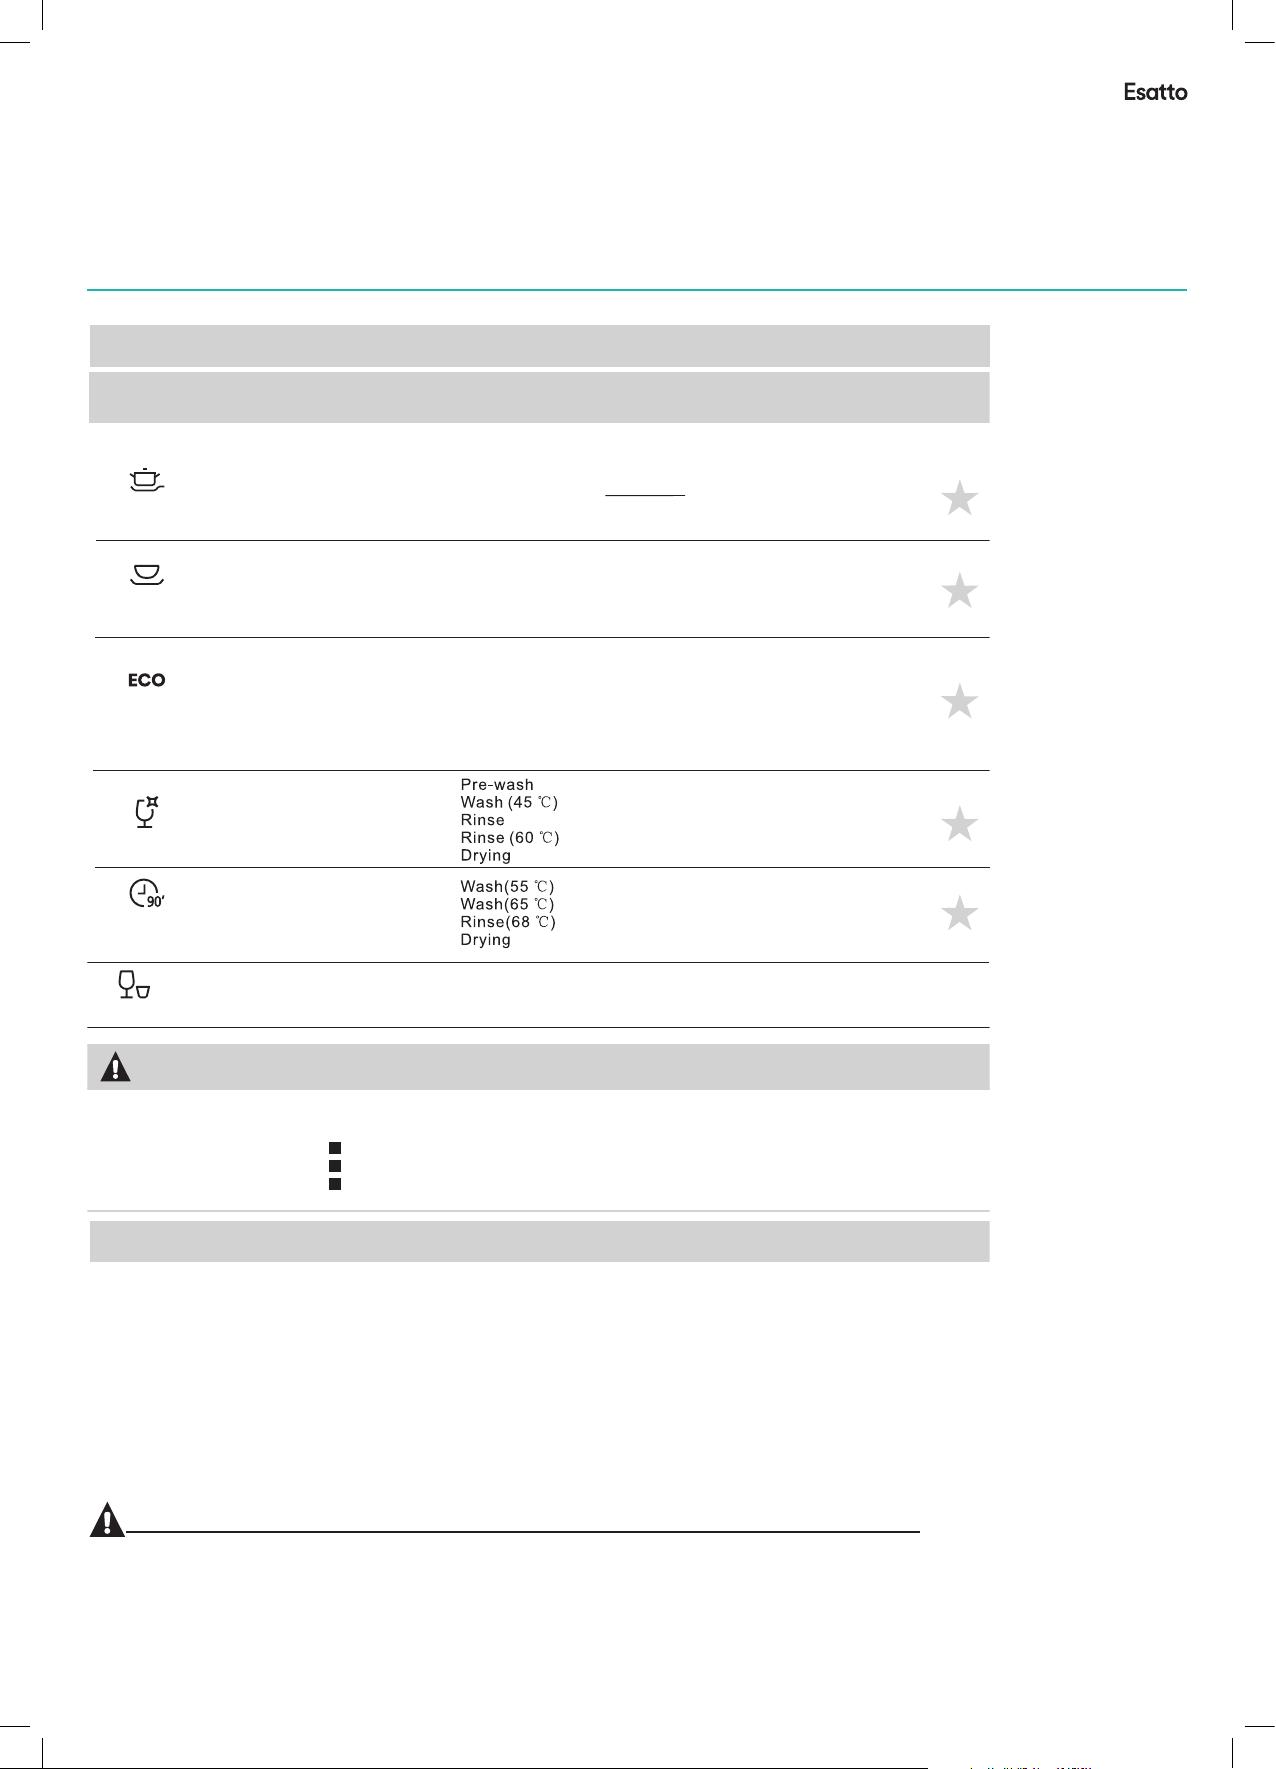
WWaasshh CCyyccllee TTaabblle
Program
Inte nsive
Heav y
(* AS/ NZS 200 7.1)
Cycle Selection
Information
For he aviest so iled croc kery、
soil ed pots、pan s、dishes
etc wi th dried on s oiling.
For he avily soi led loads ,
such a s pots, pla tes,
glas ses and lig htly
soil ed pans.
This i s standar d program ,
it is su itable to c lean norm ally
soil ed tablew are and i t is t he
most e ff ic ient pr og ramme i n
term s of its comb ined ener gy
and wa ter consu mption fo r
that t ype of tabl eware.
Description
Pre- wash 5 0℃
Was h (65 ℃)
Rins e
Rins e
Rins e (70 ℃)
Dryi ng
Pre- wash(45 ℃)
Was h (60 ℃)
Rins e
Rins e (68 ℃)
Dryi ng
Pre- wash
Was h (50 ℃)
Rins e (50 ℃)
Dryi ng
of Cycle
( )
Detergent
pre/main
5/20 g
(Or 1 pi ec e)
5/20 g
5/20 g
Running
time(min)
155
150
160
Energy
(Kwh)
1.25
1.05
0.54
Water
(l)
Aid
12
12
9.16
Glas s
90 min
Rapi d
For li ghtly soi led loads ,
such a s glasses , crystal a nd
fine c hina.
For li ghtly soi led crock ery
and gl ass.
A short er wash for l ightly so iled
load s and quick w ash.
Pre- wash
Was h (45 ℃)
Rins e
Rins e (60 ℃)
Was h(55 ℃)
Dryi ng
Was h(65 ℃)
Rins e(68 ℃)
Dryi ng
Was h (45 ℃)
Rins e
Rins e (55℃)
NNOOTTEE:
*AS/ NZS 2007. 1 : This p rogramm e is the test c ycle. The i nform at ion for c om parab il ity tes t
in acc or dance w ith AS/N ZS 2007 .1 , a s follo ws :
Capa city: 8 set tings
Rins e aid setti ng: 6
The po wer consu mption of o ff -m ode is 0. 45W
left -o n mode is 0 .4 9W
TTuurrnniinngg OOnn tthhee AApppplliiaanncce
tart ing a wash cy cle
raw ou t the baske t(see the s ectio n en title d “Lo ading t he D ishwa sh er”).
our in t he deterg ent (see th e section e ntitl ed “D eterg en t
nd Rin se Aid”).
nser t the plug in to the sock et. The power s upply is 22 0-240
AC 50 HZ , the speci ficatio n of the sock et is 10 A 250 VAC.
ake su re that the w ater supp ly is turne d on to ful l pr essur e.
5/20 g
25g
15g
95 0.7 12
90
35
1.15
0.52
10
7
Pres s the progr am button , t he wash p ro gram wi ll b e chang ed a s follo ws direct ion
ECO-> ->Int ensive->He avy
If a pro gram is sel ected, th e respons e light w il l light . Then p ress th e
Star t/Pause
Glass ->90 min->Ra pid ;
butt on, the dis hwasher b egins t o st art.
NNOOTTEE:
When you pr ess t he button to p aus e during was hin g,
Star t/Pause
the progr am li ght will sto p bli nking and the dis hwa sher will mo oin g
every min ute u nless you pr ess t he
Star t/Pause b utton to sta rt.
Page 16
User Manual
Maintenance & Cleaning
77..MMaaiinntteennaannccee aanndd CClleeaanniinngg
FFiilltteerriinngg SSyysstteemm
!
:
n
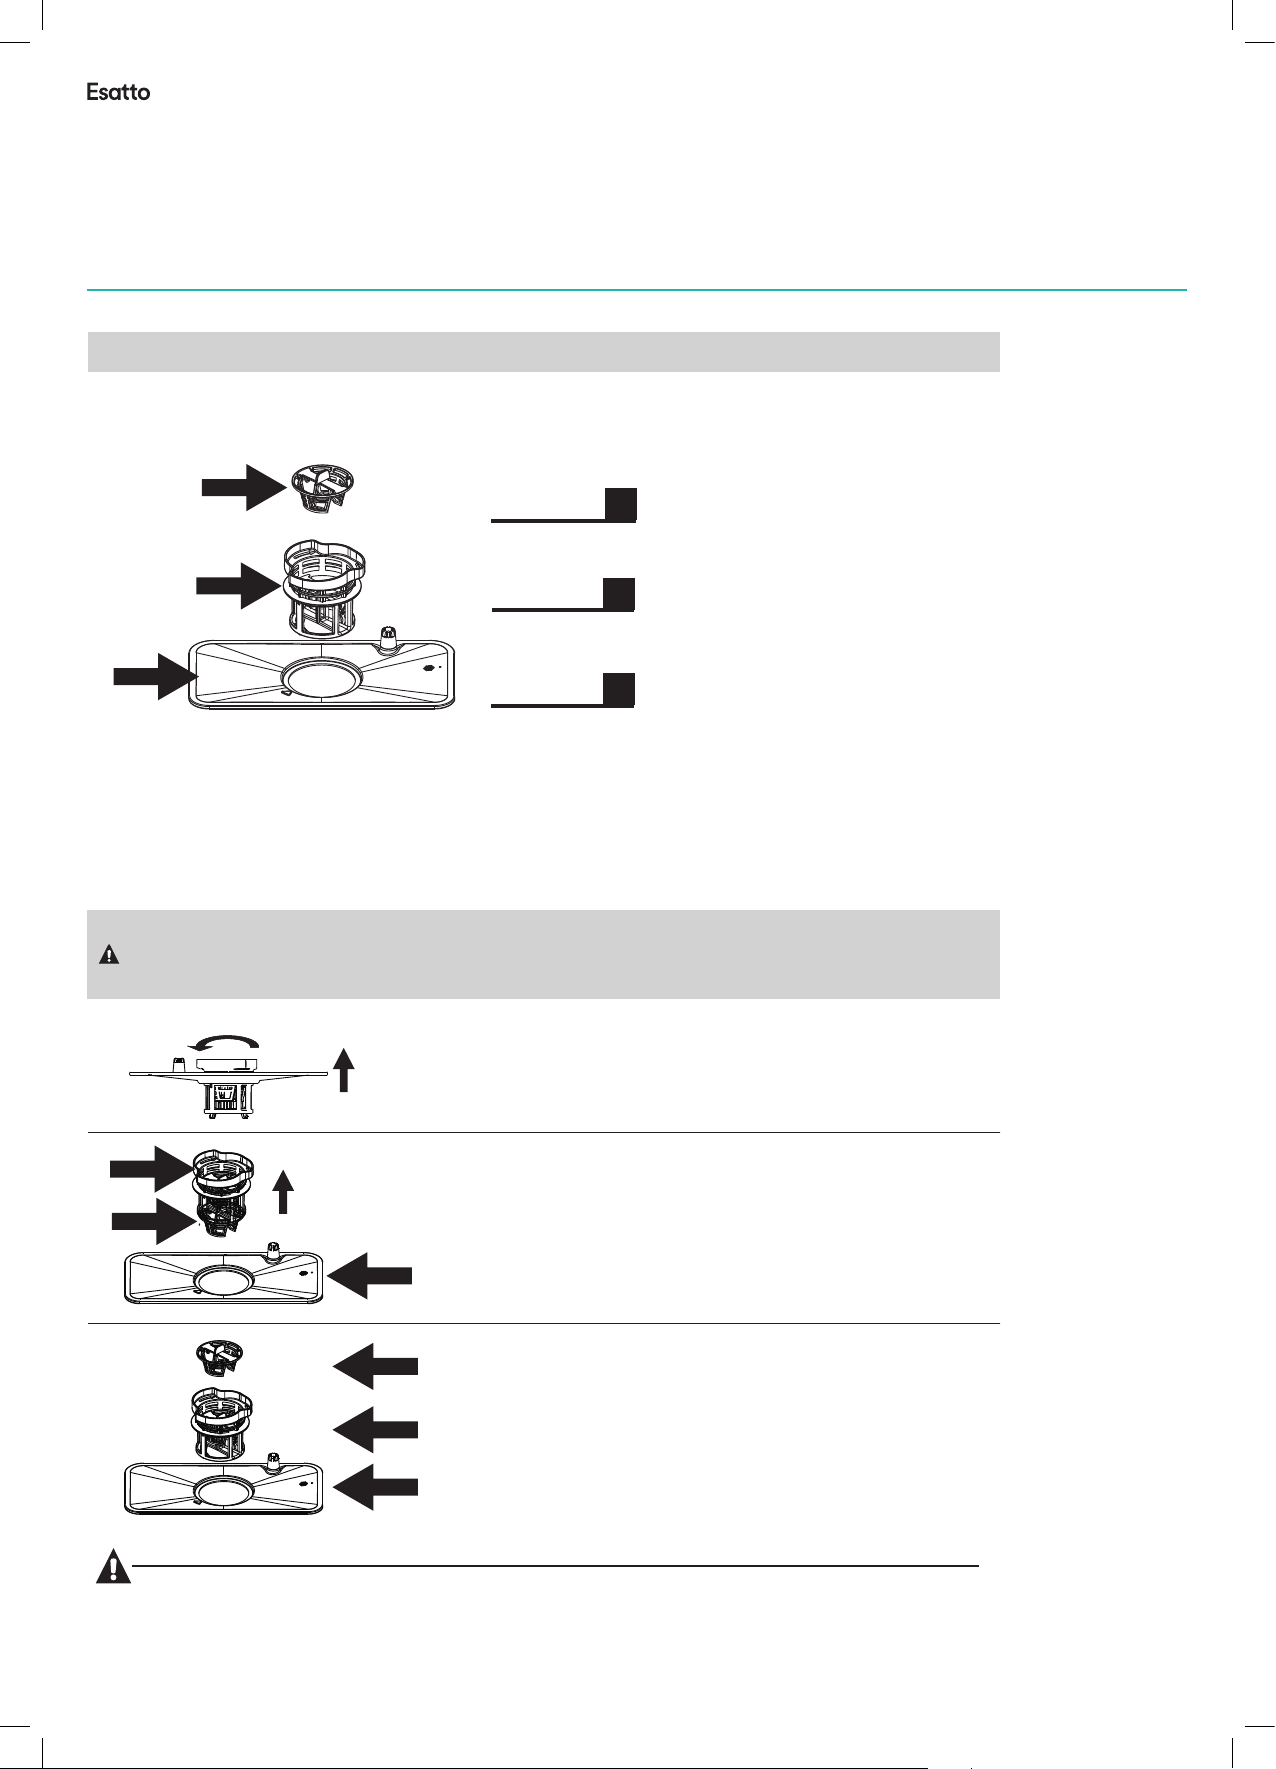
The fi lter prev ent large r remnant s of food or ot her obj ec ts from g et ting in si de the pu mp .
The filter s ystem con sists of a co arse filt er, a flat (Ma in filter )
and a mi cr o filte r (f ine fil te r).
C
Main filte r
16
A
Food a nd soil par ticles tr apped b y th is filt er a re pulv er ized by a
spec ial jet on th e spray arm a nd wash ed d own to dr ai n.
A
B
Fine fi lter
This fil te r holds s oi l and foo d residue i n the sump ar ea and
prev ents it fro m being dep osite d on t he dish es d uring w as h cycle .
Coars e filter
Larg er items, s uch as piec es of bon e or g lass, t ha t could b lo ck
the dr ain are tra pped in the c oarse f il ter. To remove the i tems
caug ht by the fil ter, gentl y squeeze t he tap on the t op of this
filt er and lift o ut.
B
C
Filter assembly
The fi lter effici en tly
For be st perfor mance and r esult s, t he filt er a ssemb ly m ust be re gu larly. For t hi s reaso n, i t is a good i de a to
remo ve the larg er food par ticle s tr appin g in t he filt er a fter ea ch w ash cyc le by rinsi ng the filt er and cup un der
runn ing water. To remo ve the filt er assemb ly, pull on the cu p handle in t he upward d irect io n.
WWAARRNNIINNGG!
remo ves food pa rticles f rom the w as h water, a ll owing i t to b e re-cy clated du ring the cy cle.
Neve r run the dis hwasher w ithou t th e filte rs i n place .
The di shwashe r must neve r be used w it hout th e fi lters .
Impr oper repl acement o f the filte r may reduc e the per fo rmanc e le vel of th e ap plian ce
and da mage dish es and uten sils.
OOppeen
Step1:contrarotate the filter assembly(A,B and C),
then lift it all up.
C
B
Step2: lift B and C up from A;
A
NNOOTTEE:
C
B
The End.
A
If do it from step1 to step 3, the filter system will be removed; while if do it from Step 3 to Step 1,
the filter system will be installed.
Page 17
esatto.house
17
m
h
:
e
!
CChhaannggee tthhee PPrrooggrraam
Premise:
runs for a short time.
released, and the applianc e may h ave a lre ady d rai ned t he wa sh water. If this
is the case, the detergent dispen ser m ust b e ref ill ed (s ee th e sec tio n ent itl ed
" Loading the Detergent " ).
Press S Button t o pause the machi ne when the door is c los ed ,Press
Program
then you ca n cha nge the program t o the desired cyc le se tting (see t he se ction
entitle d " Sta rting a wash c ycl e" ).
NOTE: If you open the door during washing, the mac hin e wil l pau se. W hen y ou
close the door , the machine will ke
The program lights show the state of the dishwas her :
a) One of the program lights on---- --- --- sta nd by o r pau se
b) One of the program lights blinki ng- --- - run
You can modify the washing program, When the dishwasher just
Otherwise, the detergent may have al rea dy be en
tart/Pa use
Button mo re th an three sec ond s the machin e wil l be in stand by stat e ,
ep on working after 10 seconds.
NNOOTTEE:
If you o pen the doo r when wash ing, th e ma chine w il l pause . Wh en you cl ose the doo r , the machi ne
will k eep on work ing after 1 0 secon ds .
FFoorrggeett ttoo AAdddd aa DDiissh
A forgotten dish can be added any time before the detergent cup opens.
Press the buttonStart/Pause
1
Open the door a little to stop the washing.
2
After the spray arms stop working,you can open the door
3
completely.
Add forgotten dishes.
4
Close the door
5
Press the button, the dishwasher will run
6
after 10 seconds.
Start/Pause
AAtt tthhee eenndd ooff tthhee WWaasshh CCyycclle
When t he workin g cycle has f inish ed , the buz ze r of dish wa sher wi ll sound 8 se conds, th en stop . Tur n off
the ap pliance u sing the ON /OFF butt on, shut off th e wa ter sup pl y and ope n the door of t he dishwa sher.
Wai t a few min ut es befo re u nload in g the dis hw asher t o avoid han dling the d ishes a nd u tensi ls w hile th ey
are st ill hot and m ore susce ptibl e to b reaka ge . Th ey will a ls o dry bet te r.
Switch Off th e Dishwasher
1.Swi tch off the dis hw asher b y pressin g the ON/OF F button.
2.Tu rn off the wate r tap!
Open the door carefully.
Hot di shes are se nsitive t o knock s. The d ishes sho uld the re fore be a ll owed to c oo l down ar ound 15 min utes
befo re removi ng from the a pplia nc e.
Open t he dishwa sher's do or, leav e it a jar and w ai t a few min ut es befo re removi ng the dish es. In this w ay they
will b e cooler an d the dryin g will be i mp roved .
Unloading the dishwasher
It is no rmal that t he dishwa sher is w et i nside .
WWAARRNNIINNGG!
It is dangerous to open the door when washing,
because the hot water may scald you.
Page 18
User Manual
r
!
:
!
n
n
:
Remarks:
- Insp ect the fil ters for bl ocking ev ery tim e th e dishw as her has b ee n used.
- By uns crewing t he coarse f ilter. yo u can rem ov e the fil te r syste m. Remov e an y food re mnants an d
clea n the filte rs under ru nning wat er.
18
NNOOTTEE:
The entire filter assembly should be cleaned once a week.
Cleaning The Filter
To clean t he coarse f ilter and t he fine fil ter, use a c le aning b ru sh. Rea ss emble t he filter p arts as sho wn in the fig ures
in the l ast page an d reinser t the ent ir e assem bl y in the di sh washe r, positio ning in its s eat and pre ssing d ow nward .
WWAARRNNIINNGG!
CCaarriinngg ffoorr tthhee DDiisshhwwaasshheer
The co ntrol pan el can be cle aned by u si ng a ligh tl y dampe ned cloth a nd dry thor oughly.
The exte ri or use a go od applia nce polis h wax.
Neve r use sharp o bjects, s couri ng p ads or ha rs h clean ers on any pa rt of the dis hwash er.
When clea nin g the filter s, do n't knock on t hem . Otherwise, th e filters co uld b e
contort ed an d the perfor man ce of dishwashe r could be debase d.
Cleaning The Door
To clean t he edge aro und the doo r, you sho ul d use onl y a so ft warm ,
damp c loth. To avoid pe netrati on of water i nto the doo r lock an d
elec trical co mponent s, do not u se a s pray cl ea ner of an y ki nd.
n
Neve r use a spray c leaner to c lean th e do or pane l as i t may dam ag e the doo r lock
and el ectrica l compone nts.
WWAARRNNIINNGG!
n
Abra sive agen t or some pap er towe l sh ould no t be u sed bec au se of the r isk of
scra tching or l eaving sp ots on th e st ainle ss s teel su rf ace.
Protect Against Freezing
plea se take fr
plea se operat e as follow s:
1.Cut o ff e le ctric al p ower to t he d ishwa sher.
2.Tu rn off the wate r supply an d disco nn ect the w at er inle t pi pe from t he w ater va lv e.
3.Dra in water fr om the inle t pipe an d wa ter val ve . (Use a pa n to c atch th e wa ter)
4.Rec onnect th e water inl et pipe t o th e water v al ve.
5.Rem ove the fil ter at the bo ttom of the t ub and use a sp onge to u se u p water i n su mp.
NNOOTTEE:
ost pr otectio n measure s on dish wa sher in w in ter. E fter was hi ng cycl es,
If you r dishwas her canno t work be ca use of th e ic e, plea se c ontac t pr ofess ional ser vice pers ons.
ach ti me a
Page 19
esatto.house
19
n
How to Keep Your Dishwasher in Shape
It is re co mmend t hat you run a w ash cycle w ith the
dish washer em pty and the n remov e th e plug fr om t he
sock et, turn off th e wa ter sup pl y and lea ve the door o f
the ap pliance s lightly o pen. This wil l help th e do or
seal s to ast long er and prev ent odo ur s from fo rm ing
with in the appl iance.
If the a pplianc e must be mov ed, try to ke ep it in the
vert ical posi tion. If ab solutel y neces sa ry, it can be
posi tioned on i ts back.
One of t he factor s that caus e odors to fo rm in the
dish washer is f ood that re mains t ra pped in t he s eals.
Peri odic clea ning wi th a d amp spo ng e will pr ev e
nt thi s
from o ccurrin g.
88..IInnssttaallllaattiioonn iinnssttrruuccttiioonn
Afte r every was h, turn off the w ater supp ly to the
appl iance and l eave th e do or slig ht ly open s o th at
mois ture and od ors are n ot t rappe d in side.
Befo re cleani ng or per fo rming m ai ntena nc e, alwa ys
remo ve the plug f rom the soc ket.
To clean t he exteri or and ru bb er part s of t he dish wa sher,
do not u se solven ts or abras ive cle an ing pro du cts.
Only u se a cloth wi th warm soa py water.
To remov e spots or st ains from t he surfac e of the
inte rior, use a cl oth dampe ned wit h wa ter wit h a li ttle
vine gar, or a clea ning pr od uct mad e sp e
cifi cally for
dish washers .
After Every Wash
Remove the Plug
No Solve nts or Abrasive Cleaning
Moving the Appliance
Seals
When it is not in need for a long time
n
Cleaning the Spray Arms
OOppeenn
It is ne cessary t o clean the s pray ar ms r egula rl y for har d
wate r chemica ls will clo g the spr ay a rm jets a nd b earin gs .
To remov e the lower s pray ar m, p ull out t he s pray ar m up ward.
To remov e the upper s pray ar m, h old the n ut , rotat e th e arm
cloc kwise to re move it.
Was h the arm s in s oapy an d wa rm wate r an d use a sof t br ush to
clea n the jets. R eplace th em after ri nsing the m thoro ug hly.
Cleaning the Spray Arms
It is ne cessary t o clean the s pray ar ms r egula rl y for har d
wate r chemica ls will clo g the spr ay a rm jets a nd b earin gs .
To remov e the upper s pray ar m, h old the n ut , rotat e th e arm
cloc kwise to re move it.
OOppeen
To remov e the lower s pray ar m, p ull out t he s pray ar m up ward.
Was h the arm s in s oapy an d wa rm wate r an d use a sof t br ush to
clea n the jets. R eplace th em after ri nsing the m thoro ug hly.
How to Keep Your Dishwasher in Shape
After Every Wash
Afte r every was h, turn off the w ater supp ly to the
appl iance and l eave th e do or slig ht ly open s o th at
mois ture and od ors are n ot t rappe d in side.
Remove the Plug
Befo re cleani ng or per fo rming m ai ntena nc e, alwa ys
remo ve the plug f rom the soc ket.
No Solve nts or Abrasive Cleaning
To clean t he exteri or and ru bb er part s of t he dish wa sher,
do not u se solven ts or abras ive cle an ing pro du cts.
Only u se a cloth wi th warm soa py water.
To remov e spots or st ains from t he surfac e of the
inte rior, use a cl oth dampe ned wit h wa ter wit h a li ttle
vine gar, or a clea ning pr od uct mad e sp ecifi ca lly for
dish washers .
Installation Instructions
When it is not in need for a long time
It is re co mmend t hat you run a w ash cycle w ith the
dish washer em pty and the n remov e th e plug fr om t he
sock et, turn off th e wa ter sup pl y and lea ve the door o f
the ap pliance s lightly o pen. This wil l help th e do or
seal s to ast long er and prev ent odo ur s from fo rm ing
with in the appl iance.
Moving the Appliance
If the a pplianc e must be mov ed, try to ke ep it in the
vert ical posi tion. If ab solutel y neces sa ry, it can be
posi tioned on i ts back.
Seals
One of t he factor s that caus e odors to fo rm in the
dish washer is f ood that re mains t ra pped in t he s eals.
Peri odic clea ning wi th a d amp spo ng e will pr ev e
from o ccurrin g.
nt thi s
Attention:
The installation of the pipes
and elec trical equipments
should b e done by professionals.
IInnssttaallllaattiioonn pprreeppaarraattiioon
The installation position of dishwasher should be near the existing inlet and drain
hoses an d power cord.
One side of the cabinet sink should b e chosen to facilitate the connection of drain
hoses of the dishwasher.
Warning
Electrical Shock Hazard
Disconnect electrical power
before installing dishwasher.
Failure to do so can result in
death or electrical shock.
Page 20
User Manual
E
s
y.
e
!
n
n
!
n
n
PPoossiittiioonniinngg tthhee AApppplliiaanncce
osit ion the app liance in t he desi re d locat io n. The back s ho uld res t ag ainst t he w all beh ind it,
nd the s ides, alo ng the adja cent ca bi nets or w al l. The dish wa sher is e qu ipped w ith water s upply
nd dra in hoses th at can be pos ition ed t o the rig ht o r the lef t to f acili ta te prop er i nstal la tion.
20
AAbboouutt PPoowweerr CCoonnnneeccttiioon
WWAARRNNIINNGG!
For personal safety:
n
Do not use an extension cord or an adapter plug
with this appliance.
n
Do not cut or remove the earthing connection from the power cord
under any circumstances.
lectrical Requirements
Plea se look at th e rating la bel to kn ow t he rati ng v oltag e an d conne ct t he dish washer to t he approp riate pow er supp l
Use th e require d fuse 10 amp , time de la y fuse or c ir cuit br ea ker rec om mende d and provi de separa te circ ui t servi ng
only t his appli ance.
Electrical Connection
Insure proper ground
exists before use
Ensu re the volt age and fre quenc y of t he powe r be ing cor re spond s to
thos e on the rati ng plate. O nly inser t the plu g in to an ele ct rical s oc ket whi ch is earth ed
prop erly. If the ele ct rical s ocket to wh ich the app lianc e mu st be con ne cted is n ot
appr opriate f or the plug , r eplac e th e socke t, r ather t ha n using a a da ptors o r th e like a
they c ould caus e overhea ting an d bu rns.
WWaatteerr CCoonnnneeccttiioon
old Water Connection
Conn ect the col d water sup ply hos e to a t hread ed 3 /4(in ch ) conne ct or and ma ke sure
that i t is f asten ed tightl y in place. I f the water p ipes ar e ne w or have n ot b een use d fo r
an ext ended per iod of time , let the w at er run to m ak e sure th at t he wate r is c lear an d
free o f impurit ies. If thi s precaut ion is no t ta ken, th er e is a risk t ha t the wat er i nlet ca n
get bl ocked and d amage the a pplia nc e.
WWAARRNNIINNGG!
plea se clos e the hyd rant af ter usi ng.
Page 21
esatto.house
21
s
:
B
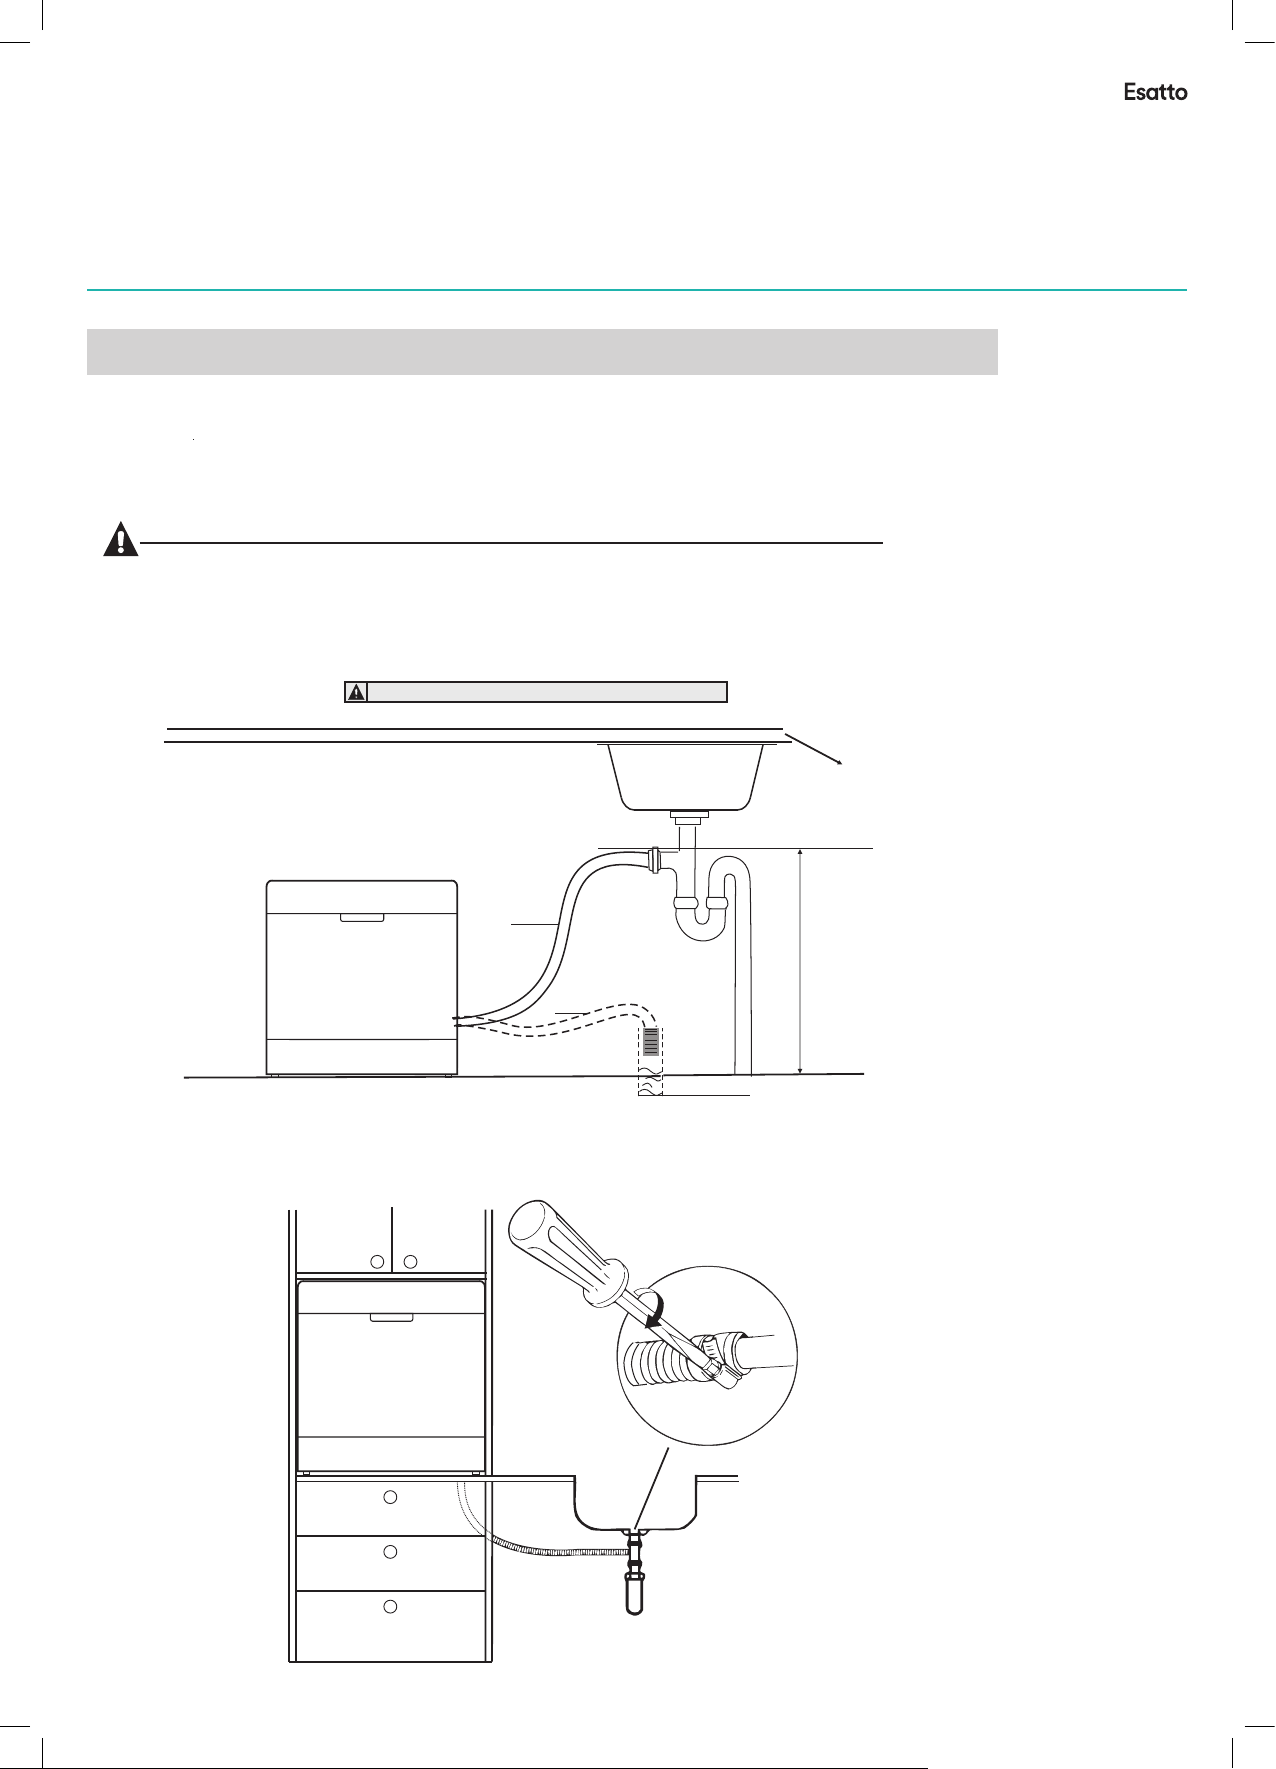
CCoonnnneeccttiioonn ooff ddrraaiinn hhoossees
Insert the drain hose into a drain pipe with a minimum diameter of 4cm, or let it
run into the sink, making sure to avo id bending or crimping it. Use the special
plastic support that comes with the appliance. The free end of the hose must be
at a height lower than75cm and must not be immersed in water to avoid the back
flow of it.
AAtttteennttiioonn:
The special plastic hose support must be solidly fastened to the wall to
prevent the drain hose from moving and allowing water to spill outside
the drain.
PPLLEEAASSEE HHAANNGG UUPP TTHHEE DDRRAAIINN HHOOSSEE EEIITTHHEERR WWAAYY OOFF AA,, B
NOTE
The top of the hose
must be less than
750mm.
Front
Drain pipe
A
B
Counter
MAX 75 0mm
φ 40m m
Page 22
User Manual
r
:
99..TTrroouubblleesshhoooottiinngg TTiippss
Problem Possible Causes What To Do
Fuse blown, or the
circuit breaker tripped.
Replace fuse or reset circuit breaker. Remove any other
appliances sharing the same circuit with the dishwasher
Suds in the tub
Spilled rinse-aid
Always wipe up rinse-aid spills immediately.
Review the charts on the following pages may save you from calling for service.
White film on
inside surface
There are rust
stains on cutlery
Knocking noise
in the wash cabinet
Rattling noise
in the wash cabinet
Knocking noise
in the water pipes
Hard water minerals
The affected items are
not corrosion resistant.
The lid of softer
is loose.
The sp ay arm is
knocking against
an item in a basket.
r
Item of crockery
are insecure
in the wash cabinet.
This may be caused
by on-site installation
or the cross-section of
the piping.
A programme was not
run after dishwasher
salt was added.
Traces of salt have
got into the wash cycle.
To clean the interior, use a damp sponge with
dishwasher detergent and wear rubber gloves.
Never use any other cleaner than dishwasher
detergent for the risk of foaming or suds.
Always run the Quick wash prog
ramme .
without any crockery in the dishwasher and
without selecting the Turbo function (if present),
after adding dishwasher salt.
Check the lip .Ensure the fix is fine.
Interrupt the programme, and rearrange the items
which are obstructing the spray arm.
Interrupt the programme,
and rearrange the items of crockery.
This has no influence on dishwasher function.
if in doubt, contact a suitably qualified plumber.
Stained tub interior
Detergent with
colourant was used.
Make sure that the detergent is the one without
colourant.
Improper detergent
Dishwasher doesn t
start
'
Make sure the dishwasher is turned on and the door is
closed securely.
Closed dishwasher making sure that door latches.
Make sure the power cord is properly plugged into the
wall socket.
Power supply is not
turned on.
Door of dishwasher
not properly closed.
Water not pumped
from dishwasher
Kink in drain hose
Filter clogged.
Kitchen sink clogged.
Check drain hose.
Check coarse filter.
(see section titled " Cleaning The Filter ")
the
Check kitchen sink to make sure it is draining well.
If problem is kitchen sink not draining ,you may need
a plumber rather than a service
man for dishwasher.
Use only the special dishwasher detergent to avoid
suds. If this occurs, open the dishwasher and let suds
evaporate. Add 1 gallon of cold water to the tub. Close
and latch the dishwasher, then Start any wash cycle
to drain out the water . Repeat if necessary.
BBeeffoorree CCaalllliinngg ffoorr SSeerrvviiccee
Technic al
probl ems
Gener al
probl ems
Noise
22
How to Drain Ex
If the s ink is 1000 h igher fro m the floor, t he exce ss w ater in h os es cann ot b e drain ed direct ly
into t he sink. It w ill be nece ssary to dr ain exc es s water f ro m hoses i nt o a bowl or s uitable
cont ainer tha t is held out side an d lo wer tha n th e sink.
cess Water From Hoses
Water Outlet
Conn ect the wat er drain ho se. The drain h ose mus t be c orrec tl y fitte d to a void wa te r leaks .
Ensu re that the w ater drai n hose is n ot k inked o r sq uashe d.
Extension Hose
If you n eed a drain h ose exten sion, o bs erve to u se a s imila r dr ain hos e.
It mus t be n o longe r than 4 metr es; other wise the cl eanin g effe ct of the dis hwash er c ould be r ed uced.
SSttaarrtt ooff ddiisshhwwaasshheer
The following things should be ch ecked before starting the dishwasher.
1 The dishwasher is level and fixed properly
2 The inlet valve is open
3 Inlet ho se connec tions are full y tig htened an d not leaki ng
4 The wires are tightly connected
5 The power is switched on
6 The inlet and drain hoses are knotted
7 All packing materials and printings should be taken o ut from the dishwasher
AAtttteennttiioonn:
After i nstallatio n, please make s ure to keep this m anual.
The con tent of this man ual is very help ful to the users .
Page 23
esatto.house
23
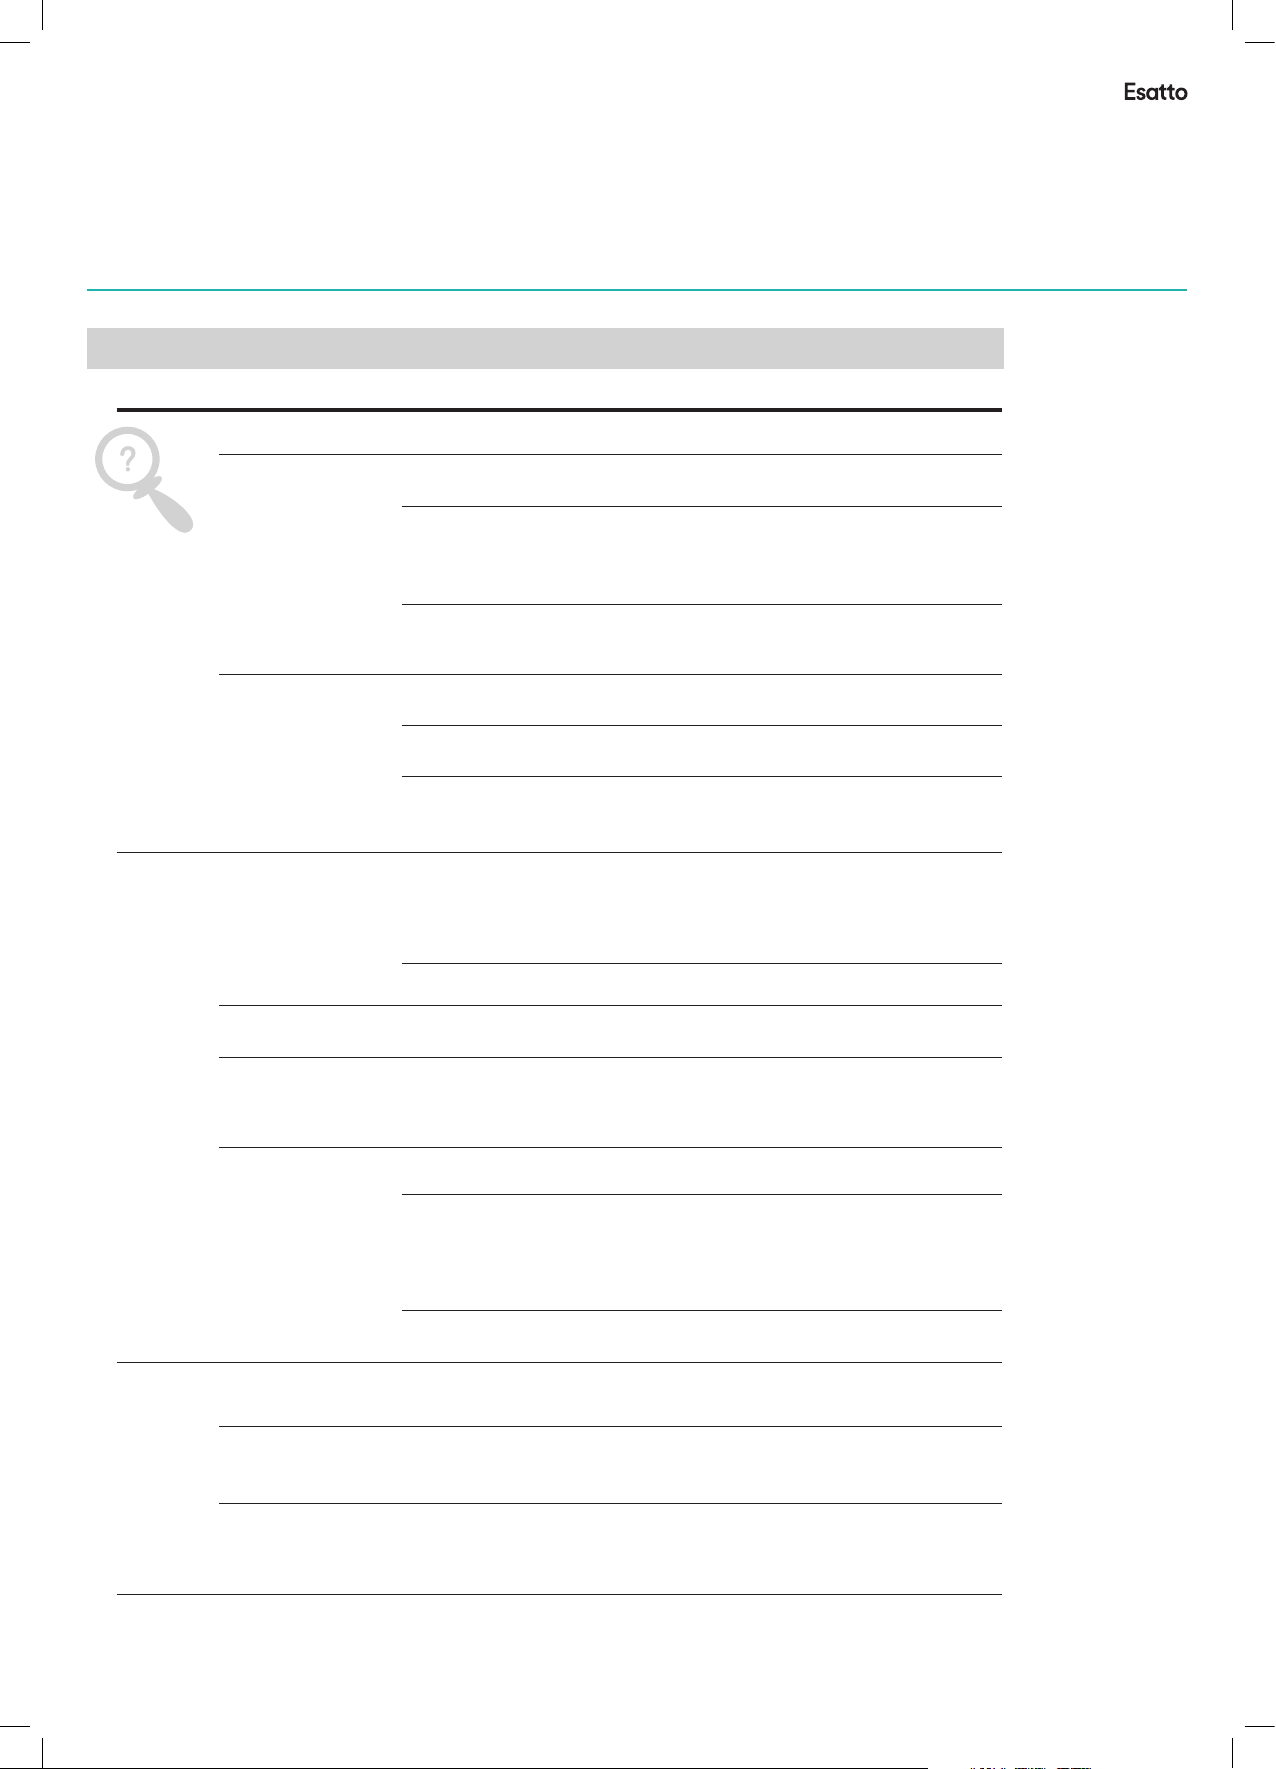
99..TTrroouubblleesshhoooottiinngg TTiippss
BBeeffoorree CCaalllliinngg ffoorr SSeerrvviiccee
Troubleshooting
Review the charts on the following pages may save you from calling for service.
Technic al
probl ems
Problem Possible Causes What To Do
Dishwasher doesn t
start
Water not pumped
Fuse blown, or the
'
circuit breaker tripped.
Power supply is not
turned on.
Door of dishwasher
not properly closed.
Kink in drain hose
from dishwasher
Filter clogged.
Kitchen sink clogged.
Suds in the tub
Improper detergent
Spilled rinse-aid
Replace fuse or reset circuit breaker. Remove any other
appliances sharing the same circuit with the dishwasher
Make sure the dishwasher is turned on and the door is
closed securely.
Make sure the power cord is properly plugged into the
wall socket.
Closed dishwasher making sure that door latches.
Check drain hose.
Check coarse filter.
the
(see section titled " Cleaning The Filter ")
Check kitchen sink to make sure it is draining well.
If problem is kitchen sink not draining ,you may need
a plumber rather than a serviceman for dishwasher.
Use only the special dishwasher detergent to avoid
suds. If this occurs, open the dishwasher and let suds
evaporate. Add 1 gallon of cold water to the tub. Close
and latch the dishwasher, then Start any wash cycle
to drain out the water . Repeat if necessary.
Always wipe up rinse-aid spills immediately.
Gener al
probl ems
Noise
Stained tub interior
White film on
inside surface
There are rust
stains on cutlery
Knocking noise
in the wash cabinet
Rattling noise
in the wash cabinet
Knocking noise
in the water pipes
Detergent with
colourant was used.
Hard water minerals
The affected items are
not corrosion resistant.
A programme was not
run after dishwasher
salt was added.
Traces of salt have
got into the wash cycle.
The l
id of softer
is loose.
The sp ay arm is
r
knocking against
an item in a basket.
Item of crockery
are insecure
in the wash cabinet.
This may be caused
by on-site installation
or the cross-section of
the piping.
Make sure that the detergent is the one without
colourant.
To clean the interior, use a damp sponge with
dishwasher detergent and wear rubber gloves.
Never use any other cleaner than dishwasher
detergent for the risk of foaming or suds.
Always run the Quick wash programme .
without any crockery in the dishwasher and
without sel
after adding dishwasher salt.
Check the lip .Ensure the fix is fine.
Interrupt the programme, and rearrange the items
which are obstructing the spray arm.
Interrupt the programme,
and rearrange the items of crockery.
This has no influence on dishwasher function.
if in doubt, contact a suitably qualified plumber.
ecting the Turbo function (if present),
Page 24
User Manual
s
!
n
n
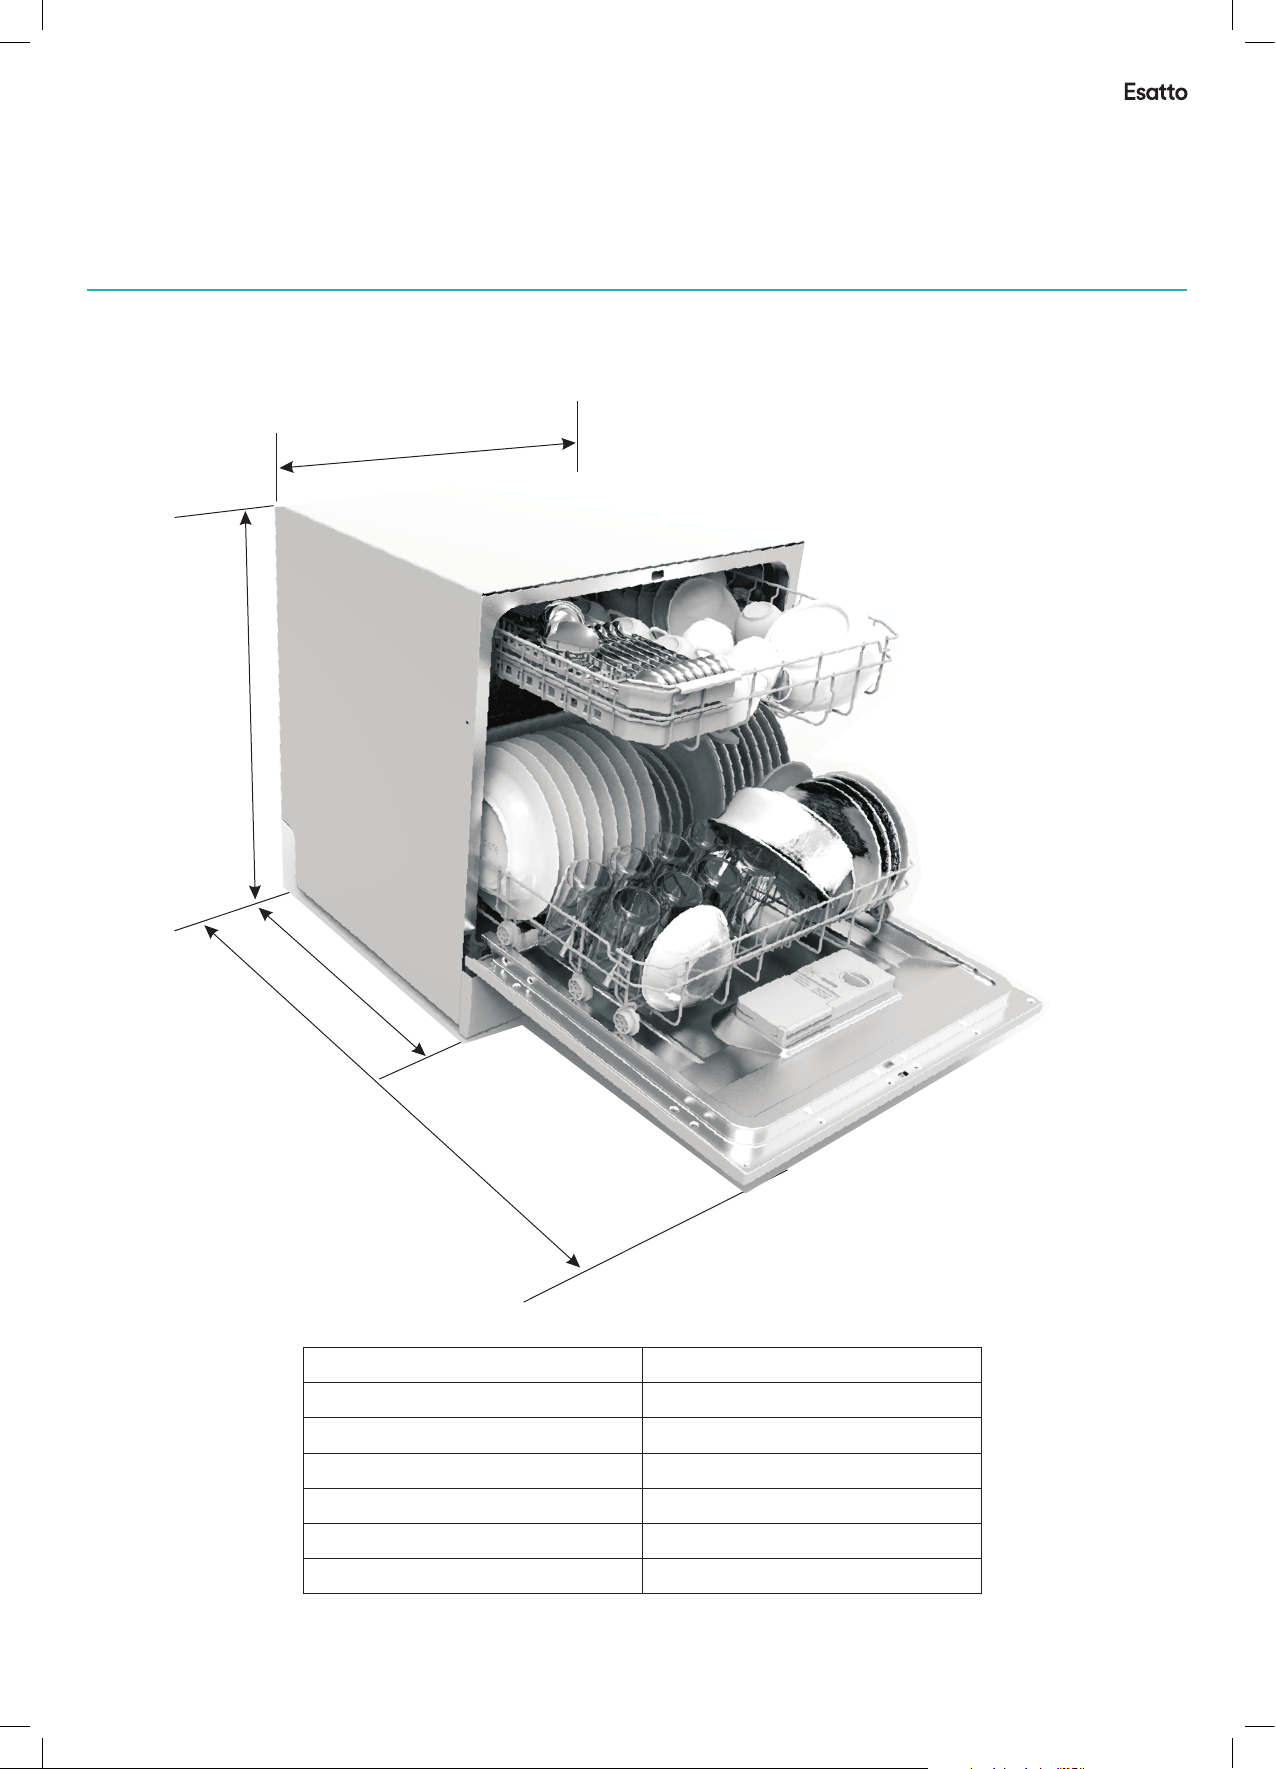
Height : 590mm
Width : 550mm
Depth : 500mm
Voltage connected Load : see rating label
Water pressure: 0.04-1.0MPa
Power supply: see rating label
Capacity: 8 Place settings
TTeecchhnniiccaall IInnffoorrmmaattiioonn
TTeecchhnniiccaall IInnffoorrmmaattiioonn
555500mmmm
559900mmmm
550000mmmm
996644mmmm
Unsat is
-fact ory
washi ng
resul t
Problem Possible Causes What To Do
The dishes
are not clean
Cloudiness
on glassware
Black or gray
marks on dishes
Detergent left in
dispenser cups
The dishes
The dishes were not
loaded correctly.
The programme was
not powerful enough.
Not enough detergent
was dispensed.
Item are blocking
the path of spray arms.
The filter combination
in the base of wash
cabinet is not clean or
is not correctly fitted.
This may cause
the spray arm jets
to get blocked.
Combination of soft
water and too much
detergent.
Aluminum utensils
have rubbed against
dishes.
Dishes block
detergent cups.
Improper loading
are not drying
Too little rinse-aid
Unsat is
Dishes are removed
too soon.
-fact ory
dryin g
resul t
Wrong programme
selection
Using cutlery with
a low-quality coating
See notes in " Loading the Dishwasher Baskets ".
Select a more intensive programme.
See" Wash Cycle Table ".
Use more detergent, or change your detergent.
Rearrange the items so that the sp ay can rotate freely.r
Clean and/or fit the filter combination correctly.
Clean the spray arm jets. See "Cleaning the Spray
Arms".
Use less detergent if you have soft water and select
a shortest cycle to wash the glassware and to get
them clean.
Use a mild abrasive cleaner to eliminate those marks.
Re-loading the dishes properly.
Load the dishwasher as suggested in the directions.
Increase the amount of rinse-aid/Refill the rins
dispenser.
Do not empty your dishwasher immediately after
washing. Open the door slightly so that the steam can
escape. Begin unloading the dishwasher only once t
he dishes are barely warm to the touch. Empty the low
basket first. This prevents water form dropping off
dishes in the upper basket.
In short programmes the washing temperature is lower.
This also lowers cleaning performance. Choose a
programme with a long washing time.
Water drainage is more difficult with these items.
Cutlery or dishes of this type are not suitable for
washing in the dishwasher.
e-aid
24
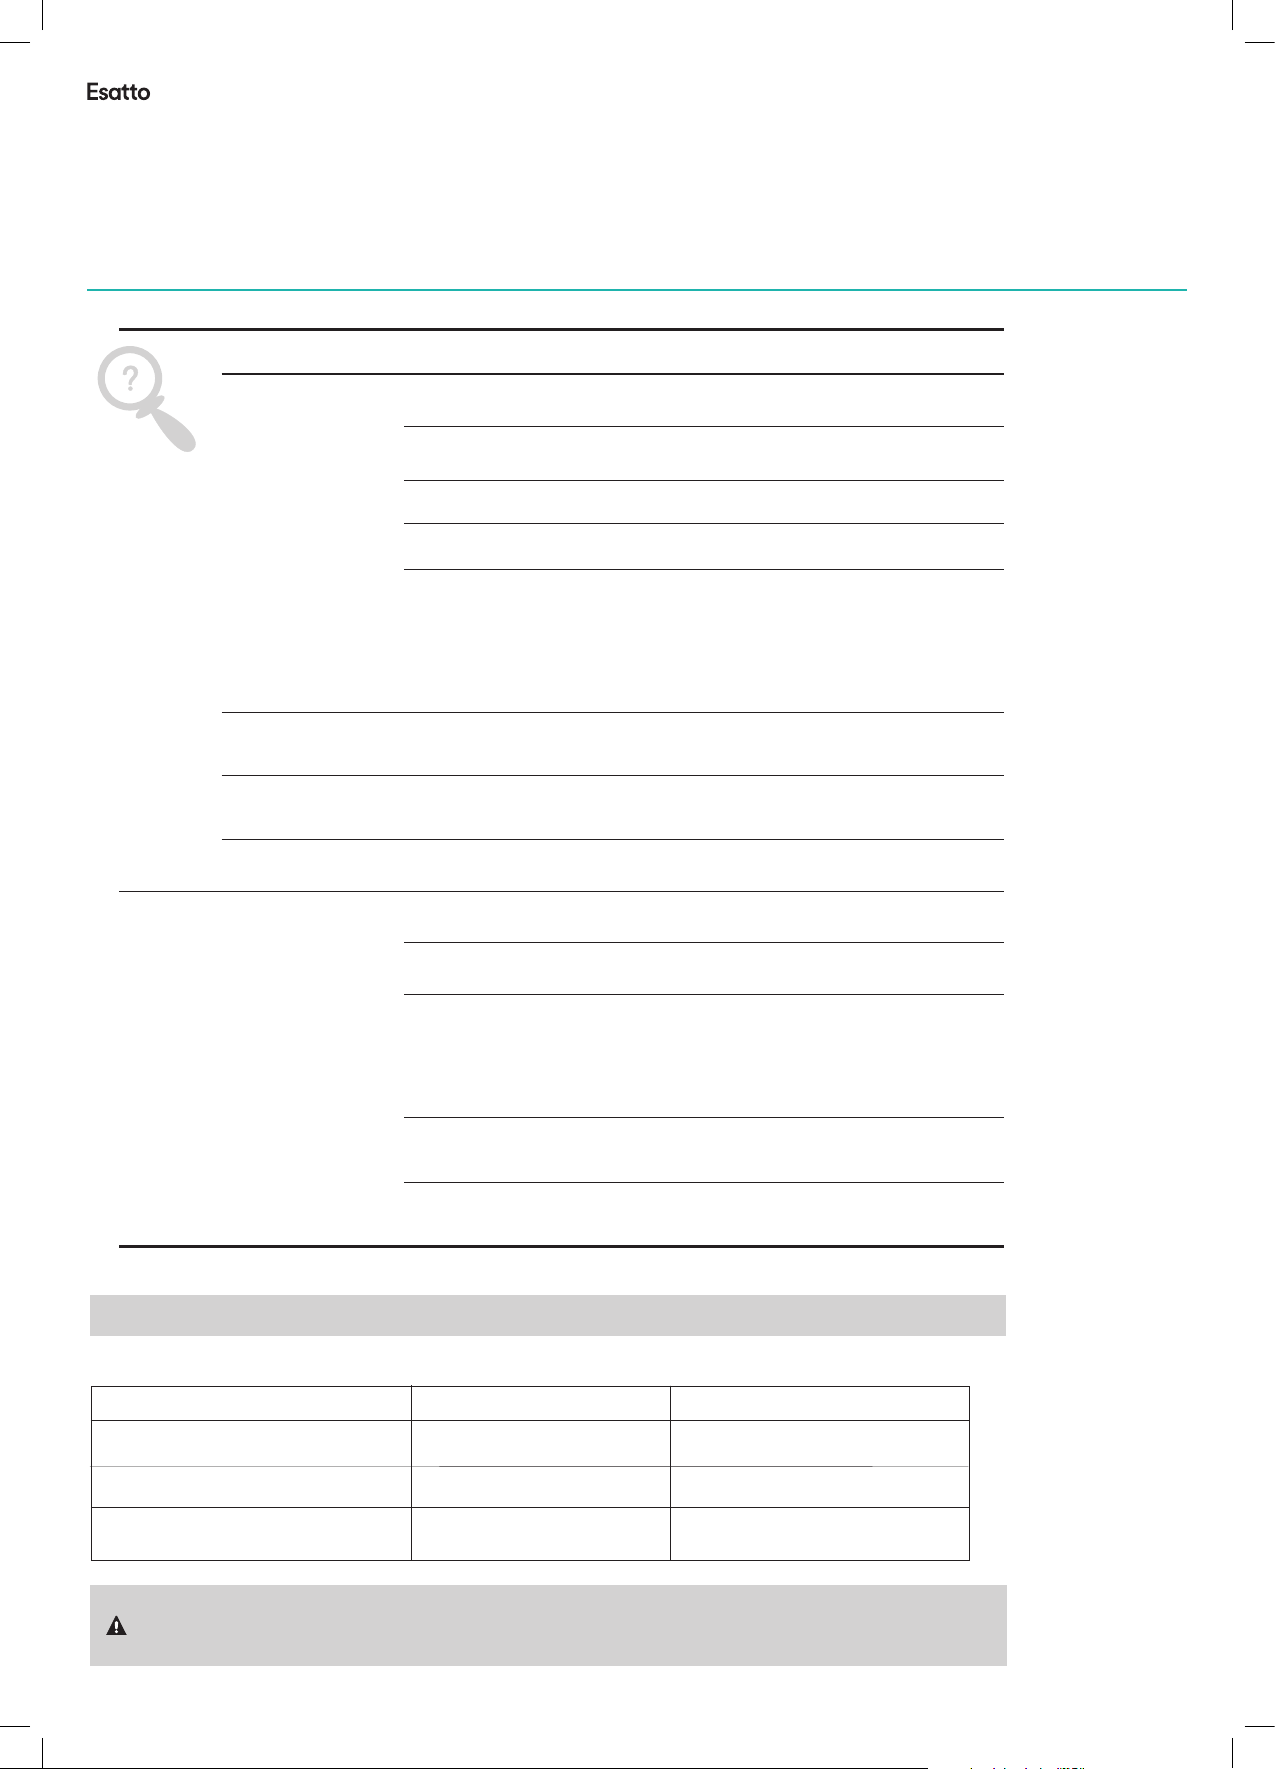
EErrrroorr CCooddees
When some malfunctions come on, the appliance will display error codes to warn you:
Codes
The Ra pid light f licker fl eetly
The Ra pid and 90m in light fl icker f le etly
The Gl ass light f licker fl eetly
WWAARRNNIINNGG!
n
If overflow occurs, turn off the main water supply before calling a service.
n
If there is water in the base pan because of an overfill or small leak,
the water should be removed before restarting the dishwasher.
Meanings
Longer inlet time.
Not reaching required temperature.
Overflow.
Possible Causes
Faucets is not opened, or water intake
is restricted, or water pressure is too low.
Malfunction of heating elenent.
Some element of dishwasher leaks .
Page 25
esatto.house
25
TTeecchhnniiccaall IInnffoorrmmaattiioonn
TTeecchhnniiccaall IInnffoorrmmaattiioonn
5
5
0
m
m
5
9
0
m
m
5
0
0
m
m
9
6
4
m
m
Technical Information
m
m
0
5
5
m
m
0
9
5
5
0
0
m
m
9
6
4
m
m
Height : 590mm
Width : 550mm
Depth : 500mm
Voltage connected Load : see rating label
Water pressure: 0.04-1.0MPa
Power supply: see rating label
Capacity: 8 Place settings
Page 26
User Manual
Purchase Details
For future reference, please record the following information
which can be found on the rating plate and the date of
purchase which can be found on your sales invoice.
STORE DETAILS
STORE NAME
ADDRESS
TELEPHONE
|
|
PURCHASE DATE
|
26
|
PRODUCT DETAILS
MODEL NO.
SERIAL NO.
|
|
Page 27

esatto.house
27
Attach your receipt
to this page →
Page 28

User Manual
Warranty Information
28
AUSTRALIA WARRANTY TERMS & CONDITIONS
DISHWASHERS
This document sets out the terms and conditions of the
product warranties for Residentia Group Appliances. It is
an important document. Please keep it with your proof of
purchase documents in a safe place for future reference
should you require service for your Appliance.
1. IN THIS WARRANTY
(a) ‘acceptable quality’ as referred to in clause 10 of this
warranty has the same meaning referred to in the ACL;
(b) ‘ACL’ means Trade Practices Amendment (Australian
Consumer Law) Act (No.2) 2010;
(c) ‘Appliance’ means any Residentia Group product
purchased by you accompanied by this document;
(d) ‘ASR’ means Residentia Group authorised service
representative;
(e) ‘Residentia Group’ means Residentia Group Pty Ltd
of 165 Barkly Ave, Burnley VIC 3121, ACN 600 546 656
in respect of Appliances purchased in Australia;
(f ) ‘major failure’ as referred to in clause 10 of this
warranty has the same meaning referred to in the ACL
and includes a situation when an Appliance cannot
be repaired or it is uneconomic for Residentia Group,
at its discretion, to repair an Appliance during the
Warranty Period;
(g) ‘Warranty Period’ means:
(i) where the Appliance is used for personal,
domestic or household use (i.e. normal
single family use) as set out in the instruction
manual, the Appliance is warranted against
manufacturing defects for 24 months, following
the date of original purchase of the Appliance;
(h) ‘you’ means the purchaser of the Appliance not having
purchased the Appliance for re-sale, and ‘your’ has a
corresponding meaning.
2. This warranty only applies to Appliances purchased
and used in Australia and is in addition to (and does
not exclude, restrict, or modify in any way) any
non-excludable statutory warranties in Australia.
3. During the Warranty Period Residentia Group or its
ASR will, at no extra charge if your Appliance is readily
accessible for service, without special equipment and
subject to these terms and conditions, repair or replace
any parts which it considers to be defective. Residentia
Group or its ASR may use remanufactured parts to
repair your Appliance. You agree that any replaced
Appliances or parts become the property of Residentia
Group. This warranty does not apply to light globes,
batteries, lters, seals or similar perishable parts.
4. Parts and Appliances not supplied by Residentia Group
are not covered by this warranty.
Page 29

esatto.house
29
5. You will bear the cost of transportation, travel and
delivery of the Appliance to and from Residentia Group
or its ASR. If you reside outside of the service area,
you will bear the cost of:
(a) travel of an authorised representative;
(b) transportation and delivery of the Appliance to and
from Residentia Group or its ASR, in all instances,
unless the Appliance is transported by Residentia
Group or its ASR, the Appliance is transported at
the owner’s cost and risk while in transit to and from
Residentia Group or its ASR.
6. Proof of purchase is required before you can make
a claim under this warranty.
7. You may not make a claim under this warranty unless
the defect claimed is due to faulty or defective parts
or workmanship. Residentia Group is not liable in the
following situations (which are not exhaustive):
(a) the Appliance is damaged by:
(i) accident
(ii) misuse or abuse, including failure to properly
maintain or service
(iii) normal wear and tear
(iv) power surges, electrical storm damage or
incorrect power supply
(v) incomplete or improper installation
(vi) incorrect, improper or inappropriate operation
(vii) insect or vermin infestation
(viii) failure to comply with any additional instructions
supplied with the Appliance;
(b) the Appliance is modied without authority from
Residentia Group in writing;
(c) the Appliance’s serial number or warranty seal has
been removed or defaced;
(d) the Appliance was serviced or repaired by anyone
other than Residentia Group, an authorised repairer
or ASR.
8. This warranty, the contract to which it relates and the
relationship between you and Residentia Group are
governed by the law applicable where the Appliance
was purchased.
10. For Appliances and services provided by Residentia
Group in Australia, the Appliances come with a
guarantee by Residentia Group that cannot be
excluded under the Australian Consumer Law. You
are entitled to a replacement or refund for a major
failure and for compensation for any other reasonably
foreseeable loss or damage. You are also entitled
to have the Appliance repaired or replaced if the
Appliance fails to be of acceptable quality and the
failure does not amount to a major failure. The benets
to you given by this warranty are in addition to your
other rights and remedies under a law in relation to the
Appliances or services to which the warranty relates.
11. At all times during the Warranty Period, Residentia
Group shall, at its discretion, determine whether repair,
replacement or refund will apply if an Appliance has a
valid warranty claim applicable to it.
12. Missing parts are not covered by warranty. Residentia
Group reserves the right to assess each request for
missing parts in a case by case basis. Any parts
that are not reported missing in the first week after
purchase will not provide free of charge.
13. To enquire about claiming under this warranty, please
follow these steps:
(a) carefully check the operating instructions, user manual
and the terms of this warranty;
(b) have the model and serial number of the Appliance
available;
(c) have the proof of purchase (e.g. an invoice) available;
(d) telephone the numbers shown below.
14. You accept that if you make a warranty claim,
Residentia Group and its ASR may exchange
information in relation to you to enable Residentia
Group to meet its obligations under this warranty.
IMPORTANT
Before calling for service, please ensure that the steps
in point 13 have been followed.
9. To the extent permitted by law, Residentia Group
excludes all warranties and liabilities (other than as
→ Service: Please call 1300 11 HELP (4357)
→ Spare parts: Please call 1300 11 SPARE (7727)
contained in this document) including liability for any
loss or damage whether direct or indirect arising from
your purchase, use or non use of the Appliance.
The Australian Consumer Law requires the inclusion of the following statement with this warranty: Our goods come with guarantees that cannot
be excluded under the Australian Consumer Law. You are entitled to a replacement or refund for a major failure and for compensation for any other
reasonably foreseeable loss or damage. You are also entitled to have the goods repaired or replaced if the goods fail to be of acceptable quality and the
failure does not amount to a major failure.
Page 30

User Manual
This page
is intentionally
left blank
30
Page 31

esatto.house
31
This page
is intentionally
left blank
Page 32

This page
is intentionally
left blank
Appliances
Exctly wht
you need
A RESIDENTIA
GROUP INITIATIVE
 Loading...