

Page 1
Page 2

2
2. Technische Daten
3. Sicherheitshinweise
4. Inbetriebnahme
5. Funktionsbeschreibung
6. Fehlerdiagnose und
Fehlerbehebung
7. Wartung und Instandhaltung
8. Ersatzteile und
Bestelldaten
9. Garantie
2. Technical Data
3. Safety information
4. Starting operation
5. Functional description
6. Fault diagnosis and
troubleshooting
7. Maintenance and servicing
8. Spare parts and
ordering information
9. Warranty
Contents
Page 3

3
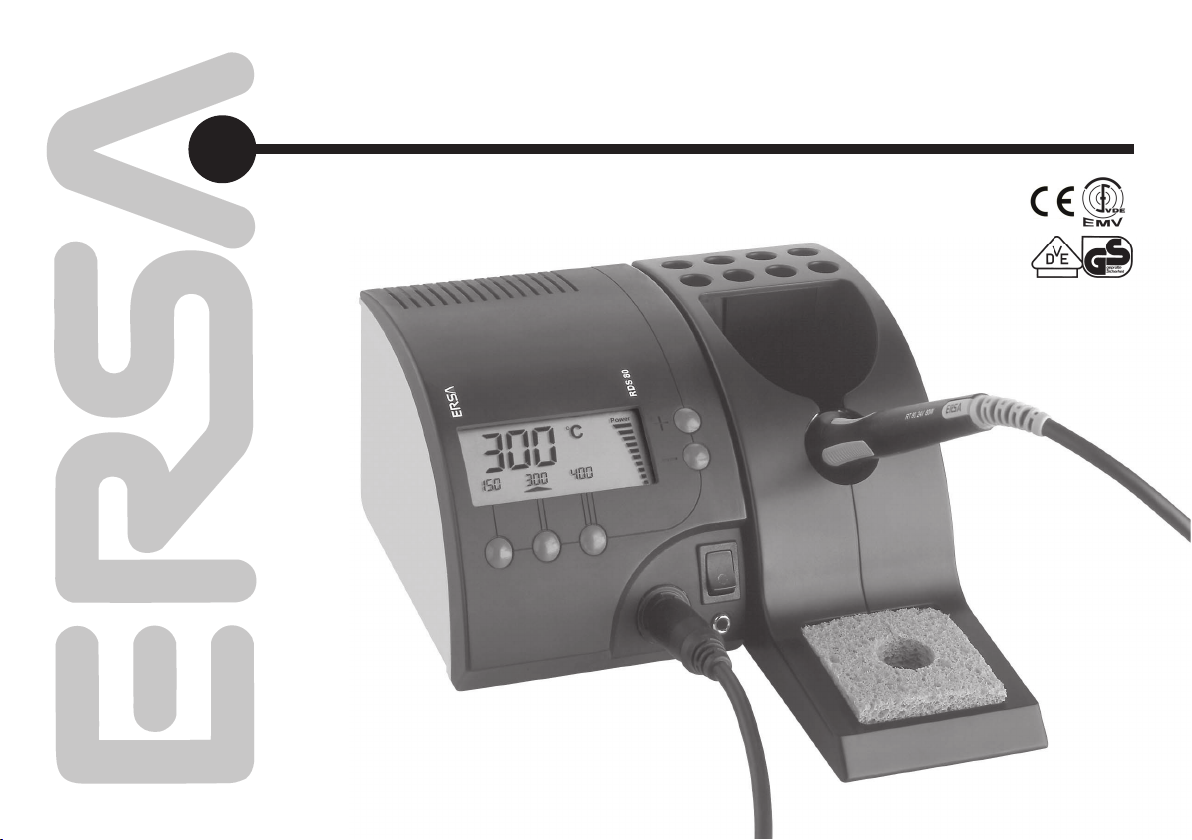
9. Netzschalter
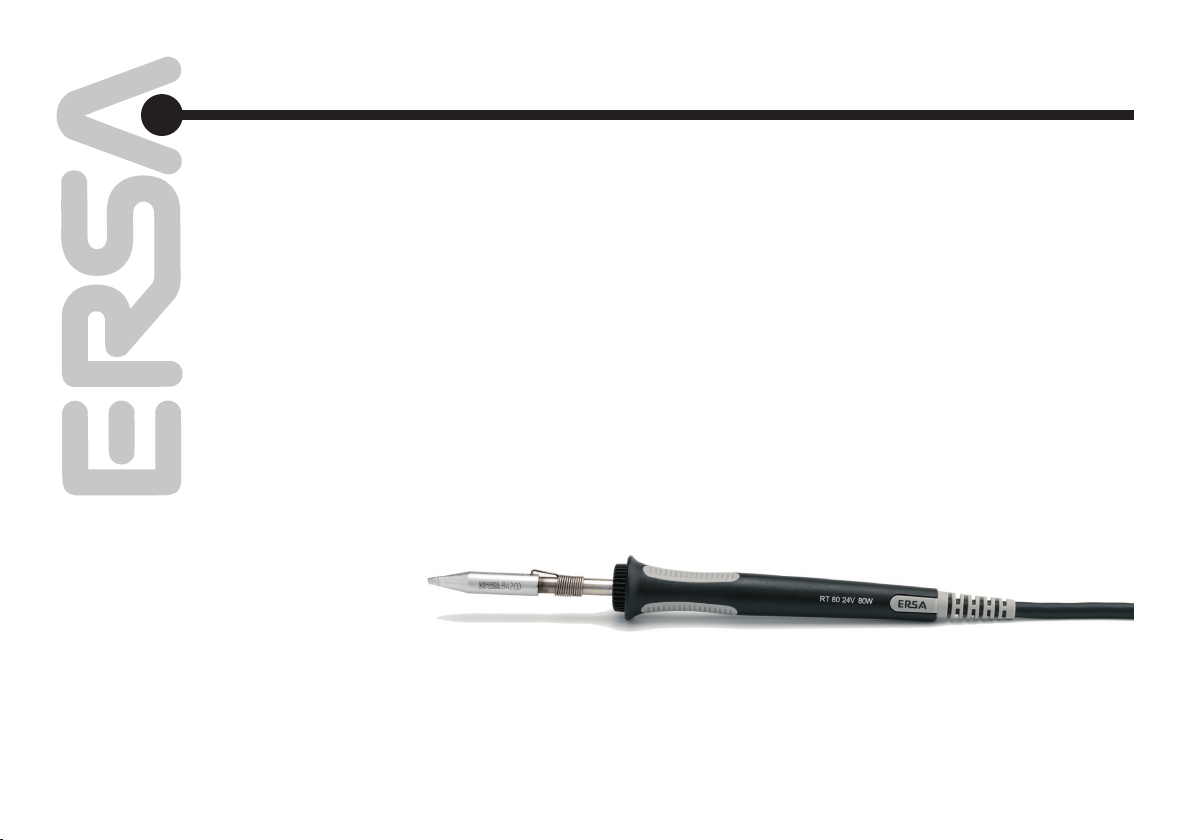
10. Lötkolben RT 80
11. Ablageständer RH 80
12. Lötspitzenmagazin
13. Schwammbehälter
14. Viskoseschwamm
15. Sicherung/Sicherungshalter
(auf Geräteunterseite)
2. Netzanschlussleitung
3. LC-Display
4. Tasten + -
5. Temperaturwahltasten
6. Steckverbinder Lötkolben
7. Anschlussleitung
Lötkolben
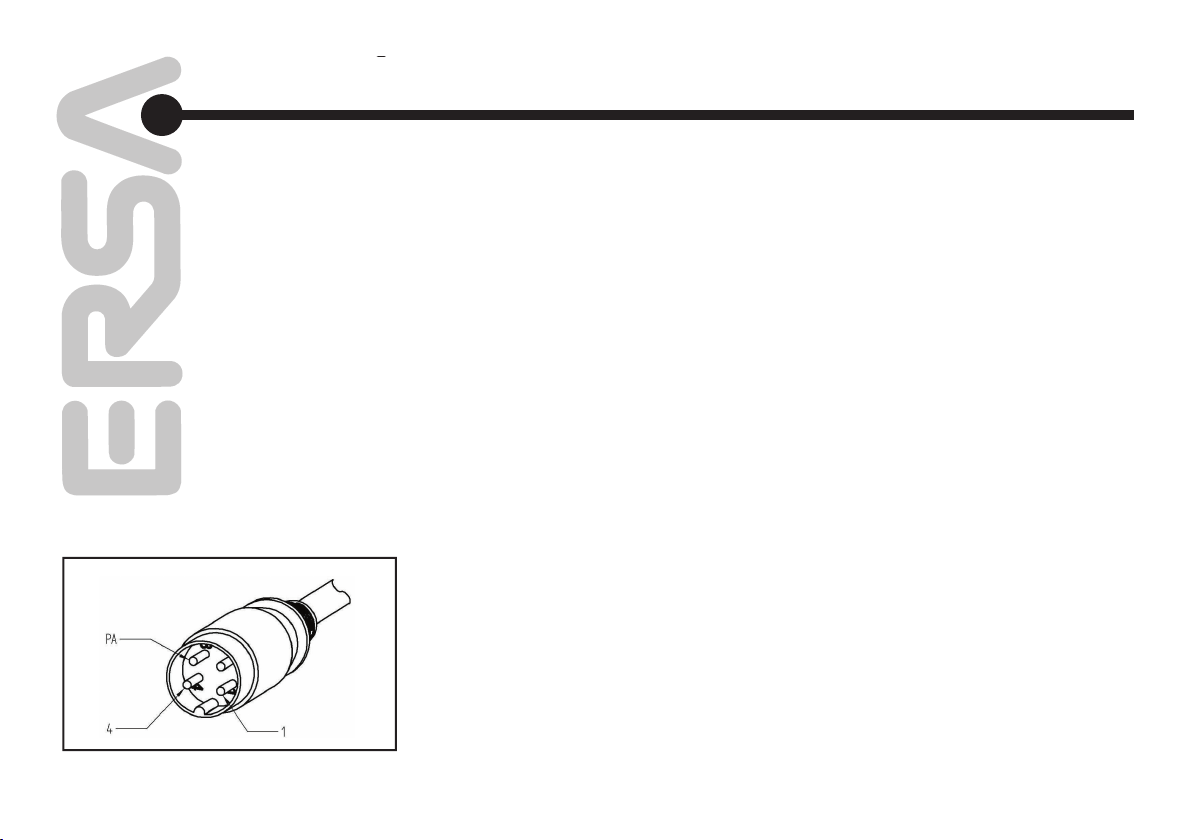
8. Potentialausgleichbuchse
Abb. 1 / fi g. 1
RDS 80
9. Power switch
10. RT 80 Soldering iron
11. RH 80 Holder
12. Soldering tip magazine
13. Sponge container
14. Viscose sponge
15. Fuse / fuse holder
(on bottom of device)
2. Power connection line
3. LC display
4. + - buttons
5. Temp. selection buttons
6. Soldering iron connector
7. Soldering iron connecting
cable
8. Potential equalization socket
3
5
9
7
8
6
Page 4
4
Vielen Dank, dass Sie sich für den Erwerb dieser
hochwertigen Lötstation entschieden haben.
Die RDS 80 ist eine mikroprozessorgeregelte
Lötstation, welche sich für den Einsatz in der
Fertigung, im Reparaturbetrieb und auch für den
Laborbereich eignet.
Die RDS 80 bietet aufgrund der Prozessorsteue-
rung sehr nützliche Eigenschaften wie z. B. die
direkte Anwahl von 3 programmierbaren Tem-
peraturen, Standby- und Automatische Power-
Off-Funktion sowie ein großes gut ablesbares
LC-Display.
1.1 Elektronikstation mit folgenden
Ausstattungsmerkmalen:
• Schutzisolierter Aufbau
• Sekundärspannung: 24 V~ für 80 W
Lötkolben RT 80
• Vollwellensteuerung
• Potentialausgleichanschluss über 220 K
Ω
Widerstand
• Prüfzeichen VDE-GS, VDE-EMV
Hinweis:
Bitte lesen Sie diese Betriebsanleitung vor der
ersten Inbetriebnahme vollständig durch!
Thank you for purchasing this high-quality solde-
ring station. The RDS 80 is a microprocessor-
controlled soldering station for use in production,
repairs and in the laboratory.
Among the very useful features of the proces-
sor-controlled RDS 80 are the direct selection of
3 pre-programmable temperatures, standby and
automatic power-off, and a large, easily readable
LC display.
1.1 Electronic Station with
following equipment features:
• Protectively insulated design
• Secondary voltage: 24 V~ for 80 W RT 80
soldering iron
• Full-wave control system
• Potential equalization port through 220 K
Ω
resistor
• Quality mark: VDE, EMC
Note:
Please read through these Operating Instruc-
tions completely before using the station for
the fi rst time.
Page 5

5
Einführung Introduction
1.2 Einfache und schnelle
Temperatureinstellung
Neben der Temperatureinstellung per Plus/Minus-
Taste ermöglicht die RDS 80 die Programmie-
rung von bis zu 3 Temperaturen (alternativ 2 Tem-
peraturen und Standby-Temperatur), die schnell
per Tastendruck vorwählbar sind.
Automatische Power-Off-Funktion
Auto-Power-Off-Funktion. Die Standby- und
Abschaltzeit ist in 5-Minuten-Schritten bis max.
1.
temperature setting
widest variety of soldering jobs, such as solde-
with the 3 programmed temperatures, the actual
automatic power-off
A feature particularly useful for everyday work
Page 6
Einführung Introduction1.
Page 7

Versorgungsspannung: 230 V / 50Hz
302° F - 842° F
Aufl ösung: 1° C bzw. 1° F
Abmessungen Station: 110x105x147 mm
(B x H x T)
Anheizleistung: 290 W
Anheizzeit: ca. 40 s
(auf 280 °C / 536° F)
Ablageständer RH 80
302° F - 842° F
(W x H x D)
Voltage: 24 V~
(to 280 °C / 536° F)
Page 8

weise vollständig lesen und die darin enthal-
Gebrauch alle Komponenten
Always use genuine ERSA spare parts for any
Page 9

Sicherheitshinweise Safety information3.
Ablageständer.
zeug niemals unbeaufsichtigt
Abschalten des Gerätes der Werkzeugeinsatz
Ordnung
Abfallbeseitigungsvorschriften.
unattended
An untidy workplace increases the risk of acci-
responsible fashion
Page 10

Sicherheitshinweise Safety information3.
Arbeitsstoffe und Arbeitshilfsstoffe können Ihre
Verbindung kommen. Beschädigte Anschlusslei-
Umgebungseinfl üsse
Verwenden Sie ausschließlich ERSA Original-
Vorschriften
whilst soldering can have a detrimental effect on
conditions
Always keep your ERSA product in a safe, dry
regulations
Page 11
Vollständigkeit.
Elektronikstation RDS 80
Lötkolben RT 80 mit Lötspitze
Ablageständer RH 80 mit Viskose-
schwamm
Betriebsanleitung
feranten in Verbindung.
Achtung:
Electronic station RDS 80
Soldering iron RT 80 with soldering tip
Holder RH 80 with viscose sponge
Operating Instructions
Attention:
Page 12

stellen).
Inbetriebnahme Starting operation4.
Page 13

(aktiv), 400°C
wegen des keramischen Heizelements nicht
frei sein.
jedoch muss die Lötstelle ausreichend und
Inbetriebnahme Starting operation4.
(active), 400°C
free of grease.
Page 14

Anhang oder bei Ihrem Händler.
Inbetriebnahme Starting operation4.
will keep oxidized solder or scorched fl ux resi-
worn or damaged. See the Appendix for orde-
Page 15
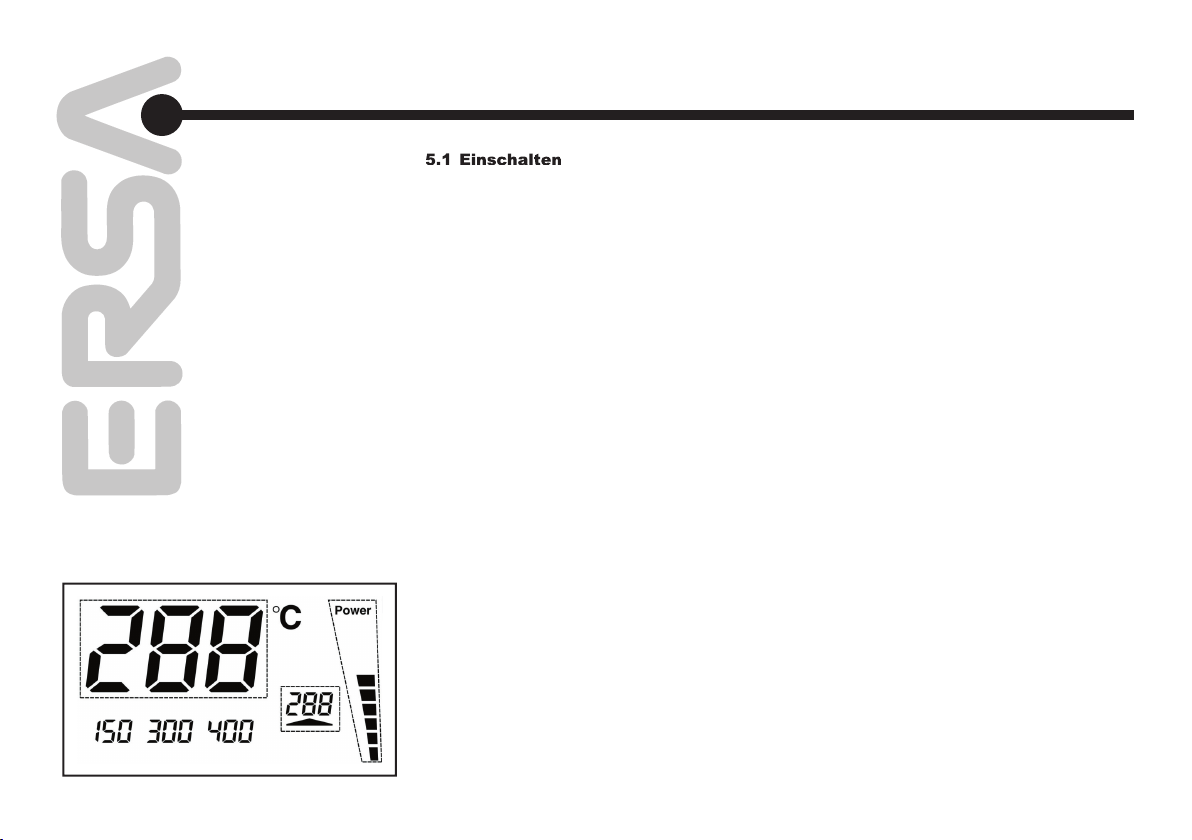
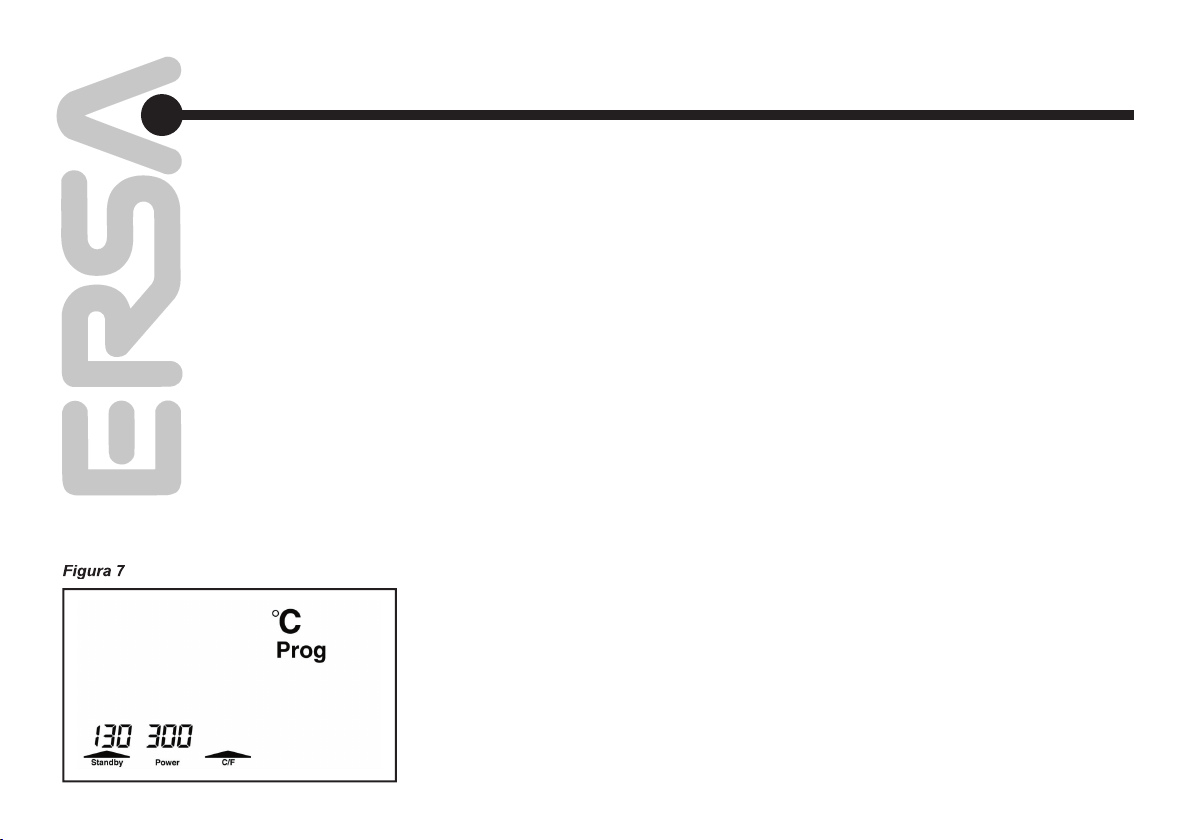
Abb. 2. Nach Erreichen der Soll-Temperatur wird
„+“ / „-“ -Taste
wird jetzt bei jeder Betätigung in 1°C -Schritten
wieder auf die Anzeige der Ist-Temperatur um.
Abb. 2 / fi g. 2
fed to the soldering iron; see Figure 2. After the
+/- buttons
As soon as one of these buttons is pressed,
when the desired value is attained.
After about 3 seconds, the main display switches
Page 16
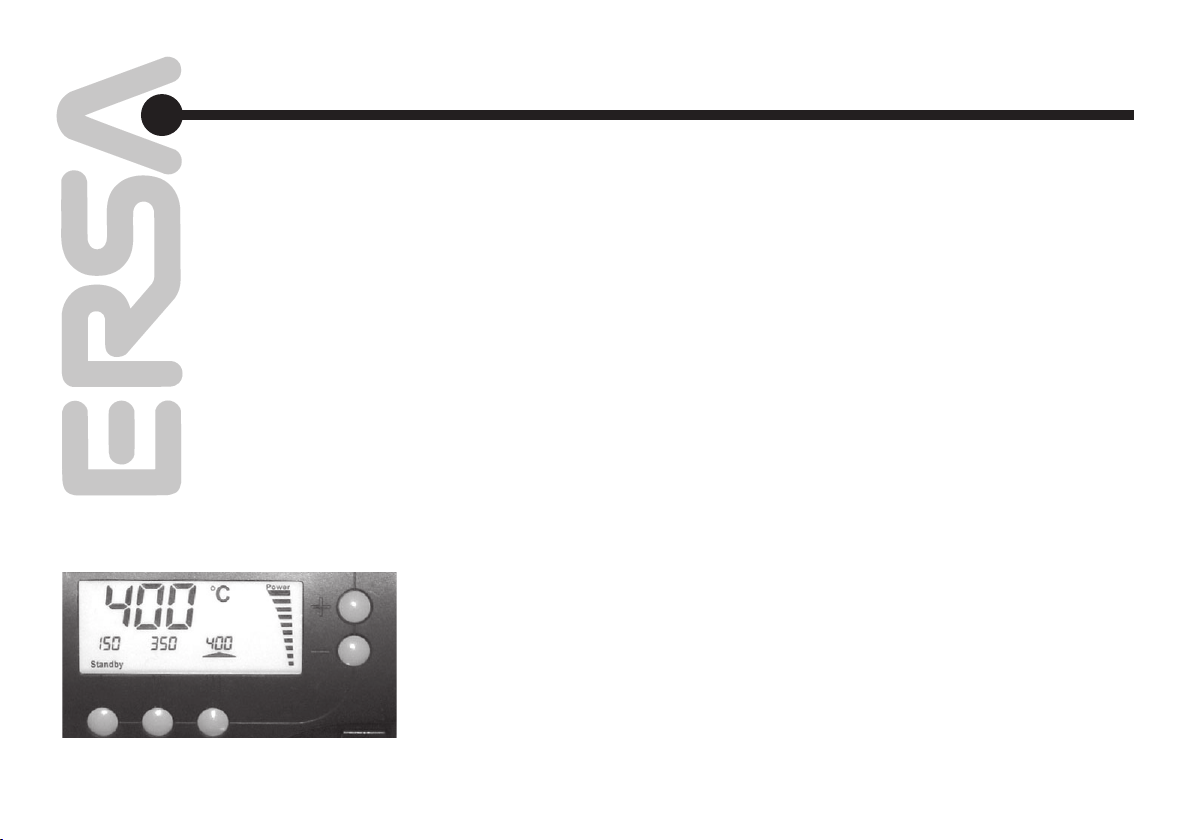
Abb. 3 / fi g. 3
Auslieferungszustand sind folgende Temperatu-
für ca. 3 Sekunden in der Hauptanzeige, bevor
Abbildung 3.
Temperaturen
T1 T2 T3
5. Funktionsbeschreibung Functional description
An arrow above the button signals the activation
temperatures
You can easily change the currently programmed
You can then change the temperature using the
Page 17
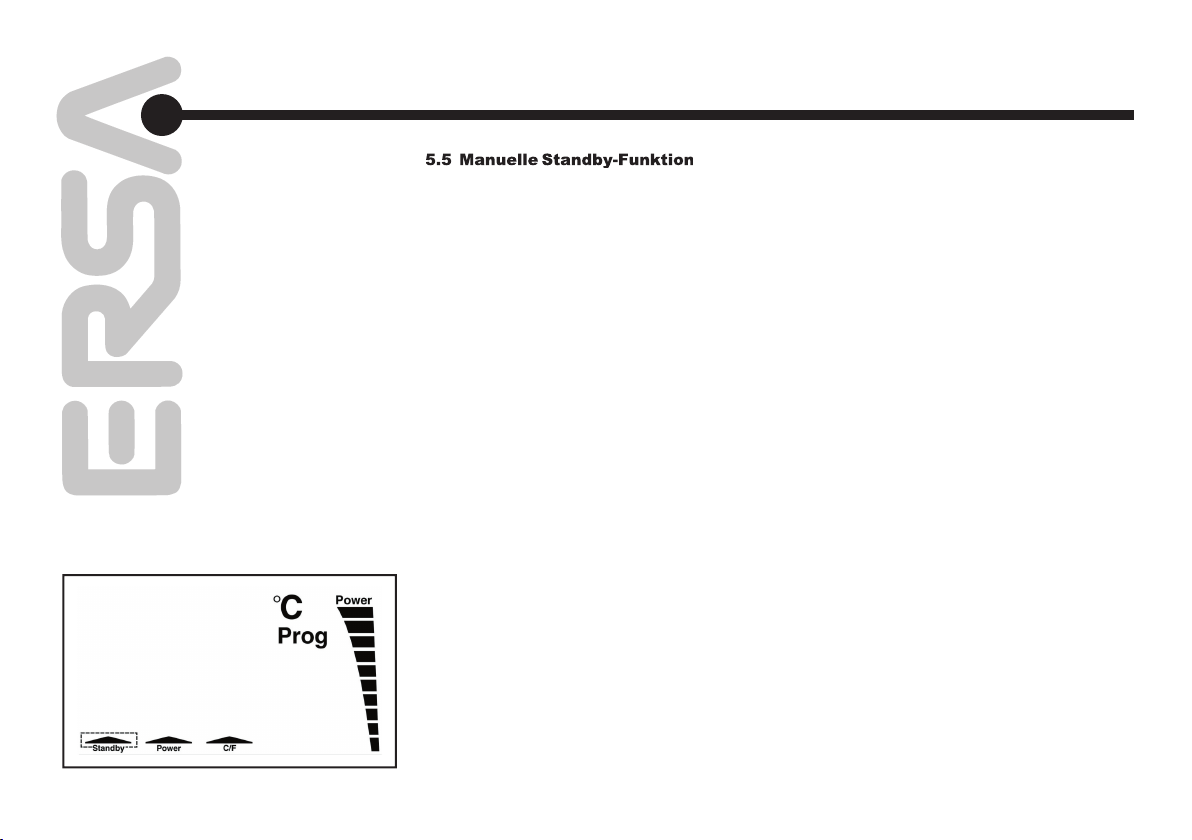
wird im Display durch das Segment „Standby“
wieder aktiviert.
werden, ist die RDS 80 zunächst in den Pro-
Abb. 4, signalisiert wird.
wieder aus und das Pfeilsegment verschwindet.
Abb. 4 / fi g. 4
5. Funktionsbeschreibung Functional description
Page 18

werden, ist die RDS 80 zunächst durch gleich-
wird.
Abb. 5 / fi g. 5
5. Funktionsbeschreibung Functional description
Page 19
wird. Die RDS 80 signalisiert dies durch die Ein-
Abb. 6 / fi g. 6
5. Funktionsbeschreibung Functional description
You can also program the RDS 80 so that the
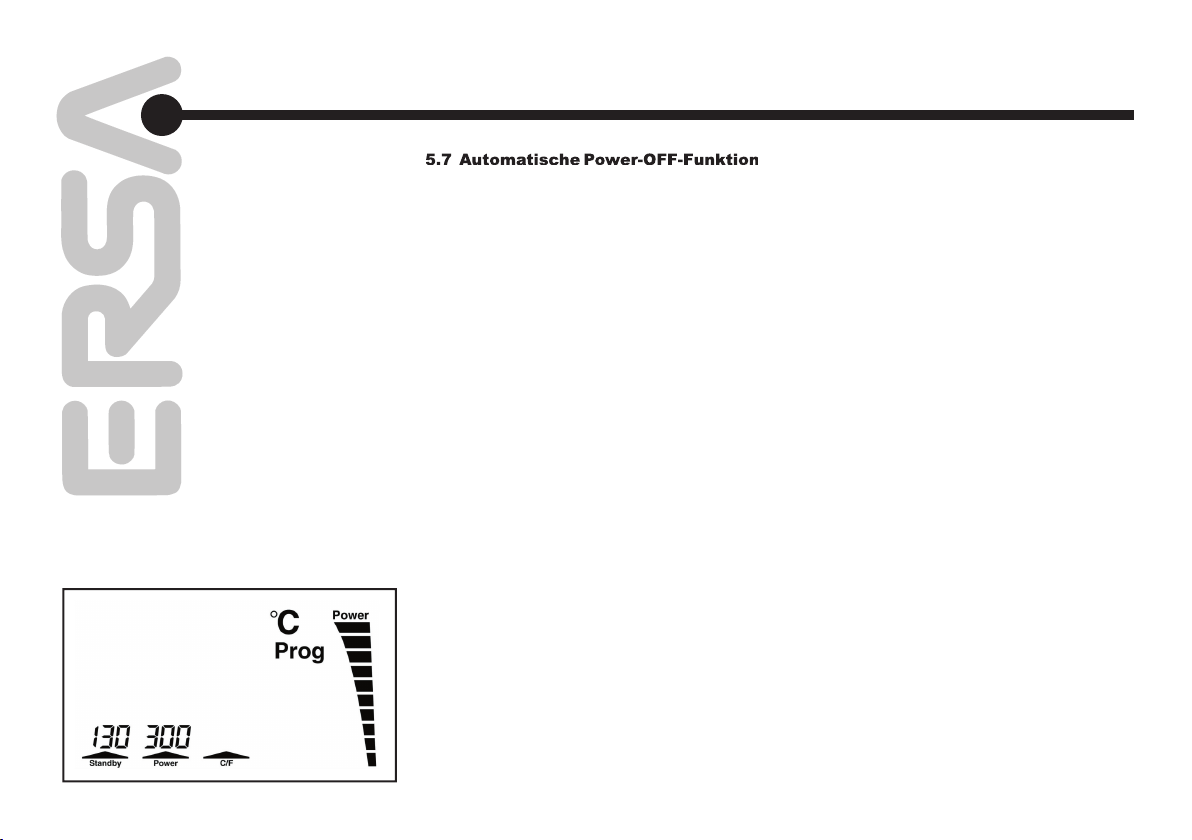
Page 20
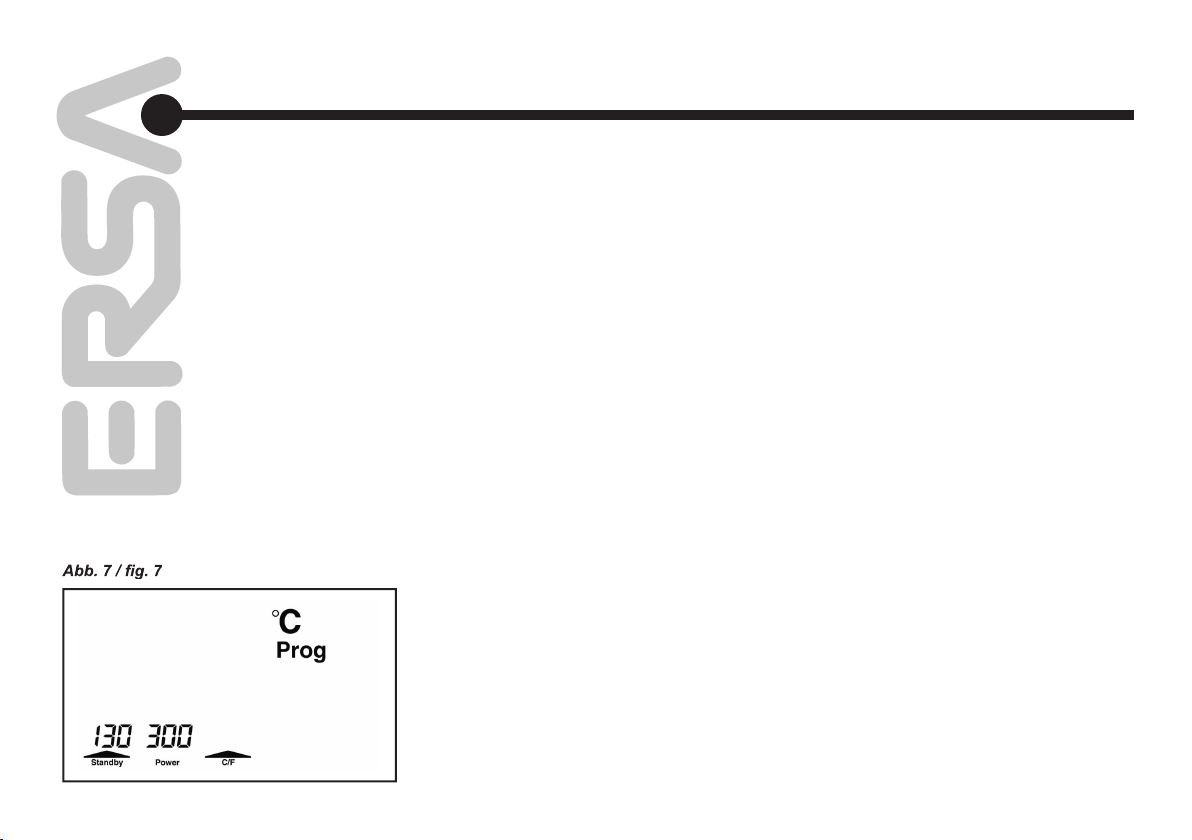
Abb. 7 / fi g. 7
Abbildung 8. Ein erneutes Drücken der Taste „T
5. Funktionsbeschreibung Functional description
You can switch off the Power bar graph by pres-
Page 21
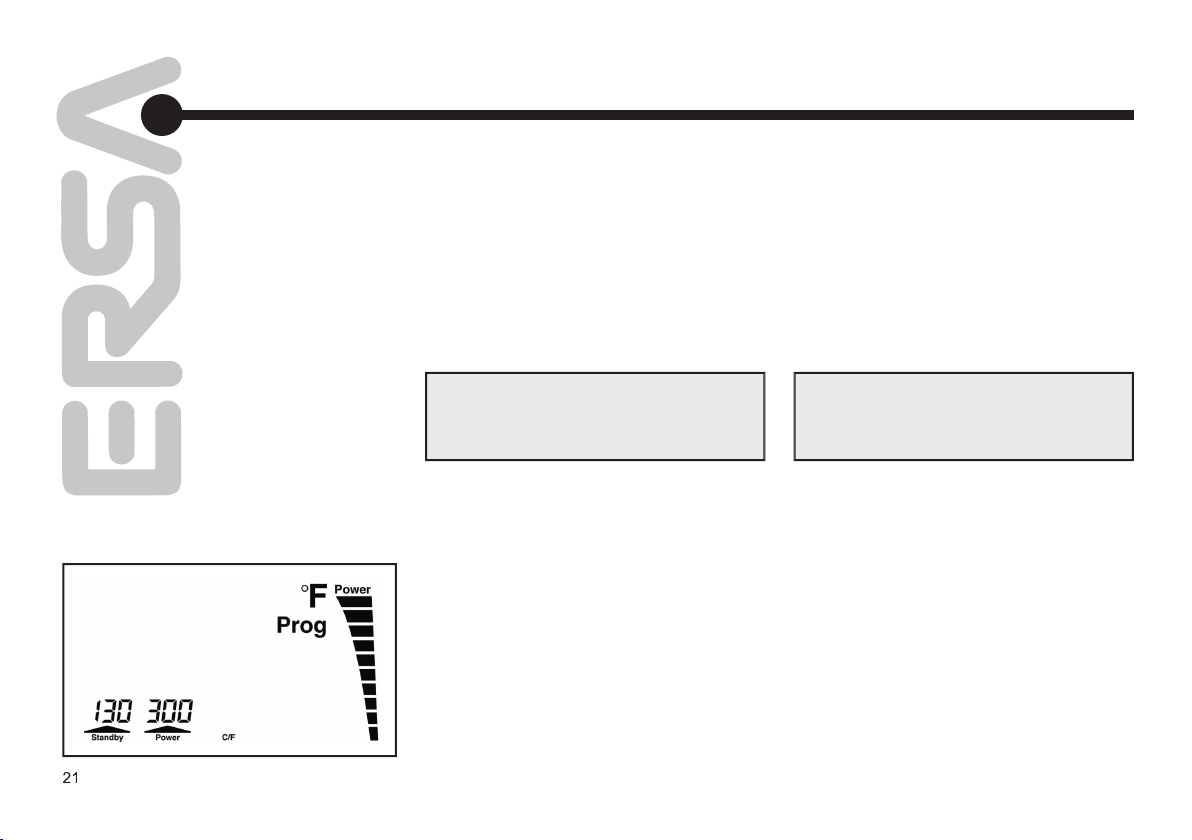
Abb. 8 / fi g. 8
5. Funktionsbeschreibung Functional description
Vor Starten des Kalibriervorganges muss sicher-
Ist die Lötspitze noch warm, warten
Achtung:
when switching on the unit (see fi g. 3; p. 16).
warm, then it must cool down to room tempera-
Attention:
Page 22

Anzeige des Temperaturmessgerätes und der
ferenz, kann diese jetzt mit Hilfe der Tasten „+“
weise betätigt werden. Zeigt es z.B. 340ºC an
werden im nichtfl üchtigen Speicher der RDS 80
5. Funktionsbeschreibung Functional description
Page 23
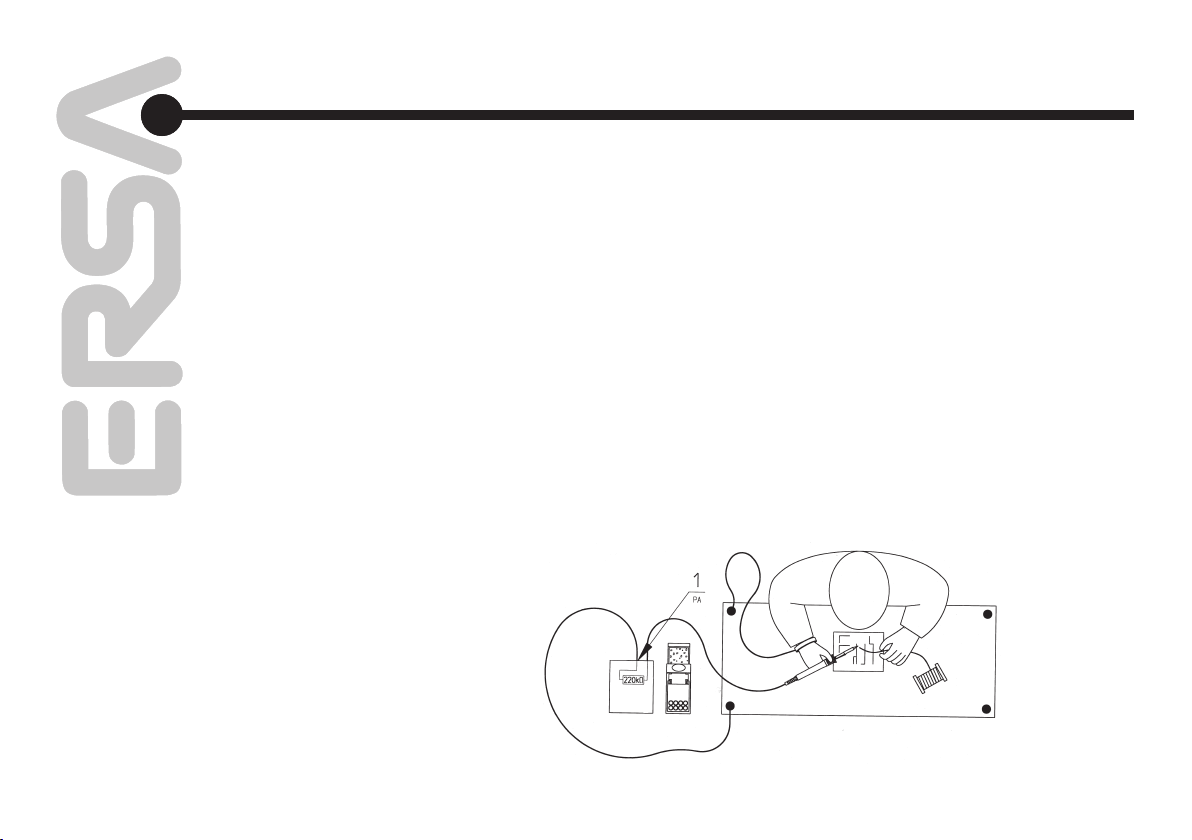
Bauelementen / Potentialausgleich
werden (beachten Sie bitte die Warnhinweise
Arbeitsunterlage verbunden werden.
5. Funktionsbeschreibung Functional description
Abb. 9 / fi g. 9
potential equalization
An ESD- protected workstation (ESD = electro-
Page 24
werden.
Achtung:
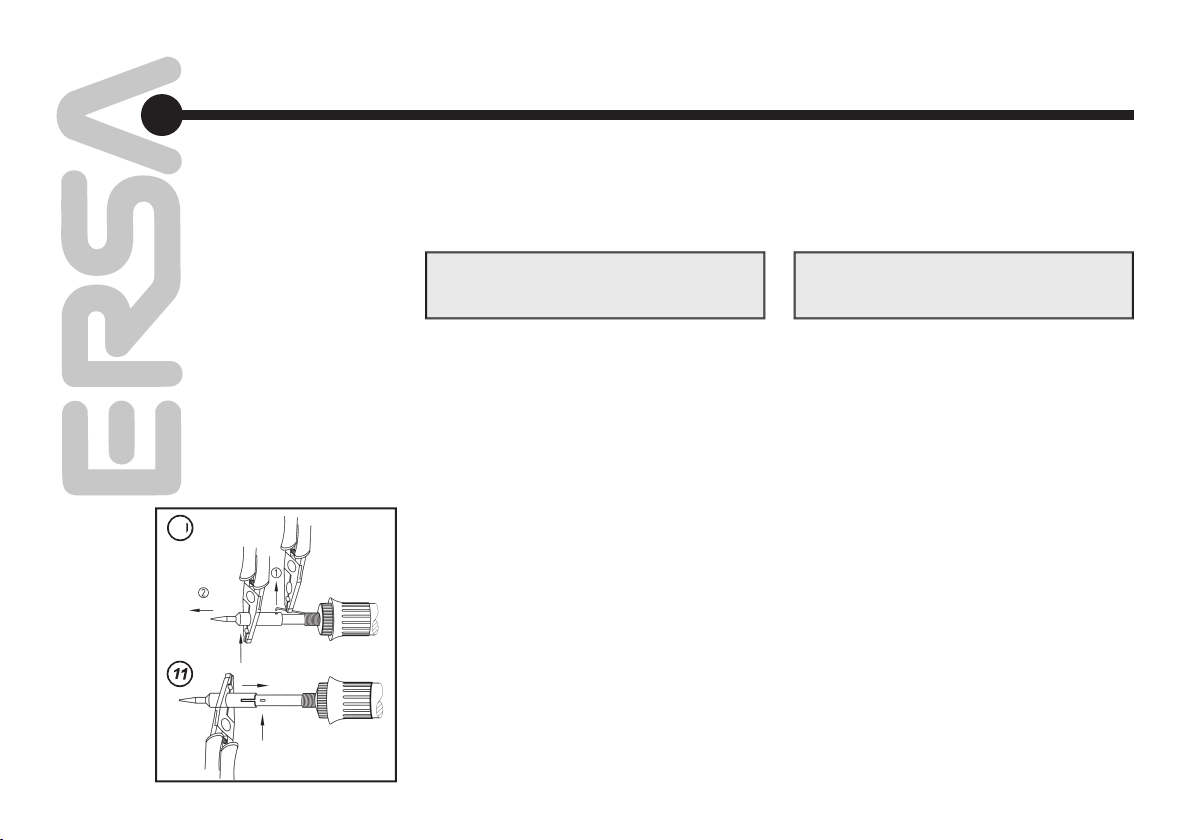
5. Funktionsbeschreibung Functional description
Abb. 10; 11
RT 80
You can also replace the soldering tip when hot
Attention:
Page 25
folgenden Punkte:
Die RDS 80 ist mit einer trägen 0,63 A-Fein-
werden.
Wird nach der Überprüfung oben genannter
fuse can also indicate a deeper-lying cause
fore generally does not suffi ce.
The RDS 80 is equipped with a delayed
If the soldering tip still does not become hot
Abb. 12 / fi g. 12
Page 26
A volume resistance of 2 to 3 ohms (with cold
Fehlerdiagnose und
Fehlerbehebung
6.
Fault diagnosis and
troubleshooting
Page 27
Wartung und
Verwenden Sie ausschließlich Original ERSA
Verbrauchs- und Ersatzteile, um sichere Funk-
fähigkeit zu erhalten, sollte die Lötspitze
with a small brass brush.
Page 28

Ablageständer RH 80
Zubehör:
Viskoseschwamm
with Euro-power plug
Accessories:
Viscose sponge
Page 29
8. Ersatzteile und
Bestelldaten
Spare parts and
ordering information
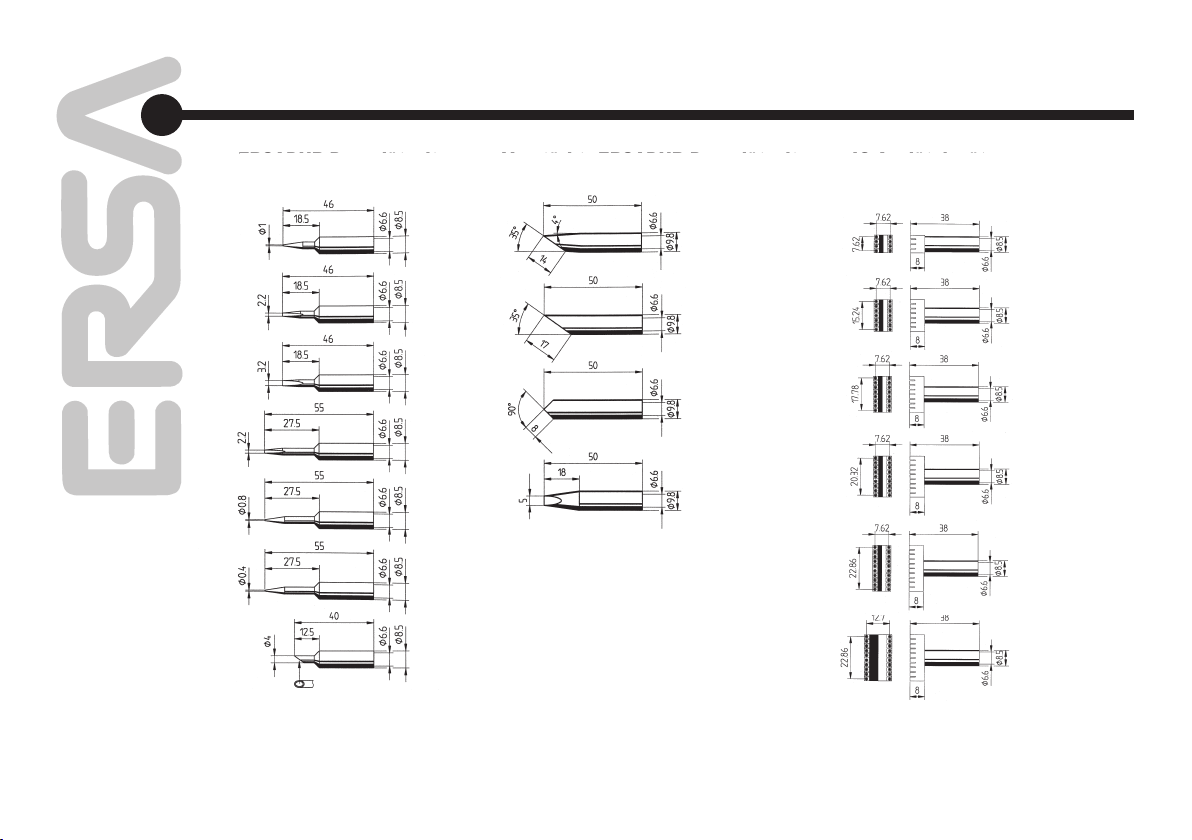
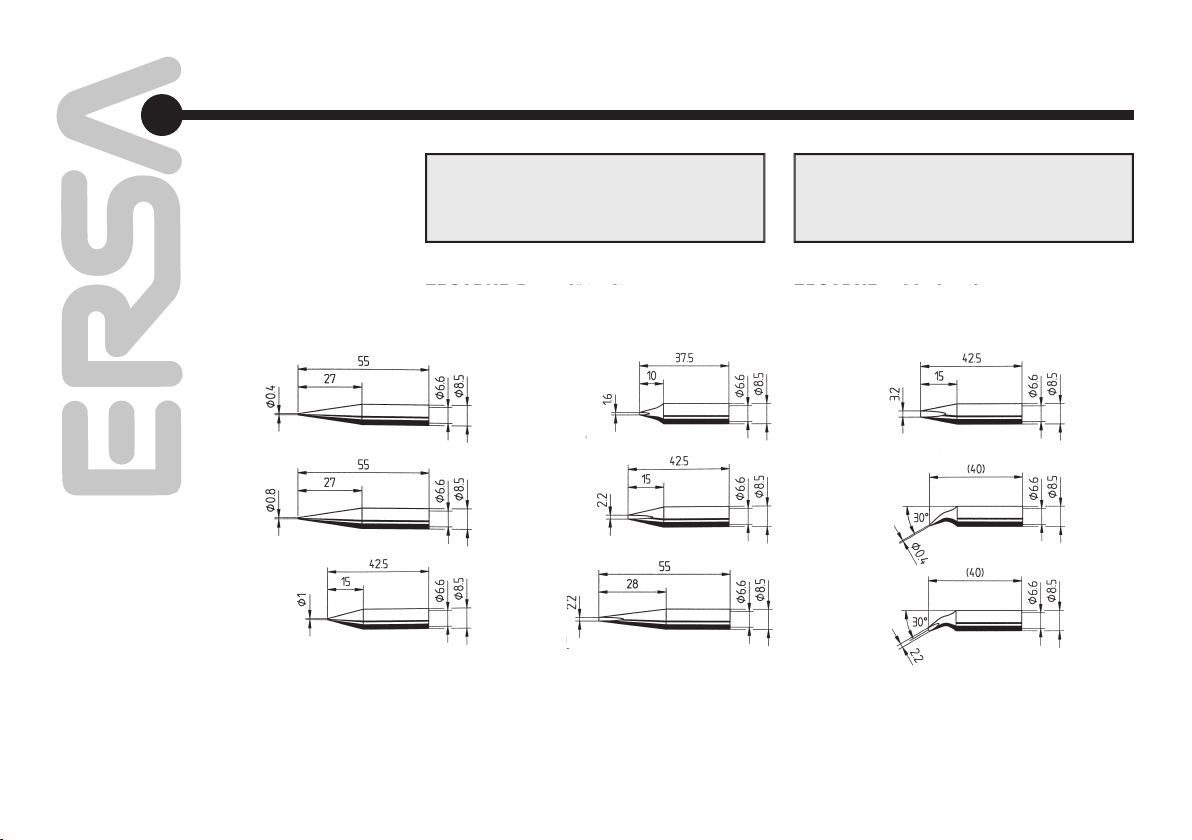
*Achtung! Vor dem Aufheizen Schlauch-Schutztülle entfernen! Weitere Lötspitzen auf Anfrage!
*Consideration! Before you start to solder please remove the hose protection nozzle. More soldering tips upon request!
Page 30
8. Ersatzteile und
Bestelldaten
Spare parts and
ordering information
Verwenden Sie ausschließlich Original ERSA
Verbrauchs- und Ersatzteile, um sichere Funk-
– recommended
for increased heat requirements
*Achtung! Vor dem Aufheizen Schlauch-Schutztülle entfernen! Weitere Lötspitzen auf Anfrage!
*Consideration! Before you start to solder please remove the hose protection nozzle. More soldering tips upon request!
Page 31

Warranty
Vollständigkeit und Qualität der Angaben in dieser Anlei-
Wissen ermittelt. Diese Angaben sind unverbindlich und ent-
für Anwendungen und Verfahrensweisen ohne vorherige
Änderungen im Sinne einer Produktverbesserung behalten
wir uns vor. Im Rahmen der gesetzlichen Möglichkeiten ist
Alle Rechte vorbehalten. Das vorliegende Handbuch darf,
fertigungsbedingte Mängel müssen unter Mitteilung der
welche bestätigt werden muss, angezeigt werden und der
Warenrücksendung beiliegen.
All rights reserved. This manual may not be reproduced,
wearing parts not covered by the warranty. Defi ciencies
Page 32

solution d‘erreurs
données de commande
dei guasti
dati per le ordinazioni
Page 33

8. Fiche de suppression de
potentiels électriques
9. Commutateur principal
(sur face inférieure de l‘appareil)
température
fer à souder
9. Interruttore generale
di saldatura
(sul lato inferiore
dell‘apparecchio)
per saldatoio
potenziale
Page 34

caractéristiques suivantes:
pour Fer à souder RT 80 de 80 W
électriques par résistance de 220 K
Veuillez lire complètement ce mode d‘emploi
seguenti caratteristiche tecniche:
Page 35

Introduction Introduzione
et rapide
jusqu‘à 3 températures (en alternative 2 tempéra-
multifonctions
Arrêt automatique
forme une caractéristique particulièrement utile
1.
temperatura
liquidi
Power-Off automatico
Page 36

Introduction Introduzione1.
Après l‘écoulement des temps programmés, le
Page 37

230 V / 50Hz
302° F - 842° F
302° F - 842° F
(L x H x P)
(à 280 °C / 536° F)
Page 38

Avvertenze di sicurezza
Il est possible de travailler en toute sécurité
avec ces fers à souder en lisant les instructions de sécurité dans leur intégralité et en
les respectant.
Application
férentes de celles pour lesquelles ils ont été
Inspection de chaque élément
avant utilisation
Avant de mettre en chauffe un fer à souder,
prima dell’uso
Assicuratevi che nessuno, in particolar modo i
Page 39

Consignes de sécurité3.
Avvertenze di sicurezza
Avant de mettre à chauffer un fer à souder,
chaud sans surveillance
rangé
toxique
fornito a tale scopo. Scollegate gli attrezzi scal-
scaldante caldo incustodito
postazione di lavoro
piombo sono tossiche
modo responsabile
Agite in conformità con le normative per
Page 40

3. Consignes de sécurité
Avvertenze di sicurezza
raccordement
internationales.
Assicuratevi che i cavi di connessione non siano
ambientali.
di saldatura.
Agite in conformità con le normative nazionali e interna-
Page 41
Veuillez contrôler la présence de tous les com-
Poste électronique RDS 80
Fer à souder RT80 avec pointe à souder
Support RH 80 avec éponge visqueuse
Mode d‘emploi
Veuillez contacter votre fournisseur si vous con-
Attention:
Verifi care che la confezione contenga tutti i com-
stazione elettronica RDS 80
RT 80 con punta di saldatura
RH 80 con spugna in viscosa
istruzioni per l‘uso
Attenzione:
Page 42

Mise en service Messa in funzione4.
Page 43

(aktif), 400°C
Mise en service Messa in funzione4.
(attivo), 400°C
Page 44

fournisseur.
Mise en service Messa in funzione4.
Page 45

fage, jusqu‘à ce que la dernière température de
Après avoir atteint la température de consigne,
touche „ + „/“ - „
Après env. 3 sec., l‘écran principal passera de
mezzo del tasto „+“ / „-“
Page 46

programmées
T1 T2 T3
5.
Description des fonctions
programmate
facile. Basta premere e tenere premuto il tasto
Descrizione del
funzionamento
Page 47

A la livraison, la fonction d‘attente manuelle n‘est
5.
Description des fonctions
Descrizione del
funzionamento
Page 48

A la livraison, la fonction d‘attente temporisée
jusqu‘à un maximum de 9h55, voir Figure 5.
fonction est réactivée en l‘éteignant suivi de la
5.
Description des fonctions
Descrizione del
funzionamento
Page 49

Vous pouvez également programmer le RDS 80
A la livraison, la fonction d‘arrêt automatique
5.
Description des fonctions
Descrizione del
funzionamento
Azionando un tasto qualsiasi, la modalità di
Page 50

de puissance
Vous pouvez désactiver le graphique de barre
Vous pouvez désactiver le graphique de barre
5.
Description des fonctions
„Power“
Descrizione del
funzionamento
Page 51

Attention:
5.
Description des fonctions
Attenzione:
Descrizione del
funzionamento
Avant d’entamer le procédé de calibrage, vous
Si la pointe
jusqu’à son refroidissement.
Se la punta di saldatura
Page 52

jusqu’à ce que la température mesurée à la
5.
Description des fonctions
Descrizione del
funzionamento
Page 53

5.
Description des fonctions
Descrizione del
funzionamento
delpotenziale
sensibles / Suppression
de potentiels électriques
Afi n de protéger ces composants, votre lieu de
Page 54

sur le RT 80
Attention:
5.
Description des fonctions
saldatura sul saldatoio RT 80
Attenzione:
Descrizione del
funzionamento
Page 55

Veuillez contrôler les points suivants, si le poste
Le RDS 80 est équipé avec un fusible lent
Vous pouvez ensuite remplacer le fusible par
Si la pointe à souder ne chauffe pas après
(Figure 12)
La stazione RDS 80 è dotata di un fusibile
Se dopo il controllo dei punti summenzionati
Page 56

funzionalità dell‘apparecchio, procedere come
Diagnose et
solution d‘erreurs
6.
Fault diagnosis and
troubleshooting
Page 57

jours recouverte d‘étain.
Page 58

Accessories:
Appareil de mesure de température
Accessori:
Page 59

8. Pièces de rechange et
données de commande
Parti di ricambio e dati
per le ordinazioni
Punte di saldatura ERSADUR Punte di saldatura rinforzate ERSADUR Inserti dissaldanti IC
Attention!
Avant de se servir de la panne enlever le capuchon de protection!
Altri modelli di punte a richiesta!
Page 60

8. Pièces de rechange et
données de commande
Parti di ricambio e dati
per le ordinazioni
fabbisogno termico
Attention!
Avant de se servir de la panne enlever le capuchon de protection!
Altri modelli di punte a richiesta!
Page 61

fi rmation expresse écrite préalable. Nous réservons le droit
ferma scritta. Ci riserviamo il diritto di apportare modifi che
Page 62

pedido
pedido
Page 63

9. Interruptor
(debajo del aparato)
(debajo del aparato)
(debajo del aparato)
9.
soldar RH 80
solda
segurança (no lado
inferior do equipamento)
soldar
Page 64

fabricación, reparación y también en entornos
electrónica
24 V~/80 vatios
stencia de 220 K
Advertencia:
tes características de equipamento
soldar RT 80 de 80 W
através de resistor de 220 K
Page 65

Introducción Introdução
Además de la regulación mediante los botones
multifuncional
apagado automático
función integrada de standby/apagado automá-
1.
Além do ajuste de temperatura via teclas „+“/“-“,
líquido (LC)
desligamento automático
Page 66

Introducción Introdução1.
Após a decorrência do tempo programado, a
jada o, en su caso, se apaga. Esto protege las
Al pulsar cualquier botón, la estación recupera la
Page 67

elemento térmico
302° F - 842° F
302° F - 842° F
(L x A x P)
Page 68

fabricante. Se os reparos forem realizados de forma
Antes de aquecer o equipamento, verifi car se os
autorizadas
Assegurar que pessoas não autorizadas, principal-
Sólo es posible trabajar sin riesgo con esas
herramientas de efecto térmico, si se lee usted
al completo el presente manual de uso y sigue
usted estrictamente las instrucciones que se dan
en el mismo.
1. Utilización
En caso de utilización indebida y de manipulaciones
en el aparato, se extingue cualquier obligación de
garantía y de aceptación de responsabilidad civil por
parte del fabricante.
2. Antes de cada uso, compruebe usted
todos los componentes
Deje reparar las piezas dañadas tan sólo por un
técnico en la materia o por el fabricante. En caso
de que las reparaciones no se lleven a cabo adecuadamente, el operario queda expuesto a accidentes.
Para las eventuales reparaciones, utilice siempre
piezas de recambio originales de ERSA.
3. Las herramientas de efecto térmico
siempre se calientan
Antes de pasar a calentar el aparato, compruebe
usted que el suplemento de inserción (la punta de
soldar, el elemento para moldear, etc.) está fi jado
correctamente a la herramienta de efecto térmico.
El elemento caliente de inserción no debe entrar en
contacto con la piel o con el cabello ni con materiales sensibles al calor o infl amables. Para la tarea
en cuestión, procúrese usted siempre una base de
soporte lo sufi cientemente resistente al calor.
4. ¡Evitar el acceso de personal ajeno!
Asegúrese de que personas ajenas, en especial los
niños, no puedan tener acceso a las herramientas
de efecto térmico.
Page 69

Observaciones de
seguridad
Recomendações de
segurança
3.
Antes de ligar a estação de solda afastar objetos,
sem a presença de um operador
tóxicas
função dos motivos mencionados.
5. ¡Peligro de incendio!
Antes de proceder a calentar la herramienta de efecto
térmico, aleje del entorno de trabajo de la misma los
objetos, líquidos y gases infl amables que puedan
haber. Al hacer cualquier interrupción en la tarea,
coloque usted siempre la herramienta de efecto térmico en la repisa de soporte prevista al efecto.
6. No deje nunca de vigilar su herramienta
de efecto térmico, mientras la misma
esté caliente
En ese sentido, rogamos que recuerde siempre
que, incluso tras la desconexión del aparato, el correspondiente suplemento de inserción necesitará
de determinado tiempo para enfriarse hasta una
temperatura que sea inocua.
7. Mantenga usted ordenado su ámbito
de trabajo
El desorden en el ámbito de trabajo eleva el riesgo
de accidentes.
8. La soldadura de plomo es venenosa
Los residuos de soldadura con contenido de plomo
que van a parar al organismo tienen un efecto tóxico.
Por tal motivo, queda estrictamente prohibido comer,
beber y fumar. Por idénticas razones, tras cada tarea
de soldadura con contenido en plomo, debería
lavarse usted a fondo las manos.
9. Los residuos de soldadura son basura
de carácter especial
Al eliminar los subproductos de su tarea de soldadura,
observe usted siempre las disposiciones municipales
en cuanto a eliminación de desperdicios.
Page 70

Observaciones de
seguridad
Recomendações de
segurança
3.
do ambiente
internacionais
10. Ventilación y extracción de vapores
El material de trabajo y los materiales auxiliares
pueden poner en peligro su salud. Procúrese usted
una ventilación suficiente o bien un sistema de
evacuación de vapores. Observe usted también
las oportunas instrucciones que se dan en las hojas
sobre seguridad.
11. ¡Proteja usted los cables!
No tire nunca del cable de conexión para desenchufar de la red ni para desplazar de lugar el aparato.
Vigile usted que el cable no entre en contacto con el
calor, con aceite o con aristas cortantes. Los cables
dañados pueden provocar incendios, cortocircuitos
y descargas eléctricas.
12. Preste atención a posibles
infl uencias del entorno
Proteja su aparato contra la acción de cualquier
líquido o de la humedad. De lo contrario, existe el
peligro de incendio o de descarga eléctrica.
13. Cuide usted de su herramienta de
fecto térmico.
Guarde usted siempre su producto ERSA en lugar
seguro, seco e inaccesible para los niños. Observe
usted las eventuales normas que puedan haber
en cuanto a mant enimiento. Revise usted su
instrumento a intervalos regulares. Utilice usted
exclusivamente accesorios y piezas de recambio
originales de ERSA.
14. Prescripciones nacionales e
internacionales
Hay que cumplir con las normas nacionales e internacionales de seguridad, de higiene pública y de
protección a los trabajadores.
Page 71

Verifi que que el contenido del paquete esté con-
forme.
Estación electrónica RDS 80
Cautín RT 80 con punta
Portacautín RH 80 con esponja
de viscosa
Instrucciones de funcionamiento
Atención:
funcionamento
Estação eletrônica RDS 80
Ferro de soldar RT 80
Suporte de ferro de soldar RH 80 com
esponja de viscose
Instruções de operação
fornecedor.
Atenção:
A ponta de solda aquece até 450°C (842°F).
Afastar objetos, líquidos e gases infl amáveis
Page 72

funcionamiento.
Puesta en
funcionamiento
Colocação em
funcionamento
4.
jaque de conexão no lado frontal da estação
Page 73

(activa), 400°C
Puesta en
funcionamiento
Colocação em
funcionamento
4.
(ativo), 400°C
forme, para assegurar uma união de solda
Page 74

Puesta en
funcionamiento
Starting operation4.
fundentes queimados no ponto de solda.
formemente en contacto la punta de cautín
Page 75

los botones „+“/“-“
Apenas se pulse una de estos botones, la pan-
teclas „+“ / „-“
A temperatura nominal pode ser também aju-
ximadamente 3 segundos, o indicador principal
Page 76

programadas
T1 T2 T3
5.
Descrição do
funcionamento
As temperaturas de solda programadas propor-
As temperaturas programadas são atribuídas
programadas
Descripción del
funcionamiento
Page 77

5.
A função standby não é ativada na confi guração
A função standby manual é ligada pressio-
Aparece o segmento de seta sobre a tecla (ver
Descripción del
funcionamiento
Descrição do
funcionamento
Page 78

función se activará después de apagar y volver
5.
A função standby controlada por tempo não é
A função standby controlada por tempo é ativada
função está ativada.
Descripción del
funcionamiento
Descrição do
funcionamento
Page 79

5.
A RDS 80 sinaliza essa condição por meio da
A função de desligamento automático é ativada,
Descripción del
funcionamiento
Descrição do
funcionamento
Page 80
„Power“
5.
energia (Power)
Descripción del
funcionamiento
Descrição do
funcionamento
Page 81

Antes de iniciar la calibración se deberá asegu-
Atención:
5.
A RDS 80 é aferida com muita precisão já na
Antes de iniciar o procedimento de calibragem
A ponta de solda precisa ter atin-
Caso a ponta
Atenção:
Descripción del
funcionamiento
Descrição do
funcionamento
Page 82

5.
Descripción del
funcionamiento
Descrição do
funcionamento
Page 83

conexión equipontencial
fabricante o vendedor).
A fi n de proteger estas piezas es recomendable
5.
sensíveis / equalização de potencial
A estação de solda pode ser integrada sem
Descripción del
funcionamiento
Descrição do
funcionamento
Page 84

RT 80
forma.
A fi n de obtener una buena conductividad eléc-
Atención:
5.
RT 80
A ponta de solda deve ser substituída em caso
forma de ponta de solda.
A substituição das pontas de solda é possível
furo da ponta.
Atenção:
Descripción del
funcionamiento
Descrição do
funcionamento
Page 85

Tenga siempre en cuenta que un fusible fun-
fusible de retardo de 0,63 A, el mismo que
Si después de haber verifi cado los puntos
Observar que um fusível defeituoso também
fusível normalmente não é sufi ciente.
A RDS 80 é equipada com um fusível tér-
facilmente substituível. Para isto, o equipa-
Se mesmo após a verifi cação dos itens acima
Page 86

Verifi cación del contacto en el cuerpo
frio) de resistência de contato. Em caso de
funcional, favor proceder conforme o capítulo 9.
Diagnóstico y
eliminación de fallas
6.
Identifi cação e
eliminação de falhas
Page 87

Advertencia:
Page 88

Accesorios
(opcional)
Aparato de medición
Acessórios
(optional)
Alicate de troca de pontas
Page 89

8. Piezas de recambio y
datos de pedido
Peças de reposição e
dados de pedido
Puntas para soldar ERSADUR Puntas ERSADUR reforzadas
Elem. de inserción para desoldar IC
Po
Antes de empezar a
calentar, ¡quitar la caperuza fl exible de protección!
Atenção
Antes do aquecimento por favor de tirar a luva de proteção da mangueira!
Page 90

8. Piezas de recambio y
datos de pedido
Peças de reposição e
dados de pedido
Advertencia:
Antes de empezar a
calentar, ¡quitar la caperuza fl exible de protección!
Atenção
Antes do aquecimento por favor de tirar a luva de proteção da mangueira!
Page 91

funcionamiento. Sin embargo, no podemos asumir respon-
fi caciones técnicas a fi n de mejorar el producto. En el marco
A ERSA elaborou estas instruções de operação com muito
Page 92

Innehåll
неисправностей
номенклатурные номера
Page 93

9. Nätströmbrytare
(på apparatens undersida)
9.
(со стороны дна)
управления
температуры
Page 94

Vi tackar dig för att du valt att köpa denna
funktion och en stor och lättläst LC-display.
utrustning
RT 80
resistans
Anvisning:
для п р о и з в о д с т в е н н ы х
ЖК-
дисплей
до начала работы со станцией
Page 95

Inledning Введение
temperaturinställning
Power-Off-funktion
1.
жал станция RDS 80 позволяет
ЖК-дисплей
ди спле е отоб ража ются все ва жней шие
автовыключения
дискретностью 5 минут до максимального
Page 96

Inledning Введение1.
Page 97

характеристики
керамического
нагревателя
диапазон: 302°C - 450
5.10)
срабатывания
при 350
длиной
302° F - 842° F
(B x H x D)
Vikt: ca. 2 kg
(à 280 °C / 536° F)
Vikt: ca. 130 g
Vikt: ca. 400 g
Page 98

1. Gällande garanti
Garantin gäller under förutsättning att utrustningen används på föreskrivet sätt och att ingen
modifi ering gjorts.
2. Kontrollera alla delar före
användandet
Skadade delar får endast repareras av fackman.
Felaktigt gjorda reparationer kan innebära fara
för användaren. Använd alltid ERSA originaldelar
vid reparationer.
3. Lödverktyg blir heta
Kontrollera före användandet att lödspetsen är
korrekt fastsatt på lödkolven. Lödspetsen bör
ej komma i kontakt med hud eller värmekänsligt material. Arbeta alltid på ett underlag med
värmebeständig yta.
4. Obehörig användning
Se till att barn och andra personer som inte arbetar med lödverktygen inte rör verktygen.
только после внимательного и полного
Для ремонта
любым термочувствительным и
случайных лиц
без разрешения.
Page 99

Säkerhetsanvisningar3.
Инструкции по
безопасности
жидкости
из рабочей зоны. В паузах между пайкой
инструмент без присмотра
Утилизируйте паяльные припои в
5. Brandfara!
Brännbart material, vätska och gaser får ej fi nnas
nära arbetsplatsen. Sätt alltid tillbaka lödkolven i
lödkolvshållaren efter varje arbetsmoment. Stäng
alltid av lödutrustningen efter användandet.
6. Lämna aldrig ett hett lödverktyg
utan uppsikt
Tänk på att det tar en viss tid innan lödkolven är
avkyld sedan den slagits av.
7. Håll ordning på arbetsplatsen
Dålig ordning på arbetsplatsen ökar risken för
olycksfall.
8. Lödtenn är giftigt
Tvätta alltid händerna efter att ni har varit i
kontakt med lödtenn. Alla typer av livsmedel
skall hållas borta från arbetsplatsen. Blyrester
kan komma in i kroppens organ via livsmedel
och cigaretter.
9. Lödrester är miljöfarligt avfall
Rester och avfall från lödning är miljöfarligt avfall
och skall hanteras enligt lokala föreskrifter.
10. Ventilation och utsug
Rök och gas från fl ussmedel kan vara skadligt
för hälsan. Försäkra dig därför om att det
finns ventilation och utsug enligt gällande
säkerhetsföreskrifter.
Page 100

3. Säkerhetsanvisningar
шнуров
и пря мого
Поврежденный кабель
жидкостей и влаги,
дабы исключить
инструмента
Храните паяльный инструмент в надежном,
международные стандарты
11. Skydda anslutningskablarna
Använd inte kabeln till att dra ur kontakten ur
uttaget eller att bära utrustningen i. Se till att
kabeln inte kommer i kontakt med värme, olja
eller skarpa kanter. Skadade kablar kan medföra
brandfara, kortslutning och att utrustningen blir
strömförande.
12. Skydda utrustningen mot fukt
Skydda din lödutrustning mot alla former av
vätskor och fukt. Dessa kan medföra brandfara
eller att utrustningen blir strömförande.
13. Var rädd om verktygen
Förvara era ERSA-verktyg på ett säkert sätt,
oåtkomligt för barn och på torr plats. Se till att
sköta service enligt föreskrifterna. Använd endast
ERSA originaltillbehör och reservdelar.
14. Nat i onella och internat i onell a
föreskrifter
Kontrollera gällande nationella och internationella
hälso- och säkerhetsföreskrifter.
Инструкции по
безопасности
 Loading...