

Ericsson LG LDP 9000BTU User Manual

Digital Key Telephone
Quick Guide
LDP-9030D
Please read this manual carefully before operating your set.
Retain it for future reference.
Important Safety Information
To prevent the unexpected danger or damage please read this information before installing and
repairing the phone. There are “Warning”, it means as follows;
Warning: To reduce the possibility of electric shock, do not expose your phone to high humidity areas,
such as a bathroom, swimming area, etc.
Warning
1. Only trained and qualified service personnel shall install, replace or service the phone.
2. Do not spill liquid like water on the phone. If so, call for the service center as this may result in
a fire or an electric shock.
3. If you see smoke or smell something during, unplug the phone line. Call for service centre
immediately.
4. Do not tug the power cord or the phone line. This may result in a fire, an electric shock or
equipment damage.
5. Do not use the phone during a thunderstorm. Lightning strike may result in a fire, severe electrical or
acoustic shock.
6. Ensure that children do not pull on phone cords. This may injure children or result in equipment
damage.
7. The ear-piece houses a magnetic device which may attract pins or small metal objects. Keep handset
clear of such objects and check before use.
8. Avoid placing the phone in an area that is dusty, damp or subject to vibration.
9. Choose a site that is dry and well ventilated.
10. Do not put the heavy things on the phone.
11. Do not drop or throw the phone.
12. Static electricity discharge will damage electronic components.
13. Keep out of direct sunlight and away from heat.
14. No user serviceable parts inside. No not insert a screw driver or any metal objects into the phone.
This may cause electric shock or damage the equipment and will render the warranty void.
15. Clean the phone with a soft, dry cloth only. Do not use volatile liquids such as petrol, alcohol or
acetone as this may cause a fire or result in discoloration or damage to plastics. Do not clean with
wax or silicon products as these may enter the equipment and cause operation to become unreliable.
Disposal of your old appliance
1. When this crossed-out wheeled bin symbol is attached to a product it means the product
is covered by the European Directive 2002/96/EC.
2. All electrical and electronic products should be disposed of separately from the municipal
waste stream via designated collection facilities appointed by the government or the local
authorities.
3. The correct disposal of your old appliance will help prevent potential negative
consequences for the environment and human health.
4. For more detailed information about disposal of your old appliance, please contact your
city office, waste disposal service or the shop where you purchased the product.
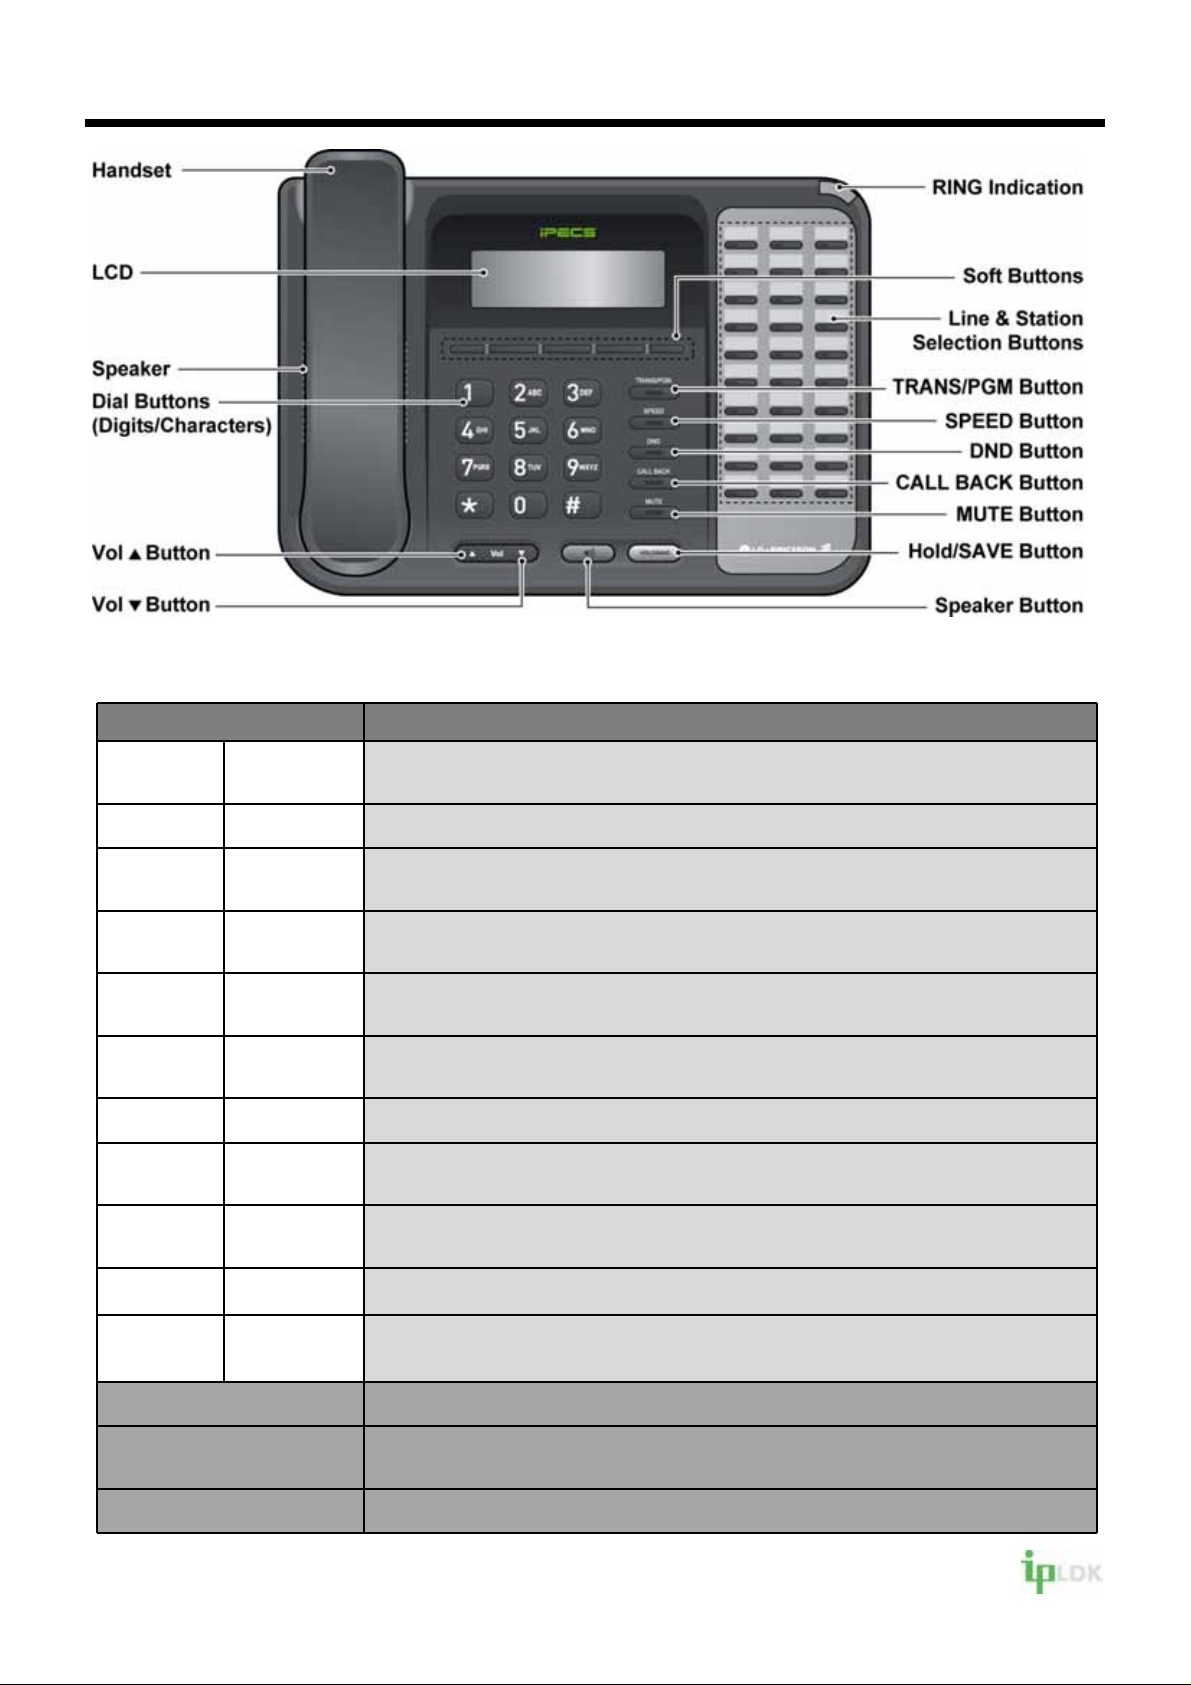
LDP-9030D Digital Telephone Description Quick Guide
Fixed Feature button definition
Button Description
3 Soft
Page
Trans/PGM
Speed
DND
Call Back
Mute
Volume
Speaker
Hold/Save
Used in conjunction with fixed and flexible features, and the function changes in
relation to call progress, as indicated on the LCD display.
Used to change more additional functions on the LCD display .
This button is used to initiate a call transfer (TRS) or to enter programming
mode (PGM).
Used to access speed dialing, speed programming, save number redial, and
last number redial.
The DND (Do Not Disturb) feature blocks all incoming calls.When DND is active,
the red LED in this button is illuminated.
A station can initiate a call back request to a busy station. Once that station
becomes idle, the initiating station is signaled.
Toggle outgoing audio; red LED illuminates.
The volume button adjusts the audio levels for ringing, handset and
speakerphone functions.
Speaker toggles the speakerphone state, and the red LED is illuminated when
the speakerphone is active.
This button is used to put a call on hold or save information when programming.
Flexible
Visual Ringing LED Illuminates when the phone is ringing.
LCD Display Displays information about telephone status, dialing directories,and test
Hands-free Microphone Microphone is used for hands-free speakerphone function.
Some flexible buttons are pre-programmed in the system for line appearances,
loop functions etc. The remaining flexible buttons can be user-programmed.
message information.

LDP Keyset User Operation
Receiving calls _ Answering a Call While Idle :
1. Lift the handset and press the flashing Flex button
(as needed), the call will be connected.
Responding to a Call While Busy
1. Press [Hold/Save] and/or
2. Press the flashing CO line button
.
Answering Calls to Other Stations
To answer a call ringing at another station:
1. Lift the handset,
2. Dial 7 (Directed Call Pick-Up code),
3. Dial the Intercom Number o f the ringing station; the
call will be connected.
To answer a call ringing at a station in your
group:
1. Lift the handset,
2. Dial * * (Group Call Pick-Up code), the call is
connected.
Using Do-Not-Disturb (DND) to Block Incoming
Calls
To toggle DND ON and OFF:
1. Press the [DND] button.
Forwarding calls to another Station or Voice
Mail
To activate Call Forward from your phone to
another phone or internal system resource:
1. Lift the handset,
2. Press the [Fwd] Soft button,
3. Dial the type of forward code 1-4
4. Dial the destinati on number.
Placing Intercom calls
To place an Intercom call:
1. Lift the handset,
2. Dial the Intercom number of the desired station,
3. On answer or Splash tone, speak to the called party.
To enter a Station Speed Dial number with CO
Line and Name:
1. Press [Trans/PGM],
2. Press [Speed],
3. Dial the desired Station Speed Dial bin number,
4. Select/dial the CO line/group,
5. Dial the desired number to be stored,
6. Press [Hold/Save],
7. Enter the associated name if desired, using the
alpha-numeric entry chart,
8. Press [Hold/Save].
To assign a Station Speed Dial number directly
to a Flex button:
1. Press [Trans/PGM],
2. Press the desired [Flexible] button,
3. Dial the desired number including CO Line/Group
access code
4. Press [Hold/Save],
5. Enter the associated name if desired, using the
Character Entry chart,
6. Press [Hold/Save].
ACNR: To retry a busy external number until
answered
To set up an ACNR, while on an outgoing call:
1. Use the Navigation button to display the next menu
and select the [ACNR] Soft button,
2. Hang-up handset.
To cancel the ACNR request:
1. Press the [ACNR] Soft button.
Call Transfer: Sending a call to a different
destination
To Transfer an active call:
1. Press [Trans/PGM],
2. Call receiving party,
3. Hang-up with or without announcement.
Using Camp-On when calling a busy station
To Camp-On (wait off-hook) for a busy station:
1. Press [*] and wait an answer.
Using Last Number Redial (LNR)
To dial the Last Number for an external call:
1. Lift the handset,
2. Select the [Redial] Soft button,
3. Press [▼ volume ▲] to select from the last 10
numbers dialed,
4. Press the [Send] Soft button or [Hold/Save].
Using System Speed Dial Numbers
To place a call using System Speed Dial:
1. Lift the handset,
2. Press the [Speed] button,
3. Dial the desired System Speed Dial bin number
Using and Entering Station Speed Dial
Numbers
To place a call using Station Speed Dial:
1. Lift the handset,
2. Press [Speed],
3. Dial the desired Station Speed Dial bin number
Call Hold: Placing a call in a waiting state
To place a call on Hold:
1. Press [Hold/Save].
Joining Multiple People in a Conference
To establish a Conference:
1. Establish call with one of the desired conference
parties,
2. Select the [Conf] Soft button,
3. Establish call with the other conference party,
4. Select the [Conf] Soft button,
5. Select the [Conf] Soft button again to establish the
conference.
To place a Conference on Hold:
1. Press the [Hold/Save] button.
To retrieve the Conference:
1. Select the [Conf] Soft button.
To make an External-parties-only Conference:
1. Establish conference with two ext ernal p arties,
2. Select the [Conf] Soft button to exit.
To enter pre-opened Conference Room:
1. Dial 5 7 X when X is the conference room number.
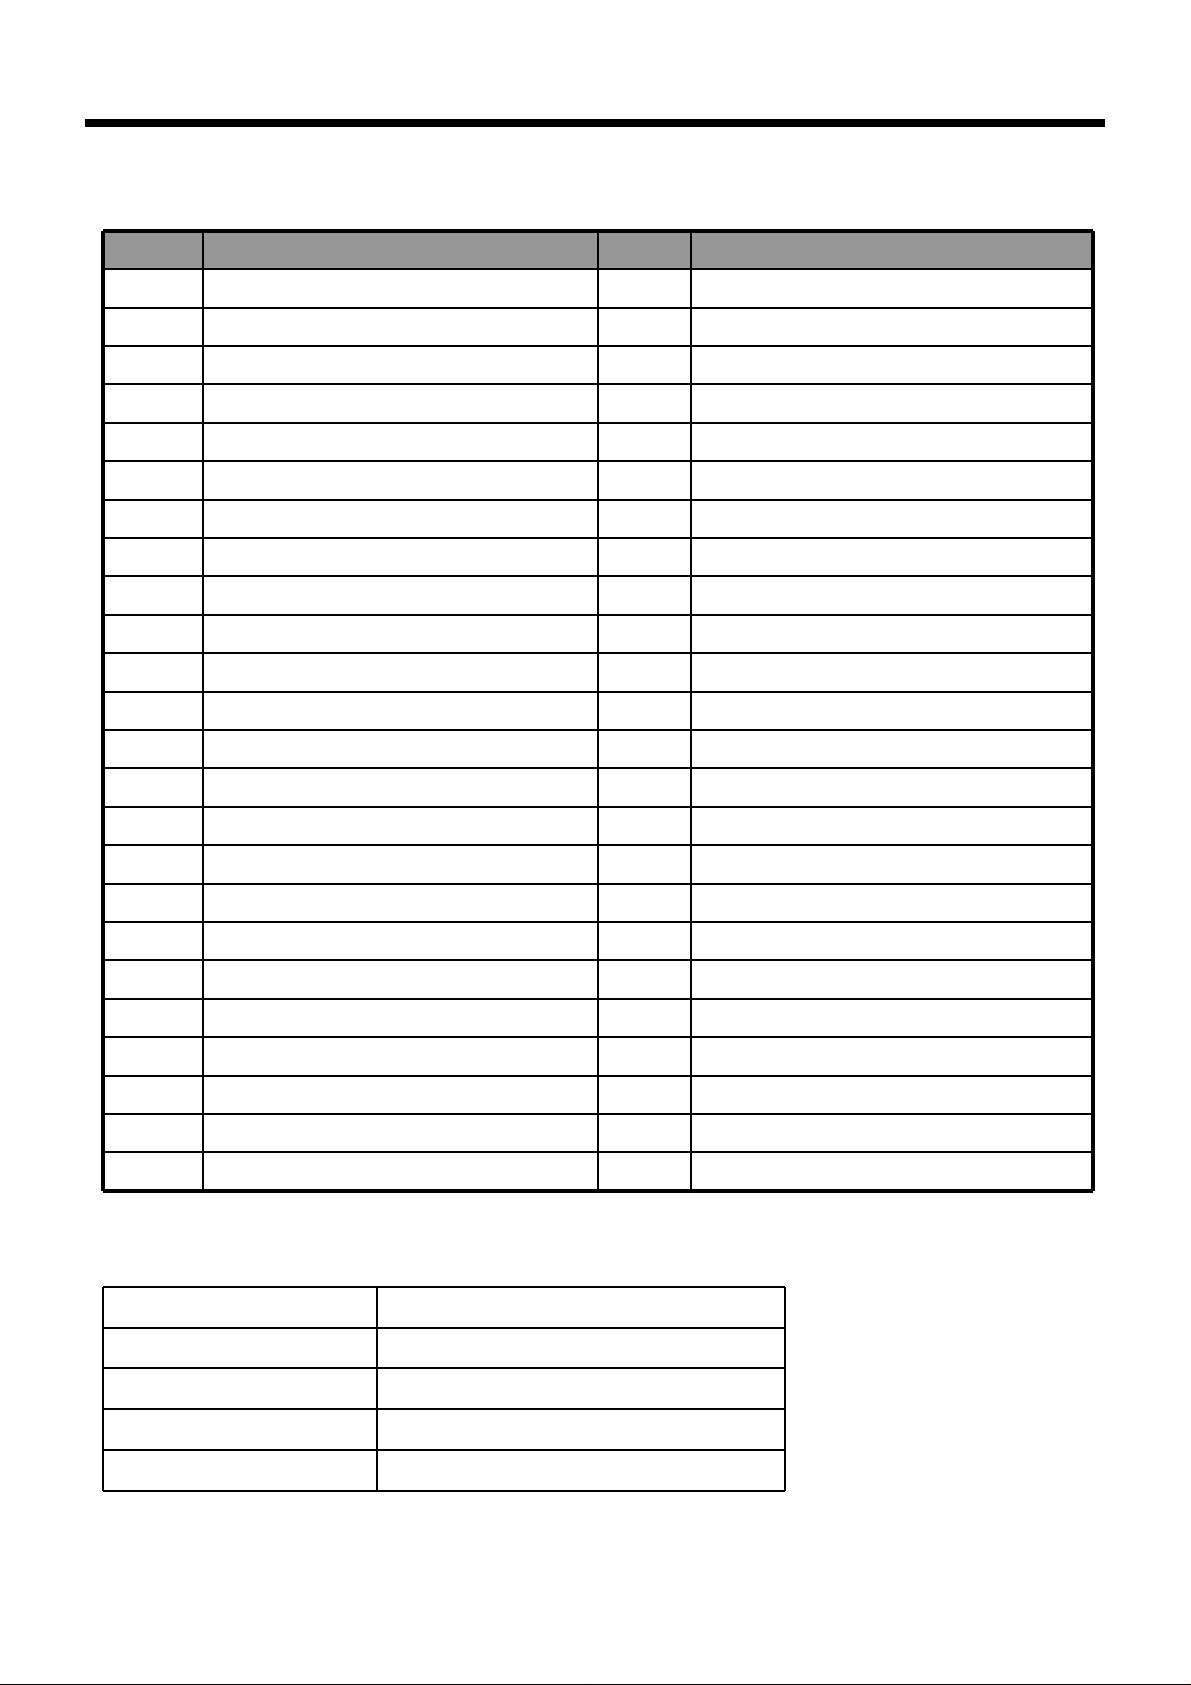
User Program Codes
• ▶ Press the [Trans/PGM] button
• ▶ Enter the desired feature code below table
CODE FUNCTION CODE FUNCTION
11 Answer mode (H/T/P) 56 Create Conference Room
12 Station Name Program 57 Delete Conference Room
13 Set Wake Up 61 Speaker/Headset PGM
14 Reset Wake Up 62 Headset Ring Program
15 Language Program 71 Register Station ICLID
16 LCD Date Mode Change 72 View Station ICLID
17 LCD Time Mode Change 73 Outcall Notification Enable
18 Set Back Light 74 Outcall Notification Attempts
21 ICM Ring Type Program 75 Outcall Notification Interval
22 CO Ring Type Program 76 Outcall Notification Number
23 Set BGM 81 View IP Address
31 Temporary COS Mode 82 View Mac Address
32 Retrieve COS 83 View Keyset Versi on
33 Walking COS 91 MPB Version Display
34 Register Password 92 View IP Address
35 Call Log Protect
36 SMS Message Protect
41 Preselected MSG PGM
42 Set User Message
51 Mobile-Ext. Enable
52 Mobile-Ext. Number PGM
53 Mobile-Ext. CLI PGM
54 Mobile Service By CLI
55 Mobile-Ext. Service CLI
Specification
Input Voltage 22 ~ 28Vdc
I/O port RJ11
Operating Temperature 0℃ ~ 40℃
Size 225.5 mm X 198 mm X 146 mm
Weight 960 g
http://www.lgericsson.com
 Loading...