

Page 1

Mobile Phone
R250s PRO
User’s Guide
Page 2
N
o
t
f
o
r
C
o
m
m
e
r
c
i
a
l
U
s
e
E
r
i
c
s
s
o
n
M
o
b
i
l
e
C
o
m
m
u
n
i
c
a
t
i
o
n
s
A
B
This page helps you to get the phone up and running quickly. If you have not
used a mobile phone before, we recommend that you read the chapter
“Preparing Your Phone for Use” on page 4, for a more detailed installation
procedure.
• Wash the phone gently in cold water under a water tap.
• Do not immerse the phone in water!
QUICK START
Page 3
N
o
t
f
o
r
C
o
m
m
e
r
c
i
a
l
U
s
e
E
r
i
c
s
s
o
n
M
o
b
i
l
e
C
o
m
m
u
n
i
c
a
t
i
o
n
s
A
B
• The R250s PRO is a mobile phone, specially designed to be used when
working outdoors. Thanks to its rugged design the R250s PRO is very
resistant to external influences such as dust, rain and shock.
• The R250s PRO is the first mobile phone which supports GSM Pro. GSM
Pro is an extended feature of the GSM network, which supports group
calls and call monitoring. (GSM Pro requires a GSM Pro subscription.)
• The R250s PRO has an vibrating call alert, which means that the phone
vibrates when you receive an incoming call or message. This is a useful
function when you are working in a noisy environment, where you
cannot hear the phone signal.
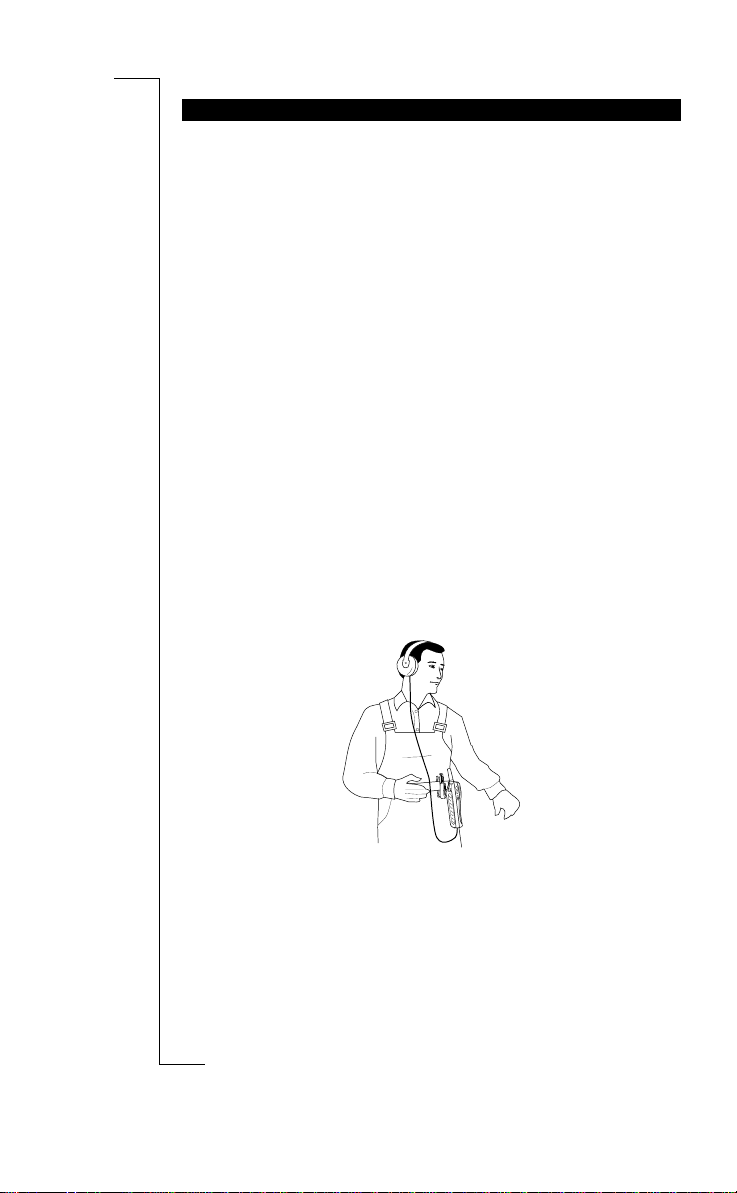
• When you work in a noisy environment, you can use Ericsson handsfree
equipment in combination with ear protection equipment. At an incoming
group call, the call is answered automatically and you will hear the conversation in the earpiece.
• Key pad lock. The key pad lock prevents accidental dialling, which could
happen if you keep your phone attached to your belt. The key pad remains
locked until you receive an incoming call. While the key pad is locked,
you can still use the Push-T o-Talk button on the left side of the phone for
entering the phone book.
• Alert button. The R250s PRO is equipped with an alert button on the top
of the phone, which makes it easy to call a pre-set alert number.
Note! Please read the chapter “Guidelines for Safe and Efficient Use” on
page 112, before using your mobile phone.
R250S PRO FEATURES
Page 4

N
o
t
f
o
r
C
o
m
m
e
r
c
i
a
l
U
s
e
E
r
i
c
s
s
o
n
M
o
b
i
l
e
C
o
m
m
u
n
i
c
a
t
i
o
n
s
A
B
Getting Started 3
Preparing Your Phone for Use 4
Turning Your Phone
On and Off 14
Display Information and Key Functions 17
Making and Receiving Calls 19
During a Call 24
Speakerphone 26
Functions and Settings 29
Using the Menu System 30
Your Personal Phone Book 33
Keeping Track of Your Phone Calls 42
Your Voice Mail Service 44
Personalizing Your Phone 46
Sending and Receiving Text Messages (SMS) 53
Diverting Incoming Calls 62
Security for Your Phone and Subscription 64
Setting Network Preferences 70
Handling More than One Call Simultaneously 74
Knowing the Call Time/Call Cost 78
Using Two Phone Lines 81
Calling Card or Credit Card Calls 83
Sending and Receiving Fax and Data calls 85
Some Useful Tools 86
GSM Pro 89
GSM Pro 90
Additional Information 97
Accessories 98
Troubleshooting 102
Ericsson Mobile Internet 104
Quick Keys 105
Technical Data 106
Glossary 107
Guidelines for Safe and Efficient Use 112
Warranty 116
Declaration of Conformity 118
Index 119
Ericsson R250s PRO
Third edition (June 2000)
This manual is published by Ericsson
Mobile Communications AB, without any
warranty. Improvements and changes to
this manual necessitated by typographical
errors, inaccuracies of current information,
or improvements to programs and/or equip-
ment, may be made by Ericsson Mobile
Communications AB at any time and with-
out notice. Such changes will, however, be
incorporated into new editions of this
manual.
All rights reserved.
©Ericsson Mobile Communications AB,
1999
Publication number: EN/LZT 108 2554 R1C
Printed in Sweden
INNOVATRON PATENTS
Contents
at a Glance
Page 5

N
o
t
f
o
r
C
o
m
m
e
r
c
i
a
l
U
s
e
E
r
i
c
s
s
o
n
M
o
b
i
l
e
C
o
m
m
u
n
i
c
a
t
i
o
n
s
A
B
Please note!
Some of the services in this manual are not supported by all networks. This also applies to the GSM International Emergency
Number 112.
Please contact your network operator or service provider if you are
in doubt whether you can use a particular service or not.
The symbol on our products signifies that they have been certified according to the EMC directive 89/336/EEC, the Telecommunications directive 91/263/EEC, and the Low Voltage directive 73/
23/EEC when applicable. The products fulfil the requirements
according to the following standards:
Cellular Phones and Accessories in Combination:
ETS 300 342-1 EMC for European digital cellular telecommunications.
Accessories Without Direct Connection to a Cellular Phone:
EN 50081 Electromagnetic compatibility, Generic Emission Standard, and EN 50082 Electromagnetic compatibility, Generic
Immunity Standard.
Page 6

N
o
t
f
o
r
C
o
m
m
e
r
c
i
a
l
U
s
e
E
r
i
c
s
s
o
n
M
o
b
i
l
e
C
o
m
m
u
n
i
c
a
t
i
o
n
s
A
B
Preparing Your Phone for Use
4
Turning Your Phone On and Off
14
Display Information and Key Functions
17
Making and Receiving Calls
19
During a Call
24
Speakerphone
26
GETTING STARTED
Page 7
N
o
t
f
o
r
C
o
m
m
e
r
c
i
a
l
U
s
e
E
r
i
c
s
s
o
n
M
o
b
i
l
e
C
o
m
m
u
n
i
c
a
t
i
o
n
s
A
B
4 Preparing Your Phone for Use
Preparing Your Phone
for Use
Note! Please read the chapter “Guidelines for Safe and Efficient Use” on
page 112, before using your mobile phone.
Front
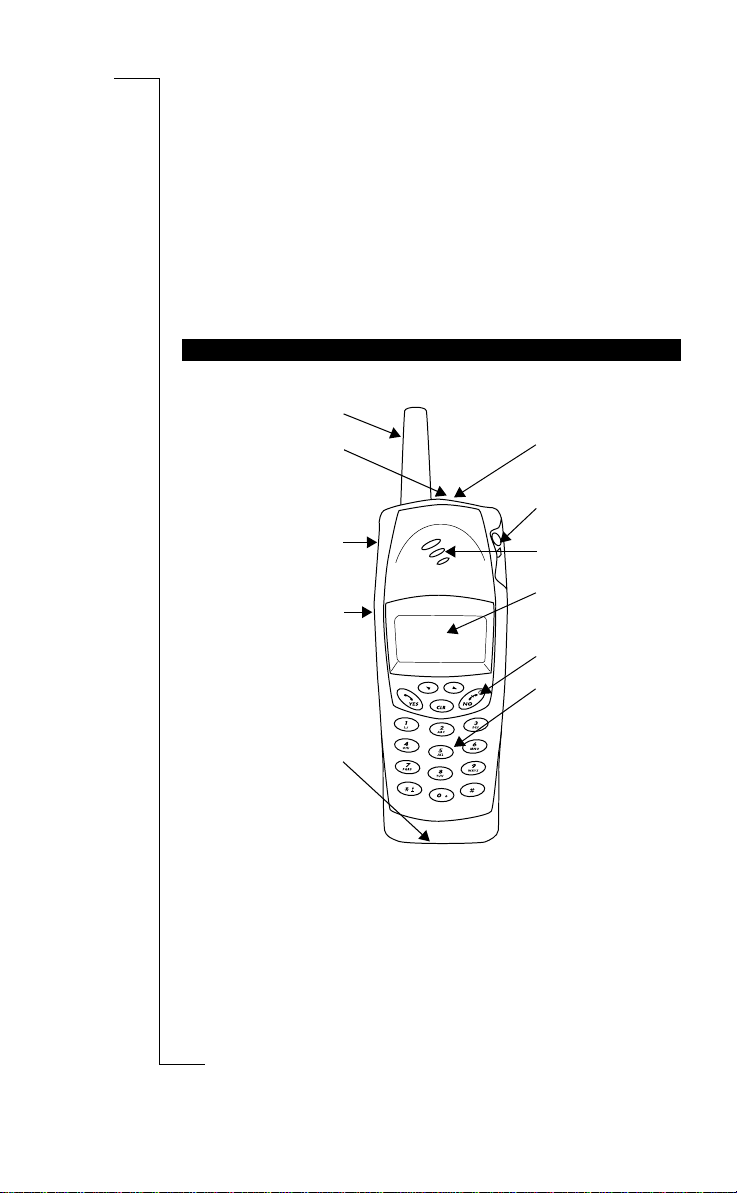
* If you are not using a SIM Pro card (see “GSM Pro” on page 90), i.e. if
you are using a regular SIM card, pressing the Push-to-talk button mutes
the microphone, if pressed during a conversation.
OVERVIEW
Indicator light
Mode switch
Earpiece/loud-
speaker
Display
On/off key
Keypad
Antenna
Alert button
Volume keys
Push-to-talk
button*
Microphone
Page 8
N
o
t
f
o
r
C
o
m
m
e
r
c
i
a
l
U
s
e
E
r
i
c
s
s
o
n
M
o
b
i
l
e
C
o
m
m
u
n
i
c
a
t
i
o
n
s
A
B
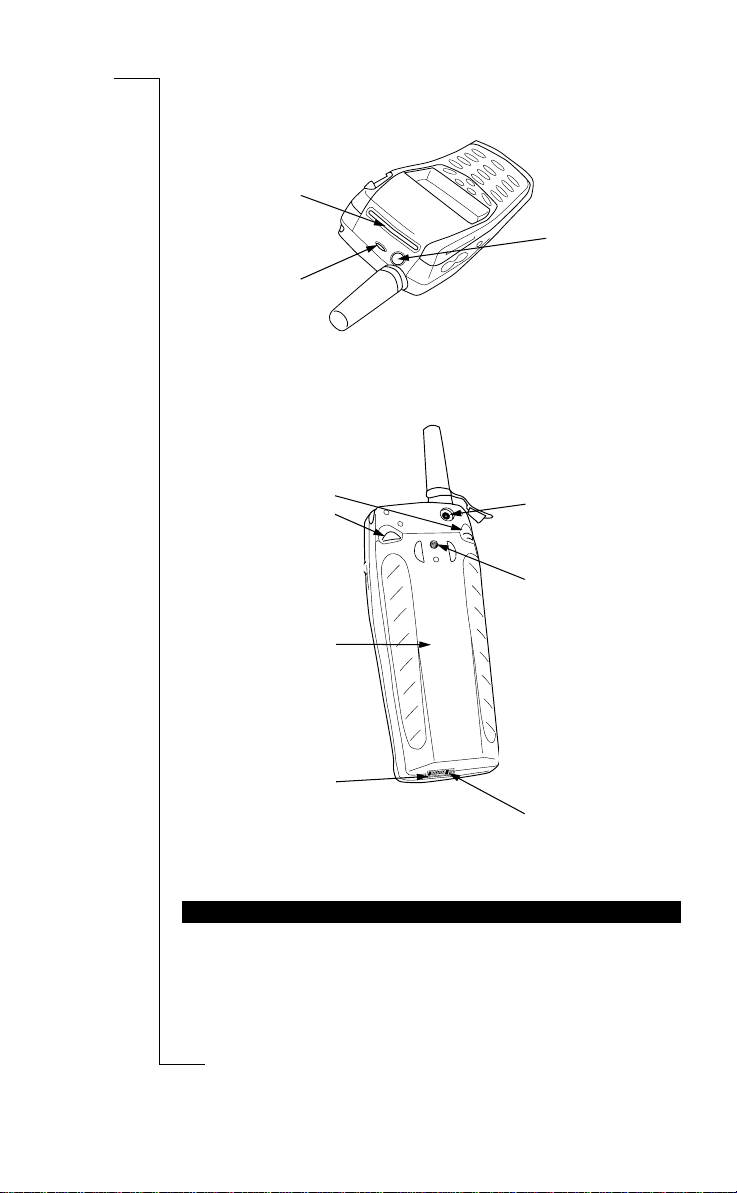
Preparing Your Phone for Use 5
Top
Back
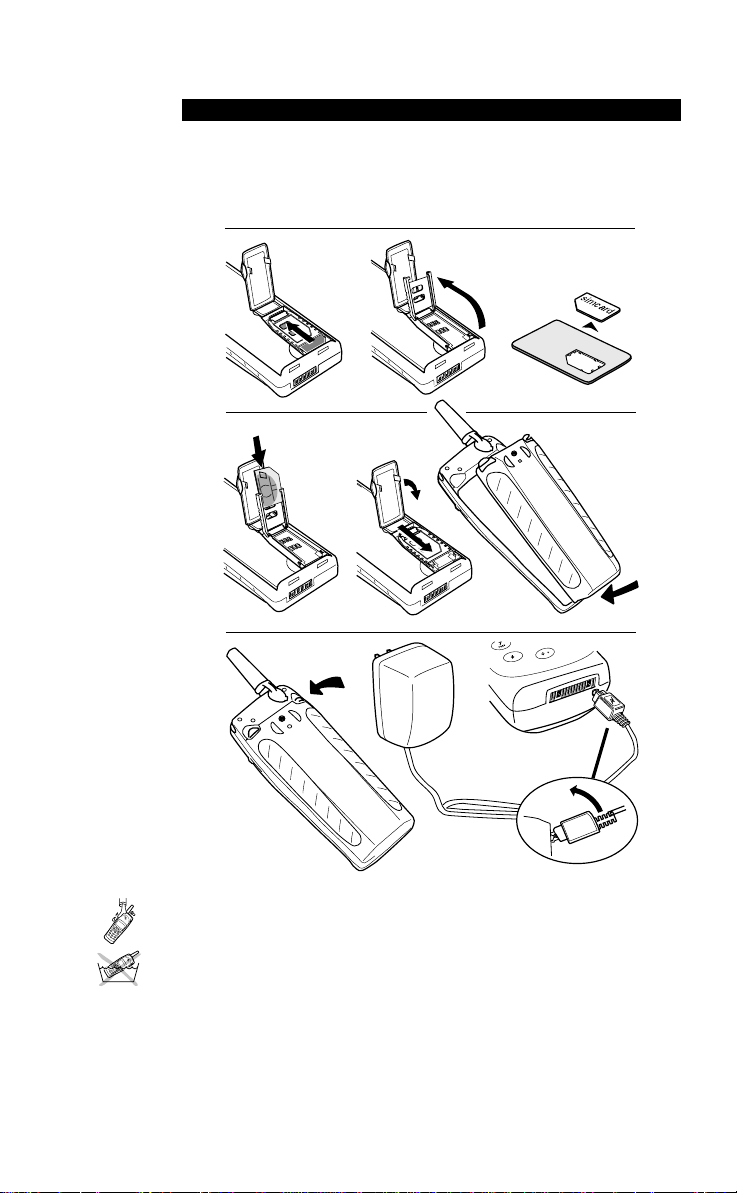
To use your phone you must:
• insert the SIM card
• attach the battery to the phone
• charge the battery
Please see the following pages.
ASSEMBLY
Indicator Light
Earpiece/Loud-
speaker
Alert Button
Connector for
external antenna
Hole for belt clip
Headset
connector
Battery release
catch
Battery
Charging
connector
Page 9
N
o
t
f
o
r
C
o
m
m
e
r
c
i
a
l
U
s
e
E
r
i
c
s
s
o
n
M
o
b
i
l
e
C
o
m
m
u
n
i
c
a
t
i
o
n
s
A
B
6 Preparing Your Phone for Use
When you register as a subscriber with a network operator, you get a SIM
(Subscriber Identity Module) card. The SIM card contains a computer chip
that keeps track of your phone number, the services included in your subscription, and your Phone Book information, among other things.
SIM cards come in two sizes. One is the size of a credit card, and the other is
smaller. Your phone uses the smaller card. Many credit card-sized SIM cards
have a perforated smaller card that you can take out easily. Before you can use
your phone, you must insert the SIM card as shown below.
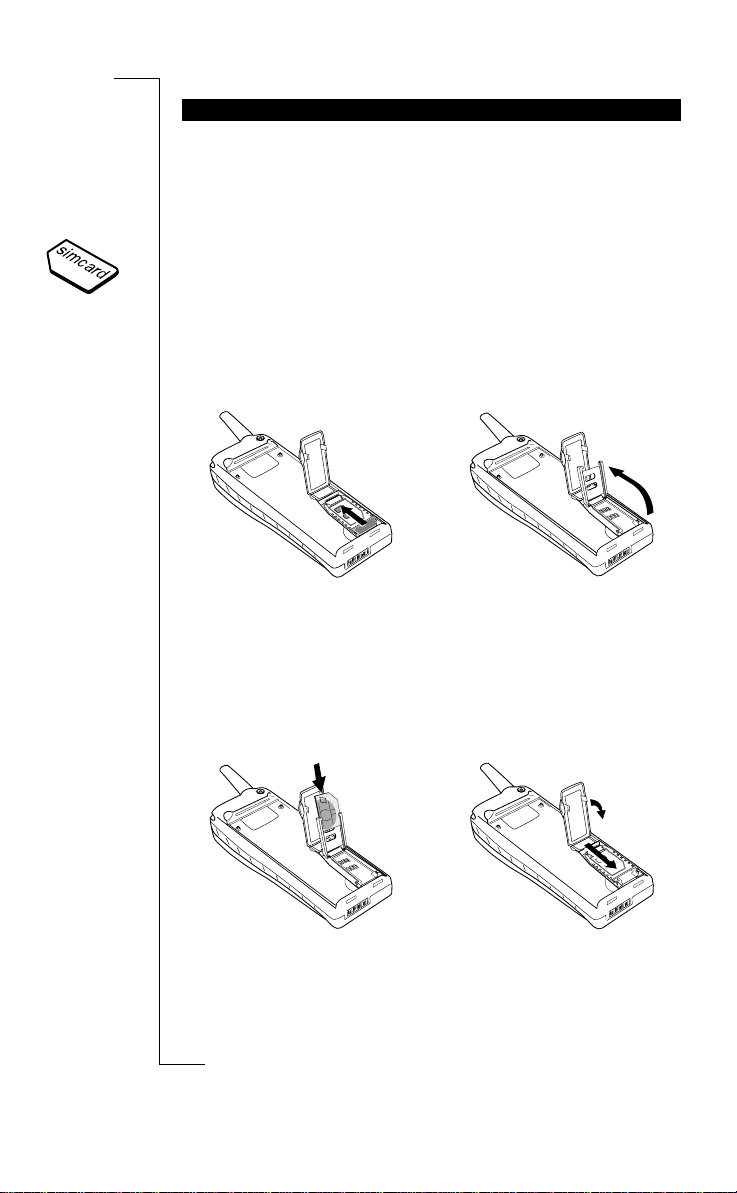
Inserting the SIM Card
To insert the SIM card, remove the battery (if attached) and follow these steps:
THE SIM CARD
3. Open the holder.
1. Open the lid that covers the SIM
card holder.
2. Release the SIM card holder by
sliding it in the direction of the
arrow.
5. Lock the holder by pressing it
down and sliding it in the direction of the arrow in the picture.
6. Finally, close the lid.
4. Slide the SIM card into the
holder. Make certain that the cut
corner is in the top right-hand
corner.
Page 10

N
o
t
f
o
r
C
o
m
m
e
r
c
i
a
l
U
s
e
E
r
i
c
s
s
o
n
M
o
b
i
l
e
C
o
m
m
u
n
i
c
a
t
i
o
n
s
A
B
Preparing Your Phone for Use 7
The PIN
Most SIM cards are supplied with a security code or PIN (Personal Identity
Number), which you need to access the network. Every time you turn on your
phone, it prompts you to enter your PIN. You will find your PIN in the information from your operator.
You may need your PIN when you want to change the settings in your phone.
Furthermore, some operators may have services that require a second PIN,
your PIN2.
You should be careful with your PIN, since it is your protection against
unauthorized use of your subscription.
If your PIN is entered incorrectly three times in a row, the SIM card is
blocked. If this happens, you can unlock it by using your PUK (Personal
Unblocking Key code), which you also get from your operator.
The R250s PRO comes with a nickel metal hydride (NiMH) battery. The
battery is not charged when you buy your phone, but there may be enough
power to turn the phone on. We recommend that you char ge the battery before
you use the phone for the first time.
The battery is specially designed for the R250s PRO. The battery has a special
locking mechanism that prevents it from falling off if you should drop the
phone on the ground.
The battery is equipped with a special rubber sealing to prevent leakage into
the phone. With the battery and antenna properly attached, the phone is dustand water-resistant. The phone can be used outdoors, even if it is raining and
the phone will not be damaged if you use it in a dusty environment.
Use only Ericsson original batteries. By using other batteries you risk damaging the phone and will void the warranty.
THE BATTERY
Enter
PIN
Page 11
N
o
t
f
o
r
C
o
m
m
e
r
c
i
a
l
U
s
e
E
r
i
c
s
s
o
n
M
o
b
i
l
e
C
o
m
m
u
n
i
c
a
t
i
o
n
s
A
B
8 Preparing Your Phone for Use
Attaching the Battery
When to Charge the Battery
The nickel metal hydride battery that comes with your phone can be charged
whenever you wish without affecting its performance. This is not the case
with the cheaper nickel cadmium type batteries, often sold as accessories by
other suppliers. For the best talk and standby time in the long run, we recommend that you use only Ericsson original batteries with your phone.
Note! If you charge a new battery, or a battery that has not been used for a
long time, it may take a while until you get an indication of charging.
To remind you that you will soon need to charge the battery or replace it with
a charged one:
• an alarm signal (a long beep) sounds and the message
Battery low
appears
for ten seconds in the display. The signal is repeated several times.
• the indicator light on top of the phone starts flashing red.
Note! The phone turns itself off when the battery can no longer power it
satisfactorily.
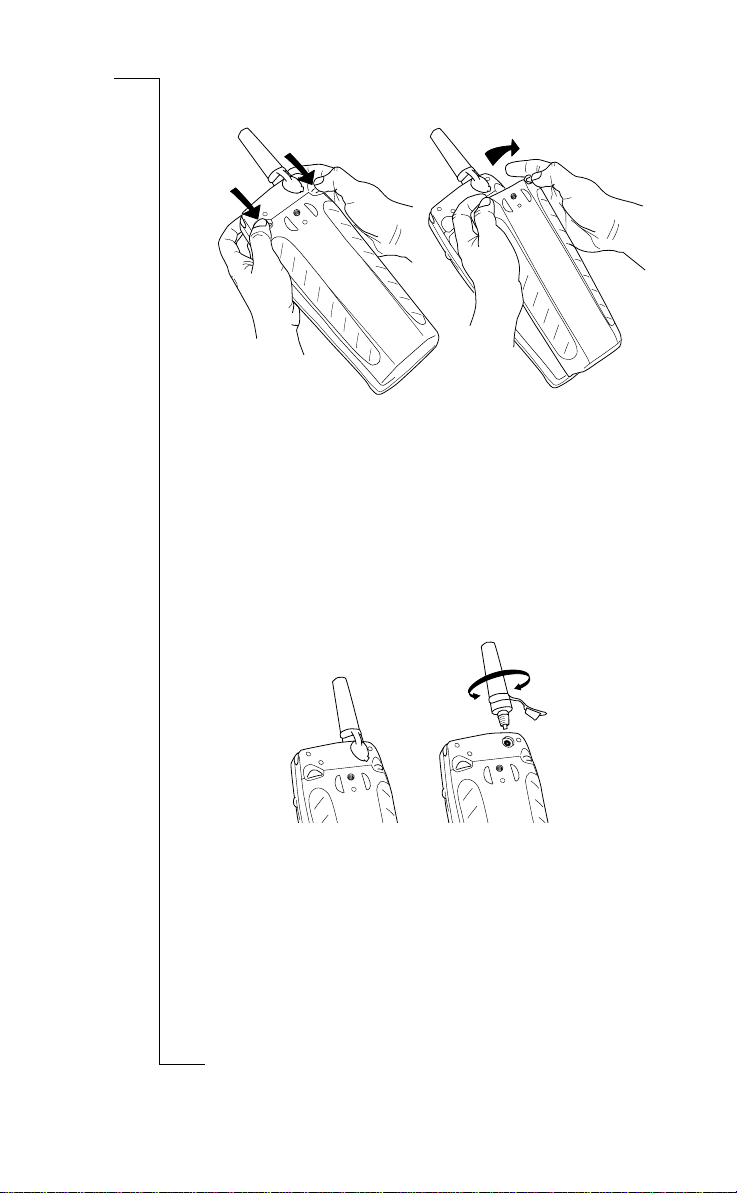
2. Press the upper part of the battery
against the phone until you hear
two clicks.
1. Attach the battery to the bottom
part of the phone.
Page 12
N
o
t
f
o
r
C
o
m
m
e
r
c
i
a
l
U
s
e
E
r
i
c
s
s
o
n
M
o
b
i
l
e
C
o
m
m
u
n
i
c
a
t
i
o
n
s
A
B
Preparing Your Phone for Use 9
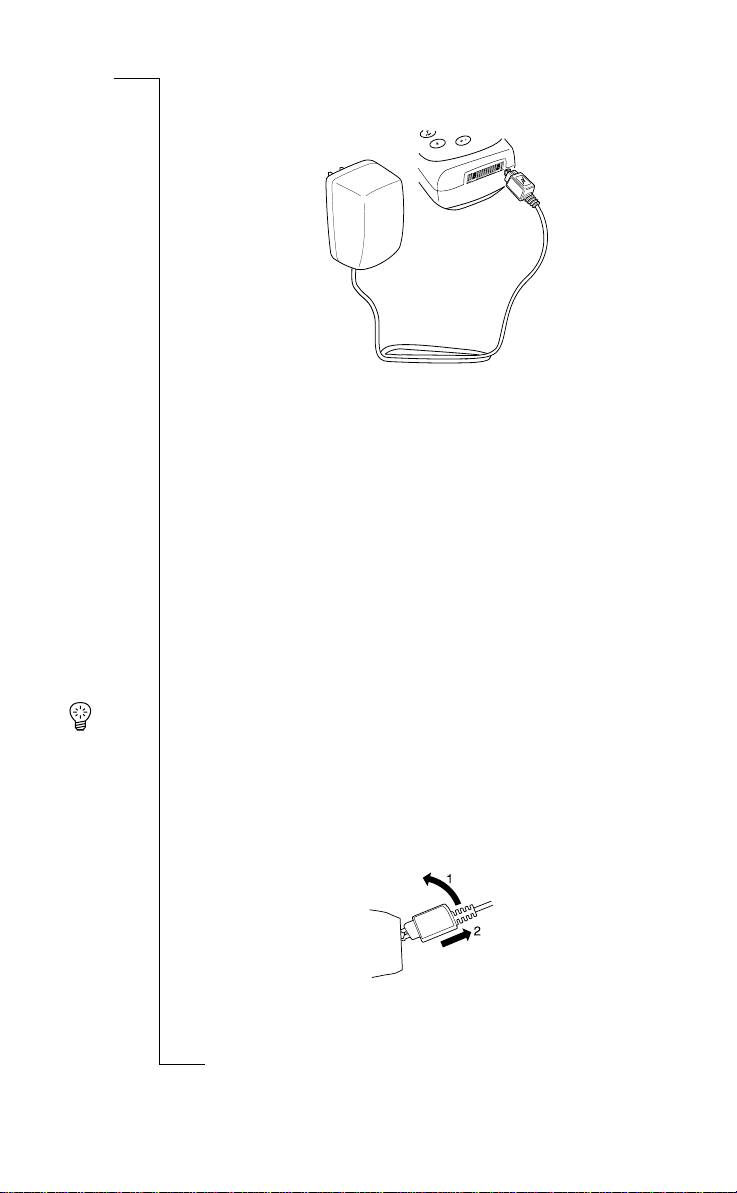
Charging the Battery
To indicate charging:
• the battery meter in the display pulses continuously.
• the indicator on top of the phone shows a steady red light (or green, if the
phone is turned on).
When the battery is fully charged, the battery meter in the display is full and
the indicator on top of the phone shows a steady green light.
Tip! You can use the phone while the battery is being charged. However, this
increases the charging time.
You can also connect the charger to the desk/wall stand that comes in your
box. Just place the phone in the desk/wall stand when you need to charge the
phone. See “Desk/W all Stand” on page99 for more information.
Disconnecting the Charger
3. Connect the other end of the
cable to the phone as shown in
the picture. The flash symbol on
the plug must face upwards.
1. Make sure that the battery is
attached to the phone.
2. Connect the charger to the mains.
• Push the plug connected to the phone upwards and pull it out.
• Attach the rubber protector to the system connector.
Page 13
N
o
t
f
o
r
C
o
m
m
e
r
c
i
a
l
U
s
e
E
r
i
c
s
s
o
n
M
o
b
i
l
e
C
o
m
m
u
n
i
c
a
t
i
o
n
s
A
B
10 Preparing Your Phone for Use
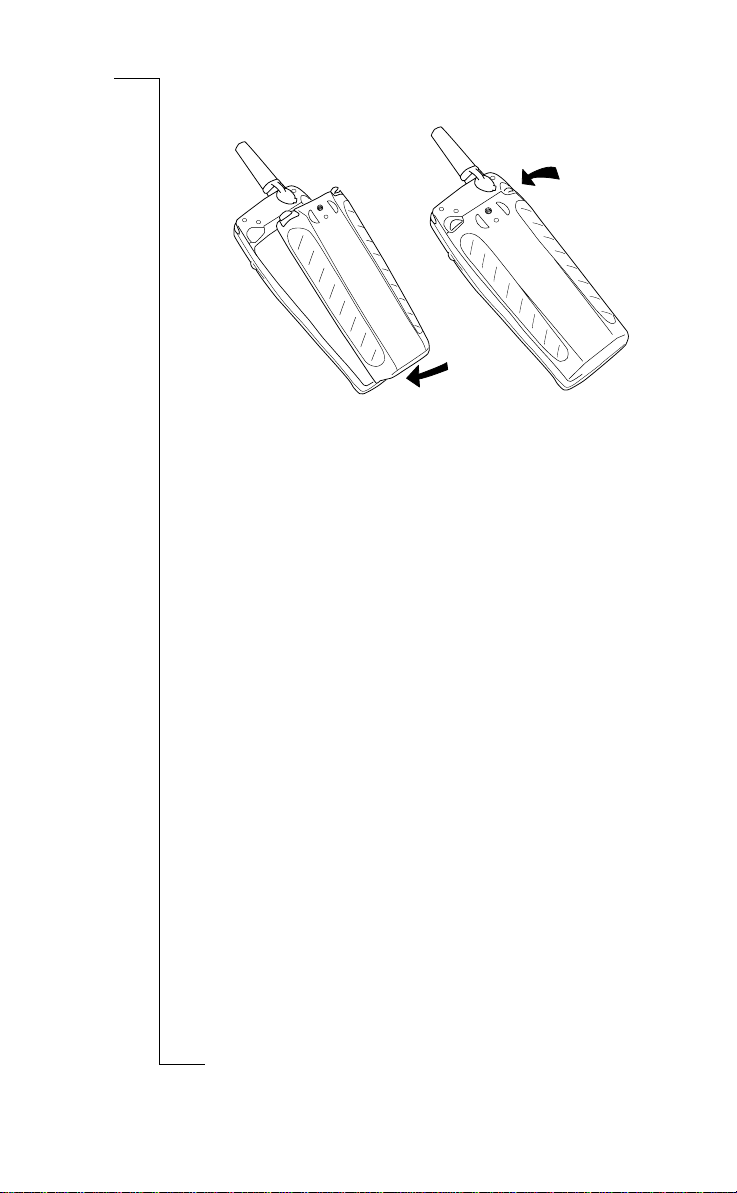
Removing the Battery
Switching Antennas
The R250s PRO comes with two antennas. The longer antenna gives you better receiving signalling when you are within an area with poor radio coverage.
Please make sure that you switch antennas during dry conditions, to prevent
leakage into the phone.
Note! Do not use any antennas designed for other type of telephone. The
antenna is specially designed for the R250s PRO. With the antenna (and battery) properly attached the phone is water resistant. Using other antennas will
void the warranty.
3. Lift the battery up and away from
the phone.
1. Turn off the phone.
2. Press the battery release catch on
the top of the battery.
3. Attach the new antenna, screwing
it clockwise until it is properly
attached.
4. Insert the rubber plug into the
external antenna connector.
1. Pull out the rubber plug from the
external antenna connector.
2. Screw the antenna anti-clockwise
to remove it.
Page 14
N
o
t
f
o
r
C
o
m
m
e
r
c
i
a
l
U
s
e
E
r
i
c
s
s
o
n
M
o
b
i
l
e
C
o
m
m
u
n
i
c
a
t
i
o
n
s
A
B
Preparing Your Phone for Use 11
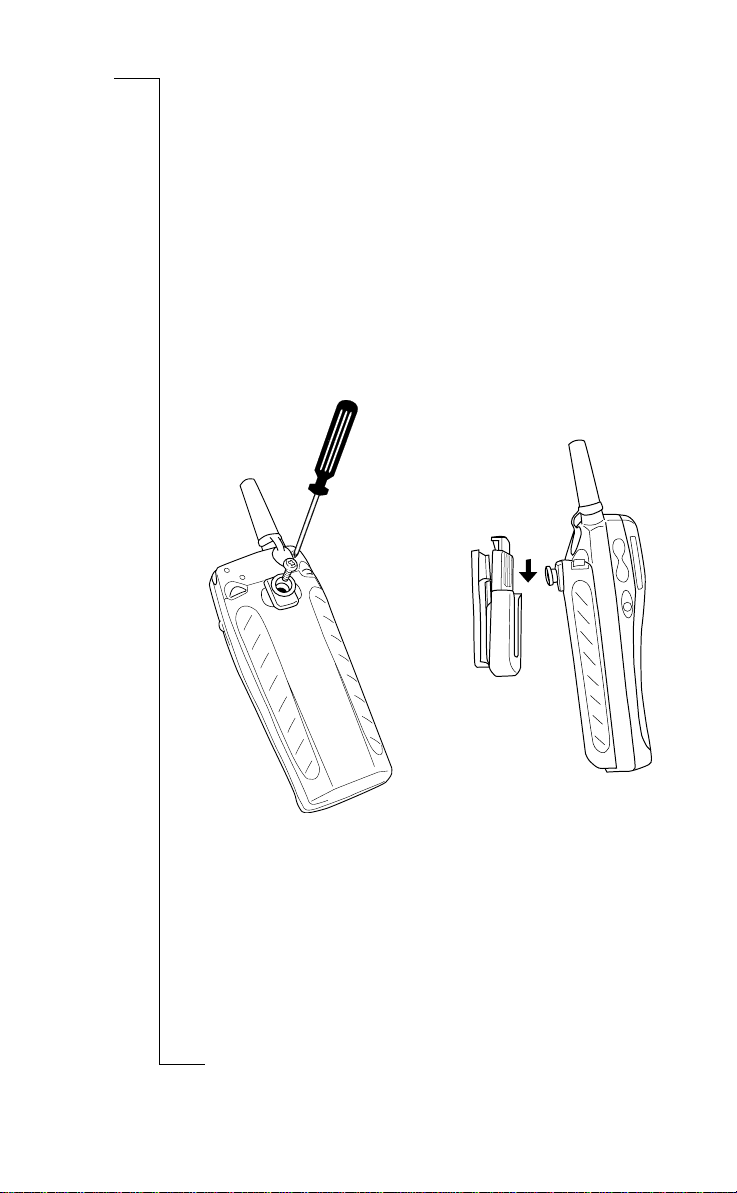
The Clips
The R250s PRO comes with two different clips:
• standard clip
• swivel clip.
The standard clip is a metal belt clip which is attached to the battery with a
screw.
The swivel clip is a belt holder which has a knob and a belt holder. The knob
is attached to the battery with a screw. The knob is round to allow the phone to
rotate in the holder. To prevent the phone from falling out of the clip, you need
to press a button to release the phone.
Attaching the Swivel Clip
2. Slide the phone downwards until
it locks.
3. To release the phone from the
belt holder: press and hold the
release button and pull the phone
upwards.
1. Attach the knob to the battery.
Page 15

N
o
t
f
o
r
C
o
m
m
e
r
c
i
a
l
U
s
e
E
r
i
c
s
s
o
n
M
o
b
i
l
e
C
o
m
m
u
n
i
c
a
t
i
o
n
s
A
B
12 Preparing Your Phone for Use
The system connector boot prevents connected accessories, e.g. a handsfree
set from falling out. When you use a portable handsfree and the phone is
attached to your belt, the handsfree will not fall out if you bend forward or sit
down.
The system connector boot also works as protection for the phone’s system
connector. W ith the system connector boot attached, you can charge the phone
outdoors, even if it is raining, or in a dusty environment without damaging the
phone’s system connector.
System Connector boot
SYSTEM CONNECTOR BOOT
1. Insert the handsfree plug or the
charger plug (or both) as shown in
the picture above. The flash and the
headset symbol must face upwards.
2. Pull the insert part of the system con-
nector boot through the system connector boot and attach it to the
phone’s system connector, as shown
in the picture to the right.
3. Pull the system connector boot over
the insert part and the phone, until it
is properly attached.
4. To release the System connector boot
from the phone, push it upwards and
pull it out.
Page 16
N
o
t
f
o
r
C
o
m
m
e
r
c
i
a
l
U
s
e
E
r
i
c
s
s
o
n
M
o
b
i
l
e
C
o
m
m
u
n
i
c
a
t
i
o
n
s
A
B
Preparing Your Phone for Use 13
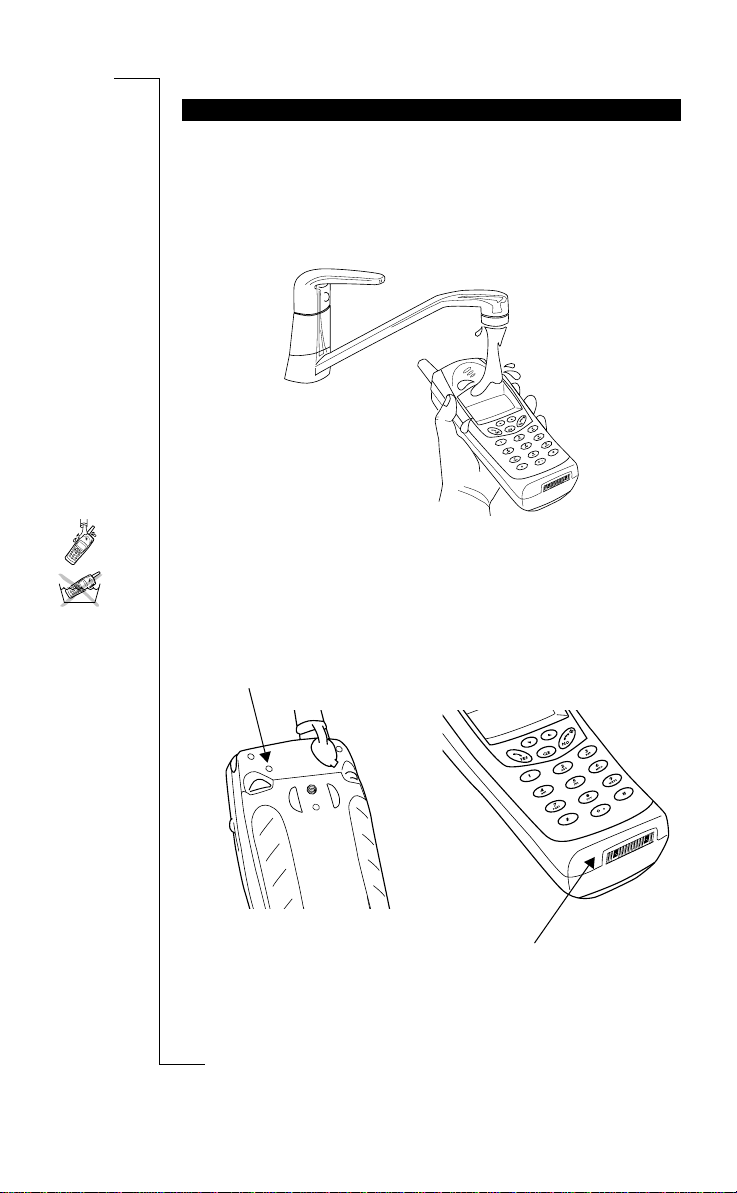
When needed, the phone can be washed under running water. We recommend
that you do it gently in cold water under a water tap. Before washing the
phone, it is important that the battery is properly connected, the antenna is
properly screwed on and that all accessories are removed.
Washing the Phone
• Wash the phone gently in cold water under a water tap.
• Do not immerse the phone in water!
Note! When washing your phone, do not direct the jet of water towards the
buzzer or the microphone.
TAKING CARE OF YOUR MOBILE PHONE
Buzzer
Microphone
Page 17

N
o
t
f
o
r
C
o
m
m
e
r
c
i
a
l
U
s
e
E
r
i
c
s
s
o
n
M
o
b
i
l
e
C
o
m
m
u
n
i
c
a
t
i
o
n
s
A
B
14 Turning Your Phone On and Off
Turning Your Phone
On and Off
• Press and hold the NO key until you hear a click.
If Enter PIN Appears in Display
Some SIM cards are protected with a PIN code. If Enter PIN appears in the
display after you have turned on the phone:
1. Enter your PIN. If you make a mistake while entering your PIN, erase the
wrong digit by pressing the
CLR
key.
2. Press # or
YES
to confirm your PIN code.
Note! If your PIN is entered incorrectly three times in a row, the SIM card is
blocked. You can unblock it by using your PUK code, which is supplied by
your operator. See “Security for YourPhone and Subscription” on page 64.
Network Search
After you have turned on the phone (and entered your PIN), the Ericsson
name appears in the display and the phone searches for a network.
When a network has been found, the phone beeps three times. The indicator
light on the top of the phone flashes green once every second and your network operator’s name (in most cases abbreviated) appears in the display.
This is called standby mode. You can now make and receive calls.
Normally, the name of a network appears in the display after you have turned
your phone on, but sometimes there is no network within range that you can
use. The display then shows one of the following:
Searching
If the message Searching remains in the display, you are within range of a
network, but you are not allowed to use it. However, in an emergency, some
operators allow you to call the international emergency number 112. See
“Making and Receiving Calls” on page 19.
TURNING YOUR PHONE ON
IF NO NETWORK IS DISPLAYED
Enter
PIN
Enter
PIN
****
Searching
13:40
4444 NETWORK 7777
22228
88
8
13:40
Searching
13:40
Page 18

N
o
t
f
o
r
C
o
m
m
e
r
c
i
a
l
U
s
e
E
r
i
c
s
s
o
n
M
o
b
i
l
e
C
o
m
m
u
n
i
c
a
t
i
o
n
s
A
B
Turning Your Phone On and Off 15
No Network
If the message No network is displayed, there is no network within range or
the received signal is too weak. Y ou have to move to get a stronger signal. You
can also try to replace the antenna with the longer high gain antenna.
The first time you turn on your phone, you may want to change the language
in the display, set the clock and choose the ring signal type. For more information about these settings, see “Personalizing Your Phone” on page 46.
Display Language
Most modern SIM cards automatically set the display language to the language of the country where you bought your SIM card. If this is not the case,
the default language is English.
If your phone displays a language that you do not understand, you can change
it to English at any time. For more information on how to change the display
language, see “Display Language” on page 46.
To change the language to English
1. Press the
CLR
key.
2. Press the
LEFT
arrow key.
3. Enter 0000.
4. Press the
RIGHT
arrow key.
For information about the keys, please see “Key Functions” on page 18.
Setting the Time
The time is shown at the bottom of the display. When you buy your phone, the
time is not normally set.
To set the time
1. Press the
LEFT
or
RIGHT
arrow key until the
Clock
menu appears.
2. Press
YES
to enter the clock menu.
3. Press the
RIGHT
arrow key until
Set clock
appears.
4. Press
YES
to enter the Set clock function.
5. Enter the correct time in hours and minutes, using the number keys.
6. Press
YES
to confirm your choice.
7. Press
CLR
to return to standby mode.
Note! The time is by default presented in the 24-hour format. If you prefer the
12-hour format, you can change the setting.
INITIAL SETTINGS
No network
13:40
MENU
LLLL Clock RRRR
CLOCK
LLLL Set Clock RRRR
(14:16)
SET CLOCK
(14:16)
_ –: – –
Page 19

N
o
t
f
o
r
C
o
m
m
e
r
c
i
a
l
U
s
e
E
r
i
c
s
s
o
n
M
o
b
i
l
e
C
o
m
m
u
n
i
c
a
t
i
o
n
s
A
B
16 Turning Your Phone On and Off
Setting the Ring Signal Level
1. Press the
RIGHT
arrow key.
The text
Ring level
and a bar representing the ring signal level appears in the
display.
2. Press
YES
to enter the Ring level menu.
The text
Buzzer
appears in the display.
3. Press
YES
to enter the Buzzer menu.
4. Use the
RIGHT
and
LEFT
arrow keys to set the ring signal level.
• Pressing the
RIGHT
key increases the volume.
• Pressing the
LEFT
key decreases the volume.
The phone rings once with the actual setting as you increase the
volume, except for the “Off” and “Step” setting.
5. Press
YES
to save your setting.
6. Press
CLR
to return to standby mode.
• In standby mode, press and hold the
NO
key until you hear a click.
TURNING YOUR PHONE OFF
MENU
LLLL Ring level RRRR
(QQQQQqq
QQQQQqqQQQQQqq
QQQQQqq)
RING LEVEL
LLLL Buzzer RRRR
(QQQQQqq
QQQQQqqQQQQQqq
QQQQQqq)
Page 20

N
o
t
f
o
r
C
o
m
m
e
r
c
i
a
l
U
s
e
E
r
i
c
s
s
o
n
M
o
b
i
l
e
C
o
m
m
u
n
i
c
a
t
i
o
n
s
A
B
Display Information and Key Functions 17
Display Information
and Key Functions
Your phone display helps you to:
• make sure that you are dialling correctly
• check your signal strength and service availability
• find out if you have received messages
• check which line is in use if you have the Two Line Service
• check battery level
Icons in the Display
Icons are displayed when specific functions are active or if you have received
a message. The figure in the margin shows an overview of all the possible
icons and where they appear.
The table below shows every icon separately and also gives you an
explanation.
DISPLAY INFORMATION
Icon: Name: Description:
42Signal strength meter The strength of the received signal is indicated
in steps. Four steps indicate the strongest
signal.
78Battery meter The fuller the icon, the more power there is.
K Keypad lock indicator The keypad is locked.
l Divert indicator An arrow means that the Divert all function is
on.
S Silent ring signal A crossed note means that no sound can be
heard when you receive a call.
Mm SMS indicator The envelope icon means that you have
received a text message.
Tt Voice mail indicator The tape loops mean that you have received a
voice message.
B Alarm indicator The bell shows that the alarm clock has been
set and is on.
Page 21

N
o
t
f
o
r
C
o
m
m
e
r
c
i
a
l
U
s
e
E
r
i
c
s
s
o
n
M
o
b
i
l
e
C
o
m
m
u
n
i
c
a
t
i
o
n
s
A
B
18 Display Information and Key Functions
Before making or receiving a call, it is useful to understand the keys. The
table below explains the basic key functions.
Note! Some keys have different functions when you enter the menu system. See
“Using the Menu System” on page 30.
L1/L2 Line indicator Tells you which line is in use if you have the
Two Line Service.
Ξ Fixed incoming calls
indicator
This icon indicates that fixed incoming calls is
activated.
KEY FUNCTIONS
Key: Use:
YES
To make and answer calls.
NO
To turn the phone on or off (press and hold the key).
To end or reject a call.
LEFT
and
RIGHT
arrow keys
To access and move (scroll) through the menu system.
CLR
(Clear)
To erase digits from the display. Press and hold the key to
erase all digits.
To mute the microphone, press and hold the key.
Number keys To enter the digits 0-9.
The 0 key enters the international (+) sign if held down.
Star To enter a star (*) character.
If held down it enters a “p” – pause.
Hash To enter #.
To complete the input of PIN and security codes.
If held down it enters the character ¤.
Volume keys
UP
and
DOWN
To increase or decrease the volume of the earpiece or
handsfree loudspeaker.
To reject a call, press the volume keys up or down twice.
Mode switch
GSM
: T o switch between phone and speakerphone mode.
If slide is up the phone is in speakerphone mode; If slide is
down the phone is in phone mode.
GSM Pro
: To switch between phone and “Push-To-Talk”
mode. If slide is up, the phone is in Push-To-Talk mode; if
slide is down, the phone is in phone mode.
Push-to-talk button In standby: to enter and scroll in Phone Book menu.
GSM
: Push this button to mute the microphone.
GSM Pro
: Push-to-talk mode, press this button to open
microphone. Phone mode, press this button to mute the
microphone.
Alert button To make alert calls. Press and hold the alert button.
Icon: Name: Description:
Page 22
N
o
t
f
o
r
C
o
m
m
e
r
c
i
a
l
U
s
e
E
r
i
c
s
s
o
n
M
o
b
i
l
e
C
o
m
m
u
n
i
c
a
t
i
o
n
s
A
B
Making and Receiving Calls 19
Making and Receiving
Calls
The instructions in this chapter assume that you have turned on your phone
and that you are within range of a network. If you are abroad, you may use
other networks, provided your home network has an agreement that allows
you to do this. See “Setting Network Preferences” on page 70.
Key Functions
Before making and receiving calls, it is useful to understand the keys and their
functions. See “Display Information and Key Functions” on page 17.
1. Enter the phone number, including the area code.
The digits are shown in the display. If you need to erase a digit, press
CLR
.
To erase all digits, press and hold the
CLR
key until all digits have been
erased.
2. Press
YES
to make the call.
The display shows
Calling
, followed by
Connecting
.
3. Press
NO
when you want to end the call.
While a call is in progress, a call time meter in the display shows how long
you have been on the phone in minutes and seconds. If you have turned on the
Call cost option and your network supports it, you see the price of the call in
the display. See “Knowing the Call Time/Call Cost” on page 78.
When you end the call the Call time meter shows the duration of the call for
three seconds.
Tip! It is possible to check the duration of the call later on. See “Knowing the
Call Time/Call Cost” on page 78.
No Answer
If nobody answers your call or you cannot get through press
NO
. The number
is stored in a memory which makes it easy to repeat the call.
MAKING A CALL
4444 NETWORK 7777
22228
88
8
012345678
4444 0:07 7777
22228
88
8
15:34
4444 NETWORK 7777
2222 Last 1:35 8888
15:36
Page 23

N
o
t
f
o
r
C
o
m
m
e
r
c
i
a
l
U
s
e
E
r
i
c
s
s
o
n
M
o
b
i
l
e
C
o
m
m
u
n
i
c
a
t
i
o
n
s
A
B
20 Making and Receiving Calls
Your phone conveniently lets you re-dial the last phone numbers you have
called (15 or more, depending on your SIM card). It can also re-dial a number
automatically if the connection failed when you first called.
To re-dial a previously called number
1. Press
YES
.
The display shows the last dialled number.
2. Scroll with the
LEFT
and
RIGHT
arrow keys until you find the number
you want to call.
3. Press
YES
to make the call.
Automatic Re-dialling
If the connection fails and the receiver’s network supports it, the display
shows
Retry?
on the top row and the reason for the failure on the second row.
To re-dial the number automatically
• Press
YES
when the message
Retry?
appears in the display.
The number is automatically re-dialled, up to 10 times:
• until the call is answered. If the re-dialling is successful, the phone
beeps and then you hear a ring signal.
• until you press a key or receive a call.
• If you do not want to retry, press
NO
.
Note! Automatic retry is not available for fax and data calls.
1. Press and hold the 0 key until
+
is displayed.
The + automatically replaces the international dialling prefix for the country you are calling from.
2. Enter the country code, the area code (without the leading zero) and the
phone number.
3. Press
YES
to make the call.
Note! When you are abroad, your phone automatically searches for a network
that you are allowed to use. Which networks you can use depends on the
agreements your operator has signed with the operators in the country you
are visiting. See “Setting Network Preferences” on page 70.
RE-DIALLING A PREVIOUSLY CALLED NUMBER
MAKING INTERNATIONAL CALLS
LAST DIALLED
LLLLR
RR
R
012345678
4444 NETWORK 7777
22228
88
8
+80123456
Page 24

N
o
t
f
o
r
C
o
m
m
e
r
c
i
a
l
U
s
e
E
r
i
c
s
s
o
n
M
o
b
i
l
e
C
o
m
m
u
n
i
c
a
t
i
o
n
s
A
B
Making and Receiving Calls 21
Checking the First Characters
If you have entered more characters than can be seen in the display, the first
characters are replaced by the l symbol. Press the
RIGHT
arrow key to check
the first characters.
The R250s PRO is equipped with an Alert button, located on the top of the
phone, next to the antenna (see “Overview” on page 4). The alert button
makes it easy to set up a call to a pre-set alert number, without having to enter
the number manually.
When you buy your phone the alert number (when using the Alert button) is
set to the international emergency number 112. This number can be changed,
if you prefer to use another alert number. For more information on how to
change the pre-set alert number, see “Personalizing Your Phone” on page 46.
Note! If you change the pre-set alert number (112), you must insert a SIM
card and enter the PIN code (if the card is locked). Otherwise the pre-set alert
number (112) will be dialled and not the number you have specified.
To make an alert call the alert button must be switched on. When you buy
your phone the alert button is set to on. The alert button must be held down for
1 second, before a call is set up. This is to avoid accidental dialling if you
press the button by mistake.
To make an alert call using the Alert button
1. Press and hold the
ALERT BUTTON
.
The call is set up and the number dialled is shown in the display. (The preset number is the international emergency number 112.)
2. Press
NO
to end the call.
Making Emergency Calls
Y ou can also make an emer gency call by entering the number in the same way
as when making an ordinary call.
To make an emergency call
1. Enter 112 (the international emergency number).
2. Press
YES
.
The display shows
Emergency
.
3. Press
NO
to end the call.
Note! Some Network operators may require that a SIM car d has been inserted
into the phone and, in some cases, that the PIN has been entered as well.
Some networks may not use the international emergency number 112.
MAKING ALERT CALLS
Page 25
N
o
t
f
o
r
C
o
m
m
e
r
c
i
a
l
U
s
e
E
r
i
c
s
s
o
n
M
o
b
i
l
e
C
o
m
m
u
n
i
c
a
t
i
o
n
s
A
B
22 Making and Receiving Calls
When you receive a call, the phone rings and the indicator light on top of the
phone blinks green rapidly. The display shows
Answer?
.
If your subscription includes the Calling Line Identification service and the
caller’s network sends the number, you see the caller’s number at the bottom
of the display. If the number is stored with a name in the phone book, the
name is shown in the display.
Note! The phone must be turned on and within range of a network before a
call can be received.
Answering a Call
• Press
YES
to answer the call.
• When the call is finished, press
NO
.
Rejecting a Call
There are two ways of rejecting a call:
• Press the
NO
key.
• Double click the volume key (up or down) on the side of the phone.
The caller hears a busy tone if the caller’s network supports this function.
If “Divert on busy” is on, the incoming call is diverted to the number you
have specified. See “Diverting Incoming Calls” on page 62.
Tip! To mute the ring signal when you receive a call, press
CLR
.
With most common subscriptions, the caller’s number is sent when a call is
made. This means that the receiver can see your phone number when you
make a call. However, some operators offer subscriptions where your phone
number is normally hidden.
If you want to change the setting for a particular call, this is possible provided
the network you use supports it.
To hide your phone number for a particular call
1. Enter the phone number you wish to call.
2. Press the
RIGHT
key.
The
Special functions
menu appears in the display.
3. Press
YES
to enter the Special functions menu.
4. Select
Hid e Id
and press
YES
to make the call.
RECEIVING A CALL
HIDING OR SHOWING YOUR NUMBER
Answer?
MENU
Special
LLLL functions RRRR
SPECIAL FUNC
LLLL Hide ID RRRR
01234567890
Page 26

N
o
t
f
o
r
C
o
m
m
e
r
c
i
a
l
U
s
e
E
r
i
c
s
s
o
n
M
o
b
i
l
e
C
o
m
m
u
n
i
c
a
t
i
o
n
s
A
B
Making and Receiving Calls 23
To Show Your Number for a Particular Call
1. Enter the phone number you wish to call.
2. Press the
RIGHT
key.
The
Special functions
menu appears in the display.
3. Press
YES
to enter the Special functions menu.
4. Select
Show Id
and press
YES
to make the call.
MENU
Special
LLLL Functions RRRR
SPECIAL FUNC
LLLL Send ID RRRR
01234567890
Page 27

N
o
t
f
o
r
C
o
m
m
e
r
c
i
a
l
U
s
e
E
r
i
c
s
s
o
n
M
o
b
i
l
e
C
o
m
m
u
n
i
c
a
t
i
o
n
s
A
B
24 During a Call
During a Call
Your phone has several functions which you might find helpful while a call is
in progress.
During a call you can change the earpiece volume.
To change the earpiece volume during a call
• Press the volume key on the side of the phone up or down.
• Pressing
UP
increases the volume.
• Pressing
DOWN
decreases the volume.
During a call you may want to talk to someone else in the room without the
person on the line hearing the conversation.
To turn the microphone off temporarily during a call
1. Press and hold the
CLR
key.
Mute
is shown in the display.
2. Release the
CLR
key to turn the microphone on again.
Tip! You can also press and hold the Push-to-talk button to mute the
microphone.
If you need to write down a phone number during a call, you can use the
Scratch pad function.
To use the Scratch pad
• Enter the phone number using the number keys.
When you end the call, the number remains in the display. You can now
call the number by pressing
YES
or save it in the Phone Book. See “Your
Personal Phone Book” on page 33.
Note! If you press any numeric key while on the phone, the person on the
other end of the line hears a tone.
CHANGING THE EARPIECE VOLUME
MUTING THE MICROPHONE
SCRATCH PAD FUNCTION
Page 28

N
o
t
f
o
r
C
o
m
m
e
r
c
i
a
l
U
s
e
E
r
i
c
s
s
o
n
M
o
b
i
l
e
C
o
m
m
u
n
i
c
a
t
i
o
n
s
A
B
During a Call 25
To use telephone banking services or control a telephone answering machine,
you need to use codes. These codes are sent as tone signals (also known as
DTMF tones or touch tones).
To send tone signals/codes during a call
• Press the appropriate keys (0–9, * and #).
Tip! You can also save the code together with a number in the Phone Book.
See “Your Personal Phone Book” on page 33.
Note! If you send tone signals while on the phone, the person on the other end
of the line hears the tones.
During a call, the display shows the duration of the call in minutes and seconds. If you prefer, you can have the call cost displayed, provided your network and your SIM card support this feature. See “Knowing the Call Time/
Call Cost” on page 78 for more information.
Y our phone is capable of handling more than one call simultaneously. Y ou can
put the current call on hold, and then make or answer a second call. You can
also set up a conference call with up to five people. See “Handling More than
One Call Simultaneously” on page 74 on how to use this feature.
SENDING TONE SIGNALS
CHECKING DURATION/COST OF CALL
MORE THAN ONE CALL SIMULTANEOUSLY
Page 29

N
o
t
f
o
r
C
o
m
m
e
r
c
i
a
l
U
s
e
E
r
i
c
s
s
o
n
M
o
b
i
l
e
C
o
m
m
u
n
i
c
a
t
i
o
n
s
A
B
26 Speakerphone
Speakerphone
The R250s PRO is equipped with a speakerphone which, when on, increases
the earpiece/loudspeaker volume significantly.
The speakerphone is very useful when e.g you need to speak to someone on
the phone and continue using both hands. You may, e.g. receive some instructions over the phone that you need both hands to perform.
The speakerphone is also convenient when you want other people to participate in a conversation. Call the person you want to talk to, switch to speakerphone mode and place the phone on a table e.g. Now, all the people around the
table can talk to the person on the other end of the line.
Note! If you are using a GSM Pro SIM card, the speakerphone mode is not
available. Please refer to the information in chapter “GSM Pro” on page90.
To turn on the speakerphone you slide the mode switch on the right side of the
phone upwards (see “Overview” on page 4).
Tip! The phone has different volume settings for phone and speakerphone
modes. See “Earpiece Volume” on page 47.
Switching Between Phone and Speakerphone Mode
Y ou can switch between phone and speakerphone mode at any time: when the
phone is in standby; when you receive a call and during a call.
When you receive a call you can switch from phone to speakerphone mode or
vice versa to answer the call. The call will then be answered in the selected
mode.
To switch between phone and speakerphone mode
• Slide the
MODE SWITCH
upwards to go to speakerphone mode.
• Slide the
MODE SWITCH
downwards to go to phone mode.
When you switch mode the phone sends out a warning tone.
While the phone is in speakerphone mode, do not hold the phone close to your
ear as this may cause damage to your hearing. Hold the phone in front of your
face around 30-50 cm away and speak into the microphone.
TURNING ON THE SPEAKERPHONE
Page 30

N
o
t
f
o
r
C
o
m
m
e
r
c
i
a
l
U
s
e
E
r
i
c
s
s
o
n
M
o
b
i
l
e
C
o
m
m
u
n
i
c
a
t
i
o
n
s
A
B
Speakerphone 27
Making and receiving calls in speakerphone mode is done in the same way as
in phone mode.
To make a call in speakerphone mode
1. Enter the phone number, including the area code, and press
YES
.
Do not hold the phone close to your ear during the conversation.
2. Press
NO
to end the call.
To answer a call in speakerphone mode
1. Press
YES
to answer the call.
Do not hold the phone close to your ear during the conversation.
• If your phone is in phone mode you can also answer the call by sliding
the mode switch upwards to go to speakerphone mode.
2. Press
NO
to end the call.
To reject a call
• Press
NO
or double click the volume key (up or down).
MAKING AND RECEIVING CALLS
Page 31

N
o
t
f
o
r
C
o
m
m
e
r
c
i
a
l
U
s
e
E
r
i
c
s
s
o
n
M
o
b
i
l
e
C
o
m
m
u
n
i
c
a
t
i
o
n
s
A
B
28 Speakerphone
Page 32

N
o
t
f
o
r
C
o
m
m
e
r
c
i
a
l
U
s
e
E
r
i
c
s
s
o
n
M
o
b
i
l
e
C
o
m
m
u
n
i
c
a
t
i
o
n
s
A
B
Using the Menu System
30
Your Personal Phone Book
33
Keeping Track of Your Phone Calls
42
Your Voice Mail Service
44
Personalizing Your Phone
46
Sending and Receiving Text Messages (SMS)
53
Diverting Incoming Calls
62
Security for Your Phone and Subscription
64
Setting Network Preferences
70
Handling More than One Call Simultaneously
74
Knowing the Call Time/Call Cost
78
Using Two Phone Lines
81
Calling Card or Credit Card Calls
83
Sending and Receiving Fax and Data calls
85
Some Useful Tools
86
FUNCTIONS AND SETTINGS
Page 33

N
o
t
f
o
r
C
o
m
m
e
r
c
i
a
l
U
s
e
E
r
i
c
s
s
o
n
M
o
b
i
l
e
C
o
m
m
u
n
i
c
a
t
i
o
n
s
A
B
30 Using the Menu System
Using the Menu System
The menu system allows you to control the phone’s functions and to customize it to suit your personal preferences. You use the menu system every time
you want to change a setting in your phone, such as the ring signal.
Each menu contains a list of options. Some menus have sub-menus with additional options.
The menus are arranged in a continuous loop, which you move (scroll)
through with the
LEFT, RIGHT, YES, NO
and
CLR
keys.
Tip! Instead of pressing the
RIGHT
or
LEFT
key repeatedly, you can press
and hold it down until you reach the menu or sub-menu you want.
Note! If you enter the menu system, but do not press a key within 60 seconds,
the phone returns to standby mode.
To select a menu or make a setting
1. Press the
RIGHT
or
LEFT
key until you find the menu or function you
want.
2. Press
YES
to enter the menu or to select the function.
3. Press the
RIGHT
or
LEFT
key to find the sub-menu you want or to select a
setting alternative.
4. Press
YES
to enter the sub-menu or to confirm the setting.
When you move through the menu system, the display changes. The following
hints can help you:
• Capital letters are used to indicate the menu or function selected.
MOVING THROUGH THE MENU SYSTEM
Press… to…
RIGHT
scroll clockwise through menus or functions.
LEFT
scroll anti-clockwise through menus or functions.
YES
select a menu or function, enter a sub-menu.
NO
go back one level in the menu system and/or leave a
setting unchanged.
CLR
go back to the standby display.
DISPLAY TEXT AND SYMBOLS
Page 34

N
o
t
f
o
r
C
o
m
m
e
r
c
i
a
l
U
s
e
E
r
i
c
s
s
o
n
M
o
b
i
l
e
C
o
m
m
u
n
i
c
a
t
i
o
n
s
A
B
Using the Menu System 31
• When L and R are displayed, there are more options you can scroll
through with the
RIGHT
and
LEFT
keys.
• Text in brackets shows the current setting of the function shown in the
display.
In this manual, we have chosen to exclude some of the details above in the
pictures of the displays. This is to make it easier for you understand the display texts in the margins.
Below is an overview of the main menus. Please note that other menus are
available if you subscribe to the two line service and if you have turned on the
Data menus.
To help you understand the instructions in this manual, see the example below
of how to interpret the instructions.
Example:
1. Scroll to
Settin gs
,
YES
,
Key sound
,
YES
.
2. Select the key sound you want and press
YES
.
Interpret This Instruction As Follows:
1. From the standby mode, use the
LEFT
or
RIGHT
keys to scroll to the
Set-
tings
menu.
INTERPRETING THE INSTRUCTIONS IN THE MANUAL
NETWORK
NETWORKNETWORK
NETWORK
06:01
06:0106:01
06:01
MENU
MENUMENU
MENU
LLLL
Ring level
Ring levelRing level
Ring level
RRRR
(
QQQQQqq
QQQQQqqQQQQQqq
QQQQQqq
)
MENU
MENUMENU
MENU
LLLL
Info
InfoInfo
Info
RRRR
MENU
MENUMENU
MENU
LLLL
Mail
MailMail
Mail
RRRR
MENU
MENUMENU
MENU
LLLL
Calculator
CalculatorCalculator
Calculator
RRRR
MENU
MENUMENU
MENU
LLLL
Phone book
Phone bookPhone book
Phone book
RRRR
MENU
MENUMENU
MENU
LLLL
Access
AccessAccess
Access
RRRR
MENU
MENUMENU
MENU
LLLL
Networks
NetworksNetworks
Networks
RRRR
MENU
MENUMENU
MENU
LLLL
Clock
ClockClock
Clock
RRRR
MENU
MENUMENU
MENU
LLLL
Settings
SettingsSettings
Settings
RRRR
MENU
MENUMENU
MENU
LLLL
Divert
DivertDivert
Divert
RRRR
MENU
MENUMENU
MENU
LLLL
Keylock
KeylockKeylock
Keylock
RRRR
On?
On?On?
On?
MENU
LLLL
Settings
RRRR
Page 35

N
o
t
f
o
r
C
o
m
m
e
r
c
i
a
l
U
s
e
E
r
i
c
s
s
o
n
M
o
b
i
l
e
C
o
m
m
u
n
i
c
a
t
i
o
n
s
A
B
32 Using the Menu System
The arrows on either side of the word
Settings
mean that you can scroll to
another menu.
2. Press
YES
to select the
Settin gs
menu.
Now you are in the Settings menu. The name of the menu that you have
chosen is shown in capital letters at the top of the display.
3. Use the
LEFT
or
RIGHT
keys to scroll to the
Key sound
menu.
The current setting is shown in brackets at the bottom of the display.
4. When you find the
Key sound
menu press
YES
to select it.
5. Use the
LEFT
or
RIGHT
key to find the key sound you want.
6. Press
YES
to select the key sound.
7. Press
CLR
to return to standby.
SETTINGS
LLLLEar volumeRRRR
(QQQQq
QQQQqQQQQq
QQQQq)
SETTINGS
LLLLKey soundRRRR
(Click)
KEY SOUND
LLLL Silent RRRR
Page 36

N
o
t
f
o
r
C
o
m
m
e
r
c
i
a
l
U
s
e
E
r
i
c
s
s
o
n
M
o
b
i
l
e
C
o
m
m
u
n
i
c
a
t
i
o
n
s
A
B
Your Personal Phone Book 33
Your Personal
Phone Book
Y our phone has a phone book in which you can store names and numbers. The
phone book also keeps track of your last dialled numbers and, if you subscribe
to the Calling Line Identification service (CLI), the last answered numbers.
Convenient if you have to call someone back. Please see “Keeping Track of
Your Phone Calls” on page 42 for more information.
When you receive a call and the caller’s number and name is stored in the
phone book, you see the name in the display.
If you are planning to use your phone abroad, it is a good idea to store all your
phone numbers with the international (+) sign.
You can store your phone numbers in two different memories:
• the card memory on the SIM card.
• the phone memory.
Every phone number that you store includes a position number, shown in
brackets. If the number is stored in the phone memory (see below) a (¤) is
shown in front of the position number.
Storing your numbers in the card memory allows you to use the numbers
stored on the SIM card even when you change phones, i.e. when you insert
your SIM card into another phone.
On the other hand, by storing your numbers in the phone memory, they are
always available to you on your phone, even if you change SIM cards.
The memory positions in the card memory are numbered from 1 upwards. The
actual number of memory positions available depends on your SIM card.
The phone memory can hold up to 99 phone numbers. The memory positions
are labelled ¤1 – ¤ 99.
Note! In the Phone Book menu, press # to enter the ¤ character. Outside the
‘Phone book’ menu, you must press and hold down # to enter the ¤ character.
PHONE BOOK MEMORIES
JIM
(4)
+123456789
JIM
(¤4)
+81234567890
Page 37

N
o
t
f
o
r
C
o
m
m
e
r
c
i
a
l
U
s
e
E
r
i
c
s
s
o
n
M
o
b
i
l
e
C
o
m
m
u
n
i
c
a
t
i
o
n
s
A
B
34 Your Personal Phone Book
If you are using a SIM Pro card, see “GSM Pro” on page 90. Some storing
positions on the SIM card may be used by your service administrator. This
means that you may not be allowed to edit, store or erase these positions. For
more information, please contact your service administrator.
International Numbers
If you intend to use your phone both at home and abroad, you should store all
phone numbers as international phone numbers, that is with the ‘+’ sign –
which replaces the international dialling prefix for the country you are calling
from – followed by the country code, then the area code and the phone
number.
• To enter the ‘+’ sign, press and hold 0.
• Omit the leading zero in the area code.
You can only enter letters when you are using the phone book and when you
are composing text messages (e.g. SMS), see “Sending and Receiving Text
Messages (SMS)” on page 53.
Press the appropriate key, 1–9, 0 or #, repeatedly until the character you want
appears in the display.
Example
• To enter an A, press 2 once.
• To enter a B, press 2 twice.
• To enter lower case letters. Enter the letter , e.g. an ‘A’. Then press *, an ‘a’
appears. Lower case letters will now appear until you press * again.
ENTERING LETTERS
Press… to get…
1 Space - ? ! ‚ . : " ’ ( ) 1;<=>
2A B C Å Ä Æ à Ç 2 Γ
3D E F è É 3 ∆ Φ
4G H I ì 4
5 J K L 5 Λ
6M N O Ñ Ö Ø ò 6
7P Q R S ß 7 Π Σ
8T U V Ü ù 8
9W X Y Z 9
0 0 + & @ / $ % £ Θ Ξ Ψ Ω ¤ ¥ § ¿ ¡
## *
Page 38

N
o
t
f
o
r
C
o
m
m
e
r
c
i
a
l
U
s
e
E
r
i
c
s
s
o
n
M
o
b
i
l
e
C
o
m
m
u
n
i
c
a
t
i
o
n
s
A
B
Your Personal Phone Book 35
• To enter the second letter on the numeric keys straight away, e.g. a ‘B’,
press and hold the volume key upwards, then press 2. To enter the third
letter, e.g. a ‘C’, press and hold the volume key downwards, then press 2.
• To enter a digit press and hold the desired key.
• To erase letters to the left of the cursor press
CLR
.
1. Scroll to
Phone book
,
YES
,
Store
,
YES
.
2. Enter a name to accompany the phone number.
3. Press
YES
.
4. Enter the phone number.
5. You now have four options:
• Press
YES
to save the number in the card memory, in the first empty
position (displayed in the top right-hand corner).
• To save the number in the card memory, in a position you decide:
press the
RIGHT
key, enter the position and then press
YES
.
• To save the number in the phone memory, in the first empty position:
press the
RIGHT
key, press the # key twice and then press
YES
.
• To save the number in the phone memory, in a position you decide:
press the
RIGHT
key, press the # key once, enter the position and then
press
YES
.
Tip! If you enter a number in the scratch pad during a call, you can store it in
the Phone Book by selecting Store from the Phone Book menu while you have
the number in the display.
Telephone Banking Services
To use telephone banking services or control a telephone answering machine,
you need to use codes. These codes are sent as tone signals (also called DTMF
tones or touch tones).
To store a number together with an account number and security code
1. Scroll to
Phone book
,
YES
,
Store
,
YES
.
2. Enter a name to accompany the phone number.
Use the numeric keys as described above.
3. Press
YES
.
4. Enter the phone number.
5. After entering the phone number, press and hold the * key until the pause
character
p
appears.
6. Enter the code. If needed, insert another pause, another code and so on.
7. Press
YES
to store.
STORING A NUMBER TOGETHER WITH A NAME
STORE 19
Name: John Doe
STORE 19
Name: John Doe
Enter no: 0123456
STORE ¤15
Name: John Doe
Enter no: 0123456
STORE 34
Bankbyphone
012345678p
Page 39

N
o
t
f
o
r
C
o
m
m
e
r
c
i
a
l
U
s
e
E
r
i
c
s
s
o
n
M
o
b
i
l
e
C
o
m
m
u
n
i
c
a
t
i
o
n
s
A
B
36 Your Personal Phone Book
To make a call with tone signal codes, proceed as described in “Making and
Receiving Calls” on page 19. When you make the call, the phone dials the
number, waits until the call is answered and then sends the code. If you
inserted another pause and another code, it pauses again, sends the next code
and so on.
If you try to store a phone number in a position which already contains a
phone number, the message
Used Overwrite?
appears in the display. You then
have two options.
To store the number in the selected position
• Press
YES
to replace the number with the new one.
To store the number in a different position
1. Press
NO
.
2. Enter the new position number and press
YES
.
When a Memory is Full
If you try to store a phone number, e.g. in the phone memory , and the memory
you want to store it in is full, the phone suggests a position number in the
memory that is not full, in this case the card memory.
When Both Memories are Full
If both memories are full, no position number is suggested. If you still wish to
store the phone number, you have to erase an old number by entering a position number that is already occupied.
To erase a phone number from the phone book memory
1. Scroll to
Phone book
,
YES
,
Erase
,
YES
.
2. Enter or scroll to the position number you want to erase.
3. Press
YES
to erase the number.
Tip! You can also recall the number you want to erase by using Name recall
or Position recall. When the name appears, press and hold
CLR
.The message
Erase?
appears in the display. Press
YES
to erase the number.
To erase all numbers from the phone memory
1. Scroll to
Phone book
,
YES
,
Erase all from phone
,
YES
.
The message Erase 30 ¤ pos ition s?
appears in the display, where the number
indicates the total number of entries stored in the phone memory.
2. To erase all phone numbers from the phone memory, press
YES
.
Note! It is not possible to erase all phone numbers from the card memory.
OVERWRITE PROTECTION
STORE 2
Used
Overwrite?
ERASE 19
LLLL John Doe RRRR
Erase?
ERASE ALL
Erase 30
¤
positions?
Page 40

N
o
t
f
o
r
C
o
m
m
e
r
c
i
a
l
U
s
e
E
r
i
c
s
s
o
n
M
o
b
i
l
e
C
o
m
m
u
n
i
c
a
t
i
o
n
s
A
B
Your Personal Phone Book 37
Note! If you are using a GSM Pro card (see “GSM Pro” on page 90) some
storing positions on the SIM card may be used by your service administrator.
This means that you may not be allowed to use these positions for storing your
own phone book entries. For more information, please contact your service
administrator.
The Push-To-Talk button on the left side of the phone, (see “Overview” on
page 4), makes it very easy to call a number that you have stored in your
phone book. To call a number , you only need to press the Push-To-Talk button
to enter and scroll through your phone book entries.
To call a number in the phone book using the Push-To-Talk button
1. Press
CLR
to go to standby (if you are not already in standby).
2. Press and hold the
PUSH-TO-TALK
button to enter the phone book and
scroll through the entries until you find the number you want to call.
3. Press
YES
to make the call.
Calling a Number in the Phone Book Using the Keypad
You can also call a number stored in the phone book by recalling the name
stored with it or recalling the memory position that the number is stored in.
To recall a phone number using the name
1. Scroll to
Phone book
,
YES
,
Name recall
,
YES
.
2. Enter the name you want to recall (or the first letters of it) using the
numeric keys as described above.
You do not have to enter the entire name; the first few letters will do. The
phone matches the letters with existing names in its memory.
3. Press
YES
.
The best match between the letters you entered and the names in the Phone
Book is displayed. You can also see the storage position in brackets.
4. If the name displayed is not the one you want, press the
LEFT
or
RIGHT
key until you find the correct name and number.
5. Press
YES
to make the call.
Tip! You can also enter the name directly after pressing LEFT from the empty
standby display.
If you know the memory position in which you have stored a certain phone
number, you can recall the number by using the position.
USING THE PHONE BOOK
NAME
RECALL
Name: SUE
SUE
LLLL (6) RRRR
012345678900
Page 41

N
o
t
f
o
r
C
o
m
m
e
r
c
i
a
l
U
s
e
E
r
i
c
s
s
o
n
M
o
b
i
l
e
C
o
m
m
u
n
i
c
a
t
i
o
n
s
A
B
38 Your Personal Phone Book
To recall a phone number using the position
1. Scroll to
Phone Book
,
YES
,
Position recall
,
YES
.
2. Enter the position number of the stored phone number.
For a position in the card memory, simply enter the number. For a position
in the phone memory, press and hold the # key until the ‘¤’ character
appears and then enter the number.
3. Press
YES
.
The name and phone number now appear in the display.
If you entered the wrong position number, press the
LEFT
or
RIGHT
key
repeatedly until you find the phone number you want.
4. Press
YES
to call the number.
Tip! You can also enter the position directly in the standby display and then
press the # key to recall the phone number. Do not forget the ‘¤’ before the
position if the number is stored in the phone memory (to get the ‘¤’ character,
press and hold the # key).
The Speed Dialling Facility
You can call the phone numbers that you store in positions 1–9 in the card
memory by entering the position number and then pressing
YES
. It is a good
idea to save positions 1–9 for important numbers.
Example:
To call Bob, whose number is stored in position 3 in the card memory:
1. Enter the number 3.
2. Press
YES
.
Sometimes people change their names, their phone numbers or even both. To
get the best use out of your phone book, you want the names and numbers to
be correct. They are easily changed with the Edit feature. If someone has
changed both name and number, it might be easier to overwrite the old storage
position with the new one, instead of changing both name and number
separately.
Note! If you are using a SIM Pro card you may not be allowed to edit the
phone numbers that your service administrator are using.
There are two ways of finding the Phone Book entry you wish to edit. Y ou can
use either the storage position or the name.
KEEPING THE PHONE BOOK UP TO DATE
NAME
RECALL
Position: 6
SUE
LLLL (6) RRRR
012345678900
Page 42

N
o
t
f
o
r
C
o
m
m
e
r
c
i
a
l
U
s
e
E
r
i
c
s
s
o
n
M
o
b
i
l
e
C
o
m
m
u
n
i
c
a
t
i
o
n
s
A
B
Your Personal Phone Book 39
To edit an entry using the position
1. Scroll to
Phone book
,
YES
,
Edit
,
YES
,
Find pos
.
2. Enter the position number for the entry you wish to edit.
For a position in the card memory, simply enter the number. For a position
in the phone memory, press and hold the # key until the ‘¤’ character
appears and then enter the number.
3. Press
YES
.
You will now see:
• the name (displayed in the middle row)
• the phone number (displayed in the bottom row)
• the storage position (displayed in the top row)
4. To select the row you wish to edit, press the
RIGHT
key.
You see the cursor to the right of the row you selected.
5. Edit the row by using:
• the
CLR
key to erase
• the numeric keys to enter letters or digits
• the
LEFT
key to move the cursor left (or the
RIGHT
key to move the
cursor right when it is positioned in a row)
6. If needed, press the
RIGHT
key to select another row and continue editing.
7. To save the changes, press
YES
.
To edit an entry using the name
1. Scroll to
Phone book
,
YES
,
Edit
,
YES
,
Find name
,
YES
.
2. Enter the name for the entry you wish to edit, using the numeric keys. The
more letters you enter, the better the match.
3. To select the entry, press
YES
.
4. You can now continue from step 4 as described above.
If you want to change SIM card or phone, it is a good idea to copy the phone
book entries stored on your SIM card to the phone memory or vice versa.
Then you can easily copy the phone book back to the memory of your choice.
Also, as you fill up the phone book memories, you might want to move entries
from one memory to another.
To copy all numbers from card memory to phone memory
1. Scroll to
Phone book
,
YES
,
Copy all
,
YES
.
2. Select
Card
rrrr
Phone
and press
YES
.
3. Enter the number of the first position in the card memory you wish to copy
to the phone memory and press
YES
.
COPYING PHONE NUMBERS BETWEEN MEMORIES
EDIT
LLLL Find pos RRRR
Position 6
EDIT 6
BOB
012345678900
EDIT
LLLL Find name RRRR
Name BOB
COPY ALL
LLLL CardrrrrPhone RRRR
COPY CARD
From start
Position: _
Page 43

N
o
t
f
o
r
C
o
m
m
e
r
c
i
a
l
U
s
e
E
r
i
c
s
s
o
n
M
o
b
i
l
e
C
o
m
m
u
n
i
c
a
t
i
o
n
s
A
B
40 Your Personal Phone Book
4. Enter the number of the first position in the phone memory you wish to
copy to and press
YES
.
The message
Old pos will be erased Start copy?
appears in the display.
5. Press
YES
to start copying.
Note! If you are using a SIM Pro card the menu “Copy all Card
r
Phone” may
not be available.
To copy all numbers from the phone memory to the card memory
1. Scroll to
Phone book
,
YES
,
Copy all
,
YES
.
2. Select
Phone
rrrr
Card
and press
YES
.
3. Enter the number of the first position in the card memory you wish to copy
to the phone memory and press
YES
.
4. Enter the number of the first position in the phone memory you wish to
copy to and press
YES
.
The message
Old pos will be erased Start copy?
appears in the display.
5. Press
YES
to start copying.
To copy numbers from card memory to phone memory one by one
1. Scroll to
Phone book
,
YES
Copy
,
YES
.
2. Select
CardrPhone
and press
YES
.
3. Enter the number of the first position in the card memory you wish to copy
and press
YES
.
4. Enter the number of the first position in the phone memory you wish to
copy to and press
YES
.
5. Press
YES
to start copying.
The starting position in the card memory is displayed and the next empty
position in the phone memory is suggested.
6. To continue copying, press one of the following:
•
YES
to copy.
•
NO
to go to the next position in the card memory.
•
CLR
to copy to another position in either the card or phone memory.
Enter the number of the position and press
YES
.
• The
LEFT
and
RIGHT
key to move between positions in the card
memory.
To interrupt copying
• Press
CLR
twice.
COPY ALL
LLLL
Phone
rrrr
Card
RRRR
COPY PHONE
From start
Position: ¤_
COPY
LLLL
Card
rrrr
Phone
RRRR
BOB
6
Copy to ¤29
Page 44

N
o
t
f
o
r
C
o
m
m
e
r
c
i
a
l
U
s
e
E
r
i
c
s
s
o
n
M
o
b
i
l
e
C
o
m
m
u
n
i
c
a
t
i
o
n
s
A
B
Your Personal Phone Book 41
To copy numbers from phone memory to card memory one by one
1. Scroll to
Phone book
,
YES
,
Copy
,
YES
.
2. Select
Phone rcard
and press
YES
.
To copy from the phone memory to the card memory use the
YES, NO
and
CLR
keys as described in “To copy numbers from card memory to phone
memory one by one” above.
Page 45

N
o
t
f
o
r
C
o
m
m
e
r
c
i
a
l
U
s
e
E
r
i
c
s
s
o
n
M
o
b
i
l
e
C
o
m
m
u
n
i
c
a
t
i
o
n
s
A
B
42 Keeping Track of Your Phone Calls
Keeping Track of Your
Phone Calls
If you subscribe to the Calling Line Identification service, and the caller’s network sends the number, the numbers of the last ten answered calls are stored
in the phone memory.
To recall one of the last ten answered numbers
1. Scroll to
Phone book
,
YES
,
Answered calls
,
YES
.
2. Select the number you want to call.
3. Press
YES
to make the call.
To clear the answered calls memory
1. Scroll to
Phone book
,
YES
,
Answered calls
,
YES
.
2. Press
CLR
.
The question
Erase all?
appears.
3. Press
YES
to erase all numbers from the answered calls memory.
If you have received calls but have been unable to answer, the number of
missed calls is shown in the display in standby mode until you press
CLR
.
Information about the ten last missed calls is saved in the phone memory,
which makes it possible for you to see when the calls were received. If your
subscription includes the Calling Line Identification service and the caller’s
network sends the number, you can also find out who called. If you have
stored the number together with a name in the phone book the name also
appears. See “Your Personal Phone Book” on page 33.
To find out who called and when
1. Scroll to
Mail
,
YES
,
Missed calls
,
YES
.
The last caller’s number (if your subscription includes the Calling Line
Identification service) is now shown in the display together with the time
CALLING SOMEONE WHO HAS CALLED YOU
UNANSWERED CALLS
ANSWERED 1
LLLLR
RR
R
123456789
Erase
all?
4444 NETWORK 7777
2222 Calls:2 8888
15:49
MENU
LLLL Mail RRRR
MISSED CALLS
LLLL 16:01 RRRR
123456789
Page 46

N
o
t
f
o
r
C
o
m
m
e
r
c
i
a
l
U
s
e
E
r
i
c
s
s
o
n
M
o
b
i
l
e
C
o
m
m
u
n
i
c
a
t
i
o
n
s
A
B
Keeping Track of Your Phone Calls 43
(or date) when the call was received. If no information about the caller’s
number was received, the display shows one of the following:
•
Unidentified
, which means that no information was available.
•
Restricted
, which means that the caller wanted to withhold the number.
2. To see your other unanswered calls, press the
LEFT
or
RIGHT
arrow key
repeatedly.
3. Press
NO
to return to the
Missed calls
menu.
Note! If you check a missed call the same day as you received it, the time of
the call is displayed. Otherwise, the time is replaced by the date. You can toggle between date and time by pressing *.
To call a number from the missed calls list
1. Scroll to
Mail
,
YES
,
Missed calls
,
YES
.
2. Select the number you want to call and press
YES
.
3. Press
NO
to end the call.
To erase a number from the missed calls memory
1. Scroll to
Mail
,
YES
,
Missed Calls
,
YES
.
2. Select the number you want to erase and press
CLR
.
The question
Erase?
appears in the display.
3. Press
YES
to erase the number.
MISSED CALLS
LLLL 19-02-99 RRRR
Unidentified
Page 47

N
o
t
f
o
r
C
o
m
m
e
r
c
i
a
l
U
s
e
E
r
i
c
s
s
o
n
M
o
b
i
l
e
C
o
m
m
u
n
i
c
a
t
i
o
n
s
A
B
44 Your Voice Mail Service
Your Voice Mail Service
Note! Not all operators have this service. The service also depends on your
subscription.
The answering service of your network allows callers to leave a voice message when you cannot answer your calls. When you receive a voice mail, an
alert signal sounds, if turned on, and the voice mail icon appears in the display.
Whenever you have a waiting voice mail waiting for you a Tt symbol is
shown at the bottom of the display.
Further information about the use of the answering service is found in the
information supplied by your network operator.
Note! Some operators may inform you of a waiting voice mail by sending a
SMS (see “Sending and Receiving Text Messages (SMS)” on page 53).
On most SIM cards the number to the Voice mail service is stored on the SIM
card. If the number cannot be retrieved from your SIM card, you need to enter
the phone number yourself.
To enter the phone number to the voice mail service
1. Scroll to
Mail
,
YES
,
Set VoiceM
,
YES
,
New number
,
YES
.
2. If no number appears, enter the new number.
3. Press
YES
to confirm your new number.
To enable the Voice mail function on your phone
1. Scroll to
Mail
,
YES
,
Set VoiceM
,
YES
.
2. Select
On
and press
YES
.
When you receive a voice mail, this is indicated in the display by the message
Voicema il Ch ec k?
. You can now check your message by pressing
YES
.
If you press
NO
, you can call the answering service at any time later on to lis-
ten to your recorded messages. To do this:
ENABLING THE VOICE MAIL FUNCTION
CALLING YOUR VOICE MAIL
4444
Voicemail
7777
22228
88
8
Check?
4444
NETWORK
7777
22228
88
8
Tt
TtTt
Tt
19:09
Page 48

N
o
t
f
o
r
C
o
m
m
e
r
c
i
a
l
U
s
e
E
r
i
c
s
s
o
n
M
o
b
i
l
e
C
o
m
m
u
n
i
c
a
t
i
o
n
s
A
B
Your Voice Mail Service 45
• Scroll to
Mail
,
YES
,
Voice mail,
YES
.
The phone automatically calls your voice mail. Follow the instructions
given to you by your operator’s answering service.
Tip! You can also call your voice mail number by pressing and holding 1 in
standby mode.
To change your voice mail number
1. Scroll to
Mail
,
YES
,
Set VoiceM
,
YES
,
New number
,
YES
.
2. Enter the new number and press
YES
.
To change the voice mail alert signal
1. Scroll to
Settin gs
,
YES
,
Ma il Ale rt
,
YES
.
2. Select the alert signal you want and press
YES
.
To turn the voice mail off
1. Scroll to
Mail
,
YES
,
Set VoiceM
,
YES
.
2. Select
Off
and press
YES
.
Page 49

N
o
t
f
o
r
C
o
m
m
e
r
c
i
a
l
U
s
e
E
r
i
c
s
s
o
n
M
o
b
i
l
e
C
o
m
m
u
n
i
c
a
t
i
o
n
s
A
B
46 Personalizing Your Phone
Personalizing
Your Phone
The Settings menu includes a number of functions which lets you adapt your
phone to your own personal preferences. Some of the settings are only
affected if you have external equipment (e.g. handsfree equipment) connected
to your phone.
Most modern SIM cards automatically set the display language to the language of the country where you bought your SIM card. If this is not the case
the default language is English.
To change the display language
1. Scroll to
Settin gs
,
YES
,
Language
,
YES
.
The currently selected language is shown in brackets.
2. Select the language you want and press
YES
.
Note! If by accident you end up with a language you do not understand, you
can return to English by pressing
LEFT
0000
RIGHT
at any time.
The R250s PRO is equipped with an Alert button located on the top of the
phone, next to the antenna (see “Overview” on page 4). By pressing and holding the alert button you can easily set up a call to a pre-defined alert number,
without having to dial the number in the ordinary way.
When you buy your phone, the alert number (when using the Alert button) is
set to the international emergency number 112. This number can be changed,
if you prefer to use another alert number.
Note! If you change the pre-set alert number (112), you must insert a SIM
card and enter the PIN code (if the card is locked). Otherwise the pre-set alert
number (112) will be dialled and not the number you have specified.
You must turn on the alert function before you can use the alert button. When
you buy your phone the alert button is activated.
DISPLAY LANGUAGE
ALERT BUTTON
SETTINGS
LLLL Language RRRR
(Auto)
SETTINGS
LLLL Alert key RRRR
Page 50

N
o
t
f
o
r
C
o
m
m
e
r
c
i
a
l
U
s
e
E
r
i
c
s
s
o
n
M
o
b
i
l
e
C
o
m
m
u
n
i
c
a
t
i
o
n
s
A
B
Personalizing Your Phone 47
To turn the Alert button on or off
1. Scroll to
Settin gs
,
YES
,
Alert key
,
YES
.
2. Select
On
or
Off
and press
YES
.
To change the alert number
1. Scroll to
Phone book
,
YES
,
Alert number
,
YES
.
2. Edit the number in the same way that you edit other phone book entries.
You can also associate a name with the alert number. See “Your Personal
Phone Book” on page 33
3. Press
YES
to confirm your new alert number.
Note! If fixed dialling is activated, the alert number must be included in this
list. If it is not included, you cannot use the alert button to make an alert call.
However, if the alert number is the international emergency number 112 you
do not have to include it in the fixed dialling list. For more information about
fixed dialling, see “Fixed Dialling and Fixed Incoming Calls” on page 68.
There are two separate volume settings for your phone, depending on which
mode, Phone or Speakerphone, you have currently selected. The mode currently selected is displayed in the middle row when you enter the Ear volume
menu.
You can have independent volume settings when you use the phone together
with different handsfree equipment. This means that if you set the earpiece
volume when the phone is connected to handsfree equipment, the volume setting when the phone is handheld is not affected and vice versa.
Note! If you are using a SIM Pro card there will be a volume setting for the
Push-to-talk mode instead of the speakerphone mode. See “Earpiece volume”
on page 91.
To set the earpiece volume
1. Scroll to
Settin gs
,
YES
,
Ear volume
,
YES
.
The current mode,
Phone
or
Speakerphone
, is displayed in the middle row.
2. Use the
LEFT
key to decrease the volume.
Use the
RIGHT
key to increase the volume.
3. Press
YES
to confirm your volume setting.
Tip! During a call you can use the volume keys at the side of the phone to
adjust the volume.
Note! When you switch the phone to Speakerphone mode (or Push-to-talk
mode) the loudspeaker volume increases significantly. Do not hold the phone
EARPIECE VOLUME
ALERT KEY
LLLL On RRRR
PHONE BOOK
Alert
LLLL Number RRRR
EAR VOLUME
SPEAKER
LQQQQQqqqR
LQQQQQqqqRLQQQQQqqqR
LQQQQQqqqR
Page 51

N
o
t
f
o
r
C
o
m
m
e
r
c
i
a
l
U
s
e
E
r
i
c
s
s
o
n
M
o
b
i
l
e
C
o
m
m
u
n
i
c
a
t
i
o
n
s
A
B
48 Personalizing Your Phone
close to your ear during a conversation as it may cause damage to your hearing. For more information, see “Speakerphone” on page 26.
You can set the ring signal level in seven steps. The first step means that two
clicks are heard when you receive a call. The last step means that the phone
rings with an increasing ring signal.You can also turn the ring signal off. The
Ring level setting allows you to specify the level:
• when the phone is handheld.
• when the phone is connected to handsfree equipment.
To set the ring signal level
1. Scroll to
Ring level
,
YES
,
Buzzer
,
YES
.
2. Use the
LEFT
and
RIGHT
key to set the ring signal level.
• Pressing
RIGHT
increases the volume.
• Pressing
LEFT
decreases the volume.
The phone rings once with the actual setting as you increase the volume, except for the Off and Step settings.
3. Press
YES
to save the setting.
Tip! Use the side keys to change the ring level silently.
If you turn the Vibrating call alert on the phone vibrates when you receive a
call or a text message. This is useful when you e.g. are working in a noisy
environment and cannot hear the phone ringing.
To turn the vibrating call alert on or off
1. Scroll to
Ring level
,
YES
,
Vibrator
,
YES
.
2. Select
On
or
Off
and press
YES
.
Note! You can choose to have both the buzzer and the vibrating call alert on
at the same time.
You can choose a ring type from a list of different sounds and melodies. You
can also compose your own melody by entering notes with the keypad (see
“Composing your own melody” below).
To choose one of the ring signal types
1. Scroll to
Settin gs
,
YES
,
Ring type
,
YES
.
The current ring signal type is displayed.
2. Select the ring signal type you want and press
YES
.
RING SIGNAL VOLUME
VIBRATING CALL ALERT
RING SIGNAL TYPE
RING LEVEL
LLLL Buzzer RRRR
LQQQQqqqR
LQQQQqqqRLQQQQqqqR
LQQQQqqqR
RING LEVEL
LLLL Vibrator RRRR
(Off)
RING TYPE
LLLL Phone RRRR
(Medium)
Page 52

N
o
t
f
o
r
C
o
m
m
e
r
c
i
a
l
U
s
e
E
r
i
c
s
s
o
n
M
o
b
i
l
e
C
o
m
m
u
n
i
c
a
t
i
o
n
s
A
B
Personalizing Your Phone 49
Note! If the Data menus are set to on (See “Sending and Receiving Fax and
Data calls” on page 85), you can set the ring signal type for speech (the display shows ‘Phone’ in the middle row), fax and data calls respectively. If you
have the Two Line service, see “Using Two Phone Lines” on page 81), you
can also set different ring types for the two lines.
You can compose a melody of your own to use as your ring signal.
To compose your own ring signal
1. Scroll to
Settin gs
,
YES
,
Edit Me lod y
,
YES
.
2. Use the numeric keys to enter notes.
3. Press
YES
to listen to the melody.
The question
Ready?
appears in the display.
4. If you want to save the melody press
YES
to save it. If not, press NO and
continue editing.
You can choose whether to hear clicks, the mixed ring signal or nothing
(silent) when you receive a text or voice message, i.e. a SMS.
To set the message signal
1. Scroll to
Settin gs
,
YES
,
Mail alert
,
YES
.
2. Select the sound you want to hear when you receive a message.
3. Press
YES
to confirm your selection.
When the minute minder is activated, you hear a beep once every minute
while you are on the phone.
To turn on/off the minute minder
1. Scroll to
Settin gs
,
YES
,
Min minder
,
YES
.
2. Select
On
or
Off
and press
YES
.
You can choose whether to hear clicks, tones or nothing (silent) when you
press the keys.
To set a key sound
1. Scroll to
Settin gs
,
YES
,
Key sound
,
YES
.
2. Select the key sound you want and press
YES
.
Note! The only sound available for the volume keys is the click sound.
COMPOSING YOUR OWN RING SIGNAL
MESSAGE SIGNAL
MINUTE MINDER
KEY SOUND
SETTINGS
LLLL Mail Alert RRRR
(Click)
SETTINGS
LLLL Min minder RRRR
(Off)
KEY SOUND
LLLL Click RRRR
Page 53

N
o
t
f
o
r
C
o
m
m
e
r
c
i
a
l
U
s
e
E
r
i
c
s
s
o
n
M
o
b
i
l
e
C
o
m
m
u
n
i
c
a
t
i
o
n
s
A
B
50 Personalizing Your Phone
The display light can be set to automatic, off or on. In automatic mode, the
display light is turned off automatically 20 seconds after the last key is
pressed. It is turned on again when a key is pressed or when a call or message
is received.
To set the display light
1. Scroll to
Settin gs
,
YES
,
Light
,
YES
.
2. Select the display light setting you want and press
YES
.
Note! Y ou can have one setting when the phone is used as a handheld unit and
another when the phone is used with a handsfree kit, powered from an external source. E.g. if you place the phone in a vehicle handsfree holder, you can
set the display light so that it is always on.
When you turn on your phone, a greeting text appears in the display. Instead
of the default greeting, you can have your phone display a welcome greeting
that you write yourself. However, some operators may not allow the greeting
text to be changed.
To enter your own greeting
1. Scroll to
Settin gs
,
YES
,
Greeting
,
YES
,
New text
,
YES
.
2. Enter your new greeting, using the numeric keys. For information on how
to enter letters, see “Entering Letters” on page 34.
3. Press
YES
to confirm your new greeting text.
To turn the Greeting text on/off
1. Scroll to
Settin gs
,
YES
,
Greeting
,
YES
.
2. Select
On
or
Off
and press
YES
.
When you turn on your phone, your phone number will be displayed, provided
it can be retrieved from your SIM card. If not, you can enter it yourself.
To enter your phone number
1. Scroll to
Settin gs
,
YES
,
Phone no
,
YES
.
2. Enter your phone number.
3. Press
YES
to confirm your choice.
Note! If your SIM card allows it, you can also enter your fax and/or data
number.
DISPLAY LIGHT
GREETING TEXT
PHONE NUMBER DISPLAY
SETTINGS
LLLL Light RRRR
(Auto)
GREETING
LLLL New text RRRR
(Welcome)
NUMBER
LLLL Phone no RRRR
()
Page 54

N
o
t
f
o
r
C
o
m
m
e
r
c
i
a
l
U
s
e
E
r
i
c
s
s
o
n
M
o
b
i
l
e
C
o
m
m
u
n
i
c
a
t
i
o
n
s
A
B
Personalizing Your Phone 51
The Clock menu lets you set the time and date. It also lets you turn on the
alarm function (see “Alarm” on page 86). The time is shown continuously at
the bottom of the display when the phone is in standby mode.
When you buy your phone, the time is set to the 24-hour format. If you wish
you can change it to the 12-hour format.
To change the time format
1. Scroll to
Clock
,
YES
,
Clock mode
,
YES
.
2. Select the clock mode you want,
24 hours
or
AM/PM
.
3. Press
YES
.
To set the clock
1. Scroll to
Clock
,
YES
,
Set Clock
,
YES
.
2. Enter the time in hours and minutes.
3. Press
YES
.
Note! If you select the 12-hour format in the ‘Clock mode’ function, you can
alternate between am and pm by pressing #.
The Date
It is possible to have the date displayed in the middle row of the display when
the phone is in standby mode.
To set the date
1. Scroll to
Clock
,
YES
,
Set d ate
,
YES
.
2. Enter the year (two digits) and press
YES
.
3. Enter the month and day in the same way.
4. Press
YES
.
To set the date format
1. Scroll to
Clock
,
YES
,
Date mode
,
YES
.
2. Select the date format you want, or select
Off
if you do not want the date to
be displayed.
3. Press
YES
.
It is possible to reset all menu settings to the way they were when you bought
your phone. To reset all settings you must enter the Phone lock code. The
default code when you buy your phone is 0000. For more information, see
“Security for Your Phone and Subscription” on page 64.
TIME AND DATE
MASTER RESET
CLOCK
LLLL Clock mode RRRR
(24 hours)
SET CLOCK
(18:39)
_ –:– –
SET DATE
Enter year:
_
CLOCK
LLLL Date mode RRRR
(08-feb-99)
SETTINGS
master
LLLL Reset RRRR
Page 55

N
o
t
f
o
r
C
o
m
m
e
r
c
i
a
l
U
s
e
E
r
i
c
s
s
o
n
M
o
b
i
l
e
C
o
m
m
u
n
i
c
a
t
i
o
n
s
A
B
52 Personalizing Your Phone
To reset all settings
1. Scroll to
Settin gs
,
YES
,
Master reset
,
YES
.
2. Enter the phone lock code. (The default code is 0000.)
3. Press
YES
to reset all settings.
Enter code
to reset
Page 56

N
o
t
f
o
r
C
o
m
m
e
r
c
i
a
l
U
s
e
E
r
i
c
s
s
o
n
M
o
b
i
l
e
C
o
m
m
u
n
i
c
a
t
i
o
n
s
A
B
Sending and Receiving Text Messages (SMS) 53
Sending and Receiving
Text Messages (SMS)
The Short Message Service (SMS) allows you to send and receive text messages consisting of up to 160 characters. If your phone is turned off when a
message is sent to you, an envelope icon lets you know you have a message
when you turn your phone back on.
To be able to reply to received messages and send your own messages, the
number to your network service centre must be set. If your SIM card does
not contain the phone number to your network service centre, you must specify the number yourself. See “Enable the Phone to Send SMS” on page 54.
Note! The Short Message Service may not be available in all networks. Some
network operators may only allow SMS to be sent within their own network.
The phone has two memories for storing messages, the phone memory and the
card memory.
The Phone Memory
If you do not want to read an incoming message at once, it is automatically
stored in the phone memory. This allows you to read it later on.
If there are any unread messages in the messages memory, a letter icon (Mm)
appears in the bottom left of the display.
The phone memory can hold up to 10 messages. When all memory positions
are full, the oldest read message is overwritten when a new message is
received. If the phone memory becomes full of unread messages, new messages are automatically stored in the SIM card memory. If the SIM card memory becomes full, the letter icon (Mm) starts blinking.
Messages remain in the phone memory until you erase them (see “Erasing a
Message” on page 57), until you insert a different SIM card, or until the telephone needs the memory space to store new messages.
THE TWO MEMORIES
Page 57

N
o
t
f
o
r
C
o
m
m
e
r
c
i
a
l
U
s
e
E
r
i
c
s
s
o
n
M
o
b
i
l
e
C
o
m
m
u
n
i
c
a
t
i
o
n
s
A
B
54 Sending and Receiving Text Messages (SMS)
The SIM Card Memory
If you receive an important message and want to make sure it is not erased
from the phone memory, you can store it in a memory on your SIM card. This
means that you can retrieve the message regardless of which phone you use.
Messages that are saved in the SIM card memory remain there until you erase
them. If the SIM card memory becomes full, the letter icon (Mm) starts
blinking.
If the phone number to your network service centre cannot be retrieved from
your SIM card, you must specify the number yourself. Otherwise you cannot
reply to received messages or send your own messages.
To set the number to your Network service centre
1. Scroll to
Mail
,
YES
,
Send message
,
YES
,
Options
,
YES
.
2. Select
Serv cent
and press
YES
.
3. If there is no number in the display enter the number of the service centre,
including the international (+) sign and press
YES
.
4. To return to standby mode, press
CLR
.
Your phone is now ready to send and receive text messages.
Note! Some network operators may only allow SMS to be sent within their
own network.
In order to compose your message, you have to know how to enter characters
using the numeric keys.
ENABLE THE PHONE TO SEND SMS
COMPOSING A TEXT MESSAGE
Press… to get…
1 Space - ? ! ‚ . : " ’ ( ) 1;<=>
2A B C Å Ä Æ à Ç 2 Γ
3D E F è É 3 ∆ Φ
4G H I ì 4
5 J K L 5 Λ
6M N O Ñ Ö Ø ò 6
7P Q R S ß 7 Π Σ
8T U V Ü ù 8
9W X Y Z 9
0 0 + & @ / $ % £ Θ Ξ Ψ Ω ¤ ¥ § ¿ ¡
## *
MAIL
Send
LLLL
Message
RRRR
SEND
MESSAGES
LLLL
Message
RRRR
OPTIONS
LLLL
Serv cent
RRRR
(0123456789)
Page 58

N
o
t
f
o
r
C
o
m
m
e
r
c
i
a
l
U
s
e
E
r
i
c
s
s
o
n
M
o
b
i
l
e
C
o
m
m
u
n
i
c
a
t
i
o
n
s
A
B
Sending and Receiving Text Messages (SMS) 55
Press the appropriate key, 1–9, 0 or #, repeatedly until the desired character
appears in the display.
Example:
• To enter an A, press 2 once.
• To enter a B, press 2 twice.
• To enter lower case letters. enter the letter, e.g. an ‘A’. Then press *, an ‘a’
appears. Lower case letters now appear until you press * again.
• To enter the second letter on the numeric keys straight away, e.g. a ‘B’,
press and hold the volume key upwards, then press 2. To enter the third
letter, e.g. a ‘C’, press and hold the volume key downwards, then press 2
• To enter a digit press and hold the desired key.
• To scroll through the text, use the
LEFT
and
RIGHT
keys.
• To erase letters to the left of the cursor press
CLR
.
To check the first characters you have entered:
• Press the
LEFT
key until you reach the characters you want to view.
Note! If there is a pause of more than 120 seconds between entering characters, the phone returns to the standby menu.
1. Scroll to
Mail
,
YES
,
Send message
,
YES
,
New
,
YES
.
An empty display appears.
2. Enter your message. See “Composing a Text Message” above.
3. When you have completed your message, press
YES
.
The message
Request reply?
appears in the display
4. If you want the recipient to reply to the message, press
YES
. If not, press
NO
.
5. Enter the recipient’s phone number or recall it from the phone book.
To access the Phone Book menu press
LEFT
.
6. You now have two options:
• If you want to send the message now, press
YES
.
• If you want to store the message for later use, press
NO
.
The message is now stored in the messages memory.
If you decide to send the message later, you can find it in the Send
message menu. The message is labelled
To S e nd
. For more information
on how to send a stored message see “Frequently Used Messages” on
page 59.
SENDING A TEXT MESSAGE
LLLL New RRRR
Request
reply?
SEND
MESSAGES
LLLLEnter no: RRRR
Page 59

N
o
t
f
o
r
C
o
m
m
e
r
c
i
a
l
U
s
e
E
r
i
c
s
s
o
n
M
o
b
i
l
e
C
o
m
m
u
n
i
c
a
t
i
o
n
s
A
B
56 Sending and Receiving Text Messages (SMS)
Note! The same procedure is used with all types of messages, for example
e-mail, fax etc. Check with your network operator which message types you
can use.
If your message cannot be delivered because the recipient has turned off the
phone, your Service Centre can save your message and send it again later. If
your service centre has not been able to reach the recipient within a specified
time the message will be deleted.
To set the validity period of a message
1. Scroll to
Mail
,
YES
,
Send message
,
YES
,
Options
,
YES
.
2. Select
Valid p er
and press
YES
.
3. Select the duration period you want and press
YES
.
Changing Message Types
The phone is prepared for sending other types of messages. Your network
operator’s Service Centre may offer the facility of converting a text message
into a format, fax, voice, e-mail etc. that suits the equipment that is going to
receive the message.
Please contact your operator for further information about the formats you can
use.
To set the message type
1. Scroll to
Mail
,
YES
,
Send message
,
YES
,
Options
,
YES
.
2. Select
Msg type
and press
YES
.
3. Select the message type you want and press
YES
.
Note! Standard means an ordinary text message (SMS) to other phones. Standard is the default message type.
When you receive a message, you hear a sound, the indicator light on the top
of the phone rapidly flashes green and the message
NewMessage Read now?
,
appears in the display.
To read the message now
1. Press
YES
.
The display shows who the message is from and when it was received.
New
stands for a new unread message.
If the message is older than 24 hours, the time is replaced with the date the
CUSTOMIZING YOUR TEXT MESSAGES
RECEIVING AND READING A MESSAGE
SEND
MESSAGE
LLLL Options RRRR
OPTIONS
LLLL Valid per RRRR
(1 day)
OPTIONS
LLLL Msg type RRRR
(Standard)
4444 NewMessage 7777
22228
88
8
Read now?
New RRRR
17:22
From: llll4567890
Page 60

N
o
t
f
o
r
C
o
m
m
e
r
c
i
a
l
U
s
e
E
r
i
c
s
s
o
n
M
o
b
i
l
e
C
o
m
m
u
n
i
c
a
t
i
o
n
s
A
B
Sending and Receiving Text Messages (SMS) 57
message arrived. However, you can toggle between the date and time by
pressing the * key.
2. Press
YES
to read the first line of the message.
Scroll through the message using the
LEFT
and
RIGHT
keys.
RIGHT
takes you forwards, and
LEFT
takes you backwards through the message.
To move three lines forward, press 3. To move three lines backwards,
press 1. To return to the beginning of the message, press and hold
LEFT
.
3. The message
Reply?
appears after the last line of the message. If the caller
wants you to reply, the displayed message says
Reply Requested Reply?
pro-
vided your network supports this feature.
To read the message later
• Press
NO
when the message
NewMessage Read now?
appears in the display.
The message is stored in the phone memory and a letter icon (Mm) appears
on the left at the bottom of the display. See “Reading Stored Messages” on
page 58.
After reading a message you are asked if you want to reply.
To reply to a message
1. Press
YES
when you see the
Reply?
prompt at the end of the message.
Your display now looks like the picture in the margin.
2. To enter your message, press
YES
and proceed as described in “Sending a
Text Message” on page 55.
If you do not want to reply:
• Press
NO
.
Note! If the sender of the message wants you to reply, the message
Reply
Requested Reply?
, appears instead of
Reply?
.
After reading a message you are asked if you want to reply.
To erase the message
1. Press
NO
when you see the
Reply?
prompt.
The message
Erase?
appears in the display.
2. Press
YES
to erase the message.
The next message automatically appears in the message list.
Note! Y ou can also press
CLR
anywhere within the message to erase it. When
Erase?
appears, press
YES
.
REPLYING TO A MESSAGE
ERASING A MESSAGE
Goodbye!
LLLL
Reply?
LLLL
New
RRRR
Goodbye!
LLLL
Erase?
Page 61

N
o
t
f
o
r
C
o
m
m
e
r
c
i
a
l
U
s
e
E
r
i
c
s
s
o
n
M
o
b
i
l
e
C
o
m
m
u
n
i
c
a
t
i
o
n
s
A
B
58 Sending and Receiving Text Messages (SMS)
All incoming messages are stored temporarily in the phone memory until the
memory space is needed for other purposes, such as storing new messages.
Even so, sometimes you may receive an important message that you want to
store more safely. This is better done in the SIM card memory.
To store a message in the SIM card memory
1. Scroll to the end of the message.
2. When the message
Reply?
appears press NO.
The message
Erase?
appears.
3. Press
NO
again.
The message
Store?
appears.
4. Press
YES
to store the message on the SIM card.
The message is automatically moved from the phone memory to the SIM
card memory.
The display now shows the position of the message. For example, if it is
the third of 10 messages that the phone can store.
Note! If the card memory is full, the text Not stored Mem full appears. In this
case you have to erase one or more messages before you can store any new
messages in the SIM card memory.
Tip! You can also store messages you have composed yourself on the SIM
card. See “Frequently Used Messages” on page59.
1. Scroll to
Mail
,
YES
,
Read messages
,
YES
.
2. Select the message you are looking for.
•
New
stands for a new unread message.
•
Old
stands for a read message.
•
Sent
stands for a sent message.
•
To S e nd
stands message you have written but not sent.
3. Press
YES
and read the message as described in “Receiving and Reading a
Message” on page 56.
Note! If there is a * in front of the message, this means that it is stored on the
SIM card.
• Press
YES
when the number appears in the display.
After the number has been called, the message is considered read and it
remains in the Messages memory.
STORING A MESSAGE
READING STORED MESSAGES
CALLING A PHONE NUMBER FOUND IN A MESSAGE
Goodbye!
LLLL Store?
Stored
on card
3(10)
Page 62

N
o
t
f
o
r
C
o
m
m
e
r
c
i
a
l
U
s
e
E
r
i
c
s
s
o
n
M
o
b
i
l
e
C
o
m
m
u
n
i
c
a
t
i
o
n
s
A
B
Sending and Receiving Text Messages (SMS) 59
If you have one or more messages you use often, you can store them on the
SIM card, to be re-used whenever you want.
Storing Frequently Used Messages
To make sure your standard messages are not erased when the phone memory
becomes full, you should store them in the SIM card memory.
To store a frequently used message on the SIM card
1. Scroll to
Mail
,
YES
,
Read messages
,
YES
.
The messages stored in your Messages memory appear.
2. Select the message you want to store in the SIM card memory.
3. Press
YES
. The message
Erase?
appears in the display.
4. Press
NO
. The message
Store?
appears in the display.
5. Press
YES
.
The message is now moved from the phone memory to the SIM card
memory.
To send a stored message
1. Scroll to
Mail
,
YES
,
Send message
,
YES
.
The message
New
appears in the display.
2. Scroll with the
LEFT
and
RIGHT
keys until you find the message you
want to send.
3. Press
YES
. Now you can edit your message, if you wish.
4. When the message is ready to be sent, press
YES
.
The message
Request reply?
appears.
5. If you want the recipient to reply to the message, press
YES
. If not, press
NO
.
6. Enter the recipient’s phone number or recall it from the phone book. To
access the
Phone book
menu, press
LEFT
.
7. Press
YES
to send the message.
The ordinary Short Message Service is a personal service that carries your
private messages. Area Information (AI) is a text message which is broadcast
to all subscribers in a certain network cell at the same time. The information
may be a local road report or a local taxi phone number.
Before you can receive any area information messages, you have to turn on
the Area information.
FREQUENTLY USED MESSAGES
AREA INFORMATION
SEND
MESSAGES
LLLLEnter no: RRRR
Page 63

N
o
t
f
o
r
C
o
m
m
e
r
c
i
a
l
U
s
e
E
r
i
c
s
s
o
n
M
o
b
i
l
e
C
o
m
m
u
n
i
c
a
t
i
o
n
s
A
B
60 Sending and Receiving Text Messages (SMS)
To turn area information on/off.
1. Scroll to
Mail
,
YES
,
Are a info
,
YES
.
2. Select
On
or
Off
and press
YES
.
You can now receive Area information messages, provided your network
operator supports this function.
Area Information Message Types
Each type of Area Information message is identified by a three-digit code. At
present, the following message types exist:
Note! These codes are operator dependent. For information about the AI ser-
vices you can use, please refer to the information supplied by your network
operator.
Area Information Message List
Y ou can decide which types of area information messages you wish to receive.
The phone’s “Area Info” list can hold up to 20 codes.
To insert an Area information code
1. Scroll to
Mail
,
YES
,
Are a info
,
YES
.
2. Select
Edit list
and press
YES
.
The digits to the left indicate the position in the list. You can scroll forwards and backwards through the list with the
LEFT
and
RIGHT
keys.
Code: AI Message Type:
000 Index
010 Newsflashes
020 Hospitals
022 Doctors
024 Pharmacies
030 Long-distance road reports
032 Local road reports
034 Taxis
040 Weather
050 District (base station identity)
052 Network information
054 Operator services
056 Directory enquiries (national)
057 Directory enquiries (international)
058 Customer care (national)
059 Customer care (international)
Page 64

N
o
t
f
o
r
C
o
m
m
e
r
c
i
a
l
U
s
e
E
r
i
c
s
s
o
n
M
o
b
i
l
e
C
o
m
m
u
n
i
c
a
t
i
o
n
s
A
B
Sending and Receiving Text Messages (SMS) 61
3. To insert a code, scroll to the first empty location, using the
LEFT
or
RIGHT
key and press
YES
.
4. Enter the new code. (You only need to enter 40 for 040, since the phone
adds the leading zero automatically.).
5. Press
YES
.
To erase or replace a code
1. Scroll to
Mail
,
YES
,
Are a info
,
YES
,
Edit list
,
YES
.
2. Select the code you wish to erase or replace and press
YES
.
The message
Erase?
appears.
3. If you want to erase this code, press
YES
.
4. If you want to replace the code, press the
RIGHT
key once, followed by
YES
.
5. Enter the new code and press
YES
.
Receiving Area Information
When you receive an Area information message, the message is stored in the
phone memory, until you have read it or until you receive a new message.
Provided Area info is on, you can read the messages with the Area messages
function in the Mail menu.
To read an area message
1. Scroll to
Mail
,
YES
,
Area messages
,
YES
.
2. Scroll from one message to another by using the
LEFT
and
RIGHT
keys.
3. Press
YES
to select a message.
Page 65

N
o
t
f
o
r
C
o
m
m
e
r
c
i
a
l
U
s
e
E
r
i
c
s
s
o
n
M
o
b
i
l
e
C
o
m
m
u
n
i
c
a
t
i
o
n
s
A
B
62 Diverting Incoming Calls
Diverting Incoming Calls
If you want to make certain that your incoming calls are taken care of when
you are unable to answer them, you can use the Call Divert service to divert
them to another phone number.
The Call Divert service lets you:
• divert calls if you are already on the phone – when busy.
• divert calls that you do not answer within a specified time limit (operator
dependent) – no reply.
• divert calls if the phone is turned off or if you are unreachable –
unreachable.
• divert all incoming calls – all calls.
The divert option All calls means that all incoming calls are diverted to a
number specified by you. If you choose to divert all calls, an arrow l is shown
in the display.
Note! If you chose the All calls divert, all other diverts are automatically cancelled. They are, however, activated again when you cancel the “All calls”
divert.
1. Scroll to
Divert
,
YES
.
2. Select the divert you want (
All calls, On busy, No reply
and
Unreachabl
).
3. Select
Activ ate
, press
YES
.
4. Enter the phone number, including the area code, to which you want your
calls to be diverted and then press
YES
.
Note! If you used the divert option earlier and then cancelled it, an earlier,
recently used number to which the calls were diverted will be suggested. Pr ess
and hold
CLR
if you want to erase this number and enter a new one.
There may be a short delay before the network responds. In the meantime, the
message
Please wait
is displayed. This is followed by the message
On busy, All
calls, No reply
or
Unreachable
–
Divert ON
, depending on which divert option you
choose. The divert number is also displayed.
The display informs you of a call divert each time you turn the phone on.
ACTIVATING CALL DIVERTS
DIVERT
LLLL
All Calls
RRRR
(Off)
Page 66

N
o
t
f
o
r
C
o
m
m
e
r
c
i
a
l
U
s
e
E
r
i
c
s
s
o
n
M
o
b
i
l
e
C
o
m
m
u
n
i
c
a
t
i
o
n
s
A
B
Diverting Incoming Calls 63
Diverting When the Data Menus Are On
If you have turned the Data menus on, you can set call diverts for your phone,
fax and data numbers respectively or for all three together. To divert, proceed
as described above.
For the fax and data numbers, there are only two divert alternatives:
• all calls
• unanswered
1. Scroll to
Divert
,
YES
.
2. Select the divert you want to check and press
YES
.
3. Select
Get status
and press
YES
.
The message
Please wait
appears, followed by either the phone number and
Divert ON
if the call divert is on, or
Divert OFF
if it is not on.
To check the status of all call diverts
1. Scroll to
Divert
,
YES
.
2. Select
Check all
and press
YES
.
The message
Please wait
appears, followed by information about all call
diverts, i.e. whether they are on or not.
To cancel a certain call diverts
1. Scroll to
Divert
,
YES
.
2. Select the divert you want to cancel and press
YES
.
3. Select
Cancel
and press
YES
.
The message
Please wait
appears followed by a message which informs you
that the call divert has been cancelled.
To cancel all call diverts
1. Scroll to
Divert
,
YES
.
2. Select
Cancel all
and press
YES
.
The message
Please wait
appears, followed by a message which informs you
that all call diverts have been cancelled.
CHECKING THE DIVERT STATUS
CANCELLING CALL DIVERTS
ALL CALLS
LLLL Get status RRRR
ALL CALLS
LLLL Cancel RRRR
Page 67

N
o
t
f
o
r
C
o
m
m
e
r
c
i
a
l
U
s
e
E
r
i
c
s
s
o
n
M
o
b
i
l
e
C
o
m
m
u
n
i
c
a
t
i
o
n
s
A
B
64 Security for Your Phone and Subscription
Security for Your Phone
and Subscription
There are several ways to protect your phone and subscription from unauthorized use. Anything from a simple keypad lock to full phone number control.
The Keypad Lock feature helps you to avoid accidental dialling, which can
happen if you keep your phone in your pocket or attached to your belt. You
can choose between manual and automatic keylock.
An icon in the shape of a key (K) in the display informs you that the keypad is
locked.
Note! Calls to the international emergency number 112 can be made when the
keypad is locked. If the phone alarm rings, you can turn it off by pressing any
key.
The keypad remains locked until you:
• answer an incoming call.
• replace the battery.
• unlock the keypad.
• press the Push-To-Talk button (to enter the phone book menu)
To lock the keypad manually
• Scroll to
Keylock
and press
YES
.
To unlock the keypad
• Press
LEFT
followed by
YES
.
The keypad is unlocked.
The Automatic Keylock
Automatic keylock means that if no keys are pressed in 25 seconds, the keypad is locked.
To set the automatic keylock
1. Scroll to
Settin gs
,
YES
,
Keylock
,
YES
.
2. Select
Auto
and press
YES
.
KEYPAD LOCK
MENU
LLLL
Keylock
RRRR
On?
KEYLOCK
LLLL
Auto
RRRR
Page 68

N
o
t
f
o
r
C
o
m
m
e
r
c
i
a
l
U
s
e
E
r
i
c
s
s
o
n
M
o
b
i
l
e
C
o
m
m
u
n
i
c
a
t
i
o
n
s
A
B
Security for Your Phone and Subscription 65
To unlock the keypad
• Press
LEFT
followed by
YES
.
The keypad is unlocked.
Note! The Keypad lock is always disabled if the phone is connected to vehicle
handsfree equipment.
Most modern SIM cards are protected with a PIN (Personal Identity Number)
at the time of purchase. If the SIM card lock is activated, you have to enter the
PIN every time you turn on your phone.
The SIM card lock only protects your subscription and not your phone itself
from unauthorized use. If you change SIM card, the phone still works with the
new SIM card.
If Your SIM Card is Blocked
If you enter your PIN incorrectly three times in a row, the SIM card is
blocked. This is indicated by the message PIN Blocked Unblock? If this happens you need to unlock it to access your subscription.
Unblocking Your SIM Card
1. Press
YES
.
2. Enter your PUK (or PUK2 if the PIN2 is blocked) which you will find in
the information from your network operator.
3. Press
YES
.
Note! If your PIN starts with the same digits as the international emergency
number 112, they appear in the display when you enter your PIN.
Changing your PIN Code
1. Scroll to
Access
,
YES
,
Change PIN code
,
YES
.
2. Enter your old PIN (current) PIN code and press
YES
.
3. Enter your New PIN and press
YES
.
4. At the prompt
Repeat new PIN
, enter your new PIN a second time and press
YES
.
The message
New PIN
confirms that the PIN has been changed.
Note! If the message Matching error appears, this means you entered the
new PIN incorrectly. If the message Wrong PIN appears, followed by Enter
Old PIN, you entered your old PIN incorrectly.
THE SIM CARD LOCK
Enter
old PIN
Page 69

N
o
t
f
o
r
C
o
m
m
e
r
c
i
a
l
U
s
e
E
r
i
c
s
s
o
n
M
o
b
i
l
e
C
o
m
m
u
n
i
c
a
t
i
o
n
s
A
B
66 Security for Your Phone and Subscription
Changing Your PIN2 Code
Depending on the network you use, some services require that you enter a second PIN, the PIN2.
1. Scroll to
Access
,
YES
,
Change PIN2
,
YES
.
2. Follow the same procedure as described in “Changing your PIN Code”
above.
Turning On the SIM Card Lock
1. Scroll to
Access
,
YES
,
Lock Card
,
YES
.
2. Enter your PIN code and press
YES
.
The message
Locked
confirms that the card lock is now on.
Cancelling the SIM Card Lock
1. Scroll to
Access
,
YES
,
Unlock Card
,
YES
.
2. Enter your PIN code and press
YES
.
The message
Unlocked
confirms that the card lock is now off.
Note! This function only applies if your SIM card allows you to turn off the
card lock.
The phone lock protects the phone against unauthorized use if it is stolen and
the SIM card exchanged. The Phone lock is not on when you buy the phone.
The default security code is 0000. You can change this code to any three- to
eight-digit code of your own choice.
The phone lock has two levels: Full lock and Autolock:
Full Lock
If the Full Lock is on, you briefly see the message Phone locked each time
you turn on the phone. The message is followed by the prompt Enter lock
code. You then have to enter a security code and press
YES
to be able to use
your phone.
Autolock
If the Autolock is on, the message Phone locked and the prompt Enter lock
code do not appear until a different SIM card is inserted in the phone. After
the security code has been entered correctly, the phone can be used with a new
SIM card. You are not asked to enter the security code until the original SIM
card or a different SIM card is inserted.
To change the security code
1. Scroll to
Access
,
YES
,
Phone lock Change code,
YES
.
2. Enter your old code and press
YES
.
PHONE LOCK
ACCESS
LLLL Phone lock RRRR
Change code
Page 70

N
o
t
f
o
r
C
o
m
m
e
r
c
i
a
l
U
s
e
E
r
i
c
s
s
o
n
M
o
b
i
l
e
C
o
m
m
u
n
i
c
a
t
i
o
n
s
A
B
Security for Your Phone and Subscription 67
3. Enter your new code and press
YES
.
The message
Repeat new code
appears in the display.
4. Re-enter your new code and press
YES
.
The message
New Code
confirms that the code has been changed.
To lock/unlock the phone
1. Scroll to
Access
,
YES
,
Phone lock
,
YES
.
2. Select the setting you want (
Full lock, Autolock
or
Unlocked
) and press
YES
.
3. Enter the security code and press
YES
.
Phone Lock
is displayed together with the new setting.
The Call Barring service of the cellular network allows you to bar different
types of outgoing and incoming calls. This means that you can restrict the use
of the phone.
Note! This service may not be available on all networks or may require a separate subscription.
The following calls can be barred:
• all outgoing calls,
• all outgoing international calls,
• all outgoing international calls except to your home country,
• all incoming calls,
• all incoming calls when you are abroad (when roaming).
To ensure that a call bar is not changed by someone else, you need a password,
which comes with your subscription, in order to activate or cancel a call bar.
Changing the Call Barring Status
1. Scroll to
Access
,
YES
,
Barring
,
YES
.
2. Select the
Barring
option you want and press
YES
.
3. You now have three options:
• Activate, which turn a call bar on
• Get status, which lets you check the status of a call bar
• Cancel, which cancels the call bar
4. Confirm your selection by pressing
YES
.
5. Enter your password and press
YES
.
There may be a short delay before the network responds. In the meantime
the message
Please wait
is displayed. This is followed by a message which
informs you whether the call bar is on or not.
CALL BARRING
BARRING
All outgoing
LLLL Calls RRRR
Page 71

N
o
t
f
o
r
C
o
m
m
e
r
c
i
a
l
U
s
e
E
r
i
c
s
s
o
n
M
o
b
i
l
e
C
o
m
m
u
n
i
c
a
t
i
o
n
s
A
B
68 Security for Your Phone and Subscription
Note! If you divert incoming calls, see “Diverting Incoming Calls” on
page 62, you cannot activate some barring options. Likewise, if you bar calls,
you cannot activate some call divert options.
Cancelling All Call Bars
1. Scroll to
Access
,
YES
,
Barring
,
YES
,
Cancel all
,
YES
.
2. Enter your password and press
YES
.
The message
Please wait
appears, followed by a message confirming that all
call bars have been cancelled.
Changing the Barring Password
The password for the Barring service comes with your subscription. You can
easily change the password as often as you like.
1. Scroll to
Access
,
YES
,
Barring
,
YES
,
Change password
,
YES
.
2. Enter the old (current) password and press
YES
.
3. Enter the new password and press
YES
.
4. Enter the new password a second time and press
YES
.
The message
Please wait
appears, followed by a message confirming that the
password has been changed.
Fixed Dialling and fixed incoming calls is a way of restricting outgoing and
incoming calls.
Note! Fixed dialling and fixed incoming calls require a SIM card that supports the storing of fixed numbers. The fixed numbers are protected by the
PIN2.
The fixed dialling numbers and fixed incoming calls numbers are stored in a
list of fixed numbers on the SIM card. The fixed dialling numbers and the
fixed incoming calls numbers must be the same. You can however, turn each
function on or off independently.
• The Fixed Dialling and Fixed incoming calls functions allow calls to be
made and received only to and from fixed numbers stored on the SIM card.
If you try to call other numbers, the message Number not permitted
appears in the display. If someone, who is not included in the Fixed incoming numbers list, tries to call you, he or she will be rejected.
• It is possible to store partial numbers, e.g. an area code, or an area code
followed by the first digits common to several numbers. Storing 0123456
allows calls to be made to and received from numbers from 012345600 to
012345699.
FIXED DIALLING AND FIXED INCOMING CALLS
BARRING
LLLL Cancel all RRRR
Page 72

N
o
t
f
o
r
C
o
m
m
e
r
c
i
a
l
U
s
e
E
r
i
c
s
s
o
n
M
o
b
i
l
e
C
o
m
m
u
n
i
c
a
t
i
o
n
s
A
B
Security for Your Phone and Subscription 69
• Numbers beginning with the international (+) sign and country code can
also be stored, allowing you to make and receive calls from abroad.
• Numbers including question marks can be stored. For example storing
01234567?0 allows calls to be made to and received from numbers ending
with a zero from 0123456700 to 0123456790. To enter a question mark
press and hold the # key.
• The maximum fixed numbers that can be stored depends on your SIM
card.
Note! The Fixed Dialling function does not prohibit calls to the international
emergency number 112 and the Service Centre of your network operator. Network services such as Call Divert and Call Barring cannot be used.
To turn fixed dialling on or off
1. Scroll to
Access
,
YES
,
Fixed dial
,
YES
.
2. Enter your PIN2 and press
YES
.
3. Select
On
or
Off
and press
YES
.
To activate or cancel fixed incoming calls
1. Scroll to
Access
,
YES
,
Fixed inco
,
YES
.
2. Enter your PIN2 and press
YES
.
3. Select
On
or
Off
and press
YES
.
To store fixed numbers
1. Scroll to
Phone book
,
YES
,
Fixed numbers
,
YES
,
Store
,
YES
.
2. Enter your PIN2 and press
YES
.
3. Enter the name (optional) and a fixed number(s) in the same way as when
storing an ordinary phone number.
Note! T o be able to stor e fixed numbers, you need to activate the fixed dialling
function (see above).
To edit a stored fixed number
1. Scroll to
Phone book
,
YES
,
Fixed numbers
,
YES
.
2. Select
Edit
and press
YES
.
After you have entered the PIN2, you can change the position number, the
name or the fixed number in the same way as with an ordinary phone
number.
3. Press
YES
when you have finished editing.
ACCESS
LLLL Fixed dial RRRR
(Off)
ACCESS
LLLL Fixed inco RRRR
(Off)
PHONE BOOK
Fixed
LLLL numbers RRRR
Page 73

N
o
t
f
o
r
C
o
m
m
e
r
c
i
a
l
U
s
e
E
r
i
c
s
s
o
n
M
o
b
i
l
e
C
o
m
m
u
n
i
c
a
t
i
o
n
s
A
B
70 Setting Network Preferences
Setting Network
Preferences
The Networks menu includes a number of functions which you can use to
determine how the phone searches for a network. You may also select a network yourself from those within range.
When you turn on the phone, it searches for the last accessed network. If this
is not within range, you may use another network, provided your home network has an agreement that allows you to do so. This is called roaming.
The order of preference in which the phone selects a network is determined by
a list of preferred networks on your SIM card. The Networks menu includes a
number of functions that let you determine how the phone searches for a network. You may also select a network yourself from those within range.
The phone has two search modes: automatic and manual.
Automatic Search Mode
The automatic search mode means that your phone first searches for the last
accessed network. If this is not available, the phone automatically searches for
another available network within range.
The Automatic search mode is normally the default setting when you buy your
phone.
To turn on automatic search mode
1. Scroll to
Networks
,
YES
,
Searchmode
,
YES
.
If
Auto
is visible in the bottom row of the display, your phone is already set
to Automatic search mode.
2. If
Auto
is not visible, press
YES
.
3. Select
Auto
and press
YES
.
The phone is now set to Automatic search mode.
4. To return to standby mode, press
CLR
.
SEARCHING FOR NETWORKS
SEARCH MODES
NETWORKS
LLLL SearchmodeRRRR
(Auto)
Page 74

N
o
t
f
o
r
C
o
m
m
e
r
c
i
a
l
U
s
e
E
r
i
c
s
s
o
n
M
o
b
i
l
e
C
o
m
m
u
n
i
c
a
t
i
o
n
s
A
B
Setting Network Preferences 71
Note! The order of preference in which the phone selects a network is determined by a list of preferred networks on your SIM card, which you can edit at
any time.
Manual Search Mode
The manual search mode means that your phone first searches for the last
accessed network. If this is not available, the question Select network?
appears.
To turn on the manual search mode
1. Scroll to
Networks
,
YES
,
Searchmode
,
YES
.
2. Select
Manual
and press
YES
.
3. To return to standby mode, press
CLR
.
To select a network, see below.
1. Scroll to
Networks
,
YES
,
Sele ct n et
,
YES
.
2. If there is more than one network within range, scroll to the network you
want and press
YES
to select it.
Display Information
Instead of the full name of a country and a network, an abbreviation is displayed when you use the Networks menu. To see the full name of a network,
press *.
Together with the network name, you also get the following information in the
display:
SELECTING A NETWORK
The display shows... meaning...
Current
The network is currently being used.
Home
Your home network is within range. You can use it.
Preferred
The name of the network is included in a list of preferred networks on your SIM card. You can use this
network.
Forbidden
The name of the network is included in a list of forbidden networks on your SIM card. You are not
allowed to use this network, except for emergency
calls.
Available
The name of the network is not included in the preferred or forbidden list on your SIM card. You can
use this network.
No network
There is no network within range.
NETWORKS
LLLL SearchmodeRRRR
(Manual)
NETWORKS
LLLL Select net RRRR
Page 75

N
o
t
f
o
r
C
o
m
m
e
r
c
i
a
l
U
s
e
E
r
i
c
s
s
o
n
M
o
b
i
l
e
C
o
m
m
u
n
i
c
a
t
i
o
n
s
A
B
72 Setting Network Preferences
To start an automatic network search
• Scroll to
Networks
,
YES
,
New search
,
YES
.
The phone automatically starts searching for a network according to the
list of preferred networks stored on your SIM card.
Forbidden Networks
The names of the forbidden networks are stored on your SIM card. If such a
forbidden network is within range, it is left out when the phone searches for a
network (automatic search mode).
If your home network and a forbidden network come to an agreement that
allows you to use the forbidden network, you can select this network even
though the message Forbidden is displayed.
You can create a list that defines in which order your phone selects a network
during automatic network selection, when your home network is not within
range.
The number of networks that can be stored in the list depends on your SIM
card.
The Edit list function lets you review the networks in the list. Apart from re-
arranging the order of the networks, you can add new networks to the list and
delete networks from it.
To review the list of networks
1. Scroll to
Networks
,
YES
,
Edit list
,
YES
.
The message
Please wait
is displayed.
The name of the first network is displayed. If a network is within range, a
‘
*’
is also displayed.
2. You can scroll through the other networks in the list using the
LEFT
and
RIGHT
keys.
Note! To see a network’s full name, press *.
To add a network to the list
1. Scroll to
Networks
,
YES
,
Edit list
,
YES
.
2. Scroll to the first free position in the list and press
YES
.
The question
Add net?
appears in the display.
If you scroll to a position that is already occupied, you must press
YES
and
then scroll with the
LEFT
or
RIGHT
key until
Add net?
appears.
3. Press
YES
and scroll with the
LEFT
or
RIGHT
key until you find the net-
work you want.
LIST OF PREFERRED NETWORKS
NETWORKS
LLLL New Search RRRR
NETWORKS
LLLL Edit list RRRR
EDIT LIST
Network name
LLLL 1 RRRR
Page 76

N
o
t
f
o
r
C
o
m
m
e
r
c
i
a
l
U
s
e
E
r
i
c
s
s
o
n
M
o
b
i
l
e
C
o
m
m
u
n
i
c
a
t
i
o
n
s
A
B
Setting Network Preferences 73
4. If the desired network does not appear, press
YES
when the question
Other?
appears. Then enter the three-digit country number and the two-digit network number.
5. Finally, to add the network to the list, press
YES
.
To erase a network from the list
1. Scroll to
Networks
,
YES
,
Edit list
,
YES
.
2. Scroll to the network you wish to erase and press
YES
.
3. Select
Erase
and press
YES
.
To re-arrange the list
1. Scroll to
Networks
,
YES
,
Edit list
,
YES
.
2. Scroll to the network you wish to move and press
YES
.
3. Select
Move
and press
YES
.
4. Enter the new position within the list and press
YES
.
EDIT LIST
Network name
LLLL Erase? RRRR
EDIT LIST
Network name
LLLL Move? RRRR
Page 77

N
o
t
f
o
r
C
o
m
m
e
r
c
i
a
l
U
s
e
E
r
i
c
s
s
o
n
M
o
b
i
l
e
C
o
m
m
u
n
i
c
a
t
i
o
n
s
A
B
74 Handling More than One Call Simultaneously
Handling More than One
Call Simultaneously
Your phone allows you to handle more than one call simultaneously. This
means that you can put a call that is in progress on hold, while you make or
answer a second call, and then switch between the two calls.
You can also set up a Conference Call to have a joint conversation with up to
five people. You can put an individual or a group of conference members on
hold while you add other people to the conference call. You can also put conference members on hold while you talk to someone privately. See “Confer-
ence Calls” on page 76.
To be able to receive a second call, you must turn on the Call Waiting service.
To activate the Call Waiting Service
1. Scroll to
Access
,
YES
,
Call Waiting
,
YES
.
2. Select
Activ ate
and press
YES
.
There may be a short delay before the network responds. In the meantime,
the message
Please wait
is displayed. This is followed by the message
Call
Waiting O N
.
To cancel the Call Waiting Service
1. Scroll to
Access
,
YES
,
Call Waiting
,
YES
.
2. Select
Cancel
and press
YES
.
Tip! With the Get status option, you can check whether the call waiting service is on or not.
1. Put the current call on hold by pressing
YES
.
The message
1 on hold
is displayed.
2. Enter the number you wish to call or recall it from the phone book.
3. Press
YES
to make the call.
CALL WAITING SERVICE
MAKING A SECOND CALL WHILE A CALL IS IN
PROGRESS
CALL WAITING
LLLL Activate RRRR
Page 78

N
o
t
f
o
r
C
o
m
m
e
r
c
i
a
l
U
s
e
E
r
i
c
s
s
o
n
M
o
b
i
l
e
C
o
m
m
u
n
i
c
a
t
i
o
n
s
A
B
Handling More than One Call Simultaneously 75
If the Call Waiting function is on, you hear a tone in the earpiece if you
receive a second call and the message
Call wa it
appears in the display. You can
do one of the following:
To end the current call and accept the waiting call
1. Press
NO
to end the current call.
The question
Answer?
appears.
2. Press
YES
to answer the waiting call.
To put the current call on hold and answer the waiting call
• Press
YES
to put the current call on hold and answer the waiting call.
The message
1 on hold
appears.
To continue the current call and reject the waiting call
• Press 0 followed by
YES
.
The waiting call is cleared. If the caller’s network supports it, the caller
hears a busy tone.
Note! If “Divert On busy” is on, the waiting call is diverted to the number you
have specified.
When you have one active call and one on hold, you can do one of the following:
To switch between two calls
• Press
YES
to switch between the active call and the call on hold.
To end the active call
1. Press
NO
to end the active call.
The message
Retrieve he ld c all?
appears and a beep sounds.
2. Press
YES
to return to the held call or press NO to end the held call.
Note! If you do not press
YES
or NO within three seconds, the message
Retrieve held call? disappears from the display. The held call is ended
automatically.
Tip! You can automatically end the current call and retrieve the held call by
pressing 1 followed by
YES
.
RECEIVING A SECOND CALL WHILE A CALL IS IN
PROGRESS
WHEN ONE CALL IS ACTIVE AND ONE CALL IS ON
HOLD
Page 79

N
o
t
f
o
r
C
o
m
m
e
r
c
i
a
l
U
s
e
E
r
i
c
s
s
o
n
M
o
b
i
l
e
C
o
m
m
u
n
i
c
a
t
i
o
n
s
A
B
76 Handling More than One Call Simultaneously
To connect two calls – explicit call transfer
If you have one active call and one on hold, it is possible to connect the two
calls.
• Press 4 followed by
YES
.
The two calls are now connected to each other, and you are disconnected
from both calls.
Note! This service may not be available on all networks. For more information, please contact your operator.
If the Call Waiting service is activated, you may receive a third call when you
have one active call and a second call on hold. You will hear a tone in the earpiece and the message
Call Wait
appears in the display. You can do one of the
following:
Only one call at a time can be on hold. If you wish to accept the third call, you
must end one of the existing calls.
To end the current call and accept the waiting call
• Press 1, followed by
YES
.
The waiting call becomes active and the held call remains on hold.
To reject the waiting call
• Press 0, followed by
YES
.
The third call is rejected. If the caller’s network supports this function, the
caller hear a busy tone.
Note! If Divert On busy is on, the waiting call is diverted to the number you
have specified.
Note! The Conference Call Service may not be available on all networks.
Please contact your operator for more information.
The Conference call service allows you to have a joint conversation with up to
five people. You may put an individual or a group of conference members on
hold while you add other people to the conference call. You may also put conference members on hold while you talk to someone privately.
To set up a conference call
1. Call the first person you wish to include in the conference call.
2. Put this person on hold by pressing
YES
.
3. Call the second person you wish to include in the conference call.
RECEIVING A THIRD CALL
CONFERENCE CALLS
Page 80

N
o
t
f
o
r
C
o
m
m
e
r
c
i
a
l
U
s
e
E
r
i
c
s
s
o
n
M
o
b
i
l
e
C
o
m
m
u
n
i
c
a
t
i
o
n
s
A
B
Handling More than One Call Simultaneously 77
4. Press 3, followed by
YES
, to include the two people in the conference
call.
You can now put the conference group on hold and add a third person by
repeating steps 2 to 4. It is possible to add up to five persons in this way.
Note! In the display, the last called number is referred to as call number one,
the call before that number two etc.
If you wish to have a private conversation with one of the members, you can
put the other members on hold.
To have a private conversation
1. Press 2.
2. Press the number of the member you want to have a private conversation
with. For example, if you wish to talk to member number three, press 3.
3. Press
YES
.
To join the member to the conference call again:
• Press 3 and then
YES
.
To release one of the members in a conference call
1. Press 1.
2. Press the number of the member you want to release. For example, if you
wish to release member number three, press 3.
3. Press
YES
to release the member.
Making a Call While a Conference Call is In Progress
Y ou can put the conference group on hold and make another call. You can then
switch between the new call and the conference call.
To put the conference group on hold and make a new call
1. Press
YES
to put the conference call on hold.
2. Enter the number you wish to dial and press
YES
To switch between the new call and the conference call
• Press
YES
.
To end the new call and return to the conference call
• Press 1 followed by
YES
.
To end a conference call
• Press
NO
to end the conference call.
Page 81

N
o
t
f
o
r
C
o
m
m
e
r
c
i
a
l
U
s
e
E
r
i
c
s
s
o
n
M
o
b
i
l
e
C
o
m
m
u
n
i
c
a
t
i
o
n
s
A
B
78 Knowing the Call Time/Call Cost
Knowing the Call Time/
Call Cost
When you are on the phone, the display shows the duration of a call.
By using the Call info function in the Settings menu you can check the time
for all calls, both incoming and outgoing. You can also have the call cost or
the number of call units displayed by selecting the Cost option, provided your
network and your SIM card support this feature.
To set what call information you want to be displayed in the Info menu
1. Scroll to
Settin gs
,
YES
,
Call info
,
YES
.
2. Select
Time:Outg, Time:All
or
Cost
.
3. Confirm your selection by pressing
YES
.
Checking the Time or Cost of the Last Call
You can check the time/cost of the last incoming (or outgoing) call with the
Last call option in the Info menu.
To check time or cost of the last call
• Scroll to
Info
and press
YES
.
Depending on the setting in the Call info function in the Settings menu,
you can use the navigation key to check:
• The elapsed time of the last outgoing call.
• The elapsed time of the last incoming call provided you have chosen
the Time:All option in the Call info function in the Settings menu.
To check the total time or call cost
• Scroll to
Info
,
YES
,
Tot calls
.
Depending on the settings in the Call info function in the Settings menu,
you can check:
• The elapsed time of all outgoing calls.
• The elapsed time of all incoming and outgoing calls.
• The cost (or the number of call units) of all incoming and outgoing
calls.
CALL INFORMATION
CALL INFO
LLLL Time: outg RRRR
INFO
LLLL Last call RRRR
1:23
Page 82

N
o
t
f
o
r
C
o
m
m
e
r
c
i
a
l
U
s
e
E
r
i
c
s
s
o
n
M
o
b
i
l
e
C
o
m
m
u
n
i
c
a
t
i
o
n
s
A
B
Knowing the Call Time/Call Cost 79
To reset the total call time/cost meter
1. Scroll to
Info
,
YES
Tot C alls
,
YES
.
The message
Reset?
appears.
2. Press
YES
to reset the meter.
Note! If you choose the call cost option you must enter your PIN2 to reset the
meter.
This menu only appears if you have selected the Cost option in the Call info
function in the Settings menu, see below.
• Scroll to the
Info
menu and select
Price
.
• The Units option means that the number of call units is displayed
during a call, and in the Last call and Tot calls functions.
• The Price function lets you enter and vary the price per call unit. The
price entered is stored on your SIM card.
To Enter the Price per Call Unit
1. Scroll to
Settin gs
,
YES
,
Call info
,
YES
.
2. Select
Cost
and press
YES
.
3. Press
CLR
to return to standby mode.
4. Scroll to
Info
,
YES
,
Price
,
YES
,
Units
,
YES
.
5. Enter your PIN2 and press
YES
.
The message
INF O P rice Un its
appears in the display.
6. Press
YES
.
7. Enter the code for the currency you want e.g. GBP for Pound Sterling, and
press
YES
.
8. Enter the price per call unit, for example 0.5, and press
YES
. To enter the
decimal point, press #.
9. Enter your PIN2 and press
YES
.
To Revert to Displaying Call Units
1. Scroll to
Info
,
YES
,
Price
,
YES
.
2. Press
YES
to select
Units
.
3. Press
YES
again to revert to displaying call units.
Provided both your network and your SIM card support this feature, you can
enter a total amount of money that can be used for making calls. This could be
useful when e.g. you, lend your phone to someone, and do not want their call
costs to exceed an amount specified by you. After a call is made, the cost is
DETERMINING THE CALL COST
CREDIT LIMITS FOR CALLS
INFO
LLLL Price RRRR
Units
Page 83

N
o
t
f
o
r
C
o
m
m
e
r
c
i
a
l
U
s
e
E
r
i
c
s
s
o
n
M
o
b
i
l
e
C
o
m
m
u
n
i
c
a
t
i
o
n
s
A
B
80 Knowing the Call Time/Call Cost
deducted from this amount. When the amount reaches zero, no more calls can
be made.
To set a credit limit for calls
1. Scroll to
Info
,
YES
Cre dit u nlim ited
,
YES
,
New Credit
,
YES
.
2. Enter the amount: for example, 30 pounds and press
YES
.
3. Enter your PIN2 and press
YES
.
CREDIT
LLLL New credit RRRR
Page 84

N
o
t
f
o
r
C
o
m
m
e
r
c
i
a
l
U
s
e
E
r
i
c
s
s
o
n
M
o
b
i
l
e
C
o
m
m
u
n
i
c
a
t
i
o
n
s
A
B
Using Two Phone Lines 81
Using Two Phone Lines
If your subscription supports the Two line service, (also called Alternate Line
Service, ALS), you can have two different speech lines. This is useful feature
if e.g. you, want to use one number for your business calls and one for your
private calls.
The two line service may not be available on all networks and may require a
separate subscription. Please contact your network operator for more
information.
Note! You can only send and receive text messages (SMS) on line 1.
The line currently selected is indicated in the display with the letter ‘L’ and
the number for the selected line. For example, if line two is selected, you will
see ‘L2’ in the display.
Note! The menu Change to only appears if you are using the two line service.
To change to the line that is not currently selected
1. Scroll to
Change to
.
2. Press
YES
to change to the line displayed in the bottom row.
From now on, all outgoing calls are made on the selected line. You can,
however, receive calls on both lines.
Tip! Instead of accessing the menu system, you can press and hold
2
to change
line, provided the phone is in standby mode.
Receiving a Call on Line 1 or Line 2
When someone calls you, the question Answer? is replaced by Line1? or
Line2? depending on which line the person is calling.
Note! If you are engaged in a call on one line, you must end that call first
before answering a call on the other line.
You can have different settings for each line: for example, the tone of the ring
signal, call diverts, call bars and call waiting function.
SELECTING A LINE
DIFFERENT SETTINGS FOR EACH LINE
MENU
LLLL Change to RRRR
Line 2
Page 85

N
o
t
f
o
r
C
o
m
m
e
r
c
i
a
l
U
s
e
E
r
i
c
s
s
o
n
M
o
b
i
l
e
C
o
m
m
u
n
i
c
a
t
i
o
n
s
A
B
82 Using Two Phone Lines
The call meters in the Info menu show the call times (call costs) for the line
currently selected.
Changing the Name of the Two Lines
The phone allows you to personalize the names of the two lines. You might,
for example, want to call Line 1 “Private” and Line 2 “Work”.
To change the name of a line
1. Scroll to
Settin gs
,
YES
.
2. Select
Line 1 Tag
or
Line 2 tag
and press
YES
.
3. Enter the name (maximum twelve characters), using the numeric keys.
4. Press
YES
to confirm the new name.
Page 86

N
o
t
f
o
r
C
o
m
m
e
r
c
i
a
l
U
s
e
E
r
i
c
s
s
o
n
M
o
b
i
l
e
C
o
m
m
u
n
i
c
a
t
i
o
n
s
A
B
Calling Card or Credit Card Calls 83
Calling Card or Credit
Card Calls
When making international or long distance calls, you may not want your
operator to charge you for these calls on your normal account. If you have a
credit card or a calling card, you may want to re-direct the charges to one of
those accounts instead. Y our phone is all set for making this procedure as easy
as possible for you.
You can store two separate card numbers in your phone. These numbers are
protected by a four- to eight-digit security code that you choose yourself.
Note! The Calling card and Credit call feature is network dependent.
To be able to make Calling cards call, you have to turn on this function.
To activate the calling card feature
1. Scroll to
Access
,
YES
,
Call cards security
,
YES
.
Enter code
appears in the display.
2. Enter your security code (the factory set code is 0000) and press
YES
.
3. Scroll to
Call card s
and press
YES
.
4. Select
On
and press
YES
.
You can change the security code to a code of your own choice. The code can
consist of four to eight digits.
To change security codes
1. Scroll to
Access
,
YES
,
Call cards security
,
YES
.
2. Enter your security code (the factory set code is 0000) and press
YES
.
3. Scroll to
Change code
and press
YES
.
4. Enter your new code and press
YES
.
The code can consist of four to eight digits.
5. Confirm your new code when
Repeat new code
appears in the display and
press
YES
.
Your security code has now been changed.
TURNING ON THE CALLING CARD FEATURE
Page 87

N
o
t
f
o
r
C
o
m
m
e
r
c
i
a
l
U
s
e
E
r
i
c
s
s
o
n
M
o
b
i
l
e
C
o
m
m
u
n
i
c
a
t
i
o
n
s
A
B
84 Calling Card or Credit Card Calls
Your phone allows you to store two calling card numbers in the phone book
menu. This sub-menu is only visible if the Call card function is activated in
the Access menu.
To store a credit or a calling card number
1. Scroll to
Phone book
,
YES
,
Call card
,
YES
.
2. Enter your security code and press
YES
.
When you buy the phone the code is set to 0000. To change security
codes, see above.
3. Select card position (
Card 1
or
Card 2
) using the
LEFT
and
RIGHT
keys and
press
YES
.
4. Enter the access number (the phone number) to the calling card server. The
numbers are entered in the same way as ordinary phone numbers.
5. Press
RIGHT
.
6. Enter the verification code to your calling card server.
7. Press
YES
to store the calling card number.
If you have two card numbers stored, you must select which card you wish to
use before making a Calling/Credit card call.
To select the card you want to use
1. Scroll to
Phone book
,
YES
,
Call card
,
YES
.
2. Enter your security code and press
YES
. (When you buy your phone the
code is set to 0000.)
3. Select the card you wish to use and press
YES
.
Your setting for the card appears.
4. Press
YES
to select the card.
1. Enter the number you wish to dial, or retrieve it from the Phone book.
2. To set up the call as a Credit/Calling card call, press and hold
YES
.
The access number to the calling card server is called and during the connecting phase, you are prompted to send the called number (the number or the person you want to call) and the verification code, in the order chosen by you (see
above).
To send the called number and the verification code during the connecting
phase, press
YES
when the display shows
Send
, or wait a few seconds and
your phone sends them automatically.
STORING CREDIT OR CALLING CARD NUMBERS
SELECTING A CARD
MAKING A CREDIT OR CALLING CARD CALL
Page 88

N
o
t
f
o
r
C
o
m
m
e
r
c
i
a
l
U
s
e
E
r
i
c
s
s
o
n
M
o
b
i
l
e
C
o
m
m
u
n
i
c
a
t
i
o
n
s
A
B
Sending and Receiving Fax and Data calls 85
Sending and Receiving
Fax and Data calls
If you have a SIM card that does not support separate fax and data numbers,
you need to turn on the data menus. When you turn on the Data menus two
new menus appear; the menu, Speech then fax appears before the Info menu
when you scroll with the
LEFT
and
RIGHT
keys. The menu Next call type
appears after the Info menu.
Note! All fax and data calls are initiated from the appropriate computer software.
To turn the data menus on or off
1. Scroll to
Settin gs
,
YES
,
Data menus
,
YES
.
The current status (
On
or
Off
) is displayed on the bottom row.
2. Select
On
or
Off
and press
YES
.
This function allows you to decide which type the next incoming call will be,
i.e. fax, data, speech then fax or fax then speech. You only see this menu if
your phone detects that you do not have separate numbers for data, fax and
speech. Once you have set your phone for a specific incoming call, it stays
like this until you change it back. The normal setting is speech.
To set the phone for a certain type of call
1. Scroll to
Next call type
(the Data menus must be turned on) and press
YES
.
2. Select the type of call you are going to receive and press
YES
.
NEXT CALL TYPE
DATA MENUS
LLLL Off RRRR
MENU
Next
LLLL call type RRRR
Page 89

N
o
t
f
o
r
C
o
m
m
e
r
c
i
a
l
U
s
e
E
r
i
c
s
s
o
n
M
o
b
i
l
e
C
o
m
m
u
n
i
c
a
t
i
o
n
s
A
B
86 Some Useful Tools
Some Useful Tools
The phone has an alarm function. When it is on, an icon in the shape of a bell
(B) is shown next to the current time in the display.
The alarm rings at the set time even if the phone is turned off. The illumination of the keys and the display flash. The volume of the alarm signal depends
on the setting of the ring signal.
The alarm rings for 60 seconds and is repeated every nine minutes if you do
not turn it off. After 60 minutes, the repeat function is turned off.
To set the alarm
1. Scroll to
Clock
,
YES
,
Set alarm
,
YES
,
New time
,
YES
.
2. Enter the time in hours and minutes.
3. Press
YES
to confirm the alarm setting.
Note! If you choose the 12-hour format in the “Clock mode” function, you
can alternate between am and pm by pressing
*
or #.
To turn the alarm signal off
1. Press any key to turn the alarm off when it rings.
2. If you do not want the alarm to be repeated, press
YES
.
To turn the alarm off
1. Scroll to
Clock
,
YES
,
Set alarm
,
YES
.
2. Select
Off
and press
YES
.
The phone’s built-in calculator can add, subtract, divide and multiply.
To use the calculator
In this example we are going to divide 134 by 32.
1. Scroll to
Calculator
and press
YES
.
2. Enter 134.
3. Scroll with the
LEFT
or
RIGHT
key to the division sign (/), and press
YES
.
4. Enter 32.
ALARM
CALCULATOR
SET ALARM
(09:30)
_ –:– –
MENU
LLLL
Calculator
RRRR
Page 90

N
o
t
f
o
r
C
o
m
m
e
r
c
i
a
l
U
s
e
E
r
i
c
s
s
o
n
M
o
b
i
l
e
C
o
m
m
u
n
i
c
a
t
i
o
n
s
A
B
Some Useful Tools 87
5. Scroll with the
LEFT
or
RIGHT
key to the equal sign (=) and press
YES
to
get the answer.
You can also press # to get the answer.
6. To clear the display, press
CLR
.
To enter a decimal point
• Press *.
To multiply
• Press * twice.
Page 91

N
o
t
f
o
r
C
o
m
m
e
r
c
i
a
l
U
s
e
E
r
i
c
s
s
o
n
M
o
b
i
l
e
C
o
m
m
u
n
i
c
a
t
i
o
n
s
A
B
88 Some Useful Tools
Page 92

N
o
t
f
o
r
C
o
m
m
e
r
c
i
a
l
U
s
e
E
r
i
c
s
s
o
n
M
o
b
i
l
e
C
o
m
m
u
n
i
c
a
t
i
o
n
s
A
B
GSM Pro
90
GSM PRO
Page 93

N
o
t
f
o
r
C
o
m
m
e
r
c
i
a
l
U
s
e
E
r
i
c
s
s
o
n
M
o
b
i
l
e
C
o
m
m
u
n
i
c
a
t
i
o
n
s
A
B
90 GSM Pro
GSM Pro
Note! The features described in this chapter require a special subscription
that supports GSM Pro. For more information about GSM Pr o, please contact
your network operator. Some network operators may choose to use a different
name for GSM Pro. For more information about GSM Pro, please see this
location on the web: http://www.ericsson.se/gsmpro.
The R250s PRO is the first mobile phone which supports GSM Pro. GSM Pro
is an extended feature of the GSM network which gives the user access to
most of the functions found today in various Private Mobile Radio (PMR) and
Public Access Mobile Radio (PAMR) networks.
With a R250s PRO and a GSM Pro subscription you get access to all the regular GSM network services and most PMR and PAMR services, such as group
calls, call monitoring and alert calls.
Group calls allows all members of a specified group to be reached with a single call. With a GSM Pro subscription, group calls are now available on the
GSM network.
In a group call, all participants can listen to and talk to each other. The group
call features and the Push-To-Talk mode give GSM Pro a walkie-talkie-like
function, that is a key feature for PMR and PAMR users.
A group number is a special number that makes it possible to call all group
members at the same time with a single call.
Push-To-Talk Mode
Group calls are preferably made and received in “Push-To-Talk mode”,
although group calls can be made and received in phone mode.
When you want to speak you press and hold the
PUSH-TO-TALK
button on
the left side of the phone, see “Overview” on page 4. When you finish talking
you release the
PUSH-TO-TALK
button, to let other group members speak.
When you release the Push-To-Talk button the microphone is muted. This is to
avoid disturbing background noise during a call.
GROUP CALLS
Page 94

N
o
t
f
o
r
C
o
m
m
e
r
c
i
a
l
U
s
e
E
r
i
c
s
s
o
n
M
o
b
i
l
e
C
o
m
m
u
n
i
c
a
t
i
o
n
s
A
B
GSM Pro 91
Mode Switch Selector
The R250s PRO has a mode switch selector on the right side of the phone, see
“Overview” on page 4, which you use to switch between phone and Push-To-
Talk mode.
When you switch modes the phone gives out a warning tone. You can switch
modes at any time: when the phone is in standby, when receiving a call and
during a call.
To switch between phone and Push-To-Talk mode
• Slide the
MODE SWITCH
upwards to go to Push-To-Talk mode.
• Slide the
MODE SWITCH
downwards to go to phone mode.
When you switch modes the phone sends out a warning signal.
Earpiece volume
When the phone is set to Push-To-Talk mode, the earpiece/loudspeaker volume increases significantly. You should not hold the phone close to your ear
as this may damage your hearing. Hold the phone in front of your face, about
10–30 centimetres away, and speak in the direction of the microphone.
To set the earpiece volume
1. Scroll to
Settin gs
,
YES
,
Ear volume
,
YES
.
The current mode,
Phone
or
Pushtotalk
, is displayed on the middle row.
2. Use the
LEFT
arrow key to decrease the volume.
Use the
RIGHT
arrow key to increase the volume.
3. Press
YES
to confirm your setting.
Tip! During a call you can use the volume keys on the side of the phone to
adjust the volume.
EAR VOLUME
PUSHTOTALK
LQQQQQQqqqR
LQQQQQQqqqRLQQQQQQqqqR
LQQQQQQqqqR
Page 95

N
o
t
f
o
r
C
o
m
m
e
r
c
i
a
l
U
s
e
E
r
i
c
s
s
o
n
M
o
b
i
l
e
C
o
m
m
u
n
i
c
a
t
i
o
n
s
A
B
92 GSM Pro
The R250s PRO is equipped with an
ALERT BUTTON
, located on the top of
the phone next to the antenna. See “Overview” on page 4. Alert calls are eas-
ily made by pressing and holding the alert button for one second. If the call
cannot get through the phone automatically re-dials the number up to ten
times.
When you buy your phone the alert number is set to the international emergency number 112. This number can be changed if you prefer another alert
number. This may be useful if e.g. you work in an area where your own organization’s rescue service can reach you faster.
For more information on how to change the alert number see “Alert Button”
on page 46.
Note! The talk group numbers are pr ovided by your service administrator. For
more information, please contact your service administrator.
The phone book makes it easy to set up a call to your talk groups. Instead of
having to remember the phone number and entering it by using the keypad,
you simply recall the number from the phone book by pressing and holding
the
PUSH-TO-TALK
button when the phone is in standby. When you find the
number you want to call, press
YES
to make the call.
The talk group numbers are stored in the same phone book as the one you use
for storing your own, personal phone numbers. See “Your Personal
Phone Book” on page 33. This means that you may not be allowed to store
your personal phone numbers in the memory positions used by your service
administrator. If you try to store a phone number in a position that you are not
allowed to use, you are prompted to store the number in another position. For
more information on how to store phone numbers see “Storing a Number
Together with a Name” on page 35.
Making and receiving group calls is similar to making and receiving ordinary
mobile phone calls.
Note! W e recommend that you set the phone to Push-To-Talk mode before you
make or receive a group call.
You can only call a group of which you are a member.
ALERT CALLS
PHONE BOOK
MAKING AND RECEIVING GROUP CALLS
Page 96

N
o
t
f
o
r
C
o
m
m
e
r
c
i
a
l
U
s
e
E
r
i
c
s
s
o
n
M
o
b
i
l
e
C
o
m
m
u
n
i
c
a
t
i
o
n
s
A
B
GSM Pro 93
To make a group call
1. Press
CLR
to go to standby (if you are not already in standby).
2. Press and hold the
PUSH-TO-TALK
button to enter the phone book menu
and find the number you want to call.
3. When you find the number, press
YES
to make the call.
The display shows
Calling
followed by
Connecting
.
The ringing tone is heard until a group member answers the call.
4. Press the
PUSH-TO-TALK
button to talk to the other group members.
5. Release the
PUSH-TO-TALK
button when you finish talking, to let other
group members talk.
6. Press
NO
when you want to end the call.
The call is ended and all group members are disconnected.
Note! You can also call a number by entering it on the keypad and then press
YES
.
Making an Alert Call
1. Press and hold the
ALERT BUTTON
for one second.
The call is set up and the dialled number is shown in the display (the preset number is the international emergency number 112.)
If the call cannot get through, the phone automatically re-dials the number
up to ten times.
2. Press
NO
to end the call.
Note! The alert button function must be on. If you change the pre-set alert
number (112), you must insert a SIM card and enter the PIN code (if the card
is locked). Otherwise the pre-set alert number (1 12) will be dialled and not the
number you have specified.
You can make an emergency call by dialling the number in the same way as
when making an ordinary call.
To make an emergency call
1. Enter 112 (the international emergency number).
2. Press
YES
.
The display shows
Emergency
.
3. Press
NO
to end the call.
Note! Some network operators may requir e that a SIM card has been inserted
into the phone and, in some cases, that a PIN code has been entered as well.
Some networks may not use the international emergency number 112.
Page 97

N
o
t
f
o
r
C
o
m
m
e
r
c
i
a
l
U
s
e
E
r
i
c
s
s
o
n
M
o
b
i
l
e
C
o
m
m
u
n
i
c
a
t
i
o
n
s
A
B
94 GSM Pro
Receiving a Group Call in Push-to-Talk Mode
An incoming group call is answered automatically, the phone sends out a
warning tone and the voice of the calling party will be heard in the loudspeaker.
Note! The phone must be set to Push-To-Talk mode to answer a group call
automatically. If the phone is set to phone mode, slide the mode switch
upwards to Push-To-T alk mode when you r eceive a group call. The call is then
answered automatically.
To receive a group call
1. The incoming group call is answered automatically, the phone emits a
warning tone and the voice of the calling party is heard in the loudspeaker.
• The group call cannot be rejected by pressing
NO
.
2. If you want to speak press and hold the
PUSH-TO-TALK
button.
3. Release the
PUSH-TO-TALK
button when you finish talking.
4. Press
NO
when you want to leave the group call.
Note! If your GSM Pro SIM card has been programmed to “Auto answer all
calls”, all calls are answered automatically (provided the phone has been set
to Push-To-Talk mode). If the incoming call is an ordinary phone call, this
means that you have to press the Push-To-Talk button, or switch to phone
mode, to be able to talk to the other person.
If your SIM card has been programmed to “Auto Answer Group”, the procedure for answering a call, may not work exactly as described above.
For more information on your SIM card settings, please contact your service
administrator.
Receiving a Group Call in Phone Mode
If you receive a group call and the phone is set to phone mode, you can do one
of the following:
• Slide the
MODE SWITCH
upwards to Push-To-Talk mode to automat-
ically answer the call.
• Press
YES
to answer the call in phone mode.
If you answer a group call in phone mode, the microphone will be open
during the whole conversation, i.e. you do not have to press the
PUSH
-
TO-TALK
button when you are requested to answer.
• Press
NO
when you want to end the call.
Page 98

N
o
t
f
o
r
C
o
m
m
e
r
c
i
a
l
U
s
e
E
r
i
c
s
s
o
n
M
o
b
i
l
e
C
o
m
m
u
n
i
c
a
t
i
o
n
s
A
B
GSM Pro 95
Receiving an Ordinary Phone Call in Push-To-Talk Mode
If the incoming call is not a group call, i.e. the call is an ordinary phone call,
and your phone has been set to auto answer group, then the phone will ring as
normal. To answer the call do one of the following:
• Slide the mode switch downwards to phone mode to automatically
answer the call.
• Press
YES
to answer the call in Push-To-Talk mode.
If you answer the call in Push-To-Talk mode, you need to press the
PUSH-TO-TALK
button when you want to speak to the person on the
other end of the line.
• Press
NO
when you want to end the call.
Note! If your GSM Pro SIM card has been programmed to “auto answer all
calls”, an incoming phone call will be answered automatically. To be able to
speak to the person at the other end of the line, you need to press the Push-ToTalk button or switch to phone mode.
During a group call you can listen to the conversation without having to press
any key. During a conversation you may receive a second call, if call waiting
is on, or you can put an ongoing call on hold and make a second call.
Call Monitoring
The call monitoring function allows you to listen passively, (provided the
phone is se to Push-To-Talk mode), to a group conversation, without having to
press any keys. This is a practical way of receiving information from other
group members while continue working.
Re-entry
If you are disconnected during a call, e.g. due to poor radio signalling or if you
voluntarily left the call, the re-entry function lets you re-enter the group call
by dialling the talk group number.
To re-enter a group call
1. Recall the number from the phone book or enter the number by using the
keypad.
2. Press
YES
to call the number and re-enter the ongoing call.
The other group members will be notified of you entering the call.
Making an Alert Call During an Ongoing Group Call
Y ou can make an alert call during an ongoing group call. The R250s PRO will
disconnect the ongoing group call and connect to the pre-set alert number.
DURING A GROUP CALL
Page 99

N
o
t
f
o
r
C
o
m
m
e
r
c
i
a
l
U
s
e
E
r
i
c
s
s
o
n
M
o
b
i
l
e
C
o
m
m
u
n
i
c
a
t
i
o
n
s
A
B
96 GSM Pro
To make an alert call during an ongoing group call
1. Press and hold the
ALERT BUTTON
for one second.
The call is set up and the number dialled is shown in the display.
2. Press
NO
to end the call.
Group Conversation Limit
The group conversation limit allows the service administrator to set a timelimit for group calls. This is an useful feature if the initiator of the call should
forgets to end the call. Please contact your service administrator for more
information.
Your phone allows you to handle more than one call simultaneously. This
means that you can put a call that is in progress on hold, while you make or
answer a second call, and then switch between the two calls. See “Handling
More than One Call Simultaneously” on page 74.
The GSM Pro Wireless Dispatch Console is an additional product for GSM
Pro users. A dispatch console located in an office e.g. makes it easy to communicate with and manage personnel in the field.
The Wireless Dispatch Console consists of a PC, dispatcher software, a
R250s PRO and a headset. The software runs under standard Windows 95/98/
NT operating system and can co-exist with other Windows programs. The
software supports ordinary phone calls, group calls, text messages (SMS) and
special display of alert calls.
As the name implies, the Wireless Dispatch Console requires no fixed telephone lines for its operation and is therefore suited for both fixed and mobile
equipment.
For more information, please contact your GSM network operator.
HANDLING MORE THAN ONE CALL
GSM PRO WIRELESS DISPATCH CONSOLE
Page 100

N
o
t
f
o
r
C
o
m
m
e
r
c
i
a
l
U
s
e
E
r
i
c
s
s
o
n
M
o
b
i
l
e
C
o
m
m
u
n
i
c
a
t
i
o
n
s
A
B
Accessories
98
T roubleshooting
102
Ericsson Mobile Internet
104
Quick Keys
105
Technical Data
106
Glossary
107
Guidelines for Safe and Efficient Use
112
Warranty
116
Declaration of Conformity
118
Index
119
ADDITIONAL INFORMATION
 Loading...