

Page 1

Epson Stylus® Pro 4900
USER’S GUIDE
Page 2

All rights reserved. No part of this publication may be reproduced, stored in a retrieval system, or transmitted in
any form or by any means, electronic, mechanical, photocopying, recording, or otherwise, without the prior
written permission of Seiko
Epson Corporation. The information contained herein is designed only for use with
these Epson printers. Epson is not responsible for any use of this information as applied to other printers.
Trademarks
Epson, Epson Stylus, UltraChrome, MicroWeave, Borderfree, and SpectroProofer are registered trademarks and
Epson Exceed Your Vision is a registered logomark of Seiko Epson Corporation.
UltraSmooth and Piezo Pro are registered trademarks; PhotoEnhance, AccuPhoto, and ePlaten are trademarks;
and Epson Preferred is a service mark of Epson America, Inc.
General Notice: Other product names used herein are for identification purposes only and may be trademarks of
their respective owners. Epson disclaims any and all rights in those marks.
This information is subject to change without notice.
Legal Notices
Neither Seiko Epson Corporation nor its affiliates shall be liable to the purchaser of this product or third parties for
damages, losses, costs, or expenses incurred by purchaser or third parties as a result of: accident, misuse, or abuse of
this product or unauthorized modifications, repairs, or alterations to this product, or (excluding the U.S.) failure to
strictly comply with Seiko Epson Corporation’s operating and maintenance instructions.
Seiko Epson Corporation shall not be liable for any damages or problems arising from the use of any options or
any consumable products other than those designated as Original Epson Products or Epson Approved Products by
Seiko Epson Corporation.
© 2010 Epson America, Inc. 10/10 CPD-28161
Page 3

FCC Compliance Statement
For United States Users
This equipment has been tested and found to comply with the limits for a Class B digital device, pursuant to
Part 15 of the FCC Rules. These limits are designed to provide reasonable protection against harmful interference
in a residential installation. This equipment generates, uses, and can radiate radio frequency energy and, if not
installed and used in accordance with the instructions, may cause harmful interference to radio or television
reception. However, there is no guarantee that interference will not occur in a particular installation. If this
equipment does cause interference to radio and television reception, which can be determined by turning the
equipment off and on, the user is encouraged to try to correct the interference by one or more of the following
measures:
• Reorient or relocate the receiving antenna.
• Increase the separation between the equipment and receiver.
• Connect the equipment into an outlet on a circuit different from that to which the receiver is connected.
• Consult the dealer or an experienced radio/TV technician for help.
WARNING
The connection of a non-shielded equipment interface cable to this equipment will invalidate the FCC
Certification of this device and may cause interference levels which exceed the limits established by the FCC for
this equipment. It is the responsibility of the user to obtain and use a shielded equipment interface cable with this
device. If this equipment has more than one interface connector, do not leave cables connected to unused
interfaces. Changes or modifications not expressly approved by the manufacturer could void the user’s authority to
operate the equipment.
For Canadian Users
This Class B digital apparatus complies with Canadian ICES-003.
Cet appareil numérique de la classe B est conforme à la norme NMB-003 du Canada.
Page 4

Page 5

Contents | 5
Contents
Introduction
Warnings, Cautions, Notes, and Tips . . . . . . . . . . . . . . . . . . . . . . . . . . . 11
Options and Accessories. . . . . . . . . . . . . . . . . . . . . . . . . . . . . . . . . . . . . . 12
Where To Get Help. . . . . . . . . . . . . . . . . . . . . . . . . . . . . . . . . . . . . . . . . 13
Windows System Requirements. . . . . . . . . . . . . . . . . . . . . . . . . . . . . . . . 13
Macintosh System Requirements . . . . . . . . . . . . . . . . . . . . . . . . . . . . . . . 14
Important Safety Instructions . . . . . . . . . . . . . . . . . . . . . . . . . . . . . . . . . 15
Ink Cartridge Safety Instructions. . . . . . . . . . . . . . . . . . . . . . . . . . . . 17
Printer Parts. . . . . . . . . . . . . . . . . . . . . . . . . . . . . . . . . . . . . . . . . . . . . . . 18
Front. . . . . . . . . . . . . . . . . . . . . . . . . . . . . . . . . . . . . . . . . . . . . . . . . 18
Back . . . . . . . . . . . . . . . . . . . . . . . . . . . . . . . . . . . . . . . . . . . . . . . . . 18
Control Panel . . . . . . . . . . . . . . . . . . . . . . . . . . . . . . . . . . . . . . . . . . 19
LCD Screen . . . . . . . . . . . . . . . . . . . . . . . . . . . . . . . . . . . . . . . . . . . 19
1 Setting Up the Printer
Unpacking and Connecting the Printer . . . . . . . . . . . . . . . . . . . . . . . . . . 21
Installing Ink . . . . . . . . . . . . . . . . . . . . . . . . . . . . . . . . . . . . . . . . . . . . . . 23
Connecting to Your System . . . . . . . . . . . . . . . . . . . . . . . . . . . . . . . . . . . 25
Connecting Directly to the Computer . . . . . . . . . . . . . . . . . . . . . . . . . . . 25
Windows. . . . . . . . . . . . . . . . . . . . . . . . . . . . . . . . . . . . . . . . . . . . . . 25
Macintosh . . . . . . . . . . . . . . . . . . . . . . . . . . . . . . . . . . . . . . . . . . . . . 27
Connecting to a Network . . . . . . . . . . . . . . . . . . . . . . . . . . . . . . . . . . . . 28
Configuring the Network Interface . . . . . . . . . . . . . . . . . . . . . . . . . . 28
Printing a Network Status Sheet . . . . . . . . . . . . . . . . . . . . . . . . . . . . 30
Installing the Printer Software . . . . . . . . . . . . . . . . . . . . . . . . . . . . . . 30
Adding the Network Port . . . . . . . . . . . . . . . . . . . . . . . . . . . . . . . . . 33
Updating Your Printer Firmware . . . . . . . . . . . . . . . . . . . . . . . . . . . . . . . 35
Checking the Current Firmware Version. . . . . . . . . . . . . . . . . . . . . . 35
Downloading and Updating the Firmware . . . . . . . . . . . . . . . . . . . . 36
2 Handling Paper and Other Media
Selecting Media for Your Printer . . . . . . . . . . . . . . . . . . . . . . . . . . . . . . . 37
Guidelines for Using Epson Media . . . . . . . . . . . . . . . . . . . . . . . . . . 38
5
Page 6

6 | Contents
Using Cut Sheet Paper. . . . . . . . . . . . . . . . . . . . . . . . . . . . . . . . . . . . . . . 38
Cut Sheet Paper Paths . . . . . . . . . . . . . . . . . . . . . . . . . . . . . . . . . . . . 39
Loading Paper in the Paper Cassette . . . . . . . . . . . . . . . . . . . . . . . . . 40
Using the Front Manual Feed Slot . . . . . . . . . . . . . . . . . . . . . . . . . . 45
Using the Rear Manual Feed Slot . . . . . . . . . . . . . . . . . . . . . . . . . . . 48
Using Roll Paper . . . . . . . . . . . . . . . . . . . . . . . . . . . . . . . . . . . . . . . . . . . 50
Roll Paper Guidelines . . . . . . . . . . . . . . . . . . . . . . . . . . . . . . . . . . . . 50
Removing and Installing the Spacer. . . . . . . . . . . . . . . . . . . . . . . . . . 51
Loading the Paper onto the Spindle. . . . . . . . . . . . . . . . . . . . . . . . . . 52
Placing the Paper in the Printer. . . . . . . . . . . . . . . . . . . . . . . . . . . . . 53
Removing Paper from the Spindle. . . . . . . . . . . . . . . . . . . . . . . . . . . 55
Switching Between 2-Inch and 3-Inch Roll Paper . . . . . . . . . . . . . . . 56
Cutting Roll Paper Manually with the Built-in Cutter . . . . . . . . . . . 56
Adjusting the Platen Gap for Thick or Thin Paper . . . . . . . . . . . . . . 57
Optimizing the Settings for Your Paper . . . . . . . . . . . . . . . . . . . . . . . . . . 58
Creating Custom Paper Configurations. . . . . . . . . . . . . . . . . . . . . . . 58
Selecting Custom Paper Configurations . . . . . . . . . . . . . . . . . . . . . . 60
3 Printing With Epson Drivers for Windows
Sizing Images for Borderless Printing on Roll Paper. . . . . . . . . . . . . . . . . 62
Choosing Basic Print Options . . . . . . . . . . . . . . . . . . . . . . . . . . . . . . . . . 63
Selecting the Correct Media Type Setting . . . . . . . . . . . . . . . . . . . . . 65
Choosing Color Management Options . . . . . . . . . . . . . . . . . . . . . . . . . . 67
Choosing Roll Paper Options . . . . . . . . . . . . . . . . . . . . . . . . . . . . . . . . . 69
Choosing Cut Sheet Paper Options . . . . . . . . . . . . . . . . . . . . . . . . . . . . . 72
Choosing Page Layout Options . . . . . . . . . . . . . . . . . . . . . . . . . . . . . . . . 75
Choosing Paper Configuration Options. . . . . . . . . . . . . . . . . . . . . . . . . . 76
Choosing Advanced Black and White Photo Settings . . . . . . . . . . . . . . . 79
Saving, Exporting, and Importing Custom Settings . . . . . . . . . . . . . . . . . 82
Saving and Exporting a Custom Settings Group . . . . . . . . . . . . . . . . 82
Importing a Custom Settings Group . . . . . . . . . . . . . . . . . . . . . . . . . 83
Loading a Pre-Defined Settings Group . . . . . . . . . . . . . . . . . . . . . . . 83
Editing Printer Driver Settings . . . . . . . . . . . . . . . . . . . . . . . . . . . . . 84
Managing Print Jobs . . . . . . . . . . . . . . . . . . . . . . . . . . . . . . . . . . . . . . . . 85
Using the Progress Meter. . . . . . . . . . . . . . . . . . . . . . . . . . . . . . . . . . 85
Optimizing Print Speed. . . . . . . . . . . . . . . . . . . . . . . . . . . . . . . . . . . 86
Setting Monitoring Preferences . . . . . . . . . . . . . . . . . . . . . . . . . . . . . 88
6
Page 7

Contents | 7
4 Printing With Epson Drivers for Macintosh
Sizing Images for Borderless Printing on Roll Paper. . . . . . . . . . . . . . . . . 90
Choosing Page Setup and Basic Print Options . . . . . . . . . . . . . . . . . 91
Choosing Advanced Media Control Options. . . . . . . . . . . . . . . . . . . 97
Choosing Roll Paper Settings . . . . . . . . . . . . . . . . . . . . . . . . . . . . . . 98
Controlling Borderless Image Expansion. . . . . . . . . . . . . . . . . . . . . 100
Creating a Custom Preset and Printing . . . . . . . . . . . . . . . . . . . . . . 101
Choosing Advanced Black and White Photo Settings . . . . . . . . . . . . . . 102
Managing Print Jobs . . . . . . . . . . . . . . . . . . . . . . . . . . . . . . . . . . . . 105
Selecting the Correct Media Type Setting . . . . . . . . . . . . . . . . . . . . . . . 106
5 Managing Color With Profiles
Macintosh Printing With a Color Profile. . . . . . . . . . . . . . . . . . . . . . . . 109
Setting Up Photoshop and Assigning a Profile. . . . . . . . . . . . . . . . . 109
Selecting Print Settings and Printing . . . . . . . . . . . . . . . . . . . . . . . . 112
Windows Printing With a Color Profile. . . . . . . . . . . . . . . . . . . . . . . . . 113
Setting Up Photoshop and Assigning a Profile. . . . . . . . . . . . . . . . . 113
Selecting Print Settings and Printing . . . . . . . . . . . . . . . . . . . . . . . . 115
6 Maintaining and Transporting the Printer
Alert Lamp. . . . . . . . . . . . . . . . . . . . . . . . . . . . . . . . . . . . . . . . . . . . . . . 117
Checking Printer Status and Part Life . . . . . . . . . . . . . . . . . . . . . . . . . . 117
Printing Status Information. . . . . . . . . . . . . . . . . . . . . . . . . . . . . . . 118
Viewing Status Information. . . . . . . . . . . . . . . . . . . . . . . . . . . . . . . 118
Checking Printer Status From the Printer Driver . . . . . . . . . . . . . . 119
Checking and Cleaning the Print Head . . . . . . . . . . . . . . . . . . . . . . . . . 120
Running the Nozzle Check and Head Cleaning Utilities. . . . . . . . . 120
Checking and Cleaning the Print Head Using the Control Panel . . 122
Automatically Checking and Cleaning the Print Head . . . . . . . . . . 123
Manually Checking and Cleaning the Print Head . . . . . . . . . . . . . . 123
Running Cleaning Cycles . . . . . . . . . . . . . . . . . . . . . . . . . . . . . . . . 124
Aligning the Print Head. . . . . . . . . . . . . . . . . . . . . . . . . . . . . . . . . . . . . 125
Replacing Ink Cartridges . . . . . . . . . . . . . . . . . . . . . . . . . . . . . . . . . . . . 126
Changing the Black Ink Cartridge. . . . . . . . . . . . . . . . . . . . . . . . . . 130
Changing the Date and Time . . . . . . . . . . . . . . . . . . . . . . . . . . . . . . . . 131
Using Maintenance Mode . . . . . . . . . . . . . . . . . . . . . . . . . . . . . . . . . . . 131
7
Page 8

8 | Contents
Replacing the Paper Cutter . . . . . . . . . . . . . . . . . . . . . . . . . . . . . . . . . . 133
Removing the Old Cutter . . . . . . . . . . . . . . . . . . . . . . . . . . . . . . . . 133
Installing the New Cutter . . . . . . . . . . . . . . . . . . . . . . . . . . . . . . . . 135
Replacing the Maintenance Tanks . . . . . . . . . . . . . . . . . . . . . . . . . . . . . 137
Replacing the Ink Maintenance Tank . . . . . . . . . . . . . . . . . . . . . . . 138
Replacing the Borderfree Maintenance Tank. . . . . . . . . . . . . . . . . . 139
Cleaning the Printer. . . . . . . . . . . . . . . . . . . . . . . . . . . . . . . . . . . . . . . . 141
Transporting or Storing the Printer . . . . . . . . . . . . . . . . . . . . . . . . . . . . 141
Preparing the Printer for Shipment . . . . . . . . . . . . . . . . . . . . . . . . . 142
Setting Up the Printer After Transportation . . . . . . . . . . . . . . . . . . 142
7 Solving Problems
Diagnosing Problems. . . . . . . . . . . . . . . . . . . . . . . . . . . . . . . . . . . . . . . 143
Checking Error Messages and Lights . . . . . . . . . . . . . . . . . . . . . . . . . . . 144
Improving Print Quality . . . . . . . . . . . . . . . . . . . . . . . . . . . . . . . . . . . . 152
Solving Operational Problems . . . . . . . . . . . . . . . . . . . . . . . . . . . . . . . . 156
Solving Miscellaneous Printing Problems. . . . . . . . . . . . . . . . . . . . . . . . 157
Solving Paper Problems . . . . . . . . . . . . . . . . . . . . . . . . . . . . . . . . . . . . . 159
Clearing Paper Jams . . . . . . . . . . . . . . . . . . . . . . . . . . . . . . . . . . . . 160
Uninstalling and Reinstalling the Printer Driver . . . . . . . . . . . . . . . . . . 163
Macintosh OS X . . . . . . . . . . . . . . . . . . . . . . . . . . . . . . . . . . . . . . . 163
Windows. . . . . . . . . . . . . . . . . . . . . . . . . . . . . . . . . . . . . . . . . . . . . 163
A Specifications
Clearing Stored Print Information . . . . . . . . . . . . . . . . . . . . . . . . . . . . . 165
Environmental . . . . . . . . . . . . . . . . . . . . . . . . . . . . . . . . . . . . . . . . . . . . 165
Electrical . . . . . . . . . . . . . . . . . . . . . . . . . . . . . . . . . . . . . . . . . . . . . . . . 165
Dimensions and Weight . . . . . . . . . . . . . . . . . . . . . . . . . . . . . . . . . . . . 166
Printer Interfaces . . . . . . . . . . . . . . . . . . . . . . . . . . . . . . . . . . . . . . . . . . 166
Safety Approvals. . . . . . . . . . . . . . . . . . . . . . . . . . . . . . . . . . . . . . . . . . . 166
Media . . . . . . . . . . . . . . . . . . . . . . . . . . . . . . . . . . . . . . . . . . . . . . . . . . 166
Roll Paper . . . . . . . . . . . . . . . . . . . . . . . . . . . . . . . . . . . . . . . . . . . . 166
Cut Sheets. . . . . . . . . . . . . . . . . . . . . . . . . . . . . . . . . . . . . . . . . . . . 167
Printable Area . . . . . . . . . . . . . . . . . . . . . . . . . . . . . . . . . . . . . . . . . 167
Ink Cartridges . . . . . . . . . . . . . . . . . . . . . . . . . . . . . . . . . . . . . . . . . . . . 168
Index
8
Page 9

11
Introduction
This User’s Guide provides important information on setting up and using
your printer, loading paper, using the Epson printer drivers, and replacing
ink cartridges. It also tells you how to maintain your printer to keep it
working at its best, and provides troubleshooting tips in case you have a
problem.
For additional information, see the following:
• The Quick Reference Guide provides a handy summary of procedures for
daily use and printer maintenance—loading paper, replacing ink
cartridges and other components, cleaning and aligning the print head,
and using the printer’s menu system. Attach it to your printer for easy
reference.
• The on-screen Network Guide provides instructions for setting up and
using your printer on a network.
Warnings, Cautions, Notes, and Tips
Please follow these guidelines as you use this book:
WARNINGS must be followed carefully to avoid bodily injury.
Cautions must be observed to avoid damage to your equipment.
Notes contain important information about your printer.
Tips contain additional hints on how to get the most out of your printer.
11
Page 10

12 | Introduction
Tip: Check the Epson Pro
Imaging website at
www.proimaging.epson.
com for accessories and
options that are currently
available.
Options and Accessories
Your Epson Stylus Pro 4900® offers these optional upgrades and accessories:
Optional equipment
Option Part number
SpectroProofer® 17-inch SPECTRO17
SpectroProofer 17-inch with UV-cut filter SPECTRO17UV
One-year extended service plan EPP49B1
Two-year extended service plan EPP49B2
In addition, you can order these user-replaceable items:
Consumables and user-replaceable parts
Part Part number
Replacement ink maintenance tank (see page 137) T619000
Replacement borderfree maintenance tank (see page 137) T619100
Replacement printer cutter blade (see page 133) C12C815351
Additional 2”/3” roll media spindle C12C811251
Ink cartridges See page 127 for
a complete list.
You can purchase optional equipment and genuine Epson ink and paper
from an Epson Professional Imaging Authorized Reseller. To find the
nearest reseller, visit www.proimaging.epson.com (U.S. sales), www.epson.ca
(Canadian sales), or call 800-GO-EPSON (800-463-7766).
12
Page 11

Tip: If you experience
difficulty with the
toll-free line or your
Unit ID number, call the
Professional Imaging
support line at
(562) 276-1305.
Introduction | 13
Where To Get Help
Epson provides technical support and information on the installation,
configuration, and operation of professional printing products through the
Epson Preferred Limited Warranty Plan. Dial (888) 377-6611, 6
6
PM, Pacific Time, Monday through Friday. Days and hours of support are
SM
AM to
subject to change without notice.
Before you call, make sure you have your Unit ID number, which is
included with the Epson Preferred Limited Warranty Plan information that
came with your printer. You’ll also need your printer serial number and
proof of purchase.
Visit Epson’s support website at epson.com/support and select your product
for solutions to common problems. You can download drivers, firmware,
and documentation, get FAQs and troubleshooting advice, or e-mail Epson
with your questions.
Windows System Requirements
Caution: Using an
improperly shielded
cable—especially a cable
more than 10 feet (3 m)
long—may cause the
printer to malfunction.
Note: USB 2.0 is
required to run the
printer at full speed.
To use your printer in either a stand-alone or peer-to-peer network
environment, your system should meet these requirements:
• IBM
®
-compatible PC with a Pentium® 4, 2 GHz or higher processor
recommended
• Microsoft
Edition, Windows
• At least 2GB of RAM (4GB or more recommended)
• At least 50GB of free hard disk space for software and processing files
• Quad-speed (4×) CD-ROM or DVD drive for installing the printer
®
Windows® 7, Windows Vista®, WindowsXP Professional x32
XP Professional x64 Edition, or Windows XP
software
• For USB connection: a Windows-compliant USB Hi-Speed 2.0 port
and a shielded USB “AB” cable from Series A (computer) to Series B,
(printer), up to 10 feet long
• For Ethernet connection: Standard Ethernet 100Base-T/10Base-TX
• SVGA (800 × 600) or higher resolution
13
Page 12

14 | Introduction
Macintosh System Requirements
Caution: Using an
improperly shielded
cable—especially a cable
more than 10 feet (3 m)
long—may cause the
printer to malfunction.
Note: USB 2.0 is
required to run the
printer at full speed.
To use your printer in either a stand-alone or peer-to-peer network
environment, your Macintosh
• Mac OS
• PowerPC
• At least 2GB of RAM (4GB or more recommended)
• At least 50GB of free hard disk space for software and processing files
• Quad-speed (4×) or faster CD-ROM or DVD drive for installing the
®
X 10.5.x or higher
®
G5, Intel®, or higher processor
®
system should meet these requirements:
printer software
• For USB connection: a compliant USB Hi-Speed 2.0 port and a
shielded USB “AB” cable from Series A (computer) to Series B (printer),
up to 10 feet long
• For network connection: Standard Ethernet 100Base-T/10Base-TX
14
Page 13
Introduction | 15
Important Safety Instructions
Before using your printer, read the following safety instructions to make sure
you use the equipment safely and effectively.
• The Epson Stylus Pro 4900 weighs about 115 lb (52 kg) without the ink
or paper. Make sure you have two people lift the printer.
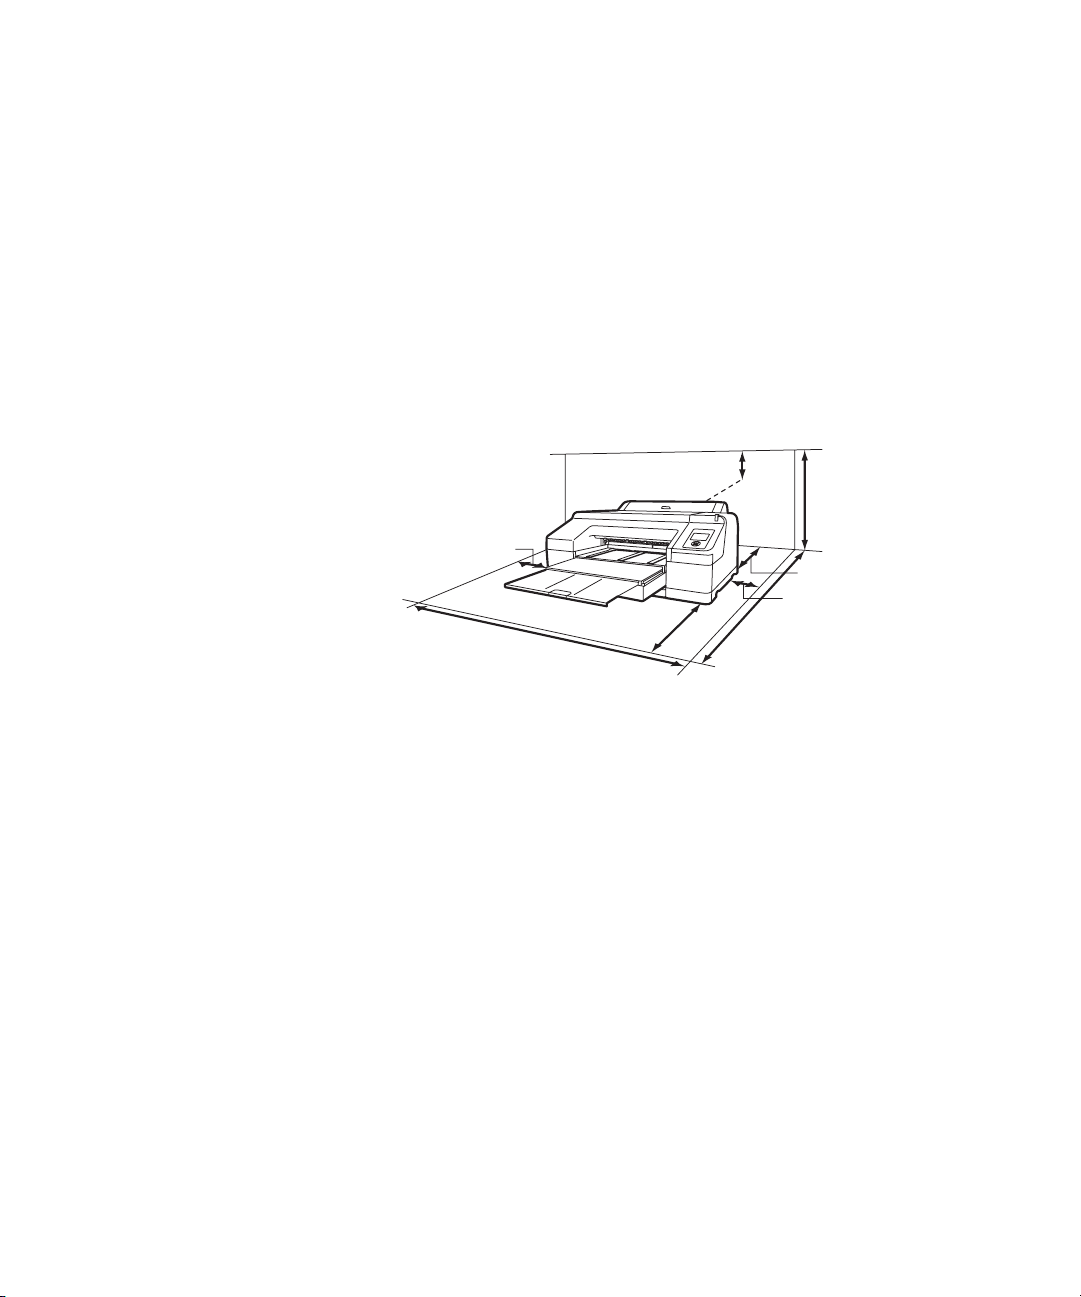
• When setting up the printer, make sure you have enough space around
it, as shown below. You may need more space behind the printer if you
print on large sheets of heavy stock or posterboard.
7 in (182 mm)
23 in (586 mm)
6 in (150 mm)
6 in (150 mm)
6 in (150 mm)
21 in (533 mm)
46 in (1163 mm)
53 in (1349 mm)
• Place the printer on a flat, stable surface that is larger than this product.
The printer will not operate properly if it is tilted or at an angle.
• Avoid places subject to rapid changes in temperature and humidity. Also
keep this product away from direct sunlight, strong light, heat sources,
or air conditioners.
• Avoid places subject to shocks and vibrations.
• Keep the printer away from dusty areas.
• Keep your entire computer system away from potential sources of
electromagnetic interference, such as loudspeakers or the base units of
cordless telephones.
• Place the printer near a wall outlet where the plug can be easily
unplugged.
• Use only the type of power source indicated on the label.
15
Page 14

16 | Introduction
Caution: Always turn
the printer off using the
P power button. When
you press this button,
POWER OFF appears on
the LCD screen and the
P power light flashes.
Do not unplug the printer
or turn off the power to
the printer until the panel
shuts off and the
P power light stops
flashing. This ensures
that the print head is
safely capped.
•
Connect the printer to a properly grounded outlet. Avoid using an
outlet on the same circuit as a photocopier or air control system that
regularly switches on and off.
• Avoid using electrical outlets controlled by wall switches or timers.
• Use only the power cord that comes with the printer. Use of another
cord may result in fire or electric shock.
• The printer’s power cord is designed for use with the printer only. Using
it with other equipment may result in fire or electric shock.
• Do not use a damaged or frayed power cord.
• If you use an extension cord with the printer, make sure the total ampere
rating of devices plugged into the extension cord does not exceed the
cord’s ampere rating. Also, make sure the total ampere rating of all
devices plugged into the wall outlet does not exceed the wall outlet’s
ampere rating.
• Do not block or cover the openings in the printer’s case.
• Do not put your hand inside the printer or touch the ink cartridges
during printing.
• Do not move the print head by hand unless instructed to do so by an
Epson service technician; otherwise you may damage the printer.
• Do not insert objects through the slots. Take care not to spill liquid on
the printer.
• Do not attempt to service the printer yourself.
• Power down the printer from the control panel, unplug the printer, and
refer servicing to qualified service personnel under the following
conditions:
The power cord or plug is damaged; liquid has entered the printer; the
printer has been dropped or the cabinet damaged; the printer does not
operate normally or exhibits a distinct change in performance.
• Before transporting the printer, make sure the print head is in the far
right (home) position.
16
Page 15

Introduction | 17
For California customers only:
The lithium batteries in this product contain
Perchlorate Material - special handling may apply,
See www.dtsc.ca.gov/hazardouswaste/perchlorate.
Ink Cartridge Safety Instructions
• Keep ink cartridges out of the reach of children and do not drink the
ink.
• Store ink cartridges in a cool, dark place.
• If ink gets on your skin, wash it off with soap and water. If ink gets in
your eyes, flush them immediately with water.
Caution: Do not use too
much force when you
shake cartridges that
have been previously
installed.
• Shake ink cartridges before installing them for best results.
• Do not use an ink cartridge beyond the date printed on the cartridge
carton.
• Use up the ink cartridge within six months of installation for best
results.
• Do not dismantle ink cartridges or try to refill them. This could damage
the print head.
• After bringing an ink cartridge inside from a cold storage site, allow it to
warm up at room temperature for at least three hours before using it.
• The IC chip on the ink cartridge retains a variety of cartridge
information, which allows you to remove and reinsert it freely.
• If you remove an ink cartridge for later use, protect the ink supply area
from dirt and dust, and store it in the same environment as this product.
Note that there is a valve in the ink supply port, making covers or plugs
unnecessary, but care is needed to prevent ink from staining items that
the cartridge touches.
• Do not touch the ink supply port, its surrounding area, or the green IC
chip on the side of the ink cartridge. Doing so may affect normal
operation and printing.
17
Page 16

18 | Introduction
Printer Parts
Front
Spindle
holders
Front cover
Cartridge
cover (left)
Paper
cassette
Output tray
Borderfree
maintenance tank
Back
Rear access
panel
Roll paper
cover
Paper eject
support
feeder
Cartridge
cover (right)
Front manual
feeder
Edge guideRoll paper
Ink maintenance
tank
Borderless printing spacer
Paper support
3-inch core adapters
Rear manual
feeder
Printer cover
Print head
Ink cartridges
Roll paper
holder unit
connector
USB interface
18
Airflow
vents
Network
interface
AC inlet
Status lights
Spindle
Paper stop
(black)
Paper stop
(gray)
Page 17

Control Panel
Introduction | 19
Power light and
button
LCD screen
Paper feed up
button
Left arrow or paper
source button
Ink menu button
LCD Screen
Paper alert
light
Paper feed down button
Ink alert
light
Pause/reset
light and button
Paper release
™
(ePlaten
button
Main Menu button
Paper cut
button
) light and
Paper
source
Ink cartridge
status
SpectroProofer
Platen gap/Paper
number
19
Roll paper
margin
Roll paper
counter
Maintenance
tank status
Type of
black ink
Page 18

20 | Introduction
20
Page 19
21
Chapter 1:
Setting Up
the Printer
WARNING: The printer
weighs about 115 pounds
(52 kg) and should be lifted
by two people.
This chapter includes the following information:
• Unpacking and connecting the Epson Stylus Pro 4900
• Installing ink
• Connecting to your computer or network
• Configuring the printer for a network
• Installing the printer software for Windows or Macintosh
• Updating the printer firmware
Unpacking and Connecting the Printer
Follow these steps to unpack the printer and connect the power cord.
Before you begin, make sure you have sufficient space to set up and use the
printer.
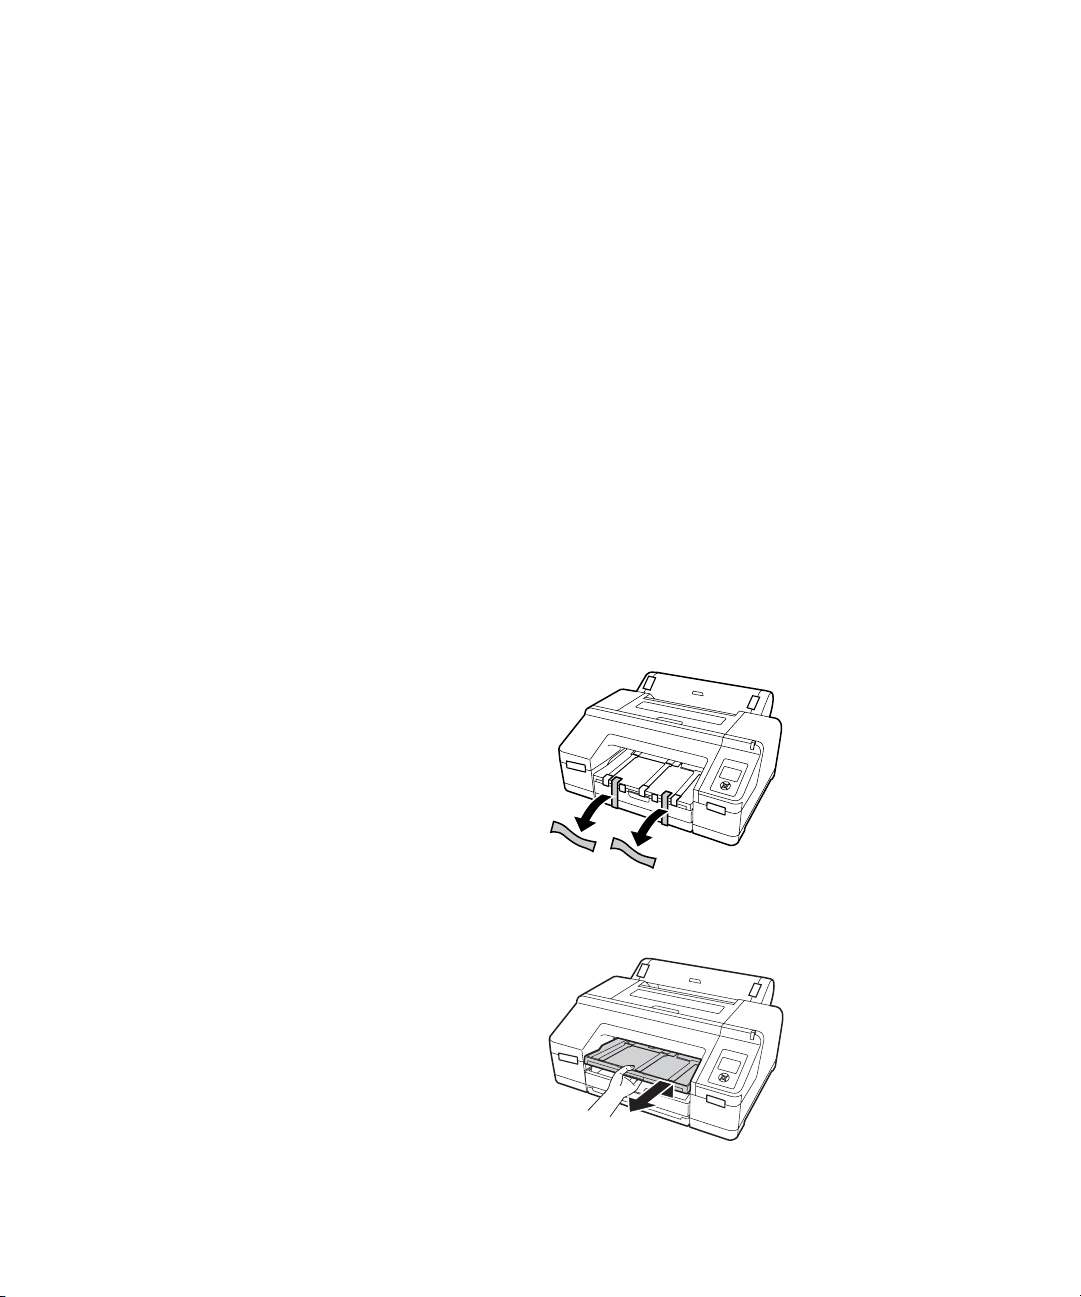
1. Remove the tape from the front of the paper tray.
2. Lift the edge of the output tray to remove it.
21
Page 20
22 | Setting Up the Printer
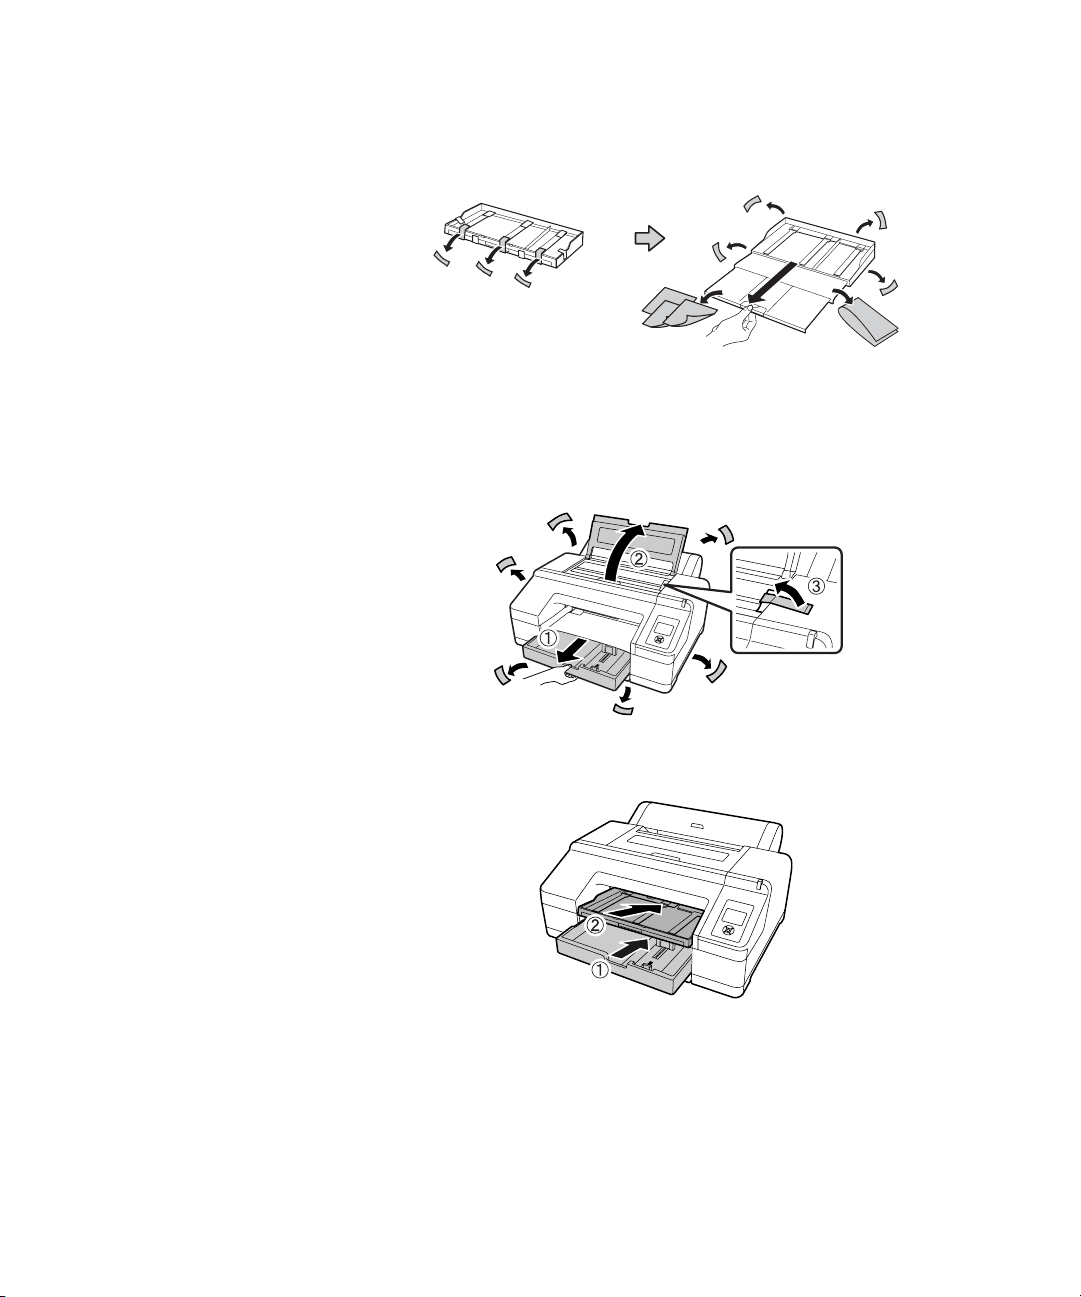
3. Remove all packing materials and tape from the output tray.
4. Open the paper tray and top cover and remove all packing materials and
tape from inside the printer. Check carefully for all the tape inside and
outside the printer, then close the top cover. Save the box and packaging
in case you need to ship the printer.
5. Replace the paper tray and output tray.
22
Page 21
Setting Up the Printer | 23
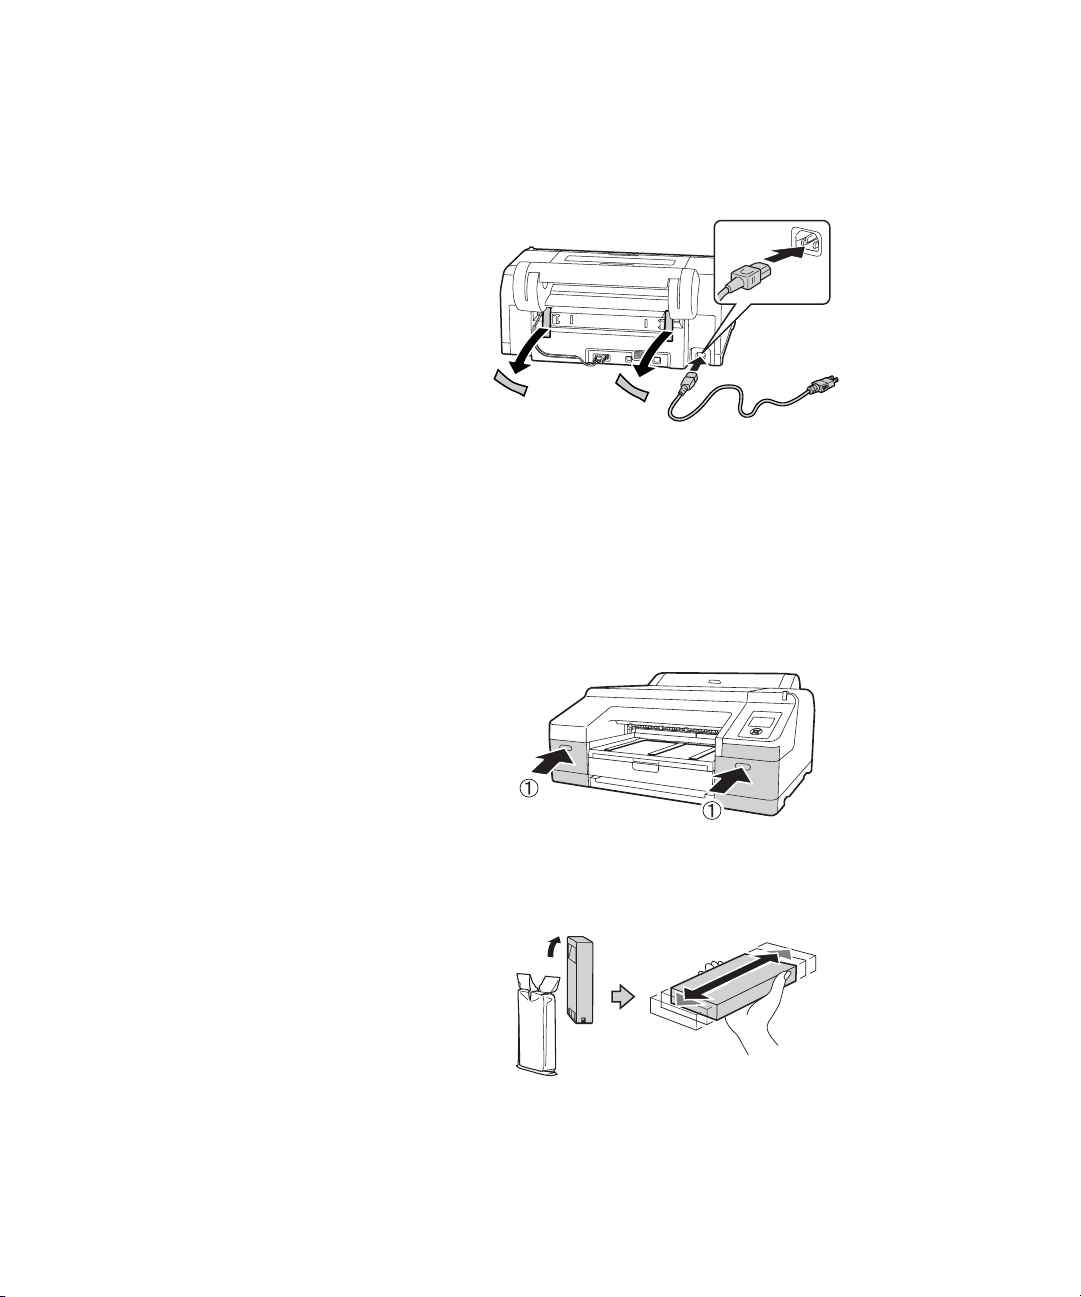
6. Remove the tape from the back of the printer and connect the power
cable.
7. Press the P power button to turn on the printer.
Installing Ink
Use the ink cartridges that came with your printer for initial ink charging.
1. Press the left and right ink compartment covers to open them.
2. Remove the ink cartridges from their packages, then gently shake each
cartridge for about 15 seconds.
23
Page 22
24 | Setting Up the Printer
3. Note the location of the slots corresponding to each cartridge.
Ink bay Slot no. Cartridge
Left
Right
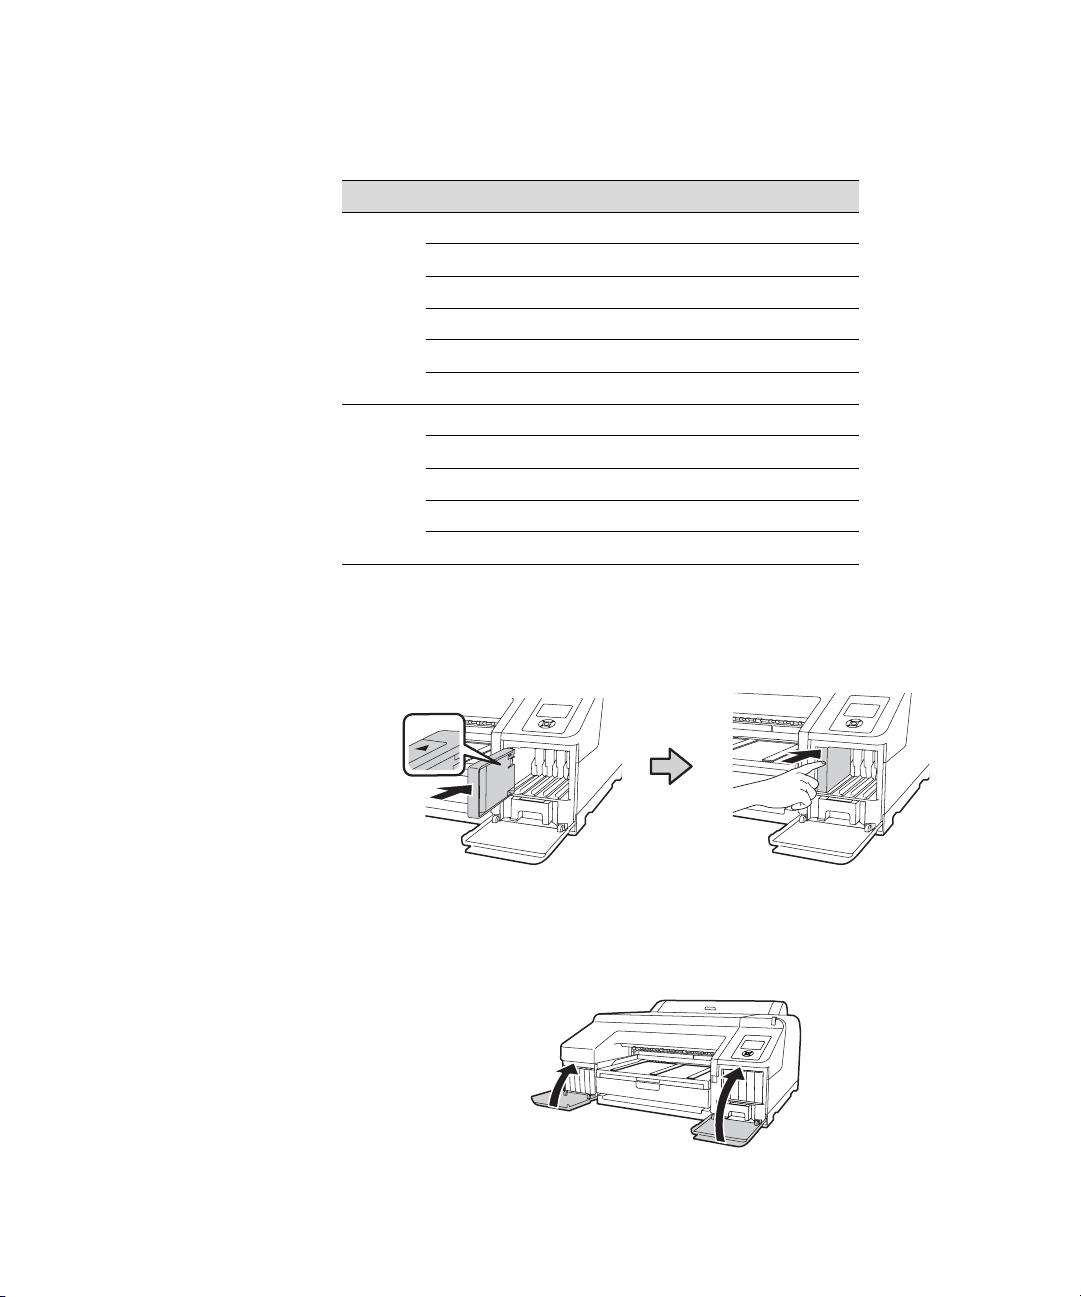
4. Hold each cartridge with the arrow pointing toward the printer, then
Caution: Do not touch the
green chip on top of the
cartridge.
1Green (GR)
2 Light Light Black (LLK)
3 Yellow (Y)
4 Light Cyan (LC)
5 Vivid Light Magenta (VLM)
6 Orange (OR)
7 Matte Black (MK)
8 Vivid Magenta (VM)
9 Light Black (LK)
10 Cyan (C)
11 Photo Black (PK)
push it into its slot until it clicks into place. Make sure you insert each
cartridge all the way into the correct slot.
Caution: Charging takes
about 15 minutes. Never
turn off the printer,
remove the maintenance
tanks, or open the front
cover or ink covers while
P power light is
the
flashing, or you may
damage the printer.
5. After installing all 11 cartridges, close the ink covers. The printer starts
charging the ink and the P power light flashes.
24
Page 23

Setting Up the Printer | 25
After ink charging is completed, you need to load paper before READY will
appear on the display. See page 37 for instructions.
Connecting to Your System
Your printer software works with Windows® 7, Windows Vista®, Windows
XP Professional x64 Edition, Windows XP, and Macintosh OS X 10.5.x to
10.6.x.
If you are using the USB interface, see “Connecting Directly to the
Computer” below to install the printer software.
If you are using the printer on a network, go to “Connecting to a Network”
on page 28 and follow the instructions to:
• Connect the printer to the network
• Configure the network interface
• Install the printer software
Note: If you see a Found
New Hardware Wizard
screen, click Cancel and
disconnect the USB cable.
You can’t install your
software that way.
Connecting Directly to the Computer
Make sure you have a compliant USB Hi-Speed 2.0 port and a shielded USB
“AB” cable from Series A (computer) to Series B (printer), up to 10 feet
long.
Windows
1. Make sure that your computer and printer are turned on and that the
Epson Stylus Pro 4900 is NOT connected to the computer.
2. Insert the printer software CD in your CD or DVD drive.
3. If the AutoPlay window appears, click
User Account Control screen, click
25
Run Setup.exe. If you see the
Yes or Continue.
Page 24
26 | Setting Up the Printer
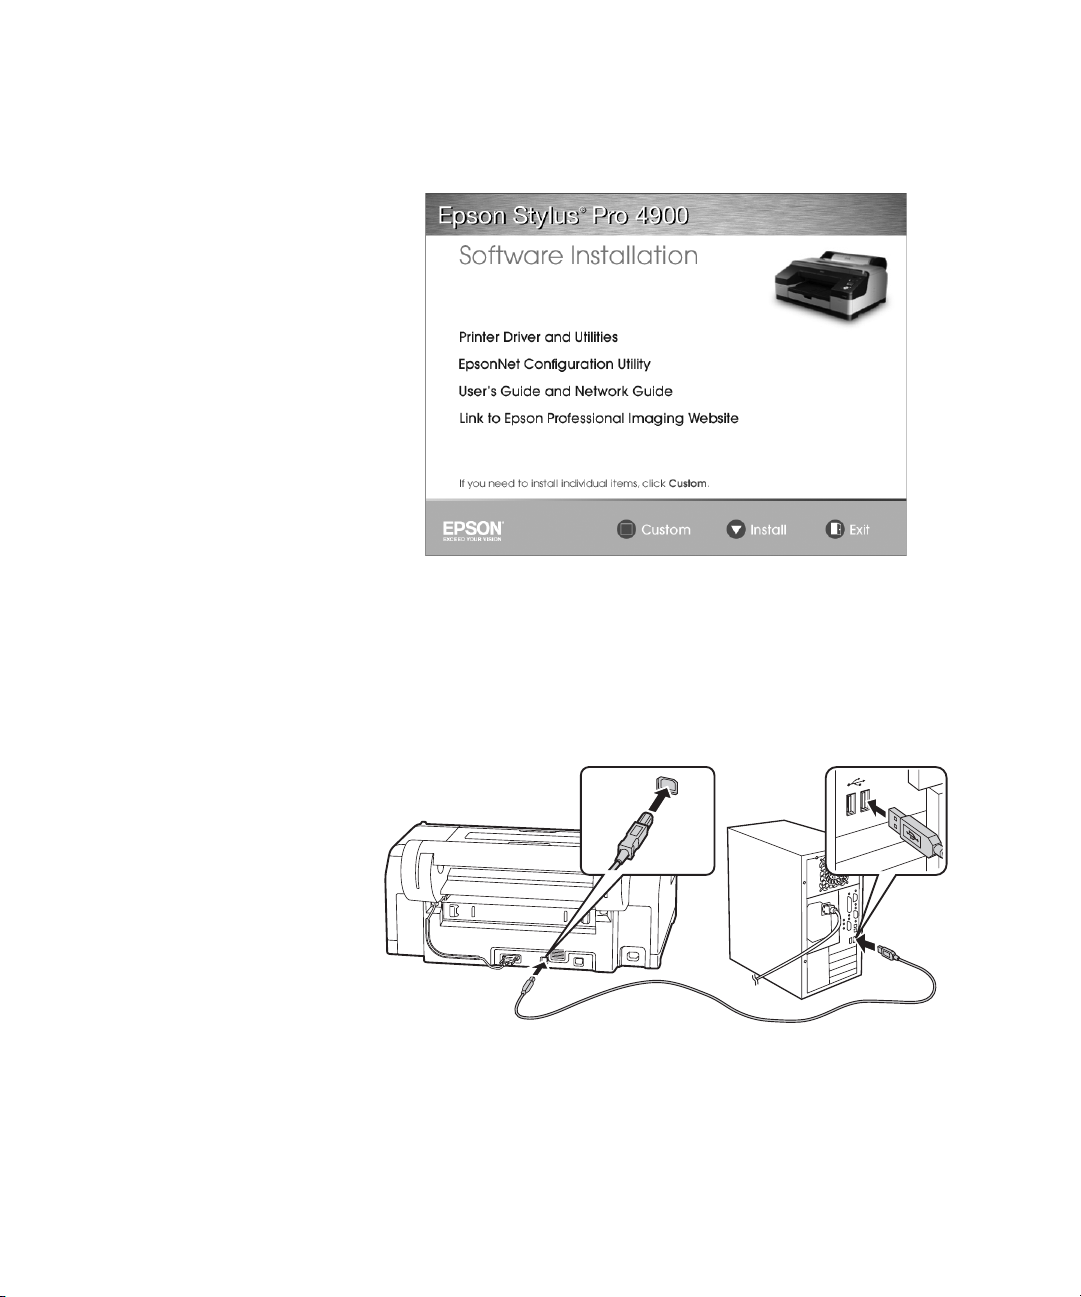
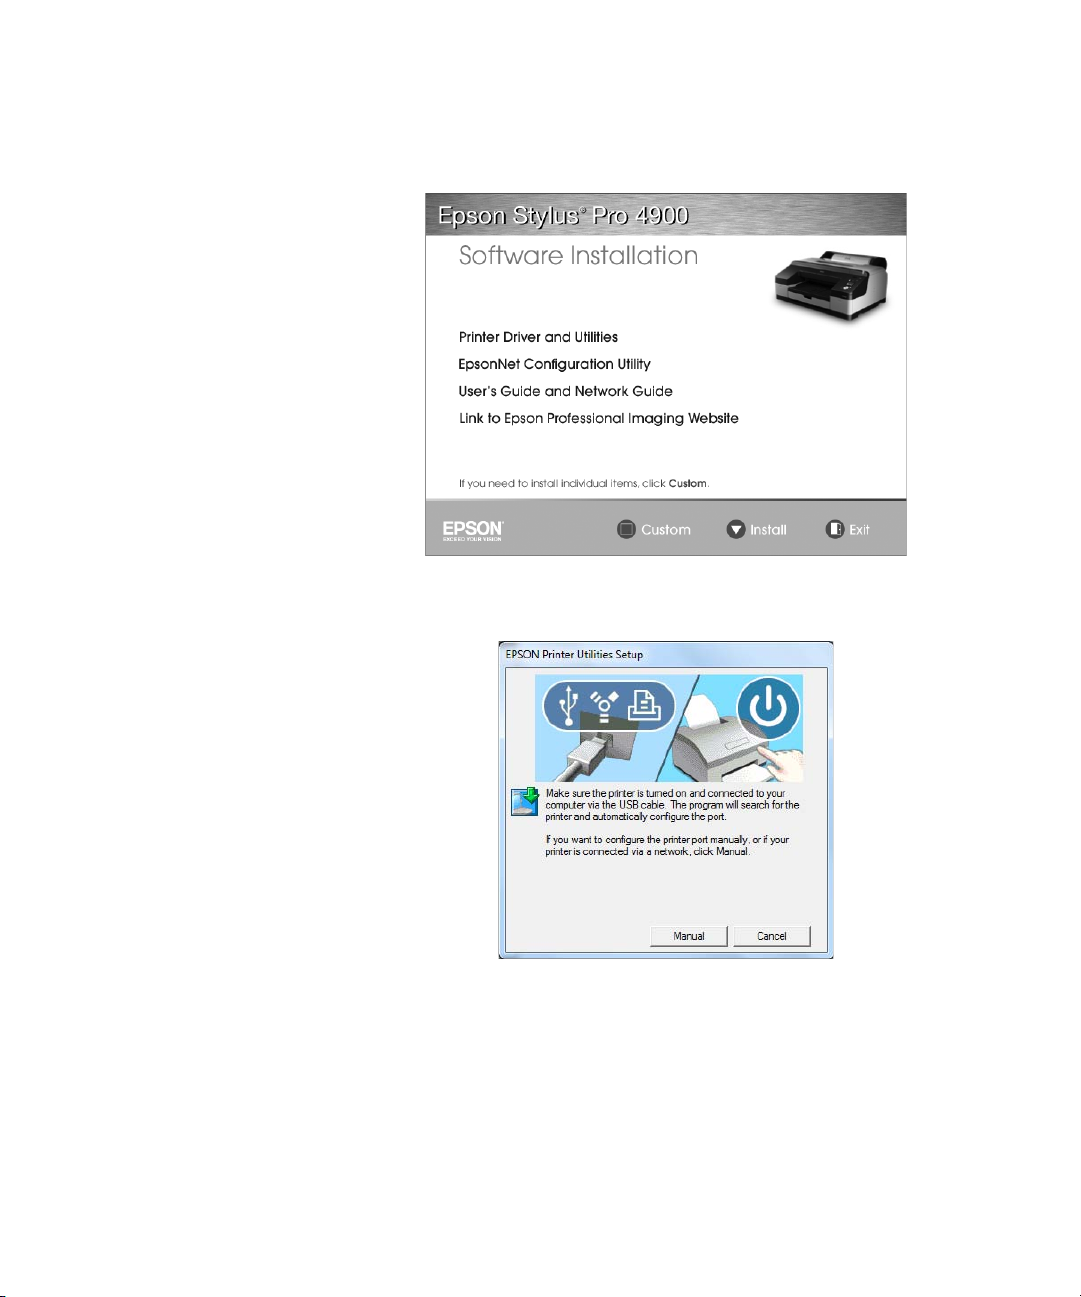
4. Click Install.
5. Follow the on-screen instructions to install all the necessary software and
manuals, place a link to the Epson Professional Imaging website on your
desktop, and register your printer.
6. When prompted, connect a USB cable. Use any open USB port on your
computer.
7. When you’re done, click
Exit and eject the CD.
26
Page 25
Setting Up the Printer | 27
Macintosh
1. Make sure that your computer and printer are turned on and that the
Epson Stylus Pro 4900 is connected to the computer
2. Insert the Epson Stylus Pro 4900 software CD in your CD or DVD
drive.
Note: If you see the
message that the installer
has detected an older
version of EpsonNet
Config on your system,
you must uninstall the old
version before you can
install the new one. To
uninstall, drag the
EpsonNet folder to the
trash. Then reinstall your
printer software.
3. Double-click the
4. Click the
Epson Stylus Pro 4900 icon.
Epson icon.
5. Follow the on-screen instructions to install the printer software
(including the printer driver and EPSON LFP Remote Panel utility)
and register your printer.
6. Click the
User’s Guide icon to place links to the User’s Guide, Network
Guide, and Epson Professional Imaging website on your desktop.
7. If connecting to a network, click the
Ethernet Utility icon to install the
EpsonNet Configuration utility (located in the EpsonNet folder under
Applications).
8. When you’re done, click
prompted.
27
Exit and eject the CD. Restart the Macintosh if
Page 26
28 | Setting Up the Printer
Connecting to a Network
Make sure you have the correct cable for connecting the printer. To connect
to a network switch or hub, you need a standard RJ-45 “straight-through”
Note: You must use a
Category 5 shielded
twisted-pair cable to
connect the network
interface to prevent
malfunction. You can use
both 10Base-T and
100Base-TX networks.
When you print a lot of
data, we recommend using
the highest speed available
for your product with light
network traffic.
network cable. To connect directly to your computer’s network interface,
you need an RJ-45 crossover cable.
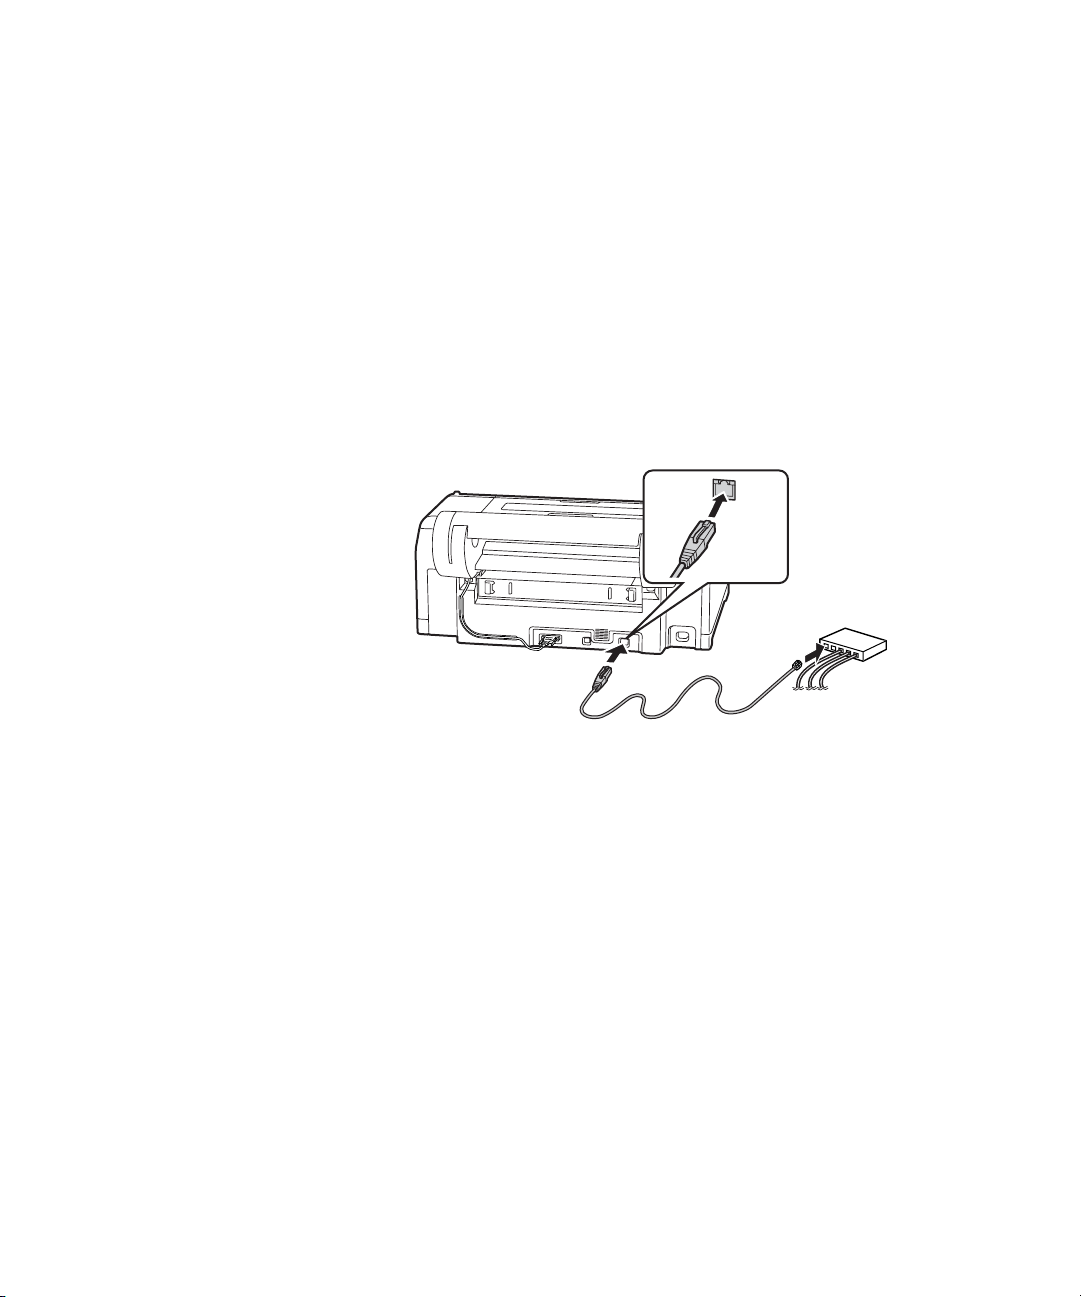
1. Turn off the printer.
2. Connect one end of the appropriate cable to the printer’s Ethernet port.
Then connect the other end to your network switch or hub or your
computer’s Ethernet port.
3. Turn on the printer.
Once the printer is connected to your network, you need to configure it. See
“Configuring the Network Interface” on page 28 for instructions.
Configuring the Network Interface
1. Make sure that the printer is turned on and the LCD screen displays
READY.
2. Press the
printer’s menu system.
3. Press d to highlight
4. Press r, then d to highlight
Menu r button on the printer’s control panel to enter the
NETWORK SETUP, then press r.
SHOW.
28
Page 27

Setting Up the Printer | 29
5. Press OK. A checkmark appears next to SHOW to show that it’s
selected.
Note: If you don’t know
which setting to use, see
your network administrator
for help configuring the
printer’s IP settings.
6. Press l to go back, then press d to highlight
IP ADDRESS SETTING.
7. Press r, then press u or d to choose one of the following IP
configuration settings:
•AUTO: Select this setting if your network uses a DHCP server to
provide IP addresses automatically. The printer’s IP address will be
obtained from the DHCP server whenever the printer is reset or
turned on.
•PANEL: Select this setting if you would like to configure the
printer’s IP settings manually.
8. Press
OK. A checkmark appears next to the setting you selected.
9. Press l to go back, then do one of the following:
• If you selected AUTO as the IP ADDRESS SETTING, press the
button to exit the printer menu. Then continue with step 14.
• If you selected PANEL as the IP ADDRESS SETTING, continue
with step 10.
10. Press d to highlight
screen displays the
IP, SM, DG SETTING, then press r. The LCD
IP ADDRESS.
11. Press u or d to change each octet value, then press r to select the next
octet. When you have changed the value of the last octet, press
LCD screen displays the
SUBNET MASK.
r. The
12. Press u or d to change each octet value, then press r to select the next
octet. When you have changed the value of the last octet, press
LCD screen displays the
DEFAULT GATEWAY.
r. The
13. Press u or d to change each octet value, then press r to select the next
octet. When you have changed the value of the last octet, press
OK, then
press the button to exit the printer menu.
14. Turn the printer off, then back on again.
29
Page 28

30 | Setting Up the Printer
15. See “Printing a Network Status Sheet” below to print a network status
Now you can install the printer software (see “Installing the Printer
Software” on page 30).
Printing a Network Status Sheet
1. Make sure that the printer is not printing and the LCD screen displays
2. Load 3 sheets of letter-size paper.
sheet and confirm the new IP address. For Windows, you’ll need the IP
address during setup.
READY.
3. Press the
Menu r button on the printer’s control panel to enter the
printer’s menu system.
4. Press d to highlight
5. Press d to highlight
6. Press
OK to print the network status sheet.
TEST PRINT, then press r.
NETWORK STATUS SHEET, then press r.
Installing the Printer Software
To print to the network printer, you need to install the printer driver
(printer software) on your computer. See the appropriate section below for
your operating system.
Windows
1. Insert the printer software CD in your CD or DVD drive.
2. If the AutoPlay window appears, click
User Account Control screen, click
Run Setup.exe. If you see the
Yes or Continue.
30
Page 29
3. Click Install.
Setting Up the Printer | 31
4. When you see a screen like this one, click the
5. Select
LPT1: as the printer port, then click OK.
Manual button.
6. Follow the on-screen instructions to install all the necessary software,
place links to the User’s Guide, Network Guide, and Epson Professional
Imaging website on your desktop, and register your printer.
7. When you’re done, click
Exit and eject the CD. Restart your computer
if prompted.
31
Page 30
32 | Setting Up the Printer
See “Adding the Network Port” on page 33 to create a network port for your
printer.
Mac OS X
1. Insert the Epson Epson Stylus Pro 4900 software CD in your CD or
DVD drive.
Note: If you see the
message that the installer
has detected an older
version of EpsonNet
Config on your system,
you must uninstall the old
version before you can
install the new one. To
uninstall, drag the
EpsonNet folder to the
trash. Then reinstall your
printer software.
2. Double-click the
Epson icon.
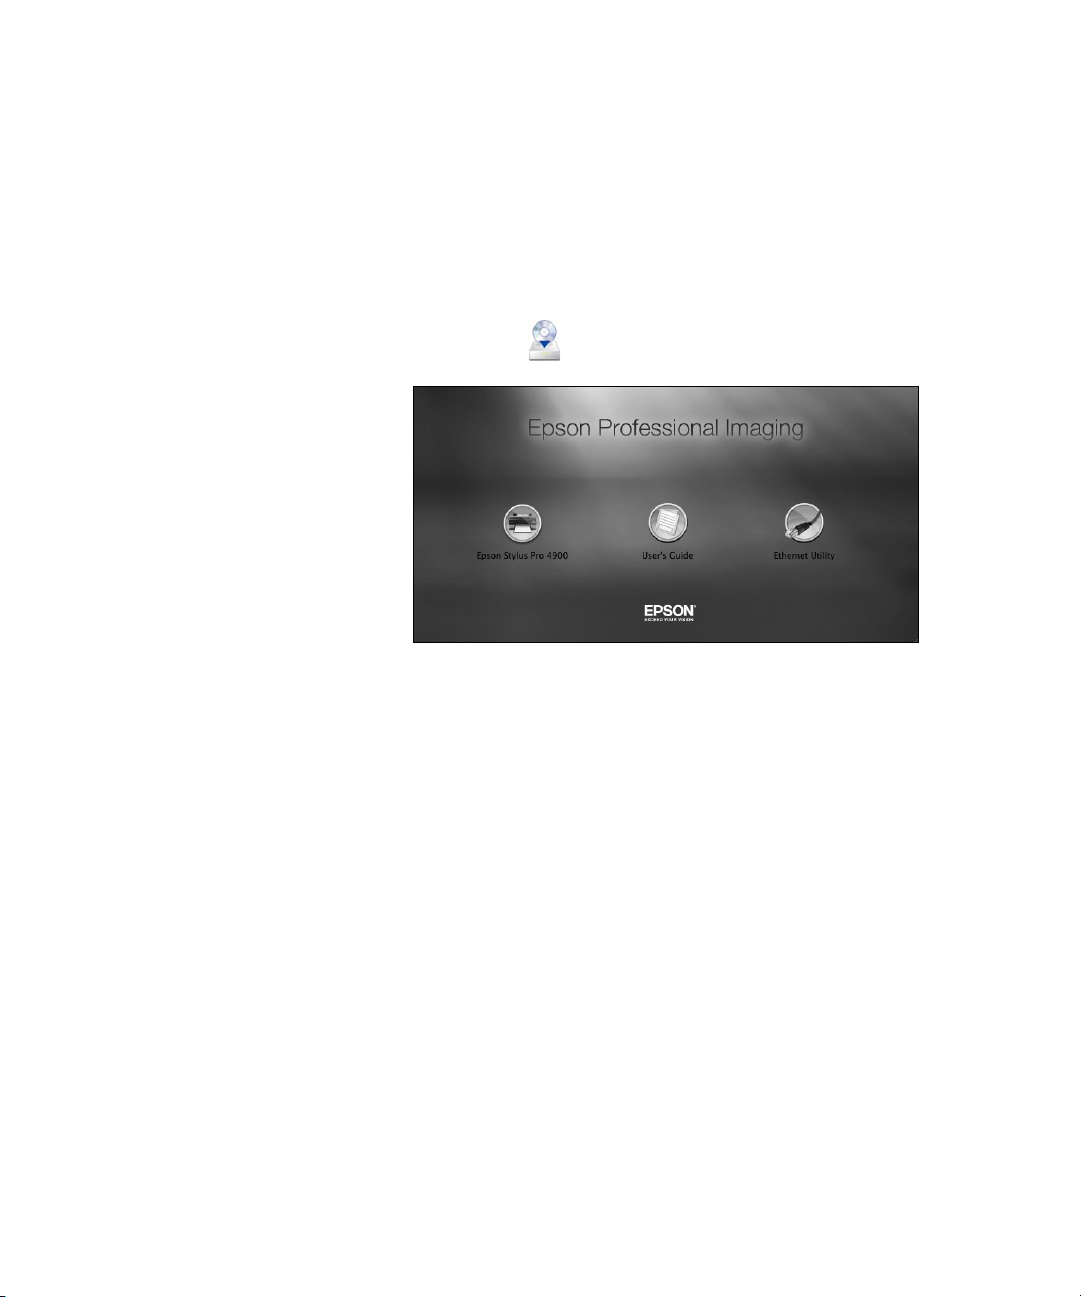
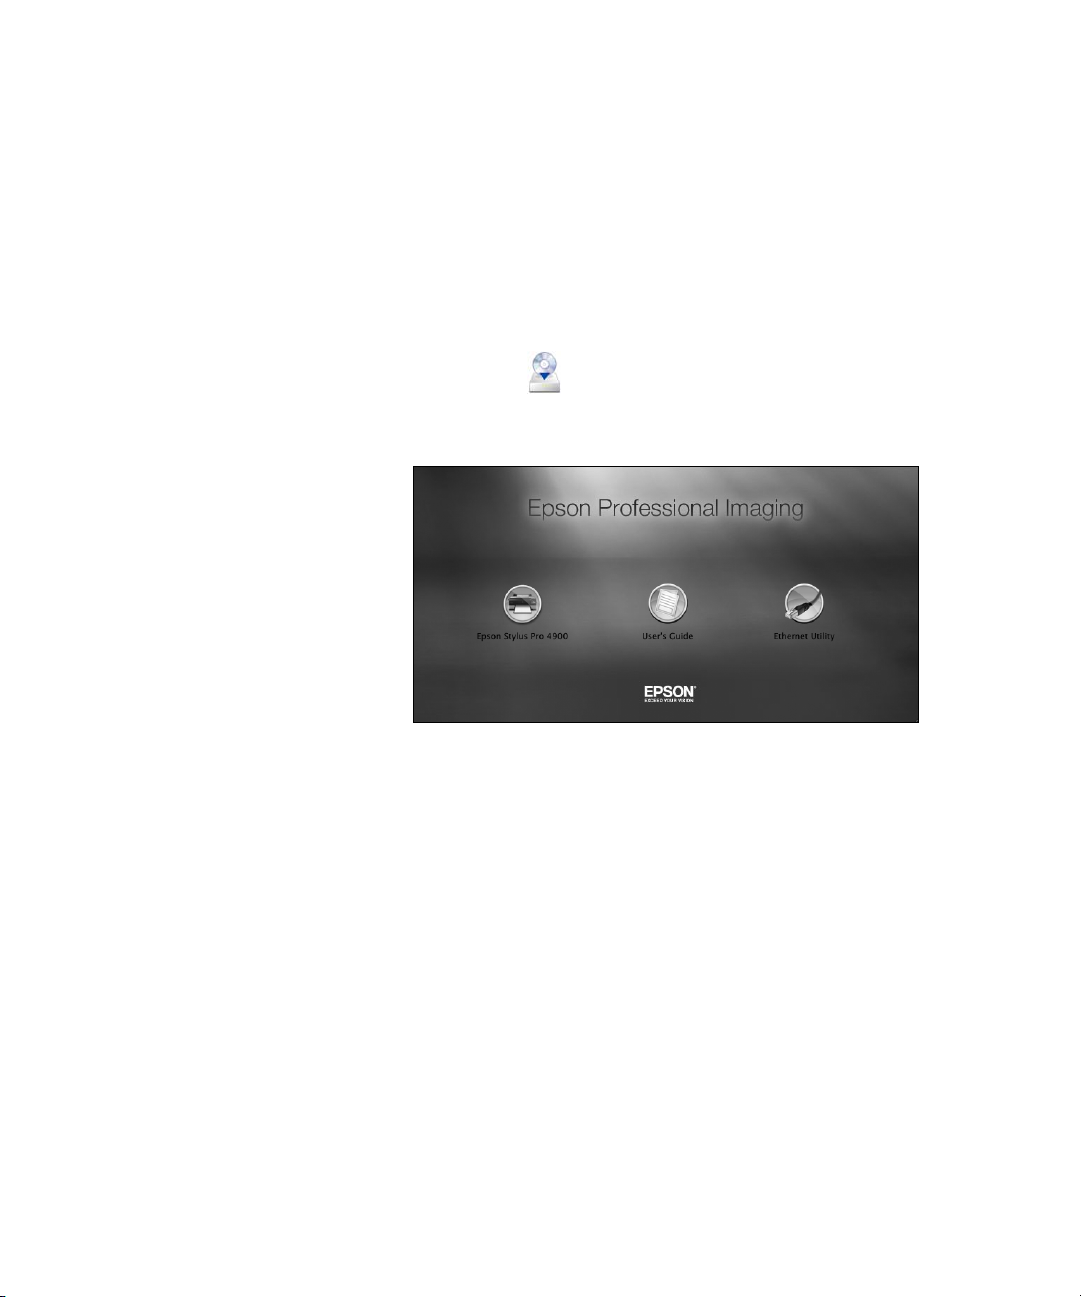
3. You see this screen:
4. Click the
Epson Stylus Pro 4900 icon.
5. Follow the on-screen instructions to install the printer software
(including the printer driver and EPSON LFP Remote Panel utility)
and register your printer.
6. Click the
User’s Guide icon to place links to the User’s Guide, Network
Guide, and Epson Professional Imaging website on your desktop.
7. Click the
Ethernet Utility icon to install the EpsonNet Configuration
utility (located in the EpsonNet folder under Applications).
8. When you’re done, click
Exit and eject the CD. Restart the Macintosh if
prompted.
See “Adding the Network Port” below to create a network port for your
printer.
32
Page 31

Setting Up the Printer | 33
Adding the Network Port
After installing the printer software on your computer, you need to add the
network port. See the appropriate section below for your operating system.
Windows
1. To add the network port for Windows, see below.
• Windows 7 and Windows Vista: Click , click View Devices
and Printers
Properties
• Windows XP: Click Start, click Control Panel, select Printers
and Faxes
, select your printer, then right-click on Printer
.
, select your printer, then right-click Properties.
2. Click the
Ports tab, then click Add Port.
33
Page 32

34 | Setting Up the Printer
3. Select Standard TCP/IP Port, then click the New Port button.
4. When the printer port wizard opens, click
Next.
5. Enter the printer’s IP address, shown on the network status sheet, in the
Printer Name or IP Address text box. Then click
6. On the next screen, click
Finish.
Next.
You can now use the printer on your network.
Mac OS X
See the section below for your printing method.
Bonjour Printing
1. Open System Preferences.
34
Page 33

2. Open Print & Fax.
Setting Up the Printer | 35
3. Click the
+ button to add a new printer.
4. Select the printer model that is connected with Bonjour.
5. Click
Add.
You can now use the printer on your network.
TCP/IP Printing
1. Open System Preferences.
2. Open
3. Click the
4. Select the EPSON TCP/IP printer model. (If you don’t see it listed,
5. Click
You can now use the printer on your network.
Print & Fax.
+ button to add a new printer.
click
More Printers and select EPSON TCP/IP from the drop down
list.)
Add.
Updating Your Printer Firmware
To keep your printer features and functionality up to date, you should check
for a newer version of firmware on the Epson support site and update your
printer, if necessary.
Checking the Current Firmware Version
1. Press the r Menu button.
2. Press the d button until
Menu.
3. Press
Menu again and note the firmware version displayed. When done,
press the l button.
35
PRINTER STATUS is highlighted, then press
Page 34

36 | Setting Up the Printer
Downloading and Updating the Firmware
1. Click the EPSON LFP Remote Panel 2 icon on your desktop. You see
Note: For more
information on using the
LFP Remote Panel, click
Help to see the on-screen
guide.
Caution: Don’t turn off
the printer while the
firmware is updating.
2. Select your printer, then click the
3. Make sure your printer is turned on, its LCD screen displays
the LFP Remote Panel.
Firmware Updater button.
When you see the prompt, click
OK to have the EPSON LFP Remote
Panel utility automatically locate and download the latest firmware from
the Epson website.
If you need to download the firmware manually, visit Epson’s U.S.
support website (www.epson.com/support) or Canadian support
website (www.epson.ca/support), select your product, then click
Drivers & Downloads.
Choose the firmware update version for Windows or Macintosh and
follow the instructions on the screen.
READY,
and it is connected to your computer or network, then choose your
printer.
4. Click
5. If the firmware version of the file is newer, click
Browse and find the firmware file that you just downloaded and
extracted. Select the file and click
Choose or Open.
Update to start the
firmware updating process. (If it is the same, you don’t need to update.)
6. When the update is complete, close the Firmware Updater window and
Epson LFP Remote window.
36
Page 35

37
Chapter 2:
Handling
Paper and
Other Media
Note: You can purchase
additional roll paper
spindles and other
accessories or options
from your Epson
Professional Imaging
authorized reseller.
The Epson Stylus Pro 4900 prints on a variety of media, including roll paper
and cut sheets up to 17 inches wide. You can also use heavy stock, such as
posterboard up to 59 mil (1.5 mm) thick, via the front manual feeder.
This chapter includes the following information:
• Selecting media for your printer
• Using cut sheet paper
• Using roll paper
• Loading paper manually
• Optimizing the settings for your paper
Selecting Media for Your Printer
You can print on most types of coated, glossy, plain paper, and other media.
Check the Epson Pro Imaging website (www.proimaging.epson.com) or
your Epson Professional Imaging authorized reseller for available media.
The following table shows the paper sizes you can use:
Supported paper sizes
Roll paper Cut sheets
Size 8.0 to 17 in. wide
(203 to 432 mm)
Maximum
external roll
diameter
Thickness 3.15 to 19.7 mil (0.8 to 0.5 mm) 3.15 to 59 mil (0.8 to 1.5 mm)
2 in. core: 4 in. (103 mm)
3 in. core: 6 in. (150 mm)
8 × 10 in. up to 17 × 24 in.
(203 x 254 up to 432 x 610
mm)
—
Always test samples of paper stock in the printer before purchasing large
quantities or printing large jobs. When you use non-Epson paper or other
media, you may need to adjust various settings and create special paper
configurations. See page 58 for instructions.
37
Page 36

38 | Handling Paper and Other Media
Guidelines for Using Epson Media
Follow these guidelines, as well as those included in your paper package,
when printing on Epson paper and other media:
• Avoid touching the printable surface with your bare hands. Fingerprints
may affect print quality. Handle media by the edges or use cotton
gloves.
• Always choose the correct Media Type setting in your printer driver
software before you send your job. See page 106 (Mac OS X) or page 64
(Windows) for instructions.
• Always select the correct paper source (roll, tray or manual feed) in the
driver software. See page 91 (Mac OS X) or page 63 (Windows) for
instructions on selecting the paper source in your printer software.
• Keep unused media in its original packaging and store it in a cool, dry
place to maintain quality. Avoid storing your printouts where they will
be exposed to high temperature, humidity, or direct sunlight.
Using Cut Sheet Paper
You can print on many types of cut sheet paper and other media.
The Epson Stylus Pro 4900 accepts sheets ranging from 8 × 10 inches to
17× 24 inches.
Follow these additional guidelines for cut sheet paper:
• You can leave your roll paper on the spindle when you print on cut
sheets.
• Store sheet media on a flat surface in its original package.
• If you need to add paper to the cassette, first remove all the paper and
then add to the stack that you removed.
• If you’re using fine art paper or other thick media, you need to load it
manually, as described on page 45.
38
Page 37

Handling Paper and Other Media | 39
Cut Sheet Paper Paths
In addition to the paper cassette, two paper paths are available for manual
feeding of special media. Make sure you use the correct paper path for Epson
media, as listed below:
Paper cassette
•
Epson or non-Epson media with paper
thicknesses from 0.08 to 0.27 mm
• Premium Photo Paper Semi-gloss
• Premium Semigloss Photo Paper
• Ultra Premium Photo Paper Luster
• Premium Luster Photo Paper
• Singleweight Matte Paper
• Presentation Paper Matte
• Photo Quality Ink Jet Paper
• Proofing Paper White Semimatte
• Proofing Paper Commercial
• Standard Proofing Paper 240
• Standard Proofing Paper SWOP 3
• Ultra Premium Presentation Paper Matte
• Enhanced Matte Paper
• Plain paper
Rear manual feed slot
•
Epson and non-Epson media with paper
thicknesses from 0.08 to 0.79 mm
• All of the above listed for paper cassette
• Epson Exhibition Fiber Paper
• Cold Press Bright
• Cold Press Natural
39
Page 38

40 | Handling Paper and Other Media
•
Hot Press Bright
• Hot Press Natural
• Watercolor Paper - Radiant White
• UltraSmooth Fine Art Paper
• Epson Velvet Fine Art Paper
Front manual feed slot
•
Epson and non-Epson media with
paper thicknesses from 0.8 to 1.5
mm
• Carolina Cover C1S 18 Point
• Tango Blanks C1S 18 Point
Loading Paper in the Paper Cassette
You can load up to 250 sheets of plain paper in the cassette. The following
table lists a guideline for paper cassette capacity for various types and sizes of
Epson paper:
Epson cut sheet paper capacity
Loading
Paper type Size (inches)
Premium Photo Paper Semi-gloss
Premium Semigloss Photo Paper
Ultra Premium Photo Paper Luster
Premium Luster Photo Paper
Singleweight Matte Paper 13 × 19 100
8.5 × 11 100
13 × 19 50
8.5 × 11 100
11.7 × 16.5
13 × 19
17 × 22 50
40
capacity
50
Page 39

Handling Paper and Other Media | 41
Epson cut sheet paper capacity
Paper type Size (inches)
Presentation Paper Matte
Photo Quality Ink Jet Paper
8.5 × 11 200
11 × 17
13 × 19
17 × 22 50
Loading
capacity
100
Proofing Paper White Semimatte
Proofing Paper Commercial
Standard Proofing Paper 240
Standard Proofing Paper SWOP 3
Ultra Premium Presentation Paper Matte
Enhanced Matte Paper
13 × 19 100
8.5 × 11 100
11.7 × 16.5
13 × 19
17 × 22
50
Follow these steps to load cut sheets in the paper cassette:
1. Make sure the printer is turned on, then press the l Paper Source
button and press d to highlight
2. Press
3. The sheet icon
OK.
appears on the LCD screen.
CUT SHEET.
4. Lift the edge of the output tray to remove it.
41
Page 40

42 | Handling Paper and Other Media
5. Slide open the paper cassette, lift it slightly and then pull it out.
6. If your paper is size A3 or larger, extend the paper cassette to match the
size of the paper.
7. Slide the edge guides outward.
42
Page 41

Handling Paper and Other Media | 43
8. Thumb through a stack of paper, then gently tap it on a flat surface to
even the edges.
9. Load the sheets with the printable side face-down, in the portrait
orientation (short edge first). Place the paper all the way back in the
paper cassette and next to the right edge.
Make sure the stack of paper fits under the arrow on the left edge guide.
10. Slide the edge guides against the paper, but not too tightly.
43
Page 42

44 | Handling Paper and Other Media
11. Insert the paper cassette. Push it firmly into the printer.
12. Replace the output tray and adjust its length to fit your paper size.
44
Page 43

Note: When the optional
SpectroProofer is
installed, you cannot print
from the front manual
feed slot.
Handling Paper and Other Media | 45
Using the Front Manual Feed Slot
If you want to print on posterboard or other media 31 to 59 mil (0.8 to 1.5
mm) thick, you must use the manual feed slot. This provides a
straight-through paper path. Be sure to allow enough room behind the
printer so the paper is not bent when it feeds into the printing position.
1. Make sure the printer is turned on, then press the l Paper Source
button until the sheet icon
2. Press the button to release the paper.
3. Open the top cover.
appears on the LCD screen.
4. Insert the sheet face-up, above the black rollers.
45
Page 44

46 | Handling Paper and Other Media
5. Push the paper under the gray feed rollers inside the printer.
6. Align the edge of the paper with the mark on the paper cassette cover, as
shown below. For longer sheets, make sure you align the right edge of
the sheet with the arrow mark on the right and the leading edge with the
OTHER mark.
Then close the top cover.
46
Arrow mark
Page 45

Handling Paper and Other Media | 47
7. Press the button. The printer automatically feeds the paper into
printing position.
8. Extend the output tray and cover if necessary to support the sheet as it
comes out of the printer. Make sure the roll paper cover is not open.
47
Page 46

48 | Handling Paper and Other Media
Using the Rear Manual Feed Slot
You may use the rear manual feed slot for thicker media types such as Velvet
Fine Art Paper and UltraSmooth Fine Art Paper. You can also use this feed
slot for other types of paper, as listed on page 39.
1. Make sure the printer is turned on, then press the l Paper Source
button until the sheet icon
2. Extend the paper support.
appears on the LCD screen.
48
Page 47

Handling Paper and Other Media | 49
3. Adjust the edge guide according to the paper width.
4. Align the sheet with the right edge of the slot and insert it until it meets
resistance. Make sure the sheet is straight.
5. Press the d button to feed the paper.
49
Page 48

50 | Handling Paper and Other Media
6. Extend the output tray and cover if necessary to support the sheet as it
comes out of the printer. Make sure the roll paper cover is not open.
Using Roll Paper
You can use roll paper with a 2- or 3-inch core, up to 17 inches wide.
Manually switching from one paper roll to another is a simple process.
Check the Epson Pro Imaging website (www.proimaging.epson.com) or
your Epson Professional Imaging authorized reseller for available media.
Caution: Some 2-inch
core roll paper at widths
smaller than 10" may
cause the print head to
strike the surface of the
paper due to paper
curling. This will damage
the paper by leaving
scratch marks on the
surface of the paper and
it can also cause paper
jams if the paper is torn
during the printing
process. If you notice
head strike marks or
paper jams when printing
on this type of paper,
Epson recommends
printing on 3-inch core
paper or wider paper.
Roll Paper Guidelines
When printing on roll paper, be sure to follow the media handling
guidelines on page 38, as well as these special guidelines for roll paper:
• When storing roll paper, keep it in its original packaging—including the
bag, end caps, and box.
• To avoid feeding excess paper, make sure the sheet icon does not
appear on the LCD screen. Press the l Paper Source button and press d
to highlight
The
• Choose if you want the paper to be cut automatically after each
page is printed.
• When printing on thin media, raise the paper eject support to ensure a
straight cut.
ROLL PAPER/CUT or ROLL PAPER/NO CUT. Press OK.
or roll icon appears on the LCD screen.
50
Page 49

Handling Paper and Other Media | 51
•
Choose if you’re printing on canvas or other heavy media. Media
that is too thick may damage the cutter. Use of an external cutter/scissor
is recommended.
Also choose this setting if you want to print a series of pages and keep
them together for cutting later on. The following media (and other
similar materials) do not work with, or may shorten the life of, the
built-in cutter:
• Fine art paper
• Canvas
• Vinyl
• Matte board
• Heavyweight polyester banner media
Removing and Installing the Spacer
When you perform borderless printing on roll paper, you may need to install
the borderless printing spacer supplied with the printer, depending on the
width of the paper.
Installing the Spacer
1. Remove the black paper stop from the spindle. When the 3-inch core
adapters are attached to the spindle, remove both left and right adapters.
2. Install the borderless printing spacer onto the gray paper stop. Push the
spacer until the holes line up with the holes in the paper stop.
Removing the Spacer
1. Remove the black paper stop from the spindle.
51
Page 50

52 | Handling Paper and Other Media
2. Remove the spacer by holding the outer edge and pulling straight off the
spindle.
Note: The spindle
accommodates both
2-inch and 3-inch roll
paper cores. To switch
between different size
cores, see page 56.
Avoid touching the
printable surface of
the paper as much as
possible. Oils from
your skin can affect
print quality.
Loading the Paper onto the Spindle
Follow these steps to attach the roll to the spindle:
1. Slide the black paper stop (flange) off the left end of the spindle.
2. Position the roll so the paper unwinds as shown, then slide the spindle
into the paper core.
3. Slide the black paper stop back onto the spindle and insert it into the
end of the roll.
roll.
Make sure it is firmly fixed into the left end of the paper
52
Page 51

Handling Paper and Other Media | 53
Placing the Paper in the Printer
Follow these steps to place the paper in the printer:
1. Open the roll paper cover.
2. Place the roll paper in the printer as shown. (The black end of the
spindle goes on the left.)
Note: To avoid feeding
excess paper, make sure
you don’t select
when you’re using roll
paper.
3. Make sure the printer is turned on, then press the button on the
control panel.
53
Page 52

54 | Handling Paper and Other Media
4. Insert the leading edge of the roll paper into the roll paper feeder until
the message on the LCD screen prompts you to press the button.
5. Press the button. The printer automatically feeds the paper to the
printing position.
6. Close the roll paper cover.
Note: The maximum
page length you can print
on is limited by the printer
driver, and may also be
limited by your application
software and/or operating
system.
To avoid indenting or creasing the paper, remove it from the paper path and
roll it up when you are not printing.
54
Page 53

Handling Paper and Other Media | 55
Removing Paper from the Spindle
If you need to remove the paper roll from the spindle, follow these steps:
1. Open the roll paper cover.
2. If the paper is loaded for printing, press the button. The paper rolls
up automatically.
3. Hold both ends of the spindle and lift up from the spindle holder.
(Make sure the roll paper is rewound before removing the spindle.)
4. Remove the roll paper and spindle from the printer.
5. Remove the black paper stop from the spindle.
6. Remove the roll paper from the spindle.
7. Place the roll in its original package.
55
Page 54

56 | Handling Paper and Other Media
Switching Between 2-Inch and 3-Inch Roll Paper
Note: Roll paper with a
2-inch core may cause
paper jams on this printer
due to severe paper curl.
If you notice frequent
paper jams when using
2-inch core media, switch
to media with a 3-inch
core.
You can convert the spindle to accept roll paper with either a 2-inch or
3-inch core by using the spindle adapters. Follow these steps to attach the
adapters for using 3-inch roll paper:
1. Remove the black paper stop from the end of the spindle.
2. Align the arrow marks as shown below and press one of the adapters
onto the gray paper stop until it locks in place. Press the other adapter
onto the black paper stop.
To remove the adapters, press on the four tabs.
Tab
Cutting Roll Paper Manually with the Built-in Cutter
When you’re not using the auto cut setting, you need to cut the paper
manually by pressing the button after your print job is finished. You
can use the button for most types of paper. However, if you’re printing on
fine art paper, canvas, or other heavy media, you should use a rotary paper
cutter/trimmer or scissors rather than the built-in cutter. See page 51 for a
list of media that cannot be used with the built-in cutter.
Follow these steps to cut manually with the built-in cutter:
1. Before you print, press the l Paper Source button and press d to
highlight
on the LCD screen.
2. Run your print job.
ROLL PAPER/NO CUT. Press OK. The roll icon appears
56
Page 55

Caution: To avoid
damaging the printer,
make sure you do not
select the NARROW
setting when you print
on heavy media.
Handling Paper and Other Media | 57
3. If the paper is not positioned correctly, press the d or u buttons to
match the cutting position on the paper with the cutting position on the
left side of the print head.
4. Press the button.
5. When the confirmation is displayed on the screen, press d to highlight
Cut, then press OK. The paper is cut.
Adjusting the Platen Gap for Thick or Thin Paper
When you print on unusually thick or thin paper, you may need to adjust
the platen gap setting. Normally, the
to adjust automatically. However, if print quality is not satisfactory when
using very thin or very thick stock, you may need to change this setting
Follow these steps:
STANDARD setting allows the printer
.
1. Press the
2. Press the
3. Press the
4. Use the d or u buttons to change the setting. (
default setting; you can also choose
WIDEST.)
5. Press the
Menu button. PRINTER SETUP appears on the display.
Menu button again to display PLATEN GAP.
Menu button. STANDARD is displayed as the current setting.
STANDARD is the
NARROW, WIDE, WIDER, or
OK button to save the setting. A checkmark appears next to the
selected setting.
6. Press the l Paper Source button to exit the menu.
If you’ve selected a non-standard platen gap, the icon appears on the
LCD screen to remind you of the narrow or wide setting. When you switch
media, don’t forget to change the setting back to
STANDARD.
If you’re printing on non-Epson media, you may also need to create a paper
configuration to optimize your results. See the following section for more
information.
57
Page 56

58 | Handling Paper and Other Media
Optimizing the Settings for Your Paper
When you choose a media type in your Epson printer software, the driver
automatically determines the best settings for your paper. However, you may
want to fine-tune how the printer handles various media—especially if you
use non-Epson paper or a paper not supported by the driver. Use the paper
configuration settings described below. If you’re printing on unusually thick
or thin paper, you may also need to adjust the platen gap; if so, you should
Note: It’s a good idea to
keep a list describing your
paper configurations.
do that first.
You can create a special configuration, or group of settings, for each paper
type (up to ten types) and select the desired configuration whenever you
print on a particular stock.
Creating Custom Paper Configurations
To create a configuration for a specific paper type, make sure the paper you
want to configure is loaded in the printer. Then follow these steps:
1. Press the
SETUP
2. Press the
PAPER.
Menu button, then press the d button to highlight PAPER
.
Menu button, then press the d button to highlight CUSTOM
3. Press the Menu button to display PAPER NUMBER.
4. Press the d button to select a paper configuration number (1 to 10).
5. Press the
Press the
STANDARD, WIDE, or WIDER. The STANDARD setting is
recommended for most paper types. Press
Menu button, then the d button to highlight PLATEN GAP.
Menu button, then press the d button to select NARROW,
OK to save the platen gap
setting.
6. Press the l Paper Source button, then the d button to display
THICKNESS PATTERN.
58
Page 57

Handling Paper and Other Media | 59
7. Press the Menu button, then press OK to print the paper thickness
pattern. The printer prints a pattern similar to the following:
Smallest gap
1 2 3 4 5 6 7 8 9 10 11 12 13 14 15 16
8. Examine the printed pattern for the most evenly overlapping lines.
Choose the number with the most even lines. In the example shown
above, the lines under number 4 are the most even.
9. After printing the pattern,
THICKNESS NUMBER is displayed. Press
the d or u buttons to select the number that you noted in step 7.
10. Press
OK to save the selected value.
11. Press the l Paper Source button, then the d button for the menu
options shown below. Make any adjustments, as needed, and press the
OK button to save each setting.
You can also make similar settings using the printer driver software. For
instructions, see page 91 (Mac OS X) or page 63 (Windows).
• PAPER FEED ADJUST A helps eliminate banding. Choose a lower
value if you see white lines on your prints, or a higher value if you
see dark lines.
• PAPER FEED ADJUST B adjusts the paper feed adjustment value
at the bottom of the cut sheets.
• DRYING TIME lets you print with non-Epson media and avoid
smearing the ink. You can make the print head wait up to 10
seconds after each pass to allow ink to dry on the page.
• PAPER SUCTION lets you decrease the paper suction level when
printing on thin media, such as drafting paper or backlight film.
• ROLL PAPER TENSION if wrinkles appear in the paper while
printing, select
• REMOVE SKEW select whether to enable or disable paper skew
High or Extra High.
reduction.
59
Page 58

60 | Handling Paper and Other Media
12. When done, press the button.
Selecting Custom Paper Configurations
Once you have created a paper configuration, you can select it whenever you
print on that paper:
1. Press the
SETUP
2. Press the
PAPER.
Menu button, then press the d button to highlight PAPER
.
Menu button, then press the d button to highlight CUSTOM
3. Press the Menu to display PAPER NUMBER, then press the d button
to select the configuration number that you want to use. If you select
STANDARD, the printer uses the driver settings. If you select a number
from 1 to 10, the control panel settings override the driver settings.
4. Press the
Menu button, then press the button to exit the menu.
5. The configuration number you selected is displayed on the LCD screen.
60
Page 59

61
Chapter 3:
Printing With
Epson Drivers
for Windows
Tip: Check the Epson Pro
Imaging website at
www.proimaging.epson.
com for updated drivers
and utilities that may
become available.
Your Epson Stylus Pro 4900 comes with drivers and utilities that let you
print and manage print jobs.
ICC profiles are included, so you can use the color management features in
Adobe Photoshop or other applications, or in the driver itself. A
color-managed workflow using Photoshop and a color-calibrated monitor
will give you the most accurate colors and best output from your printer for
color photos. See page 109 for instructions.
You can create your own profiles if you have the required hardware and
software, or you can have them created by a color specialist. Make sure any
profiles you want to use are located in the standard folder for your operating
system. When you install the Epson printer driver, the ready-made profiles
are automatically copied to the right folder.
Before you print, you need to set basic printing properties. Make sure you
have installed the Epson driver and utilities from the CD-ROM. See page 30
for instructions.
If you plan on printing borderless images on roll paper, check the guidelines
on page 62 to size your image correctly.
This chapter includes the following information:
• Sizing images for borderless printing on roll paper
• Choosing basic print options
• Choosing color management options
• Choosing roll paper settings
• Choosing cut sheet paper settings
• Choosing page layout options
• Choosing advanced black and white photo settings
• Choosing paper configuration options
• Saving, exporting, and importing groups of settings
• Managing print jobs
61
Page 60

62 | Printing With Epson Drivers for Windows
Sizing Images for Borderless Printing on Roll Paper
For true borderless printing on roll paper, you can select either Auto
Expand
page 69. Your image may be clipped on the left and right edges, but you can
minimize clipping by sizing your image according to the roll paper width
and by adjusting the length by adding 0.1 inch (2.54 mm) to it.
Auto Expand provides a simple solution for borderless printing with
minimal image clipping because you can create an image width almost equal
to the width of the roll media and choose between
expansion. If you use
than the paper width. See the table below for guidelines:
or Retain Size or create a custom paper size, as described on
Retain Size, you need to size your image slightly wider
Min, Standard, and Max
Image width
Roll paper width
8 inches*
(203 mm)
10 inches
(254 mm)
11 inches*
(279 mm)
13 inches
(330 mm)
14 inches
(356 mm)
16 inches
(406 mm)
16.5 inches*
(419 mm)
17 inches
(432 mm)
(with Auto Expand)
7.8 inches
(198.11 mm)
9.8 inches
(248.92 mm)
10.8 inches
(274.32 mm)
12.8 inches
(325.12 mm)
13.8 inches
(350.52 mm)
15.8 inches
(401.32 mm)
16.3 inches
(414.02 mm)
16.8 inches
(426.71 mm)
* Requires use of the borderless printing spacer.
Image width
(with Retain Size)
8.25 inches
(209.54 mm)
10.25 inches
(260.35 mm)
11.25 inches
(285.75 mm)
13.25 inches
(336.54 mm)
14.25 inches
(361.95 mm)
16.25 inches
(412.75 mm)
16.75 inches
(425.45 mm)
17.25 inches
(438.15 mm)
62
Page 61

Printing With Epson Drivers for Windows | 63
Choosing Basic Print Options
Before you print, you need to set basic printing properties. Make sure you
have installed the Epson driver and utilities from the CD-ROM.
The driver offers automatic settings that optimize print quality and speed
when you’re using Epson media. You can also choose custom settings for
more control over your printer and color management options.
Follow these steps to make basic settings:
Note: If you need more
information about print
options, you can click
the Help button on
any screen.
1. Start an application, open the file you want to print, and select
your application. You see the Print window.
2. Make sure your printer is selected, then click the
Preferences button. (If you see a Setup, Printer, or Options button,
click it instead. Then click
Properties or Preferences.)
Properties or
You see a window like the following:
This box shows you the
current settings, but you
can’t change them from here
Print in
63
Page 62

64 | Printing With Epson Drivers for Windows
3. Select a Media Type setting that corresponds to the paper you are
printing on. See the table on page 65 for more information.
• If you are using a color-managed workflow, make sure you choose
media type and resolution settings that match the ICC profile you
are using.
• If you have saved custom media type configurations or set up
custom paper configurations, you can select them by clicking the
Custom Settings button. See page 76 for more information about
custom paper configurations.
• If the media type has been set on the printer’s control panel, select
Auto Acquire.
Note: If a color setting is
grayed out, it is not
supported for the
selected Media Type.
Note: The Print Quality
settings depend on the
Media Type you selected.
Choose lower print quality
for faster printing, or
SuperFine - 2880 dpi for
best quality.
4. For the
• Color for any type of photographic printing.
• Advanced B&W Photo if you are printing black and white photos
Color setting, select one of the following:
on select paper types. (For paper types that don’t support this
option, print black and white photos with the
•Black only if you’re printing line drawings or other
Color setting.)
non-photographic images.
5. For the
Or choose
Print Quality setting, choose Speed, Quality, or Max Quality.
Quality Options to display a window like the following:
64
Page 63

Printing With Epson Drivers for Windows | 65
Use the Speed/Quality slider to set the desired quality level. Select from
the following additional options and click
• High Speed for fast, bidirectional printing at lower quality.
• Edge Smoothing to improve the quality of low-resolution images.
• Finest Detail for sharper edges on vector-based data including text,
OK:
graphics, and line art. (This setting does not affect photographs and
is not recommended for large files.)
6. Set the
• Click Automatic to have the printer driver analyze the contents of
Mode option as follows:
your image or file and make the appropriate printing adjustments.
If you’ve selected
Color as your Color setting, you can choose one
of these settings in the drop-down menu:
Charts and Graphs intensifies colors and lightens the midtones
and highlights of an image. Use this setting for presentation
graphics.
EPSON Standard (sRGB) increases the contrast in images. Use
this setting for color photographs.
Adobe RGB matches image colors to the Adobe RGB color
standard.
If you’ve selected
you can choose
Advanced B&W Photo as your Color setting,
Neutral, Cool, Warm, or Sepia. To choose more
detailed settings for advanced black and white photo printing, see
page 79.
• Click Custom, then follow the instructions on page 67 to select
color management options
.
Selecting the Correct Media Type Setting
The table on the next page lists the settings designed to produce the best
results on Epson media.
If your paper is not listed, check the instructions included with the paper, or
look on the Epson website www.proimaging.epson.com (U.S. sales),
www.epson.ca (Canadian sales). If you are using non-Epson paper, consult
the manufacturer for the best setting. You may have to experiment with
65
Page 64

66 | Printing With Epson Drivers for Windows
different settings to determine which one is best for the media you’re using.
For this media Select this Media Type setting
Photo Paper
Epson Exhibition Fiber Paper Exhibition Fiber Paper
Premium Luster Photo Paper (260) Premium Luster Photo Paper (260)
Premium Glossy Photo Paper (250) Premium Glossy Photo Paper (250)
Premium Semigloss Photo Paper (250) Premium Semigloss Photo Paper
Premium Semimatte Photo Paper (260) Premium Semimatte Photo Paper
Premium Glossy Photo Paper (170) Premium Glossy Photo Paper (170)
Premium Semigloss Photo Paper (170) Premium Semigloss Photo Paper
Premium Glossy Photo Paper
Premium Photo Paper Glossy
Premium Semi-gloss Photo Paper
Premium Photo Paper Semi-gloss
(250)
(260)
(170)
Premium Photo Paper Glossy
Premium Photo Paper Semi-Gloss
Premium Luster Photo Paper
Premium Photo Paper Luster
Ultra Premium Photo Paper Luster
Photo Paper Gloss (250) Photo Paper Gloss (250)
Fine ArtPaper
Cold Press Bright Cold Press Bright
Cold Press Natural Cold Press Natural
Hot Press Bright Hot Press Bright
Hot Press Natural Hot Press Natural
Premium Canvas Satin Premium Canvas Satin
Premium Canvas Matte Premium Canvas Matte
Velvet Fine Art Paper Velvet Fine Art Paper
Watercolor Paper Radiant White Watercolor Paper Radiant White
Textured Fine Art Paper Textured Fine Art Paper
UltraSmooth Fine Art Paper UltraSmooth Fine Art Paper
Proofing Paper
Standard Proofing Paper (205) Standard Proofing Paper (205)
66
Page 65

Printing With Epson Drivers for Windows | 67
For this media Select this Media Type setting
Standard Proofing Paper (240) Standard Proofing Paper (240)
Standard Proofing Paper SWOP 3 Standard Proofing Paper SWOP 3
Standard Proofing Paper Adhesive Standard Proofing Paper Adh
Proofing Paper White Semimatte Proofing Paper White Semimatte
Proofing Paper Publication Proofing Paper Publication
Proofing Paper Commercial Proofing Paper Commercial
Coated Matte Paper
Singleweight Matte Paper Singleweight Matte Paper
Presentation Paper Matte Presentation Paper Matte
Enhanced Matte Paper
Ultra Premium Presentation Paper Matte
Plain Paper
Plain paper
Plain paper (line drawing)
Tracing paper
Others
Enhanced Adhesive Synthetic Paper Enhanced Adhesive Synthetic Paper
Enhanced Matte Posterboard
Somerset Velvet (cut sheets only)
Enhanced Matte Paper
Plain Paper
Enhanced Matte Poster Board
Choosing Color Management Options
The printer driver offers several methods for managing the color in your
prints, including turning the driver’s color management settings off.
If you are using color management settings in Photoshop or another
application, it is very important to access the advanced settings and turn off
color management in the printer driver, as described here. (For instructions
on using Photoshop to manage color, see page 109.)
1. In the Properties or Preferences window, make sure the
selected.
Main tab is
2. For the Color setting, select
3. For the Mode setting, select
67
Color.
Custom.
Page 66

68 | Printing With Epson Drivers for Windows
4. Choose one of the following settings (if you select Color Controls or
ICM, click the Advanced button after you select the setting):
• Color Controls lets you specify individual values for adjusting
brightness, contrast, saturation, and CMY inks, or choose from
three Printer Color Adjustment modes. You can also choose from
two
Gamma settings, and use either a color circle or slide bar to
adjust color.
• PhotoEnhance™ allows you to automatically correct images and
choose from six Scene Correction settings.
68
Page 67

Printing With Epson Drivers for Windows | 69
Tip: If you turn off color
management, you can
still control the ink
density, as described
on page 77.
• Off (No Color Adjustment)
disables color management in the
printer driver. Choose this mode when you use a color managed
workflow in Photoshop or other software. See page 109 for
instructions.
•ICM adjusts colors based on the printer’s ICC profile, using the
Image Color Matching system. You can choose the input profile
and other settings as shown below.
Note: Many application
settings override settings
in the printer driver.
Always verify settings
to get the results
you expect.
In most cases, you will get better results by applying color management
in your application, rather than in the printer driver. See page 109 for
instructions.
5. Click
OK to save your settings.
Choosing Roll Paper Options
Follow the steps in this section to print on roll paper and select settings for
borderless printing and automatic cutting. (If you’re printing on cut sheets,
see page 72.)
1. On the Properties or Preferences window, make sure the
selected.
69
Main tab is
Page 68

70 | Printing With Epson Drivers for Windows
2. For the Source setting, select Roll Paper or Roll Paper (Banner).
Roll Paper (Banner) setting allows you to print a series of
The
continuous images without any space between them. This option is not
available with all applications, and is mostly for tiling an image.
Save Roll Paper saves paper by not feeding the blank portion of the last
page of your document. Available only if you’ve selected
Tip: Creating a
user-defined paper size
generally lets you make
the best use of your roll
paper.
(Banner)
3. For the
as the Source setting.
Size setting, select the size of your image or output paper.
To make the best use of your roll paper, creating a custom paper size is
recommended. Select
Roll Paper
User Defined. You see this window:
Type a name for your custom size, then enter the size in hundredths of
an inch (or millimeters) and click Save. Then click OK.
4. If you want to reduce or enlarge your image, click the
Page Layout tab.
See page 75 for more information.
5. If you want to print without margins, click
Borderless. If you’re not
printing borderless images, go to step 7.
Note that borderless printing takes longer than normal printing. See
page 62 for more information about borderless printing on roll paper.
70
Page 69

Normal
cut
Printing With Epson Drivers for Windows | 71
6. Click the Expansion button to select a borderless sizing option. Choose
Auto Expand or Retain Size, then click OK.
Auto Expand enlarges your image (up to 3%) to fit the size of the
paper. You can use the slider to adjust the expansion.
Retain Size prints your image at the size you specify in your
application. You need to size it slightly wider than the paper width if
you want to print without borders. See page 62 for more information.
Double
cut
Single
cut
Note: These settings
override settings made
through the control panel.
The widths shown in the table on page 62 work with the
Standard
Expansion setting.
• Use the Min setting to minimize the amount of image clipping. You
may see a white border around your image.
• Use the Max setting to maximize the image width. This will
increase the amount of image clipping.
7. Click the
8. Choose one of the following
Roll Paper Option button. You see this window:
Auto Cut settings:
71
Page 70

72 | Printing With Epson Drivers for Windows
•Off
disables automatic cutting. Choose this setting if you want to
operate the cutter manually, print multiple print jobs without
cutting, or if you are printing on heavy media that must be cut by
hand. See page 56 for instructions on operating the cutter manually.
• Single Cut allows images to be printed end-to-end and saves paper.
With borderless printing, you may see a sliver of the previous or
next image if you print multiple images in one print job. You will
see a white margin between print jobs.
• Double Cut extends the space between images and trims each print
individually. This provides the cleanest edge for borderless printing.
•Normal Cut allows margin space at the top and bottom of each
image.
9. Select these additional roll paper options, if necessary:
• Auto Rotate saves paper if your document length is shorter than
the printable width of the roll. The document is automatically
rotated 90 degrees and printed crosswise. Be sure to click
Width
and select the width of your roll paper.
• Print Page Line prints trim lines on the right and bottom edges of
Roll
your pages.
10. When you’re finished, click
OK.
Choosing Cut Sheet Paper Options
Follow the steps in this section to print on cut sheet paper and select settings
for borderless printing, if desired. (If you’re printing on roll paper, see
page 69.)
1. On the Properties or Preferences window, make sure the
selected.
72
Main tab is
Page 71

Printing With Epson Drivers for Windows | 73
2. For the Source setting, select the paper source you’re using (Paper
Cassette
or Manual Feed).
Note: Use Feed Adjust B
if you see banding at the
bottom margin when
using the Maximum
setting.
3. Click
4. For the
Printable Area and select the setting you’d like, then click OK.
• Standard makes the bottom margin larger than the top and sides.
•Maximum reduces the bottom margin.
•Centered places the image in the center of the printable area.
Size setting, select the size of the sheet loaded in the printer.
73
Page 72

74 | Printing With Epson Drivers for Windows
If the size of your paper is not listed, you can create a custom paper size.
Select
User Defined. You see this window:
Type a name for your custom size, then enter the size in hundredths of
an inch (or millimeters) and click
Save. Then click OK.
5. If you want to print to the edges of the page, click
Borderless (not
available for custom paper sizes). If you’re not printing borderless
images, go to step 7.
Note that borderless printing applies only to the left and right sides of
the page on cut sheets; margins are required at the top and bottom of the
page. For full-bleed borderless printing, use roll paper (see page 69 for
instructions).
6. Click the
• Auto Expand enlarges your image (up to 3%) to fit the size of the
Expansion button and choose Auto Expand or Retain Size:
paper. You can use the slider to control the amount of expansion.
• Retain Size prints your image at the size you specify in your
application. You need to size it slightly wider than the paper width if
you want to print without borders.
7. If you want to reduce or enlarge your image, click the
Page Layout tab.
See the next section for more information.
74
Page 73

Printing With Epson Drivers for Windows | 75
Choosing Page Layout Options
Note: Select Landscape
when you want to rotate
your image 90°.
You can print multiple copies, change the print orientation, reduce or
enlarge your image, or print on both sides of the paper.
1. On the Properties or Preferences window, click the
Page Layout tab.
You see this window:
Note: Select Landscape
when you want to rotate
your image 90°.
2. Select the settings you want for
3. Click
Reduce/Enlarge if you want to have the driver resize your image.
You can select
Custom and enter a scaling percentage.
Fit to Page or Fit to Roll Paper Width, or select
Orientation and Copies.
4. If you are enlarging your image beyond the limits of your application
program, make sure
Optimize Enlargement is selected. The driver will
increase the image size up to 650% and decrease the output resolution
to stay within the pixel limitations. Depending on the resolution of your
image and the print size, you may see reduced quality in the print.
75
Page 74

76 | Printing With Epson Drivers for Windows
5. Click Print Bckg Color if you want to print color on the background of
the page. Click the
Color Settings button to select the color you want.
6. Click
Job Settings if you want to have the time, date, and other
information about your print job printed at the top or bottom of the
page. Click
7. Click
Details, select the settings you want to use.
OK or Apply when you’re finished setting Page Layout options.
Choosing Paper Configuration Options
If you are using non-Epson media and you need to fine-tune its
performance, you can create a custom paper configuration and save it as a
Media Type setting in the printer driver. Then, whenever you print on that
media, you can select the custom Media Type, select the rest of your print
settings, and print. You can even export the settings to a file you can share.
1. Click the
Paper Config button on the Main tab. You see this window:
Note: You may need to
change the Color Density
setting if your custom
profile was created to
optimize D-max and color
gamut.
2. Select the correct settings to match your ICC profile. These settings
override any paper configuration settings you may have made using the
printer’s control panel.
76
Page 75

Printing With Epson Drivers for Windows | 77
• Color Density
lets you control the ink saturation level (for example,
when you turn off color management in your printer software).
• Drying Time per Print Head Pass lets you print with non-Epson
media and avoid smearing the ink. You can make the print head
wait up to 5 seconds after each pass to allow ink to dry on the page.
• Paper Feed Adjustment helps reduce banding. Choose a lower
value if you see white lines on your prints, or a higher value if you
see dark lines.
• Paper Suction lets you decrease the paper suction level when
printing on thinner papers (less than 12 lb), such as CAD drafting
paper.
• Paper Thickness helps reduce vertical banding and creates a
sharper image when printing on unusually thick or thin paper.
• Platen Gap lets you fine-tune the setting for various paper
thicknesses.
• Roll Paper Back Tension lets you adjust the tension when printing
on roll paper. Change the value if you find wrinkles on your
printouts when
Auto is selected.
3. When you finish selecting Paper Configuration settings, click
OK.
77
Page 76

78 | Printing With Epson Drivers for Windows
4. On the Main tab, select any other necessary setting for your paper in the
Media Settings box. (See page 63 through page 69 for details.)
5. Click the
Custom Settings button. You see a window like this:
78
Page 77

Printing With Epson Drivers for Windows | 79
6. Verify that your settings are correct, type a name for the custom media
type, and click
Save.
7. After saving your settings, you can do the following:
• To use the settings to print right away, select the name you gave
them in the
Media Type list. Select the rest of the necessary print
settings and print.
• To save the settings to a file that you can share, click the Custom
Settings
click
• To import settings from a file shared with you that does not exist in
your Media Type list, click the
click
When you return to the window shown above, click
button again, click the name of the settings in the list,
Export, select a location, enter a file name, and click Save.
Custom Settings button again,
Import, select the file you want to import, and click Open.
Cancel.
Choosing Advanced Black and White Photo Settings
The Advanced Black and White Photo mode allows you to easily produce
neutral and toned black-and-white prints using your Epson driver and offers
an alternative black and white workflow. Advanced Black and White Photo
mode also provides settings for more advanced black and white control.
Whether your photo is color or grayscale, you can use this unique screening
and color management technology to create stunning black-and-white
prints. This mode is only available when printing on select media types.
79
Page 78

80 | Printing With Epson Drivers for Windows
1. On the Main tab, Choose the Media Type setting for the paper you have
loaded in the printer.
2. Choose
3. Click
Custom, then click Advanced. You see this screen:
Advanced B&W Photo for the Color setting.
80
Page 79

Printing With Epson Drivers for Windows | 81
4. You can adjust the following settings:
• Color Toning: Allows you to add tone (hue) to your black and
white output. The default is Neutral, which will provide you with a
neutral tonal scale print. You can also choose other popular presets
such as Cool, Warm, and Sepia. Note that the presets will affect the
target found in the Tone Color Circle.
•Tone: Allows you to easily change the entire tonal scale of your
black and white output. While
may see better results if you choose
• Brightness: Adjusts the overall lightness and darkness of your
Darker is the default setting, you
Dark.
image.
• Contrast: Adjusts the difference between the light and dark areas of
your image.
• Shadow Tonality and Highlight Tonality: Allows you to control
tonality only in the shadow or highlight areas of your image.
• Max Optical Density: Adjusts the overall density or focus of the
print. Create a soft focus print by setting the density to lower.
• Highlight Point Shift: Helps to reduce gloss differential by adding
density to the highlights of your image.
• Tone Color Circle: Click on any portion of this color wheel or
enter corresponding values to customize the tone (hue) to add to
your black and white print. The closer you select to the edge of the
wheel, the more color you will add to your black and white print.
The preview approximates the image tone based on your settings. Note
this preview will always be of the same image and is not color managed.
It is just to be used to give you a level of feedback as you make changes.
81
Page 80

82 | Printing With Epson Drivers for Windows
Saving, Exporting, and Importing Custom Settings
You can save groups of settings so you can reuse them for future print jobs
with the same profile/printer/ink/media combination. You can also export
them as a file that you can share with others, who can import them for
printing.
In addition, the printer driver includes pre-defined setting groups for various
types of printing. You can select them to set most of the settings you need,
and then customize them for your particular print job.
You can also add, delete, or hide items in the printer driver window to
customize the driver for your uses.
Saving and Exporting a Custom Settings Group
1. Follow the instructions in this chapter to select all the correct settings for
a print job.
2. Click the
screen. You see a window like this:
3. Verify that your settings are correct, type a name for the settings group,
and click
Save/Del button at the top of the Main or Page Layout
Save.
82
Page 81

Printing With Epson Drivers for Windows | 83
4. After saving your settings, you can do the following:
• To use the setting group to print right away, select the name you
gave it in the
• To save the settings to a file that you can share, click the Save/Del
Select Setting list, if necessary, and print.
button again, click the name of the setting group in the list, click
Export, select a location, enter a file name, and click Save.
Importing a Custom Settings Group
1. To import settings from a file shared with you that does not exist in your
Select Setting list, click the Save/Del button.
2. Click
3. When you return to the settings list window, click
Import, select the file you want to import, and click Open.
Cancel.
4. To use the setting group to print right away, select the name you gave it
in the
Select Setting list, if necessary, and print.
Loading a Pre-Defined Settings Group
1. To view the settings associated with the pre-defined setting groups that
came with your printer driver, click the
the following category and name, and check the Registered Settings
column:
•Photo > Highest Quality
•Fine Art
• Proofing
> Monochrome
> ICM
2. Click Cancel.
3. To load a pre-defined setting group, select its category name in the
Select Setting list (if necessary), customize any of the settings that do
not match your print job, and print.
Save/Del button. Then click
83
Page 82

84 | Printing With Epson Drivers for Windows
Editing Printer Driver Settings
1. Click the Utility tab, then select Menu Arrangement.
2. Select the item you want to edit. You can do the following:
• Drag and drop the items to rearrange them
• Add or delete groups
• Move unused items into the Not Display group
3. When you’re finished, click
Save.
84
Page 83

Printing With Epson Drivers for Windows | 85
Managing Print Jobs
Your printer comes with two utilities that let you check on your print jobs
and cancel, pause, or restart them.
The Progress Meter opens each time you send a print job. Status Monitor 3,
which appears on the taskbar when you print, lets you check the printer’s
status and monitor print jobs. You can control how these programs work
using the
Using the Progress Meter
Speed and Progress and Monitoring Preferences utilities.
Note: If your print job is
no longer spooling in the
computer, you can also
cancel it by pressing the
button, selecting
JOB CANCEL, and
pressing the OK button.
After you send a print job, the Progress Meter window appears:
Click to cancel
printing
You can use the
Stop button to cancel your print job. You also see how
much ink you have left and view printing tips.
If you don’t want the Progress Meter to appear, you can turn it off. See the
next section for instructions.
85
Page 84

86 | Printing With Epson Drivers for Windows
Optimizing Print Speed
You can use the Speed and Progress utility to improve printing speed.
Note: If you want to
disable display of the
progress meter during
printing, you can click the
Show Progress Meter
checkbox to deselect it.
1. Click the
Utility tab, then click the Speed and Progress button. You
see this window:
2. Select from the following options:
• High Speed Copies speeds up printing of multiple copies of the
same document using hard disk space as a cache. If you have
multiple hard drives, you can select a different drive to spool to.
• Show Progress Meter lets you control whether or not the Progress
Meter is displayed when you send a print job.
• Disable EPSON Status Monitor 3 disables the printer software
utilities. Selecting this option is not recommended unless you
experience conflicts with other software.
• Show Mouse Over Help lets you turn off the tool tips that appear
when you move your cursor over the screen.
• Always spool RAW datatype lets you spool documents using the
RAW format instead of the EMF (metafile) format. Because the
RAW format requires fewer resources, printing is faster and you can
avoid certain problems, such as insufficient memory or disk space.
86
Page 85

Printing With Epson Drivers for Windows | 87
• Page Rendering Mode
speeds printing by rendering the entire
page. Use this setting if print speed is extremely slow or the print
head stops for a few minutes while printing. Printing will take
longer to start.
• Coarse Rendering allows you to override the length or width
limitations in applications (such as Photoshop) that restrict the
number of pixels you can print.
•Print as Bitmap allows large or complex vector graphics to print
faster in Adobe Acrobat
• Allow Applications to Perform ICM Color Matching allows the
®
or any other non-image based application.
halftone output processing to be performed by the printer. This
feature speeds up processing, especially for older computers, and
ensures that the printer runs at maximum speed. This involves
image compression and decompression, and does not affect the
quality of your output.
• Change Standard Resolution allows you to change the resolution
of your output.
3. Click
OK to save your settings.
87
Page 86

88 | Printing With Epson Drivers for Windows
Setting Monitoring Preferences
You can choose when and how you want to be notified of problems, whether
you want a Status Monitor 3 icon to appear on your Windows taskbar, and
whether you want to allow monitoring by other users who share the printer.
1. Click the
Utility tab, then click the Monitoring Preferences button.
You see this window:
2. Select the notification options you want to use if various printing events
occur.
3. If you want to have the Status Monitor 3 icon appear in your Windows
taskbar, click the
Shortcut Icon checkbox. Then select the icon to use.
When the shortcut is enabled, you can simply double-click the icon to
open the Status Monitor 3 window or right-click it, then select
Monitoring Preferences in the pop-up menu.
4. Select
Allow monitoring of shared printers if your printer is shared
and you want to let other users monitor it.
5. Click
OK to save your settings.
88
Page 87

89
Chapter 4:
Printing With
Epson Drivers
for Macintosh
Tip: Check the Epson Pro
Imaging website at
www.proimaging.epson.
com for updated drivers
and utilities that may
become available.
Your Epson Stylus Pro 4900 comes with drivers and utilities that let you
print and manage print jobs.
®
ICC profiles for ColorSync
features in Adobe
®
Photoshop® or other applications, or in the driver itself. A
are included, so you can use color management
color-managed workflow using Photoshop and a color-calibrated monitor
will give you the most accurate colors and best output from your printer for
color photos. See page 109 for instructions.
You can create your own profiles if you have the required hardware and
software, or you can have them created by a color specialist. Make sure any
profiles you want to use are located in the standard folder for your operating
system. When you install the Epson printer driver, the ready-made profiles
are automatically copied to the right folder.
Before you print, make sure you have installed the Epson printer driver and
utilities from the CD-ROM. For instructions on installing and configuring
the printer driver, see page 30.
If you plan on printing borderless images on roll paper, check the guidelines
on page 90 to size your image correctly.
This chapter includes the following information for Mac OS X:
• Choosing page setup settings for cut sheets and roll paper
• Choosing basic print options
• Choosing color management options
• Choosing paper configuration settings
• Choosing roll paper options
• Controlling expansion of borderless images
• Creating a custom preset and printing
• Managing print jobs
89
Page 88

90 | Printing With Epson Drivers for Macintosh
N
Sizing Images for Borderless Printing on Roll Paper
For true borderless printing on roll paper, you can select a Paper Size setting
with an
Your image may be clipped on the left and right edges, but you can
minimize clipping by sizing your image according to the paper width and by
adjusting the length by adding 0.1 inch (2.54 mm) to it.
Auto Expand or Retain Size option, or create a custom paper size.
ote: Make sure you set
the margins to zero when
printing a custom page
size for borderless
printing.
Paper sizes with the
Auto Expand option provide the best solution for
borderless printing with minimal image clipping. Using this setting, you can
create an image width almost equal to the width of the roll media. If you use
a paper size with the
Retain Size option, you should create an image slightly
wider than the actual width of the roll media. Or you can create a custom
paper size and select the
Retain Size option. See the table below for
guidelines:
Roll paper width
8 inches*
(203 mm)
10 inches
(254 mm)
11 inches*
(279 mm)
13 inches
(330 mm)
14 inches
(356 mm)
16 inches
(406 mm)
Image width
(with Auto Expand)
7.8 inches
(198.11 mm)
9.8 inches
(248.92 mm)
10.8 inches
(274.32 mm)
12.8 inches
(325.12 mm)
13.8 inches
(350.52 mm)
15.8 inches
(401.32 mm)
Image width
(with Retain Size)
8.25 inches
(209.54 mm)
10.25 inches
(260.35 mm)
11.25 inches
(285.75 mm)
13.25 inches
(336.54 mm)
14.25 inches
(361.95 mm)
16.25 inches
(412.75 mm)
16.5 inches*
(419 mm)
17 inches
(432 mm)
16.3 inches
(414.02 mm)
16.8 inches
(426.71 mm)
16.75 inches
(425.45 mm)
17.25 inches
(438.15 mm)
* Requires use of the borderless printing spacer.
90
Page 89

Printing With Epson Drivers for Macintosh | 91
Choosing Page Setup and Basic Print Options
Note: Many application
settings override the
printer’s page setup
options. Always verify
settings to get the results
you expect.
If your application has
margin settings, make
sure they’re turned off for
borderless printing.
You can choose from several options for printing on cut sheets or roll paper.
You can also select the orientation of your image and the paper size. For
printing on roll media, creating a custom page size is recommended to make
the best use of your paper.
Note the following limitations on borderless printing:
• Borderless printing takes longer than normal printing.
• Margins are required at the top and bottom of the page on cut sheets.
Full borderless printing is available on roll paper only.
Once you have selected your page setup options, you need to select printing
options. The Epson driver offers automatic settings that optimize print
quality and speed when you’re using Epson media. You can also choose
additional settings for more control over your printer and color output.
1. Open the file you want to print and select
Print in your application.
2. Click the arrow to expand the Print window, if necessary.
Click to expand the
Print window
91
Page 90

92 | Printing With Epson Drivers for Macintosh
N
N
ote: If you need more
information about print
options, click the
button.
ote: If you don’t see the
Paper Size setting in the
Print window, check for it
in your application before
printing. For example, you
may be able to select it by
opening the File menu
and selecting Page
Setup.
?
3. Choose your printer from the Printer menu.
Select your printer
4. Click the
Paper Size drop-down menu.
• If you’re printing on a cut sheet, choose the size of the paper you are
using and one of the options listed below. Then continue with
step 6.
• If you’re using roll paper, Epson recommends that you create a
custom paper size to make the best use of your paper. See step 5 for
instructions.
92
Page 91

Printing With Epson Drivers for Macintosh | 93
Also be sure to select roll paper options, as described on page 98.
Select the paper size,
then choose the setting
The following settings are available, depending on the size you choose:
• The Standard size setting prints on cut sheet paper with a bottom
margin larger than the top and sides.
• Borderless (Auto Expand) prints on cut sheets and enlarges your
image (up to 3%) to fit the width of the paper (without side
borders).
• Borderless (Retain Size) prints your image at the size you specify
in your application. You need to size it slightly wider than the paper
width to print without side borders.
•Maximum reduces the bottom margin (available for printing on
plain paper sheets only).
• Roll Paper - Borderless (Auto Expand) prints without borders on
roll paper and enlarges your image (up to 3%) to fit the size of the
paper. This selection is recommended for borderless printing with
minimal clipping of your image. See page 90 for more information.
93
Page 92

94 | Printing With Epson Drivers for Macintosh
N
• Roll Paper - Borderless (Retain Size)
prints your image on roll
paper at the size you specify in your application. You need to size it
slightly wider than the paper width to print without borders. See
page 90 for more information.
• Roll Paper - Banner prints a series of continuous images without
any margin space between them, but with normal side borders.
• Roll Paper - Borderless Banner prints a series of continuous
borderless images without space between them.
5. If you are printing on roll paper, choose
Paper Size menu.
the
Manage Custom Sizes from
(If you are printing on a cut sheet, skip to step 6.)
Click to create a
custom page size
Click the
ote: If you don’t see the
Orientation or Scale
settings in the Print
window, check for them
in your application before
printing. For example, you
may be able to select
them by opening the File
menu and selecting Page
Setup.
name, then define its size and margins and click
Select your new page size from the
6. Choose the appropriate
7. Click
+ (plus sign), double-click Untitled and give your paper size a
OK.
Paper Size drop-down menu.
Orientation and Scale for printing.
OK.
94
Page 93

Printing With Epson Drivers for Macintosh | 95
8. Select Printer Settings from the drop-down menu. You see this screen:
Select
Printer
Settings
9. If you created a custom paper size for your roll paper, select the
Expand
or Retain Size option in the Paper Size drop-down menu. If
you are using a color-managed workflow, make sure you choose media
type and resolution settings that match the ICC profile you are using.
See page 90 for details.
10. Select the
Media Type that corresponds to the paper you are printing
on. See the table on page 106 for more information.
11. Set the
• AccuPhoto HDR for any type of photographic printing.
• Advanced B&W Photo if you are printing black and white photos
Color option as follows:
on select paper types. (For paper types that don’t support this
option, print black and white photos with the
•Black only if you’re printing line drawings or other
Color setting.)
non-photographic images.
95
Auto
Page 94

96 | Printing With Epson Drivers for Macintosh
Note: The Print Quality
settings available depend
on the Media Type you
selected. Choose a lower
print quality setting for
faster printing or
SuperFine - 1440 dpi
for the best quality.
• Off (No Color Adjustment)
to disable color management in the
printer driver. Choose this mode when you use a color-managed
ICC workflow in Photoshop or another software application. See
page 109 for instructions.
• Select Color Controls, then choose one of the mode settings shown
at the left in the drop-down menu:
EPSON Standard (sRGB) increases the contrast in images. Use
this setting for color photographs.
Charts and Graphs intensifies colors and lightens the midtones
and highlights of an image. Use this setting for presentation
graphics.
Adobe RGB matches image colors to the Adobe RGB color
standard.
If you’ve selected
you can choose
12. Choose one of the following
• Draft - 360 dpi
• Fine - 720 dpi
• Fine - 1440 dpi
• SuperFine - 1440 dpi
Advanced B&W Photo as your Color setting,
Neutral, Cool, Warm, or Sepia.
Print Quality settings:
13. Choose any of the following advanced options:
• Super MicroWeave
®
for maximum elimination of banding (may
not be available for certain media types).
• High Speed for fast, bidirectional printing. For higher quality,
make sure you deselect this option.
• Flip Horizontal for printing a mirror image of your file.
• Finest Detail for sharper edges on vector-based data including text,
graphics, and line art. (This setting does not affect photographs and
is not recommended for large files.)
96
Page 95

Printing With Epson Drivers for Macintosh | 97
Choosing Advanced Media Control Options
Follow these instructions if you are using non-Epson media and you need to
fine-tune its performance.
Note: You may need to
change the Color Density
setting if your custom
color profile was created
to optimize D-max and
color gamut.
1. Select
this screen:
Advanced Media Control from the drop-down menu. You see
2. Select the correct settings to match your ICC profile. These settings
override any paper configuration settings you may have made using the
printer’s control panel.
• Color Density lets you control the ink saturation level.
• Drying Time per Print Head Pass lets you print with non-Epson
media and avoid smearing the ink. You can make the print head
wait up to 5 seconds after each pass to allow ink to dry on the page.
• Paper Feed Adjustment helps reduce banding. Choose a lower
value if you see white lines on your prints, or a higher value if you
see dark lines.
97
Page 96

98 | Printing With Epson Drivers for Macintosh
• Paper Thickness
helps reduce vertical banding and creates a
sharper image when printing on unusually thick or thin paper.
• Paper Suction lets you decrease the paper suction level when
printing on thinner papers (less than 12 lb), such as CAD drafting
paper.
• Platen Gap lets you fine-tune the setting for various paper
thicknesses.
• Roll Paper Back Tension lets you adjust the tension when printing
on roll paper. Change the value if you find wrinkles on your
printouts when
Auto is selected.
Choosing Roll Paper Settings
If you are printing on roll paper, make sure you choose one of the roll paper
options as the
you need to check these settings for various cutting and feeding options.
1. Select
screen:
Page Layout setting, as described on page 92. In addition,
Roll Paper Settings from the drop-down menu. You see this
98
Page 97

Normal
cut
Double
cut
Printing With Epson Drivers for Macintosh | 99
2. Choose one of the following Auto Cut Settings:
•Off disables automatic cutting. Choose this setting if you want to
operate the cutter manually, use the optional Auto Take-Up Reel,
or print multiple print jobs without cutting.
• Single Cut allows images to be printed end-to-end and saves paper.
With borderless printing, you may see a sliver of the previous or
next image if you print multiple images in one print job. You will
see a white margin between print jobs.
• Double Cut extends the space between the images and trims each
print individually. This provides the cleanest edge for borderless
printing.
•Normal Cut allows margin space at the top and bottom of each
image.
See page 56 for instructions on using the button to operate the
cutter.
3. Select the following options, if desired:
• Auto Rotate saves paper if your document length is shorter than
the printable width of the roll. The document is automatically
rotated 90 degrees and printed crosswise. When this option is
checked, be sure to select the width of your roll paper from the
drop-down menu.
Single
cut
Note: These settings
override settings made
through the control panel.
• Print Page Line prints trim lines on the right and bottom edges of
your pages.
• Save Roll Paper saves paper by not feeding the blank portion of
the last page of your document (available only when you’ve selected
a Paper Size setting with the
Roll Paper - Banner option).
99
Page 98

100 | Printing With Epson Drivers for Macintosh
Controlling Borderless Image Expansion
To control the amount of expansion when printing using a Paper Size with
Auto Expand option, select Roll Paper Settings from the drop-down
the
menu. You see this screen:
Adjust the slider to increase or decrease the amount of expansion.
The widths shown in the table on page 90 work with the
Standard
Expansion setting.
• Use the Min setting to minimize the amount of image clipping. You
may see a white border around your image.
• Use the Max setting to maximize the image width. This will increase the
amount of image clipping.
100
Page 99

Note: If you check the
settings on each screen
in the drop-down menu,
go through them carefully
from top to bottom.
Avoid cycling through
them repeatedly, or you
may lose your settings.
Printing With Epson Drivers for Macintosh | 101
Creating a Custom Preset and Printing
Once you’ve made the correct settings for your print job, create a
custom preset. This will save you time when you use the same
profile/printer/ink/media combination for future print jobs.
1. Select
2. After verifying that your settings are correct, select
Summary from the drop-down menu.
Save As from the
Presets drop-down menu.
Caution: Do not open
and close the Presets
menu without typing a
name, or you will lose
your settings.
3. Type a name for your custom preset and click
4. When you’re ready to print, click the
Print button.
OK.
Whenever you want to print with your custom preset, select it from the
Presets drop-down menu.
101
Page 100

102 | Printing With Epson Drivers for Macintosh
Choosing Advanced Black and White Photo Settings
The Advanced Black and White Photo mode allows you to easily produce
neutral and toned black-and-white prints using your Epson driver and offers
an alternative black and white workflow. Advanced Black and White Photo
mode also provides settings for more advanced black and white control.
Whether your photo is color or grayscale, you can use this unique screening
and color management technology to create stunning black-and-white
prints. This mode is only available when printing on select media types.
Note: If you are printing
from Photoshop, make
sure you turn off color
management when using
Advanced Black and
White mode. There are
no profiles associated
with this screening and
color management
technology.
1. Select Print Settings from the drop-down menu. You see this screen:
2. Choose the Media Type setting for the paper you have loaded in the
printer.
3. Choose
Speed
Advanced B&W Photo for the Color setting. Uncheck High
for the best quality.
102
 Loading...