

Page 1
Digital Handheld Telephone
for GSM
Ericsson
GH337
User’s Manual
Page 2

This manual is published by Ericsson Mobile Communications AB ,
without any warranty. Improvements and changes to this manual neces sitated by typographical errors, inaccuracies of current information, or
improvements to programs and/or equipment, may be made by
Ericsson Mobile Communications AB , at any time and without notice.
Such changes will, however, be incorporated into new editions of this
manual.
All rights reserved.
© Ericsson Mobile Communications AB , 1994.
INNOVATRON PATENTS
Page 3

SAFETY AND PRECAUTIONS
Turn off your cellular telephone when in an aircraft. The
use of cellular telephones in an aircraft may be dangerous
to the operation of the aircraft, disrupt the cellular network
and is illegal. Failure to observe this instruction may lead to
suspension or denial of cellular telephone services to the
offender, or legal action, or both.
Turn off your cellular telephone when at a refuelling point.
Users are reminded of the need to observe restrictions on
the use of radio equipment in fuel depots, chemical plants,
or where blasting operations are in progress.
There may be a hazard associated with using your cellular
telephone close to personal medical electronic devices,
such as hearing aids and pacemakers.
Operation of your cellular telephone close to other
electronic equipment, such as televisions, radios and
personal computers may cause interference.
Do not dismount the antenna. If a child gets it into the
throat, there may be a suffocation risk.
Do not attempt to dismantle your cellular telephone
yourself. There are no user-serviceable parts inside.
Do not expose your cellular telephone to rain or spill beverages on it.
Have your cellular telephone installed in a vehicle by
qualified personnel.
If you use your cellular telephone in a vehicle, it is advised
that a handheld microphone or telephone handset should
not be used by the driver while the vehicle is moving,
except in an emergency. Speak only into a fixed neck slung
or clipped-on microphone when it would not distract your
attention from the road. Do not stop on the hard shoulder
of a motorway to answer or make a call, however urgent.
Use only Charger 4225 and AC/DC Converter 4222,
Charger 4226 and AC/DC Converter 4222, or Travel
charger 4223 with this telephone. Use of any other battery
charger and/or AC/DC Converter will invalidate any
approval given to this telephone and may be dangerous.
APPROVED for connection to
telecommunication systems specified
in the instructions for use subject
to the condition set out in them.
S/1208/4/P/502763
Page 4

BATTERY INFORMATION
New Batteries
A battery that is delivered with the phone is not charged.
However, there may be enough power to turn the phone on.
Before using the phone, it is recommended that you
condition the battery by first charging it, and then
discharging it, three times in succession. See chapter 3.
Batteries and Recharging for information about battery
conditioning.
Used Batteries
An old battery that no longer works MUST be returned
to the place of purchase or to a place where used
batteries are taken care of for recovery. It must NOT be
disposed of together with household waste.
ii
Page 5

CONTENTS
1. Read This First 1
About the Phone 1
About the Manual 2
SIM -- Subscriber Identity Module 3
PIN -- Personal Identification Number 3
Phone Lock 3
Key Lock 3
Clock 3
Display Language 3
Optional Functions 4
Information from Your Network Operator 4
2. Getting Started 5
Inserting the Mini SIM Card 5
Attaching the Battery 6
Turning the Phone On/Off 6
Entering your PIN 6
Signal Strength and Battery Meters 7
If the Message ‘‘Searching’’ Remains in the Display 7
3. Batteries and Recharging 8
Batteries 8
Attaching and Removing a Battery 8
Battery Types 8
Battery Meter 8
Low Battery Alarm 8
Battery Discharge 9
Recharging a Battery 10
Using the Standard Charger 10
Using Other Chargers 11
Conditioning a Battery 11
Battery Care and Maintenance 11
Belt Clip 12
4. Basic Operation 13
Some Key Functions 13
Entering a Phone Number 14
Making a Call 14
Call Time Meter 14
Ending a Call 14
Last Number Re-dial 14
Automatic Re-try 15
International Calls 15
Emergency Calls 15
Receiving a Call 15
Answering a Call 16
Call Time Meter 16
Ending a Call 16
Unanswered Calls 16
Options during a Call 16
Adjusting the Volume 16
Muting the Microphone 16
DTMF Signalling 16
Using the Keypad as a Scratch Pad 17
5. Using Menus 18
Accessing Menu Mode and Moving Around the Menus 18
Entering a Menu and Moving Around the Functions 20
Selecting a Function 21
The NO and CLR keys 21
If You Receive a Call while in Menu Mode 21
Special Functions 22
International Number 22
Special Characters 22
Page 6

Check Digits 22
Info Menu 23
Divert Menu 24
Networks Menu 24
Network Selection 24
Network Search Mode 25
Automatic Search Mode 25
Manual Search Mode 25
Edit List 25
Reviewing the List of Networks 25
Adding a Network to the List 26
Deleting a Network from the List 26
Re-arranging the Order of the List 26
New Network Search 26
Access Menu 26
Call Barring 27
Card Lock 27
Activating the Card Lock 27
Turning the Card Lock Off 28
Change PIN 28
Phone Lock 28
Change Security Code 29
Settings Menu 29
Ringing Signal Level 29
Ringing Signal Tone 29
Key Sound 29
Illumination 30
Call Timer 30
Prefix 30
Entering a Prefix and Activating the Prefix Function 30
Turning the Prefix Function Off 30
Any Key 31
Greeting 31
Own Number 31
Language 31
Clock Menu 31
Setting the Alarm and Activating the Alarm Function 32
Turning the Alarm Function off 32
Activating the Alarm Without Changing the Time 32
Setting the Clock 33
Keylock Menu 33
Locking the Keypad 33
Unlocking the Keypad 33
Mail Menu 33
Phone Book 34
Read This First 34
Memory Positions 1 -- 9 34
International Numbers 34
Names 34
Dialling Memory 34
Scratch Pad 35
DTMF Signalling 35
The Phone Book Menu 35
Recalling a Phone Number
Using the Name -- Name Recall 36
Appending Digits to a Recalled Number 36
Replacing the Last Digits in a Recalled Number 36
DTMF Signalling 36
Recalling a Phone Number
Using the Memory Position -- Position Recall 37
Scrolling Through the Memory 37
DTMF Signalling 37
Alternative Method to Recall a Phone Number 37
Speed Dialling 37
Page 7

Storing a Phone Number (and Name) 37
Alternative Method to Store a Phone Number 38
Memory Protection 38
Memory Full 39
Erasing Phone Number (and Name) 39
Recalling the Last 10 Phone Numbers from the
Dialling Memory 39
Alternative Method to Recall the
Last 10 Phone Numbers 39
Turning the Dialling Memory Off 40
Entering Letters 40
Entering Lower-Case Letters 40
Handsfree Usage in a Vehicle 41
6. Accessories 41
Operation 42
Portable Handsfree 43
Vehicle Charger and Travel Charger 44
7. Problems You Can Solve 46
Phone Does Not Come On 46
Phone locked Is Displayed 46
Insert SIM Is Displayed 46
Wrong PIN Is Displayed 46
Card blocked. Unblock? Is Displayed. 46
BLOCKED. Contact card provider
Is Displayed 47
Searching Shows Continuously in the Display 47
Keylock Is Displayed 47
Indicator Light Blinks Red 48
Indicator Light Shows a Steady Red Light 48
Page 8

1. Read This First
About the Phone
This digital handheld cellular telephone is designed for use
on a GSM (Global System for Mobile communications)
network.
GSM is the new international standard for cellular
communication. It covers most European countries and
many other parts of the world. This lets you use your phone
wherever you travel, for business or pleasure.
The phone is very small and light and simple to use. After
you have turned it on, you can use it in much the same way
as any other telephone. However, a cellular phone operates
by using radio signals which can be subject to interference.
It may sometimes happen, therefore, that you need to move
the phone to a position where you can obtain a better radio
signal. Indoors, it is usually best to use the phone near a
window.
Beeper
Indicator
light
Microphone
Antenna
Earpiece
Display
Keypad
Rechargeable battery
1
Page 9

About the Manual
This manual is provided to help you use your phone. Keep
it handy to answer questions you may have.
Chapter 2. Getting Started describes how to make your
phone ready for use.
Correct care will prolong the life of a battery and also the
length of time between recharging. You should, therefore,
pay particular attention to Chapter 3. Batteries and
Recharging.
Chapter 4. Basic Operation describes how to make calls
and how to answer calls.
Having learnt how to perform the most essential operations,
you can go on to read Chapter 5. Using Menus. It
describes functions which you can use to adapt your phone
to your personal needs. It also describes how to create a
personal Phone Book; you can store both numbers and
names.
Chapter 6. Accessories deals with optional equipment that
can be used with the phone, for example a handsfree
system for use in a car.
Chapter 7. Problems You Can Solve lists some simple
things you should check before calling for service
personnel. This could save the cost of unnecessary service.
Right Arrow
Hash
Numeric keys
Star
ON/OFF
Left Arrow
ON/OFF
End
NO
Send
YES
Clear
Battery
meter
Signal
strength
meter
Display and Keypad
1. Read This First
2
Page 10

SIM -- Subscriber Identity Module
When you become a subscriber of a network operator, you
will obtain a Mini SIM Card.
The Mini SIM Card must be inserted into the phone.
Otherwise, the phone cannot be used. However, calls to the
emergency phone number 112 can be made without the
card being inserted, provided a GSM network is in range.
The card contains a computer chip with your personal data,
such as your subscriber number and the name of your
operator’s network, also referred to as your ‘‘home’’
network. Besides your ‘‘home’’ network, you may use your
phone also in GSM networks in other countries.
The computer chip also includes a memory, which you can
use as your personal phone book to store and recall phone
numbers.
PIN -- Personal Identification Number
Your SIM is protected by a unique 4- to 8-digit PIN, which
must be entered each time the phone is turned ON. This is
called PIN Check.
The Access menu of your phone allows you to deactivate
the PIN Check. It also allows you to choose another PIN.
Refer to Chapter 5. Using Menus.
Phone Lock
The PIN Check protects the SIM card only, not the phone
itself. The Access menu allows you to enable an electronic
lock to protect against unauthorised use of the phone in the
event of a theft. Refer to Chapter 5. Using Menus.
Key Lock
You can lock the keypad so that unintentional key action
has no effect if the phone is turned on. This is useful when
you, for example, are carrying the phone in a pocket or a
handbag. Refer to the description of the Key Lock menu in
Chapter 5.
Clock
The time of the day is shown continuously in the display.
When your phone is delivered, the clock is normally not set.
The Clock menu lets you set the clock. Refer to Chapter 5.
Display Language
Your phone is normally delivered with English text in the
display.
The Settings menu allows you to select a language other
than English. Refer to Chapter 5.
1. Read This First
3
Page 11

Optional Functions
Some of the functions described in this manual are
optional, and you may not have access to them.
Information from Your Network Operator
You should read the operating instructions from your
network operator about coverage areas of the network and
supplementary services offered by network.
1. Read This First
4
Page 12

2. Getting Started
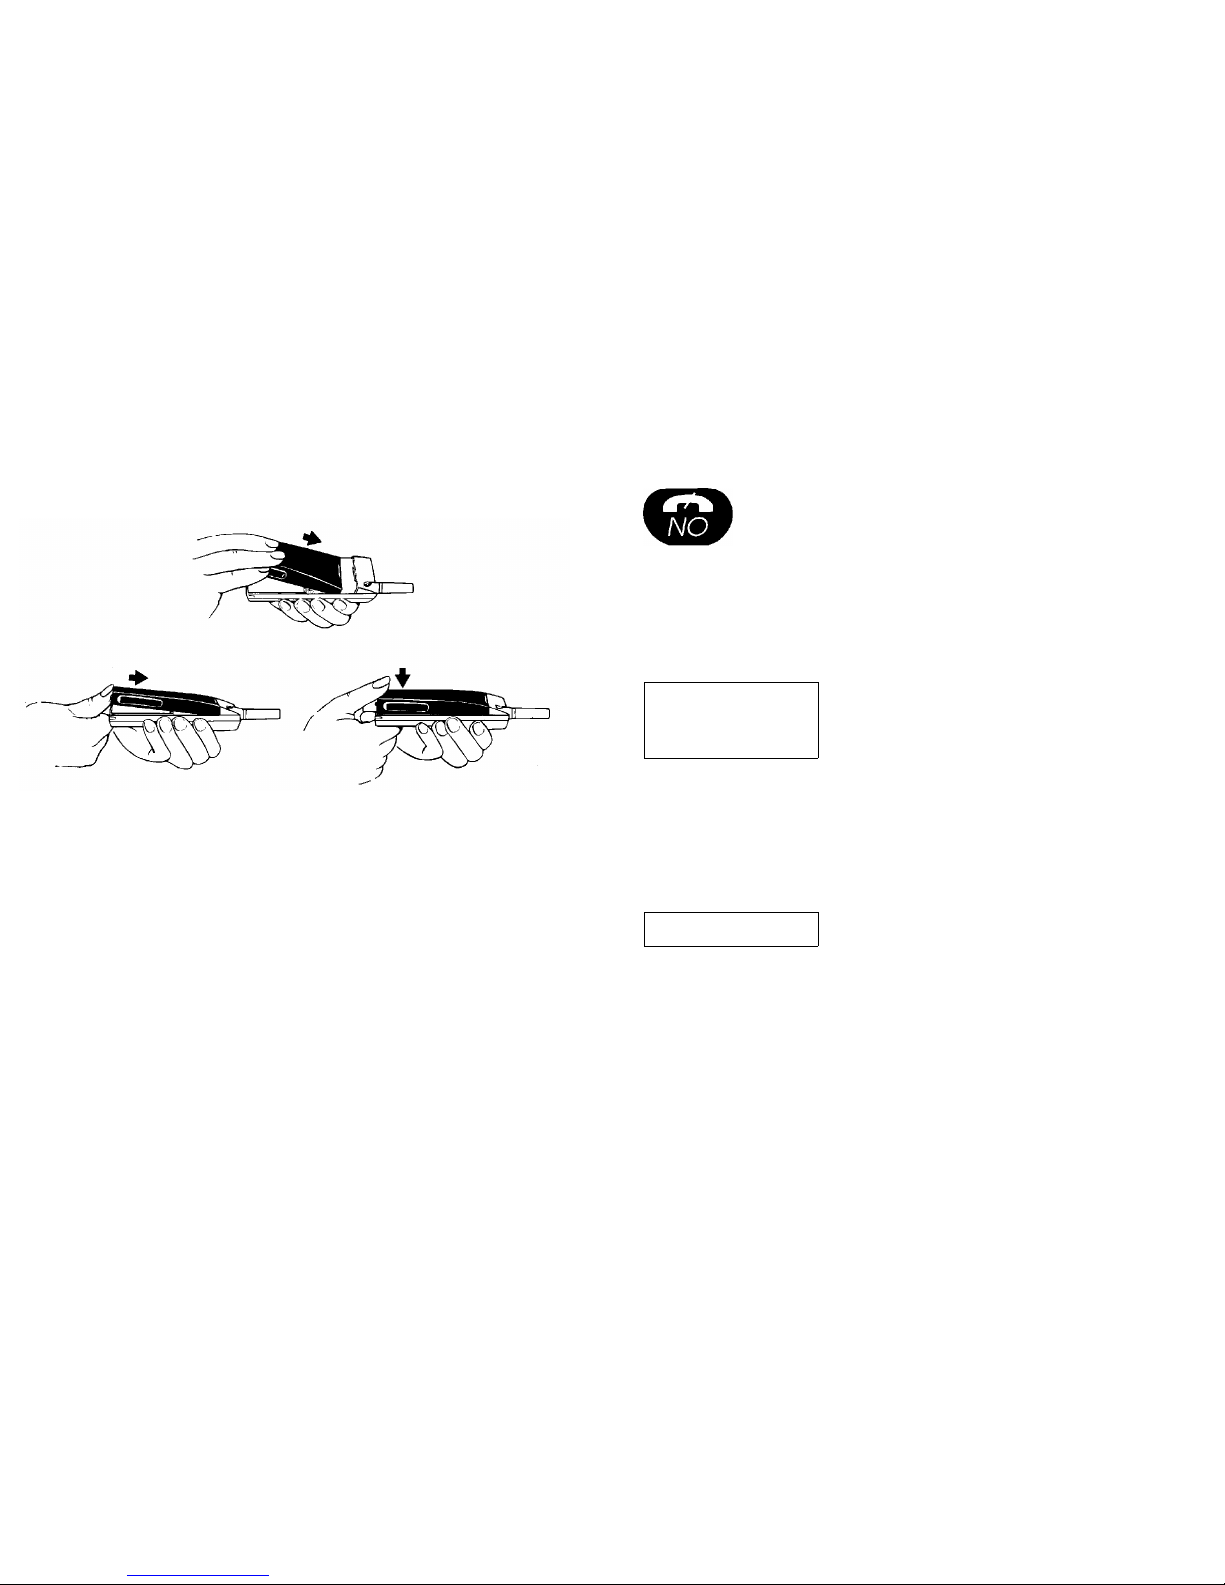
Inserting the Mini SIM Card
Before you can use your phone, you must insert your Mini
SIM Card.
1. Release the card holder by sliding it away
from you.
2. Unfold the holder.
3. Slide the Mini SIM card into the holder.
Make certain that the bevelled corner is
top right.
4. Fold down the holder.
5. Lock the holder by sliding it towards you.
If the Mini SIM Card is not inserted, the message Insert
Sim will appear in the display when you turn the phone on.
Mini Sim Card
3)
1)
2)
Card
holder
4)
5)
5
Page 13
Attaching the Battery
A battery that comes with the phone is not charged.
However, there may be enough power to turn the phone on.
If the phone does not come on when you turn it on, you
must recharge the battery. Refer to Chapter 3. Batteries
and Recharging.
Turning the Phone On/Off
To turn the phone on, press and hold down
ON/OFF until you hear a click. The display illu-
mination comes on.
To turn the phone off, press and hold down
ON/OFF until you hear a click.
Entering your PIN
Enter
PIN
After you have turned the phone on, a
short beep is heard and the prompt En-
ter PIN appears in the display.
1. Enter your PIN, using the numeric keys.
The digits are displayed as stars (
*
). If
you enter a wrong digit, you can correct it
by pressing CLR (Clear).
2. Press # (Hash).
Welcome After the PIN has been entered cor-
rectly, the message Welcome appears
in the display for about 10 seconds.
The phone will now search for its ‘‘home’’ network. If this is
not available, the phone will search for another network
from those in range.
Should a network not be found immediately, the message
Searching appears in the display.
ON/OFF
1)
2)
3)
2. Getting Started
6
Page 14
Once a network has been found, three short beeps are
heard and the indicator light on the top of the phone starts
slowly blinking green.
A NET
11:33
On or two letters, representing the
country, together with the name of the
GSM network (or an abbreviation for it),
appears in the display. The time of the
day in hours and minutes is shown, too.
You can now both make and receive calls. Refer to chapter
4. Basic Operation.
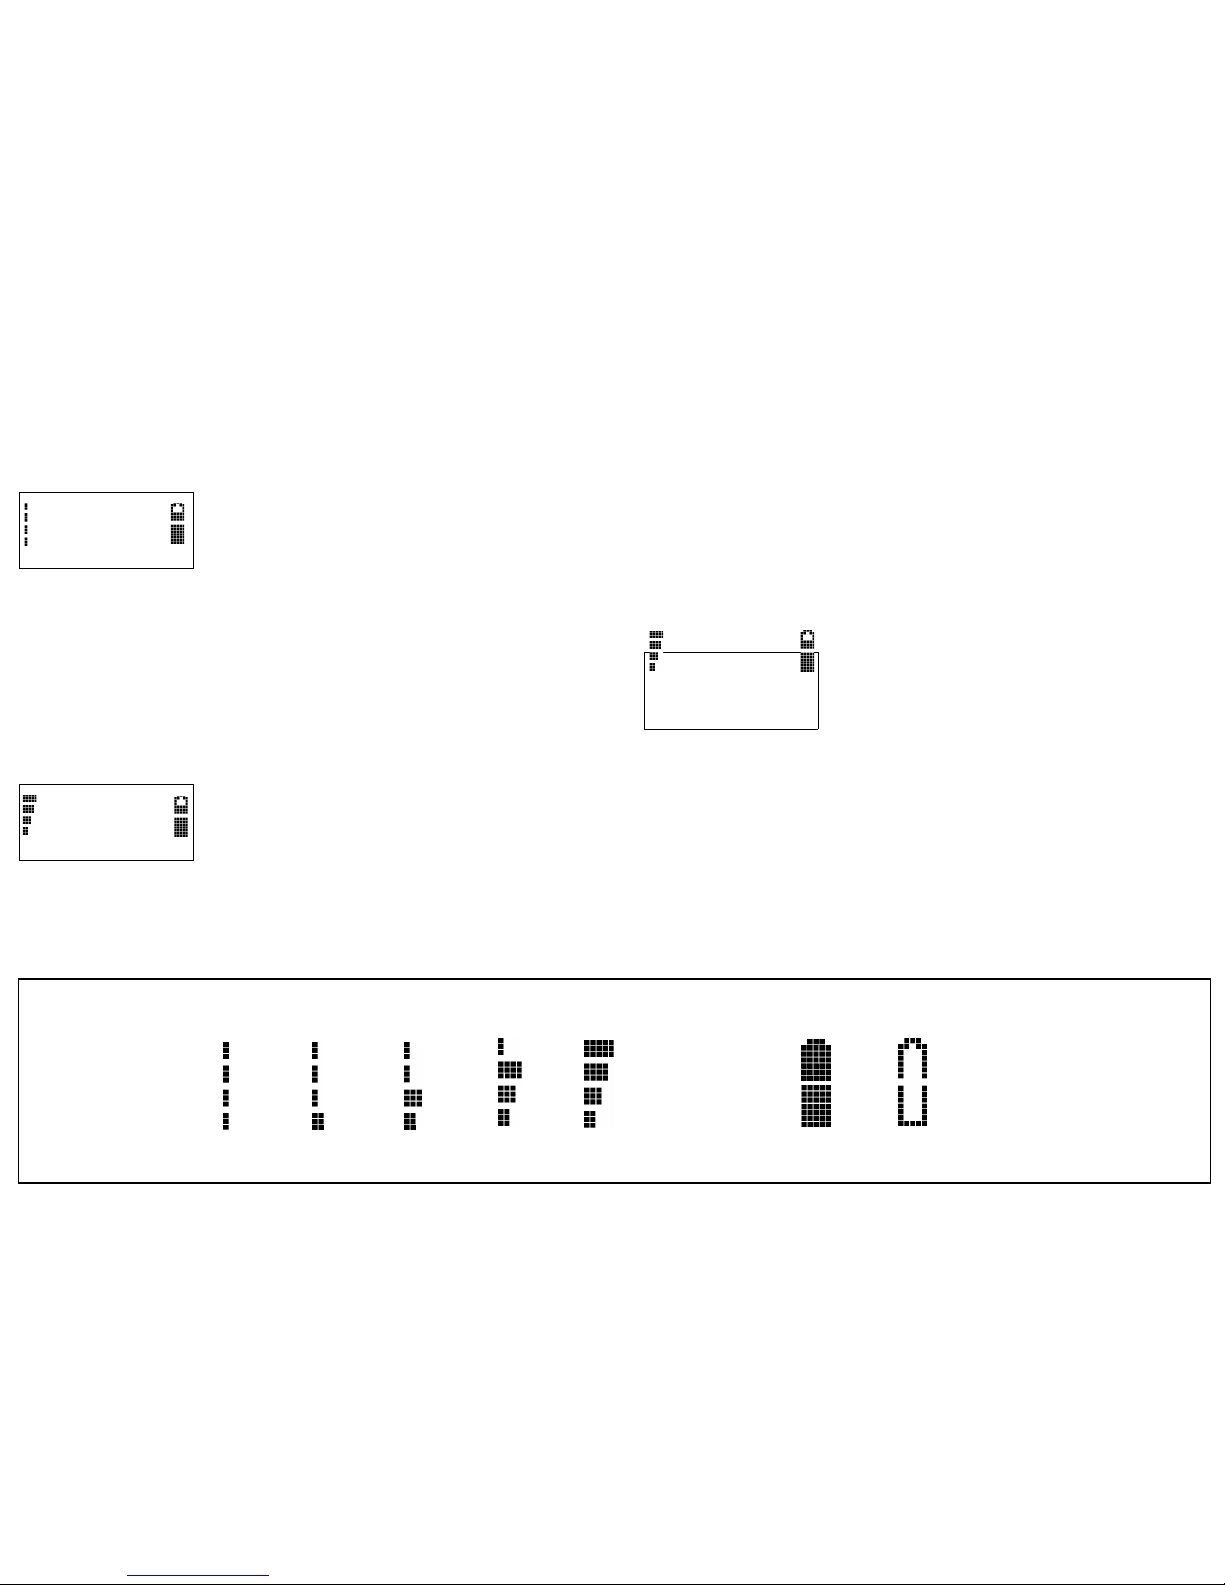
Signal Strength and
Battery Meters
A signal strength meter is shown on the
left of the display -- a battery meter on
the right.
The signal strength meter indicates the strength of the
received signal, 0 to 4. See the figure below.
The battery meter is shown in the shape of a battery. It
reflects the state of charge of the battery.
If the Message
‘‘Searching’’
Remains in the Display
Searching
11:34
This indicates that no network is in
range.
If a signal strength of 1, or higher, is shown together with
the message Searching, a network is in range, but you are
not allowed to register with that network.
0 1 2 3 4
Signal Strength Meter
Battery Meter
Fully charged Empty
2. Getting Started
7
Page 15

3. Batteries and Recharging
Batteries
Attaching and Removing a Battery
Battery Types
The batteries that can be used with this phone are of the
NiMH type. (NiMH stands for Nickel Metal Hydride.)
Compared to the commonly used NiCd (Nickel Cadmium)
batteries, the NiMH batteries have a higher capacity and
they are much more friendly to the environment.
Battery Meter
The battery meter, to the right in the
display, reflects the state of charge of the
battery attached to the phone.
Low Battery Alarm
Battery
low
As a reminder that the battery soon
needs recharging or replacing, an alarm
signal (a long beep) sounds and the
message Battery Low appears for ten
seconds in the display.
In addition, the indicator light on the top edge of the phone
starts blinking red.
If the phone is left on, after the low battery alarm has been
issued several times, it will turn itself off when the battery is
Attaching:
Removing:
1)
2)
3)
1)
2)
3)
Before removing a battery, turn the phone OFF.
8
Page 16

no longer able to power it satisfactorily. Then, it is not
possible to turn the phone on again. Instead, the battery
must be recharged, or replaced with a charged one.
Low battery alarm during a call:
If the low battery alarm is issued when a call is in progress,
you should end the call as quickly as possible. If the call
continues, the phone will turn itself off after a short period.
Battery Discharge
Battery
discharge
When the phone turns itself off, the
message Battery discharge appears in
the display and the indicator light on the
top of the phone shows a steady red
light. This indicates that the phone is now
discharging the battery.
If you have the opportunity, let the battery remain attached
to the phone, to discharge it completely. Do not remove it
until the message Battery discharge and the red light go
out. Not until then is the battery completely discharged.
Recharging a battery completely, will help to enhance its
lifetime.
3. Batteries and Recharging
9
Page 17
Recharging a Battery
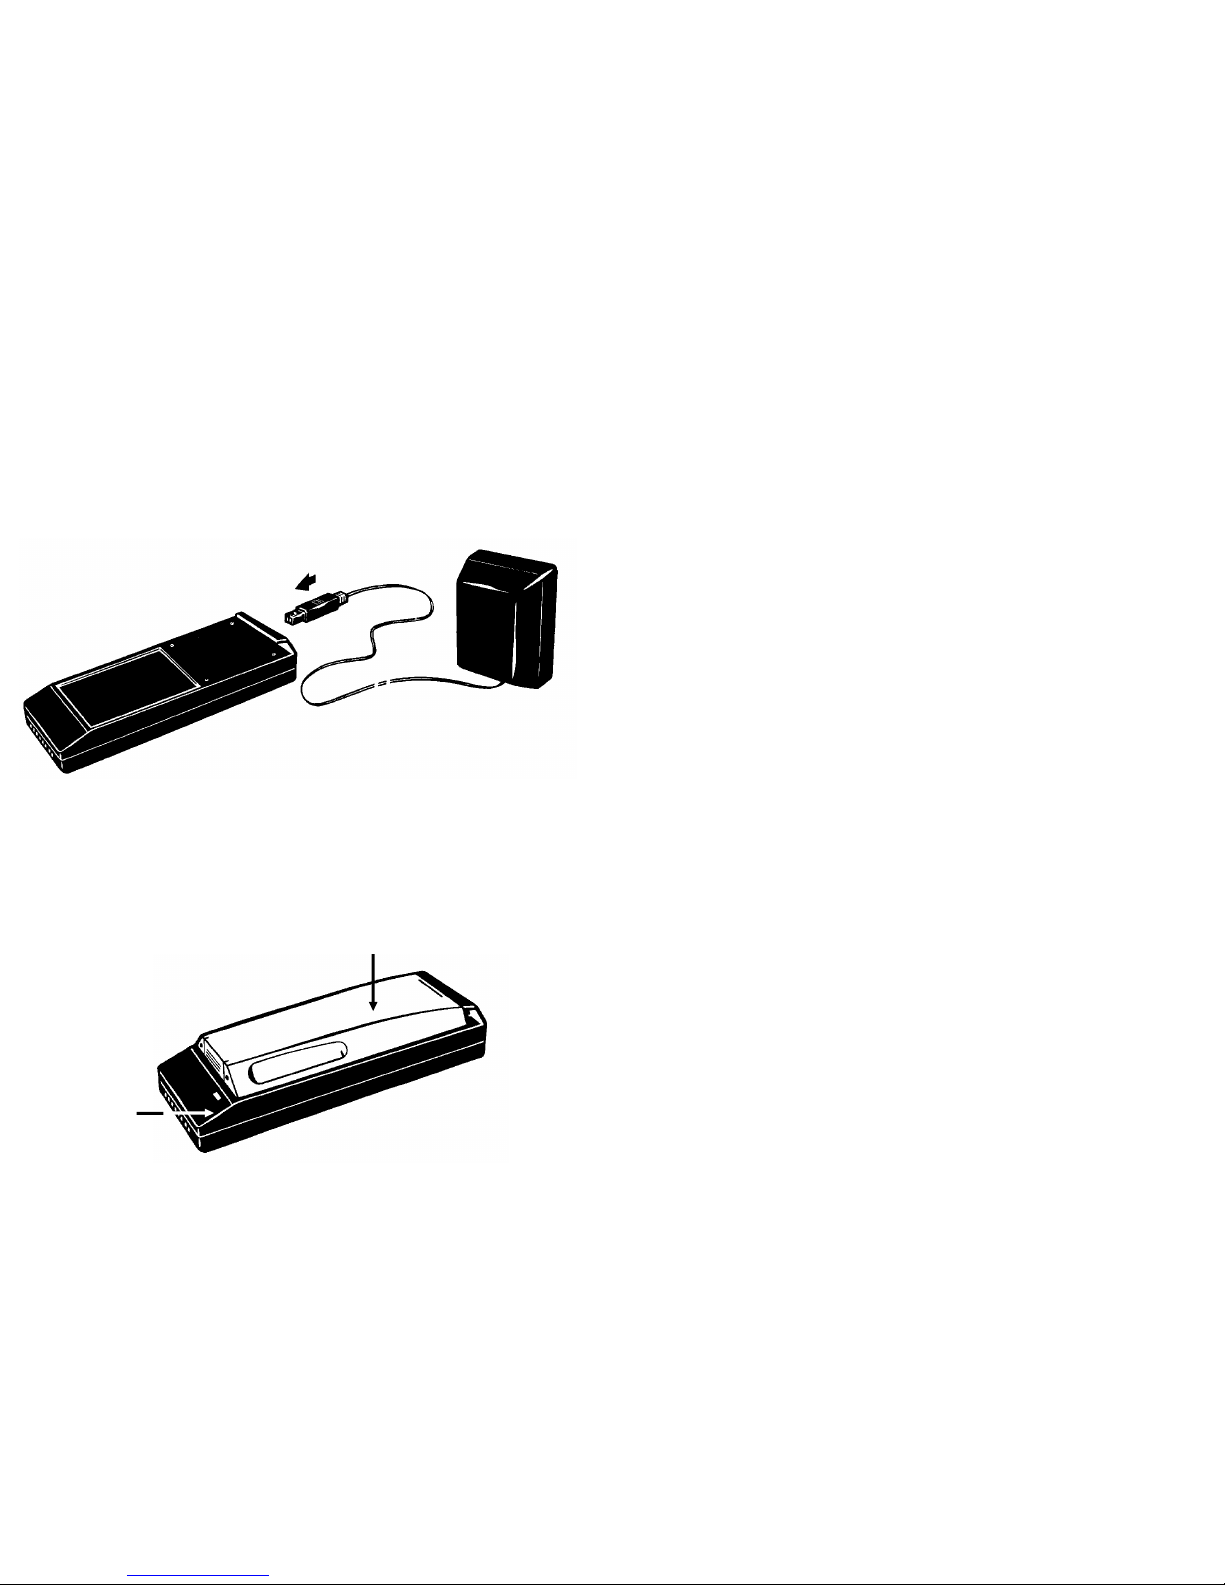
Using the Standard Charger
The charger, delivered with the phone, is to be used
indoors together with an AC/DC converter.
Use only the AC/DC converter provided with the charger.
Use of any other AC/DC converter may be dangerous.
Never recharge a battery with the basic charger when the
ambient temperature is below 5 °C or above 40 °C.
Connecting the standard charger:
1. Connect the AC/DC converter to the charger.
2. Plug the AC/DC converter into a mains socket. The
indicator light on the charger should flash to inform
that power is connected properly.
Recharging a battery:
1. Attach the battery in the same way as you would
attach it to the phone.
A red light on the charger comes on to indicate
that the battery is being recharged. An empty
standard battery will be fully recharged within
approximately 2 hours; an empty high-capacity
battery within approximately 4 hours.
2. A green light replaces the red light when
recharging is complete, and you can now remove
the battery.
However, no harm will come to the battery if left in
the charger. When a battery is fully recharged, the
charger changes to trickle-charging the battery.
AC/DC
Converter
Indicator light
Standard battery
3. Batteries and Recharging
10
Page 18

Using Other Chargers
There is a number of other chargers available that can be
used to recharge a battery.
Some of these chargers are connected to the socket at the
bottom of the phone, allowing the battery to remain
attached to the phone.
Such a charger both recharges the battery and supplies
power to the phone. The recharging is controlled by the
phone, which must be turned on.
To indicate that recharging is in progress, the battery icon
on the right of the display is filled and emptied continuously.
The battery meter will not be shown unless the PIN has
been entered.
Conditioning a Battery
A battery that is delivered with the phone is not charged.
There may, however, be enough power to turn the phone
on.
To obtain best battery performance and long battery life,
you should condition the battery.
Also a used battery that has been stored for a long period
of time may require conditioning to retain its normal
capacity.
To condition a battery properly, recharge and discharge it
completely three times in succession.
To discharge a battery completely, proceed as described in
the section Battery Discharge earlier in this chapter.
There is another method to discharge a battery. Refer to
the description of the Info menu in Chapter 5. Using
Menus.
Battery Care and
Maintenance
A battery has a long maintenance-free service life if
properly treated.
●
Never let a battery get into contact with metal objects that
may short-circuit the battery poles, for example a bunch of
keys in a pocket.
●
A battery may explode if disposed of in a fire.
●
Do not disassemble a battery.
●
If you suspect a battery of not working properly, take it to
an authorised dealer.
●
Avoid recharging a battery before the low battery alarm
has been issued. Should you often do so, the battery’s
ability to accept a charge will be impaired, with the result
that the battery can only be used for shorter and shorter
periods between recharges. Such a battery can, however,
be conditioned using the method described above.
A hint:
If you are uncertain of the state of charge of a battery,
attach the battery to the phone. Press and hold down the
ON/OFF key.
If the phone does not come on, the battery is probably
empty.
3. Batteries and Recharging
11
Page 19

If the phone comes on, enter the PIN, and then observe the
battery meter.
Belt Clip
A clip is delivered with each battery. You can mount the clip
to a battery without using any tools.
Insert the clip into the slot on the battery until you hear a
click.
3. Batteries and Recharging
12
Page 20

4. Basic Operation
Some Key Functions
Send
Used to make a call after a phone number has
been entered.
ON/OFF
To switch the phone on or off, press and hold
down the key until you here a click.
To switch the phone off if a call is in progress,
first terminate the call by pressing and releasing
the key. Wait a few seconds, and then press
and hold down the key until you hear a click.
End
Used to terminate a call.
Left Arrow
Used during a call to decrease the volume.
Clear
Used to erase digits from the bottom line of the
display.
If held down, it erases all digits.
If held down during a call, it disconnects the microphone (Mute function).
Right Arrow
Used during a call to increase the volume.
Used to insert a ‘‘+’’ character before a number
when you wish to make an international call.
Numeric keys
Used to enter the digits 0 -- 9.
Star and Hash
Used to enter the characters
*
and #.
ON/OFF
13
Page 21

Entering a Phone Number
If anything else but the time of the day is shown in the
bottom line of the display, erase it using the CLR (Clear)
key.
Enter the phone number you wish to call, using the numeric
keys. The digits are shown in the bottom line of the display.
Always use the area code:
Note that there are no local calls when you are calling from
a cellular phone; you must always include the area code
before the desired number. The only exceptions to this are
certain cellular service numbers and emergency numbers.
If you enter a wrong digit or a wrong number:
If you enter a wrong digit, you can erase it by
pressing CLR. You can press CLR repeatedly
to erase several digits, one at a time.
To erase all digits simultaneously, press and hold down
CLR until the digits disappear from the display.
Making a Call
The name of the current GSM network must be present in
the display.
Enter the number you wish to call and press Send.
If you do not press Send within five seconds after you pressed the last numeric key, a short
beep will be heard and the question Call? appears in the display.
After you have pressed Send (YES) to make the call, the
message Calling appears in the display.
When you have made contact with the mobile switching
centre, a confirmation click will be heard and the message
Connecting appears in the display.
Call Time Meter
0:01 When the call is answered, a meter shows
the elapsed call time, in minutes and seconds, in the top line of the display.
Ending a Call
When the conversation is finished, press End.
A NET
Last 2:23
The message Last, followed by the
elapsed call time, appears in the display for
five seconds.
If nobody answers:
If you hear an engaged or equipment-engaged tone:
If you receive a recorded message that the number is
unobtainable:
Press End. The phone number is stored in memory, so you
can easily repeat the call. See Last Number Re-dial below.
Last Number Re-dial
4. Basic Operation
14
Page 22

If anything else but the time of the day is shown in the
bottom line of the display, erase it using the CLR key.
Press Send. The question Call? appears in the display,
together with the number last called.
Press Send (YES) to make the call.
Automatic Re-try
If the connection of a call fails, the question Retry? may
appear in the display.
If you press Send (YES), the phone number will be
re-dialled automatically until the call is answered, or 10
times at the most. In the meantime, the message Retrying
is displayed.
If you press any key, or you receive a call, the re-dialling
will be interrupted.
If the phone is car-mounted, the question Retry? will not
appear. The re-try takes place automatically.
International Calls
If anything else but the time of the day is shown in the
bottom line of the display, erase it using the CLR key.
Press Right Arrow. The text Inter number
appears in the display.
The international character ‘‘+’’ appears automatically in
the bottom line of the display when you enter the first digit.
Enter the required country code, the area code and the
phone number.
If a leading 0 is included in the area code, omit it.
When you press Send to make the call, the ‘‘+’’ character is
automatically replaced by the correct international prefix,
independent of the country you are visiting.
Emergency Calls
The new international emergency number, 112, can
always be used, independent of the country you are visiting.
Before making an emergency call, ensure that nothing but
the time of the day is present in the bottom line of the
display.
To make the call, enter 112 and then press Send. The text
Emergency appears in the display.
Calls to the emergency number 112 can always be made,
provided a GSM network is in range -- even if no SIM card
is inserted or the phone is locked.
Other emergency numbers differ from country to country. To
call these numbers, it is required that the name of the
current GSM network is shown in the display.
Receiving a Call
4. Basic Operation
15
Page 23

The name of the current GSM network must be present in
the display.
When you are called, the phone rings. At the same time,
the question Answer?. The indicator light on the top of the
phone rapidly blinks green.
Answering a Call
Answer the call by pressing Send (YES).
Call Time Meter
During the conversation, a meter displays the elapsed time,
in minutes and seconds, in the top line of the display.
Ending a Call
When the conversation is finished, press End.
Unanswered Calls
A NET
Calls: 1
13:31
If you do not answer a call, the number of
unanswered calls will be shown in the display.
Options during a Call
Adjusting the Volume
During a conversation, you can adjust the volume by
pressing Left Arrow (decreases the volume) or Right
Arrow (increases the volume) momentarily.
Each time you press Left Arrow or Right Arrow
momentarily, the volume is altered by one step; the full
range being five steps.
1:30
Volume
■■■❏❏
The volume setting is shown in the display.
It remains in the display two seconds after
Left Arrow or Right Arrow was last
pressed.
Two independent volume settings:
You can have one setting when you use the phone as a
handheld unit and another setting when you use it as a
handsfree phone. Both settings will remain unchanged,
after the phone has been turned off.
Muting the Microphone
During a conversation, you can disconnect the
microphone by holding down the CLR key.
The word Mute is shown in the display.
To resume the conversation, release the CLR key.
DTMF Signalling
You can use your phone to send DTMF tones to perform
banking by phone, controlling answering machines, and
4. Basic Operation
16
Page 24

other functions. (DTMF stands for Dual Tone Multi
Frequency.)
After a call has been connected, pressing keys 0 -- 9,
*
and # will cause the corresponding DTMF tones to be sent.
A DTMF tone will last as long as a key is pressed.
Using the Keypad as a Scratch Pad
You can use the display as a scratch pad during a
conversation. If the person you are talking to gives you a
phone number, you can enter it as it is given to you.
The number remains in the display after you have ended
the call, and you can call it by pressing Send.
4. Basic Operation
17
Page 25

5. Using Menus
Accessing Menu Mode and Moving
Around the Menus
Your phone has a number of useful functions which can be
accessed through menus in the display.
18
Page 26

You can access the Menu Mode with the scroll keys Right
Arrow and Left Arrow .
Right Arrow takes you to the International Number
function -- Left Arrow to the
Phone Book.
You reach the other functions by (repearedly) pressing Right
Arrow or Left Arrow as indicated by the arrow heads in the
display.
Instead of repeatedly pressing Right Arrow or Left Arrow ,
you can hold down the key until you reach the desired menu.
You can access the Menu Mode also when a call is in
progress. Then, you must hold down Right Arrow or Left
Arrow. Pressing
the key momentarily, will adjust the
volume by one step.
A NET
10:03
Inter number
< >
MENU
< Divert >
MENU
<Keylock > ON?
MENU
< Settings >
MENU
< Access >
MENU
< Networks >
MENU
< Clock >
MENU
< Mail >
MENU
<Phone book>
Starting Point
MENU
< Info >
5. Using Menus
19
Page 27

Some of the menus do not appear in the display unless you
have contact with a network, that is, the name of the
network (or an abbreviation for it) must be shown in the
display. Some of the menus do not appear if a call is in
progress.
Entering a Menu and Moving Around the
Functions
When you have reached the desired menu (X in the figure
above), press YES to enter it.
Most of the menus have several functions. After you have
entered such a menu, its first function, 1, appears in the
display.
You reach the other functions, 2, 3 and 4, by (repeatedly)
pressing Right Arrow or Left Arrow .
X
< 3 >
X
< 1 > (A)
X
< 4 >
X
< 2 >
Functions
MENU
< X >
5. Using Menus
20
Page 28

Selecting a Function
When you have reached the desired function, press YES to
select it.
Some of the functions have two or more settings. In the
figure above the settings are designated A, B, C and D.
The current setting, A, is shown between brackets.
To alter the setting press YES. The first alternative setting,
B, appears in the display.
You reach the other settings, C and D, by (repeatedly)
pressing Right Arrow or Left Arrow .
When you have reached the desired setting, press YES to
select it. The new setting is shown between brackets.
The NO and CLR keys
Pressing NO, takes you one level up -- from a
function to the menu -- from a menu to the
starting point.
Pressing CLR, always takes you back to the
starting point.
You will return to the starting point automatically, if you do
not press a key within 30 seconds.
If You Receive a Call while in Menu Mode
You will leave menu mode automatically if the phone rings.
Press Send (YES) to answer the call.
1
< B >
1
< C >
1
< D >
1
< A >
Settings
Function
Menu
X
< 1 > (A)
MENU
< X >
5. Using Menus
21
Page 29

Special Functions
International Number
If the time of the day is shown in the bottom line of the
display
A NET
17:00
Pressing Right Arrow takes you to the
International Number function which
inserts the international character ‘‘+’’.
This character will be replaced by the
correct international prefix when you
make the call, independent of the country
you are visiting, home or abroad.
Inter number
< >
Press YES, or enter the first digit of the
country code.
A NET
+4
Special Characters
If you have entered digits in the display
Pressing Right Arrow takes you to the Special
Characters function.
MENU
Special
<characters>
This function lets you insert special
characters in a phone number.
At present, only the international
character ‘‘+’’ can be inserted.
If you have entered a service code, for example
*21*
,
and you wish to enter a ‘‘+’’ before the country code, you
can use this function.
Check Digits
If you have entered more digits and other characters than
can be shown in the display
A left arrow is shown on the left in the second line of the
display, before the digits and characters.
Pressing Right Arrow takes you to the Check Digits
function.
This function lets you check the digits and characters.
5. Using Menus
22
Page 30

Info Menu
The Info menu lets you read off:
●
the voltage of the battery attached to the phone.
●
the elapsed time of the last call (incoming or outgoing), in
minutes and seconds.
●
the total elapsed time of outgoing calls, in hours, minutes
and seconds.
It also lets you:
●
Discharge the battery attached to the phone.
●
Reset the total call time meter.
MENU
< Info >
INFO
<Last call >
0:26
INFO
<Battery>
6.3 V
BATTERY
Discharge?
Discharging
TOT CALLS
Reset?
INFO
<Tot calls >
2:07:10
INFO
<Tot calls >
00:00:00
5. Using Menus
23
Page 31

Divert Menu
MENU
< Divert >
Call Divert a supplementary service of
the GSM network. It is described in a
supplement to this manual, entitled GSM
Network Features.
Networks Menu
MENU
<Networks>
The Networks menu includes the
following functions which can be reached
with the scroll keys Right Arrow and
Left Arrow:
NETWORKS
<Select net>
Network Selection -- lets you select a
network from those in range.
NETWORKS
Searchmode
(Auto)
Network Search Mode -- lets you
choose between automatic and manual
network search mode.
NETWORKS
<Edit list>
Edit List -- lets you create and maintain
a list of preferred networks on your SIM.
NETWORKS
<New search>
New Network Search -- starts a new
automatic search.
Instead of the full name of a country and a network, an
abbreviation is displayed when you use the Networks menu.
Network Selection
NETWORKS
<Select net>
To select a network from those in range,
press YES. The message Please wait is
displayed briefly.
a. If the home network is in range, its name will be
displayed, together with the message Current, if
you are using the home network. or together with
the message Home, if you are using another
network.
b. If the home network is not in range, the name of
another network will be displayed, together with
one of the following messages:
Current means that the network is currently used.
Preferred means that the network is included in
the list of preferred networks on the SIM Card.
Refer to the description of the Edit List function
below.
Available means that you can use the network.
Forbidden means that you are not allowed to use
the network.
c. If no network is in range, the message No network
is displayed.
5. Using Menus
24
Page 32

If more than one network is in range, the name of the other
networks, can be displayed one by one by pressing the
Arrow keys.
When the network you wish to use is displayed, press YES
to select it.
Network Search Mode
NETWORKS
Searchmode
(Auto)
You can select either Auto(matic) or
Manual search mode.
Automatic Search Mode
The phone will select its home network in the first place. If
the home network is not in range, the phone will select
another network from those in range.
The order of preference in which the phone selects a
network, in case the home network is not in range, can be
defined in a list on the SIM card. Refer to the description of
the Edit List function below.
Manual Search Mode
The phone will select its home network in the first place. If
the home network is not in range, the message Select
network? is displayed.
To select a network, press YES. Then proceed as
described above under Network Selection.
If you do not press YES within ten seconds, the phone automatically selects the network that was last used, provided
this is in range.
Edit List
If you wish, you can create a list which defines the order of
preference in which the phone will select a network during
automatic network selection if the home network is not in
range.
The number of networks that can be stored in the list is
SIM-dependent.
The Edit List function lets you review the list, add
networks to the list, delete networks from the list and
re-arrange the order of the networks
Reviewing the List of Networks
NETWORKS
<Edit list >
To review the list, press YES. The
message Please wait is displayed
briefly.
EDIT LIST
UK VODA *
< 1 >
The name of the first network is
displayed. If a *is displayed, it indicates
that the network is in range.
You can scroll through the other networks in the list with
Right Arrow and Left Arrow .
5. Using Menus
25
Page 33

Adding a Network to the List
EDIT LIST
UK VODA *
< 1 >
Scroll to the position where you wish to
insert the network.
a. If you scroll to the first free position, the question
Add network? appears
b. If you scroll to a position which already is occupied,
you must press YES and then scroll until Add net
appears.
Press YES and then scroll until you find the desired
network.
If the desired network is not displayed, press YES when the
question Other? appears. Then enter the 3-digit country
number, followed by the 2-digit network number.
Finally, press YES to add the network to the list.
Deleting a Network from the List
EDIT LIST
UK VODA *
< 1 >
Scroll to the network you wish to delete
and press YES.
Scroll until Erase appears.
Press YES to delete the network from the list.
Re-arranging the Order of the List
EDIT LIST
UK VODA *
< 1 >
Scroll to the network you wish to move
and press YES.
Move is displayed. Press YES and enter the new position.
Press YES to move the network to its new position.
New Network Search
NETWORKS
<New search>
You can at any time request an
automatic network search with this
function.
To start an automatic search, press YES.
Access Menu
MENU
< Access >
The Access menu includes the following
functions:
Call Barring
lets you restrict outgoing and incoming calls.
Card Lock
lets you activate or turn off the PIN check which protects
the SIM card. When the PIN check is activated, the user
must enter the PIN each time the phone is turned on.
Change PIN
lets you change your PIN.
Avoid choosing a PIN code which begins with 112 to
prevent unwanted calls to the international emergency
number 112.
5. Using Menus
26
Page 34

Phone Lock
lets you activate or turn off the phone lock which prevents
the use of the phone in the event of a theft.
There are two levels of locking the phone: Full Lock and
Autolock.
If the Full Lock is activated, the message Phone Locked
is displayed briefly, followed by the prompt Enter Lock
Code, each time the phone is turned ON. The user then
has to enter a security code and press # to be able to use
the phone.
If the Autolock is activated, the message Phone Locked
and prompt Enter Lock Code will not appear in the display
unless a different SIM has been inserted in the phone.
After the security code has been entered correctly, the
phone can be used with new SIM. Not until the original
SIM or a different SIM is inserted in the phone, will the
user be asked to enter the security code again.
Change Security Code
Your phone is factory-programmed with a 4-digit security
code of 0000. To improve security, you should change this
to any 3- to 8-digit personalized code.
You are should to choose your security code carefully. You
can, for example, use the same code as your PIN, or
another code that you will remember easily.
Call Barring
ACCESS
< Barring >
Call Barring is a supplementary service
of the GSM network.
It is described in a supplement to this
manual, entitled GSM Network Features.
Card Lock
ACCESS
Unlock
< Card >
Unlock card is displayed when the PIN
check is activated.
ACCESS
Lock
< card >
Lock card is displayed when the PIN
check is turned off.
Activating the Card Lock
ACCESS
Unlock
< Card >
Press YES.
Enter
PIN
Enter your PIN and press # (Hash).
Locked The card lock is now activated.
5. Using Menus
27
Page 35

Turning the Card Lock Off
ACCESS
Lock
< Card >
Press YES.
Enter
PIN
Enter your PIN and press # (Hash).
Unlocked The card lock is now turned off.
Change PIN
The card lock must be activated. Otherwise, you cannot
change your PIN.
ACCESS
Change
< PIN code >
Press YES.
Enter
old PIN
Enter the current PIN and press #.
Enter
new PIN
Enter the new PIN and press #.
Repeat
new PIN
Enter the new PIN again.
New
PIN
The PIN has been changed.
Phone Lock
ACCESS
<Phone lock>
( )
Press YES. The current setting Full
Lock, Autolock or Unlocked is shown
between brackets.
PHONE LOCK
<Full lock >
Press YES if you wish to use Full Lock.
Otherwise, press Right Arrow.
PHONE
LOCK
< Autolock >
Press YES if you wish to use Autolock,
Otherwise, press Right Arrow.
PHONE LOCK
< Unlocked >
Press YES if you wish to turn off the
Phone Lock.
Enter
lock code
Enter the security code and press #.
Phone lock is displayed, together with
the new setting: Full Lock, Autolock or
Unlocked (within brackets).
5. Using Menus
28
Page 36

Change Security Code
ACCESS
<Phone lock>
Change code
Press YES.
Enter
old code
Enter the current security code and press
#.
Enter
new code
Enter the new security code (4 to 8
digits) and press #.
Repeat
new code
Enter the new security code again and
press #.
New
code
The security code has been changed.
Settings Menu
MENU
< Settings >
The Settings menu lets you adapt your
phone to your personal needs in different
situations.
Ringing Signal Level
SETTINGS
<Ring Level>
(■■■■❑❑)
You can set the level of the ringing signal
in six steps. The first step means that
two clicks will be heard when a call is
received.
You can also choose a ringing signal that rises in steps
from the lowest to the highest level, or turn the ringing
signal OFF.
If you turn the ringing signal OFF, all audible signals will be
turned off, too. You will, however, be informed by the
indicator light on the top of the phone and the display.
You can have one volume setting when the phone is used
as a handheld unit and another setting when the phone is
used as a handsfree phone in a car.
Ringing Signal Tone
SETTINGS
<Ring Type>
(Medium)
You can adjust the tone of the ringing
signal in three steps; low, medium and
high. You can also choose a mixed tone.
You can have one volume setting when the phone is used
as a handheld unit and another setting when the phone is
used as a handsfree phone in a car.
Key Sound
SETTINGS
<Key Sound >
(Click)
You can choose whether clicks, tones or
neither (silent) will be heard when you
press the keys.
5. Using Menus
29
Page 37

Illumination
SETTINGS
< Light >
(Auto)
The illumination of the display and
keypad can be set to automatic, turned
off, or turned on all the time.
In the automatic mode, the illumination is turned off 20
seconds after the last key was pressed. It will be turned on
again when a key is pressed, or when a call or message is
received.
You can have one setting when the phone is used as a
handheld unit and another setting when the phone is used
as a handsfree phone in a car.
Call Timer
SETTINGS
<Call timer>
(Off)
This function gives an indication of the
time spent during conversation by
emitting a short beep in the earpiece or
handsfree loudspeaker every full minute.
Prefix
SETTINGS
< Prefix >
(Off)
This function lets you choose a prefix, for
example an area code, which will be
automatically inserted before a phone
number when you make a call.
If you enter a prefix yourself, before a phone number, the
automatic prefix will not be added to the number, nor will it
be added to the emergency number 112, or to a number
which begins with +,
*
or #.
You can only use the Prefix facility in the country where it
was selected.
Entering a Prefix and Activating the Prefix Function
PREFIX
<New Prefix>
( )
Press YES.
Enter
new prefix
Press YES again and enter the prefix.
Turn the Prefix function on by pressing YES.
You can include the international character ‘‘+’’ and a
country code in the prefix, for example +46. However, if you
do so, you must always enter the international character ‘‘+’’
and the country code if you wish to call a phone number
which is not preceded by the prefix you have entered.
The international character ‘‘+’’ is entered by pressing Right
Arrow.
Turning the Prefix Function Off
PREFIX
< On >
( 0500)
Press YES, to turn the Prefix function off.
5. Using Menus
30
Page 38

Any Key
SETTINGS
< Any key >
(Off)
This facility will only be available if the
phone is used with handsfree equipment.
This facility lets you answer a call by pressing any key
except the End key.
Greeting
SETTINGS
< Greeting >
(Welcome)
Instead of the greeting Welcome, which
is displayed each time the phone is
turned on, you can have your telephone
to display a welcome greeting that you
choose yourself.
Letters are entered with the numeric keys 2 -- 9. Press the
appropriate numeric key one, two, three or four times,
depending on the position of the letter on the key. If you
want to enter a space, press the 1 key. To enter a hyphen,
press the 1 key twice.
You can also enter lower-case letters, national characters
and punctuation marks. Refer to the table at the end of this
chapter.
The Greeting function also lets you turn the greeting off.
Own Number
SETTINGS
<Own number>
( )
If you have chosen a personal greeting,
you can have your phone number
displayed, too. This function lets you
enter the number.
Language
SETTINGS
< Language >
(English)
The phone is normally delivered with
English texts in the display. This function
lets you select a language other than
English.
Clock Menu
Clock
A NET
13:10
The time of the day is shown
continuously in the bottom line of the
display. The hours and minutes are
presented in the 24-hour format, for
example 13:10.
Alarm
The phone has an alarm clock which you can set.
The alarm will sound at the time set, even if the phone is
turned off. The illumination of the keys and the display will
flash, too.
5. Using Menus
31
Page 39

The alarm will sound for 60 seconds, if you do not turn it off.
To turn it off, you can use any key.
The level of the alarm depends on the setting of the ringing
signal level. If you have turned the ringing signal off, only a
click will be heard.
An icon in the shape of a bell in front of the time of the day
informs you that the alarm is activated.
The Clock Menu
MENU
< Clock >
The Clock menu lets you set the time of
the day and the time of the alarm. You
can also turn the alarm off, or turn it on
without changing the time.
Setting the Alarm and Activating the
Alarm Function
CLOCK
<Set alarm >
(Off)
Press YES. Press Right Arrow
(repeatedly) until New Time is displayed.
SET ALARM
< New Time >
(00:00)
Press YES.
SET ALARM
(00:00)
_-:00
Enter the time, hours and minutes in the
24-hour format, for example 14:30, and
press YES.
CLOCK
<Set alarm >
(14:3O)
Turning the Alarm Function off
CLOCK
<Set alarm >
(14:30)
Press YES. Press Right Arrow
(repeatedly) until Off is displayed.
SET ALARM
< Off >
(14:30
Press YES.
CLOCK
<Set alarm >
(Off)
Activating the Alarm Without Changing
the Time
CLOCK
<Set alarm >
(Off)
Press YES. Press Right Arrow
(repeatedly) until On is displayed.
SET ALARM
< On >
(14:30)
Press YES.
CLOCK
<Set alarm >
(14:3O)
5. Using Menus
32
Page 40

Setting the Clock
CLOCK
<Set clock>
(00:00
The present setting, in hours and
minutes, is shown between brackets. To
set the clock, press YES.
SET CLOCK
(00:00)
_-:----
Enter the time, hours and minutes in the
24-hour format, for example 15:00, and
press YES.
If you wish, you need not enter the minutes. Enter the
hours,. and press YES. The minutes remain the same.
CLOCK
<Set clock>
(15:00)
Keylock Menu
You can lock the keypad so that unintentional key action
has no effect if the phone is turned on. This feature is
useful when you, for example, are carrying the phone in a
pocket or a handbag.
The keypad remains locked until you
●
answer an incoming call
●
replace the battery
●
turn the phone off by pressing and holding down the
ON/OFF key.
●
unlock the keypad yourself
Calls to the emergency number 112 can, however, be made
when the keypad is locked.
Locking the Keypad
MENU
< Keylock >
ON?
Press YES to lock the keypad.
Unlocking the Keypad
A NET
09:28
< Keylock
1. Press Left Arrow . The message
Keylock OFF appears.
MENU
< Keylock >
OFF?
2. Press YES to unlock the keypad.
Mail Menu
MENU
< Mail >
The Mail menu lets you use
supplementary services offered by the
GSM network, such as the Short
Message Service.
The Mail menu is described in a supplement to this manual,
entitled GSM Network Features.
5. Using Menus
33
Page 41

Phone Book
Read This First
You can store phone numbers on your SIM card, both when
the phone is in standby mode and during a conversation.
The actual number of number of phone numbers that can
be stored is SIM-dependent.
A phone number to be stored may contain up to 20 digits.
Memory Positions 1 -- 9
The numbers stored in memory positions 1 -- 9 can be
called directly by entering the number of the memory
position and pressing Send. See the section Speed
Dialling, later in this chapter. If you wish to use the speed
dialling facility, spare memory positions 1 -- 9 for important
numbers.
International Numbers
To be able to recall stored phone numbers independent of
the country you are visiting, home or abroad, you should
store the numbers as international numbers
This means that a phone number is to be preceded by the
international character ‘‘+’’ and the country code. For
example, the Swedish phone number 0412-345678 is
stored as +46412345678. Note that the leading 0 in the
area code (0412) must be omitted.
To enter a the ‘‘+’’ character, press Left Arrow. Then press
YES, or enter the first digit of the country code.
Names
A phone number can be stored with, or without, an
accompanying name. The actual number of letters that can
be stored is SIM-dependent.
The letters in a name is entered with the numeric keys 2 --
9. Press the appropriate numeric key one, two, three or
four times, depending on the position of the letter on the
key. For example, to enter an A, press the 1 key once. To
enter an E, press the 2 key twice.
When an underline character ( _ ) appears to the right of
the letter entered, you can enter the next.
If you want to enter a space, press the 1 key. To enter a
hyphen, press the 1 key twice.
You can also enter lower-case letters, national characters,
digits 0 -- 9, and punctuation marks. Refer to the table at
the end of this chapter.
If you make a mistake, when entering the letters, you can
correct it with the CLR key.
Dialling Memory
The last 10 numbers called are stored in a dialling memory
in the phone. This memory has 10 positions, numbered: 0
and
1 -- 9.
The last number called will always be stored in memory
position 0, the second to last number in memory position
1, and so on.
5. Using Menus
34
Page 42

When all 10 memory positions are occupied, the number
stored in memory position 9 will be lost when a new call is
ended.
A phone number will, however, not be stored twice in the
memory. If a number which is already present in the
memory is called, the ‘‘old’’ number will be deleted.
Scratch Pad
As described in chapter 4. Basic Operation, you can use
the display as a scratch pad to enter a phone number when
a call is in progress.
The phone number remains in the display after you have
ended the call. The number will, however, also be stored in
position 1 of the dialling memory.
DTMF Signalling
As described in chapter 4. Basic Operation, you can use
keys 0 -- 9, * and # to send DTMF tones when a call is in
progress.
The characters entered remain in the display after you have
ended the call.
The are characters also stored in position 1 of the dialling
memory. To avoid storing the characters, erase them using
the CLR key before you end the call.
A hint
If you often need to send a code (a sequence of
characters), it could be advantageous to store the code in
the memory on the SIM.
The Phone Book Menu
MENU
<Phone book>
The Phone Book menu includes the
following functions which can be reached
with the scroll keys Right Arrow and
Left Arrow:
PHONE BOOK
Name
< recall >
Name Recall lets you recall a phone
number using the name stored with the
number.
PHONE BOOK
Position
< recall >
Position Recall lets you recall a phone
number using the number of the memory
position.
PHONE BOOK
< Store >
Store lets you store a phone number and
an accompanying name.
PHONE BOOK
< Erase >
Erase lets you erase a phone number
and name.
PHONE BOOK
<Last call >
Last call lets you recall the last 10
phone numbers called from the dialling
memory. You can also turn the dialling
memory off, thus erasing the numbers
stored.
5. Using Menus
35
Page 43

Recalling a Phone Number
Using the Name -- Name Recall
PHONE BOOK
Name
< recall >
1. Press YES to select the Name Recall
function.
NAME
RECALL
Name:_
2. Enter the first letter of the name by
pressing the relevant numeric key as
many times as required.
When an underline character ( _ ) appears to the right of
the letter entered, you can enter the next.
You can enter up to five letters. For example, to recall the
phone number stored under the name STUART, you can
enter S, ST, STU, STUA or STUAR.
NAME
RECALL
Name:STU_
3. Press YES or Right Arrow.
<(10)STUART>
+46412345678
The first name that begins with the
letter(s) entered, is displayed. (The digits
between brackets in the top line
represent the number of the memory
position.)
4. If the name is not the desired one, scroll
forward by pressing Right Arrow until
you find it. If you scroll past the name,
you can go back by pressing Left Arrow .
5. To call the number displayed, press
Send (YES).
Appending Digits to a Recalled Number
You can append digits to a recalled number. This is useful if
you have stored a partial number, that is a phone number
which does not include the last digits.
Replacing the Last Digits in a Recalled Number
You can alter a number that you have recalled from
memory by erasing the last digit(s) with the CLR key. You
can then append new digits.
DTMF Signalling
If you have stored a code including the digits 0 -- 9 and the
characters * and #, you can recall it when a call is in
progress.
Note that you must hold down Left Arrow to enter the
Phone Book menu.
Proceed as described under points 1 to 4 above and then
press Send.
The sequence of characters are sent as DTMF tones, one
character at a time. In the meantime the message
Sending, together with the characters, is shown in the
display.
5. Using Menus
36
Page 44

Recalling a Phone Number
Using the Memory Position
-- Position Recall
PHONE BOOK
Position
< recall >
1. Press YES to select the Position
Recall function.
POSITION
RECALL
Position: _
2. Enter the number of the memory
position (one or two digits).
POSITION
RECALL
Position: 10
<(10)STUART>
+46412345678
The (name and) number is displayed.
●
3.To call the number displayed, press Send (YES).
Scrolling Through the Memory
PHONE BOOK
Position
< recall >
You can display the contents of each
memory position by scrolling though the
memory.
1. Press YES to select the Position Recall function.
2. Press Right Arrow to scroll forward or Left Arrow
to scroll backward.
DTMF Signalling
Refer to the preceding section, Recalling a Phone
Number Using the Name -- Name Recall
Alternative Method to Recall a Phone Number
1.1. If anything else but the time of the day is shown in
the bottom line of the display, erase it with the CLR
key.
2. Enter the number of the memory position (one or
two digits) and 1 and press #.
3. You can scroll forward or backward through the
memory by pressing Right Arrow or Left Arrow.
Speed Dialling
1. If anything else but the time of the day is shown in
the bottom line of the display, erase it with the CLR
key.
2. Enter the number of the memory position, 1 to 9,
and press Send.
If you called a wrong number by mistake, press End before
the call has been connected.
Storing a Phone Number (and Name)
PHONE BOOK
< Store >
1. Press YES to select the Store function.
5. Using Menus
37
Page 45

STORE 1
Name:_
2. To store a phone number in the first
free memory position (1 in this example),
go to point 5, below.
3. To store a phone number in a different memory
position, press Left Arrow.
STORE _
Name:_
4. Enter the number of the memory
position (one or two digits), for
example 10, and press Right Arrow .
STORE 10
Name:_
5. To store a phone number without a
name, press YES.
Go to point 8, below.
6. Enter the first letter of the name by pressing the
appropriate numeric key as many times as required.
STORE 10
Name:S_
When an underline character (_)
appears to the right of the letter entered,
you can enter the next.
If you want to enter a space, press the 1 key. To enter a
hyphen, press the 1 key twice.
If you make a mistake, when entering the letters,
you can correct it with the CLR key.
STORE 10
Name:STUART_
7. When you have entered the name,
press YES.
STORE 10
Name:STUART
Enter no: _
8. Enter the phone number and press
YES.
STORED 10
Name:STUART
+46412345678
9. The name and number is stored.
Alternative Method to Store a Phone Number
+46412345678
If the phone number you wish to store, is
shown in the display
PHONE BOOK
< Store >
1. Proceed as described under points
1 -- 7 in the preceding section.
STORED 10
Name:STUART
+46412345678
2. The number and name is stored.
Memory Protection
STORE 10
Used
Overwrite?
If you try to store a phone number in a
memory position which already contains
a phone number:
a. Store the number in a different memory position.
Press NO and enter the number of the memory
position.
5. Using Menus
38
Page 46

b. Store the number in the selected memory position,
thus erasing the old number (and name). Press
YES.
Memory Full
If you try to store a phone number when all memory
positions are occupied, no memory position number will be
suggested in the top line of the display.
If you wish to store the phone number, you have to enter
the number of an already occupied memory position, thus
erasing the old number (and name).
Erasing Phone Number (and Name)
PHONE BOOK
< Erase .
1. Press YES to select the Erase function.
ERASE
Position: _
2. Enter the number of the memory
position (one or two digits), for
example 10, or scroll with Right
Arrow until you find the phone
number (and name) you wish to
erase.
ERASE 10
< STUART >
Erase?
3. Press YES to erase the number.
ERASE 10
Erased
4. The phone number (and name) is
erased.
Recalling the Last 10 Phone Numbers
from the Dialling Memory
To recall a number, proceed as follows:
PHONE BOOK
<Last call .
1. Press YES to select the Last Call
function.
LAST CALL
< >
12345678
2. The number last called is displayed.
To display the other numbers, scroll
with Right Arrow.
MEMORY 1
< >
234546789
3. The second to last number is
displayed, and so on.
MEMORY 2
< >
345467890
4. Press Send (YES) call the number displayed.
Alternative Method to Recall the Last 10 Phone
Numbers
1. If anything else but the time of the day is shown in
the bottom line of the display, erase it with the CLR
key.
2. Enter 0, and press #.
LAST CALL
< >
12345678
3. The number last called is displayed.
To display the other numbers, scroll
with Right Arrow.
4. Press Send (YES) to make the call.
5. Using Menus
39
Page 47

Turning the Dialling Memory Off
LAST CALL
< (OFF) >
Press YES to turn the dialling memory off
and erase the numbers stored.
Entering Letters
Press the appropriate key, 1 -- 9 or 0, (repeatedly) until the
desired letter, character or digit appears in the display.
1 Space - ? ! , . : ‘‘ ’ ( ) 1
2 A B C Å Ä Æ à Ç 2
3 D E F è É 3
4 G H I ì 4
5 J K L 5
6 M N O Ñ Ö Ø ò 6
7 P Q R S ß 7
8 T U V Ü ù 8
9 W X Y Z 9
0 0
Entering Lower-Case Letters
Enter the letter, for example an A, and then press * or #.
An a appears instead. Lower-case letters will appear until
you press * or # again.
5. Using Menus
40
Page 48

A number of accessories is available for use with your
phone. Some are described in this chapter. For full
information on all accessories available, please contact
your dealer.
Handsfree Usage in a
Vehicle
The handsfree kit incorporates a complete system for
handsfree usage, powering the phone from the vehicle’s
battery, and recharging the battery attached to the phone.
An external antenna should be used for better telephone
communication.
When the phone rests in the holder, the internal microphone
and earpiece are disabled. Instead, an external microphone
and a loudspeaker, which is built into the holder, are used.
The handsfree feature allows you to make or answer calls
without removing the phone from the holder. You can
comfortably have a telephone conversation and still have both
hands on the wheel.
Service Available indicator
The indicator light on the top edge of the phone shows a
steady green light (instead of slowly blinking green) when
service is available from a GSM network.
Battery recharging
When the phone is ON, the attached battery is recharged.
To indicate that recharging is in progress, the battery icon
on the right of the display is filled and emptied continuously.
Illumination
The illumination of the display and keypad can be set to
automatic, turned off, or turned on all the time. Refer to
If a small battery is attached to
the phone, fold out a support
before inserting the phone in
the holder.
Handsfree Holder
6. Accessories
41
Page 49

the description of the Settings Menu in chapter 5. Using
Menus.
Operation
When the phone is used with the hands-free system, its
operation is essentially the same as described earlier in this
manual.
Any Key facility
You can press any key to answer an incoming call. Refer to
the description of the Settings Menu in chapter 5. Using
Menus.
Note:
To prevent unnecessary discharge of the vehicle’s battery,
the phone should not be left in the holder for extended
periods of time when the vehicle is not running.
6. Accessories
42
Page 50

Portable Handsfree
The portable handsfree set is plugged into the socket at the
bottom of the phone.
Any Key facility
The Any Key facility, described in the preceding section, is
available when the portable handsfree set is used.
Earpiece
Microphone
6. Accessories
43
Page 51

Vehicle Charger
and Travel Charger
The vehicle charger, or the travel charger, recharges the
attached battery and supplies power to the phone.
The vehicle charger is connected to a 12 V, negative
earth, cigarette lighter outlet in a vehicle.
The travel charger is to be used indoors, and it is
connected to the mains.
Recharging a battery and powering the phone
1. Plug the vehicle charger into the cigarette lighter
outlet in the vehicle, or the travel charger into a
mains socket.
2. Plug the vehicle charger, or the travel charger, into
the socket at the bottom of the phone.
3. Turn the phone ON.
The recharging of a battery is controlled by the phone. To
indicate that recharging is in progress, the battery icon on
the right of the display is filled and emptied continuously.
If the phone does not come on when you turn it ON, the
reason may be that the battery is fully discharged. Wait a
moment and then turn the phone ON again.
If you remove the travel charger from the mains socket, or
the vehicle charger from the cigarette lighter outlet, also
disconnect it from the phone.
Some vehicles disable the cigarette lighter when the ignition
is turned off.
To cigarette
lighter outlet
Vehicle Charger
Travel Charger
To mains
socket
6. Accessories
44
Page 52

Portable handsfree
If a portable handsfree set is fitted to the phone, the vehicle
charger (the travel charger) can be used to power the
phone from a cigarette lighter outlet (from a mains socket).
To cigarette
lighter outlet
Portable Handsfree:
Powering the phone from a
cigarette lighter outlet
To mains
socket
Portable Handsfree:
Powering the phone from the
mains
6. Accessories
45
Page 53

7. Problems You Can Solve
Phone Does Not Come On
Handheld phone:
Recharge or replace the battery. Refer to chapter
3. Batteries and Recharging.
Handsfree phone in a vehicle:
If the phone comes on, but not the handsfree equipment,
ensure that the phone is properly inserted in its holder.
Check the fuse. The fuse holder is fitted to the battery
cable, near the vehicle’s battery.
Phone locked Is Displayed
Phone
locked
The phone is locked to prevent
unauthorised use.
To unlock the phone:
Enter your personal 3- to 8-digit security code and press
#.
If you have forgotten your security code:
Contact your dealer. The only way to unlock the phone is
through using your security code. Be aware that it, for
security reasons, may take some time to solve the problem.
Insert SIM Is Displayed
Insert
card
No SIM card is inserted in the phone. To
insert the SIM card, refer to chapter 2.
Getting Started.
Wrong PIN Is Displayed
Wrong
PIN
The PIN has been entered incorrectly.
This message is followed by the prompt Enter PIN.
Enter the PIN correctly and press #.
Card blocked. Unblock? Is Displayed.
Card
blocked
Unblock?
This message appears if the PIN has
been entered incorrectly three times in
succession.
To unblock the card:
Press YES.
Enter code
to unblock
Enter your personal unblocking key
(PUK) and press #.
46
Page 54

Enter
new PIN
Enter the PIN and press #. You can
either enter the current PIN, or a new
one.
Repeat
new PIN
Enter the PIN again and press #.
New
PIN
I you entered both the unblocking key
and the PIN correctly, the message New
PIN appears.
Alternative method to unblock the SIM card
Card
blocked
Unblock?
To unblock the SIM card, enter the
following sequence:
* *
0 5 * UNBLOCK KEY * NEW PIN * NEW PIN #
BLOCKED. Contact card provider
Is Displayed
BLOCKED
Contact card
provider
The SIM card is permanently blocked
after the unblocking code has been
entered incorrectly ten times in
succession. Contact your network
operator/service provider.
Searching Shows Continuously in the
Display
Searching
09:58
This indicates that no network is in range.
The reason for this is either:
a. You are in an area which is not covered by a
network.
b. The received signal is too weak.
The strength of the received signal varies from place to
place, and often you need only move the phone by as little
as 20 -- 25 centimetres to obtain a stronger signal.
Large obstacles such as buildings, hills and mountains can
drastically affect the signal strength and you may have to
move to obtain a sufficiently strong signal.
Indoors, it is usually best to use the phone near a window.
Handsfree phone in a vehicle:
Ensure that the phone is properly inserted in its holder.
Check the external antenna and its connection.
Keylock Is Displayed
< Keylock
The keypad is locked to prevent
unintentional key action.
To unlock the keypad:
Press Left Arrow, followed by YES.
7. Problems You Can Solve
47
Page 55

Indicator Light Blinks Red
This indicates that the battery is becoming exhausted and
soon needs recharging or replacing.
Indicator Light Shows a Steady Red Light
Battery
discharge
The message Battery discharge is
displayed, too. This indicates that the battery is no longer able to
power the phone satisfactorily and the
phone has turned itself off.
It is not possible to turn the phone on again. Instead, you
must recharged or replace the battery. See also the section
on Battery Discharge in chapter 3. Batteries and
Recharging.
7. Problems You Can Solve
48
 Loading...