

Page 1

Ericsson Mobile Office GC 75
Preliminary User’s Guide
GC 75 Preliminary User’s Guide. Ericsson Mobile Communications, October 1997
GSM data card
Data • Fax • SMS • Voice
1
Page 2

The product described in this manual conforms to the TTE Directive (91/263/EEC) and
EMC Directive (89/336/EEC).
Trademark. Windows 95®, Microsoft Exchange® and Microsoft Internet Explorer® are
trademarks of the Microsoft® Corporation.
This manual is published by Ericsson Mobile Communications AB, without any warranty.
Improvements and changes to this manual necessitated by typographical errors, inaccuracies,
or improvements to programs and / or equipment, may be made by Ericsson Mobile
Communications AB, at any time and without notice. Such changes will, however, be
incorporated into new editions of this manual.
All rights reserved.
© Ericsson Mobile Communications AB, 1997
GC 75 Preliminary User’s Guide. Ericsson Mobile Communications, October 1997
Publication number: EN/LZT 123 258 R2
Printed in Sweden.
2
Page 3

Contents
Introduction ................................ ................................................................................................. 5
Contents of the User’s Guide.......................................................................................................................................5
Using the Ericsson Phone Modem Manager................................ ................................................. 6
Entering the security code............................................................................................................................................. 6
How to make emergency calls.....................................................................................................................................6
Using several SIM cards ...............................................................................................................................................6
Online Help......................................................................................................................................................................7
The Main window .................................................................................................................... 7
The Address Book ................................ ................................................................................... 7
How synchronisation works ......................................................................................................................................... 7
Adding a new person.....................................................................................................................................................8
Creating a group of several persons ..........................................................................................................................8
Modifying the Address Book for persons or groups.................................................................................................9
Deleting persons or groups ......................................................................................................................................... 9
Finding persons.............................................................................................................................................................. 9
Receiving and making phone calls .......................................................................................... 9
Receiving a phone call ............................................................................................................................................... 10
Making a phone call .................................................................................................................................................... 10
Receiving and sending SMS messages................................ ...................................................11
Receiving SMS message...........................................................................................................................................11
Composing and sending an SMS message.........................................................................................................11
Storing SMS message................................................................................................................................................11
Recommended settings................................ ...........................................................................12
How to keep the GC 75 powered up........................................................................................................................12
Area code default setting............................................................................................................................................12
Setting sound properties............................................................................................................................................12
Turning the GC 75 off ................................ .............................................................................13
Using fax programs with GC 75................................ ...................................................................14
Using TAPI compatible fax programs ......................................................................................14
Default settings for Ericsson Phone Modem Manager........................................................................................14
Creating a fax profile for Microsoft Exchange®.......................................................................................................14
Composing a new fax message..............................................................................................................................15
Sending a fax message .............................................................................................................................................17
Receiving a fax message...........................................................................................................................................18
Using non-TAPI compatible fax programs................................ ...............................................18
Introduction ...................................................................................................................................................................18
Using the Ericsson Phone Modem Manager to keep the GC 75 powered up.................................................18
Powering up the GC 75 modem and entering PIN code using AT commands ..............................................19
Installing and uninstalling the GC 75 as a modem..............................................................................................19
Using the Internet and BBSs with GC 75 .....................................................................................20
Dial-up Networking................................ .................................................................................20
Installing Dial-up Networking if required.................................................................................................................20
Making a new connection...........................................................................................................................................20
Using an existing Dial-up Networking connection................................................................................................21
System requirements before installing a web browser .............................................................21
About protocols in general.........................................................................................................................................21
Recommended TCP/IP and DNS settings .............................................................................................................21
Installing and using a web browser ................................ .........................................................21
Installing Microsoft Internet Explorer®......................................................................................................................22
Using the Internet Setup Wizard............................................................................................................................... 22
Using electronic mail ..............................................................................................................23
Visiting Web sites................................ ...................................................................................23
Using a BBS with HyperTerminal................................ ............................................................24
Making a new connection...........................................................................................................................................24
Uninstalling the Ericsson Phone Modem Manager................................ ......................................25
GC 75 Preliminary User’s Guide. Ericsson Mobile Communications, October 1997
3
Page 4

Glossary................................ ......................................................................................................26
GC 75 Preliminary User’s Guide. Ericsson Mobile Communications, October 1997
4
Page 5

Introduction
Thank you for choosing the GC 75 product from Ericsson. The GC 75 is a combined mobile
phone and modem that operates on GSM mobile telephone networks. The GC 75 is a PC card,
which connects easily to your computer.
Together with the enclosed Windows 95®-based phone program, your computer and the data
card will work as a mobile phone for voice and Short Message Service (SMS) communication.
One of the main advantages of using the GC 75 is, for example, being able to use several
applications, for example Microsoft Exchange®, voice, data and fax.
For data and fax communication, you can use the GC 75 in the same way as any modem in
Windows 95®-based telephony programs, for example the accessories Fax, Dial -up
Networking and HyperTerminal.
Note. Telecom services may vary depending on the network operator. Contact your network
operator for further information about service availability.
Contents of the User’s Guide
This User’s Guide describes how to use the data card for voice calls, SMS, fax, Internet via
Dial-up Networking, etc.
Please read the Safety Information and Useful Hints carefully in the Getting Started manual. In
addition, some of the terminology used is explained in the G lossary chapter at the end of this
document.
Please also refer to the ReadMe file, which contains last-minute news and frequently asked
questions.
GC 75 Preliminary User’s Guide. Ericsson Mobile Communications, October 1997
5
Page 6
Using the Ericsson Phone Modem
Manager
1. Insert the SIM card into the GC 75. Insert the GC 75 into the PC card slot (with antenna,
antenna unit and headset attached).
2. The PC card status icon is shown on the Windows 95® taskbar (systray), as below:
3. Start the so ftware from the Windows 95® Start menu, select Programs and Ericsson
Phone Modem Manager .
During start of the program, the status icon is shown on the Windows 95® taskbar
(systray).
4. When the Ericsson Phone Modem Manager program is active, the status icon is shown
on the Windows 95® taskbar (systray).
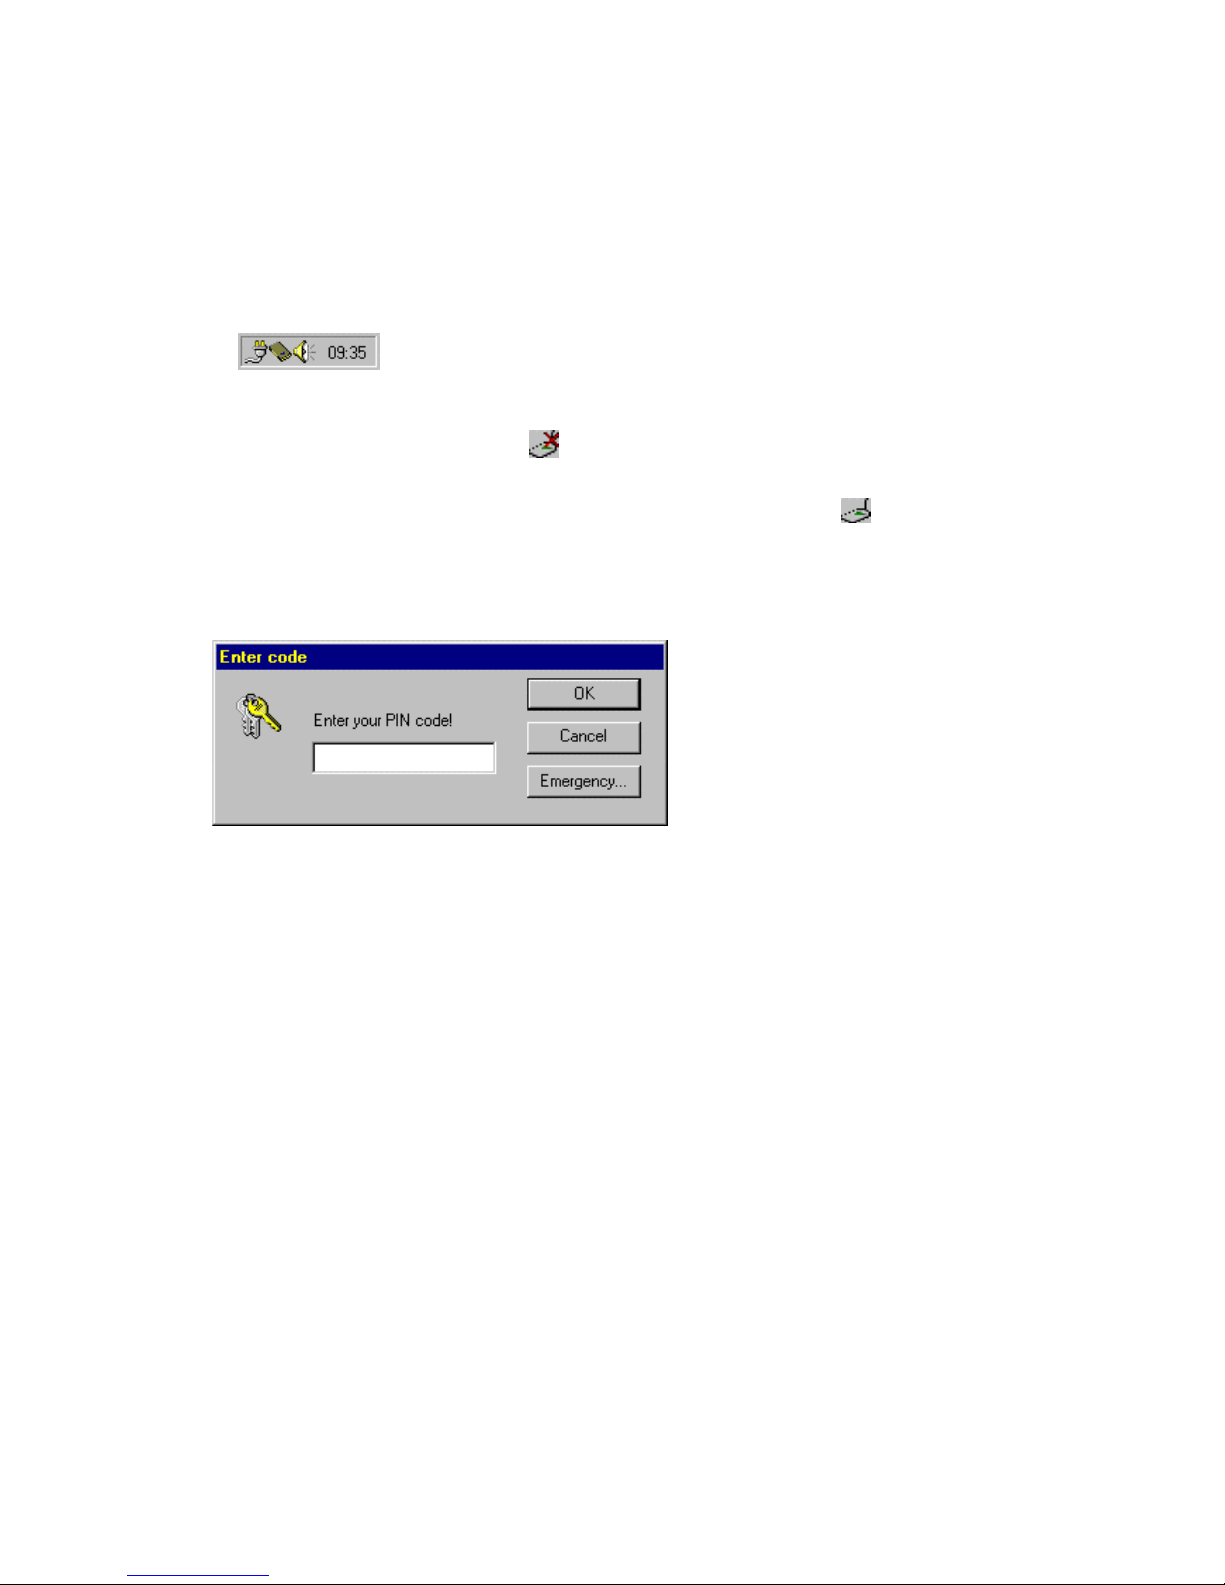
Entering the security code
When you start the phone program, if you have a PIN code, you will be prompted to enter your
PIN code (initially received from your network operator, 4-8 digits). The PIN code unlocks the
SIM card. The GC 75 will switch on after you have entered the PIN code.
Then enter your phone lock code if any.
You are allowed to make three attempts to unlock the SIM card. If you fail on all three, the SIM
card will be blocked, and you must use a PUK code to unblock it (you should have received the
PUK code from your network operator).
If no SIM card is inserted into the data card unit, you will also receive a warning message. If so,
do the following: Click on the PC card status icon in the Windows 95® taskbar (systray). Turn
the data card off as described at the end of this chapter. When the data card is removed from
the PC card slot, insert the SIM card into the data card.
How to make emergency calls
You are allowed to make emergency calls, by dialing 112, without entering the PIN code. To be
able to do this, it is not necessary that the SIM card is inserted into the data card.
1. Click on the Emergency button.
2. You are then asked: “Would you like to call emergency?”. If yes, confirm by clicking on the
Dial button.
Using several SIM cards
GC 75 Preliminary User’s Guide. Ericsson Mobile Communications, October 1997
6
Page 7

You can use several SIM cards together with your GC 75.
area code is set
Click on the Log tab and you will
strength is shown with four
phone calls.
Click with the right mouse button, all
Online Help
When you start the program, you will have access to the Online Help. There you will find the
information you need to use the GC 75 .
icons on the menu bar can be
selected from a list.
find all voice connections you
have made.
The
in the Windows 95®
Dialing properties.
The Main window
The Ericsson Phone Modem Manager is ready
for use when synchronisation “Done”.
You can make phon e
calls and send SMS
via the Personal
Address Book or by
typing the telephone
number directly into
the field. Click Dial.
The ten most recently
dialled numbers are
saved in this drop
down list from which
you can redial the
numbers.
For SMS, click on the
SMS tab.
The DTMF box should
always be checked
when you carry out
DTMF signalling.
In this case full signal
bars in black. Your data
card is prepared for
successful phone calls.
Two bars signal strength
may result in difficulties
making and receiving
The Address Book
Add persons to the Address Book to organise your phone numbers, from which you can make
different kinds of phone calls. All you need to do is to select a person or group on the list and dial.
How this is done is described in the section “Receiving and making phone calls”.
How synchronisation works
Synchronisation of the Address Book occurs when you start the Ericsson Phone Manager. This
will add information from the SIM card to the Address Book and vice-versa. This will also happen
with certain other applications (with address books), for example Microsoft Exchange®.
GC 75 Preliminary User’s Guide. Ericsson Mobile Communications, October 1997
7
Page 8
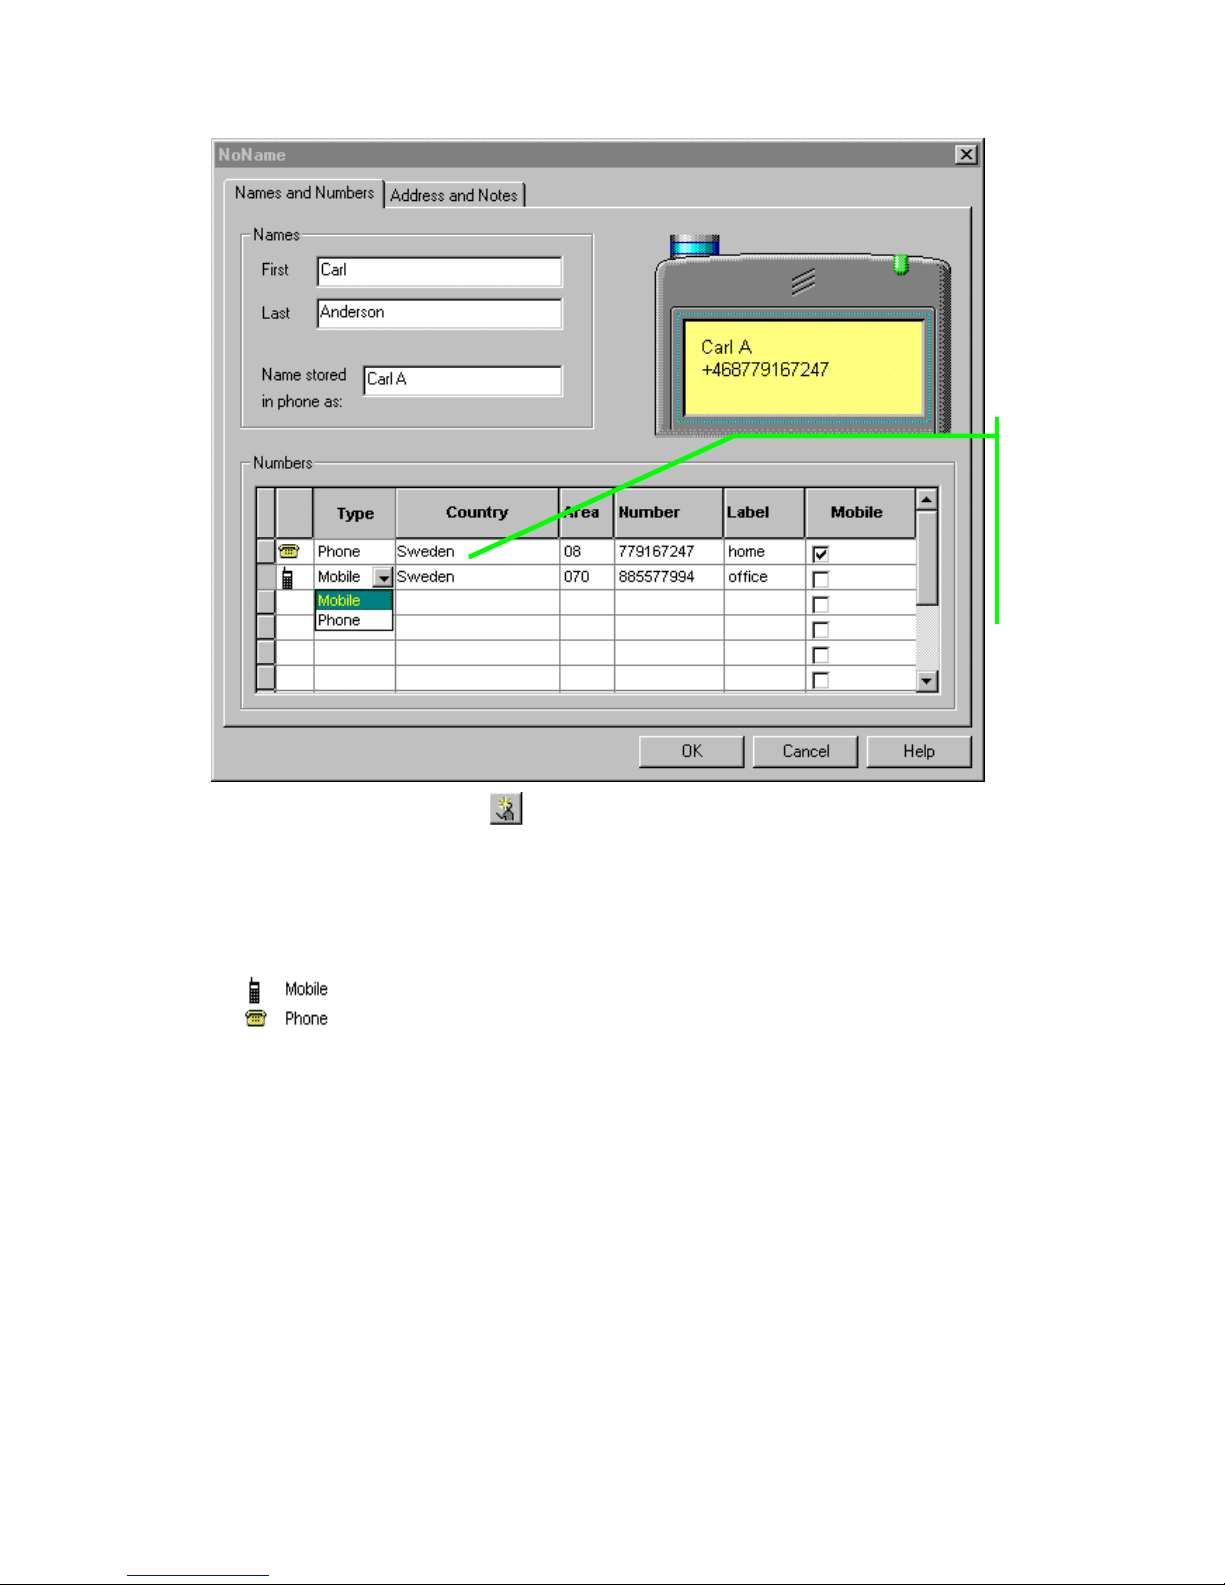
Adding a new person
second phone
on the second
Click here to
enter the field!
For entering a
number for a
person, click
row etc.
1. To add a new person, click in the main window.
2. In the window New person, type the first and last names of the person in the respective
fields for names. The Name stored in the phone as displays the short name of a person,
Label and phone number stored in the mobile phone.
3. Click on the Type field, select whether the number’s message type is a fax, mobile phone,
phone, SMS or DTMF in the drop down list. Some of the existing message type symbols are:
? shows up in the Address Book when the message type has not been defined.
4. Click on the Country field, select the country which the phone number belongs to in the drop
down list (or just type the country code, for example +46 for Sweden). It is also possible to
select a country code without ‘+’.
5. Click on the Area field, type the area code of the GSM network or the country area code.
6. Click on the Number field, type the phone number.
7. In the Label field, enter, for example, whether the phone number is to home, office, etc.
8. Check the Mobile box if you want to save the phone number in the SIM card’s memory. Note
that this memory space is limited.
9. Click OK when finished. You can later add several phone numbers under one person on the
lines below.
Creating a group of several persons
GC 75 Preliminary User’s Guide. Ericsson Mobile Communications, October 1997
8
Page 9

1. To create a new group, click in the main window.
2. In the window New Group, type a name for the group.
3. Add existing persons in the Address Book to the group from the list on the left.
4. The group members will be added to the group’s list on the right.
5. Click OK when finished.
You can later add several persons to the group. These persons should be added one by one
according to the instruction “Adding a new person”.
Modifying the Address Book for persons or groups
Select the person or group on the list you want to modify, for example, by adding a new phone
number.
1. Click (properties).
2. Click on the fresh Type field (the line below the existing phone number). Follow the procedure
in points 3 to 8 according to the instruction “Adding a new person”.
Deleting persons or groups
Select the person or group you want to delete from the Address Book list. Or just select the
phone number from th e Address Book.
1. Click (delete).
2. Confirm with OK.
Finding persons
1. Click (find).
2. In the Look For field, type, for example, the name of a person. Or type, for example,
“Sweden”, and select Country Names. Click on the Find Now button.
3. Click Close when finished.
Receiving and making phone calls
Use the Ericsson Phone Modem Manager for voice communication.
GC 75 Preliminary User’s Guide. Ericsson Mobile Communications, October 1997
9
Page 10

10
Receiving a phone call
When the Incoming call window shows up, put on your headset and click on the Answer button
or, reject the call by clicking on the Reject button. The callers phone number is normally shown
in the incoming call window. If the calling party number presentation is not active on the GSM
network, the phone number is shown as “unknown”.
Making a phone call
1. Put your headset on. With the Ericsson Phone Modem Manager main window open, there
are three ways to make a call to a stationary or mobile telephone:
A. Click on the Phone tab on the right, type the area code and telephone number directly into
the telephone number field as shown below.
B. If you have dialled a phone number before: Select the Phone tab on the right and click on
the drop down list button. Then select the phone number and click Dial.
C. Select a person or group phone number in the Personal Address Book on the left. The
phone number will now be shown in the number field on the right.
D. Double-clicking on a phone number in the Address Book will initiate dialing. In a window
you will be requested to confirm or cancel dialing.
2. Click Dial.
This is how it looks
when the call is
success fully connected.
GC 75 Preliminary User’s Guide. Ericsson Mobile Communications, October 1997
Page 11

11
Receiving and sending SMS messages
Make sure that the Service Centre address for your SIM card (often the name of the network
operator) is correct in the communications software.
1. In Ericsson Phone Modem Manager, click on Settings in the menu bar, then select SMS.
2. Select the correct Service Centre or Add to list and type the correct name of the Service
Centre.
Receiving SMS message
1. Click on the incoming SMS status icon in the taskbar (systray).
2. In the Ericsson Phone Modem Manager SMS tab, double-click the new SMS message in the
inbox list. New SMS messages are shown in bold text.
Composing and sending an SMS message
1. With the Ericsson Phone Modem Manager main window open, you have three ways
composing an SMS:
A. Click on the SMS tab on the right, click on the Compose button. Type the telephone
number directly into the telephone number field.
B. Go to the SMS menu and select Compose. Type the telephone number directly into the
telephone number field.
C. Click with the right mouse button on a person’s GSM mobile phone number in the
Personal Address Book on the left.
2. Type your message.
3. Check the Send message now box, or if you do not wish to send the SMS message now,
check the Store the message for later use box. Select Stored in PC or Stored on SIM
card. Click OK.
You can later retrieve these SMS messages by clicking on the SMS tab and selecting Stored in
PC or Stored on SIM card. You are also able to reply to SMS message.
Storing SMS message
Received messages are put in the inbox and the sent messages in the sent box. When these
boxes are full, you will be prompted to store the new message on the SIM card or in the PC. To
store a received message:
1. Click the SMS tab.
2. In the box at the top of the tab, click Inbox.
3. On the message list, click the message you want to store.
4. Point at the message and click the right mouse button.
5. On the menu that opens, click Copy to PC if you want to store the message in your
computer, or Copy to SIM card if you want it stored on your SIM card.
GC 75 Preliminary User’s Guide. Ericsson Mobile Communications, October 1997
Page 12

12
Recommended settings
How to keep the GC 75 powered up
Ericsson recommend that you always keep the GC 75 powered up, even when the Ericsson
Phone Modem Manager is closed. This makes connecting quicker and makes it easier to use
other applications with GC 75 after first starting and closing the Ericsson Phone Modem
Manager. To do this, follow the instructions below:
1. Start the Ericsson Phone Modem Manager. Enter your PIN code if any.
2. Go to the Settings menu in the Ericsson Phone Modem Manager. Select Phone and click
on the Connection tab. The Keep GSM Data Card powered on box should be checked.
Please keep this as the default setting.
3. Close the Ericsson Phone Modem Manager.
Area code default setting
The GC 75 installation program sets Ericsson GC 75 to the default calling card. This is because
GSM networks always uses area codes while Windows 95® ignores them if you are in the same
code area as the one you are dialing. This can be modified later as described below:
1. In the Ericsson Phone Modem Manager, click on Settings in the menu bar.
2. Select Dialing properties. Make your changes and click OK when ready.
Setting sound properties
You are able to apply the sound set
provided with the Ericsson Phone
Modem Manager installation for
receiving an SMS or phone call.
Carry out these settings as
described below:
1. Double-click on the Sounds
icon in the Control Panel.
2. Select the Windows default
scheme from the list. Select, for
example, “Incoming Voice Call”.
3. Click on the Browse button.
Select the Sounds folder in the
Program files, Ericsson and
Phone Modem Manager.
Select sound, for example
“ivc.wav”. The other sounds will
be applied automatically.
4. Click on the Save as button.
Name the sound scheme, for
example, “GC 75”.
GC 75 Preliminary User’s Guide. Ericsson Mobile Communications, October 1997
5. Click on the Apply button and
OK.
Page 13

13
Turning the GC 75 off
1. Before removing the GC 75 from the PC card slot, first exit the Ericsson Phone Modem
Manager.
The status icon disappears (after a while).
2. First point to, then click on the PC card status icon in the Windows 95® taskbar
(systray).
3. Select (with your left mouse button).
4. Click OK.
5. Remove the GC 75 from the PC card slot. If more than one program uses the GC 75 card,
the last one to close will turn it off.
GC 75 Preliminary User’s Guide. Ericsson Mobile Communications, October 1997
Page 14

14
Using fax programs with GC 75
With the GC 75 you are able to use several fax programs. Select the GC 75 as your modem as
described in this chapter. This Ericsson guide provides information on using Microsoft
Exchange®, which is a part of Windows 95®. Microsoft Exchange® is TAPI compatible.
You are able to fax from GC 75 to any recipient who can receive faxes (with fax subscription).
Using TAPI compatible fax programs
The GC 75 must be inserted into the computer’s PC card slot.
The GC 75 installation program creates a default profile for Ericsson Phone Modem Manager.
Two profiles are necessary for successful synchronisation between the Address Books in
Microsoft Exchange® and the Ericsson Phone Modem Manager.
Default settings for Ericsson Phone Modem Manager
Double-click on the Mail and Fax
icon in the Control Panel. Click on the
Show profiles button. Select
Ericsson Phone Modem Manager.
Click on the Properties button. The
following three information services
are required:
∗ Ericsson Mobile Phone Service
∗ Personal Address Book
∗ Personal Folders
Creating a fax profile for Microsoft Exchange®
On some computers a conflict may occur when using Microsoft Fax and Ericsson Mobile
Phone Service as information services in the same profile.
This conflict may result in an error message "Line is busy" when starting the Ericsson Phone
Modem Manager and in problems adding new persons to the Address Book.
To avoid this conflict and to make the fax work properly with the GC 75 , carry out the following
settings: Remove Microsoft Fax from the Ericsson Phone Modem Manager profile if it is
present.
Create a new profile. The following three information services are required:
∗ Microsoft Fax
GC 75 Preliminary User’s Guide. Ericsson Mobile Communications, October 1997
Page 15

15
Personal Address Book
∗
∗ Personal Folders
Create a new profile as below:
1. Double-click the Mail and Fax icon in the Control Panel.
2. Click the Show Profiles button.
3. Click the Add button.
4. In the Inbox Setup Wizard window, keep the Microsoft Fax box checked only for your new
profile. Ensure the Ericsson Mobile Phone Service box is unchecked. Click Next.
5. Type the name of your new profile (in this example it is named “New Profile”). Click Next.
6. Select Ericsson GC 75 as the modem for your new profile. Click Next.
7. You are able to use the Ericsson GC 75 Personal Address Book. Accept the suggested path
for both the profile and the Personal Folder (PST-file) by clicking Next twice. End by clicking
Finish.
8. From the Show Profiles button, select your new profile when starting Microsoft Exchange.
9. Now, when you select the new profile and click on the Properties button, these three
information services should be included in your new profile:
Composing a new fax message
1. Start Microsoft Exchange® with GC 75 inserted into the computer’s PC card slot. , the fax
icon is displayed in the Windows 95® taskbar (systray).
GC 75 Preliminary User’s Guide. Ericsson Mobile Communications, October 1997
Page 16

16
2. In Microsoft Exchange®, click on the Compose menu. Select New Fax.
are three ways to
3. With the first window Compose New Fax open, click Next.
4. With the second window Compose New Fax open, there are three ways to create
destinations while composing a fax message, all of which are now available:
A. Selecting an existing fax recipient from the Address Book.
B. Adding a fax recipient in the Address Book.
C. Entering a fax recipient while composing a new fax (without saving it in the Address Book).
Note that there
create
destinations of
your fax
message while
composing it.
Selecting and adding a fax recipient to the Address Book
Do this if you wish to save the fax recipient in the Address Book. You can add a new fax recipient
to the list while composing a new fax.
1. With the window Compose New Fax open (shown above), click on the Address Book
button. In the Address Book window:
A. If it is an existing fax reci pient in the Address Book, select them from the list and click the
To button. Click OK. The recipient is listed in the recipient list. Click Next when ready.
B. If it is a new fax recipient, click the New button. Select Fax, click OK. Enter a name and
fax number. Click OK. Back in the Address Book window, select the new fax recipient
from the list and click the To button. Click OK. The recipient is listed in the recipient list.
Click Next when ready.
2. Select a cover page if you want any. Click Next.
3. Type the subject and content of your fax message. If you wish, you can start the content on
the cover page, in which case the box should be checked. If not, uncheck it. Click Next.
(If you want to remove one or several recipients from the list before sending your fax message,
select each recipient from the list and click on the Remove button.)
Entering a fax recipient while composing a new fax
Do this if you do not wish to save the fax recipient in the Address Book. You can add the
“temporary” fax recipient to the list while composing a new fax simultaneously when selecting
fax recipient from the Address Book.
GC 75 Preliminary User’s Guide. Ericsson Mobile Communications, October 1997
Page 17

17
1. With the window Compose New Fax open (shown above), Type the name and fax number
of the recipient into the entry fields To: and Fax #:.
2. Click on the Add to List button. The recipient is listed on the recipient list. Click Next when
ready.
3. Type the subject and content of your fax message. If you wish, you can start the content on
the cover page, in which case the box should be checked. If not, uncheck it. Click Next.
(If you want to remove one or several recipients from the list before sending your fax message,
select each recipient from the list and click on the Remove button.)
Attaching files to fax message
1. If you want to attach files to your fax message, click on the Add File button.
2. Browse ... Click OK.
3. Click Next when ready.
(If you want to remove one or several files from the list before sending your fax message, select
each file from the list and click on the Remove button).
Sending a fax message
Once you have prepared your fax message successfully, you receive a message that your
message is ready to send. Send the fax by clicking Finish. Sending a fax message may take a
while.
When fax is activated, the fax icon is shown in the Windows 95® taskbar (systray).
While sending the fax, the Microsoft Fax Status window is displayed by clicking , which is
the fax status icon in the Windows 95® taskbar (systray). Click OK. Click on Hang up if the
connection is busy.
GC 75 Preliminary User’s Guide. Ericsson Mobile Communications, October 1997
Page 18

18
Once the fax is sent and ready for use again, the Microsoft Fax Status is shown as Idle.
Receiving a fax message
In order to receive a fax message, Microsoft Exchange® must be active.
Answering automatically
If you wish you can click on the Options menu and select, for example, Answer automatically
after two signals. This is the recommended setting, since you do not need to wait by your
computer to answer an incoming fax message.
Double-click on the new fax message in the Microsoft Exchange® inbox list. New fax messages
are shown in bold text.
Answering manually
Click on , the fax status icon in the Windows 95® taskbar (systray). Click on the Answer
button.
Double-click the new fax message in the Microsoft Exchange® inbox list. New fax messages are
shown with bold text.
Using non-TAPI compatible fax programs
Introduction
A number of programs exist on the market today that do not support TAPI, which is a standard
introduced by Windows 95®.
To take advantage of all old programs it is generally possible to use the COM port directly when
the Ericsson Phone Modem Manager (or other TAPI applications within the GC 75 TSP) is
closed. However, certain steps must be carried out to make sure that power to the telephone is
turned on, and that the PIN code is entered if any.
The procedure below uses the Ericsson Phone Modem Manager to achieve this goal:
Using the Ericsson Phone Modem Manager to keep the GC 75
powered up
1. Start the Ericsson Phone Modem Manager. Enter your PIN code if any.
2. Go to the Settings menu in the Ericsson Phone Modem Manager. Select Phone and click
on the Connection tab. The Keep GSM Radio Card powered on box should be checked.
Please keep this as the default setting.
3. Close the Ericsson Phone Modem Manager. You can now use any program that
communicates directly with the COM port.
Make sure that , the status icon is active in the Windows 95® taskbar (systray).
GC 75 Preliminary User’s Guide. Ericsson Mobile Communications, October 1997
Page 19

19
Powering up the GC 75 modem and entering PIN code using AT
commands
If Ericsson Phone Modem Manager can not be used as described above it is possible to power
up the telephone and enter the PIN code using AT commands.
1. This can be done either using Windows 95® HyperTerminal or any other terminal program
that communicates directly with the COM port.
∗ AT+CFUN=1 Turns the power to the telephone ON.
∗ AT+CFUN=0 Turns the power to the telephone OFF.
∗ AT+CPIN=”XXXX” Enters the PIN code.
For more information regarding how this is done, please refer to the GC 75 Reference
Manual on the CD. A normal response to the “+CFUN” command is OK, or if anything goes
wrong ERROR, however the “+CPIN” command is more complex and you may need to
request status from the GC 75 modem to determine PIN status. This is done using the
“AT+CPIN?” command.
In addition, most operators allow disabling of the PIN code which may simplify the usage of
the GC 75 modem in this environment.
2. Modify the init string of the fax or data program you are using.
Installing and uninstalling the GC 75 as a modem
Please refer to the ReadMe file.
GC 75 Preliminary User’s Guide. Ericsson Mobile Communications, October 1997
Page 20

20
Using the Internet and BBSs with
GC 75
Dial-up Networking
You can use GC 75 to access the Internet via the Windows 95® accessory Dial-up Networking
together with various web browsers. Dial-up Networking is TAPI compatible and is often used
for connections to the Internet. The GC 75 should be selected as your modem.
Installing Dial-up Networking if required
1. Start Dial-up Networking in the Accessories folder. In the window Welcome to Dial-up
Networking, click Next.
2. Type any name. Select Ericsson GC 75 as your modem. Click on the Configure button and
the Options tab. Some dial-up applications need one or several options checked, for
example one of the connection control boxes. Check with your application designer.
3. Also install Dial-up Adapter if required. You will be requested automatically to do this. Click
OK.
Making a new connection
By making a new connection, you can create and save a connection to your Internet service
provider (which could be your network operator’s server).
1. Start Dial-up Networking in the Accessories folder. Click on the Make New Connection
icon. In this window, you can either choose to keep My connection or enter the name of your
network operator. Select Ericsson GC 75 as your modem. Click Next.
GC 75 Preliminary User’s Guide. Ericsson Mobile Communications, October 1997
Page 21

21
2. Type the area code, the telephone number and the country for the server you want to call (i.e.
the complete telephone number of your network operator’s server). Also enter user name
and password if required. Click Next when ready.
3. If the settings for your new connection were successful, then click Finish. Your new
connection is saved.
To make changes later, click on the My Connection icon (or whatever you named it), go to the
File menu and Properties, where you can modify phone number, connection speed etc.
Using an existing Dial-up Networking connection
1. Double-click Dial-up Networking in the Accessories folder (or the icon of My Computer).
2. Double-click on the connection you want to use, for example My Connection. Select
Ericsson GC 75 as your modem. Type your connection user name and password if
required. Click on the Connect button.
3. The window Connecting to My Connection shows up. You will receive the message
“Logging on to network” if your connection was successful. (If the phone number you are
trying to call is not correct, your call will be automatically disconnected. The same applies for
an incorrect user name and password if required. Try again.)
4. Now prepare your web browser for use. See chapter “System requirements before installing
a web browser”.
System requirements before installing a web browser
About protocols in general
There are many protocols used on the Internet. One of the most commonly used is TCP/IP.
For using the GC 75 with the Internet, check that TCP/IP is installed:
1. Double-click on the Network icon in the Control Panel.
2. Click on the Add button.
3. Choose Protocol, Microsoft and TCP/IP. Click OK.
4. If TCP/IP is not on the list, click on the Have disk button. Insert the Windows 95® installation
CD or diskettes and run the installation.
Recommended TCP/IP and DNS settings
1. Double-click on the Network icon in the Control Panel.
2. Select TCP/IP Adapter on the list. Click on the Properties button.
3. Select the DNS Configuration tab. If required, enter the IP address (for example 10.0.0.0)
and DNS address (for example 147.xxx.xx.2) in the DNS Server Search Order field. Click
on the Add button. Also enter server host, domain and gateway to which you are dialing. You
should have received this information from your Internet service provider (i.e. network
operator).
Installing and using a web browser
GC 75 Preliminary User’s Guide. Ericsson Mobile Communications, October 1997
Page 22

22
Microsoft Internet Explorer® is the web browser provided on the Windows 95® installation CD or
diskettes. Use the Internet Setup Wizard, which will guide you through how to set up Microsoft
Internet Explorer® the first time you open it. But of course, there are other web browsers on the
market which you can also use.
Note. The four items below must be available on your computer.
A. Ericsson GC 75 (as your modem)
B. Windows 95® Dial-up Networking
C. Windows 95® TCP/IP protocol
D. An account and user name with your Internet service provider
Installing Microsoft Internet Explorer®
Choose Run from the Start menu. Run the web browser installation according to the
instructions.
Using the Internet Setup Wizard
Most Internet service providers will supply the necessary information, for example IP and
Domain Name Server (DNS) addresses. For questions concerning the setup, please contact
your Internet service provider.
1. Double-click on the Internet icon on your Windows 95® desktop.
2. Click Next in the window “Welcome to Internet Setup”.
How to connect: Choose Connect using my phone line. Click Next.
3. How to connect: Choose I already have an account with a different service provider.
Click Next.
4. Choose modem: Select Ericsson GC 75. Click Next.
5. Service Provider Information: Select your Dial-up Networking connection with your Internet
provider, for example My connection as described earlier in this chapter. Click Next.
6. Verify area code, telephone number and country code. Click Next.
7. Verify user name and password. Click Next.
8. IP address: Choose My Internet service provider automatically assigns me one. Click
Next.
9. DNS Service Address: Enter your DNS server and alternate DNS server if required. Click
Next.
10.Internet mail: If you want to use electronic mail on the Internet (e -mail), the Use Internet Mail
box should be checked. Enter your e-mail address and the name of the e -mail server (which
you should also have received from your Internet service provider). Click Next.
11.Windows Messaging Profile: Create by clicking on the New button. Accept the default
Internet Mail Settings.
12.The configuration is complete, click Finish. From now on, double-click on the Internet icon
on your Windows 95® desktop to connect to Internet.
GC 75 Preliminary User’s Guide. Ericsson Mobile Communications, October 1997
Page 23

23
Using electronic mail
Before it is possible to send and receive electronic mail (e-mail), set up your web browser as
described in “Using the Internet Setup Wizard”. Set up the name of the e-mail server, your
userid and e -mail address to the e-mail server. Enter password if required.
Then dial to your Internet account by double-clicking on the Internet icon on your Windows 95®
desktop or by using your Dial-up Networking connection, as described in chapter “Using an
existing Dial-up Networking connection”.
Sending electronic mail
Follow the documentation for your web browser.
Receiving electronic mail
Follow the documentation for your web browser.
Visiting Web sites
Make sure that you have set up the TCP/IP Adapter as described in the chapter “System
requirements before installing a web browser”.
Then dial to your Internet account by double-clicking on the Internet icon on your Windows 95®
desktop or by using your Dial-up Networking connection, as described in chapter “Using an
existing Dial-up Networking connection”.
Follow your web browser instructions.
.
GC 75 Preliminary User’s Guide. Ericsson Mobile Communications, October 1997
Page 24

24
Using a BBS with HyperTerminal
Making a new connection
1. Start HyperTerminal (go to the
Windows 95® Start menu, Programs
and Accessories). Click on the
Hypertrm icon.
2. When the New connection window
shown here opens, type a name and
choose an icon for the connection.
Click OK.
3. In the Phone Number window, check
country, telephone number and where
you are calling from.
Change properties if required:
A . Change properties calling to, then
when ready.
click on the Modify button. It is very
important that the Ericsson GC 75
is used for connection. Click OK
B. Change properties calling from, then click on the Dialing properties button. Click OK
when ready.
4. Click on the Dial button.
5. Enter your PIN code if any.
6. In the Connect window, you will receive a message if your connection was successful. If you
want to interrupt the connection, go to the Call menu in HyperTerminal and choose
Disconnect. If the telephone number you are trying to call is not correct, your call will be
automatically disconnected.
GC 75 Preliminary User’s Guide. Ericsson Mobile Communications, October 1997
Page 25

25
Uninstalling the Ericsson Phone Modem
Manager
1. Double-click “Add and Remove Programs" in the Windows 95® Control Panel to remove the
software installation.
2. Select the Ericsson Phone Modem Manager item on the list and click on the Add/Remove
button. Then confirm with Yes.
If you want to be sure that the uninstall process is carried out completely (delete all files and their
consistuent GC 75 strings), follow the instructions in the ReadMe file.
GC 75 Preliminary User’s Guide. Ericsson Mobile Communications, October 1997
Page 26

26
Glossary
The following list describes some terminology used in this manual.
Asynchronous data
transmission
AT AT commands. A standardised command set for modems. The “AT”
BBS Bulletin Board Service. An electronic bulletin board, which you can
DTMF Dual-Tone Multi -Frequency. Use your tone dialing telephone (with * and
Driver A program that controls a device such as a printer, a mouse or, as in
Fax class A standard for fax transmission.
PC card Computer card standardised by the two international associations
Phone lock A function that locks the data card. If the function is activated, you must
PIN Personal Identification Number. Your SIM card is protected by a 4 - to
A standard for data transmission. Each character is packaged with
both start and stop information. This standard is more common than
Synchronous Data Transmission (see below).
character string initiates almost all AT commands or command
strings.
connect to by using, for example, HyperTerminal in Windows 95®.
#) for typing information strings, which is later interpreted by the
receiver. For example communicating with your bank office.
this case, a GSM data card.
PCMCIA and JEIDA.
PCMCIA was the trade association that first defined and gave its name
to the international standard for PC cards.
unlock it by using a phone lock code, known as the security code.
8-digit PIN. If the SIM card lock is activated, you must enter the PIN
each time you turn on the data card.
PUK Personal Unblocking Key. Use this code to unblock a blocked SIM card.
Security code The code that you must use to unlock the da ta card. See also Phone
Lock.
SMS Short Message Service. A text messaging service included in your
voice subscription. You can send up to 160 characters.
SIM Card Subscriber Identity Module. A diminutive “Smart Card” that contains a
computer chip with personal data, such as your subscriber number
and the name of your operator’s network.
Synchronous data
transmission
TAPI Telephony Application Programming Interface. A standard for
TSP Telephony Service Provider (also called Telephony driver).
A standard for data transmission. The characters are transferred
together with a clock signal to synchronise the receiver. This standard
gives more rapid data through-put than Asynchronous Data
Transmission (see above).
telephony functions in Windows 95®. TAPI is the “owner” of the COM
port. When using more than one TAPI application, these programs can
share the same COM port.
GC 75 Preliminary User’s Guide. Ericsson Mobile Communications, October 1997
 Loading...