

Page 1

User’s Manual
EDACS
®
Duplex Portables
IPE-200
ericssonz
Page 2

NOTICE!
This manual covers Ericsson and General Electric
products manufactured and sold by Ericsson Inc.
NOTE!
Repairs to this equipment should be made only by an
authorized service technician or facility designated by the
supplier. Any repairs, alterations or substitution of recommended parts made by the user to this equipment not
approved by the manufacturer could void the user’s
authority to operate the equipment in addition to the
manufacturer’s warranty.
NOTE
The software contained in this device is copyrighted by Erics son Inc. Unpublished rights are
reserved under the copyright laws of the United
States.
This manual is published by
Improvements and changes to this manual necessitated by typographical errors, inaccuracies of current information, or improvements
to programs and/or equipment, may be made by
time and without not ice. Such changes will be incor porated into new
editions of this manual. No part of this manual may be reproduced or
transmitted in any form or by any means, electronic or mechanical,
including photocopying and recording, for any purpose, without the
Ericsson Inc.
, without any warranty.
Ericsson Inc.
, at any
express written permission of
Copyright © May 1996, Ericsson Inc.
2
Ericsson Inc
.
Page 3

TABLE OF CONTENTS
INTRODUCTION . . . . . . . . . . . . . . . . . . 5
BASIC OPERATIO N . . . . . . . . . . . . . . . . 7
TURNING THE RADIO ON . . . . . . . . . . . . 7
PLACING AN INTERCONNECT CALL . . . . . . 8
Nobody Answers or You Hear a Busy or
Fast Bu sy Tone . . . . . . . . . . . . . . . . 9
Last Number Re-Dial . . . . . . . . . . . . . 9
A Call is Unsuccessful or a Call in Progress
is Interrupted . . . . . . . . . . . . . . . . . 10
ANSWERING AN INTERCONNECT CALL . . . 10
Unanswered call Counter . . . . . . . . . . 10
PLACING AN INDIVIDUAL CALL . . . . . . . . . 11
PLACING A GROUP CALL . . . . . . . . . . . . 11
PLACING AN EMERGENCY CALL . . . . . . . 12
ANSWERING AN INDIVIDUAL CALL . . . . . . 12
VOLUME CONTROL . . . . . . . . . . . . . . . 13
MUTE KEY . . . . . . . . . . . . . . . . . . . . 14
AIR TIME METER . . . . . . . . . . . . . . . . . 14
TURNING THE UNIT OFF . . . . . . . . . . . . 15
DISPLAY, KEYPAD, AND AUDIBLE SIGNALS . . . 15
DISPLAY . . . . . . . . . . . . . . . . . . . . . 15
Alphanum eric Fi el d . . . . . . . . . . . . . 15
Numeric Field . . . . . . . . . . . . . . . . 15
Status Indicators . . . . . . . . . . . . . . . 16
BUTTON . . . . . . . . . . . . . . . . . . . . . 16
KEYPAD . . . . . . . . . . . . . . . . . . . . . . 17
MENU . . . . . . . . . . . . . . . . . . . . . . . . 18
Illumination . . . . . . . . . . . . . . . . . . 20
ALERT TONES . . . . . . . . . . . . . . . . . . . 21
AUDIBLE SIGNALS . . . . . . . . . . . . . . . . 23
Ringing Signal . . . . . . . . . . . . . . . . 23
Error Signal . . . . . . . . . . . . . . . . . 23
Malfun ct io n Ala rm Signa l . . . . . . . . . . 23
ELECTRONIC LOCK AND CALL RESTRICTIONS 24
SETUP LOCK CODE . . . . . . . . . . . . . . . 25
STORING NUMBERS . . . . . . . . . . . . . . . 26
STORING A NUMBER (AND NAME) . . . . . . . 26
MEMORY PROTECTION . . . . . . . . . . . . . 28
MEMORY FULL . . . . . . . . . . . . . . . . . . 29
RECALLING NUMBERS . . . . . . . . . . . . . . 30
3
Page 4

TABLE OF CONTENTS
Displaying Extended Digits . . . . . . . . . 30
Alph a Recall . . . . . . . . . . . . . . . . . 30
Recalling a Number by Entering the Memory
Location . . . . . . . . . . . . . . . . . . . 31
Appending Digits to a Recalled Number . . 32
Changing a Recalled Number . . . . . . . . 32
SPEED CALLING . . . . . . . . . . . . . . . . 32
ERASING A STORED NUMBER . . . . . . . . 33
RECALLING A NUMBER DURING A CALL . . . 33
DTMF SIGNALING . . . . . . . . . . . . . . . . . 34
DTMF SIGNALING USING THE KEYPAD . . . . 34
P a use Before Sending DTMF Signals . . . 35
SYSTEM SELECTION . . . . . . . . . . . . . . . 36
GROUP SELECTION . . . . . . . . . . . . . . . 36
GROUP SCAN . . . . . . . . . . . . . . . . . . . 37
ACCESSING USER MENU FUNCTIONS . . . . . 37
MENU FUNCTION DEFINITIONS . . . . . . . . 38
BATTERIES AND RECHARGING . . . . . . . . . 43
BATTERIES . . . . . . . . . . . . . . . . . . . 43
Battery Level Indicator . . . . . . . . . . . 43
Low Battery Alert . . . . . . . . . . . . . . 44
Care and Maintenance . . . . . . . . . . . 44
Rechargeable Battery Pack Disposal . . . . 45
Inserting and Removing a Battery . . . . . 46
RECHARGING . . . . . . . . . . . . . . . . . . 47
Using a Desk-Top Charger . . . . . . . . . 48
Restoring Battery Capacity . . . . . . . . . 49
APPENDIX 1 . . . . . . . . . . . . . . . . . . . . 50
FAULT TRACING . . . . . . . . . . . . . . . . . 50
No Power to the Radio . . . . . . . . . . . 50
SERV Indicator Does Not Come On . . . . 50
Receive d Signal is Weak . . . . . . . . . . 50
A Call Cannot be Placed . . . . . . . . . . 51
"LOCKED" Is Displayed . . . . . . . . . . . 51
WARRANTY . . . . . . . . . . . . . . . . . . . . 53
4
Page 5

INTRODUCTION
This manual describes how to use the IPE-200 Portable Radios. The IPE (Infinity) is a synthesized, microprocessor-based, duplex portable FM radio providing
reliable two-way communications in Enhanced Digital
Access Communications System (EDACS) trunking environments.
Duplex is provided in EDACS systems while operating in the Telephone Interconnect Mode. At other times ,
the radio provides simplex communications, i.e. when
placing group calls in the EDACS environment. In an
EDA CS trunked environment the user selects a communications system. In this mode, channel selection is
transparent to the user and is controlled via digital communication with the system controller. This provides advanced programmab le features and fast access to communication channels.
The exact operation of the r adio depends on the radio
mode, the operating mode, the radio’ s programming, and
the par ticular radio system. Most features described in
this manual may be enabled or disabled through programming. Consult the system administrator for the required features to be programmed into the radio.
5
Page 6
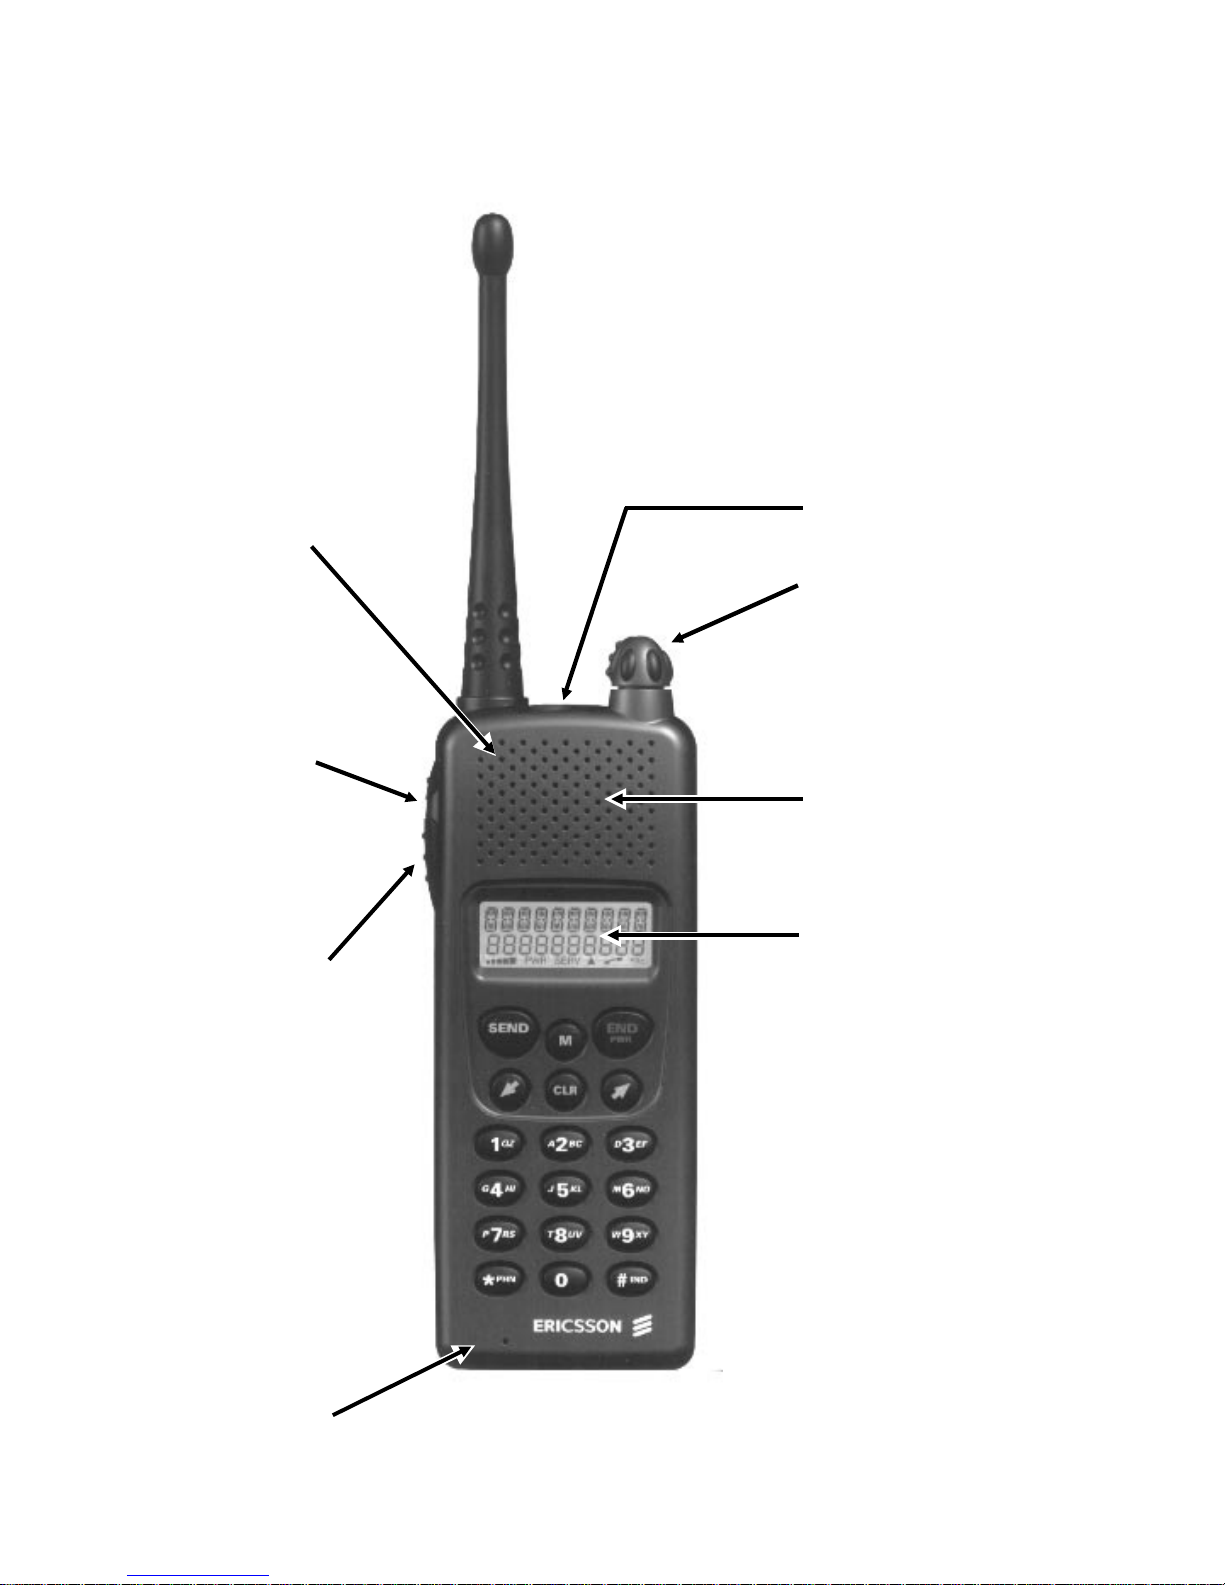
UPPER
MICROPHONE
MONITOR
BUTT O N
EMERGENCY
BUTT O N
VOLUME
SPEAKER
PUSH-TO -
TALK
(PTT)
LOWER
MICROPHONE
LCD
DISPLAY
6
Page 7
BASIC OPERATION
TURNING THE RADIO ON
E
Turn the radio on by holding down the
E
key until you hear a beep.
The display illumination comes on. All the status
indicators and all the segments in the alphanumeric and
numeric fields in the display will flash 3 times.
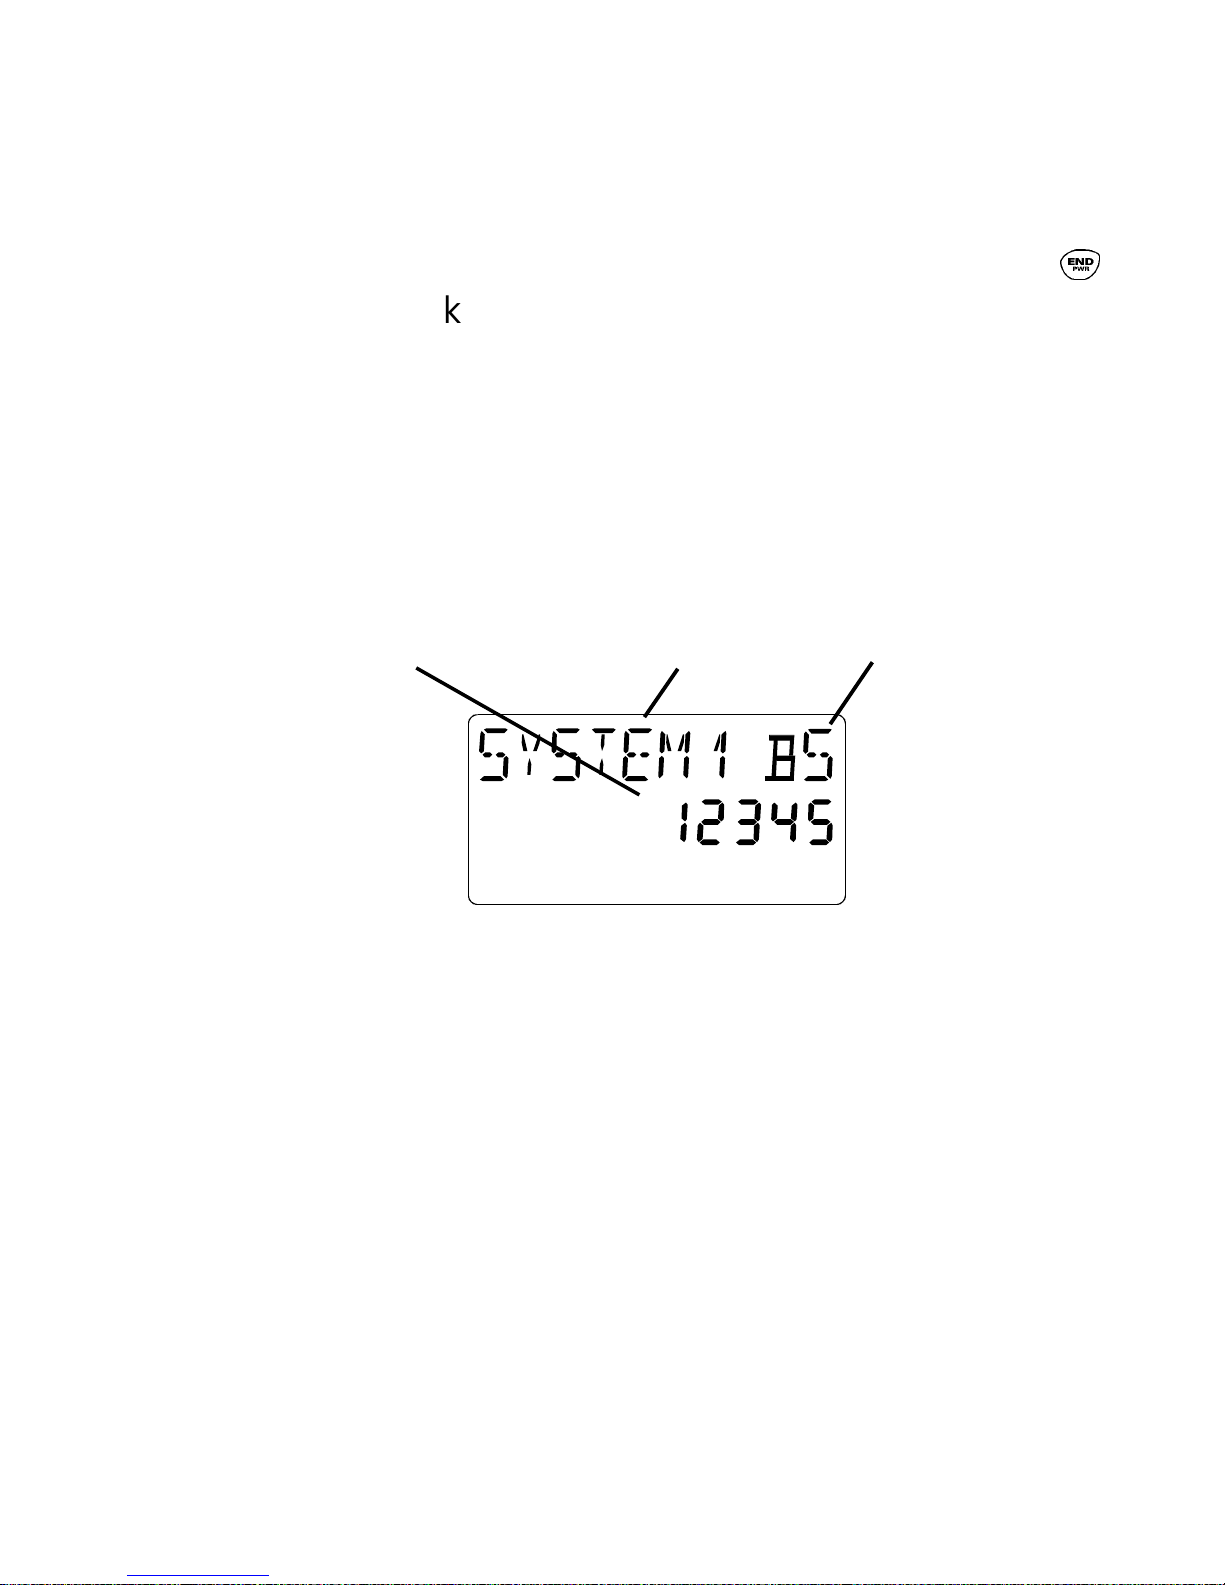
The radio’s LID number is displayed briefly.
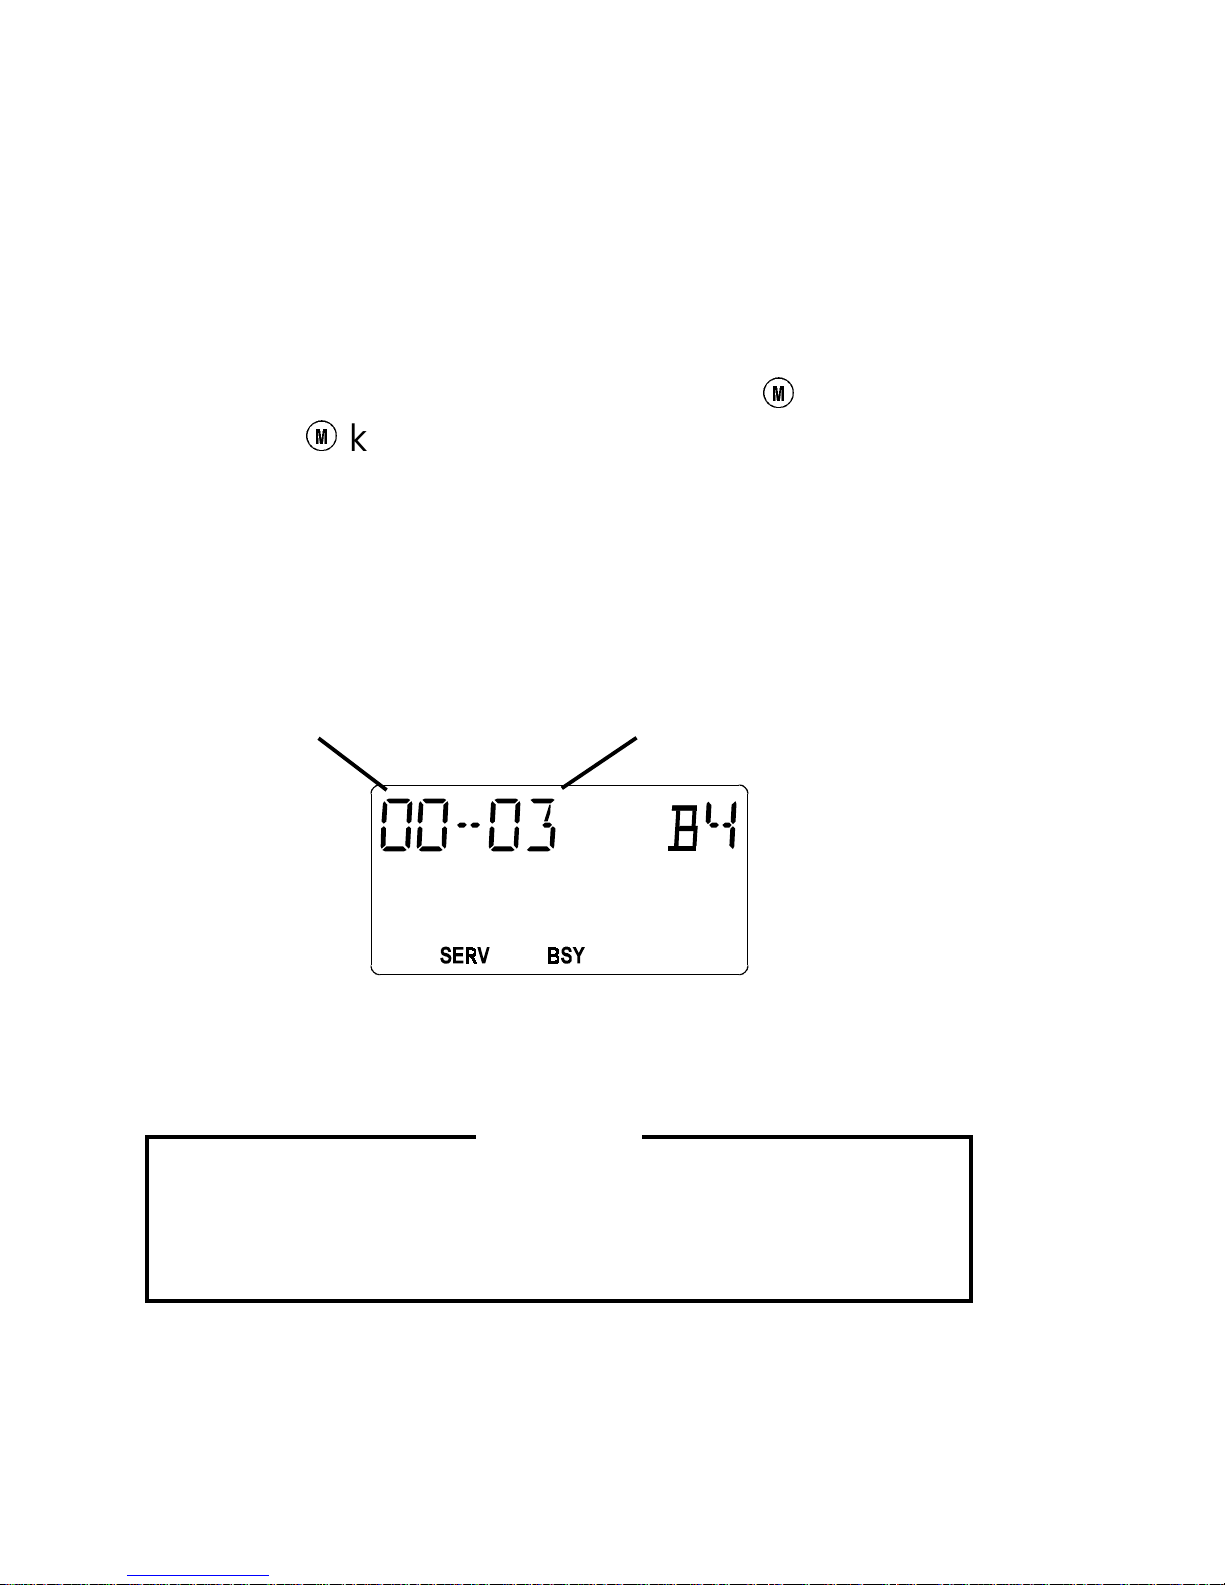
Own Logical ID
Battery Level IndicatorSystem Indicator
A bat tery le vel in dicat or is shown in the upper right
corner of the display. This can be a value from B0 to B5
in proportion to the battery’s voltage level. You can read
more about this in the chapter
.
ing
Batteries and Recharg-
Once service is available from an EDACS system, the
SER V (Serv ice) indicator comes on and the CC SCAN
goes off in the display.
Note the following points:
7
Page 8
• If the SER V indicator does not come on, you have
lost contact with the E DACS system and c annot,
therefore, place or receive any calls. Refer to
Appendix 1 for further inf ormation.
PLACING AN INTERCONNECT CALL
1. Enter the desired number on the numeric keys.
The digits are shown in the display.
If y ou enter a wrong digit or a wrong number:
Erase a wrong digit by pressing the C key momentarily. You may delete all wrong digits individually like this, or eliminate all entered digits by
holding the C key f or appro ximately 1 second. If
you are not in a call, pressing the
E
key will also
delete all entered digits.
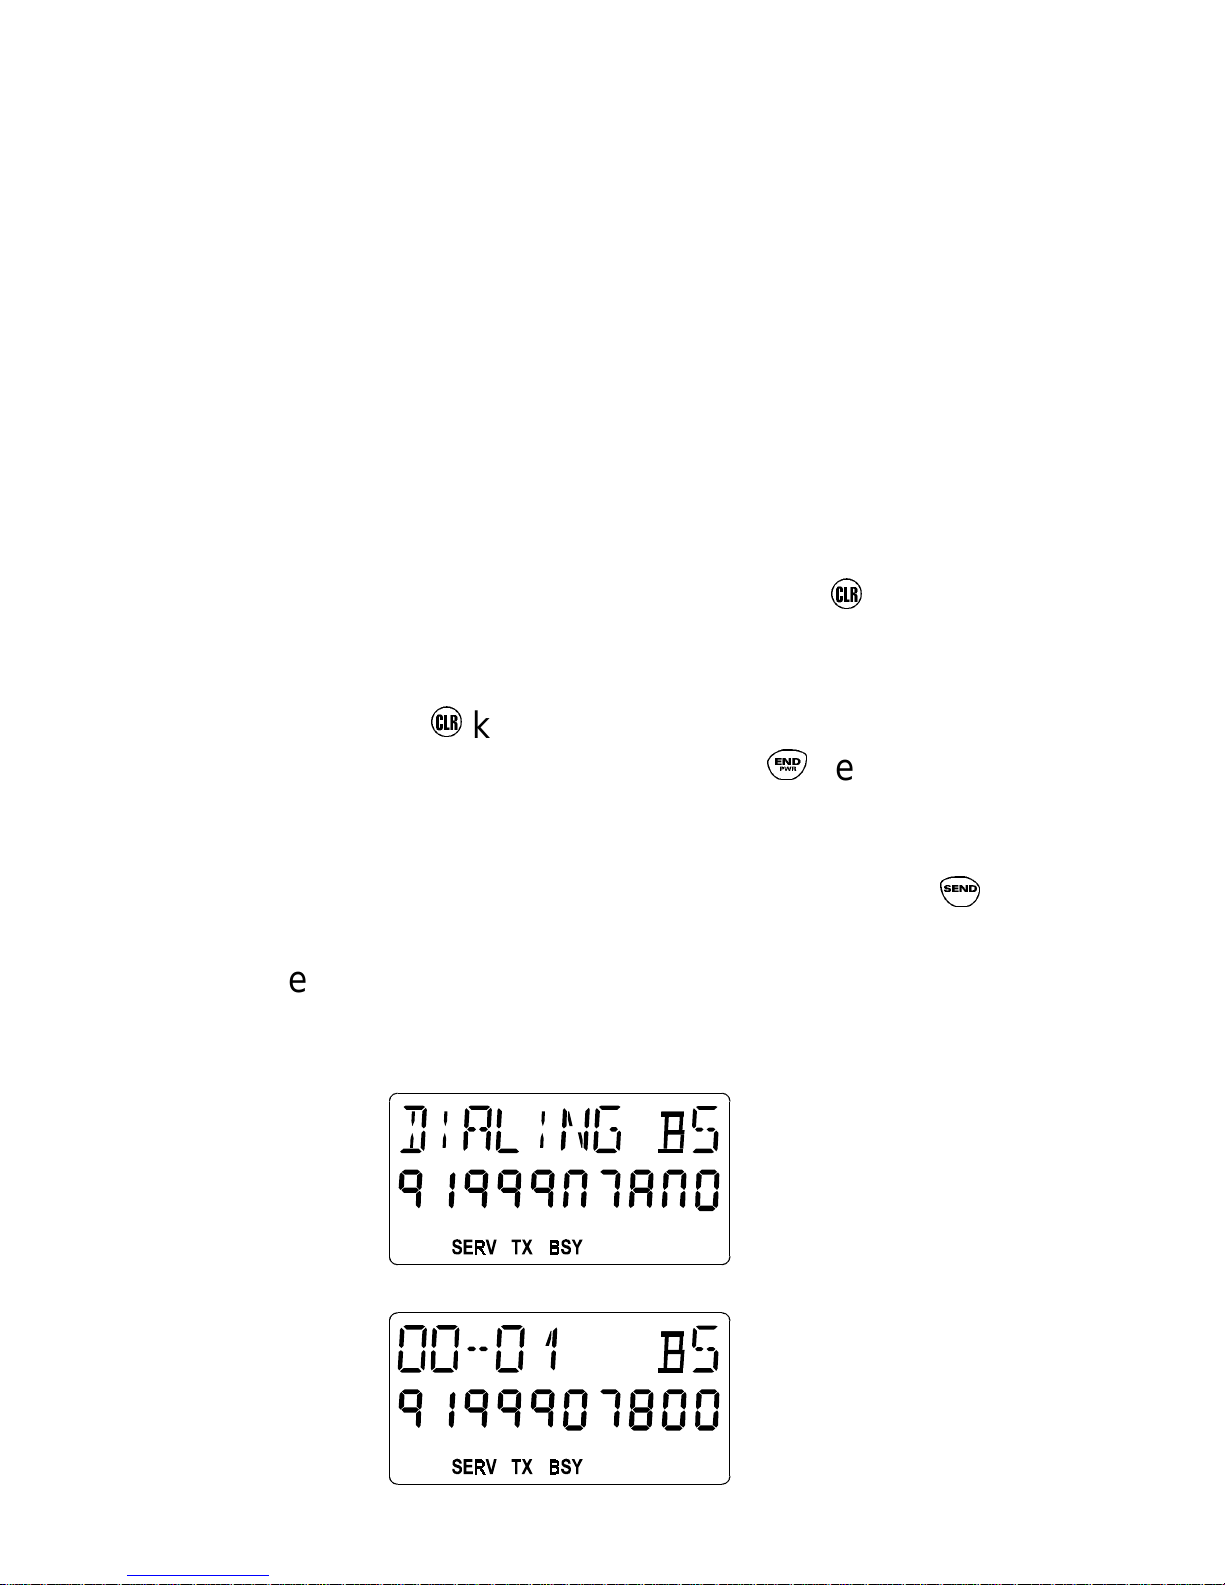
2. When you have entered the number, press
The text "
DIALING
" shows in the display and
the TX and BSY symbols come on.
S
.
8
Page 9
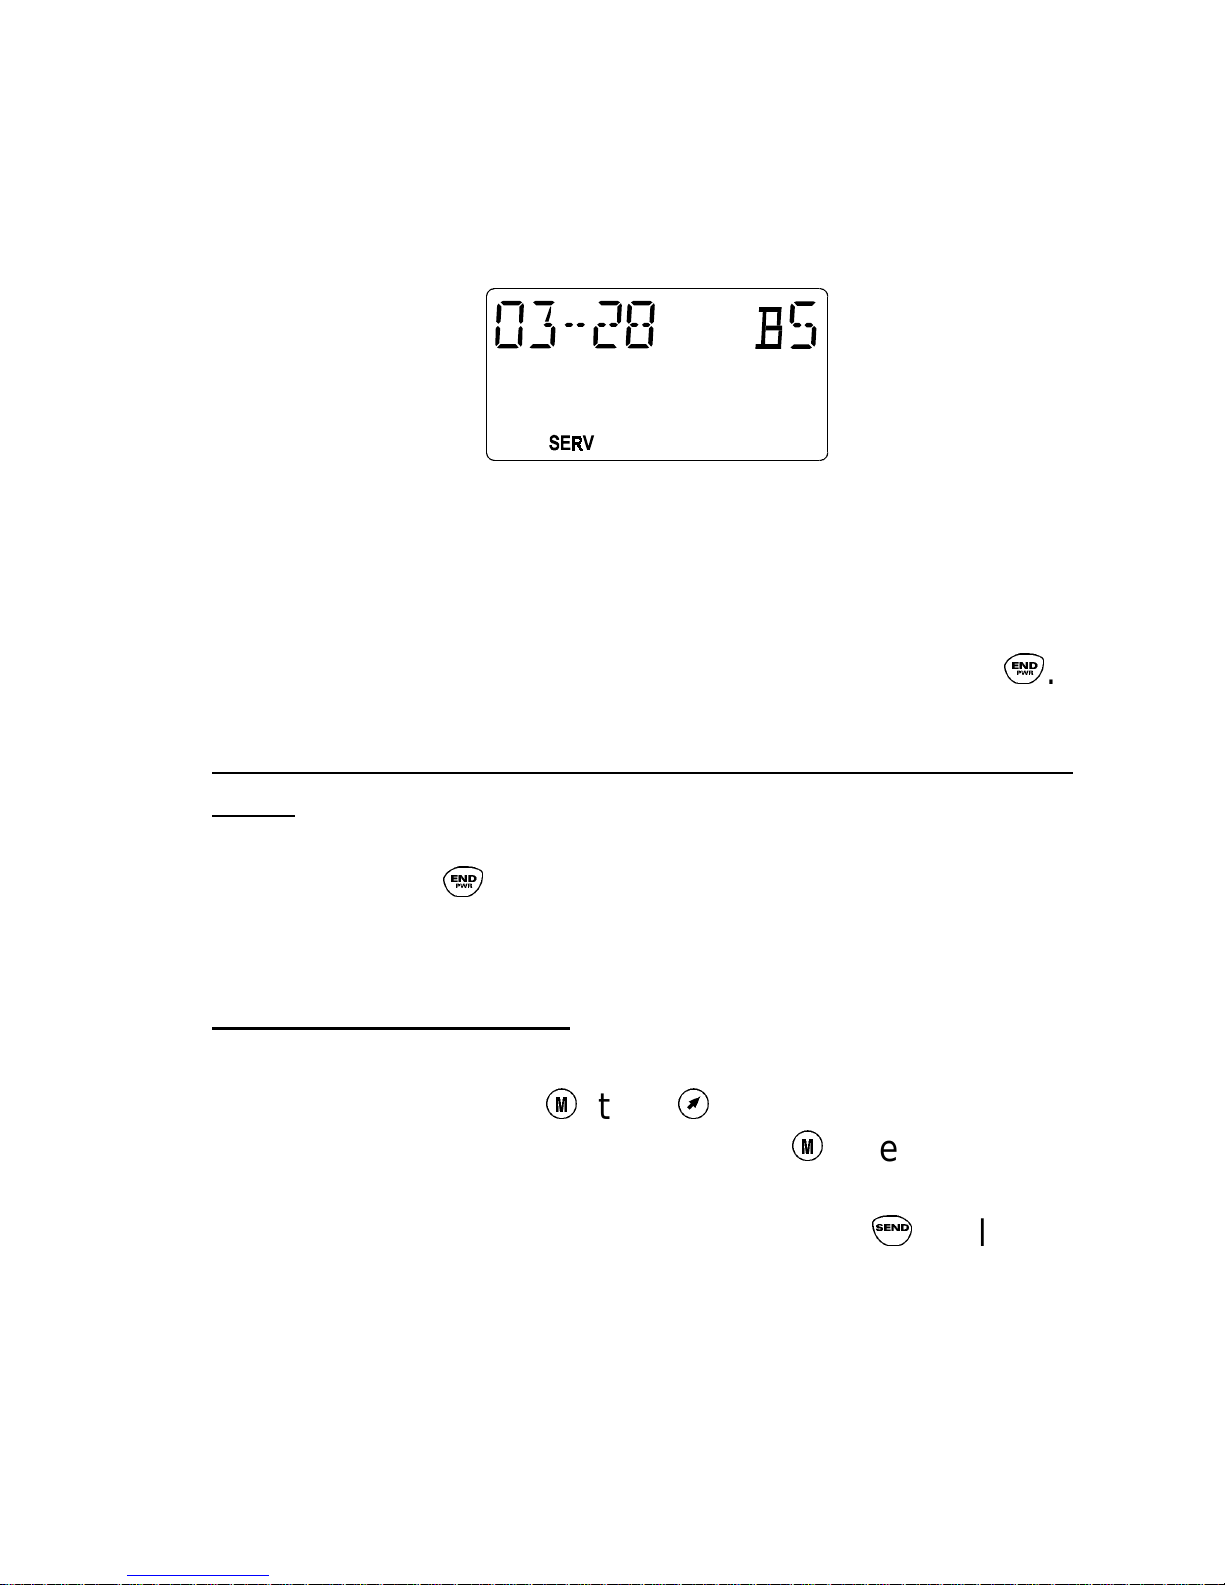
The number dialed will remain in the display until
any ke y is pressed, or the call is ended, at which
time the minutes and seconds of the call will be
displayed.
The left two digits show minutes, and the right
two digits show the seconds (separated by two
dashes).
3. When the conversation is finished, press
E
.
Nobody Ans w er s or You Hear a Busy or Fast Busy
Tone
Press
E
. The telephone number will be retained
in the memory and you can easily repeat the call.
Last Number Re-Dial
M
Press M, then > to scroll to the
function. Then press M, the word
DIAL
ber will be displayed. Press
will appear and the last dialed num-
S
RECALL
LAST
to place the
call.
The last number called will remain in the
memory even though the radio is turned
off.
9
Page 10
A Call is Unsuccessful or a Call in Pr ogress is
Interrupted
An error signal (a short beep) is heard. Refer to
Appendix 1 for further information.
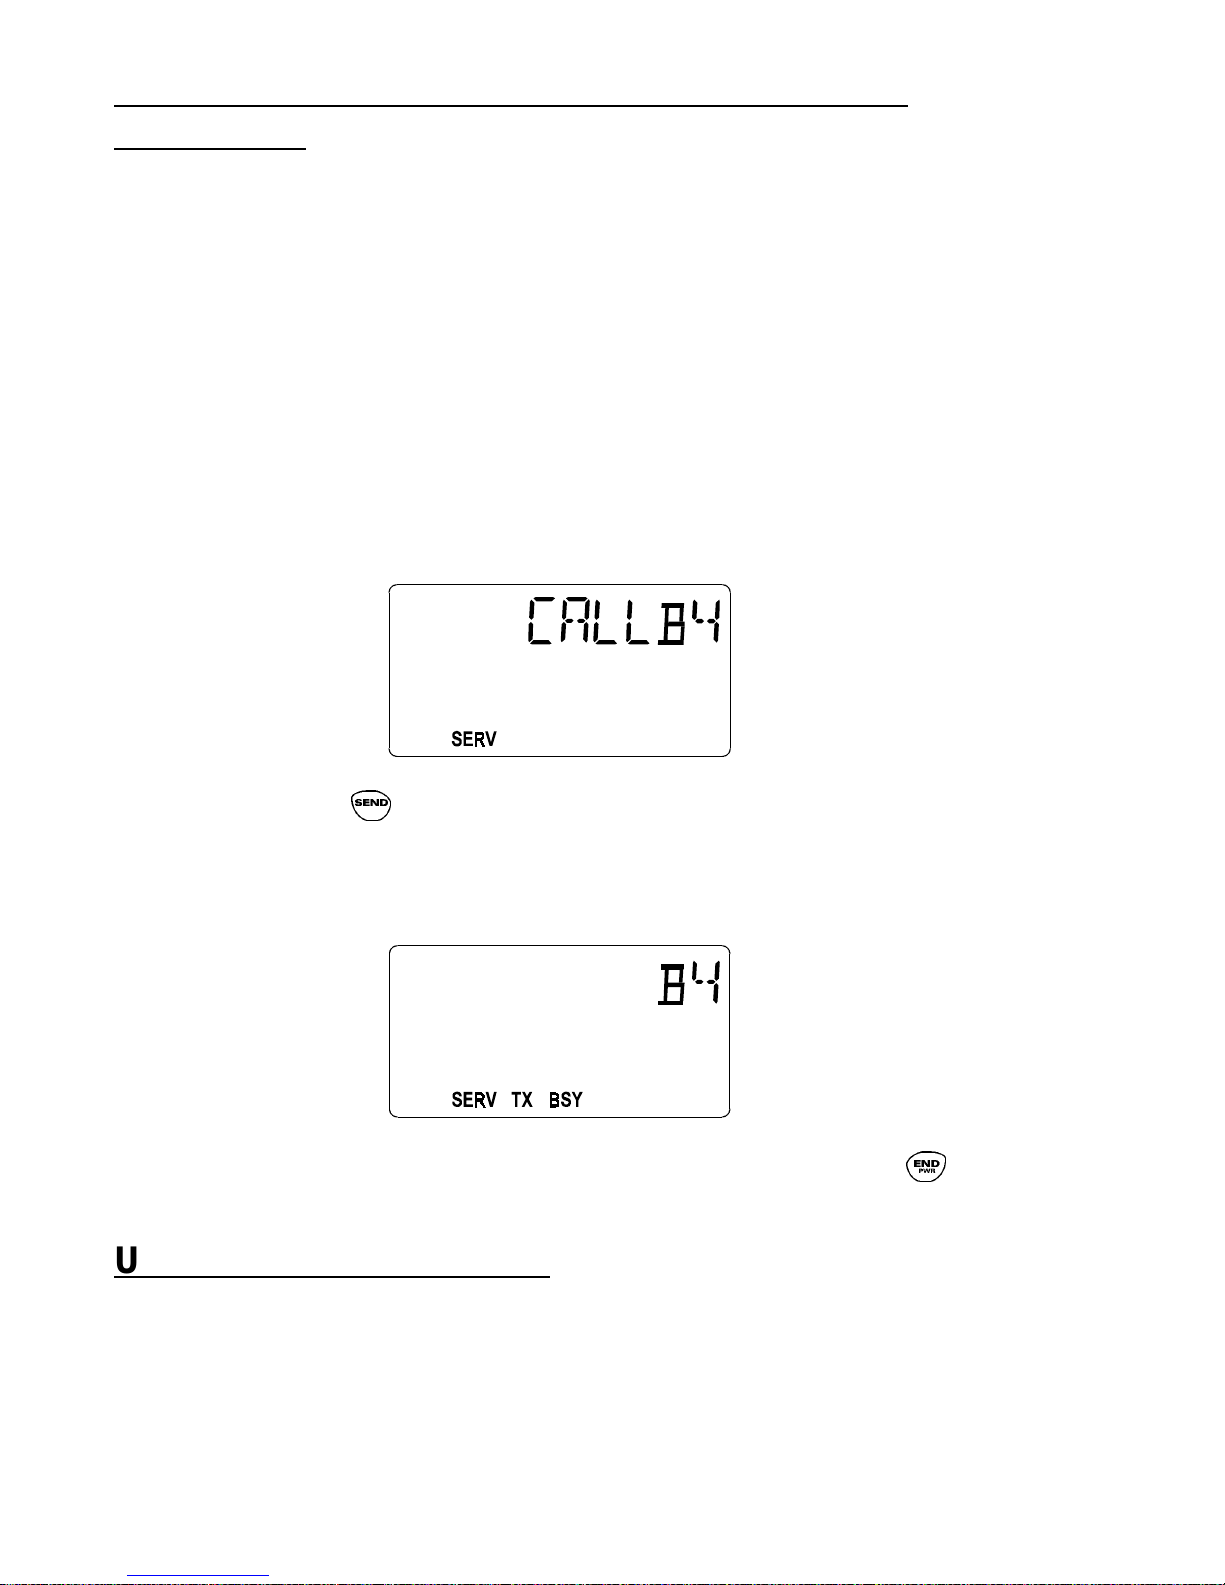
ANSWERING AN INTERCONNECT CALL
When you are being called, the radio rings according
to the setting in the Menu Mode. The backlight flashes
Green while the word "CALL" also flashes in the display.
Press
will light up and
S
to answer. The TX and BSY symbols
CALL
will be removed.
S
E
Unanswered call Counter
If one or more calls have not been answered, the
number of unanswered calls will be displayed. For e xam-
When the conversation is finished, press
E
.
ple,
as soon as you press any key.
02 CALLS
. The unanswered call counter will reset
10
Page 11
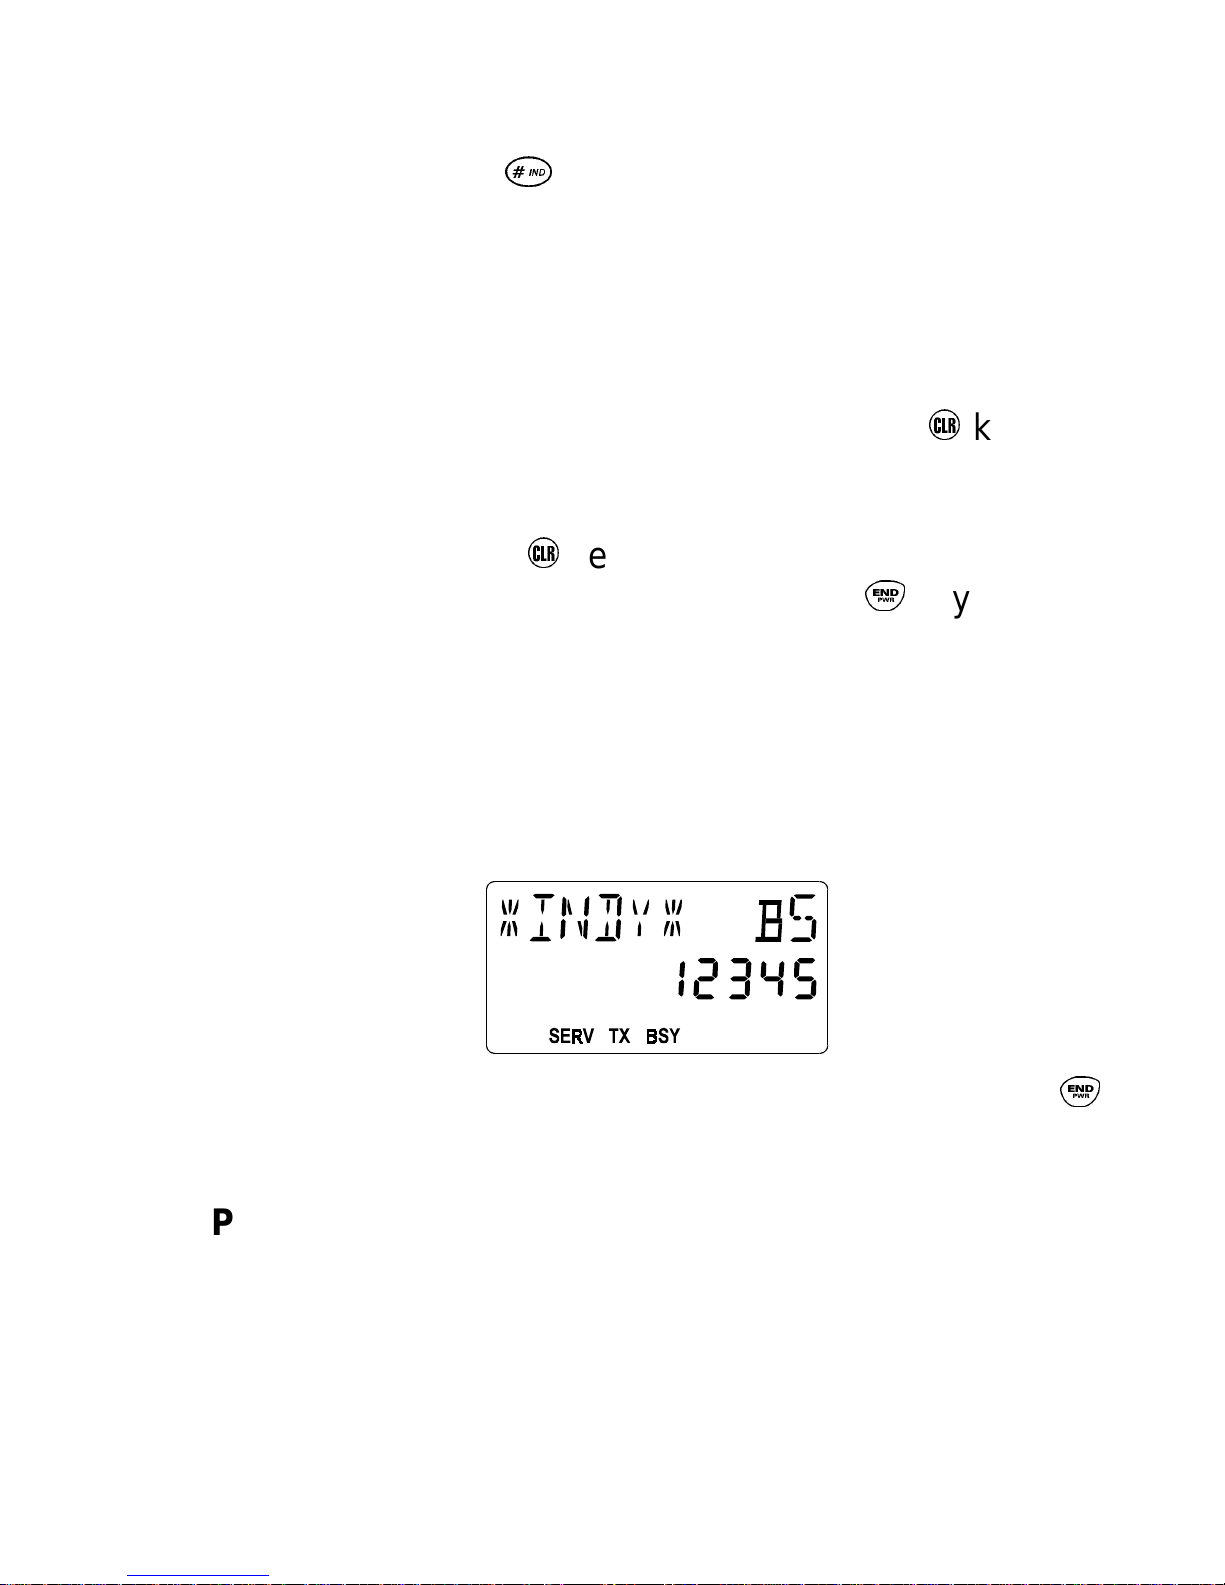
PLACING AN INDIVIDUAL CALL
1. Press the
#
ke y followed by the LID of the unit
you wish to call. These digits are shown in the
second line of the display.
If you enter a wrong digit or a wrong LID:
Erase a wrong digit by pressing the C key momentarily. You may delete all wrong digits individually like this, or eliminate all entered digits by
holding the C key f or appro ximately 1 second. If
you are not in a call, pressing the
E
key will also
delete all entered digits.
2. After you have entered the LID, press the [PTT]
key. The text "*IND V*" will appear on the first line
of the display.
3. When the conv ersation is finished, press the
key.
PLACING A GROUP CAL L
T o place and EDACS Group Call on the desired Group
E
(refer to GROUP SELECTION for further information)
simply press the [PTT] key and speak into the microphone.
11
Page 12
PLACING AN EMERGENCY CALL
Press and hold the Emergency button for approximately 2 seconds. The Red LED will begin to flash and
the work *EMERG* will appear in the display.
NO TE
This feature can be disabled in the radio’ s personality .
To clear an EMERGENCY
(supervisory function only):
Select the Group where the Emergency is active.
Press the Emergency button and then the C key. The
radio will send the Clear Emergency message.
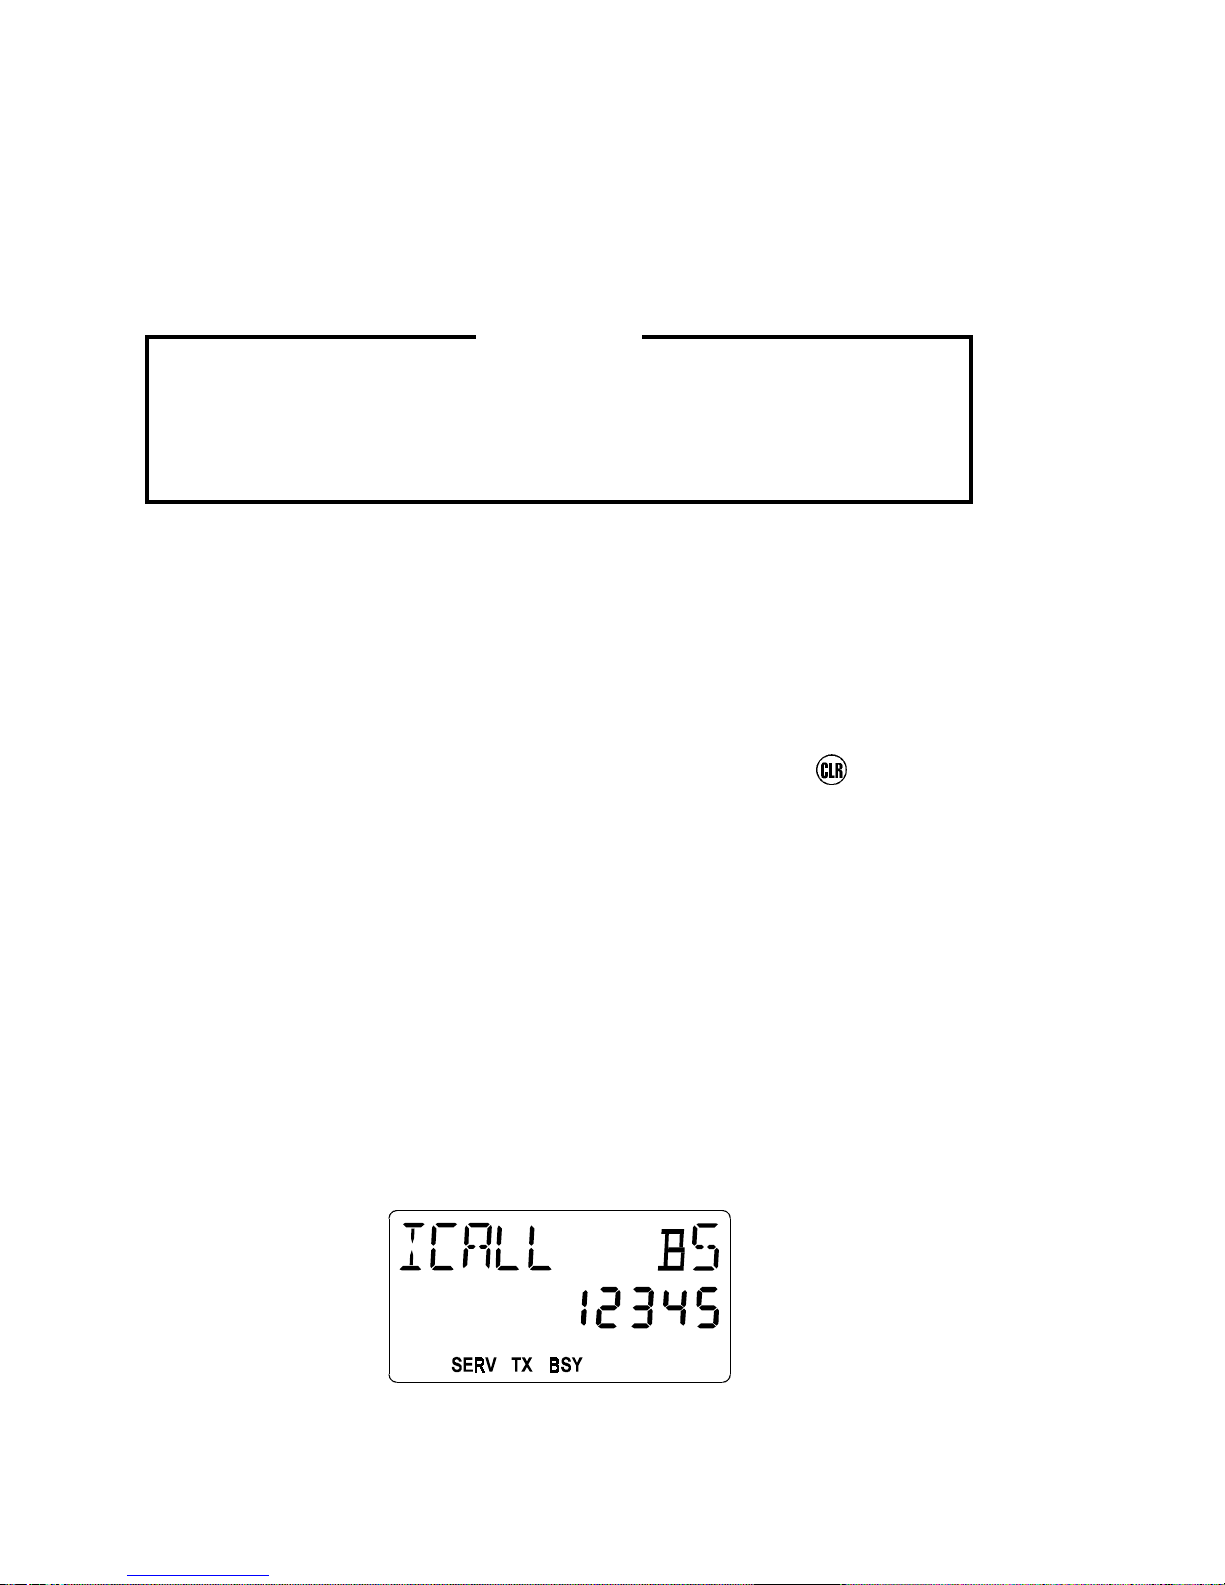
ANSWERING AN INDIVIDUAL CALL
When you are being called, the radio will beep every
5 seconds to alert you of the incoming call and will
continue until any key is pressed. The backlight flashes
while the word "ICALL" and the calling unit’ s LID flash in
the display.
12
Page 13
Press the [PTT] key to return the call, the flashing will
stop. The TX and BSY symbols will turn on while transmitting. When the conv ersation is finished, press the
key.
Unanswered ICALLS will cause the WHC symbol to
flash. The LID of the calling radio can be recalled by
pressing
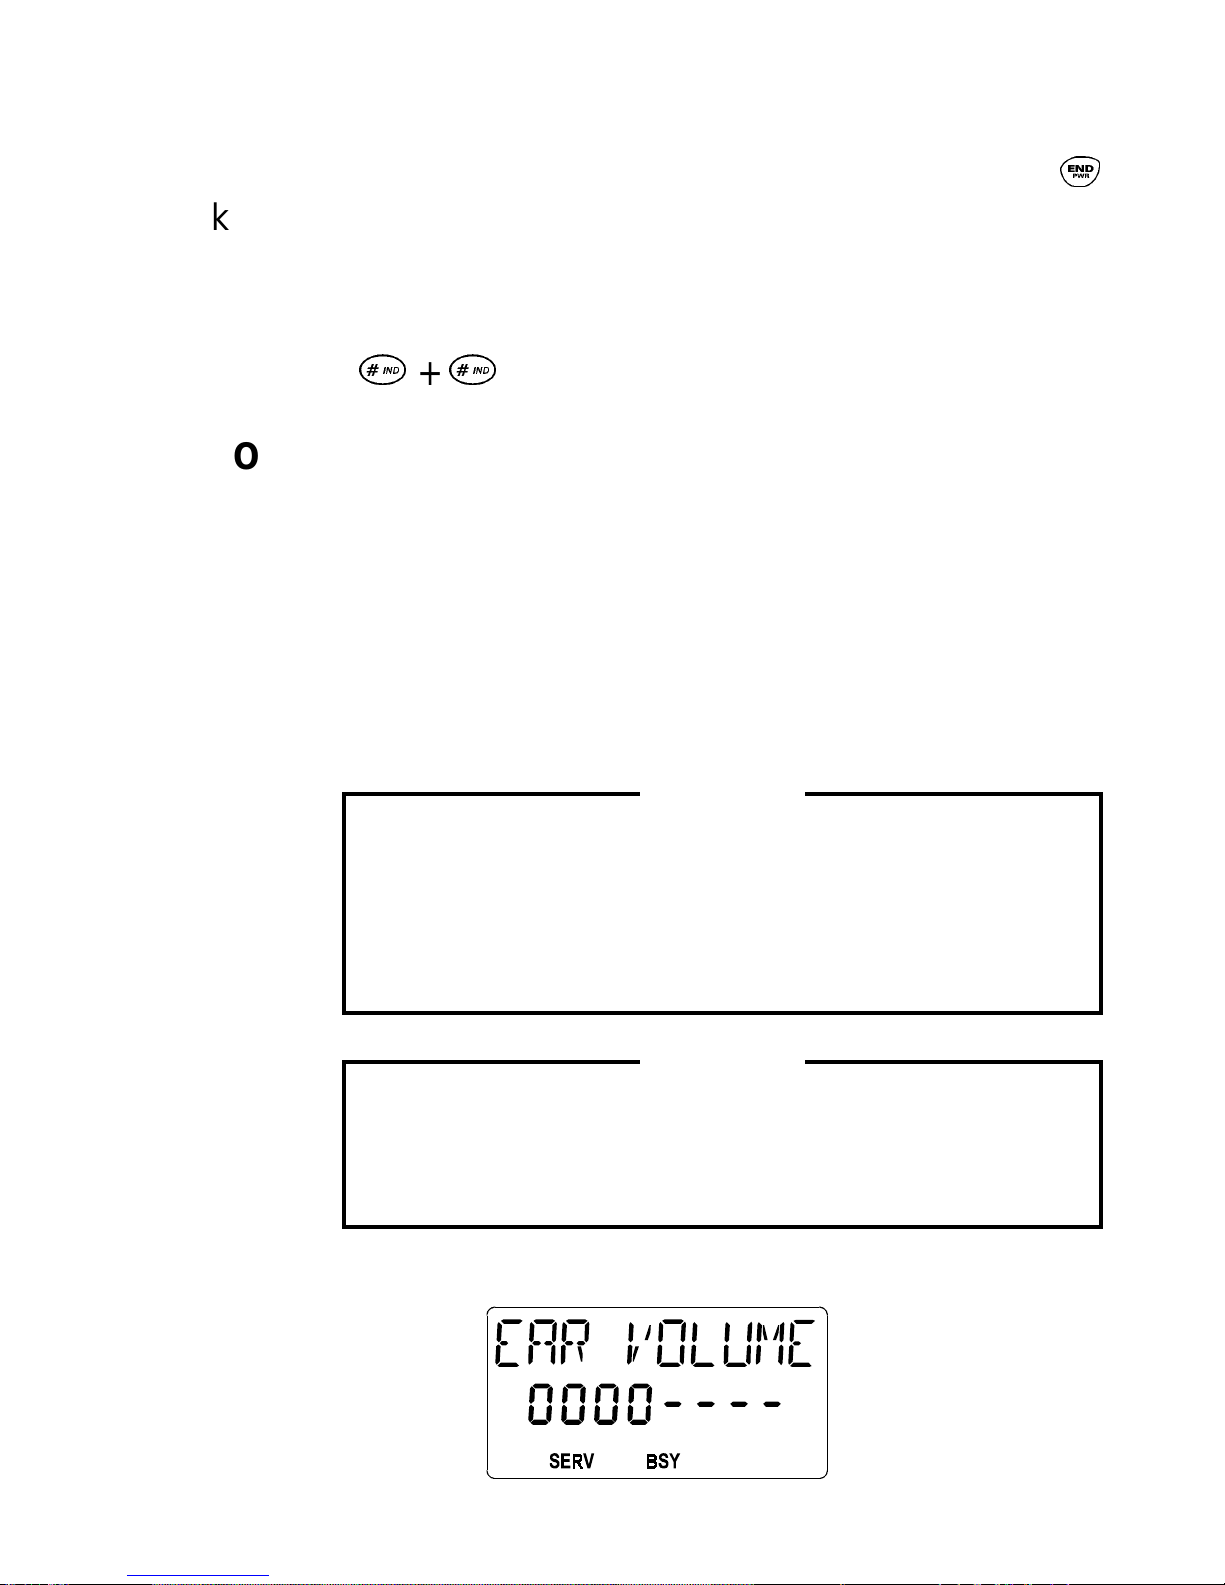
VOLUME CONTRO L
<
#
During a conversation you can adjust the volume
of the earpiece with these keys. Press and hold
+
#
.
E
>
to increase or decrease the volume. The volume
of the keypad tones may be adjusted in the same
manner when not in a conversation.
NOTE
There are separate volume levels for handheld & handsfree modes for both earpiece/
speaker and the keypad tones.
NOTE
The volume le vel can also be adjusted by the
VOLUME control knob.
13
Page 14
The display will show a line of zeroes representing the
volume level. This will remain as set, after the radio is
turned off.
MUTE KEY
M
During a conversation, the microphone can be
deactivated by holding do wn the M ke y. Release
the M key to resume the conversation.
AIR TIME METER
At end of a call, the elapsed air time, in minutes and
seconds, is displayed for two seconds.
Minutes
Seconds
The air time of the outgoing call includes the time
taken to connect the call.
The air time meter is only a guide; actual billing
time from your service provider may diff er.
14
NOTE
Page 15
TURNING THE UNIT OFF
E
Press and hold down the
a beep. If a call is in progress, end the call by
pressing and releasing the
seconds, and then press and hold down the
key until you hear a beep.
DISPLAY, KEYPAD, AND AUDIBLE SIGNALS
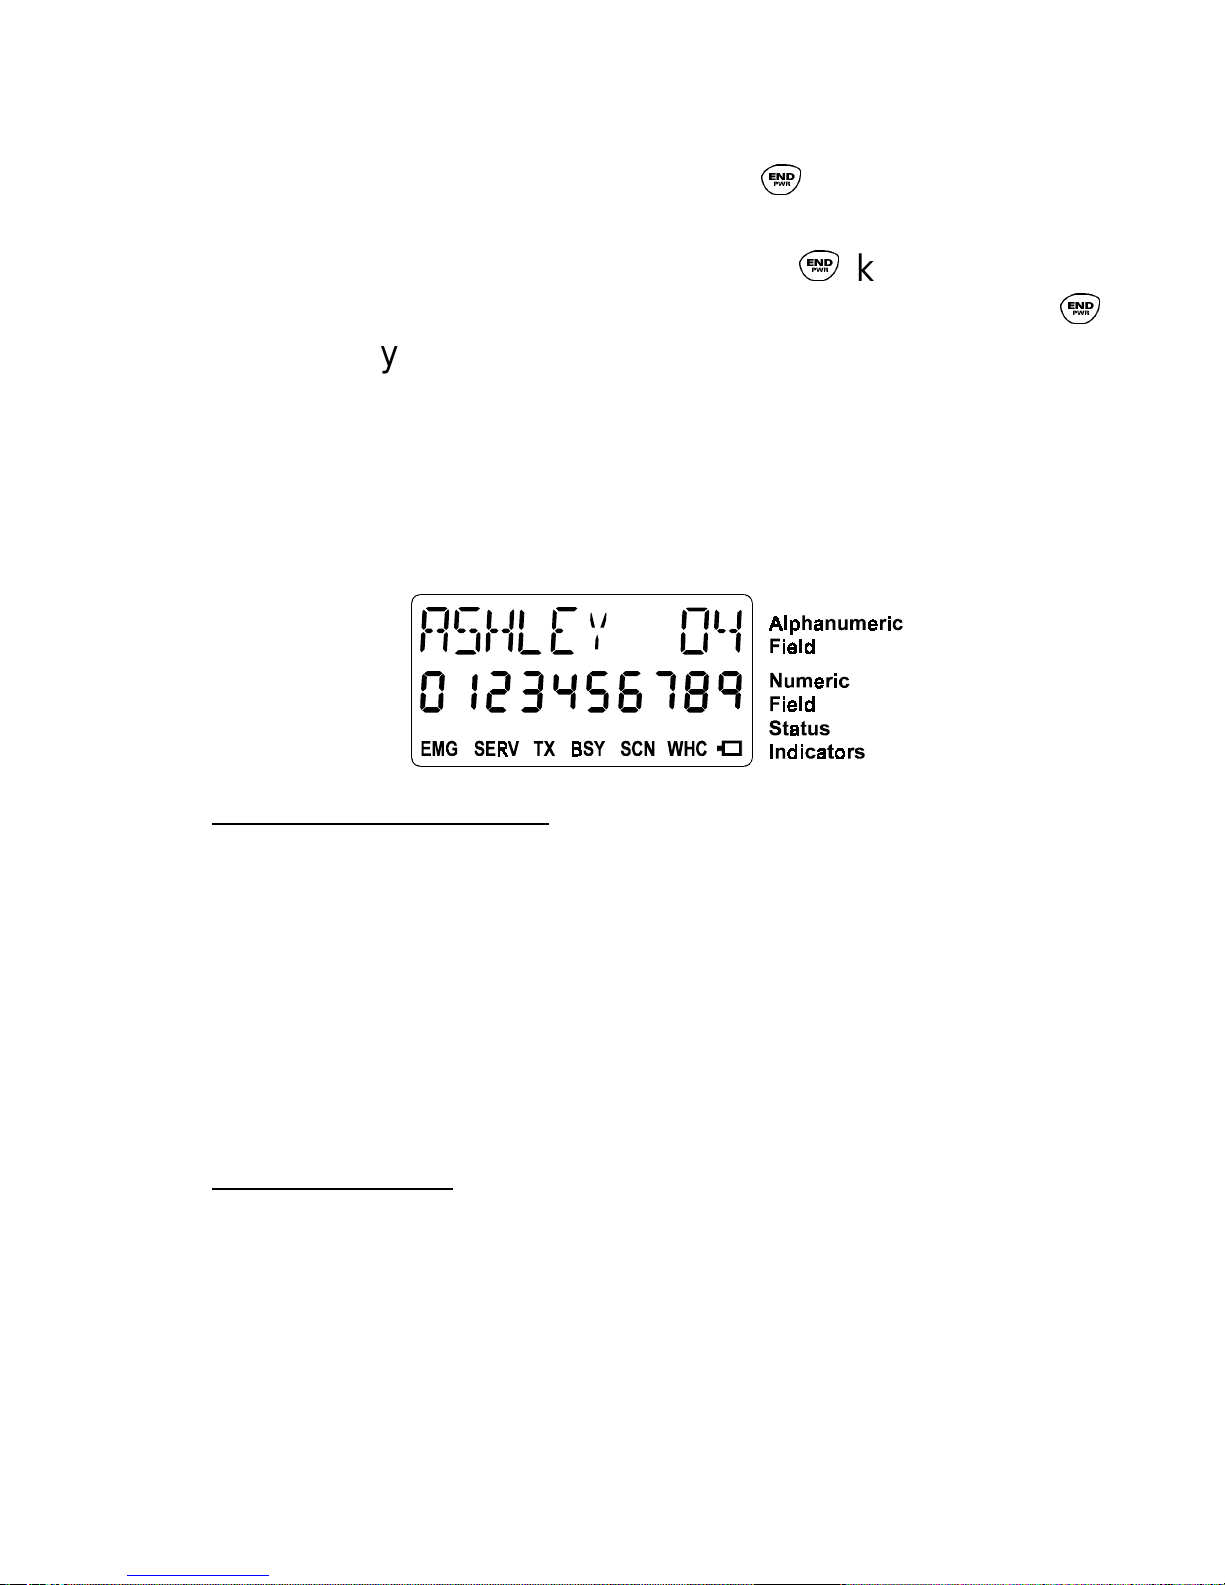
DISPLAY
E
key until you hear
E
key, wait a few
E
Alphanumeric Field
• Displays names and memory locations, etc.
• Displays messages, queries, and warnings.
• Displays "air time" at end of a call.
• Displays battery level indicator.
Numeric Field
Displays the telephone number entered on the key-
pad, or recalled from memory.
15
Page 16

Status Indicators
EMG Emergency. Indicates that an emergency
is declared on the current group.
SER V Servi ce. Indicates control channel.
TX T ransmit. Indicates unit is transmitting.
SCN Scan. Indicates Group has been added to
Group Scan List. Flashing indicates scan
function is turned on.
BSY Busy. Unit is active in some type of call.
Shown during a call and also while an outgoing call is being connected.
WHC Who Has Called. Flashes to indicate that
you received an Individual Call.
Battery. Flashes when battery reaches
level B0.
BUTT ON
PUSH-T O-TALK
(PTT button)
Located on side. Enables radio’s
transmitter . PTT must be held down
to transmit during simplex opera-
MONITOR Located on side. Same function as
16
tion.
C
key on keypad except it will not
turn scan on/off.
Page 17
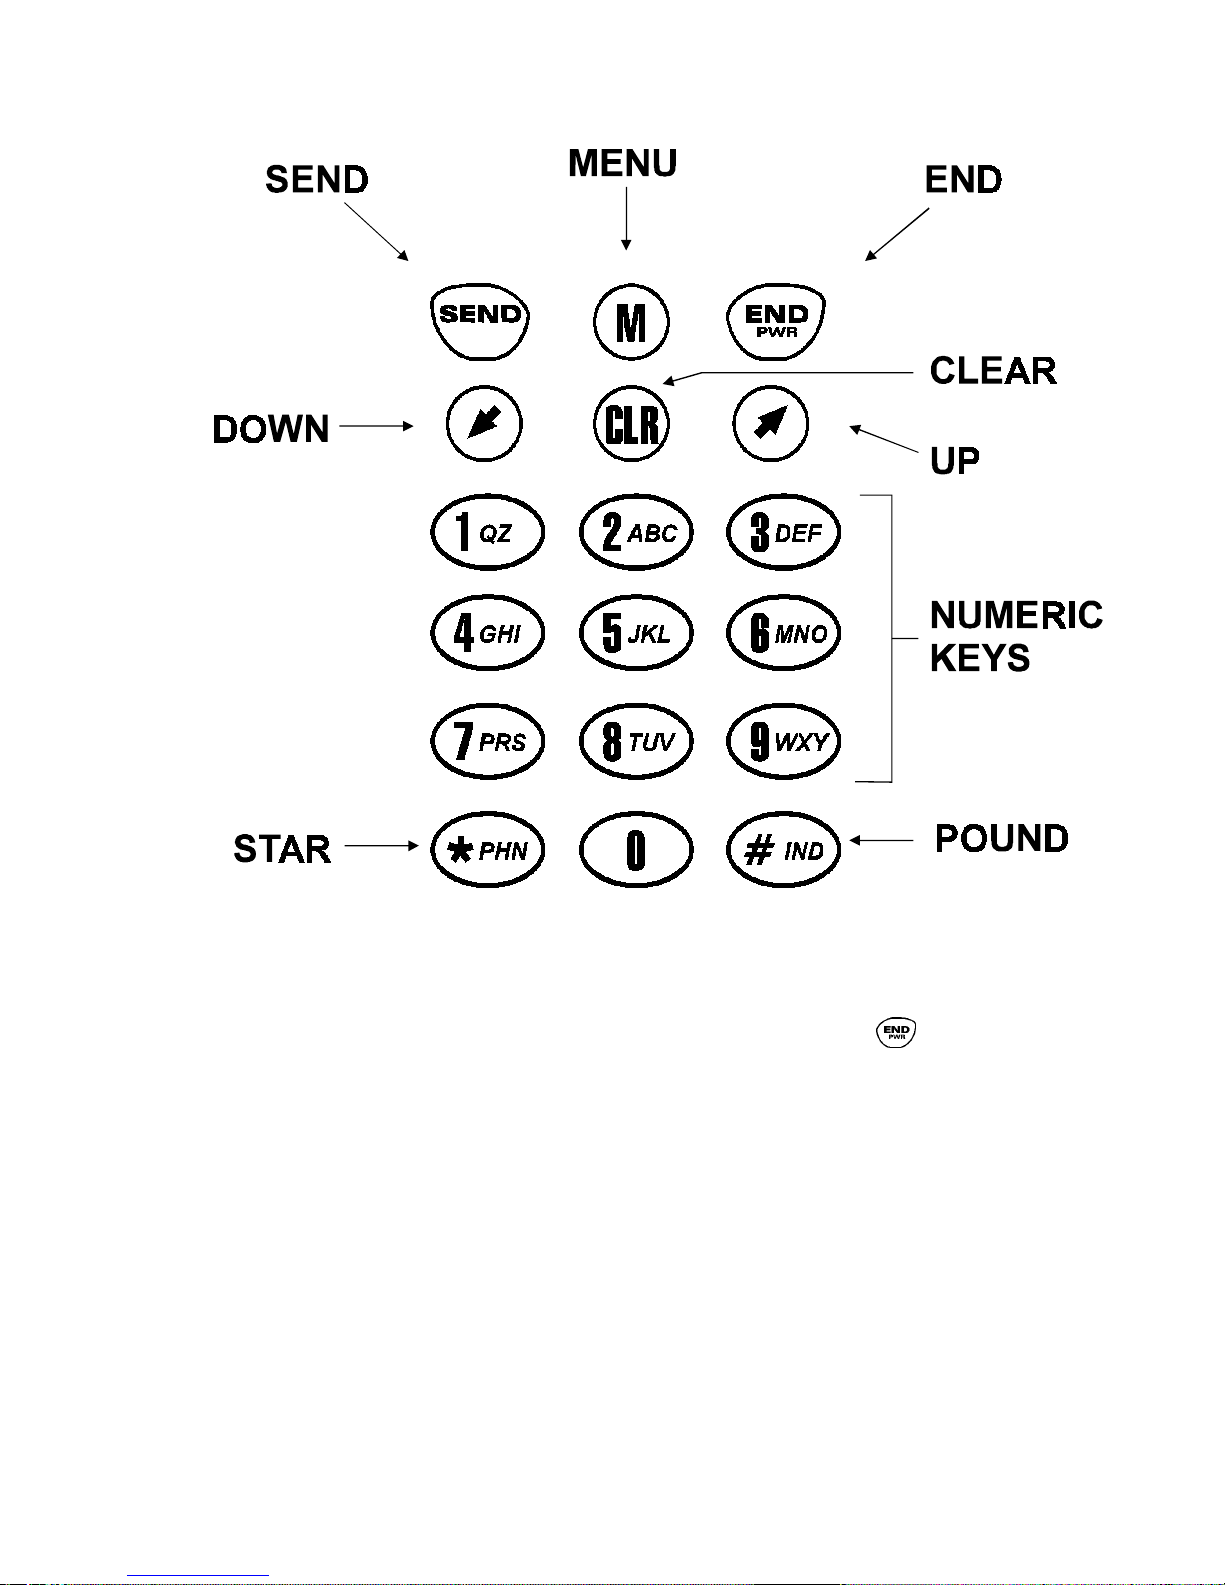
KEYPAD
E
END ON/OFF
If a call is in progress, pressing
E
terminates
the call. Otherwise you can turn the radio ON or
OFF by holding down the key until you hear a
beep. This key is also used to exit from any
sub-mode and return to the standby mode. May
also be used to delete all entered digits while
outside of a call.
17
Page 18

S
SEND
Places a call after a number has been entered,
or recalled from the memory, and answers an
incoming call.
M
M
M
MENU
This key has two different functions: 1) MENU
and 2) Mute Key.
MENU
Press to select the Special Functions of
the radio. Refer to chapter,
Functions
Mute Key (Microphone Mute)
Hold down M to mute the microphone dur-
.
User Menu
>
<
18
ing a conversation. If the radio is used with
hands free equipment, the separate microphone will be muted.
Volume Control
To change the volume simply press and
hold up or down arrows until the desired
lev el is reached. If the radio is in handsfree
operation, the loudspeaker volume will be
adjusted.
Page 19

C
CLEAR
Press the C key f or either of the f ollowing
functions.
1. If C is pressed momentarily, it erases
the last digit or letter entered. Clear can
be ex ecuted repeatedly to erase several
characters.
2. If C is held down for at least one second,
it erases all digits displayed, for example, a telephone number from the display.
12
. . .
3. Pressing C will tur n on/off Gr oup S can
function.
Numeric Keys
90
Used to enter telephone numbers to be
called, or stored in the memory .
Used to enter memory locations when recalling telephone numbers.
Used to scroll to an option within the menu
function.
When in Alpha mode, letters and digits
can be entered. Press the appropriate nu-
19
Page 20

meric key once, twice, 3 or 4 times according to the position of the desired letter on
the key. (Digit is fourth position).
*
#
Star
Used when entering an automatic pause
before a sequence of digits that is to be
sent in a cluster as DTMF signals. Press
and then, within two seconds,
the chapter,
Used in Alpha mode to enter a space or a
star .
Pound
Used when entering a manual pause before a sequence of digits that is to be sent
in a cluster as DTMF signals. Press M and
DTMF Signaling
*
. Refer to
.
M
then, within two seconds
chapter ,
Used when placing an Individual Call. Refer to PLA CING AN INDIVIDU AL CALL.
Illumination
The display and keys are illuminated.
The light will be on if the phone is being dialed, or if a
key has been pressed. After 10 seconds of inactivity the
light will automatically tur n off. See the chapter on
Menu Functions
for further information on this option.
DTMF Signaling.
#
. Refer to the
User
20
Page 21

ALERT TONES
The IPE-200 radios generate a set of unique alert
tones to indicate operating status. The following section
identifies and describes the alert tones used in the
Duplex radio for EDACS applications.
CALL ORIGINATE ALERT
If programmed, a short tone is sounded whenever the
S
key or PTT button is pressed and the radio has
acquired a channel. T his tone indicates the user ma y
begin communications.
CALL QUEUED
If no tone is heard after the transmitter is keyed and
the display flashes, this indicates that the system has
placed the request in a queue. If the
S
key or PT T
button is pressed while in queue, the radio autokeys
(automatically keys) when a channel becomes available (see AUTOKEY).
AUTOKEY
When the
S
ke y or PTT button is pressed to place a
call on the system, but is released bef ore the channel
is assigned (e.g. a queued call), the radio automatically keys on the channel when it gets the assignment. The radio gener ates a long beep and holds the
transmitter keyed for two seconds. Pressing the
S
key or PTT button keeps the channel and sends the
message before this two second time-out has expired.
21
Page 22

SYSTEM BUSY
If after pressing
S
key or PTT button a short tone is
heard and the words SYS BUSY appear on the
display, this indicates that your calling par ty is either
already on the system or the system queue is full. You
must rekey later to access the system.
CALL DENIED
If after pressing
S
key or PTT button a short tone is
heard and the word DENIED appears on the display,
this indicates that the system has denied your request. This happens when either the caller or callee
unit LIDs are not valid on the system.
OUT OF RANGE SYSTEM INOPERATIVE
A single tone sounds immediately after the
S
key or
PTT button is pressed indicating the radio is out of
range of the repeater . The radio tries to place the call
for a short period (3 seconds) after the initial attempt.
The radio generates a second low pitched tone when
it gives up tr ying to place the call. The system is off
the air or the radio needs servicing when the radio is
within calling range, and these tones are heard. Observe the SERV icon and the CCSCAN display to
determine when the system is in range and/or operational again.
22
Page 23

AUDIBLE SIGNALS
Ringing Signal
The ringing signal sounds when a call is received. It
will be repeated until the call is answered or is terminated
by the system.
There is a special function to allow you to set the
volume of the ringing signal. The r inging volume can be
set to one of several different signals. See the chapter
User Menu Functions
.
Error Signal
A short beep tells you have done something incorrectly . For e xample, if you try to store a telephone number
in a memor y loc ation that is already in use, or if you try
to place a call when the SERV indicator is not present in
the display.
Malfunction Alarm Signal
A long beep will be heard if:
• The attached battery is becoming exhausted. The
warning LOW BATT will also flash in the display.
Refer to the chapter
Batteries and Recharging
23
.
Page 24

ELECTRONIC LOCK AND CALL RESTRICTIONS
In this function the radio may be locked completely,
except for emergency calls. One of a number of call
restrictions for the user may also be selected. The 4-digit
personal Code may also be changed from this function.
IMPORTANT
The radio is factory programmed with a loc k code
of 0000. To improve security , enter a personalized
four digit code b y using the AL TER CODE option.
An option is set by entering the menu, toggling to the
right alternative and pressing M. The telephone then
prompts for the personal code. If the right code is entered,
the option is set. (To change the personal code,the code
must be entered, then the new code must be entered and
verified).
When the radio is completely locked, the option LOCK
AUTO is set and the text
LOCKED
If the right 4-digit c ode is entered the text
is shown in the display.
UNLOCKED
will be displayed f or 5 seconds and the lock is temporarily
removed. When the phone is powered off, the lock becomes active again.
The only way to permanently remove the lock is to
enter this menu and select another option. If the option
LOCK OFF is set, no restriction is active.
24
Page 25

If an incorrect personal code is entered,
WRONG
CODE
appears in the dis play and the display returns to
manual standby mode.
SETUP LOCK CODE
1. Press M twice.
2. Press > key to scroll to LOCK.
3. Press any digit key (1-9) to scroll to ALTER
CODE.
4. Press M.
5. Enter OLD code.
6. Enter NEW code.
7. Enter NEW code (to verify new code).
8. Press M to store new code.
9. Press
E
to exit from menu function.
25
Page 26

STORING NUMBERS
You can store often used telephone numbers in the
radio’s memory, both when the radio is in standby mode
and during a conversation. Numbers can be stored with,
or without, an accompanying name.
A number to be stored may contain up to 32 digits,
and a name up to 8 letter s, including spaces. Up to 25
numbers may be stored depending on the number of
systems and groups already configured.
STORING A NUMBER (AND NAME)
1. Enter the telephone number you wish to store. If
you make a mistak e, you can erase a wrong digit
by pressing the C key.
2. Press M. Then press > to scroll to STORE --.
Press M and the word
STORE
is displayed,
followed by the first free memory location, for
example 22.
M>
26
Page 27

3. To store the number in this memory location, go
to step 5.
4. To store the number in a diff erent memory location, enter the number of the memory location,
for example 11.
11
5. Press M again. The question
NAME?
appears.
This indicates that you can no w enter an accompanying name if you wish to do so.
6. Enter the first letter of the name. Pressing a
different ke y or waiting for one second will move
the cursor to the next position. You can enter up
to eight letters.
- To enter a letter, press the appropriate nu-
meric key once, twice, or three times, depending on the position of the letter on the key.
- To enter a number, press the appropriate nu-
meric key four times.
27
Page 28

-Star
*
toggles between "*" and "space" in
the alpha mode.
- Pound
#
toggles between "#" and "-" in the
alpha mode.
- If you make a mistake, correct it by pressing
the C key.
7. When you have entered the entire name, press
M
. The number and name are stored.
NOTE
If you do not wish to enter a name, press
when the question
NAME ?
appears. The
M
number will then be stored without a name.
If you do not press M, the number (and name) will be
stored automatically after about 20 seconds.
MEMORY PROTECTION
If you try to store a number in a memory location
which already contains a number, a short beep is heard
and the word
USED
flashes in the display for five sec-
onds.
28
Page 29

You can choose either to:
a. Store the number in a different memory location.
Enter the number of the memory location and
press M.
b. Store the number under the selected memory
location, thus erasing the old number (and
name). Just press M.
MEMORY FULL
If, when you attempt to store a new number, all
memory locations are in use,
STORE ? - -
is displayed.
If you do not wish to store the number, press the
key or the C key.
If, on the other hand, you do wish to store the number ,
you can do the following:
Store the number in an already occupied memory
E
location, thus erasing the old number (and name).
Enter the required memory position and press M.
29
Page 30

RECALLING NUMBERS
There are two ways of calling a stored number. You
can either recall the number so that it appears in the
display and then call it by pressing
S
, or if you are certain
of the memory location, enter the memor y location and
press just
S
(speed calling).
Displaying Ext ended Digits
If you recall a telephone number which has thirty-two
(32) digits, the number will be displayed in blocks of
numbers starting with the first two (2) digits, followed by
the next ten (10) digits , the next ten (10) digits, and then
the last ten (10) digits.
Alpha Recall
Only applies to telephone numbers stored with an
accompanying name.
1. Press M. Press > to scroll to
M
twice and the work
LETTER -
RECALL --
appears.
M
2. Enter the first letter of the name by pressing the
relev ant numeric key once , twice or three times,
depending on the position of the desired letter.
. Press
30
Page 31

2
3. The first name match will be displayed.
4. If the desired name is not displayed, scroll
through the names by holding down the > key
until you find it. The names will be sorted alphabetically. If you scroll past the name you can go
backward by repeatedly pressing the < key.
5. To place a call, press
S
.
Recalling a Number by Entering the Memory
Location
1. Press M. Press > to scroll to
RECALL--
31
Page 32

2. Enter the memory location (one or two digits).
The number (and name) appears in the display.
8
If you are uncertain of the memory location,
enter a lower memory location and then scroll
forw ard by holding do wn the > ke y until you find
the number. If you scroll too far, you can go
backward by repeatedly pressing the < key.
3. To place the call, press
S
.
Appending Digits to a Recalled Number
If you have stored a par tial number you can recall it
from the memory and then append the remaining digits.
Changing a Recalled Number
A telephone number recalled from the memor y can
be altered by erasing the last digits using the C ke y, and
then entering new digits.
SPEED CALLING
A stored number can be called by just entering the
memory location (one or two digits) and pressing
number appears in the display.
32
S
. The
Page 33

9S
If you called a wrong number , you can press
E
before
the call has been connected.
ERASING A ST ORED NUMBER
A stored number (and name) will be erased automatically if you store a new number in the same location.
Howe ver , you can erase a number without replacing with
a new number, by proceeding as follows:
1. Press C key and hold for approximately 1 second to erase any entered digits.
2. Press M. Press > to scroll to
RECALL--
.
3. Enter the desired location, for e xample 22. Press
M
. The warning message "USED" flashes for 5
seconds.
4. Press M again. The message "CLEARED 22" is
displayed for 5 seconds, and the number (and
name) stored in location 22 are now erased.
RECALLING A NUMBER DURING A CALL
You may recall a memory location during a call. The
number in that location may then be sent using DTMF
(Dual Tone Multi-Frequency) tones. See the chapter on
DTMF Signaling
for further information.
33
Page 34

DTMF SIGNALING
You can use your telephone to send DTMF (Dual T one
Multi Frequency) signals to perform banking by phone,
controlling answering machines , and other functions.
DTMF SIGNALING USING THE KEYPAD
If click sounds, or nothing, are heard when you press
the keys, use the menu function to select KEY BURST
or KEY CONT to turn the key tones on. Refer to the
chapter
User Menu Functions
.
If you select the Burst option, a tone of fixed length
will sound when you press a numeric key.
With the Continuous option, a tone will sound as long
as a numeric key is pressed.
If you select the "Clicks" option, you will hear keyclicks
in the speaker, but DTMF tones will be transmitted.
To send DTMF signals:
1. Call the desired number.
2. When the call has been connected, pressing
keys 0 - 9, *, and # will cause the corresponding
DTMF signals to be sent.
34
Page 35

Pause Before Sending DTMF Signals
You can also pause dur ing transmission of a DTMF
string to acknowledge handshaking with the called device, or system. Some automatic voice response systems may require pauses to facilitate entering digits in
response to system commands.
An automatic two (2) second pause is entered by
pressing M (Function) followed within two seconds by
*
. A pause appears in the display as a "P".
Several pauses can be entered to separate different
codes, for example:
<Tel. No.> P <Code 1> P <Code 2> P <Code 3>.
You can enter a maximum of 32 characters, including
the pauses.
Pressing M and
S
, during a call, will send the characters up to the first pause. After approximately two (2)
seconds transmission will begin again until another
pause is encountered. This will continue until the entire
sequence has been sent.
35
Page 36

SYSTEM SELECT ION
To select the E DACS system for operation from the
av ailable systems stored by PC programming, the menu
function is used.
1. Press M. Then use the > key to scroll to
TEM
. The current system will be displa y ed.
SYS-
2. Press any digit key (1-9) to scroll through the list
of pre-programmed systems. Press M to store
desired selection. The word
STORED
will appear in the display to indicate that a ne w system
has been selected.
3. Press
E
to exit from the menu function.
GROUP SELECTION
EDACS group selections are also made through the
user menu.
1. Press M. Then use the > key to scroll to the
GROUP menu. The cur rent Group will be displayed.
2. Press any digit key (1-9) to scroll through the
Group Set for the currently selected System.
Another press of the M key will store the new
selected group.
36
Page 37

3. While scrolling, the
Group to the Group Scan List, the SCN symbol
will indicate the Group has successfully been
*
key is used to add the
added. The
#
key is used to delete the Group
from the Group Scan List.
4. Press the
E
key to exit from the user menu.
GROUP SCAN
To enable Group Scan press C key. The flashing
SCN symbol will indicate that the scan function is turned
on. All groups previously entered into the Group Scan
List will be monitored.
ACCESSING USER MENU FUNCTIONS
To access the user menu functions:
1. Press M.
2. Press > to scroll forward or < to scroll backward
to select desired function.
3. Press any digit key (1-9) to select an option
within a function.
4. Press M to store desired option.
5. Press > or < to continue to scroll through menu
function or press
E
to exit menu.
37
Page 38

MENU FUNCTION DEFINITIONS
Menu
Position Function
1 Store telephone number (name)
2 Recall telephone number (name)
3 Select system
4 Group Selection
5 Electronic Lock
6 Battery Saver
7 Ring V olume
8 Ring Tone
9 LCD contrast
10 K e y Burst, Tones, Clicks
11 Backlight Selector
12 Bat. Voltage
13 Pers Program
14 Resettable Accumulated Call Time
15 Last Call Time
(1) ST ORING NUMBERS (and names): Lets you store
telephone numbers (names) in memory.
Default:
STORE --
STORE --: Store number in memory by entering
memory location and then pressing M.
NAME: Stores name associated with stored number .
38
Page 39

(2) RECALL NUMBERS (and names): Lets you recall
telephone numbers (names) from memory.
Default:
RECALL --
RECALL --: Recall number from memory by entering
memory location and then pressing M.
LAST DIAL: Recall last number dialed by scrolling
forward with > key and then pressing M.
LETTER-: Recall number from memory by entering
names.
(3) SYSTEM SE LECTION: Lets you select the sy stem
operation.
Default:
Current System
Use any digit key (1-9) to scroll through the list of
programmed systems. Press M to select new systems.
(4) GROUP SEL ECTION: A llows selection of different
EDACS Groups.
Default:
Current Group
Use any digit key (1-9) to scroll through the current
Group Set. Press M to store the selected group.
39
Page 40

(5) ELECTRONIC LOCK: Lets you lock the radio to
restrict unauthorized use and enter personal lock code.
Default:
LOCK OFF
LOCK OFF: No restrictions, the radio can send and
receive calls.
LOCK AUTO: The radio can receive calls only. The
K eypad is "locked" automatically at power on.
ALTER CODE: Allows you to change your personal
lock code.
(6) BATTERY SAVER: Lets you select the amount of
battery savings.
Default:
NORMAL
NORMAL: Radio achie v es 33 hours of standby on a
single charge.
EXTENDED: Radio achieves 40 hours of standby on
a single charge.
OFF: Radio achiev es 16 hours of standby on a single
charge.
(7) RING VOLUME: Lets you select the ring volume
signal.
Default:
RING HIGH
Note: One ring signal is sounded for each corresponding Ring Volume displa y ed.
RINGSILENT: Ring signal is silent. the low batter y
warning only clicks once.
RING LOW: Ring signal is continuous and low.
RING MED: Ring signal is continuous and medium.
40
Page 41

RING HIGH: Ring signal is continuous and high.
RING STEP: Ring signal is stepped and low.
(8) RING TONE: Lets you select the ring tone frequency.
Default:
TO NE HIGH
Note: One ring signal is sounded for each corresponding Ring Tone displa yed.
TONE LOW: Frequency tone is low.
TONE MED: Frequency tone is medium.
TONE HIGH: Frequency tone is high.
TONE MIXED: Frequency tone cycles through the
high, medium, and low tones.
(9) LCD CONTRAST: Lets you set the LCD display
contrast.
Default:
LCD LOW
LCD LOW: Display contrast is low.
LCD MEDIUM: Display contrast is medium.
LCD HIGH: Display contrast is high.
41
Page 42

(10) KEY BURST , TONES, OR CLICKS: Lets you select
whether keypad numeric keys (0-9, #, *) produce DTMF
tones or key clicks.
Default:
KEY CONT.
KEY BURST: Burst mode avoids double-digiting error. The radio signal may drop out very briefly when
you make a call in motion. This drop out can c ause
equipment to inter pret two or more digits when you
only press one. Selec t this mode if you experience a
double digit error often.
KEY CONT: Some answering machines require continuous mode. Select this mode if you are having
difficulty controlling answering machines.
KEY CLICK: Click mode sends the digits as a DTMF
click as opposed to a DTMF tone.
(11) BACKLIGHT SELECTOR: Keypad or display illumination to be automatic or switched off.
Default:
LIGHT AUTO.
LIGHT AUTO: The illumination comes on for ten
seconds after any key is pressed. The illumination
stays on continuously if the radio is mounted in a car
kit and turned on.
LIGHT OFF: The illumination is off at all times.
(12) BATTER Y V OL T A GE: Shows the input battery voltage to the radio (for example, 6-3 = 6.3 volts).
(13) PERS PROG: PC personality programming mode.
42
Page 43

(14) RESETT ABLE A CCUMULATED CALL TIME: Displays accumulated call time, in hours and minutes, since
last reset.
ACCUM TIME: Displa ys the accumulated time .
RESET?--RCL: Resets to zero by pressing k ey.
(15) LAST CALL TIME : Displa ys "air time" of last call in
minutes and seconds.
BATTERIES AND RECHARGING
BATTERIES
The Ericsson IPE- 200 is designed for use with high
quality Ericss on batteries provided in the package. Use
of other batteries should be av oided as it ma y be hazardous and may result in voiding your radio’s warranty.
Battery Level Indicator
A number from B0 to B5, based on the battery level
is shown on the right of the display . A fully charged battery
will show B5. A battery whic h is almost discharged will
indicate B1 or B0.
43
Page 44

Low Battery Alert
Your radio should typically provide ninety (90) minutes
of continuous talk-time before needing to be recharged.
An alert tone sounds for a short time and the message
LOW BATT
flashes in the display. The symbol will
also flash.
If the radio is left on, the low battery aler t will sound
and, eventually, the radio will turn itself off.
If the low battery alarm sounds while a call is in
progress, you should end the call as quic kly as possible.
If the call continues, the radio will turn itself off after a
short period.
Care and Maintenance
The batteries are of Nickel Metal Hydride type. They
have a long maintenance-free service life if properly
treated.
• Discharge battery completely before recharging.
• Never let a battery get into contact with metal
objects that may short-circuit the battery poles, for
example a bunch of keys in a pocket.
44
Page 45

• Do Not disassemble a battery.
• A battery may explode if disposed of in a fire.
• Us e only Ericss on specified batteries and charg-
ers.
Rechargeable Battery Pack Disposal
The product that you ha ve purchased contains a rechargeable battery . The battery is
recyclable. At the end of its useful life,
under various state and local laws, it may
be illegal to dispose of this battery into the
municipal waste stream. Check with your
local solid waste officials for details in your
area for recycling options or proper disposal. Call Toll
Free 1-800-8-BATTERY for information and/or procedures for returning rechargeable batteries in your state.
45
Page 46

Inserting and Removing a Battery
Standard Battery
46
Page 47

RECHARGING
Your charger is intended for indoor use only. Keep
charger and AC adaptor dry . Do not use in or near water .
Avoid recharging a battery before the low battery alert
is displayed.
Nev er recharge a battery when the ambient tempera-
ture is below 5°C or 40°F, or above 40°C or 105°F.
The LED on the charger will indicate that charging is
in progress. Remove the battery when the LED turns
green. Do not leave the batter y in the charger for more
than 48 hours. Over-charging may reduce battery life.
47
Page 48

Using a Desk-Top Charger
1. Connect the AC Adapter to the desk-top charger.
2. Plug the AC adapter into a wall outlet.
3. Remove the battery from the radio and lay it on
the desk-top charger , r adio side down. F or longest battery life,remove the battery after charging.
48
Page 49

Restoring Battery Capacity
If you often recharge a battery before the low battery
alarm has been issued, the battery’s ability to accept
charge may be impaired. This will result in less and less
time between recharges. To restore the battery, perform
the following:
1. Use the radio as you normally would, until the
low battery alarm has been issued.
2. Allow the radio to remain on until it turns itself
off.
3. Charge the battery using the desk-top charger.
After discharging and recharging the battery this wa y,
it can be used for a longer period before the next recharge
is required. To get the longest period between charges,
repeat this procedure 3 or 4 times.
Also if a battery has not been used for several months,
it may require 3 or 4 charge-discharge cycles to return to
full capacity.
49
Page 50

APPENDIX 1
F AUL T TRACING
No Power to the Radio
• If the radio does not come on when you hold down
the
to the chapter
E
key, recharge or replace the battery. Refer
Batteries and Recharging
.
SERV Indicator Does Not Come On
You have lost contact with the EDACS system and
you cannot place any calls. The reason for this is either:
• The received signal is too weak. See the next
section,
Received Signal is W eak
• You are in an area which is not covered by the
EDACS system s elected.
Received Signal is Weak
If the radio displays CC SCAN often, move the radio
to obtain a stronger signal.
• Large obstacles such as buildings, hills and mountains can drastically affect the signal strength and
you may have to move to obtain a sufficiently
strong signal.
• Indoor s, it is usually best to use the radio near a
window.
50
Page 51

A Call Cannot be Placed
The reason for this is either:
• The phone number displayed may be incorrect.
• The radio may not be in service or the signal is
weak. See the prior sections.
• The EDACS system you are using requires or
does not allow the phone number to be preceded
by a "1" or the area code. Try various combinations
or contact the operator for more information.
• You are roaming and the EDACS system you are
using doesn’t have a roaming agreement with your
home system.
"
LOCKED
" Is Displayed
The radio is locked to prevent unauthorized use.
To unlock:
1. If anything is shown on the numeric field of the
display, erase it with the C key.
2. Enter the 4-digit code lock code.
UNLOCKED
will be displayed briefly.
51
Page 52

PERSONAL MEMORY DIRECTORY
Mem. Loc. Name LID or Tel. No.
1
2
3
4
5
6
7
8
9
10
11
12
13
14
15
16
17
18
19
20
21
22
23
24
25
52
Page 53

WARRANTY
A. Ericsson Inc. (hereinafter "Seller") warrants to the original purchaser for use (hereinafter
"Buyer" ) that Eq uipment m anufactured by Seller s hall be free from defects i n materia l,
workm anshi p and t itle, an d shall conform to its publis hed sp ecifi cation s. With respect to
any Equipment not manufactured by Seller (except for integral parts of Seller’s Equipment
to which th e w ar r an ties set forth ab o v e sh all a pp ly). Seller give s no warranty, and on ly t he
warran ty, if any, given by the manufacture r shall a pply. Batteries are exclude d from thi s
warranty.
B. Seller’s obligations set forth in Paragraph C below shall apply only to failures to meet the
above warranties (except as to title) occurring within the following periods of time from date
of sale to the Buyer and are conditioned on Buyer’s giving written notice to Seller within
thirty (30) days of such occu rr en ce:
1. for fuses, incandescent lamps, vacuum tubes and non-rechargeable batteries,
opera b le on ar ri v al on ly.
2. for parts and accessories (except as noted in B.1) sold by Seller’s Service Parts
Operation, ninety (90) days.
3. for all other Equipment of Seller’s manufacture, one (1) year.
C. If any Equipment f ails t o meet the f o regoing w arr anties, Seller sh all correct the f ailure at its
option (i) by repairing any defective or damaged part or parts thereof, or (ii) by making
avai lable at Seller’s factory any ne cessa ry repa ire d o r rep lace me nt pa rts. Any repaired or
replacement part furnished thereunder shall be warranted for the remainder of the warranty
period of th e Eq ui p me nt in wh i ch it is in sta ll ed . Where such failure can no t be correct ed by
Seller’ s reasonable efforts, the parties will negotia te an equitable adju stment in price. Labor
to perfo rm warra nt y service will be provide d at n o ch ange only for the Equipm ent co v er ed
under Paragraph B.3, and only during the first three (3) months following the date of sale
to the Buyer . Thereafter , labor will be charged a t prevailing rat es. T o be eligib le for no-ch arge
labor, service must be performed by an Authorized Service Center or other Services
approved for these purposes either at its place of business during normal business hours,
for mobile or personal equipment, or at the Buyer’s location, for fixed location equipment.
Service on fixed location equipment more than thirty (30) miles from the Service Center or
other approved Service’s place of business will include a charge for transportation.
Equipment located off-shore is not eligible for no-charge labor.
D. Sel ler ’s obl iga ti o ns un de r Paragraph C s h all n ot ap ply t o a ny E qu ipm en t, or pa rt thereo f,
which (i) has been modified or otherwise altered other than pursuant to Seller’s written
instructions or written approval or, (ii) is normally consumed in operation or, (iii) has a
normal lif e i nh er en tly sh orter t ha n t he w a rr a nt y pe ri od s spe cifi e d in Paragraph B , or ( i v) is
not properly stored, installed, used, maintained or repaired, or, (v) has been subjected to
any other ki nd of misu se or det rime nt al exposure , or has be en in v olved in an accident.
E. The preceding paragraphs set forth the exclusive remedies for claims (except as to title)
based upon defects in or nonconformity of the Equipment, whether the claim is in contract,
warranty, tort (including negligence), strict liability or otherwise, and however instituted.
Upon the expiration of the warranty period, all such liability shall terminate. The foregoing
warrant ies are exclusive and in l ieu of a ll other w arrantie s, whet her ora l, written, expresse d,
implied or statutory. NO IMPLIED O R STATUTORY W ARRANTIES O F MERCHANTABILITY OR FITNESS FOR PARTICULAR PURPOSE SHALL APPLY. IN NO EVENT SHALL
THE SELLER BE LIABLE FOR ANY INCIDENTAL , CONSEQUENTIAL, SPECIAL, INDIRECT OR EXEMPLARY DAMA GES .
This warranty applies on ly within the Unite d State s.
1-800-528-7711 (outside U.S.A., 804-528-7711)
53
Page 54

NOTES
54
Page 55

NOTES
55
Page 56

Emergency Numbers
P olice
State Police
Fire
Poison Control
Ambulance
Life Saving & Rescue Squad
Ericsson Inc.
Private Radio Systems
Mountain View Road
Lynchburg,V irginia 24502
1-800-528-7711 (Outside USA, 804-528-7711) Printed in U.S.A.
AE/LZT 123 1907 R1A
 Loading...