

Page 1

Page 2

Cordless Phone 230
DT200 Handset BS230 Base Station
DECT/GAP Digital
User’s Guide
Use
l
ia
c
r
unic
e
m
Com
B
ons A
i
t
a
or Comm
f
Not
ricsson Mobile
E
Page 3

What to read first
This user’s guide consists of several sections and topics which can be read individually. You will
find each section and to pic listed in the table of contents. In addition, th e “Index” at the back of
this guide shows where to find help on each topic. If you are already familiar with this type of
product, the “Quick start ” se ct ion helps you get the phone up and running quickly. However, for
basic use of the phone, you sho uld read the “Getting sta rt ed” section and “Using the menus” on
page 19 in particular. Other parts can be read when needed.
About this user’s guide
This user’s guide is published by Ericsson Mobile Comm unications AB, without any warranty.
Improvements and changes to this user’s guide necessitated by typographical errors, inaccuracies
of current informati on, or changes to programs and/or equipment, may be made by Ericsson
Mobile Communicati ons AB at any time and without notice. Such cha nges will, however, be
incorporated into new editions of this user’s guide. All rights reserved.
U
l
se
ions
t
a
AB
Cordless phone features
• Superb sound quality
• Comfortable, ea sy-to-use handset
• Large illuminated display
• Phone book for 100 names and numbers
• Advanced calling costs manage ment
• Expandable from 1 to 8 handsets
• Total priv acy, no eavesdropping
omme
C
Not for
c
r
omm
e C
l
ia
unic
sson Mobi
c
Eri
Page 4
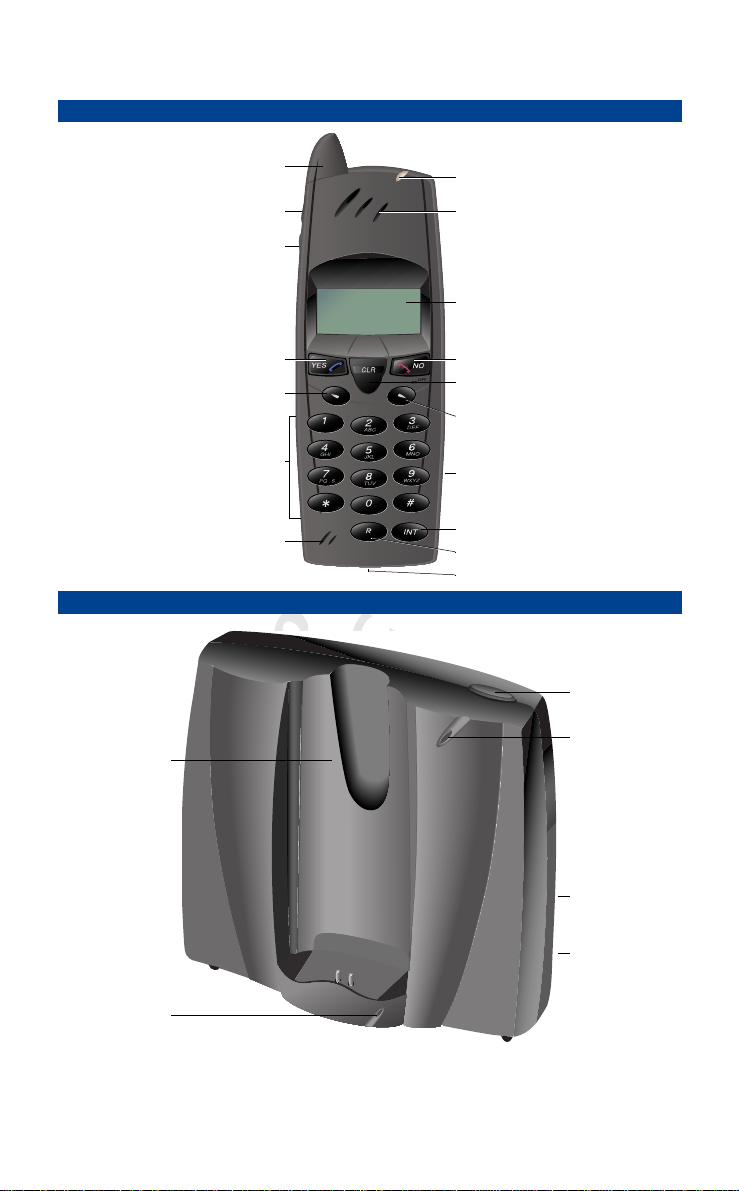
HANDSET
Volume up key
Volume down key
BASE STATION
Handset
compartment
Antenna
Off hook key
Up key
Number keys
Microphone
omme
C
e C
l
Warning light
Earpiece
Display
On Hook/On/Off key
U
Clear/Mute key
l
Down key
ia
c
Battery compartment (back)
r
Internal call key
R key
Accessory contacts
omm
se
ions
t
a
unic
Page button
External line
light
AB
Charging light
Eri
Not for
sson Mobi
c
Desk stand
(back)
Cable
connection
(back)
Page 5
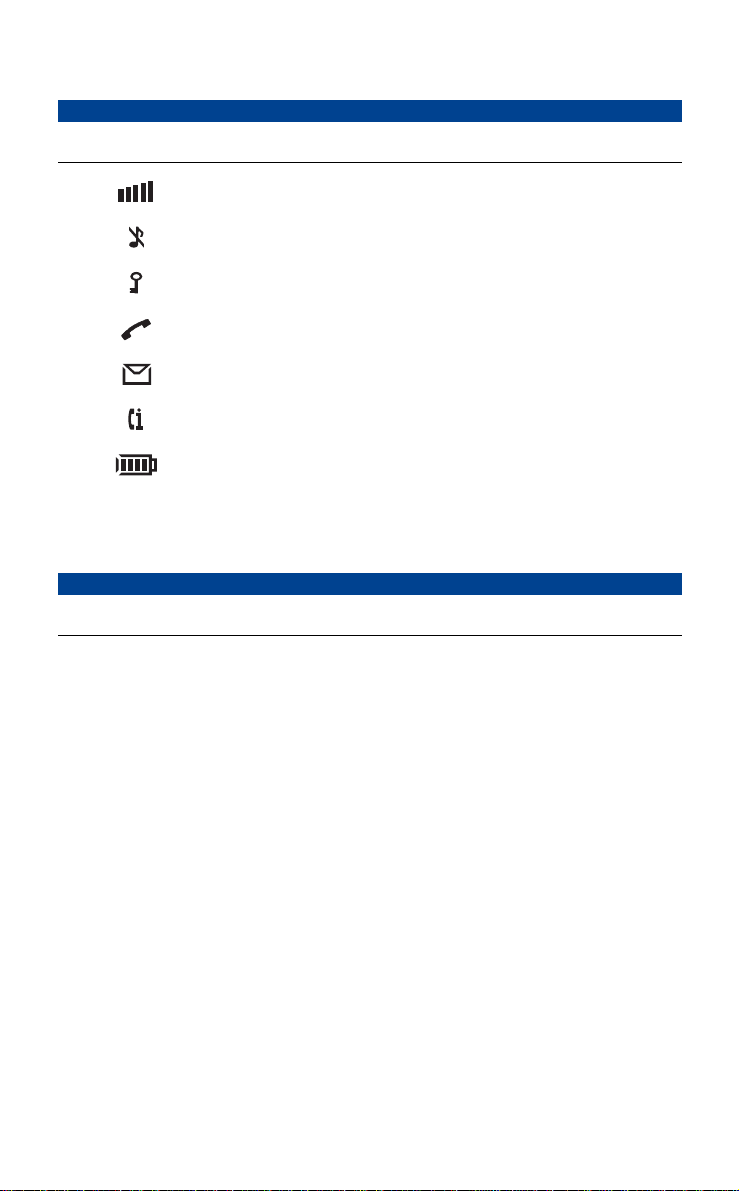
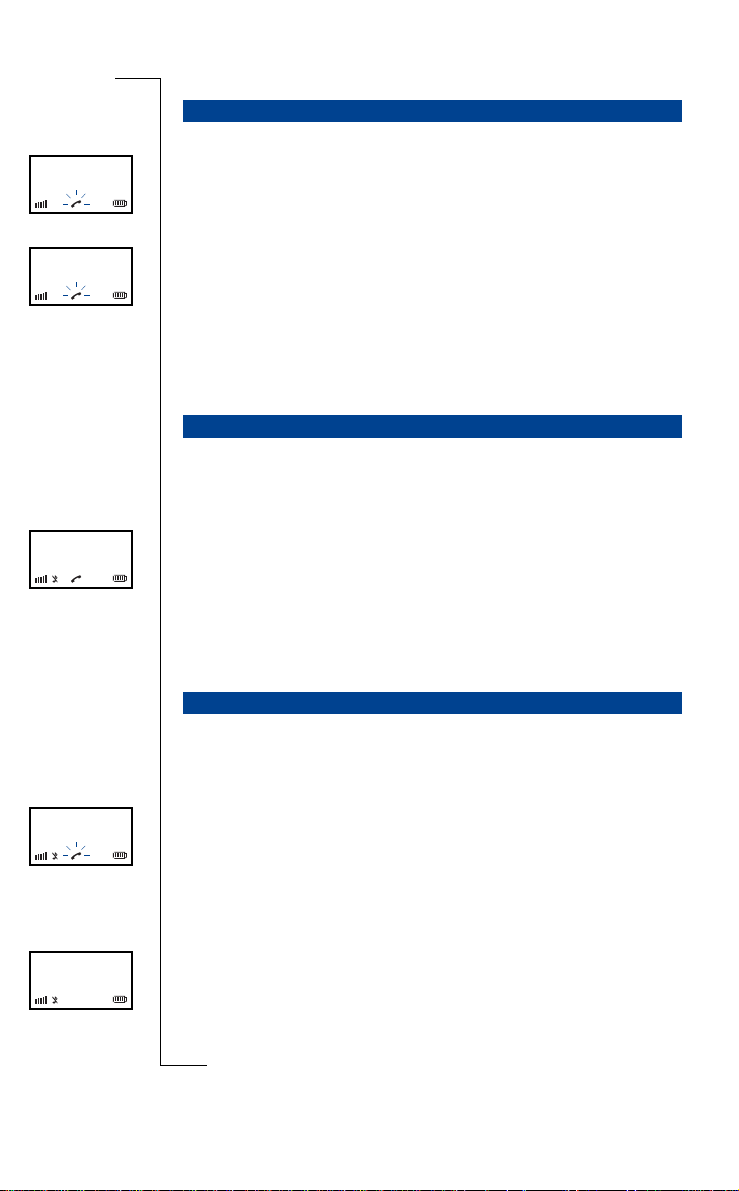
HANDSET DISPLAY ICONS AND INDICATORS
On Flashing Flashing quickly
Signal strength Visible when con-
Ring off Ring signal muted or
Key Keys locked
Hook Handset off hook Connection being made Handset is ringing
nected to a base station
microphone off
ons A
i
Message New message received
Use
Call Info New unanswered entry
in the who called list
Battery Battery status (4 blocks
is fully charged)
Battery casing flashes;
battery almost empty
l
ia
c
r
Warning light Baby phone call
interrupted
BASE STATIONS INDICATORS
On Flashing Flashing quickly
Red top light External line occupied Incoming external call No external line
Green bottom light Handset battery is
being charged
Warning (battery low/no
e
connection)
Com
unic
m
t
by the voice mailbox
a
Blocks flash successively; battery is being
charged (steady blocks
indicate the battery
level)
Incoming call
Message waiting
connection
B
For further details, please see sect ion “Reference” on page 85 of the user’s guide.
or Comm
f
Not
ricsson Mobile
E
Page 6
QUICK START
This page helps you to get t he cordless phone up and running quic kly. For a more detailed instal-
lation procedure, see “Preparing for use” on page 9. You should read the “Getting started” section
afterwards.
B
ons A
i
t
Use
l
a
ia
c
r
unic
e
m
Com
or Comm
f
Not
ricsson Mobile
E
Page 7

Contents
B
Getting started 9
What is in the box9
Preparing for use 9
Battery 12
Switching the handset on and off 15
Attaching and removing the clip 15
A brief guide 16
Information on display 18
Using the menus 19
Changing the menu language 20
Telephoning 23
Making a call 23
Call using the phone book 23
Redialling 25
Returning a call 26
Receiving a call 27
Turning off the microphone 27
T urning off the ringer and warning sound 27
Paging a handset from the base station 28
Advanced
telephoning 29
or Comm
When using more than one handset 29
Making and receiving an internal call 29
Receiving a second call 30
Searching for handsets or people 31
Consulting with another handset or
transferring a call 31
Making a three-party call 32
Setting the handset to tone dialling 32
Setting the handset to long tones 32
Sending a dial tone pause 33
Not
f
Phone book 35
Phone book use 35
Adding name and number 36
Adding last dialled numbers 36
Adding caller’s number 37
Editing names and numbers 38
Use
l
Deleting names and numbers 39
ia
Personalizing the
c
handset 41
r
Language 41
e
Earpiece volume 41
Ring volume 42
Ringer tones or melodies 42
Discreet ringing 43
Automatic answering 43
Key click43
Display light 44
Display contrast 44
Com
Clearing all handset settings 44
Personalizing the base
station 45
Changing settings (PIN code) 45
Language 45
Ring volume 46
Ringing order 46
Call waiting notification 47
Priority phone 47
Least cost routing 49
Dial tone pause 50
Clearing all base station settings 51
unic
m
ons A
i
t
a
ricsson Mobile
E
Page 8

Blocking keys and extra
security 53
Blocking handset keys53
Setting handset locks 53
Changing the handset PIN code 54
Unblocking the handset 55
Changing the base station PIN code 56
Resetting the base station PIN code 57
Showing the IPEI code 57
Overview PIN and other codes 58
Extra features 59
Emergency call 59
Baby phone 59
Direct call 60
Call barring 61
Exempt numbers 62
Call tariff 63
Call budget 64
Call statistics handset 66
Call statistics base station 66
Voice mail67
Subscribing handsets 68
Using multiple base stations 70
Single or multi-cell mode 71
Using a switchboard 71
Pulse or tone dialling 72
Signalling methods 73
Transferring calls 75
Tips and tricks 83
Reference 85
Safety instructions 85
Troubleshooting 85
Buttons and keys 88
Display icons and terminology 89
Signals 90
Menu structure 91
Maintenance 93
Technical specifications 93
Spare parts and accessories 96
Warranty 96
Use
l
Index 99
i
t
a
ia
Handset quick
c
reference (inside back
r
cover)
e
unic
m
Com
B
ons A
Using base stations 77
Connecting to base stations 77
Subscribing to a base station 78
Re-subscribing to a base station 79
Selecting another base station 80
Editing base station name 81
Deleting subscription 82
or Comm
f
Not
ricsson Mobile
E
Page 9

Use
l
ia
c
r
e
Com
unic
m
B
ons A
i
t
a
or Comm
f
Not
ricsson Mobile
E
Page 10

Getting started
WHAT IS IN THE BOX
Make sure that all the parts are in the box. If anything is missing, please contact your dealer.
The box should contai n:
1. Base station
2. Desk stand for the base station
3. Wall mounter for the base station
4. Screws and plugs for the wall mounter
5. Handset
6. Battery
7. Clip
8. Power adaptor with cable
9. Telephone line cable
10.User’s guide
11.Warranty card
PREPARING FOR USE
To install the set, follow the steps below. The cordless phone will then be
ready for use.
r
e
Com
Use
l
ia
c
m
unic
ons A
i
t
a
B
Warnings Make sure the local mains voltage corresponds to the voltage on
the power adaptor.
Only use the power adaptor that comes with the set.
or Comm
f
Not
ricsson Mobile
E
Getting started 9
Page 11
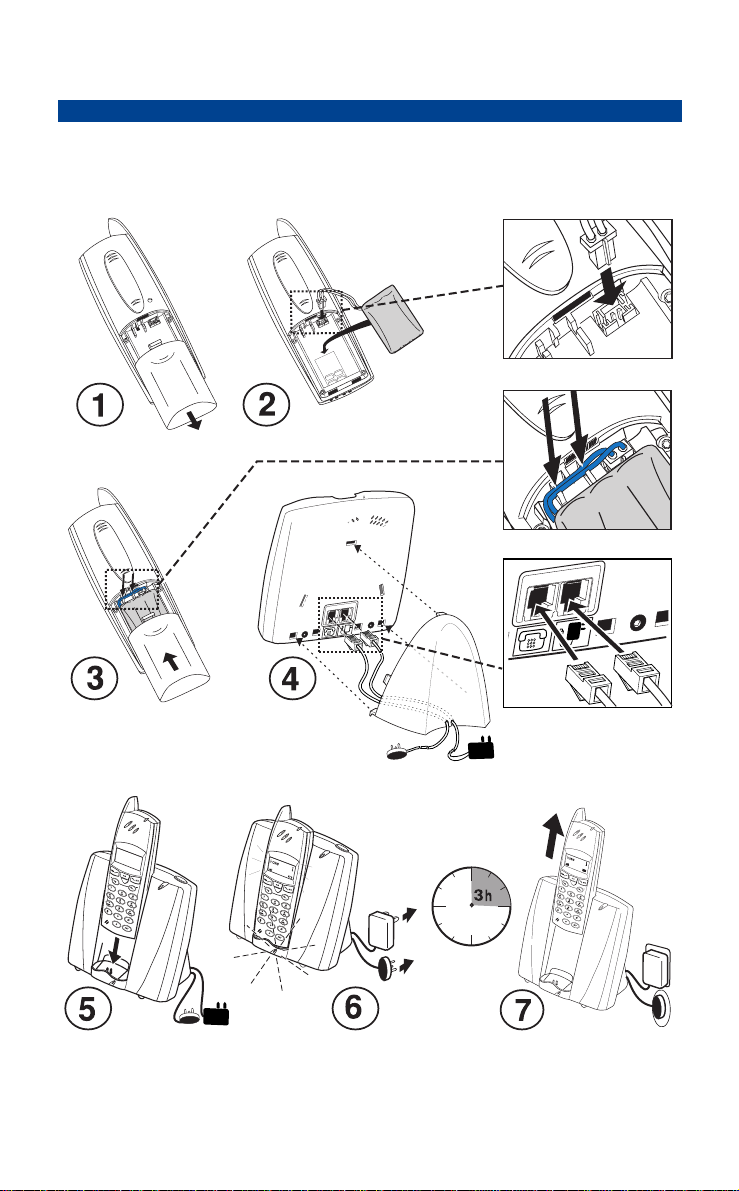
When installi ng t h e c o rdless phone, it is importan t that you closely follow
the procedure belo w:
1. Attach the clip to the handset.
ons A
i
t
Use
l
a
B
2. Insert the battery in the handset.
or Comm
f
Not
ia
c
r
unic
e
m
Com
10 Getting started
ricsson Mobile
E
Page 12
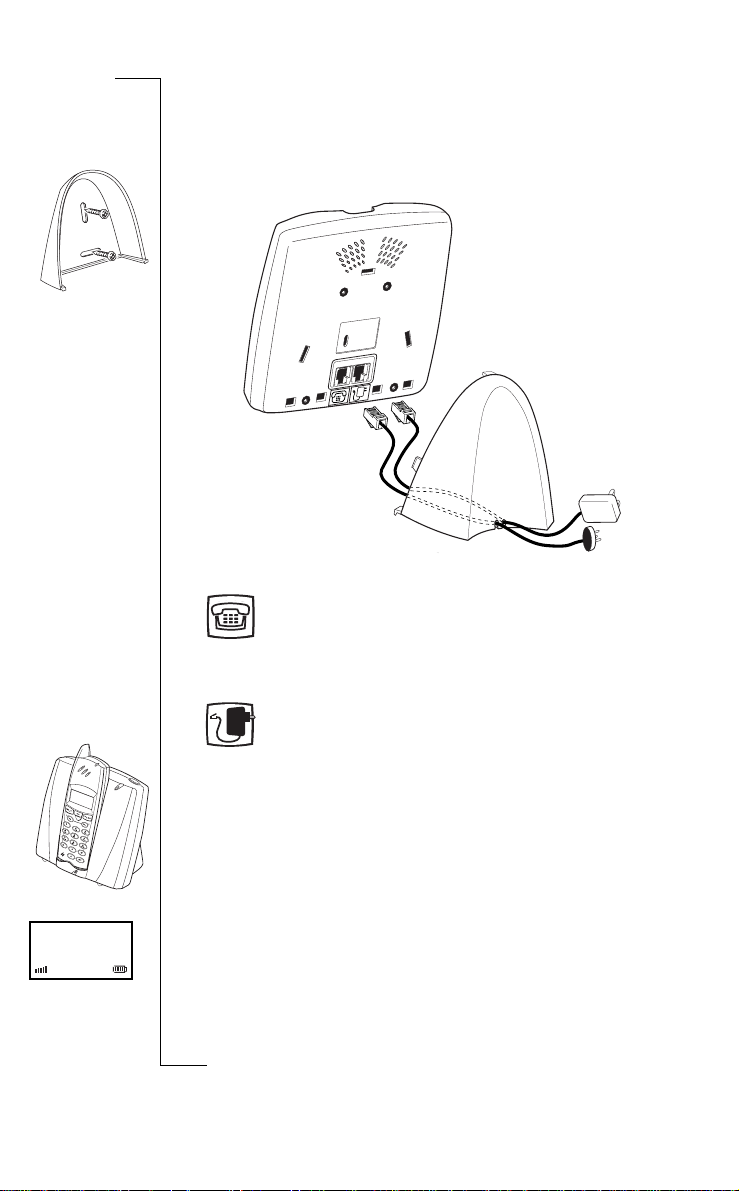
3. Find a suitable location for the base station. To make the best use of its
operating range, put your base station in a central positi on. You can place
it on a table using the desk stand or mount it on the wall using the wa ll
mounter.
4. If you place the ba s e station on a wall, sc rew th e wall mounter to th e wall.
ons A
i
t
Use
l
a
ia
c
r
unic
e
m
5. Connect the tel ep hone line to the telephone socket in the base station.
Telephone socket identifier
B
Home 1
6. Connect the tel ephone line to the analogue telephone wa ll socket.
7. Connect the power cord to t he power plug soc ket i n the base station.
Com
Power plug socket identifier
8. Connect the desk stand to the base station or connect the base station to the
or Comm
wall mounter. Put the lower hooks in first.
f
For the desk stand, route the c ables through the slots at the back.
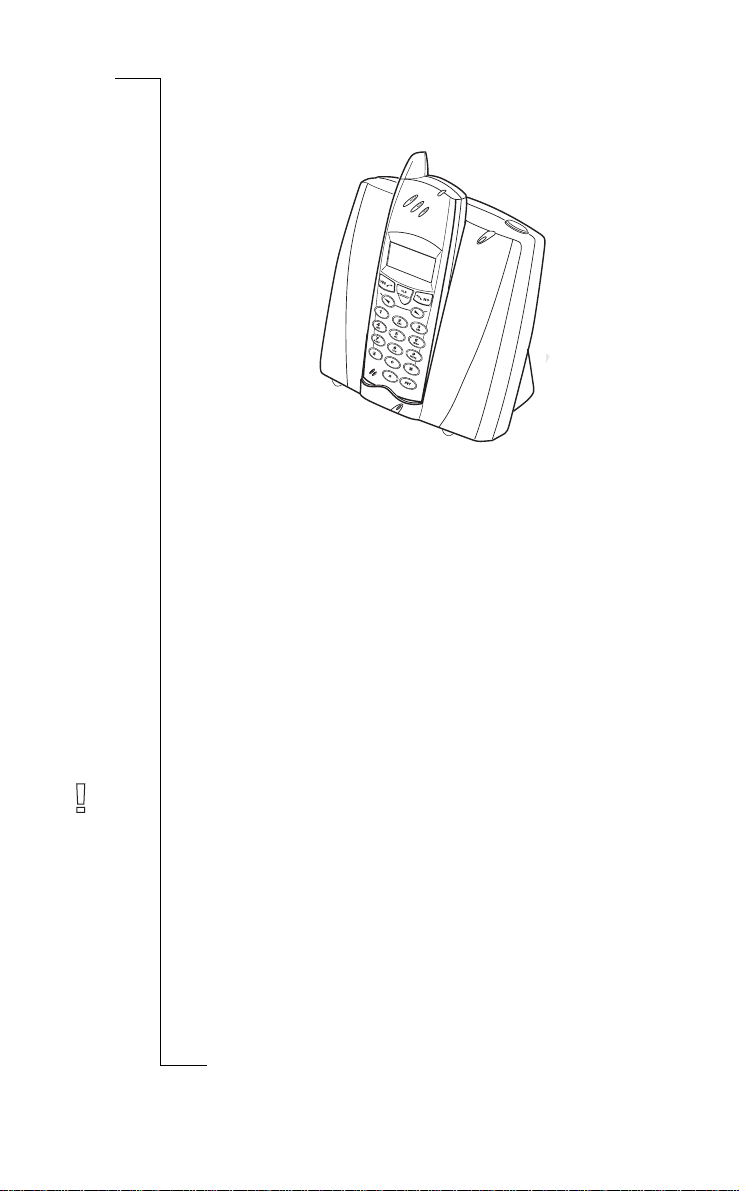
9. Put the handset into the base station as shown in the picture. The hand set
must be off.
10.Put the power adaptor plug into the wall so cket.
If you see a red, flashing light on the top of the base station, there is a fault
Not
with the telephone l ine connection.
After a few minutes the handset will subscribe itself to the base station and
turn on automatically.
11.Leave the handset in the base station for at least 3 hour s to charge the bat-
tery for the first time.
ricsson Mobile
E
Getting started 11
Page 13

If the handset does not turn on automatically, remove the power adapter plug
from the wall socket and repeat from step 9. If that does not help, please refer
to “Subscribing handsets” on pa ge 6 8.
B
When the battery is charged, the handset is ready for use. For more inform a tion about charging the bat te r y, please refer to “ Battery” below.
Important
It is important to make a note of the IPEI code. You may need it to reset the
handset’s PIN code. Please refer to “Showing the IPEI code” on pa ge 5 7 for
further details.
Note We also recommend that you change the pin code of the base station
directly after installing the cordless phone. See “Changing the base stat ion
PIN code” on page 56 for more information. See also “Overv iew P IN and
other codes” on page 58 for the PIN code of the handset and of the base
station.
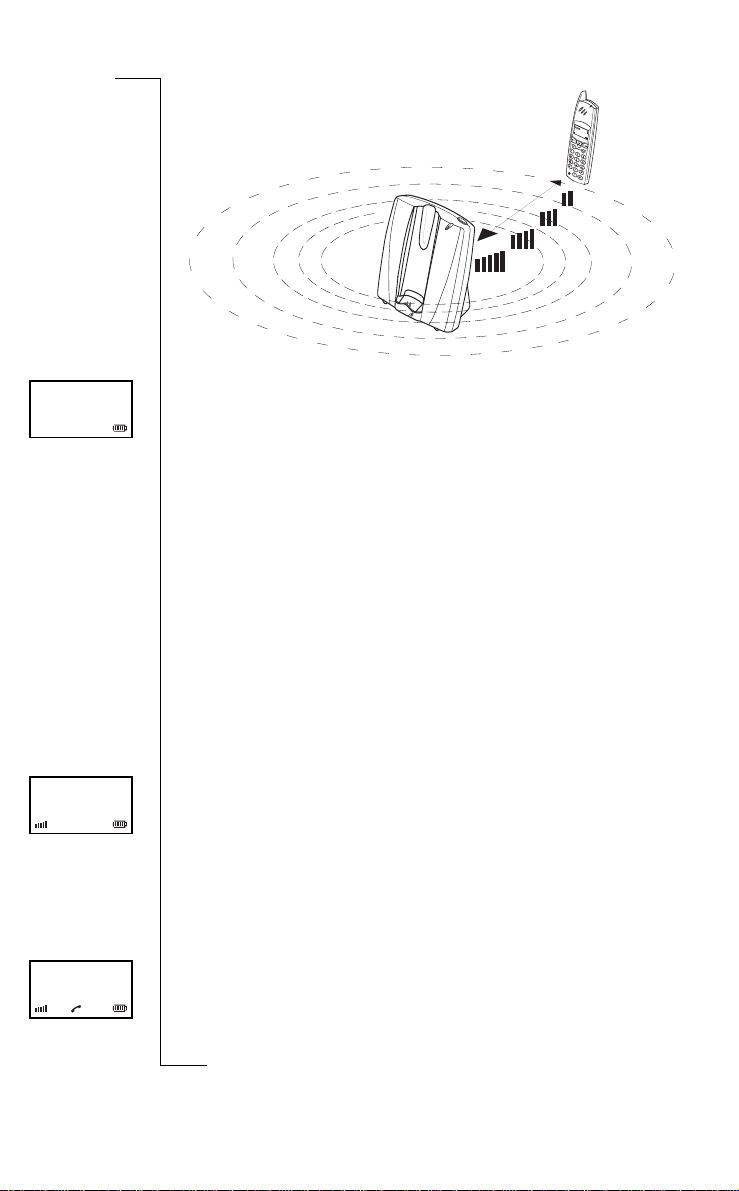
Operating range
You can use your handset in the area that is covered by the base station. Outside this area, you lose contact with the ba s e sta tion and the signal strength
indicator on the display disappears. The warning light flashes and you hear
short, fast, warning beeps.
To make best use of the operating range, plac e your base station in a centra l
position.
r
e
Use
l
ia
c
m
unic
ons A
i
t
a
BATTERY
The handset is powered by a rechargea bl e battery. You can fully charge a flat
battery by placing the handset in the base station for 3 hours. A fully charged
battery gives you up to 15 hours of callin g time or up to 100 hours of standby
time. The handset has a battery meter, which indicates you how much power is
or Comm
left in the battery.
f
Note The handset is powered by a Nickel Metal Hydride (NiMH) battery. It
can be recharged at any time. To keep the battery fully charged, you can put or
leave the handse t in the base station wit hout any problem.
Not
12 Getting started
ricsson Mobile
E
Com
Page 14
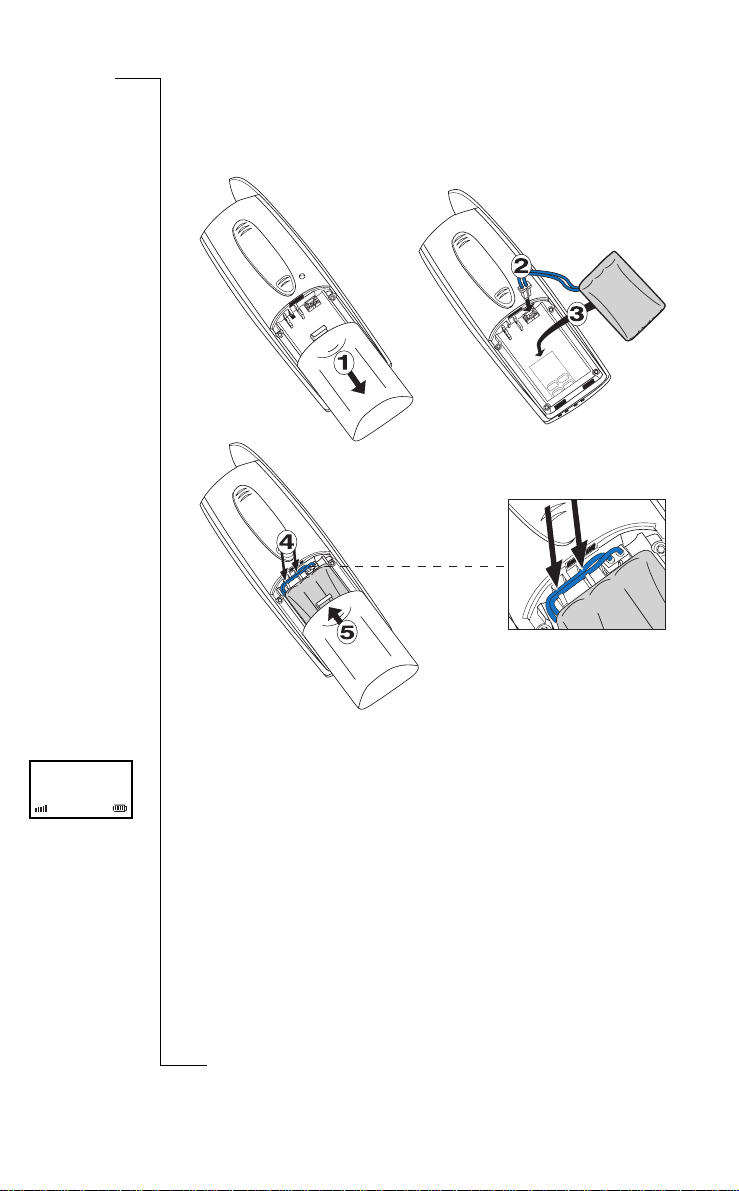
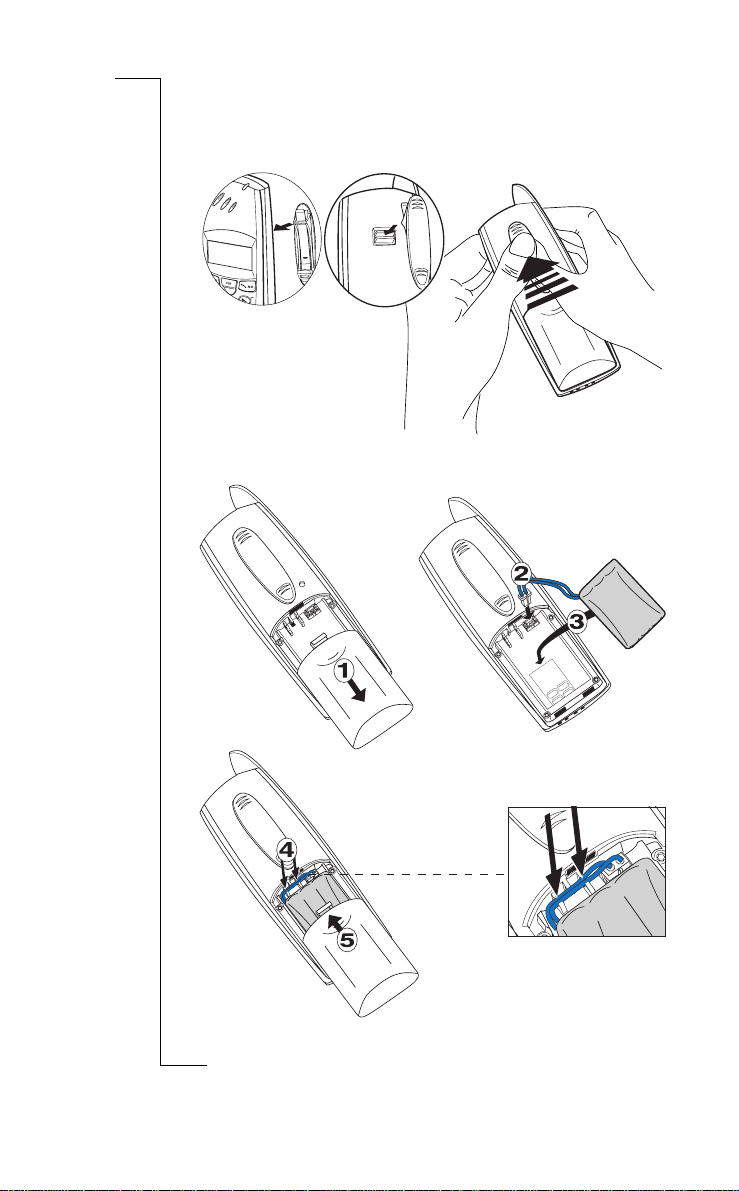
Placing the battery
Place the battery as shown below. Make sure that the batter y w ire s are put
through the notches as shown.
ons A
i
t
Use
l
a
ia
c
r
unic
e
m
B
Home 1
Com
Reading the battery meter
When the battery is fully charged, the battery meter on the handset display
or Comm
consists of four blocks. The num ber of blocks decreases as the battery dis-
f
charges. If the battery is almost flat, the battery meter and the red light on the
handset flash. An al arm sounds if there is les s than 15 minutes’ calling time
left in the battery.
Not
ricsson Mobile
E
Getting started 13
Page 15
Charging the battery
Place the handset in the base station as shown in the picture below.
ons A
i
t
Use
l
a
ia
If the lower green light on the base station is on (and the battery meter on the
display flashes), the battery is being charged. As soon as the battery is fully
charged, the lower green ligh t i s t urne d off an d the battery meter on the handset stops flashing.
If the battery is co mpletely flat it can take a few minutes before the lower
green light on the base station comes on.
Changing the battery
Rechargeable batterie s have a limited lifespan. Under normal co nditions, the
handset battery will la st for at least a year.
If the standby time for the handset becomes too low, you should replace the
battery. Please contact your dealer for more information.
or Comm
Warning Only use batteries as specified in “Technical specifications” on
f
page 93.
The battery does not contain cadmium and is therefore more environmentallyfriendly than other rechargeabl e ba t te rie s. However, all batteries should be
treated as chemical waste.
c
r
unic
e
m
Com
Not
B
14 Getting started
ricsson Mobile
E
Page 16

SWITCHING THE HANDSET ON AND OFF
While the handset is switch ed on, it is in standby mode. In standby mode , the
handset is ready to make or receive calls but consumes less ene rgy. With a
fully charged battery, the handset can operate for about 100 hours in standby
mode. If you are not using the ha ndse t to ma ke or re ce ive calls, you can put
the handset in the base stati on t o keep it fully charged.
Switching the handset on
B
Home 1
Before you can use the handset you must switch it on:
• Press
After switching on, informa tion i s displayed. For more details see “Inform ation on display” on page 18.
Switching the handset off
If you do not want to make or receive calls, you ca n switch the handset off.
• Press and hold
You cannot turn the hand set off durin g a c al l.
If the handset is off and you receive an external call, the ring signal on the
base station still works. Press
then
NO for at least one second to switc h the handset on.
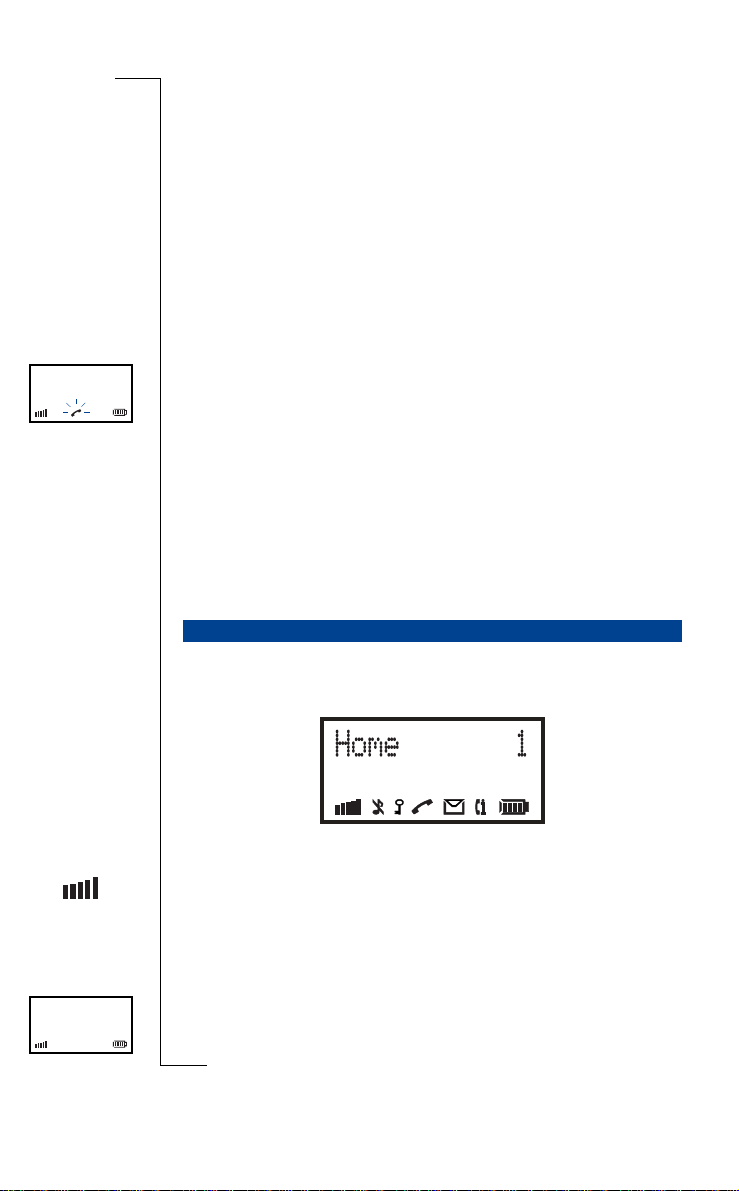
The standby display appears. The number on the right-hand side is the
internal number of th e ha ndset on the base station.
Use
l
ia
c
To switch the handset off:
NO until the display turns blank.
YES to receive the call.
r
e
NO for one second to switch on the handset,
Com
unic
m
ons A
i
t
a
ATTACHING AND REMOVING THE CLIP
The handset has a clip which you can use to attach the handset to your clothes.
• Attach the clip to the handset. Do not press on the display!
or Comm
Your handset is now ready for use.
f
T o minimize wear and tear, we recommend that you do not remove the clip
from the handset too ofte n. See a lso t he drawings below.
Not
ricsson Mobile
E
Getting started 15
Page 17
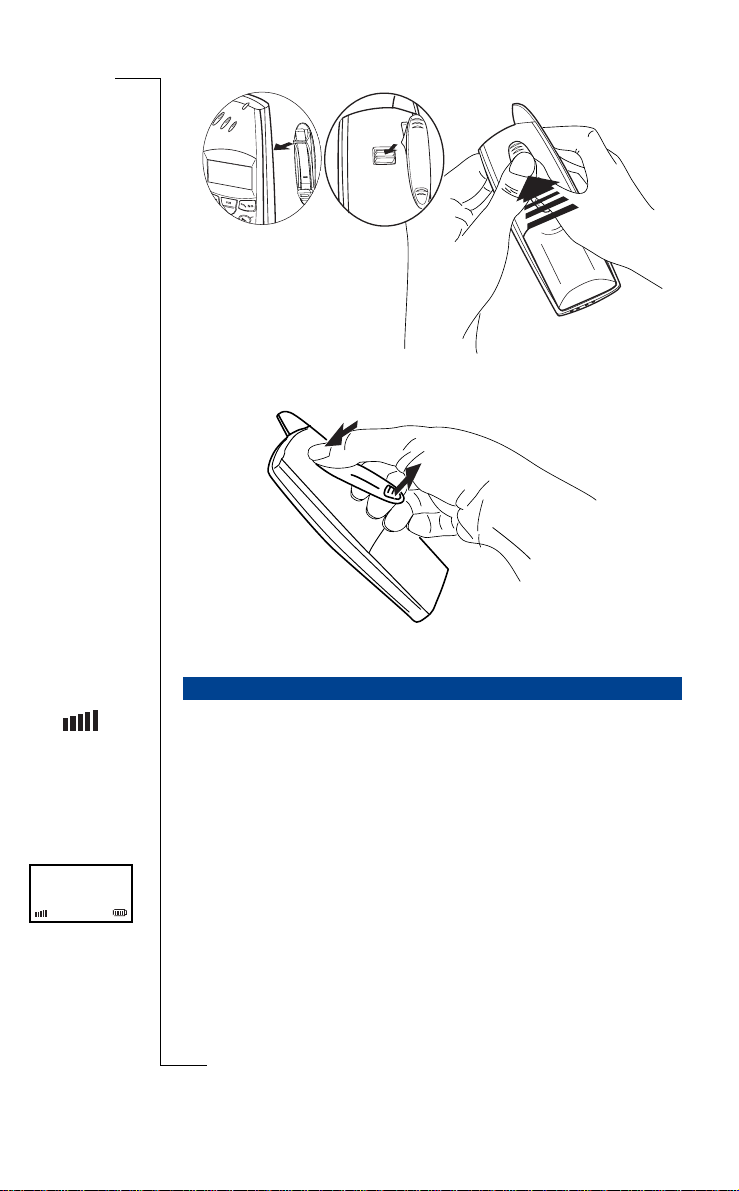
Attaching the clip
Removing the clip
r
e
Use
l
ia
c
m
B
ons A
i
t
a
unic
A BRIEF GUIDE
After installing the co rdl ess phone you can now make and receive calls. For
initial use, it is as s umed that you are near the base station and that the signal
strength indicator is vi sible.
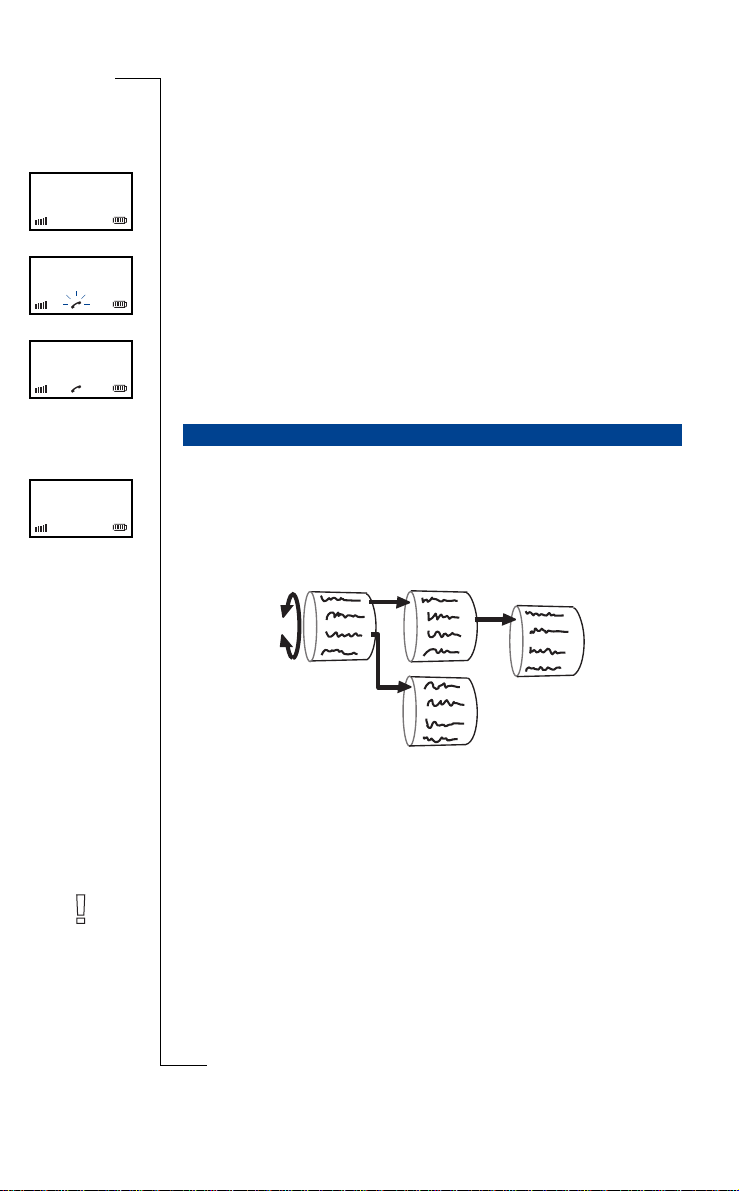
Using the base station
The base station covers an area in which the handset can ma ke and receive
calls via a radio connection. To establish a radio connection, your handset
Home 1
requires a subscription to the base station. The name of the base station is displayed on the handset.
Not
If your handset is connec te d to a base stat i on, thi s is sh own by the sig nal
strength indicator. If the indicator is visible, you can make and receive telephone calls.
16 Getting started
ricsson Mobile
E
Com
or Comm
f
Page 18
No Network
Home 1
ons A
i
t
If the indicator is not visi ble, then the handset is not co nne cted to a base station. This may me an:
• You are out of range.
Check that the base station is on and that you are within range.
• There is no access to the base s tation.
The handset is not able to conne ct or its access rights may have changed.
Set the handset to automatic base station selection and i f that does not
help, subscribe the handset to the base station again.
• There is no subscription to the base station.
Subscribe the handset to the base station.
Please refer to section “Using base stations” on page 77 for further
information.
r
e
Use
l
ia
c
m
unic
a
Com
Switching on
Before you can use the handset you must switch it on:
• Press
Making a first call
Check that the set is installed correctly by dialling a person you know.
NO for at least one second to switc h the handset on.
or Comm
The standby display appears. The number on the right-hand side is the
f
internal number of th e ha ndset on the base station.
B
0:00:06
0201482571
Not
To make a call:
1. Press
2. Dial the number you want to call using the number keys.
3. Wait for an answer and, on completing your call, ask the person to call you
YES and you can hear the dia l tone.
A red light appears on the top of the base station.
You hear the ringi ng tone.
back.
ricsson Mobile
E
Getting started 17
Page 19
ExternalCall
4. Press NO to end the call.
The duration of the call is displayed. If a vailable, the costs of the call are
also displayed.
For more information about displaying call costs, see “Call tariff” on page 63.
If you dial a number but can still hear the dial tone, you probably have to set
the base station to an other dialling method. See “Pulse or tone dial li ng” on
page 72 for more details.
Receiving a call
If someone calls you, the handset an d the base station ring.
To receive a call:
1. Press
2. Have a conversation.
3. Press
Switching off
If you do not want to make or receive calls you can switch the handset off.
• Press and hold
After switching on the handset , the di splay may show several icons and other
information.
YES to answer the call.
NO to end the call.
The duration of the call is displayed. If a vailable, the costs of the call are
also displayed.
Use
l
ia
c
r
To switch the handset off:
base station continues to work even if you switch off the handset .
INFORMATION ON DISPLAY
e
NO until the display turns blank. The ring signal on th e
unic
m
Com
ons A
i
t
a
B
Signal strength
A signal strength indicator is shown on the le ft-hand side of the display when
the handset is connected to a base station. It is a meas ure of reception quality.
Not
Five vertical bars means good reception quality and no bars means no connection. In areas where the reception quality is poor, you risk losing calls.
Home 1
18 Getting started
ricsson Mobile
Base station name
The name of the currently-connected base station i s displ ay ed when the handset is on standby. The default base station name is
E
or Comm
f
Home
but you can set the
Page 20
base station name yourself. This is described in “Edi ti ng base station name”
on page 81.
Home 1
ExternalCall
0:12:53
Anna
>PhoneBook
Handset
Extension number
Your internal number is shown on the right-hand side of the display when the
handset is on standby. The internal number ma y not be shown when the handset is connected to another type of base station.
Call information
When the handset rings, the typ e of cal l is di spl aye d.
Call costs or duration
During a call, the handset displays the duration of the call. The display also
shows call costs at the end of the call, if a call tariff and metering puls es are
available. For more details, see “Cal l tariff” on page 63.
USING THE MENUS
The handset can be operated via menus . For ins t ance, you can enter the main
menu option
UP or DOWN key again to scroll through other options. Press YES to confirm
an option. Some options take you into a new menu. Press
previous menu.
PhoneBook
by pressing either th e UP or th e DOWN key. Press the
r
e
Use
l
ia
c
m
unic
ons A
i
t
a
NO to return to the
B
Com
When scrolling through the menu you can return to the standby display or pre-
or Comm
f
vious menu by pressing
If you do not press any key for a minute, the hand set aut omatically reverts to
the standby display.
Note The handset makes use of “dynamic” menus, which means that some
Not
menu options are only visible where applica ble.
The topics that fo ll ow (changing the handset and the base stati on menu language) show you how the menus work. For changing the handset menu language, every step of the procedure is given in detai l. For al l ot he r procedures
(including changing the base station menu language), it is assumed that you
NO once or repeatedly, at any time.
ricsson Mobile
E
Getting started 19
Page 21

know your way around the menus. This gui de on l y tells you where to enter a
PIN code and what menu item t o select for a specific function. To help you
locate the menu items that are not in the main menu, a path through the menus
is given at the beginning of each procedure. These paths are indicat e d by th e
word “Route:” followed by menu items you have to select in sequence in order
to get to a specific function. In most ca se s, the next menu item is not immediately visible so you have to use th e
“Menu structure” on page 91 for an overview.
UP or DOWN key to locate it. See also
B
Navigation keys
Cancel
Use
l
Up Down
t
a
i
BackConfirm
ia
Cancel
You can cancel any operatio n:
• Press
Handset menus
The default menu language is English. To select another language, use the
Language
confirm your language c hoice.
1. Press UP or DOWN to enter the main menu.
2. Scroll to
3. Scroll to
4. Scroll through the list of languages until you find the languag e you want.
5. Press
Not
CLR shortly.
The handset returns to standby.
CHANGING THE MENU LANGUAGE
option. Please note that t he me nu options stay in English until you
To change the handset lan guage:
Handset » Language
Route:
or Comm
f
PhoneBook
Option
The current la nguage is displayed.
YES to confirm your choic e.
The language has now been changed.
Handset
Language
is displayed.
and press YES.
and press YES.
c
r
unic
e
m
Com
ons A
20 Getting started
ricsson Mobile
E
Page 22

Base station menus
The base station menus form a part of the handset me nus. They are normally
in the same language as the handset menus. If the handset language is not
available, the base station chooses English by default. To select another
Language
default language, us e the
note that the menu options stay in English until you confirm your languag e
choice.
Please note that the procedure assumes that you are going to select the
option. After you have entered your PIN code, you have to go to the
option.
To change the base station’s default la nguage:
BaseStation » Basic » Language
Route:
1. Select
2. Enter the PIN code for the base station (see page 58) and press
3. Select
4. Scroll through the list of languages until the language you want is selected.
5. Press
Basic
PIN:
The current la nguage is displayed.
The base station language ha s now been ch anged.
and press YES.
is displayed.
Language
and press YES.
YES to confirm your choic e.
option in the base station men us. Plea se
t
Use
l
a
ia
c
r
unic
e
m
ons A
i
Basic
Language
YES.
B
Com
or Comm
f
Not
ricsson Mobile
E
Getting started 21
Page 23

Use
l
ia
c
r
unic
e
m
Com
B
ons A
i
t
a
or Comm
f
Not
22 Getting started
ricsson Mobile
E
Page 24
0-0535554505
Telephoning
B
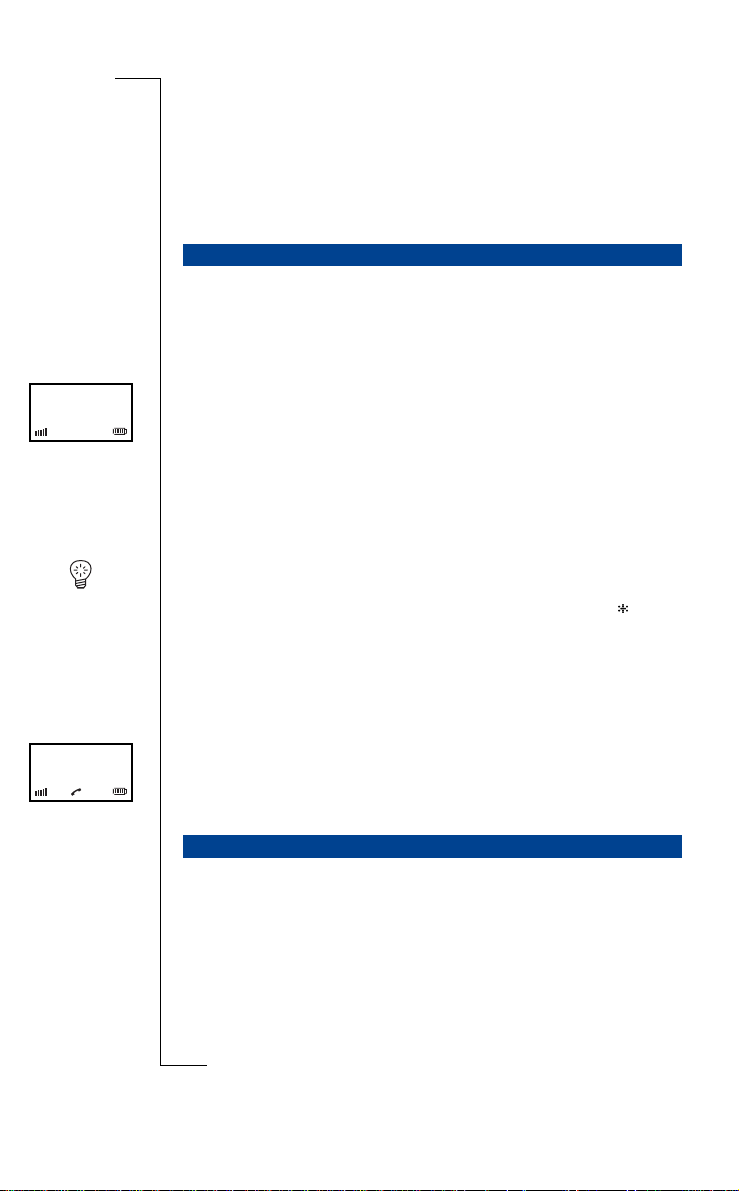
MAKING A CALL
When you make a call, you can enter the number and then press YES. This is
called pre-dialli ng a nd al lows you to check and, if necessary, correct the
number.
To pre-dial:
1. Enter the number.
The number is displayed.
2. Correct the number if necessary (
move right).
3. When the numb er is correct, press
4. Press
Tip While editing a telephone number, you can “jump” to the most left or the
most right digit by respectively pressing
You can enter a dial tone pause in the telephone number by pressing
second.
NO to end the call.
The duration of the call is displayed. If a vailable, the costs of the call are
also displayed.
r
e
Use
l
CLR = delete ; UP = move left; DOWN =
ia
YES and wait for an answer.
c
unic
m
UP or DOWN for one second.
ons A
i
t
a
for one
00535554505
Dialling while off hook
To make a call in the usual way:
1. Press
2. Dial the number and wait for a connection.
3. Press
Your handset contains a phone book for storing names and numbe rs. You can
conveniently make calls using this phone book. To add names and numbers to
Not
the phone book, see section “Phone book” on page 35 .
YES and wait for the dial tone .
NO to end the call.
or Comm
The duration of the call is displayed. If a vailable, the costs of the call are
f
also displayed.
CALL USING THE PHONE BOOK
Com
ricsson Mobile
E
Telephoning 23
Page 25

Calling by name
The call by name option l et s you search for a name and num be r in the phone
book.
To call by name:
PhoneBook » Find&Call
Route:
1. Select
2. Press the key which has the first letter of the name you are searching for.
3. Correct the name if ne cessary (
4. Press
5. Scroll until you find the right name.
6. Press
If you press
Tip W hi le edi ting a name you can “jump” to the most lef t or the most right
letter by respectively pressing
whole name by pressing
Quick call by name
You can also search for a number by name in your phone book without using
the menus.
1. Press the key which has the first letter of the name, and hold down the key
Not
2. You can now enter more lett ers as in step 1, or scroll unti l you find the
3. Press
If you press
Find&Call
Enter Name:
the phone book, see “Adding name and number” on pa ge 3 6.
Press once for the first letter of the key, twice for the second and thre e
times for the third letter of the key. To narrow down the search, you can
also enter the next letter(s) of the name .
move right).
The first name in the phone book beginning with the entered letter(s) or, if
it does not exist, a name begi nni ng with the next letter is displayed.
and press YES.
or
Phone book is empty
is displayed. To add names and numbers to
ons A
i
t
a
YES to confirm.
CLR = delete; UP = move left; DOWN =
Use
l
ia
YES to dial the number.
CLR instead of YES, you can edit the number before dialling.
r
e
c
unic
m
UP or DOWN for one second. You can clear the
CLR for one second .
Com
To use quick call by name:
until the display shows the first name in the phone book beginning with the
or Comm
letter on the key you have just pressed. For the second lette r of the key,
f
press the key again, without holding it down. For the thi rd letter, press the
key twice.
The display shows the first name in the phone book begi nning with the
chosen letter or, if it does not exist, only the letters you entered. In the la tter case, the last and incorrect letter flashes. You can enter another letter to
correct it. If the phone book is empty, see “Adding name and numb er” on
page 36 for more informati on.
right name.
YES to dial the number.
CLR instead of YES, you can edit the number before dialling.
B
24 Telephoning
ricsson Mobile
E
Page 26

1
Sabrina
Example:
Suppose you want to call someone whose name i s ‘Jone s’ . Press num be r key
5 and hold until the first name in the phone book beginning with ‘J’ appears.
Press number key 6 three times for the ‘O’. The first name in the phone book
beginning with ‘Jo’ appears. You can now continue by pressing number key 6
twice for the ‘N’ and so on or scroll until yo u find the nam e ‘J one s’. Press
YES to dial the number.
REDIALLING
The last ten numbers you dialled are available for redial.
To redial the last number dialled:
1. Press and hold
appears.
The handset beeps if there are no names or numbers available for redial. If
the number appears in the phone book, the name is shown instead.
2. Press
The handset dials the nu mb er again.
To dial one of the ten last dialled numbers:
1. Press and hold
appears.
The handset beeps if there are no names or numbers available for redial. If
the number appears in the phone book, the name is shown instead.
2. Scroll until you have the righ t nu m ber or name.
3. Press
If you press
You can also access the la st dialled number mem ory via the
LastDialled
option
redial.
YES and wait until the last di al led number or name
YES for the second time.
Use
l
ia
c
r
YES and wait until the last di al led number or name
e
unic
m
YES to dial the selected number.
CLR instead of YES, you can edit the number before dialling.
Com
. It is only available if names or numbers are available for
ons A
i
t
a
Information
B
menu
When you switch off your handset, the last dialled numbers are erased. You
or Comm
can permanently store the last dialled numbers in your phone book. See “Add-
f
ing last dialled numbers” on page 36.
Not
ricsson Mobile
E
Telephoning 25
Page 27

Check
Who Called ?
RETURNING A CALL
When you receive an internal cal l, the number (or name) of th e caller is displayed. In that cas e the number is stored in the who called memory. The call
info icon shows you if there are new unanswered calls. By using the call return
function, you can ea s ily return a call to the s e numbers. The who called memory holds up to ten numbers.
B
1!
Sabrina
1A
Sabrina
NO.
a
Information
Check Who Call ed ?
ons A
i
t
A
.
menu option
A
.
When there are ne w u nans wered cal ls, th e hands et dis plays
you do not want t o re turn a call at this stage, press
To return a call now:
1. Press
2. Scroll until you have the righ t nu m ber or name.
3. Press
You can also acces s the who called memory via the
WhoCalled
returning a call.
1. Select
2. Scroll until you have the righ t nu m ber or name.
3. Press
If you press
YES.
A list of numbers appears. If the number appears in the phone book, th e
name is shown instead .
New entries are marked with an exclamation mark. Calls that have been
answered with thi s handset are marked w it h the letter
INT to dial the selected num be r.
The number is removed from the who called memory and stored in the last
dialled memory.
r
Use
l
ia
c
unic
e
m
. You have this option only if name s or numbers are available for
To return one of the last ten calls:
Information » WhoCalled
Route:
WhoCalled
and press YES.
A list of numbers appears. If the number appears in the phone book, th e
name is shown instead .
New entries are marked with an exclamation mark. Calls that have been
answered with thi s handset are marked w it h the letter
or Comm
INT to dial the selected num be r.
f
The number is removed from the who called memory and stored in the last
dialled memory.
CLR instead of INT, you can edit the number before dial l ing.
Com
If
When you switch off your handset, the who called list is erased. You can per-
Not
manently store the who called num bers in the phone book. See “Adding
caller’s number” on page 37.
26 Telephoning
ricsson Mobile
E
Page 28
ExternalCa ll
InternalCall
Anna
ExternalCa ll
ExternalCa ll
RECEIVING A CALL
When the handset rings:
1. Press
2. To end the call, press
On an incoming internal call, the caller’s handset number is disp l ayed. If the
caller’s number is included in your han d se t phone book, the correspondi ng
name is displayed inste ad .
Sometimes the handset rings at an inconvenient moment. If you do not want to
answer the call, press
call.
During a call you may want to talk to someone else, without the caller hearing.
You can do this by switching off the microp hone using the
• Pressing
• Pressing
YES to answer the call.
The duration of the call is displayed. If a vailable, the costs of the call are
also displayed.
NO.
ons A
i
NO. You can press YES if you still want to answer the
TURNING OFF THE MICROPHONE
Use
l
t
a
ia
c
Y ou can switch the microphone off by:
CLR until you are read y to t al k to the caller again.
Short beeps and the ring off icon ind ic ate that the microphone is off.
Or
CLR quickly.
Short beeps and the ring off icon ind ic ate that the microphone is off. To
switch the microphone on, press
r
e
unic
m
CLR again.
CLR key.
B
Com
TURNING OFF THE RINGER AND WARNING SOUND
If your handset rings or a warning sounds at an inconvenient moment, you can
turn off the sound.
or Comm
To turn off the ring sound temporarily:
f
• Press
CLR quickly.
The ring of f icon appears.
Home 1
Even with the sound off, you can still answer the call. The warning light and
hook icon keep flashing.
Not
To turn off the ring or the warning sound permanently:
• Press
If a warning sounds and you press
turned off. The warning light conti nues to flash.
CLR for one second.
The ring of f icon appears.
CLR for one second only the sound is
ricsson Mobile
E
Telephoning 27
Page 29
You can also turn off the ringe r permanently by adjusting the ring volume to
its lowest level. See “Ring volume” on page 42.
Page Call
To turn the ring or the warn ing sound on again:
• Press
The base station has a search function with which you can page the handsets
connected to it.
Press the
Page Call
ton on the base station once, to stop the ringing.
CLR for one second.
The ring off icon disappears.
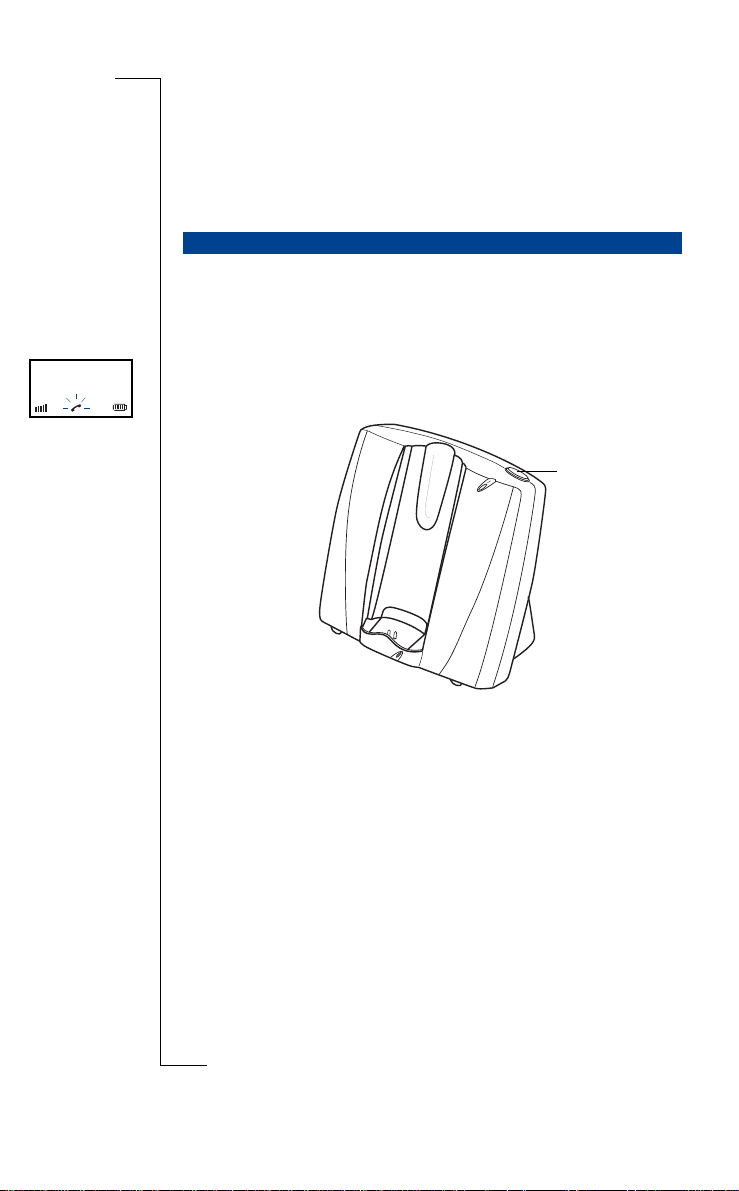
PAGING A HANDSET FROM THE BASE STATION
PAGE button on the base stati on, and the handset rings.
appears in the handset display. Press YES and NO, or the PAGE but-
Use
l
ons A
i
t
a
ia
Page button
r
c
unic
e
m
Com
B
or Comm
f
Not
28 Telephoning
ricsson Mobile
E
Page 30

Call Back
Advanced telephoning
WHEN USING MORE THAN ONE HANDSET
If you use more than one handset with the base station, here are a few special
hints.
Internal or external call?
When you receive a call, ther e i s a different ring signal for interna l and ext ernal calls:
• An internal ring signal has a two-second signal followed by a four-second
pause.
• An external ring signa l is th e s ame as usu al.
During an internal cal l, the number of the caller’s handset is displayed.
You can set the tune of the ring signa l for internal and external calls yourself.
This makes it easier for you to rec ognize the ring signal of your own han dset.
For more information, please read “Ringer tones or melodie s ” on page 42.
Call back
The base station calls you back when you transfer an external call to another
handset without waiting for an answer but the third party does not respond
within 30 seconds.
You can select different ring signals when being called back by the base station. For more information, please read “Ringer ton es or m elo dies” on
page 42.
or Comm
f
MAKING AND RECEIVING AN INTERNAL CALL
To make an internal call, you use the
internal call, the num ber of the caller appear s in the left-hand side of the display. If the caller’s number is included in your han dset phone book, the corre -
Not
sponding name appea rs instead.
r
e
Com
Use
l
ia
c
unic
m
INT key on the handset. If you receive an
ons A
i
t
a
B
ricsson Mobile
Advanced telephoning 29
E
Page 31

InternalCall
2
A call is
waiting
To make an internal call:
1. Press
2. Dial the internal telephone number and wa it for a connection.
3. Have a conversation.
4. Press
1. Press
2. Have a conversation.
3. Press
Each handset has a unique extensio n num ber on the base station by which it
can be contacted. See th e t abl e bel ow for an overview.
If you are engaged on an internal call to another ha ndset and an external call
comes in, you are notified by two short beeps in your earpiece at regular intervals. You can either finish the current call or pu t the current call on hold to
answer the external call. If yo u do not answer the external call, another handset can take the ca ll.
1. To end the current call, press
2. Press
1. Press
2. You now have three options:
INT and wait for the dial tone.
NO to end the call.
The duration of the call is displayed.
To receive an internal call:
YES to answer the call.
NO to end the call.
The duration of the call is displayed.
Use
l
Device Extension number
Handset 1 - 8 1 - 8
All handsets
RECEIVING A SECOND CALL
r
e
ia
c
unic
a
m
To finish the cu rrent call and answer the external call:
YES to answer the external call .
To put the current call on hold and answer the external call:
or Comm
R to answer the externa l ca ll.
f
• Continue the inte rnal call using
• Transfer the external cal le r us ing
• Continue the call as a three-party call by pres s ing 3.
Com
NO.
INT.
NO.
B
ons A
i
t
In a three-party call, the external call is connected to two handsets and you can
Not
have a conversation with two people at the same time. See also “Call waiting
notification” on page 47.
30 Advanced telephoning
ricsson Mobile
E
Page 32

Page Call
SEARCHING FOR HANDSETS OR PEOPLE
The cordless phone has a functi on whi ch you can use to search for handsets
and any handset user on the same base station. You can call all other handsets
by using your handset.
To use the search function:
1. Press the
All handsets connected to the base station ring.
2. Wait for an answer.
You are connected to th e first person that answ ers the call.
If you receive a search call from anot her handset on the same base sta ti on,
Page Call
are the first to answer.
CONSULTING WITH ANOTHER HANDSET OR TRANSFERRING A CALL
The cordless phone allows you to con s ul t wit h a t hird party. You can put the
caller on hold an d call another numb er. You can then talk without the caller
hearing you. Then you can continue or transfer the original call.
Y ou have an external call and want to consult with a person using another
handset on the base station:
1. Press
You hear the dial tone .
2. Dial the internal number of the han ds et you want.
If the handset is not available or en gaged, you hear the engaged tone. You
can return to the external call by pressing
you hear it ring.
3. You now have three options:
• Continue the external call using
• Transfer the external cal le r us ing
or Comm
• Continue the call as a three-party call by pres s ing 3.
f
In a three-party call, a caller is connected to two handsets.
key and press INT.
ons A
i
appears. Press YES to answer t h e c all. You only are conne cted if you
Use
l
t
a
ia
c
r
unic
e
m
INT to put the external call on hold.
Com
INT again. If the handset is free,
INT.
NO.
B
Call Back
The base station calls you back when you transfer an external call to another
handset without waiting for an answer, but the third par ty do es not respond
Not
within 30 seconds.
ricsson Mobile
Advanced telephoning 31
E
Page 33

MAKING A THREE-PARTY CALL
In a three-party call, a caller is connected to two handsets on the base stat ion.
The three-party call is sometimes also known as a conferenc e call.
You have an external call and you wish to involve a third person with a
handset on the base station:
1. Press
2. Dial the internal number of the han ds et you want.
3. Wait for a connection.
4. Press 3 to connect the three parties in the conversation.
If your handset is set to pulse dia ll ing, you can switch to tone dialling if
required. For exam ple: to control a teleservice such as voice mail.
• Select
When you hang up, the handset goes back to pulse dialling.
To select either tone or pulse dialling pe rm anently, please refer to “Pulse or
tone dialling” on page 72.
INT to put the external call on hold.
You hear the dial tone .
If the handset is not available or en gaged, you hear the engaged tone. You
can return to the external call by pressing
you hear it ring.
SETTING THE HANDSET TO TONE DIALLING
INT again. If the handset is free,
Use
l
ons A
i
t
a
ia
c
To switch the handset to tone dialling during a call:
DialMode » GoToDTMF
Route:
GoToDTMF
and press YES.
The handset now uses tone dialling.
r
e
unic
m
Com
B
SETTING THE HANDSET TO LONG TONES
The tones transmitte d by the ha ndset may be too short for some in te ractive
information services . If yo u have proble m s, you can temporarily change the
or Comm
length of the tones.
f
If the handset is set to long tones, the tones are transmitted for the same length
of time as you keep the keys pressed down.
To switch the handset to long tones during a call:
DialMode » DTMF-Long
Not
32 Advanced telephoning
ricsson Mobile
Route:
• Select
DTMF-Long
The handset switches to long ton es for t he dura ti on of the call.
E
and press YES.
Page 34

To switch the handset back to short tones duri ng a c all :
DialMode » DTMF-Short
Route:
• Select
If you are dialling while the handset is off hook, yo u ca n use menu option
SendPause
• Select
Note When you enter a phone number before dialling, you have to press
one second to insert a dial ton e pause.
DTMF-Short
The handset switches to short tones again.
SENDING A DIAL TONE PAUSE
to allow the handset t o wait for the dial ton e.
To insert a dial tone pa use while dialling off hook:
DialMode » SendPause
Route:
SendPause
-
’ is displayed and the handset waits for the dial tone.
A ‘
and press YES.
and press YES.
Use
l
ons A
i
t
a
ia
c
r
unic
e
m
B
for
Com
or Comm
f
Not
ricsson Mobile
Advanced telephoning 33
E
Page 35

Use
l
ia
c
r
unic
e
m
Com
B
ons A
i
t
a
or Comm
f
Not
34 Advanced telephoning
ricsson Mobile
E
Page 36

Phone book
B
PHONE BOOK USE
Your handset contains a phone book for 100 names and numbers. You can get
to the phone book via the
The phone book lists all the names and numbers in alphabetical order. You can
freely add names and num bers to the phone book.
Entering names
Use the number keys to enter names in the phone book.
PhoneBook
menu option.
Use
l
ons A
i
t
a
ia
Press a key once for the first letter of the key, press it twice for the second letter, three times for the third letter and so on. To enter the letters with a diaeresis or accent or to enter a digit, press the same key a fe w more times.
For example: to insert
four times and to enter a space, press number 1 onc e. See the table below for
more details.
To insert lower case letters, press the letter first and then
case letters again, press the letter and then
name, press # twice.
Ä
c
r
e
press number 2 five times; to insert È press number 3
unic
m
. T o revert to upper
. To insert an asterisk () in a
Com
Key Press the corresponding key this many times for the character
123456789101112
1 -?!,.:"’()1
or Comm
2 ABCЕДЖАЗ2
f
3 DEFÈÉ3
4 GHI Ì 4
5 JKL5
6 MNOÑÖØÒ6
Not
7 PQRSß7
8 TUVÜÙ8
9 WXY Z9
0 0+&@/$%£
# #
ricsson Mobile
E
Phone book 35
Page 37

Enter Name:
John_
EnterNumber:
053405_
ADDING NAME AND NUMBER
You can use the
To add a new phone book ent r y:
Route:
1. Select
Enter Name:
delete a phone book entry first before you can add a new one.
2. Enter a name (
space;
3. Press
EnterNumber:
4. Enter the telepho ne num ber (
move right; press
5. Press
The name and number are stored in the phone book.
Tip While editing the name or number, you can “jump” to the most left or the
most right letter by respectively pressing
can clear the whole name or nu mber by pressing
ADDING LAST DIALLED NUMBERS
The last ten numbers you have dialled remain stored in the memory of your
handset until you turn it off. You can use the
numbers to the phone book.
AddNew
option to enter names and numbers in the phone book.
PhoneBook » Store » AddNew
AddNew
and press YE S.
or
Phone book Full
CLR = delete; UP = move left; DOWN = move right; 1 =
= lower case).
YES to confirm.
is displayed.
YES to confirm.
is displayed. In the latter case, you have to
CLR = delete; UP = move left; DOWN =
for one second = dial tone pause).
Use
l
a
ia
UP or DOWN for one second. You
c
r
CLR for one second.
unic
e
m
AddLastDial
option to add these
B
ons A
i
t
Menu option
redial.
To add a number you have dial le d recently:
Route:
1. Select
A list of numbers is displayed. If
or Comm
a phone book entry first befo re you can add a new one.
f
2. Scroll through the list of last dia l le d num bers until you have the number
you want to store.
3. Press
Enter Name:
4. Enter a name (
Not
36 Phone book
ricsson Mobile
space;
5. Press
The number to be adde d is displayed.
6. Edit the number if necessa ry (
move right; press
7. Press
The name and number are stored in the phone book.
E
AddLastDial
appears only if names or numbers are available for
Com
PhoneBook » Store » AddLastDial
AddLastDial
YES.
YES to confirm.
YES to confirm.
and press YES.
Phone book Full
is displayed.
CLR = delete; UP = move left; DOWN = move right; 1 =
= lower case).
for one second = dial tone pause).
CLR = delete; UP = move left; DOWN =
appears, you have to delete
Page 38

ADDING CALLER’S NUMBER
Your phone keeps a list of numbers of people who have called you internally
with another handset. The la st te n numbers of your callers remain store d in
your handset memory unt il you turn it off. You can use the
to add these numbers to the phone book.
AddWhoCall
option
B
Menu option
returning a call.
To add a caller’s number to the ph one book:
Route:
1. Select
A list of numbers appears. If
a phone book entry first befo re you can add a new one.
2. Scroll through the list of who ca ll ed numbers until you have the number
you want to store.
3. Press
Enter Name:
4. Enter a name (
space;
5. Press
The number to be adde d is displayed.
6. Edit the number if necessa ry (
move right; press
7. Press
The name and number are stored in the phone book.
AddWhoCall
PhoneBook » Store » AddWhoCall
AddWhoCall
YES.
is displayed.
= lower case).
YES to confirm.
YES to confirm.
appears only if nam es or numbers are available for
ons A
i
and press YES.
Phone book Full
is displayed, you have to delete
Use
l
t
a
ia
CLR = delete; UP = move left; DOWN = move right; 1 =
r
c
unic
e
m
for one second = dial tone pause).
CLR = delete; UP = move left; DOWN =
Com
or Comm
f
Not
ricsson Mobile
E
Phone book 37
Page 39

EDITING NAMES AND NUMBERS
With the
Edit
option, you can change the nam e s and numbers in the phone
book.
Editing names
You can correct a misspell e d nam e or give a new name to an existing telephone number.
To edit a name:
PhoneBook » Find&Edit » Edit
Route:
1. Select
2. Enter the first letter(s) of the name you are searching for.
3. Press
4. Scroll until you find the name.
5. Press
6. Correct the name with the number keys (
7. Press
Tip While editing the name, you can “jump” to the most left or the most right
letter by respectively pressing
whole name by pressing
Editing telephone numbers
You can correct a tele phone number or give another number to a name.
1. Select
2. Enter the first letter(s) of the name you are searching for.
3. Press
4. Scroll until you find the name.
5. Press
6. Correct the number wi th t h e number keys (
Not
7. Press
Tip While editing the number, you can “jump” to the most left or the most
right digit by respectively pressing
clear the whole number by pressing
Edit
Enter Name:
are avai lable for editing.
The name to be edited is displayed.
DOWN = move r i ght; 1 = space;
and press YES.
or
Phone book is empty
YES.
YES.
YES twice to co nfirm.
e
is displayed. In the latter case, no names
Use
l
ia
c
r
= lower case).
m
UP or DOWN for one second. You can clear the
CLR for one second .
Com
To edit a number:
PhoneBook » Find&Edit » Edit
Route:
Edit
and press YES.
Enter Name:
available for editing.
f
The number to be edited is displayed.
DOWN = move right; press
or
or Comm
Phone book is empty
YES.
YES twice.
YES to confirm.
appears. In the lat te r ca s e, no numbers are
for one second = dial tone pa use).
UP or DOWN for one second. You can
CLR for one second.
CLR = delete; UP = move left;
unic
CLR = delete; UP = m ove left ;
ons A
i
t
a
B
38 Phone book
ricsson Mobile
E
Page 40

DELETING NAMES AND NUMBERS
You can also delete name s and associated numbers fro m the phone book.
To delete a name and number from the phone book:
PhoneBook » Find&Edit » Delete
Route:
1. Select
2. Enter the first letter(s) of the name you are searching for.
3. Press
4. Scroll until you find the name.
5. Press
1. Select
2. Press
Delete
Enter Name:
entries are available for deletion.
The name and number are deleted from th e phone book.
To delete all names and numbe rs from the phone bo ok :
Route:
Delete?
entries are available for deletion.
Deleting all
phone book.
and press YES.
or
Phone book is empty
YES.
YES to confirm.
PhoneBook » DeleteAll
DeleteAll
and press YES.
or
Phone book is empty
appears. In the latter ca se, no phone book
Use
l
ia
appears. In the latter case, no phone book
a
c
YES to confirm.
is displayed while all names and numbers are delete d from the
r
e
unic
m
ons A
i
t
Com
B
or Comm
f
Not
ricsson Mobile
E
Phone book 39
Page 41

Use
l
ia
c
r
unic
e
m
Com
B
ons A
i
t
a
or Comm
f
Not
40 Phone book
ricsson Mobile
E
Page 42

Personalizing the handset
LANGUAGE
You can change the langua ge of the menus at any time. The defaul t language
is English.
To change the handset men u language:
Handset » Language
Route:
1. Select
2. Scroll through the list of languages until the language you want is selected.
3. Press
Setting changes that have been confirme d remain stored in the mem ory, even
when you switch off the handset. Chang es that have not been confirmed will
be cancelled. If you receive a call when you are changing one of the settings,
press
During a telephone call, you can use the
key to adjust the volume of the earpiece.
Language
The current la nguage is displayed.
The language has now been changed.
YES to answer th e call.
EARPIECE VOLUME
and press YES.
YES to confirm your choic e.
r
e
Com
Use
l
ia
c
unic
m
VOLU M E UP or VOL UM E DOWN
ons A
i
t
a
B
To adjust the volume during a call:
• Press the
f
If you are not making a call you can still adjust the volume:
1. Press
You hear the dial tone .
2. Keep listening and press the
or more.
Not
You hear the dial tone be coming louder or quiete r.
3. Press
If the earpiece is at maximum or minimum volume, you hear a warning tone.
ricsson Mobile
VOLUM E UP or VO L UM E DOWN key once or more.
or Comm
YES.
VOLUM E UP or VO LU M E DOWN key once
NO to cancel the dial tone.
Personalizing the handset 41
E
Page 43

VolumeLevel:
RING VOLUME
You can adjust the ri ng volume of the handset.
and
and
B
Mixed
To adjust the ring volume:
Handset » Alerts » RingVolume
Route:
1. Select
2. Press the
3. Press
You can change the ringer tone for each call type to a different sound or a preprogrammed melody. For each ring signal typ e, you can choose from four
ringer tones or six melodies.
1. Select the rin g s ignal type:
2. Select sound
3. Press
The table below lists the names of the melodies.
RingVolume
A volume level bar is displayed.
You can now also use the
change the volume. Each time you press
DOWN, you hear the ring at the new volume. If you set the volume to its
lowest level, the ring off icon appears.
YES to confirm.
The ring volume level has now been changed.
RINGER TONES OR MELODIES
and press YES.
UP or DOWN key once, or more, to turn the volume up or down.
VOLUM E UP or VO LU M E DOWN key to
VOLUM E UP or VO LU M E
ons A
i
t
Use
l
a
ia
c
r
To set the sound for a ri ngi ng type:
Handset » Alerts » RingType » Internal/External/CallBack/Message/Page
Route:
YES.
press
The current setting is displayed.
The selected sound is played. The menu options
refer to the pitch of the ring ing tone.
The ringer tone or melody is set.
Low, Medium, High, Mixed
YES to confirm.
e
Internal, External, CallBack, Message
Com
unic
m
or
Melody
(1 - 6) us ing UP or DOWN.
Low, Medium, High
or
Page
or Comm
Melody Name
f
1Jumpy
2 Eine kleine Nachtmusik
3 Toccata
4 Elise
5 Samba
Not
6 Blues Rhythm
42 Personalizing the handset
ricsson Mobile
E
Page 44

DISCREET RINGING
In the discreet ringing mode , your handset starts ringing at the lowest audible
volume level. It then gets louder an d louder.
To set discreet ringing:
Handset » Alerts » Discre etRng
Route:
1. Select
2. Use the
3. Press
You can also turn off the ringer, see “Ring volume” on page 42 for more
information.
With an audio accessory attached, you can set your handset to answer incoming calls automatically. This allows full, handsfree operation.
1. Select
2. Use the
3. Press
When a call comes in, you hear a one second beep in the audio accessory and
the ringer sounds as well. Afte r this beep, the handset goes off hook.
The handset’s earpiece and microphone are automatically disa bled when an
audio accessory is attached.
DiscreetRng
The current setting is displayed.
YES to confirm.
AUTOMATIC ANSWERING
and press YES.
UP or DOWN key to select the setting you want.
ia
To enable or disable automatic answe r i n g:
Handset » AutoAnswer
Route:
AutoAnswer
The current setting is displayed.
YES to confirm.
and press YES.
UP or DOWN key to select the setting you want.
c
r
e
Com
Use
l
a
unic
m
ons A
i
t
B
KEY CLICK
Key click is the sound you hear each time you press a key. This feature can be
or Comm
enabled and disa bl ed.
f
To set key click:
Handset » Alerts » KeySound
Route:
1. Select
Not
2. Use the
3. Press
ricsson Mobile
KeySound
and press YES.
The current setting is displayed.
UP or DOWN key to select one of the following options:
Click
to have a key click with each key press.
•
Silent
for no key click.
•
YES to confirm.
Personalizing the handset 43
E
Page 45

Contrast:
DISPLAY LIGHT
Your handset has an illuminated display which lights up when a key is pressed
during an incoming call or when i t is put in or out of the base station. The illumination automatically goes off after a while, unless you press a key.
To set the display light to auto m atic or off:
Handset » D isplay » Light
Route:
1. Select
2. Use the
3. Press
You can adjust the contrast of the display to one of eight levels to make it easier to read.
1. Select
2. Adjust the contrast with
3. Press
You can clear all settings on the handset simultaneously. The last dialled numbers, the who called memory and th e l ast call i nformation are also cleared.
The phone book, the pin code, the subscriptions and the total calls information, however, ar e no t cleared.
Light
The current setting is displayed.
DISPLAY CONTRAST
To change the display co ntra st:
Route:
The contrast level bar appears.
You hear an error beep when ei ther limit is reached.
The contrast level is set.
CLEARING ALL HANDSET SETTINGS
and press YES.
UP or DOWN key to select the setting you want.
YES to confirm.
Use
l
ia
Handset » D isplay » Cont rast
Contrast
and press YES.
YES to confirm.
c
r
e
UP and DOWN.
unic
m
Com
ons A
i
t
a
B
All handset settings revert to default.
or Comm
f
To reset all handset settings:
Handset » MasterReset
Route:
1. Select
2. If requested enter your PIN code for the handset (see page 58) and press
Not
3. Press
44 Personalizing the handset
ricsson Mobile
MasterReset
Enter Pin:
YES.
Reset All Settings ?
YES to confirm.
All handset se tt ings are cleared.
and press YES.
or
Reset All Settings ?
is displayed.
E
is displayed.
Page 46

Personalizing the base station
CHANGING SETTINGS (PIN CODE)
If your handset is connected to the base station, you can change its settings by
using this handset. You may have to enter the base station PIN code to change
these settings. For the default base sta ti on PIN c ode, see page 58. To prevent
others changing the sett ings of the base station, you shoul d change this code.
You can find out how to do this in “Chan ging the base station PIN code” on
page 56.
When you must enter the PIN co de,
• Enter the base station PIN code using the number keys on the handset.
Connecting to other types of base stations
You can connect your handset to other types of base stations. Please refer to
the appropriate documentation.
LANGUAGE
The base station menus form a part of the handset menus. They are normally
in the same language as the handset menus. If the handset language is not
available, the base station chooses English by default. To select another
default language, us e the
r
e
Com
Language
Use
l
ia
c
PIN:
is displayed:
unic
m
option in the base station men us.
ons A
i
t
a
B
To change the base station’s default la nguage:
or Comm
BaseStation » Basic » Language
Route:
f
1. Select
2. Enter the PIN code for the base station (see page 58) and press
3. Select
Not
4. Scroll through the list of languages until the language you want is selected.
5. Press
ricsson Mobile
Basic
PIN:
The current la nguage is displayed.
The base station language ha s now been ch anged.
and press YES.
is displayed.
Language
and press YES.
YES to confirm your choic e.
Personalizing the base stat ion 45
E
YES.
Page 47

RING VOLUME
The base station rings when an external c al l is received. You can adjust the
ring volume.
To adjust the ring vol ume with the handset:
BaseStation » RingVolume
Route:
1. Select
2. Press the
3. Press
RingVolume
The current ring vo lume sett ing is displa yed ( 0 is the quiete st lev el and 6 is
the loudest level.
You can now also use the
handset to change the volu me. Each time you press
VOL UM E DOWN, you hear the ring at the new volume.
YES to confirm.
The base station ring volume level has now been changed.
and press YES.
UP or DOWN key once, or more, to turn the volume up or down.
VOLUM E UP or VO LU M E DOWN key on the
Use
l
ons A
i
VOLUM E UP or
t
a
B
RINGING ORDER
When the base station receives an external call, all handsets ring. The base station is pre-set so that all handsets ring at the same time. However, you can also
set the order in which the handsets ring.
Setting the ringing order
Using a handset, you can prog ram the order in which the handset s r ing .
To change the ringing order:
BaseStation » Basic » RingOrder » Priority
Route:
1. Select
2. Enter the PIN code for the base station (see page 58) and press
3. Select
4. Press
5. Press
Not
If the handset that should ring first has be e n swit ch ed off, the next handset
rings instead.
Basic
PIN:
The current ringing order is displayed.
•
or Comm
f
•
•
•
The ringing order has now been stored.
and press YES.
is displayed.
Priority
and press YES.
UP or DOWN to select one of the following options:
One
means only handset 1.
One, Rest
means first handset 1, then all handset s .
One, Two..
means first handset 1, then 2, then 3, e tc.
All
means all the handsets at the same time (default).
YES to confirm.
ia
c
r
unic
e
m
Com
YES.
46 Personalizing the base station
ricsson Mobile
E
Page 48

Setting the number of rings
You can also set the number of tim e s a han dset rings before the next handset
starts to ring.
To set the ring count:
BaseStation » Basic » RingOrder » Delay
Route:
1. Select
2. Enter the PIN code for the base station (see page 58) and press
3. Select
4. Enter the number of times a handset should ring (1 - 9).
5. Press
If you are engaged in an internal call with another handset and an external call
is received, you can be notified by two short beeps in your earpiece at regular
intervals. You can either finish the current call or put the current call on hold
to answer the exte rnal call. You can enable or disable this call waiting
function.
1. Select
2. Enter the PIN code for the base station (see page 58) and press
3. Select
4. Use the
5. Press
See also “Receiving a second call” on page 30.
Basic
PIN:
The current setting is displayed (the default is 3 times).
The number of rings is stored.
CALL WAITING NOTIFICATION
and press YES.
is displayed.
Delay
and press YES.
YES to confirm.
Use
l
ia
c
r
unic
e
To set the call waiting function:
BaseStation » Access » CallWaiting
Route:
Access
and press YES.
PIN:
is displayed.
CallWaiting
and press YES.
The current setting is displayed (default is
UP or DOWN key to select the setting you want.
YES to confirm.
The call waiting not ification setting is changed.
Com
m
Off
).
or Comm
ons A
i
t
a
f
PRIORITY PHONE
The priority phone feat ure allows you to be reachable by phone even when
you are out of range of the base station. When you are in range, calls are
routed to your handset. If you are out of range for certain period of time, calls
Not
can be routed to a GSM phone or a voice mailbox, for instance.
B
YES.
YES.
If you enable this feature, the base stat ion scans for your handset at regular
intervals. If it cannot locate the handset, it call s a ce rtain telephone network
service to activate a diverted telephone number. As soon as the ha ndset is
ricsson Mobile
Personalizing the base stat ion 47
E
Page 49

located again, th e same service is cal le d to deactivate the diverted telepho ne
number. Ask your dealer for more informat ion on the call diversion service.
Priority phone can only be set fo r on e handset. If a diversion telephone
number is activated, no calls may be received by the base station until the
priority phone handset is l oca ted again.
Setting a handset as priority phone
To set a handset as priority pho ne and to set the diverted telephone
number:
BaseStation » PriorityNo » AssignNo
Route:
1. Select
2. Enter the PIN code for the base station (see page 58) and press
3. Select
4. Enter the number of the handse t yo u want to assign as priority phone.
5. Press
6. If required, enter the access code for the call diversion service (
7. Press
8. Enter the numbers to be dialled after the access code, in order to activate a
9. Press
10.Enter the numbers to be dialled after the access code, in order to deactivate
11.Press
PriorityNo
PIN:
is displayed.
Dev.Number:
this is shown in the display.
Either
have entered a non-existent handset number. If an access code has been set
before, this is shown in the display.
delete;
Divert:
is displayed. If a divert code has been set before, this is shown in the
display.
diverted number (
Either
not entered a code for ca ll diversion. If an undo divert code has been set
before, this is shown in the display.
and press YES.
Use
AssignNo
and press YES.
is displayed. If a priority phone handset has already been set,
l
ia
YES to confirm.
Access Code:
or
c
r
Handset not known
unic
is displayed. In the latter case, you
e
m
UP = move left; DOWN = move right).
YES to confirm.
Com
CLR = delete; UP = move left; DOWN = move right).
YES to confirm.
Undo Divert:
or
Fill Divert Profile
is displayed. In the latter case, you have
or Comm
f
a diverted number (
YES to confirm.
Priority phone is now set or if
entered a code to dea ct ivate call d iversion.
CLR = delete; UP = mov e left; DOWN = move right).
Fill undo Divert Prof.
is displayed, you have not
ons A
i
t
a
B
YES.
CLR =
Not
48 Personalizing the base station
ricsson Mobile
E
Page 50

Priority phone deactivation
To deactivate a handset as priority phone:
BaseStation » PriorityNo » AssignNo
Route:
1. Select
2. Enter the PIN code for the base station (see page 58) and press
3. Select
4. Press
5. Press
Scanning period for priority phone within range
If a priority phone is activated, the base station scans for the handset at regular
intervals. The time between scans can be set. The scanning interval is a choice
between not being reachable for a short period and frequently activating and
deactivating call diversion if the hand se t is nea rly out of range.
1. Select
2. Enter the PIN code for the base station (see page 58) and press
3. Select
4. Enter the number of minut es between scans (1 - 10).
5. Press
If you are in a position to se le ct different telephone ope rators, you can have
the base station automat ic ally route calls to another operator if the telephone
number begins with a specific prefix. In this wa y, you can easily change the
operator without having to change your phone numbers.
The least cost routing function replaces the prefix with digi ts to select the
other operator. For instance, if the telephone number begins with 00, it can be
substituted by 0016 to select the other operator. Y ou can bypass this feature if
you go off hook first and then dial the number.
Not
PriorityNo
PIN:
is displayed.
The number of the priority phone handset is displayed.
The priority phone is deactivated.
and press YES.
AssignNo
and press YES.
CLR to remove the number.
YES to confirm.
Use
l
a
ia
To set the scanning pe riod:
BaseStation » PriorityNo » ScanPeriod
Route:
PriorityNo
PIN:
is displayed.
The current sca n pe riod is displayed in mi nutes (default is 2).
The scanning period for the priority phone is changed.
LEAST COST ROUTING
and press YES.
ScanPeriod
YES to confirm.
and press YES.
c
r
unic
e
m
Com
or Comm
f
ons A
i
t
B
YES.
YES.
You can set four prefixes. A prefix may consist of four digits and it can be substituted by a maximum of four di gi ts.
ricsson Mobile
Personalizing the base stat ion 49
E
Page 51

To set least cost routing:
BaseStation » Routing
Route:
1. Select
2. Enter the PIN code for the base station (see page 58) and press
3. Press the
4. Enter the prefix dig i ts (
5. Press
6. Enter the substitution digits (
7. Press
If you include a pause in a telephone number, there is a pause during dialling
at that point to wait for the dial tone. The base station automatically inserts a
dial tone pause before each telephone number. You can adjust the length of the
pause.
1. Select
2. Enter the PIN code for the base station (see page 58) and press
3. Select
4. Enter a number (1 - 10) to set the length of the pause in seconds.
5. Press
To include a pause in a telephone number, press
marks the pause. The base stati on waits for the dial tone for the lengt h of the
dial tone pause.
Routing
PIN:
is displayed.
Either
displayed.
required and press
right).
Substitution digits are displayed if they have been set before.
move right).
A prefix with associated substitution digits is set.
DIAL TONE PAUSE
and press YES.
Route
(1 - 4) or a number, if a prefix has already been set, is
UP or DOWN key, once or more, to choose a different prefix if
YES.
CLR = delete; UP = m ove left; DOWN = move
YES to confirm.
YES to confirm.
CLR = delete; UP = move left; DOWN =
Use
l
ons A
i
t
a
ia
c
r
unic
e
m
The standard pause is 1 second. You can set this from 1 to 10 seconds:
BaseStation » Basic » PhoneLine » Pause
Route:
Basic
PIN:
and press YES.
is displayed.
Com
Pause
The current pause length is displayed.
The dial tone pause has now been changed.
or Comm
and press YES.
YES to confirm.
f
for one second. A dash
B
YES.
YES.
Not
50 Personalizing the base station
ricsson Mobile
E
Page 52

CLEARING ALL BASE STATION SETTINGS
You can clear all settings on the base station simultaneously. The pin code and
the subscriptions, however, are not cleared.
All settings revert to default.
To reset all base station settings:
BaseStati on » Basic » MasterReset
Route:
1. Select
2. Enter the PIN code for the base station (see page 58) and press
3. Select
4. Press
Basic
PIN:
Reset All Settings ?
All base station settings are cleared.
and press YES.
is displayed.
MasterReset
YES to confirm.
and press YES.
is displayed.
Use
l
a
ons A
i
t
B
YES.
ia
c
r
unic
e
m
Com
or Comm
f
Not
ricsson Mobile
Personalizing the base stat ion 51
E
Page 53

Use
l
ia
c
r
unic
e
m
Com
B
ons A
i
t
a
or Comm
f
Not
52 Personalizing the base station
ricsson Mobile
E
Page 54

Blocking keys and extra
Home 1
Press to
unlock keys
security
BLOCKING HANDSET KEYS
If you carry the handset in your pocket, you mi ght ac ci dentally press the keys
and make a call. To prevent this, you can have them automatically blo cke d if
you do not press a key for one minute. The keys no longe r work and a key
symbol is displayed, but you can still receive calls.
To unblock the keys temporarily:
UP or
• Press
The key symbol disappears; the keys are ena bl ed a gain.
T o enable or disable automatic handset key locking:
Route:
1. Select
The current setting is displayed.
2. Use the
3. Press
The automatic key lock set ti ng ha s bee n changed.
If the keys are blocked and a key is pressed,
If the keys are blocked and you receive a call, you c an stil l answer the call in
the normal way, without first unblocking the keys. See also “Emergency call ”
on page 59.
and press YES.
r
Handset » AutoKeyLock
AutoKeyLock
UP or DOWN key to select the setting you want.
YES to confirm.
e
and press YES.
Com
Use
l
ia
c
m
unic
Press to unlock keys
ons A
i
t
a
or Comm
f
SETTING HANDSET LOCKS
You can protect your han dset against unauthorized use with your PIN code.
You can secure the handset against being used by someone else, or just against
adding or deleting base station subscriptions. Both security features are off by
default. You can change th e PIN code of the handset.
Not
If you enter an incorrect handse t PIN code three times in a row, the handset is
blocked.
B
is displayed.
See for the default handset PIN code “Overview PIN and other codes” on
page 58.
ricsson Mobile
Blocking keys and extra security 53
E
Page 55

Securing against unauthorized use
You can set the handset so that the P IN code must be entered after switc hi ng
on. This option is off by default.
T o enable or disable protection against unauthorized use:
Handset » PhoneLock » PowerOn
Route:
1. Select
2. Enter the PIN code for the handset (see page 58) and press
3. Press
4. Press
Securing against adding or deleting subscriptions
You can set the handset so that the P IN code must be entered when add in g or
deleting base station subsc riptions. This option is off by default.
PowerOn
Enter PIN
The current setting is displayed.
The security setting against unauthorized use has been changed .
and press YES.
: is displayed.
UP or DOWN to select the setting you wa nt.
YES to confirm.
Use
l
YES.
ons A
i
t
a
ia
To enable or disable protection agai nst adding or the deletion of
subscriptions:
Handset » PhoneLock » S ubs cri pt
Route:
1. Select
2. Enter the PIN code for the handset (see page 58) and press
3. Press
4. Press
See also “Subscribing to a base station” on page 78 and “Deleting subscription” on page 82.
Subscript
Enter PIN
The current setting is displayed.
The security setting has been changed.
and press YES.
: is displayed.
UP or DOWN to select the setting you wa nt.
YES to confirm.
c
r
unic
e
m
Com
YES.
B
CHANGING THE HANDSET PIN CODE
The handset is initially provided with a pre-set PIN code (see page 58). You
or Comm
should change this PIN code to a persona l PIN c ode to prevent misuse.
f
To change the handset PIN code:
Handset » PhoneLock » Ch ang e PIN
Route:
1. Select
Not
2. Enter the current PIN code fo r the handset (see page 58) and press
3. Enter the four digits of the new PIN code and press
54 Blocking keys and extra security
ricsson Mobile
ChangePIN
EnterOldPIN
Either
entered a number that does not the match the current PIN code.
RepeatNewPIN
: is displayed.
EnterNewPIN:
is displayed.
and press YES.
or
Wrong PIN
E
is displayed. In the latter case, you have
YES.
YES.
Page 56

4. Enter the new PIN code again an d press YES.
You can write down the new PIN code in the space provided in “Personal
handset PIN code” on page 58.
If you enter an incorrect new handset PIN code thre e times in a row, the handset leaves this menu option.
In other situations, if you enter an incorrect handset PIN code three times in a
row, the handset is blocked and
unblocking the handset.
New PIN accepted
Either
new PIN and the code you have just entered do not match.
or
Wrong New PIN
PIN Blocked, Unblock?
is displayed. In th e la tter case, the
is displayed. See below for
B
ons A
i
t
UNBLOCKING THE HANDSET
If your handset is blocked beca use an incorrect PIN code has been entered
three times, you can unlock the handset with the IPEI code. After entering the
IPEI code, you must enter a new PIN code.
The IPEI code is a unique cod e whi ch has been assigned to the handset. The
IPEI code can be found on the packaging or in “Showing the IPE I code” on
page 57.
r
e
Use
l
ia
c
a
unic
m
If the handset is blocked,
unblocked before it can be used again. To unblock:
1. Press
2. Enter the IPEI code and press
3. Enter the four digits of the new PIN code and press
4. Enter the new PIN code again an d press
If
If the handset is blocked, you ca n stil l ma ke an e me rgency ca l l wit hout first
unblocking the hand s et . See “Emergency call” on page 59.
YES.
Backdoor:
is displayed.
EnterNewPIN:
RepeatNewPIN
Either
new PIN and the code you have just entered do not match.
or Comm
f
New PIN accepted
is displayed.
is displayed.
New PIN accepted
appears, you can use the handset again.
PIN Blocked, Unblock?
YES.
Com
or
Wrong New PIN
appears. The handset must be
YES.
YES.
is displayed. In th e la tter case, the
Not
ricsson Mobile
Blocking keys and extra security 55
E
Page 57

CHANGING THE BASE STATION PIN CODE
To prevent unauthorized people from accessing vital settings on the base station, they are secured by a PIN code. Each time you want to change these base
station settings, you must enter the PIN code. You cannot switch off this security feature but you can change the base station PIN code. You change the settings of the base station by using a handset con nected to this base station.
See for the default base station PIN code “Overview PIN and other codes” on
page 58.
To change the PIN code of the base station:
BaseStation » Basic » ChangePIN
Route:
1. Select
2. Enter the PIN code for the base station (see page 58) and press
3. Select
4. Enter the four digits of the new PIN code and press
5. Enter the new PIN code ag ain press
You can write down the new PIN code in the space provided in “Personal base
station PIN code” on page 58.
If you enter an incor rect new base station PIN code three times in a row, the
handset leaves this menu option.
In other situations, if you ent er a n incorrect base station PIN code three times
in a row, the base station PIN code is invalidated and
played. See below for resetting the ba se sta t ion PIN code.
Basic
PIN:
is displayed.
ChangePIN
New PIN:
and press YES.
and press YES.
is displayed.
Use
l
ia
c
Repeat PIN:
Either
new PIN and the code you have just entered do not match.
is displayed.
New PIN activated
r
e
or
Wrong new PIN
unic
YES.
is displayed. In th e latter case, the
m
Com
ons A
i
t
a
YES.
BaseStation Blocked
B
YES.
is dis-
or Comm
f
Not
56 Blocking keys and extra security
ricsson Mobile
E
Page 58

RESETTING THE BASE STATION PIN CODE
If you enter an incor rect base station PI N code three times in a row, the PIN
code is invalidated. Although you can still make and receive calls, you cannot
alter the base sta ti on settings. Whenever yo u ma ke an attempt to change a setting, you are asked to enter the P ARI code. After entering the correct PARI
code, the base sta t ion PIN code is reset to the default code (see page 58).
B
If the base station PIN cod e i s blocked,
base station PIN code m us t be unblocked to be able make changes again.
To unblock:
1. Press
2. Enter your PARI code.
3. Press
In some cases your telephone network operator or dealer may need the International Portable part E quipment Identity (IPEI) number of your handset to
enable telephone network subscription. The IPEI code is a unique code which
has been assigned to the handset.
The IPEI code can be requested when using the handset .
1. Select
2. Enter the PIN code for the handset (see page 58) and press
3. Press
Note Write down the IPEI code in the space provided in “IPEI code handset”
on page 58. You might need it to unbl ock the handset. If you cannot retrieve
the IPEI code, please contact your deal e r.
YES.
UnblockCode
On the back of the base station, you can see that the PARI code is a
sequence of 12 digits.
The PIN code is reset to 1111.
SHOWING THE IPEI CODE
: is displayed.
YES to confirm.
c
r
e
To display the IPEI code:
Information » ShowIPEI
Route:
ShowIPEI
and press YES.
Enter PIN
: is displayed.
The 13-digit IPEI code is displayed.
or Comm
YES to leave this menu.
f
Com
Unblock BaseStation?
Use
l
ia
unic
m
appears. The
ons A
i
t
a
YES.
Not
ricsson Mobile
Blocking keys and extra security 57
E
Page 59

OVERVIEW PIN AND OTHER CODES
The handset and base station use several identification codes for security reasons. In the table below, an overview of these codes and their values is given.
Code Value Backdoor code
Handset PIN 0000 (default) IPEI
Base station PIN 1111 (default) PARI
Authentication Code (AC) Same as base station PIN. Not applicable.
International Portable part
Equipment Identity (IPEI)
Primary Access Rights
Identity (PARI)
Portable Access Rights
Key (PARK)
You can write down your personal PIN co de s a nd t he IPEI code in the spaces
provided below.
Personal handset PIN code
Personal base station PIN code
Unique identity assigned to your
handset by the manufacturer. See
packaging or “Showing the IPEI
code” on page 57.
Unique identity assigned to your
base station by the manufacturer.
See the back of the base station.
Base station identification for the
handset. See the back of the
base station.
r
Use
l
ia
c
a
unic
e
m
Not applicable.
ons A
i
t
Not applicable.
Not applicable.
B
Com
IPEI code handset
or Comm
f
Not
58 Blocking keys and extra security
ricsson Mobile
E
Page 60

00:00:34
Emergency
Extra features
B
EMERGENCY CALL
Your handset is provided with an emergency call fea tur e. Thi s allows you to
call the emergency servi ces even when the handset is P IN - code protected or
blocked or when the keys are blocked or dire ct call is on. You can access this
feature by calling 112.
To make an emergency call:
1. Enter 112 and press
Emergency
2. Wait for a connection and hold a conversation.
3. Press
This emergency call f ea ture temporaril y override s the handset PIN code a nd
blocked keys if set.
is displayed.
NO to end the call.
YES.
r
e
Use
l
ia
c
unic
ons A
i
t
a
m
BABY PHONE
You can use your handset as a ba by moni t or. This means you can list e n to the
sounds in a baby’s room from a distance, by using anoth er ha ndset as a
loudspeaker.
00:10:34
BabyPhone
The handset, which is used as a baby monitor, automatically makes a call to
another handset if this feature is activated. The handset mutes the ringer and
earpiece so that the baby is not disturbed. All keys on the handset are blocked
except for the
or Comm
If the baby phone call is interrupted, the handset displays
f
Reactivate?
press
lished, the other end hears a confirmation beep every half a minute.
If the battery in the handset is low, the low battery warning beeps sound at the
Not
other end to show that the battery needs charging.
Baby phone activation
When you use the handset as a baby monitor place it somewhere in the baby’s
room so that it can easily pic k up sounds.
NO key, which you can use to end the baby phone call.
and the warning light stays on continuously. In this case, you can
YES to re-establish the baby phone call. If the baby phone call is estab-
Com
ricsson Mobile
E
BabyCallLost
Extra features 59
Page 61

To activate the baby phone:
Handset » BabyPhone » Activate
Route:
1. Select
2. Wait for a connection and place the ha ndse t som ewhere in the baby’s
You can end a baby phone ca ll by pressing
Baby phone call number
You can change the baby phone call number whic h is the internal telephone
number of a handset you want to sele ct as the other end.
Activate
BabyPhone
phone number of the other end is incorrect or the other end is out of range.
room.
and press YES.
or
BabyPhone Call Failed
is displayed. In the latter case, either the
NO.
ons A
i
t
To set the baby phone call number:
Handset » BabyPhone » SetPhoneNo
Route:
1. Select
2. Enter the internal telephone number of the handse t to be used as the other
3. Press
Information tone
If the baby phone call is ac tivated, the other end hears an inform at ion tone
every half a minute to confirm that it i s working (default). You can switch off
the information tone if needed.
1. Select
2. Use the
3. Press
You can set the handset so that pressing any key dials a certain number. This
means that if any key is pressed, for example by a small child, the same direct
call number is alway s dialled.
Not
Switching the direct call on
Direct call deactivates the automatic key lock. For informat ion about auto-
matic key lock, see “Blocki ng handset keys” on page 53.
SetPhoneNo
The current baby phone number is displayed.
CLR = delete).
end (
YES to confirm.
The baby phone call number is set.
T o enable or disable the information tone:
Handset » BabyPhone » InfoTone
Route:
InfoTone
The current setting is displayed.
YES to confirm.
or Comm
The information tone setting has been cha nged.
f
DIRECT CALL
and press YES.
r
e
Com
and press YES.
UP or DOWN key to select the setting you want.
Use
l
ia
c
m
a
unic
B
60 Extra features
ricsson Mobile
E
Page 62

Direct Call
0201300571
CalledNumber
is barred
To switch the direct call on:
Handset » DirectCall
Route:
1. Select
2. Press
3. Enter the direct call number with the number keys (
4. Press
If direct call is on,
key on the handset. You can still make an emergency call without first swit ch-
ing off direct call. See “Emergency call” on page 59.
Switching the direct call off
If you want to switch off the direct cal l fe ature, it is important not to wait too
long between the ste ps: ot herwise the direct call number is dialled.
1. Press UP or DOWN to enter the menu and then quickly scroll to
2. Press
You can prevent certain numbers fro m be ing called from a handset by block ing those numbers in the base station. You can still receive inco mi ng calls.
You can switch call barring on and off in the handset. Call barring in the handset is off by default.
DirectCall
Enable Direct Call?
DirectC.No:
shown in the display.
move left;
The direct call funct ion is now on.
and press YES.
Yes
YES to confirm.
is displayed.
to confirm.
is displayed. If a direct call number has been set before, thi s is
DOWN = move right; press
Direct Call
and the number are di spla ye d. To call it , press an y
l
ia
c
To switch the direct call off:
Handset » DirectCall
Route:
and press
Disable Direct Call?
direct call num ber is dialled.
The direct call funct ion is now off.
CALL BARRING
YES.
is displayed. If you do not react within two seconds, the
YES to confirm.
r
e
m
Com
or Comm
CLR = delete; UP =
for one second = dial tone pause).
ons A
i
t
Use
a
unic
f
If you call a blocked number, the line always sounds busy.
Some telephone numbers, such as em ergency numbers, cannot be barred.
Please consult your deal er for more information.
Not
You can also have call barring via your telephone operator. It remains in effect
irrespective of the call barring settings of the handset and base station. Please
consult your dealer for more information.
DirectCall
B
ricsson Mobile
E
Extra features 61
Page 63

Switching call barring on and off
Each handset (if you have more tha n one) should have call barring set on or
off separately. Call barring is off by default.
T o enable or disable call barring for a handset:
BaseStation » Access » Barring
Route:
1. Select
2. Enter the PIN code for the base station (see page 58) and press
3. Select
4. Enter the number of the handset for which you want to enable or disable
5. Press
6. Press
7. Press
Setting barred numbers
You can enter three num be rs of up to 8 digits for call barring. You can also
record the prefix of numbers to be barred, for instance the prefix for chat lines
and other expensive services, or the prefix for international numbers. All calls
to numbers with this prefix will be barred.
1. Select
2. Enter the PIN code for the base station (see page 58) and press
3. Select
4. Press the
5. Enter the number or th e pr efix (
6. Press
Access
PIN:
Dev.Number:
call barring.
Either the current setting or
you have entered a non-existent ha ndset number.
You have now enabled or disabled call barring.
and press YES.
is displayed.
Barring
and press YES.
is displayed.
YES to confirm.
Handset not known
UP or DOWN to select the setting you wa nt.
YES to confirm.
Use
l
ia
c
r
unic
e
m
To set a barred number or prefix:
BaseStation » Access » BarredNo
Route:
Access
PIN:
Either
or Comm
prefix if required and press
f
Barred No:
move right).
The number or prefix is now barred.
and press YES.
is displayed.
BarredNo
and press YES.
Group
(1 - 3) or a previously set number or prefix is displaye d.
UP or DOWN key, once or more, to choose another number or
is displayed.
YES to confirm.
Com
YES.
CLR = delete; UP = move left; DOWN =
ons A
i
t
a
is displayed. I n t he la tt er c ase,
Not
EXEMPT NUMBERS
You can exempt telephone num bers, for example emergency numbers, from
call barring and call budgeting by the base station. This means that these numbers can always be dialled. Some exempt numbers, such as the national emergency number, may already have been set and cannot be edited or removed.
B
YES.
YES.
62 Extra features
ricsson Mobile
E
Page 64

Anna
1.25
To exempt a number from call barring and cal l budgeti ng:
BaseStation » Access » ExemptedNo
Route:
1. Select
2. Enter the PIN code for the base station (see page 58) and press
3. Select
4. Press the
5. Enter the exempt number (
6. Press
If the base station receives meteri ng pulses
costs of the call displayed when you finish the conversation. You can set the
amount of money (call tariff) by which the costs in crease with each me tering
pulse. If you set the amount of m oney to zero or no metering pulses are
receiv ed, the length of one call is di sp layed instead.
The call tariff can range either from 0.00 to 9.99 or from 0 to 999. The default
call tariff is 1.00.
Ask your dealer if your telephone ne twork provides metering pulses.
Access
PIN:
Either
number if required and press
Exempted No:
not edit the exempt numbe r and you have to select another entry.
right).
The number is now exempt from call barring and call budgeting.
CALL TARIFF
and press YES.
is displayed.
ExemptedNo
Number
YES to confirm.
and press YES.
or a previously set exempt number is displayed.
UP or DOWN key, once or more, to choose a different exempt
or
Exempted No. is fixed !
YES.
is displayed. In the latte r ca s e you can-
CLR = delete; UP = move left; DOWN = move
i
t
Use
l
1
during a call, you can have the
ia
a
c
r
unic
e
m
B
YES.
ons A
To set the call tariff:
BaseStation » Basic » Tariff
Route:
1. Select
2. Enter the PIN code for the base station (see page 58) and press
3. Select
4. Enter the new ca ll tariff (
5. Press
Not
1.
Basic
PIN:
or Comm
The current ca l l tariff is displayed.
f
and press YES.
is displayed.
Tariff
and press YES.
= decimal point).
right;
YES to confirm.
The amount of money ( call tariff) by which the call costs increas e wi th
each metering pulse is now set.
This function may not be supported by your telephone network operator.
Com
CLR = delete; UP = move left; DOWN = move
ricsson Mobile
E
YES.
Extra features 63
Page 65

No Budget
Example:
Suppose you have set the call tariff to 0.25. During a call when the first metering pulse is received, the call costs are 0. 25. With the second pulse, they are
0.50 and so on.
CALL BUDGET
The base station is provided with a call budgeting feature, which you can use
to set the amount of money or time a particular handset can spend on external
calls. When the budget for a part icular handset has been exce ede d, the base
station does not end an ongoi ng call but blocks the next external call until a
new budget is set. However, emergency calls and calls to exempt numbers can
still be made (see “Exempt numbers” on page 62).
If a particular handset has gone over its budget, th e ha ndset sounds busy and
No Budget
displays
Budget type
Either time or costs can be budgeted depending on the budget type setting.
Costs can only be budgeted if the call tariff is set and the base station receives
metering pulses during a ca ll . If no me tering pulses are received during an
external call, the cos t budg et remains the same. See also “Call tariff ” on
page 63.
To set the budget type:
Route:
1. Select
PIN:
is displayed.
2. Enter the PIN code for the base station (see page 58) and press
3. Select
The current budget type is displayed.
4. Press
Duration
•
or Comm
Cost
•
f
nal call.
5. Press
The budget type is set.
when an externa l call is attempted.
r
e
BaseStation » Basic » CallInfo
Basic
and press YES.
Com
CallInfo
and press YES.
UP or DOWN to select one of the following options:
to budget time that is sp ent on external calls.
to budget the costs if mete ring pulses are received during an exte r-
YES to confirm.
Use
l
ia
c
m
unic
ons A
i
t
a
B
YES.
Not
64 Extra features
ricsson Mobile
E
Page 66

Setting call budgets
You can set a budget for a partic ular handset or, if the budget is exceeded,
grant a new budget. Whether time or costs are budgeted depends on the budget
type setting, see above. The maximum budget that can be set is 99 hours and
59 minutes or 99999 in local cu rre ncy uni ts.
To set a budget for a handset:
BaseStation » Access » Budget
Route:
1. Select
2. Enter the PIN code for the base station (see page 58) and press
3. Select
4. Enter the number of the handset for which you want to set the budget.
5. Press
6. Press
7. Press
8. Edit the amount (
9. Press
1. Select
2. Enter the PIN code for the base station (see page 58) and press
3. Select
4. Enter the number of the handset for which you want to set the budget.
5. Press
6. Press
7. Press
Access
PIN:
Dev.Number:
Either the current setting or
you have entered a non-existent ha ndset number.
Either
the amount is negat ive, th e bud g et has been exceeded.
The budget is set for that handset.
To disable call budgeting for a handset :
Route:
PIN:
Dev.Number:
or Comm
Either the current setting or
f
you have entered a non-existent ha ndset number.
Call budgeting is disab led for that handset.
and press YES.
is displayed.
Budget
and press YES.
is displayed.
YES to confirm.
UP or DOWN to select
YES to confirm.
Time Budget:
YES to confirm.
BaseStation » Access » Budget
Access
is displayed.
Budget
YES to confirm.
UP or DOWN to select
YES to confirm.
or
Cost Budget:
CLR = delete; UP = m ove left ; DOWN = move right).
and press YES.
and press YES.
is displayed.
Use
l
Handset not known
ia
On
.
is displayed. I n t he la tt er c ase,
c
and the current am ount are displayed. If
r
unic
e
m
Com
Handset not known
Off
.
is displayed. I n t he la tt er c ase,
ons A
i
t
a
B
YES.
YES.
Not
ricsson Mobile
E
Extra features 65
Page 67

Remain Time
03:45
Remain Cost
00219
Remaining budget
You can easily check the remaining budget of your handset. The amount
depends on the budget type and, if a cost budget is selected, whether metering
pulses have been received during an external call. The amount can show a
negative value which means that the budget has been exceeded and no more
external calls can be made wit h your handset.
To see the remaining budget:
BaseStation » Information » CallBudget
Route:
1. Select
2. Press
CallBudget
One the following is di s played:
No Budget
•
Remain Time
•
Remain Cost
•
YES to leave this menu.
and press YES.
if no budget is assigned to your handset.
and a value in hours and minutes if the budget type is time.
and a value in the local currency if the budget type is costs.
Use
l
a
ons A
i
t
B
CALL STATISTICS HANDSET
Your phone can tell you how long yo ur la st call was. Your phone can also display the total time of all external calls made.
Last call
To see the time spent on your last call:
Information » LastCall
Route:
1. Select
2. Press
T otal external calls made
1. Select
2. Press
The base station records the tot als of all external calls made. One of th ese
Not
totals is costs which is dependent on the call tariff setting and metering pulses.
If you have set the call tariff to zero or no metering pulses are received by the
base station, this me nu op tion is not avai lab le. Only the total time can then be
displayed. See also “Call tariff” on page 63.
The maximum amount that can be displaye d is ei ther 99:59 or 99999.
LastCall
The length of the last call is displayed in hours, minutes and second s.
To see the time spent on all outgoing external calls:
Route:
or Comm
The total time of all e xter nal calls mad e is displ ayed in hour s, minu tes and
f
seconds.
CALL STATISTICS BASE STATION
and press YES.
YES to leave this menu.
Information » TotalCalls
TotalCalls
and press YES.
YES to leave this menu.
ia
c
r
unic
e
m
Com
66 Extra features
ricsson Mobile
E
Page 68

Home 1
T otal duration
To see the time spent on outgoing extern al calls:
BaseStation » Information » TotDuration
Route:
1. Select
2. Press
3. Press
4. Enter the PIN code for the base station (see page 58) and press
T otal cost
This menu optio n may not be available.
1. Select
2. Press
3. Press
4. Enter the PIN code for the base station (see page 58) and press
In some telephone networks, callers can leave a message in a voice mailbox if
they cannot reach you. You then have to dial a service number to check for
messages. With the cordless phone, this can be au tomated. If a message is
received, the message icon on the handset flashes quickly and a message waiting sound is heard. You can then conveniently dial the service number via the
Voice:
Checking for voice mail messages
Menu option
cates the number of message s. Se e al so “Voice mail notification” below for
more details.
Not
1. Select
2. Press
TotDuration
The total time of all exte rnal calls made is displayed.
YES to continue.
Reset TotCallTime?
YES to reset or NO to cance l.
PIN:
is displayed.
Total Time is Reset
To see the total amount of costs of all external calls m ade:
Route:
TotCosts
The total costs of all external calls made is displayed.
YES to continue.
Reset TotCallCost?
YES to reset or NO to cance l.
PIN:
is displayed.
Total Cost is Reset
VOICE MAIL
and press YES.
is displayed.
is displayed for a short time.
BaseStation » Information » TotCosts
and press YES.
ia
c
r
is displayed.
e
is displayed for a short time.
Use
l
unic
m
Com
menu option to listen to you r messages.
or Comm
f
Voice: x
is only available if there are voi c e mail messages. X indi-
To listen to voice mail messages:
Voice: x
The service number is displayed.
instructions given.
and press YES.
YES to dial the number. Wait for a connection and fol low th e
ons A
i
t
a
B
YES.
YES.
ricsson Mobile
E
Extra features 67
Page 69

3. Press NO to end the call.
The length of the call is displayed. If available, the costs of the call are also
displayed.
Voice mail notification
Voice mail services normally answer calls after a few rings. To check for voice
mail messages, you have to call a service number, which lets you listen to your
recorded messages. Ask your dealer for more details abou t the voice mail
service.
B
To set the voice mail notification:
BaseStation » VoiceMail
Route:
1. Select
2. Enter the PIN code for the base station (see page 58) and press
3. Use the
4. If you select
5. Press
6. Enter the number of times the base station should rin g (1 - 9) before a
7. Press
8. Enter the service number (
9. Press
If no service number has been set, the voice mail notifica t ion is cleared as
soon as an external call is made.
See also “Checking for voice mail messages” on page 67.
VoiceMail
PIN:
is displayed.
The current setting is displayed.
The current number of rings is displayed.
voice mail notification is given (default is 5).
MailBoxNo:
shown in the display.
right).
The voice mail notification set ti ng has been changed.
and press YES.
Use
l
UP or DOWN key to select the setting you want.
Off
continue with step 9.
YES to confirm.
YES to confirm.
is displayed. If a service num ber has already been set, this is
YES to confirm.
ia
c
r
unic
e
m
CLR = delete; UP = move left; DOWN = move
Com
ons A
i
t
a
or Comm
SUBSCRIBING HANDSETS
f
The handset that comes with the base station is already automatically subscribed to the base station as descr ibe d in “Preparing for use” on page 9. Any
handsets you buy separately must also be subscribed, in order to connect them
to the base station. A maximum of eight handsets can be subscribed to the
Not
base station. One handset can be subscribed to up to eight base stations.
YES.
Subscribing another handset
To subscribe a handset to a base station you need the aut hentication code of
the base station. The authentication code, which is the same as the base station
68 Extra features
ricsson Mobile
E
Page 70

PIN code, is secret and prevents other handsets subscribing to the base station
without your approval.
Home 2
John 2
If the handset does not have a subscri ption, it automatic al ly enters the subscription mode when it is switc he d on. In this case, the handset displays
<Page> base station
and three of the proce dure below.
To subscribe a DT200 handset to the base station :
Route:
1. Press the PAGE button on the base station for at least two seconds.
2. Select
Enter PIN:, Enter AC:
handset already has eight su bsc riptions and to add a new subscription you
have to delete another.
3. If requested enter the PIN code for the handset (see page 58) and press
YES.
Enter AC:
4. Enter the authentica tion (PIN) code of the base station.
Each digit of the AC number that you enter is shown only as
purposes.
5. Press
The handset now looks for base stations in subsc ription mode using the
AC number to test if it is allowed to subscribe .
6. Wait until
The handset is connected to the base station. You can see its internal phone
number on the right -ha nd side of the display.
In case of the followin g me s s age, try to subscribe again:
Subscription Failed
•
station PIN cod e or the base station al ready has eight handset subscriptions. To add a handset you have to delete the subscription of another
handset.
or Comm
You can provide a personal identity for the base station. The name is arbitrary
f
and is shown in the displ ay when the handset is connected to the bas e station
and on standby. See “Editing base station name” on page 81.
first and then
Networks » Subscribe
Subscribe
and press YES.
or
is displayed.
YES to confirm.
Subscription Ready
: the AC number you have entered does not match the base
Enter AC:
appears. If so, you can skip step two
Subscr. List Full
is displayed. In the latt er case, your
Use
l
ia
c
r
unic
e
m
is displayed for a short time.
Com
ons A
i
t
a
for security
B
Press
Subscribing another type of handset
Your base station functions c an be fully utilized when used in combina tion
Not
with a DT200 handset. If it is use d wi th another type of handset, there are a
few functions that will not work.
Please refer to the handset docum entation for subscribing anot her type of
handset to the base station. To initiate subscription, you have to press the
ricsson Mobile
E
Extra features 69
Page 71

PAGE button on the base station for at least two seconds. The base station
remains in the subscripti on mode for about 5 minutes.
Cancelling the subscription of a handset
Up to eight handsets can be subscribed to a base station. If you want to subscribe a ninth handset, you m ust cancel the subscription of another.
To cancel a subscriptio n of a handset:
BaseStation » Access » Desubscribe
Route:
1. Select
2. Enter the PIN code for the base station (see page 58) and press
3. Select
4. Enter the number of the handset whose subscription you wa nt to ca ncel.
5. Press
6. Press
To cancel your subscription on the base station, please refer t o “ D e le t ing subscription” on page 82.
By using multiple base stations you can extend the coverage area of your
handset.
When you set the handset t o aut o m a tic base station selection (de fault), you
can automatical ly connect to a subscribe d base station but you cannot continue a telephone conversation while moving from one base station to another.
Access
PIN:
Dev.Number:
Either
case, you have entered a non-existent handset number.
The subscription for that handset is cancelled.
and press YES.
is displayed.
Desubscribe
is displayed.
YES to confirm.
Desubscribe Hand set ?
YES to confirm.
and press YES.
or
Handset not known
c
r
Use
l
is displayed. I n the latter
ia
unic
e
m
USING MULTIPLE BASE STATIONS
Com
ons A
i
t
a
B
YES.
Multiple base stations on one telephone line
To be able to use the handset in a larger area, you can c onnect two or more
or Comm
base stations to the same telep hone line. The number of ba se sta ti ons you can
f
connect to one telephone line depends on local conditions. Please contact your
dealer for further inform at ion
You need to subscribe the ha ndset to each base station. Th e handset can have
different internal numbers (1 - 8) on the various base stations.
Not
Multiple base stations on multiple telephone lines
You can also use the handset with multiple base stations in various places,
connected to different telephone lines. In this case, the handset can have different internal a nd exte rnal numbers at different time s.
70 Extra features
ricsson Mobile
E
Page 72

Connecting to a base station
To be able to use a certain base station, the handset must be subscribed and
connected to th at base station. A h andset can be subscribed to multiple base
stations, but can only be connected to one base station at a time. To connect to
a base station please refer to “Selecting another base station” on page 80.
SINGLE OR MULTI-CELL MODE
Your base station can ope rate in the single-cel l (st and alone) mode or in the
multi-cell mode. In the multi-cell mode, the handset can be used in a larger
area in which base st at ions work togethe r as one unit. It is recomme nded that
you leave your base station in the single-cell mode unless otherwise specified.
This function is reserved fo r future use.
To set the cell mode:
BaseStation » Basic » CellMode
Route:
1. Select
2. Enter the PIN code for the base station (see page 58) and press
3. Select
4. Press
5. Press
If the base station is connec ted to a switchboard, you can use i ts functions in
the same way as with a conventional fixed telephone. The only difference is
the absence of a te lephone cable. One example of this type of fu nction is
transferring calls.
Basic
PIN:
The current cel l m ode is displayed.
•
•
The cell mode is set.
USING A SWITCHBOARD
and press YES.
is displayed.
CellMode
and press YES.
UP or DOWN to select one of the following options:
SingleCell
default setting; the base sta ti on operates in stand alone mode.
MultiCell
the base station works together with other base stations to form
a larger coverage area.
YES to confirm.
r
e
Com
or Comm
Use
l
ia
c
m
unic
ons A
i
t
a
f
Telephoning using a switchboard
When you use a switchboard, it is som etim e s nec essa ry t o wait for the dia l
tone before dialli ng a number. If the whole numbe r is to be entered and displayed prior to dialling, for example a stored number, then you must indicate
Not
where in the number the handset should wait for th e dial tone.
B
YES.
To include a pause (to wait for the dial tone) in a numb er, press
ond. A dash appears in the handset display to show you where you have set the
pause.
ricsson Mobile
E
for one sec-
Extra features 71
Page 73

If there is a dash in a numbe r, the handse t waits a while for the dial tone. If
you hear the dial tone, the handset continues dialling without waiting for the
full dial tone pause period .
B
PULSE OR TONE DIALLING
Some telephone networks use pulses when dialling a number. If your cordless
phone is set to pulse dialling, you can switch to tone dialling if required, for
example to control a teleservice.
To switch the handset to tone dialling during a call:
DialMode » GoToDTMF
Route:
• Select
When you hang up, the handset goes back to pulse dialling. The pulse dialling
setting stays when you switch off.
Which dialling method?
GoToDTMF
and press YES.
The handset now uses tone dialling.
ia
Use
l
ons A
i
t
a
c
You can easily check whether tone or pulse dialling is required. Proceed as
follows:
1. Check if the base station is se t to tone dialling, see “Tone dialling” on
page 73.
2. Press
3. Dial the number of someone you know.
If you dial the number and still hear the dial tone, you have to set the base station to pulse dialling. See below.
Pulse dialling
YES.
You hear the dial tone .
If the external line supports tone dialling, you hear th e phone ring.
1
r
unic
e
m
Com
To set the base station to pulse dialling:
or Comm
Route:
f
1. Select
PIN:
is displayed.
2. Enter the PIN code for the base station (see page 58) and press
3. Select
Not
72 Extra features
ricsson Mobile
The opposite of the current set ti ng is di spl ay ed.
4. Scroll to either
GoToDTMF
•
dialling.
GoToPulse
•
1.
This function may not be supported by your telephone network operator.
E
BaseStation » Basic » PhoneLine
Basic
and press YES.
PhoneLine
and press YES.
GoToPulse
or
GoToDTMF
. If the display shows:
press NO because the base station is already set to pulse
press YES to set the base station to pulse dialling.
YES.
Page 74

Tone dialling
To set the base station to tone dialling:
BaseStation » Basic » PhoneLine
Route:
1. Select
2. Enter the PIN code for the base station (see page 58) and press
3. Select
4. Scroll to either
If you use a telephone line with tone dialling, the base station transmits signals
across the telephone li ne when you press the
switchboards use either earth or hook flash as a signalling method. You will
find details of which one is used in the a ppropriate documenta ti on. You must
set the base station to the appropriate signalli ng m ethod for the telephon e network or switchboard.
Earth sign a ll ing
Earth signalling can only be used with a suitable t el ephone line.
1. Select
2. Enter the PIN code for the base station (see page 58) and press
3. Select
4. Scroll to either
Basic
PIN:
The opposite of the current set ti ng is di spl ay ed.
•
•
SIGNALLING METHODS
and press YES.
is displayed.
PhoneLine
and press YES.
GoToDTMF
or
GoToPulse
. If the display shows:
GoToPulse
press NO because the base station is already set to t one
dialling.
GoToDTMF
press YES to set the base station to tone dialling.
Use
l
ia
c
r
e
m
To set the earth signalling method :
BaseStation » Basic » PhoneLine
Route:
Basic
PIN:
The opposite of the current set ti ng is di spl ay ed.
or Comm
•
f
•
and press YES.
is displayed.
PhoneLine
GoToFlash
press NO because the base station is already se t to earth
signalling.
GoToEarth
press YES to set the base st ation to earth signa ll ing.
Com
and press YES.
GoToEarth
or
GoToFlash
. If the display shows:
ons A
i
t
a
R key. Telephone networks or
unic
B
YES.
YES.
Not
ricsson Mobile
E
Extra features 73
Page 75

Hook flash
Hook flash is a signalling method in a telephone network or on a switchboard
and is initiate d by pressing the
call transfer. Hook flash actually simulates an on-hook-off-hook sequence
during a call. The length of such a sequence can be adjusted. In most cases the
factory setting (defa ul t) is correct. You will find details in the appro pri ate
documentation.
It is important to set the hook fl ash duration correctly. If it is set too short or
too long the telephone network or the switchboard may not detect a hook flash
or may even end the call.
The hook flash durati on is li mited to a certain rang e. If you t ry to exceed the
range, the handset sounds a warning tone and defaults to the lower or upper
limit.
R key on the handset. It is normally used for
ons A
i
t
Use
l
a
B
To set the hook flash signalling method:
BaseStation » Basic » PhoneLine
Route:
1. Select
2. Enter the PIN code for the base station (see page 58) and press
3. Select
4. Scroll to either
5. Enter the required duration (
6. Press
Hook flash duration
If you use hook flash signalling , yo u m ay ne ed to change the hook flash duration. To change this, you have to go back to earth signalling first and the n
change the signallin g method back to hook flash. Se e “ E arth signalling” on
page 73 and “Hook flash” above for the corresponding procedures.
Basic
PIN:
The opposite of the current set ti ng is di spl ay ed.
•
•
right). The last digit automatic al ly defaults to
Hook flash signalling and its duration are set.
and press YES.
is displayed.
PhoneLine
and press YES.
GoToFlash
GoToEarth
press NO because the base station is already set to hook flash
signalling.
GoToFlash
press YES to set the base station to hook fla s h signalling.
Flash Time:
and current duration in milliseconds are display ed.
YES to confirm.
or Comm
f
ia
c
r
unic
e
m
or
GoToEarth
. If the display shows:
Com
CLR = delete; UP = move left; DOWN = move
0
.
Not
YES.
74 Extra features
ricsson Mobile
E
Page 76

TRANSFERRING CALLS
In general, you can transfer calls on a switchboard as described be low. However, transferring calls may work differently on your switchboard.
B
To put a call on hold and dial another numbe r, use the
menu option. If you do not know the nu mber by heart, use the
With the R key
You are on the phone an d wa nt t o tra nsfer a call.
To transfer calls to another extension:
1. Press the
You hear the dial tone of th e switchboard.
2. Enter the number of the extension to which you want to transfer the call.
If the extension is available, you hear it ring. You can wait until the call is
answered.
3. Press
With the ‘NewCall’ option
During a call, you may want to hold the call and dial another number, but you
do not know the number by heart and want to look it up in the phone book, the
who called list or the last dialled list.
To transfer calls to another extension:
1. Select
2. Enter or search for the number of the extension to which you want to trans-
fer the call, as norma l.
3. Press
4. Wait for an answer.
If the person does not answer, or is busy, press
5. If the second call is answered you ca n:
• Return to the first call by pressing
• Transfer the first call to the second party by pressing
R key to put the current call on hold.
Use
l
NO to transfer the cal l, or press the R key to return to the caller.
ia
c
r
unic
e
m
NewCall
and press YES.
YES to dial the number.
Com
R.
or Comm
R key or the
t
a
R to return to the call.
NewCall
NewCall
option.
ons A
i
NO.
f
Not
ricsson Mobile
E
Extra features 75
Page 77

Use
l
ia
c
r
unic
e
m
Com
B
ons A
i
t
a
or Comm
f
Not
76 Extra features
ricsson Mobile
E
Page 78

Home 1
No Network
No Access
Press <Page>
base station
Using base stations
CONNECTING TO BASE STATIONS
You can connect your han dset to seven other base stations, as well as to the
one that comes with your set.
Before you can connect to a base station, your handset must have access rights
to that base station. These acce ss rights are sto r ed in a so-called subscription.
You only have to subscribe to a base sta tion once. When you are subsc ribed,
you can make and receive calls whenever you are within range of that base
station. A subscr ibed base station ca n be selected automatically or manually.
While subscribing to a base station, the handset receives an internal telephone
number by which it can be called by anothe r ha ndse t.
If your handset has a radio connection with a base station, this is shown by the
signal strength indicator. If the indicator is visible, then you can make and
receive telephone calls. If the ind ic at or is not shown, then the handset is not
connected to a base station. This may mean:
• You are out of range.
Check that the base station is on and that you are within range.
• There is no access to the selected base station.
The handset is not able to conne ct or its access rights may have changed.
Set the handset to automatic base station selection (repeat if nec essary)
and if that does not help, subsc ribe the handset to the base sta tion again.
• There is no subscription to the base station.
or Comm
Subscribe the handset to the base station.
f
r
e
Com
Use
l
ia
c
m
unic
ons A
i
t
a
Out of range
If you are out of range, the handset warns you with short, fast, beeping sounds
and a flashing warning light . T he signal strength indicator i s not shown. You
must be within range to connect to a sub s cribed base station. Switching to
Not
automatic base station selection may remedy this ( s ee “Selecting anothe r base
station” on page 80). Auto m at ic base station selection may connect you to
another subscribed base station.
B
ricsson Mobile
Using base stations 77
E
Page 79

Subscriptions
Up to eight base stations may be subscribed. The names of these base stations
are stored in a prioritized list. In case of automatic base st ation selection, the
handset tries to connec t to the base stat ion with the highest prior it y; first base
station entry 1, followed by base station entry 2 etc. To change the base station
priority, see “Selection priority” on pa ge 8 0.
If you want to subscribe and no free entries are left in the subscription list, you
have to delete an entry first. See “Deleting subscription” on page 82.
B
SUBSCRIBING TO A BASE STATION
In order to connect a handset to a base station, you must subscribe to that base
station. Once subscribed to, the ba s e s ta ti o n can be connected at any tim e,
when within range. For subscribing t o a BS230 base station, please refer to
“Subscribing handsets” on page 68. The subscription procedure below is
intended for other types of base stations.
In order to subscribe to a base station, an Authenticati on Code (AC) is
required. Please consult the appropriate docum en ta ti on.
Up to eight base stations may be su bscribed and the identifyi ng names of
these base stat ions are stored in a li st.
The identifying names of base statio ns can also be used as a personal identity
for your handset. Each name could, for instance, be related to the relevant area
when connected to that particular base station. To edit the base station nam e,
while retaining the subscription data, please refer to “Editing base station
name” on page 81.
If the handset does not have a subscri ption, it automatic al ly enters the subscription mode when it is switc he d on. In this case, the handset displays
<page> base station
or Comm
and three of the proce dure below.
f
first and then
r
e
Com
Enter AC:
Use
l
ia
c
unic
m
appears. If so, you can skip step two
ons A
i
t
a
To subscribe your ha ndse t to a base station other than the BS230:
Networks » Subscribe
Route:
1. Ensure that the bas e station is ready to subscribe as indicated in the appro-
Not
priate documentation.
Subscribe
2. Select
Enter PIN:, Enter AC:
handset already has eight su bscriptions. You have to delete a subscription
before you can add a new one.
3. If requested, enter the PIN code for the handset (see page 58) and press
YES.
Enter AC:
and press YES.
or
is displayed.
Subscr. List Full
is displayed. In the latt er case, your
Press
78 Using base stations
ricsson Mobile
E
Page 80

Home 2
4. Enter the authentication code or the PIN code of the base station.
Each digit of the AC number that you enter is shown only as
purposes.
5. Press
6. Wait until
If you get the following message, try to subscribe again:
•
YES to confirm.
The handset now looks for base stations in subsc ription mode using the
AC number to test if it is allowed to subscribe .
The handset is connected to the base station. You can see its internal phone
number on the right -ha nd side of the display.
Subscription Failed
station AC number, or the base station cannot add another subscription.
Subscription Ready
: the AC number you have entered does not match the base
is displayed for a short time.
for security
ons A
i
t
RE-SUBSCRIBING TO A BASE STATION
Re-subscribing to a base stati on replaces the existing subscription data. Resubscribing can be used t o update the subscription dat a i n the handset. For
example, if telephone numbers change
This function is reserved fo r future use.
You can only re-subscribe to the currently connected base station. If neces-
sary, first select the base station you want to re-subscribe to (see “Ma nu al
selection” on page 80).
This menu optio n is only available if the handset is connected to a base
station.
To re-subscribe the handset to the currently connected base station:
Networks » Resubscribe
Route:
1. Select
2. Press
Resubscribe
Resubscribe?
YES to confirm.
Resubscribng
is displayed.
is displayed while re-subscribing takes places.
r
e
Com
and press YES.
Use
l
ia
Resubscribe
c
m
a
can be used to update them.
unic
or Comm
f
B
Not
ricsson Mobile
Using base stations 79
E
Page 81

SELECTING ANOTHER BASE STATION
The handset can connect to several base stations. It can select a base station
automatically wh en i t ha s bee n out of range or switched on. You can also
specify a base station to conne ct to.
Automatic selection
This menu option is only available if the subscription list contains base station
names.
B
To have automatic base station selection:
Networks » SelectNet
Route:
1. Choose
2. If necessary use the
3. Press
The handset tries to connect to a subscribed base station in the order of the prioritized subscription list.
Manual selection
This menu option is only available if the subscription list contains base station
names.
1. Choose
2. Press
3. Press
Selection priority
The handset can se lect a base station automatically wh e n it h as been out of
range or switched on. In this case, it searches for the base stations in the order
of priority starting with the first one on the subscription list. If you wish to
change the order of your subscription list, the base sta ti on na m es c an be rearranged using the
Not
This menu option is only available if the subscription list contains two or more
base station names.
SelectNet
Automatic
YES to confirm.
The handset is set to automatic base station selection.
and press YES.
or the currently se le cted base station is displayed.
UP or DOWN key to select
Use
l
Automatic
ia
c
r
unic
e
m
To specify the base station to connec t to:
Networks » SelectNet
Route:
SelectNet
and press YES.
Automatic
or the currently se le cted base station is displayed.
UP or DOWN to find the base station you want from the list.
YES to confirm.
The handset tries to connect to the selected bas e station.
Com
or Comm
f
Priority
option.
ons A
i
t
a
.
80 Using base stations
ricsson Mobile
E
Page 82

Home 1
To change the order of the subscription list:
Networks » Priority
Route:
1. Select
2. Use
3. Press
4. Use
5. Press
The selected base station is put into the required position on the list. The other
base stations on the list are re-arranged accordingly, maintaining their relevant
priorities. For example, if item 3 is moved to i te m 1 on the li st; i te m 1
becomes item 2, item 2 beco mes it em 3 and the other items remain
unchanged.
The name of each subscripti on entry can be set or amende d to provide a personal identity for your ha ndset. The name is arbit rary and is shown on the display when the handset is con n e ct ed to that base station and on standby. The
default name is
The default name
phone networks, the default name can be
of network.
This menu option is only available if the subscription list contains base station
names.
Priority
The first base station name on th e list is displayed.
Pos. 1
station.
The base station is moved to the position you have chosen.
and press YES.
UP and DOWN to select the base station to be mo ved.
YES.
is displayed.
UP or DOWN to select the new position in the list for the selected base
YES to confirm.
ons A
i
t
Use
l
a
ia
EDITING BASE STATION NAME
r
c
unic
e
Home
.
Home
only applies to base stations. For other type s of te le-
m
Work
or
Public
, depending on the type
Com
B
To edit the base station name:
Networks » Rename
Route:
or Comm
1. Select
2. Use
3. Press
4. Change the name (to a maximu m of ten characters) using th e
Not
ricsson Mobile
Rename
f
The first base station name in the subscription list is dis played.
Edit Name:
(delete) and then the num be r keys. Press the key whic h ha s the first letter
of the name you want. Press once for the first letter of the key, twice for the
second and three ti mes for the third letter of the key (
move left;
and press YES.
UP or DOWN to select the name to edit.
YES.
is displayed.
DOWN = move right; 1 = space;
= lower case).
Using base stations 81
E
CLR key
CLR = delete ; UP =
Page 83

5. Press YES when you finish.
The handset can display several special characters. Please refer to “Phone
book use” on page 35 for more details.
DELETING SUBSCRIPTION
If a subscription is no longe r required, you can remove it from the hand set’s
subscription list.
This menu option is only available if the subscription list contains base station
names.
To remove a subscription from the handset:
Networks » Delete
Route:
1. Select
2. If requested, enter the PIN code for the handset (see page 58) and press
3. Use
4. Press
5. Press
If you delete the currently ac tive subscrip ti on, the handset disconnects and
searches for another subscribed base sta tion.
Delete
and press YES.
Enter PIN:
or the first base station name in the subs cri p t ion list is displaye d.
YES.
UP or DOWN to find the subscription for deletion.
YES.
Delete?
is displayed.
YES to confirm.
The subscription has been re moved from the handset’s subscription list.
r
e
Use
l
ia
c
m
unic
ons A
i
t
a
B
or Comm
f
Not
82 Using base stations
ricsson Mobile
E
Com
Page 84

Tips and tricks
B
You can find a few useful tips and tricks in this sect ion.
Putting a call on hold
You can put a call on hold in three ways:
• During an external call press
handset, return to the ca ll or start a three-party call. See “C onsulting with
another handset or tran sferring a call” on pag e 31.
• During an external call press
dependent on the tel ep hone network or switchboard used . See “Transferring calls” on page 75 for more deta il s.
• Press
Starting a three-party call
You can start a three-part y call by pressing 3, if you have put an external call
on hold and are having a conversation with another handset. See also “Making
a three-party call” on page 32.
Paging handsets
To page handsets:
• Press
• Press
CLR to switch off the microphone. See “Turning off the micro-
phone” on page 27.
PAGE on the base station.
Or
and then INT on a handse t.
INT. You can now trans fer th e cal l to ano ther
Use
R. This and any further action is entirely
l
ia
c
r
unic
e
m
Com
ons A
i
t
a
See also “Searching for ha ndse ts or pe opl e” on page 31.
or Comm
f
Quick call by name
You can search for a number by nam e in the phone book without using the
menus. See “Quick call by name” on pa ge 2 4 for m ore details.
Entering a dial tone pause
To include a pause in a telephone number, press
Not
marks the pause. The base stati on waits for the dial tone for the lengt h of the
dial tone pause. See “Di al tone pause” on page 50 for more detail s.
for one second. A dash
ricsson Mobile
E
Tips and tricks 83
Page 85

Editing a name and number
If you edit a name or a number on your handset you can “jump” to the most
left or the most right character by respectively pressing
second. You can clear the whole name or number by pressing
second.
Mute ringer temporarily
If your handset rings at an inconvenient moment, you can turn off the sound
temporarily by pressing
“Turning off the ringer and warning sound” on page 27 for more details.
CLR. The ringer sounds again with the next call. See
UP or DOWN for one
CLR for one
ons A
Muting ringer and warning sound permanently
You can turn off the ringer and warning sound permanently by pressing
for second. If you press
turn the ringer and warning sound back on, press
See “Turning off the ringer and warning sound” on page 27 for m ore de tails.
CLR during a call, you turn off the microphone. To
Use
l
ia
CLR for one second again.
t
a
i
CLR
c
r
unic
e
m
B
or Comm
f
Not
84 Tips and tr icks
ricsson Mobile
E
Com
Page 86

Reference
B
SAFETY INSTRUCTIONS
Do not place the base station near audio or video equipment. It may cause
interference. The handset is not suitable for li fe line applications.
Intrinsic safety
Do not use the handset in condi ti ons where there is a danger of ele ctr ic ally
ignited explosions.
Exposure to sunlight, heat and moisture
Do not expose the cordless phone to direct sunlight for long periods. Keep the
cordless phone away from excessive heat and moisture.
Battery disposal
Defective batteries must be returned to a collection point for ch emical waste
disposal.
Spare parts and accessories
Use only approved spare parts and accessories. The operation of nonapproved parts cannot be guaranteed and may even cause damage. For more
information see “Spare pa rts and accessories” on page 96.
Power failure
In the event of a power failure or flat battery, you cannot use the handset to
make or receive calls.
or Comm
TROUBLESHOOTING
f
These answers to frequently asked questions should help you solve problems
with the cordless phone yourself.
r
e
Com
Use
l
ia
c
m
unic
ons A
i
t
a
How far can I go from the base station without the handset failing?
Not
Indoor the range is up to 50 metres , outdoor up to 300 metres. The actual
range may differ because of local circumstances.
Can somebody eavesdrop on me?
This is not possible because of the digital techniques and encryption which are
used.
ricsson Mobile
E
Reference 85
Page 87

Do I get a warning before the batteries run out?
An alarm sounds w hen approximately fifteen minutes’ ca ll ing time is left.
How can I subscribe a handset to a base station?
To subscribe a handset you need the authentication (PIN) code of the base station. How to subscribe is explained in “ S ubscribing to a base station” on
page 78.
What should I do if the handset dials a number as soon as I press a key?
A direct call has been set. See “Dire ct call” on page 60.
What should I do if I do not hear anything when I pick up the
handset and the red light on the base station is flashing?
The base station is not properly connected to th e t el ephone line. Check th e
telephone line cable.
Why do I keep on hearing the dial tone after I have dialled a number?
If you dial a number and still hear the dial tone, you probably have to set the
base station to another dialling method. See “Pul se or tone dialling” on
page 72 for more details.
I cannot understand the language on the display. Why?
An incorrect language has been selected.
To correct this:
1. Press
2. Press 5 x
Some menu options are in another language on the display. Why?
These options are the base station m en us whic h form a part of the handset
menus. They are normally in the same l ang uage as the handset menus. If the
handset language is not available, th e base station chooses English by default.
CLR.
The handset returns to the sta nd by displ ay.
UP, YES, 3 x UP and YES. Se le ct the language of your choice
from the list and press
or Comm
f
r
e
Com
YES.
Use
l
ia
c
m
unic
ons A
i
t
a
B
To choose another default language:
1. Press
Not
86 Reference
ricsson Mobile
The handset returns to the sta nd by displ ay.
2. Press 4 x
tion (see page 58), 2 x
list and press
E
CLR.
UP, YES, 3 x DOWN, YES, enter the PIN code for the base sta-
YES. Select the lang uage of your choice from th e
YES.
Page 88

I have entered an incorrect PIN code three ti mes in a r ow . Ho w can I set a new PIN code?
If you have entered an incorrect PIN code three times in a row, the current
code is invalidated. If the handset PIN code is invalidated, the handset cannot
be used any more. To reset the PIN code, see “Resetting the base stat ion PIN
code” on page 57 and “Un blocking the handset” on page 55.
B
I cannot switch on the handset by pressing
seconds. Why?
Put the handset in the base sta tion. If the display comes on, the ba ttery is
almost flat. Leave the handset in the base station to charge the battery. If the
display remains off after charging, the handset is defective or the battery is not
properly connected or m ay need replacing. See “Battery” on page 12.
I have placed the handset in the base station but the green charging light does not come on. Why?
Ensure that the handset is placed properly in the base station and the base station is on. If the battery is completely flat, leave the handset in the base station
to charge the battery. The green charging light will turn on after a few minutes.
I know that someone is calling me, but the ring signal is not ringing. Why not?
If you can see the ring off icon, it means that the volume of the ring signal has
been set to zero, or the ring signal is switched off tem porarily. If the ring signal has been switched off temporarily, it comes back on when you hang up.
For increasing the volume of the ring signal, see “Ri ng volume” on page 42.
I cannot call certain numbers. Why not?
Call barring is on or your cal l budget has been exceeded. For further deta il s,
see “Call barring” on page 61 and “Call budget” on page 64.
The external line light on the base station is flashing quickly.
or Comm
f
Why?
There is a problem w it h the connection between the base stati o n and the telephone line. Check the telephone line cable. See “Preparing for use” on page 9.
r
e
Com
Use
l
ia
c
m
NO for at least two
ons A
i
t
a
unic
I hear a warning tone and the signal strength indicator is not shown. What is wrong?
Not
The handset is not connected to the base station. Th e handset is probably out
of range. Bring the handset back within range of the base station.
It is also possible that the handset has not been subscribed or that the subscription has been cancelled . It coul d also mean that a base station othe r than the
ricsson Mobile
E
Reference 87
Page 89

one which you are close to has been selec te d. See “Subscribing handsets” on
page 68 and “Connecting to base stations” on page 77.
I hear a warning tone and the battery icon is flashing. What is wrong?
The battery is al m o s t fl at. Put the handset i n the base station to ch arge the
battery.
The red light on the base station is on. What is wrong?
Nothing is wrong. The external line is busy.
I cannot use the phone book. What is wrong?
To begin with, the phone book in the handset is empty. To make use of the
phone book, you have to add a few names and numbers. See “Adding name
and number” on page 36 .
If I press the R key nothing happens or the call is ended. Why?
If you press the
You may have selected the w rong signalling me thod. See “Signalling methods” on page 73 for more information. If you have set hook flash as the signalling method, the hook flash duration may be incorrect. Please refer to “Hook
flash” on page 74 for more details.
BUTTONS AND KEYS
On the flap of the cover of this user’s guide, you will see an illustration of the
handset. The lists below explains the use of the buttons and keys on the handset and base station.
Handset
R key a signal is sent to the telephone network or switchboard.
r
e
Com
Use
l
ia
c
m
unic
ons A
i
t
a
B
Key Function
VOLUM E UP and
VOLUM E DOWN
f
YES
CLR
Not
NO/ON/OFF If held for 1 second: switch handset on.
88 Reference
ricsson Mobile
E
or Comm
Earpiece volume louder/quieter.
Make a call or answer a call.
Confirm a menu option.
During call: microphone off.
While entering text or a number: delete last letter or
digit, del ete whole line if held longer.
If the handset rings: mute sound, mute ringer and
warning sound permanently if held longer.
Cancel a menu option, handset goes on standby.
If held for 1 second during standby: switch handset
off.
If the handset rings: mute sound.
End a call.
Cancel a menu option.
Page 90

Key Function (Continued)
UP and DOWN Start menu.
INT
R
Base station
Scroll through menu options or lists.
While entering text or number: move one character
position, move to end or beginning if held longer.
Make an internal call.
During an external call: consult another handset.
During an external call: transfer a call (if supported).
Change case of previous and subsequent letters
while entering text.
If held for 1 second: insert dial tone pause (-) while
entering a phone number.
ons A
i
B
t
Button Function
PAGE
Pressed briefly: page or search handsets.
Pressed longer: subscribe a handset.
Use
l
a
ia
DISPLAY ICONS AND TERMINOLOGY
A number of icons may appear on the hand set display. They are shown inside
the front cover of this user’s guide. The lists below explains what the icons
mean and the terminology which may appea r on t h e displ ay.
Icons Meaning
Signal strength On: when the handset is connected to a base sta-
Ring off On: ring sign al muted or microphone off.
c
r
unic
e
m
tion. Four vertical bars means good reception and
no bars means no connection.
Com
Key On: keys locked.
Hook On: handset is ‘off hook’.
or Comm
f
Message Flashes quickly: new message received in the voice
Call Info On: new unanswered entry in the who called list.
Battery On: battery charged; blocks indicate the battery
Not
Flashes: handset is ringing or a connection is being
made.
mailbox.
level.
Flashes: ba ttery almost empty.
Flashes quickly: the blocks flash successively; the
battery is being charged. The steady blocks indicate
the battery level.
ricsson Mobile
E
Reference 89
Page 91

Terminolo gy us ed on display
Term Meaning
AC Authentication code.
DTMF Dual tone multi frequency or touch tone, for dialling.
IPEI International portable part equipment identity,
PARI Primary access rights identity, unique identity
PIN Personal identification number for security.
unique ide ntity assigned to your handset by the
manufacturer.
assigned to your base station by the manufacturer.
ons A
i
SIGNALS
The handset and the base station signal certain events audibly and visually as
described below.
Use
l
t
a
B
Handset
Signal Meaning
Red warning light Incoming call.
The handset also generates audible ring signals, alarm signals and warning
tones, and key clicks.
Sound Meaning
Ring signal Incoming call.
Alarm signal 4 short beeps every 30 seconds: battery almost
or Comm
Key click You hear this each time you press a key (when
f
Warning tone You have pressed a key which has no function.
Base station
Not
Signal Meaning
Green bottom light On: charging handset battery.
Red top light On: external line is engaged.
ia
c
r
Message waiting.
e
Battery almost empty.
Handset out of range or not connected.
Baby phone call interrupted.
unic
m
Com
empty.
4 short beeps every 2 minutes: handset out of range
or not connected.
selected).
Flashes: incoming external call.
Flashes quickly: no connection to external line.
The base station generates a ring signal during an incom ing call.
90 Reference
ricsson Mobile
E
Page 92

MENU STRUCTURE
Several functions of the handset and the base station can be accessed via the
handset menus. The charts below give an overview of the top level menu items
to help you locate those functions.
Standby menu
The standby menu is accessible when the handset is in standby mode by press-
UP or DOWN (see below).
ing
B
or Comm
f
Not
PhoneBook Voice:* Handset
i
t
Find&Call
Store
Find&Edit
DeleteAll
Use
l
ia
c
r
e
m
BaseStation Networks Informa t io n
Com
...
See base
station menu
below
SelectNet*
Priority*
Renam e*
Delete*
Resubscribe*
Subscribe
AutoKeyLock*
BabyPhone
a
Alerts
PhoneLock
DirectCall
MasterReset
unic
Language
Display
AutoAnswer
WhoC alled*
LastDialled*
LastCall
Tota lCa lls
ShowIPEI
* Available where applicable
ons A
ricsson Mobile
E
Reference 91
Page 93

“In call” menu
The “in call” menu is acces sible by pressing
UP or DOWN during a call.
NewCall DialMode
Find&Call
WhoC alled*
LastDialled*
Base station menu
The base station menu can be accessed via the
handset’s standby menu.
RingVolume Routing Access
c
r
e
GoToDTMF
SendPause
DTMF -Long
Use
l
ia
Barring
unic
BarredNo
ExemptedNo
m
Desubscribe
Ca llWaiting
Budget
Com
Basic PriorityNo V oiceMail
* Available where applicable
ons A
i
t
BaseStation
menu option of the
a
Inf o rma tio n
B
f
Not
92 Reference
ricsson Mobile
E
Language
or Comm
RingOrder
CellMode
Ma sterReset
PhoneLine
Tariff
CallInfo
ChangePIN
AssignNo
ScanPeriod
CallBudget
T otDuration
To tC o sts *
* Available where applicable
Page 94

MAINTENANCE
The base station and handset do not contain user serviceable parts. If your
base station or handset require service you should return them to the dealer or
retailer from whom they were bought. See also “Warranty” on page 96.
Cleaning
Clean the cordless phone with a soft cloth moistened with water only.
The use of soap and other cleaning products can discolour and damage the
cordless phone.
TECHNICAL SPECIFICATIONS
DECT/GAP
The cordless phone has the unique advantages of DECT/GAP (Digital
Enhanced Cordless Telecommunications/Generic Access Profile). This means
that no one can eavesdrop on your calls a nd that the quality of speech is as
good as that of conventional fixed telephones. DECT/GAP enables
interoperability with other manufacturers’ products.
CE marking
The cordless phone has a CE marking according to the guidelines of the European telecommunications laws 73/23/EEC, 89/336/EEC and 91/263/EEC. The
CE marking corresponds to the European marking law 93/68/EEC.
Handset
r
e
Use
l
ia
c
m
unic
ons A
i
t
a
B
Power supply
Battery NiMH pack 600 mAh, 3.6 V
Standards and regulations
CE regulations 73/23/EEC, 89/336/EEC, 91/263/EEC and
or Comm
f
CE marking CE 0344 X
DECT standards CTR6, CTR10, CTR22
Safety standards EN60950
EMC standards ETS 300 329
Maximum environmental values during use
Not
Temperature 0 to +40 °C
Relative air humidity 20% to 75% non-condensing
Dimensions and weight
L x W x H 142 x 54 x 25 mm (excluding antenna and clip)
Weight 143 g (including batteries and clip)
Com
93/68/EEC
ricsson Mobile
E
Reference 93
Page 95

Performance
Battery NiMH, 500 to 1000 charge cycles
Standby time up to 100 hours
Call time up to 15 hours
Charge time 3 hours maximum
Volume
Ring signal Seven step adjustable volume from off to 85 dB (A)
at 30 cm
Earpiece Ten step adjustable
B
Phone book
Maximum name length 12 characters
Maximum number length 24 digits
Entries 100
External interfac es
Radio connection DECT/GAP, up to 250 mW radiated power during 1
User interface Display with two lines of 12 alphanumeric characters
Accessory connector For battery charging.
Features
Menu controlled, predial, difference between internal and external calls, phone
book, redial (10 numbers), who called memory (10 numbers), baby monitor, illuminated display, temporarily transmit long DTMF tones, security with PIN code,
keys can be locked automatically, access to up to 8 DECT/GAP telephone systems, key click on/off, battery meter, call duration indication.
Base station
of the 24 time slots
and 7 icons, keys with text, volume keys on the side.
r
Audio accessory.
e
Com
Use
l
ia
c
m
unic
i
t
a
Power supply
AC mains adapter According to local standards
Standards and regulations
or Comm
CE regulations 73/23/EEC, 89/336/EEC, 91/263/EEC and
f
CE marking CE 0344 X
DECT standards CTR6, CTR10, CTR22
Safety standards EN60950
EMC standards ETS 300 329
Not
Fixed telephone line
connection
93/68/EEC
According to national telecommunication
requirements
ons A
Maximum environmental values during use
Temperature 0 to +40 °C
Relative air humidity 20% to 75% non-condensing
94 Reference
ricsson Mobile
E
Page 96

Dimensions and weight
L x W x H 144 x 140 x 52 mm (excluding stand)
Weight 260 g (including stand)
Performance
Handset subscriptions 8
Number of calls 1 external and 1 internal at the same time
Volume
Ring signal Six step adjustable volume from off to 85 dB (A) at
External interfac es
Fixed telephone line Analogue subscriber signalling according to local
Radio connection DECT/GAP for 8 handsets, up to 250 mW radiated
Power supply 3 m cable between adaptor and base station
Charge connection Proprietary, suitable for this type of handset
1.
This function may not be supported by your telephone network operator.
Installation
Mounting Separately on stand or fixed to wall with wall
30 cm
ons A
i
1
standard, pulse
phone line, R key signal, handset units
power
or tone dialling (DTMF), 3 m tele-
Use
l
t
a
ia
c
r
unic
e
mounter
m
B
Features
Charging handset battery, pulse
another handset, transferring calls on a switchboard (R key signal), three-party
calls, call barring, direct call, least cost routing, call budgeting, security with PIN
code, adjustable ringing priority, base station ring signal, handset searching,
handset subscription.
1.
This function may not be supported by your telephone network operator.
1
or tone dialling (DTMF), transferring calls to
Com
or Comm
f
Not
ricsson Mobile
E
Reference 95
Page 97

SPARE PARTS AND ACCESSORIES
Use only approved spare parts and accessories. The operation of nonapproved parts cannot be guaranteed and may even cause damage. Contact
your dealer for more information.
• Charger XA200 with desk stand and wall mounter.
• Clip for handset.
• Wall mounter for base station.
• Desk stand for base station.
• Power adaptor for base station.
• Power adaptor for charger.
• Nickel metal hydride battery for handset.
• Battery door for handset.
• Additional DT200 handset.
Use
l
ons A
i
t
a
B
WARRANTY
If your Ericsson product requires warranty service you should return the product to the dealer/retailer from whom it was purchased.
In the event of difficulty, details of our authorized service network are
available from your local E r icsson subsidia ry.
Our warranty
Ericsson warrants this product as being free of defects in material, design and
workmanship at the time of its original purchase and for a period of twelve
(12) months immedia tely thereafter.
r
e
ia
c
unic
m
Com
What we will do
If, during the period of the warranty, this product malfunctions in normal use
and service due to defec tive design, mater ia ls or workm a nship, Ericsson will
repair or replace, at its discretion, the product under the conditions stated
or Comm
hereafter.
f
Conditions
1. The warranty will be granted only if the original warranty certificate
issued to the purchaser by the dealer is presented, and if the sa i d wa rra nty
Not
certificate stipula te s the seri al number of the purch ase d product and the
date of purchase of the pro duc t. Ericsson reserves the righ t to re fuse warranty service if this info rm ation has been removed or amended after the
original purchase of the product. The original receipt/invoice will only be
96 Reference
ricsson Mobile
E
Page 98

accepted as a proof of purc hase when presented to the dea l er from whom
the product was purchased.
2. The warranty is not applicable in circumstances other than defects in mate-
rial, design and workmanshi p . The warran ty does not cover the following:
• Periodic checks, maintenance, repair and replacement of parts due to
normal wear and tear, exchange of faulty batteries or upgrading of software due to changes in networ k pa rameters.
• Damage to the product re sul ti ng from:
• Abuse or misuse, including but not limited to the failure to use the
product for its normal purposes or in accordance with Ericsson’s
instructions for use and ma intenance of the product , or the installation or use of the product in a ma nne r inconsistent with the technical or safety standards in forc e.
• Repairs performed by non-a uthorized service workshops or open-
ing of the unit by a non-authorized person.
• Accidents, acts of God or any cause beyond the control of Ericsson,
including but not lim it ed to lightning, water, fire, public disturbances and improp er vent ilation.
3. This product will not be considered defective in materials, design or work-
manship if it needs to be adapted, changed or adj usted to conform to
national or local technical or safety standards in force in any country other
than that for which the product was originally designed and manufactured.
This warranty shall not rei m burse such a da p ta ti ons, changes or adjustments, or attempts to do so, whe th er pro perly performed or not, nor any
damage resulting from t h e m, nor any adaptation, change or adj ust ment to
upgrade the product from it s norm al purpose as described in the prod uct
manual without the prior written consent of Ericsson.
4. Repair or replacement under the terms of this warranty shall not give a
right to an extension to , or a new commencement of, the pe riod of war-
or Comm
ranty. Repair or replacement under the ter ms of thi s warr ant y m ay be ful -
f
filled with functionally equivalent reconditioned units. Exchanged parts or
components will bec om e t he property of Ericsson.
5. This warranty does not affect the purc haser’s statutory rights under appli-
cable national legisla ti on in force, nor the purchaser’s rights against the
Not
dealer arising from the sales/purchase contra c t.
In the absence of applicable nationa l legislation this warranty will be the
purchaser’s sole and exclusive remedy. Ericsson, its subsidiaries and distributors shall not be liable for any incidental or consequential damages for
breach of any express or implied warranty relating to this product.
r
e
Com
Use
l
ia
c
m
unic
ons A
i
t
a
B
ricsson Mobile
E
Reference 97
Page 99

Use
l
ia
c
r
unic
e
m
Com
B
ons A
i
t
a
f
Not
98 Reference
ricsson Mobile
E
or Comm
Page 100

Index
B
A
AC 58, 90
Accessories 85, 96
Audio accessory 43
Automatic answering 43
Automatic selection 80
B
Baby monitor 59
Baby phone 59
Backdoor code 58
Barring calls 61
Base station
changing PIN 56
language 21
master reset 51
name 18
PIN 58
ring volume 46
selection 80
selection priority 80
unblocking PIN 57
Battery 12
changing 14
charging 14
meter 13
placement 13
or Comm
Brief guide 16
f
Budget 64
Buttons 88
Not
C
Call
back 29
barring 61
budget 64
by name 24
conference call 32
Use
costs 19
l
diversion 47
duration 19
ia
information 19
c
r
e
Com
internal ca ll 29
making a call 23
unic
making a first call 17
quick call by name 24
receiving a call 18, 27
m
returning a call 26
statistics base station 66
statistics handset 66
tariff 63
three-party call 32
transfer 31, 75
using phone book 23
waiting 30
waiting notification 47
Cancel 20
Cancelling a subscripti on 70, 82
CE 93
Cell mode 71
Charge time batt ery 12
Charger 96
Charging informa ti o n 19
Cleaning 93
Clear 20
Clip
attachment 15
removal 15
Conference call 32
Connecting to base sta ti ons 77
Contrast 44
ons A
i
t
a
ricsson Mobile
E
Index 99
 Loading...