

Page 1

LBI-38988B
Configuration Manual
EDACS Station GETC1e
19D901868G3 a nd G4
ericssonzericssonz
Page 2

LBI-38988
REVISION HISTORY
REVISION DATE REASON FOR CHANGE
B Sep-95 Updated to include Station GETC1e Release 5 software, 349A9607G5 and Turbo
Board software, 344A4414G5.
A Jan-95 Updated to include Station GETC1e Release 4 software, 349A9607G4 and
instructions for using PC Programmer TQ-3357 V4.03.
Jul-94 Original
NOTICE!
This manual covers Ericsson and General Electric products manufactured and sold by Ericsson Inc.
NOTICE!
Repairs to this equipment should be made only by an authorized service technician or facility designated by the supplier.
Any repairs, alterations or substitution of recommended parts made by the user to this equipment not approved by the
manufacturer could void the user's authority to operate the equipment in addition to the manufacturer's warranty.
NOTICE!
The software contained in this device is copyrighted by Ericsson Inc. Unpublished rights are reserved under the copyright
laws of the United States.
This manual is published by Ericsson Inc., without any warranty. Improvements and changes to this manual necessitated
by typographical errors, inaccuracies of current information, or improvements to programs and/or equipment, may be made
by Ericsson Inc., at any time and without notice. Such changes will be incorporated into new editions of this manual. No
part of this manual may be reproduced or transmitted in any form or by any means, electronic or mechanical, including
photocopying and recording, for any purpose, without the express written permission of Ericsson Inc.
EDACS and MASTR are registered trademarks, and Aegis, Failsoft, GETC, Guardog , and ProSound are trademarks of
Ericsson Inc.
Copyright July 1994, Ericsson, Inc.
2 Rev. B
Page 3

TABLE OF CONTENTS
Page
REVISION HISTORY
..............................................................................................................................
2
INTRODUCTION
6
SOFTWARE FEATURES
6
349A9607G5 SOFTWARE
6
SCAT Data
6
Pro-Sound
6
Enhanced Multi-Site Login
7
Voted Digital Interconnect
7
DIP Switch Changes
8
349A9607G4 SOFTWARE
8
Multisite Digital Voice or Digital Data
8
RELATED PUBLICATIONS
9
SOFTWARE COMPATIBILITY
9
GETC EPROM and TURBO BOARD SOFTWARE COMPATIBILITY
9
EDACS COMPONENT SOFTWARE COMPATIBILITY
9
RADIO COMPATIBILITY
10
HARDWARE COMPATIBILITY
11
DESCRIPTION
12
OPERATION
12
CONTROL CHANNEL
12
Control Channel Jamming
12
WORKING CHANNEL
12
TRUNKED FAILSOFT OPERATION
12
STATION CONTROL
13
CONFIGURATION
14
HARDWARE INSTALLATION
14
Upgrading Hardware
14
GETC Logic Board Installation
14
Turbo Board Installation
14
Rockwell Modem Installation
15
Jumper Installation
15
GETC SOFTWARE INSTALLATION
17
Trunked Failsoft System
17
Fully Trunked Systems
18
Satellite Receivers & Simulcast Remote TX
19
Single Channel Autonomous Trunking (SCAT)
19
Voted Digital Interconnect (VDI)
19
De-installing The GETC-1e Software
20
TURBO BOARD SOFTWARE INSTALLATION
20
Equipment Required
20
PC Programmer Setup
21
PERSONALITY PROGRAMMING
21
Programming a Personality Using TQ-3357 V3 (or earlier)
21
Programming a Personality Using TQ-3357 Version 4.03 (or later)
22
OPERATIONAL CHECKOUT
26
.....................................................................................................................................
........................................................................................................................
..................................................................................................................
...................................................................................................................................
.....................................................................................................................................
...........................................................................................................
............................................................................................................
......................................................................................................................
..................................................................................................................
..........................................................................................
...................................................................................................................
.............................................................................................................
..............................................
...................................................................
..................................................................................................................
LBI-38988
...........................................................................................................
.........................................................................................................................................
............................................................................................................................................
.......................................................................................................................
.............................................................................................................
.......................................................................................................................
.................................................................................................
.........................................................................................................................
..................................................................................................................................
..........................................................................................................
.....................................................................................................................
.....................................................................................................
...............................................................................................................
........................................................................................................
........................................................................................................................
................................................................................................
................................................................................................................
..................................................................................................................
..................................................................................
............................................................................
..................................................................................................
............................................................................................
................................................................................
......................................................................................................................
...................................................................................................................
.....................................................................................................
...........................................................
...............................................
................................................................................................................
Rev. B 3
Page 4

LBI-38988
TABLE OF CONTENTS
DIP Switch Settings...................................................................................................................... 26
Fully Trunked System...................................................................................................................26
Failsoft System..............................................................................................................................27
Satellite Site Receiver...................................................................................................................28
INTERFACE SIGNALS......................................................................................................................28
TROUBLESHOOTING...........................................................................................................................29
FAILURE MODE................................................................................................................................29
CHANNEL ACTIVITY LOGGER.......................................................................................................29
IN CASE OF DIFFICULTY................................................................................................................29
INTERCONNECT DIAGRAMS..............................................................................................................33
PARTS LIST.............................................................................................................................................36
GETC CABLE 19C336863G1.............................................................................................................36
CABLE DIAGRAMS ............................................................................................................................... 37
APPENDIX A............................................................................................................................................A-1
APPENDIX B............................................................................................................................................ B-1
Page
LIST OF FIGURES
Page
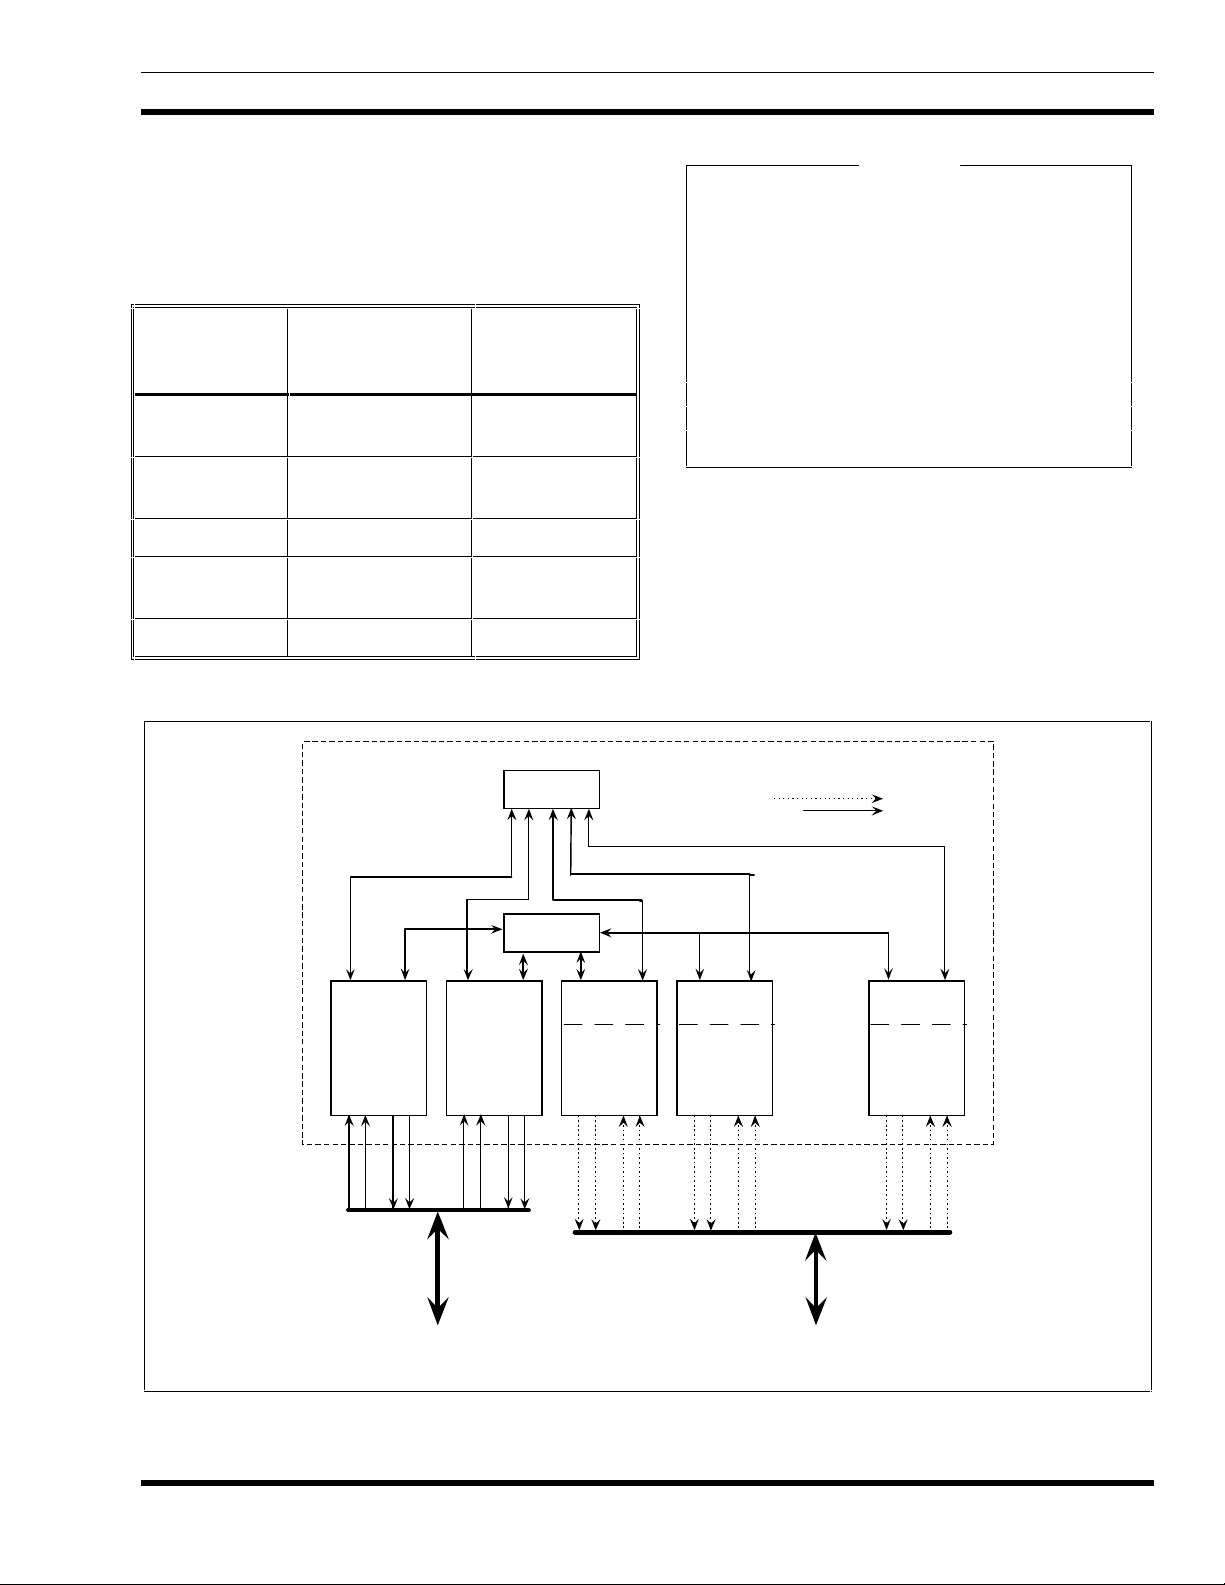
Figure 1 - Typical EDACS Site Block Diagram...................................................................11
Figure 2 - Typical Five Channel Repeater Cabinet...............................................................14
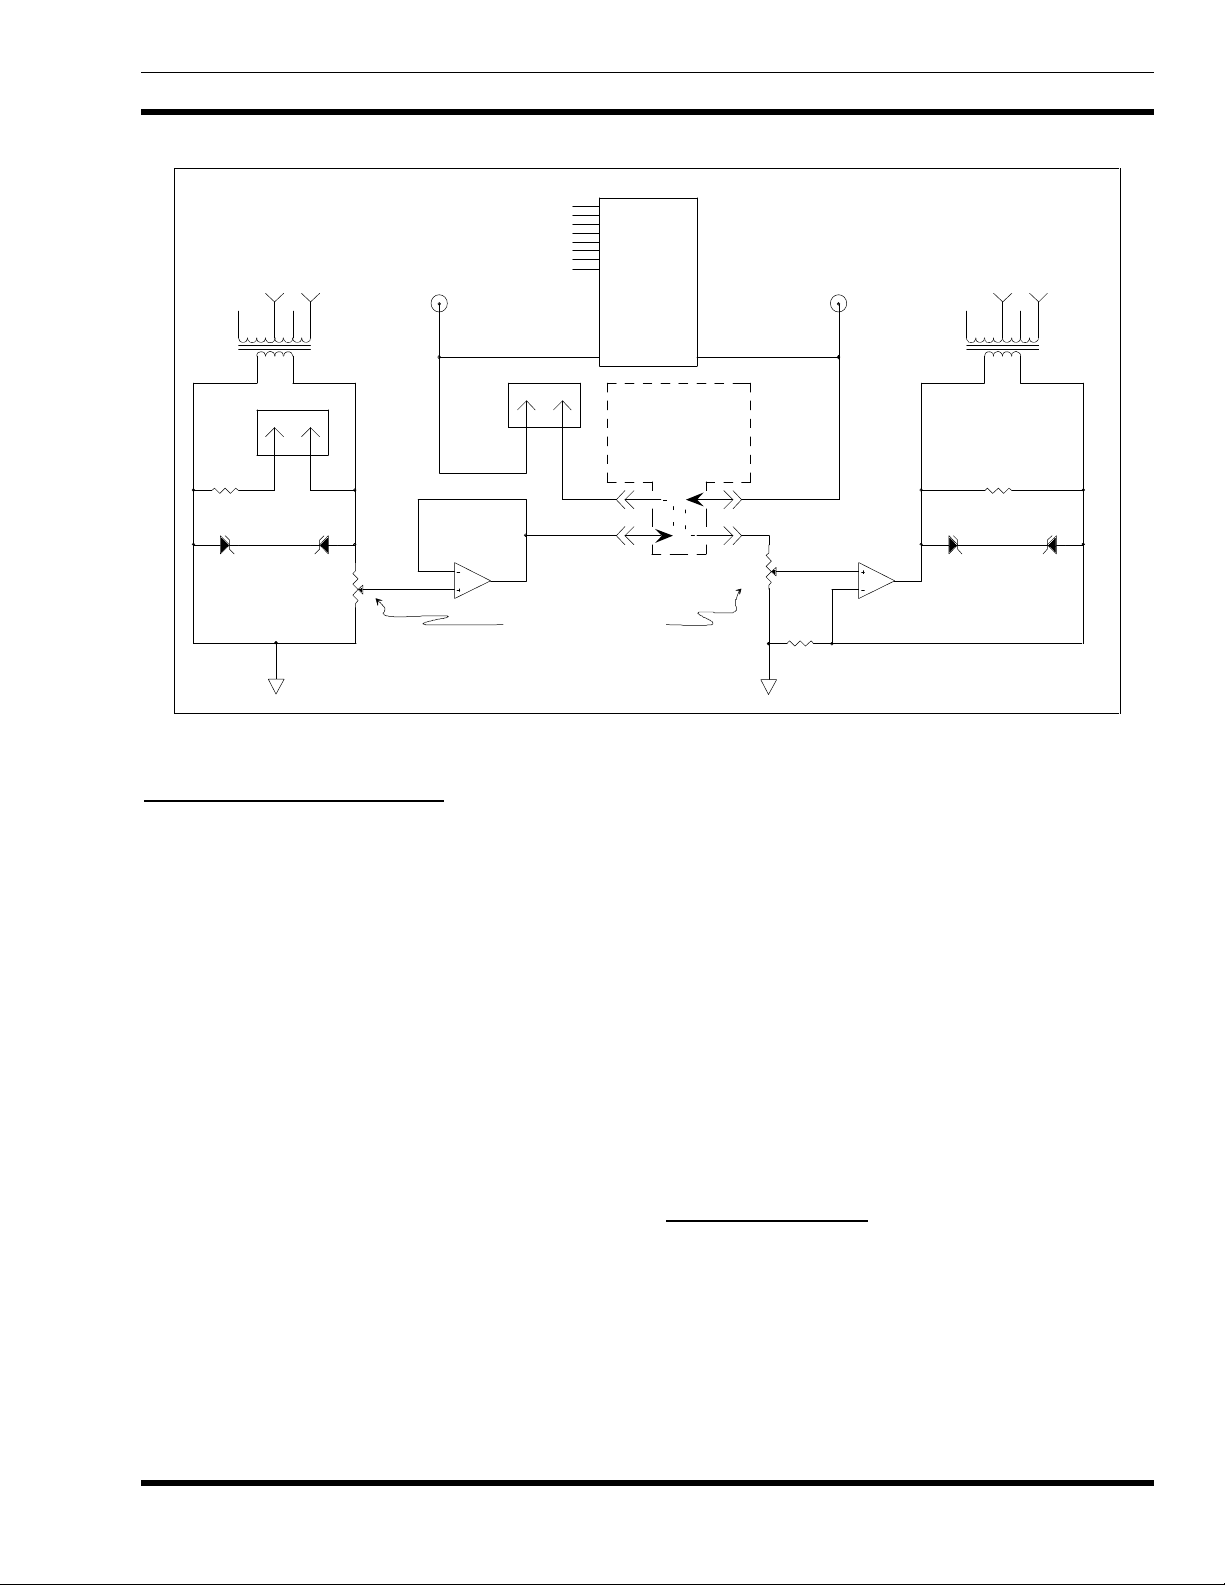
Figure 3 - GETC Phone Line Level Adjustments.................................................................15
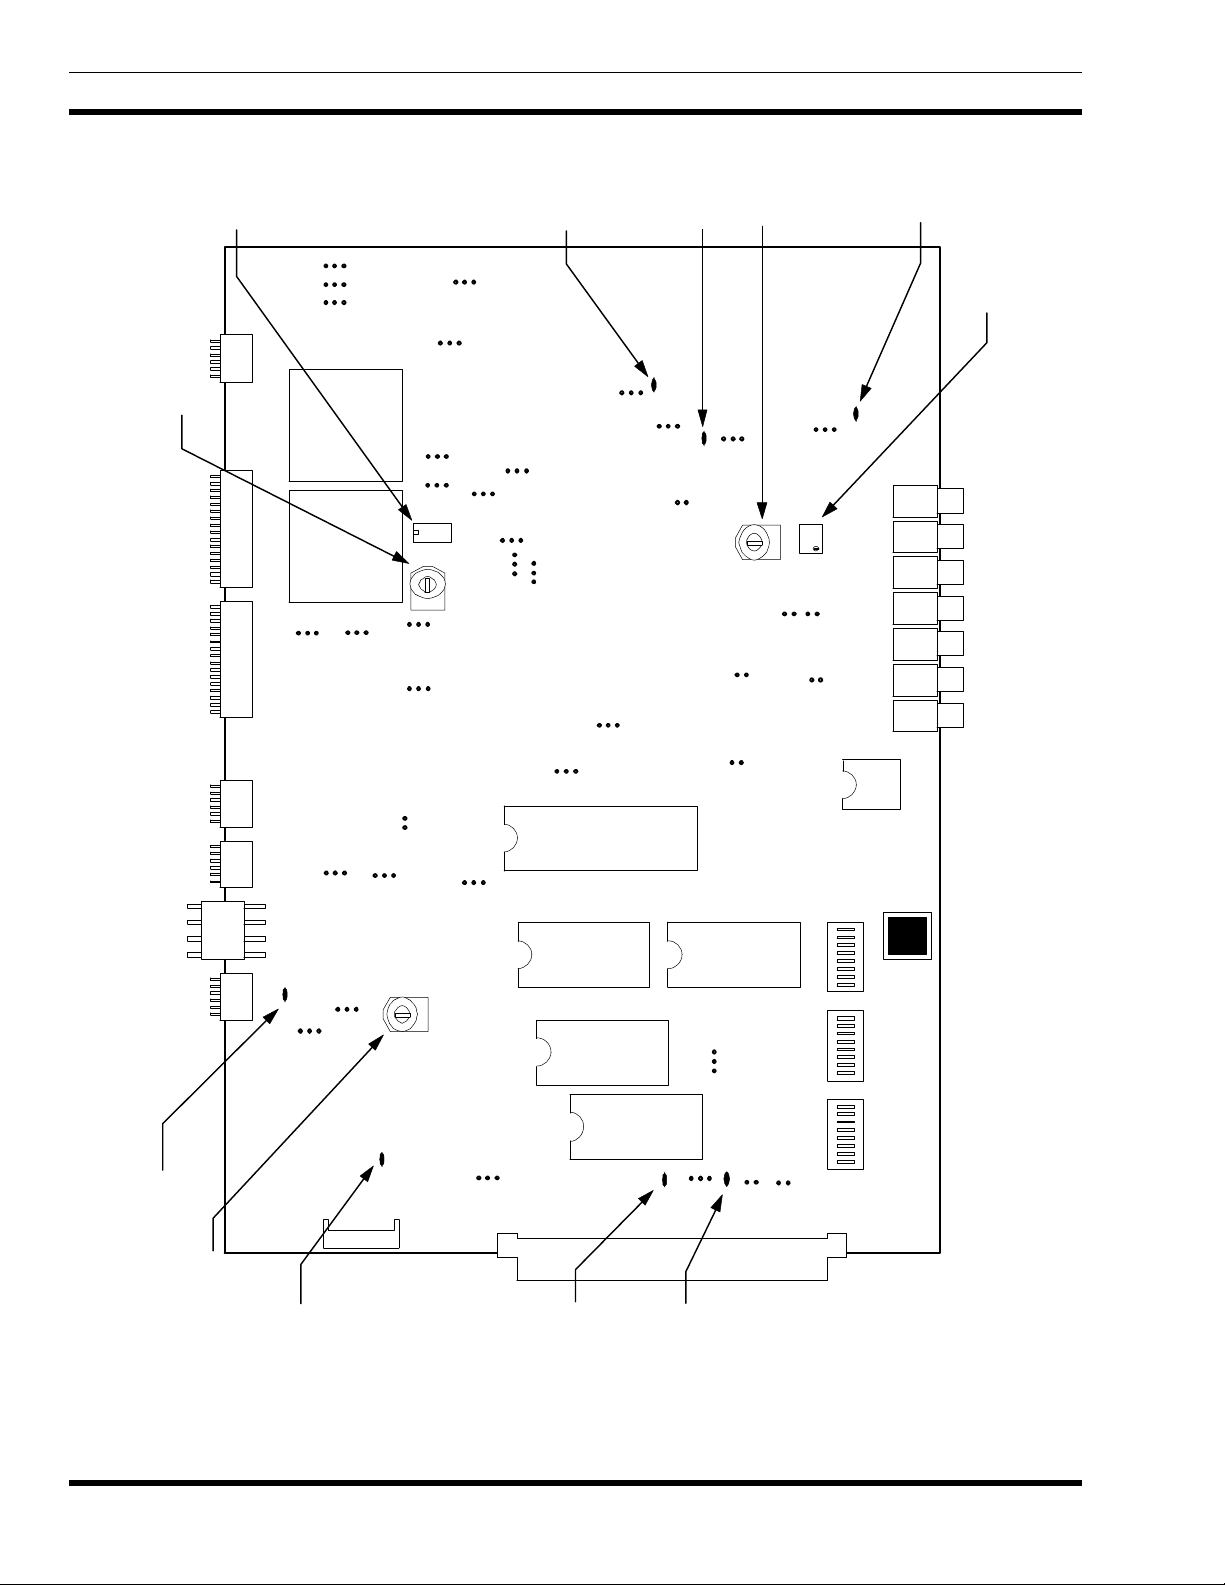
Figure 4 - Station GETC (19D904266) Jumper and Test Point Locations............................16
Figure 5 - System Hook-Up Using J100...............................................................................22
Figure 6 - Programming DIP Switch Settings......................................................................22
Figure 7 - System Hook-Up Using J104...............................................................................23
Figure 8 - Operational DIP Switch Settings.........................................................................26
4 Rev. B
Page 5

LIST OF TABLES
Page
Table 1 - GETC EPROM and Turbo Software Compatibility
...............................................
9
Table 2 - EDACS Component Software Compatibility
10
Table 3 - Radio Compatibility
10
Table 4 - GETC Hardware Compatibility
11
Table 5 - Indicators in Programming Mode Using J100
22
Table 6 - Indicators in Programming Mode Using J104
23
Table 7 - Sample Station Personality
24
Table 8 - Channel Number Switch Settings
26
Table 9 - LED Indicators for Trunked Idle Channels
27
Table 10 - LED Indicators for Trunked Assigned Channels
27
Table 11 - LED Indicators for Failsoft Idle Channels
27
Table 12 - LED Indicators for Failsoft Assigned Channels
28
Table 13 - LED Indicators for Satellite Site Receivers
28
Table 14 - Failure Modes
29
Table 15 - Interface Status During Various States
30
.........................................................
..............................................................................................
.............................................................................
.......................................................
.......................................................
...................................................................................
.........................................................................
...........................................................
.................................................
...........................................................
...................................................
..........................................................
.....................................................................................................
................................................................
LBI-38988
Rev. B 5
Page 6

LBI-38988 INTRODUCTION
INTRODUCTION
This manual provides instructions for configuring the
Ericsson GE Trunking Card Shelf (GETC), part number
19D901868G3 and G4, for Station (including repeater an d
SCAT), Satellite Site Receiver, and VDI Control operation.
This manual is applicable to GETC (pronounced “getsee”) hardware platforms installed in wideband or narrow
band 800 MHz, 900 MHz, UHF, and VHF stations. The
information presented includes an operational description
and procedures for installing, upgrading, and verifying the
hardware and software installed in the GETC.
The Lightning GETC (GETC1e) platform consists of
the following sub-assemblies:
• Logic Board 19D904266G1 (used with Group 3
shelf) or 19D904266G4 (used with Group 4 shelf).
• GETC Expansion Module (Turbo Board)
19D903536P1.
• Regulator Board 19C366861G2.
• Rockwell Modem 19A705178P1 (optional). (The
modem is required when the GETC is used in an
EDACS Voted or Simulcast System or if it is part
of an EDACS Network)
• GETC EPROM (U2) 349A9607G5 (Ver. 5.04).
349A9607G5 SOFTWARE
The 349A9607G5 software release adds the following
features to GETC operation:
• SCAT Data (Refer to LBI-38987)
• Pro-Sound
• Enhanced MultiSite Login
• Voted Digital Interconnect (Refer to LBI-39187)
SCAT Data
Release 5 Station GETC software adds SCAT
functionality to the Station GETC. This includes the SCAT
RF and Landline Data functions. The former SCAT GETC
software 344A3835G2 is replaced with 349A9607G5 and
its former Turbo software 344A4414G4 is replaced by Link
Turbo software 344A4414G5.
NOTE
NOTE
In conjunction with this software release, the
SCAT Downlink GETC software 344A3835G2
and Turbo Board software 344A4414G4 is
replaced by Link software 344A4895G5 and Turbo
software 350A1121G5, respectively. Refer to LBI-
38987 for details.
All references to GETC in this manual refer to the
GETC1e platform and the combination of GETC Logic
board and Turbo board installed in the GETC Shelf.
SOFTWARE FEATURES
The GETC software product is continuously being
improved and upgraded to include new features. The
following paragraphs provide brief descriptions of the new
features introduced by recent software releases.
Information is also provided when hardware or software
issues affect the GETC’s configuration.
For a complete description of the new or enhanced
features and its use, refer to Software Release Notes (SRN)
for the specific software release. For example, to review
release notes covering 349A9607G4 software refer to
SRN1060-4, for 349A9607G5 software refer to SRN10605, etc.
Configuration Considerations:
• Radio users must have SCAT options enabled.
• When selecting Landline data, a Rockwell modem
must be installed and EDG must be set up (refer to
EDG documentation).
• Configuration requires using PC Programmer
V4.03 and Field Macro “gtc_9505.mac” to
access applicable parameters.
Refer to LBI-38987 for complete details on configuring
SCAT systems.
Pro-Sound
The GETC Group 5 Release adds the EDACS ProSound Feature. Pro-Sound provides better end-to-end audio
quality by providing radios with a list of alternative sites
and their corresponding control channels through the use of
“adjacency information”.
The GETC has the following role in supporting the
Pro-Sound Feature:
6 Rev. B
Page 7

SOFTWARE FEATURES LBI-38988
• Receive Adjacency information from the Site
Controller or Downlink.
• Count the number of actual Adjacent Systems
listed in the Adjacency Message.
• Build an Adjacencies Table Length Definition
Message and send it.
• If a Priority System is defined, build a Priority
System Definition Message and send it.
• For each Adjacent System, build an Adjacent
System Definition Message and send it.
• The Control Channel expects an Adjacency Data
update from the IMC every 25 seconds or sooner.
• The Control Channel will stop sending Adjacency
Data if the Link to the IMC breaks, or if it waits
longer than 30 seconds for an adjacency
information update from the IMC.
• If the Link to the IMC breaks, after it recovers, the
CC will wait for a fresh set of Adjacency Data
before it will begin sending over-the-air (RF)
Adjacency Data.
Radio users must ensure the radio’s personality has
“Pro-Sound” enabled and the radio feature encryption
option “wide area scan” or “priority scan” is active.
1. A particular site color is programmed in the
Control Channel GETC.
2. The outbound Control Channel messaging tells the
radio which “color” to use on inbound
transmissions.
3. Inbound transmissions from the radio to the
Control and Working Channel are coded with
correct color.
Users must have radio’s software upgraded to support
this feature.
Configuration Considerations
• The Enhanced Multi-Site Login feature does not
require any hardware changes. However, it does
require special configuration of the GETC
software.
• To enable Enhanced Multi-Site Login, the “Site
Color” parameter needs to be programmed into the
GETC Personality. This feature is a Personality
Extended Site Option loaded into the PC
Programmer software via the Field Macro file
“gtc_9505.mac.” Refer to the Personality
Programming section in this manual for additional
information on Field Macro installation into the
PC Programmer, TQ-3357.
Configuration Considerations
Pro-Sound does not require any hardware changes or
special software configuration. The feature is activated
from the MOM PC, which is connected to the IMC.
Enhanced Multi-Site Login
The Enhanced Multi-Site Login feature provides a
method to enhance signaling integrity, on both the inbound
Control Channel and Working Channel, in an environment
where a distant site is operating with the same frequency
set or where intermodulation interference is a
consideration.
Enhanced Multi-Site Login is achieved by means of a
digital “color code” on the inbound Control and Working
Channel signaling. The CRC (BCH error correction),
which is appended to the end of each message, is coded (by
the radio) and decoded (by the GETC) in a unique way as
determined by the color specified in the GETC personality.
This allows the specified site (i.e. having the correct site
color) to acknowledge the receiving a radio transmission in
an area where many sites may also receive the
transmission. This is implemented as follows:
NOTE
NOTE
Only PC Programmer TQ-3357 V4.03 (or later)
can be upgraded through the use of Field Macros.
Current Field Macros may be downloaded from
the accompanying Station Turbo Software
distribution disk or from Ericsson’s “One1Call”
Electronic Information Retrieval system.
Voted Digital Interconnect
The Voted Digital Interconnect (VDI) feature allows
Voted and Simulcast sites to have access to the digital
Central Interconnect system, Jessica.
For a Voted (Non-Simulcast) system, an additional
GETC per channel is required, making the configuration
more like that of a Simulcast system. All GETCs attached
to RF receivers will operate as Satellite Receivers, and the
added Control GETC will take on transmit responsibilities
similar to those of the Simulcast Control Point GETC. The
main purpose of the additional GETC is to provide a
synchronous data input port which can be connected to the
output of the voter. This provides the Control GETC the
Rev. B 7
Page 8

LBI-38988 SOFTWARE FEATURES
capability of listening to both the IMC and the Voter
simultaneously.
For a Simulcast system, no additional equipment is
required once the system is equipped for Digital Dispatch.
A wiring modification is made to the digital path between
the Voter Selector and the Control Point GETC to provide a
continuous data path between them. The modification
gives the Control Point GETC the capability of listening to
both IMC and the Voter Simultaneously.
Configuration Considerations:
• Configuration of the GETC Personality requires
using PC Programmer V4.03 and Field Macro
“gtc_9505.mac” or V5.0.
Refer to LBI-39187 for complete details on configuring
GETCs for VDI systems. Additional information on Voted
Digital Interconnect is also available in the Voter and
Simulcast Control Point Maintenance Manuals, LBI-39149
and 39186.
DIP Switch Changes
The functionality of the DIP switches S1, S2, S3 have
been dramatically reduced. Many of these controls now
reside within the GETC personality and may be modified
using GETC PC programmer TQ-3357.
The following controls have been altered:
• Simulcast operation moved to personality space.
• Conventional Failsoft enable moved to personality
space.
In earlier software versions, the operating frequency
for MII/IIe systems was set into the DIP switches. With the
introduction of 349A9607G5 the MII/IIe and MIII systems
frequency is programmed in personality. MII/IIe use this
information for frequency synthesizer loading and
Narrowband systems extract even/odd information. The PC
programmer V4.03 does not accept UHF frequencies and,
as a result, UHF systems must have a fixed offset of 500
MHz added since only the even or odd frequency
information is needed.
349A9607G4 SOFTWARE
With the release of 349A9607G4 software, both
Wideband 9600 baud functionality and Narrow Band 4800
baud functionality were merged together. This release also
included three new features:
• Failsoft Patch
• Wideband Power Monitoring
• Channel Activity Logging
In addition, this software release was designed in
conjunction with the GETC PC Programmer TQ-3357
V4.03 (344A3466G5).
Multisite Digital Voice or Digital Data
Digital Voice or Digital Data applications require
installation of a Rockwell Modem. This allows the GETC
to send and receive Digital Voice or Digital Data
information, encoded as 9600 baud modem data, to the
CEC/IMC using the four-wire audio line.
• Frequency selection moved to personality space.
• Personality programming through J104 only (J100
no longer used for programming).
8 Rev. B
Additionally, the personality option for Wide Area
Digital Voice must be ENABLED for proper operation.
This can only be done using the PC Programmer V4.03 (or
later).
Page 9

RELATED PUBLICATIONS LBI-38988
GETC LOGIC BOARD
EPROM, U2
349A9607G5
349A9607G4
349A9607G2
349A9607G1 (800 MHz
only)
19A705595G8 (900 MHz
only)
344A3835G2 (SCAT only)
RELATED PUBLICATIONS
It may be necessary to consult one or more of the
following documents during the installation process. These
manuals will also provide additional guidance if you
encounter technical difficulties during the configuration
process.
LBI-38430 - MASTR IIe Control Shelf Maintenance
Manual.
LBI-38636 - MASTR III Base Station Installation
Manual.
LBI-38822 - Turbo Board (GETC-1e) Maintenance
Manual.
LBI-38894 - GETC Trunking Card Maintenance Manual.
LBI-38896 - EDACS Site Downlink and CEC/IMC
Uplink Configuration Manual.
LBI-38985 - EDACS Site Controller Maintenance
Manual.
LBI-38987 - EDACS SCAT & SCAT Downlink
Configuration Manual.
LBI-39149 - EDACS Compact Vertical Voter
Maintenance Manual.
LBI-39186 - EDACS Simulcast Control Point
Maintenance Manual.
LBI-39187 - EDACS Voted Digital Interconnect
Configuration Manual.
SRN-1010 - Software Release Notes for GETC Turbo
Board Software, 344A4414G1 only.
SRN-1024 - Software Release Notes for GETC 900 MHz
Software, 19A705595G8.
SRN-1060 - Software Release Notes for GETC-1e
Software, 349A9607G1 (or later).
SRN-1062 - Software Release Notes for Turbo Board
with GETC-1e Software, 344A4414G2 (or
later).
TQ-3357 - GETC Shelf Programming Manual
Table 1 - GETC EPROM and Turbo Software
Compatibility
TURBO BOARD
SOFTWARE
344A4414G5
344A4414G4 (or later)
344A4414G3 (or later)
344A4414G2 (or later)
344A4414G1
344A4414G2
CAUTION
CAUTION
To ensure system compatibility, all repeaters and
Satellite Receivers should have the same firmware
versions installed. Also, for proper Voted or
Simulcast operation, Test Unit Software
19A705272 Group 6 is required. Failure to
observe these precautions could result in less than
acceptable system operation.
NOTE
NOTE
Software used in the GETC is subject to changes
resulting from improvements or enhancements.
Refer to release notes SRN1060, SRN1061 and
SRN1062 for compatibility of GETC1e with other
EDACS platforms. Software Release Notes take
precedence over this manual.
EDACS COMPONENT SOFTWARE
COMPATIBILITY
SOFTWARE COMPATIBILITY
GETC EPROM and TURBO BOARD
SOFTWARE COMPATIBILITY
The following software is required for GETCs used in
the Station configurations:
Rev. B 9
The data presented in Table 2 represents the minimum
EDACS component software versions required to support
the features indicated.
NOTE
NOTE
If a system has Group 5 Link software and Group
11 IMC software, then the Site Controller must
use Group 6 (or later) software.
Page 10

LBI-38988 SOFTWARE COMPATIBILITY
RADIO COMPATIBILITY
Table 3 describes the minimum software requirements
for radio products supporting the features included in this
release.
Table 2 - EDACS Component Software Compatibility
EDACS COMPONENT Required for
SCAT Data
C3 MAESTRO N/A 344A3922G4 344A3922G4 344A3922G4 344A3922G4
IMC U58
U59
U3
MOM
Site Controller N/A 344A3265G3 344A3265G6 344A3265G6 344A3265G2
VAX System Manager
PDP System Manager
Link GETC
Link Turbo
PC Programmer TQ-3357 Ver 4.03 Ver 4.03
Voter / Simulcast N/A 19A149567G12 19A149567G12 19A149567G13 19A149567G12
Jessica PI N/A N/A N/A 349A9982G3 349A9982G3
EDG Application
147 ROMs
VC24 ROMs
344A3567G11
344A3568G11
344A3565G11
344A3630G11
344A4583G2
19A149495G8
344A4895G5
350A1121G5
350A1069G1
350A1101G1
350A1072G1
Required for
Enhanced
Multisite Login
344A3567G8
344A3568G8
344A3565G7
344A3630G4
344A4583G2
19A149495G8
N/A 344A4895G5
(gtc_9505.mac)
N/A N/A N/A N/A
Required for
ProSound
344A3567G11
344A3568G11
344A3565G11
344A3630G11
344A4583G2
19A149495G8
350A1121G5
Ver 4.03 Ver 4.03 Ver 4.03
Required for
Voted Digital
Interconnect
344A3567G11
344A3568G11
344A3565G11
344A3630G11
344A4583G2
19A149495G8
344A4895G5
350A1121G5
Required for
Failsoft Patch
Operation
344A3567G11
344A3568G11
344A3565G11
344A3630G11
344A4583G2
19A149495G8
344A4895G4
350A1121G4
Table 3 - Radio Compatibility
FEATURE MPA MDX MDR MRK ORION Alpha
FMD
ProSound G15 G9 G8 G22 G22 N/A
Enhanced Multisite Login G16 G10 N/A G22 G22 G2
Modified Data Protocol N/A G10 N/A G19 G19 G2
SCAT G8 G1 G1 G19 G19 G1
SCAT Data N/A G10 N/A G22 G22 G2
Interconnect G10 G1 G1 G1 G1 G1
Digital Interconnect G12 G1 N/A G5 G1 G1
10 Rev. B
Page 11
HARDWARE COMPATIBILITY LBI-38988
Trunked Site #1 of N
Tx Rx
4-Wire Audio Circuits
Figure 1 - Typical EDACS Site Block Diagram
HARDWARE COMPATIBILITY
The GETC hardware compatibility depends on the
version of EPROM installed on the Logic Board, refer to
the following table:
Table 4 - GETC Hardware Compatibility
GETC LOGIC
BOARD
EPROM, U2
349A9607G5 19D904266G4
349A9607G4 19D904266G4
349A9607G3 19D904266G1 19D903536P1
349A9607G2
(or earlier)
19A705595G8 19D904266G1 19D903536P1
LOGIC BOARD TURBO BOARD
19D903536P1
19D904266G1
19D903536P1
19D904266G1
19D904266G1 19D903536P1
NOTE
NOTE
GETCs using EPROM 349A9607G4 or later must
use Logic Board 19D904266G4 or upgrade the
Logic Board 19D904266G1 with the Speedup
(80C320) microprocessor and Amps Modem
chips, U4 and U19 (19A704727P4). (Refer to
Upgrading Hardware in the Hardware Installation
section of this manual.)
GETCs using EPROM 349A9607G4 or later must
also have the FerriShield Toroid (REG70469/1)
installed around the Turbo Board’s harness for
EMI suppression, refer to LBI-28822 for details.
Site Controller
Computer
Backup Serial Link
J100 J102
Primary
Downlink
Rx TB10 Tx
12 11 10 9
J100 J102
Backup
Downlink
Rx TB10 Tx
12 11 10 9
9600 baud Modem Data
To MSC
Failsoft
J102 J100
GETC #1
Repeater #1
Audio
Tx Rx
Audio Path
Digital Data Path
J102 J100
GETC #2
Repeater #2
Audio
3 4 2 5
. . .
To MSC
J102 J100
GETC #N
Repeater #N
Audio
Tx Rx
3 4 2 5 3 4 2 5
Rev. B 11
Page 12

LBI-38988 DESCRIPTION
DESCRIPTION
The Station GETC is the foundation of all EDACS
trunking operations. It is capable of operating in the
Trunked Failsoft mode or as part of a fully trunked system
or network. In the Trunked Failsoft mode, one of the
Station GETCs operates as the Control Channel GETC,
providing the command and control link between the
mobile radios and the EDACS system. The remaining
station GETCs operate as Working Channel GETCs and
enable or disable selected repeater channels for the actual
voice or digital data communication. Each Station GETC
has the ability to operate as a Control Channel if the
operation of the current Control Channel GETC is
interrupted.
In a Fully Trunked EDACS network or system (Figure
1), the Station GETCs function as either Control Channel
or Working Channel GETCs. In this environment, the Site
Controller Computer directs all communications, and
designates the Control Channel and Working Channel
GETC's. This allows EDACS to provide advanced features
such as Dynamic Transmission/Message Trunking, Local
Telephone Interconnect, Activity Logs, and Management
functions.
However, should the Site Controller fail, the EDACS
system defaults to the Trunked Failsoft mode. In this
mode, one of the GETCs assumes the role of Control
Channel GETC and directs Working Channel assignments
using the Backup Serial Link (BSL). Should the Control
Channel GETC fail, one of the other Working Channel
GETCs assumes the Control Channel function. The end
result is reliable, high performance trunked
communication.
The Downlink GETC provides the communication
path between the site and the Integrated Multisite and
Console Controller (IMC) or the Console Electronics
Controller (CEC) via the Uplink or Link GETC. Refer to
LBI-38896 when configuring Downlink and Uplink
GETCs.
OPERATION
The Station GETC communicates with the Site
Controller through an RS-232C port (J100), see the
Interconnect Diagrams, operating at 19.2K baud.
Additional communications parameters are one start bit,
eight data bits, and one stop bit.
The designated Control Channel GETC communicates
with the Working Channel GETC's using a Sync line that
indicates outbound Control Channel data and inbound
mobile data. The Sync line is connected in a bus fashion to
each Station GETC.
CONTROL CHANNEL
The Control Channel GETC provides continuous
outbound Control Channel data. The data stream consists
of message frames containing information such as Channel
Assignments. The Channel Assignment message includes
the originating mobile's LID, communication type,
Trunking mode, communications channel, and the group or
individual involved in the call.
The mobile radios synchronize their transmissions on
the Control Channel to reduce Control Channel collisions.
The designated Control Channel GETC processes the
inbound data prior to passing the data along to the Site
Controller. When operating in the Failsoft mode, the
Control Channel GETC also produces the required Channel
Assignments.
Control Channel Jamming
Whenever an invalid signal is present on the inbound
Control Channel for longer than six seconds, the Control
Channel GETC generates a jamming alarm . The Station
sends the alarm to the Site Controller which can initiate
corrective action such as re-assigning the Control Channel
to a different operating frequency.
WORKING CHANNEL
Sub audible signaling or Low Speed Data (LSD) is
present on the Working Channel along with the primary
voice communication. The LSD indicates group call
activity on other channels and also indicates a channel drop
when appropriate.
The Working Channel operates in either the
Transmission Trunked mode or Message Trunked mode.
Transmission Trunking allows for an instantaneous
channel drop upon receipt of an "unkey" message from the
mobile radio. This is the most efficient use of channel
resources.
Message Trunking provides hang time following the
channel drop message. This mode is used when it is
important to provide uninterrupted communication. When
using Message Trunking, the user(s) occupy the same
Working Channel until the message trunk timer expires.
TRUNKED FAILSOFT OPERATION
The Trunked Failsoft operating mode provides basic
trunked communications. The designated Control Channel
GETC makes all channel assignments and transmits the
assignments over the BSL (J102-3) to each of the Working
Channel GETCs. The Failsoft operating mode is entered
12 Rev. B
Page 13

whenever the communications between the Site Controller
TX MOD (J7-4)
Direct modulation input to the
synthesizer-exciter (MIIe
only).
GETC DATA (J7-5)
Input to the transmitter for
filtered High Speed Data
(HSD) to be transmitted.
VOL\SQ HI (J7-2)
Unfiltered receiver audio (9600
or 4800 baud data, voice, or
Low Speed Data (LSD).
LSD TX (J19-5)
Low-Speed Data to be
transmitted.
1950 DIS (J6-5)
Keeps line output active during
absence of a clear voice,
working channel call (EDACS
Voting System).
TX DATA LINK
Serial link, transmit output, to
the Site Controller.
RX DATA LINK
Serial link, received input from
the Site Controller.
BSL
Backup Serial Link between
Failsoft GETC's.
SYNC
Frame Sync Line (FSL)
provides GETC
synchronization in trunked
stations.
and the Control Channel GETC is lost.
STATION CONTROL
The Station GETC controls the Repeater Station's
radio through the following interface and control lines:
DELAY PTT (J6-1) Station executes an EXTernal
PTT sequence to key the
station transmitter.
REM PTT OUT (J6-16) Station executes a REMote
PTT, used to control audio
routing from the remote line
input to the transmitter.
RUS OUT (J7-15) Controls receiver (Vol/Sq)
audio sent to the transmitter.
LBI-38988
DET DIS (J6-10) Detect Disable signal disables
LSD while sending HSD to the
transmitter.
PA FAIL (J7-13) RF power amplifier failure
sensing line.
SYNTH LOCK DET
(J6-13)
SYNTH CLK (J6-12) Synthesizer-exciter clock line
SYNTH DATA (J6-11) Synthesizer-exciter data line
SYNTH LD EN (J6-15) Synthesizer-exciter load enable
Synthesizer-exciter lock detect
indicator.
(MIIe - 800/900 MHz
applications only).
(MIIe - 800/900 MHz
applications only).
pulse line (MIIe - 800/900
MHz applications only).
For a complete description of the interface signals, and
their activity during the various operating modes, refer to
Table 15 .
The GETC uses the following lines to communicate
with other GETCs and with the Site Controller:
Rev. B 13
Page 14

LBI-38988 CONFIGURATION
CONFIGURATION
The configuration process involves the following
procedures and should be completed in the order presented:
1. Hardware Installation - The Hardware Installation
procedure verifies proper installation of GETC
hardware.
2. GETC Software Installation - The GETC Software
Installation procedure provides instructions for
installing the GETC operating software,
349A9607.
3. Turbo Board Software Installation - This
procedure provides instructions for installing the
Turbo Board software, 344A1441.
4. Personality Programming - This procedure
provides instructions for programming and storing
system configuration data in the GETC.
5. Operational Checkout - The Operational Checkout
procedure provides instructions for verifying the
GETC operation when the configuration is
complete.
HARDWARE INSTALLATION
Typically, a Station GETC is installed in a n EDACS
station cabinet just above each of the station's radio
assemblies as shown in Figure 2. The assembly is mounted
within a slide out shelf measuring 1.75 inches (one rack
unit) high by 19 inches wide.
Installation or removal of the shelf sub-assemblies
involves sliding the GETC shelf out of the cabinet and into
the service position. This position allows access to the
shelf's sub-assemblies. Install all components with the
appropriate screws, nuts, and washer hardware. Refer to
the MASTR IIe (LBI-38430) or MASTR III (LBI-38636)
Application Assembly Diagrams for detailed information
on installing the GETC Shelf.
Observe basic safety precautions to prevent injury or
equipment damage.
Upgrading Hardware
GETC Shelves 19D901868G3 which are upgrading to
the 349A9607G4 or G5 software must ensure their
hardware is upgraded to the proper level. (The
19D901868G4 GETC Shelf meets all Group 5
requirements.)
Upgrading the hardware involves three elements:
• The microprocessor U1, 19A705557P1 (80C32), is
replaced with a faster “Speedy” microprocessor
RYT 121 6060/A (80C320).
• Replacing the AMPS modem chips U4 and U19
with the TI AMPS modem chips 19A704727P4.
• Installing a Ferrite Toroid on the Turbo Board
harness to suppress EMI spurs at 74 MHz.
The replacement microprocessor and Ferrite Toroid are
available in the field installable upgrade kit SPK9505. If
replacement of the modem chips is necessary, they must be
ordered separately. Refer to LBI-38894 and LBI-38822 for
complete installation instructions.
DISTRIBUTION
PANEL
SPACE
STATION GETC
REPEATER
CHANNEL #2
POWER SUPPLY
SPACE
STATION GETC
REPEATER
CHANNEL #1
DISTRIBUTION
PANEL
SPACE
STATION GETC
REPEATER
CHANNEL #4
POWER SUPPLY
SPACE
STATION GETC
REPEATER
CHANNEL #3
DISTRIBUTION
PANEL
SPACE
STATION GETC
REPEATER
CHANNEL #5
GETC Logic Board Installation
This manual assumes the GETC Logic Board
(19D904266G1 or G4) is previously installed, setup for the
default configuration (Wideband EDACS Station), and
fully operational. If you suspect that the GETC Logic
board is not operating properly, refer to the
Troubleshooting section in this manual.
Turbo Board Installation
This manual assumes the Turbo Board is previously
POWER SUPPLY
POWER SUPPLYPOWER SUPPLY
installed and fully functional. If, after installing or
attempting to install the Turbo Software, the Turbo Board
is not functioning properly, refer to the Troubleshooting
REPEATER
CABINET
REPEATER
CABINET
REPEATER
CABINET
section. Additional maintenance information is also
available in LBI-38822, SRN1060 and SRN1062.
Figure 2 - Typical Five Channel Repeater
Cabinet
14 Rev. B
Page 15
CONFIGURATION LBI-38988
Receiving Half of
Telephone Line
J6-07
J6-06
68
T1
52
12
J67
R36
604
D11 D10
R1
5K
TP107
Demodulated
Rx Data
U18A
4558
Level
3
2
Rx
Figure 3 - GETC Phone Line Level Adjustments
Parallel
Data Bus
4
5
6
7
8
9
10
11
19 21
2
1
D0
D1
D2
D3
D4
D5
D6
D7
Serial Data
Rx Tx
J11
J3C-22
J3A-32
1
Telephone Line
Level Adjustments
U19
Rockwell
Modem
19A705178
Unmodulated
J3C-24
J3A-31
R2
Level
1K
R38
220
TP105
Tx Data
Tx
U18B
4558
5
6
Transmitting Half of
Telephone Line
J6-09 J6-08
68
T2
52
R146
604
D13 D12
7
Rockwell Modem Installation
The Rockwell Modem provides a high speed
synchronous serial interface between the Station GETC and
the CEC/IMC's Uplink GETC. The Station GETC uses the
modem to send and receive serial digital data representing
GID information, polling messages, keying messages, and
channel assignments. Data transfer rates are 9600 bits per
second (bps) using dedicated 3002 data grade four-wire
audio lines. Technical specifications for the modem may be
found in LBI-33031. Information on installing and testing
the modem may be found in LBI-38894, and LBI-38822.
Modem Alignment
Use the following steps to set up the basic audio line
levels. If the Station GETC is linked to a MultiSite system
other than the CEC/IMC (i.e. Data Gateway), different
levels may be required. Consult the applicable system
installation manual for the required levels.
1. Ensure jumpers are installed on J11 pins 1 & 2
and J12 pins 1 & 2.
2. Apply power to the GETC.
3. Adjust the receive level by monitoring U18 pin 1
(refer to Figures 3 and 4) and adjusting the receive
level potentiometer R1 (located on the GETC
Logic Board) for 400 mVpp as measured with a n
oscilloscope (85 mVrms if using an RMS
Voltmeter).
4. Verify the presence of demodulated signal data at
TP107.
5. Adjust the transmit level potentiometer R2 for the
maximum output level allowed by the phone line,
microwave link, or equivalent communication
line. For telephone lines linking the Station
GETC to the CEC/IMC Uplink GETC, adjust R2
for .77 Vrms (0 dBm) measured across J6-8 and
J6-9 (TB10-1 and 2). For microwave links, adjust
R2 for -10 dBm across J6-8 and J6-9.
6. Initialize the modem by pressing S4 (on the GETC
Logic Board) to reset the Station GETC or cycle
the GETC Shelf's operating power.
Jumper Installation
There are a few jumpers on the GETC Logic Board
which must be re-configured for different applications. To
properly configure the GETC jumpers, refer to jumper
tables in SRN1060 and install or remove jumpers according
the intended GETC application. The location of the
jumpers may be found using the board layout diagram in
Figure 4.
Rev. B 15
Page 16
LBI-38988 CONFIGURATION
U18
J47
R1
Receive Level Adjustment
T1 T2
1
J7
J9 J8 J6 J19
J14
J15
1
1
1
J28
1
1
J20
J48
TP104
1
TP114
R141
J13
1
J50
J21
J26
J18
J53
1
1
1
1
U18
R1
J74
J51
1
1
J46
1
1
1
J69
J73
J71
1
J44
J17
TP104
1
1
J25
1
TP114
J16
1
J24
1
TP111
J60
1
J65
R31
1
J66
1
J64
R141
1
J63
1
1
J55
1
1
J67
1
J12
1
1
U1
TP111
R31
L7
L6
LED Indicators
L1 L2 L3 L4 L5
U35
J61
J10
J27
TP108
1
J29
U2
J52
1
1
U4
1
S3S2S1
R2
1
J72
TP109
1
1
TP110
U3
1
U19
1
1
S4
Reset Switch
Dip Switches
J62
19D904266
TP108
R2
TX Level Adj
TP110
J49
TP107
TP107
J3
J11
TP109
J68
J54 1
Figure 4 - Station GETC (19D904266) Jumper and Test Point Locations
16 Rev. B
Page 17

CONFIGURATION LBI-38988
GETC SOFTWARE INSTALLATION
The GETC software installation procedure involves
installing the latest version of the EPROM containing the
GETC operating software.
NOTE
NOTE
Download applicable Field Macros into the PC
Programmer TQ-3357 prior to configuring the
GETC software.
The following procedures provide instructions for
installing the GETC software when the GETC functions in
a Failsoft System, a Fully Trunked System, or a Satellite
Site Receiver or Simulcast Remote Transmitter:
caution
CAUTION
Observe precautions
for handling
ELECTROSTATIC
h
SENSITIVE DEVICES
Trunked Failsoft System
Perform the following steps when installing the
software in a GETC connected in a Trunked Failsoft
system.
NOTE
NOTE
Upgrading to Group 4 or Group 5 software is
backward compatible in functionality with
349A9607G1 & G2 and 19A149256G18 thru G21
software in the Failsoft operation. However, the
GETC hardware must be upgraded to include the
Turbo Board with 344A4414G4 or Group 5
software, respectively, and Ferrite Toroid. The
Logic board must be upgraded with the 80C320
microprocessor (U1), and 19A704727P4 Modem
(U4 & U19), refer to the Upgrading Hardware
section for details.
1. Power down the channel and place the GETC into
the service position. Refer to LBI-38894 if
necessary.
2. If upgrading from 19A149256G21 (or earlier)
software, remove RAM chip U3 and install Turbo
Board. Refer to LBI-38822 for instructions.
3. Ensure Modem chips U4 and U19 are TI AMPS
modems 19A704272P4. TI Amps modems are
required when upgrading to 349A9607G4 (or
later), replace if necessary.
4. Ensure microprocessor U1 is the “Speedy”
microprocessor 80C320 (RYT 121 6060/A). This
processor is required when upgrading the software
to 349A9607G4 (or later). The processor is
available in the Speedy Upgrade Kit SPK9505.
Replace if necessary. Refer to LBI-38894 for
installation instructions.
5. Ensure Turbo Board harness has Ferrite Toroid
installed. Toroid is included in the SPK9505
Speedy Upgrade Kit. Replace if necessary. Refer
to LBI-38822 for installation instructions.
6. Remove the old EPROM (U2) from the GETC
Logic Board.
7. Install the new EPROM into the XU2 socket,
being sure to properly orient the chip.
8. Remove EEPROM U35, if necessary, from the
Logic Board. The GETC personality will reside in
the Turbo Board and this device is no longer
required.
9. Power up the channel.
10. Place the Turbo processors U1 and U2 in the
program mode by switching Turbo Board switches
S2 and S3 toward the front of the Turbo Board.
11. Download the Turbo Board Software from the disk
provided in the Turbo Media Kit, 344A4414.
Refer the Turbo Board Software Installation
section, SRN1060, SRN1062, and LBI-38822.
12. After downloading the Turbo Board software,
move switches S2 and S3 toward the back of the
Turbo Board and press the GETC Logic Board
Reset button, S4.
13. The two LEDs on the Turbo Board should light.
14. Program the GETC’s personality using the
Personality Programming procedures contained in
Rev. B 17
Page 18

LBI-38988 CONFIGURATION
this manual and the detailed instructions contained
in TQ-3357 and SRN1060.
15. Perform an operational checkout using the Failsoft
System checkout procedures.
Fully Trunked Systems
Perform the following steps when installing the
software in a GETC connected i n a fully trunked system.
Following these procedures will allow upgrading the GETC
without interrupting normal communications.
These procedures apply to all fully trunked sites with
PDP System Manager Group 8 (or later), or VAX System
Manager Group 1 (or later).
NOTE
NOTE
If uninterrupted service is not an issue, skip steps
1 and 2.
1. Using the System Manager, place the channel into
Channel Test (formerly 2nd partition). This
allows the GETC to be tested for correct operation
before the channel is placed back into service.
2. Enable the test radios (two required) to operate in
Channel Test. This is done using the System
Manager’s Logical Unit Definition to change the
Logical ID database. Also, enable a test group(s)
for Channel Test by using the System Manager’s
Group Definition to change the Group ID
database. Refer to LBI-38984.
Replace if necessary. Refer to LBI-38894 for
installation instructions.
7. Ensure Turbo Board harness has Ferrite Toroid
installed. Toroid is included in the SPK9505
Speedy Upgrade Kit. Replace if necessary. Refer
to LBI-38822 for installation instructions.
8. Remove the old EPROM (U2) from the GETC
Logic Board.
9. Install the new EPROM into the XU2 socket,
being sure to properly orient the chip.
10. Remove EEPROM U35, if necessary, from the
Logic Board. The GETC personality will reside in
the Turbo Board and this device is no longer
required.
11. Power up the channel.
12. Place the Turbo processors U1 and U2 in the
program mode by switching Turbo Board switches
S2 and S3 toward the front of the Turbo Board.
13. Download the Turbo Board Software from the disk
provided in the Turbo Media Kit, 344A4414.
Refer the Turbo Board Software Installation
section, SRN1060, SRN1062, and LBI-38822.
14. After downloading the Turbo Board software,
move switches S2 and S3 toward the back of the
Turbo Board and press the GETC Logic Board
Reset button, S4.
3. Power down the channel and place the GETC into
the service position. Refer to LBI-38894 if
necessary.
4. If upgrading from 19A149256G21 (or earlier)
software, remove RAM chip U3 and install Turbo
Board. Refer to LBI-38822 for instructions.
5. Ensure Modem chips U4 and U19 are TI AMPS
15. The two LEDs on the Turbo Board should light.
16. Program the GETC’s personality using the
Personality Programming procedures contained in
this manual and the detailed instructions contained
in TQ-3357 and SRN1060.
17. Perform an operational checkout using the Fully
Trunked System checkout procedures.
modems 19A704272P4. TI Amps modems are
required when upgrading to 349A9607G4 (or
later), replace if necessary.
When upgrading from 349A9607G1 (or later)
NOTE
NOTE
software, existing personality data is stored during
6. Ensure microprocessor U1 is the “Speedy”
microprocessor 80C320 (RYT 121 6060/A). This
processor is required when upgrading the software
the installation process. It will only be necessary
to reprogram the personality if new features are
being enabled.
to 349A9607G4 (or later). The processor is
available in the Speedy Upgrade Kit SPK9505.
18 Rev. B
Page 19

CONFIGURATION LBI-38988
Satellite Receivers & Simulcast Remote TX
Perform the following steps when installing the
software in a GETC connected in a Voted system as a
Satellite Site Receiver or at the Remote TX Site.
NOTE
NOTE
For Voted systems using Satellite Site Receiver
software, the Satellite Site Receiver software must
be the same version as the Main/Control Site
software before the channel will operate properly.
NOTE
NOTE
For Simulcast systems, all Satellite Receivers of a
channel must use the same software version, and
the receiver software need not be the same as the
Control Point software although it is
recommended.
We also recommend upgrading the Satellite Site
Receiver software before the Main/Control Site.
Receiver sites are somewhat redundant in their
operation, and changing one site has only a
localized affect on the over all operation.
1. Power down the channel and place the GETC into
the service position. Refer to LBI-38894 if
necessary.
2. If upgrading from 19A149256G21 (or earlier)
software, remove RAM chip U3 and install Turbo
Board. Refer to LBI-38822 for instructions.
Speedy Upgrade Kit. Replace if necessary. Refer
to LBI-38822 for installation instructions.
6. Remove the old EPROM (U2) from the GETC
Logic Board.
7. Install the new EPROM into the XU2 socket,
being sure to properly orient the chip.
8. Remove EEPROM U35, if necessary, from the
Logic Board. The GETC personality will reside in
the Turbo Board and this device is no longer
required.
9. Power up the channel.
10. Place the Turbo processors U1 and U2 in the
program mode by switching Turbo Board switches
S2 and S3 toward the front of the Turbo Board.
11. Download the Turbo Board Software from the disk
provided in the Turbo Media Kit, 344A4414.
Refer the Turbo Board Software Installation
section, SRN1060, SRN1062, and LBI-38822.
12. After downloading the Turbo Board software,
move switches S2 and S3 toward the back of the
Turbo Board and press the GETC Logic Board
Reset button, S4.
13. The two LEDs on the Turbo Board should light.
14. Program the GETC’s personality using the
Personality Programming procedures contained in
this manual and the detailed instructions contained
in TQ-3357 and SRN1060.
3. Ensure Modem chips U4 and U19 are TI AMPS
modems 19A704272P4. TI Amps modems are
required when upgrading to 349A9607G4 (or
later), replace if necessary.
4. Ensure microprocessor U1 is the “Speedy”
microprocessor 80C320 (RYT 121 6060/A). This
processor is required when upgrading the software
to 349A9607G4 (or later). Processor is available
in Speedy Upgrade Kit SPK9505. Replace if
necessary. Refer to LBI-38894 for installation
instructions.
5. Ensure Turbo Board harness has Ferrite Toroid
installed. Toroid is included in the SPK9505
Rev. B 19
15. Perform an operational checkout using the
Satellite Receiver checkout procedures.
Single Channel Autonomous Trunking (SCAT)
Detailed SCAT Installation Instructions for Station
GETCs are available in LBI-38987. This manual also
includes complete configuration instructions.
Voted Digital Interconnect (VDI)
Detailed VDI Installation Instructions for Station
GETCs are available in LBI-39187. This manual also
includes complete configuration instructions.
Page 20

LBI-38988 CONFIGURATION
De-installing The GETC-1e Software
If a problem arises while upgrading or installing the
new software, it may be necessary to de-install the software.
Restoring the site to its original configuration will depend
on which of the following the original hardware platform.
The two cases are described below.
If the original equipment configuration was a GETC1e
(GETC with Turbo) platform, then perform the following
steps:
1. Replace Group 5 GETC PROM with original
software.
2. Reload original Turbo software using PC
Programmer.
3. If changes were made to the personality, then
reload the previous parameters.
4. The Speedy microprocessor upgrade, if installed,
does not need to be reversed.
If the original equipment was a GETC (GETC with no
Turbo) platform, then perform the following steps:
When using PC Programmer TQ-3357 V3 (or earlier)
and downloading 344A4414G3 (and earlier) software, the
data from the PC files is routed to the Turbo Board
microprocessors through Turbo Board programming
connector J100 at the rear of the GETC Shelf.
When using PC Programmer TQ-3357 V4.03 (or
later), the Turbo software is downloaded to the Turbo
Board microprocessors through Turbo Board programming
connector J104. Programming through J104 also allows
you to load the GETC personality without changing setups.
In addition, the V4.03 PC Programmer will diagnose any
problems between the PC and the GETC during the
downloading process and simplify the handling and
archiving of the Turbo software.
NOTE
NOTE
PC Programmer TQ-3357 V4.03 must be used
when upgrading to 349A9607G5 (or later). Only
TQ-3357 V4.03 (or later) is capable of using Field
Macros. When using 349A9607G5 software, the
Field Macro “gtc_9505.mac” must be installed
into TQ-3357 to access the new feature’s
parameters.
1. Replace Group 5 GETC PROM with original
software.
2. Disable the Turbo by sliding Turbo switches S2
and S3 toward the front of the GETC shelf.
3. Re-install the original personality EEPROM, if it
was removed, else no change.
4. The Turbo upgrade, if installed, does not need to
be reversed.
5. The Speedy microprocessor upgrade, if installed,
does not need to be reversed, except for SCAT
sites.
TURBO BOARD SOFTWARE
INSTALLATION
This procedure provides instructions for downloading
the Turbo software. The software is included in the Turbo
Media Kit, 344A4414. The installation process involves
downloading the GETC1E utilities to an IBM compatible
personal computer (PC), and connecting the programming
cable (TQ-3360) between the PC and the Turbo Board
programming connector.
Equipment Required
• IBM PC/XT/AT or compatible with at least 640K
memory, monitor and keyboard running MS-DOS
version 3.0 or higher.
• Hard disk is recommended; but, not required.
• Serial Port configured as either COM1 or COM2.
• TQ-3360 programming cable.
• Male DB-25 to female DB-9 adapter or cable if the
PC's serial port connector is a male DB-9
connector instead of a male DB-25 connector.
• Station Turbo Software distribution diskette
344A4414 (344A4414G5 required when installing
349A9607G5 GETC Software). Refer to
SRN1060 and SRN1062 to verify software
compatibility.
• Field Macro “gtc_9505.mac” (supplied with
the Station Turbo Software distribution disk).
20 Rev. B
Page 21

CONFIGURATION LBI-38988
PC Programmer Setup
Prepare the PC for programming the GETC Turbo
Board by performing the following steps:
TQ-3357 V4.03 (or later)
1. Connect the TQ-3360 programming cable from
the PC's serial port connector to the GETC Shelf
connector J104 (A DB-25 to DB-9 adapter may be
needed.)
2. Using the TQ-3357’s LOAD utility, copy the
Station Turbo software (344A4414) into the PC
Programmer’s working directories.
3. Load the Field Macro “gtc_9505.mac” into the
TQ-3357 PC Programmer using the instructions
contained in Chapter 5 of the TQ-3357 manual.
4. Refer to TQ-3357 Chapter 5 Load1E Utility for
complete instructions on downloading the Turbo
software .
TQ-3357 V3 (or earlier)
1. Connect the TQ-3360 programming cable from
the PC's serial port connector to the GETC Shelf
connector J100 (A DB-25 to DB-9 adapter may be
needed.)
NOTE
NOTE
When using Turbo Board 344A4414 Group 2 (or
later) software, re-programming the GETC Turbo
Board will not alter previously stored Personality
Data. When Personality Data is present,
“load1e.exe” clears and performs CRC functions
over the code portion of memory only.
PERSONALITY PROGRAMMING
Personality refers to the system configuration data
stored in the GETC's memory. The GETC's Personality
includes system configuration information such as channel
frequencies, call parameters, operating modes, and
identification information.
The Personality Programming process involves using
the TQ-3357 GETC Shelf PC Programmer which includes
the programming software to create the desired personality
and transfer the Personality data to the battery backed-up
RAM located on the Turbo Board.
NOTE
If installing GETC software 349A9607G4 (or
later), you must use PC Programmer V4.03 (or
later). Version 4.03 allows access to new G4
features. TQ-3357 V5.0 or V4.03 with Field
Macro file GTC_9505.MAC is required to access
349A9607G5 features’ parameters.
2. Using standard DOS commands or a software file
manager, create a directory named "LOAD1E" on
the PC's hard drive.
3. Make "LOAD1E" the current directory and copy
the following files from the software diskette into
the "LOAD1E" directory:
• load1e.exe
• 1etop.hex
• 1ecrc.hex
• 1ebot.hex
4. Run the load1e.exe program. Follow the on
screen instructions and program the Turbo Board.
Additional programming instructions may be
found in SRN1062 and LBI-38822.
The TQ-3357 V4.03 (or later) also allows you to
upload the GETC’s Personality without changing the DIP
switch settings.
NOTE
NOTE
It is not necessary to recreate the personality when
upgrading from Group 1 or Group 2 software to
Group 4. However, to activate new features, read
the existing personality and edit the personality as
required.
Programming a Personality Using TQ-3357 V3
(or earlier)
When using TQ-3357 Version 3 (or earlier) you must
program the personality through J100.
1. Connect one end of the serial programming cable
(TQ-3360) to the computer. Connect the other end
Rev. B 21
Page 22

LBI-38988 CONFIGURATION
8
OPEN
of the serial cable to the GETC Shelf connector
J100, see Figure 5.
2. Set the GETC DIP switches S1, S2, and S3 for the
programming mode as shown in Figure 6. Set S28, S3-3 and S3-6 to OPEN. All other S3 positions
should be CLOSED. Switches S1-1 thru S2-7 can
be in any position and need not be changed. DIP
switches S1-S3 are located near the front of the
GETC Shelf, see Figure 4.
3. Reset the GETC by either applying power or
pressing the GETC RESET switch S4, see Figure
4, located just below the DIP switches. Resetting
the GETC, in combination with the DIP switch
settings, places the GETC into the Personality
Programming mode.
4. Verify that front panel LEDs L3, L4, and L5 are
ON, as shown in Table 5. This indicates the
GETC is ready for programming.
Table 5 - Indicators in Programming Mode Using J100
LED Indicators L1 L2 L3 L4 L5 L6 L7
Programming Mode
Legend: ❍ = OFF ● = ON ❉ = FLASHING
❍❍●●●❍❍
S1
1234567
OPEN
12345678S212345678
S3
OPEN
Figure 6 - Programming DIP Switch Settings
5. Proceed with the Personality programming as
described in TQ-3357 Chapter 4.
6. After saving the personality and downloading it
into the GETC, perform an operational checkout
of the GETC.
Programming a Personality Using TQ-3357
Version 4.03 (or later)
When using TQ-3357 Version 4.03 (or later), program
the personality through J104.
1. Connect one end of the serial programming cable
(TQ-3360) to the computer. Connect the other end
of the cable to the GETC Shelf connector J104.
See Figure 7.
2. Move Switch S2 on the Turbo Board to the front
placing the GETC into the Personality
Programming mode. See Figure 7.
Software Disk
TQ-3357 V3 or earlier
Cable
TQ-3360
J100
Harness 19C336863G2
J10
J27
J9 J8 J5
TQ3357
To
COM 1 or
COM 2
U1
J3
U2
J7
J49
J49
1
U3
1
1
U19
U19
J3
TP107
TP107
J8
1
1
U2
U1
1
U4
Dip Switches S1-S3
S3S2S1
Switch S4
S4
L1 L2 L3 L4 L5 L6 L7
J19
T1 T2
U18R1
Turbo Board Lightning GETC
GETC Shelf 19D901868G3
Figure 5 - System Hook-Up Using J100
22 Rev. B
Page 23

CONFIGURATION LBI-38988
3. Verify that front panel LEDs L6 and L7 are
flashing, as shown in Table 6. This indicates the
GETC is ready for programming.
Table 6 - Indicators in Programming Mode Using J104
LED Indicators L1 L2 L3 L4 L5 L6 L7
Programming Mode
Legend: ❍ = OFF ● = ON ❉ = FLASHING
❍❍❍❍❍
❉❉
4. Proceed with the Personality programming as
described in TQ-3357.
5. After saving the personality and downloading it
into the GETC, perform an operational checkout
of the GETC.
Software Disk
TQ3357 V4 or later
Cable
TQ-3360
J103 J104
Harness
19C337712G1
TQ-3357
To
COM Port
J2
S2
S3
U1
U2
J3
J49
1
J3
TP107
J10
J27
J9 J8 J5
J7
1
1
1
U2
U3
U19
U1
1
U4
S3S2S1
S4
L1 L2 L3 L4 L5 L6 L7
J19
T1 T2
U18R1
Turbo Board GETC Logic Board
GETC Shelf 19D901868G3
Figure 7 - System Hook-Up Using J104
Rev. B 23
Page 24

LBI-38988 CONFIGURATION
Table 7 - Sample Station Personality
Personality: C:\GE\GTC\PERS\SAMPLE.GTC
~~~~~~~~~~~~~~~~~~~~~~~~~~~~~~~~~~~~~~~~~~~~~~~~~~~~~~~~~~~~~~~~~~~~~~~~~~~~
Personality Description
This is a sample personality for
a Station GETC.
Channel Allocations
11111 11111 22222 22222 333
Channel Number 1234 56789 01234 56789 01234 56789 012
Control Channel YYYY YYYYY YYYYY YYYYY Y.... ..... ...
Clear Voice YYYY YYYYY YYYYY YYYYY Y.... ..... ...
Digital Voice YYYY YYYYY YYYYY YYYYY Y.... ..... ...
Data YYYY YYYYY YYYYY YYYYY Y.... ..... ...
Pager (DnLink GETC).... YY... ..... ..... ..... ..... ...
Interconnect YYYY YYYYY Y.... ..... ..... ..... ...
Allow DV Telephone YYYY YYYYY Y.... ..... ..... ..... ...
Multisite Downlink .... ..... ..... ..... ..... ..YY. ...
Downlink (to TSIN) .... ..... ..... ..... ..... YY... ...
Channel Data
System Type : WIDE BAND
Ch # Freq (Mhz) Ch # Freq (Mhz) Ch # Freq ( Mhz)
1 855.0125 10 858.0125 19 0.0000
2 855.0250 11 858.0250 20 0.0000
3 855.0375 12 858.0375 21 0.0000
4 856.0125 13 0.0000 22 0.0000
5 856.0250 14 0.0000 23 0.0000
6 856.0375 15 0.0000 24 0.0000
7 857.0125 16 0.0000 25 0.0000
8 857.0250 17 0.0000
9 857.0375 18 0.0000
Site Data
Site Name : TESTSITEONE Site ID : 4
Date : 01/13/95 Morse ID : WTST4
Channel Assignment: Ascending Rotating Assign: Yes Indv. Call Hang : 0
Indv. Call Update : One Slot Multisite Syst.: Yes Group Call Hang : 0
IMC Platform : IMC/CEC Simulcast Syst.: No Telephn Call Hang: 30
Wideband Pwr Sense: Disabled CTIS(Telephone): No Dig. Voice Hang : 0
Jamming Threshold : 0 Voter System : No Emerg. Call Hang : 0
Rem Site DV Delay : 0 SCAT : No Sys All Call Hang: 0
Max Interconnects : 4 LIDs>8192 : Yes TX Trunked Timer : 60
Msg Trunked Timer: 120
Morse Intvl Timer: 15
24 Rev. B
Page 25

CONFIGURATION LBI-38988
Table 7 - Sample Station Personality (Continued)
CONFIRMED CALL ENABLES STATUS:
Clear Voice Digital Voice
----------- ------------ Group Calls: No No
Indiv Calls: No No
Teleph Calls: No No
Digital Voice Group ID
Group ID Group ID Group ID
1 0 19 0 37 0
2 0 20 0 38 0
3 0 21 0 39 0
4 0 22 0 40 0
5 0 23 0 41 0
6 0 24 0 42 0
7 0 25 0 43 0
8 0 26 0 44 0
9 0 27 0 45 0
10 0 28 0 46 0
11 0 29 0 47 0
12 0 30 0 48 0
13 0 31 0 49 0
14 0 32 0 50 0
15 0 33 0 51 0
16 0 34 0 52 0
17 0 35 0 53 0
18 0 36 0 54 0
Conventional Network Interface Data
Conventional Network Logical ID : 0
C.N.I Group ID C.N.I Channel Guard Tone
**GETC Personality Extended Options:
~~~~~~~~~~~~~~~~~~~~~~~~~~~~~~~~~~~~~~~~~
CV C-Call Timeout 0
DV C-Call Timeout 0
Wide Area DV No
Data Mode RF Data
Polarity Invert None
Baud Rate 9600
Dig.Voted Inter. Unavail
Data Protocol Normal
Data Queuing Disabled
Msg Trunked Data Disabled
DataCall Hangtime 0
FS Patch Enable Disabled
LSTX Polarity Normal
MII/IIe 900MHz? No
Conv. FS Enable Disabled
MS Confirmation 0
NOTE
NOTE
** The contents of the GETC Personality Extended Options panel will display the parameters for new features
when the Field Macro(s) is installed into the PC Programmer. Field Macros keep the programmer current
until a fully upgraded PC Programmer which includes all features is made available. The Field Macros are
supplied with the Turbo Software Media Kit and may be downloaded from Ericsson’s “One1Call” retrieval
system.
Rev. B 25
Page 26

LBI-38988 OPERATIONAL CHECKOUT
OPERATIONAL CHECKOUT
Verify that the GETC is operating correctly by
performing the following steps:
DIP Switch Settings
Through imporvements in software and hardware,
fewer changes in DIP switch settings are required. As a
result more switch positions are being ignored and their
functionality is being programmed into the GETC via the
Personality Programming.
S3
12345678S112345678S212345678
OPE N OP E N
S2-8 Always Closed for
Normal operation, Open for
Test program.
Figure 8 - Operational DIP Switch Settings
1. Set the GETC DIP switches S1-1 through S1-7
and S2-1 through S2-4 to the operating frequency.
Refer to SRN1060, Appendix A for wideband
frequencies, and Appendix B for narrow band
frequencies.
NOTE
NOTE
For MASTR II/IIe (using 349A9607G5 or later)
and MASTR III stations, set DIP switches S1-1
through S1-7 and S2-1 through S2-4 to the
CLOSED position. Frequency is selected via the
Personality programming.
OPE N
1442443
Channel
Number
6. Set S3-1 thru S3-5 to the Channel Address. Refer
to Table 8.
7. Set S3-6 to CLOSED.
8. Set S3-7 OPEN for Simulcast or CLOSED for
non-Simulcast. With software 349A9607G4 (or
later) set S2-6 to CLOSED, use Personality
Programming.
9. Set S3-8 to OPEN.
Table 8 - Channel Number Switch Settings
GETC DIP SWITCH
SW-3 SELECTION
(LSB) (MSB)
CH # 1 2 3 4 5 CH # 1 2 3 4 5
1 OCCC C 13 OCOOC
2COCCC14COOOC
3 OOCC C 15 OOOO C
4 CCOC C 16 CCCCO
5OCOCC17OCCCO
6 COOC C 18 COCC O
7 OOOC C 19 OOCCO
8 CCCO C 20 CCOCO
9OCCOC21OCOCO
10 COCO C 22 COOCO
11 OOCO C 23 OOOC O
12 CCOO C 24 CCCOO
GETC DIP SWITCH
SW-3 SELECTION
(LSB) (MSB)
O = open switch position (1)
C = closed switch position (0)
1. Reset the GETC by pressing S4.
2. Complete the verification process for the specific
GETC application, by using the procedure for:
2. Set S1-8 to CLOSED for Satellite Receivers and
a. A Fully Trunked System
Remote Simulcast Site operation. Open for all
other operating modes.
3. Set S2-5 to CLOSED.
4. Set S2-6 to CLOSED enable Conventional Failsoft
or OPEN to disable Conventional Failsoft. With
software 349A9607G4 (or later) set S2-6 to
Fully Trunked System
checkout of a trunked GETC channel moved to the Channel
Test during the Firmware Installation.
b. A Failsoft System
c. Satellite Site Receiver
Perform the following steps to complete the operational
CLOSED, use Personality Programming.
1. Verify correct LED indicators for the Trunked
5. Set S2-7 and S2-8 to CLOSED.
System Control Channel and the idle Working
Channels as shown Table 9.
26 Rev. B
Page 27

OPERATIONAL CHECKOUT LBI-38988
Table 11 - LED Indicators for Failsoft Idle Channels
LED Indicators
Failsoft Idle WB
Working Channel
Failsoft WB Control
Channel
Failsoft Idle NB
Working Channel
Failsoft NB Control
Channel
Legend:
= OFF ● = ON ❉ = FLASHING
2. Place test calls from radios in Channel Test by
keying one of the test radios and monitoring the
audio from the other radio. Place Clear Voice
calls and if programmed, Digital Voice calls.
Table 9 - LED Indicators for Trunked Idle Channels
LED Indicators L1 L2 L3 L4 L5 L6 L7
Fully Trunked Idle WB
❍❍❍❍❍❍●
Working Channel
Fully Trunked Idle NB
❍❍●❍❍❍●
Working Channel
Fully Trunked WB
❍❍❍❍❍●●
Control Channel
Fully Trunked NB
❍❍●❍❍●●
Control Channel
Legend: ❍ = OFF ● = ON ❉ = FLASHING
3. Verify LED indicators are correct, as shown in
Table 10, for the trunked channels assigned Clear
Voice and Digital Voice calls.
Failsoft System
Perform the following steps to verify operation of a
GETC used in a Failsoft System:
1. Verify the GETC LED indicators for the Failsoft
Control Channel and idle Working Channels are
correct as shown in Table 11.
L1 L2 L3 L4 L5 L6 L7
●❍❍❍❍❍●
●❍❍❍❍●●
●❍●❍❍❍●
●❍●❍❍●●
❍
Table 10 - LED Indicators for Trunked Assigned
Channels
LED Indicators L1 L2 L3 L4 L5 L6 L7
Fully Trunked Assigned
❍❍❍❍❍●❍
WB Clear Call
Fully Trunked Assigned
❍❍❍❍❍●●
WB Digital Voice Call
Fully Trunked Assigned
❍❍●❍❍●❍
NB Clear Call
Legend: ❍ = OFF ● = ON ❉ = FLASHING
4. Using the System Manager, put channel back into
service by taking it out of Channel Test.
5. Repeat for all channels.
NOTE
NOTE
To switch a GETC from the Control Channel
operation to Working Channel operation, press
and hold S4 on the Control Channel GETC. This
causes the Failsoft System to re-assign the Control
Channel responsibilities to the next functioning
GETC. Release S4 and verify LEDs.
2. Place Clear Voice calls on both wideband or
narrowband channels and Digital Voice calls on
the wideband channels to verify correct operation.
3. Verify LED indicators are correct, as shown in
Table 12, for the Failsoft Wideband channel(s)
assigned Clear Voice and Digital Voice calls and
Failsoft Narrow Band channel(s) assigned Clear
Voice calls.
4. Repeat for all channels.
Rev. B 27
Page 28

LBI-38988 OPERATIONAL CHECKOUT
Table 12 - LED Indicators for Failsoft Assigned
Table 13 - LED Indicators for Satellite Site Receivers
Channels
LED Indicators L1 L2 L3 L4 L5 L6 L7
LED Indicators L1 L2 L3 L4 L5 L6 L7
WB Working Channel
Failsoft Assigned WB
●❍❍❍❍●❍
Satellite Site Idle
Clear Call
WB Working Channel
Failsoft Assigned WB
●❍❍❍❍●●
Satellite Site Assigned
Digital Voice Call
WB Control Channel
Failsoft Assigned NB
●❍●❍❍●❍
Satellite Site
Clear Call
Legend: ❍ = OFF ● = ON ❉ = FLASHING
WB Working Channel
Remote Simulcast
Assigned
Satellite Site Receiver
Verify proper operation of a GETC used in as a
Satellite Site Receiver by observing the GETC LED
indicators when the receiver is used as a Control Channel
and idle or assigned Working Channel as shown in Table
13.
INTERFACE SIGNALS
between the GETC and the Station Repeater. For the
specific location of these signals, refer to the Interconnect
Diagrams.
Legend: ❍ = OFF ● = ON ❉ = FLASHING
Table 15 describes the various interface signals
●❍❍❍❍❍●
●❍❍❍❍●●
●●❍❍❍❍●
●❍❍❍❍●❍
28 Rev. B
Page 29

TROUBLESHOOTING LBI-38988
TROUBLESHOOTING
The hardware used in the GETC is extremely reliable,
making component failure the unlikely cause of most
problems. The most common causes of problems are
programming errors and interface connections.
Use the following guidelines when troubleshooting a
GETC on site:
1. Verify the operation of front panel LEDs. This
can be done by performing the Operational
Checkout and verifying the LED indications.
GETCs using 349A9607 Group 4 software may
also indicate the specific cause of the failure, refer
to Failure Mode.
2. Verify that all cables are properly connected and
secure.
3. Verify the GETC’s personality is properly
programmed for the specific application. Refer to
TQ-3357, PC Programmer and SRN1060 (SRN
1024 if using 19A705595G8 software).
4. Verify the Turbo Board is properly configured if
applicable. Refer to LBI-38822 and SRN 1062.
5. If you suspect that the GETC has failed, replace
the it with a known good unit properly configured
for this application. Recheck all software and
personality parameters and checkout the GETC’s
operation. If the GETC functions properly, repair
or replace the malfunctioning GETC according to
the instructions in LBI-38894.
panel LEDs. Prior to group 4 software, a failure is
indicated by incorrect LEDs, but the GETC did not indicate
the root cause. The failure modes listed in Table 14
describe the LED displays and their corresponding failure
mode interpretation.
In all 3 failure modes, the channel is completely taken
out of service. This allows the System Manager in Fully
Trunked systems to display a channel failure. In Trunked
Failsoft, the channel is removed from service to avoid using
the bad channel.
CHANNEL ACTIVITY LOGGER
Another diagnostic feature introduced with the
349A9607 Group 4 software is the Channel Activity
Logger. This feature allows the GETC to supply
information about what it sees from its inputs: the RF
receiver, phone line receiver, station interface I/O.
Additionally, the GETC can supply internal event
information about what the GETC is doing. For example,
if the GETC tries to train its Rockwell modem, it will print
a message “MODEM TRAINING STARTED,” and when
the modem becomes trained, it will print “MODEM
TRAINING COMPLETED.” In General, the information
supplied by the Channel Activity Logger is EDACS specific
and in some cases may need technical assistance for
interpretation. For detailed instructions on using the
Channel Activity Logger, refer to SRN1060 and PC
Programmer TQ-3357 V4.03 (or later).
IN CASE OF DIFFICULTY
FAILURE MODE
With the introduction of 349A9607 Group 4 software,
the GETC is able to indicate a specific failure via the front
Table 14 - Failure Modes
LED DISPLAY FAILURE MODE POSSIBLE FAILURE CAUSE
LED 7 (only ) - Flashing
Flashing rate = 1 second
Quick synthesizer reload after every 5 flashes
of LED 7 (quick flash of LEDs 3, 4, and 5)
LED 6 (only) - Flashing
Flashing rate = 1 second
LED 6 & 7 (only) - Flashing simultaneously
Flashing rate = 1 second
Rev. B 29
GETC is unable to cause a
synthesizer lock.
GETC has detected a PA Low
Power Alarm condition.
GETC has detected failure of
Turbo Board.
If you are unable to resolve a problem to your
satisfaction, then contact the Ericsson Technical Assistance
Center (TAC) at 1-800-528-7711 (outside USA, 804-528-
7711).
Bad synthesizer, Bad 10V Station Power
Supply, incorrect operation of MASTER
III Station Module, J26 Incorrect.
Bad PA, incorrect adjustment of R141,
uncalibrated Power Sensor.
Turbo Board switches not in operational
position (toward rear of GETC), wrong
turbo software, bad turbo card.
Page 30

LBI-38988 TROUBLESHOOTING
Table 15 - Interface Status During Various States
SIGNAL STATE STATUS
Control Channel:
Vol/Sq (J7-2) Data High Speed signaling is being routed to the HSD Detector.
RUS In (J7-14) High Receiver is unsquelched and watching carrier activity for the presence
(present = Low) of an interfering signal (without valid signaling).
Rus Out (J7-15) Low GETC is receiving HSD and mutes the receiver (no Receiver audio to the
transmitter).
RPT Inhibit (1950 DIS) (J6-5) Low If a Voting system, this line is low during a Control Channel. The 1950
tone is present on the Line Output.
Rem PTT (J7-9) High No inbound calls from console or IMC.
Delay PTT (J6-1) Low Transmitting (HSD).
Rem PTT (J6-16) High No calls from the remote line allowed when Control Channel.
DET DIS (J6-10) High Transmitting high speed data, low speed data disabled.
MOD Out (J7-4) Data Control Channel Data to be transmitted is sent into the station on this line
now. (Simulcast Transmit Site.)
CG HI (J7-4) Data No Low speed data during Control Channel signaling.
Phone lines (J6 6, 7, 8, & 9) Analog If Voter or Simulcast, these lines contain modem communication between
the Voter and Main Site/Control Point GETCs, otherwise inactive.
Working Channel (Inactive):
Vol/Sq (J7-2) Data Not Listening for data.
RUS In (J7-14) High Watching carrier activity for the presence (present = Low) of an interfering
signal (without valid signaling).
Rus Out (J7-15) Low Receiver is muted (no Receiver audio to the transmitter).
RPT Inhibit (1950 DIS) (J6-5) Low If a Voting system, this line is low during a Control Channel. The 1950
tone is present on the Line Output.
Rem PTT (J7-9) High No inbound calls from console or IMC. Line not considered until channel is
assigned.
Delay PTT (J6-1) High Not Transmitting.
Rem PTT (J6-16) High No calls from the remote line allowed until channel is assigned.
DET DIS (J6-10) Low High speed data disabled, low speed data enabled.
MOD Out (J7-4) Data No High speed data is sent to the station on this line now.
CG HI (J7-4) Data No Low speed data until channel is assigned.
Phone lines (J6 6, 7, 8, & 9) Analog If Voter or Simulcast, these lines contain modem communication between
the Voter and Main Site/Control Point GETCs, otherwise inactive.
30 Rev. B
Page 31

TROUBLESHOOTING LBI-38988
Table 15 - Interface Status During Various States (Continued)
SIGNAL STATE STATUS
Working Channel (Active): Handshake Mode
Vol/Sq (J7-2) Data Listening to High Speed handshake.
RUS In (J7-14) N/A RUS activity is being ignored during the handshake.
Rus Out (J7-15) L/H Receiver is muted (no receiver audio to the transmitter) until call is
validated.
RPT Inhibit (1950 DIS) (J6-5) Low If a Voting system, this line is low during a Control Channel. The 1950
tone is present on the Line Output.
Rem PTT (J7-9) N/A If inbound call is from console or IMC this signal will be considered after
channel is assigned.
Delay PTT (J6-1) High Transmitting High speed data (handshake).
Rem PTT (J6-16) High No calls from the remote line allowed until channel is assigned.
DET DIS (J6-10) High Transmitting high speed data, low speed data disabled.
MOD Out (J7-4) Data High speed data (handshake) to be transmitted is sent to the station on this
line now. (Simulcast Remote Transmit Site.)
CG HI (J7-4) Data No Low speed data until channel is assigned.
Phone lines (J6 6, 7, 8, & 9) Analog If Voter or Simulcast, these lines contain modem communication between
the Voter and Main Site/Control Point GETCs, otherwise inactive.
Working Channel (Active): During Analog Call
Vol/Sq (J7-2) Analog Voice and Low speed data from the receiver on this line. GETC listening to
Low speed data.
RUS In (J7-14) Low Carrier activity indicated.
Rus Out (J7-15) High Receiver is unmuted. Receiver audio is routed to the transmitter.
RPT Inhibit (1950 DIS) (J6-5) High If a Voting system, this line is high (+5 Vdc) during a Clear Voice Working
Channel. The 1950 Hz tone is muted and voice audio is present on the Line
Output.
Rem PTT (J7-9) H/L If inbound call from console or IMC this line is pulled low, after channel is
assigned, as a result of 2175 Secur-it-Hold on the line input to the station.
Delay PTT (J6-1) High Transmitting.
Rem PTT (J6-16) H/L If call is from the remote line this line is Low which routes transmitter audio
from the line input.
DET DIS (J6-10) Low High speed data disabled, low speed data enabled.
MOD Out (J7-4) Data No High speed data is sent to the station on this line now.
CG HI (J7-4) Data Low speed data is being transmitted for the duration of the call.
Phone lines (J6 6, 7, 8, & 9) Analog If Voter or Simulcast, these lines contain modem communication between
the Voter and Main Site/Control Point GETCs, otherwise inactive.
Rev. B 31
Page 32

LBI-38988 TROUBLESHOOTING
Table 15 - Interface Status During Various States (Continued)
SIGNAL STATE STATUS
Working Channel (Active): During Digital Call
Vol/Sq (J7-2) Analog Digital Voice data on this line.
RUS In (J7-14) N/A Carrier activity is ignored during Digital Voice call.
Rus Out (J7-15) Low Receiver is muted.
RPT Inhibit (1950 DIS) (J6-5) Low If a Voting system, this line is low during a Digital Voice call. The 1950 Hz
tone is present on the Line Output.
Rem PTT (J7-9) H/L This line is normally High during a digital call. When digital call is from a
console or IMC, Modem data is present on the line input. This looks like
2175 Secur-it to the station and this line is toggled Low.
Delay PTT (J6-1) High Transmitting Voice data.
Rem PTT (J6-16) L/H During a Digital Voice call this line is used by the GETC to indicate a valid
Digital Voice remote call (console, IMC).
DET DIS (J6-10) High Transmitting high speed data, low speed data disabled.
MOD Out (J7-4) Data High speed data (Digital Voice) to be transmitted is sent to the station on
this line now.
CG HI (J7-4) Data No Low speed data during Digital Voice call.
Phone lines (J6 6, 7, 8, & 9) Analog If call is from console or IMC this line contains the Digital Voice (Modem
data). If Modem voting, Voice-Modem data present.
32 Rev. B
Page 33

J100
To
Site Controller
(MSL)
J102
To
Other GETCs
(BSL)
J101
INTERCONNECT DIAGRAMS LBI-38988
1
6
2
7
3
8
4
9
5
1
6
2
7
3
8
4
9
5
1
6
2
7
3
8
4
9
5
19C336863G1
J8P8
3
3
2
2
1
1
6
6
4
4
5
5
P1 9
J19
4
4
6
6
3
3
2
2
1
1
J3
GND
RxD
TxD
BSL RxD
BSL TxD
GND
FSL
GND
RxD
TxD
Lightning GETC
19D904266
Det Dis (MIII)
LOCK DET (MII)
LD EN (MII)
REM PTT OUT
GETC Data (TX MOD)
REM PTT IN
Delay PTT
Phone Rx
Phone Rx
Phone Tx
Phone Tx
DATA (MII)
CLK (MII)
VOL/SQ HI
RUS IN
RUS OUT
P6J6
1
1
6
6
7
7
8
8
9
9
10
10
11
11
12
12
13
13
15
15
13
13
J 7 P 7 (P 27)
2
2
4
4
9
9
14
14
15
15
19C320811 (MASTR II/IIe)
19B802401 (MASTR III)
Interconnect Harness
to EDACS Station
J103
Serial Interface
For Initial
Turbo Board
Programming
J104
Serial Interface
For Initial
Turbo Board
Programming
Rockwell Modem
19A705178
PWR GND
13.8 VDC
J10 P10
212
1
J19 P19
J27 P1
GND
55
1
1
2
2
3
3
4
4
5
5
6
6
A2
Voltage
Regulator
19C336816G2
19C234898G1
1
6
2
7
3
8
4
9
5
1
6
2
7
3
8
4
9
5
P3 J3
2
2
1
1
3
3
P2 J2
2
2
1
1
3
3
RxD
TxD
GND
RxD
TxD
GND
19D903536
Turbo Board
P1 XU3
CG HI (LSD)
5 VDC RM Regulated
5 VDC RM Unregulated
13.8 VDC
5 VDC Unregulated
5 VDC Regulated
19C337712G1
STATION GETC SHELF
INTERCONNECT DIAGRAM
Rev. B 33
Page 34

LBI-38988B INTERCONNECT DIAGRAMS
MASTR III STATION INTERCONNECT
34 Rev. B
Page 35

LBI-38988
Delay
PTT
TX
MOD
CG
HI
PTT
EXT
REPEATER STATION
3
6
+
-
J801
16
1
16
1J6
P26
2 9 1514
2 9 1514
J7
P27
5
5
J19
P19
P/O Harness
19C320811
GETC
POWER SUPPLY
4
4
VOL/SQ
HI
IN
REM
RUS
RUS
IN
98
VOL/SQ
HI
P3-8 P2-6
MOD
P8-20
IN
TX
OUT
SYS
PTT
OUT
REM
P6-18
RUS
IN
P3-7
REM
PTT
76
3425
P3-1
MODEM
Data
MODEM
Data
9876
Delay
PTT
P3-10
OUT
REM
PTT
IN
J10
P10
+13.8 V
GND
1 2
1 2
P8-3
LSD
IN
RUS
OUT
TB1201
19D901868
(Refer to LBI-38430, wiring diagram 19D902787 for complete wiring details)
MASTR IIe
19A149978
11 12 13 15
11 12 13 15
DATA
CLK
DET
LOCK
EN
LD
EN
LD
DET
LOCK
CLKDATA
J2-7
J2-6
J2-5 J2-8
P19
J102
3
2
6
SYNC
1
4
J19
6 4
GND
P8
J100
BSL
DATA
3
2
2 6
RX
DATA
1
TX
1
3
J8
2 61 3
GND
Failsoft GETC Data
to Downlink GETC
and other Station GETC's
Serial Link to
Site Controller, Downlink GETC,
and other Station GETC's
GETC Logic Board
19D904266
Rev. B 35
MASTR IIE STATION INTERCONNECT
Page 36

LBI-38988B
GETC CABLE
19C336863G1
SYMBOL PART
DESCRIPTION
NUMBER
------------------ JACKS ------------------
J100
thru
J102
P8 19A700041P32 Shell: 6-Position; sim to Molex 22-01-
P19 19A700041P32 Shell: 6-Position; sim to Molex 22-01-
2 19B209727P11 Contact, electrical: sim to AMP 1-
3 19A704779P26 Contacts: 22-30 AWG; sim to Molex
4 19J706152P5 Retainer strap: sim to Panduit Corp.
6 19A149502P3 Sleeving, spiral.
13 19B209727P9 Machine Screw.
19B209727P18 Connector: 9 contacts; sim to AMP
205203-1.
----------------- PLUGS -----------------
2065.
2065.
--------------- MISCELLANEOUS----------------
66504-0.
08-55-0101, Qty of 10.
SST-1.
36 Rev. B
Page 37

LBI-38988
GETC CABLE
19C336863G1
(19C336863, Sh. 1, Rev. 4; 19C336866, Sh. 1, Rev. 0)
Rev. B 37
Page 38

LBI-38988B
This page intentionally left blank
38 Rev. B
Page 39

800 MHZ FREQUENCY SELECTIONS LBI-38988
APPENDIX A
800 MHZ EDACS APPLICATIONS
FREQUENCY SELECTIONS
GETC DIP SWITCH SETTINGS
NOTE
NOTE
For MASTR II/IIe using Station GETC software 349A9607G4 (or earlier) only.
For MASTR II, IIe, and III using 349A9607G5 (or later), set switches S1-1 thru S1-7 and S2-1
thru S2-4 to the CLOSED position
Rev. B A-1
Page 40

LBI-38988 800 MHZ FREQUENCY SELECTIONS
S1-1 S2-1 S1-1 S2-1 S1-1 S2-1
TX FREQ Thru Thru TX FREQ Thru Thru TX FREQ Thru Thru
(MHz) S1-7 S2-4 (MHz) S1-7 S2-4 (MHz) S1-7 S2-4
851 MHz
851.0125 1000111 0000
851.0250 0100111 0000
851.0375 1100111 0000
851.0500 0010111 0000
851.0625 1010111 0000
851.0750 0110111 0000
851.0875 1110111 0000
851.1000 0001111 0000
851.1125 1001111 0000
851.1250 0101111 0000
851.1375 1101111 0000
851.1500 0011111 0000
851.1625 1011111 0000
851.1750 0111111 0000
851.1875 1111111 0000
851.2000 0000000 1000
851.2125 1000000 1000
851.2250 0100000 1000
851.2375 1100000 1000
851.2500 0010000 1000
851.2625 1010000 1000
851.2750 0110000 1000
851.2875 1110000 1000
851.3000 0001000 1000
851.3125 1001000 1000
851.3250 0101000 1000
851.3375 1101000 1000
851.3500 0011000 1000
851.3625 1011000 1000
851.3750 0111000 1000
851.3875 1111000 1000
851.4000 0000100 1000
851.4125 1000100 1000
851.4250 0100100 1000
851.4375 1100100 1000
851.4500 0010100 1000
851.4625 1010100 1000
851.4750 0110100 1000
851.4875 1110100 1000
851.5000 0001100 1000
851.5125 1001100 1000
851.5250 0101100 1000
851.5375 1101100 1000
851.5500 0011100 1000
851.5625 1011100 1000
851.5750 0111100 1000
851.5875 1111100 1000
851.6000 0000010 1000
851.6125 1000010 1000
851.6250 0100010 1000
851.6375 1100010 1000
851.6500 0010010 1000
851.6625 1010010 1000
851.6750 0110010 1000
851.6875 1110010 1000
851.7000 0001010 1000
851.7125 1001010 1000
851.7250 0101010 1000
851.7375 1101010 1000
851.7500 0011010 1000
851.7625 1011010 1000
851.7750 0111010 1000
851.7875 1111010 1000
851.8000 0000110 1000
851.8125 1000110 1000
851.8250 0100110 1000
851.8375 1100110 1000
851.8500 0010110 1000
851.8625 1010110 1000
851.8750 0110110 1000
851.8875 1110110 1000
851.9000 0001110 1000
851.9125 1001110 1000
851.9250 0101110 1000
851.9375 1101110 1000
851.9500 0011110 1000
851.9625 1011110 1000
851.9750 0111110 1000
851.9875 1111110 1000
852 MHz
852.0000 0000001 1000
852.0125 1000001 1000
852.0250 0100001 1000
852.0375 1100001 1000
852.0500 0010001 1000
852.0625 1010001 1000
852.0750 0110001 1000
852.0875 1110001 1000
852.1000 0001001 1000
852.1125 1001001 1000
852.1250 0101001 1000
852.1375 1101001 1000
852.1500 0011001 1000
852.1625 1011001 1000
852.1750 0111001 1000
852.1875 1111001 1000
852.2000 0000101 1000
852.2125 1000101 1000
852.2250 0100101 1000
852.2375 1100101 1000
852.2500 0010101 1000
852.2625 1010101 1000
852.2750 0110101 1000
852.2875 1110101 1000
852.3000 0001101 1000
852.3125 1001101 1000
852.3250 0101101 1000
852.3375 1101101 1000
852.3500 0011101 1000
852.3625 1011101 1000
852.3750 0111101 1000
852.3875 1111101 1000
852.4000 0000011 1000
852.4125 1000011 1000
852.4250 0100011 1000
852.4375 1100011 1000
852.4500 0010011 1000
852.4625 1010011 1000
852.4750 0110011 1000
Legend: 0 = Closed, 1 = Open
NOTE: For MASTR III - set all switches (S1-1 thru S1-7 and S2-1 thru S2-4) to the CLOSED position.
A-2 Rev. B
Page 41

800 MHZ FREQUENCY SELECTIONS LBI-38988
S1-1 S2-1 S1-1 S2-1 S1-1 S2-1
TX FREQ Thru Thru TX FREQ Thru Thru TX FREQ Thru Thru
(MHz) S1-7 S2-4 (MHz) S1-7 S2-4 (MHz) S1-7 S2-4
Legend: 0 = Closed, 1 = Open
NOTE: For MASTR III - set all switches (S1-1 thru S1-7 and S2-1 thru S2-4) to the CLOSED position.
0100
0100
0100
0100
0100
0100
0100
0100
0100
0100
0100
0100
0100
0100
0100
0100
0100
0100
0100
0100
0100
0100
0100
0100
0100
0100
0100
0100
0100
0100
0100
0100
0100
0100
0100
0100
0100
0100
0100
0100
0100
0100
852.4875 1110011 1000
852.5000 0001011 1000
852.5125 1001011 1000
852.5250 0101011 1000
852.5375 1101011 1000
852.5500 0011011 1000
852.5625 1011011 1000
852.5750 0111011 1000
852.5875 1111011 1000
852.6000 0000111 1000
852.6125 1000111 1000
852.6250 0100111 1000
852.6375 1100111 1000
852.6500 0010111 1000
852.6625 1010111 1000
852.6750 0110111 1000
852.6875 1110111 1000
852.7000 0001111 1000
852.7125 1001111 1000
852.7250 0101111 1000
852.7375 1101111 1000
852.7500 0011111 1000
852.7625 1011111 1000
852.7750 0111111 1000
852.7875 1111111 1000
852.8000 0000000 0100
852.8125 1000000 0100
852.8250 0100000 0100
852.8375 1100000 0100
852.8500 0010000 0100
852.8625 1010000 0100
852.8750 0110000 0100
852.8875 1110000 0100
852.9000 0001000 0100
852.9125 1001000 0100
852.9250 0101000 0100
852.9375 1101000 0100
852.9500 0011000 0100
852.9625 1011000 0100
852.9750 0111000 0100
852.9875 1111000 0100
853 MHz
853.0000 0000100 0100
853.0125 1000100 0100
853.0250 0100100 0100
853.0375 1100100 0100
853.0500 0010100 0100
853.0625 1010100 0100
853.0750 0110100 0100
853.0875 1110100 0100
853.1000 0001100 0100
853.1125 1001100 0100
853.1250 0101100 0100
853.1375 1101100 0100
853.1500 0011100 0100
853.1625 1011100 0100
853.1750 0111100 0100
853.1875 1111100 0100
853.2000 0000010 0100
853.2125 1000010 0100
853.2250 0100010 0100
853.2375 1100010 0100
853.2500 0010010 0100
853.2625 1010010 0100
853.2750 0110010 0100
853.2875 1110010 0100
853.3000 0001010 0100
853.3125 1001010 0100
853.3250 0101010 0100
853.3375 1101010 0100
853.3500 0011010 0100
853.3625 1011010 0100
853.3750 0111010 0100
853.3875 1111010 0100
853.4000 0000110 0100
853.4125 1000110 0100
853.4250 0100110 0100
853.4375 1100110 0100
853.4500 0010110 0100
853.4625 1010110 0100
853.4750 0110110
853.4875 1110110
853.5000 0001110
853.5125 1001110
853.5250 0101110
853.5375 1101110
853.5500 0011110
853.5625 1011110
853.5750 0111110
853.5875 1111110
853.6000 0000001
853.6125 1000001
853.6250 0100001
853.6375 1100001
853.6500 0010001
853.6625 1010001
853.6750 0110001
853.6875 1110001
853.7000 0001001
853.7125 1001001
853.7250 0101001
853.7375 1101001
853.7500 0011001
853.7625 1011001
853.7750 0111001
853.7875 1111001
853.8000 0000101
853.8125 1000101
853.8250 0100101
853.8375 1100101
853.8500 0010101
853.8625 1010101
853.8750 0110101
853.8875 1110101
853.9000 0001101
853.9125 1001101
853.9250 0101101
853.9375 1101101
853.9500 0011101
853.9625 1011101
853.9750 0111101
853.9875 1111101
Rev. B A-3
Page 42

LBI-38988 800 MHZ FREQUENCY SELECTIONS
S1-1 S2-1 S1-1 S2-1 S1-1 S2-1
TX FREQ Thru Thru TX FREQ Thru Thru TX FREQ Thru Thru
(MHz) S1-7 S2-4 (MHz) S1-7 S2-4 (MHz) S1-7 S2-4
854 MHz
854.0000 0000011 0100
854.0125 1000011 0100
854.0250 0100011 0100
854.0375 1100011 0100
854.0500 0010011 0100
854.0625 1010011 0100
854.0750 0110011 0100
854.0875 1110011 0100
854.1000 0001011 0100
854.1125 1001011 0100
854.1250 0101011 0100
854.1375 1101011 0100
854.1500 0011011 0100
854.1625 1011011 0100
854.1750 0111011 0100
854.1875 1111011 0100
854.2000 0000111 0100
854.2125 1000111 0100
854.2250 0100111 0100
854.2375 1100111 0100
854.2500 0010111 0100
854.2625 1010111 0100
854.2750 0110111 0100
854.2875 1110111 0100
854.3000 0001111 0100
854.3125 1001111 0100
854.3250 0101111 0100
854.3375 1101111 0100
854.3500 0011111 0100
854.3625 1011111 0100
854.3750 0111111 0100
854.3875 1111111 0100
854.4000 0000000 1100
854.4125 1000000 1100
854.4250 0100000 1100
854.4375 1100000 1100
854.4500 0010000 1100
854.4625 1010000 1100
854.4750 0110000 1100
854.4875 1110000 1100
854.5000 0001000 1100
854.5125 1001000 1100
854.5250 0101000 1100
854.5375 1101000 1100
854.5500 0011000 1100
854.5625 1011000 1100
854.5750 0111000 1100
854.5875 1111000 1100
854.6000 0000100 1100
854.6125 1000100 1100
854.6250 0100100 1100
854.6375 1100100 1100
854.6500 0010100 1100
854.6625 1010100 1100
854.6750 0110100 1100
854.6875 1110100 1100
854.7000 0001100 1100
854.7125 1001100 1100
854.7250 0101100 1100
854.7375 1101100 1100
854.7500 0011100 1100
854.7625 1011100 1100
854.7750 0111100 1100
854.7875 1111100 1100
854.8000 0000010 1100
854.8125 1000010 1100
854.8250 0100010 1100
854.8375 1100010 1100
854.8500 0010010 1100
854.8625 1010010 1100
854.8750 0110010 1100
854.8875 1110010 1100
854.9000 0001010 1100
854.9125 1001010 1100
854.9250 0101010 1100
854.9375 1101010 1100
854.9500 0011010 1100
854.9625 1011010 1100
854.9750 0111010 1100
854.9875 1111010 1100
855 MHz
855.0000 0000110 1100
855.0125 1000110 1100
855.0250 0100110 1100
855.0375 1100110 1100
855.0500 0010110 1100
855.0625 1010110 1100
855.0750 0110110 1100
855.0875 1110110 1100
855.1000 0001110 1100
855.1125 1001110 1100
855.1250 0101110 1100
855.1375 1101110 1100
855.1500 0011110 1100
855.1625 1011110 1100
855.1750 0111110 1100
855.1875 1111110 1100
855.2000 0000001 1100
855.2125 1000001 1100
855.2250 0100001 1100
855.2375 1100001 1100
855.2500 0010001 1100
855.2625 1010001 1100
855.2750 0110001 1100
855.2875 1110001 1100
855.3000 0001001 1100
855.3125 1001001 1100
855.3250 0101001 1100
855.3375 1101001 1100
855.3500 0011001 1100
855.3625 1011001 1100
855.3750 0111001 1100
855.3875 1111001 1100
855.4000 0000101 1100
855.4125 1000101 1100
855.4250 0100101 1100
855.4375 1100101 1100
855.4500 0010101 1100
855.4625 1010101 1100
855.4750 0110101 1100
855.4875 1110101 1100
Legend: 0 = Closed, 1 = Open
NOTE: For MASTR III - set all switches (S1-1 thru S1-7 and S2-1 thru S2-4) to the CLOSED position.
A-4 Rev. B
Page 43

800 MHZ FREQUENCY SELECTIONS LBI-38988
S1-1 S2-1 S1-1 S2-1 S1-1 S2-1
TX FREQ Thru Thru TX FREQ Thru Thru TX FREQ Thru Thru
(MHz) S1-7 S2-4 (MHz) S1-7 S2-4 (MHz) S1-7 S2-4
Legend: 0 = Closed, 1 = Open
NOTE: For MASTR III - set all switches (S1-1 thru S1-7 and S2-1 thru S2-4) to the CLOSED position.
0010
0010
0010
0010
0010
0010
0010
0010
0010
0010
0010
0010
0010
0010
0010
0010
0010
0010
0010
0010
0010
0010
0010
0010
0010
0010
0010
0010
0010
0010
0010
0010
0010
0010
0010
0010
0010
0010
0010
0010
855.5000 0001101 1100
855.5125 1001101 1100
855.5250 0101101 1100
855.5375 1101101 1100
855.5500 0011101 1100
855.5625 1011101 1100
855.5750 0111101 1100
855.5875 1111101 1100
855.6000 0000011 1100
855.6125 1000011 1100
855.6250 0100011 1100
855.6375 1100011 1100
855.6500 0010011 1100
855.6625 1010011 1100
855.6750 0110011 1100
855.6875 1110011 1100
855.7000 0001011 1100
855.7125 1001011 1100
855.7250 0101011 1100
855.7375 1101011 1100
855.7500 0011011 1100
855.7625 1011011 1100
855.7750 0111011 1100
855.7875 1111011 1100
855.8000 0000111 1100
855.8125 1000111 1100
855.8250 0100111 1100
855.8375 1100111 1100
855.8500 0010111 1100
855.8625 1010111 1100
855.8750 0110111 1100
855.8875 1110111 1100
855.9000 0001111 1100
855.9125 1001111 1100
855.9250 0101111 1100
855.9375 1101111 1100
855.9500 0011111 1100
855.9625 1011111 1100
855.9750 0111111 1100
855.9875 1111111 1100
856 MHz
856.0000 0000000 0010
856.0125 1000000 0010
856.0250 0100000 0010
856.0375 1100000 0010
856.0500 0010000 0010
856.0625 1010000 0010
856.0750 0110000 0010
856.0875 1110000 0010
856.1000 0001000 0010
856.1125 1001000 0010
856.1250 0101000 0010
856.1375 1101000 0010
856.1500 0011000 0010
856.1625 1011000 0010
856.1750 0111000 0010
856.1875 1111000 0010
856.2000 0000100 0010
856.2125 1000100 0010
856.2250 0100100 0010
856.2375 1100100 0010
856.2500 0010100 0010
856.2625 1010100 0010
856.2750 0110100 0010
856.2875 1110100 0010
856.3000 0001100 0010
856.3125 1001100 0010
856.3250 0101100 0010
856.3375 1101100 0010
856.3500 0011100 0010
856.3625 1011100 0010
856.3750 0111100 0010
856.3875 1111100 0010
856.4000 0000010 0010
856.4125 1000010 0010
856.4250 0100010 0010
856.4375 1100010 0010
856.4500 0010010 0010
856.4625 1010010 0010
856.4750 0110010 0010
856.4875 1110010 0010
856.5000 0001010
856.5125 1001010
856.5250 0101010
856.5375 1101010
856.5500 0011010
856.5625 1011010
856.5750 0111010
856.5875 1111010
856.6000 0000110
856.6125 1000110
856.6250 0100110
856.6375 1100110
856.6500 0010110
856.6625 1010110
856.6750 0110110
856.6875 1110110
856.7000 0001110
856.7125 1001110
856.7250 0101110
856.7375 1101110
856.7500 0011110
856.7625 1011110
856.7750 0111110
856.7875 1111110
856.8000 0000001
856.8125 1000001
856.8250 0100001
856.8375 1100001
856.8500 0010001
856.8625 1010001
856.8750 0110001
856.8875 1110001
856.9000 0001001
856.9125 1001001
856.9250 0101001
856.9375 1101001
856.9500 0011001
856.9625 1011001
856.9750 0111001
856.9875 1111001
Rev. B A-5
Page 44

LBI-38988 800 MHZ FREQUENCY SELECTIONS
S1-1 S2-1 S1-1 S2-1 S1-1 S2-1
TX FREQ Thru Thru TX FREQ Thru Thru TX FREQ Thru Thru
(MHz) S1-7 S2-4 (MHz) S1-7 S2-4 (MHz) S1-7 S2-4
857 MHz
857.0000 0000101 0010
857.0125 1000101 0010
857.0250 0100101 0010
857.0375 1100101 0010
857.0500 0010101 0010
857.0625 1010101 0010
857.0750 0110101 0010
857.0875 1110101 0010
857.1000 0001101 0010
857.1125 1001101 0010
857.1250 0101101 0010
857.1375 1101101 0010
857.1500 0011101 0010
857.1625 1011101 0010
857.1750 0111101 0010
857.1875 1111101 0010
857.2000 0000011 0010
857.2125 1000011 0010
857.2250 0100011 0010
857.2375 1100011 0010
857.2500 0010011 0010
857.2625 1010011 0010
857.2750 0110011 0010
857.2875 1110011 0010
857.3000 0001011 0010
857.3125 1001011 0010
857.3250 0101011 0010
857.3375 1101011 0010
857.3500 0011011 0010
857.3625 1011011 0010
857.3750 0111011 0010
857.3875 1111011 0010
857.4000 0000111 0010
857.4125 1000111 0010
857.4250 0100111 0010
857.4375 1100111 0010
857.4500 0010111 0010
857.4625 1010111 0010
857.4750 0110111 0010
857.4875 1110111 0010
857.5000 0001111 0010
857.5125 1001111 0010
857.5250 0101111 0010
857.5375 1101111 0010
857.5500 0011111 0010
857.5625 1011111 0010
857.5750 0111111 0010
857.5875 1111111 0010
857.6000 0000000 1010
857.6125 1000000 1010
857.6250 0100000 1010
857.6375 1100000 1010
857.6500 0010000 1010
857.6625 1010000 1010
857.6750 0110000 1010
857.6875 1110000 1010
857.7000 0001000 1010
857.7125 1001000 1010
857.7250 0101000 1010
857.7375 1101000 1010
857.7500 0011000 1010
857.7625 1011000 1010
857.7750 0111000 1010
857.7875 1111000 1010
857.8000 0000100 1010
857.8125 1000100 1010
857.8250 0100100 1010
857.8375 1100100 1010
857.8500 0010100 1010
857.8625 1010100 1010
857.8750 0110100 1010
857.8875 1110100 1010
857.9000 0001100 1010
857.9125 1001100 1010
857.9250 0101100 1010
857.9375 1101100 1010
857.9500 0011100 1010
857.9625 1011100 1010
857.9750 0111100 1010
857.9875 1111100 1010
858 MHz
858.0000 0000010 1010
858.0125 1000010 1010
858.0250 0100010 1010
858.0375 1100010 1010
858.0500 0010010 1010
858.0625 1010010 1010
858.0750 0110010 1010
858.0875 1110010 1010
858.1000 0001010 1010
858.1125 1001010 1010
858.1250 0101010 1010
858.1375 1101010 1010
858.1500 0011010 1010
858.1625 1011010 1010
858.1750 0111010 1010
858.1875 1111010 1010
858.2000 0000110 1010
858.2125 1000110 1010
858.2250 0100110 1010
858.2375 1100110 1010
858.2500 0010110 1010
858.2625 1010110 1010
858.2750 0110110 1010
858.2875 1110110 1010
858.3000 0001110 1010
858.3125 1001110 1010
858.3250 0101110 1010
858.3375 1101110 1010
858.3500 0011110 1010
858.3625 1011110 1010
858.3750 0111110 1010
858.3875 1111110 1010
858.4000 0000001 1010
858.4125 1000001 1010
858.4250 0100001 1010
858.4375 1100001 1010
858.4500 0010001 1010
858.4625 1010001 1010
858.4750 0110001 1010
858.4875 1110001 1010
Legend: 0 = Closed, 1 = Open
NOTE: For MASTR III - set all switches (S1-1 thru S1-7 and S2-1 thru S2-4) to the CLOSED position.
A-6 Rev. B
Page 45

800 MHZ FREQUENCY SELECTIONS LBI-38988
S1-1 S2-1 S1-1 S2-1 S1-1 S2-1
TX FREQ Thru Thru TX FREQ Thru Thru TX FREQ Thru Thru
(MHz) S1-7 S2-4 (MHz) S1-7 S2-4 (MHz) S1-7 S2-4
Legend: 0 = Closed, 1 = Open
NOTE: For MASTR III - set all switches (S1-1 thru S1-7 and S2-1 thru S2-4) to the CLOSED position.
0110
0110
0110
0110
0110
0110
0110
0110
0110
0110
0110
0110
0110
0110
0110
0110
0110
0110
0110
0110
0110
0110
0110
0110
0110
0110
0110
0110
0110
0110
0110
0110
0110
0110
0110
0110
0110
0110
0110
0110
858.5000 0001001 1010
858.5125 1001001 1010
858.5250 0101001 1010
858.5375 1101001 1010
858.5500 0011001 1010
858.5625 1011001 1010
858.5750 0111001 1010
858.5875 1111001 1010
858.6000 0000101 1010
858.6125 1000101 1010
858.6250 0100101 1010
858.6375 1100101 1010
858.6500 0010101 1010
858.6625 1010101 1010
858.6750 0110101 1010
858.6875 1110101 1010
858.7000 0001101 1010
858.7125 1001101 1010
858.7250 0101101 1010
858.7375 1101101 1010
858.7500 0011101 1010
858.7625 1011101 1010
858.7750 0111101 1010
858.7875 1111101 1010
858.8000 0000011 1010
858.8125 1000011 1010
858.8250 0100011 1010
858.8375 1100011 1010
858.8500 0010011 1010
858.8625 1010011 1010
858.8750 0110011 1010
858.8875 1110011 1010
858.9000 0001011 1010
858.9125 1001011 1010
858.9250 0101011 1010
858.9375 1101011 1010
858.9500 0011011 1010
858.9625 1011011 1010
858.9750 0111011 1010
858.9875 1111011 1010
859 MHz
859.0000 0000111 1010
859.0125 1000111 1010
859.0250 0100111 1010
859.0375 1100111 1010
859.0500 0010111 1010
859.0625 1010111 1010
859.0750 0110111 1010
859.0875 1110111 1010
859.1000 0001111 1010
859.1125 1001111 1010
859.1250 0101111 1010
859.1375 1101111 1010
859.1500 0011111 1010
859.1625 1011111 1010
859.1750 0111111 1010
859.1875 1111111 1010
859.2000 0000000 0110
859.2125 1000000 0110
859.2250 0100000 0110
859.2375 1100000 0110
859.2500 0010000 0110
859.2625 1010000 0110
859.2750 0110000 0110
859.2875 1110000 0110
859.3000 0001000 0110
859.3125 1001000 0110
859.3250 0101000 0110
859.3375 1101000 0110
859.3500 0011000 0110
859.3625 1011000 0110
859.3750 0111000 0110
859.3875 1111000 0110
859.4000 0000100 0110
859.4125 1000100 0110
859.4250 0100100 0110
859.4375 1100100 0110
859.4500 0010100 0110
859.4625 1010100 0110
859.4750 0110100 0110
859.4875 1110100 0110
859.5000 0001100
859.5125 1001100
859.5250 0101100
859.5375 1101100
859.5500 0011100
859.5625 1011100
859.5750 0111100
859.5875 1111100
859.6000 0000010
859.6125 1000010
859.6250 0100010
859.6375 1100010
859.6500 0010010
859.6625 1010010
859.6750 0110010
859.6875 1110010
859.7000 0001010
859.7125 1001010
859.7250 0101010
859.7375 1101010
859.7500 0011010
859.7625 1011010
859.7750 0111010
859.7875 1111010
859.8000 0000110
859.8125 1000110
859.8250 0100110
859.8375 1100110
859.8500 0010110
859.8625 1010110
859.8750 0110110
859.8875 1110110
859.9000 0001110
859.9125 1001110
859.9250 0101110
859.9375 1101110
859.9500 0011110
859.9625 1011110
859.9750 0111110
859.9875 1111110
Rev. B A-7
Page 46

LBI-38988 800 MHZ FREQUENCY SELECTIONS
S1-1 S2-1 S1-1 S2-1 S1-1 S2-1
TX FREQ Thru Thru TX FREQ Thru Thru TX FREQ Thru Thru
(MHz) S1-7 S2-4 (MHz) S1-7 S2-4 (MHz) S1-7 S2-4
860 MHz
860.0000 0000001 0110
860.0125 1000001 0110
860.0250 0100001 0110
860.0375 1100001 0110
860.0500 0010001 0110
860.0625 1010001 0110
860.0750 0110001 0110
860.0875 1110001 0110
860.1000 0001001 0110
860.1125 1001001 0110
860.1250 0101001 0110
860.1375 1101001 0110
860.1500 0011001 0110
860.1625 1011001 0110
860.1750 0111001 0110
860.1875 1111001 0110
860.2000 0000101 0110
860.2125 1000101 0110
860.2250 0100101 0110
860.2375 1100101 0110
860.2500 0010101 0110
860.2625 1010101 0110
860.2750 0110101 0110
860.2875 1110101 0110
860.3000 0001101 0110
860.3125 1001101 0110
860.3250 0101101 0110
860.3375 1101101 0110
860.3500 0011101 0110
860.3625 1011101 0110
860.3750 0111101 0110
860.3875 1111101 0110
860.4000 0000011 0110
860.4125 1000011 0110
860.4250 0100011 0110
860.4375 1100011 0110
860.4500 0010011 0110
860.4625 1010011 0110
860.4750 0110011 0110
860.4875 1110011 0110
860.5000 0001011 0110
860.5125 1001011 0110
860.5250 0101011 0110
860.5375 1101011 0110
860.5500 0011011 0110
860.5625 1011011 0110
860.5750 0111011 0110
860.5875 1111011 0110
860.6000 0000111 0110
860.6125 1000111 0110
860.6250 0100111 0110
860.6375 1100111 0110
860.6500 0010111 0110
860.6625 1010111 0110
860.6750 0110111 0110
860.6875 1110111 0110
860.7000 0001111 0110
860.7125 1001111 0110
860.7250 0101111 0110
860.7375 1101111 0110
860.7500 0011111 0110
860.7625 1011111 0110
860.7750 0111111 0110
860.7875 1111111 0110
860.8000 0000000 1110
860.8125 1000000 1110
860.8250 0100000 1110
860.8375 1100000 1110
860.8500 0010000 1110
860.8625 1010000 1110
860.8750 0110000 1110
860.8875 1110000 1110
860.9000 0001000 1110
860.9125 1001000 1110
860.9250 0101000 1110
860.9375 1101000 1110
860.9500 0011000 1110
860.9625 1011000 1110
860.9750 0111000 1110
860.9875 1111000 1110
861 MHz
861.0000 0000100 1110
861.0125 1000100 1110
861.0250 0100100 1110
861.0375 1100100 1110
861.0500 0010100 1110
861.0625 1010100 1110
861.0750 0110100 1110
861.0875 1110100 1110
861.1000 0001100 1110
861.1125 1001100 1110
861.1250 0101100 1110
861.1375 1101100 1110
861.1500 0011100 1110
861.1625 1011100 1110
861.1750 0111100 1110
861.1875 1111100 1110
861.2000 0000010 1110
861.2125 1000010 1110
861.2250 0100010 1110
861.2375 1100010 1110
861.2500 0010010 1110
861.2625 1010010 1110
861.2750 0110010 1110
861.2875 1110010 1110
861.3000 0001010 1110
861.3125 1001010 1110
861.3250 0101010 1110
861.3375 1101010 1110
861.3500 0011010 1110
861.3625 1011010 1110
861.3750 0111010 1110
861.3875 1111010 1110
861.4000 0000110 1110
861.4125 1000110 1110
861.4250 0100110 1110
861.4375 1100110 1110
861.4500 0010110 1110
861.4625 1010110 1110
861.4750 0110110 1110
861.4875 1110110 1110
Legend: 0 = Closed, 1 = Open
NOTE: For MASTR III - set all switches (S1-1 thru S1-7 and S2-1 thru S2-4) to the CLOSED position.
A-8 Rev. B
Page 47

800 MHZ FREQUENCY SELECTIONS LBI-38988
S1-1 S2-1 S1-1 S2-1 S1-1 S2-1
TX FREQ Thru Thru TX FREQ Thru Thru TX FREQ Thru Thru
(MHz) S1-7 S2-4 (MHz) S1-7 S2-4 (MHz) S1-7 S2-4
Legend: 0 = Closed, 1 = Open
NOTE: For MASTR III - set all switches (S1-1 thru S1-7 and S2-1 thru S2-4) to the CLOSED position.
0001
0001
0001
0001
0001
0001
0001
0001
0001
0001
0001
0001
0001
0001
0001
0001
0001
0001
0001
0001
0001
0001
0001
0001
0001
0001
0001
0001
0001
0001
0001
0001
0001
0001
0001
0001
0001
0001
0001
0001
861.5000 0001110 1110
861.5125 1001110 1110
861.5250 0101110 1110
861.5375 1101110 1110
861.5500 0011110 1110
861.5625 1011110 1110
861.5750 0111110 1110
861.5875 1111110 1110
861.6000 0000001 1110
861.6125 1000001 1110
861.6250 0100001 1110
861.6375 1100001 1110
861.6500 0010001 1110
861.6625 1010001 1110
861.6750 0110001 1110
861.6875 1110001 1110
861.7000 0001001 1110
861.7125 1001001 1110
861.7250 0101001 1110
861.7375 1101001 1110
861.7500 0011001 1110
861.7625 1011001 1110
861.7750 0111001 1110
861.7875 1111001 1110
861.8000 0000101 1110
861.8125 1000101 1110
861.8250 0100101 1110
861.8375 1100101 1110
861.8500 0010101 1110
861.8625 1010101 1110
861.8750 0110101 1110
861.8875 1110101 1110
861.9000 0001101 1110
861.9125 1001101 1110
861.9250 0101101 1110
861.9375 1101101 1110
861.9500 0011101 1110
861.9625 1011101 1110
861.9750 0111101 1110
861.9875 1111101 1110
862 MHz
862.0000 0000011 1110
862.0125 1000011 1110
862.0250 0100011 1110
862.0375 1100011 1110
862.0500 0010011 1110
862.0625 1010011 1110
862.0750 0110011 1110
862.0875 1110011 1110
862.1000 0001011 1110
862.1125 1001011 1110
862.1250 0101011 1110
862.1375 1101011 1110
862.1500 0011011 1110
862.1625 1011011 1110
862.1750 0111011 1110
862.1875 1111011 1110
862.2000 0000111 1110
862.2125 1000111 1110
862.2250 0100111 1110
862.2375 1100111 1110
862.2500 0010111 1110
862.2625 1010111 1110
862.2750 0110111 1110
862.2875 1110111 1110
862.3000 0001111 1110
862.3125 1001111 1110
862.3250 0101111 1110
862.3375 1101111 1110
862.3500 0011111 1110
862.3625 1011111 1110
862.3750 0111111 1110
862.3875 1111111 1110
862.4000 0000000 0001
862.4125 1000000 0001
862.4250 0100000 0001
862.4375 1100000 0001
862.4500 0010000 0001
862.4625 1010000 0001
862.4750 0110000 0001
862.4875 1110000 0001
862.5000 0001000
862.5125 1001000
862.5250 0101000
862.5375 1101000
862.5500 0011000
862.5625 1011000
862.5750 0111000
862.5875 1111000
862.6000 0000100
862.6125 1000100
862.6250 0100100
862.6375 1100100
862.6500 0010100
862.6625 1010100
862.6750 0110100
862.6875 1110100
862.7000 0001100
862.7125 1001100
862.7250 0101100
862.7375 1101100
862.7500 0011100
862.7625 1011100
862.7750 0111100
862.7875 1111100
862.8000 0000010
862.8125 1000010
862.8250 0100010
862.8375 1100010
862.8500 0010010
862.8625 1010010
862.8750 0110010
862.8875 1110010
862.9000 0001010
862.9125 1001010
862.9250 0101010
862.9375 1101010
862.9500 0011010
862.9625 1011010
862.9750 0111010
862.9875 1111010
Rev. B A-9
Page 48

LBI-38988 800 MHZ FREQUENCY SELECTIONS
S1-1 S2-1 S1-1 S2-1 S1-1 S2-1
TX FREQ Thru Thru TX FREQ Thru Thru TX FREQ Thru Thru
(MHz) S1-7 S2-4 (MHz) S1-7 S2-4 (MHz) S1-7 S2-4
863 MHz
863.0000 0000110 0001
863.0125 1000110 0001
863.0250 0100110 0001
863.0375 1100110 0001
863.0500 0010110 0001
863.0625 1010110 0001
863.0750 0110110 0001
863.0875 1110110 0001
863.1000 0001110 0001
863.1125 1001110 0001
863.1250 0101110 0001
863.1375 1101110 0001
863.1500 0011110 0001
863.1625 1011110 0001
863.1750 0111110 0001
863.1875 1111110 0001
863.2000 0000001 0001
863.2125 1000001 0001
863.2250 0100001 0001
863.2375 1100001 0001
863.2500 0010001 0001
863.2625 1010001 0001
863.2750 0110001 0001
863.2875 1110001 0001
863.3000 0001001 0001
863.3125 1001001 0001
863.3250 0101001 0001
863.3375 1101001 0001
863.3500 0011001 0001
863.3625 1011001 0001
863.3750 0111001 0001
863.3875 1111001 0001
863.4000 0000101 0001
863.4125 1000101 0001
863.4250 0100101 0001
863.4375 1100101 0001
863.4500 0010101 0001
863.4625 1010101 0001
863.4750 0110101 0001
863.4875 1110101 0001
863.5000 0001101 0001
863.5125 1001101 0001
863.5250 0101101 0001
863.5375 1101101 0001
863.5500 0011101 0001
863.5625 1011101 0001
863.5750 0111101 0001
863.5875 1111101 0001
863.6000 0000011 0001
863.6125 1000011 0001
863.6250 0100011 0001
863.6375 1100011 0001
863.6500 0010011 0001
863.6625 1010011 0001
863.6750 0110011 0001
863.6875 1110011 0001
863.7000 0001011 0001
863.7125 1001011 0001
863.7250 0101011 0001
863.7375 1101011 0001
863.7500 0011011 0001
863.7625 1011011 0001
863.7750 0111011 0001
863.7875 1111011 0001
863.8000 0000111 0001
863.8125 1000111 0001
863.8250 0100111 0001
863.8375 1100111 0001
863.8500 0010111 0001
863.8625 1010111 0001
863.8750 0110111 0001
863.8875 1110111 0001
863.9000 0001111 0001
863.9125 1001111 0001
863.9250 0101111 0001
863.9375 1101111 0001
863.9500 0011111 0001
863.9625 1011111 0001
863.9750 0111111 0001
863.9875 1111111 0001
864 MHz
864.0000 0000000 1001
864.0125 1000000 1001
864.0250 0100000 1001
864.0375 1100000 1001
864.0500 0010000 1001
864.0625 1010000 1001
864.0750 0110000 1001
864.0875 1110000 1001
864.1000 0001000 1001
864.1125 1001000 1001
864.1250 0101000 1001
864.1375 1101000 1001
864.1500 0011000 1001
864.1625 1011000 1001
864.1750 0111000 1001
864.1875 1111000 1001
864.2000 0000100 1001
864.2125 1000100 1001
864.2250 0100100 1001
864.2375 1100100 1001
864.2500 0010100 1001
864.2625 1010100 1001
864.2750 0110100 1001
864.2875 1110100 1001
864.3000 0001100 1001
864.3125 1001100 1001
864.3250 0101100 1001
864.3375 1101100 1001
864.3500 0011100 1001
864.3625 1011100 1001
864.3750 0111100 1001
864.3875 1111100 1001
864.4000 0000010 1001
864.4125 1000010 1001
864.4250 0100010 1001
864.4375 1100010 1001
864.4500 0010010 1001
864.4625 1010010 1001
864.4750 0110010 1001
864.4875 1110010 1001
Legend: 0 = Closed, 1 = Open
NOTE: For MASTR III - set all switches (S1-1 thru S1-7 and S2-1 thru S2-4) to the CLOSED position.
A-10 Rev. B
Page 49

800 MHZ FREQUENCY SELECTIONS LBI-38988
S1-1 S2-1 S1-1 S2-1 S1-1 S2-1
TX FREQ Thru Thru TX FREQ Thru Thru TX FREQ Thru Thru
(MHz) S1-7 S2-4 (MHz) S1-7 S2-4 (MHz) S1-7 S2-4
Legend: 0 = Closed, 1 = Open
NOTE: For MASTR III - set all switches (S1-1 thru S1-7 and S2-1 thru S2-4) to the CLOSED position.
1001
1001
1001
1001
1001
1001
1001
1001
0101
0101
0101
0101
0101
0101
0101
0101
0101
0101
0101
0101
0101
0101
0101
0101
0101
0101
0101
0101
0101
0101
0101
0101
0101
0101
0101
0101
0101
0101
0101
0101
864.5000 0001010 1001
864.5125 1001010 1001
864.5250 0101010 1001
864.5375 1101010 1001
864.5500 0011010 1001
864.5625 1011010 1001
864.5750 0111010 1001
864.5875 1111010 1001
864.6000 0000110 1001
864.6125 1000110 1001
864.6250 0100110 1001
864.6375 1100110 1001
864.6500 0010110 1001
864.6625 1010110 1001
864.6750 0110110 1001
864.6875 1110110 1001
864.7000 0001110 1001
864.7125 1001110 1001
864.7250 0101110 1001
864.7375 1101110 1001
864.7500 0011110 1001
864.7625 1011110 1001
864.7750 0111110 1001
864.7875 1111110 1001
864.8000 0000001 1001
864.8125 1000001 1001
864.8250 0100001 1001
864.8375 1100001 1001
864.8500 0010001 1001
864.8625 1010001 1001
864.8750 0110001 1001
864.8875 1110001 1001
864.9000 0001001 1001
864.9125 1001001 1001
864.9250 0101001 1001
864.9375 1101001 1001
864.9500 0011001 1001
864.9625 1011001 1001
864.9750 0111001 1001
864.9875 1111001 1001
865 MHz
865.0000 0000101 1001
865.0125 1000101 1001
865.0250 0100101 1001
865.0375 1100101 1001
865.0500 0010101 1001
865.0625 1010101 1001
865.0750 0110101 1001
865.0875 1110101 1001
865.1000 0001101 1001
865.1125 1001101 1001
865.1250 0101101 1001
865.1375 1101101 1001
865.1500 0011101 1001
865.1625 1011101 1001
865.1750 0111101 1001
865.1875 1111101 1001
865.2000 0000011 1001
865.2125 1000011 1001
865.2250 0100011 1001
865.2375 1100011 1001
865.2500 0010011 1001
865.2625 1010011 1001
865.2750 0110011 1001
865.2875 1110011 1001
865.3000 0001011 1001
865.3125 1001011 1001
865.3250 0101011 1001
865.3375 1101011 1001
865.3500 0011011 1001
865.3625 1011011 1001
865.3750 0111011 1001
865.3875 1111011 1001
865.4000 0000111 1001
865.4125 1000111 1001
865.4250 0100111 1001
865.4375 1100111 1001
865.4500 0010111 1001
865.4625 1010111 1001
865.4750 0110111 1001
865.4875 1110111 1001
865.5000 0001111
865.5125 1001111
865.5250 0101111
865.5375 1101111
865.5500 0011111
865.5625 1011111
865.5750 0111111
865.5875 1111111
865.6000 0000000
865.6125 1000000
865.6250 0100000
865.6375 1100000
865.6500 0010000
865.6625 1010000
865.6750 0110000
865.6875 1110000
865.7000 0001000
865.7125 1001000
865.7250 0101000
865.7375 1101000
865.7500 0011000
865.7625 1011000
865.7750 0111000
865.7875 1111000
865.8000 0000100
865.8125 1000100
865.8250 0100100
865.8375 1100100
865.8500 0010100
865.8625 1010100
865.8750 0110100
865.8875 1110100
865.9000 0001100
865.9125 1001100
865.9250 0101100
865.9375 1101100
865.9500 0011100
865.9625 1011100
865.9750 0111100
865.9875 1111100
Rev. B A-11
Page 50

LBI-38988 800 MHZ FREQUENCY SELECTIONS
S1-1 S2-1 S1-1 S2-1 S1-1 S2-1
TX FREQ Thru Thru TX FREQ Thru Thru TX FREQ Thru Thru
(MHz) S1-7 S2-4 (MHz) S1-7 S2-4 (MHz) S1-7 S2-4
866 MHz
866.0000 0000010 0101
866.0125 1000010 0101
866.0250 0100010 0101
866.0375 1100010 0101
866.0500 0010010 0101
866.0625 1010010 0101
866.0750 0110010 0101
866.0875 1110010 0101
866.1000 0001010 0101
866.1125 1001010 0101
866.1250 0101010 0101
866.1375 1101010 0101
866.1500 0011010 0101
866.1625 1011010 0101
866.1750 0111010 0101
866.1875 1111010 0101
866.2000 0000110 0101
866.2125 1000110 0101
866.2250 0100110 0101
866.2375 1100110 0101
866.2500 0010110 0101
866.2625 1010110 0101
866.2750 0110110 0101
866.2875 1110110 0101
866.3000 0001110 0101
866.3125 1001110 0101
866.3250 0101110 0101
866.3375 1101110 0101
866.3500 0011110 0101
866.3625 1011110 0101
866.3750 0111110 0101
866.3875 1111110 0101
866.4000 0000001 0101
866.4125 1000001 0101
866.4250 0100001 0101
866.4375 1100001 0101
866.4500 0010001 0101
866.4625 1010001 0101
866.4750 0110001 0101
866.4875 1110001 0101
866.5000 0001001 0101
866.5125 1001001 0101
866.5250 0101001 0101
866.5375 1101001 0101
866.5500 0011001 0101
866.5625 1011001 0101
866.5750 0111001 0101
866.5875 1111001 0101
866.6000 0000101 0101
866.6125 1000101 0101
866.6250 0100101 0101
866.6375 1100101 0101
866.6500 0010101 0101
866.6625 1010101 0101
866.6750 0110101 0101
866.6875 1110101 0101
866.7000 0001101 0101
866.7125 1001101 0101
866.7250 0101101 0101
866.7375 1101101 0101
866.7500 0011101 0101
866.7625 1011101 0101
866.7750 0111101 0101
866.7875 1111101 0101
866.8000 0000011 0101
866.8125 1000011 0101
866.8250 0100011 0101
866.8375 1100011 0101
866.8500 0010011 0101
866.8625 1010011 0101
866.8750 0110011 0101
866.8875 1110011 0101
866.9000 0001011 0101
866.9125 1001011 0101
866.9250 0101011 0101
866.9375 1101011 0101
866.9500 0011011 0101
866.9625 1011011 0101
866.9750 0111011 0101
866.9875 1111011 0101
867 MHz
867.0000 0000111 0101
867.0125 1000111 0101
867.0250 0100111 0101
867.0375 1100111 0101
867.0500 0010111 0101
867.0625 1010111 0101
867.0750 0110111 0101
867.0875 1110111 0101
867.1000 0001111 0101
867.1125 1001111 0101
867.1250 0101111 0101
867.1375 1101111 0101
867.1500 0011111 0101
867.1625 1011111 0101
867.1750 0111111 0101
867.1875 1111111 0101
867.2000 0000000 1101
867.2125 1000000 1101
867.2250 0100000 1101
867.2375 1100000 1101
867.2500 0010000 1101
867.2625 1010000 1101
867.2750 0110000 1101
867.2875 1110000 1101
867.3000 0001000 1101
867.3125 1001000 1101
867.3250 0101000 1101
867.3375 1101000 1101
867.3500 0011000 1101
867.3625 1011000 1101
867.3750 0111000 1101
867.3875 1111000 1101
867.4000 0000100 1101
867.4125 1000100 1101
867.4250 0100100 1101
867.4375 1100100 1101
867.4500 0010100 1101
867.4625 1010100 1101
867.4750 0110100 1101
867.4875 1110100 1101
Legend: 0 = Closed, 1 = Open
NOTE: For MASTR III - set all switches (S1-1 thru S1-7 and S2-1 thru S2-4) to the CLOSED position.
A-12 Rev. B
Page 51

800 MHZ FREQUENCY SELECTIONS LBI-38988
S1-1 S2-1 S1-1 S2-1 S1-1 S2-1
TX FREQ Thru Thru TX FREQ Thru Thru TX FREQ Thru Thru
(MHz) S1-7 S2-4 (MHz) S1-7 S2-4 (MHz) S1-7 S2-4
Legend: 0 = Closed, 1 = Open
NOTE: For MASTR III - set all switches (S1-1 thru S1-7 and S2-1 thru S2-4) to the CLOSED position.
1101
1101
1101
1101
1101
1101
1101
1101
1101
1101
1101
1101
1101
1101
1101
1101
1101
1101
1101
1101
1101
1101
1101
1101
0011
0011
0011
0011
0011
0011
0011
0011
0011
0011
0011
0011
0011
0011
0011
0011
867.5000 0001100 1101
867.5125 1001100 1101
867.5250 0101100 1101
867.5375 1101100 1101
867.5500 0011100 1101
867.5625 1011100 1101
867.5750 0111100 1101
867.5875 1111100 1101
867.6000 0000010 1101
867.6125 1000010 1101
867.6250 0100010 1101
867.6375 1100010 1101
867.6500 0010010 1101
867.6625 1010010 1101
867.6750 0110010 1101
867.6875 1110010 1101
867.7000 0001010 1101
867.7125 1001010 1101
867.7250 0101010 1101
867.7375 1101010 1101
867.7500 0011010 1101
867.7625 1011010 1101
867.7750 0111010 1101
867.7875 1111010 1101
867.8000 0000110 1101
867.8125 1000110 1101
867.8250 0100110 1101
867.8375 1100110 1101
867.8500 0010110 1101
867.8625 1010110 1101
867.8750 0110110 1101
867.8875 1110110 1101
867.9000 0001110 1101
867.9125 1001110 1101
867.9250 0101110 1101
867.9375 1101110 1101
867.9500 0011110 1101
867.9625 1011110 1101
867.9750 0111110 1101
867.9875 1111110 1101
868 MHz
868.0000 0000001 1101
868.0125 1000001 1101
868.0250 0100001 1101
868.0375 1100001 1101
868.0500 0010001 1101
868.0625 1010001 1101
868.0750 0110001 1101
868.0875 1110001 1101
868.1000 0001001 1101
868.1125 1001001 1101
868.1250 0101001 1101
868.1375 1101001 1101
868.1500 0011001 1101
868.1625 1011001 1101
868.1750 0111001 1101
868.1875 1111001 1101
868.2000 0000101 1101
868.2125 1000101 1101
868.2250 0100101 1101
868.2375 1100101 1101
868.2500 0010101 1101
868.2625 1010101 1101
868.2750 0110101 1101
868.2875 1110101 1101
868.3000 0001101 1101
868.3125 1001101 1101
868.3250 0101101 1101
868.3375 1101101 1101
868.3500 0011101 1101
868.3625 1011101 1101
868.3750 0111101 1101
868.3875 1111101 1101
868.4000 0000011 1101
868.4125 1000011 1101
868.4250 0100011 1101
868.4375 1100011 1101
868.4500 0010011 1101
868.4625 1010011 1101
868.4750 0110011 1101
868.4875 1110011 1101
868.5000 0001011
868.5125 1001011
868.5250 0101011
868.5375 1101011
868.5500 0011011
868.5625 1011011
868.5750 0111011
868.5875 1111011
868.6000 0000111
868.6125 1000111
868.6250 0100111
868.6375 1100111
868.6500 0010111
868.6625 1010111
868.6750 0110111
868.6875 1110111
868.7000 0001111
868.7125 1001111
868.7250 0101111
868.7375 1101111
868.7500 0011111
868.7625 1011111
868.7750 0111111
868.7875 1111111
868.8000 0000000
868.8125 1000000
868.8250 0100000
868.8375 1100000
868.8500 0010000
868.8625 1010000
868.8750 0110000
868.8875 1110000
868.9000 0001000
868.9125 1001000
868.9250 0101000
868.9375 1101000
868.9500 0011000
868.9625 1011000
868.9750 0111000
868.9875 1111000
Rev. B A-13
Page 52

LBI-38988 800 MHZ FREQUENCY SELECTIONS
S1-1 S2-1 S1-1 S2-1 S1-1 S2-1
TX FREQ Thru Thru TX FREQ Thru Thru TX FREQ Thru Thru
(MHz) S1-7 S2-4 (MHz) S1-7 S2-4 (MHz) S1-7 S2-4
869 MHz
869.0000 0000100 0011
869.0125 1000100 0011
869.0250 0100100 0011
869.0375 1100100 0011
869.0500 0010100 0011
869.0625 1010100 0011
869.0750 0110100 0011
869.0875 1110100 0011
869.1000 0001100 0011
869.1125 1001100 0011
869.1250 0101100 0011
869.1375 1101100 0011
869.1500 0011100 0011
869.1625 1011100 0011
869.1750 0111100 0011
869.1875 1111100 0011
869.2000 0000010 0011
869.2125 1000010 0011
869.2250 0100010 0011
869.2375 1100010 0011
869.2500 0010010 0011
869.2625 1010010 0011
869.2750 0110010 0011
869.2875 1110010 0011
869.3000 0001010 0011
869.3125 1001010 0011
869.3250 0101010 0011
869.3375 1101010 0011
869.3500 0011010 0011
869.3625 1011010 0011
869.3750 0111010 0011
869.3875 1111010 0011
869.4000 0000110 0011
869.4125 1000110 0011
869.4250 0100110 0011
869.4375 1100110 0011
869.4500 0010110 0011
869.4625 1010110 0011
869.4750 0110110 0011
869.4875 1110110 0011
869.5000 0001110 0011
869.5125 1001110 0011
869.5250 0101110 0011
869.5375 1101110 0011
869.5500 0011110 0011
869.5625 1011110 0011
869.5750 0111110 0011
869.5875 1111110 0011
869.6000 0000001 0011
869.6125 1000001 0011
869.6250 0100001 0011
869.6375 1100001 0011
869.6500 0010001 0011
869.6625 1010001 0011
869.6750 0110001 0011
869.6875 1110001 0011
869.7000 0001001 0011
869.7125 1001001 0011
869.7250 0101001 0011
869.7375 1101001 0011
869.7500 0011001 0011
869.7625 1011001 0011
869.7750 0111001 0011
869.7875 1111001 0011
869.8000 0000101 0011
869.8125 1000101 0011
869.8250 0100101 0011
869.8375 1100101 0011
869.8500 0010101 0011
869.8625 1010101 0011
869.8750 0110101 0011
869.8875 1110101 0011
869.9000 0001101 0011
869.9125 1001101 0011
869.9250 0101101 0011
869.9375 1101101 0011
869.9500 0011101 0011
869.9625 1011101 0011
869.9750 0111101 0011
869.9875 1111101 0011
Legend: 0 = Closed, 1 = Open
NOTE: For MASTR III - set all switches (S1-1 thru S1-7 and S2-1 thru S2-4) to the CLOSED position.
A-14 Rev. B
Page 53

900 MHZ FREQUENCY SELECTIONS LBI-38988
APPENDIX B
900 MHZ EDACS APPLICATIONS
FREQUENCY SELECTIONS
GETC DIP SWITCH SETTINGS
NOTE
NOTE
For MASTR II/IIe using Station GETC software 349A9607G4 (or earlier) only.
For MASTR II, IIe, and III using 349A9607G5 (or later), set switches S1-1 thru S1-7 and S2-1
thru S2-4 to the CLOSED position
Rev. B B-1
Page 54

LBI-38988 900 MHZ FREQUENCY SELECTIONS
S1-1 S2-1 S1-1 S2-1 S1-1 S2-1
TX FREQ Thru Thru TX FREQ Thru Thru TX FREQ Thru Thru
(MHz) S1-7 S2-4 (MHz) S1-7 S2-4 (MHz) S1-7 S2-4
935 MHz
935.0125 1000000 0000
935.0250 0100000 0000
935.0375 1100000 0000
935.0500 0010000 0000
935.0625 1010000 0000
935.0750 0110000 0000
935.0875 1110000 0000
935.1000 0001000 0000
935.1125 1001000 0000
935.1250 0101000 0000
935.1375 1101000 0000
935.1500 0011000 0000
935.1625 1011000 0000
935.1750 0111000 0000
935.1875 1111000 0000
935.2000 0000100 0000
935.2125 1000100 0000
935.2250 0100100 0000
935.2375 1100100 0000
935.2500 0010100 0000
935.2625 1010100 0000
935.2750 0110100 0000
935.2875 1110100 0000
935.3000 0001100 0000
935.3125 1001100 0000
935.3250 0101100 0000
935.3375 1101100 0000
935.3500 0011100 0000
935.3625 1011100 0000
935.3750 0111100 0000
935.3875 1111100 0000
935.4000 0000010 0000
935.4125 1000010 0000
935.4250 0100010 0000
935.4375 1100010 0000
935.4500 0010010 0000
935.4625 1010010 0000
935.4750 0110010 0000
935.4875 1110010 0000
935.5000 0001010 0000
935.5125 1001010 0000
935.5250 0101010 0000
935.5375 1101010 0000
935.5500 0011010 0000
935.5625 1011010 0000
935.5750 0111010 0000
935.5875 1111010 0000
935.6000 0000110 0000
935.6125 1000110 0000
935.6250 0100110 0000
935.6375 1100110 0000
935.6500 0010110 0000
935.6625 1010110 0000
935.6750 0110110 0000
935.6875 1110110 0000
935.7000 0001110 0000
935.7125 1001110 0000
935.7250 0101110 0000
935.7375 1101110 0000
935.7500 0011110 0000
935.7625 1011110 0000
935.7750 0111110 0000
935.7875 1111110 0000
935.8000 0000001 0000
935.8125 1000001 0000
935.8250 0100001 0000
935.8375 1100001 0000
935.8500 0010001 0000
935.8625 1010001 0000
935.8750 0110001 0000
935.8875 1110001 0000
935.9000 0001001 0000
935.9125 1001001 0000
935.9250 0101001 0000
935.9375 1101001 0000
935.9500 0011001 0000
935.9625 1011001 0000
935.9750 0111001 0000
935.9875 1111001 0000
936 MHz
936.0000 0000101 0000
936.0125 1000101 0000
936.0250 0100101 0000
936.0375 1100101 0000
936.0500 0010101 0000
936.0625 1010101 0000
936.0750 0110101 0000
936.0875 1110101 0000
936.1000 0001101 0000
936.1125 1001101 0000
936.1250 0101101 0000
936.1375 1101101 0000
936.1500 0011101 0000
936.1625 1011101 0000
936.1750 0111101 0000
936.1875 1111101 0000
936.2000 0000011 0000
936.2125 1000011 0000
936.2250 0100011 0000
936.2375 1100011 0000
936.2500 0010011 0000
936.2625 1010011 0000
936.2750 0110011 0000
936.2875 1110011 0000
936.3000 0001011 0000
936.3125 1001011 0000
936.3250 0101011 0000
936.3375 1101011 0000
936.3500 0011011 0000
936.3625 1011011 0000
936.3750 0111011 0000
936.3875 1111011 0000
936.4000 0000111 0000
936.4125 1000111 0000
936.4250 0100111 0000
936.4375 1100111 0000
936.4500 0010111 0000
936.4625 1010111 0000
936.4750 0110111 0000
936.4875 1110111 0000
Legend: 0 = Closed, 1 = Open
NOTE: For MASTR III - set all switches (S1-1 thru S1-7 and S2-1 thru S2-4) to the CLOSED position.
B-2 Rev. B
Page 55

900 MHZ FREQUENCY SELECTIONS LBI-38988
S1-1 S2-1 S1-1 S2-1 S1-1 S2-1
TX FREQ Thru Thru TX FREQ Thru Thru TX FREQ Thru Thru
(MHz) S1-7 S2-4 (MHz) S1-7 S2-4 (MHz) S1-7 S2-4
Legend: 0 = Closed, 1 = Open
NOTE: For MASTR III - set all switches (S1-1 thru S1-7 and S2-1 thru S2-4) to the CLOSED position.
1000
1000
1000
1000
1000
1000
1000
1000
1000
1000
1000
1000
1000
1000
1000
1000
1000
1000
1000
1000
1000
1000
1000
1000
1000
1000
1000
1000
1000
1000
1000
1000
1000
1000
1000
1000
1000
1000
1000
1000
936.5000 0001111 0000
936.5125 1001111 0000
936.5250 0101111 0000
936.5375 1101111 0000
936.5500 0011111 0000
936.5625 1011111 0000
936.5750 0111111 0000
936.5875 1111111 0000
936.6000 0000000 1000
936.6125 1000000 1000
936.6250 0100000 1000
936.6375 1100000 1000
936.6500 0010000 1000
936.6625 1010000 1000
936.6750 0110000 1000
936.6875 1110000 1000
936.7000 0001000 1000
936.7125 1001000 1000
936.7250 0101000 1000
936.7375 1101000 1000
936.7500 0011000 1000
936.7625 1011000 1000
936.7750 0111000 1000
936.7875 1111000 1000
936.8000 0000100 1000
936.8125 1000100 1000
936.8250 0100100 1000
936.8375 1100100 1000
936.8500 0010100 1000
936.8625 1010100 1000
936.8750 0110100 1000
936.8875 1110100 1000
936.9000 0001100 1000
936.9125 1001100 1000
936.9250 0101100 1000
936.9375 1101100 1000
936.9500 0011100 1000
936.9625 1011100 1000
936.9750 0111100 1000
936.9875 1111100 1000
937 MHz
937.0000 0000010 1000
937.0125 1000010 1000
937.0250 0100010 1000
937.0375 1100010 1000
937.0500 0010010 1000
937.0625 1010010 1000
937.0750 0110010 1000
937.0875 1110010 1000
937.1000 0001010 1000
937.1125 1001010 1000
937.1250 0101010 1000
937.1375 1101010 1000
937.1500 0011010 1000
937.1625 1011010 1000
937.1750 0111010 1000
937.1875 1111010 1000
937.2000 0000110 1000
937.2125 1000110 1000
937.2250 0100110 1000
937.2375 1100110 1000
937.2500 0010110 1000
937.2625 1010110 1000
937.2750 0110110 1000
937.2875 1110110 1000
937.3000 0001110 1000
937.3125 1001110 1000
937.3250 0101110 1000
937.3375 1101110 1000
937.3500 0011110 1000
937.3625 1011110 1000
937.3750 0111110 1000
937.3875 1111110 1000
937.4000 0000001 1000
937.4125 1000001 1000
937.4250 0100001 1000
937.4375 1100001 1000
937.4500 0010001 1000
937.4625 1010001 1000
937.4750 0110001 1000
937.4875 1110001 1000
937.5000 0001001
937.5125 1001001
937.5250 0101001
937.5375 1101001
937.5500 0011001
937.5625 1011001
937.5750 0111001
937.5875 1111001
937.6000 0000101
937.6125 1000101
937.6250 0100101
937.6375 1100101
937.6500 0010101
937.6625 1010101
937.6750 0110101
937.6875 1110101
937.7000 0001101
937.7125 1001101
937.7250 0101101
937.7375 1101101
937.7500 0011101
937.7625 1011101
937.7750 0111101
937.7875 1111101
937.8000 0000011
937.8125 1000011
937.8250 0100011
937.8375 1100011
937.8500 0010011
937.8625 1010011
937.8750 0110011
937.8875 1110011
937.9000 0001011
937.9125 1001011
937.9250 0101011
937.9375 1101011
937.9500 0011011
937.9625 1011011
937.9750 0111011
937.9875 1111011
Rev. B B-3
Page 56

LBI-38988 900 MHZ FREQUENCY SELECTIONS
S1-1 S2-1 S1-1 S2-1 S1-1 S2-1
TX FREQ Thru Thru TX FREQ Thru Thru TX FREQ Thru Thru
(MHz) S1-7 S2-4 (MHz) S1-7 S2-4 (MHz) S1-7 S2-4
938 MHz
938.0000 0000111 1000
938.0125 1000111 1000
938.0250 0100111 1000
938.0375 1100111 1000
938.0500 0010111 1000
938.0625 1010111 1000
938.0750 0110111 1000
938.0875 1110111 1000
938.1000 0001111 1000
938.1125 1001111 1000
938.1250 0101111 1000
938.1375 1101111 1000
938.1500 0011111 1000
938.1625 1011111 1000
938.1750 0111111 1000
938.1875 1111111 1000
938.2000 0000000 0100
938.2125 1000000 0100
938.2250 0100000 0100
938.2375 1100000 0100
938.2500 0010000 0100
938.2625 1010000 0100
938.2750 0110000 0100
938.2875 1110000 0100
938.3000 0001000 0100
938.3125 1001000 0100
938.3250 0101000 0100
938.3375 1101000 0100
938.3500 0011000 0100
938.3625 1011000 0100
938.3750 0111000 0100
938.3875 1111000 0100
938.4000 0000100 0100
938.4125 1000100 0100
938.4250 0100100 0100
938.4375 1100100 0100
938.4500 0010100 0100
938.4625 1010100 0100
938.4750 0110100 0100
938.4875 1110100 0100
938.5000 0001100 0100
938.5125 1001100 0100
938.5250 0101100 0100
938.5375 1101100 0100
938.5500 0011100 0100
938.5625 1011100 0100
938.5750 0111100 0100
938.5875 1111100 0100
938.6000 0000010 0100
938.6125 1000010 0100
938.6250 0100010 0100
938.6375 1100010 0100
938.6500 0010010 0100
938.6625 1010010 0100
938.6750 0110010 0100
938.6875 1110010 0100
938.7000 0001010 0100
938.7125 1001010 0100
938.7250 0101010 0100
938.7375 1101010 0100
938.7500 0011010 0100
938.7625 1011010 0100
938.7750 0111010 0100
938.7875 1111010 0100
938.8000 0000110 0100
938.8125 1000110 0100
938.8250 0100110 0100
938.8375 1100110 0100
938.8500 0010110 0100
938.8625 1010110 0100
938.8750 0110110 0100
938.8875 1110110 0100
938.9000 0001110 0100
938.9125 1001110 0100
938.9250 0101110 0100
938.9375 1101110 0100
938.9500 0011110 0100
938.9625 1011110 0100
938.9750 0111110 0100
938.9875 1111110 0100
939 MHz
939.0000 0000001 0100
939.0125 1000001 0100
939.0250 0100001 0100
939.0375 1100001 0100
939.0500 0010001 0100
939.0625 1010001 0100
939.0750 0110001 0100
939.0875 1110001 0100
939.1000 0001001 0100
939.1125 1001001 0100
939.1250 0101001 0100
939.1375 1101001 0100
939.1500 0011001 0100
939.1625 1011001 0100
939.1750 0111001 0100
939.1875 1111001 0100
939.2000 0000101 0100
939.2125 1000101 0100
939.2250 0100101 0100
939.2375 1100101 0100
939.2500 0010101 0100
939.2625 1010101 0100
939.2750 0110101 0100
939.2875 1110101 0100
939.3000 0001101 0100
939.3125 1001101 0100
939.3250 0101101 0100
939.3375 1101101 0100
939.3500 0011101 0100
939.3625 1011101 0100
939.3750 0111101 0100
939.3875 1111101 0100
939.4000 0000011 0100
939.4125 1000011 0100
939.4250 0100011 0100
939.4375 1100011 0100
939.4500 0010011 0100
939.4625 1010011 0100
939.4750 0110011 0100
939.4875 1110011 0100
Legend: 0 = Closed, 1 = Open
NOTE: For MASTR III - set all switches (S1-1 thru S1-7 and S2-1 thru S2-4) to the CLOSED position.
B-4 Rev. B
Page 57

S1-1 S2-1 S1-1 S2-1 S1-1 S2-1
TX FREQ Thru Thru TX FREQ Thru Thru TX FREQ Thru Thru
(MHz) S1-7 S2-4 (MHz) S1-7 S2-4 (MHz) S1-7 S2-4
Legend: 0 = Closed, 1 = Open
NOTE: For MASTR III - set all switches (S1-1 thru S1-7 and S2-1 thru S2-4) to the CLOSED position.
939.5000 0001011 0100
939.5125 1001011 0100
939.5250 0101011 0100
939.5375 1101011 0100
939.5500 0011011 0100
939.5625 1011011 0100
939.5750 0111011 0100
939.5875 1111011 0100
939.6000 0000111 0100
939.6125 1000111 0100
939.6250 0100111 0100
939.6375 1100111 0100
939.6500 0010111 0100
939.6625 1010111 0100
939.6750 0110111 0100
939.6875 1110111 0100
939.7000 0001111 0100
939.7125 1001111 0100
939.7250 0101111 0100
939.7375 1101111 0100
939.7500 0011111 0100
939.7625 1011111 0100
939.7750 0111111 0100
939.7875 1111111 0100
939.8000 0000000 1100
939.8125 1000000 1100
939.8250 0100000 1100
939.8375 1100000 1100
939.8500 0010000 1100
939.8625 1010000 1100
939.8750 0110000 1100
939.8875 1110000 1100
939.9000 0001000 1100
939.9125 1001000 1100
939.9250 0101000 1100
939.9375 1101000 1100
939.9500 0011000 1100
939.9625 1011000 1100
939.9750 0111000 1100
939.9875 1111000 1100
900 MHZ FREQUENCY SELECTIONS LBI-38988
Rev. B B-5
Page 58

LBI-38988
Ericsson Inc.
Private Radio Systems
Mountain View Road
Lynchburg, Virginia
1-800-528-7711 (Outside USA, 804-528-7711)
Printed in U.S.A.
 Loading...