

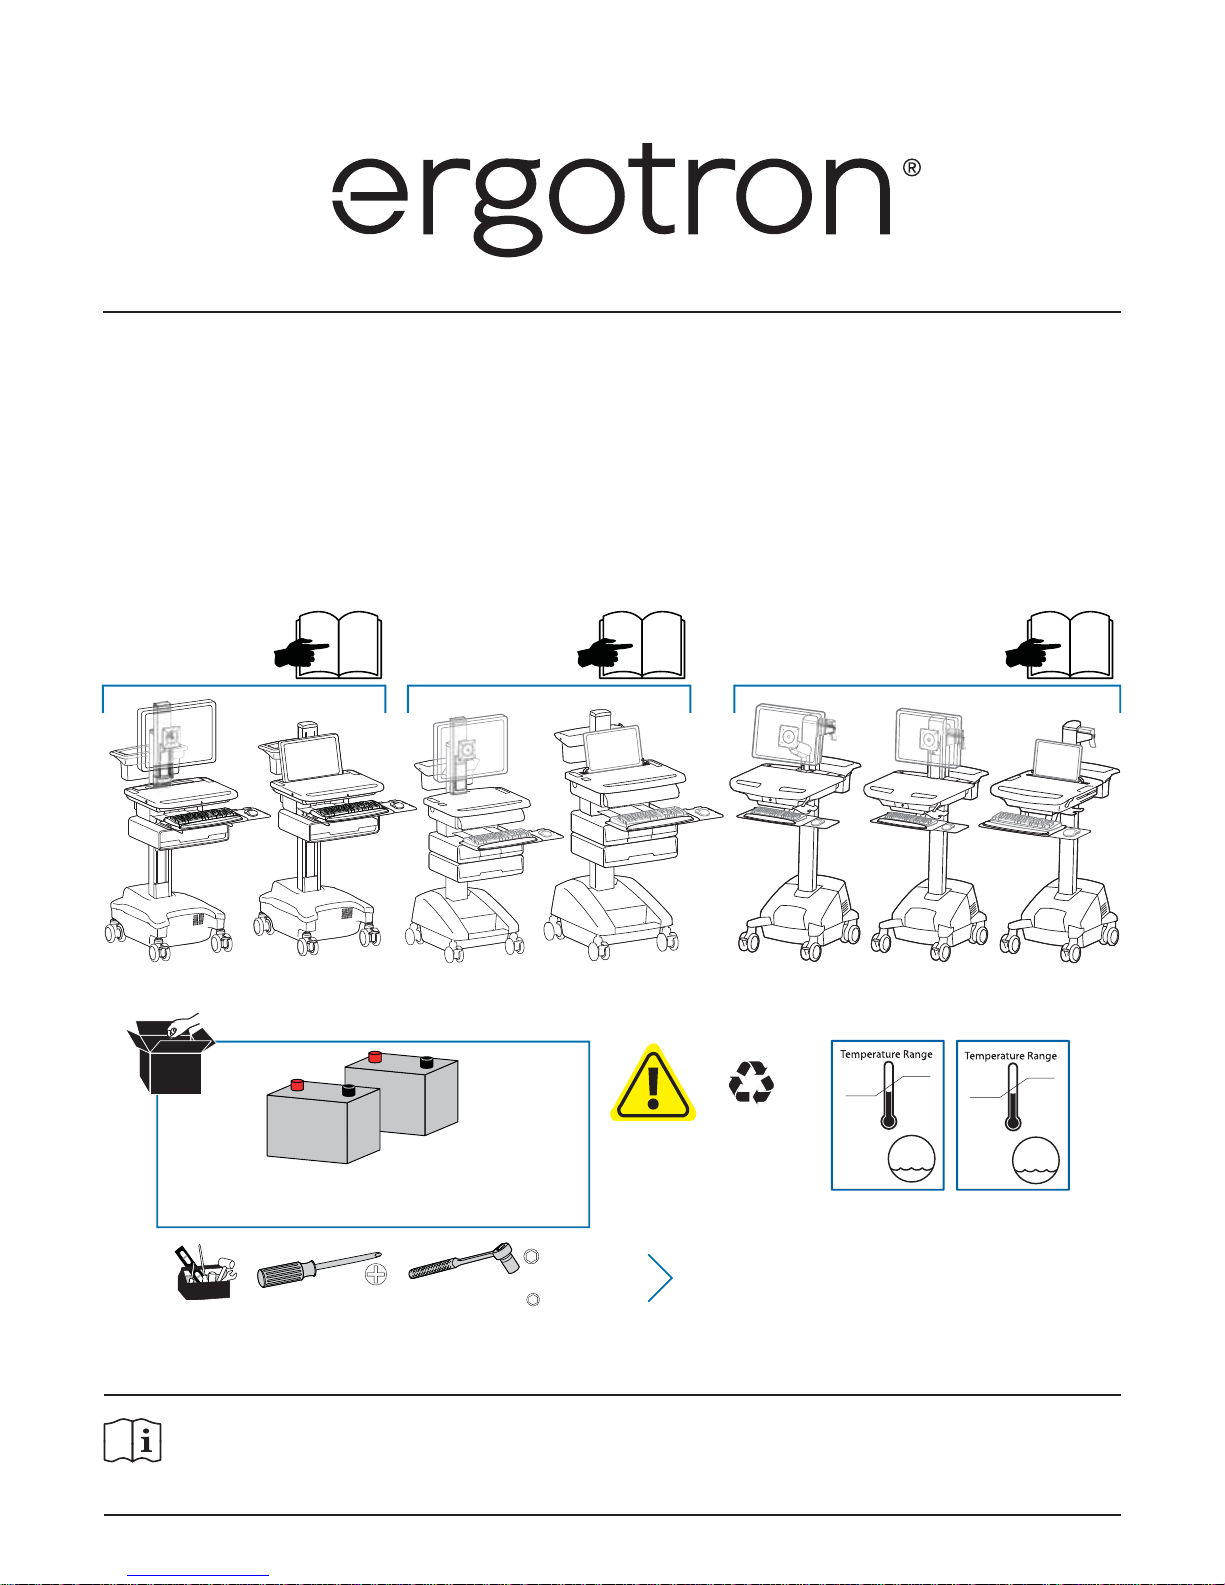
Ergotron StyleView SV32-S, StyleView SV32-T, StyleView SV32 PHD, StyleView SV32, StyleView SV42 Installation Manual
Page 1
1 of 10
888-83-065-G-01 rev. E • 03/19
10mm (3/8")
or
8mm (5/16")
SV32-S
SV32-T
SV32
SV32 PHD SV42
3 6 8
www.ergotron.com |
USA: 1-800-888-8458
|
Europe: +31 (0)33-45 45 600
|
China: 400-120-3051
|
Japan: japansupport@ergotron.com
English, Español, Français, Deutsch, Nederlands, Italiano, Svenska, 日本語, 汉语
10 °C
50 °F
29 °C
86 °F
Relative
Humidity
Range
5-95% rH
Operational
-20 °C
- 4 °F
50 °C
122 °F
Relative
Humidity
Range
5-95% rH
Storage
BATTERY
LEAD
Please dispose of all batteries
in accordance with local law
Two Sealed Lead Acid, Absorbed Glass Mat, 12VDC batteries.
Depends on battery
StyleView® SLA
Change Power System Batteries
· SV32-S
· SV32-T
· SV32
· SV32 PHD
· SV42
English
For the latest User Installation Guide please visit: www.ergotron.com
User's Guide
Page 2
2 of 10
888-83-065-G-01 rev. E • 03/19
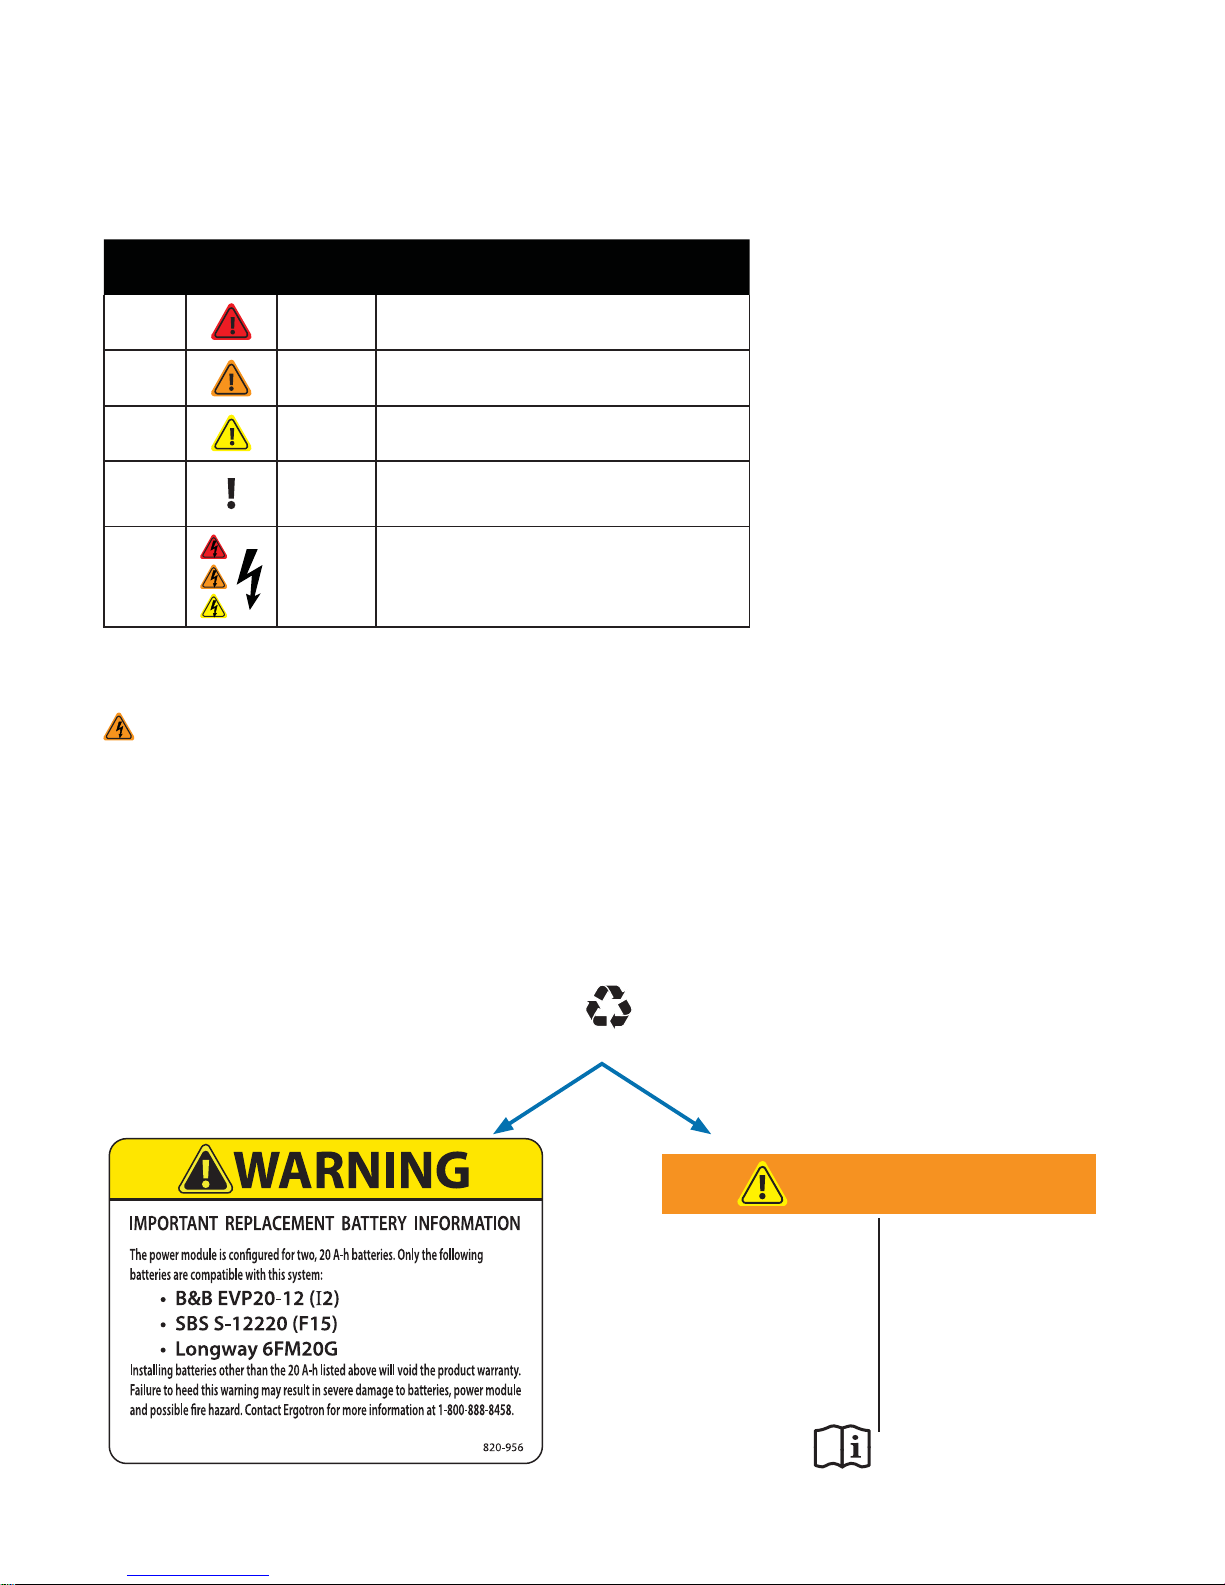
Maintenance & Safety
Color Symbol
Signal
Word
Level of Hazard
Red
DANGER
Indicates an imminently hazardous situation which, if not
avoided, will result in death or serious injury.
Orange
WARNING
Indicates a potentially hazardous situation which, if not
avoided, could result in death or serious injury.
Yellow
CAUTION
Indicates a potentially hazardous situation which, if not
avoided, may result in minor or moderate injury.
None
CAUTION
Used without the safety alert symbol indicates a potentially hazardous situation which, if not avoided, may
result in property damage.
Red,
Orange
or
Yellow
Electrical
Indicates an impending electrical hazard which, if not
avoided, may result in personal injury, re and/or death.
Hazard Symbols Review
The Meaning of Symbols appearing in this Guide, on the Cart or on the Power System
These symbols alert you to a safety condition that demands your attention. You should be able to recognize and understand the signi cance of the following Safety Hazards if
you encounter them on the Cart or within Cart documentation such as this Set-up Guide.
33 Amp-Hour Batteries
BATTERY
LEAD
WARNING: RISK OF ELECTRICAL DISCHARGE
• Do NOT swap battery cables, doing so will cause arcing and trip the circuit breaker.
• Do not remove or replace the batteries while cart is located in an oxygen rich or hazardous environment, arcing may occur and cause combustion.
• Replace rst battery before removing second battery to reduce the risk of cables touching terminals and causing arcing.
• Always replace both batteries!
• Replace rst battery before removing second battery.
• Replace batteries with same Amp/Hour rating batteries only.
• Only Ergotron-speci ed batteries may be used in the StyleView Power System. Please call customer care for more details.
• Recycle battery or contact Ergotron for proper battery disposal guidelines.
20 Amp-hour Batteries
BATTERY REPLACEMENT
The power module is congured for two, 33 -Ah batteries.
Only the following batteries are compatible with this
system:
• B&B EP33-12 • SBS S-12330
• Longway 6FM33G • Vision 6FM33D
• Vision 6FM33HD-X • PBQ PBQ33-12L
• Werker WKA12-33C • Werker WKA12-35C
• Duracell Dura 12-35C
Installing batteries other than the 33 -Ah listed above will
void the product warranty. Failure to heed this warning
may result in severe damage to batteries, power module
and possible re hazard.
REMPLACEMENT DE LA BATTERIE
Le module d’alimentation est conguré pour deux batteries 33 A-h.
Seules les batteries suivantes sont compatibles avec ce système :
• B&B EP33-12 • SBS S-12330
• Longway 6FM33G • Vision 6FM33D
• Vision 6FM33HD-X • PBQ PBQ33-12L
• Werker WKA12-33C • Werker WKA12-35C
• Duracell Dura 12-35C
L’installation de batteries autres que les batteries 33 A-h citées
ci-dessus annulera la garantie du produit. Si vous ne vous conformez
pas à cette précaution d’utilisation, les batteries et le module
d’alimentation risquent d’être sérieusement endommagés, ce qui
pourrait provoquer un incendie.
WARNING
AVERTISSEMENT
822-386
www.ergotron.com
Page 3
3 of 10
888-83-065-G-01 rev. E • 03/19
bacd
12
3
4
5
SV32-S
SV32-T
SV32
Turn o all mounted equipment. Disconnect Power System from
power source.
Turn power system o by holding down the AC Outlet Power button for 1 - 3 seconds. Power light will shut o .
If your cart has circuit breakers, switch them both to "OFF".
Page 4

4 of 10
888-83-065-G-01 rev. E • 03/19
6
7
8
bca
10mm (3/8")
or
8mm (5/16")
b
e
f
ca
d
e
f
d
Red
Black
BATTERY
LEAD
Caution: Remove Black (-) before removing Red (+).
Recycle battery or contact
Ergotron for proper battery
disposal guidelines.
Caution: Replace only one battery at a time.
Do NOT swap battery cables, doing so will cause
sparking and trip the circuit breakers.
Depends on battery
Black
Caution: Connect Red (+) before connecting Black (-).
Caution: Remove Black (-) before removing Red (+).
Red
Red
Black
BATTERY
LEAD
Recycle battery or contact
Ergotron for proper battery
disposal guidelines.
Red
Caution: Connect Red (+) before connecting Black (-).
Black
Page 5

5 of 10
888-83-065-G-01 rev. E • 03/19
10
11
12
a
or
b
dcba
9
8hrs
7 hrs
07.00
Wake power system from sleep mode by holding
down the two buttons at the same time for about
7 seconds until it beeps.
Turn cart's power on by holding down the power button until it beeps.
For carts with these part numbers only:
· SV32-32001-S
· SV32-32002-S
· SV32-32025-S
· SV32-32026-S
· SV32-32051-S
· SV32-32052-S
Turn on power system by holding power buttondown for 1 - 3 seconds.
With cart's power cord plugged into the wall outlet, wait until cart
is at 100% charge. (takes aproximately up to 7 hours to charge)
Plug Cart's Power Cord into wall outlet.
Do Not stretch coiled cord further than 8 feet
(2.5 meters), damage to the cord may occur.
CAUTION: There is no on/o switch on
this equipment; the AC power cord is the only
power disconnect. The socket outlet should be
easily accessible and should be installed near the
equipment.
Initial Power on/Charge
Battery (takes aproximately 7
hours to charge)
All other powered StyleView (SV32) carts
Page 6

6 of 10
888-83-065-G-01 rev. E • 03/19
a
a
b
b
c
c
b
c
a
e
f
d
SV32 PHD
1
2
3
4
Turn o all mounted equipment.
Disconnect
Power System
from power
source.
Turn power system o by holding down
the AC Outlet Power button for 1 - 3
seconds. Power light will shut o .
BATTERY
LEAD
Recycle battery or contact
Ergotron for proper battery
disposal guidelines.
Caution: Replace only one battery at a time.
Do NOT swap battery cables, doing so will cause
sparking and trip the circuit breakers.
Turn both circuit breakers to "OFF".
Red
Black
Caution: Remove Black (-) before removing Red (+).
Red
Caution: Connect Red (+) before connecting Black (-).
Black
Page 7

7 of 10
888-83-065-G-01 rev. E • 03/19
bc
a
e
f
d
8
7
6
5
a
c
b
8hrs
7 hrs
07.00
BATTERY
LEAD
Recycle battery or contact Ergotron for
proper battery disposal guidelines.
Red
Black
Caution: Remove Black (-) before removing Red (+).
Red
Caution: Connect Red (+) before connecting Black (-).
Black
Initial Power on/Charge Battery (takes aproximately 7 hours to charge)
Turn on power system
by holding power
buttondown for 1 - 3
seconds.
With cart's power cord plugged into the wall outlet, wait until cart is
at 100% charge. (takes aproximately up to 7 hours to charge)
Plug Cart's Power Cord into wall outlet.
Do Not stretch coiled cord further than 8 feet
(2.5 meters), damage to the cord may occur.
CAUTION: There is no on/o switch on
this equipment; the AC power cord is the only
power disconnect. The socket outlet should be
easily accessible and should be installed near the
equipment.
Note: If StyleLink is installed, it will report battery status “checking” until
battery has gone through one full cycle (charge to 100%, discharge to <
70%, and then plug cart into wall outlet). After battery has gone through
one full cycle, StyleLink will provide battery status. In the event that
StyleLink still reports status “checking’, repeat the discharge / recharge and
plug in.
Page 8

8 of 10
888-83-065-G-01 rev. E • 03/19
a bc
b
b
g
c
e
h
a
d
f
10mm (3/8")
SV42
1
2
3
a
Turn o all mounted equipment.
Disconnect Power System from power source.
Turn power system o by holding down
the AC Outlet Power button for 1 - 3
seconds. Power light will shut o .
Turn both circuit breakers to "OFF".
Red
Red
Black
Black
BATTERY
LEAD
Caution: Remove Black (-) before removing Red (+).
Recycle battery or contact
Ergotron for proper battery
disposal guidelines.
Caution: Replace only one battery at a time. Do NOT swap battery cables, doing so will cause sparking and trip the circuit breakers.
Caution: Connect Red (+) before connecting Black (-).
Page 9

9 of 10
888-83-065-G-01 rev. E • 03/19
5
b
a
b
g
c
e
h
a
d
f
4
Black
Black
Red
Red
BATTERY
LEAD
Caution: Remove Black (-) before removing Red (+).
Recycle battery or contact
Ergotron for proper battery
disposal guidelines.
Caution: Replace only one battery at a time. Do NOT swap battery cables, doing so will cause sparking and trip the circuit breakers.
Caution: Connect Red (+) before connecting Black (-).
Page 10

10 of 10
888-83-065-G-01 rev. E • 03/19
6
ab c
8hrs
7 hrs
07.00
© 2012 Ergotron, Inc. All rights reserved. StyleView™ is a registered trademark of Ergotron, Inc.
www.ergotron.com |
USA: 1-800-888-8458
|
Europe: +31 (0)33-45 45 600
|
China: 400-120-3051
|
Japan: japansupport@ergotron.com
Initial Power on/Charge Battery (takes aproximately 7 hours to charge)
Turn on power system by holding power button down for
1 - 3 seconds.
With cart's power cord
plugged into the wall
outlet, wait until cart is
at 100% charge. (takes
aproximately up to 7 hours
to charge)
Plug Cart's Power Cord into wall outlet.
Do Not stretch coiled cord further than 8 feet
(2.5 meters), damage to the cord may occur.
CAUTION: There is no on/o switch on
this equipment; the AC power cord is the only
power disconnect. The socket outlet should be
easily accessible and should be installed near the
equipment.
Note: If StyleLink is installed, it will
report battery status “checking” until
battery has gone through one full
cycle (charge to 100%, discharge
to < 70%, and then plug cart into
wall outlet). After battery has gone
through one full cycle, StyleLink will
provide battery status. In the event
that StyleLink still reports status
“checking’, repeat the discharge /
recharge and plug in.
For local customer care phone numbers visit: http://contact.ergotron.com
For Service visit: www.ergotron.com
For Warranty visit: www.ergotron.com/warranty
 Loading...