

Page 1
Erba Lachema s.r.o., Karásek 2219/1d, 621 00 Brno, CZ
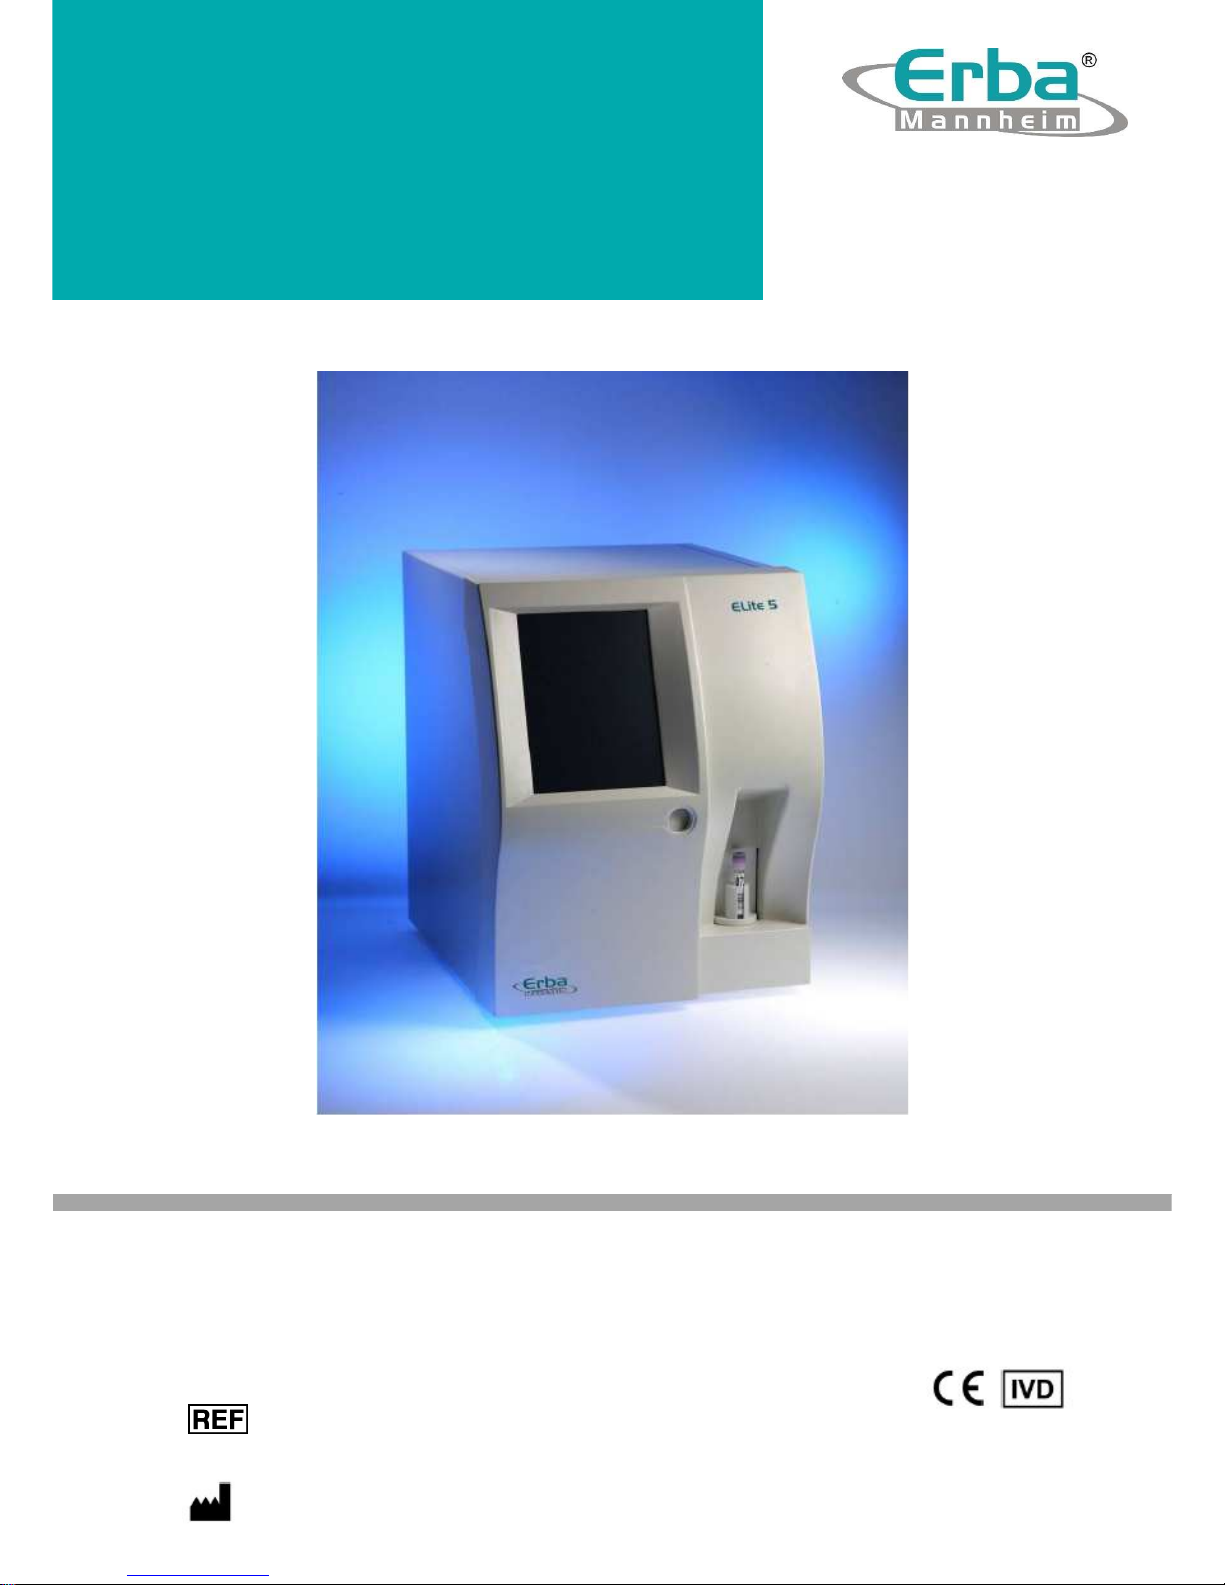
ELite 5
Hematology Analyzer
USER MANUAL
INS00068
Page 2

Page 2 of 159
Introduction
This user manual is intended to give detailed information for end users of the ‘ELite 5’ optical
hematology analyzer.
All information contained herein is the intellectual property of Erba Lachema s.r.o. and should
not be used or reproduced without prior agreement of Erba Lachema s.r.o., the
manufacturer.
This manual was written with the intention to give the most precise and up-to-date, detailed
description of operation and use of the analyzer for laboratory purposes.
Despite careful revision and multiple grammar and content control, mistakes can still be
present in this manual. Erba Lachema may from time to time issue errata, or a new revision
of the manual. Would you find things unclear, please contact your service engineer for
assistance.
Descriptions contained herein are relevant to ‘ELite 5’, software versions (latest available at
the publication of the manual):
High Level SW version: 1.5.2105.0
Low Level SW version: 1.5.2105.0
Low Level boot version 2.0
Firmware: 2.78 (1208)
PIC SW: 2.1
Laser SW: 3.5
TCU SW: 3.42
Page 3

Page 3 of 159
Warranty
THIS WARRANTY IS EXCLUSIVE AND IS IN LIEU OF ALL OTHER WARRANTIES,
EXPRESSED OR IMPLIED, INCLUDING WARRANTIES OF MERCHANTABILITY OR
FITNESS FOR ANY PARTICULAR PURPOSE.
Exemptions
Erba Lachema’s obligation or liability under this warranty does not include any transportation
or other charges or liability for direct, indirect or consequential damages or delay resulting
from the improper use or application of the product or the use of parts or accessories not
approved by Erba Lachema or repairs by people other than Erba Lachema authorized
personnel.
This warranty shall not extend to:
• Any Erba Lachema product which has been subjected to misuse, negligence or
accident.
• Any Erba Lachema product from which Erba Lachema’s original serial number tag or
product identification markings have been altered or removed.
• Any product of any other manufacturer.
Page 4

Content
Page 4 of 159
Table of Contents
1 For Your Safety ........................................................................................................ 10
1.1 Who Should Use This Manual ....................................................................................... 10
1.2 Special symbols used in this Manual............................................................................. 10
1.3 General Precautions .................................................................................................... 10
1.4 Environmental Factors ................................................................................................. 11
1.5 Electrical Requirements ............................................................................................... 12
1.6 Space Requirements .................................................................................................... 12
1.7 Weight Requirements .................................................................................................. 14
1.8 Waste Disposal ............................................................................................................ 15
1.9 Known Limitations ....................................................................................................... 15
1.10 Emergency Situations .................................................................................................. 15
2 Product Support ....................................................................................................... 16
3 Installation .............................................................................................................. 17
3.1 Package contents ......................................................................................................... 17
3.1.1 The ‘ELite 5’ Analyzer Package ....................................................................................................... 17
3.1.2 The Autosampler Package ............................................................................................................. 17
3.1.3 Small Sample Package (optional) ................................................................................................... 17
3.2 Connecting the reagents .............................................................................................. 18
3.3 Power connection ........................................................................................................ 18
3.4 Connections to the peripherals .................................................................................... 18
3.5 Environmental conditions ............................................................................................ 18
3.6 Visual inspection ......................................................................................................... 19
3.7 Moving to the selected location ................................................................................... 19
3.8 Removing the safety card from the shear valve ............................................................ 19
3.9 Connecting the Autosampler ........................................................................................ 20
3.10 Connecting the reagents .............................................................................................. 20
4 General Overview and Principles of Operation .......................................................... 21
4.1 General Overview ........................................................................................................ 21
4.1.1 Measured Parameters ................................................................................................................... 21
4.1.2 Approved Reagents and Control Materials .................................................................................... 22
4.1.3 Original Erba Lachema Reagents ................................................................................................... 22
4.2 Principles of Operation ................................................................................................ 24
4.2.1 Volumetric Impedance Method ..................................................................................................... 24
4.2.2 Photometric Light Absorbance Method ........................................................................................ 24
Page 5

Content
Page 5 of 159
4.2.3 Optical Light Scatter and Diffraction Method ................................................................................ 25
Inside the ‘ELite 5’ Analyzer .................................................................................................... 28
4.2.4 Front Panel ..................................................................................................................................... 28
4.2.5 Back Panel ...................................................................................................................................... 28
4.2.6 Left Side Assembly ......................................................................................................................... 30
4.2.7 Right Side Assembly ....................................................................................................................... 31
4.2.8 Front Assembly .............................................................................................................................. 32
4.3 Small Sample Mode (SSM) – optional ........................................................................... 32
5 User Interface .......................................................................................................... 34
5.1 Using the Touch Screen ................................................................................................ 34
5.2 Using the ‘Start’ Button ............................................................................................... 34
5.3 Using an External Mouse ............................................................................................. 34
5.4 Using an External Keyboard ......................................................................................... 35
5.5 Using the On-Screen Virtual Keypads ........................................................................... 35
5.6 Using the Graphical User Interface ............................................................................... 37
5.6.1 Quick Links ..................................................................................................................................... 37
5.6.2 Interactive Display Area ................................................................................................................. 37
5.6.3 Status Display ................................................................................................................................. 38
5.6.4 Entering Information ..................................................................................................................... 38
5.7 The Menu System ........................................................................................................ 38
5.7.1 Primary Menu Items ...................................................................................................................... 38
5.7.2 Starting a Manual Single Tube Measurement ............................................................................... 38
5.7.3 Start Automated Measurements ................................................................................................... 39
5.7.4 Access the Database ...................................................................................................................... 39
5.7.5 Initiate Printing .............................................................................................................................. 39
5.7.6 Main Menu .................................................................................................................................... 40
5.7.7 Autosampler (AS) Control Panel .................................................................................................... 40
5.7.8 Adjust the Time and Date .............................................................................................................. 40
5.7.9 Open the Warning Panel ................................................................................................................ 40
5.7.10 Menu tree ...................................................................................................................................... 41
5.7.11 Safety Access Codes ....................................................................................................................... 43
5.7.12 SSM Menu Add-ons ....................................................................................................................... 43
6 Start Up and Shut Down of ‘ELite 5’ .......................................................................... 45
6.1 Start Up and Shut Down Overview ............................................................................... 45
6.2 Starting Up the ‘ELite 5’ Analyzer ................................................................................. 45
6.2.1 Visual Inspection ............................................................................................................................ 45
6.2.2 Power Up the ‘ELite 5’ Analyzer ..................................................................................................... 45
6.2.3 Start Up the User Interface ............................................................................................................ 46
6.2.4 User Login ...................................................................................................................................... 47
6.2.5 Pneumatic System Start and Blank Measurement ........................................................................ 47
6.3 Exiting the ‘ELite 5’ Analyzer ........................................................................................ 48
6.3.1 Log Off ............................................................................................................................................ 48
6.3.2 Shut Down...................................................................................................................................... 49
Page 6

Content
Page 6 of 159
6.3.3 Prepare for Shipment .................................................................................................................... 49
6.3.4 Emergency Shut Down ................................................................................................................... 52
6.3.5 Repackaging the ‘ELite 5’ Analyzer ................................................................................................ 53
7 Sample Measurement .............................................................................................. 55
7.1 Sample Types Supported by the ‘ELite 5’ ...................................................................... 55
7.1.1 Supported Sample Tube Types ...................................................................................................... 55
7.1.2 Sampling Depth .............................................................................................................................. 55
7.1.3 Open or Closed Sample Tubes ....................................................................................................... 56
7.1.4 Sample Collection and Handling .................................................................................................... 56
7.2 Sample Types and Modes ............................................................................................ 57
7.3 Sample Identification ................................................................................................... 57
7.4 Running Samples ......................................................................................................... 58
7.4.1 Manual Mode ................................................................................................................................ 58
7.4.2 Prediluted mode ............................................................................................................................ 61
7.4.3 Automatic Mode ............................................................................................................................ 62
7.5 Result Display .............................................................................................................. 72
7.6 Printing Reports........................................................................................................... 72
7.7 The Measurement Process ........................................................................................... 72
8 Result Interpretation ................................................................................................ 74
8.1 The Result Screen ........................................................................................................ 74
8.2 Sample Identification Information ................................................................................ 74
8.3 Parameter Information ................................................................................................ 75
8.3.1 Scatter Diagrams and Histograms .................................................................................................. 76
8.3.2 Warnings ........................................................................................................................................ 77
9 Database Functions .................................................................................................. 85
9.1 Database Overview ...................................................................................................... 85
9.2 Scrolling the Database View ......................................................................................... 86
9.3 Sorting Database Information ...................................................................................... 87
9.4 Manual Selection of Database Records ......................................................................... 87
9.5 Automatic Selection of Database Records .................................................................... 88
9.6 Viewing Detailed Results ............................................................................................. 88
9.7 Statistics ...................................................................................................................... 88
9.8 Managing Database Records ........................................................................................ 88
9.8.1 Select By ......................................................................................................................................... 89
9.8.2 Importing ....................................................................................................................................... 90
9.8.3 Export ............................................................................................................................................. 91
9.8.4 Send to LIS...................................................................................................................................... 91
9.8.5 Save Tab File .................................................................................................................................. 91
9.8.6 Save Raw Data ............................................................................................................................... 92
9.8.7 Delete ............................................................................................................................................. 92
Page 7

Content
Page 7 of 159
10 Calibration ........................................................................................................... 93
10.1 Calibrating the ‘ELite 5’ ................................................................................................ 94
10.1.1 View Calibrations ........................................................................................................................... 95
10.2 SSM Calibration ........................................................................................................... 96
11 Quality Control ..................................................................................................... 97
11.1 Set QC Reference ......................................................................................................... 97
11.2 QC Measure................................................................................................................. 99
11.3 View QC References ..................................................................................................... 99
11.4 View QC Data .............................................................................................................. 99
11.5 View QC Diagrams ....................................................................................................... 99
11.6 View X-B Data............................................................................................................. 100
11.7 View X-B diagrams ...................................................................................................... 101
12
Patients ............................................................................................................ 102
13 Settings ............................................................................................................... 104
13.1 Customize Settings ..................................................................................................... 104
13.2 Laboratory Settings..................................................................................................... 105
13.3 External Devices ......................................................................................................... 106
13.4 System Settings .......................................................................................................... 107
13.5 Units .......................................................................................................................... 108
13.6 Printer Settings ........................................................................................................... 109
13.7 Profile Limits Settings ................................................................................................. 110
13.8 X-B Settings ................................................................................................................ 111
13.9 User Settings .............................................................................................................. 112
13.10 Date and Time Adjustment ...................................................................................... 113
14 Instrument Diagnostics ........................................................................................ 114
14.1 Self Test of the Analyzer ............................................................................................. 115
14.2 Daily Log .................................................................................................................... 117
14.3 Reagent Status ........................................................................................................... 117
14.4 Statistics ..................................................................................................................... 118
14.5 Information ................................................................................................................ 118
15 Maintenance ....................................................................................................... 120
15.1 Opening the Front Panel ............................................................................................. 120
15.1.1 Closing the Front Panel ................................................................................................................ 121
15.1.2 Removing the Side Panels ............................................................................................................ 121
Page 8

Content
Page 8 of 159
15.1.3 User Maintainable Parts of the Analyzer ..................................................................................... 121
15.2 Maintenance Programs of the Analyzer ....................................................................... 122
15.2.1 Cleaning the Shear Valve ............................................................................................................. 123
15.2.2 Cleaning the Washing Head ......................................................................................................... 127
15.2.3 Cleaning the Measuring Chambers (Hard Cleaning) .................................................................... 128
15.2.4 Daily Cleaning .............................................................................................................................. 128
15.2.5 Special Cleaning Procedure .......................................................................................................... 128
15.2.6 Replacing Reagents ...................................................................................................................... 129
15.2.7 Disposal of Reagent Containers ................................................................................................... 130
16 Reagent Locking .................................................................................................. 131
17 The Daily-Routine ................................................................................................ 132
18 Troubleshooting .................................................................................................. 134
18.1 Software error messages ............................................................................................ 134
18.2 Pneumatic error messages .......................................................................................... 134
18.3 Mechanical Problems .................................................................................................. 135
18.4 Sample Rotor (SR) Failures .......................................................................................... 135
18.4.1 SR Gives Grinding Noise And / Or SW Displays SR Error Messages ............................................. 135
18.4.2 SR Error Appears During Initialization Process: ........................................................................... 136
18.4.3 The SR Does Not Turn Into the Analyzer Even With Open Front Panel ....................................... 136
18.5 Needle Mechanics, Vertical Motor (Mvert) Problems ................................................... 136
18.5.1 The Needle Carriage Keeps Dropping Back (Down) At Initialization ............................................ 136
18.6 Shear Valve (SV) Related Errors ................................................................................... 136
18.6.1 SV Error at the First Startup ......................................................................................................... 136
18.6.2 Grinding Noise after SV Cleaning, (after SV Reinstallation) ......................................................... 136
18.6.3 SV Leakage ................................................................................................................................... 136
18.7 Dilutor Errors .............................................................................................................. 137
18.8 Priming Problems ....................................................................................................... 137
18.8.1 The Analyzer Would Not Prime Liquids ....................................................................................... 137
18.9 Electronics Related Problems ...................................................................................... 137
18.9.1 No Image on Display, No Backlight .............................................................................................. 137
18.9.2 Touch Sensitive Surface Not Working .......................................................................................... 137
18.9.3 Touch (Click) Is Inaccurate ........................................................................................................... 137
18.9.4 The Cursor Seems To Be Moving With Good Ratios, But In a Smaller Area ................................ 137
18.10 The Analyzer Does Not Power On ............................................................................ 137
18.11 I2c Errors Displayed At Startup ................................................................................ 137
18.12 Measurement results related problems ................................................................... 138
18.12.1 Fluctuating PLT background values .............................................................................................. 138
18.12.2 Long, smeared population ........................................................................................................... 138
19 Accessories .......................................................................................................... 139
20 Appendices .......................................................................................................... 140
20.1 Reagent Consumption ................................................................................................ 140
Page 9

Content
Page 9 of 159
20.2 Display Range ............................................................................................................. 141
20.3 Printed Report Formats .............................................................................................. 142
20.4 Specifications ............................................................................................................. 144
20.4.1 Measured Parameters ................................................................................................................. 144
20.4.2 Technical Data .............................................................................................................................. 145
20.4.3 Performance Data ........................................................................................................................ 148
20.4.4 Reagent System ........................................................................................................................... 151
20.4.5 Tab File Format ............................................................................................................................ 152
20.5 Fluidic System............................................................................................................. 153
20.6 Summary of Cleaning Products and Procedures for Elite Hematology Analyzers ........... 154
21 Known Problems .................................................................................................. 155
22 Index ................................................................................................................... 156
23 Contact ................................................................................................................ 158
24 Appendix- package inserts for reagents and cleaning solutions ............................ 159
Page 10
ELite 5, User Manual
Page 10 of 159
1 For Your Safety
1.1 Who Should Use This Manual
This User Manual is intended for clinical laboratory professionals using the ‘ELite 5’
automated hematology analyzer. The Manual includes information about the operation and
user interface of the ‘ELite 5’ analyzer.
It also contains basic steps necessary to perform the setup procedures to adapt the
operation of the analyzer to the requirements of your laboratory.
This manual also describes daily routine maintenance requirements to keep your analyzer
functioning properly.
1.2 Special symbols used in this Manual
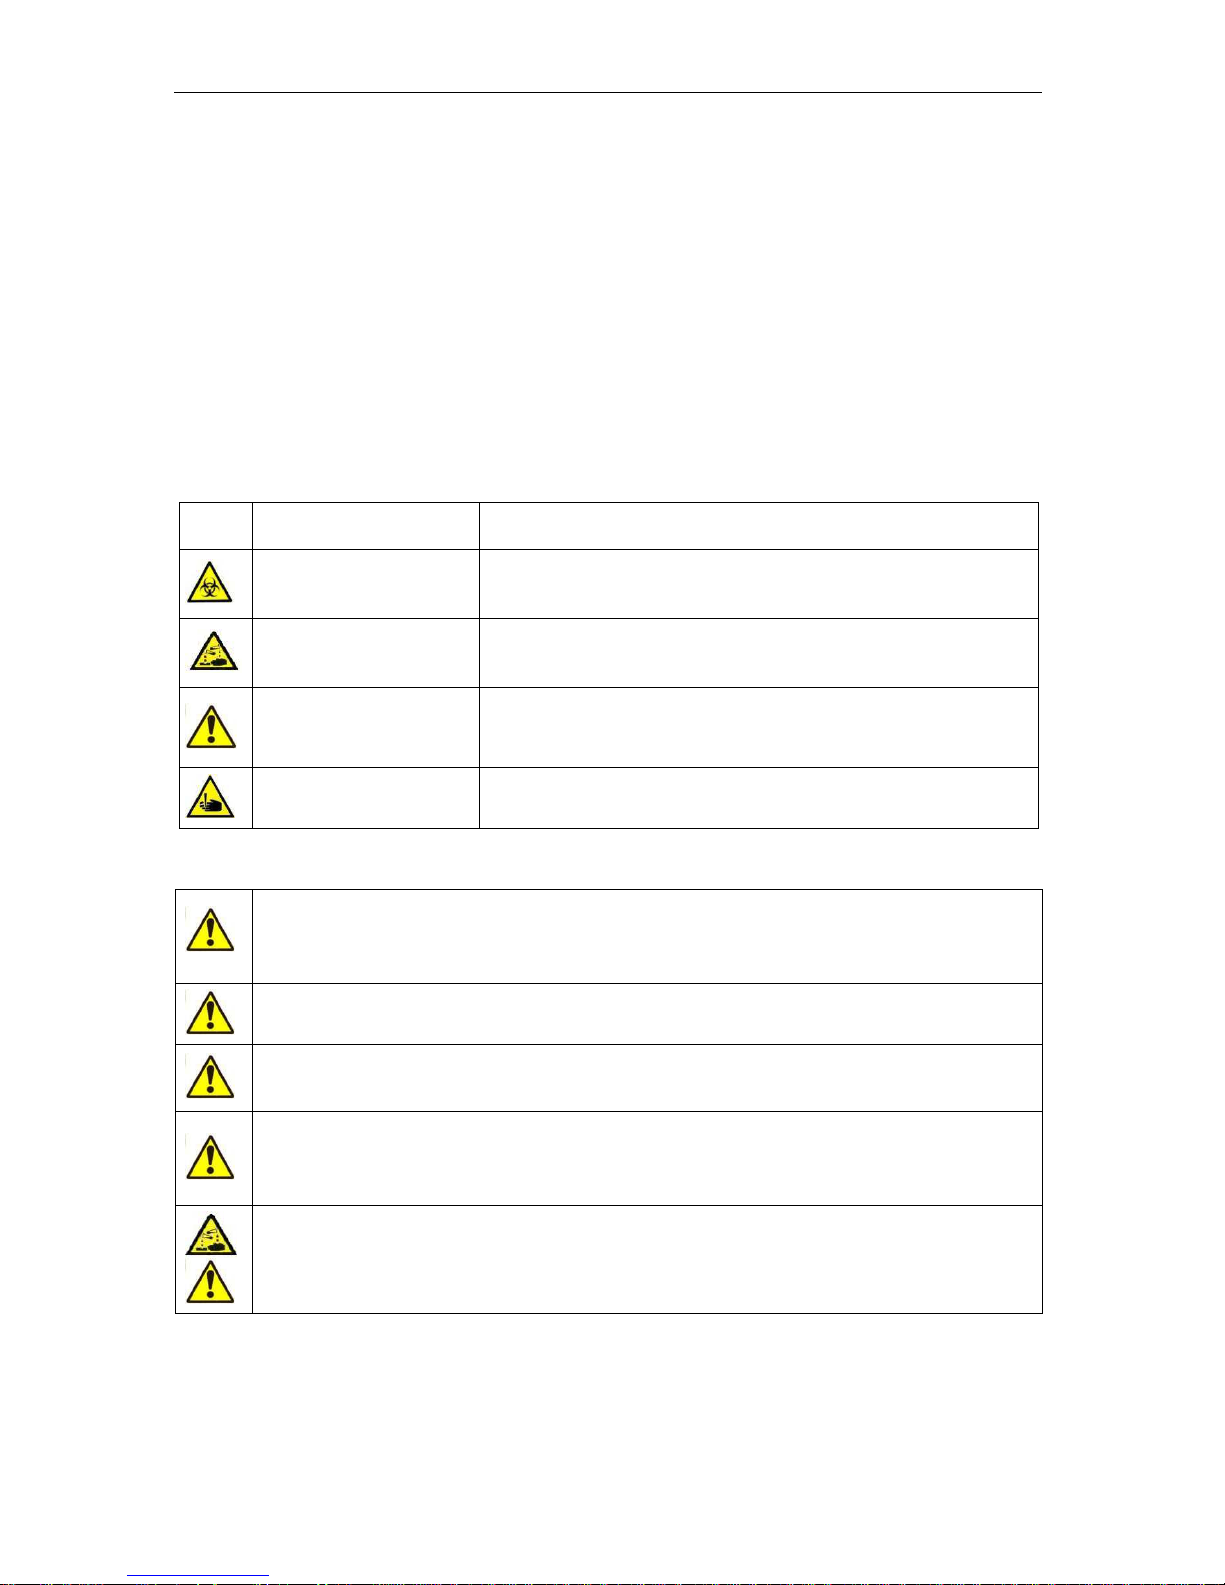
Label
Meaning Explanation
Biohazard
Blood samples and analyzer waste are potentially
infectious materials.
Corrosive Reagents may cause corrosion or skin irritation.
Warning General warning of possible hazard conditions.
Sharp needle warning The sampling needle may be a hazard to the operator.
1.3 General Precautions
The analyzer weighs 35kg (~77lbs).Please do not attempt to move it alone. The
analyzer should always be moved by two persons holding the analyzers by its sides
in an upright position.
Always use safe lifting procedures when lifting the analyzer.
Make sure to retain the original packaging material for safe transportation and
storage in the future.
To prepare the analyzer for shipping, storage or extended periods of inactivity,
please drain the reagents and repackage the ‘ELite 5’ in its original packaging. Do
not expose the ‘ELite 5’ to direct sunlight, extreme temperature or humidity (>80%).
The analyzer operates with chemically and biologically active reagents. Physical
contact with these reagents should be avoided. Please read reagent descriptions
carefully for possible emergency actions.
Page 11
ELite 5, User Manual
Page 11 of 159
To ensure reliable operation and reliable results:
• Only human blood samples should be analyzed
• Only original Erba Lachema reagents should be used
• Required maintenance (user and service level) should be performed as
recommended in this Manual
• Only Erba Lachema certified service personnel should perform service
actions
• Only original Erba Lachema service materials and spare parts should be
used
Original reagents and service materials and spare parts are available from Erba
Lachema.
Only Erba Lachema certified service personnel that have successfully completed
the ‘Erba Lachema ELite 5 Service Training program are qualified to service the
‘ELite 5’ analyzer.
Before operating the ‘ELite 5’ analyzer, all operators should complete the ‘Erba
Lachema ELite 5 Operator Training’ program. This program is offered by Erba
Lachema or by Erba Lachema certified service personnel.
Replacement materials or spare parts (tubes, valves, etc.) which might have been in
contact with human blood or reagents should be handled as a potentially
biologically hazardous and chemically dangerous material. All applicable laws and
regulations must be observed in the handling and disposal of these materials.
The ‘ELite 5’ is designed for laboratory operation. Mobile operation is not supported.
Operate ‘ELite 5’ within the ambient temperature range described in section 1.4.
The IVD equipment complies with the emission and immunity requirements
described in relevant part of the IEC 61326 series.
This equipment has been designed and tested to CISPR 11 Class A. In a domestic
environment it may cause radio interference, in which case, you may need to take
measures to reduce the interference.
Electromagnetic environment should be evaluated prior to operation of the device.
This analyzer contains electronic components. Please handle electronic
waste adhering to local or federal regulations.
1.4 Environmental Factors
Operate the ‘ELite 5’ analyzer at the ambient temperature within the range of 15-30°C
(59-86 °F) and a relative humidity range of 10% - 80%. The optimum operating temperature
is 25°C (~77°F).
Avoid exposing the ‘ELite 5’ analyzer to direct sunlight or to extreme high or low
temperatures. If the ‘ELite 5’ analyzer was subjected to extreme temperatures during
shipment or storage, the analyzer must be placed for at least one hour in a room whose
temperature is within the operational range before installation or use.
Reagents should be stored within the temperature range of 15-30°C (59-86 °F).
The analyzer should be placed in a well-ventilated location.
Page 12
ELite 5, User Manual
Page 12 of 159
Operation at an altitude above 3000 meters (9800 ft) is not recommended.
1.5 Electrical Requirements
The analyzer should only be operated from a wall outlet meeting these power input
requirements:
• 100-127VAC/200-240VAC; 47Hz to 63Hz
• Power Consumption: maximum 400 VA
Please ensure that the wall outlet is also capable of supplying the power consumption of any
additional devices (such as a printer).
Only the power cord supplied with the instrument should be used. Avoid using extension
cords. The ‘ELite 5’ analyzer comes with a power cord appropriate for your power system.
Proper use of the appropriate power cord assures adequate grounding of the system. If the
power network is not reliable, contact your representative for options such as the installation
of an external UPS module.
Failure to properly ground the ‘ELite 5’ bypasses important safety features
and may result in electrical hazard.
The instrument should not be placed near potentially interfering devices capable of emitting
radio frequencies (e.g. radio or television transmitters/receivers, radars, centrifuges, X-ray
devices, fans, etc.).
This analyzer is designed to be safe for transient voltages to INSTALLATION CATEGORY II
and POLLUTION DEGREE 2.
1.6 Space Requirements
It is important to install the instrument in a suitable location. A poor location can adversely
affect its performance.
Select a well-ventilated location near a power source and close to a suitable drain.
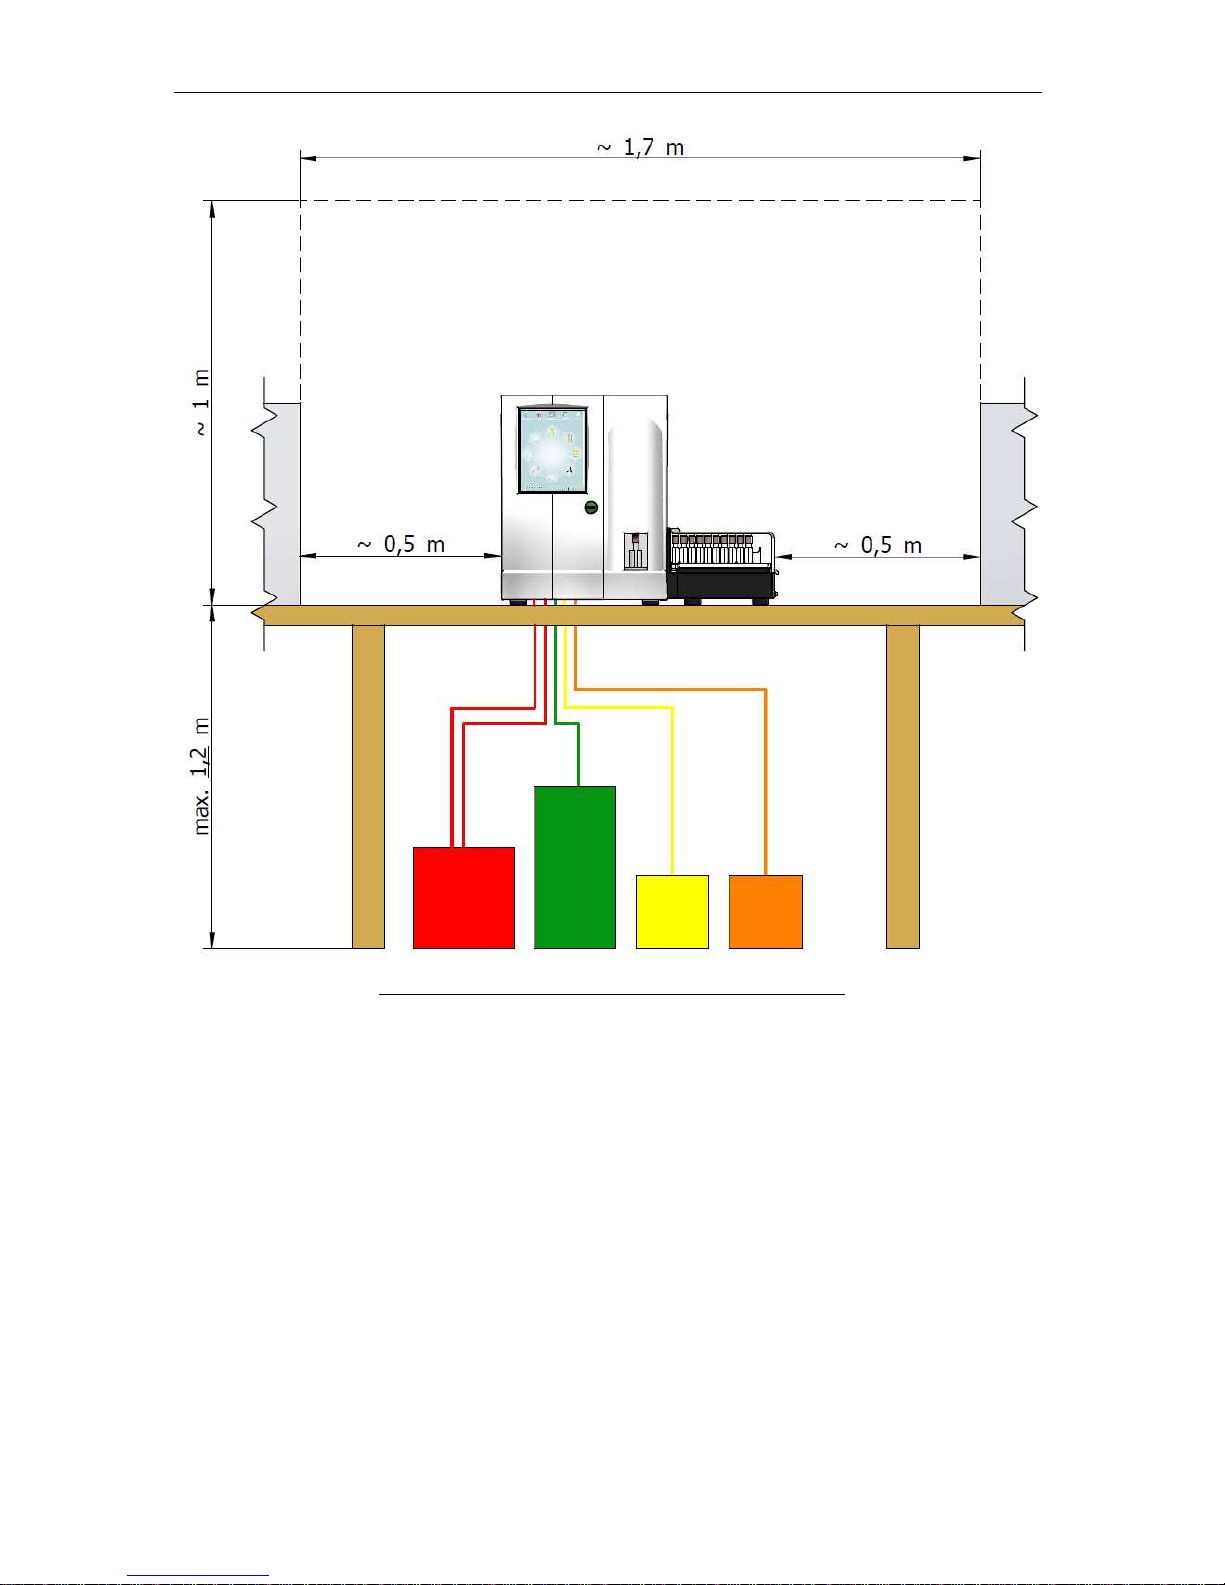
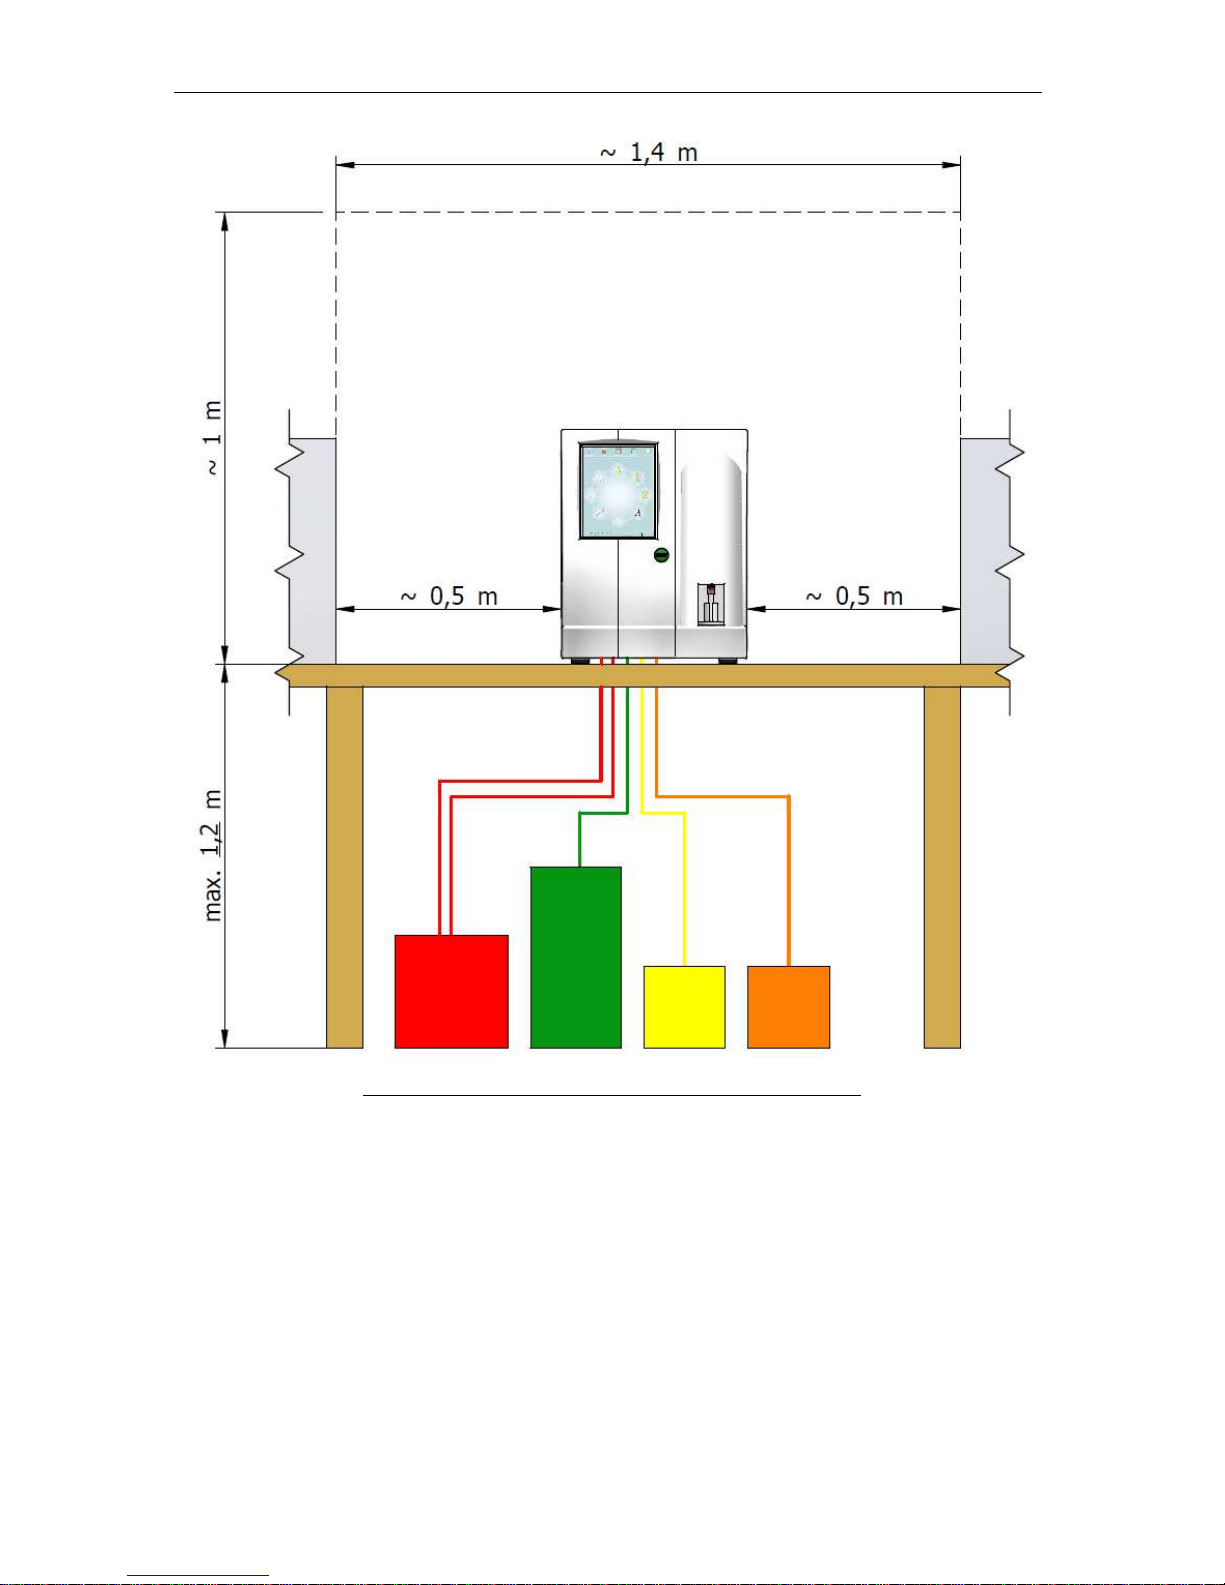
Place the unit on a clean, level surface. Leave at least 0.5 m (18 inches) space on both sides
and above the instrument to access pneumatics. A minimum of 0.2 m (8 inches) must be
maintained between the rear panel and the wall to allow for heat dissipation and tube
clearance.
Ensure there is enough clearance in front of the ‘ELite 5’ analyzer to open the front panel.
Allow enough space if you want to use optional external keyboard, mouse or bar code
reader.
Your selected location should allow placement of the reagents in an unobtrusive location
below the laboratory bench that the instrument is placed on, or on the same surface.
Placement below the laboratory bench also allows for storage of a spare set of reagents.
Never place the reagents above the ‘ELite 5’ analyzer.
See Chyba! Nenalezen zdroj odkazů. and Chyba! Nenalezen zdroj odkazů. for more
information about proper analyzer location and clearance.
Page 13
ELite 5, User Manual
Page 13 of 159
Figure 1. ELite 5 with Autosampler Space Requirements
Page 14
ELite 5, User Manual
Page 14 of 159
Figure 2. ELite 5 Without Autosampler Space Requirements
1.7 Weight Requirements
The ‘ELite 5’ analyzer weighs 35 Kg (77 lb) without the Autosampler. The ‘ELite 5’ with
optional Autosampler weighs 47Kg (104 lb). Adding an external keyboard, printer etc. can
bring the total weight up to 60 Kg (132 lb). If you decide to store the reagents on the same
surface, then the combined weight can reach 100 Kg (220 lb).
Please select a table, laboratory shelf, or other location which can support the weight of the
‘ELite 5’ with accessories and is free from vibration.
Page 15

ELite 5, User Manual
Page 15 of 159
To allow reliable operation and to provide a safe working environment, make
sure that the table supporting the unit is stable enough to carry the weight of
the instrument and accessories.
1.8 Waste Disposal
‘ELite 5’ analyzer waste contains human blood and reagents that are chemically and
biologically active, and should be considered to be a potential infection and biohazard threat.
Safe laboratory practices must be followed including the use of personal protective when
operating the ‘ELite 5’ and handling blood, reagents, and waste.
1.9 Known Limitations
The ‘ELite 5’ is not intended for analysis of animal blood samples. Anti-coagulated and
homogenized human blood samples must be free from contamination.
Blood samples must be analyzed within 12 hours of venipuncture.
1.10 Emergency Situations
Always follow all applicable laws and regulations with regard to emergency situations.
If the ‘ELite 5’ needs to be powered off due to an emergency situation (like fire, thunderstorm
etc.), follow the procedures in chapter 6.3.4.
In case of fire, do not use water to extinguish the fire unless the ‘ELite 5’ is
disconnected from the electrical network!
Page 16

ELite 5, User Manual
Page 16 of 159
2 Product Support
Your sales representative is trained and qualified to answer questions about applications and
the operation of the ‘ELite 5’ analyzer. If you have additional questions regarding the ‘ELite
5’, please ask for manufacturer support through your sales representative.
Erba Lachema makes every effort to provide excellent support and up to date information
and services regarding the ‘ELite 5’ analyzer. Software updates and application documents
are available on the Erba Lachema web site at http://www.erbamannheim.com.
Page 17

ELite 5, User Manual
Page 17 of 159
3 Installation
Your Erba Lachema certified service engineer will perform the initial installation of the ‘ELite
5’ analyzer and train you and selected laboratory personnel on the proper use and
maintenance of the analyzer. The analyzer should only be operated by properly trained
personnel. You’ll also be explained about necessary maintenance actions.
3.1 Package contents
3.1.1 The ‘ELite 5’ Analyzer Package
After opening the ‘ELite 5’ analyzer packaging, you will find an accessory box. The analyzer
is in a plastic bag in between cushioning protective material. After opening the bag, remove
the desiccant packs. The package should contain the following items:
• ‘ELite 5’ analyzer
• Accessories box on top of the analyzer, containing:
• Power cord
• User Manual (this document)
• Sample tube adapter for the individual sample unit (1 pc)
• Reagent tube kit (in a plastic bag, with special caps)
• Plastic waste container
• Cardboard box for the waste container
• “Preparing for shipment” tube kit
• ‘ELite 5’ analyzer Final Check Report
Please inform your Sales Representative if any item is missing or damaged. Retain the
original ‘ELite 5’ analyzer packaging for future transportation and storage.
3.1.2 The Autosampler Package
The Autosampler is an optional unit that attaches to the ELite 5. If the optional Autosampler
unit was ordered, package should contain the following items:
• Autosampler unit
• Sample tray
• Sample racks -10 pieces
• Autosampler Final Check Report
Please inform your sales representative if any item is missing or damaged. Retain the
original Autosampler packaging for future transportation and storage.
3.1.3 Small Sample Package (optional)
• SSM Micro dilutor front-left frame rail assembly
• Ribbon cable #1 with connectors for the SSM micro dilutor
• SSM valve assembly with connected Tygon tubing
• “T” fitting with attached 3 cm Tygon tube
• 4-way ribbon cable #2 with connectors for the SSM valve assembly
• Pre-dilution chamber plus pre-dilution chamber holder assembly with rubber chamber
protector
• SSM sample rotor plate
• 2 pcs of 3x10 hex screws with washers (used for mounting SSM pre-dilution chamber holder)
• Adhesive cable holder, plastic adhesive tube holder and 2 pcs of plastic tube holders
Page 18
ELite 5, User Manual
Page 18 of 159
• Silicon edge protectors and cable guide tool
3.2 Connecting the reagents
The ‘ELite 5’ is capable to aspirate reagents from 1.2m (~4’). (Measured from the bottom of
the reagent container to the table level where the ‘ELite 5’ is installed.)
You will use 3 input reagents and the 2 waste-output. Select a location close to a suitable
drain. The waste container should be periodically emptied.
You can place the reagent below or on the same level where the ‘ELite 5’ is installed. Do not
place the reagents to a higher location than the bottom of the ‘ELite 5’, because in case of
any tubing problem, valve error etc. the reagent can spill out.
3.3 Power connection
The analyzer should only be operated from a wall out
let meeting general
specifications of power input requirements: 100-127VAC/200-240VAC; 47Hz
to 63Hz
Power Consumption: maximum 400 VA
If the power network is not reliable, contact your representative for options
(e.g. installation of an external UPS module).
Only the power cord supplied with the instrument should be used. Avoid
using extension cords.
Please check the power consumption of the additional devices (printer) as well.
3.4 Connections to the peripherals
If you plan to connect any external devices (printer, host-computer etc.) to ‘ELite 5’ then prior
the installation please check the possible cable paths. If it is necessary then make all the
preparations (cable-channels, cable-binders, drilling trough tables, walls etc.) before the
installation starts.
Although the Windows® XP® Embedded operating system can recognize several peripheral
devices please prepare the installation material provided by the vendor of the device.
3.5 Environmental conditions
The ‘
ELite
5’ is designed for laboratory operation.
Mobile operation is not
supported. Operate ‘ELite 5’ at the ambient temperature within the range of
15-30°C (59-98 °F) and maximum relative humidity of 80%. The optimum
operating temperature is 25°C. Reagents should be stored at a temperature
range of 15-30°C. The ‘ELite 5’ operates properly up to 3000 meters above
sea-level.
Do not place the reagent containers to a higher position than ‘ELite 5’. This
is to avoid unintentional spilling of reagents. The vertical distance between
the reagent container and ‘ELite 5’ must not be more than 120 centimeter.
The instrument should be placed in a well-ventilated location. The instrument should not be
placed near potentially interfering devices capable of emitting radio frequencies (e.g. radio or
television transmitters/receivers, radars, centrifuge, X-ray devices, fans, etc.).
Page 19

ELite 5, User Manual
Page 19 of 159
Operation at an altitude over 3000 meters (9000 ft) is not recommended.
3.6 Visual inspection
To ensure correct operation, and to check that the instrument has been delivered to you
without any damage, please check the following before starting the unit for the first time:
‘ELite 5’:
• The front panel should have no cracks;
• The screen should have no cracks;
• No visible dents or bumps on instrument housing (front, side rear, top cover);
• Open the front panel of the unit:
o The front panel is easy to open and close (see section 15.1);
o Inspect that the syringes are not cracked;
o Check if the shear valve has the safety card installed;
o Check if there are no fluid inside the tubing;
o Check if there are no salt build-ups inside the tubing.
Autosampler:
• No visible dents or bumps on the housing of the Autosampler;
• The transparent cover opens and closes smoothly;
• The sample-tray and the racks have no visible damage.
3.7 Moving to the selected location
Check the presence of all necessary connections.
Move the ‘ELite 5’ to the selected location.
If it is hard to access the back of the ‘ELite 5’ after it is in the final location then connect the
reagent tubes to the ‘ELite 5’ but not to the reagent containers. (For details see chapter 3.2)
Be sure that the main switch (right next to the power connector) is in off position.
3.8 Removing the safety card from the shear valve
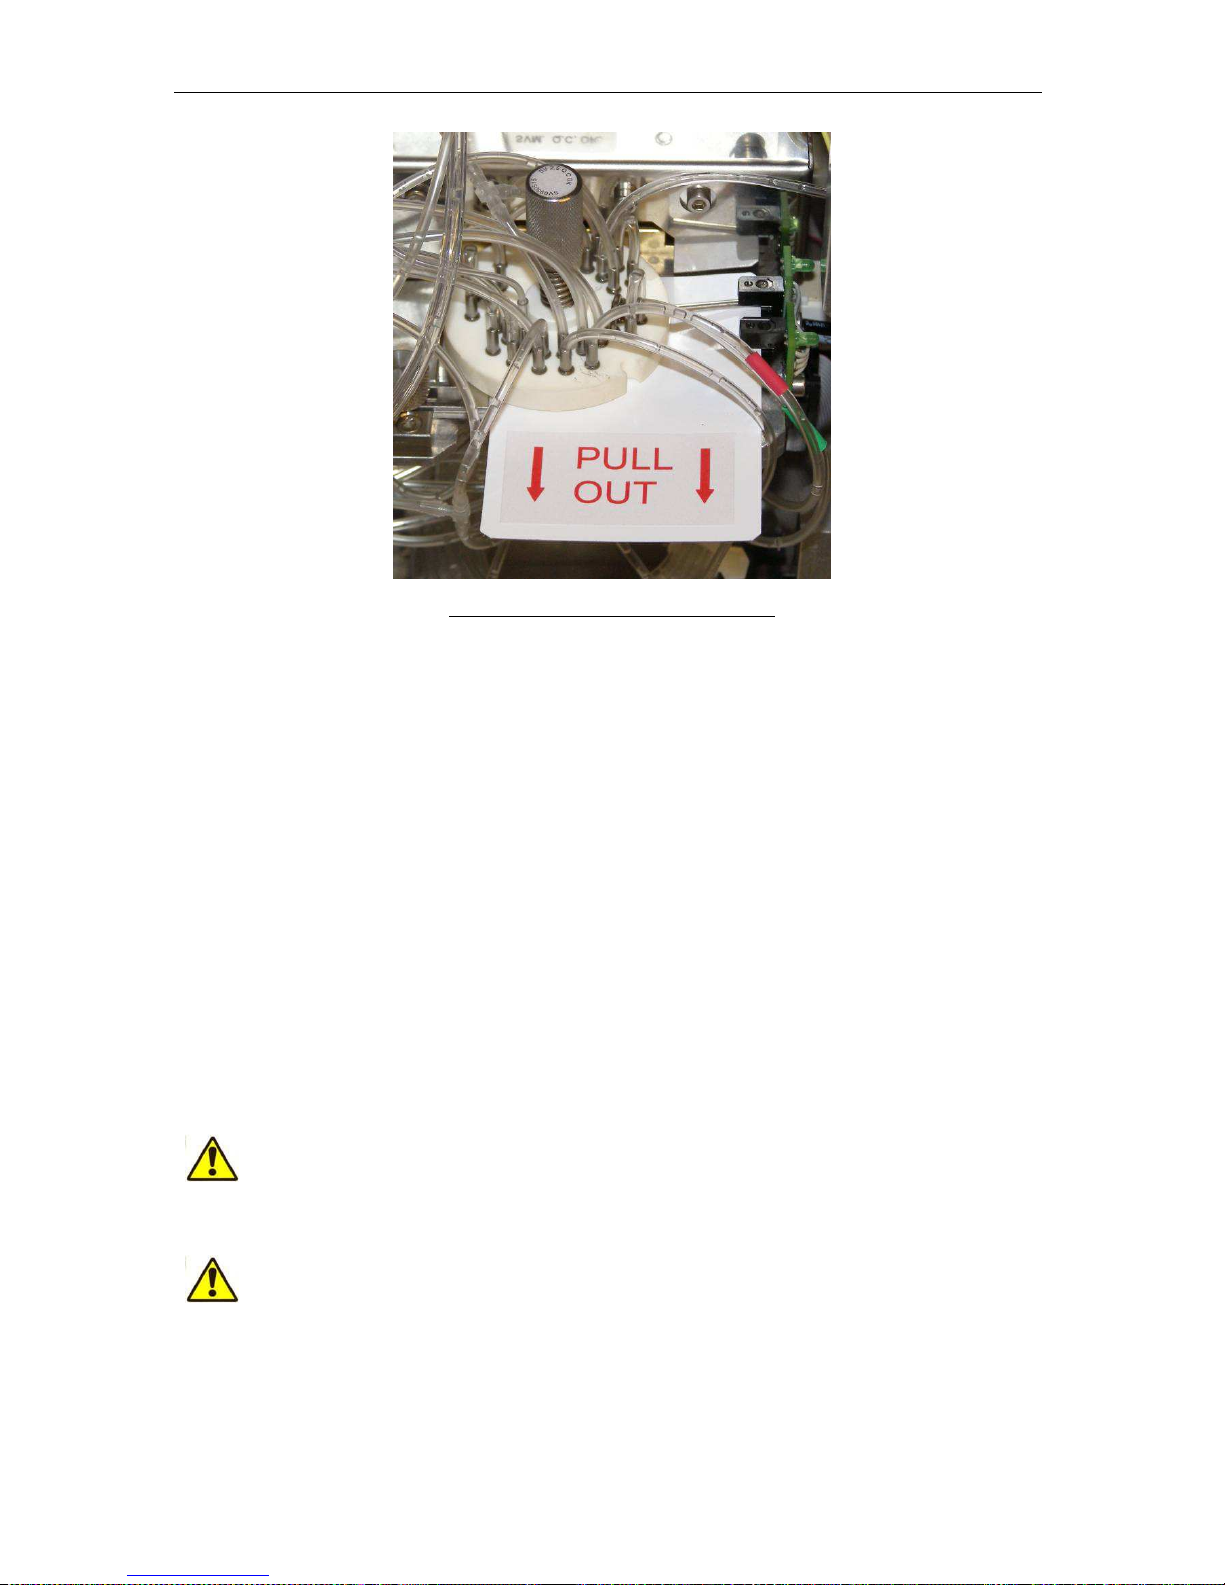
In order to prevent the damage of the shear valve during transportation a protective plastic
card is placed between the ceramic disks of the shear valve. Before using the ’ELite 5’
instrument, this card must be removed.
Please perform the following steps:
• Open the cover of the equipment
• Locate the white plastic card in shear valve
• Pull out the card
• Check and tighten the locking screw of the shear valve if necessary
Page 20
ELite 5, User Manual
Page 20 of 159
Figure 3. Shear Valve with plastics card
3.9 Connecting the Autosampler
If the optional Autosampler unit also purchased then:
• Remove the secondary cover-plate from the right-side cover-plate of the ‘ELite 5’;
• Check that the connection surface is clean and there are no blocking objects (like
hanging, swinging cables);
• Push the Autosampler into the ‘ELite 5’ until the clamps are locked.
3.10 Connecting the reagents
If it was not done beforehand than:
• Connect the reagent tubes to the ‘ELite 5’:
o Use the supplied connecting tubes and special bottle caps;
o Be sure that the color on each tube, cap and connector in the back of the
instrument match.
• Connect the reagent containers to the reagent tubes.
The analyzer operates with chemically and biologically active reagents.
Direct (skin) contact with these reagents should be avoided. Please read
reagent descriptions carefully for possible emergency actions. Only original
reagents are usable with ‘ELite 5’, available from Erba Lachema.
Place the reagent containers near the instrument, to an accessible location.
Do not place the containers to a higher position than ‘ELite 5’. This is to
avoid unintentional spilling of reagents.
Page 21
ELite 5, User Manual
Page 21 of 159
4 General Overview and Principles of Operation
4.1 General Overview
The ‘ELite 5’ is a fully automated high quality hematology analyzer for in vitro diagnostic use
in clinical laboratories. It provides precise and accurate 5-part differential measurement using
a laser based optical measurement technology.
The ‘ELite 5’ analyzer uses the impedance method for measurement of leukocytes (WBC),
erythrocytes (RBC) and platelet (PLT) concentrations. Measurement of the hemoglobin
(HGB) content of red blood cells is accomplished by photometric measurement technology.
5-part leukocyte differentiation (LYM%, MON%, NEU%, EOS%, BAS%) is accomplished
using optical laser-based flow cytometric technology.
A vivid color touch screen display is featured with an intuitive, informative, and attractive user
interface. A START button allows one-touch operation for ease of use.
The ‘ELite 5’ analyzer’s unique software system supports the use of many commonly used
external printers with its USB connections. The ‘ELite 5’ internal database is capable of
storing 100,000 patient, QC, and calibration result records including flags and graphical
scatter diagrams and histograms. The system software is field-upgradeable to ensure up-todate operation.
An automatic optional Autosampler is available (sold separately) for automated processing
up to 100 sample tubes for increased laboratory efficiency. The system software supports a
variety of flexible LIS download techniques for efficient integration into laboratory workflow.
The ‘ELite 5’ features advanced Ethernet LIS connectivity using the HL7 protocol in addition
to standard serial interfaces, providing the clinical laboratory with flexible connectivity
options.
Small Sample Module (optional) enables to test patient samples having only a small venous
blood volume.
4.1.1 Measured Parameters
‘ELite 5’ determines 26 hematology parameters including 5-part WBC differential. The
instrument requires 110 l of whole blood-sample in closed- and open-vial mode. Cycle time
is 60 seconds.
With SSM (small sample module - optional) 25 µl of venous blood is aspirated in open-vial
mode.
Par
ameter
Symbol
Measurement method
White Blood Cell count WBC Impedance measurement
Lymphocyte count LYM Calculated
Monocyte count MON Calculated
Neutrophil count NEU Calculated
Eosinophil count EOS Calculated
Basophil count BAS Calculated
Lymphocyte percentage LYM% Optical measurement
Monocyte percentage MON% Optical measurement
Neutrophil percentage NEU% Optical measurement
Eosinophil percentage EOS% Optical measurement
Basophil percentage BAS% Optical measurement
Page 22

ELite 5, User Manual
Page 22 of 159
Par
ameter
Symbol
Measurement method
Red Blood Cell count RBC Impedance measurement
Hemoglobin HGB Photometric measurement
Hematocrit HCT Calculated
Mean Corpuscular Volume MCV Derived
Mean Corpuscular Hemoglobin MCH Calculated
Mean Corpuscular Hemoglobin
Concentration
MCHC Calculated
Red Blood cells Distribution Width RDWcv Derived
Red Blood cells Distribution Width RDWsd Derived
Platelet count PLT Impedance measurement
Mean Platelet Volume MPV Derived
Platelet Distribution Width**
(for Research Use Only)
PDWcv Derived
Platelet Distribution Width**
(for Research Use Only)
PDWsd Derived
Thrombocrit**
(for Research Use Only)
PCT Calculated
Large platelet count PLCC PLT count above 12 fl in
size
Large platelet percentage PLCR Calculated
**The PDWcv, PDWsd, and PCT parameters are considered to be for Research
Use Only (RUO), and will be marked on the screen, printout, database, and LIS
transmission.
Table 1. ‘ELite 5’ Analyzer Parameters
4.1.2 Approved Reagents and Control Materials
Always use reagents, control and calibration materials that are recommended and approved
by the manufacturer. The ‘ELite 5’ analyzer, controls, calibrator and reagents are part of a
system and are carefully designed and selected for optimal performance. Using unapproved
reagents or controls may cause false flagging or incorrect, inaccurate results.
Only original Erba Lachema reagents may be used in the ‘ELite 5’ analyzer. For additional
details about these materials, please contact the manufacturer directly.
4.1.3 Original Erba Lachema Reagents
Use only the original Erba Lachema reagents listed below to ensure proper
performance of the ‘ELite 5’ analyzer. Reagents are manufactured and provided by
Erba Lachema s.r.o., and are for in vitro diagnostic use only. For using leave the
reagent at room temperature for at least 12 hours. Do not use reagent once frozen.
Kat. číslo
Název
Objem
HEM00006 Erba Lyse-5P 5 l
HEM00002 Erba Diff-5P 1 l
HEM00005 Erba Hypoclean CC 100 ml
Page 23

ELite 5, User Manual
Page 23 of 159
HEM00003 Erb Dil-5P 20 l
Additional cleaning solutions – use as needed
HEM00017 Erba Clenz 1 l
HEM00016 Erba Hypoclean 1 l
For package insert for reagents and cleaning solutions please see Appendix
Page 24
ELite 5, User Manual
Page 24 of 159
4.2 Principles of Operation
The ‘ELite 5’ analyzer uses a combination of methods to provide measurement results:
• Volumetric impedance (the Impedance method) is used to determine the cellular
concentrations and volume distributions of leukocytes (WBC), erythrocytes (RBC),
and platelets (PLT).
• Photometric measurement of light absorbance is used to determine hemoglobin
(HGB) concentration.
• Optical measurement of light scattering and diffraction is used to determine 5-part
leukocyte (LYM%, MON%, NEU%, EOS%, BAS%) differential parameters.
4.2.1 Volumetric Impedance Method
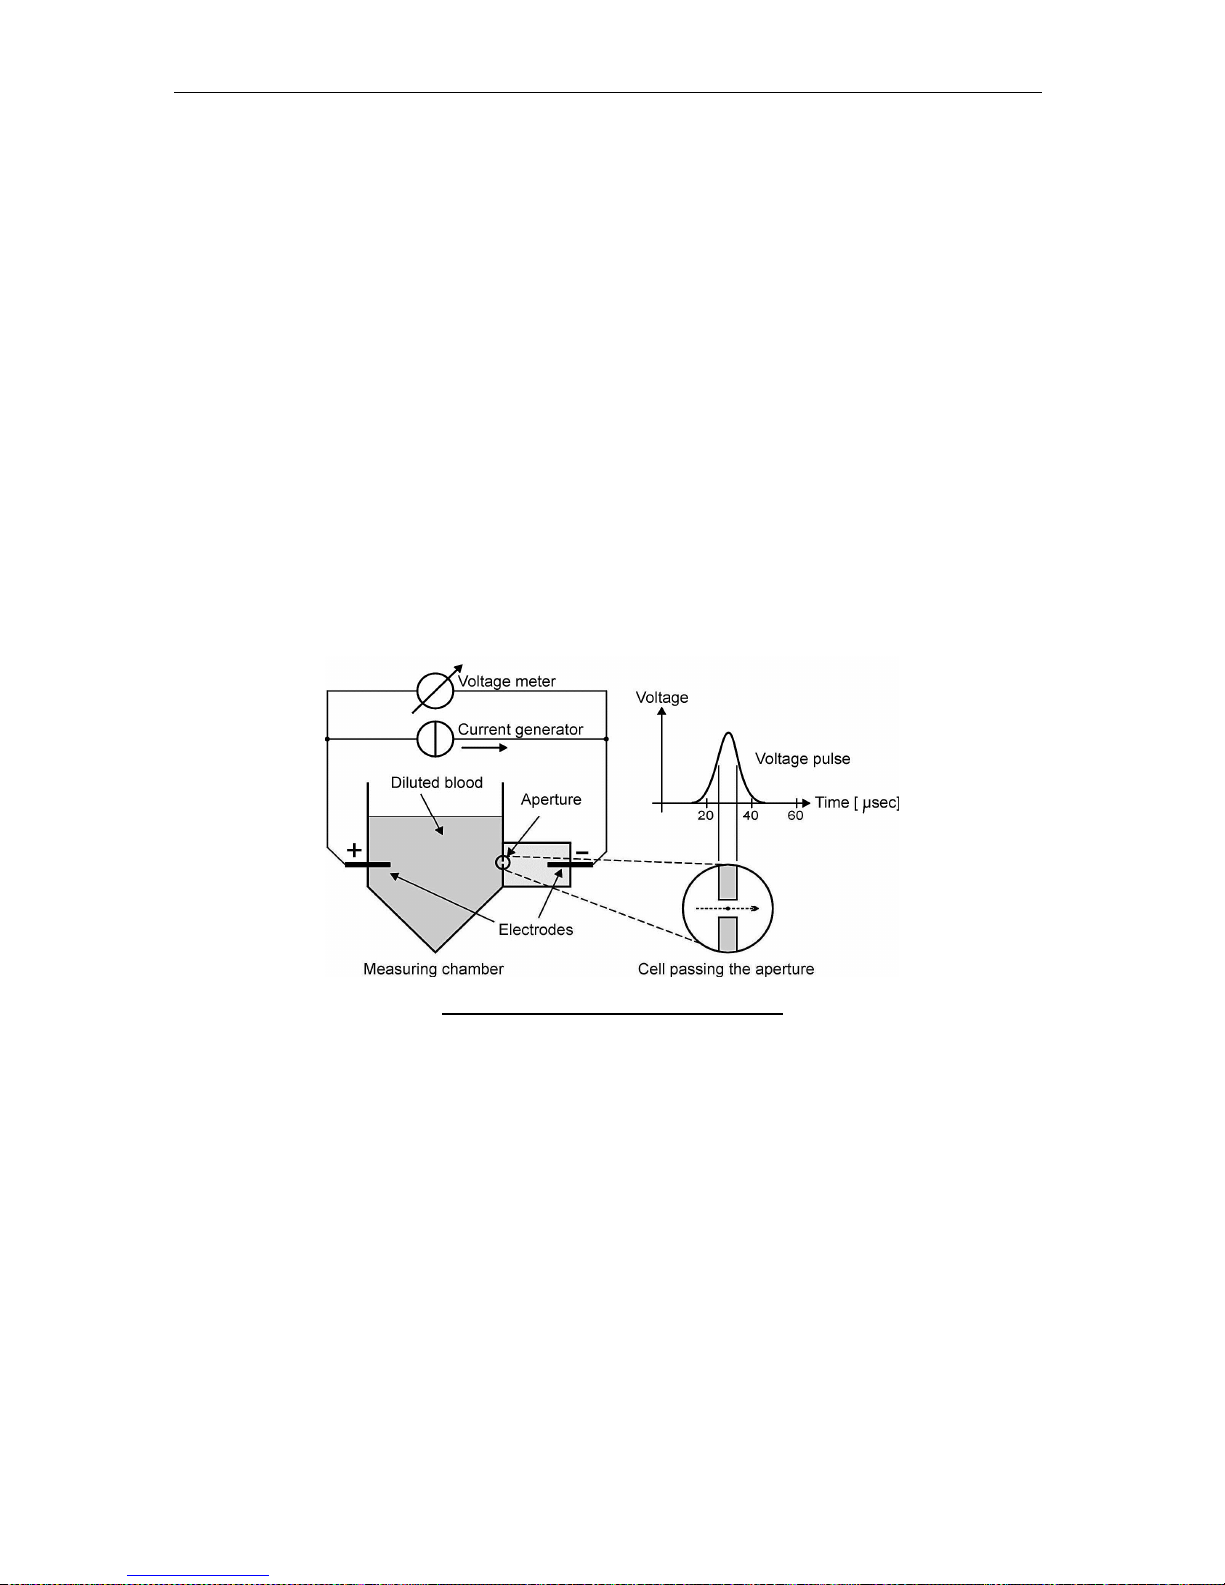
The volumetric impedance method determines cellular concentrations and volume
distributions of cells by detecting and measuring changes in electrical impedance when
particles suspended in a conductive liquid pass through a small aperture. The method is
“volumetric” because a small known volume of blood is precisely diluted with a conductive
diluent and forced through the aperture at a fixed rate.
Figure 4. Volumetric Impedance Method
A constant direct current flows between the electrodes on either side of the aperture. Each cell
passing through the aperture causes a change in the electrical impedance of the conductive blood
cell suspension. This change is sensed by the ‘ELite 5’ electronics and converted to an electrical pulse.
The quantity of pulses is proportional to the number of particles. The intensity of each pulse is
proportional to the volume of the particle. The volume distribution diagrams of the particles result in
the WBC, RBC, and PLT histograms that measured in femtoliter volume units.
Electronic discrimination allows separation of erythrocytes (RBC) and platelets (PLT). A lytic
reaction lyses erythrocytes to clearly measure leukocytes (WBC).
4.2.2 Photometric Light Absorbance Method
A lysed blood sample dilution can be analyzed for hemoglobin (HGB) concentration based on
its stable chromogen content. The reagent lyses the red blood cells causing the release of
cellular hemoglobin. The hemoglobin concentration is measured by taking a photometric
reading across the ‘ELite 5’ WBC chamber. The HGB measurement is calculated as the
Page 25

ELite 5, User Manual
Page 25 of 159
difference between blank and sample measurement with and without illumination to reduce
the effect of liquid refraction and incident light.
Figure 5. Photometric Light Absorbance Method
4.2.3 Optical Light Scatter and Diffraction Method
Optical measurement of light scattering and diffraction is used to determine 5-part leukocyte
(LYM%, MON%, NEU%, EOS%, BAS%) differential parameters. An optical measuring head
contains a focused laser source that is used to illuminate a stream of leukocytes (WBC)
suspended in an optically clear diluent moving through a flow cell.
The cells scatter light as they flow through the path of the laser beam. An optical detector
senses changes in the intensity of the scattered laser light which are proportional to the cell
volume and granularity of the cell’s internal structure. The ‘ELite 5’ electronics convert these
changes to electrical pulses which are gathered and stored for analysis. Five part population
discrimination is based on analysis of the two dimensional volume and granularity distribution
scatter diagram.
Figure 6. ‘ELite 5’ Optical Head Block DIagram
Cells with greater volume or size or more granularity will tend to scatter greater amounts of
light. The intensity of scattered light is detected by an optical signal processing system.
Page 26
ELite 5, User Manual
Page 26 of 159
Figure 7. Optical Signal Processing System
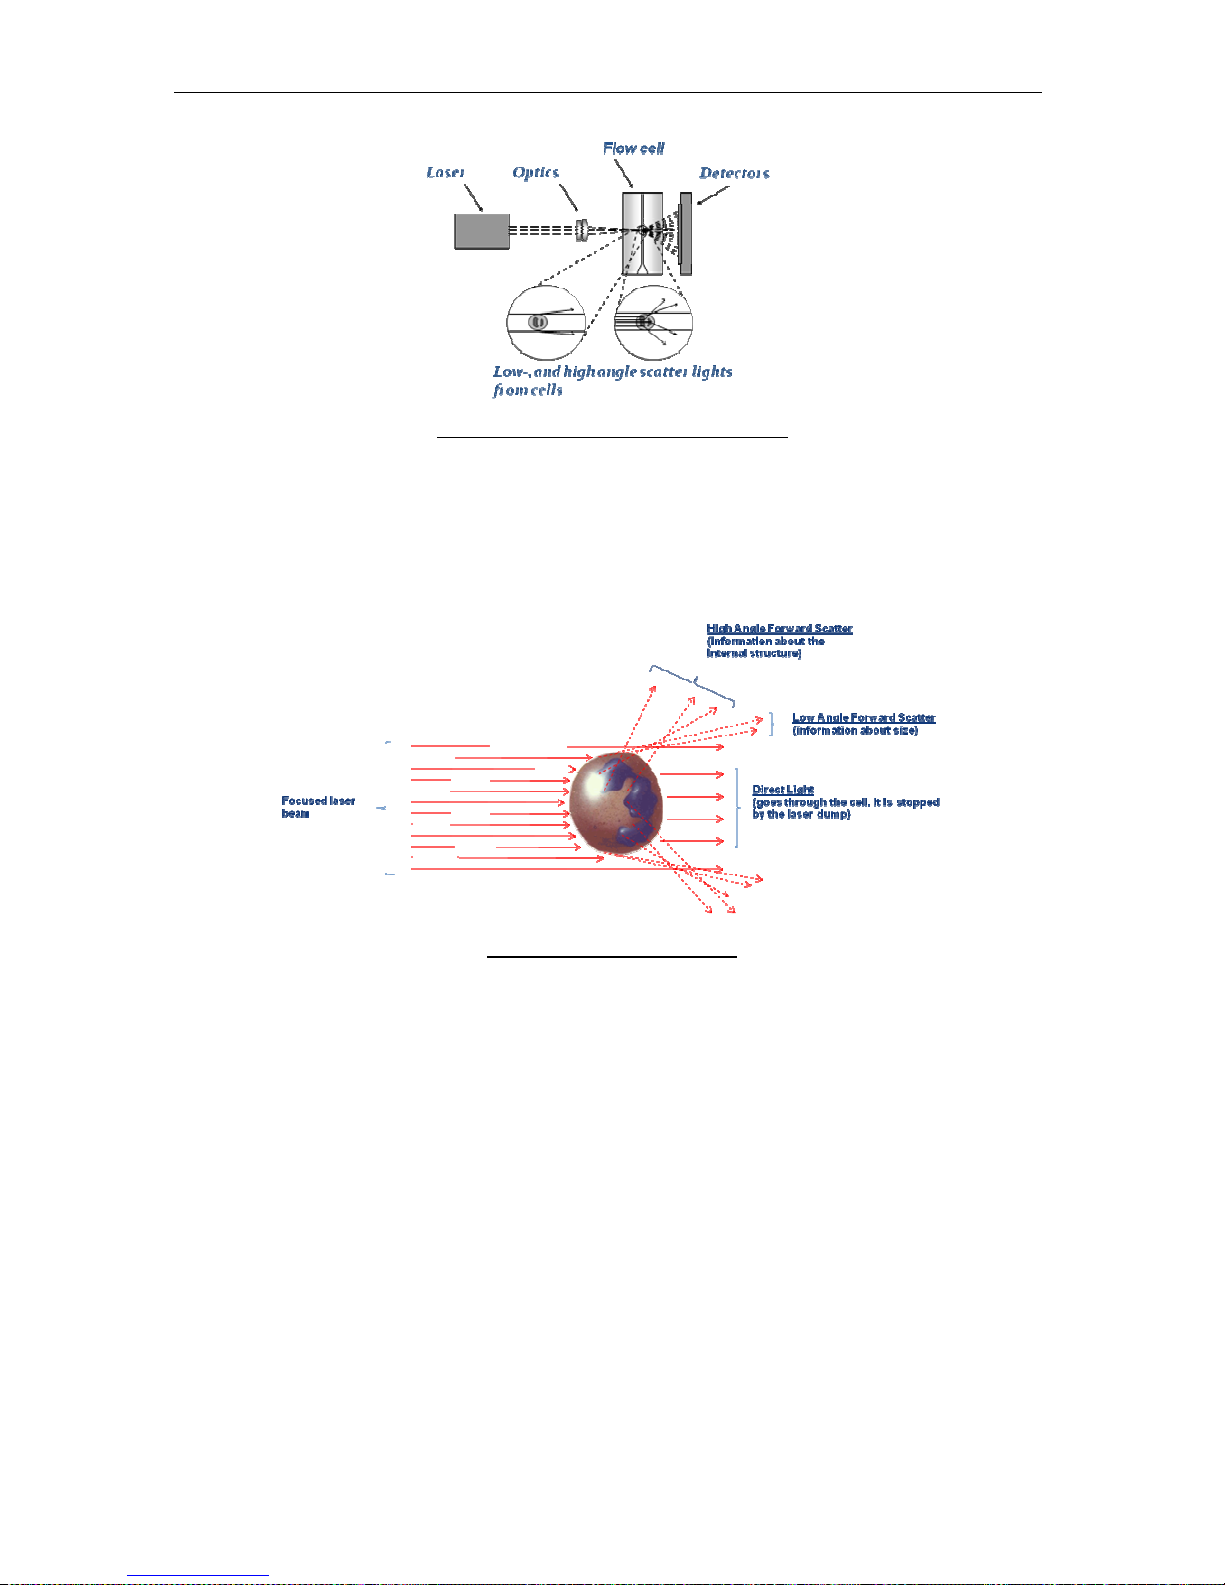
External structure (and the size of the cell) causes lower angles of scatter, and internal
granularity or complexity causes higher angles of diffraction. Both low and high angles of
light scatter are captured by optical sensors, providing the ‘ELite 5’ analyzer with two
independent measurements for each cell crossing the path of the laser beam.
Figure 8. Cellular Light Scatter
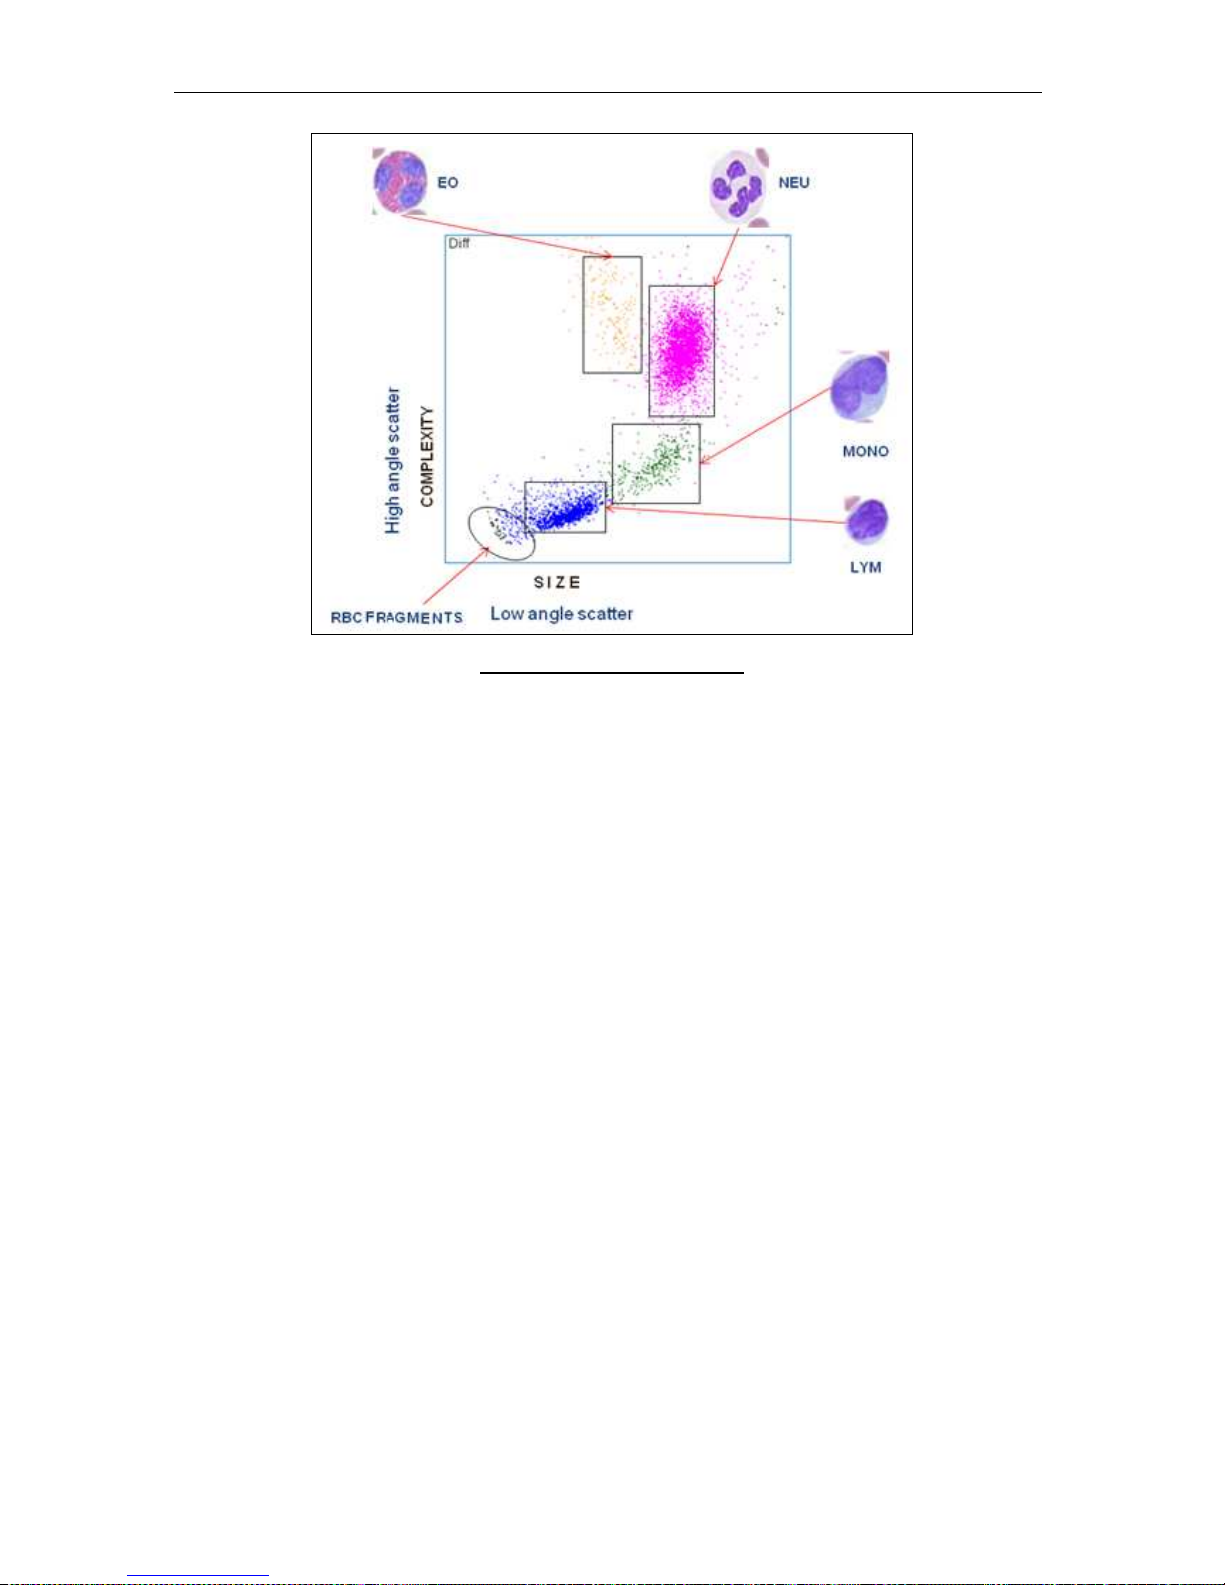
The light scatter data are gathered and plotted as a two dimensional scatter diagram. Similar
cells have similar scatter characteristics and tend to group together. This allows the
analytical software to differentiate and identify the leukocyte populations and generate the
4DIFF and BASO scatter diagrams.
Page 27
ELite 5, User Manual
Page 27 of 159
Figure 9. 4DIFF Scatter Diagram
Page 28
ELite 5, User Manual
Page 28 of 159
Inside the ‘ELite 5’ Analyzer
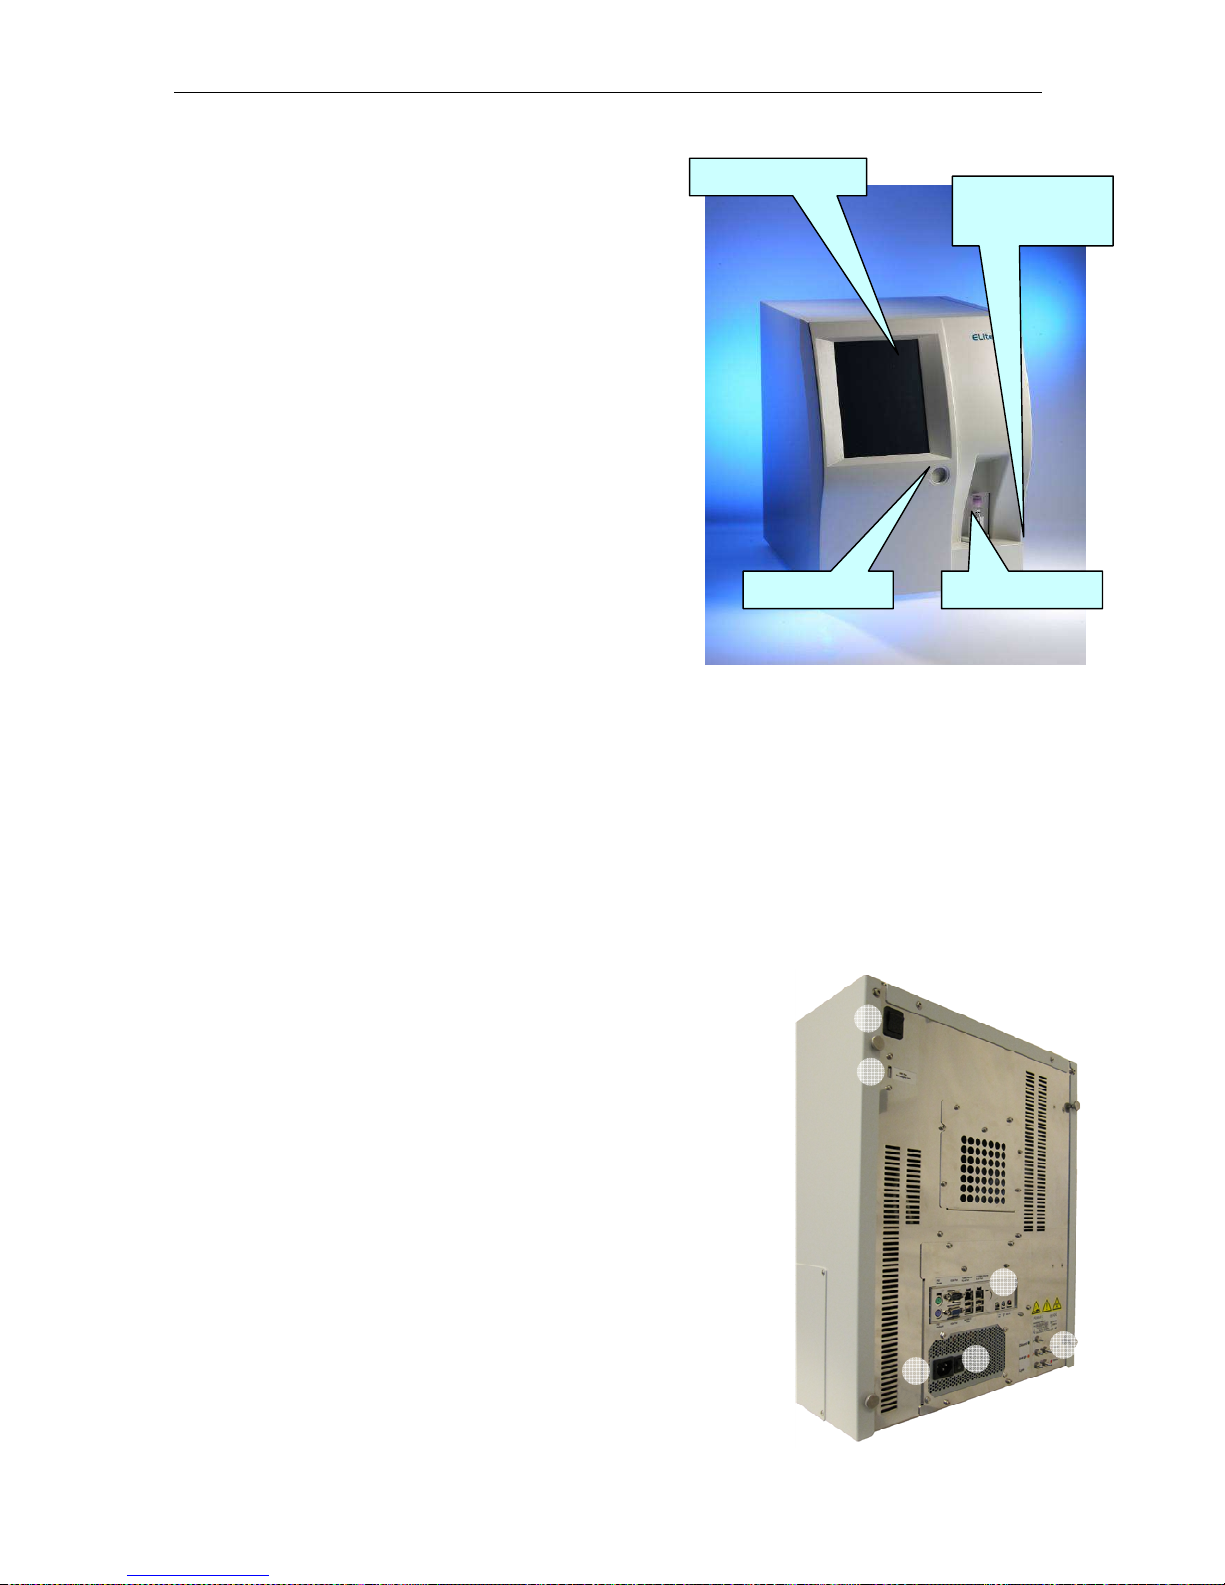
4.2.4 Front Panel
The touch screen display is the primary user interface
of ‘ELite 5’ analyzer for user interactions and data
entry. The LCD screen can be cleaned with a damp
sponge and gentle detergent.
The front panel is a hinged cover that provides easy
access to the shear valve, sampling needle and
syringes for cleaning and maintenance. The front
panel, START button, and the sample rotor can be
cleaned with a damp sponge and ethanol or
isopropanol.
Sample tube is placed into a tube adapter inserted on
the sample rotor for closed vial or open vial singletube manual sample processing. The sample tube is
rotated from the front of the unit into the inside of the
‘ELite 5’ for aspiration. This safety feature protects
the operator from inadvertent contact with the
aspiration needle during specimen processing.
Automatic sample processing with the optional Autosampler can be interrupted in order to
run one or more stat samples with the sample rotor. Automatic processing can be resumed
after stat sample processing is complete.
The START button allows easy one-hand operation of the ‘ELite 5’ analyzer. The color of the
START button indicates the status of the ‘ELite 5’ analyzer:
Green - ready to process samples
Red – busy
Orange - standby mode.
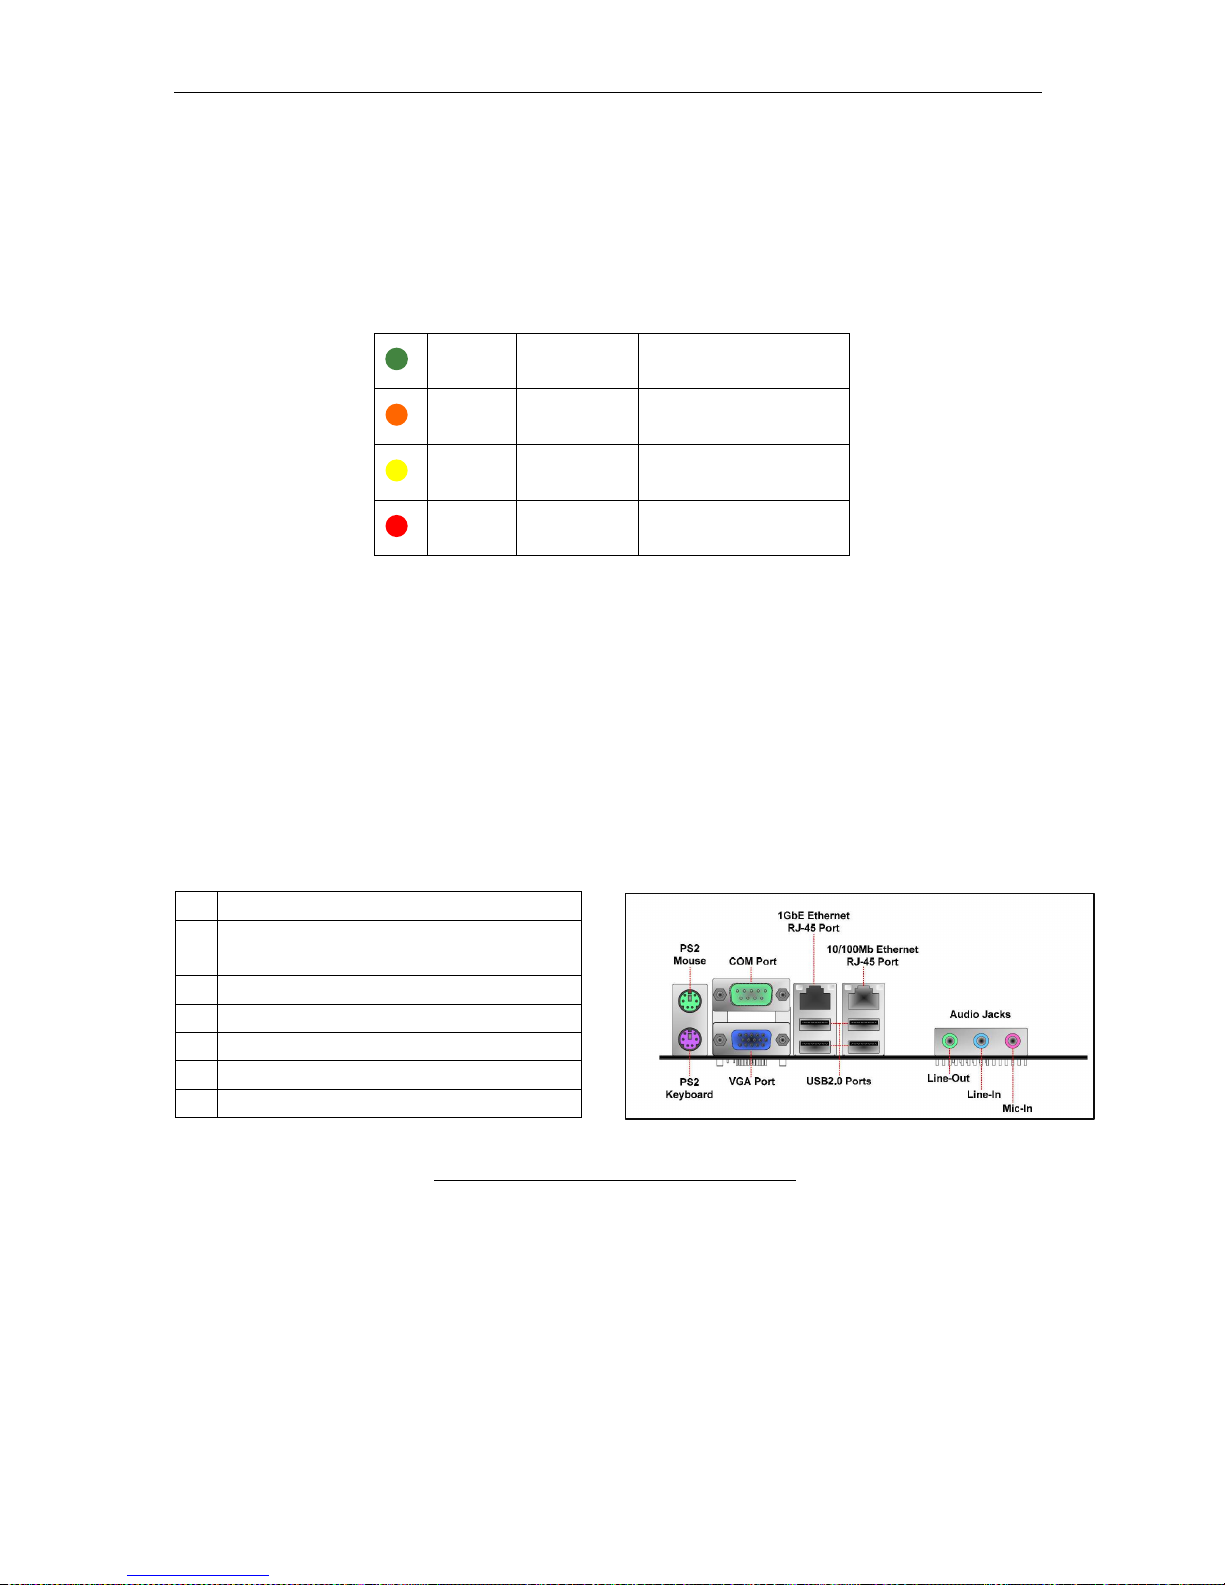
4.2.5 Back Panel
Power connector: the ‘ELite 5’ power connector should be
connected to a grounded power outlet that meets the
requirements listed in section 1.5.
Main power switch: this is a small switch located next to the
power connector. This switch turns off all electrical power to the
‘ELite 5’ analyzer. Leaving this switch on allows the ‘ELite 5’ to
remain in the standby mode. The switch is on when it is in the
‘up’ position labeled ‘1’ and is off when it is in the down position
labeled ‘0’.
Standby switch: flipping this switch to the ‘up’ position takes
the ‘ELite 5’ main computer out of the standby state and
powers up internal analyzer components. Please note that this
switch springs back to the down position when released and
does not stay in the ‘up’ position.
Figure
10
. Elite 5 Front Panel
1
2
3
4
5
6
Start button
Touch screen
Sample rotor
Place for
autosampler
Page 29
ELite 5, User Manual
Page 29 of 159
Hardware key connector: this connection is used to plug in the hardware key supplied with
every new package of original Erba Lachema Erba•Lyse-5P reagent. A new reagent key
provides the analyzer with the ability to run 800 measurements. When the measurement
count has been exhausted, the ‘ELite 5’ analyzer stops processing samples.
Reagent connectors: five color-coded tubing connectors provide connection to the
reagents. There are three reagent connectors and two waste connectors.
Green
1
connector
Erba•Dil-5P diluent
Orange
1
connector
Erba•Diff-5P
Yellow
1
connector
Erba•Lyse-5P
Red
2
connectors
Waste
Main board back panel I/O Ports: these are the back panel computers of the ‘ELite 5’
analyzer main computer board. They provide standard connection to peripherals such as
external keyboard and mouse, printers, bar code readers.
Avoid getting liquids on the electrical connectors. The rear panel of the analyzer should
be cleaned with a cloth or sponge with 70% ethanol
1 PS2 Mouse port for optional mouse
1 PS2 Keyboard for optional PS2
keyboard
1 COM port for LIS
2 RJ45 Ethernet port for LIS
1 VGA port (unused)
4 USB 2.0 ports for peripherals
3 Audio jacks (unused)
Figure 12. Main Board Back Panel I/O Ports
Page 30

ELite 5, User Manual
Page 30 of 159
4.2.6 Left Side Assembly
To access the left or right side assemblies, the side panels must be removed. Please refer to
section 15.1.2 for information about removing the side panels.
Pressure Sensors
Small Measure Buffer
Drain Buffer,
Mix, RBC & WBC
Chambers
Valves 1-22
Valves 23-44
Diluent Buffers
Diff-5p, Lyse-5p Buffer s
Sheath Buffer
Figure 13. Left Side Assembly
• Pressure sensors measure the differential pressures of vacuum buffer for
impedance base and optical measurement and empty chamber process.
• Small Measure buffer is a vacuum buffer used for impedance measurement.
• Sheath buffer is a reservoir for Erba•Dil-5P diluent for optical measurements.
• Diff-5P buffer is a reservoir for Erba•Diff-5P reagent.
• Lyse-5P puffer is a reservoir for Erba•Lyse-5P reagent.
• Diluent buffers are reservoirs for Erba•Dil-5P diluent.
• Valves 1-44 connect pneumatic components to carry out dilution, reaction,
measurement, and waste disposal processes.
• Drain buffer controls chamber draining procedures.
• Mix chamber performs the first step of RBC dilution.
• RBC chamber performs the second step of RBC dilution and contains the RBC
aperture.
• WBC chamber performs the WBC dilution and holds the WBC aperture and HGB
photometric measurement system.
Page 31
ELite 5, User Manual
Page 31 of 159
4.2.7 Right Side Assembly
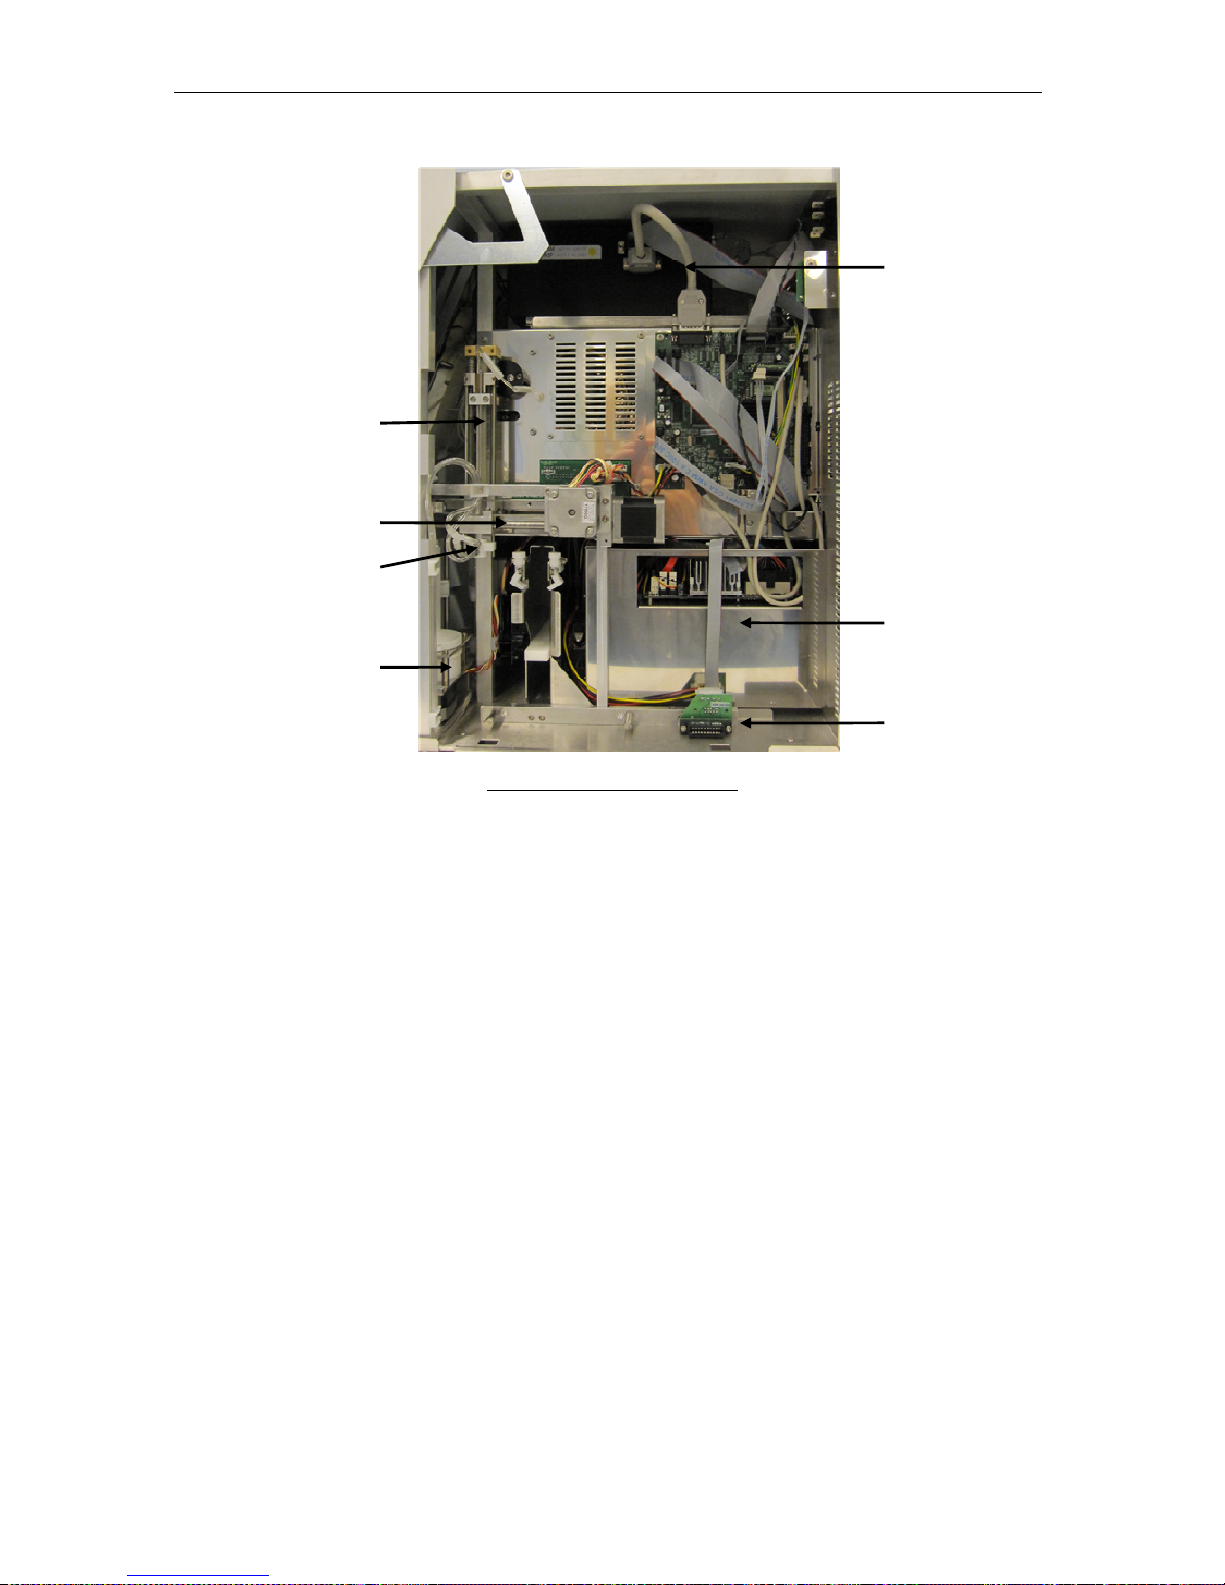
Aspiration Needle
Horizontal, Vertical
Motion Unit
Sample Rotor
Washing Head
Optical Head
Power Supply
Autosampler
Connector
Figure 14 Right Side Assembly
• Aspirating needle aspirates a blood sample from the sample tube.
• Horizontal, vertical motion unit positions the aspiration needle.
• Washing head cleans the aspiration needle to prepare for the next sample.
• Sample rotor holds the sample tube for single tube manual presentation.
• Autosampler connector is the power and control connector of the optional
Autosampler.
• Optical head contains the laser source, optical detectors and auto alignment
mechanism for the optical measurement.
Page 32
ELite 5, User Manual
Page 32 of 159
4.2.8 Front Assembly
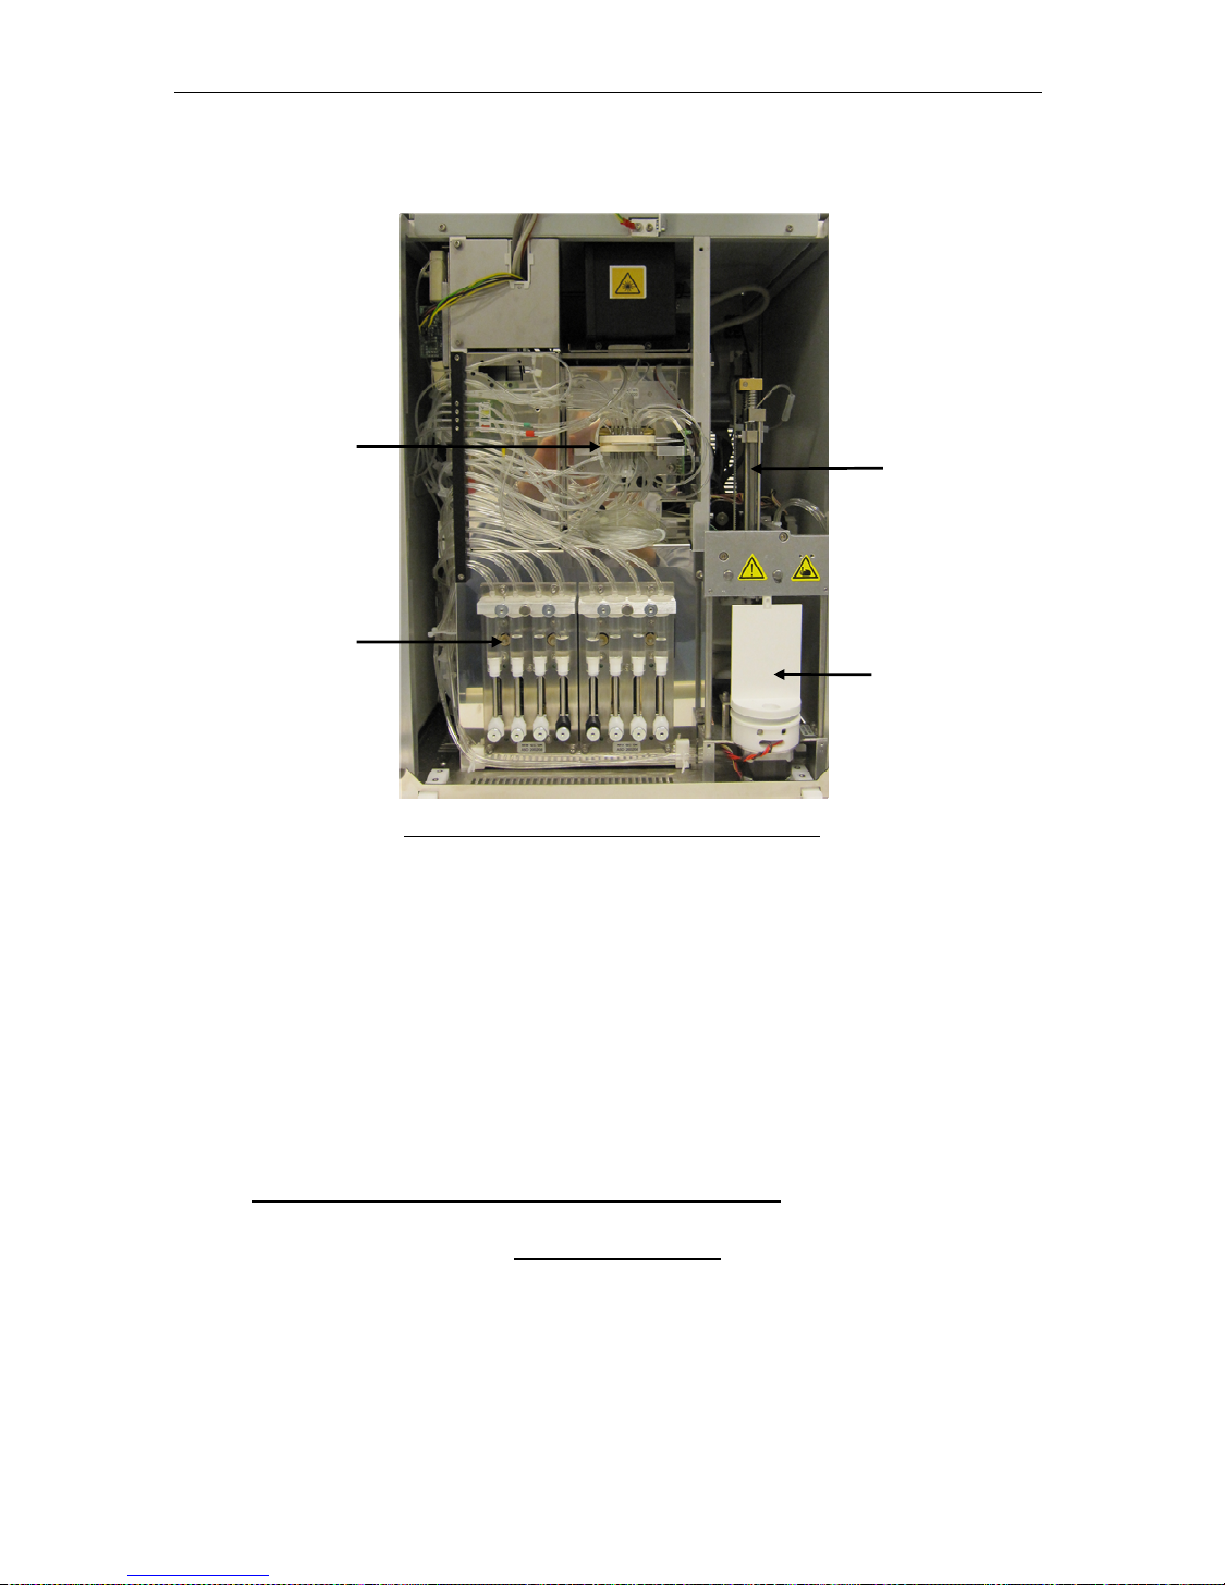
Shear Valve
Aspiration Needle
Sample Rotor
Figure 15. Front Assembly Behind the Front Panel
• Syringe pumps control the volume and flow rate of reagents through the pneumatic
components.
• Shear valve is an integrated multi functional valve for segmenting precise volumes of
blood.
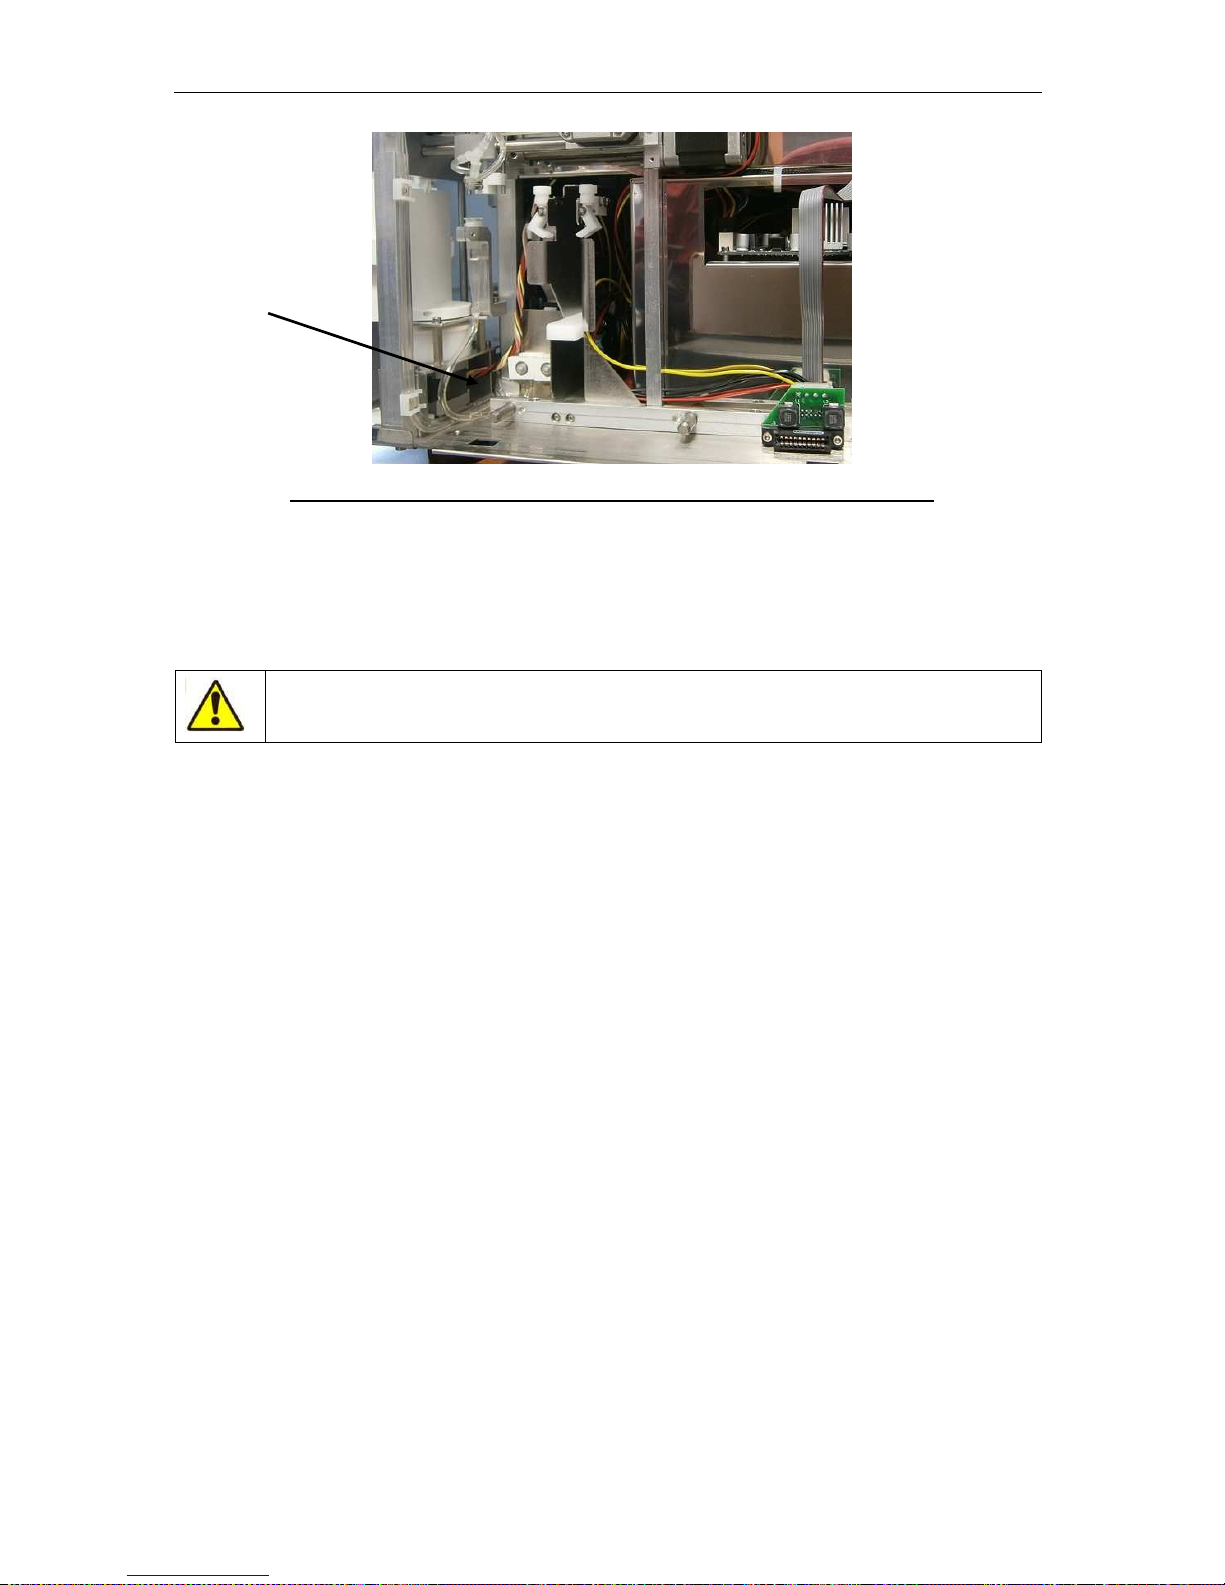
4.3 Small Sample Mode (SSM) – optional
Instruments which have the small sample module (SSM) installed can be used for taking
sample from a small amount of whole blood sample, which is not enough for normal
sampling.
• SSM measurements are only open vial measurements.
• At least 250 µl of sample is necessary for reliable sampling.
• The analyzer will aspirate 25 µl of whole blood and put it in to the pre-dilution
chamber to dilute it to 1:6.
• After pre-dilution, the needle will take 100 µl of diluted sample into the shear valve
and ´ELite 5´ is going to proceed with the normal measuring process.
Syringe pumps
Page 33
ELite 5, User Manual
Page 33 of 159
Figure 16. SSM installed instrument Sampling side with Pre-dilution chamber
In small sample mode there is no possibility using the Auto Sampler. It is working only in
manual feeding mode through the sample rotor.
Small Sample Mode is NOT a cap piercer mode.
Please remove the cap from the vial before measurement.
Pre-dilution
chamber
Page 34

ELite 5, User Manual
Page 34 of 159
5 User Interface
The user interface of the ‘ELite 5’ analyzer is designed to be intuitive and easy to use, and
provide access to all user level functions. You can interact with the ‘ELite 5’ by using the
touch screen and the virtual on-screen keypad, or by using an external keyboard and mouse
(PS2 or USB). The Start button is considered an important part of the user interface, allowing
one-hand, one touch processing of sample tubes.
5.1 Using the Touch Screen
The touch screen is a pressure sensitive overlay on the screen of the ‘ELite 5’. It allows
selection of menu items and pressing of buttons by gently pressing or tapping the surface
over the selected item. This method is called ‘tapping’. The touch-screen device used in the
‘ELite 5’ analyzer is selected for reliability, endurance and compatibility with the medical
laboratory environment. Simple operations are supported, but multi-touch “gestures” or
multiple tapping are not supported
The touchable items on the ‘ELite 5’ user interface are designed to be large enough to tap
with finger. The use of a tapping tool may be useful if the operator has larger or thicker
fingers, or when wearing oversize gloves. A tapping tool can be pencil eraser or a specially
designed stylus available at computer or consumer electronics stores.
Do not use sharp or heavy objects to operate the touch screen. The surface material is
moderately resistant to liquids. Avoid touching the screen with wet fingers, or allow liquids to
come in contact with the screen or the surrounding area.
If you find that the ‘ELite 5’ touch screen responds in a different area than the one you are
tapping, then please perform a touch screen calibration procedure before calling for service
or support. See chapter 15.2 for more details on touch screen calibration and other
maintenance procedures.
5.2 Using the ‘Start’ Button
The ‘Start’ button is a physical button on the front cover of the ‘ELite 5’. It has the following
functions:
• Start a single tube, closed or open vial measurement using the sample rotor by
pressing the Start button.
• Provide color-coded feedback about the status of the measurement system.
• Green means that the ‘ELite 5’ is ready to start a new measurement.
• Red means that the system is busy running a measurement or a procedure.
• Orange color means that the analyzer is in standby mode.
5.3 Using an External Mouse
An external mouse can be used to perform the same functions as the touch screen. Navigate
the mouse pointer over the desired item and click the left mouse button instead of tapping
the touch-screen to activate the function. This procedure is referenced as clicking (click) an
item. Touch screen operation continues to be available even if an external mouse is
connected to the ‘ELite 5’ analyzer.
It is possible to move the mouse pointer to a place on the screen where it is not viewable.
Move the mouse pointer up or to the left to make it visible again.
Page 35
ELite 5, User Manual
Page 35 of 159
5.4 Using an External Keyboard
An external keyboard provides the same data entry features as the on-screen virtual keypad
presented by the touch screen user interface with faster typing.
The “Settings/Customize/On screen keyboard active” check-box allows you to choose
whether the on-screen virtual keypad is presented or not when data entry is required (name,
sample ID, target value etc.). If the check box is left unchecked, then the on-screen virtual
keypads are not presented and an external keyboard is required for data entry. If the check
box remains checked, the external keyboard can still be used by pressing the ‘ESC’ key on
the external keyboard to dismiss the on-screen virtual keyboard and complete the data entry
using the external keyboard.
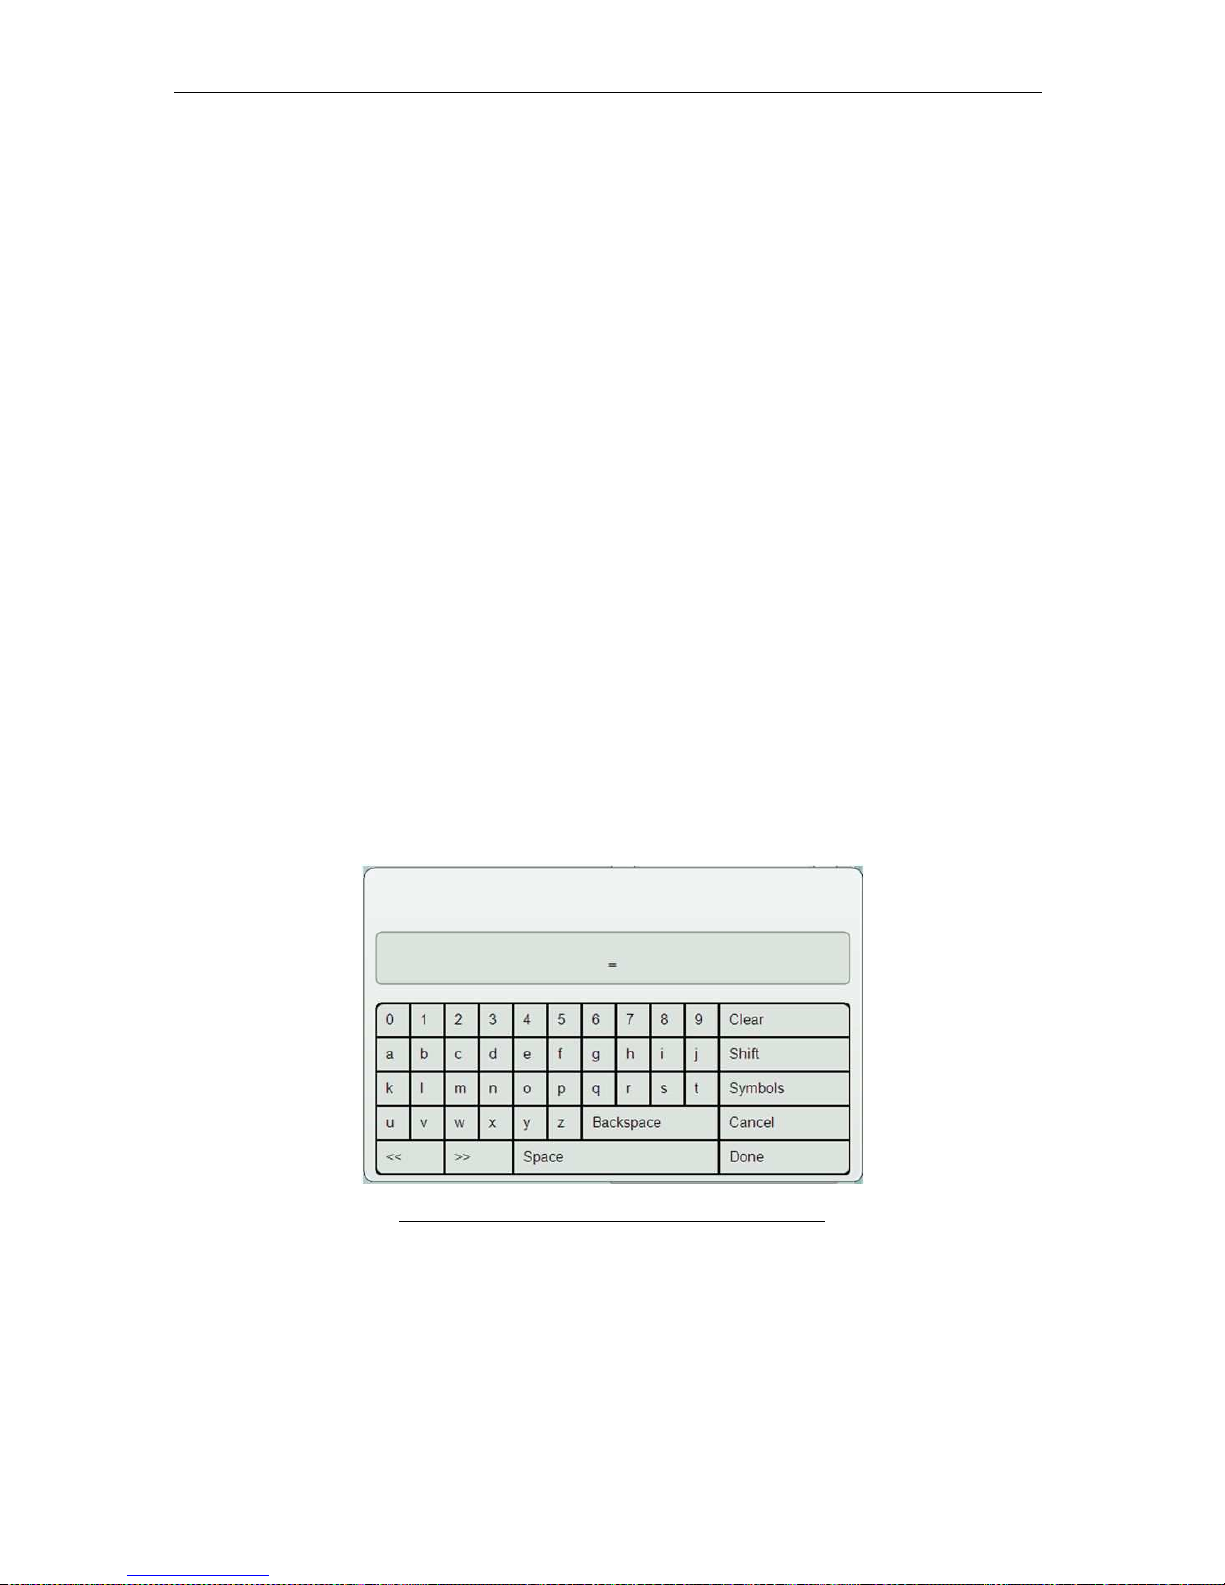
5.5 Using the On-Screen Virtual Keypads
There are three types of virtual on-screen keypads:
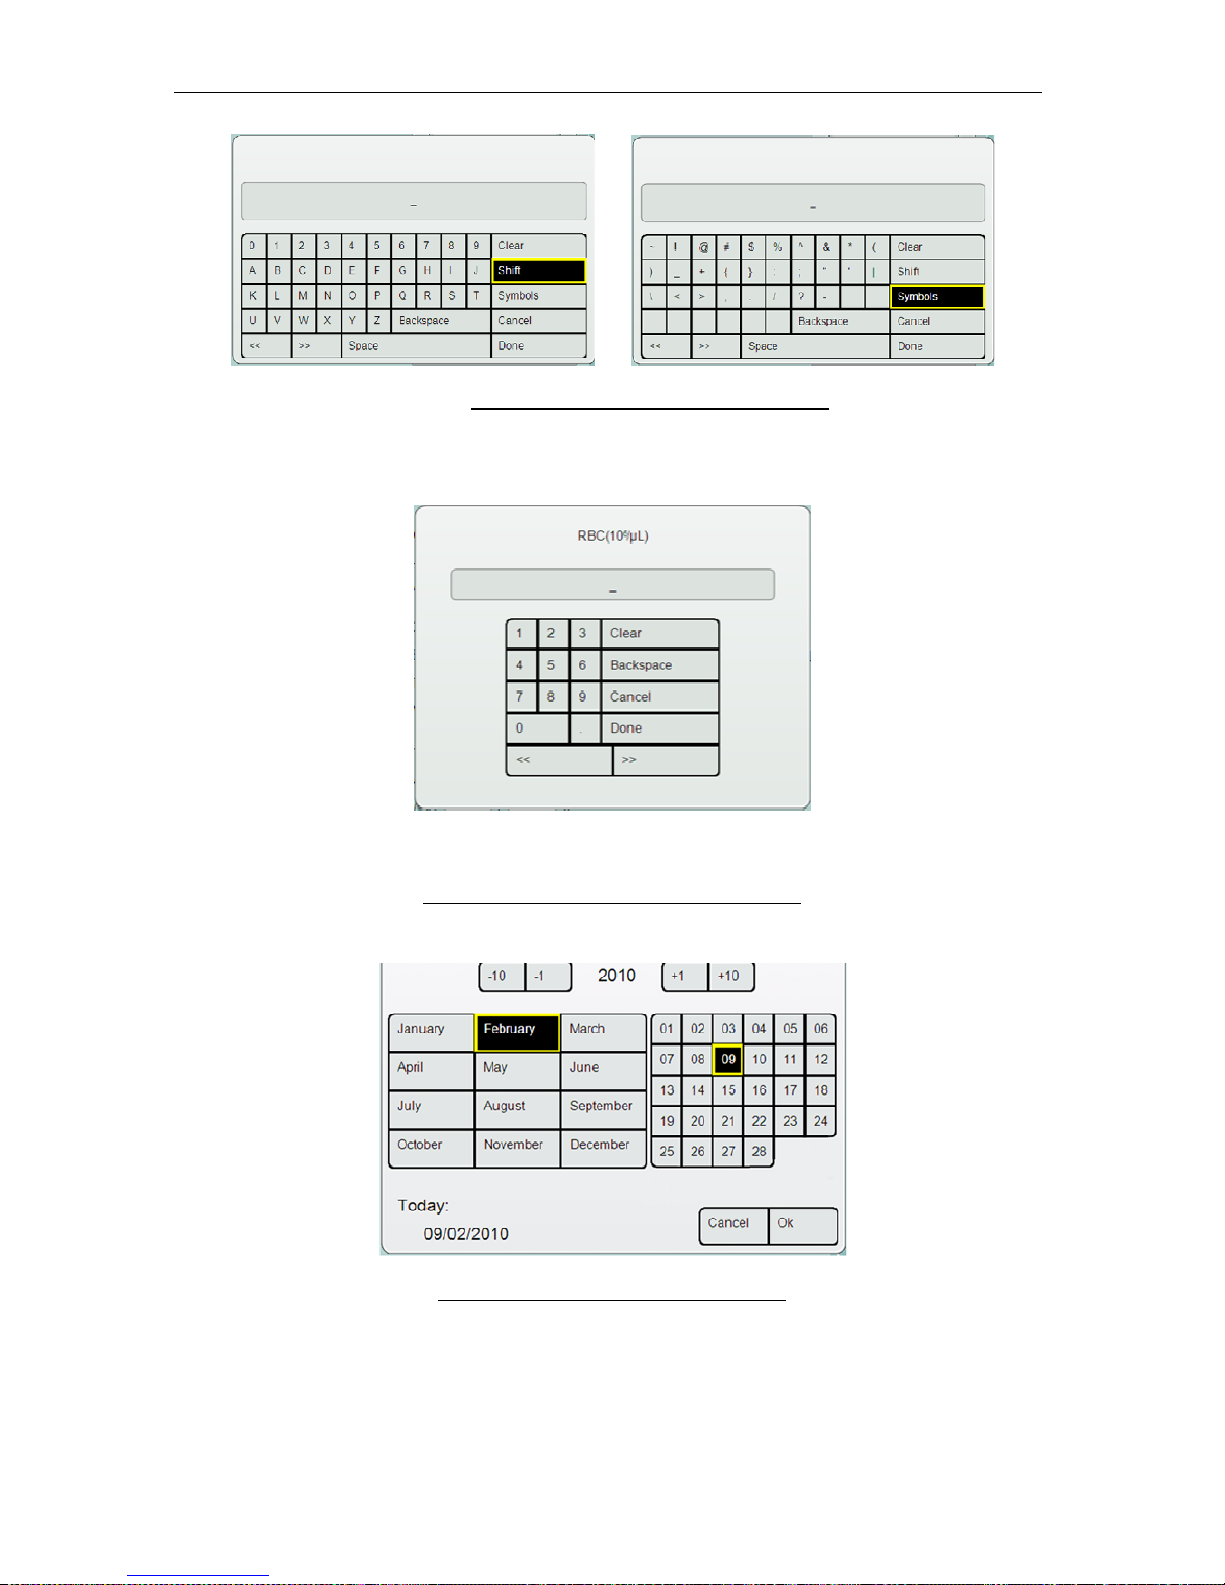
• Alpha-numeric with shift and symbol options
• Numeric only
• Date
The particular virtual on-screen keypad presented is tailored to the data entry required. If
only numeric values are accepted than a numeric-only keypad is presented. For selection of
dates, a date keypad is presented.
The touch-pad of the ‘ELite 5’ handles single taps only. The Shift and Symbol keys are
‘sticky’ on the virtual on-screen keypads like the ‘caps-lock’ on a PC key-board. Click/tap on
the appropriate buttons to type in the required value. Complete the operation by
clicking/tapping the ‘Done’ button. The ‘Symbols’ button presents special characters such as
the question mark or ampersand (&).
Figure 17. Alphanumeric Virtual On-Screen Keypad
Page 36
ELite 5, User Manual
Page 36 of 159
Figure 18. Sticky’ Shift and Symbol Buttons
Figure 19. Numeric Virtual On-screen Keypad
Figure 20. Date Virtual On-Screen Keypad
Page 37
ELite 5, User Manual
Page 37 of 159
5.6 Using the Graphical User Interface
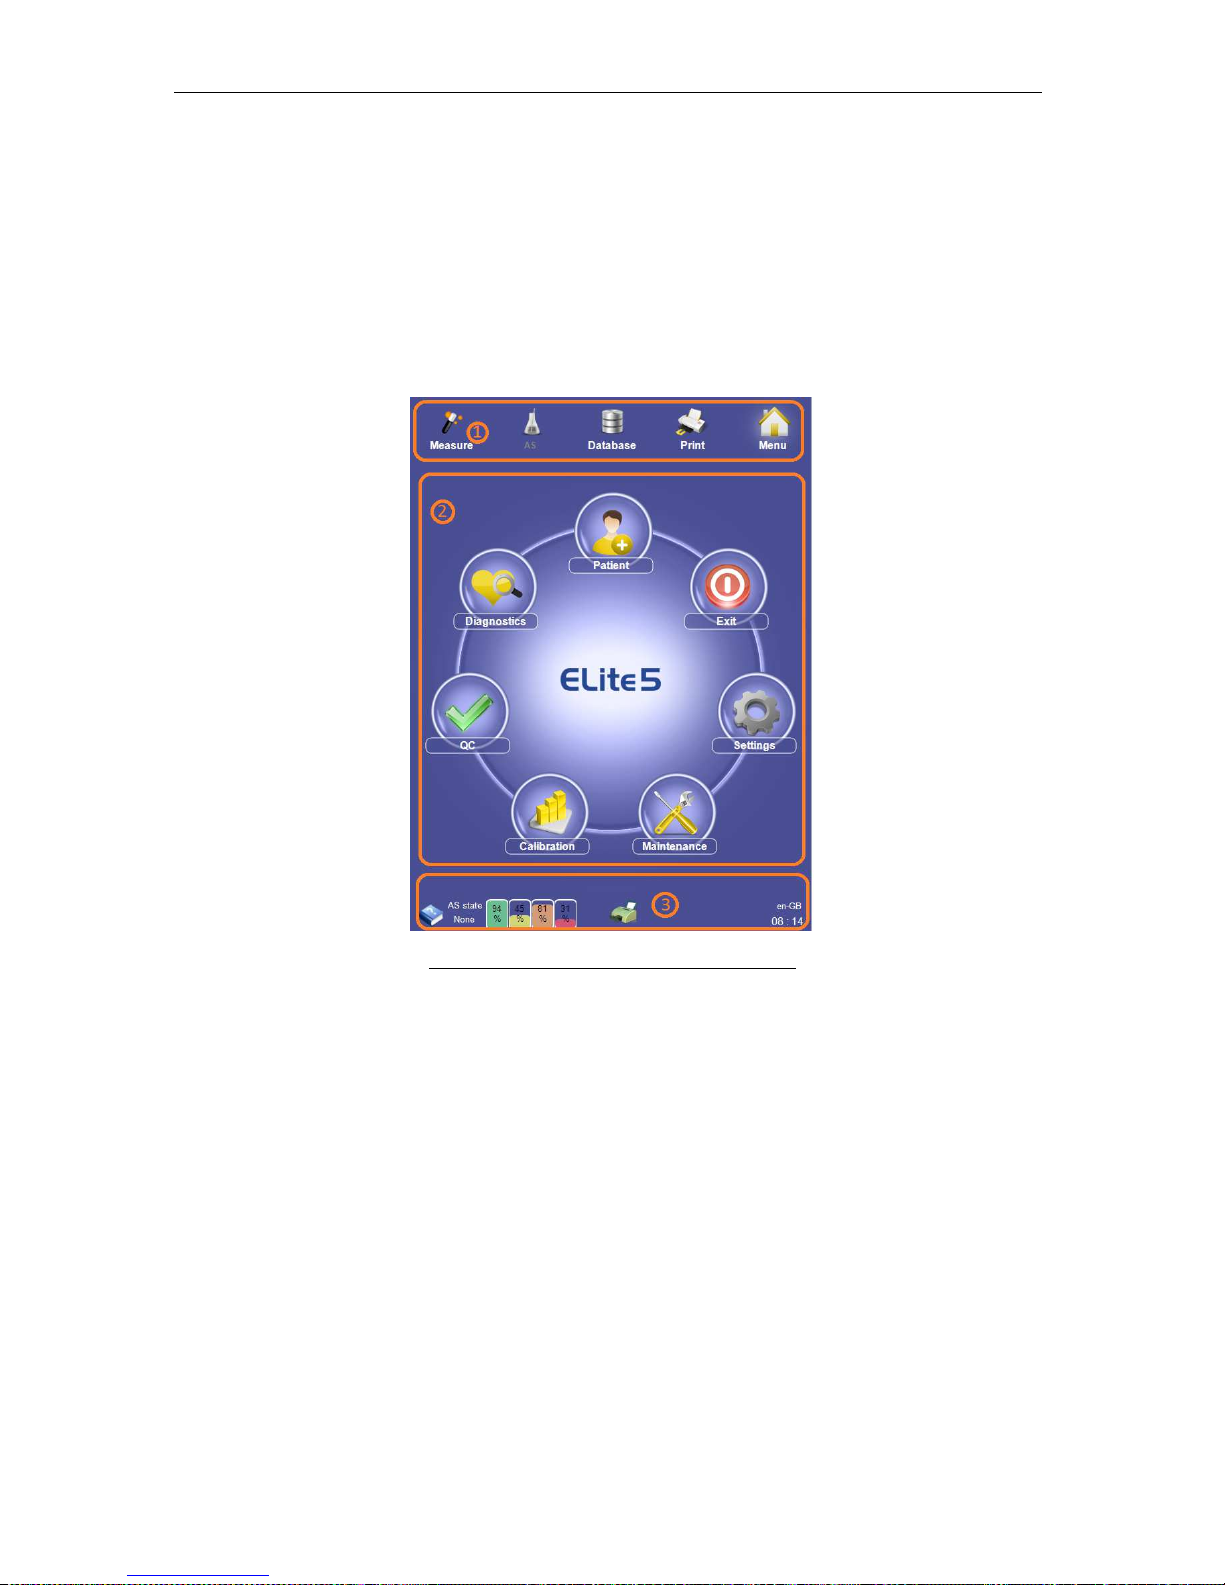
The graphical user interface (GUI) of the ‘ELite 5’ is divided into three main sections. Refer to
Chyba! Nenalezen zdroj odkazů. to see these sections:
1. Quick links to main functions (top section)
2. Interactive display area (middle section)
3. Status display (bottom section)
The main menu shown below is displayed in the interactive display area when the ‘ELite 5’
analyzer is initially powered up.
Figure 21. Graphical User Interface Sections
5.6.1 Quick Links
The upper part of the GUI is always visible during all operations and presents several quick
link buttons. Selecting one of the quick link buttons determines what is displayed in the
interactive display area. The selected button is framed on three sides for clear visual
feedback. The quick link for Auto-sampler functions is enabled only if the optional Autosampler is connected and turned on.
5.6.2 Interactive Display Area
The middle section is used to display the main menu, functions, information, results, and all
the panels that contain information about the active mode.
Page 38
ELite 5, User Manual
Page 38 of 159
5.6.3 Status Display
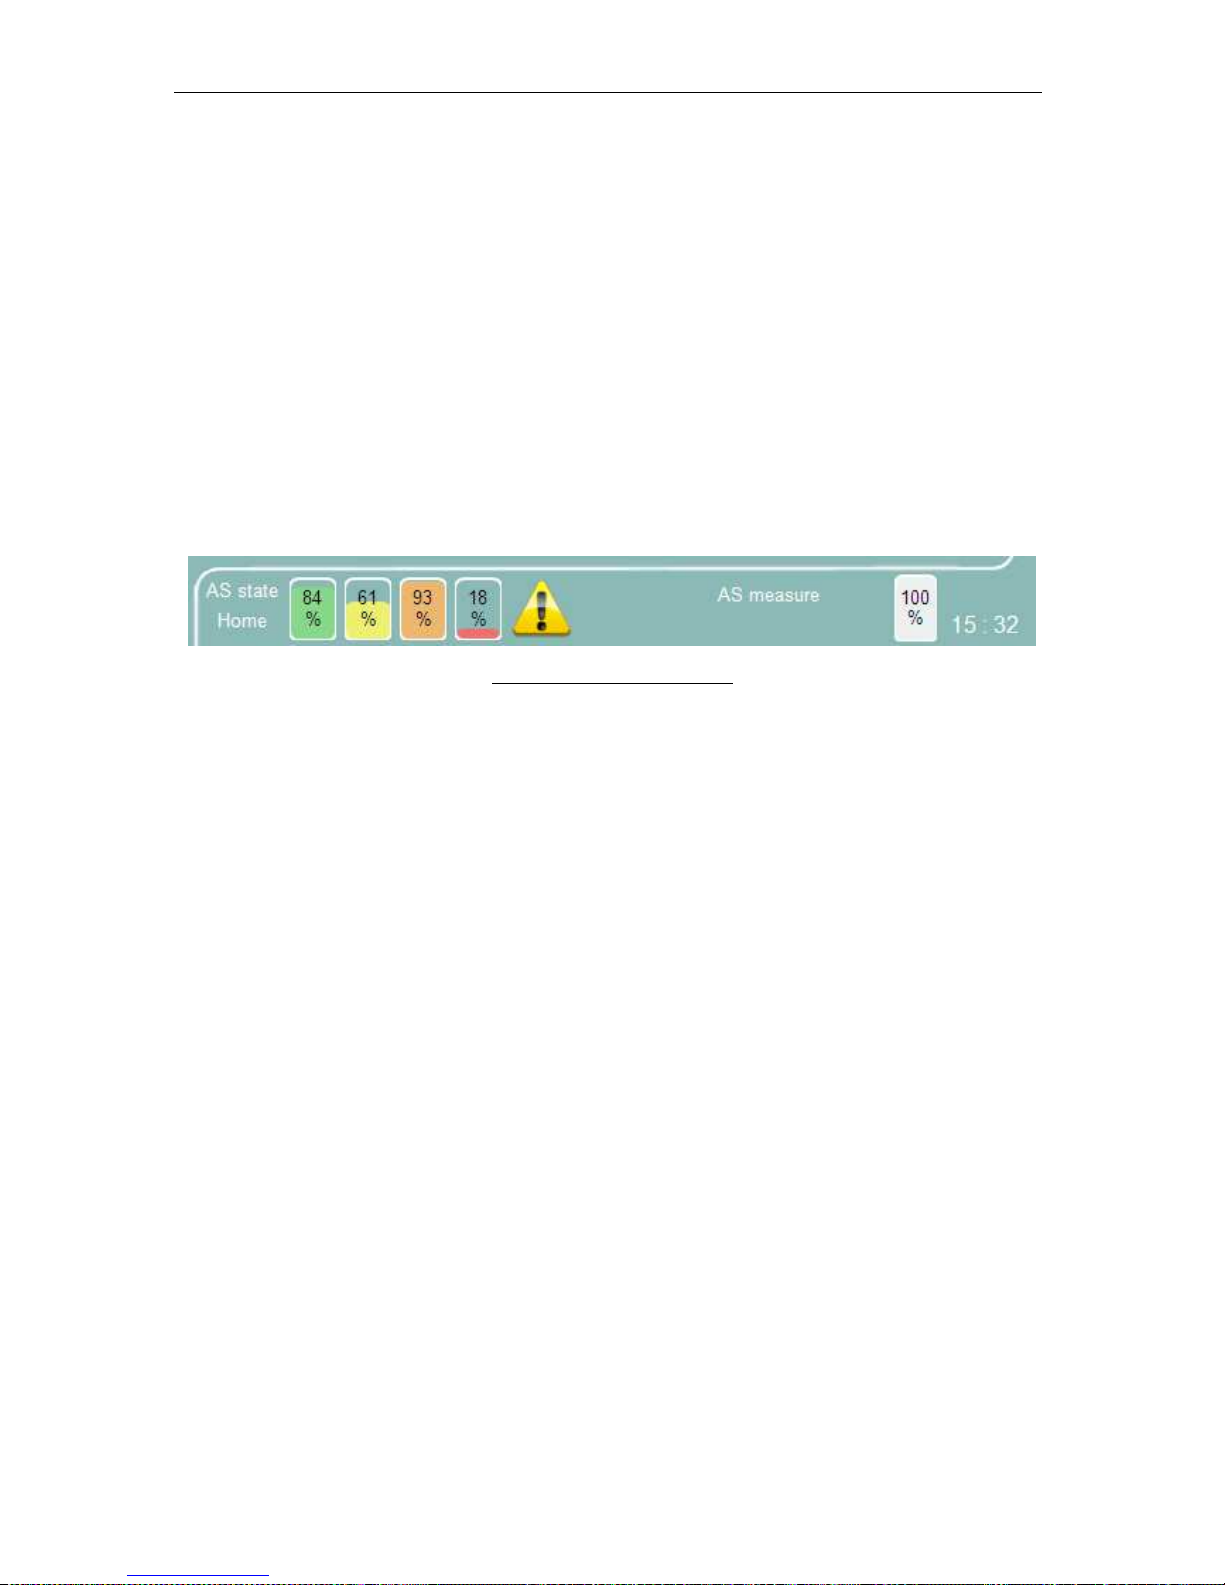
The bottom section is called the Status display, and shows information of the following:
• Status of the Autosampler unit
• The state of the reagent and waste containers
• Error/ warning icons
• Status of the pneumatic system (standby, manual measure, rinse, clean)
• Progress of the active operation
• Time
• Printer status
Clicking or tapping on an error or warning icon navigates directly to the relevant menu where
the problem can be addressed, or provides the user with information on how to resolve the
problem.
Figure 22. The Status Display
5.6.4 Entering Information
The ‘ELite 5’ sometimes requires the operator to enter information such as sample ID or
patient data. In order to enter information into a data field simply tap or click on it. The data
field will change color to yellow indicating that data entry is active for that field. Information
can be entered using the virtual on-screen keypad or with an optional external keyboard.
5.7 The Menu System
The graphical user interface of the ‘ELite 5’ analyzer has primary functions that are
accessible directly by means of icons or controls that are always available to the operator.
The ‘ELite 5’ analyzer also has secondary functions that are available via two or more taps or
clicks through the menu structure, or menu tree.
5.7.1 Primary Menu Items
The following menu items or functions are directly accessible:
• Start a manual single tube measurement
• Start an automated measurement
• Access the database
• Initiate printing
• Access the main menu
• Access the control panel of the Autosampler (opens with double click or tap)
• Access the time adjustment panel (opens with double click/tap)
• Access the warnings panel (only visible if an error or warning was reported)
5.7.2 Starting a Manual Single Tube Measurement
Tapping or clicking on the ‘Measure’ icon with the single sample tube graphic allows access
to the following functions:
Page 39

ELite 5, User Manual
Page 39 of 159
• Initiate a primary blank measurement
• Make adjustments and settings about the manual measurement:
o Enter the Sample ID (unique or auto-increment)
o Select the associated patient
o Select the sample type or patient mode
• Start a manual measurement
• View the measurements results in detail:
o View the measured parameters
o View the calculated parameters
o View parameters that are out of the normal range
o View error, warning, or clinical flags
See section 7.4.1 for more information about manual measurements.
5.7.3 Start Automated Measurements
Tapping or clicking the ‘AS’ icon with the multiple sample tube graphic allows access to the
following functions:
• Initiate automated measurements in one of three run modes:
o Full scan mode
o Free list mode
o Selected samples mode
o Remote worklist mode
• Define sample parameters (the parameter list depends which one of the three sample
modes is selected)
• Monitor the progress of the automated measurements
• View the details of completed measurements
See section 7.4.3 for more details about the automated measurements.
5.7.4 Access the Database
Tapping or clicking the ‘Database’ icon with the file cabinet graphic allows access to the
following functions:
• Select completed and measurement stored as database records
• Export database records for storage or import results for viewing
• Delete database records
• Send database records to the LIS
• Review the details of selected measurements
See section 9 for more details about accessing and using the ‘ELite 5’ database.
5.7.5 Initiate Printing
Tapping or clicking the ‘Print’ icon with the printer graphic will print the active panel or
measurement result according to the printer settings.
See section 13.6 for more details about printing on the ‘ELite 5’ analyzer.
Page 40
ELite 5, User Manual
Page 40 of 159
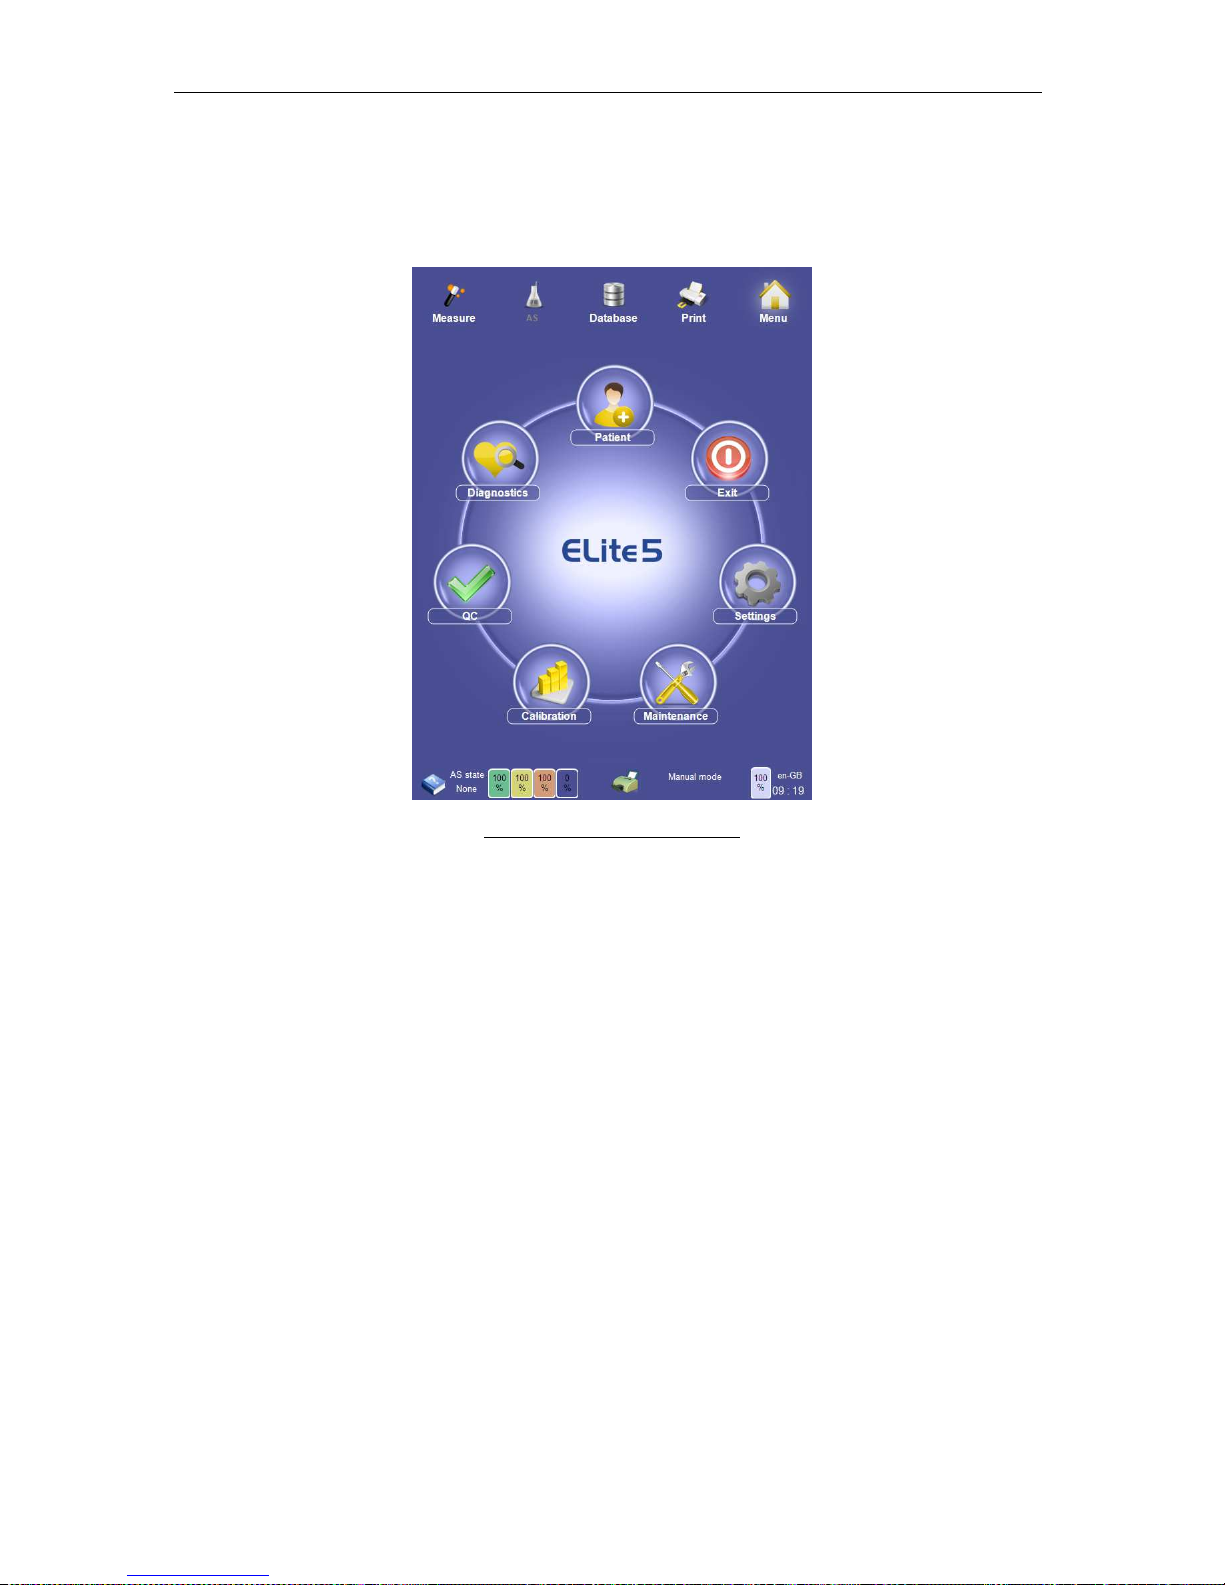
5.7.6 Main Menu
Tapping or clicking the ‘Menu’ icon with the main menu graphic displays and allows access
to the main menu. The main menu is automatically displayed when the ‘ELite 5’ analyzer is
started up. The main menu icons are arranged in an intuitive and attractive circular design.
Figure 23. ‘ELite 5’ Main Menu
5.7.7 Autosampler (AS) Control Panel
If you have an optional Autosampler installed, the Autosampler control panel can be opened
by double clicking/tapping the Autosampler status on the left side of the status display on the
bottom of the screen. The Autosampler control panel allows you to see whether the
Autosampler is operational and perform an Autosampler initialization.
See section 7.4.3.6 for more details about the Autosampler control panel.
5.7.8 Adjust the Time and Date
Double click/tap the time display on the right side of the status display on the bottom of the
screen to bring up a panel for adjusting the stored time and date of the ‘ELite 5’ analyzer.
See section 13.9 for more information about time and date adjustment.
5.7.9 Open the Warning Panel
If an error or warning is currently active, an exclamation point icon appears on the status
display. Click the icon to review the active error or warning and jump to the appropriate menu
where the error or warning can be addressed (such as reagent replacement).
Page 41

ELite 5, User Manual
Page 41 of 159
5.7.10 Menu tree
The following is a listing of the ‘ELite 5’ analyzer main menu tree:
Patient
New: Add a new patient
Edit: Modify an individual patient’s information
Details: View an individual patient’s information
See section 12 for more details about patient data
Exit
Cancel: Cancels shutdown of the ‘ELite 5’ analyzer
Prepare for shipment: Performs an extensive drain procedure of the ‘ELite 5’ pneumatic
system in preparation for shipment or an extended period of inactivity
Log off: Logs off the current user session
Shutdown: Prepares the ‘ELite 5’ for a complete shutdown
See section 6.3 to learn how to power down the ‘ELite 5’ analyzer correctly
Settings
Customize
Language: Change the active language
Limit Style: View parameter normal range status in numerical or graphical format
Sound Volume: Change the volume of the ‘ELite 5’ built-in speaker
On screen keyboard active: Turn off on-screen virtual keypads for use with an optional
external keyboard
Patient’s displayed data: Patient identifier visible in the database display
Laboratory: Seven lines of text of lab information be displayed on each printed page
Skins: Change the display skin
Demo mode: The analyzer will not perform any pneumatic action
External devices
Sending port baud rate: Select transmission rate for serial LIS
Automatic LIS: Select whether to automatically transmit results each time a sample is
processed
LIS: Select Ethernet LIS connection
IP: IP address of Ethernet-based LIS host computer listening port
Port: Port number of Ethernet-based LIS host computer listening port
Bidirectional LIS: Selects whether Autosampler information downloads are allowed
System
Database column order: Change visibility and position of the database columns
Waste container volume: Selects a 10L, 20L, or no waste container (direct to drain)
Database display limit: Selects all or only last month of database record display
Use only Sarstedt-Monovette tubes from sample rotor: Change sampling adjustments to
accommodate Sarstedt Monovette tubes. Please refer to Section 7.1.1 for further description
of the same.
Standby time: Time period of inactivity before the ‘ELite 5’ automatically enters standby
Offline rinsing frequency: Time period of inactivity before the ‘ELite 5’ performs an offline
rinse to keep the pneumatic system in peak operating condition
Screen saver – Time period of inactivity before screen saver takes effect
Special flags(G, L): Select whether G, L flags are displayed or printed
Blank Request Time: Time interval between system requests to process a blank specimen (0
h = no blank request reminders)
Units
HGB unit: Selects the units for HGB and HGB-derived or calculated parameters
Count unit: Selects the units for WBC, RBC, and PLT and derived or calculated parameters
PCT/HCT unit: Selects the units for PCT/HCT parameters
MCV unit: Selects the units for MCV parameters
Printer
Page 42

ELite 5, User Manual
Page 42 of 159
Printer: Selects which printer to print to
Printer status: Display the currently selected printer status
Color printing: Selects whether to print in color
Double sided printing: Selects whether to print multi-page printouts on both sides of a page
Items in queue: Number of items in the printer queue
Cancel all jobs: Cancels all items in the selected printer’s queue
Pre-printed paper´s header length (px): Reserves space (pixels) at top of page for pre-printed
letterhead
Automatic print: Selects whether to print for every new sample processed
Logo visible: Selects whether to print or omit graphical logo to printout
Warning flags are visible: Selects whether to print or omit warning flags to printout
Diagnostic flags are visible: Selects whether to print or omit diagnostic flags to printout
Refresh printers list: Refreshes the list of displayed printers
Profile limits: Enter normal ranges for various profile limits
X-B: Change X-B limits and targets
User: Add and manage users of the ‘ELite 5’ analyzer (only available to administrator users)
Delete user: Initiates deletion of a user account
Administrator: Selects or unselects administrator privileges for the currently selected user
See section 13 for more details about ‘ELite 5’ analyzer settings
Maintenance
Cleaning: Perform extended cleaning of various pneumatic components
Draining: Drain various internal system reservoirs
Empty chamber: Empty RBC, WBC, and mix chambers
Prime: Prime one or all reagent reservoirs
Fill: Fills the fluidic components of the system with reagents
Show MS On-Screen Keyboard: Brings up a vertical keyboard
Touch screen: Calibrate the touch screen location for taps and button presses
Reset Auto Sampler: Sets Auto Sampler to home position
See section 15 for more details about ‘ELite 5’ maintenance procedures
Calibration
Calibrate
Calibration mode: Select type of calibration procedure to run
Calibration type: Select human blood or calibration material
Target values: Enter the target values for each calibrated parameter
Cancel: Cancel a calibration procedure
Next: Initiates processing of calibration run
View Calibrations: View and delete previous calibrations
See section 10 for more details about ‘ELite 5’ calibration
QC
QC Measure: Initiate processing of a control sample
QC Reference select: Select which stored QC reference this measurement belongs to
Set QC Reference: Create a new stored QC reference
Load QC reference: load QC reference values from removable media such as a flash drive
Save reference: Save entered QC reference values
View QC references: Browse stored QC references
Delete: Delete a stored QC reference
Details: View detailed results for a stored QC reference
View QC data: Browse individual QC sample measurements
Delete: Delete currently selected QC run
View QC diagrams: View QC diagrams for currently selected control
Details: View detailed result screen of a QC run
View QC diagrams: View Levy-Jennings diagrams of QC data for the currently selected QC
reference
View QC data: Browse individual QC sample measurements
Next diagrams: Browse the next set of QC diagrams
Page 43
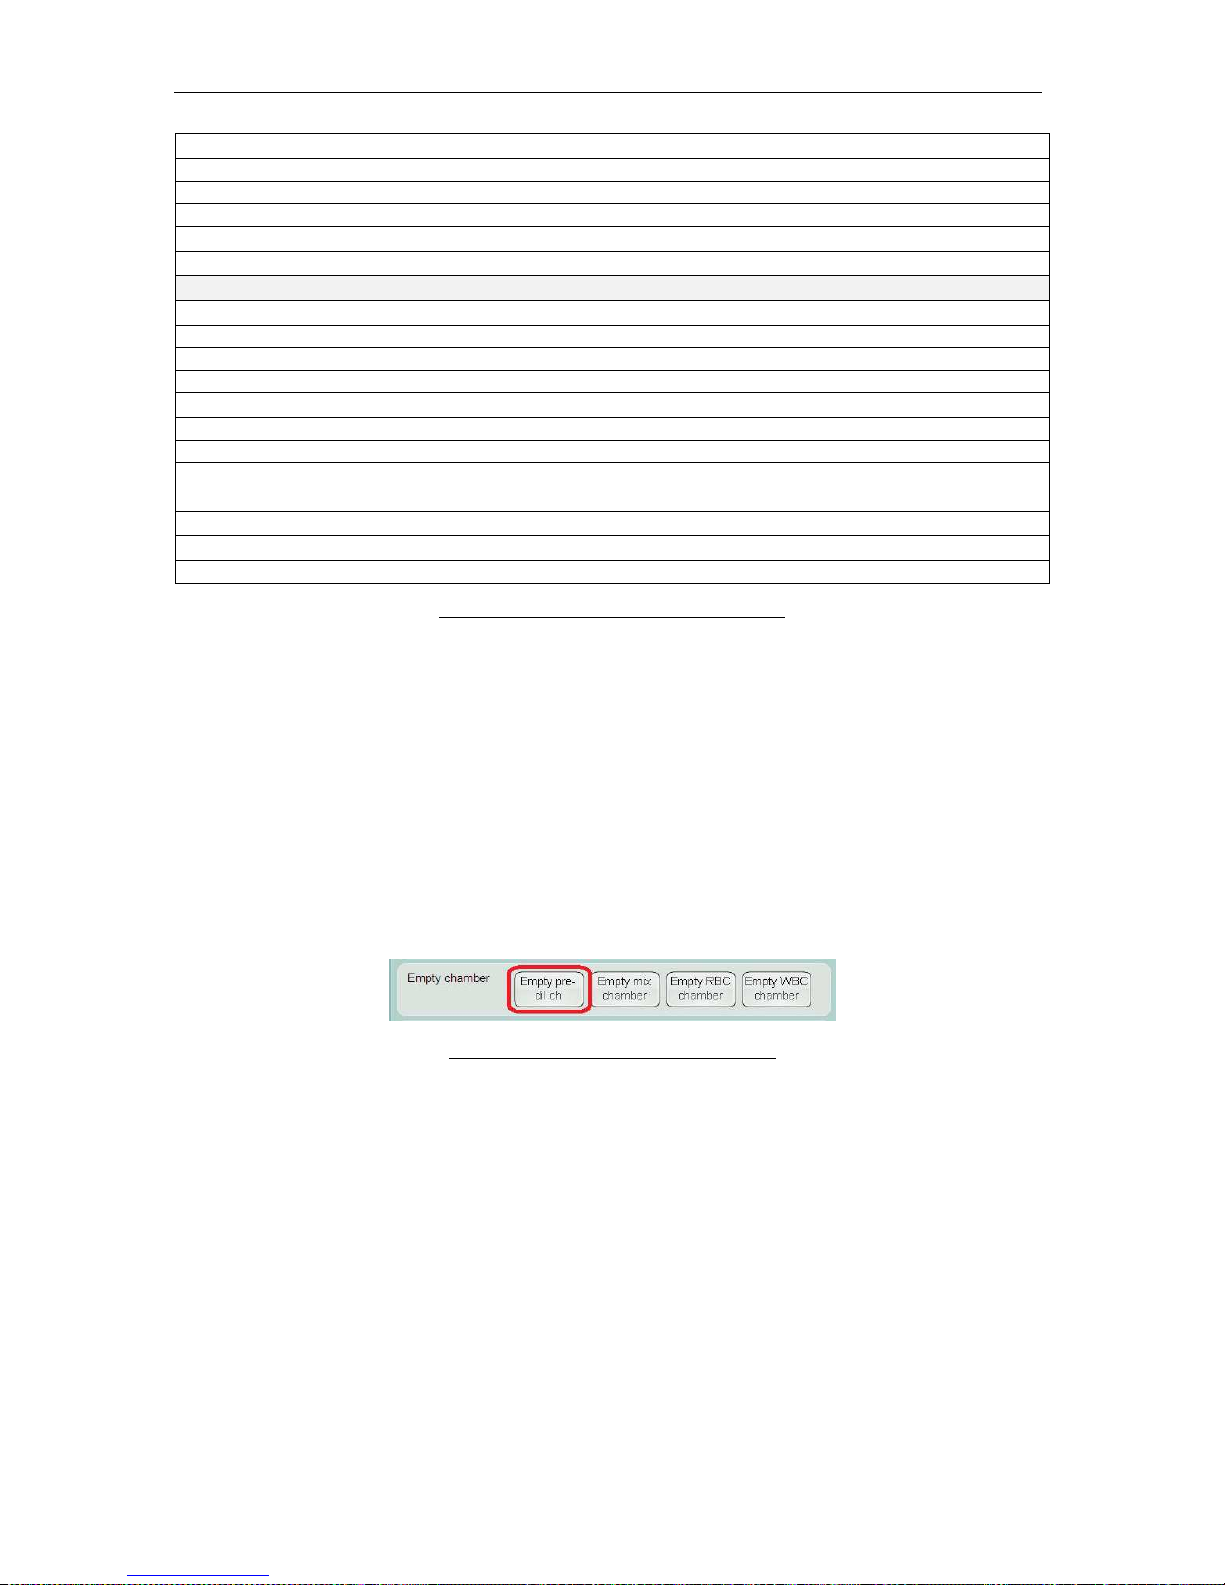
ELite 5, User Manual
Page 43 of 159
View X-B data: Browse individual X-B sample measurements
Reject: Reject a run from being included in X-B calculations
View rejected: View previously rejected X-B runs
Undo reject: Restore a previously rejected X-B run and use in X-B calculations
View X-B diagrams: Navigate directly to X-B diagrams
See section 11 for more details about quality control on the ‘ELite 5’ analyzer
Diagnostics
Self test: perform electronic and/or pneumatic system self test
Load last self test: Loads the results of the last self test
Start electronic: Starts the electronic tests
Start both: Starts both electronic and pneumatic tests
Log: Review and obtain additional details about events in the system log
Details: Display details about the selected event in the system log
Self test: Navigates directly to self test screen
Reagent status: Reset levels for individual reagents and waste (or all) for reagent
replacement
Statistics: Provides operating statistics such as cycle counts, errors, etc.
Information: Provides version information for all software items in the ‘ELite 5’ analyzer
Collect: Creates a collect file with information about the analyzer for troubleshooting
Table 3. ‘ELite 5’ Analyzer Menu Tree
5.7.11 Safety Access Codes
Some functions require password protected confirmation. For example, deleting a record
from the database requires entry of a password.
The security password for deleting database entries is: 555.
5.7.12 SSM Menu Add-ons
• With SSM mode turned on there will be new options available. In Maintenance menu
there is a new option called Empty Pre-dilution Chamber:
Figure 24. Empty Pre-dilution Chamber
• Under Calibration menu, now you can calibrate for the Small Sampling measurement.
Also you can view these calibartion factors.
Page 44
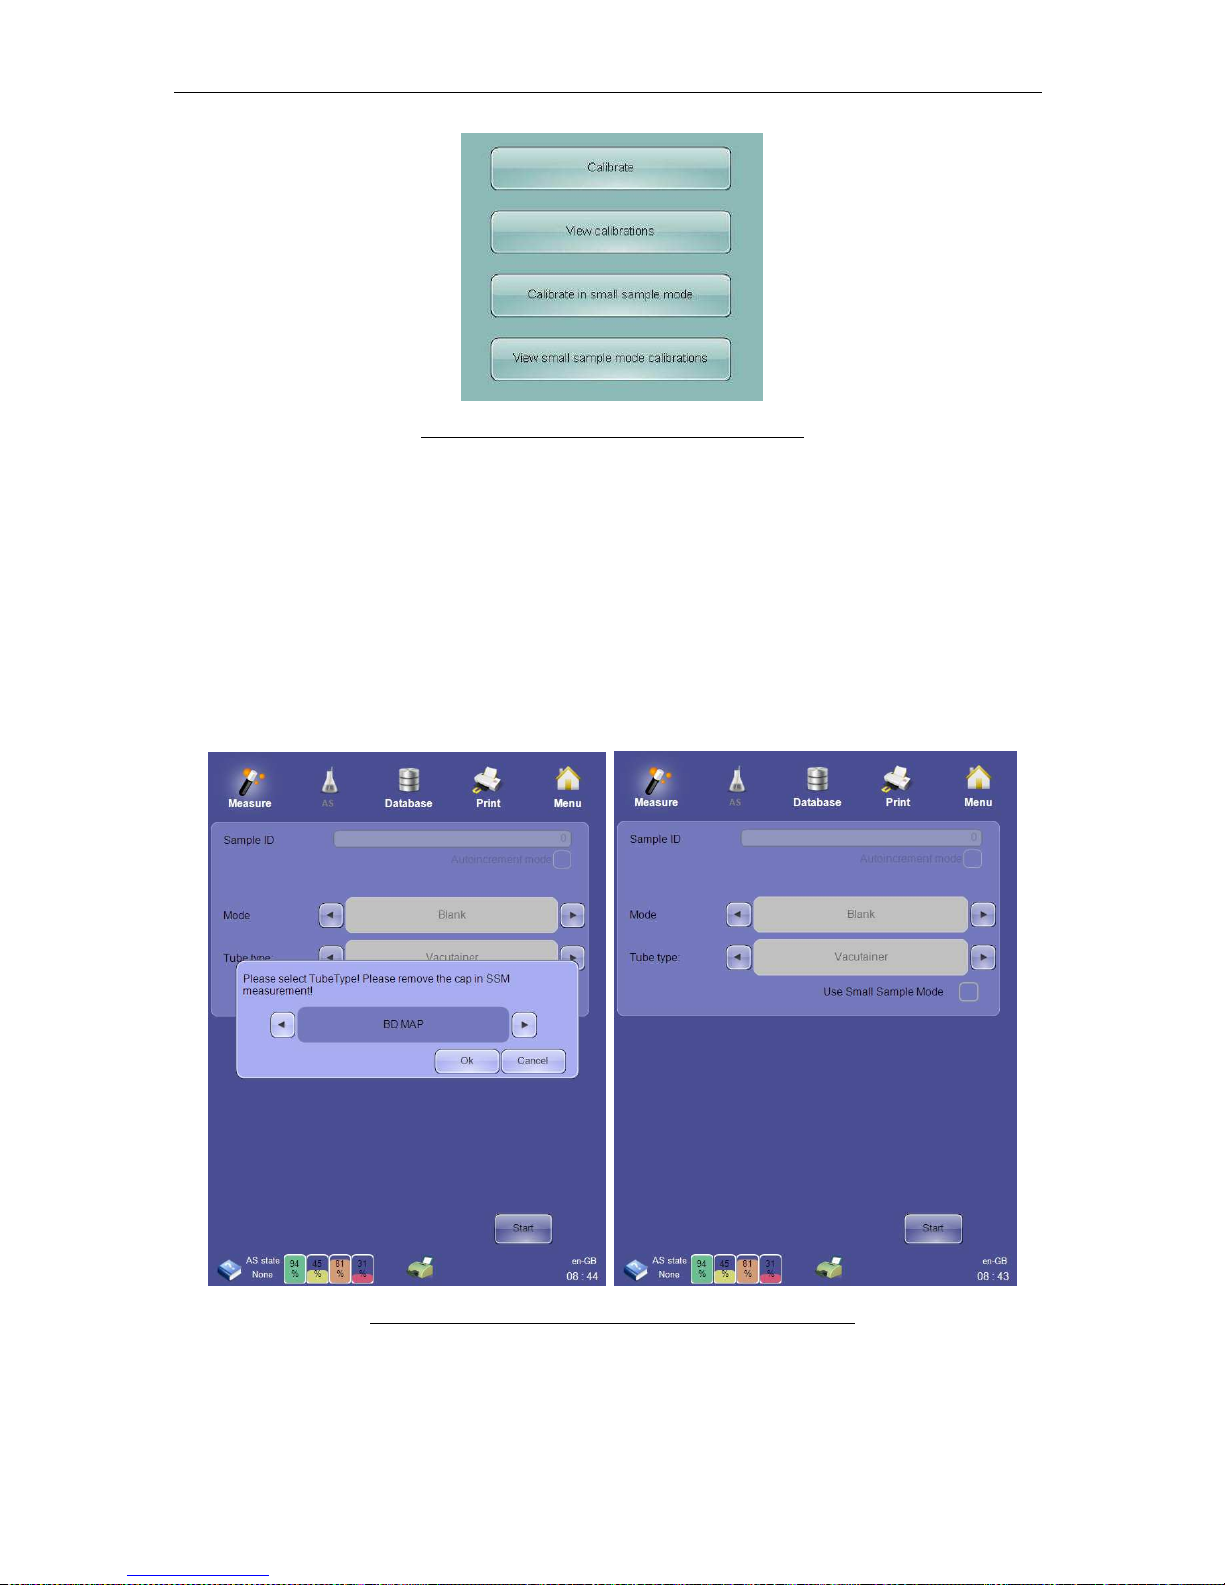
ELite 5, User Manual
Page 44 of 159
Figure 25. Calibration in small sample module
• In QC menu there is a new feature for Small Sample Mode.
• Under Diagnostics, Information menu there is a new line which is indicating the state
(on/off) of the Small Sample Mode.
• In Self-test the presence of Microdilutor is also indicated.
• In measurement a new option will appear. There is a square you have to mark if you
would like to use the sample Small Sample Measurement Mode.
• Also you can choose the Tube type you will use at the measurement.
Figure 26. Measurement menu in Small Sample Mode
Page 45

ELite 5, User Manual
Page 45 of 159
6 Start Up and Shut Down of ‘ELite 5’
6.1 Start Up and Shut Down Overview
The ‘ELite 5’ is an advanced instrument with computer and pneumatic subsystems that need
to be properly started up and shut down for continuing reliable performance. Not following
proper startup and shutdown procedures may lead to increased maintenance and
unnecessary service calls.
The ‘ELite 5’ analyzer start up sequence requires four steps:
• Power up the electrical system.
• Start up the internal user interface computer and log in if the multi-user mode is
activated.
• Start up the pneumatic system components.
• Perform and accept an initial ‘blank’ measurement.
A normal shut down of the ‘ELite 5’ analyzer has the reverse steps:
• Clean and empty the pneumatic system components.
• Log off (multi-user mode is activated) and properly shut down the internal user
interface computer.
• Power down the electrical subsystem.
The ‘ELite 5’ analyzer also has a ‘prepare for shipment’ shut down option that performs an
extended cleaning and emptying of the pneumatic components. This option can be used to
prepare the ‘ELite 5’ analyzer for an extended period of inactivity or for shipping to a new
location.
There are also emergency shutdown procedures in case of emergency.
6.2 Starting Up the ‘ELite 5’ Analyzer
6.2.1 Visual Inspection
Perform a visual inspection of the ‘ELite 5’ analyzer before starting up. This is particularly
important if the ‘ELite 5’ is operated by multiple operators.
• Check the reagent tubes by gently pulling on them to make sure that connections are
not loose.
• Open the front cover and ensure that there is no leakage around the shear valve or
the syringe pumps.
• Check for salt stains around the reagent tubing and the reagent containers.
• Check that the power cord is plugged in both into the back panel of the ‘ELite 5’
analyzer and to the wall outlet.
• Empty the waste container. After start up reset the waste level in the “Main menu/
Diagnostics/Reagent status panel”.
6.2.2 Power Up the ‘ELite 5’ Analyzer
To power up the ‘ELite 5’ analyzer, perform the following steps:
• Turn on the main power switch (small switch) on the rear panel of the ‘ELite 5’
analyzer located near the power connection to the ‘up’ position labeled ‘1’ to power
on the electrical system of the ‘ELite 5’ analyzer.
Page 46

ELite 5, User Manual
Page 46 of 159
• If the optional Autosampler is installed, turn the power switch on the right side of the
Autosampler to the ‘on’ position labeled ‘1’ to power on the electrical system of the
Autosampler.
• Turn on printers or any peripherals that have their own power switches.
The electrical system of the ‘ELite 5’ analyzer can remain powered up indefinitely. Please
follow local regulations or laboratory procedures when deciding whether to fully power down
the ‘ELite 5’ analyzer after work hours.
6.2.3 Start Up the User Interface
To start up the internal user interface computer of the ‘ELite 5’ analyzer, flip the standby
switch near the top of the rear panel of the ‘ELite 5’ analyzer to the ‘up’ position. The standby
switch springs back to the ‘down’ position after activation.
Figure 27. Start Up Logo Screen
The following sequence of events takes place after enabling the standby switch:
• The internal computer starts displaying the ‘EPIA’ logo in a rotated way.
• The embedded Windows® XP® operating system starts up. As the display initializes
the screen changes color.
• The ‘ELite 5’ application software starts up displaying the ‘ELite 5’ logo screen.
Individual component start up status is displayed in the bottom right corner of the
logo.
• If the multi-user option is enabled then a user ID and password is required.
• The ‘ELite 5’ main menu is displayed.
At this point, the ‘ELite 5’ analyzer user interface is ready to use, but the analyzer is not yet
ready to measure samples. This requires initialization of the ‘ELite 5’ pneumatic system. The
following functions are available at this time:
• Use the patient database to add and modify entries.
• Review, archive, send to LIS and print existing measurement records.
• Review calibration and QC results and history.
• Change settings.
Page 47
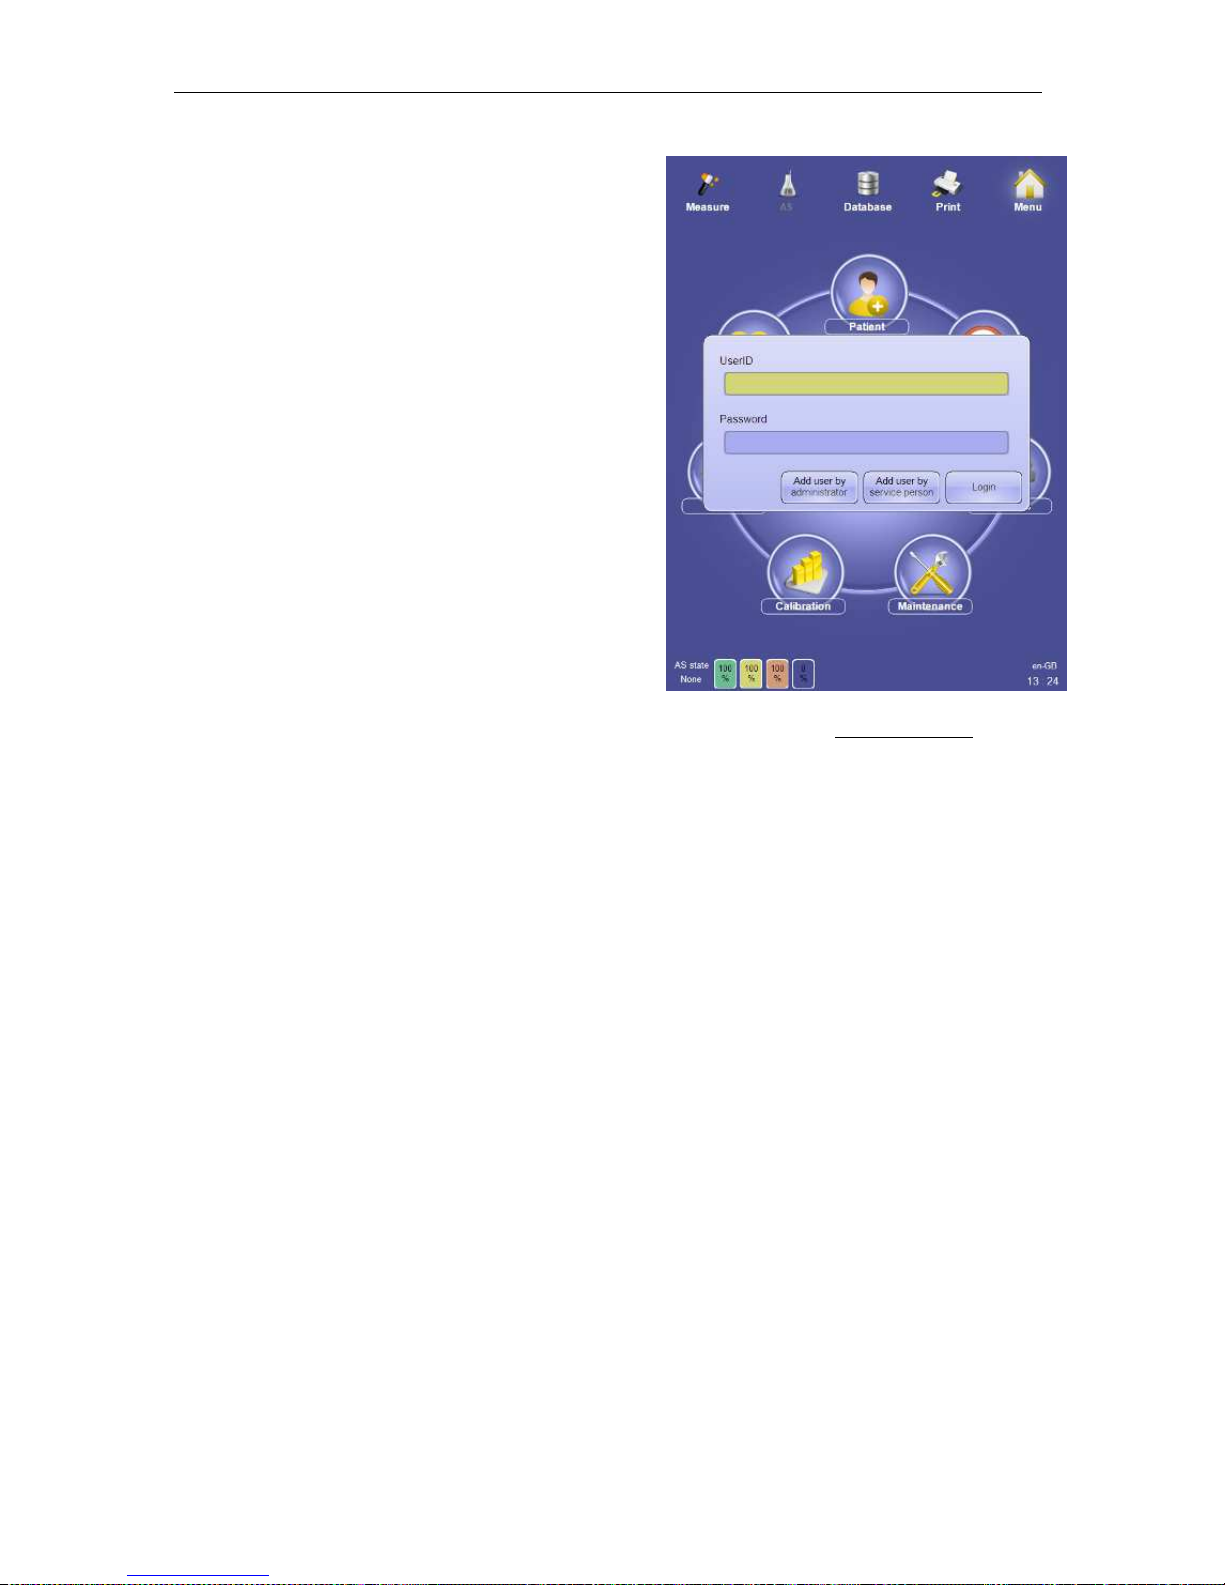
ELite 5, User Manual
Page 47 of 159
6.2.4 User Login
If the multi-user feature is activated, a user must
be logged in before the user interface of the ‘ELite
5’ can be accessed. You can log in on two
different ways:
• Enter the user ID and password assigned
to your account.
• Create a new user account.
The multi-user feature of the ‘ELite 5’ analyzer
tracks which user is logged on when important
activities are performed such as sample or QC
measurements or calibration. The multi-user
feature allows full access to administrator users
while restricting regular users from actions that
change the way the ’ELite 5’ analyzer operates,
such as changing calibration settings.
See section 13.8 for more details about the user
management.
6.2.5 Pneumatic System Start and Blank Measurement
Before measuring any blood or control samples, the pneumatic system components of the
‘ELite 5’ analyzer need to be initialized and a blank measurement run and accepted. To start
the pneumatic system and run a blank measurement, click or tap the ‘Measure’ icon with the
single test tube graphic on the top left corner of the screen. The following sequence takes
place:
• The color of the ‘Start’ button changes to red.
• The reagents are primed.
• The measuring system is flushed.
• The sample-door, syringe, needle x/y movement, and shear valve motors are
activated and tested.
• The vacuum system is activated, and pump sensors and vacuum leakage is tested.
• A blank measurement is initiated automatically.
• An empty result screen is displayed.
• The blank measurement is performed.
• The results of the blank measurement are displayed.
The results of a blank measurement must be accepted before blood or control samples can
be processed. If the results from the first blank measurement are not acceptable, it does not
necessarily mean that something is wrong about your ‘ELite 5’ analyzer. Please consider the
following:
• Blood proteins or other particles can accumulate in the pneumatic tubing or
components.
Figure
28.
Log In
Page 48
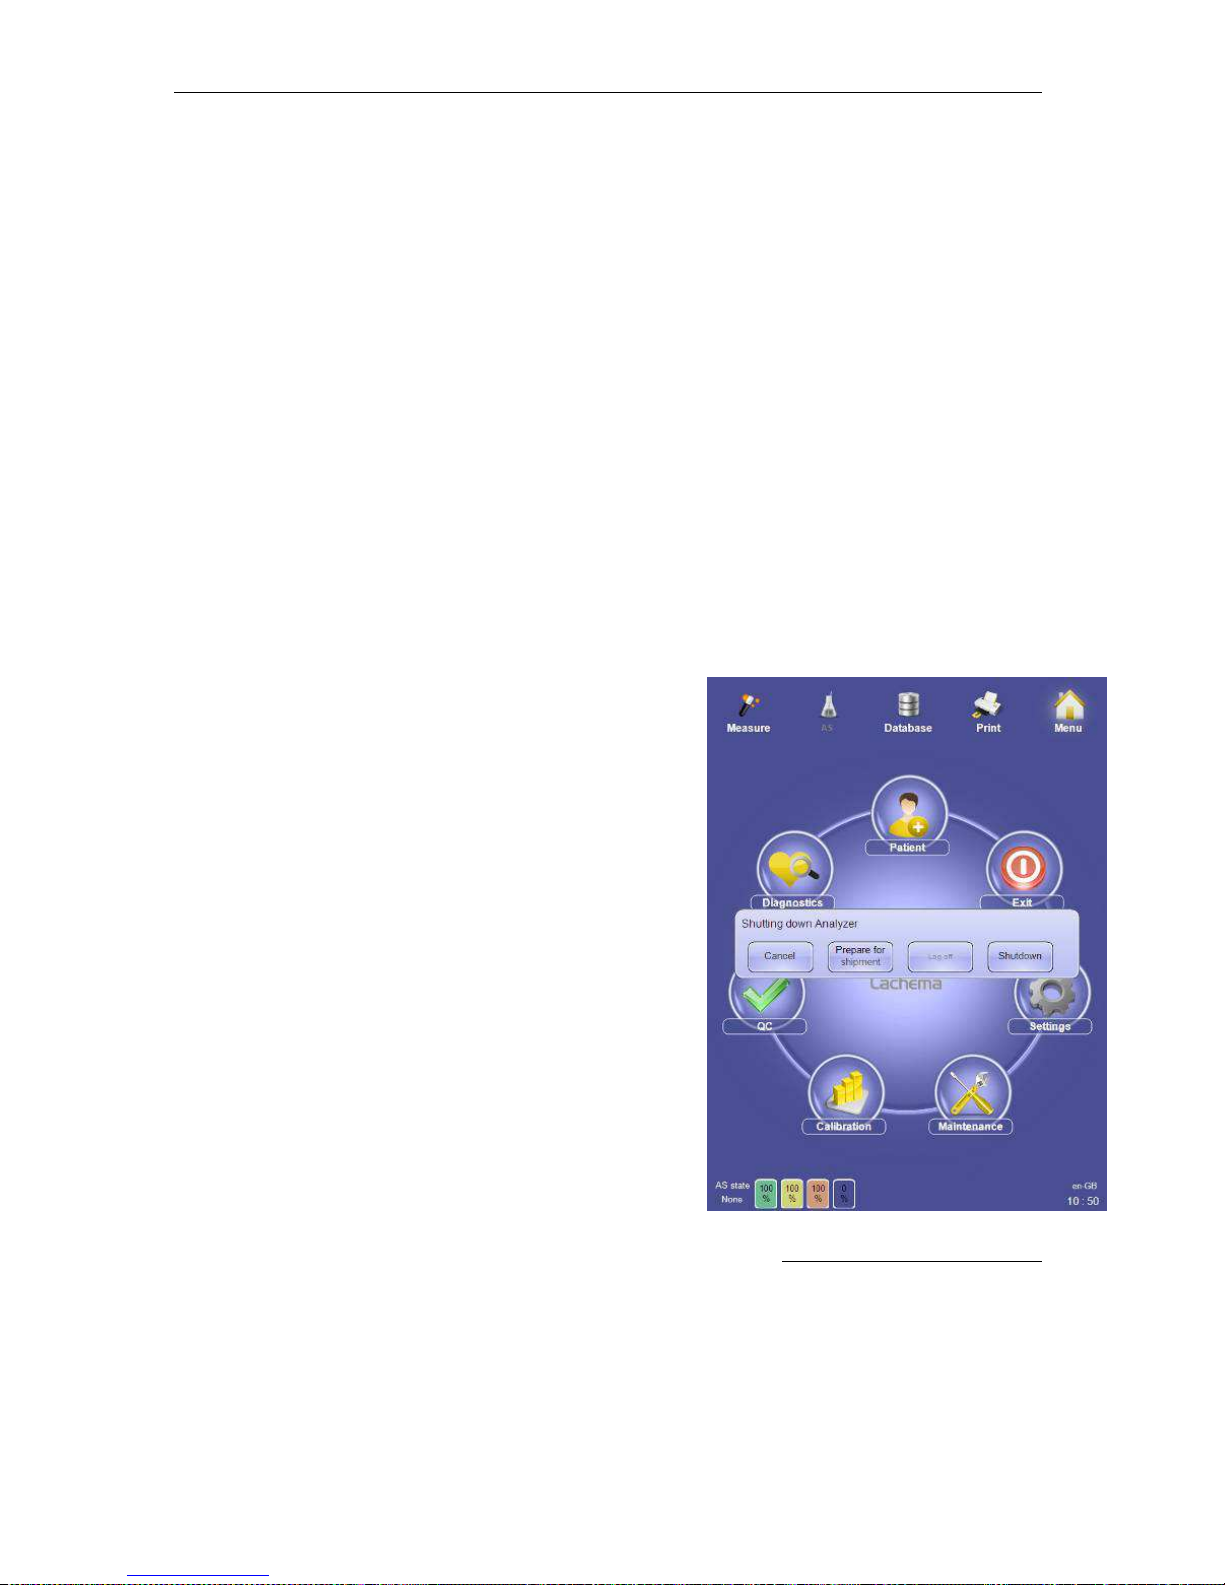
ELite 5, User Manual
Page 48 of 159
• Contaminated reagent may cause high background. Perform cleaning/hard cleaning,
replace the diluent and try Blank measurement again.
• An extended period of inactivity without performing a ‘prepare for shipment’ procedure
may result in salt crystal development in the pneumatic components, which will
increase background count. Perform cleaning.
Running additional blank measurements will usually bring the blank measurements down to
an acceptable level. Blank measurements will be flagged if they exceed the following
thresholds:
• WBC ≥ 0.2 * 103 cells/µL
• RBC ≥ 0.05 * 106 cells/µL
• PLT ≥ 15 * 103 cells/µL
• HGB ≥ 100 g/dL
If the ‘ELite 5’ was not in use for an extended period of time, the start up of the
pneumatic system components can take significantly longer time and require more
blank measurements. To prevent these problems, use the ‘prepare for shipment’ process
when the ‘ELite 5’ analyzer will be inactive for an extended time.
6.3 Exiting the ‘ELite 5’ Analyzer
After you have completed lab operations and you are
ready to exit the ‘ELite 5’ analyzer, you can:
• Log off
• Shut down the ‘ELite 5’
• Power off the ‘ELite 5’
• Prepare the ELite 5’ for shipment
Click or tap the Exit icon on the main menu to access
various exit options. Click or tap the ‘Cancel’ button to
return to normal operation.
6.3.1 Log Off
Clicking or tapping the Exit icon on the main menu brings up the ‘Shutting down Analyzer’
panel. Select ‘Log off’ to end the active user session.
Figure 29. ‘ELite 5’ Exit Options
Page 49
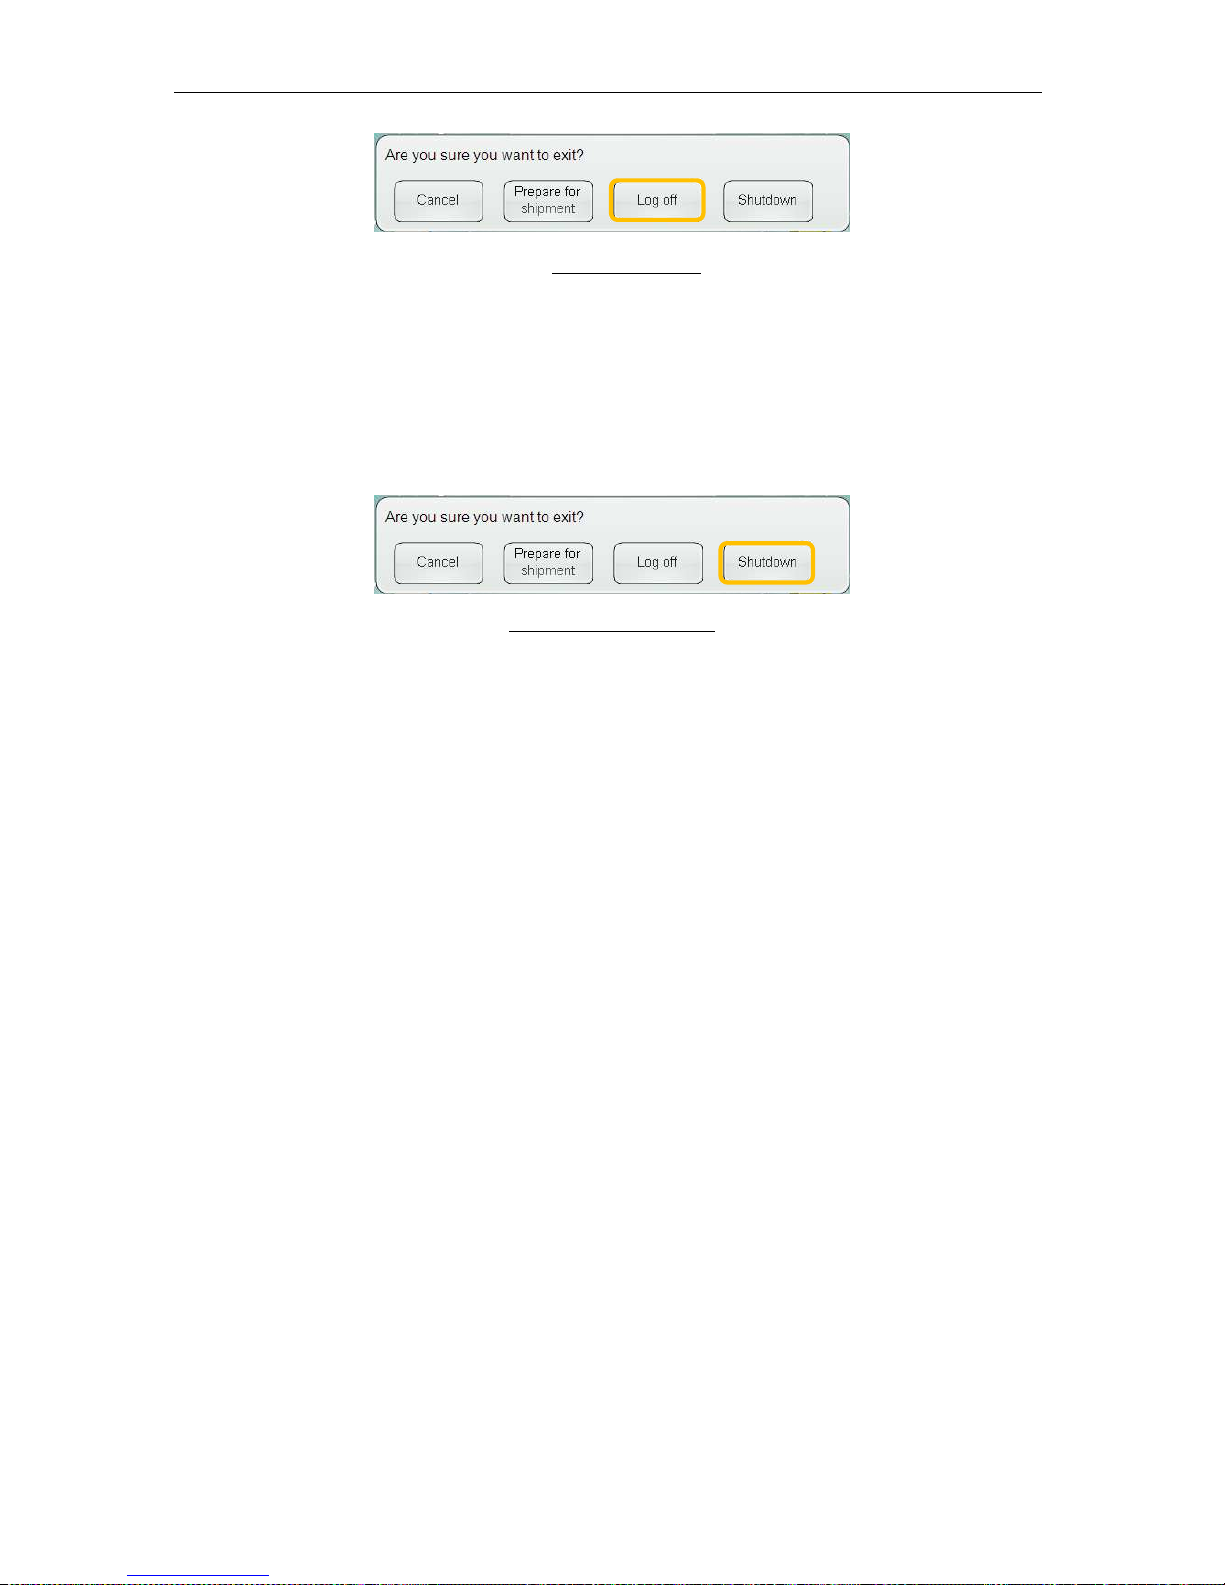
ELite 5, User Manual
Page 49 of 159
After the current user is logged off the login panel is displayed.
6.3.2 Shut Down
The shutdown procedure has to be used to maintain the reliable operation of the instrument.
To properly shut down the ‘ELite 5’ analyzer, click or tap the Exit icon on the main menu and
select ‘Shutdown.’
Figure 31. 30 Shut Down
The shutdown procedure performs two key functions:
• If the pneumatic system components of the ‘ELite 5’ analyzer were initialized, a shut
down procedure is performed that rinses the pneumatic components. This prepares
the ‘ELite 5’ analyzer for shorter periods of inactivity such as overnight or over a
weekend.
• The ‘ELite 5’ operating software and the Windows® XP® Embedded operating system
are shut down. The analyzer saves all settings, closes the file system and database,
and automatically shuts down the internal user interface computer.
The ‘ELite 5’ analyzer may ask to perform a cleaning cycle based on the analyzer’s usage
patterns and the state of the pneumatic components. If this occurs, the ‘ELite 5’ analyzer will
request that a tube with cleaning solution (Erba•Hypoclean CC) to be introduced at the
sample rotor. The cleaning procedure may take a few minutes. Do not turn off the analyzer
until it indicates that it is safe to do so.
6.3.3 Prepare for Shipment
If the ‘ELite 5’ analyzer is not used for a significant period of time or is being transported to a
new location then the ‘prepare for shipment’ procedure should be performed instead the
regular shutdown procedure. Click or tap the ‘Exit’ icon on the main menu, then select the
‘Prepare for shipment’ button.
Figure
30. Log Off
Page 50
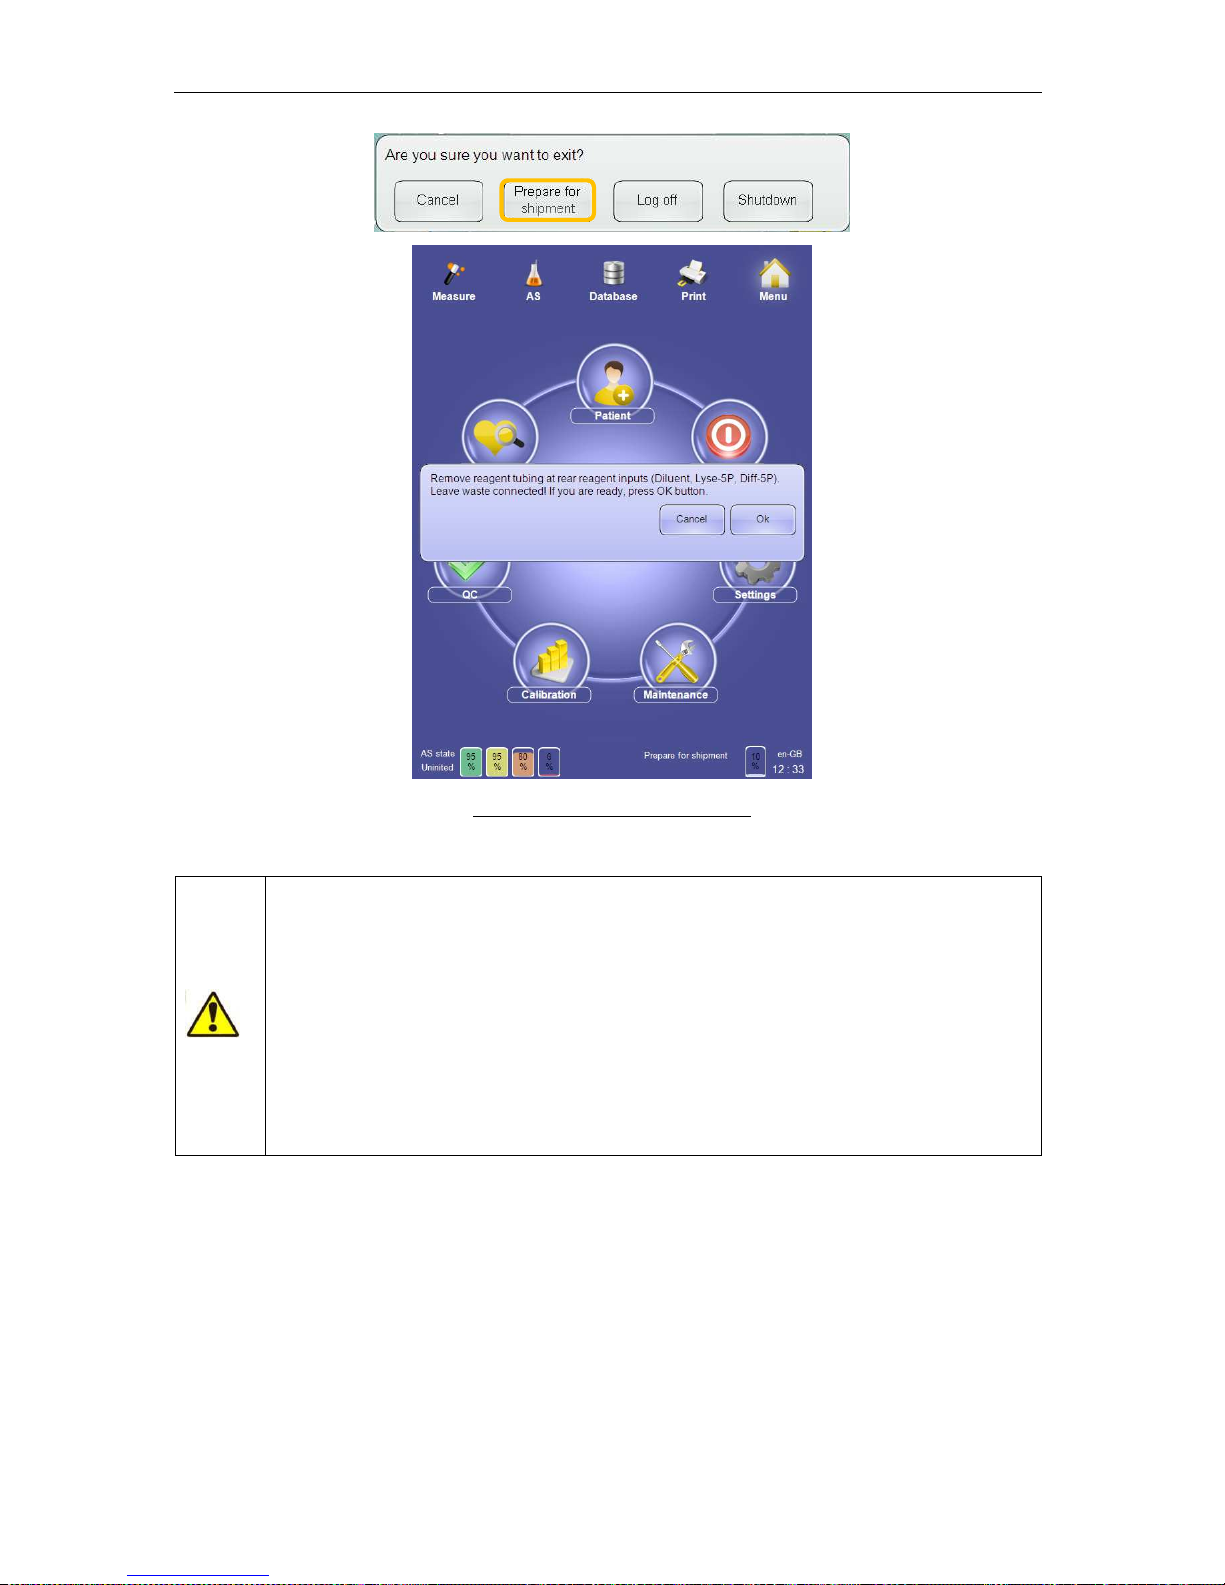
ELite 5, User Manual
Page 50 of 159
Figure 312. Prepare for shipment
If the ‘ELite 5’ analyzer is powered off without a proper shutdown or prepare
for shipment procedure, the following may occur:
• The pneumatic components may lock in an undefined state. The next
startup and pneumatic initialization may take longer with increased
reagent consumption.
• The ‘ELite 5’ application software and/or the Windows® XP®
Embedded operating system can suffer damage or data loss.
• The ‘ELite 5’ analyzer may have to be restarted by a service engineer
after an improper shut down or power off sequence.
The ‘Prepare for Shipment’ procedure should be used for following reasons:
• The reagents may spill out if the ‘ELite 5’ is tilted, potentially causing electrical short
circuit or corrosion.
• Reagents can flow out of the ‘ELite 5’ if the reagent intakes are disconnected.
• Evaporation may cause reagents left in the pneumatic components in the ‘ELite 5’
analyzer to become concentrated and form crystals that increase blank results,
damage pneumatic components, and may require a service engineer to restore
proper operation.
Page 51
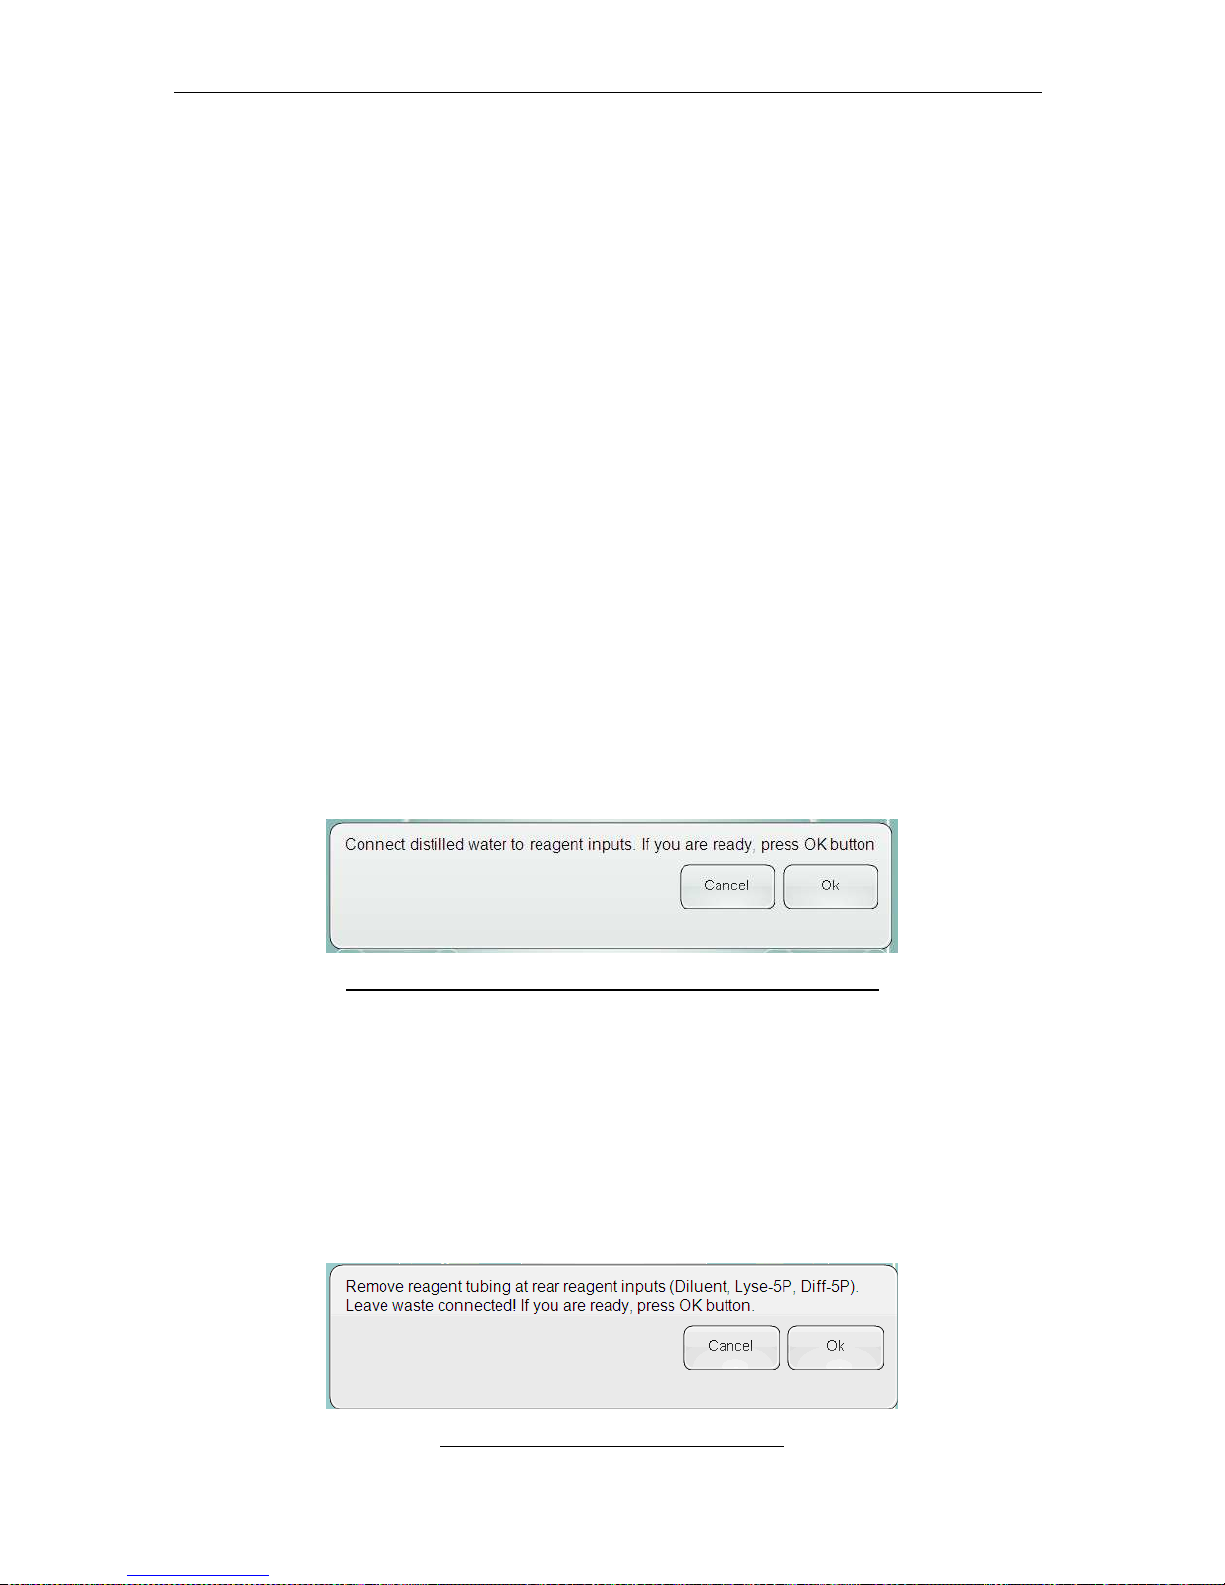
ELite 5, User Manual
Page 51 of 159
• Microbial growth may occur if reagents are left in an inactive analyzer for extended
time periods, causing high blank results and may require a service engineer to
restore proper operation.
• Accidental storage at very low temperatures may cause freezing that damages the
pneumatic components.
It is strongly recommended that the ‘Prepare for shipment’ procedure is used if the analyzer
will be inactive for more than five days. Higher temperature or lower humidity decreases the
period of time the ‘ELite 5’ can be idle without performing the ‘Prepare for shipment’
procedure.
The analyzer will guide you through the preparing for shipment process. This process takes
about 30 minutes and requires the following items:
• “Prepare for shipment” tube set included in your ‘ELite 5’ analyzer accessories kit
• Distilled water
After initiating the ‘Prepare for shipment’ procedure the system will prepare itself for the
draining process. Do not power off the analyzer during these steps unless the system
indicates that is safe to do so.
Step 1: The analyzer will ask you to disconnect the reagents from the reagent connectors on
the back panel except for the waste connection. Leave the waste container tubing connected
to the analyzer. The system will drain all inner reagent buffers throughout the pneumatic
system. This step takes approximately 9 minutes. Do not turn the analyzer off during this
step.
Step 2: The instrument will ask you to connect distilled water to the reagent inputs.
Figure 323. Prepare for shipment - Distilled Water connection
Use the ‘Prepare for shipment’ tube set included in your ‘ELite 5’ analyzer accessories to
perform this step. The system will prime and fully rinse the tubing and pneumatic system with
distilled water. This step takes approximately 7 minutes. Do not turn the analyzer off during
this step.
Step 3: The analyzer will ask you to disconnect the ‘Prepare for shipment’ tube set from the
reagent connectors on the back panel except for the waste connection. Leave the waste
container tubing connected to the analyzer.
Figure 34. Remove Reagent Tubing Panel
Page 52
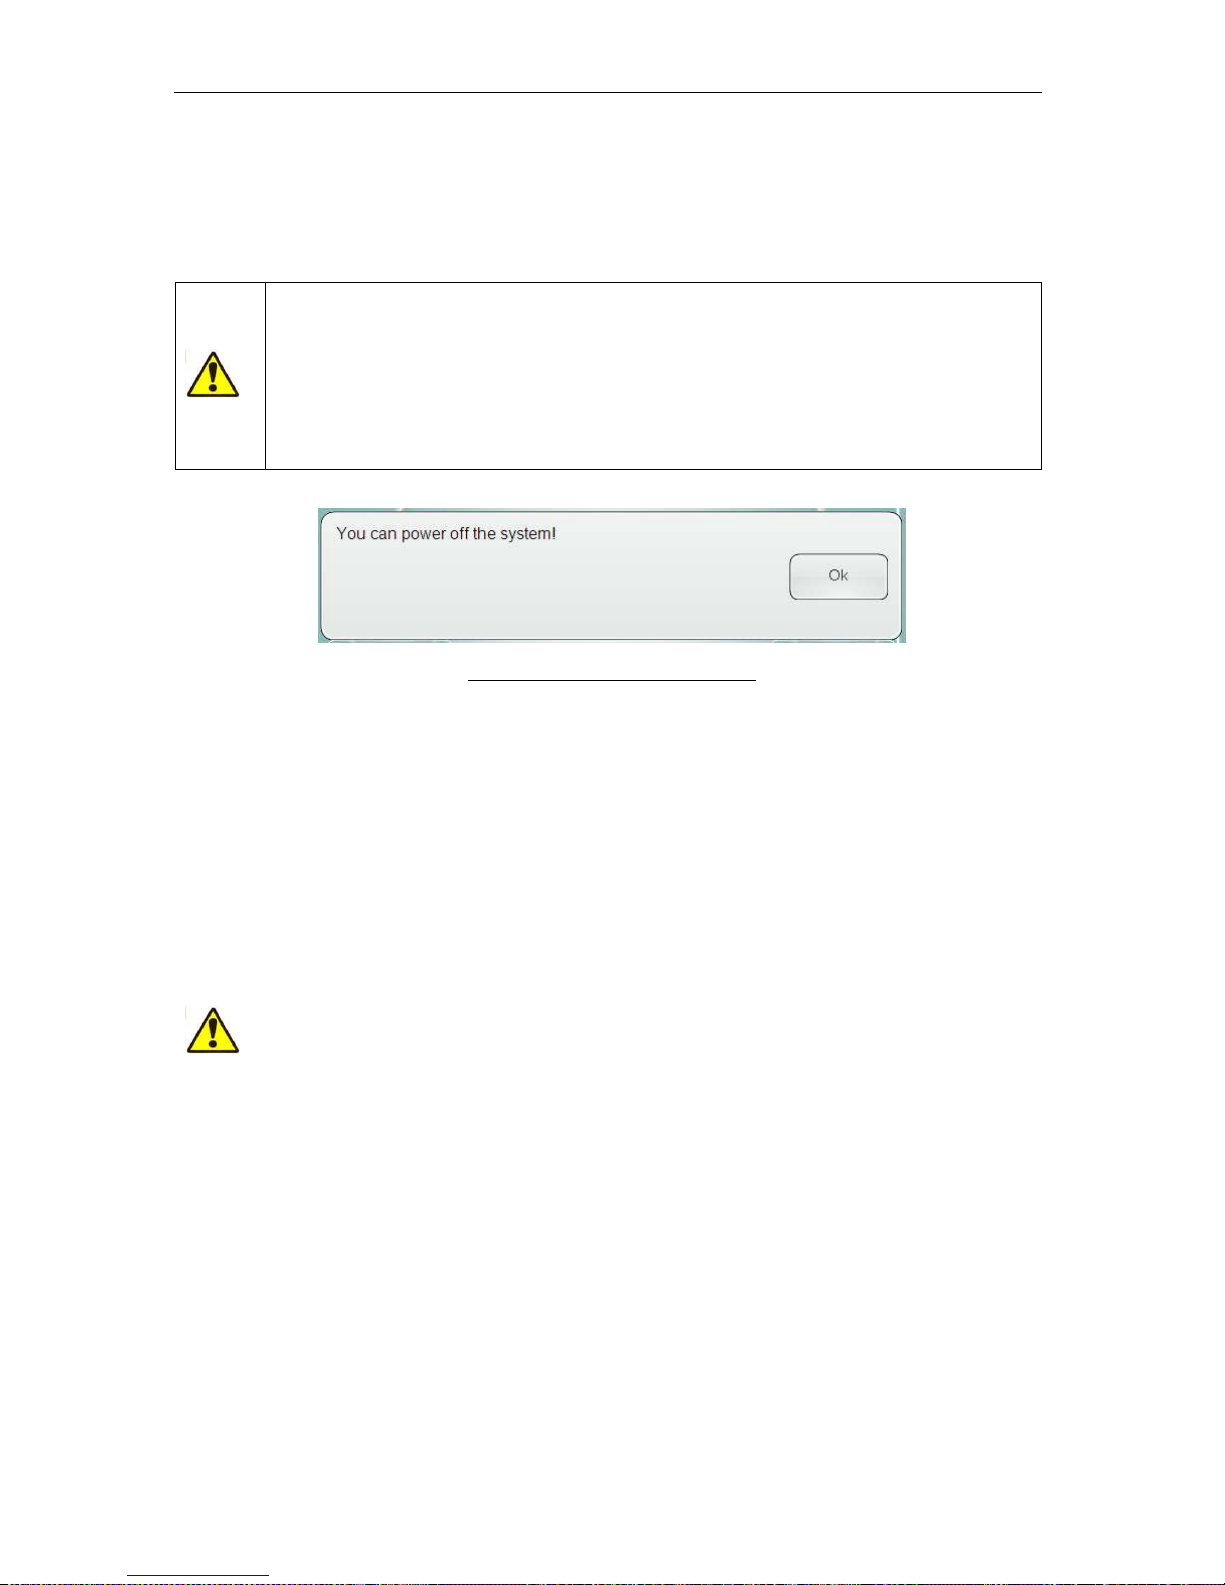
ELite 5, User Manual
Page 52 of 159
The analyzer will drain all liquids from the instrument. This step takes approximately 10
minutes. Do not turn the analyzer off during this step. When the process is over, the system
will notify you about switching off the instrument. Click or tap the ‘OK’ button on the
notification panel and wait until the Windows® XP® Embedded exits and power off the user
interface computer.
Do not turn off power of the ‘ELite 5’ at this stage. First click or tap the ‘OK’
button, then wait until the Windows® XP® Embedded operating system exits
and shuts down the internal ‘ELite 5’ user interface computer.
After the shut down process is completed, you can turn off the main power
switch (small switch) on the rear panel of the ‘ELite 5’ analyzer near the
power connection to the ‘down’ position labeled ‘0’.
Figure 33. Shut Down Ready Panel
Step 4: Disconnect the waste container tubing from the waste reagent connector on the back
panel of the ‘ELite 5’ analyzer.
Small droplets of distilled water may remain in the tubing after the ‘Prepare for shipment’
process is completed. These droplets will not cause any malfunction during transportation or
the next start up procedure.
The preparing for shipment procedure cleans the Small Sample Mode related lines too, if the
function is enabled.
6.3.4 Emergency Shut Down
The procedures described in this section can damage t
he ‘
ELite
5’ analyzer
or cause data loss or damage to critical system computer files. Use these
procedures in case of emergency only!
6.3.4.1 Immediate Shut-Down
The immediate shut-down can be initiated by pressing the standby button near the top of the
back panel of the ‘ELite 5’ analyzer. This is the same button which is used to start up the
‘ELite 5’ user interface computer. This shuts down the user interface computer without
properly shutting down the pneumatic system components.
Possible side-effects:
• The pneumatic components may be left in an undefined state. The next startup and
pneumatic initialization may take longer with increased reagent consumption.
• The last settings changes and measurement results are not saved.
Immediate shut down should be avoided as a routine procedure. It should only be used if
loss of electrical power is imminent such as thunderstorms or if loss of uninterruptible power
supply (UPS) backup power is imminent.
Page 53
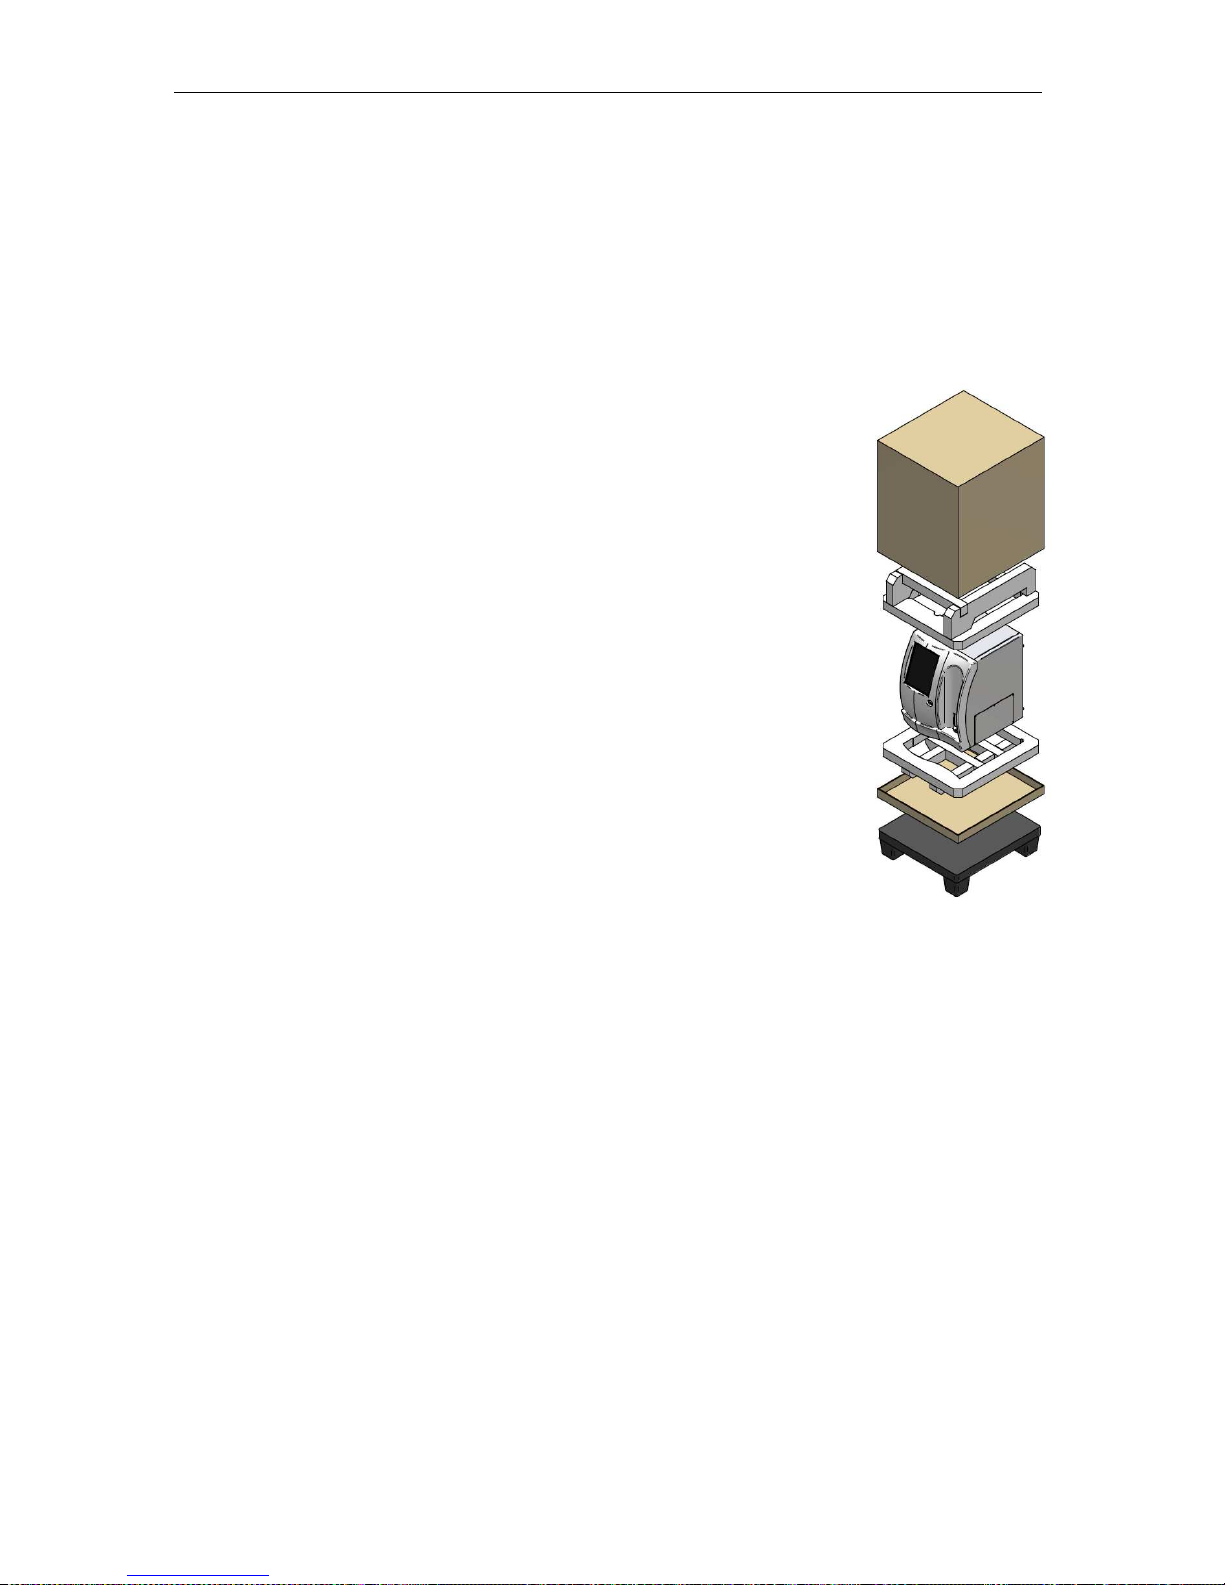
ELite 5, User Manual
Page 53 of 159
6.3.4.2 Immediate Switch Off
In case of immediate danger (fire or electric shock caused by the analyzer) you can power off
the ‘ELite 5’ analyzer by turning off:
• main laboratory power supply
• unplugging the power cord from wall outlet
• main power switch (small switch) on the rear panel of ‘ELite 5’ analyzer located near
the power connection to the ‘down’ position labeled ‘O’.
6.3.5 Repackaging the ‘ELite 5’ Analyzer
Before repackaging your ‘ELite 5’ analyzer for transportation or
storage, always do the following:
• Perform a ‘Prepare for shipment’ procedure.
• Fully power down the analyzer.
• Disconnect all reagent tubes, power cords and peripheral
connections.
• Clean the shear valve and put “pull out” card between the two
ceramics plates.
• Always use the original packaging materials to repackage the
‘ELite 5’ analyzer.
Prepare the following packaging materials which were included in your
original shipment:
• Mini-pallet
• Upper and lower packaging foams
• Upper and lower carton box
• Accessory box for power cord, reagent tubing, sample adapter,
etc.
• Plastic bag with desiccant bag
Follow the steps below for packing up the analyzer.
• Collect all accessories into the accessory box.
• Place the pallet on the ground.
• Place the lower part of the carton box on the pallet, and place the lower packaging
foam on the carton bottom.
• Put the ‘ELite 5’ into the plastic bag, and place it into the bottom foam part.
• Put a desiccant bag into the plastic bag and close it.
• Place the top packaging foam on the analyzer.
• Place the accessory box on top of the top foam spacer.
• Put on the top carton cover box over the package.
• Align the lower carton box flaps so that they fit beneath the upper box edges.
• Use shipping straps to fix and hold the package on the pallet.
Page 54

ELite 5, User Manual
Page 54 of 159
Make sure to use shipping straps or band to hold the package fixed on the pallet,
otherwise the analyzer can be seriously damaged during shipping.
Do not apply excess force to the straps because that may break the carton box
and damage the analyzer.
Never put the analyzer upside down on the pallet.
Page 55
ELite 5, User Manual
Page 55 of 159
7 Sample Measurement
7.1 Sample Types Supported by the ‘ELite 5’
In this chapter you will find information about the samples usable with the ‘ELite 5’ analyzer.
7.1.1 Supported Sample Tube Types
The ‘ELite 5’ supports the following K3-EDTA, 13x75 mm sample-tubes:
• Sarstedt Monovette®
• Becton Dickinson (BD) Vacutainer®
• Terumo Venosafe®
• BD MAP® tube (only in SSM mode)
Please note that the Sarstedt Monovette® sample tubes have a false bottom that is
not the same as the bottom of the sample tube. The sampling depth on the ‘ELite 5’
analyzer must be changed for a Sarstedt Monovette® sample tube. To change the
sampling depth for manually presented Sarstedt Monovette® tubes at the sample
rotor, check the ‘Use only Sarstedt Monovette tube from sample rotor’ check box in
the Main menu/Settings/System panel.
The Autosampler automatically recognizes Sarstedt Monovette® tubes and
automatically changes the sampling depth.
You may use sample tubes from other vendors if certain conditions are fulfilled. For manually
presented sample tubes at the sample rotor measurement check if the new tube type:
• Is mechanically compatible (13x75 mm family)
• Can be pierced or used in open vial mode
• Can be handled by the tube centralizing mechanisms on the ‘ELite 5’ analyzer
It is suggested to contact your sales representative before using the new sample tube type.
For automated sample handling with the optional Autosampler, contact your sales
representative before using a new sample tube type. The Autosampler may not reliably
recognize sample tube types other than the officially supported sample tubes.
Although these sample tube types are designed for multiple piercing, it is
recommended to replace the cap after 3-4 piercing cycles. Small rubber bits parts can
crumble into the blood and adversely affect the performance of the ‘ELite 5’ analyzer.
7.1.2 Sampling Depth
The ‘ELite 5’ is equipped with a piercing needle capable of aspirating samples from closed
sample tubes. To prevent needle blockage from rubber sample tube cap material and blood
particulates, the piercing needle hole is located on the side of the needle rather than at the
bottom. Also, the sampling needle is given a safety clearance of two millimeters from the
bottom of the tube to prevent accidental breakage of sample tubes. This means that the
sampling needle cannot aspirate the last 8 millimeters (0.31 inches) of sample at the bottom
of a tube. This results in sample volume that cannot be aspirated of 0.5 ml for a Beckton
Dickinson Vacutainer® tube and 0.3 ml for a Sarstedt Monovette® tube.
Page 56
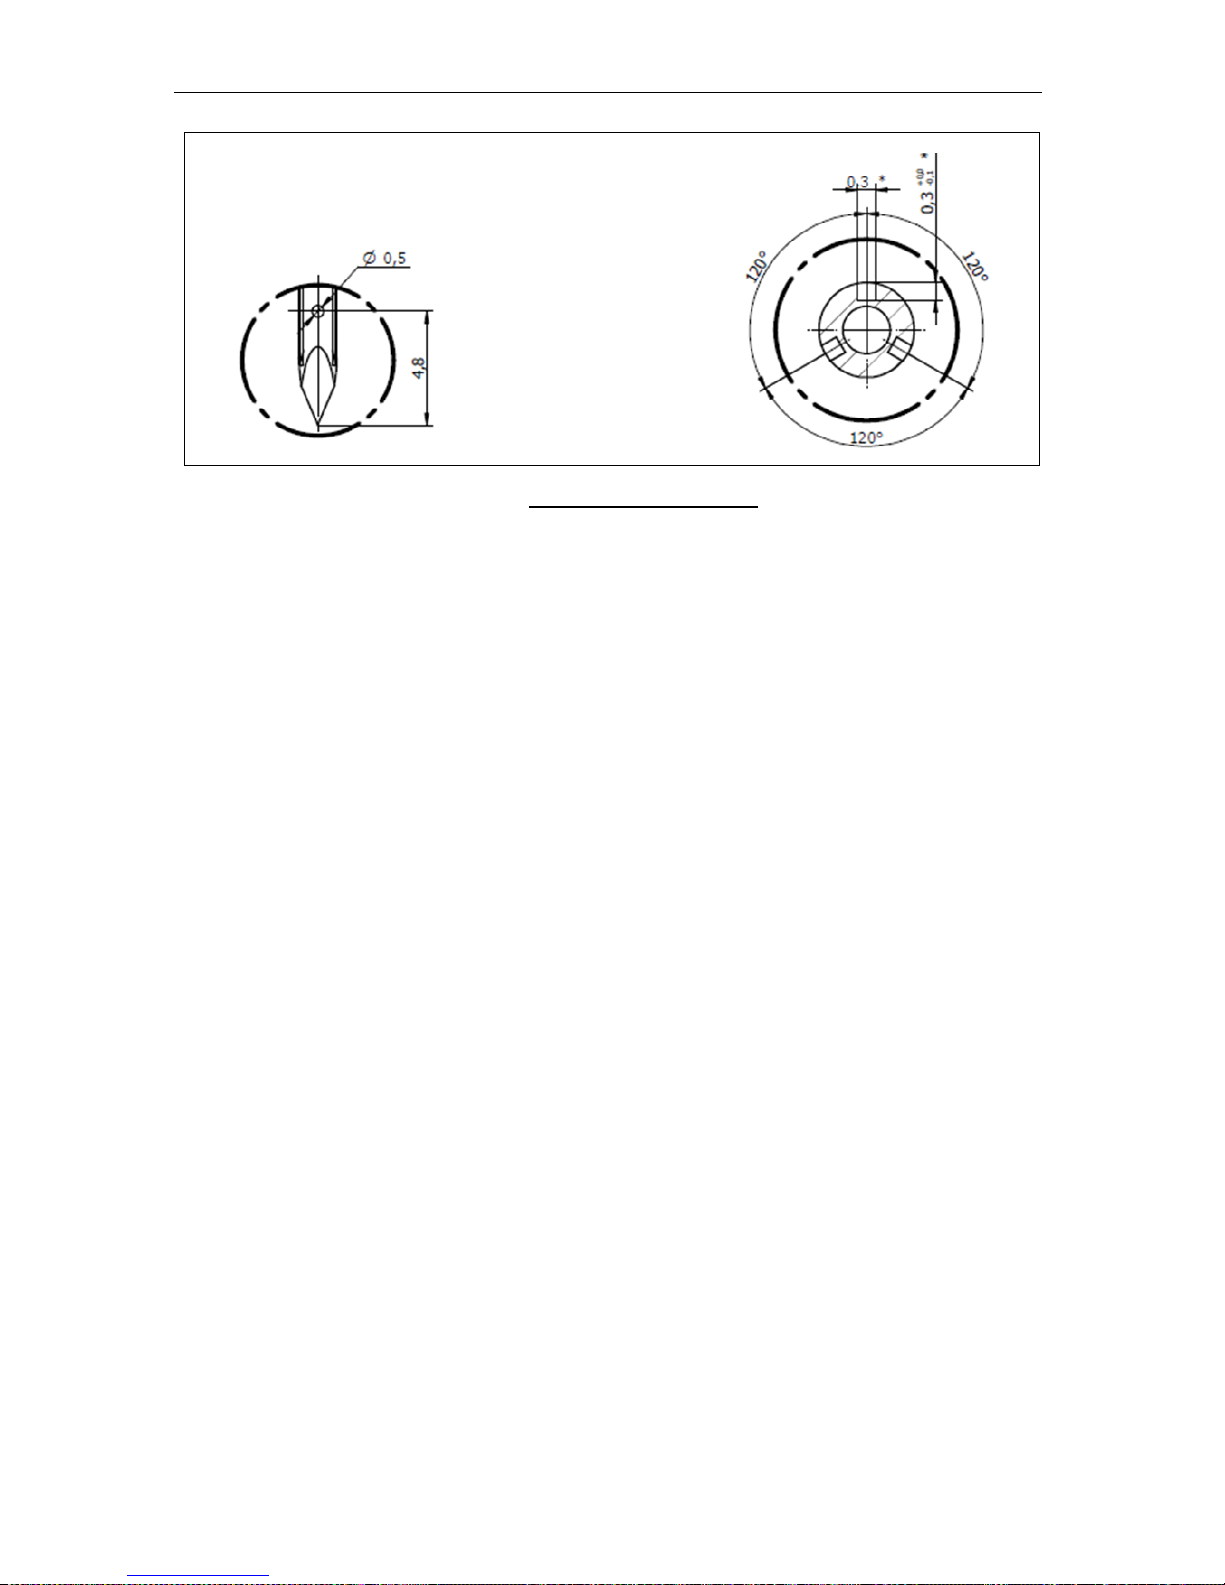
ELite 5, User Manual
Page 56 of 159
7.1.3 Open or Closed Sample Tubes
The ‘ELite 5’ can process both open and closed sample tubes in manual mode using the
sample rotor. Manually presented sample tubes must be mixed properly before being
presented to the ‘ELite 5’ analyzer.
Only closed sample tubes will be automatically processed by the optional Autosampler. Open
sample tubes placed in the Autosampler will be skipped and not processed.
In Small Sample Mode ‘ELite 5’ can only take sample from vial with the cap REMOVED!
7.1.4 Sample Collection and Handling
Please consider the following when collecting and handling blood samples:
• The ‘ELite 5’ analyzer aspirates 110 µL of sample in both closed and open vial
modes. Under the following conditions, the ‘ELite 5’ may aspirate less than 110 µL of
sample, but will detect and flag any inadequate sample aspirations:
- The sample tube does not vent properly and contains residual vacuum
- The viscosity of the blood is very high
• The ‘ELite 5’ is unable to aspirate the last 8 mm (0.31 inches) or 0.3 to 0.5 ml of
sample volume.
• Make sure that the sample tube is filled to the sample level line indicated by the tube
manufacturer. The anticoagulant not only prevents the coagulation of blood, but also
dilutes it. If the volume of blood is too low, than this dilution can adversely affect
measurement results.
• Ensure that the blood and anticoagulant are properly mixed by inverting it at least 8
times. Do not shake the sample as this could damage blood cells.
• A minimum of 30 minutes should elapse between taking the blood sample and
running it on the ‘ELite 5’ for analysis to ensure that the interaction of blood and
anticoagulant has fully stabilized. Check the data sheet of the sample tube for the
exact period of time.
• Use only K3-EDTA anticoagulated fresh whole blood as sample.
• Analyze blood samples within 7 hours of collection.
• Samples should be analyzed at room temperature.
• Do not deliver or store the samples at temperatures above normal body temperature.
The sampling hole is 4,8
mm (~0.19”) from the tip
of the sampling needle.
O
n the cross
-
section of the
piercing needle you can
see the 3 grooves designed
to equalize the pressure in
the closed sample-tubes.
Figure 36. Sampling Needle
Page 57
ELite 5, User Manual
Page 57 of 159
All samples should be handled as potentially infectious material and treated as a
biohazard.
7.2 Sample Types and Modes
The ‘ELite 5’ analyzer is designed to process the following sample types:
• Whole human blood to determine the hematology parameters of the blood,
• Quality control (QC) materials for quality control purposes,
• Calibration material for calibration of the hematology parameters.
QC samples are artificially modified human or human and animal blood samples with known
parameter values. QC samples can be stored for a period of time as indicated by the
manufacturer.
The ‘ELite 5’ analyzer works in the following modes. The sample mode must be selected
before a measurement starts:
• Blank mode: no sample need be presented to run a blank. Blank mode checks that
the measuring system is operating correctly and that blank measurement results are
acceptable.
• Human blood mode: choose one of five human blood modes (Human, Male, Female,
Alternate 1 or Alternate 2). Each mode has a unique set of normal ranges associated
with it. NOTE: Alternate 1 and Alternate 2 are sample modes that are different than
Human, Male and Female and have user-definable normal ranges.
• Control (QC) mode: the hematological parameters of QC materials are known prior to
analysis. Controls are used to check the long term stability of the ‘ELite 5’ analyzer.
Calibration with a calibration material is not one of the ‘ELite 5’ sample modes, but a specific
procedure that can be accessed from the Calibration icon on the main menu.
7.3 Sample Identification
Use caution and ensure accurate data entry when manually entering sample ID or patient ID
information into the user interface of ‘ELite 5’ analyzer to avoid possible misidentification of
sample results.
The following sample information items are used to uniquely identify the samples:
• Sample Mode
• Measurement time: assigned automatically by the ‘ELite 5’ analyzer
• Result ID: unique database identifier automatically assigned by the ‘ELite 5’ analyzer
• Sample ID: assigned by the operator
- The ‘ELite 5’ doesn’t require the sample ID to be unique
- The sample ID can be submitted by:
Manual typing
Bar code reading (manual or Autosampler)
Auto-increment
- The sample ID is not applicable on blank measurements
• Patient:
- A record from the patient database connected to a measurement
Page 58
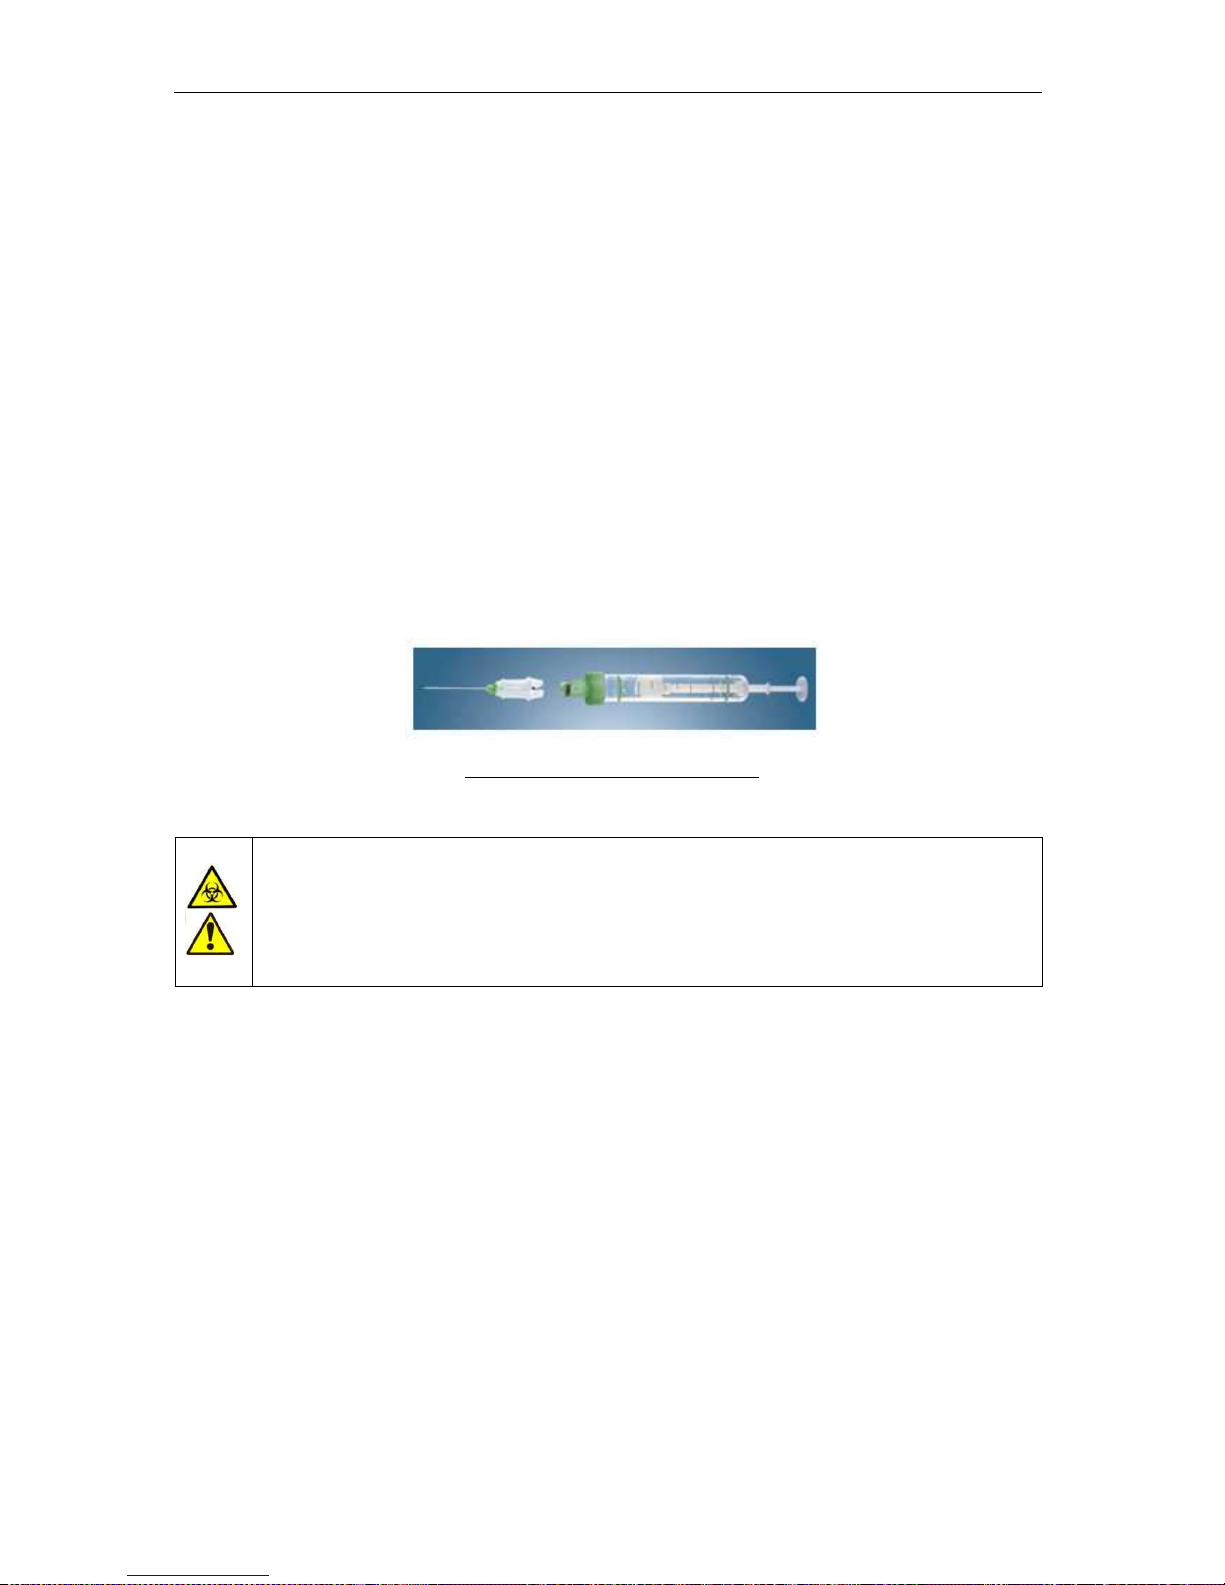
ELite 5, User Manual
Page 58 of 159
- Not applicable for blank and QC measurements
- Can be changed by setting the name or the database identifier of the patient
displayed with the measurement results
- The ‘default’ patient (ID =1) patient is used if no patient is selected
7.4 Running Samples
The ‘ELite 5’ supports both manual and automatic sample presentation modes. Automatic
sample presentation requires the optional Autosampler. The ‘ELite 5’ analyzer software
automatically detects and initializes the Autosampler.
Before performing any measurement the ‘ELite 5’ should be:
• Powered up and started
• The pneumatic system initialized and a blank measurement performed and accepted
7.4.1 Manual Mode
To use Sarstedt Monovette® manually presented tubes at the sample rotor, check the ‘Use
only Sarstedt Monovette tube from sample rotor’ check box in the Main
menu/Settings/System panel.
Figure 37. Sarsted Monovette tube
Always ensure the ‘Use only Sarstedt Monovette tube from sample rotor’
check box in the Main menu/Settings/System panel is checked if you are
manually presenting Sarstedt Monovette® tubes in the sample rotor. Needle
damage, tube damage and spilled blood may result if Sarstedt Monovette®
tubes are presented and this option is not checked.
Select the ‘Measure’ quick link at the top left of the screen to initiate a manual measurement.
The new measurement panel opens, giving you the following options:
• Review the results of the previous measurement by using the ‘Last Measure’ function.
This feature can be useful if you were interrupted during the measurement batch, and
you want to double-check which sample is the last processed sample.
• Define the sample ID of the sample to be processed by clicking or tapping on the
“Sample ID” field:
- You can type it in the Sample ID using the virtual on-screen keypad or an
external keyboard.
- You can use an external (USB) bar-code reader.
- You can use the auto-generated sample ID.
• Activate or deactivate the automatic generation of sample IDs. If the ‘Autoincrement
mode’ check box is checked, then the ‘ELite 5’ will add 1 to the last sample ID if it was
fully numeric or offer ‘0’ if the last sample ID had any non-numeric characters.
• Connect a patient to the sample by clicking/ tapping on the Patient field:
Page 59
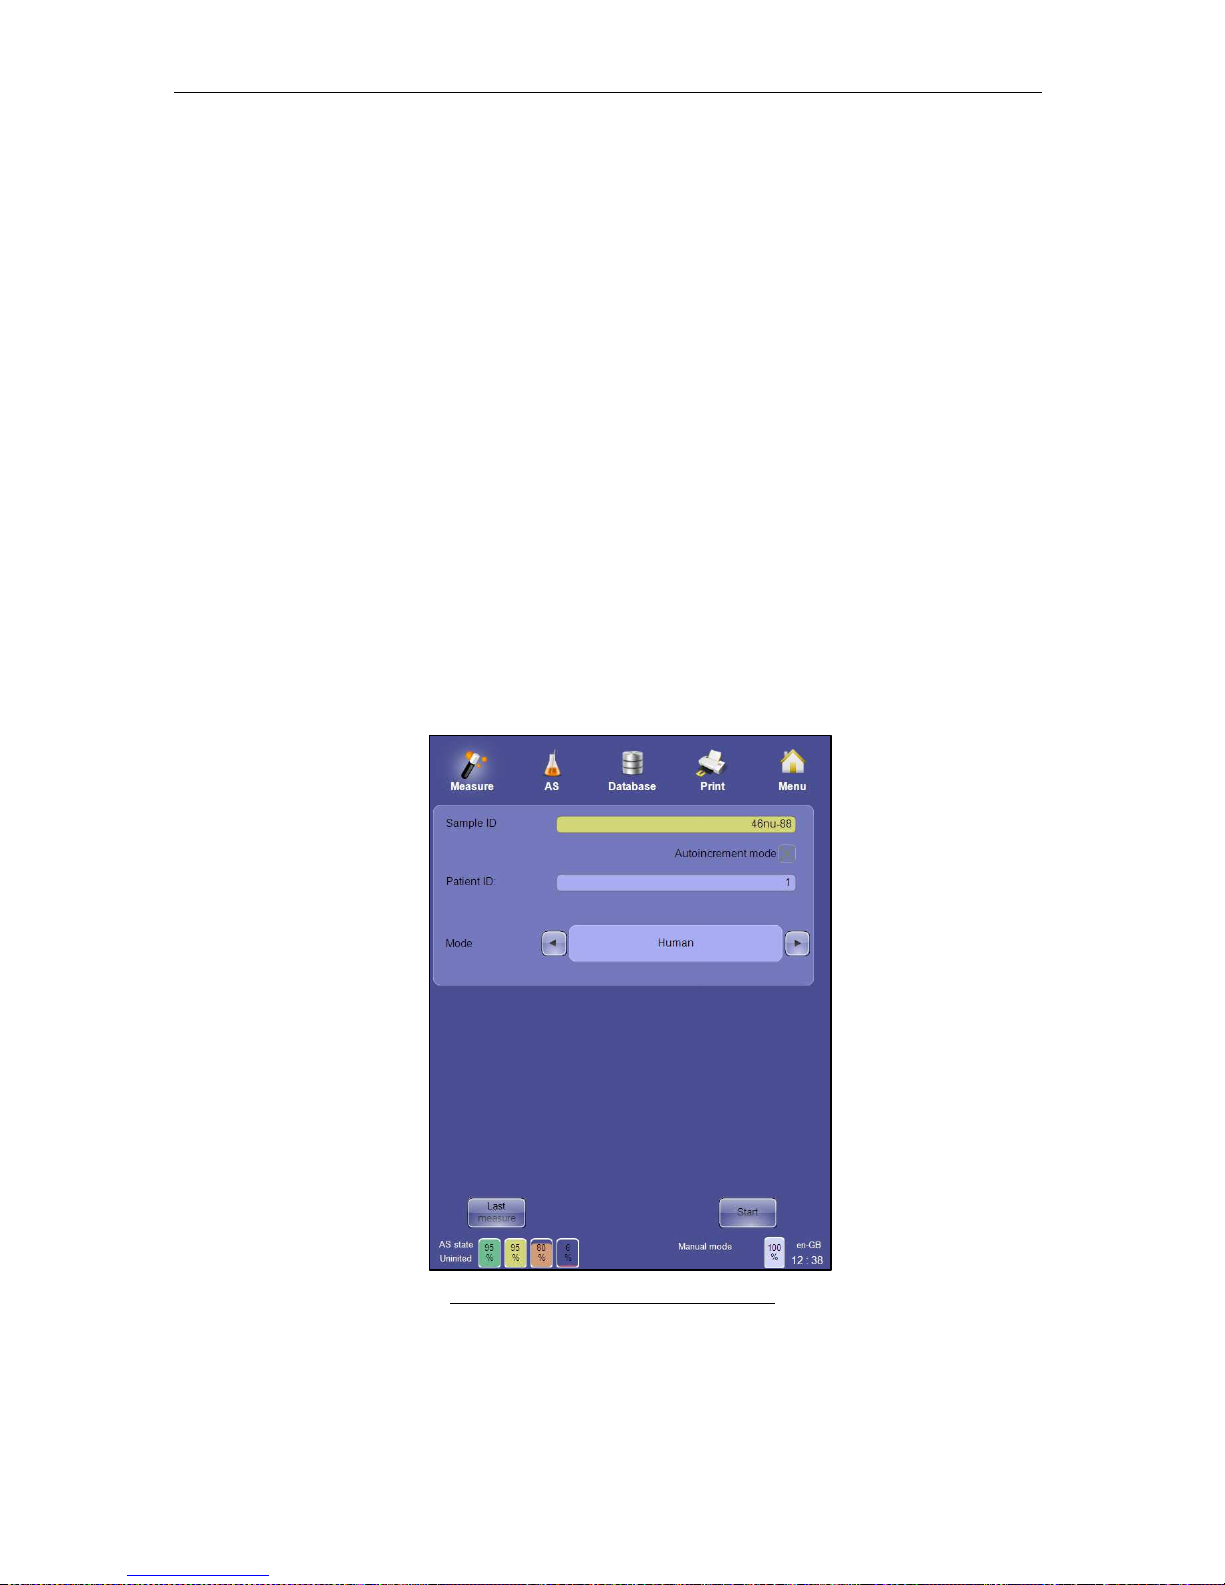
ELite 5, User Manual
Page 59 of 159
- The name of this field can be ‘Name’ or ‘ID’ depending on the ‘Main Menu
Settings/ Customize/Patient’s displayed data’ setting.
- If you don’t select a patient then the default patient will be used.
- As you select the patient field, the patient menu is displayed. You can select
an existing patient or define a new one. See section 12 or more detail about
Patients on the ‘ELite 5’ analyzer.
• Select the sample mode:
- Blank: a blank measurement will be processed. This is the only option
available if the pneumatic system is not initialized, or the ‘ELite 5’ was inactive
for an extended period of time. After performing and accepting a blank
measurement the other modes will be available.
- Control: QC sample is expected. QC measurements initiated from this menu
will not be saved into the QC database, and are not part of the QC procedure.
This mode is intended only as a quick system checks. See section 11 for more
information about the QC process.
- Human blood modes: Human, Male, Female, Alternate 1 and Alternate 2.
Select the mode which has the appropriate normal ranges. NOTE: Alternate 1
and Alternate 2 are sample modes that are different than Human, Male and
Female and have user-definable normal ranges.
• Start the measurement by clicking or tapping the ‘Start’ button on the screen or by
pressing the physical ‘Start’ button located on the front panel of the ‘ELite 5’.
Figure 38. Sample Measurement Panel
Page 60
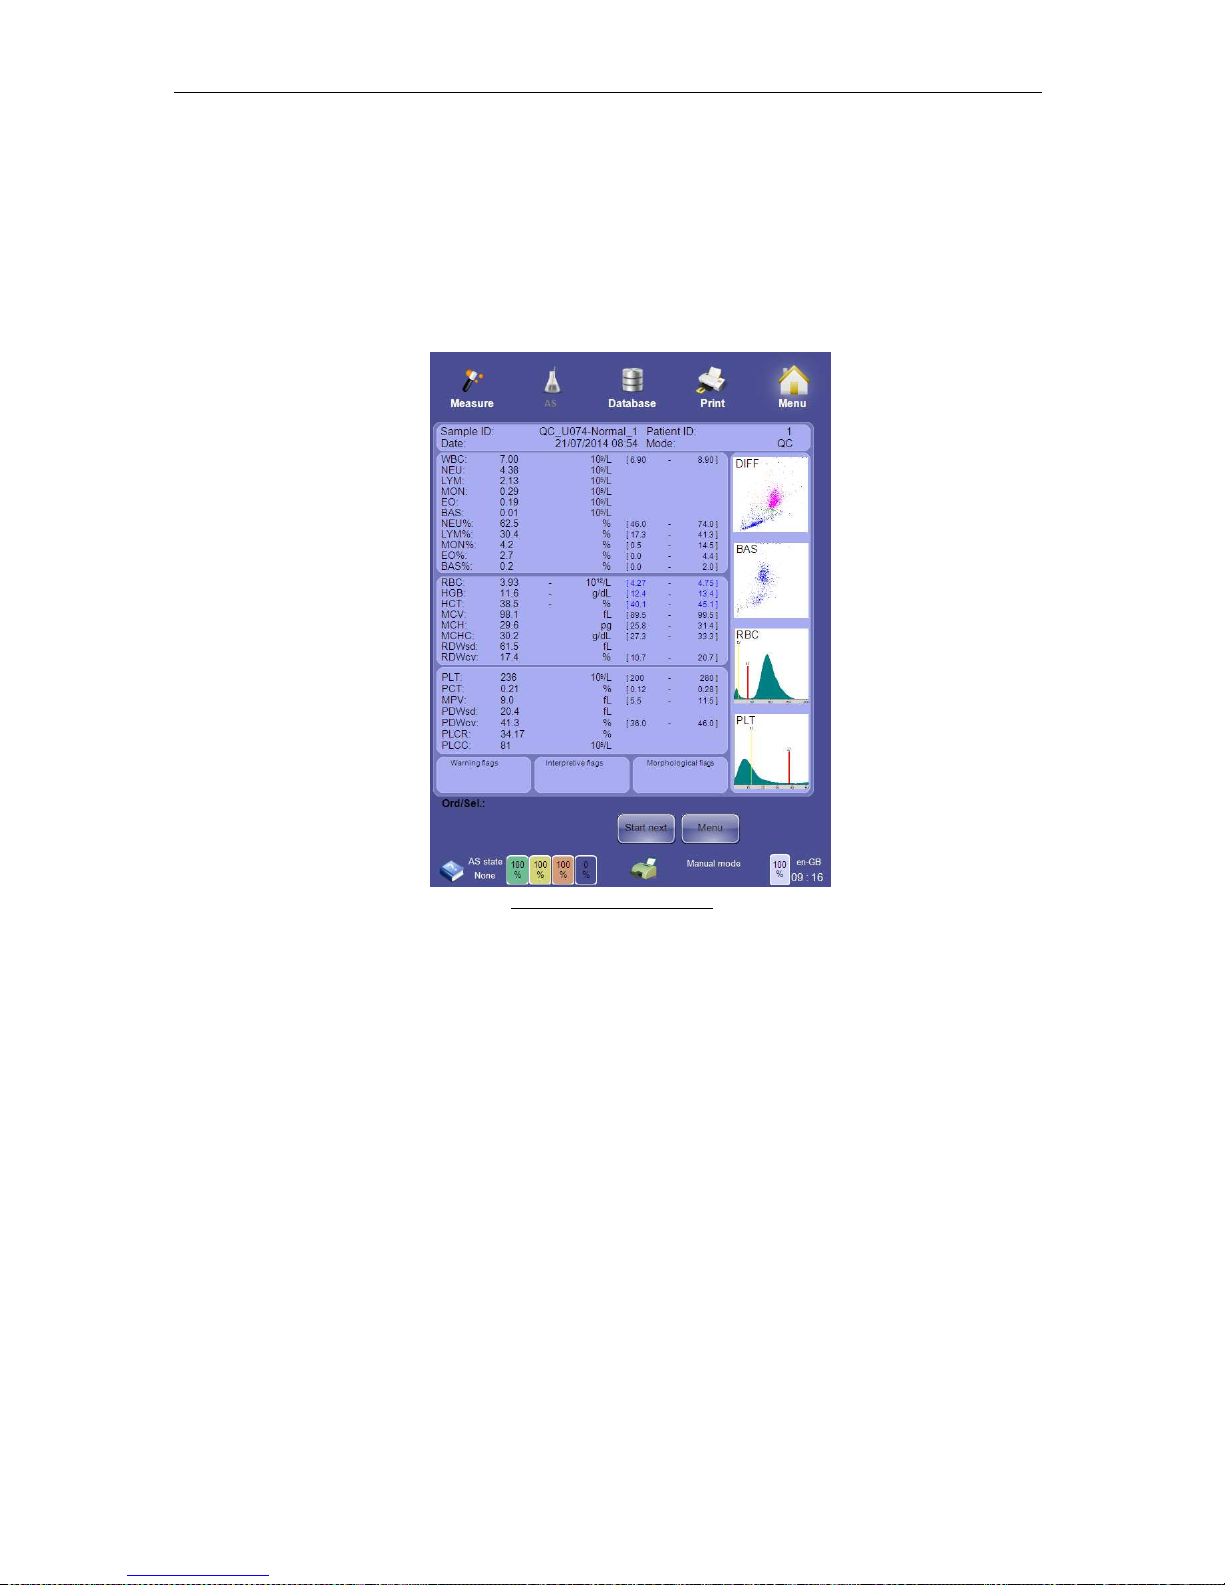
ELite 5, User Manual
Page 60 of 159
After starting the measurement the sample door rotates and takes the sample tube inside the
‘ELite 5’ analyzer. This is a key safety feature of the ‘ELite 5’ and protects the operator from
the sample needle during routine operation. The Start button changes color to red to indicate
that the system is busy processing the sample. The sample is aspirated inside the analyzer
and returned to the operator when the sampling process is complete. As soon as the
measurement results are available the result screen is displayed. See section 8 for more
information about the results screen.
Figure 39. Result Screen
The ‘ELite 5’ analyzer will be ready to take the next sample after it has finished cleaning and
preparing for the next sample. The Start button will change to green indicating it is ready to
start the next sample measurement.
On the result screen you have the following options:
• You can print the results by clicking/ tapping on the ‘Print’ quick link at the top of the
screen. Please note that the printing is a feature that is always available. See section
5.6 for more details about printing.
• Return to the measurement panel by clicking or tapping the using the ‘Back’ button.
• Run the next sample in routine mode by:
- Editing the ‘Next sample ID’ just below the actual results
- Accepting the auto-generated sample ID
- Starting the next measurement by clicking/ tapping the ‘Start’ button on the
screen or by pressing the physical ‘Start’ button on the front panel of the ‘ELite
5’.
- Please note that in this mode the patient and sample mode will be carried over
from the previous sample unless they are changed.
Page 61
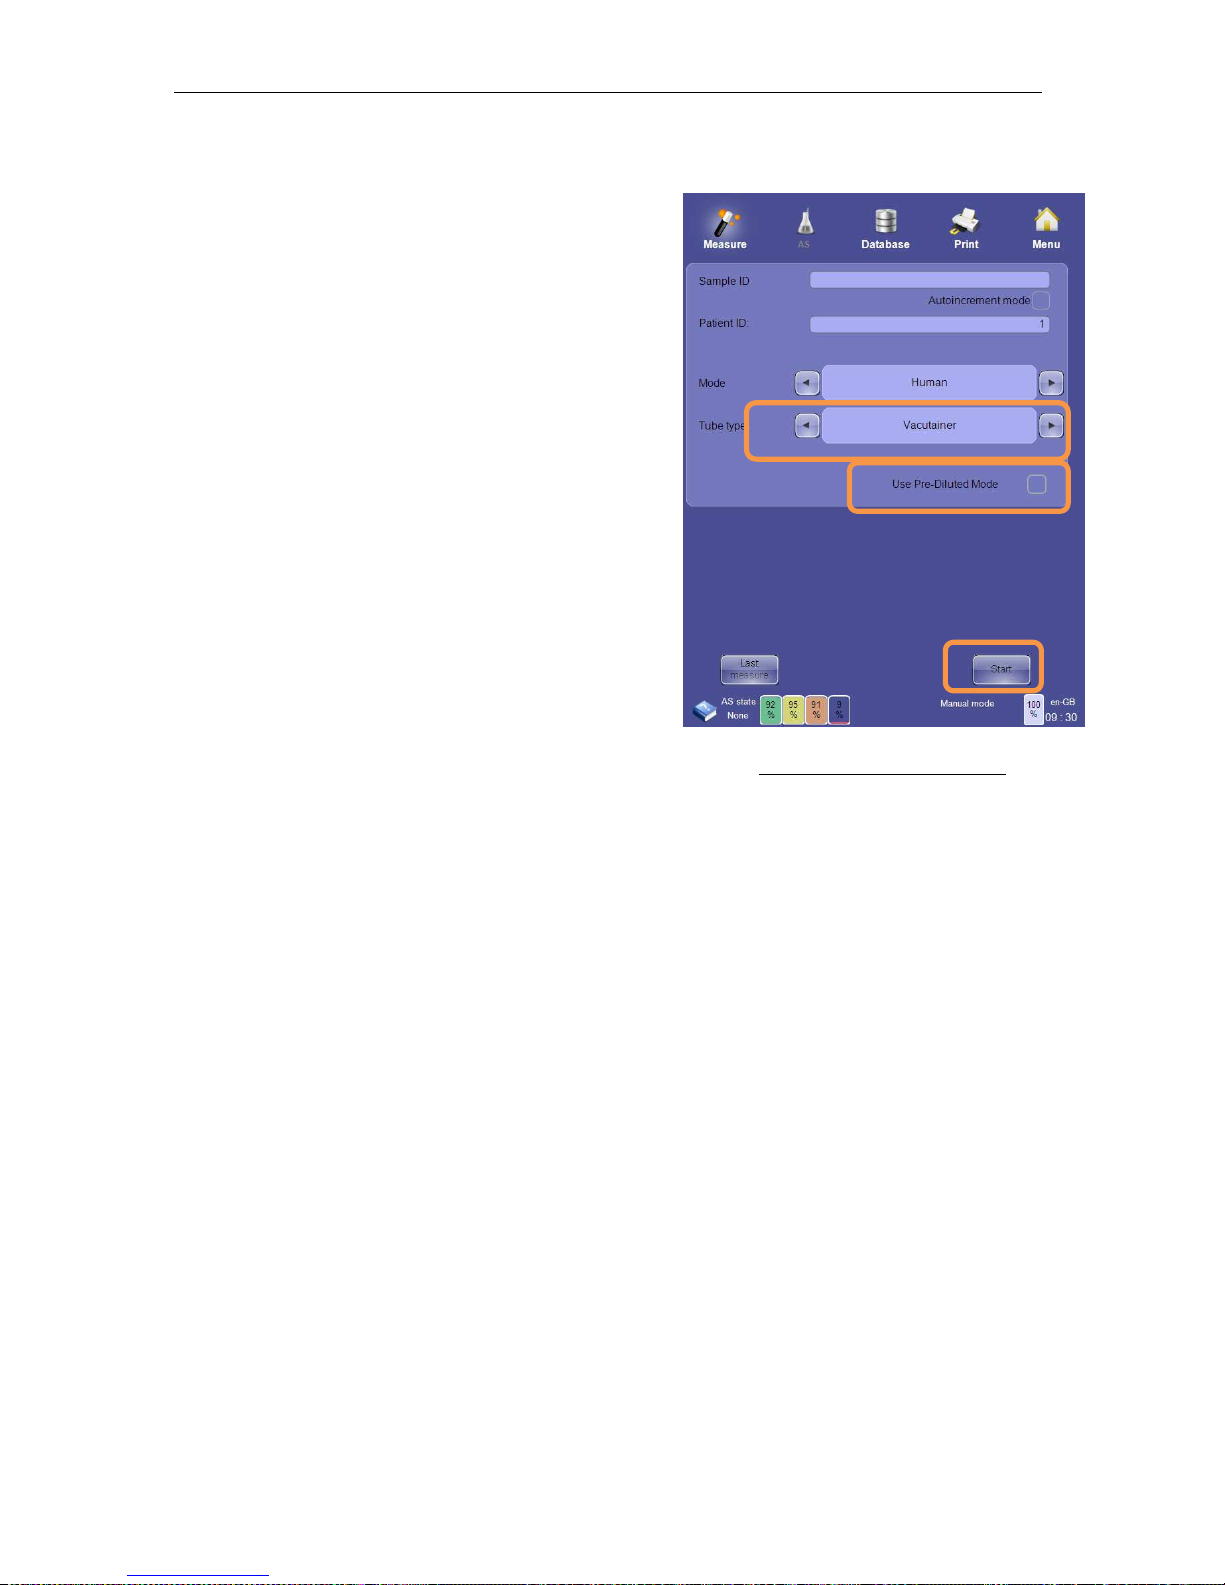
ELite 5, User Manual
Page 61 of 159
7.4.2 Prediluted mode
The sample pre-dilute method test protocol has
been specifically developed to allow Elite 5 users
to measure CBC results on samples having only
small volumes or when one of the counted
parameter result is higher than its linearity range.
The sample must be diluted off-line in an
appropriate tube with physiological saline at a ratio
of 1 part blood sample to 5 parts saline. It is
important to ensure there is a sufficient final
volume in the tube to enable the analyzer to
aspirate the diluted sample satisfactorily. The
suggested minimum diluted sample volume is
300ul from Vacutainer.
When the pre-dilute mode is selected on the
analyzer all results are automatically corrected and
calculated for the dilution factor.
How to use the pre-diluted sample mode
• Step 1. Prepare a diluted patient sample at a dilution ratio of 1:6 (1 part blood to 5
parts saline) in physiological saline. Please ensure that the sample is well mixed and
placed on the analyzer immediately after preparation.
• Step 2. Select the pre-dilute mode on the analyzer
• Step 3. Place the diluted sample onto the analyzer using the
• appropriate tube holder
• Step 4. Initiate the measurement by pressing start button.
• Step 5. Analysis will take place. Please note that due to the lower cell numbers it is
necessary for analyzer to count for a longer period than in the normal sample mode.
(Approximate read time is 16 seconds as opposed to 8 seconds)
• Step 6. CBC results are corrected for the dilution factor, displayed on screen and can
also be printed. Please note it is indicated on the screen and on the print-outs that the
measurement was conducted in the pre-diluted sample mode.
• Step 7. Remove diluted sample and to move next measurement ensuring correct
sample type is selected.
Important notes
• It is also important to use physiological saline and not analyzer diluent to prepare
diluted samples.
• The pre-diluted sample option can only be used manually and not with the autoloader.
Figure 40. Autosampler Panel
Page 62
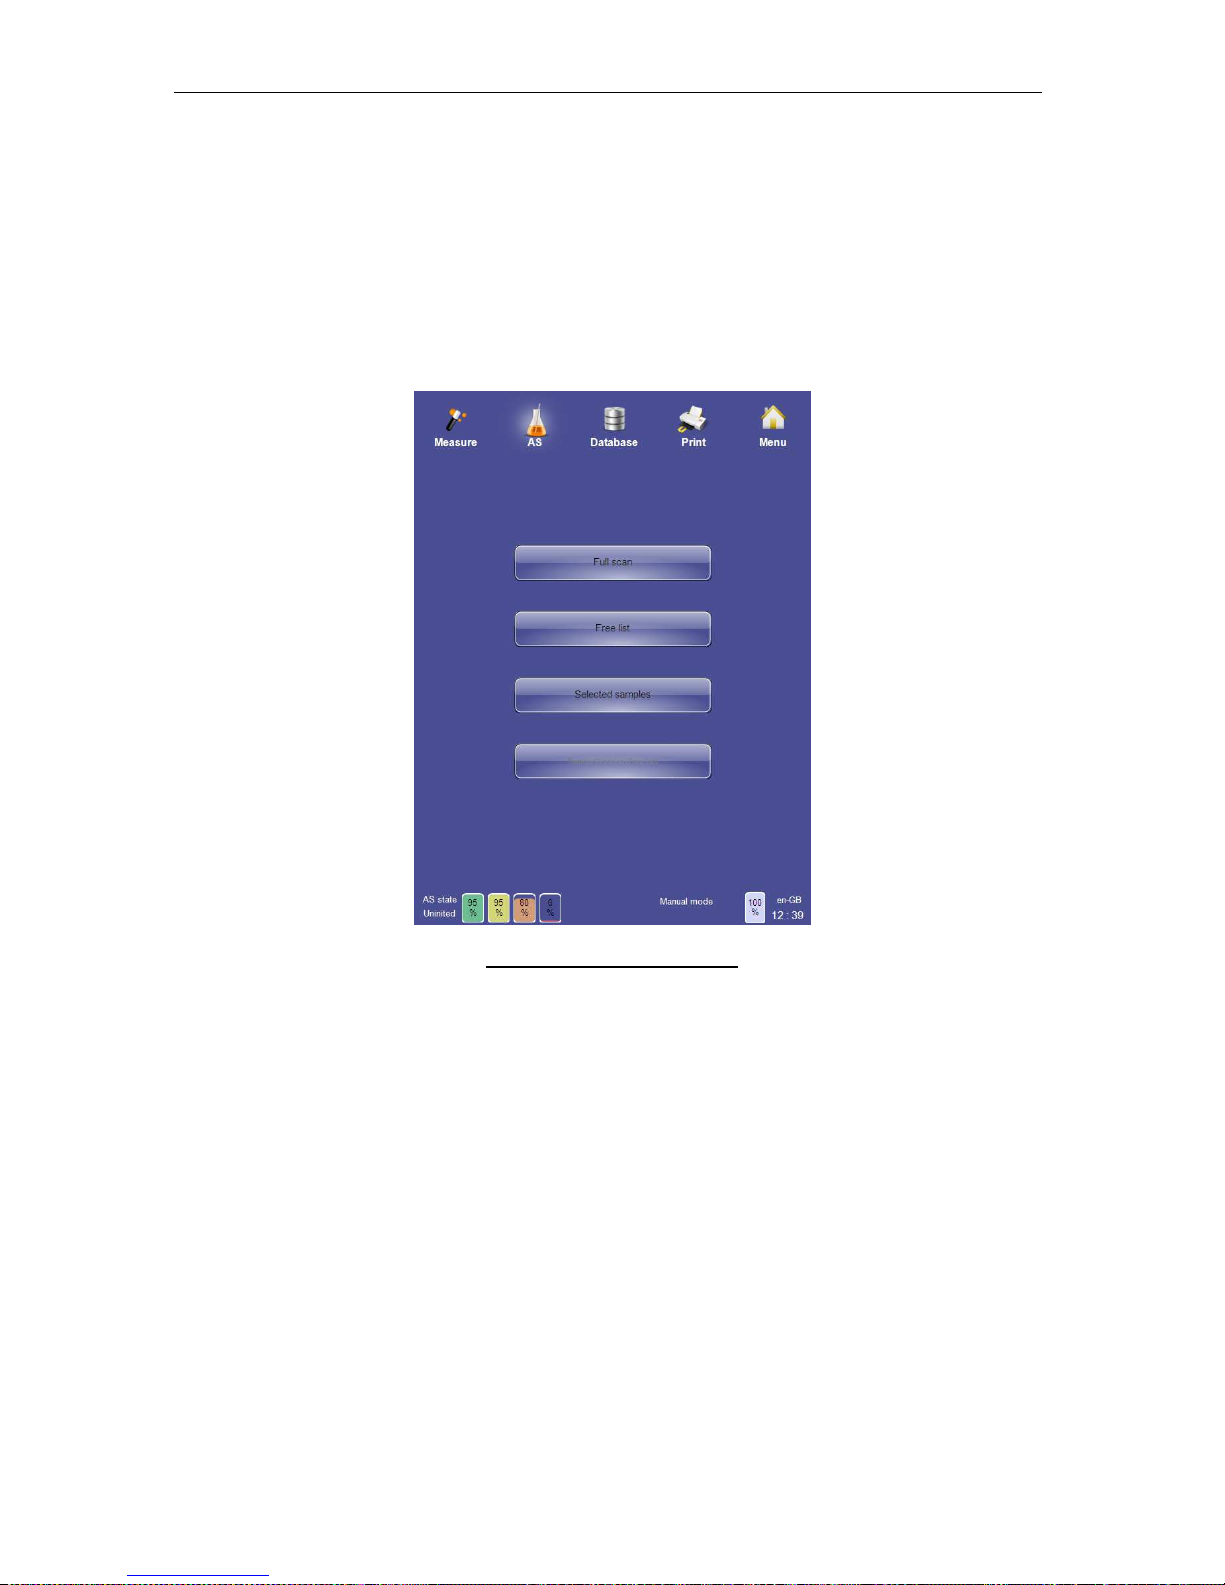
ELite 5, User Manual
Page 62 of 159
7.4.3 Automatic Mode
Only human samples in closed sample tubes can be processed in automatic mode from the
Autosampler. QC samples and open tubes must be processed in manual mode.
After starting up the ‘ELite 5’, select the ‘Measure’ quick link. A new blank must be processed
if this is the first time a new measurement panel is opened since starting up, or if an earlier
blank has expired due to inactivity. An accepted blank measurement is required before
starting automatic sample processing.
Open the AS panel by using the “AS” quick link at the top of the screen.
From the AS panel, you can initiate automated sample measurement in 3 modes:
• Full Scan mode:
- The Autosampler will scan the whole sample tray
- The same sample mode will be used for all the samples
- The sample ID is generated from the sample tube barcode (if available)
- It is not possible to assign a patient to automatically processed samples. The
default patient will be used for all samples.
• Free List mode:
- The samples are defined in a list.
- The following parameters can be individually defined per sample:
Sample ID
Patient
Sample mode
- The samples should be placed in the same order in the sample tray as the
samples defined in the list.
Figure 41. Autosampler Panel
Page 63

ELite 5, User Manual
Page 63 of 159
- Empty sample positions will be skipped on the sample tray.
• Selected Samples mode:
- A sample can be defined for each position on the sample tray.
- Only defined samples positions on the sample tray will be processed.
Additional samples will be skipped and missing samples will be marked for
later review.
- The following parameters can be defined per sample:
Sample ID
Patient
Sample mode
Remote Work list (Free list)
- The samples are defined in a list received from the LIS.
- There is no need to put the samples in the same order into the sample tray as the
samples defined in the list.
- Empty sample positions will be skipped on the sample tray.
Samples are automatically scanned and processed in the following order:
• Rack order starting with rack ‘A’ to rack ‘J’
- Rack ‘A’ is the rack nearest to the front panel of the ‘ELite 5’
- Rack ‘J’ is the rack nearest to the back panel of the ‘ELite 5’
• Sample order for each rack starting with sample ‘1’ to sample ‘10’
- Sample ‘1’ is the sample closest to the ‘ELite 5’
- Sample ‘10’ is the sample closest to rounded edge of the Autosampler cover
• Sample A1 is the first sample processed and sample J10 is the last.
7.4.3.1 Supported Barcode
Some of the ‘ELite 5’ analyzer automatic processing modes use the barcode on the sample
tube to determine the sample ID of the sample tube. The following bar code symbols are
supported by Auto sampler bar code reader:
Bar Code
Checksum Status
Code 128 Uses check digits
Code 39 No check digits used. If check digit are present they are considered part of the sample ID
Interleave 2 of 5 No check digits used. If check digit are present they are considered part of the sample ID
Codabar Uses check digits
Code 93 Uses check digits
Code 11 Uses check digits
The use of bar code symbologies with check digits will identify incorrect bar code reads in the
unlikely event that the Auto sampler bar code reader incorrectly reads the sample tube bar
code. Erba Lachema recommends the use of bar code symbologies that uses check digits to
help prevent sample misidentification.
Symbols of sample types in tray view:
Sample (in position 6) has bar code and cap. Auto sampler finished the mixing.
Sample (in position 5) has bar code and cap. Sample is currently measured.
Page 64
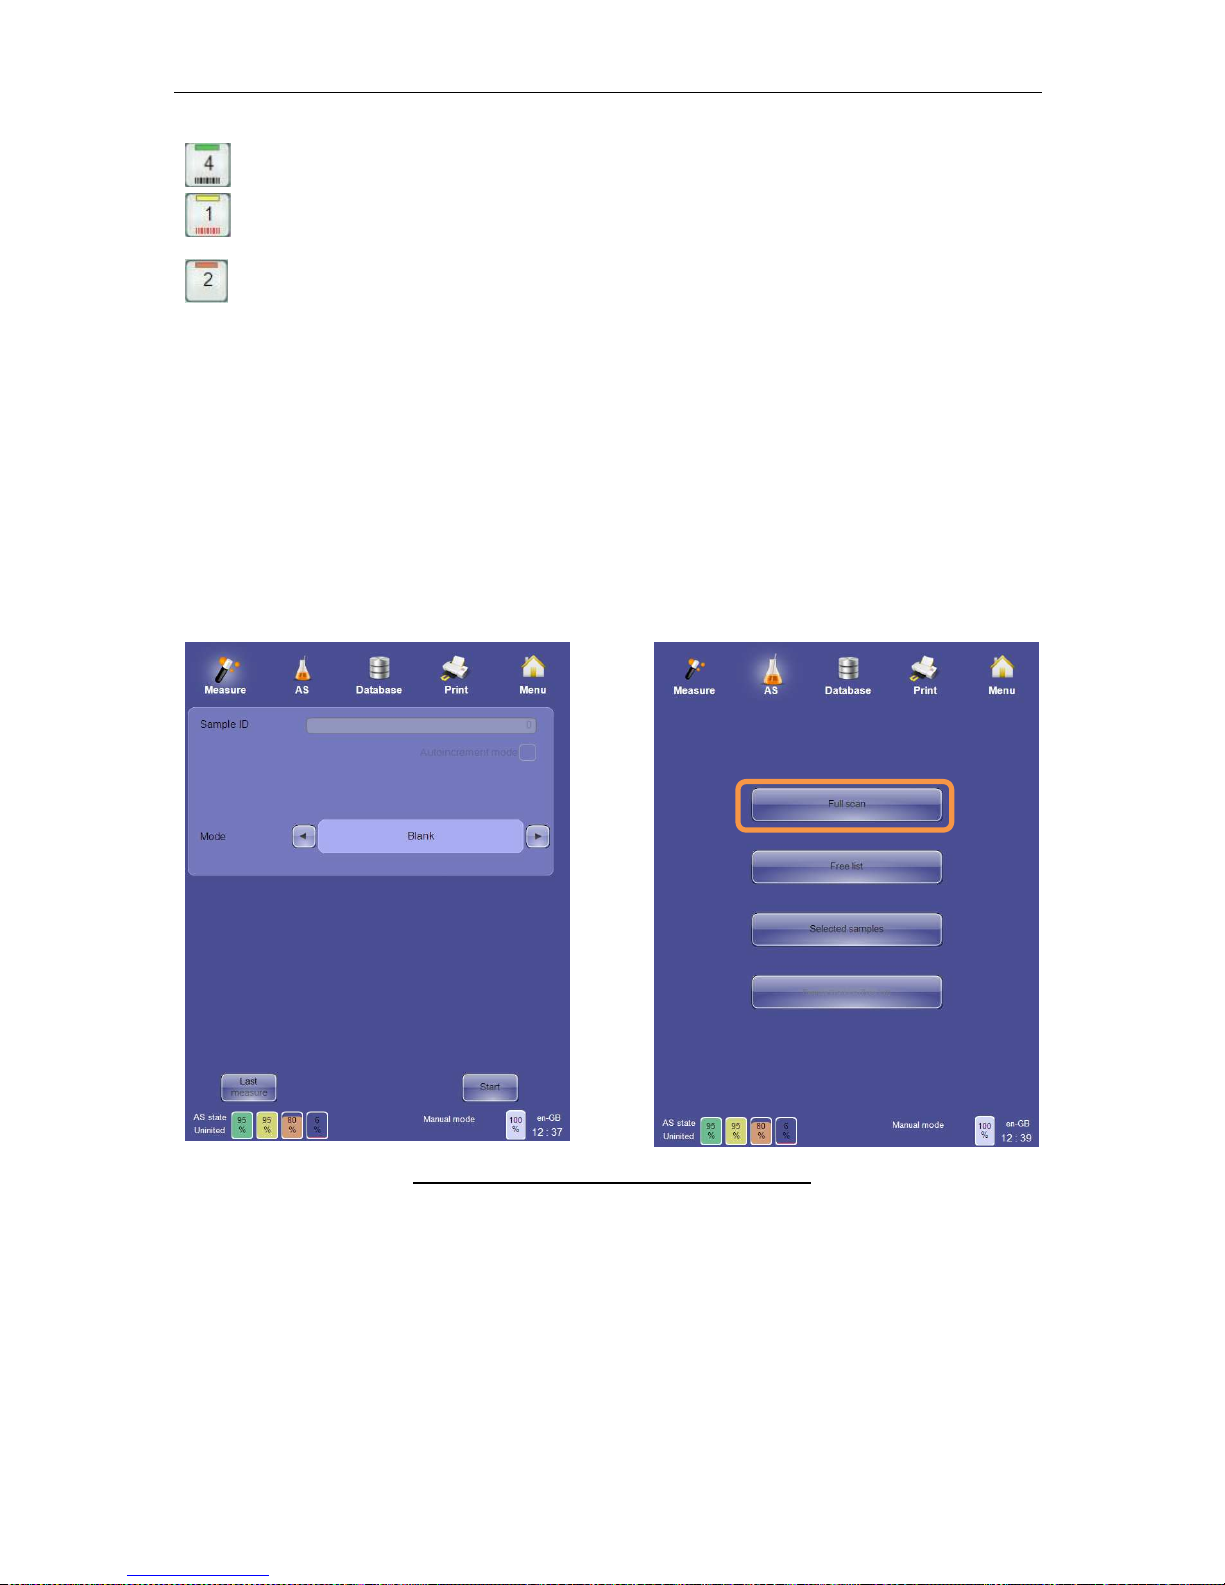
ELite 5, User Manual
Page 64 of 159
Sample (in position 4) has bar code and cap. Sample measurement is finished.
Sample (in position 1) has no barcode but has cap. Sample measurement is
finished.
Sample (in position 2) has no cap. Sample is ignored.
7.4.3.2 Full Scan Mode
Full Scan mode is suitable for laboratories where:
• There are batches of samples with the same sample mode,
• Barcode labels are in use, and
• An LIS system rather than the ‘ELite 5’ is used to associate patients with sample
results.
In Full Scan mode it is possible to add more samples to the batch after starting the
automated measurement. As usual, an accepted blank is necessary before starting
automatic sample processing.
Figure42. Full Scan Automatic Processing Mode
On the Full Scan mode panel you can:
• Return to the AS panel to select a different type of automated measurement by using
the ‘Back’ function.
• Select a common measure mode for all samples in the tray.
• Swap between the tray and list views by using the ‘View list’ and ‘View tray’ functions.
• Start the automated measurement by clicking or tapping on the ‘Start’ button on the
GUI.
Page 65
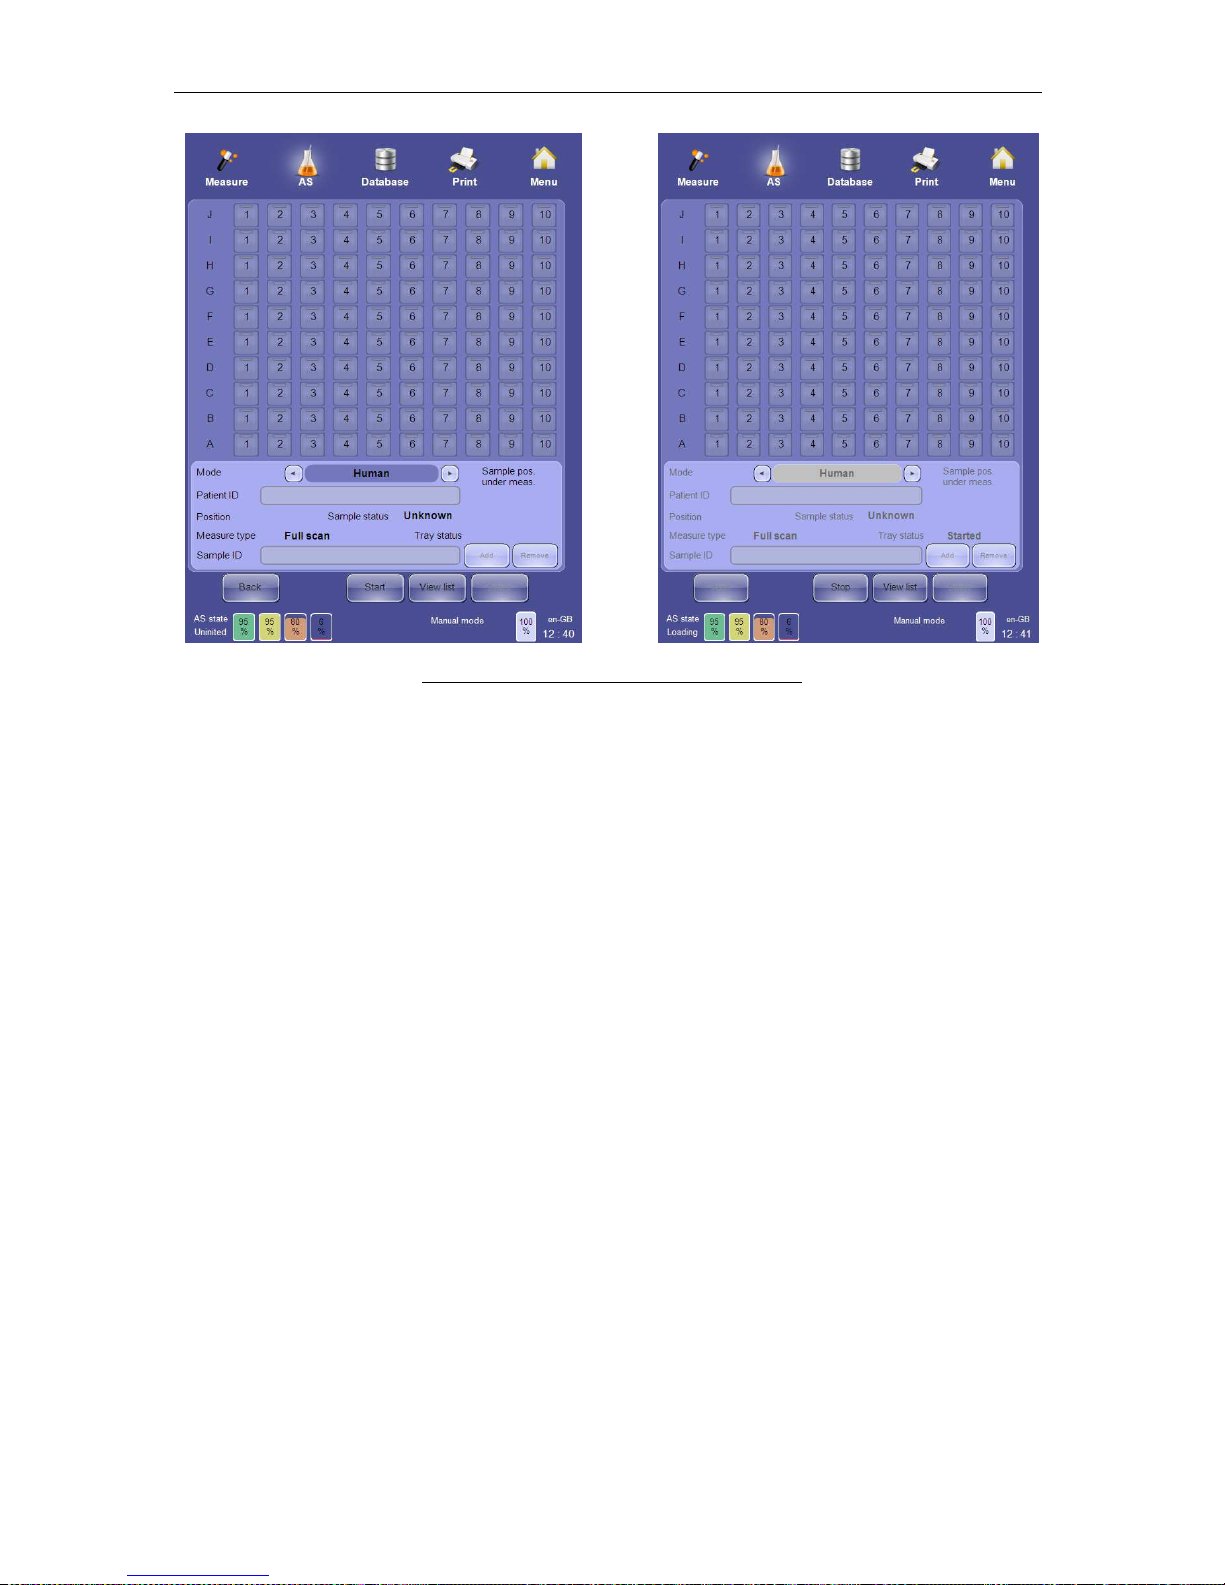
ELite 5, User Manual
Page 65 of 159
Figure 43. Full Scan Mode Tray View Progress
After starting the automated measurement in Full Scan mode, the Autosampler will scan all
the sample positions on the tray. Any rows with missing racks will be skipped. The
Autosampler can detect the tube type and whether the tube has a cap. Sample tubes will be
skipped if it has no cap or the Autosampler cannot determine the tube type.
The Autosampler then mixes the sample tube and reads the barcode label if one is used.
The sample tube is then moved to the aspiration position where the sample is aspirated and
measurement is performed. The aspiration and measurement process is the same in
automatic mode as in manual mode.
The sample tray progress can be followed in the tray view or the list view. The results for
completed samples can be reviewed by clicking or tapping on a completed sample.
The patient ID is not editable in the Full Scan mode as it is automatically set to the default
patient. The sample ID is not editable as it is read from the barcode label. If the barcode label
is missing or not readable, the ‘ELite 5’ analyzer assigns a default value and allows manual
entry of the sample ID.
Page 66
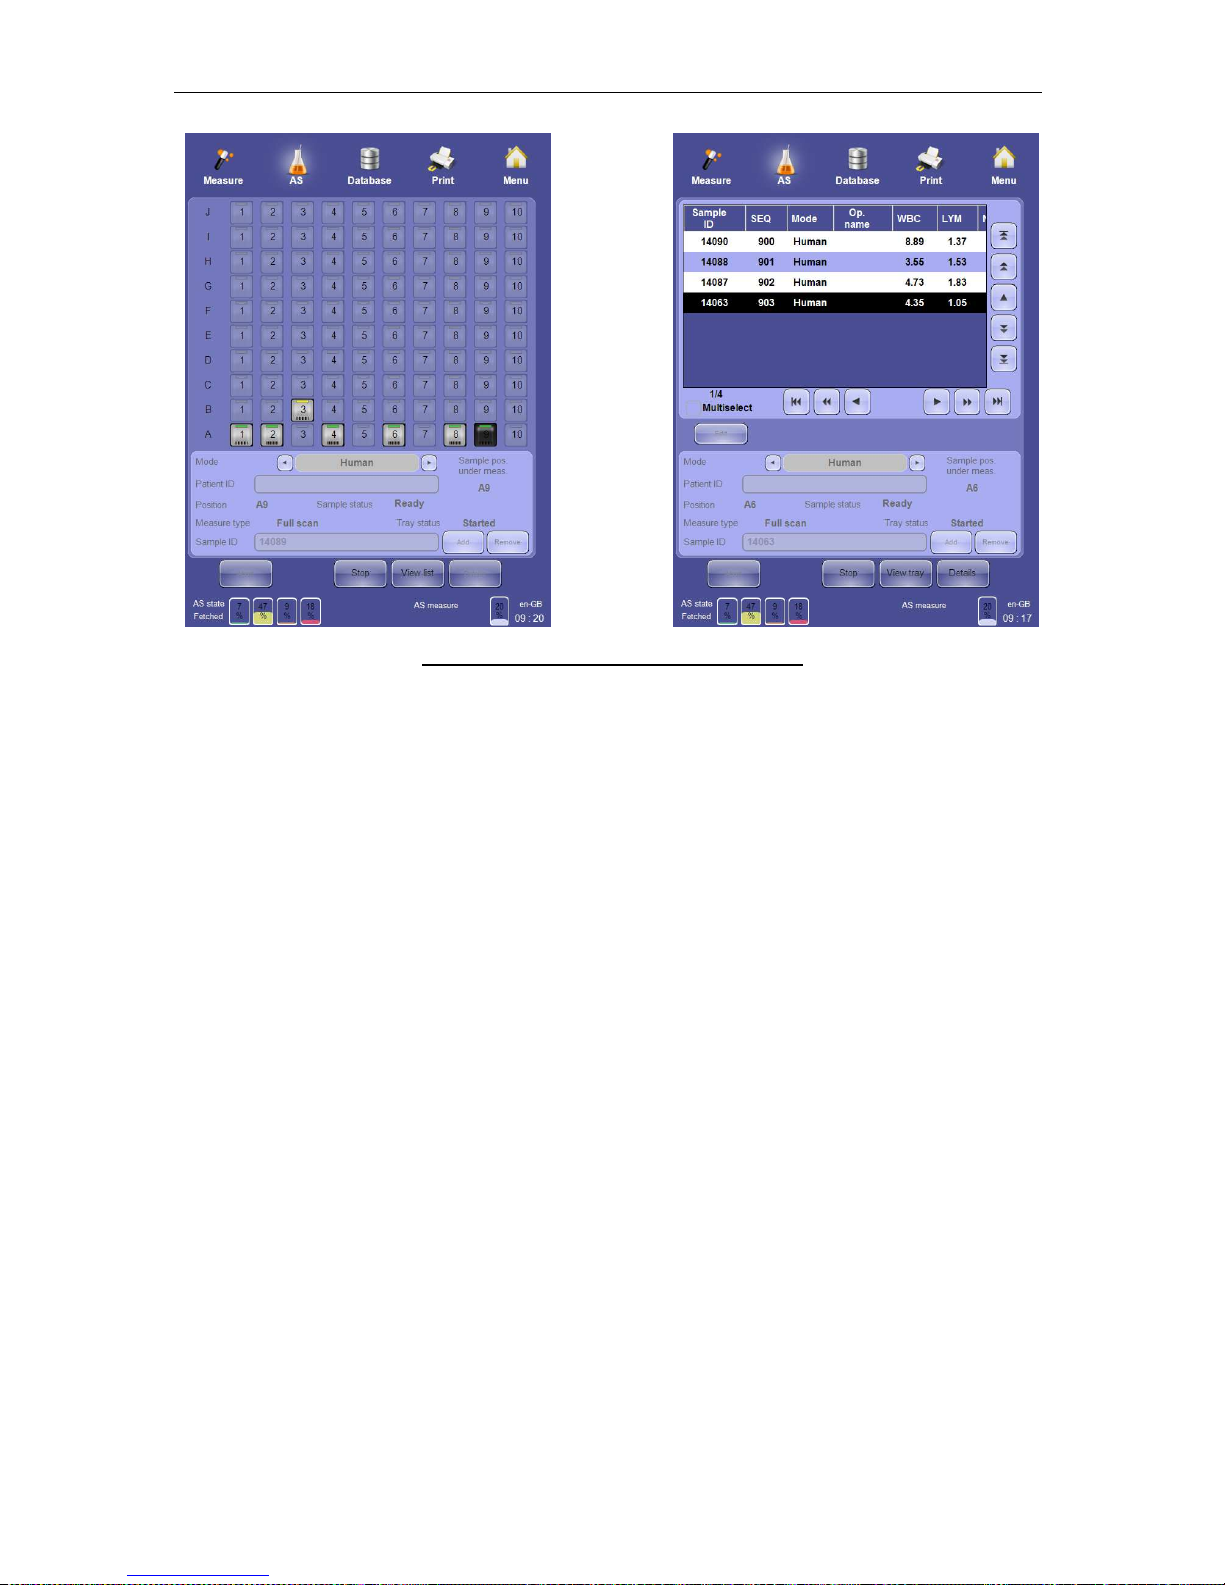
ELite 5, User Manual
Page 66 of 159
Figure 44. Full Scan Mode Tray and List Views
The Autosampler allows the addition of sample tubes to a Full Scan process already in
progress. To add more sample tubes, perform the following steps:
• Click or tap the ‘Stop’ button. The ‘ELite 5’ will prompt you to wait until the current
sample is completed.
• Acknowledge the message by clicking or tapping the ‘OK’ button.
• Insert the new samples into a rack.
• Open the cover of the Autosampler.
• Place the new samples behind the last measured sample.
• Close the Autosampler cover.
• Start the automated measurement by clicking or tapping on the ‘Start’ button on the
GUI or by pressing the physical Start button.
The ‘ELite 5’ analyzer keeps track of the last analyzed sample on the sample tray of the
Autosampler. After restarting the full scan process the ‘ELite 5’ moves the Autosampler to the
last processed position and continues scanning from there.
7.4.3.3 Free List Mode
Free List mode is suitable for laboratories where:
• The barcode labels are not used, or the bar codes are not the primary identifiers.
(This is the only mode where the sample ID is defined before the measurements.)
• Samples are arriving from multiple sources in small batches.
• In a given batch there are samples which should be measured using different modes
for different normal ranges.
To start sample measurement in Free List mode, first perform and accept the blank
measurement if one is needed. Click or tap the ‘AS’ quick link at the top of the screen and
select ‘Free list mode’. The Free List mode only requires that samples are placed in the
same sequence as in the free list. It does not require that samples be matched to exact rack
Page 67
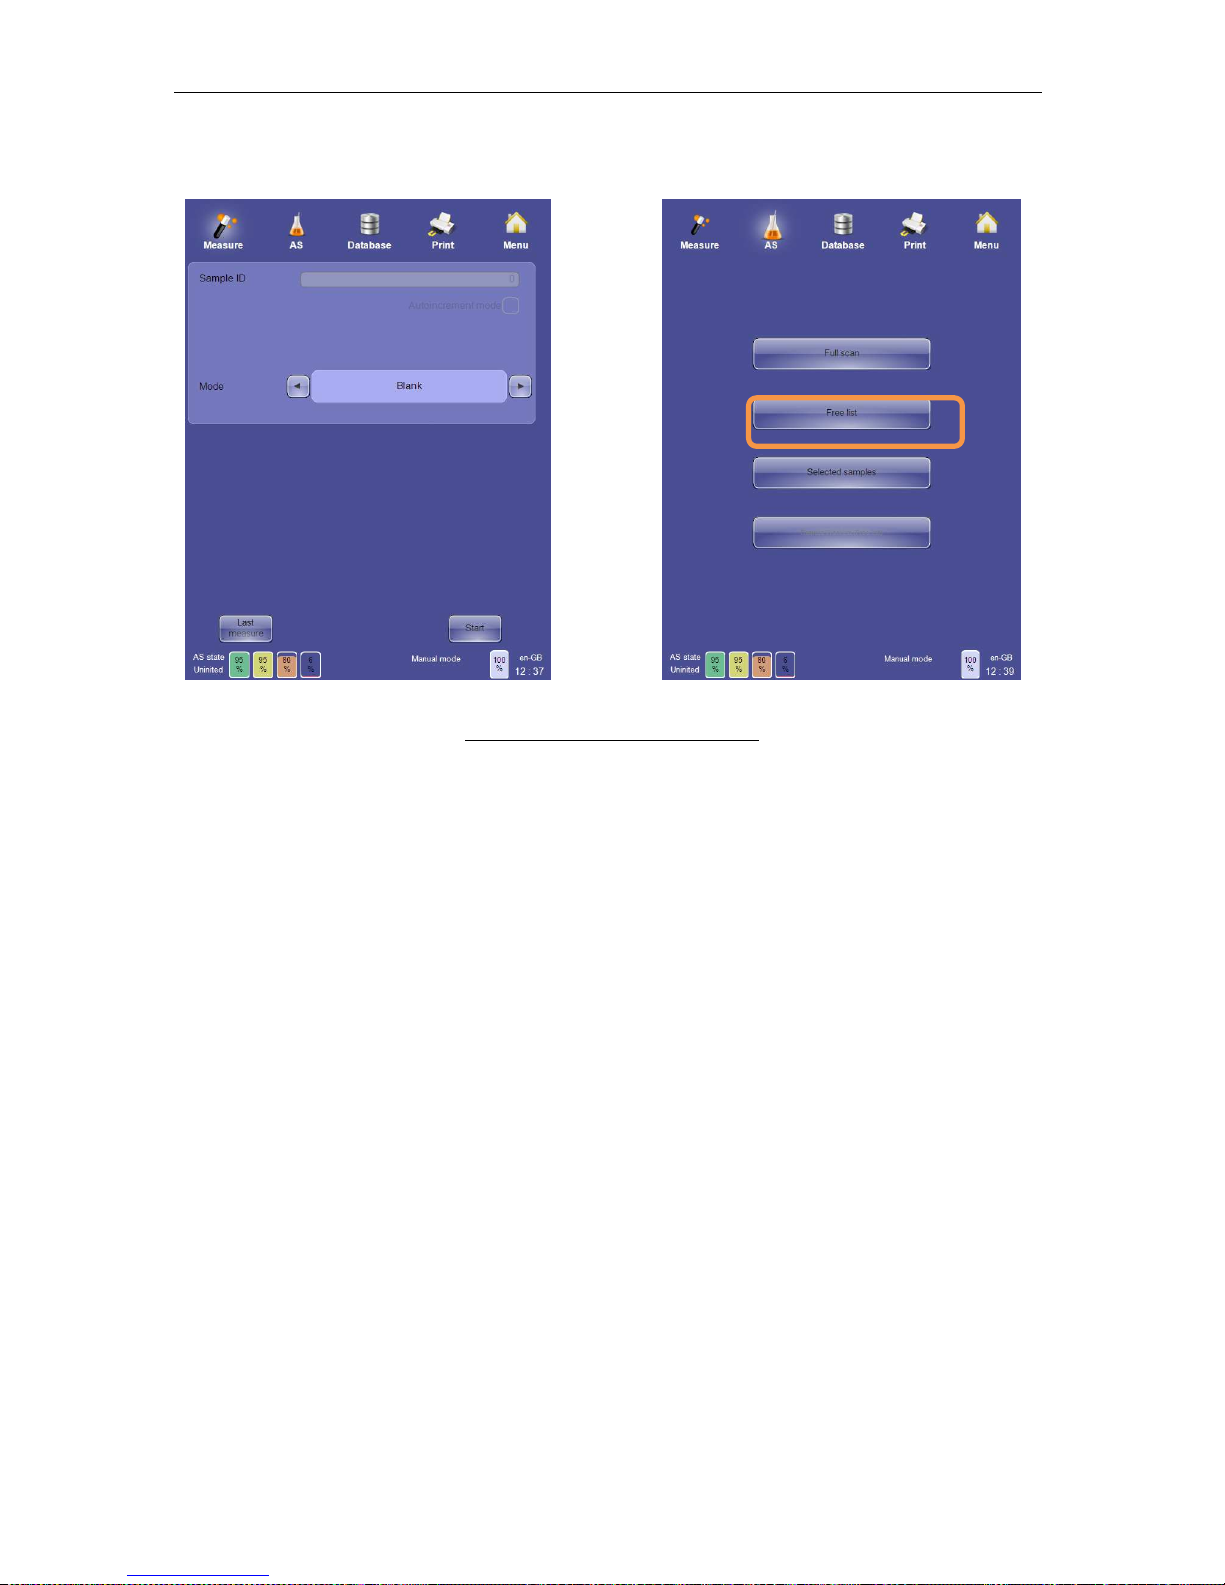
ELite 5, User Manual
Page 67 of 159
and sample positions. It is not possible to add additional samples to the batch in free list
mode after automated measurement has started.
Figure 45. Free List Mode Selection
On the Free List mode panel you can:
• Return to the AS panel to select a different type of automated measurement by using
the ‘Back’ function
• Add or remove list items
• Define the following parameters for the new list items:
- Measure mode
- Sample ID
- Patient ID
• Swap between the tray and list views by using the ‘View list’ and ‘View tray’ functions
• Start the automated measurement by clicking or tapping on the ‘Start’ button on the
GUI or by pressing the physical Start button
Page 68
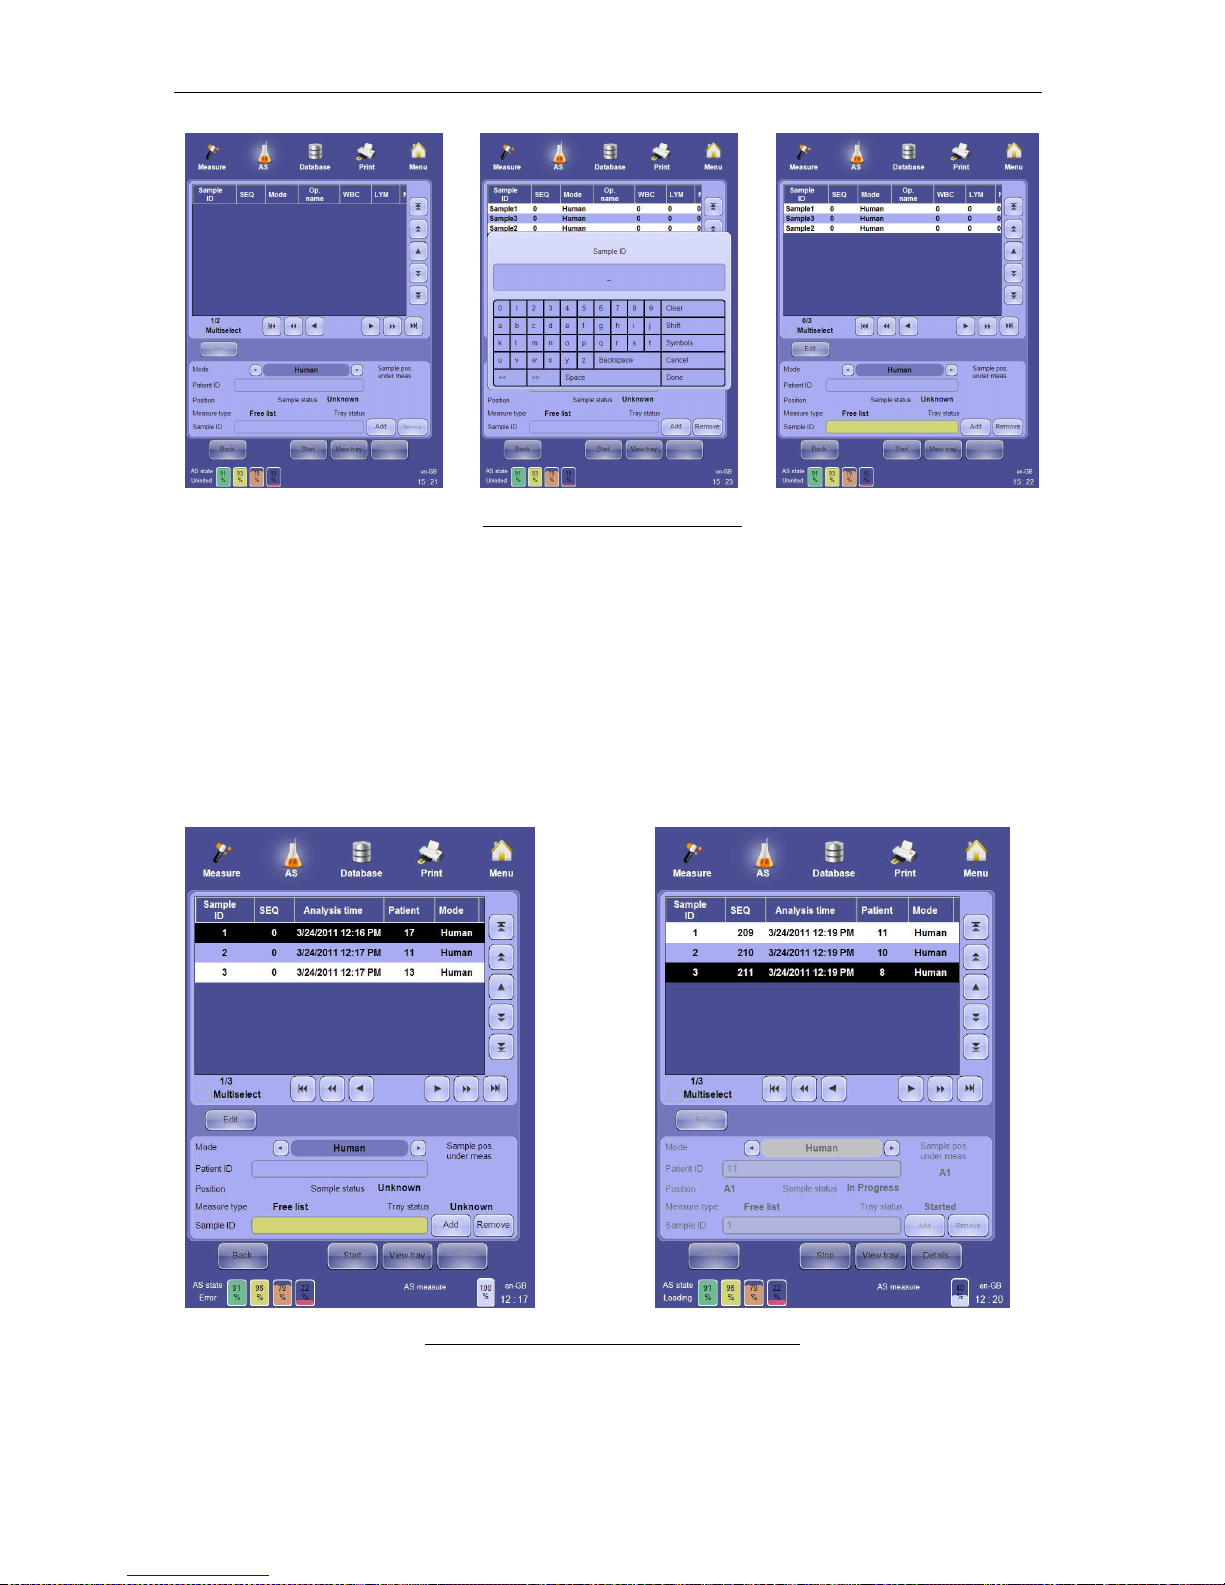
ELite 5, User Manual
Page 68 of 159
Figure 46. Preparing a Free List
As with the Full Scan mode, the Autosampler will scan all the sample positions on the tray
and rows with missing racks will be skipped. The Autosampler will only process tube types it
recognizes with caps attached. The automated mixing, aspiration, and analysis process is
the same as the Full Scan Mode, and the progress can be followed in tray or list view.
The main difference between the Free List mode and the Full Scan mode is that the Free List
mode identifies samples by matching them sequentially to the list, and comparing their
measurement results to the normal range associated with the sample mode selected for that
sample.
Figure 47. Free List Mode Progress: List View
Page 69
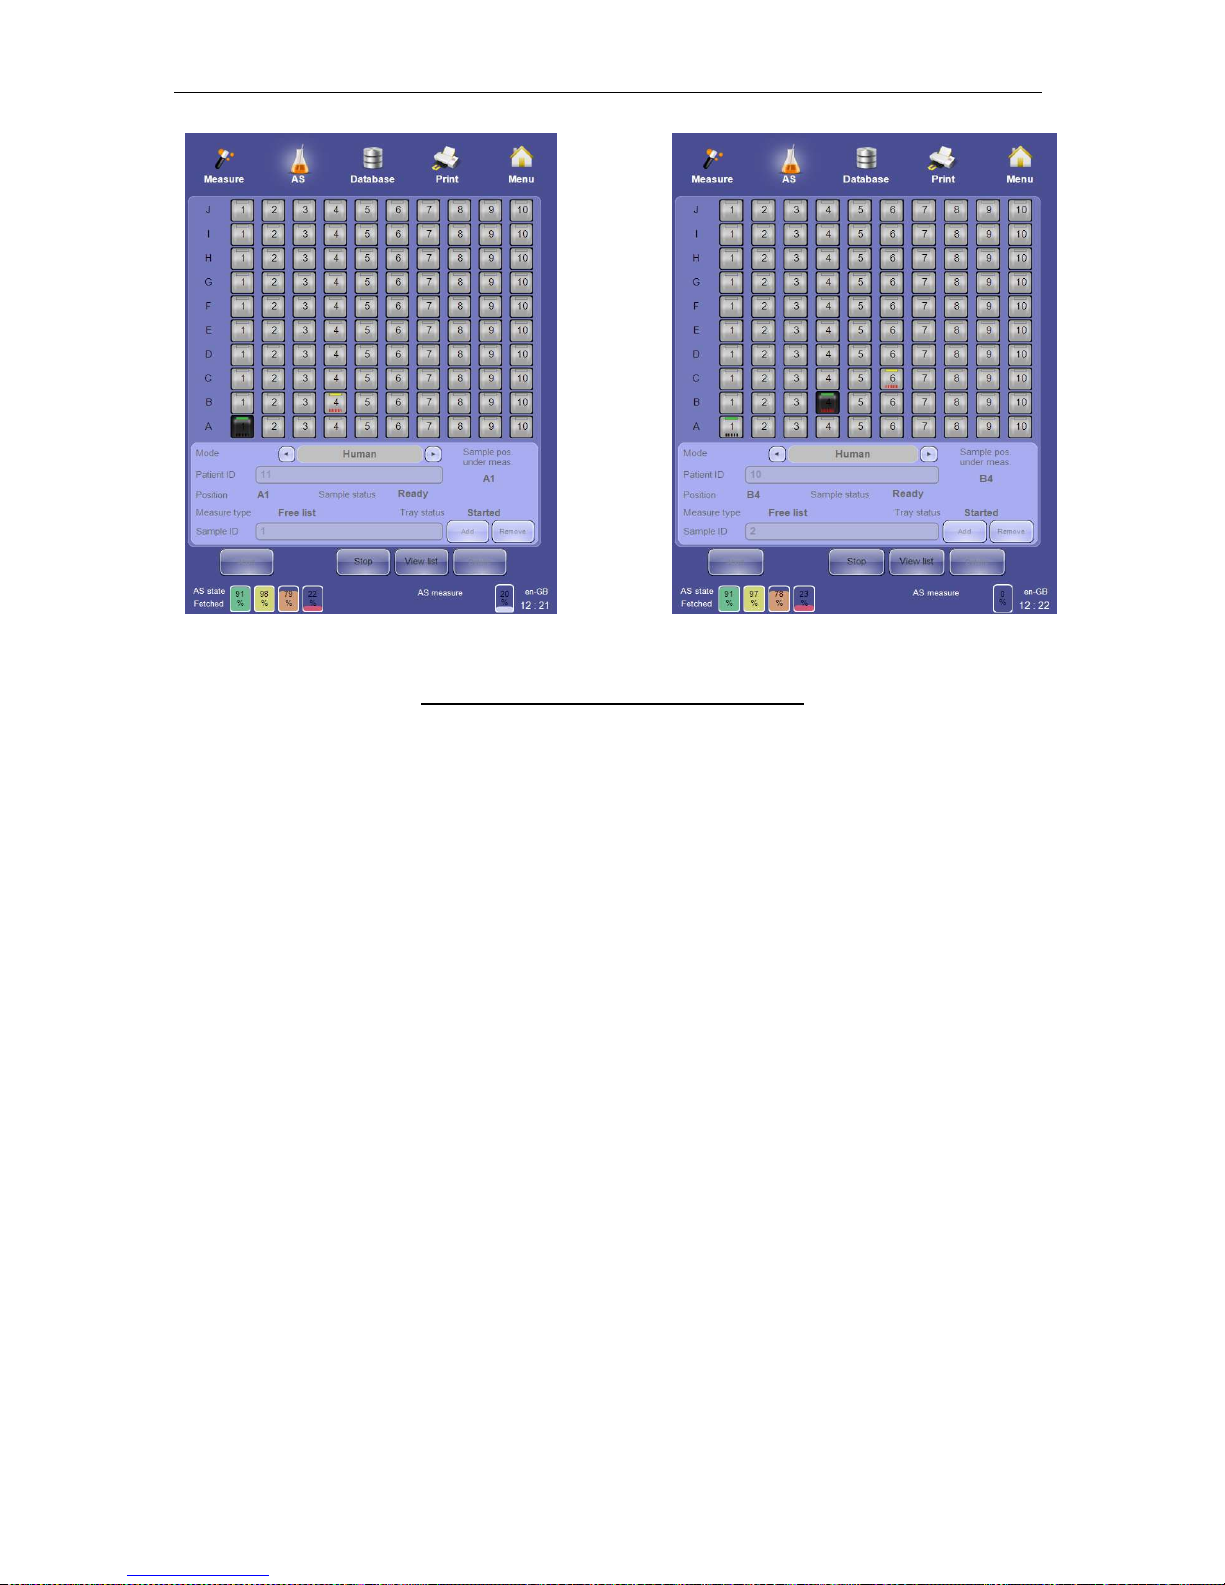
ELite 5, User Manual
Page 69 of 159
Figure 48. Free List Mode Progress: Tray View
Sample barcode labels are read and compared with the sample ID that was previously
entered into the free list before starting automatic processing. If the two do not match, the
barcode part of the tray view sample icon changes to red.
If the automated interrupted for any reason, it can be restarted it by clicking or tapping on the
‘Start’ button on the screen or by pressing the physical Start button.
7.4.3.4 Selected Samples Mode
Selected Samples mode is suitable for laboratories where:
• Barcode labels are used.
• In a given batch there are samples which should be measured using different modes
for different normal ranges.
• Data security is a concern.
Selected Samples mode can also be used to rerun only certain samples in a sample tray
already processed in one of the other two modes. Samples cannot be added to the sample
tray once automatic processing is started in Selected Samples mode. An accepted blank
measurement is required as with all sample processing.
In Selected Samples mode, the ‘ELite 5’ analyzer will only look for samples in the sample
positions selected for analysis. All other samples in sample positions that are not selected
will be ignored. If a sample position is selected for processing but contains no sample tube,
the sample position will be marked for review.
On the Selected Sample mode panel you can:
• Return to the AS panel to select a different type of automated measurement by using
the ‘Back’ function.
• Define the samples to be measured:
Page 70
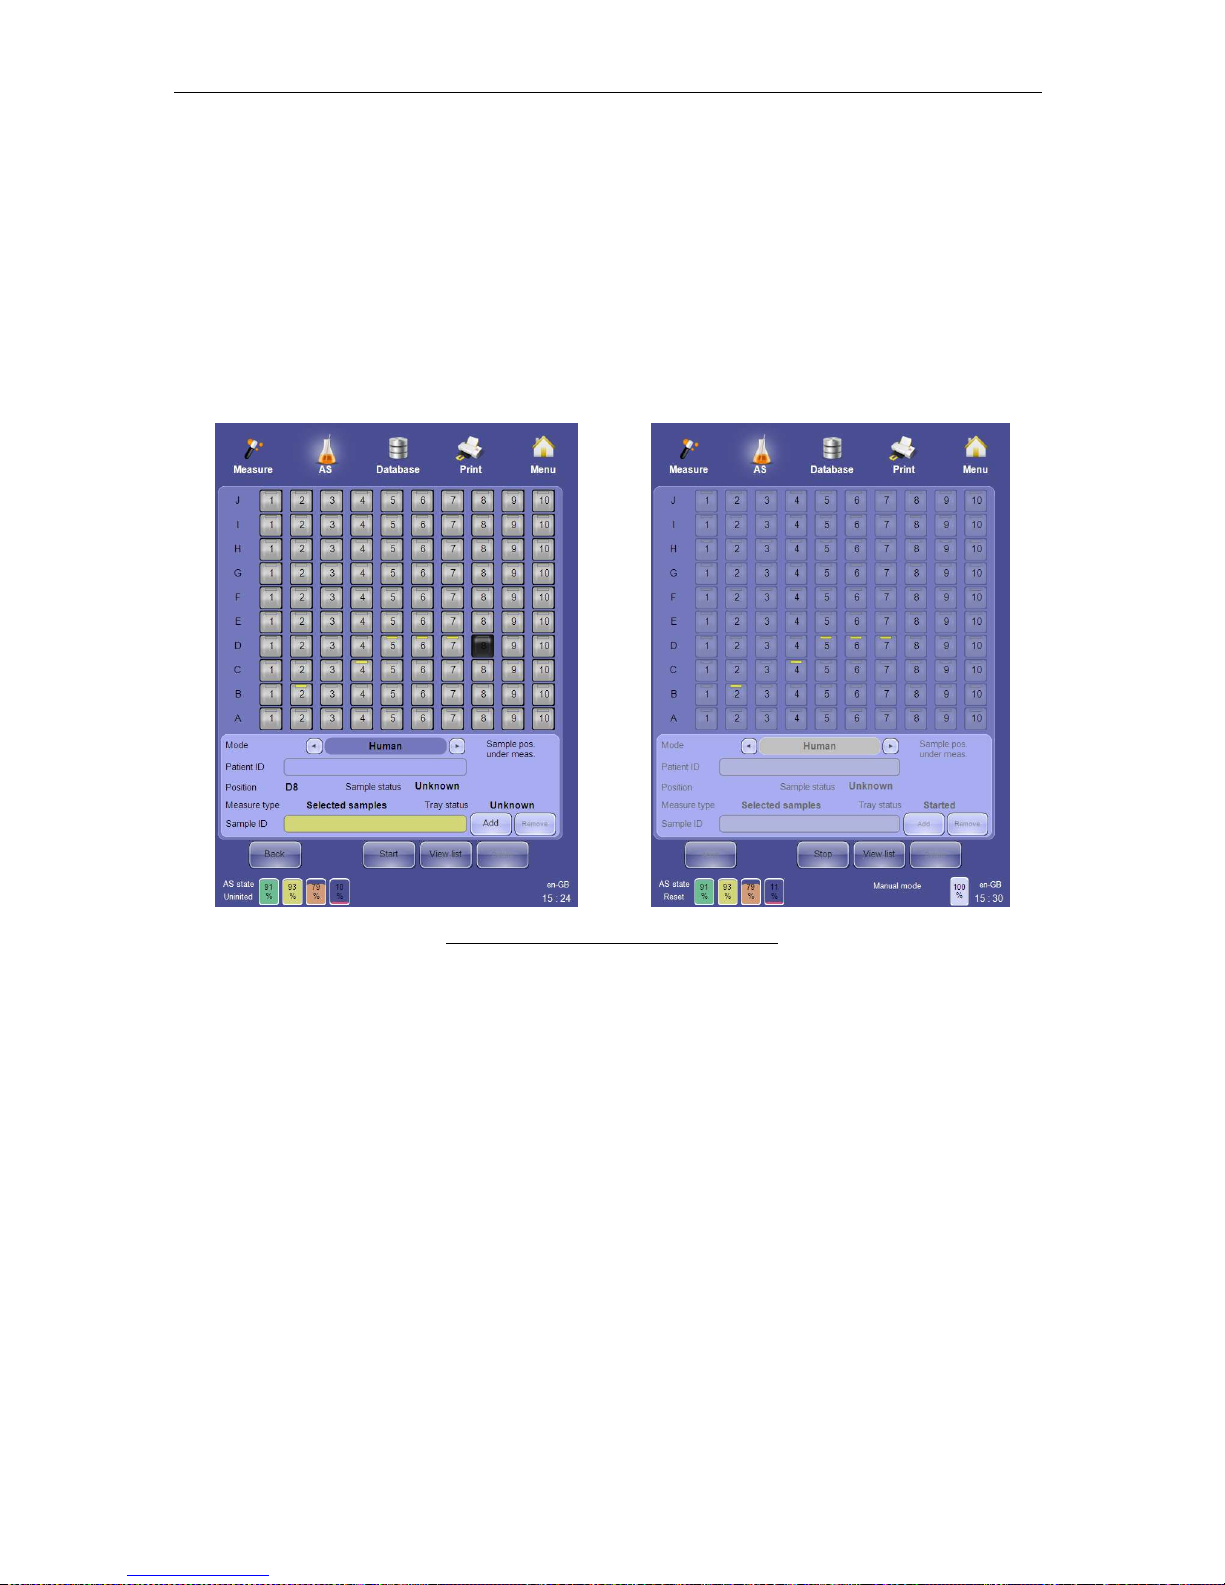
ELite 5, User Manual
Page 70 of 159
- Click or tap the sample tray position icon where the selected sample is
located.
- Select the appropriate measure mode.
- Define the sample ID.
- Define the patient ID.
- Save the changes by clicking or tapping the ‘Add’ button.
• Remove selected samples by clicking or tapping the “Remove” button.
• Swap between the tray and list views by using the ‘View list’ and View tray’ functions.
• Start the automated measurement by clicking or tapping on the ‘Start’ button on the
GUI or by pressing the physical Start button
Figure 49. Selected Sample Mode Panel
7.4.3.5 Interrupting Automatic Processing for Stat Samples
If one or more stat samples need to be processed, you can interrupt automatic processing to
analyze the stat sample(s) without having to wait until the entire sample tray has been
processed. To interrupt automatic processing for stat specimens, perform the following steps:
• Click or tap the ‘Stop’ button. The ‘ELite 5’ will prompt you to wait until the current
sample is completed.
• Acknowledge the message by clicking or tapping the ‘OK’ button.
• Place the stat sample into the sample rotor.
• As soon as the current measurement completes change to the manual measurement
panel by clicking or tapping the ‘Measure’ quick-link at the upper left corner of the
screen.
• Process the stat sample(s) in manual mode.
• Return to the automated measurement panel by clicking or tapping the ‘AS’ quick link;
• Restart the measurement by clicking or tapping the ‘Start’ button or by pressing the
physical Start button.
• The ‘ELite 5’ will continue automated measurement from where it was interrupted.
Page 71
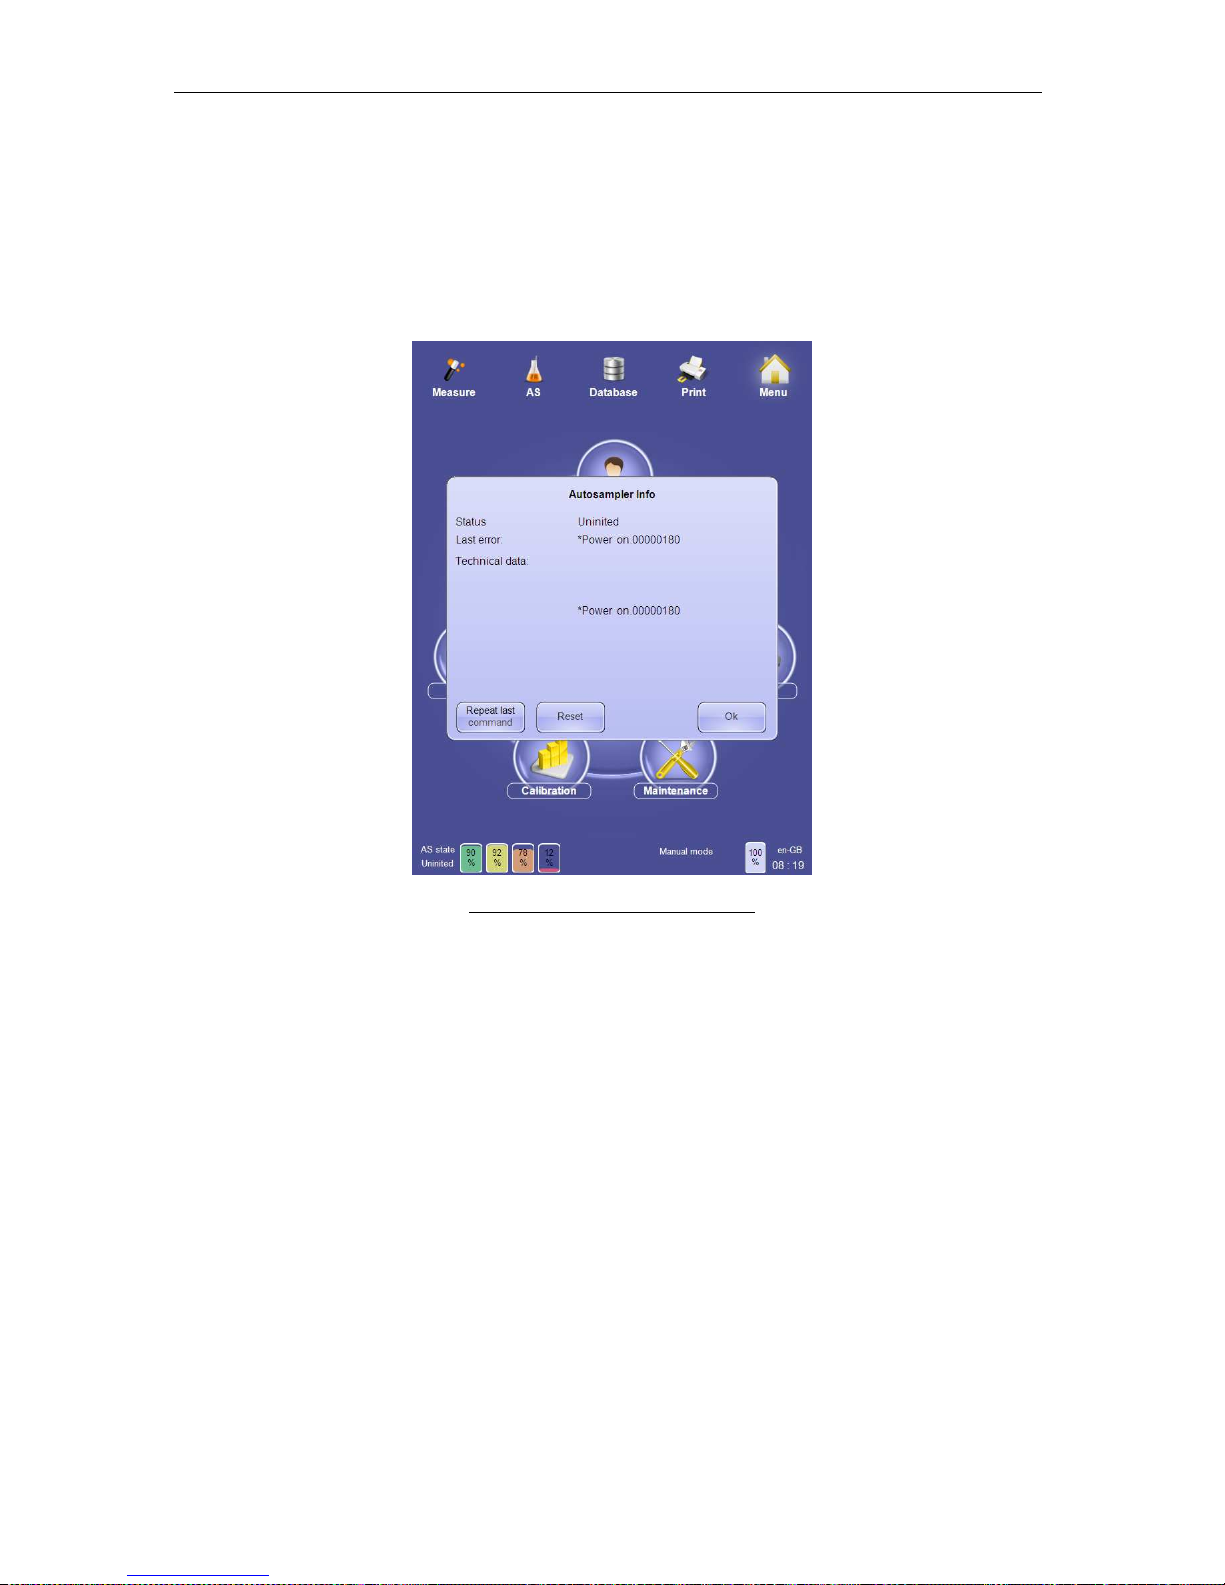
ELite 5, User Manual
Page 71 of 159
7.4.3.6 Controlling the Autosampler
Detailed information about the Autosampler is available from the Autosampler info panel.
You can also reset the Autosampler from this panel. Double click or tap the Autosampler
status in the bottom left corner of the screen to view the Autosampler info panel. With this
panel, you can command the Autosampler to repeat the last command, or reset the
Autosampler. You can also view Autosampler messages with detailed information about the
last action or sample tube processed.
Figure 50. Autosampler Info Panel
The following is a list of messages from the Autosampler:
• Home message:
o Response after a successful reset
o +HOME_XX.YY (The XX.YY is the software revision number)
• VT zzzzzzz XY:
o Vacutainer® style tube detected
o Barcode content: “zzzzzzzzzzz”
o Tray position XY
• MV zzzzzzz XY:
o Monovette® style tube detected
o Barcode content: “zzzzzzzzzzz”
o Tray position XY
• +F : confirmation that the tube was moved from the mixing to the sampling position
• The power-on message contains the serial number of the Autosampler unit.
During the reset cycle are the Autosampler components moving to their ‘home position’. The
mixing stations moves to an upright position, the active rack moves back on to the sample
tray, and the entire tray moves to its home position. Small Sample Mode is not supported by
the Autosampler.
Page 72
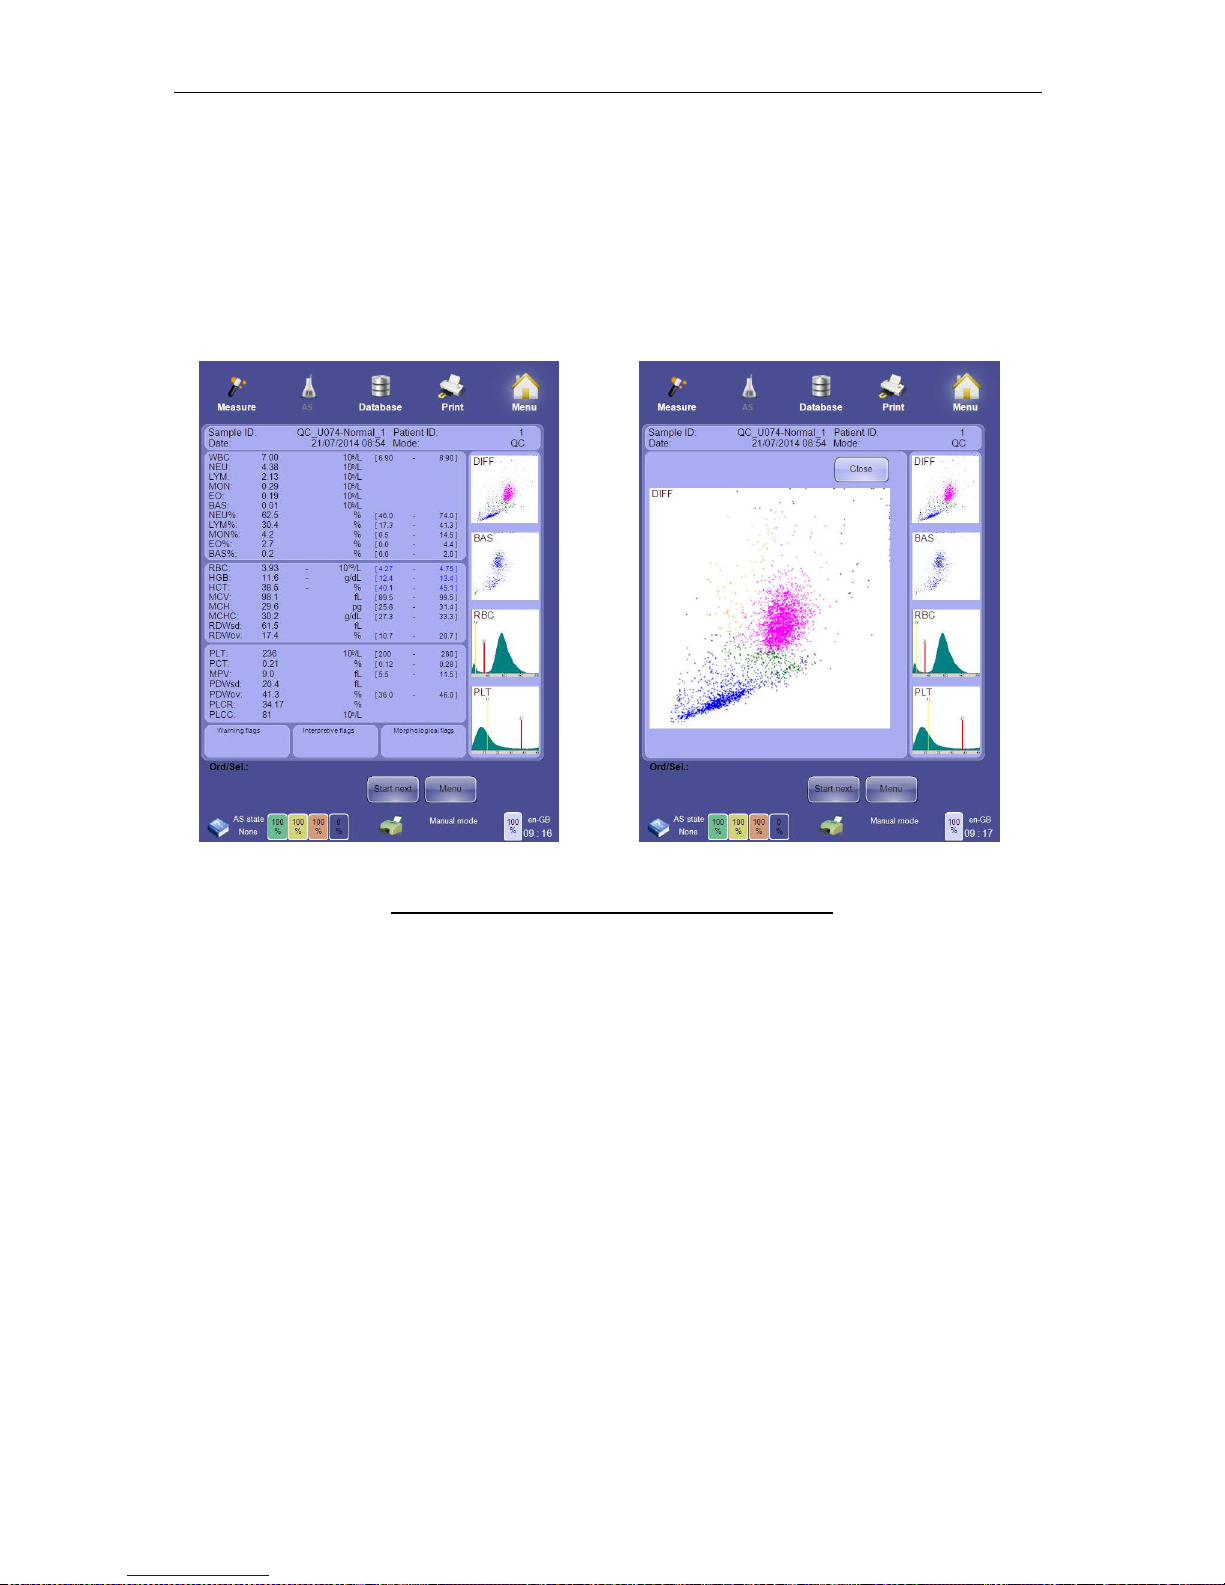
ELite 5, User Manual
Page 72 of 159
7.5 Result Display
After the analysis is completed, the result screen displays all measured parameters, flags,
histograms and scatter plots. This information is automatically stored in the database, and
stored result data can be retrieved at any time from the database.
Histograms and scatter plots can be zoomed for closer inspection. Click or tap the histogram
or scatter plot to magnify it. Click or tap the ‘Close’ button on the upper right corner of the
image to close it and return to the result display.
Figure 51. Results Display and Magnified Scatter Plot
Comparison of parameters to the normal range can be displayed numerically or graphically.
See section 13.7 for more information on display of normal range status. Other kinds of flags
are also displayed in the result screen.
See section 8 for detailed information about the ‘ELite 5’ result screen.
7.6 Printing Reports
Click or tap the Print icon at the top of the screen to send a report (or any displayed screen)
to the external printer.
7.7 The Measurement Process
The ‘ELite 5’ analyzer measures 24 parameters of whole human blood samples. Internal
dilutions are made to allow measurement of particles in the sample. Manual or automatic
mode samples are processed in the same way.
Page 73
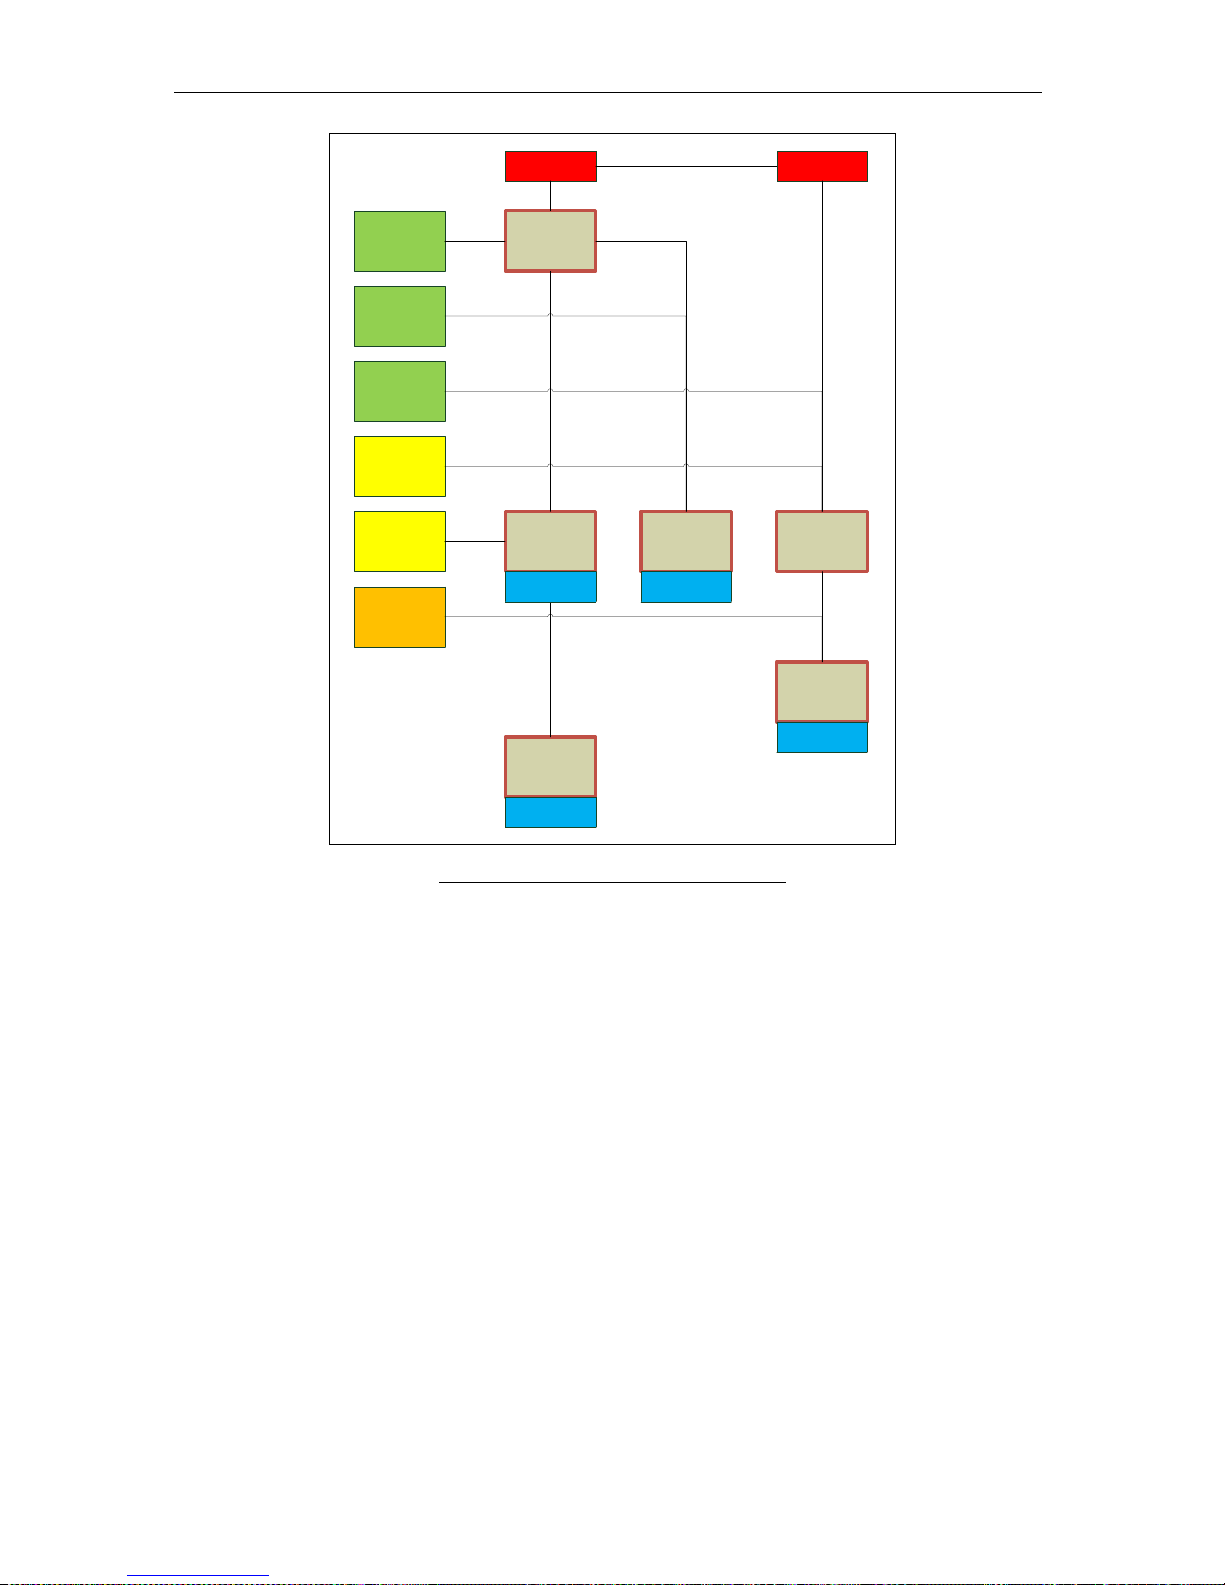
ELite 5, User Manual
Page 73 of 159
WHOLE BLOOD
SAMPLE
WHOLE BLOOD
SAMPLE
MIX DILUTION
IMPEDANCE
MEASUREMENT
+
LIGHT
ABSORBEANCE
DILUENT
LYSE
IMPEDANCE
MEASUREMENT
DILUENT
DILUENT
TEMPERATURE
CONTROLLED
INCUBATION
LYSE
LYSE2
OPTICAL
MEASUREMENT
OPTICAL
MEASUREMENT
TOTAL WBC, HGB RBC, PLT
4DIFF
BASO
Figure 52. ‘ELite 5’ Measurement Process
When you present the sample tube and press the Start button, the ‘ELite 5’ rotates the
sample rotor and takes the sample tube inside the analyzer. The piercing needle pierces the
sample tube cap (if present) and aspirates approximately 110 µL of primary blood sample.
Blood sensors ensure that the primary blood sample is continuous and free of major bubbles
as it is moved to the shear valve. The shear valve separates the primary sample into further
samples of exact volumes of blood that are distributed to provide dilutions for the RBC, WBC,
HGB and 5 Diff population measurements. Lysing reagents are used to eliminate RBCs for
dilutions that measure WBCs.
RBC/PLT and WBC are measured with impedance technology through 70 and 80 µm
apertures respectively. Two portions of the sample are used for determining a five
subpopulation differential of WBC in two independent 4DIFF and BASO measurements.
Sample results are displayed on the screen as the process is nearing completion. Results
are stored in the internal database and transmitted to an external LIS if configured to do so.
The ‘ELite 5’ performs a cleaning rinse of the internal pneumatic components and prepares
to measure the next sample.
Page 74
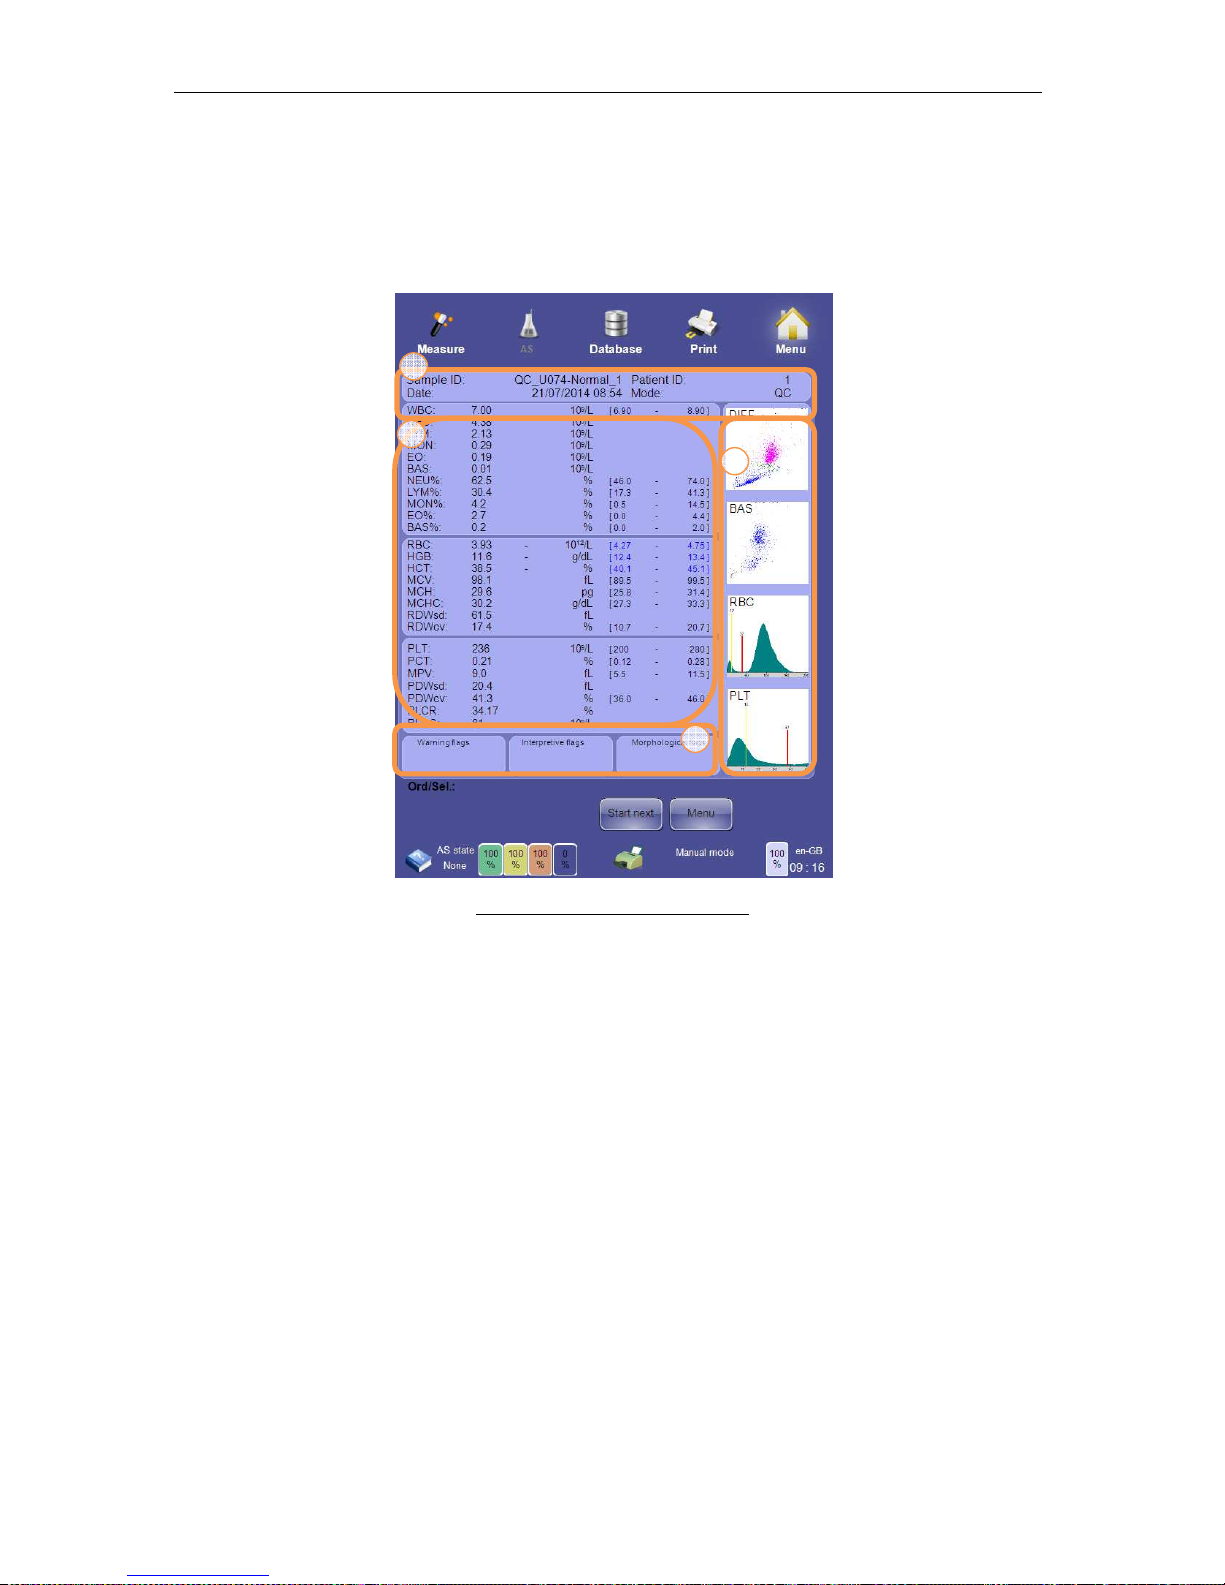
ELite 5, User Manual
Page 74 of 159
8 Result Interpretation
This chapter provides description about interpreting and understanding reports provided by
the ‘ELite 5’ analyzer.
8.1 The Result Screen
Figure 53. ‘ELite 5’ Result Screen
The ‘ELite 5’ analyzer result screen is divided into 4 major areas:
1. Sample identification information: contains identifying information used to uniquely
identify this sample’s information.
2. Parameter information: contains parameter names, values, units, and normal range.
Normal range, linearity, and high blank flags are also displayed in this area.
3. Histograms and scatter diagrams: visual elements that provide information about the
measured population dispersion. These are active elements that can be individually
magnified by clicking or tapping.
4. Warning flags area: this area displays warning, interpretive, and morphological flags
associated with this sample. If flag display overflows its assigned space, an ellipsis
will be displayed and the user can click on the information icon to see a detailed
display of flags.
8.2 Sample Identification Information
This part of the results screen contains information that uniquely identifies a particular
sample run.
1
2
3
4
Page 75
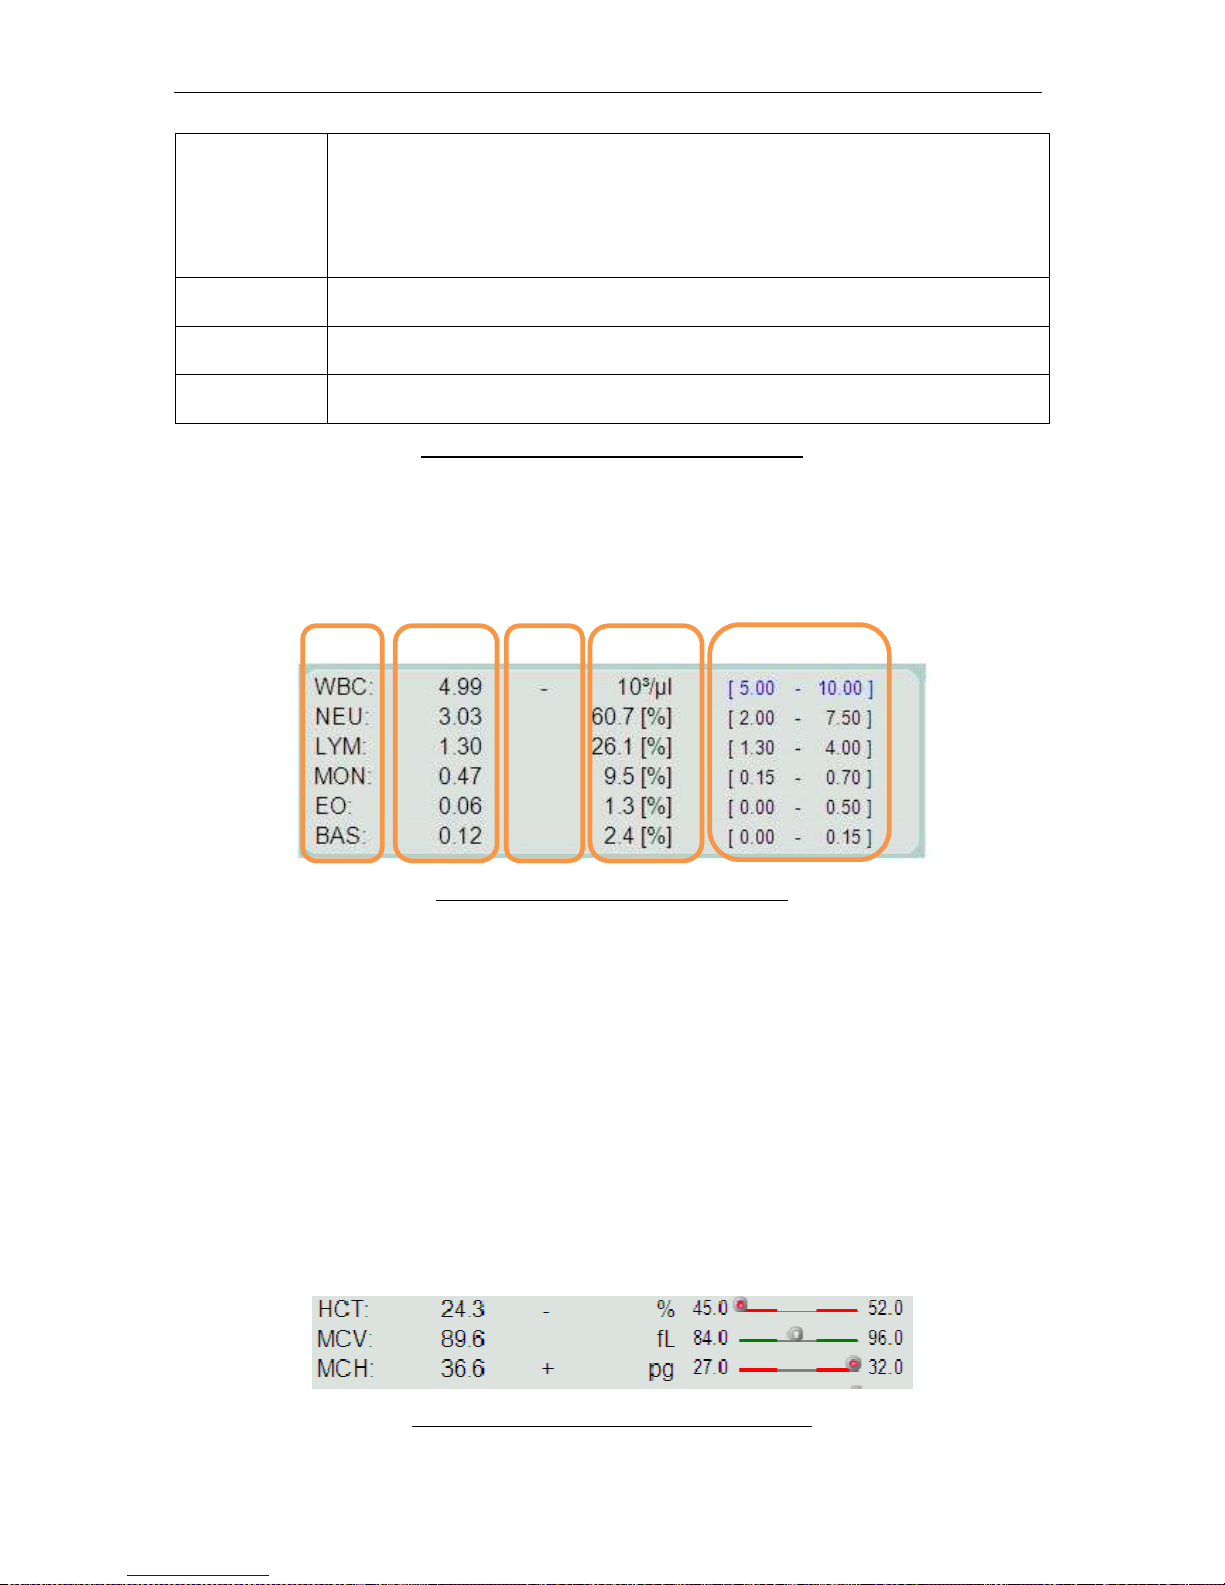
ELite 5, User Manual
Page 75 of 159
Sample ID
The Sample ID is the ID entered by the operator from a keyboard or handheld barcode reader for a manually processed specimen. For automatically
processed specimens, the sample ID can be read from a sample tube
barcode or entered into a list for one of the automatic processing list modes.
Sample IDs can be reused in the ‘ELite 5’ analyzer, but other identifying
information together with the sample ID uniquely identify the sample run.
Patient ID
This is the patient associated with this sample run. If none was entered or
selected, the default patient ID is set to 1.
Run
Date/Time
This is the time and date that this sample was run.
Sample
Mode
This is the sample mode selected for this specimen. Each sample mode
applies a different set of normal ranges to this sample run.
Table 4. Sample Identification Information
8.3 Parameter Information
The parameter information area of the ‘ELite 5’ analyzer result screen lists information on 26
parameters.
Figure 54. Parameter Information Display
Each row shows the parameter name, value, flags (normal range, linearity range, and high
blank), units, and normal range. The unit area displays the differential percentage for the five
leukocyte subpopulations (NEU, LYM, MON, EO, BAS).
Parameter names are listed with their standard abbreviation. Parameter values are always
displayed according to their selected unit. In case of error during sample evaluation, the
software will display ‘E’ or” ---" signs to indicate the problems. Parameter values falling within
the normal range are un-flagged and displayed with black text. Parameter values falling
above the normal range are marked with a ‘+’ and displayed with red text, and values falling
below the normal range are marked with a ‘-‘, and displayed in blue text.
Normal range information can also be conveyed graphically as well as numerically. This
setting can be changed in the Main menu/Settings/Customize panel.
Figure 34. Graphical Normal Range Display
Par Value
Unit/5p
Flag
Normal Range
Page 76
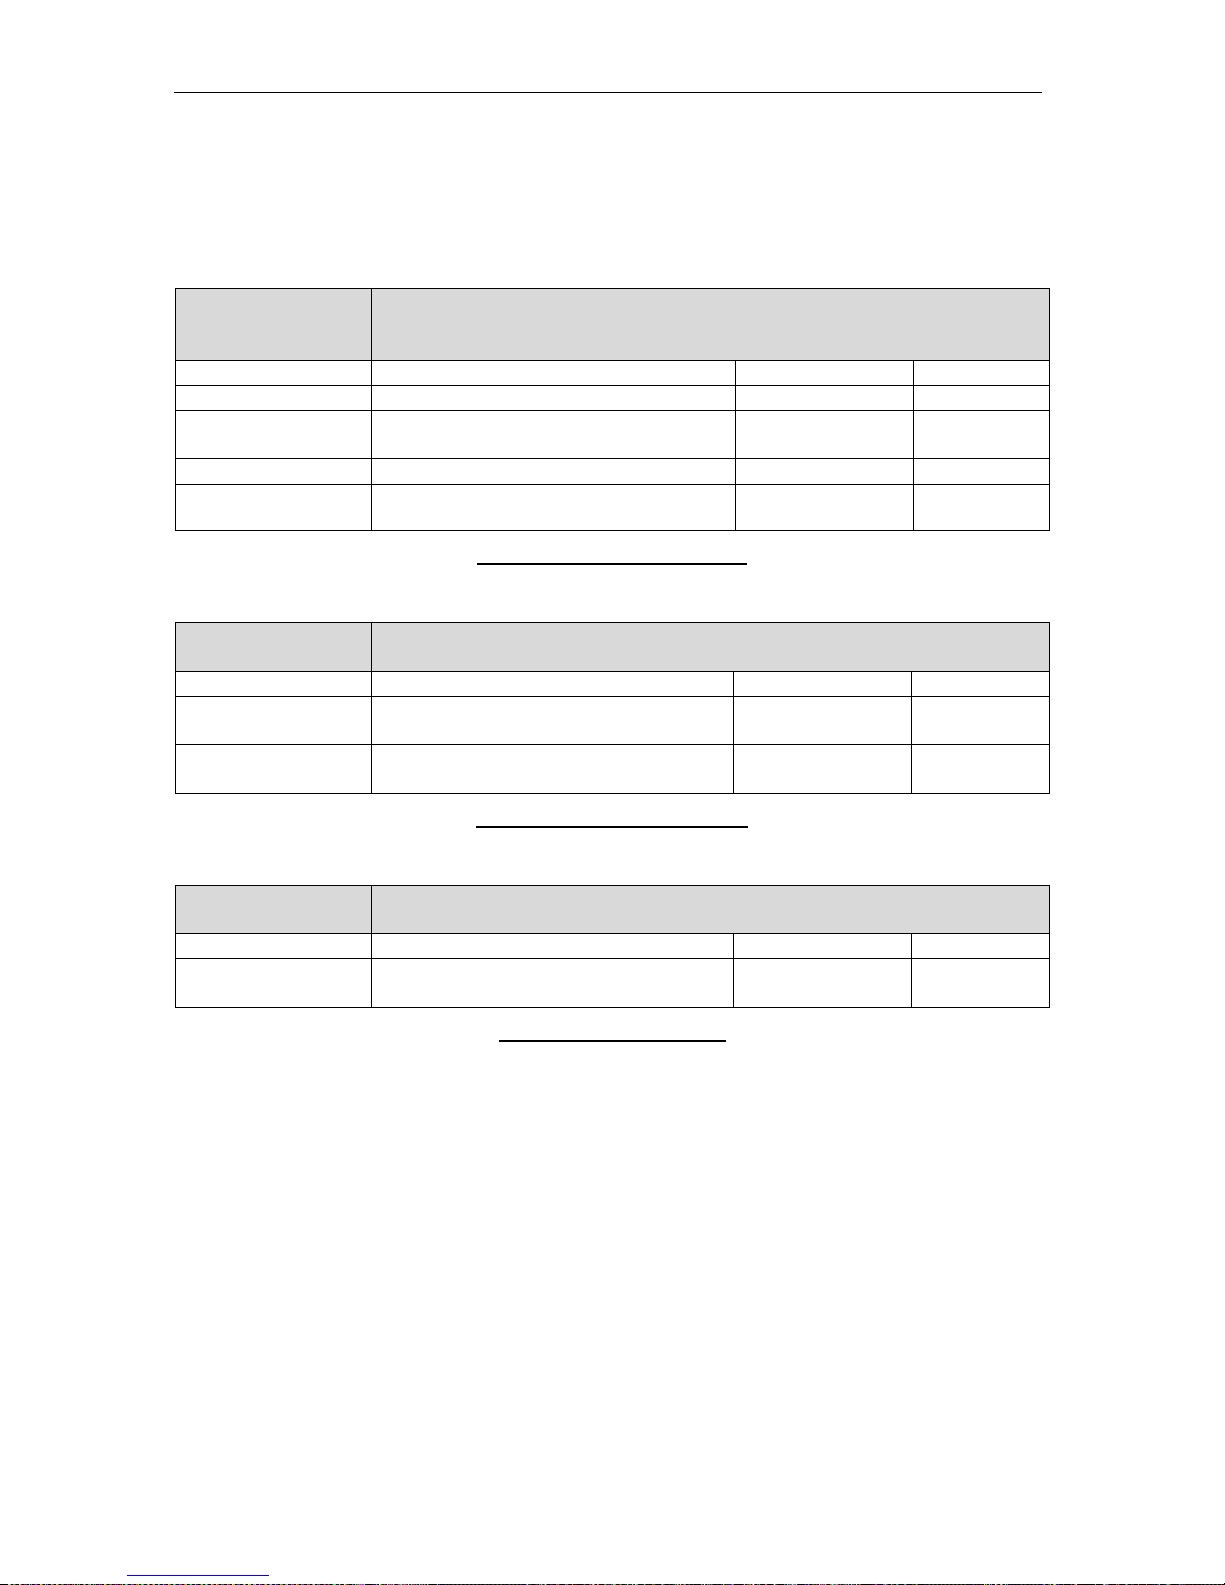
ELite 5, User Manual
Page 76 of 159
The flags displayed in the parameter information area are as follows:
Normal range flags
Normal range flags are raised when a particular parameter is above or
below the normal range, which is defined for the patient profile currently
in effect.
Flag Meaning Hierarchy Color Code
-
Parameter is under normal range Lowest Blue
--
Parameter is under the half of the
low limit of normal range
Low Blue
+
Parameter is over normal range
Lowest Red
++
Parameter is over the double of the
high limit of normal range
Low Red
Table 5. Normal Range Flags
Linearity range flag
Linearity range flags are raised when a particular parameter is above or
below the linearity range of the device.
Flag Meaning Hierarchy Color Code
*
The related parameter is out of the
linearity range
High N/A
**
The related parameter is out of the
display range.
High N/A
Table 6. Linearity Range Flag
High blank flag
A high blank flag is raised when the blank measurement result of the
particular parameter was higher than the blank limit.
Flag Meaning Hierarchy Color Code
!
The blank value of the related
primary parameter is high
Middle N/A
Table 7. High Blank Flag
8.3.1 Scatter Diagrams and Histograms
The ‘ELite 5’ analyzer displays the results of the optical measurements in scatter diagram
representation. Scatter diagrams represent two-dimensional data. There are two scatter
diagrams in the patient report: the 4-DIFF and BASO scatter diagrams.
The 4-DIFF scatter diagram displays cells identified after the first lysing and optical
measurement process. Due to the measurement technology, cells are classified based on
their optically detected properties: low and high angle scattered light intensity. The optical
detector can measure the intensity of the light scattered or diffracted by each cell. One
portion of this scattered light is proportional to size of the cell the other is proportional to the
complexity of the internal structures in the cell.
Cells in a leukocyte sub-population have similar light scattering properties, allowing them to
be grouped together and identified separately from other cell types. Different colors are used
to identify various populations of blood cells.
Page 77
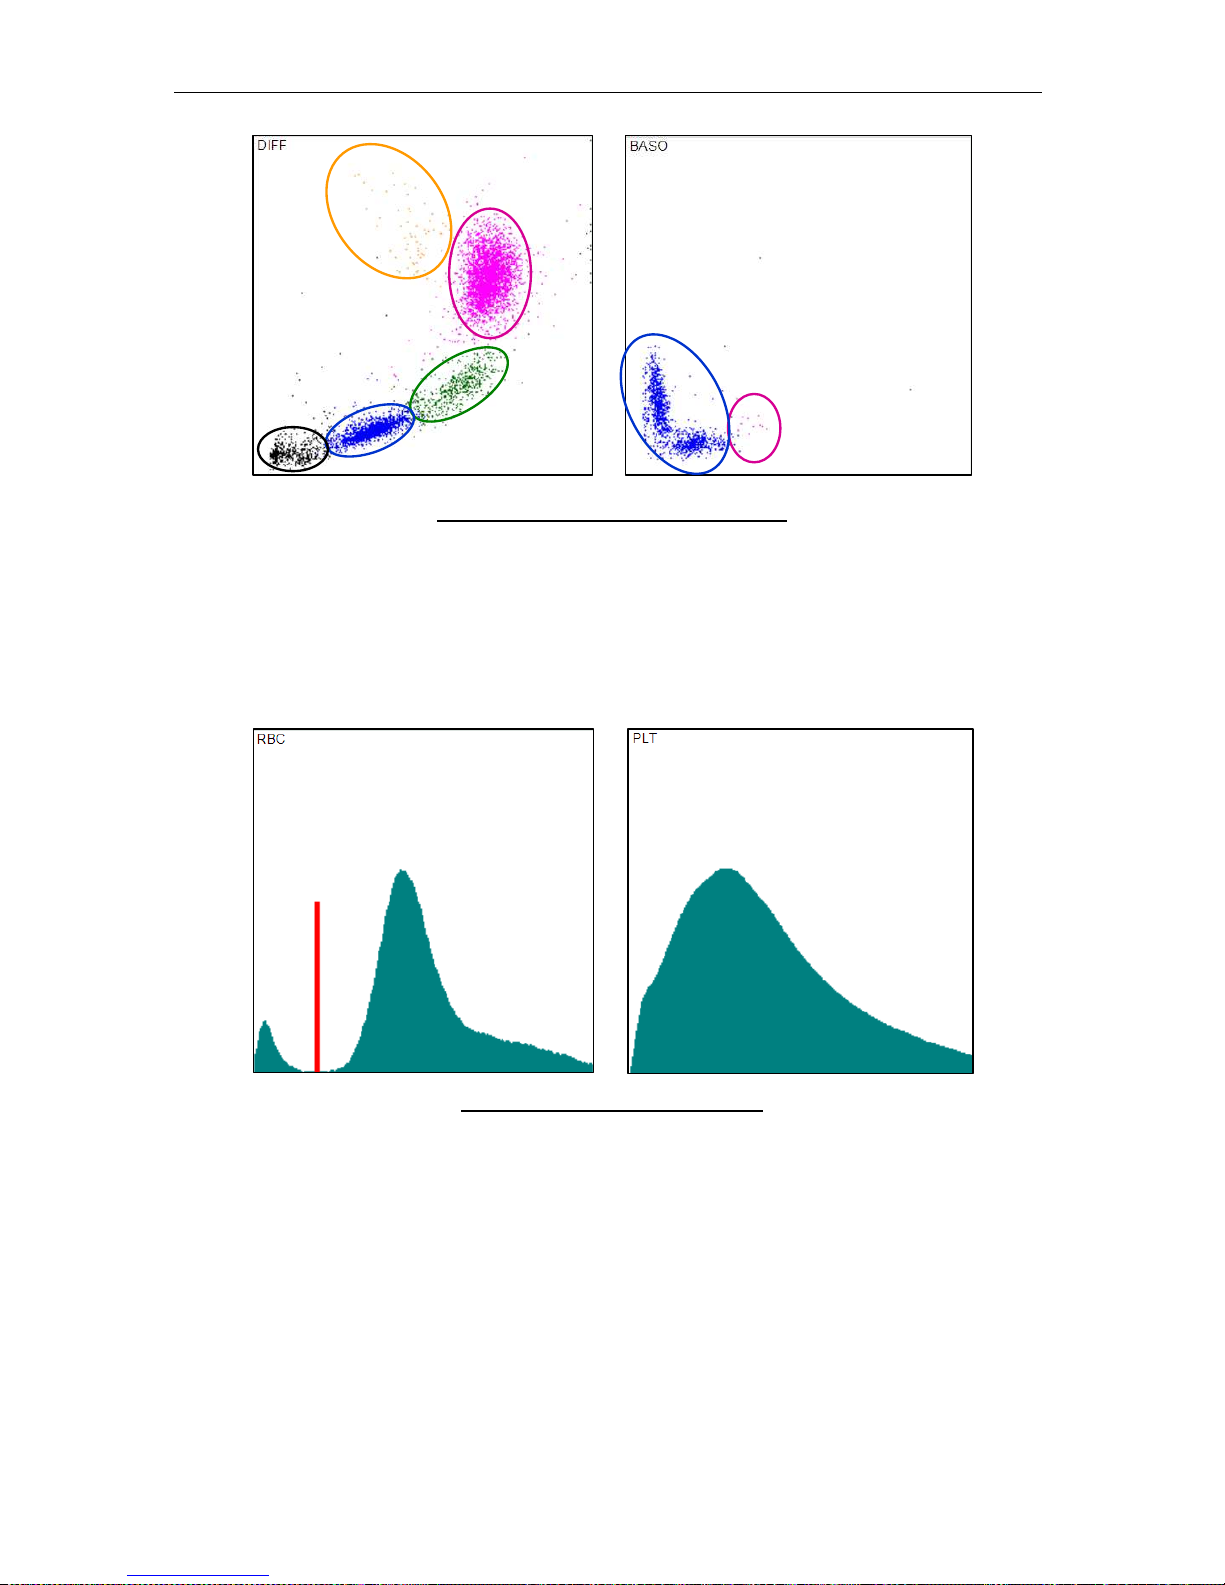
ELite 5, User Manual
Page 77 of 159
Figure 56. Result Screen Scatter Diagrams
RBC and PLT impedance-based measurements are represented by histograms. These
diagrams show the number of cells on the Y axis and the cell size on the X axis. Smaller
cells are displayed on the left side of the histogram, and larger cells are displayed on the
right side. The height of the histogram at a given size represents the number of cells with that
size. Greater histogram height indicates more cells.
Figure 57. Result Screen Histograms
Both the RBC and PLT histograms can be zoomed. Discriminators (thresholds) are displayed
with red color. Platelets are located on the leftmost part of the RBC histogram to the left of
the red discriminator. The PLT histogram is a magnified version of this region.
8.3.2 Warnings
The warnings area of the result screen shows flags and messages related to the evaluation
of the sample. Clicking or tapping the question mark icon on the left side of the warnings
section of the results screen displays a detailed warnings panel. Click or tap OK to close the
detailed warnings panel.
Eosinophils
(Orange)
Neutrophils
(Magenta)
Monocytes
(Green)
Ly
mphocytes (Blue
)
Artifact
(Black)
Basophils
(Magenta)
Non-Basophil WBCs
(Blue)
PLT
RBC
PLT/RBC
Discriminator
Page 78
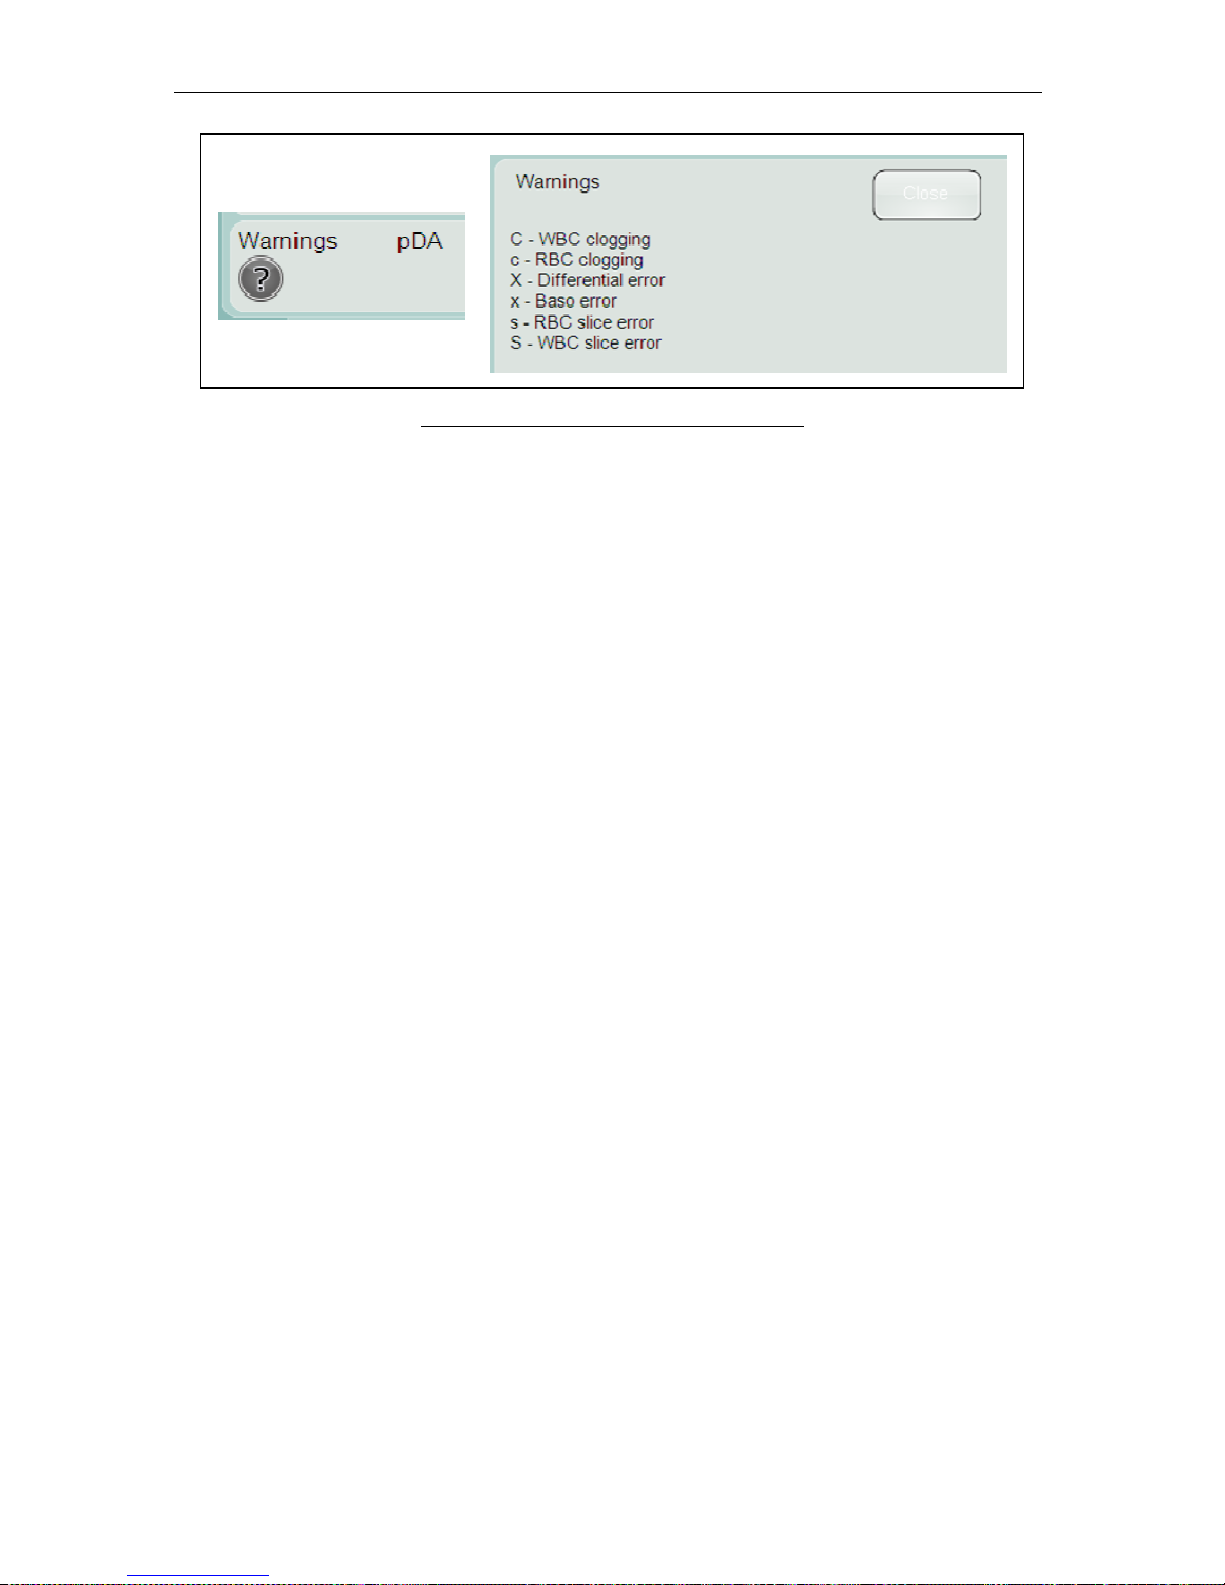
ELite 5, User Manual
Page 78 of 159
Figure 58. Warnings Section of Results Screen
The ‘ELite 5’ analyzer provides Warning flags, Morphological flags, and Interpretive
messages in the Warnings panel. The following tables describe these flags and messages in
detail. It also provides guidance on actions the operator can take to correct the problem
described by the flag.
Page 79
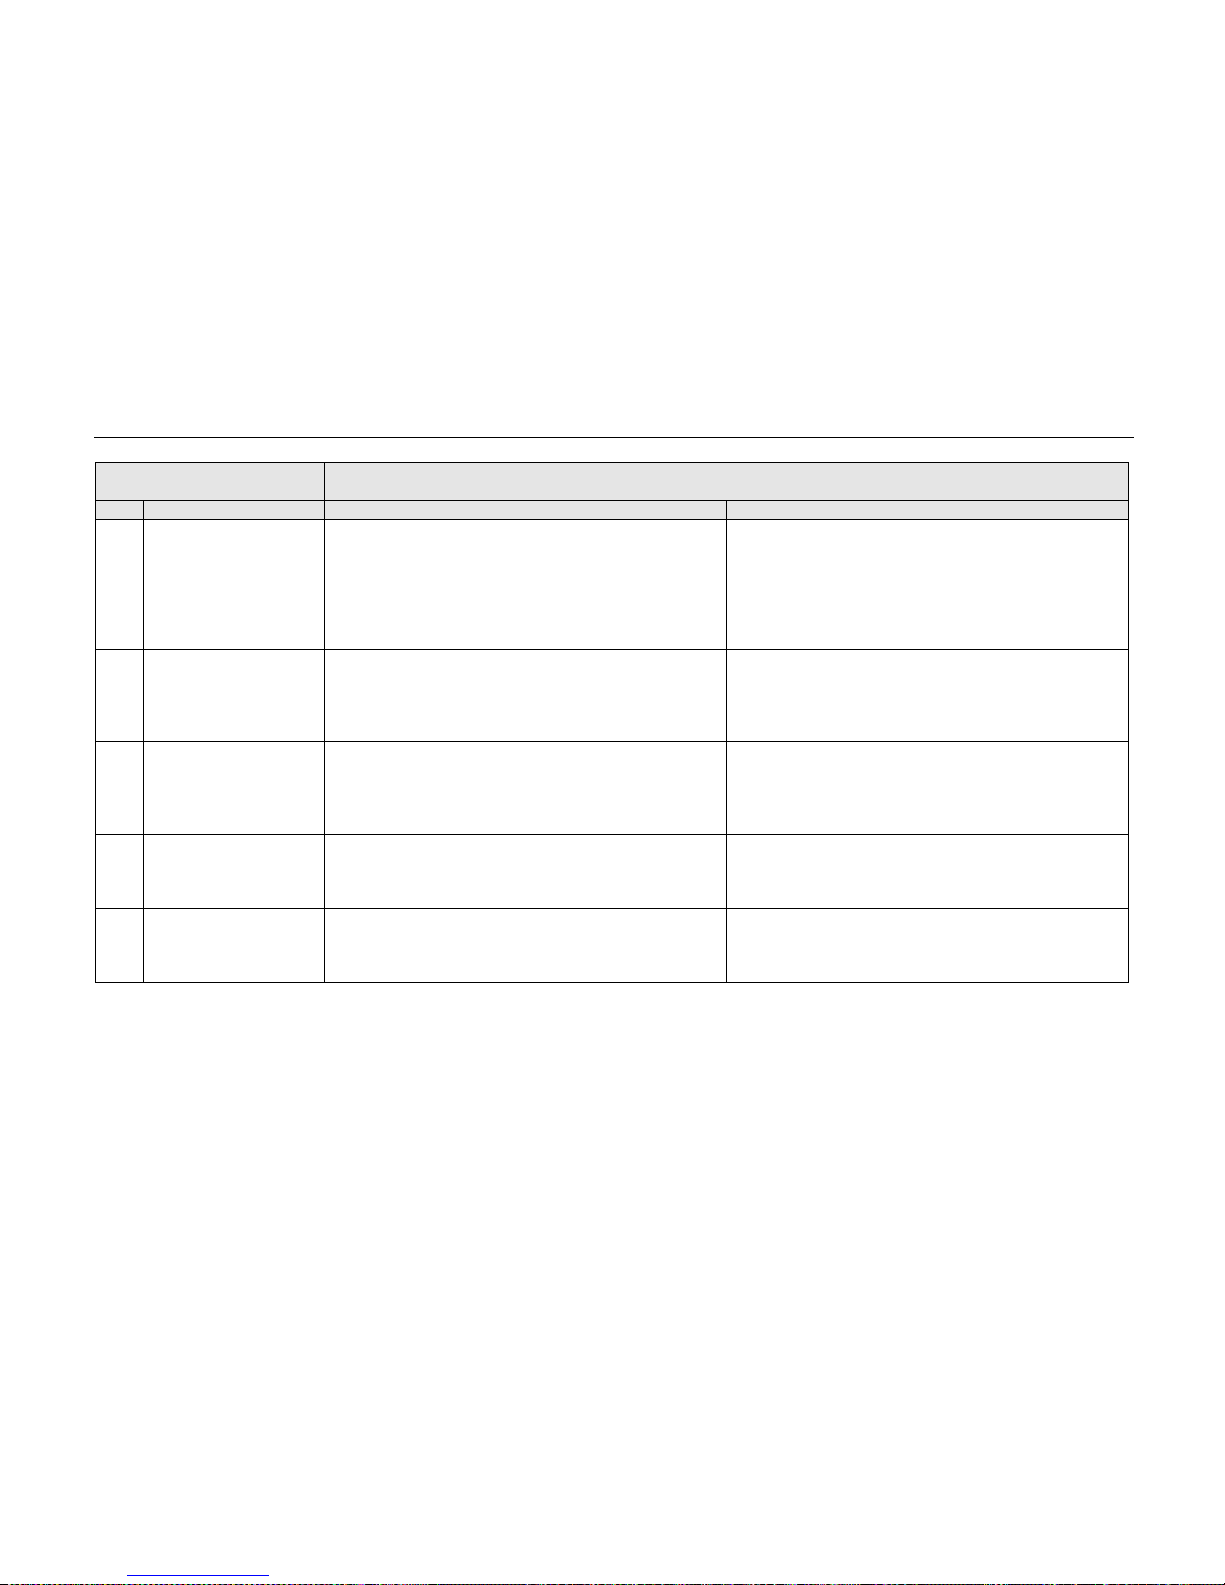
ELite 5, User Manual
Page 79 of 159
Warning flags
Warning flags are raised when the analyzer detects
a problem in the analysis process that may cause
incorrect or suspect results or the parameters in the valid blank measurement was too high.
Flag Meaning
Cause
Action
A 4 Diff Alarm
The 4DIFF populations are not clearly distinguishable
on the scatter diagram.
If other parameters predict a ‘normal’ sample then
perform a cleaning procedure and repeat the
measurement.
If 4DIFF results reported then treat them as ‘reduced
reliability’. If not all the parameters reported or the
sample is predicted as pathological then perform a
manual count on a stained smear.
B WBC blank is high WBC > WBC blank high limit
Check cleanliness of the reagents and the ‘ELite 5’.
Perform cleaning of the ’ELite 5’. Repeat blank
measurement. See chapter: 6.2.5:Pneumatics start
and blank measurement
Treat WBC result as ‘reduced reliability’.
b RBC blank is high RBC > RBC blank high limit
Check cleanliness of the reagents and the ‘ELite 5’.
Perform cleaning of the ’ELite 5’. Repeat blank
measurement See chapter: 6.2.5 :Pneumatics start
and blank measurement
Treat RBC result as ‘reduced reliability’.
C WBC clogging
Drift in the probe voltage of the WBC capillary. The
two main reasons for this drift are the misconnected
reagent and the clogging of the capillary.
Check the reagent connections.
Perform a cleaning procedure! See chapter:
Maintenance.
Please repeat the measurement.
c RBC/PLT clogging
Drift in the probe voltage of the RBC capillary. The two
main reasons for this drift are the misconnected
reagent and the clogging of the capillary.
Check the reagent connections.
Perform a cleaning procedure! See chapter:
Maintenance.
Please repeat the measurement.
Page 80
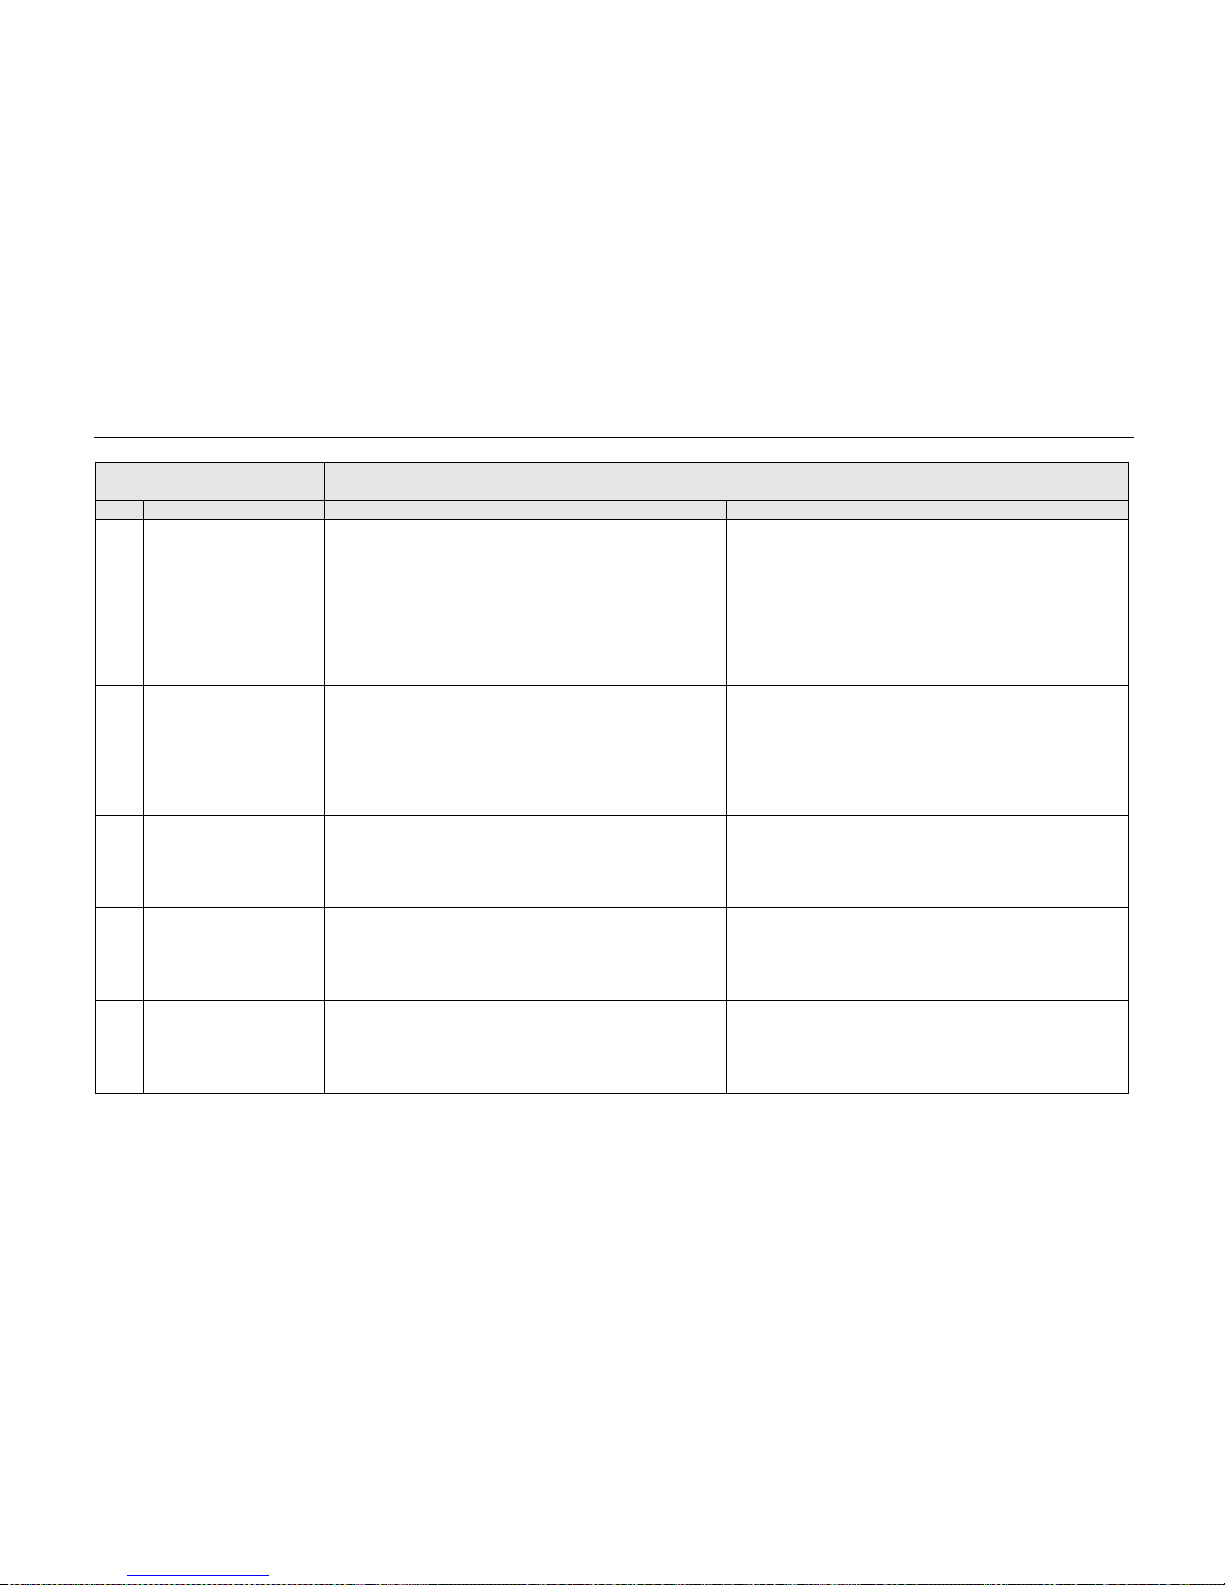
ELite 5, User Manual
Page 80 of 159
Warning flags
Warning flags are raised when the analyzer detects
a problem in the analysis process that may cause
incorrect or suspect results or the parameters in the valid blank measurement was too high.
Flag Meaning
Cause
Action
D MON - NEU alert
The MON and NEU populations are not clearly
distinguishable on the scatter-gram.
If other parameters predict a ‘normal’ sample then
perform a cleaning procedure and repeat the
measurement.
If MON, MON%, NEU, NEU% results reported then
treat them as ‘reduced reliability’. If not all the
parameters reported or the sample is predicted as
pathological then perform a manual count on a stained
smear.
E EO - NEU alert
The EO and NEU populations are not clearly
distinguishable on the scatter-gram.
If other parameters predict a ‘normal’ sample then
perform a cleaning procedure and repeat the
measurement.
If EO, EO%, NEU, NEU% results reported then treat
them as ‘reduced reliability’. If not all the parameters
reported or the sample is predicted as pathological
then perform a manual count on a stained smear.
F Differential blank high
More than 100 cells detected during the ’4Diff-blank’
procedure.
Check cleanliness of the reagents and the ‘ELite 5’.
Perform flow cell cleaning of the ’ELite 5’. Repeat
blank measurement. See chapter: 6.1.5 :Pneumatics
start and blank measurement
Treat 4 Diff results as ‘reduced reliability’.
f BASO blank high
More than 100 cells detected during the ’Baso-blank’
procedure.
Check cleanliness of the reagents and the ‘ELite 5’.
Perform flow cell cleaning of the ’ELite 5’. Repeat
blank measurement. See chapter: 6.1.5 :Pneumatics
start and blank measurement
Treat BASO result as ‘reduced reliability’.
H HGB blank high Last accepted blank result: HGB ≥ 10 g/l
Check cleanliness of the reagents and the ‘ELite 5’.
Perform cleaning of the ’ELite 5’. Repeat blank
measurement. See chapter: 6.2.5:Pneumatics start
and blank measurement
Treat HGB result as ‘reduced reliability’.
Page 81
ELite 5, User Manual
Page 81 of 159
Warning flags
Warning flags are raised when the analyzer detects
a problem in the analysis process that may cause
incorrect or suspect results or the parameters in the valid blank measurement was too high.
Flag Meaning
Cause
Action
l PLT URI
The PLT-RBC gap is not clearly detectable on the
PLT-RBC histogram: small MCV, fractured RBC-s,
aggregated PLT-s (cold blood), side-effect of bloodtransfusion.
Check the sample quality. Repeat the sample. If the
problem persists then perform a manual count on a
stained smear.
M
Out of RBC linearity
range
The RBC coincidence is over the limit: too high RBC
count.
Check the sample homogeneity. Repeat the sample
with manual pre-dilution.
m
Close to RBC linearity
range
The RBC coincidence is close to the limit: too high
RBC count.
Treat RBC result as ‘reduced reliability’. Check the
sample homogeneity. Repeat the sample with manual
pre-dilution.
N High angle noise
The flow in the optical head is not clean or contains
bubbles
Perform a blank measurement. If noise still appears,
make a flow cell backwash.
n Low angle noise
The flow in the optical head is not clean or contains
bubbles
Perform a blank measurement. If noise still appears,
make a flow cell backwash.
O
High linearity range
limit exceeded
If any of RBC,PLT or WBC results are higher than
high linearity range limits.
Perform manual pre-dilution of sample and remeasure it.
o
Low linearity range
limit exceeded
If any of RBC,PLT or WBC results are lower than Low
linearity range limits.
None
p PLT blank high Last accepted blank result: PLT ≥ 15 * 103 cells/µl
Check cleanliness of the reagents and the ‘ELite 5’.
Perform cleaning of the ’ELite 5’. Repeat blank
measurement. See chapter: 6.2.5:Pneumatics start
and blank measurement
Treat PLT result as ‘reduced reliability’.
Q MON - LYM alert
The MON and LYM populations are not clearly
distinguishable on the scatter-gram.
If other parameters predict a ‘normal’ sample then
perform a cleaning procedure and repeat the
measurement.
If MON, MON%, LYM, LYM% results reported then
treat them as ‘reduced reliability’. If not all the
parameters reported or the sample is predicted as
pathological then perform a manual count on a stained
smear.
Page 82
ELite 5, User Manual
Page 82 of 159
Warning flags
Warning flags are raised when the analyzer detects
a problem in the analysis process that may cause
incorrect or suspect results or the parameters in the valid blank measurement was too high.
Flag Meaning
Cause
Action
S
WBC measurement
statistics warning
The distribution of the RBC detection changes in time.
It points to clogging, non-homogeneous sample, cold
sample, partial coagulation of the sample.
Perform cleaning of the ’ELite 5’. Check the
homogeneity, the temperature and the coagulation of
the sample.
Repeat the sample.
s
RBC measurement
statistics warning
The distribution of the RBC detection changes in time.
It points to clogging, non-homogeneous sample, cold
sample, partial coagulation of the sample.
Perform cleaning of the ’ELite 5’. Check the
homogeneity, the temperature and the coagulation of
the sample.
Repeat the sample.
T Blood detector error
Blood Detector malfunction (received signals are all
zeros or not received signals)
Check BD and its connection to the LSDACQ card.
Check sampling tube connection to BD.
u BASO high
The number of the BASO population is high or there
are lyse-resistant cells in the sample.
Repeat the measurement or perform a manual count
on a stained smear.
V WBC vacuum warning
There is a (partial) clogging or leakage in the RBC
part of measurement system. A faulty/ worn-out pump
can create vacuum errors as well.
Perform cleaning of the ’ELite 5’. Perform a self-test.
If vacuum problems persist then call for service.
v RBC vacuum warning
There is a (partial) clogging or leakage in the RBC
part of measurement system. A faulty/ worn-out pump
can create vacuum errors as well.
Perform cleaning of the ’ELite 5’. Perform a self-test.
If vacuum problems persist then call for service.
W Sampling warning
Blood Detector detected a sample volume that was
too small.
Check sample volume in sample vial. Check sampling
process. Re-run sample.
X Differential error
Not enough cells detected during the 4DIFF WBC
differentiating.
Perform a flow cell cleaning procedure! Repeat the
measurement. If the problem persists then ask for
service.
x BASO error
Not enough cells detected during the BASO WBC
differentiating.
If the total-WBC count is below 2 * 103 cells/µl then
perform a manual count on a stained smear.
Perform a flow cell cleaning procedure! Repeat the
measurement. If the problem persists then ask for
service.
Y
Differential percentage
error
Algorithm error while distinguishing the WBC-s in the
4DIFF procedure.
Repeat the measurement. If the problem persists on a
given sample then perform a manual count on a
stained smear.
Page 83
ELite 5, User Manual
Page 83 of 159
Warning flags
Warning flags are raised when the analyzer detects
a problem in the analysis process that may cause
incorrect or suspect results or the parameters in the valid blank measurement was too high.
Flag Meaning
Cause
Action
y Baso percentage error
Algorithm error while distinguishing the WBC-s in the
BASO procedure.
Repeat the measurement. If the problem persists on a
given sample then perform a manual count on a
stained smear.
Z WBC noise high
During WBC count there is too much (more than 10%
of the total) detected pulse on the first 10 channel of
the 255 channel full range. This may be caused by
lyse resistant RBC, electronic noise, contaminated
WBC chamber or contaminated reagents.
Perform Clean process. Perform Hard Clean process.
Table 8. Warning Flags
Morphological flag
Morphologic
al flags are raised when the presence of morphologically abnormal cell types such as
immature granulocytes are suspected.
Flag Meaning
Cause
Action
G Immature granulocytes
The count in the region of (low - high angle scatter of
ELite 5) where the Immature granulocyte typically
located is > 3% of the total WBC count.
Perform a manual count on a stained smear.
L Atypical lymphocytes
The count in the region of (low - high angle scatter of
ELite 5) where the atypical lymphocytes typically
located is > 1% of the total WBC count.
Perform a manual count on a stained smear
Table 9. Morphological Flags
Interpretive flag
Interpretive flags infer the presence of distributional abnormalities such as leukocytosis.
Flag
Meaning
Leukopenia
WBC --
Leukocytosis
WBC + or WBC ++
Neutropenia
NEU --
Neutrocytosis
NEU ++
Lymphopenia
LYM --
Page 84

ELite 5, User Manual
Page 84 of 159
Interpretive flag
Interpretive flags infer the presence of distributional abnormalities such as leukocytosis.
Flag
Meaning
Lymphocytosis
LYM ++
Monocytosis
MON ++
Eosino
philia EOS ++
Basophilia
BASO
++
Anemia
RBC - or RBC
--
Polycythemia
RBC + or RBC ++
Microcytic RBC
MCV -
or MCV
--
Macrocytic RBC
MCV + or MCV ++
Hypochromic
MCHC
- or MCHC
--
Hyperchromic
MCHC + or MCHC ++
Anisocytosis
RDW + or RDW ++
Thrombocytopenia
PLT --
Thrombocytosis
PLT + or PLT ++
Microcytic PLT
MPV -
or MPV
--
Macrocytic PLT
MPV + or MPV ++
Table 10. Interpretive Flags
Page 85
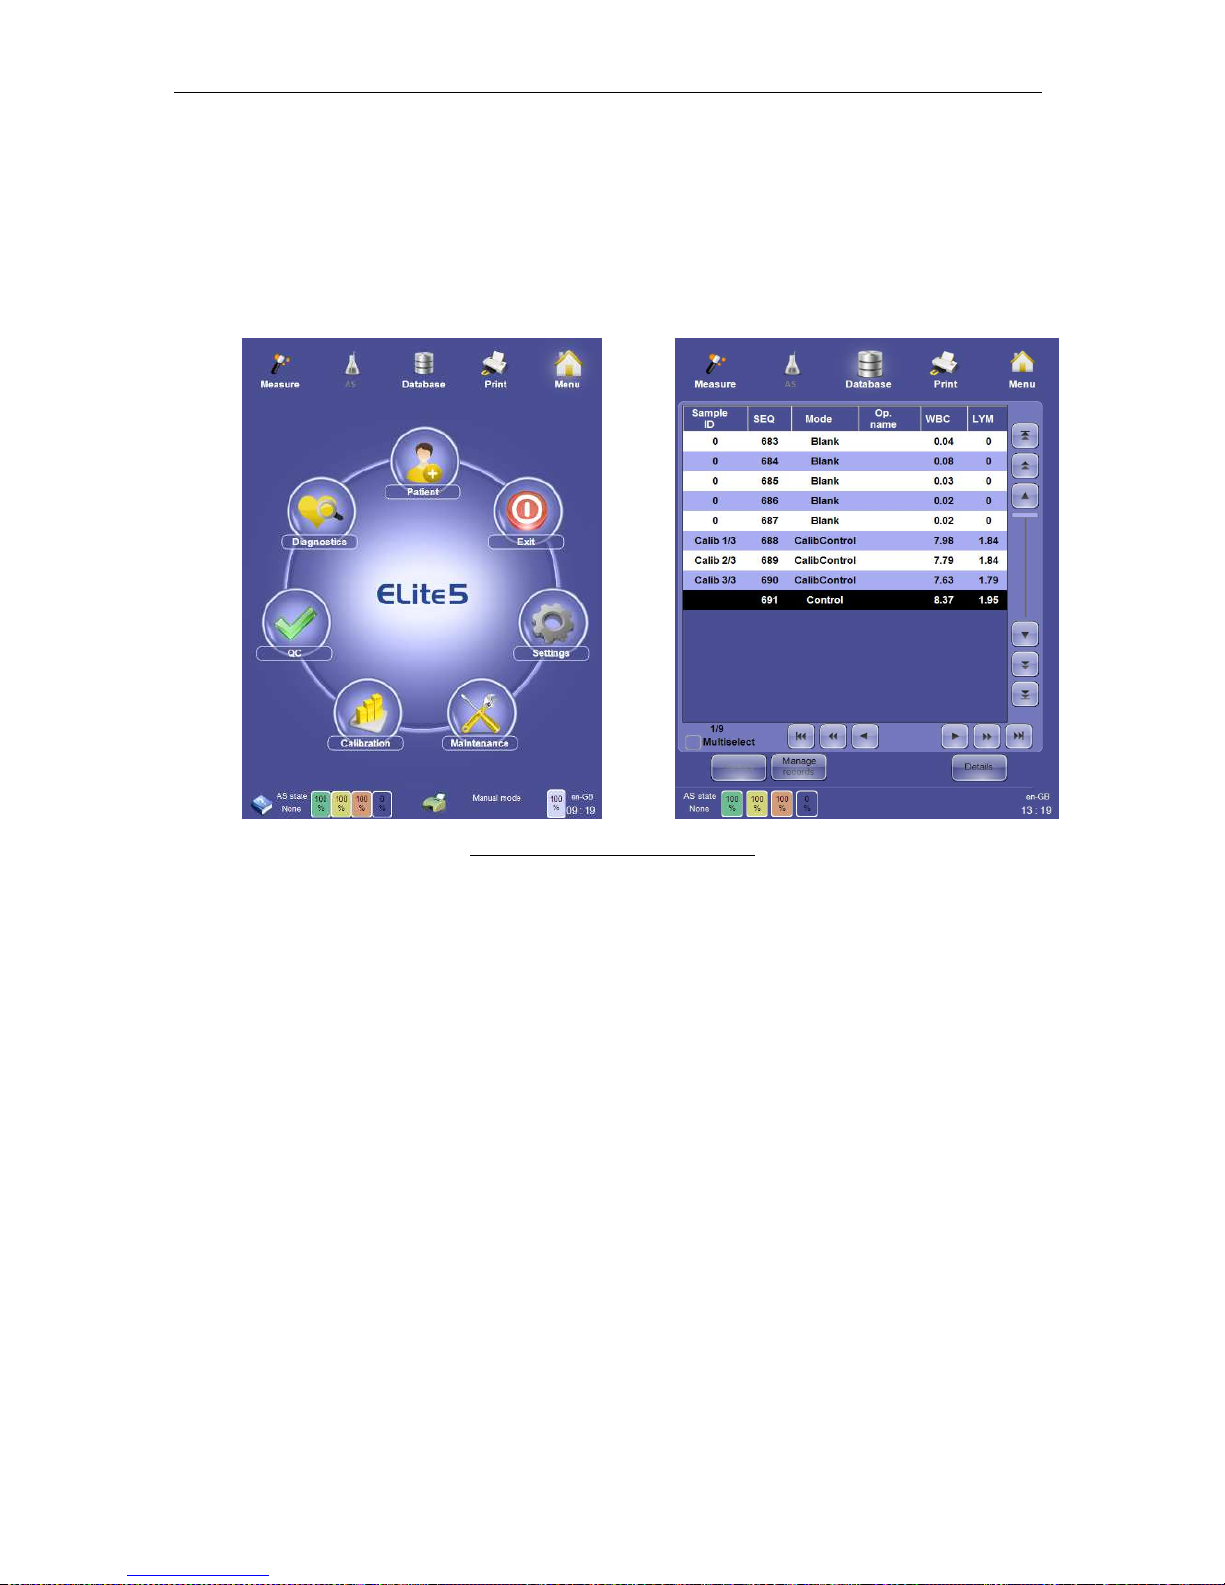
ELite 5, User Manual
Page 85 of 159
9 Database Functions
The ‘ELite 5’ database stores all measured data including sample results, QC, and patient
data. Each sample result stored includes the complete parameter list, histograms, flags, and
identifying data. The ‘ELite 5’ has a data capacity of up to 100,000 total records.
To activate Database panel, clicking or tapping the Database quick link on the top of the
screen will take you to the database view from any screen.
Figure 59. Accessing the Database
The database can be accessed at any time, even when processing samples in the
background. You can return to the measurement panel anytime to view ongoing sample
measurements.
9.1 Database Overview
The ‘ELite 5’ analyzer database provides a powerful, easy-to-use method of storing,
accessing, and managing patient and sample result information. The database of the ‘ELite
5’ analyzer is capable of storing up to 100,000 measurement, control and patient records.
The database presents information in a table view of rows and columns. Each row in the
database panel represents one sample measurement. Rows are also called ‘records.’ Each
column in the database consists of sample identification information and measurement
parameter results.
The database information can be scrolled using navigation buttons along the right and the
bottom of the database view, or by a moving a vertical scroll bar. Database records can be
selected individually or in groups. Detailed result views are available for selected database
records. Selected records can be printed, sent to LIS and exported into a tab file. Various
sort options are provided for quickly finding results.
Page 86
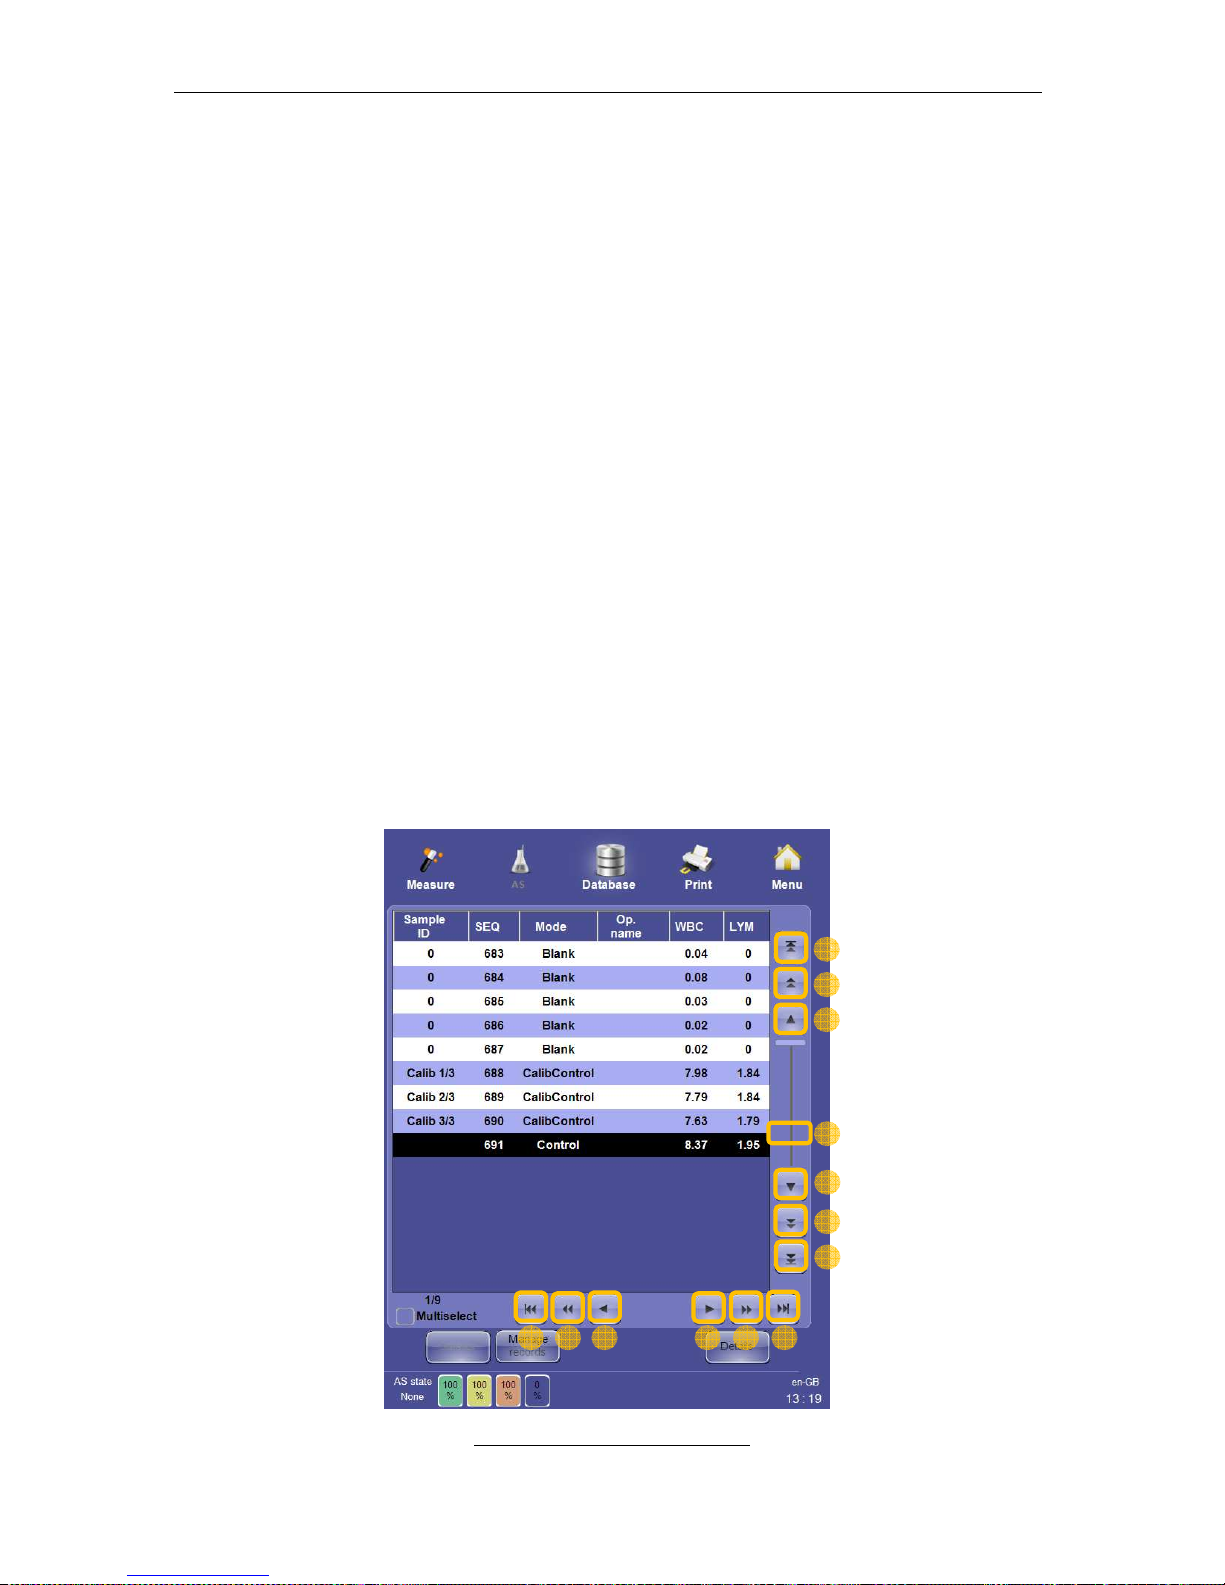
ELite 5, User Manual
Page 86 of 159
Database records can be exported for storage and backup. Exported database information
can be later imported for review. Imported records do not become part of your ‘ELite 5’
analyzer’s database. They are only imported for viewing, but can be sorted, selected, and
managed in the same way as with the regular data stored inside the ‘ELite 5’ analyzer
database.
The ‘ELite 5’ database displays two numerical counters separated by a slash under the left
side of the database table. The left number is the number of selected rows, and the right
number is the total number of rows in the database.
9.2 Scrolling the Database View
The limited size of the interactive database display acts like a viewport into the large amount
of information inside your database. You can scroll the database view to bring desired
information into view. The ‘ELite 5’ analyzer provides several powerful and easy-to-use
scrolling methods. The numbered items below match the items in Figure below.
1. The scrollbar: tapping, holding and moving the scrollbar labeled ‘1’ with the tip of your
finger on the touch screen display will quickly scroll information in the vertical
direction. Clicking and dragging with an optional external mouse will achieve the
same effect.
2. Tapping or clicking the buttons labeled ‘2’ will advance the display by one line or one
column.
3. Tapping or clicking the buttons labeled ‘3’ will advance the display by one page of
information at one time.
4. Tapping or clicking the buttons labeled ‘4’ will advance the display to the first or last
item in the list.
Figure 60. Scrolling and Selecting
1
2
2
2 2
3
4
3
4
3 4 3 4
Page 87
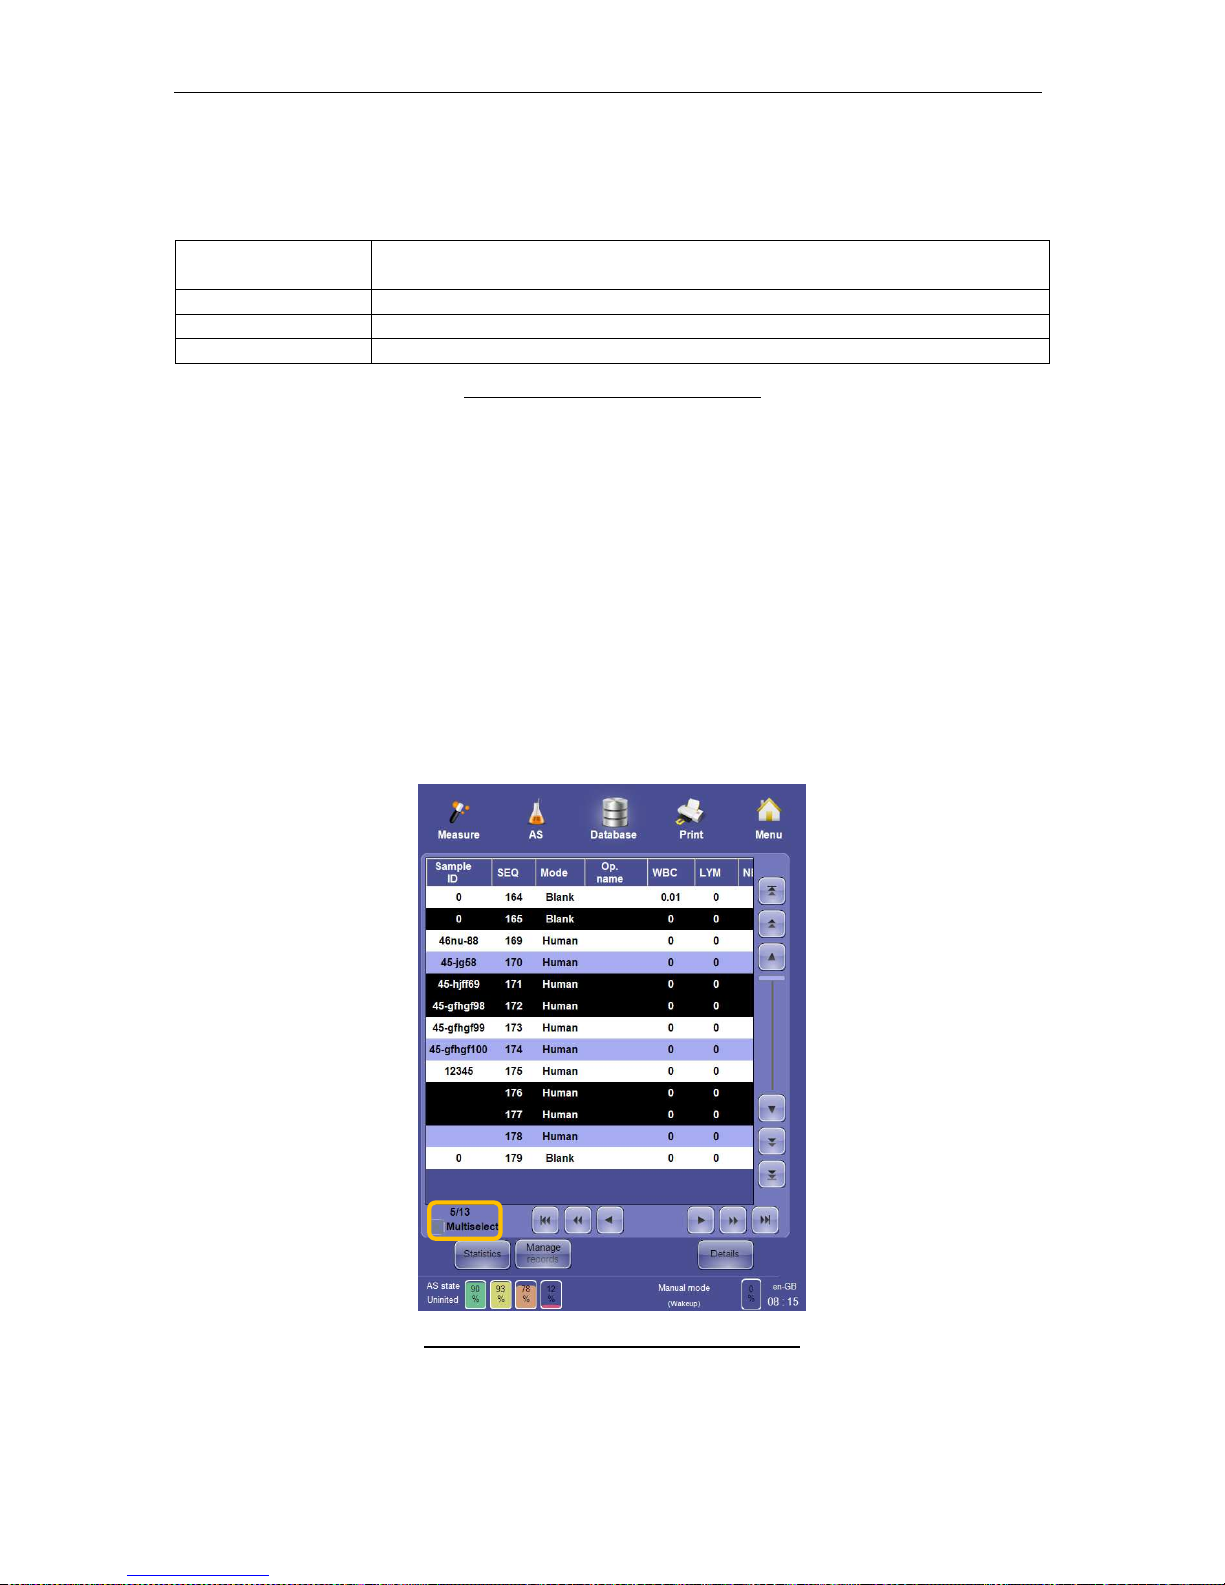
ELite 5, User Manual
Page 87 of 159
9.3 Sorting Database Information
The database is sorted by Result ID by default. Clicking or tapping the following database
column headings changes the sort order of the database records:
Sample ID Sample ID entered by the operator or read from a sample tube barcode
label
Patient Identifier that associates a result record with a patient records
Analysis Time Time and date this sample tube was analyzed
Result ID Unique sequential identifier assigned by the ‘ELite 5’ to each records
Table 11. Database Sort Criteria
Clicking or tapping the same column heading again changes the ascending or descending
order of values in the column.
9.4 Manual Selection of Database Records
Clicking or tapping on a row in the database display single-selects a row. Clicking or tapping
it again de-selects the row. Selecting another row will de-select previously selected rows in
single selection. Selected rows are highlighted with white text on a black background.
Checking the ‘Multiselect’ check box below the left side of the database table allows the
selection of multiple rows. Tapping or clicking once selects a row, but previous selections
remain selected unless you click or tap it again to de-select it. Un-checking the Multiselect
check box will de-select all selected records.
Figure 61. Multiselect and Multiple Selection
Page 88
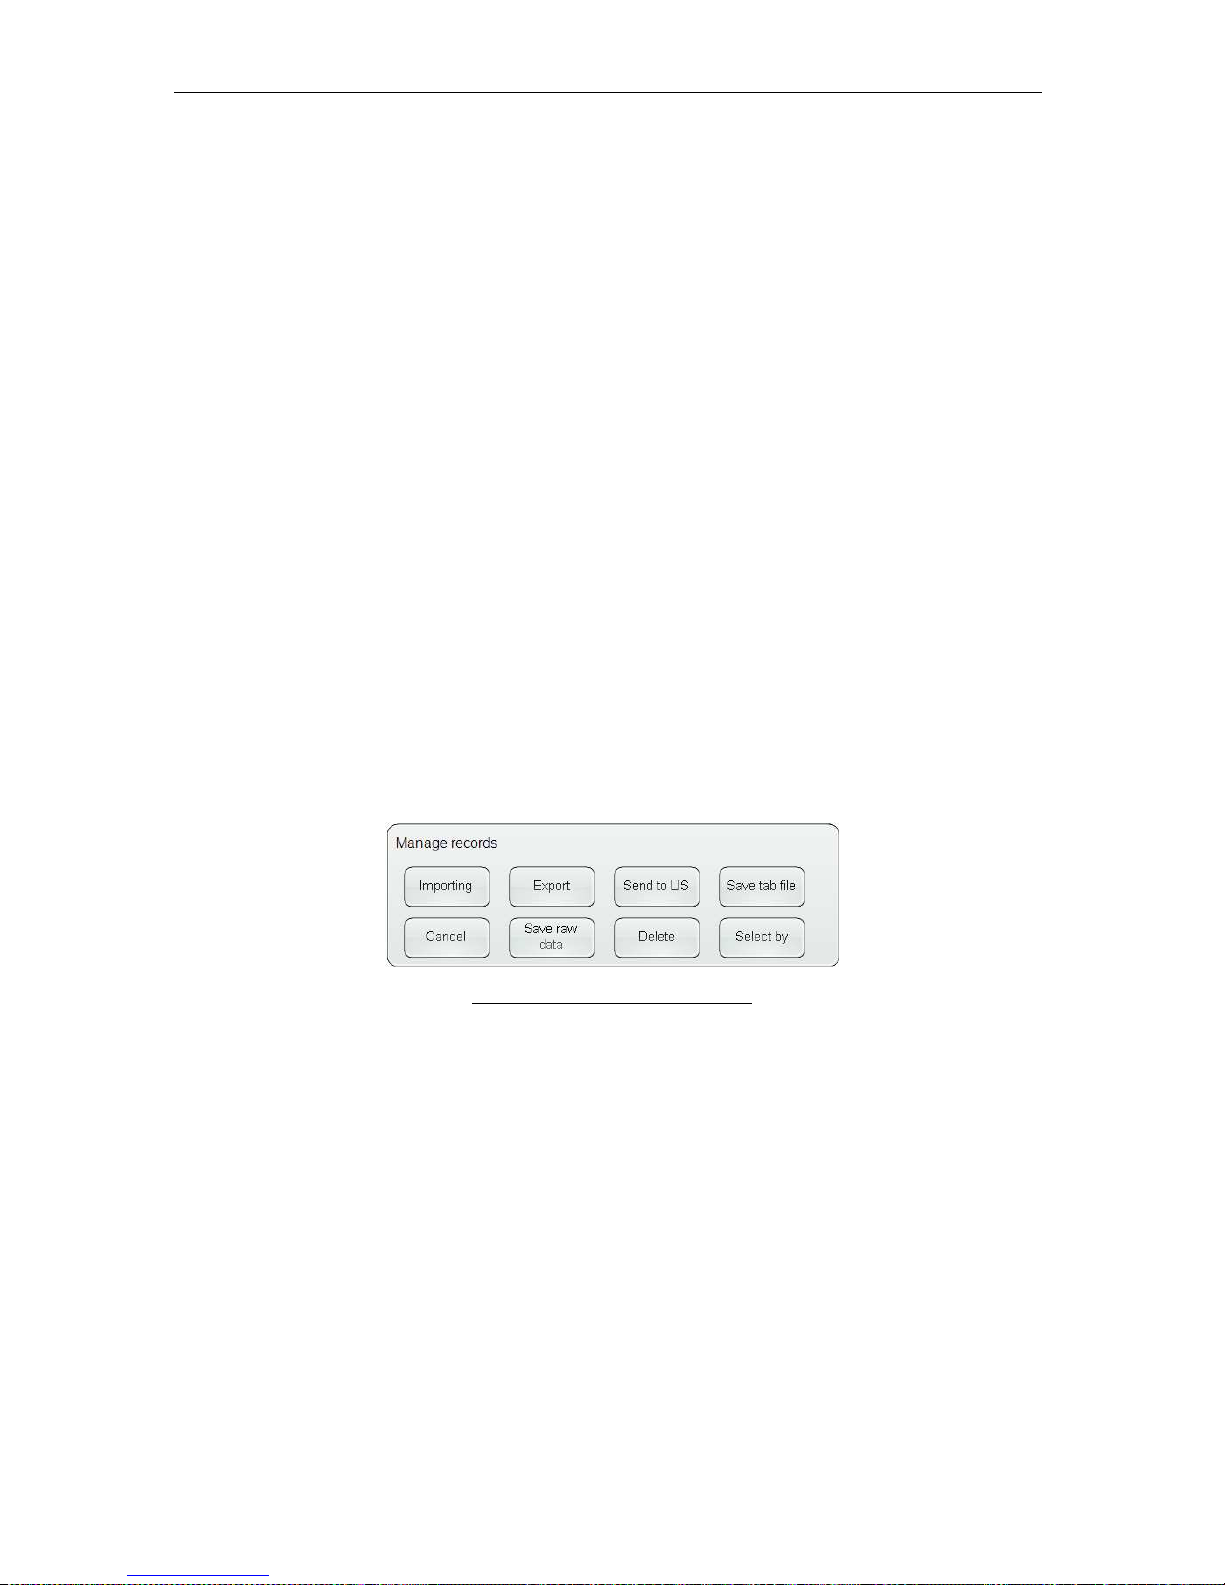
ELite 5, User Manual
Page 88 of 159
Multiple selections are useful for viewing, managing and quickly viewing statistics of only a
few selected records.
9.5 Automatic Selection of Database Records
When the total number of records in a database becomes very large, manual selection of
records can become difficult. The ‘Select by’ function in the Manage records panel provides
the means to select a group of records automatically according to their identifying
information. See section 9.8.1 for more information on the Select by database function.
9.6 Viewing Detailed Results
Multiple selections are also useful for viewing the detailed results of a few records rather than
navigating through the database. After selecting several records, clicking or tapping the
‘Details’ button on the database panel will display the detailed results for the first record in
the selection. Clicking or tapping the ‘Up’ or ‘Down’ buttons on the details screen displays the
details of the next record in the selection.
9.7 Statistics
After selecting a group of records, click or tap the ‘Statistics’ button on the database panel to
view the coefficients of variation (CV) associated with each of the 26 parameters. This
function is useful to quickly measure the imprecision of multiple runs of the same sample.
9.8 Managing Database Records
‘ELite 5’ analyzer database management functions are accessed by clicking or tapping the
‘Manage records’ button to bring up the Manage records panel.
Figure 62. Manage Records Panel
All data manipulation actions that change the data stored in the ‘ELite 5’ database are logged
in the ‘ELite 5’ log. If the multi-user mode is enabled, the name of the operator logged on at
the time the data manipulation occurs will also be stored in the log.
Page 89
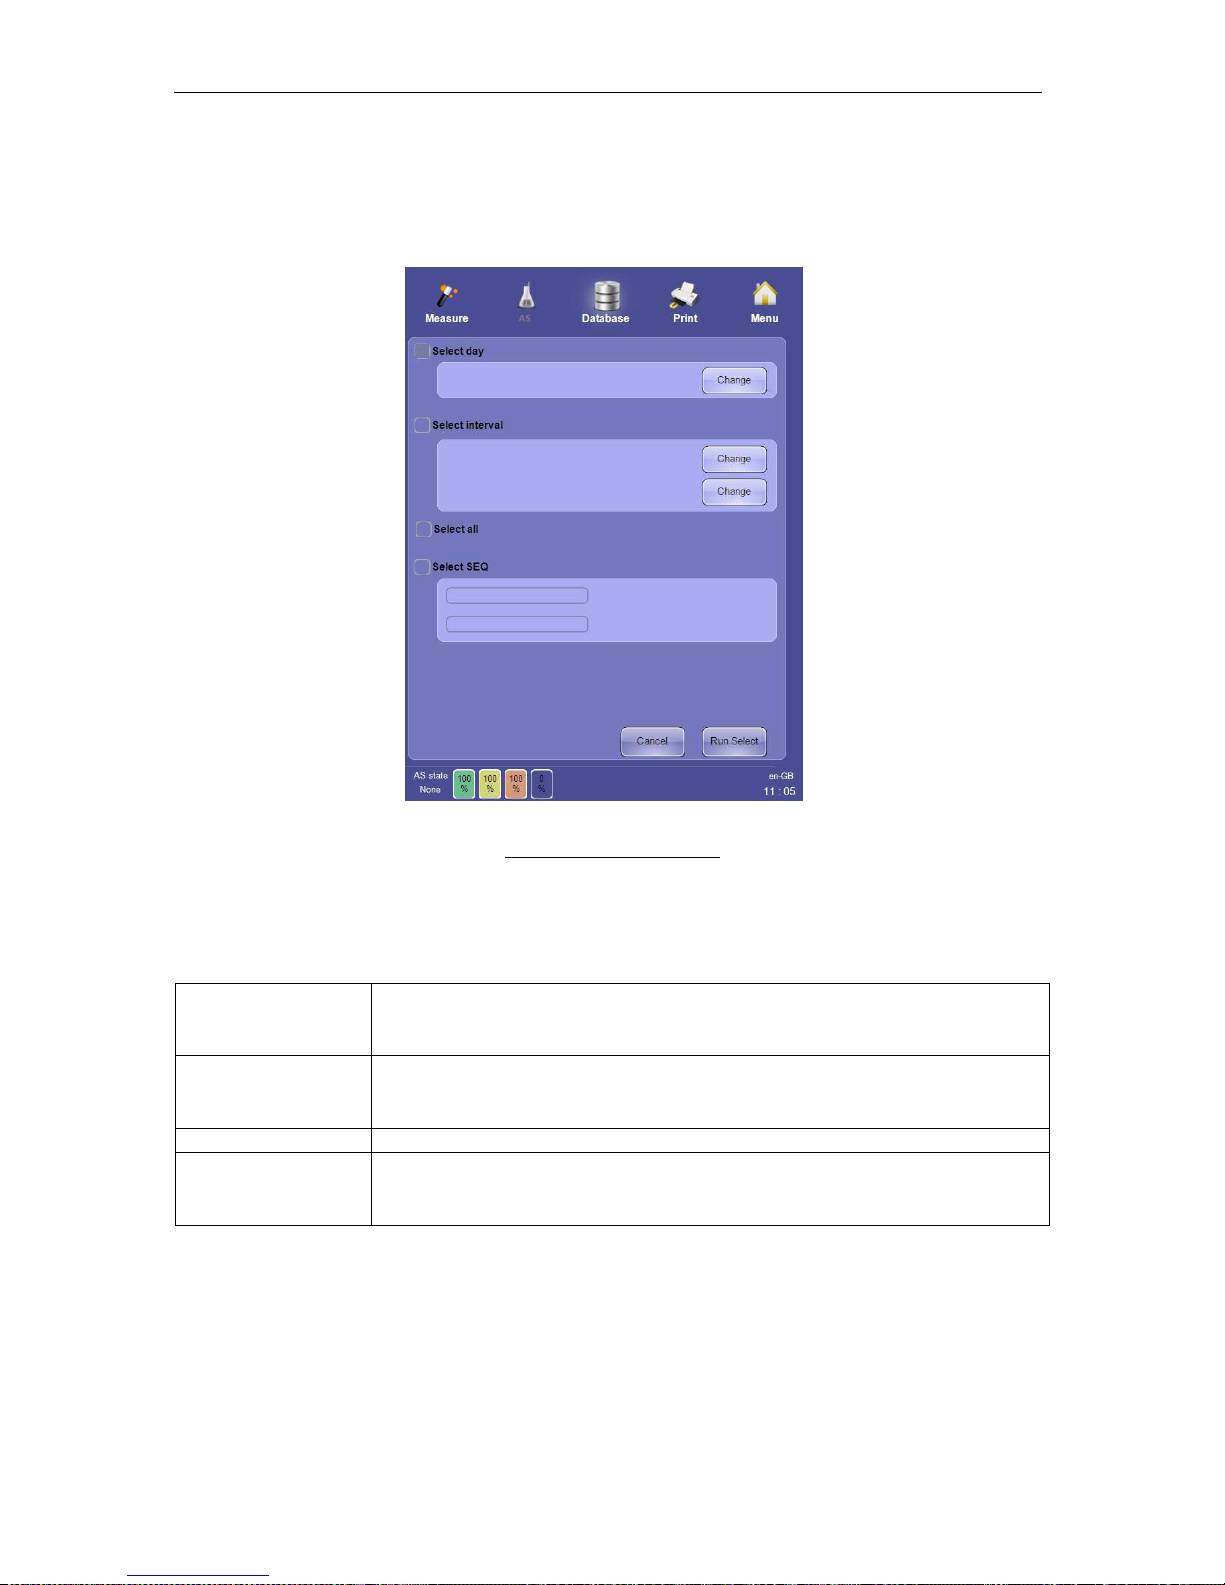
ELite 5, User Manual
Page 89 of 159
9.8.1 Select By
Click or tap the ‘Select by’ button on the Manage Records panel to display the Select by
panel. The Select by panel allows you to select a group of records with dates and Result IDs
that match criteria entered into the panel.
Figure 63. Select By Panel
The Select by panel provides various ways to select records. Only one of the four selection
methods can be chosen.
Select day
Clicking or tapping the ‘Change’ button displays a virtual on-screen
date keyboard. All records analyzed on the date entered will be
selected.
Select interval
The two ‘Change’ buttons allow entry of a start and end date. All
records on the start date, the end date, and all dates in between will be
selected.
Select all
All records in the database will be selected.
Select Result ID
Entering one Result ID will select a record with the same Result ID.
Entering two Result IDs will select a range of records including the start
and end Result IDs.
Clicking or tapping the ‘Run select’ will create a multiple selection of all database records that
match the criteria (if any). The ‘Cancel’ button returns to the database view and the current
selection is not changed.
Page 90
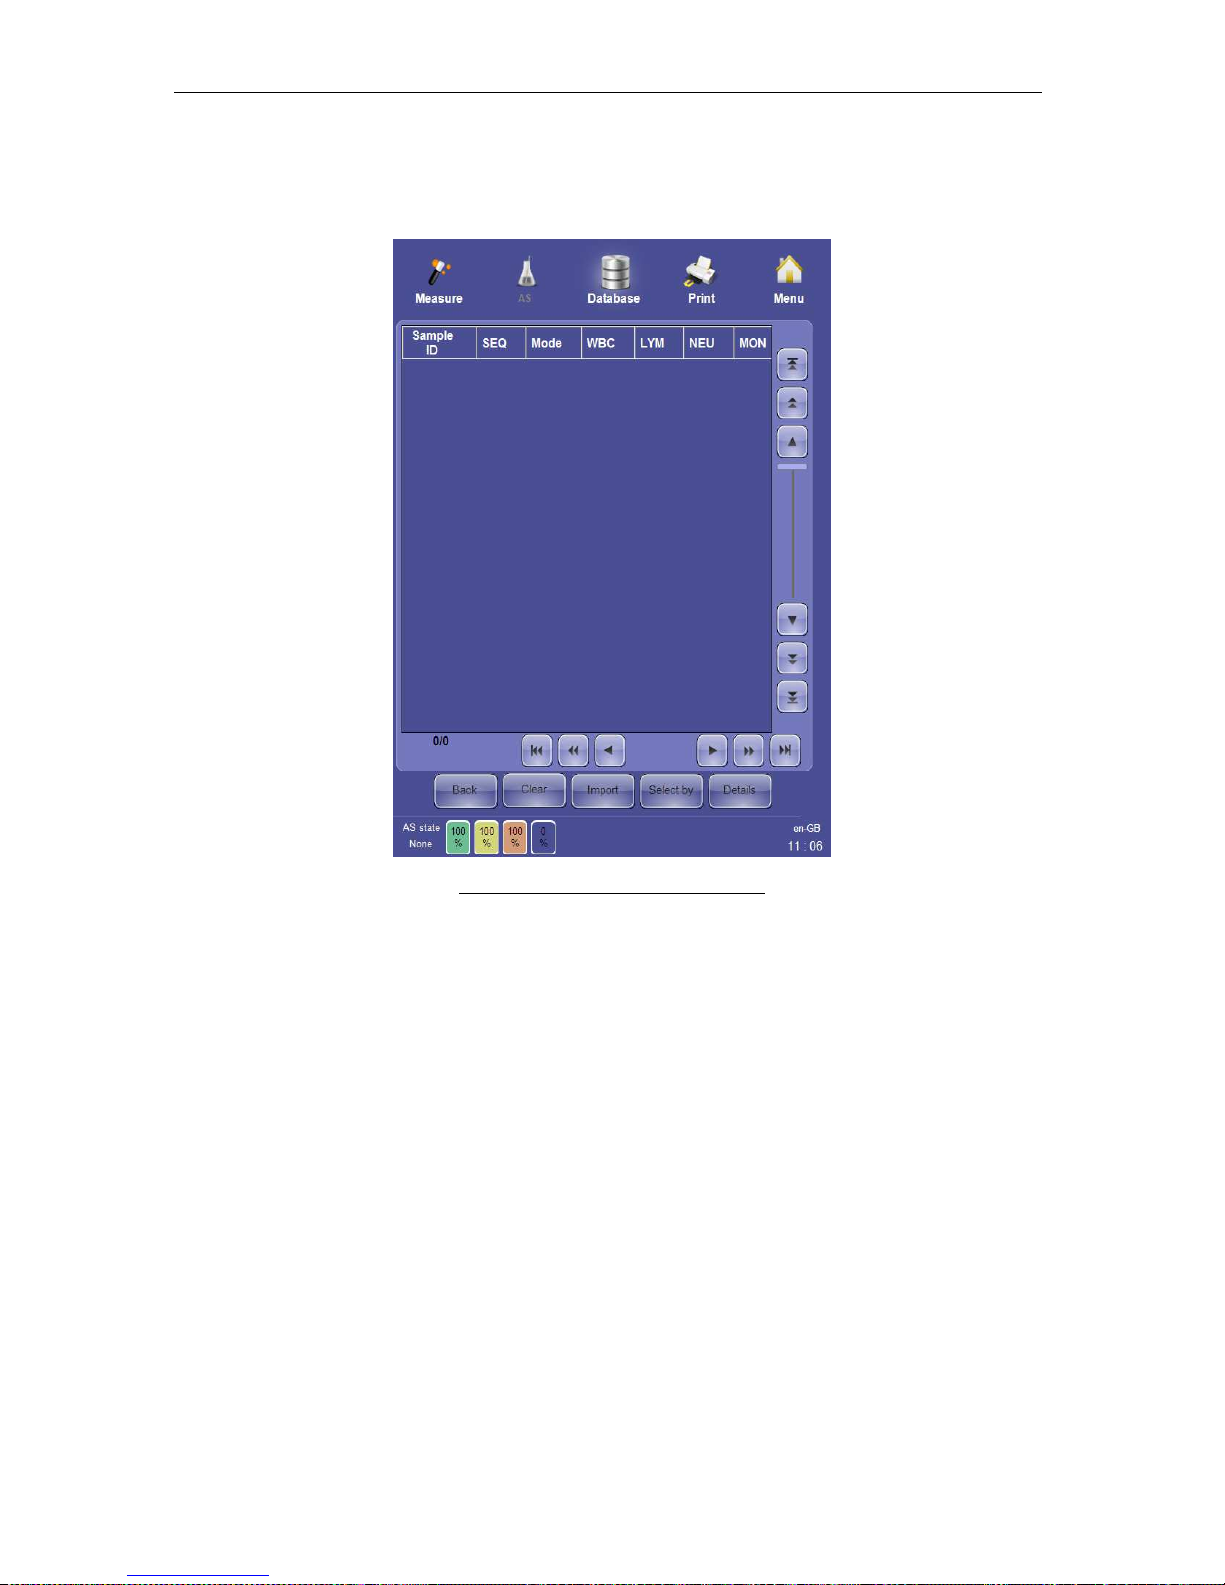
ELite 5, User Manual
Page 90 of 159
9.8.2 Importing
Clicking or tapping the ‘Import’ button displays a blank, modified version of the database
panel.
Figure 64. Database Importing Panel
The database importing panel provides the following options:
• The ‘Import’ button brings up a panel to select previously exported database record
files to load and view.
• ‘Select by’ performs the select by database function to select a group of imported
records according to criteria entered by the operator.
• ‘Details’ views the detailed result information for all or a selection of imported records.
• ‘Clear’ removes selected records from the imported records table, but does not
permanently remove the cleared records from the stored database file.
• ‘Back’ ends viewing of imported database information and returns to the ‘ELite 5’
stored database.
Page 91
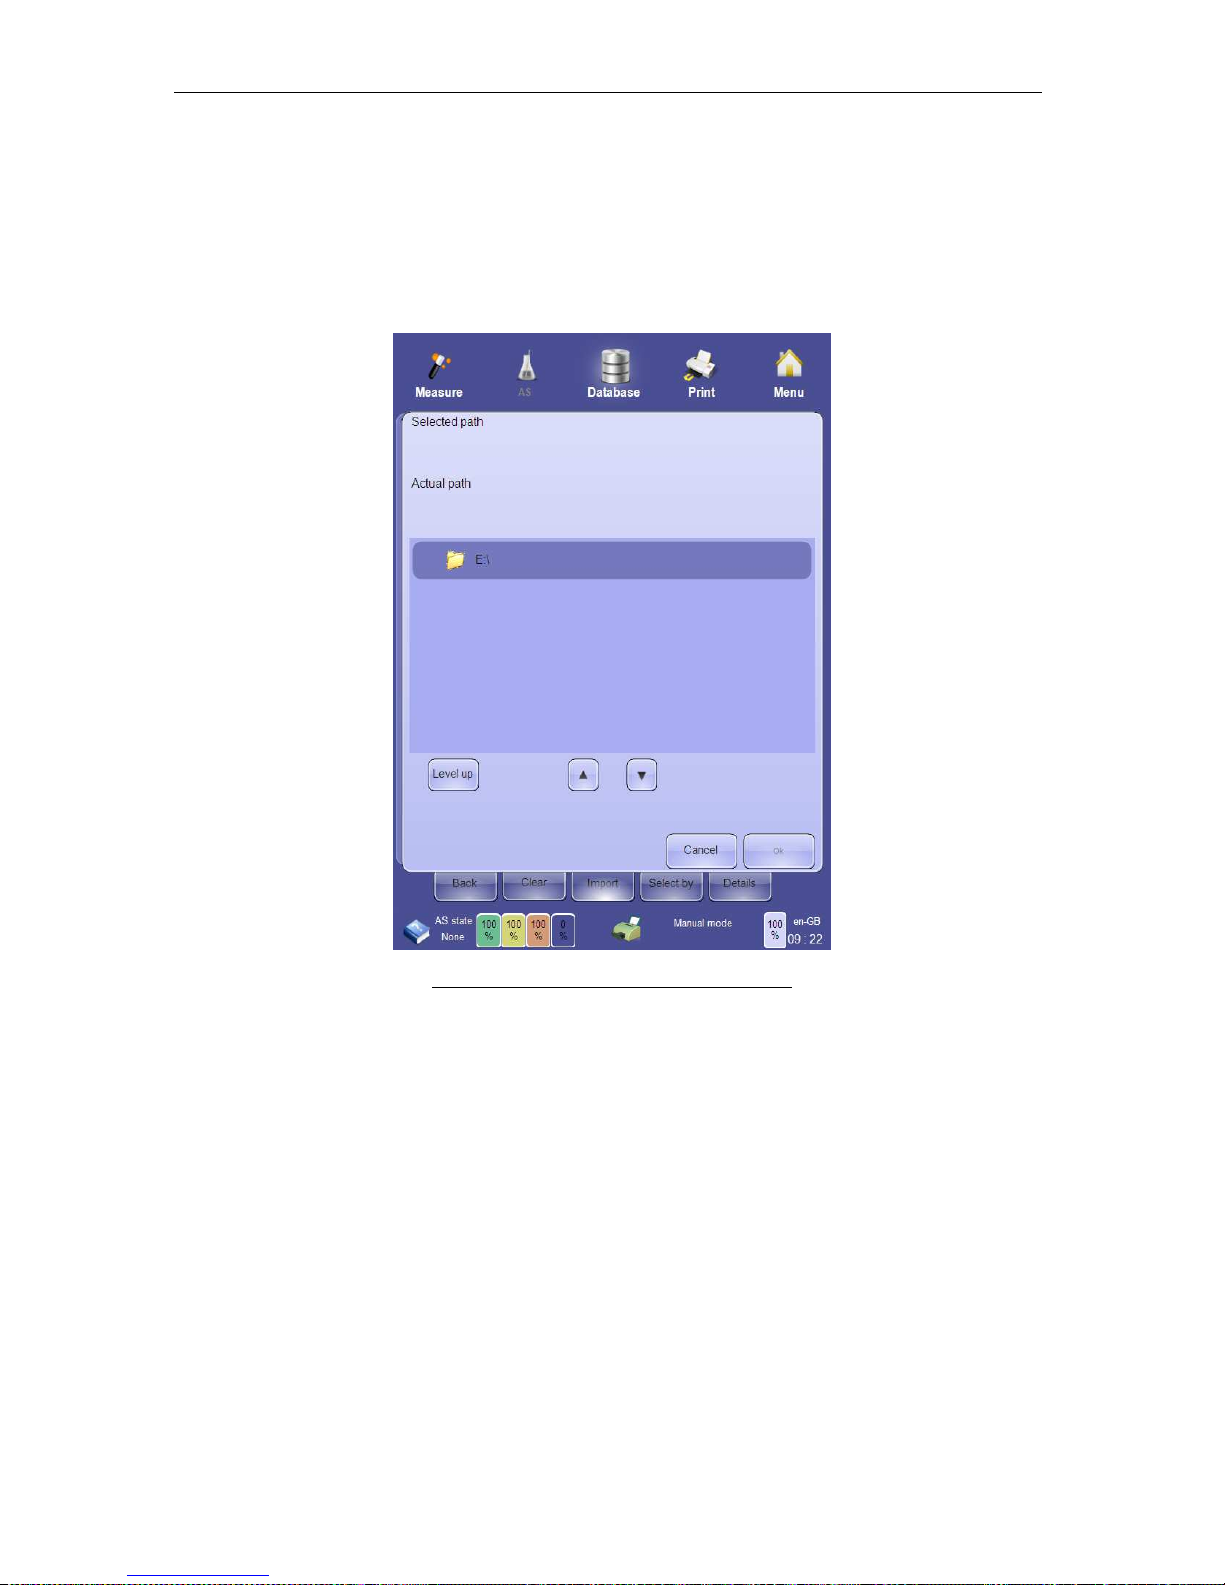
ELite 5, User Manual
Page 91 of 159
9.8.3 Export
The database export panel allows you to select a directory location to store records in a
selection for backup or reference purposes. To back up all records in the database, first use
the Select by function to select all records in the database and export them using the export
function.
Clicking or tapping the ‘Export’ button displays the database export panel.
Figure 65. Directory Panel for Data Storage
Introduce a USB storage device (USB hard drive, memory stick, etc.) into an available USB
port on the back panel of the ‘ELite 5’ analyzer. Select the directory to store the exported
data and press the ‘Ok’ button to start the export.
The file format of exported data is an internal format, and can only be read and interpreted by
the ‘ELite 5’ analyzer using the Import function. Each database record is stored as an
individual file with a ‘.rp’ extension.
9.8.4 Send to LIS
The ‘Send to LIS’ button immediately transmits selected database records to the external LIS
according to your LIS settings.
9.8.5 Save Tab File
The Save tab file function is used to archive database data to a tab separated text file. The
‘Save tab file’ button displays a directory panel like Figure , except that the file saved in the
Page 92

ELite 5, User Manual
Page 92 of 159
selected location is a tab separated text file rather than a database backup file. Tab
separated text files can be loaded and viewed by a text editor or imported into spreadsheet
software.
The filename created by the Save tab file function is generated automatically in the following
format: TAB_YYYYMMDDHHMMSS.txt with the year, month, day, hour, minute, and second
of the time when the operation started.
To archive database data using this function, insert a USB data storage device to one of the
USB inputs on the back panel of the ‘ELite 5’ analyzer. Select the file location of your USB
data storage device and click or tap the ‘OK’ button to begin the export.
9.8.6 Save Raw Data
The Save raw data function saves the raw data information associated with a selection of
database records. Raw data files are only suitable for internal use by Erba Lachema staff.
Your service engineer may ask you to save raw data files to help diagnose a service issue.
A confirmation password is required to save raw data. The default factory-set confirmation
password is 555. This password can be changed only by Erba Lachema certified service
engineer.
Insert a USB data storage device to one of the USB inputs on the back panel of the ‘ELite 5’
analyzer. Click or tap the ‘Save raw data’ button on the Manage records panel, then enter the
correct confirmation password. Click or tap the ‘Ok’ button to display a directory panel like
Figure . Select the file location of your USB data storage device and click or tap the ‘OK’
button to save raw data.
9.8.7 Delete
The Delete function is used to delete permanently the records from a selection from the
‘ELite 5’ analyzer database. To permanently delete records, select a group of records and
click or tap the ‘Delete’ button on the Manage records panel.
To prevent accidental deletion of data, the ‘ELite 5’ requests the same confirmation
password used in the save raw data function. After entering the correct password and
clicking or tapping the ‘Ok’ button, the records will be permanently deleted.
The password to allow deleting records is: 555.
Page 93
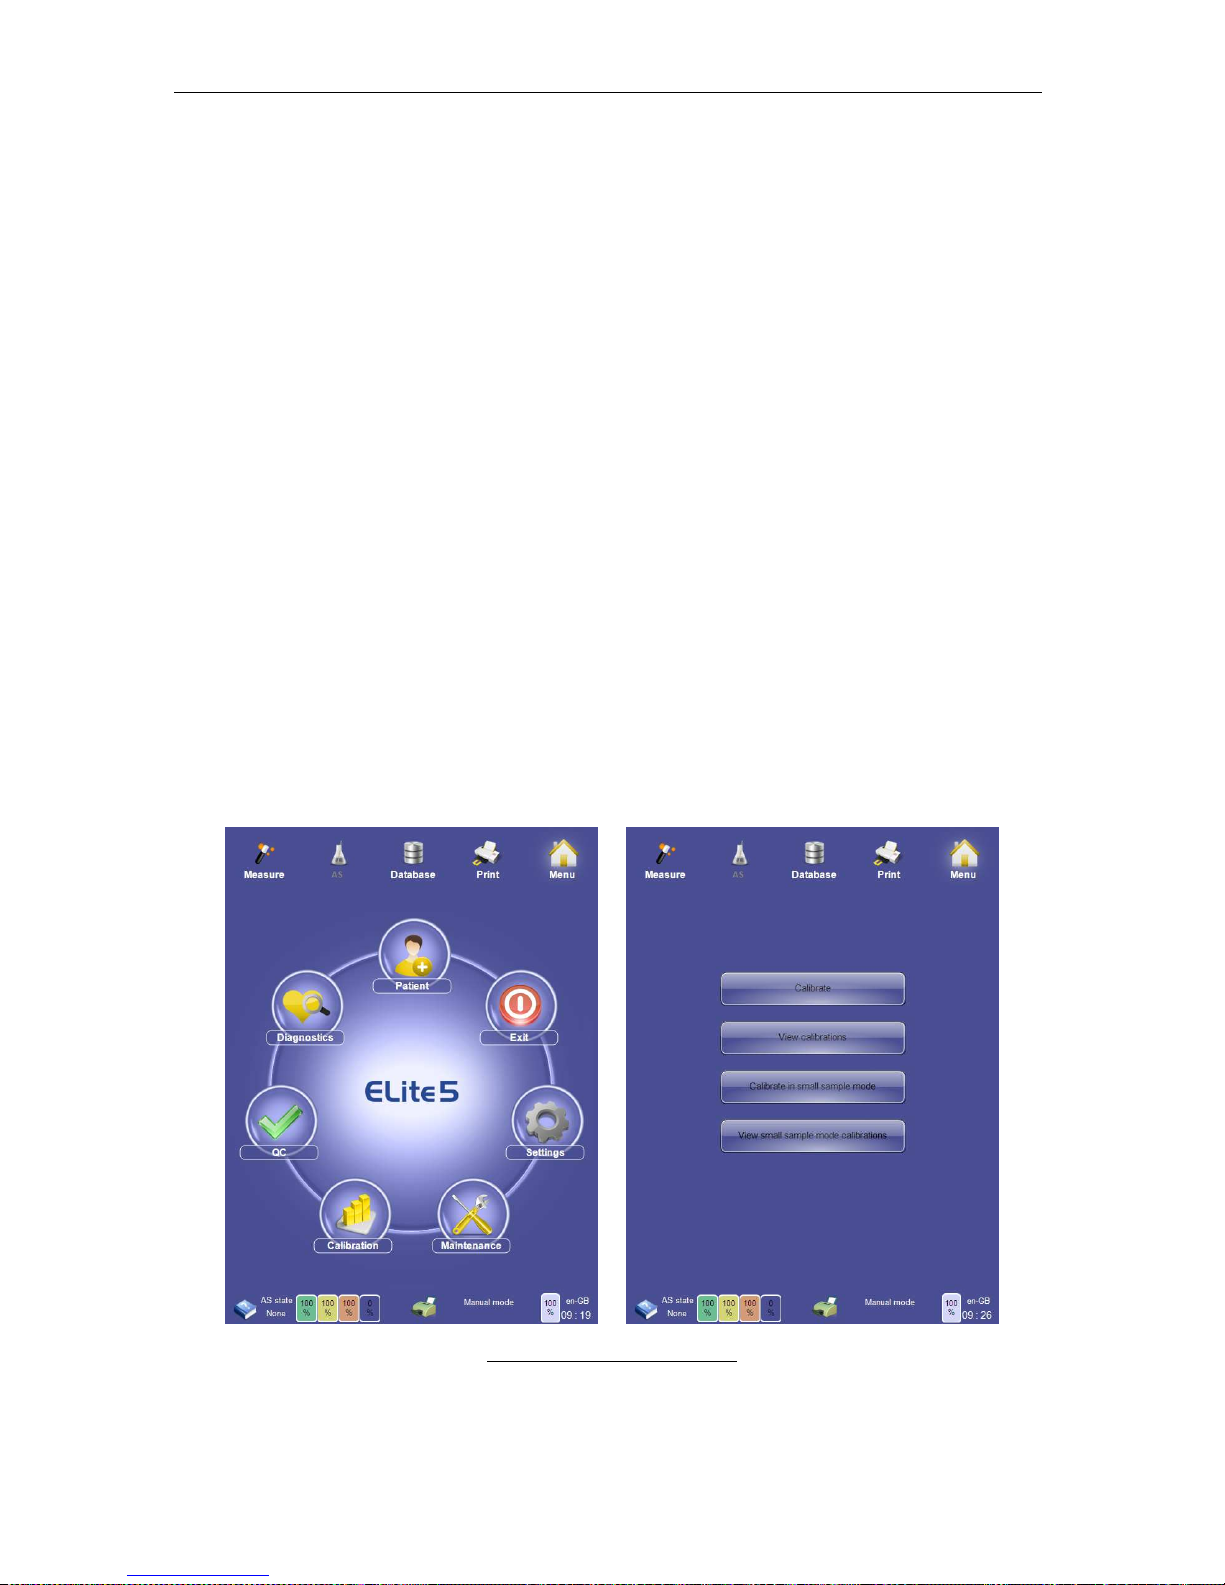
ELite 5, User Manual
Page 93 of 159
10 Calibration
The ‘ELite 5’ analyzer must be calibrated in order to provide correct, reliable results.
Calibration should be done at the following times:
• At initial installation,
• After replacing any component critical to the dilution or measurement process,
• Any time quality control shows a systematic error or is outside predefined limits,
• At periodic time intervals determined by laboratory regulations.
The ‘ELite 5’ analyzer calibration process consists of running a commercial calibration
material or a human whole blood sample with known parameter values multiple times. The
known parameter values and the average values of multiple runs are used to calculate
calibration factors. The new calibration factors take effect once they are accepted by the
operator.
If you are using a human whole blood as a calibrator, the calibration target values must be
measured on a reference analyzer according to applicable regulations, standards, or
laboratory procedures.
An automated calibration procedure is provided that guides the operator through the
calibration process and performs the calibration factor calculation. Calibration factors can
also be modified directly without running a calibration procedure. Only the parameters that
are traceable to reference methods are calibrated: WBC, RBC, PLT, HGB, MCV and MPV.
To view the calibration functions of the ‘ELite 5’ analyzer, select the ‘Calibration’ icon on the
main menu to display the calibration panel. The Calibration panel displays an option to
calibrate the ‘ELite 5’ analyzer or to view prior calibrations.
Figure 66. Calibration Options
Page 94
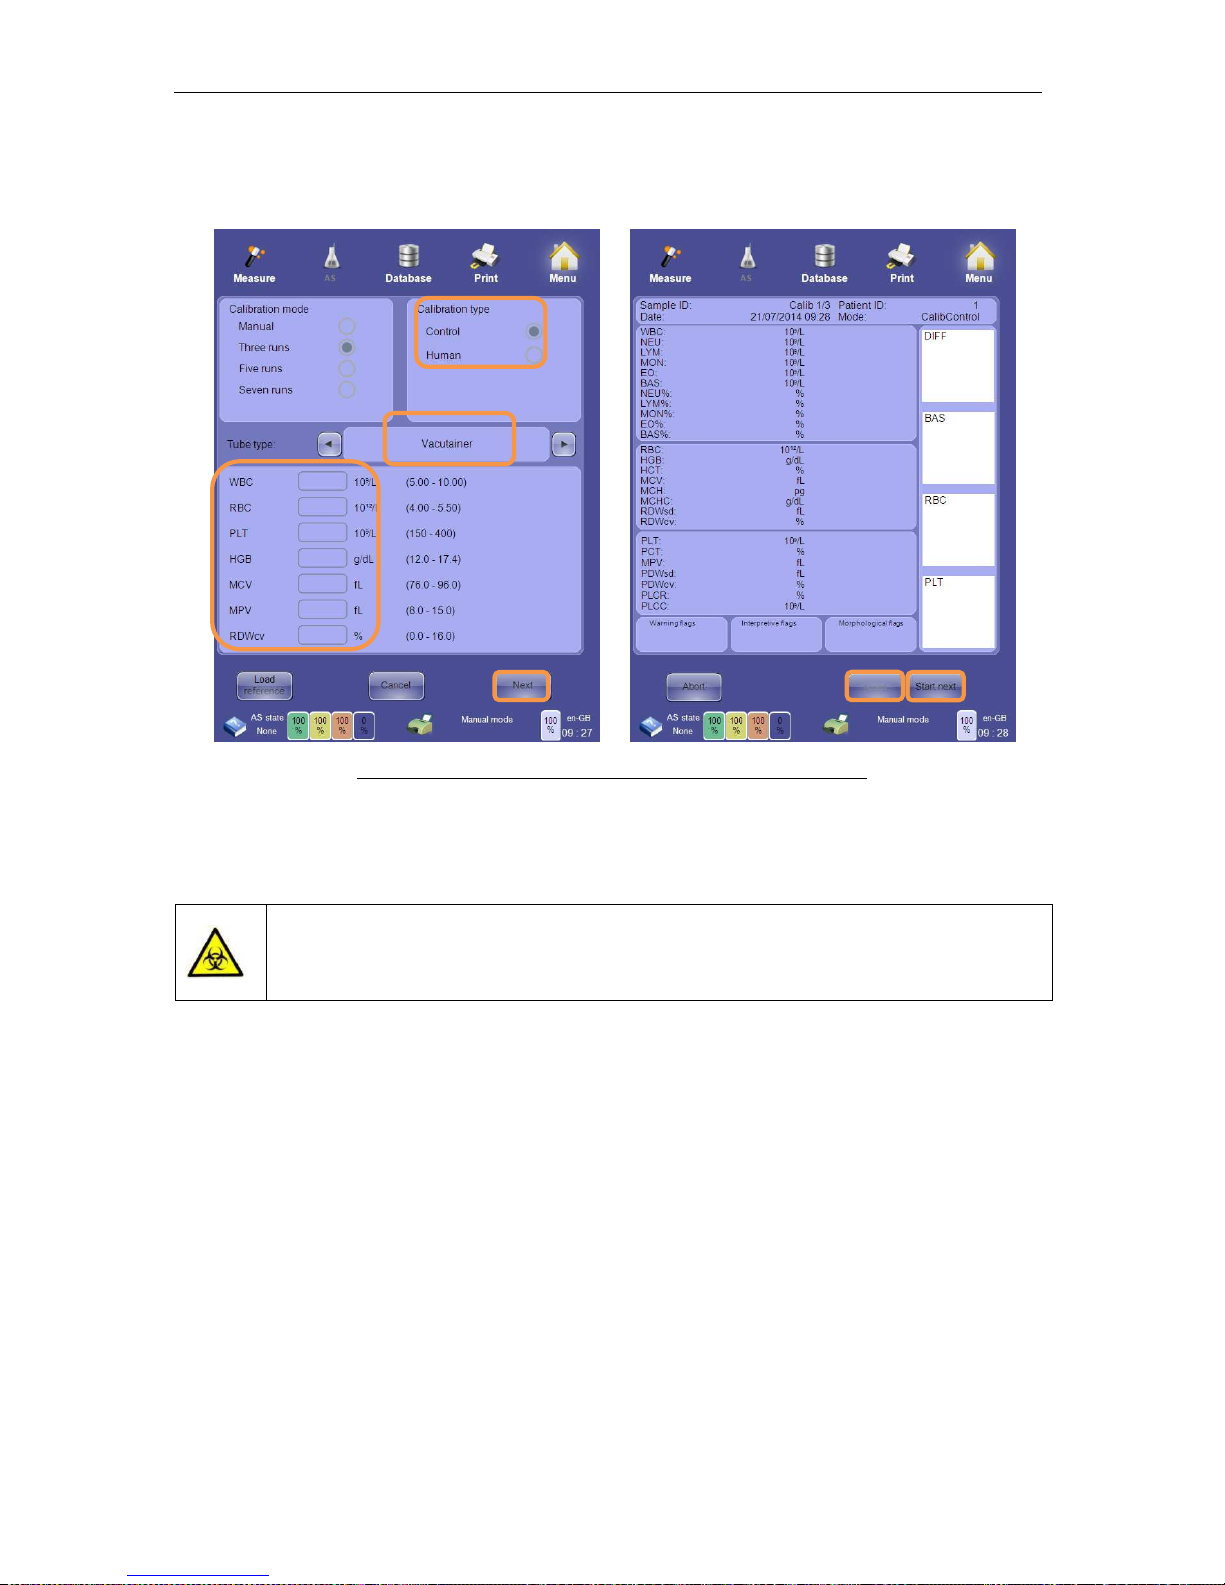
ELite 5, User Manual
Page 94 of 159
10.1 Calibrating the ‘ELite 5’
.
Selecting the ‘Calibrate’ option on the calibration options panel displays the calibration panel.
Figure 67. Calibration Panel and Calibration Run Result Panel
The limits of the calibration target values are linked to the normal range of the ‘Human’
sample mode.
Commercial calibrat
ion material and sample tube should be handled as a
potentially biohazardous material. All applicable laws, regulations, and
laboratory practices should be followed in the handling and disposal of
calibration materials.
To perform the automated calibration procedure, ensure that the ‘ELite 5’ pneumatic system
is started up and that a valid blank measurement has been accepted. Perform the following
steps:
• Prepare a sample tube with commercial calibration material or human whole blood.
Ensure that there is sufficient sample volume for three or seven consecutive runs.
• Place the sample tube with calibration material in the sample rotor.
• Select ‘Three measures’ or ‘Seven measures’ according to your laboratory’s standard
practices.
• Select ‘Control’ for a commercial calibration material (control or calibrator) or ‘Human’
for whole human blood calibration.
• Enter the calibration target values provided with your commercial calibration material
or the previously determined parameter values for human blood calibration.
• Click or tap the ‘Next’ button to begin the calibration process.
Page 95
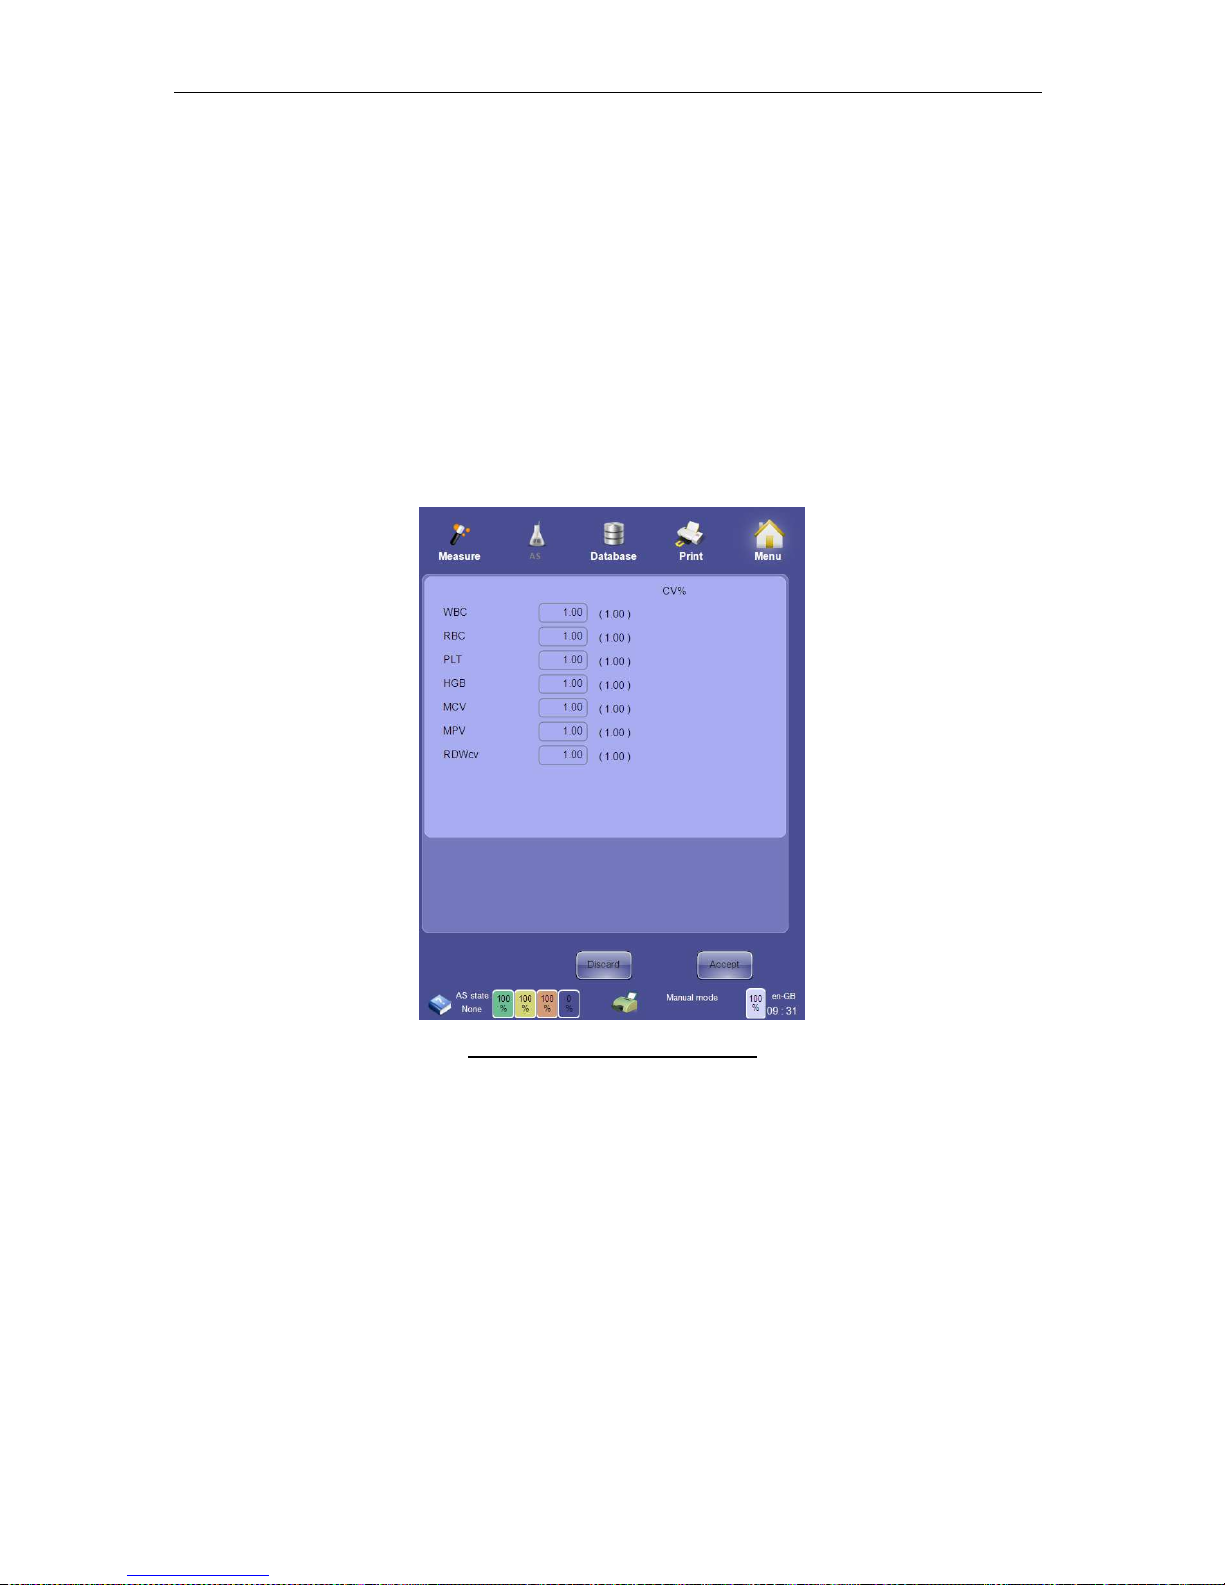
ELite 5, User Manual
Page 95 of 159
• The analyzer displays a blank result screen and begins sample measurement of the
calibration material. Wait for the screen to be populated with results when sample
measurement is complete.
• Click or tap the ‘Accept’ button if the measurement run is acceptable.
• Click or tap the ‘Start next’ button to begin the next calibration run. Selecting ‘Start
next’ without accepting a calibration run discards the run. Selecting ‘Abort’ will abort
the entire calibration procedure and discards all calibration results.
• The calibration procedure ends when three or seven accepted calibration runs are
completed. The calibration factors are calculated and presented in the calibrator
factor. The previous calibration factors and the coefficient of variation (CV) of the
sample runs for each parameter are also displayed.
• Select ‘Accept’ to replace the current calibration factors with the accepted factors.
Selecting ‘Discard’ eliminates the entire calibration process.
Figure 68. Calibration Factor Panel
The automatic calibration process can be skipped by selecting the ‘Manual’ calibration mode
on the calibration panel and clicking or tapping the ‘Next’ button proceeds directly to the
calibration factor panel for manual entry of factor values. Manually entered factor values can
be accepted in the same way as calculated factors from calibration sample runs, and are
treated by the ‘ELite 5’ in the same way.
10.1.1 View Calibrations
The view calibration features is helpful for reviewing the calibration history for the analyzer.
Increasing or decreasing calibration value trends over time may indicate a problem that
requires service intervention.
Page 96
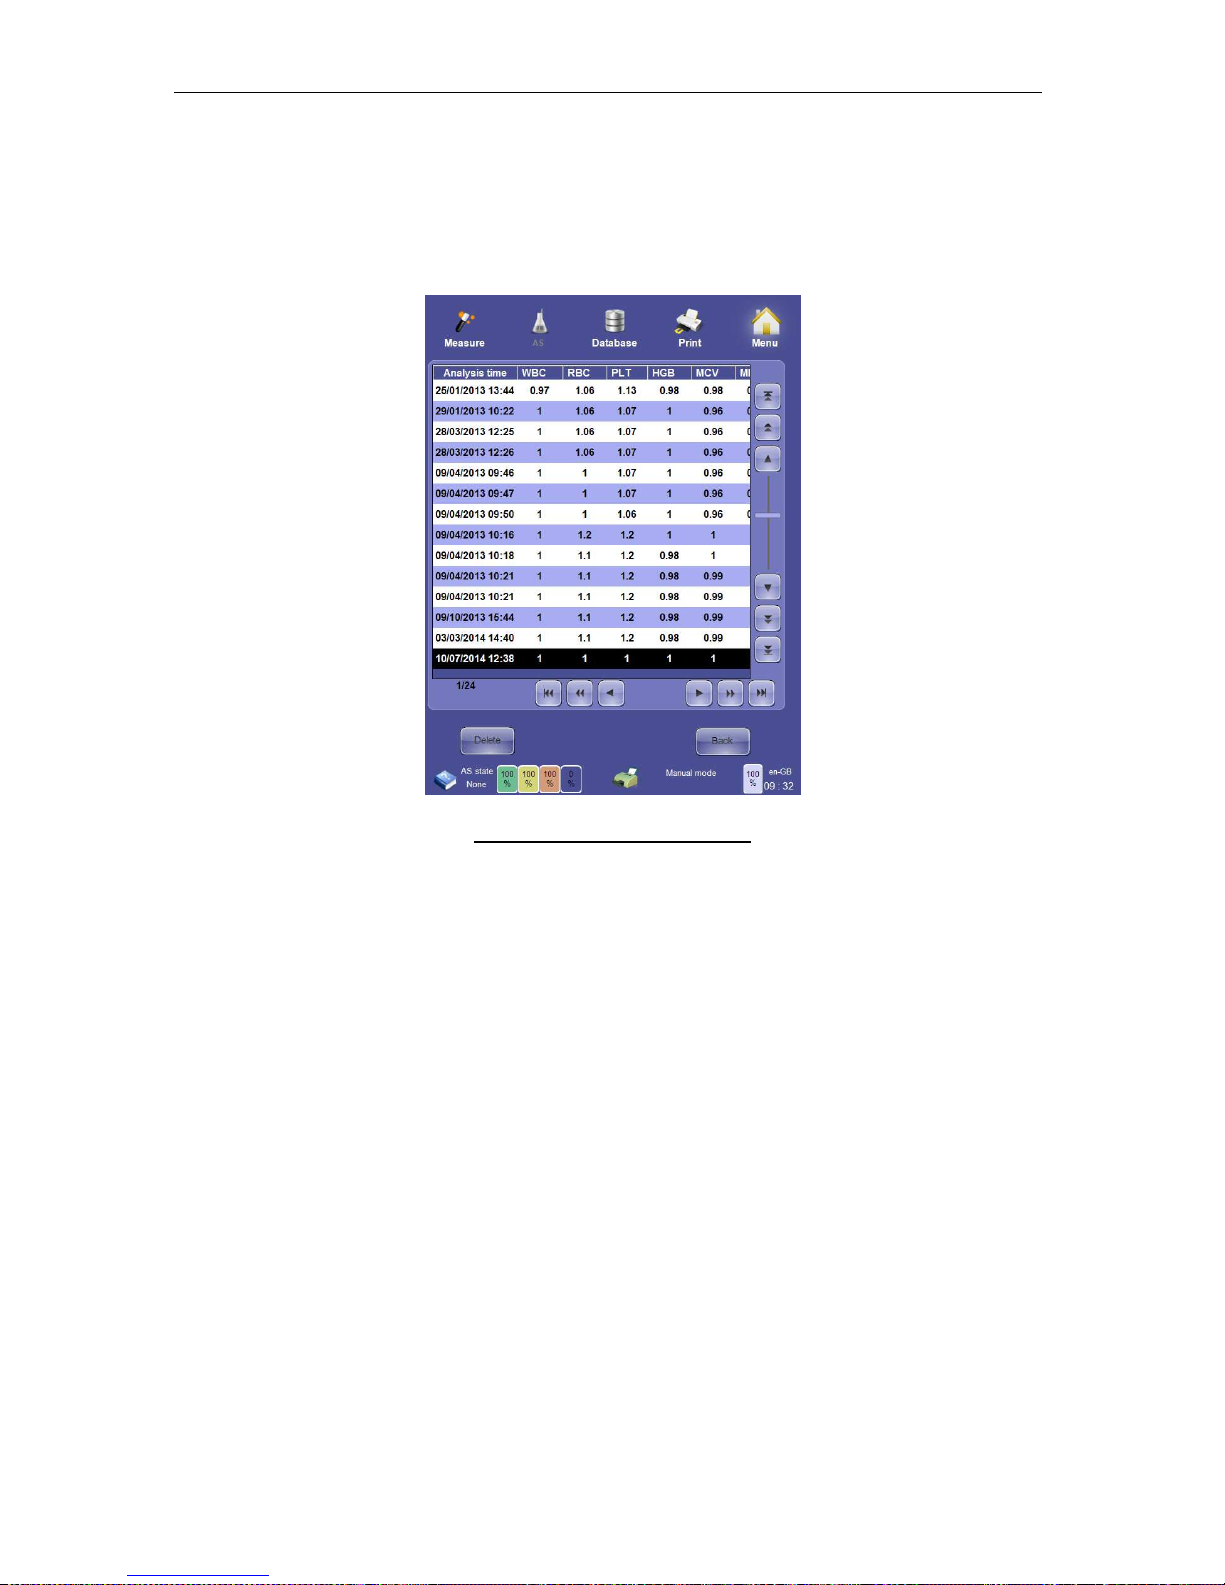
ELite 5, User Manual
Page 96 of 159
To view the calibration history click or tap the ‘View calibration’ function on the calibration
panel. The calibration history is presented in a table view that can be navigated in the same
way as the database panel.
Any calibration can be deleted. Deleting the last calibration causes the ‘ELite 5’ analyzer to
revert to the last accepted calibration.
Figure 69. View Calibration Panel
To delete a calibration, click or tap the ‘Delete’ button. The system will ask you for a
confirmation password to avoid accidental deletion of calibration data. The confirmation
password is set at the factory to 555, and can be changed by your Erba Lachema certified
service engineer.
10.2 SSM Calibration
The Small Sample Calibration procedure is the same as the Calibration in normal mode.
Be aware of choosing the right vial which you are using for calibration. For the best precision
we recommend to choose the calibration for the most measurements in SSM mode.
Calibration factors are going to be generated like:
Measurement result = raw result x calibration factors x SSM calibration factors
Page 97
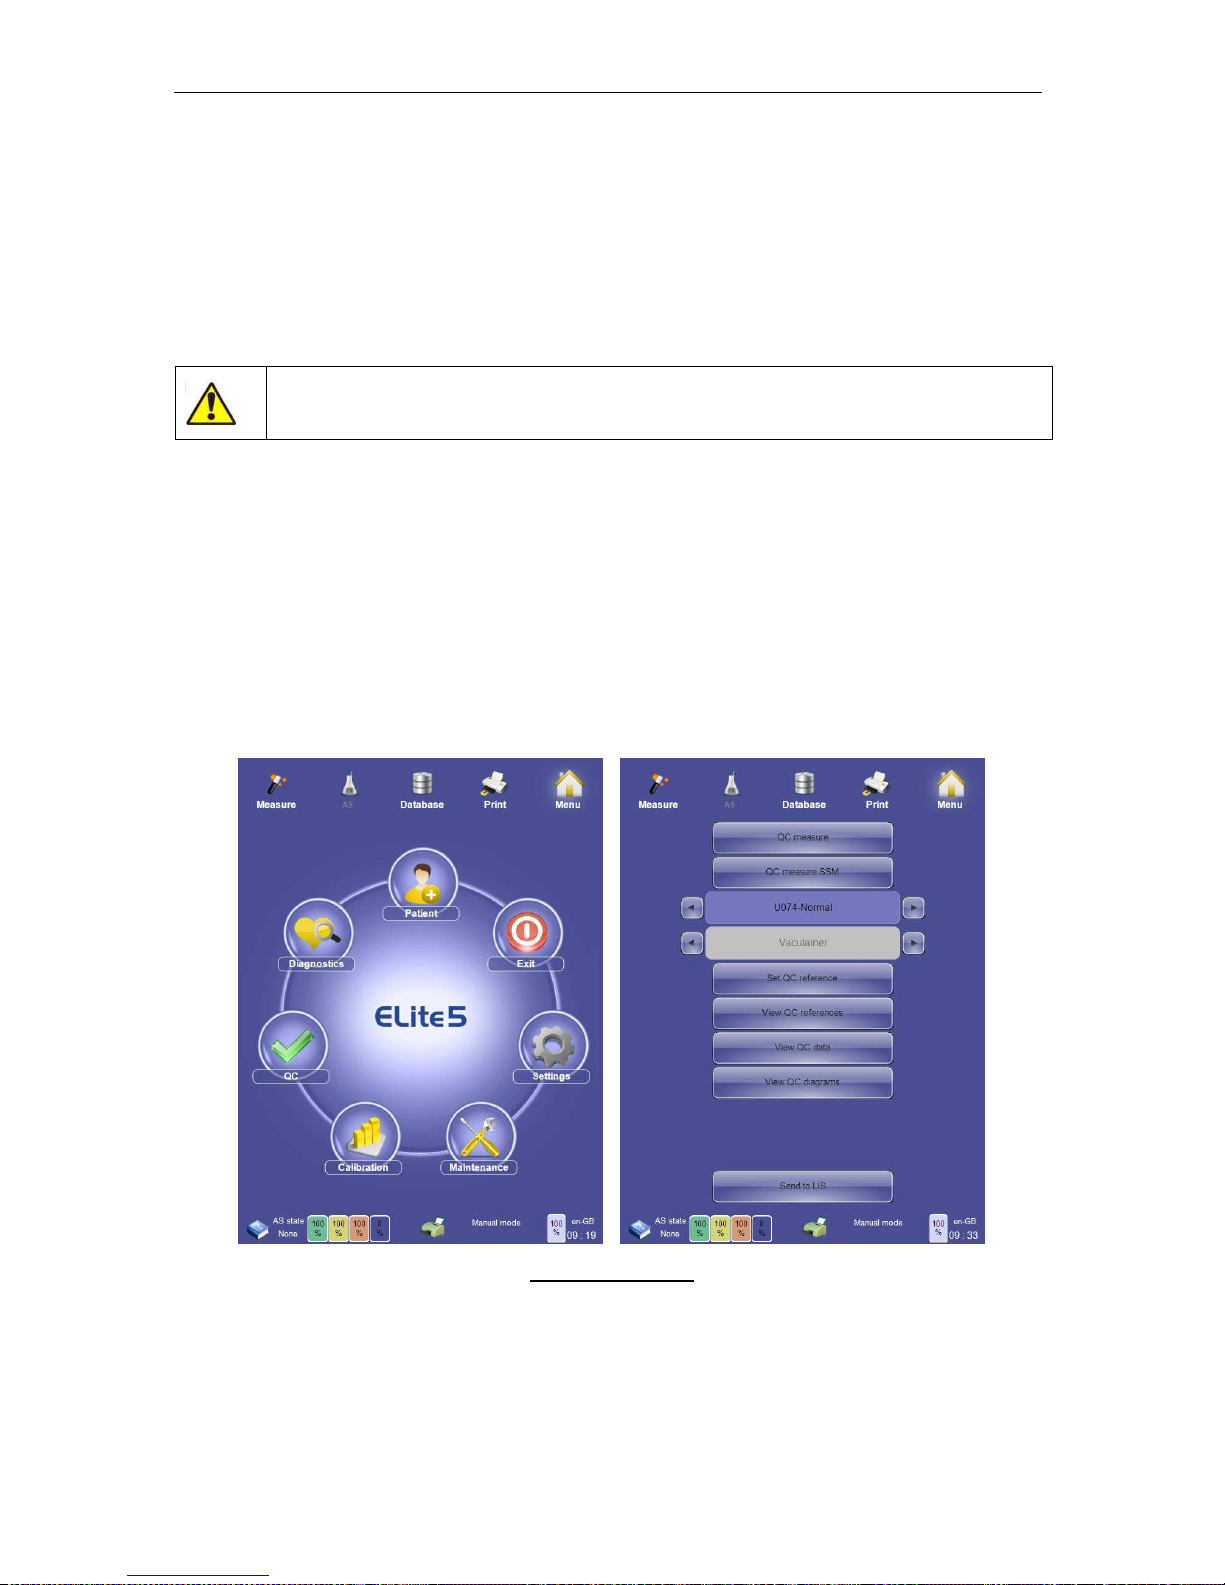
ELite 5, User Manual
Page 97 of 159
11 Quality Control
Regular use of quality control (QC) ensures that the ‘ELite 5’ analyzer is operating optimally.
Stable recovery of standard QC material parameters assures the operator that the ‘ELite 5’ is
operating consistently on a day-to-day basis and is functioning correctly.
By analyzing control materials on a regular basis, day-to-day reproducibility and general
condition of the analyzer can be monitored. Target values and acceptable (tolerance) ranges
for each parameter can be specified for an unlimited number of QC materials.
C
ontrol
materials
must be used before
their
expir
y date
. Always observe
the
control manufacturer’s instructions for storage and use. Control materials
must be well mixed before use.
The ‘ELite 5’ analyzer does not limit the number of QC material lots or the number of QC
measurement runs that are stored in the control database. Each QC measurement run is
saved to the selected QC material lot.
QC lots can be commercial control materials or a whole human blood sample whose
parameter values and ranges are determined by other means. The advantage of a
commercial control material is that its shelf life is much longer than human blood, allowing
control of the analyzer for a longer period of time.
Controls in the ‘ELite 5’ are processed in manual mode only. To access the QC panel, select
the ‘QC’ icon on the main menu.
Figure 70. QC Panel
11.1 Set QC Reference
Before taking any QC measurements, target values and acceptable ranges must be specified
for a lot of control material. Click or tap the ‘Set QC reference’ button to display the Set QC
panel.
Page 98
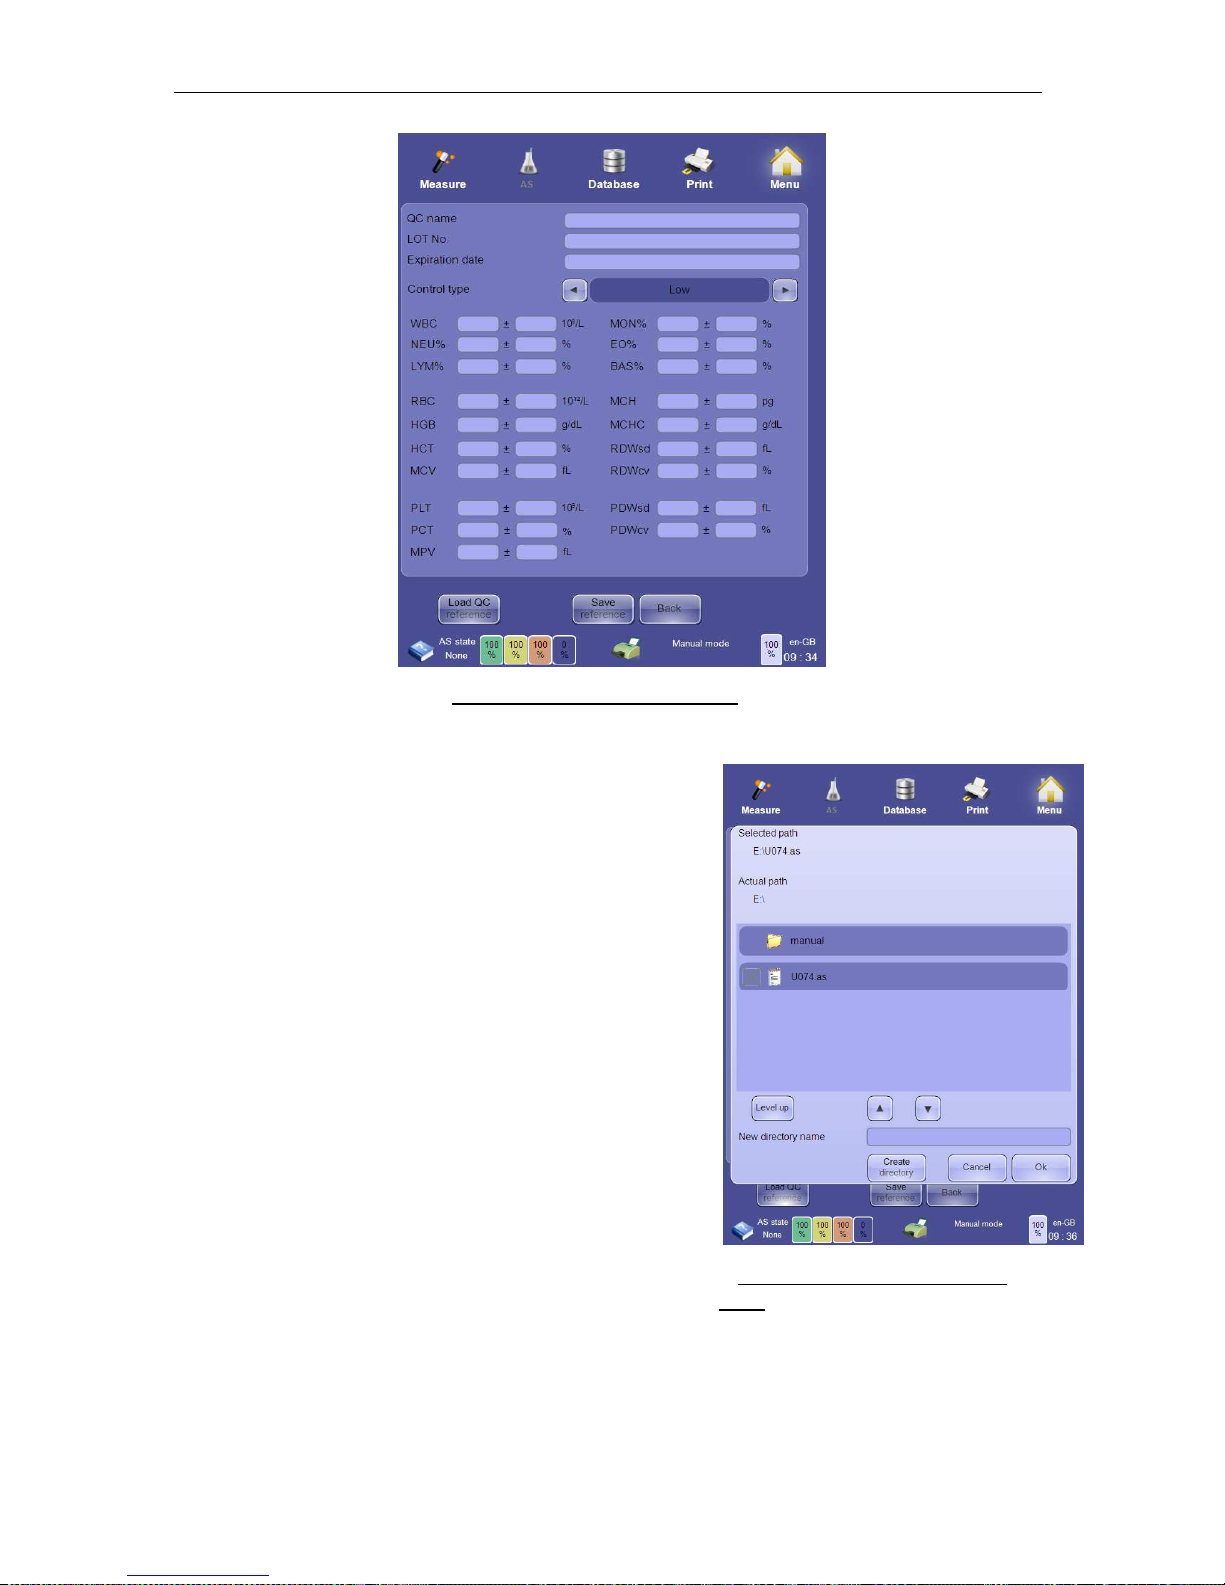
ELite 5, User Manual
Page 98 of 159
Figure 71. Set QC Reference Panel
The ‘QC name’ is the name that will be displayed for
selecting the control to associate with a QC
measurement. Enter the identifying information, and the
target values and tolerance ranges for any parameters
that are to be controlled with the ‘ELite 5’ QC system. To
exclude a parameter from the QC procedure, leave its
target value and tolerance range field empty. Press the
‘Save reference’ button after data entry is completed.
Tapping the “Load QC reference” button will allow filling
QC material data electronically – using a file provided by
the manufacturer of the analyzer. A dialog will open.
Browse to the correct folder, and select the file by
tapping the check box in front of the filename.
The file contains information for all three levels of the
control material (Low, Normal and High). All three levels
will be loaded into the system and will become
selectable in the QC menu.
Figure 72.35 Load QC Reference
Panel
Page 99
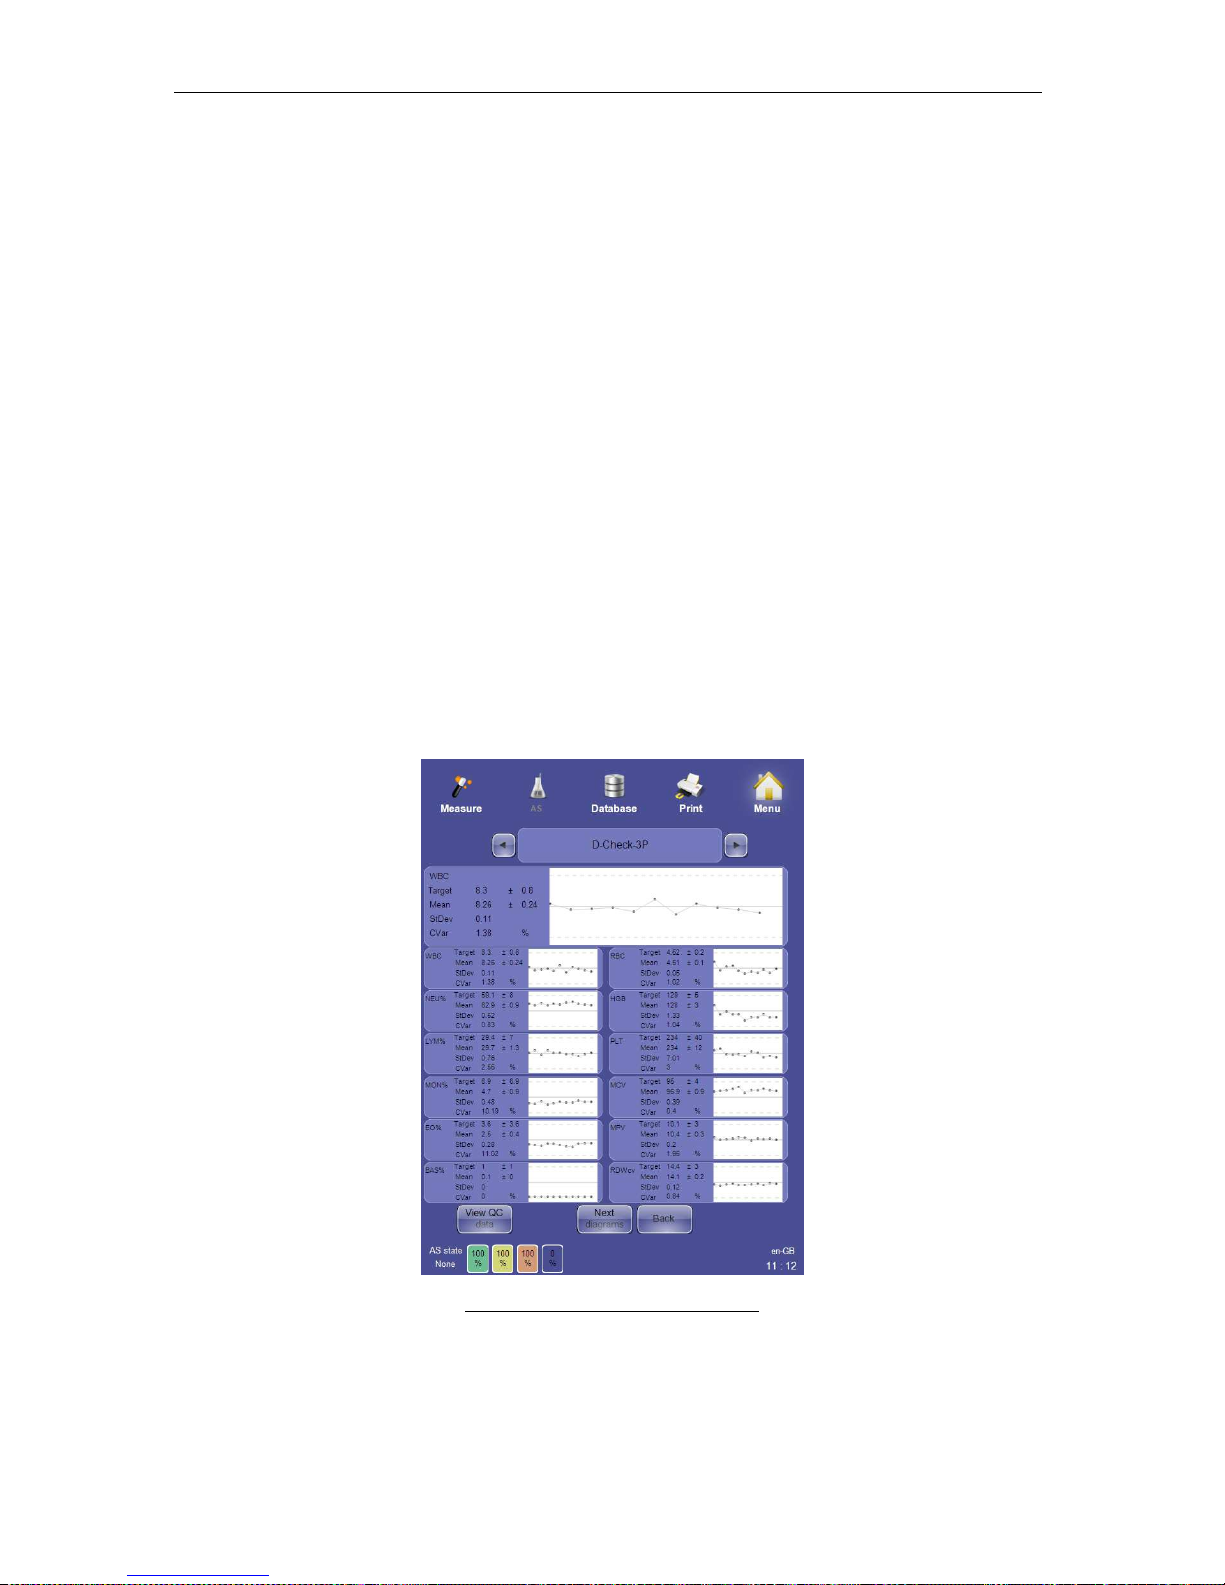
ELite 5, User Manual
Page 99 of 159
11.2 QC Measure
To run a QC measurement, please ensure that a valid blank measurement has been run and
accepted. Associate the QC measurement to the correct control material lot by select the
matching QC name in the selector below the ‘QC measure’ button on the QC panel. Place
sample tube with the control material in the sample rotor and click or tap ‘QC measure’.
The QC measurement results will be added to the QC database and associated with
matching QC material lot.
11.3 View QC References
Click or tap the ‘View QC References’ button to see a list of QC lot references stored in the
‘ELite 5’ analyzer control database. Target values and ranges can be viewed for any stored
QC references.
11.4 View QC Data
Selecting ‘View QC data’ displays QC runs stored in the QC database in a table format that
operates the same way as the ‘ELite 5’ analyzer database. QC measurement results will
have sequential ID numbers. Option buttons are provided to switch back and forth between
viewing QC data and viewing QC diagrams.
11.5 View QC Diagrams
Click or tap ‘View QC diagrams’ to see the QC diagrams for control measurements.
Figure 73. View QC Diagrams Panel
Means, standard deviations (SD) and coefficients of variation (CV) are calculated based on
the QC analyses. The dotted lines delineate acceptable ranges on QC diagrams. Use the
Page 100
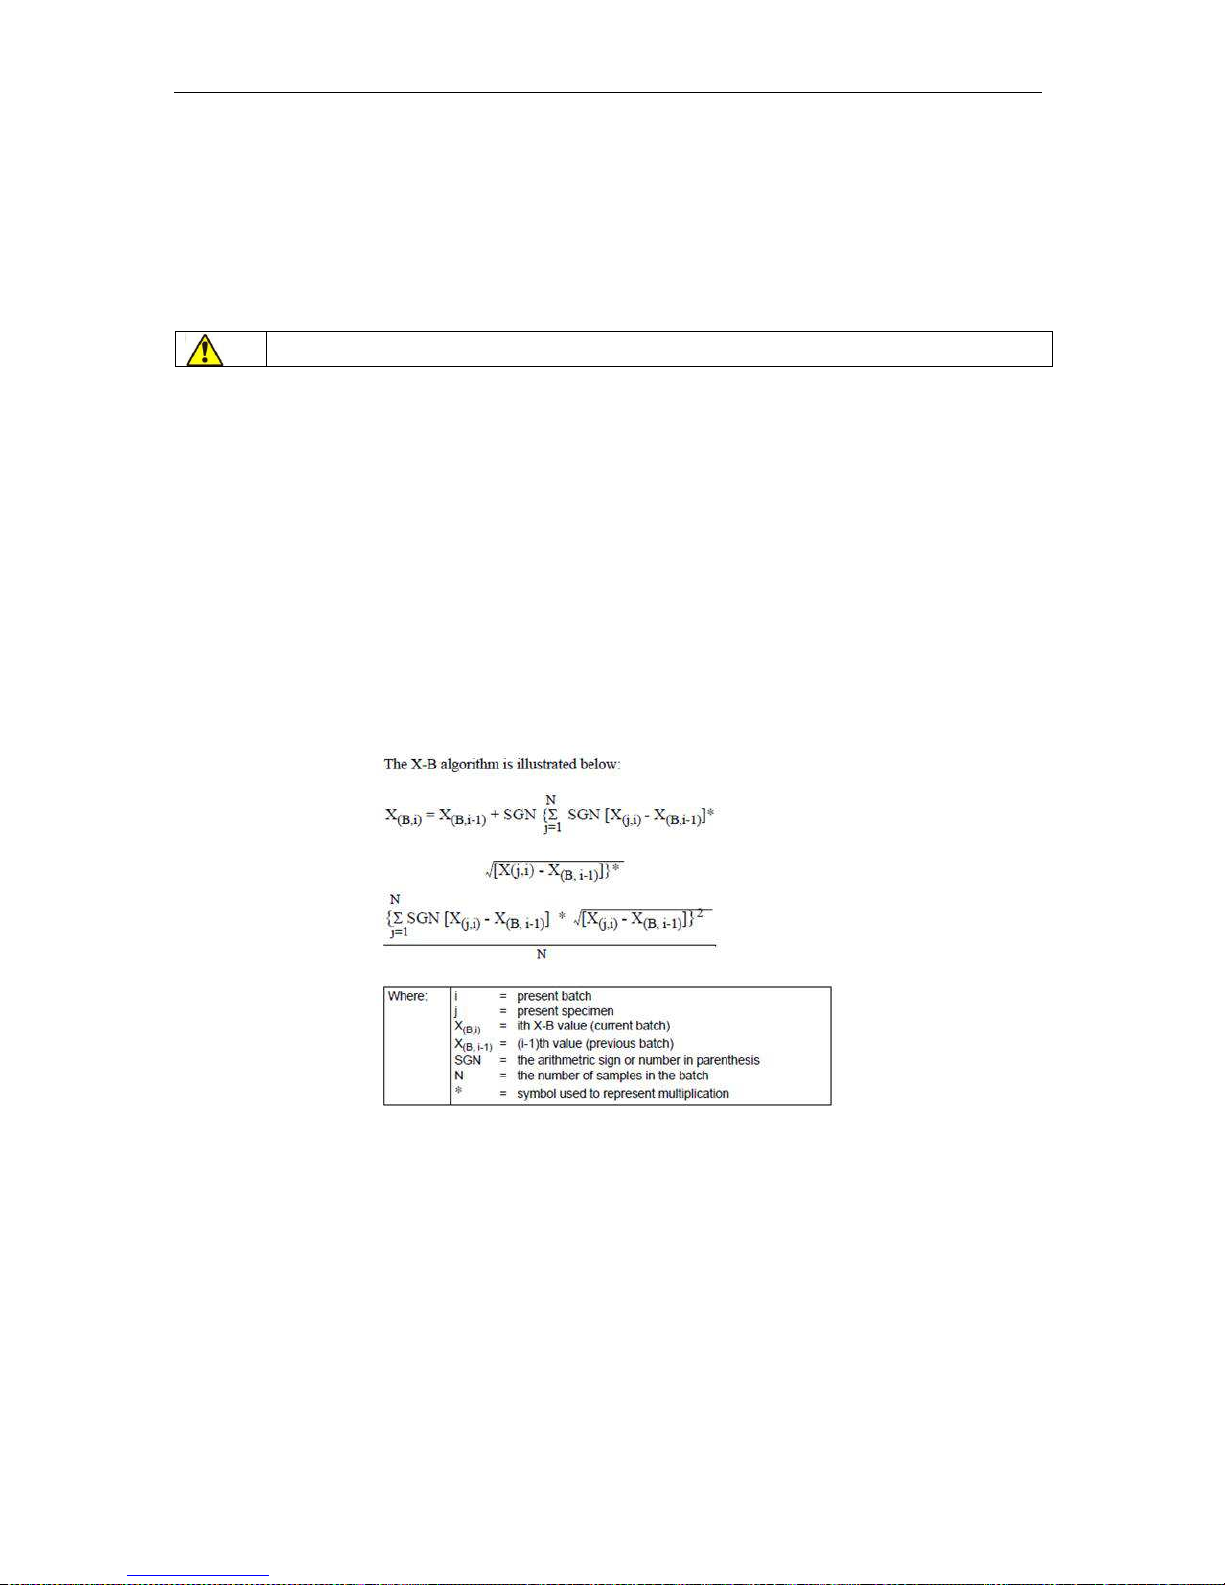
ELite 5, User Manual
Page 100 of 159
selector control at the top of the panel to view graphical control information for other lots of
control materials.
In Small Sample Mode there is a new AS file with modified ranges for Small Sample Mode.
The QC will only work with choosing the vial type “Vacutainer”, because the control and
calibrator blood is provided in that type of vial.
The Small Sample QC measurement procedure is the same as it is on normal mode.
Take attention to choose the proper values and ranges for QC.
11.6 View X-B Data
‘ELite 5’ offers X-B to facilitate trend analysis of samples run.
The X-B moving average is an algorithm which is capable of tracking changes of the
accuracy- alternating of the measurements. The algorithm observes the alteration of the
derived values which are generally stable.
For example the MCV, MCH and MCHC values show the proportion between the blood
components. These values fall within narrow limits in human blood therefore these values
are able to show the drifting of the device.
The X-B algorithm works with batches. There are 20 samples in the batches. The average
deviation of the corresponding batch is calculated as follows:
Divide the average deviation of the corresponding batch by the number of the items in the
batch (N=20). Add the square of the resulting deviation to the mean. Then the result
represents a point on the diagram. The value of the mean will be changed with all counted
average deviation from the corresponding batch.
The average of the first batch (X) equals the target value. All the average deviations
belonging to the corresponding batch are added to the mean with correct signs.
The samples are used in calculation chronologically therefore the copulated deviation points
show the deviation from the mean line.
 Loading...