

Page 1
Erba Lachema s.r.o., Karásek 2219/1d, 621 00 Brno, CZ
ELite 3
Hematology Analyzer
USER MANUAL
INS00066
Page 2

Content
Page 2/72
Table of Contents
1. INTRODUCTION .................................................................................................. 5
1.1. Intended Use ................................................................................................. 5
1.2. The Instrument .............................................................................................. 5
1.2.1. Patient Testing ....................................................................................... 6
1.2.2. Reagents ............................................................................................... 7
1.2.3. Technical Operation ............................................................................... 7
1.2.4. Calibration .............................................................................................. 7
1.3. Instrument features ....................................................................................... 8
1.4. Parts of the Analyzer ................................................................................... 11
1.5. The measurement process ......................................................................... 11
1.5.1. Control Panels ..................................................................................... 12
1.5.2. Display ................................................................................................. 12
1.5.3. Touch screen ....................................................................................... 12
1.6. Control Material ........................................................................................... 13
1.7. Accessories ................................................................................................. 13
1.8. Specifications .............................................................................................. 14
2. INSTALLATION ................................................................................................. 15
2.1. General information ..................................................................................... 15
2.2. Environmental factors ................................................................................. 15
2.2.1. Electrical requirements ........................................................................ 15
2.2.2. Space requirements ............................................................................. 16
2.2.3. Peripherals ........................................................................................... 16
2.2.4. Reagents and waste handling .............................................................. 17
2.2.5. Maintenance ........................................................................................ 17
2.2.6. Cleaning ............................................................................................... 17
2.2.7. General points ...................................................................................... 17
2.3. Unpacking and installation .......................................................................... 18
2.3.1. Turning the Instrument ON, MAIN Menu .............................................. 20
2.3.2. Turning the Instrument OFF ................................................................. 21
2.3.3. Preparing for shipment ......................................................................... 21
2.3.4. Handling in Emergency ........................................................................ 22
2.3.5. Warning labels on the analyzer ............................................................ 23
3. MENU SYSTEM ................................................................................................. 24
3.1. General Information .................................................................................... 24
3.1.1. Navigating in the Menu System ........................................................... 24
Page 3

Content
Page 3/72
3.1.2. Touch screen calibration ...................................................................... 24
3.1.3. Menu structure ..................................................................................... 25
4. OPERATING PRINCIPLES ............................................................................... 27
4.1. Impedance Method ..................................................................................... 27
4.2. Principle of HGB Measurement ................................................................... 27
4.3. Parameters ................................................................................................. 28
4.4. Absolute and Linearity Ranges of Parameters ............................................ 29
5. ROUTINE UTILIZATION and MEASUREMENT ............................................... 30
5.1. Sample handling ......................................................................................... 30
5.2. Sample analysis .......................................................................................... 33
5.2.1. Sample preparation .............................................................................. 33
5.2.2. Running a (new) sample ...................................................................... 33
5.2.3. Results ................................................................................................. 36
5.2.4. Warning flags ....................................................................................... 37
5.2.5. Parameter Limits (Normal ranges) ....................................................... 39
5.2.6. Blank Measurement ............................................................................. 39
5.2.7. Using Pre-diluted Mode ....................................................................... 40
6. DATABASE ....................................................................................................... 41
6.1. Database services....................................................................................... 42
6.2. The Filter / Select function .......................................................................... 43
6.3. Printing records ........................................................................................... 44
6.4. Manage records .......................................................................................... 45
7. MAINTENANCE ................................................................................................. 46
7.1. Cleaning ...................................................................................................... 46
7.2. Calibration ................................................................................................... 47
7.2.1. Calibration with factors ......................................................................... 48
7.2.2. Calibration by measurement ................................................................ 48
7.3. Quality control ............................................................................................. 50
7.3.1. References........................................................................................... 51
7.3.2. Measure ............................................................................................... 51
7.3.3. Diagram ............................................................................................... 51
7.3.4. Database ............................................................................................. 52
8. Diagnostics ....................................................................................................... 53
8.1.1. Device Information ............................................................................... 53
8.1.2. Self Test ............................................................................................... 53
8.2. Reagent status ............................................................................................ 54
8.2.1. How to empty waste container ............................................................. 55
8.2.2. Neutralization of Waste ........................................................................ 55
Page 4

Content
Page 4/72
9. Settings ............................................................................................................. 56
9.1. Printer settings ............................................................................................ 56
9.2. General settings .......................................................................................... 58
9.3. Measurement .............................................................................................. 58
9.3.1. Unit settings ......................................................................................... 59
9.3.2. Normal ranges ..................................................................................... 59
9.3.3. Profile ................................................................................................... 60
9.3.4. Settings ................................................................................................ 60
9.4. Date and Time ............................................................................................ 61
9.5. Multi user mode........................................................................................... 62
10. PRINTING .......................................................................................................... 65
10.1. Printouts ...................................................................................................... 65
11. Troubleshooting ............................................................................................... 67
11.1. Regular Troubleshooting Procedures .......................................................... 67
11.2. Weekly User Maintenance .......................................................................... 67
11.2.1. Cleaning needle washing head ............................................................ 67
12. Fluidic Schematics ........................................................................................... 68
13. Reagent consumption ..................................................................................... 69
14. Appendix A ....................................................................................................... 70
15. Contact .............................................................................................................. 71
16. Appendix- package inserts for reagents and cleaning solutions ................ 72
Page 5

ELite 3, User Manual
Page 5/72
1. INTRODUCTION
1.1. Intended Use
This hematology analyzer is a fully automated cell counter designed for in vitro
diagnostic use, developed for small clinics and point-of-care lab offices.
1.2. The Instrument
ELite 3 is a fully automated, bench-top hematology cell counter.
It implements the so-called Coulter-method for counting cells passing through a small
aperture, and measures the hemoglobin content of red blood cells.
The analyzer features a color graphical LCD display module with touch screen, and
has a separate START button.
The software allows sending results to an external printer (via USB port), or can have
an optional, 58 mm built-in thermal printer module.
Its internal memory is capable of storing 1000 records with full histograms, and
individual patient data. QC measurements are also stored in separate database. The
software operating the instrument is easy to upgrade using a USB pen-drive. The
instrument allows connecting to a host computer for uploading records stored in the
memory through a USB B (slave) port. Archiving and restoring of records to and from
USB pen-drive is also possible.
NOTE
:
If the equipment is used in a manner different from which the
manufacturer specified, the protection provided by the equipment
may be impaired. Misuse of equipment or use other than its
intended purpose will invalidate conditions of warranty. The
accuracy and precision may also be impaired.
Page 6

ELite 3, User Manual
Page 6/72
1.2.1. Patient Testing
The analyzer can process 80 samples per hour in 3-part WBC differential mode.
Samples can have individual sample data, and additional parameters.
You can print results to an external or to the optional built-in printer. The user can
customize the report format.
The analyzer determines the following 20 hematology parameters, including 3-part
WBC differential, from a 25 µl whole blood sample:
WBC total white blood cell count
LYM lymphocytes count
MON monocytes count
GRA granulocytes count
LYM% lymphocytes percentage
MON% monocyte percentage
GRA% granulocytes percentage
HGB hemoglobin
RBC red blood cell count
HCT hematocrit
MCV mean corpuscular volume
MCH mean corpuscular hemoglobin
MCHC mean corpuscular hemoglobin concentration
RDWc v red cell distribution width*
RDWsd red cell distribution width*
PLT platelet count
PCT plateletcrit (trombocrit)
MPV mean platelet volume
PDWcv platelet distribution width*
PDWsd red cell distribution width*
* RDW and PDW parameters have two forms of representation: CV and SD.
Both parameters describe the distribution width, but from different aspects.
User can select the units to use for displaying RDW and PDW parameters.
Page 7
ELite 3, User Manual
Page 7/72
1.2.2. Reagents
Use only reagents supplied by the manufacturer with the analyzer, otherwise
accuracy cannot be guaranteed. All reagents are stabilized and micro-filtered.
Reagents are environmental friendly, azide-free and do not contain harmful
ingredients. Please refer to the MSDS associated with reagent. Store reagents
between +15 and +30°C. Do not use reagent beyond the expiration date printed on
the container label. Discard opened container after 120 days. Do not use reagent
once frozen. These reagents are ready for use and can be applied straight from the
container; no special reagent preparation is necessary. Leave the reagent at room
temperature for at least 12 hours before using.
Cat. No. Product name Volume
HEM00004 Erba Diluent- Diff 20 l
HEM00008 Erba Lyse- Diff 1 l
HEM00001 Erba Cleaner 1 l
Additional cleaning solutions:
HEM00017 Erba Clenz 1 l
HEM00016 Erba Hypoclean 1 l
For package insert for reagents and cleaning solutions please see Appendix
1.2.3. Technical Operation
As the cell counter is a fully automated instrument, operating it requires minimal
training or technical support. Operator interaction is reduced to the following:
• Perform a Blank Measurement in case the instrument is not used for a specific
time
• Enter sample and/or patient data
• Insert the sample to be analyzed into the sample holder
• Print results either one-by-one, or in groups by selecting records from the
database
• Perform simple weekly maintenance, as described later in this description
(7.1.2.).
1.2.4. Calibration
EELLiittee 33
arrives to your laboratory factory-calibrated and ready to use. However,
calibration needs updating whenever you find that the results have slightly changed,
or a different or new control material is used. With each control material you receive
for the instrument, you will find a control sheet listing the parameters the instrument
should match. Perform these calibrations as explained in a later chapter (7.2).
Page 8
ELite 3, User Manual
Page 8/72
1.3. Instrument features
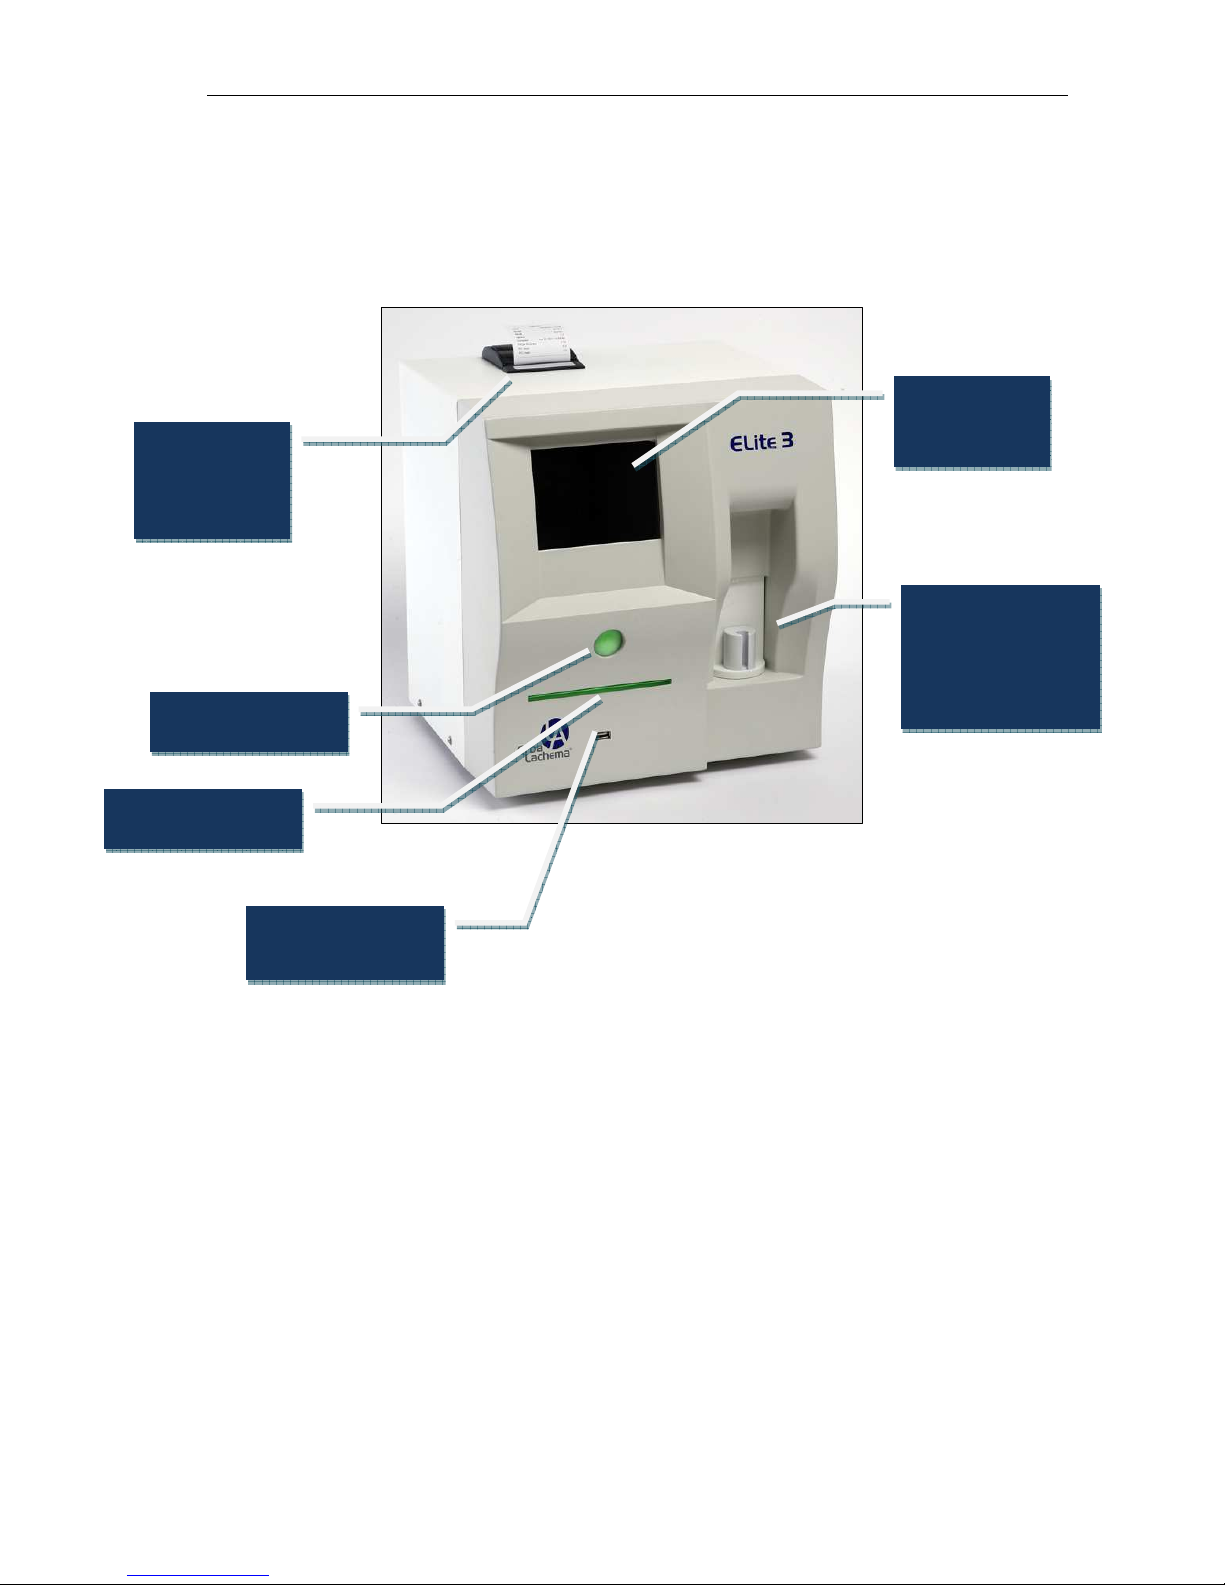
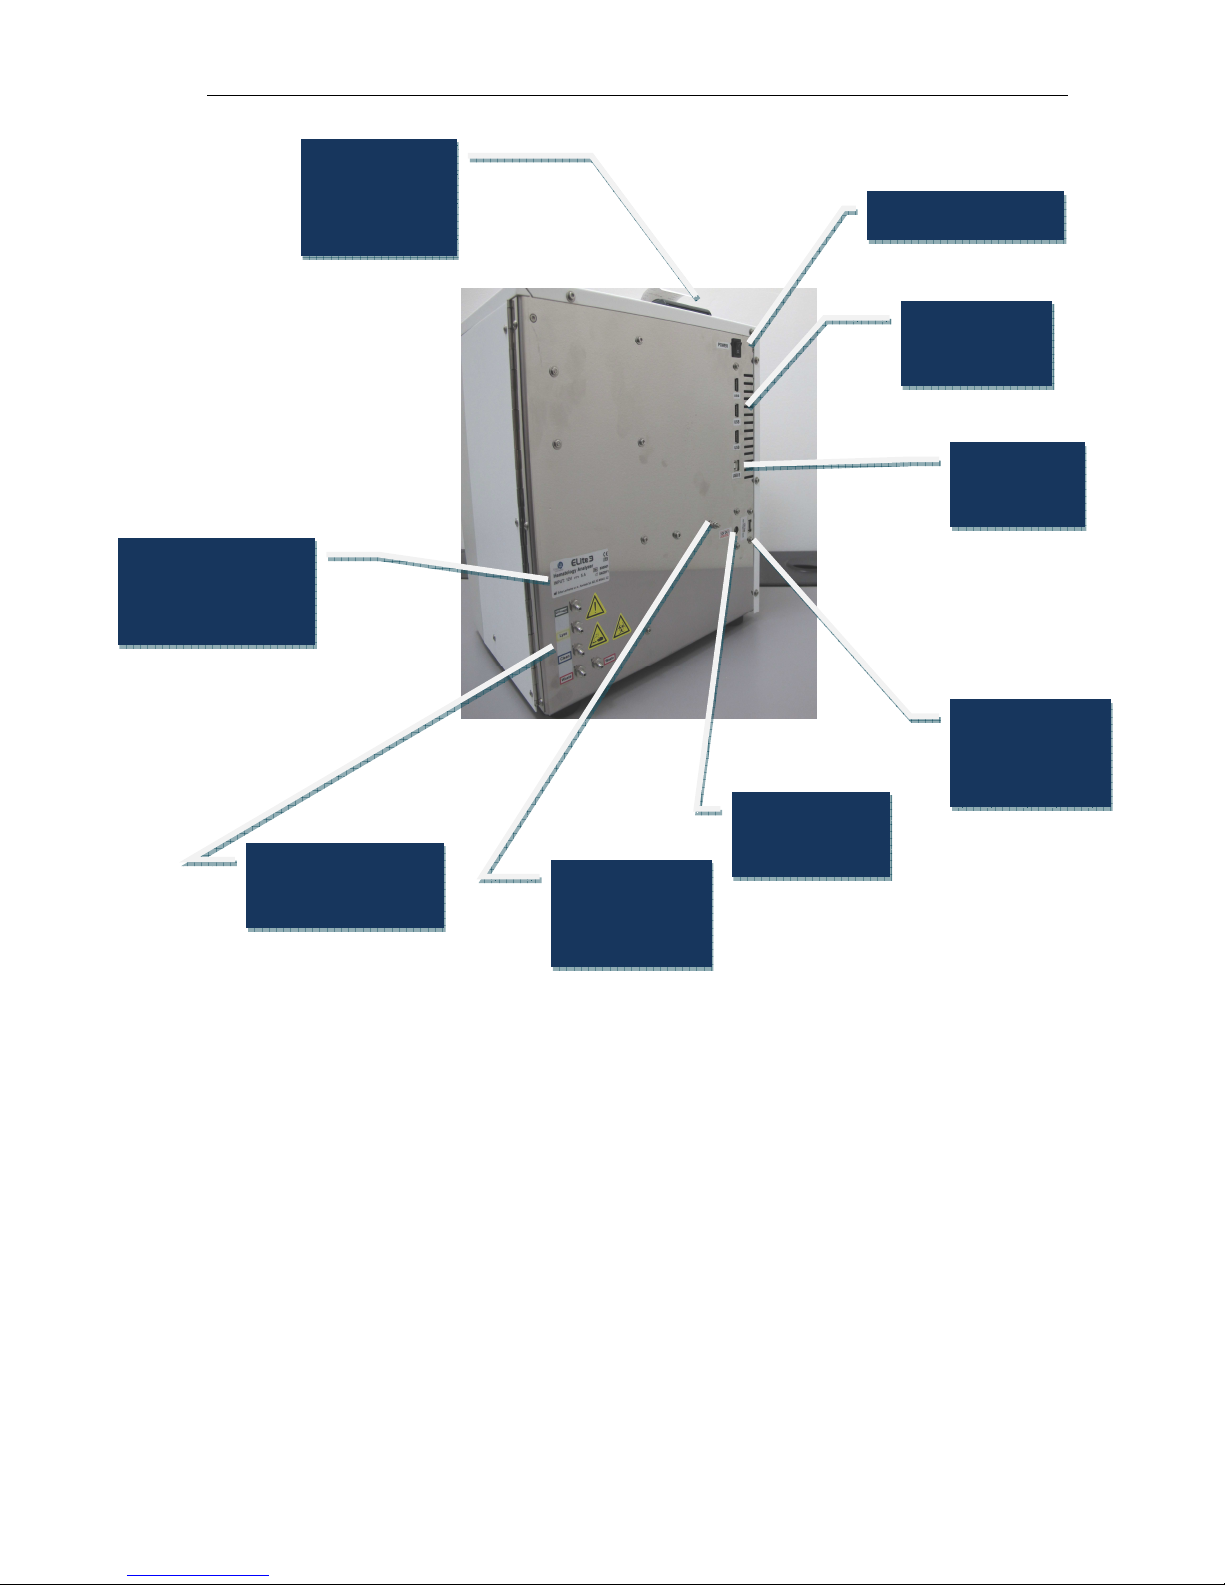
Figures 1 and 2 show front and rear view of the analyzer, with controls and
connectors.
Figure 1. Front view
Color LCD
touchscreen
START button
Built-in
thermal
printer
Sample holder
with
interchangeable
adapters
Front panel USB
socket
Status indicator
Page 9
ELite 3, User Manual
Page 9/72
Figure 2. Rear view
Instrument label
(S/N, manuf.data)
Reagent
connectors
Power switch
USB A
connectors
External
grounding
connector
USB B
connector
Built-in
thermal
printer
Reagent Lock
connector
Power source
connector
Page 10
ELite 3, User Manual
Page 10/72
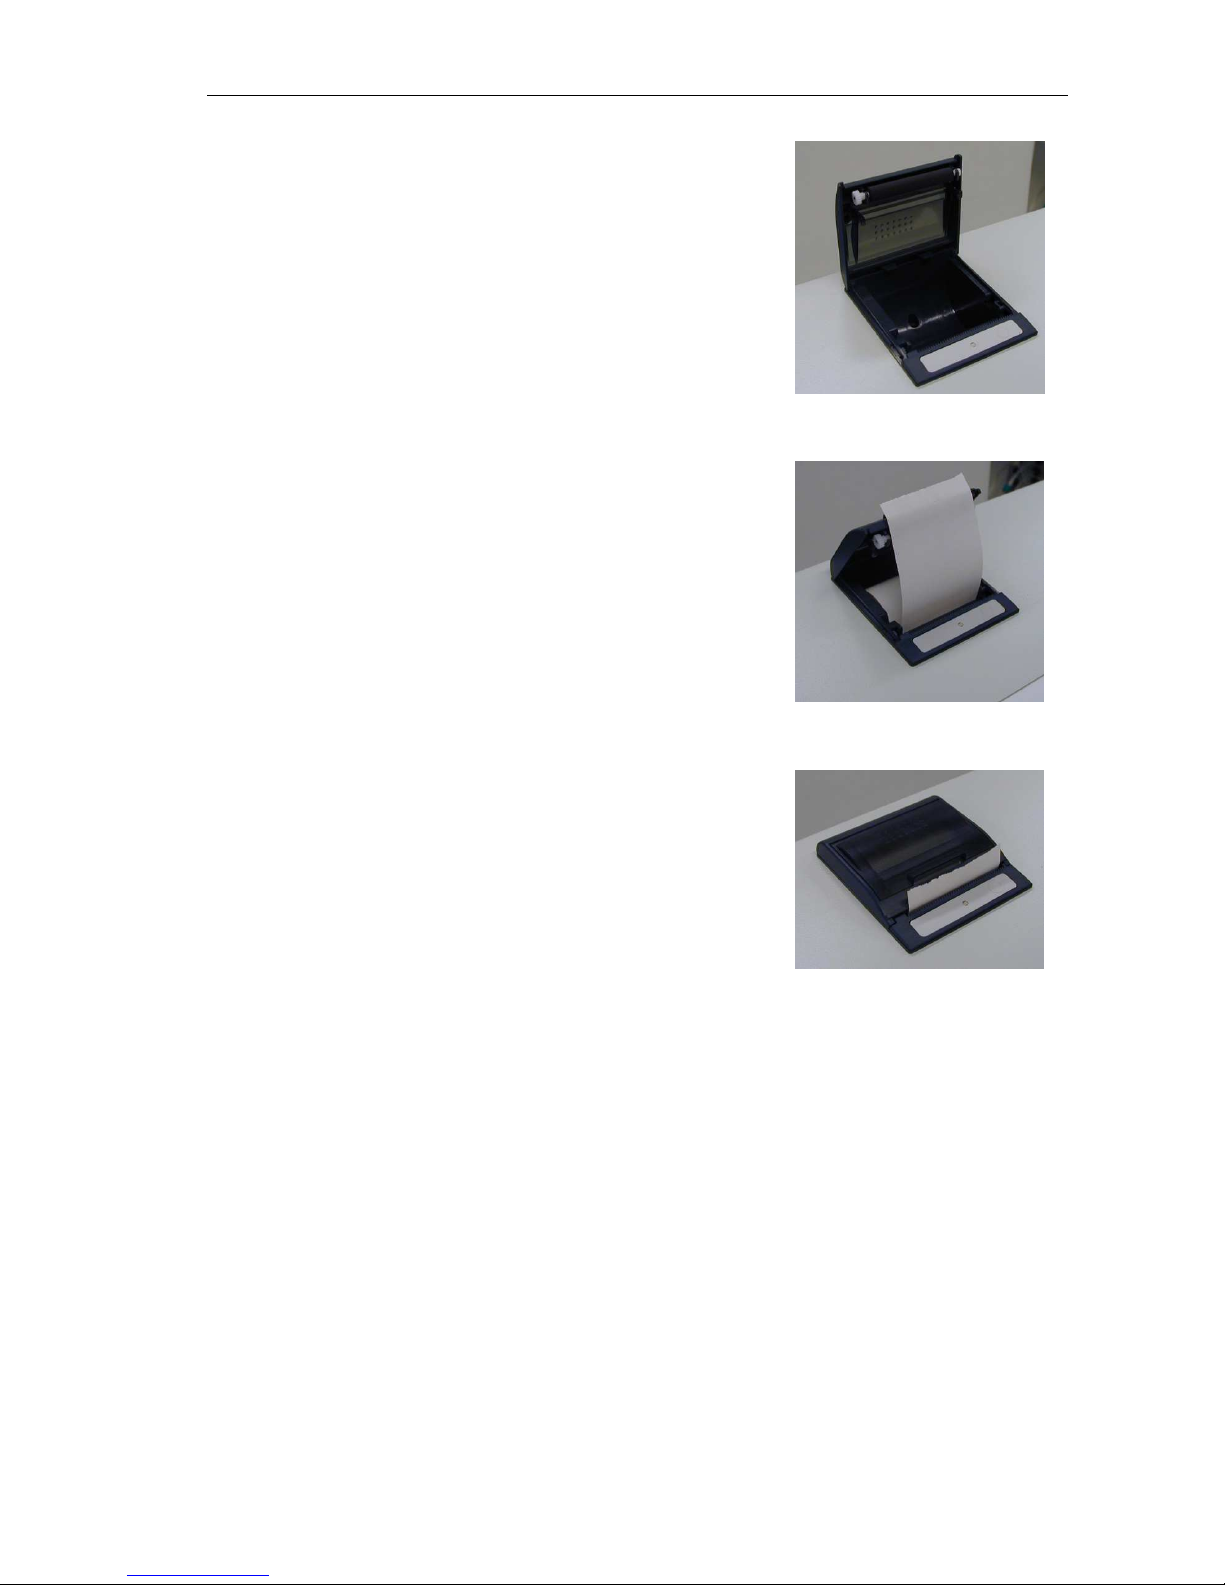
To replace paper in the printer:
- open the paper lid (pull the lid upwards by the
handle)
- remove central plastic roller of old paper roll
- unwind new paper roll, so that the “starting edge”
is coming from down under towards you
- gently drop the new roll into the holder of the
printer, and hold the “starting edge” with your
hand, and make sure it comes out on the front of
the printer
- close the lid, making sure that the paper is
captured between the lid and the front of the
printer
The analyzer works with an external power supply. The power supply module has a
so-called auto range input, allowing operation on 230V or 115V power system. The
power supply unit complies CE and UL safety certifications.
The input socket is a standard power cable connection and the output is a DC jack.
CAUTION!
Use only the provided power supply with the instrument:
“GlobeTek Electronics Corp.” Model ID: GT-81081-6012-T3
Page 11
ELite 3, User Manual
Page 11/72
1.4. Parts of the Analyzer
The hematology analyzer is composed of three main units:
Fluidic System: Performs sampling, diluting, mixing, and lysing
functions. Generates the regulated vacuum used for
moving cells through the aperture during the
counting process.
Data Processing System: Counts, measures and calculates blood cell
parameters, generates and stores numerical results
and histograms.
Control Panel: Features an LCD display, touch screen, START
button, status LED, and USB port interfaces.
1.5. The measurement process
For the Schematics of the fluidics system, see Section 13.
Sample aspiration and dilution:
Stages of the blood testing process
a.
25 µl of anti-coagulated (K3-EDTA) whole blood sample is aspirated into the
sampling needle, and mixed with 4 ml of diluent and stored in the chamber
(MIX dilution).
b.
25 µl of the MIX dilution is aspirated into and stored in the needle during WBC
measurement and hemoglobin analysis
c.
Lysing reagent is added to the mix dilution held in the WBC chamber for
WBC differential analysis. This amount of lysing reagent is patient type
dependent and the operator can change it.
d.
After WBC counting, HGB reading and washing process, 4 ml of diluent is
added to the second dilution (using the 25 μl of mix dilution stored in the
needle).
e.
This portion is analyzed for RBC count, PLT count and their parameters.
f.
Another washing process prepares the unit for the next analysis.
Table 1.
Dilution rates used: Measurement times:
MIX dilution
1:160 WBC count 12 seconds
RBC dilution
1:32 000 HGB measurement 3 seconds
WBC dilution 1:196
(depends on lyse amount)
RBC/PLT count 12 seconds
Page 12

ELite 3, User Manual
Page 12/72
1.5.1. Control Panels
START button
Pressing and releasing the START button triggers an analysis cycle.
Status indicator
A two-color (red/green) LED (light emitting diode) is located above START button.
Its actual color indicates the status of the analyzer.
LED color Analyzer status
•
Green
The analyzer is ready to measure sample. Analysis can be
initiated by pressing START button.
∗
Red blinking
Blood sample can be removed when the LED blinks red 3
times and the instrument beeps 3 times.
•
Red
The analyzer is currently performing an analysis.
No new measurement can be started.
•
Yellow
The analyzer is performing a maintenance process.
∗
Yellow blinking
The instrument is in stand-by and display light is off. Hit the
screen to have SW wake up from stand-by.
1.5.2. Display
The display is 320 x 240 dots, high contrast backlit high-color graphic LCD module,
with integrated touch screen.
1.5.3. Touch screen
The LCD screen has a touch-sensitive foil on the front surface. If the operator
touches the LCD active area gently, the analyzer can recognize it and identify the
position where the screen was pressed. By touching (slightly pressing) one small
spot on the touch screen, the SW will activate the function/menu/key that the
corresponding area represents.
Page 13
ELite 3, User Manual
Page 13/72
1.6. Control Material
The analyzer allows continuous monitoring of measurement performance with Erba
Hematology Control (Low, Normal, High) - control blood. This must match the types
of samples usually run on the instrument. Specification for this material (assay values
and allowed tolerances along with expiry date) is always packed with the approved
control material.
1.7. Accessories
Below is a list of accessories shipped with your analyzer.
This list can also be referred as the “EELLiittee 33 - pack”
EELLiittee 33
Hematology Analyzer
User's Manual (this booklet)
Reagent Tubing kit (with colored tubes)
Diluent tube (green)
Lyse tube (yellow)
Cleaner tube (blue)
Waste tube (red)
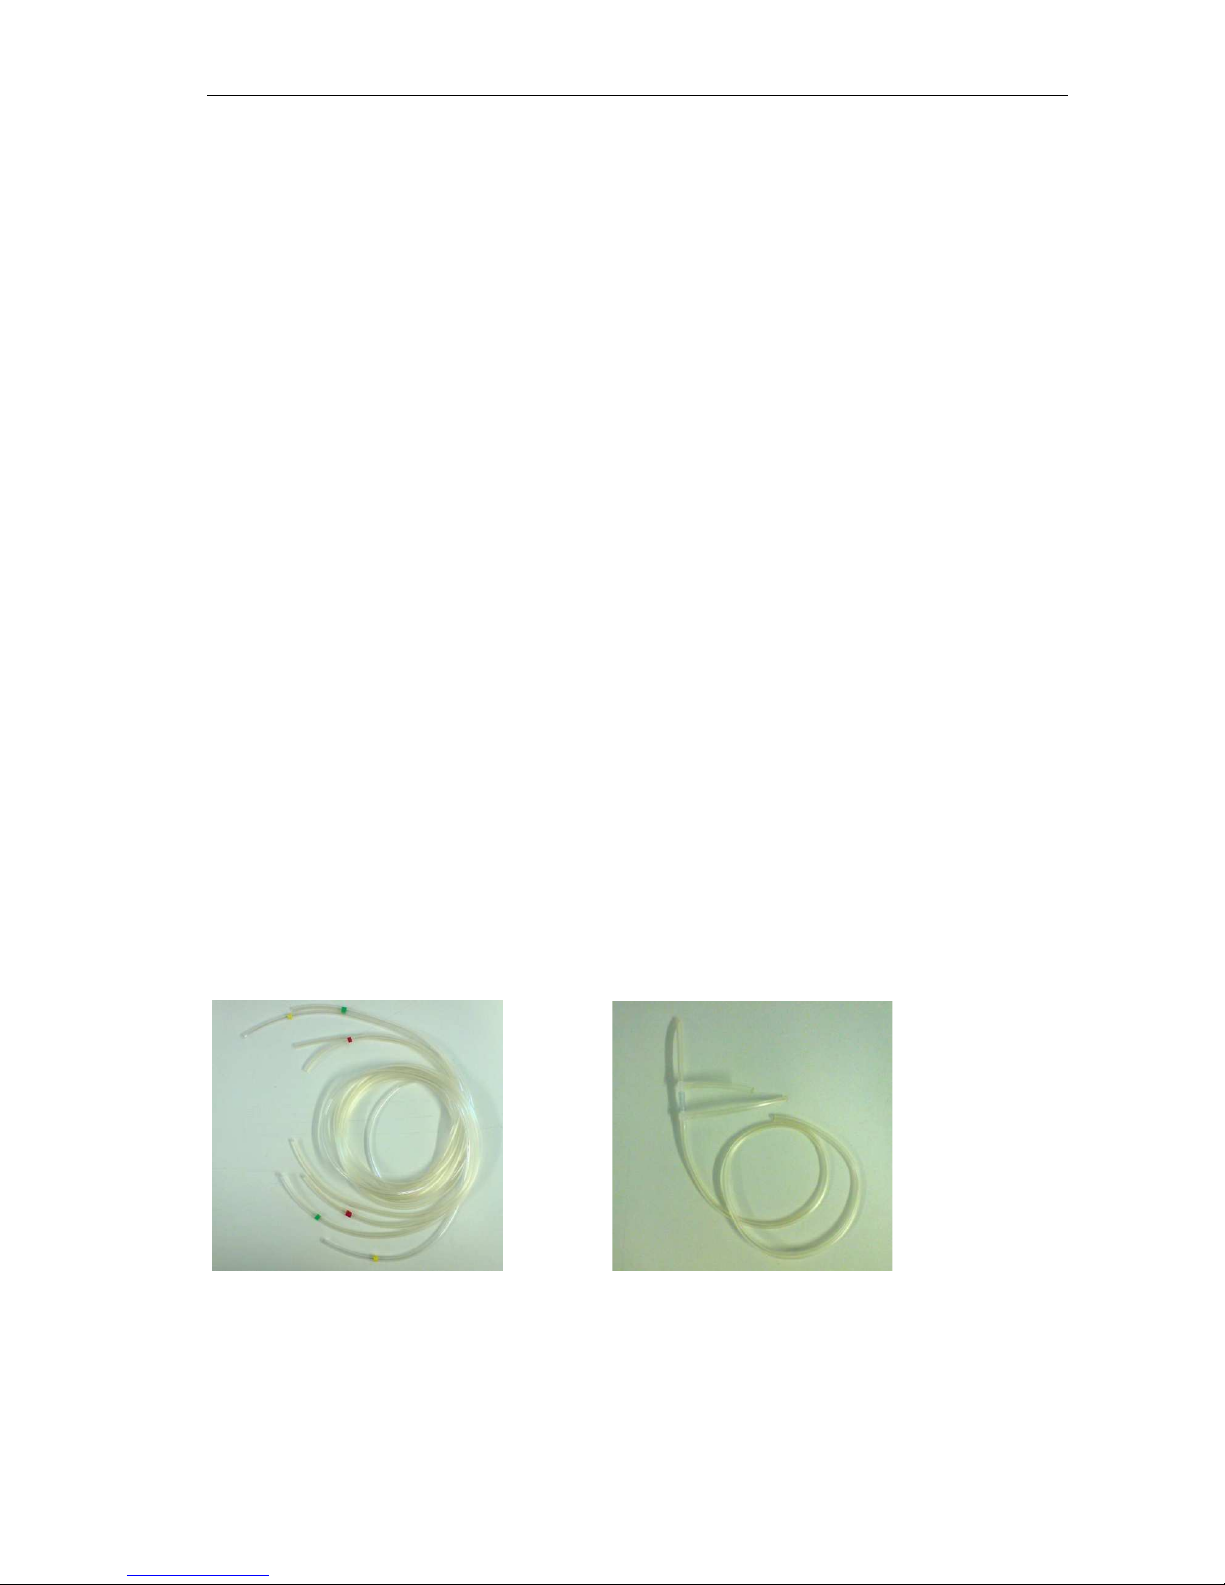
Cleaning Tube Kit.
Caps for reagent containers (matching connector colors).
Waste Container (20 L).
External power supply and power cable.
Sample tube adapters.
Optional: spare thermal roll-paper.
Reagent Tubing Kit: Cleaning Tube Kit:
Page 14
ELite 3, User Manual
Page 14/72
1.8. Specifications
Sample volume
25 μl of whole blood in normal 3-part or non-diff mode
50 μl of whole blood in pre-diluted mode
Chambers
2 counting chambers for diluting whole blood and counting
Reagent system
Isotonic Diluent, Lyse, Cleaner
Aperture diameter
70μm (RBC/PLT), 100μm (WBC)
Throughput
80 tests/hour
Characteristics
Parameter:
Accuracy
Reproducibility
(CV)
Carry-over
sample to
sample
Test range Unit
WBC
3% 3% <1% 4.0-20.0 103/μl
RBC
3%
2%
<1% 4.0-15.0 106/μl
HCT
3%
3%
<1% 25.0-50.0 %
MCV
2%
1%
N/A 60-100 fl
HGB
2%
2%
<1% 9-16 g/dl
PLT
5%
5%
<3% or <20 200-900 103/μl
Sampling method
Open tube system with automatic sample rotor.
Sample types
Human (general), male, female, baby, toddler and child.
Clog prevention
High-voltage pulse on aperture in each analysis cycle, chemical cleaning and
high pressure back-flush of the aperture using Cleaner reagent.
Cleaning procedure
High-voltage burst of the aperture, high-pressure back-flush, chemical
cleaning of the aperture using Cleaner reagent.
Calibration
1- or more-measurement automatic and manual (factors) calibration of WBC,
HGB, RBC, PLT, MCV (or HCT), RDW, and MPV.
User interface
Easy-to-use, menu driven user interface with touch-screen and separate
START button, status LED
Languages available
English, Spanish, Portuguese, French, Russian, Indonesian, German, Italian,
Czech
Data capacity
1000 results, with RBC, PLT, and WBC 3-part histogram
Host computer interface
USB B port
Data back-up method
USB mass storage device
Software upgrade method
via USB A port using USB mass storage device
Printer interface
USB with support for HP printers (DeskJet, LaserJet, PCL3, PS, LIDIL)
Built-in printer
Axiohm thermal printer module, 58 mm wide roll paper, full report with
histograms
Display
320x240 -dots, high-contrast, backlit, color graphics LCD (liquid crystal
display)
User interface
Full-LCD Touch-screen + separate START button, red/green state LED
External keyboard
USB keyboard via USB A port
Power requirement
12VDC, 5A, 60W max. operating power
Power supply unit
External, auto-ranging power unit for 100-120 or 200-240 VAC, 50–60Hz
Operating temperature
59–86 °F (15–30 °C). Optimal temperature is 77 °F (25 °C)
Dimensions (W x D x H)
12.6 x 10.2 x 14.4 in (320 x 260 x 365 mm)
Net weight
12 kg
Storage tempera
ture
3 – 35°C
Transport temperature
5 – 40°C
Page 15

ELite 3, User Manual
Page 15/72
2. INSTALLATION
2.1. General information
This chapter provides instructions for the installation of EELLiittee 33 hematology analyzer.
The procedures described below must be followed correctly to ensure proper
operation and service. Please carefully read and follow all instructions in this User’s
Manual before operating the analyzer.
This hematology analyzer is a precision instrument: handle with care. Dropping or
other improper handling of the instrument will disturb calibrated mechanic and
electronic components and/or cause damage.
CAUTION: Always handle the instrument with care.
2.2. Environmental factors
Operate EELLiittee 33 within the ambient temperature range of 15 - 30°C and relative
humidity of 45% - 85%. The optimum operating temperature is 25°C.
Avoid using the instrument in areas of extreme high or low temperatures or where it
is exposed to direct sunlight. If kept at a temperature less than 10°C, the instrument
should be allowed to sit for an hour at the correct room temperature before use.
Reagents should be stored at a temperature range of 18 - 30°C.
Place the instrument in a well-ventilated location. Do not place it near potentially
interfering devices capable of emitting radio frequencies (e.g. radio or television
receiver, radars, centrifuge, X-ray devices, fans, etc.).
Operation at an altitude over 3000 meters (9000 ft) is not recommended, because the
throughput will be degraded.
Instrument is safe for transient voltages to INSTALLATION CATEGORY II and
POLLUTION DEGREE 2.
Environmental and electrical characteristics provide accuracy and precision of the
instrument and maintain a high level of operational safety for lab personnel.
2.2.1. Electrical requirements
EELLiittee 33
comes with an approved power cord, appropriate for your power system.
Proper use of the appropriate power cord assures adequate grounding of the system.
WARNING: Improper grounding of the analyzer bypasses important safety
features and may result in electrical hazard.
Page 16

ELite 3, User Manual
Page 16/72
2.2.2. Space requirements
It is important to install the instrument in a suitable location. A poor location can
adversely affect its performance. Consider the following space requirements:
- Select a location near a power source and close to a suitable drain.
- Place the unit on a clean and level surface.
- Leave at least 0.5m (20in) space on both sides and above the instrument to
access pneumatics and (optional) built in printer. Provide a minimum of 0.2m
(8in) between the rear panel and the wall to allow for heat dissipation and tube
clearance.
- Install the reagents in a suitable place that will make your work easy. The best
place is on the ground, below the supporting desk of the instrument. The
pneumatic system is capable of aspirating reagents from containers being 1m
(3ft) below the reagent inputs. Make sure the reagent tubes are not bent,
broken, twisted or blocked in between the desk the instrument is on and the
wall behind. Such circumstances can result in instrument operation failure.
- DO NOT PLACE the reagents above the instrument, as there can be a risk of
falling and spilling.
WARNING: Install the unit on a table or workbench. If the unit was installed
without a supporting desktop under the unit, there is a possibility
that the analyzer could accidentally fall.
2.2.3. Peripherals
Connect external peripherals only when both the instrument and the peripheral
device are off. Possible peripherals are:
- external printer
- the printer must be recommended by authorized technician
- the printer must be approved and listed
- the printer must have a CE mark
- external keyboard
- the external keyboard must be approved
- the external keyboard must have a USB port or suitable adapter
- link to host computer via USB port
- serial link cable must be approved by technician
- USB B port (linking to host computer) requires a USB A-B cable and
USB driver software (contact service for availability)
Page 17
ELite 3, User Manual
Page 17/72
2.2.4. Reagents and waste handling
Handle reagents according to national or international regulations.
WARNING! Reagents may cause corrosion and skin irritation. If any of the
liquids leaked onto the cover of analyzer or the furniture, wipe it
off immediately. In case of skin contact, rinse the liquid off with
plenty of water.
Waste generated by the unit is biohazard material. Handling and disposal must
happen according to regulations regarding reagent systems. See Section 7.3.2.
WARNING! Waste contains poisonous substances (because of chemical
content) and human origin substances meaning biohazard. These
substances are representing potential danger to environment. For
this reason, safe handling of the waste liquid is very important.
2.2.5. Maintenance
The user should check the following components weekly:
- bottom of washing head for salt build up – should be wiped off with a damp
cloth or wiper
- tubing system – by opening the side door and look for any liquid leakage. If
you experience leakage, contact authorized technician.
WARNING! The power supply unit and internal electronic boards must NOT be
opened or serviced by the user!
2.2.6. Cleaning
Clean the instrument and its power supply – in off state – on the outside only, using a
damp cloth with a soft detergent. DO NOT let liquids get inside these units.
2.2.7. General points
The manufacturer guarantees work safety reliability and general characteristics under
the following conditions only:
- services and repairs are performed by an authorized technician
- the electrical system of the laboratory follows national and/or international
regulations
- the system is operated according to instructions contained herein
Page 18

ELite 3, User Manual
Page 18/72
2.3. Unpacking and installation
1. Carefully remove the analyzer from the shipping carton. Inspect the
instrument for any visible signs of damage incurred during shipping. Would
you find any damage, file a claim with the carrier or your distributor
immediately. Check the accessories received against the packing list.
Contact Service if anything is missing.
CAUTION! Prior to initial operation, allow the instrument to reach room
temperature (approx. 2 hours). Rapid temperature changes in an
operating unit can lead to water condensation, which may damage
electronic parts, and cause malfunction.
2. Place the instrument on a firm work surface in the designated work area,
near an appropriate AC electrical outlet. The power outlet connection
MUST be grounded.
NOTE Before making connections: Make sure that all power is in “OFF”
state before connections (printer, external keyboard) are made.
Carefully read all literature accompanying the instrument and its
accessories. Pay particular attention to the operating procedures
for the external printer.
3. Keyboard and external printer
Attach the keyboard cable to one of the USB A ports on the back of the
instrument. Attach both ends of the printer cable to the appropriate ports
on the printer and EELLiittee 33. Attach the AC adapter to the printer (if required)
and plug it into an AC outlet.
4. Host Computer
The instrument has a built-in USB B port that allows connection to a host
computer. You can export results, including histograms. USB B I/O
settings are located in Settings menu.
For installation instructions for communication, please, contact Service.
5. Power supply
Connect the power supply to the instrument. Attach power cord outlet to
the external power supply of EELLiittee 33 and plug the other end into a properly
grounded AC outlet.
WARNING: Do not switch on the analyzer before connecting external power
supply to it and to the AC outlet, as well as before connecting an
external printer or a keyboard to the analyzer.
Page 19
ELite 3, User Manual
Page 19/72
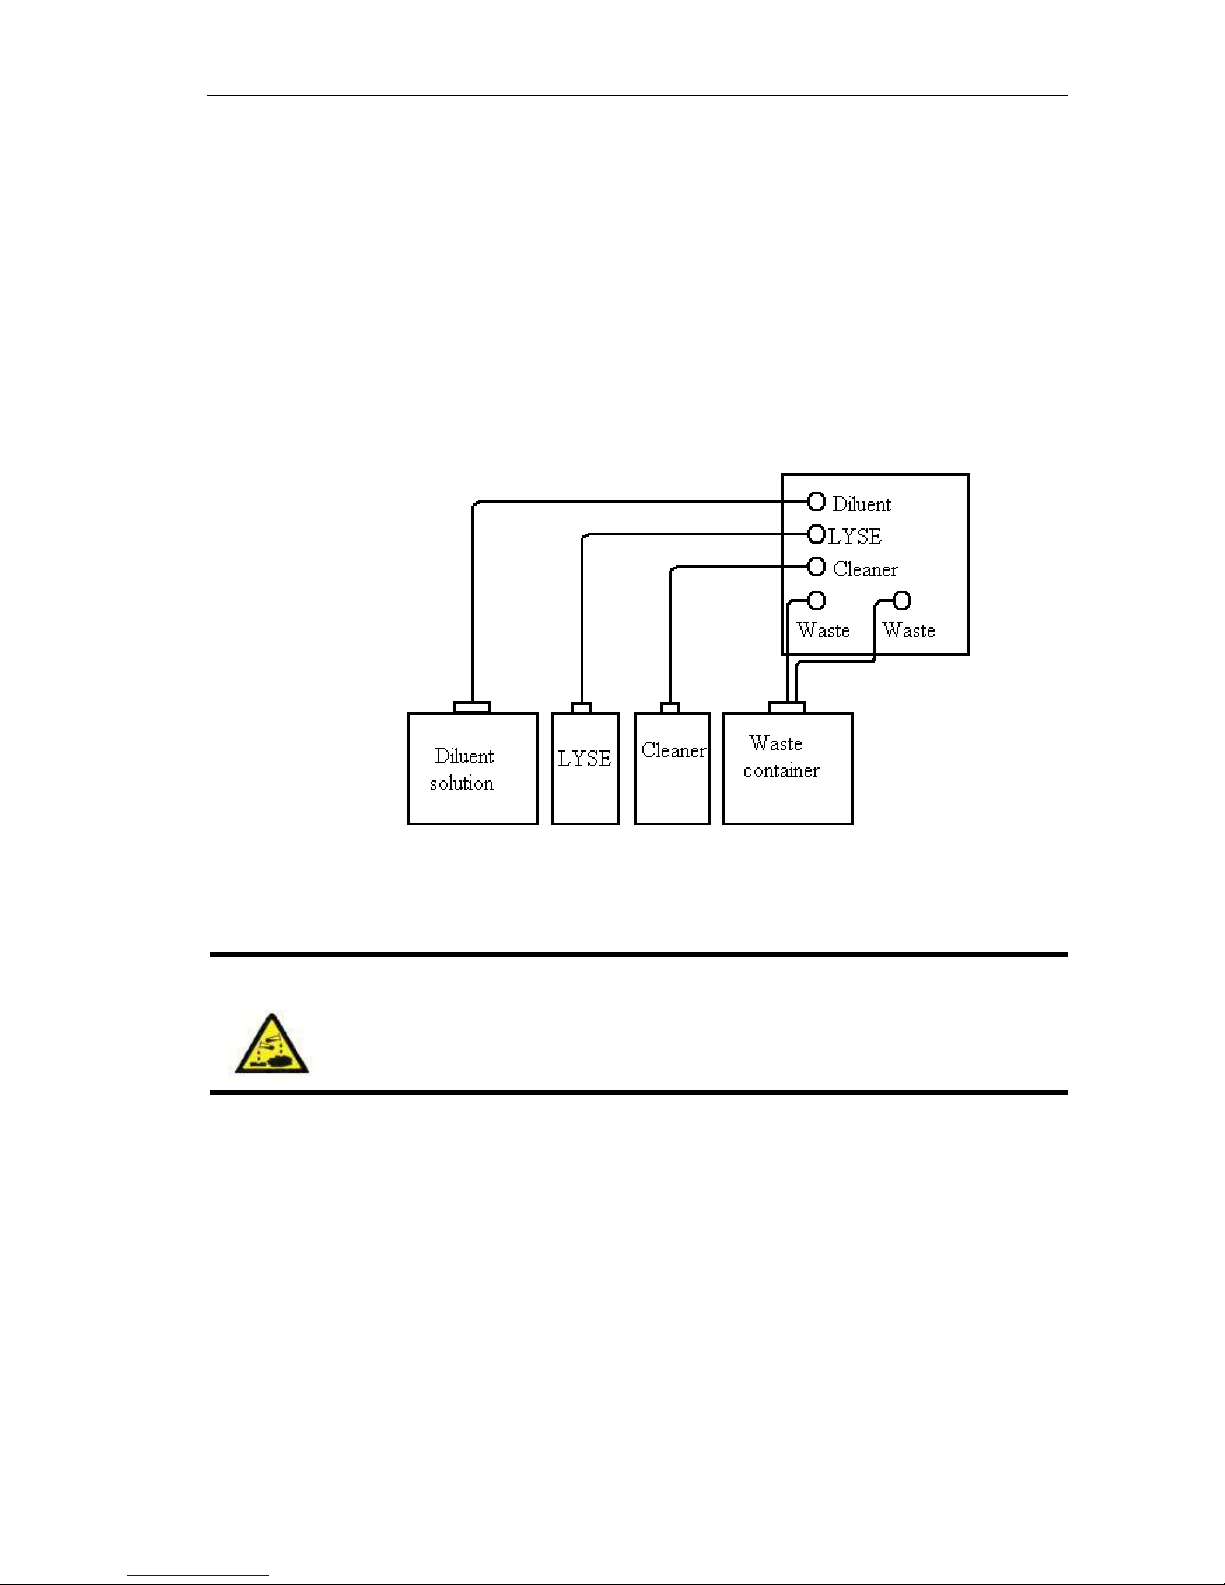
6. Reagent Containers
Place the reagent containers near the instrument, to an accessible
location. Do not place the containers to a higher position than that of
EELLiittee 3
3, because would a tube come off its connector, the fluids spill out.
Use the supplied connecting tubes and special bottle caps. Be sure that
the color on each tube and cap match. You can, for example, place the
reagent containers below the desk the analyzer is installed on, as the
instrument has sufficient power to draw the liquids from a lower location.
All containers should be left open (do not block the small air vent hole on
the special container caps) in order to provide free airflow.
Figure 5. Reagent connections
WARNING! Reagents may cause corrosion and skin irritation. If any of liquids
leaked to cover of analyzer or the furniture, wipe it off immediately.
In case of skin contact, rinse the liquid with plenty of water.
Page 20

ELite 3, User Manual
Page 20/72
2.3.1. Turning the Instrument ON, MAIN Menu
a. In case you use an external printer (for information, read manual
shipped with the printer) connect it and turn it on.
b. Turn the analyzer on using the power switch on the rear panel. The
‘ON’ position is marked by the ‘I’ symbol.
After turning on power, there will not be LCD
activity for a few seconds, but the status LED
goes on.
During start-up, the following screen is
displayed.
When SW is loaded, Main menu is displayed.
Tap a touch-screen item to go activate the
menu element.
CAUTION! Wait 5 minutes before initiating any measuring process to allow
the instrument to reach the optimal working temperature.
In some cases, a priming cycle is necessary prior to sample introduction. The
instrument will perform priming cycle automatically if additional liquid in the tubing
system is required.
Run a priming cycle in case of:
• installation
• extended time out of use
• replacement of any component related to the Fluidic System
• replacement of reagents with instrument turned on
Page 21
ELite 3, User Manual
Page 21/72
2.3.2. Turning the Instrument OFF
DO NEVER turn off the analyzer by simply flipping the power switch on the rear
panel. Doing so may result in erroneous operation during later use. It can be so,
because the instrument uses diluent. This liquid is an isotonic saline solution
containing salt. Would it not be washed out of special units of the instrument or would
chambers not be filled with this solution may lead to dust condensation or salt build
up.
Therefore always follow the instructions below when switching the instrument off.
In Main menu, select SHUTDOWN. The following screen appears.
EXIT
SHUT DOWN
Select Shutdown.
The analyzer will perform the necessary
steps to prevent failure to the pneumatic
system, and then gives a tone indicating
that it is safe to shut it off.
Turn off power using the rear power switch.
Turn off the instrument using the power switch on the rear panel. The ‘OFF’ position
is marked by ‘O’ symbol.
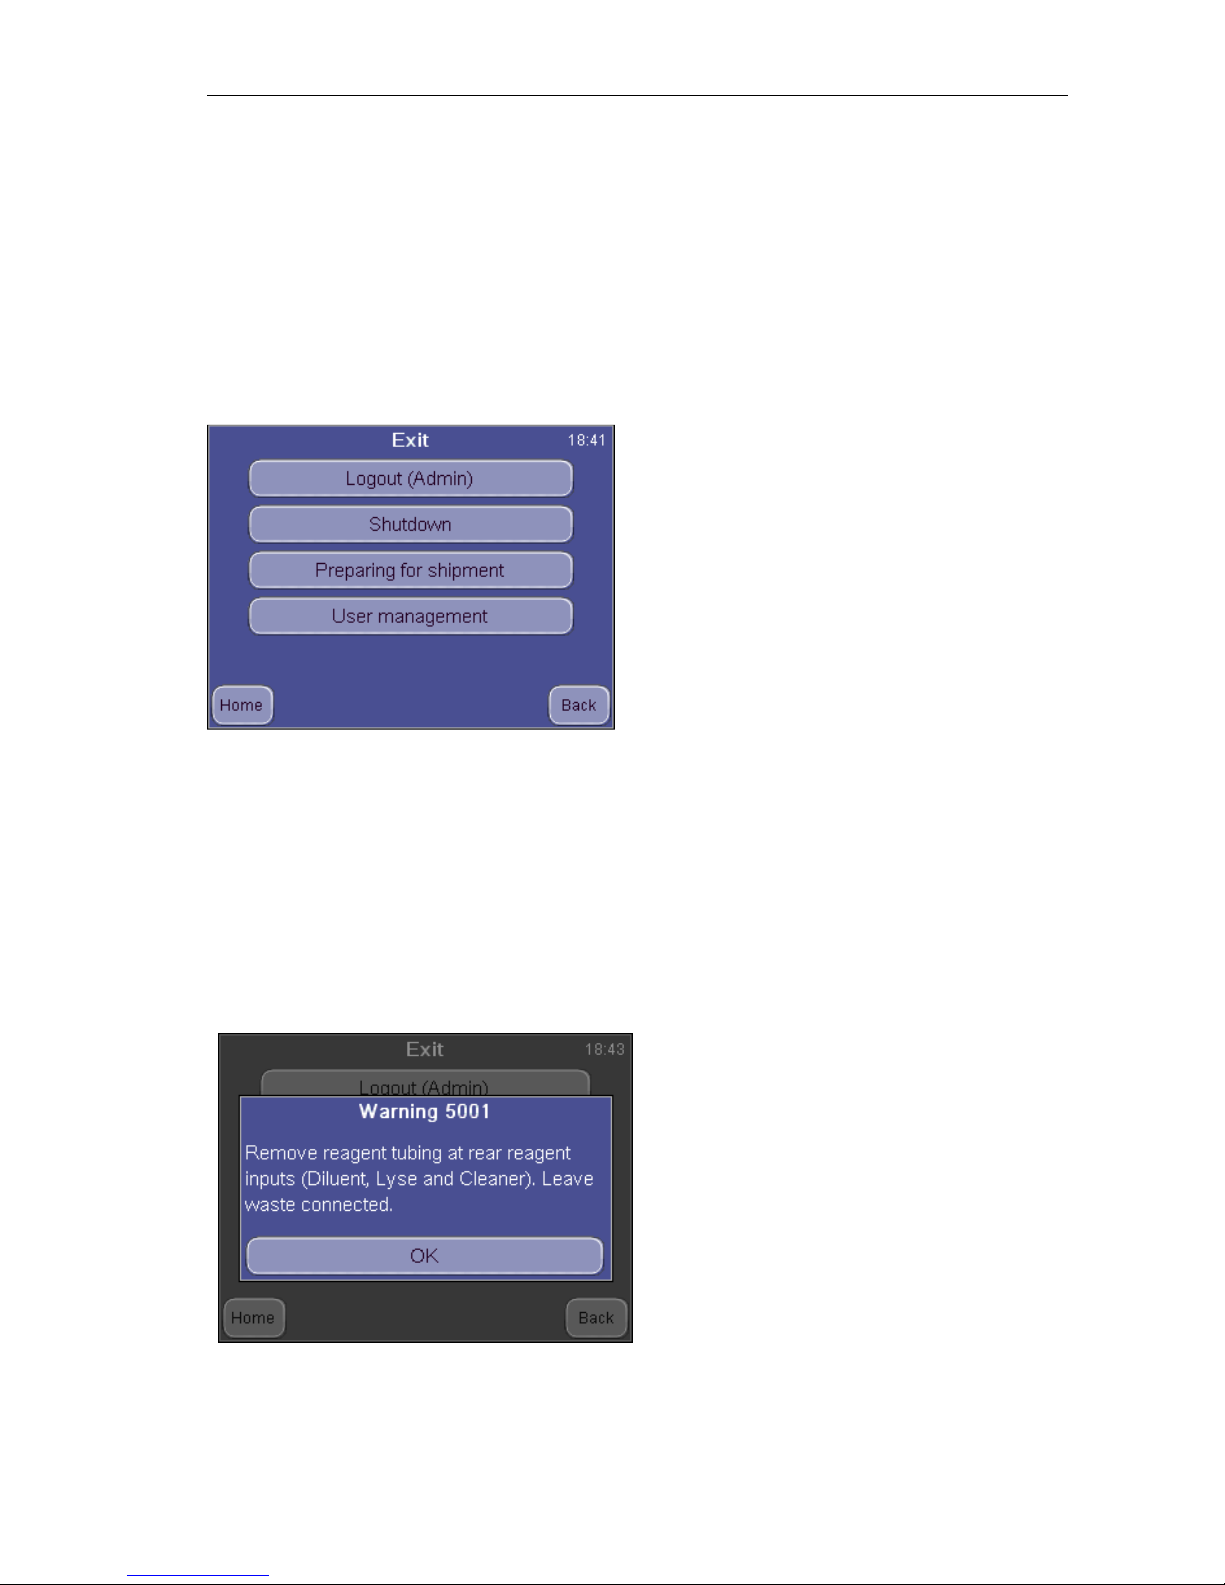
2.3.3. Preparing for shipment
Use the second item in the Shutdown menu when the instrument is to be shipped or
left unused for a longer time (more than 1 week). The instrument will ask you to use
the cleaning tube kit and 100ml of distilled water.
Follow the instructions appearing on the display.
SHUTDOWN
Preparing for shipment (2)
Remove tubing connectors, so the system
can drain itself.
Leave the waste connector attached.
Page 22

ELite 3, User Manual
Page 22/72
Next, you should connect the cleaning
tube kit to the reagent inputs, submerging
the free end in a bottle containing at least
100 ml of distilled water.
Cleaning tube kit connected
The analyzer will flush any remaining
reagents from the system into the waste
container.
As a next step, the analyzer asks you to
remove the cleaning tube kit. Leave Waste
connected.
When finished, the analyzer prompts you
to power off the system. Remove the
waste connector after shutting down.
2.3.4. Handling in Emergency
In case of emergency situation - like instrument catching on fire (short-circuit, etc.) -
cut off power immediately by disconnecting mains power or DC input line, and use a
fire-extinguisher if necessary.
Page 23
ELite 3, User Manual
Page 23/72
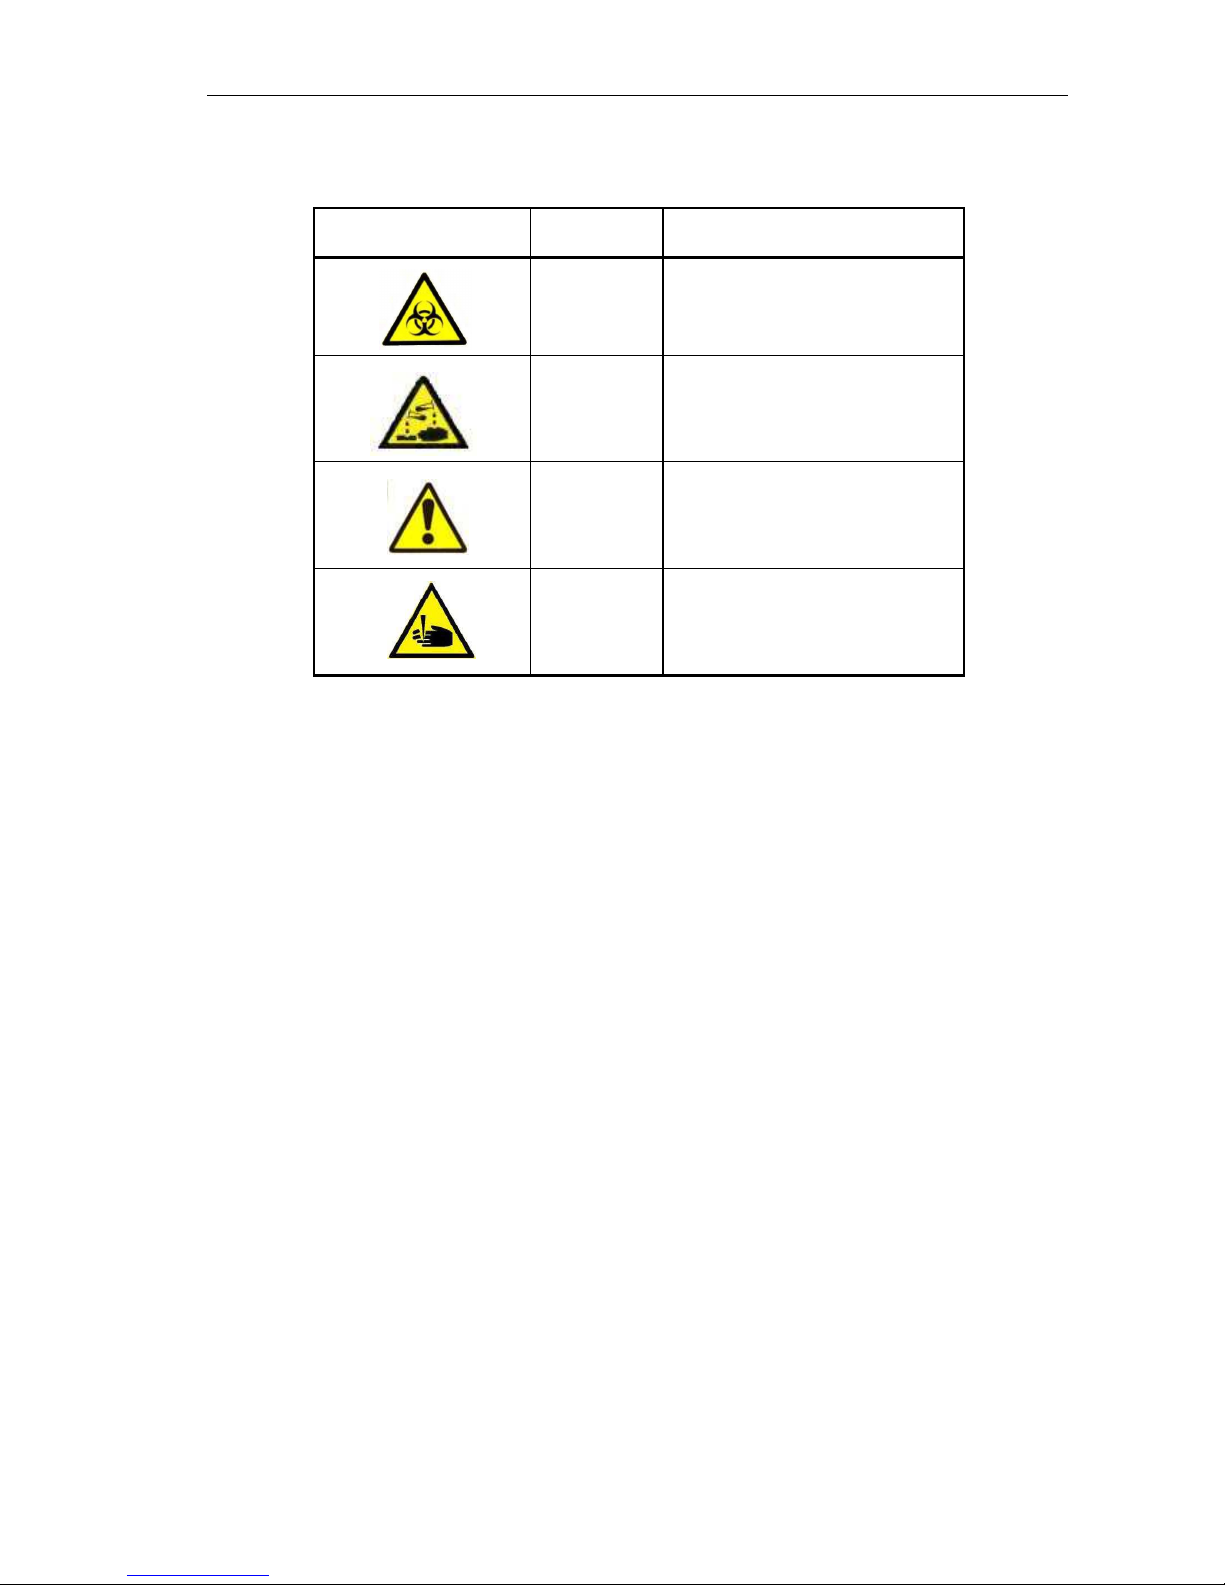
2.3.5. Warning labels on the analyzer
Label Meaning Explanation
Biohazard
Sample and waste are
potentially infectious
material
Corrosive
Reagents may cause
corrosion or skin irritation.
Warning General warning of injury.
Sharp
needle
warning
Sampling needle may
cause injury.
Page 24
ELite 3, User Manual
Page 24/72
3. MENU SYSTEM
3.1. General Information
This chapter contains information about the structure and usage of the software
implemented menu structure.
This integrated software controls instrument operations including calculation and
evaluation of measured data, displaying results and information screens, storage and
recalling of data.
3.1.1. Navigating in the Menu System
The instrument uses a menu system to initiate actions and to access settings.
Navigate in the menu system by simply touching the LCD at the item you want to
open/activate. From any submenu, the Home button will go back to Main menu, while
Back moves one step back in the menu tree.
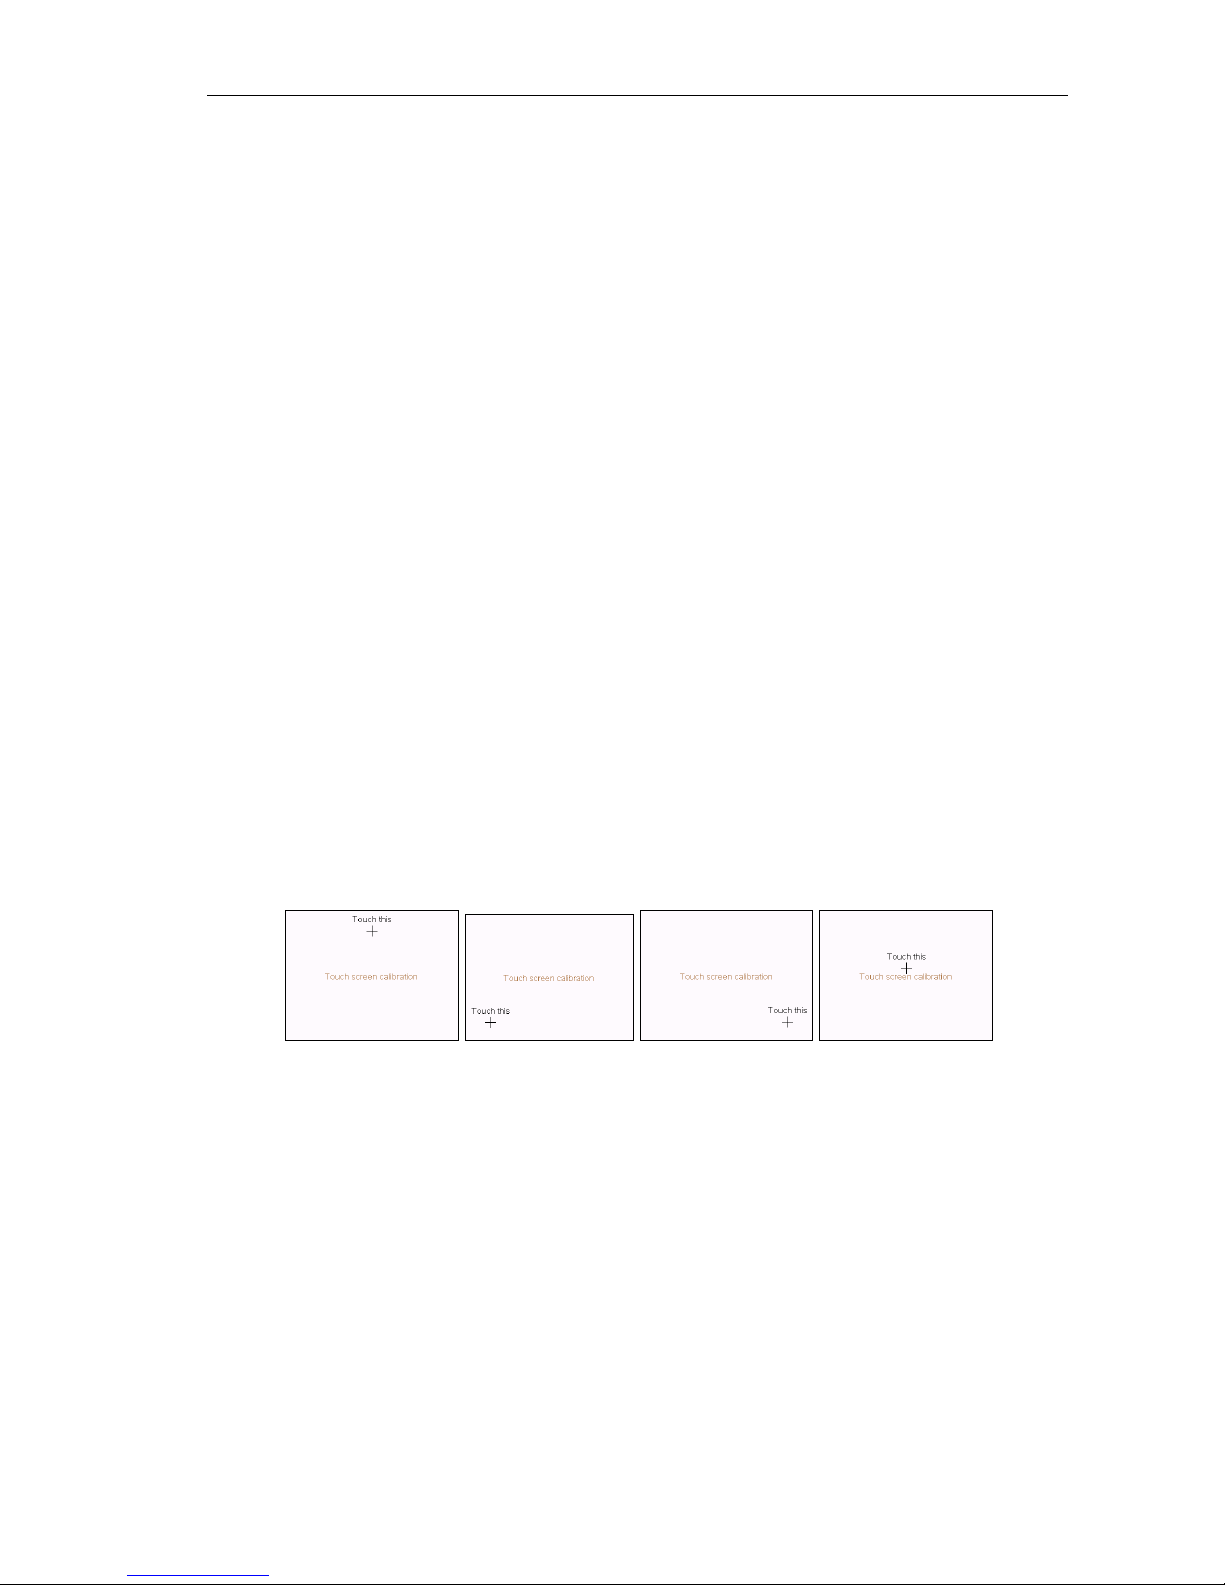
3.1.2. Touch screen calibration
In case you experience uncertainties during tapping the touch screen (you tap a
specific location, still the required function key is not being activated) you will have to
calibrate the touch panel.
Tap and gently hold any location on the touch screen. (Make sure not to press it
hard, otherwise you can damage the screen.) After cca 10 seconds, a calibrating
screen appears. Tap the reference points one after another. If you made an error,
you will hear an error beep, and the process restarts.
If the calibration was successful, you will return to the original screen.
Page 25
ELite 3, User Manual
Page 25/72
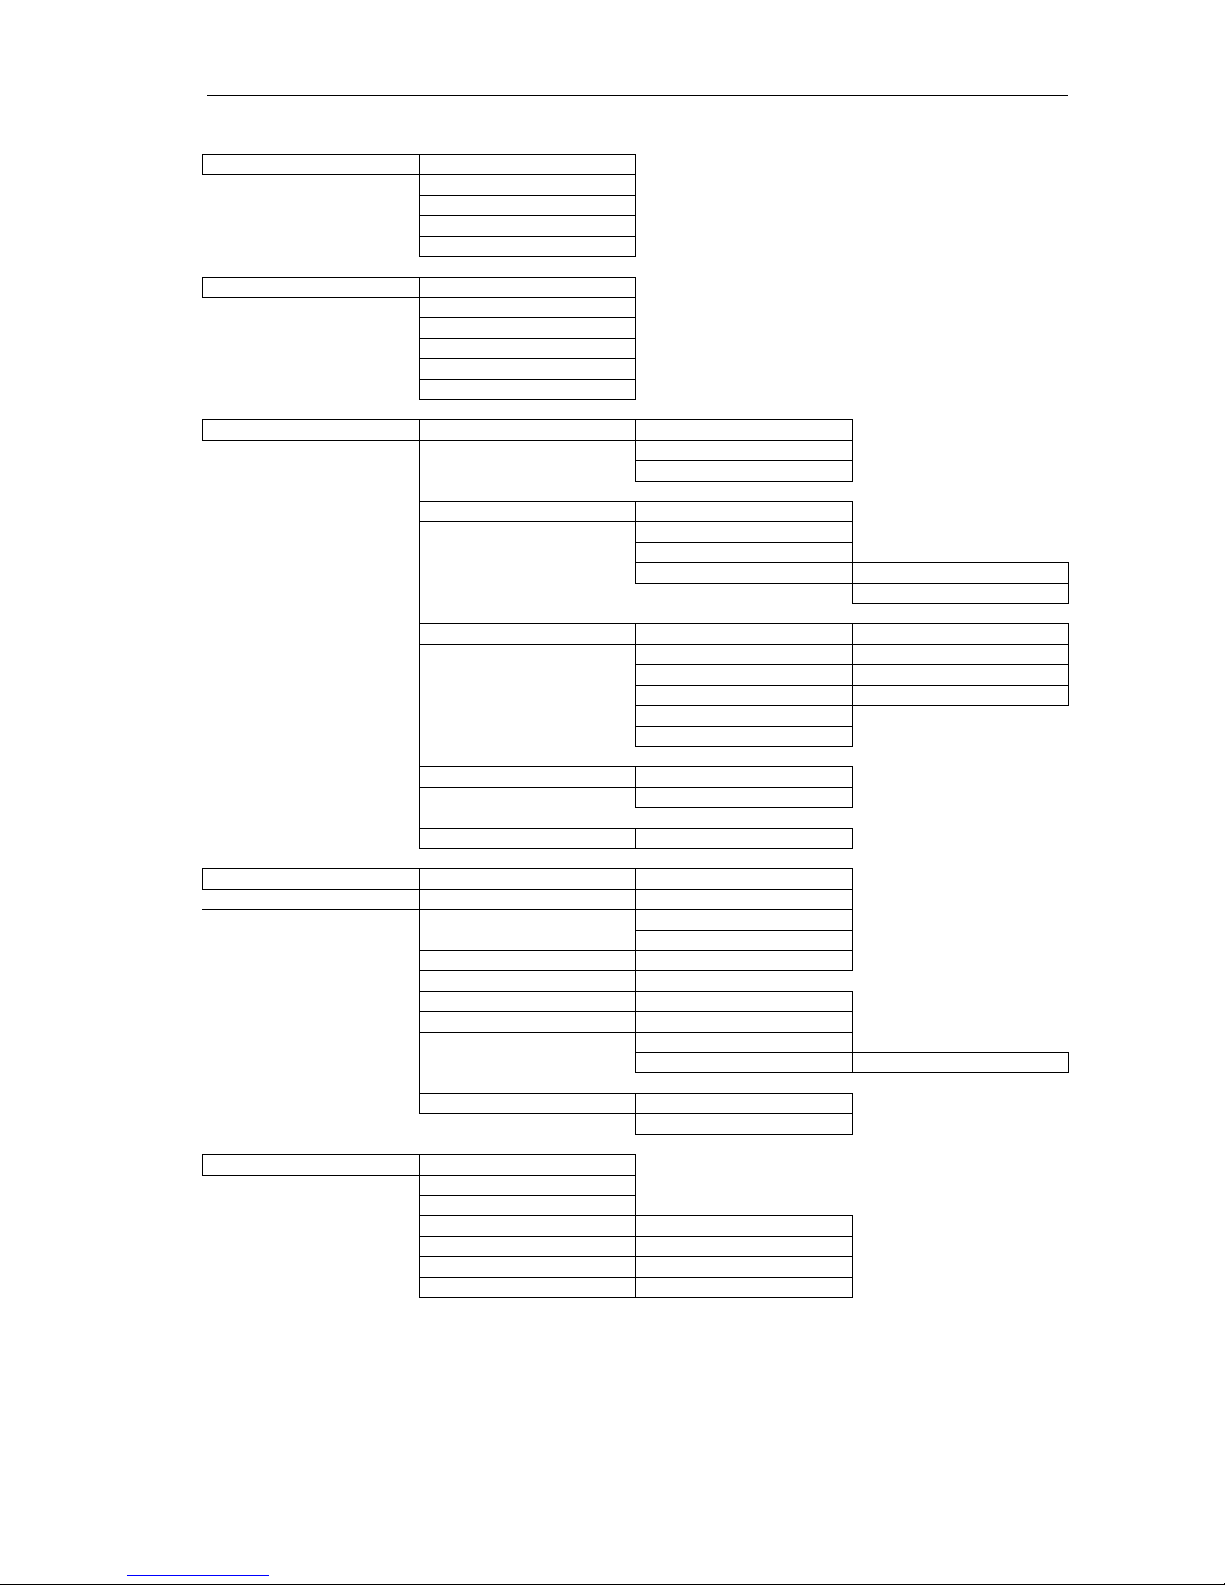
3.1.3. Menu structure
Measure New
Re-run
Blank
Print
Discard
Database Detail / Table view
Edit record
Print
Filter
Trends
Manage
Maintenance Cleaning Cleaning
Hard cleaning
Drain chamber
Calibration Factors
Measure
History
Pre-diluted Factors
History
Quality control QC1 References
QC2 Measure
QC3 Diagram
QC4 Database
QC5
QC6
Diagnostics Device information
Self test
Reagent status Volumes
Settings Printer Device
Format
Header
General settings
Measurement Units
Normal ranges
Profile
Settings Result / Calibration
Date and time Set Date / Time
Date Format
Exit Logout Add new user
Shut down Remove User
Preparing for shipment Auto login set
User Management Edit / View user
Page 26
ELite 3, User Manual
Page 26/72
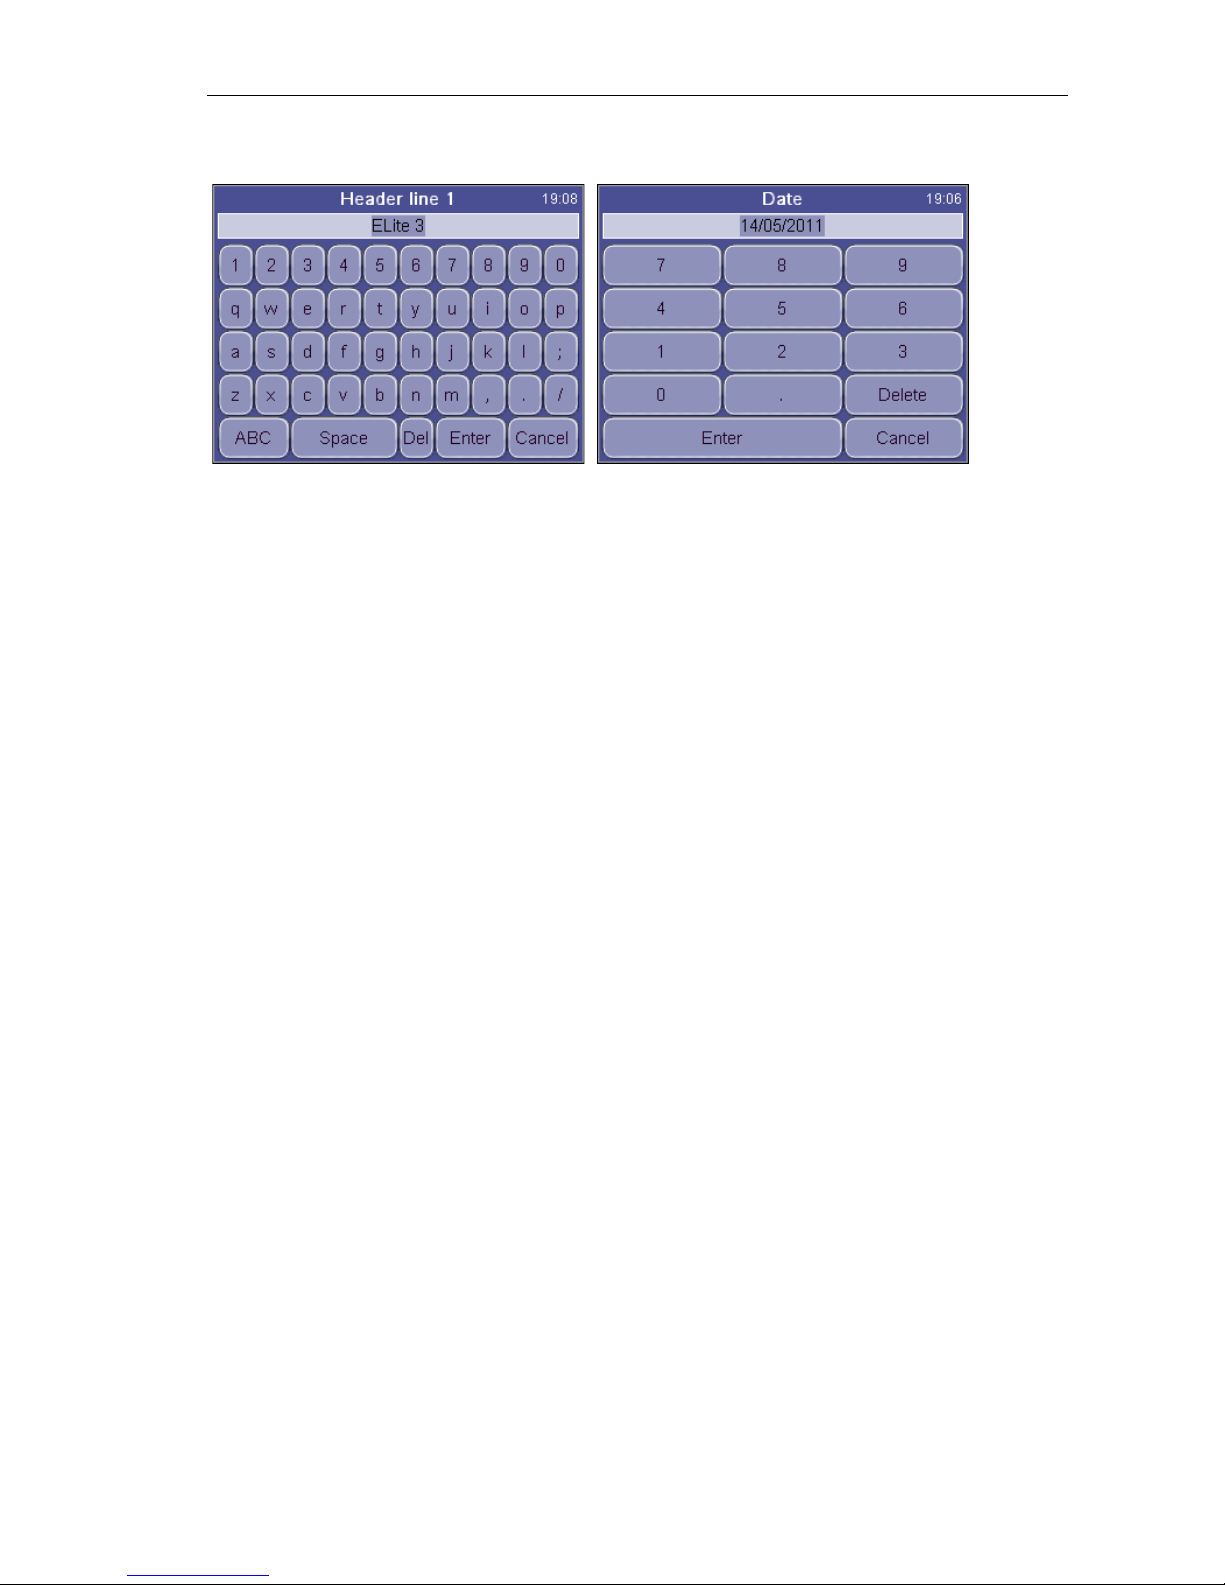
When you have to enter data, an the on screen keyboard appears on the screen.
It can be a numerical or alphanumeric keyboard, depending on the function.
Page 27
ELite 3, User Manual
Page 27/72
4. OPERATING PRINCIPLES
4.1. Impedance Method
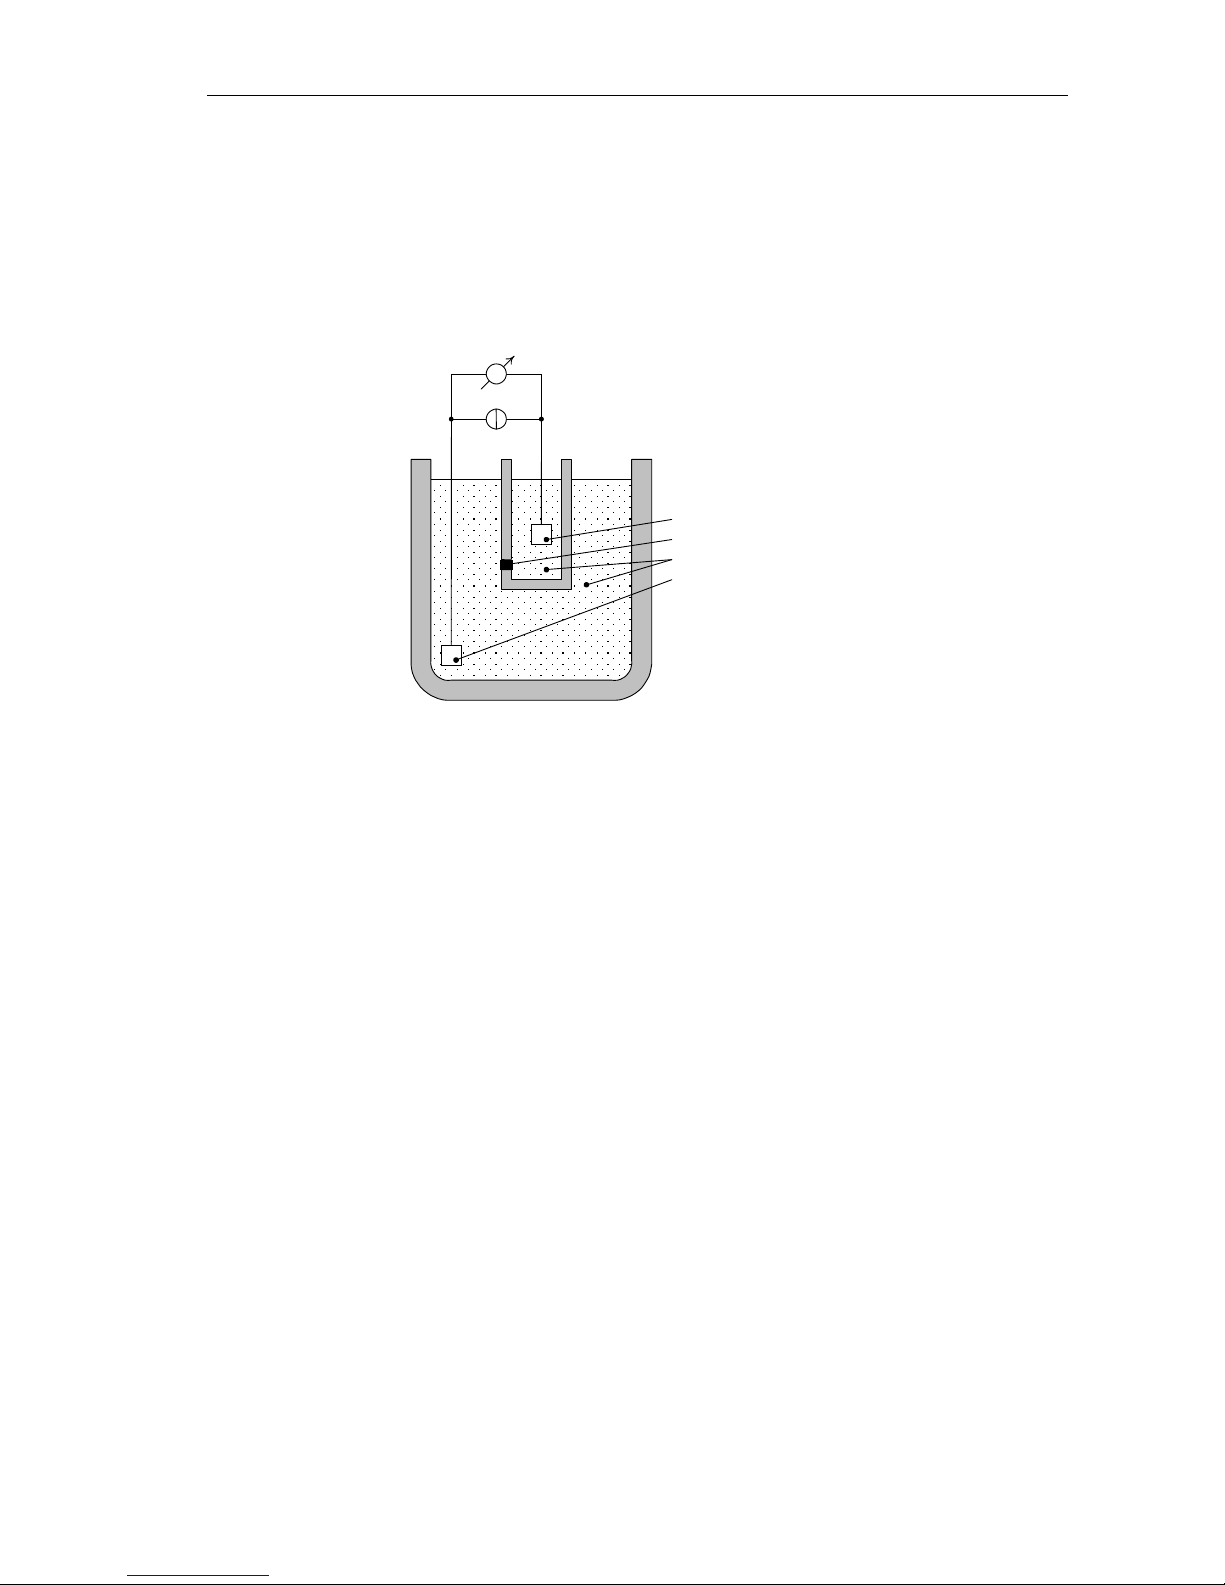
The impedance method (a.k.a. Coulter-method) counts and sizes cells by detecting
and measuring changes in electrical impedance when a particle in a conductive liquid
passes through a small aperture.
Figure 7. Impedance method
Each cell passing through the aperture – there is a constant DC current flowing
between the external and internal electrodes – causes some change in the
impedance of the conductive blood cell suspension.
These changes are recorded as increases in the voltage between the electrodes.
The number of pulses is proportional to the number of particles. The intensity of each
pulse is proportional to the volume of that particle. The volume distribution of the cells
are displayed on diagrams: WBC, RBC, and PLT histograms.
4.2. Principle of HGB Measurement
The lysed sample dilution can be measured by a photometric method. The reagent
lyses the red blood cells, which release hemoglobin. The chemical process forms a
stable form of methemoglobin. This is measured by a photometer on the chamber.
All Erba Lachema branded reagents are cyanide free, and thus are environmentfriendly. However, some reagents from other manufacturers may contain cyanide. In
that case, cyanide and any other chemical composition formed using cyanide is
environmentally dangerous. Contact the reagent manufacturer for safety measures.
The manufacturer (Erba Lachema s.r.o.) is not liable for any damage caused by
using cyanide based reagents with any of its analyzers.
-
+
Blood cell suspension
External electrode
Internal electrode
Aperture
Page 28
ELite 3, User Manual
Page 28/72
4.3. Parameters
EELLiittee 33
measures and calculates 20 parameters, listed below. For each parameter
we list the name, abbreviation and measurement unit in the first column. Short
description for each parameter is in the second column.
White Blood Cells – WBC
(cells/l, cells/µl)
Number of leukocytes
WBC = WBC
cal
x counted WBC (cells/l, cells/µl)
Red Blood Cells – RBC
(cells/l, cells/µl)
Number of erythrocytes
RBC = RBC
cal
x counted RBC (cells/l, cells/µl)
Hemoglobin concentration - HGB
(g/dl, g/l, mmol/l)
Measured photometrically at 540 nm; in each cycle blank
measurement is performed on diluent
HGB = HGB
cal
x (HGB
measured
– HGB
blank
)
Mean Corpuscular Volume - MCV
(fl)
Average volume of individual erythrocytes derived from
the RBC histogram.
Hematocrit – HCT
(percentage, absolute)
Calculated from the RBC and MCV values.
HCT
percentage
= RBC x MCV x 100
HCT
absolute
= RBC x MCV
Mean Corpuscular Hemoglobin – MCH
(pg, fmol)
Average hemoglobin content of erythrocytes, calculated
from RBC and HGB values.
MCH = HGB / RBC
Mean Corpuscular Hemoglobin
Concentration – MCHC
(g/dl, g/l, mmol/l)
Calculated from the HGB and HCT values.
MCHC = HGB / HCT
absolute
Unit of measurement is displayed according to the one
chosen for HGB result (g/dl, g/l or mmol/l)
Red Cell Distribution Width – RDW-SD
(fl)
Platelet Distribution Width – PDW-SD
(fl)
Red cell Distribution Width – RDW-CV
(absolute)
Platelet Distribution Width – PDW-CV
(absolute)
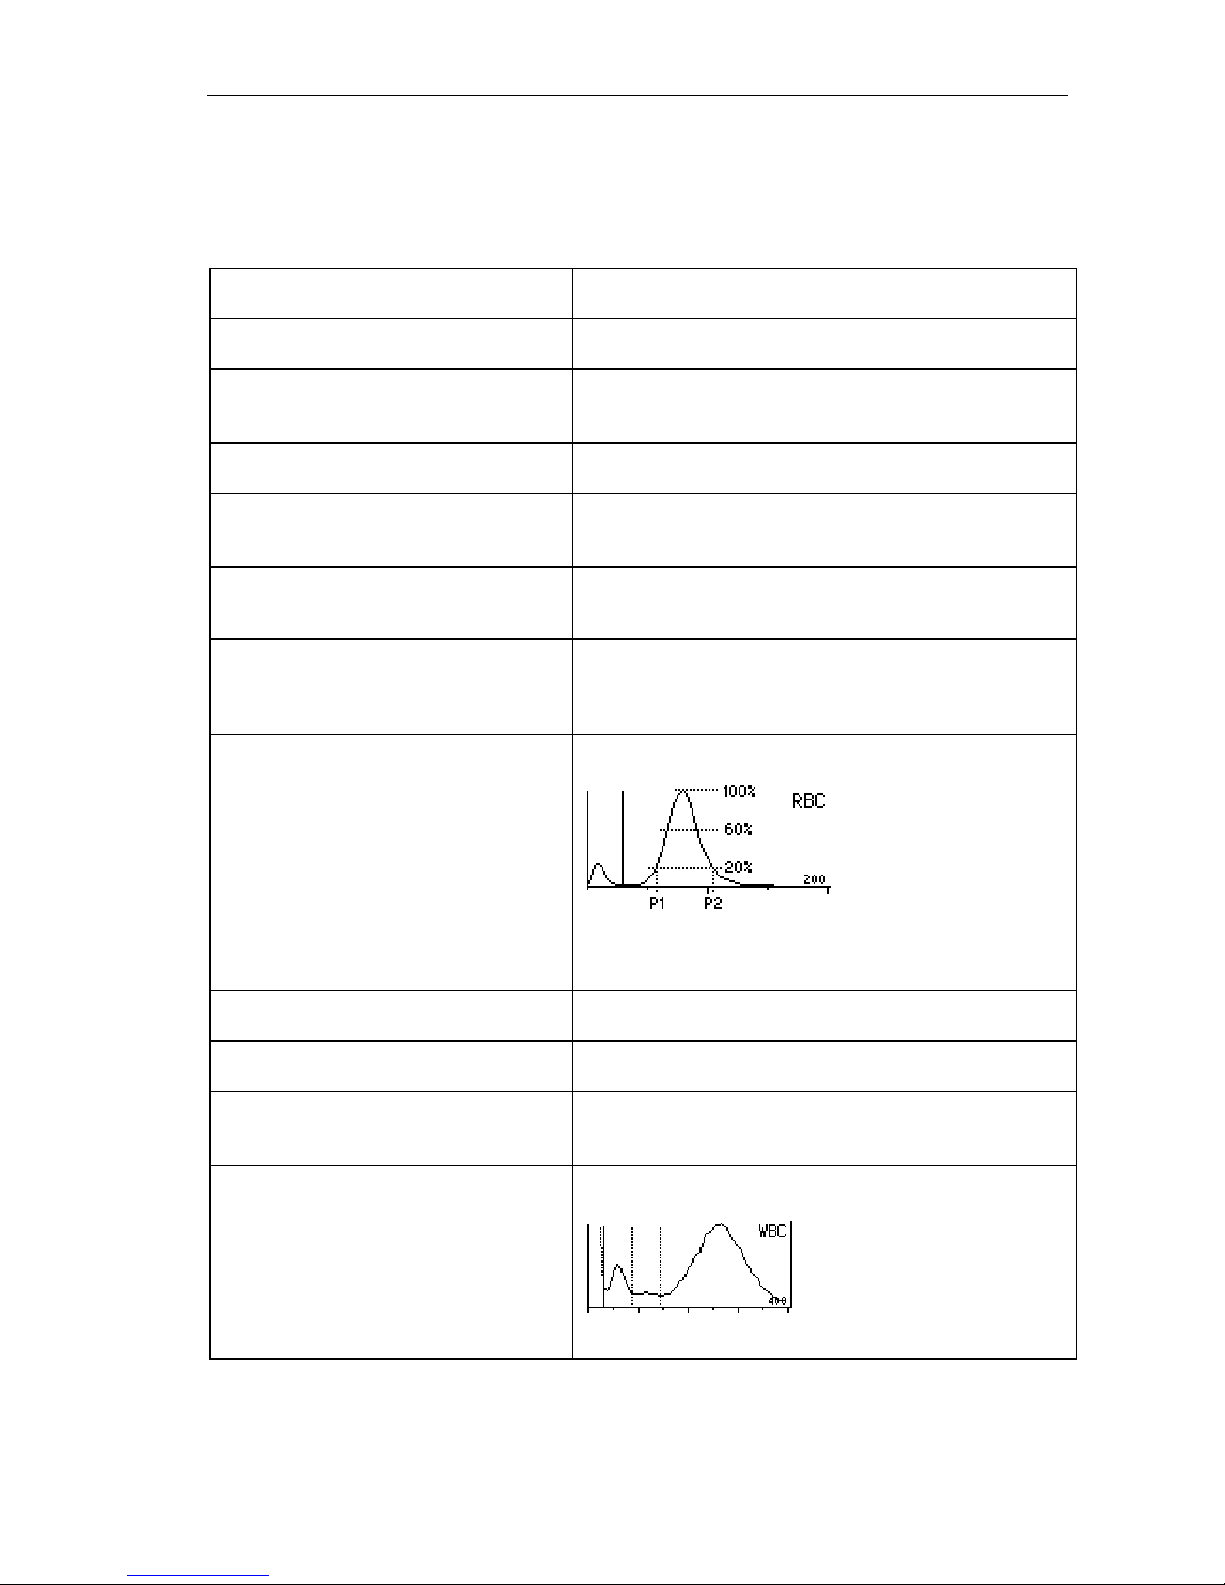
The distribution width of the erythrocyte or platelet
population derived from the histogram at 20% of peak
xDW-SD = RDW
cal
x (P2 - P1) (fl),
xDW-CV = RDW
cal
x 0.56 x (P2 - P1) / (P2 + P1)
by the factor of 0.56 CV is corrected to the 60% cut
Platelet – PLT
(cells/l, cells/µl)
Number of thrombocytes (platelets)
PLT = PLT
cal
x counted PLT (cells/l, cells/µl)
Mean Platelet Volume – MPV
(fl)
Average volume of individual platelets derived from the
PLT histogram
Thrombocrit – PCT
(percentage, absolute)
Calculated from the PLT and MPV values
PCT
percentage
= PLT x MPV x 100
PCT
absolute
= PLT x MPV
White blood cell 3-part differential:
LYM, LYM% : lymphocytes
MON, MON% : monocytes and some
eosinophils
GRA, GRA%: granulocytes
Absolute values counted in the channels determined by
the three WBC discriminators:
Percentages calculated from the absolute WBC value.
GRA
LYM
1. 2.
Page 29
ELite 3, User Manual
Page 29/72
4.4. Absolute and Linearity Ranges of Parameters
The analyzer provides specified accuracy within its linearity range. Beyond this
linearity range, the instrument can display results but accuracy is impaired.
If a value is over the maximum range of guaranteed linearity, the instrument cannot
measure it and the result will be marked with an E (Error) flag.
To measure a sample, whose parameters exceed the maximum value indicated in
the table below, pre-dilution is recommended. See section 5.2.7 of this manual.
Linearity ranges of primary parameters in normal measuring mode:
Parameter Linearity Ranges Maximum Unit
WBC
0...100 150 109 cells/liter
RBC
0...15 20 10
12
cells/liter
PLT
0...700 1000 109 cells/liter
HGB
0...250 400 g/l
HCT
0...100 - %
MCV
30...150 - fl
MPV
3...30 - fl
Table 2. Linearity ranges of parameters
Linearity ranges for 1:5 pre-dilution mode:
Parameter Linearity Ranges Maximum Unit
WBC
2…200 300 109 cells/liter
RBC
1…30 40 10
12
cells/liter
PLT
100…2000 3000 109 cells/liter
Table 3. Linearity ranges of Pre-dilution mode
Page 30
ELite 3, User Manual
Page 30/72
5. ROUTINE UTILIZATION and MEASUREMENT
5.1. Sample handling
Since some time will usually elapse between collection of samples and counting, it is
necessary to preserve the sample with an anti-coagulant to prevent large groups of
cells forming into clots or lumps of cell matter that will clog the cell counter. Choice of
anti-coagulant is very important, as some anticoagulants will affect the shape and
size of blood cells. In general K3-EDTA (liquid), preferably potassium based, is the
only anti-coagulant recommended for use with electronic blood counters.
Care must be taken when using homemade containers pre-dosed with EDTA. If the
container is not filled with enough blood, the concentration of EDTA to blood may
reach a level, which results in osmotic transfer from the RBCs which shrinks them.
The concentration of EDTA to blood should not exceed 3 mg/ml. Generally, we
suggest using pre-manufactured sample tubes containing the necessary amount of
EDTA. Also, when taking blood, please make sure that requirements attached to
sample tubes are met.
Important
! Make sure to fill sample tubes to at least 7-8 mm height with blood
otherwise correct sampling cannot be guaranteed! Observe
marking on sample tube.
There is another possibility that can help the user to help the analyzer get a reliable
sample from the tube: using the needle setting function. This is available in
Measurement Local menu, and controls sampling height of the needle inside the
sample tube. If you have a sample tube with a higher/lower bottom, you can control
the sampling height adjusting this option. This can also help if sample level is too low
within a sampling tube.
Needle offset is displayed in the lower left corner of the measurement screen.
Attention! If you hurt yourself during analysis, biohazard substances can cause infection!
Always take special care to sharp objects and always use rubber gloves!
To initiate analysis:
1. Invert the closed sample tube at least 8 times to achieve a homogenous
sample. Do not shake the sample, because micro-bubbles can form inside
which may cause erroneous sampling!
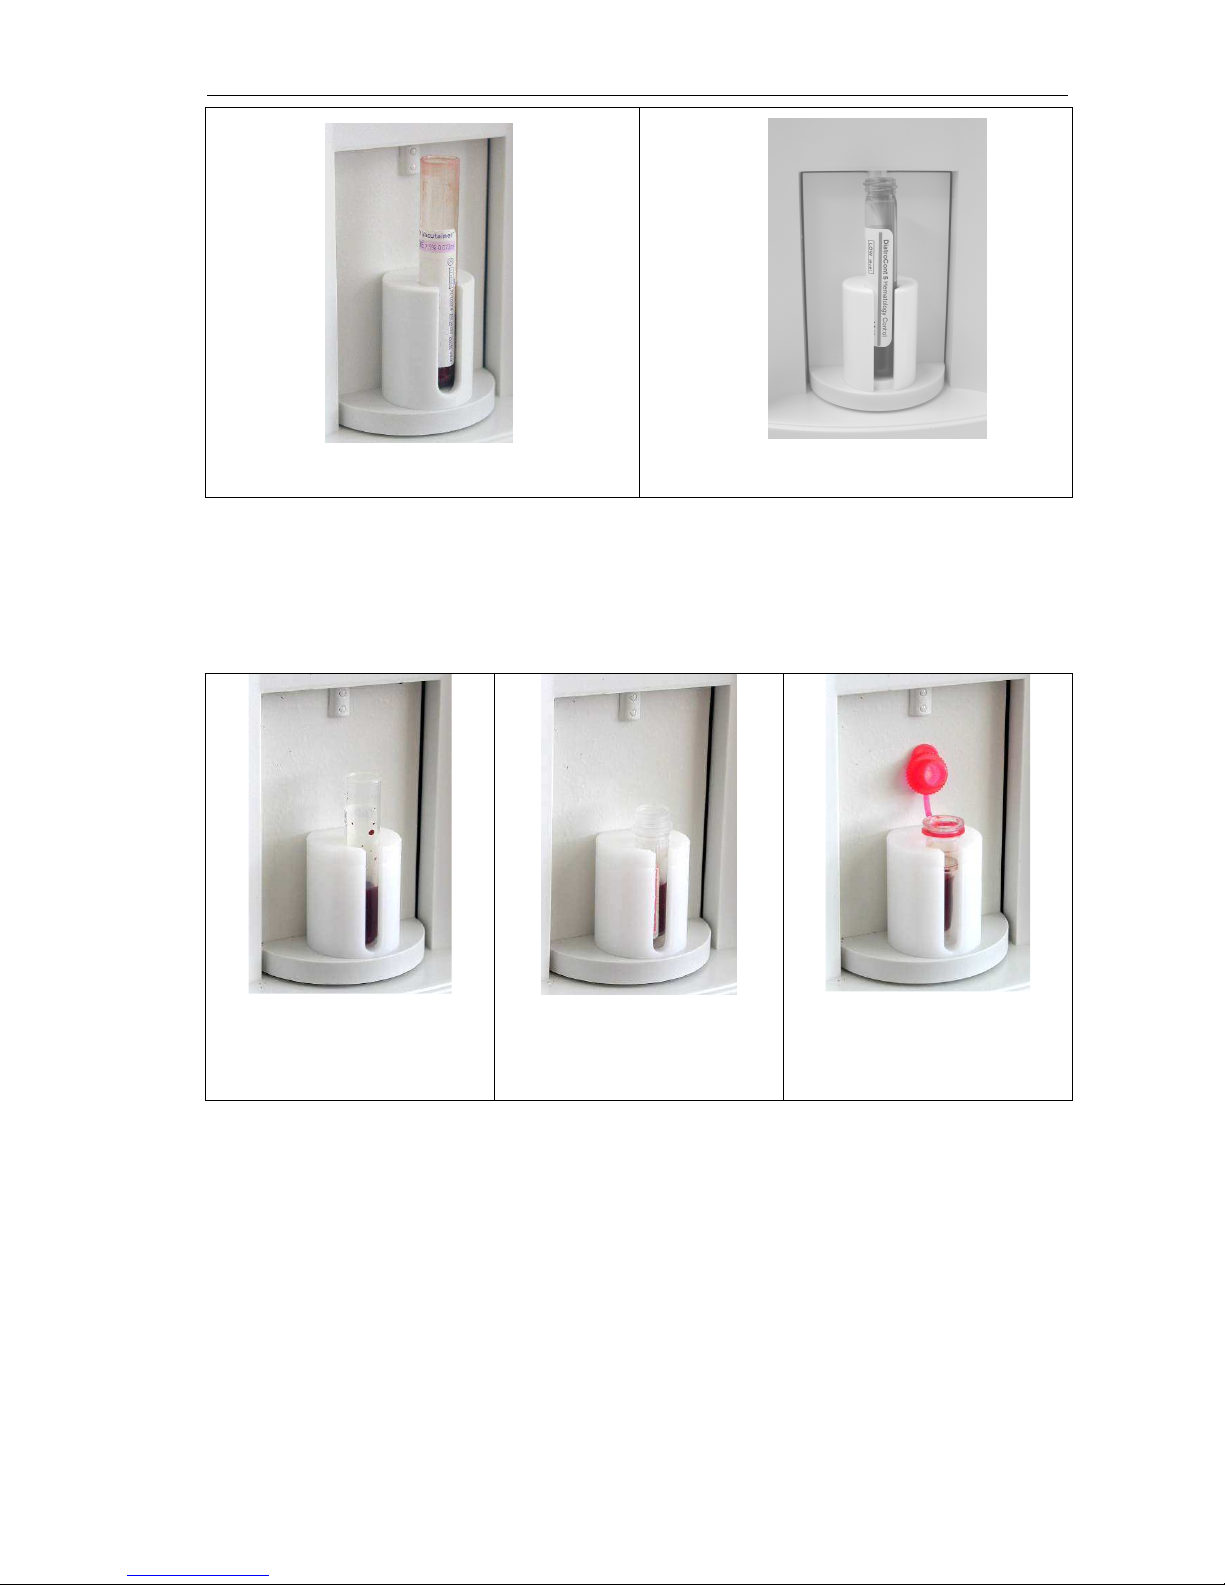
You have the possibility to use 3 different interchangeable adapters for
different tube types. Tube types are shown in the next pictures:
• Vacutainer tube adapter for 3-5 ml sample tubes
• Micro adapter for micro-tainers
• Control adapter for 2 ml blood control vial
Page 31
ELite 3, User Manual
Page 31/72
Vacutainer with sample blood (cap removed)
Sample tube with 5 ml control blood
Figure 8. Tubes used in Vacutainer ® adapter
Below you can see 3 types of microtainer tubes used in micro adapter. These are
only examples given by us, you can try to use other type of microtainers as well.
There must be at least 8 mm
sample level for safe
sampling
Be careful to place the tube with
the cap always in the position
shown above, otherwise the cap
can get stuck when the sample
holder turns.
Figure 9. Tubes used in micro adapter
Page 32
ELite 3, User Manual
Page 32/72
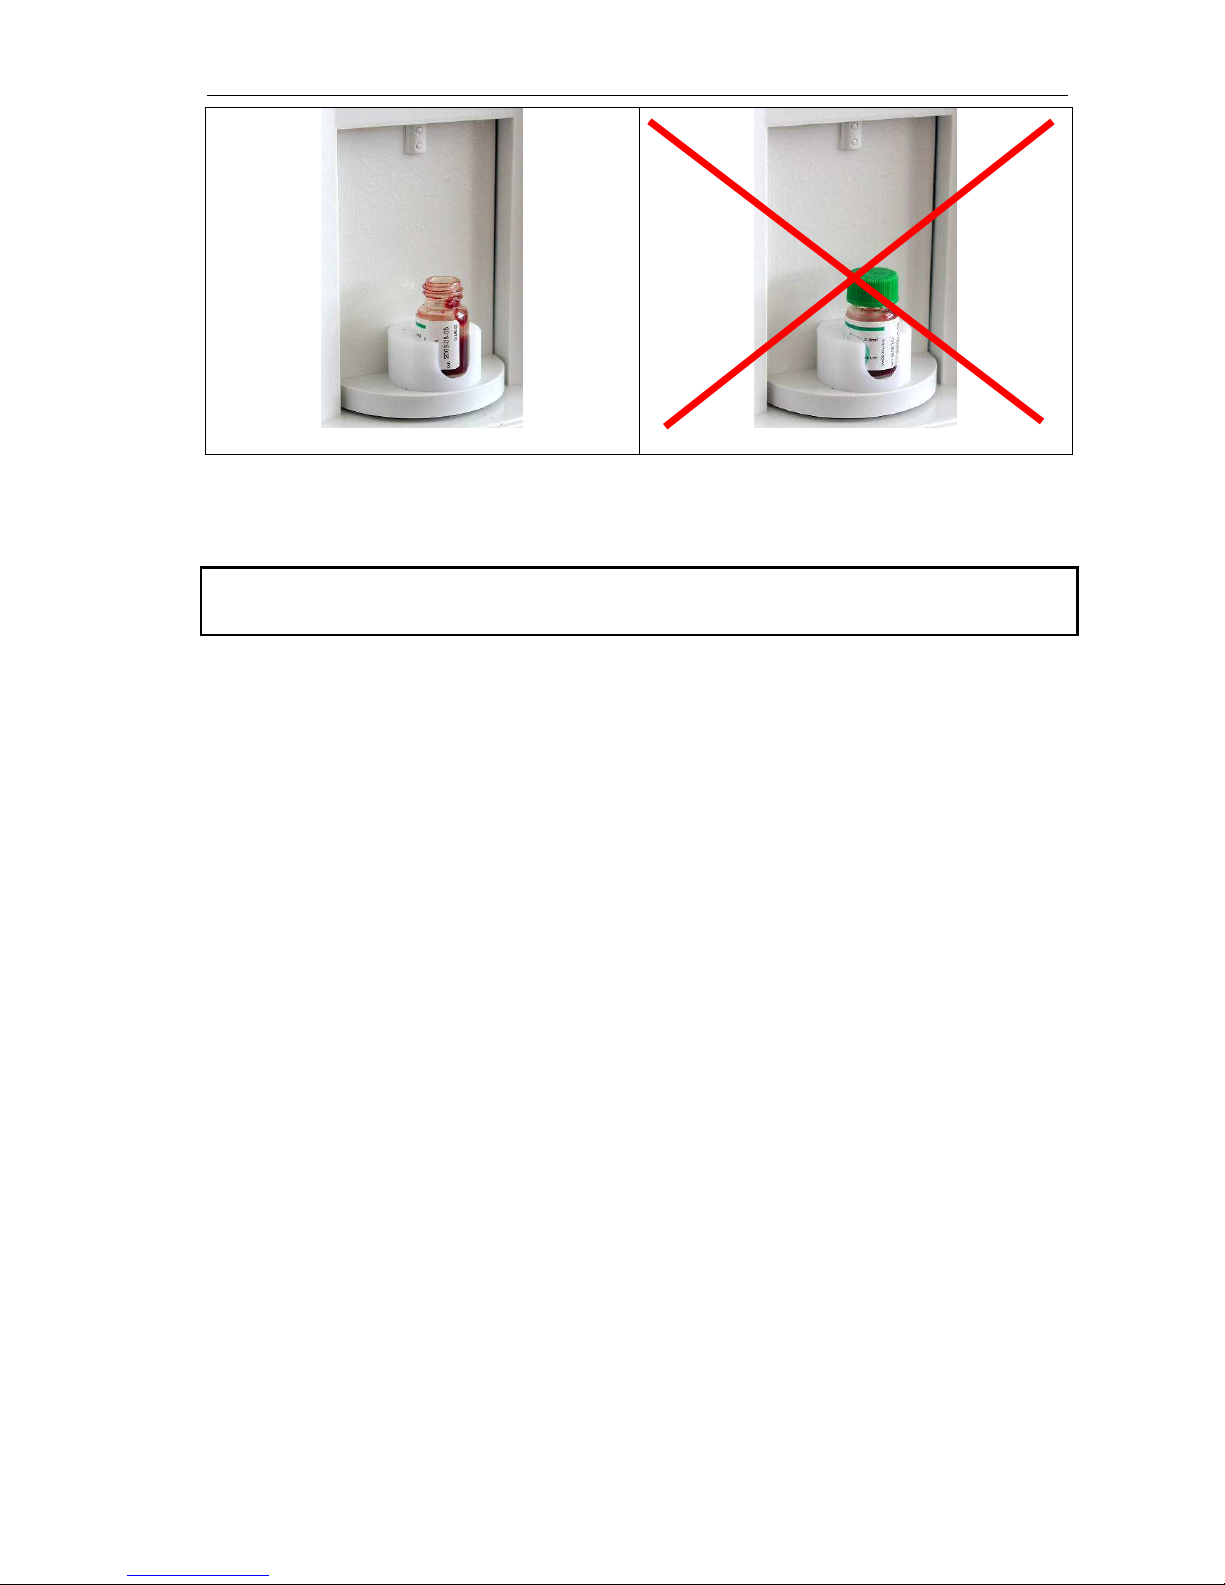
Adapter for 2 ml control blood
Figure 10. Vial used in control adapter
1. Remove the cap!! It is very important because the tip can not
pierce the cap!
2. Position the sample tube in the sample rotor.
3. Press START key.
The sample rotor will turn the vial into the inside of the instrument and needle draws
sample from the tube. The aspirating needle is retracted, while its outer surface is
automatically rinsed with diluent by needle wash head. This insures the low carryover between samples. After a few seconds, the rotor turns out. Now you can remove
the sample tube from the adapter.
Page 33
ELite 3, User Manual
Page 33/72
5.2. Sample analysis
5.2.1. Sample preparation
Use K3-EDTA anti-coagulated fresh whole blood as sample. Prior to sampling, mix
the sample gently by inverting it at least 8 times. Do not shake as this could
damage blood cells and create micro-bubbles that cause sampling error.
5.2.2. Running a (new) sample
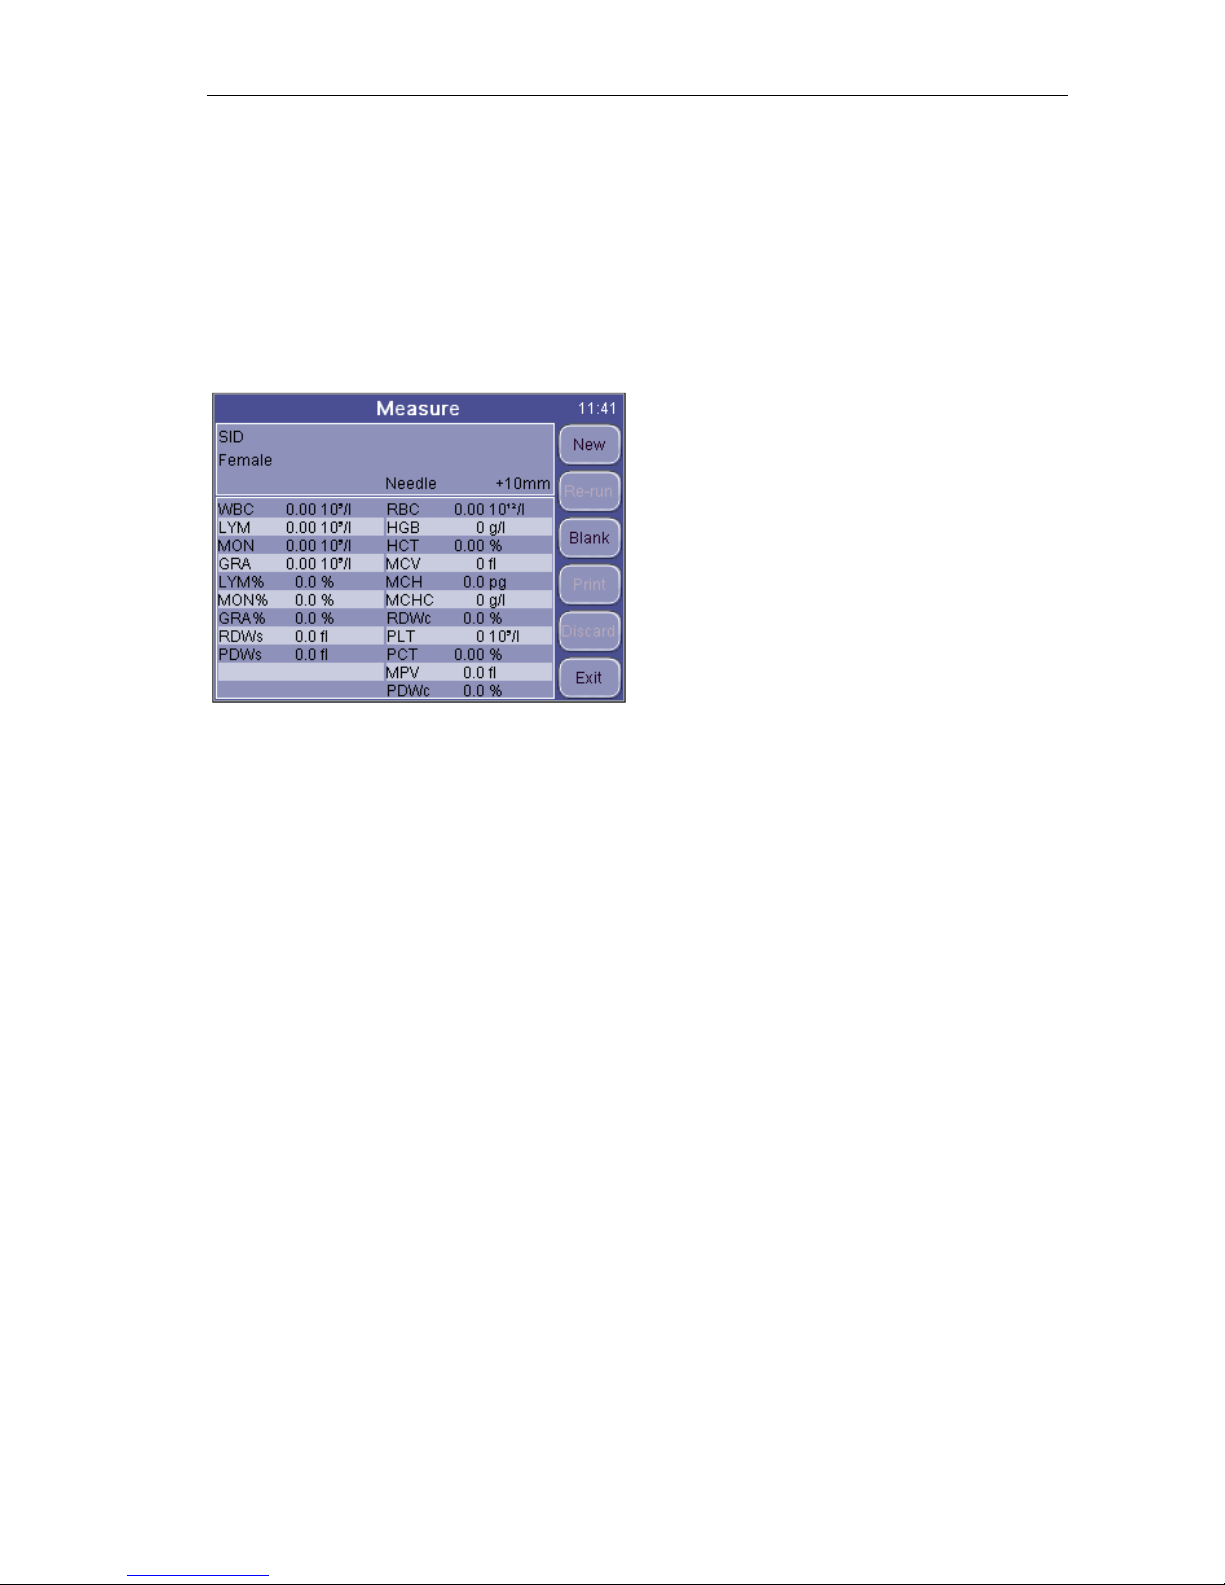
MEASURE
This is the screen where you can start
measurements.
Exit will return to the Main menu
Press New to enter data for the sample.
Software allows the user to enter information for every sample. If an external PC
keyboard (via USB) is used, connect it before turning the instrument on.
Page 34
ELite 3, User Manual
Page 34/72
There are two options to enter sample information:
• immediately before analysis
• in Database menu
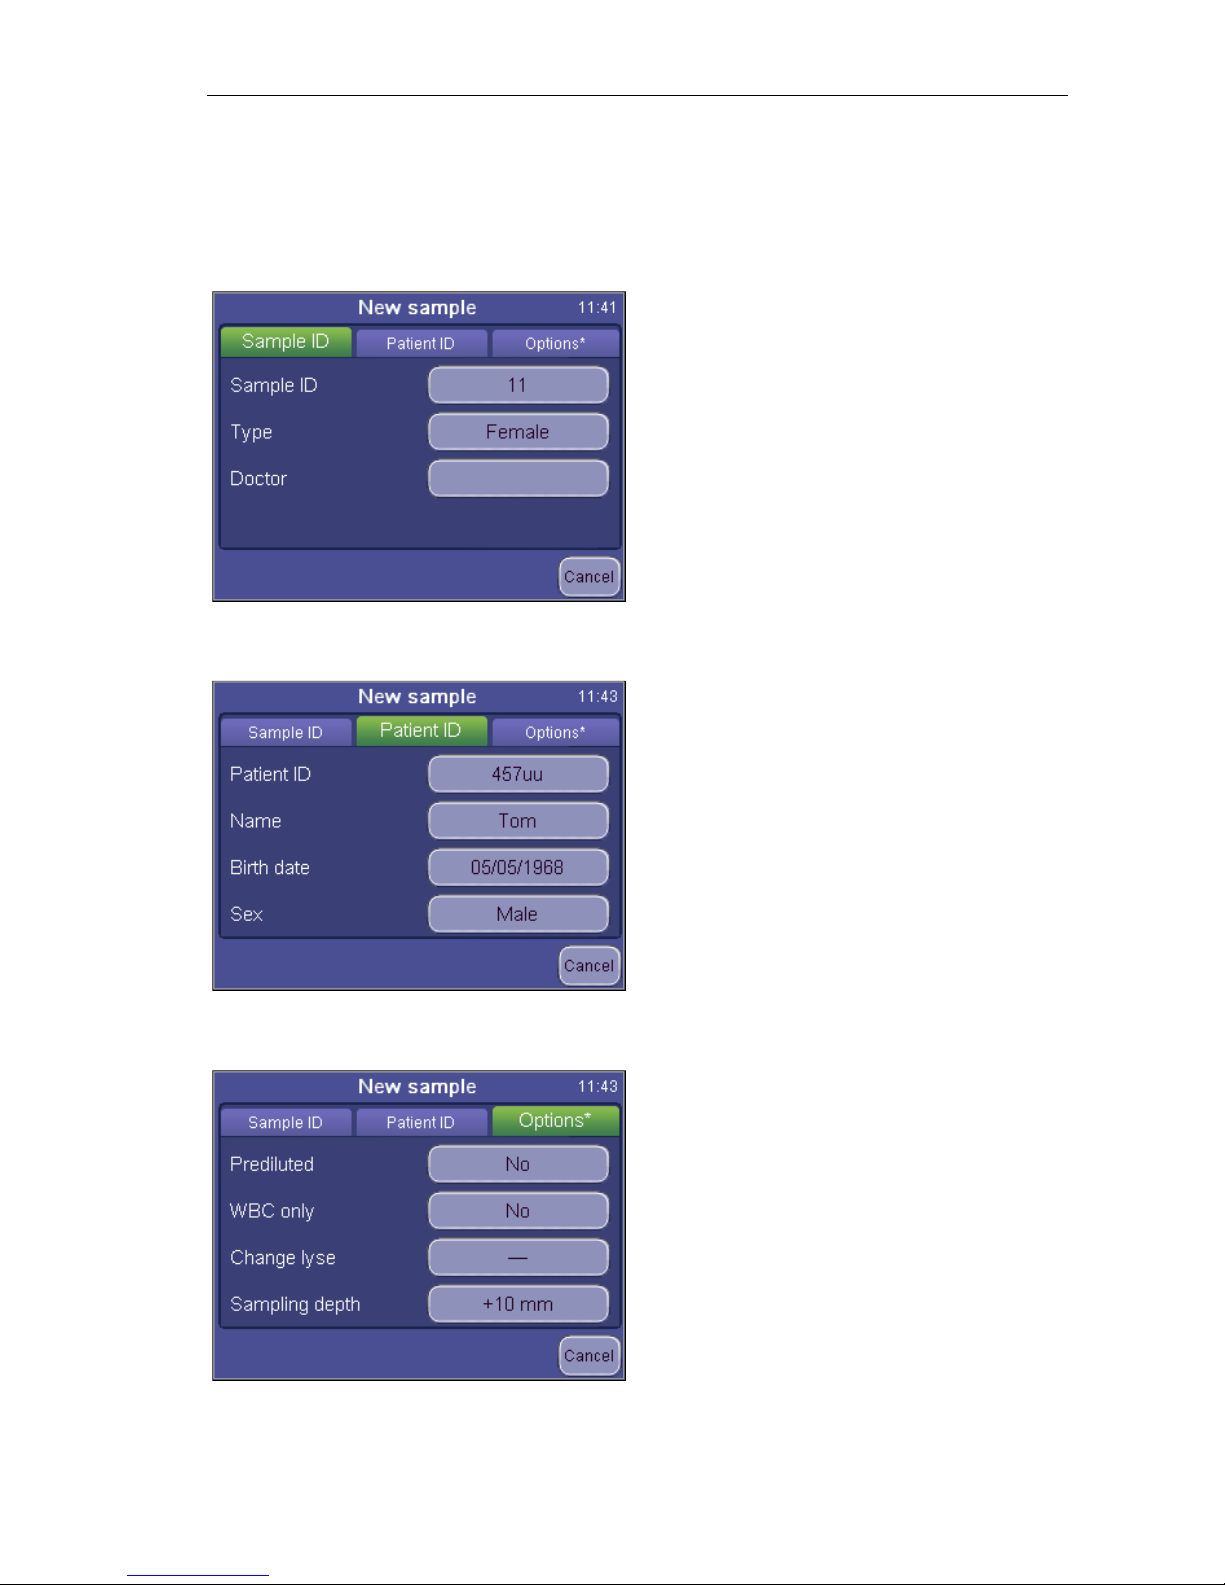
To enter sample information prior to sample analysis, touch sample info field in the
MEASURE screen. The following screen appears:
MEASURE
New
Sample ID
A screen appears
offering data entry for
the upcoming sample.
Sample ID can be defined to identify the
sample
Type offers a list of profiles to select from
Doctor will appear on the printout as well
Cancel will return to the measurement
screen (above).
MEASURE
New
Patient ID
A screen appears
offering data entry for
the patient.
Cancel will return to the measurement
screen.
MEASURE
New
Options
A screen appears where
offering data
entry for the upcoming sample.
Settings remain as they are set for the
following samples as well.
Cancel will return to the sample info
screen.
Page 35
ELite 3, User Manual
Page 35/72
Pre-diluted mode offers two options: Yes or No. If you set it to Yes, then the
instruments expects a pre-diluted sample (with a ratio of 1:5 – 1 unit of sample and 5
units of isotonic saline solution – the total volume should be minimum 1ml)
WBC only offers two options: Yes or No. If you set it to Yes, then the instrument will
not measure and display RBC and PLT related parameters. You’ll receive a total
WBC count with 3part results and HGB reading (WBC, LYM, MON, GRA, LYM%,
MON%, GRA%, HGB)
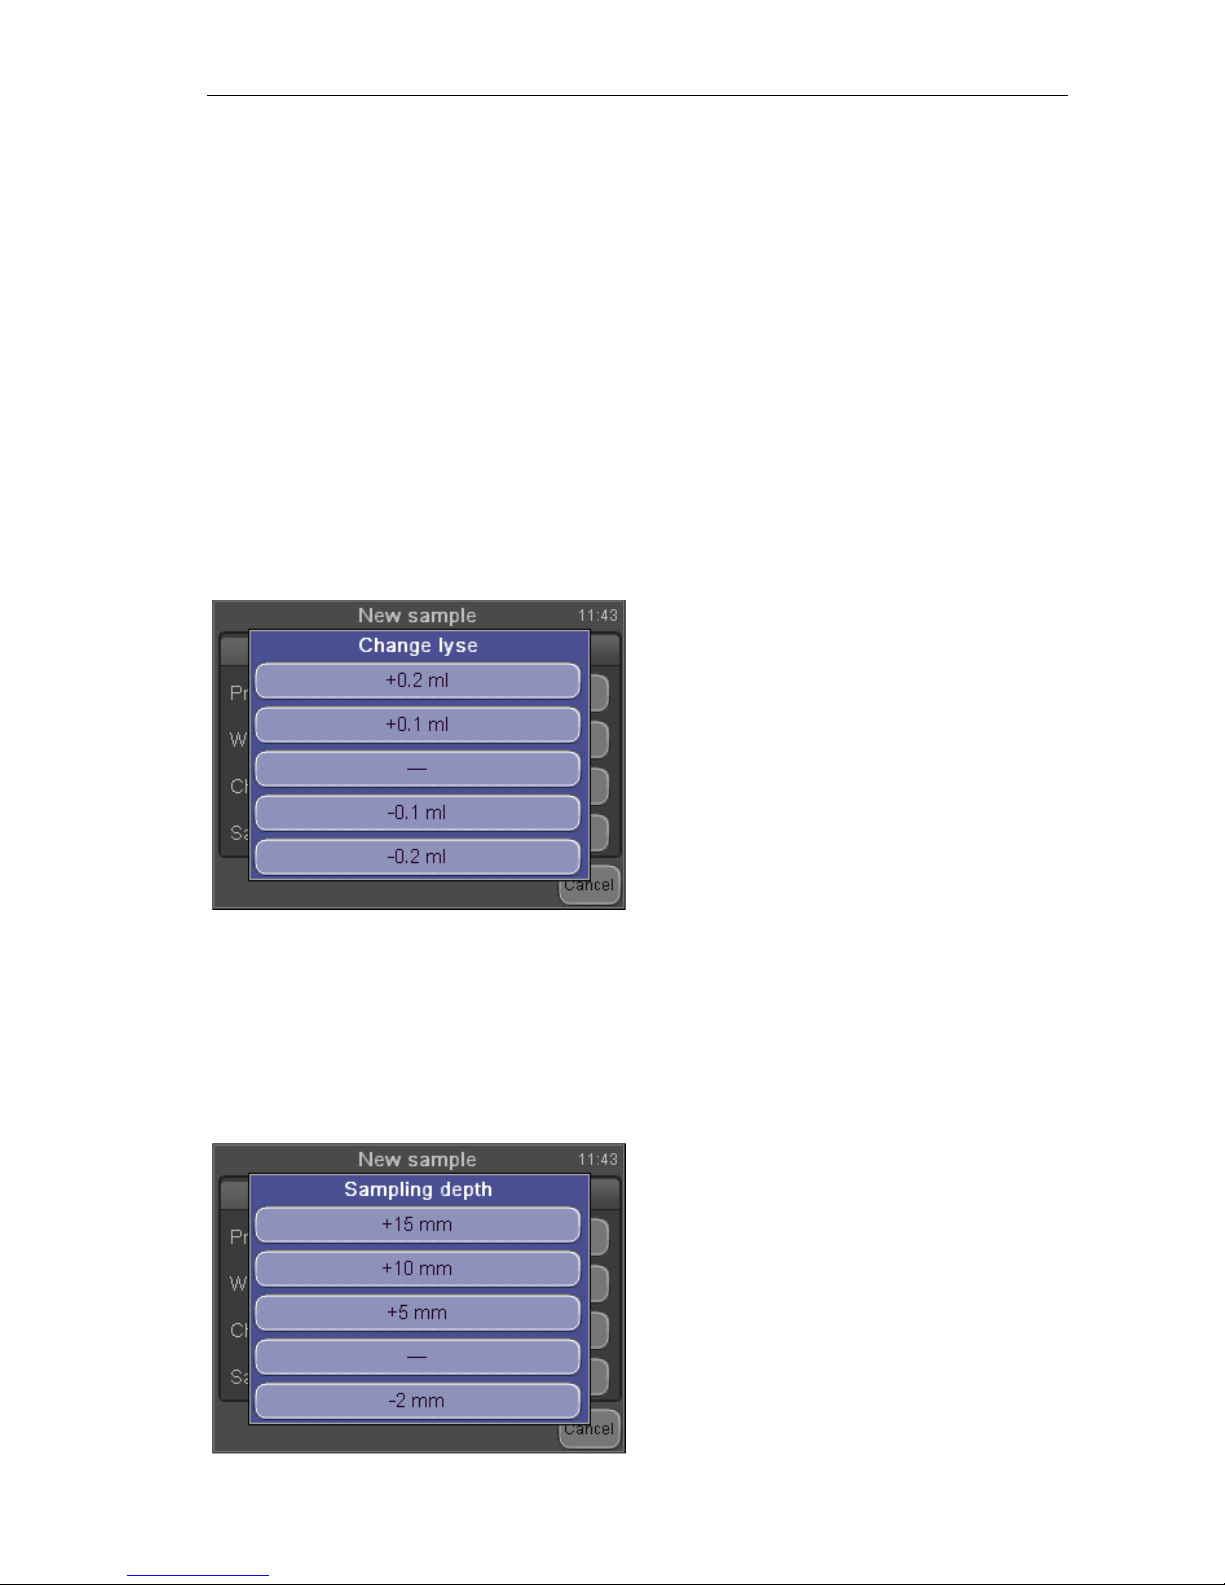
Change lyse
Volume of lyse reagent added to MIX dilution controls performance of WBC 3-part
differential. Default lyse setting for each sample type (Human, control, Child, etc.) are
specified by SW. Default lyse quantity can be adjusted in Patient limits menu
(Settings / Measurement Limits)
Select an increased (+0.1, +0.2ml) volume if the separation between lysed RBCs and
WBC populations is poorly differentiated, resulting in increased WBC and LYM
counts. Select a decreased (-0.1, -0.2ml) volume if the WBC histogram seems to be
shrunk to the left, i.e. the different WBC populations are overlapped. This can inhibit
proper separation of WBC populations.
MEASURE
New
Options / Lyse volume
Change lyse
These are the + or – options you can
select from. See above description for
information.
Sampling depth
The analyzer requires a minimum of 2ml of whole blood in the sampling tube. ELite 3
can however be adjusted for low volume samples. This becomes necessary when
there is extremely low volume of sample in the tube.
This option also allows using sampling tubes with an elevated bottom. In this case
you have to set a higher sampling level to avoid the needle hitting the bottom of the
tube.
MEASURE
New
Options / Sampling depth
Select the necessary option so that the
instrument can take sample from the right
location.
Page 36
ELite 3, User Manual
Page 36/72
When all parameters are set, press the START button to save your settings and start
the measurement.
WARNING! Do not reach inside the instrument during operation,
as the needle can injure you!
5.2.3. Results
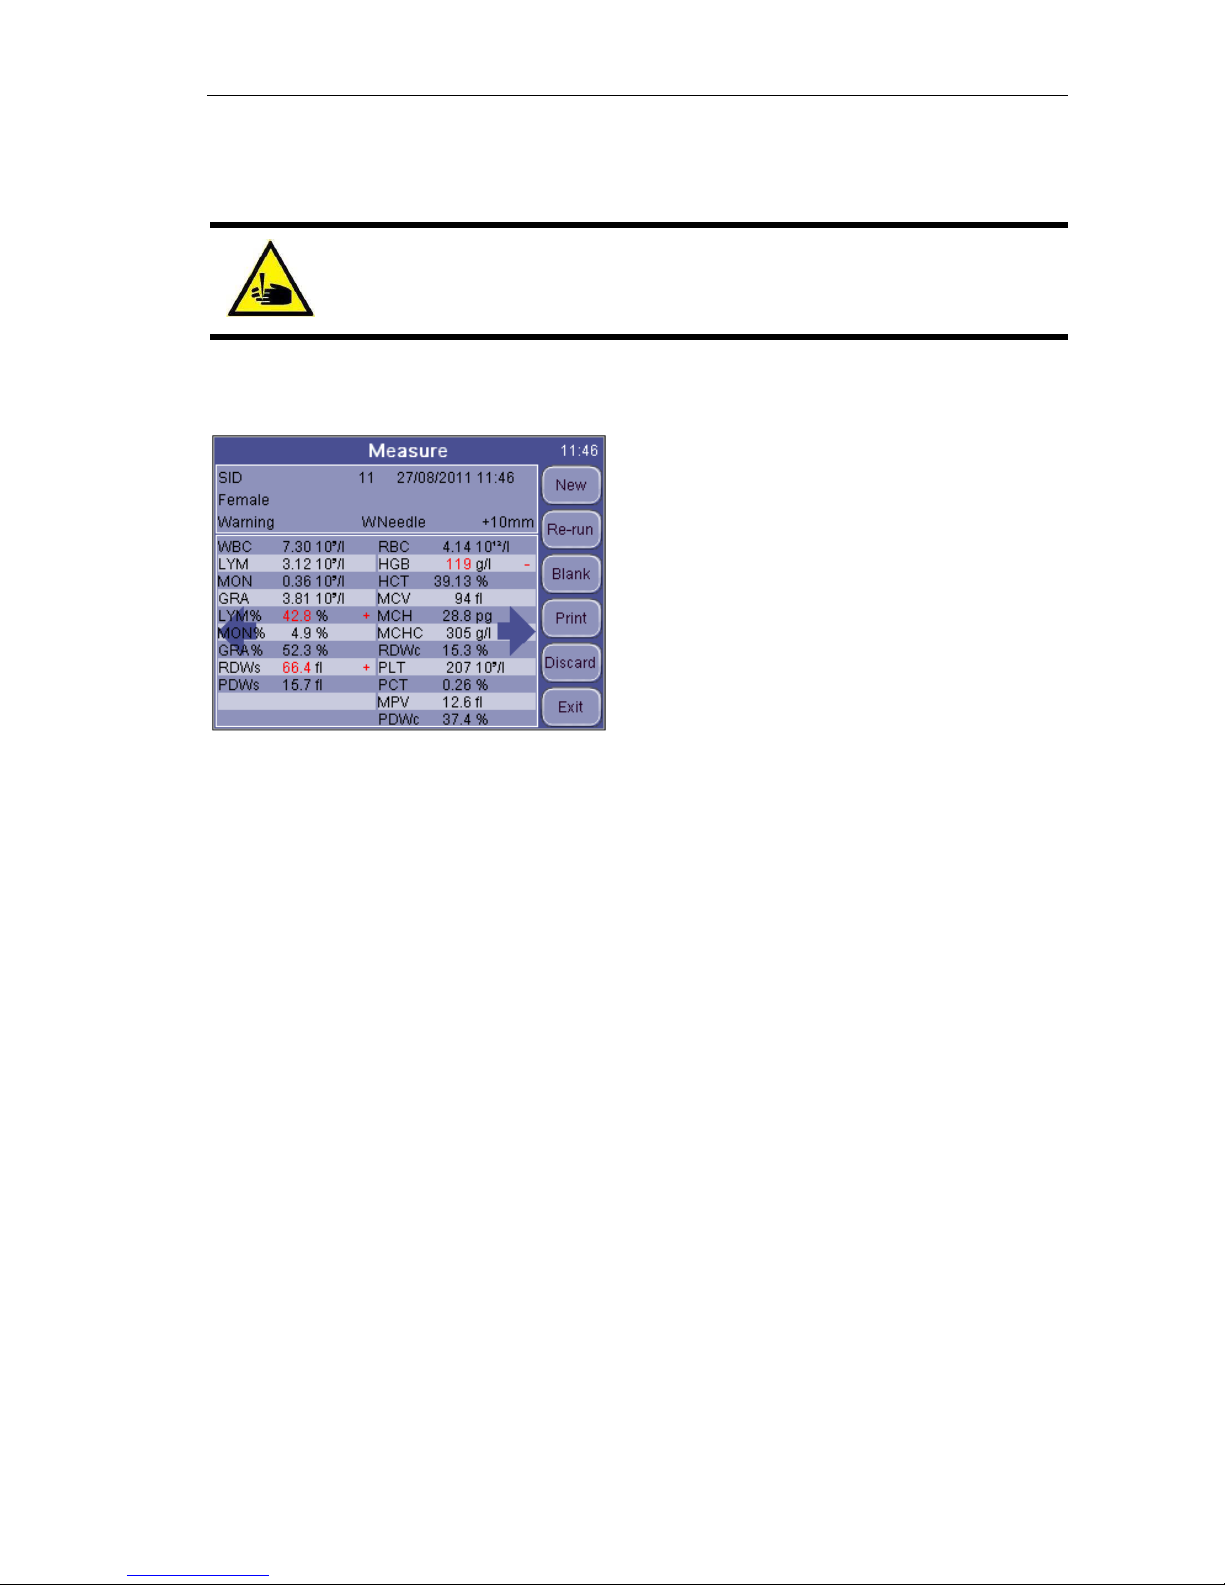
When analysis is complete, the
following screen is displayed, including
all measured and calculated parameters
as well as the WBC, RBC, and PLT
histograms.
Results, histograms and other data will
be stored automatically in the memory.
To look at histograms in detail, tap the
arrows to see further details.
Page 37
ELite 3, User Manual
Page 37/72
5.2.4. Warning flags
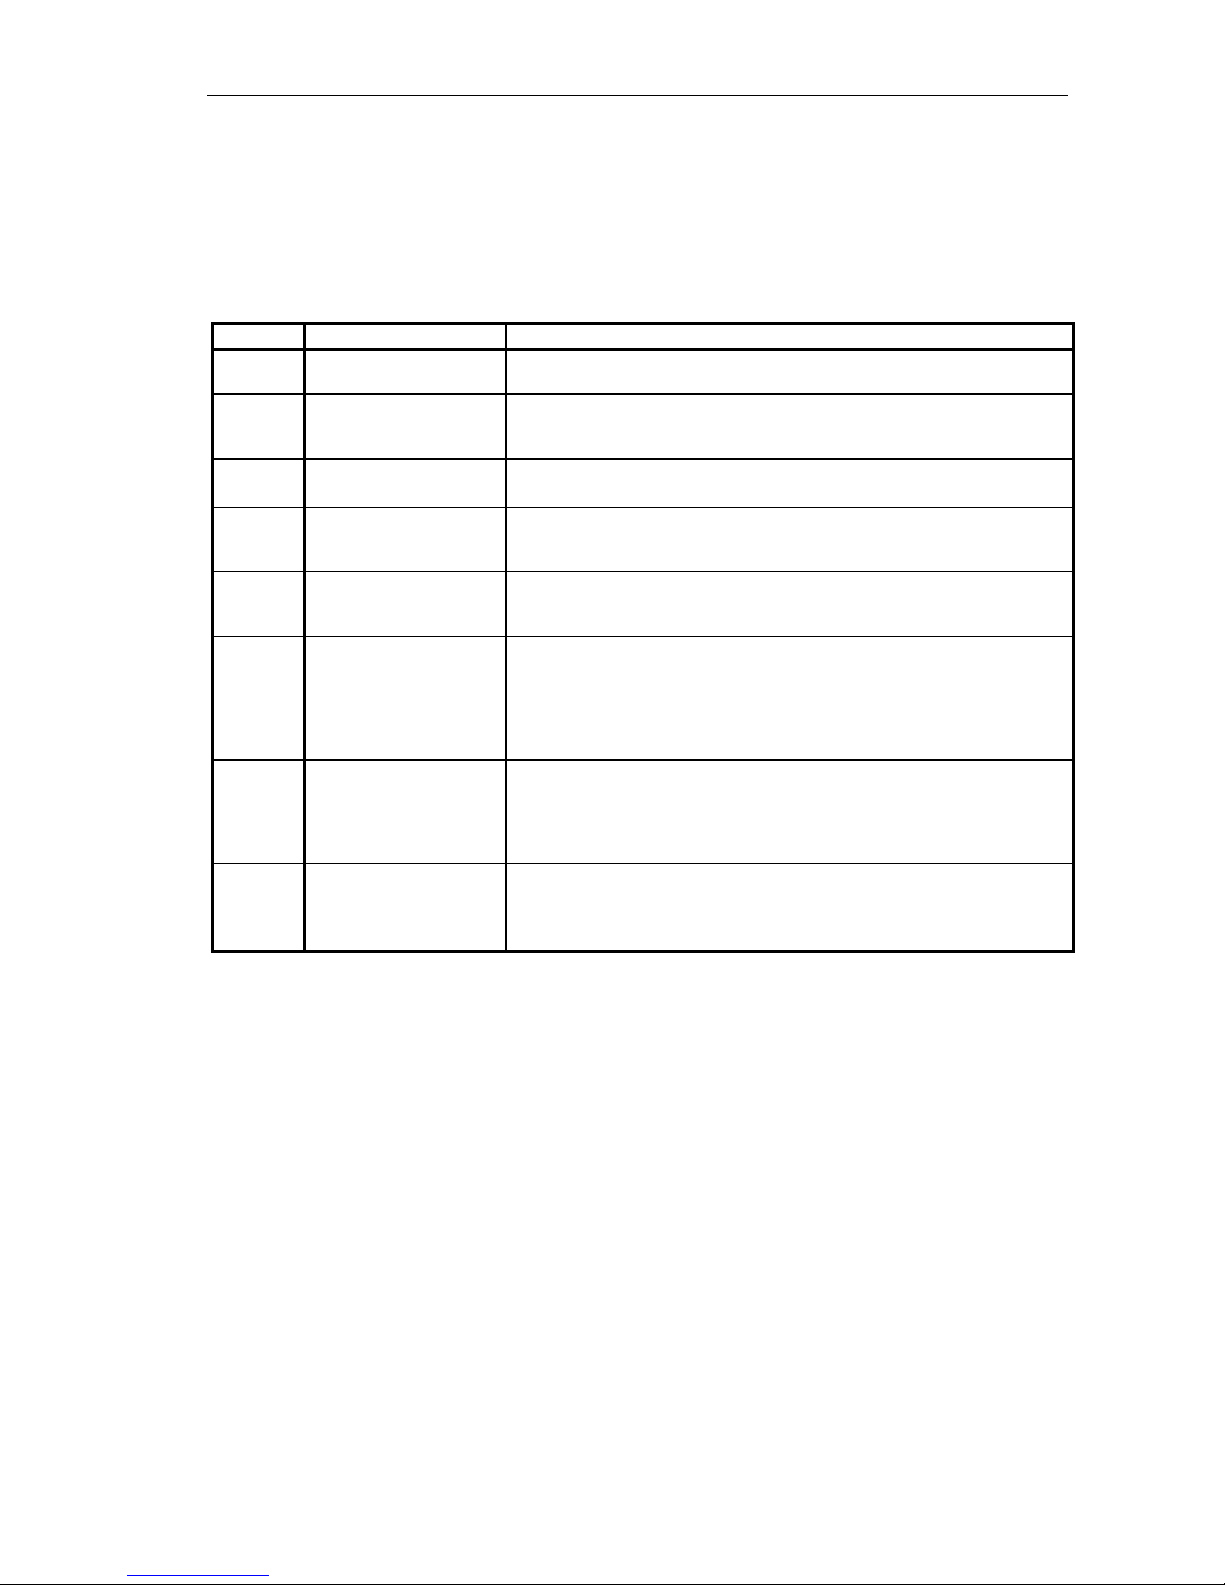
Analyzer SW displays warning flags for each individual measurement to notify user
about status of results. The following table summarizes warning flags and gives
explanation of their possible cause and a few hints to overcome the problem.
Flag Meaning Recommended user action
E
No WBC 3-part
differential
Possible lyse problem. May occur in pathological lymphocytosis.
H
HGB blank is high, or no
HGB blank
Repeat the blank measurement. If HGB blank is not stable there are
probably bubbles in the WBC chamber: Run a cleaning and try blank
again. Close the side door if open during measurement.
B
WBC blank is high, or no
WBC blank
Repeat the blank measurement, or run prime lyse and try blank again.
Possible lyse contamination, or noise problem.
M
linearity range exceeded
in WBC stage
The analyzer found that the cell count is higher than the linearity range of
the analyzer. Make a pre-dilution, and run the same sample in pre-diluted
mode
R
RBC cells found in
sample during WBC
stage
RBC cells were detected during the WBC measurement. Either the lyse
reagent is not effective enough (volume should be increased) or the
RBC’s in the sample are somewhat lyse resistive
W
WBC 3-part warning
Probably large PLTs or clumped PLTs are present in the sample. Usually
caused by the nature of the sample. cat and goat samples tend to clump.
Intensive, but careful mixing of the sample (e.g. Vortex) can help remove
the clumps. If the rerun sample gives the same results, consider that
WBC and NEU values seem higher because of the clumps. Lyse
modification can’t solve the problem.
L
RBC-WBC limit warning
Typically insufficiently lysed RBC’s interfere with the start of the WBC
histogram. Repeating the measurement with an increased lyse volume
should provide better separation. If the repeated run reports very similar
results then the MON and NEU results are VALID but the WBC and LYM
results may be higher because of interfering RBCs.
C
WBC clogging
Aperture clogging. Perform cleaning and repeat the measurement. If it is
a general problem, please contact your Service Personnel.
Low temperature reagents can cause it as well (mainly diluent), in this
case you will have to wait until they reach room temperature.
Table 4. Summary of warning flags related to WBC/HGB
Page 38
ELite 3, User Manual
Page 38/72
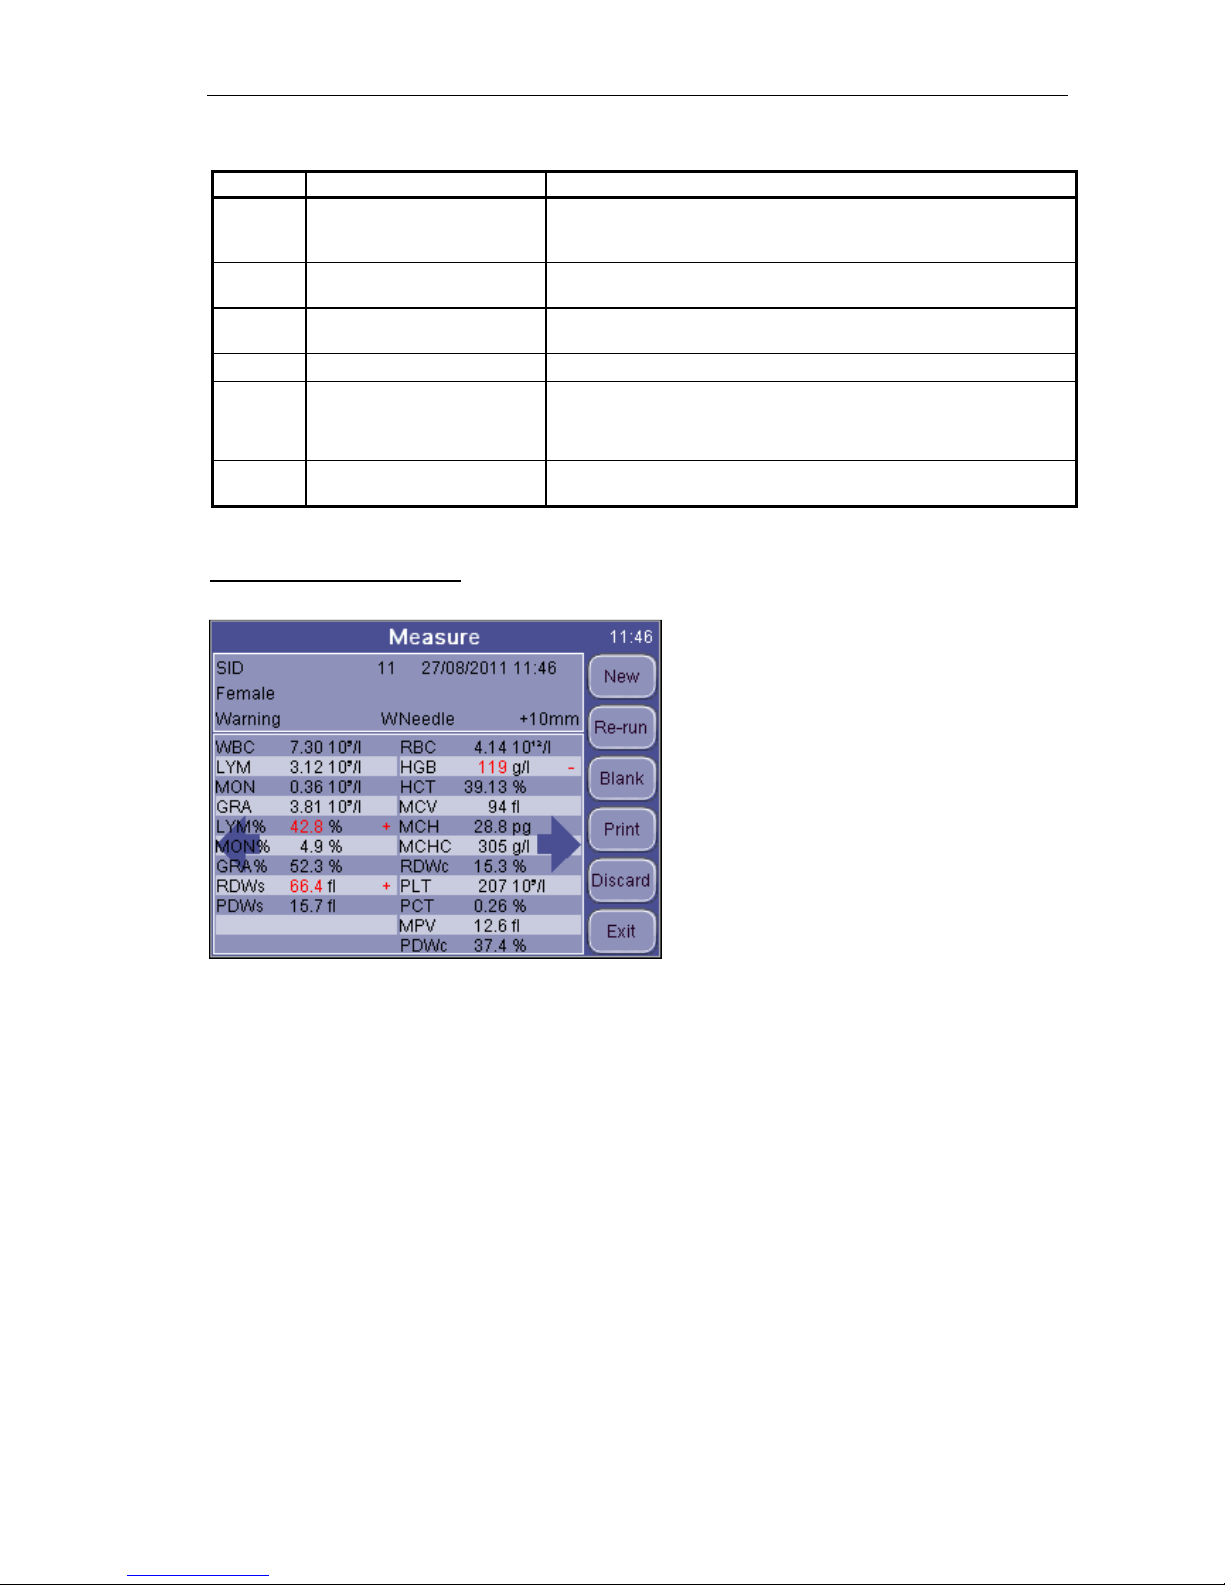
Warning flags in lowercase refer to RBC or PLT problems.
Flag Meaning Recommended user action
m
linearity range exceeded in
PLT/RBC stage
The analyzer found that the cell count is higher than the linearity
range of the analyzer. Make a predilution, and run the same sample
in pre-diluted mode
k
RBC peak error
Multiple or incorrect RBC peak(s) detected. Try to run the sample
again.
l
PLT / RBC limit not correct
PLT and RBC cells could not be separated, or the histogram
remained high in the PLT/RBC valley range.
c
RBC/PLT clogging
The same action as in case of the C warning flag.
p
PLT blank is high, or no PLT
blank
Run cleaning and repeat the blank measurement.
Diluent or system cleanliness problem. If it is stable high, replace the
diluent by opening a new tank.
b
RBC blank is high, or no RBC
blank
Same action as in case of warning flag p.
Table 5. Summary of warning flags related to RBC/PLT
Measurement conditions: when the flags are related to clogging (c, C), probably
hemolysing problems (E). Try to repeat the measurement.
The exclamation mark flag (!) near a
parameter shows some doubt during
the evaluation of that parameter.
The reasons can be: a high PLT blank
(PLT value will be marked), a case of
indefinite discriminator setting (default
location is used for some reasons,
related parameters will be marked),
etc.
Another flagging method is evaluation against the normal ranges. If some of the
parameters is out of range it gets a (-) flag if under the range, or gets (+) if over the
range. (And the given parameter will be highlighted as well.) You can customize
ranges for all kind of patients by setting the corresponding lower and upper ranges. If
you set 0 for a range limit, it will be not verified.
Page 39
ELite 3, User Manual
Page 39/72
5.2.5. Parameter Limits (Normal ranges)
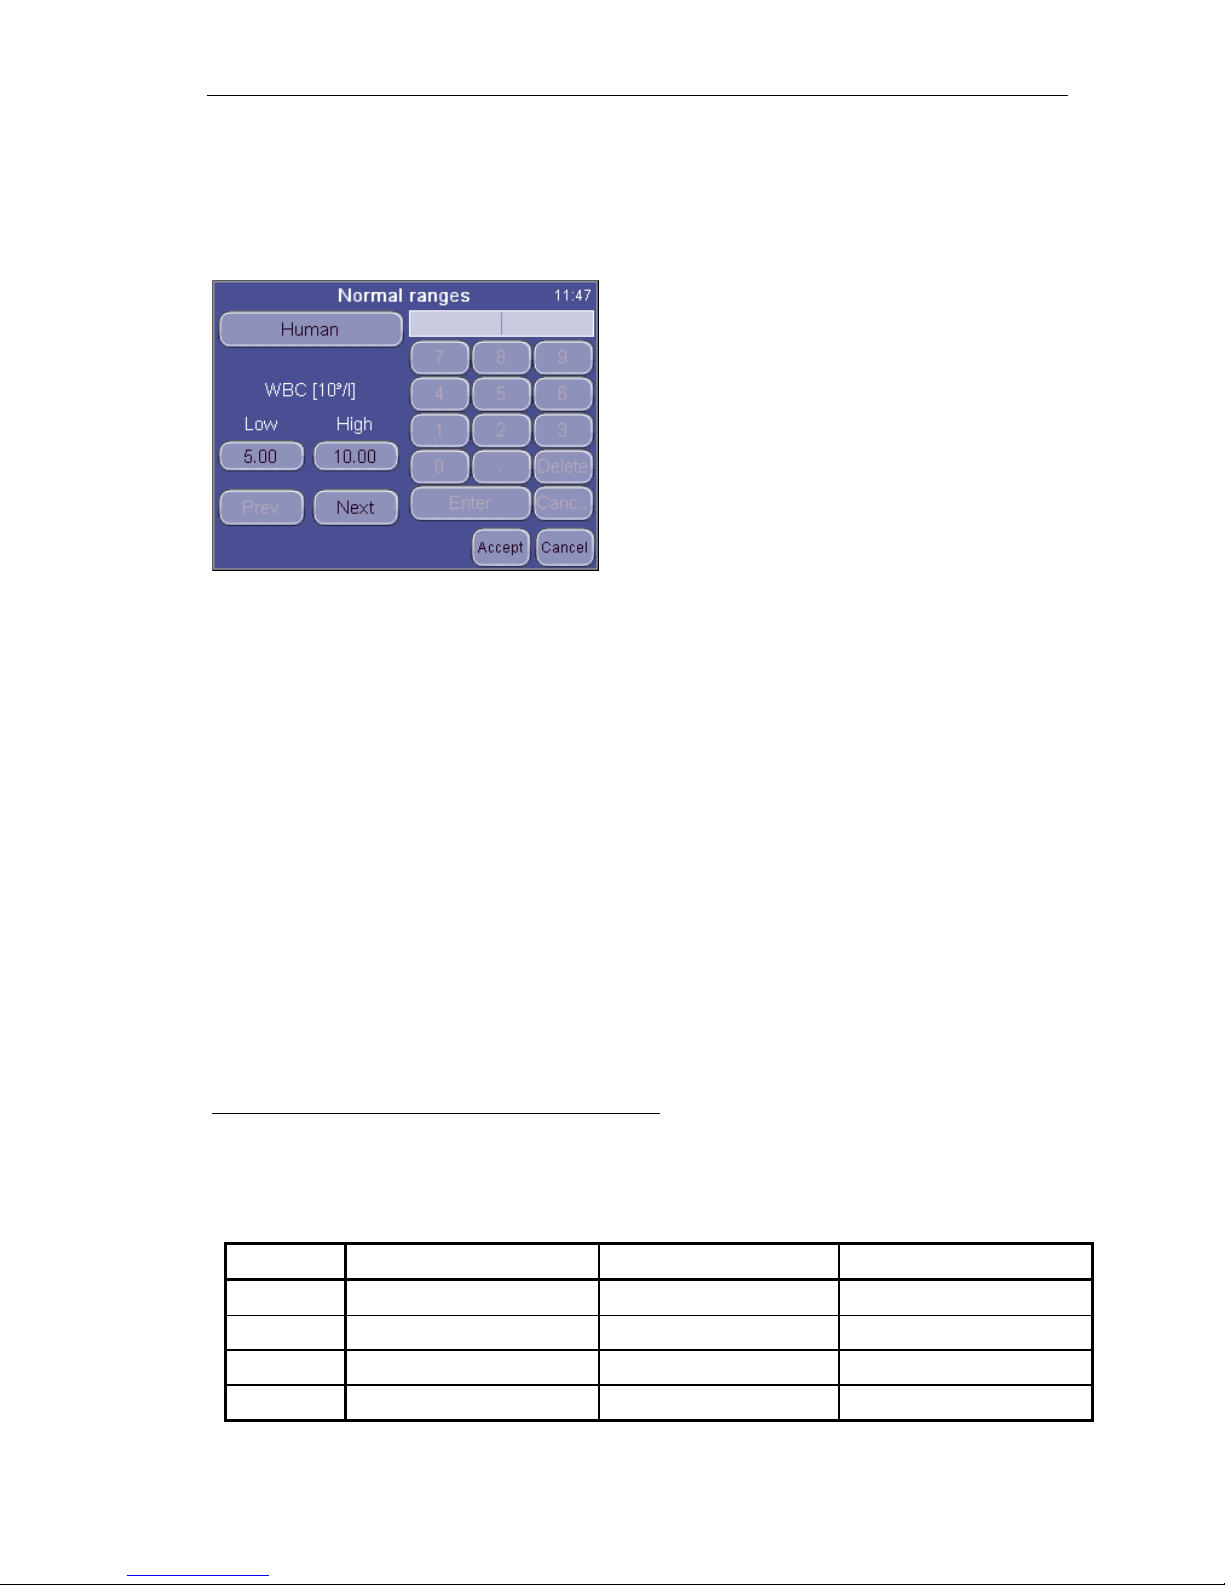
Limits define normal ranges. Outside this range, parameters will be flagged: – or +.
Settings
Measurement
Normal ranges
The “Human” (profile) button brings up the
profile selection menu
Prev and Next allow browsing among
parameters.
Parameter order: WBC RBC HGB HCT
MCV MCH MCHC PLT PCT MPV PDWs
PDWc RDWs RDWc LYM MID GRA LYM%
MID% GRA%
You can modify normal range of parameters: left column is lower, right column is
upper limit of normal range. Press Accept to accept changes, or Cancel to keep
previous settings and return to the settings menu.
5.2.6. Blank Measurement
The system uses blank measurements to check cleanliness of the system and
reagents. Run a Blank measurement:
• Daily once, before sample analysis
• After any reagent change (activated manually from MEASURE / MEASURE
BLANK menu).
• After the replacement of any hardware component that is closely related to the
measuring process (aspiration, dilution, counting, rinsing).
In MEASURE mode press the Blank button. If Blank measurement was not
acceptable, press DISCARD to discard blank result or repeat Blank measurement
until the results are acceptable. The analyzer is ready for sample analysis, and
displays an empty sample measurement screen.
There are 3 regions for blank value handling:
1. Optimal – all results are within acceptable ranges.
2. Blank is high – ! flag displayed at relevant results.
3. Blank exceeds acceptability – no results displayed.
Parameter 1. No flag at parameter
2. ! flag at result 3. E (error) flag at result
HGB 0-10 g/l 10 - 25 g/l > 25 g/l
WBC 0 - 0.5 x10³ cells/µl 0.5 - 1.0 x10³ cells/µl > 1.0 x10³ cells/µl
PLT 0 - 25 x103 cells/µl 25 - 50 x103 cells/µl > 50 x103 cells/µl
RBC 0 - 0.05 x10⁶ cells/µl 0.05 - 0.5 x10⁶ cells/µl
> 0.5 x10⁶ cells/µl
Table 6. Blank measurement ranges
Page 40

ELite 3, User Manual
Page 40/72
Accepted blank values are essential for proper calibration.
Perform calibration only if all blank values came in the first region (no flags or errors).
If analysis errors occur or blank measurement is too high, an E error flag appears
along with the affected parameter and “---“ is displayed instead of results. In this
situation, perform a cleaning (see Section 7.1.).
5.2.7. Using Pre-diluted Mode
Pre-diluted measurement mode allows to measure insufficient sample for normal
mode, or if some parameter is out of the linearity range (WBC = 300 x 103 cells/µl).
Perform an external pre-dilution of the sample using clean isotonic saline solution, or
diluent reagent. Dilute the sample to 1:5 ratio (1 part sample to 5 part diluent), using
a clean sample vial. Mix it well.
To perform the analysis on a pre-diluted sample:
1. In Main menu select Measure
2. New
3. In Options, select Pre-diluted mode
4. Put pre-diluted sample into the sample adapter
5. Press START button. The analyzer will automatically calculate the results with
the 1:5 pre-dilution factor.
Page 41
ELite 3, User Manual
Page 41/72
6. DATABASE
Patient results are stored in the memory in chronological order, and can be retrieved
at any time. Data storing capacity is 1000 measurements, including the complete
parameter list, histograms, flags, sample data, and date/time of measurements. If
memory is full, newest (actual) record will overwrite oldest record.
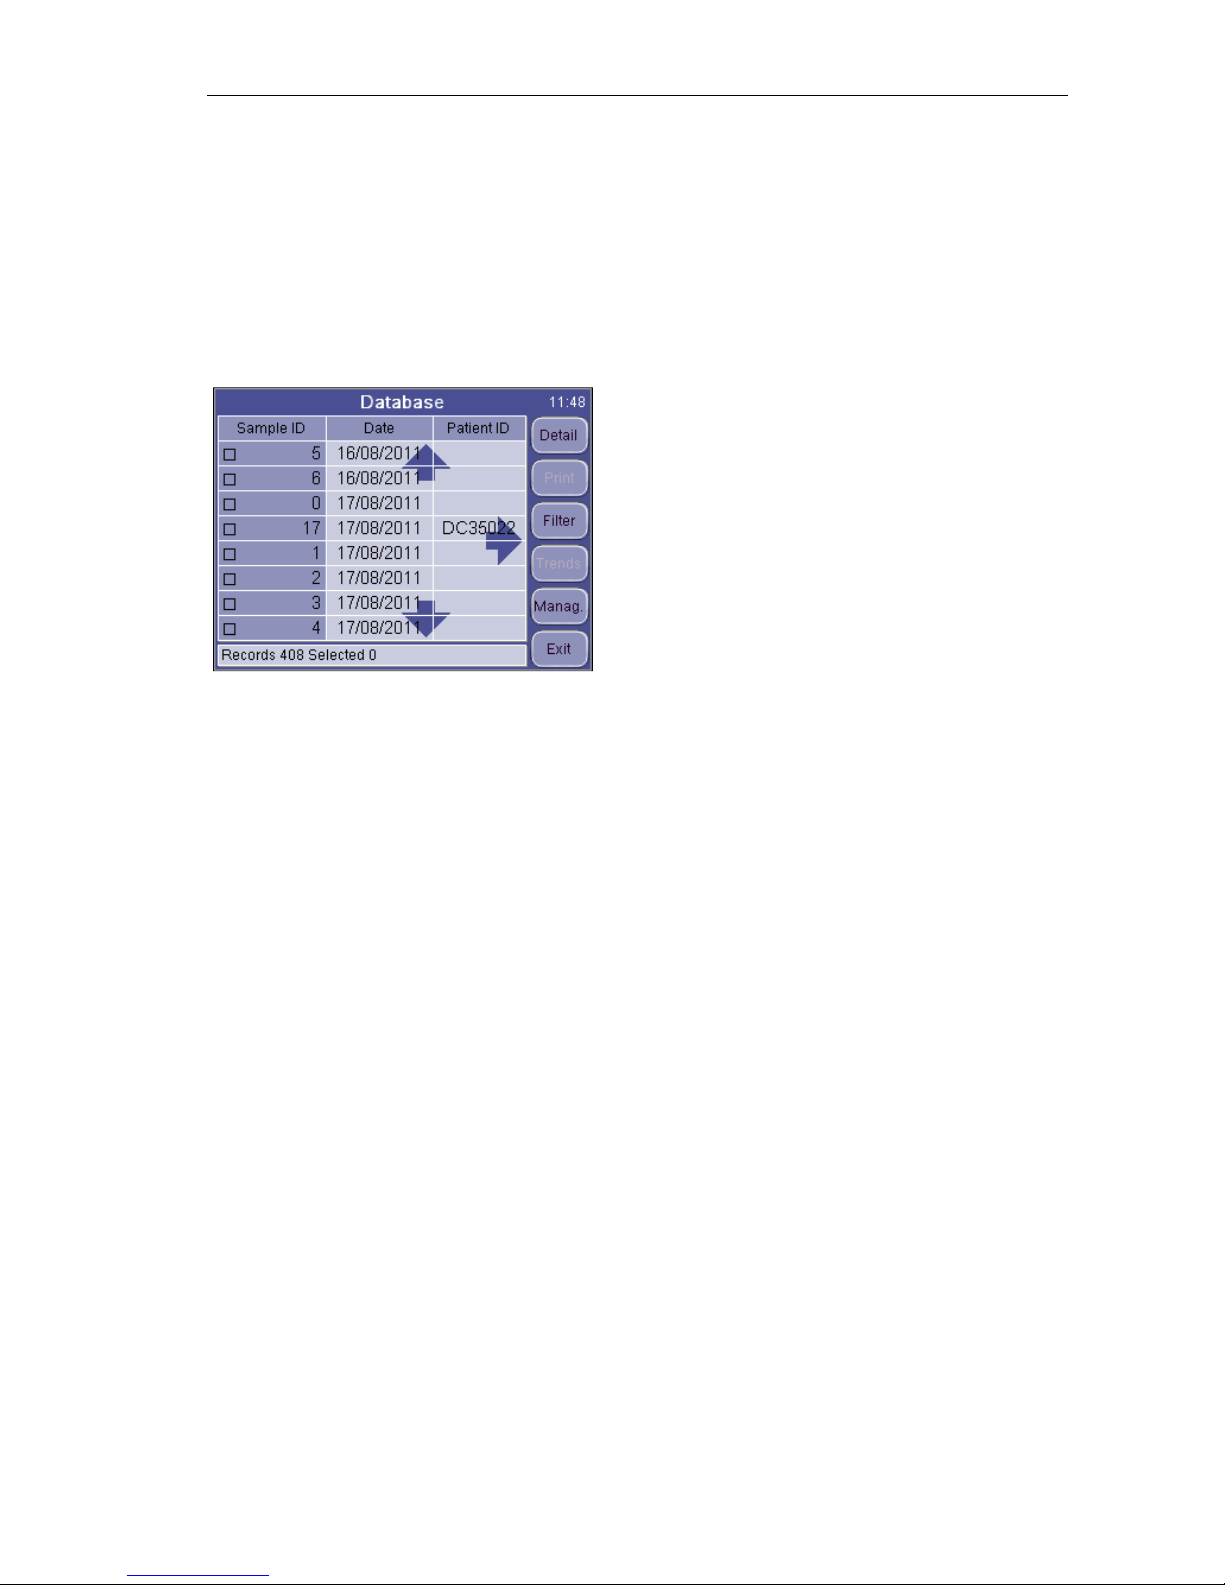
Select Database to access records stored in the memory of the analyzer. The first
screen that appears shows the most recent saved results.
DATABASE
Left and right arrows access remaining, non-
visible parameter results, up and down
arrows scroll among records individually.
Menu key opens up local menu for accessing
further functions (see below).
Exit key returns to MAIN menu.
Each line starts with a checkbox and the Sample ID displayed. A filled checkbox
indicates that a specific record is selected for further operations.
The bottom row of the screen shows the status line. This line provides information
about the number of records stored in the database and the number of records
selected.
As it can be seen on the screen, some buttons are not active (Print, Trends,
Manage). They become active when at least one record is selected.
Detail will open up detailed data (parameters, histograms, flags) of the record at the
top of the list.
Print will send the result to the selected printer (USB or internal)
Filter offers tools to select records from the database. You can select based on
Sample ID, Patient ID, measurement time stamp, sample type.
Trends offers a statistical tool to monitor variation of parameter values. It is an ideal
tool to track variation of parameters of a specific patient with time.
Manage opens up a menu where data can be deleted, archived or transmitted to a
computer.
Exit returns to the main menu.
Page 42
ELite 3, User Manual
Page 42/72
6.1. Database services
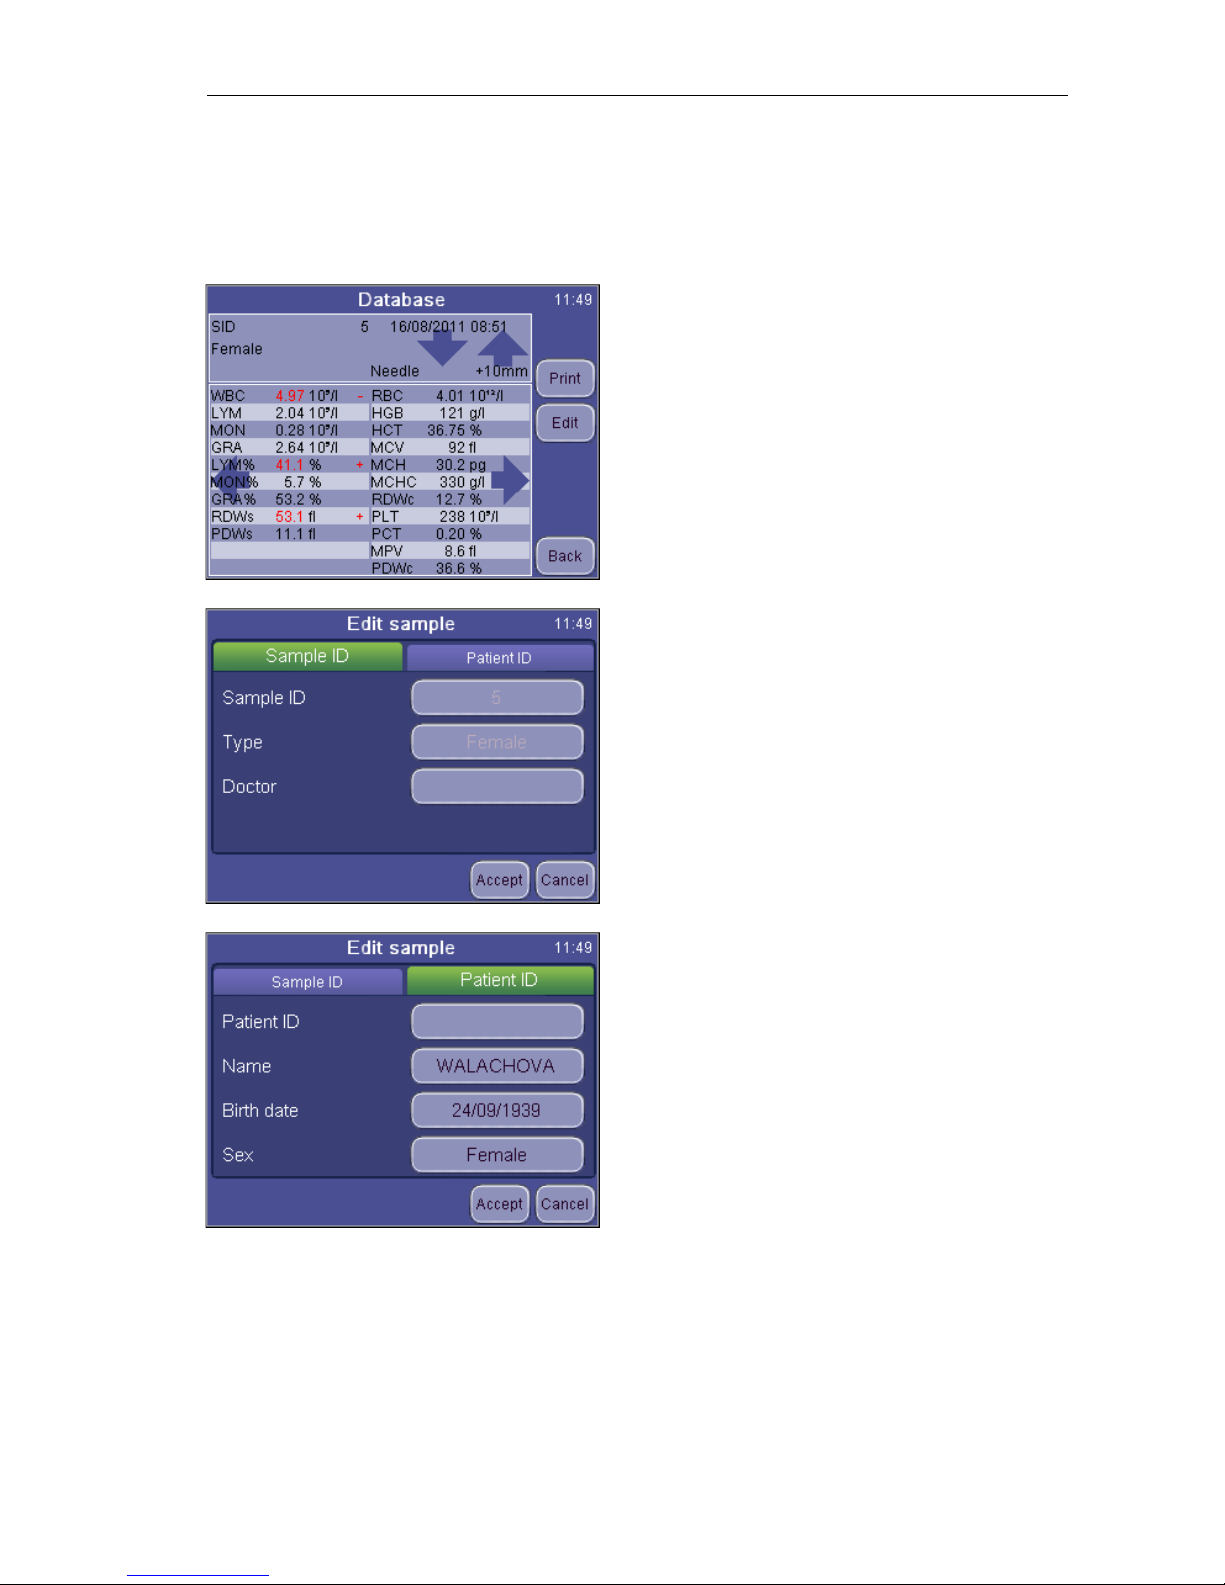
Detail will open up the parameter and histogram view of a record.
DATABASE
Detail
Print sends the record to the printer.
Edit opens up the dialog for data
manipulation of the record
Back returns to the Main menu
DATABASE
Detail
Edit
When looking at record from the database
view, some fields are not editable (Sample
ID, sample type). These can only be set
before running the sample. Patient ID tab
allows entering further data.
DATABASE
Detail
PID
This option allows editing patient
information. When you push the ACCEPT
button, your changes will be saved.
The Sample ID tab returns to the Sample ID
screen (above).
Patient ID can be 32 characters long and the name of the patient can hold 40
characters.
Page 43
ELite 3, User Manual
Page 43/72
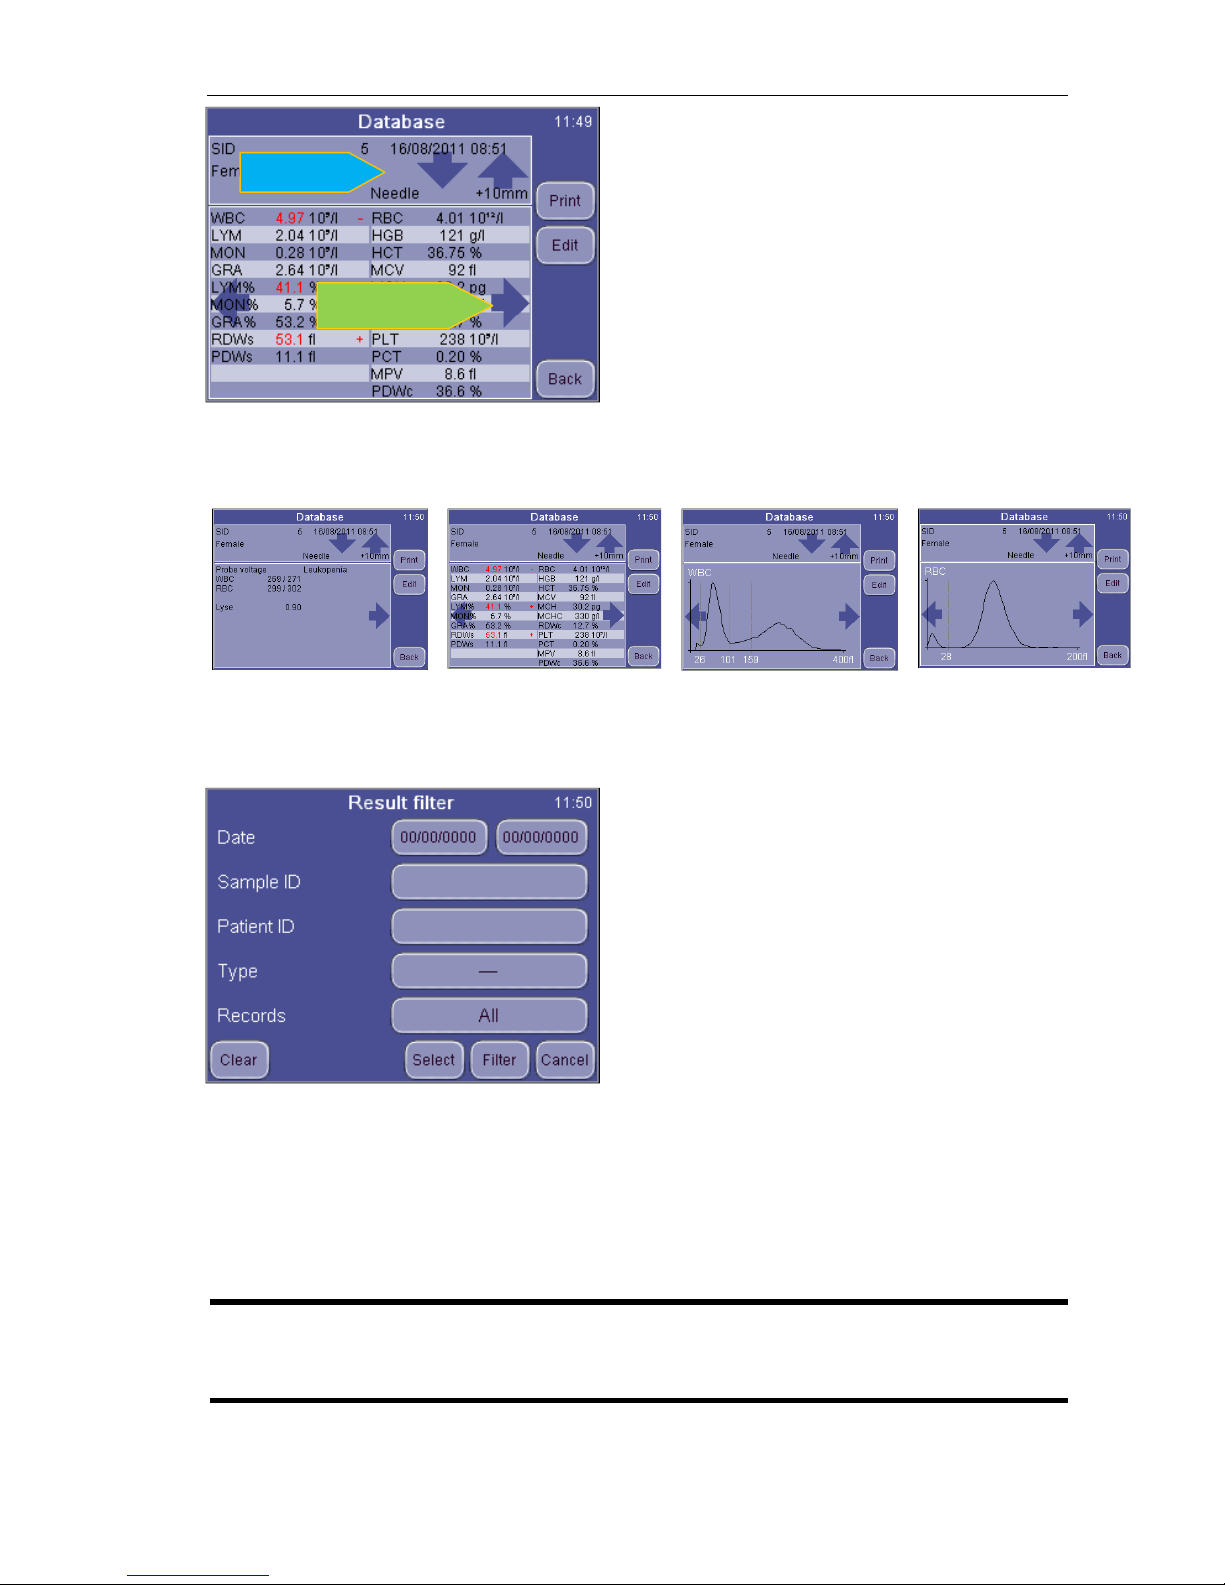
DATABASE
Detail
Arrows
Te database record view allows browsing in
the database, and you can also look at
histograms and various diagnostic
parameters of the sample.
The arrows in the sample data field (indicated with BLUE marks) allow browsing in
the database. Tapping them brings up the next or the previous record in the
database.
The arrows marked with GREEN color allow looking at various panels of the result.
Diagnostic flags Parameter view WBC histogram RBC histogram
6.2. The Filter / Select function
DATABASE
Filter
Date allows defining the start and end dates
for the search.
Sample ID and Patient ID can narrow the
search. If you enter “5” for sample id, then
all records, whose Sample ID contains the
expression (“5” in our case) will be selected
(5, 15, 451, etc..)
Using Type you can further narrow the list of samples.
With Records you can define to use All or already selected results for the search.
Clear will reset all fields.
Select will return to the table view, and will fill the checkboxes of records matching
the criteria.
Filter will also return to the table view, but only records matching the criteria will be
shown. The status bar of the table view will show: “Filter on”.
NOTE There is an AND relation between the fields. If you fill in more than
one field, then you can narrow the search: e.g. measured between
2009/08/10 and 2009/09/20 AND having a sample ID “1221”
UP / DN
Histograms
Page 44
ELite 3, User Manual
Page 44/72
6.3. Printing records
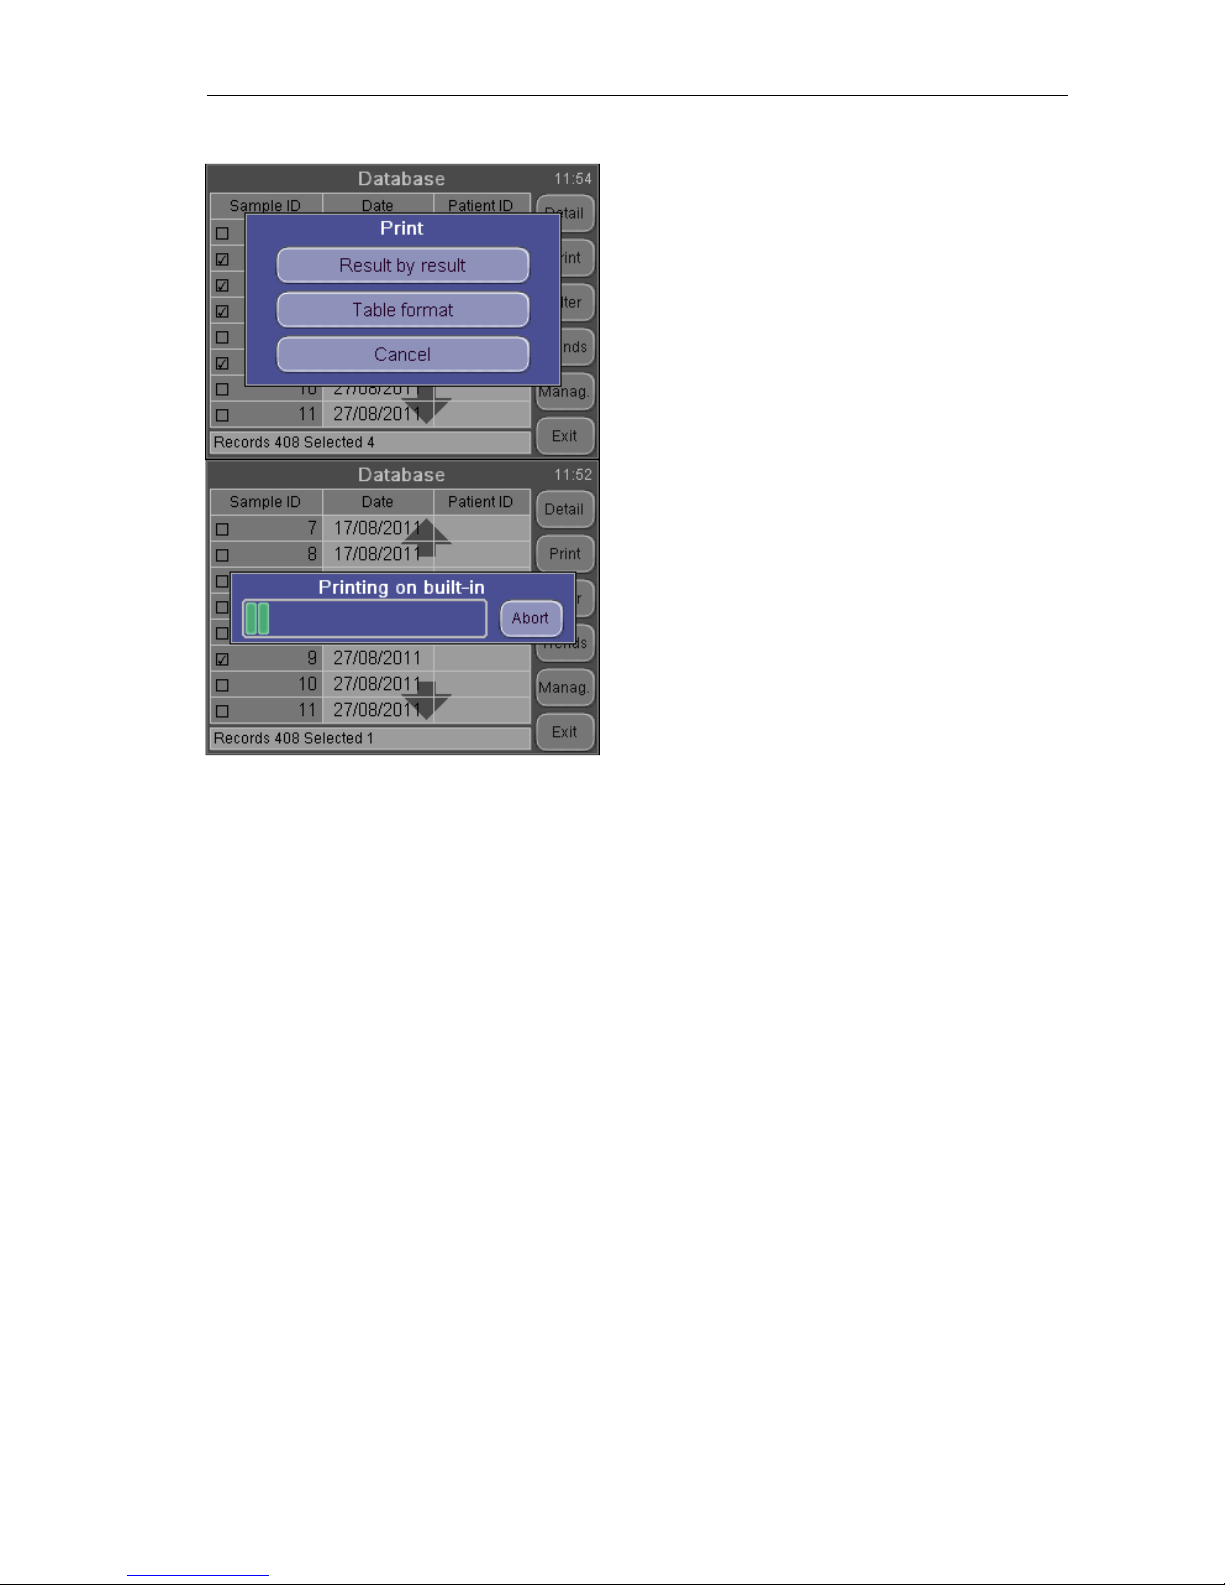
DATABASE
Print
If there is no record selected, then the
software prints the actual (top / detail view)
record.
If there is more than 1 record selected, then
you will be able to choose between
individual printing (Result by result), or
Table format format if external USB
printer is set.
Using built-in printer only the result-by-result
printing is available.
Abort, Cancel aborts the operation.
Page 45
ELite 3, User Manual
Page 45/72
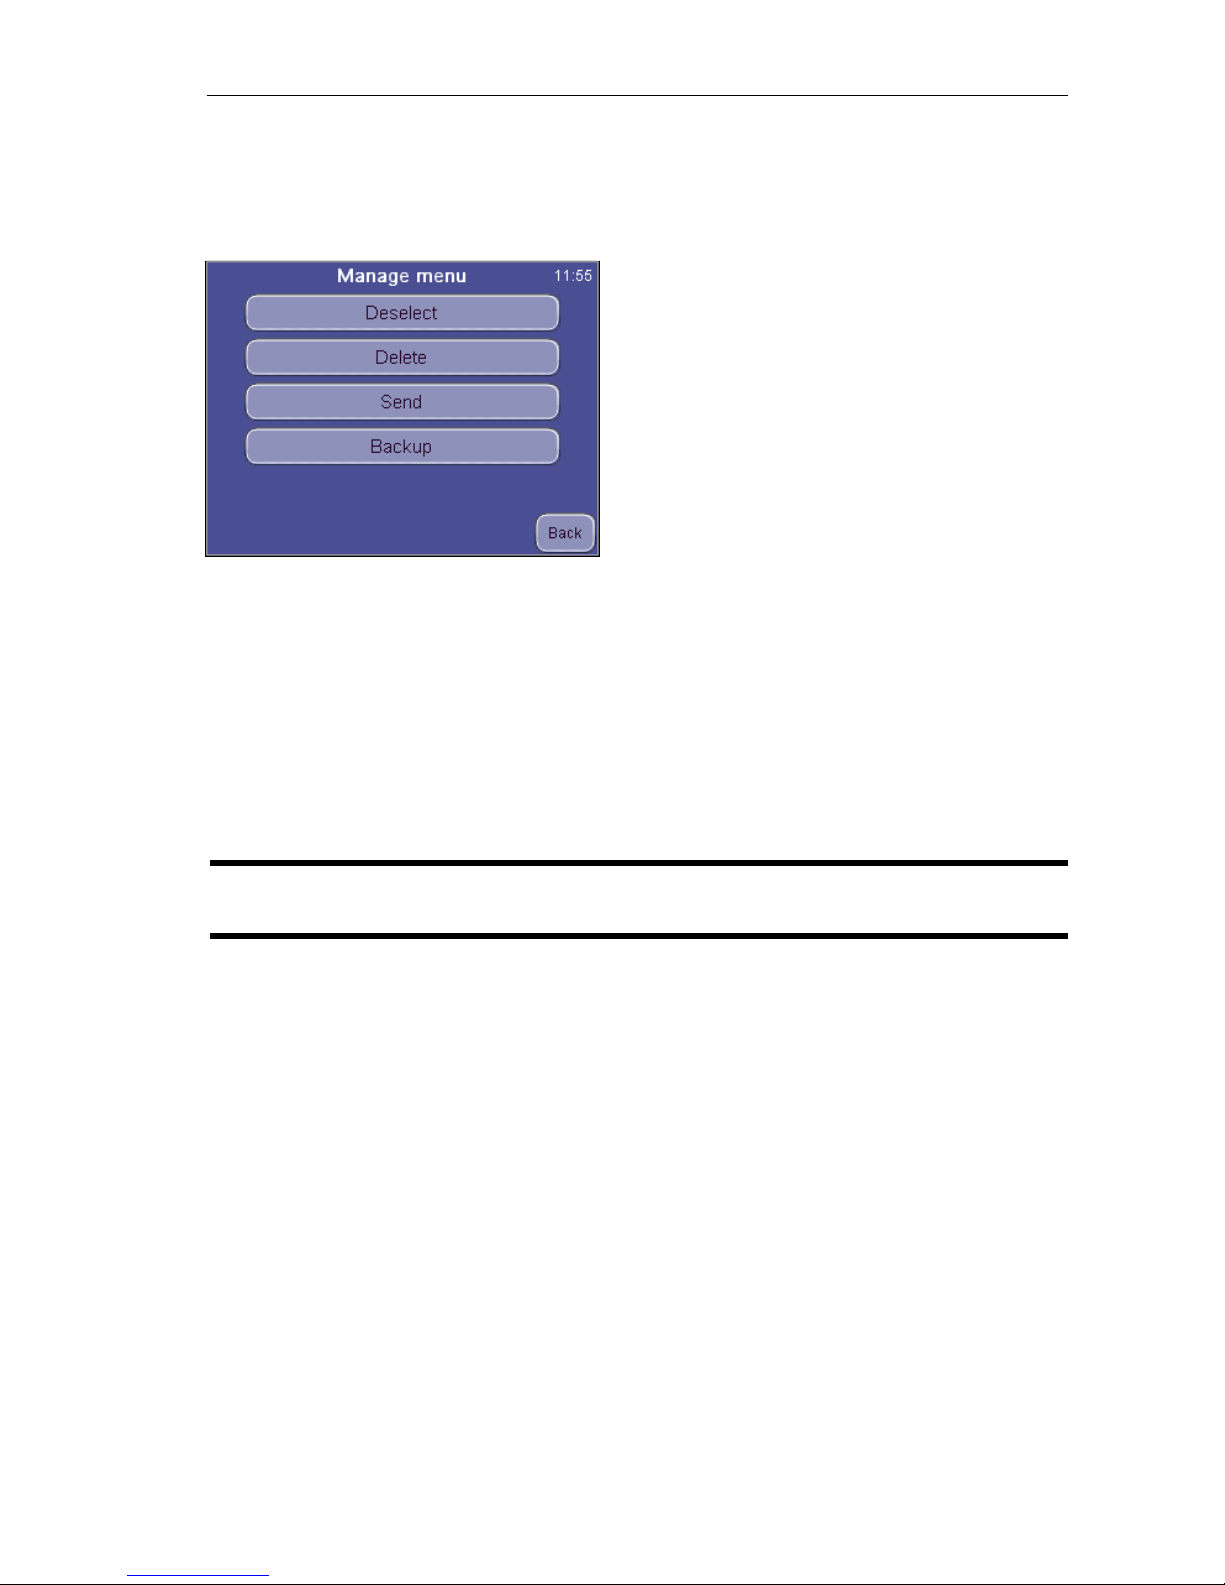
6.4. Manage records
The Manage button becomes active if there is more than 1 record selected in the
database. Pressing Manage brings up the following screen:
DATABASE
Manage
Back aborts the operation and returns to the
table view.
Deselect will clear the checkboxes of all selected records.
Send will transmit record(s) to a connected computer. A progress bar shows the
status of the process.
Delete will permanently delete selected record(s) from the database. You have to
confirm this operation.
Backup will save selected record(s) to an external USB memory device. A progress
bar shows the status of the process.
NOTE Do not remove the USB memory device as long as its status LED
is blinking, because it can cause data loss on the memory device.
Page 46
ELite 3, User Manual
Page 46/72
7. MAINTENANCE
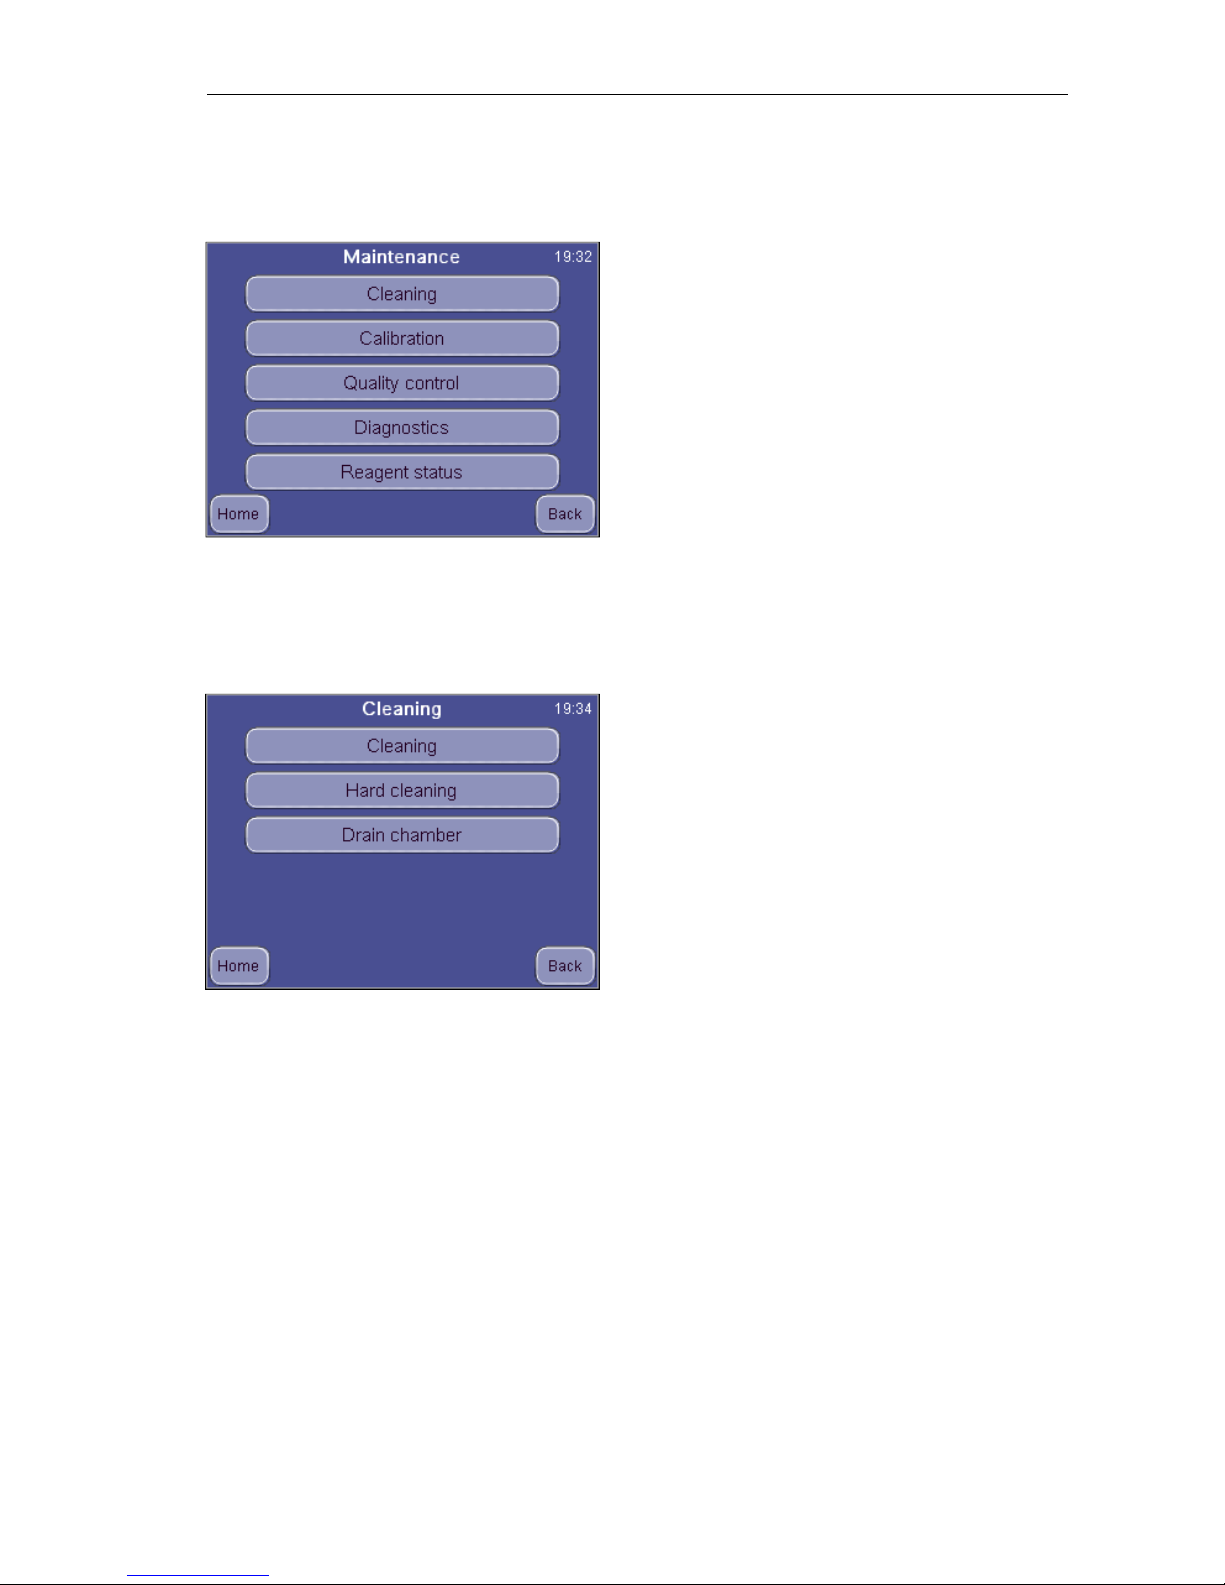
In the Maintenance menu you can initiate procedures, for cleaning, calibration or
specific performance analysis.
Maintenance
Touch menu item of the desired function.
Home will return to the Main menu
Back returns to the previous level.
7.1. Cleaning
Cleaning functions allow cleaning of fluidics to reduce blank value by removing
contamination from tubing, chamber and valves.
Maintenance
Cleaning
Press HOME to go to Main menu.
Press BACK to go back to previous menu.
Cleaning starts a washing cycle using the system cleaner reagent connected to the
analyzer. This action is recommended if clogging problems are experienced (C or Q
error flag), or the blank is high.
Hard cleaning initiates a process that uses a light solution of Erba Hypocleaner CC,
and washes the sampling needle and related tubing with it. The instrument will ask
for the cleaning solution in a sampling tube.
Drain chamber will empty the measurement chamber. You can use this option to
manually add cleaning solution to the chamber when necessary (extreme
contamination in the chamber).
Page 47
ELite 3, User Manual
Page 47/72
7.2. Calibration
The analyzer stability can be monitored with Erba Hematology Control - control
blood. Performing QC determinations regularly verifies continued optimal
performance.
It is recommended to do calibration in the following cases:
1. At analyzer installation, before beginning the analyses.
2. After replacing any component, related to the process of dilution or
measurement.
3. When quality control measurements show any systematic error (bias) or they
are outside predefined limits.
4. At regular time intervals (determined by the lab itself).
5. If you want to use the instrument in Pre-diluted mode (separate pre-diluted
calibration factors are available).
Calibration can be performed in two ways:
1. User can enter calibration factors – without any calibration measurements –
using the numerical keypad.
2. 1, 2, 3 or more measurements of control blood or calibrator, with known
parameters. In this case, the instrument automatically calculates new factors
using the following formula:
New factor =
Assigned value x Stored factor
Measured value(s) (or average of those)
CAUTION! New calibration will invalidate the previous factors.
Old values can be checked at Calibration History.
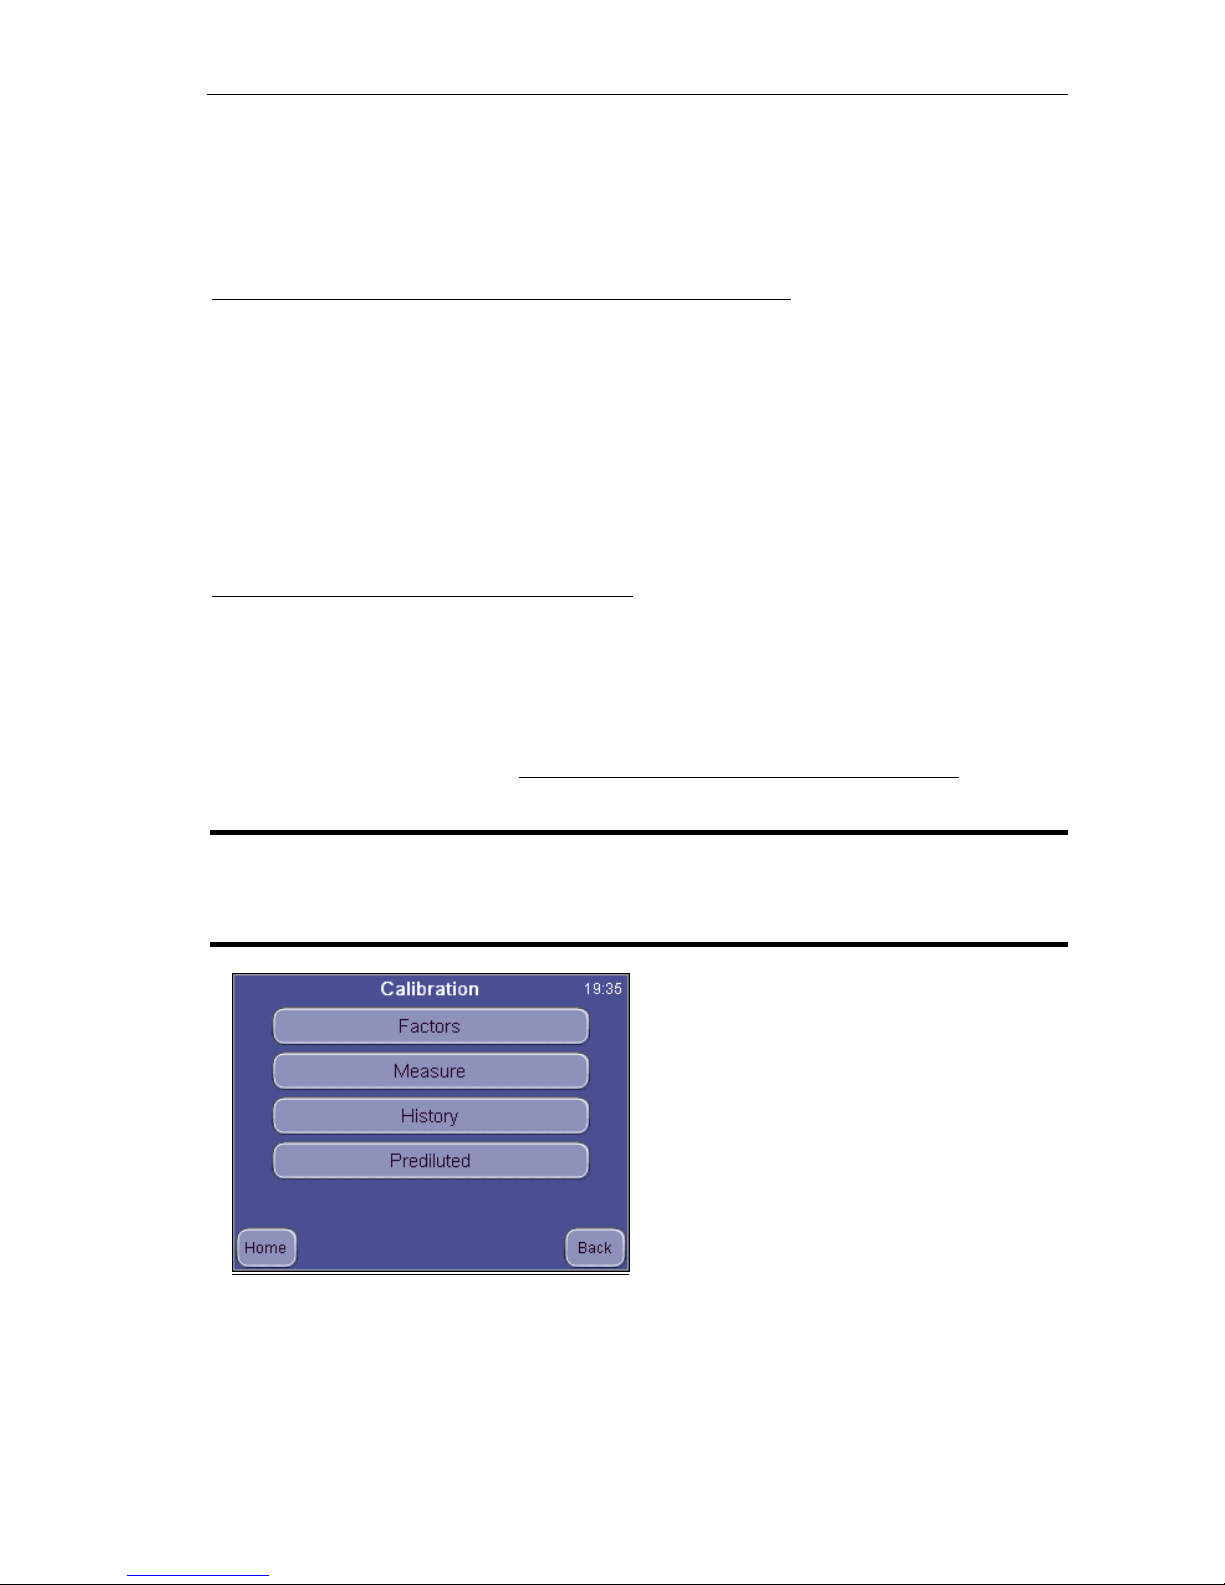
Maintenance
Calibration
You can select the following functions:
Factors: enter calibration coefficients
manually
Measure: define target values and start
calibration measurements
History: display past calibration factors.
Pre-diluted: calibration Factors and
History for pre-diluted measurements.
Press HOME to go to Main menu.
Press BACK to go back to previous menu.
Page 48
ELite 3, User Manual
Page 48/72
7.2.1. Calibration with factors
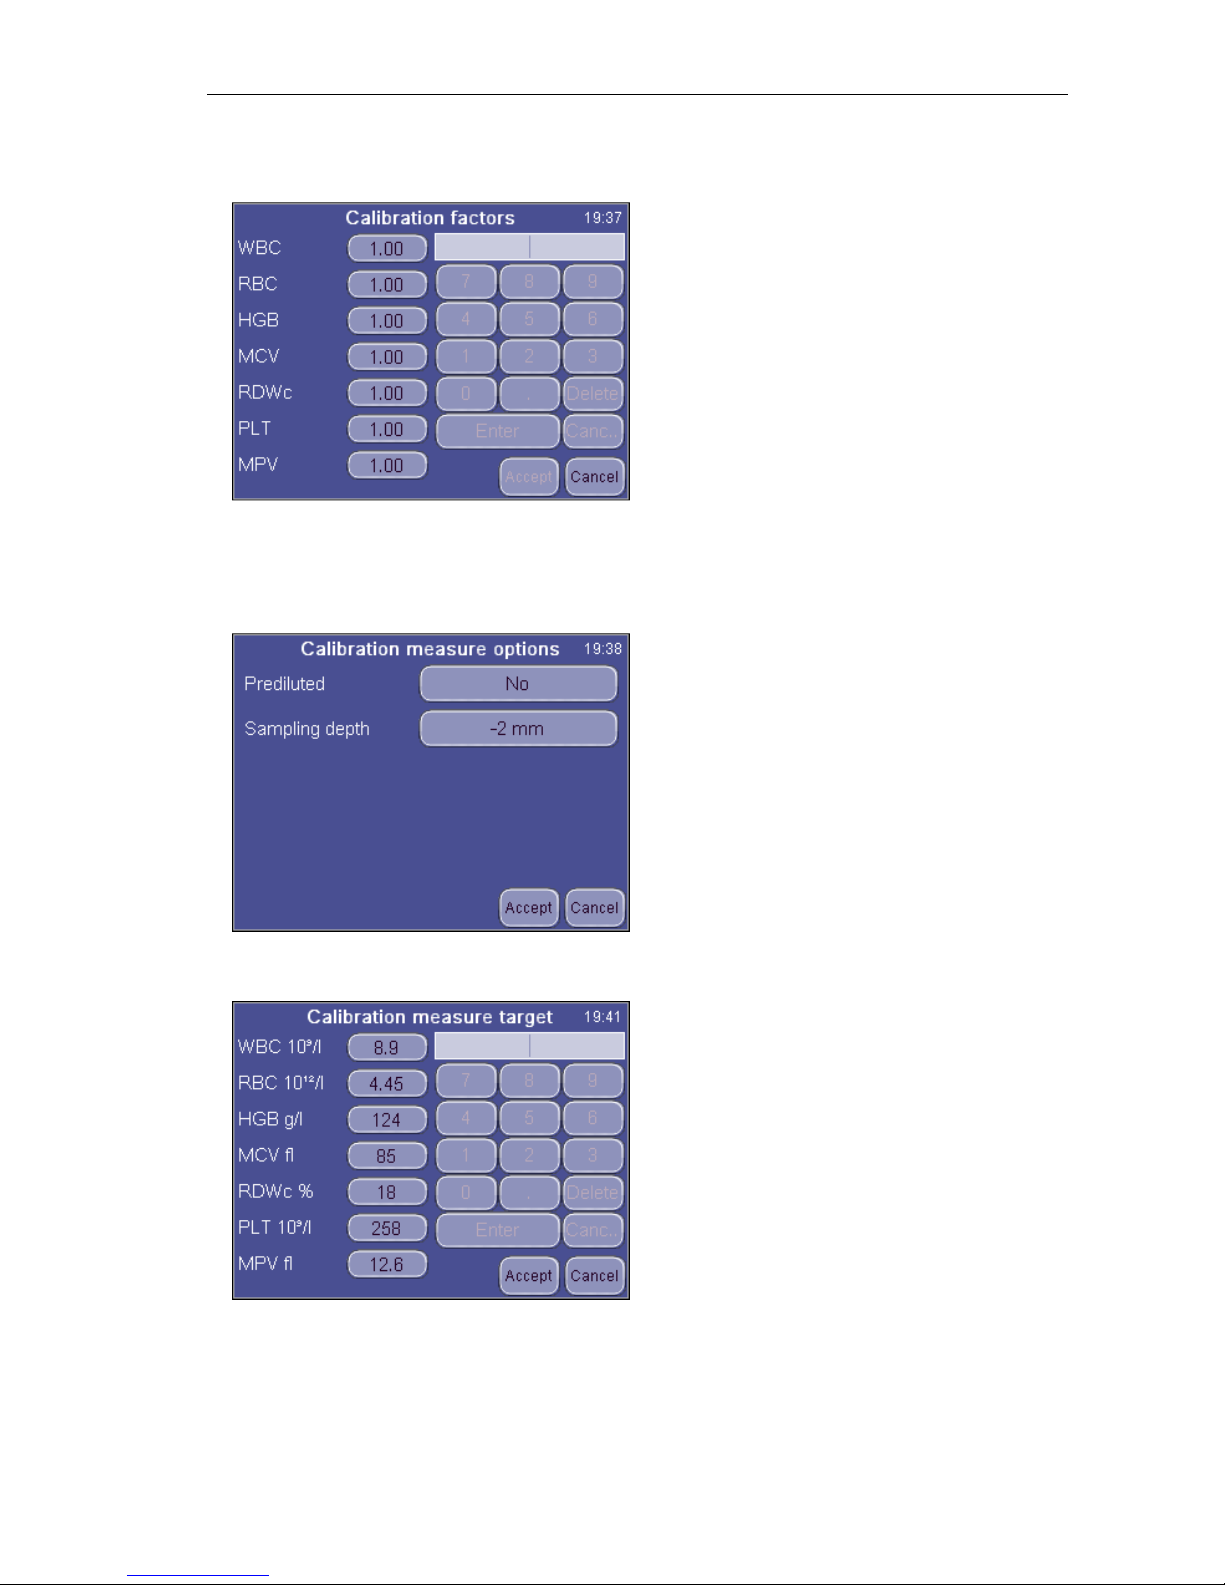
Factor based calibration allows adjustment of primary parameters with a factor.
Maintenance
Calibration / Factors
Press white data field to modify calibration
factor. A numeric input screen will show up
so that you can enter values.
All values must be in the 0
.8…1.2 range.
Press Accept to proceed with new
settings, or Cancel to keep values
unchanged.
7.2.2. Calibration by measurement
The analyzer can run calibrator, and perform calculation of factors automatically.
User can decide the number of measurements to use for calibration.
Maintenance
Calibration / Measurement
Prior to starting the calibration
measurements, you have to define some
basic parameters for the upcoming
measurements.
As the next step, target values from the assay sheet of the calibrator or control must
be entered before measurement.
Maintenance
Calibration / Measurement
Prior to starting the calibration
measurements, you have to define some
basic parameters for the upcoming
measurements.
Page 49
ELite 3, User Manual
Page 49/72
Target values for calibrated parameters can be set within the following ranges:
Parameter
Low limit
High limit
WBC 1.0 30.0
RBC 1.00 8.00
HGB g/l 30 300
MCV 50 120
RDW CV 10 50
PLT 30 800
MPV 5 15
PDW CV 5 50
HCT 0.1 0.6
PCT 0 2
Table 7. Calibration target ranges
When all parameters are set, press Accept key.
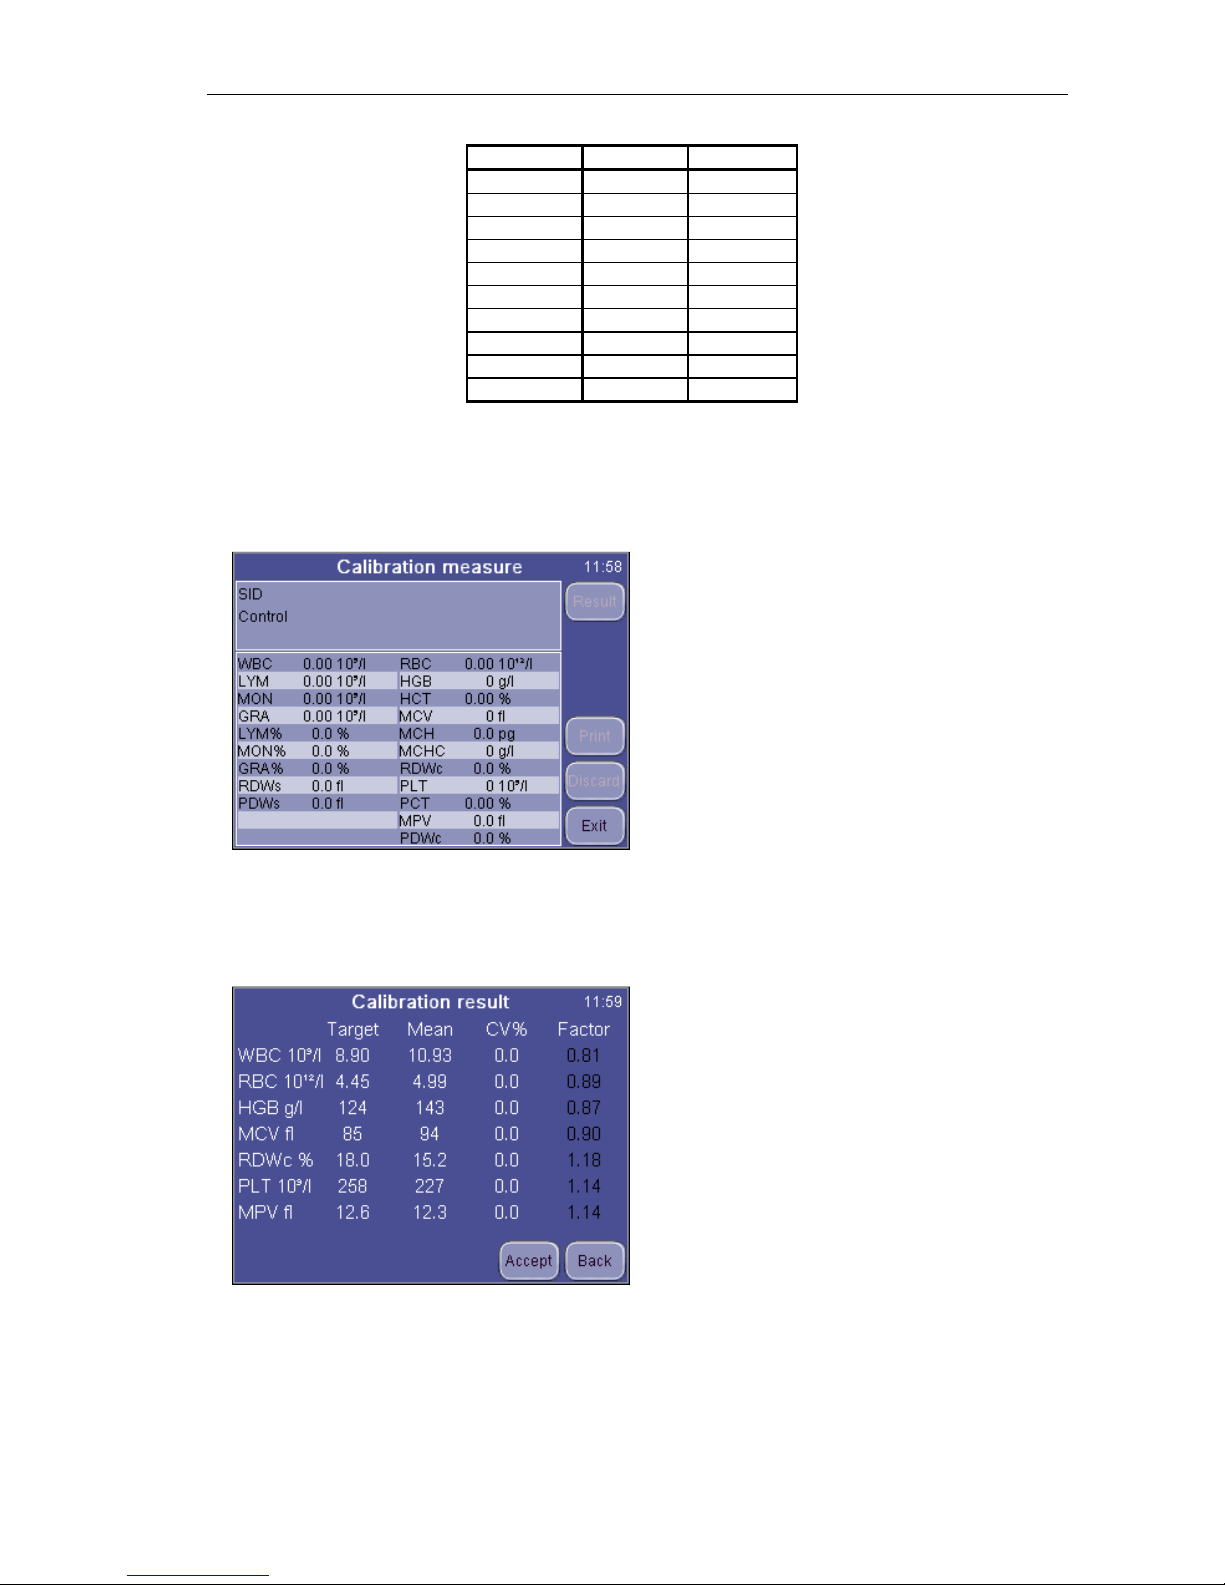
The display shows Calibration measurement at top.
Maintenance
Calibration / Measurement
Insert the sample tube to the sample door
and press the START button.
Exit will abort the operation.
Calibration runs are saved automatically. If you find that a result should not be used,
use the Discard button to delete the measurement so that it is not used for
calibration.
Maintenance
Calibration / Measurement / Result
Result will display the average of each
parameter of accepted measurements
compared to the target value and the
calibration factor calculated.
Accept saves new factors and aborts
calibration
Back will return to the calibration
measurement screen so that you can
measure more samples for calibration.
You can compare target and measured values, observe CV and see how the
calibration factor would change.
Maintenance
Page 50
ELite 3, User Manual
Page 50/72
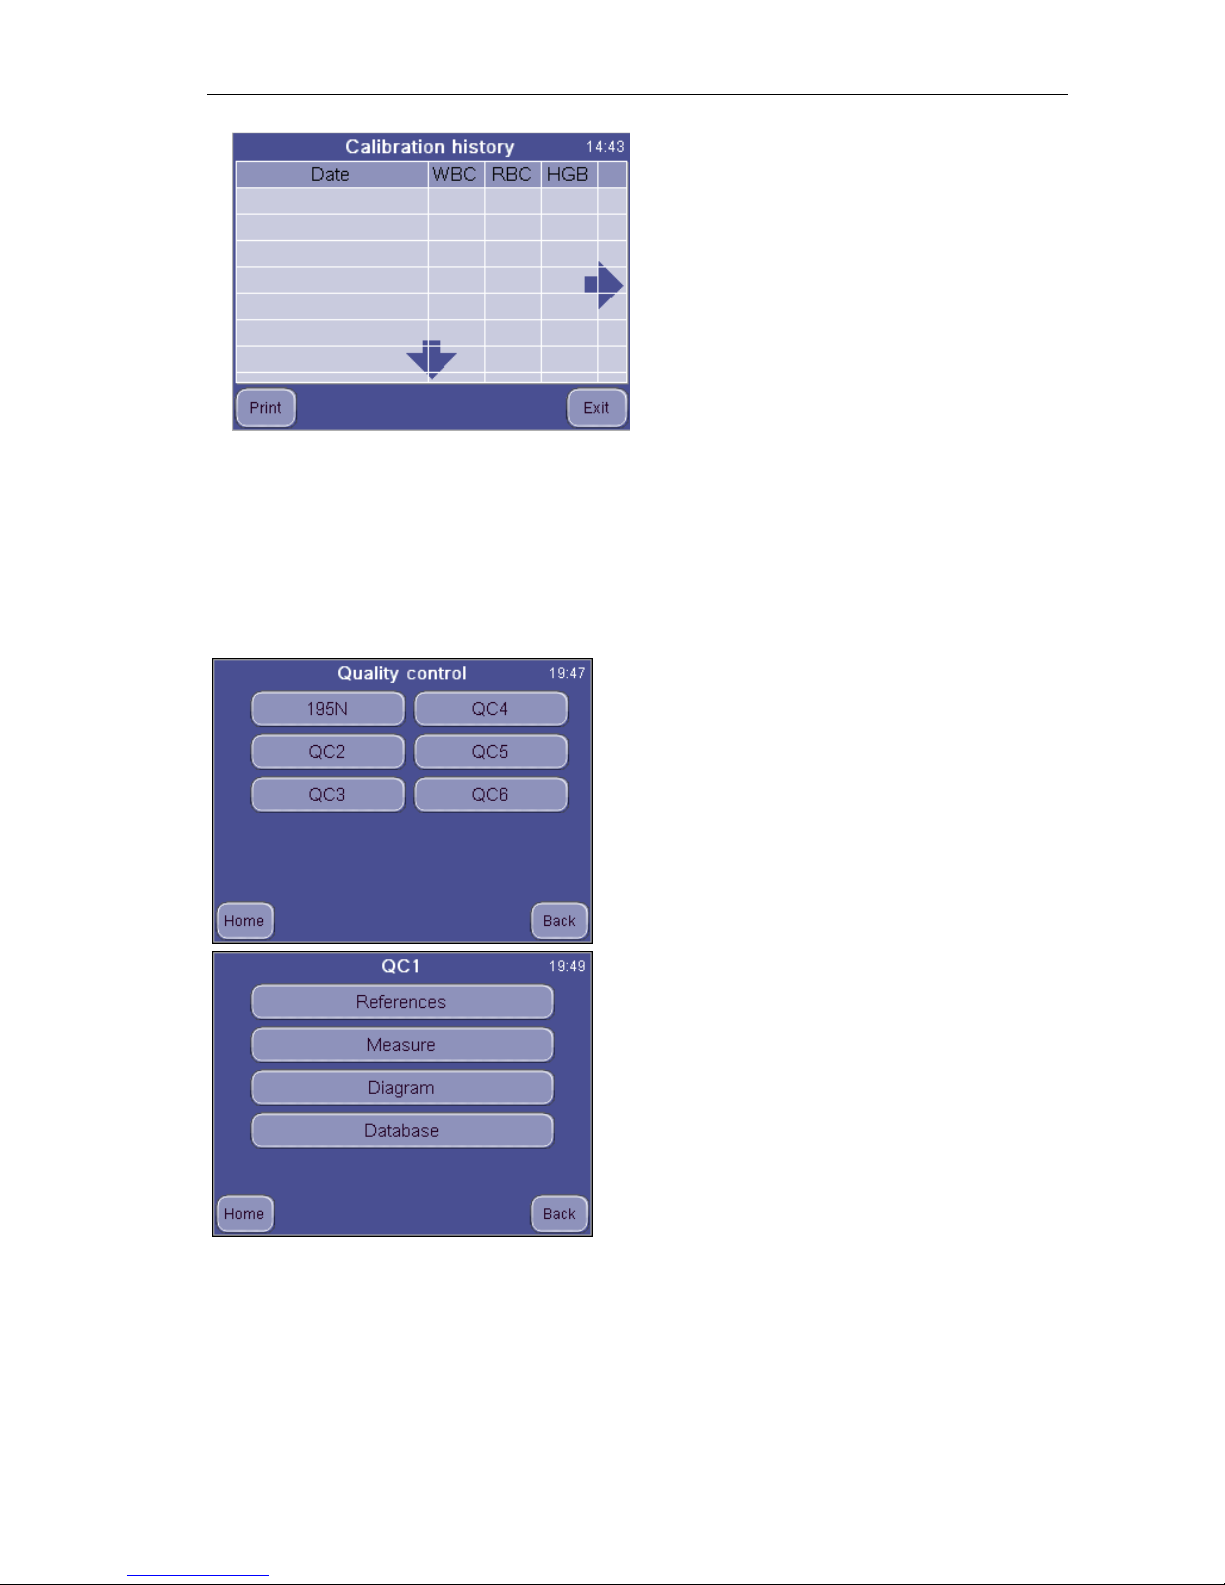
Calibration / History
You can check the date and values of
previous calibrations.
7.3. Quality control
Quality control feature allows tracing the operation and reliability of the analyzer in
time. The best practice is to run a control sample every morning. You can also use
multiple control material lots.
Maintenance
Quality control
Select LOT to work on.
Press HOME to go to Main menu.
Press BACK to go back to previous menu.
Maintenance
Diagnostics / QC1
Press HOME to go to Main menu.
Press BACK to go back to previous menu.
Control material is a defined and controlled quality prepared (almost artificial) blood
product. It has conserved and treated blood cells inside which allows this material to
be stable for a much longer time than normal blood would be.
The “Measure” option will become active only if there are reference values entered
for the actual QC Lot.
Page 51
ELite 3, User Manual
Page 51/72
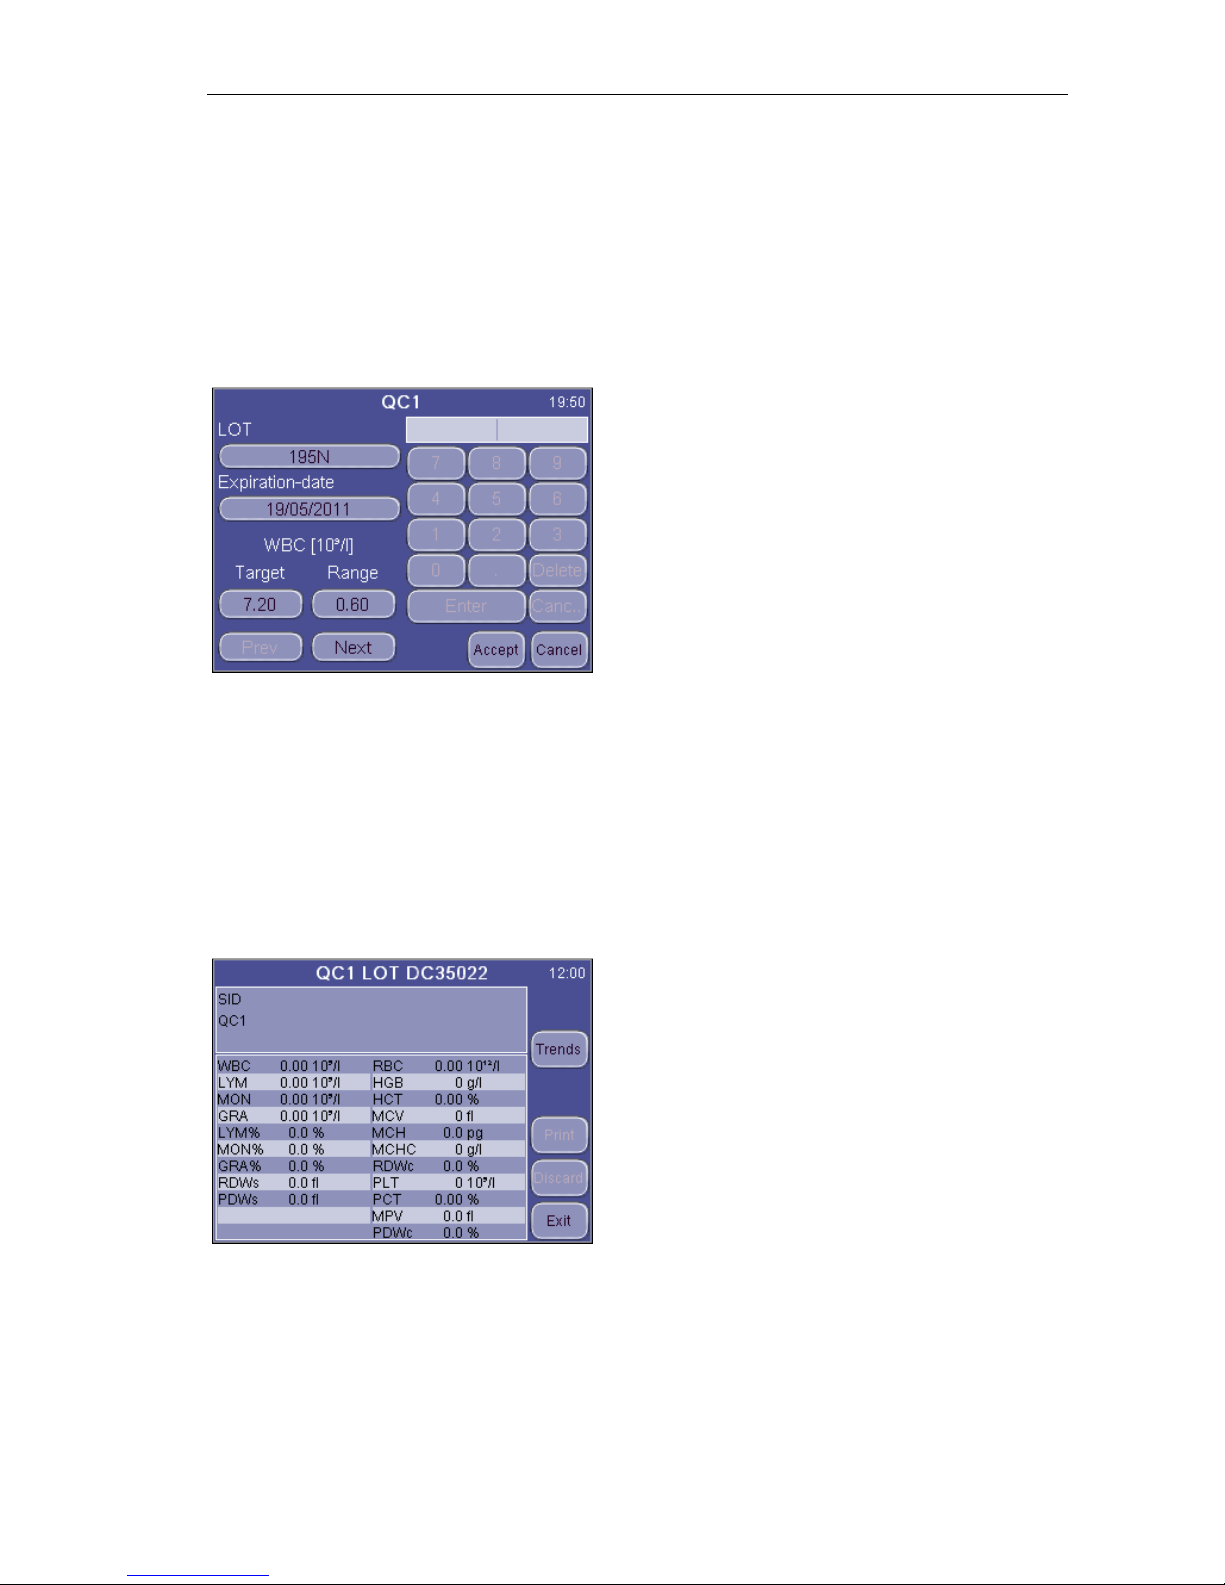
7.3.1. References
To be able to run specific samples, and to see stability or variation of parameters, it is
necessary to define a reference material for the software. This is going to be the
basis for Quality Control. The idea is to enter these so-called expected or target
values, and save everyday repeated runs of the same material in a separate
database so that these values can be compared to the reference data.
Reference values arrive with the control material. The manufacturer recommends
using Erba Hematology Control with the analyzer.
The assay value sheet contains all necessary parameters for the control material.
Maintenance
Quality control / Reference
Use Prev and Next to browse among
parameters.
Press Accept to save data.
Press Cancel to discard changes and return
to the previous menu.
Enter the values as defined on the assay value sheet of the control material.
In case you want to omit the trend analysis of a parameters, define 0 (zero) as target
and range values.
7.3.2. Measure
This option puts you to the measurement screen and sets up the parameters for
Control Blood measurement. Put the sample in the sample holder and press the
START button. When analysis is complete, you will have to accept the results.
Maintenance
Quality control / Measure
The software saves all results automatically
to the selected QC lot database.
Press Discard to remove data from QC
series.
Exit returns to the QC menu
7.3.3. Diagram
QC Diagram displays the trends of parameters with respect to time. The screen will
show two parameters at a time.
Page 52
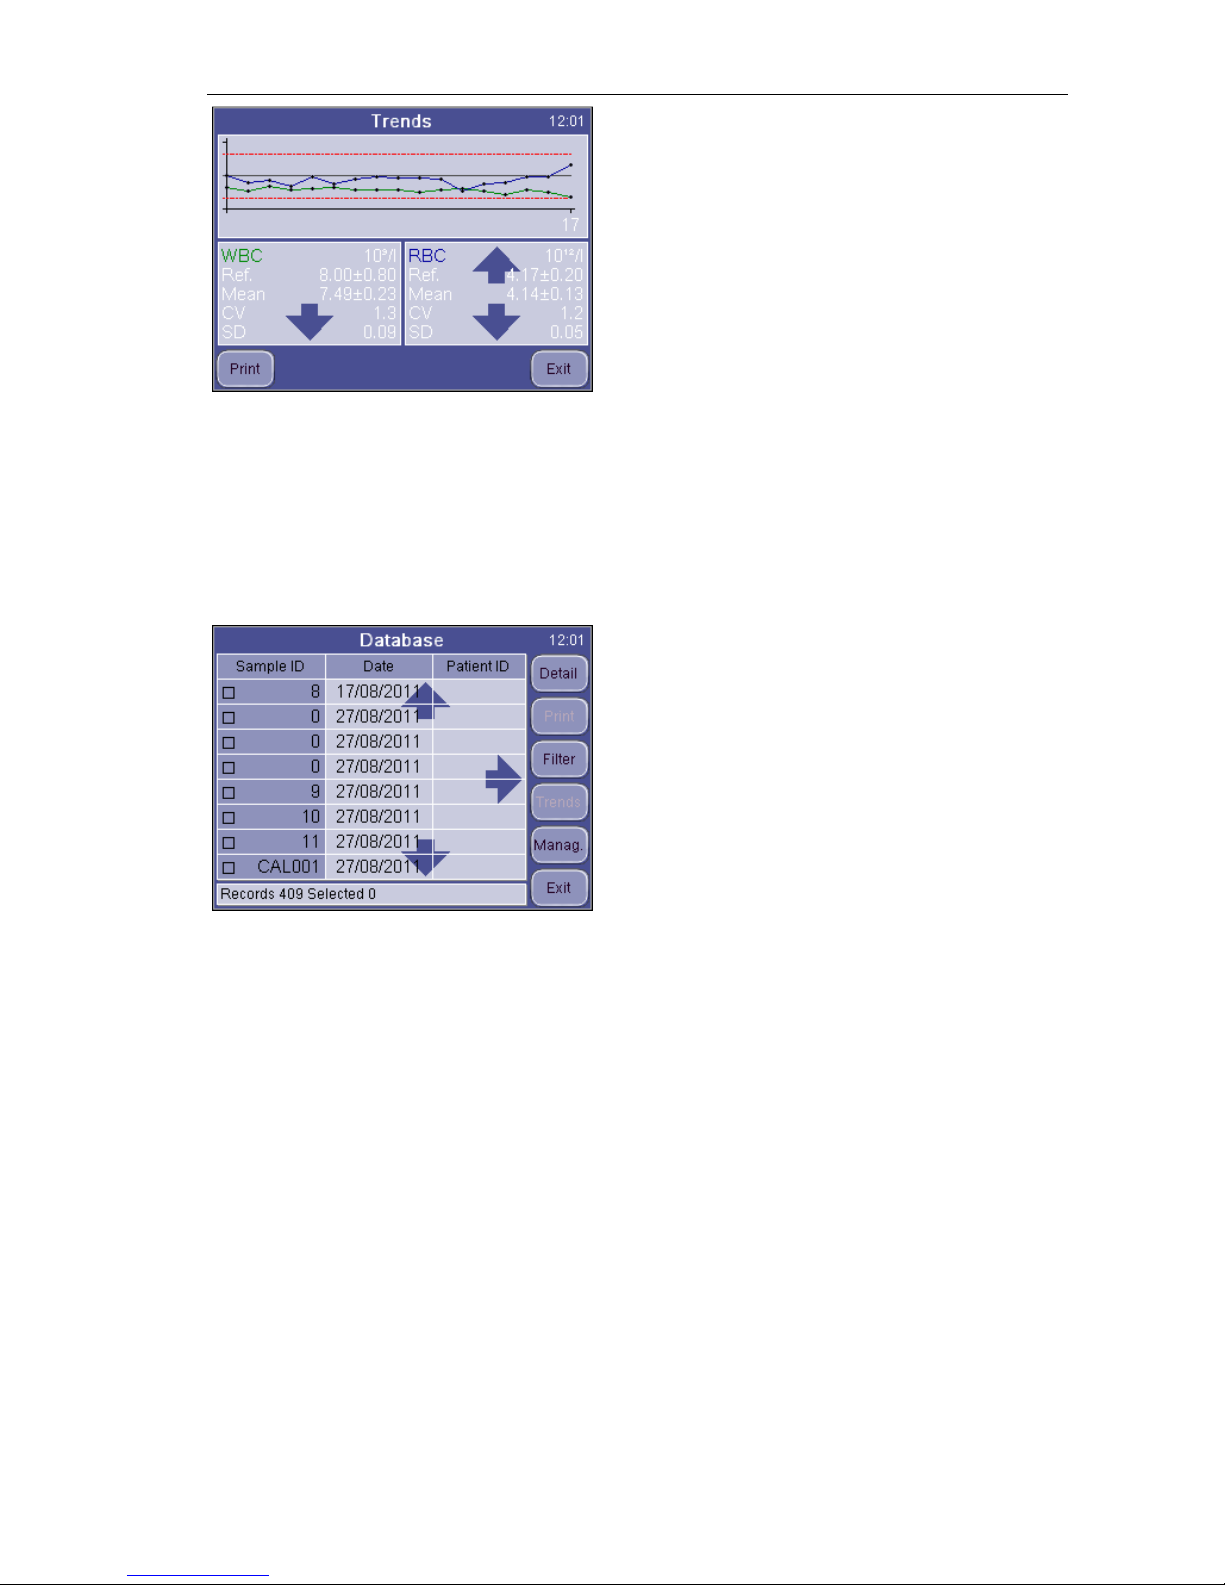
ELite 3, User Manual
Page 52/72
Maintenance
Quality control / Diagram
Use Up and Down shaded arrows to browse
among parameters on both sides.
Press Exit to return to the previous menu.
This mode allows comparing tendencies, trends of any two parameters.
7.3.4. Database
This option displays the contents of the QC database. You can browse in this view
just like in the regular database view. Functions (selection, browsing, details, printing)
are the same as well.
Maintenance
Quality control / Database
Use Prev and Next to browse among
parameters.
Exit returns to the QC menu.
Note: QC database is a filtered view of the
normal database. The status bar shows
the “Filter on” text.
Page 53
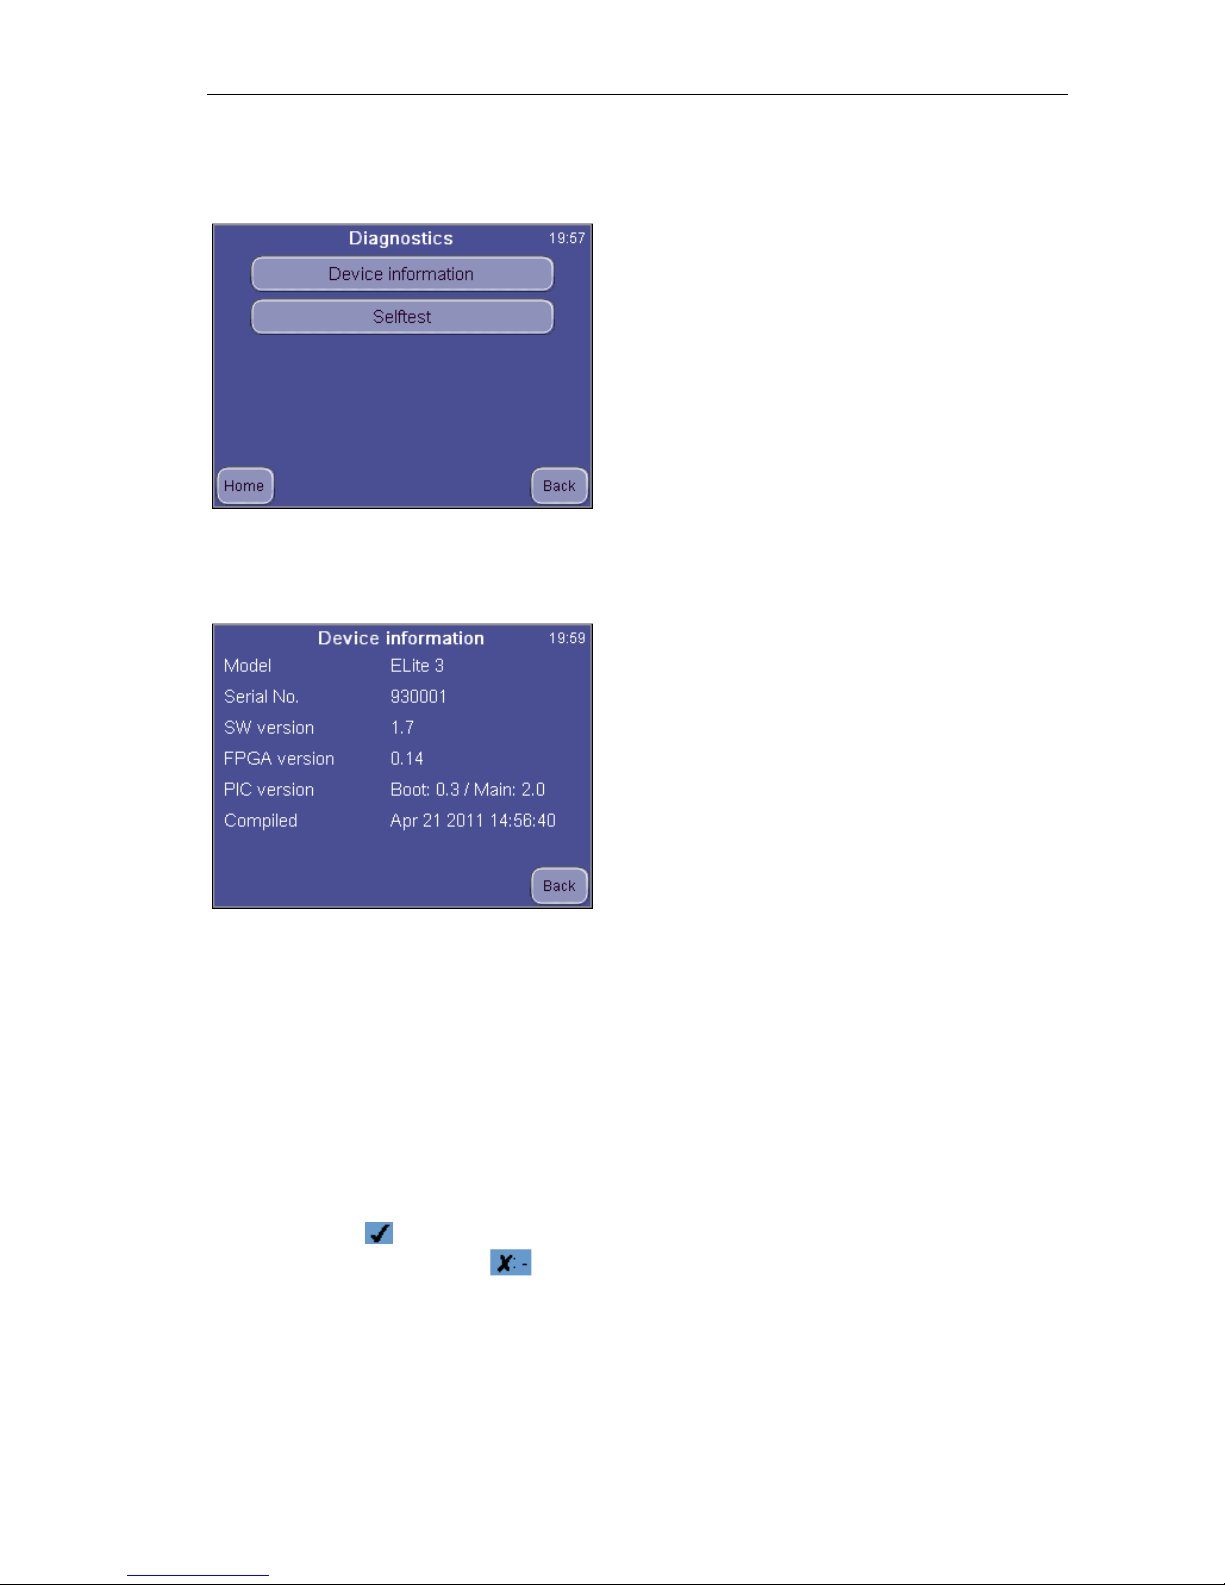
ELite 3, User Manual
Page 53/72
8. Diagnostics
Diagnostics menu allows access to system information and hardware check-up.
Maintenance
Diagnostics
Press HOME to go to Main menu.
Press BACK to go back to previous menu.
8.1.1. Device Information
Device information shows system hardware and software setup.
Maintenance
Diagnostics / Device Information
The various system parameters can be seen
on the screen.
Press EXIT to go back to the previous menu.
8.1.2. Self Test
Self test is a procedure to verify proper operation of essential components of the
instrument. Self test should be performed:
• At installation.
• After replacing any component.
• After extended time out of use.
During self test, the analyzer checks system components, and displays the results.
On the right side of the results screen, the SW displays if the tested parameter falls
into the desired range:
• If yes, a sign is displayed at the end of the line, or
• if it is out of range: a sign appears.
Page 54
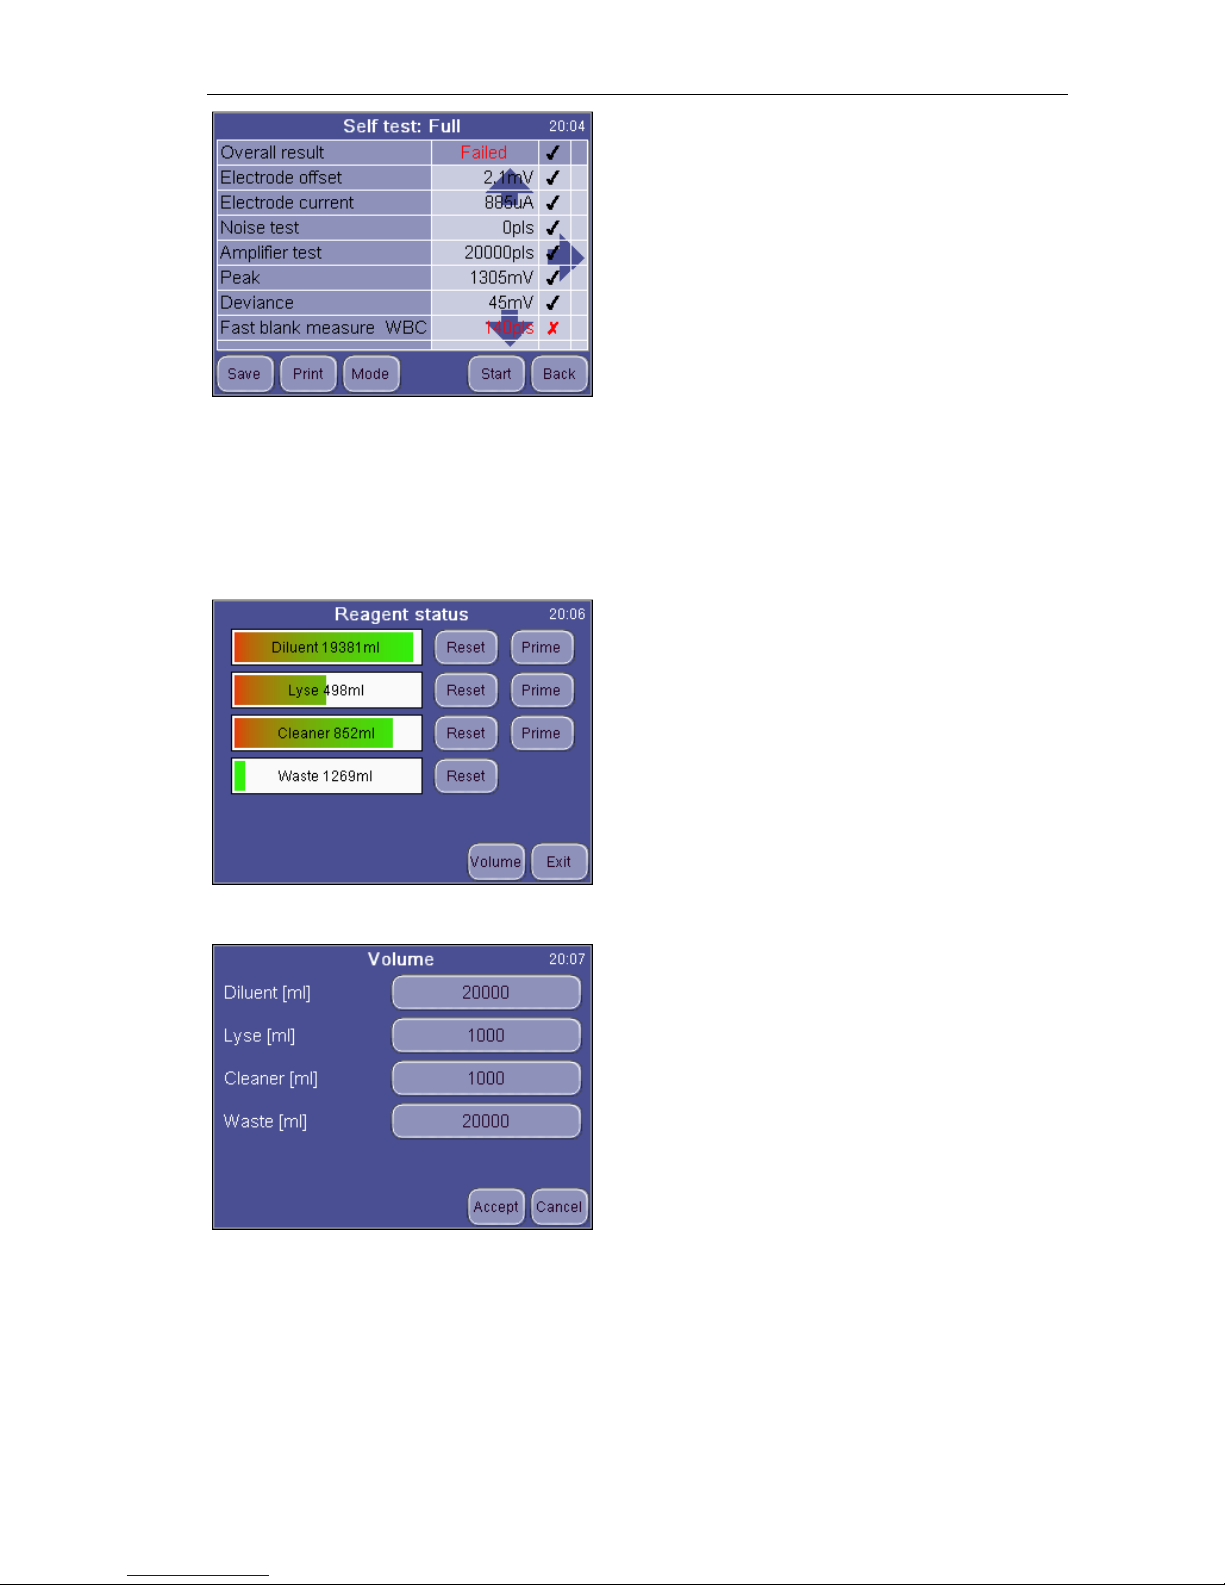
ELite 3, User Manual
Page 54/72
8.2. Reagent status
The screen shows reagent volumes in containers, as calculated by the instrument.
With each measurement, the volumes are changing accordingly. When reagent
volume in a container is running low, instrument will notify user, and ask for
replacement.
MAINTENANCE
REAGENT STATUS
Bar graphs show reagent status.
Reset will reset reagent level to its full value.
If any of the reagents is replaced (Reset),
press Prime to aspirate liquid into the system
Volume opens up the container volume setup
screen.
If Waste is high, it should be disposed of properly (see next section for instructions).
MAINTENANCE
REAGENT STATUS
Volume
Set the volume of the containers used.
Values in ml. If volume of a reagent is set to 0
(zero), software will not keep track of
consumption.
.
Accept saves your changes.
Cancel discards changes and returns to reagent status screen
DIAGNOSTICS
SELF TEST
The analyzer lists and checks subsystems.
When tests are finished, display shows a
summary of the results. Various system
parameters can be seen on the screen.
Press START to run Self test again.
Press BACK to go back to previous menu.
Page 55

ELite 3, User Manual
Page 55/72
8.2.1. How to empty waste container
Software counts volume of waste, and gives warning message when the waste tank
is close to its maximum capacity.
Empty the waste tank when this warning message appears. See next Section for
neutralization steps.
8.2.2. Neutralization of Waste
Waste contains human origin substances representing biohazard. These substances
are representing potential danger to environment. For this reason, safe handling of
the waste liquid is very important
Neutralization of biohazard waste:
•
Put 2 ml per liter of hypochlorite solution into the waste. Close the cap and
shake the container.
•
After 1 hour you can dispose of the Waste liquid into the drain.
Page 56
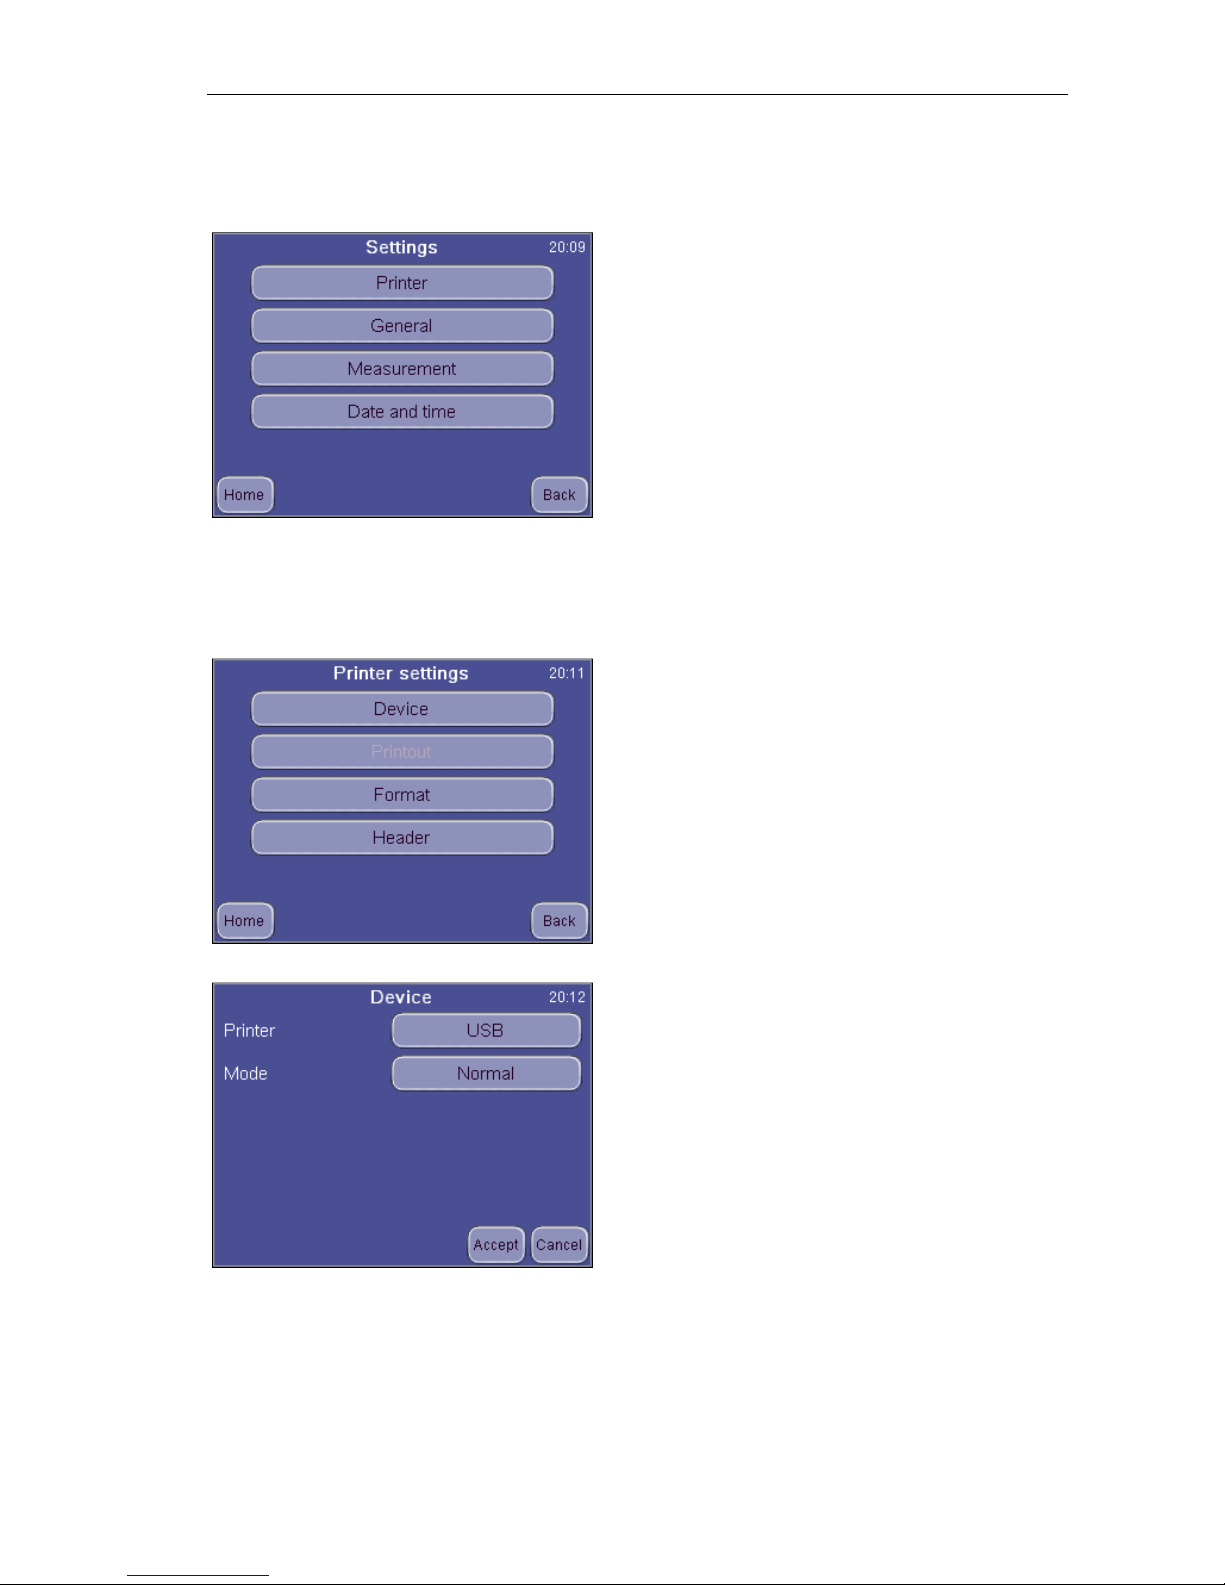
ELite 3, User Manual
Page 56/72
9. Settings
Selecting Settings accesses various lists of options
9.1. Printer settings
Printer settings menu allows setting up parameters of report printing.
Settings
Press BACK to go back to MAIN menu.
Settings
Printer settings
Settings
Printer settings / Device
Printer: Selection between built-in or USB
printer. If the printer is recognized, the screen
will show the printer’s name.
Format: Selects printout quality.
Press Accept to approve changes made.
Press Cancel to go back to previous menu
keeping the old settings.
Page 57
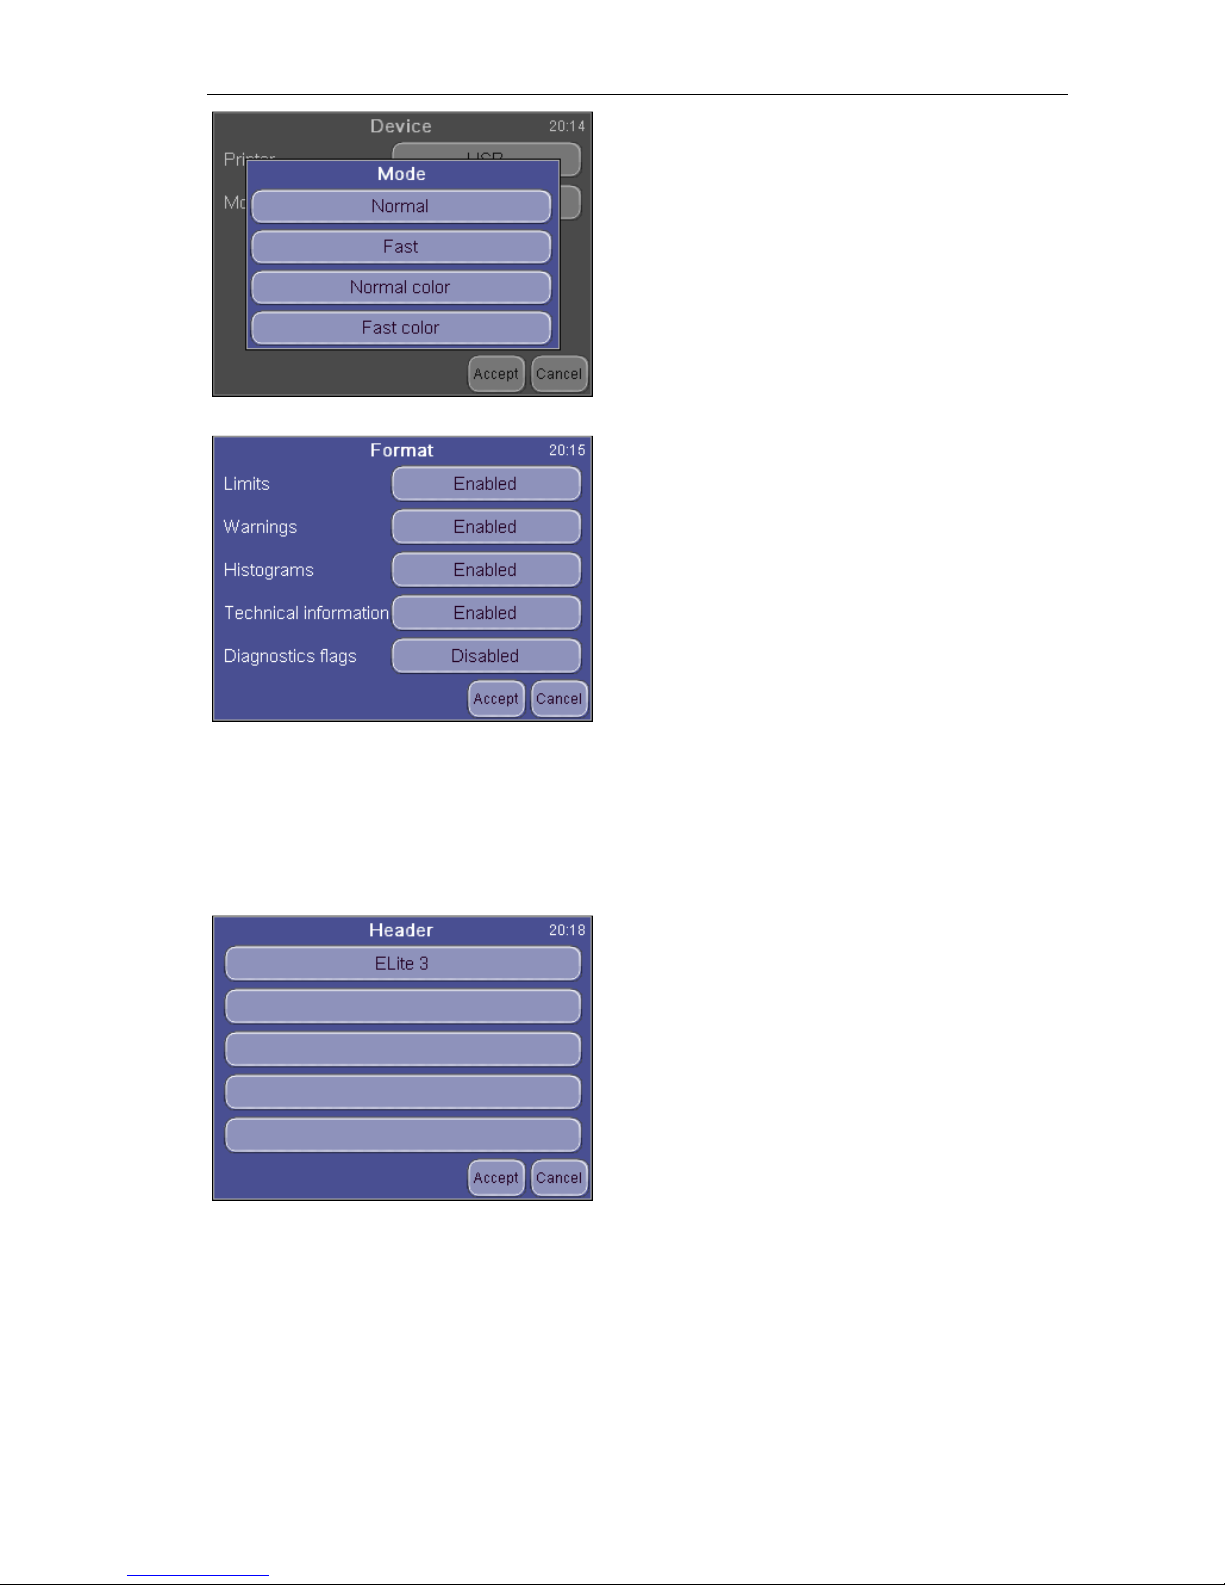
ELite 3, User Manual
Page 57/72
Limits: Enable / Disable parameter limit (normal range) printing.
Warnings: If Enabled, warning flags appear on the report as well.
Histograms: Enable / Disable graph printing.
Technical information: If Enabled, probe voltages (WBC,RBC), lyse volume, (ml)
and software/firmware version appear in the printout.
Diagnostic flags: If Enabled the diagnostic flags appear on the report as well
(except table format)
Settings
Printer / Device / Mode
Fast modes save ink and provide faster
printout. Only normal color and fast color
printouts will give color printouts.
SETTINGS
Printer settings / Format
Press Accept to approve changes made.
Press Cancel to go back to previous menu
keeping the old settings.
Settings
Printer settings / Header
The data entered will be printed on the top of
each printed report.
Press Accept to approve changes made.
Press Cancel to go back to previous menu
keeping the old settings.
Page 58
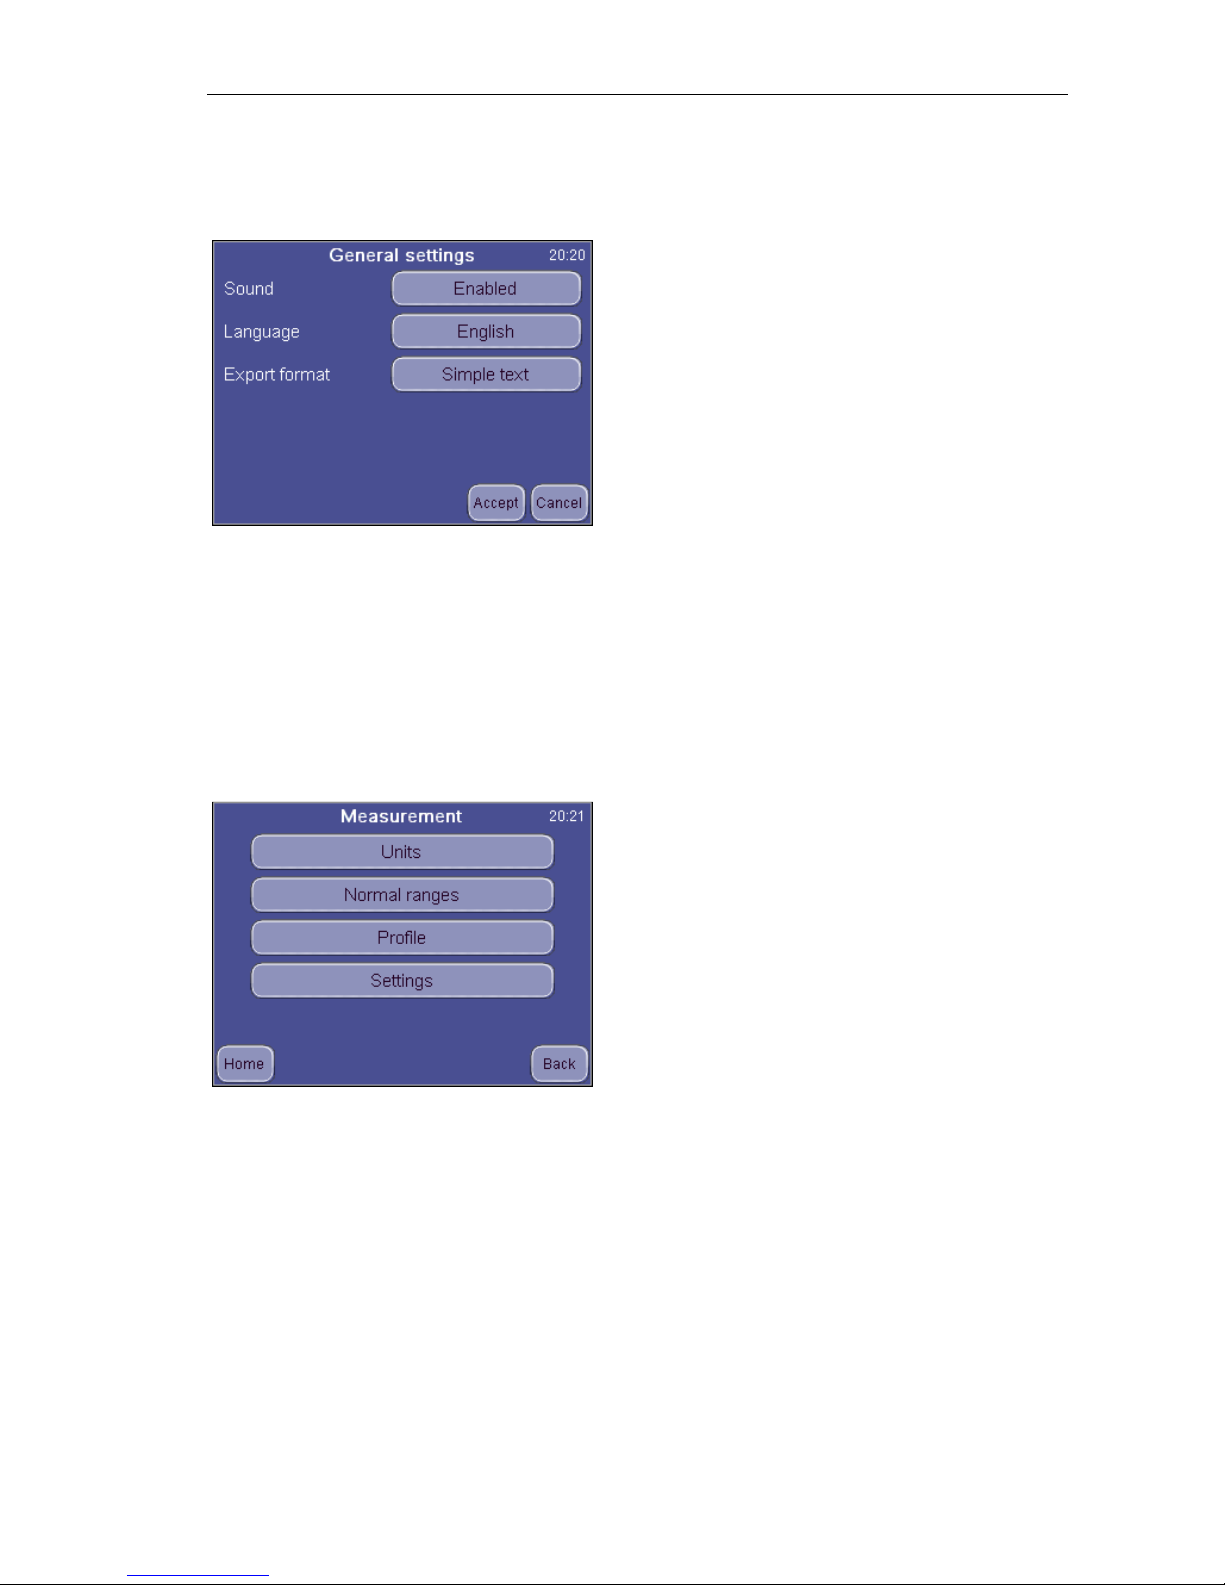
ELite 3, User Manual
Page 58/72
9.2. General settings
General settings control operation of the following functions.
Export format: The following settings are available (See Appendix A for details):
•
Simple text
•
Extended text
•
Advances text
Press Accept to approve changes made.
Press Cancel to go back to previous menu keeping the old settings.
9.3. Measurement
SETTINGS
General
Sound: If enabled the analyzer provide
audible guidance of usage.
Language: Selects the language of the
analyzer
Press Accept to approve changes made.
Press Exit to go back to previous menu.
This section groups measurement related
options and settings.
Page 59
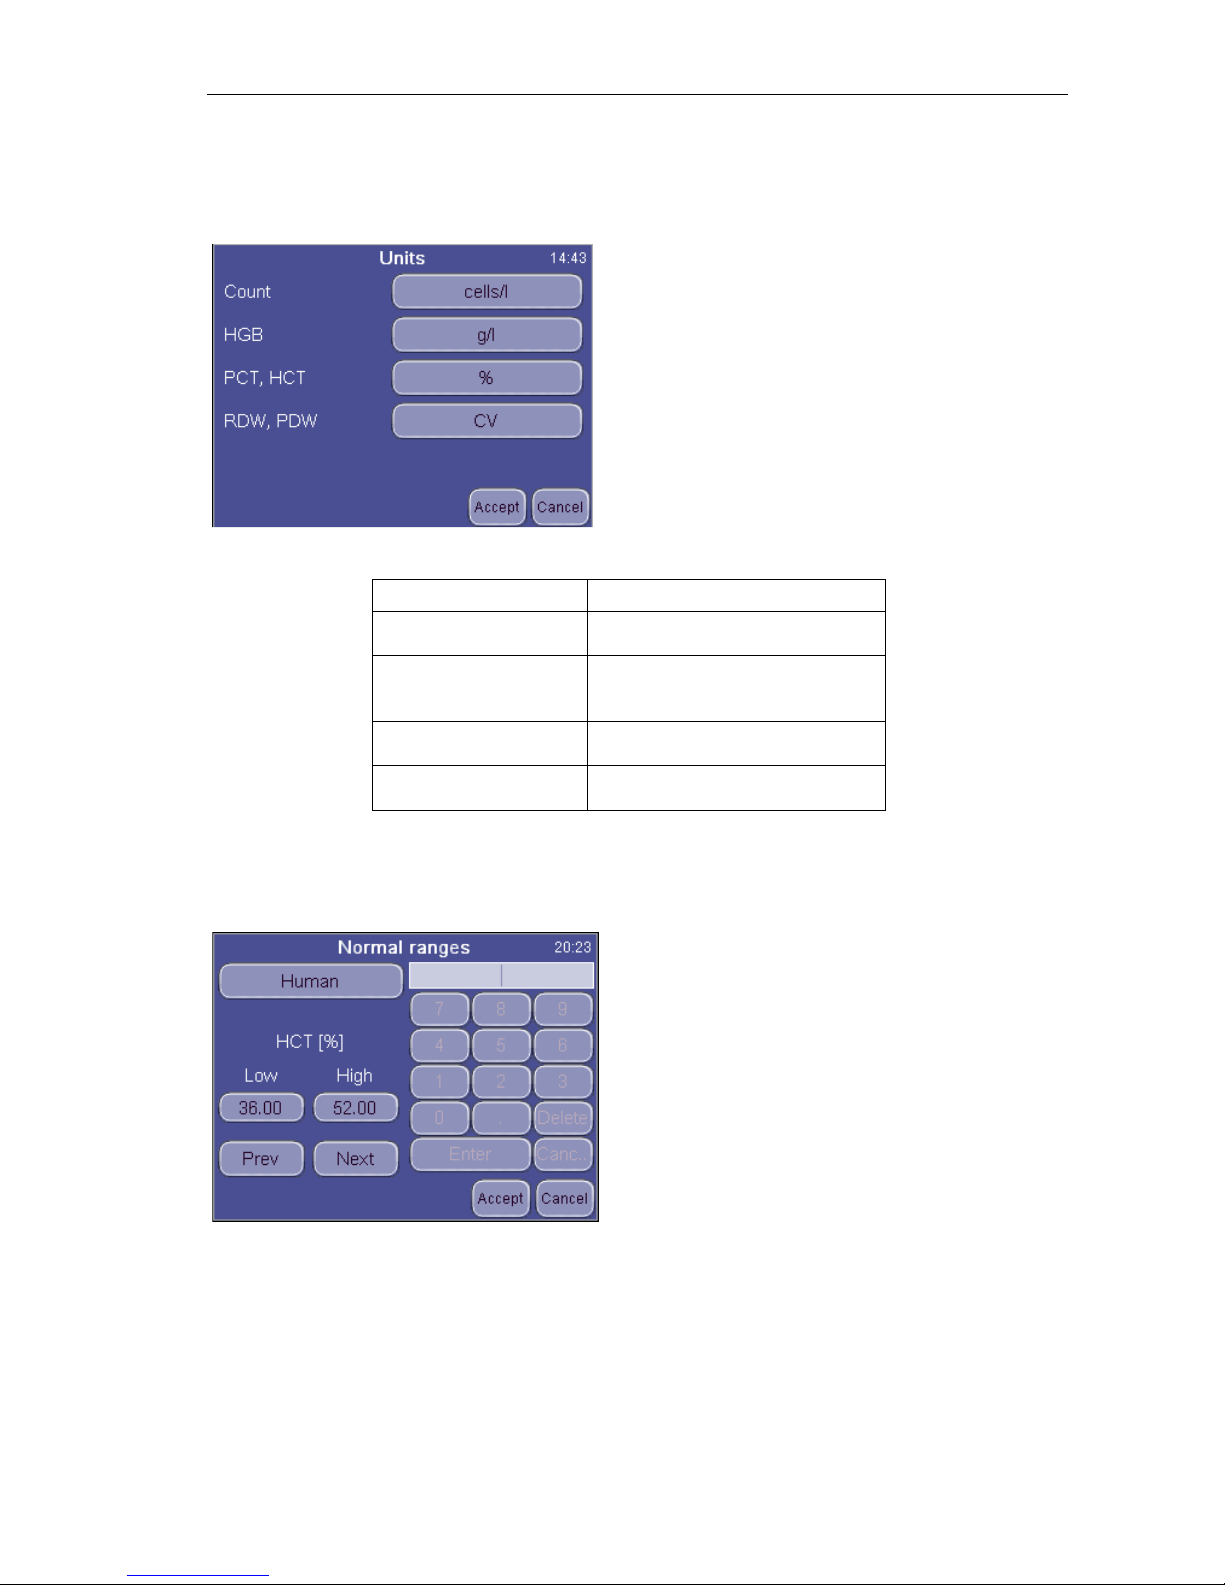
ELite 3, User Manual
Page 59/72
9.3.1. Unit settings
Unit settings menu allows to set up units of parameters displayed or printed.
Possible units for the parameters:
Parameter Available units
Count unit
cells/liter(cells/l)
cells/μl(cells/μl)
HGB unit
grams/liter (g/l)
grams/deciliter (g/dl)
millimols/liter (mmol/l)
PCT, HCT unit
Percentage (%),
absolute(ABS)
RDW, PDW mode
standard deviation (SD),
coefficient of variation(CV)
9.3.2. Normal ranges
Limits define normal ranges. Outside this range, parameters will be flagged: – or +.
Settings
Measurement
Normal ranges
The “Human” (profile) button brings up the
profile selection menu
Prev and Next allow browsing among
parameters.
Parameter order: WBC RBC HGB HCT
MCV MCH MCHC PLT PCT MPV PDWs
PDWc RDWs RDWc LYM MON GRA
LYM% MON% GRA%
You can modify normal range of parameters: left column is lower, right column is
upper limit of normal range. Press Accept to accept changes, or Cancel to keep
previous settings and return to the settings menu.
Settings
Measurement / Units
Press units to change them individually
Press Accept to approve changes made.
Press Cancel to go back to previous menu
keeping the old units.
Page 60
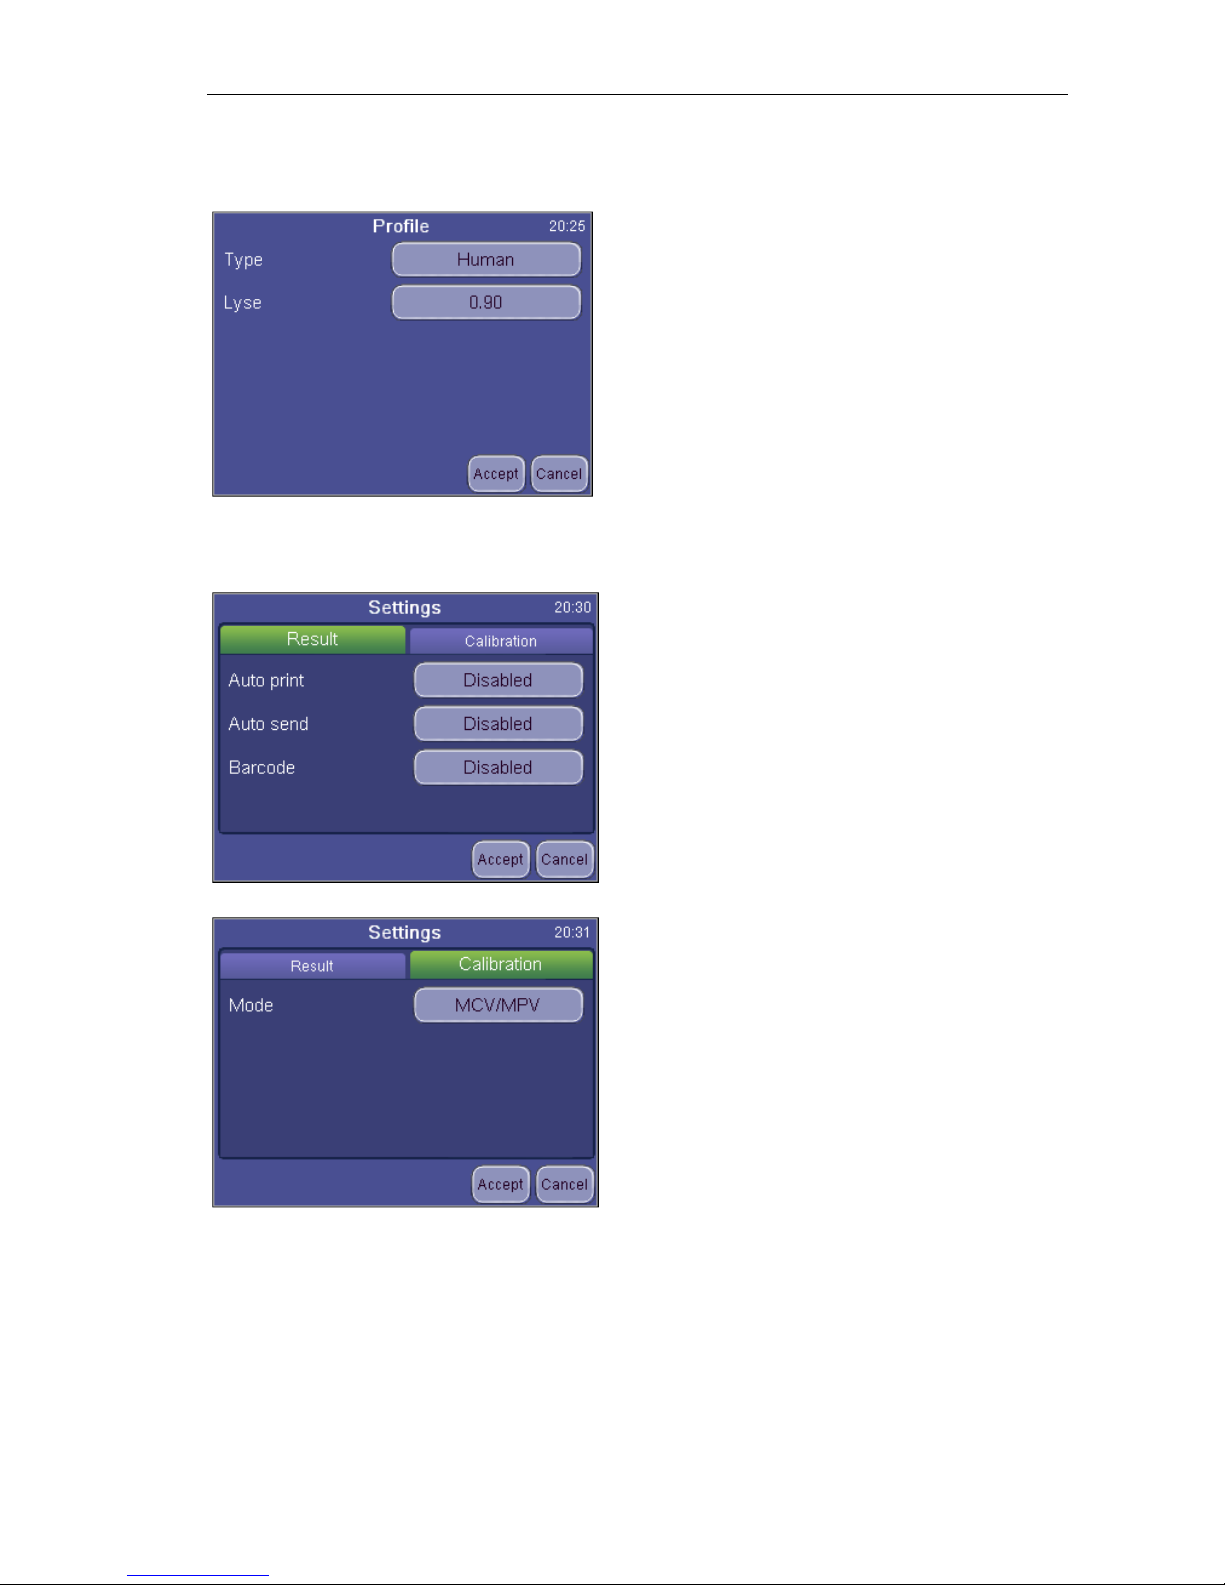
ELite 3, User Manual
Page 60/72
9.3.3. Profile
Settings
Measurement
Profile
The default lyse volume can be set for each
profile.
9.3.4. Settings
Settings
Measurement / Settings/Result
Auto print will print the report automatically
when the results are displayed
Auto send will automatically transmit
results if a PC is connected
Barcode allows setting scanned data to be
entered as Sample ID or Patient ID
Accept saves changes made
Cancel returns to previous menu discarding
changes made
Settings
Measurement / Settings/Calibration
Mode allows choosing between HCT/PCT
or MCV/MPV based calibration
Accept saves changes made
Cancel returns to previous menu discarding
changes made
Page 61
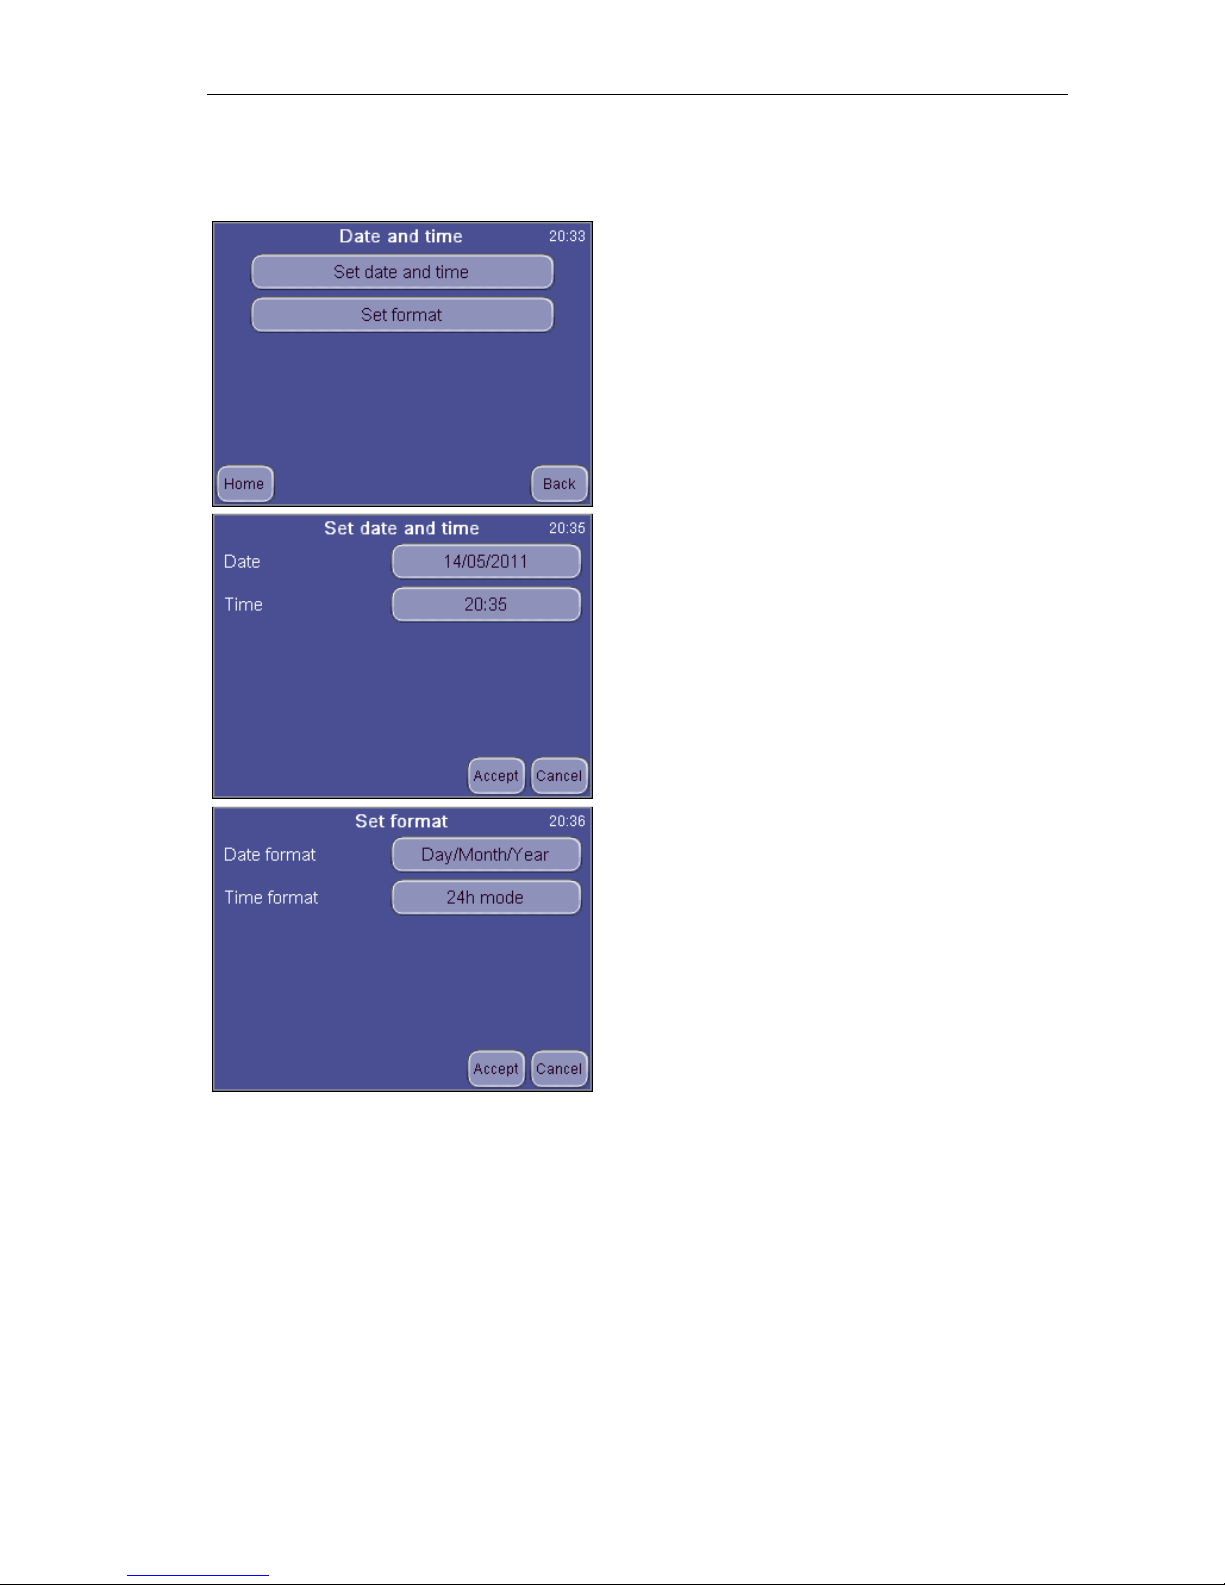
ELite 3, User Manual
Page 61/72
9.4. Date and Time
Date and time of each analysis is stored with the results. This menu allows setting
the built-in clock and the format of the date displayed.
The analyzer has a built-in battery responsible for running the built-in clock when the
unit is powered off. If the analyzer asks for date and time setting after power on, then
this battery is having problems. To resolve the problem, contact Service.
Settings
Date and time
Type in the date and time.
Select formats for displaying the date.
Press Accept to save settings.
Press Cancel to go back to previous menu
keeping the old values.
Type in the date and time.
Press Accept to save settings.
Press Cancel to go back to previous menu
keeping the old values.
Select formats for displaying the date.
Press Accept to save settings.
Press Cancel to go back to previous menu
keeping the old values.
Page 62
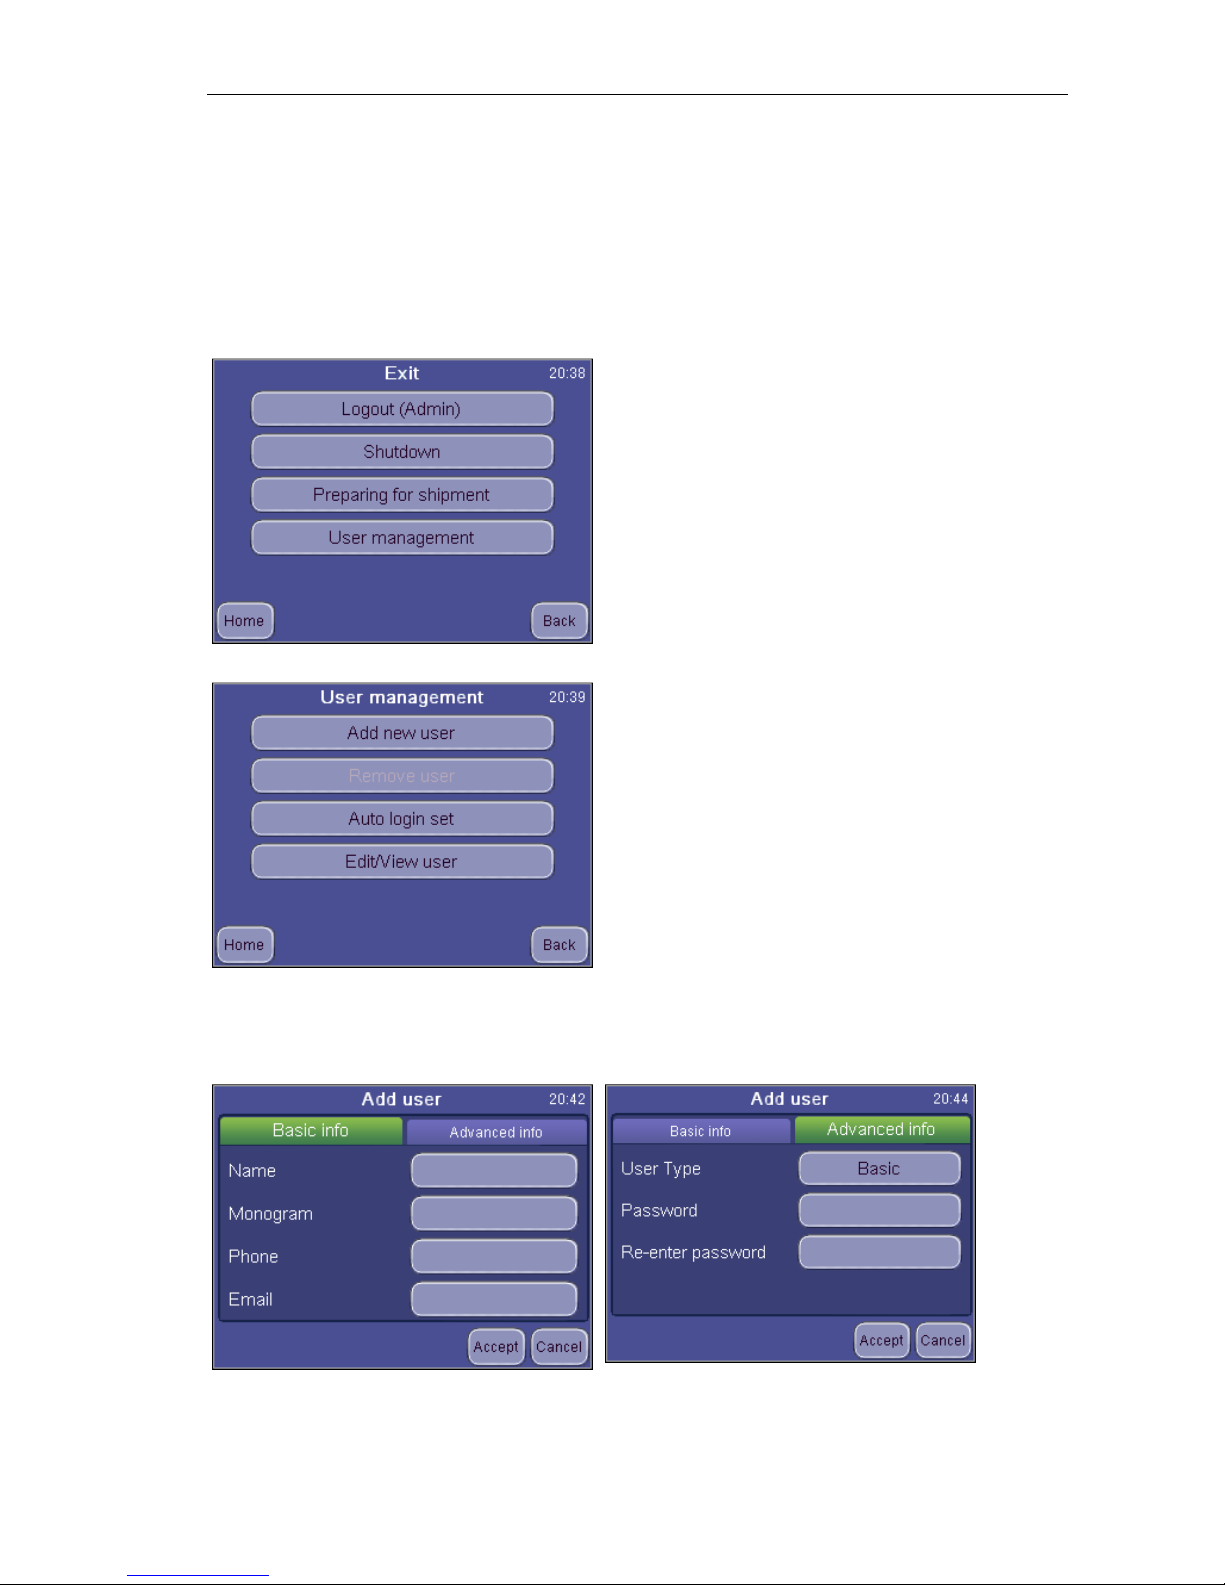
ELite 3, User Manual
Page 62/72
9.5. Multi user mode
The analyzer allows operation in a multi-user environment, where users can have
different rights and access levels.
This feature is accessed upon startup, and can of course be customized.
The analyzer by deafult operates in a multi-user environment – however the user
should not notice this functionality.
Users can be added (Add New User) or edited (Edit / View User). Adding a user
allows filling in the below parameters. Password must be defined on “Advanced Info”
tab. Monogram will be displayed on the login screen.
Use Remove User option to disable its access.
Exit
Logout will leave the unit on, and the login
screen appears.
Multi user mode functionality can be enabled
in the Exit menu by adding users in User
Management.
Exit
User Management
Auto Login Set will allow login-free starting of
the analyzer.
Page 63
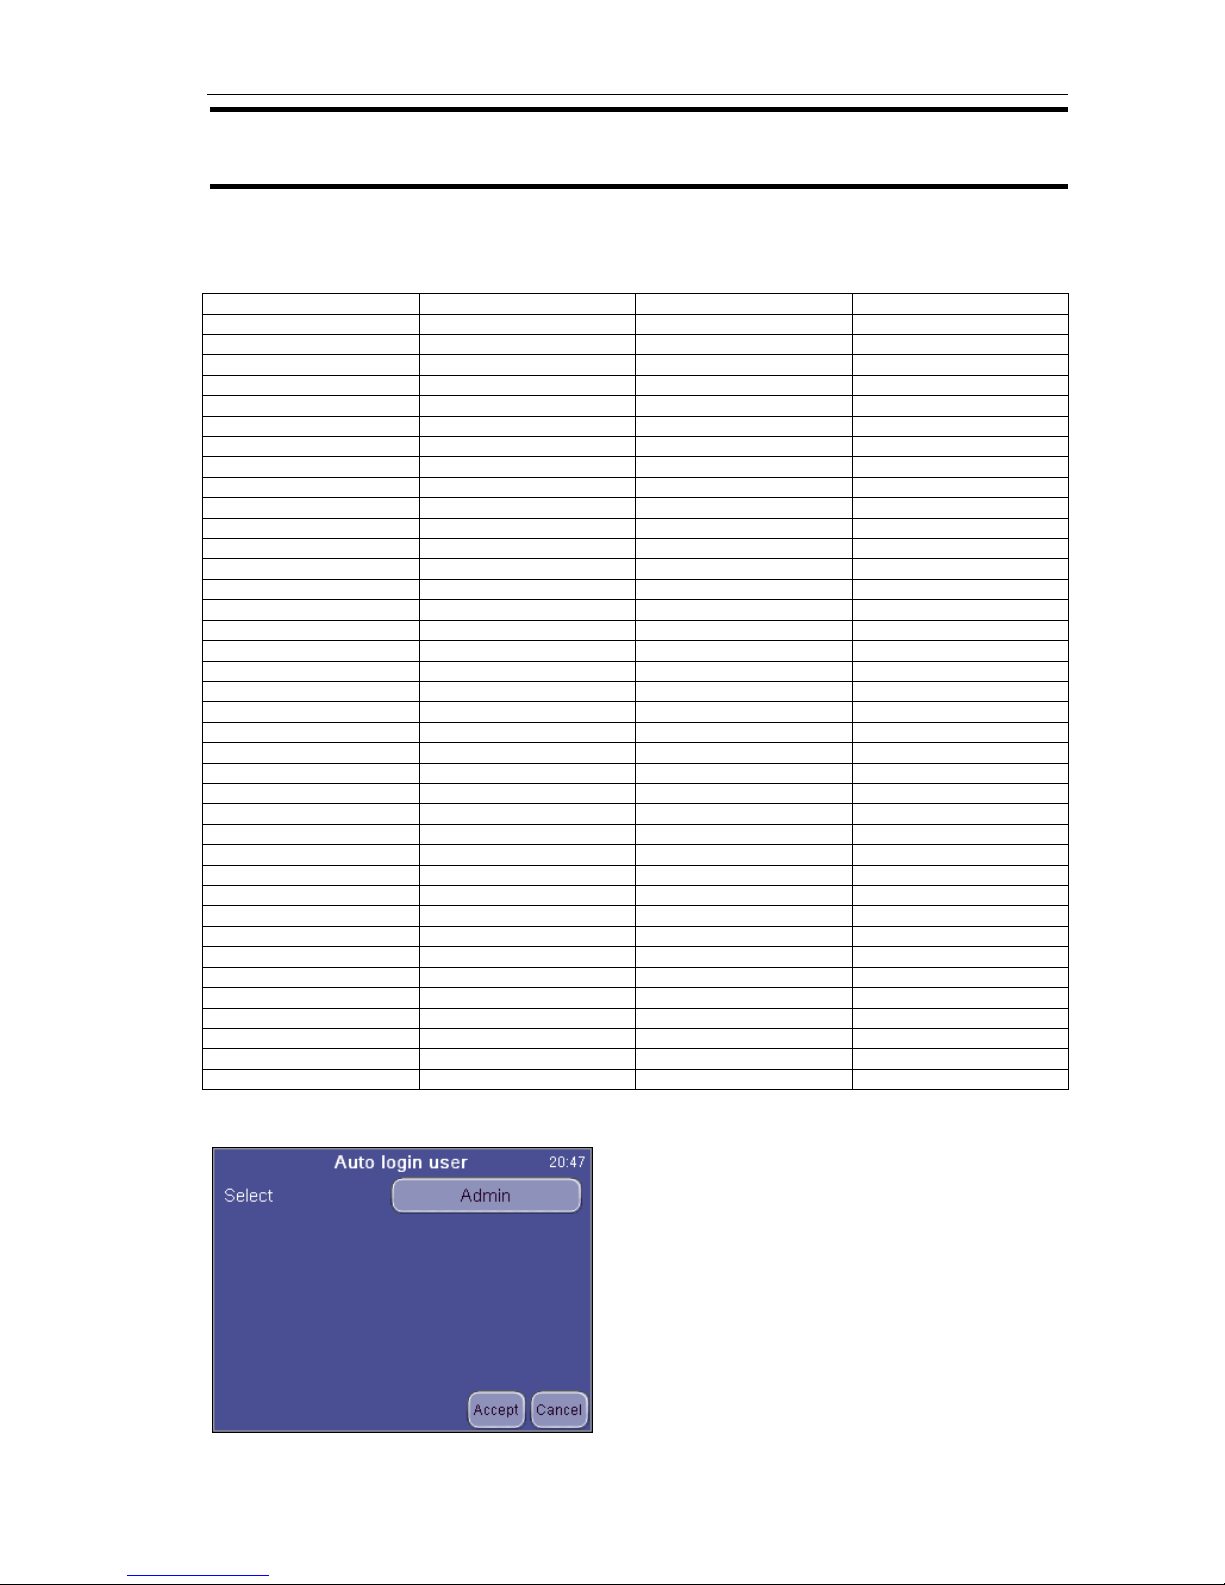
ELite 3, User Manual
Page 63/72
NOTE
:
User Admin cannot be deleted. Admin password cannot be changed.
Admin password: 0000
User Type BASIC has limited access to the menu tree:
Measure New Options
Re-run
Blank
Print
Discard
Database Detail / Table view
Edit record
Print
Filter
Trends
Manage
Maintenance Cleaning Cleaning
Hard cleaning
Drain chamber
Calibration Factors
Measure
History
Pre-diluted Factors
History
Quality control (forbidden)
Diagnostics Device information
Self test
Service
Reagent status
(Settings forbidden)
Exit Logout Add new user
Shut down Remove User
Preparing for shipment Auto login set
User Management Edit / View user
Exit
User Management
Auto Login Set
Auto Login Set will allow login-free starting of
the analyzer.
Select the user to be logged in automatically.
With Auto Login Off selected, the instrument
will prompt for a user and a password upon
startup.
Page 64
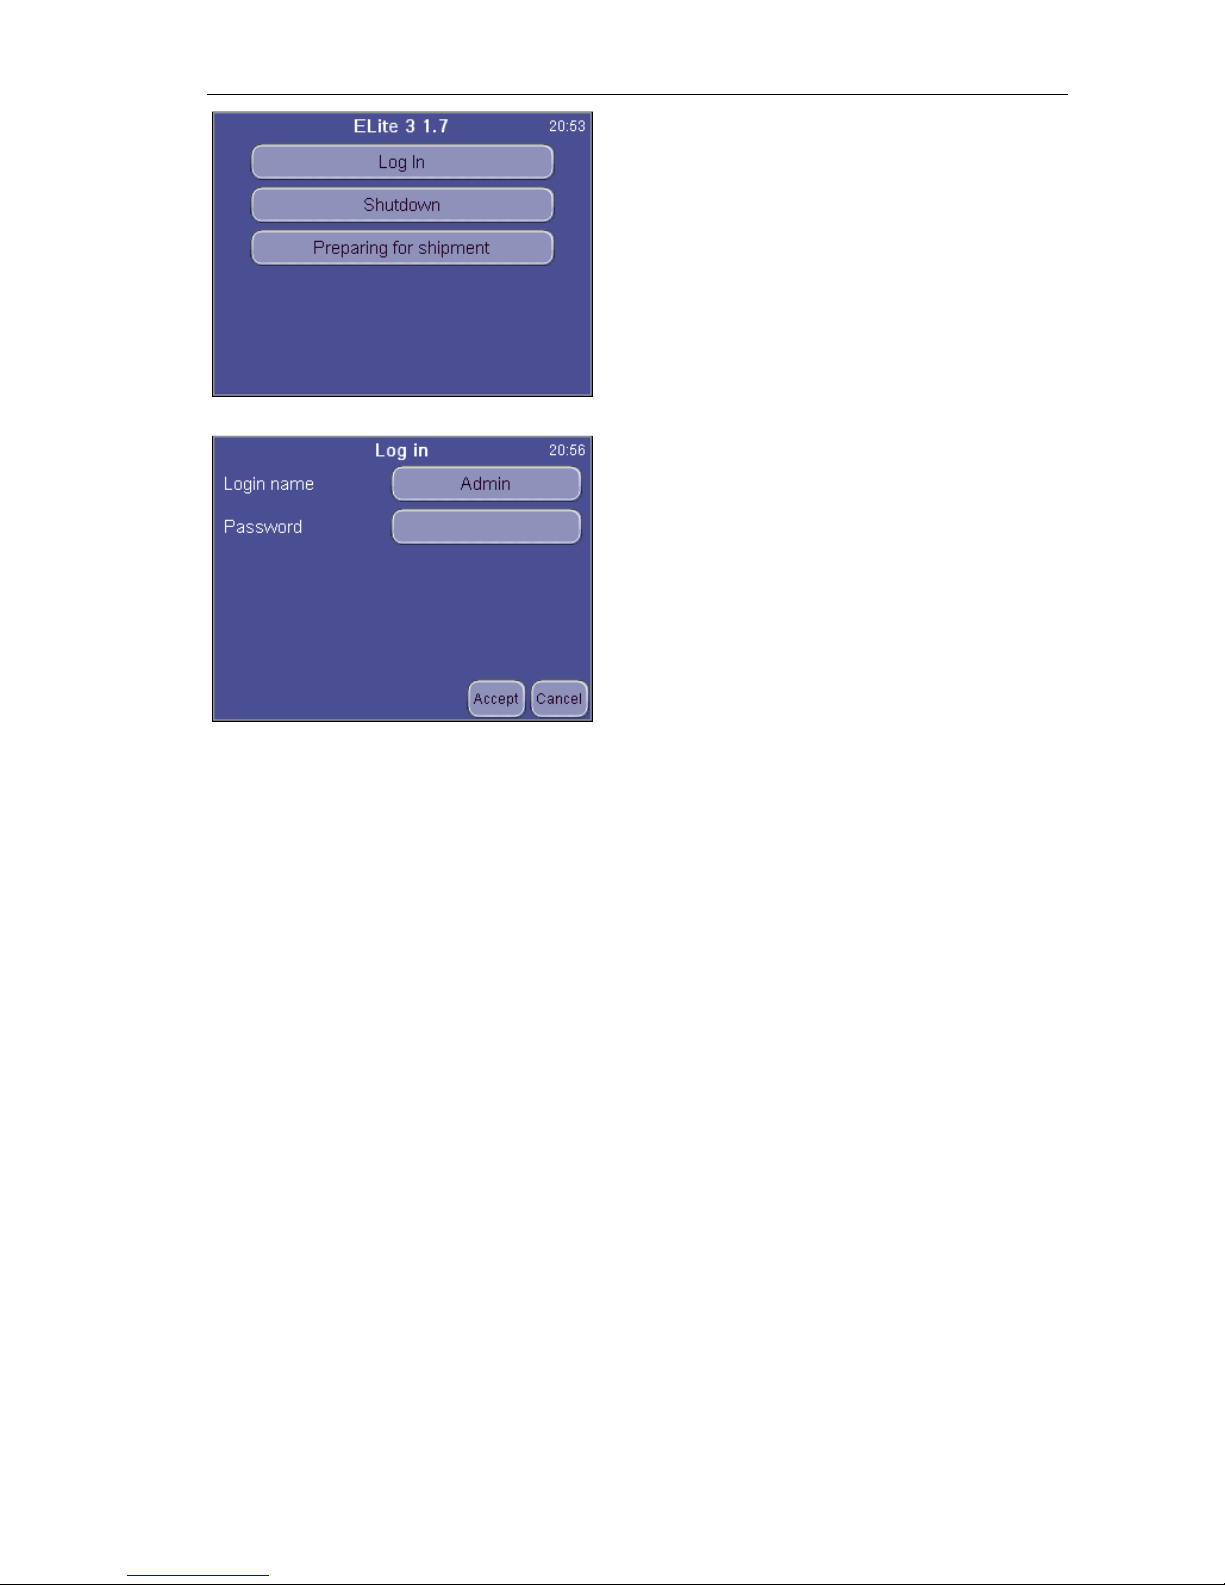
ELite 3, User Manual
Page 64/72
Login screen (with Auto Login Off)
Use Shutdown to stop the analyzer (power
off)
Preparing for shipment will drain the unit so
that it can be transported.
Log In brings up the login screen (below)
Login screen (with Auto Login Off)
Touch Login name. Select name from list.
Enter password.
Instrument will show database upon correct
password entry.
Page 65
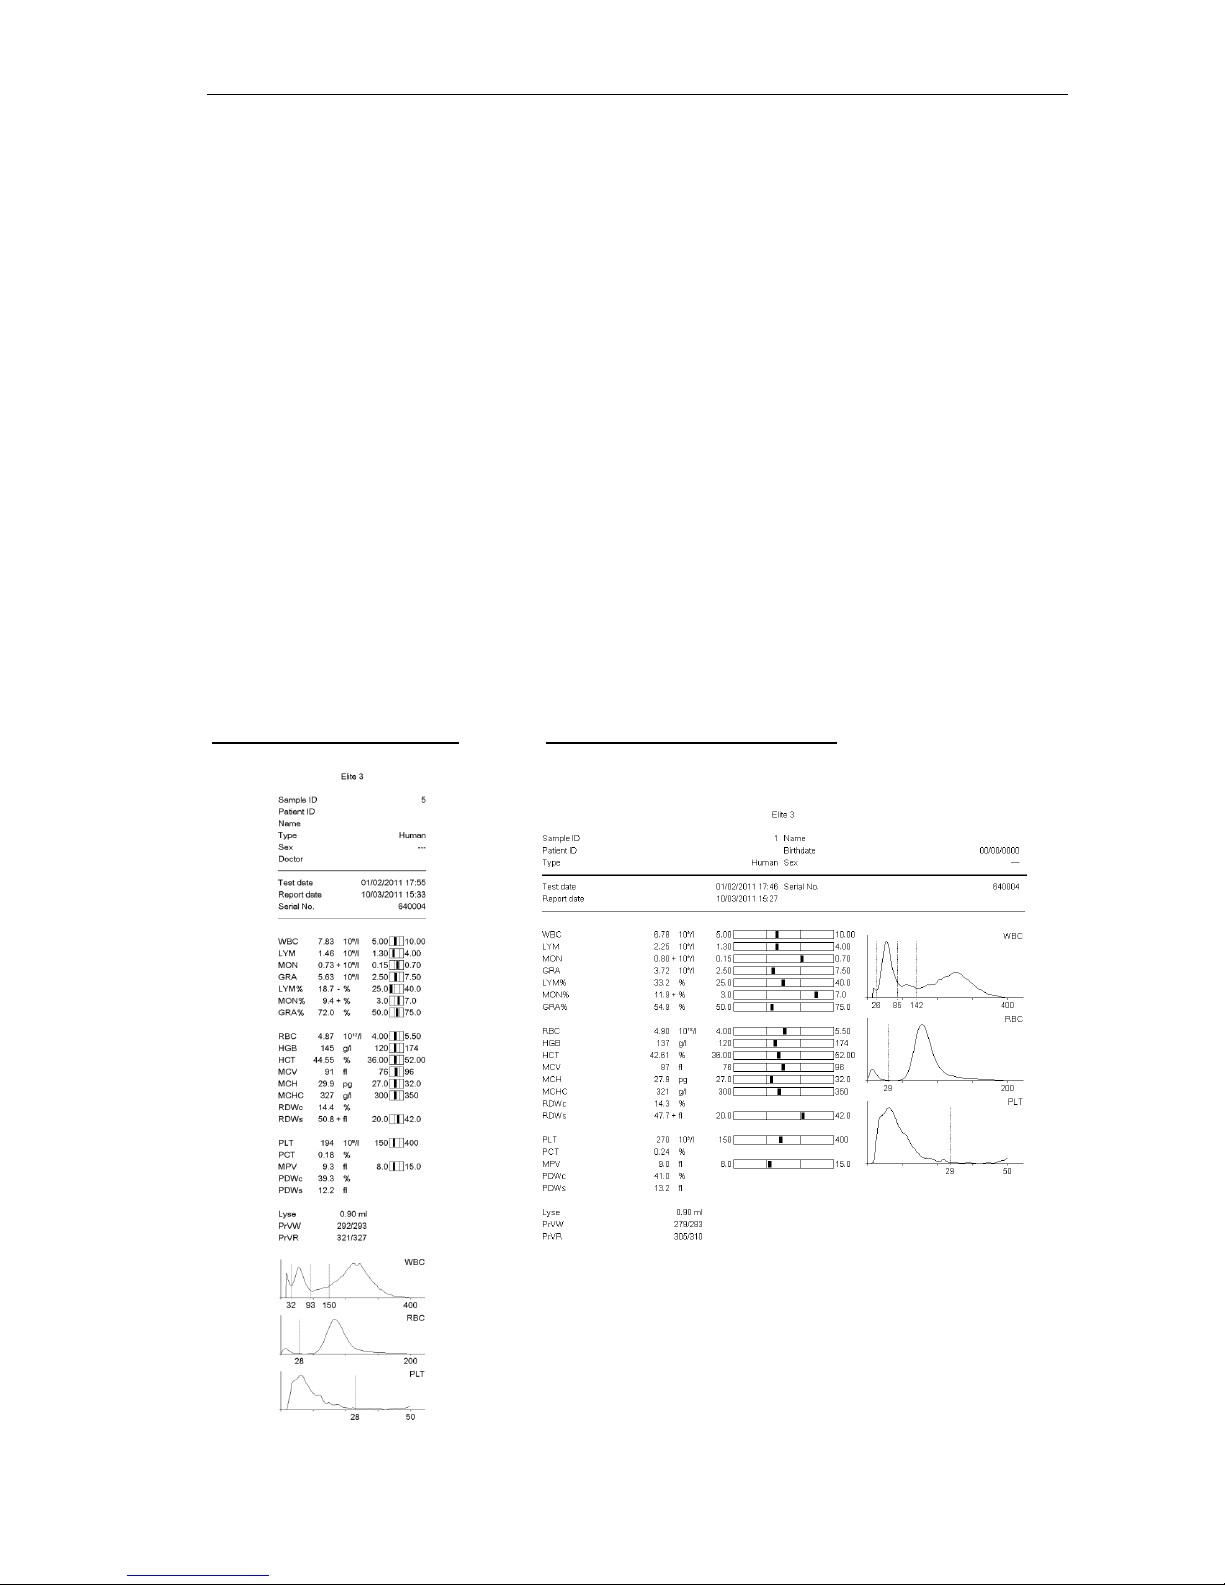
ELite 3, User Manual
Page 65/72
10. PRINTING
This chapter covers information on making printed reports on measured samples.
10.1. Printouts
When required, the following items can be sent to an external printer or to the built-in
printer by selecting Print option.
* Database result(s) (table format)
* Database (specified patient results with histograms)
* QC result (Levey-Jennings chart)
* QC result(s) (table format)
* Calibration results
* Last measured blank result
* Last measured patient result (with histograms)
* Last measured QC result
* Device information and statistics
* Self test result
* Set parameters
* Diagnostic flags (optional)
Thermal paper printout Printout on external printer
Page 66
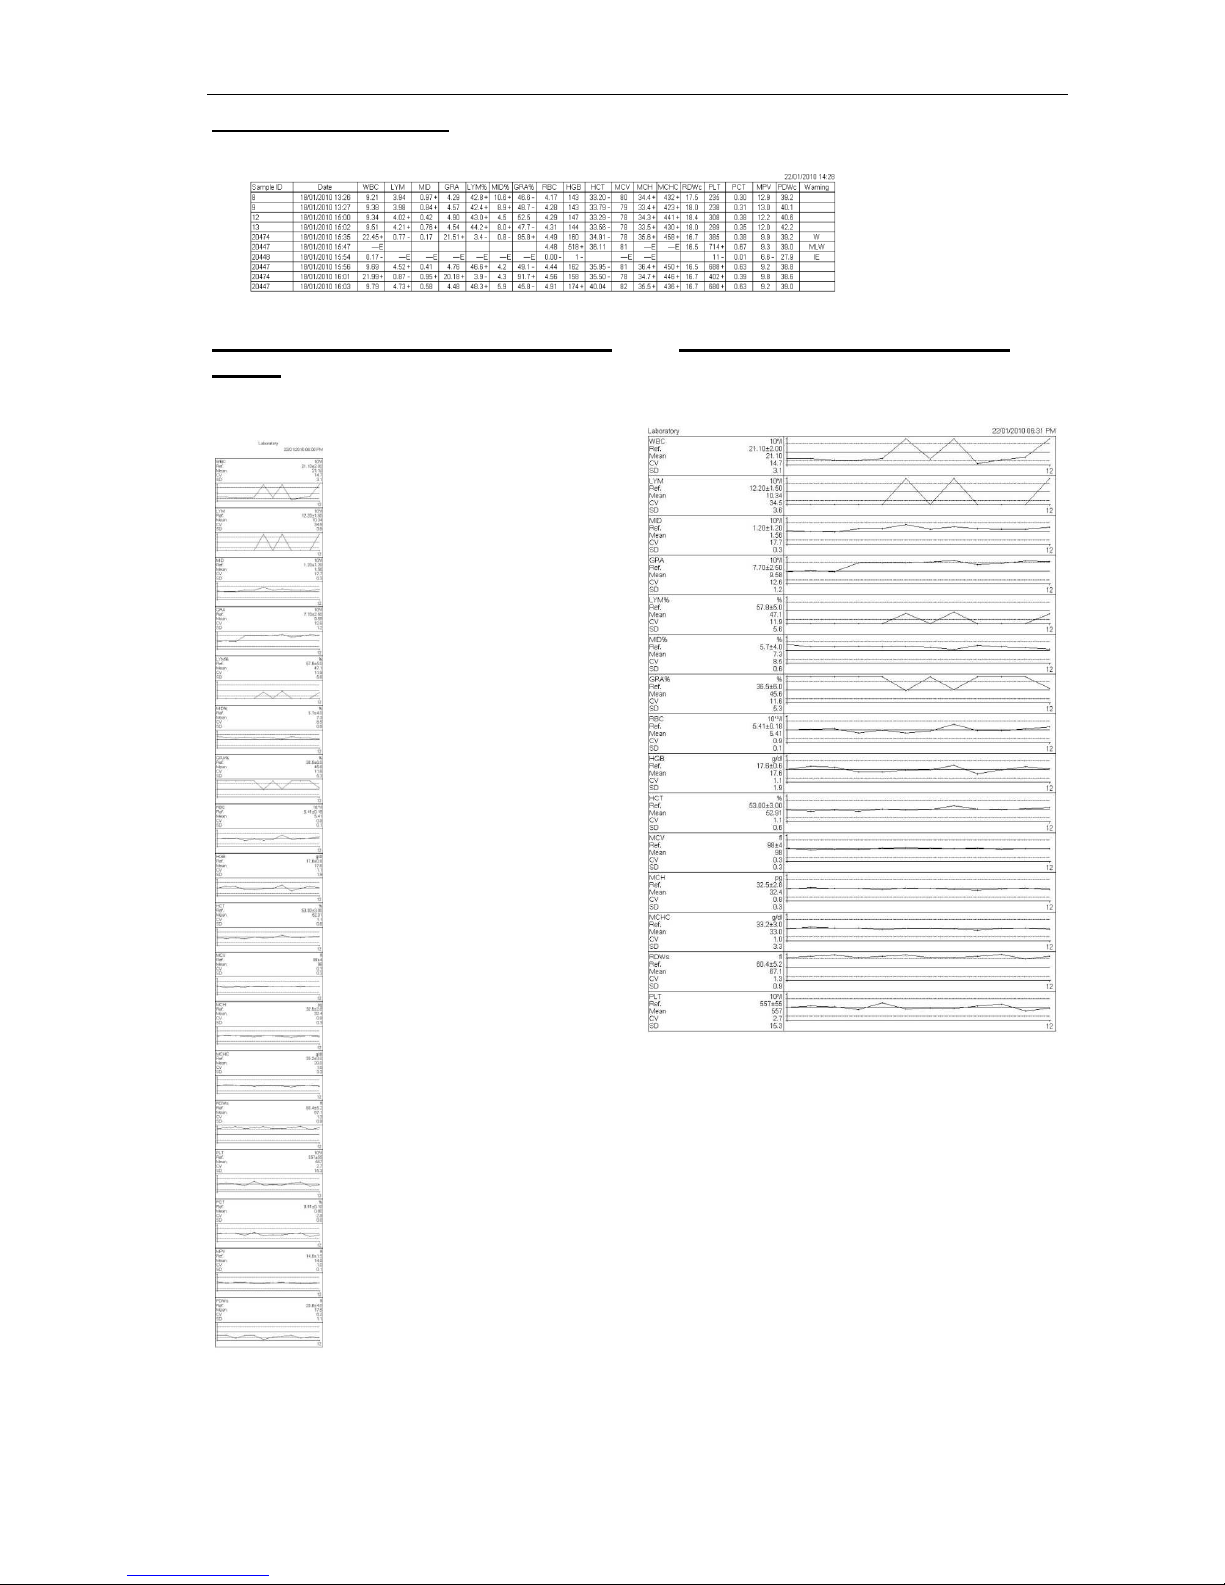
ELite 3, User Manual
Page 66/72
Database Table Printout
QC graphical printout on built-in printer QC graphical printout on external
printer
Page 67
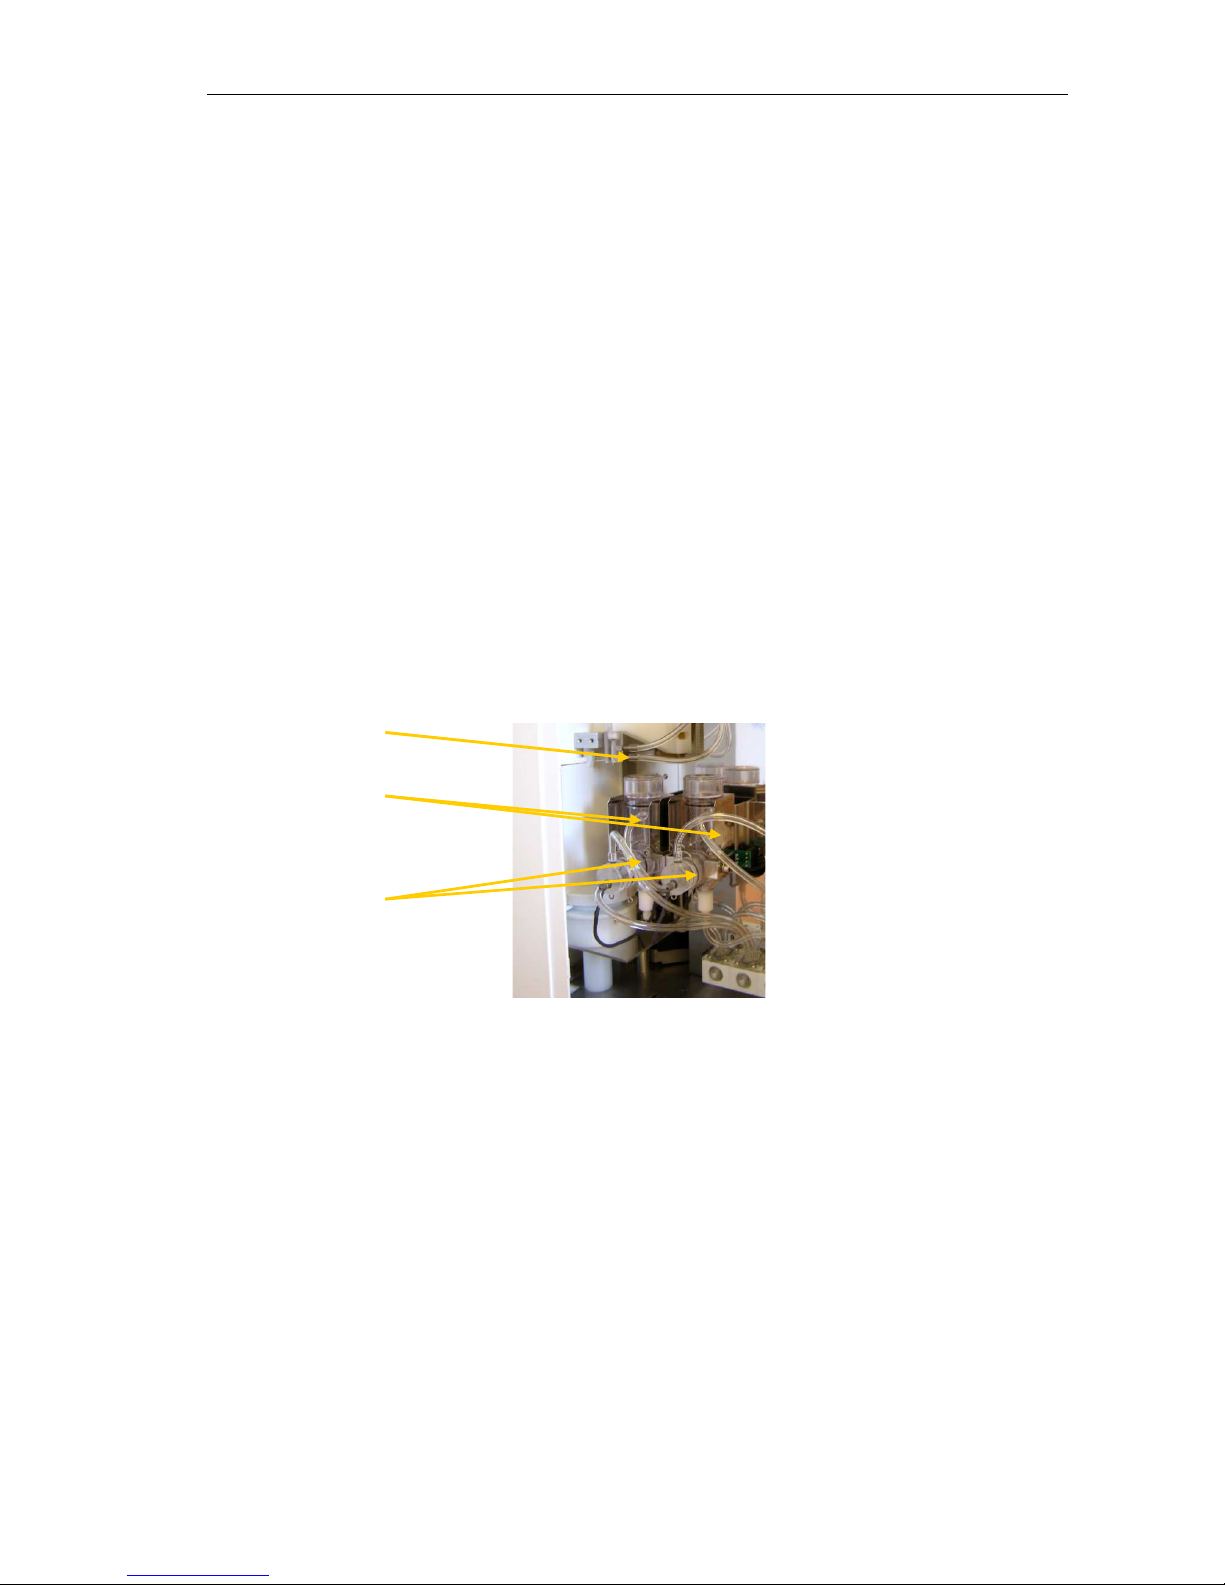
ELite 3, User Manual
Page 67/72
11. Troubleshooting
11.1. Regular Troubleshooting Procedures
From Troubleshooting submenu, user can initiate maintenance procedures such as
blank measurement, cleaning, priming, or draining chamber.
For details on Blank measurement, see Section 5.2.6.
11.2. Weekly User Maintenance
Perform weekly maintenance before turning on the power switch. The right side has a
side door giving access to the fluidic system and the mechanical parts easily.
11.2.1. Cleaning needle washing head
Needle washing head cleans the outer surface of the aspirating needle with diluent.
Any salt build-up on the lower surface may cause malfunction during operation. Use
a soft cloth or wiper dampened with water to clean this area. You can see the
washing head indicated in the following figure:
Figure 12. Parts of measuring block
1. Exit Measure menu. Open the side door after the needle has stopped moving.
2. Gently rub the lower surface of the washing head with a damp cloth or wiper to
remove the salt build-up.
3. Close the side door.
Washing head
Measuring
chambers
Measuring
apertures
Page 68
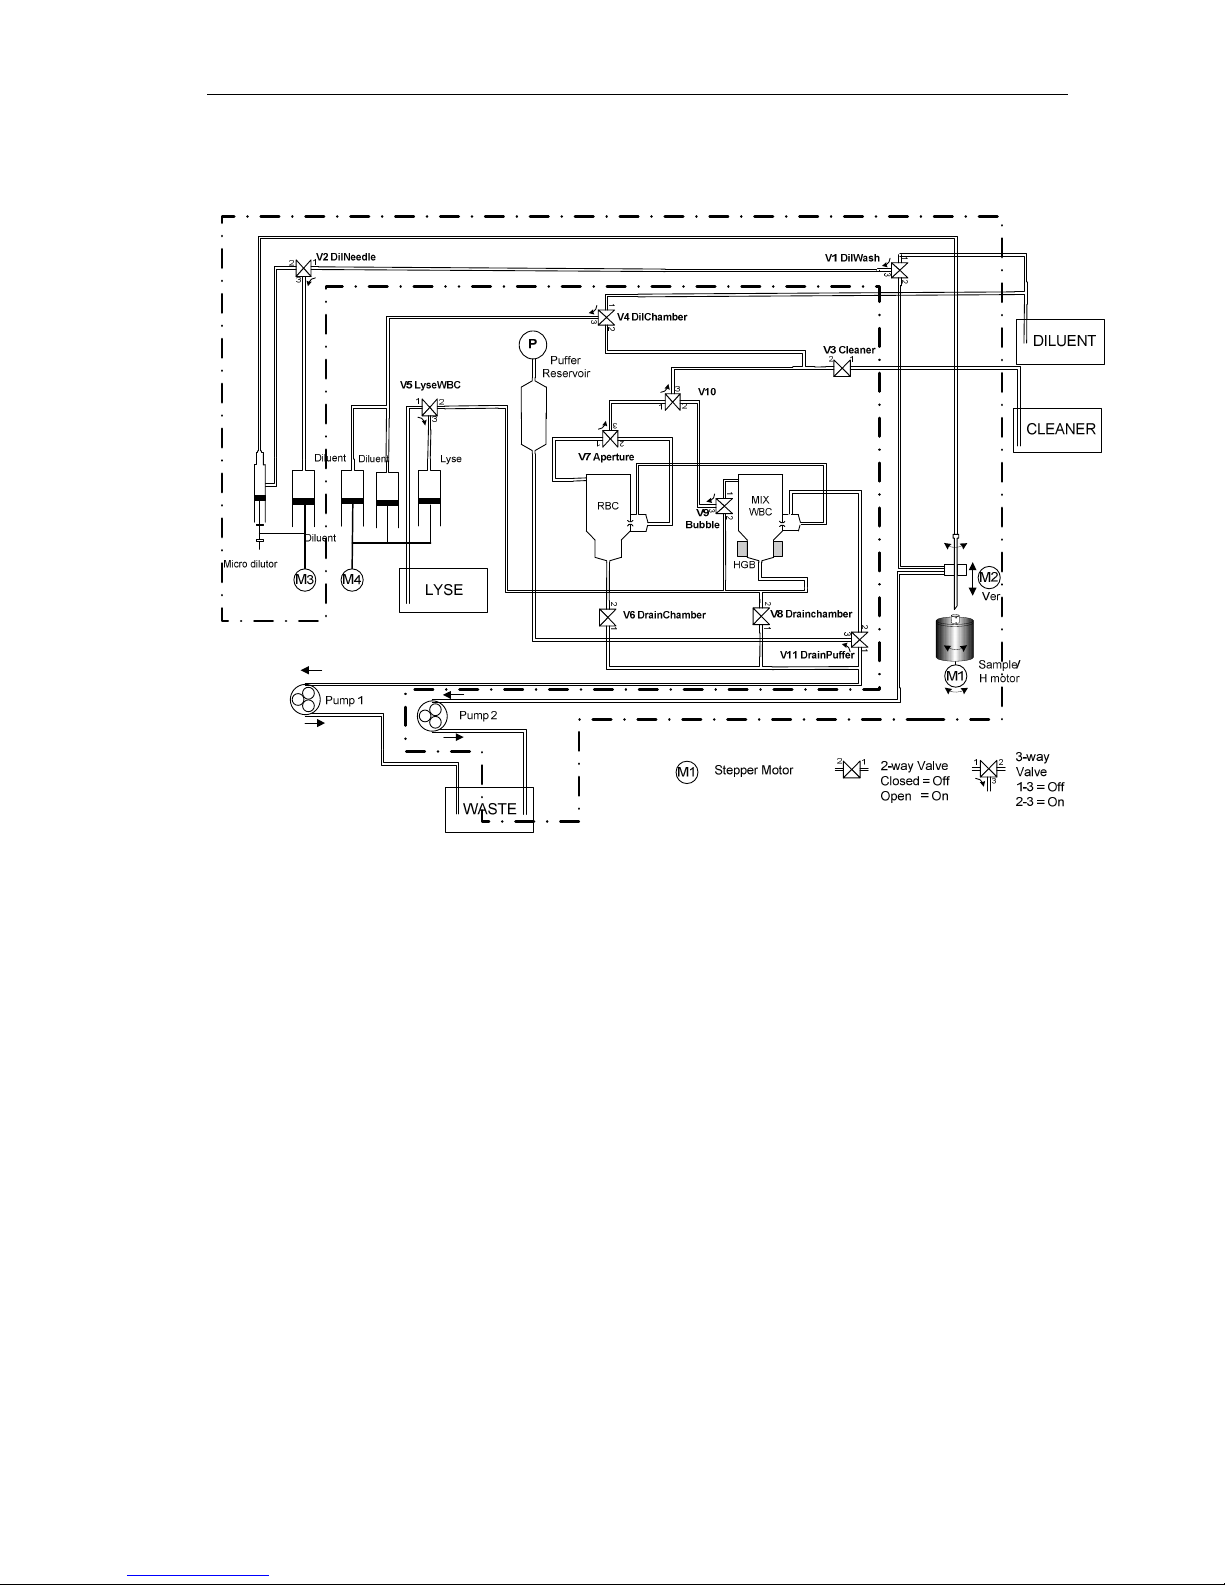
ELite 5, Uživatelský manuál
Page 68/72
12. Fluidic Schematics
Page 69
ELite 3, User Manual
Page 69/72
13. Reagent consumption
Function
Reagent consumption / function (ml)
Diluent Lyse Cleaner
Startup (init + wake up) 200 5 7
Shut down 37 0 6
Measure Blank 34 1 0
Measure Human 34 1 0
Measure Calibration 34 1 0
Measure QC 34 1 0
Prime Diluent 29 0 0
Prime Lyse 26 2 0
Prime Cleaner 31 0 2
Standby 13 0 0
Wake up 9 0 0
Clean 41 0 5
Hard clean 51 0 0
Selftest 16 0 0
Preparing for shipment: rinse 80 ml
Hard clean: cleaning solution 0,7 ml
Page 70

ELite 5, Uživatelský manuál
Page 70/72
14. Appendix A
To save in text format (tab separated values) use the Export function in Database menu. To
process the results in Microsoft Excel import the text files into Excel worksheets.
Note: The text format files do not contain all the information available in binary format files.
The following 3 text file format is available:
HT means Horizontal Tabulator Character in the following descriptions:
A. Simple text
<SAMPLEID>HT<DATE>HT<TIME>HT<WBC>HT<RBC>HT<HGB>HT<HCT>HT<MCV>HT<MCH>HT
<MCHC>HT<PLT>HT<PCT>HT<MPV>HT<PDWc>HT<RDWc>HT<LYM>HT<MON>HT<GRA>HT<LYM%>
HT<MON%>HT<GRA%>
Note: The parameters are in the units according to the current settings.
B. Extended text
<SAMPLEID>HT<DATE>HT<TIME>HT<WBC>HT<RBC>HT<HGB>HT<HCT>HT<MCV>HT<MCH>HT
<MCHC>HT<PLT>HT<PCT>HT<MPV>HT<PDWc>HT<RDWc>HT<LYM>HT<MON>HT<GRA>HT<LYM%>
HT<MON%>HT<GRA%>HT<Type>HT<WARNING>HT<RBC probe min>HT<RBC probe max>HT
<WBC probe min>HT<WBC probe max>HT<Lyse>
C. Advanced text
<SAMPLEID>HT<DATE>HT<TIME>HT<WBC>HT<RBC>HT<HGB>HT<HCT>HT<MCV>HT<MCH>HT
<MCHC>HT<PLT>HT<PCT>HT<MPV>HT<PDWc>HT<RDWc>HT<LYM>HT<MON>HT<GRA>HT<LYM%>
HT<MON%>HT<GRA%>HT<Type>HT<WARNING>HT<RBC probe min>HT<RBC probe max>HT
<WBC probe min>HT<WBC probe max>HT<Lyse>HT<WBC Histogram>HT<WBC Marker 1>HT
<WBC Marker 2>HT<WBC Marker 3>HT<RBC Histogram>HT<RBC Marker 1>
where
- WBC ill. RBC histogram 256 pieces numbers between 0 and 255 separated by HT
character
- <WBC marker 1> WBC low marker
- <WBC marker 2> LYM-MON marker
- <WBC marker 3> MON-GRA marker
- <RBC marker 1> PLT-RBC marker
- The marker value is a number between 0..255 gives the index of the related value in the
WBC/RBC histogram data set.
Page 71

ELite 3, User Manual
Page 71/72
15. Contact
For customer and technical support:
Manufacturer:
Erba Lachema s.r.o.,
Karásek 2219/1d, 621 00 Brno
Czech Republic
Tel: +420 517 077 111
e-mail: [email protected]
Website : https://www.erbamannheim.com/en/product-support/
Contact your local technical support: (Print this page and write or paste contact
information for easy access)
Page 72

ELite 3, User Manual
Page 72/72
16. Appendix- package inserts for reagents and
cleaning solutions
Revision 3.0
Date of Revision 07/2017
HEMA/PI/14/17/B
Page 73
Erba Lachema s.r.o., Karásek 2219/1d, 621 00 Brno, CZ
e-mail: [email protected], www.erbalachema.com
Erba Diluent-Diff
Diluent for automated analyzers
Name Cat. No. Package volume
Erba Diluent-Di
HEM00004 20 L
For in vitro diagnostic use only
INTENDED USE
Erba Diluent-Di is a buered, stabilized and micro-ltered
electrolyte solution for automated dilution of human blood
samples, quantitative and qualitative determination of erythrocytes (RBC), leucocytes (WBC) and the leucocyte subpopulations, thrombocytes (PLT) and measurement of hemoglobin (HGB) concentration on hematology analyzers.
Erba Diluent-Di should be used with only Erba Lachema
reagents. Erroneous results may be obtained if the reagent
is applied with third party reagents.
Please refer to the instrument’s User Manual for further information.
INGREDIENTS
Sodium chloride < 1.5 %
Buers < 1.0 %
Preservative < 0.5 %
Stabilizers < 0.5 %
in ion-free water
HANDLING PRECAUTIONS
- Erba Diluent-Di is environmental friendly, azide-free reagent; does not contain harmful ingredients.
- Avoid contact with eyes, skin and clothing.
- In case of eye or skin contact ush eyes with copious
amounts of water for several minutes or wash skin area
with water.
- Keep the reagent container closed when not in use.
- Wear laboratory gloves when handling the reagent.
- All body uid samples should be considered potentially
infectious materials. Treat all blood and other potentially infectious materials with appropriate precautions. Use gloves,
masks and gowns if blood exposure is anticipated.
- Use Good Laboratory Practices (GLP) when handling the
reagents.
SPECIMEN COLLECTION AND PREPARATION
Erba Diluent-Di is intended for use with blood specimens
collected by vein puncture in EDTA anticoagulant. Specimens
for hematological analysis may be stored for up to 8 hours at
(+15 to +30) ºC or up to 24 hours after collection when refrigerated (+2 to +8) ºC.
REAGENT PREPARATION
- This reagent is ready for use and can be applied straight from
the container; no special reagent preparation is necessary.
- Leave the reagent at room temperature for at least 12 hours.
REAGENT REPLACEMENT
- Person installing the reagent must be a trained laboratory
professional.
- Remove the inlet cap from the reagent container to be replaced. Connect the reagent inlet to the new reagent container.
- Be sure that the colour on each tube, reagent container
label and connector in the back of the instrument match.
- Avoid any dust or microbial contamination of the tubing
and reagents.
- Prime thoroughly the new reagent and measure backgrounds
according to the instrument’s User Manual.
- When installing a new lot of reagent, recalibrate the instrument as specied in your User Manual.
REAGENT STORAGE, STABILITY AND DISPOSAL
- Store Erba Diluent-Di diluent between +15 and +30°C.
- The shelf life of the Erba Diluent-Di diluent is 36 months
from date of manufacture, if stored at the prescribed temperature range.
- Do not use reagent beyond the expiration date printed on
the container label.
- Discard opened container after 120 days.
- Do not use reagent once frozen.
- Dispose of waste product, unused product and contaminated packaging in compliance with local regulations.
IVD
Hematology reagents
HEMA/PI/10/17/B Date of revision: 25. 7. 2017
See Instruction for Use
i
Catalogue Number Lot Number
Expiry date
In vitro Diagnostics
Storage Temperature
Content
CONT
Manufacturer
REF
CE Mark Device comply with
the Directive 98/79/EC
USED SYMBOLS
IVD
50003763
Page 74
Erba Lachema s.r.o., Karásek 2219/1d, 621 00 Brno, CZ
e-mail: [email protected], www.erbalachema.com
Erba Lyse-Diff
Lysing reagent for automated analyzers
Name Cat. No. Package volume
Erba Lyse-Di HEM00007 (opened) 1 L
Erba Lyse-Di HEM00008 (closed) 1 L
For in vitro diagnostic use only
INTENDED USE
Erba Lyse-Di lysing reagent is a stabilized and micro-ltered lysing agent for stromatolysis of erythtrocytes (RBC),
for quantitative determination of leukocytes (WBC), leukocyte
three-part dierentiation (LYM, MID, GRAN) and hemoglobin
(HGB) concentration measurement in human blood on hematology analyzer.
Erba Lyse-Di lysing reagent should be used with only Erba
Lachema reagents. Erroneous results may be obtained if the
reagent is applied with third party reagents.
Please refer to the instrument’s User Manual for further information.
INGREDIENTS
Surfactants < 3.5 %
Buers < 1.0 %
Preservative < 0.5 %
Stabilizers < 0.5 %
in ion-free water
HANDLING PRECAUTIONS
- Erba Lyse-Di lysing reagent is environmental friendly,
cyanide-free and azide-free reagent; does not contain harmful ingredients.
- Avoid contact with eyes, skin and clothing.
- In case of eye or skin contact ush eyes with copious
amounts of water for several minutes or wash skin area with
water.
- Keep the reagent container closed when not in use.
- Wear laboratory gloves when handling the reagent.
- All body uid samples should be considered potentially
infectious materials. Treat all blood and other potentially infectious materials with appropriate precautions. Use gloves,
masks and gowns if blood exposure is anticipated.
- Use Good Laboratory Practices (GLP) when handling the
reagents.
SPECIMEN COLLECTION AND PREPARATION
- Erba Lyse-Di lysing reagent is intended for use with blood
specimens collected by vein puncture in EDTA anticoagulant.
Specimens for hematological analysis may be stored for up
to 8 hours at (+15 to +30) ºC or up to 24 hours after collection
when refrigerated (+2 to +8) ºC.
REAGENT PREPARATION
- This reagent is ready for use and can be applied straight
from the container; no special reagent preparation is necessary.
- Leave the reagent at room temperature for at least 12 hours.
REAGENT REPLACEMENT
- Person installing the reagent must be a trained laboratory
professional.
- Remove the inlet cap from the reagent container to be replaced. Connect the reagent inlet to the new reagent container.
- Be sure that the colour on each tube, reagent container
label and connector in the back of the instrument match.
- Avoid any dust or microbial contamination of the tubing
and reagents. Do not pour and mix the remains of a reagent
from a container into other one.
- Prime thoroughly the new reagent and measure backgrounds
according to the instrument’s User Manual.
- When installing a new lot of reagent, recalibrate the instrument as specied in your User Manual.
REAGENT STORAGE, STABILITY AND DISPOSAL
- Store Erba Lyse-Di lysing reagent between 15 and 30°C.
- The shelf life of the Erba Lyse-Diysing agent is 48
months from date of manufacture, if stored at the prescribed
temperature range.
- Do not use reagent beyond the expiration date printed on
the container label.
- Discard opened container after 120 days.
- Do not use reagent once frozen.
- Dispose of waste product, unused product and contaminated packaging in compliance with local regulations.
IVD
Hematology reagents
Date of revision: 25. 7. 2017
See Instruction for Use
i
Catalogue Number Lot Number
Expiry date
In vitro Diagnostics
Storage Temperature
Content
CONT
Manufacturer
REF
CE Mark Device comply with
the Directive 98/79/EC
USED SYMBOLS
IVD
50003764
50004171
HEMA/PI/09/17/B
HEMA/PI/08/17/B
Page 75
Erba Lachema s.r.o., Karásek 2219/1d, 621 00 Brno, CZ
e-mail: [email protected], www.erbalachema.com
Erba Cleaner
Cleaning solution for automated analyzers
Name Cat. No. Package volume
Erba Cleaner HEM00001
1 L
For in vitro diagnostic use only
INTENDED USE
Erba Cleaner is a stabilized and micro-ltered detergent solution for regular automated cleaning, rinsing and washing
of hematology analyzers’ capillaries, tubing and chambers,
removing blood component precipitates and lipoprotein deposits on Erba Lachema hematology analyzers.
Erba Cleaner should be used with only Erba Lachema reagents. Erroneous results may be obtained if the reagent
is applied with third party reagents.
Please refer to the instrument’s User Manual for further information.
INGREDIENTS
Detergents < 1.0 %
Buers < 1.0 %
Preservative < 0.5 %
Stabilizers < 0.5 %
in ion-free water
HANDLING PRECAUTIONS
- Erba Cleaner is environmental friendly, azide-free reagent;
does not contain harmful ingredients.
- Avoid contact with eyes, skin and clothing.
- In case of eye or skin contact ush eyes with copious
amounts of water for several minutes or wash skin area with
water.
- Keep the reagent container closed when not in use.
- Wear laboratory gloves when handling the reagent.
- All body uid samples should be considered potentially
infectious materials. Treat all blood and other potentially infectious materials with appropriate precautions. Use gloves,
masks and gowns if blood exposure is anticipated.
- Use Good Laboratory Practices (GLP) when handling the
reagents.
SPECIMEN COLLECTION AND PREPARATION
Erba Cleaner reagent is intended for use with blood specimens collected by vein puncture in EDTA anticoagulant.
Specimens for hematological analysis may be stored for up
to 8 hours at (+15 to +30) ºC or up to 24 hours after collection
when refrigerated (+2 to +8) ºC.
Please refer to the instrument’s User Manual for further
details.
REAGENT PREPARATION
- This reagent is ready for use and can be applied straight from
the container; no special reagent preparation is necessary.
- Leave the reagent at room temperature for at least 12 hours.
REAGENT REPLACEMENT
- Person installing the reagent must be a trained laboratory
professional.
- Remove the inlet cap from the reagent container to be replaced. Connect the reagent inlet to the new reagent container.
- Be sure that the colour on each tube, reagent container
label and connector in the back of the instrument match.
- Avoid any dust or microbial contamination of the tubing
and reagents.
- Prime thoroughly the new reagent and measure backgrounds according to the instrument’s User Manual.
- When installing a new lot of reagent, recalibrate the instru-
ment as specied in your User Manual.
REAGENT STORAGE, STABILITY AND DISPOSAL
- Store Erba Cleaner reagent between +15 and +30°C.
- The shelf life of the Erba Cleaner is 48 months from date of
manufacture, if stored at the prescribed temperature range.
- Do not use reagent beyond the expiration date printed on
the container label.
- Discard opened container after 120 days.
- Do not use reagent once frozen.
- Dispose of waste product, unused product and contaminated packaging in compliance with local regulations.
IVD
Hematology reagents
See Instruction for Use
i
Catalogue Number Lot Number
Expiry date
In vitro Diagnostics
Storage Temperature
Content
CONT
Manufacturer
REF
CE Mark Device comply with
the Directive 98/79/EC
USED SYMBOLS
IVD
HEMA/PI/06/17/B Date of revision: 25. 7. 2017
50003767
Page 76
Erba Lachema s.r.o., Karásek 2219/1d, 621 00 Brno, CZ
e-mail: [email protected], www.erbalachema.com
Erba Clenz
Enzymatic cleaner reagent for automated analyzers
Name Cat. No. Package volume
Erba Clenz HEM00017 1 L
For in vitro diagnostic use only
INTENDED USE
Erba Clenz enzymatic cleaner reagent is a stabilized and micro-ltered
proteolytic enzyme solution for regular automated cleaning, rinsing and
washing of hematology analyzers capillaries, tubing and chambers, removing blood component precipitates and lipoprotein deposits on ELite
hematology analyzers.
Erba Clenz enzymatic cleaner reagent should be used only with Erba
reagents. Erroneous results may be obtained if the reagent is applied
with third party reagents. Please refer to the instrument User Manual for
further information.
INGREDIENTS
Sodium chloride < 1.0%
Proteolytic enzymes < 1.0%
Preservative < 0.5%
Stabilizers < 2.0%
In ion-free water
HANDLING PRECAUTIONS
- Erba Clenz enzymatic cleaner is environmental friendly, azide-free reagent, does not contain harmful ingredients.
- Avoid contact with eye, skin and clothing.
- In case of eye or skin contact ush eyes with copious amounts of water
for several minutes or wash skin area with water.
- Keep the reagent container closed when not in use.
- Wear laboratory gloves when handling the reagent.
- All body uid samples should be considered potentially infectious materials.
Treat all blood and other potentially infectious materials with appropriate precautions. Use gloves, masks and gowns if blood exposure is anticipated.
- Use Good laboratory Practices (GPL) when handling the reagents.
SPECIMEN COLLECTION AND PREPARATION
Erba Clenz reagent is intended for use with blood specimens collected by
vein puncture in EDTA anticoagulant. Specimens for hematological analysis
may be stored for up to 8 hours at 15-30°C or up to 24 hours after collection
when refrigerated (2-8°C).
REAGENT PREPARATION
- This reagent is ready for use and can be applied straight from the container, no special reagent preparation is necessary.
- Leave the reagent at room temperature for at least 12 hours.
REAGENT REPLACEMENT
- Person installing the reagent must be a trained laboratory professional.
- Remove the inlet cap from the reagent container to be replaced. Connect the reagent inlet to the new reagent container.
- Be sure that the color on each tube, reagent container label and connector in the back of instrument match.
- Avoid any dust or microbial contamination of the tubing and reagents.
Do not pour and mix the remains of a reagent from a container into other
one.
- Prime thoroughly the new reagent and measure backgrounds according to the instrument User Manual.
- When installing a new lot of reagent, recalibrate the instrument as
specied in your User Manual.
IVD
See Instruction for Use
i
Catalogue Number Lot Number
Expiry date
In vitro Diagnostics
Storage Temperature
Content
CONT
Manufacturer
REF
CE Mark Device comply with
the Directive 98/79/EC
USED SYMBOLS
IVD
Hematology reagents
EN
REAGENT STORAGE, STABILITY AND DISPOSAL
Store Erba Clenz enzymatic cleaner reagent between 15 – 30°C.
The shelf life of Erba Clenz is 24 months from the date of manufacture, if
stored at the prescribed temperature range.
Do not use reagent beyond the expiration date printed on the container label.
Discard opened container after 120 days.
Do not use reagent once frozen.
Dispose of waste product, unused product and contaminated packaging in
compliance with local regulations.
HEMA/PI/24/17/C Date of revision: 25.7. 2017
50004375
Page 77
Erba Lachema s.r.o., Karásek 2219/1d, 621 00 Brno, CZ
e-mail: [email protected], www.erbalachema.com
Erba Hypoclean
Hypochlorite cleaning solution for automated analyzers
Name Cat. No. Package volume
Erba Hypoclean HEM00016 1 L
For in vitro diagnostic use only
INTENDED USE
Erba Hypoclean hypochlorite cleaning solution is a stabilized and micro-
-ltered hypochlorite solution for intensive oxidative cleaning, rinsing and
washing of hematology analyzers capillaries, tubing and chambers, removing blood component precipitates and lipoprotein deposits on ELite hema-
tology analyzers.
Erba Hypoclean hypochlorite cleaning solution should be used only with
Erba reagents. Erroneous results may be obtained if the reagent is applied
with third party reagents. Please refer to the instrument User Manual for
further information.
INGREDIENTS
Detergents < 1.0%
Sodium hypochlorite < 1.0%
Sodium hydroxide < 0.5%
Stabilizers < 0.4%
In ion-free water
HANDLING PRECAUTIONS
Erba Hypoclean contains < 0.5% sodium hydroxide and < 1% sodium hypochlorite.
Warning
Hazard statement:
H315 Causes skin irritation.
H319 Causes serious eye irritation.
EUH031 Contact with acids liberates toxic gas.
Precautionary statement:
P280 Wear protective gloves/protective clothing/eye protection.
P302+P352 IF ON SKIN: Wash with plenty of water.
P305+P351+P338 IF IN EYES: Rinse cautiously with water for several minutes. Remove contact lenses, if present and easy to do. Continue rinsing.
- Avoid contact with eyes, skin and clothing.
- In case of eye contact ush eyes with plenty of water for several minutes
and seek medical advice.
- In case of skin contact wash the skin area with water.
- If swallowed do NOT induce vomiting. Drink plenty of water and seek
medical advice. Beware of aspiration if vomiting does occur.
- Keep the reagent container closed when not in use.
- Avoid any dust or microbial contamination of the reagents.
- Wear laboratory gloves when handling the reagent.
- All body uid samples should be considered potentially infectious materials. Treat all blood and other potentially infectious materials with appropriate
precautions. Use gloves, masks and gowns if blood exposure is anticipated.
- Please refer to the MSDS associated with the reagent.
- Use Good Laboratory Practices (GLP) when handling the reagents.
SPECIMEN COLLECTION AND PREPARATION
Erba Hypoclean reagent is intended for use with blood specimens collected by vein puncture in EDTA anticoagulant. Specimens for hematological
analysis may be stored for up to 8 hours at 15-30°C or up to 24 hours after
collection when refrigerated (2-8°C).
IVD
Hematology reagents
REAGENT PREPARATION
- This reagent is ready to use and can be applied straight from the container, no special reagent preparation is necessary.
- Leave the reagent at room temperature for at least 12 hours.
REAGENT REPLACEMENT
- Person installing the reagent must be a trained laboratory professional.
- Remove the inlet cap from the reagent container to be replaced. Connect
the reagent inlet to the new reagent container.
- Be sure that the color on each tube, reagent container label and connector in the back of instrument match.
- Avoid any dust or microbial contamination of the tubing and reagents. Do
not pour and mix the remains of a reagent from a container into other one.
- Prime thoroughly the new reagent and measure backgrounds according
to the instrument User Manual.
- When installing a new lot of reagent, recalibrate the instrument as specied in your User Manual.
REAGENT STORAGE, STABILITY AND DISPOSAL
Store Erba Hypoclean hypochlorite cleaning reagent between 15 – 30°C.
The shelf life of Erba Hypoclean is 24 months from the date of manufacture,
if stored at the prescribed temperature range.
Do not use reagent beyond the expiration date printed on the container label.
Discard opened container after 120 days.
Do not use reagent once frozen.
Dispose of waste product, unused product and contaminated packaging in
compliance with local regulations.
EN
HEMA/PI/25/17/C Date of revision: 25.7. 2017
See Instruction for Use
i
Catalogue Number Lot Number
Expiry date
In vitro Diagnostics
Storage Temperature
Content
CONT
Manufacturer
REF
CE Mark Device comply with
the Directive 98/79/EC
USED SYMBOLS
IVD
50004376
 Loading...