

EQTA BCC 5T, BCC 6T, BCC 7T, BCC 10T, BCC 14T User manual
...
Coldline
MAINTENANCE HANDBOOK
РУКОВОДСТВО ПО ЭКСПЛУАТАЦИИ И УХОДУ
Via Enrico Mattei, 38
35038 Torreglia
Padova (PD) - Italy
coldline@pec.it


MAINTENANCE HANDBOOK Page 5
РУКОВОДСТВО ПО ЭКСПЛУАТАЦИИ И УХОДУ Стр 23

Correct Disposal of This Product (Waste Electrical & Electronic Equipment)
Надлежащая утилизация данного изделия (Отработавшее электрическое и электронное оборудование)
(Applicable in the European Union and other European countries with separate collection system)
This marking shown on the product or its literature, indicates that it should not be disposed with other household wastes at the end of
its working life. To prevent possible harm to the environment or human health from uncontrolled waste disposal, please separate this
from other types of wastes and recycle it responsibly to promote the sustainable reuse of materiale sources.
Household users should contact either the retailer where they purchased this product, or their local government office, for details of
where and how they can take this item for environmentally safe recycling.
Business users should contact their supplier and check the terms and conditions of the purchase contract. This product should not be mixed with other
commercial wastes for disposal.
(Применимо в Европейском Союзе и других странах Европы с внедренной системой раздельного сбора мусора)
Такая маркировка, нанесенная на изделие или приведенная в соответствующей документации, указывает на то, что по окончании срока
службы продукт не должен утилизироваться вместе с прочими бытовыми отходами. Для предотвращения возможного вреда окружающей
среде или здоровью людей в результате бесконтрольной утилизации отходов, пожалуйста, отделите данный продукт от прочих бытовых
отходов и подойдите к
использования источников материалов.
Бытовые пользователи должны обратиться к розничному продавцу, у которого был приобретен данный товар, или в местные органы власти за получением
информации о том, как они могут направить данный продукт на экологически безопасную переработку.
Промышленные пользователи должны обратиться к своему поставщику и выяснить у него условия договора закупки изделия. При переработке данный
продукт не должен смешиваться с другими коммерческими отходами.
его утилизации ответственно, поддержав тем самым инициативу по обеспечению устойчивости повторного

English
Русский
CONTENTS
1.0 OPERATING CONDITIONS 6
1.1 General information
1.2 Operating conditions
2.0 SPECIFICATIONS 6
3.0 INSTALLATION 7
3.1 Introduction
3.2 Damage check
3.3 Cleaning
3.4 Working conditions
3.5 Levelling
3.6 Putting into operation
4.0 CONTROL PANEL 8
5.0 DESCRIPTION OF CYCLES 9
5.1 Notions on blast chilling/blast freezing cycles
5.2 Blast chilling/blast freezing modes
5.3 Holding
6.0 OPERATION 10
6.1 Switching on/off
6.2 Blast chilling/blast freezing
6.3 Opening the door while a cycle is running
6.4 Pump-down
6.5 Temperature sensor and needle probe readings
6.6 Heated needle probe (optional extra)
6.7 Automatic defrosting
6.8 Manual defrosting
7.0 TEMPERATURE-BASED BLAST CHILLING/BLAST FREEZING 11
7.1 Temperature-based soft blast chilling
7.2 Temperature -based hard blast chilling
7.3 Temperature -based blast freezing
8.0 TIME-BASED BLAST CHILLING/BLAST FREEZING 13
8.1 Time-based soft blast chilling
8.2 Time-based hard blast chilling
8.3 Time-based blast freezing
9.0 PROGRAMS 16
9.1 Creating a new program
9.2 Calling up an existing program
10.0 HACCP ELECTRONIC RECORDER (OPTIONAL) 17
11.0 OPERATING TIPS AND WARNING 17
12.0 ALARMS 19
13.0 CONNECTION DIAGRAM 20
14.0 MAINTENANCE AND CLEANING 21
14.1 Cleaning the appliance
14.2 Cleaning the condenser
14.3 Emptying condensation
5

English
Русский
Do not store pressurised spray botles bearing the wording “flammable”. Risk of explosion!
certificate of EC
conformity.
Model
Voltage
Total
Power
Total current
demand
Yield (Kg)
+65°/+3°C
Yield (Kg)
+65°/-18°C
Yield (Kg/h)
-10°C/-18°C
BCC 5T
14
10
10
BCC 6T
18
14
15
BCC 7T
25
18
20
BCC 10T
40
28
35
BCC 14T
55
35
50
BCC 20T
80
55
-
115
75
-
BCC 20K
80
55
-
115
75
-
BCC 40K
120
80
-
200
140
-
1.0 OPERATING CONDITIONS
1.1 GENERAL INFORMATIONS
Our appliances are disigned and optimised in order to obtain high performance. This appliance must not be
used by people with limited physical, mental or sensory abilities or without experience and knowledge of it,
unless instructed in its use by those responsible for thir safety.
1.2 OPERATING CONDITIONS
The appliance must only be used within the temperature range specified by the manufacturer.
2.0 SPECIFICATIONS
The appliance conforms to European directives as
given in detail on the attached
The data are featured on the CE plate inside the
appliance.
6
230V/50 Hz 886W 4.9A
230V/50 Hz 1088W 6.0A
230V/50 Hz 1096W 6.1A
400V 3N/50 Hz 3345W 6.2A
400V 3N/50 Hz 3440W 6.6A
400V 3N/50 Hz 5590W 16.4A
400V 3N/50 Hz 6480W 19.0A
400V 3N/50 Hz 5590W 16.4A
400V 3N/50 Hz 6480W 19.0A
400V 3N/50 Hz 6480W 19.0A
400V 3N/50 Hz 8310W 24.4A

English
Русский
The Manufacturer declines all responsibility in the event of improper use of the appliance.
Installation must be carried out by specialized technical personnel only.
The manufacturer cannot be held responsible for damage or injury resulting from failure to earth
the appliance or inefficient earthing thereof, incorrect installation, tampering, poor maintenance
and incompetent use, or resulting from failure to comply with electrical safety standards in force in the
country where the appliance is used.
3.0 INSTALLATION
3.1 INTRODUCTION
The appliance must be used solely for the purpose it was specifically designed for, i.e. for storing food within
the temperature range stated by the manufacturer. Understand that any other use shall be considered
improper.
3.2 DAMAGE CHECK
Check all parts of the appliance for damage and that the standard-issue accessories inside are as expected.
3.3 CLEANING
Remove the PVC film covering the inside and outside of the appliance. Clean the compartment inside using a
sponge damp with lukewarm water.
3.4 WORKING CONDITIONS
Make sure the room in which the appliance is installed meets the following conditions:
• Room temperature in the range +5°C to +43°C.
• Positioning away from sources of heat and in a well ventilated area.
3.5 LEVELLING
Move the appliance into its final position and adjust the screw-type feet until you have the unit perfectly level.
Keep the unit at least 10 cm from the wall for a proper ventilation of the technical compartment
.
3.6 PUTTING INTO OPERATION
Before connecting to the power mains, make sure:
• Voltage and frequency are in conformity with the working conditions featured on the CE plate inside the
appliance: maximum tolerance is ±10% of the rated value.
• The power supply circuit meets regulations in force.
• The electrical system is fitted with a residual current circuit breaker (automatic cutout).
• Earthing is compulsory.
If the appliance is going to be switched off for a length of time, it is best to disconnect its power cord.
7

English
Русский
4.0 CONTROL PANEL
On/Off. To switch the instrument off.
Start/Stop
View needle temperature
Switch to time-based cycle
Decrease
Increase
Select hard blast chilling cycle
Select soft blast chilling cycle
Select blast freezing cycle
Select sterilization (optional)
Manual defrosting
Select programs
8
English
Русский
Soft
Hard
Freezing
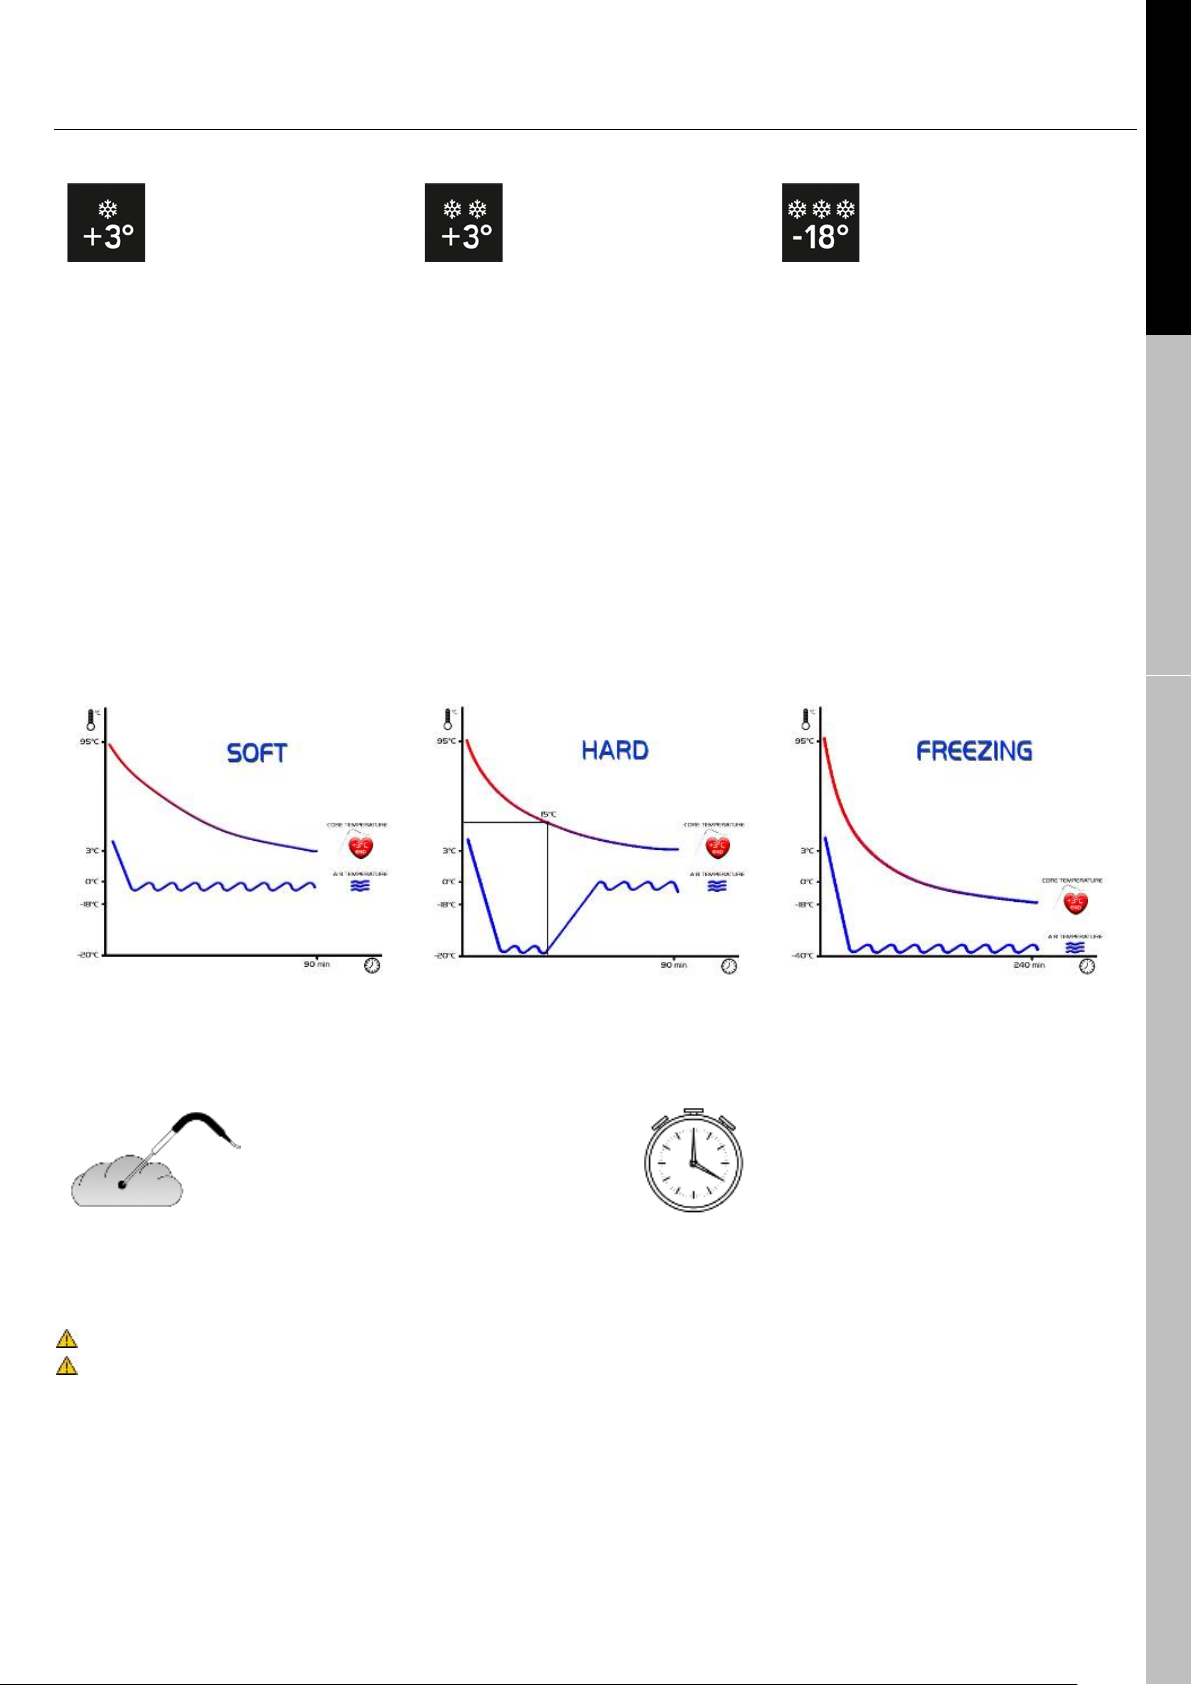
Soft blast chilling is employed to
with a constant
air tempera-ture of -2°C
blast chill-ing time from +65°C to
+3°C must not exceed 90 minutes
Hard blast chilling is employed to
C with negative
air temperature during the first
stage (-35°C) and positive
temperature during the second
stage (0°C)
blast chill-ing time from +65°C to
+3°C must not exceed 90 minutes
Blast freezing is employed to freeze
with an air
temperature of -38°C
blast chilling time from +65°C to 18°C must not exceed 240
minutes.
Temperature
Time
Holding temperature at end of cycle
5.0 DESCRIPTION OF CYCLES
5.1 NOTIONS ON BLAST CHILLING/BLAST FREEZING CYCLES
cool the product quickly to a core
temperature of +3°C
Ideal for delicate, lightweight and
thin products: food tem-perature is
lowered quickly but without
damaging the outside. The food can
be stored for 5/6 days.
Whether dealing with products that
are cold or at room tem-perature, or
products that have just been cooked,
.
cool the product quickly to a core
temperature of +3°
. Ideal for products that
are dense, have a high fat con-tent,
come in large portions or are hard to
The food can be stored for 5/6
cool.
days.
Whether dealing with products that
are cold or at room tem-perature, or
products that have just been cooked,
.
the product quickly to a core
temperature of -18°
Ideal for increasing storage life of
food (weeks or a few months), quick
blast freezing preserves the product's
original visual, aromatic and flavour
properties, and stops macro crystals
forming, keeping quality and texture
intact.
Whether dealing with products that
are cold or at room temperature, or
products that have just been cooked,
5.2 BLAST CHILLING/BLAST FREEZING MODES
One of two modes can be selected for the blast chilling/blast freezing cycle:
needle probe
-based using the
-based using the timer
5.3 HOLDING
At the end of the blast chilling/blast freezing cycle, the appliance automatically switches to holding mode,
which continues indefinitely and is only stopped using the manual stop command.
Do not use the blast chiller/blast freezer as a normal storage unit.
The chilled/frozen product should be kept in a suitable appliance (refrigerator/freezer).
Soft: +3°C Hard: +3°C Blast Freezing: -20°C
9

English
Русский
3.0
OFF"
Switching on
standby
DY1
DY2
---
Switching off
OFF
DY1
OFF
DY2
7.0
8.0
]-[
DY2
The blast chilling/blast freezing cycle cannot be started with the door open. If the door stays
open for longer than 30 seconds during the blast chilling/blast freezing cycle, the blast chilling
cycle is stopped.
Pump-down
Stopping the compressor
5
DY1
the value
DY1
DY1
the value
DY1
6.0 OPERATIONS
6.1 SWITCHING ON/OFF
Once you have turned on the appliance's power, the control panel (
LEDs and displays come on for a few seconds, after which the display switches
still powered).
) automatically runs a lamp test. The
"
(control panel is off but
Hold button down for a few seconds: the appliance goes into
stands by to receive a command.
Display
Display
Hold button down for a few seconds: the appliance switches "
Display
Display
gives the temperature inside the appliance.
reads "
reads "
stays off.
".
".
. During this phase, the machine
".
6.2 BLAST CHILLING/BLAST FREEZING
See points
and
for details.
6.3 OPENING THE DOOR WHILE A CYCLE IS RUNNING
If the door is opened while a blast chilling/blast freezing cycle is running, the "
intermittently on display
and only restart once the door is closed.
and, at the same time, a buzzer will sound. The compressor and fans inside stop
6.4 PUMP DOWN
pressures during start-up.
is a system designed to protect the compressor and its job is to avoid excessive working
" code will flash up
When button is pressed to stop a blast chilling, blast freezing or holding cycle manually, the compressor
keeps working for
more seconds.
6.5 TEMPERATURE SENSOR AND NEEDLE PROBE READINGS
While a temperature-based cycle is running,
view compartment sensor temperature by pressing the button relating to the cycle selected:
The value is put up on
While a time-based cycle is running,
view needle probe temperature by pressing button
for 5 seconds.
indicates
indicates
. The value is put up on
measured by the compartment sensor. You can
measured by the needle probe. You can
for 5 seconds.
, or .
6.6 HEATED NEEDLE PROBE (Optional extra)
The heated needle probe (optional extra) has a device that heats its tip, making it easier to pull out of frozen
products. Holding button down for 5 seconds at the end of a blast freezing cycle turns on heating so that
the probe can be easily removed from the frozen product. Heating only comes on if the door is open.
6.7 AUTOMATIC DEFROSTING
During operation, frost forms on the surface of the evaporator: this is normal but it reduces evaporator
efficiency. The purpose of defrosting is to restore full efficiency. Defrosting is performed automatically:
10

English
Русский
Shortcut commands while in standby mode
6.1
soft
Shortcut commands while in standby mode
Detailed commands sequence:
standby
6.1
10.0
soft
.
DY1
-2°C).
DY2
---”.
soft
6.4
DY1
DY2
+3°C
6.4
- At the end of each blast chilling/blast freezing cycle.
- At 6-hour intervals during holding.
The purpose of the evaporator sensor is to produce the utmost efficiency and shorten defrosting times by
measuring the end-of-defrosting temperature.
6.8 MANUAL DEFROSTING
This mode should be used only when further defrosting is required in addition to that performed
automatically by the appliance.
Make sure the appliance is working (
Hold button down for 5 seconds.
The led by the button comes on, and goes off when cycle ends.
The defrosting cycle stops automatically. How long it takes depends on how much frost there is on the
evaporator coil.
Once defrosting has finished, the appliance resumes normal operation.
).
7.0 TEMPERATURE-BASED BLAST CHILLING/BLAST FREEZING
7.1 TEMPERATURE-BASED SOFT BLAST CHILLING
The temperature-based
blast chilling cycle is controlled by the needle probe.
1
1. Make sure the appliance is in
2. Insert the needle probe in the product to be chilled (
3. Press button to select the
• The led button comes on.
• Display
• Display
4. Press button to start the
• The led button
•
The compressor only starts working 5 seconds after key is pressed (pump-down
•
minutes
• If you press button
5. A buzzer sounds to advise that the blast chilling cycle has finished.
6. At the end of the cycle, holding mode starts and continues indefinitely at a holding temperature of
Soft blast chilling
gives the setpoint of the air in the compartment (
reads “
gives needle probe temperature, and
.
comes on.
while the cycle is running, you can view the time elapsed since it started.
2
mode (
blast chilling cycle
blast chilling cycle.
Start
).
).
the cycle time remaining, counting down from 90
).
.
• The led button flashes.
• If you press button
how long it took.
•
The holding stage must last only as long as strictly necessary.
7. To exit holding mode, press button
• The led button
•
The compressor stops 5 seconds after button is pressed (pump-down
during holding time, you can view the time of the cycle just completed to see
goes off.
.
).
11

English
Русский
Important
soft
-2°C
+3°C.
90 minutes
hard
Shortcut commands while in standby mode
Detailed commands sequence:
standby
6.1
10.0
DY1
-35°C).
DY2
---”.
6.4
DY1
DY2
+3°C
6.4
Important
hard
-35°C
-2°C
+3°C.
90 minutes
• Countdown starts when core temperature measured by the needle probe drops below +65°C.
When a
•
compartment reaches
prevent frost from forming.
The blast chilling cycle ends when the product's core temperature measured by the needle probe reaches
•
blast chilling cycle is started, the compressor works non-stop until air temperature in the
. After this, it can cycle on and off to keep this temperature constant and
The cycle cannot last more than
.
7.2 TEMPERATURE -BASED HARD BLAST CHILLING
The temperature-based
blast chilling cycle is controlled by the needle probe.
1
Hard blast chilling
2
Start
1. Make sure the appliance is in
2. Insert the needle probe in the product to be chilled (
3. Press button to select the hard blast chilling cycle.
• The led button comes on.
• Display
• Display
4. Press button to start the hard blast chilling cycle.
• The led button
•
•
minutes.
• If you press button while the cycle is running, you can view the time elapsed since it started.
5. A buzzer sounds to advise that the blast chilling cycle has finished.
At the end of the cycle, holding mode starts and continues indefinitely at a holding temperature of
6.
• The led button
gives the setpoint of the air in the compartment (
reads “
The compressor only starts working 5 seconds after key is pressed (pump-down
gives needle probe temperature, and
comes on.
flashes.
mode (
).
).
the cycle time remaining, counting down from 90
).
.
• If you press button
how long it took.
•
The holding stage must last only as long as strictly necessary.
7. To exit holding mode, press button
• The led button
•
The compressor stops 5 seconds after button is pressed (pump-down
• Countdown starts when core temperature measured by the needle probe drops below +65°C.
•
When a
compartment reaches
preventing the formation of frost
•
The blast chilling cycle ends when the product's core temperature measured by the needle probe reaches
blast chilling cycle is started, the compressor works non-stop until air temperature in the
The cycle cannot last more than
during holding time, you can view the time of the cycle just completed to see
.
goes off.
).
. After this, it can cycle on and off to keep a constant temperature of
.
.
7.3 TEMPERATURE -BASED BLAST FREEZING
The temperature-based blast freezing cycle is controlled by the needle probe.
,
12

English
Русский
Shortcut commands while in standby mode
Detailed commands sequence:
standby
6.1
10.0
DY1
-38°C).
DY2
---”.
working 5
6.4
DY1
DY2
240
-20°C
6.4
Important
-38°C
-18°C.
240 minutes
soft
Shortcut commands while in standby mode
Detailed commands sequence:
standby
6.1
soft
DY1
-2°C).
1
1. Make sure the appliance is in
2. Insert the needle probe in the product to be chilled (
3. Press button to select the blast freezing cycle.
• The led button comes on.
• Display
• Display
4. Press button to start the blast freezing cycle.
• The led button
•
The compressor only starts
•
minutes.
• If you press button while the cycle is running, you can view the time elapsed since it started.
5. A buzzer sounds to advise that the blast chilling cycle has finished.
At the end of the cycle, holding mode starts and continues indefinitely at a holding temperature of
6.
• The led button
Blast freezing
gives the setpoint of the air in the compartment (
reads “
gives needle probe temperature, and
comes on.
flashes.
2
mode (
Start
).
).
seconds after key is pressed (pump-down
the cycle time remaining, counting down from
)
.
• If you press button
how long it took.
•
The holding stage must last only as long as strictly necessary.
7. To exit holding mode, press button
• The led button
•
The compressor stops 5 seconds after button is pressed (pump-down
• Countdown starts when core temperature measured by the needle probe drops below +65°C.
When a blast freezing cycle is started, the compressor works non-stop until air temperature in the
•
compartment reaches
•
The blast freezing cycle ends when the product's core temperature measured by the needle probe reaches
The cycle cannot last more than
during holding time, you can view the time of the cycle just completed to see
.
goes off.
).
. After this, it can cycle on and off to keep this temperature constant.
.
8.0 TIME-BASED BLAST CHILLING/BLAST FREEZING
8.1 TIME-BASED SOFT BLAST CHILLING
The time-based
blast chilling cycle is controlled by the timer.
1
1. Make sure the appliance is in
2. Press button to select the
• The led button comes on.
• Display
Soft blast chilling
gives the setpoint of the air in the compartment (
2
mode (
blast chilling cycle.
Time-based cycle
).
3
Start
13
 Loading...