

Page 1
Quadro Manual II: A d min istrator's Guide
Edition 1, June 2013
SW Release 5.3.23 and higher
Page 2

Quadro Manual II: A d min istrator's Guide
Table of Contents
Manual I: see Installation Guide
Step-by-step guide to install and configure Quad ro basically.
Manual II: Administrator's Guide
About this Ad ministrator's Guide .............................................................................................................. 4
Quadro’s Graphical Interf ace ................................................................................................................... 5
Administrator’s Main Page ................................................................................................................................................ 5
Recurrent Buttons .......................................................................................................................................................... 6
Recurrent Functional Buttons ............................................................................................................................................ 6
Enteri ng SIP Ad dresses Correctly ....................................................................................................................................... 6
Administrator’s Menus ............................................................................................................................... 7
System M en u ............................................................................................................................................................... 7
System Configuration Wizard ......................................................................................................................................... 7
Internet Configuration Wizard ......................................................................................................................................... 9
Needed B a ndwidth f or IP Calls .............................................................................................................................. 10
System S ecurity Man ag em ent ....................................................................................................................................... 11
Status .................................................................................................................................................................... 13
General Information ................................................................................................................................................ 13
Network S t atus...................................................................................................................................................... 13
Lines Status ......................................................................................................................................................... 15
Memory Status ...................................................................................................................................................... 18
Hardware Status .................................................................................................................................................... 19
SIP Registration Status ............................................................................................................................................ 19
IP Lines Registration Status ...................................................................................................................................... 19
License Status ...................................................................................................................................................... 20
IP Routing Configuration .............................................................................................................................................. 20
Configuration Management .......................................................................................................................................... 22
Legible Configuration Management ............................................................................................................................. 23
Events ................................................................................................................................................................... 24
Time/Date Settings .................................................................................................................................................... 27
Mail Settings ............................................................................................................................................................ 28
SMS Setti ngs ........................................................................................................................................................... 28
Firmware Update....................................................................................................................................................... 29
Automatic Firmware Update ...................................................................................................................................... 30
Networking Tools ...................................................................................................................................................... 31
SNMP Settings ......................................................................................................................................................... 32
Diagnostics.............................................................................................................................................................. 33
System L ogs ........................................................................................................................................................ 34
Automatic Provisioning ................................................................................................................................................ 35
Features ................................................................................................................................................................. 35
Upload Language Pack ............................................................................................................................................... 36
Update Languages for IP Phones ............................................................................................................................... 37
User Rights Management ............................................................................................................................................ 37
Users Menu ................................................................................................................................................................ 40
Extensi ons M an agement ............................................................................................................................................. 40
User Extension Settings ........................................................................................................................................... 42
Pickup Group Extension Settings ................................................................................................................................ 49
Call Park Extension Settings ..................................................................................................................................... 50
Paging Group Extension Settings ............................................................................................................................... 52
Recording Box Extension Settings .............................................................................................................................. 54
Attendant Extension Settings ..................................................................................................................................... 56
Extension Codecs .................................................................................................................................................. 62
Quadro2x, 2xi; Quadro4x, 4xi; Quadro16x, 16xi (SW Version 5.3.x) 2
Page 3

Quadro Manual II: A d min istrator's Guide
Call Park and Directed Call Park Services ..................................................................................................................... 63
Recording Box ...................................................................................................................................................... 64
Upload Universal Extension Recordings ....................................................................................................................... 65
Upload Universal Ex te n sion Recordings - Hold music ............................................................................................... 65
Add Multiple Extensions ........................................................................................................................................... 65
Receptionist Management ............................................................................................................................................ 66
Extensions Directory .................................................................................................................................................. 70
Authorized Phones Database ........................................................................................................................................ 70
Call Back Services ................................................................................................................................................. 71
Teleph on y M enu ........................................................................................................................................................... 73
Call Statistics ........................................................................................................................................................... 73
RTP Statistics ....................................................................................................................................................... 76
FAX Statistics ....................................................................................................................................................... 77
SIP Settings ............................................................................................................................................................. 77
Host aliases for SIP ................................................................................................................................................ 78
Generate And Install New CA Root Certificate ................................................................................................................ 78
RTP Settings............................................................................................................................................................ 78
NAT Traversal Settings ............................................................................................................................................... 79
Line Sett in gs ............................................................................................................................................................ 82
Onboard Line Settings ............................................................................................................................................. 82
Information on the Caller ID system .................................................................................................................. 83
IP Line Settings ..................................................................................................................................................... 84
Supported SIP Phones ...................................................................................................................................... 86
Programmable Key s Configuration ..................................................................................................................... 86
Manage IP Phones Templates ............................................................................................................................ 87
IP Phones Logo ............................................................................................................................................... 88
FXS Gateway Management ............................................................................................................................... 88
Loopback Settings.................................................................................................................................................. 89
Hot Desking ......................................................................................................................................................... 89
FXO Settings ........................................................................................................................................................... 90
ISDN Settings .......................................................................................................................................................... 91
External PSTN Gateways ............................................................................................................................................ 95
Gain Control ............................................................................................................................................................ 96
SIP Tunnel Settings ................................................................................................................................................... 96
Call Routing ............................................................................................................................................................. 98
Local AAA Table .................................................................................................................................................. 104
Global Speed Dial Directory .................................................................................................................................... 105
Allowed Characters and Wildcards ............................................................................................................................ 105
Best Matc hi ng A l g orithm ........................................................................................................................................ 106
VoIP Carrier Wizard ................................................................................................................................................. 109
RADIUS Client Settings ............................................................................................................................................. 110
Voice Mail Common Settings ...................................................................................................................................... 111
Dial Plan Sett ings .................................................................................................................................................... 113
3PCC Settings ........................................................................................................................................................ 113
RTP Streaming Channels .......................................................................................................................................... 113
Call Recording Settings ............................................................................................................................................. 114
Internet Uplink Menu .................................................................................................................................................... 116
PPP/ PPTP Settings ................................................................................................................................................. 116
Advanc ed PP P Settings ......................................................................................................................................... 117
VPN Configuration ................................................................................................................................................... 117
Dynamic DNS Settings .............................................................................................................................................. 124
Firewall and NAT..................................................................................................................................................... 125
Advanced Firewall Settings ..................................................................................................................................... 125
Fil tering Rules ........................................................................................................................................................ 126
Servi ce Pool ....................................................................................................................................................... 127
IP Pool ............................................................................................................................................................. 128
IDS Log ................................................................................................................................................................ 130
Network M en u ........................................................................................................................................................... 131
Quadro2x, 2xi; Quadro4x, 4xi; Quadro16x, 16xi (SW Version 5.3.x) 3
Page 4

Quadro Manual II: A d min istrator's Guide
DNS Settings ......................................................................................................................................................... 131
DNS Server Settings ................................................................................................................................................ 131
DHCP Server Settings .............................................................................................................................................. 132
Registration Form ....................................................................................................................................................... 134
Administrator’s Additional Features .................................................................................................................................. 135
Incoming Call Blocking and Outgoing Call Blocking............................................................................................................ 135
Voice Mail Profiles ................................................................................................................................................... 135
Logout .................................................................................................................................................................... 138
Appendix: PBX Services for Quadro’s Admini strator .................................................................................. 139
Appendix: Extension User's Welco me Page ............................................................................................. 140
Appendix: Sy stem Default Values .......................................................................................................... 141
Administrator Settings .................................................................................................................................................. 141
Extension Settings ...................................................................................................................................................... 147
Appendix: Software License Agreement .................................................................................................. 149
Manual III: see Extension User's Guid e
Describes d e taile d the menus available f o r extension users and includes f u rthe r a ll call cod e s a t a glance.
Quadro2x, 2xi; Quadro4x, 4xi; Quadro16x, 16xi (SW Version 5.3.x) 4
Page 5

Quadro Manual II: A d min istrator's Guide About this Administrator's Guide
About th is Ad ministrator's Gu ide
The Quadro Manual is divided into three parts:
• Manual-I: Installation Guide
gives step-by-step instructions to provision the Quadro IP PBX and configure the phone extensions with the Epygi SIP Server. After successfully
configuring the Quadro IP PBX, users will be able to make SIP phone calls to remote Quadro devices, make local calls to the PSTN and acc ess
the Internet from devices connected to the LAN.
• Manual-II: Administrator's Guide expl ai ns all Q u adro manag em ent menus avai l ab l e for ad m in is t r at ors on l y. It incl u des a list of all System
Default Values.
• Manual-III: Ext ensi on Us er's Gui de explains all Quadro management menus availabl e for extens ion us ers. A list of all cal l codes can b e found
there, t oo.
This Administrator's Guide explains all Quadro2x flavors (2x, 2xi), all Quadro4x flavors (4x, 4xi) and all Quadro16x flavors ( 16 x, 16 xi ) .
Throughout this Administrator's Guide, the Quadro4x is shown as the reference system.
This gui d e c ontains man y ex am pl e s c reen illustrations. Since Qu ad ro IP PBXs of f er a wid e variety of featur es and f unc tionality, th e ex ample scr eens
shown may not appear exactly the same for your particular Quadr o IP PB X as th ey ap pear in this m anual. T he e xamp le s cr eens are f or ill ust rati ve
and expl an at ory purposes , an d sh ou ld n ot b e cons trued to repr es en t you r ow n u ni qu e environm ent.
Quadro’s Graphical Interface describ es to the Quadr o's graphic al us e r int erface and expl ai ns al l r ecur r en t but tons.
Adminis tr ator’s Menus expl ains t h e Adminis trator's m an ag em ent pages according t o the m enu s t ruc t ure show n on the m ain p age of t h e Q u adro
management.
Adminis trator’s A dditional F eatures explai ns some input -options f or adminis trators only that may be selected f rom the ext ension us er's main
page.
Appendix: PBX Services for Quadro’s Administrator explains PBX features for administrator accessible from the handset.
Appendix: Extension User's Welcome Page includes a form that allows the administrator to inform his extens ion user w ith all individu all y n eeded
addresses and phone numbers.
Appendix: System Default Values lists all factory defaults.
Appendi x: Software Li cense Agr eement includes the contract for using Quadro's hardware and software.
Quadro2x, 2xi; Quadro4x, 4xi; Quadro16x, 16xi (SW Version 5.3.x) 4
Page 6
Quadro Manual II: A d min istrator's Guide Quadro's Graphical Interface
Internet Uplink Menu
Network Menu
Quadro’s Graphical Interface
Administrator’s Main Page
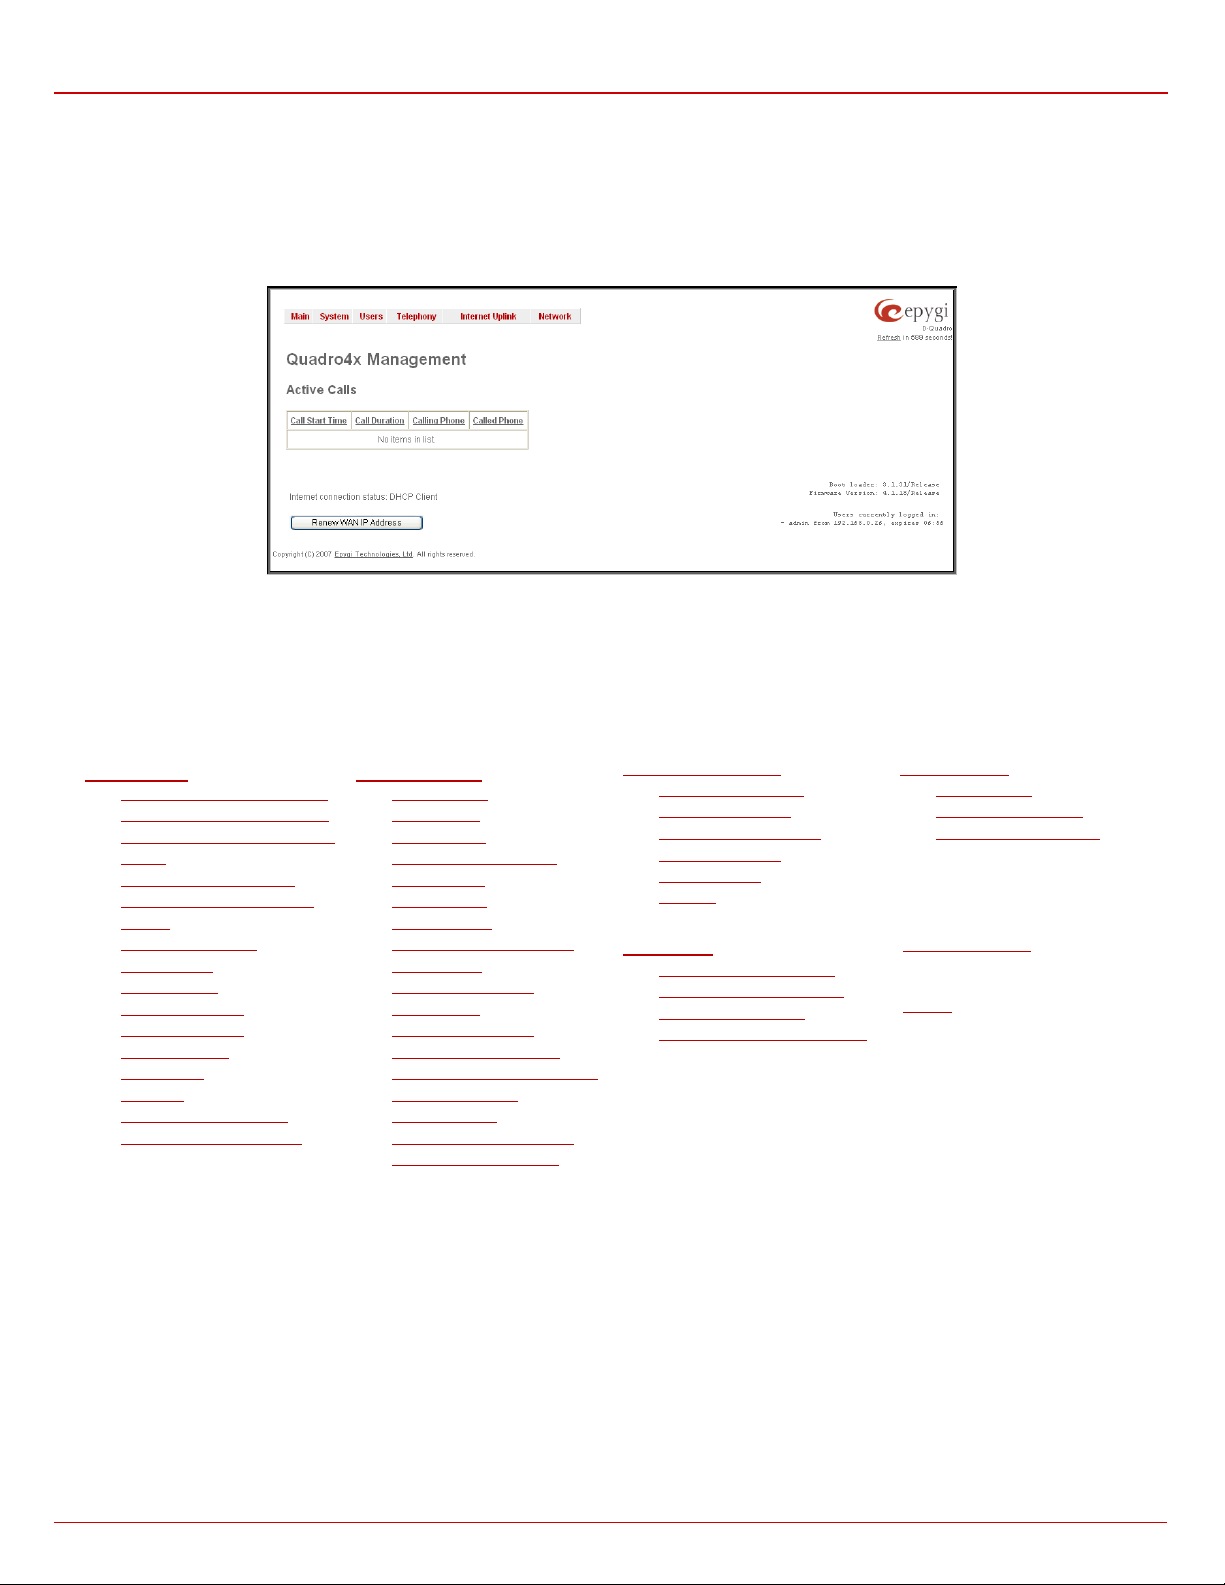
When the ad ministr ator l ogs in, th e Quadro M anage men t page is d ispl ayed wit h a t abl e of ac tive c al ls (i nclu di ng i nform ati on about c all peers, call
duration and start t i m e) at th e s tartup. T h e button Terminate next to eac h ac t i ve call is us ed t o t er mi nate the c orr es p onding c all. The num b er of t otal
active c alls is dis pl ay ed above the tabl e.
Fig. II-1: Quadro4 x M an ag em en t
Here the ad mi nis trator m ay access the f ollow i ng s ett in gs and per form the act i ons:
By clic king on Sy stem, Users, T elephony, Inter net Uplink or Network th e administrator may access the follow ing settings in eac h respective
category and perform actions specific to each category.
The Instal l Chec klist opti on in the Main M enu opens a p age that lis ts the m ost us eful acti ons and the c orresp ondin g hyperl inks f or the Q uadro’s
initial s etu p and c onf ig urati on proc edur e. Fr om t his pag e you c an be link ed t o th e appr op riat e p ages wh ere th e c orres pond ing c onf igu rati on c an be
done. Here, you can also save your progress of Quadro’s setup by selecting the corresponding action’s checkbox and pressing Save.
System Menu
•
System Configuration Wizard
•
Internet Configuration Wizard
•
System S ecurity Man ag em ent
•
Status
•
IP Routing Configuration
•
Configuration Management
•
Events
•
Time/Date Settings
•
Mail Settings
•
SMS Setti ngs
•
Firmware Update
•
Networking Tools
•
SNMP Settings
•
Diagnostics
•
Features
•
Upload Language Pack
•
User Rights Management
The funct ional butt on Renew Wan I P Address appear s on the admi nistrator’s main Quadr o Management page if the Quadro de vic e act s as a
DHCP client. The Renew WAN IP Add r ess button is used to obtain a new WAN IP address in case, e.g., the Quadro moves to another network.
The func tional bu tton E stablish Your Internet Conne ction Now respectively T erminate Your Internet Co nnection No w occurs on th e Qu adro
Management page if PPPoE is used as WAN i n terface protocol.
The link Please Check Y our Pending Ev ents will be dis played on th e administr ator Main M enu page if n ew s ystem events exis t. Th e link l eads t o
the Events page that can be also accessed from the System menu.
Th e li s t of Users curr ent ly logg ed int o the sy ste m is seen in t he lower rig ht corner of th e A d m in istrator's M ai n M en u. I nformati on about I P ad d r es s
user acc ess ed Quadro GUI fr om, th e user name user is logged in a nd the time until the next automatic ally logout is provi ded herein. T he curren t
version of t h e Q u ad ro's fir m ware and of its boot l oader is also available h ere. The idle session tim eout is s et to 20 min utes. If n o action is perf orm ed
during that time, user will be automatically moved to the Login page and will be requested to login again.
Telephony Menu
•
Call Statistics
•
SIP Settings
•
RTP Settings
•
NAT Traversal Settings
•
Line Sett in gs
•
FXO Settings
•
ISDN Settings
•
External PSTN Gateways
•
Gain Control
•
SIP Tunnel Settings
•
Call Routing
•
VoIP Carrier Wizard
•
RADIUS Client Settings
•
Voice Mail Common Settings
•
Dial Plan Sett ings
3PCC Settings
•
RTP Streaming Channels
•
•
Call Recording Settings
•
PPP/ PPTP Settings
•
VPN Configuration
•
Dynamic DNS Settings
•
Firewall and NAT
•
Fil tering Rules
•
IDS Log
Users Menu
•
Extensi ons M an agement
•
Receptionist Management
•
Extensions Directory
•
Authorized Phones Database
•
DNS Settings
•
DNS Server Settings
•
DHCP Server Settings
Registration Form
(in menu tr ee on l y)
Logout
Quadro2x, 2xi; Quadro4x, 4xi; Quadro16x, 16xi (SW Version 5.3.x) 5
Page 7
Quadro Manual II: A d min istrator's Guide Quadro's Graphical Interface
page of a fixed sequence of pages (used
This button opens the help page
belonging to the currently active Quadro
the button will select all
Recurrent Buttons
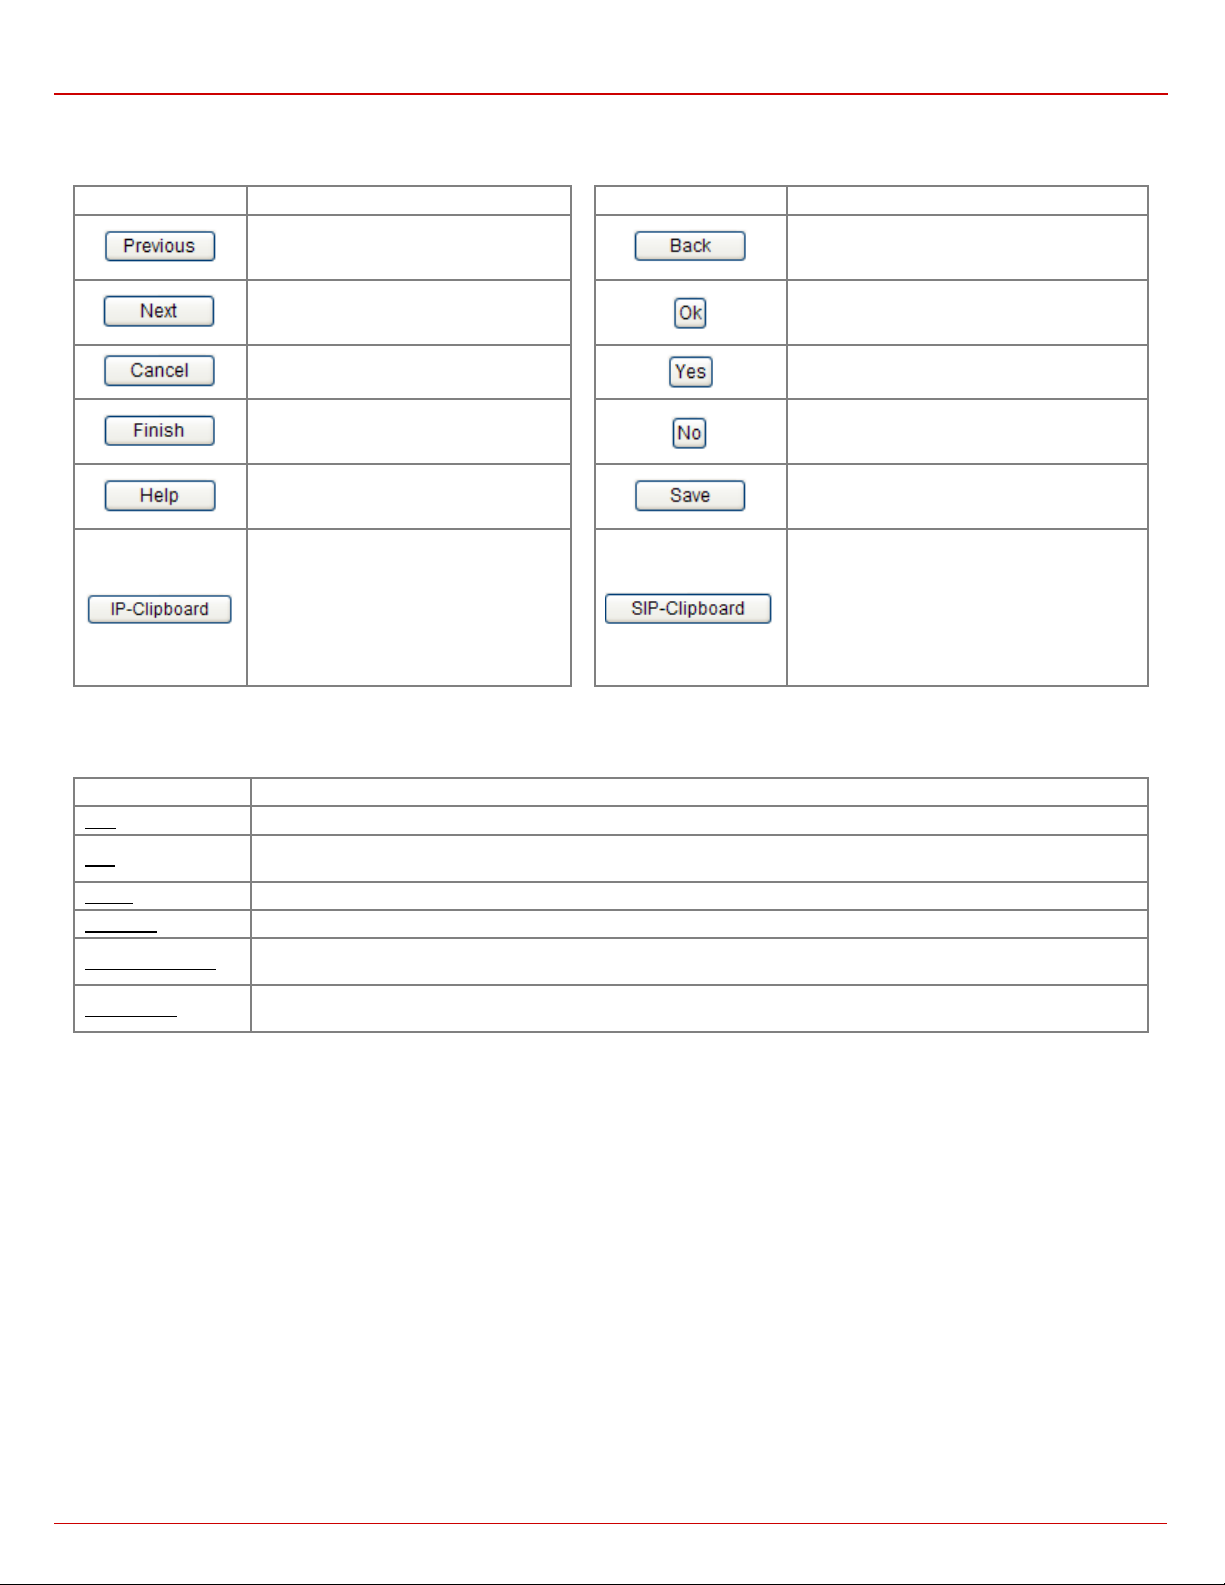
Throughout this gui d e, you wil l s ee a var i ety of recurr ent buttons. B el ow is a d esc ription of th es e bu ttons.
Button Description Button Description
This button leads back to the previous
mainly in wizards).
This bu tton leads forward to the next page
of a fixed sequence of pag es (used m ai nl y
in wizar ds ).
This button discards the latest not yet
confirm ed ent ri es .
This is th e last but ton of a f ixed s eq uenc e
of pages that completes and saves the
entries of an entire sequenc e.
management page.
This butt on opens a wind ow w h er e th e las t
inserted IP addr esses ar e listed. It allows
the user to m ak e a quick sel ec ti on of an IP
address that has been previously used.
This will avoid the user needing type it
again. Th e clipboar d can hold up to 10 IP
addresses and a new IP address will
replace the oldest one from the li s t.
This but ton returns you to the page you were
previous l y on .
This button confirms an operation you started
before.
This button confirms an operation you chose
before.
This button discards an operation you chose
before.
This bu tton s aves the s ettings modifi ed on th e
current l y ac ti ve m an agement p ag e.
This button opens a window where the last
inserted S IP addr esses ar e listed. It allows th e
user to make a quic k sel ecti on of an IP add ress
that has b een previousl y used. This wi ll avoid
the user needing type it again. The clipboard
can hold up to 10 SIP addresses and a new
SIP address will replace the oldest one from the
list.
Recurrent Functional Buttons
In connection with the tables, the following are the few buttons you will see:
Functional Butt on Description
Allows add in g a new rec ord to the displayed tabl e. A new page will b e dis pl a yed t o ent er any new settings. Add
Edit
Inverse Selection
Refresh in...
Most of th e tables offer th e option to s ort t h e en t ri es i n ascend in g or d escending order by clicking the headings of t h e c ol um ns . A s m all arrow next to
the colu mn headin g indicates the direc tion of sor ting - upward or downward. The entries of the table can be selected by using the corresponding
checkboxes in ord er to edit or d el et e th em .
Allows mod if ying th e s ett ings of t he r ec ord s elect ed by a ch eckb ox. N ormal ly only one ( 1) rec ord may be s el ected. A new
page will be dis played t o enter the modif i ed s ettings.
Deletes t h e s elec t ed entry(s) of a table. A warning mess age will ask for conf ir m ati on befor e del eti ng an existin g entry. Delete
Selects all table entry(s) for example for further deletion. Select All
Invers es (op posites) an existi ng selection of table entry(s). If no e ntries are s elected, clic king
records.
May be show n in the up per right c orn er of a page. It displ ays the numb er of s econ ds rem aini ng unt il th e next r efresh of th e
page will occ ur. It may be us ed t o rel oad the page m anu ally.
Entering SIP Addresses Correct ly
Calls over I P are impl em ent ed bas ed on S essi on In itiat ing P rotoc ol ( SIP) on th e Quadr o. W hen mak ing a call t o a des tin ation t hat is somewhere on
the Internet, a SIP address must be provided.
SIP addr esses needs to be specifi ed in on e of t h e f ollowing f orm ats:
“display name” <username@ipaddress:port>
“display name” <username@ipaddress>
username@ipaddress:port
username@ipaddress
username
For your convenience, the following combinations can be used:
• *@ipaddress - any user from the specified SIP server
• username@* - a specified user from any SIP server
• *@* - any user from any SIP server
Quadro2x, 2xi; Quadro4x, 4xi; Quadro16x, 16xi (SW Version 5.3.x) 6
The disp lay name and the p ort numb er ar e optional p arameters i n the
SIP addr ess. If a port is n ot specifi ed, 506 0 will be set up as th e defaul t
one. The r an g e of vali d ports is betw een 1024 and 655 36.
A flexible structure of wildcards is allowed. In comparison with a
wildc ar d, th e “ ?” ch aract er s tands f or onl y on e unk now n dig it an d t he “* ”
charact er st an ds for an y nu mb er of an y di git s .
Please Note: Wildcards are available for caller addresses only. No
wildcar d characters are allowed f or called p arty address es. Except ions
ar e a ddr es s es i n th e Suppl ement ary A ddres ses table th at are us ed by
Outgoing Call Blocking and Hiding Caller Information Settings
servic es. To us e “*” and “ ?” alone ( as non wildcar d char acters ), use “ \*”
and “\?” correspondingly.
Page 8
Quadro Manual II: A d min istrator's Guide Administrator’s Me n us
DHCP Settings for the LAN are described in the chapters below.
Administrator’s Menus
System Menu
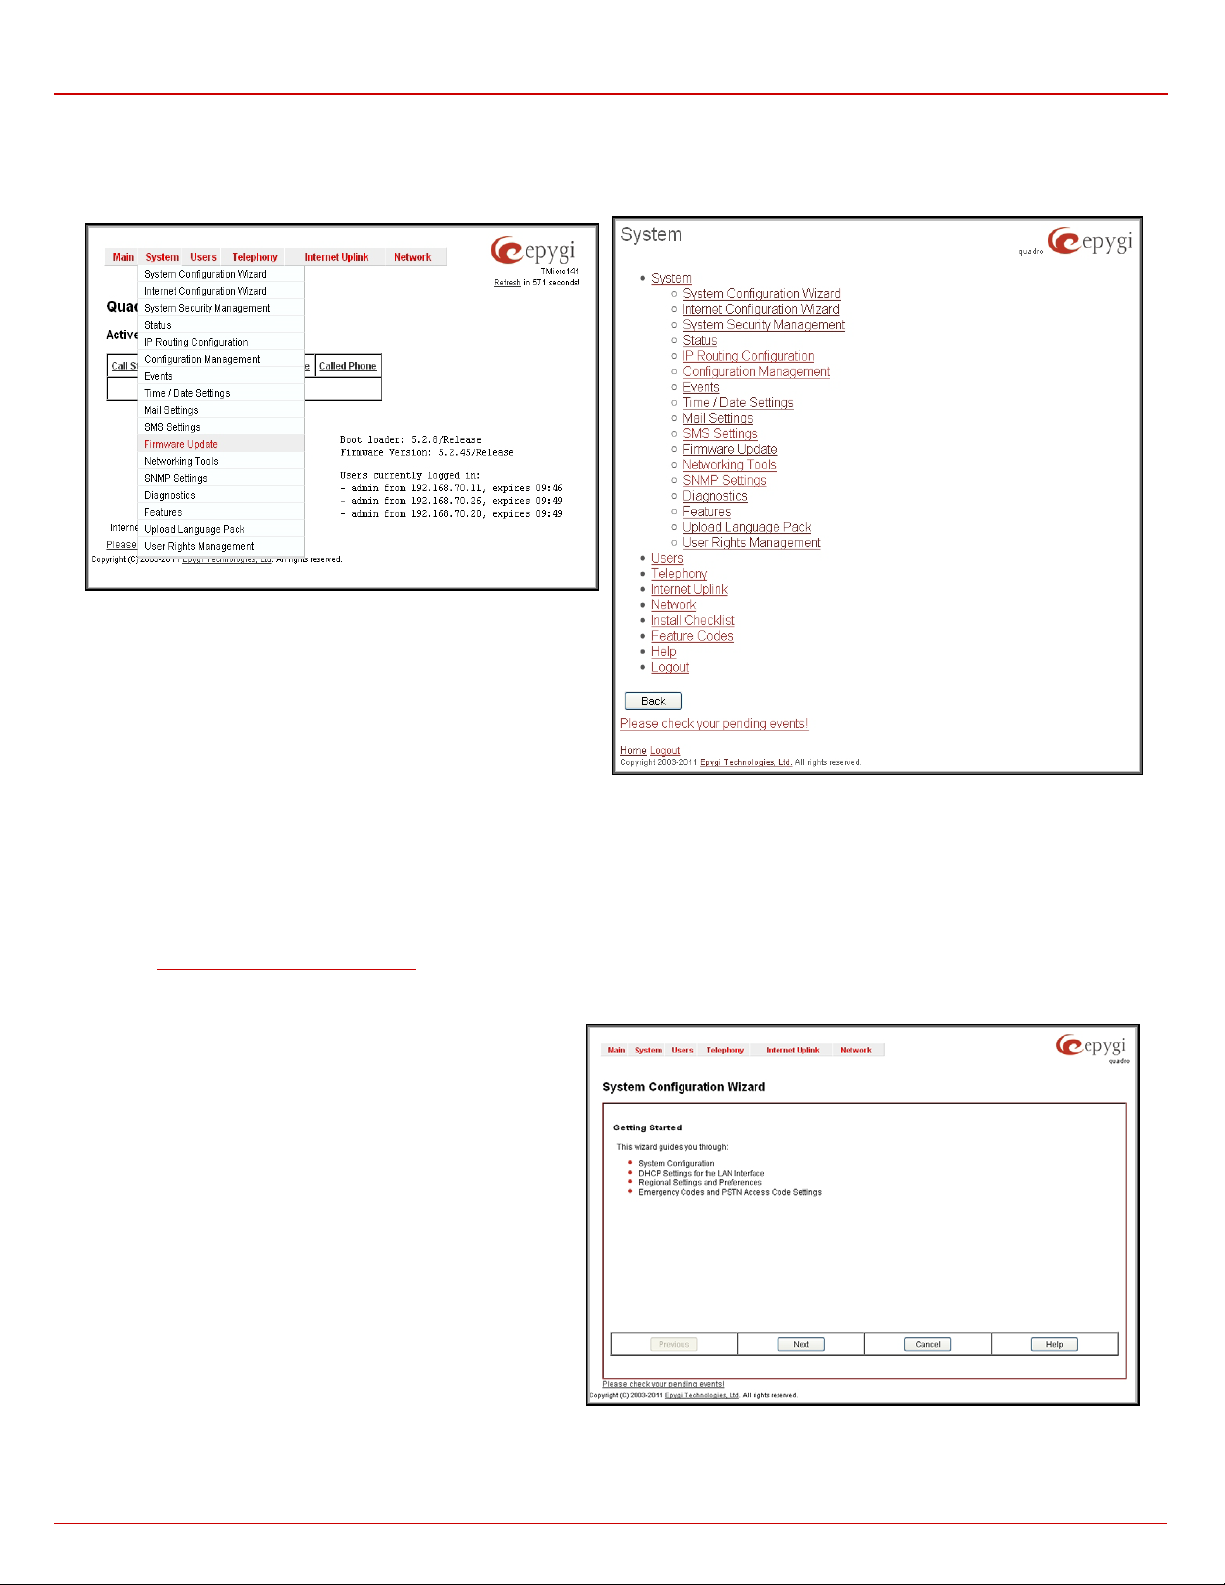
Fig. II-1: System Menu in Dynamo theme
Fig. II-2: System Menu in Plain theme
System Configuratio n Wiz ard
The System Configuration Wizard allows the administrator to define the Quadro’s Local Area Network settings and to specify regional configuration
settings t o m ak e Q uadro op erational in its LAN. T he System Confi g urati on Wizard MUST be run up on Qua dro's first start up t o m ak e s ure that it
works properly in its network environment. The Wizard allows navigating through the following basic configuration parameters and settings:
• System Configuration (see below)
• DHCP Settings for the LAN Interface
• Regional Set t in gs and P r eferences (see below)
• Emergency Codes and PSTN Access Codes Settings (see below)
The LAN c onfigur ation an d region al sett ings will be descr ibed lat er
in this chapter.
Please Note: It is strongly recommend ed to leave th e factory
default settings if their meanings are not fully clear to the
administrator.
Fig. II-3: System Configuration Wizard - Start page
Quadro2x, 2xi; Quadro4x, 4xi; Quadro16x, 16xi (SW Version 5.3.x) 7
Page 9
Quadro Manual II: A d min istrator's Guide Administrator’s Me n us
checkbox indicates whether the
Dialing the digits inserted in this text field will provide the PSTN dial
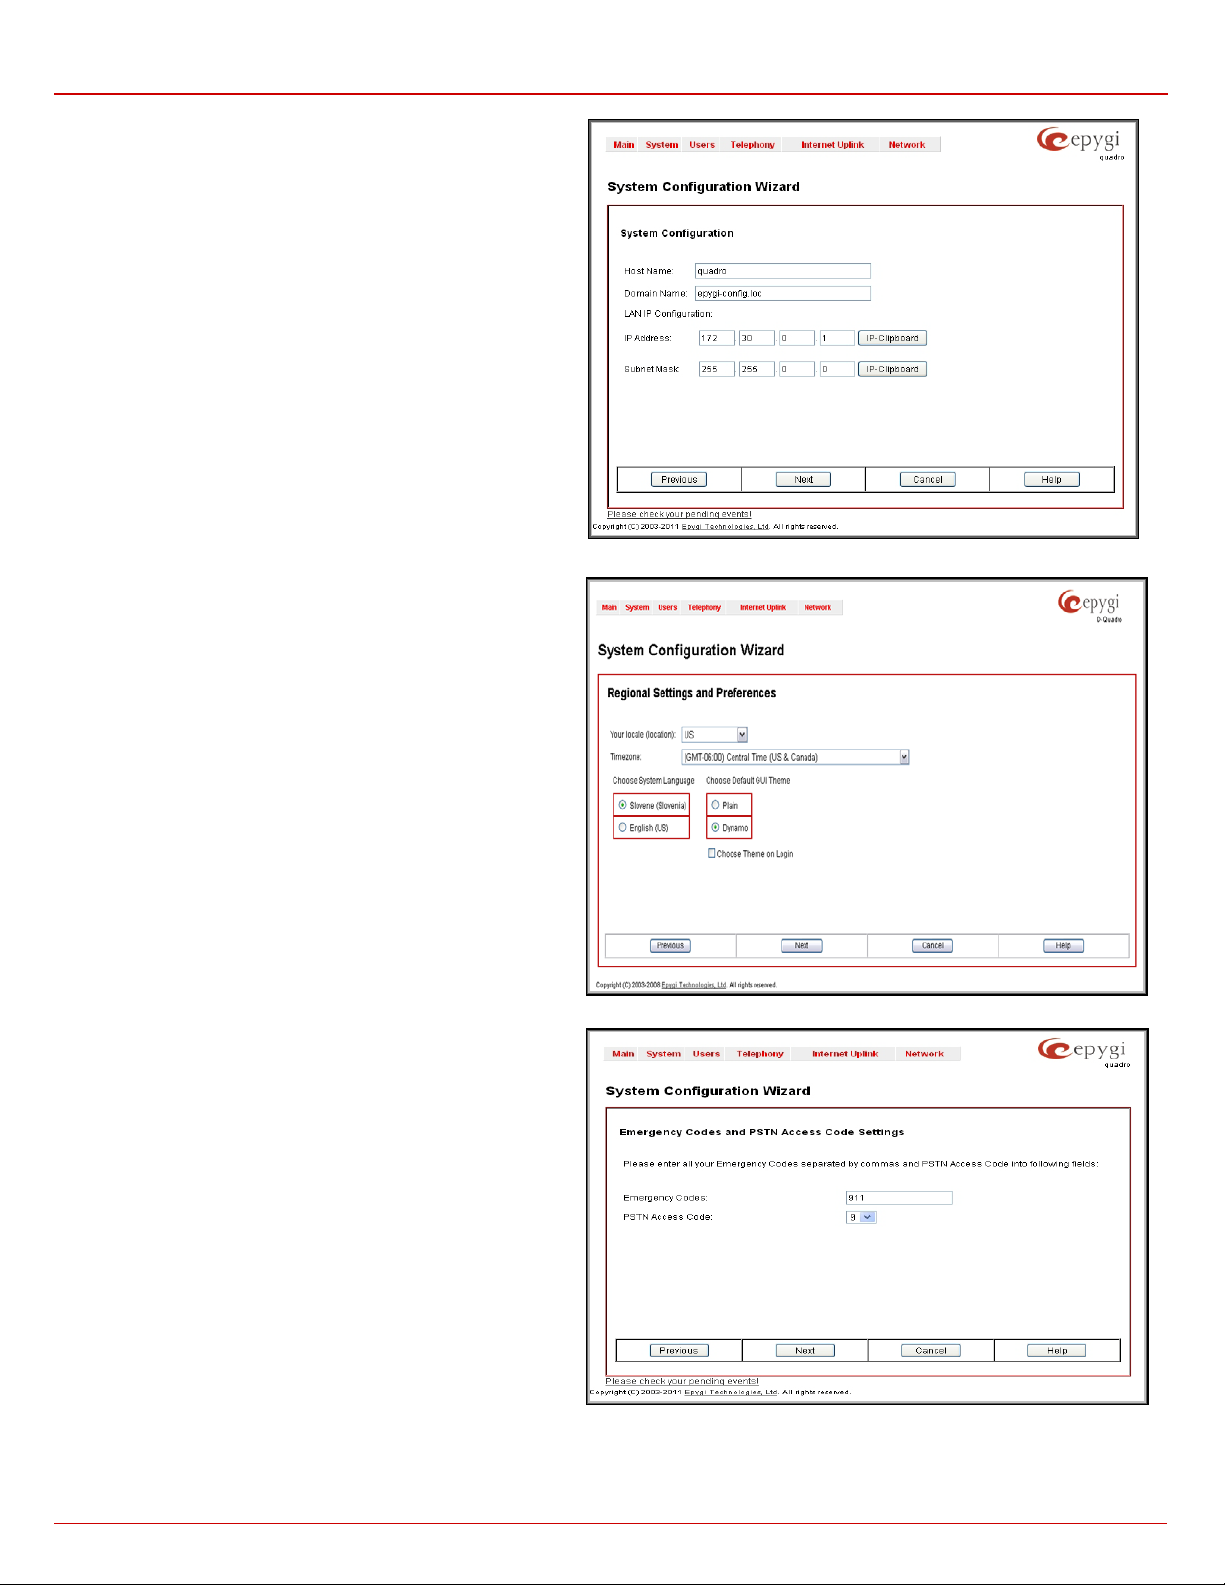
The System Configuration page contains the host name, IP
address and Subnet Mask information about the Quadro LAN
interface. These settings make Quadro available to the internal
network.
The System Configuration page offers the following input options:
Host Name requires a host name for the Quadro device.
Domain Name requires the LAN side domain name which the
Quadro belongs to.
IP Address requires the Quadro host address for the LAN
interface.
Subnet Mask requires the Quadro hosts’ Subnet Mask.
Fig. II-4: System Configuration Wizard - System Configuration page
The Regional Settings and Preferences are used to select
settings sp ecif ic t o th e loc ati on of t h e Qu adro. T h is is i mp ortan t f or
the functionality of the voice subsystem.
The Re gional Settings an d Preferences p ag e has two dr op d own
lists to select the Location (country) and a corresponding
Timezone. Quadro will su pport Daylight Savings (DST) correction if
it is available for the selected time zone.
This pag e also has a manipu lation radio button group to choose:
• System Language – selection is available only when the
cust om Lang uage Pack h as been uploaded and it is used t o
enable custom language for system voice messages or
returning back to the default language English.
• GUI Theme - s election us ed to se lec t th e GU I t hem e s tyl e of
the web based config uration pag es.
• The Choo se The me o n Lo gin
GUI them e s elect i on rad io bu tt ons s houl d b e dis play ed on th e
Quadr o Login p age. S el ectin g the c heck box will allow us ers to
choose the GUI theme before logging into the Quadro.
Leavin g the ch eckb ox uns el ected will r equir e the ad minis tr ator
to run the System Configuration Wizard to change the theme.
The E mergency Codes and PST N Access Codes S ettings are
used to configure the emergency dial plan.
The E mergency Cod es text field requ ires the PSTN nu mbers of
the emergency or lifeline services. Multiple emergency codes,
separated by commas, can be inserted in this field. For each
emergenc y code, a routing pattern will be generated in the Call
Routin g T abl e, w hic h wi ll al low fast er and eas ier calls to em er g ency
destinations.
The PSTN Access Code dr op down list allows you to select th e
prefix code for accessing the PSTN line in the routing mode.
Fig. II-5: System Configuration Wizard - Regional Settings page
tone when dialed from the handset.
Fig. II-6: System Configuration Wizard - Emergency Codes and PSTN Codes Settings page
Quadro2x, 2xi; Quadro4x, 4xi; Quadro16x, 16xi (SW Version 5.3.x) 8
Page 10
Quadro Manual II: A d min istrator's Guide Administrator’s Me n us
described in the chapters below except thos e f or the IP settings,
not to change the
Internet Configuration Wizard
The Inter net Configurati on Wizard al lows th e administr ator t o configur e the W AN interf ace settin gs and t o adjust Qu adro’s connecti vity with an
external network. The Internet Configuration Wizard MUST be r un for Qu adro to be co nne ct ed to the Internet.
All the settings of the Internet Configuration Wizard are
which wil l b e desc ribed in this ch apter.
Please Note: It is strongly recommended
factory def ault setti ngs if their meanin gs are not fully cl ear to
an admin istrator.
The Wizard allows navigating through the following basic configuration parameters and settings:
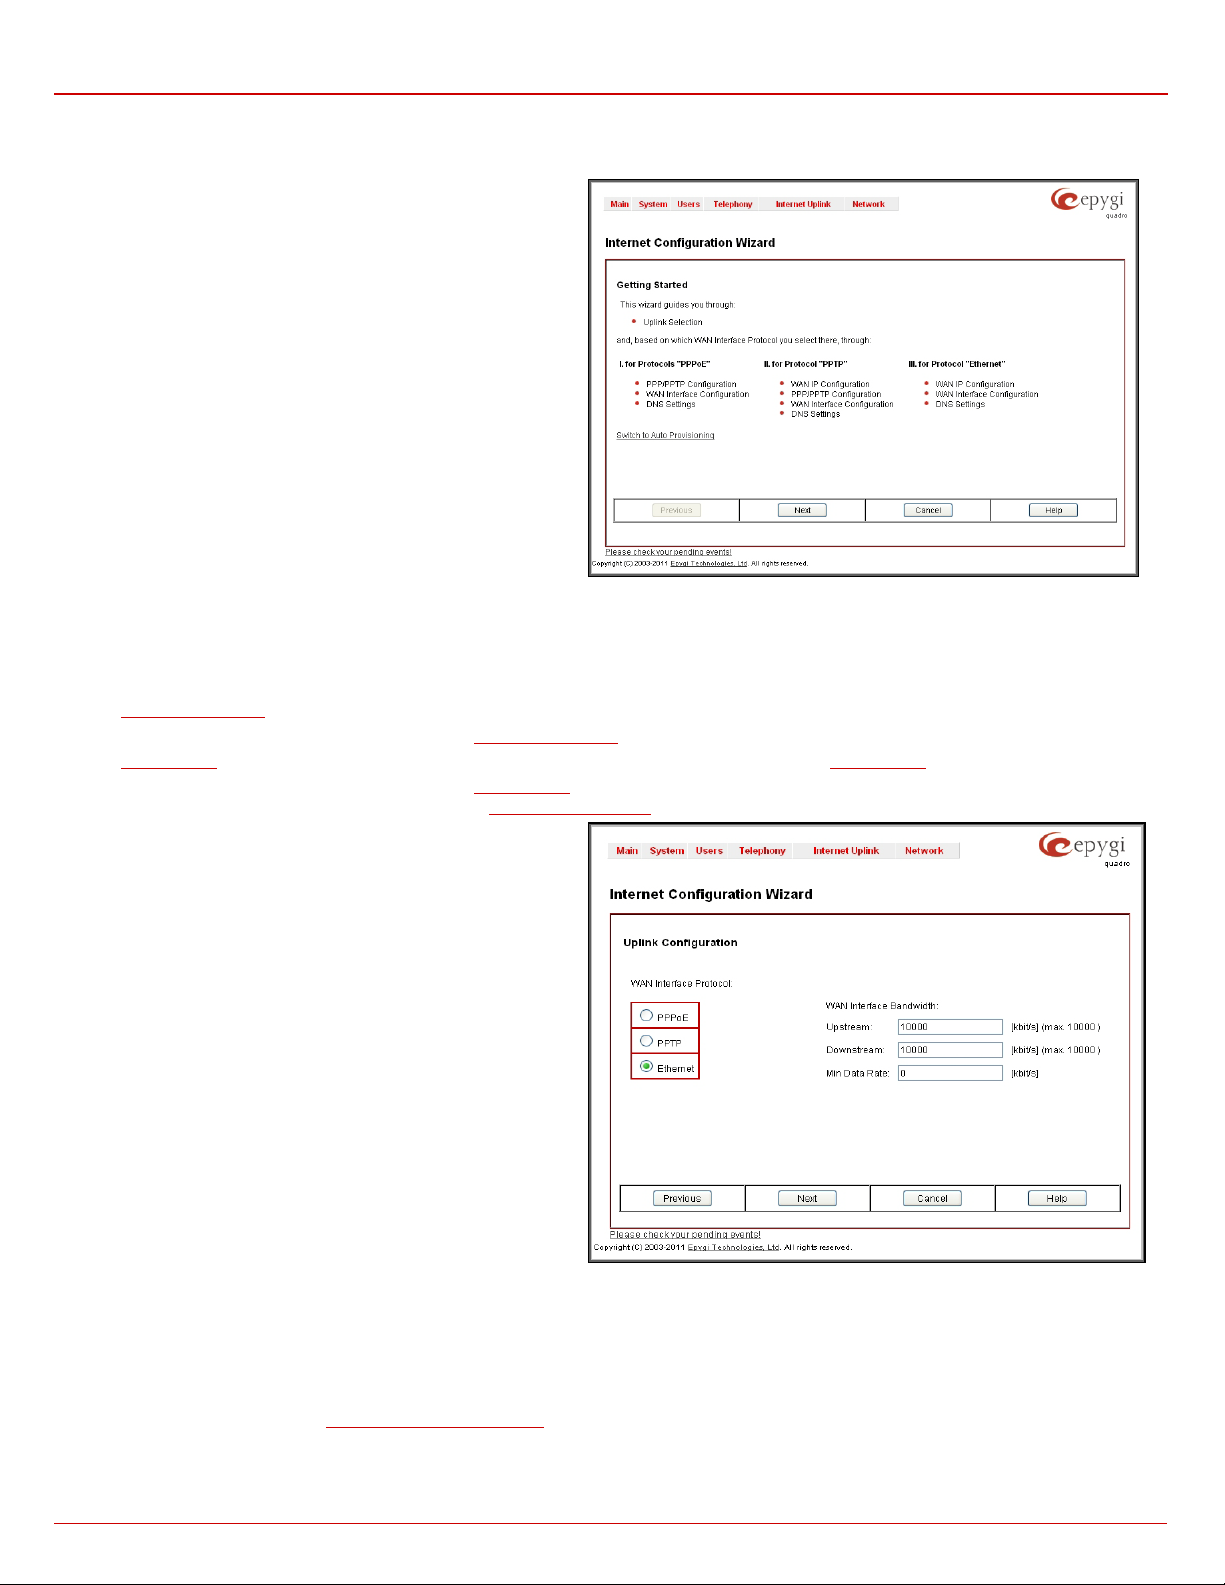
Fig. II-7: Internet Configuration Wizard - Start page
• Uplink configuration (see below)
For WAN Interface protocol PPPoE:
• PPP/ PPTP Settings
• WAN Interface Configuration (see below)
•
DNS Settings
The Swit ch to Auto Pr ov isi oni ng link moves you to the Automatic Provisioning page where Quadro can be configured automatically.
For WAN Interface protocol PPTP:
• WAN IP Configuration (see below)
• PPP/ PPTP Settings
• WAN Interface Configuration (see below)
•
DNS Settings
For WAN Interface protocol Ethernet:
• WAN IP Configuration
• WAN Interface Configuration (see below)
•
DNS Settings
The Uplink Confi guratio n page all ows y ou to s elect th e Quadr o‘s
WAN interface con nection t ype and its bandwidt h settings . These
settings w ill make Quadro available to the external network.
Depending on the Uplink Interface Protocol selection, the page
following the Uplink Configuration page is different. Thus if
PPPoE is selected, the next page will be PPP Configuration, while
selecting Ethernet will bring up t h e WAN IP Configuration page.
The Uplink Configuration page offers the following components:
The WAN Interface Prot ocol radio but tons are us ed to ch oos e th e
protocol dep end in g on t h e req uirements of the ISP ( In t er n et Service
Provider):
• PPPoE - turns on the PPP over an Ethernet connection.
• PPTP – turns on the Point to Point Tunneling Protocol
(PPTP) int erface us ed for the conn ection b etween Q uadro
and ADSL modem. A fixed IP address configuration is
needed in this case.
• Ethernet - turns on the Ethernet connection.
The WAN I nterf ac e Band width settings allow th e s p ecif ication of the ups tream and downstr eam speeds in kb it/s , help ing to ass ur e the quali ty of IP
calls. A n IP call looses th e v oice quality if there is no available bandwidth. When approaching the limits of bandwidth capacity, another IP call will be
declined.
The bandwidth provided by the ISP has to be specified in the text fields Upstream Speed and Downstream Speed. The default ent ry in b ot h f i eld s
is 10000, th e maximum band width of a 10 MB Ethern et. In most c ases, pr oviders offer a smaller b andwidt h than 1 0000 kbit/s . You m ay see th e
required bandwidth in the chapter
The Min D ata Rate te xt field requires the amount of ups tream ban dwidth th at ought to r em ain for data ap pl ications even if voice ap plications use the
entire avai lable ups tream bandwidth. The value selected here needs to be smaller than the upstream bandwidth and is measured in kbit/s.
Needed Bandwidth for IP Calls.
Fig. II-8: Internet Configuration Wizard - Uplink Configuration page
Quadro2x, 2xi; Quadro4x, 4xi; Quadro16x, 16xi (SW Version 5.3.x) 9
Page 11
Quadro Manual II: A d min istrator's Guide Administrator’s Me n us
Packet
Needed bandwidth in kbit/s using the Codecs:
a
13.33
10
105
58
66
74
82
50 - 105
74
40
74
27
34
42
50
19 - 74
42
50
71
25
32
40
48
17 - 71
40
60
67
22
30
37
45
15
20
67
37
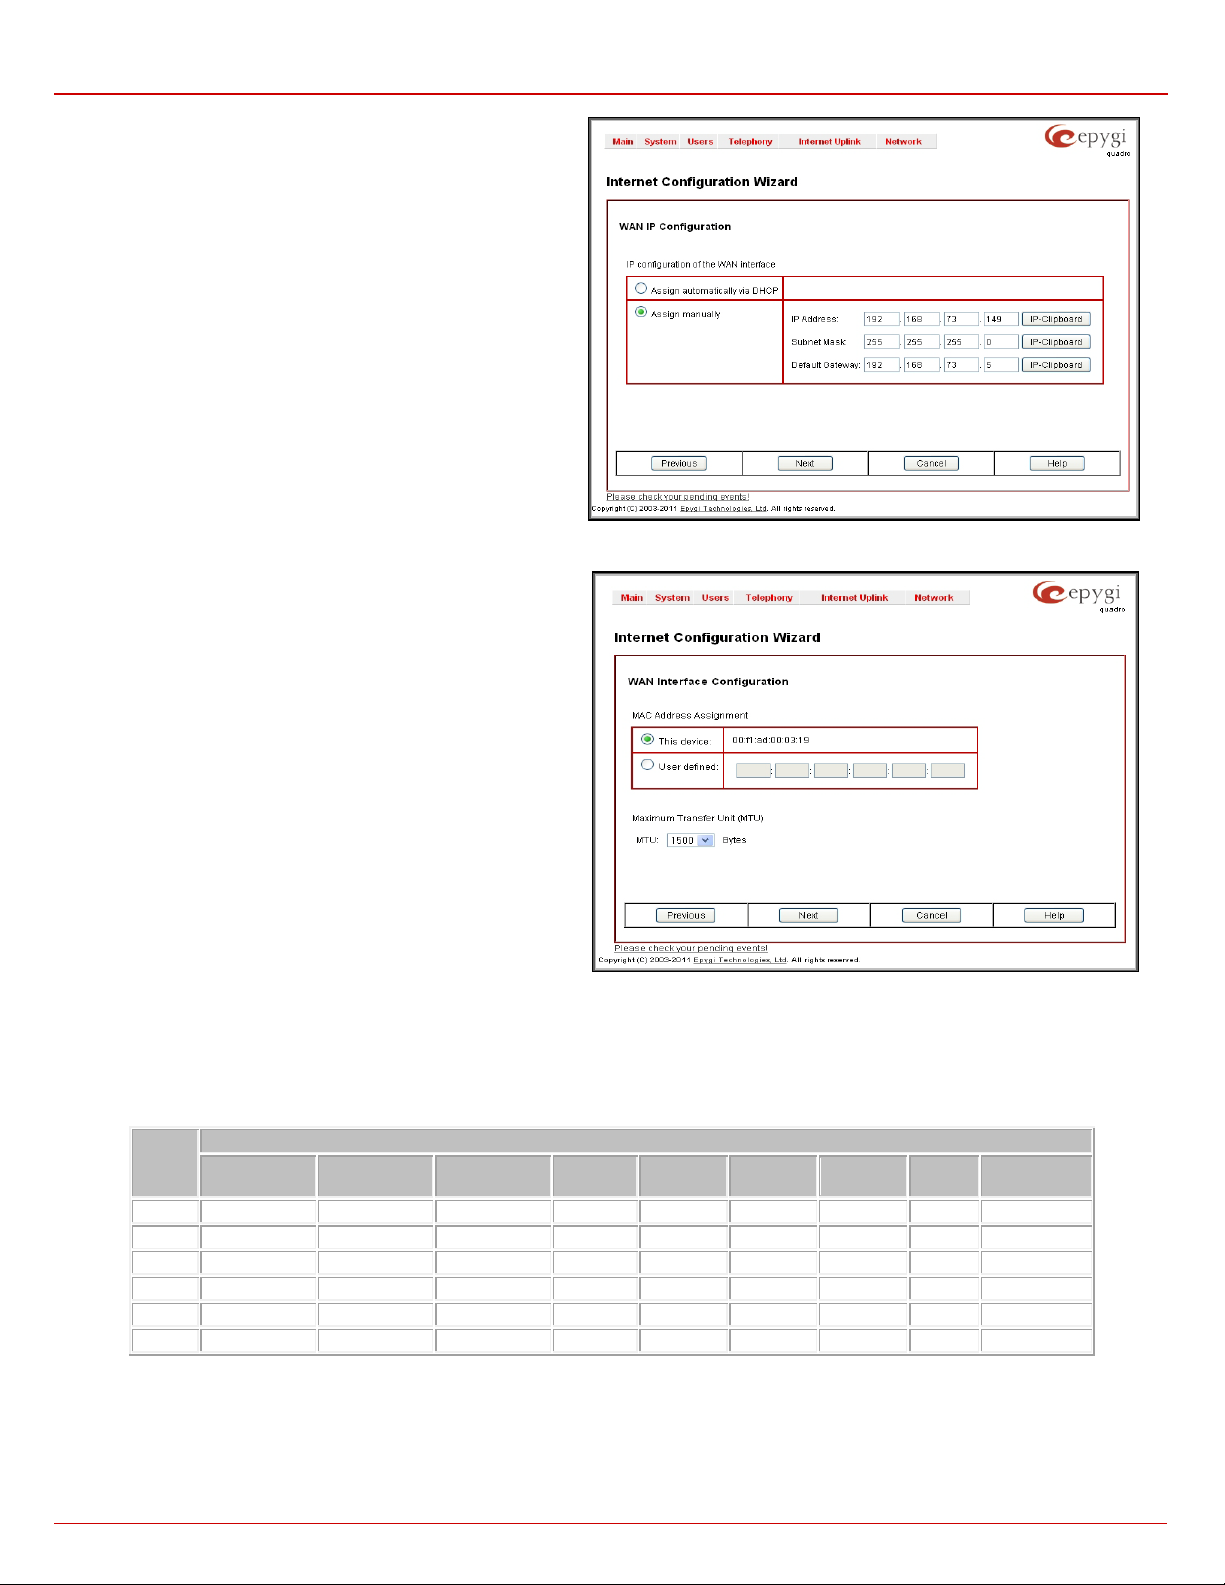
The WAN IP C onfiguration page is only displ ayed if Ethernet or
PPTP has been selected to be the uplink protocol. It offers the
follo wing com ponents:
The Assign automatically via DHCP radio-button selection
switches to automatic retrieval of the WAN IP address from a
DHCP server at the ISP/uplink.
Please Note: DHCP referr ed to here is the on e th at runs on the
provider’s side and not the Quadro’s personal DHCP server.
The Assign Manually radio-button switches to the manual
adjustment of IP settings. This selection requests the following
parameters:
IP Address requires the IP address for t he Quadro WAN interface.
Subnet Mask requires the subnet mask for the Quadro device
WAN interface.
Default G ateway req uire s the I P ad dress of the r outer wh ere all
packets are to be sent to, for example, to the router of the provider.
The WAN Interface Configurati on page may be used t o modif y
th e MA C ad dres s of the Quadro. This might be necessary if the ISP
(Internet S ervice P rovid er) re quir es a spec ifi ed MAC addr ess, for
example, for authentication. This page offers the following
components:
MAC Address Assignment manipulation radio-buttons:
Fig. II-9: Internet Configuration Wizard - WAN IP Configuration page
• This Devi ce turns to th e def aul t MAC address of the Quadro.
• User Defi ne d requires user defined MAC Address.
The MTU drop d own list allows you t o select the maxim um packet
size on the Ethernet (in bytes). MTU is used to fragment the
packets before transmitting them to the network. The MTU
preferred value is dependent on the Ethernet connection. The
default MTU size is 1500 Byt es f or Ethernet and 1400 Bytes for
PPPoE.
Fig. II-10: Internet Configuration Wizard - WAN MAC Address Configuration page
Needed Bandwidth for IP Calls
The bandwidth required by an IP call depends on the codecs used and these specifications are listed in the tables below:
Required Bandwidth for Standard Packets:
Size in
msec.
Quadro2x, 2xi; Quadro4x, 4xi; Quadro16x, 16xi (SW Version 5.3.x) 10
G.711u/G.711
20 84 37 45 53 61 29 - 84 53
30 76 30 38 45 53 22 27 76 45
G.726-16 G.726-24 G.726-32 G.726-40 G.729a
iLBC-
G.722 G.722.1
Page 12
Quadro Manual II: A d min istrator's Guide Administrator’s Me n us
Needed bandwidth in kbit/s using the Codecs:
13.33
20
89
41
49
57
65
33 - 89
57
30
81
33
41
49
57
26
31
81
49
Packet
Needed bandwidth in kbit/s using the Codecs:
iLBC-
13.33
10
148
98
105
118
124
92 - 148
118
20
105
59
65
74
81
49 - 105
74
30
90
43
52
60
66
35
41
90
60
40
85
38
45
53
61
30 - 85
53
50
80
34
41
48
56
26 - 80
48
60
74
29
37
45
52
22
26
74
45
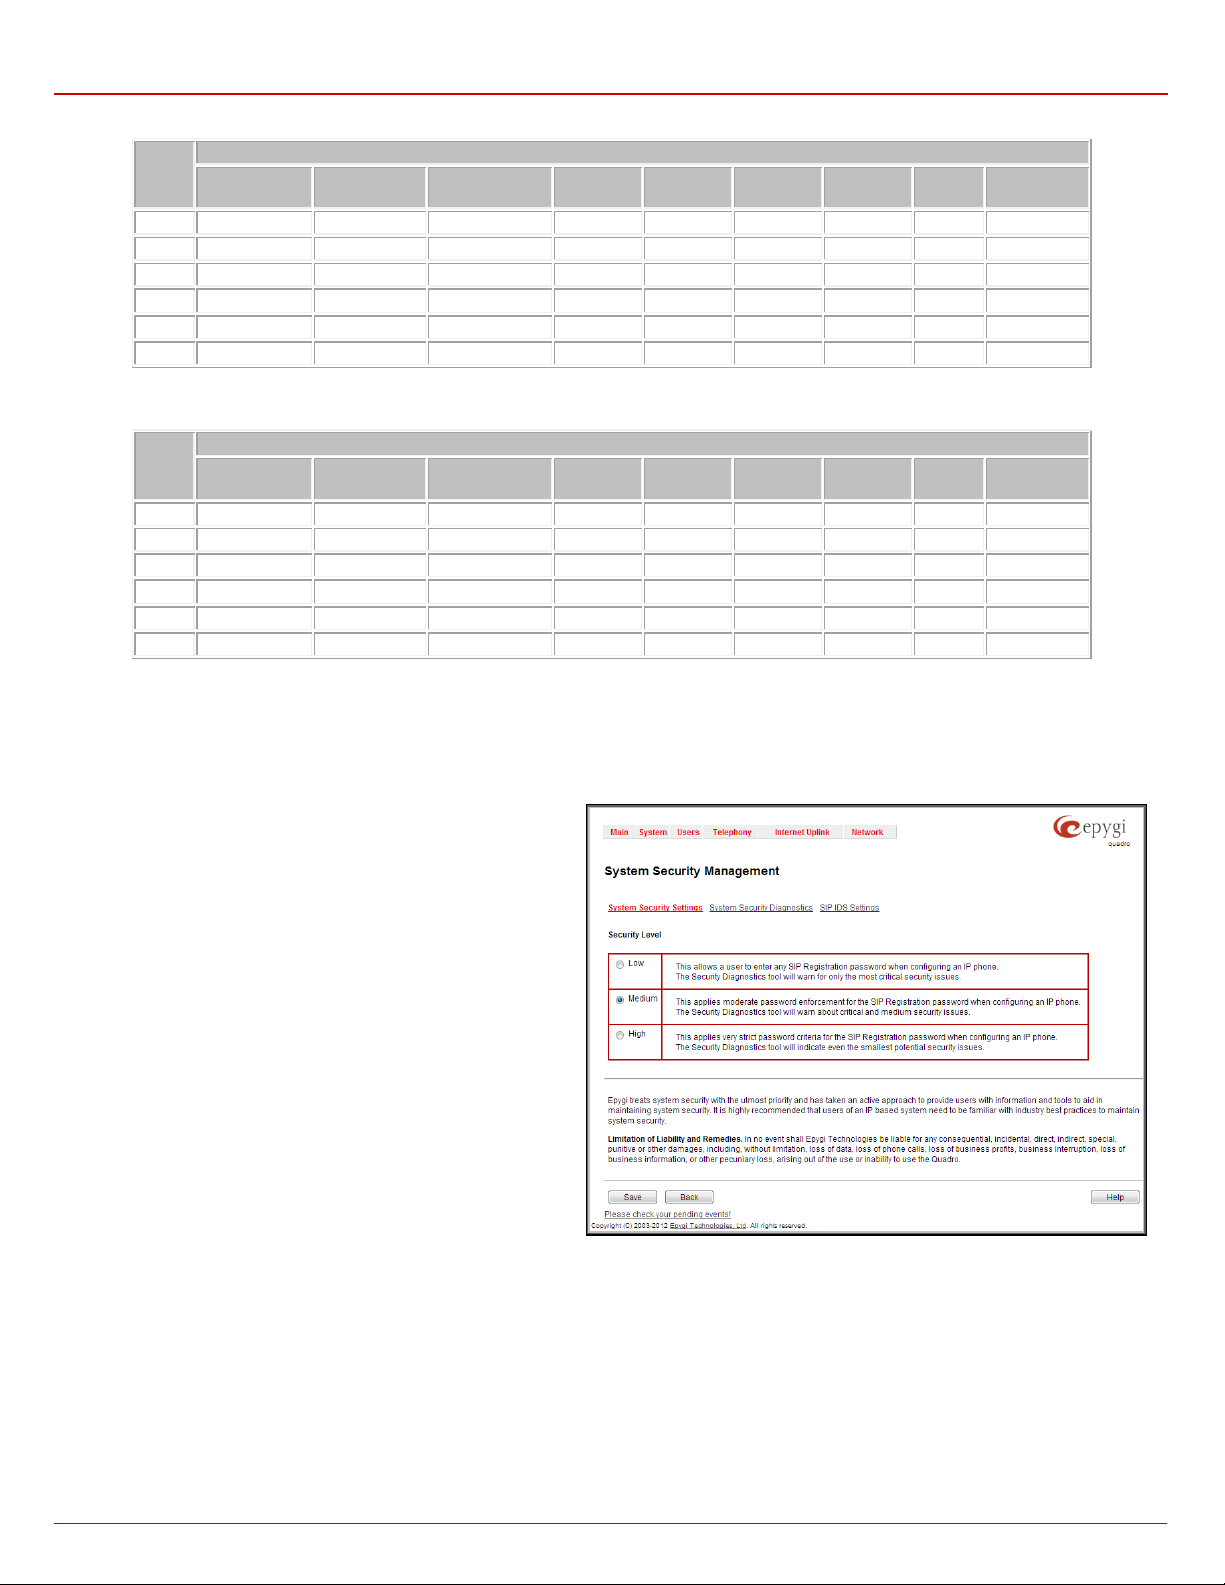
page includes the following
allows selecting the Security Level
PSTN, disabled
The minimum strength of the IP Line
The minimum strength of the IP Line passwords
warnings on the IP Line passwords, disabled IDS,
Needed Bandwidth for Encrypted Packets when using a SRTP:
Packet
Size in
G.711u/G.711a G.726-16 G.726-24 G.726-32 G.726-40 G.729a
msec.
10 114 66 74 82 90 58 - 114 82
40 76 28 36 44 52 20 - 76 44
50 74 26 34 42 50 18 - 74 42
60 72 24 32 40 48 16 22 72 40
Required Bandwidth for Encrypt ed P a ck et s when a VPN is used:
Size in
G.711u/G.711a G.726-16 G.726-24 G.726-32 G.726-40 G.729a
msec.
iLBC-
G.722 G.722.1
G.722 G.722.1
System Security Management
The System Security Management offers a possibility of managing the global security levels, running the system securit y d i agnostics pr ogram and
receivi ng compl ete rep orts on the Q uadro c onfigurat ion s ecurity. It includes three pages- the Syste m Security Settings page, System Se curity
Diagnostics page and the SIP IDS Settings page.
The System Security Settings
components:
The Security Level table definin g requir ements to the IP Lines' pass word strength an d the
Security Report granularity. The security levels are as follows:
• Low - There are no spec if ic r estr ic t i ons on th e strengt h of
the saved password. Only the critical warnings on the
Call Routing Rules to PSTN and IPFirewall and IDS will be generated in Security Report.
• Medium -
passwords should be "good". The Security Report will
generate warnin gs on al l unsecur ed Call Routi ng ru l es, IP
Line p assw ords, F irewall level (if it is s et to l ower than
"Medium" ) and disab l ed IDS .
• High -
should be "strong". The Security Report will generate
unsecured SIP, and unsecured Routing Rules to SIP,
PSTN and IP-PST N and als o r egar ding t h e Firew all lev el
if it is set to lower than "High".
Fig. II-11: Quadro System Security Management page
The Sy stem Security Dia gnostics p age allows r unning the s ecurity aud it and gett ing the secur ity reports . The Start S ecurity Audit functional
button is used for r u nn in g the s ecurity aud it. The Qu ad ro Security A udit is a sec urity repor t in g system, w hic h g en erates the warni ngs regardi ng the
Quadr os w eak n esses relat i ve t o the sel ect ed Security L ev el. The w arnings m ay var y d ep ending on t he select ed gl obal Security Level. The Security
Audit will detect the security related configuration issues in Firewall, IDS, IP Line passwords, Call Routing and extension settings.
Quadro2x, 2xi; Quadro4x, 4xi; Quadro16x, 16xi (SW Version 5.3.x) 11
Page 13
Quadro Manual II: A d min istrator's Guide Administrator’s Me n us
to discard the accumulated SIP messages from the Quadro SIP
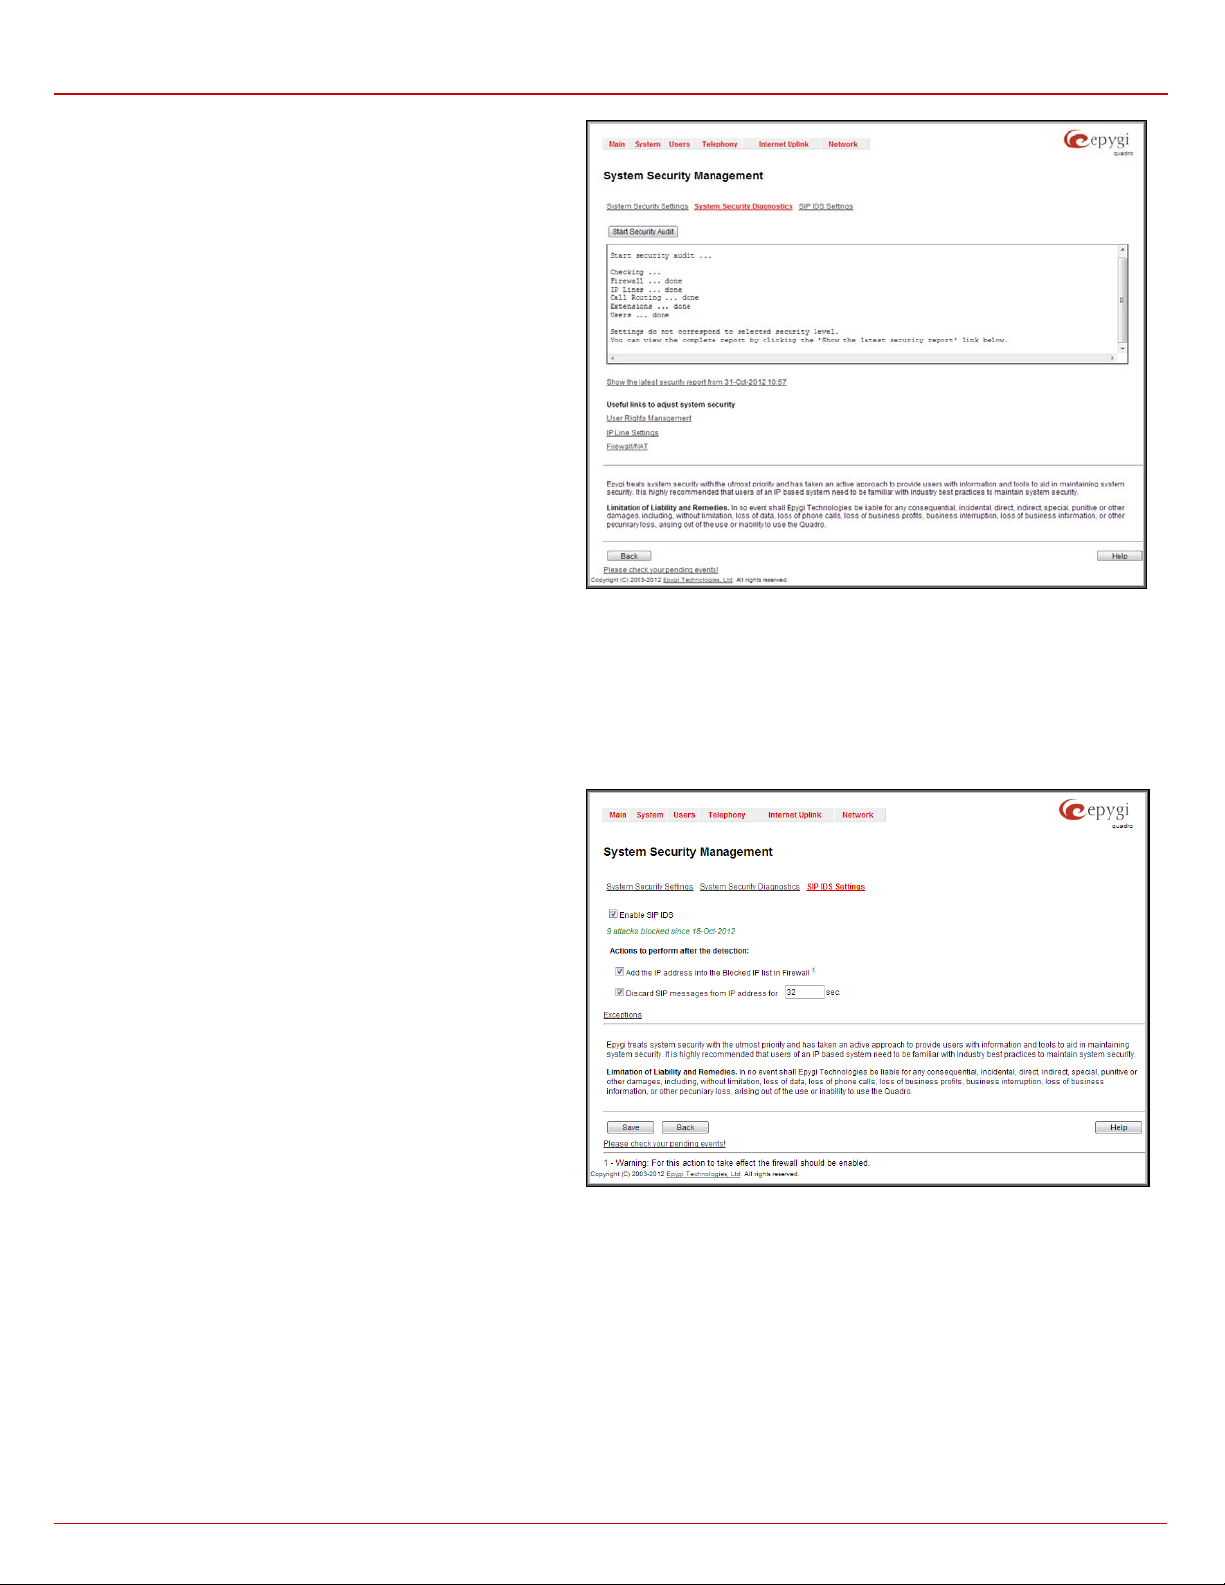
The output of Security Audit may look as follows:
Start security audit...
Checking...
Firewall ... done
IP Lines ... done
Call Routing ... done
Extensions ... done
Users ... done
Settings do not correspond to selected security level.
You can view the complete report by clicking the 'Show
the latest security report' link below.
Fig. II-12: Quadro System Security Diagnostics page
The Sho w the l atest s ecurity report link allows to display the last security audit r ep ort. T his pag e als o cont ai ns th e foll owin g us eful l inks to adj us t
the system security:
• User Rights Management
• IP Line Settings
• Firewall/NAT
The SIP IDS Settings page includes the followin g co mponents:
Enable SIP IDS checkbox selection allows to prevent the SIP
attacks.
The Add the IP address into the Blocked IP list in Firewall
checkbox allows t o bloc k SIP att acker ’s IP add ress. SIP att acker’s
IP address wi ll be bloc ked b y Quadr o Firewal l and wi ll be add ed on
the Firewall Blocked IP List table.
The Discard SI P mess ages fr om IP ad dre ss for checkbox allows
cash after defi ned timeout (default timeout value of “Disc ard SIP
messages from IP address for” service is 32 seconds).
Fig. II-13: Quadro SIP IDS Settings page
Quadro2x, 2xi; Quadro4x, 4xi; Quadro16x, 16xi (SW Version 5.3.x) 12
Page 14
Quadro Manual II: A d min istrator's Guide Administrator’s Me n us
page includes the following information about
lists the subnet masks corresponding to each
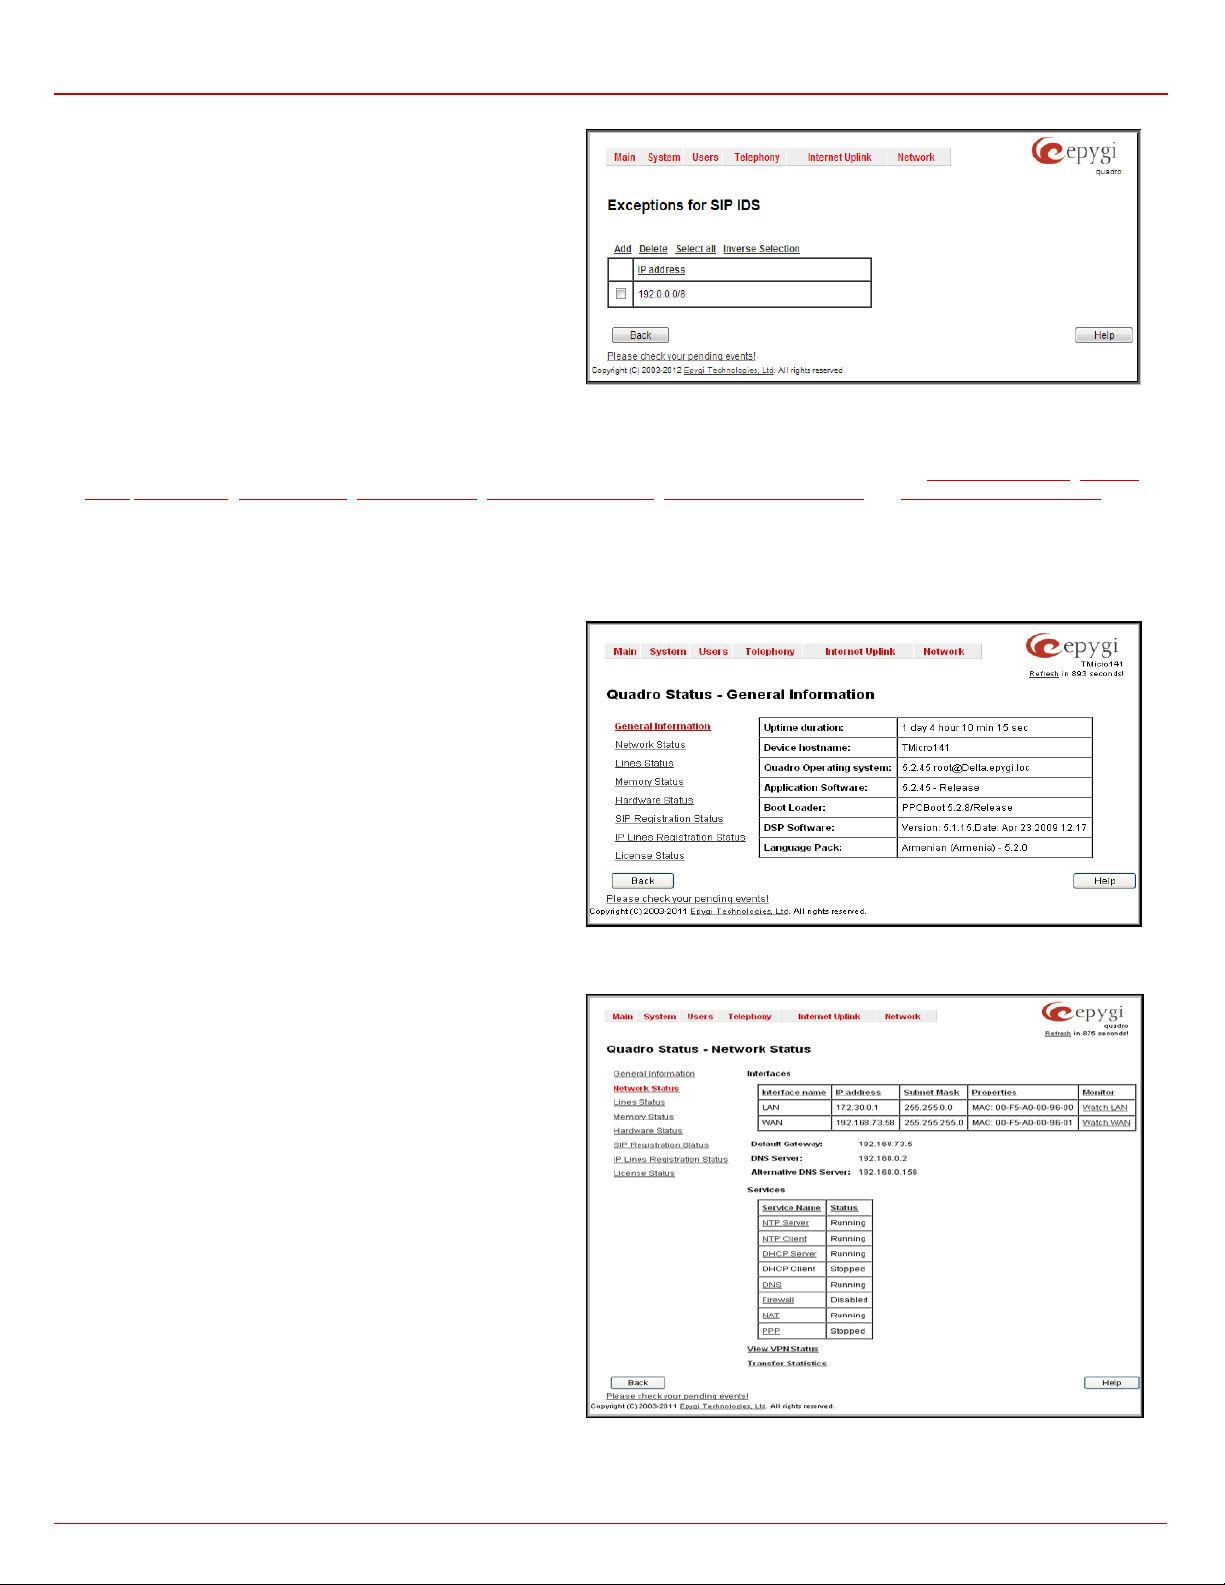
The Exceptions link leads to the Exceptions for SIP IDS page
where user can require the trusted IP address(es) that can't be
blocked.
Add opens th e pag e Excepti on IP- Add Entry, wh ere a tr ust ed IP
address can be established.
Delete removes the selected entries from the IP address table.
Select al l s elec t s all entries of the table.
Inverse Selection inverses the current s election (if no record is
selected, clicking on inverse selection will select a l l recor d s).
Fig. II-14: Exceptions for SIP IDS Table
Status
The s ystem st atus win dow d isp l ays non -editabl e tab les pr ovidi ng ext ensiv e s ystem st atus inf orm ati on about Qu adr o: G en eral I nf ormati o n, Network
Status, Lin es St atus, Memor y S tat us, Hard war e St atus, SIP R eg istr ati on St atus , IP Lin es R egistr ati on S tatus and IP Lin es R egis tr ation Status. The
links on this p ag e lead t o d evice Transfer Statistics, user mailboxes and supplementary services configuration pages.
The System Status page has several tables providing system information.
General Inf or m a tion
The General Information page includes the fo llowing information:
• Uptim e dur a tio n - Period Quadro is running since last reboot.
• Device hostname - Quadro device host name.
• Quadro Operating System - Quadro operating system
version.
• Appli cation Soft ware - Soft ware and file system vers ions of
the Quadro.
• Boot Loa der - Quadro boot l oad er v er s i on.
•
DSP Software - Quadro DSP software version and the date of
build.
•
Languag e Pack – th is field is pr esent only when th e custom
language pack is uploaded and it indicates the version.
Fig. II-15: Quadro Status - General Information page
Network Status
The N etwor k St atus
Interfaces:
Interface Name lists the Network interfaces available on the
Quadro (LAN, WA N, IPSec an d a number of P PPs, dep ending on
the number of active PPP connections).
IP Address li st s t he I P ad dr ess es c orresp onding to each net work
interface.
Subnet Mask
network interface.
Properties w ill lis t eit her th e MAC addr ess c orrespon din g to eac h
network interf ace on the Quadro or the PPTP, L2TP and IPSec
peer IP address if an active VPN (IPSec or PPP) interface exi st s.
Monitor includes links to survey LAN, WAN, IPSec and PPP traffic
correspondingly. The VPN traffic lin k w il l b e dis p l ayed onl y if a VPN
has been c onfigur ed. The s election of t hese lin ks will open a new
window with a table of network traffic statistics on the following
se lected i nt er faces :
Quadro2x, 2xi; Quadro4x, 4xi; Quadro16x, 16xi (SW Version 5.3.x) 13
Fig. II-16: Quadro Status Network Status page
Page 15
Quadro Manual II: A d min istrator's Guide Administrator’s Me n us
defined statistics
checkbox is selected, an
• Received Bytes
• Received Packets
• Received Errors
• Received Drop Errors
• Received Overrun Errors
• Received Mu l tiCas t Pac ket s
• Transmitted Bytes
• Transmitted Packets
• Transmitted Errors
• Transmitted Drop Errors
• Transmitted Carrier Errors
• Transmitted Collisions
When op eni ng the corr esp on di n g i nt erface statis tics wind ow , n o tr affic valu es are display ed at first. After opening the window, the tables will serve as
a counter an d tr affic statis tic s wi ll b e updated every minut e.
DNS Server, Alter nativ e DNS S erver and Defau lt Gate way - thes e displ ay the Q uadro s et ti n gs c orr es p ond ing to w hat has been c onfigur ed wi th
System Configuration Wizard.
the
Services (NT P S erver and Cli ent, D HCP S er ver an d Clien t, DNS, Fi rew all, NAT, PPP, IDS) status es: s hows if th ey hav e stopped or if they are still
running.
The View VPN Status link refers to the
VPN Configuration page wher e all VPN (IPSec, PPTP and L2TP ) c onnections c an b e viewed and edit ed.
Transfer Statistics - link to the Transfer Statistics page.
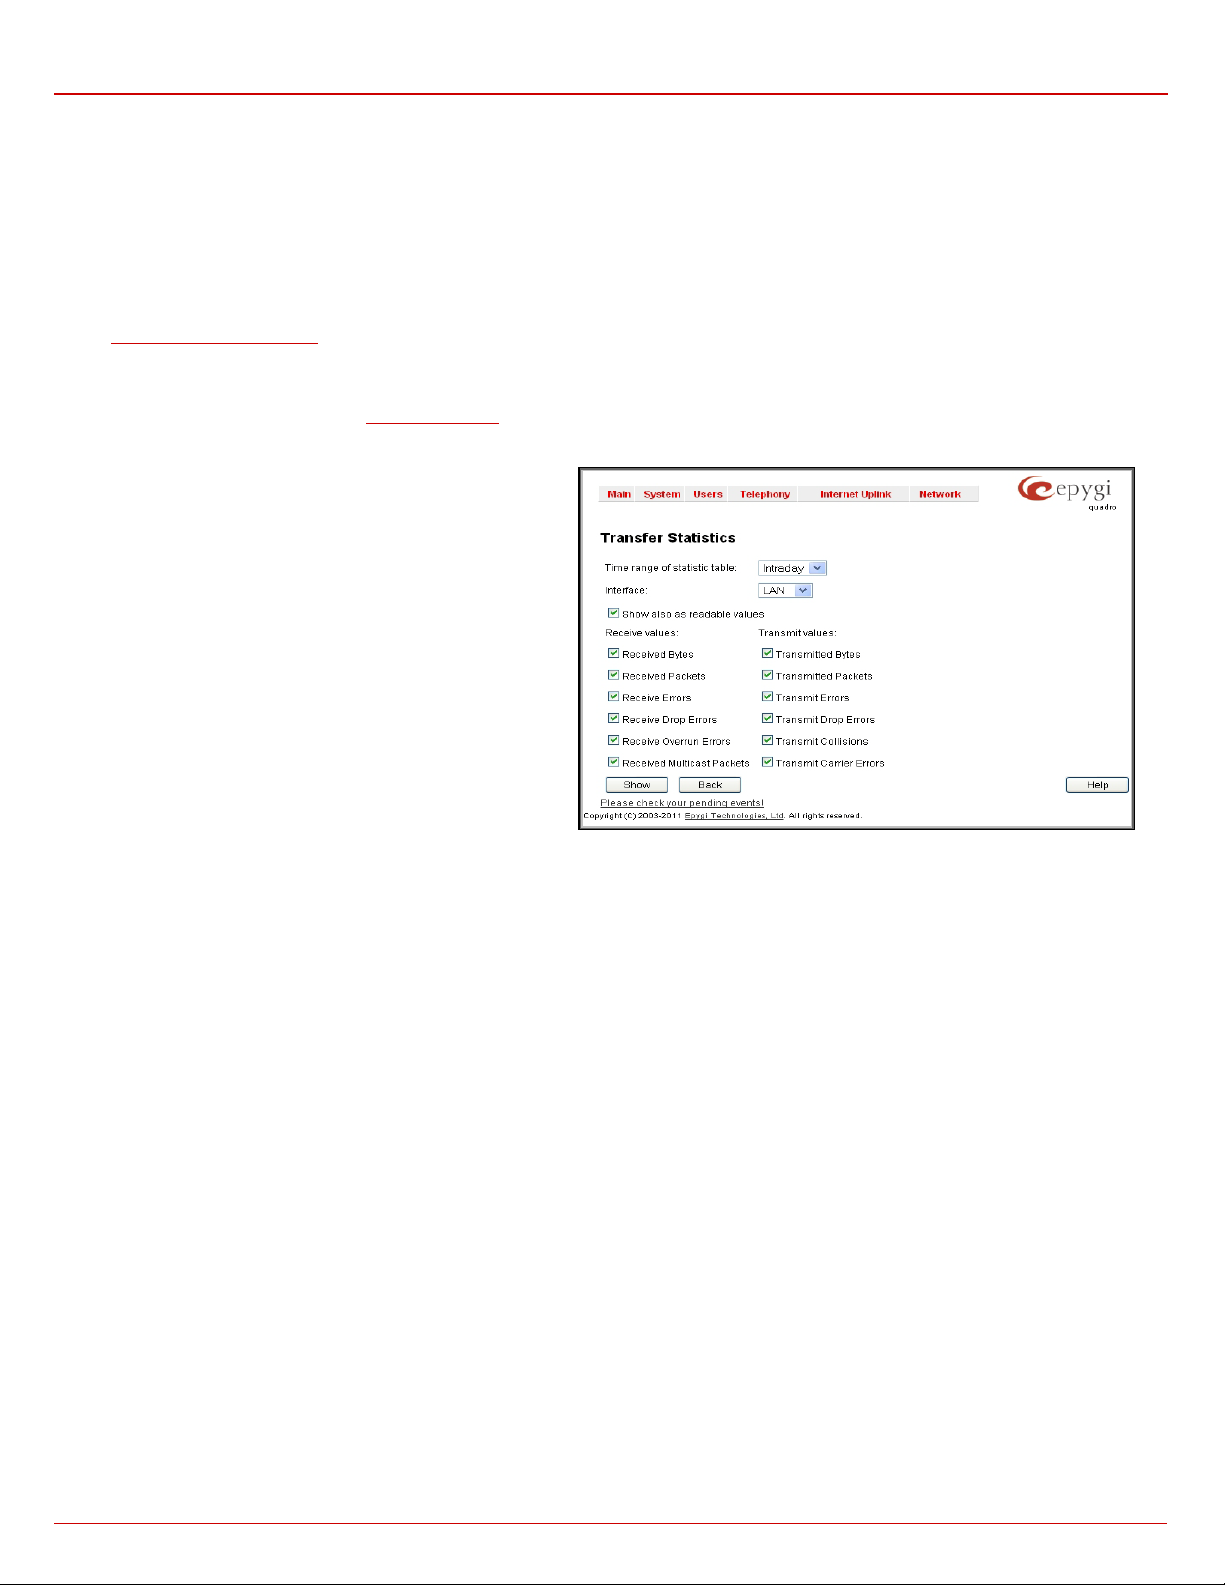
The Transfer Statistics page shows a usertable w ith the trans mit/recei ve value (c riteria), i nter fac e type and
time period. It contains the following components:
Time range of sta tistic table - the dr op down list includes the
period (in days) statistics data that is to be collected and the
corresp onding diag ram charts th at ar e t o be bui lt.
Interface - the drop-down list offer the values:
• WAN - Wide Area Network (WAN) events only
• LAN - Local Area Network (LAN) even t s onl y
When S how also as readabl e values
additi onal tabl e with stat istic s valu es will be dis played on the n ext
page.
Fig. II-17: Transfer Statistics page
Quadro2x, 2xi; Quadro4x, 4xi; Quadro16x, 16xi (SW Version 5.3.x) 14
Page 16
Quadro Manual II: A d min istrator's Guide Administrator’s Me n us
that occur due to a defective or lost connection on the
The area Receive Values provides the following:
• Receive Byt es - number of rec eived bytes.
• Receive Pa ck ets - number of received Ethernet packets.
• Receive Errors - number of received packets containing
errors.
• Receive Drop Errors - number of received packets that
have been discarded.
• Receive Overrun Errors - number of received overrun
errors th at occ ur when the rec ei ve buff er is not l arge en oug h
to hold all incom ing pac kets. T his error usu ally ap pears du e
to a slow receiving system.
• Receive M ul tiC a st Pac kets - nu mb er of rec eived br oadc as t
packets.
The area Transmit Values provides the fo llowing:
• T r ansm i t By te s - number of transmitted bytes
• Transmit Packets - number of transmitted Ethernet
packets.
• T r ansm i t Er rors - number of tr ans m itted pac k ets contain in g
errors.
• T ransmit Drop Err ors - numb er of tr ans mitted pac kets t hat
have been discarded.
• T ransmit Carrier Errors - number of transmit carrier errors
Ethernet link.
• Transmit Collisions - number of transfer errors that
occurred during a simultaneous packet transmission from
both s ides.
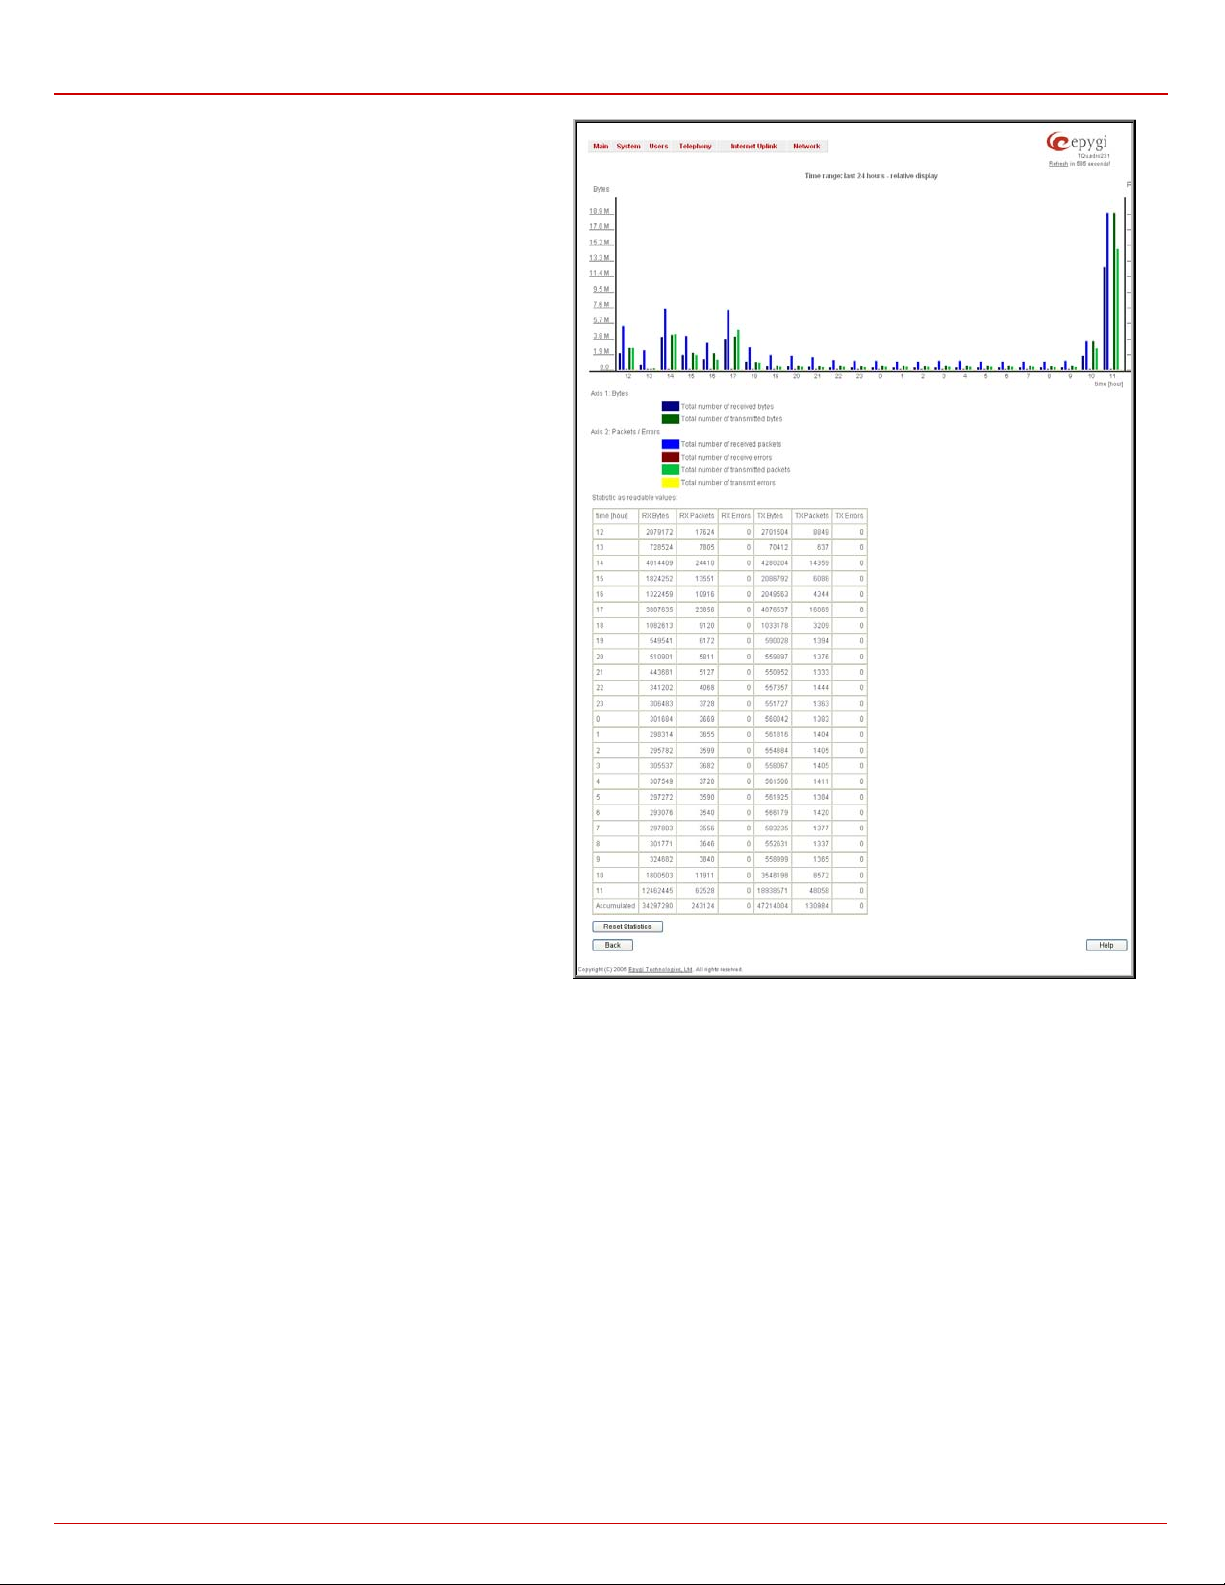
To see t he Transfer Statistics Diagram Charts, s elect t he desired cr iteria and c lick Save to generate the correspondi ng chart an d the table
showing the transfer statistics values (if enab led). Th e letter s M (millions ) and K (thousands) used in t h e l egend of t he displ ay ed d iagrams s h ow t h e
total number of specified criteria. The Reset Statistics button is used to reset the chart and the table (if enabled).
Fig. II-18: Transfer Statistics Diagram Chart
Lines Stat us
The Quadro Status - Lines S tatus pag e shows the curr ent stat us of eac h of th e FXS, IP and FXO/ ISDN li nes incl uding d etails of the att ached
extens ion. Since only on e line of inform ation can be displ ayed at a tim e, the Line, IP Line and FXO/ISD N Trunk functional buttons are used to
navigate through the information regarding other lines.
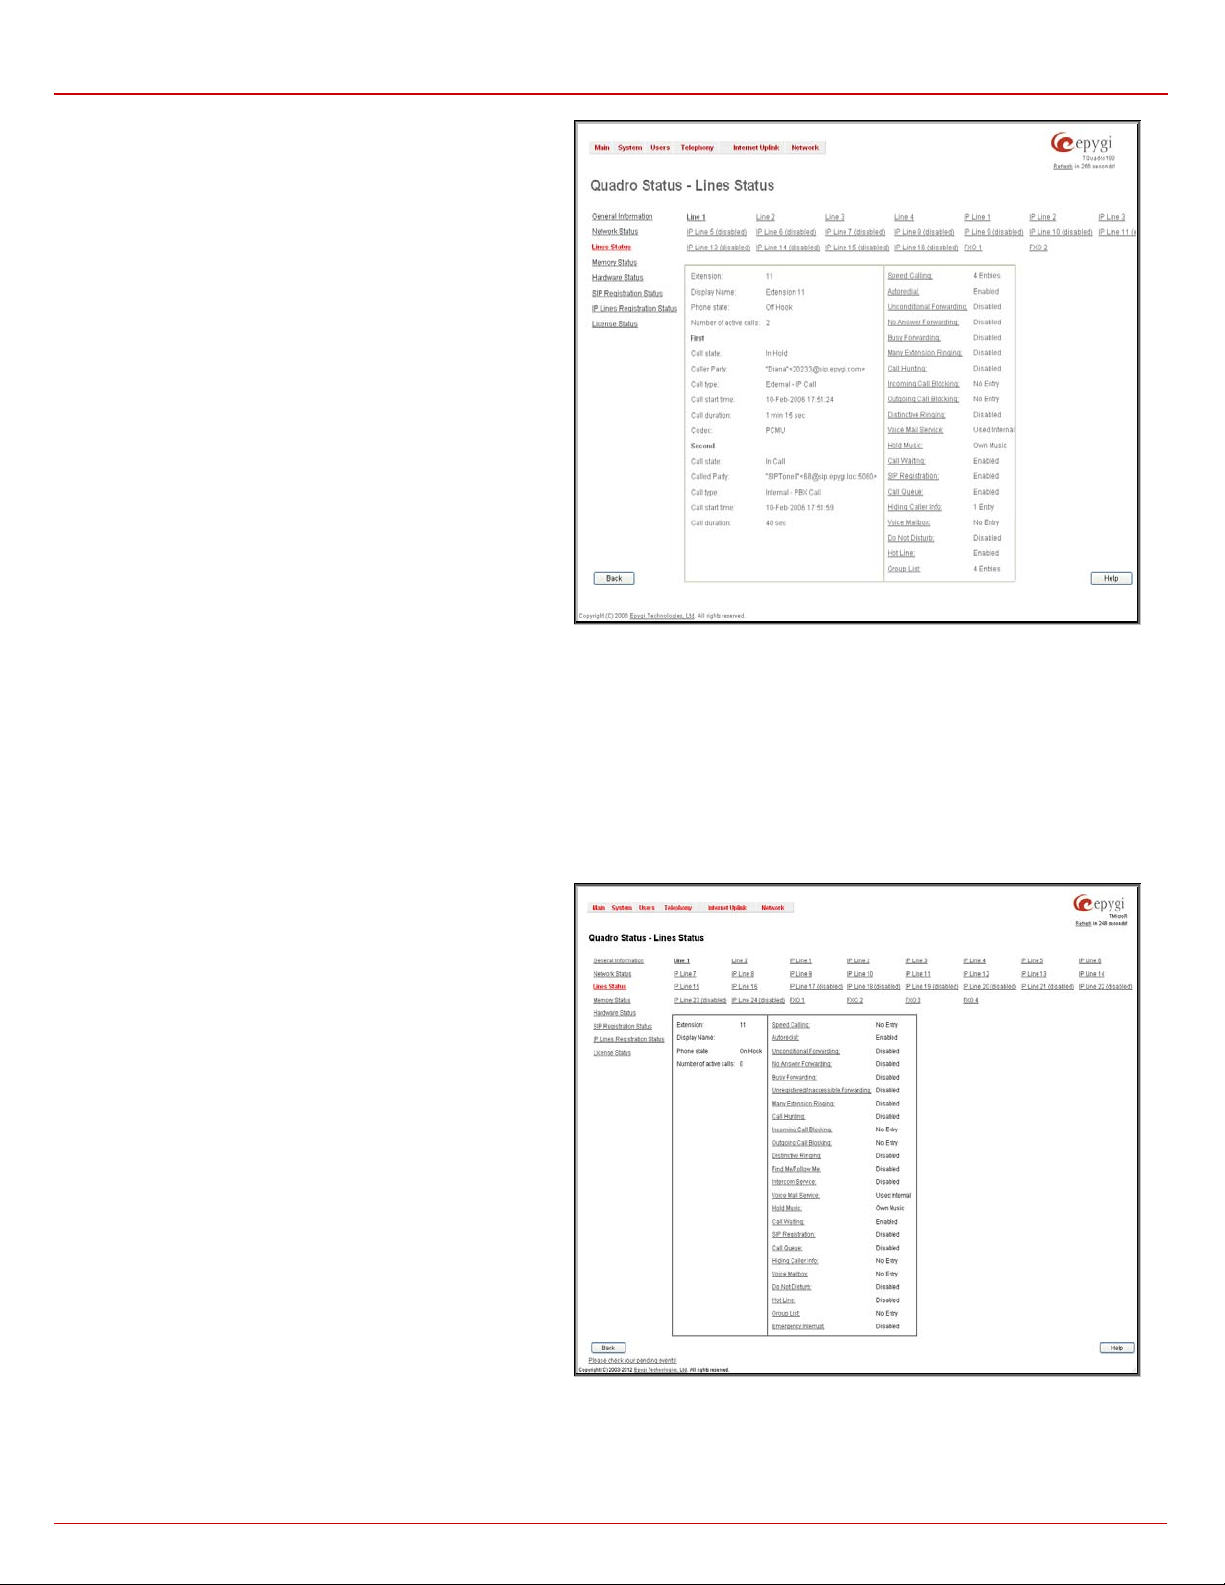
The Li nes St atu s table dis pl ayed f or FXS and IP lines i nclu des a gr oup of stat ic and dyn amic par amet ers. St at ic p aramet ers are al ways dis play ed.
Dynamic parameters only appear w h en an e ven t tak es pl ac e on t h e ext ension.
Quadro2x, 2xi; Quadro4x, 4xi; Quadro16x, 16xi (SW Version 5.3.x) 15
Page 17
Quadro Manual II: A d min istrator's Guide Administrator’s Me n us
provides the following
designed as links that guide the administrator to the
Static Par a me t ers:
Extension shows the extension number of the selected
tele phone line.
Display Name shows the corresponding name.
Phone State may h ave the val ue On Hook or Of f Hook. For
IP Line S t atus , th is field may ad dit ionally h av e Not Co nf ig ure d
and Temporary Offline values.
Number of Active Calls shows th e number of calls that are
current l y pr es ent on th e phone.
Dynami c Par a m et ers:
Call State sh ows the curr ent stat e of the e xtension (i n voice
mail, in call, waiting, busy, c all out, ring in, etc .).
Caller Party appears w hen a call is rec eived and in dic ates the
caller extension and the IP address or a phone number,
depend in g on type of call.
Called Par ty appears when a call is placed and i ndicat es the
destin ation extensi on and the IP address or a phon e number,
depend in g on type of call.
Call Type shows whether the c all is Internal or External and
whether it is a PSTN call, PBX call or IP call.
Call Start Time shows th e c all start dat e and ti m e.
Call Duration shows the current call duration.
Fig. II-19: Lines Status - Lines Status page upon established call
RX Codec sh ows the cod ec used to encr ypt the inc oming p ackets. T X Cod ec s hows t h e cod ec us ed t o encr ypt th e outg oing p ackets . If RX an d
TX codecs are the same, only one Codec f ield will be displayed.
For IP Line Status, the followin g dyn am ical param et ers appear on thi s pag e:
Username shows the IP phone’s client name registered on the Quadro.
Last Registered shows the date and time, the corresponding IP phone has been last registered on the Quadro.
Expires In shows when the last regi s tration of the IP phone will expire.
Binding IP Addre ss shows the IP address of the IP phone within the Quadro’s LAN network.
The list of supplementary services
additi onal st atus inf orm ation f or each teleph one line: Enabled or
Disabled.
For Incoming and Outgoing Call Blocking, Speed Calling,
Hiding Caller Inf o, Voice Mailbo x and Group Li st servic es, t h e
number of Entries wi ll be dis played i n the c orresp onding s ervic e
tab le. For Voice M ail Service, the voic e mailbox configuration
mode is displayed here.
This allows administrator to view the status and to be notified
about s ervices run ni ng on Q u adro for every line. Th e services are
corresponding service page of the selected user.
Quadro2x, 2xi; Quadro4x, 4xi; Quadro16x, 16xi (SW Version 5.3.x) 16
Fig. II-20: Quadro Status - Lines Status
Page 18
Quadro Manual II: A d min istrator's Guide Administrator’s Me n us
over which the FXO traffic chart will be built. At least one Trunk
it may display the maximum number of calls performed in the
displays the state of the B1 and
Fig. II-23: FXO Channel Usage Statistics chart
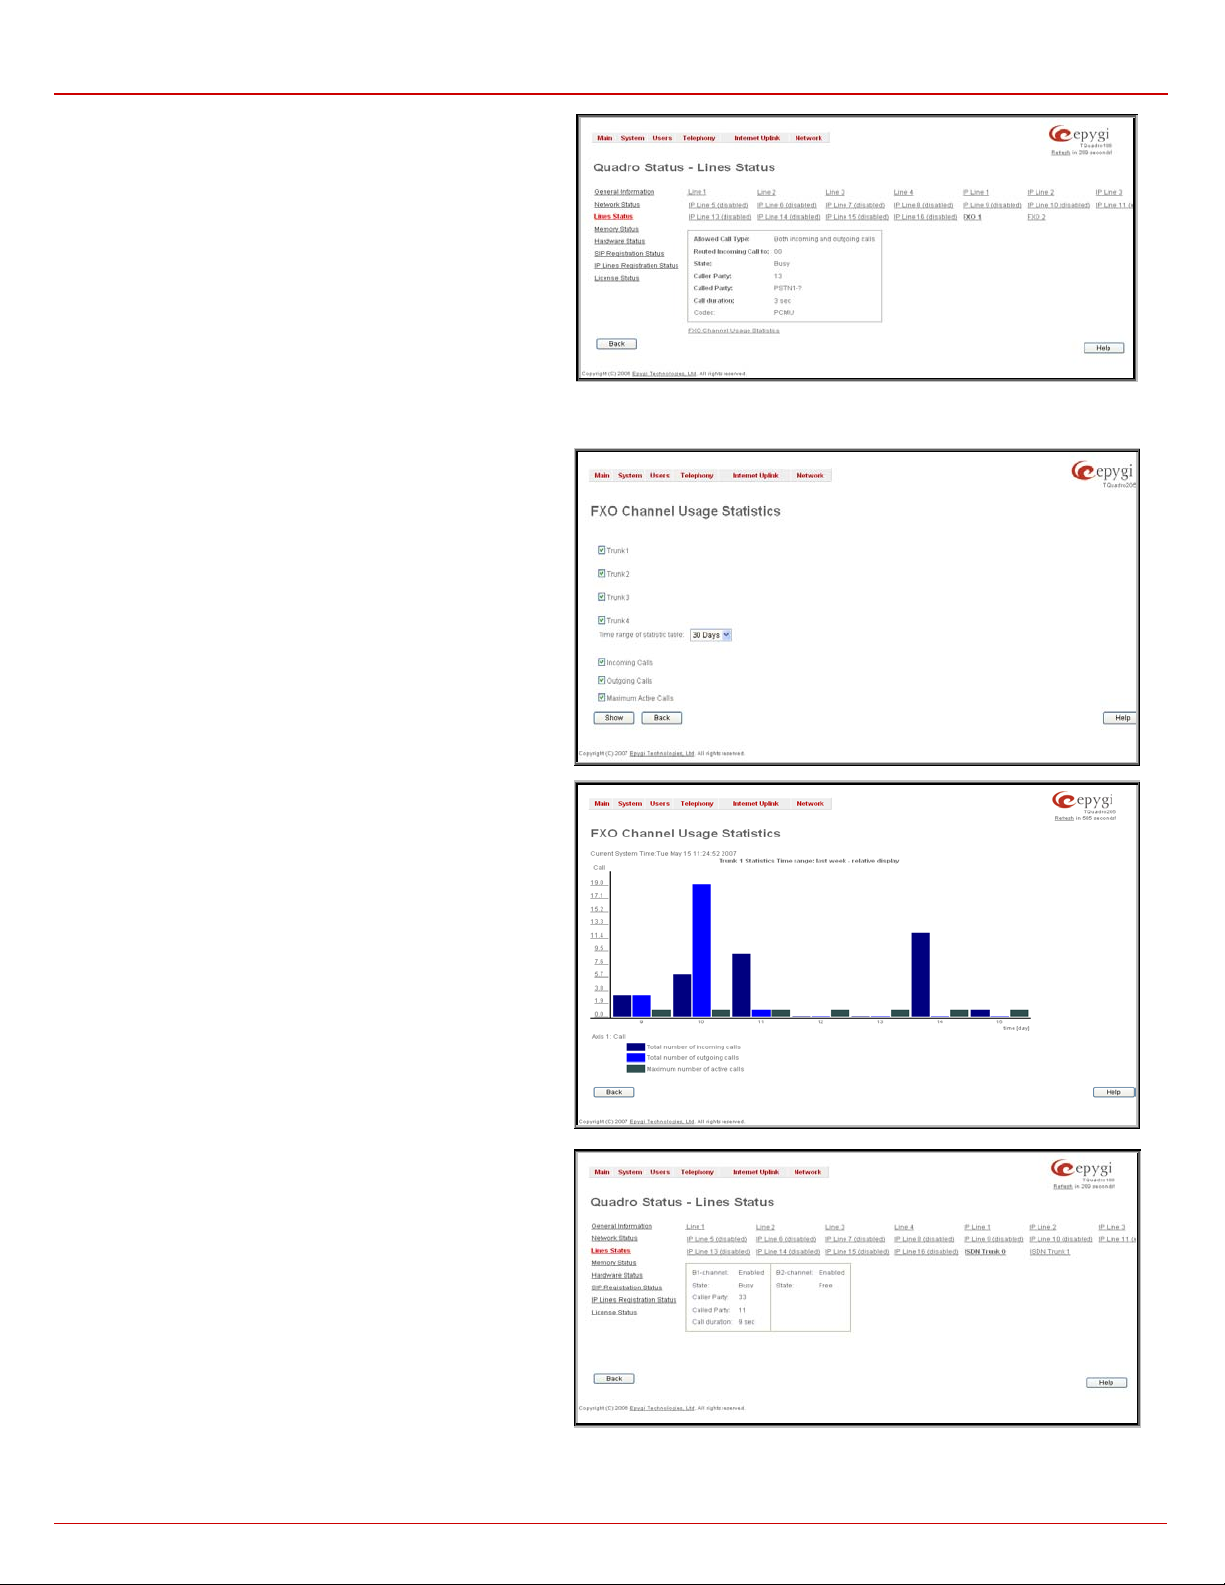
The Lin es Status tab le of each FX O Line provides information
about the Allo wed Call T ypes, th e extens ion nu mber ( atten dant
or rout ing cl ient), to wh om th e Incoming Call is Rout ed T o and
the State of the line (Free or Busy).
The FXO Channel Usa ge Statistic s l ink is onl y present f or local
FXO lines (this opti on is n ot avail able f or sh ared FXO lin es) and
leads to the page where diagram chart of FXO lines usage can be
viewed.
Fig. II-21: Line Status - FXO Status page
The FX O Channel Usa ge Statistics page consis ts of foll owing
components used t o define the chart p arameters:
Trunk checkboxes are used to select the FXO line number(s)
checkbox should be s elec t ed, otherwise error message app ears .
Time ra nge of statisti c tabl e drop d own list inclu des the period
(in days) statistics data that is to be collected and the
corresp onding diag ram chart that is to be bu ilt .
Incoming Calls and Outgoing Calls checkboxes are used to
select whether the FXO traffic statistics for only incoming or
outgoing or for both type of calls should be displayed in the
diagram chart.
Maximu m A ctive Cal ls checkb ox is us ed t o h ave t he n u mber of
maximum active calls displayed in the diagram chart.
At least one of t hese ch eckboxes s hould b e selec ted , ot herw is e
error message appears.
Fig. II-22: FXO Channel Usage Statistics page
Show button is used to generate an FXO channels usage
diagram chart over the parameters selected above.
When this button is pressed, FXO Channel Usage Statistics
chart ap pear s. It r epres ent s d epen denc y b etw een t he ti me f r ame
and the nu mb er of calls p erformed d uring that period. A d di t i on all y
selected time frame.
The Li ne Sta tus for ISDN T runk
B2 chann els and th e inform ation about t he acti ve calls on them.
This page includes a group of static and dynamic parameters.
Static parameters are always displayed. Dynamic parameters
appear on ly when an event takes place on the channel.
Static Parameters:
• B ch ann el - the state of the channel (enabled or disabled)
• State - the current state of the channel (free, busy or N/A)
Dynamic Parameters:
• Caller Party - this parameter appears when a call is
received an d in di cates the call er ad dress
• Cal led Party - this p aram et er app ears when a call is pl aced
and indicates the destination address
• Call Dur at ion - current call duration (in seconds)
Fig. II-24: Lines Status page
Quadro2x, 2xi; Quadro4x, 4xi; Quadro16x, 16xi (SW Version 5.3.x) 17
Page 19
Quadro Manual II: A d min istrator's Guide Administrator’s Me n us
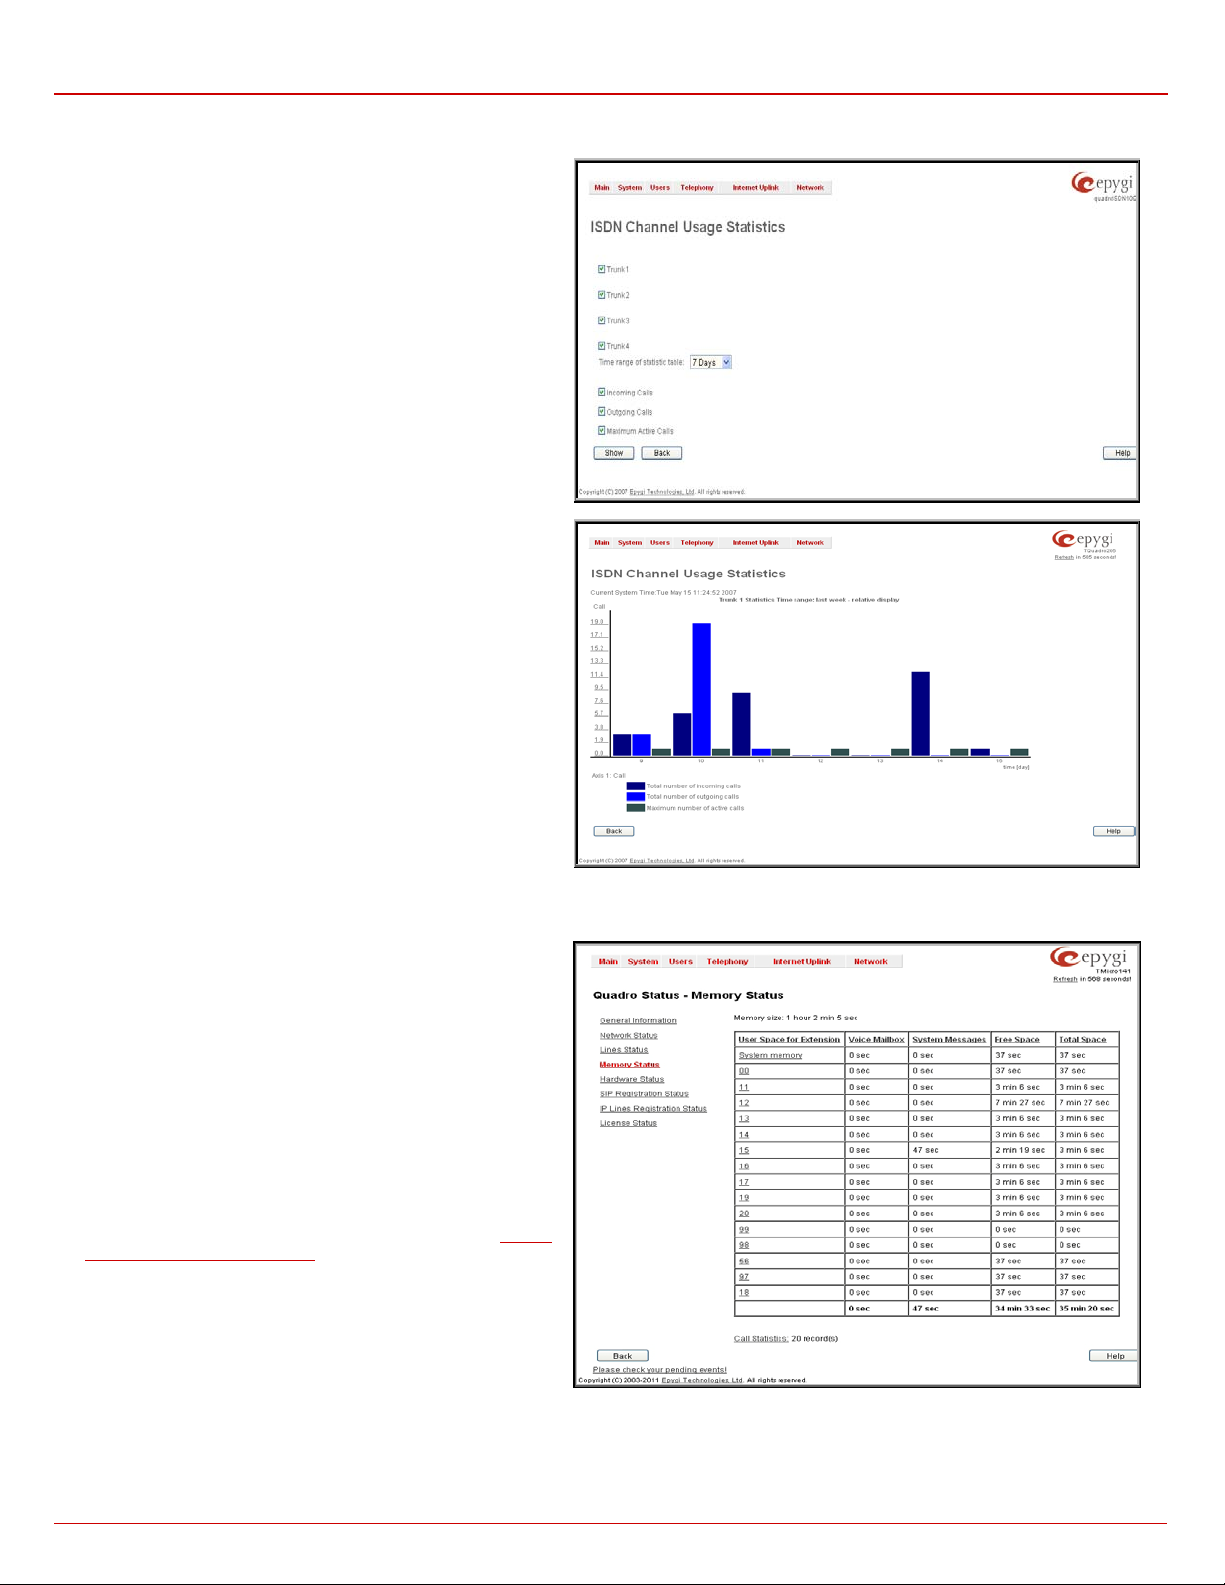
The ISDN Channel U sage Statist ics link is only present for local ISDN lines (this option is not available for shared ISDN lines) and leads to the
page where diagr am ch art of ISDN trunks usage can be vi ew ed .
The ISD N Channel Usage Stat istics page cons ists of f ollowing
components used t o define the chart p arameters:
Trunk check boxes are us ed to select the IS DN line num ber(s)
over whi ch th e ISDN tr affic chart will be built. At least one T runk
checkbox should be selec t ed, otherwise error message app ears .
Time ra nge of statisti c tabl e drop d own list inclu des the period
(in days) statistics data that is to be collected and the
corresp onding diag ram chart that is to be bu ilt .
Incoming Calls and Outgoing Calls checkboxes are used to
select whether the ISDN traffic statistics for only incoming or
outgoing or for both type of calls should be displayed in the
diagram chart.
Maximu m A ctive Cal ls checkb ox is us ed t o h ave t he n u mber of
maximum active calls displayed in the diagram chart.
At least one of t hese ch eckboxes s hould b e select ed, other wise
error message appears.
Fig. II-25: ISDN Channel Usage Statistics page
Show button is used to generate an ISDN channels usage
diagram chart over the parameters selected above.
When this button is pressed, ISDN Channel Usage Statistics
chart ap pear s. It r epres ent s d epen denc y b etw een t he ti me f r ame
and the nu mb er of calls p erformed d uring that period. A d di t i on all y
it may display the maximum number of calls performed in the
selected time frame.
Fig. II-26: ISDN Channel Usage Statistics chart
Memory Status
The M emor y Status p age incl udes tables w ith the avai labl e User
Space information for each extens ion. Thes e tables dis play the
space us ed by the voice mail box and upl oaded/r ecorded s ystem
greetings. It shows the free and total space (counted in
minutes/seconds) for every extension. This page includes the
following information:
Memory Size shows total memory space (counted in
minutes/seconds) available on the Quadro and assigned to all
extensions.
The tabl e’s links lead th e administ rator t o the extens ion s ettings
page where User Space may be altered.
The System Memory row indic ates the space oc cupied by the
universal extension recordings. Link refers to the
Univers al Extens ion Recor dings
page wh ere universal extens ion
Upload
system m essages may b e uploaded.
Call Stat istics shows the current number of calls with recorded
statistic entri es.
Fig. II-27: Memory Status page
Quadro2x, 2xi; Quadro4x, 4xi; Quadro16x, 16xi (SW Version 5.3.x) 18
Page 20
Quadro Manual II: A d min istrator's Guide Administrator’s Me n us
board. Also, the hardware device version number and
o the column
field displays the connection
Quadro currently is acting in (direct connection or behind
Hardware Status
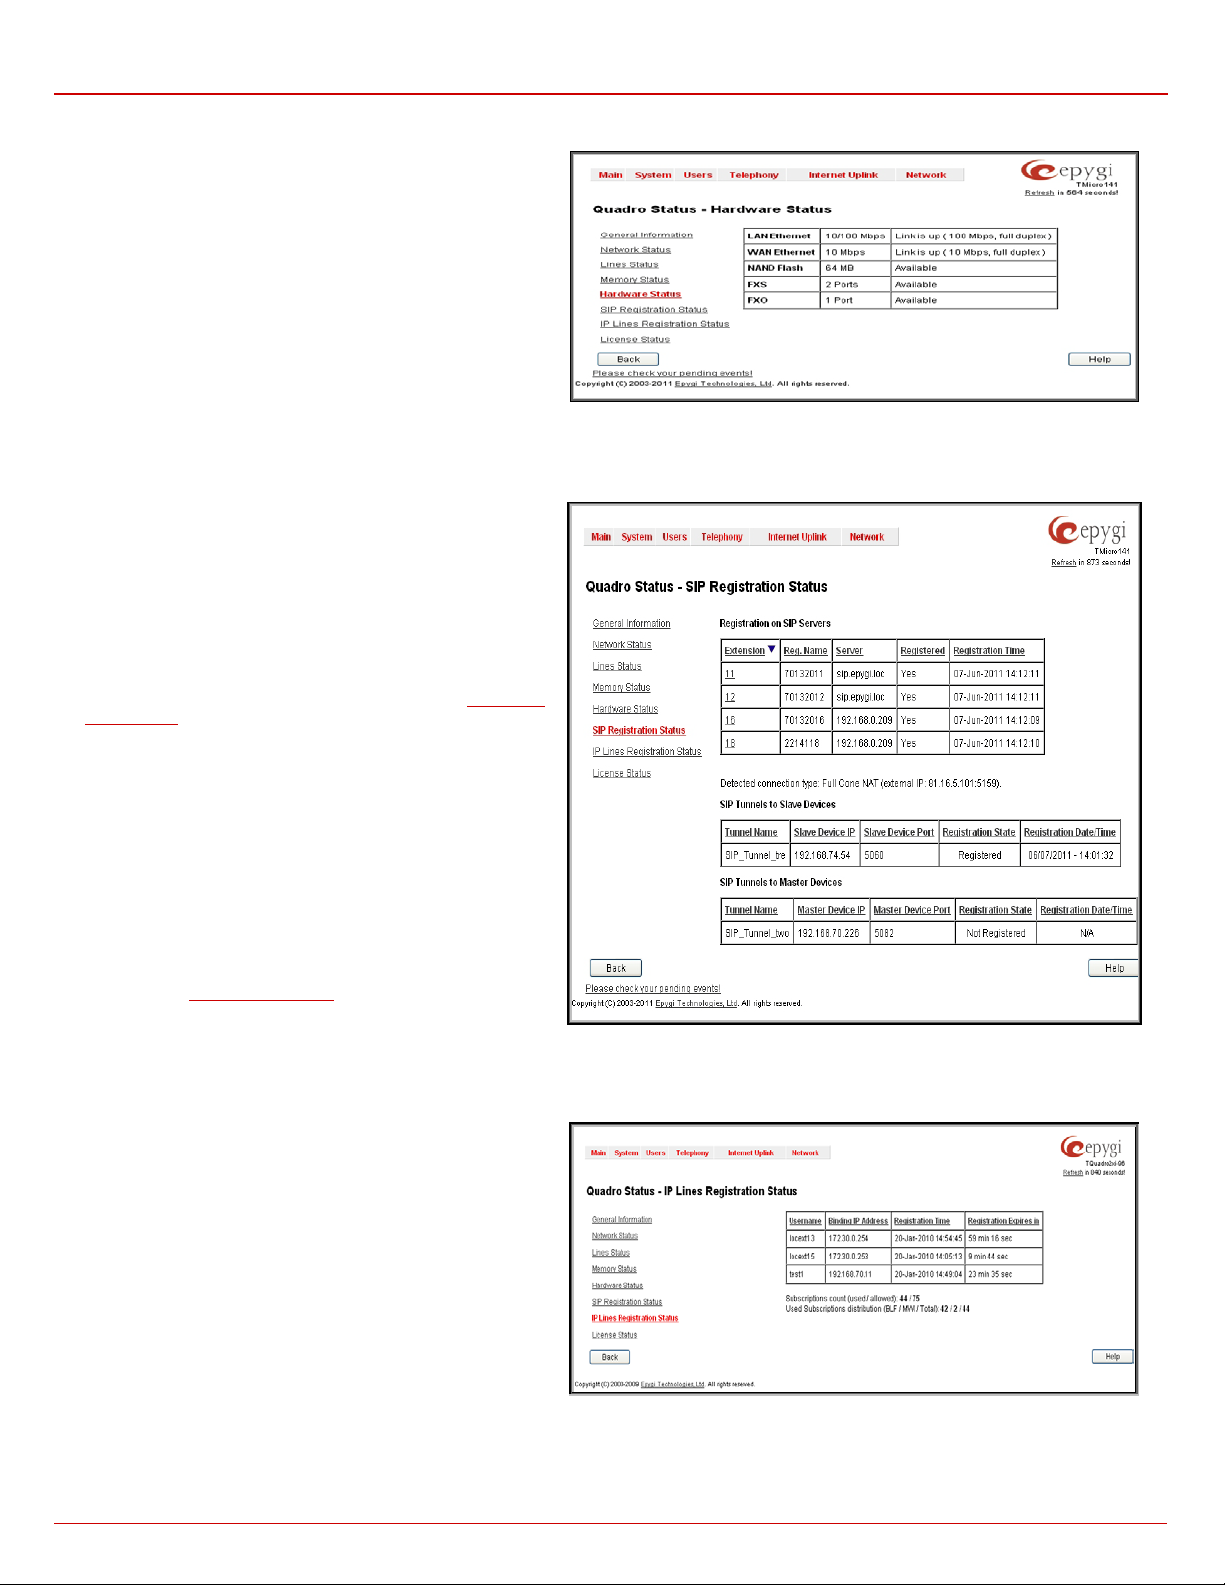
The Hardware Status table displays a list of the hardware
devices pr esent an d parts present and c urrent ly avail able on th e
Quadro
additi on al c om m ent s ab out its st at e ar e dis p l ayed here.
Fig. II-28: Hardware Status page
SIP Regist r a tion S ta t us
The SIP Registration Status is a table displaying the SIP
registration information of th e Qu ad ro extensions.
The table c ontains a list of all the register ed extens ions of the
Quadro, SIP regis trati on name f or each ext ension , addr esses of
SIP servers wh ere t hey are r egis ter ed (if applic able), w hether or
not it is regist ered for each extens ion, and the regist ration dat e
and tim e. By c lic k in g on t h e row heading, the tabl e wi ll be sorted
by the selected column. When sorting (ascending or
descending), arrows will be displayed next t
heading.
The links inside the table will link you to the Extensions
Management page where the SIP registration settings may be
altered.
The Detected Connection Type
type
NAT). If Quadro is acting behind NAT, the NAT machine IP
address is also displayed.
The Registered IP Lines table lists the IP lines and remote
extensions registered on the Quadro. The table indicates the
actual IP addresses of the remote devices, the usernames by
which th e d evices h ave b een r egister ed on the Q uadro, as well
as the registration status information.
The SI P Tu n nels to Slav e D ev i c es and SIP Tunnels t o Master
Devices tables lis t t h e SIP tunnels bet ween l ocal and th e remot e
Quadr os (see
Devices tabl e lists thos e tunnels where loc al Quadr o acts as a
mas ter. The S IP Tunnels to M aster Device s table lists those
tunnels wh er e loc al Quadro acts as a sl ave.
SIP Tun nel Setti ngs). T h e SIP Tunnels to Slav e
Fig. II-29: SIP Registration Status page
IP Lines R e gis t r a tion S ta t us
The IP Lines Regi stration St atus page lists the IP lines and
remote ext ensions r egistered on th e Quadro, as wel l as all SLA
lines registered from each IP phone. The table indicates the
actual IP addresses of the remote devices, the usernames by
which th e d evices h ave b een r egister ed on the Q uadro, as well
as the registration status information.
Subscription Count field indic ates used and all owed numb er of
subscriptions for all IP phones registered on the Quadro.
Subscri pti ons ar e events origi nated b y IP phones w hen w atchi ng
other ext ensions or SLAs on th e Qu adro and when monit oring
voice mailbox for new received voice mails.
Quadro2x, 2xi; Quadro4x, 4xi; Quadro16x, 16xi (SW Version 5.3.x) 19
Fig. II-30: SIP Registration Status page
Page 21
Quadro Manual II: A d min istrator's Guide Administrator’s Me n us
indicates the number of the corresponding licenses
license. Links in this column move to the corresponding service
When the all owed number of subs criptions is reached, no n ew subs criptions are p ossib le. Typically th e numb er of subsc ription shou ld be keep
reasonably below the maximum allowed number, to avoid losing subscriptions. Thus, in case the actual subscription number is close to the
limit, configuration of IP phones should be adjusted to decrease the number of total subscriptions on the Quadro.
Used Subscripti on Distribution fi eld ind icates IP ph one’s subs cri ptions distr ibution among B LF (B usy Lam p Fiel d) subs cript ions, which ar e used
for watch ing extensions an d SLAs on IP phones, and MW I (Message W aiting Ind ication) subscriptions , which are used for voic e mailbox status
indication on the phon e.
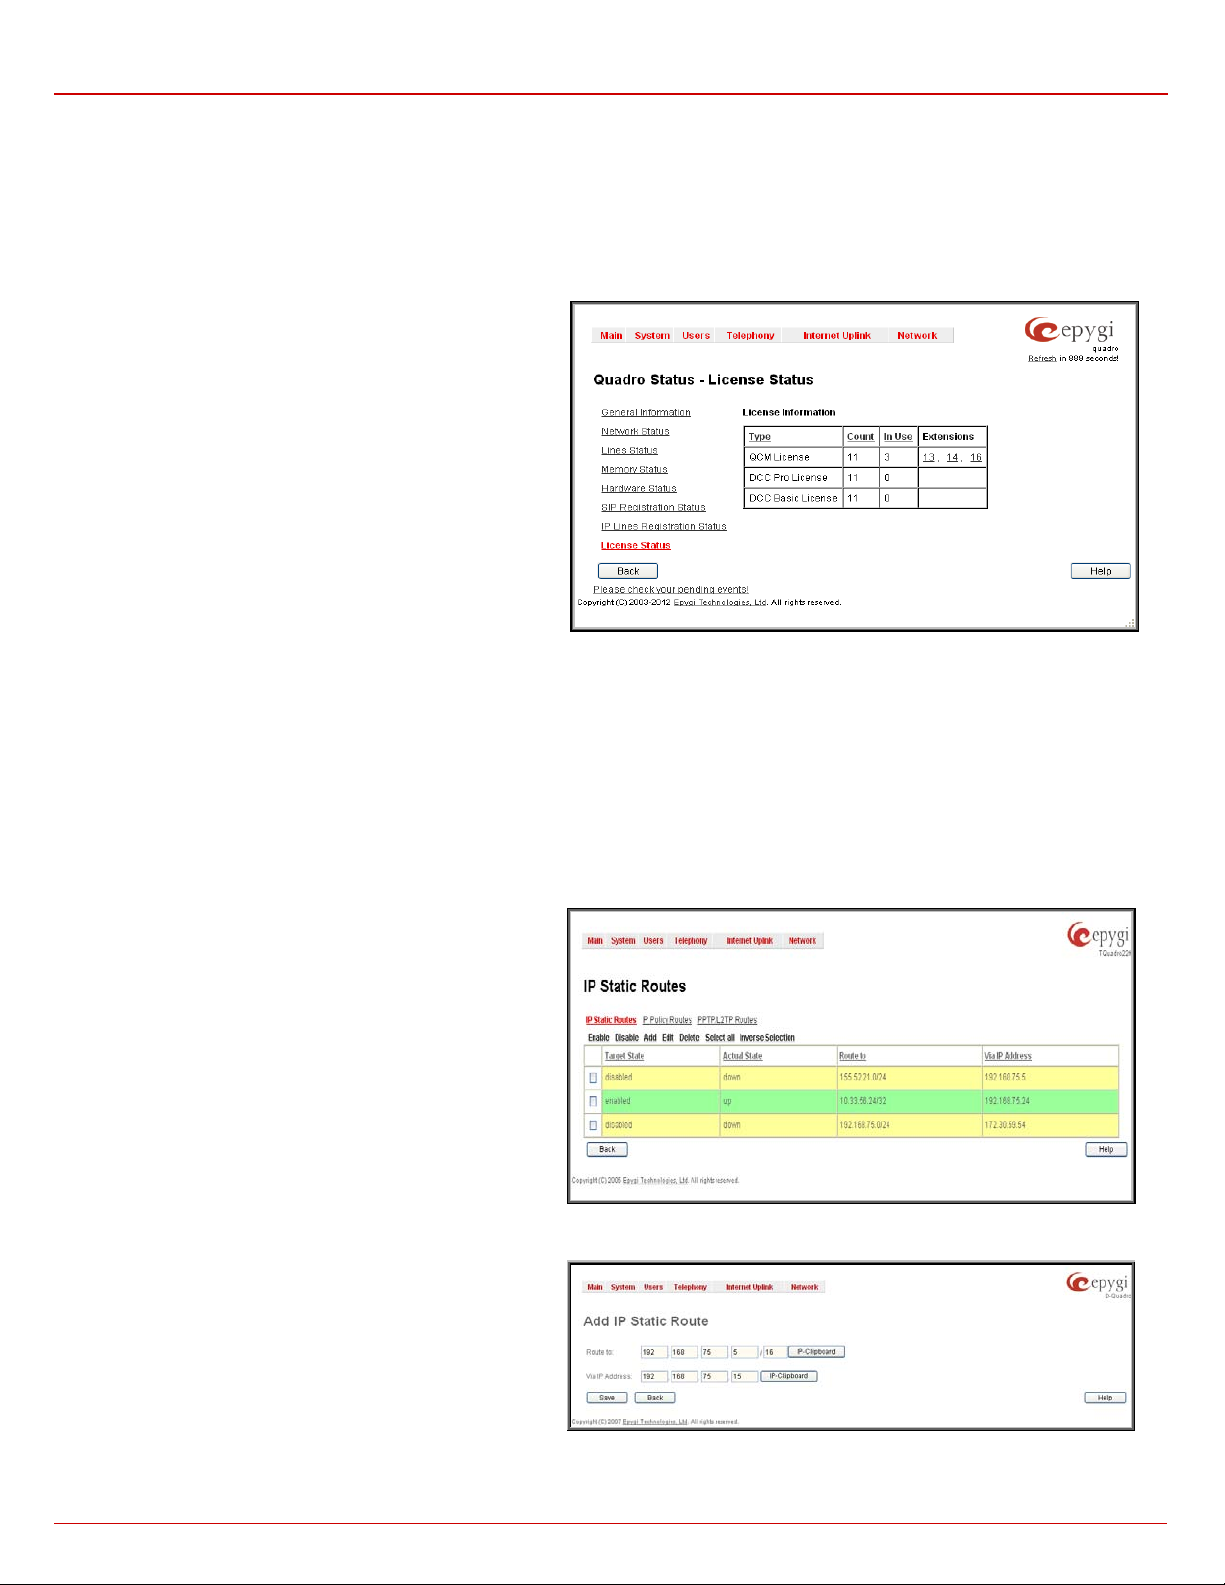
License Status
The License Status page displays a table with all available
licens es on th e Quadro and the c orresp onding s etti ngs for eac h
license (Currently only QCM and DCC license statuses are
displayed).
This page includes the following information:
Type in dicates th e typ e of t h e lic ense available on the Qu adr o.
Count
available on the Quadro.
In Use indicates the number of used licensed from the total
available licenses.
Extension lists the ext ensi ons that are us ing the c orres pondi ng
configuration page for the extension.
Fig. II-31: License Status page
IP Routing Configuration
Routing is us ed t o relay infor mation across th e Intern et fr om a s ourc e to a d estinat ion. A long t he wa y, at least one int ermed iate n ode is typic ally
encoun tered. R outing is differ ent than bridgin g. The m ain diff erence b etween bridgin g and rout ing is t hat brid ging op erates at the OS I Data Link
Layer (Level Two Media Access Control Layer) and routing operates at OSI Network Layer (Level Three).
Quadro’s IP Routing servic e all ows you to r oute IP p ackets f rom one des tinat ion to an other ( or to a spec ified rout er) thr ough Q uadr o or a Quadr o
VPN.
The IP R outing Con figur ation page is us ed to mak e IP St atic , IP P olic y and VP N r outes f or IP p ack ets r outin g. Thi s p age c onsist s of thr ee tabl es.
Entri es in the t ables are col or coded accord ing t o the st ate of th e rout e. For exampl e, yell ow indic ates d isabl ed rout es, green indi cates success ful
routes and r ed in dicates rout es wi th an err or .
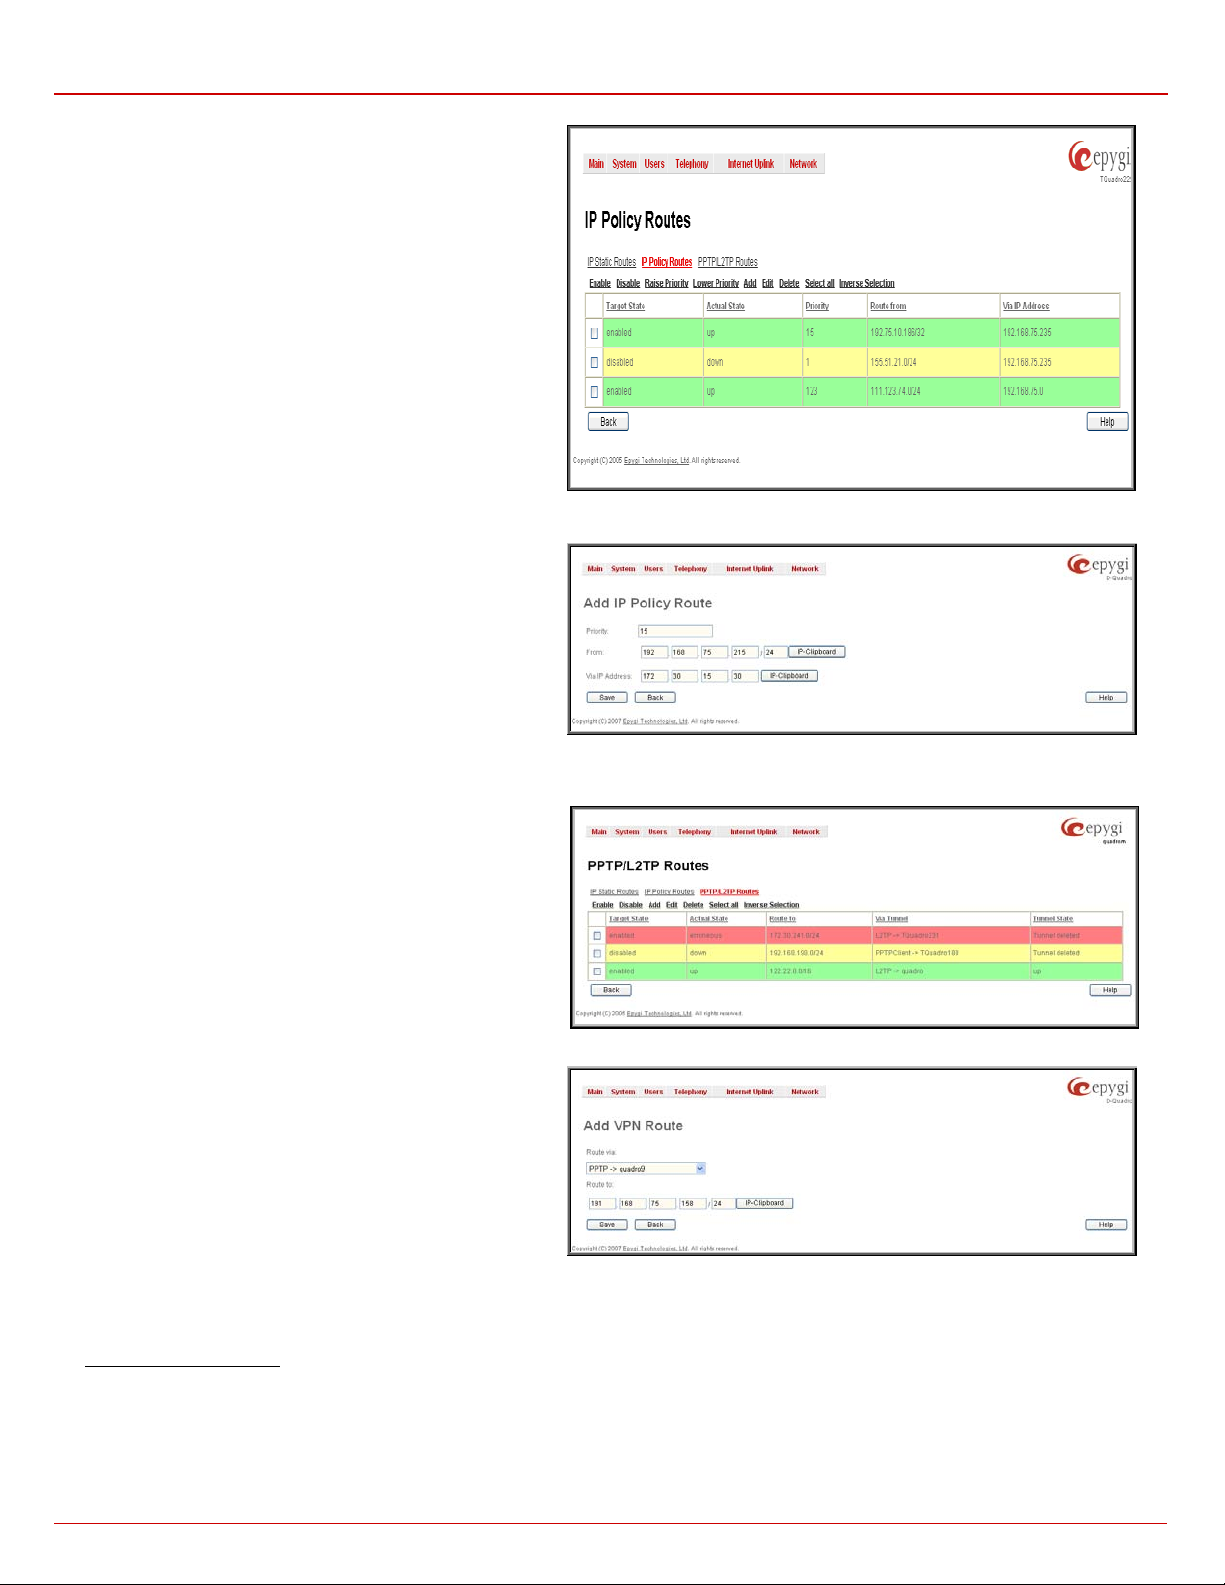
IP Static Routes are used to forward IP packets from the
Network, where the Quadro is connected, to the specified
destination.
The IP Static Routes table displays all established IP static
routes with t heir paramet ers: Tar get State for the state of the
route (enabled or dis abled), Actual State f or th e state of the
route connection (up, down or erroneous), Route To for the
subnet wh ere the inc oming p ack ets s houl d be r out ed t o an d Via
IP Address for the router IP ad dress where incoming packets
should be routed through.
Add opens the Add IP St atic Route p age where a new static
route can b e establish ed.
Enable/Disable is used to activate and deactivate a selected
route(s ). At least one rout e should b e selected i n order to use
these functions, otherwise the following error message will
appear: “No record(s) selected.”
Fig. II-32: IP Static Routing table
The Add IP Static Route page offers the following components:
Route To requires the IP address and subnet mask for the
destination the IP packet should be forwarded to.
Via IP Address requires the IP address of the subsequent router
for IP packet forwarding to the specified destination.
Attention: T he rule wit h the long est subn et (smalles t IP rang e)
will take eff ect when havin g two or m ore IP Static rout ing rules
with the coinc iding subnets.
Fig. II-33: Add IP Static Routing page
Quadro2x, 2xi; Quadro4x, 4xi; Quadro16x, 16xi (SW Version 5.3.x) 20
Page 22
Quadro Manual II: A d min istrator's Guide Administrator’s Me n us
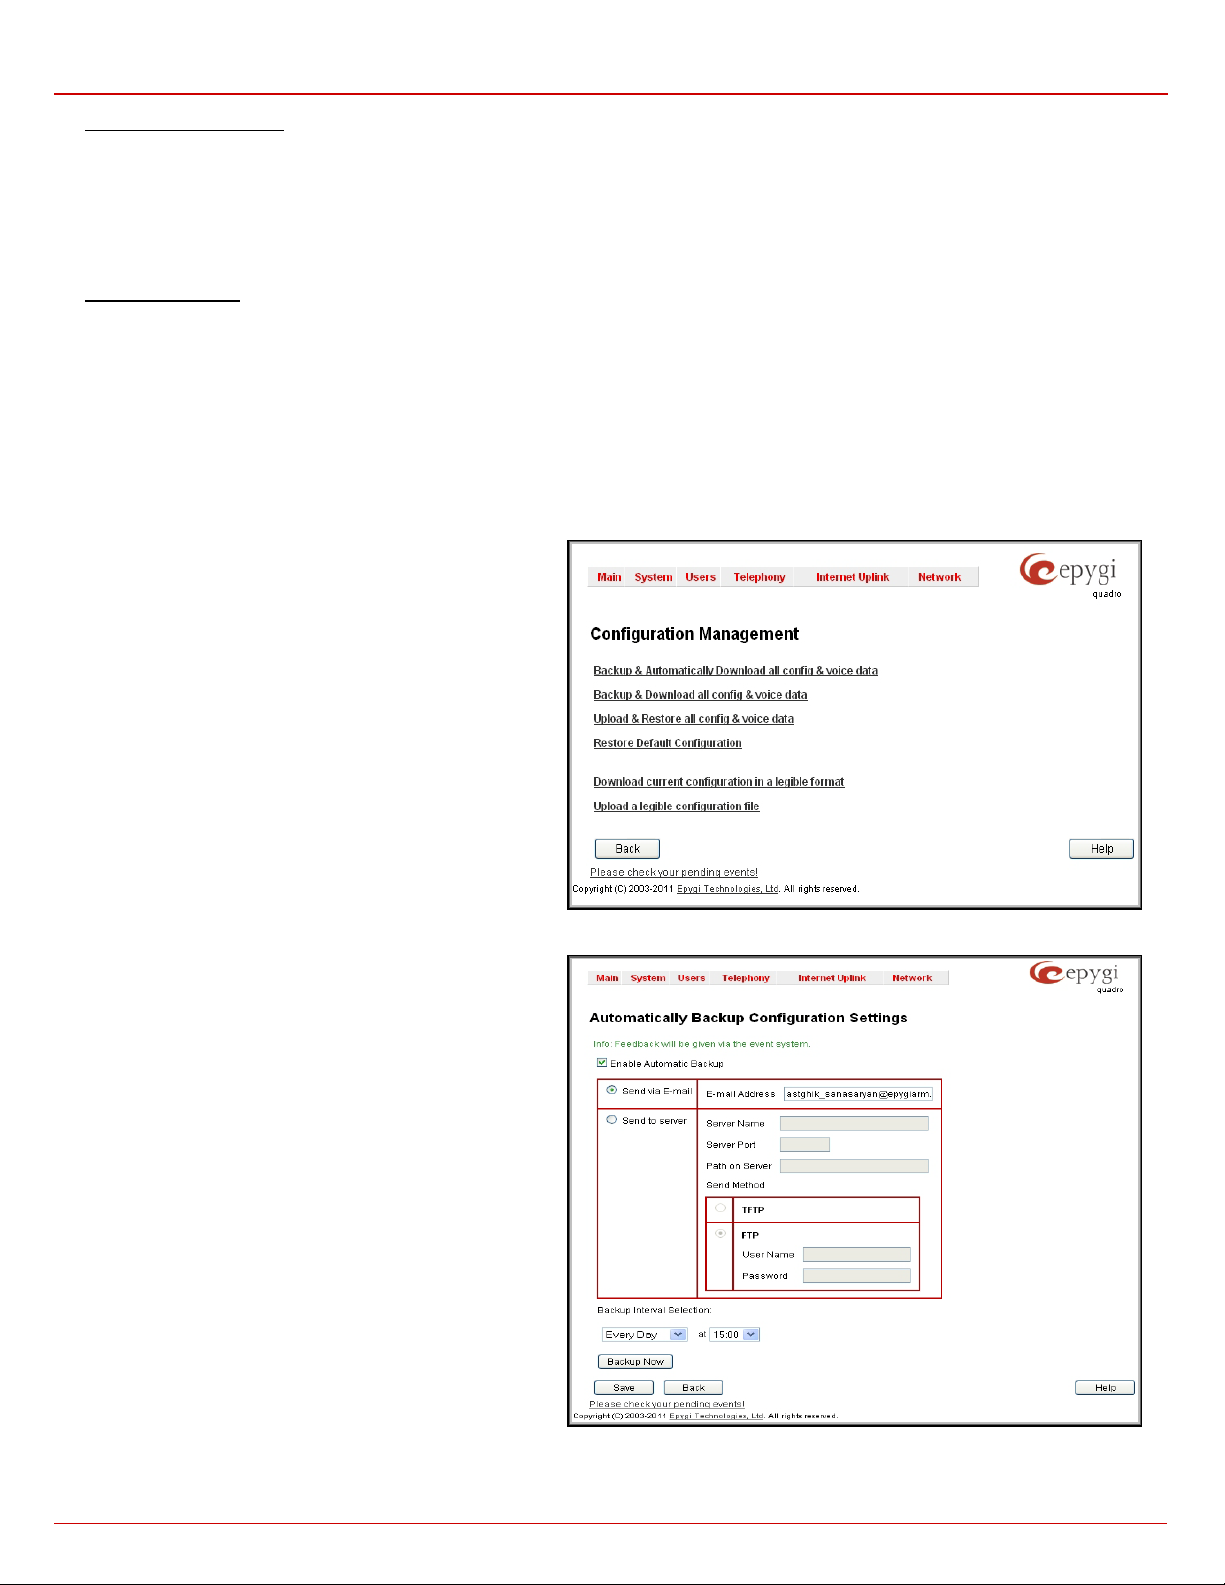
table displays all specified IP policy
offers the following input
IP Policy Routes allow IP p ackets forwar ding to the specified
router depending on the source IP address as well as defining
the priority for the current routing rule.
The IP Policy Routes
routes with t heir paramet ers: Tar get State for the state of the
route (enabled or dis abled), Actual State f or th e state of the
route conn ection (up, d own or erroneous ), Priority for the route
priority, Route From is where the s ubnet, rout ed pac kets c ome
from and Via IP Address is where the router IP address
incoming packets should be routed through.
Add opens the Add IP Policy Route pag e to establi sh a new
polic y rout e.
Enable and Disable are used to activate or to deactivate the
selected route(s).
Raise Priority and Lower Priority are used to increase or
decreas e the priority of th e sel ected policy route(s) by one. At
least one route should be selected to use these functions,
otherwise the error message “No record(s) selected” will appear.
Fig. II-34: IP Policy Routing table
The Add IP Policy Route page
options:
Priority requires a numeric val ue (from 1 to 252) to define the
priorit y of th e rou ting r ul e. Th e lower t he nu mber , th e soon er th e
routing rule will take effect (higher priority).
From req uir es the pac ket sourc e IP addr ess and su bnet m ask of
the specif i ed d estinati on t o m atc h wi th th e r ul e.
Via IP ad dr e ss requires the IP address of th e s ubsequ ent r outer
for IP packet forwarding.
Fig. II-35: Add IP Policy Route page
The PPTP/L2TP Routes allow IP packets forwarding through
the PPTP and L2TP tunnels of the Quadro. If PPTP/L2TP
connections do not exist on Quadro, VPN routes cannot be
generated.
The PPTP/L2TP Routes table displays all generated VPN
routes with their parameters: Target State for the state of the
route (enabled or dis abled), Actual State f or th e state of the
route connection (up, down or erroneous), Route To for the
subnet where the incoming packets should be routed, Via
Tunnel f or the VPN tunnel inc oming packets sh ould be routed
through an d Tunnel St at e for the act u al stat e of the rout e tunn el
(up or down).
The Add button opens the Add V PN Ro ute pag e where a new
VPN route can be generated.
Fig. II-36: VPN Routing table
The Add VPN Route page offer s the following components:
Route Via c ontains t he availabl e PPTP and L 2TP connec tions
on the Q uadro. A con nection selec ted f rom this list w ill be us ed
to route the IP p ac k et f rom the Q u adro’s LAN to the peer behind
the PPTP/L2TP tunnel.
Route To requir es the IP ad dress ran ge of the possible p eers
behind t he PP TP /L2T P tu nnel wh ereto t h e IP pac ket s sh oul d be
routed.
Fig. II-37: Add VPN Route page
The Enable and Disable functi onal b utt ons are used t o acti vat e or t o d eacti vat e the s elec t ed rout e(s ). At l east one r out e sh ould b e sel ec ted t o us e
these functions, otherwise the error message “No record(s) selected” will appear.
To Add an IP Static Route
1. Select the IP Static Routes link on the Routing Configuration page.
2. Press the Add butt on on the IP Static Routes page. The Add Entry page will appear in the browser window.
3. Enter the destination IP address and subnet mask in the Route To text fields. Use the IP-Clip button to select a previously entered IP address.
4. Enter the router IP address into the Vi a IP Address text fiel ds.
5. Press the Save button to make the static route with these settings.
Quadro2x, 2xi; Quadro4x, 4xi; Quadro16x, 16xi (SW Version 5.3.x) 21
Page 23
Quadro Manual II: A d min istrator's Guide Administrator’s Me n us
checkbox enables
select whether the backup files will be delivered by email or
text field that requires the email
To Add an IP Policy Route
1. Select the IP Policy Routes link on the Routing Configuration page.
2. Press the Add butt on on the IP Policy Routes page. The Add Entry page will appear in the br owser window.
3. Spec ify the pol icy rout ing rule p riority in the Priority text field.
4. Enter the packet source IP address and subnet mask in the From text fields. Use the IP-Clip button t o s elec t a previousl y ent ered IP addr ess .
5. Enter the router IP address into the Vi a IP Address To text fields.
6. Press the Save button to make the policy route with these settings.
To Add a VPN Route
1. Select the VPN Routes link on the Routing Configuration page.
2. Press the Add butt on on the VPN Routes page. The Add Entry page wi ll ap p ear in the browser window.
3. Choose the VPN connection from the Route Via dr op d ow n lis t.
4. Enter the destination IP address and the subnet mask into the Route To text fields.
5. Press the Save button to make the VPN route with these settings.
Config ur a tion Managem ent
The C onfigur ation M anag ement page assists th e admi nist rat or wit h man agin g th e sys tem c onf igu rati on s ettin gs and v oic e data. For example, the
adminis trator is able to bac kup and dow nload th e settings t o a PC and th en upload and restor e them back t o the Quadr o. Additionally, this page
provides the possibility of restoring the factory default configuration settings.
The Backup & Automatically Download all config & voice
data link leads to the Automatically Backup Configuration
Settings page where the automatic backup of the system
configu rati on and th e voice d ata can b e configu red. T he ser vice
allows you to setup Quadr o so it will automaticall y backup the
system configuration and the voice data and store it in the
specified location.
Fig. II-38: Configuration Management page
The Autom ati cally B ac kup Co nfig ur at ion Settin gs page allows
you to enable t he aut omatic back up of th e syst em conf igur ation
and the voic e dat a on th e Qu adr o. W ith th is s ervic e, Qu adr o will
automatically backup the system configuration and the voice
data and st ore it in the specified locat i on.
This page contains the following components:
The Enable Automatically Backup
automat ic bac k up m ec hanism on th e Q u adro.
The foll owing group of manipu lation radi o buttons allows you t o
stored in some location:
• The Send via Email radio button is used to send the
automatically backed up files via email. The selection
enables Email Address
address of the administrating person to receive the
automatically backup files.
• The Send to Server radio button is used to store the
automatically backup files on a remote server. This
selection enables the following fields to be inserted:
The Serv er Name requires the IP addres s or the host name of th e r em ot e server.
Quadro2x, 2xi; Quadro4x, 4xi; Quadro16x, 16xi (SW Version 5.3.x) 22
Fig. II-39: Configuration Management page
Page 24

Quadro Manual II: A d min istrator's Guide Administrator’s Me n us
The Serv er Port requires the port number of the remote server.
The Path on Server requires the path on the server to store the backup files in.
The Send Method manipulation radio buttons allow you to select the remote server type: TFTP or FTP. In case of FTP selection, the
authent ication us ern am e and the pass w ord need to be inserted. In cas e these fields ar e lef t em p ty, anonym ous au thentic ati on will be used.
The Backu p Int er v al Se le cti on checkboxes ar e used to select the time inter val automatically bac kup the Qu adro's c onf igu ration and the voic e d at a.
The Time based ch eckb ox is us ed t o s elect t he h our wh en th e c onfi gur ation and th e voic e dat a wil l be aut omat ic ally back ed u p on the daily basis.
The Weekday ch eckb ox is used to select the week day when the config uration and the voic e data will be automat ically backed up on th e weekly
basis. At least one of these checkboxes nee ds to be selected.
Backup No w bu t t on is us ed t o p erform a manual l y im m ediate backup of the system configuration and the voice data.
The Backu p & D o wnl oad all conf ig & v oic e d ata link gener at es a backup fil e with all c onfigur at ion s ettings and user up load ed greet ing messages .
It opens a file chooser window for immediate download to t he users PC.
The Upload & R es tor e all co nfig & voice data link opens a page that has a Browse button, ( wh ic h op ens a f il e c h ooser to s el ect a bac k ed-up file)
and a Configur ation to Upload fi eld r equir in g th e fil e p ath t o upl oa d and to r est ore it im medi at ely. Pr es sin g Save will restore the s elected backup
file, and delete all current user defined greetings and replace configuration settings.
Attention: Rest orin g the c onf igur ation an d voic e d ata requ ir es s witc hing Mem ory All ocat ion (s ee c hapt er
that was selected when the config uration an d voi ce data were bac k e d u p, ot h er w ise an error message pre ven ts upl oading the b ackup file.
The Restore Default Configuration func tional butt on resets all configuration settings and restores th e board ’s factory def ault configurati on. By
restor in g th e default configur at i on you wil l replace your c u r rent confi g uration, l ose all voic e m ai ls and reboot the device. You will not be automatically
redir ect ed to the GUI st art page. Aft er th e suc cessful reboot you will need to enter int o th e m an ag em en t p ag e and l ogin again to access the Quadro’s
configu ration. A warning message will ask you to confirm your selection before restoring the default configuration.
Please Not e: Unlik e th e factory def ault settin gs restor e procedur e initialized f rom the Reset b utton on the Quadro bo ard, this link will keep th e
following data:
• Call Statistics
• Transf er Statistics
• Syste m E ve n ts
• Feature Keys
• Device Registration state
The Downloa d current co nfiguration in a legible form at and Up load a legibl e configuratio n file links leads you to the
Management pag e w h er e l egi bl e c onfigurat i on c an be d ow nl oad ed and upl oad ed back aft er th e r eq uired edits.
Voic e Mail C om mon S ettings ) to the state
Legible C onfiguration
Legible Co nfiguration Management
The Legible Confi gur ation M anage ment is us ed to manuall y manag e the conf igurat ion on the Qu adro. Th is will allow you to down load a piec e of
configu ration from th e Quadro in the way of leg ible file, to make nec essary chang es in th at file and to upload it bac k to the same or differ ent
Quadr o(s). W ith this servic e, some pieces of config uration (like extensi on settings, N AT settings, etc.) of one Quadro c an be used on an other
Quadr o. This also helps to app ly the same grou p of settings t o the s everal instanc es (f or examp le, to apply t he same SIP settings to multiple
extens ions on the Q uadr o) on th e sam e or diff eren t Quad r os avoi din g manu al c onfigur ati on of eac h of t hos e inst anc es (i.e. ext ension) from the web
manag em en t on eac h of th e Qu adros. The Quadro reseller, distributor, ISP or carrier usually uses this service.
The Download current configuration in a legible format link refers to the Configuration Summary page where a partial or complete
configu ration can b e defined and downloaded or viewed.
The Configuration Summary page is us ed to gener ate a piece of legibl e conf iguration and to d ownload it to a PC or to view it dir ectl y in the
browser. This page consists of the following components:
Th e man ipulation r adio buttons are used to select b etween partic ular CGI or a nam ed group of CGIs for which the legibl e configur ation file will be
generated.
• The Specific CGI selection allows you t o ch oose a certai n CGI fr om the l ist of Q uadr o’s W eb m anagem ent pages for which the legible
configu ration can be manu ally manag ed. For examp le, selectin g "RTP Settings " will gener ate a legible config uration fil e with parameters
present on the RTP Settings page.
• The Named Group of CGIs selection allows you to choose among the four predefined groups: Internet Connection Settings, LAN
Config uration Setti ngs, T eleph ony G eneral S ettings and E xtens ion S ettings . Each of thes e groups ref er to all C GIs c haract eriz ed by the
selected criteria, e.g. Internet Connection Settings group contains all parameters on the CGIs related to the networking and WAN
configuration.
Quadro2x, 2xi; Quadro4x, 4xi; Quadro16x, 16xi (SW Version 5.3.x) 23
Page 25
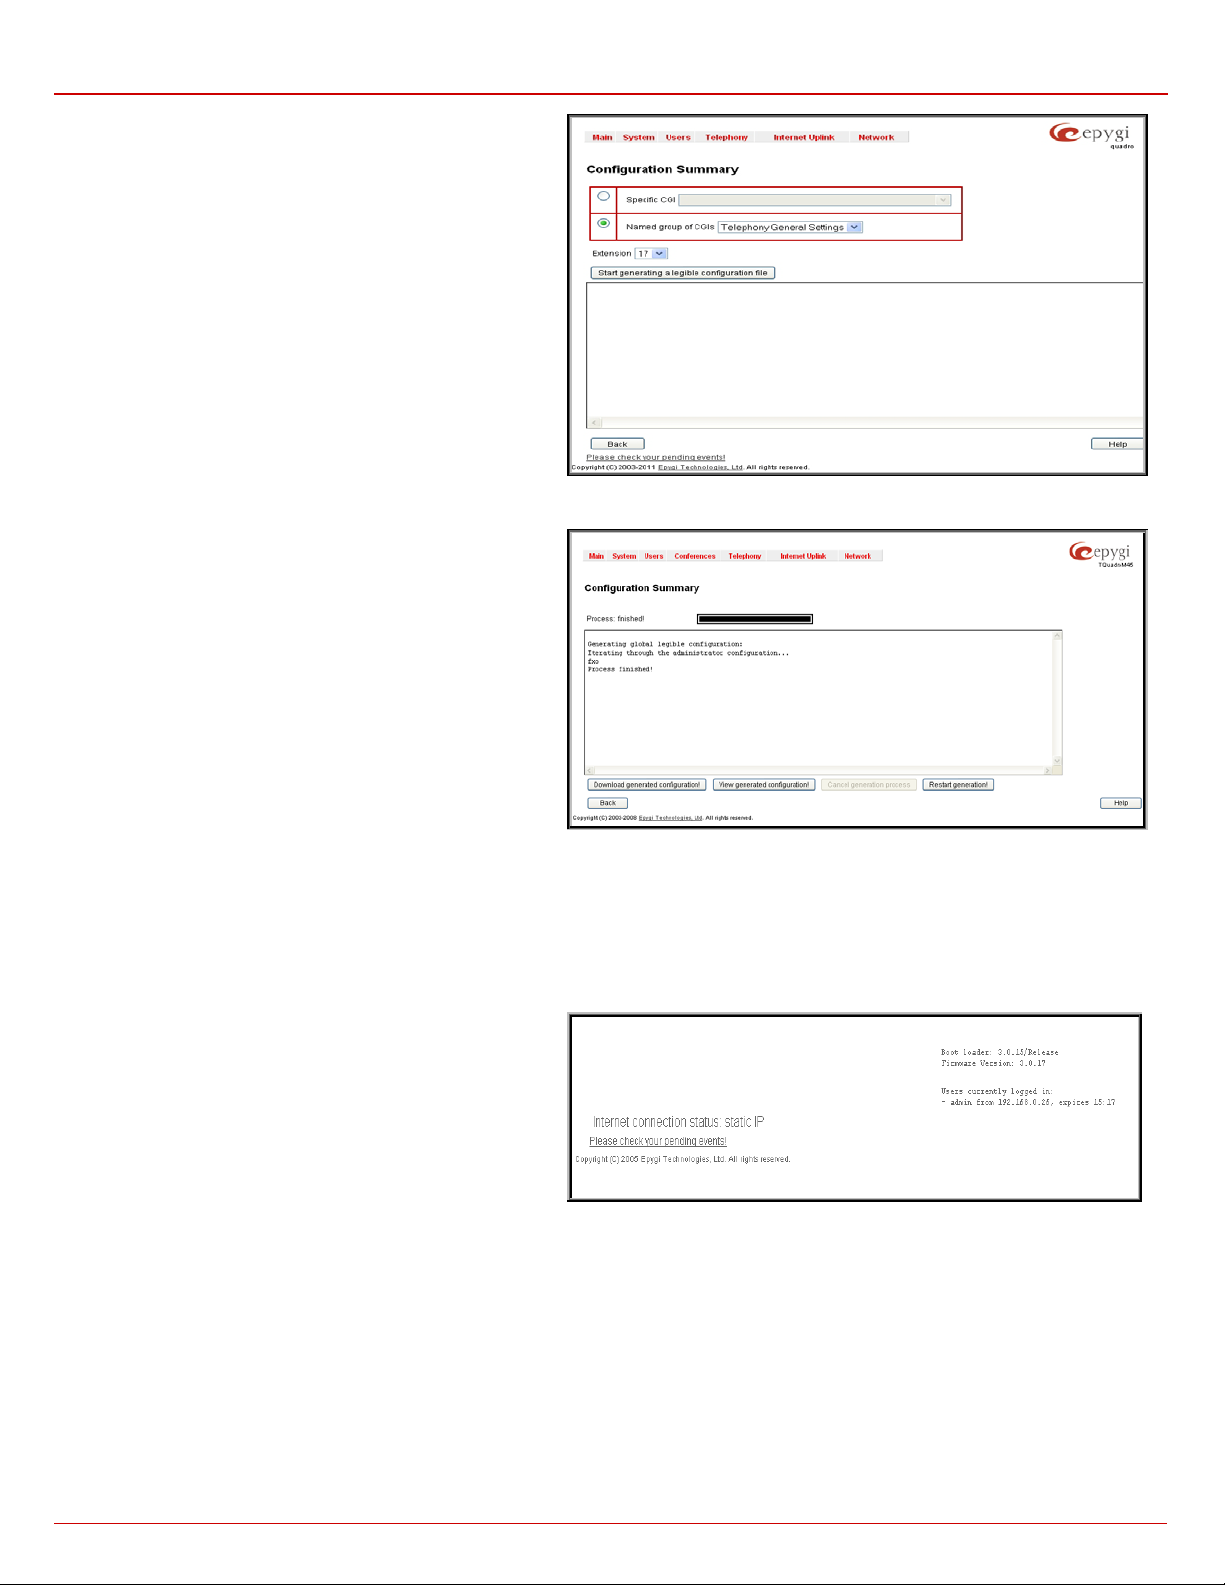
Quadro Manual II: A d min istrator's Guide Administrator’s Me n us
The Extension dr op down list all ows you to limit the settings in
the gen erat ed leg ibl e conf igur ati on f ile t o one s pecif ic extens ion.
For exampl e, each of the extensions on the Qu adro have own
SIP set ti ngs or Codecs. To downl oad the s ettings f or a particular
extens ion onl y, you need t o choos e the c orres pon ding ext ensi on
from the lis t . Th e drop down m ay als o h ave a bl ank s elec tion . In
that cas e the legi ble conf igur ation f ile will c ontai n the par ameter
of all available extensions on the Quadro (if the selected
paramet er appl i es to the extension and n ot t o t h e over all syst em,
like RTP settings).
The Start generate a legible configuration file button start
parsing the conf igurati on struct ure of th e devic e for the d efined
parameters. The progress will be displayed in the area below.
Fig. II-40: Configuration Summary – Parameters page
The Cancel generation process button appears when the
configuration generation procedure starts and it is used to stop it.
The Download generated configuration button becomes
avail able when th e legi ble c onf ig urati on g en erati on is f in ish ed. It
is used t o download t he gener ated file t o the PC in a plai n text
format. Necessary changes can be made in the downloaded
configuration file and then uploaded back to the system.
Attention: Make sure the changes you have done in the
downloaded legible configuration file are valid and will not
corrupt th e s yst em w h en b ein g uploaded back to device.
The View generated configuration button becomes available
when the legible configur ati on gener at i on is f i nis h ed . I t is used to
view the generated file directly in the browser.
The Restart generation! button becomes available when the
legibl e configur ation gener ation is f inished. It is used to c ancel
the generated configuration file and to start over.
Fig. II-41: Configuration Summary Preview page
The Upload Leg ible C onfi guratio n pag e is us ed to upl oad a c onfi gurat ion fil e in a t ext f or mat. T he Browse button in the opened pag e is used to
browse c ertain leg ible confi gurati on file to be u ploaded an d updat ed into the s ystem. Th e config uration f iles to be upl oaded sh ould be in th e *.txt
for mat, oth erwis e a syst em error occ urs. Conf iguration file upload progress will be displayed in the ar ea below. During l egible conf iguration f ile
upload, Quadro's functionality failures may occur.
Events
The Events page has two tables. All system events that have occurred will be dis p l ayed in one tabl e and even t settings wi ll b e displayed in th e other.
The System Eve nts page m a y b e access ed t hr ough the Events
link fr om t h e m ain m enu. It lists inf or mati on abou t syst em ev ents
that hav e occ ur r ed on Quadro. W hen a new event t akes place, a
record is added to the System Event table. For failure events
(priority 2 and 3, see below), the warning “Please check your
pending events!” will appear at the bottom of all management
pages.
The syst em event s an d the w arnin g mess ag e are visi ble only for
the admi nistrator. T he warning li nk, (which l eads directly t o the
System Events page) will disappear from the management
pages if th e adm inistrator has mark ed all new events as “r ead”.
Quadro2x, 2xi; Quadro4x, 4xi; Quadro16x, 16xi (SW Version 5.3.x) 24
Fig. II-42: Event Warning on the Main Menu page
Page 26
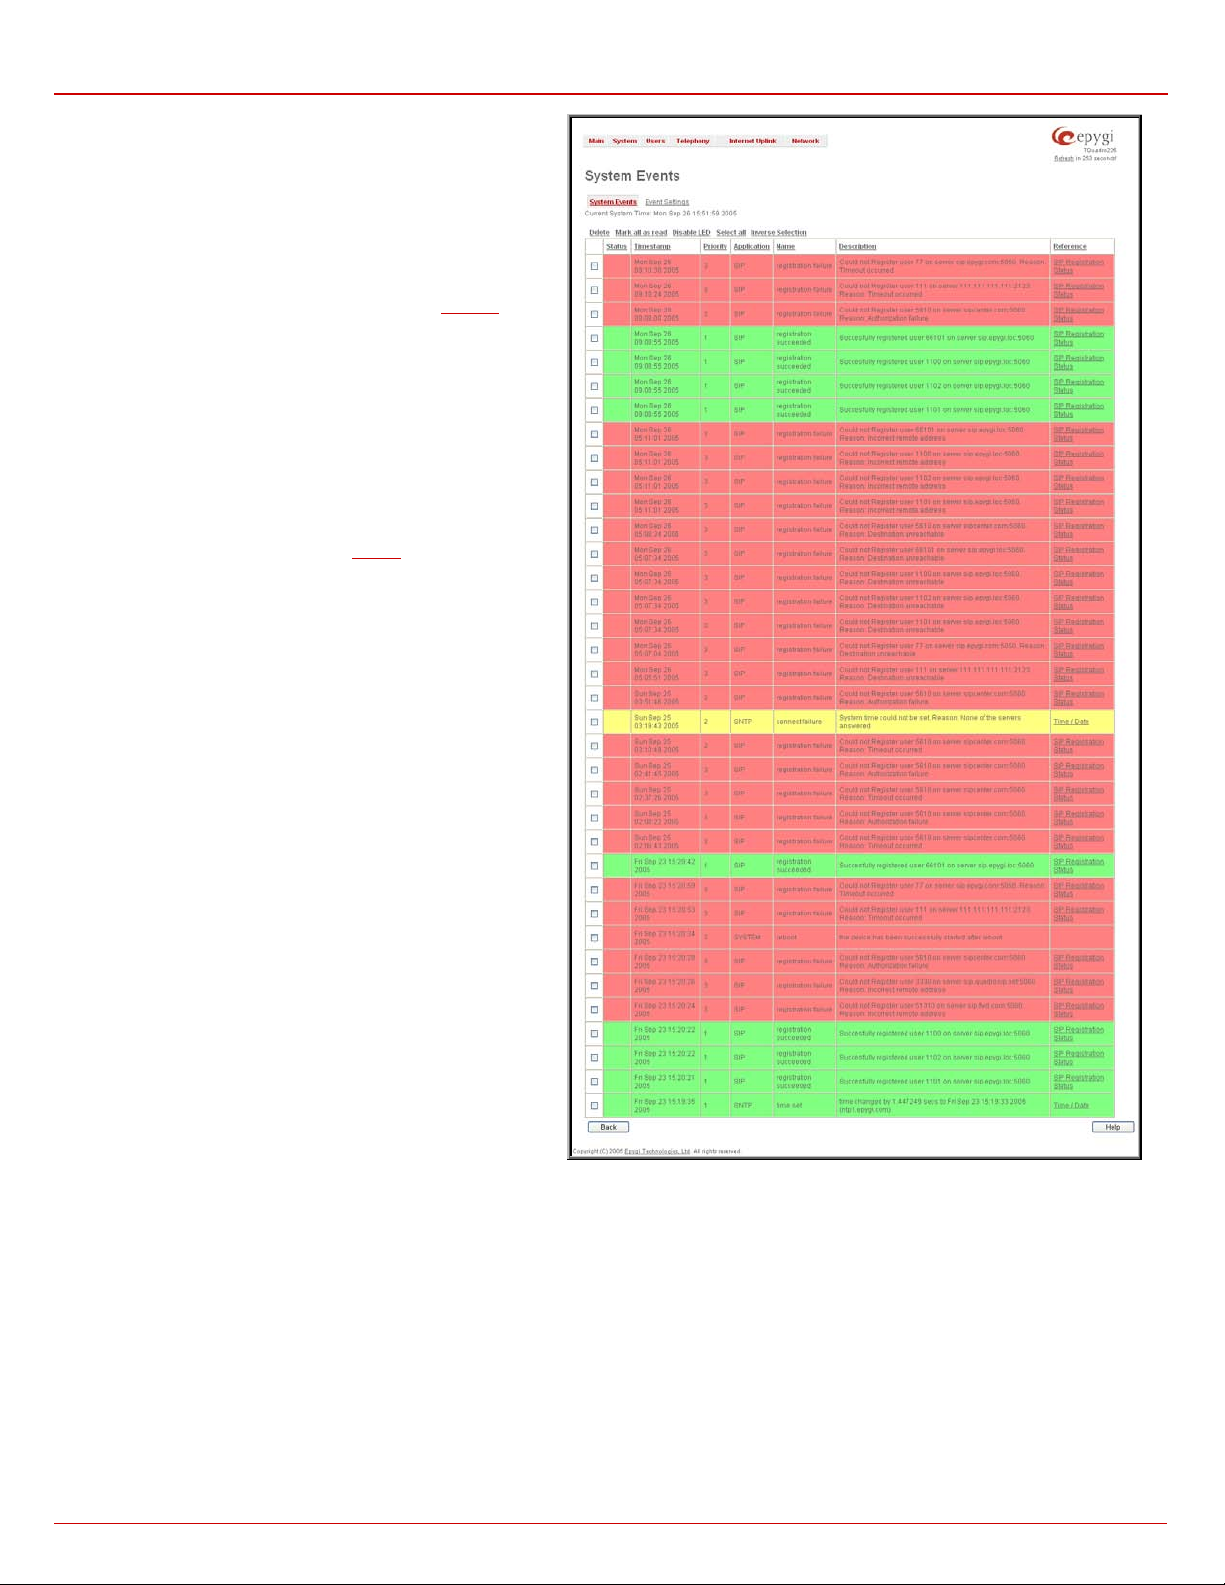
Quadro Manual II: A d min istrator's Guide Administrator’s Me n us
nding links will be seen in the
displays the local date and time on
The System Events table is the list of new and read s ystem
events . System e vents have c orresp onding col oring dep ending
on the nat ure of t he event : succ ess (pr iorit y 1, color g reen), low
importance failure (priority 2, color yellow), critical failure ( priority
3, color red).
The table shows the Status of th e ev en t (n ew or read) as wel l as
the name of the application the event refers to, event description,
and the date wh en the event was recei ved. For exampl e, if the
event was caused by the IDS service, the Check IDS link
appears in the ref erenc e row th at will lead to the
IDS Log page,
or if the ev ent has occurr ed du e t o inc orrec t mai l s ending or SIP
registration, the correspo
Reference colu mn of th e table. T he admin istrator can view the
detail ed log for each event t h at h as occ u r r ed.
The System Events page offers the following components
:
Current System Time
Quadro.
Mark all as read marks n ew l y occ urred events as “r ead ” .
Disabl e LE D s w itch es off th e fl ashin g LED (if appl ic able) on t he
board. An LED notification may appear (depending on the
notification type given) in the page
Events page when a new
event occurs.
Fig. II-43: System Events list
Quadro2x, 2xi; Quadro4x, 4xi; Quadro16x, 16xi (SW Version 5.3.x) 25
Page 27
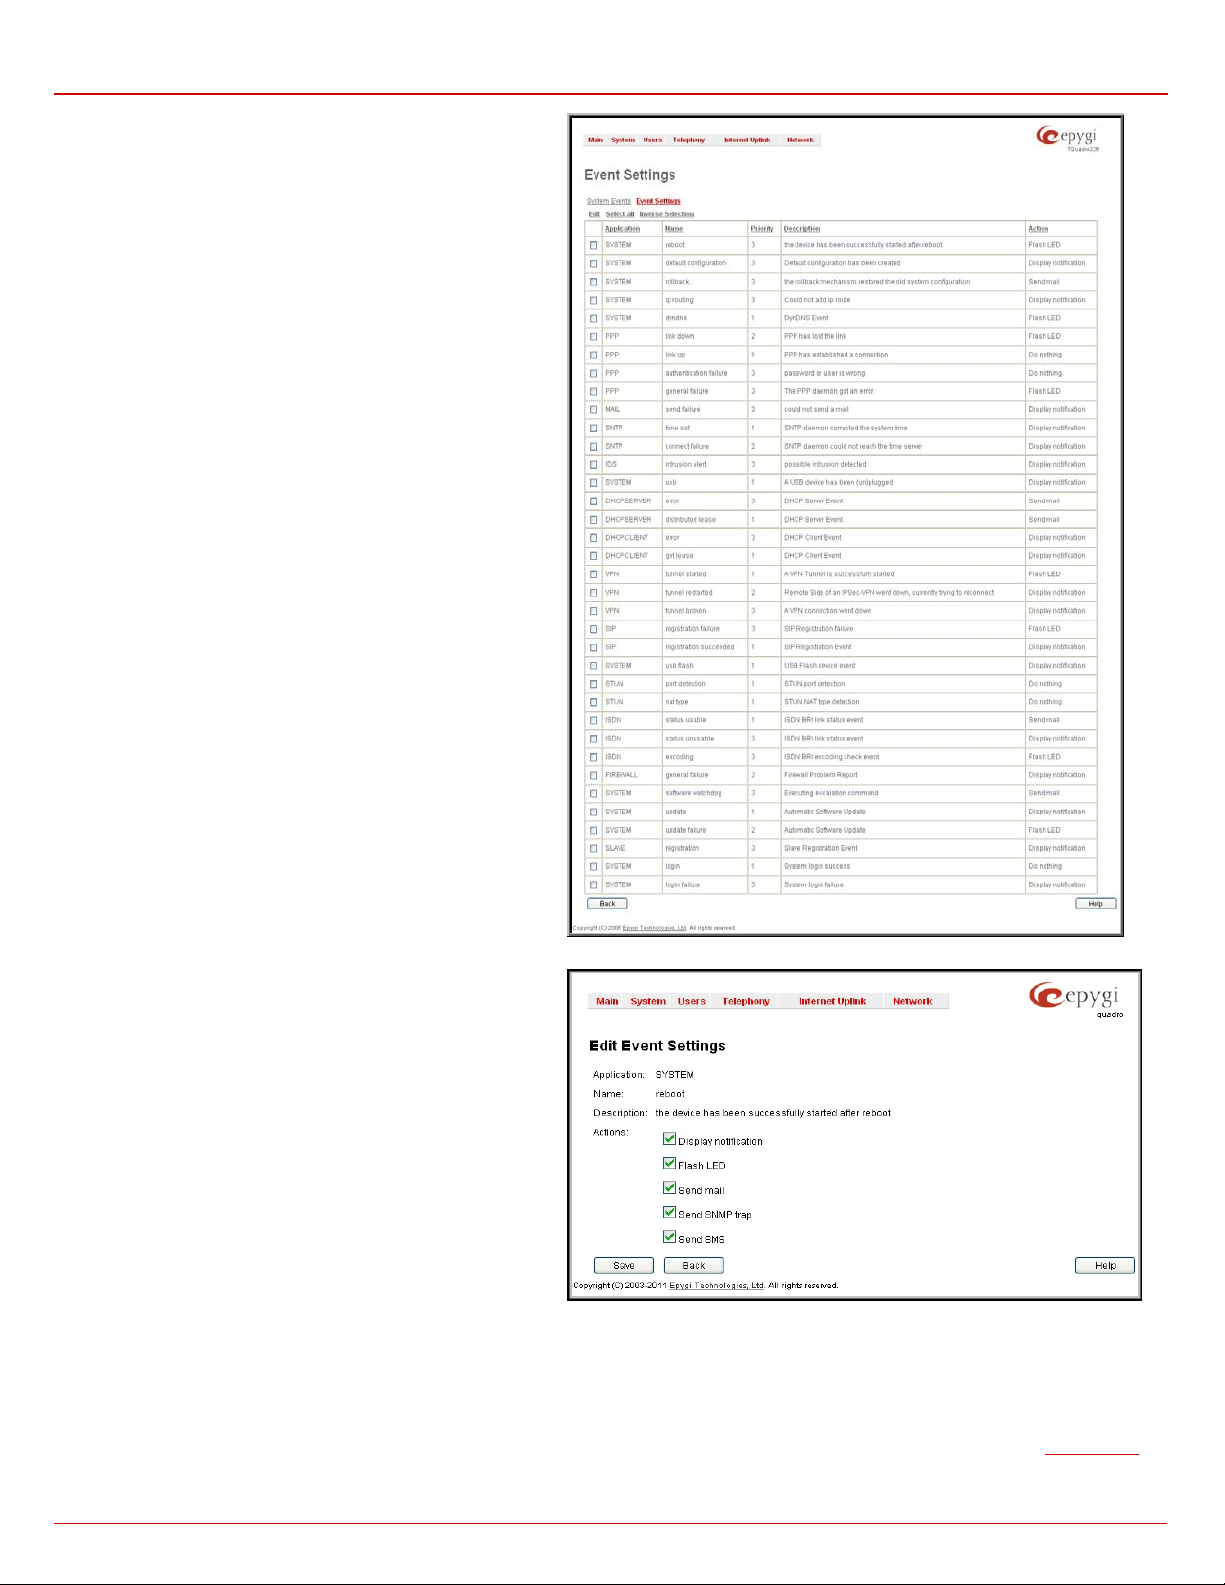
Quadro Manual II: A d min istrator's Guide Administrator’s Me n us
Numerous circumstances may cause a certain application on
Quadr o to flag an event.
The Event Settings page lis ts all p ossi bl e events on the Qu adro
and all ows controll ing notific ation (acti on) when an ev ent takes
place.
Each en try in the events’ table has a ch ec k b ox assign ed t o eac h
row. By selecting the corresponding checkboxes, operations
such as Edit may be done f or on e or m ore events.
Edit opens th e Edit Event Settings page t o modif y the event
action.
Fig. II-44: Event Configuration Settings page
The Edit Event Settings p ag e offers the f oll ow in g in put options:
Application displays the application the event refers to. Multiple
is shown h ere if m ore than one even t has been s elec ted for t he
action ass i g nm en t .
Name displ ays the n ame of the even t. Multiple is shown here if
more than one event has been selected for the action
assignment.
Description displays additional information about the event.
Multiple is shown here if more than one event has been
selected for the action assignment.
Action offers radio bu ttons to c h oose one of th e actions t o n ot ify
the Quadro administrator when an event(s) takes place. The
following actions can be available:
Fig. II-45: Edit Event Settings page
• Display Notific ation - A notification link will be displayed on the bot tom of all pages and a rec ord is added into th e Events table. Th e
notific ation is ex ecut ed as a link “Pl eas e C h ec k you r pendi ng events !” . The link leads to the Sys t em Events p age. T his acti on als o will take
place if Flash LED or Send Mail has been selected, even if not specifically selected.
• Flash LED - Th e second LED ( yellow) will blink ever y second an d a notificati on will be dis played on th e bottom of al l pages. F or some
events the LED will start flashing after a delay.
• Send Mail – an e-mai l notific ation ab out the new event on t he Quadr o will be s ent to t he e-mail address s pecified i n the
Mail Sett ings
page.
Quadro2x, 2xi; Quadro4x, 4xi; Quadro16x, 16xi (SW Version 5.3.x) 26
Page 28
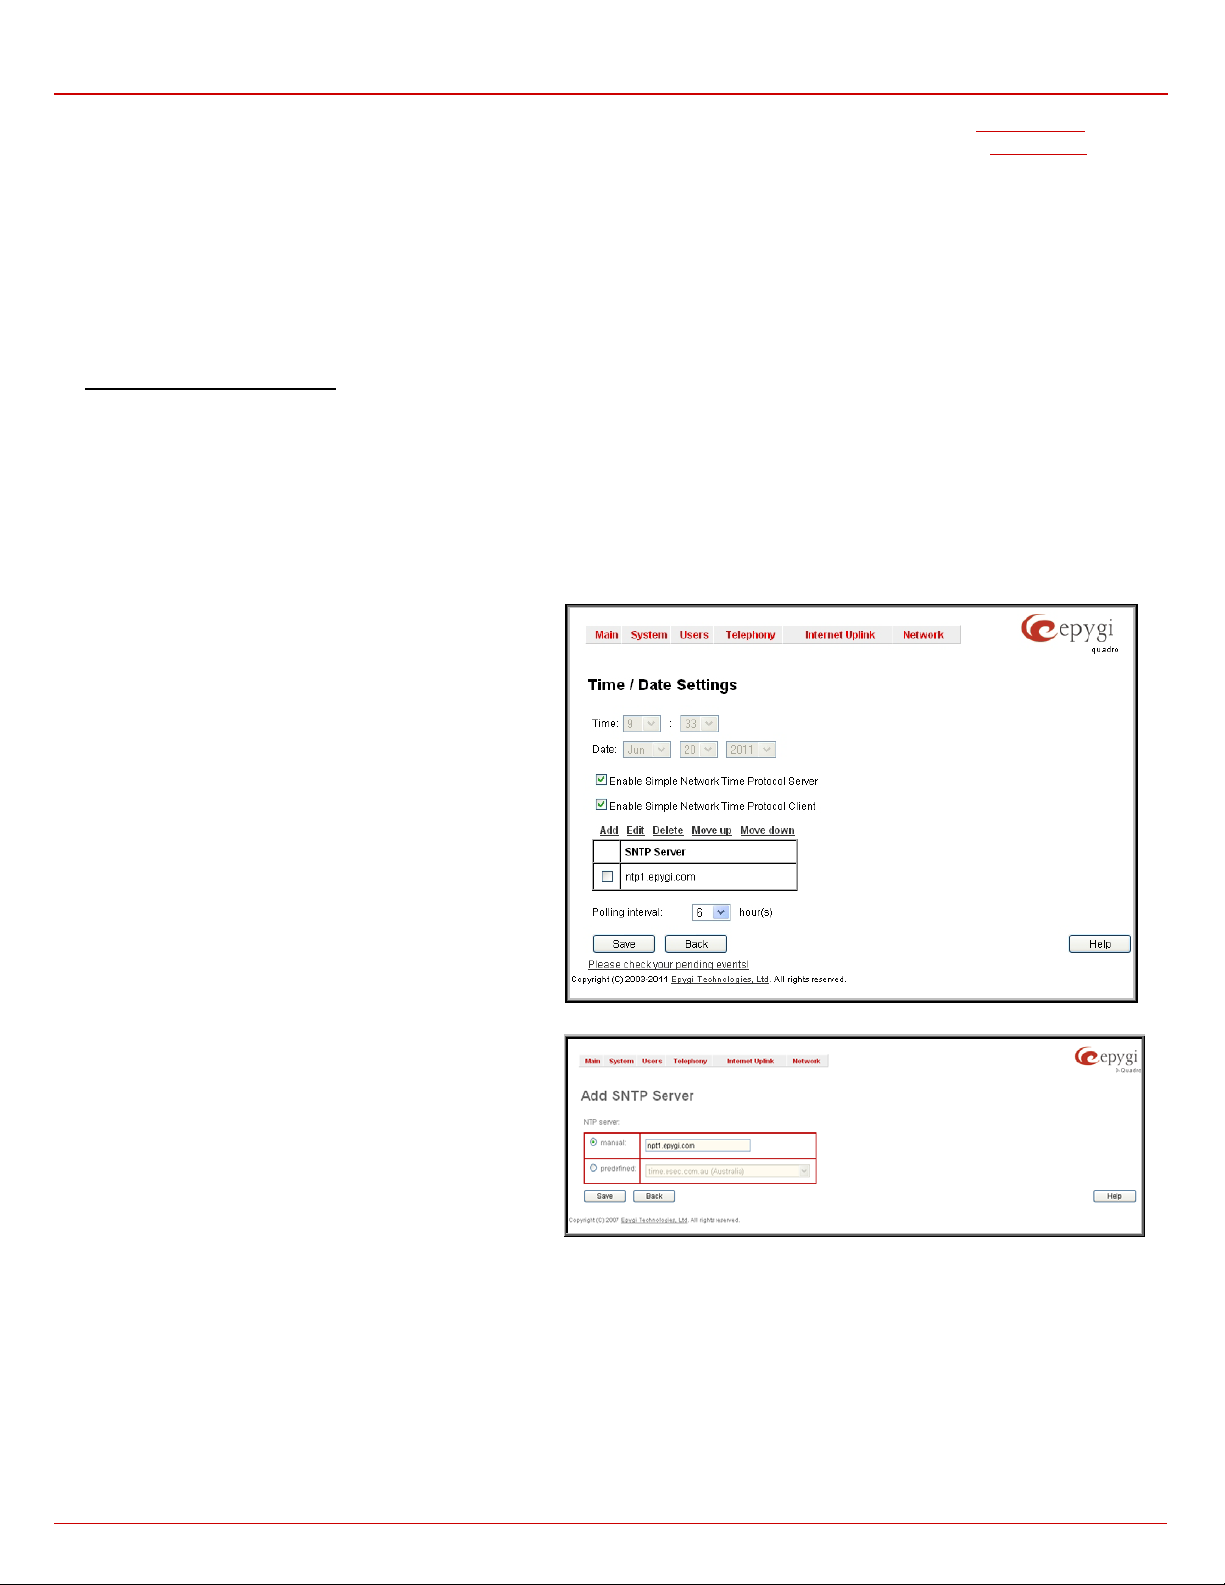
Quadro Manual II: A d min istrator's Guide Administrator’s Me n us
TP server can be defined. This page offers the
•
•
• Send SNMP Trap – an SNMP notification will be sent to the traphost(s) listed in the SNMP Trap Settings table (see SNMP Settings).
• Send SMS – an SM S not ification ab ou t t h e new ev en t on the Quadro wil l be s ent to the mobil e ph one specifi ed in th e
SMS S etti ngs page.
Actions th at are n ot all owed for th e s elect ed event (l ike mail not if ic ation if th e P PP link is dow n or th e mai l s erv er h as b een c onfig ured i mprop er ly)
are hidden . For m ultiple even ts editing, actions that are not appr opr i ate for least on e of the selected ev ent s will also be hid d en.
Please Not e:
In c ase of an IDS (Intr usi on Detecti on Syst em) intrus ion alert, only the firs t possibl e intrus ion in each 10 mi nute per iod will initiate an
event. T his h elps t o avoi d f loodi ng th e Syst em E vents tabl e, and fl oodin g th e us er with var ious intr usi on al erts t hat r esult f rom each p os sibl e Den ial
of Servic e attack. W hen thes e events are displayed i n the System Events tabl e, the user can r ecei ve detailed inf ormation about t he intrusions
through a link to the IDS log list.
If Quadr o cann ot rec eive an IP addr ess fr om the DH CP or P PP ser vers, or can not regis ter an extens ion on the SIP or Rout ing s ervers , or c annot
reach an NTP server, it r aises only one even t for the ent ire period t he action has fail ed, but will c ontinue t o try. When the required action is
successful Quadro raises an appropriate message.
To Assign an Action to the Ev ent
1. Select the checkbox of one or mor e even ts to ass i gn an action to th em.
2. Press the Edit button. The Edit Event Settings p ag e app ear s .
3. Select an ac tion type from the Action radio but t ons to notify the adm inistrator about th e ev ent .
4. Press the Save button to submit the changes or use Back to ab ort the select ed ac ti on.
Time/Date Settings
The Time and Date Settings page provides information about the current system time and date. The settings may be updated through the
international time and date servers.
Time is used to set the local time (hour, minute).
Date is used to set the date (month, day, year).
Enable Simple Network Time Protocol Server enables the
SNTP ( Simple N etwork T ime Pr otocol) s erver on Quadr o, thus
Quadro becomes the timeserver for its LAN.
Enable Simple Network Time Protocol Client enables the
SNTP c li ent on t he Quadr o, thus Quadro b ec omes a cl i ent t o an
extern al timeserver. A c heckbox dis ables D ate and T ime drop
down lists and enables th e following parameter s :
The SNTP Servers table lists all defined NTP Servers.
The Add functional button opens an Add NTP Server page
where a new N
NTP Server radi o buttons that are used to choos e between a
manual and a pr edefined NT P s er ver .
Manual requires the NTP server’s FQDN (Full Qualified
Domain N am e) or its IP addr ess .
Predefined is used to select the NTP server’s host
address from the drop down list, where the most
common NTP servers are listed.
The M ove Up and Mo ve Do wn func tional b uttons are used t o
sort NT P servers i n the ord er they need t o be acc essed. If the
NTP s erver in th e fir st p ositi on of th e SNT P S erv ers tabl e does
not answer, NTP server in the next position will try to be
reached.
Please Not e: You can ad d an other NT P serv er to th e list if th e
defined N TP servers are not funct ional (for example, Qu adro's
date/time is not b ei n g up d ated automat ically).
Polling Interval indicates the time interval for the periodical
synchr onization b etween th e timeser ver and Qu adro. It counts
in hours.
Attention: Time/Date Settings will be reset if Quadro has lost power.
Fig. II-46: Time and Date Settings page
Fig. II-47: Add NTP Server page
Quadro2x, 2xi; Quadro4x, 4xi; Quadro16x, 16xi (SW Version 5.3.x) 27
Page 29
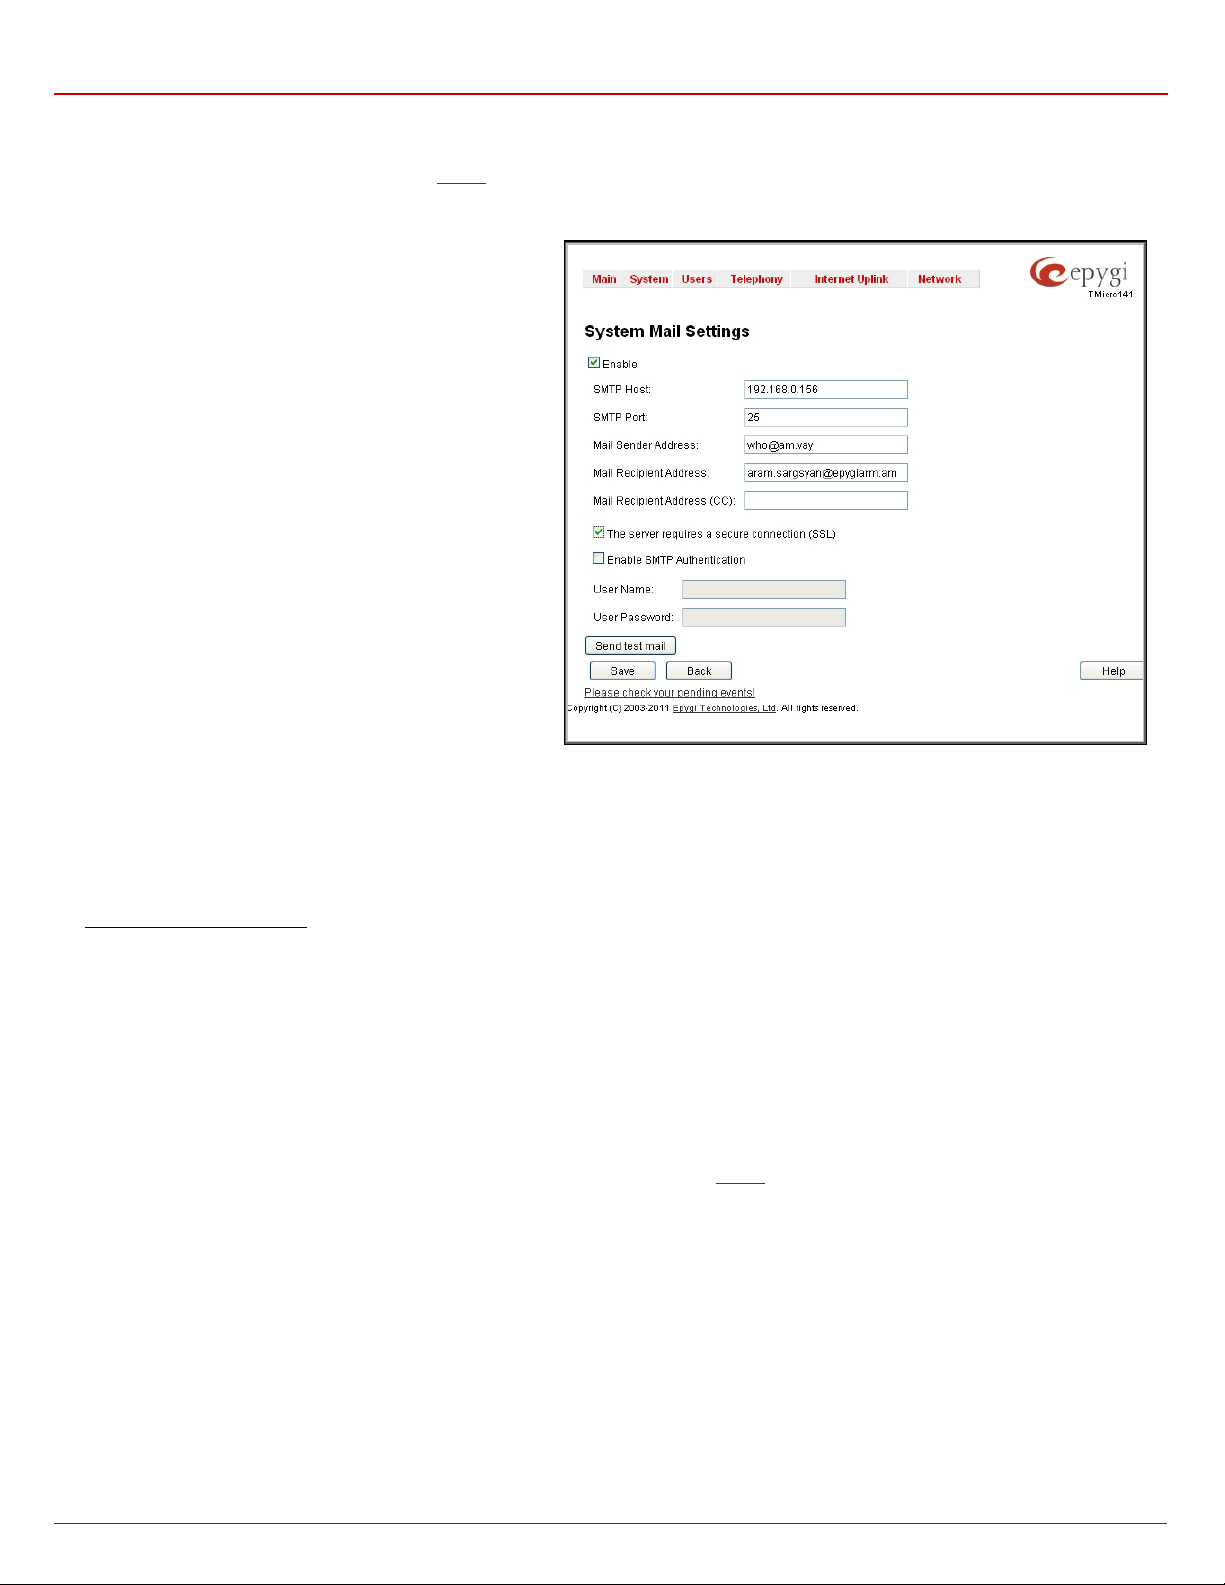
Quadro Manual II: A d min istrator's Guide Administrator’s Me n us
Mail Settings
The Sy stem M ail S et tings p age allows you t o send w arnings au t om at ically ab ou t t h e b oard status or p roblems to the adminis trator. System events
that requ ire emai l notif ic ation ar e selec t ed on the
message transmission to the extension user’s mai li ng ac count.
Enable enables s yst em mai l s endi ng and voice messages transmissi on to the extens i on us er ’s m ail b ox.
SMTP Host requires the SMTP host IP address or domain
name. T he SMTP h ost needs t o be conf igured to enab le voice
messag e tr ans m is s ion.
SMTP Por t requires the SMTP host port number.
Mail Sender Addr ess text f i eld r equir es t he s ourc e ad dr ess f or
the Qu adro not ific ation emails. T he email address defin ed h ere
should be an existing valid e-mail address registered on the
select ed SMTP ser ver or it s hould hav e permiss ion to use th at
particular SMTP server for e-mail transmission.
Mail Recipient Address text field requires an active e-mail
address where system emails will be delivered. The e-mail
recipient here can be a Quadro administrator or someone
responsible for network and system problems.
Mail Recipi ent Address (CC) text field r equi r es an act ive emai l
address wh ere a carb on c op y (CC) of t he s yst em em ails wil l be
delivered.
The server requires a secure connection (SSL) must be
selected if the specified SMTP server requires secure
connection usi ng SSL. If the specif ied SMTP s erver al lows to
use b oth s ecure and unsecure c onnections then this selecti on
forces to establish the secure connection.
Enable SMT P Authentic ation must b e select ed if th e specif ied S MTP s erver requ ires authentic ati on. In this cas e, auth enticati on User Name and
Password configured on the SMTP server should be defined in the corresponding text fields.
Attention: The following symbols are not allowed for the Password field: '$', '(', ')','/', '`', '&', '\', '''.
Send T est Mail is used t o init iate a t est e-m ail tr ansmis sion. T his b utton will b e enab led if c orrect valu es have been submitt ed and saved on th is
page.
To configure the System Mail
1. Enable the system mail sending by the Enable checkbox selection.
2. Update or set the SMTP host in the SMTP Host text field.
3. Update or s et the e-mail sender address in the Mail Sender Address text field.
4. Update or s et the e-mail address in the Mail Recipient Address t ext f ield.
5. Enable SMTP Authenti cati on if it is required on the server.
6. Insert into the corresponding text fields an authentication User Nam e and User Pass w or d defined by yo ur SMTP server.
7. Press the Save button to submit these settings.
8. Use the Send Test Mail button to send a test e-mail with the configured settings.
Events page. System mail must b e en abled an d th e SMTP server n eeds t o b e config ured for voice
Fig. II-48: System Mail Settings page
SMS Settings
The SMS Settings ar e used t o c onfigure the S MS p arameter s th at wil l allow Q uadr o to sen d the voice mai l notific ations or even t notific ations via
SMS to the extens ion us er’s m obil e phone. E very ext ensi on us er can enabl e voic e mail not ific ations wh en a new voice mai l is rec eiv ed and they c an
to define their own mobile numbers from the V oice Mail Sett ings or to set th e cer tain
Quadro to deliver SMS notifications, the SMS service should be enabled and SMS settings should be configured from this page.
Enable SMS Service enables the SMS service on the Quadro.
User Name and Password text fields require the authentication settings of the SMS server.
SMS S ender A ddress r equ ires the source address f or t h e Q u adro notif ication S MS. The add ress defi n ed in this field will be seen in the “From” field
of the SMS delivered to the mobile phone.
SMS Recipient Address requires a destination mobile number for a test SMS.
SMS Gateway manipulation radio buttons allow to select between pre-defined Clickatell SMS gateway and the custom defined SMS gateways.
Events n otification to b e delivered per SMS. Howe ver, for
• Clickatell – this sel ecti on allows t o us e a pr e-def ined S MS gatew ay . S electi on en abl es th e A PI I D t ext fi eld wh ich ind ic ates a C lic atell s p ecific
parameter obtained from the server and should match on both sides.
• Custom – this selection allows to use a custom SMS gateway. Selection requires following parameters to be inserted:
Quadro2x, 2xi; Quadro4x, 4xi; Quadro16x, 16xi (SW Version 5.3.x) 28
Page 30
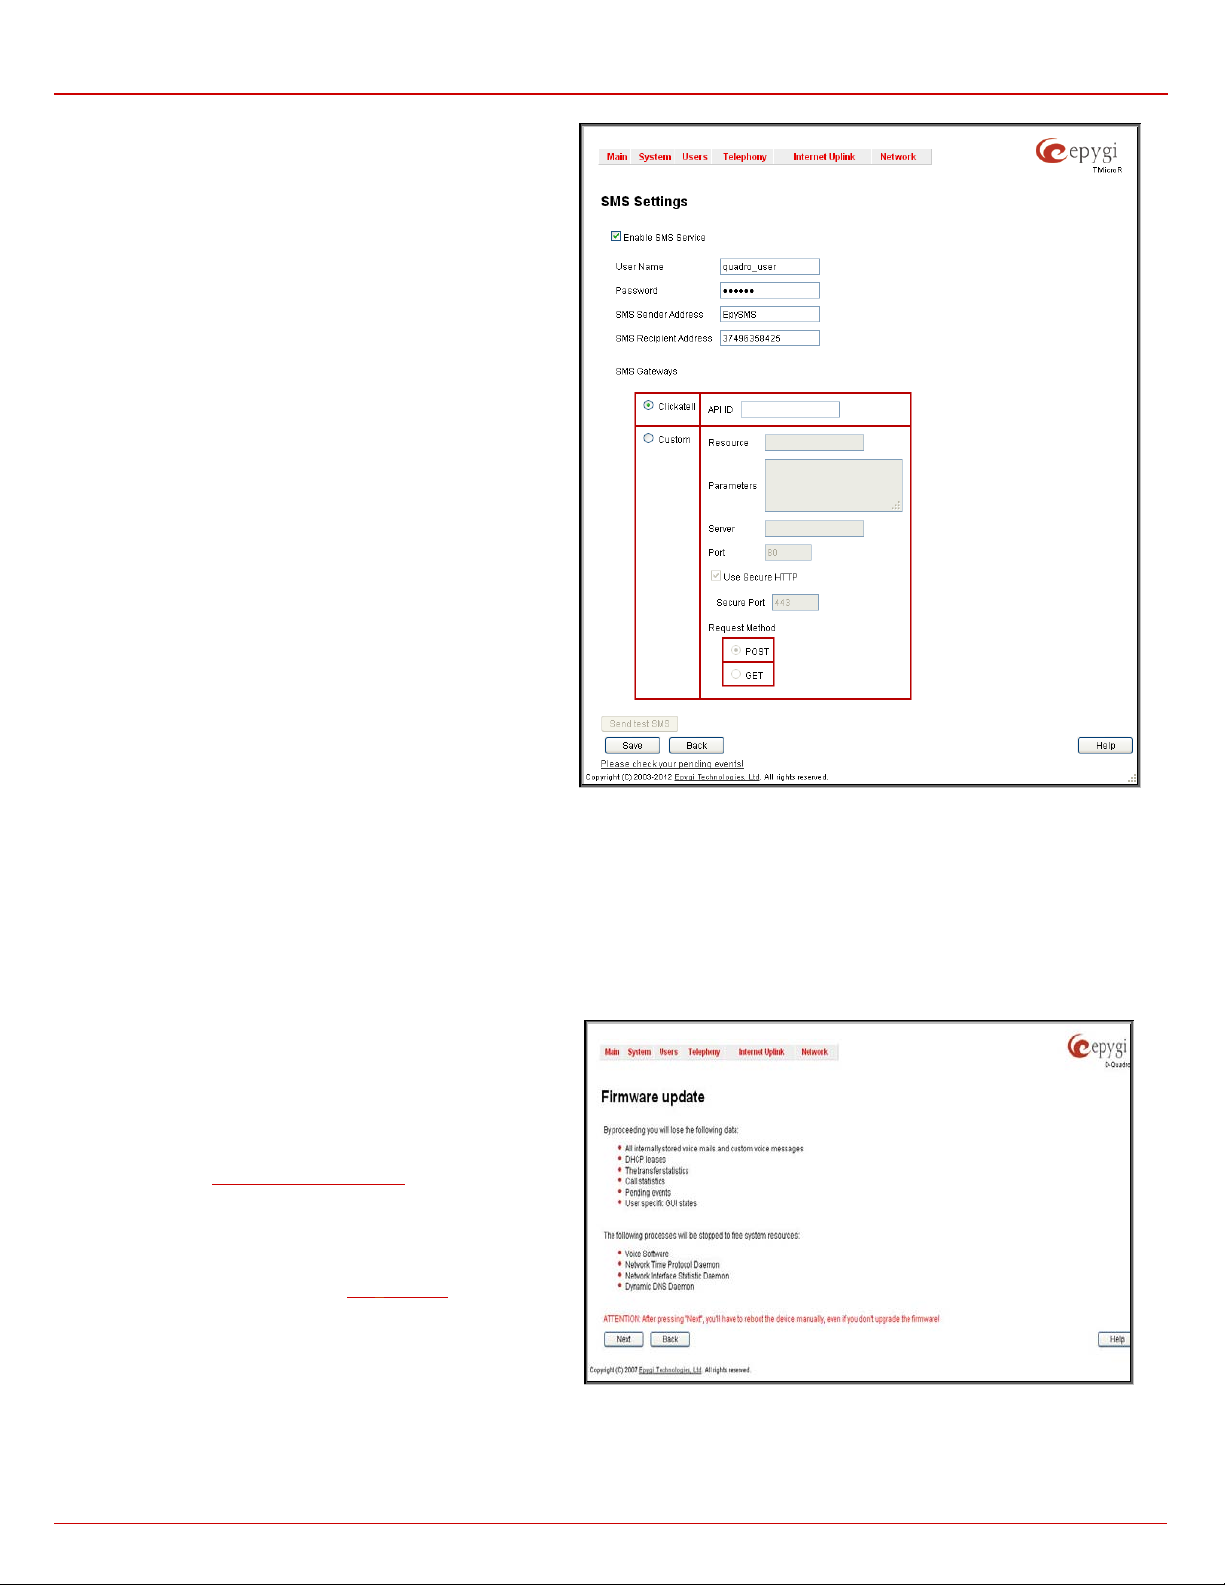
Quadro Manual II: A d min istrator's Guide Administrator’s Me n us
certain field on this page. The value is dependent on the
indicates the password defined in the
indicates the password defined in the field
text field requires the port number of the SMS
select the HTTP request method used by Quadro the
entries in the
o Resource text field requires the HT TP resourc e name
on the SMS gateway, for example: /http/sms.cgi.
o Parameters text field requires the parameters to be
submitt ed to the resou r ce addres s . T he value of t his field
represents a string with tokens (separated by percent
(%) symb ols) insid e. Each tok en indic ates a valu e of the
SMS gateway requirements. For example:
user=%username%&password=%password%&to=%to%
&from=%from%&text=%text%
The tokens are the strings that have the following
dependencies from the field in this page:
%username% – indicates the us ername defined in the
field Username
%password% –
field Password
%to% - indic ates t he pass word defined in th e field SMS
Recipi ent Add ress
%from% -
SMS Sender Address
%text% - indicates the SMS text generated by Quadro
(voic e mail notificati on, event notification , et c .)
o Server text field requires the IP address or the host
name of the SMS gateway.
o Port
gateway.
o Use Secure HTTP checkbox enables access to SMS
server via HTTPS. Checkbox selection enables a
Secure Por t t ext fi eld that r equires t he port n umber f or
HTTPS traffic.
o Request Method manipulation radio buttons allow to
access the SMS gateway: POST or GET.
Fig. II-49: SMS Settings page
Send Test SMS is us ed to s end a t est SMS t o the defined S MS Recipient Address. This but ton will be en abled if correc t values have been
submitt ed and s aved on this pag e.
Firmware Update
This win dow al lows u pdatin g th e softwar e of Q uadro b y instal ling n ew fir mware ( imag e). Us ers regis tered at Ep ygi wil l recei ve a not ic e when new
firmware is available and will be able to download it from the Epygi Technical Support WEB page.
Updating new firmwar e requ ir es a work ing p ow er su pply. Qu adr o is provi ded with a b attery (acc umulat or). If th e batter y is low or simpl y absent th e
“There is no batter y or voltage is low” war ning is displayed.
Please Not e: Inst alling new f irmwar e will tak e about 1 5 minutes.
During this time, Quadro, telephony and Internet access will be
disabled.
The firmware update will cause the loss of the following data:
• All int er nally stored voice mails and custom voi ce messag es
Please N ote: If you do not wish t o los e your voice d ata, have it
download ed from
the Firmware Update.
• DHCP leases
Configurati on M an ag em en t page prior to starting
• Transfer statistics
• Call statistics
Please Note: If you consider the
Call Statistics
displ ayed tabl es to be im portant, it is rec ommend ed to dow nload
them fr om the corresp onding pag e prior to st arti ng the Firm ware
Update.
• All pending events
• User specific GUI states
Fig. II-50: Firmware Update - page 1
The following main processes will be stopped during the firmware update and will be restarted after the installation is completed:
• Voice Software
Quadro2x, 2xi; Quadro4x, 4xi; Quadro16x, 16xi (SW Version 5.3.x) 29
Page 31
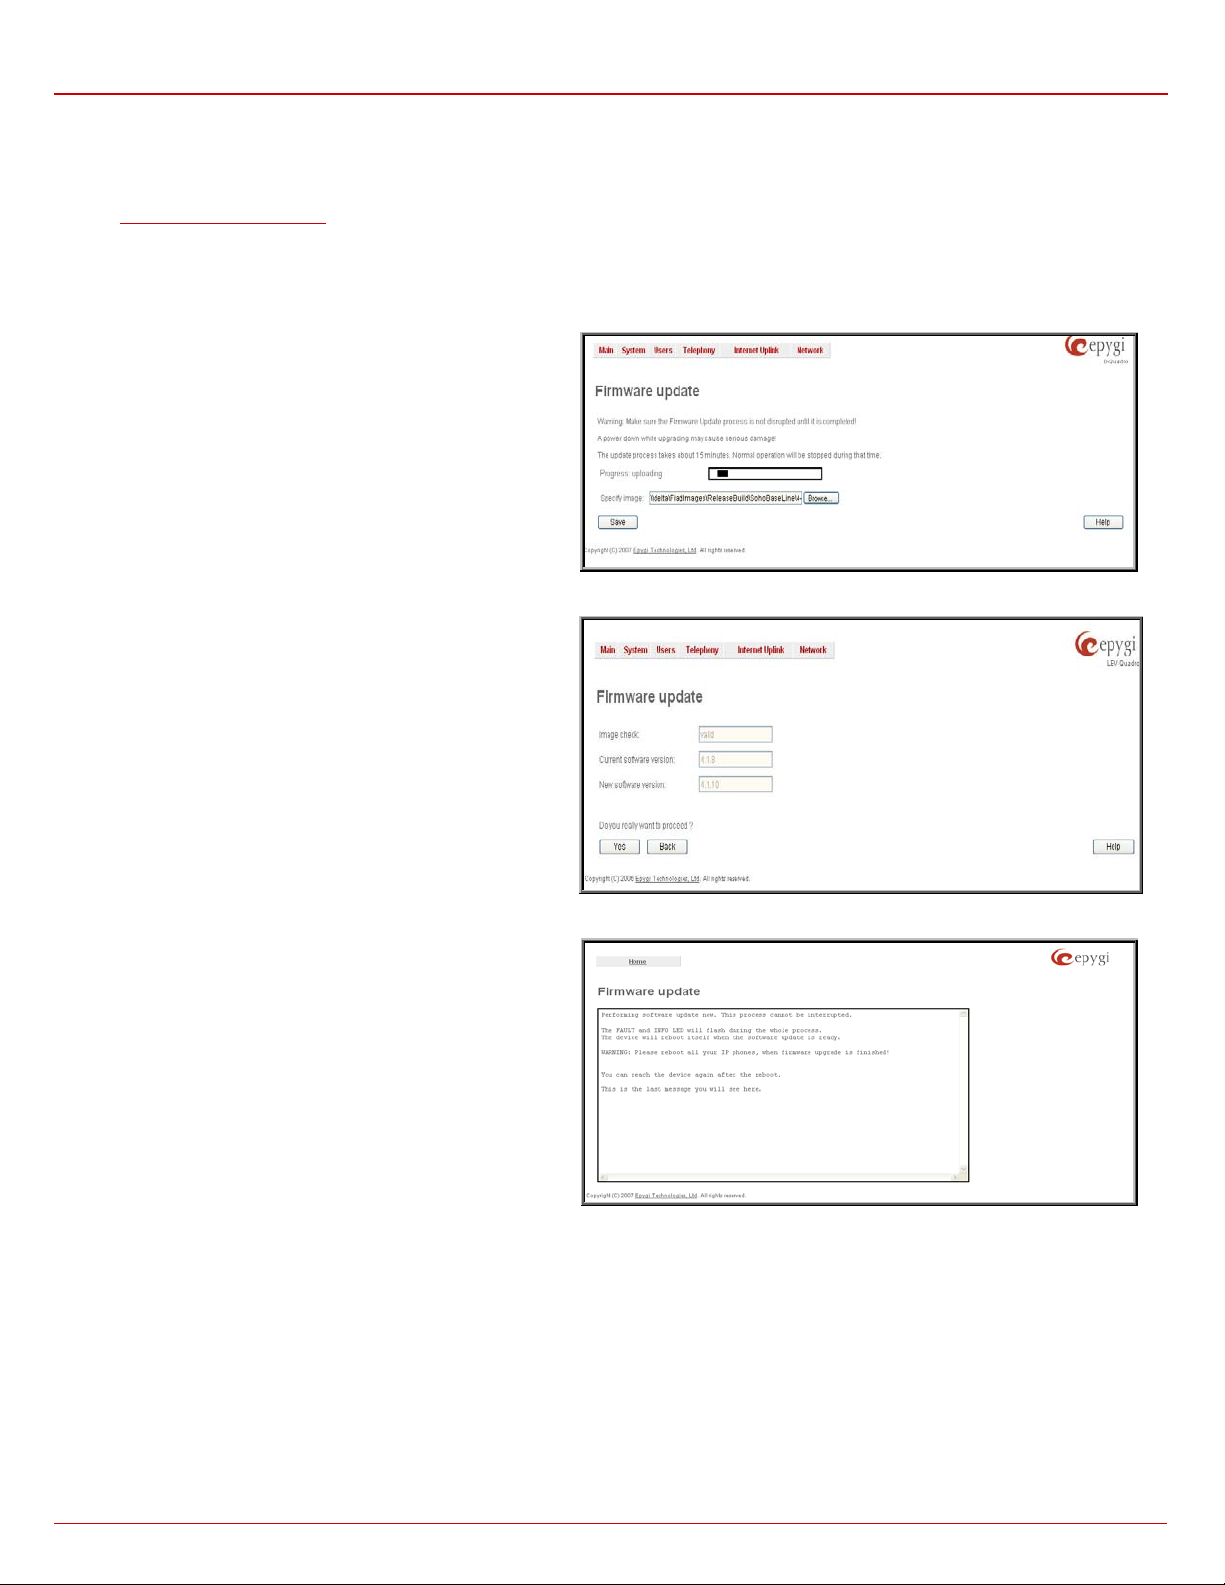
Quadro Manual II: A d min istrator's Guide Administrator’s Me n us
will start uploading the image file to the board and
field shows the old software
l be displayed next. There are no
device is being lost and you need to wait until the firmware will be
After the firmware update, all IP phones attached to the
• Network Time Protocol Daemon
• Network I nt erf ace S tat i sti c Daem o n
• Dynamic DNS Daemon
The Automatic Firmware Update link leads you to the page where the automatic update of the Quadro's firmware (software image) can be
configured.
Next will move you to the second page of Firmware Update where the image file should be selected.
Attention: Pressing the Next butt on wi ll stop some vit al pr oc esses on th e Qu adr o, t h erefore you w ill need to reboot you r d evice manually even if you
have cancelled the firmware update procedure on the following steps.
The sec ond pag e of Firmware update has a Browse butt on us ed
to brows e the im age f ile, and th e Specify Imag e text field that will
display the selected image filename.
Pressing Save
the next page will display results and verification of the image
being burned.
Fig. II-51: Firmware Update - page 2
This page displays non-editable information about the image
validity. The I mage Che ck field will display “invalid” if the image
does not correspond to the hardware version.
The Current Software Version
version. The Ne w Soft ware Ver sion f ield sh ows the new vers ion
of the software image.
This page needs to be confirmed in order to continue image
updatin g. If you are sure th at th e image version is appropri ate for
your device press Save.
Fig. II-52: Firmware Check page
If you have confirmed the firmware version, a new page with
firmware update progress wil
functions available on this page, just information about the
firmw are upd at e proc edur e. At s om e point th e con necti on w ith th e
burned on the Quadr o.
You will not be automatically redirected to the Login page. To
access the Quadr o’s Web GUI, you need to c onn ect Quadr o ag ain
and login.
Attention:
Quadro should be restarted.
Fig. II-53: Firmware Update page
Automatic Firmware Update
The Automatic Fir mware Update page allows you t o configur e an automatic updat e of t he Quadro’s firmwar e (software i mage) as it becomes
avail able on th e serv er. W h en this s ervic e is enabl ed, on t he c onfi gur ed day and t i me Qu adr o wil l aut omat ic ally ch eck f or a new avai labl e f irmw are
on the server and will eit h er n ot if y t h e adm inis t rator or upd ate the firm war e right away, dep en di ng on the config ured sett in gs.
The s erver config uration can be done manually or through th e DHCP s erver. In cas e of DHCP s erver repl ying conf iguration, the corr espond ing
adjustments should be done on the DHCP server to automatically point the Quadro to the destination where the firmware is stored.
Please Note: Independent on th e s el ect ed server type, there shoul d b e an “ auto-update” f old er in t h e r oot directory of the s er ver. Quadr o wi ll c h eck
for any new firmware in that specific folder only. Besides the firmware *.bin file, the “auto-update” folder should contain supplementary file(s) to point
to the correct firmware file.
Quadro2x, 2xi; Quadro4x, 4xi; Quadro16x, 16xi (SW Version 5.3.x) 30
Page 32
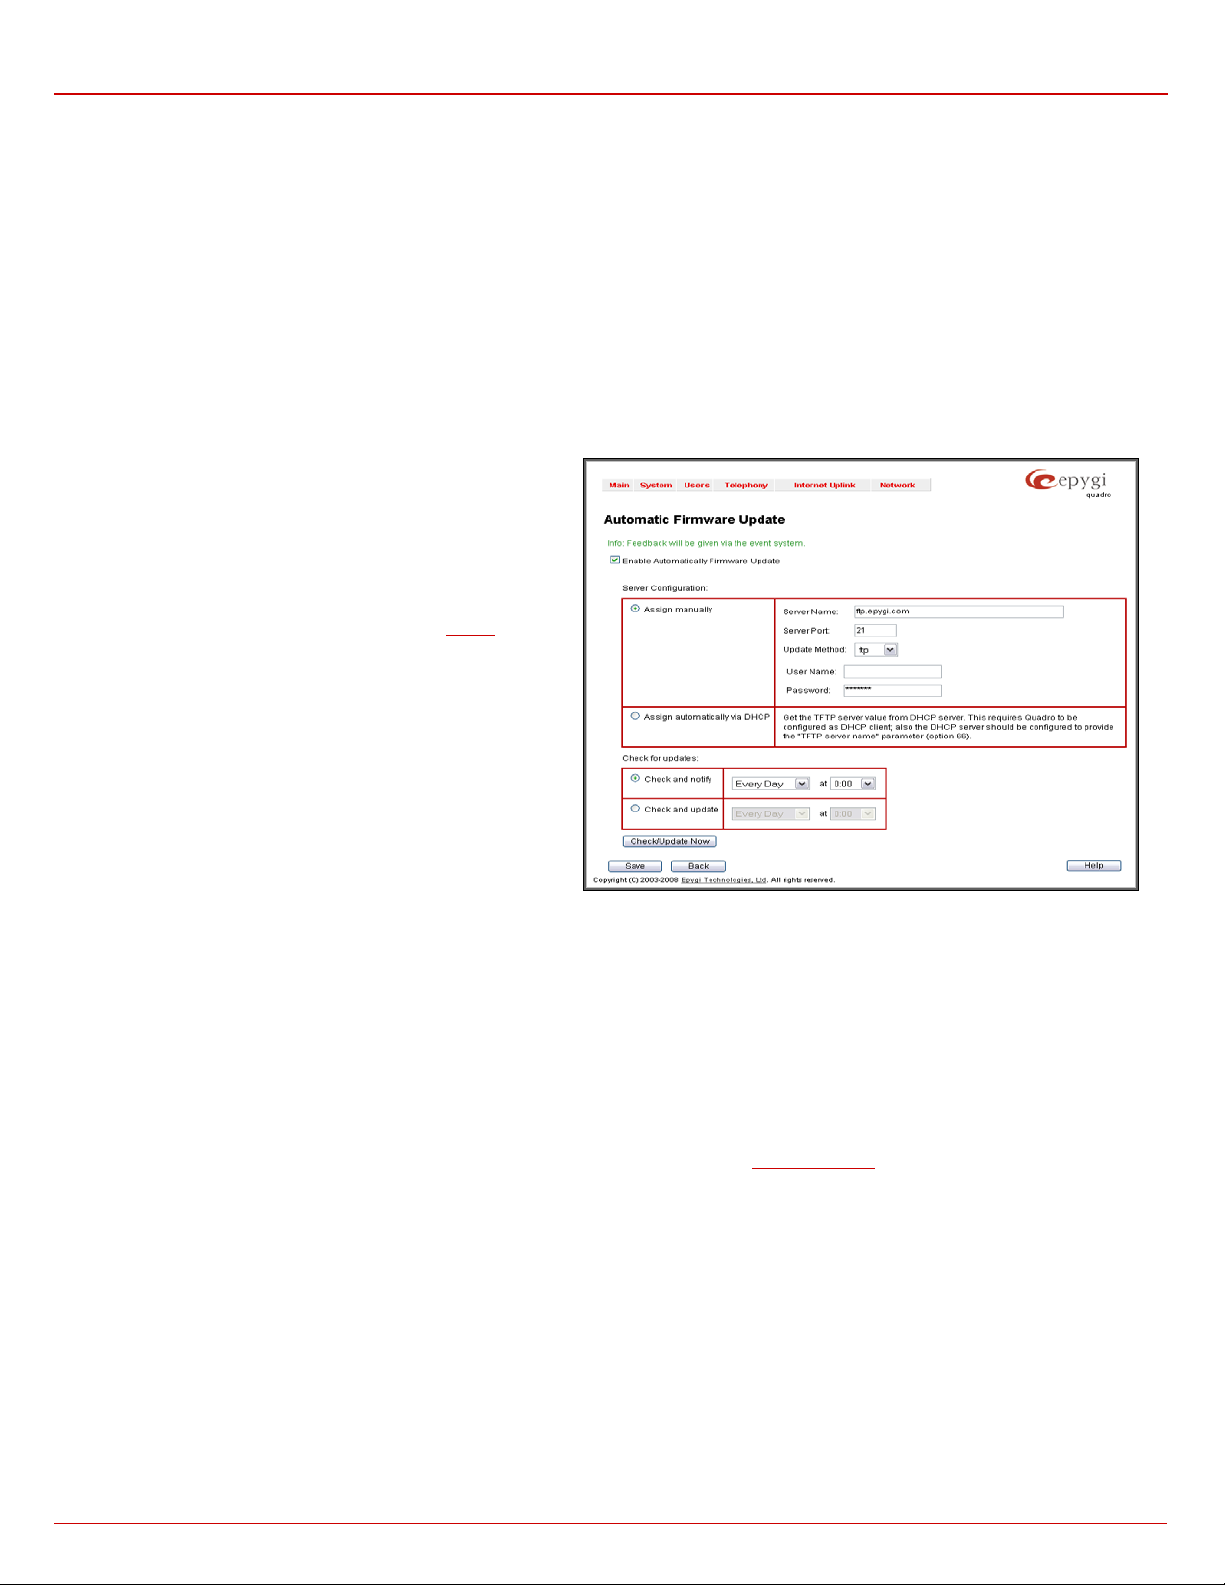
Quadro Manual II: A d min istrator's Guide Administrator’s Me n us
choose this selection to check and
it becomes available on the server. With this selection,
basis, the Quadro will check for a new firmware
The detail ed instr ucti ons on the func ti onali ty of autom atic f irmw are upd ate as well as ser ver conf igur ati on are descr ib ed in the “ A utomati c Fir m w ar e
Update” document which you can find at the Epygi Web support p ortal.
This page consists of the following components:
The Enab l e A utomatic ally F irmware Upd at e checkbox selection enables the automatic firmware update service on the Quadro.
Attention: When the older firmware is installed on the Quadro, the system configuration will be lost and the device will be factory reset.
The first man ipul ation butt ons group on thi s p age al lows you to c hoo se bet ween th e man uall y c onfigur ed f irm ware s er ver and t h e s erv er d ef i n ed b y
the DHCP server.
• Assign manually – this s election is used to manually configur e the firmware server settings. The Server Name (the IP address or
hos tn ame) , th e Server Port and th e Update M ethod should be defined. The Update Metho d drop down list provides a possibility to
choose among T FTP, FTP , HTTP or HTTP S methods . For s ome of th ese select ions, authentic ation Username and Password c an be
entered.
• Assign automatically via DHCP - c hoose this s election if the Quadr o acts as a DHCP cli ent in its W AN interface. In t his case the
firmw are ser ver’s c onfigur ati on wi ll be autom atic ally obt ained f rom th e DHC P s erver. This sel ecti on req uir es previ ous c onf igur ati on on the
firmware server and will work only if the “auto-update” directory is created on the TFTP s erver. The DHCP server should also be
configured to provide the "TFTP server name" parameter (option 66) to the Quadro.
The sec on d m an ip ulation b ut t ons group on t his page all ows you to
select the frequency of checking for a new update.
• Check and notify – choose this selection if you only
wish to b e notif ied abou t the new avail able firmwar e on
the serv er . With this s el ection, on th e indic ated w eek d a y
and time, on daily or weekly basis, the Quadro will
check f or a new fir mware avai lable on t he server. The
way of notification is configured from the
Events page.
• Check and up date –
automat ic ally i nst all t he n ew f irm ware on th e Q uadr o as
on the indic ated weekd ay and time, on daily or weekl y
avail able on the s erver, will au tom aticall y downl oad and
install it on the Quadro.
The Che ck/ Updat e No w but t on is used to manually in itiate Check
and notify or Check and update actions. The action to be
executed depends on the radio button selected above.
Fig. II-54: Upload Configuration page
Network i ng Tools
The Networking Tools page provides the possibility to check the Internet connection.
Ping sen ds four IC MP (Inter net Con trol M essage Prot ocol) r equest s with a def ault si ze of 64 b ytes to th e destin ation (IP address or h ost n ame )
specif i ed in t he text field Ping Target. The response tim es ar e l ogg e d, and t h e r ou nd t r ip time (the t i m e required from being sent unti l b eing recei ved
again) is m eas u red. Th e mi ni mu m an d m aximum r ou nd t r ip time an d its average as w ell as the perc entage of l ost and of r ec eiv ed fram es results are
displ ayed in th e low er area of th e pag e.
Traceroute c hec ks th e In ter net conn ection by trig gering the r outers ( hops) that are p assed to reac h the desti nation specif ied in the Traceroute
Target text fi eld. Tr ace routing gi ves feedb ack on the r outers pass ed by packets on the way t oward the d estination and the rou nd trip del ay of
packets to these routers.
Attention: No Traceroute is possibl e if a hi g h pri or it y Firewall h as b een en abled (see c h apter
For th e purpose of t r ac eroutin g, several I P packets are sent out. U DP (Us er D atagram Protocol) is used to s end pack ets and ICMP (In ternet Con t r ol
Messag e P rotocol) is used to r ec eive inf ormation ab out the routers. In th eir headers , t h e TTL (Tim e T o Li ve) v al u e increases from 1 to 30. When the
first IP frame is received by the first router, its IP address will be returned in its acknowledgement.
Firewall and NAT).
Quadro2x, 2xi; Quadro4x, 4xi; Quadro16x, 16xi (SW Version 5.3.x) 31
Page 33
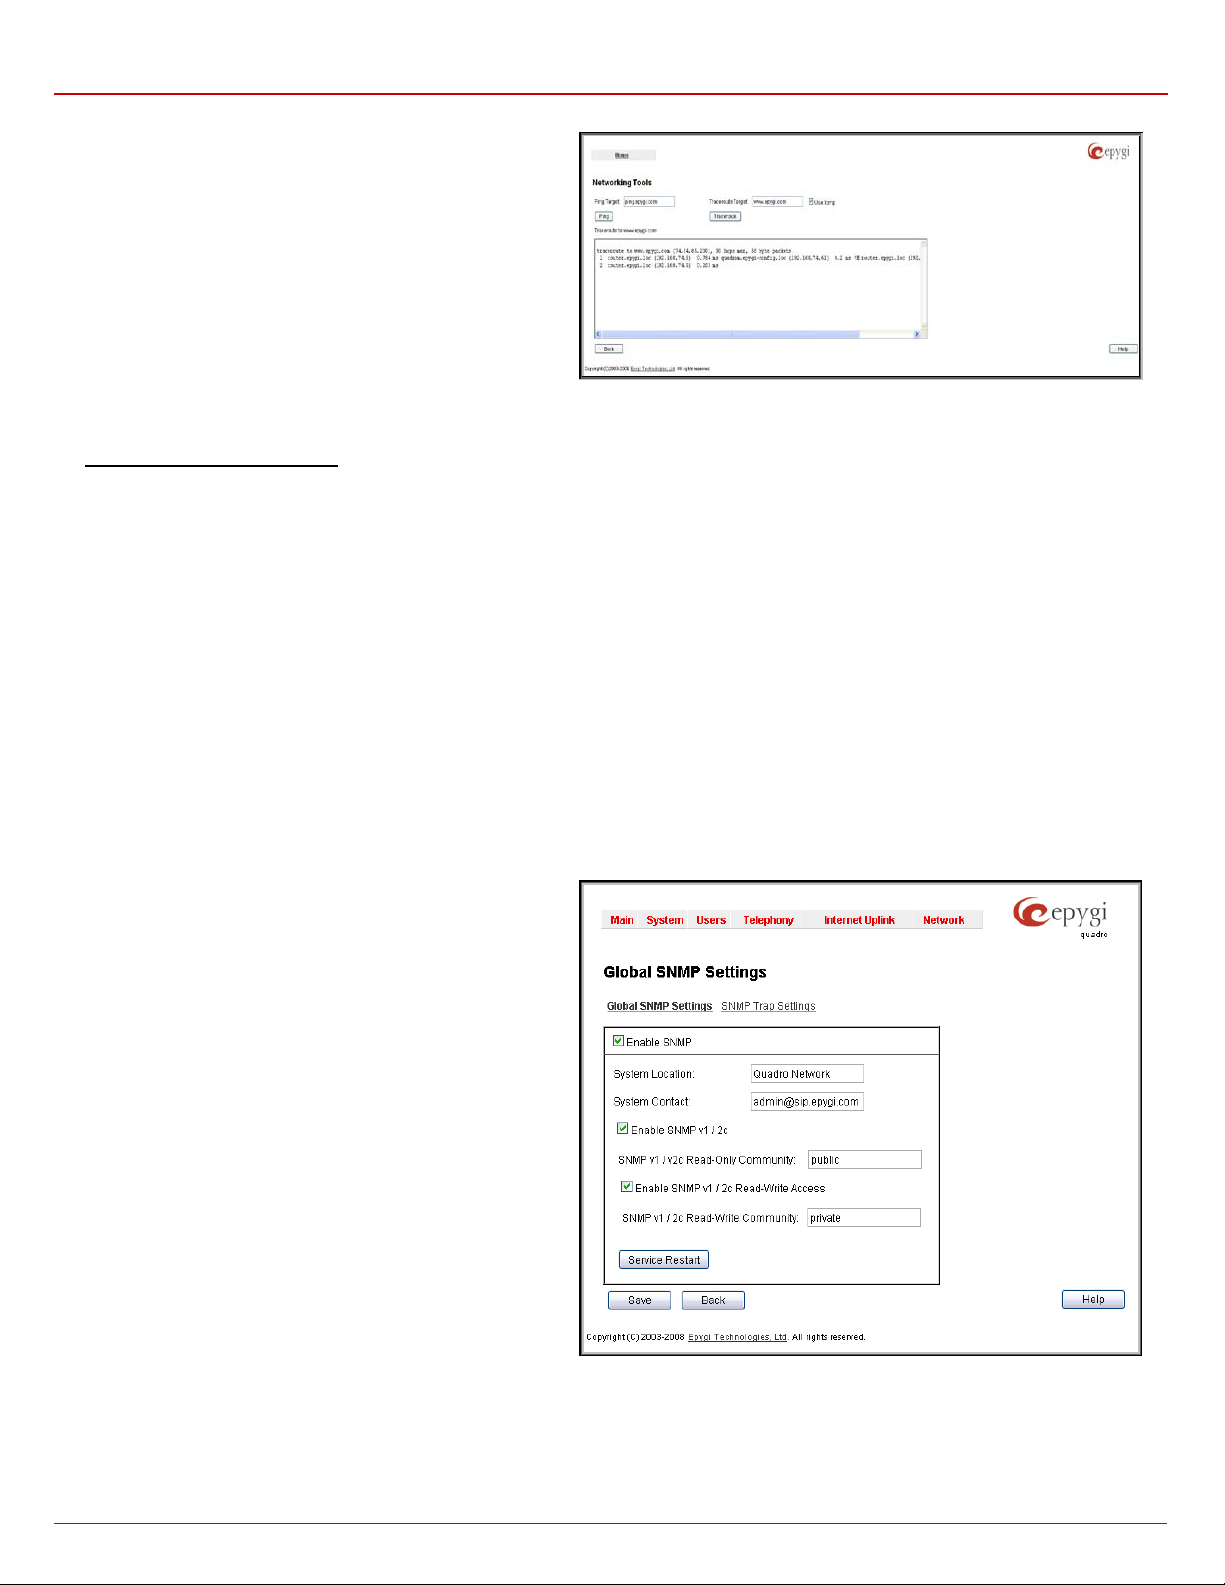
Quadro Manual II: A d min istrator's Guide Administrator’s Me n us
The second fr ame d elivers the IP addr ess of the s econd rout er
and s o on and s o forth. T he result s of Traceroute are d isplayed
on the lower area of the page.
Ping Target requires the destination (IP address or h ost nam e ) for
the ping request. If Use ICMP checkbox is selected, an ICMP
request will be send to the ping destination (MS Windows
stand ard). Other wise, if c heckbox is not select ed, a UDP r equest
will be send (Linux standard).
The Ping button starts pinging the specified ping target.
Traceroute Target is us ed to enter the I P address or hos t name
of the destination to be trace routed.
The Traceroute but ton is us ed t o proc ess th e rout er trig gerin g to
check the Internet connection.
Fig. II-55: Networking Tools page
In the field below these, the output of the Ping or Traceroute procedure is shown.
To Check the Internet connection
1. Specify the destination address for the ICMP request in the Ping Target text field.
2. Press the Ping button to process the ICMP request.
3. Spec ify the de s tination address to trace the route.
4. Press the Traceroute button to process the router triggering.
SNMP Settings
The Simple Network Management Protocol (SNMP) is an application layer protocol that facilitates the exchange of management information
between n etwor k devices an d is used b y networ k admin istrat ors to man age netw ork perf ormance, f ind and s olve netw ork probl ems, and pl an for
network growth.
On Quadro, SNMP agent is running to allow administrators to remotely manage Quadro’s network and the device’s configuration. Remote
administration is being performed b y means of special SNMP monitoring prog rams (SNMP Manager), which c an automaticall y feedback by th e
certainly configured actions on some events on the Quadro or remotely modify Quadro’s settings.
SNMP Settings page is divided into two pages: Global SNMP Settings and SNMP Trap Settings.
Global SNM P Setting s are us ed to enable t he SNMP ag ent on the Qu adro, to select the SN MP protocol version for c ommunicatio n with the
adminis tr at i ng app lication an d to define the c om mu nity for administrat in g ap plication to connect the Quadro.
Enable SNMP check b ox is us ed to en able SNMP ag ent on the Quad ro.
System Location t ext field requires option al informati on to d esc r i b e the network where SNMP m anagement is p erformed.
System Contact text fi eld req uires optional inf ormation abou t the
contact person responsible for the SNMP management in the
defined network. Field may indicate the point person’s name,
email ad dr ess , phone numb er or oth er c ont ac t informati on.
Enable SNMP v1 / 2c ch eckbox is us ed to enabl e SNMP v1/2c
protocol version for the messaging between Quadro’s SNMP
agent and the administrating applic ation. If this checkbox is not
selected, SNMP v1 will be implied.
SNMP v1 / v 2c Re ad-On ly Comm unity text fi eld is us ed t o ins ert
the community description (public, privat e, etc.) f or the read-only
management (like gathering information (events, statistics, etc.)
about Q uadro’s ). Fiel d may c ontain s ome kind of pass word wh ich
should be matching both on Quadro and on the administrating
application for successful SNMP management.
Enable S NM P v1 / 2c Re ad-Writ e Access checkbox additionally
enables a read-write access on the Quadro for the SNMP
monitor ing applic ation . Wit h this ch eckbox enab led, administr ator
will be able to remotely configure the Quadro via SNMP
administrating program.
SNMP v1 / v 2c Read-Writ e Co mm uni t y text field is used to insert
the com munity des cription ( public, pr ivate, etc.) for the r ead-write
management (like gathering information (events, statistics, etc.)
about Quadro’s and remotely changing Quadro’s configuration).
Field may contain some kind of password which should be
matchi ng both on Quadr o and on th e ad minis trat ing ap plic ati on for
successful SNMP management.
Fig. II-56: Global SNMP Settings page
The Service Restart button restarts the SNMP sub-system on the Quadro. Restarting the SNMP sub-system is recommended if it does not respond
to a SNMP manager's requests.
Quadro2x, 2xi; Quadro4x, 4xi; Quadro16x, 16xi (SW Version 5.3.x) 32
Page 34
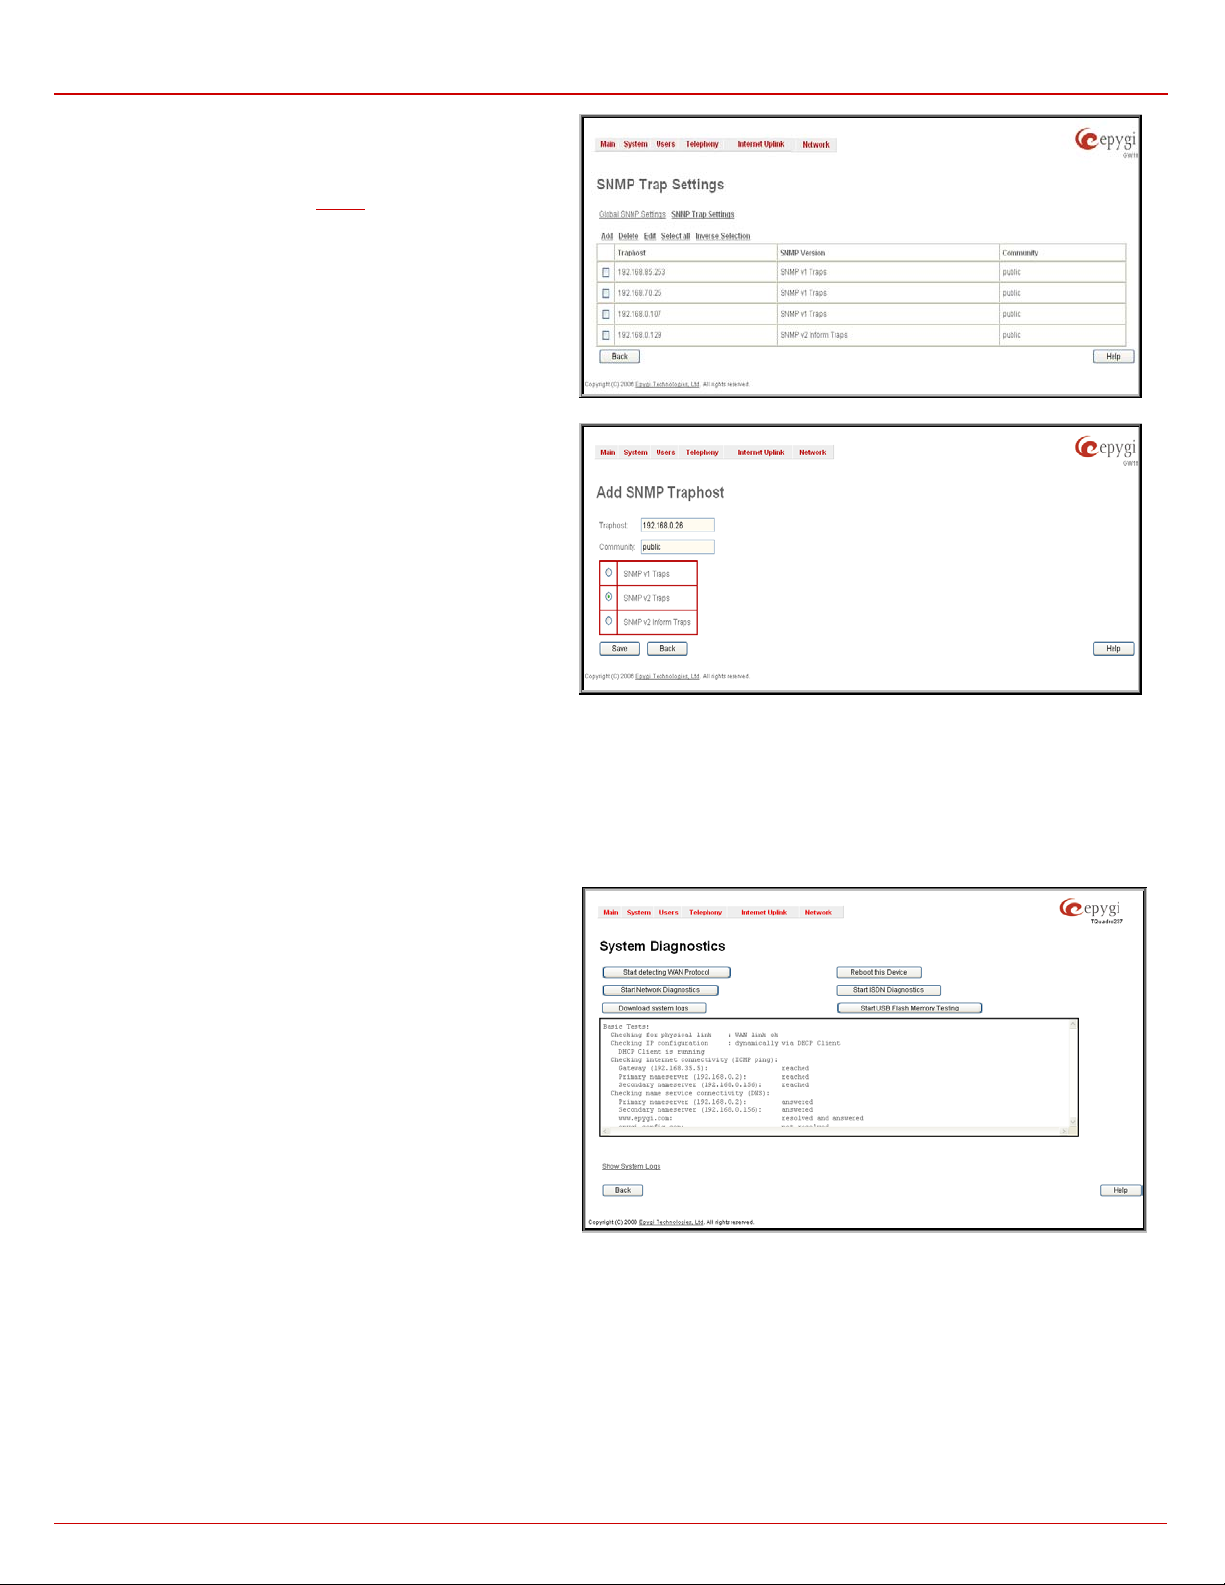
Quadro Manual II: A d min istrator's Guide Administrator’s Me n us
traphost. Administrating application’s host address should be
the Epygi Technical Support Office to determine the problem that
the Quadro will be closed, i.e.,
the Quadro GUI should be newly opened and a new login will be
For Quadro 2x/4x/16x models, the Start FXO Diagnostics button
runs FXO diagnos tic tests to determine the optimal value f or the
SNMP Trap Settings are us ed to d efi ne th e tr aphos ts th at sh oul d
be informed when c ertain events occur on the Quadro. For the
listed t raphosts to be inf ormed abou t the events on th e Qu adro,
Send SNMP Trap action should be configured for the
corresponding event(s) from the
Events page.
SNMP Trap Settings page contains a list of all configured
traphosts with the referring information.
Fig. II-57: SNMP Trap Settings page
Add f unction al button is used to add a n ew traphost to th e table
and opens Add SNMP Traphost page where the new traphost
might be defined. Page consists of the following components:
Traphost text f i eld requires an IP address or the host n am e of the
inserted here.
Community text field requires community description (public,
private, etc.) for the administrating application to accept the
notific ations about the certain events on the Quadro. Field may
contain some kin d of p assword w hich shou ld be th e same bot h on
Quadr o and on the admin is trating app lication for succ essful SNMP
management.
A group of radio buttons is used to select the SNMP protocol
version used for even ts notific ations deliver ed by the Quadr o to
the admin is trating applicati on.
Fig. II-58:Add SNMP Traphost page
Diagnostics
The System Diagnostic page gi ves a possi bilit y of r unni ng N etwor k and W A N prot ocol di agn ostic s t o verif y Qu adro's con necti vit y an d to d ownl oad
all system logs for possible problems recovery.
The St art Detecting WAN Protoc ol b utton is used t o initiat e W AN diagn ostics th at will d etec t the W AN IP c onfigur ations: s tatic or thro ugh DHCP
and PPP s erv ers. For s tat ic W AN IP conf igur ati on, g atew ay a vail abil ity is ch ecked . W hen acting as a clien t, DH CP and PP P s erv ers' accessibilities
are being verified.
The S tart Net work Diagno stics butt on is us ed to ini tiate n etwork
diagnostics, i.e., to check the WAN link and IP configuration, to
verify gateway, DNS primary and secondary (if configured) servers'
accessibilities.
The Do wnl o ad sy stem log s button is used to dow nl o ad all l ogs t o
the local P C as a *. t ar arc hi ve file. Th es e logs c an th en b e used by
has occur r ed on your Quadr o.
The Reboot this Device button is used to reboot the Quadro.
Pl ease not e th at th e ses sio n wit h
requir ed aft er w ards .
FXO coun try specific regional s etting (CSRS) appropriat e to your
PSTN provider. Once the FXO diagnostic is complete, the
recomm ended valu e shoul d be s et man uall y on t he fxoc fg hid den
cgi. Setting this value may resolve echo or poor audio quality
issues on FXO lines.
Fig. II-59: System Diagnostic page
For Qu adro 2xi/ 4xi/16xi models , the Start IS DN Diagnostics bu tton is used t o initiat e ISDN BR I low l evel diagn ostic. W ith thes e test s the ISDN
physical link is checked and the Frame Synchronization is verified.
The Start US B Flash Memor y Test ing button is used to test the USB flash memory attached to the Quadro. The system will check whether the
attach ed U SB f l ash m em ory is supp orted by the Q u adro or not as we ll as will perform th e el em entary pr oc ed ures (like m ounting and d ata formatt in g)
on the USB flash memory.
If you us e a USB f lash mem or y not s upp ort ed by th e Qu adro, the s ys tem will i nf orm you ab out t hat and you may s till c onti n ue using that USB flash
memor y at you r ow n r is k. Th e list of U SB flash memories supported and tested with the Quadro is posted on the Epygi’s Web download portal.
Attention: During the USB flash memory testing, all the data stored on it will be deleted.
Quadro2x, 2xi; Quadro4x, 4xi; Quadro16x, 16xi (SW Version 5.3.x) 33
Page 35
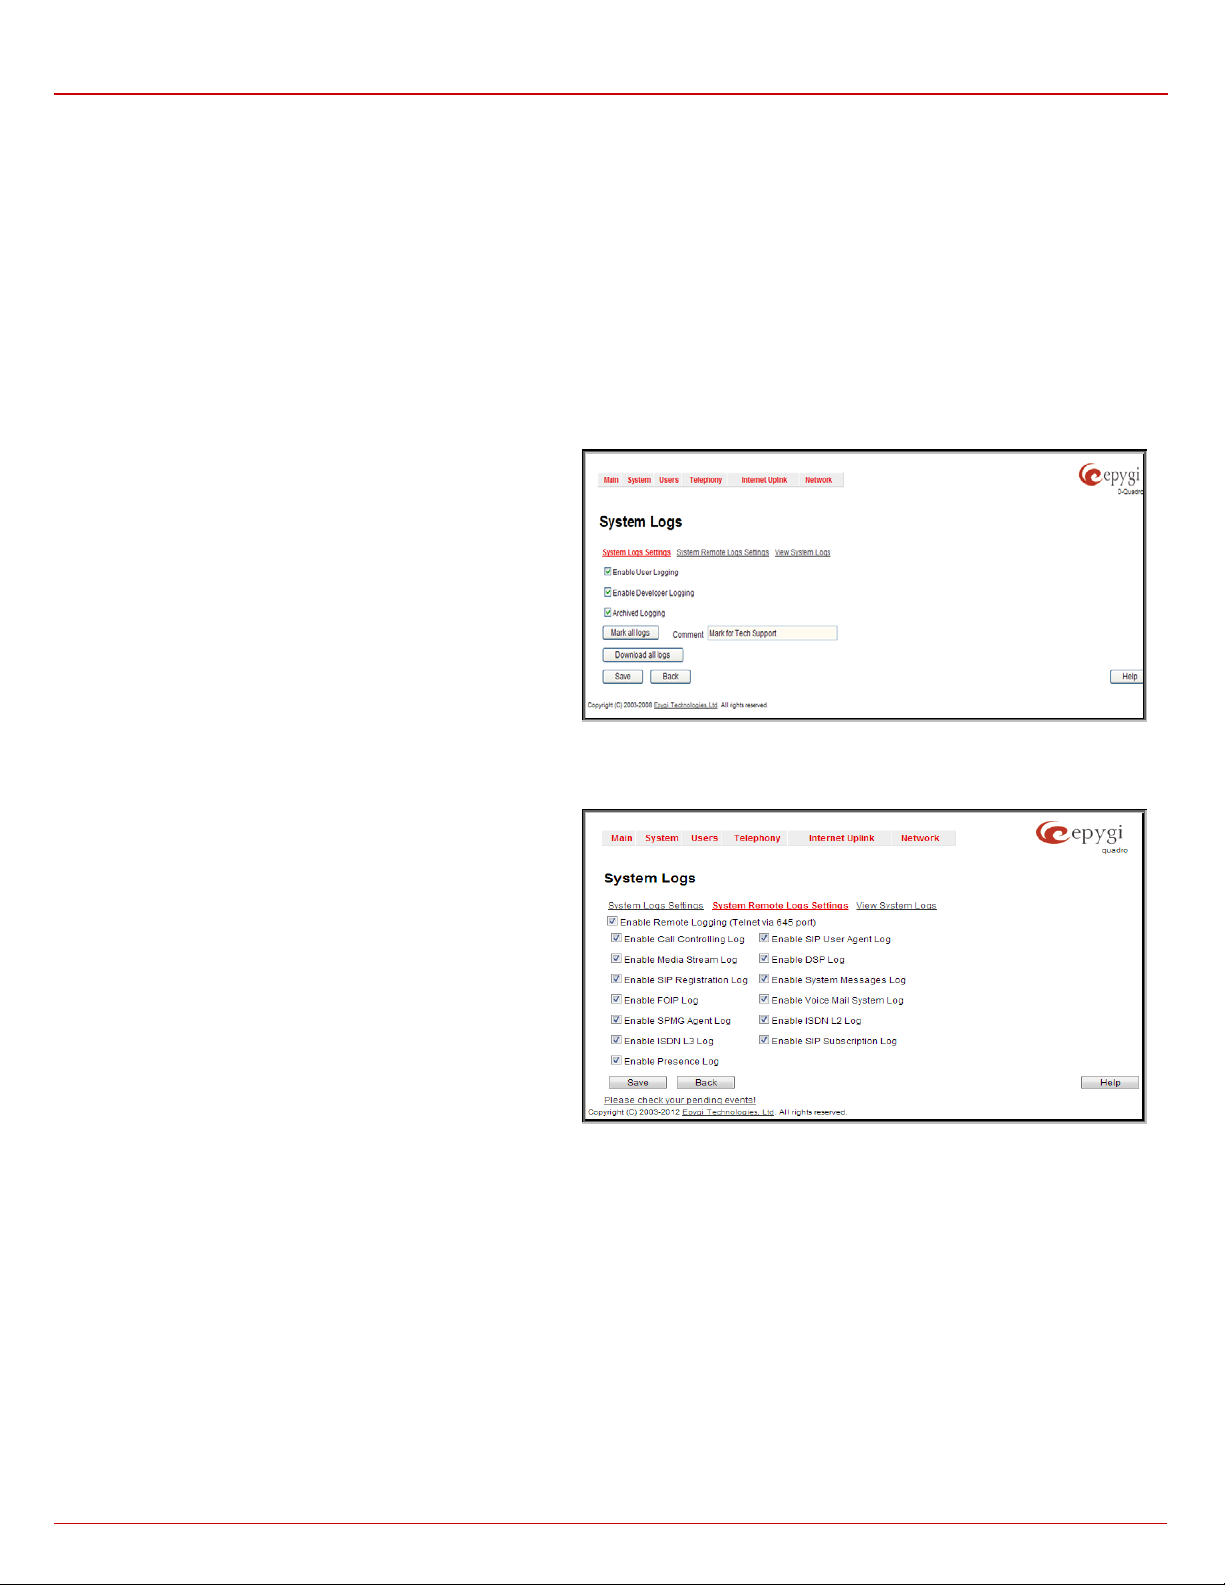
Quadro Manual II: A d min istrator's Guide Administrator’s Me n us
The fi eld b elow wil l dis pla y th e diag n ostic s r esults and th e c onnec tiv it y condit i ons. T he s yst em s houl d be r ec onfi gur ed if pr obl ems occur durin g t he
diagnostics.
Show System Logs link leads to the page where Quadro’s logs might be viewed, downloaded and the logging setting may be adjusted.
System Logs
The System L ogs page is accessible by pressing the Show System Lo gs link on t h e Diagnostics page. This p age is us ed t o adjust where syst e m
logging s ettings, view s yst em logs direc tly in your browser or download them loc al ly to your PC.
The System Logs page consists of three sub-pages.
The System Logs Settings page is used to adjust the system logging settings and contains the following components.
The Enable User Logging checkbox is used to enable user level logging. This logging contains brief information about events on the Quadro.
The E nable Deve loper Loggin g checkb ox is us ed to enabl e devel oper hi gh level l ogging . This logging c ontains det ailed inf ormati on about events
on the Quadro.
The Archived Loggi ng checkb ox is used to keep more logs on
the Qu adro. T his opti on all ows to c ollect more s ystem i nfor mation
in the log files and to keep them longer.
Attention: This option requires quite sufficient resources on the
Quadro. It is recommended to use this option in urgent cases only.
The Mark all Logs button is used to set a line marker in th e logs. If
you need t o follow a certain p iece of log, pus h this butt on to s et a
starting m ark in all l ogs and then p erform th e needed ac tions ov er
the Qu adro. W hen the acti ons ar e don e, p ush th is b utton agai n to
set an ending mark in all logs. This way you sh all clearly see a
piece of log between the staring and ending marks generated
during t he cert ain acti ons tak en over the Qu adro. Th e Comment
text field is used to insert some text information which will be
displayed next to the marks inserted in the logs. This comment
may desc rib e the pr oblem captur ed in t he f ollowi ng logs and may
be useful for the Technical Support.
The Download all Logs butt on is used t o download all logs to the local PC as a *.tar archive file. Thes e logs can then be used by the Epygi
Technical Support Office to determine the problem that has occurred on your Quadro.
Fig. II-60: System Logs - System Logs Settings page
The System Remot e Logs Settings p age is used to adj ust the
system logging settings and contains the following components.
The Enable Rem ote Lo gging chec kb ox is us ed to en able r emot e
monitor ing of Quadr o’s l ogs. W hen this opti on is s elect ed, rem ote
administrators may connect Quadro with Telnet protocol (port
number 645) and acc ess th e logs s elect ed on this page. T his is
done for remote Quadro’s diagnostics and is mainly used by
Epygi’s T ech ni cal Support Office. To mak e the Qu adr o’s logs op en
for remote access, appropriate Firewall level or Filtering Rules
must be created.
Checkboxes below on this p age are used t o select those l og t yp es
that sh oul d be acc essible rem otely. Select onl y th ose logs th at you
wish to have monitored remotely.
Fig. II-61: System Logs - System Remote Logs Settings page
Quadro2x, 2xi; Quadro4x, 4xi; Quadro16x, 16xi (SW Version 5.3.x) 34
Page 36
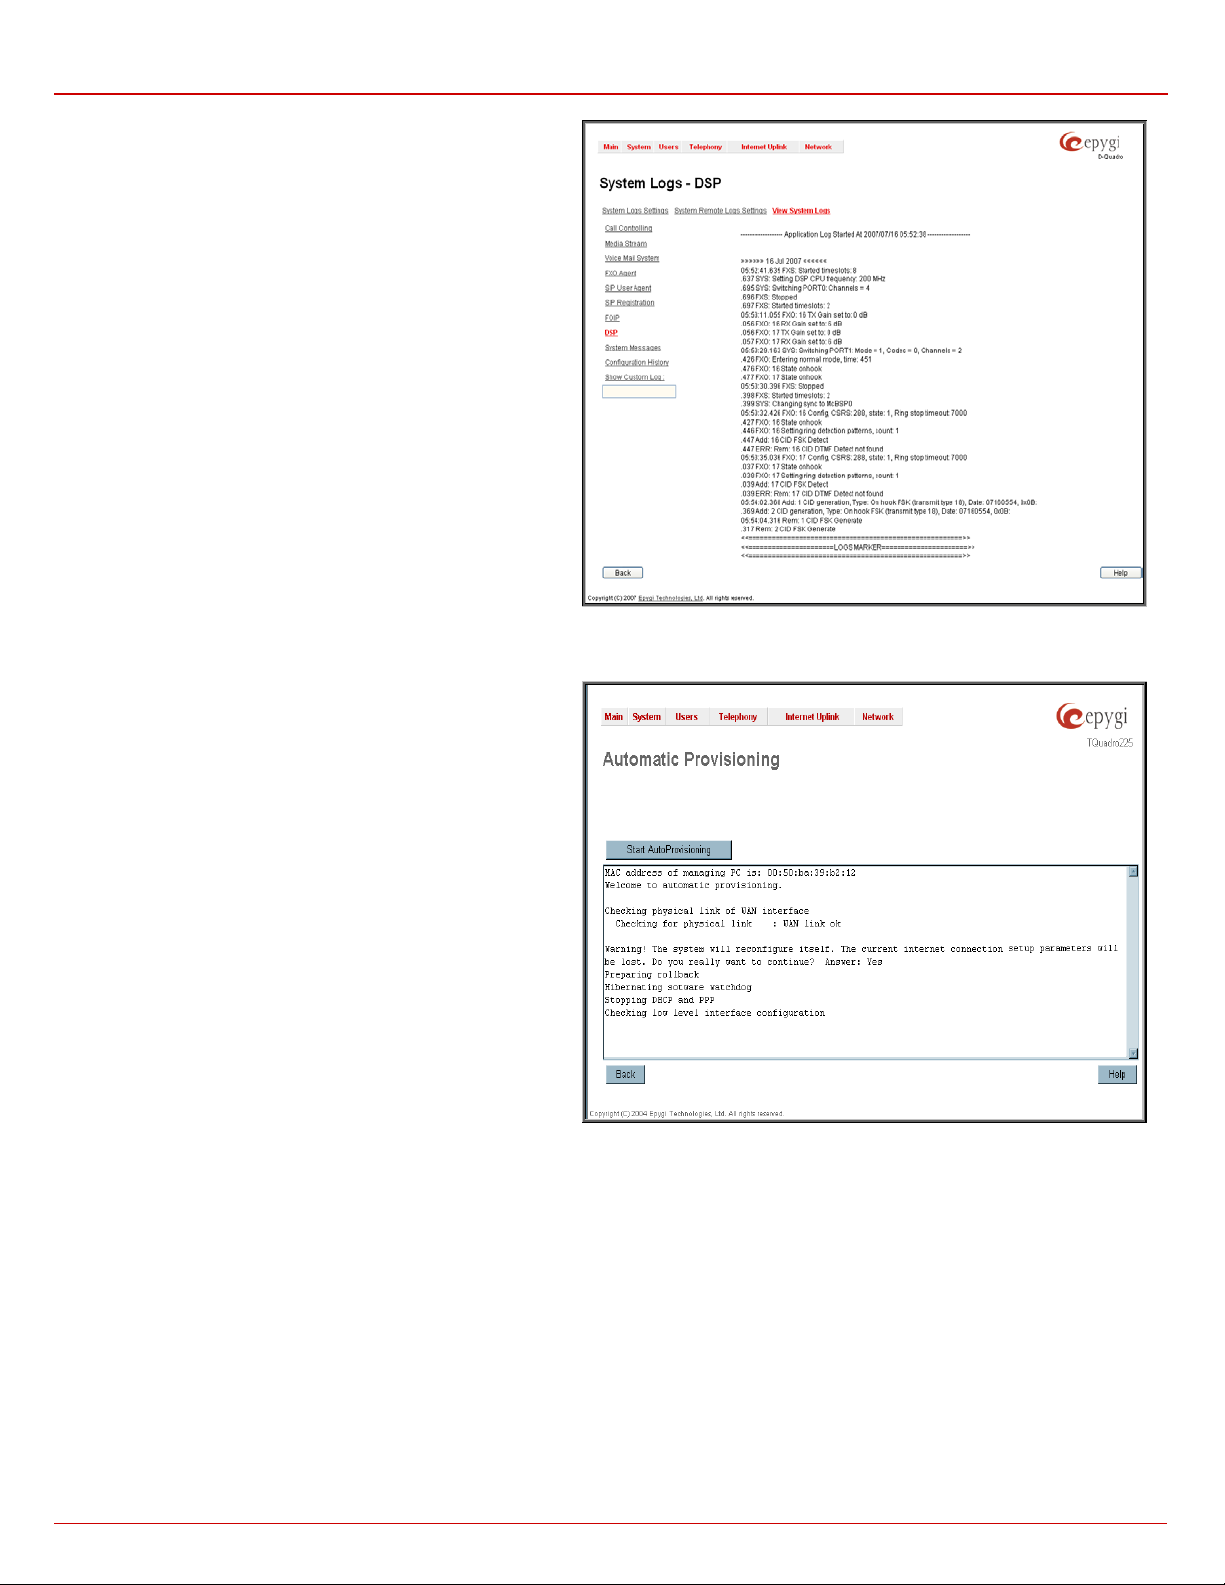
Quadro Manual II: A d min istrator's Guide Administrator’s Me n us
Clicking on the needed link will display the log on the right side of
C connected to the
In the View Sy stem Lo gs page you ma y view the generated logs
on the Quadro. Syst em logs ar e useful to deter mine any king of
problems on the Quadro as well as to monit or the user’s access
and the usage of it.
On the left side of the page, a list of main logs is displayed.
the page.
The text f ield on the left s ide is dedic ated for support pers onnel
only an d is used to search a c us t om log not l is ted on this page. T o
do so, i ns ert a r equir ed l og n ame t o the t ext fi eld and pr ess Show
Custom Log functional button.
If the user has used Logs Coll ection (*82) feat ur e cod e aft er or
during (f rom another phone c onnected to the same Quadro) the
call, a special l og file will b e gen erated c ontaining the details of
that call and few l ast c alls done in t he syst em. T his log f ile will b e
internal ly kept in t he s ystem unti l the next t ime s omeone us ed the
Logs Colle ction featur e code again. T he collec ted logs will be a
par t of the System Logs when user downl oads them n ext t i m e, so
it can b e reviewed b y appropri at e s up port st aff . T his c oul d be used
to collect the logs at the exact moment when a problem has
happened.
Fig. II-62: System Logs – View System Logs page
Automatic Provisioning
Automatic Prov isioning pr ovides th e possibilit y to aut omatically
configu re t he W AN netw ork s etti ngs of Qu adro. T his is very us efu l
when the ad ministrator is not actu ally aware ab out the Quadro’s
network settings. Automatic Provisioning automatically detects
the matc hing netw ork configur ation s ettings, ap plies them on the
Quadro, thus connecting the device to the internet through the
available ISP connection.
Please N ote: Automatic Pr ovisioning c an only be run fr om the
LAN side of the Quadro, i.e. from the P
Quadro’s LAN.
Automatic Prov isioning au tom atic all y d etects and c onfig ures the
following settings on the Quadro:
• WAN interface type (PPPoE or Ethernet)
• WAN IP settings
• PPP settings
• ISP settings
• DHCP settings
• DNS settings
• NAT Traversal settings
Features
This page lists all features that may be activated by a software key, characterized by a Feature Description and provided wit h its Status:
• No Key Found - the feature is currently not av ai l abl e
• Reboot N ee ded - the feature key has been entered and Quadro needs to be rebooted
• Activated - the feature is now available on the Quadro
Following features may be activated via the software key:
• Debug – enables Telnet connection towards the Quadro for debugging purposes.
• 3pcc Support - enabl es Third P art y C all Contr ol f eature on the Quadr o. T h e f eature allow s th e call c ontrolling ap pl ications r unning on a user
PC to remotely initiate and handle calls on the Quadro and to subscribe for certain event notifications from the Quadro.
Fig. II-63: Auto Provisioning page
Quadro2x, 2xi; Quadro4x, 4xi; Quadro16x, 16xi (SW Version 5.3.x) 35
Page 37
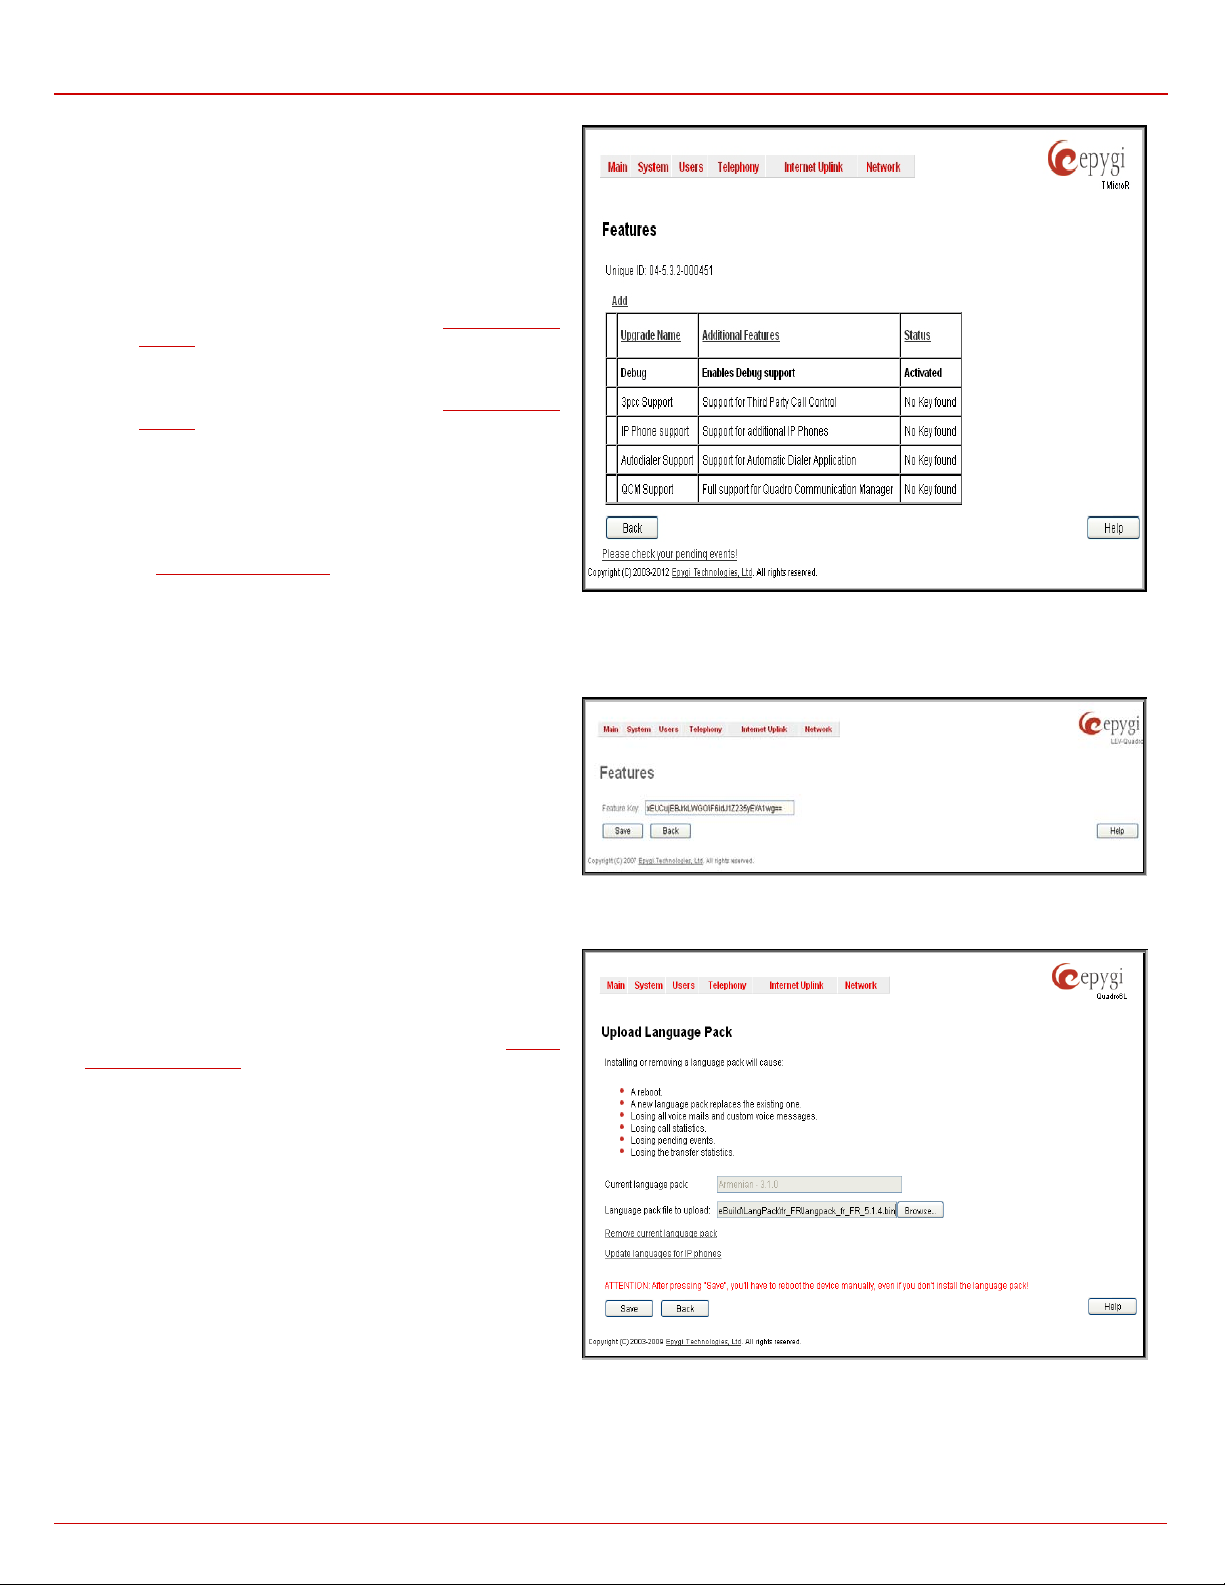
Quadro Manual II: A d min istrator's Guide Administrator’s Me n us
ialer application (the application description can be found
. The language of GUI session can be
Uploading a language pack will also change the language of some
Uploading a Language Pack will cause the loss of the following
• IP Phone support - enables additional LAN-sided IP
phones on the Quadro. On Quadro4x and quadro16x
models, this feature key allows you to activate two
packages of 16 IP lines su pport. Th e featur e key ins erted
once will activate additional 16 IP lines. The feature key
inserted twice will activate additional 32 IP lines. On
Quadr o2x mod els, this featur e allows to acti vate 8 IP l ines
support w it h a sin gle key.
• DCC Pro Support - enables Quadro PBX extensions to
use the Pro-level Desktop Communication Console (the
application description can be found at
Support).
Epygi Technical
• DCC Basic Support - enables Quadro PBX ext ensi ons to
use the Basic-level Desktop C ommunicati on Console (the
application description can be found at
Support).
Epygi Technical
• QCM Suppor t – allows Q uadr o’s extens i ons to b e used b y
Quadro Communication Manager after QCM trial period
expires . D epend ing on th e feat ur e key t ype, addit ion al 4 or
10 QCM lic enses can be acti vat ed on the Quad ro.
• Autodialer Support - allows run with Quadro the Auto
D
at Epygi Tec hnical S upport).
• Call Recording – activates the feature which is used to
record PBX, SIP or PSTN c alls on the Quadr o and save
the rec ordi ngs i nto t he l ocal r ec ordin g b ox or upl oad to t h e
remote s erver. This Feature is available only for Quadro
4x, 4xi; 16x, 16xi.
To receive a Feature Key, regist er th e Qu ad ro device an d s end a
corresponding request to Epygi's Technical Support. This request
must include the Unique ID that is displayed in the Features page
above the features list.
Fig. II-64: Features page
Fig. II-65: Features Add page
Upload La n guage Pack
The U pload Languag e Pack page allows you t o u pload a c ust om
language for GUI and Voice Messages of the Quadro. The
language of voice messages can be switched to the custom
Langu ag e Pack lan gu ag e from the GUI s ett i ng p age in th e
Configuration Wizard
changed to the custom Language Pack language from the r adio
buttons on the login page.
supported IP phones (Aastra, snom v.6.x, Grandstream
GXP200 0). After a custom Langu age Pack is upl oaded onto th e
system, reb oot th e IP ph one t o load a matc hin g lang u age ont o the
phone.
data:
Please Note: Only one cust om L ang u age Pack c an b e up loaded at t he time. Up l oad ing a Lang u ag e P ac k wi ll r em ove the exis t ing one (if applicable)
and will r eb oot th e Qu adr o. The Curr ent Langu ag e Pac k f ield d ispl ays r ead -onl y inf ormat ion abou t th e cust om lang uag e pac k upl oade d. W hen n o
custom language pack is uploaded, the field indicates “unknown”.
• All int ernally st or ed voice mail and cus t om voice mess ages
• Call statistics
• P endi ng even t s
• Transfer statistics
System
Fig. II-66: Upload Language Pack page
Quadro2x, 2xi; Quadro4x, 4xi; Quadro16x, 16xi (SW Version 5.3.x) 36
 Loading...