

Page 1
User's Guide
Page 2

Contents
2
Notations Used in This Guide 5
Introduction to Your Projector 8
Projector Parts and Functions .......................................................... 9
Projector Parts - Front/Top........................................................................................................... 9
Projector Parts - Rear.................................................................................................................... 10
Projector Parts - Base ................................................................................................................... 10
Projector Parts - Control Panel................................................................................................. 11
Projector Parts - Remote Control ............................................................................................ 12
Setting Up the Projector 14
Projector Placement ........................................................................ 15
Projector Setup and Installation Options............................................................................. 16
Projection Distance....................................................................................................................... 17
Projector Connections ..................................................................... 18
Connecting to a Streaming Media Player ............................................................................ 18
Connecting to Video Sources ................................................................................................... 20
Connecting Headphones............................................................................................................ 21
Connecting to Bluetooth®Audio Devices ............................................................................ 22
Bluetooth Specifications ....................................................................................................... 23
Installing Batteries in the Remote Control.................................... 24
Remote Control Operation ........................................................................................................ 24
Changing the Projection Mode Using the Menus ............................................................ 30
Adjusting the Image Height............................................................ 31
Image Shape..................................................................................... 32
Auto V-Keystone ............................................................................................................................ 32
Correcting the Image Shape Horizontally with the Horizontal Keystone
Buttons .............................................................................................................................................. 32
Correcting the Image Shape with the Keystone Button ................................................ 33
Correcting the Image Shape with Quick Corner ............................................................... 34
Focusing the Image Using the Focus Lever ................................... 36
Resizing the Image with Zoom ....................................................... 37
Image Aspect Ratio .......................................................................... 38
Changing the Image Aspect Ratio.......................................................................................... 38
Available Image Aspect Ratios ................................................................................................. 39
Projected Image Appearance with Each Aspect Mode .................................................. 39
Adjusting Image Quality (Color Mode).......................................... 40
Changing the Color Mode ......................................................................................................... 40
Available Color Modes................................................................................................................. 40
Turning On Automatic Luminance Adjustment................................................................ 40
Adjusting the Sharpness ................................................................. 42
Adjusting the Image Color .............................................................. 43
Adjusting the Color Temperature ........................................................................................... 43
Adjusting the RGB Offset and Gain ........................................................................................ 43
Adjusting the Hue, Saturation, and Brightness.................................................................. 44
Adjusting the Gamma ................................................................................................................. 45
Using Basic Projector Features 26
Turning On the Projector ................................................................ 27
Turning Off the Projector ................................................................ 28
Selecting the Language for the Projector Menus ......................... 29
Projection Modes ............................................................................. 30
Adjusting the Light Source Brightness .......................................... 47
Saving Settings to Memory and Using Saved Settings ............... 48
Controlling the Volume with the Volume Buttons ....................... 49
Changing the Sound Mode ............................................................. 50
Available Sound Modes .............................................................................................................. 50
Page 3

Contents
3
Adjusting Projector Features 51
HDMI Link Features ......................................................................... 52
Operating the Connected Devices Using the HDMI Link Features............................ 52
Shutting Off the Image and Sound Temporarily (A/V Mute)....... 54
Projector Security Features............................................................. 55
Locking the Projector's Buttons............................................................................................... 55
Unlocking the Projector's Buttons .................................................................................... 55
Installing a Security Cable .......................................................................................................... 56
Adjusting the Menu Settings 57
Using the Projector's Menus ........................................................... 58
Using the Displayed Keyboard ....................................................... 59
Available Text Using the Displayed Keyboard ................................................................... 59
Image Quality Settings - Image Menu............................................ 60
Projector Feature Settings - Settings Menu .................................. 61
Projector Information Display - Info Menu ................................... 64
Info Menu - Projector Info Menu ............................................................................................. 64
Solving Problems 73
Projection Problems......................................................................... 74
Projector Indicator Status ............................................................... 75
Solving Projector Power-On or Power-Off Problems ................... 77
Solving Projector Power Problems ......................................................................................... 77
Solving Projector Shutdown Problems ................................................................................. 77
Solving Image Problems ................................................................. 78
Solving Missing Image Problems ............................................................................................ 78
Adjusting an Image that is not Rectangular ....................................................................... 78
Adjusting a Fuzzy or Blurry Image .......................................................................................... 79
Fixing Partial Image Problems.................................................................................................. 79
Adjusting an Image that Contains Noise or Static............................................................ 79
Adjusting an Image with Incorrect Brightness or Colors ............................................... 80
Adjusting an Upside-down Image .......................................................................................... 80
Solving Missing or Low Audio Problems ....................................... 81
Solving Bluetooth Problems ........................................................... 82
Solving Remote Control Operation Problems............................... 83
Solving HDMI Link Problems .......................................................... 84
Projector Reset Options - Reset Menu ........................................... 66
Maintaining the Projector 67
Projector Maintenance .................................................................... 68
Cleaning the Projection Window.................................................... 69
Cleaning the Projector Case............................................................ 70
Air Filter and Vent Maintenance .................................................... 71
Cleaning the Air Filter and Vents ............................................................................................ 71
Replacing the Air Filter................................................................................................................ 71
Appendix 85
Optional Accessories and Replacement Parts............................... 86
Mounts............................................................................................................................................... 86
Replacement Parts ........................................................................................................................ 86
Screen Size and Projection Distance .............................................. 87
Supported Monitor Display Resolutions........................................ 89
Projector Specifications................................................................... 90
Connector Specifications............................................................................................................ 90
External Dimensions........................................................................ 91
Page 4

Contents
List of Safety Symbols and Instructions ........................................ 92
Laser Safety Information................................................................. 94
Laser Warning Labels................................................................................................................... 94
Glossary............................................................................................. 96
Notices............................................................................................... 97
FCC Compliance Statement ...................................................................................................... 97
Indication of the manufacturer and the importer in accordance with
requirements of EU directive .................................................................................................... 98
Restriction of Use........................................................................................................................... 98
Trademarks ...................................................................................................................................... 98
Copyright Notice ........................................................................................................................... 98
Copyright Attribution .................................................................................................................. 99
4
Page 5
Notations Used in This Guide
Safety Symbols
The projector and its manuals use graphical symbols and labels to indicate content that tells you how to use the projector safely.
Read and carefully follow the instructions that are marked with these symbols and labels to avoid injury to persons or damage to property.
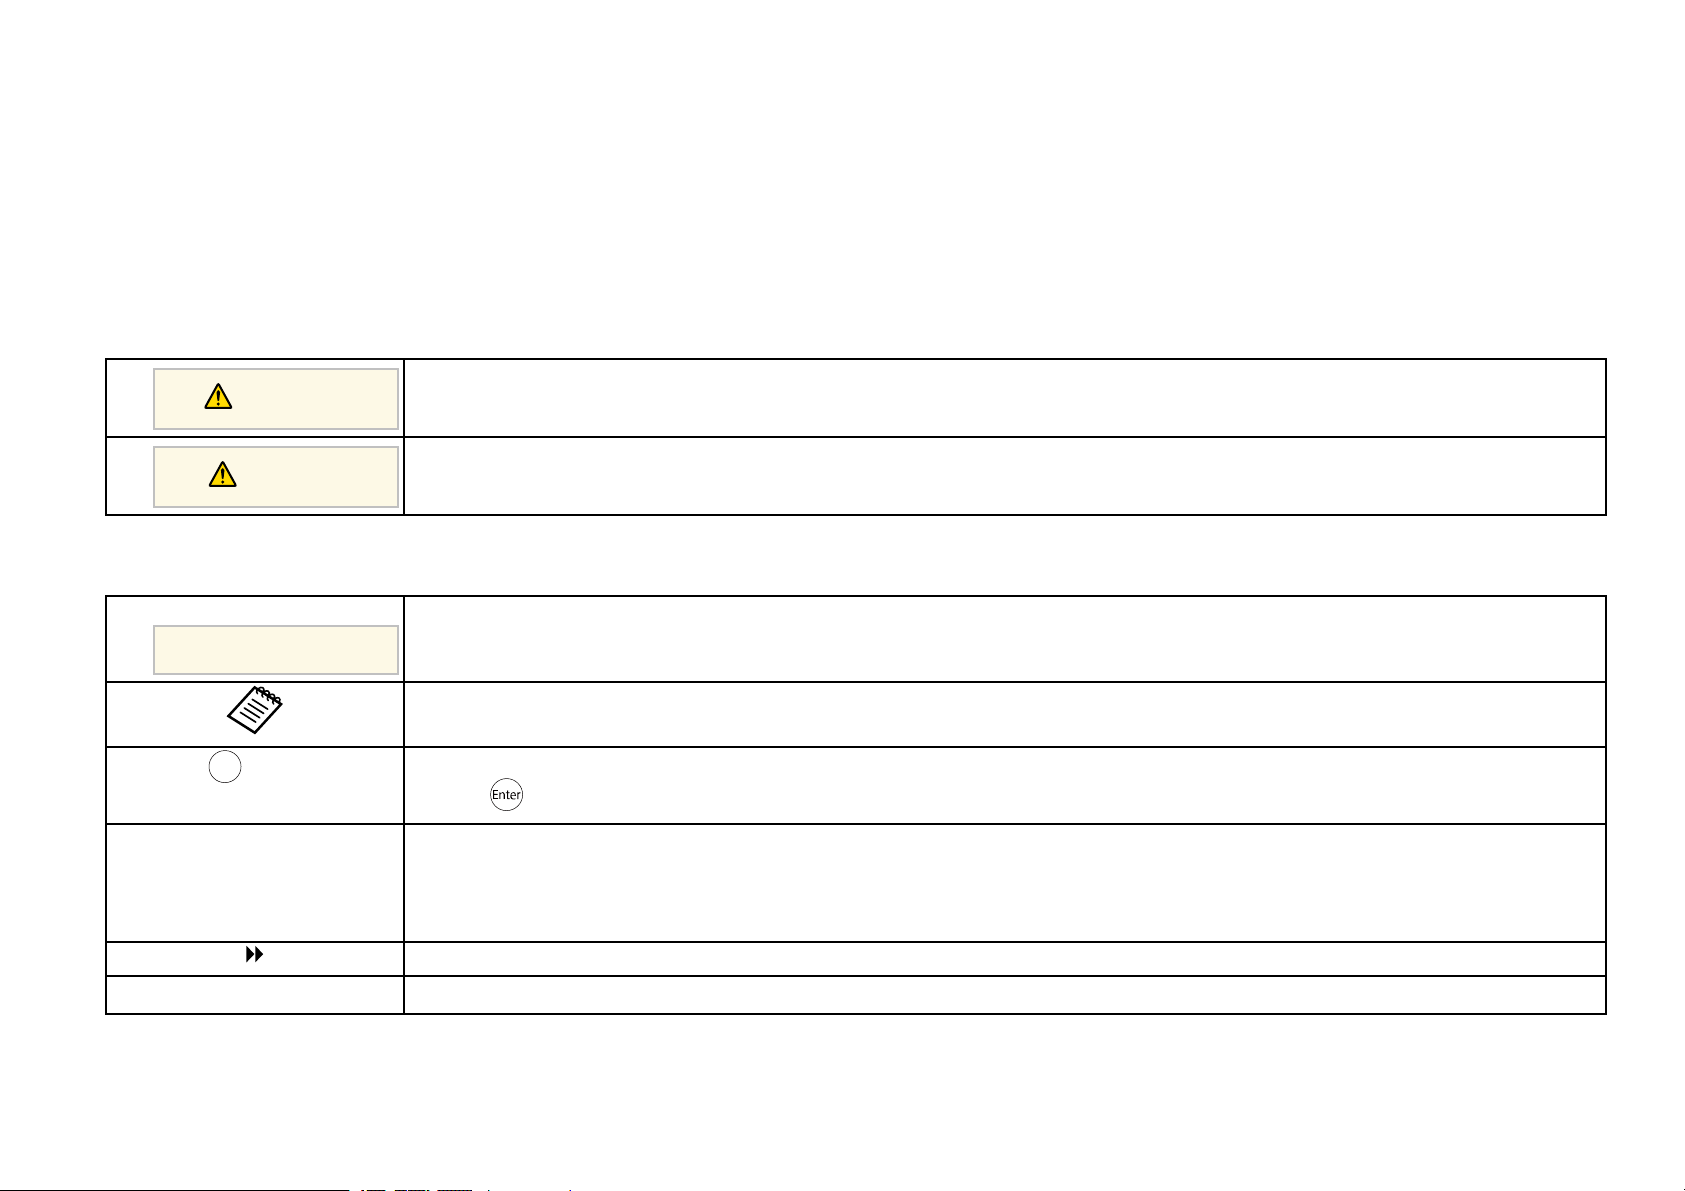
This symbol indicates information that, if ignored, could possibly result in personal injury or even death.
Warning
This symbol indicates information that, if ignored, could possibly result in personal injury or physical damage due to incorrect handling.
Caution
General Information Notations
This label indicates procedures that may result in damage or injury if sufficient care is not taken.
Attention
This label indicates additional information that may be useful to know.
button
Menu/Setting name Indicates projector menu and setting names.
s
Using the Manual to Search for Information
The PDF manual allows you to search for information you are looking for by keyword, or jump directly to specific sections using the bookmarks. You can also print only
the pages you need. This section explains how to use a PDF manual that has been opened in Adobe Reader X on your computer.
Indicates the buttons on the remote control or the control panel.
Example: button
Example:
Select the Image menu.
s Image > Color
This label indicates links to the related pages.
This label indicates the projector's current menu level.
Page 6

Searching by keyword
Click Edit > Advanced Search. Enter the keyword (text) for information you want to find in the search window, and then click Search. Hits are displayed as a list. Click
one of the displayed hits to jump to that page.
Jumping directly from bookmarks
Click a title to jump to that page. Click + or > to view the lower level titles in that section. To return to the previous page, perform the following operation on your
keyboard.
• Windows: Hold down Alt, and then press ←.
• Mac OS: Hold down the command key, and then press ←.
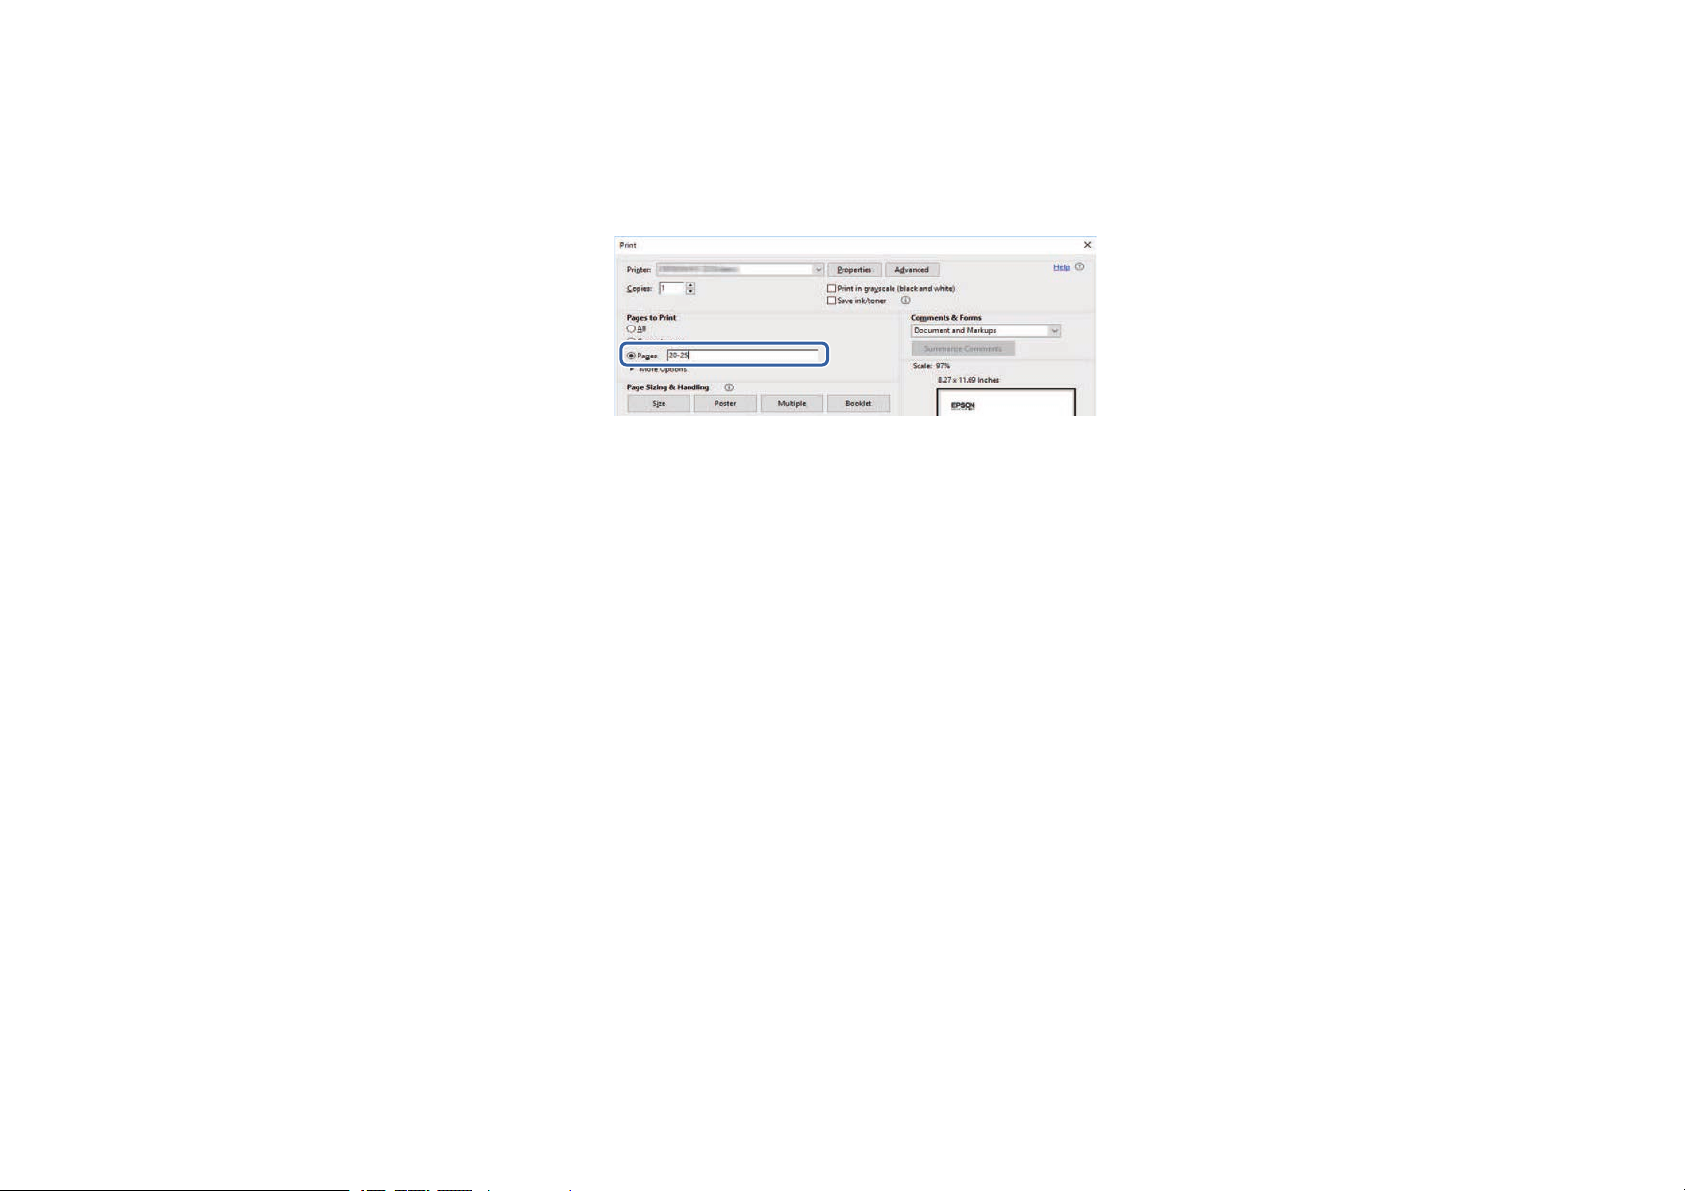
Printing only the pages you need
You can extract and print only the pages you need. Click Print in the File menu, and then specify the pages you want to print in Pages in Pages to Print.
• To specify a series of pages, enter a hyphen between the start page and the end page.
Example: 20-25
Page 7
• To specify pages that are not in series, divide the pages with commas.
Example: 5, 10, 15
Page 8

Introduction to Your Projector
See these sections to learn more about your projector.
gg Related Links
• "Projector Parts and Functions" p.9
Page 9
Projector Parts and Functions
9
The following sections explain the projector parts and their functions.
gg Related Links
• "Projector Parts - Front/Top" p.9
• "Projector Parts - Rear" p.10
• "Projector Parts - Base" p.10
• "Projector Parts - Control Panel" p.11
• "Projector Parts - Remote Control" p.12
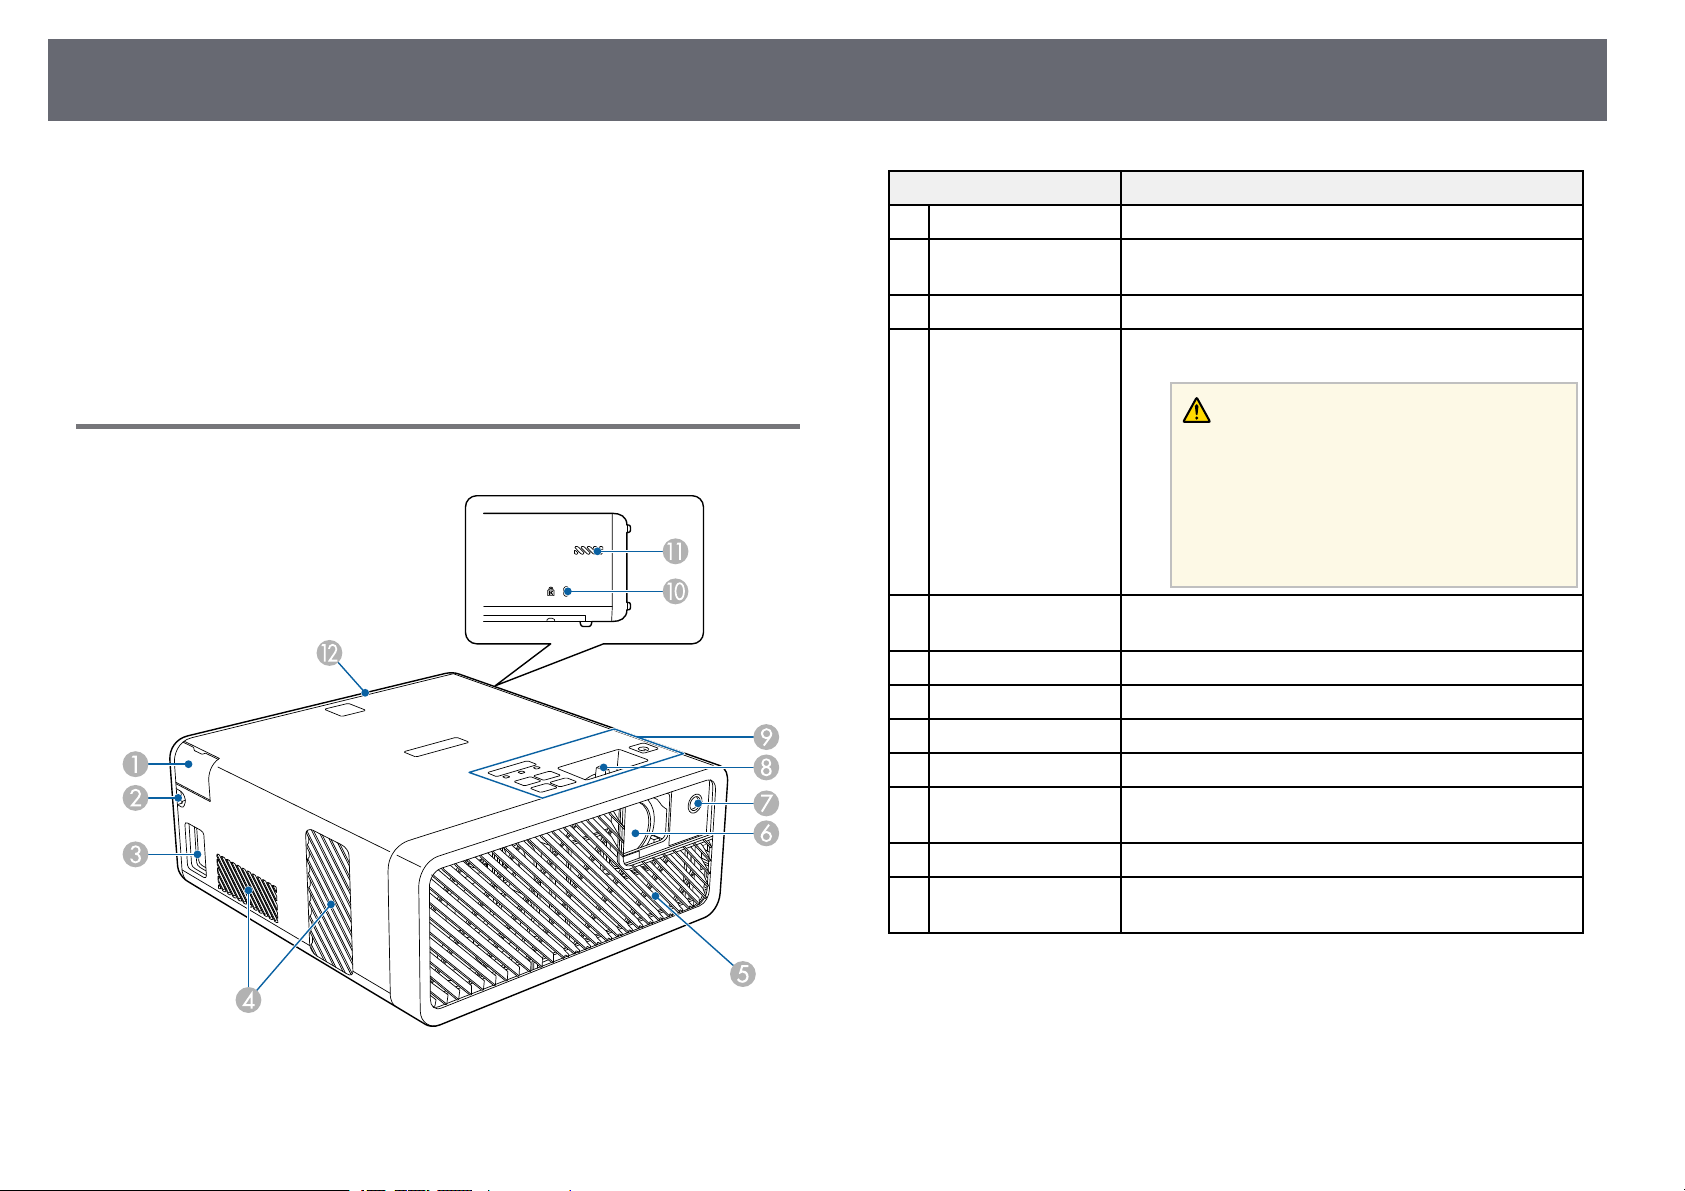
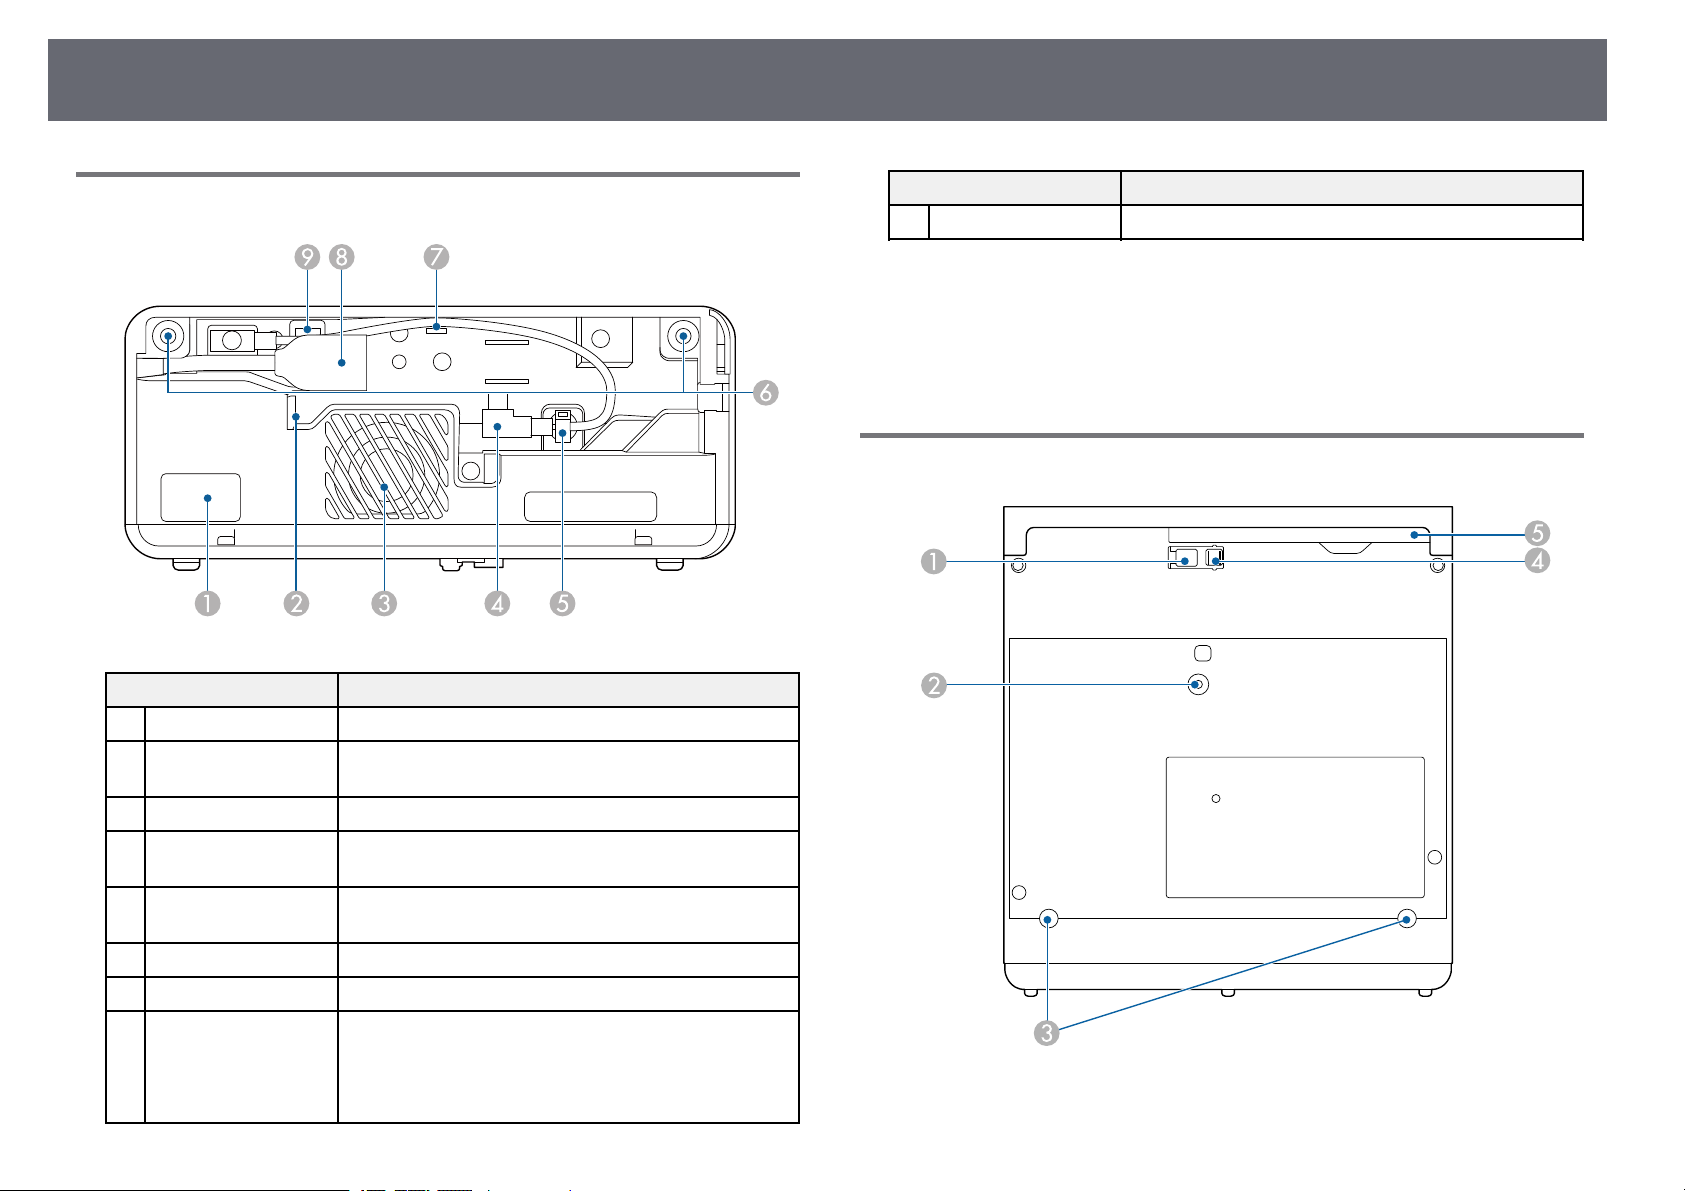
Projector Parts - Front/Top
Name Function
Audio Out port cover Open to connect headphones.
A
Cable path Pass an HDMI cable connecting the projector and
B
Power inlet Connects the power cord to the projector.
C
Air exhaust vents Exhaust vents for air used to cool the projector
D
video equipment through here.
internally.
Caution
While projecting, do not put your face or
hands near the air exhaust vent, and do not
place objects that may become warped or
damaged by heat near the vent. Hot air from
the air exhaust vent could cause burns,
warping, or accidents to occur.
Air intake vent (air
E
filter)
Projection window Images are projected from the lens inside the projector.
F
Remote receiver Receives signals from the remote control.
G
Focus lever Adjusts the image focus.
H
Control panel Operates the projector.
I
Security slot The security slot is compatible with the Microsaver
J
Air intake vent Takes in air to cool the projector internally.
K
Rear cover Open to connect a streaming media player or other
L
Takes in air to cool the projector internally.
Security System manufactured by Kensington.
video equipment.
gg Related Links
• "Remote Control Operation" p.24
• "Projector Parts - Control Panel" p.11
• "Focusing the Image Using the Focus Lever" p.36
• "Connecting to Video Sources" p.20
• "Connecting Headphones" p.21
• "Installing a Security Cable" p.56
Page 10
Projector Parts and Functions
10
Projector Parts - Rear
Name Function
Remote receiver Receives signals from the remote control.
A
Air exhaust vent Exhaust vents for air used to cool the streaming media
B
Speaker Outputs audio.
C
Power supply USB
D
cable
Cable clamp Pass the power supply USB cable through here to
E
Rear cover slots Slots to install the rear cover.
F
Cable hook Pass the power supply USB cable through here.
G
HDMI port with an
H
extension cable
player.
Connects to a streaming media player to power it.
secure it.
Inputs video signals from a streaming media player or
other HDMI compatible video equipment.
This projector is compatible with HDCP.
You cannot remove this extension cable.
Name Function
Service port This port is not normally used.
I
gg Related Links
• "Remote Control Operation" p.24
• "Connecting to Video Sources" p.20
• "Connecting to a Streaming Media Player" p.18
Projector Parts - Base
Page 11

Projector Parts and Functions
11
Name Function
Foot release lever Press the foot release lever to extend and retract the
A
Ceiling Mount / Floor
B
Stand fixing point or
Lighting Track Mount
fixing point
Rear feet (Ceiling
C
Mount / Floor Stand
fixing points or
Lighting Track Mount
fixing points)
Front adjustable foot When setup on a surface such as a desk, extend the foot
D
Air filter cover Open to access the air filter.
E
front adjustable foot.
Attach the optional Ceiling Mount / Floor Stand or
Lighting Track Mount here.
Loosen these feet by turning them counterclockwise,
and then remove them to attach the optional Ceiling
Mount / Floor Stand or Lighting Track Mount.
to adjust the position of the image.
gg Related Links
• "Air Filter and Vent Maintenance" p.71
• "Adjusting the Image Height" p.31
Projector Parts - Control Panel
Name Function
Power button Turns the projector on or off.
A
Focus lever Adjusts the image focus.
B
Indicators Indicates the projector's status.
C
Volume up/down
D
buttons
Horizontal keystone
E
buttons
Adjusts the volume for the speaker and headphones.
You can also control the volume for Bluetooth audio
devices connected to the projector.
Displays the Keystone screen allowing you to correct
horizontal keystone distortion.
gg Related Links
• "Projector Indicator Status" p.75
• "Correcting the Image Shape Horizontally with the Horizontal Keystone
Buttons" p.32
• "Turning On the Projector" p.27
• "Focusing the Image Using the Focus Lever" p.36
• "Controlling the Volume with the Volume Buttons" p.49
Page 12
Projector Parts and Functions
12
Projector Parts - Remote Control
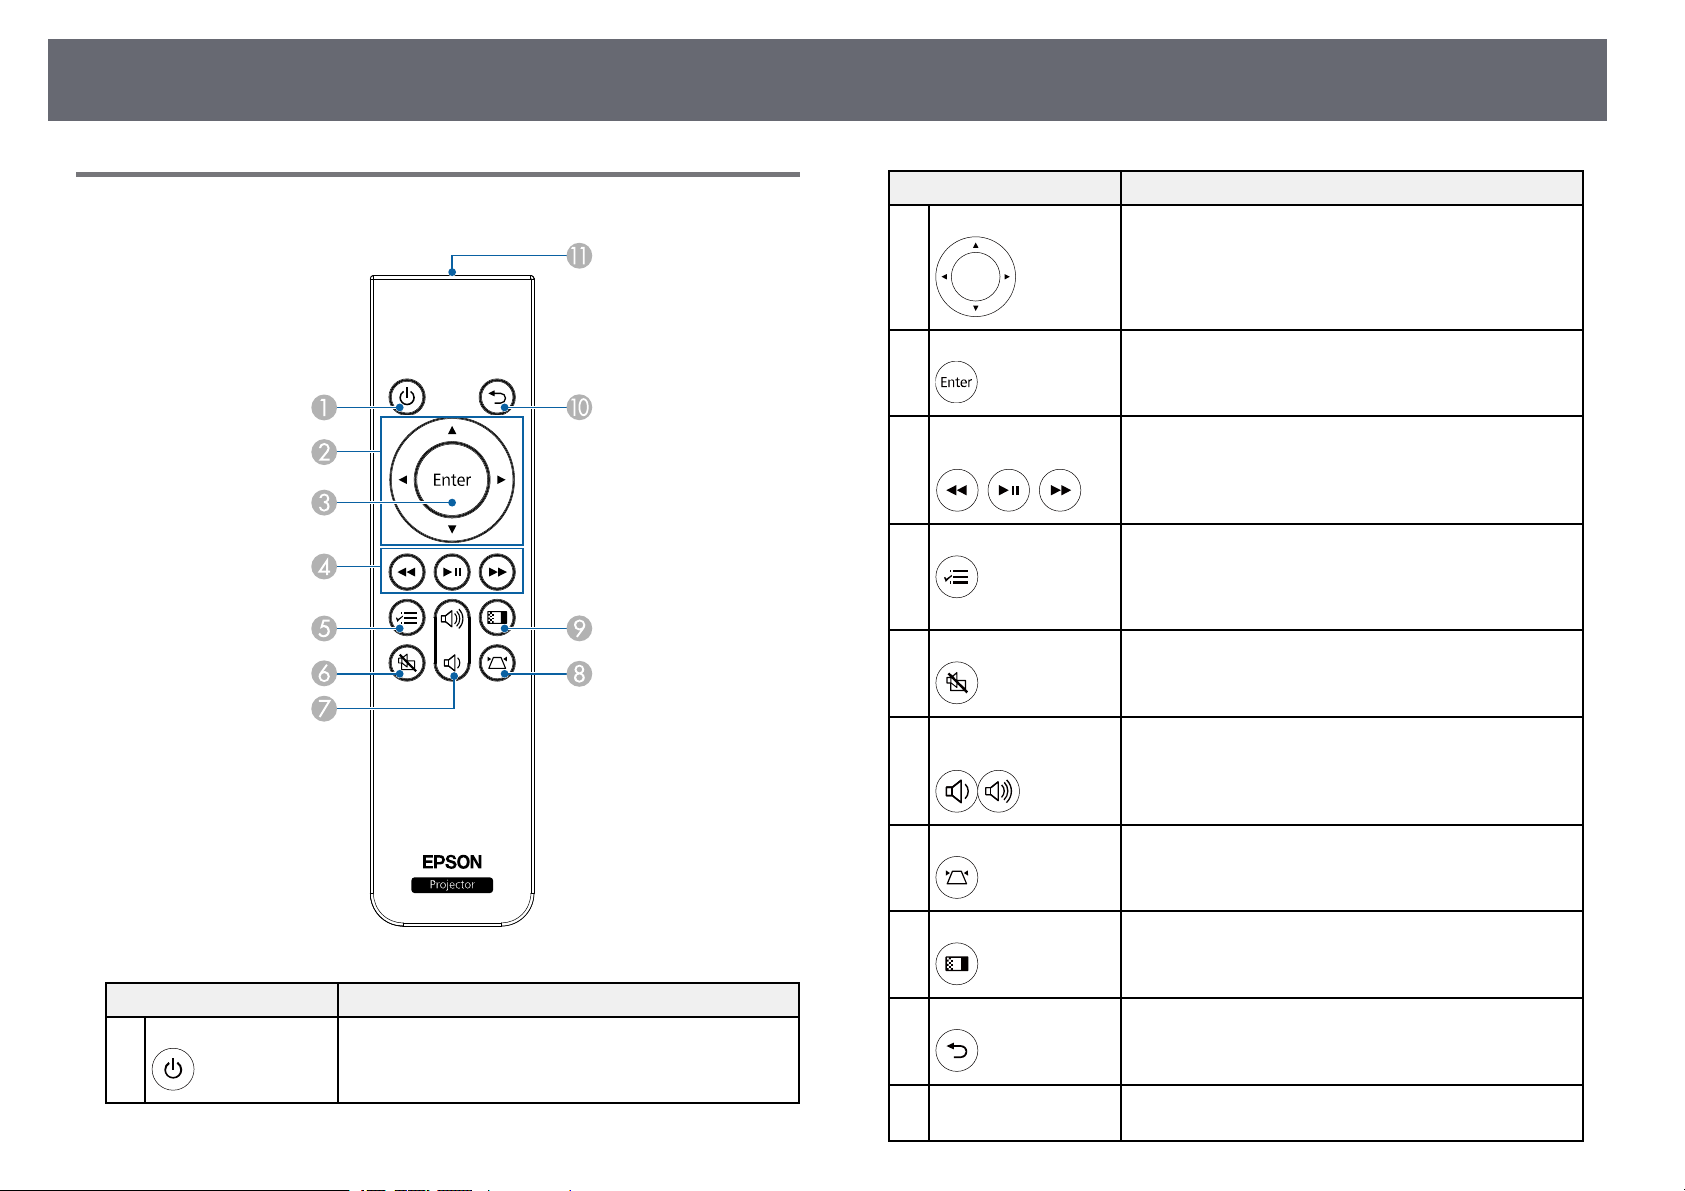
Name Function
Arrow buttons Selects menu items while displaying the projector's
B
Enter button Enters the current selection and moves to the next level
C
Playback control
D
buttons
Menu button Displays and closes the projector's menu. You can use
E
A/V Mute button Turns the video and audio on or off temporarily.
F
Volume up/down
G
buttons
menu.
while displaying the projector's menu.
Controls playback of the connected streaming media
player or video equipment that supports the HDMI
CEC standard.
the projector's menus to adjust the settings that control
how your projector works.
Hold down this button to display the Bluetooth menu.
Adjusts the volume for the speaker and headphones.
You can also control the volume for Bluetooth audio
devices connected to the projector.
Name Function
Power button Turns the projector on or off.
A
Keystone button Displays the Keystone adjustment screen or the Quick
H
Color Mode button Changes the color mode.
I
Esc button Stops the current function.
J
Remote control light
K
emitting area
Corner screen.
Moves back to the previous menu level while
displaying the projector's menu.
Outputs remote control signals.
Page 13

Projector Parts and Functions
gg Related Links
• "Adjusting Image Quality (Color Mode)" p.40
• "Correcting the Image Shape with the Keystone Button" p.33
• "Correcting the Image Shape with Quick Corner" p.34
• "Turning On the Projector" p.27
• "Controlling the Volume with the Volume Buttons" p.49
• "Shutting Off the Image and Sound Temporarily (A/V Mute)" p.54
• "Using the Projector's Menus" p.58
13
Page 14

Setting Up the Projector
Follow the instructions in these sections to set up your projector.
gg Related Links
• "Projector Placement" p.15
• "Projector Connections" p.18
• "Installing Batteries in the Remote Control" p.24
Page 15
Projector Placement
15
You can place the projector on almost any flat surface to project an image.
You can also install the projector in a mount if you want to use it in a fixed
location. An optional Ceiling Mount / Floor Stand is required when installing
the projector on a ceiling, a wall, or a floor.
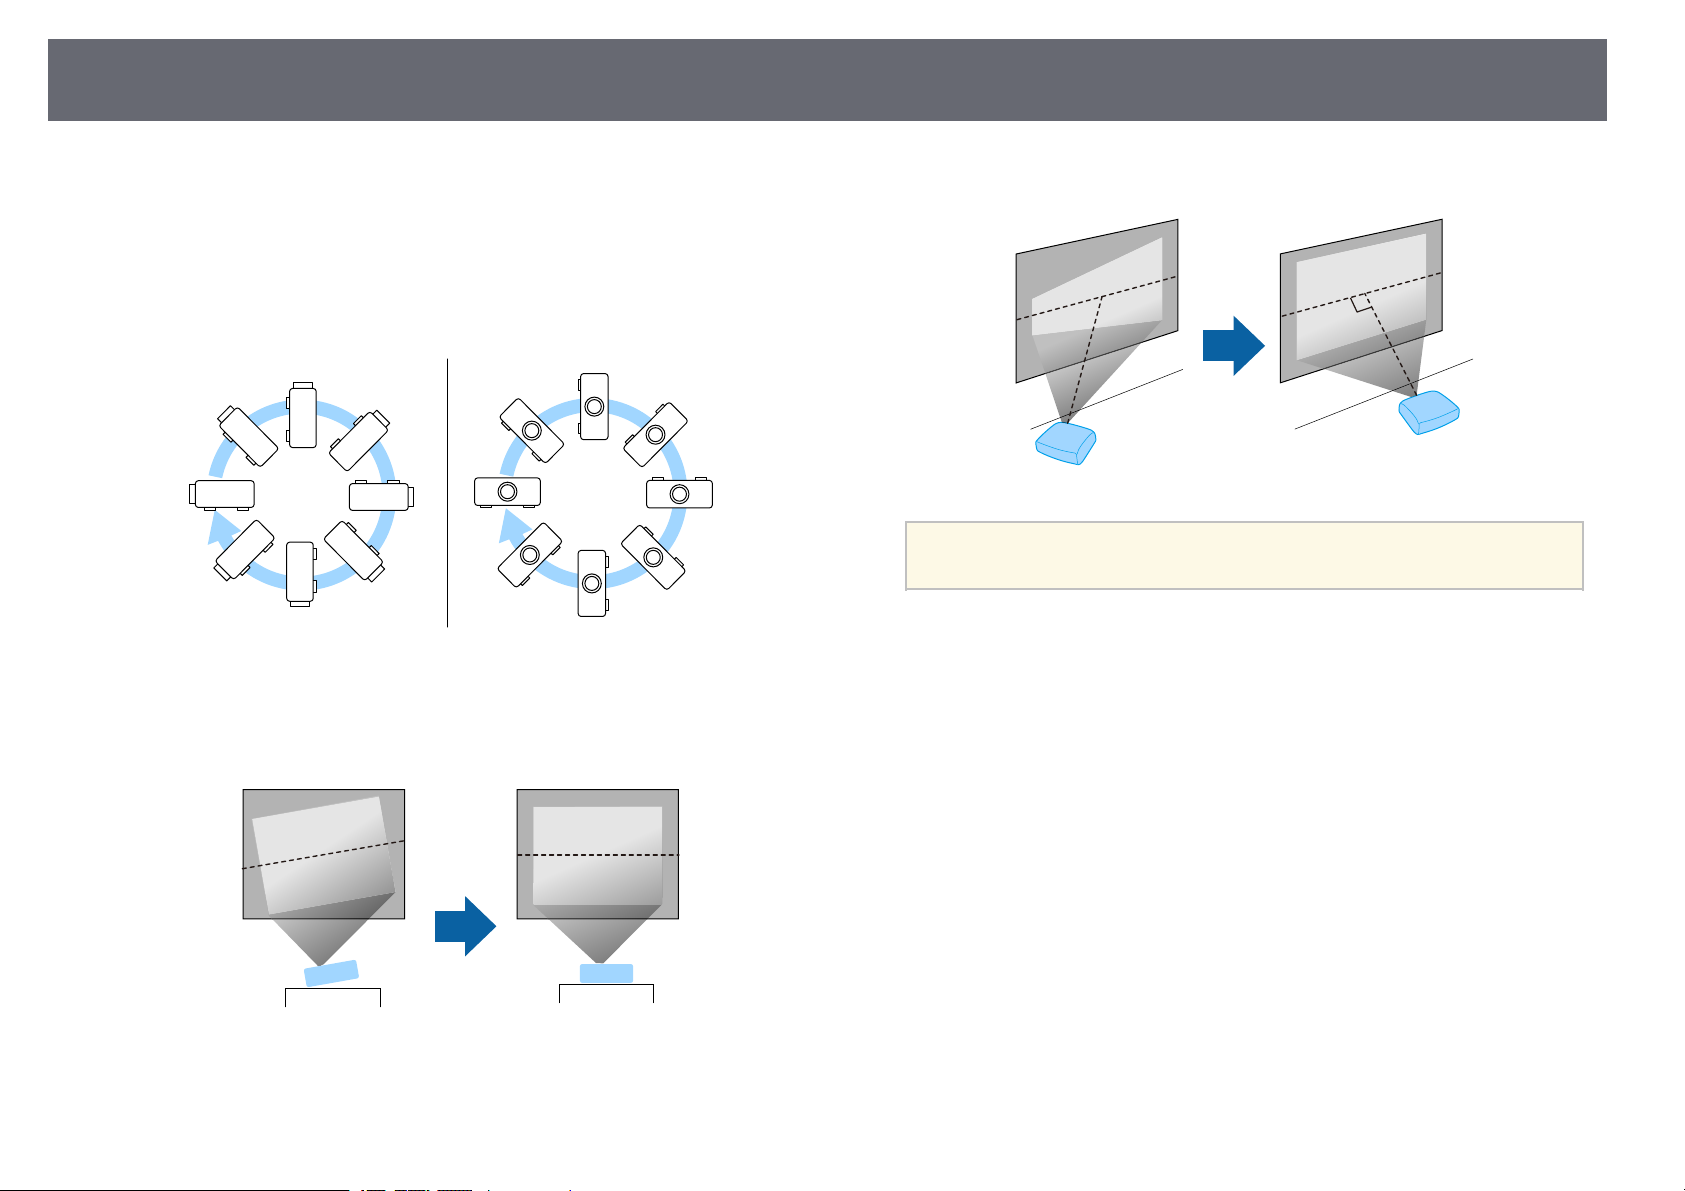
The projector can be installed at various angles. There is no vertical or
horizontal limit to how the projector can be installed.
Note the following points when selecting a projector location:
• Place the projector on a sturdy, level surface or install it using a compatible
mount.
• Place the projector parallel to the screen.
If you cannot install the projector parallel to the screen, correct
a
keystone distortion using the projector controls.
• Leave plenty of space around and under the projector for ventilation, and
do not place it on top of or next to anything that could block the vents.
Page 16

Projector Placement
Warning
• You must install a ceiling mount when suspending the projector from a ceiling.
If you do not install the projector correctly, it could fall and cause damage or
injury.
• Do not use adhesives on the ceiling mount fixing points to prevent the screws
from loosening, or use lubricants, oils, or similar substances on the projector; the
projector case may crack causing it to fall from its ceiling mount. This could
cause serious injury to anyone under the ceiling mount and could damage the
projector.
• Do not cover the projector's air intake or air exhaust vents. If the vents are
covered, the internal temperature could rise and cause a fire.
• Do not install the projector on an unstable surface or in a location beyond the
weight specifications of the projector. Otherwise, it could fall or topple causing
an accident and injury.
• When installing the projector in a high position, take measures to prevent falling
by using belts to ensure safety in an emergency, such as an earthquake, and to
prevent accidents. If it is not installed correctly, it could fall causing an accident
and injury.
• Do not install the projector in locations exposed to high humidity and dust, such
as on a kitchen counter, in the kitchen, or near a humidifier, or in locations
exposed to oil smoke or steam. Doing so could cause fire or electric shock. In
addition, the oil content could cause the projector’s outer case to deteriorate and
could cause the projector to fall off from the ceiling where it is suspended.
16
• "Projection Distance" p.17
• "Image Shape" p.32
• "Projector Feature Settings - Settings Menu" p.61
• "Adjusting the Image Height" p.31
• "Resizing the Image with Zoom" p.37
• "Focusing the Image Using the Focus Lever" p.36
Projector Setup and Installation Options
You can set up or install your projector in the following ways:
Front/Rear
Attention
• If you are using the projector at altitudes above 1500 m, set the High Altitude
Mode setting to On in the projector's menu to ensure the projector's internal
temperature is regulated properly.
s Settings > Installation > High Altitude Mode
• Try not to setup the projector in locations subject to high humidity and dust, or
in locations subject to smoke from fires or tobacco smoke.
• If the internal temperature of the projector gets too high due to the installation
environment, select the Rear Bay Cooling setting in the projector menu to cool
the streaming media player connected to the projector.
s Settings > Operation > Rear Bay Cooling
gg Related Links
• "Projector Setup and Installation Options" p.16
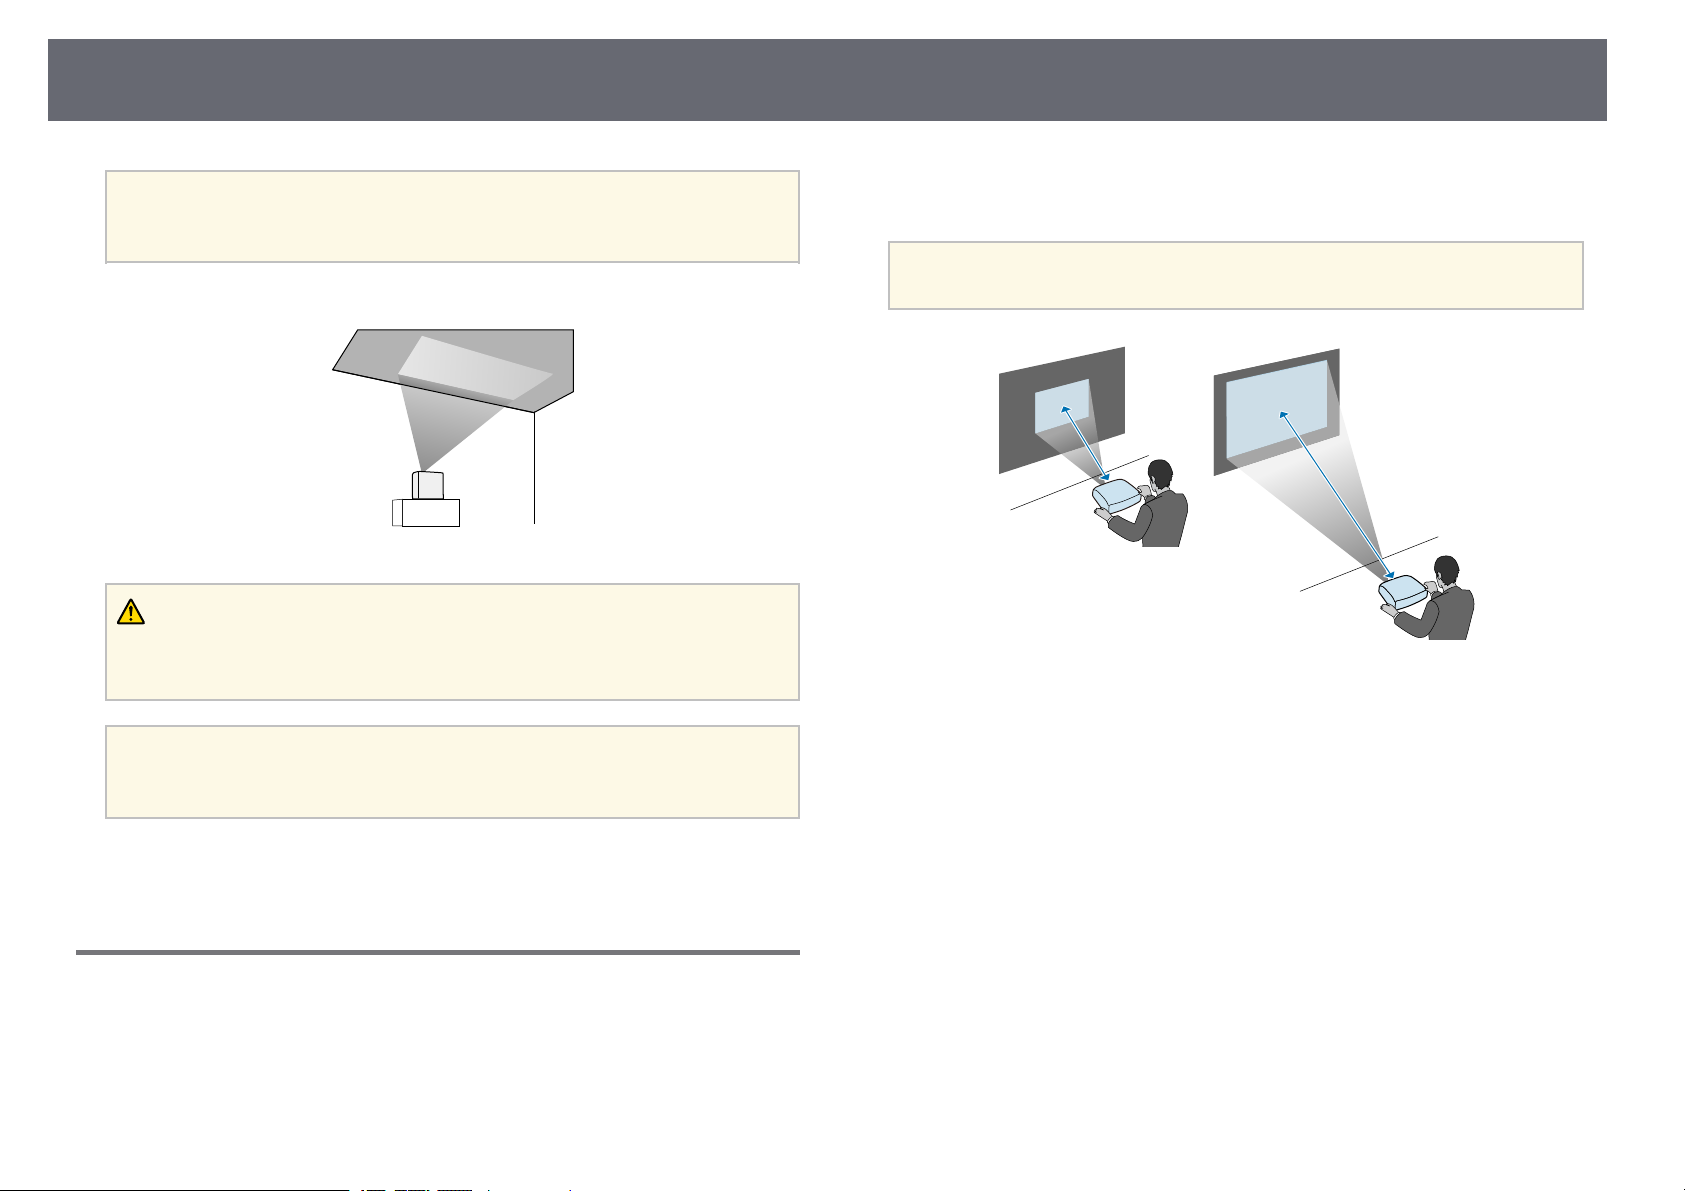
Front Ceiling/Rear Ceiling
Page 17
Projector Placement
17
If you project from the ceiling or from the rear, select the correct
a
Projecting Images onto a Ceiling
Projection setting and, if necessary, adjust the OSD Rotation setting.
s Settings > Installation > OSD Rotation
Warning
Do not cover the projection window. If the window is covered, the internal
temperature could rise and cause a fire.
Attention
When projecting images onto a ceiling, make sure that the rear cover is replaced
correctly.
See the Appendix for details about how far to place the projector from the
screen based on the size of the projected image.
When correcting keystone distortion, your image is slightly smaller.
a
gg Related Links
• "Screen Size and Projection Distance" p.87
gg Related Links
• "Projection Modes" p.30
Projection Distance
The distance at which you place the projector from the screen determines the
approximate size of the image. The image size increases the farther the
projector is from the screen, but can vary depending on the zoom factor,
aspect ratio, and other settings.
Page 18
Projector Connections
18
See these sections to connect the projector to a variety of projection sources.
Attention
Check the shape and orientation of the connectors on any cable you plan to
connect. Do not force a connector into a port if it does not fit. The device or your
projector could be damaged or could malfunction.
See the Quick Start Guide for a list of cables supplied with your
a
gg Related Links
• "Connecting to a Streaming Media Player" p.18
• "Connecting to Video Sources" p.20
• "Connecting Headphones" p.21
• "Connecting to Bluetooth® Audio Devices" p.22
projector. Purchase optional or commercially available cables when
necessary.
Connecting to a Streaming Media Player
You can connect your streaming media player to the projector's HDMI port.
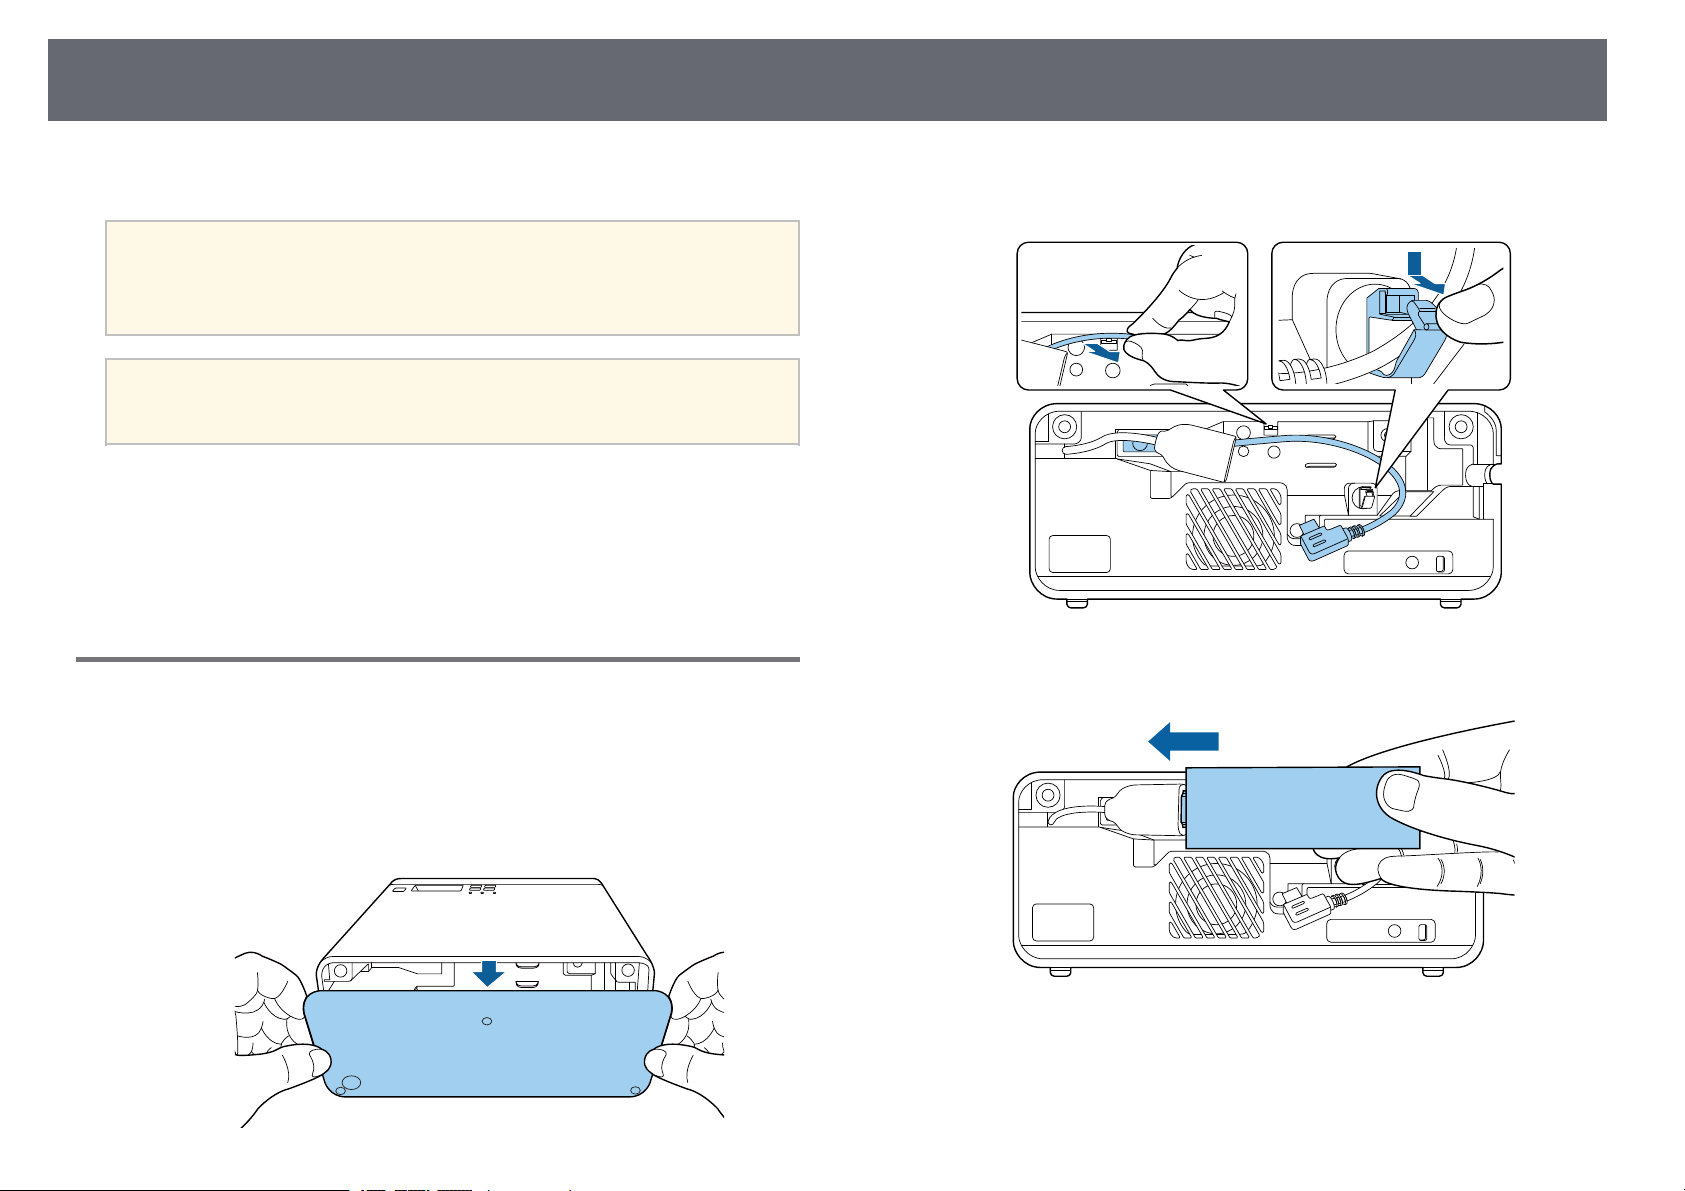
Release the power supply USB cable from the cable hook and cable
b
clamp.
Connect your streaming media player to the projector's HDMI port.
c
By connecting the power supply USB cable, you can power the streaming
media player from the projector.
Remove the rear cover from the projector.
a
Page 19

Projector Connections
19
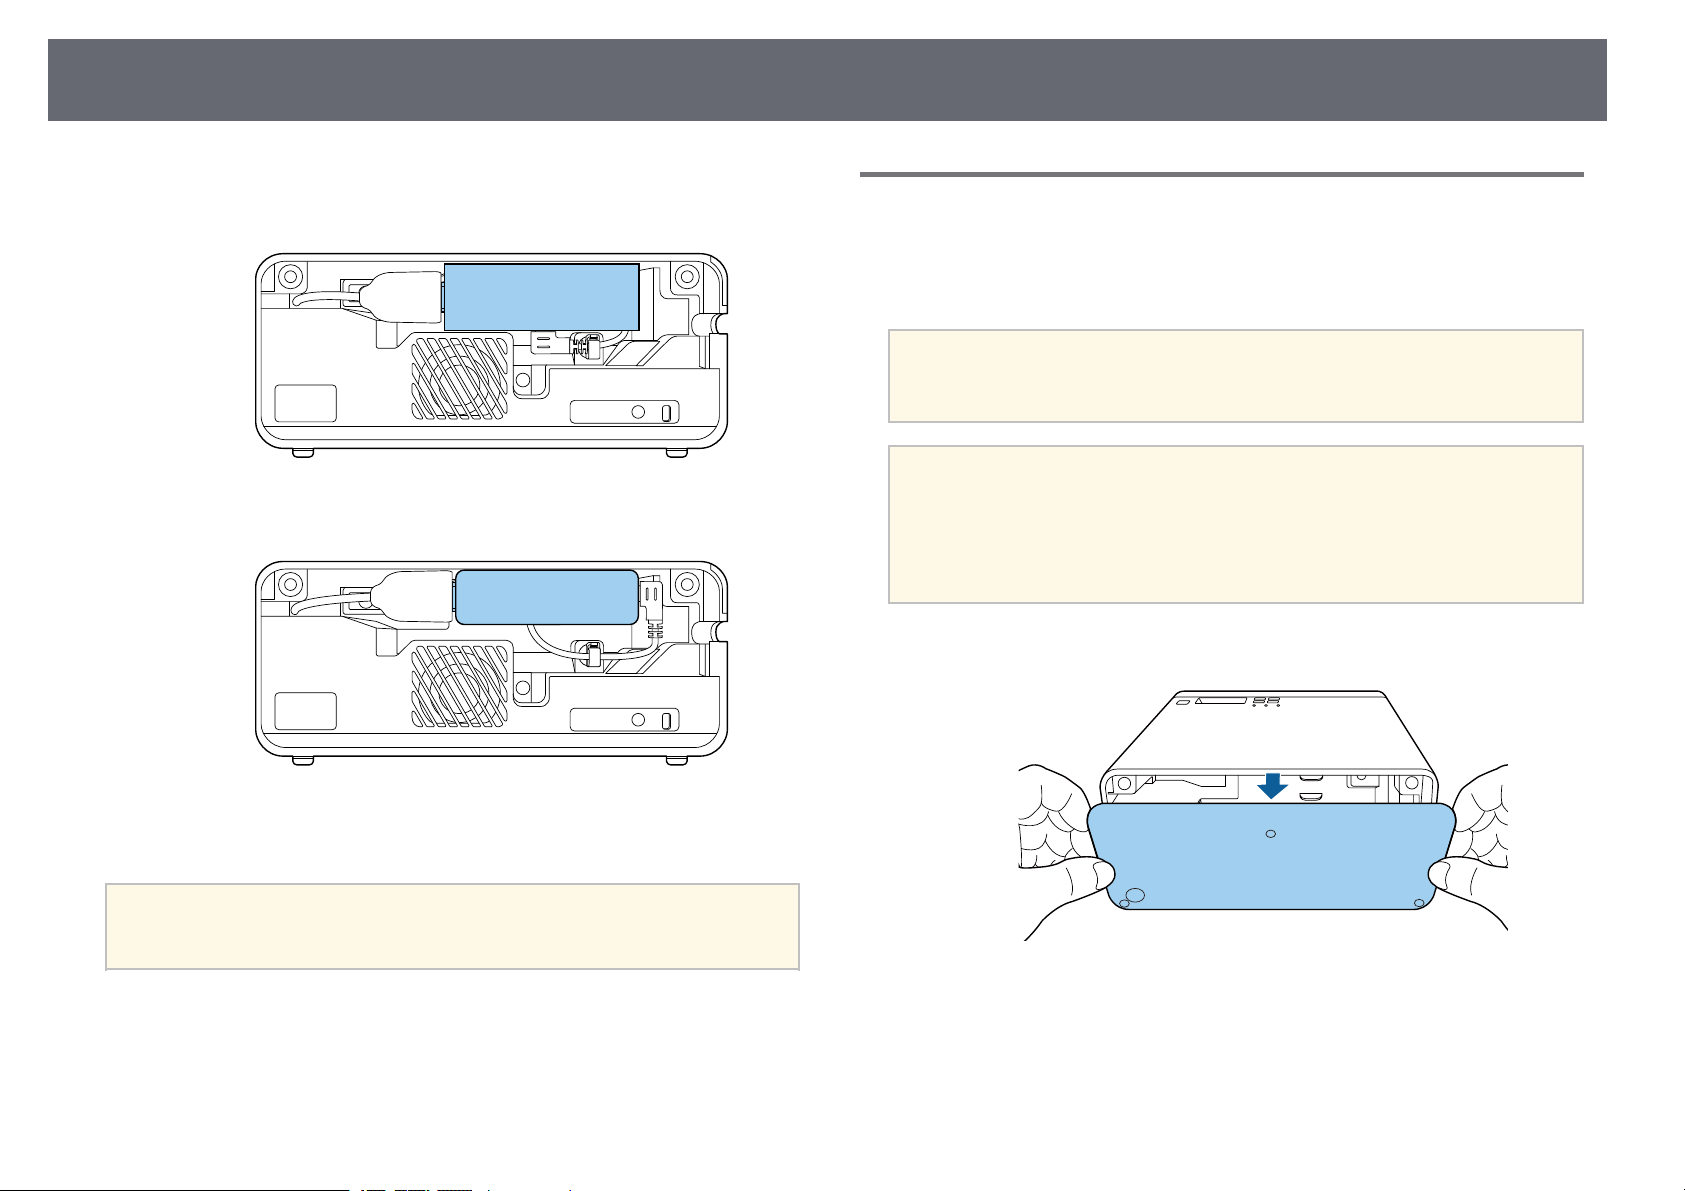
Connect the power supply USB cable to the streaming media player's
d
USB port (Type-B).
• USB port on the side
• USB port at the bottom
Pass the power supply USB cable through the cable hook and cable
e
clamp, and then close the cable clamp to secure the cable.
• USB port on the side
• USB port at the bottom
Page 20
Projector Connections
20
Place the streaming media player as shown.
f
• USB port on the side
• USB port at the bottom
Connecting to Video Sources
If your video source has an HDMI port, you can connect it to the projector
using an HDMI cable and send the image source's audio with the projected
image.
Attention
Do not turn on the video source before connecting it to the projector. Doing so
could damage the projector.
• If the port on the device you connect has an unusual shape, use the
a
Remove the rear cover from the projector.
a
cable supplied with the device or an optional cable to connect to the
projector.
• Some video equipment is capable of outputting different types of
signals. See your video equipment manual to confirm what type of
signals can be output.
Replace the rear cover.
g
If your streaming media player supports the HDMI CEC standard, you
a
can operate some of the player's functions by using the projector's
remote control. See your streaming media player's manual for details.
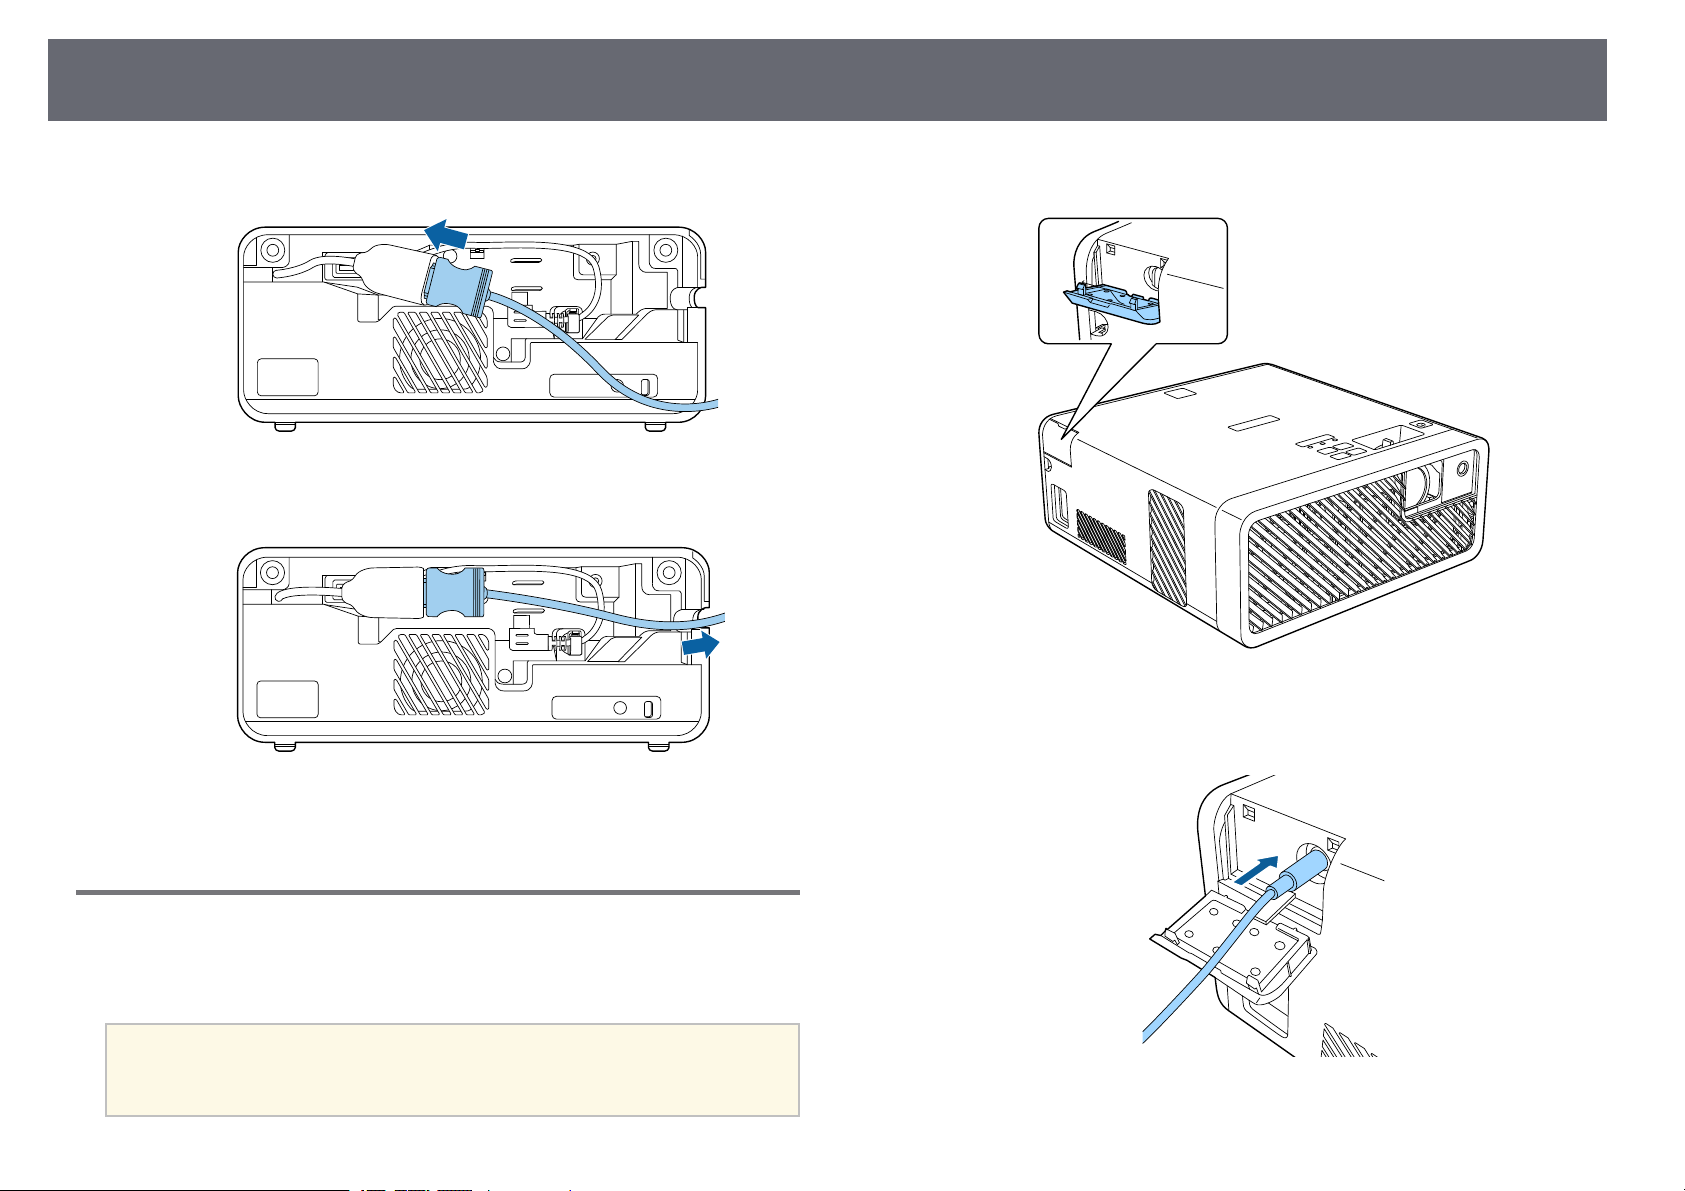
Connect the HDMI cable to your video source's HDMI output port.
b
Page 21
Projector Connections
21
Connect the other end to the projector's HDMI port.
c
Pass the HDMI cable through the cable path as shown.
d
Open the Audio Out port cover.
a
Connect the stereo headphone's mini-jack cable to the projector's
b
Audio Out port.
Replace the rear cover.
e
Connecting Headphones
You can connect headphones to the projector's Audio Out port. You can
control the volume using the projector's remote control.
Attention
The projector's Audio Out port only supports 3-pin headphones. If you use any
other headphones, audio may not be output normally.
Page 22
Projector Connections
Caution
Do not start a playback at a high volume setting. Sudden loud noises may cause
hearing loss.
Always lower the volume before powering off, so that you can power on and then
gradually increase the volume.
Connecting to Bluetooth®Audio Devices
You can connect your projector to Bluetooth audio devices (A2DP compliant)
such as speakers or headphones to output audio from streaming media player
or other video equipment connected to the projector.
• There is a delay in the audio output from any Bluetooth audio
a
devices.
• Bluetooth audio devices are not supported in some countries and
regions.
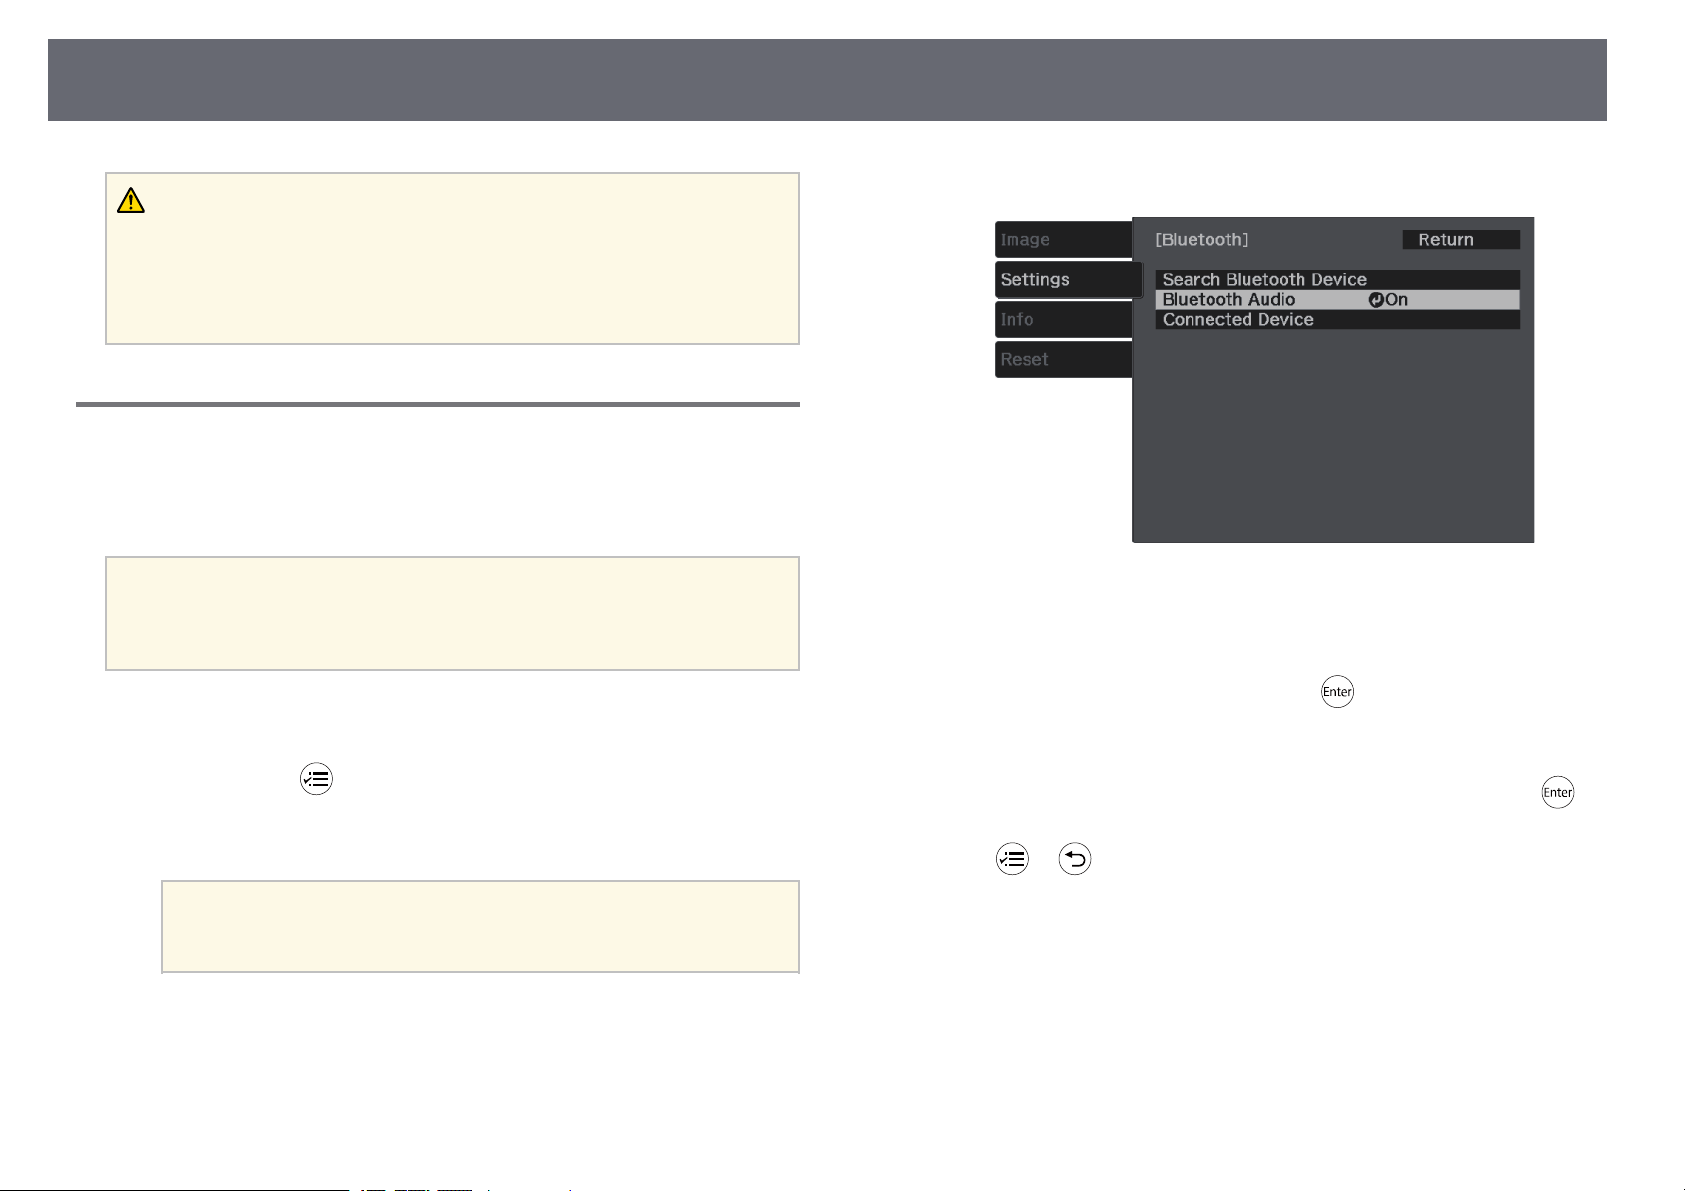
Select On as the Bluetooth Audio setting.
c
Turn on "pairing mode" on the Bluetooth audio device you want to
d
connect to. See your Bluetooth audio device manual for details.
22
Turn on the projector and display an image.
a
Hold down the button on the remote control for about two
b
seconds.
The Bluetooth screen is displayed.
You can also select Bluetooth settings in the projector's Settings
a
menu.
s Settings > Sound > Bluetooth
Select Search Bluetooth Device and press .
e
A list of available devices is displayed.
Select the Bluetooth audio device you want to connect to and press .
f
Press or to exit the menus.
g
The next time you turn on the projector, the last connected device is
automatically connected to the projector. To change the connected device,
repeat from steps 4.
gg Related Links
• "Bluetooth Specifications" p.23
Page 23

Projector Connections
Bluetooth Specifications
Version Bluetooth Ver. 3.0
Output Class 2
Communication distance Approx. 10 m
Supported profiles A2DP
Content protection SCMS-T
Frequency used 2.4 GHz band (2.402 to 2.480 GHz)
Supported codecs SBC, Qualcomm®aptX™audio
Warning
Do not use the device near any medical equipment or equipment that is
automatically controlled, such as automatic doors or fire alarms. Electromagnetic
interference from the device may cause such equipment to malfunction and cause
an accident.
23
a
• Connect a Bluetooth device that supports copyright protection
(SCMS-T).
• You may not be able to connect depending on the standard and type
of device.
• Even when connecting within the specified communication distance,
connections can be lost due to the status of the signal.
• The communication method for Bluetooth uses the same frequency
(2.4 GHz) as wireless LAN (IEEE802.11b/g) or microwave ovens.
Therefore, if these devices are used at the same time, radio wave
interference may occur, the audio may be interrupted, or
communication may not be possible. If you do need to use these
devices at the same time, make sure there is enough distance between
them and the Bluetooth device.
• You cannot connect multiple Bluetooth devices to the projector at
the same time.
Page 24
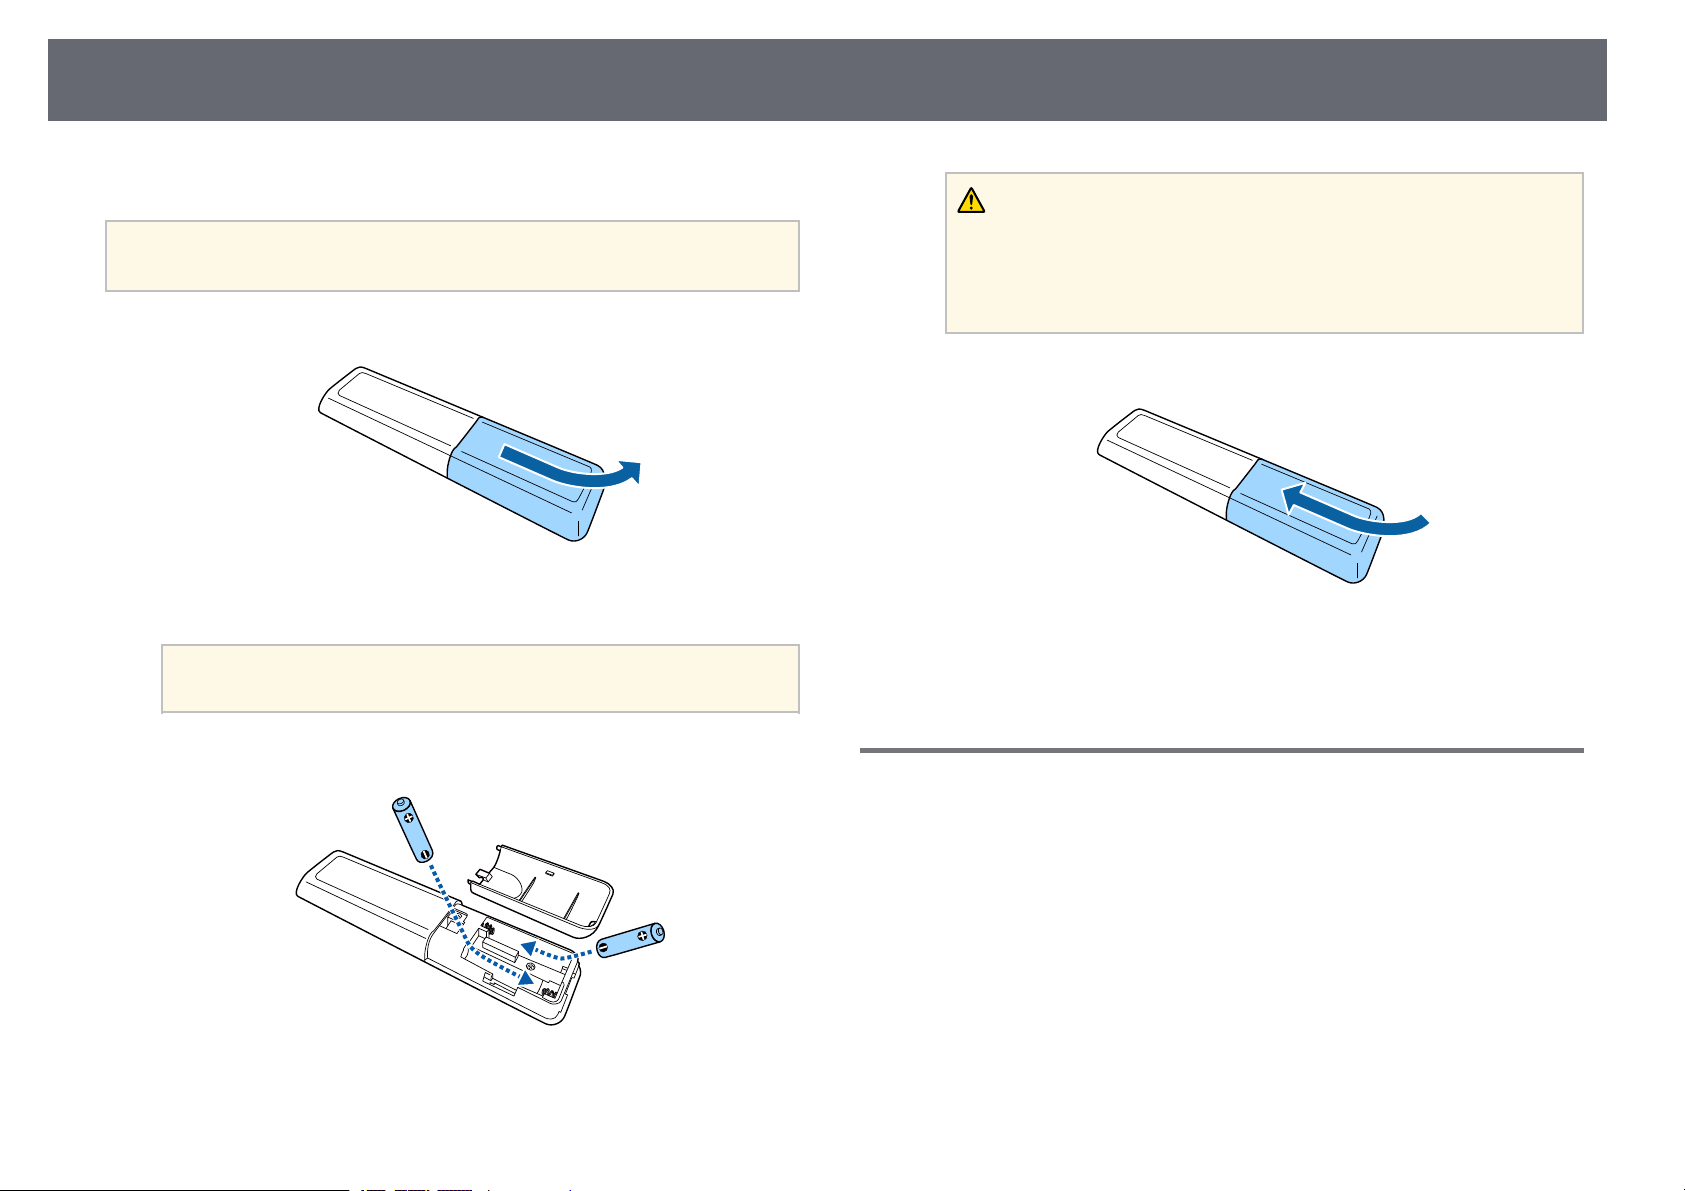
Installing Batteries in the Remote Control
The remote control uses the two AAA batteries that came with the projector.
24
Warning
Attention
Make sure you read the Safety Instructions before handling the batteries.
Remove the battery cover as shown.
a
Remove the old batteries, if necessary.
b
Dispose of used batteries according to local regulations.
a
Insert the batteries with the + and – ends facing as shown.
c
Check the positions of the (+) and (–) marks inside the battery holder to
ensure the batteries are inserted the correct way. If the batteries are not used
correctly, they could explode or leak causing a fire, injury, or damage to the
product.
Replace the battery cover and press it down until it clicks into place.
d
gg Related Links
• "Remote Control Operation" p.24
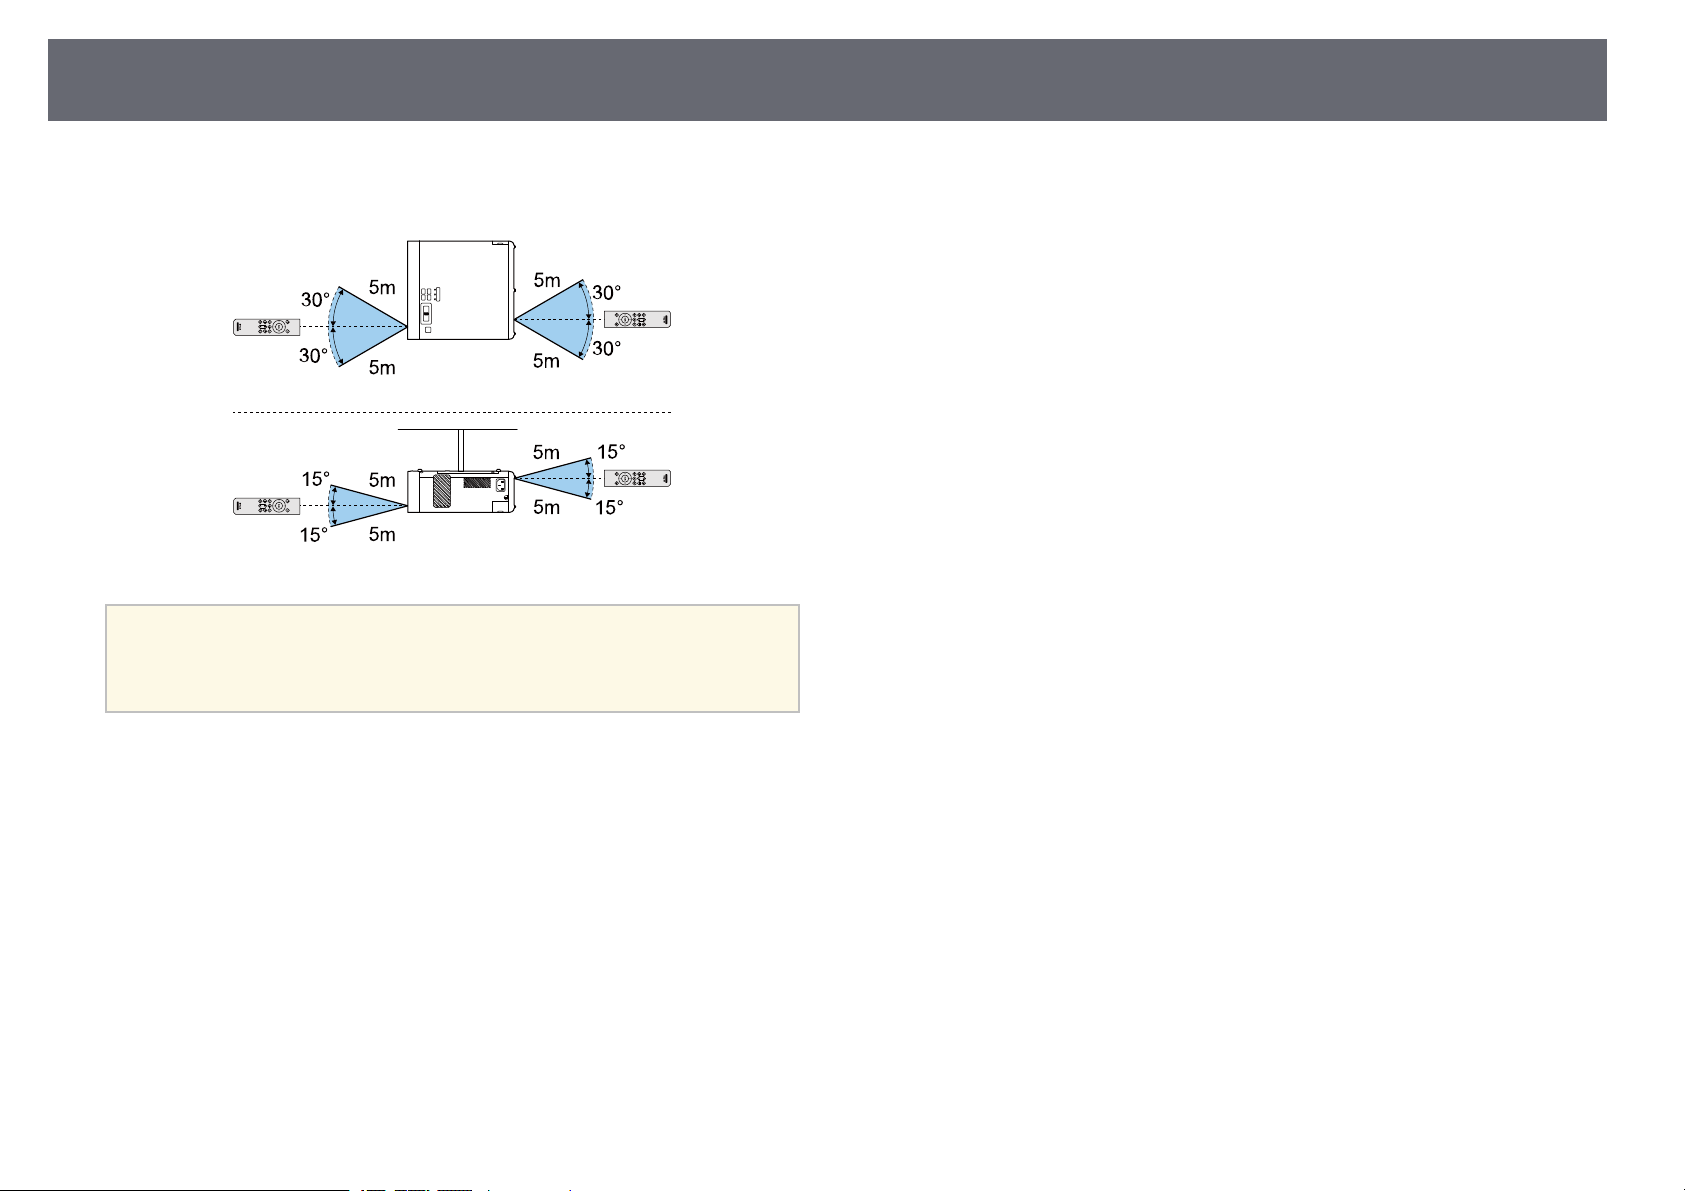
Remote Control Operation
The remote control lets you control the projector from almost anywhere in
the room.
Page 25
Installing Batteries in the Remote Control
Make sure that you aim the remote control at the projector's receivers within
the distance and angles listed here.
Avoid using the remote control in conditions with bright fluorescent
a
lights or in direct sunlight, or the projector may not respond to
commands. If you are not going to use the remote control for a long
time, remove the batteries.
25
Page 26

Using Basic Projector Features
Follow the instructions in these sections to use your projector's basic features.
gg Related Links
• "Turning On the Projector" p.27
• "Turning Off the Projector" p.28
• "Selecting the Language for the Projector Menus" p.29
• "Projection Modes" p.30
• "Adjusting the Image Height" p.31
• "Image Shape" p.32
• "Focusing the Image Using the Focus Lever" p.36
• "Resizing the Image with Zoom" p.37
• "Image Aspect Ratio" p.38
• "Adjusting Image Quality (Color Mode)" p.40
• "Adjusting the Sharpness" p.42
• "Adjusting the Image Color" p.43
• "Adjusting the Light Source Brightness" p.47
• "Saving Settings to Memory and Using Saved Settings" p.48
• "Controlling the Volume with the Volume Buttons" p.49
• "Changing the Sound Mode" p.50
Page 27
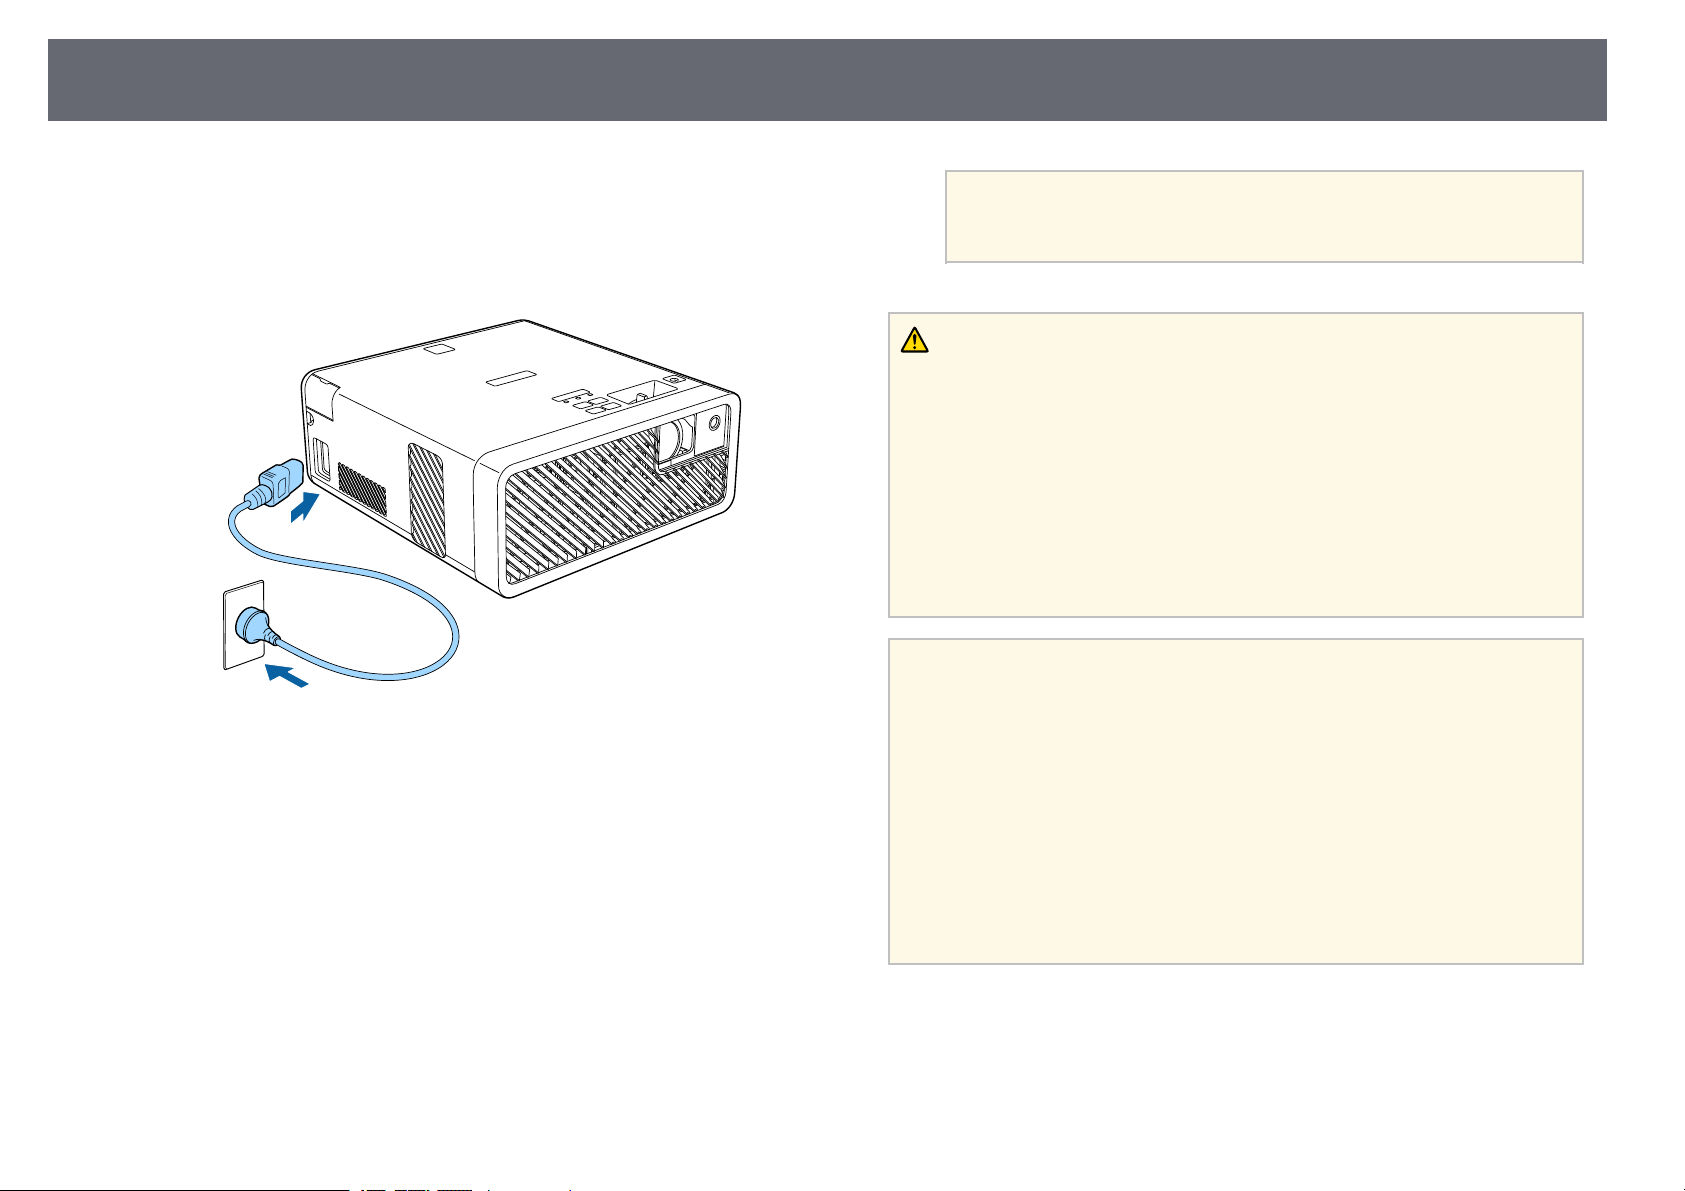
Turning On the Projector
27
Turn on the streaming media player or video equipment you want to use after
you turn on the projector.
Connect the power cord to the projector's power inlet and plug it into
a
an electrical outlet.
The projector's power indicator turns blue. This indicates that the
projector is receiving power, but is not yet turned on (it is in standby
mode).
Press the power button on the control panel or remote control to turn
b
on the projector.
The status indicator flashes blue as the projector warms up. Once the
projector is warmed up, the status indicator stops flashing and turns
blue.
If you want to display the Welcome Guide screen again, select
a
Welcome Guide in the projector's Settings menu.
s Settings > Display > Welcome Guide
Warning
• Never look into the projector lens when the light source is on. This can damage
your eyes and is especially dangerous for children.
• When turning on the projector at a distance using the remote control, make sure
there is no one looking into the lens.
• During projection, do not block the light from the projector with a book or other
objects. If the light from the projector is blocked, the area on which the light
shines becomes hot which could cause it to melt, burn, or start a fire. Also, the
lens may get hot due to the reflected light which could cause the projector to
malfunction. To stop projection, use the A/V Mute function, or turn off the
projector.
• When the Direct Power On setting is set to On in the projector's
a
Settings menu, the projector turns on as soon as you plug it in. Note
that the projector also turns on automatically in cases such as
recovering from a power outage.
s Settings > Operation > Direct Power On
• This projector provides a Child Lock function to prevent children
from accidentally turning the power on and a Control Panel Lock
function to prevent accidental operations and so on.
s Settings > Operation > Child Lock
s Settings > Operation > Control Panel Lock
• When using at an altitude of 1500 m or more, set High Altitude
Mode to On.
s Settings > Installation > High Altitude Mode
The first time you turn on the projector, the Welcome Guide screen is
displayed. The Welcome Guide shows product features and tips on
how to use the projector.
gg Related Links
• "Projector Feature Settings - Settings Menu" p.61
Page 28

Turning Off the Projector
Turn off the projector after use.
• Turn off this product when it is not in use to prolong the life of the
a
Press the power button on the control panel or remote control.
a
The projector displays a shutdown confirmation screen.
projector. Light source life varies depending on the environmental
conditions and usage. Brightness decreases over time.
• Since the projector supports the direct shutdown feature, it can be
turned off directly using the breaker.
28
Press the power button again. (To leave it on, press any other button.)
b
The light source turns off, and the status indicator turns off.
To transport or store the projector, make sure the power indicator is
c
blue (but not flashing) and the status indicator is off, then unplug the
power cord.
You can keep supplying power to the streaming media player even if
a
gg Related Links
• "Projector Feature Settings - Settings Menu" p.61
the projector is in standby mode by selecting On as the USB Power in
Standby setting. This lets the device start earlier, or perform updates
automatically over a network if necessary.
s Settings > Operation > USB Power in Standby
Page 29
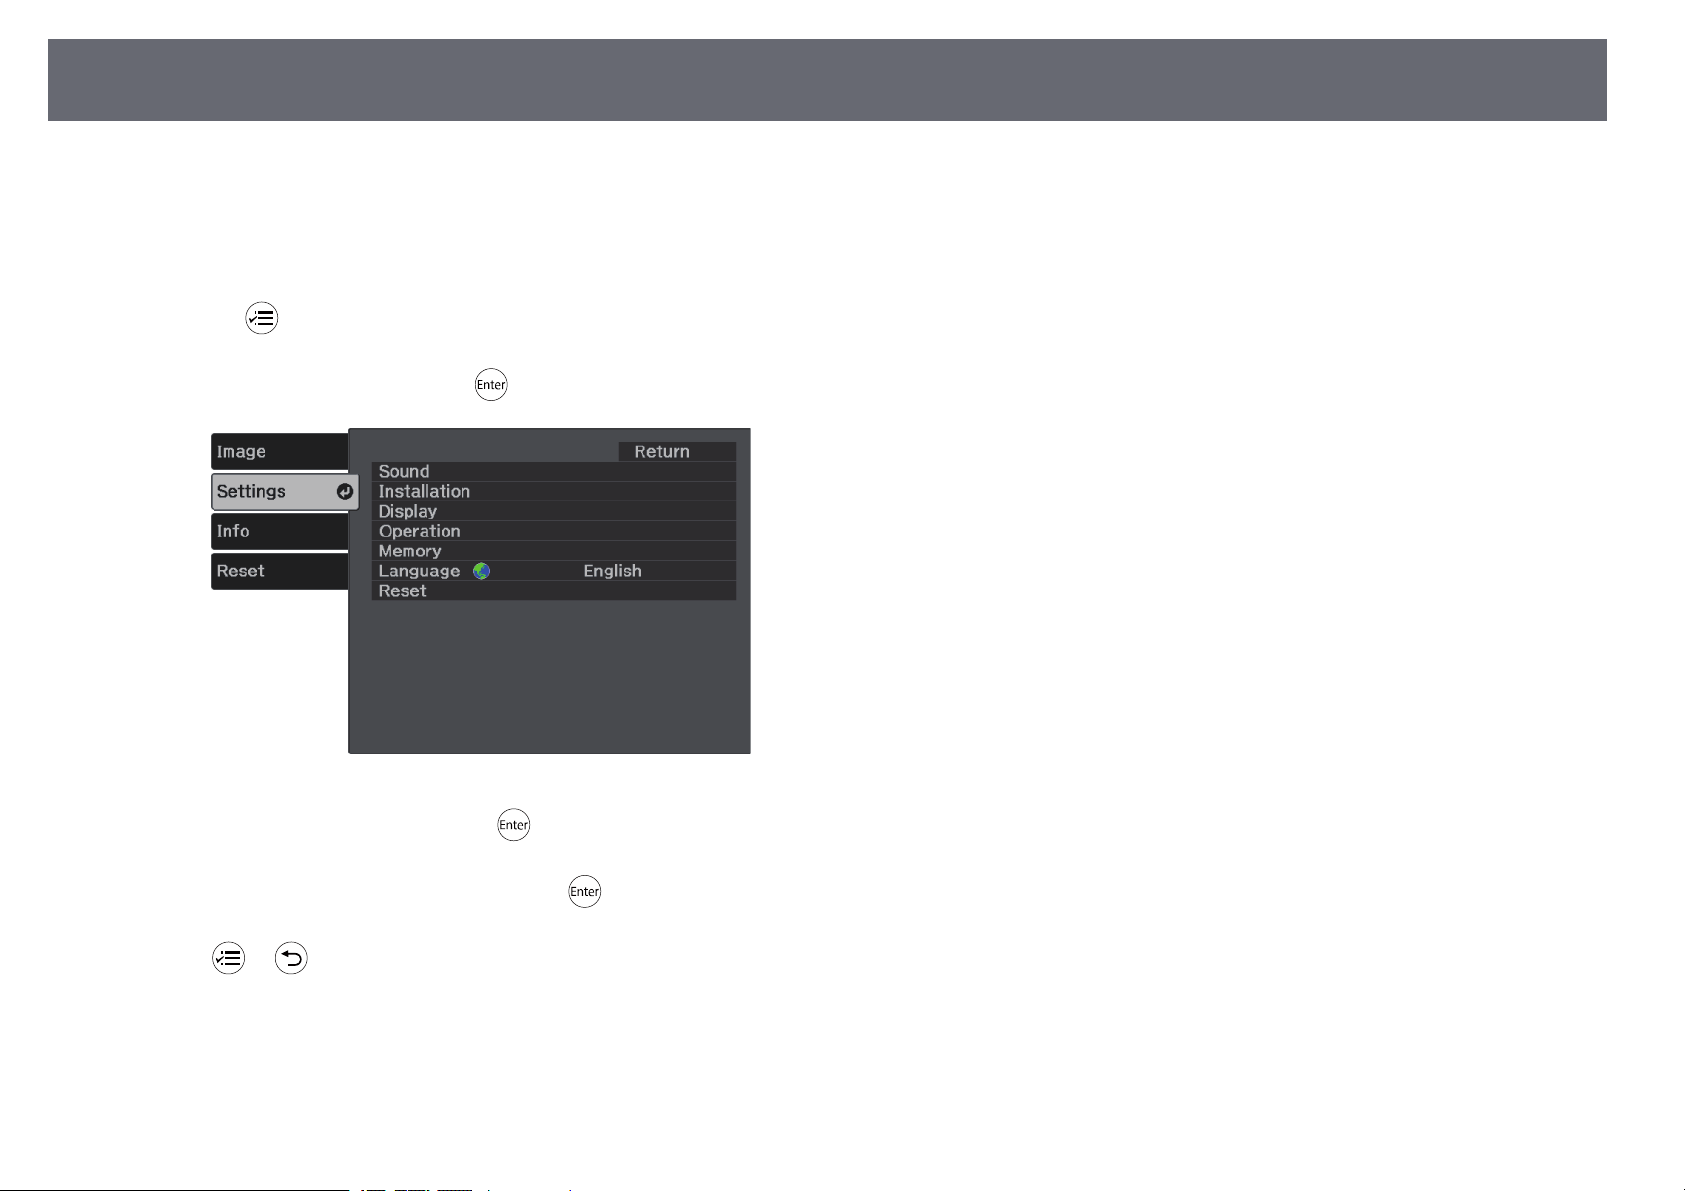
Selecting the Language for the Projector Menus
If you want to view the projector's menus and messages in another language,
you can change the Language setting.
Turn on the projector.
a
Press the button on the remote control.
b
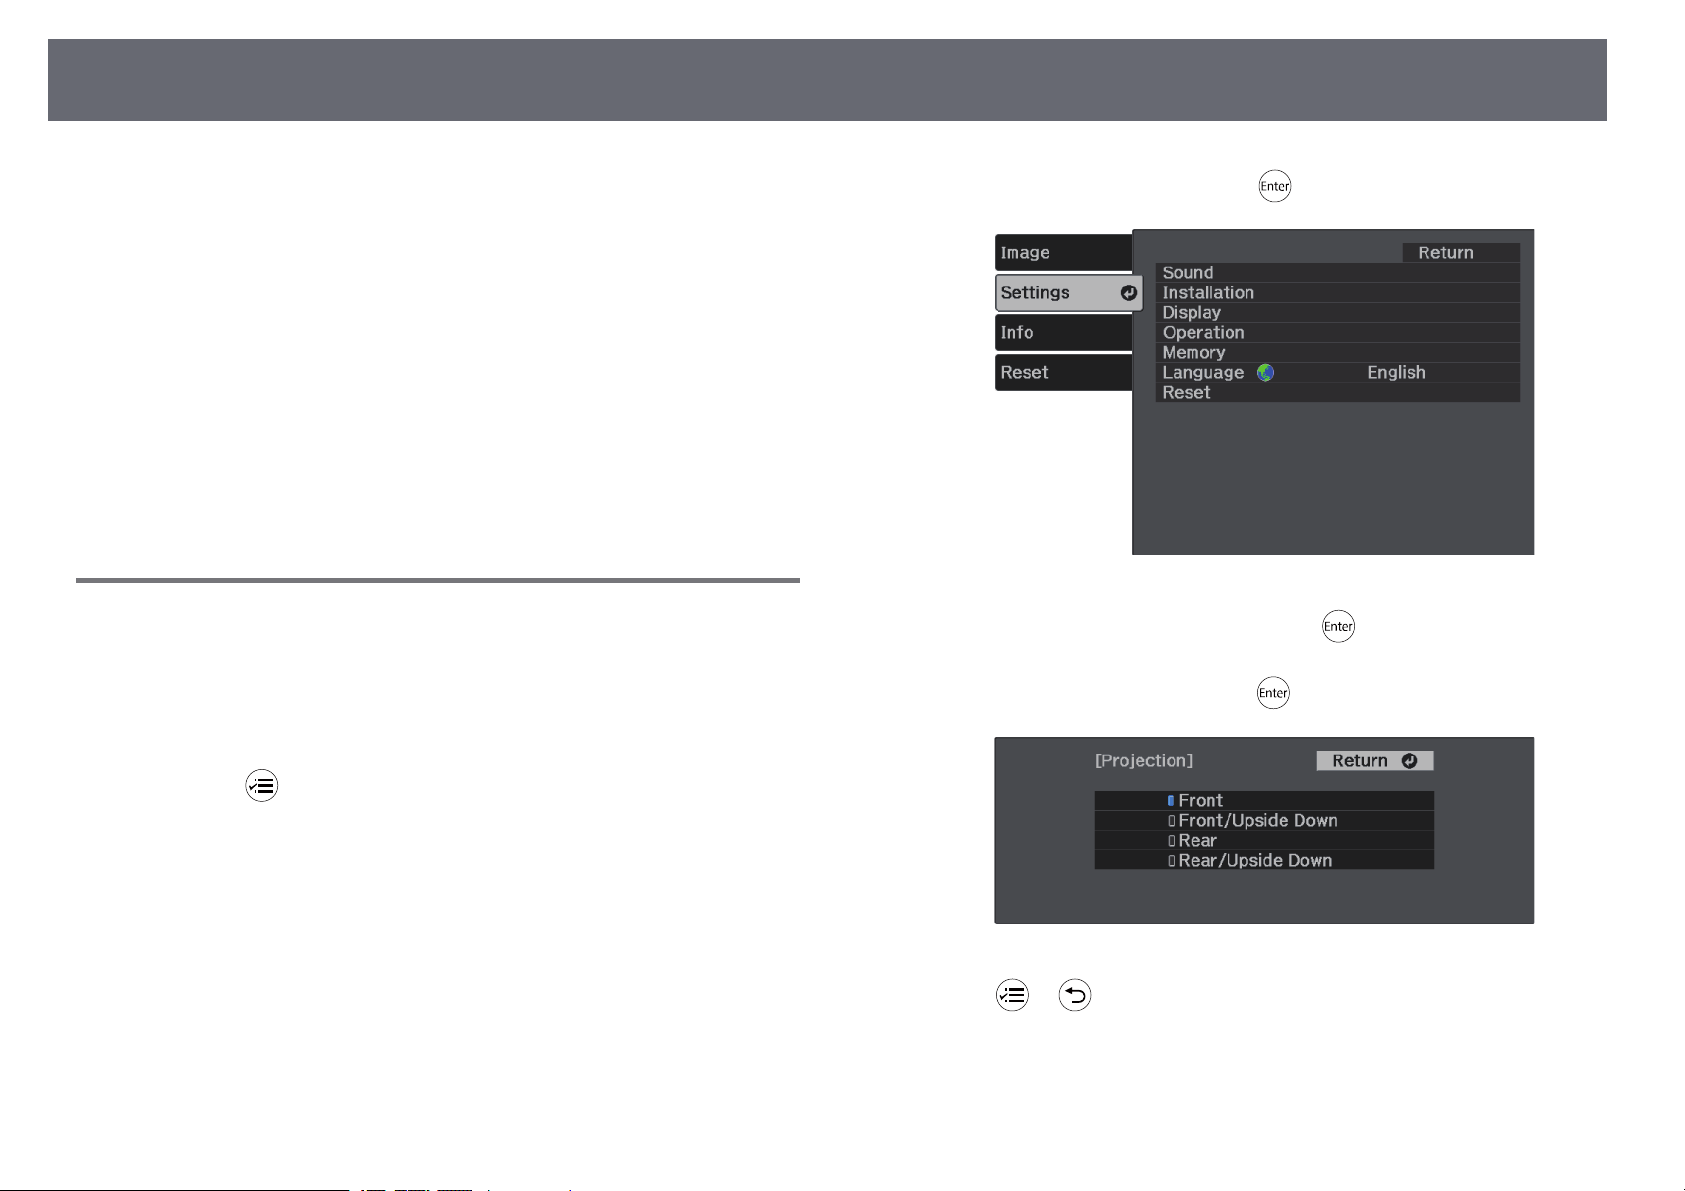
Select the Settings menu and press .
c
29
Select the Language setting and press .
d
Select the language you want to use and press .
e
Press or to exit the menus.
f
Page 30
Projection Modes
30
Depending on how you positioned the projector, you may need to change the
projection mode so your images project correctly.
• Front (default setting) lets you project from a table in front of the screen.
• Front/Upside Down flips the image over top-to-bottom to project upsidedown from a ceiling or wall mount.
• Rear flips the image horizontally to project from behind a translucent
screen.
• Rear/Upside Down flips the image over top-to-bottom and horizontally to
project from a ceiling or wall mount and behind a translucent screen.
gg Related Links
• "Changing the Projection Mode Using the Menus" p.30
• "Projector Setup and Installation Options" p.16
Changing the Projection Mode Using the Menus
You can change the projection mode to flip the image over top-to-bottom
and/or left-to-right using the projector menus.
Turn on the projector and display an image.
a
Select the Settings menu and press .
c
Select Installation > Projection and press .
d
Select a projection mode and press .
e
Press the button on the remote control.
b
Press or to exit the menus.
f
Page 31

Adjusting the Image Height
If you are projecting from a table or other flat surface and the image is too
high or low, you can adjust the image height using the projector's adjustable
foot.
The larger the angle of tilt, the harder it becomes to focus. Locate the
projector so that it only needs to be tilted at a small angle.
Turn on the projector and display an image.
a
Press the foot release lever to extend and retract the front adjustable
b
foot.
31
The foot extends from the projector.
You can adjust the position up to 11 degrees.
Release the lever to lock the foot.
c
If the projected image is unevenly rectangular, you need to adjust the image
shape.
gg Related Links
• "Image Shape" p.32
Page 32

Image Shape
32
You can project an even, rectangular image by placing the projector directly
in front of the center of the screen and keeping it level. If you place the
projector at an angle to the screen, or tilt it up or down, or off to the side, you
may need to correct the image shape.
gg Related Links
• "Auto V-Keystone" p.32
• "Correcting the Image Shape Horizontally with the Horizontal Keystone
Buttons" p.32
• "Correcting the Image Shape with the Keystone Button" p.33
• "Correcting the Image Shape with Quick Corner" p.34
Auto V-Keystone
When the projector is moved or tilted, Auto V-Keystone automatically
corrects any vertical keystone distortion.
Auto V-Keystone can correct the projected image distortion in these
conditions:
• The OSD Rotation setting is set to Off in the projector's Settings menu
s Settings > Installation > OSD Rotation
• Auto V-Keystone can correct the shape of an image vertically in a
a
projection angle of 360 degrees. If you want to correct the shape of
the image finely, use the button on the remote control to correct
images manually.
• If you do not want to use the Auto V-Keystone function, set Auto V-
Keystone to Off in the projector's menu.
s Settings > Installation > Keystone > H/V-Keystone > Auto V-
Keystone
Correcting the Image Shape Horizontally with the Horizontal Keystone Buttons
You can use the projector's horizontal keystone buttons to correct the shape
of an image horizontally when it is projected as an uneven rectangle.
You can use horizontal keystone buttons to correct images up to 40º right or
left.
Turn on the projector and display an image.
a
Press one of the horizontal keystone buttons on the control panel.
b
You see the Keystone adjustment screen:
Press a keystone button to adjust the image shape.
c
gg Related Links
• "Projector Feature Settings - Settings Menu" p.61
• "Correcting the Image Shape with the Keystone Button" p.33
After correction, your image is slightly smaller.
Page 33

Image Shape
33
If the projector is installed out of your reach, you can also correct
a
the shape of the image using the button on the remote
control.
Correcting the Image Shape with the Keystone Button
You can use the button on the remote control to correct the shape of an
image that is unevenly rectangular.
• You cannot combine H/V-Keystone correction with other image
a
shape correction methods.
• You can correct horizontal keystone distortion up to 40º right or left.
You see the Keystone adjustment screen:
Use the arrow buttons on the remote control to select between vertical
c
and horizontal keystone correction and to adjust the image shape as
necessary.
• V-Keystone
• H-Keystone
Turn on the projector and display an image.
a
Press the button on the remote control.
b
When you are finished, press .
d
After correction, your image is slightly smaller.
Page 34

Image Shape
34
Correcting the Image Shape with Quick Corner
You can use the projector's Quick Corner setting to correct the shape and size
of an image that is unevenly rectangular.
Turn on the projector and display an image.
a
Press the button on the remote control.
b
Select the Settings menu and press .
c
Select Installation > Keystone and press .
d
Select Quick Corner and press . Then press again if necessary.
e
You see the area selection screen.
Use the arrow buttons to select the corner of the image you want to
f
adjust. Then press .
a
Press the arrow buttons to adjust the image shape as necessary.
g
To reset the Quick Corner corrections, hold down for about
two seconds while the area selection screen is displayed, and then
select Yes.
Page 35

Image Shape
To return to the area selection screen, press .
• If you see this screen, you cannot adjust the shape any further
a
Repeat steps 6 and 7 as needed to adjust any remaining corners.
h
35
in the direction indicated by the gray triangle.
When you are finished, press .
i
gg Related Links
• "Projector Feature Settings - Settings Menu" p.61
Page 36

Focusing the Image Using the Focus Lever
You can correct the focus using the focus lever.
36
Page 37

Resizing the Image with Zoom
37
You can resize the image using the projector's menu.
Turn on the projector and display an image.
a
Press the button on the remote control.
b
Select the Settings menu and press .
c
Press the left or right arrow button to adjust the zoom setting and press
e
.
Press or to exit the menus.
f
Select Installation > Zoom and press .
d
Page 38

Image Aspect Ratio
38
The projector can display images in different width-to-height ratios called
aspect ratios. Normally, the input signal from your video source determines
the image's aspect ratio. However, you can change the aspect ratio for certain
images to fit your screen.
If you always want to use a particular aspect ratio for a certain video input
source, you can select it using the projector's Image menu.
gg Related Links
• "Changing the Image Aspect Ratio" p.38
• "Available Image Aspect Ratios" p.39
• "Projected Image Appearance with Each Aspect Mode" p.39
• "Image Quality Settings - Image Menu" p.60
Changing the Image Aspect Ratio
You can change the aspect ratio of the displayed image.
Turn on the projector and display an image.
a
Press the button on the remote control.
b
Select the Image menu and press .
c
Select Aspect and press .
d
Select one of the available aspect ratios for your input signal and press
e
.
Press or to exit the menus.
f
gg Related Links
• "Image Quality Settings - Image Menu" p.60
Page 39

Image Aspect Ratio
39
Available Image Aspect Ratios
You can select the following image aspect ratios, depending on the input
signal from your image source.
• Black bands and cropped images may project in certain aspect ratios,
a
Aspect mode Description
Auto Automatically sets the aspect ratio according to the
16:9 Converts the aspect ratio of the image to 16:9.
Full Displays images using the full size of the projection
Zoom Displays images using the full width of the projection
depending on the aspect ratio and resolution of your input signal.
• Note that using the aspect ratio function of the projector to reduce,
enlarge, or split the projected image for commercial purposes or for
public viewing may infringe upon the rights of the copyright holder
of that image based on copyright law.
input signal.
area, but does not maintain the aspect ratio.
area and maintains the aspect ratio of the image.
Aspect mode Aspect ratio for input signals
16:10 16:9 4:3
16:9
Full
Zoom
Projected Image Appearance with Each Aspect Mode
Black bands and cropped images may project in certain aspect ratios,
depending on the aspect ratio and resolution of your input signal. See the
following table to confirm the position of black bands and cropped images.
Aspect mode Aspect ratio for input signals
16:10 16:9 4:3
Auto
Page 40

Adjusting Image Quality (Color Mode)
40
The projector offers different color modes to provide optimum brightness,
contrast, and color for a variety of viewing environments and image types.
You can select the mode designed to match your image and environment, or
experiment with the available modes.
gg Related Links
• "Changing the Color Mode" p.40
• "Available Color Modes" p.40
• "Turning On Automatic Luminance Adjustment" p.40
Changing the Color Mode
You can change the projector's Color Mode using the remote control to
optimize the image for your viewing environment.
Turn on the projector and display an image.
a
Press the button on the remote control to change the Color Mode.
b
The name of the Color Mode appears briefly on the screen and then
image appearance changes.
To cycle through all of the available color modes for your input signal,
c
press the button repeatedly.
Available Color Modes
You can set the projector to use these color modes, depending on your
environment and image types.
Color mode Description
Dynamic This is the brightest mode. Best for prioritizing
brightness.
Bright Cinema Best for projecting vivid images.
Natural Best for adjusting the image color.
Cinema Best for enjoying content such as movies.
Turning On Automatic Luminance Adjustment
You can turn on Dynamic Contrast to automatically optimize the image
luminance. This improves the image contrast based on the brightness of the
content you project.
This setting is available for Dynamic or Cinema color modes.
Turn on the projector and display an image.
a
Press the button on the remote control.
b
You can also set the Color Mode setting in the projector's Image
a
gg Related Links
• "Image Quality Settings - Image Menu" p.60
menu.
Page 41

Adjusting Image Quality (Color Mode)
Select the Image menu and press .
c
Select Brightness > Dynamic Contrast and press .
d
41
Select one of the following options and press :
e
• Normal for standard brightness adjustment.
• High Speed to adjust brightness as soon as the scene changes.
Press or to exit the menus.
f
Page 42

Adjusting the Sharpness
42
You can fine-tune various aspects of the quality of your projected images.
Turn on the projector and display an image.
a
Press the button on the remote control.
b
Select the Image menu and press .
c
• To reduce flickering in MPEG images, adjust the MPEG Noise
Reduction setting.
Press or to exit the menus.
f
Select Sharpness and press .
d
Do the following as necessary for each setting:
e
• To adjust the outline of the image, adjust the Sharpness setting.
• To reduce flickering in images, adjust the Noise Reduction setting.
Page 43

Adjusting the Image Color
43
You can fine-tune various aspects of how colors are displayed in your
projected images.
gg Related Links
• "Adjusting the Color Temperature" p.43
• "Adjusting the RGB Offset and Gain" p.43
• "Adjusting the Hue, Saturation, and Brightness" p.44
• "Adjusting the Gamma" p.45
Adjusting the Color Temperature
You can set the overall color tone by adjusting the Color Temp. setting if the
image is too bluish or reddish.
Turn on the projector and display an image.
a
Press the button on the remote control.
b
Select the Image menu and press .
c
Select Color > White Balance > Color Temp. and press .
d
Press the left or right arrow button to adjust the color tone of the
e
image.
Higher values tint the image blue and lower values tint the image red.
Press or to exit the menus.
f
Adjusting the RGB Offset and Gain
You can adjust the brightness of dark and bright areas by adjusting the Offset
and Gain settings for individual image colors.
Turn on the projector and display an image.
a
Press the button on the remote control.
b
Page 44

Adjusting the Image Color
44
Select the Image menu and press .
c
Select Color > White Balance > Custom and press .
d
Do the following as necessary for each R (red), G (green), and B (blue):
e
• To adjust the brightness of dark areas, adjust the Offset setting.
• To adjust the brightness of bright areas, adjust the Gain setting.
the image appears more full-bodied but shading for the dark areas is
harder to distinguish.
In the Gain setting, the bright areas become whiter and shading is lost
when you select a high value. When you select a low value, shading for
the bright areas is more vividly expressed.
Press or to exit the menus.
f
Adjusting the Hue, Saturation, and Brightness
You can adjust the Hue, Saturation, and Brightness settings for individual
image colors.
Turn on the projector and display an image.
a
Press the button on the remote control.
b
Select the Image menu and press .
c
Higher values make the image brighter and lower values make the
image darker.
In the Offset setting, shading for the dark areas is more vividly
expressed when you select a high value. When you select a low value,
Page 45

Adjusting the Image Color
45
Select Color > RGBCMY and press .
d
Select the color to adjust, and press .
e
Do the following as necessary for each setting:
f
• To adjust the overall hue of the color, bluish - greenish - reddish,
adjust the Hue setting.
• To adjust the overall vividness of the color, adjust the Saturation
setting.
• To adjust the overall color brightness of the color, adjust the
Brightness setting.
Turn on the projector and display an image.
a
Press the button on the remote control.
b
Select the Image menu and press .
c
Select Brightness > Gamma and press .
d
Press or to exit the menus.
g
Adjusting the Gamma
You can correct differences in projected image colors that occur between
different image sources by adjusting the Gamma setting.
Select and adjust the correction value.
e
Page 46

Adjusting the Image Color
46
When you select a smaller value, you can reduce the overall brightness
of the image to make the image sharper. When you select a larger value,
the dark areas of images become brighter, but the color saturation for
lighter areas may become weaker.
If you want to make finer adjustments, select Custom and press .
f
Press the left or right arrow buttons to select the color tone you want to
g
adjust on the gamma adjustment graph. Then press the up or down
arrow button to adjust the value and press .
Press or to exit the menus.
h
Page 47

Adjusting the Light Source Brightness
You can adjust the brightness of your projector's light source.
Turn on the projector and display an image.
a
Press the button on the remote control.
b
Select the Image menu and press .
c
47
Select Light Output and press .
d
Press the left and right arrow buttons to select the brightness.
e
Press or to exit the menus.
f
Page 48

Saving Settings to Memory and Using Saved Settings
48
You can save the customized Image menu settings for your video inputs and
then select the saved settings whenever you want to use them.
Turn on the projector and display an image.
a
Press the button on the remote control.
b
Select the Settings menu and press .
c
Select Memory and press .
d
• Erase Memory lets you erase the selected memory settings.
• Rename Memory lets you rename a saved memory.
Press or to exit the menus.
f
• The saved Color Mode is displayed on the right of the memory
a
name.
• To delete all saved memories, select Reset Memory in the projector's
Reset menu.
Select one of the following options:
e
• Load Memory lets you overwrite your current Image menu settings
with saved settings.
• Save Memory lets you save your current Image menu settings to
memory (10 memories with different names are available).
A memory name that has already been used is indicated by a
a
blue mark. Saving over a previously saved memory overwrites
the settings with your current settings.
Page 49

Controlling the Volume with the Volume Buttons
The volume buttons control the projector's internal speaker system.
You can also control the volume of Bluetooth audio devices connected to the
projector.
You must adjust the volume of the projector's internal speaker system and the
Bluetooth audio devices separately.
Turn on the projector and start a video.
a
To lower or raise the volume, press the or button on the
b
control panel or remote control.
A volume gauge appears on the screen.
Caution
Do not start a playback at a high volume setting. Sudden loud noises may cause
hearing loss.
Always lower the volume before powering off, so that you can power on and then
gradually increase the volume.
49
gg Related Links
• "Projector Feature Settings - Settings Menu" p.61
Page 50

Changing the Sound Mode
50
The projector offers different sound modes to provide optimum sound for a
variety of image types.
You can select the mode designed to match your image, or experiment with
the available modes.
Sound Mode is disabled when the audio is output from Bluetooth
a
a
b
c
audio devices.
Turn on the projector and start a video.
Press the button on the remote control.
Select the Settings menu and press .
Select your sound mode and press .
e
Press or to exit the menus.
f
gg Related Links
• "Available Sound Modes" p.50
Available Sound Modes
You can set the projector to use these sound modes, depending on the input
source you are using:
Select Sound > Sound Mode and press .
d
Sound mode Description
Standard Outputs the audio using normal sound quality.
Vocal Best for hearing voices and spoken lines.
Music Best for music. Low and high pitch sounds are clearer.
Movie Best for audio from videos or movies. Low and high
pitch sounds are emphasized.
Page 51

Adjusting Projector Features
Follow the instructions in these sections to use your projector's adjustment features.
gg Related Links
• "HDMI Link Features" p.52
• "Shutting Off the Image and Sound Temporarily (A/V Mute)" p.54
• "Projector Security Features" p.55
Page 52

HDMI Link Features
52
When an audio/video source that meets the HDMI CEC standard is
connected to the projector's HDMI port, you can use the projector's remote
control to control certain features of the linked device.
gg Related Links
• "Operating the Connected Devices Using the HDMI Link Features" p.52
Operating the Connected Devices Using the HDMI Link Features
You can select the connected device that is available for HDMI Link and
control the selected device using the HDMI Link features.
• You must also configure the connected device. See the
a
Press the button on the remote control.
a
documentation supplied with the device for more information.
• Some connected devices or functions of those devices may not
operate properly even if they meet the HDMI CEC standard. See the
documentation supplied with the device for more information.
• Use a cable that supports the HDMI standard.
Select the Settings menu and press .
b
Select Operation > HDMI Link and press .
c
Select On as the HDMI Link setting and press .
d
Page 53

HDMI Link Features
53
Select Device Connections and press .
e
You see the Device Connections list.
Select the device you want to control and project the image from, and
f
press .
• A linked device is indicated by a blue mark.
a
• The device name is left blank if it cannot be acquired.
• Power Off Link only works when the connected device's
a
• Note that depending on the status of the connected device
Press to exit the menus.
h
CEC power link function is enabled.
(for example, if it is recording), the device may not be
turned off.
Press to select the HDMI Link options as necessary.
g
• Power On Link lets you control what happens when you turn on the
projector or linked device. Select PJ -> Device or Bidirectional to
turn the linked device on when the projector is turned on. Select
Device -> PJ or Bidirectional to turn the projector on when the
linked device is turned on.
• Power Off Link lets you control whether linked devices are turned
off when the projector is turned off.
You can use the projector's remote control to control the linked device such
as playback, stop, or adjust the volume.
gg Related Links
• "Projector Feature Settings - Settings Menu" p.61
Page 54

Shutting Off the Image and Sound Temporarily (A/V Mute)
You can temporarily turn off the projected image and sound. Any sound or
video action continues to run, however, so you cannot resume projection at
the point that you stopped it.
Press the button on the remote control.
a
The light source turns off and the projected image and sound are
interrupted.
To turn the image and sound back on, press again.
b
54
Page 55

Projector Security Features
55
You can secure your projector to deter theft or prevent unintended use by
setting up the following security features:
• Button lock security to block operation of the projector using the buttons
on the control panel.
• Security cabling to physically secure the projector in place.
gg Related Links
• "Locking the Projector's Buttons" p.55
• "Installing a Security Cable" p.56
Locking the Projector's Buttons
You can lock the buttons on the control panel to prevent anyone from using
the projector. The projector can still be operated using the remote control.
Press the button on the remote control.
a
Select the Settings menu and press .
b
Select one of these lock types and press :
d
• To lock the projector's power button, select Child Lock. To turn the
projector on, you must press the power button for longer than three
seconds.
Child Lock does not prevent the projector from turning on
a
• To lock all of the projector's buttons, select Control Panel Lock >
Full Lock.
• To lock all buttons except the power button, select Control Panel
Lock > Partial Lock.
You see a confirmation prompt.
Select Yes and press .
e
gg Related Links
• "Unlocking the Projector's Buttons" p.55
• "Projector Feature Settings - Settings Menu" p.61
when the power cord is connected if the Direct Power On
setting is set to On.
s Settings > Operation > Direct Power On
Select Operation and press .
c
Unlocking the Projector's Buttons
If the projector's buttons have been locked, do one of the following to unlock
them.
• To release Child Lock, select Off as the Child Lock setting in the projector's
Settings menu.
s Settings > Operation > Child Lock
• To release Control Panel Lock, hold down the button on the control
panel for seven seconds.
A message is displayed and the lock is released.
Page 56

Projector Security Features
Installing a Security Cable
You can use the security slot on the projector to attach a Kensington
Microsaver Security system as a theft deterrent.
For more details on the Microsaver Security System, see
a
gg Related Links
• "Projector Parts - Front/Top" p.9
http://www.kensington.com/.
56
Page 57

Adjusting the Menu Settings
Follow the instructions in these sections to access the projector menu system and change projector settings.
gg Related Links
• "Using the Projector's Menus" p.58
• "Using the Displayed Keyboard" p.59
• "Image Quality Settings - Image Menu" p.60
• "Projector Feature Settings - Settings Menu" p.61
• "Projector Information Display - Info Menu" p.64
• "Projector Reset Options - Reset Menu" p.66
Page 58

Using the Projector's Menus
58
You can use the projector's menus to adjust the settings that control how your
projector works. The projector displays the menus on the screen.
Press the button on the remote control.
a
You see the menu screen displaying the Image menu settings.
Press the up or down arrow buttons to move through the menus listed
b
on the left. The settings for each menu are displayed on the right.
Press or to exit the menus.
h
To change settings in the displayed menu, press .
c
Press the up or down arrow button to move through the settings.
d
Change the settings using the buttons listed on the bottom of the menu
e
screens.
To return all the menu settings to their default values, select Reset.
f
When you finish changing settings on a menu, press .
g
Page 59

Using the Displayed Keyboard
59
You can use the displayed keyboard to enter numbers and characters.
Use the arrow buttons on the remote control to highlight the number
a
or character you want to enter and press the button.
Each time you select the CAPS key, the characters change
a
After entering the text, select Finish on the keyboard to confirm your
b
entries. Select Cancel to cancel entering text.
gg Related Links
• "Available Text Using the Displayed Keyboard" p.59
between upper case and lower case. Each time you select the
SYM1/2 key, the symbols enclosed by the frame change.
Text type Details
Symbols ! " # $ % & ' ( ) * + , - . / : ; < = > ? @ [ \ ]
^ _ ` { | } ~
Available Text Using the Displayed Keyboard
You can enter the following text when using the displayed keyboard.
Text type Details
Numbers 0123456789
Alphabet ABCDEFGHIJKLMNOPQRSTUVWXY
Z
abcdefghijklmnopqrstuvwxyz
Page 60

Image Quality Settings - Image Menu
60
Settings on the Image menu let you adjust the quality of your image for the
input source you are currently using.
Setting Options Description
Color Mode See the list of
available color
modes
Light Output Varying levels
available
Brightness Brightness Lightens or darkens the overall image.
Contrast Adjusts the difference between light and
Gamma Adjusts the coloring by selecting one of
Dynamic Contrast Adjusts the projected luminance based
EPSON Super
White
Adjusts the vividness of image colors for
various image types and environments.
Adjusts the brightness for the light
source.
dark areas of the image.
the gamma correction values, or referring
to a gamma graph.
on the image brightness. (Available when
Color Mode is set to Dynamic or
Cinema.)
Reduces over-exposure of whites in your
image.
Setting Options Description
Color Color Saturation Adjusts the intensity of the image colors.
Tint Adjusts the balance of green to magenta
tones in the image.
White Balance Color Temp.: Sets the color temperature
according to the color mode you selected.
Higher values tint the image blue and
lower values tint the image red.
Customized: Adjusts the individual R
(red), G (green), and B (blue)
components of the offset and gain.
RGBCMY Adjusts the hue, saturation, and
brightness of each color R (red), G
(green), B (blue), C (cyan), M (magenta),
Y (yellow) individually.
Sharpness Sharpness Adjusts the sharpness or softness of
image details.
Noise Reduction Reduces flickering in analog images.
MPEG Noise
Reduction
Aspect See the list of
available aspect
ratios.
HDMI Video
Range
Reset — Resets all adjustment values on the
Auto
Limited (16-235)
Full (0-255)
Reduces the noise or artifacts seen in
MPEG video.
Sets the aspect ratio (width-to-height
ratio) for the input source.
Sets the video range to match the setting
of the device connected to the HDMI
port.
Image menu for the selected color mode
to their default settings.
gg Related Links
• "Available Color Modes" p.40
• "Projected Image Appearance with Each Aspect Mode" p.39
• "Adjusting the Light Source Brightness" p.47
• "Adjusting the Sharpness" p.42
• "Adjusting the Image Color" p.43
Page 61

Projector Feature Settings - Settings Menu
61
Options on the Settings menu let you customize various projector features.
Setting Options Description
Sound Volume Adjusts the volume of the projector’s
speaker system. You can also adjust the
volume of Bluetooth audio devices
connected to the projector. Setting values
are saved individually for each speaker.
Sound Mode Select your favorite mode for sound
output from the projector's speaker
system according to the playback
contents. When outputting sound from
Bluetooth audio devices, this item is
disabled.
Bluetooth Search Bluetooth Device: searches for
available Bluetooth devices and lists
them.
Bluetooth Audio: enables or disables
audio output from Bluetooth audio
devices.
Connected Device: displays information
on the connected Bluetooth device.
Setting Options Description
Installation Keystone H/V-Keystone: select to manually
correct horizontal and vertical sides.
Quick Corner: select to correct image
shape and alignment using an on-screen
display.
Zoom Adjusts the image size.
Projection Selects the way the projector faces the
screen so the image is oriented correctly.
OSD Rotation Rotates the menu display 90°.
High Altitude
Mode
Display Welcome Guide Shows the Welcome Guide that presents
Messages Set to On to display messages such as
Startup Screen Set to On to display the Epson logo when
Standby
Confirmation
Picture Demo
Mode
Regulates the projector’s operating
temperature at altitudes above 1500 m.
product features and tips on how to use
the projector.
color mode name, aspect ratio, or high
temperature warning on your projected
image. Set to Off if you do not want to
display messages.
the projector starts up.
Set to Off to shut down the projector
without displaying the shutdown
confirmation screen when you press the
power button on the control panel or
remote control.
Set to On to display images that have
been pre-installed on the projector when
there is no input signal. You can remove
the images by pressing any key on the
control panel or remote control. When
you enable this item, the projector does
not enter Sleep Mode.
Page 62

Projector Feature Settings - Settings Menu
62
Setting Options Description
Operation HDMI Link Device Connections: lists the devices
connected to the HDMI ports.
HDMI Link: enables or disables the
HDMI Link features.
Power On Link: controls what happens
when you turn on the projector or
connected device.
• Bidirectional: automatically turns on
the connected device when you turn on
the projector, and vice versa.
• Device -> PJ: automatically turns on
the projector when you turn on the
connected device.
• PJ -> Device: automatically turns on
the connected device when you turn on
the projector.
Power Off Link: controls whether
connected devices are turned off when
you turn off the projector.
Sleep Mode Automatically turns off the projector
after an interval of inactivity (when On).
Sleep Mode Timer Sets the interval for Sleep Mode.
Direct Power On Lets you turn on the projector by
plugging it in without pressing the power
button.
Illumination Turns off the indicators on the projector.
Child Lock Locks the power button on the control
panel in standby mode (when the power
is off) to prevent children from turning
on the projector.
Control Panel Lock Select Full Lock to lock all buttons or
Partial Lock to lock all buttons except
the power button.
Setting Options Description
USB Power in
Standby
(For some
countries and
regions)
Rear Bay Cooling Selects the rotation speed of the cooling
Memory Load Memory
Save Memory
Erase Memory
Rename Memory
Language Various languages
available
Reset — Resets all adjustment values on the
Set to On to power the streaming media
player connected to the projector even if
the projector is in standby mode (when
the power is off).
When the internal temperature of the
projector gets too high, the power supply
may stop automatically.
fan for the streaming media player.
Save customized sets of settings to
memory.
Select the language for projector menu
and message displays.
Settings menu to their default settings,
except for the following:
• Zoom
• Projection
• High Altitude Mode
• Power On Link
• Power Off Link
• USB Power in Standby
• Rear Bay Cooling
• Memory
• Language
gg Related Links
• "Image Shape" p.32
• "HDMI Link Features" p.52
• "Projector Security Features" p.55
• "Connecting to Bluetooth® Audio Devices" p.22
• "Saving Settings to Memory and Using Saved Settings" p.48
Page 63

Projector Feature Settings - Settings Menu
• "Controlling the Volume with the Volume Buttons" p.49
• "Changing the Sound Mode" p.50
63
Page 64

Projector Information Display - Info Menu
64
You can display information about the projector and version by viewing the
Info menu. However, you cannot change any settings in the menu.
Information item Description
Projector Info Displays the projector information.
Light Source Info Displays the number of operating hours for the
projector's light source.
Version Displays the projector's firmware version.
gg Related Links
• "Info Menu - Projector Info Menu" p.64
Info Menu - Projector Info Menu
You can display information about the projector and input sources by viewing
the Projector Info menu in the projector's Info menu.
Information item Description
Total Op. Time Displays the number of hours the projector has been
used in its operating life.
Operation Hours Displays the number of hours the projector has been
used since it was turned on.
Source Displays the name of the port to which the current
input source is connected.
Input Signal Displays the input signal setting of the current input
source.
Resolution Displays the resolution of the current input source.
Refresh Rate Displays the refresh rate of the current input source.
Sync Info Displays information that may be needed by a service
technician.
Status Displays information about projector problems that
may be needed by a service technician.
Page 65

Projector Information Display - Info Menu
Information item Description
Product Name Displays the projector's product name.
Serial Number Displays the projector's serial number.
65
Page 66

Projector Reset Options - Reset Menu
You can reset most of the projector settings to their default values using the
Reset menu.
Setting Options Description
Reset Memory — Resets the name and settings of a saved
memory.
Reset All Config — Resets most of the projector settings to
their default values.
66
You cannot reset the following settings using the Reset All Config option:
• Zoom
• Memory
• Language
Page 67

Maintaining the Projector
Follow the instructions in these sections to maintain your projector.
gg Related Links
• "Projector Maintenance" p.68
• "Cleaning the Projection Window" p.69
• "Cleaning the Projector Case" p.70
• "Air Filter and Vent Maintenance" p.71
Page 68

Projector Maintenance
You may need to clean the projection window periodically, and clean the air
filter and air vents to prevent the projector from overheating due to blocked
ventilation.
The only parts you should replace are the air filter and remote control
batteries. If any other part needs replacing, contact Epson or an authorized
Epson servicer.
Warning
Before cleaning any part of the projector, turn it off and unplug the power cord.
Never open any cover on the projector, except as specifically explained in this
manual. Dangerous electrical voltages in the projector can injure you severely.
68
Page 69

Cleaning the Projection Window
Clean the projection window periodically, or whenever you notice dust or
smudges on the surface. To remove dust or smudges, gently wipe the
projection window with lens-cleaning paper.
Warning
Do not use a lens cleaner that contains flammable gas. The high heat generated by
the projector may cause a fire.
Attention
Do not use glass cleaner or any harsh materials to clean the projection window and
do not subject the projection window to any impacts; otherwise, it could be
damaged.
69
Page 70

Cleaning the Projector Case
Before cleaning the projector case, turn off the projector and unplug the
power cord.
• To remove dust or dirt, use a soft, dry, lint-free cloth.
• To remove stubborn dirt, use a soft cloth moistened with water and mild
soap. Do not spray liquid directly on the projector.
Attention
Do not use wax, alcohol, benzene, paint thinner, or other chemicals to clean the
projector case. These can damage the case. Do not use canned air, or the gases
may leave a flammable residue.
70
Page 71

Air Filter and Vent Maintenance
71
Regular filter maintenance is important to maintaining your projector. Clean
the air filer when a message appears telling you the temperature inside the
projector has reached a high level. It is recommended that you clean these
parts at least once every three months. Clean them more often than this if you
use the projector in a particularly dusty environment.
Attention
If regular maintenance is not performed, your Epson projector will notify you
when the temperature inside the projector has reached a high level. Do not wait
until this warning appears to maintain your projector filter as prolonged exposure
to high temperatures may reduce the life of your projector.
gg Related Links
• "Cleaning the Air Filter and Vents" p.71
• "Replacing the Air Filter" p.71
Cleaning the Air Filter and Vents
Clean the projector's air filter or vents if they get dusty, or if you see a
message telling you to clean them.
Turn off the projector and unplug the power cord.
a
Gently remove the dust using a small vacuum designed for computers
b
or a very soft brush (such as a paintbrush).
You can remove the air filter so that you can clean both sides. Do
a
Attention
Do not use canned air. The gases may leave a flammable residue or push
dust and debris into the projector's optics or other sensitive areas.
If dust is difficult to remove or the air filter is damaged, replace the air
c
filter.
not rinse the air filter in water, or use any detergent or solvent to
clean it.
Replacing the Air Filter
You need to replace the air filter in the following situations:
• After cleaning the air filter, you see a message telling you to clean or replace
it.
• The air filter is torn or damaged.
You can replace the air filter while the projector is mounted to the ceiling or
placed on a table.
Turn off the projector and unplug the power cord.
a
Turn the projector upside down.
b
Page 72

Air Filter and Vent Maintenance
72
Open the air filter cover.
c
Pull the air filter out of the projector.
d
Place the new air filter in the projector as shown and push gently until
e
it clicks into place.
Close the air filter cover.
f
gg Related Links
• "Replacement Parts" p.86
a
Dispose of used air filters according to local regulations.
• Filter frame: ABS
• Filter: Polyurethane foam
Page 73

Solving Problems
Check the solutions in these sections if you have any problems using the projector.
gg Related Links
• "Projection Problems" p.74
• "Projector Indicator Status" p.75
• "Solving Projector Power-On or Power-Off Problems" p.77
• "Solving Image Problems" p.78
• "Solving Missing or Low Audio Problems" p.81
• "Solving Bluetooth Problems" p.82
• "Solving Remote Control Operation Problems" p.83
• "Solving HDMI Link Problems" p.84
Page 74

Projection Problems
If the projector is not working properly, turn it off, unplug it, and then plug it
back in and turn it on.
If this does not solve the problem, check the following:
• The indicators on the projector may indicate the problem.
• The solutions in this manual can help you solve many problems.
If none of these solutions help, contact Epson for technical support.
74
Page 75

Projector Indicator Status
75
The indicators on the projector indicate the projector status and let you know
when a problem occurs. Check the status and color of the indicators and then
refer to this table for a solution.
• If the indicators display a pattern not listed in the table below, turn
a
On/Standby (power) indicator
A
Status indicator
B
Laser indicator
C
Temp (temperature) indicator
D
the projector off, unplug it, and contact Epson for help.
Projector status
Indicator and status Problem and solutions
Power: Lit blue
Status: Lit blue
Laser: Off
Temp: Off
Power: Lit blue
Status: Flashing blue
Laser: Off
Temp: Off
Power: Lit blue
Status: Off
Laser: Off
Temp: Off
Power: Flashing blue
Status: Off
Laser: Off
Temp: Off
Power: Lit blue
Status: Flashing blue
Laser: Off
Temp: Off
Power: Flashing blue
Status: Indicator status
varies
Laser: Indicator status
varies
Temp: Flashing orange
Normal operation.
Warming up or shutting down. When warming up, wait
about 30 seconds for an image to appear.
All buttons are disabled during warm-up and shutting
down.
Standby or sleep mode.
When you press the power button, projection starts.
Preparing to enter USB Power in Standby mode.
Cooling down; all buttons are disabled.
Projector is too hot.
• Make sure that the vents and air filter are not clogged
with dust or obstructed by nearby objects.
• Clean or replace the air filter.
• Make sure the environmental temperature is not too
hot.
Page 76

Projector Indicator Status
76
Indicator and status Problem and solutions
Power: Off
Status: Flashing blue
Laser: Off
Temp: Lit orange
Power: Flashing blue
Status: Indicator status
varies
Laser: Flashing orange
Temp: Indicator status
varies
Power: Off
Status: Flashing blue
Laser: Lit orange
Temp: Off
Power: Off
Status: Flashing blue
Laser: Off
Temp: Flashing orange
Power: Off
Status: Flashing blue
Laser: Flashing orange
Temp: Off
Projector has overheated and turned off. Leave it turned
off to cool down for 5 minutes.
• Make sure that the vents and air filter are not clogged
with dust or obstructed by nearby objects.
• Make sure the environmental temperature is not too
hot.
• Clean or replace the air filter.
• If operating the projector at high altitude, set the High
Altitude Mode setting to On in the projector menu.
s Settings > Installation > High Altitude Mode
• If the problem persists, unplug the projector and
contact Epson for help.
Laser warning.
Turn the projector off, unplug it, and contact Epson for
help.
Laser has a problem.
Turn the projector off, unplug it, and contact Epson for
help.
A fan or sensor has a problem. Turn the projector off,
unplug it, and contact Epson for help.
Internal projector error. Turn the projector off, unplug
it, and contact Epson for help.
• "Replacing the Air Filter" p.71
gg Related Links
• "Projector Feature Settings - Settings Menu" p.61
• "Cleaning the Air Filter and Vents" p.71
Page 77

Solving Projector Power-On or Power-Off Problems
77
Check the solutions in these sections if the projector does not turn on when
you press the power button or it turns off unexpectedly.
gg Related Links
• "Solving Projector Power Problems" p.77
• "Solving Projector Shutdown Problems" p.77
Solving Projector Power Problems
If the projector does not turn on when you press the power button, try the
following steps until the problem is solved.
Check the following items.
a
• If you are using the remote control, check the batteries of the remote
control.
• Make sure the power cord is securely connected to the projector and
to a working electrical outlet.
Unlock the lock feature using the following method.
b
• To release Control Panel Lock, hold down the button on the
control panel for seven seconds.
Projectors may have entered sleep mode after a period of inactivity.
a
Perform any operation to wake the projector. To turn off sleep mode,
select Off as the Sleep Mode setting.
s Settings > Operation > Sleep Mode
When the status indicator is flashing, and the temp (temperature)
b
indicator is lit, the projector has overheated and turned off.
The cooling fans may run in standby status depending on the
a
gg Related Links
• "Projector Feature Settings - Settings Menu" p.61
projector settings. Also, when the projector wakes from standby
status, the fans may cause an unexpected noise. This is not a
malfunction.
• To release Child Lock, hold down the power button on the control
panel for three seconds.
Disconnect the cord and contact Epson for help.
c
gg Related Links
• "Projector Security Features" p.55
Solving Projector Shutdown Problems
If the projector's light source turns off unexpectedly, try the following steps
until the problem is solved.
Page 78

Solving Image Problems
78
Check the solutions in these sections if you have any problems with projected
images.
gg Related Links
• "Solving Missing Image Problems" p.78
• "Adjusting an Image that is not Rectangular" p.78
• "Adjusting a Fuzzy or Blurry Image" p.79
• "Fixing Partial Image Problems" p.79
• "Adjusting an Image that Contains Noise or Static" p.79
• "Adjusting an Image with Incorrect Brightness or Colors" p.80
• "Adjusting an Upside-down Image" p.80
Solving Missing Image Problems
If no image is displayed, try the following steps until the problem is solved.
Check the projector's status:
a
• Press the button on the remote control to see if the image was
temporarily turned off.
• Check the status indicator to confirm that the projector is in normal
operating status.
• Press the projector's power button to wake it from standby or sleep
mode. Also, check if the connected computer is in sleep mode or
displaying a blank screen saver.
s Settings > Operation > Sleep Mode
Check the status of your video source:
c
• If you are projecting from a streaming media player, make sure it is
powered by the power supply USB cable on the projector.
• Turn on the connected streaming media player or video source, and
press the play button to start a video, if necessary.
• Make sure the connected device meets the HDMI CEC standard. See
the documentation supplied with the device for more information.
• If you are projecting from a laptop computer, make sure it is set up
to display on an external monitor.
Check the following items:
d
• Turn off the projector and the connected streaming media player or
video source, and then turn them back on.
• Set the CEC function for the connected device again and restart the
device.
• Make sure the computer's display resolution does not exceed the
projector's resolution and frequency limits. If necessary, select a
different display resolution for your computer. (See your computer
manual for details.)
• Resets all of the projector settings to their default values.
s Reset > Reset All Config
gg Related Links
• "Projector Feature Settings - Settings Menu" p.61
• "Projector Reset Options - Reset Menu" p.66
Check the cable connection:
b
• Make sure all necessary cables are securely connected and the power
is on for the projector.
• Connect the video source directly to the projector.
• Replace the HDMI cable with the shorter one.
Adjusting an Image that is not Rectangular
If the projected image is not evenly rectangular, try the following steps until
the problem is solved.
Place the projector directly in front of the center of the screen, facing it
a
squarely, if possible.
Page 79

Solving Image Problems
79
Adjust the image shape using the Keystone settings.
b
s Settings > Keystone > H/V-Keystone
s Settings > Keystone > Quick Corner
gg Related Links
• "Projector Feature Settings - Settings Menu" p.61
• "Correcting the Image Shape with the Keystone Button" p.33
• "Correcting the Image Shape with Quick Corner" p.34
Adjusting a Fuzzy or Blurry Image
If the projected image is fuzzy or blurry, try the following steps until the
problem is solved.
Adjust the image focus using the focus lever.
a
Check the following items:
b
• Position the projector close enough to the screen.
• Position the projector so the keystone adjustment angle is not so
wide that it distorts the image.
Clean the projection window.
c
gg Related Links
• "Image Quality Settings - Image Menu" p.60
• "Focusing the Image Using the Focus Lever" p.36
• "Cleaning the Projection Window" p.69
Fixing Partial Image Problems
If only a partial computer image is displayed, try the following steps until the
problem is solved.
If you zoomed into or out of the image using the Zoom setting, press
a
the button until the projector returns to a full display.
Make sure you selected the correct projection mode. You can select this
b
using the Projection setting in the projector's Settings menu.
s Settings > Installation > Projection
Check your computer display settings to disable dual display and set the
c
resolution within the projector's limits. (See your computer manual for
details.)
gg Related Links
• "Projector Feature Settings - Settings Menu" p.61
To avoid condensation on the lens after bringing the projector in
a
Adjust the Sharpness setting in the projector's Image menu to improve
d
image quality.
If you are projecting from a computer, use a lower resolution or select a
e
resolution that matches the projector's native resolution.
from a cold environment, let the projector warm up to room
temperature before using it.
Adjusting an Image that Contains Noise or Static
If the projected image contains electronic interference (noise) or static, try the
following steps until the problem is solved.
Check the cables connecting your video source to the projector. They
a
should be:
• Separated from the power cord to prevent interference
• Securely connected at both ends
Page 80

Solving Image Problems
80
• Not connected to an extension cable
If you adjusted the image shape using the projector controls, try
b
decreasing the Sharpness setting in the projector's Image menu to
improve image quality.
If you connected an extension power cable, try projecting without it to
c
see if it caused interference in the signal.
Select a computer video resolution and refresh rate that are compatible
d
with the projector.
If you connect using Bluetooth, try the following solutions:
e
• Check for obstacles between the Bluetooth audio device and the
projector, and change their positions to improve communication.
• Make sure the connected Bluetooth audio device is within the
specified communication distance.
• Avoid using the projector near wireless networks, microwave ovens,
2.4 GHz cordless phones, or other devices that use the 2.4 GHz
frequency band.
These devices can interfere with the signal between the projector and
the Bluetooth audio device.
Check your video source settings.
b
Adjust the available settings in the projector's Image menu for the
c
current input source, such as Brightness, Contrast, Tint, and Color
Saturation.
s Image > Brightness
s Image > Color
Make sure you selected the correct HDMI Video Range setting in the
d
projector's Image menu, if available for your image source.
s Image > HDMI Video Range
Make sure all the cables are securely connected to the projector and
e
your video equipment. If you connected long cables, try connecting
shorter cables.
Position the projector close enough to the screen.
f
gg Related Links
• "Image Quality Settings - Image Menu" p.60
gg Related Links
• "Image Quality Settings - Image Menu" p.60
Adjusting an Image with Incorrect Brightness or Colors
If the projected image is too dark or bright, or the colors are incorrect, try the
following steps until the problem is solved.
Press the button on the remote control to try different color modes
a
for the image and environment.
Adjusting an Upside-down Image
If the projected image is upside-down, select the correct projection mode.
s Settings > Installation > Projection
gg Related Links
• "Projector Feature Settings - Settings Menu" p.61
Page 81

Solving Missing or Low Audio Problems
81
If there is no sound or the volume is too low, try the following steps until the
problem is solved.
Adjust the projector's volume settings using the or button on
a
the control panel or remote control.
Check the cable connection between the projector and your video
b
source.
Check the following settings on the projector:
c
• Press the button on the remote control to resume video and
audio if they were temporarily stopped.
• Select Off as the Bluetooth Audio setting when you are using the
projector's speaker or headphones.
• Select On as the Bluetooth Audio setting when you are using a
connected Bluetooth audio device.
s Settings > Sound > Bluetooth > Bluetooth Audio
Check the following settings on your video equipment:
d
• Check your streaming media player or video source to make sure the
volume is turned up and the audio output is set for the correct
source.
• Avoid using the projector near wireless networks, microwave ovens,
2.4 GHz cordless phones, or other devices that use the 2.4 GHz
frequency band.
These devices can interfere with the signal between the projector and
the Bluetooth audio device.
gg Related Links
• "Projector Feature Settings - Settings Menu" p.61
• Set the connected device to PCM output.
• When you are connecting the projector to a Mac using an HDMI
cable, make sure your Mac supports audio through the HDMI port.
If you connect using Bluetooth, try the following solutions:
e
• Check for obstacles between the Bluetooth audio device and the
projector, and change their positions to improve communication.
• Make sure the connected Bluetooth audio device is within the
specified communication distance.
Page 82

Solving Bluetooth Problems
If you cannot connect to a Bluetooth audio device, try the following solutions.
Make sure the connected Bluetooth audio device supports copyright
a
protection (SCMS-T) and A2DP.
Select Search Bluetooth Device in the projector's Settings menu when
b
you connect a Bluetooth audio device for the first time or change to
another Bluetooth audio device.
s Settings > Sound > Bluetooth > Search Bluetooth Device
gg Related Links
• "Projector Feature Settings - Settings Menu" p.61
82
Page 83

Solving Remote Control Operation Problems
If the projector does not respond to remote control commands, try the
following steps until the problem is solved.
If you lose the remote control, you can order another one from Epson.
a
Check that the remote control batteries are installed correctly and have
a
power. If necessary, replace the batteries.
Check to see if a button on the remote control is stuck down, causing it
b
to enter sleep mode. Release the button to wake the remote control up.
If the image is projected from the projector, make sure you are
c
operating the remote control within the reception angle and range of
the projector.
Make sure the projector is not warming up or shutting down.
d
83
Strong fluorescent lighting, direct sunlight, or infrared device signals
e
may be interfering with the projector's remote receivers. Dim the lights
or move the projector away from the sun or interfering equipment.
gg Related Links
• "Remote Control Operation" p.24
Page 84

Solving HDMI Link Problems
If you cannot operate the connected devices using the HDMI Link features,
try the following steps until the problem is solved.
Make sure the cable meets the HDMI CEC standard.
a
Make sure the connected device meets the HDMI CEC standard. See
b
the documentation supplied with the device for more information.
Check if the device is available in the Device Connections list.
c
If the device does not appear in the Device Connections list, it does not
meet the HDMI CEC standards. Connect a different device.
s Settings > Operation > HDMI Link > Device Connections
Check that all cables required for HDMI Link are securely connected.
d
Make sure the connected devices are turned on and in standby status.
e
See the documentation supplied with the device for more information.
84
If you connect a new device or change the connection, set the CEC
f
function for the connected device again and restart the device.
gg Related Links
• "Projector Feature Settings - Settings Menu" p.61
Page 85

Appendix
Check these sections for the technical specifications and important notices about your projector.
gg Related Links
• "Optional Accessories and Replacement Parts" p.86
• "Screen Size and Projection Distance" p.87
• "Supported Monitor Display Resolutions" p.89
• "Projector Specifications" p.90
• "External Dimensions" p.91
• "List of Safety Symbols and Instructions" p.92
• "Laser Safety Information" p.94
• "Glossary" p.96
• "Notices" p.97
Page 86

Optional Accessories and Replacement Parts
The following optional accessories and replacement parts are available. Please
purchase these products as and when needed.
The following list of optional accessories and replacement parts is current as
of: December 2018.
Details of accessories are subject to change without notice and availability
may vary depending on the country of purchase.
gg Related Links
• "Mounts" p.86
• "Replacement Parts" p.86
Mounts
Ceiling Mount / Floor Stand ELPMB60
Use when installing the projector on a ceiling, a wall, or a floor.
Lighting Track Mount ELPMB61
Use when installing the projector on a lighting track.
86
Special expertise is required to suspend the projector from a ceiling.
a
Contact Epson for help.
Replacement Parts
Air filter ELPAF57
Use as a replacement for used air filters.
Page 87

Screen Size and Projection Distance
87
Check the table here to determine how far to place the projector from the
screen based on the size of the projected image.
Projection distance (cm)
A
Distance from the center of the lens to the base of the screen (or to the top of
B
the screen, if suspended from a ceiling) (cm)
Center of lens
C
16:10 screen size
Minimum (Wide) to
30" 65 × 40 65 - 88 -4
40" 86 × 54 88 - 119 -5
50" 108 × 67 111 - 150 -6
A B
Maximum (Tele)
16:10 screen size
Minimum (Wide) to
60" 129 × 81 134 - 181 -7
80" 172 × 108 180 - 243 -10
90" 194 × 121 203 - 274 -11
100" 215 × 135 226 - 305 -12
120" 258 × 162 272 - 368 -15
130" 280 × 175 295 - 399 -16
150" 323 × 202 341 - 461 -18
4:3 screen size
Minimum (Wide) to
30" 61 × 46 74 - 100 -4
40" 81 × 61 100 - 136 -6
50" 102 × 76 126 - 171 -7
60" 122 × 91 152 - 206 -8
70" 142 × 107 179 - 241 -10
80" 163 × 122 205 - 276 -11
90" 183 × 137 231 - 311 -12
100" 203 × 152 257 - 347 -14
110" 224 × 168 283 - 382 -15
120" 244 × 183 309 - 417 -17
130" 264 × 198 335 - 452 -18
A B
Maximum (Tele)
A B
Maximum (Tele)
Page 88

Screen Size and Projection Distance
88
16:9 screen size
Minimum (Wide) to
30" 66 × 37 67 - 91 -2
40" 89 × 50 91 - 123 -2
50" 111 × 62 114 - 154 -3
60" 133 × 75 138 - 186 -3
70" 155 × 87 162 - 218 -4
80" 177 × 100 185 - 250 -5
90" 199 × 112 209 - 282 -5
100" 221 × 125 233 - 314 -6
110" 244 × 137 256 - 346 -6
120" 266 × 149 280 - 378 -7
130" 288 × 162 304 - 410 -7
A B
Maximum (Tele)
Page 89

Supported Monitor Display Resolutions
Signal Refresh rate (Hz) Resolution (dots)
VGA 60 640 × 480
SDTV (480i/480p) 59.94 720 × 480
SDTV (576i/576p) 50 720 × 576
HDTV (720p) 50/59.94/60 1280 × 720
HDTV (1080i) 50/59.94/60 1920 × 1080
HDTV (1080p) 23.98/24/29.97/30/50/59.94/60 1920 × 1080
89
Page 90

Projector Specifications
90
Product name EF-100W/EF-100B
Dimensions 210 (W) × 88 (H) × 227 (D) mm (not including raised
section)
LCD panel size 0.59"
Display method Poly-silicon TFT active matrix
Resolution 1,024,000 pixels
WXGA (1,280 (W) × 800 (H) dots) × 3
Focus adjustment Manual
Zoom adjustment 1.0 to 1.35 (Digital Zoom)
Light source Laser diode
Light source output power Up to 43 W
Wavelength 449 to 461 nm
Light source life Light Output 100%: Up to about 12,000 hours
Light Output 50%: Up to about 20,000 hours
Max. audio output 5 W
Speaker 1
Power supply 100-240V AC±10% 50/60Hz 1.8 - 0.9 A
Power consumption (100
to 120 V area)
Power consumption (220
to 240 V area)
Standby power
consumption
Operating altitude Altitude 0 to 3,000 m
Operating temperature Altitude of 0 to 2,286 m: 5 to +35°C (No condensation)
Storage temperature -10 to +60°C (Humidity of 10 to 90%, No condensation)
Mass Approx. 2.7kg
Operating power consumption: 178 W
Operating power consumption: 172 W
0.4 W
Altitude of 2,287 to 3,000 m: 5 to +30°C (Humidity of
20 to 80%, No condensation)
This product is also designed for IT power distribution system with phase-tophase voltage 230V.
gg Related Links
• "Connector Specifications" p.90
Connector Specifications
Audio Out port 1 Stereo mini pin jack
HDMI port 1 HDMI (Audio is only supported by PCM)
USB-A port 1 USB connector (Type A)
Service port 1 USB connector (Type B)
Page 91

External Dimensions
Center of lens
A
Distance from center of lens to suspension bracket fixing point
B
91
The unit in these illustrations is mm.
Page 92

List of Safety Symbols and Instructions
92
The following table lists the meaning of the safety symbols labeled on the
equipment.
No. Symbol mark Approved
standards
A
B
C
D
E
F
G
H
IEC60417
No.5007
IEC60417
No.5008
IEC60417
No.5009
ISO7000
No.0434B,
IEC3864-B3.1
IEC60417
No.5041
IEC60417
No.6042
ISO3864-B3.6
IEC60417
No.5957
IEC60417
No.5926
Description
"ON" (power)
To indicate connection to the mains.
"OFF" (power)
To indicate disconnection from the
mains.
Stand-by
To identify the switch or switch
position by means of which part of the
equipment is switched on in order to
bring it into the stand-by condition.
Caution
To identify general caution when
using the product.
Caution, hot surface
To indicate that the marked item can
be hot and should not be touched
without taking care.
Caution, risk of electric shock
To identify equipment that has risk of
electric shock.
For indoor use only
To identify electrical equipment
designed primarily for indoor use.
Polarity of d.c. power connector
To identify the positive and negative
connections (the polarity) on a piece
of equipment to which a d.c. power
supply may be connected.
No. Symbol mark Approved
standards
I
J
K
L
M
N
O
P
— The same as No.8.
IEC60417
No.5001B
IEC60417
No.5002
— The same as No.11.
IEC60417
No.5019
IEC60417
No.5017
IEC60417
No.5032
IEC60417
No.5031
Description
Battery, general
On battery powered equipment. To
identify a device for instance a cover
for the battery compartment, or the
connector terminals.
Positioning of cell
To identify the battery holder itself
and to identify the positioning of the
cell(s) inside the battery holder.
Protective earth
To identify any terminal which is
intended for connection to an external
conductor for protection against
electric shock in case of a fault, or the
terminal of a protective earth
electrode.
Earth
To identify an earth (ground) terminal
in cases where neither the symbol
No.13 is explicitly required.
Alternating current
To indicate on the rating plate that the
equipment is suitable for alternating
current only; to identify relevant
terminals.
Direct current
To indicate on the rating plate that the
equipment is suitable for direct
current only; to identify relevant
terminals.
Page 93

List of Safety Symbols and Instructions
93
No. Symbol mark Approved
standards
Q
R
S
T
U
V
W
X
IEC60417
No.5172
ISO 3864 General prohibition
ISO 3864 Contact prohibition
— Never look into the optical lens while
— To indicate that the marked item don’t
ISO3864
IEC60825-1
ISO 3864 Disassembly prohibition
IEC60417
No. 5266
Description
Class II equipment
To identify equipment meeting the
safety requirements specified for Class
II equipment according to IEC 61140.
To identify actions or operations that
are prohibited.
To indicate injury that could occur
due to touching a specific part of the
equipment.
the projector is on.
place anything on projector.
Caution, laser radiation
To indicate the equipment has a laser
radiation part.
To indicate a risk of injury, such as
electric shock, if the equipment is
disassembled.
Standby, partial standby
To indicate that part of the equipment
is in the ready status.
No. Symbol mark Approved
standards
a
b
IEC60417
No. 6043
— To indicate that looking into the lens
Description
Caution (Sharp Corners)
To indicate sharp corners that should
not be touched.
while projecting is prohibited.
Y
Z
ISO3864
IEC60417
No. 5057
IEC60417
No. 6056
Caution, movable parts
To indicate that you must keep away
from movable parts according to
protection standards.
Caution (Moving Fan Blades)
As a safety precaution, stay away from
the moving fan blades.
Page 94

Laser Safety Information
94
This projector is a Class 1 laser product that complies with the IEC/EN608251:2014 international standard for lasers. Follow these safety instructions when
using the projector.
Warning
• Do not open the projector's case. The projector contains a high-powered laser.
• Possibly hazardous optical radiation emitted from this product. Do not look at
operating light source. Eye injury may result.
Caution
Do not disassemble the projector when disposing of it. Dispose according to your
local or national laws and regulations.
• The projector uses a laser as the light source. The laser has the
a
following characteristics.
• Depending on the surroundings, the brightness of the light source
may decline. The brightness declines a lot when the temperature
gets too high.
• The brightness of the light source declines the longer it is used.
You can change the relationship between usage time and decline in
brightness settings.
Inside
Side
As with any bright source, do not stare into the beam, RG2 IEC/EN 624715:2015.
gg Related Links
• "Laser Warning Labels" p.94
Laser Warning Labels
Laser warning labels are attached on the projector.
Page 95

Laser Safety Information
Base
For North/South America
This projector is a Class 2 laser product that complies with the IEC/EN608251:2007 international standard for lasers. Follow these safety instructions when
using the projector.
Complies with FDA performance standards for laser products except for
deviations pursuant to Laser Notice No. 50, dated June 24, 2007.
95
Page 96

Glossary
96
This section briefly explains the difficult terms that are not explained in the
text of this guide. For details, refer to other commercially available
publications.
Aspect Ratio The ratio between an image's length and its height.
Screens with a horizontal:vertical ratio of 16:9, such as HDTV
screens, are known as wide screens.
SDTV and general computer displays have an aspect ratio of
4:3.
Contrast The relative brightness of the light and dark areas of an image
can be increased or decreased to make text and graphics stand
out more clearly, or to make them appear softer. Adjusting this
particular property of an image is called contrast adjustment.
HDCP HDCP is an abbreviation for High-bandwidth Digital Content
Protection.
It is used to prevent illegal copying and protect copyrights by
encrypting digital signals sent over DVI and HDMI ports.
Because the HDMI port on this projector supports HDCP, it
can project digital images protected by HDCP technology.
However, the projector may not be able to project images
protected with updated or revised versions of HDCP
encryption.
™
HDMI
HDTV An abbreviation for High-Definition Television that refers to
An abbreviation for High Definition Multimedia Interface.
HDMI™is a standard aimed at digital consumer electronics and
computers. This is the standard by which HD images and
multichannel audio signals are digitally transmitted.
By not compressing the digital signal, the image can be
transferred at the highest quality possible. It also provides an
encryption function for the digital signal.
high-definition systems which satisfy the following conditions:
• Vertical resolution of 720p or 1080i or greater (p =
Progressive, i = Interlace)
• Screen aspect ratio of 16:9
Interlace Transmits information needed to create one screen by sending
every other line, starting from the top of the image and working
down to the bottom.
Images are more likely to flicker because one frame is displayed
every other line.
Pairing Register devices in advance when connecting with Bluetooth
devices to ensure mutual communication.
Progressive Projects information to create one screen at a time, displaying
the image for one frame.
Even though the number of scan lines is the same, the amount
of flicker in images decreases because the volume of
information has doubled compared with an interlace system.
Refresh Rate The light-emitting element of a display maintains the same
luminosity and color for an extremely short time.
Because of this, the image must be scanned many times per
second to refresh the light-emitting element.
The number of refresh operations per second is called the
Refresh rate and is expressed in hertz (Hz).
SDTV An abbreviation for Standard Definition Television that refers
to standard television systems which do not satisfy the
conditions for HDTV High-Definition Television.
VGA A screen size standard with a resolution of 640 (horizontal) ×
480 (vertical) dots.
WXGA A screen size standard with a resolution of 1,280 (horizontal) ×
800 (vertical) dots.
Page 97

Notices
97
Check these sections for important notices about your projector.
gg Related Links
• "FCC Compliance Statement" p.97
• "Indication of the manufacturer and the importer in accordance with
requirements of EU directive" p.98
• "Restriction of Use" p.98
• "Trademarks" p.98
• "Copyright Notice" p.98
• "Copyright Attribution" p.99
FCC Compliance Statement
Supplier's DECLARATION of CONFORMITY
According to 47CFR, Part 2 and 15
Class B Personal Computers and Peripherals; and/or
CPU Boards and Power Supplies used with Class B Personal Computers
We: Epson America, Inc.
Located at: 3840 Kilroy Airport Way Long Beach, CA 90806
Tel: 562-981-3840
Model: H914C
FCC Compliance Statement For United States Users
This device complies with part 15 of the FCC Rules. Operation is subject to
the following two conditions: (1) This device may not cause harmful
interference, and (2) this device must accept any interference received,
including interference that may cause undesired operation.
This equipment has been tested and found to comply with the limits for a
Class B digital device, pursuant to Part 15 of the FCC Rules. These limits are
designed to provide reasonable protection against harmful interference in a
residential installation. This equipment generates, uses, and can radiate radio
frequency energy and, if not installed and used in accordance with the
instructions, may cause harmful interference to radio communications.
However, there is no guarantee that interference will not occur in a particular
installation. If this equipment does cause interference to radio and television
reception, which can be determined by turning the equipment off and on, the
user is encouraged to try to correct the interference by one or more of the
following measures.
• Reorient or relocate the receiving antenna.
• Increase the separation between the equipment and receiver.
• Connect the equipment into an outlet on a circuit different from that to
which the receiver is connected.
• Consult the dealer or an experienced radio/TV technician for help.
Declare under sole responsibility that the product identified herein, complies
with 47CFR Part 2 and 15 of the FCC rules as a Class B digital device. Each
product marketed, is identical to the representative unit tested and found to
be compliant with the standards. Records maintained continue to reflect the
equipment being produced can be expected to be within the variation
accepted, due to quantity production and testing on a statistical basis as
required by 47CFR 2.906. Operation is subject to the following two
conditions: (1) this device may not cause harmful interference, and (2) this
device must accept any interface received, including interference that may
cause undesired operation.
Trade Name: EPSON
Type of Product: Home Projector
WARNING
The connection of a non-shielded equipment interface cable to this
equipment will invalidate the FCC Certification or Declaration of this device
and may cause interference levels which exceed the limits established by the
FCC for this equipment. It is the responsibility of the user to obtain and use a
shielded equipment interface cable with this device. If this equipment has
more than one interface connector, do not leave cables connected to unused
interfaces. Changes or modifications not expressly approved by the
manufacturer could void the user's authority to operate the equipment.
Page 98

Notices
98
Indication of the manufacturer and the importer in
accordance with requirements of EU directive
Manufacturer: SEIKO EPSON CORPORATION
Address: 3-5, Owa 3-chome, Suwa-shi, Nagano-ken 392-8502 Japan
Telephone: 81-266-52-3131
http://www.epson.com/
Importer: EPSON EUROPE B.V.
Address: Atlas Arena, Asia Building, Hoogoorddreef 5,1101 BA Amsterdam
Zuidoost
The Netherlands
Telephone: 31-20-314-5000
http://www.epson.eu/
Restriction of Use
When this product is used for applications requiring high reliability/safety
such as transportation devices related to aviation, rail, marine, automotive
etc.; disaster prevention devices; various safety devices etc; or
functional/precision devices etc, you should use this product only after giving
consideration to including fail-safes and redundancies into your design to
maintain safety and total system reliability. Because this product was not
intended for use in applications requiring extremely high reliability/safety
such as aerospace equipment, main communication equipment, nuclear
power control equipment, or medical equipment related to direct medical care
etc, please make your own judgment on this product’s suitability after a full
evaluation.
Mac, Mac OS, OS X, and macOS are trademarks of Apple Inc.
Microsoft, Windows, Windows Vista, PowerPoint, and the Windows logo are
trademarks or registered trademarks of Microsoft Corporation in the United
States and/or other countries.
HDMI and High-Definition Multimedia Interface are the trademarks or
registered trademarks of HDMI Licensing LLC.
The Bluetooth®word mark and logo are registered trademarks of Bluetooth
SIG, Inc., and the Seiko Epson Corporation uses these marks under license.
Other trademarks or trade names are the property of their respective owners.
Bluetopia®is provided for your use by Stonestreet One, LLC®under a software
license agreement. Stonestreet One, LLC®is and shall remain the sole owner of
all right, title and interest whatsoever in and to Bluetopia®and your use is
subject to such ownership and to the license agreement. Stonestreet One, LLC
reserves all rights related to Bluetopia®not expressly granted under the license
agreement and no other rights or licenses are granted either directly or by
implication, estoppel or otherwise, or under any patents, copyrights, mask
works, trade secrets or other intellectual property rights of Stonestreet One,
LLC®.
Qualcomm aptX is a product of Qualcomm Technologies International, Ltd.
Qualcomm is a trademark of Qualcomm Incorporated, registered in the
United States and other countries, used with permission. aptX is a trademark
of Qualcomm Technologies International, Ltd., registered in the United States
and other countries, used with permission.
©2000-2012 Stonestreet One, LLC®All Rights Reserved.
Adobe and Adobe Reader are either registered trademarks or trademarks of
Adobe Systems Incorporated in the United States and/or other countries.
Other product names used herein are also for identification purposes only
and may be trademarks of their respective owners. Epson disclaims any and
all rights in those marks.
®
Trademarks
EPSON is a registered trademark, EXCEED YOUR VISION, ELPLP and their
logos are registered trademarks or trademarks of Seiko Epson Corporation.
Copyright Notice
All rights reserved. No part of this publication may be reproduced, stored in a
retrieval system, or transmitted in any form or by any means, electronic,
mechanical, photocopying, recording, or otherwise, without the prior written
Page 99

Notices
permission of Seiko Epson Corporation. No patent liability is assumed with
respect to the use of the information contained herein. Neither is any liability
assumed for damages resulting from the use of the information contained
herein.
Neither Seiko Epson Corporation nor its affiliates shall be liable to the
purchaser of this product or third parties for damages, losses, costs, or
expenses incurred by the purchaser or third parties as a result of: accident,
misuse, or abuse of this product or unauthorized modifications, repairs, or
alterations to this product, or (excluding the U.S.) failure to strictly comply
with Seiko Epson Corporation's operating and maintenance instructions.
Seiko Epson Corporation shall not be liable against any damages or problems
arising from the use of any options or any consumable products other than
those designated as Original Epson Products or Epson Approved Products by
Seiko Epson Corporation.
The contents of this guide may be changed or updated without further notice.
Illustrations in this guide and the actual projector may differ.
99
Copyright Attribution
This information is subject to change without notice.
©SEIKO EPSON CORPORATION 2018. All rights reserved.
2018.12 413748200EN
 Loading...