

Epson PowerLite 9300i, V11H071920 - PowerLite 9300i SXGA+ LCD Projector, PowerLite 9300i - PowerLite 9300NL Multimedia Projector Quick Manual
Page 1
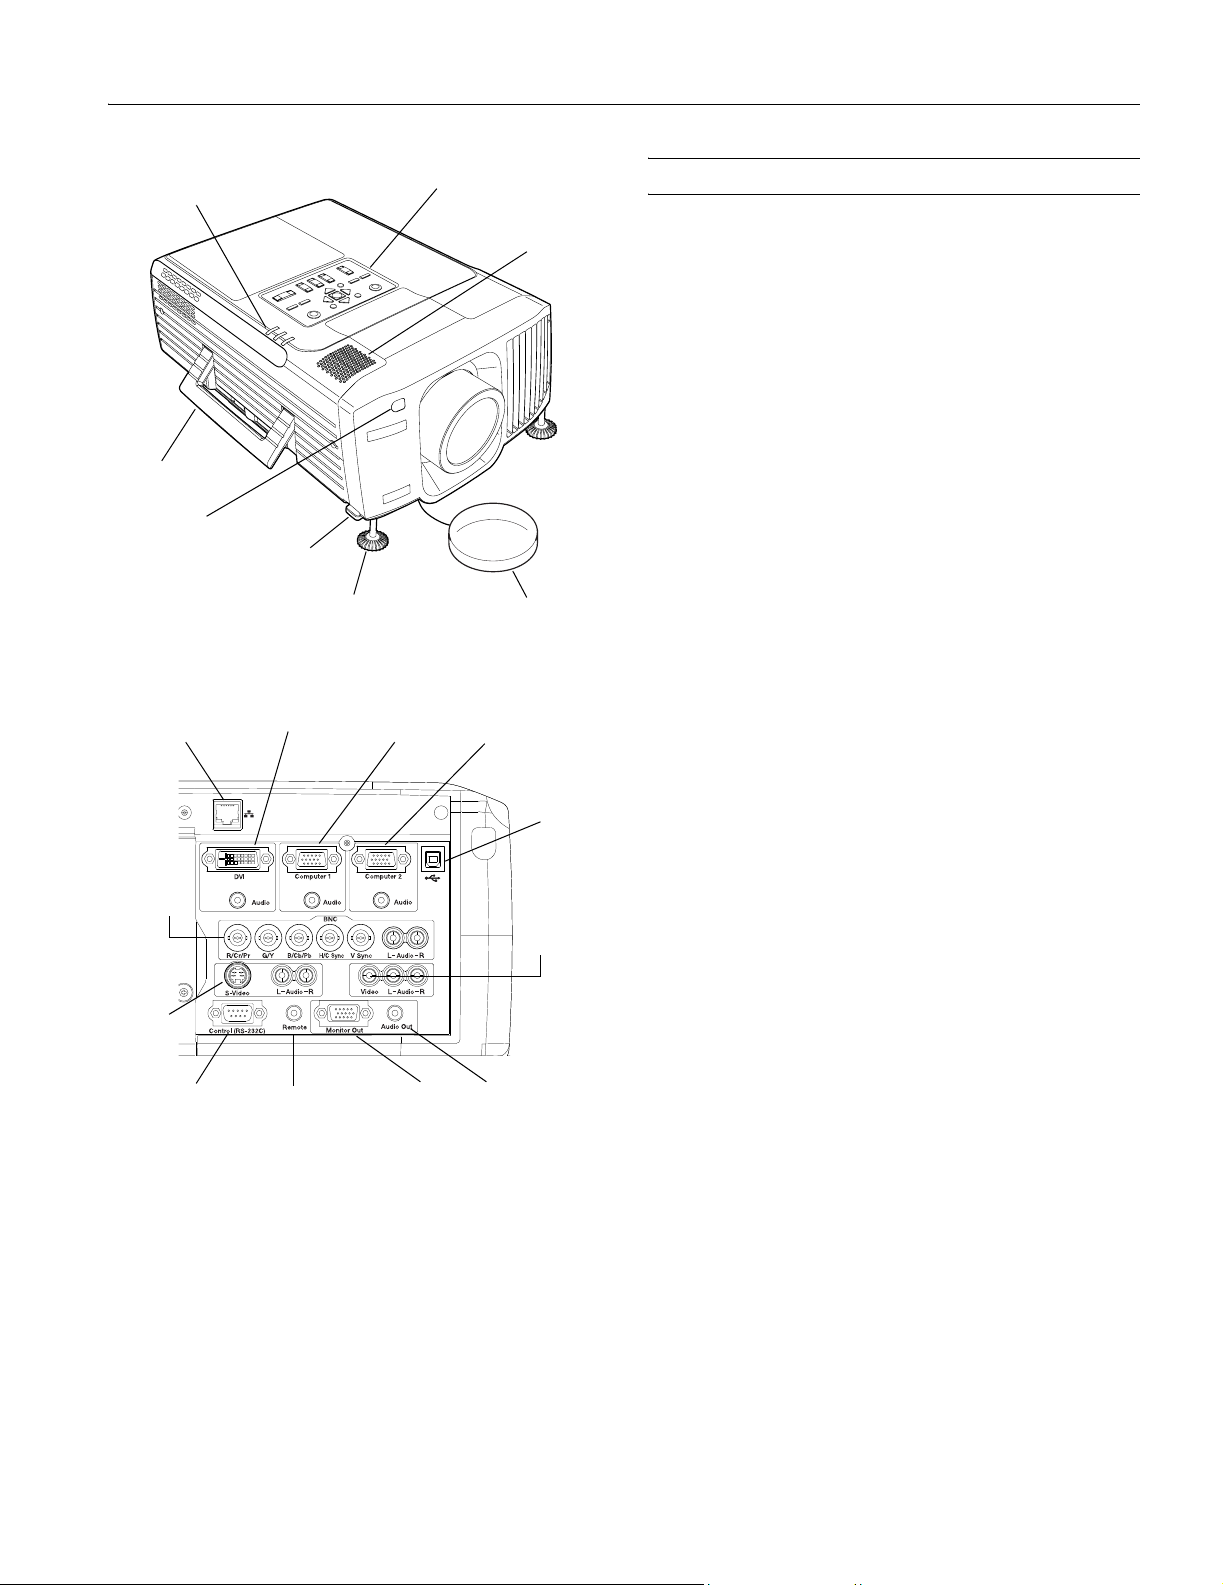
EPSON PowerLite 9300i Projector
Indicator lights
Handle
IR receiver
Network
port
BNC ports
(component
video)
S-Video
port
Foot release
lever
DVI-D port
(dual-link DVI)
Adjustable foot
Computer 1
port
Control panel
Computer 2
port
Speaker
Lens cover
USB
port
Video
port
(composite
video)
Projector Specifications
General
Type of display Poly-silicon Thin Film Transistor
(TFT), active matrix
Size of LCD panels Diagonal: 1.4 inch (35.6 mm)
Lens F=1.7 to 2.2, f=53 to 72 mm
Resolution 1400
Color reproduction 24 bit, 16.8 million colors
Brightness Approx. 2500 ANSI lumens
Contrast ratio 1100:1 (in dynamic color mode)
Image size 22 to 300 inches
Projection distance 3.6 to 49.2 feet (1.1 to 15 meters)
Projection methods Front, rear, upside-down front
Internal sound
system 7 W monaural
Optical aspect ratio 4:3 (horizontal:vertical);
Zoom ratio 1:1.35
Noise level 33 dB
Keystone correction
angle ±40° vertical
Projection Lamp
Type UHE (Ultra High Efficiency)
Power consumption 200 W
Lamp life Up to 7000 hours
Part number V13H010L26
× 1050 pixels (SXGA+)
(native format)
(ceiling mount), and upside-down rear
supports 16:9 and 5:4
±20° horizontal
Control port
(RS-232C)
Hardwired
remote control
cable port
Monitor Out
port
Audio Out port
Note: Independent audio input connectors are provided for
each computer and video port.
Remote Control
Range about 30 feet (10 meters)
Battery AA
× 2
Mouse compatibility
Supports USB mouse
10/03 EPSON PowerLite 9300i Projector - 1
Page 2
EPSON PowerLite 9300i Projector
Dimensions
Height 7.6 inches (193 mm) including feet
Width 13.9 inches (352 mm)
Depth 19.3 inches (491 mm)
Weight 24.7 lb (11.2 kg) (with lens)
Electrical
Rated frequency 50 to 60 Hz
Power supply 100 to 120 VAC, 5.4 A
200 to 240 VAC, 2.5 A
Power
consumption Operating: 340 W
Standby mode: 1.8 W (network off)
Standby (network on): 60 W
Environmental
Temperature Operating: 41 to 104 °F (5 to 40°C)
Storage: 14 to 140 °F (–10 to 60 °C)
Humidity Operating: 20 to 80% RH,
non-condensing
Storage: 10 to 90% RH,
non-condensing
Safety
United States FCC 47CFR Part15B Class B (DoC)
UL1950 Rev. 3
Canada ICES-003 Class B
CSA C22.2 No. 950-95 (cUL)
CE Marking Directive 73/23/EEC, 89/336/EEC
EN 55022, EN 55024
Computer Port Pin Assignments
The Computer1, Computer 2, and Monitor Out ports are
female video RGB, 15-pin D-sub connectors.
Pin no. Signal Pin no. Signal
1 Red video 9 Reserved
2 Green video 10 Synchronous GND
3 Blue video 11 GND
4 GND 12 SDA
5GND 13
6 Red GND 14 Vertical sync
7 Green GND 15 SCL
8 Blue GND
Horizontal sync/
composite sync
Compatible Video Formats
You can use any of the following video sources: VCR, DVD
player, camcorder, digital camera, gaming console, or laser
disc player. The projector supports composite video, S-video,
component video, and RGB video, and it automatically senses
the video format (HDTV, NTSC, PAL, or SECAM).
The projector supports these international video standards:
Mode Refresh Rate (Hz)
NTSC
NTSC 4:3
PAL
M-PAL
N-PAL
PAL—60
SECAM
HDTV (720p)
HDTV (720p)
HDTV (1080i)
HDTV (1080i)
SDTV (480p)
SDTV (480p)
TV (525i)
TV (625i)
60
60
50
60
50
60
50
60
50
60
50
60
50
60
50
Compatible Computer Display Formats
You can connect the projector to a wide range of computers,
including PCs and notebooks, Apple Macintosh,
Macintosh
PowerBook
®
series (including G3, G4, and G5 systems),
®
computers, many iMac® and iBook® series
systems, and high-end workstations such as the Sun
SPARCstation.
™
®
Power
®
Although images are displayed at the projector’s native
resolution of 1400 × 1050 pixels, EPSON’s patented
SizeWise
™
chip supports computer display formats ranging
from VGA through UXGA.
To project images output from a computer, the computer’s
external monitor signal must be set at a refresh rate (vertical
frequency) that’s compatible with the projector; see the
following table for compatible formats. For best results, the
computer’s resolution should be set to match the projector’s
native SXGA+ resolution (1400
Mode Refresh Rate (Hz) Resolution
VGA-EGA 70 640 × 350
VGA—60
VESA—72
VESA—75
VESA—85
VGA—120
60
72
75
85
120
× 1050).
640 × 480
640 × 480
640 × 480
640 × 480
640 × 480
2 - EPSON PowerLite 9300i Projector 10/03
Page 3
EPSON PowerLite 9300i Projector
Mode Refresh Rate (Hz) Resolution
SVGA—56
SVGA—60
SVGA—72
SVGA—75
SVGA—85
SVGA—120
XGA—43i
XGA—60
XGA—70
XGA—75
XGA—85
XGA—120
SXGA1—70
SXGA1—75
SXGA1—85
SXGA1—100
SXGA2—60
SXGA2—75
SXGA2—85
SXGA3—43i
SXGA3—60
SXGA3—75
SXGA3—85
SXGA+60
SXGA+75
SXGA+85
UXGA—48i
UXGA—60
UXGA—65
UXGA—70
UXGA—75
UXGA—80
UXGA—85
iMAC VGA
iMAC SVGA
iMAC XGA
MAC13
MAC16
MAC19—60
MAC19
MAC21
56
60
72
75
85
120
86
60
70
75
85
120
70
75
85
100
60
75
85
86
60
75
85
60
75
85
96
60
65
70
75
80
85
117
95
75
67
75
59
75
75
800 × 600
800 × 600
800 × 600
800 × 600
800 × 600
800 × 600
1024 × 768
1024 × 768
1024 × 768
1024 × 768
1024 × 768
1024 × 768
1152 × 864
1152 × 864
1152 × 864
1152 × 864
1280 × 960
1280 × 960
1280 × 960
1280 × 1024
1280 × 1024
1280 × 1024
1280 × 1024
1400 × 1050
1400 × 1050
1400 × 1050
1600 × 1200
1600 × 1200
1600 × 1200
1600 × 1200
1600 × 1200
1600 × 1200
1600 × 1200
640 × 480
800 × 600
1024 × 768
640 × 480
832 × 624
1024 × 768
1024 × 768
1152 × 870
Positioning the Projector
❏ Place the projector on a sturdy, level surface.
❏ Make sure there is plenty of space for ventilation around
and under the projector. Do not set the projector on top of
loose papers that could block the vents under the projector.
❏ Make sure the projector is within 10 feet of a grounded
electrical outlet or extension cord.
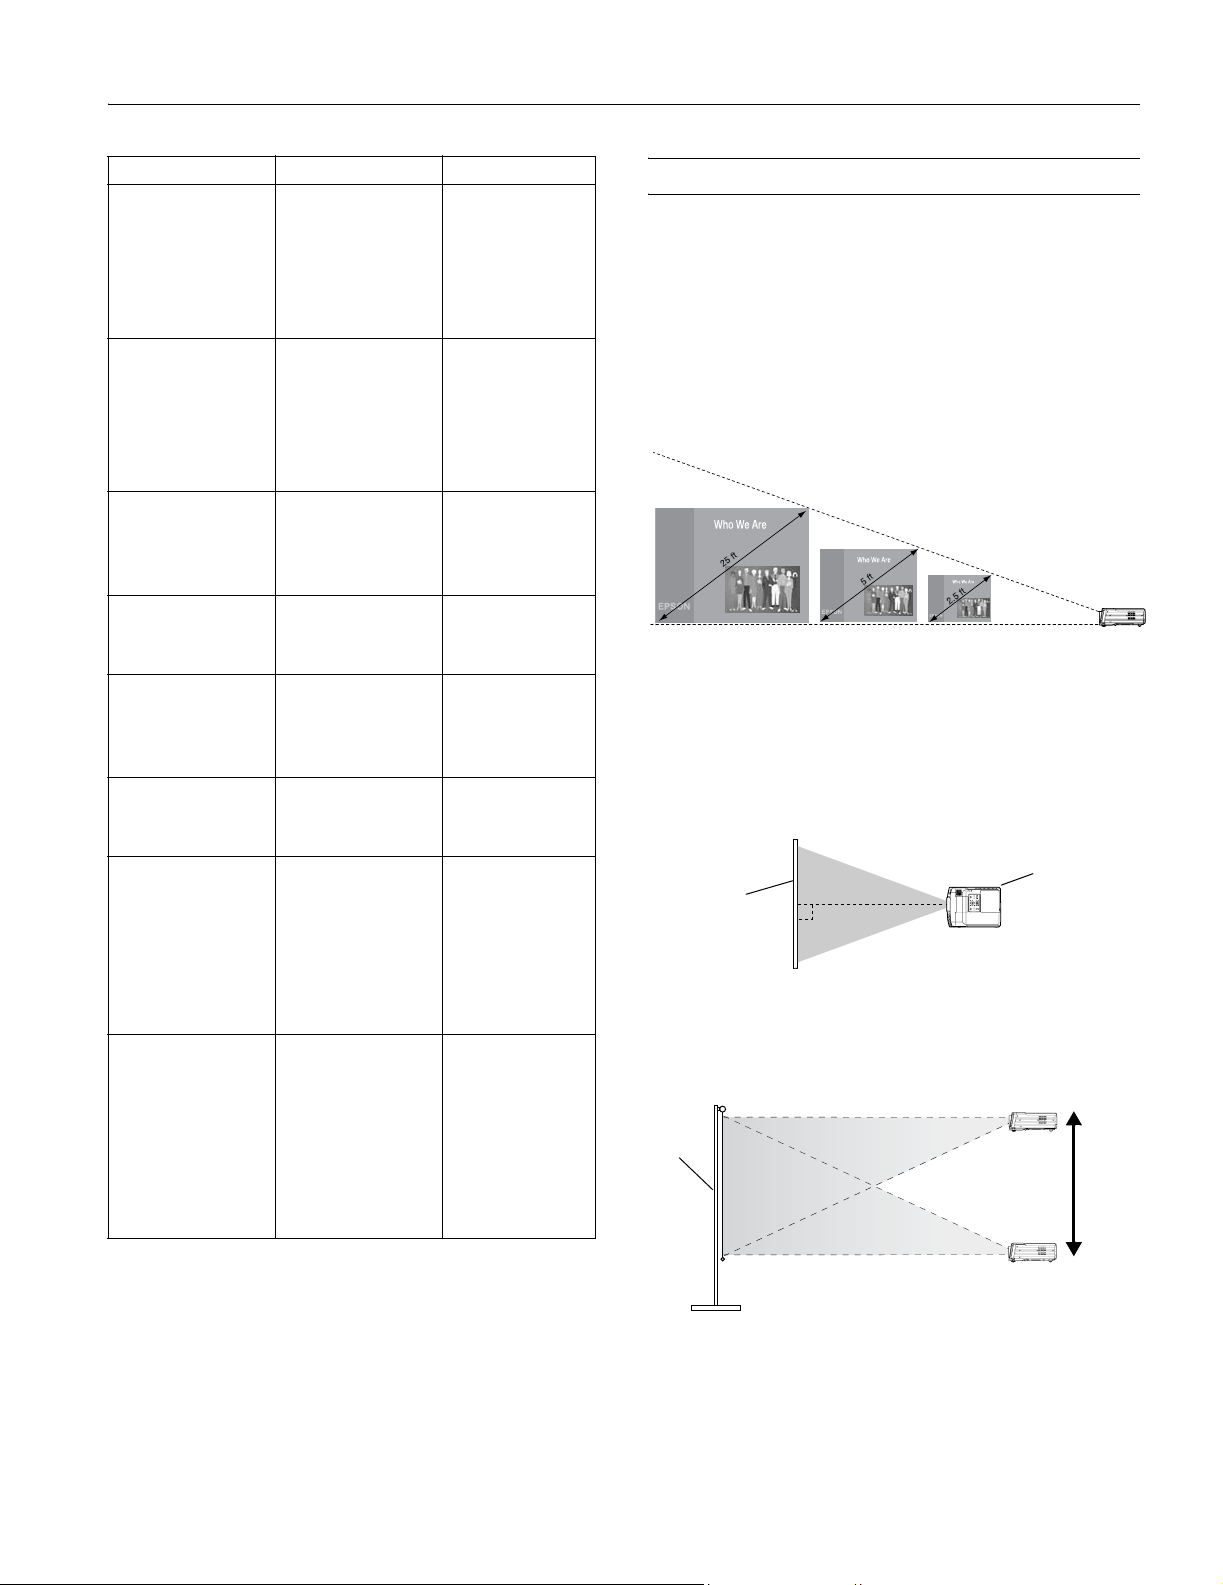
Image size increases with distance, but varies depending on
how you’ve adjusted the optical zoom and other settings.
TBD
3 to 5 ft7 to 10 ft37 to 50 ft approx. distance
It’s best to place the projector directly in front of the center of
the screen, facing the screen squarely. If it isn’t placed this
way, the image will be “keystone” shaped, instead of square or
rectangular. If this happens, you can use the projector’s
keystone buttons (see page 9) or QuickCorner
correct the image shape (see page 10).
Screen
Overhead View
If you place the projector between the top and bottom of the
screen, you can use the Lens Shift to raise or lower the image
(see page 9).
Screen
from screen
™
function to
Projector
Ideal
height
Side View
If you place the projector below screen level, you’ll have to tilt
it up by extending its feet. This causes the image to lose its
square shape, but you can correct the distortion by pressing
Keystone button as described on page 9.
the
10/03 EPSON PowerLite 9300i Projector - 3
Page 4

EPSON PowerLite 9300i Projector
Distance and Screen Size Calculations
Use the calculations below to determine the how far to place
the projector from the screen and the size of the screen.
Standard Zoom Lens (V12H004S02)
To find the distance when you know the screen’s diagonal
size:
❏ Distance at Wide setting (inches) =
(diagonal screen size [inches] × 3.7857 - 9.6813)/2.54
❏ Distance at Tele setting (inches) =
(diagonal screen size [inches] × 5.175 - 9.5418)/2.54
To find a screen’s diagonal size when you know the distance:
❏ Screen size at Wide setting (inches) =
(projection distance [inches] × 0.264152 × 2.54) +
2.557334
❏ Screen size at Tele setting (inches) =
(projection distance [inches] × 0.193237 × 2.54) +
1.843826
Rear Projection Wide Lens (V12H004R02)
To find the distance when you know the screen’s diagonal
size:
❏ Distance (inches) =
(diagonal screen size [inches] × 1.81553 - 6.59805)/2.54
To find a screen’s diagonal size when you know the distance:
❏ Screen size (inches) =
projection distance [inches] × 2.54 × 0.5508024 +
3.634232
Wide Zoom Lens (V12H004W02)
To find the distance when you know the screen’s diagonal
size:
❏ Distance at Wide setting (inches) =
(diagonal screen size [inches] × 2.68681 - 6.80456)/2.54
❏ Distance at Tele setting (inches) =
(diagonal screen size [inches] × 3.80739 - 6.46563)/2.54
To find a screen’s diagonal size when you know the distance:
❏ Screen size at Wide setting (inches) =
(projection distance [inches] × 2.54 × 0.372189 + 2.53258)
❏ Screen size at Tele setting (inches) =
(projection distance [inches] × 2.54 × 0.262647 +
1.698179)
Middle Throw Zoom Lens (V12H004M01)
To find the distance when you know the screen’s diagonal
size:
❏ Distance at Wide setting (inches) =
(diagonal screen size [inches] × 5.02466 - 13.5124)/2.54
❏ Distance at Tele setting (inches) =
(diagonal screen size [inches] × 7.6049 - 13.3501)/2.54
To find a screen’s diagonal size when you know the distance:
❏ Screen size at Wide setting (inches) =
(projection distance [inches] × 2.54 × 0.199018 +
2.689217)
❏ Screen size at Tele setting (inches) =
(projection distance [inches] × 2.54 × 0.131494 + 1.75546)
Middle Throw Zoom Lens (V12H004M02)
To find the distance when you know the screen’s diagonal
size:
❏ Distance at Wide setting (inches) =
(diagonal screen size [inches] × 7.409 - 14.5823)/2.54
❏ Distance at Tele setting (inches) =
(diagonal screen size [inches] × 11.2032 - 14.8525)/2.54
To find a screen’s diagonal size when you know the distance:
❏ Screen size at Wide setting (inches) =
(projection distance [inches] × 2.54 × 0.134971 +
1.968187)
❏ Screen size at Tele setting (inches) =
(projection distance [inches] × 2.54 × 0.08926 + 1.323702)
Long Throw Zoom Lens (V12H004L04)
To find the distance when you know the screen’s diagonal size:
❏ Distance at Wide setting (inches) =
(diagonal screen size [inches] × 10.6703 +14.1243)/2.54
❏ Distance at Tele setting (inches) =
(diagonal screen size [inches] × 14.407 + 13.343)/2.54
To find a screen’s diagonal size when you know the distance:
❏ Screen size at Wide setting (inches) =
(projection distance [inches] × 2.54 × 0.093718 -
1.323702)
❏ Screen size at Tele setting (inches) =
(projection distance [inches] × 2.54 × 0.069411 -
0.926168)
4 - EPSON PowerLite 9300i Projector 10/03
Page 5
EPSON PowerLite 9300i Projector
Connecting the Projector
You can connect the projector to four computer sources or
five video sources—up to a total of six sources altogether. You
can include an independent sound channel for each of the six
sources.
Type of connections
The following types of connections are possible, depending on
the kinds of signals your equipment generates and its available
output ports:
Computer equipment
Output signal Required cable
Analog RGB video
DVI
Video equipment
Output signal Required cable
Composite video RCA video cable
S-video S-video cable
Component video—
NTSC (YCbCr)
Component video—
HDTV (YPbPr)
RGB video
Note that the projector’s Computer 1, Computer 2, and BNC
ports accept a variety of input signals. If you’re connecting to
one of these ports, you’ll need to make sure that the correct
input signal setting is selected, or your image won’t display
properly.
To change the input signal setting, do the following:
1. After turning on the projector, press the
menu screen appears.
2. Select the
Setting menu.
3. Change the Computer 1 Input, Computer 2 Input, or BNC
Input
setting, as needed, to match the signal generated by
your computer or video equipment.
VGA cable
BNC cable
VGA-to-BNC cable
DVI-D dual-link cable (DVI-to-DVI or
DFP-to-DVI available from EPSON)
BNC cable
BNC cable
VGA cable
BNC cable
Menu button. The
Viewing Images on an External Monitor
You can use an external monitor to display images from any
connected computer or video source. This lets you view your
presentation close-up, as well as on the projection screen.
Note: Some LCD monitors may not be able to display the image
correctly. If you have trouble displaying the image, connect a
multiscan monitor. If you’re projecting computer images, make
sure the computer’s refresh rate is set to 65 Hz or greater.
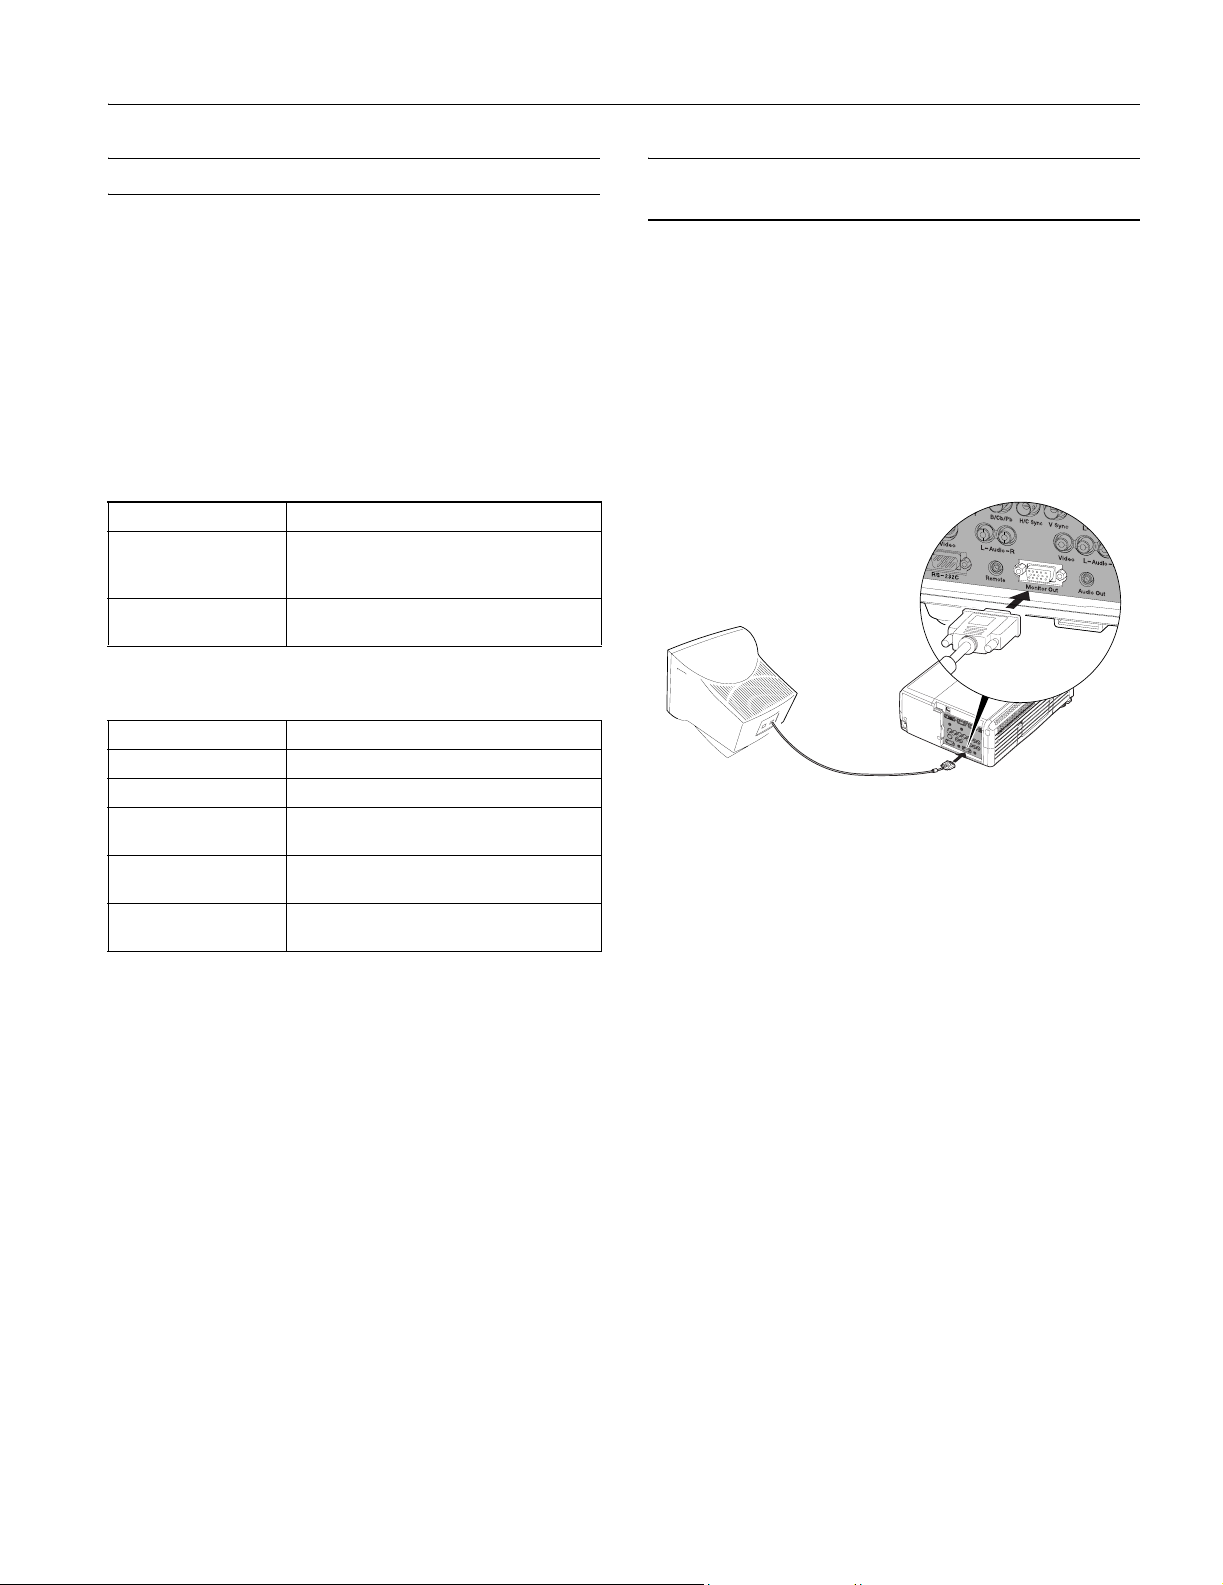
To use an external monitor, connect it to the projector’s
Monitor Out port, as shown:
External monitor
Follow these guidelines when using an external monitor:
❏ The monitor displays the currently selected video source.
Press the
active sources at once (see page 7).
❏ If you want, you can view (or preview) images on the
monitor while the projection screen is darkened after
pressing the
❏ You can also view images on the monitor while the
projector is in standby mode (plugged in but not turned
on), if the
ON
Preview button if you want to display all the
A/V Mute button.
Standby Mode setting has been set to Network
in the Advanced1 menu.
10/03 EPSON PowerLite 9300i Projector - 5
Page 6
EPSON PowerLite 9300i Projector
Displaying an Image
If you turn on your computer or video equipment before
turning on the projector, the projector will automatically
select the connected source. If you have multiple sources
connected, you may have to switch to the desired source
manually (see “Selecting the Image Source” at right).
Turning On the Projector
1. Remove the lens cap.
Caution: Do not use the projector with the lens cap in place.
The heat generated by the lens can damage the cap.
2. Connect the power cord to the projector, then plug the
other end into a grounded electrical outlet.
3. Wait a few seconds until the P
4. Press the red P
can also use the P
Power button on top of the projector. You
Power button on the remote control.
Power
button
power light to turns orange.
Selecting the Image Source
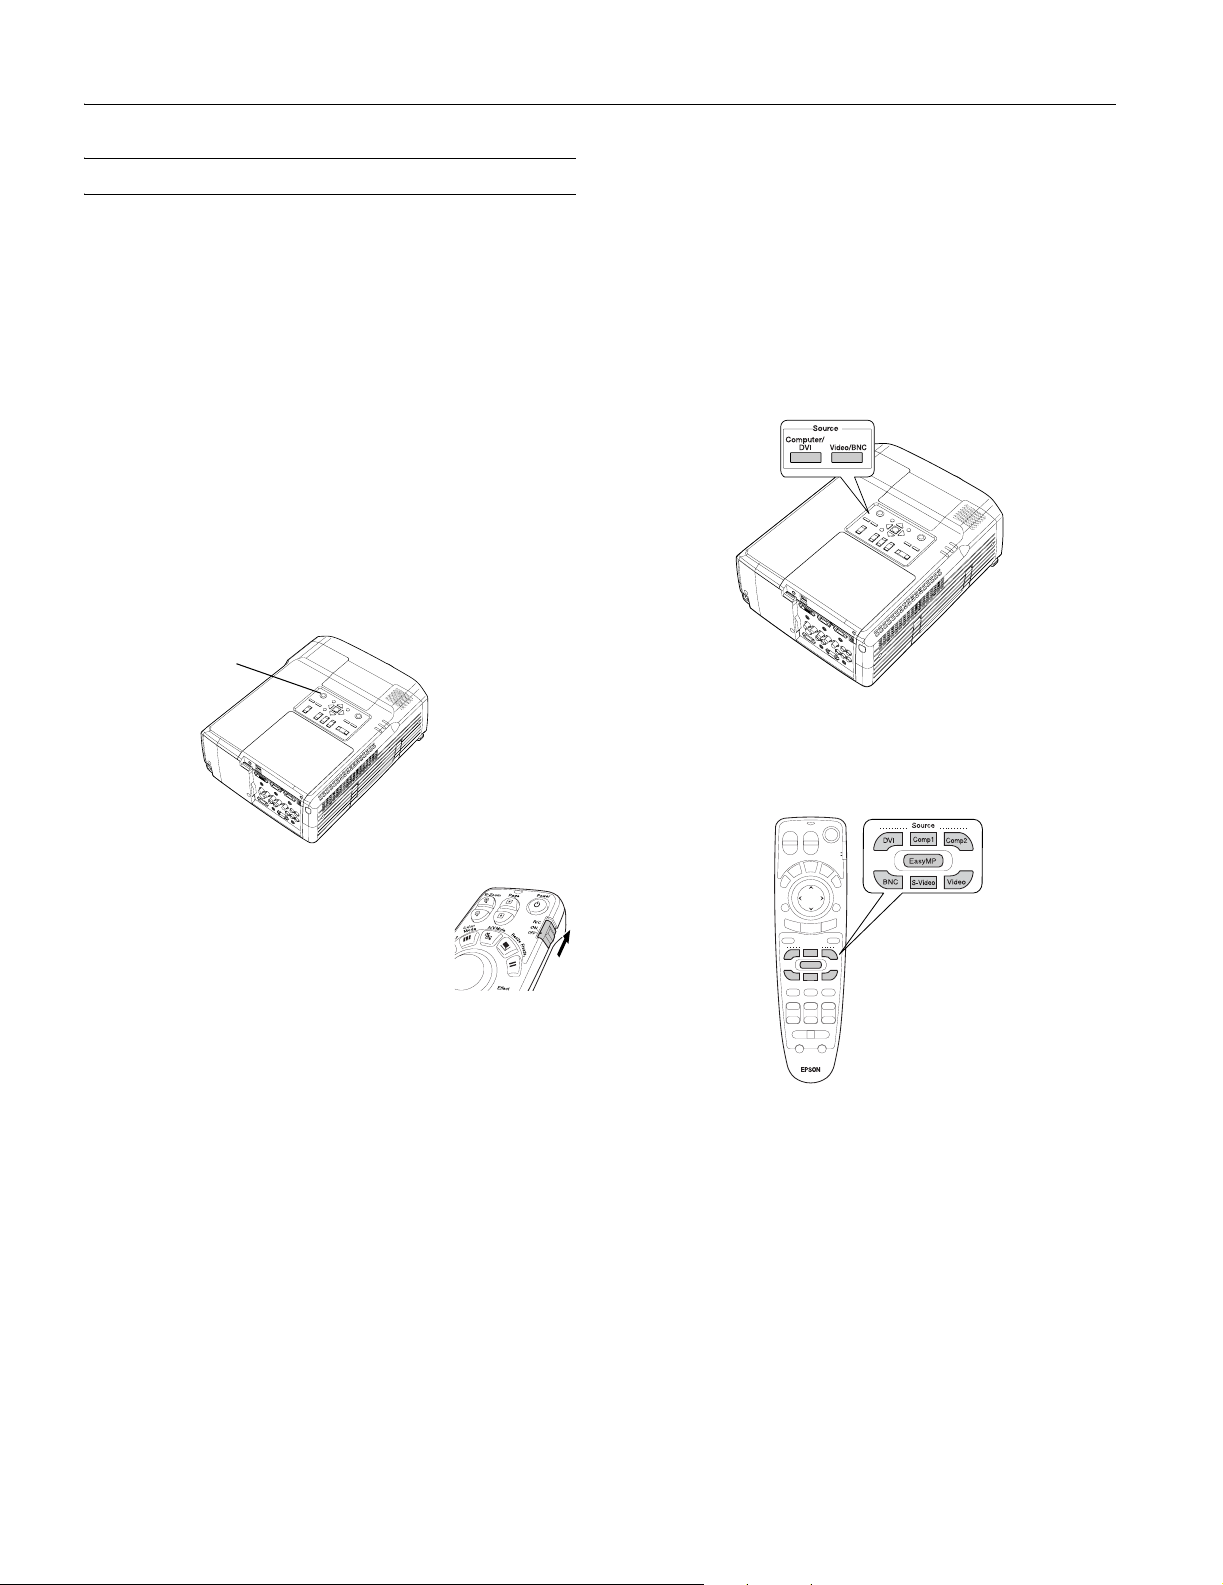
You can use the source buttons either on the projector or the
remote control:
❏ The projector has two
Use the
Computer/DVI button to switch between
Source buttons.
equipment connected to the Computer 1, Computer 2, and
DVI ports.
Use the
Video/BNC button to switch between equipment
connected to the Video, S-Video, and BNC ports.
❏ The remote control has seven
Source buttons. Use them to
switch between equipment connected to the port identified
on each button.
If you’re using the remote control, make
sure batteries are installed and the power
switch on the side of the remote control
is turned on.
power light flashes green as the
The P
projector warms up, and an image begins
to appear after about 30 seconds. When the power light
stops flashing and remains green (in about 40 seconds), the
projector is ready for use.
If you’ve enabled password protect, enter your password at
the prompt.
Warning: Never look into the lens when the lamp is on. This
can damage your eyes.
Note: To shut down the projector, see page 10. Shutting
down the projector correctly prevents premature lamp failure
and possible damage from overheating.
Note: You can preview all sources to help you select the desired
source (see page 7).
6 - EPSON PowerLite 9300i Projector 10/03
Page 7
EPSON PowerLite 9300i Projector
Previewing Image Sources
You can use the Preview function to help you select the image
source.
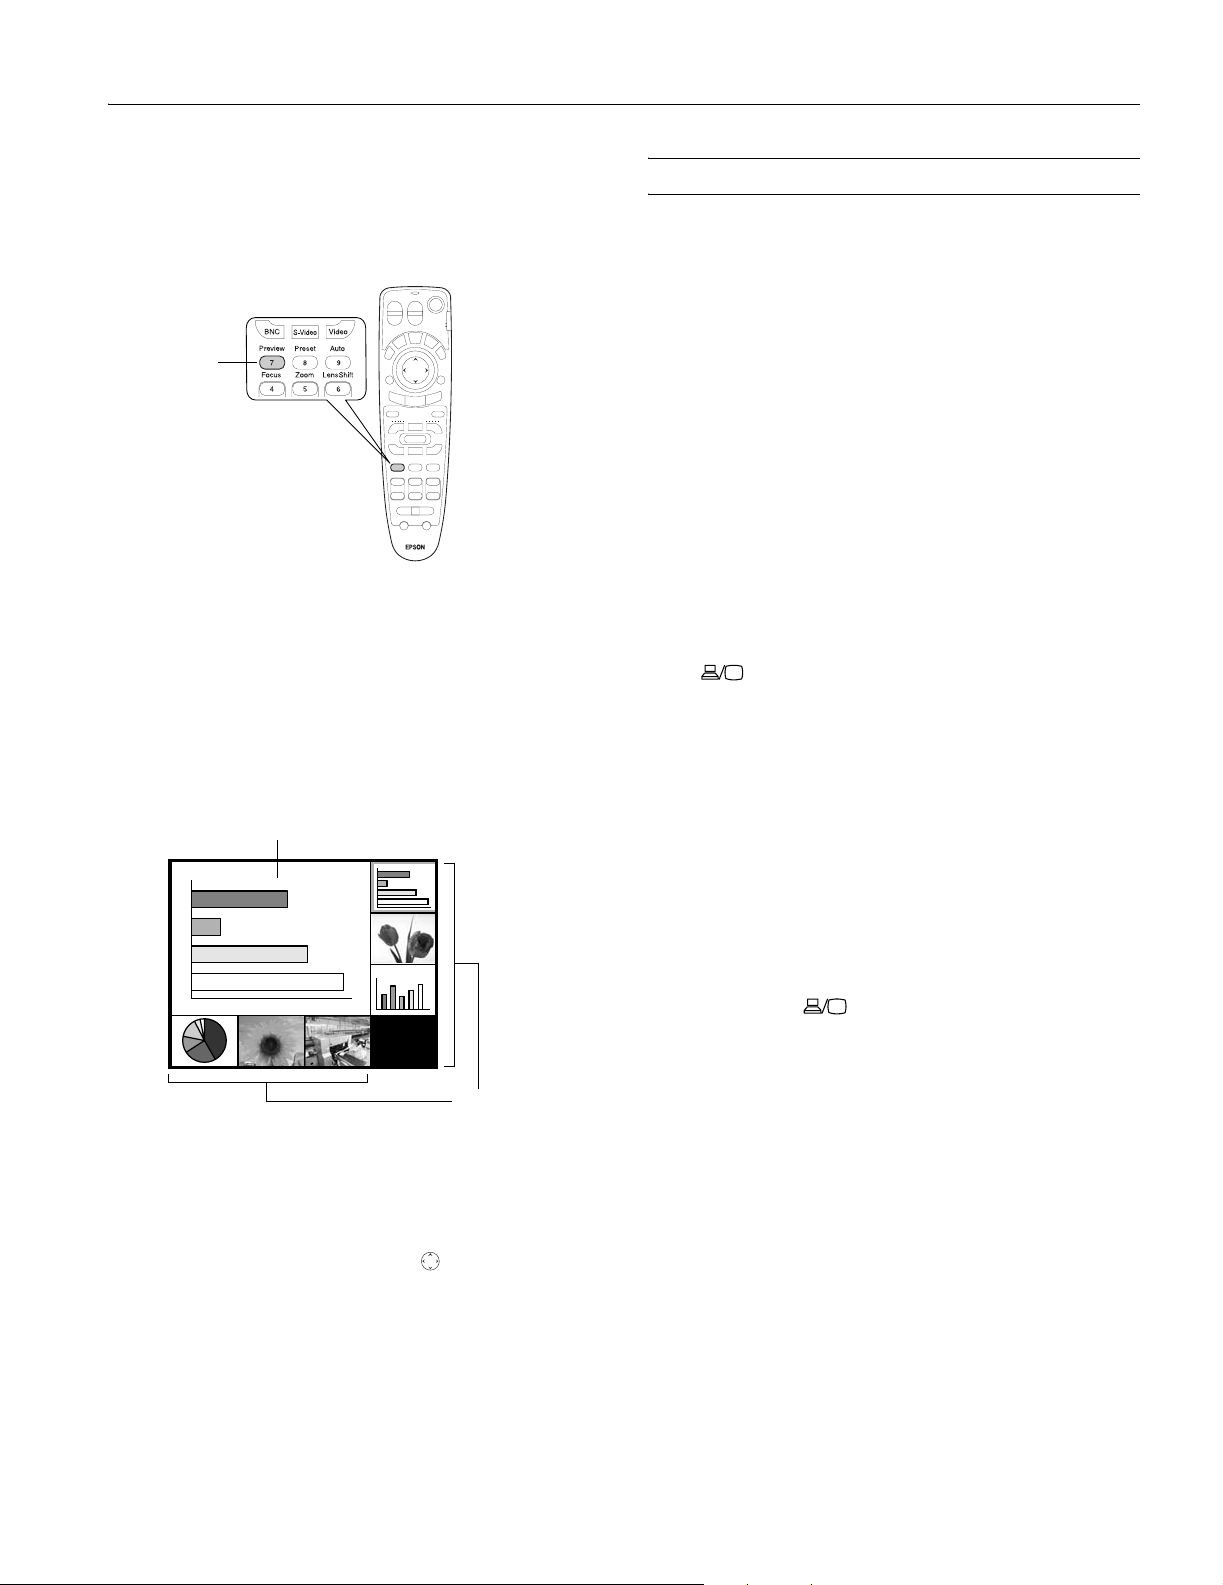
1. Press
Preview on the remote control.
Preview
You see the currently selected source displayed in the main
window, as shown below. All sources (including the
currently selected source) are displayed in smaller preview
windows on the right side and at the bottom. If no
equipment is connected to a port, or if there is no incoming
signal, the preview window for that source appears blank.
Troubleshooting Display Problems
Follow these guidelines if you’re having trouble displaying an
image.
You Can’t Project an Image
If you see a blank screen or a blue screen with the
message, try the following:
❏ Make sure the cables are connected correctly.
❏ Make sure the power light is green and not flashing and the
lens cover is off.
❏ If you’ve connected more than one computer and/or video
source, you may need to press one of the
the projector’s control panel or the remote control to select
the correct source. (Allow a few seconds for the projector to
sync up after pressing the button.)
❏ If you’re using a Windows/PC notebook, press the function
key on your keyboard that lets you display on an external
monitor. It may be labeled
CRT/LCD or have an icon such
as . You may have to hold down the
pressing it. Allow a few seconds for the projector to sync up
after changing the setting.
No Signal
Source buttons on
Fn key while
Note: Movies are displayed as still images on the preview
screen.
Currently selected source
Preview windows
2. Press one of the
switch to the desired source. Or press
Source buttons on the remote control to
ESC to exit the
preview screen without switching sources.
Note: A red highlight surrounds the preview window for the
currently selected source. You can use the pointer button on
the remote control to highlight a different source, and then press
Enter to display it.
The Projector and Notebook Don’t Display the Same Image
If you’re projecting from a notebook, and you don’t see the
same image on the projection screen and on your computer
screen, follow these guidelines.
If you’re using a Windows/PC notebook:
❏ On most systems, there’s a function key that lets you toggle
between the LCD screen and the projector, or display on
both at the same time. It may be labeled
an icon such as . You may have to hold down the
CRT/LCD or with
Fn
key while pressing it. Allow a few seconds for the projector
to sync up after changing the setting.
❏ If the function key doesn’t permit you to display
simultaneously on both screens, you should check your
monitor settings to make sure both the LCD screen and the
external monitor port are enabled.
1. From the Control Panel, open the
2. In the Display Properties dialog box, click the
then click
Advanced.
Display utility.
Settings tab,
3. The method for adjusting the settings varies by brand; you
may need to click a
Monitor tab, then make sure the
external Monitor port is set as your primary display and/or
enabled.
See your computer’s documentation or online help for
details.
10/03 EPSON PowerLite 9300i Projector - 7
Page 8
EPSON PowerLite 9300i Projector
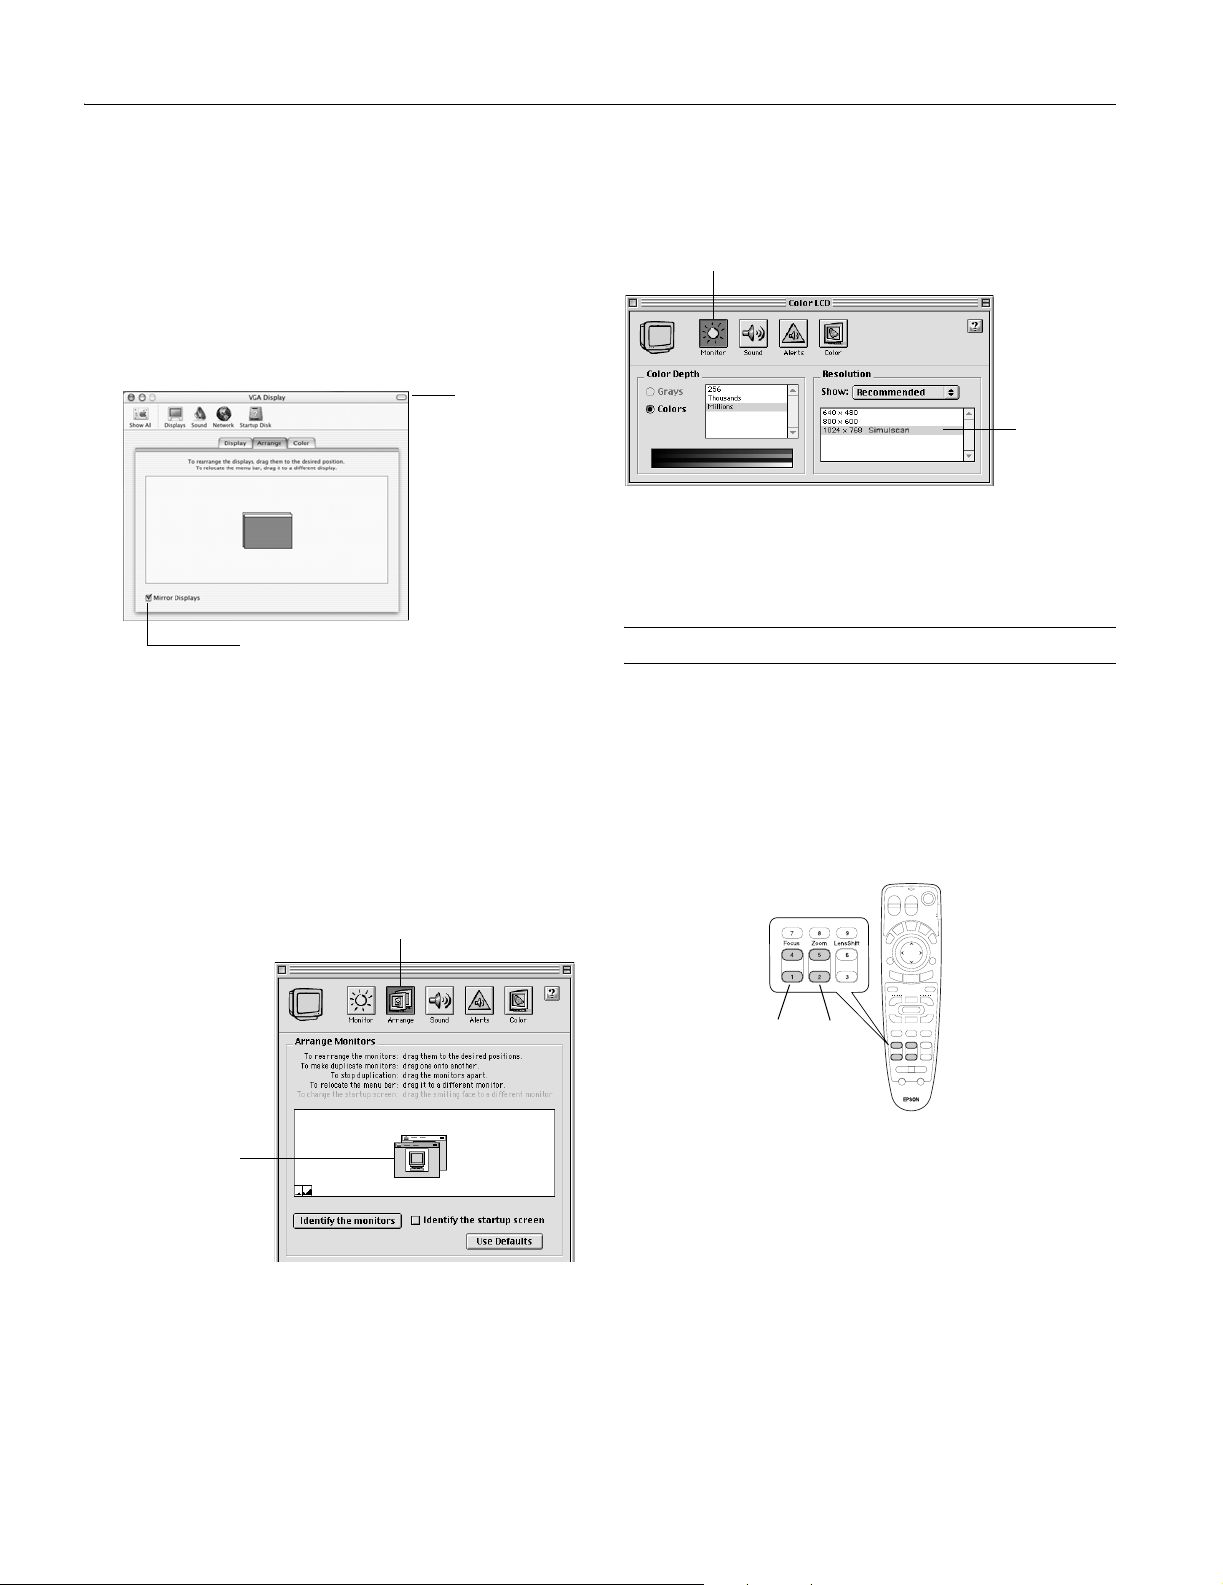
If you're using Macintosh OS X:
You may need to set up your system to display on the
projector screen as well as the LCD screen. Follow these steps:
1. From the Apple menu, select
select
Displays.
2. Make sure the
VGA Display or Color LCD dialog box is
System Preferences, then
selected.
3. Click the
4. Make sure the
If you’re using OS 8.6 to 9.x:
Arrange (or Arrangement) tab.
Select the
VGA Display
dialog box
Make sure Mirror Displays is checked
Mirror Displays checkbox is selected.
You may need to set up your system to display on the
projector screen as well as the LCD screen. Follow these steps:
1. From the Apple menu, select
Monitors or Monitors and Sound.
2. Click the
Arrange icon.
Control Panels, then click
If the Arrange option isn’t available, you may need to select
one of the Simulscan resolution settings:
1. Click the
Click here
2. Select a
Monitor icon.
Select a
Simulscan
resolution
Simulscan resolution as shown. (Allow a few
seconds for the projector to sync up after making the
selection.)
Adjusting the Image
Once you see your image, you may need to make certain
adjustments.
Focusing and Zooming Your Image
Use the
projector) to sharpen the image.
Use the
Focus buttons on the remote control (or on the
Zoom buttons to reduce or enlarge the image.
Click here
Drag one monitor
icon on top of
the other
3. Drag one monitor icon on top of the other.
8 - EPSON PowerLite 9300i Projector 10/03
Focus Zoom
If the image still isn’t large enough, you may need to move the
projector farther away from the screen. You can also use the
E-Zoom buttons on the remote control to zoom in on a
portion of the image.
Note: The Focus and Zoom buttons won’t work when the wideangle rear projection lens is installed.
Page 9
EPSON PowerLite 9300i Projector
Adjusting the Height of Your Image
If the image is too low on the screen, you can raise it using the
Lens Shift. This is the best method for adjusting the height of
the image. If you need to raise the image further, you can tilt
the projector upward by extending the feet.
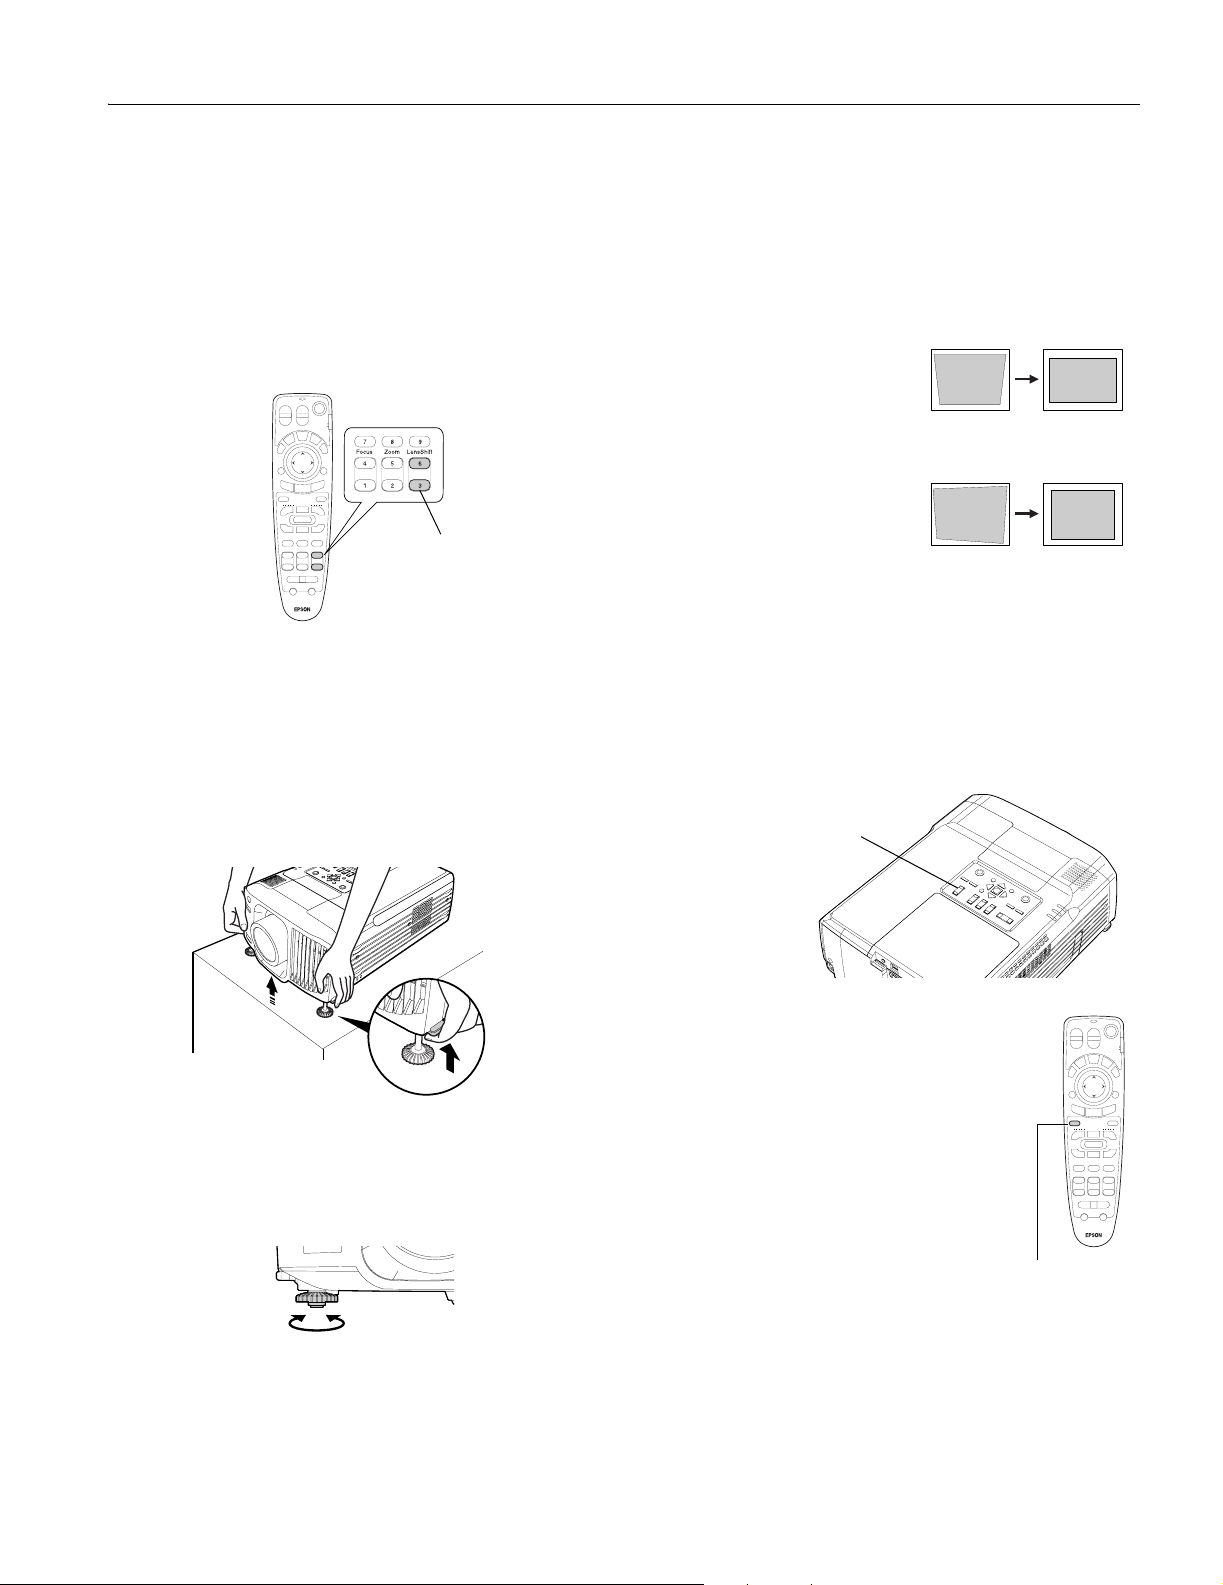
Using the Lens Shift
To raise or lower the image, use the Lens Shift buttons on the
remote control (or on the projector).
Lens Shift
Note: The Lens Shift buttons won’t work when the wide-angle
rear projection lens is installed.
Raising the Projector’s Feet
If you need to raise the image further, you can incline the
projector:
1. Stand behind the projector. Press the foot release buttons
on each side and lift the front of the projector.
Adjusting the Image Shape
In most cases, you can maintain a square or rectangular image
by placing the projector directly in front of the center of the
screen and using the Lens Shift (instead of tilting the projector
upward) to adjust the image height.
If this isn’t possible, use one of these methods to correct the
image shape:
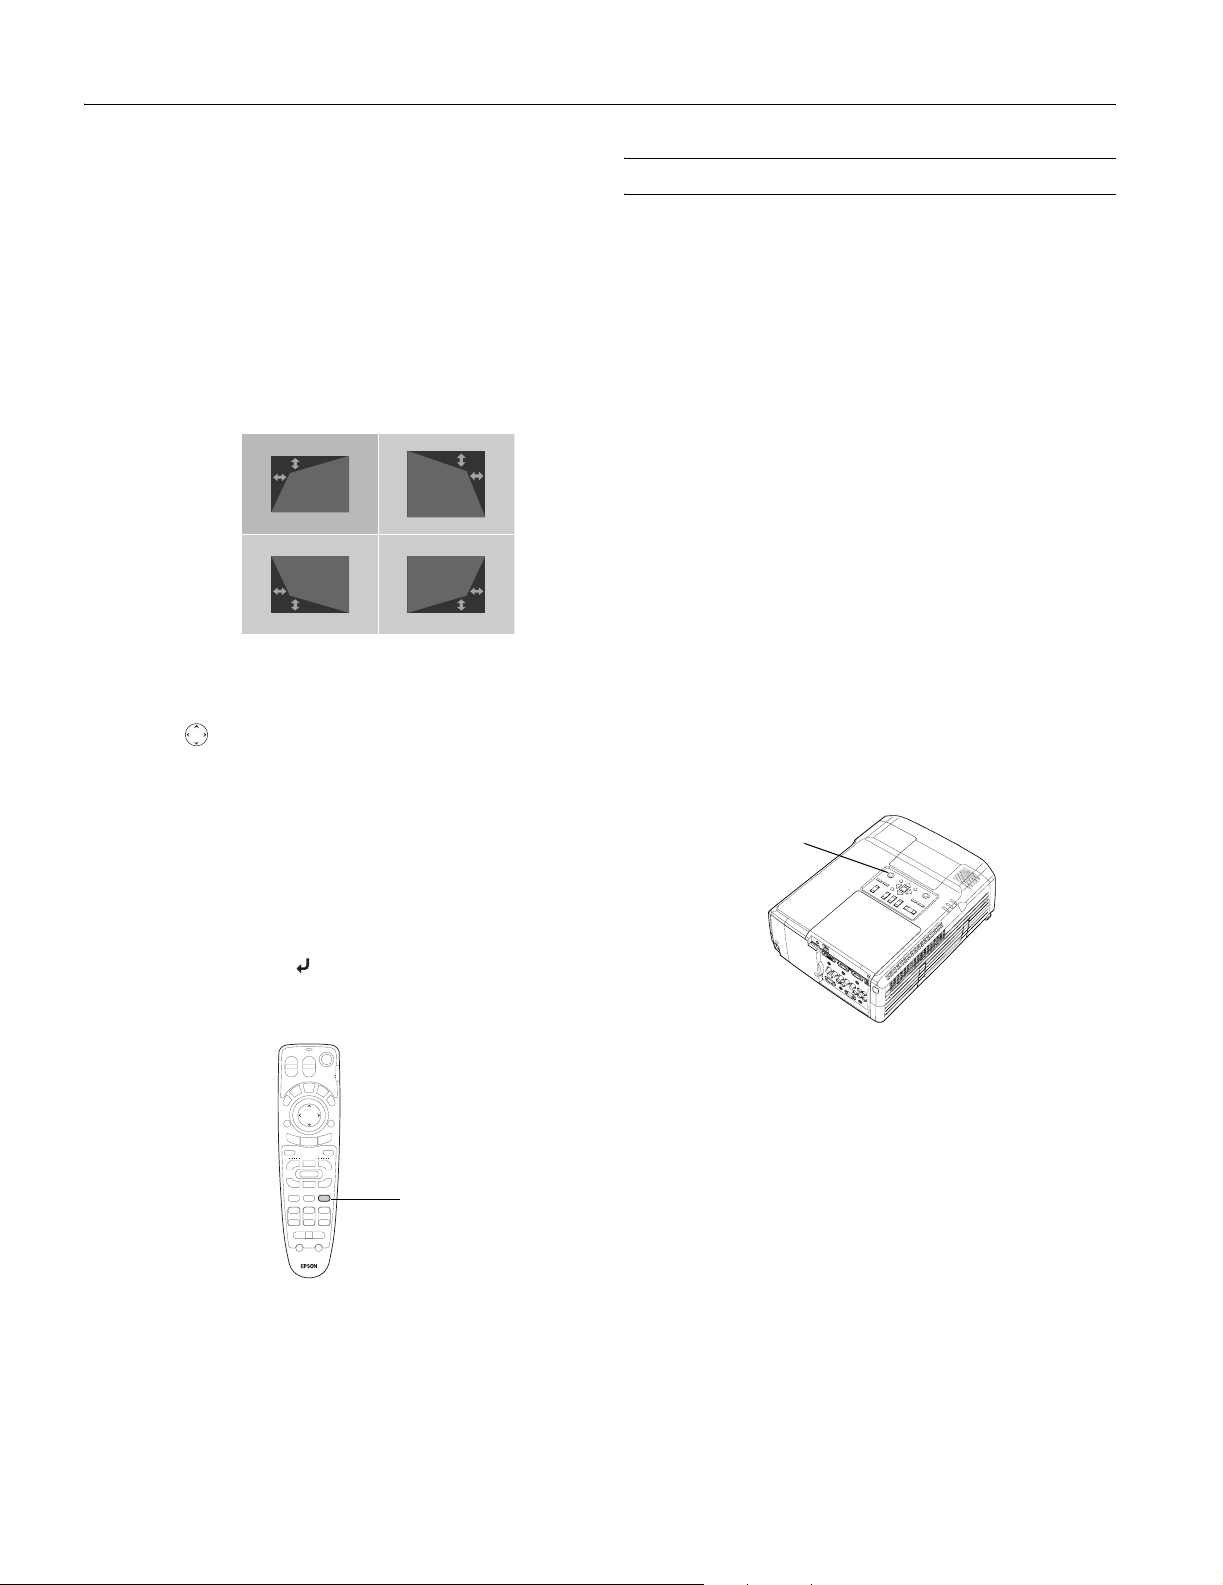
❏ If the image tapers inward on
the right and left sides only,
use Keystone correction as
described on the next page.
❏ If the image looks uneven on
all sides, or just on the top
and bottom, you can adjust
its shape using QuickCorner.
You cannot use both Keystone correction and QuickCorner at
the same time.
Using Keystone Correction
To adjust your image when the right and left sides are uneven,
do one of the following:
❏ Use the
Keystone buttons on the projector’s control panel
to adjust the image shape.
Keystone buttons
2. Once the image is positioned where you want it, release the
buttons to lock the feet in position.
3. If necessary, you can level the picture or fine-tune the
height by turning the projector feet.
Raising the projector causes the image to distort or
“keystone,” but you can manually correct the shape as
described in the next section.
❏ Or use the Keystone function in the
projector’s menu system. (Press the
Menu
button on the remote control, select the
Setting menu, and press Enter. From the
Setting menu, select
Enter. Then select V-Keystone and press
Enter. Adjust the setting as needed.)
Keystone and press
Menu button
Note: After using Keystone correction, the image will be slightly
shorter. If it’s important to maintain the correct aspect ratio, you
can stretch the image to its proper size using the
Height setting in
the Keystone menu.
10/03 EPSON PowerLite 9300i Projector - 9
Page 10
EPSON PowerLite 9300i Projector
Using QuickCorner
Use QuickCorner to correct the image shape when it’s uneven
on the top and bottom, or on all sides.
1. Press the
Menu button on the remote control (or on the
projector’s control panel).
2. Select the
Setting menu and press Enter.
3. From the Setting menu, select Keystone and press Enter.
4. Select Quick Corner and press Enter.
You see this screen:
5. Press the
Enter button to select the corner you want to
adjust.
6. Use the pointer button on the remote control (or the
arrow buttons on the projector) to adjust the shape.
7. Repeat steps 5 and 6 as needed to adjust any remaining
corners.
8. When done, press
ESC to exit the menu system.
Shutting Down the Projector
When you’ve finished using the projector, follow the
recommended procedure to shut it down. This extends the life
of the lamp and protects the projector from possible
overheating.
Note: When the projector has not received any input signals for
30 minutes, it automatically turns off the projector lamp and
enters sleep mode. This conserves electricity, cools the projector,
and extends the life of the lamp. If you are done using the
projector, unplug the power cord. If you want to start projecting
again, press the
You can turn off sleep mode using the
Setting menu. If
the Advanced1 menu), the lamp will turn off but the projector will
not go into full standby mode.
Follow these steps to turn off the projector:
1. If you’re using a computer or notebook, shut it down first.
Otherwise you may not be able to see your computer’s
display to shut it down properly.
2. To turn off the projector, press the red P
the projector or remote control. You see a confirmation
message. (If you don’t want to turn it off, press any other
button.)
Power button.
Sleep Mode option in the
Standby Mode has been set to Network ON (in
Power button on
Power
button
Correcting Computer Images
If you’ve connected a computer and the image doesn’t look
right or fit properly on the screen, press the
the remote control (or the
Auto/Enter button on the
Auto button on
projector’s control panel). This automatically resets the
projector’s tracking, sync, resolution, and position settings.
Auto button
Note: You must be projecting an image for this button to have
any effect. The
Auto button works only with computer images.
3. Press the P
Power button again. The power light flashes
orange for about a minute as the projector cools down.
When the projector has finished cooling, the orange light
stays on and the exhaust fan shuts off.
If you want to turn the projector on again, wait until the
orange light stops flashing. Then press the P
Power
button.
4. Turn off and disconnect any equipment plugged into the
projector.
5. Replace the lens cap, retract the feet, and unplug the power
cord.
Caution: To avoid damaging the projector or lamp, never
unplug the power cord when the power light is green or
flashing orange.
10 - EPSON PowerLite 9300i Projector 10/03
Page 11
EPSON PowerLite 9300i Projector
Using the Remote Control
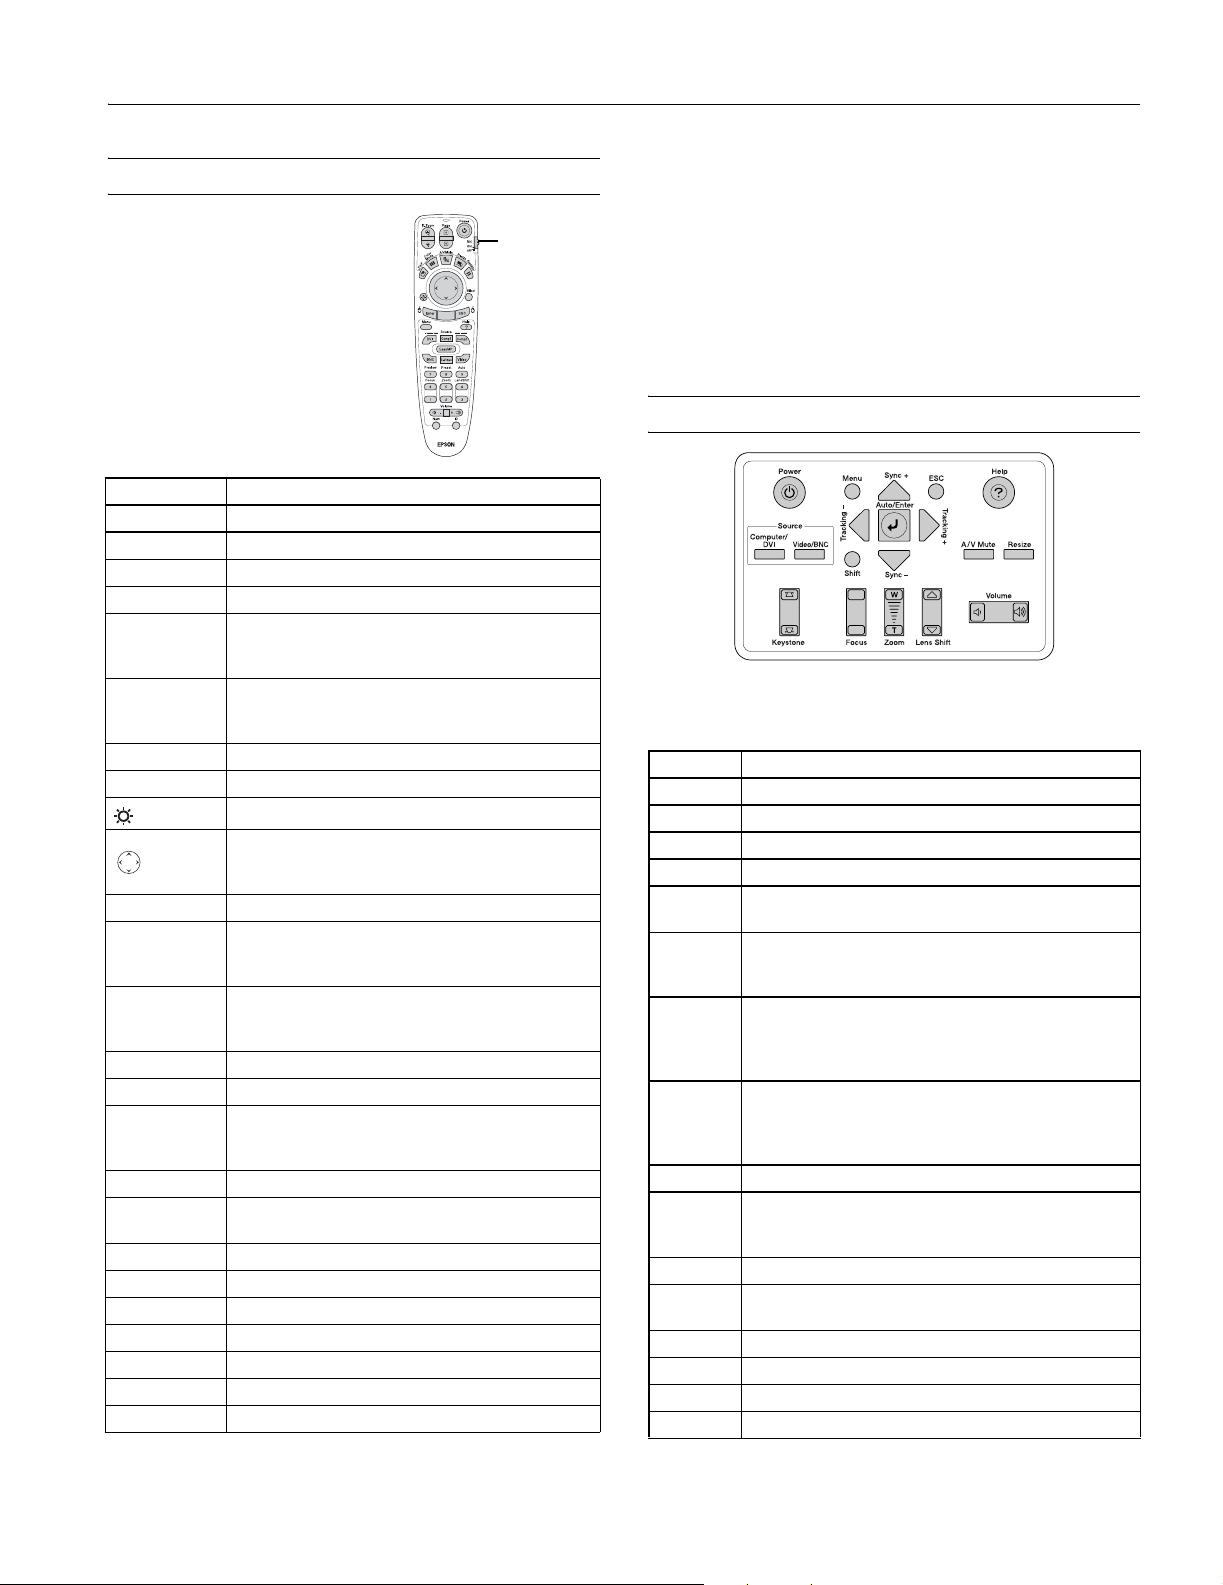
The remote control lets you use your
projector from anywhere in the
room (up to 30 feet away).
This table summarizes the functions
on the remote control.
Button Function
E-Zoom Zooms in on a portion of your image.
Page Advances to the next or previous image.
Power Turns the projector on or off.
PinP Displays a picture-in-picture image.
Color Mode Adjusts the vividness of the image color. Select
A/V Mute Turns off audio and video, displaying the black,
Resize Adjusts how an image fits into the display area.
Freeze Halts action. Press again to resume action.
Effect Lets you select a drawing or pointer tool.
Enter Selects a highlighted menu option, or functions as
Esc Displays the previous menu. Functions as the right
Menu Displays the on-screen menu system.
Help Displays the on-screen help system.
Source Press one of the Source buttons to switch to the
Preview Lets you preview connected sources (see page 7).
Preset Lets you select a preset selection of options for
Auto Optimizes a computer image.
Focus Sharpens the image.
Zoom Reduces or enlarges the image.
Lens Shift Raises or lowers the image.
Volume Increases or decreases the sound.
Num Press until it lights to use the numeric keypad.
ID Used for setting remote control ID (see page 12).
from several settings, and save a different setting
for each computer or video source.
blue, or user logo background. Press again to turn
audio and video back on.
Illuminates the buttons on the remote control.
Navigates menus or controls the mouse pointer
when the projector is connected to a computer
with an optional USB cable.
the left mouse button when the remote control is
used in place of your computer’s mouse.
mouse button when the remote control is used in
place of your computer’s mouse.
equipment connected to the corresponding port
(DVI, Comp1, Comp2, BNC, S-Video, or Video)
displaying computer images.
Turn on
remote control
before using
Note: If the projector does not respond to the remote control, make
sure batteries are installed and the switch on its side is turned on.
The projector also might not respond if the batteries are weak;
you’re standing at too great a distance from the projector; ambient
light is too bright; a certain type of fluorescent light is present; a
strong light source (such as direct sunlight) shines into the infrared
receiver; or other equipment emitting infrared energy is present
(such as a radiant room heater).
Using the Control Panel
This table summarizes the functions of the buttons on top of
the projector.
Button Function
Power Turns the projector on or off.
Help Displays the online help menu.
Source Switches between Computer, Video, and S-Video.
Menu Displays the on-screen menu system.
ESC Pressing ESC while viewing a menu displays the
previous menu.
Auto/Enter Use as Enter button to select an option when the menu
or help system is active. When computer images are
displayed, press to auto-adjust the image.
Tracking Lets you manually eliminate vertical banding that may
be present in some computer images. Use the
Tracking buttons as arrow keys to navigate the onscreen menu and help systems.
Sync Lets you manually correct blurriness that may be
present in some computer images. Use the Sync
buttons as arrow keys to navigate the on-screen menu
and help systems.
Shift Press and hold to use the Tracking and Sync buttons.
A/V Mute Turns off audio and video, displaying the black, blue,
or user logo background. Press again to turn audio
and video back on.
Resize Adjusts how an image fits into the display area.
Keystone Squares an image that’s ‘keystoned’ or tapered on the
sides after tilting up the projector.
Focus Sharpens the image.
Zoom Reduces or enlarges the image.
Lens Shift Raises or lowers the image.
Volume Increases or decreases the sound.
10/03 EPSON PowerLite 9300i Projector - 11
Page 12
EPSON PowerLite 9300i Projector
Controlling Multiple Projectors
If you’re using more than one projector, you can control all
the projectors—or just selected ones—by using the projector
ID system. To operate a projector, you have to set the remote
control’s ID to match that of the projector. Or you can
control all of the projectors simultaneously by setting the
remote control’s ID to zero.
Setting the Projector ID
The projector’s default ID is 1. If you need to change it,
follow these steps:
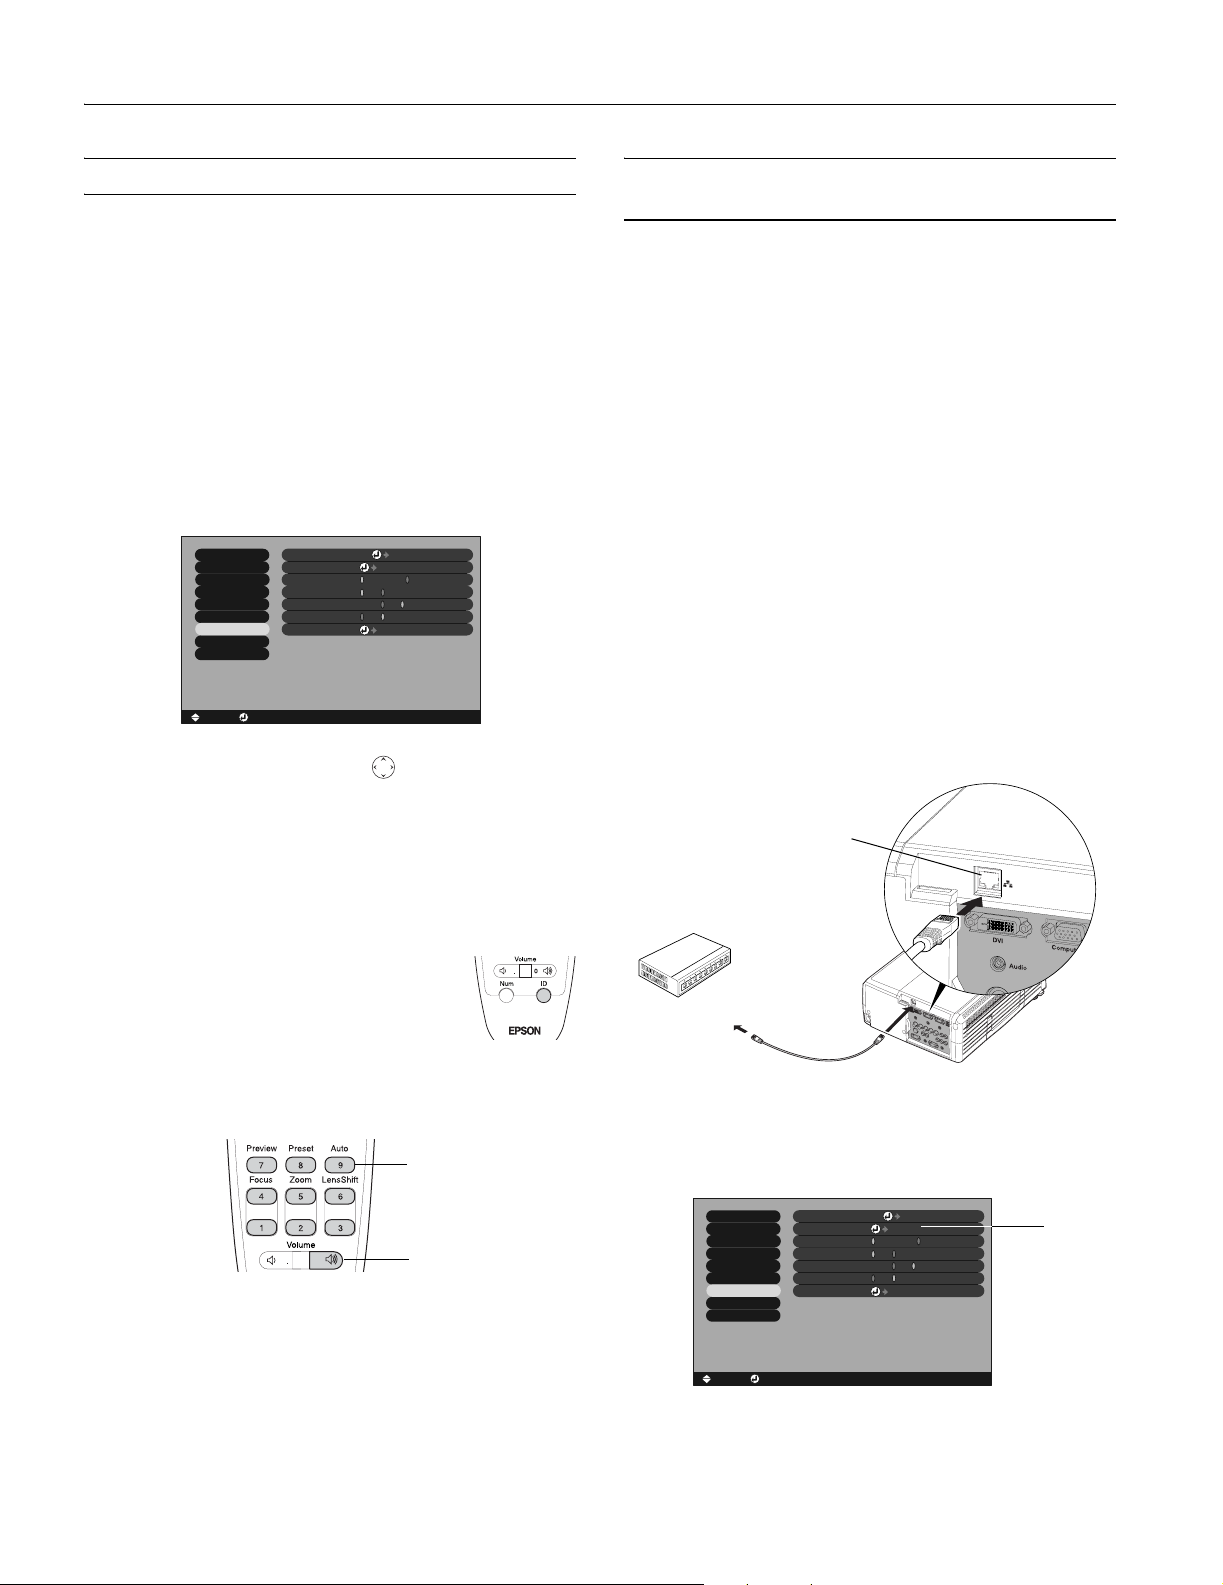
1. Access the projector’s
Projector ID.
Video
Audio
Effect
Setting
User’s Logo
Advanced1
Advanced2
About
Reset All
2. Press the right or left side of the pointer button on the
remote control to increase or decrease the ID value.
3. Press
Enter to set the value.
4. When done, press ESC to exit the menu system.
Advanced2 menu and highlight
:
: 1
Projector ID
Network
COM Port
Auto Setup
BNC Sync Termination
Direct Power ON
Reset
Set
RS-232C USB
:
:
ON OFF
:
ON OFF
:
ON OFF
Execute
Set
[Menu]: Exit[ ]: Enter[ ]: Select
Managing Projectors from a Remote Computer
The EasyManagement software lets you monitor and control
projector(s) from a remote computer. These features are
intended for use by network administrators.
❏ Use EMP Monitor to see your projectors’ status, switch
image sources, and control basic settings.
❏ Use EMP NetworkManager to receive e-mail notifications
alerting you to possible problems.
❏ Use EMP Multi Screen Adjustment to make your image
appear consistent when you are combining multiple
projectors to display a single, large image.
Make sure you install the software (included on the projector’s
CD-ROMs) on the computer you want to use to monitor
your projectors.
Setting Up the Network
Connect each projector you want to monitor to your network
and configure it with an appropriate IP address.
1. Connect the projector to your network using a
commercially available 100baseTX or 10baseT network
cable.
Ethernet port
Setting the Remote Control ID
The remote control’s default ID is zero. To change it:
1. Press the
ID button on the remote control.
You see it light up.
2. Press one of the numbered buttons on the
remote control to select the desired ID (0
through 9). Select zero to control all
projectors, or select a number to match the
ID of the projector(s) you want to operate.
Nine
0
The
ID button’s light shuts off and the new ID is registered.
Zero
If you would like to check the remote control’s current ID,
press the
ID button twice in succession. Count the number of
flashes; this number corresponds to the remote control’s ID.
(If it doesn’t flash, it is set to zero.)
To network port
2. Turn on the projector.
3. Press the
Network from the Advanced2 menu.
Menu button on the remote control and select
Video
Audio
Effect
Setting
User’s Logo
Advanced1
Advanced2
About
Reset All
Projector ID
Network
COM Port
Auto Setup
BNC Sync Termination
Direct Power ON
Reset
:
: 1
:
:
:
Set
Set
RS-232C USB
ON OFF
:
ON OFF
ON OFF
Execute
Select
Network
[Menu]: Exit[ ]: Enter[ ]: Select
12 - EPSON PowerLite 9300i Projector 10/03
Page 13
EPSON PowerLite 9300i Projector
4. If your network assigns addresses automatically, turn on
DHCP.
5. If your network does not assign addresses automatically,
turn off
Subnet Mask, and Gateway Address, as needed.
DHCP and enter the projector’s IP Address,
Note: To enter numbers using the remote control, press the
Num button until it lights, then use the number keypad.
6. After changing an address in the network menu, press the
Enter button. This stores the value.
7. When done making all necessary changes, press ESC to exit
the menu system.
Registering a Projector in EMP Monitor
Before you can monitor a projector, you have to register it.
Follow these steps:
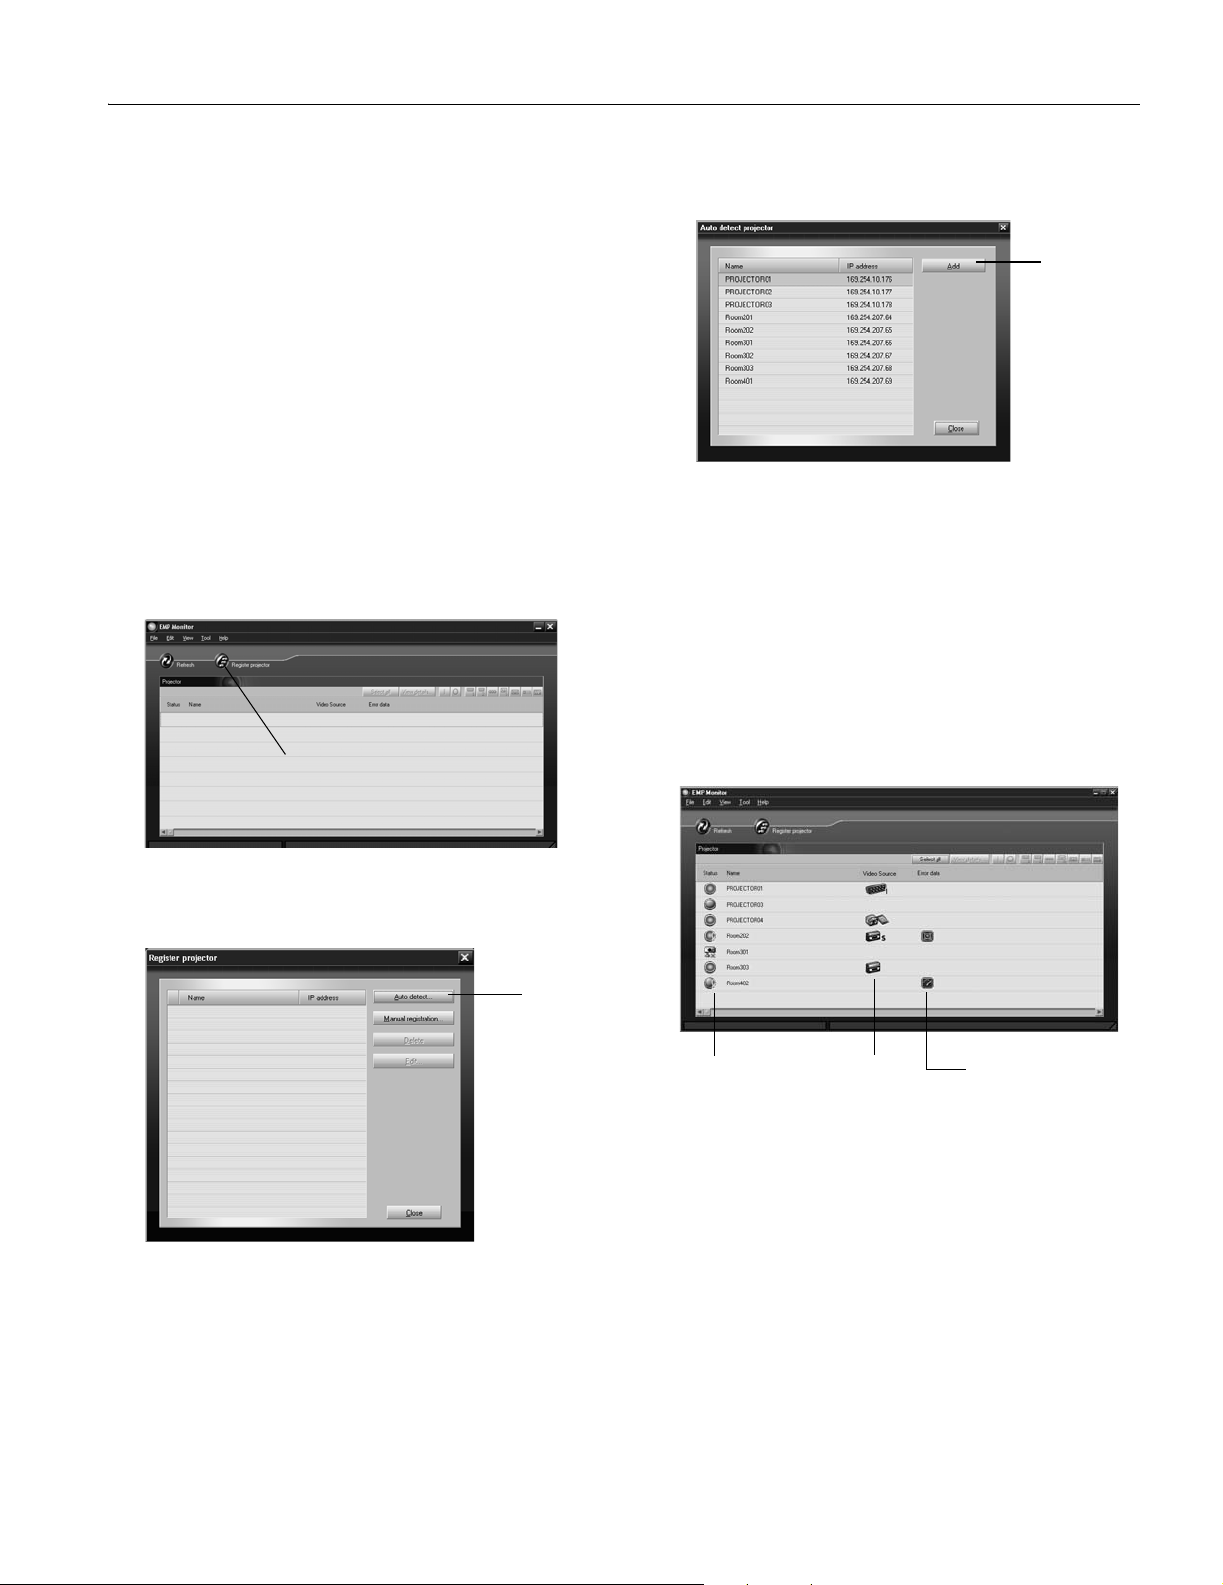
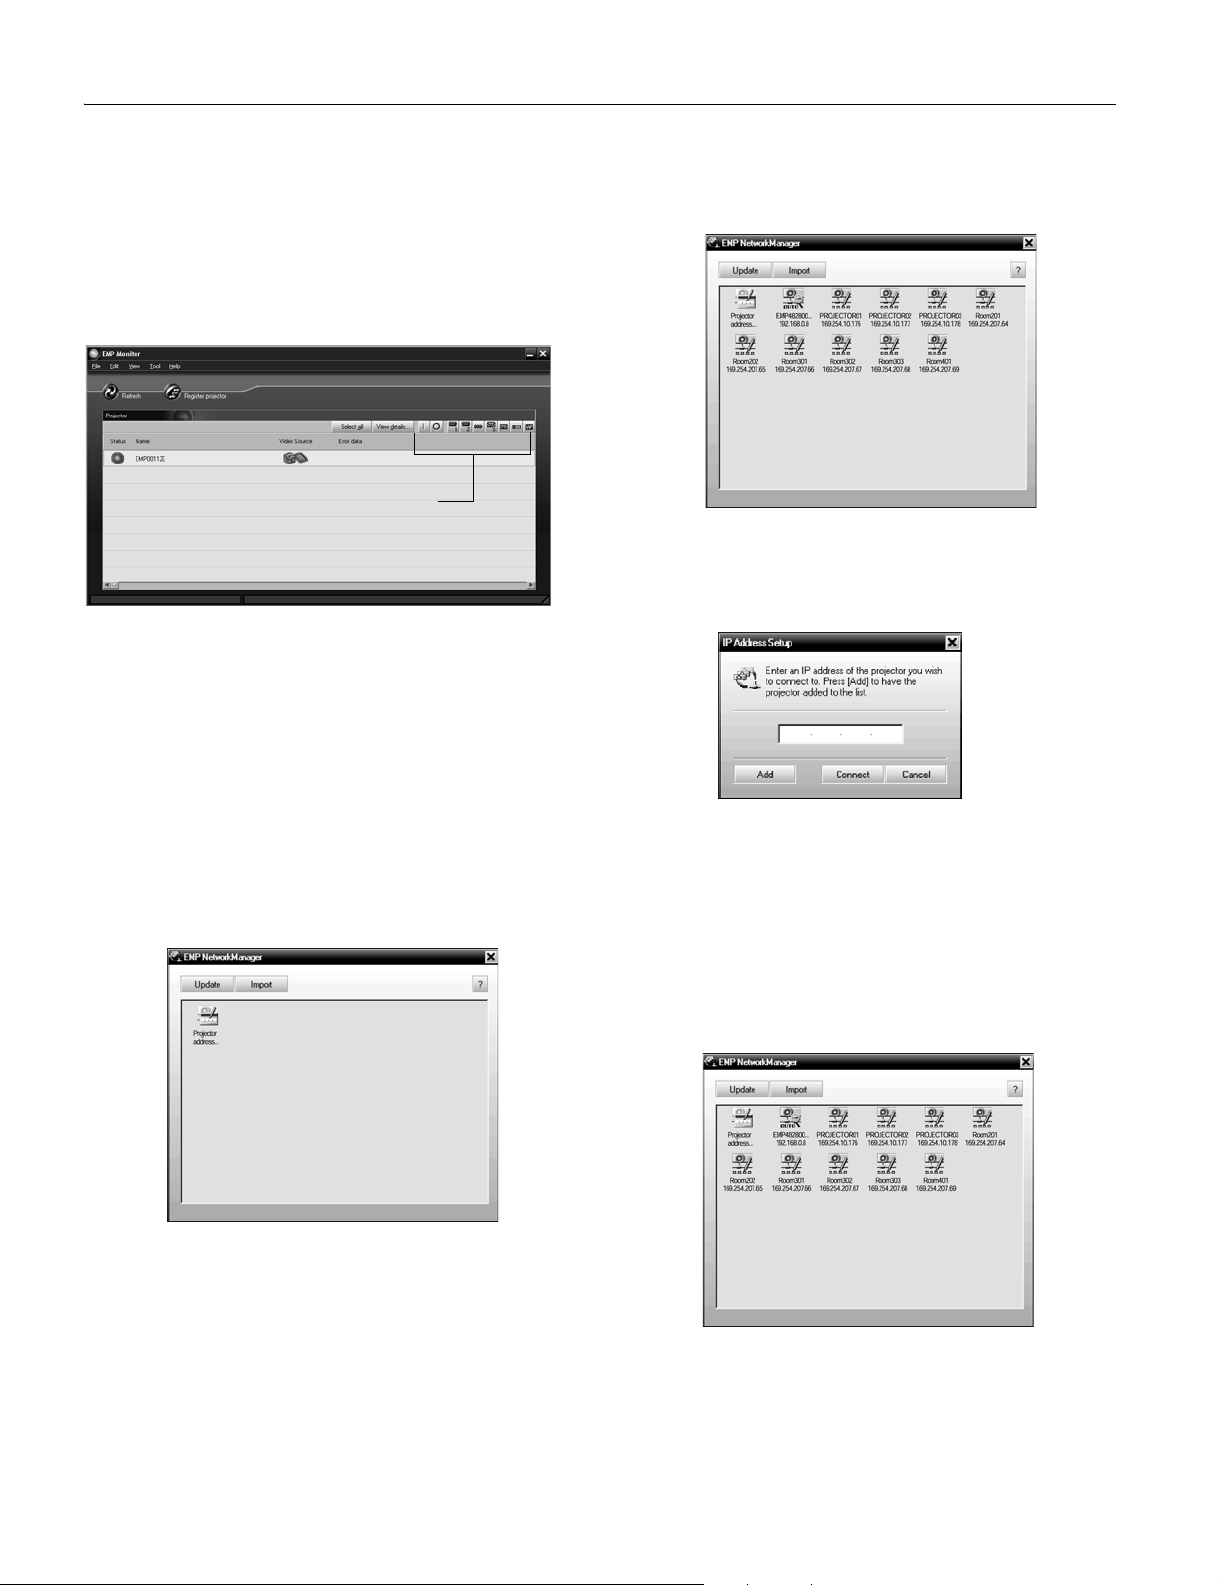
1. Open EMP Monitor by selecting
EMP Monitor from the
Start menu. You see this screen:
Click here
Any projectors found on the network are listed as shown
below:
Click here
4. Select the projectors you want to add by clicking their
name. Then click
Add, and on the next screen click Close.
You see your registered projectors listed on the main EMP
Monitor screen.
Monitoring Your Projector(s)
The EMP Monitor screen lets you monitor your projectors
using the Status, Video Source, and Error icons shown below.
This lets you see which projectors are currently being used,
from which source (or port) they are projecting an image, and
if a problem occurs.
2. Click
Register projector as shown.
You see this screen:
3. Click
Auto detect to locate projectors currently operating
on the network. Or click
Manual registration and enter the
projector’s name and network address.
Click here
Status icon Video Source icon Error icon
For detailed status information, select the projector in
question and click
View details.
Note: To monitor a projector when it’s in standby mode (plugged
in but not projecting), you must have selected
Standby Mode setting in the projector’s Advanced1 menu.
Network ON as the
10/03 EPSON PowerLite 9300i Projector - 13
Page 14
EPSON PowerLite 9300i Projector
Controlling Your Projector(s)
The control buttons in the upper-right of the EMP Monitor
screen let you turn on and off the projectors and select video
sources. (Hold the mouse pointer over a button to see a
description of its meaning.) Make sure you’ve selected the
projector(s) you want to operate (with the mouse pointer)
before clicking one of the buttons.
Control buttons
Note: To turn on a projector when it’s in standby mode (plugged in
but not projecting), you must have selected
Standby Mode setting in the projector’s Advanced1 menu.
Network ON as the
Registering a Projector in EMP NetworkManager
EMP NetworkManager lets you receive e-mail notifications
alerting you to possible projector problems.
1. To open the program, select
EMP NetworkManager from
the Start menu.
You see this screen:
In a few moments, your projectors are displayed as
icons as shown:
2. If you’d like to register a projector manually and you know
its IP address, click the
You see this screen:
3. Enter the projector’s IP address and click
projector’s icon is added to the EMP NetworkManager
screen.
Creating the E-Mail Settings
1. If EMP NetworkManager is not already running, open it
from the Start menu.
You see your registered projectors displayed as shown:
Projector address selection icon.
Add. The
14 - EPSON PowerLite 9300i Projector 10/03
2. Double-click the icon for the projector whose e-mail
settings you want to create.
Page 15
EPSON PowerLite 9300i Projector
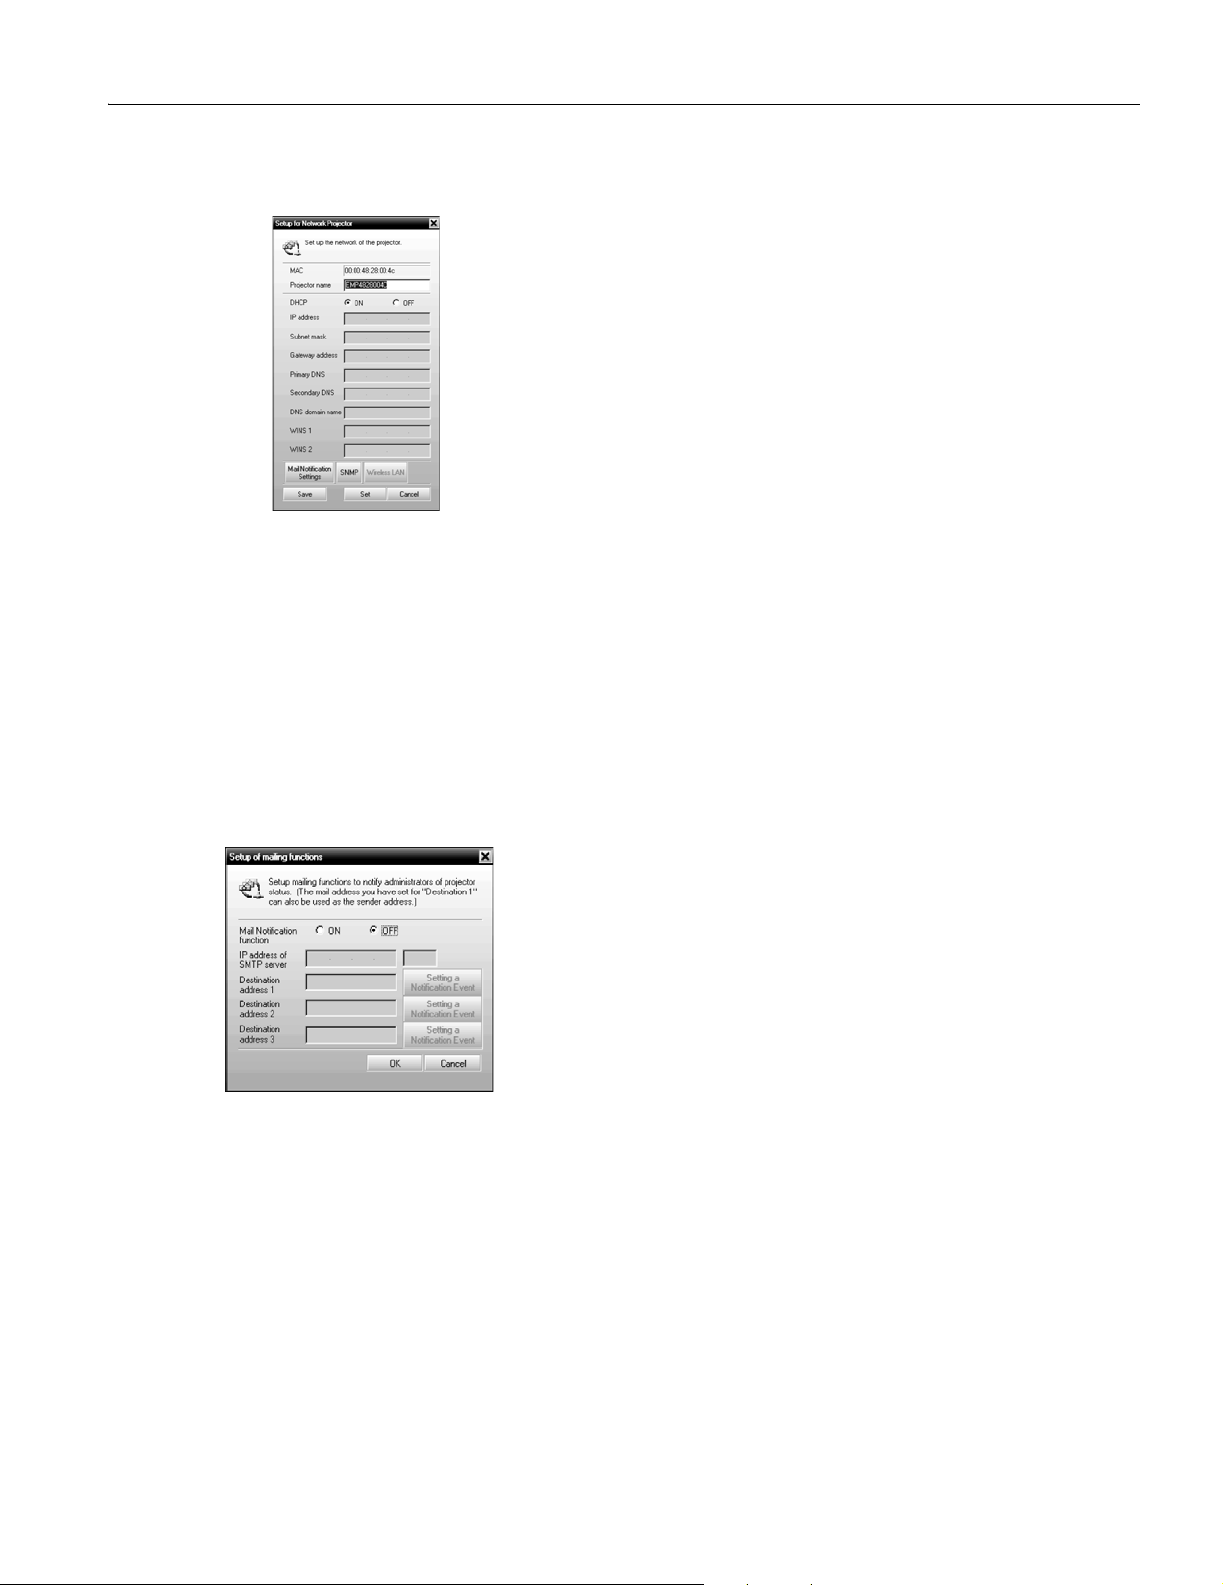
3. EMP NetworkManager connects to the projector, and you
see this screen:
4. Verify that the network settings are correct.
❏ Make any desired changes to the projector’s network
address configuration (turning off DHCP enables the
manual settings).
❏ You can give the projector a name—up to 15 characters
long, including the hyphen (-) symbol.
Naming the projector helps you identify it in EMP
Monitor and EMP NetworkManager. This is especially
useful if you’re managing more than a few projectors.
11. When you see the test message window, you can send a
message with the heading “TEST MAIL” to the addresses
you have entered. The projector’s name and IP address are
included in the body of the message.
12. When done making all your projector settings, close the
EMP NetworkManager. (It does not have to be open for
messages to be sent or received.)
Understanding the E-mail Messages
If a projector experiences a problem, it sends an e-mail
message to each of the addresses you provided using EMP
NetworkManager. The message includes the heading
“EPSON Projector” in the subject line.
The body of the message contains:
❏ the name of the projector
❏ the projector’s IP address
❏ a description of the problem
If a plus (+) sign appears before the description, it indicates
that a problem has occurred. A minus (–) sign appears when
the problem goes away or is resolved.
5. Click
6. Select
Mail Notification Settings. You see this screen:
ON for the Mail Notification setting.
7. Enter the IP address and port number of the SMTP server
used for sending e-mail. (The port’s default setting is 25,
but you can enter any number from 1 to 65535.)
8. Enter up to three e-mail addresses where you want the
event notification messages to be sent.
9. Click the
Setting a Notification Event button next to each
address, then select the conditions under which you want a
message to be sent.
10. Click
OK, then on the next screen click Set. Confirm as
needed.
10/03 EPSON PowerLite 9300i Projector - 15
Page 16
EPSON PowerLite 9300i Projector
Projector Status Lights
s
Power light
Lamp light
Temperature light
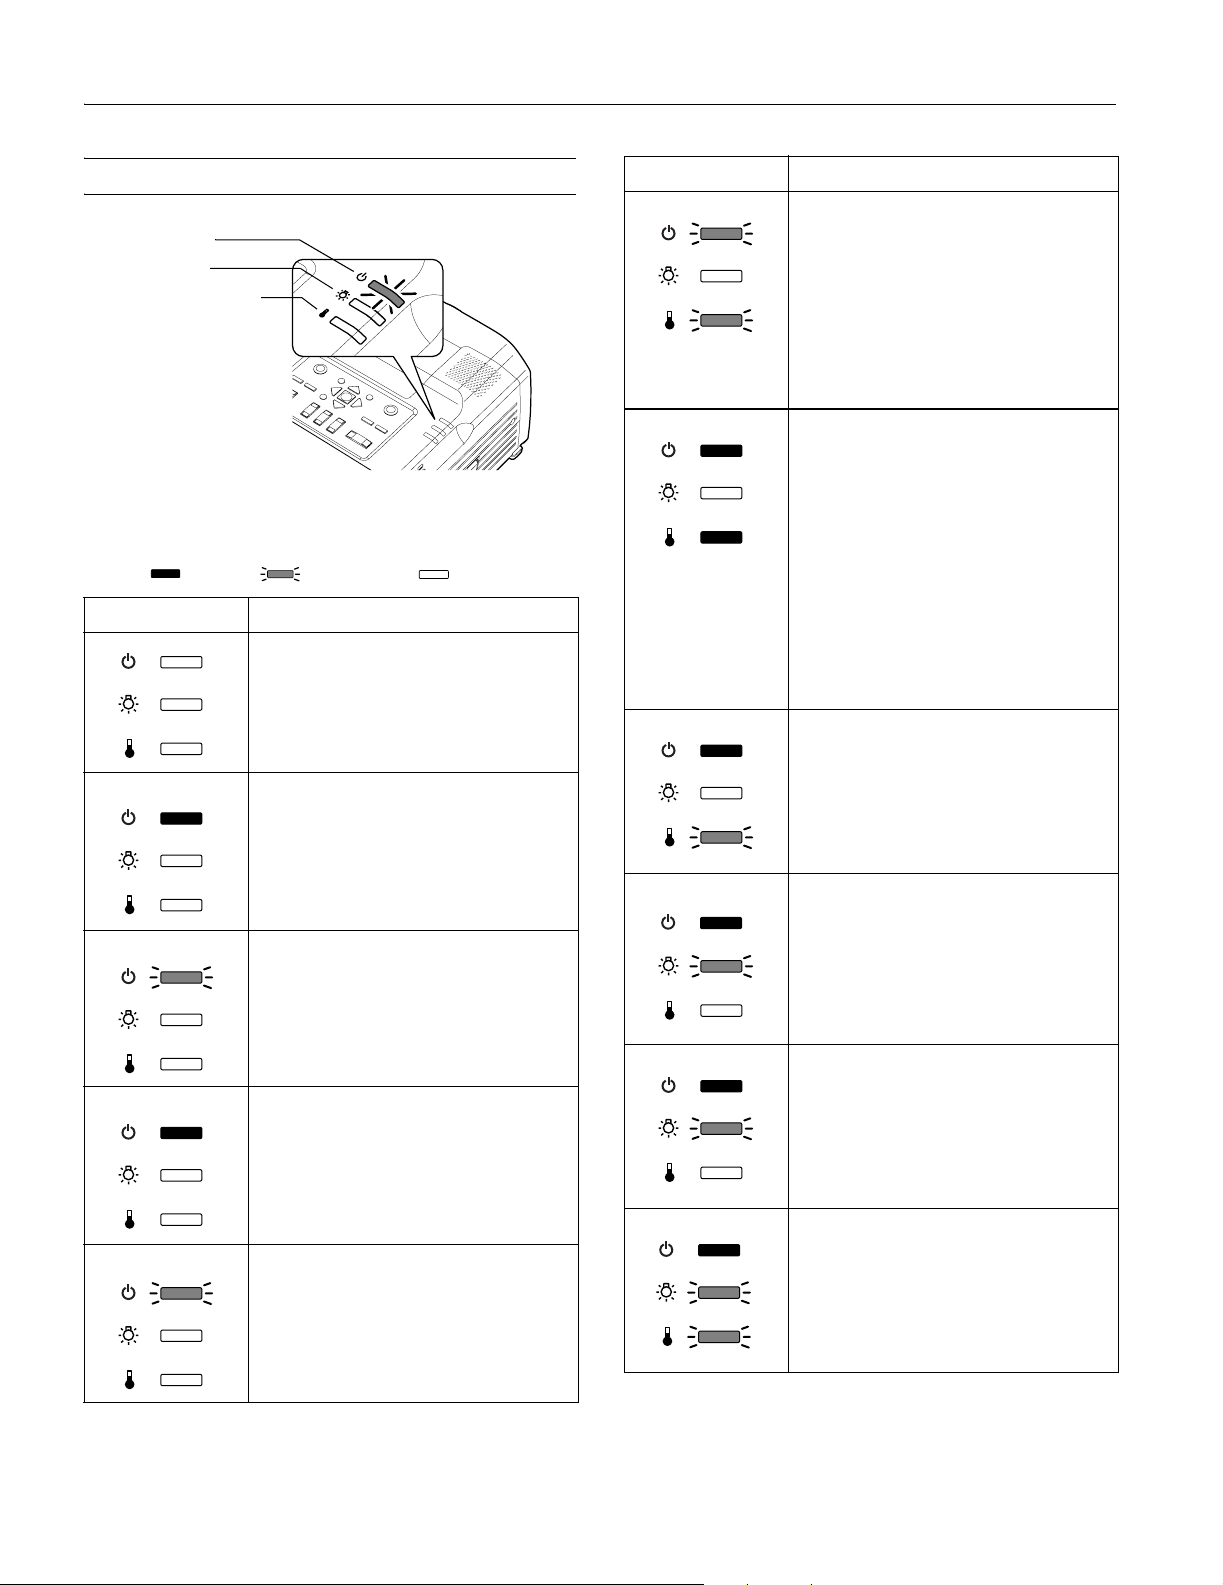
The lights on top of the projector indicate the projector’s
status and let you know when a problem occurs.
Key: = on = flashing = off
Light Description and solution
If no lights are on, make sure the power
cord is connected securely both at the
power outlet and the projector. If you have
just replaced the lamp, make sure the cover
is securely fastened.
Orange
When the power light is orange, the
projector is in standby mode. Press the
Power button to turn it on.
Green
When the power light is flashing green, the
projector is warming up. Wait for the
image to appear.
Light Description and solution
Red
Orange
Red
Red
When the power and temperature lights
are flashing, the projector is getting too
hot, but you can continue running it in this
condition.
Verify that the air filter is not clogged.
Clean or replace it as described on page 17.
Make sure the room temperature is not
above 95 °F (35 °C) and there is plenty of
space around and under the projector for
ventilation.
When the power and temperature lights
are red, the projector has overheated,
which turns off the lamp automatically.
Wait about 5 minutes for the projector to
cool, then unplug the power cord.
Verify that the air filter is not clogged.
Clean or replace it as described on page 17.
Make sure the room temperature is not
above 95 °F (35 °C) and there is plenty of
space around and under the projector for
ventilation. Then plug the power cord back
in and press the Power button.
If the projector continues to overheat,
contact EPSON for help.
Red
When the power light is red and the
temperature light is flashing red, there is a
problem with the fan or temperature
Red
sensor. Unplug the power cord and contact
EPSON for help.
Green
When the power light is green and the
Orange
lamp light is flashing orange, the lamp is
reaching the end of its life. To ensure
continued operation, you should replace it
as soon as possible (see page 18).
Green
When the power light is green, the
projector is operating normally.
Orange
When the power light is flashing orange,
the projector is cooling down. Do not
unplug it until the light stops flashing and
remains orange. If you want to turn it back
on, wait until the light stops flashing.
16 - EPSON PowerLite 9300i Projector 10/03
Red
Red
Red
Red
Red
When the power light is red and the lamp
light is flashing red, the lamp has burned
out. Replace it as described on page 18.
If these lights come on after replacing the
lamp, make sure the lamp is fully inserted
and the lamp cover is attached.
If all three lights are red, the projector has
an internal problem. Unplug the power
cord and contact EPSON for help.
Page 17
EPSON PowerLite 9300i Projector
Cleaning the Lens
Clean the lens whenever you notice dirt or dust on the surface.
❏ Use a canister of compressed air to remove dust.
❏ To remove dirt or smears on the lens, use lens-cleaning
paper. If necessary, moisten a soft cloth with lens cleaner
and gently wipe the lens surface.
Caution: Do not use glass cleaner to clean the lens.
Cleaning the Projector
Before you clean the case, first turn off the projector and
unplug the power cord.
❏ To remove dirt or dust, wipe the case with a soft, dry,
lint-free cloth.
❏ To remove stubborn dirt or stains, moisten a soft cloth with
water and a mild detergent. Then wipe the case.
❏ Do not use wax, alcohol, benzene, paint thinner, or other
chemical detergents. These can damage the case.
3. If the dirt is difficult to remove or a filter is broken, replace
the filters as described below. Contact your dealer or call
EPSON at (800) 873-7766 in the United States to obtain
new ones. In Canada, please call (800) 463-7766 for dealer
referral.
Note: When you replace the lamp, new filters are included
with the lamp. This is a good time to replace them.
Replacing the Filters
1. Turn the projector over (unless it’s ceiling-mounted).
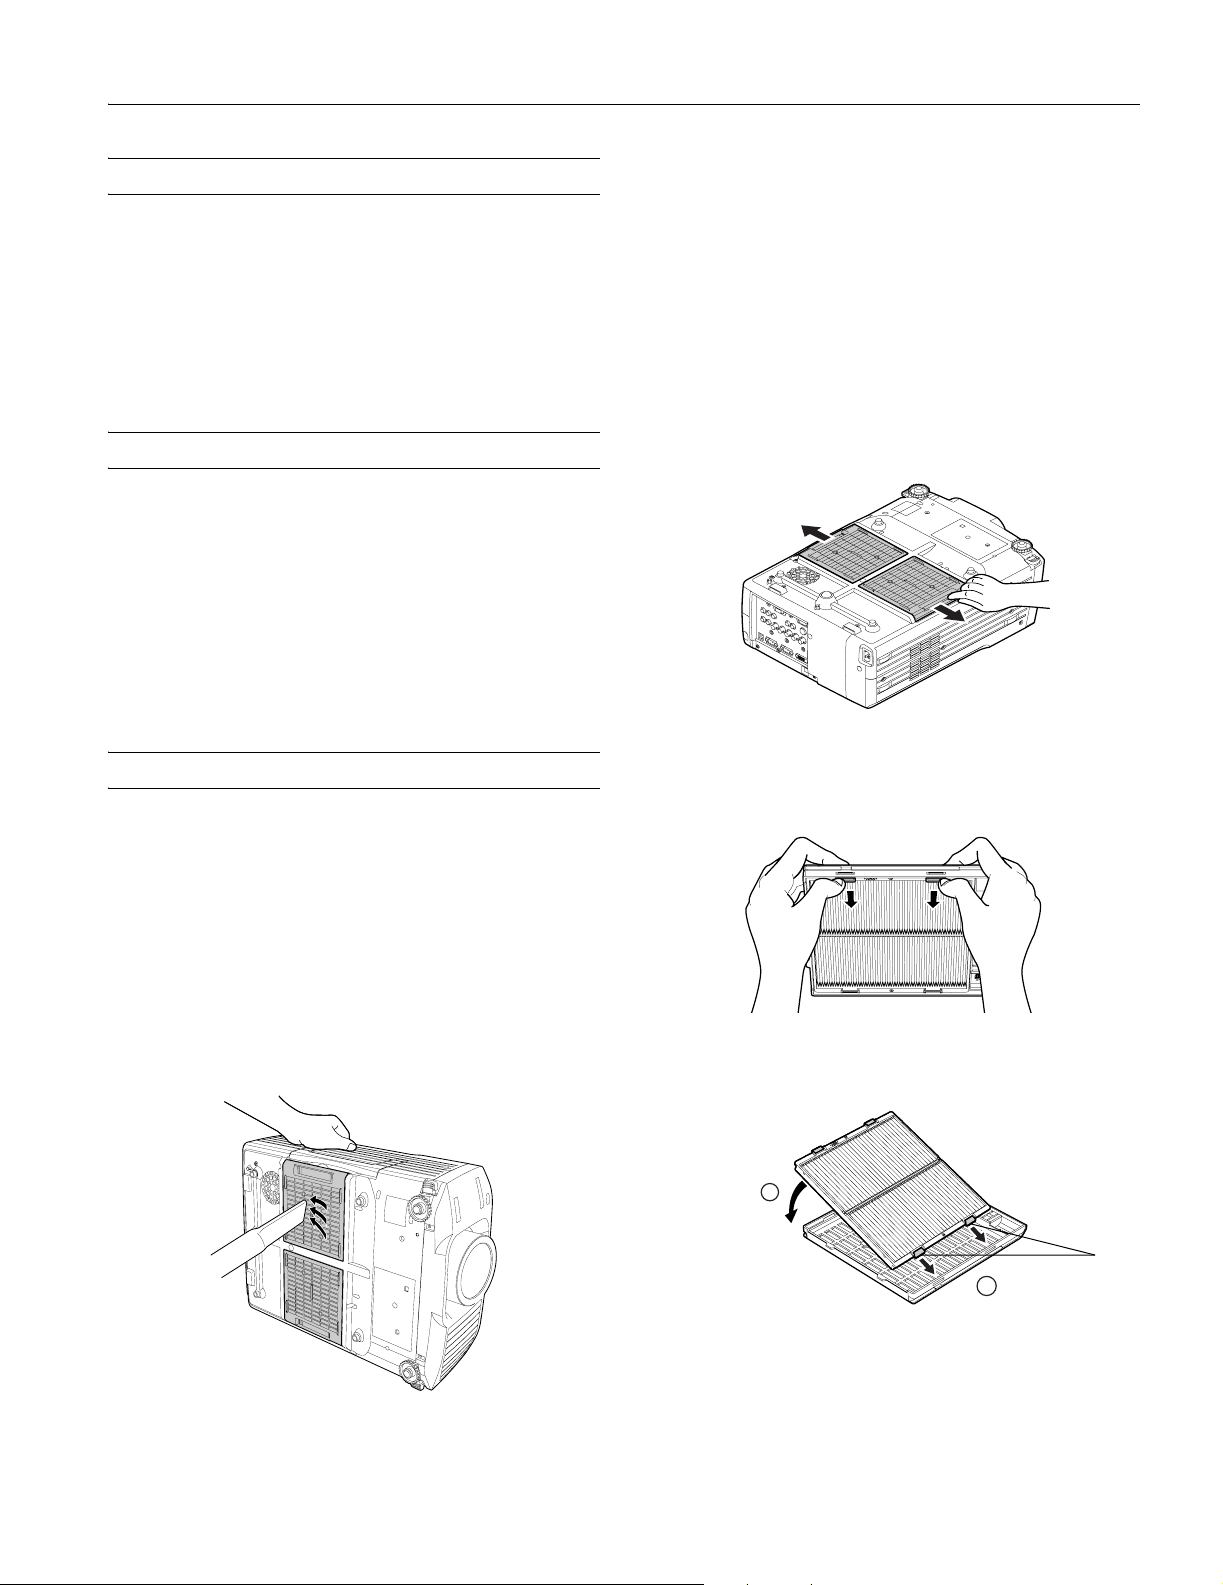
2. Remove the filters from the projector by sliding them out
to the sides.
Cleaning and Replacing the Air Filters
Clean the air filters on the bottom of the projector after every
100 hours of use. If they are not cleaned periodically, they can
become clogged with dust, preventing proper ventilation. This
can cause overheating and damage the projector.
To clean the air filters, follow these steps:
1. Turn off the projector and unplug the power cord.
2. To clean the filters, EPSON recommends using a small
vacuum cleaner designed for computers and other office
equipment. If you don’t have one, gently clean the filters
with a soft brush (such as an artist’s paintbrush).
3. Remove each filter from its holder by releasing the two tabs,
as shown.
4. Install new filters in the holders, aligning the tabs with the
slots on each side.
2
Tabs
1
5. Slide the assembled filters back into the projector.
10/03 EPSON PowerLite 9300i Projector - 17
Page 18
EPSON PowerLite 9300i Projector
Replacing the Lamp
The projection lamp lasts up to 7000 hours.
It is time to replace the lamp when:
❏ The projected image gets darker or starts to deteriorate.
❏ The message
the lamp comes on and the lamp warning light is
flashing orange. To maintain projector brightness and
image quality, replace the lamp as soon as possible.
❏ The lamp warning light is flashing red (the lamp is
burnt out).
Contact your dealer or call EPSON at (800) 873-7766 in the
United States for a replacement lamp. Request part number
V13H010L26. In Canada, please call (800) 463-7766 for
dealer referral.
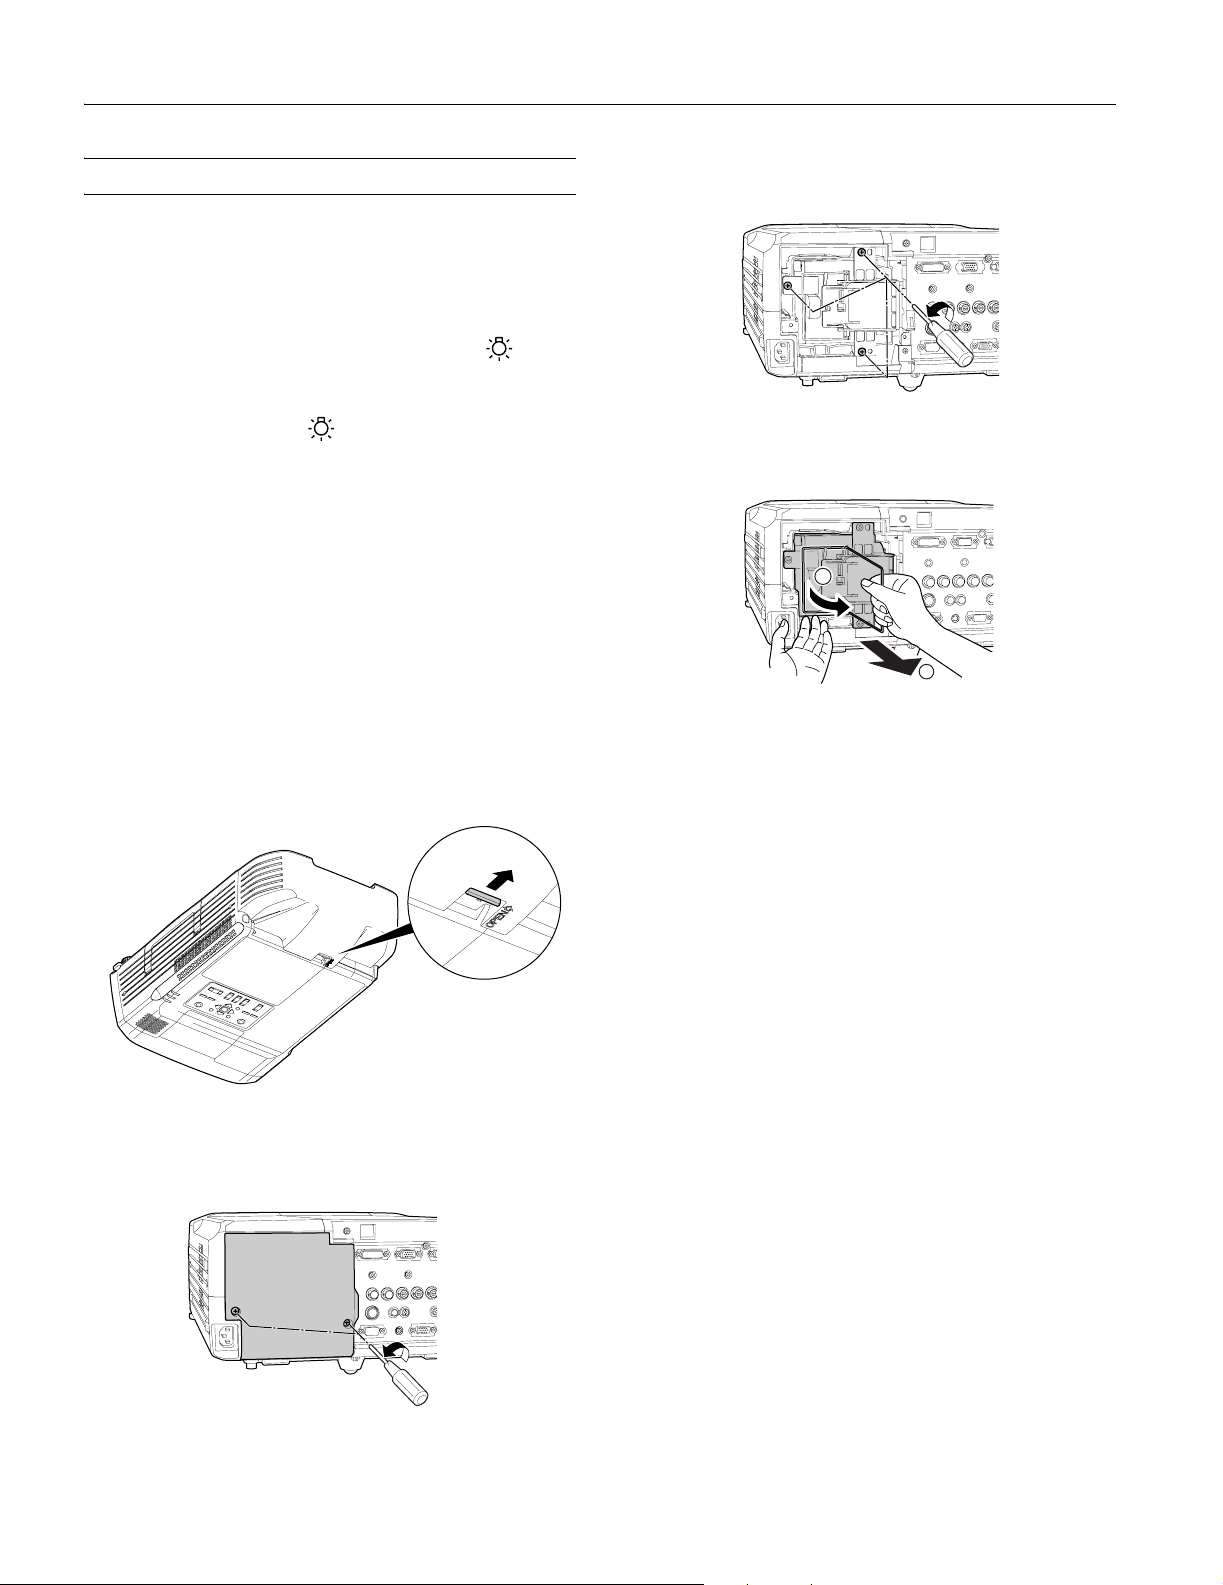
Follow these steps to replace the lamp:
1. Turn off the projector.
2. When the power light stops flashing, unplug the power
cord and let the projector cool.
Warning: Let the projector cool for at least half an hour, if it
has been on. The lamp is extremely hot immediately after use.
3. If the projector is mounted on the ceiling, remove the rear
cover.
LAMP REPLACE appears on the screen when
5. Loosen the three screws holding the lamp in place (you
can’t remove them).
6. Grasp the wire handle as shown and pull the lamp straight
out.
1
2
7. Gently insert the new lamp.
8. Once the lamp is fully inserted, tighten its screws and
replace the cover. (The projector won’t come on if the lamp
cover is loose.)
9. Reset the lamp timer (select
projector’s
About menu).
Reset Lamp Timer in the
Release tab to
remove rear cover
4. Loosen the lamp cover screws (you don’t need to take them
out all the way). Then remove the cover.
18 - EPSON PowerLite 9300i Projector 10/03
Page 19

EPSON PowerLite 9300i Projector
Optional Accessories
Product Product no.
Replacement lamp (includes air filter) V13H010L26
Air filter set V13H134A02
Mounting hardware:
Ceiling mount
Suspension adapter
False ceiling plate
Projection screens:
50-inch portable screen
60-inch portable pop-up screen
80-inch portable pop-up screen
Lenses:
Rear-projection wide lens
Wide zoom lens
Standard zoom lens
Middle throw zoom lens (2.41 to 3.69:1)
Middle throw zoom lens (3.58 to 5.45:1)
Long throw zoom lens
Cables:
Component video cable
S-video cable
DVI to DVI cable, 10 ft
DVI to DFP cable, 10 ft
Macintosh adapter set (monitor and desktop
adapter)
Remote control cable set V12H005C28
Distribution amplifier ELPDA01
ATA shipping case ELPKS47
Kensington® security lock ELPSL01
High resolution document imager
High resolution document camera
ELPMB41
ELPMBAST
ELPMBFCP
ELPSC06
ELPSC07
ELPSC08
V12H004R02
V12H004W02
V12H004S02
V12H004M01
V12H004M02
V12H004L04
ELPKC19
ELPSV01
ELPKC20
ELPKC21
ELPAP01
ELPDC02
V12H064020
Related Documentation
CPD-17183 EPSON PowerLite 9300i User’s Guide
CPD-17184 EPSON PowerLite 9300i Quick Setup
sheet
You can purchase these accessories from your dealer, by calling
EPSON at (800) 873-7766, or by visiting the EPSON Store
SM
at www.epsonstore.com (U.S. sales only). In Canada, please
call (800) 463-7766 for dealer referral.
10/03 EPSON PowerLite 9300i Projector - 19
 Loading...