

Page 1

Contents
Unpacking and Assembling the Printer ..................................................................................................3
Setting up the SureColor T3270/T5270/T7270 ....................................................................................5
Setting up the SureColor T5270D/T7270D ........................................................................................15
Connecting the Power Cord ................................................................................................................24
Installing Ink Cartridges ......................................................................................................................25
Loading Roll Paper ..............................................................................................................................26
Loading Roll Paper into the Secondary Roll Unit ................................................................................32
Performing a Test Print .......................................................................................................................36
Aligning the Print Head .......................................................................................................................36
Installing Software ...............................................................................................................................37
Updating Your Printer Firmware .........................................................................................................37
English
Page 2

2 |
Page 3
Unpacking and Assembling the Printer | 3
Unpacking and Assembling the Printer
Note: Unless otherwise indicated, the illustrations in this manual show the Epson® SureColor® T7270, but the
instructions apply to all five models.
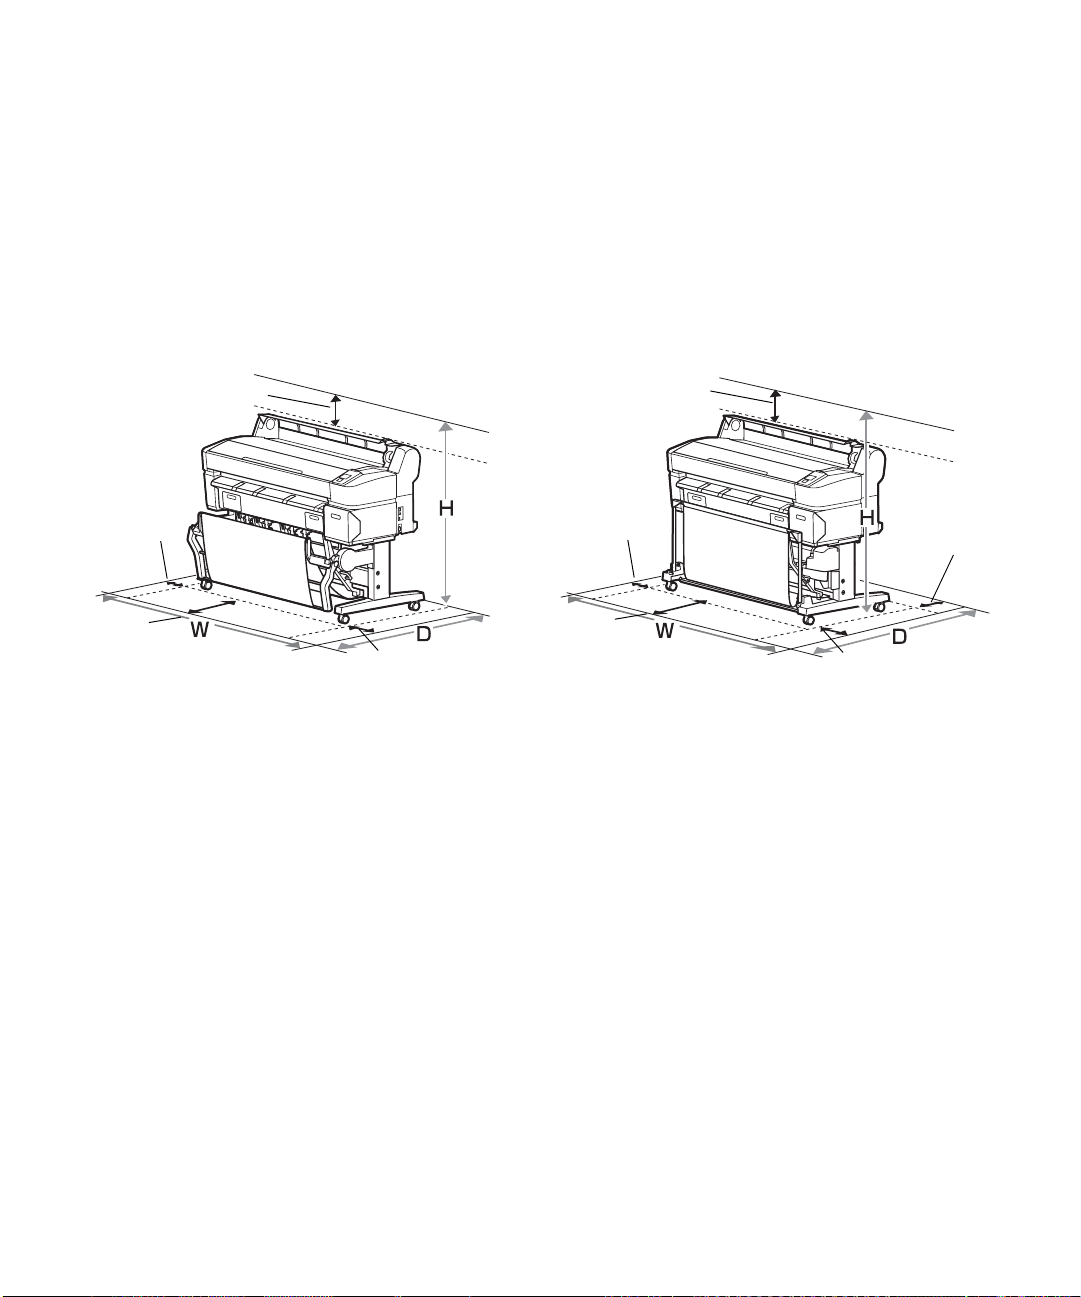
Before beginning assembly, make sure you have sufficient space to set up and use the printer. The
following illustrations show the minimum space required for using the printer:
SureColor T3270/T5270/T7270 SureColor T5270D/T7270D
5.9 in. (150 mm)
0.39 in.
(10 mm)
23.6 in.
(600 mm)
5.9 in. (150 mm)
5.9 in. (150 mm)
0.39 in.
(10 mm)
19.7 in.
(500 mm)
3.9 in.
(100 mm)
5.9 in. (150 mm)
When choosing a place for the printer, leave adequate room for easy access and ventilation. Avoid locations
subject to direct sunlight, excessive heat, humidity, or dust. Be sure the printer is placed on a flat, stable
location that can support the following weight for each printer:
• SureColor T3270 — 148 lb (67 kg)
• SureColor T5270 — 185 lb (84 kg)
• SureColor T7270 — 203 lb (92 kg)
• SureColor T5270D — 260 lb (118 kg)
• SureColor T7270D — 293 lb (133 kg)
WARNING: Two people are required to unpack and install the SureColor T3270 printer; four people are required
to unpack and install the SureColor T5270, T5270D, T7270, and T7270D printers.
You need an even larger floor space to assemble the printer and stand, so be sure to prepare a large, clear
area before unpacking them. Also make sure you save the box and packaging in case you need to ship the
printer later.
Page 4
4 | Unpacking and Assembling the Printer
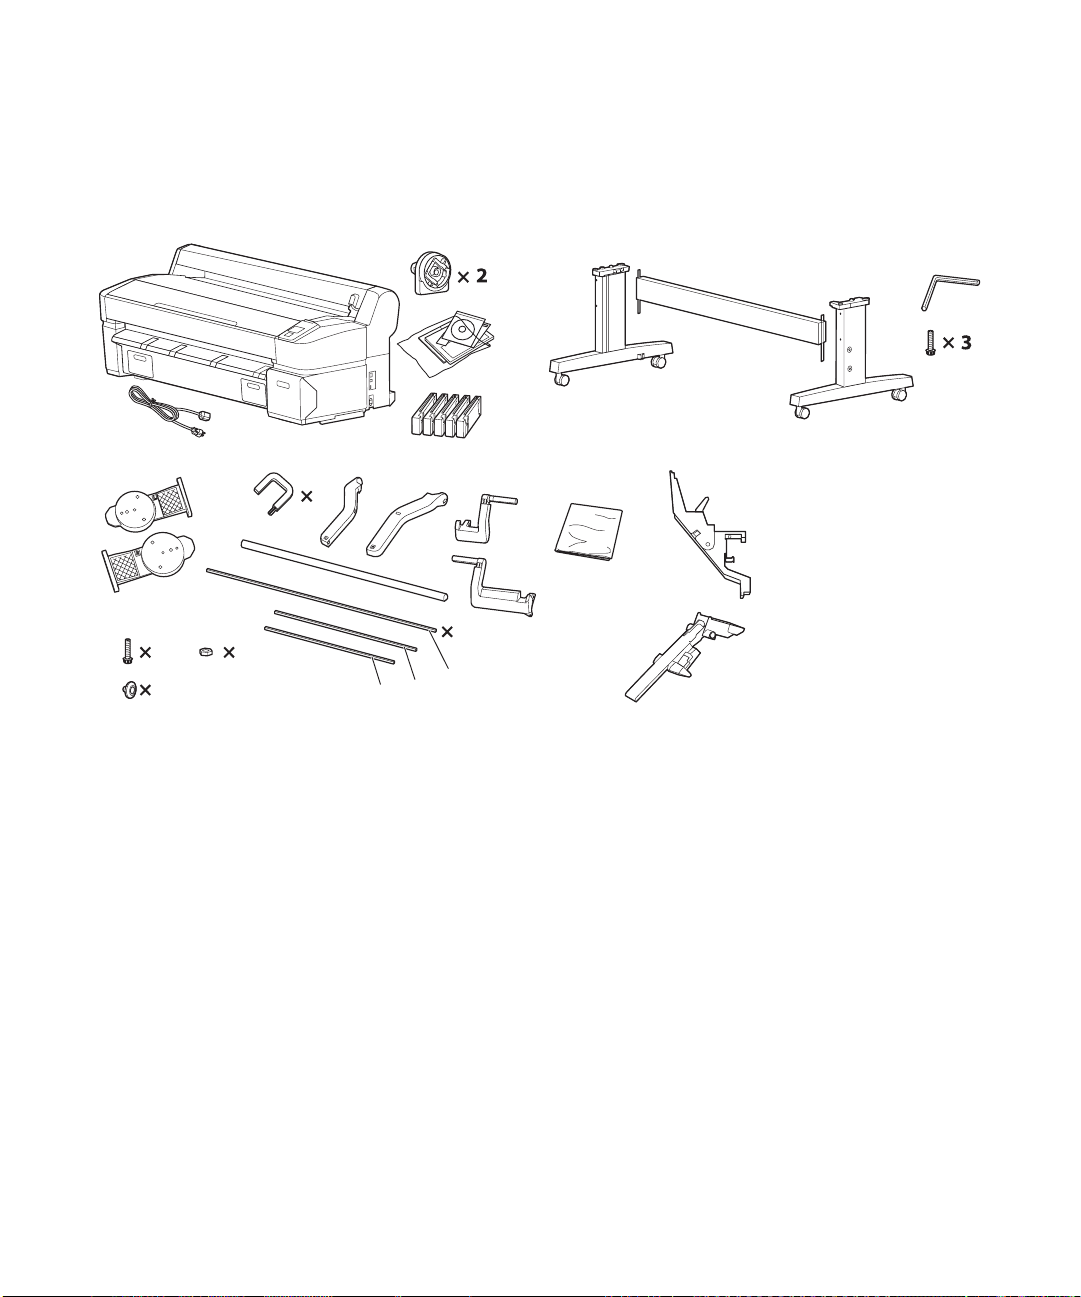
The following items are included with your printer:
SureColor T3270/T5270/T7270
4
2
10
6
C
2
Note: For information on the optional hard disk and the Take-up Reel, see the online User’s Guide.
B
A
× 4 (T7270)
× 3 (T5270)
× 2 (T3270)
× 5 (T7270)
× 4 (T5270)
× 3 (T3270)
Page 5
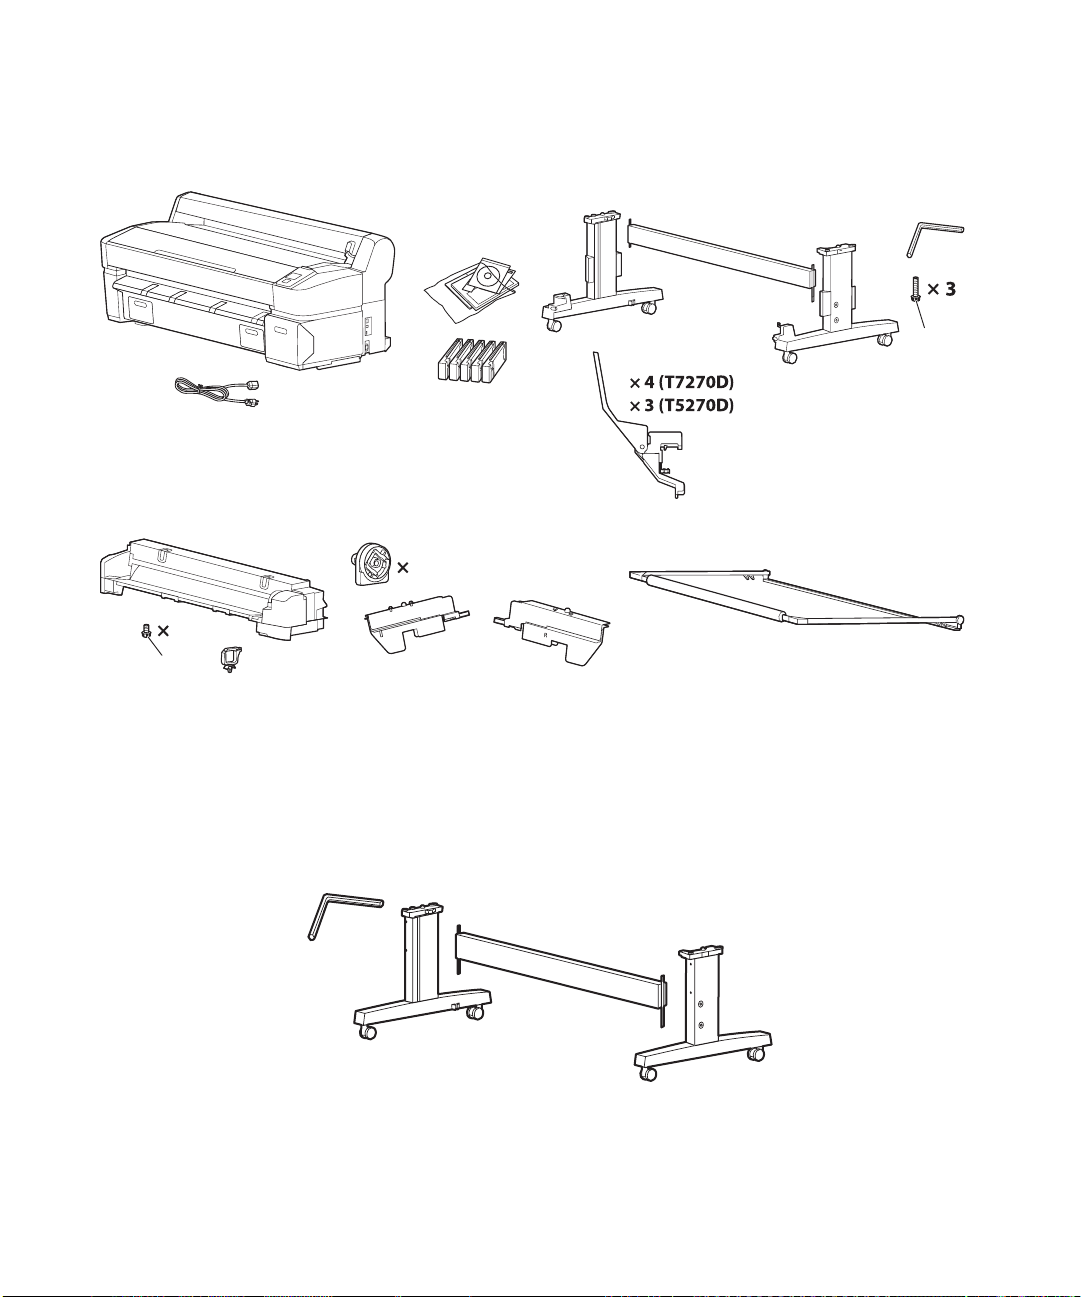
SureColor T5270D/T7270D
Setting up the SureColor T3270/T5270/T7270 | 5
A
4
12
L
B
Setting up the SureColor T3270/T5270/T7270
Assembling the Stand
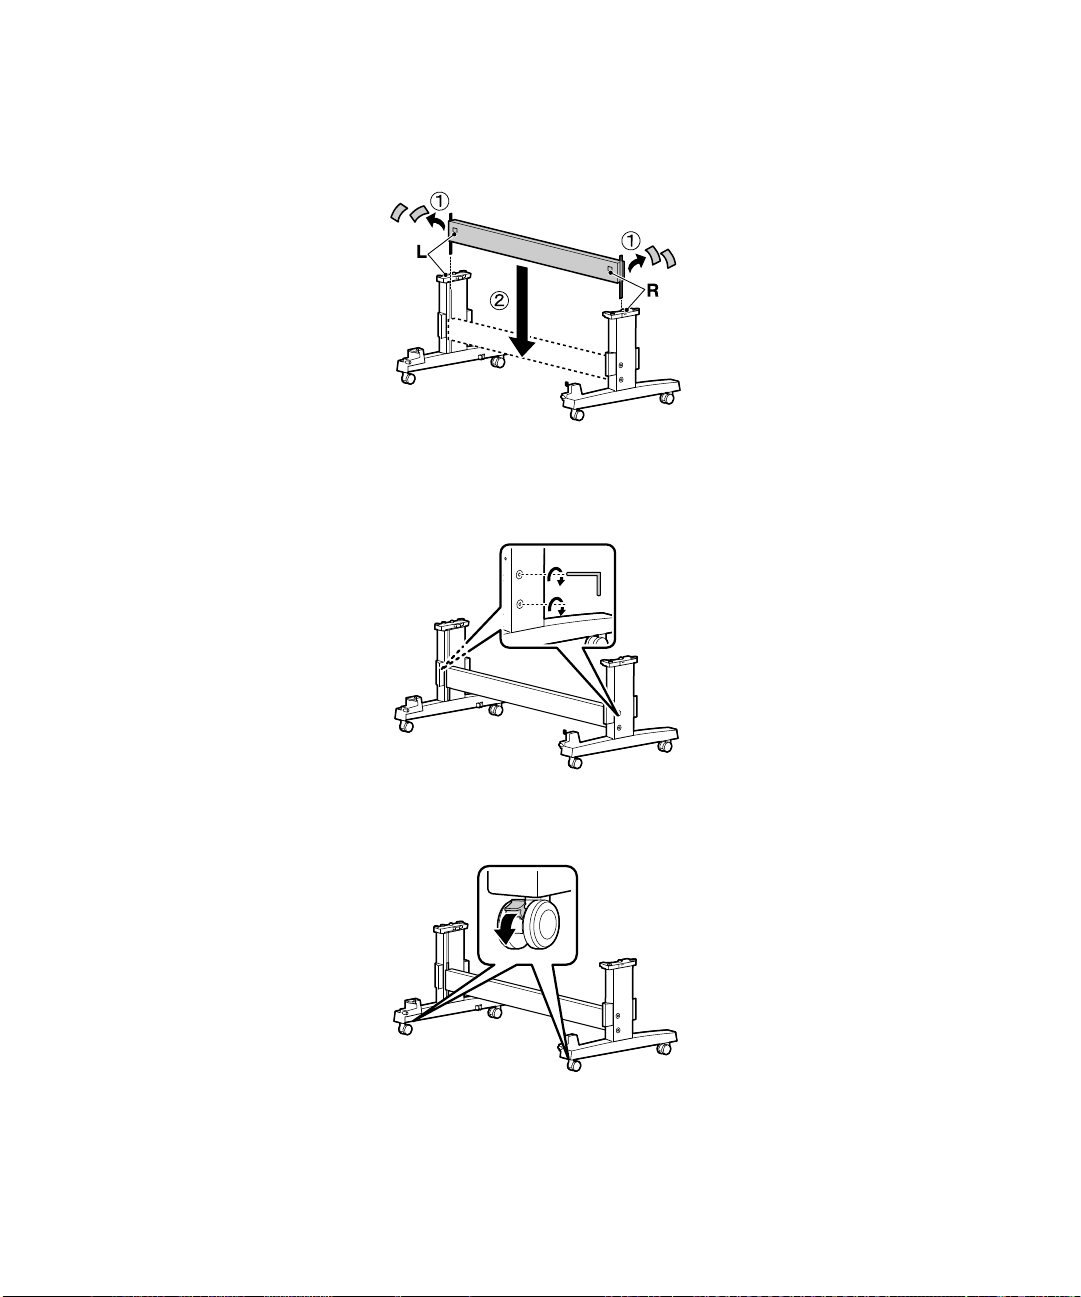
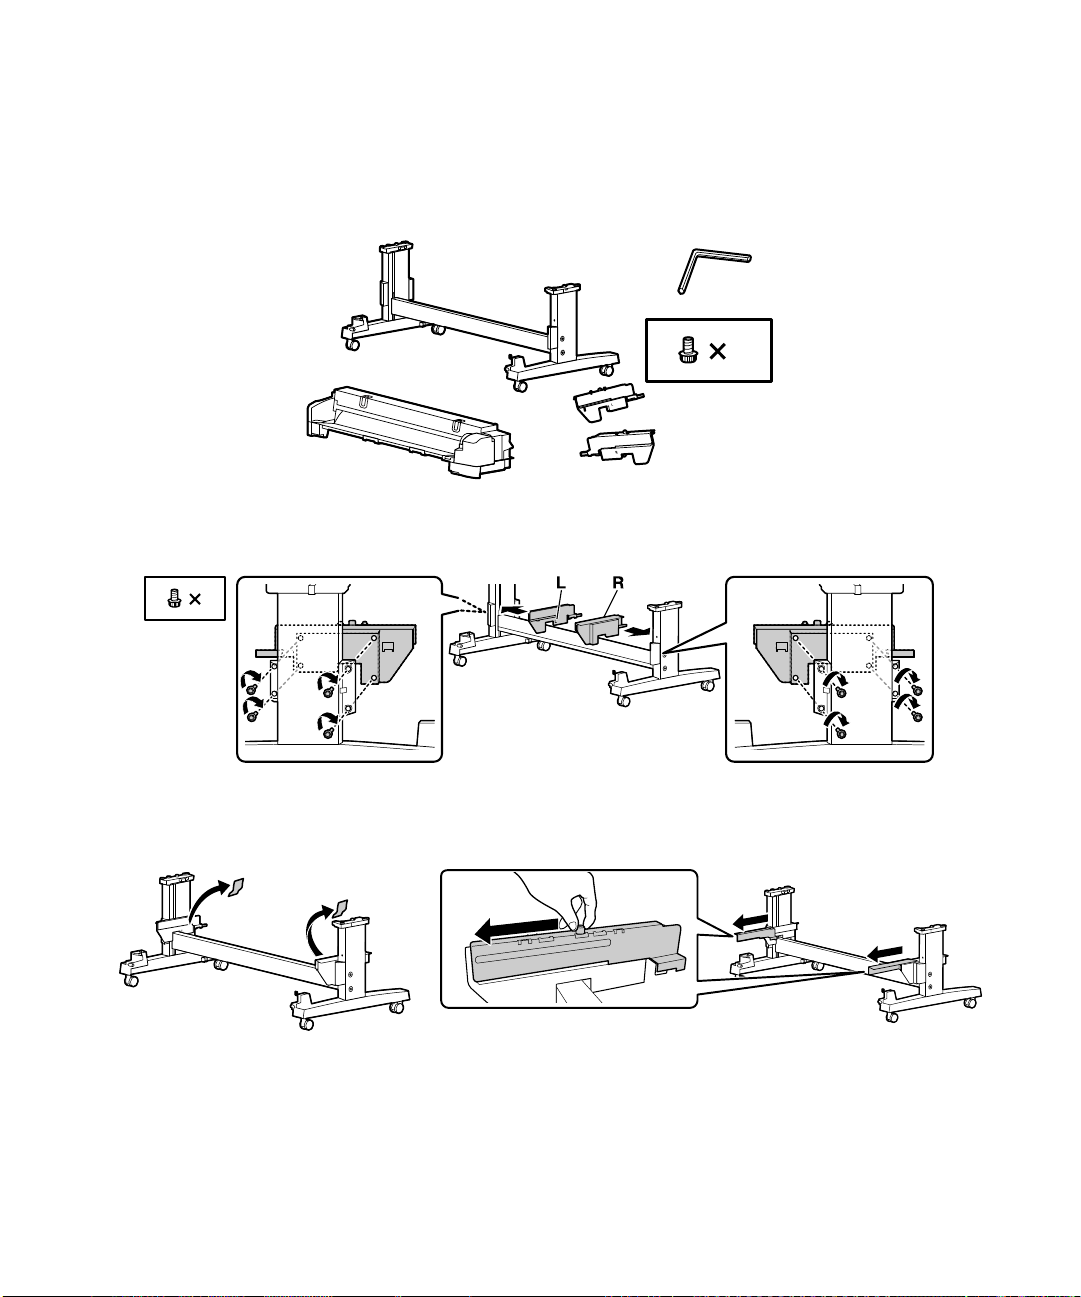
1. Unpack the stand and make sure you have all of these items.
Page 6

6 | Assembling the Stand
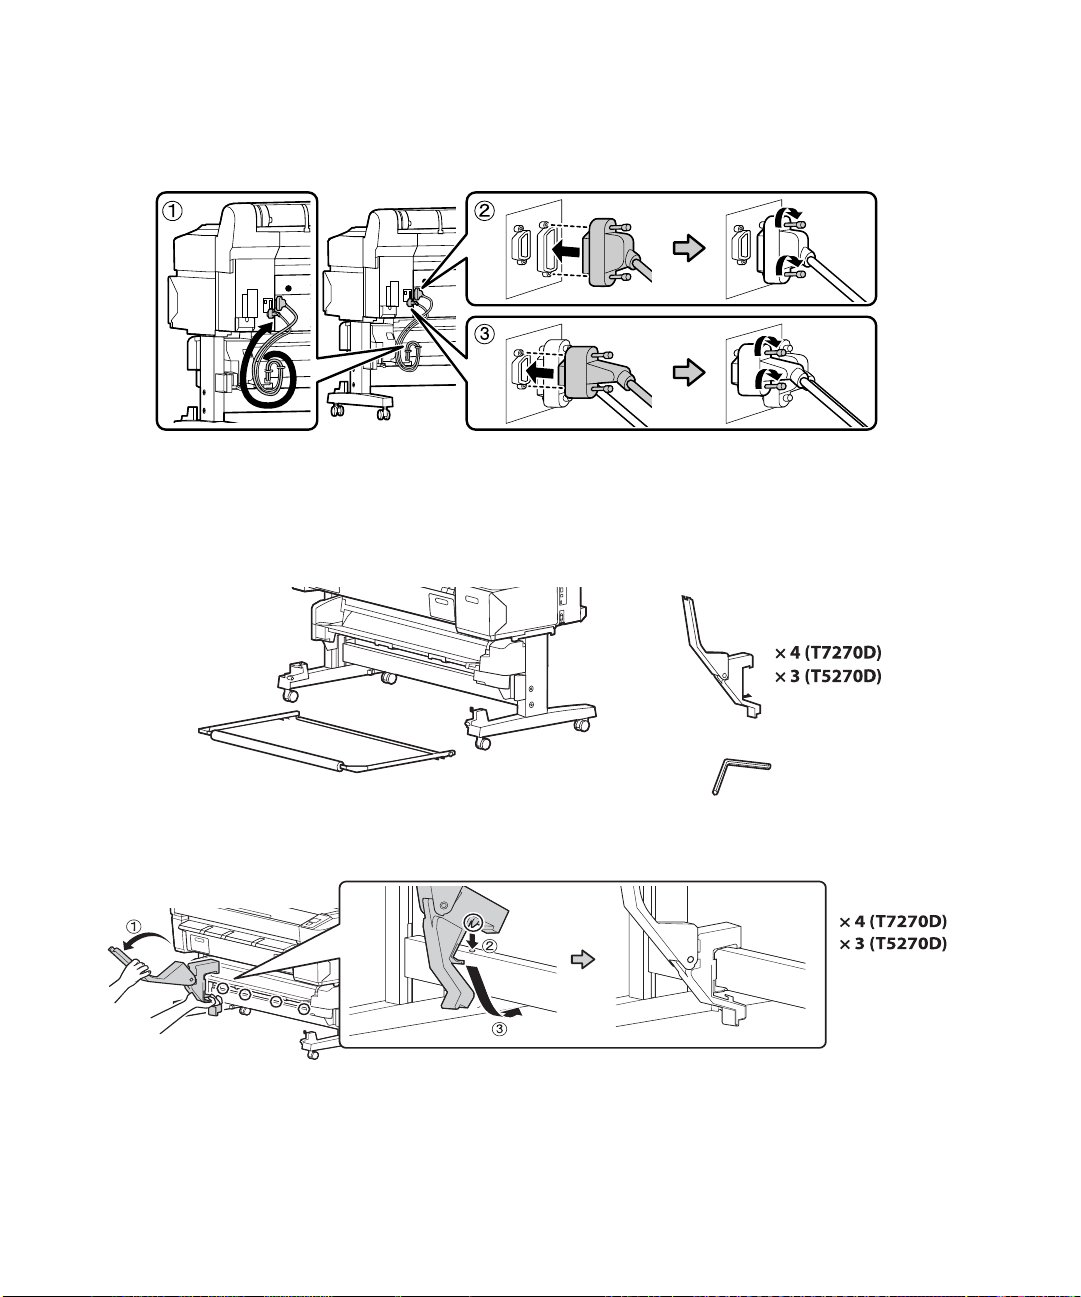
2. Slide the horizontal strut into both of the legs.
3. Use the long end of the hex wrench to tighten the pre-placed screws on each side of the horizontal
strut.
4. Lock the casters to fix the stand in place. (When moving the printer, unlock the casters.)
Page 7
Mounting the Printer on the Stand | 7
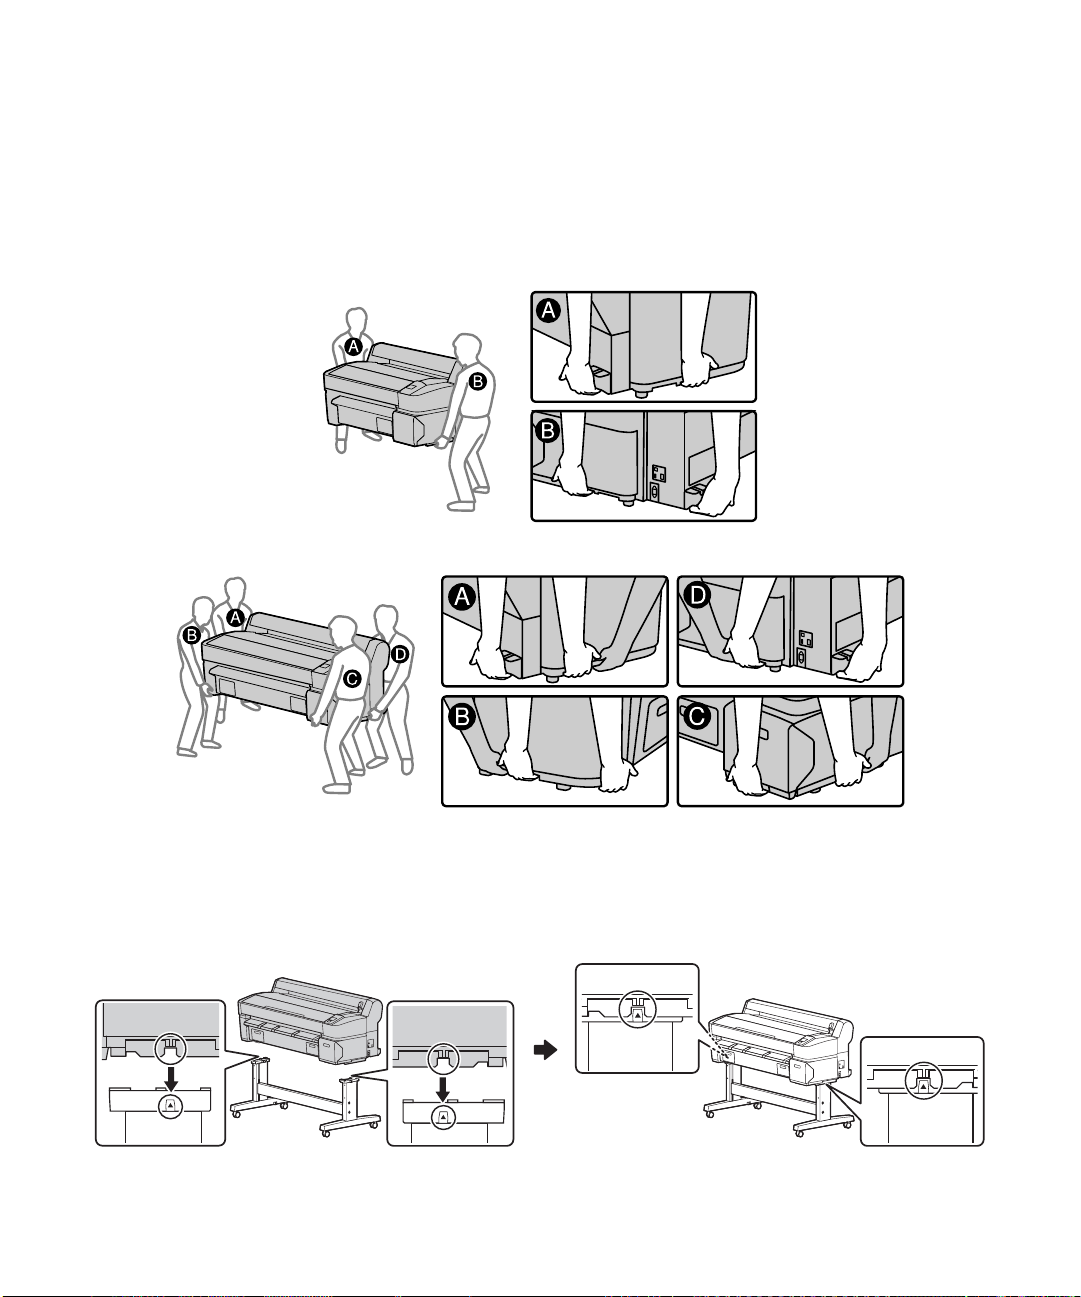
Mounting the Printer on the Stand
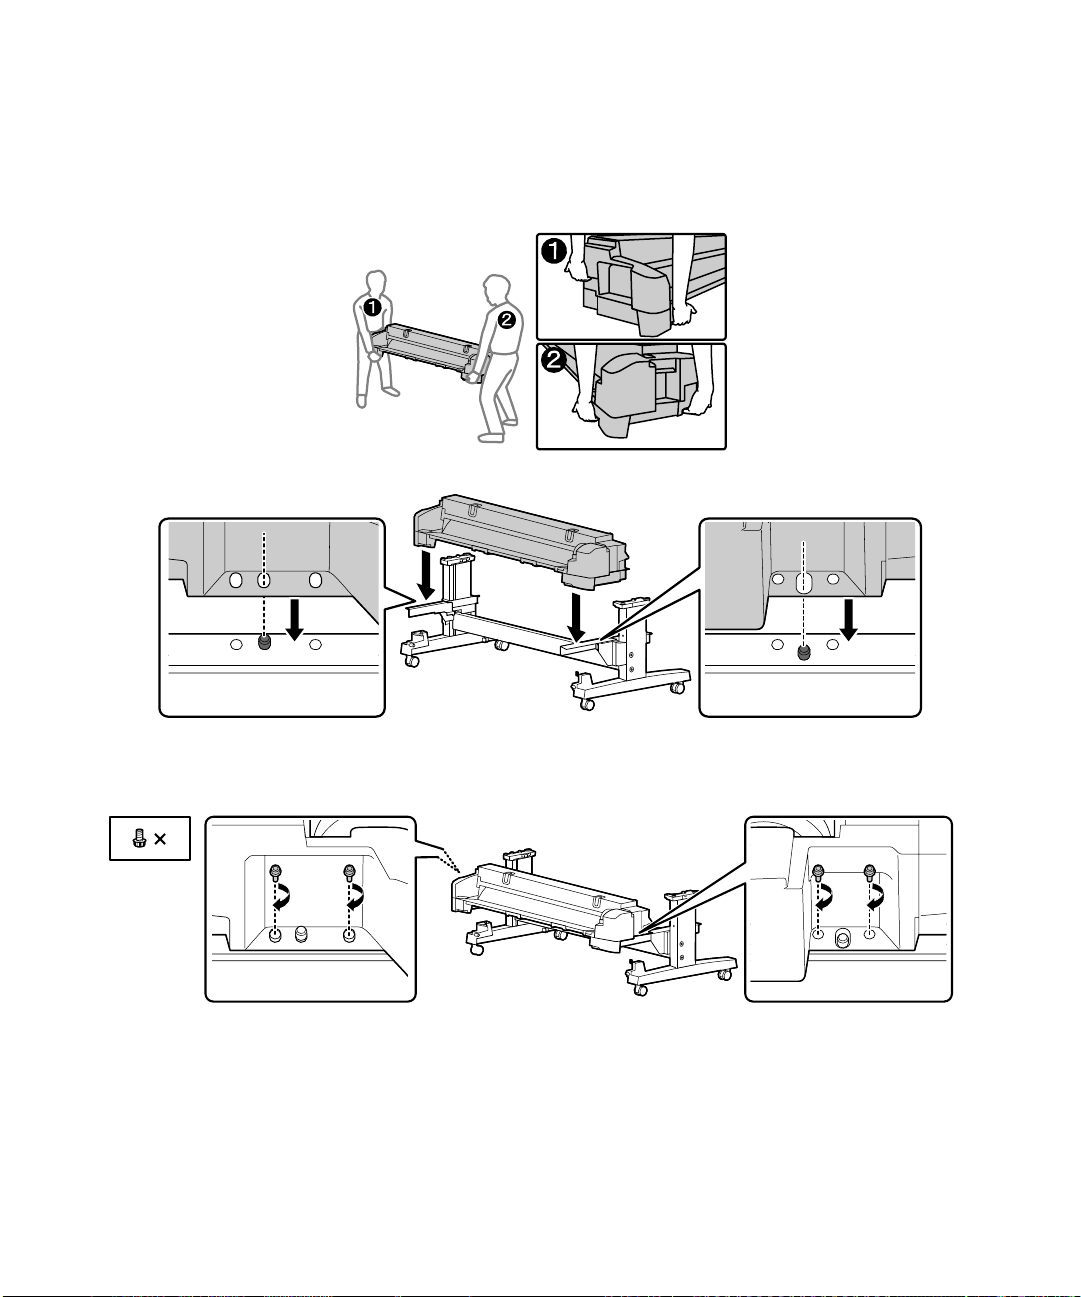
You need at least two people (SureColor T3270) or four people (SureColor T5270/T7270) to install the
printer and position it on the stand. When lifting the printer, only hold the areas shown below. Otherwise,
damage may occur.
SureColor T3270
SureColor T5270/T7270
Caution: Before installing the printer, lock the casters to make sure the stand is fixed in place.
1.
Lift the printer onto the stand. Line up the marks on the bottom of the printer with the arrows on the
top of the stand legs before setting the printer down.
Page 8
8 | Attaching the Paper Basket
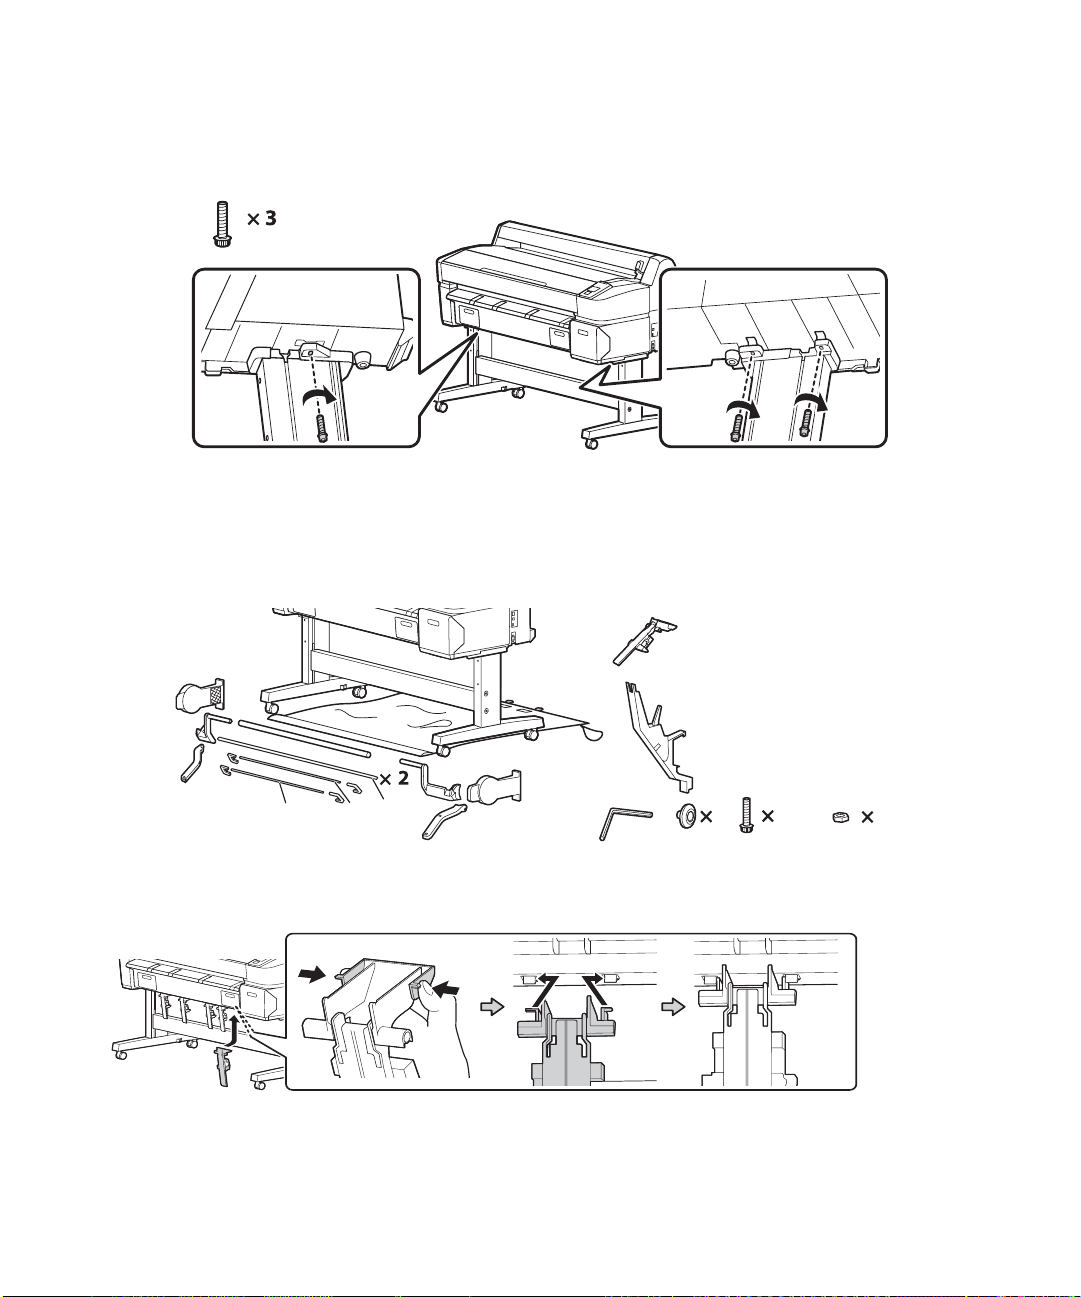
2. Attach the printer to the stand using three bolts.
Attaching the Paper Basket
The paper basket is a cloth sheet that attaches to the printer stand and catches your prints as they come
out. You need the following parts to assemble and attach the paper basket:
× 4 (T7270)
× 3 (T5270)
× 2 (T3270)
A
1. Attach the stabilizers.
× 5 (T7270)
× 4 (T5270)
× 3 (T3270)
C
B
2
10 6
× 5 (T7270)
× 4 (T5270)
× 3 (T3270)
Page 9
Attaching the Paper Basket | 9
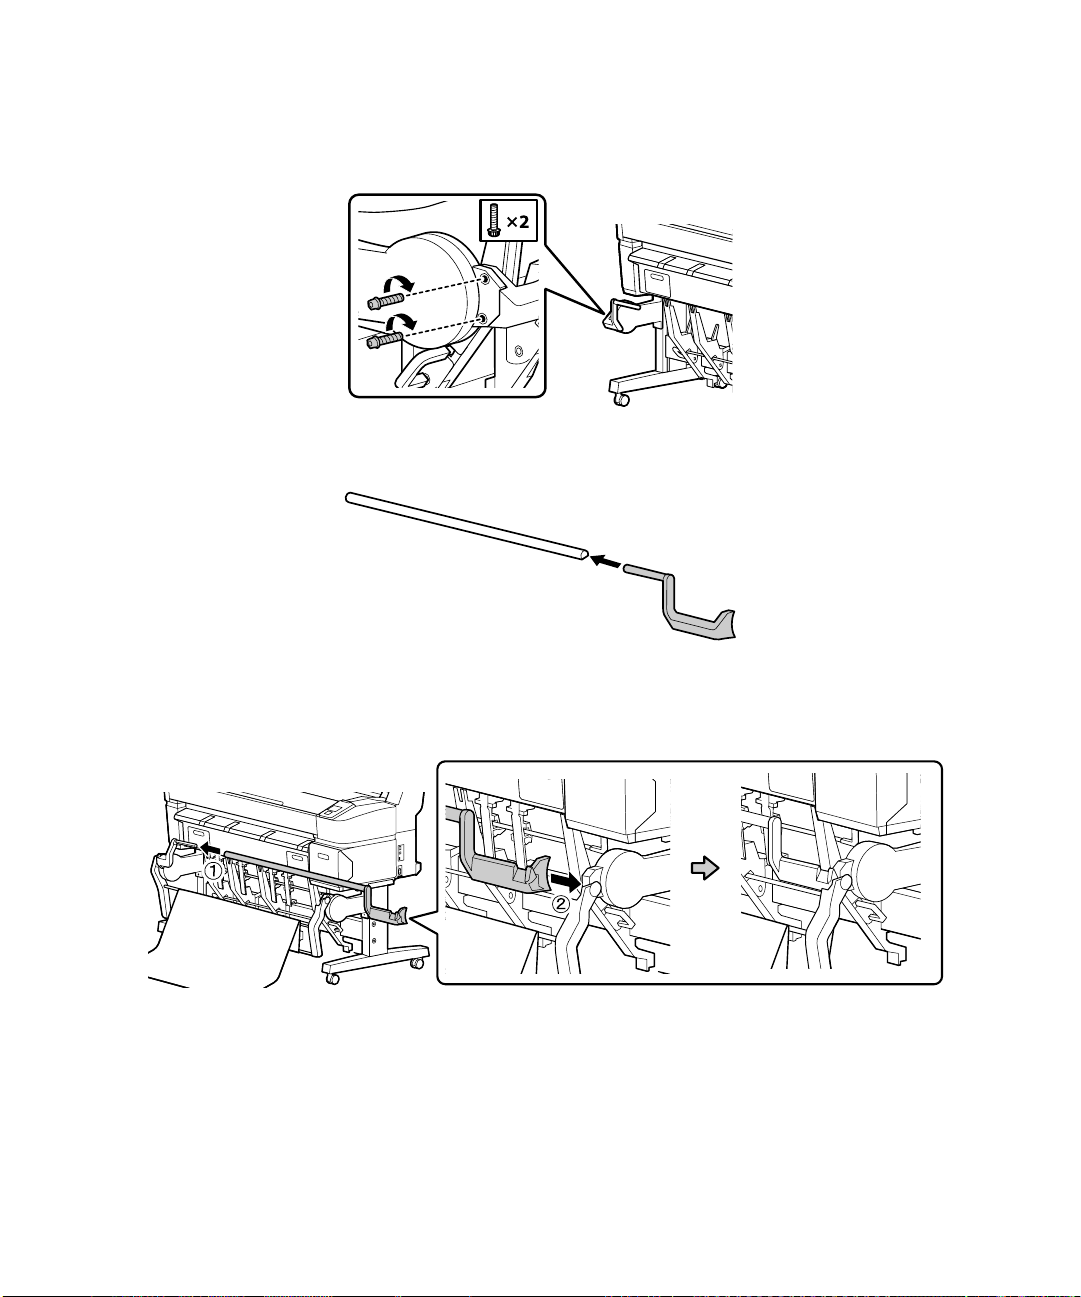
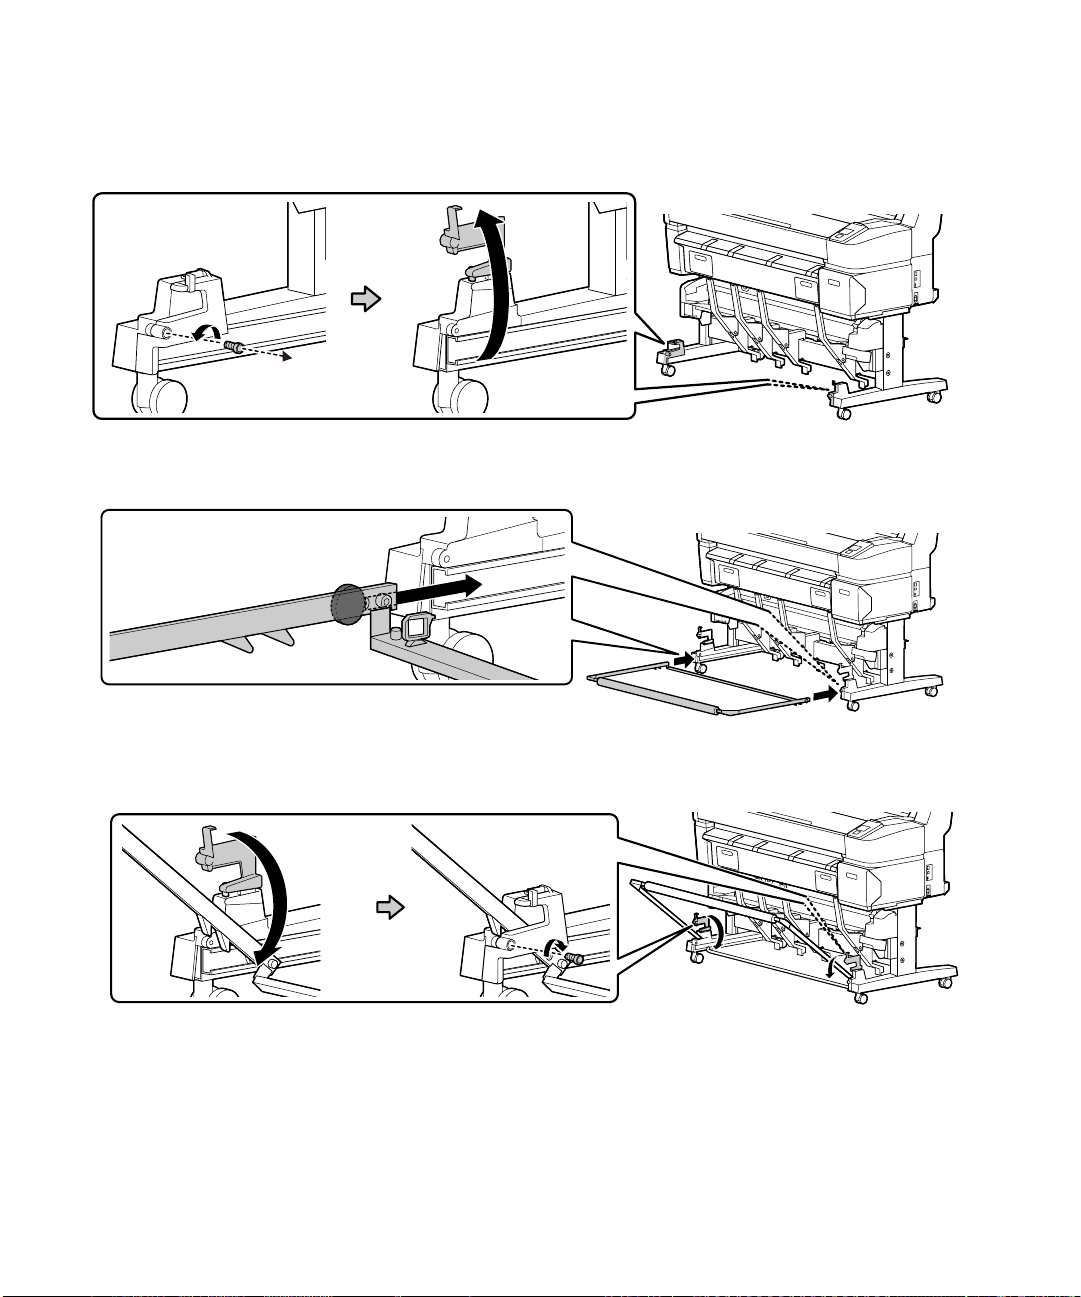
Insert the end of one of the shorter square poles into one of the plastic connectors.
2.
3. Slide the pole through the holes in the stabilizers and attach a plastic connector to the other end of the
pole. Then, fasten the plastic connectors in place on each side of the stand.
4. Attach the stack guides to the bottom of the printer. Make sure each guide snaps securely into place.
× 4 (T7270)
× 3 (T5270)
× 2 (T3270)
Page 10

10 | Attaching the Paper Basket
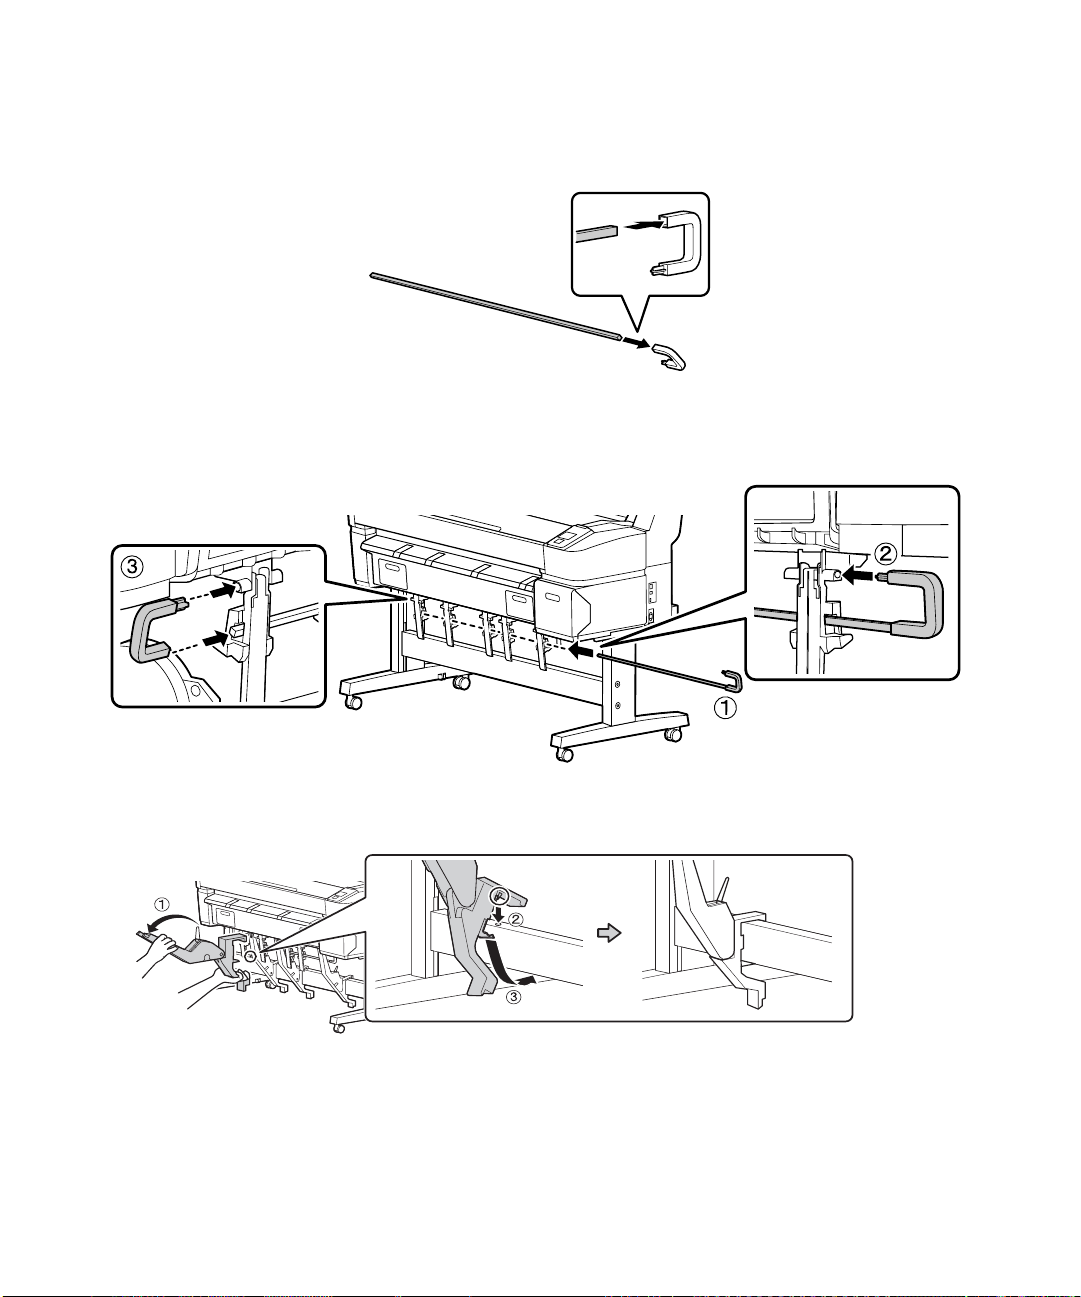
5. Insert the end of the other short square pole into one of the plastic connectors.
6. Slide the pole through the holes in the stack guides and attach a plastic connector to the other end of
the pole. Then, fasten the plastic connectors in place on each side of the stand.
7. Insert the two longer square poles into the right basket arm.
C
Page 11
Thread both poles through the paper basket.
8.
9. Insert the ends of the poles into the left basket arm.
L
Attaching the Paper Basket | 11
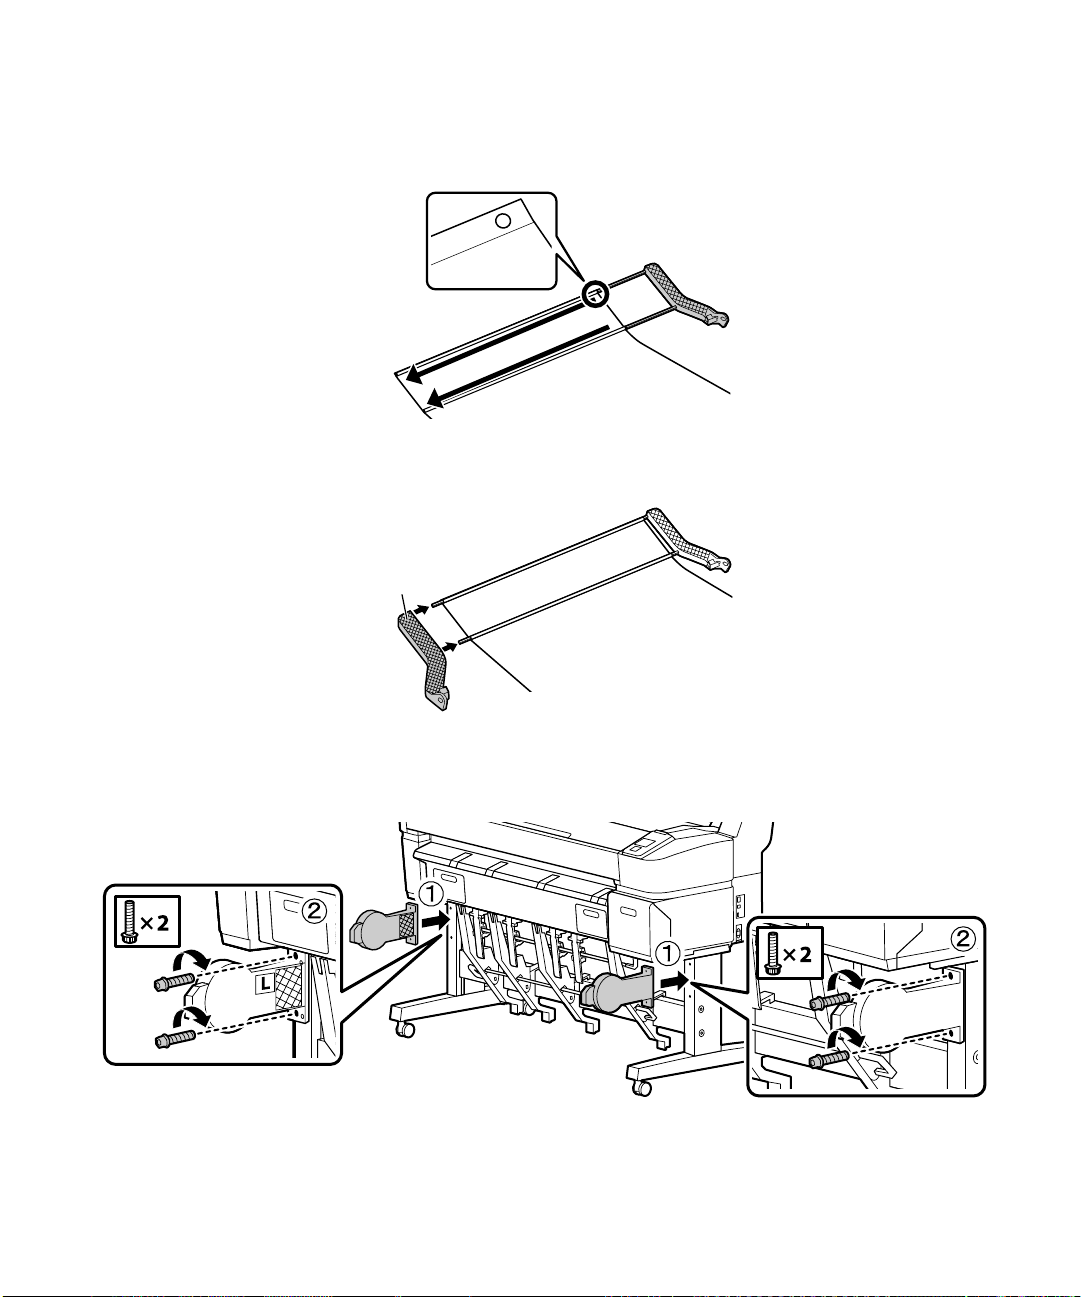
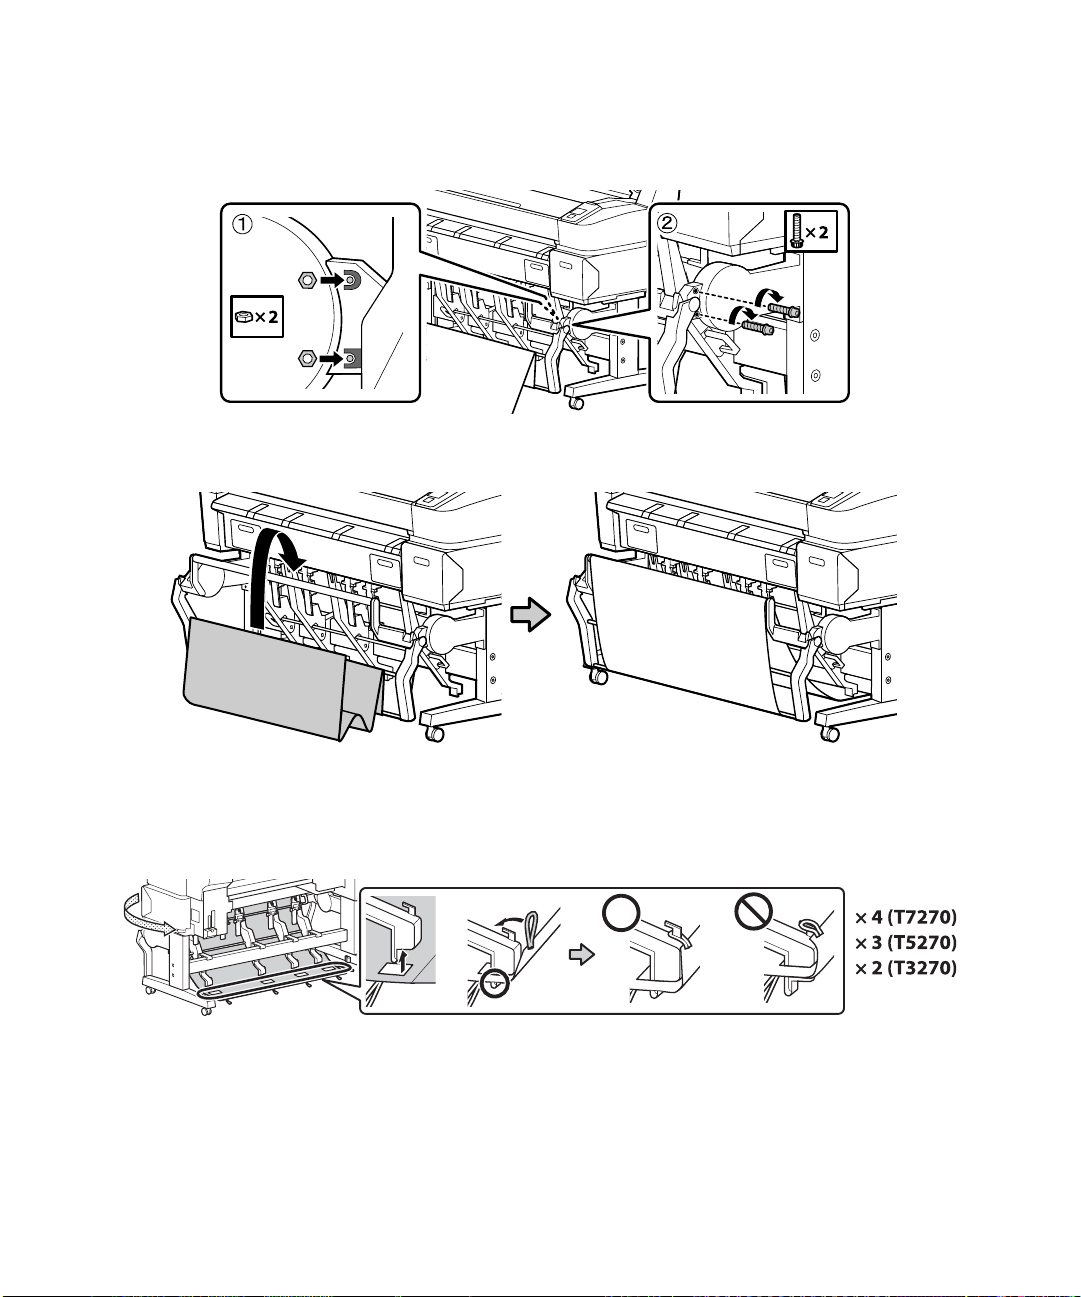
10. Attach the two basket holders, one on each side of the stand. Use four bolts to fasten the holders in
place.
Page 12
12 | Attaching the Paper Basket
11. Insert a nut into the center bolt hole on the basket holder, and align the right basket arm with the bolt
hole.
12. Insert the bolt sleeve through the basket arm and into the bolt hole. Insert the bolt into the bolt sleeve
and tighten it. Repeat steps 11 and 12 on the left side of the printer.
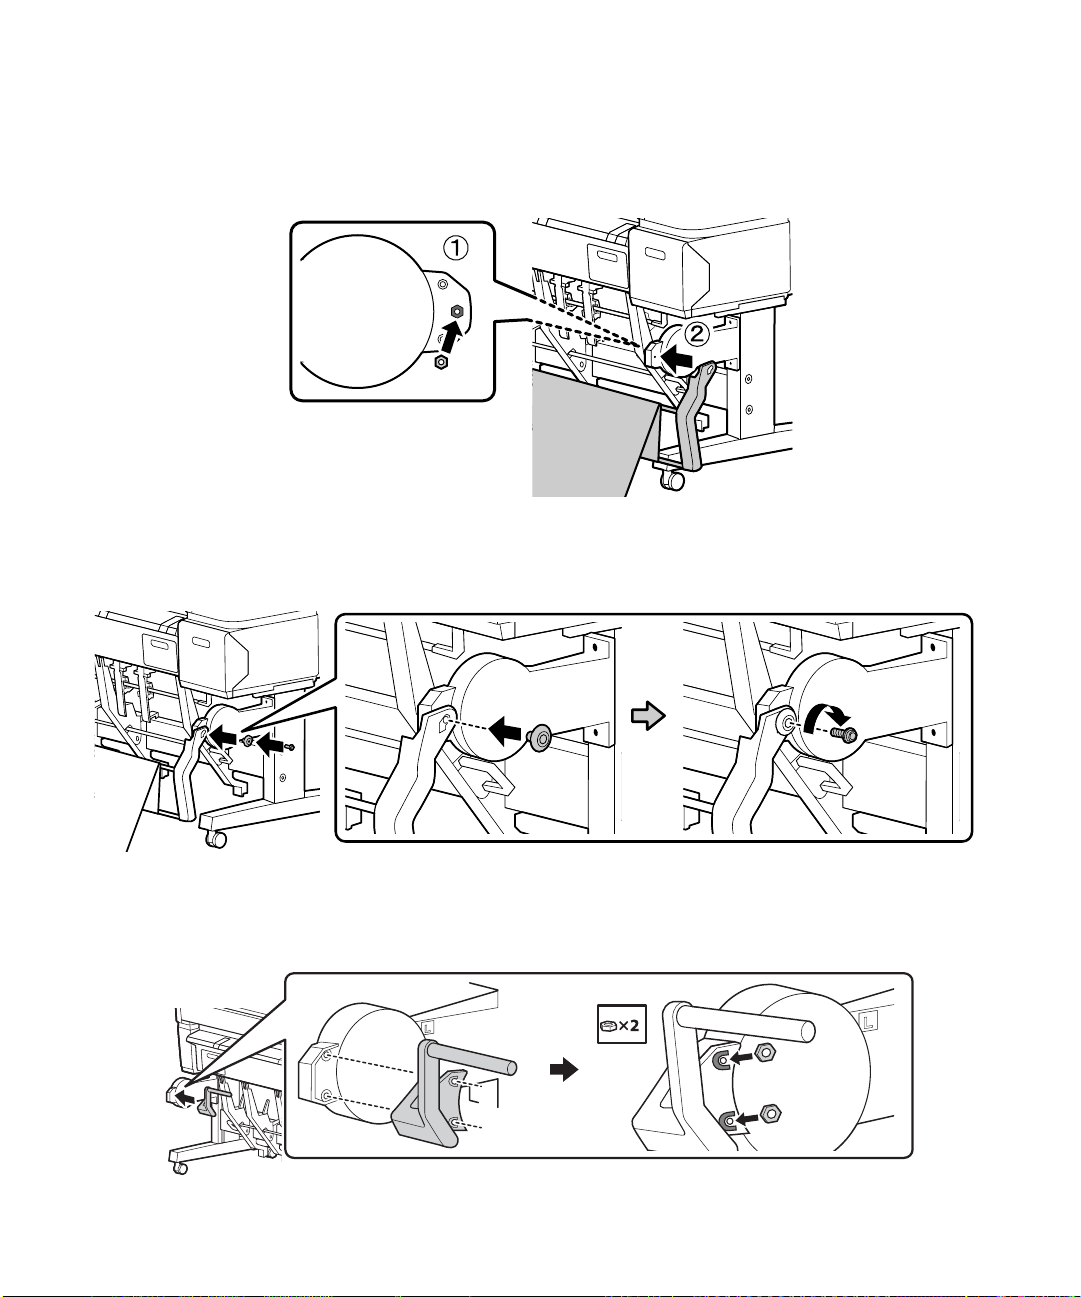
13. Attach the shorter arm to the inside of the basket holder on the left side of the printer. Use two nuts to
hold the arm in place.
Page 13
Use two bolts to fasten the arm in place.
14.
15. Insert the longer arm into the round pole.
Attaching the Paper Basket | 13
16. Insert the end of the round pole into the arm on the left side of the printer. Then, align the right
basket arm with the mounting holes on the right basket holder.
Page 14
14 | Attaching the Paper Basket
17. Use two nuts and two bolts to fasten the arm in place.
18. Flip the loose end of the basket cloth over the top rail and feed it towards the back of the printer.
19. On the back side of the printer, pull the paper basket up so that the stack guides fit into the slots as
shown. Then, hook the loops around the pins on the back of the stack guides to hold the basket in
place.
Page 15
Setting up the SureColor T5270D/T7270D | 15
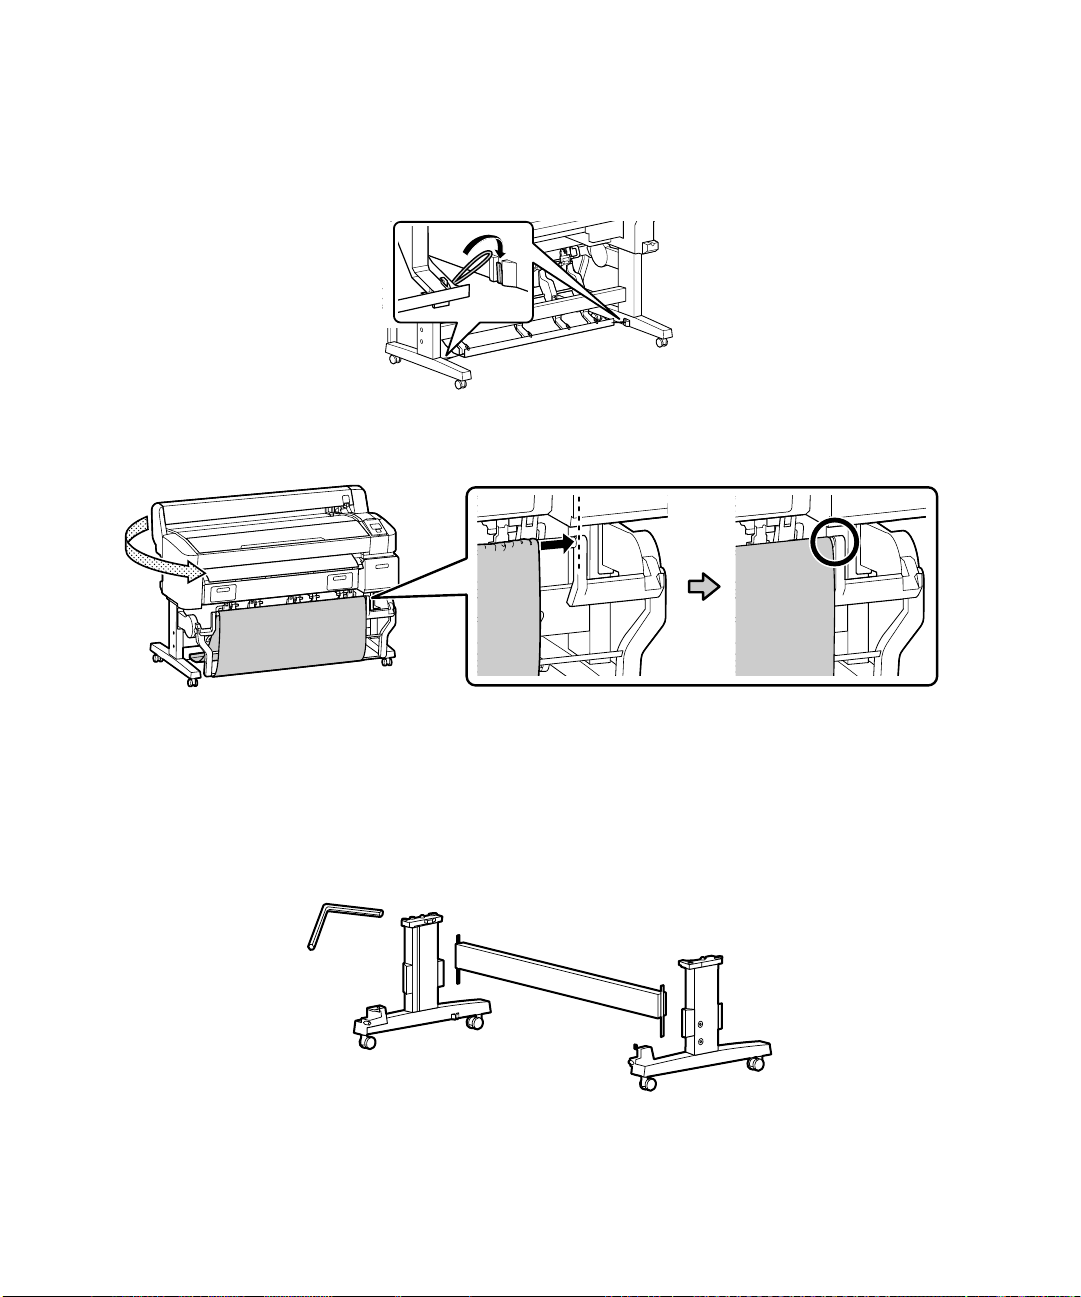
Hook the loops on the sides of the basket to the pins on the back of the stand legs to secure the basket
20.
to the printer.
21. On the front side of the printer, slide the basket fabric all the way to the ends of the pole.
Setting up the SureColor T5270D/T7270D
Assembling the Stand
1. Unpack the stand and make sure you have all of these items.
Page 16
16 | Assembling the Stand
2. Slide the horizontal strut into both of the legs.
3. Use the long end of the hex wrench to tighten the pre-placed screws on each side of the horizontal
strut.
4. Lock the casters to fix the stand in place. (When moving the printer, unlock the casters.)
Page 17
Mounting the Second Paper Roll | 17
Mounting the Second Paper Roll
1. Unpack the roll unit and make sure you have all of these items.
B
2. Secure the roll supports to the legs of the stand using four bolts per support.
8
B
3. Remove the tape from the mounting brackets and extend the left and right rail until you hear a click.
12
Page 18
18 | Mounting the Second Paper Roll
4. Carefully place the second roll unit on the extended rails.
Caution: Placing the unit requires two people.
Secure the unit to the rails with two bolts on each side.
5.
4
B
Page 19
Mounting the Printer on the Stand | 19
Mounting the Printer on the Stand
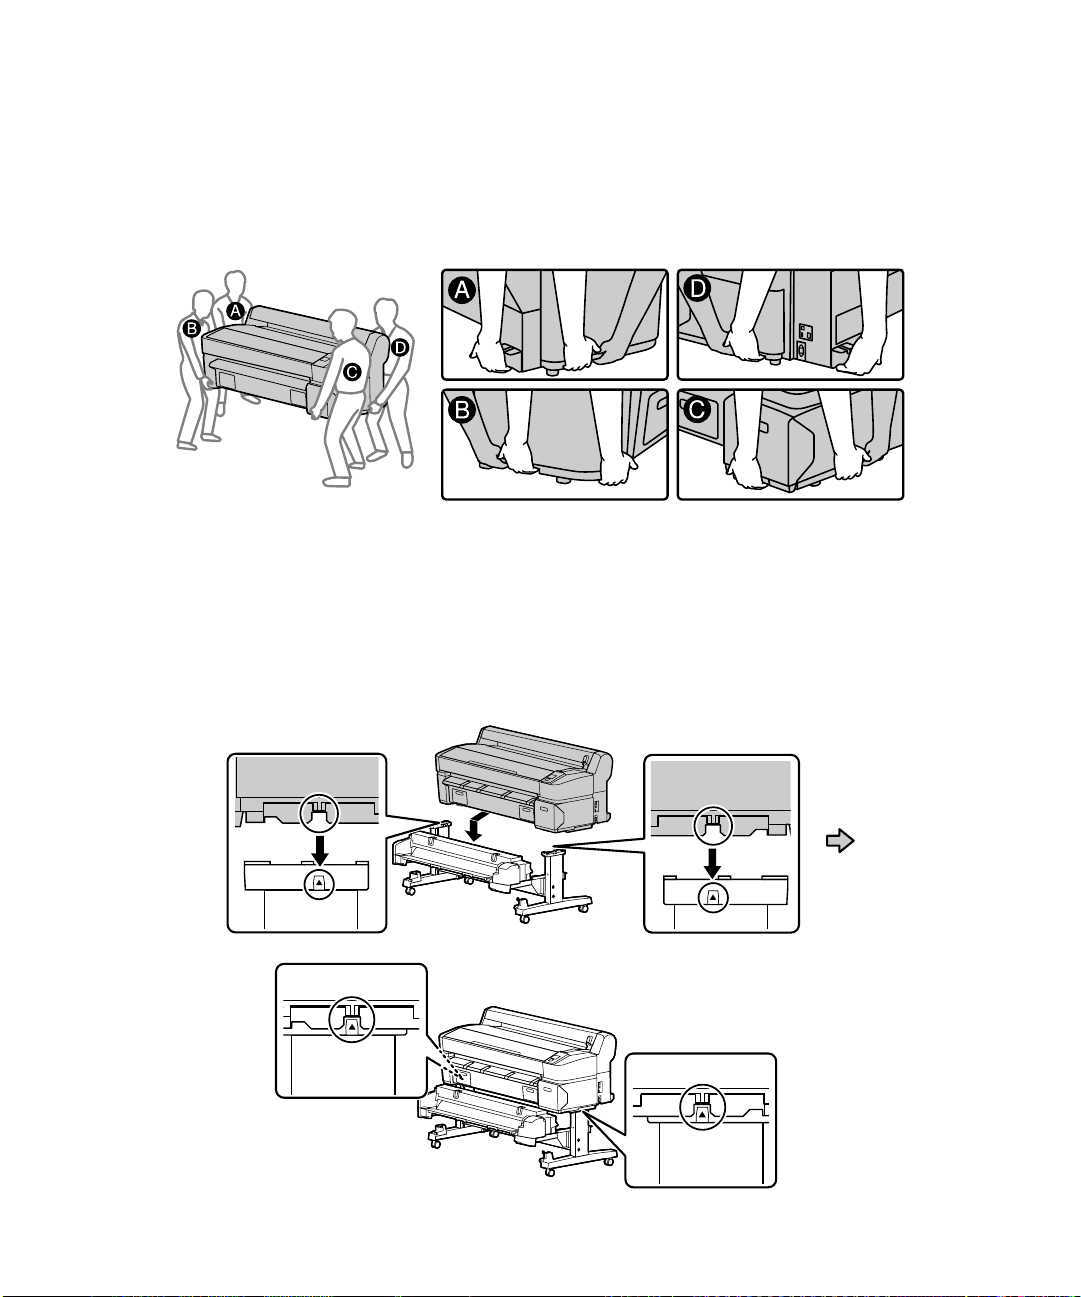
You need four people to install the printer and position it on the stand. When lifting the printer, only hold
the areas shown below. Otherwise, damage may occur.
Caution: Before installing the printer, lock the casters to make sure the stand is fixed in place.
1.
Lift the printer onto the stand. Line up the marks on the bottom of the printer with the arrows on the
top of the stand legs before setting the printer down.
Caution: Make sure the second roll unit is pulled out from the stand. Otherwise, the printer may be
damaged.
Page 20
20 | Mounting the Printer on the Stand
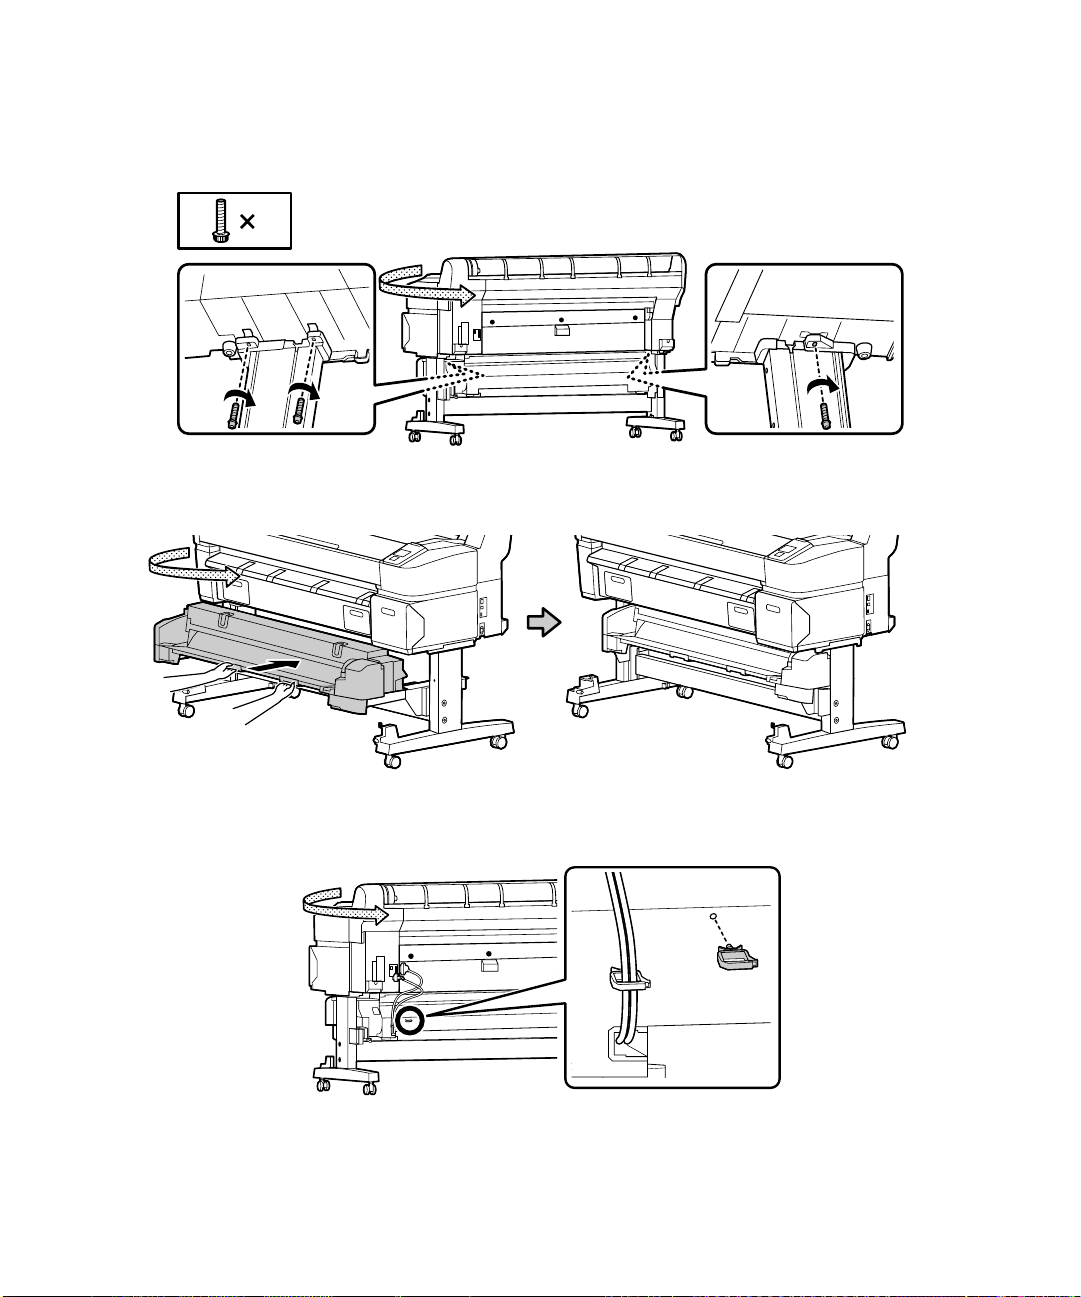
2. Attach the printer to the stand using three bolts.
A
3. Push the second roll unit underneath the printer.
3
4. Insert the cable guide into the back of the second roll unit.
Page 21
Attaching the Paper Basket | 21
Route the cables through the cable guide and connect them to the printer.
5.
Attaching the Paper Basket
The paper basket is a cloth sheet that attaches to the printer stand and catches your prints as they come
out. You need the following parts to assemble and attach the paper basket:
1. Attach the stack guides to the bottom of the printer. Make sure each guide snaps securely into place.
Page 22
22 | Attaching the Paper Basket
2. Remove the bolts from the front of the printer stand and then open the rail covers.
3. Insert the discs on the outside of the basket frame into the rails.
4. Pivot the basket frame and close the rail covers. Replace the bolts.
Page 23
Attaching the Paper Basket | 23
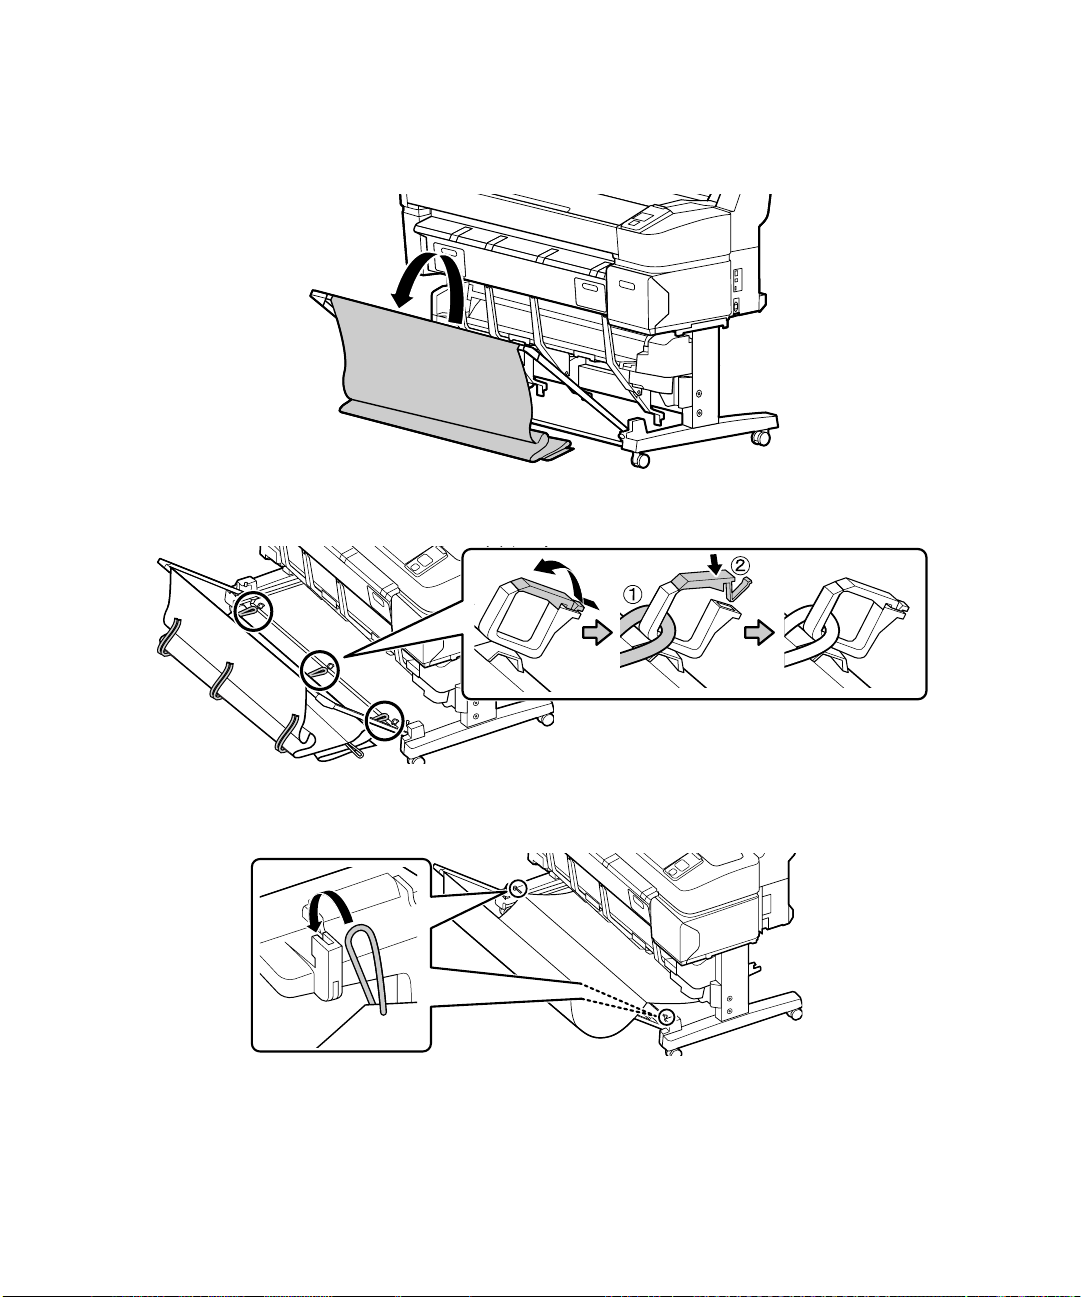
Unwind the basket cloth from the frame.
5.
6. Open the clips on the basket, insert the loops and close the clips.
7. Hook the loops on the sides of the bottom of the basket to the pins on the stand.
Page 24
24 | Connecting the Power Cord
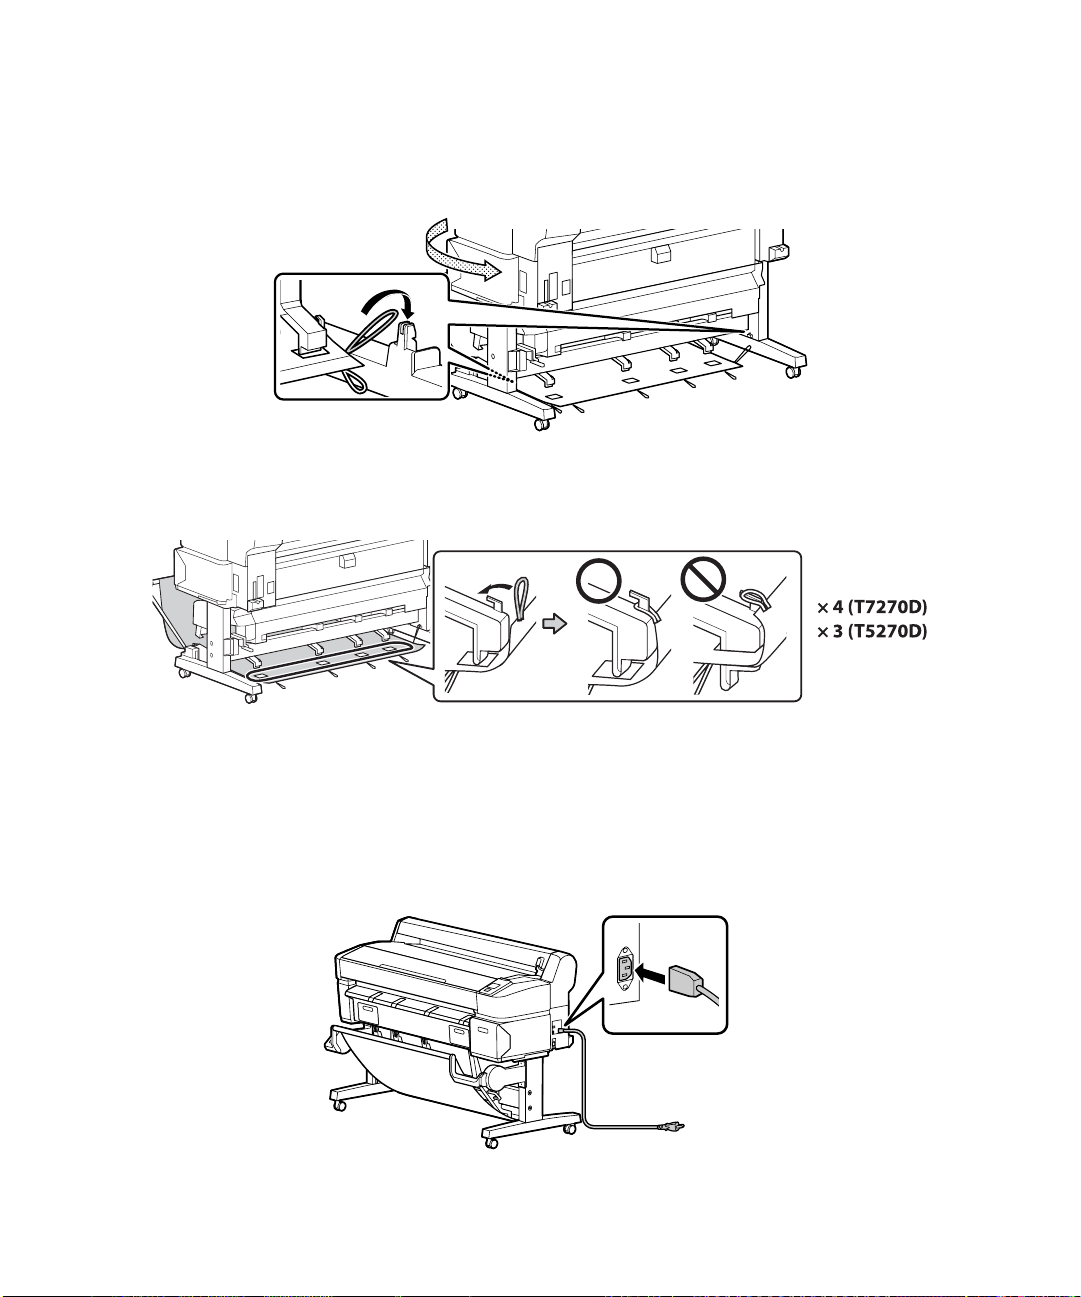
8. Hook the loops on the sides of the basket to the pins on the back of the stand legs to secure the basket
to the printer.
9. On the back side of the printer, pull the paper basket up so that the stack guides fit into the slots.
Then, hook the loops around the pins on the back of the stack guides to hold the basket in place.
Connecting the Power Cord
1. Unlock the casters. Then, move the printer to the place of use. (The casters are meant for moving the
printer for only a short distance.) Lock the casters.
2. Connect the power cord to the AC inlet on the side of the printer.
3. Plug the power cord into a properly grounded electrical outlet.
Page 25
Installing Ink Cartridges | 25
Installing Ink Cartridges
Use the ink cartridges that came with your printer for initial ink charging. During the initial installation
process, it is normal for most of the ink in each cartridge to be used.
1. Turn on the power and configure the initial settings, such as the language and date. Then, follow the
instructions on the control panel to install the ink cartridges.
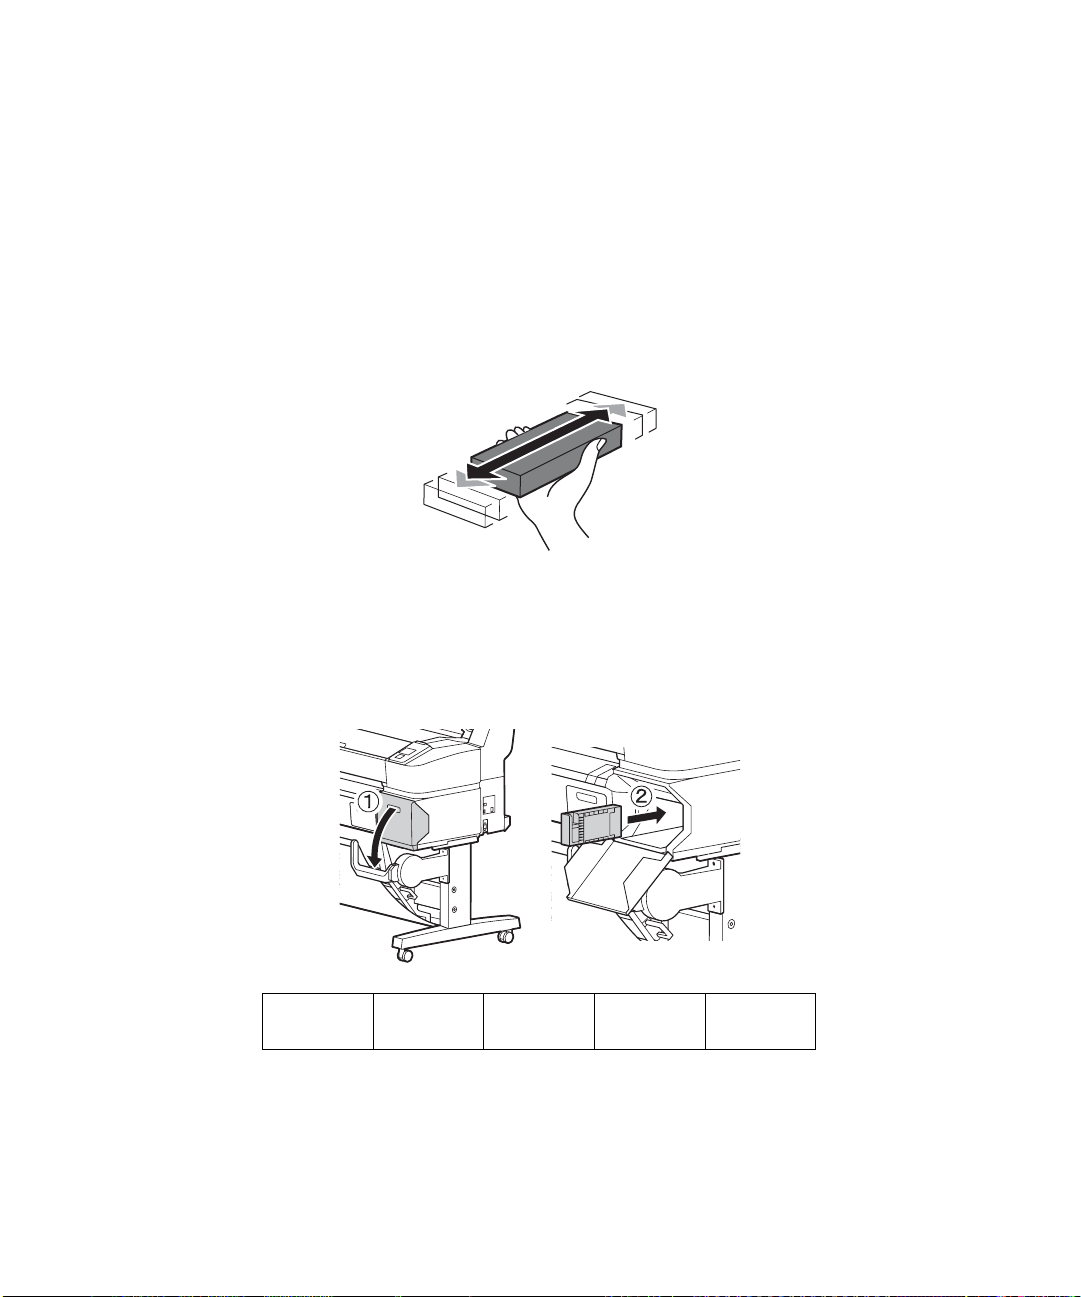
2. Unpack the ink cartridges and shake each 30 times (about 10 seconds).
Note: Do not touch the IC chip on the cartridge.
3.
Install the ink cartridges in the printer. Hold each cartridge with the arrow pointing toward the
printer, then insert it into its slot until it clicks into place. Make sure you insert each cartridge all the
way into the correct slot.
CYMMK/MBPK/BK
Cyan Yellow Magenta Matte Black Photo Black
Page 26
26 | Loading Roll Paper
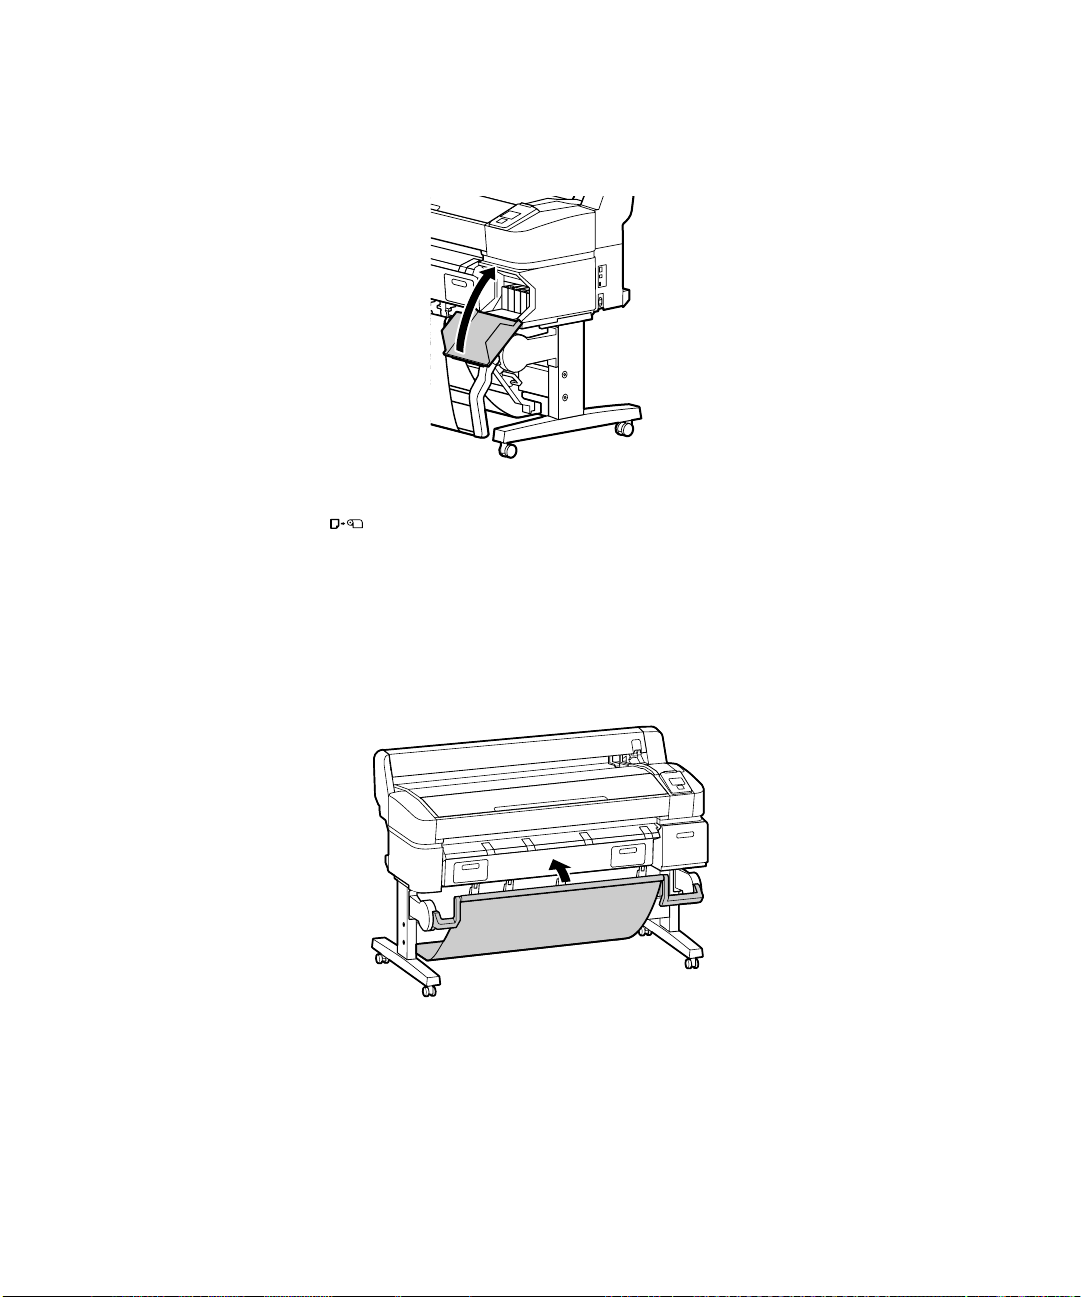
4. Close the ink cover and wait for the ink to charge. The ink charging process takes about 25 minutes.
Caution: Do not turn off the printer or open any cover when it is charging or you may waste ink. When the ink
charging is completed, press and Load paper is displayed on the control panel. Do not perform operations
other than those specified on the screen.
Loading Roll Paper
Before you start, close the paper basket. This makes it easier to access the top of the printer during the
paper loading process.
Note: If the optional multifunction scanner is installed, raise the scanner until you hear a click.
Page 27
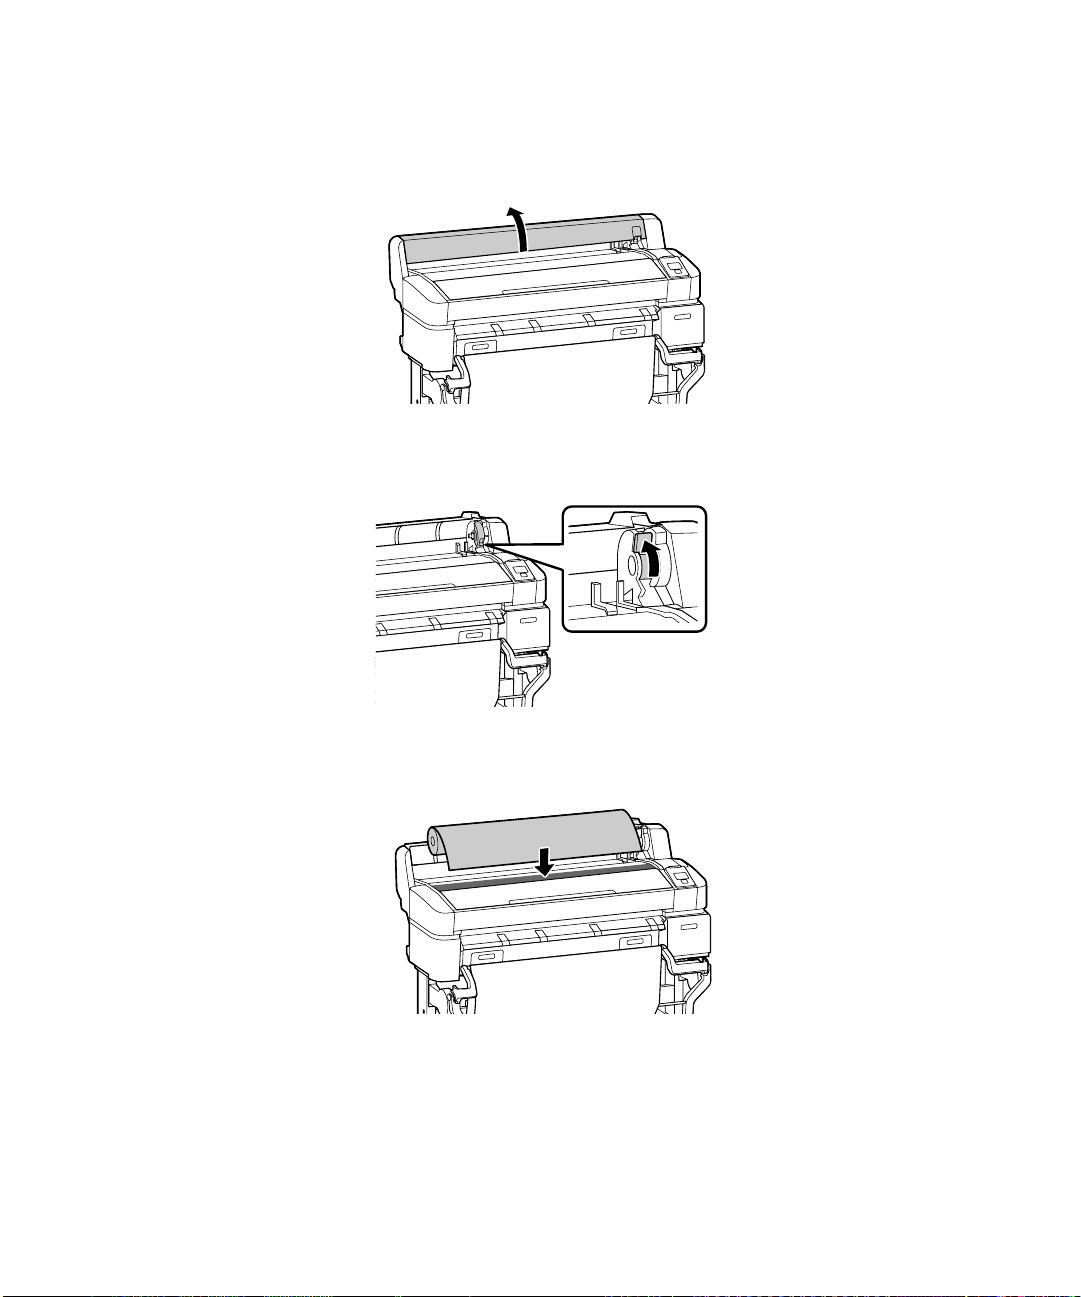
Open the roll paper cover.
1.
2. Raise the roll lock lever.
Loading Roll Paper | 27
3. Place the roll on top of the printer.
Page 28
28 | Loading Roll Paper
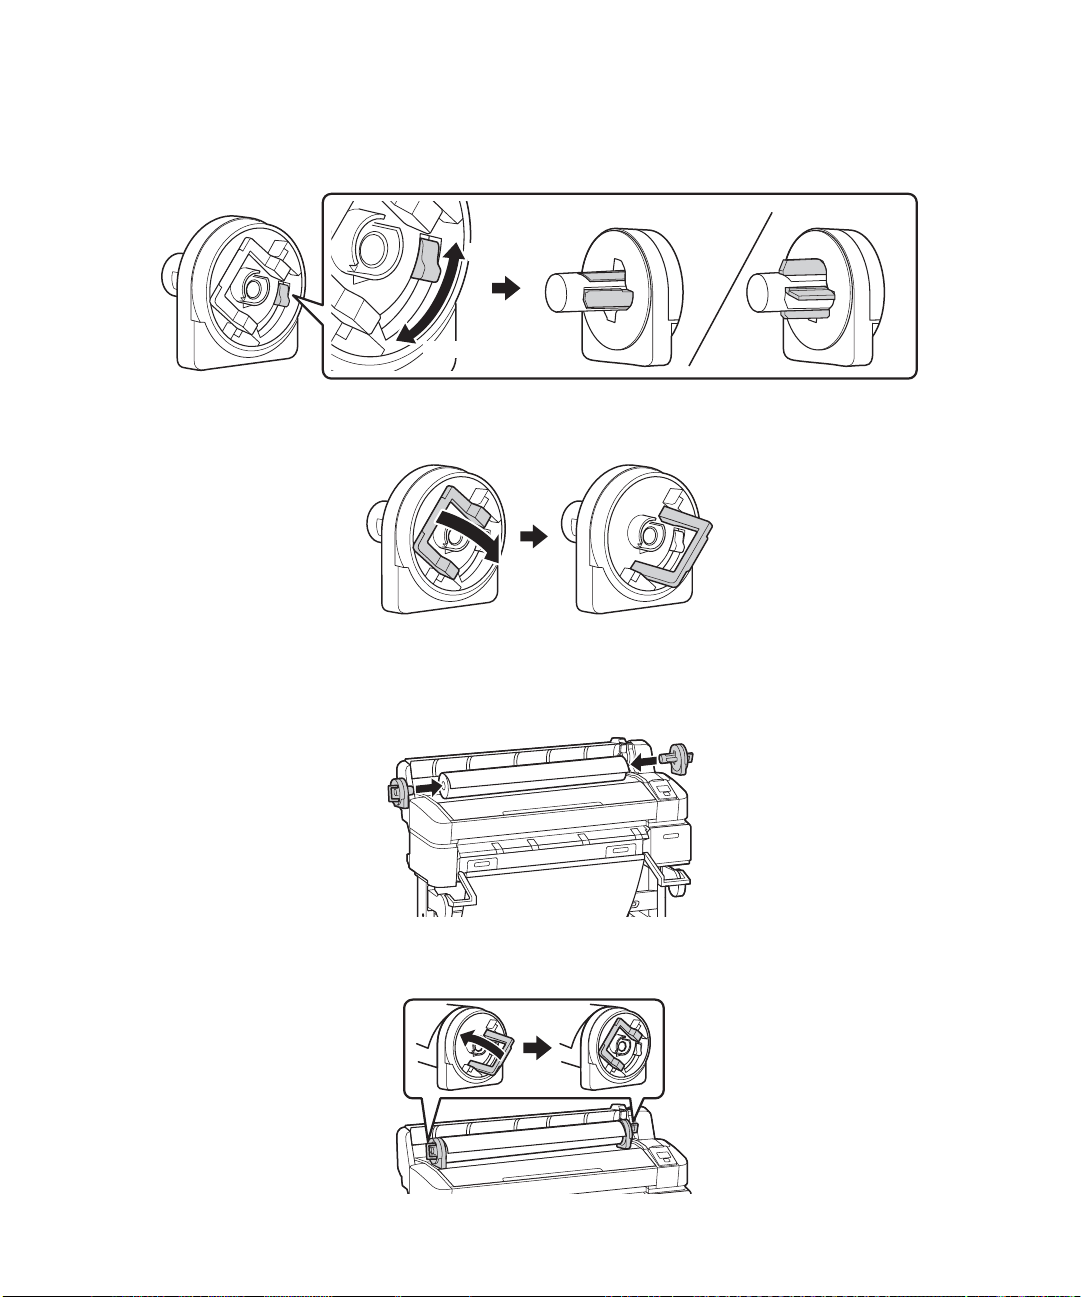
4. If necessary, adjust the roll media adapters to fit the core size of the roll paper.
2-inch core
2-inch
3-inch
5. Release the tension lever on both adapters.
6. Push the adapters into the paper core at both ends of the roll. Press the adapters in until they are fully
3-inch core
inserted into the roll.
7. Push down the tension lever on both adapters to secure them.
Page 29
Loading Roll Paper | 29
Slide the roll paper all the way to the right until it lines up with the adapter guides.
8.
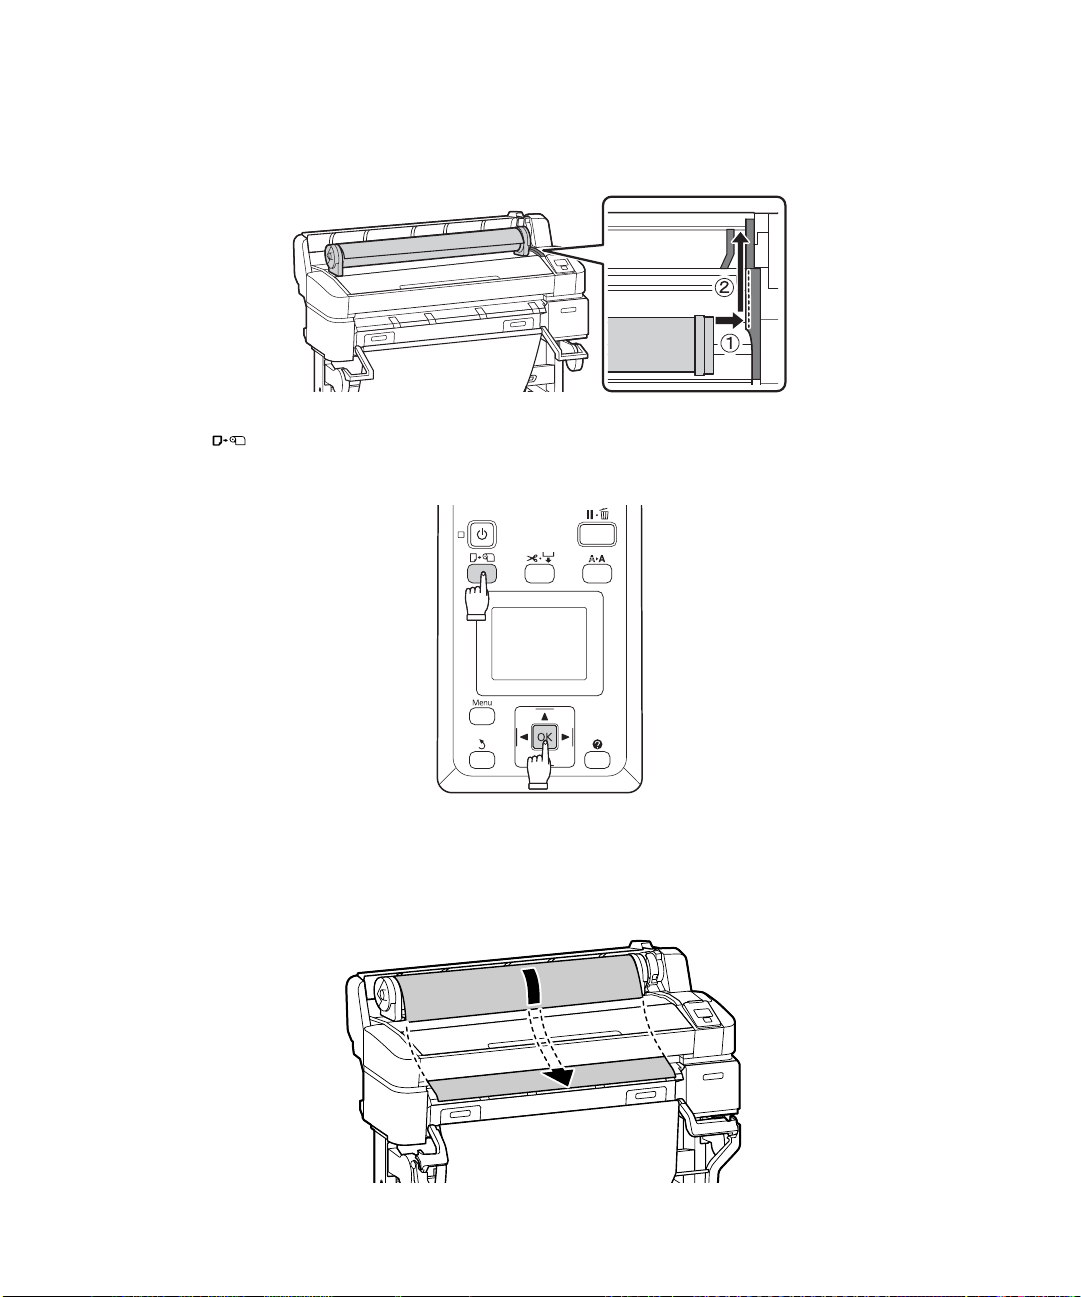
9. Press the button on the control panel. Confirm that Roll Paper is highlighted in the display,
then press the
OK button.
10. Insert the end of the roll paper into the paper slot and pull it through. Make sure the paper is free of
slack and that the end is not folded. If Auto Loading is enabled on the T5270D or T7270D, you hear
a beep. Continue with step 12.
Page 30

30 | Loading Roll Paper
11. Rotate the roll paper adapters to push the paper straight through until the leading edge reaches the
front of the printer.
12. Lower the roll lock lever.
13. Following the instructions on the control panel, press the OK button. The paper is fed into the printer.
Page 31

Loading Roll Paper | 31
Close the roll paper cover.
14.
15. Check the message on the control panel.
• If the paper type was automatically detected, the printer displays Ready on the LCD screen. The
printer is ready to print.
• If the paper type was not detected, the printer displays the Paper Type and Roll Paper
Remaining
to change or confirm the current settings. Press
settings for the paper currently selected. Follow the instructions on the control panel
OK when finished.
16. Before printing, close the optional multifunction scanner and open the paper basket, if necessary.
Note: See the User’s Guide for information on loading cut sheets and poster board.
Page 32

32 | Loading Roll Paper into the Secondary Roll Unit
Loading Roll Paper into the Secondary Roll Unit
You can load a second roll of paper into the secondary roll unit of the SureColor T5270D and T7270D.
1. Move the paper basket to the horizontal position by pulling the basket towards you, then lowering it.
Push the paper basket in towards the printer.
2. Press the button on the control panel. Select Roll2, then press the OK button.
3. Use the drawer handles to pull the secondary roll unit out.
Note: Pull out the secondary roll unit only when instructed by the control panel. If the roll unit is pulled out
carelessly while paper is loaded, it can cause paper jams or damage the paper.
Page 33

Loading Roll Paper into the Secondary Roll Unit | 33
Raise the roll paper lock lever, if necessary.
4.
5. Place the roll paper adapters on the adapter guides with the flat side down. Then, slide the paper roll
slowly inside.
Page 34

34 | Loading Roll Paper into the Secondary Roll Unit
6. Insert the end of the roll paper into the paper slot and pull it through. Make sure the paper is free of
slack and that the end is not folded. You hear a beep and the paper is automatically loaded.
7. Lower the roll lock lever.
Page 35

Loading Roll Paper into the Secondary Roll Unit | 35
Push the secondary roll unit back into the printer.
8.
9. Check the message on the control panel.
• If the paper type was automatically detected, the printer displays Ready on the LCD screen. The
printer is ready to print.
• If the paper type was not detected, the printer displays the Paper Type and Roll Paper
Remaining
to change or confirm the current settings. Press
settings for the paper currently selected. Follow the instructions on the control panel
OK when finished.
Page 36

36 | Performing a Test Print
Performing a Test Print
You can print a nozzle check from the control panel and examine it to determine whether any nozzles are
clogged or deflected. Then you can run a cleaning cycle if necessary.
1. Make sure the paper source and media type settings are correct for the type of paper loaded.
2. Confirm that the printer is ready to print, then press the button on the control panel. The
Maintenance menu is displayed.
3. Confirm that Nozzle Check is highlighted and press the OK button. A confirmation message is
displayed.
4. Press OK to print a nozzle check pattern.
5. Examine the printed pattern.
• If the pattern looks good, as shown below, the print head is clean.
• If any dots or segments are missing or deflected, as shown below, follow the instructions on the
control panel to run a cleaning cycle. Then print another nozzle check pattern to make sure the
nozzles are clean.
Aligning the Print Head
Follow the steps below to align the print head using the printer’s control panel. Make sure the paper source
and media type settings are correct for the type of paper loaded.
1. Confirm that the printer is ready to print. Press l or r on the control panel to highlight settings
and press
2. Press d to select Head Alignment, then press OK.
3. Press d to select Auto (Bi-D), then press OK.
OK. The Maintenance menu is displayed.
Page 37

Installing Software | 37
Press OK again to begin the head alignment. The printer automatically aligns the head as it prints the
4.
head alignment pattern. When alignment is complete, the Maintenance menu will be displayed.
Note: See the online User’s Guide for instructions on performing a manual head alignment.
Installing Software
Insert the software CD that came with your printer into your computer and follow the on-screen
instructions.
Connecting to Your System
You can use USB and/or Ethernet network connections.
For a USB connection, make sure your system has the appropriate port and that you have a standard,
shielded cable, 10 feet (3 m) long or less.
Note: Do not connect the printer until a software installation screen prompts you to do so.
To connect to a network hub or directly to your computer’s network interface, you need a standard RJ-45
CAT-6 network cable.
1. Plug the interface cable into the appropriate port on the printer.
2. Plug the other end of the cable into the appropriate port on your computer or network switch or hub.
Updating Your Printer Firmware
To keep your printer features and functionality up to date, you should check for a new version of firmware
on the Epson support site and update your printer, if necessary.
Page 38

38 | Checking the Current Firmware Version
Checking the Current Firmware Version
1. Press the r button twice to highlight settings.
2. Press the Menu button.
3. Press the d button until Printer Status is highlighted, then press OK.
4. Press OK again. Note the firmware version displayed. When finished, press the button.
Updating the Firmware
Before updating your printer’s firmware, make sure your printer is turned on and connected to your
computer or network.
1. Click the EPSON LFP Remote Panel 2 icon on your desktop. You see the EPSON LFP Remote
Panel 2. Make sure your printer is selected from the drop-down menu.
2. Click the Firmware Updater button. You see the Firmware Updater window.
3. Click Acquire Latest Information to automatically download the latest firmware version for your
printer from the internet. If there is a firmware update, the message “Found the latest firmware
information. Do you want to download the firmware file?” appears. Click
Note: If the Acquire Latest Information button fails to download the latest firmware, you can also find it by
visiting Epson’s support site epson.com/support (US) or global.latin.epson.com/Soporte (Latin America;
website available in Spanish and Portuguese). You need to download the latest version and upload it by
clicking Browse and locating the file, then continue from step 5.
When the message “File download complete” appears, click OK. The file you just downloaded should
4.
Yes to download the file.
automatically be selected and appear in the File Name window.
5. Click Update and follow the on-screen instructions.
6. If the firmware version of the file is newer than what is currently installed, click Update to start the
firmware updating process.
Caution: Don’t turn off the printer while the firmware is updating.
7.
When the update is complete, close the Firmware Updater window and EPSON LFP Remote Panel 2
window.
Page 39

Updating the Firmware | 39
EPSON and SureColor are registered trademarks, and EPSON Exceed Your Vision is a registered logomark of Seiko Epson
Corporation.
General Notice: Other product names used herein are for identification purposes only and may be trademarks of their respective
owners. Epson disclaims any and all rights in those marks.
This information is subject to change without notice.
Page 40

Page 41

| 41
Contenido
Cómo desembalar y montar la impresora . . . . . . . . . . . . . . . . . . . . . . . . . . . . . . . . . . . . . . . . . . . . . . 43
Cómo instalar la impresora SureColor T3270/T5270/T7270 . . . . . . . . . . . . . . . . . . . . . . . . . . . . . . . 45
Cómo instalar la impresora SureColor T5270D/T7270D . . . . . . . . . . . . . . . . . . . . . . . . . . . . . . . . . 56
Conexión del cable de alimentación . . . . . . . . . . . . . . . . . . . . . . . . . . . . . . . . . . . . . . . . . . . . . . . . . . 65
Cómo instalar los cartuchos de tinta . . . . . . . . . . . . . . . . . . . . . . . . . . . . . . . . . . . . . . . . . . . . . . . . . . 66
Cómo cargar papel . . . . . . . . . . . . . . . . . . . . . . . . . . . . . . . . . . . . . . . . . . . . . . . . . . . . . . . . . . . . . . . 67
Cómo cargar un rollo de papel en la unidad de rollo adicional . . . . . . . . . . . . . . . . . . . . . . . . . . . . . . 73
Cómo realizar una prueba de impresión . . . . . . . . . . . . . . . . . . . . . . . . . . . . . . . . . . . . . . . . . . . . . . . 76
Cómo alinear el cabezal de impresión . . . . . . . . . . . . . . . . . . . . . . . . . . . . . . . . . . . . . . . . . . . . . . . . . 77
Cómo instalar el software . . . . . . . . . . . . . . . . . . . . . . . . . . . . . . . . . . . . . . . . . . . . . . . . . . . . . . . . . . 77
Cómo actualizar el firmware de la impresora . . . . . . . . . . . . . . . . . . . . . . . . . . . . . . . . . . . . . . . . . . . . 78
Español
Page 42

42 |
Page 43

Cómo desembalar y montar la impresora | 43
Cómo desembalar y montar la impresora
Nota: A no ser que se indique lo contrario, las ilustraciones utilizadas en esta guía muestran la impresora Epson®
SureColor
En el presente, la palabra “papel” se utiliza para referirse a todos los materiales de impresión compatibles con
las impresoras.
®
T7270, pero las instrucciones aplican a los cinco modelos.
Antes de comenzar el montaje, asegúrese de tener suficiente espacio para instalar y usar la impresora. En las
siguientes ilustraciones se muestra el espacio mínimo que se requiere para usar la impresora:
SureColor T3270/T5270/T7270 SureColor T5270D/T7270D
5,9 pul. (150 mm)
0,39 pul.
(10 mm)
23,6 pul.
(600 mm)
Ancho
Alt.
Prof.
5,9 pul. (150 mm)
5,9 pul. (150 mm)
0,39 pul.
(10 mm)
19,7 pul.
(500 mm)
Ancho
3,9 pul.
Alt.
(100 mm)
Prof.
5,9 pul. (150 mm)
Seleccione un lugar donde haya suficiente espacio para acceder fácilmente al equipo y una ventilación
adecuada. Evite lugares que estén expuestos a luz solar directa, calor excesivo, humedad o polvo. Coloque
la impresora en un lugar plano y estable que pueda soportar el peso de la impresora.
• SureColor T3270 — 148 lb (67 kg)
• SureColor T5270 — 185 lb (84 kg)
• SureColor T7270 — 203 lb (92 kg)
• SureColor T5270D — 260 lb (118 kg)
• SureColor T7270D — 293 lb (133 kg)
ADVERTENCIA: Se requieren dos personas para desembalar e instalar la impresora SureColor T3270; se
requieren cuatro para desembalar e instalar la SureColor T5270, T5270D, T7270 y SureColor T7270D.
Se necesita un espacio mayor aún para montar la impresora y el soporte, por lo tanto, prepare un área
despejada y amplia antes de desembalar los componentes. Además, guarde la caja y el material de embalaje
en caso de que necesite transportar la impresora en el futuro.
Page 44

44 | Cómo desembalar y montar la impresora
Los siguiente componentes se incluyen con la impresora:
SureColor T3270/T5270/T7270
4
2
10
6
C
2
Nota: Para información acerca del disco duro y el sistema de rodillo de recogida opcionales, consulte el Manual
del usuario en línea.
B
A
× 4 (T7270)
× 3 (T5270)
× 2 (T3270)
× 5 (T7270)
× 4 (T5270)
× 3 (T3270)
Page 45

SureColor T5270D/T7270D
Cómo instalar la impresora SureColor T3270/T5270/T7270 | 45
A
4
12
L
B
Cómo instalar la impresora SureColor T3270/T5270/T7270
Cómo montar el soporte
1. Desembale el soporte y confirme que se hayan incluido todos los elementos que se muestran a
continuación.
Page 46

46 | Cómo montar el soporte
2. Instale el montante horizontal en las patas del soporte, tal como se muestra a continuación.
3. Apriete los tornillos preinstalados en cada costado del montante horizontal con el extremo largo de la
llave hexagonal (Allen).
Page 47

Cómo montar la impresora en el soporte | 47
Bloquee las ruedas para fijar el soporte en su lugar. (Desbloquéelas para mover la impresora).
4.
Cómo montar la impresora en el soporte
Se necesitan por lo menos dos personas (SureColor T3270) o cuatro personas (SureColor T5270/T7270)
para instalar la impresora y colocarla en el soporte. Al levantar la impresora, solamente sujétela por las
zonas que se muestran. De caso contrario, se podían ocasionar daños.
SureColor T3270
SureColor T5270/T7270
Precaución: Antes de colocar la impresora en el soporte, bloquee las ruedas y confirme que el soporte está fijo
en su lugar.
Page 48

48 | Cómo instalar el cesto de papel
1. Coloque la impresora sobre el soporte. Antes de colocar la impresora en el soporte, alinee las marcas
localizadas en la parte inferior de la impresora con las flechas localizadas en la parte superior de las
patas del soporte.
2. Fije la impresora al soporte con tres pernos.
Cómo instalar el cesto de papel
El cesto de papel es un pedazo de tela que se sujeta al soporte de la impresora para atrapar las impresiones a
medida que salen de la impresora. Se requieren las siguientes piezas para montar e instalar el cesto de papel:
× 4 (T7270)
× 3 (T5270)
× 2 (T3270)
× 5 (T7270)
× 4 (T5270)
× 3 (T3270)
C
A
B
2
10 6
Page 49

Cómo instalar el cesto de papel | 49
Instale los estabilizadores.
1.
× 5 (T7270)
× 4 (T5270)
× 3 (T3270)
2. Introduzca el extremo de una de las varillas cuadradas más cortas en uno de los conectores de plástico.
3. Deslice la varilla por los agujeros de los estabilizadores y fije el conector de plástico al soporte de la
impresora. Luego, anexe otro conector de plástico a la varilla y al soporte de la impresora.
Page 50

50 | Cómo instalar el cesto de papel
4. Instale las guías de apilamiento a la parte inferior de la impresora. Confirme de que cada guía se encaje
bien en su lugar.
× 4 (T7270)
× 3 (T5270)
× 2 (T3270)
5. Introduzca un extremo de la varilla cuadrada en uno de los conectores de plástico.
6. Deslice la varilla por los agujeros de las guías de apilamiento y fije el conector de plástico al soporte de
la impresora. Luego, anexe otro conector de plástico a la varilla y al soporte de la impresora, tal como
se muestra.
Page 51

Encaje las dos varillas cuadradas en el brazo derecho (R) del cesto.
7.
C
8. Introduzca las varillas en el dobladillo del cesto.
Cómo instalar el cesto de papel | 51
9. Introduzca los extremos de las varillas en el brazo izquierdo (L) del cesto.
L
Page 52

52 | Cómo instalar el cesto de papel
10. Fije los soportes del cesto, uno en cada lado del soporte de la impresora. Utilice cuatro pernos para fijar
los soportes del cesto.
11. Introduzca una tuerca en el agujero central del soporte del cesto, luego alinee el brazo derecho del cesto
con el agujero para el perno.
Page 53

Cómo instalar el cesto de papel | 53
Introduzca un taquete expansor en el brazo del cesto y en el agujero para el perno. Luego introduzca el
12.
perno en el taquete expansor y ajústelo. Repita los pasos 11 y 12 en el lado izquierdo de la impresora.
13. Instale el brazo más corto en el costado interior del soporte del cesto, en el lado izquierdo de la
impresora. Use dos tuercas para mantener fijo el brazo.
14. Fije el brazo con dos pernos.
Page 54

54 | Cómo instalar el cesto de papel
15. Introduzca el extremo largo del brazo del cesto en la varilla redonda.
16. Introduzca el extremo de la varilla redonda en el brazo del lado izquierdo de la impresora. Después,
alinee el brazo derecho con los agujeros de montaje del soporte derecho del cesto.
17. Fije el brazo con dos tuercas y dos pernos.
Page 55

Cómo instalar el cesto de papel | 55
Coloque la orilla suelta del cesto sobre la barra superior y pásela hacia la parte posterior de la
18.
impresora.
19. Desde la parte posterior de la impresora, estire la tela del cesto hacia arriba para que las guías de
apilamiento se enganchen en las ranuras, tal como se muestra. Enganche los lazos en las clavijas
posteriores de las guías de apilamiento para mantener el cesto fijo en su lugar.
20. Enganche los lazos laterales del cesto en las clavijas localizadas en la parte posterior de las patas del
soporte de la impresora para fijar el cesto a la impresora.
Page 56

56 | Cómo instalar la impresora SureColor T5270D/T7270D
21. Deslice la tela del cesto hasta el extremo derecho de la barra por la parte frontal de la impresora.
Cómo instalar la impresora SureColor T5270D/T7270D
Cómo montar el soporte
1. Desembale el soporte y confirme que se hayan incluido todos los elementos que se muestran a
continuación.
2. Instale el montante horizontal en las patas del soporte, tal como se muestra a continuación.
Page 57

Cómo montar el segundo rollo de papel | 57
Apriete los tornillos preinstalados en cada costado del montante horizontal con el extremo largo de la
3.
llave hexagonal (Allen).
4. Bloquee las ruedas para fijar el soporte en su lugar. (Desbloquee las ruedas para mover la impresora).
Cómo montar el segundo rollo de papel
1. Desembale la unidad de rollo adicional y confirme que se hayan incluido todos los elementos que se
muestran a continuación.
B
12
Page 58

58 | Cómo montar el segundo rollo de papel
2. Fije los soportes de la unidad de rollo adicional a las patas del soporte de la impresora con cuatro
pernos.
8
B
3. Retire la cinta adhesiva de las placas de montaje y extienda las barras deslizantes derecha e izquierda
hasta escuchar un clic.
Page 59

Cómo montar el segundo rollo de papel | 59
Coloque la unidad de rollo adicional con cuidado en las barras deslizantes extendidas.
4.
Precaución: Se necesitan dos personas para colocar la unidad de rollo adicional.
Fije la unidad a las barras deslizantes con dos pernos en cada lado.
5.
4
B
Page 60

60 | Cómo montar la impresora en el soporte
Cómo montar la impresora en el soporte
Se necesitan por lo menos cuatro personas para instalar la impresora y colocarla en el soporte. Al levantar la
impresora, solamente sujétela por las zonas que se muestran. De caso contrario, se podían ocasionar daños.
Precaución: Antes de colocar la impresora en el soporte, bloquee las ruedas y confirme que el soporte está fijo
en su lugar.
1.
Coloque la impresora sobre el soporte. Antes de colocar la impresora, alinee las marcas localizadas en la
parte inferior de la impresora con las flechas localizadas en la parte superior de las patas del soporte.
Precaución: Confirme que la unidad de rollo adicional no esté cargada. De caso contrario, la impresora se
podría dañar.
Page 61

Fije la impresora al soporte con tres pernos.
2.
Cómo montar la impresora en el soporte | 61
A
3. Empuje la unidad de rollo adicional por debajo de la impresora.
3
4. Instale la guía para cables en la parte posterior de la unidad de rollo adicional.
Page 62

62 | Cómo instalar el cesto de papel
5. Pase los cables por la guía para cables y conéctelos a la impresora.
Cómo instalar el cesto de papel
El cesto de papel es un pedazo de tela que se sujeta al soporte de la impresora para atrapar las impresiones a
medida que salen de la impresora. Se requieren las siguientes piezas para montar e instalar el cesto de papel:
1. Instale las guías de apilamiento a la parte inferior de la impresora. Confirme de que cada guía se encaje
bien en su lugar.
Page 63

Cómo instalar el cesto de papel | 63
Retire los pernos de la parte frontal del soporte de la impresora y abra las cubiertas de las barras
2.
horizontales.
3. Introduzca los discos localizados en la parte exterior del marco del cesto en las barras horizontales.
4. Gire el marco del cesto hacia arriba y cierre las cubiertas de las barras horizontales. Vuelva a colocar los
pernos.
Page 64

64 | Cómo instalar el cesto de papel
5. Desenrolle la tela del cesto.
6. Abra las presillas del cesto, enganche los lazos y vuelva a cerrar las presillas.
7. Enganche los lazos laterales de la parte inferior del cesto en las clavijas del soporte de la impresora.
Page 65

Conexión del cable de alimentación | 65
Enganche los lazos laterales del cesto en las clavijas posteriores de las patas del soporte de la impresora.
8.
9. Desde la parte posterior de la impresora, estire la tela del cesto hacia arriba para que las guías de
apilamiento se enganchen en las ranuras, tal como se muestra. Enganche los lazos en las clavijas
posteriores de las guías de apilamiento para mantener el cesto fijo en su lugar.
Conexión del cable de alimentación
1. Desbloquee las ruedas y luego mueva la impresora al sitio donde la va utilizar. (Las ruedas están
diseñadas para mover la impresora distancias cortas solamente). Bloquee las ruedas después de mover
la impresora.
2. Conecte el cable de alimentación a la toma de corriente localizada en la parte posterior de la impresora.
Page 66

66 | Cómo instalar los cartuchos de tinta
3. Conecte el cable de alimentación a una toma de corriente puesta a tierra.
Cómo instalar los cartuchos de tinta
Utilice los cartuchos de tinta que se incluyen con la impresora para la carga inicial de tinta. Durante la
carga inicial, es normal que se consuma la mayoría de la tinta de cada cartucho.
1. Encienda la impresora y configure los ajustes iniciales, tal como el idioma y la fecha, si es necesario.
Después, siga las instrucciones del panel de control para instalar los cartuchos.
2. Desembale los cartuchos de tinta y agite cada uno unas 30 veces (aproximadamente 10 segundos).
Nota: No toque el chip del cartucho.
3.
Instale los cartuchos de tinta en la impresora. Sujete cada cartucho con la flecha orientada hacia la
impresora, luego introdúzcalo en su ranura hasta que escuche un clic y se encaje en su lugar. Asegúrese
de introducir cada cartucho hasta el fondo en la ranura correcta.
CYMMK/MBPK/BK
(Cian) (Amarillo) (Magenta) (Negro mate) (Negro
fotográfico)
Page 67

Cómo cargar papel | 67
Cierre la cubierta del compartimento de cartuchos y espere a que se cargue la tinta. La carga se tarda
4.
aproximadamente 25 minutos.
Precaución: No apague la impresora o abra la cubierta del compartimento de cartuchos mientras la tinta se
esté cargando, de lo contrario, es posible que desperdicie tinta. Cuando la carga de tinta haya finalizado, pulse
el botón .
operaciones que se indican en la pantalla.
Aparece un mensaje en el panel de control indicándole que cargue el papel. Solamente realice las
Cómo cargar papel
Antes de comenzar, cierre el cesto de papel. De esta forma, será más fácil acceder a la parte superior de la
impresora mientras carga el papel.
Nota: Si el escáner opcional está instalado, levante la unidad del escáner hasta escuchar un clic.
Page 68

68 | Cómo cargar papel
1. Abra la cubierta del rollo de papel.
2. Levante la palanca de bloqueo del rollo.
3. Coloque el rollo en la parte superior de la impresora.
Page 69

Cómo cargar papel | 69
Si es necesario, ajuste los adaptadores del rollo al tamaño del centro del rollo de papel que va a cargar.
4.
Centro de 2 pulg. Centro de 3 pulg.
2-inch core
2 pulg.
2-inch
3 pulg.
3-inch
5. Desbloquee la palanca de bloqueo de ambos adaptadores.
6. Coloque un adaptador en cada extremo del rollo de papel. Presione los adaptadores hacia adentro
3-inch core
hasta que se encajen por completo en el centro del rollo.
7. Baje la palanca de bloqueo de los adaptadores para fijarlos.
Page 70

70 | Cómo cargar papel
8. Deslice el rollo de papel a la extrema derecha, hasta que quede alineado con las guías del adaptador.
9. Pulse el botón del panel de control. Confirme que la opción Rollo De Papel esté resaltada en la
pantalla LCD y luego pulse el botón
OK.
10. Introduzca el extremo del papel por la ranura y tire de él. Verifique que no haya holgura en el papel y
que la orilla no esté doblada. Si el ajuste Carga autom. está habilitado en la impresora T5270D o en la
T7270D, se escucha un pitido. Continúe con el paso 12.
Page 71

Cómo cargar papel | 71
Gire los adaptadores del rollo de papel para alimentar el papel hasta que la orilla delantera alcance la
11.
parte frontal de la impresora.
12. Baje la palanca de bloqueo del rollo.
13. Siga las instrucciones que aparecen en el panel de control y luego pulse el botón OK. El papel avanza
por la impresora.
Page 72

72 | Cómo cargar papel
14. Cierra la cubierta del rollo de papel.
15. Revise el mensaje que aparece en el panel de control.
• Si el tipo de papel fue detectado automáticamente, aparecerá el mensaje Preparada en la pantalla
LCD de la impresora. La impresora está lista para imprimir.
• Si el tipo de papel no fue detectado, la impresora mostrará los ajustes Tipo de Papel y Rollo
Papel Restante
control para cambiar o confirmar los ajustes actuales. Pulse el botón
para el papel actualmente seleccionado. Siga las instrucciones del panel de
OK cuando termine.
16. Antes de imprimir, baje la unidad de escáner y abra el cesto de papel, si es necesario.
Nota: Consulte el Manual del usuario en línea para información sobre cómo cargar hojas sueltas y cartulina.
Page 73

Cómo cargar un rollo de papel en la unidad de rollo adicional | 73
Cómo cargar un rollo de papel en la unidad de rollo adicional
Con las impresoras SureColor T5270D y T7270D, puede cargar un segundo rollo de papel utilizando la
unidad de rollo adicional.
1. Mueva el cesto de papel a la posición horizontal tirando el cesto hacia usted, luego bajándolo. Empuje
el cesto hacia la impresora.
2. Pulse el botón del panel de control. Seleccione Rollo2, luego pulse el botón OK nuevamente.
3. Utilice las asas del cajón para sacar la unidad de rollo adicional.
Nota: Solamente tire del cajón cuando se lo indiquen las instrucciones en el panel de control. Si saca el cajón
sin cuidado mientras el papel está cargado, se podrían ocasionar obstrucciones de papel o el papel se podría
dañar.
Page 74

74 | Cómo cargar un rollo de papel en la unidad de rollo adicional
4. Levante la palanca de bloqueo del rollo, si es necesario.
5. Coloque los adaptadores del rollo de papel en las guías de los adaptadores con la superficie plana
queden boca abajo. Después, deslice el rollo lentamente hacia el interior.
Page 75

Cómo cargar un rollo de papel en la unidad de rollo adicional | 75
Introduzca el extremo del papel por la ranura y tire de él. Verifique que no haya holgura en el papel y
6.
que la orilla no esté doblada. Se escucha un pitido y el papel avanza automáticamente.
7. Baje la palanca de bloqueo del rollo.
Page 76

76 | Cómo realizar una prueba de impresión
8. Empuje la unidad de rollo adicional una vez más al interior de la impresora.
9. Revise el mensaje que aparece en el panel de control.
• Si el tipo de papel fue detectado automáticamente, aparecerá el mensaje Preparada en la pantalla
LCD de la impresora. La impresora está lista para imprimir.
• Si el tipo de papel no fue detectado, la impresora mostrará los ajustes Tipo de Papel y Rollo
Papel Restante
control para cambiar o confirmar los ajustes actuales. Pulse el botón
para el papel actualmente seleccionado. Siga las instrucciones del panel de
OK cuando termine.
Cómo realizar una prueba de impresión
Puede imprimir una prueba de los inyectores desde el panel de control y examinarlo para determinar si
alguno de los inyectores está obstruido. Luego ejecute un ciclo de limpieza, si es necesario.
1. Verifique que los ajustes de fuente de papel y de tipo de papel sean correctos para el tipo de papel que
está cargado.
2. Confirme que la impresora está lista para imprimir, luego pulse el botón del panel de control. Se
abre el menú
3. Confirme que la opción Test De Inyectores está resaltada y luego pulse el botón OK. Aparece un
mensaje de confirmación.
4. Pulse el botón OK para imprimir una prueba de los inyectores.
5. Examine el patrón de prueba.
• Si se ve bien, tal como se muestra a continuación, el cabezal de impresión está limpio.
Mantenimiento.
Page 77

Cómo alinear el cabezal de impresión | 77
• Si hay brechas en la impresión, tal como se muestra a continuación, siga las instrucciones que
aparecen en el panel de control para ejecutar un ciclo de limpieza. Después, imprima otra prueba
de inyectores para verificar que los inyectores están limpios.
Cómo alinear el cabezal de impresión
Siga los próximos pasos para alinear el cabezal de impresión utilizando el panel de control. Verifique que
los ajustes de fuente y tipo de papel sean correctos para el tipo de papel que cargó.
1. Confirme que la impresora está lista para imprimir. Pulse el botón l o r del panel de control para
resaltar la opción y pulse el botón
2. Pulse el botón d para seleccionar Alineación Cabezales y luego pulse el botón OK.
3. Pulse el botón d para seleccionar Automática (Bi-D) y luego pulse el botón OK.
OK. Aparece el menú Mantenimiento.
4. Pulse el botón OK una vez más para iniciar la alineación del cabezal. La impresora automáticamente
alinea el cabezal a la vez que imprime el patrón de alineación de cabezales. Cuando concluya la
alineación, el menú Mantenimiento aparece en la pantalla del panel de control.
Nota: Consulte el Manual del usuario en línea para las instrucciones sobre cómo realizar una alineación manual
del cabezal.
Cómo instalar el software
Coloque el CD de software que se incluye con la impresora en el lector de CD/DVD de su computadora y
siga las instrucciones que aparecen en pantalla.
Cómo conectar la impresora a su sistema
Puede utilizar una conexión USB o Ethernet.
Para una conexión USB, primero confirme que tiene a la mano un cable USB blindado de no más de
10 pies (3 m) y que su computadora tiene un puerto USB.
Nota: No conecte la impresora hasta que la pantalla de instalación del software le indique que lo haga.
Page 78

78 | Cómo actualizar el firmware de la impresora
Para conectar la impresora a un concentrador de red, o directamente a la interface de red de su
computadora, necesita un cable de red estándar RJ-45 CAT-6.
1. Apague la impresora, luego conecte el cable de interface al puerto de la impresora correcto.
2. Conecte el otro extremo del cable al puerto correcto de la computadora o del conmutador o
concentrador de red.
Cómo actualizar el firmware de la impresora
Para mantener las prestaciones y la funcionalidad de la impresora al día, revise si hay una nueva versión
del firmware disponible en la página de soporte de Epson y actualice el firmware de la impresora, si es
necesario.
Cómo revisar la versión actual del firmware
1. Pulse el botón r dos veces hasta resaltar la opción .
2. Pulse el botón Menu.
3. Pulse el botón d hasta que la opción Estado De Impresora esté resaltada y luego pulse el botón OK.
4. Pulse el botón OK una vez más. Anote la versión de firmware que se muestra. Cuando termine, pulse el
botón .
Cómo actualizar el firmware
Antes de actualizar el firmware de la impresora, verifique que la impresora esté encendida y conectada a su
computadora o red.
1. Haga clic en el icono EPSON LFP Remote Panel 2 que se encuentra en el escritorio. Verá la ventana
EPSON LFP Remote Panel 2. Confirme que la impresora esté seleccionada en el menú desplegable.
Page 79

Cómo actualizar el firmware | 79
Haga clic en el botón Firmware Updater. Verá la ventana Firmware Updater.
2.
3. Haga clic en Adquirir últimos datos para descargar automáticamente la última versión del firmware
para su impresora. Si hay una actualización disponible, aparecerá el mensaje “Se han encontrado los
últimos datos de firmware. ¿Desea descargar el archivo de firmware?” Haga clic en
Sí para descargar el
archivo.
Nota: Si no logra descargar el firmware, también lo puede encontrar en la página de soporte técnico de
Epson en global.latin.epson.com/Soporte. Para descargar la última versión y cargarla, haga clic en
Examinar y localice el archivo, luego continúe desde el paso 5.
Cuando aparezca el mensaje “Descarga de archivo terminada” haga clic en Aceptar. El archivo que
4.
acaba de descargar debería estar seleccionado automáticamente y aparecer en la ventana Nombre
archivo.
5. Haga clic en Actualizar y siga las instrucciones que aparecen en pantalla.
6. Si la versión del firmware es más reciente que la que está actualmente instalada en la impresora, haga
clic en
Precaución: No apague la impresora mientras se esté actualizando el firmware.
Actualizar para iniciar el proceso de actualización del firmware.
Cuando haya concluido la actualización, cierre las ventanas Firmware Updater y EPSON LFP Remote
7.
Panel 2.
EPSON y SureColor son marcas registradas y EPSON Exceed Your Vision es un logotipo registrado de Seiko Epson Corporation.
Aviso general: El resto de productos que se mencionan en esta publicación aparecen únicamente con fines de identificación y
pueden ser marcas comerciales de sus respectivos propietarios. Epson renuncia a cualquier derecho sobre dichas marcas.
La información contenida en la presente está sujeta a cambios sin previo aviso.
© 2014 Epson America, Inc., 8/14
Page 80

Page 81

| 81
Conteúdo
Desembalagem e montagem da impressora . . . . . . . . . . . . . . . . . . . . . . . . . . . . . . . . . . . . . . . . . . . . . 83
Instalação da SureColor T3270/T5270/T7270 . . . . . . . . . . . . . . . . . . . . . . . . . . . . . . . . . . . . . . . . . . 85
Instalação da SureColor T5270D/T7270D . . . . . . . . . . . . . . . . . . . . . . . . . . . . . . . . . . . . . . . . . . . . 95
Conexão do cabo de alimentação . . . . . . . . . . . . . . . . . . . . . . . . . . . . . . . . . . . . . . . . . . . . . . . . . . . 104
Instalação dos cartuchos de tinta . . . . . . . . . . . . . . . . . . . . . . . . . . . . . . . . . . . . . . . . . . . . . . . . . . . . 105
Colocação de papel em rolo . . . . . . . . . . . . . . . . . . . . . . . . . . . . . . . . . . . . . . . . . . . . . . . . . . . . . . . 106
Carregamento de papel em rolo na unidade de rolo secundária . . . . . . . . . . . . . . . . . . . . . . . . . . . . . 112
Realização de um teste de impressão . . . . . . . . . . . . . . . . . . . . . . . . . . . . . . . . . . . . . . . . . . . . . . . . . 116
Alinhamento do cabeçote de impressão . . . . . . . . . . . . . . . . . . . . . . . . . . . . . . . . . . . . . . . . . . . . . . . 116
Instalação do software . . . . . . . . . . . . . . . . . . . . . . . . . . . . . . . . . . . . . . . . . . . . . . . . . . . . . . . . . . . . 117
Atualização do firmware de sua impressora . . . . . . . . . . . . . . . . . . . . . . . . . . . . . . . . . . . . . . . . . . . . 118
Português
Page 82

82 |
Page 83

Desembalagem e montagem da impressora | 83
Desembalagem e montagem da impressora
Observação: Salvo indicação contrária, as ilustrações neste manual mostram a Epson SureColor® T7270, mas as
instruções se aplicam a todos os cinco modelos.
Antes de iniciar a montagem, verifique se você tem espaço suficiente para instalar e usar a impressora.
As ilustrações a seguir mostram o espaço mínimo necessário para a utilização da impressora:
SureColor T3270/T5270/T7270 SureColor T5270D/T7270D
10 mm
600 mm
150 mm
L
P
150 mm
A
500 mm
10 mm
150 mm
L
A
100 mm
P
150 mm
Ao escolher um local para a impressora, deixe um espaço adequado para o fácil acesso e a ventilação. Evite
locais sujeitos a luz solar direta, calor excessivo, umidade ou poeira. Certifique-se de que a impressora seja
colocada em um local plano e estável, que possa suportar o seguinte peso para cada impressora:
• SureColor T3270 — 67 kg
• SureColor T5270 — 84 kg
• SureColor T7270 — 92 kg
• SureColor T5270D — 118 kg
• SureColor T7270D — 133 kg
ALERTA: São necessárias duas pessoas para desembalar e instalar a impressora SureColor T3270;
são necessárias quatro pessoas para desembalar e instalar as impressoras SureColor T5270, T5270D,
T7270 e T7270D.
Você precisará de um espaço ainda maior para montar a impressora e o suporte, portanto, certifique-se de
preparar uma área grande e desempedida antes de desembalá-los. Certifique-se também de que a caixa e a
embalagem sejam guardadas, caso precise transportar a impressora no futuro.
Page 84

84 | Desembalagem e montagem da impressora
Os itens a seguir estão incluídos com sua impressora:
SureColor T3270/T5270/T7270
4
2
10
6
C
2
Observação: Para informação sobre o disco rígido e a unidade de enrolamento automático opcionais, consulte o
Manual do usuário online.
B
A
× 4 (T7270)
× 3 (T5270)
× 2 (T3270)
× 5 (T7270)
× 4 (T5270)
× 3 (T3270)
Page 85

SureColor T5270D/T7270D
Instalação da SureColor T3270/T5270/T7270 | 85
A
4
12
L
B
Instalação da SureColor T3270/T5270/T7270
Montagem do suporte
1. Desembale o suporte e certifique-se de que você tem todos estes itens.
Page 86

86 | Montagem do suporte
2. Deslize o suporte horizontal em ambas as pernas da impressora, como mostrado.
3. Use a extremidade longa da chave sextavada para apertar os parafusos pré-posicionados em cada lado
do suporte horizontal.
4. Trave as rodas para fixar o suporte em seu lugar. (Ao mover a impressora, destrave as rodas.)
Page 87

Montagem da impressora no suporte | 87
Montagem da impressora no suporte
Você precisa de, pelo menos, duas (SureColor T3270) ou quatro pessoas (SureColor T5270/T7270) para
instalar a impressora e posicioná-la no suporte. Ao levantar a impressora, segure apenas as áreas indicadas
abaixo. Caso contrário, poderão ocorrer danos.
SureColor T3270
SureColor T5270/T7270
Cuidado: Antes de instalar a impressora, trave as rodas para certificar-se de que o suporte esteja fixado no lugar.
1.
Levante a impressora sobre o suporte. Alinhe as marcas na parte inferior da impressora com as setas na
parte superior das pernas antes de abaixar a impressora.
Page 88

88 | Anexação da cesta de papel
2. Conecte a impressora ao suporte usando três parafusos.
Anexação da cesta de papel
A cesta de papel é um pano que é anexado ao suporte da impressora e que pega suas impressões à medida
que elas saem. Você precisa das seguintes peças para montar e anexar a cesta de papel:
× 4 (T7270)
× 3 (T5270)
× 2 (T3270)
A
1. Instale os estabilizadores.
× 5 (T7270)
× 4 (T5270)
× 3 (T3270)
C
B
2
10 6
× 5 (T7270)
× 4 (T5270)
× 3 (T3270)
Page 89

Anexação da cesta de papel | 89
Insira a extremidade de uma das barras quadradas mais curtas em um dos conectores de plástico.
2.
3. Deslize a barra através dos orifícios nos estabilizadores e anexe um conector plástico à outra
extremidade da barra. Em seguida, fixe os conectores plásticos no lugar, em cada lado do suporte.
4. Anexe as guias da pilha na parte inferior da impressora. Certifique-se de que cada guia se encaixe de
maneira segura no local.
× 4 (T7270)
× 3 (T5270)
× 2 (T3270)
Page 90

90 | Anexação da cesta de papel
5. Insira a extremidade da barra quadrada mais curta em um dos conectores de plástico.
6. Deslize a barra através dos orifícios nas guias da pilha e anexe um conector plástico à outra extremidade
da barra. Em seguida, fixe os conectores plásticos no lugar, em cada lado do suporte.
7. Insira as duas barras quadradas mais longas no braço direito da cesta.
C
Page 91

Passe as duas barras pela cesta de papel.
8.
9. Insira as extremidades das barras no braço esquerdo (L) da cesta.
L
Anexação da cesta de papel | 91
10. Anexe os dois suportes da cesta, um em cada lado do suporte da impressora. Use quatro parafusos para
fixar os suportes da cesta no lugar.
Page 92

92 | Anexação da cesta de papel
11. Coloque uma porca no orifício de parafuso central no suporte da cesta e alinhe o braço direito da cesta
com o orifício de parafuso.
12. Insira o protetor de parafuso pelo braço da cesta e no orifício de parafuso. Insira o parafuso no protetor
e aperte-o. Repita os passos 11 e 12 no lado esquerdo da impressora.
13. Anexe o braço mais curto no interior do suporte da cesta, no lado esquerdo da impressora. Use duas
porcas para manter o braço no lugar.
Page 93

Use dois parafusos para fixar o braço no lugar.
14.
15. Insira o braço mais longo na barra arredondada.
Anexação da cesta de papel | 93
16. Insira a extremidade da barra arredondada no braço do lado esquerdo da impressora. Depois, alinhe o
braço direito da cesta com os orifícios de montagem no suporte direito da cesta.
Page 94

94 | Anexação da cesta de papel
17. Use duas porcas e dois parafusos para fixar o braço no lugar.
18. Vire o lado solto da cesta de pano sobre o trilho superior e alimente-o na direção da parte traseira da
impressora.
19. Na parte traseira da impressora, levante a cesta para que as guias da pilha se encaixem nas aberturas,
conforme mostrado. Em seguida, coloque os laços em torno dos pinos na parte traseira das guias da
pilha para prender a cesta no lugar.
Page 95

Instalação da SureColor T5270D/T7270D | 95
Conecte os laços nas laterais da cesta nos pinos na parte traseira da perna, a fim de prender a cesta na
20.
impressora.
21. Na parte frontal da impressora, deslize o tecido da cesta por todo o caminho até a extremidade da barra
arredondada.
Instalação da SureColor T5270D/T7270D
Montagem do suporte
1. Desembale o suporte e certifique-se de que você tem todos estes itens.
Page 96

96 | Montagem do suporte
2. Deslize o suporte horizontal em ambas as pernas da impressora.
3. Use a extremidade longa da chave sextavada para apertar os parafusos pré-posicionados em cada lado
do suporte horizontal.
4. Trave as rodas para fixar o suporte em seu lugar. (Ao mover a impressora, destrave as rodas.)
Page 97

Montagem do segundo rolo de papel | 97
Montagem do segundo rolo de papel
1. Desembale a unidade de rolo e certifique-se de que você tem todos estes itens.
B
2. Prenda os suportes do rolo nas pernas da base usando quatro parafusos por suporte.
8
B
3. Remova a fita adesiva das placas de montagem e estenda os trilhos esquerdo e direito até ouvir um som
de “clique”.
12
Page 98

98 | Montagem do segundo rolo de papel
4. Coloque cuidadosamente a segunda unidade de rolo nos trilhos estendidos.
Cuidado: A colocação da unidade requer duas pessoas.
Prenda a unidade nos trilhos com dois parafusos de cada lado.
5.
4
B
Page 99

Montagem da impressora no suporte | 99
Montagem da impressora no suporte
Você precisa de quatro pessoas para instalar a impressora e posicioná-la na base. Ao levantar a impressora,
segure apenas nas áreas indicadas abaixo. Caso contrário, poderão ocorrer danos.
Cuidado: Antes de instalar a impressora, trave as rodas para certificar-se de que o suporte esteja fixado no lugar.
1.
Levante a impressora sobre o suporte. Alinhe as marcas na parte inferior da impressora com as setas na
parte superior da perna antes de abaixar a impressora.
Cuidado: Certifique-se de que a segunda unidade de rolo está puxada para fora da base. Caso contrário,
a impressora pode ser danificada.
Page 100

100 | Montagem da impressora no suporte
2. Conecte a impressora ao suporte usando três parafusos.
A
3. Empurre a segunda unidade de rolo para baixo da impressora.
3
4. Insira a guia do cabo dentro da parte traseira da segunda unidade de rolo.
 Loading...