

Page 1

Epson
®
SureColor
®
T3170x User's Guide
Page 2

Page 3

Contents
SureColor T3170x User's Guide ................................................................................................................. 9
Introduction to Your Printer...................................................................................................................... 10
Wi-Fi or Wired Networking........................................................................................................................ 34
Printer Features ................................................................................................................................. 10
Optional Equipment and Replacement Parts................................................................................. 11
Notations Used in the Documentation ................................................................................................ 11
Printer Part Locations......................................................................................................................... 11
Product Parts - Front ..................................................................................................................... 12
Product Parts - Top/Inside............................................................................................................. 13
Product Parts - Rear...................................................................................................................... 14
Control Panel Parts ....................................................................................................................... 15
Using the Control Panel ..................................................................................................................... 17
Changing the LCD Screen Language............................................................................................ 17
Selecting the Date and Time ......................................................................................................... 18
Setting a Password and Locking the Control Panel ....................................................................... 19
Assembling the Optional Printer Stand and Paper Basket ................................................................. 21
Network Security Recommendations ................................................................................................. 34
Wi-Fi Infrastructure Mode Setup......................................................................................................... 35
Selecting Wireless Network Settings from the Control Panel ........................................................ 36
Wi-Fi Direct Mode Setup .................................................................................................................... 38
Enabling Wi-Fi Direct Mode........................................................................................................... 38
Wi-Fi Protected Setup (WPS)............................................................................................................. 40
Using WPS to Connect to a Network ............................................................................................. 40
Printing a Network Status Sheet......................................................................................................... 41
Printing a Network Connection Report ............................................................................................... 42
Network Connection Report Codes and Messages ....................................................................... 44
Changing or Updating Network Connections ..................................................................................... 49
Accessing the Web Config Utility................................................................................................... 49
Changing a USB Connection to a Wi-Fi Connection...................................................................... 50
Changing a Wi-Fi Connection to a Wired Network Connection...................................................... 50
3
Page 4

Connecting to a New Wi-Fi Router ................................................................................................ 51
Disabling Wi-Fi Features ............................................................................................................... 52
Media Handling.......................................................................................................................................... 54
Roll Paper Handling ........................................................................................................................... 54
Loading Roll Paper ........................................................................................................................ 54
Cutting Roll Paper ......................................................................................................................... 58
Cutting Roll Paper Manually...................................................................................................... 58
Removing Roll Paper..................................................................................................................... 59
Cut Sheet Handling ............................................................................................................................ 61
Loading Single Cut Sheets ............................................................................................................ 62
Loading Paper in the Auto Sheet Feeder....................................................................................... 63
Removing Paper from the Auto Sheet Feeder............................................................................... 67
Creating Custom Paper Configurations.............................................................................................. 70
Selecting Custom Paper Configurations........................................................................................ 70
Compatible Epson Papers.................................................................................................................. 71
Paper or Media Type Settings - Printing Software.............................................................................. 72
Selecting the Paper Settings for Each Source - Control Panel ........................................................... 73
Paper Type Settings - Control Panel ............................................................................................. 74
Printing from a Computer ......................................................................................................................... 76
Printing with Windows ........................................................................................................................ 76
Selecting Basic Print Settings - Windows ...................................................................................... 76
Document Size Options - Windows........................................................................................... 79
Paper Source Options - Windows ............................................................................................. 79
Print Mode Options - Windows.................................................................................................. 80
Color Mode Options - Windows ................................................................................................ 80
Level Options - Windows .......................................................................................................... 81
Using Layout Manager - Windows ............................................................................................ 83
Selecting Print Layout Options - Windows..................................................................................... 88
Page Layout Options - Windows............................................................................................... 88
Selecting Advanced Settings - Windows ....................................................................................... 90
Roll Paper Options - Windows .................................................................................................. 91
Selecting Additional Settings - Windows ....................................................................................... 92
Printing Your Document - Windows............................................................................................... 93
4
Page 5

Checking Print Status - Windows.............................................................................................. 94
Saving, Sharing, and Customizing the Printer Settings ................................................................. 94
Saving and Sharing Print Settings - Windows........................................................................... 94
Editing Print Setting Displays - Windows .................................................................................. 96
Selecting Default Print Settings - Windows.................................................................................... 97
Changing the Language of the Printer Software Screens.............................................................. 98
Changing Automatic Update Options .......................................................................................... 100
Printing on a Mac ............................................................................................................................. 100
Selecting Basic Print Settings - Mac ............................................................................................ 101
Paper Size Options - Mac ....................................................................................................... 105
Paper Source Options - Mac................................................................................................... 105
Print Mode Options - Mac ....................................................................................................... 106
Color Mode Options - Mac ...................................................................................................... 106
Level Options - Mac ................................................................................................................ 107
Selecting Print Layout Options - Mac........................................................................................... 108
Selecting Advanced Settings - Mac ............................................................................................. 108
Managing Color - Mac ................................................................................................................. 110
Color Matching Options - Mac................................................................................................. 111
Sizing Printed Images - Mac........................................................................................................ 111
Selecting Printing Preferences - Mac .......................................................................................... 111
Printing Preferences - Mac...................................................................................................... 112
Printing Your Document or Photo - Mac ...................................................................................... 113
Checking Print Status - Mac.................................................................................................... 114
Printing CAD Drawings..................................................................................................................... 115
Printing CAD Drawings from the Printer Driver............................................................................ 115
Printing CAD Drawings in HP-GL/2 or HP RTL Mode.................................................................. 117
Using the Control Panel Menus.............................................................................................................. 119
Accessing the Printer's Menus ......................................................................................................... 119
Paper Setting Menu.......................................................................................................................... 120
Basic Settings Menu......................................................................................................................... 122
Printer Settings Menu....................................................................................................................... 124
Network Settings Menu .................................................................................................................... 130
System Administration Settings Menu .............................................................................................. 130
5
Page 6

Maintenance Menu........................................................................................................................... 132
Printer Status/Print Menu ................................................................................................................. 133
Refilling Ink .............................................................................................................................................. 134
Ink Safety Precautions ..................................................................................................................... 134
Check Ink and Maintenance Box Levels........................................................................................... 136
Checking Maintenance Box Status on the LCD Screen............................................................... 137
Checking Ink and Maintenance Box Levels - Windows ............................................................... 137
Checking Ink and Maintenance Box Levels - Mac ....................................................................... 138
Disabling Special Offers with Windows ....................................................................................... 140
Purchase Epson Ink and Maintenance Box...................................................................................... 141
Ink Bottle and Maintenance Box Part Numbers ........................................................................... 141
Refilling the Ink Tanks ...................................................................................................................... 141
Replacing the Maintenance Box....................................................................................................... 146
Adjusting Print Quality............................................................................................................................ 148
Print Head Maintenance................................................................................................................... 148
Print Head Nozzle Check............................................................................................................. 148
Checking the Nozzles Using the Product Control Panel ......................................................... 149
Checking the Nozzles Using a Computer Utility...................................................................... 150
Print Head Cleaning .................................................................................................................... 152
Cleaning the Print Head Using the Product Control Panel ...................................................... 153
Cleaning the Print Head Using a Computer Utility................................................................... 154
Using the Powerful Cleaning Utility ......................................................................................... 156
Flushing the Ink Tubes............................................................................................................ 158
Adjusting Print Quality Using the Product Control Panel .................................................................. 159
Cleaning the Auto Sheet Feeder ...................................................................................................... 161
Cleaning the Roll Paper Feeder ....................................................................................................... 162
Maintenance and Transportation ........................................................................................................... 163
Replacing the Cutter......................................................................................................................... 163
Before Moving or Transporting Your Product ................................................................................... 166
After Moving or Transporting Your Product ...................................................................................... 171
Solving Problems .................................................................................................................................... 176
Checking for Software Updates........................................................................................................ 176
6
Page 7

Product Status Messages ................................................................................................................ 177
Resetting Control Panel Defaults ..................................................................................................... 177
Solving Printer Problems.................................................................................................................. 179
Printer Does Not Turn On ............................................................................................................ 179
LCD Screen Shuts Off ................................................................................................................. 179
Solving Network Problems ............................................................................................................... 179
Product Cannot Connect to a Wireless Router or Access Point .................................................. 180
Network Software Cannot Find Product on a Network................................................................. 181
Product Does Not Appear in Mac Printer Window ....................................................................... 182
Cannot Print Over a Network....................................................................................................... 182
Wireless Network Connection is Unstable on a Mac ................................................................... 183
Solving Printing Problems ................................................................................................................ 183
Nothing Prints.............................................................................................................................. 184
Print Head Moves But Nothing Prints .......................................................................................... 184
Solving Paper Problems................................................................................................................... 185
Paper Feeding Problems............................................................................................................. 185
Printout Quality Problems............................................................................................................ 186
Roll Paper Jam Problems ............................................................................................................ 187
Cut Sheet Paper Jam Problems .................................................................................................. 189
Solving Print Quality Problems......................................................................................................... 190
Overall Print Quality is Poor......................................................................................................... 190
Lines Are Misaligned ................................................................................................................... 191
Prints are Scuffed or Smeared .................................................................................................... 192
Prints are Not Positioned Properly............................................................................................... 193
Uninstall Your Product Software....................................................................................................... 193
Uninstalling Product Software - Windows.................................................................................... 193
Uninstalling Product Software - Mac............................................................................................ 194
Where to Get Help............................................................................................................................ 195
Technical Specifications ........................................................................................................................ 197
Windows System Requirements ...................................................................................................... 197
Mac System Requirements .............................................................................................................. 198
Paper Specifications ........................................................................................................................ 198
Printable Area Specifications ........................................................................................................... 200
7
Page 8

Ink Specifications ............................................................................................................................. 202
Dimension Specifications ................................................................................................................. 202
Electrical Specifications ................................................................................................................... 203
Environmental Specifications ........................................................................................................... 203
Interface Specifications .................................................................................................................... 204
Network Interface Specifications ...................................................................................................... 204
Safety and Approvals Specifications ................................................................................................ 205
Safety and Approvals Specifications for Latin America .................................................................... 206
Notices ..................................................................................................................................................... 208
Important Safety Instructions............................................................................................................ 208
General Product Safety Instructions ............................................................................................ 208
LCD Screen Safety Instructions................................................................................................... 210
Wireless Connection Safety Instructions ..................................................................................... 210
FCC Compliance Statement............................................................................................................. 210
Binding Arbitration and Class Waiver ............................................................................................... 211
Trademarks...................................................................................................................................... 214
Copyright Notice............................................................................................................................... 215
A Note Concerning Responsible Use of Copyrighted Materials................................................... 215
Default Delay Times for Power Management for Epson Products ............................................... 216
Copyright Attribution.................................................................................................................... 216
8
Page 9

SureColor T3170x User's Guide
Welcome to the SureColor T3170x User's Guide.
For a printable PDF copy of this guide, click here.
9
Page 10

Introduction to Your Printer
Refer to these sections to learn more about your printer and this manual.
Printer Features
Notations Used in the Documentation
Printer Part Locations
Using the Control Panel
Assembling the Optional Printer Stand and Paper Basket
Printer Features
The Epson SureColor T3170x printer includes these special features:
High productivity
• 140-ml ink bottles with T49H ink
• HP-GL2 support for CAD software
Reliability
• Improved anti-dust design for reduced print head nozzle maintenance
• PrecisionCore Micro TFP print head offers Precision Droplet Control
• Nozzle Verification Technology detects nozzle condition and adjusts print quality
High resolution
• Prints at resolutions up to 2400 dpi
Easy-to-use setup and operation
• Intuitive, easy-to-read, 4.3-inch, color LCD touchscreen
• Sleek, minimal design that easily fits on desktops
• Easy-to-use software
• Supports roll paper up to 24 inches (609.6 mm) wide and sheets up to 11 × 17 inches (279 × 432 mm)
Optional Equipment and Replacement Parts
Parent topic: Introduction to Your Printer
10
Page 11

Optional Equipment and Replacement Parts
You can purchase genuine Epson ink, paper, and accessories from an Epson authorized reseller. To
find the nearest reseller, visit proimaging.epson.com (U.S.) or proimaging.epson.ca (Canada), select
your product series and product, and click the Where to Buy button. Or call 800-GO-EPSON (800-463-
7766) in the U.S. or 800-807-7766 in Canada.
Option or part Part number
Printer stand and paper basket C12C933151
Roll paper spindle C12C933211
Maintenance box C13S210057
Replacement printer cutter blade C13S210055
1-year extended Epson Preferred Plus service plan EPPT3151B1
Parent topic: Printer Features
Notations Used in the Documentation
Follow the guidelines in these notations as you read your documentation:
• Warnings must be followed carefully to avoid bodily injury.
• Cautions must be observed to avoid damage to your equipment.
• Notes contain important information about your printer.
• Tips contain additional printing information.
Parent topic: Introduction to Your Printer
Printer Part Locations
Check the printer part illustrations to learn about the parts on your printer.
Product Parts - Front
Product Parts - Top/Inside
Product Parts - Rear
Control Panel Parts
Parent topic: Introduction to Your Printer
11
Page 12
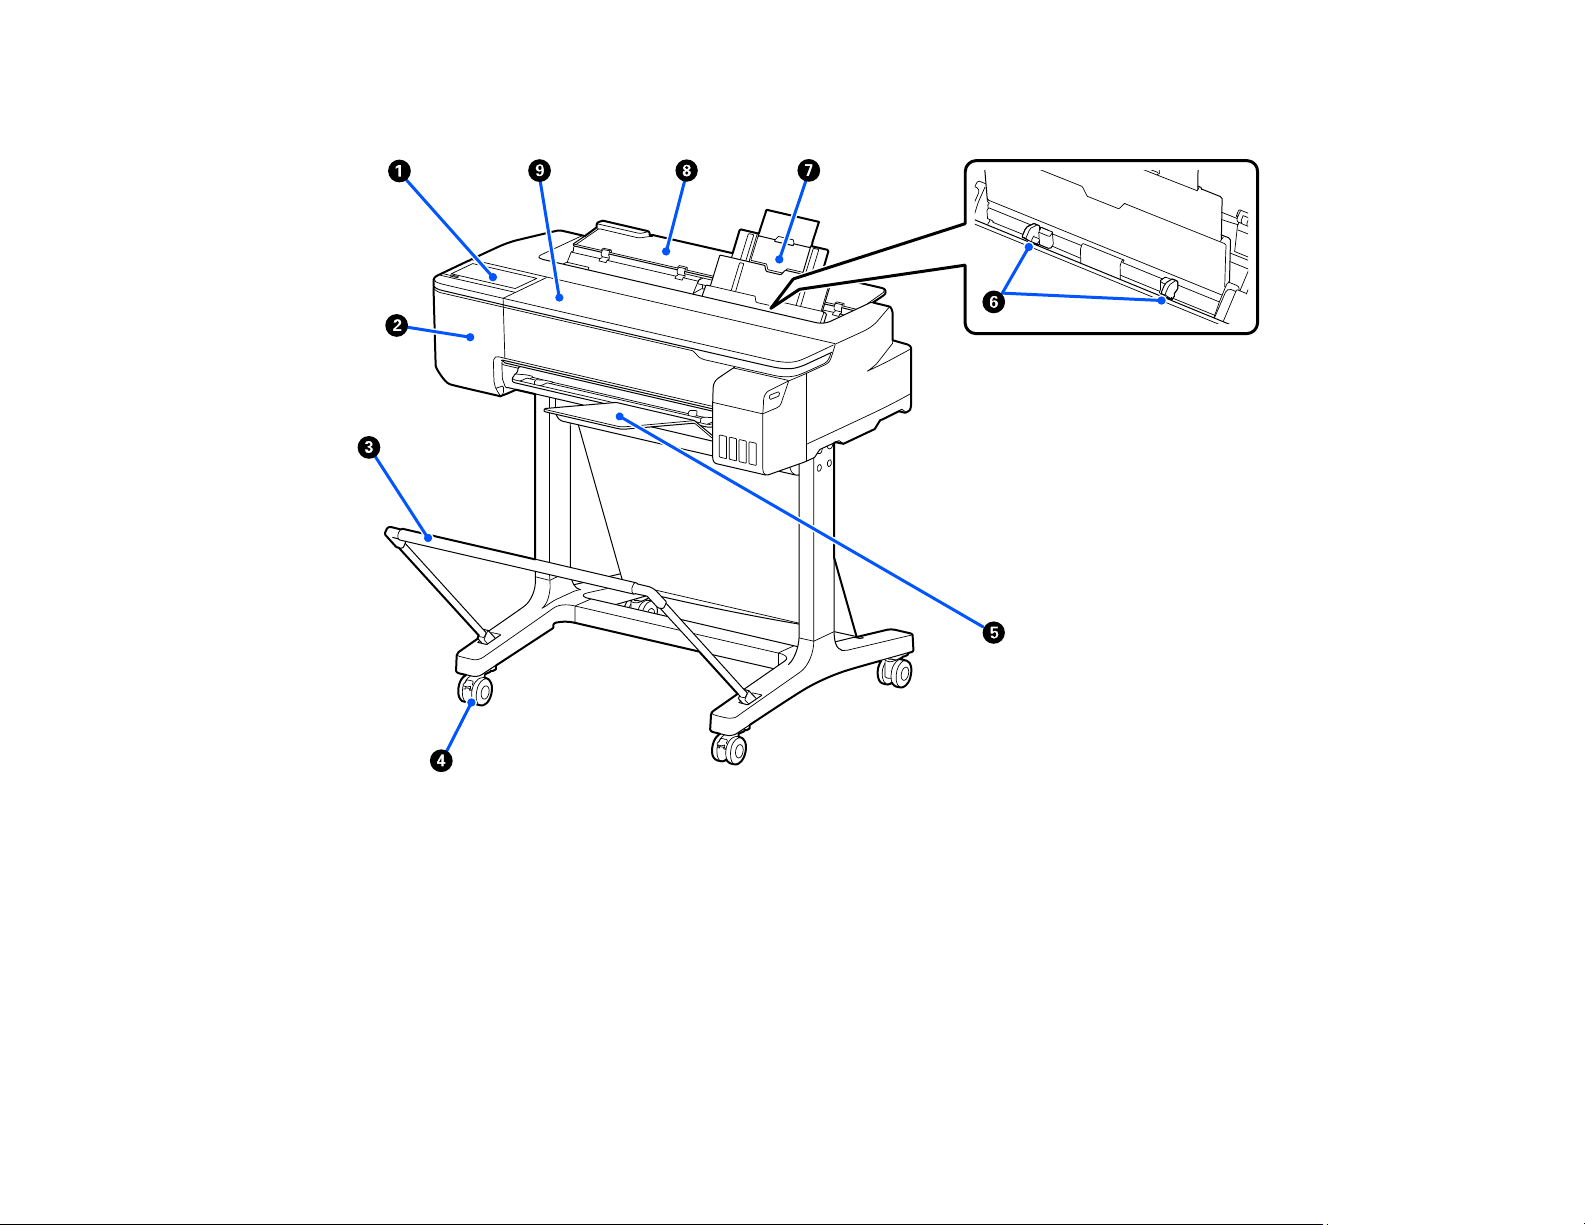
Product Parts - Front
1 Control panel
2 Cutter cover
3 Optional paper basket and stand
4 Casters (included with optional stand)
5 Output tray
6 Edge guides
7 Auto sheet feeder
12
Page 13
8 Cut sheet cover
9 Front cover
Parent topic: Printer Part Locations
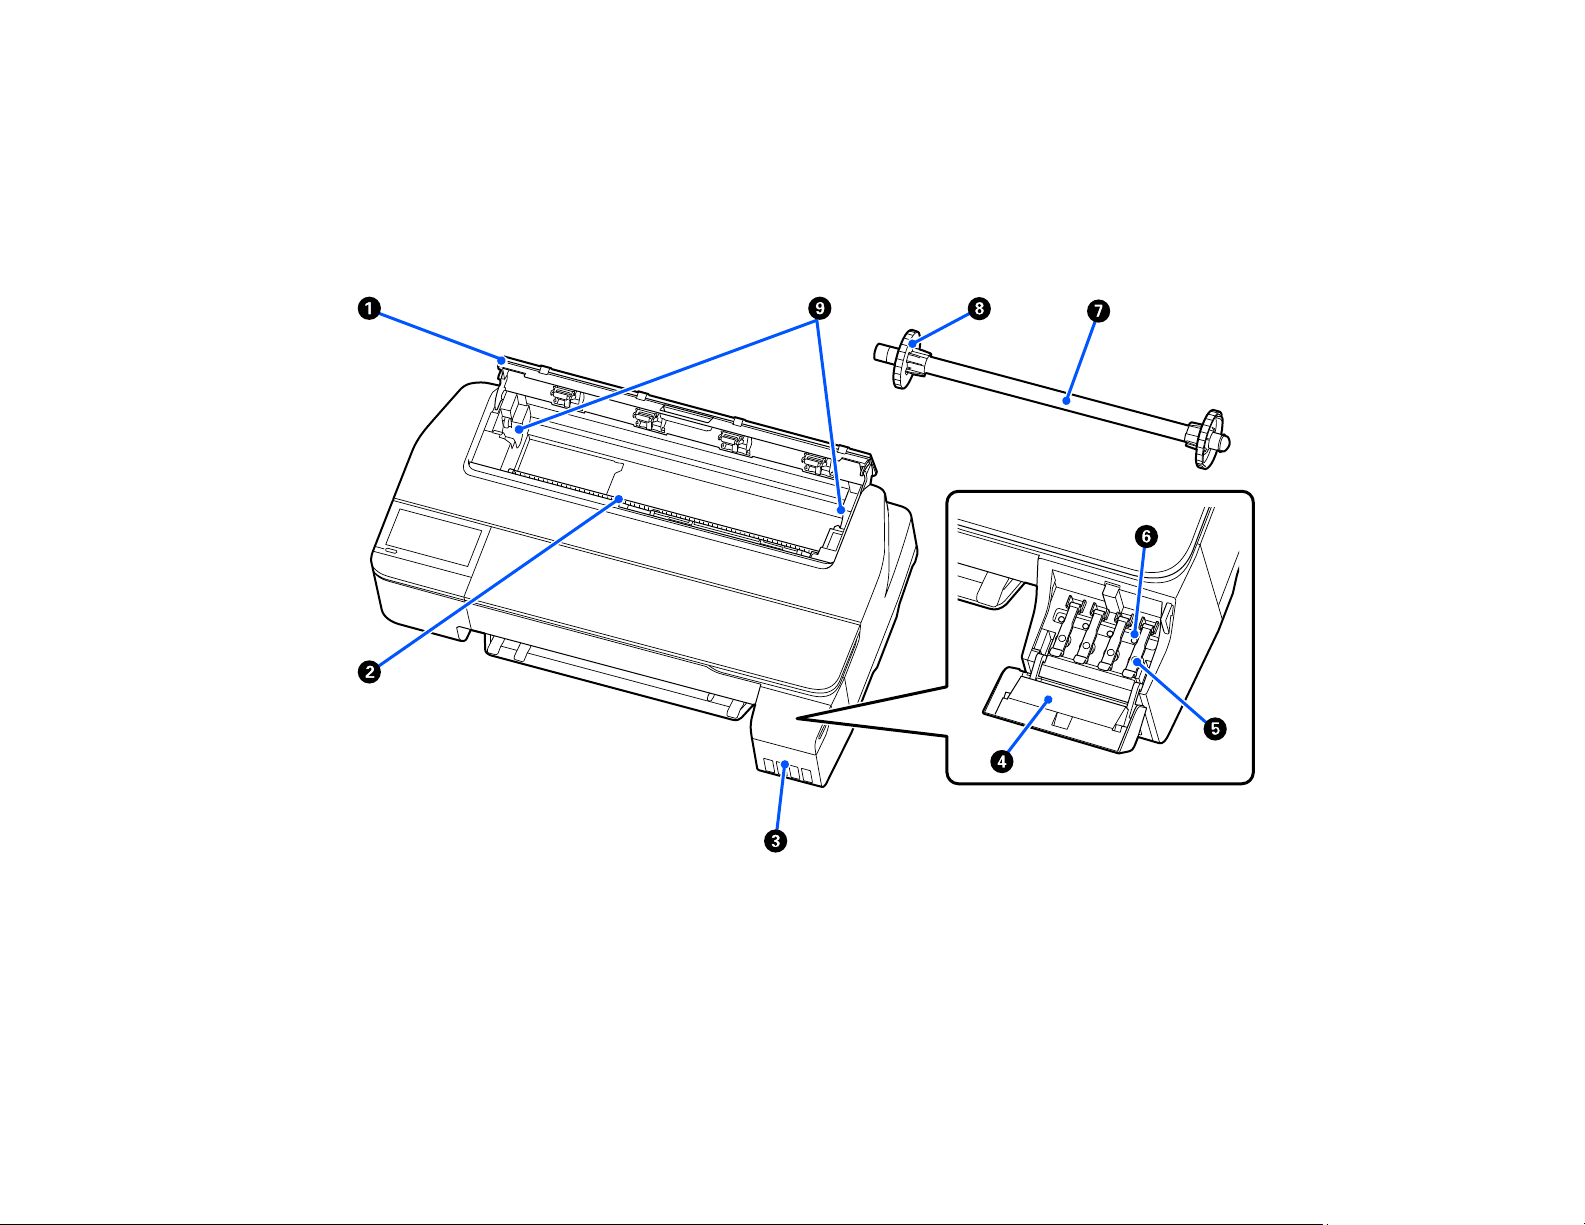
Product Parts - Top/Inside
1 Roll paper cover
2 Paper feeder
3 Ink tanks
4 Ink tank cover
5 Ink tank caps
13
Page 14
6 Transportation cap
7 Roll paper spindle
8 2-inch core paper stop (left side is removeable)
9 Roll paper spindle holders
Parent topic: Printer Part Locations
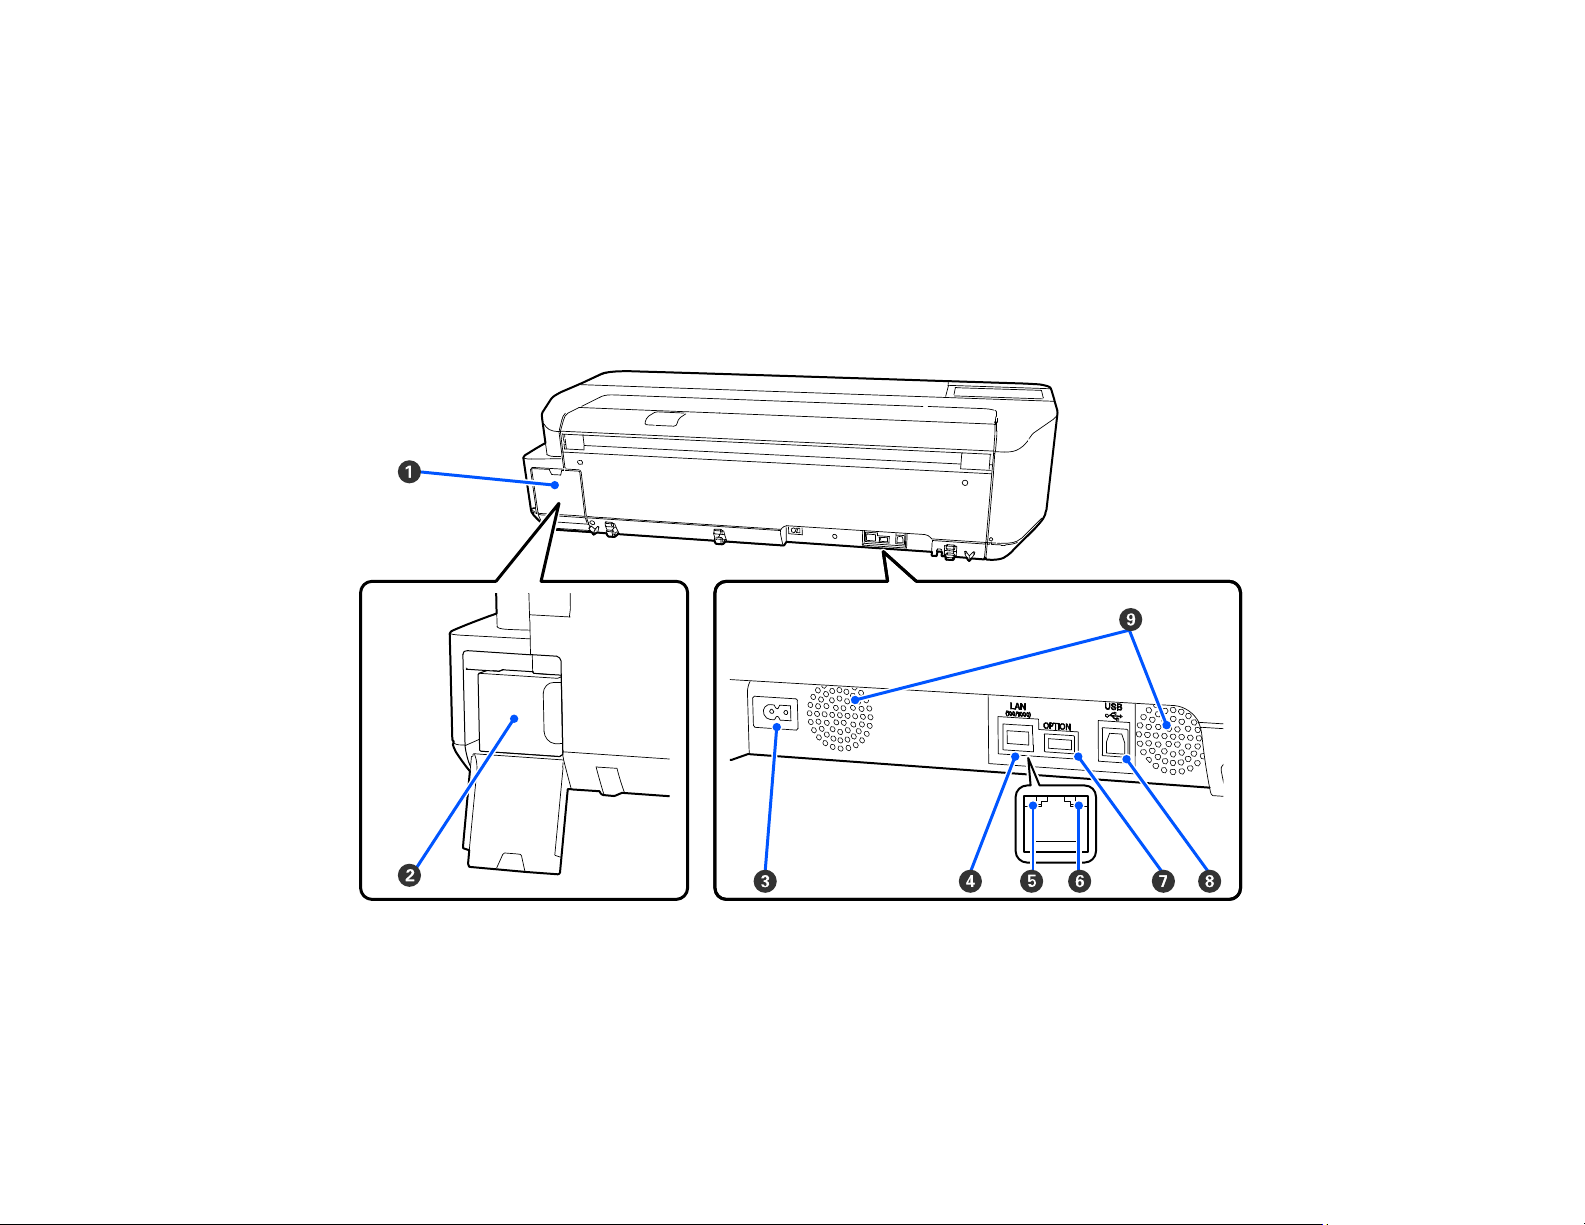
Product Parts - Rear
1 Maintenance box cover
2 Maintenance box
3 AC inlet
14
Page 15
4 Ethernet LAN port
5 Status light
6 Data light
7 OPTION port (not available for this product)
8 USB port
9 Air vents
Caution: Do not block the air vents shown above.
Parent topic: Printer Part Locations
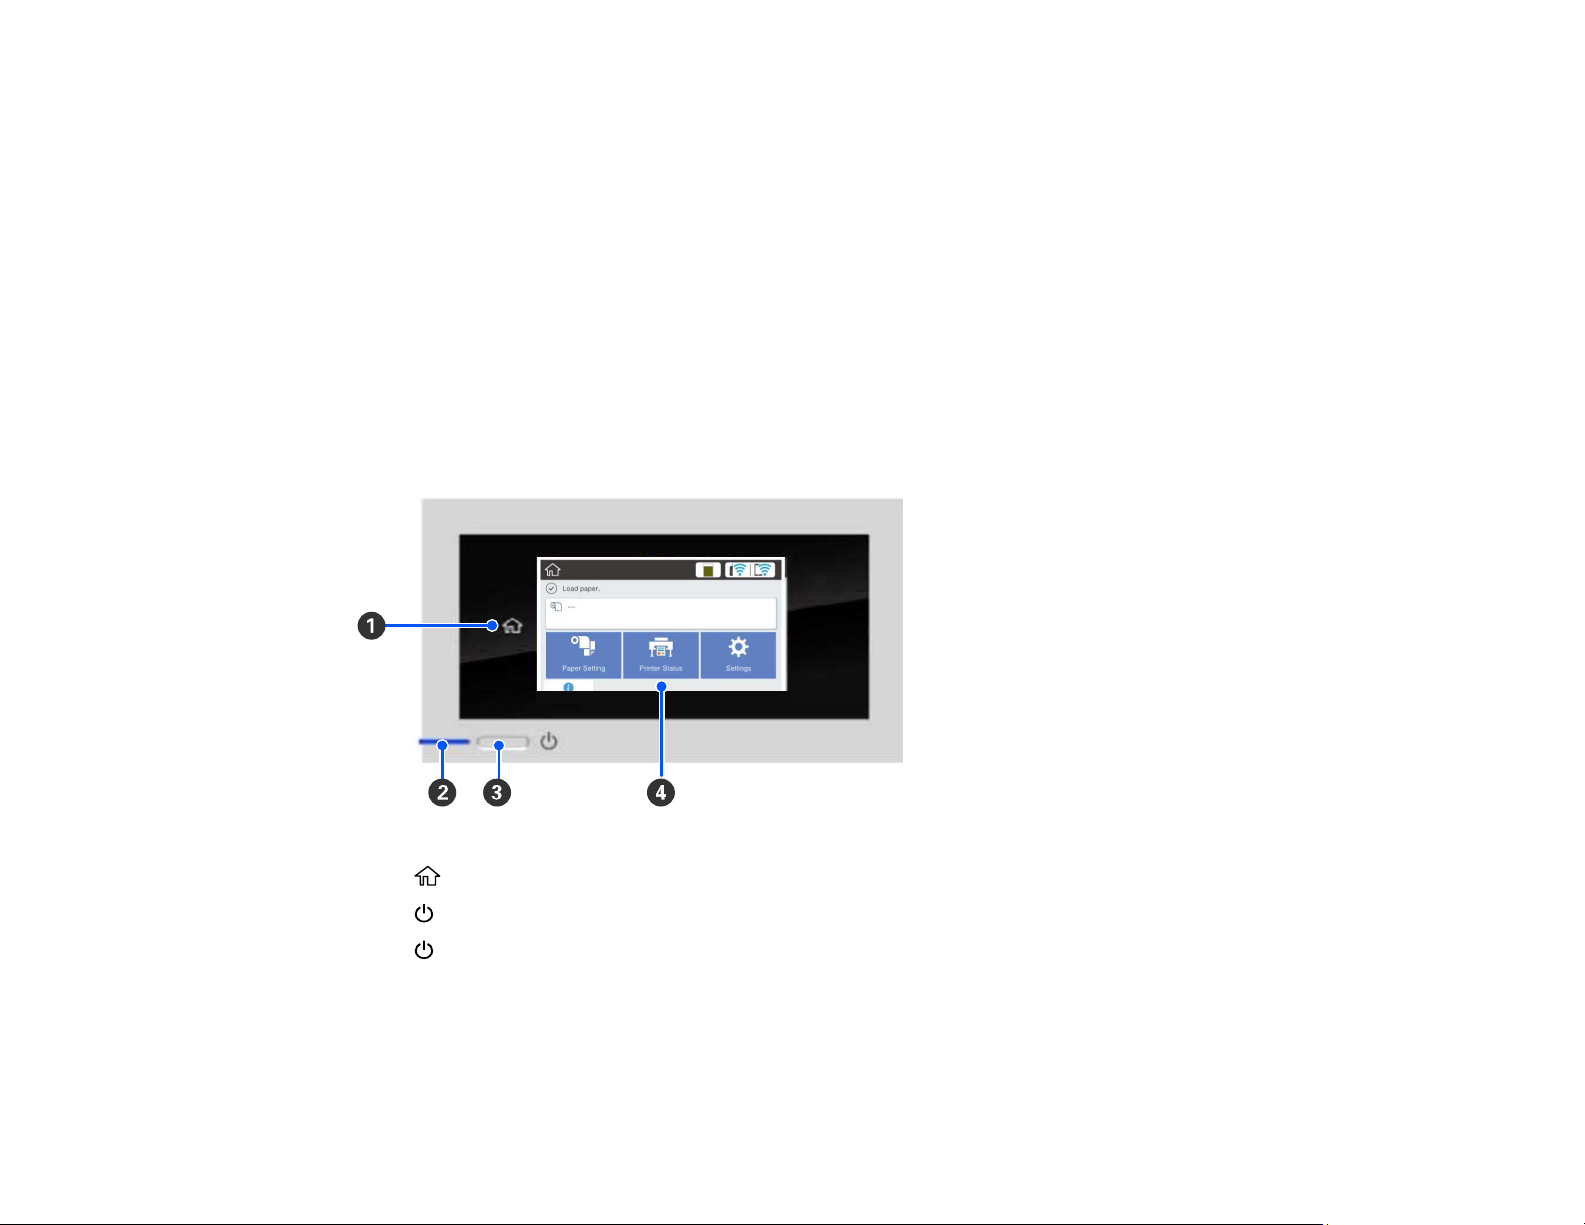
Control Panel Parts
1
2
3
4 LCD touchscreen
home button
power light
power button
15
Page 16
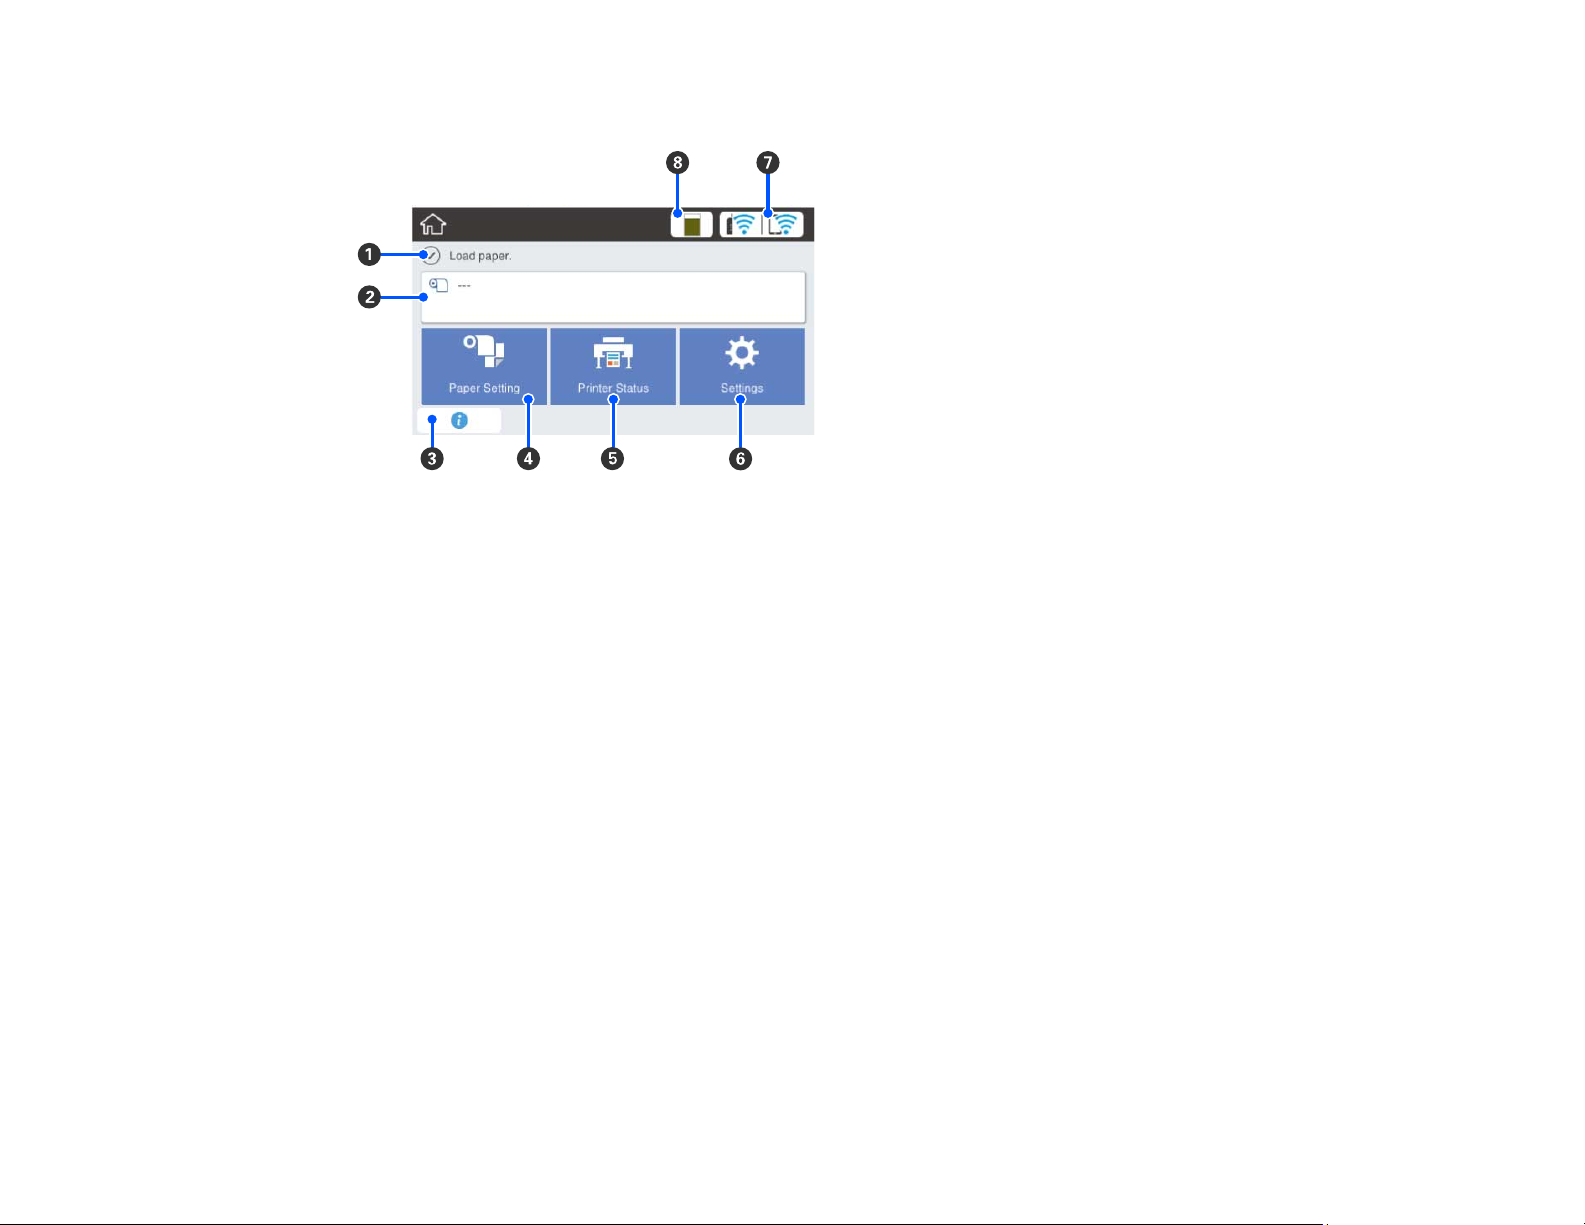
LCD Screen Display
1 Status messages
2 Roll paper information
When roll paper is not loaded, - - - is displayed.
3 Information icon (displays notifications or warnings)
4 Paper Setting menu
5 Printer Status menu
6 Settings menu
16
Page 17

7 Network connection settings
: No Ethernet connection or Ethernet/Wi-Fi connection is not set up
: Ethernet connection established
: Wi-Fi is disabled
: Wi-Fi network error or the product is searching for a connection
: Wi-Fi connection established; the number of bars indicates signal strength
: Wi-Fi Direct is disabled
: Wi-Fi Direct connection established
8 Supply status (displays remaining maintenance box level)
Parent topic: Printer Part Locations
Using the Control Panel
See these sections to learn about the control panel and select control panel settings.
Changing the LCD Screen Language
Selecting the Date and Time
Setting a Password and Locking the Control Panel
Parent topic: Introduction to Your Printer
Changing the LCD Screen Language
You can change the language used on the LCD screen.
1. Press the home button, if necessary.
2. Select Settings > Language.
17
Page 18
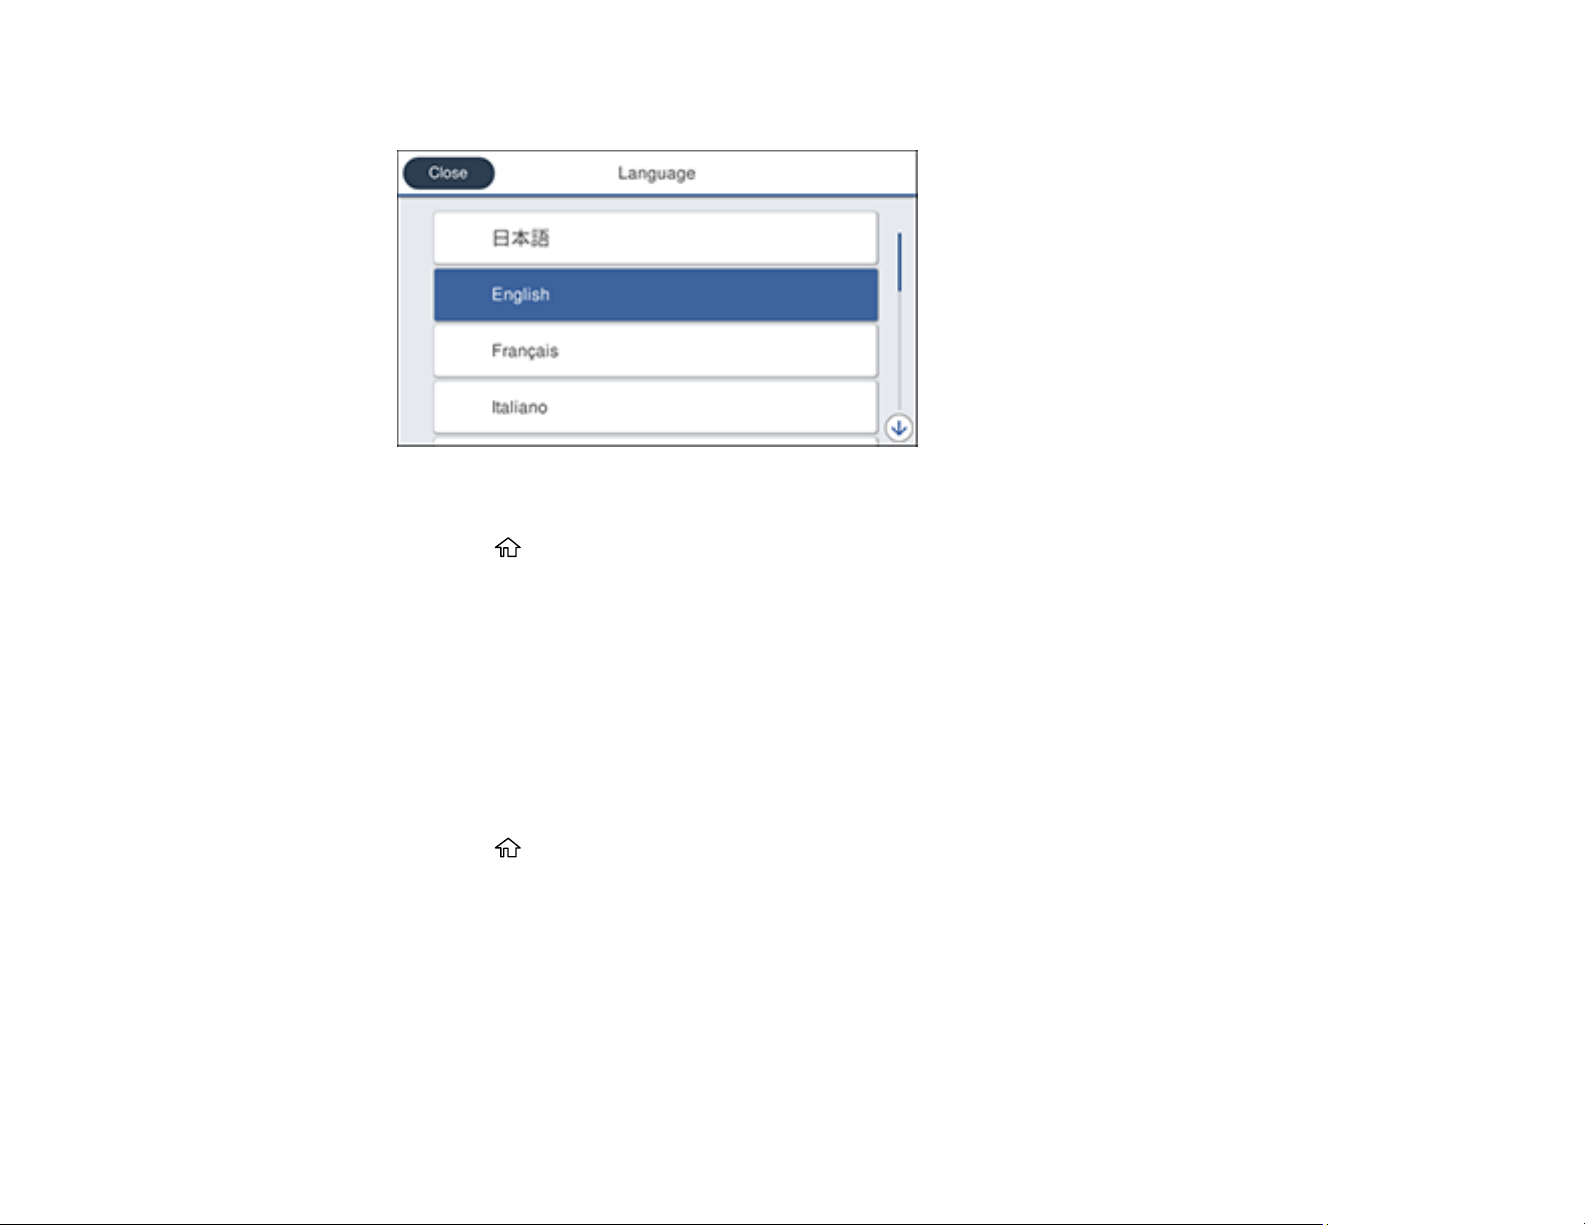
You see this screen:
3. Select a language.
4. Press the home button to exit.
Parent topic: Using the Control Panel
Selecting the Date and Time
Before using your product, select the current date, time, and daylight saving phase in your area, and
choose your preferred date and time format.
Note: This setting can be locked by an administrator. If you cannot access or change this setting,
contact your administrator for assistance. For more information on administration settings, see the
Administrator's Guide.
1. Press the home button, if necessary.
2. Select Settings > General Settings > Basic Settings > Date/Time Settings.
18
Page 19

You see this screen:
3. Select Date/Time.
4. Select the date format you want to use.
5. Use the on-screen keyboard to enter the current date and select OK.
6. Select the time format you want to use.
7. Use the on-screen keyboard to enter the current time and select OK.
8. Press the home button to exit.
Parent topic: Using the Control Panel
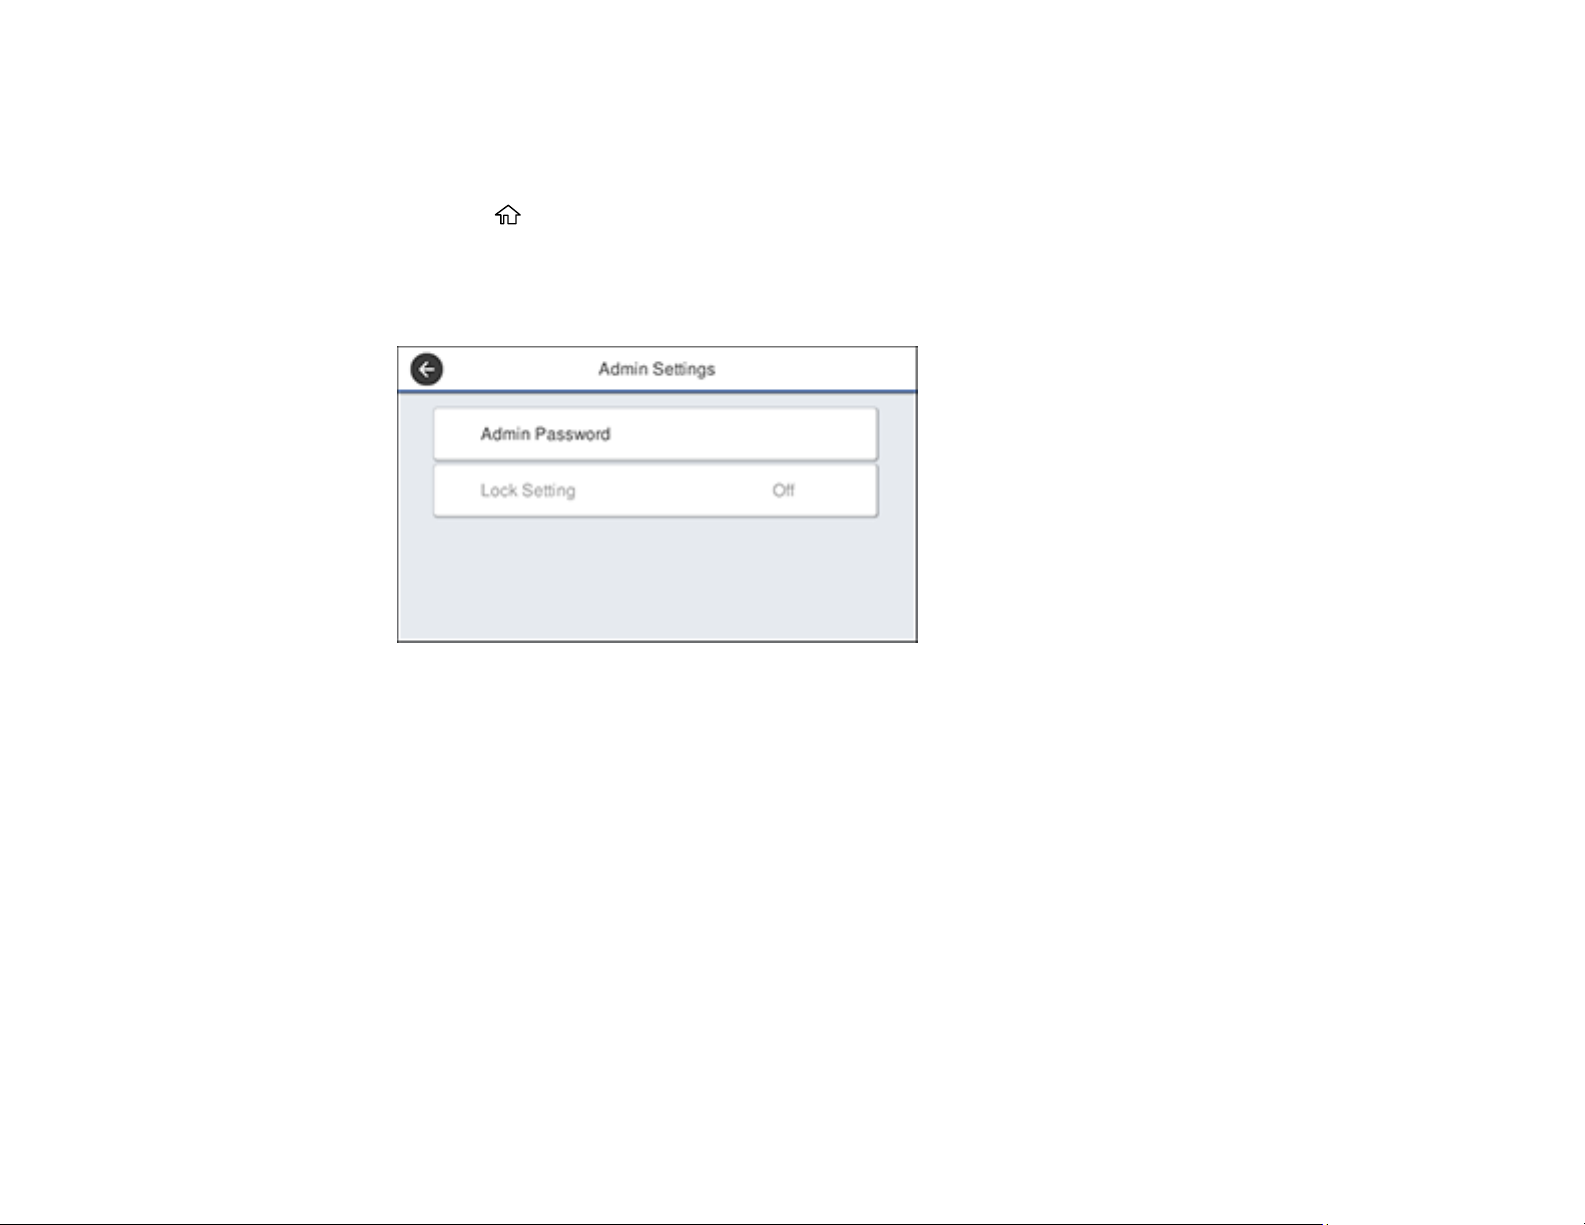
Setting a Password and Locking the Control Panel
You can set an administrator password to lock the following settings and prevent them from being
changed:
• Network settings
• Certain printer settings
• Certain maintenance settings
• System administration settings
• Web Config settings
• EpsonNet Config settings
19
Page 20
Note: This setting can be locked by an administrator. If you cannot access or change this setting,
contact your administrator for assistance. For more information on administration settings, see the
Administrator's Guide.
1. Press the home button, if necessary.
2. Select Settings > General Settings > System Administration > Security Settings > Admin
Settings.
You see a screen like this:
3. Select Admin Password.
4. Select Register.
5. Use the on-screen keyboard to enter a password and select OK.
6. Enter the password again to confirm and select OK.
Note: Keep a copy of your password in a safe place.
7. Select OK.
8. Select Lock Setting > On to lock settings.
A prompt appears confirming that you want to enable locked settings. Select Yes to enable the
setting and return to the home screen.
You must enter the admin password to access any of the locked settings.
20
Page 21
Note: If you forget your password, contact Epson for assistance.
Parent topic: Using the Control Panel
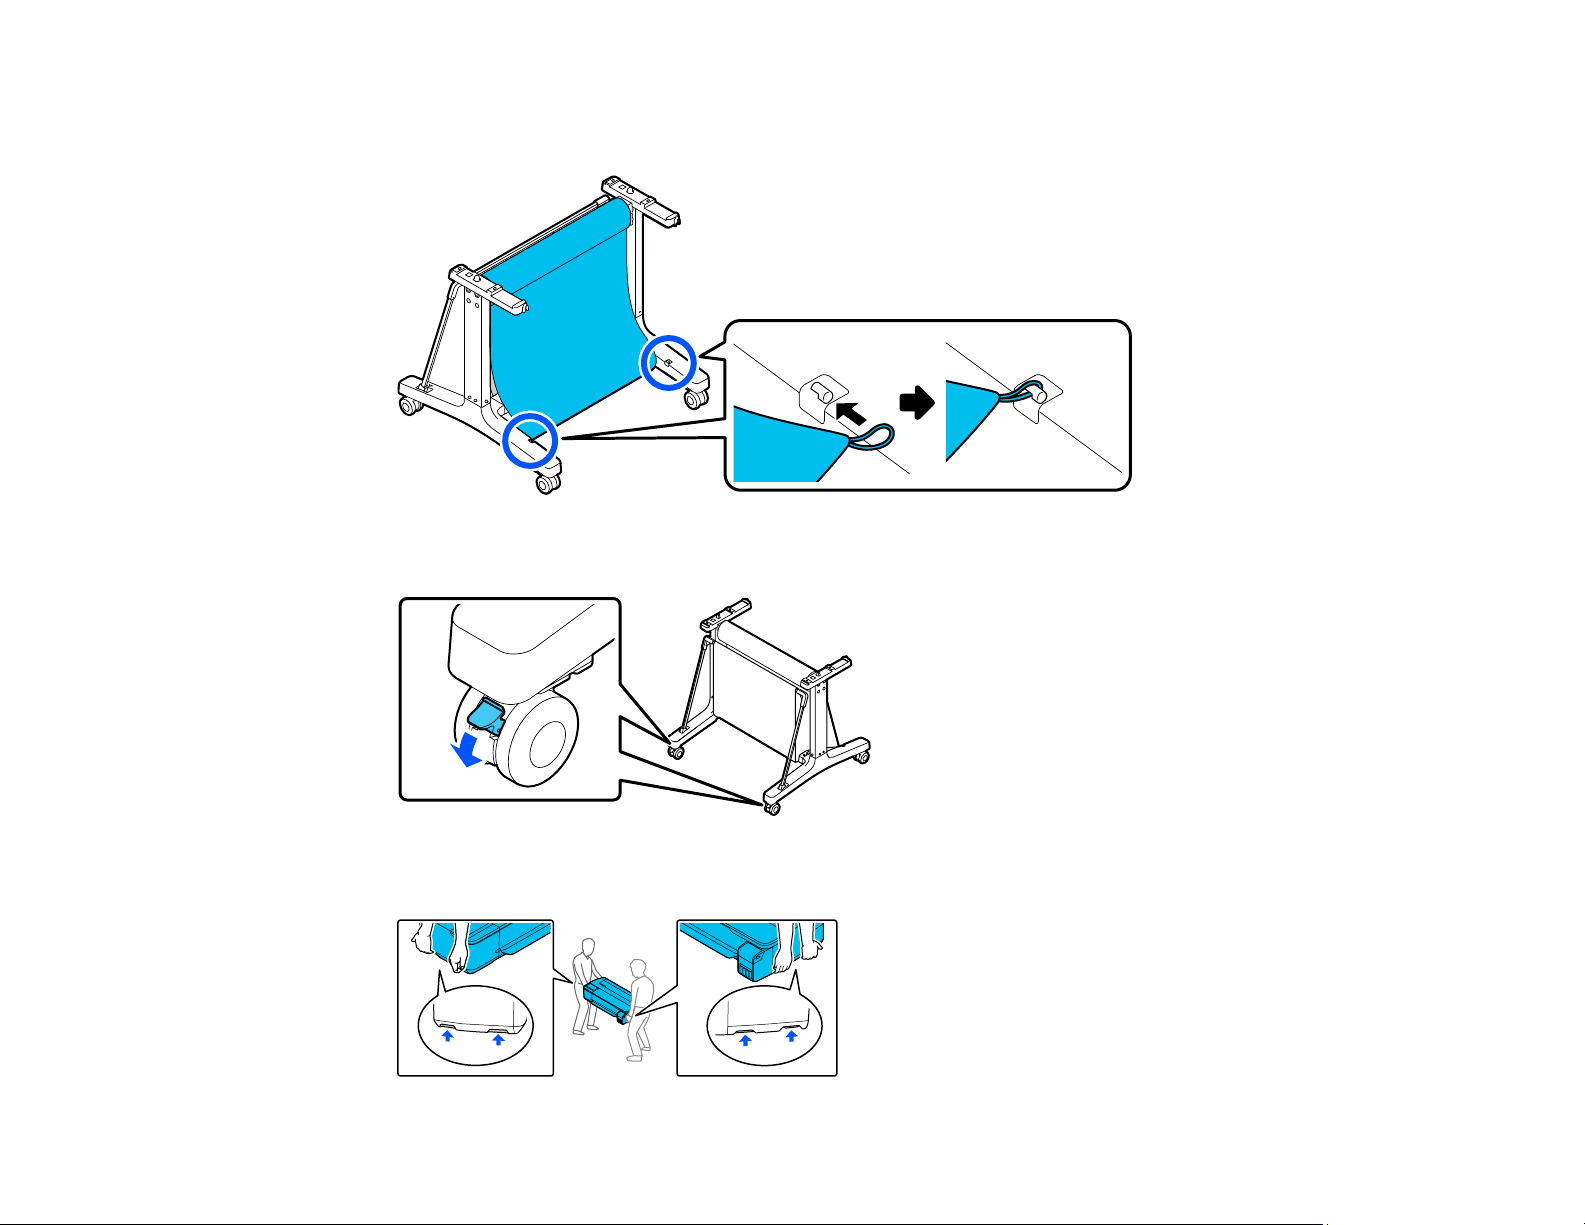
Assembling the Optional Printer Stand and Paper Basket
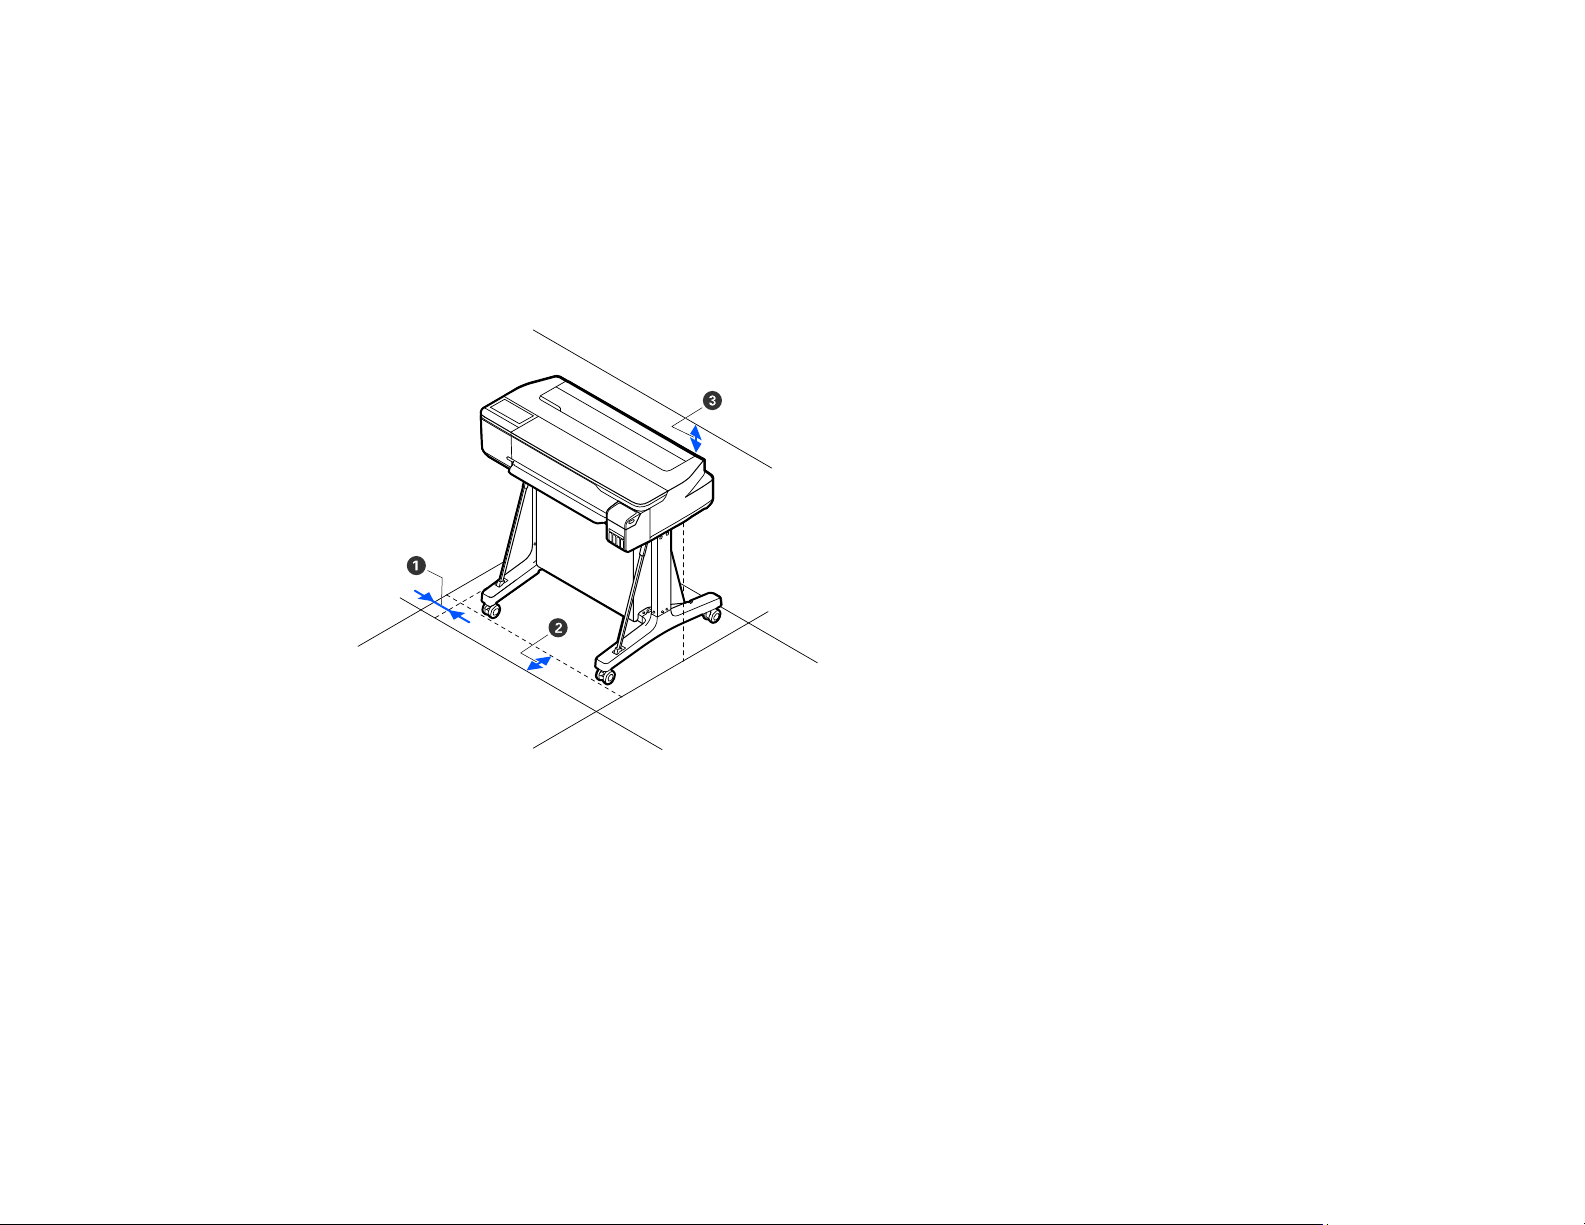
Follow these instructions to assemble the optional printer stand and paper basket.
Before you begin, make sure you have enough space to set up the printer as shown here.
1 2 inches (50 mm)
2 11.2 inches (285 mm)
3 6 inches (150 mm)
Caution: At least two people are required to lift the printer onto the assembled stand.
21
Page 22
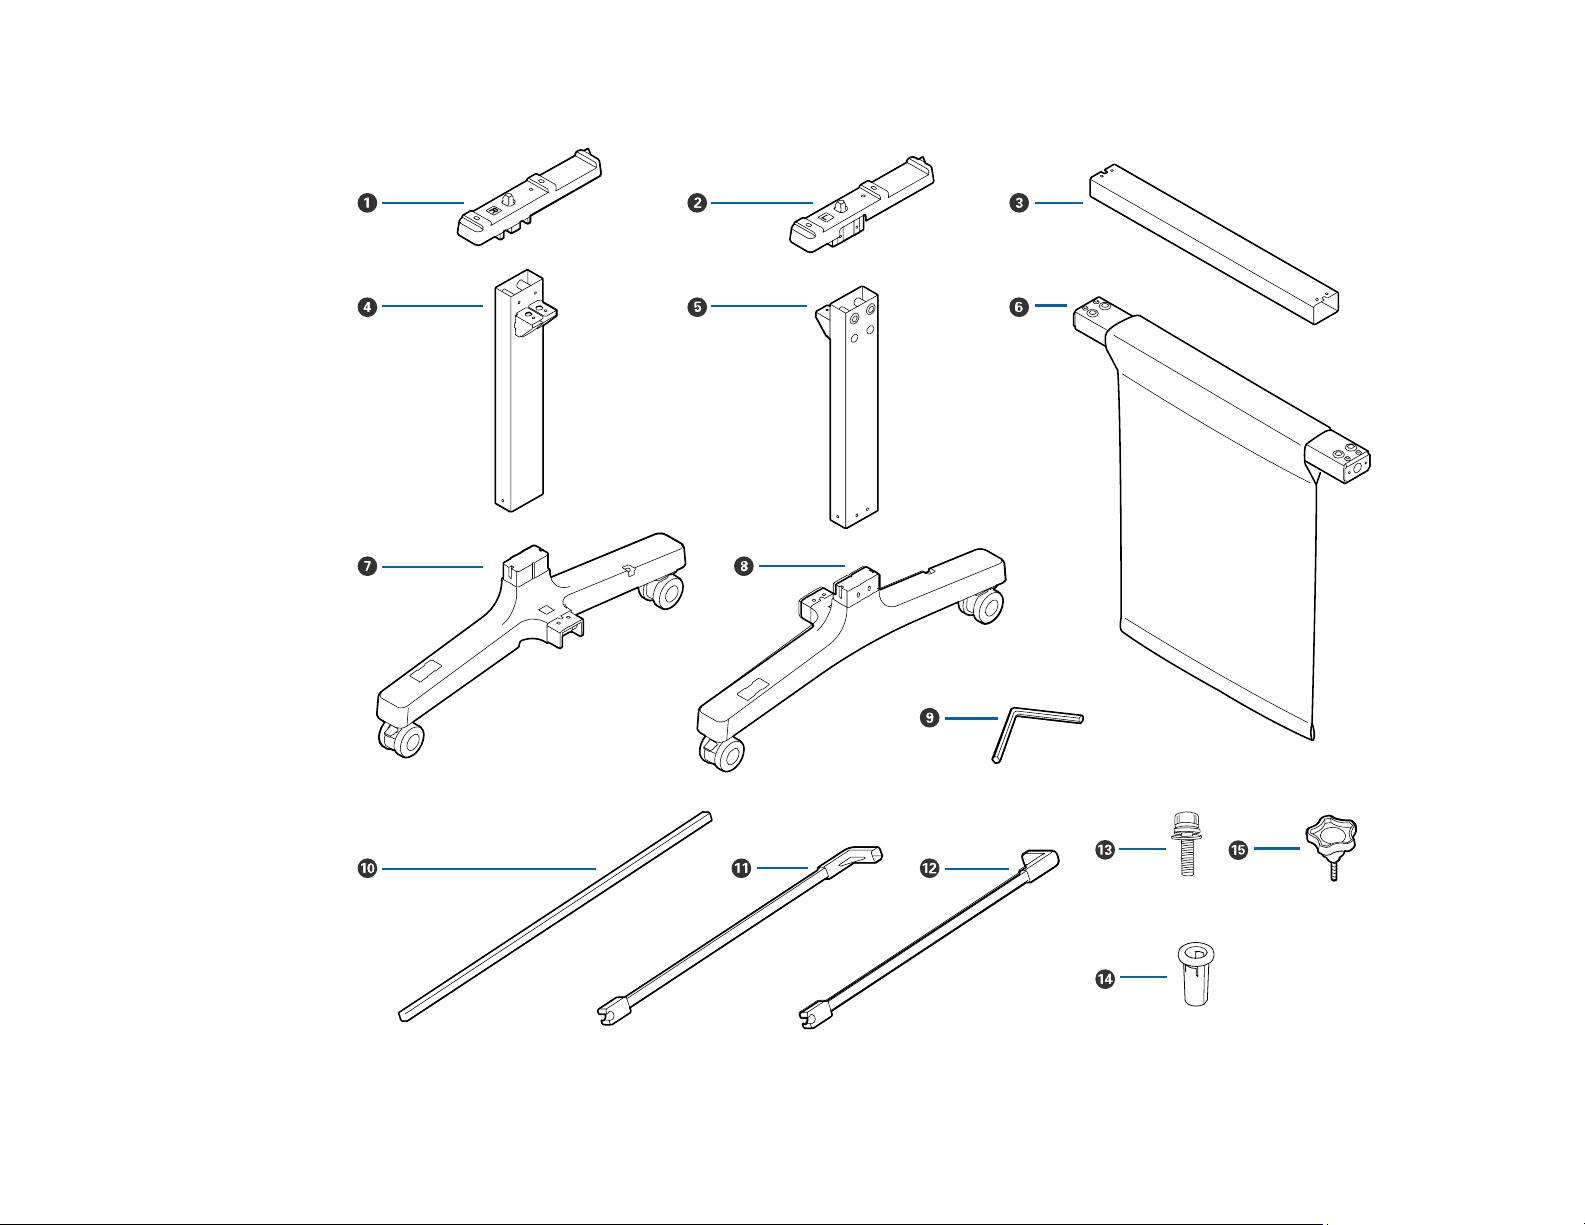
Make sure you have all of these items for assembly:
22
Page 23
1 Left mounting bracket
2 Right mounting bracket
3 Support brace
4 Left leg
5 Right leg
6 Paper basket bar
7 Left leg base (square hole faces front)
8 Right leg base (square hole faces front)
9 Allen wrench
10 Paper basket rod
11 Left paper basket support rod
12 Right paper basket support rod
13 Screws (28; 24 if thumbscrews are included)
14 Screw holders (4)
15 Thumbscrews (4; not included with all stands)
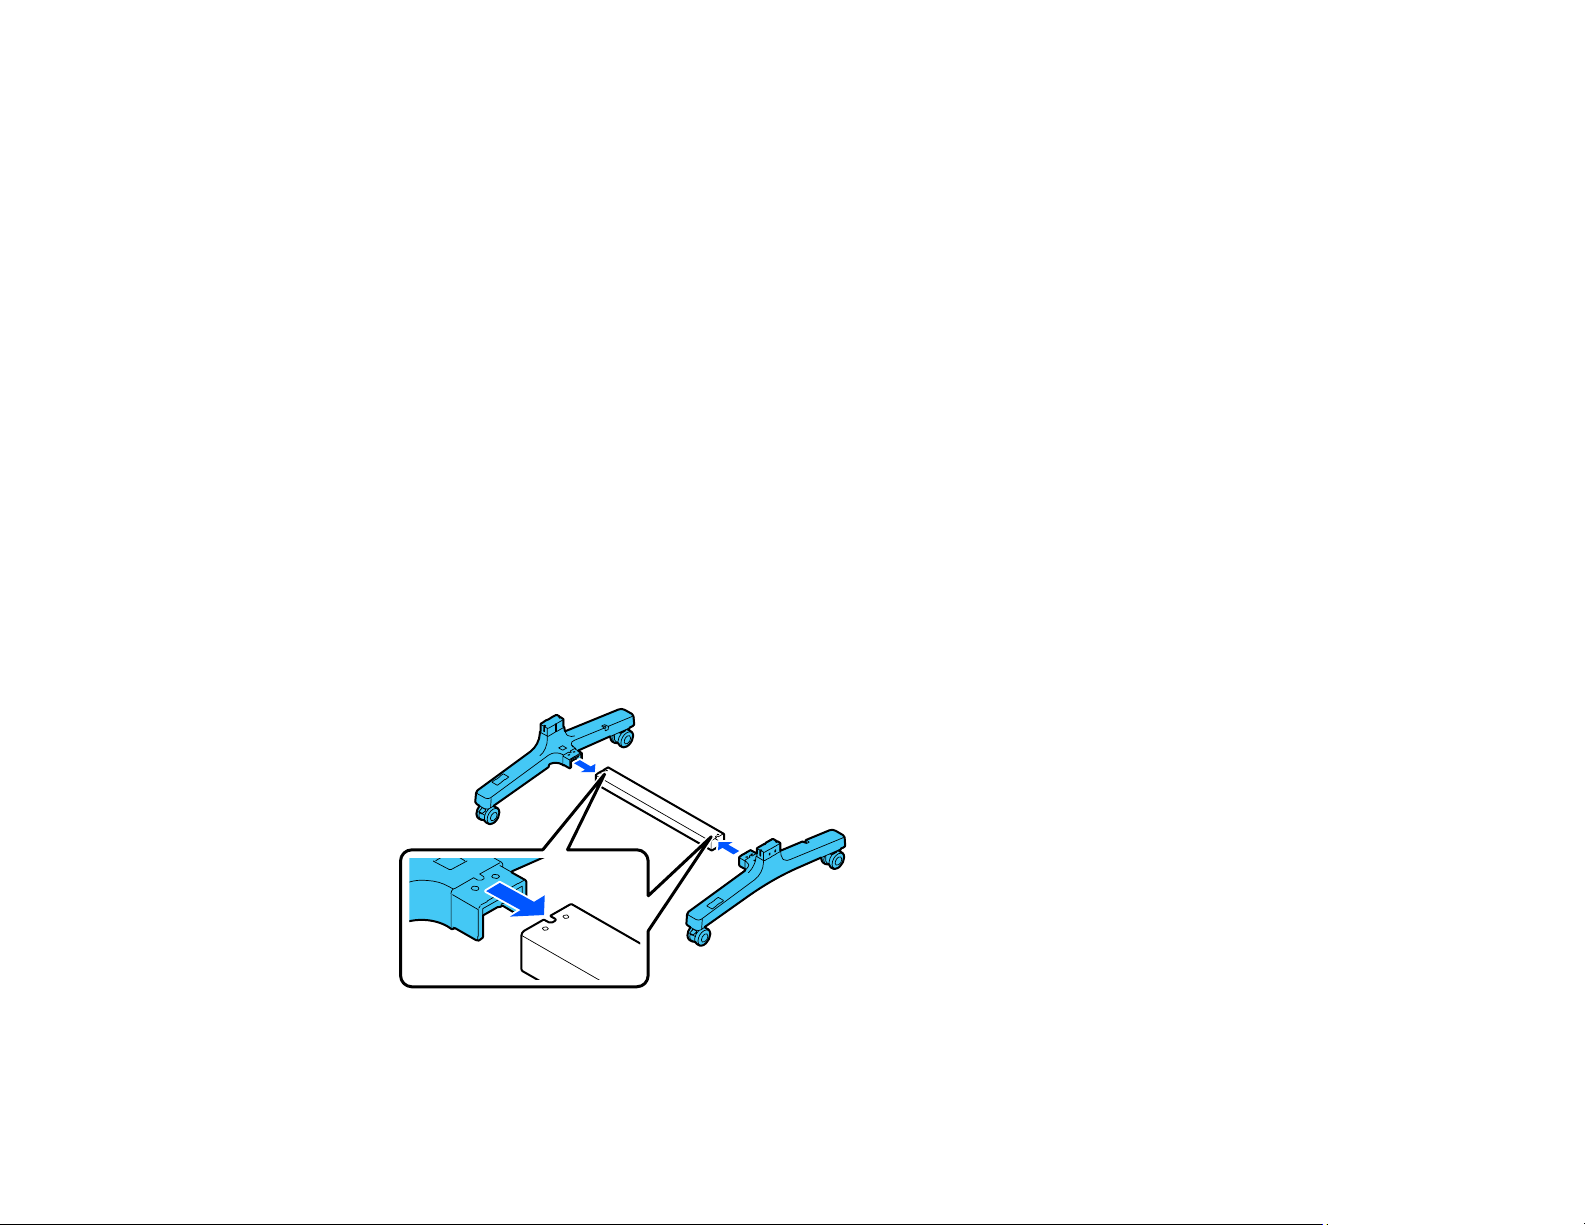
1. Attach the support brace to the left leg base and the right leg base.
23
Page 24
2. Use the Allen wrench to insert 8 screws (four on each side) into the holes on the support brace and
leg bases as shown.
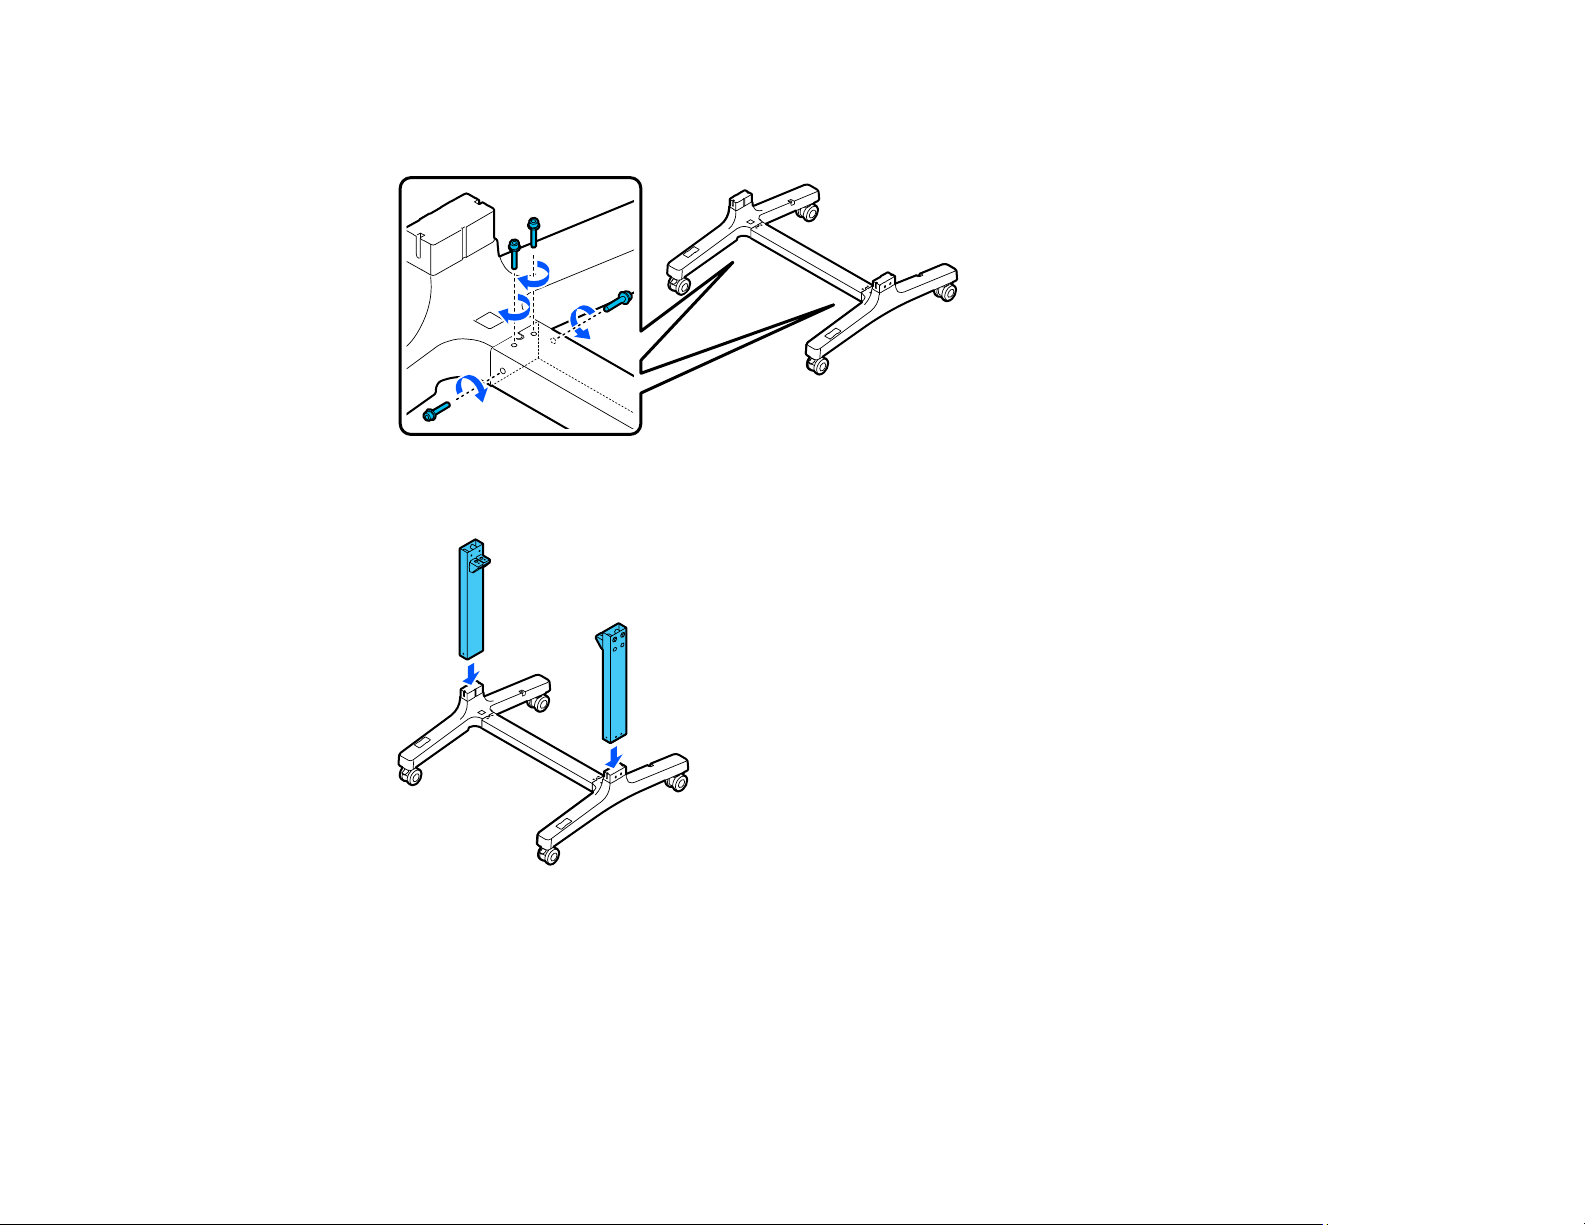
3. Attach the legs to the bases.
24
Page 25
4. Insert 8 screws (4 on each side) into the holes in the legs.
5. Push in the cloth on the paper basket bar so it does not get caught between the bar and the legs,
and attach the bar to the legs as shown.
25
Page 26
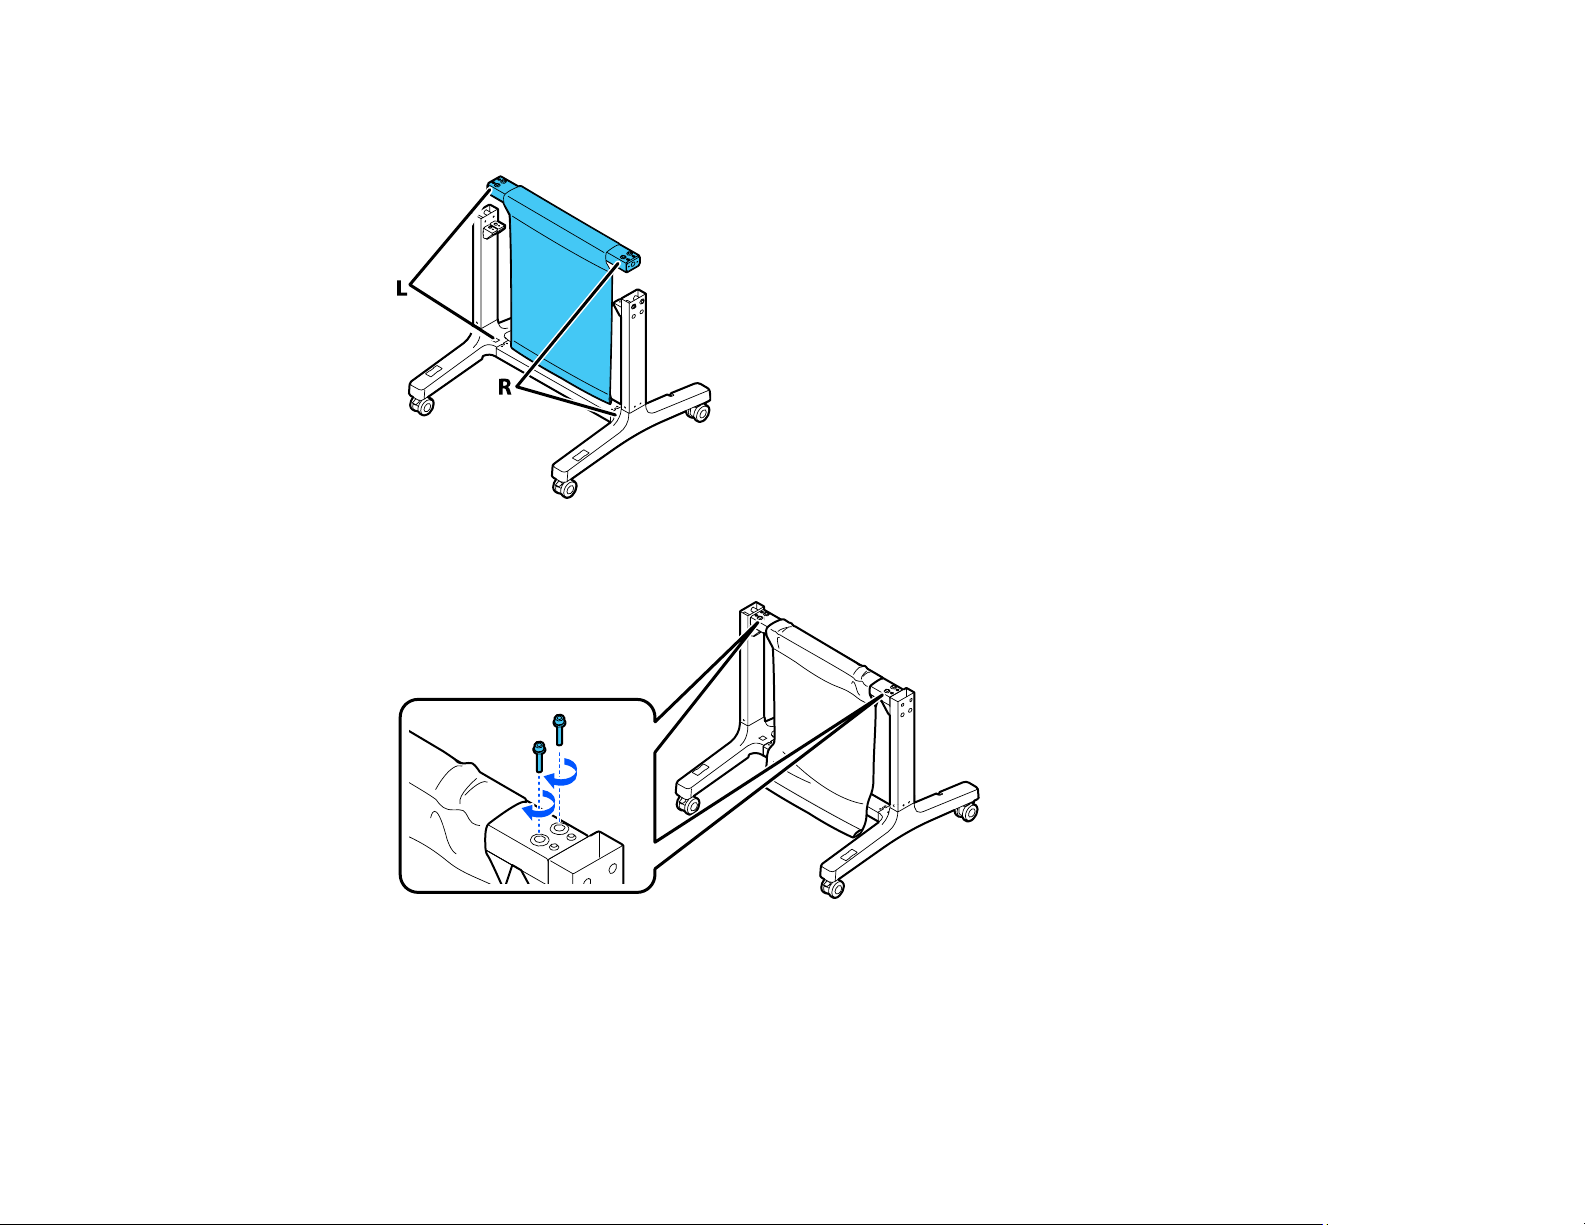
Note: Make sure the L and R stickers on the paper basket bar are correctly oriented with the L and R
stickers on the leg bases.
6. Insert 4 screws (2 on each side) into the holes on the paper basket bar to secure it to the legs.
26
Page 27
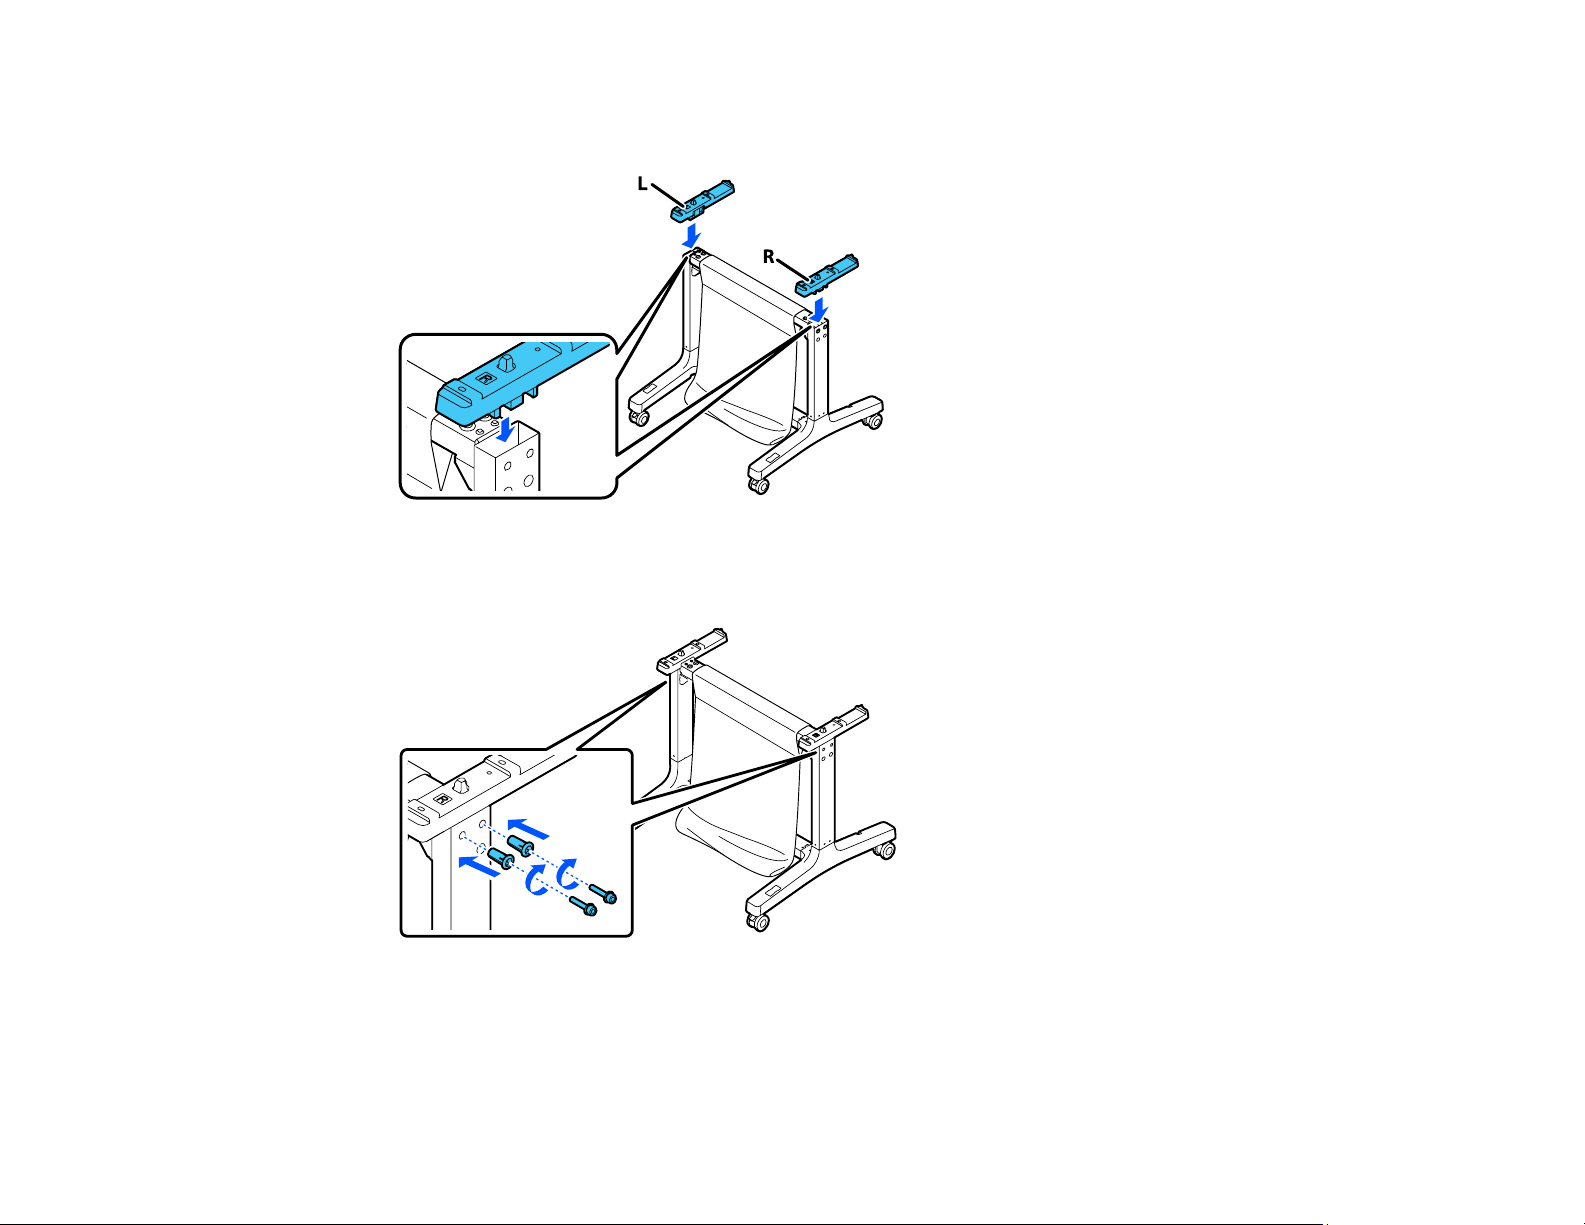
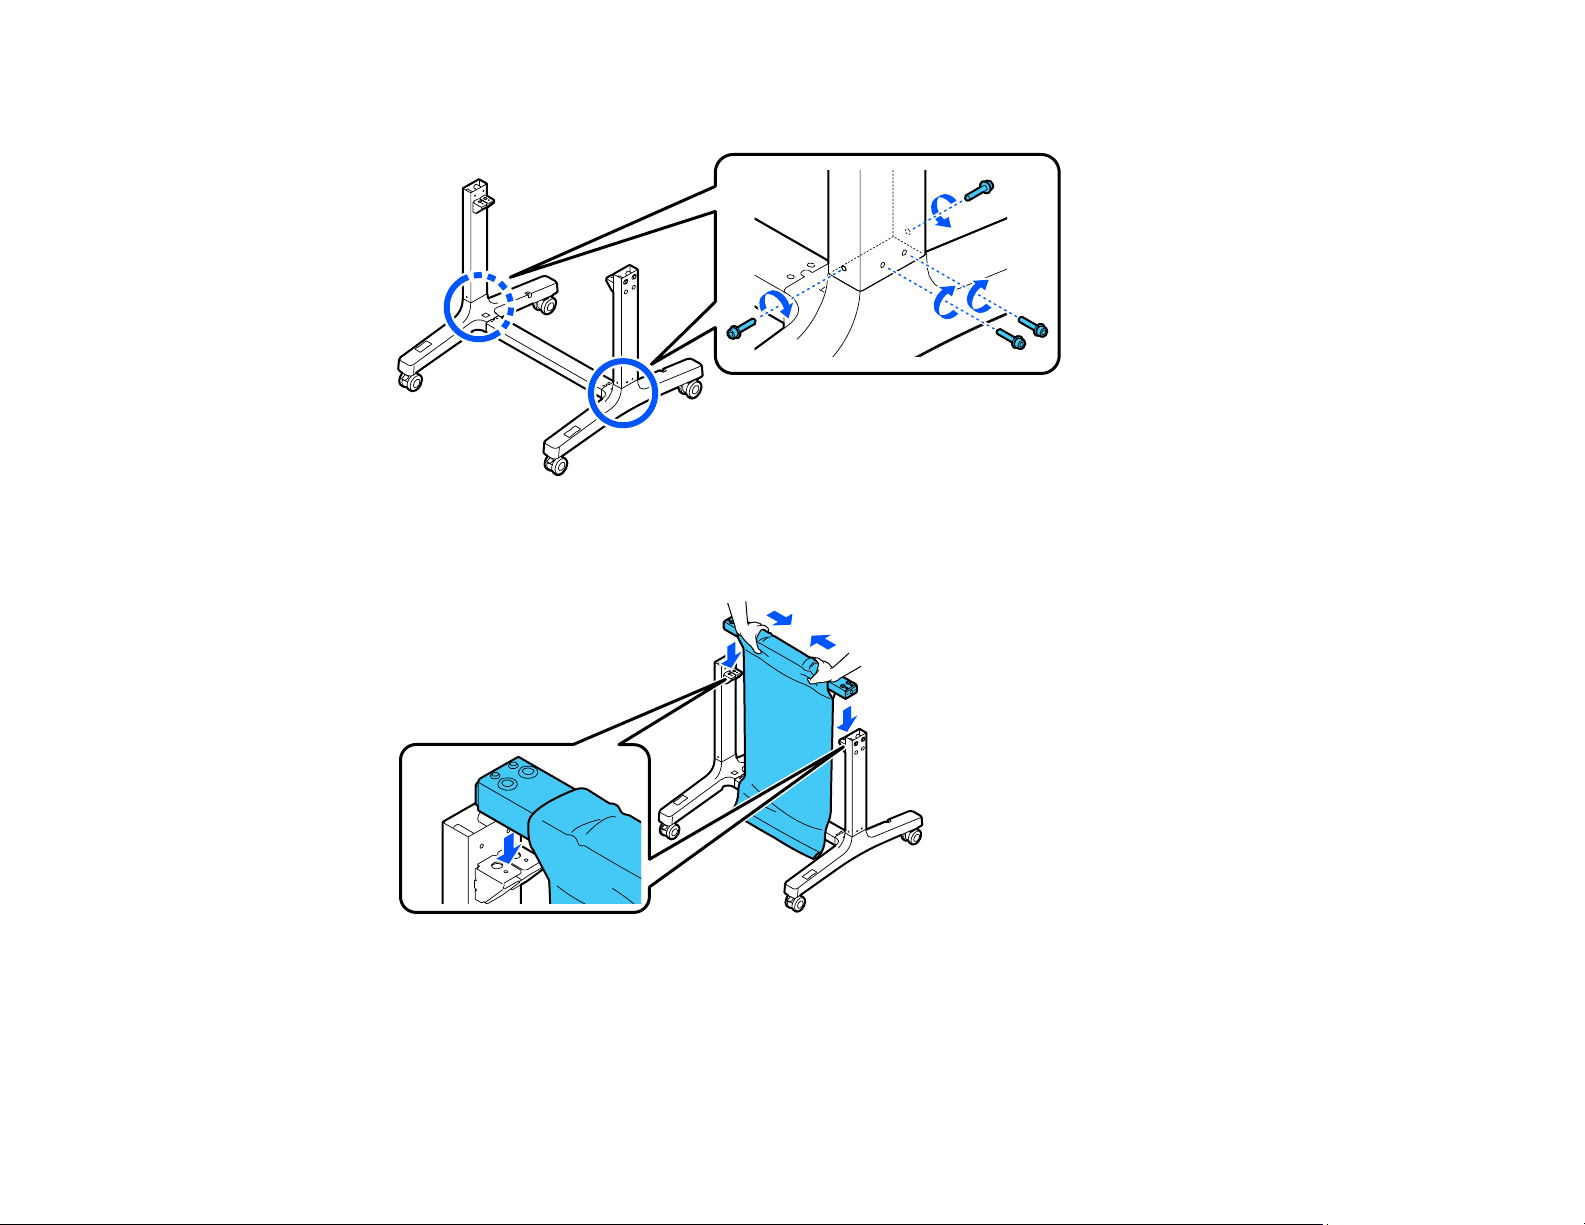
7. Make sure the L and R stickers on the mounting brackets are correctly oriented with the left and right
legs and attach them as shown.
8. Insert 4 screws into 4 screw holders (2 on each side) and insert them into the holes on the legs to
secure the mounting brackets.
27
Page 28
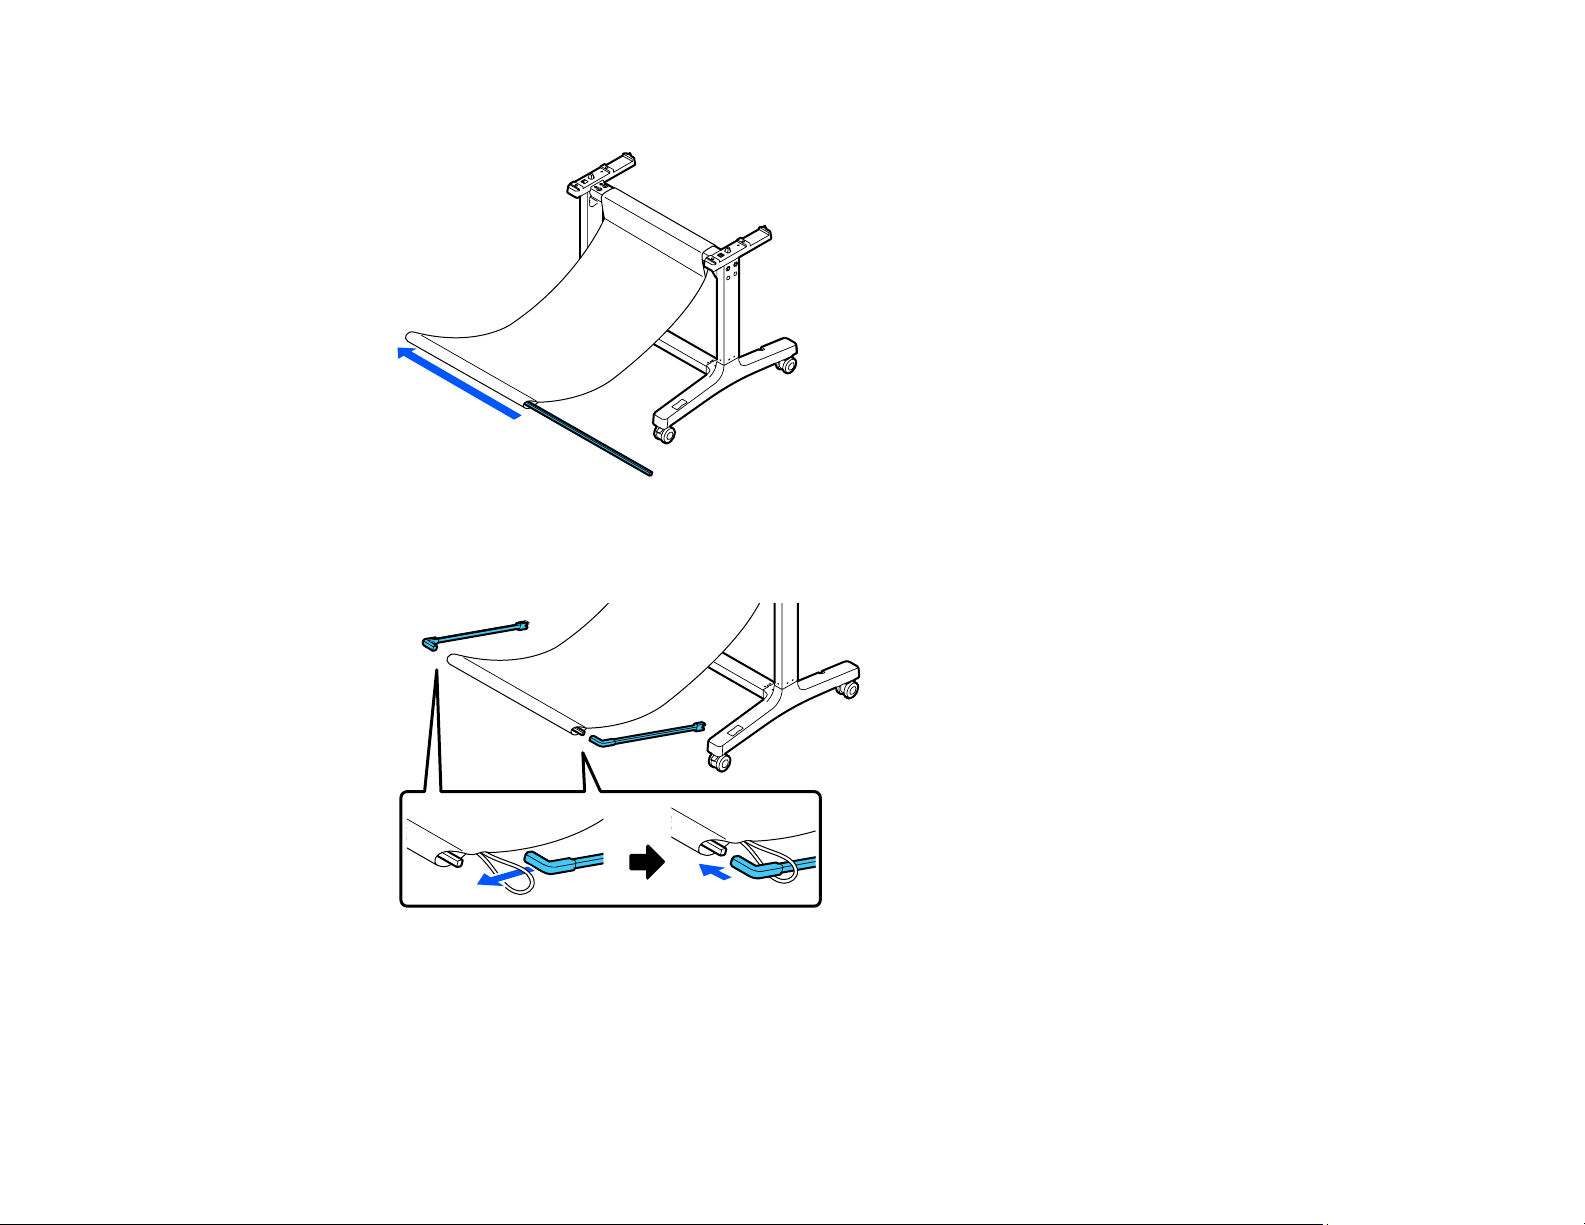
9. Slide the paper basket rod into the pocket on the end of the paper basket cloth.
10. Insert the top of the paper basket support rods through the loops on the paper basket cloth and
attach them to the paper basket rods.
28
Page 29
11. Insert the ends of the paper basket support rods into the holes on the leg bases.
12. Close the paper basket as shown.
29
Page 30
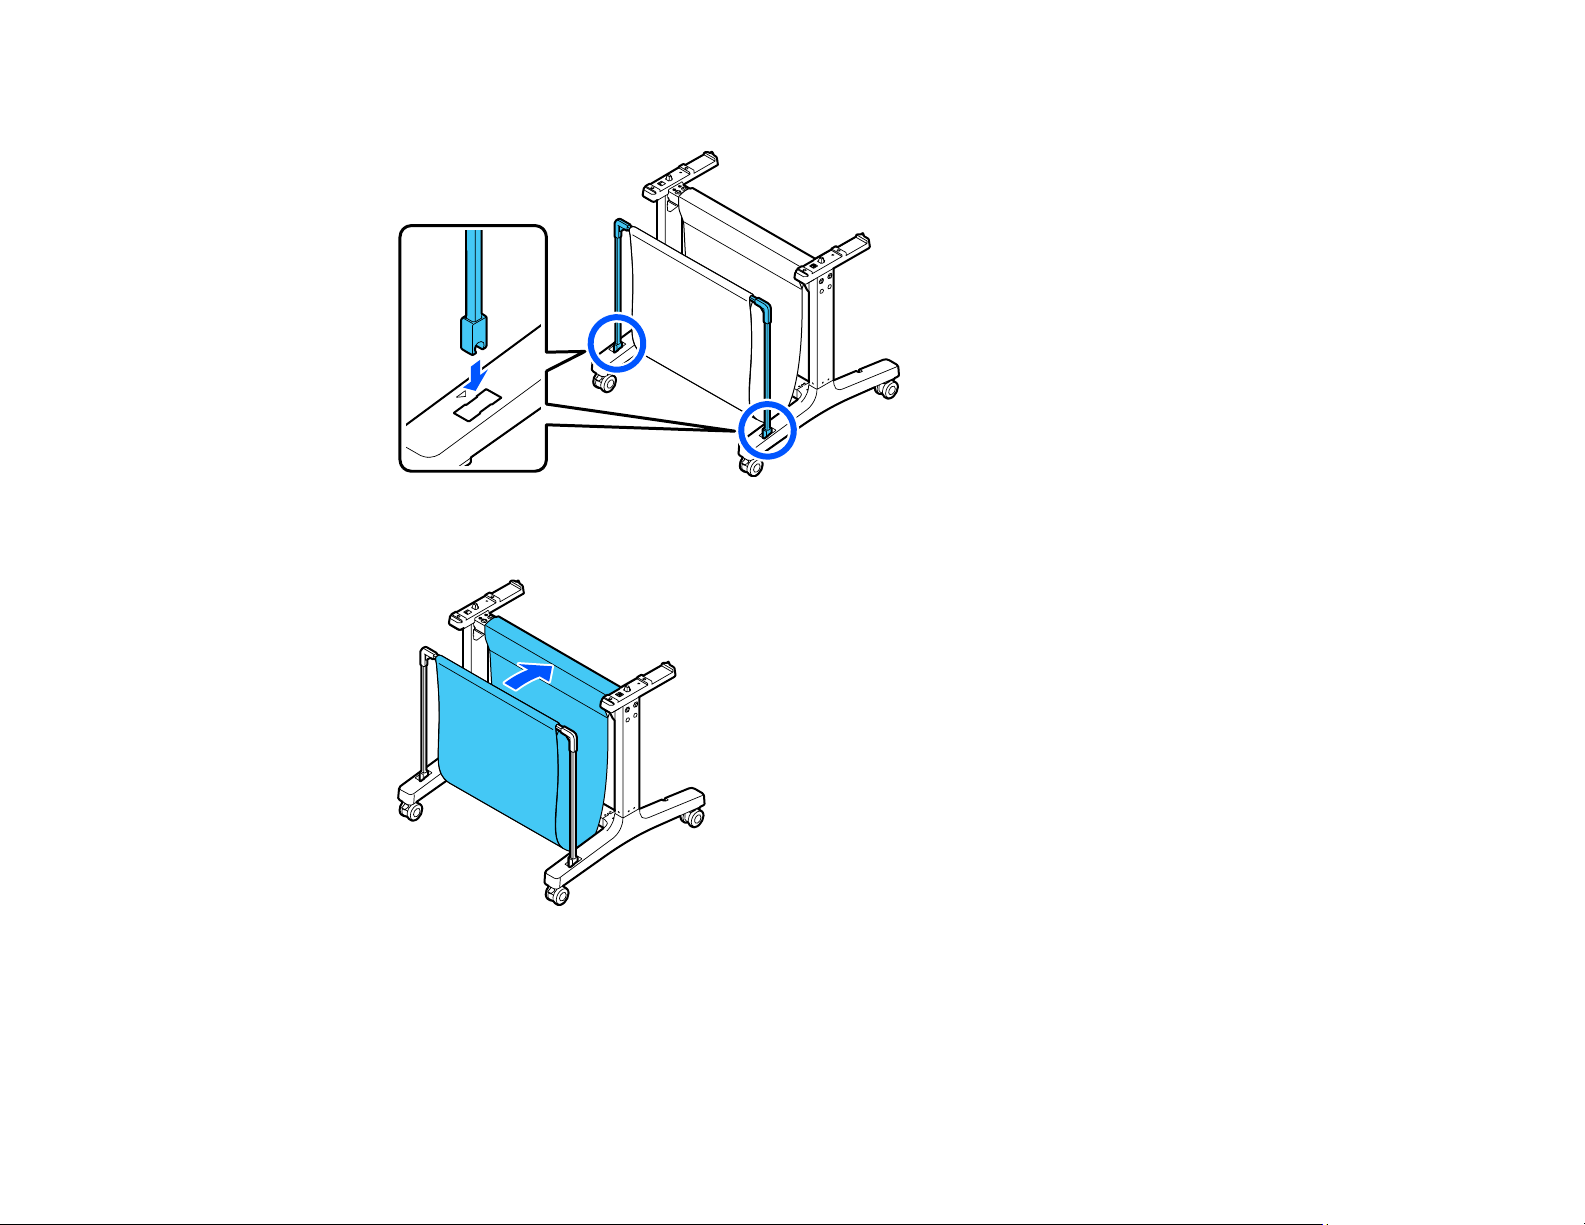
13. On the back of the paper basket and stand, attach the loops on the paper basket cloth to the hooks
on the leg bases as shown.
14. On the front of the stand, lock the casters.
15. Have at least two people lift the printer using the handholds as shown.
30
Page 31

Caution: Do not hold the printer by the output tray. You may damage it.
16. Align the notches on the printer with the notches on the back of the stand as shown and place the
printer on the stand.
31
Page 32

17. Do one of the following:
• If your stand does not include thumbscrews, insert 4 screws (2 on each side) into the bottom of the
mounting brackets to secure the printer to the stand. On the left rear side, insert the screw through
the wired loop on the printer as shown.
• If your stand includes thumbscrews, insert 4 thumbscrews (2 on each side) into the bottom of the
mounting brackets to secure the printer to the stand. On the left rear side, insert the thumbscrew
through the wired loop on the printer as shown.
32
Page 33

Parent topic: Introduction to Your Printer
33
Page 34

Wi-Fi or Wired Networking
See these sections to use your product on a Wi-Fi or wired network.
Network Security Recommendations
Wi-Fi Infrastructure Mode Setup
Wi-Fi Direct Mode Setup
Wi-Fi Protected Setup (WPS)
Printing a Network Status Sheet
Printing a Network Connection Report
Changing or Updating Network Connections
Network Security Recommendations
To help deter unauthorized access to your product over a network, you should protect your network
environment using appropriate security measures.
Security measures such as these can help deter threats such as loss of user data, use of telephone and
fax lines, and other intrusions:
• Enable security on your wireless LAN
Enable the appropriate security on the wireless LAN you plan to use with your product. Network
security such as a network password can deter interception of traffic over the wireless LAN. Your
router may already have a default password enabled by your Internet service provider (ISP). See your
ISP and router documentation for instructions on how to change the default password and better
secure your network.
• Connect your product only to a network protected by a firewall
Connecting your product directly to the Internet may leave it vulnerable to security threats. Instead,
connect it to a router or other network connection protected by a firewall. Your router may already
have a firewall set up by your Internet service provider; check with your ISP for confirmation. For best
results, set up and use a private IP address for your network connection.
• Change the default administrator password on your product
If your product has an option to set an administrator password, change the default administrator
password to deter access by unauthorized users to personal data stored on your product, such as IDs,
passwords, and contact lists.
Parent topic: Wi-Fi or Wired Networking
34
Page 35

Wi-Fi Infrastructure Mode Setup
You can set up your product to communicate with your computer using a wireless router or access point.
The wireless router or access point can be connected to your computer over a wireless or wired network.
Note: You cannot connect to a wired and wireless network at the same time.
1 Epson product
2 Wireless router or access point
3 Computer with a wireless interface
4 Computer
5 Internet
6 Ethernet cable (used only for wired connection to the wireless router or access point)
35
Page 36

Selecting Wireless Network Settings from the Control Panel
Parent topic: Wi-Fi or Wired Networking
Selecting Wireless Network Settings from the Control Panel
You can select or change wireless network settings using your product control panel.
To install your product on a wireless network, install the necessary software by downloading it from the
Epson website. The installer program guides you through network setup.
Note: This setting can be locked by an administrator. If you cannot access or change this setting,
contact your administrator for assistance.
1. Press the home button, if necessary.
2. Select the icon.
You see a screen like this:
3. Select Router > Start Setup or Change Settings > Wi-Fi Setup Wizard.
4. Select the name of your wireless network or select Enter Manually to enter the name manually. Use
the on-screen keyboard to enter your network name.
36
Page 37

5. Select the Enter Password field and enter your wireless password using the on-screen keyboard.
Note: The network name and password are case sensitive. Be sure to correctly enter uppercase and
lowercase letters, and numeric or special characters.
• To move the cursor, press the left or right arrows.
• To enter numbers or symbols, select 123#.
• To change the case of letters, select .
• To delete the previous character, select .
• To enter a space, select Space.
6. Select OK when you finish entering your password.
7. Confirm the displayed network settings and select Start Setup to save them.
8. If you want to print a network setup report, select Print Check Report. (Otherwise, select OK.)
9. Press the home button to exit.
You see the icon on the LCD screen and should be able to connect to your product directly from
your computer or device, and then print. If you are printing from a computer, make sure you installed
the network software from the Epson website.
37
Page 38

Note: If you don't see the icon, you may have selected the wrong network name or entered the
password incorrectly. Repeat these steps to try again.
Parent topic: Wi-Fi Infrastructure Mode Setup
Wi-Fi Direct Mode Setup
You can set up your product to communicate directly with your computer or another device without
requiring a wireless router or access point. In Wi-Fi Direct Mode, the product itself acts as a network
access point for devices.
1 Epson product
2 Computer with a wireless interface
3 Other wireless device
Enabling Wi-Fi Direct Mode
Parent topic: Wi-Fi or Wired Networking
Enabling Wi-Fi Direct Mode
You can enable Wi-Fi Direct mode to allow direct communication between your product and computer or
other devices without a wireless router or access point.
38
Page 39

Note: This setting can be locked by an administrator. If you cannot access or change this setting,
contact your administrator for assistance.
1. Press the home button, if necessary.
2. Select the icon.
You see a screen like this:
3. Select Wi-Fi Direct > Start Setup > Start Setup.
You see a screen like this:
39
Page 40

4. Use your computer or wireless device to select the Wi-Fi network name (SSID) displayed on the
LCD screen, then enter the password shown.
5. Press the home button to exit.
You see the icon on the LCD screen and should be able to connect to your product directly
from your computer or device, and then print. If you are printing from a computer, make sure you
installed the network software from the Epson website.
Note: If you don't see the icon on the LCD screen, you may have selected the wrong network
name or entered the password incorrectly. Repeat these steps to try again.
Parent topic: Wi-Fi Direct Mode Setup
Wi-Fi Protected Setup (WPS)
If your network uses a WPS-enabled wireless router or access point, you can quickly connect your
product to the network using Wi-Fi Protected Setup (WPS).
Note: To check if your router is WPS-enabled, look for a button labeled WPS on your router or access
point. If there is no hardware button, there may be a virtual WPS button in the software for the device.
Check your network product documentation for details.
Using WPS to Connect to a Network
Parent topic: Wi-Fi or Wired Networking
Using WPS to Connect to a Network
If you have a WPS-enabled wireless router or access point, you can use Wi-Fi Protected Setup (WPS) to
connect your product to the network.
Note: This setting can be locked by an administrator. If you cannot access or change this setting,
contact your administrator for assistance.
1. Press the home button, if necessary.
2. Select the icon.
40
Page 41

You see a screen like this:
3. Select Router > Start Setup or Change Settings > Push Button Setup (WPS).
4. Follow the instructions on the LCD screen to complete WPS setup.
5. Press the home button to exit.
You see the icon on the LCD screen and should be able to connect to your product directly from
your computer or device, and then print. If you are printing from a computer, make sure you installed
the network software from the Epson website.
Note: If you don't see the icon, repeat these steps to try again.
Parent topic: Wi-Fi Protected Setup (WPS)
Printing a Network Status Sheet
You can print a network status sheet to help you determine the causes of any problems you may have
using your product on a network.
Before you begin, make sure paper is loaded in the product.
1. Press the home button, if necessary.
2. Select Settings > General Settings > Network Settings > Network Status.
41
Page 42

You see a screen like this:
3. Select Print Status Sheet > Print.
Examine the settings shown on the network status sheet to diagnose any problems you have.
Parent topic: Wi-Fi or Wired Networking
Printing a Network Connection Report
You can print a network connection report to view solutions to any problems you may have using your
product on a network.
1. Press the home button, if necessary.
2. Select Settings.
3. Select General Settings.
42
Page 43

You see a screen like this:
4. Select Network Settings.
5. Select Connection Check.
6. Select Print Check Report.
7. Select Print.
Examine the error codes and solutions shown on the network connection report.
Network Connection Report Codes and Messages
Parent topic: Wi-Fi or Wired Networking
43
Page 44

Network Connection Report Codes and Messages
Check the error codes and messages on the network connection report to solve problems you may
encounter with network connections. The tables here list solutions to problems based on the error codes
and messages that may appear on the top of the report.
1 Error code
2 Message
Note: Error codes and messages listed here may not all apply to your product.
Error Codes and Messages
Error code and message Solution
E-1
Confirm that the network cable is
connected and network devices such as
hub, router, or access point are turned on.
Make sure your router, access point, and/or hub are
turned on, and the network cable is securely connected to
your device and to your product.
If you are trying to set up Wi-Fi, remove the network cable
and set up Wi-Fi again. Ethernet and Wi-Fi cannot be
connected at the same time.
44
Page 45

Error code and message Solution
E-2, E-3, or E-7
No wireless network names (SSID) found.
Confirm that the router/access point is
turned on and the wireless network (SSID)
is set up correctly. Contact your network
administrator for assistance.
No wireless network names (SSID) found.
Confirm that the wireless network name
(SSID) of the PC you wish to connect is set
up correctly. Contact your network
administrator for assistance.
Entered security key/password does not
match the one set for your router/access
point. Confirm security key/password.
Contact your network administrator for
assistance.
Check the following:
• Make sure your router or access point is turned on, and
is correctly connected to your computer or network
device.
• Turn off the router or access point, wait about 10
seconds, and turn it on again.
• Move your product closer to your router or access point,
and remove any obstacles between them. Also move
your product away from devices such as wireless
phones or microwaves.
• Confirm that the SSID shown on the network
connection report matches the label on your router or
access point. Also make sure your SSID uses only
ASCII characters and symbols, or your product cannot
display the SSID correctly.
• If you are trying to connect using the WPS push button
method, make sure your router or access point supports
it.
• If you are using a network password, check the label on
your router or access point to confirm that you are using
the correct password, or check with your network
administrator or router/access point documentation.
• If you are connecting to a smart device that generates
an SSID, check the device documentation for the SSID
and password you should use.
• If your wireless connection suddenly disconnects, and
another smart device was added to the network using a
WPS push button method or your network was set up
using a non-WPS push button method, try downloading
and installing your product software again.
45
Page 46

Error code and message Solution
E-5
Security mode (e.g. WEP, WPA) does not
match the current setting of the printer.
Confirm security mode. Contact your
network administrator for assistance.
E-6
MAC address of your printer may be
filtered. Check whether your router/access
point has restrictions such as MAC address
filtering. See the documentation of the
router/access point or contact your network
administrator for assistance.
If the security on your router or access point is not one of
the following types, change the type of security on your
router or access point and reset your product's network
settings.
• WEP-64 bit (40 bit)
• WEP-128 bit (104 bit)
• WPA PSK (TKIP/AES); also known as WPA Personal
• WPA2 PSK (TKIP/AES); also known as WPA2 Personal
• WPA (TKIP/AES)
• WPA2 (TKIP/AES)
If your router or access point has MAC address filtering
enabled, register your product's MAC address so it is not
filtered. Locate the MAC address on the network
connection report and check your router or access point
documentation for instructions.
If your router or access point is using shared
authentication with WEP security, confirm that you are
using the correct authentication key and index.
If your router or access point limits the number of
connected devices, raise the connection limit. See your
router or access point documentation for instructions.
E-8
Incorrect IP address is assigned to the
printer. Confirm IP address setup of the
network device (hub, router, or access
point). Contact your network administrator
for assistance.
If your product's Obtain IP Address setting is set to Auto,
enable DHCP on your router or access point. If it is set to
Manual, the IP address may be out of range or on a
different network segment; set a valid IP address using
your product control panel or the Web Config utility.
You can also try turning off your product and the router or
access point, waiting about 10 seconds, and turning them
on again.
46
Page 47

Error code and message Solution
E-9
Confirm the connection and network setup
of the PC or other device. Connection using
the EpsonNet Setup is available. Contact
your network administrator for assistance.
E-10
Confirm IP address, subnet mask, and
default gateway setup. Connection using
the EpsonNet Setup is available. Contact
your network administrator for assistance.
Make sure your computer or network device are turned
on. Also make sure that you can access the Internet and
other devices on the same network from the devices you
are trying to connect to your product.
If you still cannot connect to your product, turn off your
router or access point, wait about 10 seconds, and turn it
on again. Download and install your product software
again to reset your network settings.
Make sure other devices on the network are turned on and
do the following:
• If your product's Obtain IP Address setting is set to
Manual, check the IP address, subnet mask, and
default gateway addresses on the network connection
report to see if they are correct. If not, correct the
settings.
• If DHCP is enabled, set your product's Obtain IP
Address setting to Auto. If you want to use the DHCPassigned address as a static address, set the Obtain IP
Address setting to Manual, enter the product's IP
address as listed on the network connection report, and
set the subnet mask to 255.255.255.0.
If you still cannot connect to your product, turn off your
router or access point, wait about 10 seconds, and turn it
on again.
E-11
Setup is incomplete. Confirm default
gateway setup. Connection using the
EpsonNet Setup is available. Contact your
network administrator for assistance.
If you set your product's TCP/IP Setup setting to Manual,
check that the default gateway address listed on the
network connection report is correct. Also turn on the
device that is set as the default gateway.
47
Page 48

Error code and message Solution
E-12
Confirm the following:
-Entered security key/password is correct
-Index of the security key/password is set to
the first number
-IP address, subnet mask, or default
gateway setup is correct
Contact your network administrator for
assistance.
E-13
Confirm the following:
-Entered security key/password is correct
-Index of the security key/password is set to
the first number
-Connection and network setup of the PC
or other device is correct
Contact your network administrator for
assistance.
Make sure other devices on the network are turned on and
do the following:
• Make sure the IP address, subnet mask, and default
gateway addresses are correct, if you are entering them
manually.
• Confirm that the subnet mask and default gateway
addresses for other devices are the same.
• Make sure the IP address does not conflict with other
devices.
If you still cannot connect to your product, do the
following:
• Turn off your router or access point, wait about 10
seconds, and turn it on again.
• Download and install your product software again to
reset your network settings.
• If your router or access point uses WEP security with
several registered passwords, make sure that the first
registered password is set on your product.
Make sure your router, access point, and/or hub are
turned on. Also make sure the TCP/IP setup on your
router, access point, and/or hub is not set manually; this
may cause your product's network settings to differ from
the manually set up devices.
If you still cannot connect to your product, do the
following:
• Turn off your router or access point, wait about 10
seconds, and turn it on again.
• Download and install your product software again to
reset your network settings.
• If your router or access point uses WEP security with
several registered passwords, make sure that the first
registered password is set on your product.
48
Page 49

Network Environment Messages
Message Solution
The Wi-Fi environment needs to be
improved. Turn the wireless router off and
then turn it on. If the connection does not
improve, see the documentation for the
wireless router.
*No more devices can be connected.
Disconnect one of the connected devices if
you want to add another one.
Parent topic: Printing a Network Connection Report
Move your product closer to your router or access point,
and remove any obstacles between them. Then turn off
your router or access point, wait about 10 seconds, and
turn it back on again. If you still cannot connect to your
product, check the documentation that came with your
router or access point for solutions.
You can connect computers or other devices to your
product using a Wi-Fi Direct (Simple AP) connection. If
you want to add another device, disconnect an existing
connected device first.
Changing or Updating Network Connections
See these sections to change or update how your product connects to a network.
Accessing the Web Config Utility
Changing a USB Connection to a Wi-Fi Connection
Changing a Wi-Fi Connection to a Wired Network Connection
Connecting to a New Wi-Fi Router
Disabling Wi-Fi Features
Parent topic: Wi-Fi or Wired Networking
Accessing the Web Config Utility
You can select your product's network settings and confirm its operating status using a web browser.
You do this by accessing your product's built-in Web Config utility from a computer or other device that is
connected to the same network as your product.
1. Print a network status sheet.
2. Locate the IP address for your product that is listed on the network status sheet.
3. On a computer or other device connected to the same network as your product, open a web
browser.
4. Enter your product's IP address into the address bar.
49
Page 50

You see the available Web Config utility options.
Parent topic: Changing or Updating Network Connections
Related tasks
Printing a Network Status Sheet
Changing a USB Connection to a Wi-Fi Connection
If you have already connected your product to your computer using a USB connection, you can change
to a Wi-Fi connection.
1. Disconnect the USB cable from your product.
2. Uninstall your product software.
3. Download and install your product software from the Epson website using the instructions on the
Start Here sheet.
Parent topic: Changing or Updating Network Connections
Related concepts
Uninstall Your Product Software
Changing a Wi-Fi Connection to a Wired Network Connection
If you have already connected your product to your computer wirelessly, you can change to a wired
network connection if necessary.
1. Press the home button, if necessary.
2. Select the icon.
50
Page 51

You see a screen like this:
3. Select Description > Wired LAN Connection Method > Start Setup.
The Wi-Fi connection is disabled. Select OK.
4. Connect one end of an Ethernet network cable to the product's LAN port.
5. Connect the other end to any available LAN port on your router or access point.
Parent topic: Changing or Updating Network Connections
Connecting to a New Wi-Fi Router
If you change the wireless router you have been using on your network, you need to update your
product's Wi-Fi connection to the new router.
Note for Latin America: If you are using a 5 GHz wireless router, set the router to operate in dual band
(2.4 GHz and 5 GHz) mode. If your router uses a single network name (SSID) for both the 2.4 GHz and
5 GHz band, give each band its own network name (SSID) instead, such as Home Network 2.4 GHz and
Home Network 5 GHz. See your router documentation or contact your internet service provider for
instructions.
1. Do one of the following:
• Windows: Uninstall your product software.
• Mac: Go to the next step.
51
Page 52

2. Download and install your product software from the Epson website using the instructions on the
Start Here sheet.
Parent topic: Changing or Updating Network Connections
Related concepts
Uninstall Your Product Software
Disabling Wi-Fi Features
You may need to disable your product's Wi-Fi features if you change your network connection type or
need to solve a problem with your network connection.
Note: Before disabling Wi-Fi features, make a note of your product's SSID (network name) and
password.
Note: This setting can be locked by an administrator. If you cannot access or change this setting,
contact your administrator for assistance.
1. Press the home button, if necessary.
2. Select the icon.
You see a screen like this:
3. Select Router > Start Setup or Change Settings > Others > Disable Wi-Fi.
4. Select Start Setup to disable Wi-Fi.
52
Page 53

Parent topic: Changing or Updating Network Connections
53
Page 54

Media Handling
See these sections to load and handle media on your product.
Roll Paper Handling
Cut Sheet Handling
Creating Custom Paper Configurations
Compatible Epson Papers
Paper or Media Type Settings - Printing Software
Selecting the Paper Settings for Each Source - Control Panel
Roll Paper Handling
See these sections to load, cut, and remove roll paper in your product.
Loading Roll Paper
Cutting Roll Paper
Removing Roll Paper
Parent topic: Media Handling
Loading Roll Paper
Load roll paper onto the spindle before loading the roll paper in the printer.
Note: To prevent dust from accumulating inside the printer, always keep the roll paper cover and cut
sheet cover closed unless you are loading or unloading media.
Note: This product does not support 3-inch core diameter media.
1. Remove any tape and protective paper from the end of the roll. Make sure the paper is cut straight
across to avoid paper feeding problems.
Note: Avoid touching the surface of your paper or leaving it on a dusty area.
2. Make sure Load paper is displayed on the home screen.
54
Page 55

3. Open the cut sheet cover.
4. Release the central lock and open the roll paper cover.
5. Remove the spindle.
6. Remove the transparent paper stop from the spindle.
55
Page 56

7. Insert the spindle into the roll paper core as shown, with the leading edge of the roll paper facing
towards you.
8. Push the fixed paper stop against the roll paper until there is no gap between the paper stop and the
roll paper.
9. Attach the transparent paper stop to the spindle and press it in until there is no gap between the
paper stop and the roll paper.
56
Page 57

10. Place the roll paper into the roll paper spindle holders in the printer with the black end of the spindle
on the right.
11. Insert the leading edge of the roll paper into the paper feeder until you hear a beep.
Note: Make sure the leading edge of the roll paper is not bent or skewed, or a paper jam or skew
error may occur.
12. Close the roll paper cover and the cut sheet cover.
13. Select the paper type you loaded on the LCD screen and set the remaining amount, if necessary.
If you installed the optional stand and paper basket, make sure the paper basket is open to catch
printouts.
Parent topic: Roll Paper Handling
Related references
Compatible Epson Papers
Roll Paper Options - Windows
57
Page 58

Paper Specifications
Related tasks
Removing Roll Paper
Selecting Advanced Settings - Mac
Cutting Roll Paper
The printer has a built-in cutter that can automatically cut most paper types. When Auto Cut is turned on,
paper is automatically cut after each page prints, or if the roll paper leading edge is not straight.
To switch between automatic or manual cutting methods, adjust the Auto Cut settings in the printer
driver. The setting selected in the printer driver overrides the control panel setting.
Note: The built-in cutter cannot cut roll paper segments that are shorter than 3.93 inches (100 mm). If
the length of roll paper in the eject slot is less than 3.93 inches (100 mm), additional paper is fed
automatically until that length is reached.
Cutting Roll Paper Manually
Parent topic: Roll Paper Handling
Related references
Roll Paper Options - Windows
Related tasks
Selecting Advanced Settings - Mac
Cutting Roll Paper Manually
You can keep your prints on the roll until you manually cut them.
1. Turn off the Auto Cut setting in the printer driver or the control panel, depending on the situation:
• If you want to cut the paper manually, turn off the setting in the printer driver. Select Advanced >
Roll Paper Option > Auto Cut.
Note: The Auto Cut setting in the printer driver takes priority over the setting in the control panel.
The printer driver setting returns to automatic cutting when you close the application.
• If you are using a paper type that cannot be cut with the built-in cutter, turn off the setting in the
control panel. From the roll paper information area, select Advanced Media Setting > Auto Cut >
Off.
2. Print your document.
58
Page 59

3. From the roll paper information area, select Feed/Cut Paper.
4. To move the paper into a cutting position, press and hold Forward or Backward until the position at
which you want to cut appears at the dotted line as shown.
5. To cut the paper, select Cut.
• If the Auto Cut setting is turned off only in the printer driver, the paper is cut and the paper leading
edge returns to the print wait position.
• If the Auto Cut setting is turned off in the control panel, select Cut to manually cut the paper with
scissors or select Print Cutting Guideline to print a line on the paper to guide with manual
cutting.
Parent topic: Cutting Roll Paper
Removing Roll Paper
When you finish printing on roll paper, you should remove it from the printer to avoid indenting or
creasing the leading edge of the paper.
1. Open the cut sheet cover.
59
Page 60

2. Release the central lock and open the roll paper cover.
3. Select Remove on the LCD screen. The roll paper rewinds automatically.
Note: Make sure the roll paper is rewound completely before removing it from the printer.
4. Hold both ends of the spindle and lift it up from the spindle holder.
5. Remove the transparent paper stop from the spindle.
6. Remove the spindle from the roll paper.
60
Page 61

7. Place the roll paper in its original package.
Note: Store roll paper on its end or horizontally (if the packaging end-caps are installed). Never store
roll paper on its edge, as a flat spot can develop and lead to imaging artifacts on the prints. Do not
store roll paper in dusty areas. Print head maintenance and cleanings increase if dust accumulates
on the paper.
8. Reattach the transparent paper stop to the spindle.
9. Place the spindle back into the roll spindle holders in the printer.
10. Close the roll paper cover and the cut sheet cover.
Note: To prevent dust from accumulating inside the printer, always keep the roll paper cover and cut
sheet cover closed unless you are loading or unloading media.
Parent topic: Roll Paper Handling
Cut Sheet Handling
You can load a variety of types and sizes of cut sheet paper in your product.
Loading Single Cut Sheets
Loading Paper in the Auto Sheet Feeder
Removing Paper from the Auto Sheet Feeder
61
Page 62

Parent topic: Media Handling
Loading Single Cut Sheets
You can print on a variety of cut sheet paper types and sizes up to 24 inches (61 cm) wide and 0.1 inch
(0.27 mm) thick. You can load and print on one sheet at a time.
Before printing on cut sheets, remove any loaded roll paper, close the auto sheet feeder, and remove the
output tray.
1. Make sure Load paper is displayed on the home screen.
2. Select Paper Setting > Cut Sheet (1 sheet) on the LCD screen
3. Open the cut sheet cover.
4. Load one sheet of paper, printable side up in portrait orientation. Align the right edge of the paper
with the right edge guide on the printer and the left mark line for the paper size you are using.
62
Page 63

5. Insert the paper into the paper feeder until you hear a beep.
Note: Make sure the leading edge of the paper is straight to prevent a skew error or paper jam.
6. Select the paper type and size you loaded on the LCD screen.
Note: If you installed the optional stand and paper basket, make sure the paper basket is open to
catch the printout.
To remove a loaded cut sheet without printing, select Paper Setting > Cut Sheet (1 sheet) > Remove.
The paper is ejected.
Parent topic: Cut Sheet Handling
Related references
Compatible Epson Papers
Paper Specifications
Loading Paper in the Auto Sheet Feeder
You can load up to 50 sheets of plain paper up to 0.1 inch (0.27 mm) thick in the auto sheet feeder in the
following sizes: A3 (11.7 × 16.5 inches [297 × 420 mm]), A4 (8.3 × 11.7 inches [210 × 297 mm]), Letter
(8.5 × 11 inches [216 × 279 mm]), or Legal (8.5 × 14 inches [216 × 356 mm]).
63
Page 64

Note: Roll paper can remain loaded when using the auto sheet feeder. Switch between paper sources in
the printer driver.
1. Attach the output tray by inserting its hooks into the holes in the front of the printer.
2. Make sure Load paper or Ready is displayed on the home screen.
3. Open the cut sheet cover.
64
Page 65

4. Tilt back the auto sheet feeder, then pull up and tilt back the paper support extensions all the way.
65
Page 66

5. Slide the edge guides outward.
6. Load paper, printable side up, in portrait orientation into the auto sheet feeder.
66
Page 67

7. Adjust the edge guides to fit the paper width.
8. Select the paper type and size you loaded on the LCD screen.
Parent topic: Cut Sheet Handling
Related references
Compatible Epson Papers
Paper Specifications
Removing Paper from the Auto Sheet Feeder
Remove paper from the auto sheet feeder when you finish printing.
Note: To prevent dust from accumulating inside the printer, always remove any paper from the auto
sheet feeder and keep the auto sheet feeder closed unless you are loading or unloading media.
67
Page 68

1. Slide out the edge guides and remove the paper from the auto sheet feeder.
68
Page 69

2. Fold down and push in the paper support extensions and close the auto sheet feeder.
3. Close the cut sheet cover.
4. Pull off the output tray.
Note: Remove the output tray when printing on roll paper or cut sheets so the paper can eject
smoothly.
69
Page 70

Parent topic: Cut Sheet Handling
Creating Custom Paper Configurations
You can create and store up to 10 custom paper configurations for use if printing on non-Epson paper or
paper that is not supported by the Epson printer driver.
1. Load the type of paper that you want to configure in the printer.
2. Press the home button, if necessary.
3. Select Settings > General Settings > Printer Settings > Custom Paper Setting.
4. Select a number for the custom paper configuration.
5. Select Change Name and enter a name.
6. Select OK when you are done.
7. Select Change Reference Paper.
8. Select a paper type that is similar to the paper that you want to use.
9. Select Advanced Media Setting.
10. Select any additional settings as necessary.
11. When you finish changing the custom paper configuration settings, press the left arrow button to
return to exit the menu.
Selecting Custom Paper Configurations
Parent topic: Media Handling
Selecting Custom Paper Configurations
Once you have created a custom paper configuration, you can select the configuration whenever you
print on the associated media.
1. Press the home button, if necessary.
2. Select Paper Setting.
3. Select the paper type you are printing on.
4. Select Change Paper Type or Change Paper Type/Paper Size.
5. Select Paper Type > Others > Custom Paper.
6. Select the custom paper configuration you want to use.
7. Press the left arrow button to exit the menu.
70
Page 71

Parent topic: Creating Custom Paper Configurations
Compatible Epson Papers
You can purchase genuine Epson ink, paper, and accessories from an Epson authorized reseller. To
find the nearest reseller, visit proimaging.epson.com (U.S.) or proimaging.epson.ca (Canada), select
your product series and product, and click the Where to Buy button. Or call 800-GO-EPSON (800-463-
7766) in the U.S. or 800-807-7766 in Canada.
Note: Paper/media availability varies by country.
Note: For the most updated list of supported Epson papers, visit proimaging.epson.com (U.S.) or
proimaging.epson.ca (Canada).
Roll Paper
Paper Type Size Part number Amount
Epson Singleweight Matte Paper 17 inches (432 mm) × 132 feet
(40.2 m)
24 inches (610 mm) × 132 feet
(40.2 m)
Epson Doubleweight Matte Paper 24 inches (610 mm) × 132 feet
(40.2 m)
Epson Premium Semigloss Photo
Paper (170)
Epson Premium Glossy Photo
Paper (170)
Enhanced Adhesive Synthetic
Paper
Cut Sheets
Paper Type Size Part number Amount
Epson Ultra Premium Photo Paper
Luster
24 inches (610 mm) × 100 feet
(30.5 m)
24 inches (610 mm) × 100 feet
(30.5 m)
24 inches (610 mm) × 100 feet
(30.5 m)
Letter (8.5 × 11 inches
[216 × 279 mm])
S041746 1 roll
S041853 1 roll
S041385 1 roll
S041393 1 roll
S041390 1 roll
S041617 1 roll
S041405 50 sheets
71
Page 72

Paper Type Size Part number Amount
Epson Premium Photo Paper
Glossy
Epson Premium Photo Paper
Semi-gloss
Epson Premium Presentation
Paper Matte
Parent topic: Media Handling
Letter (8.5 × 11 inches
[216 × 279 mm])
Letter (8.5 × 11 inches
[216 × 279 mm])
Letter (8.5 × 11 inches
[216 × 279 mm])
Paper or Media Type Settings - Printing Software
For this paper Select this Paper Type or Media Type setting
Plain paper 16 to 20 lb (60 to 75 g/m2) Plain Paper
Epson Singleweight Matte Paper Singleweight Matte Paper
Epson Doubleweight Matte Paper Doubleweight Matte Paper
Epson Premium Presentation Paper Matte Enhanced Matte Paper
Archival Matte Paper
Epson High Quality Ink Jet Paper Photo Quality Inkjet Paper
Coated paper (generic) Coated Paper (Generic)
S041667 50 sheets
S041331 20 sheets
S041257 50 sheets
Epson Premium Glossy Photo Paper (170) Premium Glossy Photo Paper (170)
Epson Premium Semigloss Photo Paper (170) Premium Semigloss Photo Paper (170)
Epson Premium Photo Paper Glossy Premium Glossy Photo Paper
Photo Paper Glossy
Epson Premium Photo Paper Semi-gloss Premium Semigloss Photo Paper
Epson Premium Luster Photo Paper (260)
Epson Ultra Premium Photo Paper Luster
Photo paper (generic) Photo Paper (Generic)
72
Premium Luster Photo Paper
Page 73

For this paper Select this Paper Type or Media Type setting
Tracing paper/vellum paper Tracing Paper
Tracing Paper <Low Duty>
Matte Film
Enhanced Adhesive Synthetic Paper Enhanced Adhesive Synthetic Paper
Enhanced Low Adhesive Synthetic Paper
Polyester banner (generic) Heavy Weight Polyester Banner
Note: The settings listed here are available only when printing from your computer; they do not apply to
your product's control panel settings.
Parent topic: Media Handling
Selecting the Paper Settings for Each Source - Control Panel
You can change the default paper size and paper type for each source using the control panel on the
product.
1. Press the home button, if necessary.
2. Select Paper Setting.
You see a screen like this:
73
Page 74

3. Select the paper source you want to select settings for.
You see a screen like this:
4. Select Change Paper Type or Change Paper Type/Paper Size.
5. Select Paper Type.
6. Select the paper type for the paper you loaded.
7. Select Paper Size.
8. Select the paper size you loaded.
9. Press the home button to exit.
Paper Type Settings - Control Panel
Parent topic: Media Handling
Paper Type Settings - Control Panel
Select a Paper Type setting that matches the paper you loaded. If you do not see your paper type listed,
select Others in the menu.
Paper type loaded Paper Type setting
Plain paper 16 to 20 lb (60 to 75 g/m2) Plain Paper
Coated paper (generic) Coated Paper (Generic)
Epson Doubleweight Matte Paper Doubleweight Matte
74
Page 75

Paper type loaded Paper Type setting
Epson Premium Photo Paper Glossy Premium Glossy Sheet
Photo Paper
Epson Premium Presentation Paper Matte Matte Paper
Tracing paper/vellum paper CAD
Polyester banner (generic) Heavyweight Polyester
Enhanced Adhesive Synthetic Paper Enhanced Adhesive Syn.
Enhanced Low Adh. Syn.
Parent topic: Selecting the Paper Settings for Each Source - Control Panel
75
Page 76

Printing from a Computer
Before printing from your computer, make sure you have set up your product and installed its software
as described on the Start Here sheet.
Note: If you have an Internet connection, it is a good idea to check for updates to your product software
on Epson's support website. If you see a Software Update screen, select Enable automatic checking
and click OK. The update scans your system to see if you have the latest product software. Follow the
on-screen instructions.
Printing with Windows
Printing on a Mac
Printing CAD Drawings
Printing with Windows
You can print with your product using any Windows application, as described in these sections.
Note: If you are using your Epson product with the Windows 10 S operating system, you cannot use the
software described in this section. You also cannot download and install any Epson product software
from the Epson website for use with Windows 10 S; you must obtain software only from the Windows
Store.
Selecting Basic Print Settings - Windows
Selecting Print Layout Options - Windows
Selecting Advanced Settings - Windows
Selecting Additional Settings - Windows
Printing Your Document - Windows
Saving, Sharing, and Customizing the Printer Settings
Selecting Default Print Settings - Windows
Changing the Language of the Printer Software Screens
Changing Automatic Update Options
Parent topic: Printing from a Computer
Selecting Basic Print Settings - Windows
Select the basic settings for the document you want to print.
76
Page 77

1. Open a document for printing.
2. Select the print command in your application.
Note: You may need to select a print icon on your screen, the Print option in the File menu, or
another command. See your application's help utility for details.
3. If necessary, select your product name as the printer you want to use.
Note: You may also need to select Preferences, Properties, Print Settings, or Printer Properties
to view your print settings.
You see the Printer Settings window:
4. Select the Current Settings option or a custom setting.
5. Click Settings to select the Document Size setting that matches the size of the document you are
printing.
77
Page 78

6. If you want your printout to be a different size than the selected document size, select the Output
Size setting.
Note: If you select Fit to Output Size, you can select a different output size. If you select Same as
Paper Size, the Document Size and Output Size settings are the same.
Note: Select Custom Paper Size to set a user-defined output size.
7. Select the Source setting that matches the paper source you are using.
8. Select the Media Type setting that matches the paper you loaded.
Note: If you want to use paper settings that have been set in the printer's control panel, select Use
Printer Settings.
Note: Click Acquire Info to refresh the settings if you loaded or changed paper after opening the
print window.
9. Select the Select Target setting that matches the type of document you are printing.
Note: If you want the printer driver to determine print settings based on the document type, select
the Simple Settings checkbox. Deselect the checkbox if you want to select your own color
correction, print mode, or other settings.
10. If you want to prioritize quality over print speed, select the Print with High Quality checkbox.
11. If you deselect the Simple Settings checkbox, the following options are available:
• Print Mode: choose a printout color
• Color Mode: choose a color mode to fine-tune printout colors
• Level: choose speed or quality as the printing priority
• High Speed: select to speed up printing, but quality may be reduced
• Emphasize Thin Lines: select to smooth out jagged edges in low-resolution images
Note: The Emphasize Thin Lines setting may reduce print speed, especially if the printer is
connected wirelessly. Use a wired connection if you enable this setting.
Note: Available options depend on the selected Select Target setting.
78
Page 79

12. To see a preview of how your document will print, select Print Preview. (The preview appears after
you click Print but before printing starts.)
13. To layout multiple print data or images for printing all at once, select Layout Manager.
Document Size Options - Windows
Paper Source Options - Windows
Print Mode Options - Windows
Color Mode Options - Windows
Level Options - Windows
Using Layout Manager - Windows
Parent topic: Printing with Windows
Related tasks
Printing Your Document - Windows
Document Size Options - Windows
You can select any of the Document Size options to size your printed image.
Same as Paper Size
Sizes your printed image to fit the selected paper size.
Fit to Roll Paper Width
Sizes your printed image to fit the width of the roll paper you loaded.
Fit to Output Size
Sizes your printed image to fit the selected output size.
Others
Sizes your printed image to a specified size.
Parent topic: Selecting Basic Print Settings - Windows
Paper Source Options - Windows
You can select any of the available options in the Source menu to print on the paper loaded in that
source.
Roll Paper
Selects roll paper loaded in the roll paper holder.
Auto Sheet Feeder
Selects cut sheets loaded in the auto sheet feeder.
Sheet
Selects the cut sheet loaded in the paper feeder.
79
Page 80

Parent topic: Selecting Basic Print Settings - Windows
Print Mode Options - Windows
You can select a Print Mode option to determine the color of your printouts.
Color
Select to print your document in color.
Black
Select to print your document in black and white (grayscale is supported).
Black (Bi-Level)
Select to print CAD drawings in black and white (grayscale is not supported).
Colored Paper (Yellow)
Select if you are printing your document on yellow paper. This option is used for some poster
applications.
Parent topic: Selecting Basic Print Settings - Windows
Color Mode Options - Windows
You can adjust the Color Mode setting to fine-tune the colors in your printout or turn off color
management in your printer software.
EPSON Standard (sRGB)
Optimizes the sRGB space and corrects the color.
Business Graphics
Performs color correction to optimize your images based on the sRGB space.
Line Drawing
Optimizes color correction for line drawings by processing the border between lines and the
background as discontinuous.
GIS
Performs optimal printing for topographic maps and other geographic information system (GIS) data.
ICM
Automatically adjusts colors based on the printer’s ICC profile and the selected Media Type setting,
using the Image Color Matching system. Click the Advanced button to choose the input profile and
other settings.
Note: In most cases, you get better results by applying color management in your application, rather
than in the printer driver.
80
Page 81

Off (No Color Adjustment)
Turns off color management in your printer software so you can manage color using only your
application software.
Note: An ICC profile is required if color management is turned off.
Click Settings to open the Color Controls window, where you can specify values for adjusting
brightness, contrast, saturation, and individual Cyan, Magenta, and Yellow color tones. You can choose
from two Gamma settings, and use either a color circle or slide bar to adjust color.
Parent topic: Selecting Basic Print Settings - Windows
Level Options - Windows
You can select a print speed or print quality priority for your printouts.
Speed
Select to prioritize print speed over print quality; quality may be reduced.
81
Page 82

Quality
Select to prioritize print quality over print speed.
Max Quality
Select to use the maximum print quality; print speed may be slower.
Quality Options
Select print speed or print quality levels using a slider.
Parent topic: Selecting Basic Print Settings - Windows
82
Page 83

Using Layout Manager - Windows
Layout Manager lets you include multiple pieces of print data created in different applications onto one
sheet of paper for printing.
83
Page 84

You can also place the same print data multiple times as shown here.
84
Page 85

You can place print data in different sizes and orientations to maximize media usage, as shown here.
85
Page 86

You can place print data on roll paper as shown here.
1. Open the file you want to print in your application.
2. Select the print command in your application.
3. Select the Layout Manager checkbox on the Printer Settings tab.
4. Choose an option for the Document Size setting that matches the size of the document in your
application.
5. Click OK and then click Print, if necessary.
The Layout Manager screen opens and displays one page in the layout.
86
Page 87

6. Leave the Layout Manager screen open and repeat steps 1 to 4 to arrange additional print data. The
pages are added to the Layout Manager screen.
7. Do the following to arrange objects on the Layout Manager screen:
• Drag pages to move and resize them.
• Use the tool buttons and the Object menu to align and rotate pages.
• Resize and replace whole pages in the Preference or Arrangement Settings screens.
Note: See the Layout Manager screen help for details.
8. Click File > Properties and select your print settings, including the size of the paper you are printing
on.
9. Open the File menu on the Layout Manager screen and click Print.
Note: To save the current job to a file, open the File menu on the Layout Manager screen, save the
file, and close the Layout Manager screen. To open the saved file later for editing or reprinting, rightclick the printer icon in the Windows taskbar, click Layout Manager, and select the file.
Parent topic: Selecting Basic Print Settings - Windows
87
Page 88

Selecting Print Layout Options - Windows
You can select a variety of layout options for your document on the Layout tab.
• To select multiple copies and their print order, select the Copies, Collate, and Reverse Order
options.
• To print multiple pages on one sheet of paper, or print one image on multiple sheets of paper, select
the Page Layout checkbox and select the option you want.
• To print on both sides of the paper, select the 2-sided Printing checkbox and select the options you
want.
• To rotate or flip the printed image, select the Rotate 180° or Mirror Image checkbox.
Page Layout Options - Windows
Parent topic: Printing with Windows
Page Layout Options - Windows
You can select these Page Layout options to set up your multi-page print job.
88
Page 89

Note: Available options depend on the Paper Source setting.
Folded Double-Side
Prints two consecutive pages on one sheet of paper. The second page is flipped and printed next to
the first page, allowing the sheet to be folded to make a 2-sided document. Click Settings to select a
binding edge option and set margins.
N-up
Prints 2 (2-up) or 4 (4-up) pages on one sheet of paper. Click Settings to choose the number of
pages per sheet and set the page order.
Poster
Prints one image on multiple sheets of paper to create a large poster. Click the Settings button to
select the layout and guideline options.
Print Banner
Select when using a Windows application designed for banners.
Parent topic: Selecting Print Layout Options - Windows
89
Page 90

Selecting Advanced Settings - Windows
You can select advanced printing settings on the Advanced tab.
• To control how roll paper is cut after printing, select an Auto Cut option. Select other roll paper options
as necessary.
• To print on cut sheet paper with 14 mm margins above and below your print, select Vertical
Centering.
• To adjust the ink saturation level, select Advanced Media Control.
• To create or edit custom printing settings, select Custom Settings.
• To print a color background on the page, select the Print Bckg Color checkbox and click Color
Settings to select the color you want to use.
• To print the time, date, and other information about your print job at the top or bottom of the page,
select the Job Settings checkbox and click Details to select the settings you want to use.
Roll Paper Options - Windows
90
Page 91

Parent topic: Printing with Windows
Roll Paper Options - Windows
Select any of the available roll paper options.
Note: Some settings may not be available, depending on the Roll Paper Option you selected for your
paper size.
Auto Cut
• Off: Select this option to cut your prints manually.
• Normal Cut: Creates a margin at the top and bottom of your image and automatically cuts the
paper. These margins vary by media type and may be changed from their defaults using custom
media settings.
Auto Rotate
Automatically positions the image or print data to fit the roll paper.
Print Page Line
Prints lines between pages as a guide for manual cutting.
Save Roll Paper
When Auto Cut is enabled, the printer cuts the roll paper at the end of the image as positioned on the
page.
Parent topic: Selecting Advanced Settings - Windows
91
Page 92

Selecting Additional Settings - Windows
You can run maintenance utilities and select additional settings that apply to all your print jobs on the
Utility tab.
• Click Nozzle Check to print a nozzle check pattern to check whether the print head nozzles are
clogged.
• Click Head Cleaning to clean the print head if you notice banding or gaps in your printouts.
• Click Epson Status Monitor 3 to check the printer's status.
• Click Monitoring Preferences to select the error notifications displayed on the Epson Status Monitor
3 screen, or add a shortcut to the utility in the Windows taskbar.
• Click Print Queue to display a list of all waiting print jobs, view information on the data waiting to be
printed, and delete or reprint the jobs.
• Click Speed and Progress to select various printing options.
92
Page 93

• Click Menu Arrangement to arrange the Select Setting, Media Type, and Paper Size options by
frequency of use.
• Click Export or Import to save the print settings to a file or import them from a file. This is useful when
you want to select the same print settings on multiple computers.
• Select a Language option for the language you want to use for the printer software screens.
Parent topic: Printing with Windows
Related tasks
Cleaning the Print Head Using a Computer Utility
Using the Powerful Cleaning Utility
Flushing the Ink Tubes
Printing Your Document - Windows
Once you have selected your print settings, you are ready to save your settings and print.
1. Click OK to save your settings.
You see your application's Print window, such as this one:
93
Page 94

2. Click OK or Print to start printing.
Checking Print Status - Windows
Parent topic: Printing with Windows
Checking Print Status - Windows
During printing, you see this window showing the progress of your print job. It allows you to control
printing and check ink status.
• To cancel printing, click Cancel.
• To see print jobs lined up for printing, click Print Queue.
Parent topic: Printing Your Document - Windows
Saving, Sharing, and Customizing the Printer Settings
You can save groups of print settings or media settings so you can reuse them for future print jobs. You
can export these settings as a file so you can share them with other users. You can also edit the settings
displayed in the printer software screens.
Saving and Sharing Print Settings - Windows
Editing Print Setting Displays - Windows
Parent topic: Printing with Windows
Saving and Sharing Print Settings - Windows
You can save your print settings so you can use them for future print jobs.
94
Page 95

1. Make sure the selected settings on the Printer Settings, Layout, and Advanced tabs are set to what
you want to save.
2. Under the Select Setting dropdown menu, select Custom Settings.
You see a window like this:
3. Verify that your settings are correct, enter a name for the group of settings in the Name field, and
click Save.
4. Do the following as necessary:
• If you need to delete a group of settings you have created, select the name of the group of settings
from the list and click Delete.
• To export the settings, select the name of the group of settings, click Export, select a location,
and enter a file name.
• To import a group of settings, click Import, select the file you want to use, and click Open. Then
use the settings to print.
Once custom settings are saved, you can select the name of the group of settings from the Select
Setting dropdown menu and use them to print.
95
Page 96

Parent topic: Saving, Sharing, and Customizing the Printer Settings
Related tasks
Selecting Basic Print Settings - Windows
Printing Your Document - Windows
Editing Print Setting Displays - Windows
You can arrange the displayed print settings so you can easily select the settings you use most often.
1. Click the Utility tab in the printer software.
2. Select Menu Arrangement.
You see this window:
96
Page 97

3. Select the item you want to edit.
4. Order or group items in the List box as follows:
• To move and reorder items, drag and drop them in the list.
• To add a new group (folder), click Add Group.
• To delete a group (folder), select the group and click Delete Group.
• To hide a group, drag and drop it to Not Display.
Note: If you delete a group, the group folder is deleted but the items within the folder remain.
5. Click Save.
Parent topic: Saving, Sharing, and Customizing the Printer Settings
Selecting Default Print Settings - Windows
When you change your print settings in a program, the changes apply only while you are printing in that
program session. If you want to change the print settings you use in all your Windows programs, you can
select new default print settings.
1. Access the Windows Desktop and right-click the icon for your product in the right side of the
Windows taskbar, or click the up arrow and right-click .
2. Select Printer Settings.
97
Page 98

You see the printer settings window:
3. Select the print settings you want to use as defaults in all your Windows programs.
4. Click OK.
These settings are now the defaults selected for printing. You can still change them as needed for
printing in any program session.
Parent topic: Printing with Windows
Related tasks
Selecting Basic Print Settings - Windows
Printing Your Document - Windows
Changing the Language of the Printer Software Screens
You can change the language used on the Windows printer software screens.
98
Page 99

1. Access the Windows Desktop and right-click the icon for your product in the right side of the
Windows taskbar, or click the up arrow and right-click .
2. Select Printer Settings.
You see the printer settings window.
3. Click the Utility tab.
You see these options:
4. Select the language you want to use as the Language setting.
5. Click OK to close the printer software window.
The printer software screens appear in the language you selected the next time you access them.
Parent topic: Printing with Windows
99
Page 100

Changing Automatic Update Options
Your printer software for Windows automatically checks for updates to the product software. You can
change how often the software checks for updates or disable this feature.
1. Access the Windows Desktop and right-click the icon for your product in the right side of the
Windows taskbar, or click the up arrow and right-click .
2. Select Software Update Settings.
You see this window:
3. Do one of the following:
• To change how often the software checks for updates, select a setting in the Check every menu.
• To disable the automatic update feature, select the Never option.
4. Click OK to exit.
Note: If you choose to disable the automatic update feature, you can check for updates manually.
Parent topic: Printing with Windows
Printing on a Mac
You can print with your product using any Mac printing program, as described in these sections.
100
 Loading...