

Epson SURECOLOR SC-S80610, SURECOLOR SC-S60610, SURECOLOR SC-S80600, SURECOLOR SC-S60600 SETUP GUIDE
Page 1

Printing with WH/MS,
Matching Specific Colors
CMP0087-00 EN
Page 2

Epson Printing with WH/MS, Matching Specific Colors
Copyrights and Trademarks
Copyrights and Trademarks
EPSON, EPSON EXCEED YOUR VISION, EXCEED YOUR VISION, and their logos are registered trademarks or trademarks of Seiko Epson.
Microsoft
Mac
Adobe
States and/or other countries.
General Notice: Other product names used herein are for identification purposes only and may be trademarks of their respective owners. Epson disclaims any
and all rights in those marks.
© 2016 Seiko Epson Corporation. All rights reserved.
and Windows® are registered trademarks of Microsoft Corporation.
®
and Mac OS® are registered trademarks of Apple Inc.
®
, Illustrator®, Photoshop,® and Adobe® RGB (1998) are either registered trademarks or trademarks of Adobe Systems Incorporated in the United
®
2
Page 3

Epson Printing with WH/MS, Matching Specific Colors
Contents
Contents
Copyrights and Trademarks
Introduction
What to Prepare........................... 4
Workflow................................ 6
Processing Print Data
Illustrator Settings......................... 7
Photoshop Settings........................ 10
Print Settings in the RIP
Settings in ONYX RIP...................... 15
How to Create Quick Sets................. 15
Printing Processed Data.................. 21
Printing Unprocessed Data................ 24
Settings in Caldera RIP..................... 29
Settings in DINAX Mirage................... 42
Matching Specific Colors
Settings in ONYX RIP...................... 46
Settings in Caldera RIP..................... 50
Troubleshooting
WH/MS does not Print..................... 57
Color and WH/MS Overlapping Parts Do Not
Print Correctly........................... 57
Gradation Skipping Occurs When Printing at
High Densities........................... 58
3
Page 4

Epson Printing with WH/MS, Matching Specific Colors
Introduction
Introduction
When using White ink (hereafter WH) or Metallic Silver ink (hereafter MS) for RIP printing, some additional work,
apart from that needed to print with only other color inks, is needed. This manual explains the procedures and
workflow for WH/MS printing. In addition, it also presents the method for matching specific colors, such as corporate
colors or spot colors (PANTONE or DIC Color). See the Manual for RIP Printing (PDF), which also has the basic
information on RIP printing.
What to Prepare
Software RIP (hereafter RIP)
Use a RIP that supports WH/MS. Check the web site of the manufacturer regarding the information on supported
RIP.
Epson Control Dashboard (Dashboard)
Use the latest version of Dashboard. (Update as soon as possible if you are notified of new information.)
Use when importing setting information for the printer or RIP, or download an EMX file for printing with WH/MS.
For more information, see the Manual for RIP Printing (PDF).
Print data (PDF)
Important:
c
When printing with WH/MS, it is necessary to do the following process with image processing software before
reading the data to be printed with the RIP.
For example, when printing with WH, the RIP does not automatically process WH as the print area by just
putting all the print objects on a specified layer named “White” for WH in the print data.
❏
Specify the areas printed in WH/MS as spot colors.
This section explains examples when printing with WH. The white (RGB = all 255 or CMYK is all 0%) in the print
data is processed by the RIP as an area in which ink does not need to be applied, the same as when printing with other
color inks only. Because of this, the RIP cannot automatically process the parts that look white on screen = WH in
print areas even when using a printer that supports WH.
We recommend first splitting the areas to be printed using color ink and the areas to be printed using WH/MS into
layers.
❏
Specify the order in which inks are layered (print order). (Adobe Illustrator only)
We recommend splitting the layers for color ink and for WH/MS so you can more easily specify the order in which
inks are layered during printing.
Details about processing procedures U “Processing Print Data” on page 7
4
Page 5

Epson Printing with WH/MS, Matching Specific Colors
Introduction
Image processing software
Use this for processing data to print. In this manual, we explain the procedures for Adobe Illustrator and Adobe
Photoshop. In either case, we recommend version CS1 or later.
5
Page 6
Epson Printing with WH/MS, Matching Specific Colors
Introduction
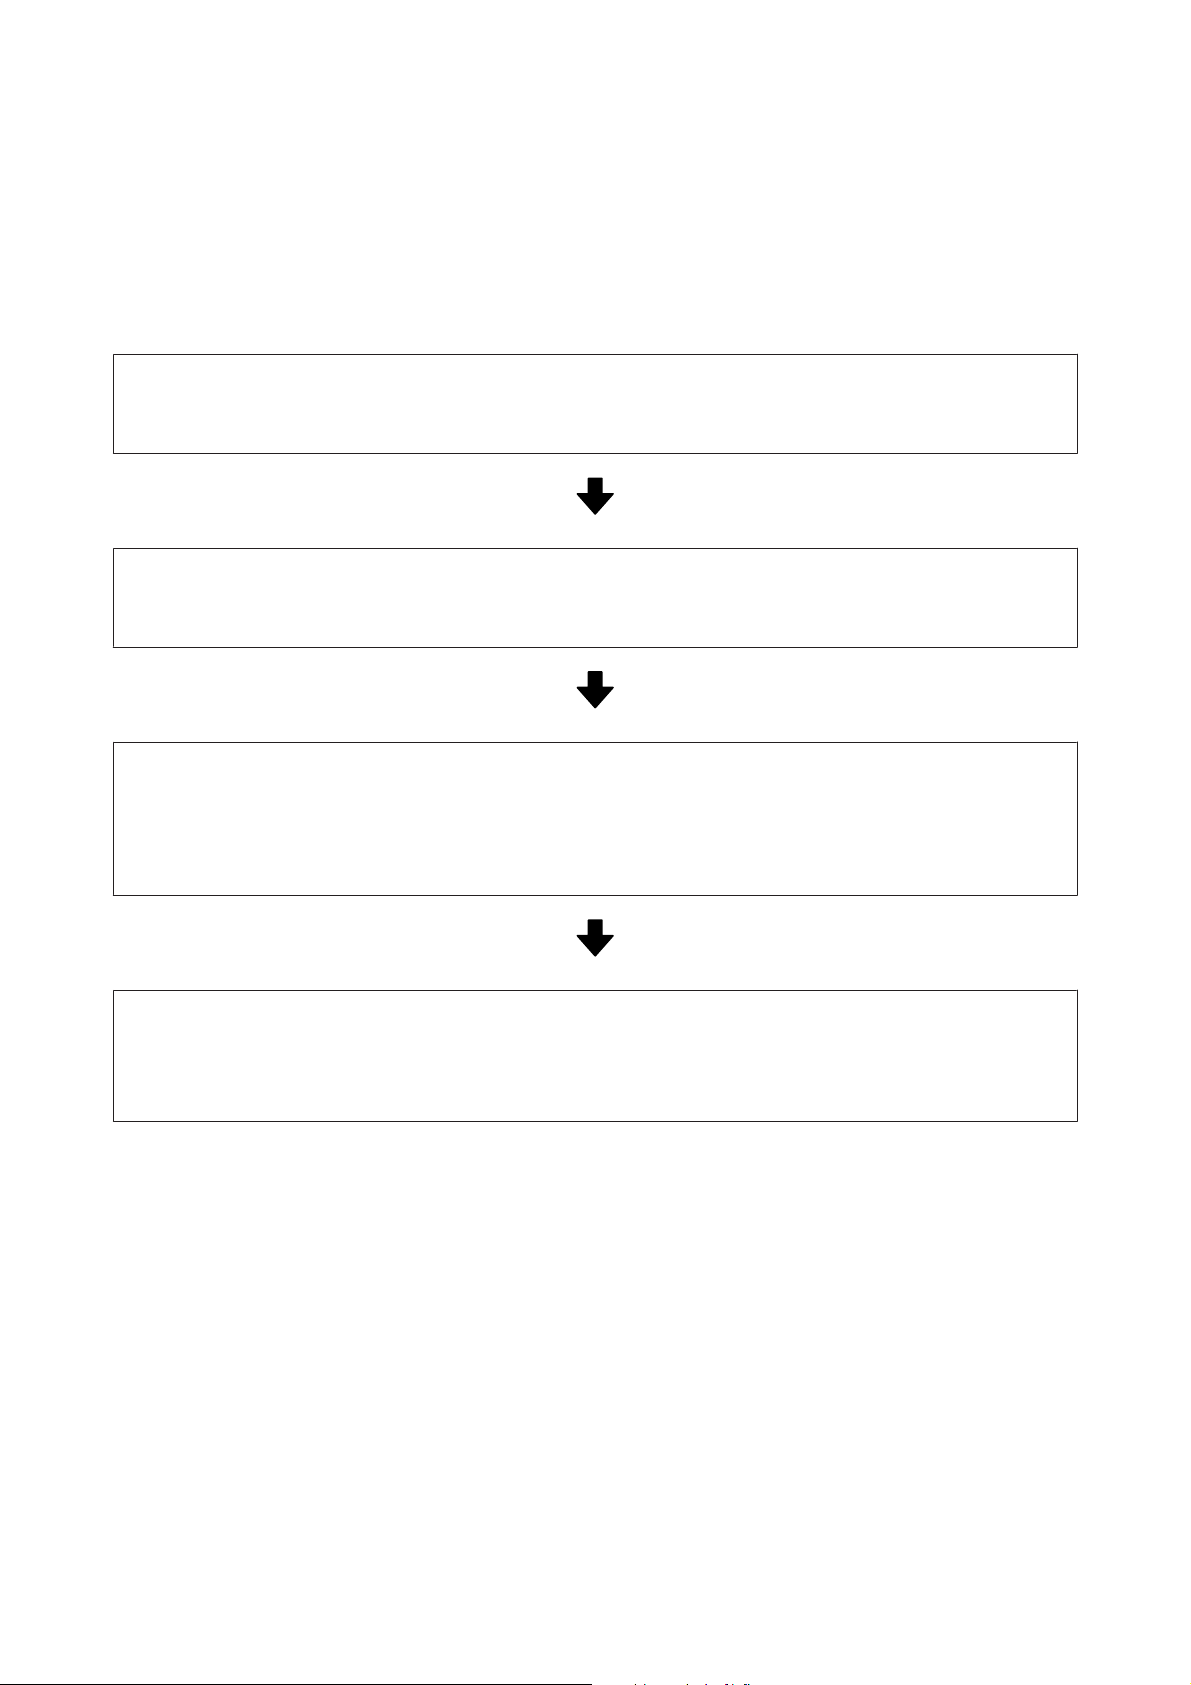
Workflow
Follow the steps below to perform printing work.
For the first time only, see “1. Prepare Printing” in the Manual for RIP Printing (PDF).
1. Perform Change Color Mode on the printer.
Proceed to step 2 if you have installed the ink cartridge to be used for printing.
If you have not installed it, be sure to perform Change Color Mode. See the User's Guide (PDF) for more information.
2. Load media in the printer and select the media setting number.
Load the media correctly and select the media setting number which has been registered to the printer.
See the User's Guide (PDF) for more information about loading media and selecting media setting number.
3. Check the data to be printed, and process it for WH/MS printing.
Open the print data in the image processing software. Make such sett ings as how to layer the ink and the specified spot colors for
the areas to print with WH/MS.
Proceed to step 4 if you are using a RIP that can print unprocessed data the same as processed data by using the print settings.
U “Processing Print Data” on page 7
4. Read the print data to the RIP, and then print it. (The procedure varies depending on the RIP that is used.)
Open the print data in the RIP and select the print mode according to the colors of ink being used and make the print settings.
We recommend that you always check the data in a preview before you start printing.
U “Print Settings in the RIP” on page 15
6
Page 7

Epson Printing with WH/MS, Matching Specific Colors
Processing Print Data
Processing Print Data
In this section we present the procedure to process the print data, including the parts that are printed with WH/MS,
using Adobe image processing software. Use Adobe Illustrator (hereafter Illustrator) to process vector data, in which
the object and text are the main thing, as in diagram A. Use Adobe Photoshop (hereafter Photoshop) to process raster
data, in which photos and graphics are the main thing, as in diagram B. See the following for the processing procedure.
U “Illustrator Settings” on page 7
U “Photoshop Settings” on page 10
Diagram A Diagram B
Note:
❏ When the print data includes no parts that are printed with WH/MS, write the data with the image processing software
before processing.
❏ With ONYX RIP and Caldera RIP, you can easily do the print settings for WH/MS while checking the data when it is
printed, without processing the data. See the following for details.
ONYX RIP U “Settings in ONYX RIP” on page 15
Caldera RIP U “Settings in Caldera RIP” on page 29
Illustrator Settings
This section uses an example of data that includes WH to explain the data processing procedure of Adobe Illustrator
CC(2015) in Windows 7.
Start Illustrator and open the print data.
A
7
Page 8
Epson Printing with WH/MS, Matching Specific Colors
Processing Print Data
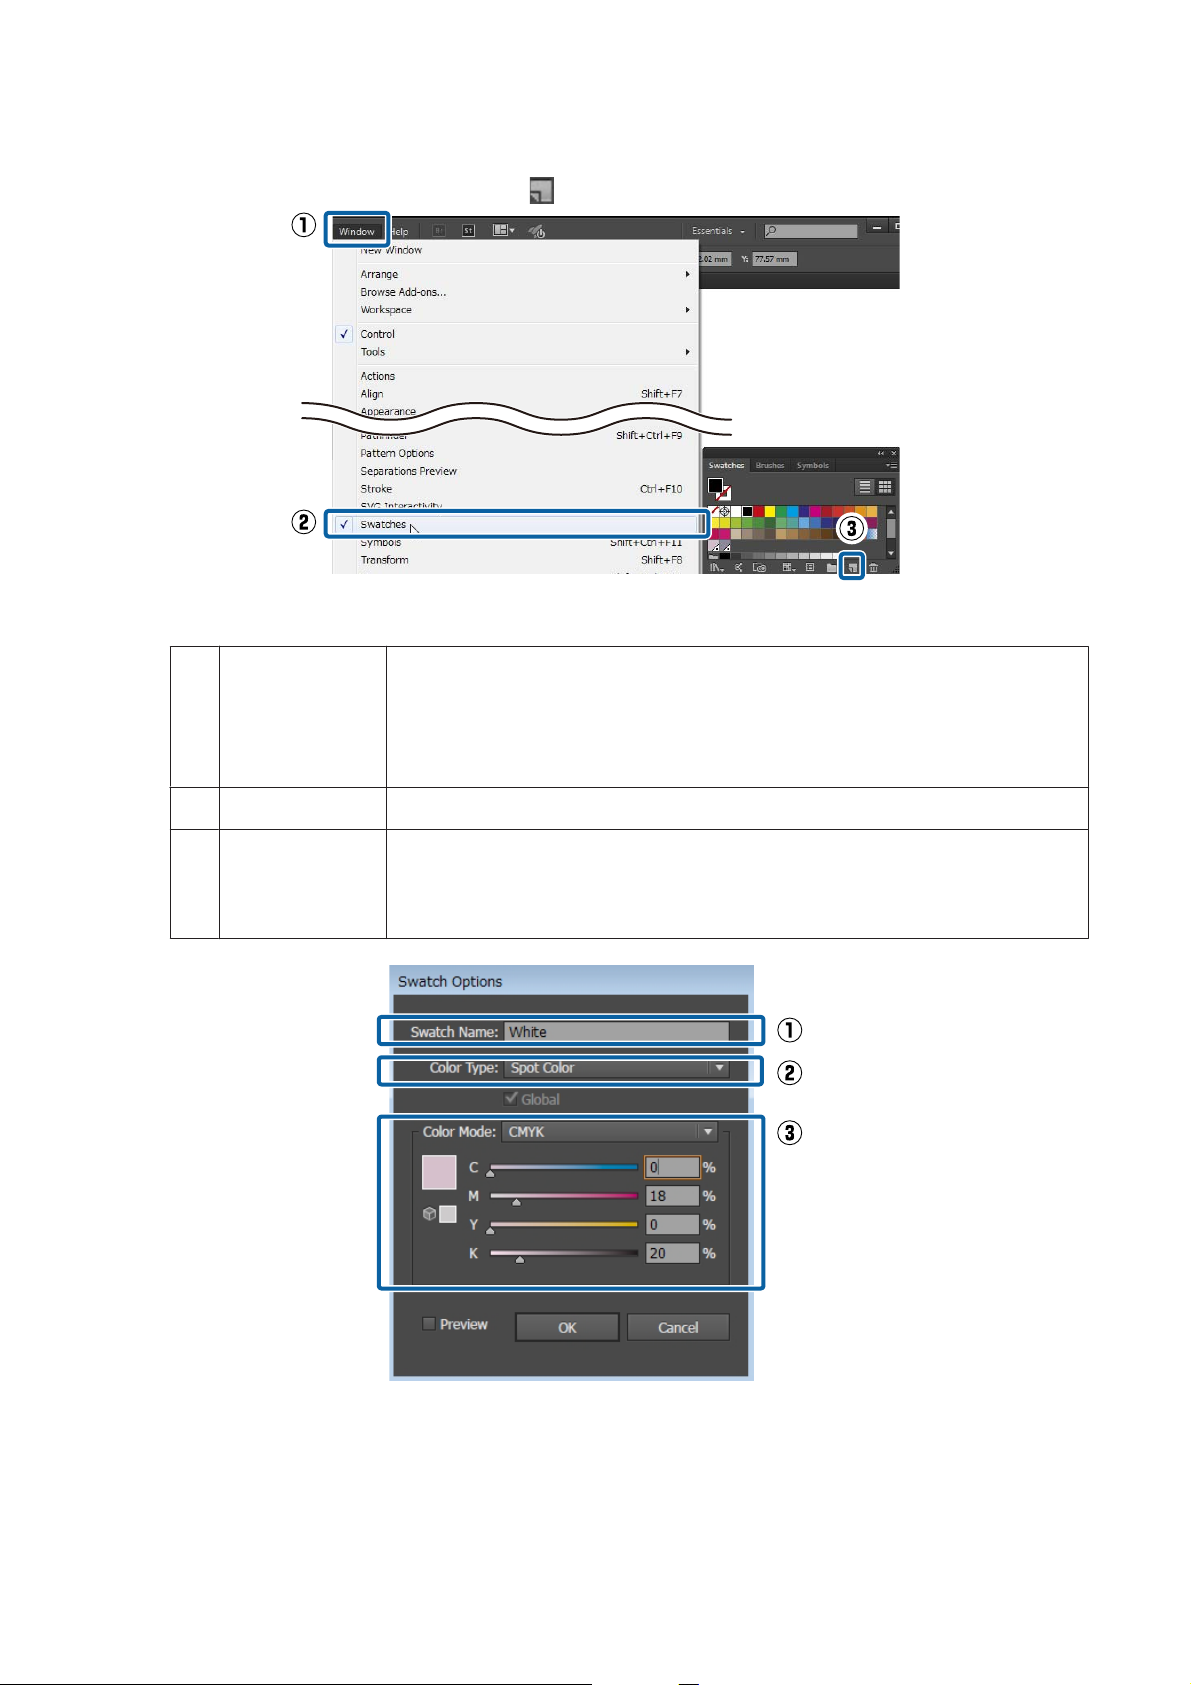
Click Window - Swatches, and then click (New Swatch).
B
Refer to the following table and specify the color to be used for areas printed with WH, and then click OK.
C
(1)
Swatch Name
(2)
Color Type Select Spot Color.
(3)
Color Mode Select CMYK and specify the color to print. We recommend specifying a bright color that is
Input the name of the spot color in single-byte characters. We recommend using names that
allow you to identify the color of the ink, such as “White” for printing with WH and “Metallic”
for printing with MS.
Use the names that are assigned here when making print settings in the RIP. Keep a record of
the names, so you do not mistake the upper and lower cases.
not used in the image for checking because it is difficult to identify the background color if
you use white (all CMYK at 0%). (In the example diagram, the color is set as a very light ash
gray.)
In the following, the parts of the image that are specified with the color from the swatch are printed in WH.
8
Page 9
Epson Printing with WH/MS, Matching Specific Colors
Processing Print Data
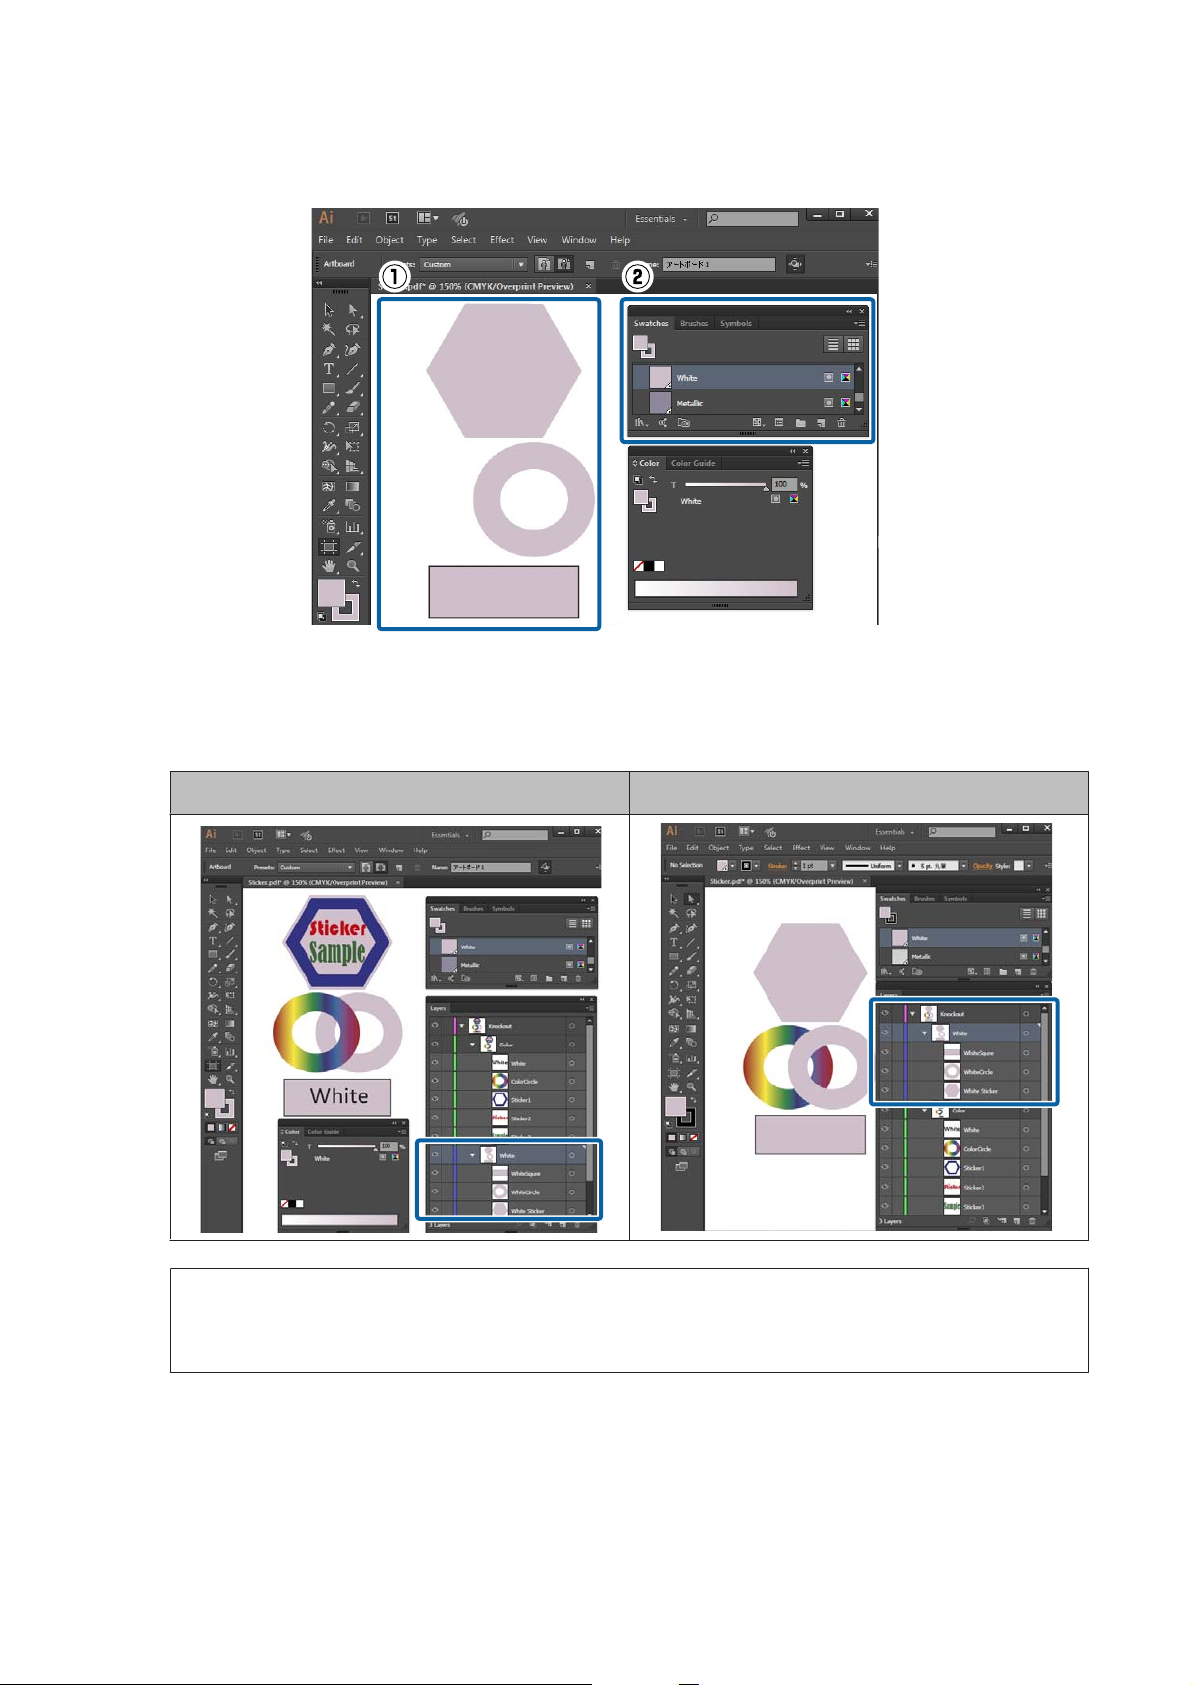
Select the objects to print with WH, and specify the spot color you saved to the swatch in step 3 to color them.
D
Click Window - Layer, and then specify the order of the layers of ink (print order).
E
When all of the objects are on the same layer, the lower objects are printed first.
When you divide the layers on which there are objects printed in WH, the lower layer are printed first.
When WH is printed first When WH is printed later (such as for inverted printing)
Note:
Depending on the RIP you are using, the print order set in the RI P may have priority over the print order that is decided
here. See the manual supplied with the RIP for more details.
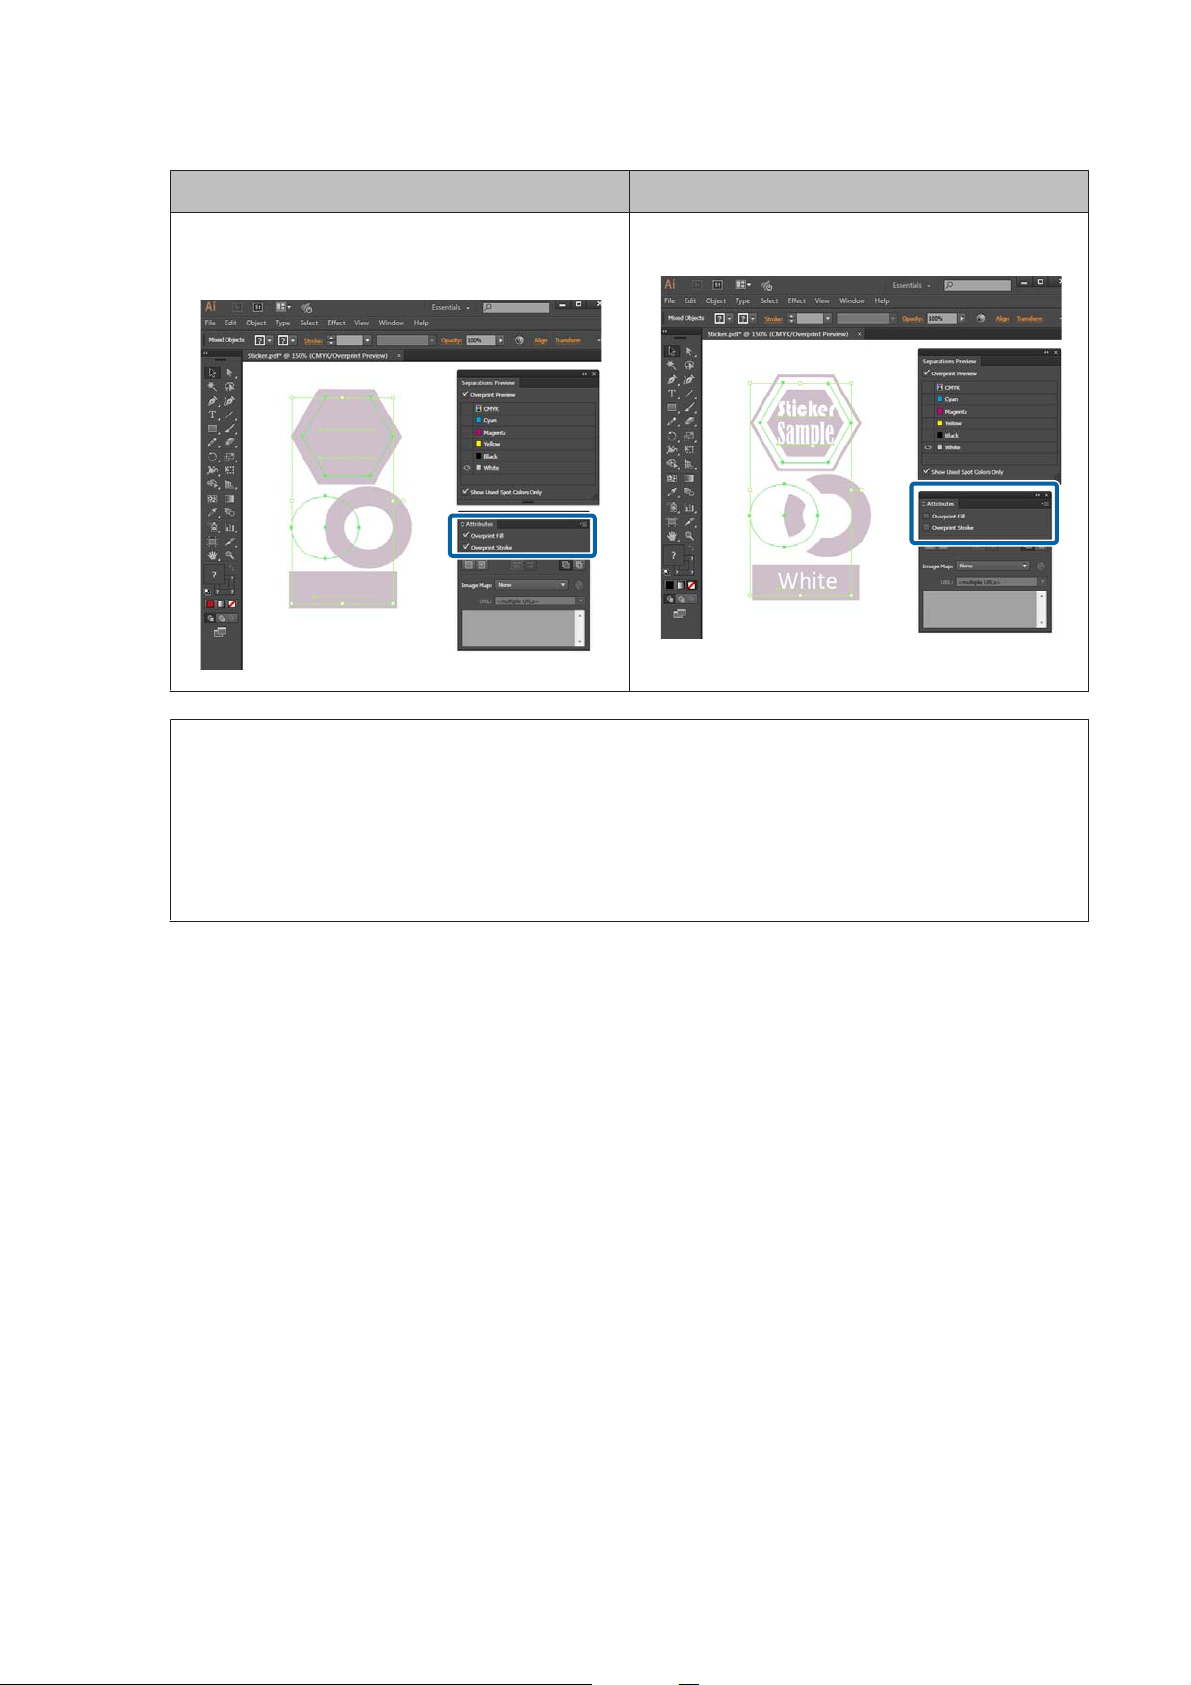
Click Window - Attributes, and then make the settings according to the print results of the parts where objects
F
overlap.
Refer to the following table and make the settings while the object that will be on top when they overlap is
selected.
9
Page 10
Epson Printing with WH/MS, Matching Specific Colors
Processing Print Data
When checked When not checked
The shapes of the objects are printed as they appear using
colors or WH according to the order of layers. (Overprint is
enabled.)
Note:
❏ The diagrams in the table are when Overprint Preview is selected in Separations Preview, and the CMYK plates
are not displayed, so it is easy to understand the results of printing with WH.
Separations Preview is displayed by clicking Separations Preview in the Window.
When they overlap, the parts on the lower layer are not
printed. (Overprint is disabled.)
❏ With Overprint, you can get the same effect as with Transparency. (To overprint, select Multiply. And, to not
overprint, select Normal.) For more information, see the online help for Illustrator.
When you have set all the objects the same way, save the data in PDF format.
G
In Compatibility, we recommend Acrobat 4 (PDF 1.3) or Acrobat 5 (PDF 1.4).
Photoshop Settings
This section uses an example of data that includes WH to explain the data processing procedure of Adobe Photoshop
CC(2015) in Windows 7.
Start Photoshop and open the print data.
A
Click Window - Layer.
B
Right click on a layer that includes parts that are printed in WH, and then click Duplicate Layer.
C
The image is copied and there are now two image layers.
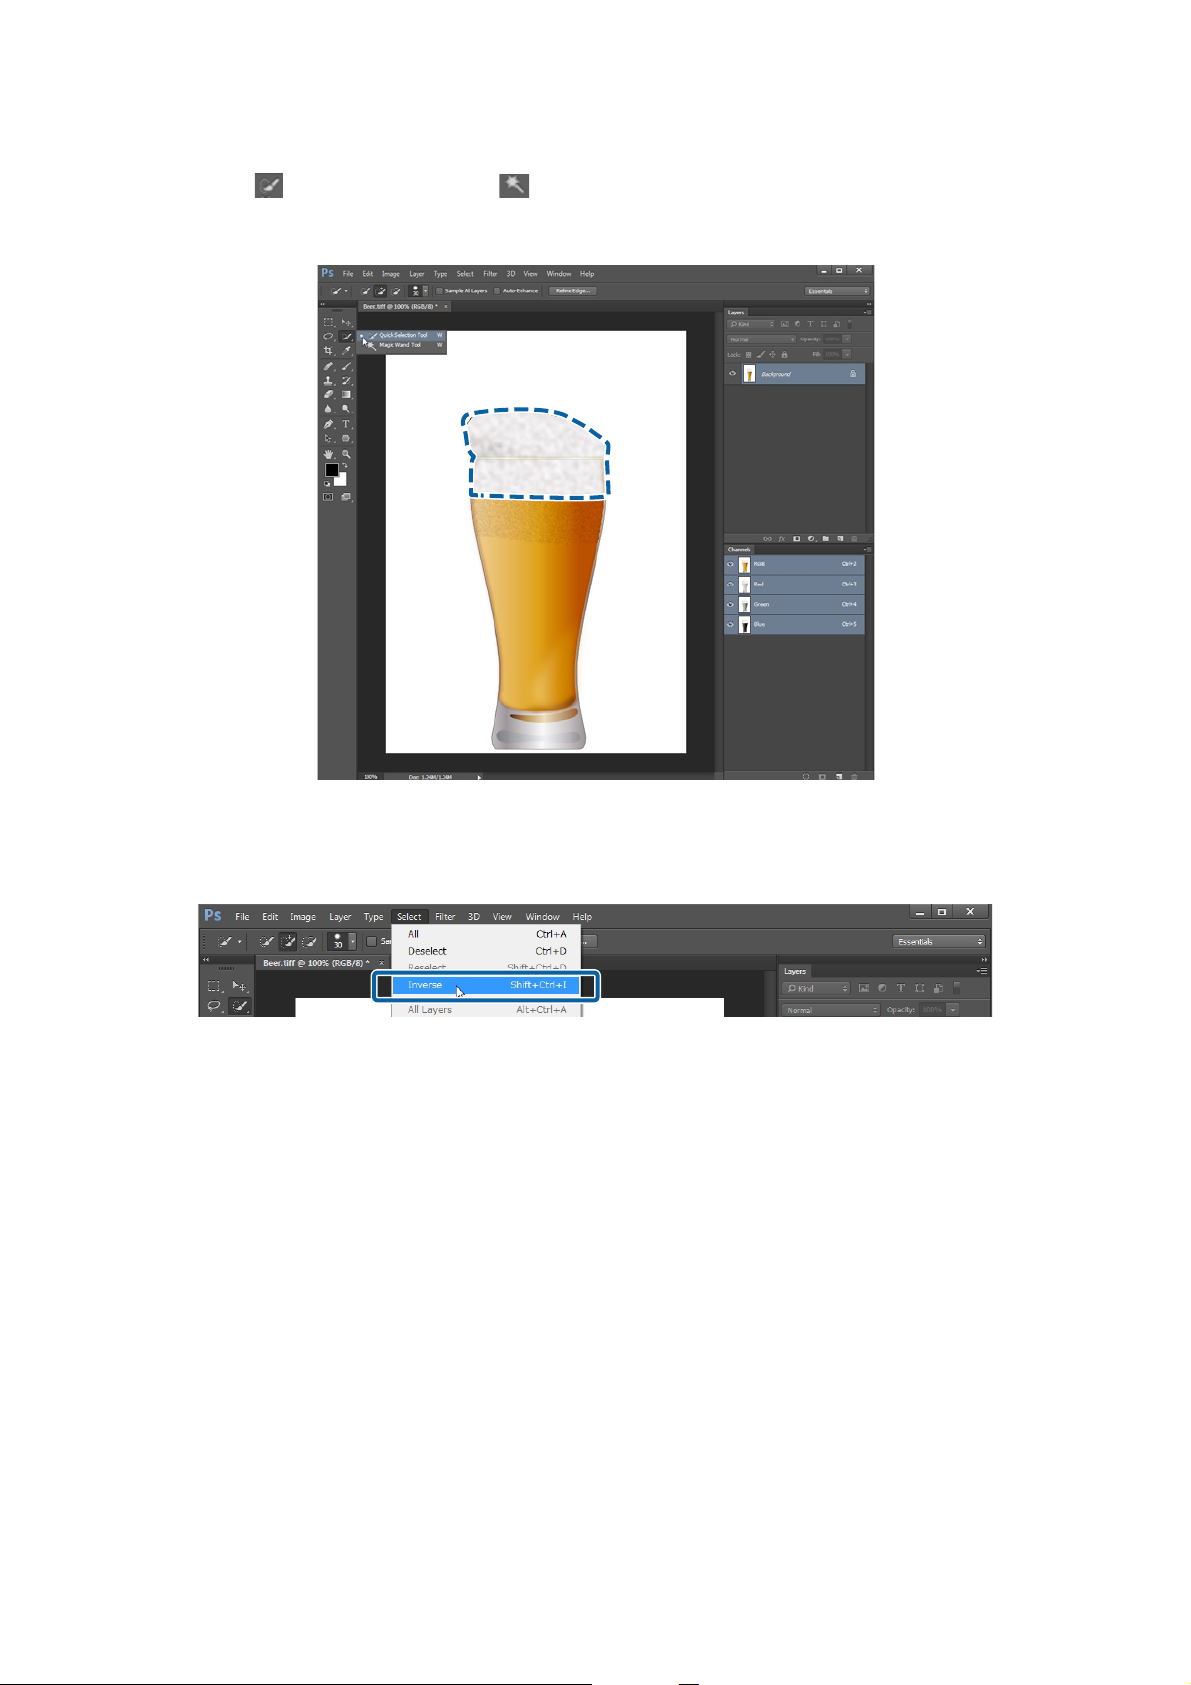
On the Layer, select the original image layer, and then delete the part that is printed in WH.
D
There are two ways to select only the part that is printed in WH. For more information, see the online help for
Photoshop.
10
Page 11
Epson Printing with WH/MS, Matching Specific Colors
Processing Print Data
❏ Use the (Quick Selection tool) or (Magic Wand tool) for selecting things.
❏ After using the Select tool to select an area that includes WH, use Select - Color Range to specify the color for
WH.
On the Layer, select the copied layer and click Select - Inverse, and then delete all the parts except those printed
E
in WH.
The parts that are not printed in WH disappear so that parts where there is nothing are selected.
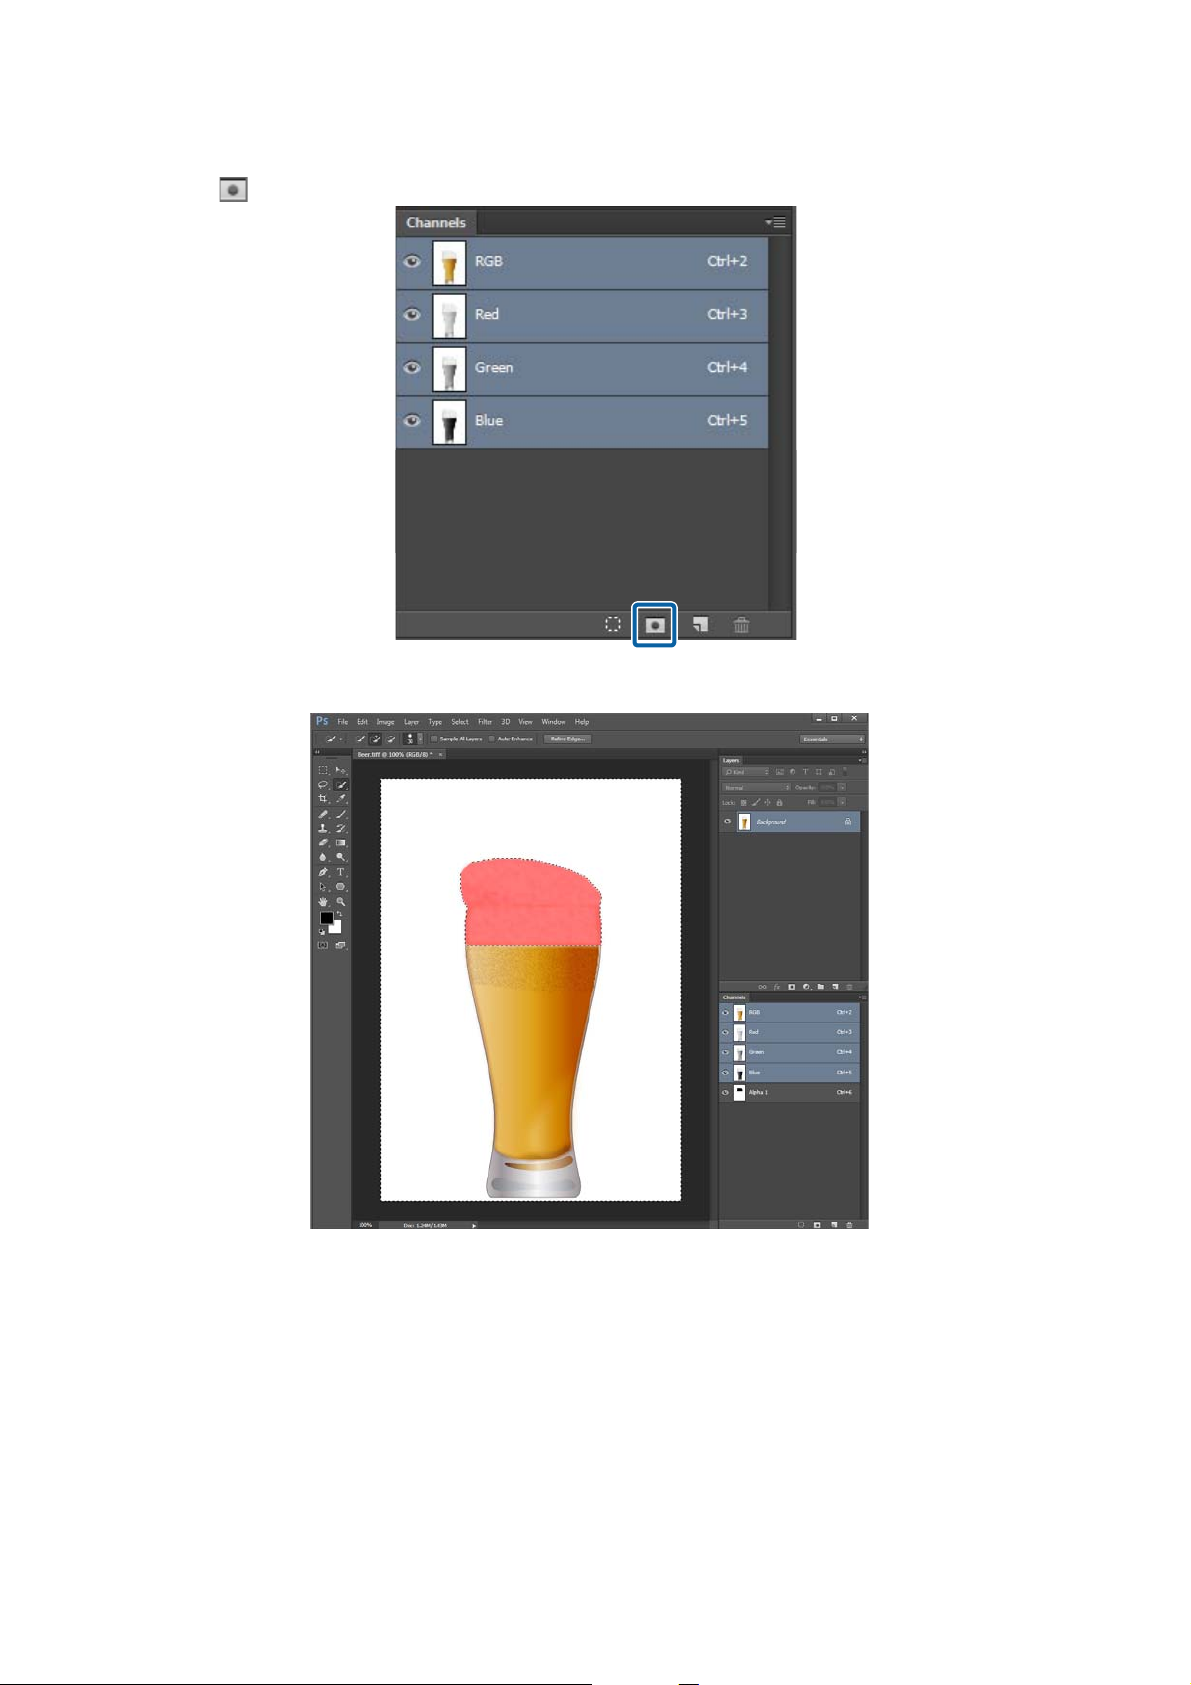
Click Window - Channel.
F
11
Page 12
Epson Printing with WH/MS, Matching Specific Colors
Processing Print Data
Click (Save selection as channel).
G
The parts that are printed in WH are masked. (The red colored parts are the masked areas.)
12
Page 13
Epson Printing with WH/MS, Matching Specific Colors
Processing Print Data
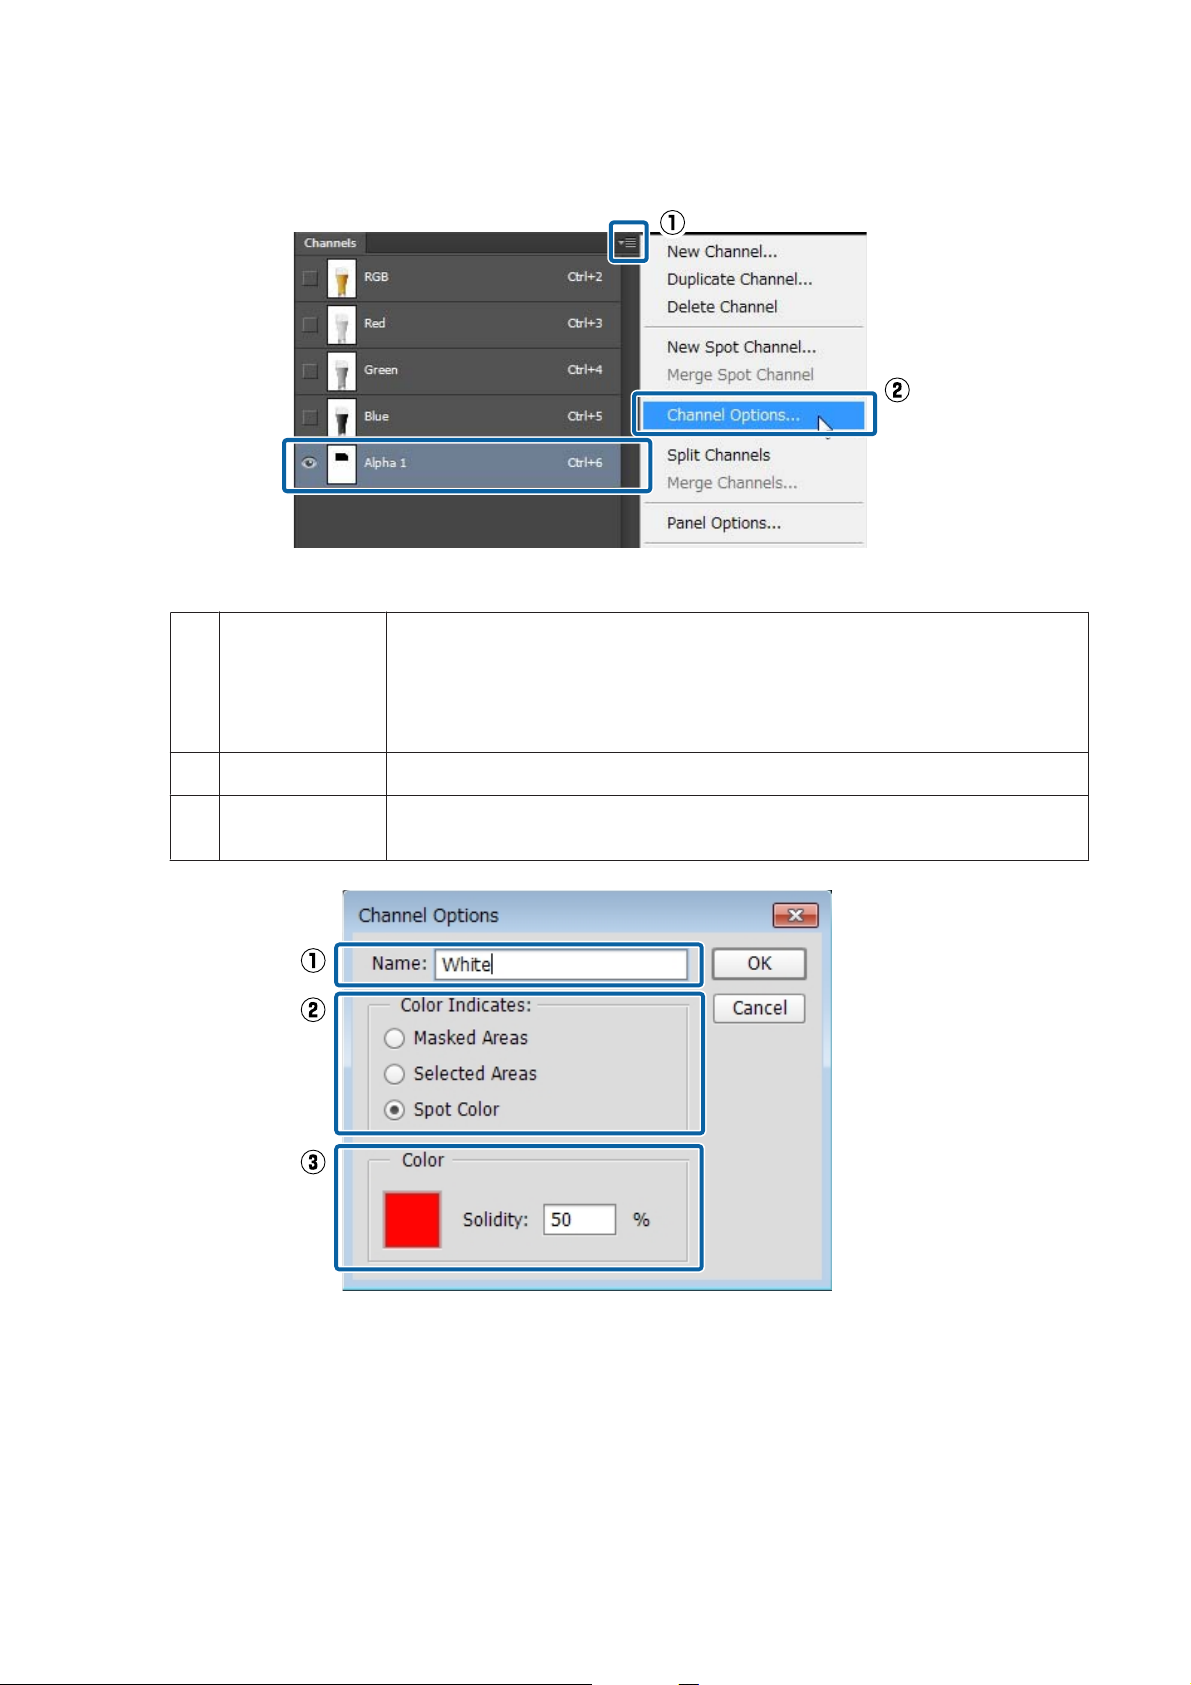
While Alpha channel is selected click the menu and then click Channel Options.
H
Refer to the following table and set (1) to (3), and then click OK.
I
(1)
Name
Input the name of the channel in single-byte characters. We recommend using names that
allow you to identify the color of the ink, such as “White” for printing with WH and “Metallic”
for printing with MS.
Use the names that are assigned here when making print settings. Keep a record of the
names, so you do not mistake the upper and lower cases.
(2)
Color Indicates Select Spot Color.
(3)
Color
When printing the image on this layer using only WH/MS:
Hide the copied layer so you do not use color ink unnecessarily when printing. (Make the setting while the
copied layer is selected using Window - Layer.) Only the alpha channel remains and printing can be done using
only WH/MS.
Specify the color in which to display parts that are printed in WH. (In the example diagram, the
red colored parts are printed in WH.)
When color ink overlaps with WH/MS:
Proceed to step 10.
13
Page 14

Epson Printing with WH/MS, Matching Specific Colors
Processing Print Data
Save the data in PDF format.
J
In Compatibility, we recommend Acrobat 4 (PDF 1.3) or Acrobat 5 (PDF 1.4).
14
Page 15
Epson Printing with WH/MS, Matching Specific Colors
Print Settings in the RIP
Print Settings in the RIP
When printing with WH/MS, it is necessary to check the print data in the RIP as you make the settings. We do not
recommend printing without checking the print data as in hot folder printing. The printing method varies depending
on the RIP that is used.
See the following for details.
ONYX RIP U “Settings in ONYX RIP” on page 15
Caldera RIP U “Settings in Caldera RIP” on page 29
DINAX Mirage U “Settings in DINAX Mirage” on page 42
Settings in ONYX RIP
Important:
c
See the Manual for RIP Printing (PDF) before you start the following tasks and import “Install and Connect” and
“Importing Print Information”.
With ONYX RIP, use the quick set (often used print settings are saved as a preset), and then print while checking the
image in Job Editor.
How to Create Quick Sets
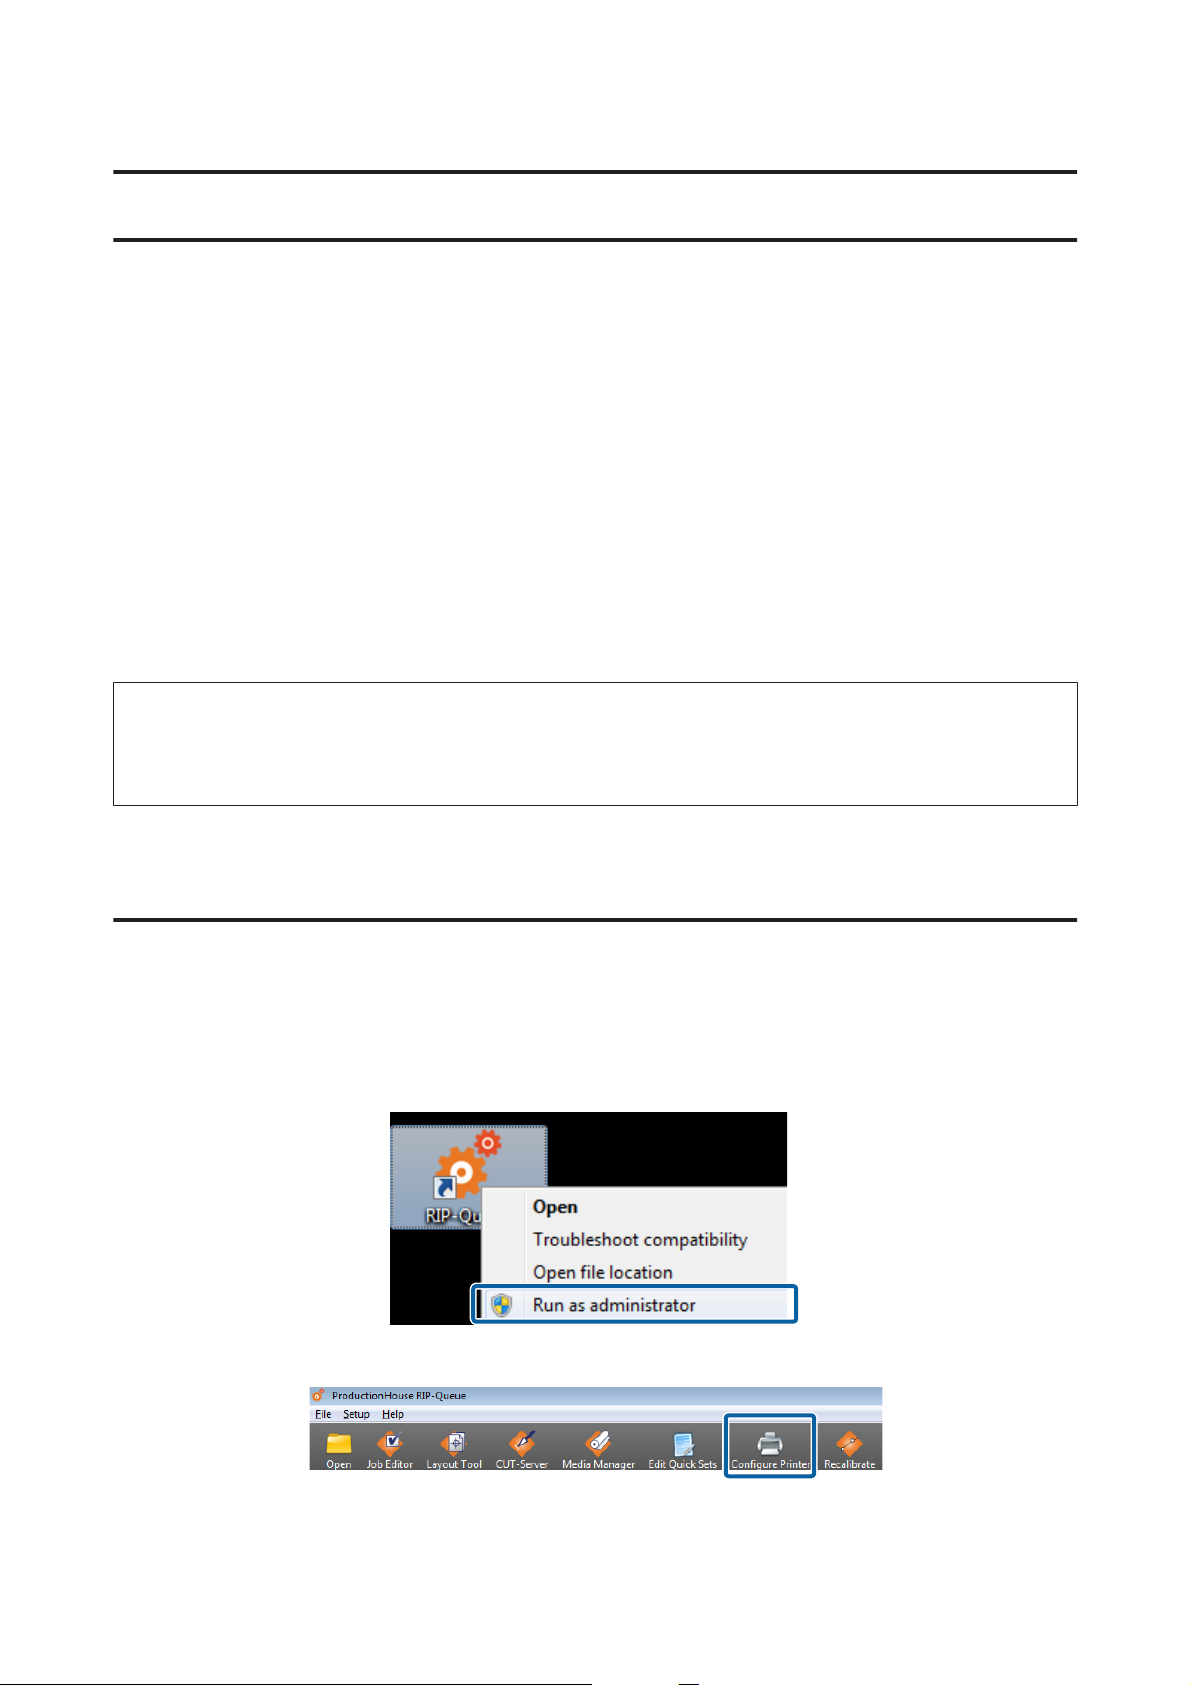
This section explains how to make the settings for RIP Queue (Ver. 12).
Right click the RIP Queue icon and select Run as administrator.
A
Always start the software in administrator mode when you update or create new quick sets.
Click Configure Printer in the toolbar.
B
15
Page 16
Epson Printing with WH/MS, Matching Specific Colors
Print Settings in the RIP
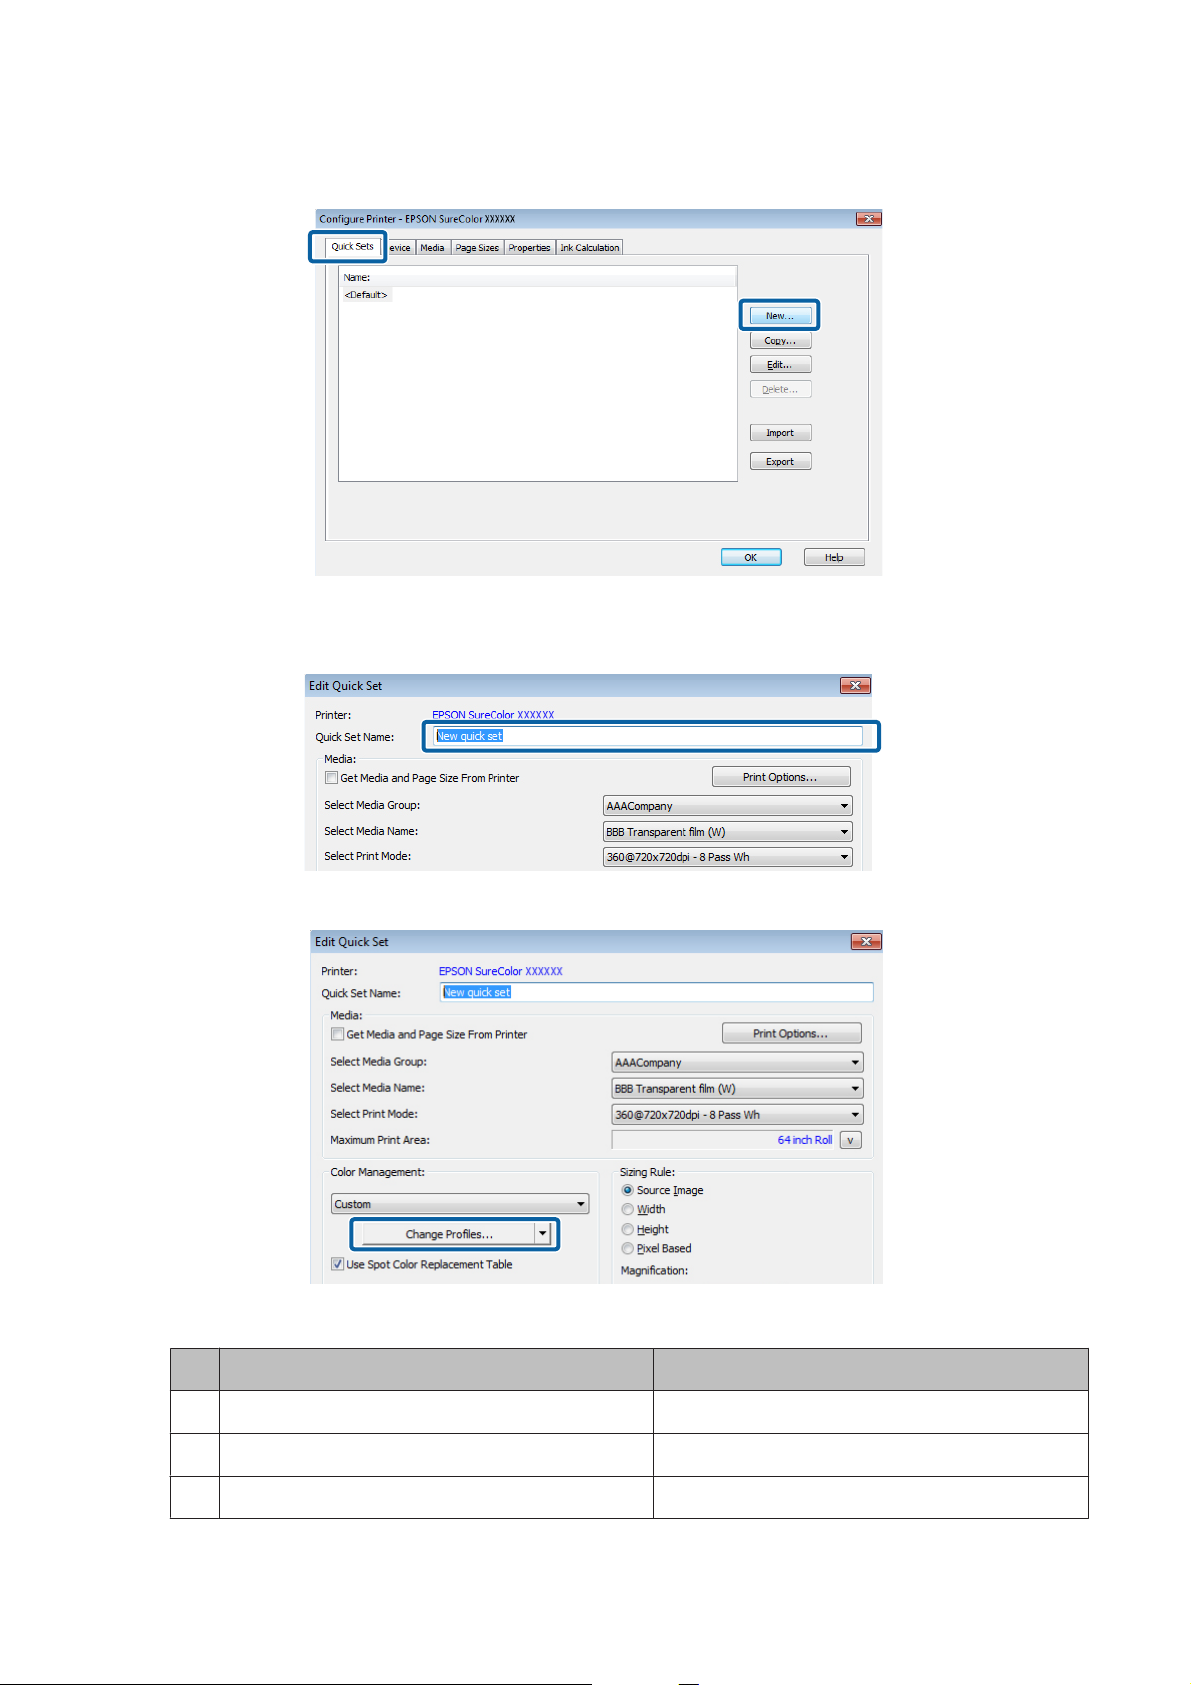
In the Quick Sets tab, click New.
C
Input the Quick Set Name.
D
We recommend using a name that is easy to understand for the other person that is printing something.
Click Change Profiles in Color Management.
E
Refer to the following table and set (1) to (3) in the Profiles tab.
F
For printing with a wide color gamut For general printing
(1) EpsonWideCMYK Ver2.icc Select general profile for printing.
(2) AdobeRGB1998.icc sRGB.icc, etc.
(3) Not checked Checked
16
Page 17

Epson Printing with WH/MS, Matching Specific Colors
Print Settings in the RIP
Refer to the following also when matching spot colors.
U “Settings in ONYX RIP” on page 46
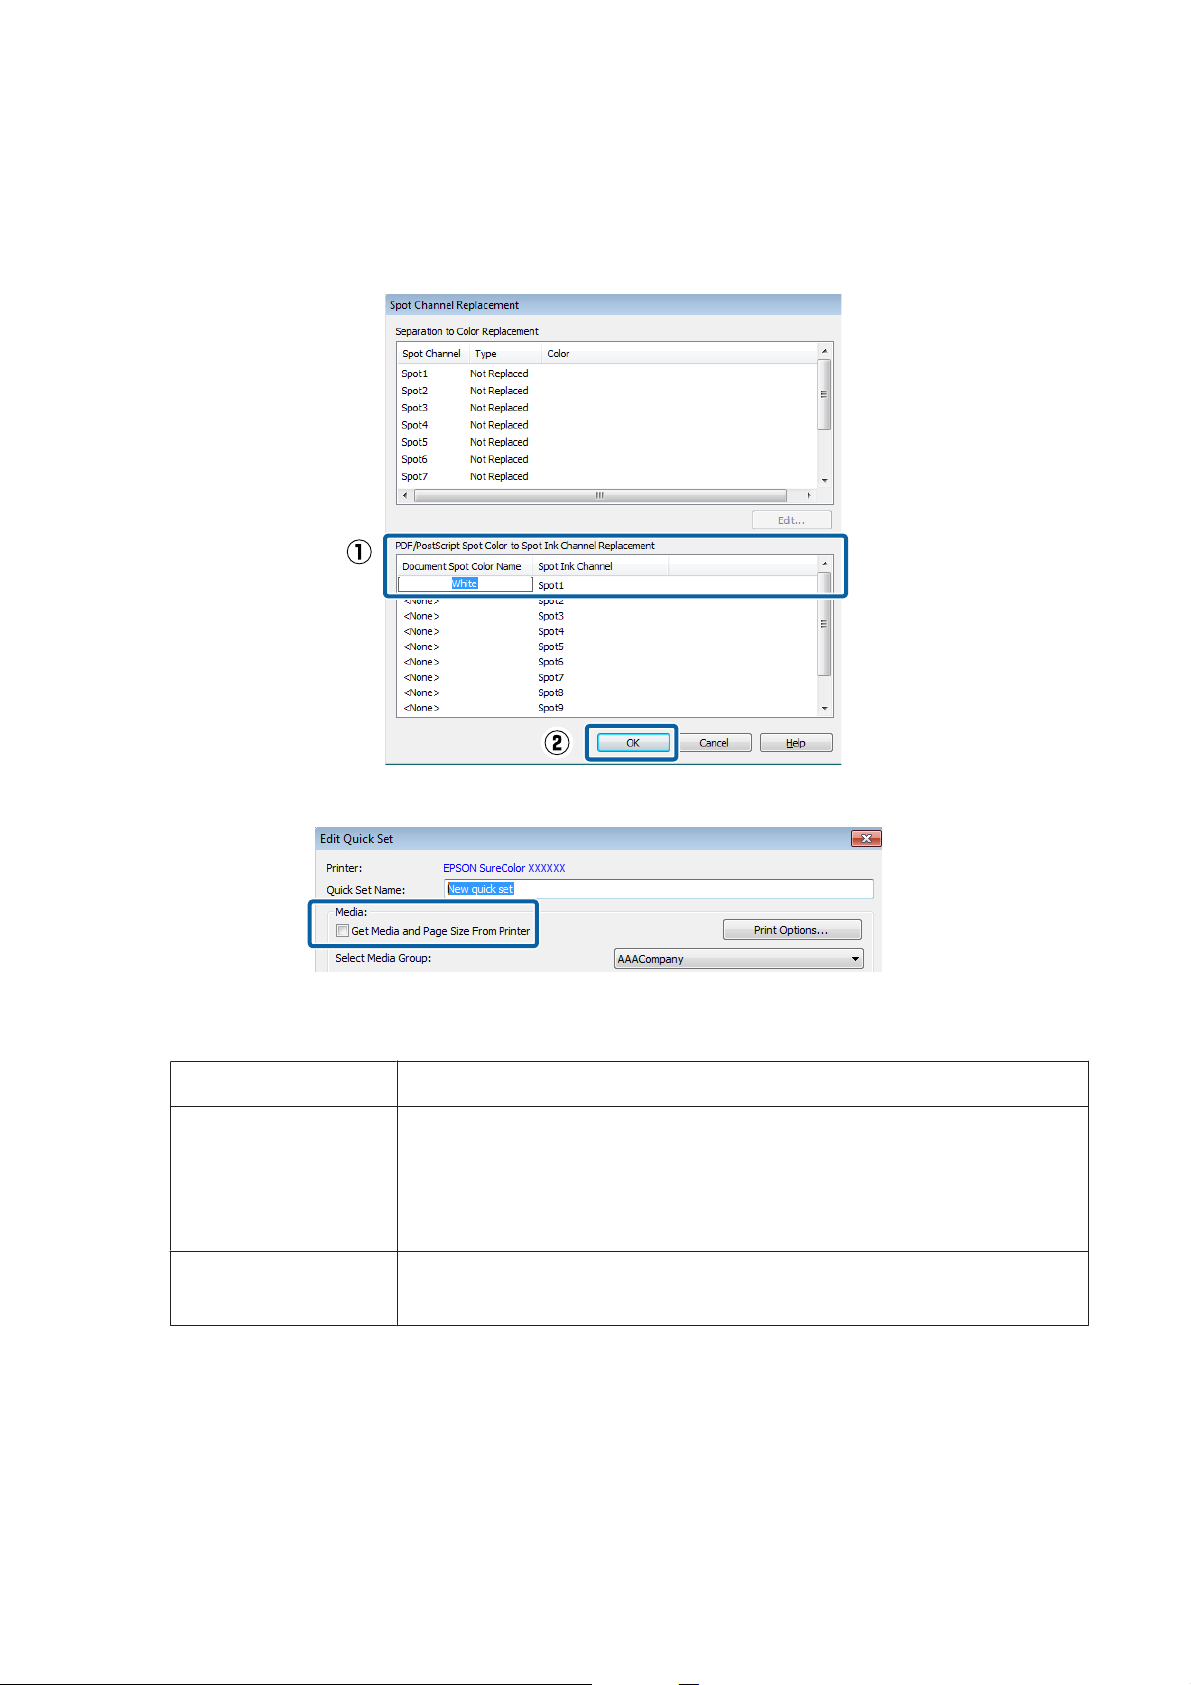
In the Output tab, click Spot Channel Replacement.
G
17
Page 18
Epson Printing with WH/MS, Matching Specific Colors
Print Settings in the RIP
Input the spot color name for WH/MS in the Document Spot Color Name, and then click OK.
H
Click the left side of Spot 1 to input. Input the correct name (White or Metallic etc.) saved for the spot color
swatch (Illustrator) or spot color channel (Photoshop). Be careful that you do not mistake the upper and lower
cases or misspell the name.
Return to the Edit Quick Set screen, and clear the Get Media and Page Size From Printer check box.
I
Refer to the following table and make the settings to match the media setting that has been selected on the
J
printer's control panel.
Select Media Group
Select Media Name
Select Print Mode
* If you cannot find the name of the company for the media you are using, search for the EMX files provided by Epson. If no
EMX files have been provided, select a media that has similar characteristics.
Select the name of a media company.
Select from the following according to the combination of ink and media you are using.
❏ When printing with only color ink: media name only
❏ When printing MS: something that has an (Ms) after the media name
❏ When printing WH: something that has a (W) after the media name
Select a print mode (resolution and number of passes).
See the supplementary table about how to read Print mode.
*
18
Page 19

Epson Printing with WH/MS, Matching Specific Colors
Print Settings in the RIP
How to Read Print Mode
The following settings output the print data (input resolution of 360 dpi) to 720 x 1440 dpi and then print 32
passes in WH and color. Descriptions of the settings from A to E are shown in the following table.
A Indicates the input resolution. You can select either 360 or 720 dpi.
B Indicates the output resolution of the RIP. The higher the number the better the print quality, but the printing
speed decreases.
C Indicates the print passes (how many times printing is split for one interval). The higher the number the better the
print quality, but the printing speed decreases. Depending on the media you are using, the term High Quality may
appear following the name of the media. This setting helps prevent the occurrence of tin t unevenness and banding
from the setting of the same number of passes, but it reduces the print speed.
D Indicates the spot color that is used. (Wh or Ms)
When printing with only color ink, select a mode that does not have D or E.
E Indicates number of print layers. When printing with WH/MS and color ink at the same time, that do not overlap,
select a mode that does not have E. Whe n pr int ing wit h WH /MS and col or i nk t hat do o ver lap , se lec t 2L or 3 L
can be selected only when printing with WH.) When you select 3L, you also need to select how the print results
appear.
❏ Printouts that appear correct from just either the front or back side:_1Way
❏ Printouts that appear correct from both sides:_2Way
* Depending on your country or region, you may not be able to select 3L. For more details, contact your dealer or Epson
Support.
Click Print Options.
K
*
. (3L
19
Page 20

Epson Printing with WH/MS, Matching Specific Colors
Print Settings in the RIP
If necessary, set (1) to (4) and then click OK.
L
(1) Print Order
Set the order in which colors and WH/MS are printed. The settings that can be used vary depending on the
print mode that is selected. If you select a setting value that cannot be used, the RIP changes the print mode
automatically.
When printing 1 layer or 2 layers (2L)
Spot->Color(Underprint)
Color->Spot(Overprint)
Color and Spot
* When you want to read the character correctly when looking at the printout from the back side, invert the image.
Prints WH/MS under the colors.
Prints WH/MS over the colors.
Prints both WH/MS and colors at the same time.
Use this only when you want to print very fast.
*
*
When printing 3 layers (3L) (only when printing WH)
Color->White->Color
White->White->Color
Color->White->White
* When you want to read the character correctly when looking at the printout from the back side, invert the image.
Colors are printed two times with WH in between.
Select Mirror first color layer when you want to be able to correctly read
the text from either the front or back sides.
Prints two coats of WH under the colors.
Prints two coats of WH over the colors.
*
(2) White Print Type (when printing inWH only)
Select one of the following according to the conditions of the part you are printing in WH.
❏ Standard White: normally select this one.
❏ High Contrast White: when the data includes parts that are printed all over (solid printing) in WH.
20
Page 21

Epson Printing with WH/MS, Matching Specific Colors
Print Settings in the RIP
(3) Enable Tinted White (only when printing 2 layers (2L))
Select this when you do not want to print with WH ink only, but when you want to mix it with other colors
(LC/LM/Y/LK) to adjust the colors, and then click Edit. Adjust the colors in the following screen.
(1) Set the mixing color ink ratio to WH 100%.
(2)
Set the ratios for each color so that the total value for all the colors is 100%, and then click OK.
(4) Page Dry Time
Set the drying time in which additional drying is done by the drying fan and heater after a job has finished
printing.
Note:
❏ When printing in layers of color inks and WH/MS, if the printed surface is rolled up before it has sufficiently dried,
the printed surfaces may stick together. The appropriate drying times vary depending on the media you are using.
However, we recommend setting a little longer time than when printing with color ink only.
❏ Set the Drying Time Per Pass on the control panel menu of the printer for banner print jobs (length rolled before
additional drying after a print job). See the User's Guide (PDF) for more information.
Return to the Edit Quick Set screen, and then click OK.
M
Use Job Editor, for the following, to check the print data as you print. The procedure varies depending on whether or
not the data is processed.
When the print data has already been processed:U “Printing Processed Data” on page 21
When the print data is not processed:U “Printing Unprocessed Data” on page 24
Printing Processed Data
Refer to the previous sections and create a quick set in advance.
U “How to Create Quick Sets” on page 15
Double click the RIP Queue icon.
A
21
Page 22

Epson Printing with WH/MS, Matching Specific Colors
Print Settings in the RIP
Click Open in the toolbar.
B
Select the print data and the quick set, select Open in Job Editor, and then click Open. Select a quick set that has
C
been made for printing with WH/MS.
Job Editor starts automatically.
22
Page 23

Epson Printing with WH/MS, Matching Specific Colors
Print Settings in the RIP
Click the Printer and Media tab, and then check the print data.
D
The WH/WH print areas that were specified in the image processing software appear with their colors. (The
RIP automatically applies the colors to check the display.) If the print data has no problem, click Apply.
Click the printer icon.
E
23
Page 24

Epson Printing with WH/MS, Matching Specific Colors
Print Settings in the RIP
Click Print Now on the right side of the RIP Queue screen.
F
Printing Unprocessed Data
In this section we explain the procedure for printing by assigning the WH/MS print area to parts of the images and
objects. Refer to the previous sections and create a quick set in advance.
U “How to Create Quick Sets” on page 15
Double click the RIP Queue icon.
A
Click Open in the toolbar.
B
24
Page 25

Epson Printing with WH/MS, Matching Specific Colors
Print Settings in the RIP
Select the print data and the quick set, select Open in Job Editor, and then click Open. Select a quick set that has
C
been made for printing with WH/MS.
Job Editor starts automatically.
Click Spot Layer Tool from Tools in the Color Correction tab.
D
Select Enable Spot Layer Generation.
E
25
Page 26

Epson Printing with WH/MS, Matching Specific Colors
Print Settings in the RIP
Select the print area for WH/MS.
F
According to the selected information, print area for WH/MS will be colored for display checking in the
preview screen.
Flood Fill: Prints the entire area of the print data with WH/MS.
Fill Image Area: Prints WH/MS in the areas that include images or objects.
Fill Non- Image Area: Prints WH/MS in the areas with no images or objects.
26
Page 27

Epson Printing with WH/MS, Matching Specific Colors
Print Settings in the RIP
Set (1) and (2) as necessary.
G
(1) Fill Choke/Spread (when Fill Image Area or Fill Non-Image Area is selected)
You can set how far the ink extends outside the images and objects in the WH/MS print area.
By selecting a negative value, you can keep the ink inside the edges of the images and objects.
(2) Knockout settings (when Flood fill is selected)
You can make knockout settings (not print when the WH/MS and color inks overlap on printed parts) under
Media Color Handling by clicking Show Advanced Options. See the following table for details.
No Knockout
Spot Knockout Does not print WH/MS only in parts with specified colors. Be sure to specify a color in Set
Full Knockout
Prints WH/MS even in parts that overlap with color inks.
Extra Spot Knockout Color.
Does not print WH/MS in parts that overlap with color inks.
27
Page 28

Epson Printing with WH/MS, Matching Specific Colors
Print Settings in the RIP
Click Apply in the Printer and Media tab.
H
Click the printer icon.
I
28
Page 29

Epson Printing with WH/MS, Matching Specific Colors
Print Settings in the RIP
Click Print Now on the right side of the screen.
J
Settings in Caldera RIP
Important:
c
See the Manual for RIP Printing (PDF) before you start the following tasks, from “Install and Connect” to “Create
Configuration (Print Settings)”.
This section explains the procedure for printing in Caldera RIP (Ver. 10.2) on a Mac OS X.
Start Caldera RIP.
A
29
Page 30

Epson Printing with WH/MS, Matching Specific Colors
Print Settings in the RIP
In the Main tab, click Fileman.
B
Select a file to print, and then select Open.
C
Drag and drop an image from Default to the preview area in the printer dialog box.
D
30
Page 31

Epson Printing with WH/MS, Matching Specific Colors
Print Settings in the RIP
Click (Colors) in the printer dialog box.
E
Refer to the following table and set (1) to (3) in the Color Management tab, and then click Close.
F
For printing with a wide color gamut For general printing
(1) Not checked Checked
(2) AdobeRGB1998.icc sRGB.icc, etc.
(3) EpsonWideCMYK Ver2.icc Select general profile for printing.
31
Page 32

Epson Printing with WH/MS, Matching Specific Colors
Print Settings in the RIP
Note:
If you cannot find Epson Wide CMYK_Ver2.icc in (3), click More in the lowest level and select the Files tab in the
Profile Browser screen.
Refer to the following also when matching spot colors.
U “Settings in Caldera RIP” on page 50
32
Page 33

Epson Printing with WH/MS, Matching Specific Colors
Print Settings in the RIP
Do the print settings in the printer dialog box.
G
The white text settings are the recommended sett ings. Print quality cannot be guaranteed for settings other than
the white text.
See the following table for a summary of the setting items. (See the manual supplied with the RIP for more
details.)
Copies Specify the number of copies.
Resolution Specify the print resolution for the image.
Loading Select the width of the media that has been loaded in the printer.
Media Select the type of the media that has been loaded in the printer.
Mode If you are using print information that is imported from an EMX file, select a setting that
includes Epson Precision Dot CMYK in its name.
Quality Select this according to the number of print passes and layers. The recommended settings
for each print pass are indicated by an “*” (asterisk). See the supplementary table for details.
Action
Normally, select Print. Printing starts automatically when the settings are complete.
How to Read Quality
The following settings are for 32 passes bidirectional printing of WH and color. Descriptions of the settings
from A to D are shown in the following table.
A Indicates print passes (how many times printing is split for one interval). The higher the number the better the print
quality, but the printing speed decreases. Depending on the media you are using, the term High Quality may
appear following the name of the media. This setting helps prevent the occurrence of uneven density and banding
from the setting of the same number of passes, but it reduces the print speed.
33
Page 34

Epson Printing with WH/MS, Matching Specific Colors
Print Settings in the RIP
B Indicates spot colors used for printing. Select from those below.
❏ When printing with WH and color ink that overlap:Wh
❏ When printing with WH and color ink at the same time, that do not overlap:(Wh)
❏ When printing with MS (either overlapping or not):Ms
❏ When printing with only color ink and a low number of print passes: mode that does not have B or C.
❏ When printing with only color ink and a high number of print passes: mode that has (Wh) in B that does not
have C.
C Indicates number of print layers. When printing with WH/MS and color ink at the same time, that do not overlap,
select a mode that does not have C. Whe n pr int ing wit h WH /MS and col or i nk t hat do o ver lap , se lec t 2L or 3 L
can be selected only when printing with WH.) When you select 3L, you also need to select how the print results
appear.
❏ Printouts that appear correct from just either the front or back side:1 Way
❏ Printouts that appear correct from both sides:2 Way
D Indicates the method in which printing is done. The printhead prints while moving both left and right; or the
printhead prints while moving in only one direction. You can select one of the following.
❏ Bid: The print head prints while moving both left and right, so printing can be done quickly.
❏ Unid: Printing is done only in one direction. The print quality increases, but the printing speed decreases.
* Depending on your country or region, you may not be able to select 3L. For more details, contact your dealer or Epson
Support.
Click (Page Setup).
H
*
. (3L
34
Page 35

Epson Printing with WH/MS, Matching Specific Colors
Print Settings in the RIP
Select the White or Metallic tab and select Enable Separation.
I
Note:
Printing may not be done correctly if Enable Separation is selected in both the White and Metallic tabs. Clear the
selections in tabs for colors of ink that are not being used for printing.
If necessary for the print data, set (1) and then click Close.
J
Processed print data
Method
S p ot S e le c t a n a m e ( W h i t e o r Me t a l l i c) t h a t i s s av e d i n a s po t c o l o r sw a t c h ( I l lu s t r a t o r) o r s p o t co l o r
Unprocessed print data (when you want to specify WH/MS print areas in the RIP settings)
Method
Computation Select one of the following as the part you want to print with WH/MS.
Density Set the ink density for WH/MS.
Unprocessed print data (when WH/MS is printed all over)
Method
Density Set the ink density for WH/MS.
Select Use a Spot Color.
Select Automatic to automatically set Spot.
channel (Photoshop).
Select Generate from CMYK data.
❏ Parts that have images and objects:Generate where there is some ink
❏ Parts that do not have images and objects:Generate where there is no ink
Select Fill page coverage.
35
Page 36

Epson Printing with WH/MS, Matching Specific Colors
Print Settings in the RIP
Note:
When printing something other than PDF format data in the channel for printing WH/MS, select Use Extra Channel
for Method and then select the ink color for Channel. See the manual supplied with the RIP for more details.
Click (Advanced settings).
K
36
Page 37

Epson Printing with WH/MS, Matching Specific Colors
Print Settings in the RIP
Check that the following item is not selected in the Printer tab.
L
Select this only when the print data has parts that are printed all over (solid printing) with WH.
Set the print order and ink colors used for each layer.
M
The settings vary depending on the number of print layers. See the following for details.
37
Page 38

Epson Printing with WH/MS, Matching Specific Colors
Print Settings in the RIP
When printing only in color ink or when printing colors and WH/MS without overlapping
Select None for everything in (1) and (3). Set (2) according to the following table.
(2)
Normal layer Colors+
Normal layer operations
The setting is different from where to see the print results.
❏ Front:None
❏ Back: Mirrored (when printing inverted)/None (when printing normally)
When 2L is selected
The settings vary depending on the print order of WH/MS and color ink.
❏
When printing WH/MS on top (when the print results can be seen from the back side)
Set (1) and (2) according to the following table. Select None for everything in (3).
(1)
Top layer Metallic Silver/White
Top layer operations None
(2)
Normal layer Colors+
Normal layer operations Mirrored (when printing inverted)/None (when printing normally)
❏
When printing WH/MS on bottom (when the print results can be seen from the front side)
Select None for everything in (1). Set (1) and (2) according to the following table.
(2)
Normal layer Colors+
Normal layer operations None
(3)
Bot layer Metallic Silver/White
Bot layer operations None
When 3L is selected
The settings vary depending on the print order of WH and color ink.
❏
When printing color ink two times with WH in between (when the print results can be seen from both
sides)
(1)
Top layer Colors
Top layer operations None
(2)
Normal layer Metallic Silver/White
Normal layer operations None
(3)
Bot layer Colors
Bot layer operations Mirrored
38
Page 39

Epson Printing with WH/MS, Matching Specific Colors
Print Settings in the RIP
❏
When printing WH two times overlapping on color ink (when the print results can be seen from the back
side)
(1)
Top layer Metallic Silver/White
Top layer operations None
(2)
Normal layer Metallic Silver/White
Normal layer operations None
(3)
Bot layer Colors
Bot layer operations Mirrored (when printing inverted)/None (when printing normally)
❏
When printing WH two times overlapping under color ink (when the print results can be seen from the
front side)
(1)
Top layer Colors
Top layer operations None
(2)
Normal layer Metallic Silver/White
Normal layer operations None
(3)
Bot layer Metallic Silver/White
Bot layer operations None
39
Page 40

Epson Printing with WH/MS, Matching Specific Colors
Print Settings in the RIP
In the Media tab, set Drying time (in seconds) and click Close.
N
Set the drying time in which additional drying is done by the drying fan and heater after a job has finished
printing.
Note:
❏ When printing in layers of color inks and WH/MS, if the printed surface is rolled up before it has sufficiently dried,
the printed surfaces may stick together. The appropriate drying times vary depending on the media you are using.
However, we recommend setting a little longer time than when printing with color ink only.
❏ Set the Drying Time Per Pass on the control panel menu of the printer for banner print jobs (length rolled before
additional drying after a print job). See the User's Guide (PDF) for more information.
40
Page 41

Epson Printing with WH/MS, Matching Specific Colors
Print Settings in the RIP
When all the settings are complete, click Print in the printer dialog box.
O
Printing starts automatically.
41
Page 42

Epson Printing with WH/MS, Matching Specific Colors
Print Settings in the RIP
Note:
Click
We recommend using a name for the settings that is easy to understand for other people that are printing something.
to save the setting. Then you can print by recalling the settings next time.
Settings in DINAX Mirage
Important:
c
See the Manual for RIP Printing (PDF) before you start the following tasks and import “Install and Connect” and
“Importing Print Information”.
This section explains the procedure for printing in DINAX Mirage (Ver. 3.50) on Windows.
Start Mirage Print.
A
42
Page 43

Epson Printing with WH/MS, Matching Specific Colors
Print Settings in the RIP
Select Settings in File.
B
Refer to the following table and set (1) to (3) in the Color Settings tab.
C
For printing with a wide color gamut For general printing
(1) AdobeRGB1998.icc sRGB.icc, etc.
(2) EpsonWideCMYK Ver2.icc Select general profile for printing.
(3) Assign default profiles Leaves as is
43
Page 44

Epson Printing with WH/MS, Matching Specific Colors
Print Settings in the RIP
Note:
If your print data falls into one of the categories below, we recommend selecting Ask when opening in (3). When you
open the data, the following screen is displayed and you can check and change the settings.
❏ No profile is embedded
❏ Uncertain whether a profile is embedded
Drag and drop the print data to Mirage Print.
D
Select the name of the media loaded in the printer in on, and the print mode in with.
E
How to Read Print Mode
In the following setting example, the print data is output at 720 x 1440 dpi and then print 32 passes in WH and
color. Descriptions of the settings from A to D are shown in the following table.
A Indicates the output resolution of the RIP. The higher the number the better the print quality, but the printing
speed decreases.
44
Page 45

Epson Printing with WH/MS, Matching Specific Colors
Print Settings in the RIP
B Indicates the print passes (how many times printing is split for one interval). The higher the number the better the
print quality, but the printing speed decreases. Depending on the media you are using, the term High Quality may
appear following the name of the media. This setting helps prevent the occurrence of uneven density and banding
from the setting of the same number of passes, but it reduces the print speed.
C Indicates spot colors are used. (Wh or Ms)
When printing with only color ink, select a mode that does not have C or D.
D Indicates number of layers and print order.
❏ When printing WH/MS without overlapping with color ink (when printing WH/MS and color ink at the same
time): mode that does not have D
❏ When printing WH two times overlapping: mode that has 3L_1Way
❏ When printing WH/MS on colors: mode that has “-Reverse” at the end
* Depending on your country or region, you may not be able to select 3L. For more details, contact your dealer or Epson
Support.
*
Set (1) and (2) according to the print mode you selected in step 5.
F
(1) Border (only when you have selected a mode that has “-Reverse” in D)
When you want to be able to read printed characters correctly when looking at the printout from the back
side, select Mirrored Image.
(2) White Handling (only when printing WH)
Select Print White Ink Based on according to the print data.
❏ Data processed in Illustrator: Channel: White
❏ Data processed in Photoshop: Use Alpha for White
❏ When not printing WH: No White
If you select anything other than No White for Print White Ink Based on, then also select the following.
❏ Standard White: Normally select this one.
❏ High Contrast White: When the data includes parts that are printed all over (solid printing) with WH.
Click Print in the bottom right of the screen to start printing.
G
45
Page 46

Epson Printing with WH/MS, Matching Specific Colors
Matching Specific Colors
Matching Specific Colors
When matching specific colors, such as spot colors or corporate colors, determine the optimum value by comparing
the target to the printed color sample (Color Books) created with a RIP. The target differs according to the color being
matched.
Spot color
Other than spot colors Actual printed materials and sample goods
* Indicates named colors specified in the swatch library of the image processing software.
See the following for how to make the settings for each RIP.
ONYX RIP U “Settings in ONYX RIP” on page 46
Caldera RIP U “Settings in Caldera RIP” on page 50
Note:
There is no specific color matching function in DINAX Mirage.
*
Commercially available color books, such as PANTONE and DIC
Settings in ONYX RIP
Open the print data using Job Editor.
A
Select Tools from the Color Correction tab and click .
B
Select the following according to the color being matched.
Spot color
Other than spot colors
Named Color Replacements
Color Replacements
46
Page 47

Epson Printing with WH/MS, Matching Specific Colors
Matching Specific Colors
Select the target color according to the matching color.
C
Spot color
Select the spot color name for matching colors in Color To Replace. If the data contains multiple spot colors,
select the correct replacement colors.
Other than spot colors
Click
in Current Color, then click the matching color on the preview screen.
Click Swatch Books.
D
Make the settings for the color patches and click Print.
E
See the following table for a summary of the settings. (See the manual supplied with the RIP for more details
about the items.)
47
Page 48

Epson Printing with WH/MS, Matching Specific Colors
Matching Specific Colors
(1)
Select the number of components to set in (3). (Example: Selecting 3-Dimensional will allow you to set three
components.)
(2) Set the number of pages to print and the number of each vertical and horizontal print patch.
(3)
Normally, use this while Auto Patches is selected.
Select the components to change for each Horizontal, Vertical, and Page, then set the ranges from the drop-down
menu on the right side.
The brightness can be changed in Lightness, vividness (saturation) can be changed in Chroma and the tone can be
changed in Hue.
(4) Set the height and width of the patch. We recommend over 20 mm.
Compare the target (color books, samples) with the printed color patches and search for the patch with the
F
closest color.
If you cannot find a suitable color, return to step 5, increase the number of patches and change the range, then
recreate and print the color patches. Repeat steps 5 and 6 until you find a suitable color.
48
Page 49

Epson Printing with WH/MS, Matching Specific Colors
Matching Specific Colors
Enter the CMYK value of the color found in step 6 into the Values for the Desired Color.
G
Important:
c
When color matching, all of the colors that are the same as the specified color in the print data will be
replaced. Make sure to check on the preview screen for the Job Editor whether unintended parts have also
been replaced.
Print the actual data and check the color matching results.
H
If you would like a more precise match, start again from step one and find another similar color.
49
Page 50

Epson Printing with WH/MS, Matching Specific Colors
Matching Specific Colors
Settings in Caldera RIP
Click (Spot Colors) in the printer dialog box.
A
Select Enable Spot Colors processing, and then specify the area to match colors in Range.
B
❏ Vectors: Only areas that include vector data, such as objects or text
❏ Images: Only areas of raster data, such as photos
❏ Both: Both Vectors and Images
50
Page 51

Epson Printing with WH/MS, Matching Specific Colors
Matching Specific Colors
Select and register the target color according to the matching color.
C
Spot color
Select a name for the spot color. If the data contains multiple spot colors, select the correct colors for matching
colors.
Other than spot colors
Use the following procedure to register colors for matching colors as new spot colors.
(1)
Click New.
(2)
Click (Pick) in New Spot Color.
(3) Click
(4)
Click (OK) in New Spot Color.
in Preview, then select the color for the matching color.
51
Page 52

Epson Printing with WH/MS, Matching Specific Colors
Matching Specific Colors
Click Color books.
D
Click the Colors tab, and then use the following procedure to set the color swatch book data.
E
(1)
Select Targeted color book.
(2)
Select from Device (input CMYK color) or LCH (Lightness, Chroma, and Hue) for the elements in which to
change values. (The following explanation uses an example of when Device is selected.)
(3) Refer to the following table to set the various items. See the manual supplied with the RIP for more details.
Range
Samples per direction
Combinations Select the combinations of colors to change. When you select Custom and click …, you can
Ink Mixing
Set the percentage (positive or negative) to change the value.
Set the number of patches to create per line.
select detailed combinations.
Select the number of colors for which to change values.
52
Page 53

Epson Printing with WH/MS, Matching Specific Colors
Matching Specific Colors
Refer to the following table to set the print settings for the patches in the Layout tab.
F
See the manual supplied with the RIP for more details.
(1)
You can print the name of the color book, comments and other information in the header. Sele ct Repeat header on
each page to print the header on each page.
(2)
❏ Format: Select the width of the roll paper on which to print the color patches.
❏ Width: Specify the print width per one line of color patches.
❏ M. Left - M. Bottom: Set the top, bottom, left, and right margins.
(3)
❏ Width/Height: Set the height and width of the patch. We recommend over 20 mm.
❏ Hspace/Vspace: Specify the vertical and horizontal margins between the patches.
❏ Mode: Normally automatically set to 1 line. Select Center to print the patches i n the center of the media. Select
Make packs to block the patches for each element that has a changed value when printing them.
53
Page 54

Epson Printing with WH/MS, Matching Specific Colors
Matching Specific Colors
Click Export and then select PDF in Output and then click OK.
G
54
Page 55

Epson Printing with WH/MS, Matching Specific Colors
Matching Specific Colors
Click Print in the printer dialog box.
H
Compare the target (color books, samples) with the printed color patches and search for the patch with the
I
closest color.
If you cannot find a suitable color, return to step 4, change the range and number of patches, and recreate and
print the color patches. Repeat steps 4 to 8 until you find a suitable color.
In the Details tab of Spot Colors for the original print data, input the CMYK values (detailed values on the
J
bottom row) that you found in step 9, and then click Close.
55
Page 56

Epson Printing with WH/MS, Matching Specific Colors
Matching Specific Colors
Important:
c
When color matching, all of the colors that are the same as the specified color in the print data will be
replaced. Be sure to check on the preview screen that unintended parts have not also been replaced.
Print the actual data and check the color matching results.
K
If you would like a more precise match, start again from step one and find another similar color.
56
Page 57

Epson Printing with WH/MS, Matching Specific Colors
Troubleshooting
Troubleshooting
WH/MS does not Print
Check the following.
Was the print data processed beforehand?
When printing with WH/MS, processing is necessary before reading the print data with the RIP. And, be sure to make
the print settings for unprocessed data when printing the data, without processing.
Steps for data processing U “Processing Print Data” on page 7
Print Settings in ONYX RIP U “Printing Unprocessed Data” on page 24
Print Settings in Caldera RIP U “Settings in Caldera RIP” on page 29
Is your RIP setting for WH/MS printing?
The ink is not correctly assigned if the input name in the RIP is not the same as the spot color layer name or channel
name, such as White and Metallic, that was given in the image processing software. Make sure there are no
misspellings or errors with the case. Also, make sure to select a print mode for WH/MS.
ONYX RIP U “How to Create Quick Sets” on page 15
Caldera RIP U “Settings in Caldera RIP” on page 29
Is your printer's color mode correct?
The printer's color mode does not switch just by replacing the ink cartridge. Be sure to perform Change Color Mode
on the menu of the control panel.
Setting procedure U User's Guide (PDF)
Color and WH/MS Overlapping Parts Do Not Print Correctly
The items to check vary depending on whether or not the print data is processed.
Processed Data
Check the following points.
❏
Is the order of the overlapping layers correct?
Open the print data in Illustrator or Photoshop and check the order of the layers.
57
Page 58

Epson Printing with WH/MS, Matching Specific Colors
Troubleshooting
❏
Are the settings for overprint (Attributes/Transparency) correct? (Illustrator only)
Open the print data in Illustrator and check whether the settings have been done to either print or not print the parts
on the lower layer when objects overlap.
Also, depending on the RIP used, if the setting for overprint is selected in Attributes, printing may not be done
correctly. Clear everything in Attributes and select Multiply in Transparency for the Blending Mode.
❏
Are the print settings for the RIP correct?
Depending on the RIP used, you can set to overprint (knockout) or reshuffle the print order of the layers in the print
settings of the RIP. Check whether there is a problem with the print settings of the RIP.
Steps for data processing U “Processing Print Data” on page 7
Print settings for ONYX RIP U “Printing Processed Data” on page 21
Print settings for Caldera RIP U “Settings in Caldera RIP” on page 29
Print settings for DINAX MirageU “Settings in DINAX Mirage” on page 42
Unprocessed Data
Check the following points in the print settings of the RIP.
❏ Are the selected print order, number of layers for the print mode, and way to see the print results appropriate?
❏ Is the print order of the layers correct?
❏ Are the settings for overprint (knockout) correct?
Print settings for ONYX RIP U “Printing Unprocessed Data” on page 24
Print settings for Caldera RIP U “Settings in Caldera RIP” on page 29
Print settings for DINAX MirageU “Settings in DINAX Mirage” on page 42
Gradation Skipping Occurs When Printing at High Densities
Check the following.
58
Page 59

Epson Printing with WH/MS, Matching Specific Colors
Troubleshooting
Are you using an EMX file that suits the media you are using?
You cannot achieve optimal print results if you do not us an EMX file that suits the media you are using. The mode for
high-density printing is in the EMX file for Back Lite Film. Select the mode for high-density printing in the RIP
settings.
When using media for which Epson does not provide an EMX file, edit the media settings based on the EMX file for
media with similar characteristics.
Is the density of ink (Ink Density) set over 100%?
You can print with concentrated colors by setting the ink density to over 100% in the RIP. However, gradation
skipping and unevenness in color may occur. Also, if you raise the density too high, the ink will take a long time to
dry.
When setting the ink density over 100%, lower the setting value.
59
 Loading...