

Page 1

All rights reserved. No part of this publication may be reproduced, stored in a retrieval
system, or transmitted in any form or by any means, electronic, mechanical, photocopying,
recording, or otherwise, without the prior written permission of SEIKO EPSON
CORPORATION. The information contained herein is designed only for use with this EPSON
printer. EPSON is not responsible for any use of this information as applied to other printers.
Neither SEIKO EPSON CORPORATION nor its affiliates shall be liable to the purchaser of
this product or third parties for damages, losses, costs, or expenses incurred by the purchaser
or third parties as a result of: accident, misuse, or abuse of this product or unauthorized
modifications, repairs, or alterations to this product, or (excluding the U.S.) failure to strictly
comply with SEIKO EPSON CORPORATION’s operating and maintenance instructions.
SEIKO EPSON CORPORATION shall not be liable for any damages or problems arising from
the use of any options or any consumable products other than those designated as Original
EPSON Products or EPSON Approved Products by SEIKO EPSON CORPORATION.
Adobe, PageMaker, PostScript, and the PostScript logo are trademarks of Adobe Systems
Incorporated which may be registered in certain jurisdictions.
Apple, the Apple logo, LaserWriter, LocalTalk, Performa, and Power Macintosh are
trademarks of Apple Computer, Inc.
EPSON is a registered trademark and EPSON Stylus and EPSON StylusRIP are trademarks
of SEIKO EPSON CORPORATION.
General Notice: Other product names used herein are for identification purposes only and may be
trademarks of their respective owners. EPSON disclaims any and all rights in those marks.
Copyright © 1999 by SEIKO EPSON CORPORATION, Nagano, Japan.
User’s Guide
Page 2

Contents
Introduction
Features . . . . . . . . . . . . . . . . . . . . . . . . . . . . . . . . . . . . . . . . . . . . . . . .4
Chapter 1 Installing StylusRIP in Your PC
System Requirements . . . . . . . . . . . . . . . . . . . . . . . . . . . . . . . . . . . .5
What to Check Before Setting Up StylusRIP . . . . . . . . . . . . . . . . .6
Installation. . . . . . . . . . . . . . . . . . . . . . . . . . . . . . . . . . . . . . . . . . . . . .7
Color Matching. . . . . . . . . . . . . . . . . . . . . . . . . . . . . . . . . . . . . . . . . .13
PANTONE Color Support. . . . . . . . . . . . . . . . . . . . . . . . . . . .13
ICC Support. . . . . . . . . . . . . . . . . . . . . . . . . . . . . . . . . . . . . . . .14
Chapter 2 Printing With StylusRIP Server
Using the StylusRIP Server. . . . . . . . . . . . . . . . . . . . . . . . . . . . . . . .15
Exiting the StylusRIP Server. . . . . . . . . . . . . . . . . . . . . . . . . . . . . . .16
Checking Print Status . . . . . . . . . . . . . . . . . . . . . . . . . . . . . . . . . . . .16
Using the Preferences Dialog Box . . . . . . . . . . . . . . . . . . . . . . . . . .18
Starting the StylusRIP Server automatically . . . . . . . . . . . . . . . . .22
Using the Device Options Menu . . . . . . . . . . . . . . . . . . . . . . . . . . .22
Things to check for when using roll paper and single
sheets . . . . . . . . . . . . . . . . . . . . . . . . . . . . . . . . . . . . . . . . . . .24
Changing the Graphics Resolution setting . . . . . . . . . . . . . .25
Printing the PostScript file from your application . . . . . . . . . . . .27
Chapter 3 Troubleshooting
Troubleshooting Hints . . . . . . . . . . . . . . . . . . . . . . . . . . . . . . . . . . .28
Getting the Best Possible Print Quality . . . . . . . . . . . . . . . . .28
Printer prints out illegible type or characters. . . . . . . . . . . .29
Wrong fonts or jagged type. . . . . . . . . . . . . . . . . . . . . . . . . . .29
2
Page 3

StylusRIP takes a long time before printing starts. . . . . . . .30
EPS files do not print . . . . . . . . . . . . . . . . . . . . . . . . . . . . . . . .30
Bitmap images or clip art looks jagged . . . . . . . . . . . . . . . . .30
TIFF images and simple text files do not print. . . . . . . . . . .30
There are white lines on the output . . . . . . . . . . . . . . . . . . . .30
StylusRIP does not run from Navigator or other special
desktops. . . . . . . . . . . . . . . . . . . . . . . . . . . . . . . . . . . . . . . . .31
Printout has misplaced images or type . . . . . . . . . . . . . . . . .31
PPD in PageMaker 6.0 is missing . . . . . . . . . . . . . . . . . . . . . .31
When a problem occurs with ECP mode. . . . . . . . . . . . . . . .31
Glossary
Index
3
Page 4

Introduction
®
EPSON
or NT 4.0 that turns your EPSON Stylus™ printer into a
PostScript
PC, reads and interprets Adobe Level 2 PostScript (for Windows
95 / 98) or Adobe PostScript3 (for Windows NT 4.0) and allows
your EPSON Stylus printer to print color raster images.
Adobe PostScript is the standard for high quality graphic output.
All elements of a document, including text, graphics, and images
are processed, stored, and reproduced using the PostScript code.
When you print from an application, such as PageMaker
StylusRIP processes the PostScript code and sends the processed
image to the printer.
Features
❏ Enables PostScript printing
StylusRIP™ is software for use with Windows 95® , 98
®
printer. Stylus RIP processes raster images for your
StylusRIP enables an EPSON Stylus printer connected to a PC
to perform as a PostScript printer.
®
,
❏ Compliance with the network
By using the folder sharing function of Windows 95, 98 or NT
4.0, you can print from other PCs on the network.
4
Page 5

Chapter 1
Installing StylusRIP in Your PC
Before you install the StylusRIP software in your PC, make sure
your PC meets the system requirements listed below.
System Requirements
Your PC needs to meet the following configuration requirements
to use StylusRIP, whether in a standalone or network
environment:
❏ At least 15 MB of RAM (23 MB recommended). Also, any
memory requirements for optional software must be added
to this total.
❏ At least 50 MB of available disk space. As the number of files
in the jobs folder increases, the amount of required disk space
also increases.
❏ Windows 95, 98, or NT 4.0 operating system
❏ CPU: i486 or later, Pentium 133 MHz or faster is
recommended.
❏ CD-ROM drive is required.
5
Page 6

What to Check Before Setting Up StylusRIP
Before setting up StylusRIP, make sure your system meets the
minimum hardware and software requirements listed above, and
install any necessary fonts and printer drivers in your PC. See
your font installation software and printer user's guides for more
details.
Note:
Read the “README” file provided on the StylusRIP CD-ROM before
setting up StylusRIP. The README file contains some important
notices and the latest information concerning StylusRIP.
Also, be sure to note the following when setting up StylusRIP.
❏ Turn off all virus protection. For instructions on how to do
this, see your virus protection or Windows documentation.
❏ Close all other active applications.
❏ Be sure to print a self test for the printer in question to make
sure the printer is operating properly. Also, make sure the
printer and PC are connected correctly.
❏ Remove all other printer drivers which access the LPT port
(or change the port).
6
Page 7
Installation
This section explains how to install the Stylus RIP Server for
Windows 95, 98 and NT 4.0. Uses Windows 95 as an example to
explain how to install the Stylus RIP Server in this section. Follow
these steps:
1. Make sure Windows 95, 98 or Windows NT 4.0 is running.
2. Insert the CD-ROM into the appropriate drive.
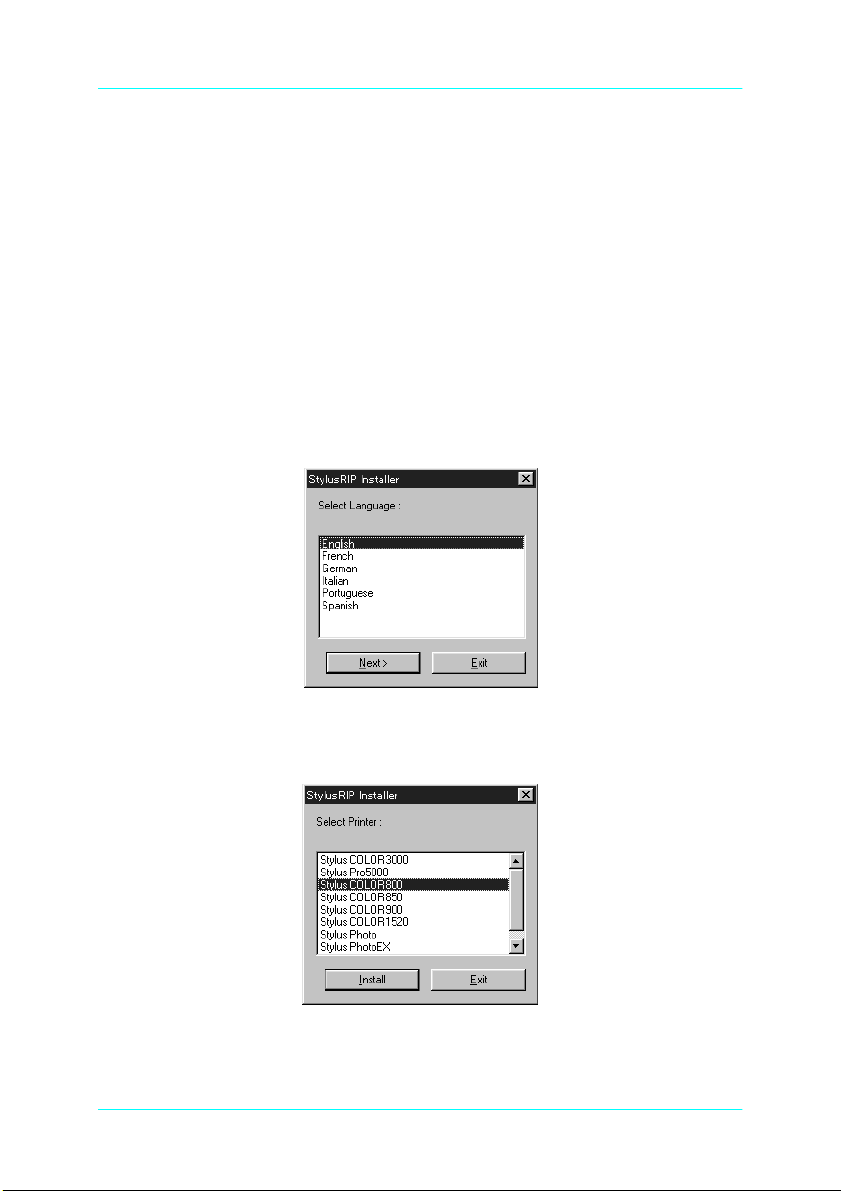
3. The StylusRIP Installer dialog box appears.
4. Select English and click Next.
5. Select the printer you want to use and click Install.
7
Page 8
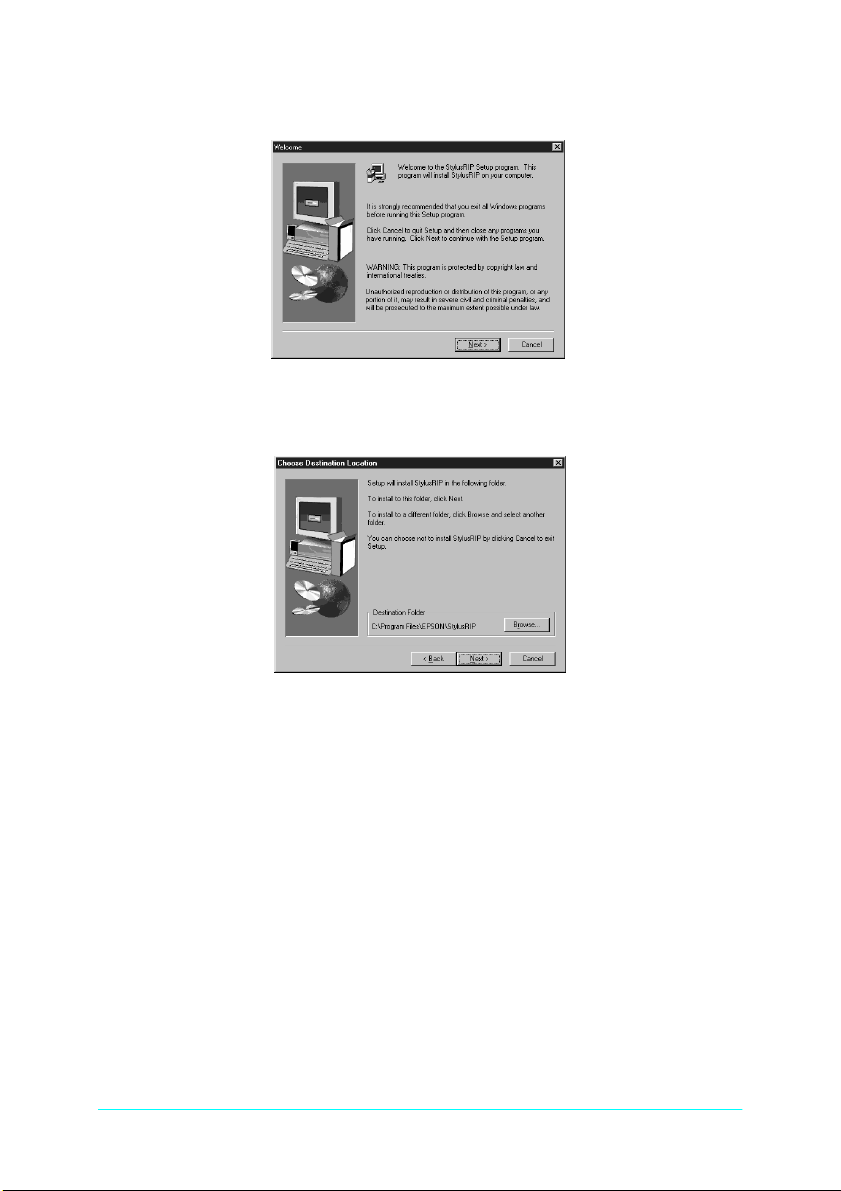
6. Click Next.
7. Click Next for the default installation.
Note:
The installer saves the StylusRIP files to your hard disk. If you want
to install the files somewhere other than on your hard disk, choose
the destination.
8
Page 9
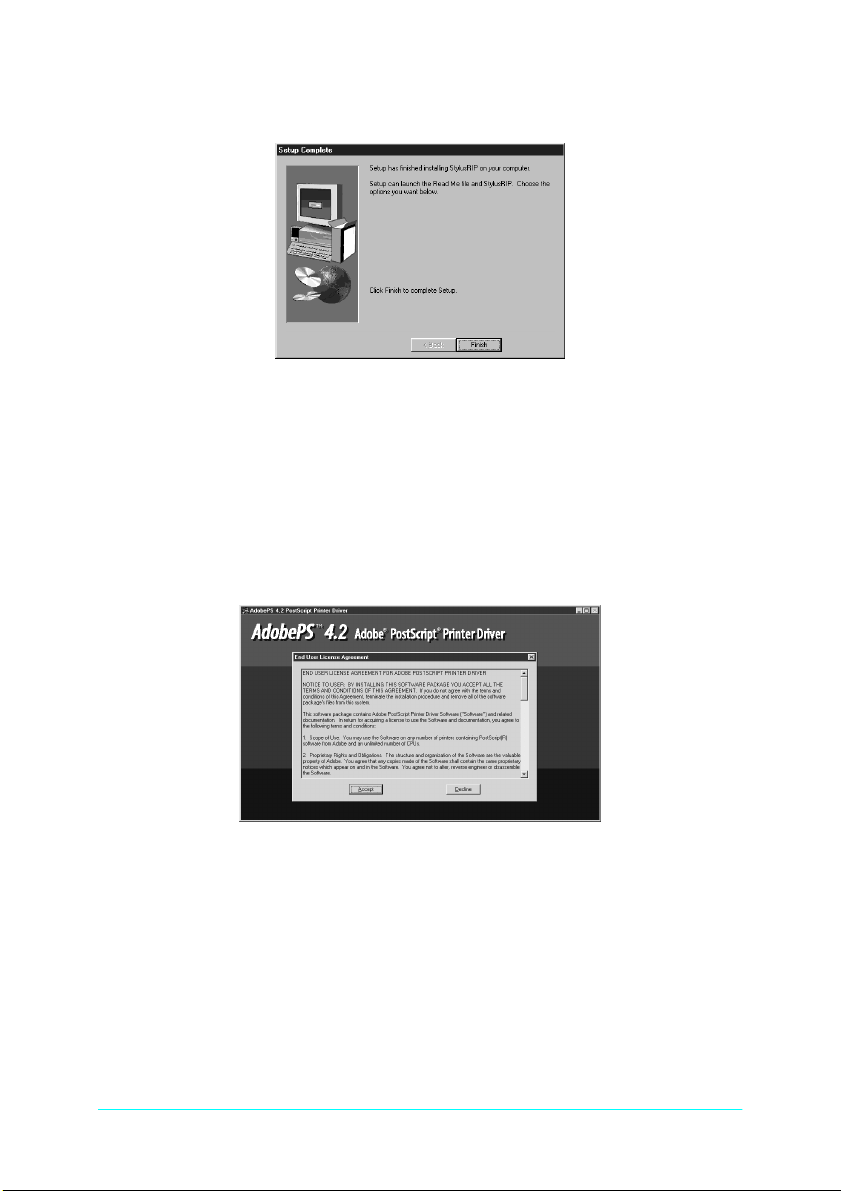
8. Click Finish to complete the setting up.
9. The program installs all files necessary to run StylusRIP.
When installation is complete, make the Preference settings,
if necessary. See “Using the Preferences Dialog Box” on page
18.
10. AdobePS 4.2 Adobe PostScript Printer dialog box appears.
Click Accept.
9
Page 10
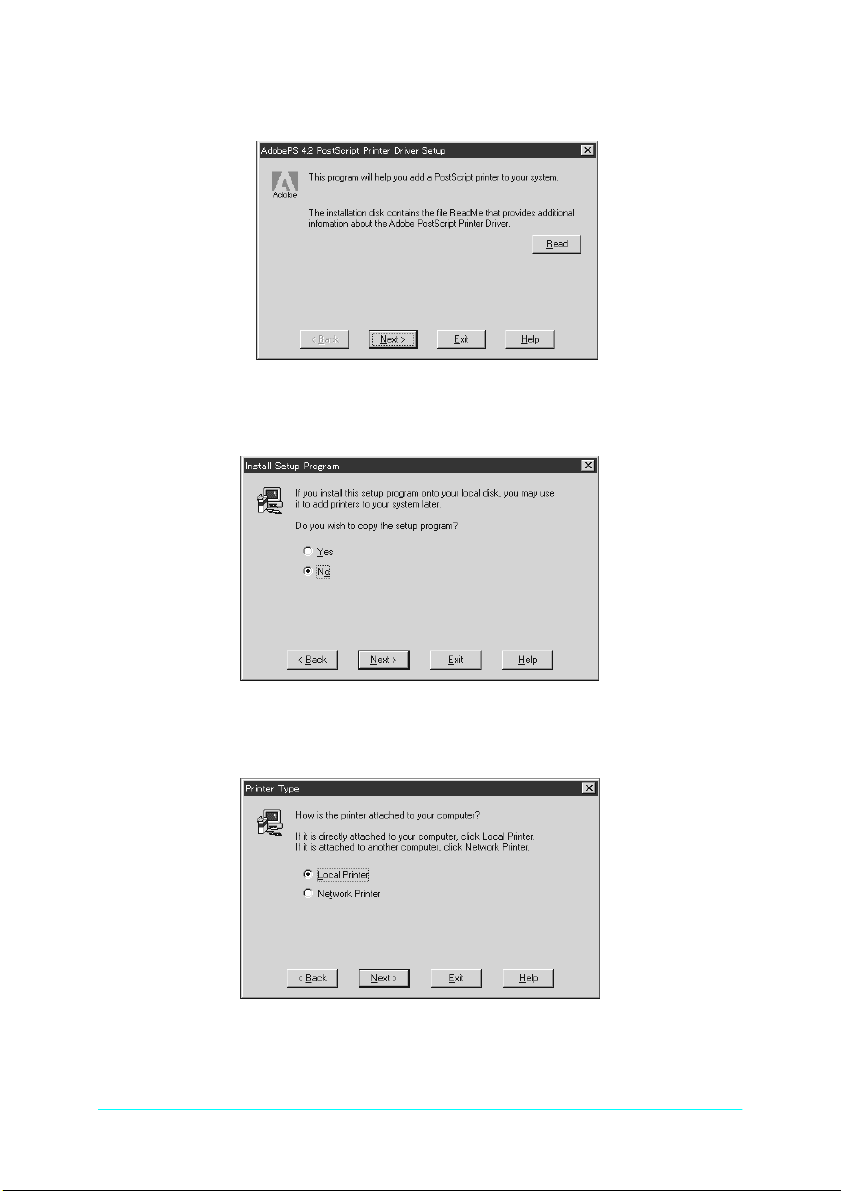
11. Click Next.
12. Click Next.
13. Select the Local Printer radio button; then click Next.
10
Page 11

14. Select your printer’s PPD file in the right column in the dialog
box; then click Next
15. Select StylusRIP from the available ports list box, then click
Next.
.
11
Page 12

16. Select the No button at the Question: Would you like to print
the test page? Then click Next. The printer driver is installed
automatically.
Note:
Some applications display a proprietary dialog box at this point. If
one appears, see your application manual for instructions.
17. Click OK for the default setting.
12
Page 13

18. When installation is complete, click Exit.
19. Click Yes to restart Windows.
The printer driver is now installed on your PC.
Color Matching
During the StylusRIP installation, PANTONE color profiles for
EPSON Stylus printers and the ICC profiles are installed in the
StylusRIP Utilities folder.
PANTONE Color Support
PANTONE professional color palette files for the EPSON Stylus
series printer are included with StylusRIP. These files can be read
directly into all PANTONE-licensed applications so you can have
printer calibrated versions of all PANTONE colors. The colors are
calibrated to use StylusRIP’s stochastic screens and EPSON’s
coated and high-quality glossy paper.
13
Page 14

For installation instructions, refer to the README file,
PANTONE documentation, and PANTONE manual in the
PANTONE folder.
ICC Support
For applications that support ICC (International Color
Consortium), use the ICC profiles that are included in the
StylusRIP software.
For installation instructions, refer to the README file in the ICC
PROFILE folder.
14
Page 15

Chapter 2
Printing With StylusRIP Server
The StylusRIP Server is software that can play the role of print
server. When you send a print job (when you save a document as
a file, the file extension must be “.ps”) from your application
program, the StylusRIP Server receives the print job and puts it
in a print queue in the order it was received. When your print job
reaches the top of the queue, the StylusRIP Server sends it to the
printer to be printed. The StylusRIP Server, just like any other
application, must be opened before you can use it.
Using the StylusRIP Server
The first time you open the StylusRIP Server after setting up the
StylusRIP software package, be sure to select the printer that you
just updated.
1. Turn on the printer. Make sure the printer’s power light is on
before you open the StylusRIP Server.
2. Click Start, point to Programs, then click StylusRIP.
3. The StylusRIP Server searches for the upgraded printer. If the
printer’s power is on and the printer is ready to print, the
StylusRIP Server selects the printer and prepares for printing.
When Licence Key dialog box appears, type your key in the dialog
box.
15
Page 16

Exiting the StylusRIP Server
Close the StylusRIP Server by clicking the close box on the top
right corner of the StylusRIP Server window. Keep in mind that
you need to open StylusRIP every time before printing.
Note:
Unless your PC is low on memory, you do not need to exit StylusRIP
after every print job. You can leave it active until you turn off your PC.
Checking Print Status
If the StylusRIP Server is activated, the Server Status window
automatically appears and shows the print status when you send
a print job. This window displays the following information:
Connect:
Displays the name of the application program used to create the
PostScript file.
16
Page 17

Printer:
Displays the raster output printer name that is selected in the
StylusRIP Server.
Page:
Displays the number of the page that is being processed and the
total number of pages.
Quality:
Displays the print resolution and print direction.
Data Size:
Displays the size of the PostScript file that is being processed. The
value increases as more of the file is received and processed. Once
the entire file has been processed, the raster output is sent to the
printer, as shown by the “Progress” bar.
Status:
Displays the current status of StylusRIP.
Message:
Displays specific printer information such as “Paper out” or “Ink
end.” All recoverable printer errors are displayed here. When an
error occurs, StylusRIP holds the print job until the error is fixed
and then automatically releases the job for printing. PostScript
error messages are also shown here.
Progress:
Displays the progress of the raster output that is sent to the printer
using a status bar. The color of this bar changes to gray when data
is first sent to the printer. Printing begins soon after this. The bar
progresses from left to right and reaches the right edge when the
print job has been completely sent.
List of Waiting File(s):
Displays the files waiting for printing.
Cancel Printing:
Click the Cancel Printing button to cancel the print job that is
now spooling.
17
Page 18

Cancel Selected Files:
You can cancel the files that are displayed in the List of Waiting
File(s) dialog box. To cancel a file, select the one that you want to
cancel, then click the Cancel Selected Files button.
Using the Preferences Dialog Box
You can make special preference settings by clicking on the top
left corner of the StylusRIP Server window and choosing
Preferences. The Preferences settings are for changing the folder
that stores the PostScript file to be printed.
Temp Directory:
The StylusRIP Server searches for and prints the file (when you
save a document as a file from driver, the file extension must be
.ps) that is stored in the Temp Directory (for default installation,
C:\Program Files\StylusRIP\tmp). To change the Temp
Directory, type another folder name in the Temp Directory box,
and click OK.
18
Page 19

By using the folder sharing function of Windows 95, 98 and NT
4.0, you can print the PostScript file from other PCs on the
network. Follow the steps below.
1. Open the Control Panel and double-click Network.
2. Click File and Print Sharing.
3. Check I want to be able to give others access to my files
if you want to share the folder. Check I want to be able to
allow others to print to my printer[s] if you want to share
the printer driver.
4. Click OK.
5. The network dialog box appears. Click OK.
6. Insert the Windows 95 CD-ROM and click OK.
7. Restart Windows and click Yes.
19
Page 20
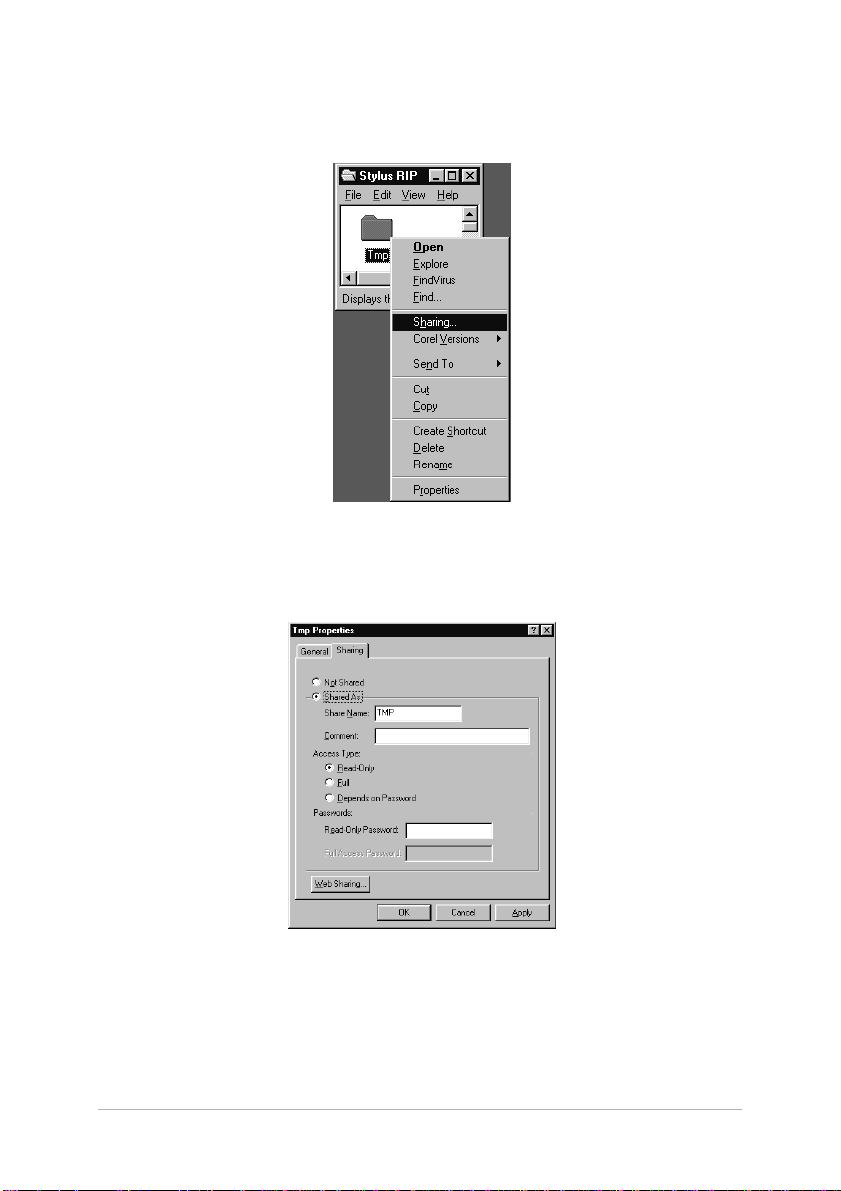
8. Right-click the Temp Directory (Tmp folder, in the example
below) and click Sharing in the menu that appears.
9. Click the Shared As radio button, and select the options you
want.
20
Page 21

To share the Printer driver, follow the steps below.
1. Repeat steps 1 to 7.
2. Select the printer you want in the Printer dialog box. Then
right-click and click Sharing in the menu that appears.
3. Click the Shared As radio button, and select the options you
want.
21
Page 22

Starting the StylusRIP Server automatically
Follow the steps below if you often use the StylusRIP Server. This
procedure causes the StylusRIP Server to start automatically
every time you turn on your PC.
1. Right-click the StylusRIP Server icon (which is in
C:\StylusRIP\ for default installation), then choose Create
Shortcut.
2. Move the Shortcut into the C:\Win95\Start
Menu\StartUp\Programs folder.
Using the Device Options Menu
You can make the following Print features settings in the
Properties window. To open this window, click Start, point to
Settings, and click Printers. Next right-click the target printer’s
icon and click Properties. Click the Device Options tab to access
the Printer features options.
From the Printer features list, select the option you want to
change, then select a setting from the Change setting for dropdown list. You can make the following Printer features settings:
22
Page 23

Press Simulation
The Press Simulation function is useful when you print CMYK
color data. You can easily make colors match CMYK color with
the standard 3 offset colors (SWOP, Euro (Eurostandard), and
DIC), and print.
Almost all PostScript compliance applications, suchs PageMaker,
QuarkXPress, Illustrator, and PhotoShop (CMYK mode), use
CMYK color designation. You can easily simulate offset color
printing by using the Press Simulation function.
Select the profile of the target offset printing machine that you
want to use. Your choices are SWOP, Euro (Eurostandard), DIC,
or OFF. SWOP is the profile to simulate SWOP publications. Euro
(Eurostandard) is the profile to simulate European publications.
DIC is the profile to simulate standard DIC color publication. The
default setting is SWOP. When using this settings, make sure of
the following:
❏ Use only 360 dpi Ink Jet Paper, Photo Quality Ink Jet Paper,
Photo Quality Glossy Paper, or Photo Quality Glossy Film
(see your printer manual for which paper is available for your
printer). You can not use Press Simulation with other paper
types.
❏ Turn the Color settings to Color/Grayscale in the Print
window.
❏ Some applications, schas PageMaker 6.5, Illustrator 7.0, or
QuarkXPress 3.3 with HELIOS ColorSync2 XTension, can be
used for color management functions. When using the
application’s color management function, make sure to select
OFF for Press Simulation.
❏ The color of printouts look different depending on lighting.
Press Simulation assumes you are looking at the printouts
under correlated color temperature 5,000K°.
23
Page 24

❏ Because each offset machine has its unique properties, the
simulation results may vary.
Media(Quality)
Select the media type and resolution combinations. If a symbol
appears beside the media type you select, you need to change the
Resolution setting on the Graphics menu, as described on page 25.
Ink
Select CMYK or Gray.
Paper option
Select the paper that you want to use. Your choices are Print on
roll paper or Print on single sheets. This menu does not appear
unless roll paper is available in your printer.
Things to check for when using roll paper and single
sheets
Make sure of the following when you use roll paper or single
sheets.
❏ Be sure to select Print on roll paper in the Change settings for
Paper option drop-down list; otherwise the printer will eject
entire roll of roll paper, because the printer believes the
printout is just a long cut sheet.
❏ The available paper sizes depend on your printer. Verify the
paper size, because the printer driver may automatically
correct or change the paper size.
❏ If your application supports successive page printing, you
can override the paper size setting and print over the above
paper size as a result. For details, see your application manual.
24
Page 25

❏ When you use single sheets, select Print on single sheets in
the Change settings for Paper option drop-down list;
otherwise, the top and bottom margins of the printout will be
deleted.
Changing the Graphics Resolution setting
On the Device Option menu, a symbol appears beside the
Media (Quality) setting you want to select in the Change settings
for drop-down list, follow the steps below.
1. Select the media type in the Change settings for drop-down
list.
25
Page 26

2. Click the Graphics
3. Select setting that does not have a symbol beside it the
resolution in the Resolution drop-down list.
tab
.
4. Click OK.
26
Page 27

Printing the PostScript file from your application
If you want to print the PostScript file (when you save a document
as a file, the file exteniton must be “.ps”) from your application,
save the file to the Temp Directory (for default installation,
C:\Program Files\StylusRIP\tmp). If you want to change the
Temp Directory, see “Temp Directory:” on page 18.
27
Page 28

Chapter 3
Troubleshooting
This chapter lists possible solutions for common problems. Please
refer to the troubleshooting hints before calling technical support.
When calling for technical assistance, be ready to identify your
system and its configuration, the serial number of your copy of
StylusRIP, and a description of the problems you are
encountering.
Troubleshooting Hints
This section includes the most common problems StylusRIP users
may encounter. These problems may include several possible
solutions.
Getting the Best Possible Print Quality
The StylusRIP is a true Adobe Level 2 PostScript and Adobe
PostScript3 raster image processor, which means it can utilize
color rendering dictionaries when the RIP is driving a color
printer. Adobe Photoshop automatically accesses these color
rendering dictionaries when directly printing to the printer.
Images created in Photoshop can be placed in other applications
and still access color rendering dictionaries by saving them as
LAB.EPS or calibrated RGB.EPS files. Note that color rendering
dictionaries are not accessed by RGB.TIF or CMYK.TIF files when
they are placed in other applications and printed.
Color profiles for Windows 95, Windows 98 and Windows NT are
included with StylusRIP. These ICC color files provide support
for printer color adjustment from the application, but only for
applications which support this feature.
28
Page 29

CMYK files are usually developed in a device-independent space,
which makes it possible to adjust specific printing parameters for
specific printers instead of accepting the default options given in
the color rendering dictionary.
To obtain high-quality color images, keep the following points in
mind.
❏ Use the manufacturer’s inks and recommended paper for
your ink jet printer.
❏ Try using a higher-quality paper. Paper designed for your ink
jet printer has special coatings to evenly distribute the ink,
and is different from uncoated bond paper used in laser
printers and copiers.
❏ Make sure that you use the correct printer driver (included in
the StylusRIP CD-ROM).
❏ For scanned images, check the scanner software settings.
❏ Perform a print head cleaning; then print a few lines to check
the output.
Printer prints out illegible type or characters
❏ StylusRIP can only to print to a file. In the printer driver, check
that StylusRIP is set to file and not to an LPT port.
Wrong fonts or jagged type
❏ Most fonts are downloaded with the print job. Sometimes a
bitmap image of a font is downloaded. If the page is missing
a font, StylusRIP will default to the Courier font or print the
bitmap image of the font. Make sure you have the printer fonts
installed properly.
❏ If you have the correct printer fonts, try cleaning the print
head.
29
Page 30

StylusRIP takes a long time before printing starts
❏ Change to a faster CPU or add more RAM. Complex jobs that
use a large number of fonts will process faster on a faster CPU
or with more RAM. We recommends that you change to a
faster CPU first, then add more RAM, if necessary.
EPS files do not print
❏ EPS files are designed to be placed into other documents.
They cannot be processed directly by StylusRIP. Place EPS
files on a page created in another application and then print
from that application.
Bitmap images or clip art looks jagged
❏ Bitmap images and clip art are processed for a set resolution
and size. When enlarged, they tend to look jagged. EPS files
produce higher-quality images.
TIFF images and simple text files do not print
❏ TIFF images and simple text files are designed to be placed
into other documents. They cannot be processed directly by
StylusRIP. Place these files on a page created in another
application and then print from that application.
There are white lines on the output
❏ Screen savers interrupt the CPU during the printing process.
Turn off your screen saver.
❏ Run a self test on the printer to verify that you have no clogged
nozzles.
30
Page 31

StylusRIP does not run from Navigator or other special desktops
❏ StylusRIP runs from Windows and may not run from special
desktops like Navigator. If you are using a special desktop,
click the Windows icon, then click the StylusRIP icon.
Printout has misplaced images or type
❏ You may not have enough memory to run StylusRIP. If you
have other applications open, print to the StylusRIP directory
and then launch StylusRIP.
❏ You may need to install more RAM in your system.
PPD in PageMaker 6.0 is missing
❏ To install the StylusRIP PPDs for PageMaker 6.0, follow these
steps:
1. Select Start, Find, Files or Folders.
2. In the Named box, type in *.ppd and click Find Now.
3. Click the appropriate PPD name.
4. On the Edit menu, select Copy and copy the file to the
appropriate PageMaker directory, for example
C:\PM6\RSRC\USENGLISH\PPD4.
When a problem occurs with ECP mode
❏ If a print problem occurs in ECP mode when using the
StylusRIP utility, such as incorrect characters or blank pages
are ouput, change from ECP mode to Comptible (or Nibble)
mode in your computer’s BIOS setting. For details how to
change the BIOS setting, see your computer’s manual.
31
Page 32

Glossary
CPSI
Configurable PostScript Interpreter. This Adobe Level 3 PostScript Interpreter
runs on a Macintosh server rather than on a hardware peripheral device.
StylusRIP uses this interpreter to render a raster image.
EPS
Encapsulated PostScript. This is a file type that may contain complex graphics.
It is designed as a universal format to include complex graphics in other
applications.
FPU
Floating Point Unit. A chip capable of executing operations with real numbers.
ICC
International Color Consortium. A consortium of operating-sytem vendors that
has agreed to a standard color matching sytem for device profiles.
Imaging device
A device capable of printing a raster image on a physical medium, for example,
a printer, imagesetter, or digital film recorder.
Interpreter
A set of software functions that convert PostScript language commands into a
raster image. StylusRIP uses the CPSI interpreter.
OPI
Open Prepress Interface. A set of PostScript language commands for defining
and specifying the placement of images.
PostScript
An interpretive computer language developed by Adobe that describes the text,
graphics, and image content of a document to a printer or other output device.
PostScript is hardware, software, and network independent so your images
always appear the way you want them to.
PSPrinter driver
A printer driver used by an application to create a PostScript file.
Raster image
A digital representation of an image, consisting of values that are assigned to,
and represent, each dot in an image.
Render
The process by which PostScript language commands are interpreted and a raster
image is produced.
32
Page 33

RIP
Raster Image Processor. An application or device that translates PostScript data
into dots that can be printed.
StylusRIP server
A PC running the StylusRIP Server application.
TIFF
Tagged Image File Format. A standard image file format consisting of labeled
fields.
33
Page 34

Index
A
Adobe PostScript, 4
B
Bitmap, 30
C
Cancel Printing, 17
Cancel Selected Files, 18
Color matching, 13
Connect, 16
D
Data Size, 17
DIC, 23
E
EPS, 30
Euro (Eurostandard), 23
I
ICC, 14
Ink, 24
Preferences dialog box, 18
Press Simulation, 23
Printer, 17
Progress, 17
Q
Quality, 17
S
Status, 17
StylusRIP Server, 15
SWOP, 23
System reqirement, 5
T
Temp Directory, 18
TIFF, 30
L
List of Waiting File(s), 17
M
Media, 24
Message, 17
P
PANTONE, 13
34
Page 35

EPSON OVERSEAS MARKETING LOCATIONS
EPSON AMERICA, INC.
20770 Madrona Ave.
P.O. Box 2842
Torrance, CA 90509-2842
Phone: (800) 922-8911
Fax: (310) 782-5220
EPSON DEUTSCHLAND GmbH
Zülpicher Straße 6,
40549 Düsseldorf Germany
Phone: (0211) 56030
Fax: (0211) 5047787
EPSON AUSTRALIA PTY. LTD.
70 GIBBES STREET, CHATSWOOD 2067 NSW.
Phone: 2-9903-9000
Fax: 2-9903-9177
EPSON HONG KONG LTD.
Rooms 4706-10, 47/F,
China Resources Bldg.,
26 Harbour Road, Wanchai, Hong Kong
Phone: 2585-4300
Fax: 2827-7083
EPSON ITALIA S.p.A.
V.le F.lli Casiraghi 427
20099 Sesto S.Giovanni
MI, Italy
Phone: 2-262331
Fax: 2-2440750
EPSON UK LTD.
Campus 100, Maylands Avenue,
Hemel Hempstead, Herts,
HP2 7TJ, U.K.
Phone: (+44) 01442 261144
Fax: (+44) 01442 227227
EPSON FRANCE S.A.
68 bis, rue Marjolin
92300, Levallois-Perret, France
Phone: 33.1.40.87.37.37
Telex: 610657
EPSON SINGAPORE P TE. LTD.
No. 1 Temasek Avenue #36-00
Millenia Tower, Singapore 039192
Phone: (065) 33 77 911
Fax: (065) 33 41 185
EPSON TAIWAN TECHNOLOGY &
TRADING LTD.
10F, No. 287 Nanking E. Road, Sec. 3,
Taipei, Taiwan, R.O.C.
Phone: (02) 717-7360
Fax: (02) 712-9164
EPSON IBERICA S.A.
Av. de Roma, 18-26
08290 Cerdanyola del Valles
Barcelona, Spain
Phone: 582. 15.00
Fax: 582. 15.55
SEIKO EPSON CORPORATION
(Hirooka Office)
80 Harashinden, Hirooka
Shiojiri-shi, Nagano-ken
399-0785 Japan
EPSON PORTUGAL, S.A.
R. do Progresso, 471, 1° Perafita
4460 Matosinhos, Portugal
Phone: (02) 996 14 02
Fax: (02) 996 14 11
1998 February
 Loading...