

Page 1
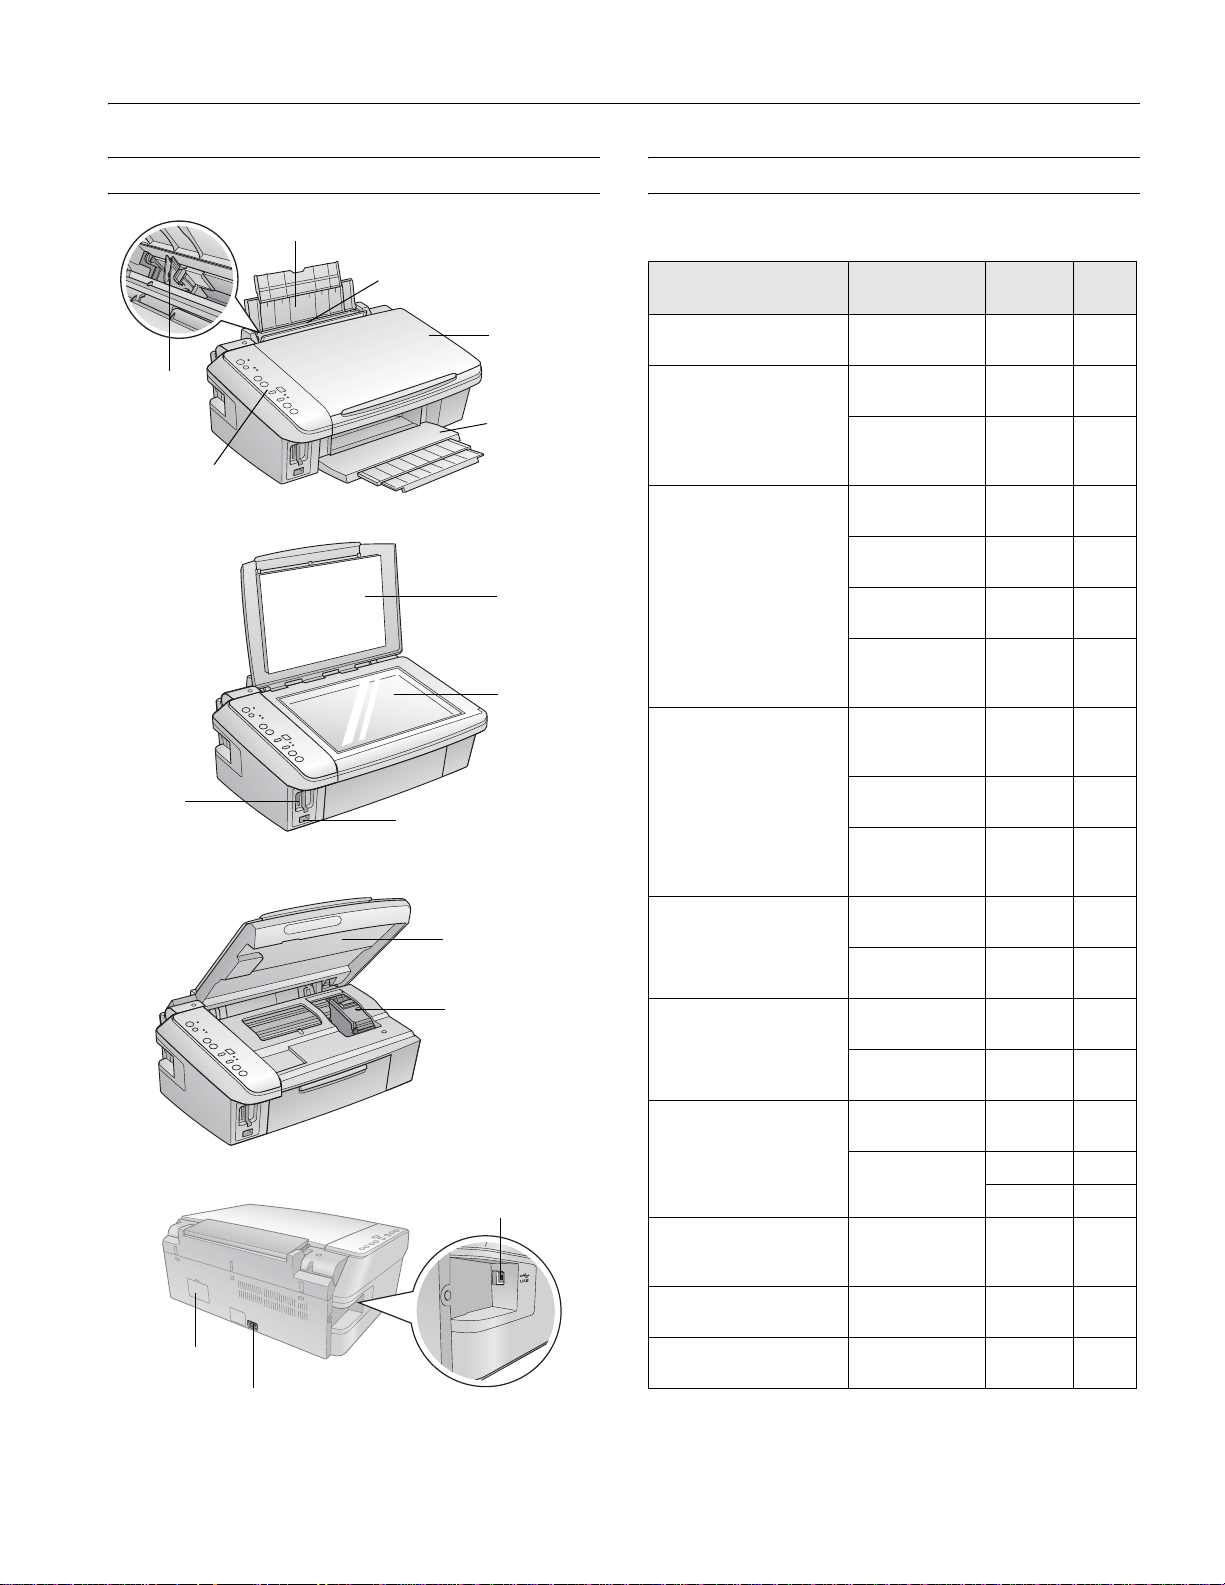
Epson Stylus CX7400 Series Parts Accessories
s
Epson Stylus CX7400 Series
Edge
guide
Control panel
buttons
Memory
card slots
Service only
(do not open)
Paper support
Power inlet
(for power cable)
Feeder guard
PictBridge/USB port
(for camera cable)
Scanner
Ink cartridge holder
(in home position)
USB port
(for computer cable)
Scanner
lid
Output tray
and extension
Scanner lid
Document
table
Media
Paper type Size
Epson Bright White Paper Letter
Epson Photo Paper Glossy 4 × 6 inches S041809
Epson Premium Photo
Paper Glossy
Epson Ultra Premium
Photo Paper Glossy
Epson Premium Photo
Paper Semi-gloss
Epson Presentation Paper
Matte
Epson Premium
Presentation Paper
Matte
Epson Premium
Presentation Paper
Matte Double-sided
Epson Photo Quality
Self-adhesive Sheets
Epson Iron-on Cool Peel
Transfer Paper
(8.5 × 11 inches)
Letter
(8.5 × 11 inches)
Borderless
4 × 6 inches
Borderless
5 × 7 inches
Borderless
8 × 10 inches
Letter
(8.5 × 11 inches)
Borderless
4 × 6 inches
Borderless
5 × 7 inches
Letter
(8.5 × 11 inches)
Borderless
4 × 6 inches
Letter
(8.5 × 11 inches)
Letter
(8.5 × 11 inches)
Legal
(8.5 × 14 inches)
Borderless
8 × 10 inches
Letter
(8.5 × 11 inches)
Letter
(8.5 × 11 inches)
A4 (8.3 × 11.7
inches)
Letter
(8.5 × 11 inches)
Part
number
S041586 500
S04203850100
S041141
S041649
S041271
S041808
S04172740100
S041464 20
S041465 20
S041286
S042183
S041667
S041934
S042181
S042174
S041945 20
S041935
S042182
S042175
S041982 40
S041331 20
S041062 100
S041067 100
S041467 50
S041257 50
S042180 100
S041568 50
S041106 10
S041153 10
Sheet
count
20
50
100
20
25
50
50
60
100
20
25
50
7/07 1
Page 2
Epson Stylus CX7400 Series
Ink Cartridges
For heavy use For moderate use
69 Black 88 Black
69 Cyan 88 Cyan
69 Magenta 88 Magenta
69 Yellow 88 Yellow
Note:
It’s best to use 69 for heavy use and 88 for moderate use.
Specifications
Printing
Paper path Sheet feeder, top entry
Sheet feeder capacity Approx. 120 sheets at 24 lb (90 g/m
Scanning
Scanner type Flatbed color
Photoelectric device CIS
Effective pixels 10,200 × 14,040 pixels at 1200 dpi
Document size 8.5 × 11.7 inches (216 × 297 mm)
US letter or A4 size
Scanning resolution 1200 dpi (main scan)
2400 dpi (sub scan)
Output resolution 50 to 4800, 7200, and 9600 dpi
(50 to 4800 dpi in 1 dpi increments)
Image data 16 bits per pixel per color internal
8 bits per pixel per color external
(maximum)
Light source RGB three color LED
Paper
Use paper under normal circumstances:
Temperature: 59 to 77 °F (15 to 25 °C)
Humidity: 40 to 60% RH
Note:
Since the quality of any particular brand or type of paper may be
changed by the manufacturer at any time, Epson cannot
guarantee the quality of any non-Epson brand or type of paper.
Always test a sample of paper stock before purchasing large
quantities or printing large jobs.
Single sheets
Size A4 (8.3 × 11.7 inches)
A6 (4.1 × 5.8 inches)
Letter (8.5 × 11 inches)
Legal (8.5 × 14 inches)
4 × 6inches
5 × 7inches
8 × 10 inches
Paper type Plain paper or special paper
distributed by Epson
Thickness 0.003 to 0.004 inch (0.08 to 0.11 mm)
Weight 17 lb (64 g/m²) to 24 lb (90 g/m²)
Envelopes
Size No. 10 (4.1 × 9.5 inches)
Paper type Plain bond paper or airmail paper
2
)
Weight 20 lb (75 g/m²) to 24 lb (90 g/m²)
Printable Area
Note:
When printing borderless, quality may decline in the expanded
printable area.
Single sheets
Top
Left
Bottom
Sheets with borders
Top: 0.12 inch (3.0 mm) minimum
Left: 0.12 inch (3.0 mm) minimum
Right: 0.12 inch (3.0 mm) minimum
Bottom: 0.12 inch (3.0 mm) minimum
Right
Borderless
printing
2 7/07
Page 3

Epson Stylus CX7400 Series
Envelopes
Left
Top
Bottom
Right
Top: 0.20 inch (5.0 mm) minimum
Left: 0.12 inch (3.0 mm) minimum
Right: 0.78 inch (20 mm)
Bottom: 0.20 inch (5.0 mm) minimum
Memory Cards
Compatible memory
cards CompactFlash
Microdrive
™
SD
SDHC
miniSD™*
miniSDHC*
microSD*
microSDHC*
MultiMediaCard
Memory Stick
Memory Stick Duo™*
Memory Stick PRO
Memory Stick PRO Duo™*
Memory Stick Micro*
MagicGate
MagicGate Memory Stick Duo
xD-Picture Card
xD-Picture Card Type H
xD-Picture Card Type M
*Requires adapter
Memory card format DCF (Design rule for Camera File
system) version 1.0 or 2.0 compliant.
All card types standard version
compliant.
Voltage requirements 3.3 V
Photo data specifications
File format: JPEG with Exif Version 2.21 standard
Image size: 80 × 80 pixels to 9200 × 9200 pixels
Number of files: Up to 999
™
™
™
Memory Stick
®
Type I and II
™
™
™
™
™
Ink Cartridges
Note:
We recommend that you use genuine Epson
refill them. The use of other products may affect your print quality
and could result in printer damage.
For best printing results, use up a cartridge within six months of
opening the package.
Yields vary considerably based on images printed, print settings,
paper type, frequency of use and temperature. For print quality, a
small amount of ink remains in the cartridge after the “replacement
cartridge” indicator comes on.
The printer ships with full cartridges and part of the ink from this first
set of cartridges is used for charging the printer.
Color Cyan, magenta, yellow, black
Part number 69 or 88
Cartridge life
Opened package: 6 months at 77 °F (25 °C)
Unopened
package: Do not use if the date on the package
has expired.
Storage temperature
–4 to 104 °F (–20 to 40 °C)
1 month at 104 °F (40 °C)
Ink freezes at 10.4 °F (–12 °C)
Ink thaws and is usable after 3 hours at 77 °F (25 °C)
®
cartridges and do not
Size and Weight
Size
*
Stored: Width: 17.7 inches (450 mm)
Depth: 13.4 inches (340 mm)
Height: 7.1 inches (179 mm)
Printing: Width: 17.7 inches (450 mm)
Depth: 18.6 inches (472 mm)
Height: 10.6 inches (268 mm)
Weight 13 lb (5.9 kg)
without the ink cartridges
Electrical
Power supply rating 100 to 120 V
Input voltage range 90 to 132 V
Rated frequency 50 to 60 Hz
range
Input frequency 49.5 to 60.5
range
Rated current 0.6 A
Power consumption
7/07 3
Page 4
Epson Stylus CX7400 Series
Copying: 12 W
Low power: 3 W
Sleep mode: 2.5 W
Power-off mode: 0.2 W
Environmental
Temperature
Operation: 50 to 95 °F (10 to 35 °C)
Storage: –4 to 104 °F (–20 to 40 °C)
1 month at 104 °F (40 °C)
Humidity
Operation: 20 to 80% RH
Storage: 5 to 85% RH
(without condensation)
Standards
Safety UL 60950-1
CAN/CSA C22.2 No. 60950-1
EMC FCC part 15 Subpart B class B
CAN/CSA-CEI/IEC CISPR 22
Class B
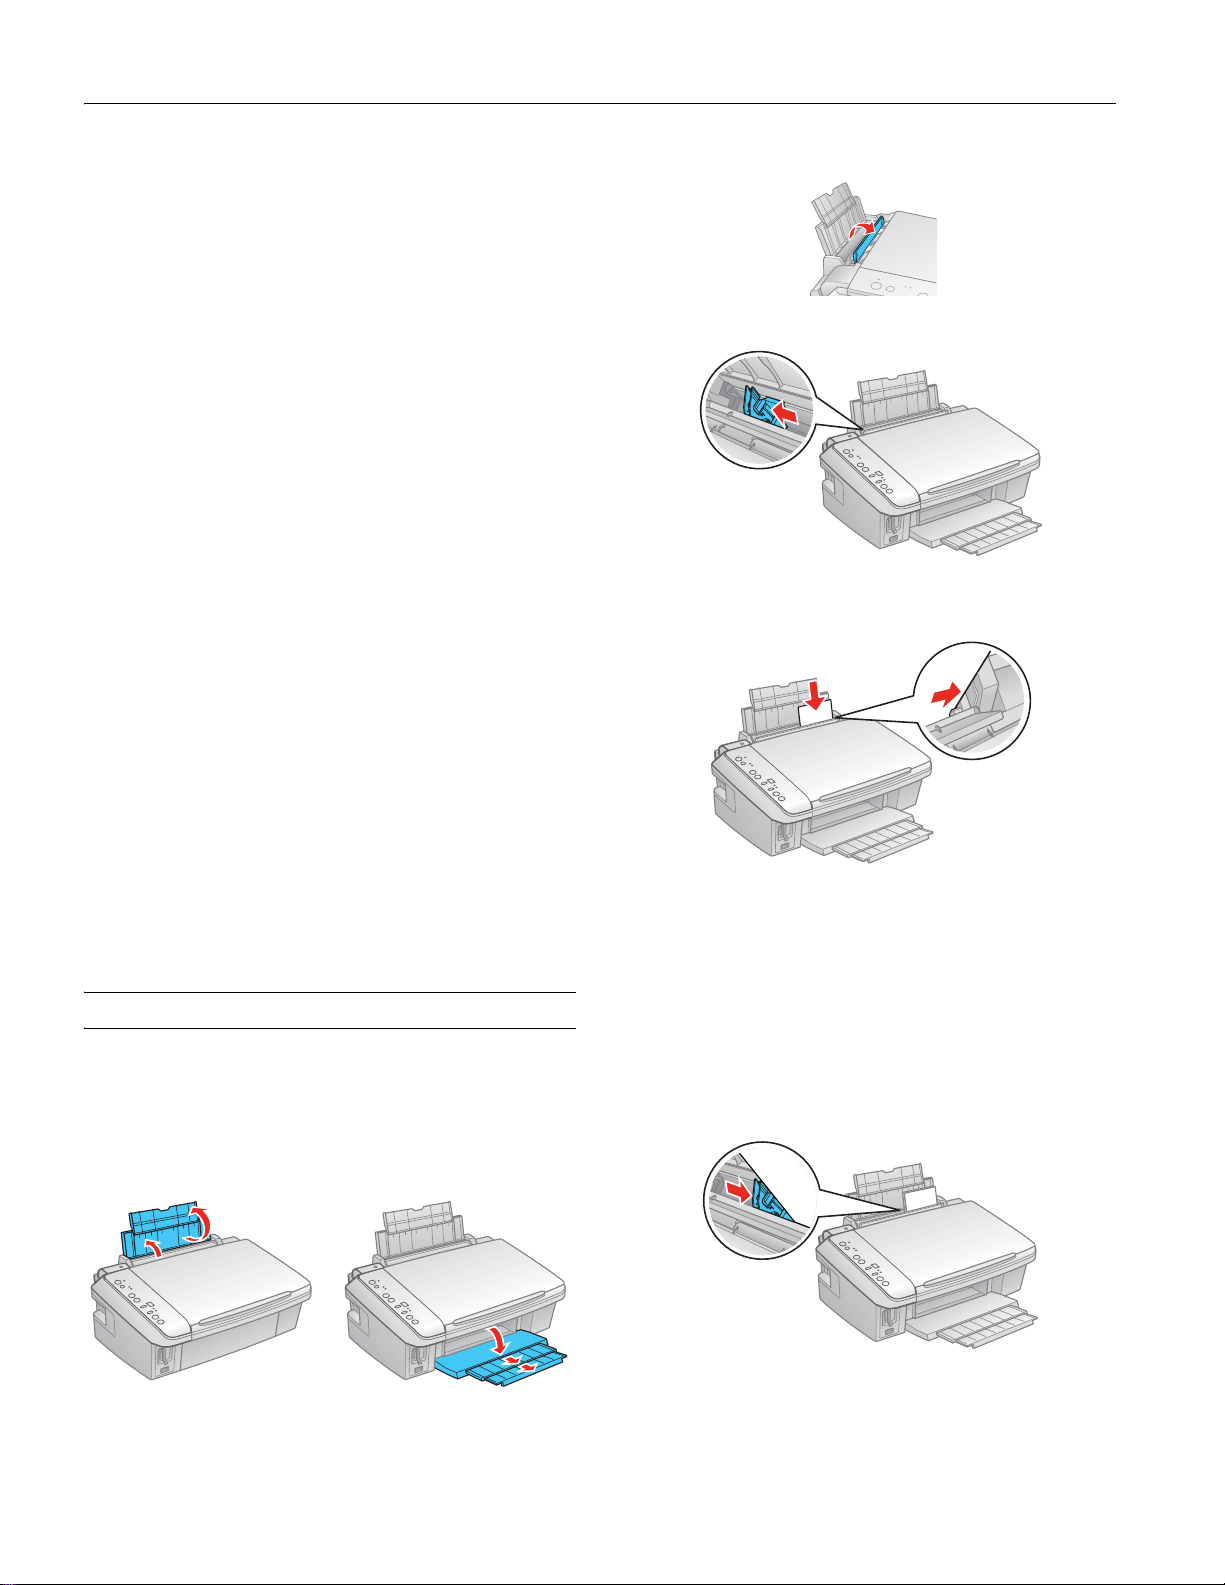
2. Flip the feeder guard up.
3. Press in the tab on the edge guide and slide it left.
4. Insert the paper, glossy or printable side up, against the
right side and beneath the tab.
Interfaces
USB ports One USB 2.0 Hi-Speed (Device Class
for computers); Type B port
One USB 1.1 Full-Speed (for
PictBridge
PRINT
™
or USB-DIRECT-
™
compliant devices)
Loading Paper
You can load up to 120 sheets of plain paper, 80 sheets of
matte, or 20 sheets of photo paper. Load other special papers
one sheet at a time.
1. Open the paper support and flip up the extension. Then
open the output tray and pull out the extensions.
Always load paper short edge first, even for landscape
printing. Load letterhead or pre-printed paper top edge
first.
Note:
Do not load paper with holes punched in it.
Do not load paper above the arrow on the edge guide.
Check the paper package for any additional loading instructions.
5. Slide the edge guide against the paper, but not too tightly.
4 7/07
Page 5

Epson Stylus CX7400 Series
6. Flip the feeder guard down.
Note:
For instructions on loading envelopes, see your on-screen
User’s Guide.
Placing Originals for Copying or Scanning
Caution:
Do not place anything on top of the document cover or use the
cover as a writing surface.
1. Open the document cover and place your original facedown on the glass, with the top facing into the front right
corner.
2. Close the document cover gently to keep your original in
place.
Copying
Note:
Copies may not be exactly the same size as the originals.
Copying a Document
1. Press the P On button to turn on the CX7400 Series.
2. Load letter-size plain paper or Epson special paper in the
sheet feeder (see page 4).
Note:
Load only the recommended number of sheets.
3. Press the paper size button, if necessary, to select Letter
Size Plain Paper
4. Place your original document on the document table.
5. Press the
Copies button to select from 1 to 9 copies.
The number is displayed in the
.
Copies window.
To make 10 to 100 copies, press the
appears in the
Copies window. Then load only enough
Copies button until
paper for the copies you want to make. For example, for
12 copies, load 12 sheets of paper. (Be sure to change this
setting back to
6. Press the x
documents) or the x
1 when you’re finished.)
Start B&W button (for black-and-white
Start Color button (for color
documents) to start copying.
7. If you pressed the
Copies window to make more than 10 copies, press the
y
Stop button when you have finished copying.
Copies button until appeared in the
Copying Draft Documents
1. Press the P On button to turn on the CX7400 Series.
2. Load letter-size plain paper or Epson special paper in the
sheet feeder (see page 4).
3. Press the paper size button, if necessary, to select
Letter Size Plain Paper.
4. Place your original document on the document table.
5. Press the
The number is displayed in the
6. To make 10 to 100 copies,
press the
Copies button to select from 1 to 9 copies.
Copies window.
Copies button until
appears in the
Copies
Stop
button
window. Then load only
enough paper for the copies
you want to make. For
example, for 12 copies, load
12 sheets of paper. (Be sure
to change this setting back to
1 when you’re finished.)
7. Press and hold the
y
Stop button as you press
either the x
Start B&W
Start
B&W and
Start Color
buttons
button (for black-and-white
documents) or the
x
Start Color button (for color documents).
If you need to cancel copying, press the y
Stop button.
Copying a Photo
1. Press the P On button to turn on the CX7400 Series.
2. Load 4 × 6-inch Epson special paper in the sheet feeder
(see page 4).
Note:
Load only the recommended number of sheets.
3. Press the paper size button, if necessary, to select
4"×6" Photo Paper.
4. Place your original photo on the document table.
7/07 5
Page 6

Epson Stylus CX7400 Series
5. Press the
The number is displayed in the
To make 10 to 100 copies, press the
Copies button to select from 1 to 9 copies.
Copies window.
Copies button until
appears in the
Copies window. Then load only enough
paper for the copies you want to make. For example, for
12 copies, load 12 sheets of paper. (Be sure to change this
setting back to
6. Press the x
photos) or the x
1 when you’re finished.)
Start B&W button (for black-and-white
Start Color button (for color photos) to
start copying. The CX7400 Series automatically sizes your
photo to fit on the 4 × 6-inch photo paper you loaded.
If you need to cancel copying, press the y
Stop button.
Printing from a Memory Card
You can print photos right from your digital camera’s memory
card by inserting it into the CX7400 Series memory card slots.
See the sections below to print photos from an index sheet.
See the on-screen User’s Guide to perform the following
memory card functions:
❏ Printing photos using DPOF (Digital Print Order Format)
❏ Transferring files between the CX7400 Series and
acomputer
Make sure the files on the card are compatible with your
CX7400 Series.
File format JPEG with the Exif version 2.21 standard
Image size 80 × 80 pixels to 9200 × 9200 pixels
Number of files Up to 999
Note:
Also consult your memory card and adapter documentation for any
special use instructions for your card or adapter.
If you will only be printing from your memory card, it is best if the
CX7400 Series is not connected to your computer (or your computer
should be turned off).
Insert Memory Card
Insert one card at a time in one of the CX7400 Series memory
card slots. Insert the type of card you have into the correct
slot, as shown below.
1. Turn on the CX7400 Series.
2. Insert your card into the correct slot as shown below:
Left slot
Right slot
Compatible Memory Cards and Files
Make sure your memory card is one of the following types:
Slot Type of card
Right slot CompactFlash Type I and II
Microdrive
Left slot SD
SDHC
miniSD*
miniSDHC*
microSD*
microSDHC*
MultiMediaCard
Memory Stick
Memory Stick Duo*
Memory Stick PRO
Memory Stick PRO Duo*
Memory Stick Micro*
MagicGate Memory Stick
MagicGate Memory Stick Duo*
xD-Picture Card
xD-Picture Card Type H
xD-Picture Card Type M
* Requires adapter
Memory card
access light
The memory card access light flashes and stays lit.
Caution:
Do not remove a card or turn off the CX7400 Series when the
memory card access light is flashing or you may lose photos on
the card.
Print Photos From an Index Sheet
You can print an index sheet containing small versions of all
the photos on your memory card. Then you can select the
photos you want to print by marking them on the sheet and
scanning the sheet. The CX7400 Series automatically prints
them.
Printing an Index Sheet
1. Load several sheets of plain letter-size paper (see page 4).
2. Insert a memory card in a memory card slot (see above).
6 7/07
Page 7

Epson Stylus CX7400 Series
3. Press the Print Index Sheet button to print the index sheet.
Print Index Sheet
button
4. The most recent photos are printed on the first index sheet,
up to 30 photos per page.
Note:
If you need to cancel printing, press the
y Stop button.
Now you can select your photos on the sheet, and scan and
print them.
Print Photos From Index Sheet
1. Make sure your memory card is still inserted.
2. Use a dark pen or pencil to fill in the circles on the sheet.
Correct:
Incorrect:
4. Place the index sheet face-down on the glass, in the lower
right corner so that the top of the sheet is aligned against the
right edge of the glass.
5. Close the document cover.
6. Load photo paper.
7. Press the
Print from Index Sheet button to start scanning
and printing. Wait until printing finishes before printing
from any additional index sheets.
Note:
If you need to cancel printing, press the
y Stop button.
When you finish printing, you can remove your memory card.
❏ Select the paper type and size you loaded.
❏ Select a
Borderless or With Border layout.
❏ If you want to print the date the photo was taken on
each photo, select
Print date on photos.
❏ Fill in one circle beneath each photo you want to print.
The numbers indicate how many copies you want of
that photo. If you want to print one copy of all the
photos on the index sheet, fill in the
All circle at the top.
3. Open the document cover.
Printing From Other External Devices
If you have a digital camera that supports PictBridge or USB
DIRECT-PRINT, you can connect it to the CX7400 Series
and print your photos directly from the camera. Check your
camera manual to see if it is compatible.
After you connect the CX7400 Series to your computer and
install its software, you can also print documents or photos
from your computer.
See the on-screen User’s Guide for instructions on printing or
transferring files from a camera or computer.
7/07 7
Page 8

Epson Stylus CX7400 Series
Selecting the Correct Media Type
The table below lists the settings you should choose for your
paper in the printer software:
Paper
Plain paper
Epson Bright White Paper
Epson Presentation Paper Matte
Epson Ultra Premium Photo Paper Glossy Ultra Premium Photo
Epson Premium Photo Paper Glossy Premium Photo Paper
Epson Photo Paper Glossy Photo Paper Glossy
Epson Premium Photo Paper Semi-gloss Premium Photo Paper
Epson Premium Presentation Paper Matte
Epson Premium Presentation Paper Matte
Double-sided
Epson Photo Quality Self-adhesive Sheets
Epson Iron-on Cool Peel Transfer Paper
Envelopes Envelope
Type or Media Type
setting
Plain Paper /
Bright White Paper
Paper Glossy
Glossy
Semi-Gloss
Premium Presentation
Paper Matte
Scanning
You can use your CX7400 Series to scan a photo or document
and save it as a digital file on your computer. You can even
restore and correct photographs as you scan.
The Epson Scan software provides three scanning modes:
❏
Full Auto Mode scans quickly and easily using automatic
settings.
❏
Home Mode previews your image and provides preset
options for scanning.
❏
Professional Mode previews your image and provides
a full array of tools.
For detailed scanning instructions, see the on-screen
User’s Guide.
Replacing Ink Cartridges
Your CX7400 Series and its software will let you know when
an ink cartridge is low or expended.
When the red B ink light flashes, a cartridge is low on ink.
You can continue printing until a cartridge needs replacement.
When the red B ink light stays on, you need to replace
acartridge.
Note:
You cannot print when a cartridge is expended, even if the other
cartridges are not expended. Replace any expended cartridges before
printing or copying.
If you remove a low or expended ink cartridge, you cannot reinstall
and use the cartridge.
If a cartridge is more than 6 months old, print quality may
decline. If necessary, try cleaning the print head (see page 10).
If printouts still do not look their best, you may need to
replace the cartridge.
Removing and Installing Ink Cartridges
Caution:
Do not open ink cartridge packages until you are ready to install the
ink. Cartridges are vacuum packed to maintain reliability.
Note:
Leave the expended cartridge installed until you have obtained
a replacement, or the ink remaining in the print head nozzles may
dry out.
1. Make sure the CX7400 Series is on and the red B ink light
is on but not flashing.
Note:
If you need to change a cartridge before it is expended, run the
Ink Cartridge Replacement utility in the Windows driver (see the
on-screen User’s Guide for details).
2. Open the scanner.
8 7/07
3. Press the y
Stop button. The print head moves to the
_ position to indicate which cartridge is low or expended.
Page 9

Epson Stylus CX7400 Series
If no other cartridges are low or expended, the print head
moves to the replacement position on the right. Go to
step 5.
Caution:
Do not move the print head by hand; this may damage the
CX7400 Series. Always press and release the
move it.
y Stop button to
4. Press the y Stop button again.
If another cartridge is low or expended, it moves to the
_ position. Press the y
Stop button again to see if more
cartridges are low or expended.
If no other cartridges are low or expended, the print head
moves to the replacement position on the right.
5. Open the cartridge cover.
7. Before you open the new ink cartridge package, shake it
four or five times. Then remove it from the package.
Caution:
Do not touch the green chip on the front of the cartridge. This can
damage the ink cartridge.
8. Remove the yellow tape from the bottom of the ink
cartridge.
Caution:
Do not remove any other labels or seals, or ink will leak.
9. Insert the new ink cartridge into the cartridge holder and
push it down until it clicks into place.
6. Squeeze the tab on the cartridge and lift the cartridge
straight up to remove it. Dispose of it carefully. Do not take
the used cartridge apart or try to refill it.
Warning:
If ink gets on your hands, wash them thoroughly with soap and
water. If ink gets into your eyes, flush them immediately with
water. Keep ink cartridges out of the reach of children.
10. Once you replace all the necessary cartridges, close the
cartridge cover and press it down until it clicks into place.
11. Close the scanner.
7/07 9
Page 10

Epson Stylus CX7400 Series
12. Press the y
takes about 2 minutes. When it’s finished, the
Stop button to begin charging the ink. This
P On light
stops flashing and remains on.
Caution:
Never turn off the CX7400 Series while the P On
or you’ll waste ink. If the
B ink light flashes, press the
light is flashing
y Stop button and press down all the cartridges securely.
Adjusting Print Quality
If the print quality declines, you may need to run a utility to
clean or align the print head. You can use the control panel or
software to run these utilities. See the on-screen User’s Guide
for instructions on using software.
Checking and Cleaning the Print Head
If your printouts become too light, or you see dark or light
bands across them, you may need to clean the print head
nozzles. Cleaning uses ink, so clean the nozzles only if print
quality declines. You can check for clogged nozzles before you
clean them so you don’t clean them unnecessarily.
Checking the Print Head Nozzles
1. Load several sheets of plain letter-size paper (see page 4).
2. Turn off the CX7400 Series.
3. Hold down the y
button to turn the CX7400 Series back on. Hold down
both buttons until the
release the buttons.
Stop button as you press the P On
P On light begins to flash, then
Cleaning the Print Head Nozzles
Note:
You cannot clean the print head if an ink cartridge is low or expended.
You must replace the cartridge first (see page 8).
1. Load several sheets of plain letter-size paper (see page 4).
2. Hold down the y
Stop button for 3 seconds to start the
head cleaning cycle, which lasts about 1 minute. The
P
On light flashes throughout the cleaning cycle and stays
on when the cycle is finished.
Caution:
Never turn off the CX7400 Series during a cleaning cycle or you
may damage it.
3. Run a nozzle check to verify that the print head is clean
(see page 10).
Note:
If you don’t see any improvement after cleaning the print head
two times, turn off the CX7400 Series and wait at least 6 hours to
let any dried ink soften. Then try printing again.
If you do not use your CX7400 Series often, it is a good idea to
print a few pages at least once a month to maintain good print
quality.
Aligning the Print Head
If your printouts look grainy or blurry, or you see light or dark
bands across them, you may need to align the print head.
Note:
Banding may also occur if your print head nozzles need cleaning.
You can align the print head using the control panel or your software.
See the on-screen User’s Guide for instructions on using software.
4. Check the nozzle check pattern that prints to see if there are
gaps in the lines:
Nozzles are clean
Nozzles need
cleaning
5. If there are no gaps, the print head is clean. If there are gaps
or the pattern is faint, clean the print head.
10 7/07
1. Load several sheets of plain letter-size paper (see page 4).
2. Turn off the CX7400 Series.
3. Hold down the
P
On button to turn the CX7400 Series back on. Hold
down both buttons until the P
Copies button as you press the
On light begins to flash,
then release the buttons.
The alignment sheet prints.
4. Look at pattern #1 and find the patch that is most evenly
printed, with no noticeable streaks or lines.
5. Press the
appears in the
6. Press the x
Copies button until the number for that patch
Copies window.
Start B&W button.
7. Repeat steps 5 and 6 for each of the other alignment
patterns.
8. The CX7400 Series will turn off when alignment is
complete.
Page 11

Epson Stylus CX7400 Series
Cleaning the CX7400 Series
To keep the CX7400 Series working at its best, you should
clean it several times a year.
Caution:
Do not use a hard brush, benzine, alcohol, or paint thinner to clean
the CX7400 Series or you may damage it. Do not use oil or other
lubricants inside the CX7400 Series or let water get inside it.
1. Turn off the CX7400 Series.
2. Unplug the power cable.
3. Remove all the paper.
4. Clean the sheet feeder using a soft brush.
5. Clean the document table glass with a soft, lint-free cloth
moistened with a little glass cleaner.
Caution:
Do not spray glass cleaner directly on the glass.
6. Clean the document cover with a soft, non-abrasive
microfiber-type cloth.
7. Close the document cover and paper support, then clean the
outer case with a soft cloth dampened with mild detergent.
8. Pack the CX7400 Series in its original box or one of a
similar size using protective material to keep it from moving
inside the box.
9. Keep the CX7400 Series level during transportation to
prevent damage.
10. After transporting the CX7400 Series, remove the tape
securing the ink cartridge holder.
If print quality has declined when you print again in a new
location, clean and align the print head (see page 10).
Related Documentation
CPD-23788 Epson Stylus CX7400 Series
Start Here sheet (English/French)
CPD-23790 Epson Stylus CX7400 Series
Quick Guide (English)
CPD-23789 Epson Stylus CX7400 Series
CD-ROM (English/French
includes on-screen User’s Guides)
Transporting the CX7400 Series
If you need to ship your CX7400 Series or transport it a long
distance, prepare it for transportation as follows:
1. Turn off the CX7400 Series.
2. Unplug all the connected cables.
3. Remove all the paper.
4. Close the paper support and output tray.
5. Lift up the scanner and check that the ink cartridge holder
is all the way to the right (the home position). If necessary,
turn on the CX7400 Series, then turn it off again.
6. Fasten the ink cartridge holder to the case using tape. Leave
the ink cartridges installed to avoid damaging the printer.
7. Close the scanner.
7/07 11
 Loading...