

Page 1
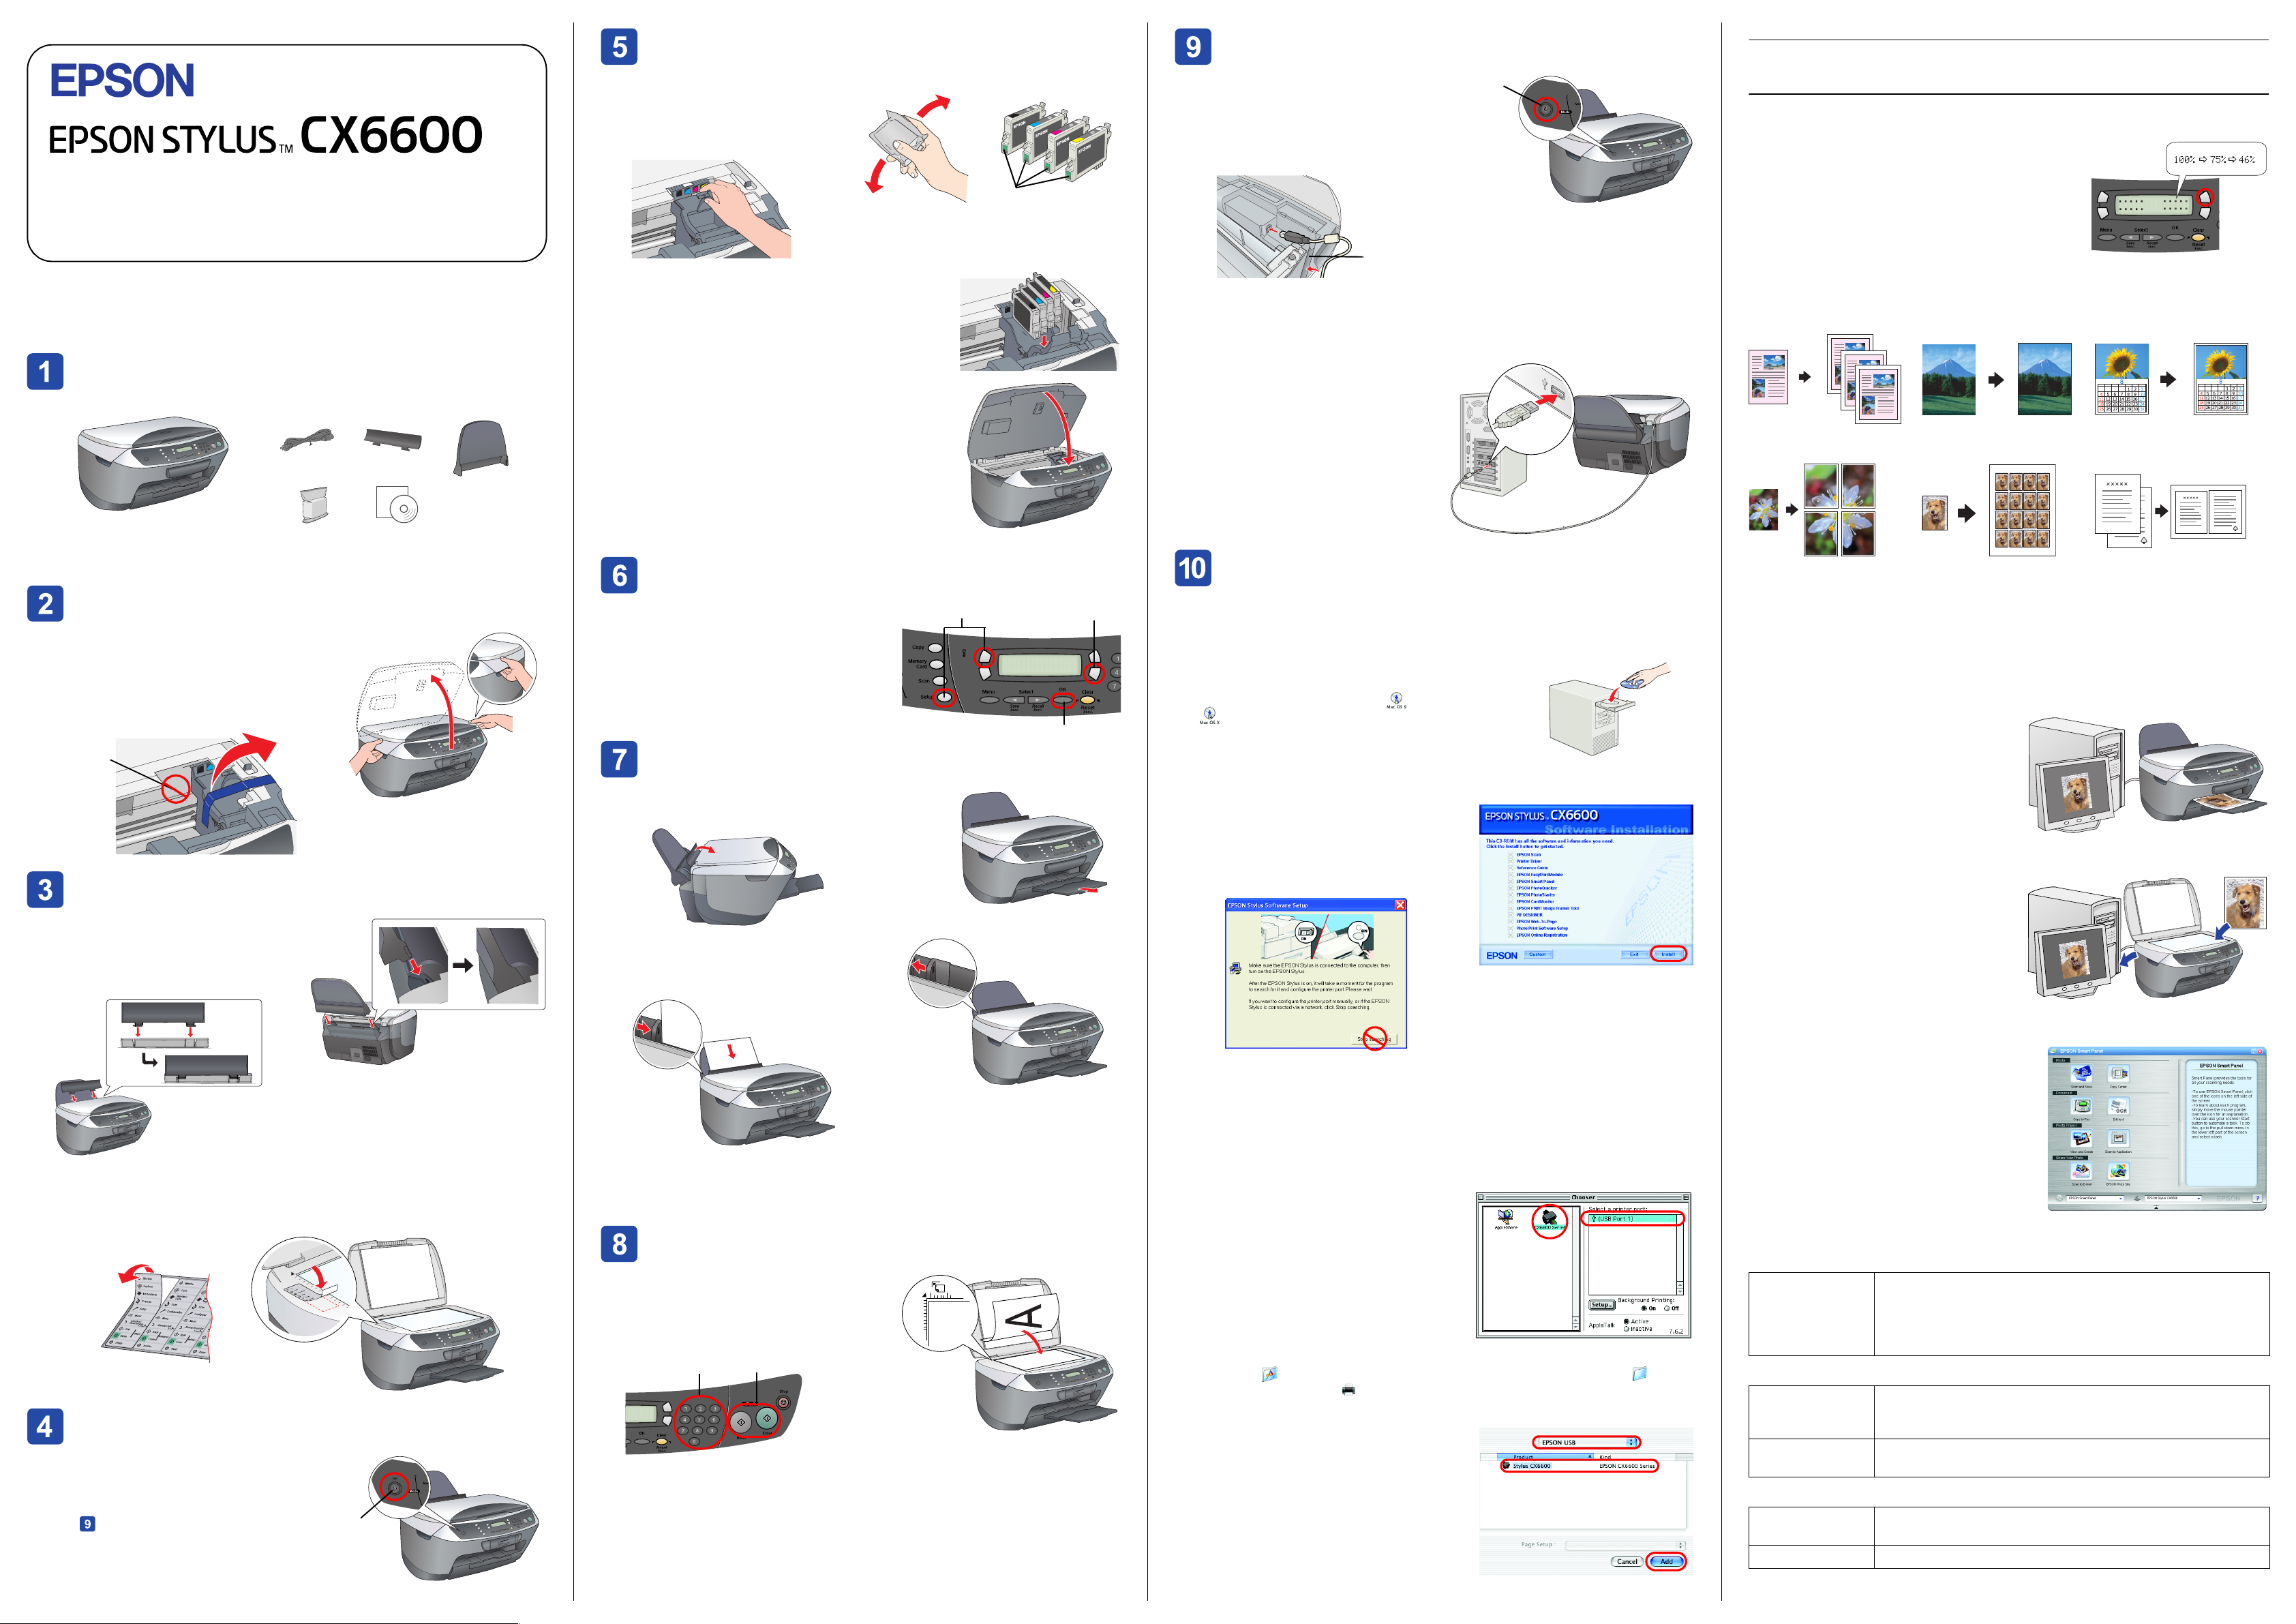
Setup
Veuillez trouver les instructions en français au verso.
Cautions and Notes
Cautions must be observed to avoid damage to your equipment.
English
4050543-00
XXX
c
Notes contain important information and useful tips on the operation of this product.
Unpacking
Make sure the following parts are included and not damaged.
power cord
The body color and contents may vary in
certain locations.
The power cord comes attached in some
countries.
ink
cartridges
Removing the Tapes
1. Open the scanner unit.
2. Remove all tape and packing material from this
product. Make sure the protective materials
around the ink cartridges are removed.
Do not Touch or
remove.
Attaching the Parts
1. Attach the paper support.
2. Insert the feeder guard into two slots in
front of the paper support.
feeder guard
paper support
CD-ROM
Installing Ink Cartridges
1. Open the scanner unit.
2. Shake an ink cartridge four or five
times and then remove it from its
package.
3. Open the cartridge cover.
4. Place each cartridge into its holder. Then, push the ink
cartridge down until it clicks into place.
Note:
Install all ink cartridges. This product does not work unless
all cartridges are installed properly.
5. Close the cartridge cover.
6. Lower the scanner unit.
Ink charging starts and it takes about two minutes to
complete.
Initial charge... appears on the LCD panel and the
Stylus CX produces a variety of mechanical sounds. This
is normal.
Caution:
c
❏ Never turn off this product during the ink
charging process.
❏ Do not load paper until ink charging is complete.
Selecting a Language
1. Press the Setup button and A button until
7.Languages appears on the LCD panel and
then press the x Color button.
2. Select a language by pressing the D button.
3. Press the OK button.
Menu items appear in the selected language.
Loading Paper
1. Slide out the output extension tray.
2. Move the feeder guard towards you.
3. Slide out the edge guide.
4. Load a stack of paper to rest against the
right side of the feeder and slide the edge
guide against the paper.
1
Do not touch
A
Connecting to your Computer
1. Press the P On button to turn off the Stylus
CX.
2. Open the Scanner unit.
3. Plug the connector of the USB cable into the
USB port of this product, and then connect
the cable to the slot.
USB cable slot
Caution:
c
Push the USB cable securely into the slot. The USB connector may snap if it is
not securely in the slot and the scanner unit is closed with force.
4. Close the scanner unit.
5. Connect the other end of the USB cable
to your computer.
Press
Features
Buttons around LCD Panel
The four buttons around the LCD panel allow you to
make settings quickly. Simply press the button next to a
setting you want to change to move through the
available options.
Copying
You can copy with a variety options.
Standard BorderFree Small Margin
Poster Repeat 2-up
Installing the Software
2
D
3
Note for Mac OS X:
❏ This software does not support the UNIX File System (UFS) for Mac OS X. Install the
software on a disk or in a partition that does not use UFS.
❏ This product does not support the Max OS X Classic environment.
1. Make sure the Stylus CX is connected and turned off,
and then insert the software CD.
For Macintosh, double-click the Mac OS 9 icon or
Mac OS X icon in the software CD.
2. Turn off all virus protection programs and then click
Continue.
3. Read the license agreement. If you agree with the
terms, click Agree.
4. Click Install, and then follow the onscreen
instructions.
5. When you see this screen, turn on your Stylus
CX and wait until the screen disappears. Then
follow the onscreen instructions. Note that
EPSON Smart Panel is installed in several steps.
Using a Memory Card
The built-in memory card slot allow you to do the followings:
❏ Print directly from a memory card. (See Basic Operation Guide.)
❏ Scan and save an image directly to a memory card. (See Basic Operation Guide.)
❏ Transfer the data stored on a memory card to your computer. (See Reference Guide.)
Printing
You can print data, and make photos,
postcards, and posters from your computer.
To use this feature, you need to connect the
Stylus CX to a computer with the Epson Printer
software installed. See “Installing the
Software” on this sheet to install the Epson
printer driver.
Scanning
You can scan documents, photos and other
materials into an electronic format for your
computer, and then use the scanned images
in greeting cards, e-mail, or on the web.
To use the scan features, you need to connect
the Stylus CX to a computer with EPSON Scan
and EPSON Smart Panel installed. See
“Installing the Software” on this sheet to install
EPSON Scan and EPSON Smart Panel.
Note:
The feeder guard prevents items put on the document cover from getting into the
inside of this product.
3. Affix a panel sticker.
Turning On
Plug in the power cord and press the P On button
to turn on this product.
Note:
Do not connect it to your computer before
step or you will fail to install the software.
Press
5. Move the feeder guard back.
Now you are ready to use this product as a stand-alone device. See the next section to
learn how to make a test copy. If you want to install software, see “Connecting to Your
Computer” on this sheet.
Making Copies
1. Place a document on the document table.
2. Press the Copy Mode button to enter the
Copy Mode.
3. Press the numeric buttons to set the number
of copies.
3
4. Press the x B&W button (to copy in grayscale), or the x Color button (to copy in color).
Stylus CX starts Copying.
Caution:
c
Do not open the scanner unit during scanning or copying; otherwise, you may
damage this product.
The Stylus CX has a variety of copy functions. See “Features” on this sheet or Basic
Operation Guide. To use this product with your computer, see next step.
4
6. Click Exit or Restart Now on the final screen, and then remove the CD-ROM.
For Windows users, you are ready to scan and print. See “Features” or “Getting More
Information” on this sheet for instructions.
For Macintosh users, see the next section to set up the Stylus CX as a printer.
For Mac OS 9
1. Open Chooser from the Apple menu.
2. Select CX6600 Series and your USB port, and
then close Chooser.
For Mac OS X
1. Open the Applications folder on your hard drive, and then open the Utilities
folder and double-click Print Center or Printer Setup Utility.
2. Click Add in the Printer List dialog box.
3. Select EPSON USB or USB, click Stylus CX6600,
and then click Add.
4. Make sure Printer List contains Stylus CX6600
and then close this printer list.
Now you are ready to scan and print. See
“Features” or “Getting More Information” on this
sheet for instructions.
EPSON Smart Panel
It is the copy center of your Stylus CX when it is
functioning as a scanner. Use it to copy, create
an e-mail, scan, print, fax, or use OCR (Optical
Character Recognition).
Getting More Information
Basic Operation Guide
Contents Describes how to use the Stylus CX as a stand-alone device. You
can copy, print directly from a memory card, and scan to a
memory card. Also, you can change ink cartridges and check
the condition of the Stylus CX. It also provides troubleshooting tips
and customer support information.
Reference Guide
Contents Provides basic information on printing and scanning.
Maintenance and troubleshooting tips, technical and customer
support information are also included.
How to access Double - click the ESCX6600 Reference Guide icon on the
desktop.
Online Help
Contents Provides you with detailed information on the printer driver and
EPSON Scan.
How to access See "Getting Information" on the Reference Guide.
 Loading...