

Page 1
Printing Your
First Page
Attaching the
Paper Support
Checking
the Printer
Installing the
Ink
Cartridges
7
1
Plugging
6
2
in the
Printer
3
5
4
Connecting
the Printer
Installing the
Printer
Software
4012512-00
XXX
Page 2
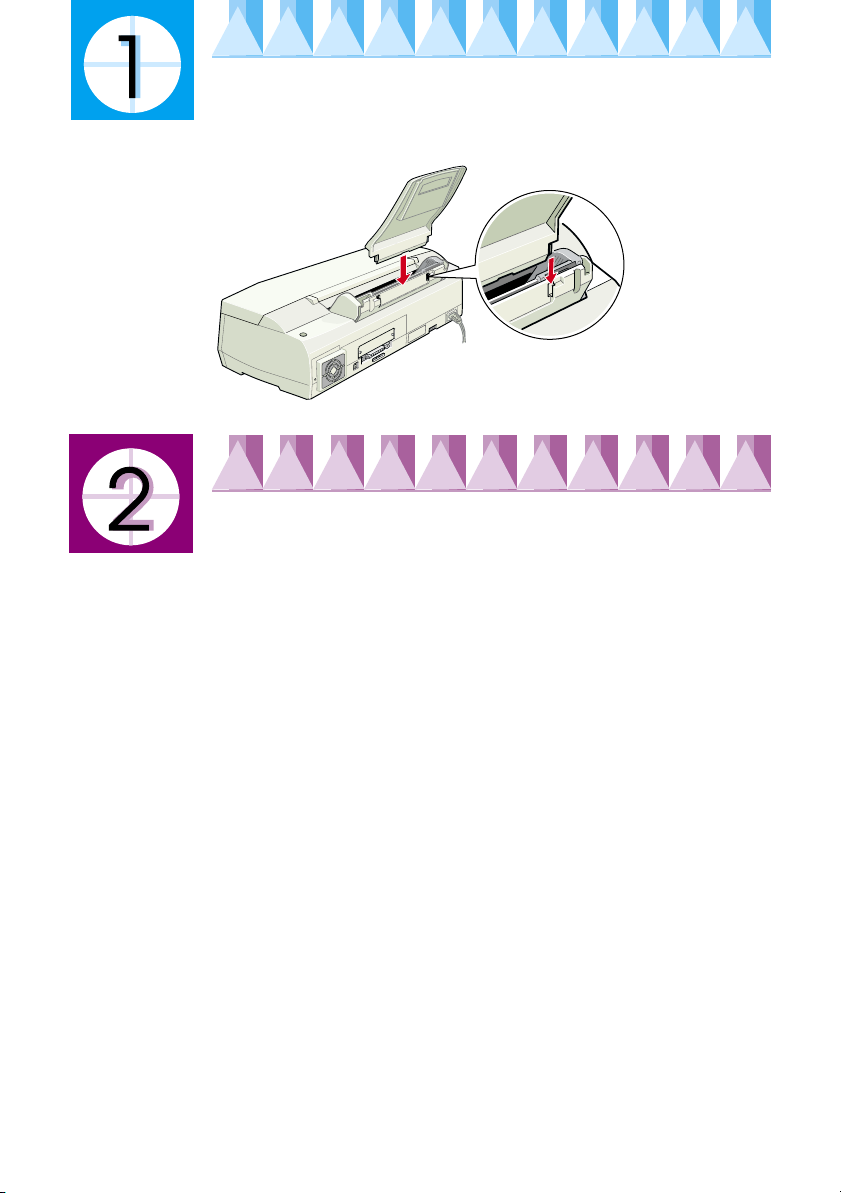
Attaching the Paper Support
Insert the paper support into the slots at the rear of the printer.
Plugging in the Printer
Follow the steps below to plug in the printer.
1. Make sure that the printer is turned off. It is off when the2power light
is off.
2. Check the label on the back of the printer to make sure that the voltage
required by the printer matches that of the electrical outlet that you will
be plugging it into. Also, make sure that you have the correct power
cable for your power source.
Caution:
?
3. If the power cord is not attached to the printer, connect it to the AC inlet
on the back of the printer.
4. Plug the power cord into a properly grounded electrical outlet.
It is not possible to change the printer's voltage. If the rated voltage and
your outlet voltage do not match, contact your dealer for assistance. Do
not plug in the power cord.
Page 3
Connecting the Printer
If you have a PC, it is possible to connect to your printer using either the
parallel or the USB interface. A Macintosh can only be connected via the
USB interface. Depending on your geographic location, you may need to
acquire the appropriate cable. See “Options and Consumable Products” in
the
Daily Use
Note:
In order to connect your PC via the USB interface, your computer must be a
Windows 98 or Windows 2000 pre-installed model that is equipped with a USB
port.
Using the parallel interface for PCs
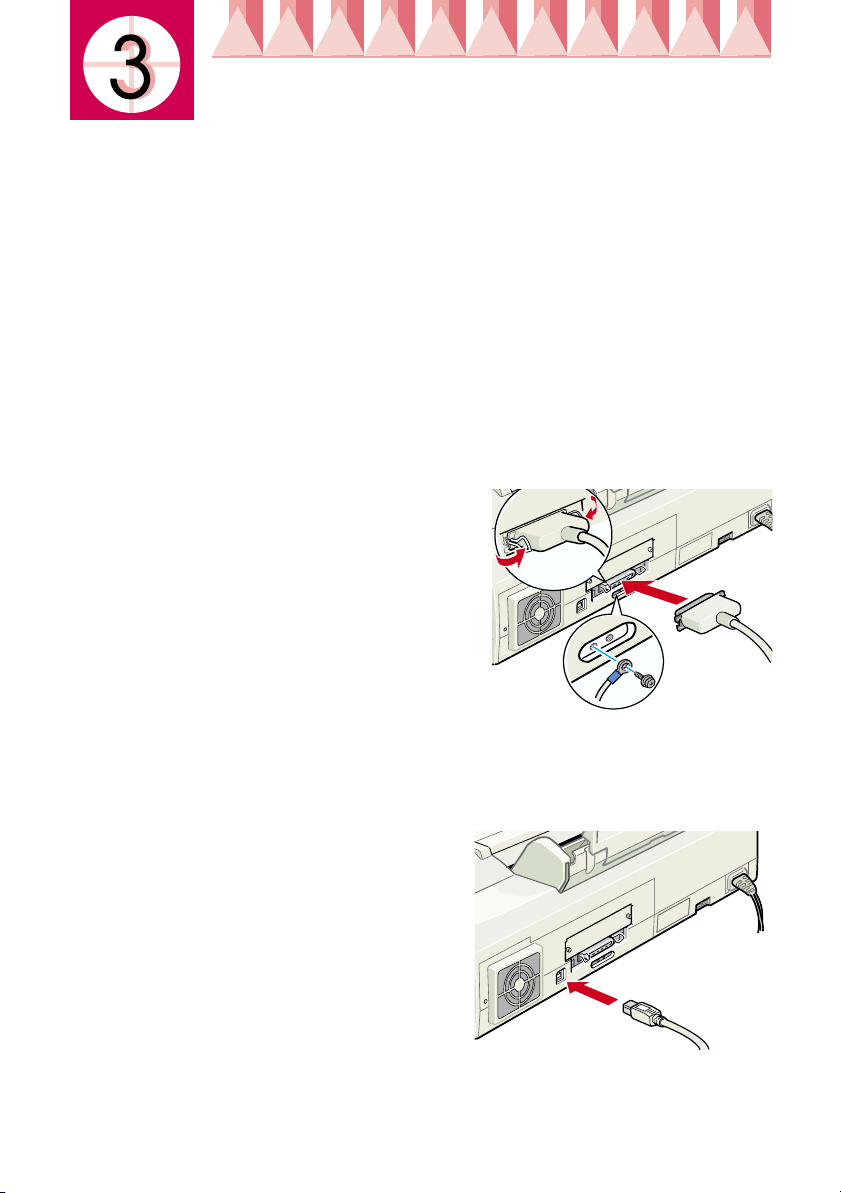
To connect the printer to your PC, you need a shielded, twisted-pair parallel
cable. Follow the steps below.
1. Make sure that both the printer and the computer are turned off.
2. Plug the cable connector securely
into the printer’s interface connector,
then squeeze the wire clips together
until they lock into place on both
sides. If your cable has a ground
wire, connect it to the ground
connector below the interface
connector.
3. Plug the other end of the cable into
the computer’s parallel interface. If
there is a ground wire at the computer end of the cable, connect it to the
ground connector at the back of the computer.
guide for details.
Using the USB interface for Windows and Macintosh users
To connect the printer to a USB port,
you need a standard, shielded USB
cable. Follow the steps below.
1. Make sure that both the printer and
the computer are turned off.
2. Plug the appropriate end of the
cable into the USB port at the back
of the printer. (The shape of the end
that fits the printer differs from that
of the end that fits the computer.)
3. Connect the other end of the cable to the computer’s USB port.
Page 4

Installing the Printer Software
After connecting the printer to your computer, you must install the software
that is included on the “Printer Software for EPSON Stylus COLOR 980”
CD-ROM shipped with your printer.
Your printer software CD-ROM includes the following:
Printer driver and utilities
❏
The printer driver runs, or “drives,” your printer; use it to make settings
such as print quality, speed, media type, and paper size. The Nozzle
Check, Head Cleaning, and Print Head Alignment utilities help you to
keep your printer in top operating condition. EPSON Status Monitor 3
(for Windows 98, 95, 2000, and NT 4.0) or EPSON StatusMonitor (for
Macintosh) notifies you of printer errors and displays printer status
information, such as the amount of ink remaining. The Status Monitor
also guides you through the ink replacement process.
Online guides
❏
The online
about your printer and color printing.
If you are using the floppy disk version of the software, make a backup copy
of the EPSON printer software disk before you begin installation. If you
wish to make a floppy disk version of the printer software, you can use the
driver disk creation utility that is included on the CD-ROM.
Follow the instructions in the appropriate section below to install the printer
software. If you are DOS user, see “Printing with DOS” in the
.
guide
Reference Guide
and the
Color Guide
help you to learn more
Daily Use
For Windows 98, 95, 2000, and NT 4.0 users
Windows 98, 95, 2000, and NT 4.0 users must first install the printer
software, and then, if you are connecting via the USB port, check to ensure
that the USB cable is correctly installed. If you are connecting via the parallel
port, proceed to section
Note:
❏
When using Windows 2000, if you do not follow the steps below to install the
printer software, Microsoft's Universal driver may be installed instead. To see
if the Universal driver has been installed, right click anywhere in the printer
driver window and then click
containing the words
below to reinstall the printer driver.
❏
If the Digital Signature Not Found dialog box appears during the installation
process, click
described below.
. If you click No, you must reinstall the printer software as
Yes
after installing the software.
About
Unidrv Printer Driver
in the list that appears. If a screen
is displayed, follow the steps
Page 5
Installing the software
Follow the steps below to install the printer software.
1. Make sure that your printer is off.
2. Turn on your computer and start Windows. If the New Hardware
Found screen or any other Wizard appears, click
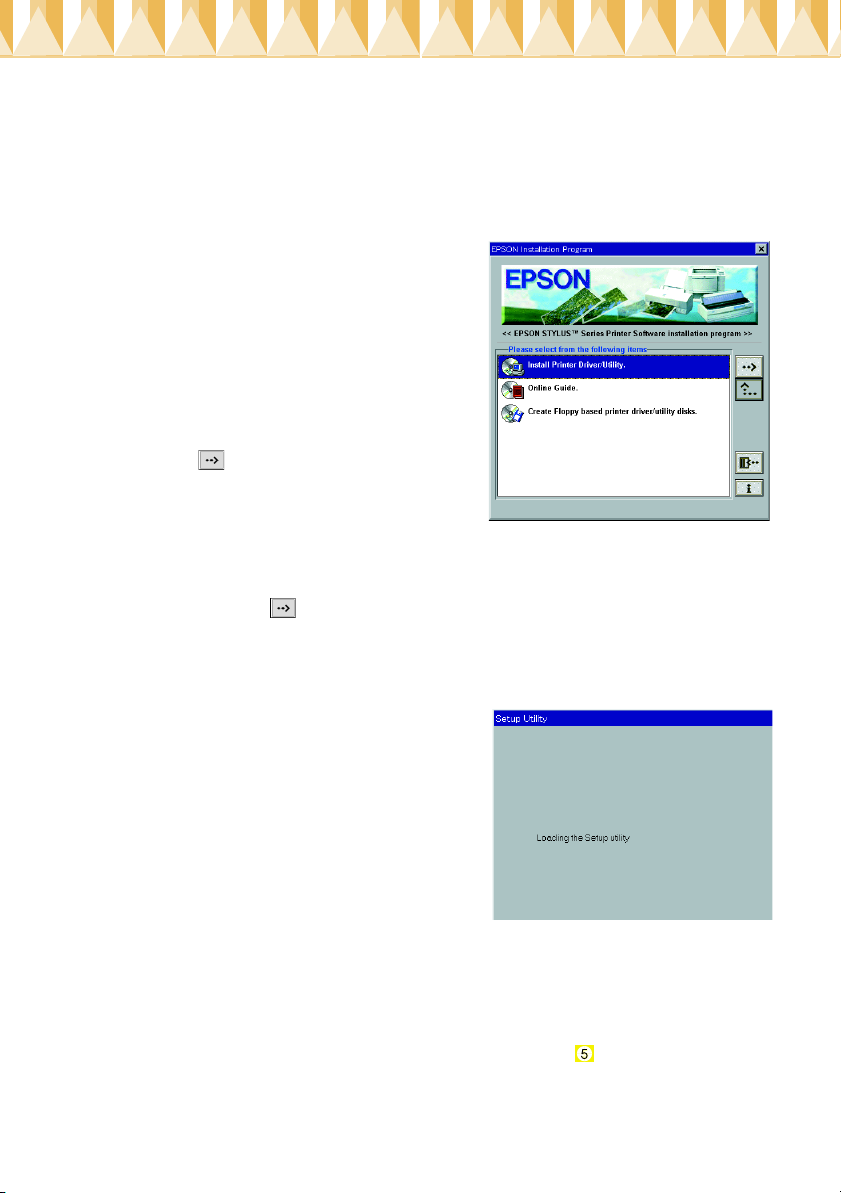
3. Insert the printer software CD that is
shipped with your printer in the CDROM drive. The Installer dialog box
opens. (For floppy disk users, insert
the disk in the disk drive and doubleclick the
My Computer
icon, the
floppy disk drive icon, and then
Setup.exe.
4. Select
)
Install Printer Driver/Utility
and
click . Then, click OK in the dialog
box that appears to start the printer
software installation
Note:
It is possible to install the Reference Guide on your hard drive from the Installer
dialog box, as shown at the right. To install the guide, select
and then click . Then, click
Install Reference Guide
screen instructions. When the installation is complete, an
icon appears in the EPSON folder. Double-click the icon to open the guide.
5. Follow the on-screen instructions to turn on your printer.
For Windows 98 users, the printer port
configuration starts automatically.
For printers connected via USB cable,
the USB device driver installation
starts automatically at this point. A
message will appear asking you to
restart your computer. Follow this
instruction.
6. After turning on the printer, the Setup
utility opens automatically. Follow
the on-screen instructions to install the ink cartridges, check the print
head nozzles, and clean the print head. When a message appears
informing you that the setup is complete, click OK.
Note:
If the Setup utility does not start, proceed to section to install the ink
cartridge using the printer's control panel.
Cancel
and follow the on-
ESC980 Guide
.
Online Guide
Copyright© 2000 by SEIKO EPSON CORPORATION,
Nagano, Japan.
Printed in Japan.00.xx-xx
Page 6
7. When a message appears informing you that the installation is
complete, click OK.
Note:
If an error message appears, either the printer driver or the EPSON USB
printer device driver is not installed correctly. See “Troubleshooting” in the
Daily Use guide for details.
After the setup is complete, proceed to section to print your first page.
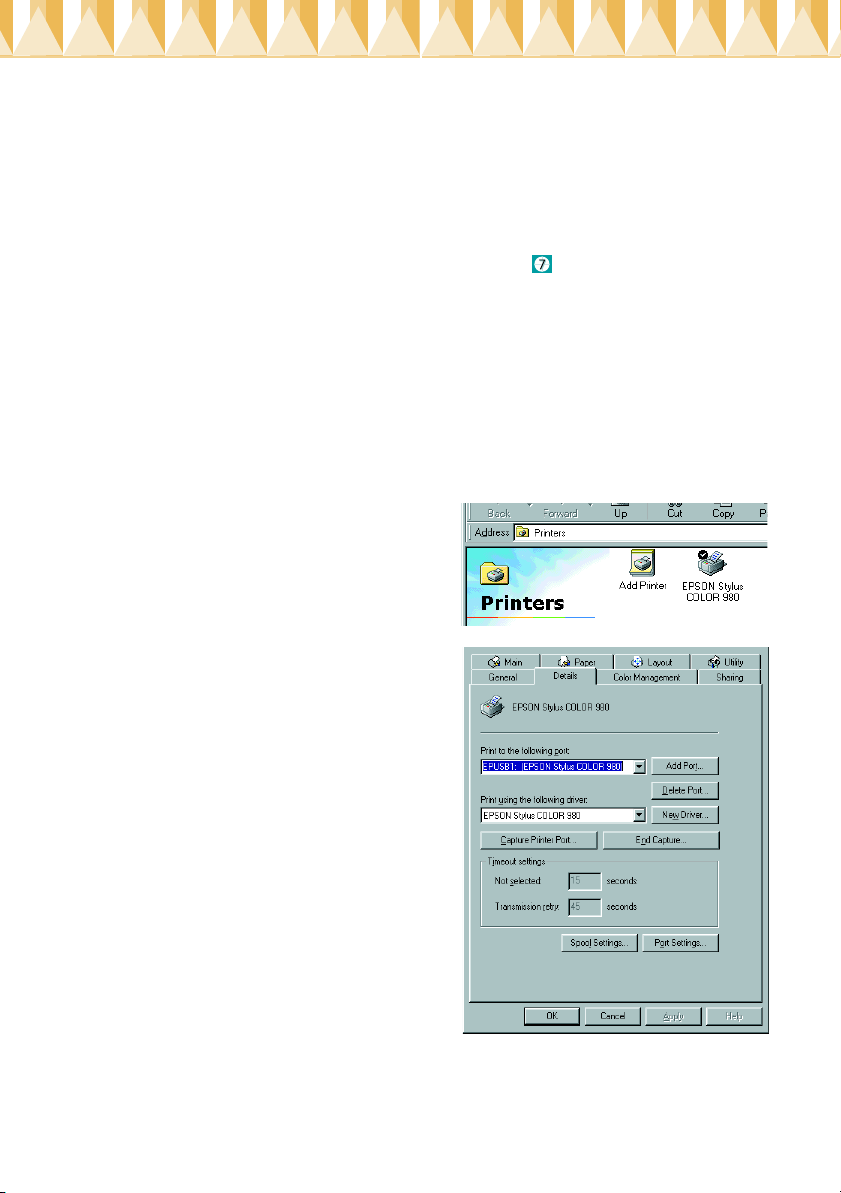
Ensuring that the USB driver is installed correctly
After installing the software, USB users should follow the directions below
to confirm that the USB driver is installed correctly.
Note:
The illustrations used in this section show the procedure for Windows 98.
1. Click the
sure that the icon for your printer is displayed in the Printers window.
2. Select the icon for your printer,
then click
menu.
3. For Windows 98 users, click the
Details
EPUSBx: (EPSON Stylus COLOR
980)
following port list box.
For Windows 2000 users, click the
Ports
USBxxx, EPSON Stylus COLOR
980
following port(s) list box.
Note:
If the correct port is not displayed,
refer to the “Troubleshooting” section
of the Daily Use guide or the Online
Guide.
tab and make sure that
is displayed in the Print to the
tab and make sure that
is displayed in the Print to the
button, point to
Start
Properties
on the
Settings,
File
and then click
Printers
. Make
Page 7

For Windows 3.1 users
Follow the steps below to install the software in Windows 3.1.
1. Make sure that Windows 3.1 is running and the Program Manager
window is open.
2. Insert the printer software CD that is shipped with your printer in the
CD-ROM drive. (If you use the floppy disk version, insert the disk in
the disk drive.)
3. Click
dialog box appears. In the Command
Line text box, type
OK
the printer software files.
Note:
If the CD-ROM drive is assigned a drive letter other than “D” or if you are
using the floppy disk version of the software, substitute the appropriate letter.
4. When the installation is complete, click OK to exit the installation
program.
The installation program automatically selects this printer as the default
printer for Windows applications.
For information on accessing and using the software, see “Using the Printer
Software for Windows” in the
on the File menu. The Run
Run
D:SETUP
. The installation program copies
and click
Daily Use
guide.
For Macintosh users
Macintosh users must first install the printer software, and then select the
printer in the Chooser.
Caution:
?
Turn off all virus protection programs before installing the printer software.
Installing the software
Follow the steps below to install the printer software.
1. Turn on your Macintosh and insert the software CD in the CD-ROM
drive. The contents of the EPSON printer software CD are displayed.
2. If a single
folders containing installer icons for several languages are displayed,
double-click the folder for your preferred language, then double-click
the
Installer
Installer
icon is displayed, double-click the icon. If separate
icon inside it.
Page 8
Note:
It is possible to install the Reference Guide on your hard drive from the printer
software CD-ROM. To install the guide, click
follow the on-screen instructions. When the installation is complete, a
Reference Guide
to open the guide.
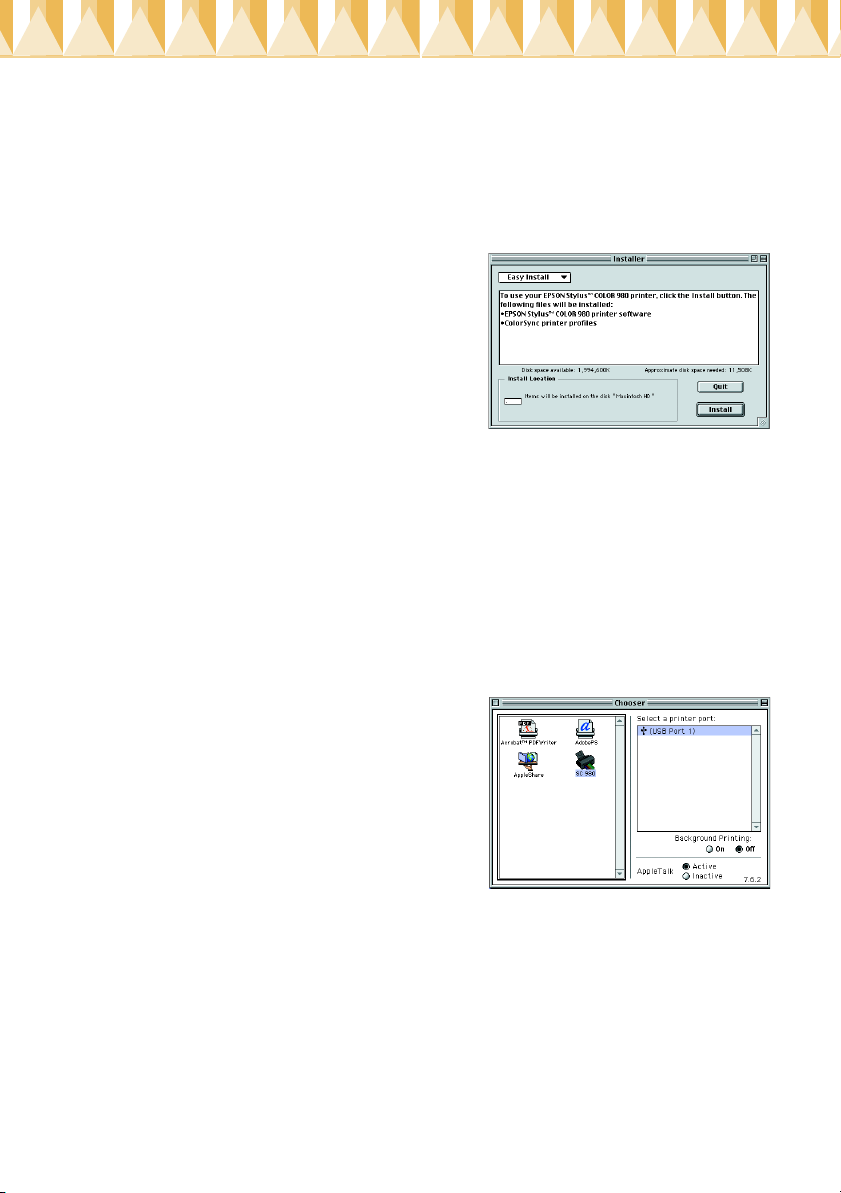
3. In the initial dialog box, click
Continue.
opens.
4. Make sure that the Install Location box displays the correct drive to
install to, then click
5. When a message appears informing you that the installation is
complete, click
The Installer dialog box
icon appears in the EPSON folder. Double-click the icon
.
Install
Restart
to restart your computer.
Install Reference Guide
Selecting your printer in the Chooser
After you have installed the printer software on your Macintosh, you must
open the Chooser and select your printer. You need to select a printer the
fi rs t t im e y ou us e i t o r w he ne ve r yo u w an t t o s wi tc h t o an ot he r p ri nt er . Yo ur
Macintosh will always print using the last printer selected.
1. Choose
menu. Then click your printer's icon
and the port that your printer is
connected to.
Chooser
from the Apple
and
View
2. Select the appropriate
background printing on or off.
When background printing is on, you can use your Macintosh while it
is preparing a document for printing. In order to use the EPSON
Monitor3 utility to manage print jobs, background printing must be
turned on.
3. Close the Chooser.
Background Printing
radio button to turn
Page 9
Installing the Ink Cartridges
Windows 98, 95, 2000, and NT 4.0 users can use the Setup utility to install
ink cartridges. Windows 3.1 and Macintosh users must use the printer’s
control panel. Refer to the appropriate section below.
Using the Setup utility
If you have Windows 98, 95, 2000, or NT 4.0 installed on your computer,
the Setup utility will open automatically when the printer software
installation is complete. Follow the on-screen instructions.
Using the printer's control panel
If you can not access the Setup utility, use the printer’s control panel to
install the ink cartridges.
Warning:
M
Note:
Do not open the ink cartridge packages until just before you install them; otherwise,
the ink may dry up.
Install the ink cartridges as described below.
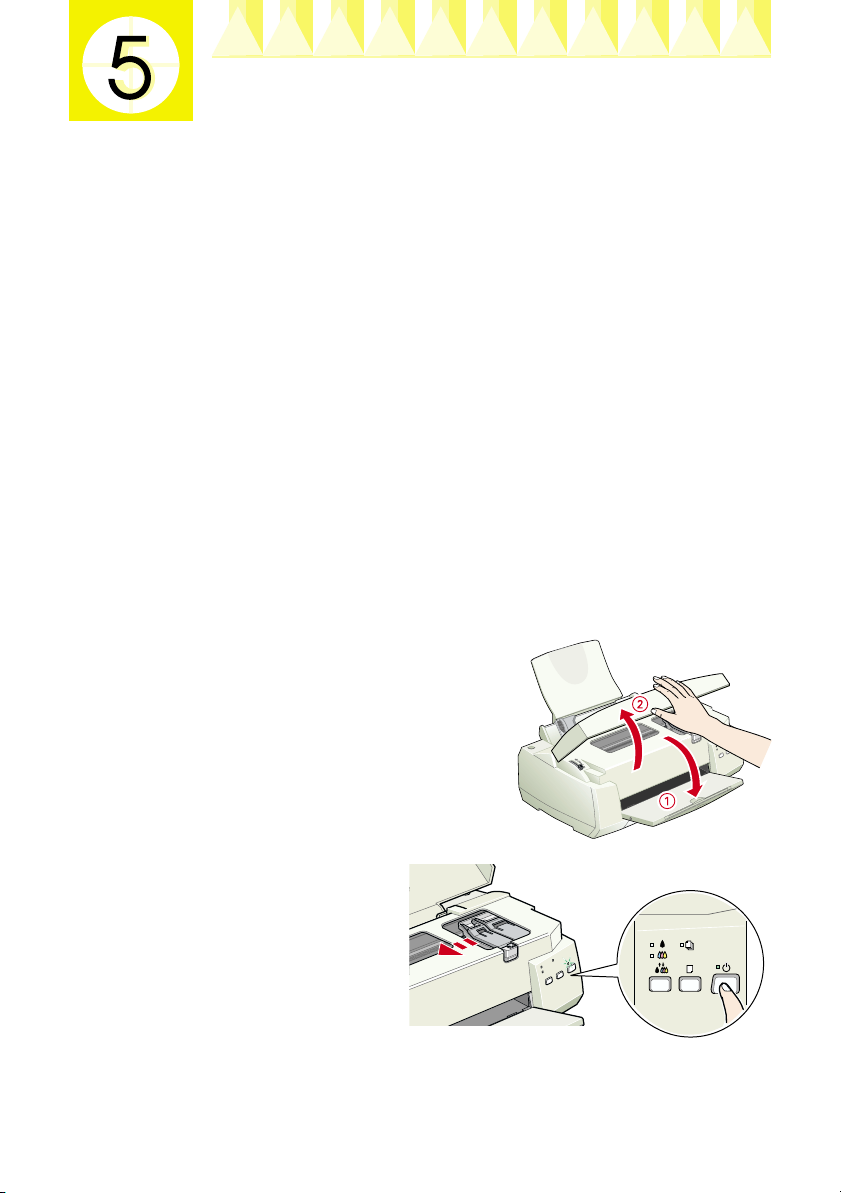
1. Lower the output tray and then open the
The ink cartridges are self-contained units. Under ordinary use, ink will
not leak from a cartridge. If ink does get on your hands, wash them
thoroughly with soap and water. If ink gets into your eyes, flush them
immediately with water.
printer cover.
2. Press the2power button
to turn on the printer.
Page 10
The print head moves left to the ink
cartridge installation position. The
power light flashes and the *and
2
ink out lights come on.
Caution:
?
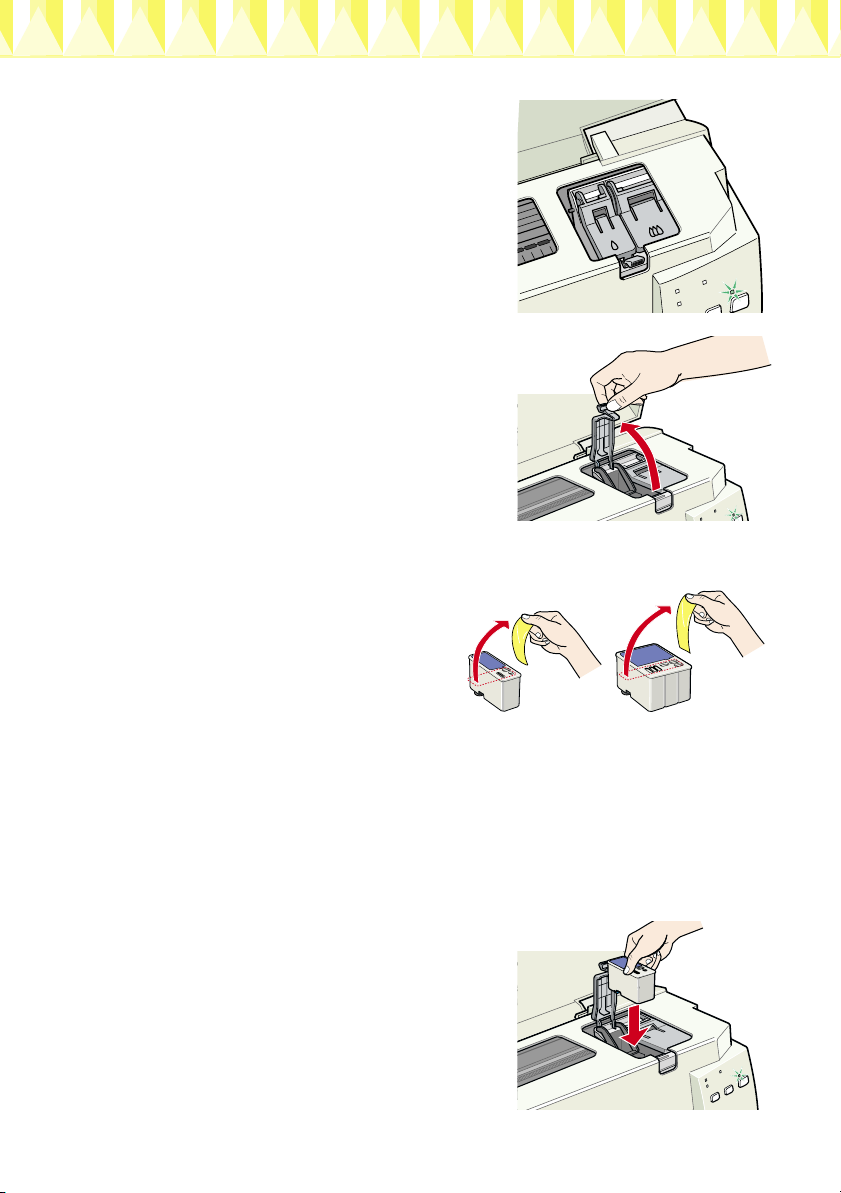
3. Lift up the ink cartridge clamps.
Note:
Do not remove the small sponges that are attached to the ink cartridge clamps.
4. Open the ink cartridge packages
and remove only the yellow tape
seals from each cartridge.
Do not move the print head by hand;
doing so may damage the printer.
)
Caution:
❏
?
5. Place the black ink cartridge gently into
its holder with the labels facing up. Do
not press down on the cartridges.
Note:
Install both ink cartridges. If either of the
cartridges is not installed, the prin ter will not
work.
You must remove the yellow tape seals from the cartridges before
installing them; otherwise, a fatal error will occur and the
cartridges will become unusable.
❏
Do not remove the blue portion of the tape seals from the cartridges;
otherwise, the cartridges may become clogged and unable to print.
❏
Do not remove the tape seals from the bottom of the cartridges;
otherwise, ink will leak.
Page 11
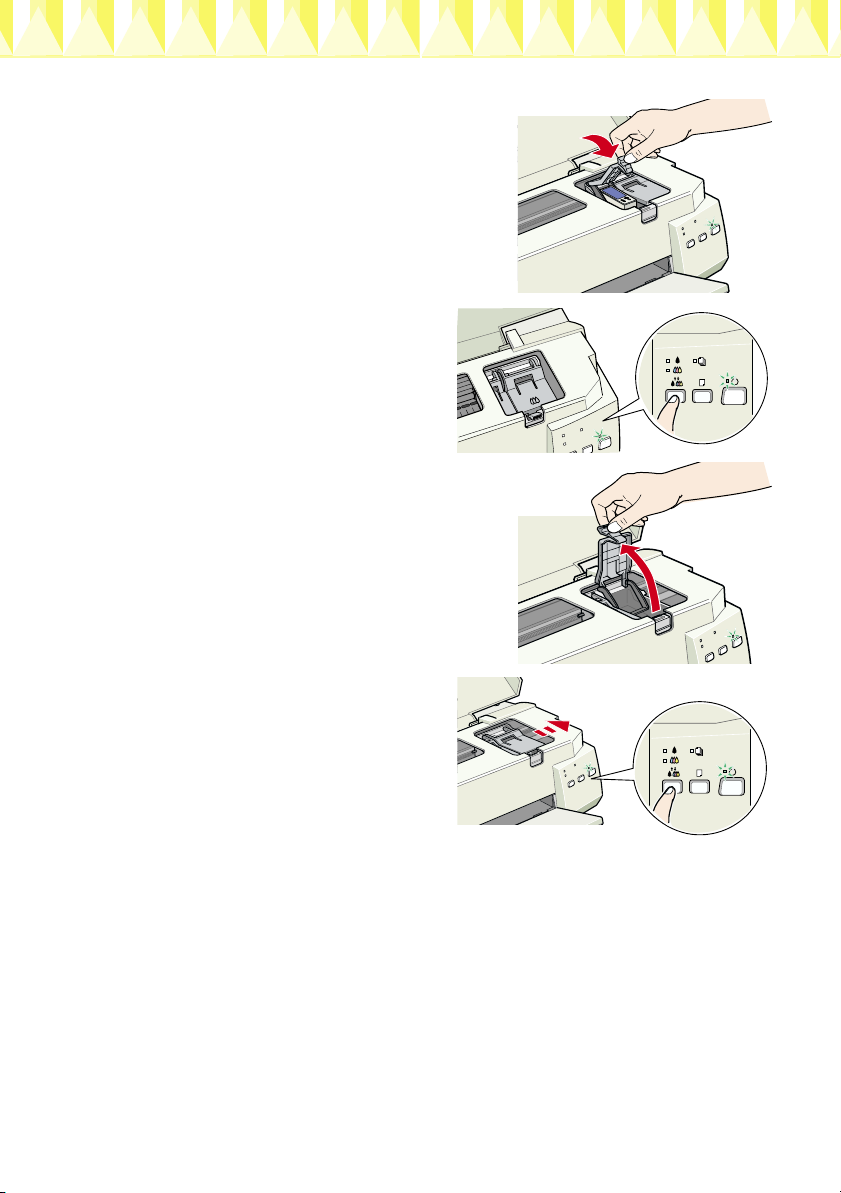
6. Lower the ink cartridge clamps until
they lock in place.
Caution:
?
7. Press the
install the color ink cartridge. The
printer moves the print head to
the color ink cartridge installation
position.
8. Lift up the ink cartridge clamp.
Install the color ink cartridge as
described in steps 5 and 6, substituting
“color ink cartridge” for “black ink
cartridge” where appropriate. Then go to
step 9 to complete the ink cartridge
installation.
Once you install the ink cartridges,
do not open their clamps again until
you replace the ink cartridges;
otherwise, the cartridges may become
unusable.
4
cleaning button to
9. Press the
printer moves the print head and
begins charging the ink delivery
system.
?
While the ink is charging, the
produces a variety of mechanical sounds. These sounds are normal.
When the ink delivery system has been charged, the print head returns
to its home (far right) position and the 2 power light comes on.
?
10. Close the printer cover.
4
cleaning button. The
Caution:
Always press the
move the print head by hand. Doing so may damage the printer.
Caution:
Never turn off the printer while the 2power light is flashing.
4
cleaning button to move the print head. Do not
power light flashes and the printer
2
Page 12
Checking the Printer
Before printing your first page, load plain paper in the printer and print a
nozzle check page to make sure that the printer is working correctly. If the
nozzle check is unsatisfactory, you may need to clean the print head.
Loading paper
Follow the steps below to load plain paper in the printer.
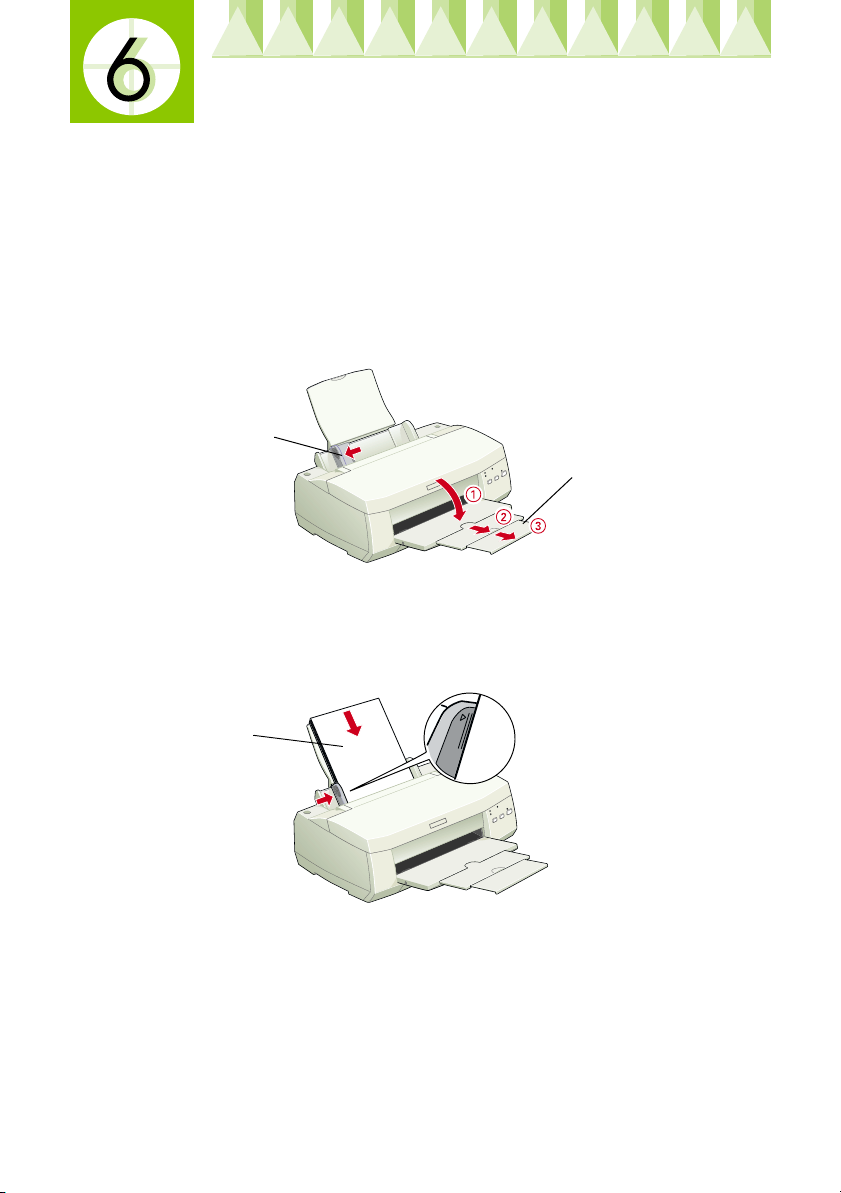
1. Lower the output tray and slide out the extension, then slide the left
edge guide so that the distance between the edge guides is slightly
wider than the width of your paper.
edge guide
output tray
2. Fan a stack of paper, then tap it on a flat surface to even the edges.
3. Load the stack of paper in the sheet feeder with the printable side up
and the right edge of the paper resting against the right edge guide.
Then slide the left edge guide against the left edge of the paper.
printable
side up
Note:
❏
Always load paper into the sheet feeder short edge first.
❏
Make sure that the paper stack fits under the arrow mark on the inside of
the edge guide.
Page 13
Checking the print head nozzles
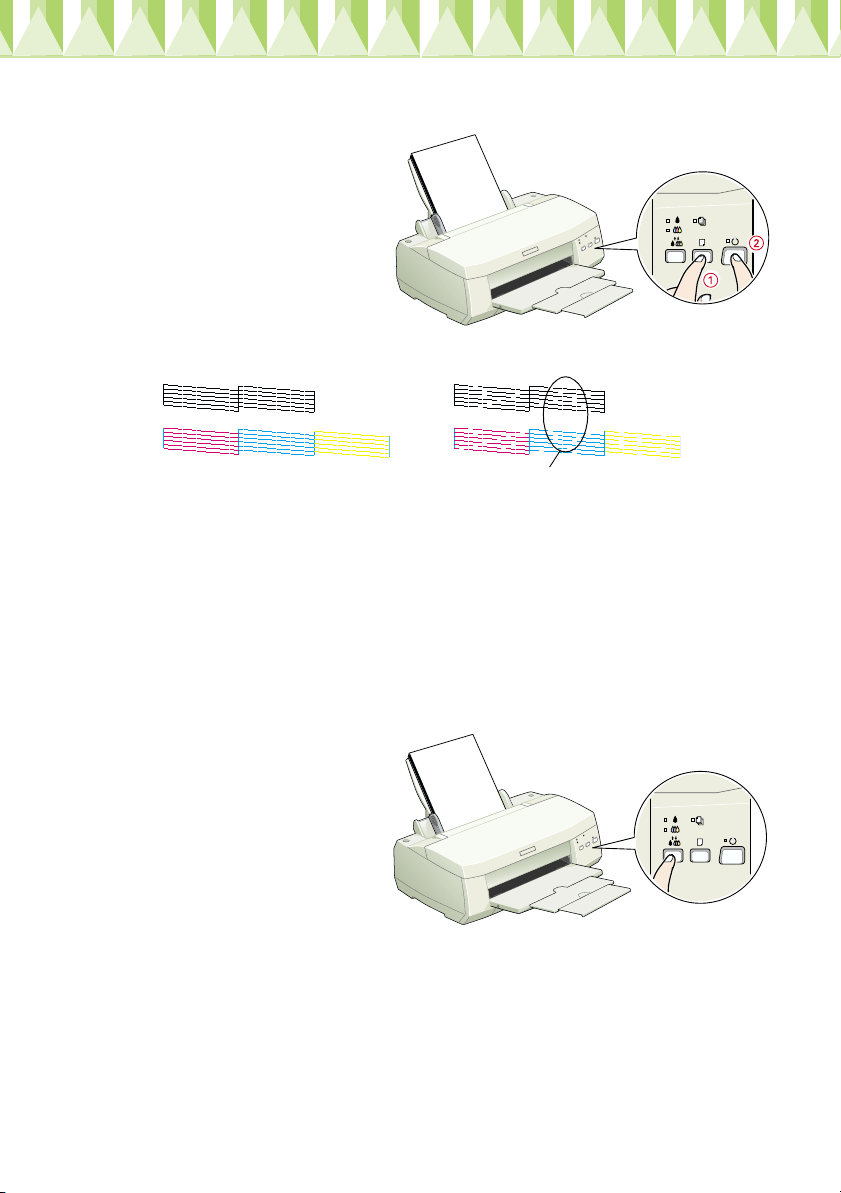
Make sure that the printer is
turned off. Hold down
-
the
load/eject button (➀ in
the illustration) and press
the2power button (➁ in the
illustration) to turn on the
printer. Then release both
buttons.
Here are sample printouts.
Good Sample Print head Needs to be cleaned.
segments are missing
If the nozzle check page does not print satisfactorily (for example, if any
segment of the printed lines is missing), then you should clean the print
head as described below. If the printout is satisfactory, you are ready to
print your first page. See “Printing Your First Page” for instructions.
Cleaning the print head
Follow the steps below to clean the print head.
1. Make sure that the 2power light is on and that both the *black and
color ink out lights are off.
)
2. Hold down the
cleaning button for three
seconds.
The printer starts cleaning
the print head and the
power light begins
2
flashing. Print head
cleaning takes about thirty
seconds to complete.
Caution:
?
3. When the 2power light stops flashing, print a nozzle check pattern to
confirm that the head is clean and to reset the cleaning cycle.
If print quality hasn’t improved after repeating the nozzle checking and
cleaning procedures four or five times, contact your dealer.
Never turn off the printer while the 2 power light is flashing. Doing
so may damage the printer.
4
Page 14
Printing Your First Page
After making sure that your printer is operating correctly, you are ready to
print your first page. To familiarize yourself with the printer software, we
recommend that you print one of the sample files provided with your
printer software. To print a sample file, follow the instructions for Windows
or Macintosh in this section.
If you choose to print your own document instead, load the appropriate
paper in the printer, open the document in your application, then proceed
to step 4 in the relevant section below, making changes where appropriate.
Note:
❏
See your software manual for details on how to use an application.
❏
Depending on the type of document that you are printing and the type of paper
that you are using, you may have to make settings that differ from those
described in this section.
For Windows users
Follow the steps below to print the sample file.
1. Make sure that A4 or Letter size EPSON Photo Quality Ink Jet Paper is
loaded in the printer.
2. Insert the printer software CD in the CD-ROM drive. If the Installer
dialog box appears, click
3. Double-click the
click
Open
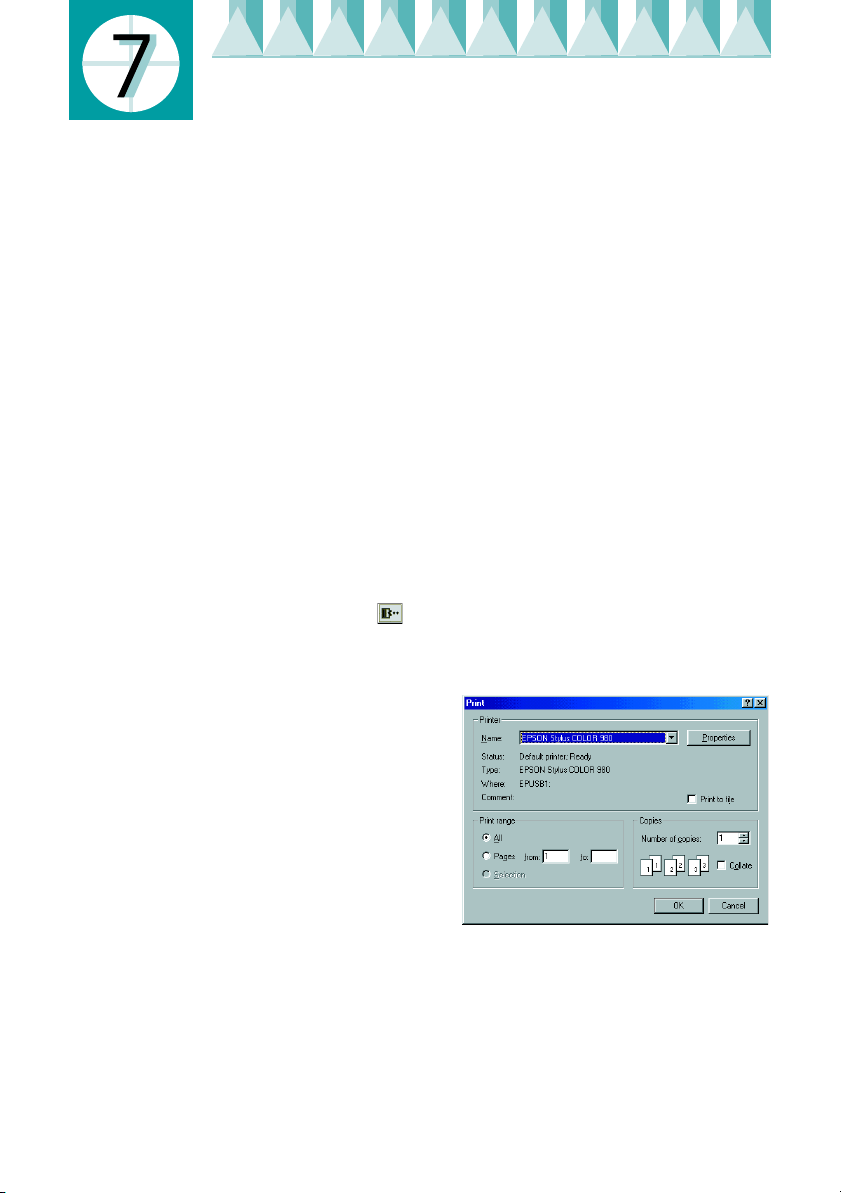
4. To change the printer driver
settings, click
menu. A Print dialog box similar
to the one on the right opens. (This
example is from Paint).
5. Select your printer in the Name list
box, then click
printer driver opens
My Computer
. Then double-click the
on the File
Print
Properties
. The
.
Quit
icon. Right-click the CD-ROM icon and
sample.bmp
file to open it.
Page 15
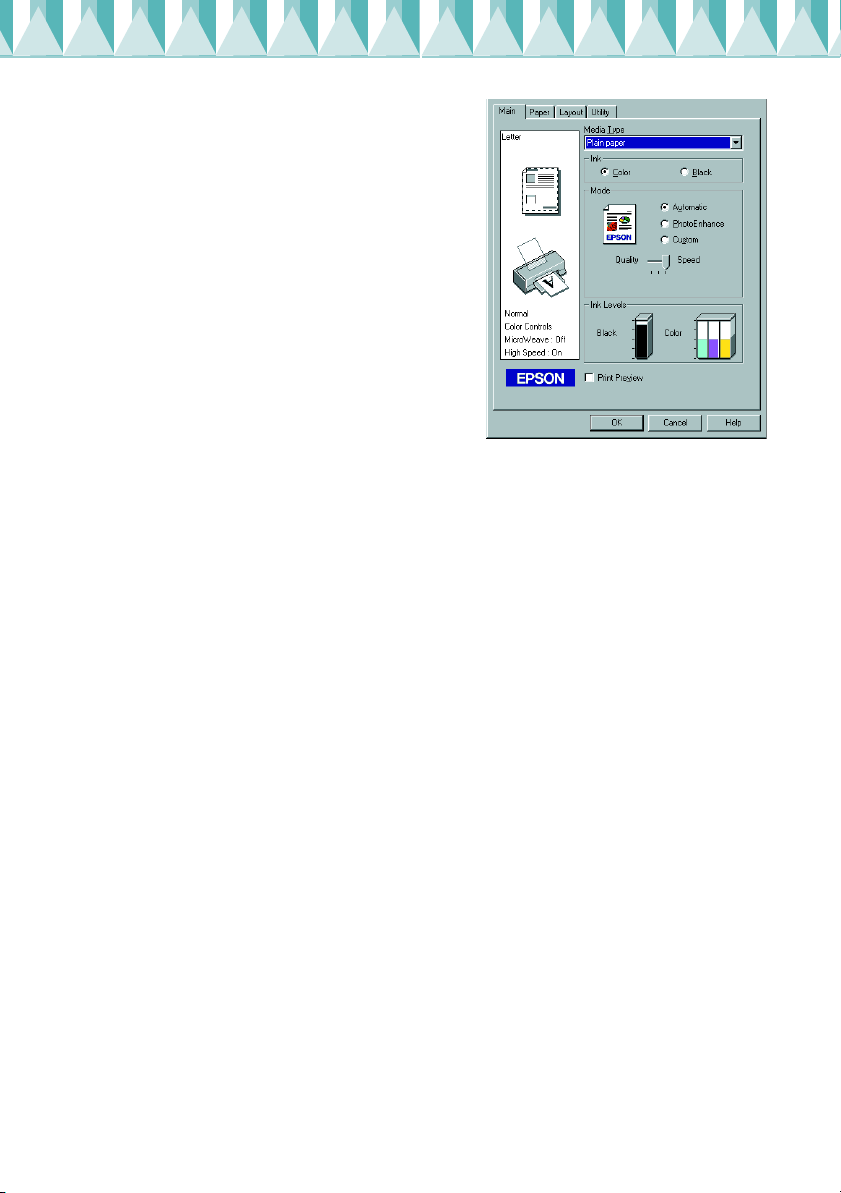
6. Click the
Quality Ink Jet Paper
Type list box.
Main
tab, then select
in the Media
Photo
7. Select
8. Select
the printer software optimizes other settings according to the Media
Type and Ink settings that you make.
9. Click the
select the paper size that is loaded in the printer.
10. Click OK at the bottom of the printer driver window. You return to the
Print dialog box (or a similar dialog box).
11. Click
of these buttons.
While printing is in progress, the EPSON Progress Meter
as the Ink setting.
Color
Automatic
Paper
Close, Print
as the Mode setting. When
tab, then click anywhere in the Paper Size list box and
, or OK to print. You may need to click a combination
Automatic
is selected,
(for Windows 98,
95, 2000, and NT 4.0) or the EPSON Despooler dialog box (for
Windows 3.1)
of your printer.
is displayed, showing the printing progress and the status
For Macintosh users
Follow the steps below to print the sample file.
1. Make sure that A4 or Letter size paper is loaded in the printer.
2. Insert the printer software CD in the CD-ROM drive.
3. Open the EPSON folder and double-click the
README
file.
Page 16
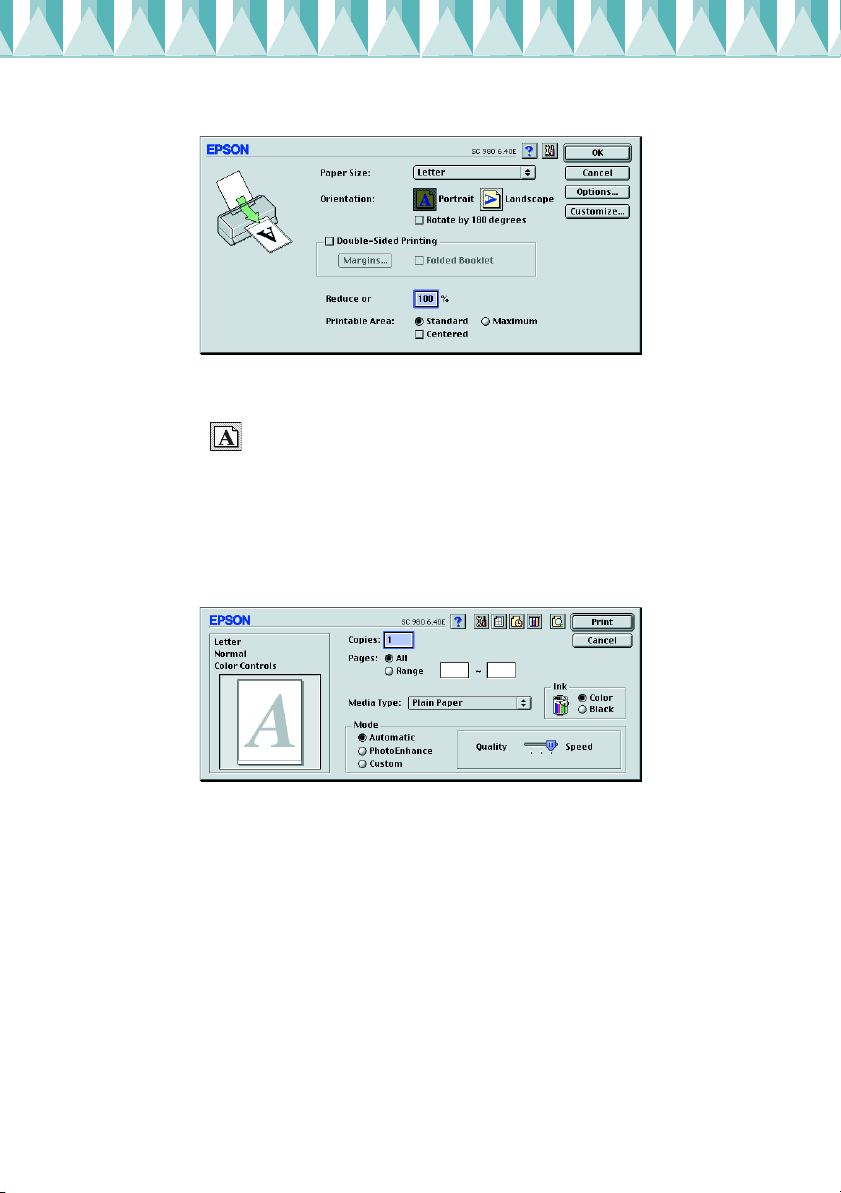
4. Click
5. Select the paper size that is loaded in the printer from the Paper Size list
6. Select
7. After making your settings, click OK to close the Page Setup dialog box.
8. Click
Page Setup
box.
Portrait
Note:
You cannot print from the Page Setup dialog box. You can only print from the
Print dialog box.
on the File menu. The Print dialog box opens.
Print
on the File menu. The following dialog box appears.
as the Orientation setting.
9. Select
10. Select
11. Select
12. Click
Plain Paper
Color
Automatic
the printer software optimizes other settings according to the Media
Type and Ink settings that you make.
to start printing.
Print
from the Media Type list.
as the Ink option.
as the Mode setting. When
Automatic
is selected,
 Loading...