

Epson Stylus COLOR 580 Owner's Manual

CPD-10843
Printer Basics
Informations de base
sur I’imprimante
Printer Basics
Informations de base
sur I’imprimante
EPSON Stylus Color 580
EPSON Stylus Color 580
®
®
®
®

How To Order EPSON Ink and Paper
To order EPSON ink cartridges and paper, contact your dealer or call EPSON at
(800) 873-7766. You can also visit the EPSON Store™ at www.epson.com
(U.S. sales only). In Canada, please call (800) 873-7766 for dealer referral.
Ink Cartridges
: Black T013201 (U.S.) or T013311 (Canada and Latin America)
Color T014201 (U.S.) or T014311 (Canada and Latin America)
EPSON Papers:
Paper name Size Part number
EPSON 360 dpi Ink Jet Paper Letter (8.5 x 11 inches)
A4 (8.3 x 11.7 inches)
EPSON High Quality Ink Jet Paper Letter (8.5 x 11 inches)
A4 (8.3 x 11.7 inches)
EPSON Photo Quality Ink Jet Paper Letter (8.5 x 11 inches)
A4 (8.3 x 11.7 inches)
Legal (8.5 x 14 inches)
EPSON Photo Quality Ink Jet Cards A6 (4.1 x 5.8 inches) S041054
EPSON Photo Quality Ink Jet Note Cards A6 (4.1 x 5.8 inches) S041147
EPSON Glossy Photo Greeting Cards 4.75 x 7 inches (folded) S041267
EPSON Photo Paper 4 x 6 inches
EPSON Photo Stickers Kit
(CD-ROM/paper)
EPSON Photo Stickers (refill)
EPSON Photo Quality Glossy Film Letter (8.5 x 11 inches)
EPSON Ink Jet Transparencies Letter (8.5 x 11 inches) S041064
EPSON Photo Quality Self Adhesive
Sheets
EPSON Iron-On Cool Peel Transfer Paper Letter (8.5 x 11 inches) S041153/
EPSON Photo Quality Glossy Paper Letter (8.5 x 11 inches)
EPSON M atte Paper - Heavyweight Lett er (8.5 x 11 inches) S041257
Letter (8.5 x 11 inches)
A4 (8.3 x 11.7 inches)
Panoramic (8.3 x 23 inches)
A6 (4.1 x 5.8 inches)
A6 (4.1 x 5.8 inches)
A4 (8.3 x 11.7 inches)
A6 (4.1 x 5.8 inches)
A4 (8.3 x 11.7 inches) S041106
A4 (8.3 x 11.7 inches)
S041060
S041059
S041111
S041117
S041062
S041061
S041067
S041134
S041141
S041140
S041145
S041144-KIT
S041144
S041072
S041071
S041107
S041155
S041124
S041126

This manual is divided into two sections: English and French. The English
manual begins on the next page.
The French manual begins on the page labelled “Français.”
Ce manuel est divisé en deux sections, l’une contenant le manuel anglais et l’autre
le manuel français. Le manuel anglais commence à la page suivante.
Le manuel français commence à la page marquée “Français.”
Printer Basics
Printed on recycled paper.
English

Copyright Notice
All rights reserved. No part of this publication may be reproduced, stored in a retrieval system, or
transmitted in any form or by any means, electronic, mechanical, photocopying, recording, or
otherwise, without the prior written permission of SEIKO EPSON CORPORATION. The
information contained herein is designed only for use with this EPSON printer. EPSON is not
responsible for any use of this information as applied to other printers.
Neither SEIKO EPSON CORPORATION nor its affiliates shall be liable to the purchaser of this
product or third parties for damages, losses, costs, or expenses incurred by purchaser or third parties
as a result of: accident, misuse, or abuse of this product or unauthorized modifications, repairs, or
alterations to this product, or (excluding the U.S.) failure to strictly comply with SEIKO EPSON
CORPORATION’s operating and maintenance instructions.
SEIKO EPSON CORPORATION shall not be liable for any damages or problems arising from the
use of any options or any consumable products other than those designated as Original EPSON
Products or EPSON Approved Products by SEIKO EPSON CORPORATION.
Trademarks
EPSON, EPSON Stylus, Photo Stickers, and Micro Piezo are registered trademarks of SEIKO
EPSON CORPORATION.
PhotoEnhance and EPSON Store are trademarks of Epson America, Inc.
General Notice: Other product names used herein are for identification purposes only and may be
trademarks of their respective owners. EPSON disclaims any and all rights in those marks.
The E
NERGY STAR
emblem does not represent EPA endorsement of any product or service.
CPD-10843
Copyright © 2000 by Epson America, Inc. 8/00
ii

Contents
WELCOME! 1
About Your Software 1
About Your Documentation 2
Warnings, Cautions, Notes, and Tips 2
Viewing Your Electronic Printer Manual 3
PRINTING FROM START TO FINISH 5
Printing with Windows 5
Loading Paper 5
Opening the Printer Software 6
Selecting Printer Software Settings 7
Controlling Printing 9
Printing on a Macintosh 10
Loading Paper 10
Opening the Printer Software 11
Selecting Printer Software Settings 12
Controlling Printing 13
Using PhotoEnhance, Custom, and Advanced Settings 14
Using PhotoEnhance 14
Using Custom Settings 15
Using Advanced Settings 15
Using Special Papers 16
EPSON Photo Paper 16
Envelopes 18
Selecting the Correct Media Type 19
iii

MAINTAINING YOUR PRINTER 20
Cleaning the Print Head 20
Printing a Nozzle Check 21
Using the Head Cleaning Utility 22
Aligning the Print Head 24
Replacing an Ink Cartridge 26
Ink Cartridge Precautions 27
Replacing a Low or Empty Ink Cartridge 27
Replacing an Outdated Ink Cartridge 28
Cleaning the Printer 29
Transporting the Printer 30
PROBLEM SOLVING 31
Identifying Printer Parts 32
Problems and Solutions 33
Problems Setting Up the Printer or Installing Software 33
Problems with Printing 34
Problems Getting Good Print Quality 35
Problems with Paper Feeding 38
Solving Miscellaneous Printout Problems 39
Uninstalling and Reinstalling Printer Software 40
Where To Get Help 41
EPSON Technical Support 41
EPSON Accessories 42
Bonus Software Technical Support 42
REQUIREMENTS AND NOTICES 43
System Requirements 43
Windows 43
Macintosh 44
Important Safety Instructions 45
Ink Cartridge Safety Instructions 46
INDEX 49
iv

Welcome!
You r E PS ON Sty lu s® Color 580 is a user-friendly, photo quality printer that’s
perfect for printing all your home projects—from homework assignments and
envelopes to full-color greeting cards and banners.
The printer comes with these features:
EPSON’s exclusive Micro Piezo® ink jet technology for cleaner printed dots
■
Resolutions up to 1440 by 720 dpi (dots per inch), even on plain paper
■
Four-color printing for photo quality color and sharp black text from separate
■
black and color ink cartridges
No front panel control buttons or lights—just follow the on-screen
■
instructions to control all printing and maintenance functions
About Your Software
The printer software CD-ROM includes all the software you need for printing:
Your printer driver runs your printer and lets you control how your documents
■
look. You can’t use your printer without it.
Your bonus software, ArcSoft™ PhotoPrinter™ 2000, is a photo layout
■
program that lets you print your images in creative formats, such as multiple
photo montages, framed or bordered pictures, and calendars. Using a variety of
templates, you can print your photos almost any way you can think of.
Your electronic Reference Guide gives you complete information about your
■
printer. (You need an HTML browser—such as Microsoft® Internet Explorer
or Netscape® Navigator,® version 3.0 or later—to view the guide.)
If you haven’t yet installed the printer software or Reference Guide from your
CD-ROM, see the Start Here sheet for instructions.
1

About Your Documentation
To set up your printer and install its software, see the Start Here sheet. This book
contains system requirements, important safety information, and instructions on:
Viewing your electronic printer manual
■
Printing with Windows® or on a Macintosh
■
Using special papers
■
Maintaining the printer
■
Solving basic problems
■
You’ll find your product warranty on page 48.
For more details about printing with, maintaining, or troubleshooting your
printer, see your electronic Reference Guide. For instructions on viewing it, see the
next page.
Warnings, Cautions, Notes, and Tips
Please follow these guidelines:
Warnings must be followed carefully to avoid bodily injury.
®
Cautions must be observed to avoid damage to your equipment.
Notes contain important information about your printer.
Tips contain additional hints for better printing.
2

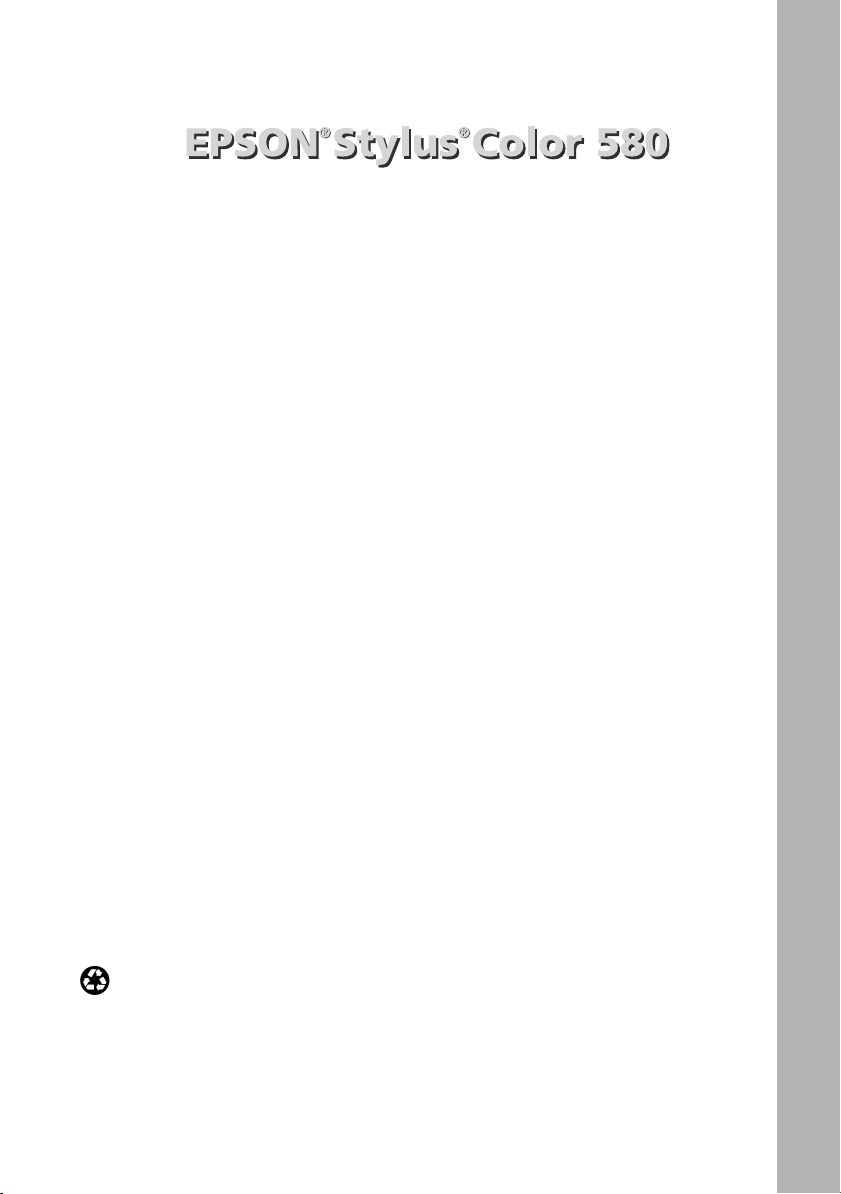
Viewing Your Electronic Printer Manual
Your printer software CD-ROM includes an electronic Reference Guide for your
printer. The manual is in HTML format, so you need a browser—such as Internet
Explorer or Netscape Navigator, version 3.0 or later—to view it. If you are using a
different browser, the pages may not display correctly. (A browser is not included
on the printer software CD-ROM.)
Accessing Your Electronic Printer Manual
You can view your electronic Reference Guide from the CD-ROM or copy it to
your hard drive and view it from there. Follow these steps:
1. Insert your printer software CD-ROM.
2. Windows: Double-click
My Computer
, double-click your
CD-ROM or DVD drive icon, then double-click the
Select
English
Macintosh: Double-click the
Epson
.
icon.
EPSON
CD-ROM icon, then double-click the
You see the Main Menu.
3. Click
View Electronic
Documentation
. This
submenu appears:
4. You can either view the manual
from the CD-ROM (
Reference Guide
manual to your hard drive (
Reference Guide
View
) or copy the
Install
) and view it
from there. For details on viewing
the manual, see the next section.
Once you’ve copied the manual to
your hard drive, you can access it at any time as follows:
Windows: Select
Guide ESC580
Start
.
, point to
Programs
, and then
EPSON
Epson
. Select
icon.
Macintosh: Open the EPSON Stylus COLOR 580 folder and double-click
View Reference Guide
.
3
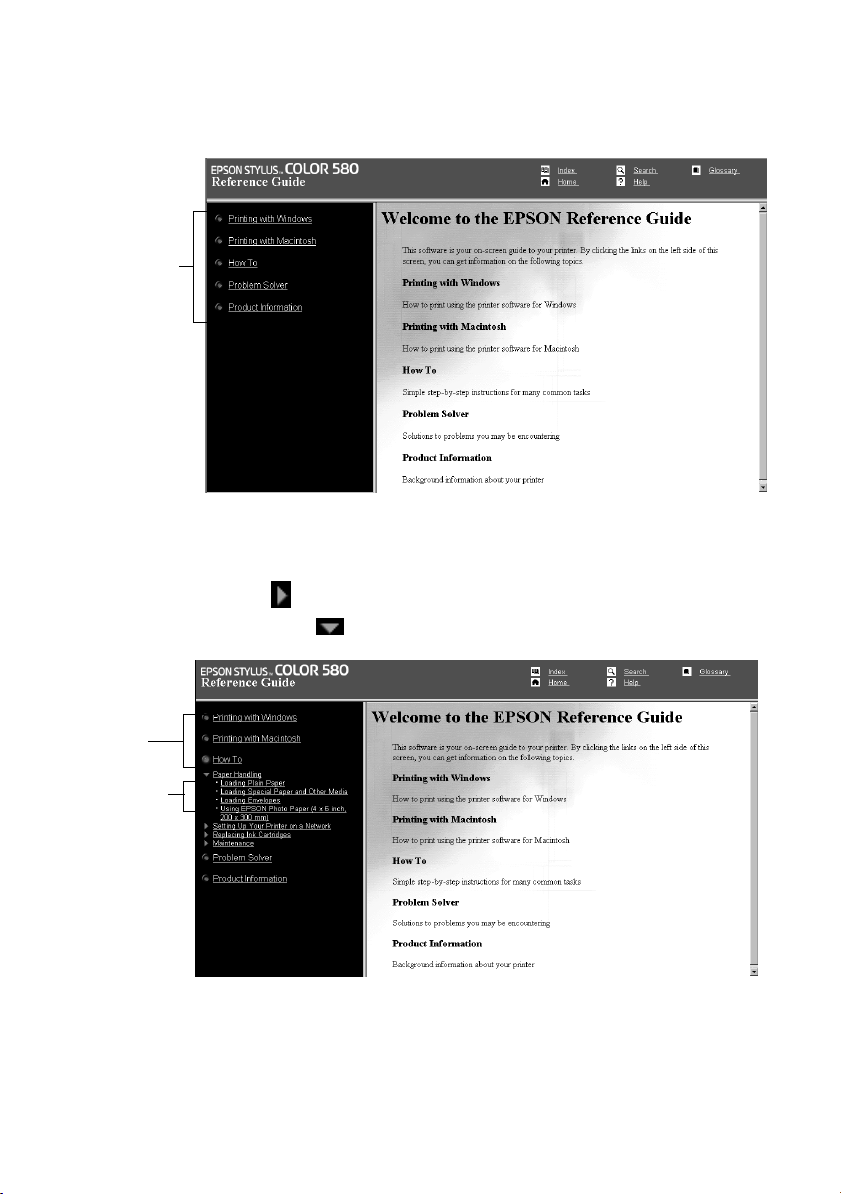
Navigating Your Electronic Printer Manual
When you first open the Reference Guide, you see this screen:
Click here to
expand the
table of
contents
Click a topic on the left to expand the table of contents. After expanding the table
of contents, you can click on the topic you want to view.
If there’s a right arrow , click it to view subtopics, then click on a topic to go
to it. Click the down arrow to close a subtopic list.
Click to
expand
Click to go
to topic
4

Printing from Start to Finish
Here’s what to do to print a basic document—such as a memo, newsletter, or
photograph—from loading the paper to selecting print settings to controlling the
print job. Follow the instructions in “Printing with Windows” below or “Printing
on a Macintosh” on page 10.
If you’re already familiar with EPSON ink jet printing, you can skip ahead to
“Using PhotoEnhance, Custom, and Advanced Settings” on page 14.
For instructions on using special papers—such as EPSON Photo Paper or
envelopes—see page 16.
Printing with Windows
This section describes these basic steps for printing with Windows:
Loading paper below
■
“Opening the Printer Software” on page 6
■
“Selecting Printer Software Settings” on page 7
■
“Controlling Printing” on page 9
■
(To print on a Macintosh, see page 10.)
Loading Paper
Make sure your printer and
computer are turned on.
Place your paper against the
right edge of the sheet feeder
and slide the left edge guide
against the paper.
Load paper only up
to this arrow
5
Slide paper against
the right edge

Keep the following in mind when loading paper:
Load the printable side face up. It’s usually whiter or brighter than the other
■
side.
Load letterhead or preprinted paper into the printer top edge first.
■
Don’t load paper above the arrow on the left edge guide.
■
If you’re printing on envelopes or other special paper sizes or types, see
page 16 for loading instructions.
I
Opening the Printer Software
After you open your application program and create your document, you’re ready
to select your printer software settings.
. You see your application’s Print dialog box (your
From the File menu, click
dialog box may look slightly different):
Print
Select your printer here
Click here to open
your printer software
6
Make the following selections on the Print dialog box:
Make sure
■
Click the
■
Properties
click it. Then click
If you click the print icon on your application’s tool bar instead of selecting
Print from the File menu, you may not get the option to change the printer
software settings before printing.
EPSON Stylus COLOR 580
button. (If you see a
Properties
on the next screen.)
is selected.
Setup, Printer
, or
Options
button,
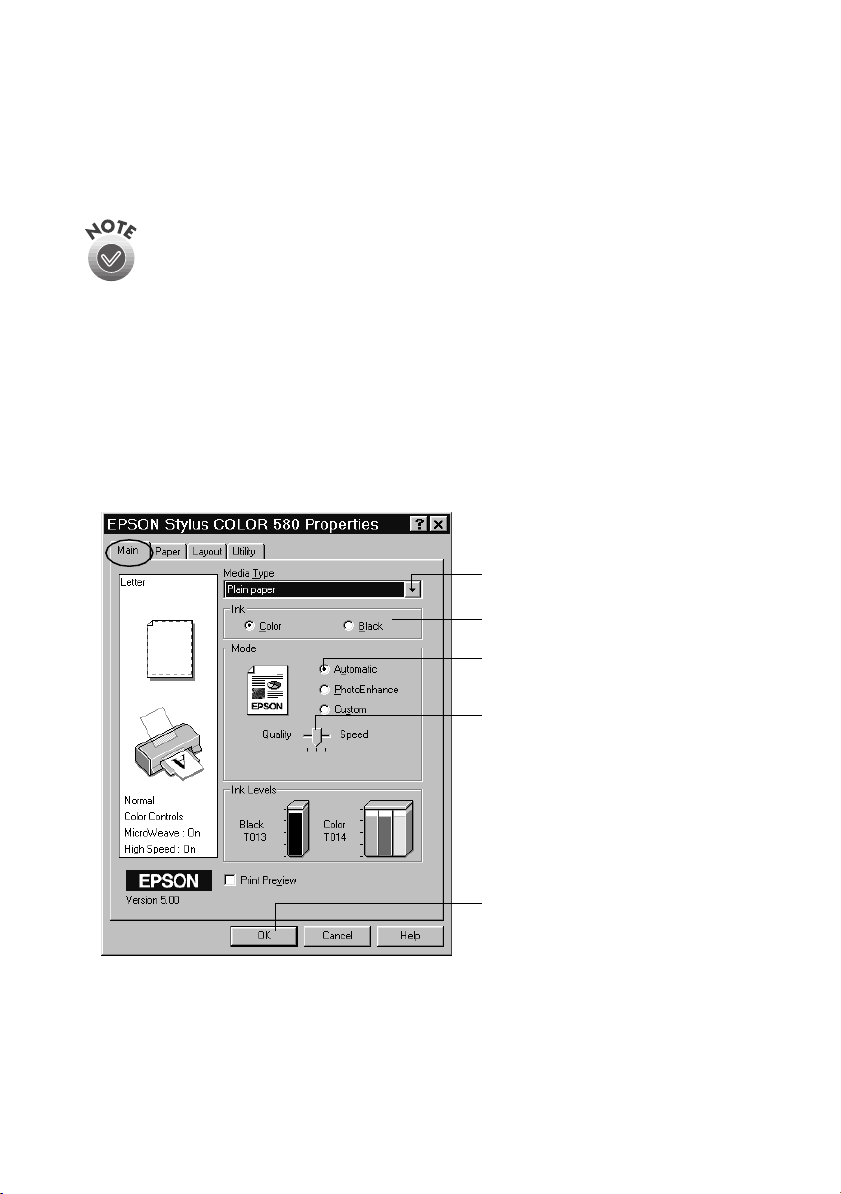
Selecting Printer Software Settings
Once you click
Properties
The most important thing to remember is to set the correct Media Type for the
paper you’re using. The Media Type setting affects the other options you
can choose. If necessary, click the
, you see your printer software Properties dialog box.
tab to display the settings shown below:
Main
Select the type of paper you loaded
Select the Ink color
Select Automatic mode
7
Select high-quality printing,
faster printing, or in-between
Click OK

Make the following settings on the Properties dialog box:
Choose the Media Type you’re printing on (click
■
the arrow button to scroll through the list). If you’re
not sure which setting to select, see page 19.
Set the Ink option to
■
unless you’re printing in
Color
black only.
Set the Mode option to
■
Automatic
. This lets the printer software determine
the best settings for your print job. It’s the easiest way to get good printing
results on all types of paper.
Set the slider in the Mode box to
■
Quality
or
. This lets you choose
Speed
between a higher resolution, faster printing, or an in-between setting. (The
slider is not available when certain media types are selected.)
Click OK to return to your application’s Print dialog box.
■
For more information about printer settings, click the Help button. Or you
can right-click any item on the screen and then click What’s This?.
Selecting Windows Default Settings
The printer settings you make apply only to the application you’re currently using.
If you usually print one type of document in different applications—for example,
black ink on legal size paper—you can change the default printer settings for all
your programs. You do this using the Windows Printers utility:
1. Click
Start
, point to
Settings
, and then select
Printers
.
2. Right-click the
3. Select
Properties (Printing Preferences
4. Click the
EPSON Stylus COLOR 580
tab.
Main
5. Select the default settings you want to use for all your applications. Click
icon.
in Windows 2000).
OK
when you’re finished.
You can always change the default settings in your application when you want to
print different types of documents. You can also save a group of common settings;
see the electronic Reference Guide (described on page 3) for details.
8
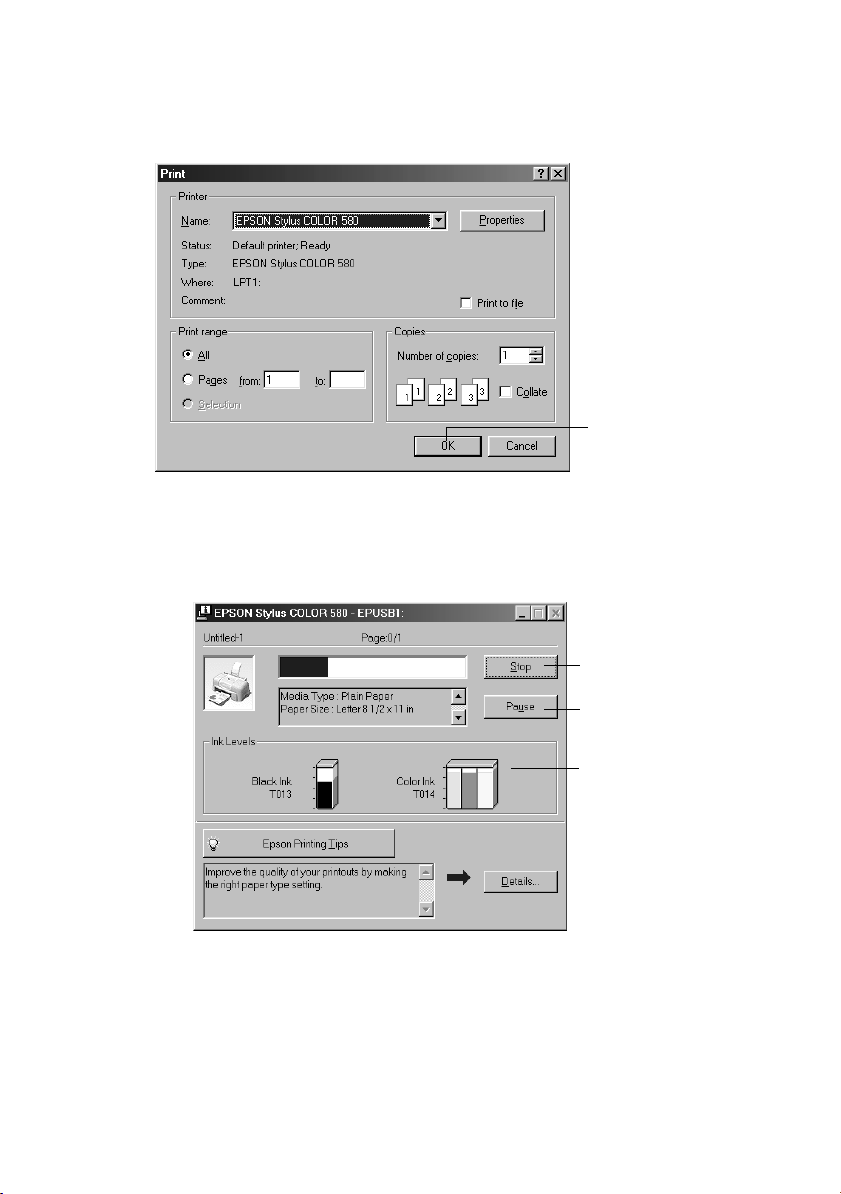
Controlling Printing
At the Print dialog box, click OK (or maybe
) to start printing.
Print
Click to start printing
After a moment, the Progress Meter appears and shows the progress of your print
job. You can use the buttons to cancel, pause, or restart printing. You can also see
how much ink you have left and view printing tips.
Click to cancel printing
Click to pause or
resume printing
Does not appear if
you are print ing
over a network
For more advanced printer settings, see page 14. For more information on
printing—for example, previewing your printout, changing the paper size, or
adding a watermark—see your electronic Reference Guide (described on page 3).
9

Printing on a Macintosh
This section describes these basic steps for printing on a Macintosh:
Loading paper below
■
“Opening the Printer Software” on page 11
■
“Selecting Printer Software Settings” on page 12
■
“Controlling Printing” on page 13
■
(To print with Windows, see page 5.)
Loading Paper
Make sure your printer and
Load paper only up
to this arrow
computer are turned on.
Place your paper against the right
edge guide and slide the left edge
guide against the paper.
Keep the following in mind when
loading paper:
Load the printable side face
■
up. It’s usually whiter or
brighter than the other side.
Load letterhead or preprinted paper into the printer top edge first.
■
Don’t load paper above the arrow on the left edge guide.
■
If you’re printing on envelopes or other special paper sizes or types, see
page 16 for loading instructions.
Slide paper aga inst
the right edge
10
Opening the Printer Software
After you open your application program and create your document, you’re ready
to select your page setup and other printer software settings.
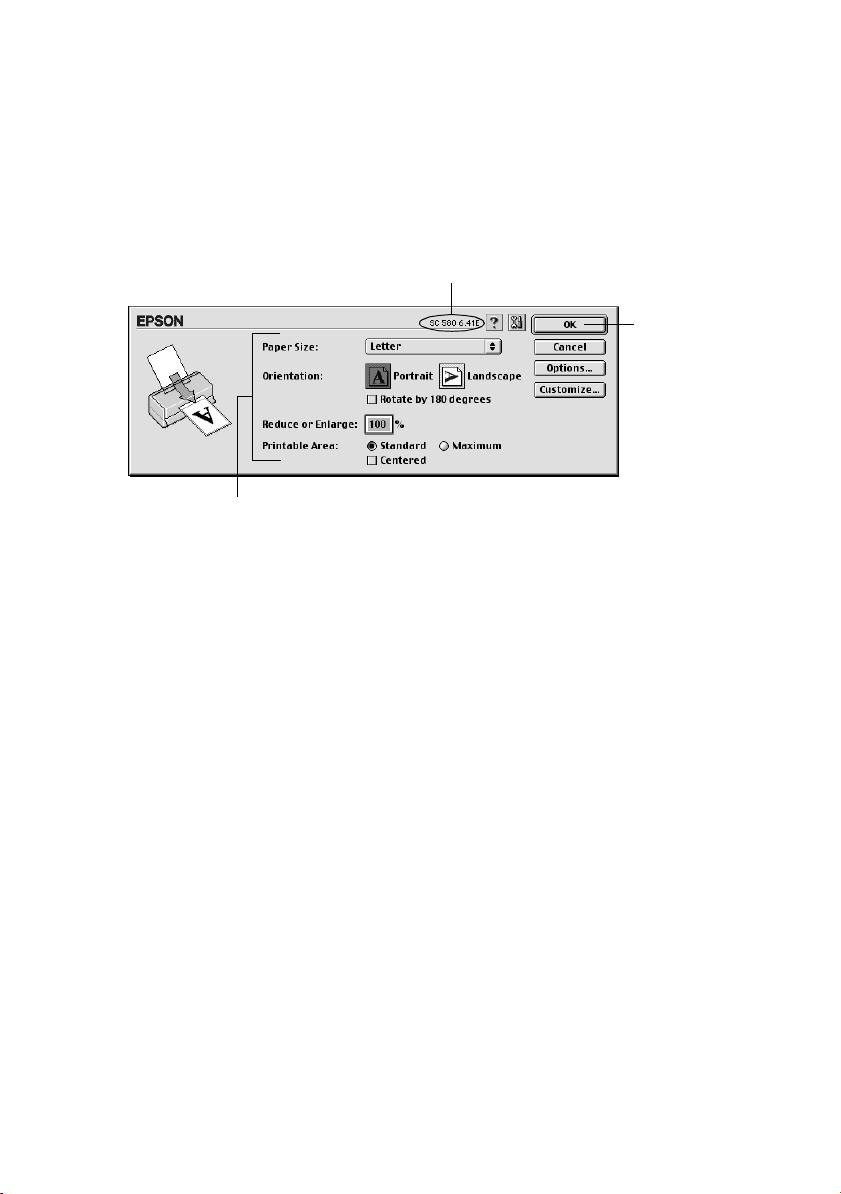
From the File menu, click
Page Setup
. You see your application’s page setup
dialog box (your dialog box may look slightly different):
Verify your printer model here
Click OK
Select your Paper Size, Orientation,
and Printable Area settings
Make the following selections on the page setup dialog box:
Make sure your printer (
■
SC 580
) is selected. (If not, you need to select your
printer in the Chooser; see the Start Here sheet for instructions.)
Select the correct
■
Paper Size, Orientation
, and
Printable Area
settings for
your document. See your electronic Reference Guide for details.
When you’ve selected your settings, click OK to close the page setup dialog box
■
and return to your application window.
11
 Loading...