

Page 1
Epson Stylus Pro 3800
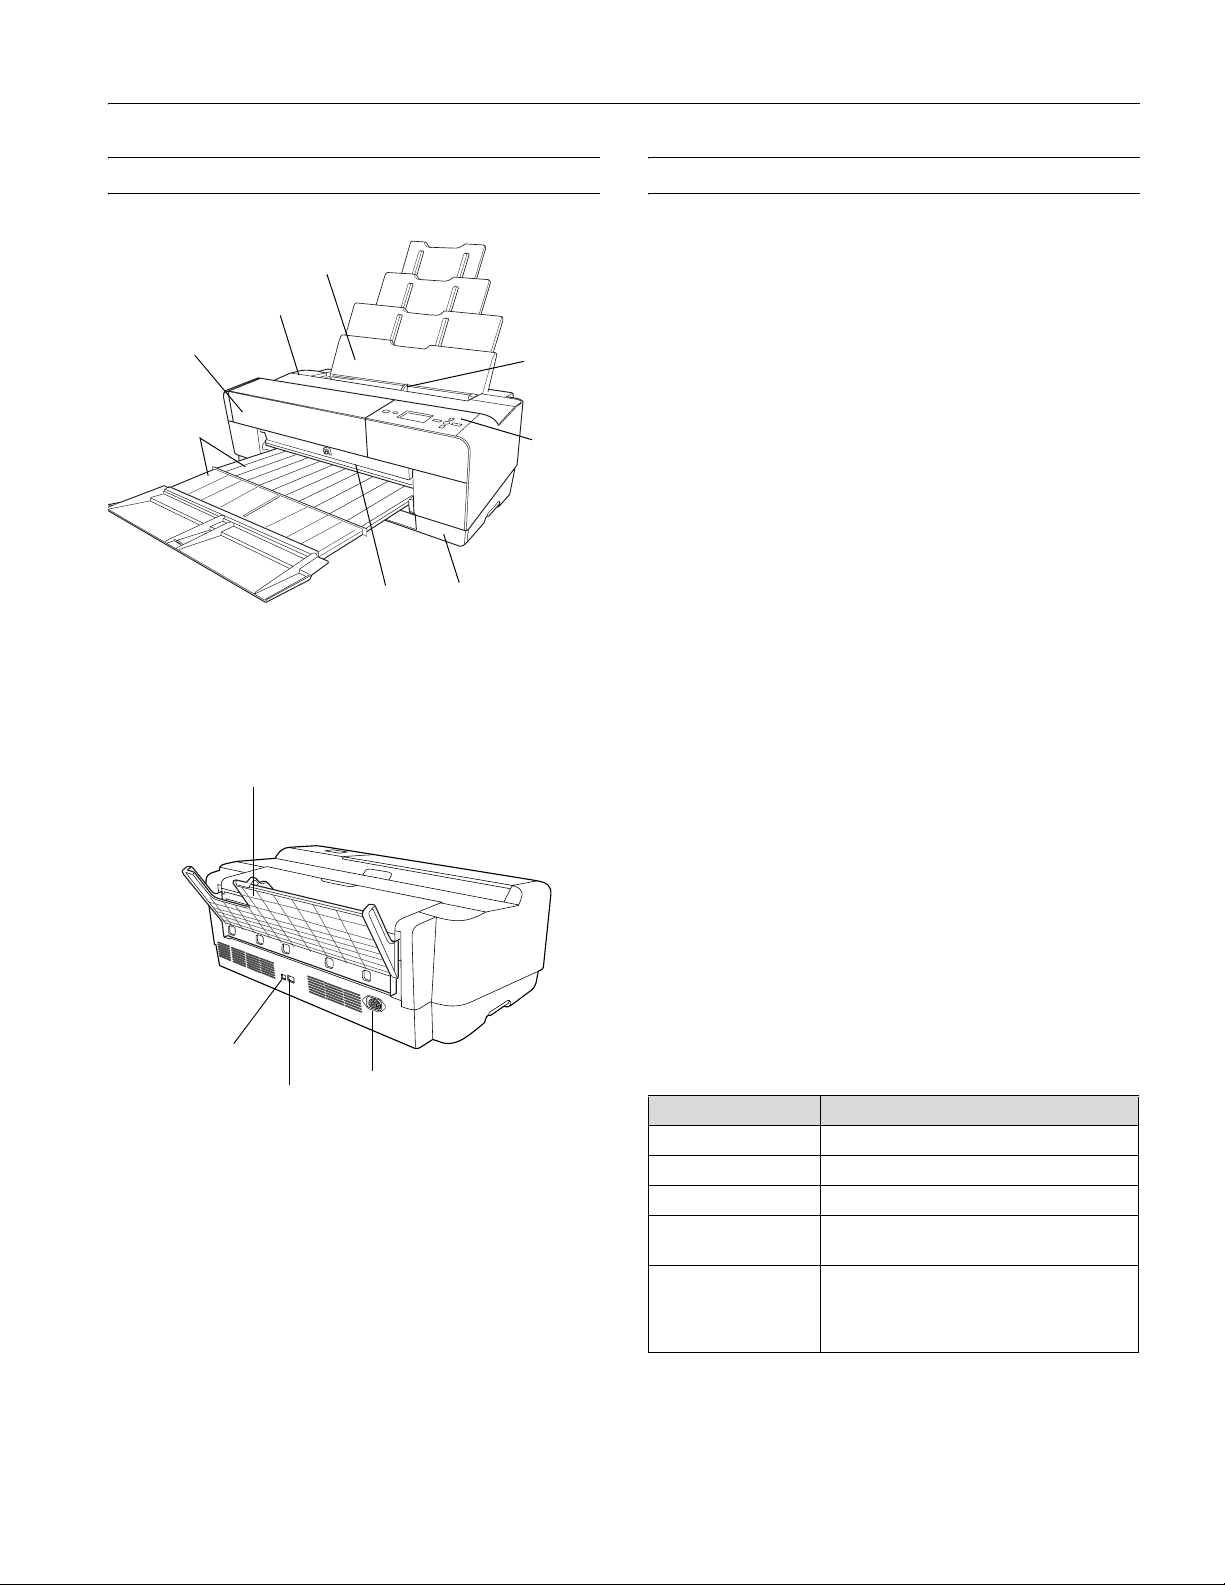
Printer Parts
-
Auto sheet feeder paper
guide and extensions
Top cover
Ink cover (ink
cartridges)
Output tray
and extension
Rear paper guide
Front tray
Left edge
guide
Control
panel
Maintenance
cartridge cover
Printer Specifications
Printing
Printing method Pressurized on-demand ink jet
Nozzle
configuration
Resolution Maximum 2880 × 1440 dpi
Print direction Bidirectional
Control code ESC/P
RAM 64MB
Character tables PC 437 (US, Standard Europe)
Character sets Epson Courier 10 cpi
Character mode Character pitch: 10 characters per inch
Black: 180 nozzles × 3
(Photo Black or Matte Black, Light Black,
Light Light Black)
Color: 180 nozzles × 5
(Cyan, Magenta, Light Cyan, Light
Magenta, Yellow)
®
Raster
PC 850 (Multilingual)
Printing columns: 167
USB port
Ethernet port
Printable Area
The default margins around the printable area are 0.12 inch
(3 mm) for the top, right, and left, and bottom.
The borderless printing feature allows edge-to-edge printing
on some media (in the auto sheet feeder or rear paper slot).
Electrical
AC inlet
Specification Description
Input voltage range 90 V to 264 V
Rated frequency range 50 to 60 Hz
Input frequency range 49 to 61 Hz
Rated current 0.6 A at 120 V
0.3 A at 220 V
Power consumption Approx. 25 W or less (ISO 10561 letter
pattern) in standard operating mode;
5 W or less in low power mode;
0.3 W or less in power off mode
Note: Check the label on the back of your printer for voltage
information.
12/06 Epson Stylus Pro 3800 - 1
Page 2
Epson Stylus Pro 3800
Environmental
Specification Operation Storage
Temperature 50 to 95 °F (10 to 35 °C)
Print quality guarantee:
59 to 77 °F (15 to 25 °C)
Humidity
(without
condensation)
20 to 80% RH
40 to 60% RH for optimum
print quality
For optimal operation,
humidity should be between
35 and 45% RH
–4 to 104 °F
(–20 to 40 °C)
5 to 85% RH
Dimensions and Weight
Specification Covers closed Covers open
Height 10.28 inches (257 mm) 22.8 inches (579 mm)
Width 27.36 inches (684 mm) 27.36 inches (684 mm)
Depth 14.88 inches (376 mm) 37.87 inches (962 mm)
Weight 43.2 lb (19.6 kg) with cartridges installed
Printer Interfaces
❏ USB (1.1 and 2.0 compatible)
Options and Supplies
Epson offers the following optional upgrades and supplies
for your Stylus Pro 3800. You can purchase genuine Epson
ink and paper from an authorized Epson reseller. To find the
nearest reseller, call 800-GO-EPSON (800-463-7766).
Or you can purchase online at www.epsonstore.com (U.S.
sales) or www.epson.ca (Canadian sales).
Ink Cartridges / Maintenance Cartridge
Ink cartridges / maintenance cartridge Product code
Photo Black Ink Cartridge T580100
Cyan Ink Cartridge T580200
Magenta Ink Cartridge T580300
Yellow Ink Cartridge T580400
Light Cyan Ink Cartridge T580500
Light Magenta Ink Cartridge T580600
Light Black Ink Cartridge T580700
Matte Black Ink Cartridge T580800
Light Light Black Ink Cartridge T580900
Replacement Ink Maintenance Cartridge T582000
❏ Ethernet (10/100Base-TX)
Safety Approvals
Safety standards UL 60950-1, CSA 22.2 No. 60950-1
EMC FCC part 15 subpart B, class B, CSA
C108.8 class B
Ink Cartridges
Cartridge life 2 years from production date if
unopened; within 6 months after
opening package, at 77 °F (25 °C)
Temperature –4 to 104 °F (–20 to 40 °C);
1 month at 104 °F
Capacity 80 ml
Dimensions Width: 1.19 inches (30.1 mm)
Depth: 3.68 inches (93.4 mm)
Height: 2.76 inches (70.2 mm)
Printer Cover
You can purchase a nylon cover to protect the printer from
dust, spills, and scratches. Order the Epson Stylus Pro 3800
Tumi Cover, product code C3800TUMI.
Extended Service Plans
Option Product code
One-Year Premium Upgrade EPP38B1
Two-Year Premium Upgrade EPP38B2
2 - Epson Stylus Pro 3800 12/06
Page 3
Epson Stylus Pro 3800
Media
You can print on most types of coated, glossy, and plain
paper. The following table shows the Epson paper types and
sizes you can use in your printer. You can also check the
Epson Pro Graphics website (prographics.epson.com) or your
authorized Epson dealer for available media.
Always test samples of paper stock in the printer before
purchasing large quantities or printing large jobs. When you
use non-Epson paper or other media, you may need to adjust
various settings or create special paper configurations.
Media Size Number of
Epson Presentation
Paper Matte
Epson Photo Quality Ink
Jet Paper
Epson Premium Photo
Paper Glossy
Epson Premium Glossy
Photo Paper
Epson Premium Photo
Paper Luster
Epson Premium Luster
Photo Paper
Epson Premium Photo
Paper Semi-gloss
Epson Premium
Semigloss Photo Paper
8.3” × 11.7” 100 S041061
8.5” × 11” 100 S041062
8.5” × 14” 100 S041067
11” × 17” 100 S041070
13” × 19” 100 S041069
16.5” × 23.4” 30 S041079
17” × 22” 100 S041171
4” × 6” 40 S041808
5” × 7” 20 S041464
8” × 10” 20 S041465
8.5” × 11” 50 S041667
11” × 14” 20 S041466
11” × 17” 20 S041290
11.7” × 16.5” 20 S041288
13” × 19” 20 S041289
17” × 22” 25 S042092
8.5” × 11” 50 S041405
11.7” × 16.5” 50 S041406
13” × 19” 50 S041407
17” × 22” 25 S042084
4” × 6” 40 S041982
8.5” × 11” 20 S041331
13” × 19” 20 S041327
sheets in
package
100 S041727
250 S041913
100 S041604
Part
number
Media Size Number of
Epson Ultra Premium
Presentation
Paper Matte
Epson Enhanced Matte
Paper
Epson Proofing Paper
Commercial Semimatte
Epson Singleweight
Matte Paper
Epson Watercolor Paper
- Radiant White
Epson Velvet Fine Art
Paper
Epson UltraSmooth®
Fine Art Paper
8.5” × 11” 50 S041341
11.7” × 16.5” 50 S041343
13” × 19” 50 S041339
17” × 22” 50 S041908
13” × 19” 100 S041744
13” × 19” 100 S041747
17” × 22” 100 S041907
13” × 19” 20 S041351
8.5” × 11” 20 S041636
13” × 19” 20 S041637
17” × 22” 25 S042097
13” × 19” 25 S041896
17” × 22” 25 S041897
sheets in
package
250 S041914
100 S041605
Part
number
Guidelines for Using Epson Media
❏ Avoid touching the printable surface with your bare hands.
Fingerprints may affect print quality. Handle media by the
edges or use cotton gloves.
❏ Always choose the correct Media Type setting in your
printer driver software before printing.
❏ Keep unused media in its original packaging and store it flat
in a cool, dry place to maintain quality. Avoid storing your
printouts where they will be exposed to high temperature,
humidity, or direct sunlight.
12/06 Epson Stylus Pro 3800 - 3
Page 4
Epson Stylus Pro 3800
Choosing the Correct Paper Path
The printer provides three paths for loading media:
❏ Auto sheet feeder
(multiple sheets, up to
17” wide)
❏ Rear manual feed slot
(one sheet only, up to
17” wide)
❏ Front manual feed slot
(one sheet only, up to
16” wide)
It’s very important to use the correct paper path and to load
the correct number of sheets. For example, you can load only
one sheet at a time in the front and rear slots, and poster board
can be inserted only in the front slot. If you need to make sure
the paper stays flat, use the rear or front slot.
The following table shows which path to choose for the type
of media you are using and the maximum number of sheets
you can load for the different types of special Epson media.
The letter
rear manual feed slot, and
feed slot.
Note: Do not leave paper in the printer for a long period of time; its
quality will deteriorate. Epson recommends that you remove the
paper from the printer after printing.
A stands for the auto sheet feeder, R stands for the
F stands for the front manual
Paper type Paper
Plain paper A 8.5” × 11” 120
Epson Presentation
Paper Matte
Epson Photo Quality
Ink Jet Paper
Epson Premium Photo
Paper Glossy
Epson Premium
Glossy Photo Paper
Epson Premium Photo
Paper Luster
Epson Premium Luster
Photo Paper
Epson Premium Photo
Paper Semi-gloss
Epson Premium
Semigloss Photo
Paper
Epson Ultra Premium
Presentation
Paper Matte
Epson Enhanced
Matte Paper
Epson Proofing Paper
Commercial
Semimatte
Epson Singleweight
Matte Paper
Epson Watercolor
Paper - Radiant White
Epson Velvet Fine Art
Paper
Epson UltraSmooth
Fine Art Paper
* Always load only 1 sheet at a time in the front or rear slot.
path
A, R, F 8.3” × 11.7” 60
A, R 17” × 22” 20
A 4” × 6” 20
A, R, F 8.5” × 11” 20
A, R 17” × 22” 10
A, R, F 8.5” × 11” 20
A,R 17” × 22” 10
A 4” × 6” 20
A, R, F 8.5” × 11” 20
A, R, F 8.5” × 11” 20
A, R 17” × 22” 10
A, R, F 13” × 19” 1
A, R, F 13” × 19” 50
A, R 17” × 22” 10
R 13” × 19” 1
R 8.5” × 11” 1
R 13” × 19” 1
Size Auto sheet
8.5” × 11” 60
8.5” × 14” 50
11” × 17” 20
13” × 19” 20
16.5” × 23.4” 20
5” × 7” 20
8” × 10” 20
11” × 14” 10
11” × 17” 10
11.7” × 16.5” 10
13” × 19” 10
11.7” × 16.5” 10
13” × 19” 10
13” × 19” 10
11.7” × 16.5” 20
13” × 19” 10
13” × 19” 1
17” × 22” 1
17” × 22” 1
feeder
capacity *
4 - Epson Stylus Pro 3800 12/06
Page 5
Epson Stylus Pro 3800
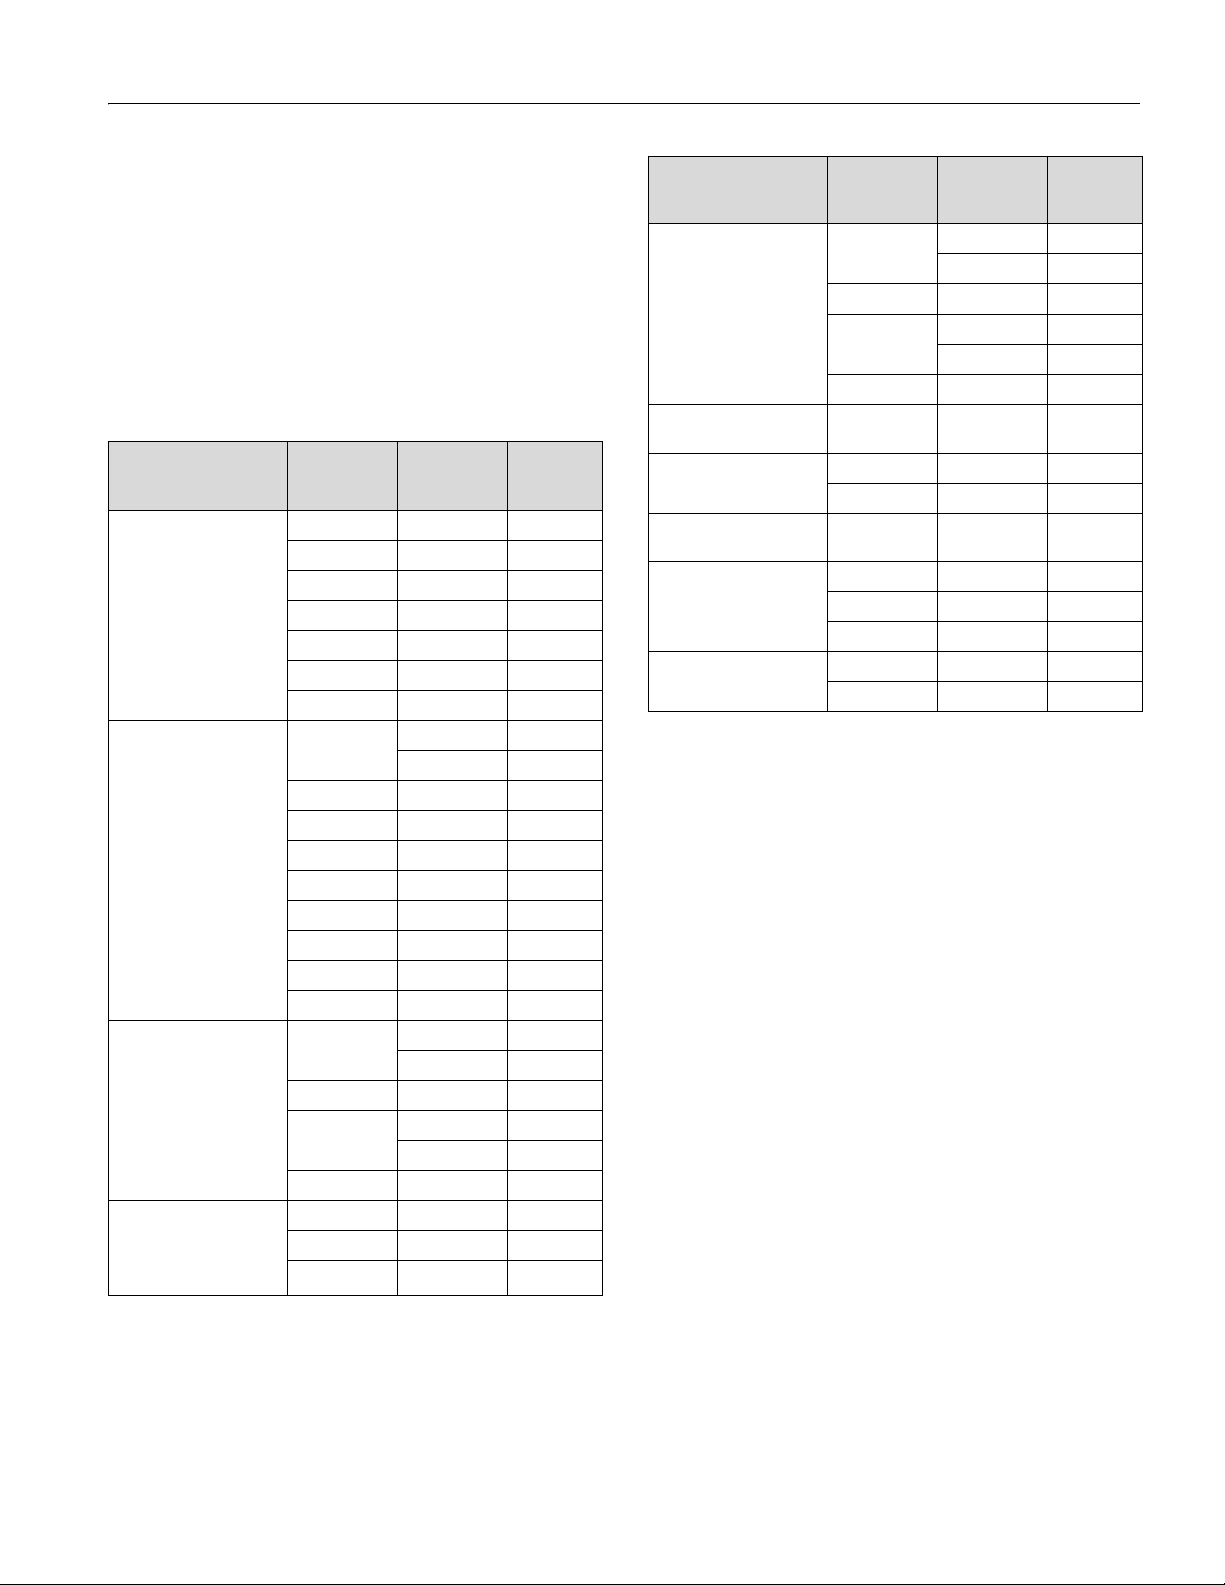
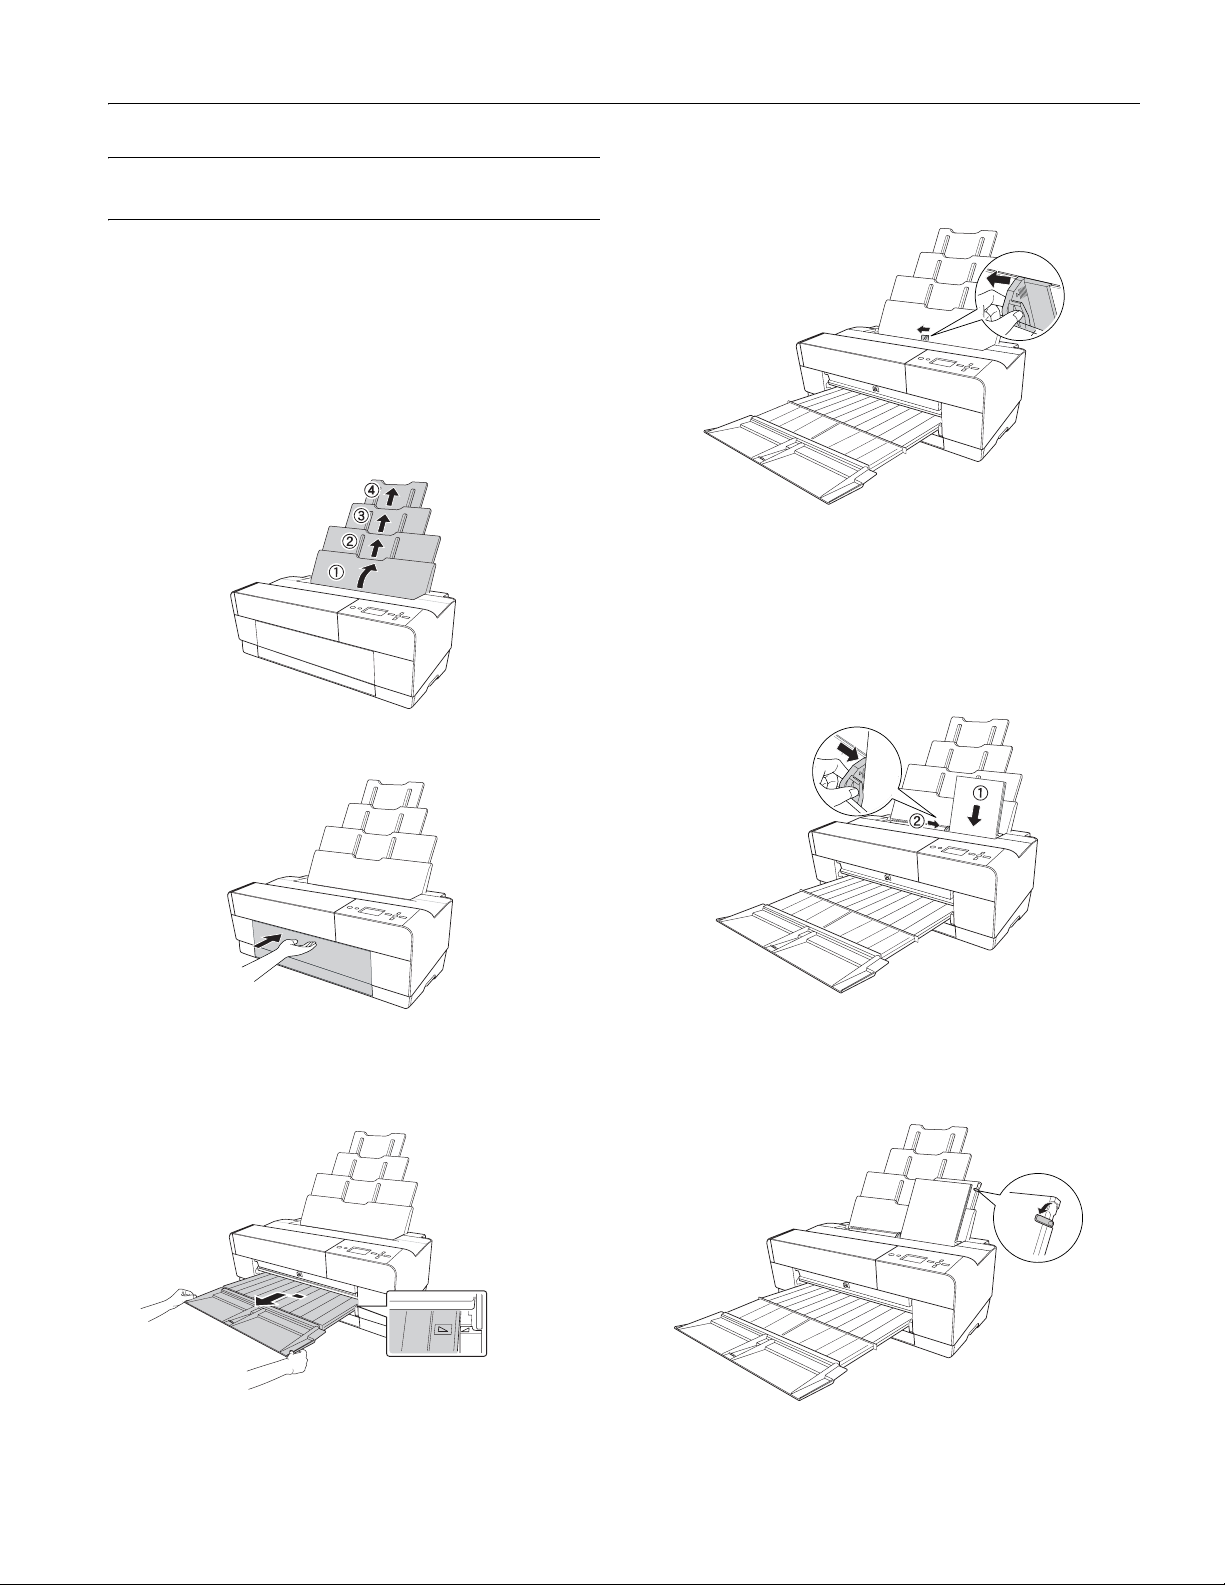
Loading Paper in the Auto Sheet Feeder
Using the auto sheet feeder, you can load up to 120 sheets of
plain paper and varying amounts of special media types. Refer
to the table on page 4 to see how many sheets you can load for
your paper type. Then follow these steps:
1. Make sure the printer is turned on and
the LCD.
2. Flip up the paper guide and pull out as many of its
extensions as you need to support your paper size.
READY appears on
6. Squeeze the left edge guide and slide it to the left so that it is
slightly wider than the width of your paper.
7. If you are loading multiple sheets, thumb through the stack
of paper, then gently tap it on a flat surface to even the
edges. If the paper is curled, flatten it before you load it.
8. Load the paper against the right edge, face-up and short
edge first. Insert it until it meets resistance. Slide the edge
guide against the left side of the paper.
3. Press the front cover to release it and open the output tray.
4. Use both hands to pull out and extend the output tray,
lifting it slightly as you pull. Make sure the arrow marks on
the tray and the printer are aligned.
Note: If the paper skews when you’re printing on large sheets, flip
out the edge guide located on the right side of the auto sheet feeder
to help the paper feed straight.
5. Pull out the output tray extensions for your paper size.
12/06 Epson Stylus Pro 3800 - 5
Page 6
Epson Stylus Pro 3800
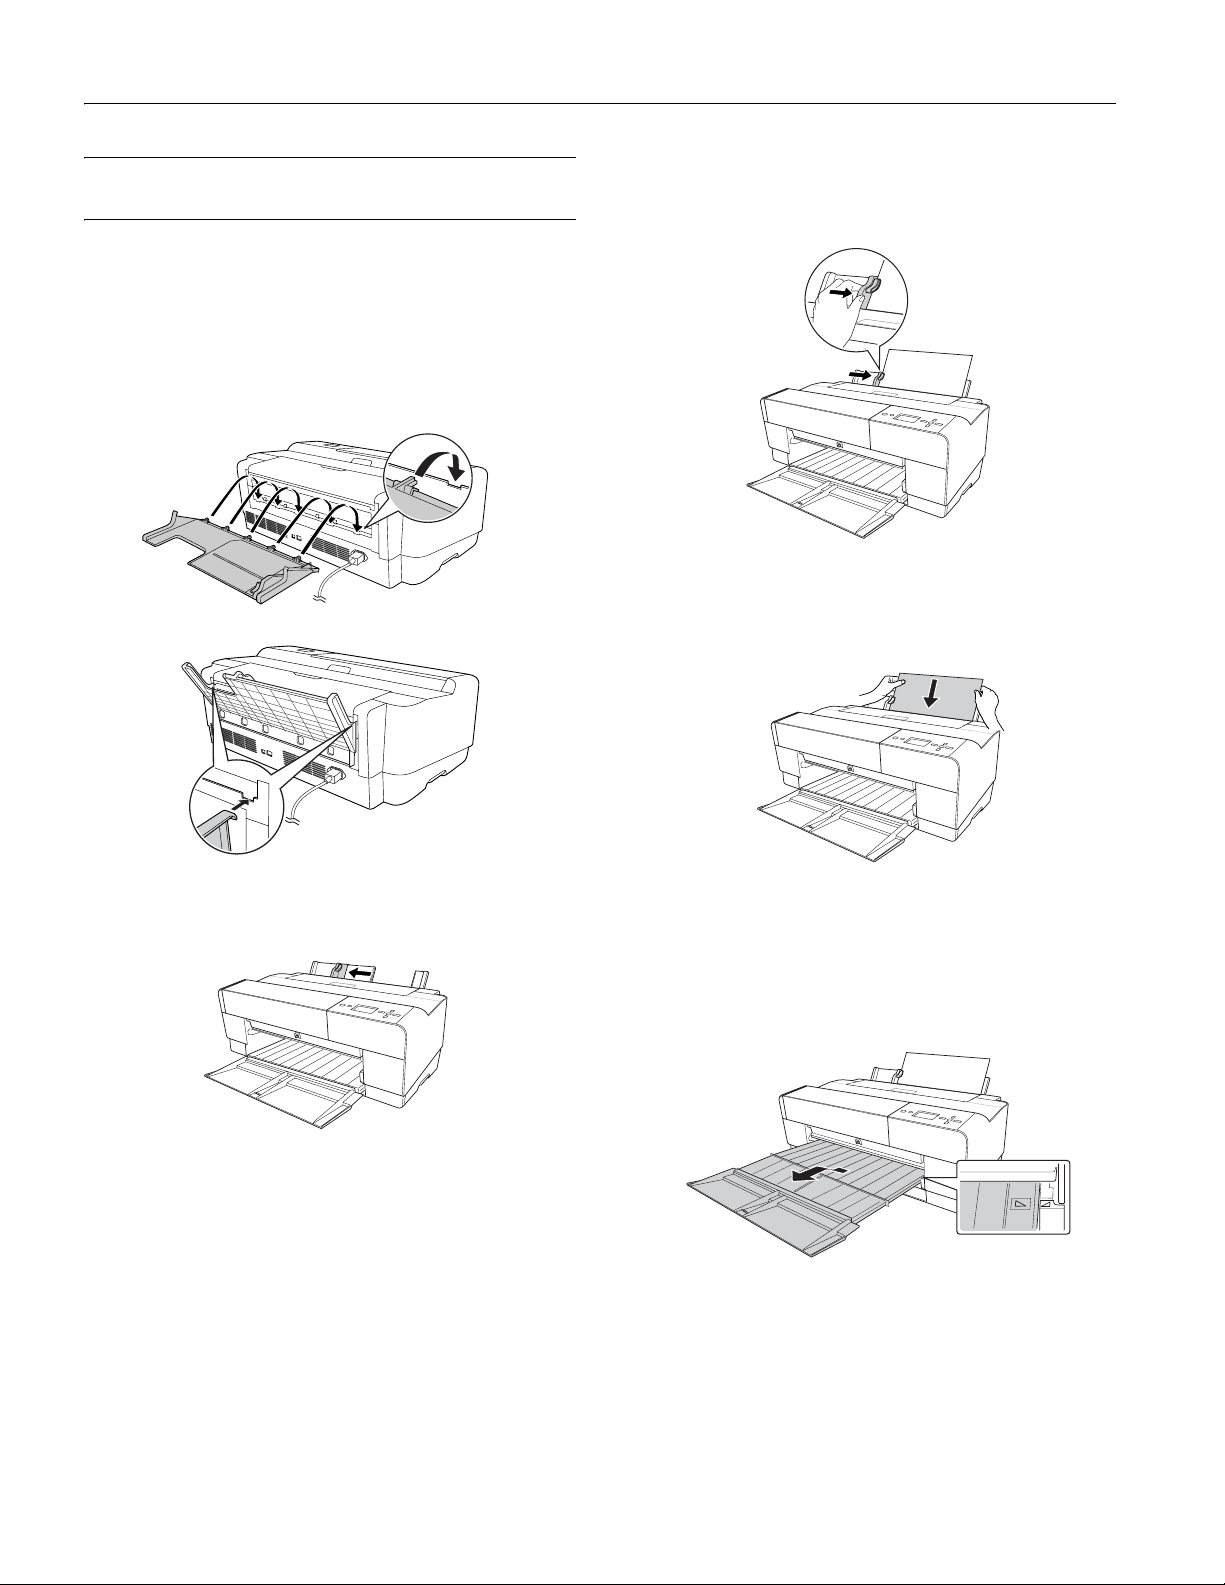
Loading Paper Into the Rear Manual Feed Slot
Use the rear manual slot to load special media one sheet at a
time. (See the table on page 4 for a list of papers you can load
in the rear slot.)
1. Make sure the printer is on and
LCD.
2. Attach the rear sheet guide to the back of the printer.
READY appears on the
4. Insert one sheet face-up and short edge first against the right
edge guide, then slide the edge guide against the left edge of
the paper.
5. Gently guide the paper into the slot until it meets resistance.
Maintain a constant pressure; after a few seconds you’ll feel
the printer pull the paper into printing position.
3. Slide the edge guide to the left so it is slightly wider than the
width of your paper.
Note: If you want to remove the paper, press the d Paper feed
button on the control panel to back out the sheet.
6. Use both hands to pull out and extend the output tray,
lifting it slightly as you pull. Make sure the arrow marks on
the tray and the printer are aligned.
6 - Epson Stylus Pro 3800 12/06
Page 7

Epson Stylus Pro 3800
Loading Paper Into the Front Manual Feed Slot
Use the front manual feed slot when you need to print on
thick media (1.2 to 1.5 mm), such as posterboard. Make sure
there is enough space behind the back of the printer for the
paper to feed without obstruction.
Also keep the following in mind when using the front slot:
❏ Load only one sheet at a time and make sure the printable
side is face-up.
❏ If the paper is wider than 16 inches, use the auto sheet
feeder or rear slot if allowed for your paper type; see page 4
for details.
❏ If
PAPER SIZE CHECK is set to OFF on the LCD, you
cannot load paper in the front slot. Use the printer’s menu
system to turn this setting on. (See your
on-screen User’s Guide for more information.)
3. Press the front tray as shown to pop it out.
4. Insert a single sheet of paper, short edge first and face-up
into the front tray.
1. Make sure the printer is on and
LCD.
2. Press the front cover to release it and open the output tray.
READY appears on the
12/06 Epson Stylus Pro 3800 - 7
Page 8

Epson Stylus Pro 3800
5. Position the right edge of the paper against the right side of
the tray and align the paper’s bottom edge with the white
line on the tray.
6. Press the d Paper feed button to feed the paper into
printing position.
Control Panel
The control panel includes various lights and an LCD panel to
indicate the status of the printer.
Power light
Paper light
Ink light
Cancel button
Power
button
LCD
Ink, maintenance
cartridge status
When your ink is low or expended, paper runs out, or a
problem occurs, a message appears on the LCD, and the lights
on the control panel come on or flash. The following table
lists the messages in alphabetical order and includes
instructions for correcting the problem.
Ink cover
open / u
button
Back / l
button
Paper feed / d
button
Menu / r
button
Enter
button
7. Use both hands to pull out and extend the output tray,
lifting it slightly as you pull.
You’re ready to print.
When you finish printing, push the front tray back in.
8 - Epson Stylus Pro 3800 12/06
Page 9

Error Messages
Message Explanation Response
BORDERLESS ERROR
PRESS THE DOWN BUTTON.
LOAD THE CORRECT SIZE
PAPER
CLEANING ERROR
PRESS THE CANCEL/RESET
BUTTON
CLEANING ERROR
PRESS THE DOWN BUTTON
AND REMOVE THICK PAPER
COMMAND ERROR
CHECK DRIVER SETTINGS
FRONT FEED SLOT OPEN
CLOSE THE FRONT MANUAL
FEED SLOT
FRONT FEED SLOT OPEN
LOAD MEDIA
PRESS THE DOWN BUTTON
FRONT FEED SLOT OPEN
PRESS THE DOWN BUTTON
AND REMOVE PAPER
FRONT SLOT CLOSED
OPEN THE FRONT MANUAL
FEED SLOT
INK CARTRIDGE ERROR
CHECK CARTRIDGE
INK CARTRIDGE ERROR
PLEASE INSTALL THE
CORRECT CARTRIDGE
INK CARTRIDGE ERROR
PRESS THE UP BUTTON
REPLACE THE CARTRIDGE
INK CARTRIDGE ERROR
REPLACE CARTRIDGE
INK CARTRIDGE
NON-GENUINE CARTRIDGE
MAY NOT PERFORM AT
OPTIMUM. CONTINUE?
<YES NO>
INK CARTRIDGE
PLEASE USE GENUINE EPSON
INK CARTRIDGES
INK CARTRIDGE
REPLACE INK CARTRIDGE
The installed paper is not supported
for borderless printing or the
PAPER SIZE CHECK setting is off.
The nozzles are still clogged. Press the + Cancel button, then run the Head Cleaning utility. See
Print head cleaning cannot be started
because thick paper is loaded.
Damaged data was sent to the printer
or the data has an incorrect command.
The installed printer driver is not
correct for the printer.
The front tray is open during operation. Close the front tray.
The front tray is open, but no paper is
loaded.
Paper is loaded in the front tray. Press the d Paper feed button, then remove the paper from the front tray.
The front tray is closed during
operation.
The wrong type of cartridge is
installed.
An ink cartridge that cannot be used
with this printer is installed.
An ink cartridge is installed incorrectly
(perhaps in the wrong slot).
There is a problem with one of the ink
cartridges. It may be installed in the
wrong slot.
The wrong type of cartridge is installed
or is installed in the wrong slot.
A non-genuine ink cartridge is installed. Replace the ink cartridge with a genuine Epson ink cartridge. See “Replacing
The ink cartridge is expended. Install a new ink cartridge. See “Replacing Ink Cartridges” on page 14.
Press the
select ON for PAPER SIZE CHECK in the printer’s menu system.
“Checking and Cleaning the Print Head” on page 12.
Remove the thick paper.
Stop printing and press the + Cancel button for 3 seconds.
Stop printing and press the + Cancel button for 3 seconds. Then make sure
that the installed printer driver is correct for the printer.
Load a sheet of paper in the front tray, and then press the d Paper feed
button.
Open the front tray by pressing it gently (see page 7). If necessary, remove
the paper.
Remove the ink cartridge and install one that is designed for your printer.
See “Replacing Ink Cartridges” on page 14.
Remove the ink cartridge and install one that can be used in your printer.
See “Replacing Ink Cartridges” on page 14.
Press the
ink cartridge and install it correctly. See “Replacing Ink Cartridges” on
page 14.
Remove the ink cartridge and reinstall it correctly. If this message appears
after reinstalling the ink cartridge, replace it. See “Replacing Ink Cartridges”
on page 14.
Select NO (press the Menu r button) if you want to replace the ink cartridge
with a genuine Epson ink cartridge. See “Replacing Ink Cartridges” on
page 14. Otherwise, select
Ink Cartridges” on page 14.
Epson Stylus Pro 3800
d Paper feed button, and then load a different size media. Also,
u Ink cover open button to open the ink cover. Then remove the
YES (press the l button).
12/06 Epson Stylus Pro 3800 - 9
Page 10

Epson Stylus Pro 3800
Message Explanation Response
INK CARTRIDGE
THIS MAY VOID EPSON’S
WARRANTY.
DO YOU ACCEPT THIS?
<ACCEPT DECLINE>
INK LOW The ink cartridge is almost expended. You need to replace the ink cartridge soon. Although you can continue
MAINTENANCE CARTRIDGE
FULL
REPLACE THE CARTRIDGE
MAINTENANCE CARTRIDGE
NEARLY FULL
REPLACE THE CARTRIDGE
MAINTENANCE REQUEST
NNNN
MAINTENANCE
PLEASE USE GENUINE EPSON
CARTRIDGES
NO INK CARTRIDGE
INSTALL INK CARTRIDGE
PAPER EJECT ERROR
PRESS THE DOWN BUTTON
AND REMOVE PAPER
PAPER ERROR
LOAD PAPER
PAPER ERROR
PRESS THE DOWN BUTTON.
LOAD PAPER CORRECTLY
PAPER FEED ERROR
LOAD PAPER CORRECTLY
PRESS THE DOWN BUTTON
PAPER JAM
REMOVE PAPER
PAPER REMOVE
REMOVE PAPER FROM THE
REAR
PAPER SENSOR ERROR
PRESS THE + BUTTON.
LOAD THE CORRECT PAPER
PAPER SENSOR ERROR
PRESS THE + BUTTON
LOAD DIFFERENT PAPER
A non-genuine ink cartridge is installed,
and if you use it, may void Epson’s
warranty.
The maintenance cartridge is full and
needs to be replaced with a new one.
The maintenance cartridge is almost
full.
A part used in the printer has nearly
reached the end of its life. "NNNN"
shows the product code for the part.
A non-genuine maintenance cartridge
is installed.
An ink cartridge is not installed. Install any missing ink cartridges.
The printer could not eject the printout. Press the d Paper feed button, then remove the printout.
No paper is loaded in the printer. Load paper correctly.
The printer cannot detect the loaded
media because it is wavy or curled.
The printer cannot detect the loaded
media because the color of the paper
is either transparent or black, like the
platen color.
You have selected double-sided
printing, but the printer cannot feed
the paper correctly.
Paper is jammed. Remove the jammed paper. See the Printer Guide or on-screen User’s Guide
You need to remove the paper from
the rear slot.
The loaded paper is not the same as
the paper type selected for the
Automatic Head Alignment.
The loaded paper does not match the
paper type selected.
Select DECLINE (press the Menu r button) to replace the ink cartridge with
a genuine Epson ink cartridge. Selecting ACCEPT (by pressing the l button)
may void Epson’s warranty.
printing when the INK LOW message appears, print quality may decline.
Replace the maintenance cartridge with a new one. See “Replacing the
Maintenance Cartridge” on page 15.
You need to replace the maintenance cartridge soon with a new one. See
“Replacing the Maintenance Cartridge” on page 15.
Note the code and contact Epson.
Replace the maintenance cartridge with a genuine Epson maintenance
cartridge. See “Replacing the Maintenance Cartridge” on page 15.
Flatten the media.
Select OFF for PAPER SIZE CHECK using the printer’s menu system, or
load the correct type of genuine Epson paper.
Load the paper that has just been ejected, and then press the
button.
for details.
Remove the paper from the rear slot.
Press the + Cancel button, and then load the paper that matches the type
selected for the Automatic Head Alignment. See “Aligning the Print Head” on
page 13.
Press the + Cancel button, and then load the paper that matches the type of
paper you selected. See “Aligning the Print Head” on page 13 for details.
d Paper feed
10 - Epson Stylus Pro 3800 12/06
Page 11

Message Explanation Response
PAPER SETTING ERROR
CHECK PAPER SOURCE IN
THE DRIVER SETTINGS AND
LOAD PAPER CORRECTLY
PAPER SIZE ERROR
LOAD THE CORRECT SIZE
PAPER
PAPER SKEW
PRESS THE DOWN BUTTON.
LOAD PAPER CORRECTLY
You are using the wrong paper path
for your media.
The size of paper you loaded is not
correct for the document/image you
are printing.
The paper is not loaded straight. Press the d Paper feed button, and then load the paper straight. If you are
Check the Paper Source setting in the printer driver, and load the paper in
the correct slot.
Remove the paper and load media that is the correct size for what you are
printing.
using the auto sheet feeder, you can use the top edge guide to help feed the
paper straight. See page 5 for details.
Epson Stylus Pro 3800
Checking Printer Status and Part Life
Using the printer’s menu system, you can check the status of
your ink cartridges, the total number of prints made, and the
status of your maintenance cartridge and other printer parts.
You can either print out a status check or you can view the
printer’s status on the LCD panel.
Note: To test the print quality, see page 12 for instructions on
printing a nozzle check.
Printing Status Information
The status check sheet shows some of the current default
settings, the status of the ink in each cartridge, the page count,
and the status of various printer parts.
Follow these steps to print the status check sheet:
1. Make sure paper is loaded in the printer.
2. Press the
PRINT
3. Press r then d to select
4. Press r to select
5. Press the
The service life for each ink cartridge and the maintenance
cartridge is indicated as follows:
E[*****]F
E[**** ]F
E[*** ]F
E[** ]F
E[* ]F
Menu r button and then d to highlight TEST
.
STATUS SHEET.
PRINT.
Enter button to start printing.
Viewing Status Information
To view printer status information instead of printing it,
follow these steps:
1. Press the
STATUS
2. Press r to select
3. Do one of the following:
❏ To check the firmware version, press r
❏ To check the number of pages that can be printed with
❏ To check the ink status, press d to select
❏ To check how much of the maintenance cartridge has
❏ To check the total amount of ink used (in milliliters),
Menu r button and then d until PRINTER
is highlighted.
VERSION.
again. When
done, press l.
each ink cartridge, press d to select
PAGES
, then press r. Press d or u to scroll through
PRINTABLE
the ink cartridges and see approximately how many
pages can be printed with each ink cartridge. When
done, press l.
INK LEVEL,
then press r. You see
MATTE BLACK and the ink
status for that cartridge. Press d or u to scroll through
the ink cartridges and see their status. When done,
press l.
been used, press d to select
MAINTENANCE CART,
then press r. You see how much capacity remains in the
cartridge. When done, press l.
press d to select
USAGE COUNT, then press r.
When done, press l.
You can clear this setting with the
COUNT
option.
CLEAR USAGE
12/06 Epson Stylus Pro 3800 - 11
Page 12

Epson Stylus Pro 3800
❏ To check job history, press d to select
JOB HISTORY,
then press r. For the last 10 print jobs saved in the
printer, you see the total ink used (in milliliters) and the
paper size used most recently. The most recent job is
saved as No. 0. When done, press l.
❏ To check the total number of prints, press d to select
TOTAL PRINTS, then press r. You see the total
number of pages that have been printed. When done,
press l.
4. Press the +
Cancel button to exit the menu.
For more information about the Printer Status menu, see your
on-screen User’s Guide.
Checking and Cleaning the Print Head
If your printed image shows a color shift or horizontal or
vertical lines, you should check the print head to see if any
nozzles are clogged.
You can automatically check and clean the print head using
the Auto Cleaning feature in your printer utility software, as
described below. This enables the printer to print a nozzle
check pattern, read it, and run a cleaning cycle if necessary.
You see a screen like the following:
3. Click the
4. Click
Nozzle Check icon.
Print to print the nozzle check pattern so you can see
if the print head needs to be cleaned. Or click
want to run the nozzle check and have the printer
automatically clean the print head if necessary.
Auto if you
Note: You can also run a cleaning cycle by holding down the Menu
button for three seconds, and you can use the printer’s menu to run a
power cleaning cycle. See page 13 for details.
1. Make sure several sheets of letter-size (or larger) paper are
loaded in the auto sheet feeder.
2. Do one of the following to access the printer utilities:
❏ Macintosh: Open the
click
Epson Printer Utility2. Select Stylus Pro 3800
and click
OK.
❏ Windows XP: Click
Double-click
Printers and Faxes. Right-click your
printer icon and select
Utility tab.
❏ Windows 2000: Click
select
Printers. Right-click your printer icon and select
Printing Preferences. Click the Utility tab.
Applications folder and double-
Start and select Control Panel.
Printing Preferences. Click the
Start, point to Settings, then
5. Examine the nozzle check pattern to make sure it has no
gaps or lines.
❏ If the printout looks okay as shown below, you’re done.
Click
Finish.
❏ If you see any gaps as shown below, click
Clean to clean
the print head and follow the on-screen instructions.
12 - Epson Stylus Pro 3800 12/06
6. If the nozzles do not clear after a few cleaning cycles, run a
Power Cleaning Cycle, as described in the next section.
Page 13

Epson Stylus Pro 3800
Running a Power Cleaning Cycle
You can run a power cleaning cycle from the control panel if
the normal cleaning process is not sufficient to clear the
nozzles. However, the power cycle uses a large quantity of ink,
so it is recommended only as a last resort.
The cartridges need to be at least 50% full to use power
cleaning. You may need to replace a low cartridge to run the
cleaning cycle. After cleaning, you can reinsert the old
cartridge.
1. Print a nozzle check to make sure the print head needs
cleaning, as described on page 12.
2. Make sure the printer is ready and the red B ink light is not
on or flashing.
3. Press the
Caution: Don’t run a power cleaning cycle while thick media is
loaded in the printer.
4. Press d until MAINTENANCE is highlighted, then press r.
5. Press d to select
6. Press the
7. When cleaning is finished and the P
flashing, print the nozzle check again to confirm that the
head is clean.
For effective cleaning, always run a nozzle check between
cycles.
If the pattern is still missing segments after a few power
cleaning cycles, turn off the printer and let it sit overnight.
Then clean the print head again the following morning with
regular cleaning cycles. If you still see no improvement,
contact Epson for assistance.
Menu r button.
POWER CLEANING, then press r.
Enter button to start the power cleaning.
Power light stops
Aligning the Print Head
Aligning the print head is the most important thing you can
do to ensure the best print quality. If banding appears on your
prints, if they look grainy or blurry, or you see misregistration
or “ghosting,” you need to align the print head.
Although you can align the print head using the printer utility
software, it’s best to align from the printer’s control panel.
This will do the most thorough job in the shortest time, and
it’s all automatic.
If you haven’t already done so, it’s a good idea to run a nozzle
check before aligning the print head (see page 12). This
ensures that the print head alignment patterns print correctly.
Follow these steps to align the print head using the control
panel:
1. Make sure the printer is turned on. Then load one of the
following types of paper:
❏ Epson Premium Glossy Photo Paper
❏ Epson Premium Photo Paper Glossy
❏ Epson Premium Luster Photo Paper
❏ Epson Ultra Premium Photo Paper Luster
❏ Enhanced Matte Paper
❏ Epson Ultra Presentation Paper Matte
❏ Epson Photo Quality Ink Jet Paper
❏ Epson Presentation Paper Matte
2. Press the
3. Press d until
press r.
4. Make sure Auto is highlighted and then press r.
5. Press d or u to select the type of paper you loaded:
PREM. GLOSSY/LUSTER, P Q INK JET PAPER (Epson
Presentation Paper Matte), or
PAPER
Then press r.
Menu r button.
HEAD ALIGNMENT is highlighted. Then
ENHANCED MATTE
(Ultra Premium Presentation Paper Matte).
6. Press
Enter to start printing. After printing is complete,
the printer starts aligning the print head.
It takes several minutes to run the head alignment. The
printer’s white beam sensor reads the alignment pattern and
adjusts the printer automatically. Make sure you don’t open
the top cover or turn off the printer during this process.
If you want to verify or fine-tune the alignment process, you
can perform a manual head alignment. See your on-screen
User’s Guide for instructions.
12/06 Epson Stylus Pro 3800 - 13
Page 14

Epson Stylus Pro 3800
Replacing Ink Cartridges
Before you begin a large print job, you should check your ink
levels. If one of your cartridges is low, you can replace it before
you start. Or you can wait until the ink cartridge needs to be
replaced, and then continue the job without any loss of print
quality. However, it is best to replace a low ink cartridge
before starting a large print job.
The easiest way to check ink levels is from the control panel:
1 Matte Black
2 Photo Black
3 Light Black
4 Light Light Black
5 Cyan
9 Yellow
8 Light Magenta
7 Light Cyan
6 Magenta
Before you start, make sure the printer is turned on. Then
follow these steps to replace an ink cartridge:
1. Note the color of the cartridge whose icon and abbreviation
is on or flashing. This is the cartridge you need to replace.
Caution: Leave the low or expended cartridge in the printer until
you are ready to replace it. To prevent ink reporting errors, never
replace the ink cartridges with the printer turned off.
2. If the red B ink light is on and REPLACE INK CARTRIDGE
appears on the printer’s LCD, press the u Ink cover open
button to unlock the ink cover. If the light is flashing and
the LCD message is
INK LOW, you need to hold down the
button for 3 seconds to unlock the ink cover.
When the red B ink light is flashing and
INK LOW appears on
the LCD panel, the indicated cartridge is low on ink. Make
sure you have a replacement cartridge.
When the light stays on and you see the LCD message
REPLACE INK CARTRIDGE, the cartridge is expended. You
must replace the cartridge before you can continue printing.
Use the following UltraChromeK3
Cartridge Product code
Photo Black T580100
Cyan T580200
Magenta T580300
Yellow T580400
Light Cyan T580500
Light Magenta T580600
Light Black T580700
Matte Black T580800
Light Light Black T580900
TM
Epson ink cartridges:
You can purchase genuine Epson ink and paper from an
authorized Epson reseller. To find the nearest reseller, call
800-GO-EPSON (800-463-7766). Or you can purchase
online at www.epsonstore.com (U.S. sales) or www.epson.ca
(Canadian sales).
3. Lift the ink cover.
4. Press the ink eject button above the cartridge you need to
replace. The ink cartridge slides out slightly.
14 - Epson Stylus Pro 3800 12/06
Page 15

Epson Stylus Pro 3800
5. Carefully pull the cartridge straight out of the slot and
dispose of it properly.
Warning: Do not shake the expended cartridge, or ink may
leak out. If ink gets on your hands, wash them thoroughly with
soap and water. If ink gets in your eyes, flush them
immediately with water.
6. Make sure the replacement ink cartridge is the correct color,
and then remove it from its package.
7. Shake the ink cartridge well before installing it.
9. Close the ink cover and press it until it clicks.
When you see
READY on the LCD, the printer is ready to
print.
8. Hold the ink cartridge with the arrow mark facing up and
pointing to the back of the printer, and then insert it into
the slot until it clicks.
Arrow mark
The printer has a protection system to prevent improper
cartridge insertion. If you cannot insert the ink cartridge
easily or if you see the message
INK CARTRIDGE ERROR
on the LCD panel, the type of cartridge may be incorrect.
Check the package and product code.
If the B ink light remains on, the ink cartridge may not be
installed correctly. Remove the ink cartridge and then
reinsert it as described above.
Replacing the Maintenance Cartridge
The maintenance cartridge stores ink that gets flushed from
the system during print head cleaning. When the cartridge is
almost full, the message
NEARLY FULL
appears on the LCD panel. When the
cartridge is completely full, the printer stops working and
REPLACE THE CARTRIDGE appears on the LCD.
You can check how much space remains in the maintenance
cartridge by viewing its indicator on the control panel, as
shown below. You can also check its status using the printer’s
menus (see page 11) or by printing a nozzle check sheet
(see page 12).
Replacement cartridges are available from Epson (product
code T582000).
MAINTENANCE CARTRIDGE IS
Maintenance
cartridge indicator
(showing a new
cartridge)
12/06 Epson Stylus Pro 3800 - 15
Page 16

Epson Stylus Pro 3800
You can purchase replacement items for your printer from an
authorized Epson reseller. To find the nearest reseller, call
800-GO-EPSON (800-463-7766). Or you can purchase
online at www.epsonstore.com (U.S. sales) or www.epson.ca
(Canadian sales).
Follow these steps to replace the maintenance cartridge:
1. Make sure the printer is not printing or performing any
other operations. (
READY or PAPER OUT should appear
on the control panel.)
2. Open the maintenance cartridge cover.
Caution: Be careful not to tilt the used cartridge or spill ink from
it when removing it. Hold it upright at all times and dispose of it
carefully.
5. Insert the new maintenance cartridge into the printer as far
as it will go.
Caution: Do not touch the green chip on the side of the
maintenance cartridge. This may prevent normal operation.
3. Grasp the handle of the maintenance cartridge, then push it
up while gently pulling it toward you to remove it.
4. Remove the replacement cartridge from its package. Then
put the used maintenance cartridge in the plastic bag
provided and dispose of it properly.
6. Close the maintenance cartridge cover.
16 - Epson Stylus Pro 3800 12/06
Page 17

Epson Stylus Pro 3800
Cleaning the Printer
Warning: Be careful not to touch the gears inside the printer.
Caution: To avoid damaging the components as well as the
case, never use alcohol or thinners to clean the printer.
Be careful not to get water on the printer mechanism or screen
components.
Don’t use a hard or abrasive brush.
Do not touch the ink absorption pads; otherwise, printouts may
be soiled.
Don’t spray the inside of the printer with lubricants; unsuitable
oils can damage the mechanism. Contact Epson if you think the
printer needs lubrication.
To keep your printer working at its best, you should clean it
several times a year.
1. Make sure the printer is turned off, then unplug the power
cord and disconnect the printer from your computer. Let
the printer sit for a minute.
2. If the outer case is dirty, clean it with a soft, clean cloth
dampened with mild detergent. Keep the ink cartridge
compartment closed to prevent water from getting inside.
3. If the front manual tray is extended, close it by pushing it
in.
4. Open the top cover and then use a soft, lint-free cloth to
carefully remove any dust or dirt inside the printer. If the
back of a printout is soiled, carefully clean the plastic ribs
using a soft, lint-free cloth wiping in the direction of the
arrows. Also clean any area with excess ink or debris.
Transporting or Storing the Printer
If you are moving the printer a short distance (for example, in
the same building), close any open extensions and covers and
remove the rear sheet guide if installed.
Warning: The printer weighs about 43 lb (20 kg), and should be
lifted by two people.
To ship the printer, you must repack it using the original box
and packing materials. If you do not have these items, contact
Epson to request them. Otherwise, the printer may be
damaged beyond repair.
Preparing the Printer for Shipment
1. Turn on the printer, make sure the print head is in the
home (far right) position, then turn off the printer.
2. Unplug the power cord and interface cable.
Caution: Do not remove the ink cartridges and do not turn off the
printer by unplugging it or turning off a power strip. You will not
be able to lock the print head, and ink may leak out of the
reservoir, damaging the printer.
3. Install the blue carriage retainer bracket to secure the print
head and ink tubes in place. If you don’t have the bracket,
secure them with tape.
4. Remove any paper or media in the printer, then close the
paper tray extensions and covers, and remove the rear sheet
guide if installed.
5. Tape all of the doors, covers, and trays securely in place.
These include the front cover, ink cover, front manual feed
tray, and maintenance cartridge cover.
6. Insert the protective materials included with the printer and
repack it using the original box and packing materials.
Plastic
ribs
If the problem still occurs, clean the area using a soft, lint-free,
dampened cloth. Then wipe the inside of the printer dry with
a dry, lint-free, soft cloth.
12/06 Epson Stylus Pro 3800 - 17
Page 18

Epson Stylus Pro 3800
Updating Your Printer Firmware
You can check for a newer version of firmware on the Epson
support site and update your printer, if necessary. Follow the
steps below to download the latest firmware and update your
printer.
Note: Although the examples in these instructions show Macintosh
screens, the procedure is the same in Windows.
1. Navigate to epson.com/support in your browser.
2. Choose your printer.
3. Click
4. Choose the version for Macintosh or Windows and follow
5. Double-click the downloaded firmware file to extract it.
6. Double-click the
Drivers and Downloads to find the newest
firmware.
the instructions on the screen to dowload it.
EPSON LFP Remote Panel icon on your
desktop. You see a window like this one:
8. Make sure your printer is on, its LCD displays
READY,
and it is connected to your computer. Then choose
Stylus Pro 3800 in the Printer list and click Browse.
9. Find the firmware that you just downloaded and extracted.
Select the file and click
10. If the firmware version of the file is newer, click
Choose.
Update to
start the firmware update process. (If it is the same, you
don’t need to update it.)
Caution: Don’t turn off the printer while the firmware is
updating.
7. Click the
this one:
11. When the update is complete, close the Firmware Updater
window and the LFP Remote Panel window.
Note: You can follow this same procedure to update the built-in
network adapter firmware.
Related Documentation
CPD-22652 Epson Stylus Pro 3800 Printer Guide
Firmware Updater icon. You see a window like
CPD-22653 Epson Stylus Pro 3800 Start Here sheet
CPD-22654 Epson Stylus Pro 3800 CD-ROM with
electronic User’s Guide
CPD-22655 Epson Stylus Pro 3800 Registration Card
CPD-22927 Epson Stylus Pro 3800 Preferred Limited
Warranty
CPD-22928 Epson Stylus Pro 3800 Preferred Plus
One-Year Premium Upgrade (optional
extended warranty)
CPD-22929 Epson Stylus Pro 3800 Preferred Plus
Two-Year Premium Upgrade (optional
extended warranty)
18 - Epson Stylus Pro 3800 12/06
 Loading...