

Page 1

COLOR INK JET PRINTER
User’s Guide
All rights reserved. No part of this publication may be reproduced, stored in a retrieval
system, or transmitted in any form or by any means, electronic, mechanic al, photocopying,
recording, or oth erwise, without t he prior writ ten permission of Seiko Eps on Corporation.
No patent liability is assumed with respect to the use of the information contained herein.
Neither is any liability assumed for damages resulting from the use of the information
cont a ined herei n.
Neither Seiko Epson Corporation nor its affiliates shall be liable to the purchaser of this
product or thir d p ar tie s fo r da mage s, lo sse s, costs, or expen ses inc urr ed by purcha ser or
third p arties as a resu lt of: accident, misuse, or abuse of this product or unauthorized
modifications, repairs, or alterations to this product, or (excluding the U.S.) failure to
strict ly comply with Seiko E pson Corporation’s operating and maintenanc e instructions.
Seiko Epson Corporation shall not be liabl e against any damages or p roblems arising from
the use of any options or any consumable prod ucts other than thos e designated as
Original EPSON Products or EPSON Approved Products by Seiko Epson Corporation.
EPSON, EPSON Stylus, and EPSON ESC/P a re registere d trademarks an d
EPSON ESC/P 2 is a trademark of Seiko Epson Corporation.
EPSON Connection is a se rvice mark of Epson America, Inc.
Software 2000 is a trademark of Software 2000 Ltd.
Windows Printer driver copyrig h t Software 2000 Ltd Oxford, Eng land.
General Noti ce: Other product names used herein are for identification purposes only and
may be trademarks of their respective owners. EPS ON disclaims an y and all rights in
those marks.
The Energy Star emblem does not represent EPA endorsement of any product or service.
Copyrigh t © 1996 by Epson America, Inc. 3/96
Printed on recycled paper with at least 10% post-con sumer content
Page 2

Printer Parts
edge
guides
sheet feeder
paper
thickness
lever
paper support
contr ol p an e l
printer cover
power switch
thickness
adjustment
lever
print head
unit release
lever
print head unit
parallel interface
connector
ink cartridge
clamp
Page 3

FCC Compliance Statement
For United States Users
This equipment has be en tested and found to comp ly with the limits for a Class B digital
device, pur sua nt to Part 15 of the FCC Rules. These limits are designed to provide
reasonable prote ction against harmful interference in a residential installation. This
equipment generates, uses, and can radiate radio frequency energy and, if not ins t alled
and used in accordance with the instructions, may cause harmful interference to radio or
television recep tion. However, there is no guarantee th at in t erference will not occur in a
particular installation. If this equipment does cause interference to radio and television
receptio n, whi ch can be determined by turning the equipment off and on, the user is
encourag ed to try to correct the interference by one or more of the following measures.
❑ Reori en t or re lo ca t e th e rece iv i ng an t e nn a .
❑ Increase the sepa ration between the equipment and receiver.
❑ Connect the equipment into an outlet on a circuit diff erent from that to which the
receiver is connected.
❑ Consult the dealer or an experienced radio/TV technician for help.
WARNING
The connection of a non-shielded equipment interface cable to this equipment will
invalid a t e the FCC Certificat ion of this device and may cause interference levels w h ich
exceed the limits established by the FCC for this equipment. It is the responsibility of the
user to obtain and use a shielded equipment interface cable with this device. If this
equipment has more than one interface connector, do not leav e cables connected to unused
interfaces . Changes or modifications not expressly approved by the manufacturer could
void the user’s au thority to operate the equipme nt.
For Canadian Users
This digital appa rat us does not exceed the Class B lim it s for radio noi se emissions from
digital apparatus as set out in th e radio int erference regulations of the Canadian
Department of Communications.
Le présent appareil numérique n’ émet pas de bruits radio électriques dépassant les limites
applicables aux appareils numériques de Classe B prescrites dans le règlement sur le
brouillage radioélectrique édicté par le Ministère des Communications du Canada.
ii
Page 4

Contents
Introduction
Getting the Most Out of Your Printer . . . . . . . . . . . . . . . 0-1
If You Are New to Color Printing . . . . . . . . . . . . . . . . . 0-3
Energy Star Compliance . . . . . . . . . . . . . . . . . . . . . . 0 -4
Energy-saving Tips . . . . . . . . . . . . . . . . . . . . . . . 0-5
How to Use This Manual . . . . . . . . . . . . . . . . . . . . . . 0 -5
Where to Get Help . . . . . . . . . . . . . . . . . . . . . . . . . 0-6
Electronic Support Services . . . . . . . . . . . . . . . . . . 0 -7
Important Safety Instructions . . . . . . . . . . . . . . . . . . . 0 -9
Chapter 1
System Requirements . . . . . . . . . . . . . . . . . . . . . . . . 1 -2
Unpacking the Printer . . . . . . . . . . . . . . . . . . . . . . . 1 -3
Setting Up the Printer . . . . . . . . . . . . . . . . . . . . . . . . 1-4
Selecting a Location . . . . . . . . . . . . . . . . . . . . . . . 1-4
Attaching the Paper Support . . . . . . . . . . . . . . . . . . 1-4
Plugging In and Tur ning O n the Pri nter . . . . . . . . . . . 1-5
Charging the Ink Delivery System . . . . . . . . . . . . . . 1-6
Checking the Paper Thickness Lever . . . . . . . . . . . . . 1 -14
Loading Paper . . . . . . . . . . . . . . . . . . . . . . . . . . 1-15
Testing the Printer . . . . . . . . . . . . . . . . . . . . . . . 1 -17
Connecting the Printer to Your Computer . . . . . . . . . . . . 1-18
Chapter 2
Installing the Printer Software . . . . . . . . . . . . . . . . . . . 2-2
Setting Up the Printer
Installing an d Us ing the Printer Software
Installing the Software for Windows 3.1 . . . . . . . . . . . 2-2
Installing the Software for Windows 95 . . . . . . . . . . . 2-5
Installing a Driver for DOS Programs . . . . . . . . . . . . 2-8
Accessing the Printer Driver . . . . . . . . . . . . . . . . . . . . 2 -9
Accessing the Driver From Windows Applications . . . . . 2-9
Accessing the Driver From Windows 3.1 . . . . . . . . . . . 2 -10
Accessing the Driver From Windows 95 . . . . . . . . . . . 2-10
iii
Page 5

Using the Printer Driver . . . . . . . . . . . . . . . . . . . . . . . 2-11
Changing Settings . . . . . . . . . . . . . . . . . . . . . . . . 2-14
Using Online Help . . . . . . . . . . . . . . . . . . . . . . . . . . 2-15
Accessing Online Help From Windows 3.1 . . . . . . . . . . 2-15
Accessing Online Help From Windows 95 . . . . . . . . . . 2-15
Chapter 3 Paper Handling
Choosing Paper and Other Media . . . . . . . . . . . . . . . . . 3-2
Setting the Paper Thickness and Adjustment Levers . . . . . . . 3-3
Paper Thickness Lever . . . . . . . . . . . . . . . . . . . . . . 3-3
Thickness Adjustment Lever . . . . . . . . . . . . . . . . . . 3-4
Loading Plain Paper . . . . . . . . . . . . . . . . . . . . . . . . . 3 -5
Loading Special Papers and Other Media . . . . . . . . . . . . . 3-8
Loading Special Papers and Transparencies . . . . . . . . . 3-8
Loading Envelopes . . . . . . . . . . . . . . . . . . . . . . . . 3-11
Chapter 4 Controlli ng the Printer
Managing Print Jobs . . . . . . . . . . . . . . . . . . . . . . . . . 4-2
Using the Printer’s Control Panel . . . . . . . . . . . . . . . . . . 4 -5
Lights . . . . . . . . . . . . . . . . . . . . . . . . . . . . . . . . 4-5
Buttons . . . . . . . . . . . . . . . . . . . . . . . . . . . . . . . 4 -6
Using the Default Setting Mode . . . . . . . . . . . . . . . . . . 4-8
Chapter 5 Maintenance
Cleaning the Print Head . . . . . . . . . . . . . . . . . . . . . . . 5-2
Changing the Print Head Unit . . . . . . . . . . . . . . . . . . . 5-3
Replacing an Ink Cartridge . . . . . . . . . . . . . . . . . . . . . 5-6
Selecting the Correct Ink Cartridges . . . . . . . . . . . . . . 5-7
Removing and Installing an Ink Cartridge . . . . . . . . . . 5-7
Cleaning the Printer . . . . . . . . . . . . . . . . . . . . . . . . . 5-10
Transporting the Printer . . . . . . . . . . . . . . . . . . . . . . . 5-11
Calibrating the Printer . . . . . . . . . . . . . . . . . . . . . . . . 5-12
Calibrating the Printer From Windows . . . . . . . . . . . . 5-13
Calibrating the Printer From DOS . . . . . . . . . . . . . . . 5-14
iv
Page 6

Chapter 6 Troubleshooting
Diagnosing Problems . . . . . . . . . . . . . . . . . . . . . . . . 6-2
Print Quality Problems . . . . . . . . . . . . . . . . . . . . . . . 6-3
Problems With Printing . . . . . . . . . . . . . . . . . . . . . . . 6-8
Paper Handling Pr oblems . . . . . . . . . . . . . . . . . . . . . 6-13
Paper Jam Problems . . . . . . . . . . . . . . . . . . . . . . . 6-13
Paper Feeding Problems . . . . . . . . . . . . . . . . . . . . 6-14
Other Paper Handling Problems . . . . . . . . . . . . . . . 6-14
Appendix A Technical Specifi ca tio ns
Printing . . . . . . . . . . . . . . . . . . . . . . . . . . . . . . . . A-2
Paper . . . . . . . . . . . . . . . . . . . . . . . . . . . . . . . . . A-3
Ink Cartridges . . . . . . . . . . . . . . . . . . . . . . . . . . . . A-6
Mechanical . . . . . . . . . . . . . . . . . . . . . . . . . . . . . . A-7
Electrical . . . . . . . . . . . . . . . . . . . . . . . . . . . . . . . A-7
Environmental . . . . . . . . . . . . . . . . . . . . . . . . . . . . A-8
Safety Approvals . . . . . . . . . . . . . . . . . . . . . . . . . . A-8
Fonts . . . . . . . . . . . . . . . . . . . . . . . . . . . . . . . . . A-8
Parallel Interface Specifications . . . . . . . . . . . . . . . . . . A-9
Pin Assignments . . . . . . . . . . . . . . . . . . . . . . . . . A-9
Reverse Channel . . . . . . . . . . . . . . . . . . . . . . . . . A-11
Timing Chart . . . . . . . . . . . . . . . . . . . . . . . . . . . A-14
Initialization . . . . . . . . . . . . . . . . . . . . . . . . . . . . . A-14
Default Settings . . . . . . . . . . . . . . . . . . . . . . . . . A-15
Appendix B Commands and Character Tables
Command List . . . . . . . . . . . . . . . . . . . . . . . . . . . . B-2
Character Tables . . . . . . . . . . . . . . . . . . . . . . . . . . . B-3
International Character Sets . . . . . . . . . . . . . . . . . . B-7
Characters Available With the ESC ( ^ Command . . . . . B-8
Glossary
Index
v
Page 7

Introduction
The EPSON® Stylus® COLOR 200 is an affordable, hig h-qu ality
ink jet printer that can print up to 16 millio n co lo r s at hig h
resolution to produce full-color, photo-quality images. It also
produces realistic grayscale images, laser-quali ty tex t, a nd line
art. The printer’s ink jet technology al low s it to operate qu ietl y ,
keeping your workspace peaceful.
The Stylus COLO R 200 is easy to install and use. Yo u simply
set it up, connect it to your computer, and install the printer
software, as described in this book. The printer has a built-in
parallel interface so you can connect it to any IBM
compatible computer.
The printer software includes a “driver” that controls printing
and lets you choose from a wide var ie ty of printer settings. You
®
PC
can change settings to improve print quality, speed up
printing, or achie ve specia l pr inting effe c ts. And to make your
selections easy, the driver includes an option that analyzes each
page and automatically adjusts the settings before printing it.
Getting the Most Out of Y our Pr inter
To achieve the highest quali ty printo ut, you sho uld know a few
of the elements that contribute to outstanding color printing:
Resolution is a meas u re of the am ou nt of detail that can be
❑
represented on the page. The higher the resolution, the
more detail ed and r ea listic the i mage, and the longer it
takes to print. For printed image s , resolutio n is me asur ed
in dots per inch (dpi). Your printer has three resolutions:
720 dpi, 360 dpi, and E c onomy (180 dpi).
Introduction
1
Page 8

Use 720 dpi for the best possible images. For high-quality
images in less time, use 360 dpi. Whe n speed is important
and draft quality is good enough, use Economy (180 dpi).
Paper type and quality are very important. Although you
❑
get good results with plain bond paper, you will get better
results by using coated or glossy papers because they do
not absorb as much ink.
To ensure the best possible quality, EPSON offers special
coated papers, g lossy papers, and transparenc ies that ar e
specially formulated for the inks used by the printer.
You can order these products from EPSON Accessories at
(800) 873-7766 (U.S. sales only). In Canada, call
(800) BUY-EPSON for sales locations. (For information
about sp ecial pa p ers and ot her media, s e e Chapter 3.)
EPSON ink cartridges (black and colo r) ar e specially
❑
formulated to work with EPSON papers and your printer
software to deliver the best looking images. Always use
genuine EPSON ink c ar tri dg es and do not refill them.
Other products may cause damage not covered by
EPSON’s warranty.
Prin ter driver settings control every aspect of how your
❑
printer prints, so be sure to select the driver settings that
are appropriate for your images each time you print.
The basic driver settings include docum ent type, paper type
and size, resol u tion, and print head unit. Op tional settings
that you may or may not ne ed to check inc lud e hal fton ing ,
color adjustments, and the printing mode options described
below.
2
Introduction
Page 9

Printing mode options affect the speed and accuracy
❑
with which the print head sprays ink onto the paper.
MicroWeave mod e appl ies i nk in an intr icate pa ttern to
eliminate the possibility of banding (light, horizontal lines)
that can someti mes occur in normal mode. High Speed
mode prints bidirectionally (one line from right to left and
the next from left to right) to speed up printing. You should
use MicroWeave mode when printing detailed graphic and
photographic images. High Speed mode is good for all
draft copies and for printing text; however, the vertical
alignment in your images may not be as precise.
If You Are New to Color Printing
Color printing with the EPSO N Stylus CO LOR 200 produc es
amazing imag es, w hether you print text, g raphic s, line
drawings, photographs, or documents containing many
different image types. However you use your color printer,
keep the following in mind:
Leave a la rg e amo u n t o f hard disk sp ace fr ee to make ro o m
❑
for your color images. A full-page color photographic
image may require 40MB or more of disk space, depending
on the resolution. To reduce file size, you can decrease the
size and resolution of your images using your printer
driver and appl ic ation software.
Color printing takes time because of the complex
❑
processing required to create a color image. How much
time depends on the size and type of your image, the
resolution you use, and the speed of your computer.
However, the fantastic results make the time spent well
worth it.
Introduction
3
Page 10

Your screen colors will not ex ac tly match the printed colors
❑
becau s e your c omputer monito r and print er use di fferent
methods to produce the colors you see. If you scan
images using a scanner, the im age goe s thro ugh anothe r
interpretive process that also affects the color.
Monitors and sca nners produc e co lor s by com b ining red,
green, and blue—the RGB method. Monitor can produce
up to 16 millio n colo rs by turni ng on and off the tiny red,
green, and blue phosphors co ntaine d in e ach pixe l on the
screen. Colors produced this way differ from colors
produced by your printer’s cyan, magenta, and yellow ink
colors— the CM Y method.
Your printer driver settings help you closely match colors fo r
your image type, resolution, and paper or other media. If
you n eed extrem e p reci sion in mat chin g c olors, you c a n u s e
a color calibr ati on sy stem available with many sof twa re
applications. I f you use a scanner, make sure your scanning
software is set to the correct setting for ink jet printers.
Also, your applic ation may include imag e edit ing
capabilities that let you adjust the colors.
Energy Star Com pli ance
As an Energy Star Partner, EPSON has determined
that this product meets the Energy Star guidelines
for energy efficiency.
The EPA estimates that if all desktop computers, printers, and
other peripheral devices met Energy Star standards, energy
cost savings would exceed $1 billion annuall y and car bon
dioxide emissio ns w ould be red uc ed by 20 m illion tons.
4
All of EPS ON’s ink je t printers conform to Energy Star
standards.
Introduction
Page 11

Energy-saving Tips
Here are a few tips you can use to be even more energy-wise:
If your monitor isn’t Energy Star compliant, turn it off
❑
when you’re not using it.
Turn off your computer, printer, and monitor each day
❑
when you are done using them.
Use the print preview option in your software so you can
❑
catch errors before you print some thing.
If you have an electronic mail system available to you, send
❑
e-mail rather than memos. Not only is this faster, but you’ll
save paper and storag e space too.
How to Use This Manual
This manual contains all the information you need to set up
and use your printer.
Chapter 1 , “Setting Up the Pr inter, ” provides simple steps for
setting up your printer, running its self test, and connecting it
to your computer.
Chapter 2 , “Installing and U sing the Pri nter So ftw are, ”
explains how to install and ac c ess the printer softw are and
gives guidelines for sel ecting pri nter dr ive r settings.
Chapter 3 , “P ape r Hand ling,” explains how to select the right
paper or other media for your print job and load it in your
printer.
Chapter 4 , “Controlling the Printer,” provides instructions for
managing the printer’s operation usi ng the Spool Man ag er, the
printer’s control panel, and Defa ult setting mo de.
Introduction
5
Page 12

Chapter 5 , “M aintenance,” gives instructions for cl eani ng the
print heads, changing the print head unit, replacing the ink
cartridge, and cleaning, transporting, and calibrating the
printer.
Chapter 6 , “Tr oubleshooting,” contains guidel ines for solving
any print quality or printer operation problems you may have.
Appendix A, “Te chn ic al S pecif ic ations,” gives the
specifications for the Stylus COL OR 200 printer.
Appendix B, “Com m ands and Character Tables,” lists the
ESC/P 2
emulation commands supported by the printer and
shows the printer’s built-in character tables.
A Glossary and Index are included at the end of the book.
Where to Get Help
If you purchased your printer in the United S tates or Canada,
EPSON provides customer support and service through a
network of Authorized EPSON Customer Care Centers.
EPSON also provides the following servic es when you dial
(800) 922-8 911:
EPSON fax-on-d em and technic al informatio n libr ar y
❑
Product literature on current and new products
❑
Assistance in locating your nea res t Author ize d E P SON
❑
Reseller or Cu s t omer Care Center
Technical info rmation on the installati on, c onf ig ura tion,
❑
and oper ation of EPSON p r oducts
6
Customer relations.
❑
Introduction
Page 13

You can purchase ink cartridges, paper, parts, printed manuals,
and accessories for EPSON products from EPSON Accessories
at (800) 873 -7 766 (U.S. sales only). In Canada, call
(800) BUY-EPSON for sales locations.
If you purchased your printer outside the United States or
Canada, contact your EPSON dealer or the marketing location
nearest you for customer support and service.
If you need help wi th any so ftwa re progra m yo u are using,
see the documentatio n for that progra m for technic a l support
information.
Electronic Support Services
If you have a modem, the fastest way to access helpful tips,
specifications, drivers, application notes, and bul leti ns fo r
EPSON products is through the online services below.
World Wide Web
If you are connected to the Interne t and have a Web browser ,
you can access EPSON’s World Wide Web site at
http://www.epson.com. EPSON’s home page links users to
What’s New, EPSON Products, EPSON Connection,
Info, and EP SON Contacts. Link to the EPSON Conne c ti on for
the latest drivers and FAQs (Frequently Asked Questions) and
the EPSON Chat area. To get in touch with EPSON around the
world, EPS ON Contacts includes Contac t Information for l oc al
EPSON subsidiaries.
EPSON FTP Site
SM
Corporate
If you have access to the Internet and an FTP client, you can
download drivers, FAQs, and sample files from EPSON’s FTP
site. Use your FTP client or Web browser to log onto
ftp.epson.com with the user name
anonymous
and your
e-mail address as the password.
Introduction
7
Page 14

EPSON Fax-on-Demand service
You can access the EPSON fax-on-demand technical
information libr ary by ca lling (800) 922-8911 or (800) 44 2-2110.
To receive information, you m u st provid e a fax number.
EPSON Download Service
You can call the EPSON Download Service at (310) 782-4531.
Make sure your communications software is set to 8 data bits
with 1 stop bit, no parity bit, and a modem speed up to
28.8 Kbps. See your communic ations software docum entati on
for more information.
EPSON Forum on CompuServe
CompuSer ve® members can call the Epso n Am eric a For um
on CompuServe. If you are already a member, simply type
GO EPSON
If you are not currently a member, you are eligible for a free
introductory membership as an owner of an EPSON product.
This membership entitles you to:
An introductory credit on CompuServe
❑
Your own user ID and password
❑
A complimentary subscription to
❑
CompuServe’s monthly publi c ation
To take advantage of this offer, call (800) 848-8199 in the United
States and Canada an d ask fo r representative #529. In other
countries, call the follow ing U.S. telephone number:
(614) 529-1 611, or your local Com puServe ac c ess number .
at the menu prompt to reach the Forum.
CompuServe Magaz ine,
.
8
Introduction
Page 15

Important Safety Instructions
Before using your printer, read the following safety
instructions to make sure you use the printer safely and
effectively.
Turn off and unplug the printer before cleaning. Clean with
❑
a damp clo t h only. Do not spill liquid on the printer.
Do not place the printer on an unstable surface or near a
❑
radiator or heating vent.
Do not block or co ver the openings in the printe r’s cabinet
❑
or insert objects through the slots.
Use only the type of power source indicated on the
❑
printer’s label.
Connect all equipment to properly grounded power
❑
outlets. Avoid using outlets on the same circuit as
photocopiers or air control systems that regularly switch
on and off.
Do not let the power cord become damaged or frayed.
❑
If you use an extension cord with the printer, make sure
❑
the total ampere rating of the devices plugged into the
extens ion c ord do es n o t exceed t h e cord ’ s ampere rat in g.
Also, make sure the total of all devices plugged into the
wall outlet does not exceed 15 amperes.
Except as specifically explained in this
❑
User’s Guide
attempt to service the printer yourself.
Unplug the printer and refer servicing to qualified service
❑
personnel under the fol low ing conditio ns:
If the power cord or plug is damaged; if liquid has entered
the printer; if the printer has been dropped or the cabinet
, do not
damaged; if the printer do es not operate normally or
exhibits a distinct change in perform anc e. Ad j u st only those
controls that are covered by the operating instructions.
Introduction
9
Page 16

Chapter 1
Setting Up the Printer
System Requirements . . . . . . . . . . . . . . . . . . . . . . . . 1-2
Unpacking the Printer . . . . . . . . . . . . . . . . . . . . . . . 1-3
Setting Up the Printer . . . . . . . . . . . . . . . . . . . . . . . . 1-4
Selecting a Location . . . . . . . . . . . . . . . . . . . . . . . 1-4
Attaching the Paper Support . . . . . . . . . . . . . . . . . . 1-4
Plugging In and Tur ning O n the Pri nter . . . . . . . . . . . 1-5
Charging the Ink Delivery System . . . . . . . . . . . . . . 1-6
Checking the Paper Thickness Lever . . . . . . . . . . . . . 1-14
Loading Paper . . . . . . . . . . . . . . . . . . . . . . . . . . 1-15
Testing the Printer . . . . . . . . . . . . . . . . . . . . . . . 1-17
Connecting the Printer to Your Computer . . . . . . . . . . . . 1-18
1
Setting Up the Printer
1-1
Page 17

Be sure to read all the sections in this chapter to ensure that you
set up your printer properly.
System Requirements
To use your printer and its driver, we recommend that your
system includes:
An 80386/25 M H z or fa ster processor
❑
Microsoft® Windows® 3.1, Windows for Workgroups 3.1, or
❑
Windows 95
At least 8MB of available RAM ( mo re fo r W ind ows 95)
❑
A minimum of 10MB of hard disk space for storing images
❑
(40MB or more is recommended for color images)
VGA or higher standar d m onitor
❑
A shielded, twisted -pai r para lle l c abl e (6 to 10 f eet long) to
❑
connect your computer to the printer’s parallel interface;
the cable must have a D-SUB , 25- pin, male connector for
®
your computer and a 36-pin, Centronics
compatible
connector for the printer.
1-2
Setting Up the Printer
Page 18

Unpacking the Printer
In addition to this
Quick Setup
a
Sheet, a registration card, and these items:
print head
storage box
card, the printer software diskettes, a Notice
User’s Guide
printer
, your printer box should include
paper support
black ink cartridgecolor ink cartridge
monochrome
print head
Caution:
c
Save all packag ing and protective materials in case y ou ne ed to
transport the printer in the future. You should always
transport it in its original pa ckaging or equivalent materials.
To avoid damaging the printer, you must remove all protective
materi a ls packed arou nd and insid e t he prin t er before you set it
up and turn on the power. Follow the directions on the Notic e
Sheet packed with the printer.
Setting Up the Printer
1-3
Page 19
Setting Up the P rinte r
The following procedures describe how to set up and test the
printer before you connect it to your computer. Refer to the
illustrations on the inside front c ove r of this manual to identify
the main components while setting it up.
Selecting a Location
When choosing a location for the printer, select a surface that is
flat, horizontal, and stable. Locate the printer away from the
edge of your desk or table so that paper ejected from the front
has room to land on a flat surface.
Avoid locations subj e ct to rapi d c hange s i n temperatu re and
humidity. Also keep the printer aw ay from d ir ect sunlig ht, heat
sources, and sources of electromagnetic interference, such as
the base unit of a cordless telephone.
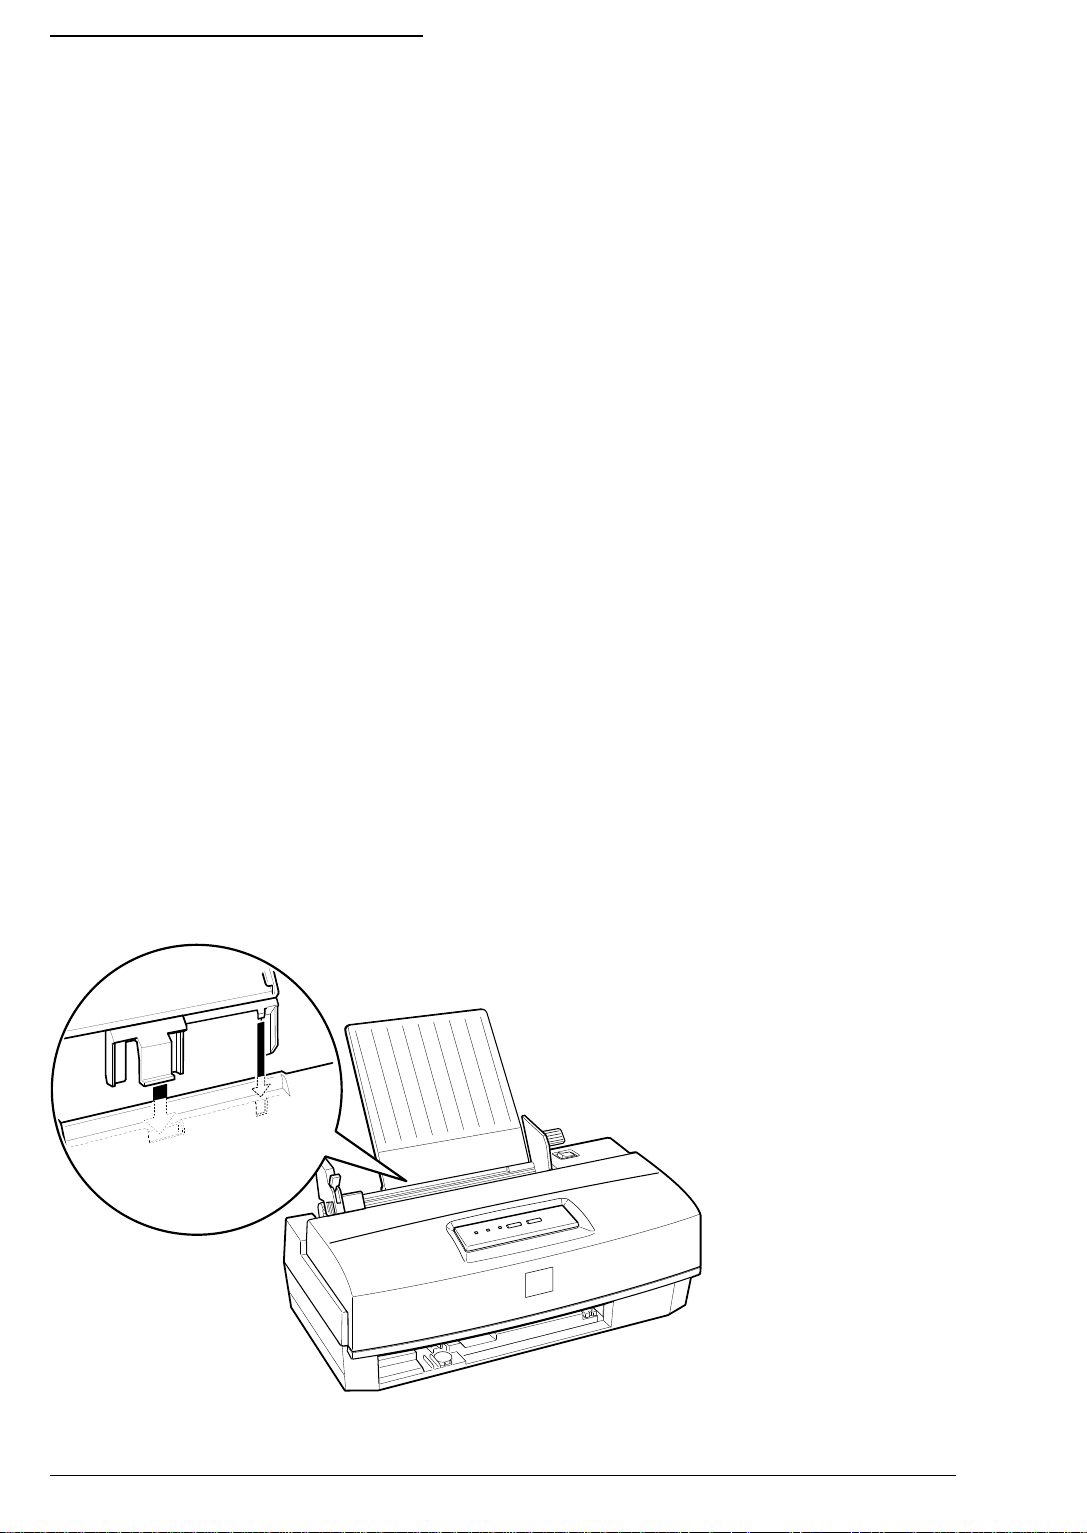
Attaching the Paper Support
Insert the paper support into the slots at the back of the printer.
Tilt the paper support slightly forw ard while inserting it.
1-4
Setting Up the Printer
Page 20

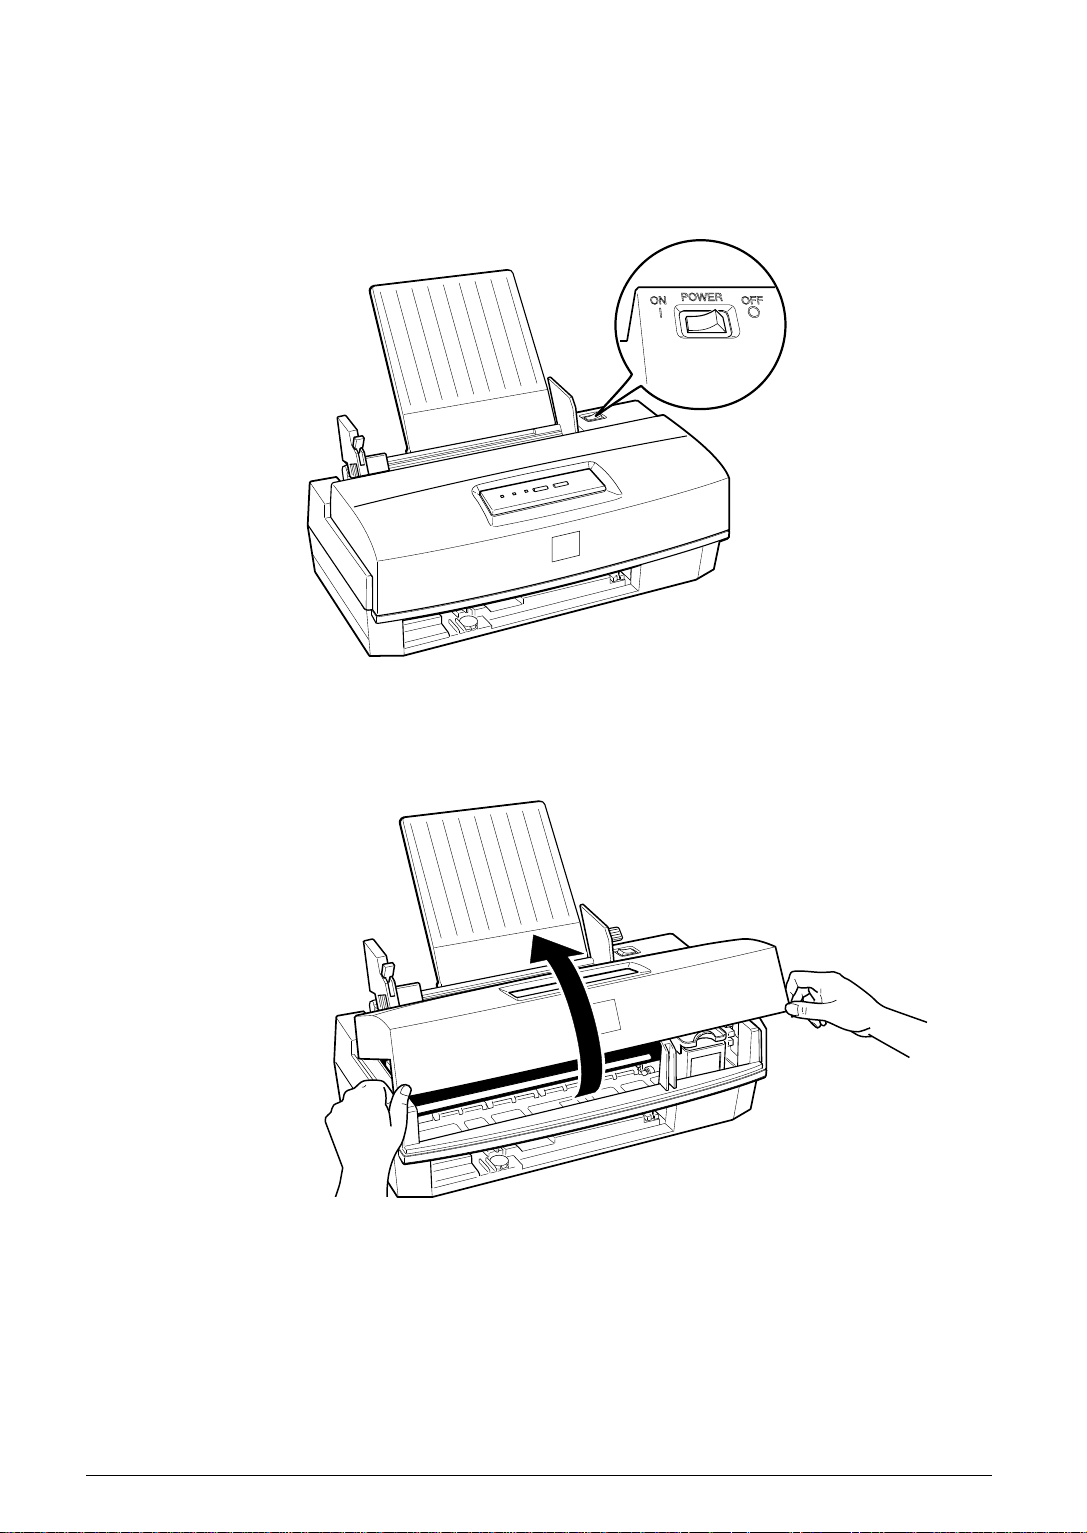
Plugging In and Turning On the Printer
Follow these steps to plug in and turn on your printer:
1. Make sure you have removed all protective packing
materi als from inside the pr i nt er. (See the Not ice Shee t for
more inf or matio n.)
2. Make sure the printer is turned off by checking the position
of the
POWER
switch, as shown below.
3. Plug the power cord into a properly grounded electrical
outlet.
4. Turn on the printer by pressing the
Note:
The
Power
cartridge is installed.
and
Ink Out
lights turn on to indicate that no ink
Setting Up the Printer
POWER
switch.
1-5
Page 21

Charging the Ink Deliv ery System
Your printer comes with a colo r print head, i nstalled in the
printer, and a monochrome print head, packed in the plastic
storage box. When you want to print in color, install the color
print head unit with the co lor ink cartrid ge in the printer. When
you want to print in b lack, insta ll the monochr ome print head
unit and black ink cartridge in the printer.
Note:
When printing a page that does not include color, using the black ink
cartridge is much faster and more economical. However, the color ink
cartridge can print composite black. Composite black is a mixture of
the inks in the color ink cartridge that closely resembles black in k.
When you first set up the printer, you need to completely
charge its ink delivery system by first installing the color ink
cartridge and then replacing it with the black print head unit
and cartridge. Fol low all the steps in this section.
Note:
Even if you don’t plan to use the black ink ca rtrid ge imm edia tely, you
still need to install it to charge the ink delivery system.
Once both ink delivery systems are charged, you can easily
switch between color and m ono c hrom e printing as nee ded.
Follow the instructio ns in Chapte r 3
Warning:
w
The ink cartridges are self-contained units. Under ordina ry
use, ink will not leak from a cartridge. If ink gets on your
hands, wash them thoroughly with soap and water. If ink gets
into your eyes, flush them immediatel y with water.
.
c
1-6
Caution:
Do not open t he ink cartridg e p a ckages un til just befo re you
install t he m or they m a y b ecome dry.
Setting Up the Printer
Page 22
Installing the color ink cartridge
Follow these st eps to i n sta ll the color ink cartri d ge:
1. Make sure the printer is turned on.
2. Raise the printer cover by l ifting the edges, as show n belo w .
Setting Up the Printer
1-7
Page 23

3. Hold down the
until the print head moves slightly le ft, to the in k cartr idge
Load/Eject
button for about five seconds
install position. The
Caution:
Power
light begins flashing.
c
4. Raise the ink cartridge clamp to open the print head unit.
Never move the print head by han d; a lways use the
Load/Eject
button to move it.
ink cartridge clamp
paper sheet
5. Remove the protective paper sheet.
1-8
Setting Up the Printer
Page 24

6. Open the foil ink cartridge packages and take out the
cartridges. Remove the tape seal from the top of each one.
Set the black cartridge aside for now.
color cartridge
Caution:
c
7. Lower the color ink ca rtri d ge i nto the print head unit wi th
the label facing up and the arrow on th e to p o f th e cart ridge
pointing to w a rd the back of the printer.
You must remove the tape seal from the top o f ea ch
cartridge; leaving the tape on will permanently damage a
cartridge. Do not remove the clear seal from th e bottom o f
the cartridge; ink will leak out.
black cartridge
Setting Up the Printer
1-9
Page 25

8. Press down the ink cart ridg e clamp until it locks in place.
You will feel some resistance.
Caution:
c
9. Press the
to its home position. (E ven if you do not press
the print head moves back to its home position about
60 seconds after you close the clamp.)
The printer charges the ink delivery system for about two
minutes. During this time, the
the printer is finished charging, the
c
Once you install an ink cartridge, do not open the ink
cartridge clamp again o r remove t he ca rtrid ge except to
replace it with a new one. Once you remo ve a ca rtrid ge, do
not reuse it; you may damage the print head.
Load/Eject
Caution:
Never turn off the printer while the
flashing.
button again to return the print head
Load/Eject
Power
light flashes. When
Power
light stays on.
Power
light is
,
1-10
Setting Up the Printer
Page 26

Installing the black ink cartridge
Follow these steps to remove the color print head unit and
install the monochrome print head unit and black ink cartridge:
1. Make sure the printer is on and the printer cover is open.
2. Hold down the
until the print head unit moves slightly left to the ink
cartr i dge install posit i on. T he
3. Raise the blue print head unit release l ever as far as it wi ll go.
release lever
Load/Eject
button for about five seconds
Power
light flashes.
Caution:
c
4. Grasp both sides of the print head unit and c arefull y lift it o ut
of the printer. Place the print head unit on a flat, clean surface.
Do not lift up the ink cartridge clamp; the ink cartridge
and print head may become unusable.
Setting Up the P ri nt er
1-11
Page 27

Caution:
c
5. Remove the monochrome print head unit from its storage
box by pressing on the notch as shown. Place the color print
head unit in the box. Always store the unused print head
unit in this box to protect its delicate components.
Do not touch the electrical contacts on the back and
bottom of the print head unit or inside the printer; you
may damage th em.
6. Carefully insert the m ono chro me print head unit into the
printer with the electrical c ontacts and print head facing the
back of the prin t er.
1-12
Setting Up the Printer
Page 28

7. Press down the print head unit release lever until it clicks
into place.
Caution:
c
8. Open the i nk car tr idge clamp and remove the protective
paper s heet .
9. Lower the black ink cartrid g e into the print head unit w ith
the label facing up and the arrow on the top of the cartridge
pointing toward the back of the printer.
10. Press down the ink cartridge clamp until it loc ks i n place.
You will feel some resistance.
c
If the
print head unit (beginning a t step 3) and reinsert it.
Caution:
Once you install an ink cartridge, do not open the ink
cartridge clamp or remove the cartridge excep t to replace it
with a new one. Once you rem o ve a cartridge, do not reuse
Power
and
Ink Out
lights are flashing, remove the
it; you may dama ge th e print h ead .
11. Press the
to its home position. (Even if you do not pr ess
the printer moves the print head back to its home position
about 60 seconds af ter yo u cl ose the cl amp.)
After you install the black ink cartridge, the printer charges
the ink delivery system for ab out one minute. During this
time, th e
charging, the
c
Load/Eject
Power
Caution:
Make sure the printer completes the ink cha rging pro cess
even if you plan to reinstall the color print head unit. If
charging is not completed, the printer may be damaged.
light flashes. When the printer finishes
Power
button again to return the print head
Load/Eject
light stays on.
,
Setting Up the P ri nt er
1-13
Page 29

12. Close the printer cover.
Caution:
c
When you want to print in color again, replace the
monochrome print head unit wi th the colo r pri nt head unit
as described in Chapter 5.
Never turn off the printer while the
When you switch between print head units, always leave the
ink cartridge installed. On ce yo u remo ve a cartridge, do not
reuse it. Reusing a cartridge that has been rem oved may
damage the print head.
Use only genuine EPSO N in k cartridg es and do not refill
them. Other products m ay ca use d am a ge not co vered b y
EPSON’s warranty.
Checking the Paper Thickness Lever
Power
light is flashing.
Before you load paper, make sure that the paper thickness
lever, which controls the distance be tw een the paper and the
printer carriage, is set correctly. The paper thickness lever is on
the top right side of the printer, next to the paper support. For
now, it should be set to the plain paper setting (forward).
thick paper
setting
plain paper
setting
1-14
Setting Up the Printer
Page 30
For instructions on setting the lever for thick paper (or other
special media), see Cha pter 3.
Loading Paper
This section explai ns how to load up to 100 sheets of plain
bond p aper in the sheet f eeder. (For ins t r uctions on loading
coated or glossy paper, envelopes, or transparencies, see
Chapter 3. For paper specifications, see Appendix A.)
Always load plain paper with the printable surface facing up.
The printable surface is marked with an arrow on most paper
packaging.
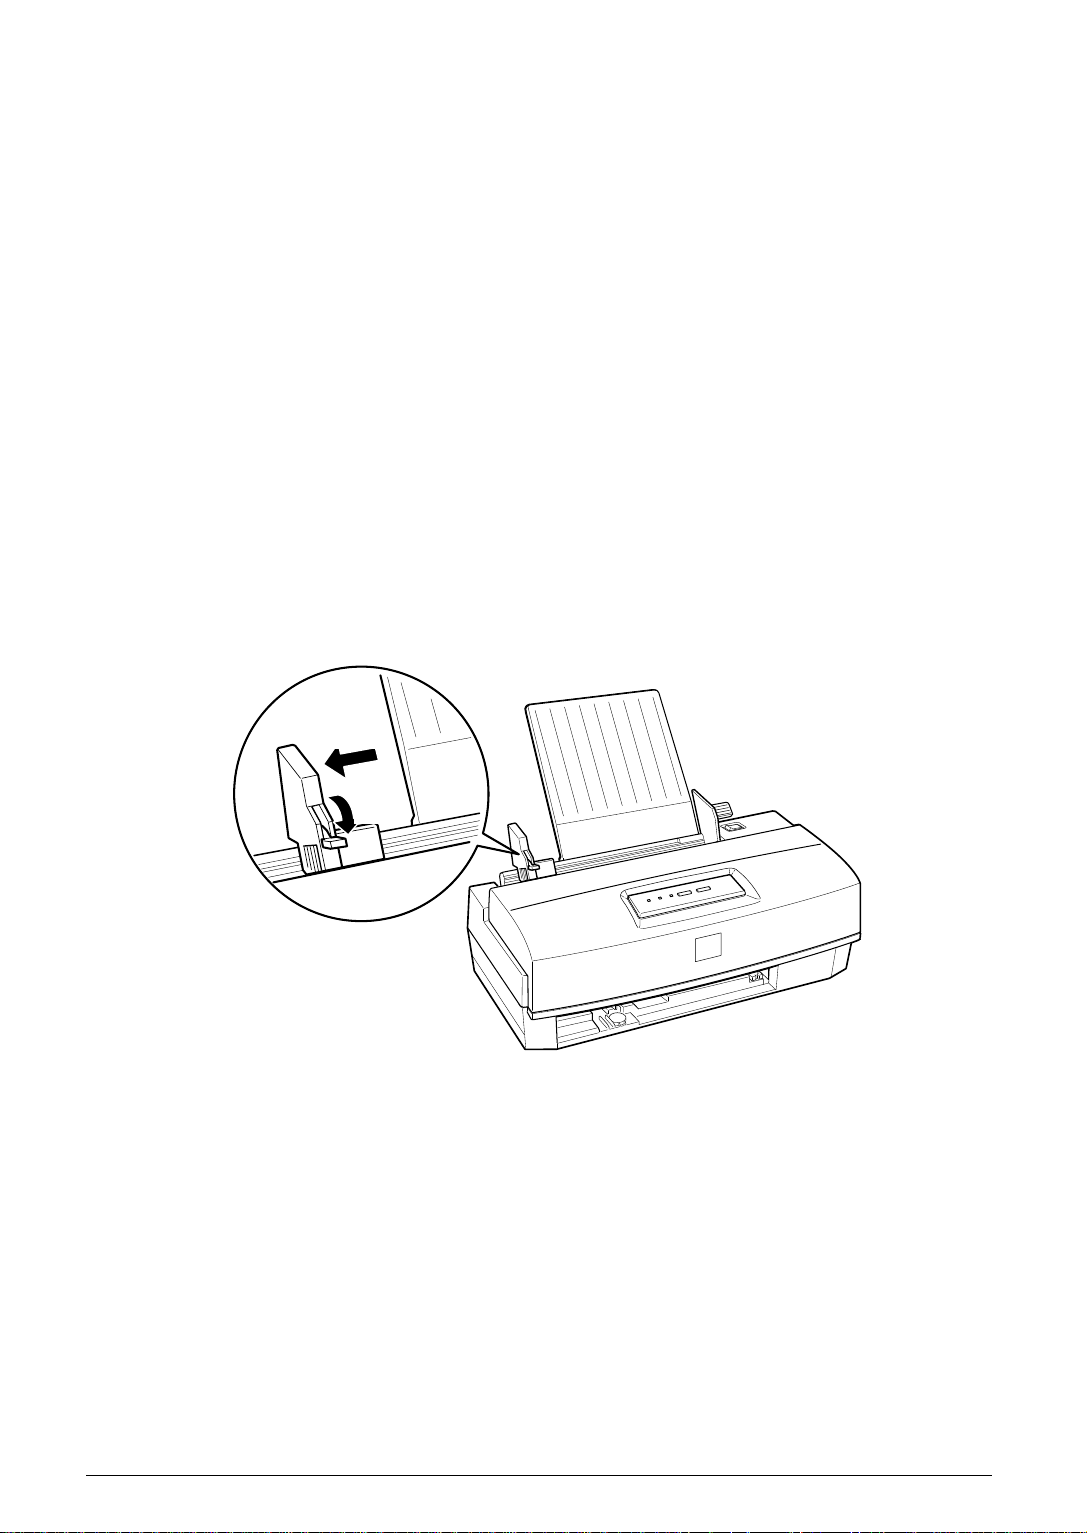
1. Push down the left edge guide lock lever; then slide the left
edge guide to the left as far as it will go.
Setting Up the P ri nt er
1-15
Page 31

2. Load a sta ck o f paper, printab le s ide up , so that its right edge
rests against t he right si d e of the sh eet feeder. Do not load
paper above the arrow mark inside the left edge guide of
the sh eet feeder.
3. Slide the left edge guide against the left edge of the paper;
then push up the lock lever to secure its position.
4. Remove the paper, fan the stack, and tap the edges against a
1-16
flat surface to even them u p .
Setting Up the Printer
Page 32

5. Reload the paper straight down into the printer as shown.
Then rest it against the paper support.
Testing the Printer
Before continuing, test the printer to make sure i t is functioning
properly. Make sure you loaded paper that is at least 8.25
inches (210 mm) wide.
1. Press the
c
2. Hold down the
switch to turn on the printer. Keep holding down
Cleaning
prints in black on the first and l ast line s of the first sheet to
measure the page length.
3. After the first page prints, press
POWER
Caution:
Never turn off the printer by unplugging it or turning off
a power strip. Always turn it off w ith the
until the printer begins feeding a page. The test
switch to turn off the printer.
Cleani ng
button while pressing the
Load/Eject
POWER
to print the next
switch.
POWER
page containing character sam p les of the internal f onts and ,
when the color pri nt head is installed, available colors.
4. To end the self test, wait until the printer ejects the paper and
then turn off the printer.
Setting Up the P ri nt er
1-17
Page 33

If the quality of the test output is not suitable, you may need to
clean the print head; see Chapter 5 for instructio ns.
Connecting the Printer to You r C omp uter
You need a shielded, twisted-pa ir parallel cable (6 to 10 feet
long) to connect your compute r to the printer’s bui lt- in parallel
interface. The cable must have a D-SUB, 25-pin, male co nnector
for your computer and a 36 -pin, Ce ntronic s c om patible
connector for the printer.
Follow these steps to connect the cable:
1. Make sure both the printer and computer are turned off.
2. Plug the 36-pin end of the cable securely into the printer’s
interface connector. Then squeeze the wire clips together
until they lock in place on both sides. (If your cable has a
ground wire, attach it to the ground connector below the
interface connector.)
3. Pl u g the 2 5 -p in end o f the ca b l e into t h e compu t er’s pa rallel
4. Turn on the printer by pressing the
1-18
interface. (See your computer manual, if necessary.)
POWER
then turn on your computer.
Setting Up the Printer
swi tch and
Page 34

Chapter 2
Installing and Using the P rinter Software
Installing the Printer Software . . . . . . . . . . . . . . . . . . . 2-2
Installing the Software for Windows 3.1 . . . . . . . . . . . 2-2
Installing the Software for Windows 95 . . . . . . . . . . . 2-5
Installing a Driver for DOS Programs . . . . . . . . . . . . 2-8
Accessing the Printer Driver . . . . . . . . . . . . . . . . . . . . 2-9
Accessing the Driver From Windows Applications . . . . . 2-9
Accessing the Driver From Windows 3.1 . . . . . . . . . . . 2-10
Accessing the Driver From Windows 95 . . . . . . . . . . . 2-10
Using the Printer Driver . . . . . . . . . . . . . . . . . . . . . . 2-11
Changing Settings . . . . . . . . . . . . . . . . . . . . . . . . 2-14
Using Online Help . . . . . . . . . . . . . . . . . . . . . . . . . . 2-15
Accessing Online Help From Windows 3.1 . . . . . . . . . 2-15
Accessing Online Help From Windows 95 . . . . . . . . . . 2-15
Installing and Using the Printer Software
2-1
Page 35

This chapter describes how to install and use the EPSON Stylus
COLOR 200 printer software on your computer.
The printer software includes a printer driver, which allows
your computer to control the printer; you must install it to use
the print er. The pri n ter dri ver lets you choose from a wide
variety of settings to customize the appearance of your printed
documents.
The printer software also includes the Spool Manager, which
manages your printing, and the Cal ibration Utility, whic h you
can use to adjust the vertical alignment of your printouts. See
Chapter 4 for information on the Spoo l M anag er and Chapter 5
for instructions on using the Calibration Utility.
Note:
Be sure to make backup copies of you r so ftwa re disk et tes.
Installing the Printer Software
If you are using Window s 3. 1, follow the steps in the next
section to install the printer software. If you ar e ru nning
Windows 95, see page 2-5 for instructions.
Installing the Software for Windows 3.1
1. Make sure your printer and computer are turned on and
Windows Pr og ra m Man ag er is running.
2. Insert the Wind ow s S etup disk 1 in a dis kette dr ive.
3. In the File menu, select
4. In the Command Line box, type A:SETUP (or B:SETUP
if you inserted the diskette in drive B). Press Enter or
. You see the Run dialog box.
Run
2-2
click
Installing and Using the Printer Software
OK
.
Page 36

5. When you see the EPSON Printer Utility Setup dialog box,
highlight
installation program be g ins c opying the file s. You see a
screen showing the progress of the installati on as it
proceeds.
6. Follow the prompts on the screen to install the software.
After a few mom ents, the installation program c r ea tes the
EPSON program gro up i n Wind ows containing these ic ons:
Spool Manager
EPSON Printer Calibration
EPSON Stylus COLOR 200 Help
EPSON Stylus ReadMe
7. When you see the message that the installation is complete,
click
Epson Stylus COLOR 200
to exit Se tup.
OK
and click
OK
. The
The installation program automatic al ly selec ts the EPSON
Stylus COLOR 200 printer as your default printer for Windows
applications. It also assigns the printer driver to port LPT1. If
you are happy with this configuration, go to page 2-9 for
information on accessing the driver. If you need to change the
default printer driver or the port assignment, see the next
section.
Note:
If you installed the printer soft ware usin g W ind o ws 3.1 and w ill
upgrade to Windows 95 later, you will need to reinstall your software
using the steps beginning on p age 2-5 af ter you install W in do ws 9 5.
This procedure sets up the dri ver correctly for W in do w s 95.
Installing and Using the Printer Software
2-3
Page 37

Changing the default printer o r printe r port
If you do not want to use the EPSON Stylus COLOR 200
printer driver as your default printer in Wi ndo ws or if you
want to u s e i t on a diff erent pri nt er port, follow these st ep s :
1. In the Main wind ow, double-cl ic k the
2. Doub le-cli ck the
appears.
3. To change the default printer, in the I nstalled Printers
drop-down list, select the printer you want to use as your
default printer. Then click the
button.
If you do not need to change the printer port assignment for
the EPSON Stylus COLOR 200 printer, go to step 8.
4. To change the port assignment, select
COLOR 20 0
5. Click the
Connect
Printers
in the Installed Printe r dro p-d o wn list.
button. You see the Connect dialog box.
icon. The Printers dial og box
Set As Default Printer
Control Panel
EPSON Stylus
icon.
6. In the Ports drop-down list, select the port to whic h you
want to assign the EPSON Stylus COLOR 200 printer.
(Click
the Connect dialog box.)
7. Click
8. Click
9. Close the Control P anel window.
See page 2-11 for instructions on using the printer drive r .
Help
OK
Close
for instructions on selecting other options in
to c l ose the Conn e ct dialog box.
to exit the Printers dialog box.
2-4
Installing and Using the Printer Software
Page 38

Installing the Software for Windows 95
Follow these steps to install the printer driver using the
Windows 95 plug-a nd- play capabilities:
1. Make sure the printer is connected to the computer’s parallel
port.
2. Turn off the printer and your computer, if they are on.
3. Turn on the printer first; then turn on the computer. Your
computer begins loading Windows 95.
4. If you defined a password, enter it at the prompt. You see
the New Hardware Found screen.
Note:
If you do not see the New Hardware fo und screen, follow the
procedure under “Installing the driver while running
Windows 95” on pa ge 2- 7 in ste ad .
5. Your printer model name is displayed on the screen.
Click the
manufacturer
buttons.
Note:
The next time you turn on or resta rt your co mputer after
installing the driver, W indo ws 95 ma y display the New
Hardware Found screen again . In this case, select the
install a driver
appear again.
6. Click
Driver from disk provided by hardware
button. Do not select any of the other
radio button; then click
. You see the Install From Disk screen.
OK
. This screen will not
OK
Do not
7. Insert the Windows Setup disk 1 in a diskette drive.
Installing and Using the Printer Software
2-5
Page 39

8. If you inserted the diskette in drive A, click
change the drive letter in the Copy manuf acturer’s file s
OK
. Otherwise,
from box and click
9. Make sure your printer model name appears in the next
screen and click
10. At the next screen you can give the printer a unique name.
We recommend that you keep the model name, but you can
type a new one in the Printer name box, if desired.
To use the printer as the default printer for all Wind ow s 95
applications, sel ect
11. Click the
12. Follow the prompts on the screen to install your software.
After the program has installed all the files, it creates an
Epson folde r co ntaining the following ic ons:
Finish
OK
button.
.
OK
.
Yes (No
is the default).
Spool Man ager
EPSON Printer Calibration
EPSON Stylus COLOR 200 Help
EPSON Stylus ReadMe
13. When the installation is complete, click
The Setup program adds an icon to the Windows 95 Printers
group using the printer name you selected.
Your printer driver is now installed. Go to page 2-9 for
information on ac c essi ng a nd using the dri ver.
OK
.
2-6
Installing and Using the Printer Software
Page 40

Installing the driver while running Windows 95
If you had trouble install ing the printer dr iver using the
plug-and-play feature, follow these steps to install the printer
driver:
1. Make sure Window s 95 is r u nning.
2. Insert the Windows Setup disk 1 disk in a diskette drive.
3. Double-click the
My Computer
4. Double-click the appropriate drive icon:
1
3
/2 Floppy [B:]
5. Double-click the
.
Setup
icon. The EPSON Printer Utility
icon.
1
/2 Floppy [A:]
3
Setup dialog box appea rs.
6. Select
click
Stylus COLOR 200
to start the printer driver installation.
OK
in the Printer Model tab; then
7. Follow the prompts on the screen to install the software.
After the program has installed all the files, it creates an
Epson folder containing the follo w ing ic ons:
Spool Manager
EPSON Printer Calibration
or
EPSON Stylus COLOR 200 Help
EPSON Stylus ReadMe
8. When the installation is complete, click
OK
.
For information on acc essing the d river, see “Ac c essing the
Driver From Windows 95,” on page 2-10.
Installing and Using the Printer Software
2-7
Page 41

Installing a Driver for DOS Programs
Most DOS software programs include drivers for EPSON
ESC/P 2
in your software, choose the first printer ava ilable in the lists
below. Also check with your software manufacturer to see if a
Stylus COLOR 200 driver is available or is included with a new
version of your software.
When printing in color as well as black and white, selec t:
LQ-860
LQ-2550
When printing blac k and white only, select:
LQ-870/ 1170
LQ-570( +)/ 1070(+)
printers. If the Stylus COLOR 200 driver is not listed
SQ-870/1070
LQ-850
LQ-500
Note:
These drivers let you use your pri nter but do not sup port some
features, such as 720 dpi an d Mi croWeave.
2-8
Installing and Using the Printer Software
Page 42

Accessing the Printer Driver
You can access the driver in diff erent ways , depending on how
you want to use the settings you select:
If you want the changes to apply only to the document(s)
❑
you will print i n a partic ular Windows applicati on, see the
following sectio n.
If you want the settings to apply to all Windows
❑
applications, ac c ess the driver as described on page 2-10
for either Windows 3.1 or Windows 95.
Accessing the Driver From Windows Applications
If you want to change the drive r settings only fo r the
application you are currently using, you can access the driver
by choosing
software program. If you choose
printer driver directly an d see the Main m enu tab sho wn on
page 2-11.
If you choose
dialog box contains the settings you change most often,
including the number of copies and the print range. To access
the prin t er driv er setting s , choos e the
Properties
option, depending on your software program.)
Note:
The printer driver settings you select through your Windows app lication
apply only for the du ration of your sessio n with th at ap plication. Once
you exit the application, the d river settings r eturn to th e default values
selected through the Windows 3. 1 Co n trol P a nel or Win dows 95 (or
, or
or
Print
Print
Options
Print Setup
, you first see a Print dialog box. The Print
button. (You may need to select another
from the File menu of your
Print Setup
Printe r, Setup
, you access the
,
the driver’s defaults).
Installing and Using the Printer Software
2-9
Page 43

Accessing the Driver From Windows 3.1
Follow these steps to access the driver from the Wi ndows
Control Panel:
1. Doub le-cli ck the
group.
2. Doub le-cli ck the
3. Ch oo s e
Printers.
4. Choose
page 2-11.
EPSON Stylus Color 200
Setup
. You see the Main menu tab, shown on
Control Panel
Printers
icon.
icon in the Main program
from the list of Insta lle d
Accessing the Driver From Windows 95
Follow these steps to access the driver from the Wi ndows 95
My Computer group:
1. Doub le-cli ck the
My Computer
icon.
2. Doub le-cli ck the
3. Right-click the
double-click the icon and then pull down the Printer menu).
4. Select
5. Click the
page 2-11.
Properties
Main
Printers
EPSON Stylus COLOR 200
.
tab. You see the Main menu tab, shown on
icon.
icon (or
2-10
Installing and Using the Printer Software
Page 44

Using the Printe r Dr iv er
However you accessed the printer driver, you see the Main
menu tab:
There are two menu tabs o f printer dr iver settings: M ain (sho wn
above) and Graphics. These settings, which are listed in the tabl es
on pages 2-13 and 2-14, let you c ontr ol the appear ance of your
printed documents. All the driver settings are preset to default
values which produce good quality output for the most common
types of documents.
Installing and Using the Printer Software
2-11
Page 45

The printer driver also includ es an A uto (Automatic) setting for
Document Type. When Auto is select ed for Do c ume nt Ty pe,
the driver automatically chooses the best print settings for your
document b y an aly zing the different types of data to be
printed. It adjusts the Color Ma tchi ng , Colo r Bal anc e, and
Halftoning settings for each object on the page to produce the
best printed results. It is a good idea to try printing your
document with Auto Document Type selected before changing
any other settings in the driver.
Before printing, you should always check the following settings
on the Main menu tab to make sure the driver selections are
appropriate for the media you are using:
Document Type—the type of ima ge to be printe d: busine ss
❑
graphics, photographs, text, etc.
Printing Mod e— res olution: 720 dpi , 360 dpi, or Economy
❑
(180 dpi)
Head Unit—the co lor or m ono c hro me pri nt head curr ently
❑
installed
Media Type—the type of paper or other media you are
❑
using
Paper Size—the size of paper you have load ed.
❑
The best way to learn about your printer driver is to use the
driver’s extensive onli ne help. It expla ins all the options a vai lable
for each setting and also describes how to use the printer driver.
See “Using Online Help” on page 2-15. For general information
on changing settings, see page 2-14.
The following table s summ ar ize the setting s available in eac h
menu tab (with default values in bold type). Because the driver
software is updated periodically, some of your options may be
slightly different than the ones shown here; see your printer
driver’s online help fo r mor e i nfo rmation.
2-12
Installing and Using the Printer Software
Page 46

Main menu settings
Setting Options
Document Type
Head Unit Mono (Monochrome Printing)
Printing Mode Super - 720 dpi
Media Type
Print Options MicroWeave (On,
Paper Size A4 210 x 297 mm
Auto (Automatic mode)
Graph (Business Graphics)
Photo (Photographic Images)
Video (Video/Digital Camera)
Economy (Monochrome) *
Color (Full Color Printing)
Best - 360 dpi
Economy (180 dpi)
Plain paper
Special coated paper - 360 dpi
Special coated paper - 720 dpi
High-quality glossy paper
Transparency
High Speed (On, Off)
A4 (Centered) 210 x 297 mm
B5 182 x 157 mm
Letter 8 1/2 x 11 in
Letter (Centered) 8 1/2 x 11 in
Legal 8 1/2 x 14 in
Legal (Centered) 8 1/2 x 14 in
Envelope #10 4 1/8 x 9 1/2 in
Envelope DL 110 x 220 mm
Statement 5 1/2 x 8 1/2 in
Executive 7 1/2 x 10 in
A6 Index card (not used)
User Defined
)
Off
Copies Number (1-99)
Collate (On,
Reverse Page Order (On,
Orientation
Paper Source
* The Economy Document Type option appears only when you select Mono
for the Head Unit setting.
Portrait
Auto Sheet Feeder
or Landscape
Installing and Using the Printer Software
Off
)
)
Off
2-13
Page 47

Graphics menu settings
Setting Options
Color Matching * Disabled
Use Windows’ matching
Use Driver’s matching
Match for business graphics
Match for photo images
Match for logo
Color Balance * Saturation –50% -
Halftoning ** No halftoning
* These options work as toggles, so only one appears in the menu at a time.
** There is no default setting for Halftoning; the setting is determined
automatically depending on the Document Type setting.
Changing Se tti ngs
To change a setting in the printer driver, click the m enu tab you
want to see and click the setting you want to change. Use the
scroll arrows or click the appropriate radio button to choose the
- +50%
0%
Red Strength –50% Green Strength –50% Blue Strength –50% -
Error diffusion
Dithering A
Dithering B
0%
0%
- +50%
- +50%
0%
- +50%
desired option. Do this for each setting you want to change and
then click the
your settings. Go to the other tab (if necessary) and do the same.
If you make one or more changes but then decide you want to
go back to the default settings, select
can do this before or after applying your changes.
When you finish making cha nges, cl ic k
and close t he driver.
If you make changes before selecting
cancel them, click the
driver.
2-14
Apply
button at the bottom of the screen to save
Restore D efaults
Apply
Cancel
Installing and Using the Printer Software
button. This closes the printer
to save the settings
OK
, and you want to
. You
Page 48

Using Online Help
For complete information about using the printer driver, you
can easily access online help any tim e. I t provid es de tailed
descriptions of the different settings and options.
Note:
Online help is not available for DOS applications.
Accessing Online Help From Windows 3.1
To access online help from the printer driver menus while yo u
are in a Windows application, clic k the
bottom of the menu tab. Then select a help topic.
To access online help from Program Manager, open the EPSON
program group and click the EPSON Stylus COLOR 200 Help
icon. You see the help contents window.
If you need instructions for ho w to use help, click the
button in the help screens.
Help
button at the
Accessing Online Help From Windows 95
To access online help from the printer d river whi le you are in a
Windows applic ation, click the
the menu tab. Then select the topic you need help with.
Help
button at the bottom of
Help
For specific help related to any item in the menus, right-click
the item, then click the
To access online help from Sta rt, c lick the
Programs
200 Help
instructions for how to use help, c lic k the
help screens.
, and
. You see the help contents window. If you need
Epson
What’s This?
, and then click
Installing and Using the Printer Software
prompt.
Start
EPSON S t ylus COLOR
Help
button, point to
button in the
2-15
Page 49

Chapter 3
Paper Handling
Choosing Paper and Other Media . . . . . . . . . . . . . . . . . 3-2
Setting the Paper Thickness and Adjustment Levers . . . . . . 3-3
Paper Thickness Lever . . . . . . . . . . . . . . . . . . . . . 3-3
Thickness Adjustment Lever . . . . . . . . . . . . . . . . . . 3-4
Loading Plain Paper . . . . . . . . . . . . . . . . . . . . . . . . 3-5
Loading Special Papers and Other Media . . . . . . . . . . . . 3-8
Loading Special Papers and Transparencies . . . . . . . . 3-8
Loading Envelopes . . . . . . . . . . . . . . . . . . . . . . . 3-11
3
Paper Handl ing
3-1
Page 50

Read this chapter for infor mation about choo sing and loading
the best paper and other media for your printing needs.
Choosing Paper a n d O ther Me di a
You can use most plain paper wi th your printer and ac hie ve
good results. Coated and glossy papers give you better results
because they reduce the amount of ink that is absorbed.
However, if the coated or glossy paper does not absorb enough
ink, the ink can smear.
To ensure the best results, EPSON provides special papers and
transparencies that are formulated for the inks used in EPSON
ink jet printers. These papers include the follow ing :
EPSON sp ec i al coated pape r for 36 0 dpi. Use this paper for
❑
best results when printing at 360 dpi.
EPSON sp ec i al coated pape r for 72 0 dpi. Use this paper for
❑
best results when printing at 720 dpi.
EPSON high-quality glossy paper. Use this paper when
❑
printing at 720 dpi to produce camera-ready co m posite s.
When printing on glossy paper, use only EPSON
high-quality glossy paper. For best results, use glossy paper
within six months o f opening the pack ag e.
EPSON transparency film. When printing transparencie s,
❑
use only EPSON transparencies. For best results, use
transparencies within six months of opening the pack ag e.
Do not select 720 dpi wh en printing transpar encie s.
To order EPSON papers and transparencies, contact your
dealer or call EPSON Accessories at (800) 873-77 66 (U.S. only).
In Canada, c all (800) BUY-EPSON for sales lo cations.
3-2
Paper Handling
Page 51

Use the following part numbers when ordering:
Paper Size Part Number
Special coated paper for
720 dpi
Special coated paper for
360 dpi
High-quality glossy paper Letter (8.5 x 11 inches) S041072
Transparency film Letter (8.5 x 11 inches) S041064
Letter (8.5 x 11 inches)
Legal (8.5 x 14 inches)
Letter (8.5 x 11 inches) S041060
S041062
S041048
Setting the Paper Thickness and Adjustment Levers
Before you start printing, you should check the paper thickness
and thickness adjustment levers to make sure they are set
correctly for the type of paper or other media you are loading.
Caution:
c
Before you change the lever set tings, ma k e su re th e printer is
not loading, printing , or ejecti ng pa per.
Paper Thickness Lever
The paper thicknes s lever on t h e right si de of the sh eet feeder
has two settings: plain paper and thick paper. Set the lever to
the position that best suits the paper or other media you plan
to use, as shown in the following table and illustration.
Paper type Paper thickness lever position
Plain or special paper Plain paper
Transparencies Plain paper
Envelopes or labels Thick paper
Paper Handl ing
3-3
Page 52

Thickness Adjustment Lever
You need to change the position of the thickness adjustment
thick paper
setting
plain paper
setting
lever when you print on thick paper—such as envelopes or
labels—or if your docum ents sme ar, as show n in the fol low ing
table.
Paper type Thickness adjustment lever position
Plain or special paper 0
Transparencies 0
Envelopes or labels +
Previously smeared documents +
3-4
Paper Handling
Page 53

To access the lever, open the printer cover; the lever is in the
left back corner, as shown below.
If a document is smeared, set the thickness adjustment lever to
the + position (regardless of the paper type) and print it again.
If your docume nt still sm ears, enab le the non-smea r printi ng
mode. See “Using the Printer’s Control Panel” in Chapter 4 for
more information.
Loadi n g Plain P ap e r
This section explai ns how to lo ad plain bond paper in the
printer. For instructions on loading coated or glossy paper,
envelopes, and transpa renci es, see page 3-8.
You can load up to 100 sheets of plain paper in the sheet
feeder. Be sure to load it with the printable surface facing up.
The printable surface is marked with an arrow on most paper
packaging.
Paper Handl ing
3-5
Page 54

Note:
You can use these instructions for printing on labels; how ever, be sure
to set the paper thickness lever to the thick pa per position and the
thickness adjustment lever to the + position. Also ma k e sure no labels
are curled or peeling away from the backin g w hen yo u load them .
1. Push down the left edge guide lock lever; then slide the left
edge guide to the left as far as it will go.
2. Load a sta ck o f paper, printab le s ide up , so that its right edge
rests against t he right si d e of the sh eet feeder. Do not load
paper above the arrow mark inside the left edge guide of
the sh eet feeder.
3-6
Paper Handling
Page 55

3. Slide the left edge guide against the left edge of the paper;
then push up the lock lever to secure its position.
4. Remove the paper, fan the stack, and tap the edges against a
flat surface to even it up.
5. Reload the paper straight down into the printer as shown.
Then rest it against the paper support.
6. Change the Media Type and other printer driver settings so
they are appropriate for the paper or labels you loaded. For
more in forma tion, s ee Chapt er 2. ( For lab els, s el ect
paper
as your Media Type.)
Paper Handl ing
Plain
3-7
Page 56

Loadi n g Special Papers and Other Me dia
When using coated paper, glossy paper, envelopes, and
transparencies, keep the foll owing in mind:
Do not touch the printable surfac e of the paper; hold the
❑
sheets by their edges. The moisture and oils on your hands
can reduce print quality.
Use special coated paper within one year of purchase. Use
❑
glossy papers and transparencies within six months.
You can print on sheets of labels in your printer; just follow
❑
the instructions for loading plain paper on page 3-5.
When printing on high-quality g lossy pape r or
❑
transparencies, remove each sheet from the output tray
immediately after it is printed. Make sure each sheet is dry
before stacking.
Return unused sheets and envelopes to their original package
❑
as soon as possible after you finish printing. Unfavorable
storage conditions—especially high temperature, humidity,
and direct sunlig ht—can dama ge the me dia.
Follow any other special loading procedures included in
❑
the following sections.
Loading Special Papers and Transparencies
This section explains how to lo ad coated papers, glossy paper,
and transparencies. You can load up to the following number
of sheets at one time:
70 sheets of special coated paper. If you load legal-size
❑
special coated paper f or 720 d p i, d o not load it more than
halfway to the arrow mark on the left edge guide of the
3-8
sheet feeder.
Paper Handling
Page 57

30 sheets of EPSON high-quality glossy paper with a sheet
❑
of plain paper beneath the last sheet in the stack; to avoi d
printing on the plain paper, print your document one page
at a time. If you load a single sheet of glossy paper, place a
sheet of plain paper bene ath it and pri nt one page at a time.
Note:
If you load multip le sheets of glo ssy paper, the minimum t o p
margin is 1.2 inches (30 mm). To print with a smaller top
margin, load and prin t glo ssy pa per one sheet at a time.
50 sheets of transparency film, printed one at a time, with
❑
one sheet of plain paper beneath the last transparency in
the stack.
Follow these steps to load special paper or transparency film:
1. Push down the left edge guide lock lever; then slide the left
edge guide to the left as far as it will go.
2. Fan a stack of paper or transparencies; then tap it on a flat
surface t o even the ed ges.
Paper Handl ing
3-9
Page 58

3. Stack the paper or transparencies so the printable surface
faces up. For coated papers, the printable side is whiter
than the other side. For glossy paper and transparencies,
position the cut corner in the upper right, as shown below.
Load the paper or transparencies straight down into the
printer with the printable surface face up; then rest it
against the paper support.
4. Slide the left edge guide against the left edge of the paper;
then push up the lock lever to secure its position.
5. Change the Media Type and other printer driver settings so
they are appropriate for the paper or transparency film you
loaded.
Before printing on EPSON hig h- qual ity g lossy paper or
special coated paper, make sure the color print head unit is
installed and
Color
glossy paper, also select
is selected as the Head Unit setting. For
Super - 720 dpi
for the Printing
Mode option. (See Chapter 2 for more information.)
3-10
Paper Handling
Page 59

Loading Envelopes
For detailed specif ications on the thickness and weight of the
envelopes you can load, see Appendix A. Do not use envelopes
that are curled or folded, or ones that are too thin; they m ay
curl during printing. Also, do not choose 720 dpi resolution for
envelope printing.
Follow these steps to load envelopes:
1. Make sure you set the paper thickness and thickness
adjustment levers to the correct positions for envelope
printing, as described on page 3-3.
2. Load up to 10 envelopes in the sheet feeder with the front
side facing up as shown.
3. Adjust and lock the left edge guide so the envelopes feed
straight into the paper path.
4. Change the Paper Size and other printer driver settings
so they are appropriate for the envelopes you loaded. (See
Chapter 2 for more information.)
Paper Hand li ng
3-11
Page 60

Chapter 4
Controlling the Printer
Managing Print Jobs . . . . . . . . . . . . . . . . . . . . . . . . 4-2
Using the Printer’s Control Panel . . . . . . . . . . . . . . . . . 4-5
Lights . . . . . . . . . . . . . . . . . . . . . . . . . . . . . . . 4-5
Buttons . . . . . . . . . . . . . . . . . . . . . . . . . . . . . . 4-6
Using the Default Setting Mode . . . . . . . . . . . . . . . . . . 4-8
Controlling the Printer
4
4-1
Page 61

This chapter explains how to control the printer. It is divided
into these sections:
“Managing Pri nt Jobs” expl ains ho w yo u can use the
❑
EPSON Spool Manager, Despooler, and Status Monitor
(Windows 95 only) to monitor, cancel, or change the order
of print jobs.
“Using the Printer’s Contro l Panel ” c overs the printer
❑
functions available through the control panel on the
printer.
“Using the Default Setting Mode” describes how to access
❑
the printer’s Default setting mode. In rare cases, you may
need to use this mode to specify the print dir ectio n, use a
different character table, or adjust the paper loading
position.
Managing P rint Jo bs
The EPSON Spool Manager was automatically copied to your
hard disk drive when you insta lle d the printe r softw are. Whe n
you print a document, the printer uses the EPSON Spool
Manager to send data to the printer. This allows you to
continue working in your sof twa re program w hile printing.
When you send a print job to the printer, the Despooler dialog
box appears on your screen and a Spool Manager icon
(Windows 3.1) or button ( Windows 95) appears near the
bottom of your screen. You can also access Spool Manager from
the EPSON program group or folder so you can manage print
queues or perform other operations wh en y ou are not se n ding
a print job. (See Spool Manager’ s onli ne he lp utility for more
information . )
4-2
Controlling the Printer
Page 62

Note:
In Windows 3.1, yo u ma y n ot see th e Spool M an ag er ico n in the
bottom portion of yo ur screen if the Pro gra m Manager window or a n
application window is maximized. Reduce the window size to reveal
the icon.
The Despool er is a program wi t h a dial o g box , sim i l ar to the
one shown below, that appears when you send a print job to
the printer. It allows you to monitor the progress of the print
job and cancel ( ), pause ( ), or restart ( ) the job.
Note:
If you do not want the Despoo ler dia l og b o x to a ppea r ea ch t ime yo u
print you can turn it off using Spool Manager. Start Spool Manager,
open the View menu, and select
Show Despool Popup
to turn it
off; the checkmark next to the o pt ion disappears.
Controlling the Printer
4-3
Page 63

If you’re using Windows 95, the Status Monitor box appears
inside the Despooler dialog box (as shown above) each time
you send a print job. It includes a gauge representing the
amount of ink left in the ca rtrid g e and an ic on that reports the
current status of your printer. The icon alerts you to any printer
error conditions.
Note:
The Status Monitor appears only if your printer is connected to the
host computer; it does not ap pea r wh en you are prin t ing over a
network with the printer connected to ano ther com pu t er.
The Status Monitor uses these icons to report the status of your
printer:
Checking the printer status.
A printing error has occured and your printer
cannot print.
The printer is ready to print.
The printer is currently printin g.
The ink level is low or empty; ch ec k the Ink Out
light on the control panel and replace the
cartridge.
Note:
If you get an error message whi le trying to prin t, t he proble m ma y b e
caused by conflicts with other temporary files or directories. See
Chapter 6 for more informat ion.
4-4
Controlling the Printer
Page 64

Using the Printer’s Control Panel
The printer’s control panel contai ns lights fo r displaying the
printer status and buttons for controlling certai n func tio ns.
Most printer settings can be controlled from software, so you
normally use the control panel only to do the fol low ing:
Clean the black or color print heads
❑
Replace an ink ca rtrid g e or pr int head unit
❑
Print a self test or demonstration page.
❑
Lights
Power
Ink Out
Paper Out
On when the printer is on. Flashes while replacing
the ink cartridge or print head unit, while cleaning
the print head, and in certain e rror c onditions.
Flashes when ink is low or duri ng certa in err or
conditions. On when the ink cartridge is empty or
not installed. (The printer will not work when the
ink cartridge i s empty or not installed.)
On when the printer runs out of paper. Flashes if
there is a paper jam or in certain error cond itions.
Note:
For a list of error conditions indicated by the control panel light s, see
Chapter 6.
Controlling the Printer
4-5
Page 65

Buttons
This section describes the control panel button f u nc tions and
their functions in power-on sequences.
Load/Eject
Cleaning
Loads or ejects a s h eet of paper. (The pri nt er
normally loads and ejects paper automatically.) Also
used when you replace the ink cartridge or print
head unit.
Starts a print head cleaning cycle.
Button functions in power-on sequences
Press these buttons while turning on the printer to perform the
functions described. The
briefly before the operation begins.
Cleaning
(Self t es t )
Ink Out
Checks the paper length and performs a printer self
test at 360 dpi. (Paper must be loaded in the printer.)
Hold down
Cleaning
and
until the printer feeds the first
Pape r Out
lights flash
Load/Eject
(Demo p age)
page. Then press
To stop the self test, wait until the second page prints
and then turn off the printer. (See Chapter 1 for more
information on testing the printer.)
Prints a demonstration page of the printer’s fonts
and colors. (Paper must be loa ded in the printer.)
Hold down
page. To exit demonstration m od e, w ait until the
page prints and then turn off the printer.
Load/Eject
Load/Eject
until the printer feeds a
to print the next page.
4-6
Controlling the Printer
Page 66

Load/Eject
then
Cleaning
Enables non-smear printi ng mode, which redu c es
the chance of smeared pages by decreasing the
per-line printing speed. This mod e is help ful whe n
printing on coated or glossy paper because it allows
more time for the ink to dry.
(Non-smear mode)
Load/Eject
Hold down
then pres s
lights are flashing. Send a print j ob.
Out
To exit non-smear mode, wait until all pages print
and turn off the printer.
and
Cleaning
Enters the printer’s Default setting mode and prints
an instruction page; see page 2-8 for more
information. (Paper must be loaded in the printer.)
Hold down both the
buttons while you turn on the printer and hold them
down until the printer feeds a page.
Load/Eject
Cleaning
(Default setting mode)
as you turn on the printer;
whil e t h e
Load/Eject
Ink Out
and
and
Cleaning
Paper
Cleaning
then
To use Default setting mode without printing an
instruction page, hold do wn
Cleani ng
Load/Eject
wait until all pages print and turn off the printer.
Load/Eject
Prints a page containing a he xadecimal
representation (hex dump) of the data rec eiv ed b y
the printer for troubleshooting purpose s; see
Chapter 6 for more information. (Paper must be
loaded in the printer. )
, and turn on the printer; then press
again. To exit the Default setting m od e,
(Hex dump mode)
Load/Eject
Controlling the Printer
and
4-7
Page 67

Hold down
Cleaning
as you turn on the printer;
then pres s
lights are flashing. Send a print job. To exit hex
Out
dump mode, wait until all pages print and turn off
the prin t er.
Load/Eject
whil e t h e
Using the Default Setting Mode
Additional pr inter f u ncti ons are available throu g h the Defau lt
setting mode. Because the printer’s factory default settings are
designed to meet the needs of almost all users, you rarely need
to change the additional printer functions listed below. If
necessary, however, you can turn on Default setting mode and
change the settings using the control panel buttons.
Character table. Selects the set of characters and symbols
❑
that can be printed. The default is the Italic U.S.A. charac ter
Ink Out
and
Paper
table. If you comm only use a language contai ning ac c ents,
symbols, or other characters not available in the Italic
U.S.A. character table, change to a different character table.
For a list of available char acter tables, see Appendix B.
Prin t direction . Spec ifi es how the print head m oves across
❑
the page. The options are Uni-D, Bi-D, and Auto (default).
When Uni-D is on, the print head prints in only one
direction to provide the most precise alignment for
graphics and text. In Bi-D printing, the print head prints in
both directions. Bi-D is faster, but the vertical alignment
may not be as precise as Uni-D. When Auto is selected, the
printer switches automatic al ly between Uni-D and Bi-D as
necessary when it receives data.
Network interface mode. If you’re having trouble printing
❑
when the printer is connected to multiple computers, turn
4-8
on network interface mode. By default, network interface
mode is off.
Controlling the Printer
Page 68

Auto line feed. Specifies that a carriage return character
❑
encountered in the print file be accompanied by a lin e feed
command. By default, auto line feed is off. If text lines print
on top of one another, turn on auto line feed.
Loading position. Determines the top margin by d ef ining
❑
how close to the paper edge the first line can pri nt. The
loading position can be 3 mm or 8. 5 mm (default).
Normally you should use your software to adjust your top
margin.
Font and Pitch. Select the built-in printer font and
❑
character pitch used as the default setting. The factory
default pitch is 10 cpi (characters per inch); the default font
is Courier. Generally you use your software to select the
font and pitch.
Thick pape r. Sel ect Enve lope (default) if you print on thick
❑
paper or envelopes.
Monochrome print speed. Sets a faster print speed when
❑
the monochrom e print he ad unit is installed. The speed can
be 167 cps (characters per second) or 125 cps (default).
Economy. Turns on economy mode for printing rough
❑
drafts. With economy mode on, the printer uses less ink by
printing fewer dots per charac ter. (The defaul t setting is
off.)
To turn on the Default setting mode and print instructions,
turn off the printer. Then hold down both the
Cleaning
buttons while you turn the printer back on, and keep
Load/Eject
and
holding down the bu ttons until an instruction page prints.
Follow the instructions on the page to select a language; then
press
Load/Eject
to print a second instructio n pag e.
Follow the instructions the printer prints to change the default
settings by pressing buttons on the control panel. To exit
Default setting mode, wait until printing stops and turn off the
printer.
Controlling the Printer
4-9
Page 69

Chapter 5
Maintenance
Cleaning the Print Head . . . . . . . . . . . . . . . . . . . . . . 5-2
Changing the Print Head Unit . . . . . . . . . . . . . . . . . . . 5-3
Replacing an Ink Cartridge . . . . . . . . . . . . . . . . . . . . 5-6
Selecting the Correct Ink Cartridges . . . . . . . . . . . . . 5-7
Removing and Installing an Ink Cartridge . . . . . . . . . . 5-7
Cleaning the Printer . . . . . . . . . . . . . . . . . . . . . . . . . 5-10
Transporting the Printer . . . . . . . . . . . . . . . . . . . . . . 5-11
Calibrating the Printer . . . . . . . . . . . . . . . . . . . . . . . 5-12
Calibrating the Printer From Windows . . . . . . . . . . . . 5-13
Calibrating the Printer From DOS . . . . . . . . . . . . . . . 5-14
5
Maintenance
5-1
Page 70

The instructions in this chapter tell you how to do the
following to m aintain and care for yo ur printer:
Clean the print head
❑
Change the print head unit
❑
Replace an ink cartridge
❑
Clean the printer
❑
Transport the printer
❑
Calibrate the printer.
❑
Cleaning the Print Hea d
The printer periodical ly cl ea ns the print head for you, so
normally yo u should not need to run a cleani ng cy c le.
However, if print qua lity diminishes, run the print head
cleaning cycl e to unclog the print head so the nozzles de liver
ink properly.
Follow these steps to clean either print head:
1. Make sure the printer is turned on and not printing .
2. Press the
Cleaning
button. The cleaning cycl e takes ab out
one minute, during which the carriage move s and y ou he ar
the printer recharging the print head. The
Power
light
flas h es th roughou t t h e c ycle and t h en s t ays on when it is
finished.
3. Turn off the printer.
4. Hold down the
5-2
Load/Eject
button as you turn the printer
back on. This prints a de m onstration page so you can see if
your print quality has impr ove d.
Maintenance
Page 71

5. After the page prints, turn off the printer to exit
demonstration m od e.
If your print quality has not improved, repeat the steps above.
If the quality has not improved after you cle an the print hea ds
five times, and you are sure the printer is not low on ink,
contact your dealer or authorized EPSON servicer.
To clean the other print head, change the print head unit (as
described below) and repeat the steps above.
Changing the Print He ad Unit
When you need to switch between color and monochrome
printing (or vice-versa), follow the instructions in this section to
remove one print head unit and replace it with the other.
Caution:
c
1. Make sure the printer is turned on and not printing .
2. Open the printer cover by lifting the edges on both sides.
When you change the print head unit, always leave the ink
cartridge installed in it. Once you remove an ink cartridg e
from its print head unit, it becomes unusable.
Maintenance
5-3
Page 72

3. Hold down the
until the print head moves slightly le ft, to the print hea d
Load/Eject
button for about five seconds
unit replacement position. The
(The print head unit returns to its home positi on if y ou d o
not perform the operation in step 4 withi n 60 seco nds. )
Caution:
c
4. Raise the print head unit release lever a s far as it w ill go .
c
release lever
Never move the print head unit by hand; a l w ay s use the
Load/Eject
Caution:
Do not lift up the ink cartridge clamp; the ink cartridge
and print head will become unusable.
button to move it.
Power
light begins flashing.
5. Grasp both sides of the print head unit and carefully lift it out
5-4
of the printer. Place it on a flat, clean surface.
Maintenance
Page 73

Caution:
c
6. Remove the other print head unit from its stor ag e box by
pressing the notch as shown.
Do not touch the electrical contacts on the back and
bottom of the print head unit o r i nside the prin ter; yo u
may damage them.
7. Carefully insert the print head unit into the printer with the
electrical contacts and the print head fa c ing the back of the
printer, as shown.
Maintenance
5-5
Page 74

8. Press down the print head unit release le ver until i t clic k s
into place.
Caution:
c
9. Press the
home position. (Eve n if you do not press
printer moves the print head back to its ho me positio n
about 60 seconds after you press down the lever.)
10. Place the print head unit you removed in the storage box.
Always store the unused print head unit in this box to
protect its delicate components.
11. Close the printer cover.
If the
the print head unit (beginning wit h step 4) an d rein sert it.
Power
Load/Eject
and
Ink Out
button to return the print head to its
Replacing an Ink Cartridge
lights start flashing, rem ov e
Load/Eject
, the
The prin t er’s
low on ink and when you need to replace the cartridge. If the
Ink Out
stops and the
c
light flashes, the cartridge is low on ink. If the printer
Caution:
Do not replace an ink cartridge unless the
you to. If you replace a cartridg e before th e light fla shes, th e
sensor that tells you when ink is out will not work with the
new cartridge.
Leave the old cartridge instal led in the p rinter until yo u are
ready to replace it with a new one. Attempting to print
without a cartridge installed can damag e the printer.
Ink Out
Ink Out
light tells you when an ink cartridge is
light comes on, the cartridge is empty.
Ink Out
light tells
5-6
Maintenance
Page 75

Caution:
c
When you discard your used ink ca rtridge, a lways remove it
from the print head unit first; do n ot discard the print head
unit.
Once you install an ink cartridge, do not open the clamp or
remove the cartridge except to replace it wit h a new on e. O nce
you remove a cartridge, you cann ot reu se it.
Selecting the Correct Ink Cart ridges
Use only these EPSON ink c ar tri dg e s:
Black ink c ar tridge S 020047
Color ink car trid g e S020097
When you need new ink cartridges, contact your dealer or call
EPSON Accessories at (800) 873-7766 (U.S. only). In Canada,
call (800) BUY-EPSON for sales locations.
Caution:
c
Use only genuine EPSON cartridges and do not refill them.
Other products may ca use dam a ge n ot covered b y EPSON’s
warranty.
Removing and Installing an Ink C artridge
Follow these steps to replace an ink cartridge:
1. Make sure the printer is on and not printing, and the
light is flashing or turned on.
2. Open the printer cover by lifting the edges on both sides.
Ink Out
3. Hold down the
until the print head moves slightly left, to the i nk cartr id ge
install position. The
Load/Eject
Power
button for about five seconds
light begins flashing.
Maintenance
5-7
Page 76

(The print head unit returns to the home position if you do
not proceed to step 4 within 60 se conds.)
Caution:
c
4. Raise the ink cartridge clamp to open it. The cartridge rises
partially out of the printer.
Never move the print head by han d; a lways use the
Load/Eject
button to move it.
ink cartridge clamp
5. Lift the cartridge out of the printer and dispose of it carefully
so any excess ink does not spill out. Do not take the used
cartridge apart or try to refill it.
5-8
Maintenance
Page 77

Warning:
w
6. Open the package containing the ink cartridge and remove
the cartridge from its foil wrapper. Remove the tape seal
from the top of the cartridge.
If ink gets on your hands, wash them thoroughly with
soap and water. If ink gets into yo u r eyes, flu sh t hem
immediately with water.
color
cartridge
Caution:
black
cartridge
c
7. Lower the ink cartridge into the print head unit with the
label facing up and the arrow on the top of the cartridge
pointing toward the back of the printer.
You must remove the tape sea l from the top o f th e
cartridge; leaving the tape on will permanently damage it.
Do not remove the clear seal from the bottom o f the
cartridge; ink will leak out.
Maintenance
5-9
Page 78

8. Press down the ink cart ridg e clamp until it locks in place.
You will feel some resistance.
Caution:
c
9. Press the
to its home position. (E ven if you do not press
the printer moves the print head back to its home position
about 60 sec ond s af ter yo u cl ose the cl am p.)
The
delivery system for about two minutes.
10. Close the printer cover. When the charging cycle finishes,
the
Once you install an ink cartridge, do not open the ink
cartridge clamp again o r remove t he ca rtrid ge except to
replace it with a new one. Once you remo ve a ca rtrid ge, do
not reuse it; this may dam age the p rin t head.
Load/Eject
Power
Power
Caution:
light flashes as the printer charges the ink
light stops flashing and stays on.
button again to return the print head
Load/Eject
,
c
Never turn off the printer while the
Cleaning the Printer
If you want to clean the printer, follo w these steps:
1. Turn off the printer and disconnect any ca bles c o nnect ed
to it. Be sure to keep the printer cover closed as you clean it.
2. Re move any pap er or ot h er media from the sheet feed er .
3. Carefully clean away loose dust and dirt with a soft brush or
cloth.
4. Clean the exterior of the printer with a soft cloth dampened
with mild detergent.
Power
light is flashing.
5-10
Maintenance
Page 79

5. To clean ink out of the printer’s interio r , wipe it g ently w ith
a damp cloth.
Caution:
c
Never use alcohol or thinner to clean the prin ter; th ese
chemicals can damage the components and the printer case.
Do not use a hard or abrasive brush; these can scra tch the
printer surfaces.
Do not allow water to get on the printer mechanism or any
electronic components.
Do not touch the gears inside t he printer.
Do not spray inside the printer with lubricants or oils; they
can damage the printer mechanisms.
Do not clean or remove the print head unit while cleaning the
printer and do not clean the spa re print head unit.
Transporting the Printer
If you need to transport your printer, carefully repack it in the
original box and packing ma ter ials as follows:
1. Turn off the printer, if you have not already done so.
2. Open the printer cover and make sure that the print head
is locked in the far right position. If it isn’t, turn on the
printer, wait about 10 seconds, and turn it off.
Caution:
c
Do not remove the ink cartridg es wh en transp o rting the
printer. Transporting the pri nter witho u t the cartrid ges
installed can damage the printer.
Maintenance
5-11
Page 80

3. Unplug the power cord from the electrical outlet.
4. Disconnect the interface cable from the printer.
5. Use a strong adhesive tape to secure the print head to the
side of the pri n ter .
6. Remo ve any paper from the sheet feeder and remove the
paper support.
7. Attach the protective materials to the printer. See the Notice
Sheet that was packed with the printer.
8. Repack the printer and attachments in the original box.
Be sure to keep the printer flat as you transport it. If you notice
problems with printed ou tput after transporting the printer,
clean the print head as described on page 5-2. If the printed
image is misaligne d, c ali br ate the printer as descr ibed bel ow.
Calibrating the Printer
Your printer has been calibrated at the factory so that vertical
lines in your text and graphics ar e properly aligned. If you
notice misalig ned ima ges in pr intouts, how ever, you can
calibrate the printer with the EPSON P rinter Calibration Utility .
You may need to do this after moving the printer to a new
location, for example.
You can clibrate your printer from Windows or from DOS. To
use the Windows utility, see the next section. To calibrate from
DOS see page 5-14 .
5-12
Maintenance
Page 81

Calibrating the Printer From Windows
Before calibrating, load several sheets of paper in your printer.
Then foll ow t h es e steps:
1. In Window s, do uble-click
EPSON program group or folder.
2. At the first screen, click
3. Make sure
menu.
4. Click the
installed in the printer. Then click
5. At the next screen, select the port to which you c onne cted
your printer and click
6. Make sure the printer is loaded with several sheets of
letter-size paper. Then click
7. The printer prints the Current Alignment Sheets. Examine the
Stylus Color200
Black
or
Color
EPSON Printer Calibration
.
OK
is selected in the drop-down
radio button to select the print head
.
Next
.
Next
Next
.
in the
printout for misaligned vertica l line s.
||
| |
Aligned Not aligned
If none are misaligned, click
If one or more patterns are misaligned, click the appropriate
check boxes and click
8. Click
Next
.
Next
Next
.
and go to step 11.
Maintenance
5-13
Page 82

9. For each pattern you selected, the printer prints a Test
Alignmen t Sheet containing multiple samples of vertical
lines, each of which is assigned a number. On each sheet,
look for the sample that is most closely aligned. Then enter
the number of the aligned sample or select
none of the samples are al ig ned . Click
10. Repeat steps 8 and 9 until all patterns are aligned.
11. Click the
a final test sheet or click
Print Current Alignment Sheet
Finish
Calibrating the Printer From DOS
Before you calibrate the printer from DOS for the first time, you
must copy the EPSON Printer Calibration Utility to your
computer’s hard disk.
Copyi n g the calibration utility
1. Insert the EPSON Setup disk 1 into your diskette drive.
Not-aligned
Next
to exit the Calibration Utility.
.
checkbox to print
if
2. At the DOS prompt, type
the diskette in drive B) and press Enter.
3. When you see the Printer Utility Setup screen, highlight
Epson Stylus COLOR 200
4. At the next screen, select the directory in which you want to
install the calibra tio n utility . To choose the defaul t dire cto ry
(C:\CALIBRAT), press Enter; to change the directory, erase
the default, type in another, and press Enter.
5. Follow the prompts on the screen to install the software.
6. At the installation completion prompt, press Enter.
A:SETUP
and press Enter.
(or
B:SETUP
if you inserted
5-14
Maintenance
Page 83

Running the calibration utility
Before you run the calibration uti lity , lo ad several sheets of
letter-size paper in the printer. You can use the utility with a
keyboard or a mouse (keyboard instructions are given below).
1. Log onto the directory to which you copied the calibration
utility.
2. At the DOS prompt, type
calibration utility . You see the EPS ON Pr inte r Ca libration
Utility screen.
3. Make sure
menu. If not, press ↓ or ↑ to highlight it.
4. Press Tab to move to the Calibration item box and select the
print head you have installed in the printer: color or black
(monochrome).
5. Press Tab twice to hi g hlig ht the
6. At the next screen, select the port to which you c onne cted the
printer and select
7. Select
Next
Stylus Color 200
Next
at the next screen if you’ve already loaded paper.
ECALIB
is selected in the drop-dow n
.
and press Enter to run the
Next
button and press Enter.
8. The printer prints the Current Alignment Sheet. Examine the
printout for misaligned vertica l line s.
||
| |
Aligned Not aligned
If none are misaligned, press Tab twice to highlight
and press Enter. Go to step 13.
If one or more patterns are misaligned, select the appropriate
checkboxes; then select
Next
.
Maintenance
Next
5-15
Page 84

9. Select
Next
.
10. For each pattern you selected, the printer prints a Test
Alignmen t Sheet containing multiple samples of vertical
lines, each of which is assigned a number. One each sheet,
look for the sample that is most closely aligned.
Enter the number of the ali gned sam ple or select
if none of the samples are ali gned . Then selec t
Not-aligned
Next
11. Repeat steps 9 and 10 until all patterns ar e aligned.
12. Se lect the
Print Current Alignment Sheet
a final test sheet or select
Finish
to exit the Calibration
checkbox to print
Utility.
.
5-16
Maintenance
Page 85

Chapter 6
Troubleshooting
Diagnosing Problems . . . . . . . . . . . . . . . . . . . . . . . . 6-2
Print Quality Problems . . . . . . . . . . . . . . . . . . . . . . . 6-3
Problems With Printing . . . . . . . . . . . . . . . . . . . . . . 6-8
Paper Handling Problems . . . . . . . . . . . . . . . . . . . . . 6-13
Paper Jam Problems . . . . . . . . . . . . . . . . . . . . . . . 6-13
Paper Feeding Problems . . . . . . . . . . . . . . . . . . . . 6-14
Other Paper Handling Pr oblems . . . . . . . . . . . . . . . 6-14
6
Troubleshoot ing
6-1
Page 86

This chapter describes what you can do if you are having
problems printing. I t is divided into these sect ions:
Diagno s ing problems. See this sectio n to di ag nose
❑
problems by checking the control panel l ights and Status
Monitor ico ns (Wi ndows 95 only).
Print quality problems. See this section if the print quality
❑
is not good or not what you expect.
Problems with printing. See this section if your printer is
❑
having trouble printing .
Paper handling problems. See this section if you have
❑
paper jams or other proble ms w ith pape r handling.
Diagnosing Problems
Your printer’s control panel and the Status Monito r bo x in the
EPSON Despooler (Windows 95 only) report the status of your
print job and alert you to printing errors. Check the tables
below to diagnose your pro ble m using the control panel lights
and the Status Monitor icons.
Control panel light status
Problem In k Out Paper Out
Ink low Flashing Off
Ink out On Off
Paper out Off On
Paper jammed Off Flashing
Print head unit or ink
cartridge installation error
Rapid flashing Off
6-2
Carriage error On On
Fatal error Flashing Flashing
Troubleshooting
Page 87

Status Monitor icon status
Icon Problem
The printer is checking the current status.
A printing error has occurred and your printer
cannot print. See “Problems With Printing” in this
chapter for possible solutions.
The printer is ready to print.
The printer is currently printing.
The ink level is low; check the Ink Out light and
replace your ink cartridge as described in Chapter
5.
Note:
In Windows 95, if the Status Monitor box does not appear with the
Despooler when you print, see pa ge 6-11.
If you have a printing problem, check the appropriate section
below and follow all sugge sti ons that apply to your problem .
Also check the ReadMe item in the EPSON program group or
folder and the online he lp available in the driv er fo r the latest
information. If none of the suggested solutions solve your
problem, see “Where to Get Help” in the Introduction.
Print Quality Problems
To help you determine the nature of a print qual ity pro ble m,
you may want to print a de monstration page and analyze the
elements on it; see Chapter 4 for instructions. Print quality can
often be improved by cl eaning the print head as described in
Chapter 5.
Troubleshoot ing
6-3
Page 88

If cleaning the print head does no t improve the print quality,
try the following:
Check the status of the
❑
Ink Out
light to see whether the ink
cartridge is low on ink or empty. If so, replace the cartridge
as described in Chapter 5.
For color or complex grayscale images, turn on
❑
MicroWeave and turn off High Speed mode.
Use a higher quality paper. For best print quality, use
❑
EPSON special coated paper s for 360 and 720 dpi or
EPSON high-qual ity g lossy paper ( 720 dpi only).
Note:
Do not use high-qual ity glossy pa per when you print at 360 dp i.
Make sure the Media Type setting matches the type of
❑
paper or other media loaded in the printer.
If you’re printing a scanned ima g e and the colo rs a re not
❑
right, first try to fix the problem usin g your sc anning
software program.
If print quality does not improve , se e t h e follow ing specific
problems.
Printed output is not what you expect, or is faint or blurred.
You may not be printing on the correct side of the paper. On
coated paper, print only on the white coated side; on glossy
paper or transparencies, print only with the cut corner in the
upper right. Also remove each sheet as it is printed to prevent
smearing by the next sheet.
Check that the paper thickness and thickness adjustment levers
are set correctly for the media type. (See Chapter 3 for more
information.) Faint or blurred printouts c an result if you print
with these levers in incorrect positions.
6-4
Troubleshooting
Page 89

Use a higher quality paper. Also, check that the Media Type
setting in the driver is set for the type of paper or other media
you loaded. If you are using the 720 dpi printing mode, you get
better results if you use EPSON special coated paper for 720
dpi or EPSON high-quality glossy paper.
You may be printing on special coated or glossy paper at
360 dpi with the mo noc hr om e print head unit. For better
results, print on plain paper or transparencies or use the color
head unit and print using composite black.
Check whether your paper is moist or damp. Ink jet printers
are sensitive to moisture absorbed by paper. Do not store paper
in damp or humid places.
If you are printing color graphics at 360 or 720 dpi, make sure
MicroWeave is on and High Speed mode is off. Also check that
the
Brightness
image.
Turn on non-smear printing mode, if necessary, as described in
Chapter 4.
Make sure the correct print head unit is selected in the printer
driver. Se lect
monochrome print head.
Try using the printer driver’s
let the driver determine the appropriate image settings.
Your Windo w s vi de o driver may n ot be compatible wi th the
printer. Use the standard Windows VGA driver or contac t the
manufacturer of your video card for an updated driver. For
information on changing the video driver, see your Windows
and
Color
Contrast
for the color print head and
settings are appropriate for the
Auto
Document Ty pe fe atur e to
Mono
for
documentation.
Clean the print head as described in C hapter 5.
Replace the ink cart r id ge as de sc ri bed in Chapter 5.
Troubleshoot ing
6-5
Page 90

Vertical lines do not align.
Calibrate your printer as described in Chapter 5.
You see white banding in your printed output.
Turn on MicroWeave in the printer driver. If you still see white
banding, clean the print head as de sc ribed in Chapte r 5 .
Print speed is not what you expect.
You may be printing a text docu me nt using printer dr iver
settings that are more approp ri ate f or graphics. Select the
Economy
Print speed is slower for large documents and for those
printing at high resolutio n. Experim e nt wi th smal ler fi le sizes
and lower resolutions to speed up printing. If this is not
possible, be patient; the printed results will be worth the wait.
Document Type for the fastest text printing settings.
The printout contains incorrect or garbled characters.
Make sure EPSON Stylus COLOR 200 is selected as the default
Windows printer driver.
If you are running Windo w s, mak e sure the Print M anager is
turned off in the Control Panel Printers utili ty; see your
Windows docum enta tion o r online help for instruc tions.
Print jobs may be held in the EPSON Spool Manager. Click
Spool Ma nager 3
Select any print jobs marked pending, waiting, or held; then
select
If you still see incorrect characters, print a demonstration page
to see if the problem is with your printer; see Chapter 4 for
instructions. If the demonstratio n pag e prints, yo u ma y ha ve a
problem with your application software or your printer cable.
Make sure your cable is connected securely and see your
program’s d ocu mentation for trou ble s hooting information.
6-6
in the EPSON program group or folder.
Delete or Cancel Printing
Troubleshooting
.
Page 91

If no demonstration page prints, y ou may have a problem with
your printer; contact your EPSON dealer or authorized EPSON
servicer.
You see incorrect colors in your printout.
Make sure EPSON Stylus COLOR 200 is selected as the default
Windows printer d ri ver.
Check that the printer driver’s
Saturation,
appropriate for the image.
If you scanned the image, the different color interpretation
technologies used by your scanne r, m onito r , and pr inter c an
never produce an exact color match with the or ig inal image.
However, check your scanner do cu m entatio n for utilities you
can use to calibrate your scanner to your monitor and printer to
more closely match colors.
If you are printing from a DOS application using ec onomy
mode, black text or graphics will appear gray on your printout;
turn off economy mode using the printer’s Default setting
mode to achieve deeper blacks. See Chapter 4 for instructions.
and
Red, Green
Brightness, Contrast
, and
Blue Strength
,
settings are
Printing starts too high or too low on the page, or the page
length or margins are not what you expect.
Make sure you selected the correct
printer driver; see Chapter 2 and your online driver help utility
for more information.
Use your software program to adjust the margins, or change
the number of lines per page, or change the page length setting
to match the paper you are using.
If necessary, change the loading position of the paper using the
Default setting mode as described in Chapter 4.
Paper Size
setting in the
Troubleshoot ing
6-7
Page 92

Problems With Printing
If you cannot get the printer to print, first check that paper is
loaded in the printer. Th en check t hat t h e p r i n ter is plu g ged
into a working electrica l outlet that is not controlled by a switc h
or timer. Verify that the interface cable is securely connected to
the print er and co mputer an d t hat b oth are t u rn e d on.
After you have done all this, see the following specific
problems.
Printing stops and the
No paper is loaded in the printer or it is loaded incorrectly.
Load paper in the sheet feeder correctly; then press the
Load/Eject
printing.
button to turn the
Printing stops and the
Paper may have jammed in the printer. Turn off the printer and
gently pull out the paper. If it tears off inside the printer, open
the printer cover and r em ove the paper . See “P aper Handling
Problems” late r in this cha p ter for inf or m atio n on pr eve nting
paper jams.
The
Ink Out
If the
light is flashing or on.
Ink Out
light is flashing, the ink cartridge is low on ink; if
Paper Out
Paper Out
light is on.
Paper Out
light off and resume
light is flashing.
it is on, the cartridge is empty. Replace the ink cartridge as
described in Chapter 5.
The
Ink Out
You may have pressed the
cartridge or the print head unit wa s not instal led or not
installed correctly. Follow the steps in Chapter 5 to install the
ink cartridge or reinstall the print head unit.
6-8
light flashes rapidly.
Troubleshooting
Load/Eject
button when the ink
Page 93

Printing stops and the
There is a carriage error. Turn off the printer; then, after a few
seconds, turn it on and try printing again. If the same lights
flash again, co ntac t yo u r dea ler or an au thorized EPSO N
servicer.
Ink Out and Paper Ou t
lights are on.
Printing stops and all lights are flashing.
There is a fatal error; contact your dealer or an authorized
EPSON servicer.
The printer sounds like it is printin g , but nothing prints.
The print head may need cleaning; see Chapte r 5 for
instructions.
The ink cartridge may be too old. A cartridge is too old if it has
been used longer than six months or beyond the da te on i ts
packaging. First clean the print head as described in Chapter 5.
If this does not solve the proble m, r epla c e the ink c art ri dge.
The cab le b etween t he printe r and com p u t er may not b e
connected securely or it ma y not meet the specific ations for the
printer or computer. See “System Requirements” in Chapter 1
for cable guidelines.
Turn off the printer and perform a self test as described in
Chapter 1. If the self test does not print, the problem is with the
printer. If the self test prints correctly, the problem is probably
caused by your software.
The printer driver installed with Windows 3.1 does not work
correctly after you upgrade to Windows 95.
You need to reinstall the printer driver after upgrad ing to
Windows 95 so the driver is set up correctly for Windows 95.
See Chapter 2 for instructions.
Troubleshoot ing
6-9
Page 94

You see error messages because of printing conflicts.
Before sending print jobs to the printer, the EPSON Spool
Manager stores them in a temporary directory. If you see
conflict error messages or pr inting is ve ry slo w, the problem
may be caused by other temporary files in this directory. To
change the Spool Manager default directory, follow these steps:
1. Make a directory on y ou r hard d i sk where you want Spool
Manager to store th e file s, for ex amp le, C:\SP L TEMP.
2. Open the EPSON program group or folder and double-click
Spool Manager3
3. Make sure
open th e Queue menu.
4. Select
spool directory to the one you created in step 1.
5. Also make sure the
checkbox is checked. Then select
6. Open the Options menu and select
7. In the dialog box, change the spool directory to the one you
created in step 1. Then select
8. Close the Spool Manager.
Setup
Epson Stylus COLOR 200
. In the Queue Setup dial o g box, change the
.
is selected, and then
Use Print Manager for this port
.
OK
Default Spool Directory
.
OK
.
The printer prints blank pages.
Make sure EPSON Stylus COLOR 200 is selected as the default
Windows printer driver.
Make sure you selected the correct
printer driver; see Chapter 2 and your driver’s online help
utility for more information. Also make sure the margins in
your application software fit the paper size you’re using.
6-10
Troubleshooting
Paper Size
setting in the
Page 95

Text printing is slow.
You may be using printer driver settings that are more suitable
for graphics printing and unnecessarily slowing down text
printing. If you’re printing black text only, make sure the
monochrome print head unit is installed in your printer and
selected in the printer driver.
To speed up text printing only, turn off MicroWe ave mo de and
turn on High Speed mode. Some combinations of
Mode
these settings; if this is the case for your settings, select a lower
resolution, possibly using Economy (180 dpi) for drafts and
360 dpi for your final output. However, do not turn off
MicroWeave when pri nting fina l c opies of high-qual ity
graphics or photographs.
(resolution) and
Media Type
do not allow yo u to select
Ink cartridges do not last as long as expected.
The ink cartridge life depends o n the am ount of ink used in
printing. If you often print pages with large graphics and little
white space, you will use up cartridges faster than if you print
pages wi th lots of white spac e. (The pri nt er also u s es in k
during print head cleanin g cyc les, so do not perform them
unless necessary.)
Printing
If you replace an ink cartridge before the
the sensor that tells you when ink is out will not work correctly
with the new cartridge.
Ink Out
light flashes,
In Windows 95, the Status Monitor box does not appear with
the Despooler.
The Windows Pri nt Ma nager ma y b e interfering with the
Status Monitor. Double -click
folder. Open the Queue menu and sele ct
Use Print Manager for this port
Spool Manager3
checkbox is not checked.
Setup
Troubleshoot ing
in the EPSON
. Make sure the
6-11
Page 96

Then check your bidirectional spool settings. Click
Start
, point
to
Settings
COLOR 200
Properties
make sure the
option is turned on. Click
appear when you send your next print job.
, and select
icon, open the Printer menu, and selec t
. Click the Details tab, select
Enable bi-directional support for this printer
Printers
. Double-click the
Spool Settings
. The Status Monitor should now
OK
EPSON Sty lus
, and
The printer does not seem to receive print jobs sent by the
computer.
Double-click
or folder; then click any job marked pending or held. Open the
Document menu and sel ect
queue i s n o t h eld, open the Queue menu and click
is a checkmark beside the option. Also change the Spool
Manager default directory as described on page 6-10.
Spool Manager3
in the EPSON program group
Delete
. To verify that the print
Hold
if there
Make sure EPSON Stylus COLOR 200 is selected as the default
Windows printer driver.
If you still get no output, try printing a d emonstr atio n pag e to
see if the problem is with your printer; see Chapter 4 for
instructions. If no demonstration page prints, you may have a
problem with your printer; contact your EPSON dealer or
authorized EPS ON se rv icer .
If the demonstration page prints, you may have a problem with
your application software or your printer cable. Make sure
your cable is connected securely and see your program’s
documentatio n fo r troubleshooting info rmation.
6-12
Troubleshooting
Page 97

You can use the printer’s hex dump mode to pinpoint
communicatio n proble ms between the printer and a software
program. To turn on hex dump mode, first turn off the printer.
Then hold down the
printer. Keep holding d ow n
Then send a print job. The printer prints the exact codes it
receives from the computer in hexadecimal format. Report the
codes to your support technici an.
Cleaning
Cleani ng
Paper Handling Prob le ms
To prevent paper jams and other feeding problems, try these
suggestions.
Paper Jam Problems
Use a higher quality paper that is suitab le for ink j et printers
and is not too thin, too thic k , or rough. For best quality , use
button as you turn on the
and press
Load/Eject
.
EPSON special coated and high-quality glossy papers. See
Appendix A for paper specifications.
Do not load too many sheets at once. You can load up to 100
sheets of plain paper, 70 sheets of special coated paper, 50
sheets of transparency film (with one sheet of plain pape r
beneath the stack), 30 sheets of high-quality glossy paper (with
one sheet of plain paper beneath the stack), or 10 envelopes.
Fan the stack of paper before you load it.
If you loaded plain paper, try turning the stack over. The
printable side may have been facing do w n.
Troubleshoot ing
6-13
Page 98

Paper Feeding Problems
The paper may be curled or folded. Use flat, undamaged paper.
The paper may be poor quality; use a better quality paper.
The paper may be too thin or thick; see Appendix A for paper
size and type specifications.
The paper may have been exposed to excess humidity (over
60%); see Appendix A for the required environmental
conditions.
The edge guides may be too tight or too loose. Adjust the left
edge guide for the size of the paper and lock it in place.
Too many sheets may be loaded in t he s h eet feede r. Y ou can
load up to 100 sheets of plain paper, 70 sheets of special coated
paper, 50 sheets of transparency film (with one sheet of plain
paper beneath the stack), 30 sheets of high-quality glossy paper
(with one sheet of plain paper beneath the stack), or 10
envelopes.
The paper may be pushed down too far in the sheet feeder.
Remove the paper, fan it, even up the stack, and then reload it
as described in Chapter 3.
Other Paper Handlin g Problems
For other paper handling problems, try these suggestions.
The printer loads more than one sheet at a time.
Remove the stack of paper, fan it, and even up the edges. Then
reload the paper as d escribed in Ch apter 3.
The paper may be too thin or thick, or was exposed to excess
humidity; see Appendix A for exact specifications.
6-14
Troubleshooting
Page 99

Make sure the paper thickness and thickness adjustment levers
are set correctly for your media type; see Chapter 3 for
instructions.
Make sure the printer driver’s
setting in your application sof tw ar e are set to print one copy at
a time. Also veri fy that you have sele cted the c orrect paper size
in the driver and in your appli cation software.
Ejected paper is wrink led.
The paper may be too thin or damp. Do not store paper in
damp or hu mi d pl aces.
Paper does not fully eject.
Use the
The paper may be too long. Use pa per that is wi thin the
maximum size listed in Appendix A.
Load/Eject
button to eject the page.
Copies
setting and the copies
Paper is feeding crooked.
The paper is old or creased. Use only new, smooth sheets of
paper.
Too much paper is loaded in the sheet feeder. Remove a few
sheets.
The paper is not the proper size and quality; see Appendix A
for exact specifications.
Troubleshoot ing
6-15
Page 100

Appendix A
A
Technical Specifications
Printing . . . . . . . . . . . . . . . . . . . . . . . . . . . . . . . . A-2
Paper . . . . . . . . . . . . . . . . . . . . . . . . . . . . . . . . . A-3
Ink Cartridges . . . . . . . . . . . . . . . . . . . . . . . . . . . . A-6
Mechanical . . . . . . . . . . . . . . . . . . . . . . . . . . . . . . A-7
Electrical . . . . . . . . . . . . . . . . . . . . . . . . . . . . . . . A-7
Environmental . . . . . . . . . . . . . . . . . . . . . . . . . . . . A-8
Safety Approvals . . . . . . . . . . . . . . . . . . . . . . . . . . A-8
Fonts . . . . . . . . . . . . . . . . . . . . . . . . . . . . . . . . . A-8
Parallel Interface Specifications . . . . . . . . . . . . . . . . . . A-9
Pin Assignments . . . . . . . . . . . . . . . . . . . . . . . . . A-9
Reverse Channel . . . . . . . . . . . . . . . . . . . . . . . . . A-11
Timing Chart . . . . . . . . . . . . . . . . . . . . . . . . . . . A-14
Initialization . . . . . . . . . . . . . . . . . . . . . . . . . . . . . A-14
Default Settings . . . . . . . . . . . . . . . . . . . . . . . . . A-15
Technical Specifications
A-1
 Loading...