

Page 1
EPSON STYLUS 1000
Paper feed speed: 82 milliseconds per 1/6-inch line
2.2 inches/sec. fo r co nt inuous paper
Input buffer: 64 KB when Mixed text/graphics opt ion
in default-settings mo de is set to ON
128 KB when Mixed text/graphics o pt io n
in default-settings mo de is set to OFF
Internal fonts and character tables
Bitmap fonts:
Font 10 cpi 12 cpi 15 cpi Proportional
Draft √
EPSON Roman √ √√√
EPSON Sans Serif √√√√
EPSON Courier √√√
EPSON Prestige √√√
EPSON Script √√√
Select other font/pitch combinations using ESC /P 2
command s.
Scalable fonts:
Font Min. pt. Max. pt. Increments
EPSON Roman 8 32 2 pt
EPSON Sans Serif 8 32 2 pt
EPSON Roman T 8 32 2 pt
EPSON Sans Serif H 8 32 2 pt
√√
Printer Specifications
Printing
Printing method: Drop on demand 48- no zzle ink jet matrix
Printable columns and printing speed:
Character pitch
10 cpi 136 150 cps 250 cps
12 cpi 163 180 cps 300 cps
15 cpi 204 225 cps 375 cps
17 cpi (10 cpi condensed) 233 257 cps 428 cps
20 cpi (12 cpi condensed) 272 300 cps 500 cps
cpi: characters per inch cps: characters per second
Maximum
Printable
columns
360 × 360 dpi text and graphics
resolution:
Printing
direction:
Bidirectional with logic-seeking for text
and graphics . ( The aut o print direction can
be set in the default-setting mode.)
Line spacing : 1/6 inch, 1/8 inch, or program m able in
1/360-inch increments
Printing speed
(Letter Quality)
Printing speed
(Draft)
Character tables: 1 italic and 7 graphics char act er t ables
Character sets : 14 international character sets and
1 legal character set
Paper
Single sheets (paper feeder):
Width 182 to 420 mm (7.2 to 16.5 inches)
Length 182 to 297 mm (7.2 to 11.7 inches)
Thickness 0. 065 to 0. 11 mm (0.0026 to 0.0 043 inches)
Weight 64 to 90 g /m
Quality Bond pape r, plain paper
Single sheets (manual insertion):
Width 182 to 420 mm (7.2 to 16.5 inches)
Length 182 to 420 mm (7.2 to 16.5 inches)
Thickness 0. 065 to 0. 11 mm (0.0026 to 0.0 043 inches)
Weight 52 to 90 g /m
Quality Bond pape r, plain paper
Note:
Use recycled paper under normal temperature and humidity
conditions onl y. Poor quality pa per may reduce print quality, as
well as cause paper jams and ot her problems. If you encounter
problems , s w it c h to a higher grade of paper.
2
(18 to 24 lb)
2
(14 to 24 lb)
Ink Jet Printers 4/26/94 EPSON STYLUS 1000-1
Page 2

EPSON STYLUS 1000
Envelopes (manual insertion):
Size
No. 6: 166 × 92 mm (6.5 × 3.6 inches)
No. 10: 240 × 104 mm (9.5 × 4.1 inches )
Thickness 0. 16 to 0. 52 m m (0.0063 to 0.020 inches)
Weight 45 to 90 g/m
2
(12 to 24 lb)
Quality Bond paper, plain paper, air mail
❏ Use envelopes only under normal temperature and
humidity conditions.
❏ Insert envelopes long side first; use the man ual feed
slot only.
❏ Difference in thic kness within print able area must be
less than 0.25 mm (0.01 inches).
Printable area:
Single sheets Envelopes
(paper feeder and
manual insert io n)
Mechanical
Paper-feed
method:
Ink cartridge ( S020025):
Type: EPSON exclusive
Color: Black
Print capac it y: Approxima tely 0.7 million characters in
Ink life: 2 years from production date
Temperature: Storage: –30 to 40° C (–22 to 104° F)
MTBF: 6,000 power-on ho urs
Lifetime print
capacity :
Friction, tractor feed with optional tractor
letter quality mode
(The cartridge life ma y va ry, depending
on how often you use the print head
cleaning function.)
Transit: –30 to 60° C (–22 to 140° F)
1 month at 40° C (104° F)
120 hours at 60° C (140° F)
Freezing: –3° C (26.6° F)
thaws in approx . 2 ho urs at
25° C (77° F)
75,000 pages (A4 or letter)
A The minimum top margin is 3.0 mm (0.12 inches).
B The minimum left and right margins are 3.0 mm (0.12 inches).
However, the maximum printable width is 345 mm (13.6 inches).
C The minimum bottom margin is 13.0 mm (0.51 inches).
Continuous paper
A The minimum top and
bottom margins (above
and below the perforation)
are 9.0 mm (0.35 inches).
B The minimum left and
right margins are 13.0 mm
(0.51 inches). However,
the maximum printable
width is 345 mm (13.6
inches).
Print head life: 1,000 mil lio n dot s per nozzle
Dimensions and weight:
Height 164 mm (6.45 inches)
Width 666 mm (26.22 inc hes)
Depth 284 mm (11.2 inches)
(without paper feeder)
466 mm (18.3 inc hes)
(with paper feeder)
Weight 8.6 kg (19 lb)
Electrical
Rated voltage: AC 120 V
Input voltage
range:
Rated frequency
range:
Input fre q ue ncy
range:
Rated current: 0.5 A
Power
consumption:
AC 103.5 to 132 V
50 to 60 Hz
49.5 to 60.5 Hz
Approx. 15 W (during self-test printing in
draft mode at 10 cpi)
EPSON STYLUS 1000-2 4/26/94 Ink Jet Printers
Page 3
EPSON STYLUS 1000
Environmental
Temperature: Operation: 10 to 35° C (50 to 95° F)
Storage: –20 to 50° C (–4 to 122° F)
Humidity (w it hout condensation ):
Operation: 20 to 80% RH
Storage: 5 to 85% RH
Safety approvals
Safety standards: UL1950 with D3 , C SA 22. 2 #220
R.F.I.: FCC Part 15 Subp art B class B
Interface specifications
Your printer is equipped with an 8-bit parallel interface,
which has the follo wing characteris ti cs:
Data format: 8-bit parallel
Synchronizat ion:
Handshake
STROBE pu lse
BUSY and
ACKNLG signals
timing:
Signal level: TTL compatible
Connector: 36-pin 57-30360 Amphenol connector or
equivalent
Default settin g s
The table below shows the default settings that take effect
when the printer is initialized. In addit ion, hardware and
control pan el init ialization clears the da ta buffer.
Item Default setting
Top-of-form position Current paper position
Page length Single sheets:
Left and right margins Canceled
Line spacing 1/6-inch line spacing
Character size 10.5 point
Vertical tab position Cleared
Horizontal tab positions Every eight characters
Font selection Last font selected on control panel
Special printing effects Canceled (except condensed printing)
Download character set Hardware initialization: cleared
oo65 lines for A4-size paper
oo61 lines for letter-size paper
oo22 inches for manual insertion
Software/control panel
initialization: deselected only
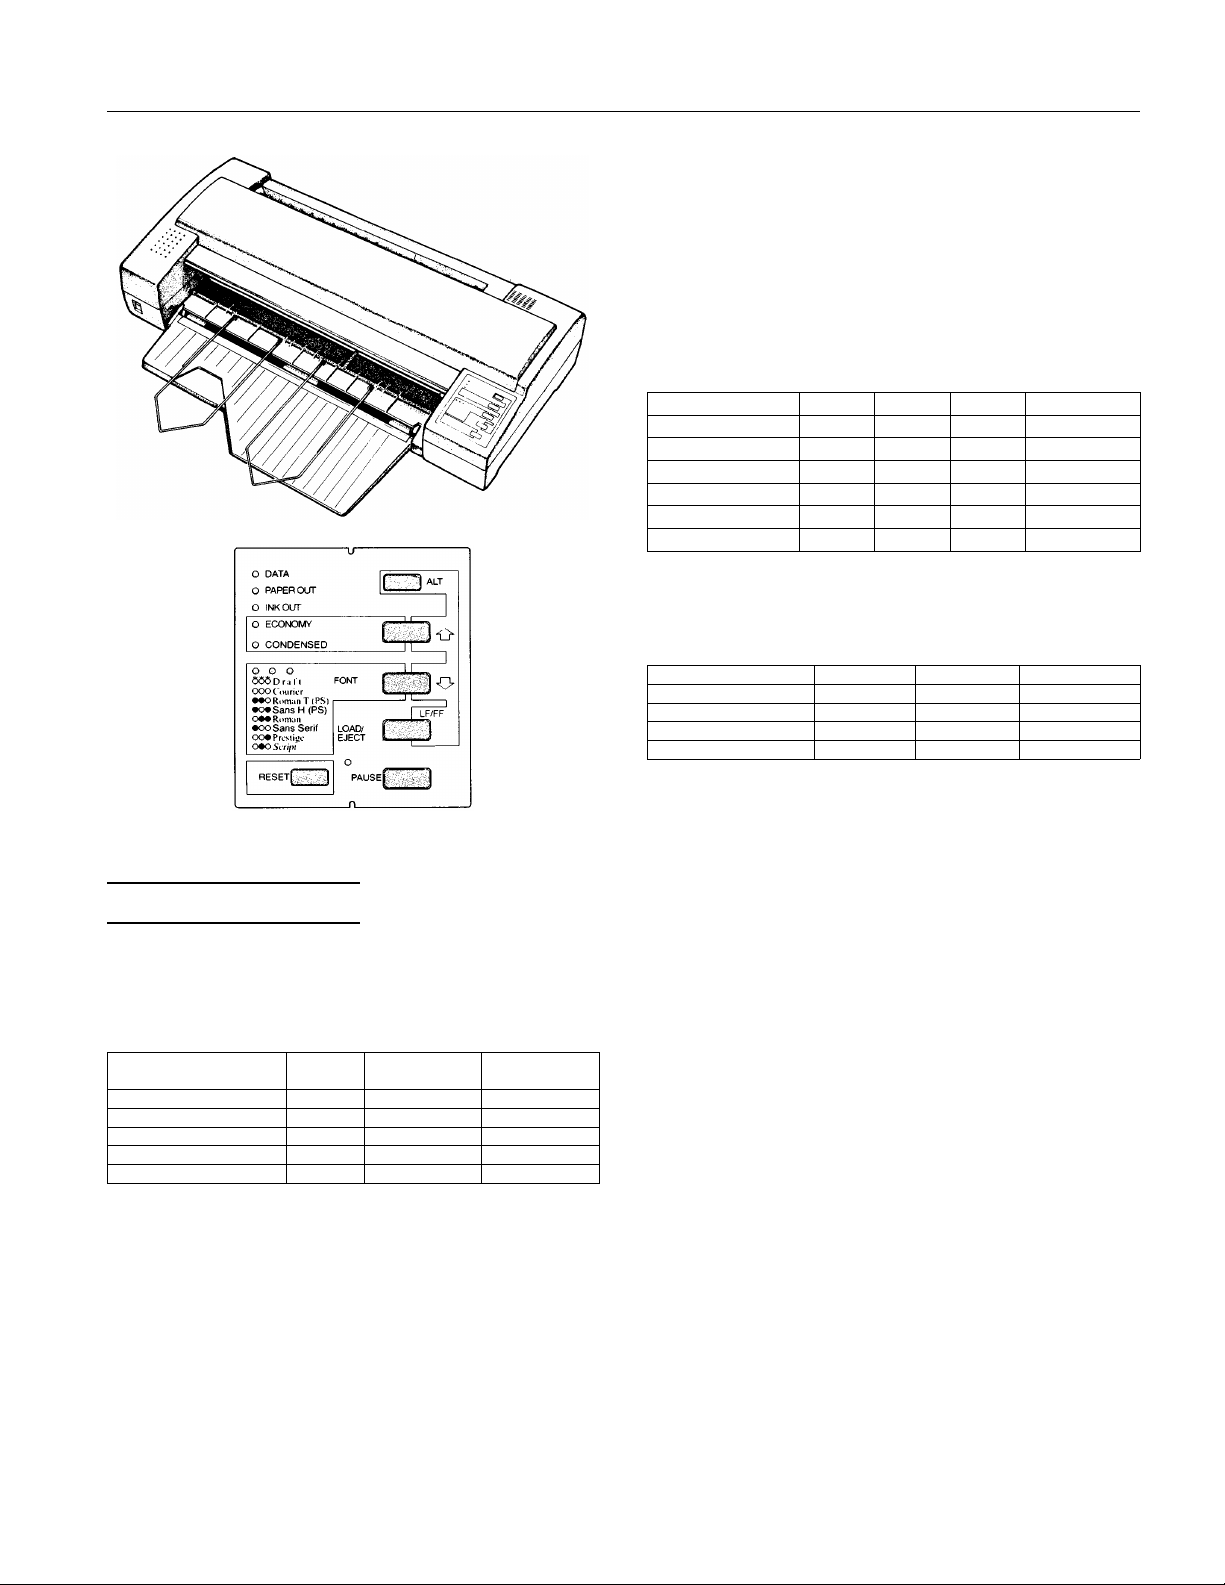
The Control Panel
The printer contro l panel gives you easy control over most
common printer operations. It consists of indica tor lights and
buttons.
Indicator lights
PAUSE
On when printing is paused
FONT
Indicates the current font setting. These three lights go on
and off when you press th e FO NT butt on. The font menu on
the control panel tells you which fon t is select ed.
CONDENSED
On when the condensed printing mode is selected. Wh en th is
mode is selected , the printer prints a co ndensed version of
selected fonts.
ECONOMY
On when the economy printing mode is selected. When this
mode is selected , the pr int er uses less ink. This mode is ideal
for rough draf ts .
INK OUT
On when the ink car tr idge runs out of ink. Rapid flashing
indicates that ink is low.
PAPER OUT
On when the printer runs out of paper. Rapid flashing
indicates a pape r jam.
DATA
On when data rem ains in the printer’ s m emory.
Buttons
RESET
Clears the printe r’ s buffer and initializes t he printer settings
to their factory settings.
PAUSE
Press this button to st op printing temporar ily. Press it again
to resume printing.
Ink Jet Printers 4/26/94 EPSON STYLUS 1000-3
Page 4
EPSON STYLUS 1000
LOAD/EJECT
Press this button to lo ad or eject a sheet of paper. If you have
been printing from the manua l feed sl ot, press ing this button
switches pap er loading back to the pap er feeder.
FONT
Press this button to cycle through the font choices on the font
menu. The FONT lights indicate the current selection.
ECONOMY/CONDENSED
Press this button t o selec t economy printing or condensed
mode. The indicator lights indicate which mode i s on.
ALT
Hold down this button for several seconds to move the print
head to the ink cartridge replac e po sition when the printer is
paused .
The ALT button also alters the functions of the other buttons.
Hold down the ALT button and press another button to
change the func ti ons as follows:
PRINT HEAD CLEANING (ALT + PAUSE)
Starts the print head c leaning cycle.
LF/FF (ALT + LOAD/EJECT)
Press this button briefly to feed the paper forward one line.
Hold this button down to eject a single sh eet or to advanc e
continuous paper to the top of the next page. You can also
use this butt on to feed continuous paper f rom t h e paper-park
position to the loading position.
MICRO FEED:
(ALT + FONT)
Feeds paper forward in 1/180-inch increm ents.
(ALT + ECONOM Y / CONDENSED)
Feeds paper backw ard in 1/180-inch increments.
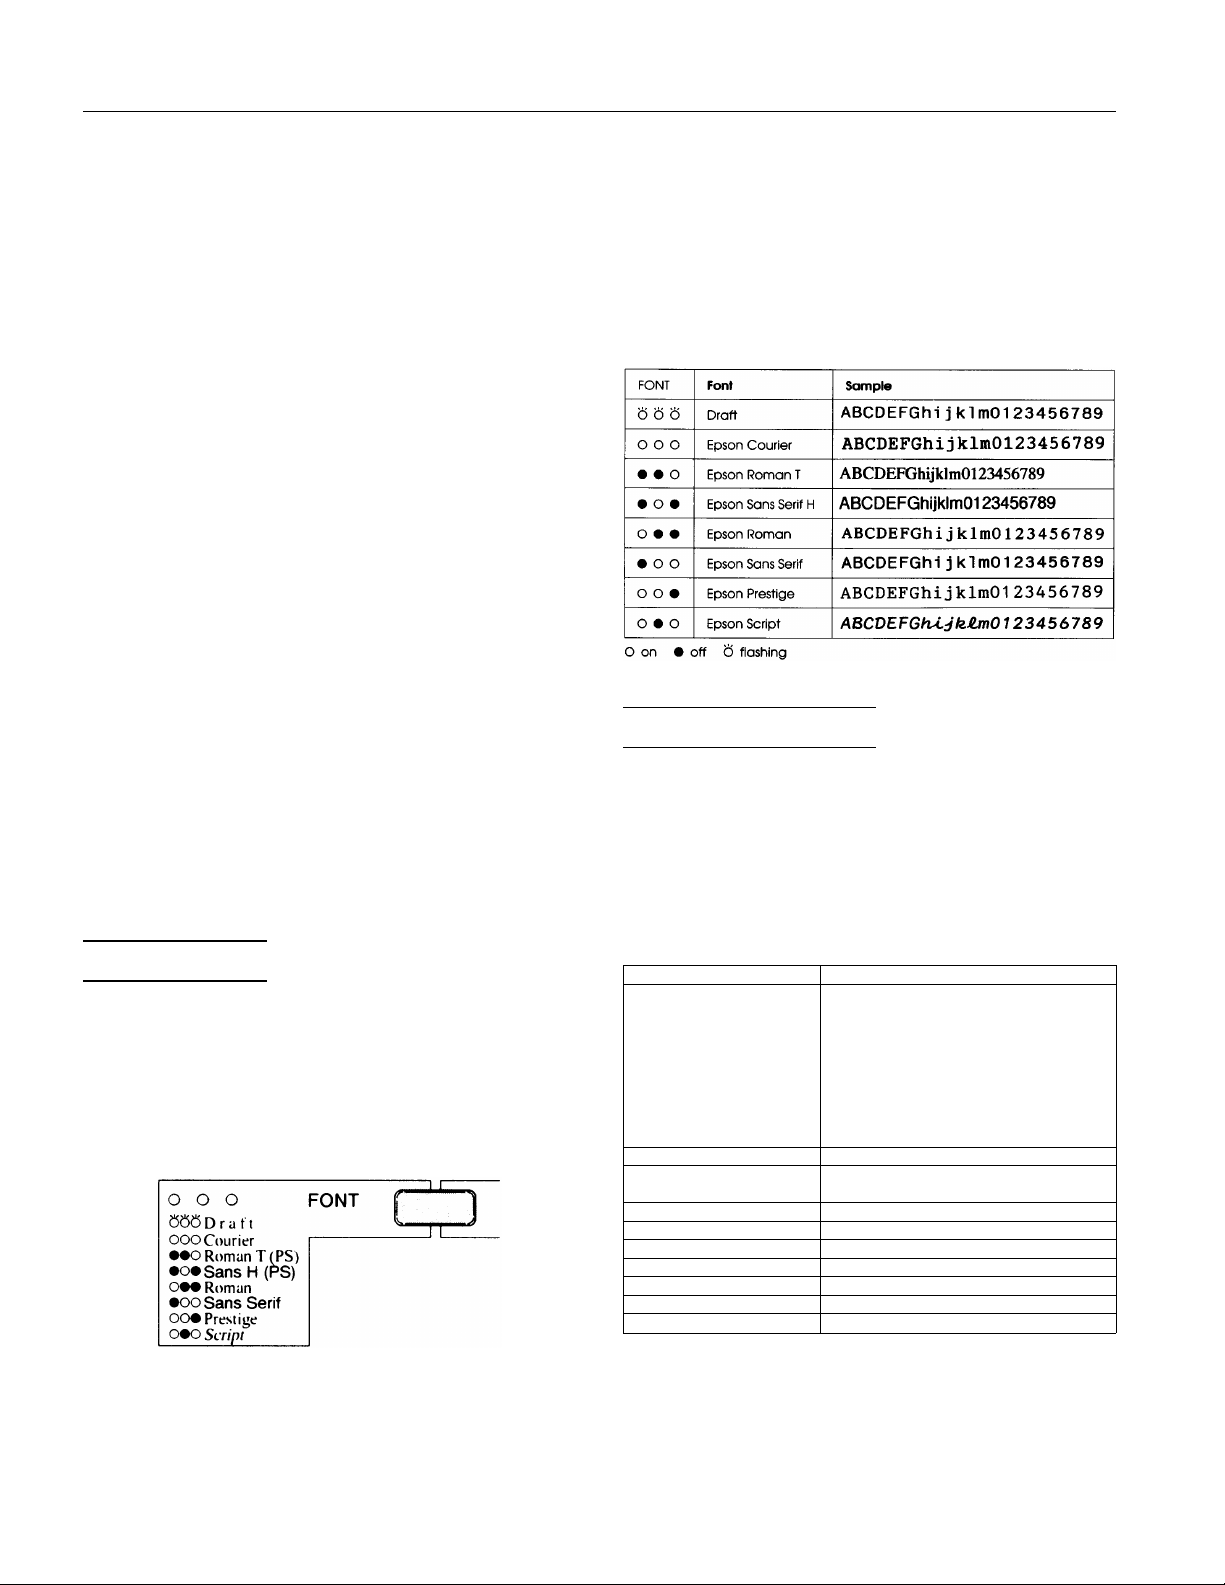
Character Fonts
Your printer has eight built-in character fonts inclu d ing two
new fonts: EPSO N R om an T and EPSON San s Serif H.
(Roman T is sim ilar to the Times
to Helvetica.
)
Press the FONT button to selec t from the eight fonts listed on
the control panel. The three FON T lights come on (
O) to indicate the active font.
(
font; Sans Serif H is similar
N) or go of f
Note:
❏ Roman T and Sans Serif H fonts are available in proportional
spacing only.
❏ Font selections you make with your software program usually
override these control panel selections. For best results, use your
software program to select fonts.
The table below lists the av ailable fonts and shows how th e
FONT lights appear for each selection.
Default-Settings Mode
Your printer co m e s w it h a series of internal settings that
control a variety of printer functions, such as print direct ion
and auto line feed. Because these settin gs take effe ct eac h
time you turn on the printer, they are called default settings.
The factory default settings are designed to meet the need s of
most users, so you ma y not need to c hange them. The table
below lists all the feat ures you can select in t he
default-settings mode.
Settings Options
Character table Italic U.S.A., Italic France,
Auto print direction On, Off
Continuous-paper page
length
Skip-over-perforation On, Off
Network interface mode On, Off
Mixed text/graphics mode On, Off
Auto line feed On, Off
Auto interface selection On, Off
Auto interface wait time 10 seconds, 30 seconds
Tear off On, Off
* Available only in the European version
** Available only in the North/South American version
Italic Germany, Italic U.K.,
Italic Denmark, Italic Sweden,
Italic Italy, Italic Spain 1,
PC437, PC850, PC860, PC863,
PC865, PC853*, PC857*,
PC437 Greek*, PC851*, PC855*,
PC866*, PC852*, BRASCII**,
Abicomp**
11 inches, 12 inches, 8.5 inches,
70/6 inches
EPSON STYLUS 1000-4 4/26/94 Ink Jet Printers
Page 5

EPSON STYLUS 1000
Note:
Most so ftware programs control the character table and auto line
feed. If your software program controls these features, you may
never n eed to set them with the control panel.
Default settin g s descriptions
Character table
Character tables contain the charact ers and symbols used by
different languages. The printer prints text with the selected
character table. When you select this fe at ure, t he fo nt l ight s
on the control panel go on or off to indicate the current
selection.
Auto print direction
When auto print direction is set to on, the printer switches
automatically between bidirectional (for text data) and
unidirectio n al m otion (for graphics dat a). When this featur e
is set to off, the print head motion is controlled by your
software.
Continuous-paper page length
When you are print ing on continuous paper, this feature lets
you select from four page lengths.
Skip-over-perforation
When this feature is on and you are using continuous pape r,
the printer leaves a 1- inch (25.4-mm) ma rgin between the last
printable line on one page and the first pri n table line on the
next page. This causes the pri nter to skip over the perforation
between continuous sheets.
Most software takes care of the top and bottom margins. Do
not turn on skip-over- perforation unless your software does
not provide these margins.
Adjust your top-of-form position with the micro-feed feature
to get half of the margin at the bottom of one page and half at
the top of the next page.
Network interface mode
If your printer is connected to a single computer, leave this
feature off. If you want to use the printer in a network
environment and share it among mul ti ple computers, set this
featur e t o on.
Note:
When this feature is set to on, data may be present in the printer’s
buffer even though the printer is not continuously printing.
DATA
Always make sure the
printer.
light is off before turning off the
Mixed text/graphics mode
This feature is fo r sof t ware that has problem s printing
scalable font text combined with graphi cs. Leav e t he m ix ed
text/graphics mode set to off if you do not notice any
problems in your printout.
Auto line feed
When the auto line feed feature is on, each carriage return
(CR) code is accompanied by a line feed (LF) co de. If your
printed text is unex pectedly double-spaced, set this feature to
off. If text lines print on top of each other, set it to on.
Auto interface selection
This feature is necessary when an optional interface c ard is
installed and interface cables are connected to both the
parallel interface and the optional i nt erface card.
When this feature is on, the printer determines which
interface receives data and then switches to th at in te rfa ce
until the end of the print job (when no data is received fr om
the selected interface for the amount of time specified by the
Auto interface wait time). Usually, you should set this
featu r e to on.
When this feature is set to off, the printer receives data only
from the interface specified by th e DIP switch on the optional
interface card.
Auto interface wait time
This feature is necessary when the auto interface selection
is set to on. If the data from the computer is not sent within
the specified period, the printer re-determ ines the source of
any new data. Otherwise, the printer receives data only from
the currently select ed interface and ignor es dat a fr om t he
other interface. You can set the ti m e to eith er 10 seconds or
30 seconds.
Tear off
You can set this feature on to select tear-off mode. Use the
tear-off feature only with continuous paper. Do not use the
tear-off feature wi th labels.
Changing the default settings
To change the printer’s default settings, follow the steps
below:
1. Make sure the printer is t urned off and paper is lo aded in
the paper feeder.
2. Hold down the ECON OMY/CONDEN SE D button and turn
on the printer to enter the default-settings mode.
The printer load s a sheet of paper and prints a brief
summary an d inst ructions. It instr ucts you to select the
language that y ou wan t messages printed in (English,
French, Germ an, It alian, or Spanish) .
Ink Jet Printers 4/26/94 EPSON STYLUS 1000-5
Page 6

O
O O
O O
O N
O N
O N
O F
O F
O F
N O
N O
EPSON STYLUS 1000
3. Press the FONT button until the FONT lights indica te the
language of you r cho ice; then press the AL T button to
make your select io n.
Languages FONT
English
French
German
Italian
Spanish
on
N
off
O
O
O
N
O
N
O
N
O
O
O
N
N
N
N
After you press the ALT button, the printer prints the
current defau lt s ettings and the next instru ction in the
language you selected. Wait until prin ti ng is finished,
then go to the next step.
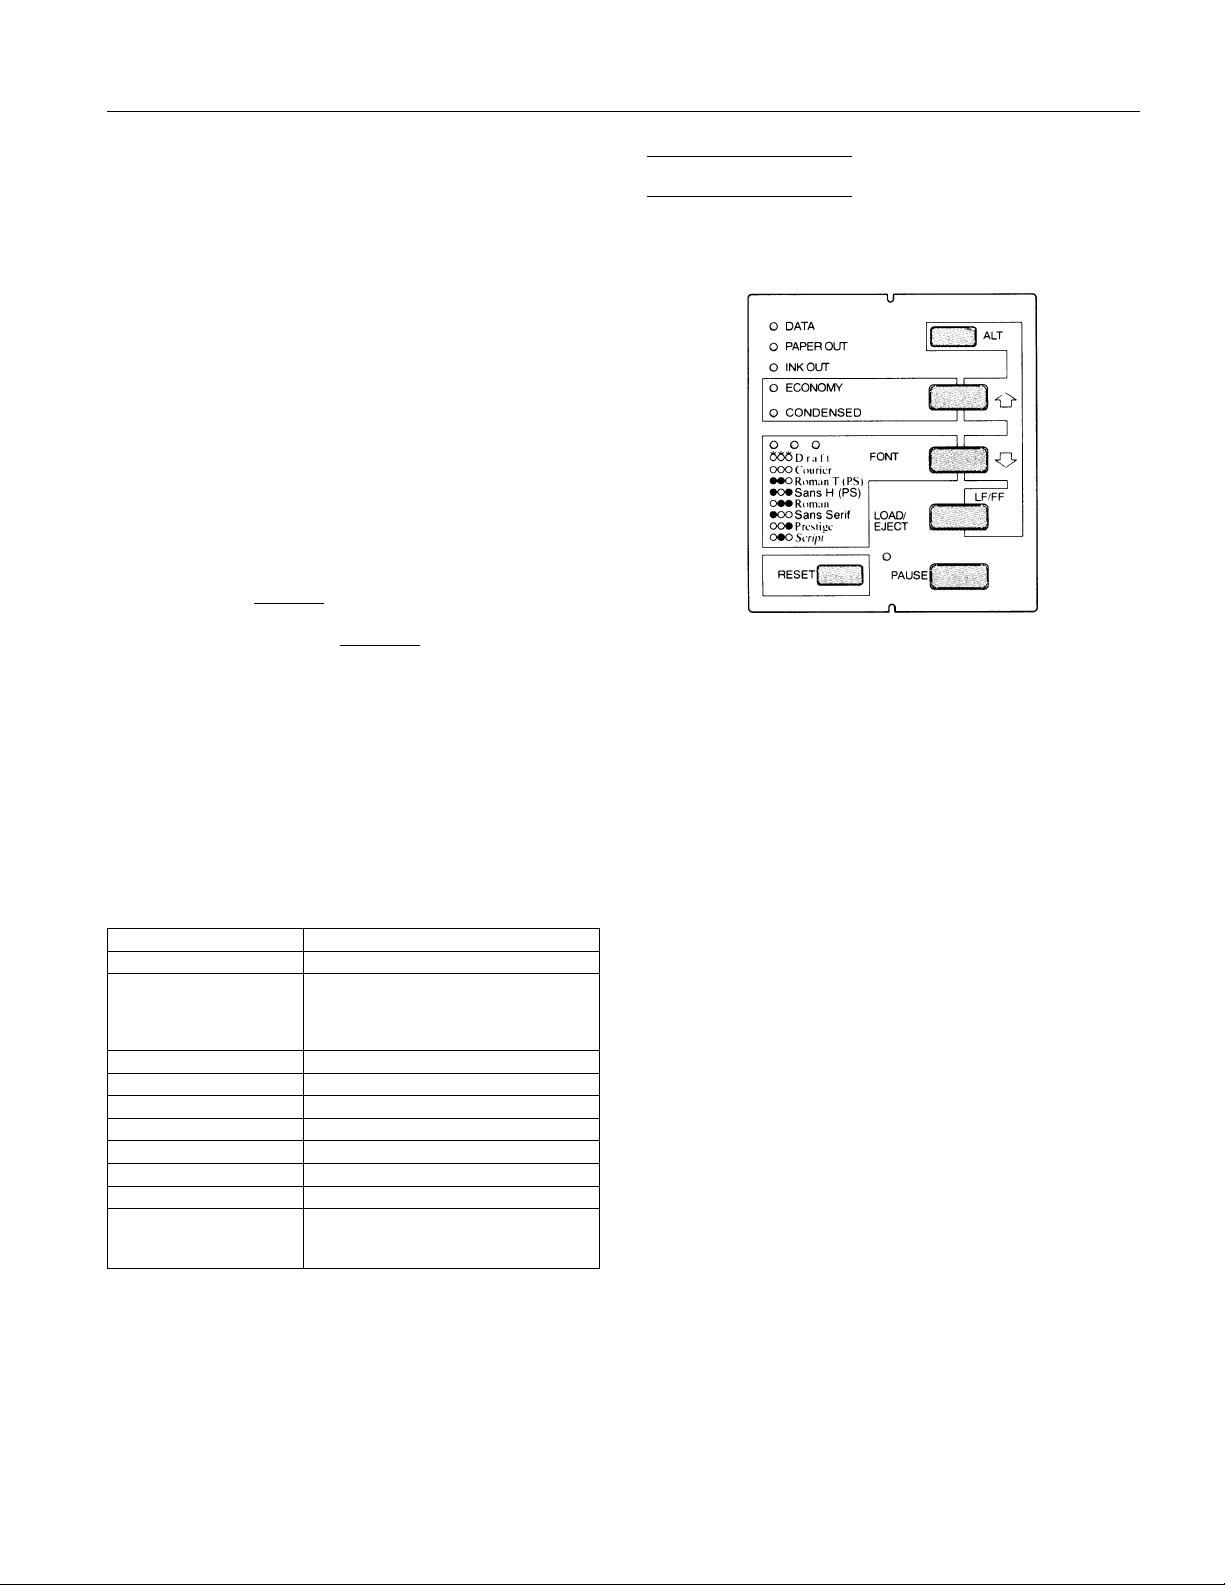
4. To move to the feature you want to change, press the ALT
button until the DATA, PAPER OUT, and INK OUT lights
indicate the ap propriate selection.
Default-settings menu DATA PAPER OUT INK OUT
Character table
Auto print direction
Continuous-paper page length
Skip-over-perforation
Network interface mode
Mixed text/graphics mode
Auto line feed
Auto interface selection
Auto interface wait time
Tear off
N
on
O
off
flashing
F
N
F
O
N
F
O
N
F
O
N
For example, if you want to change the character table
setting, press the AL T button until the DATA and PAPER
OUT lights are off and the INK OUT light is on.
5. Next, press the FONT button to change the setting.
As you move from setting t o setting, t he FONT lights turn
), off (
on (
N
), and flash (
O
) to show your selection, as
F
ind icated in the following table.
Default-settings
menu Settings FONT
Character table Italic U.S.A
Italic France
Italic Germany
Italic U.K.
Italic Denmark 1
Italic Sweden
Italic Italy
Italic Spain 1
PC437 (USA, Standard Europe)
PC850 (Multilingual)
PC860 (Portuguese)
PC863 (Canadian-French)
PC865 (Norwegian)
PC853 (Turkish)*
BRASCII (Brazilian Portuguese)**
PC857 (Turkish)*
Abicomp (Brazilian Portuguese)**
PC437 Greek (Greek)*
PC851 (Greek)*
PC855 (Cyrillic)*
PC866 (Russian)*
PC852 (East Europe)*
Auto print direction on
off
Continuous-paper
page length
Skip-overperforation
Network interface
mode
Mixed text/graphics
mode
Auto line feed off
Auto interface
selection
Auto interface wait
time
Tear off off
*Available only in the European version
**Available only in the North/South American version
11 inches
12 inches
8.5 inches
70/6 inches
off
on
off
on
off
on
on
on
off
10 seconds
30 seconds
on
O O O
O O N
O O F
O N O
O N N
O N F
O F O
O F N
O F F
N O O
N O N
N O F
N N O
N N N
N N F
N F O
N F N
N F F
F O O
F O N
O O O
O O N
O O O
O O N
O O F
O N O
O O O
O O N
O O O
O O N
O O O
O O N
O O O
O O N
O O O
O O N
O O O
O O N
O O O
O O N
6. Repeat steps 4 and 5 to make all of your changes.
7. To exit the default-settings mode, turn the printer off.
Note:
❏ You may exit the def ault-settings mode any time by turn ing off
the printer. Any changes you have made remain in effect until
you change them again.
❏ If you want to check the new default sett ings, enter the
default-settings mode again and print the current settings.
After you check them, turn the printer off to exit without
making changes.
EPSON STYLUS 1000-6 4/26/94 Ink Jet Printers
Page 7

EPSON STYLUS 1000
Installing the Ink Cartridge
Each ink cartridge contains enough ink to print about 700
pages. The exact number of pages a single cartri dge can print
varies accord ing t o th e am ount of text and graph ics on each
page.
The first time you use your new printer, you need to charge
the ink delivery system with ink. You need to perform this
operation only once.
Install the ink cartridge as follows:
Note:
❏ Do not op en the ink cartridg e p ackage until just before yo u
install the cartridge, or the ink may dry up.
❏ Once you install the ink cartridge, do not open the clamp or
remov e t h e ink cartridge exce pt to replace it with a ne w one. The
cartridge may become unusab l e otherwise.
1. Make sure the printer is t urned off.
2. Hold down both the AL T and PAU SE butto ns w hile you
turn on the printer. Release the buttons after the printer
starts initiali zing.
The print head moves t o the ink cartridge replac e pos it ion
automatically.
5. Open the foil package containing the ink cartridge and
remove it from the protective cardbo ard. Be sure to
remove the tape seal from th e ink cartridge.
6. Lower the cartridge int o the hol d er w it h th e label face up
and the arrow mark on the cartridge towar d th e arrow
mark on the pri nt er case.
7. Push the ink cartrid ge clamp toward the ba ck of the printer
to secure the cartridge.
3. Open the printer cover.
4. Pull the top of the ink cart ridge clamp toward you to
open it.
8. Press the ALT button again to charge the ink d eliv ery
system. It takes about one m inute. The PAUSE light flashes
throughou t the cycle and turns off wh en th e i nk charging
has finished.
Caution:
c
Do not turn of f or reset the printer unti l the ink-charging
cycle is complete.
9. Close the printer cover.
Ink Jet Printers 4/26/94 EPSON STYLUS 1000-7
Page 8

EPSON STYLUS 1000
Testing the Printer
After you charge the ink delivery system, you can use the
built-in self test to make sure the printer is work ing properly.
You can run the self test with paper from the built-in paper
feeder or by feeding a sheet m anually. This section describes
loading paper in the pa per f eeder.
Loading pap er in the paper feeder
1. Open the paper feeder cover while holding up the lever on
the right side.
2. Slowly slide the right edge guide as far to the left as it will
go, and align it to the gu ide m ark. Then adjust the left
edge guide to match the width of your paper. You may
also use the guide mar k fo r A 4 size paper. When you load
paper 420 mm (16.5 inches) wide, mov e th e right edge
guide as far to the right as i t will go.
3. Move the center support to the center of both edge guides.
When you load A 4 or A 3 size paper in the landscape
direction, adjust the center support until you can see the
paper size you are using through the cut out in the center
support.
4. Fan a stack of paper; th en tap it on a f lat surface to even the
edges. While aligni ng t he pap er’ s edges with the edge
guides, insert it wit h t he printable surface face do wn all
the way into the paper feeder until it meets resistanc e.
* Right for 420 mm
wide paper
Note:
The paper feede r holds up to 100 sheets ( the m axi mum for 64-g/m
2
or 16-lb. paper). Do not load paper higher than the mark on the
edge guide.
A: A4 portrait
B: Letter/legal portrait
C: Letter landscape
D: A4 landscape
E: Legal landscape
F: B4 landscape
5. Close the paper feeder cover.
When you send data to the print er or when you run the self
test, the printer advances the paper to the loading position
and starts printing.
Now you are ready t o run the self test.
EPSON STYLUS 1000-8 4/26/94 Ink Jet Printers
Page 9

EPSON STYLUS 1000
Running the self test
1. Make sure the printer is t urned off.
2. While holding dow n th e FONT button, turn on the printer.
It loads a sheet of pa per automatically fro m the paper
feeder and begins the self test.
In LQ mode, the printer prints characters in each font, in
the order the fonts app e ar on the control panel. Her e is
part of a typica l self test:
3. The self test continues until the paper in the paper feeder
runs out or you pr ess the PAUSE button. To resume the
test, press the PAUSE button again.
4. To end the self test, press the PAUSE button to stop printing
and then press the LOAD/EJECT button to eject the paper.
5. Turn off the printer.
Specifying the Printer Type
Most software programs let you specify the type of printer
you use so that th e pro gram can take full adva nt age of th e
printer’s features. Many of these programs pro v ide an
installation or setup menu that presents a list of printers.
To take full advantage o f your printer’s features , in cluding
ESC/P 2, choose one of the printers on the list below. If none
of these is listed, contact your software manufacturer for an
update that includes one of the listed printers. Until you
receive an update, cho ose another printer as close to the to p
of the list as possible.
Stylus 1000
Stylus 800
SQ-870/1170
LQ-870/1170
LQ-570/1070
If none of these printers is list ed among your program ’s
options, select the first one available from the following: LQ,
EX, FX, LX, RX, MX, EPSON printer, Standard printer, and
Draft printer.
ESC/P 2
SQ-850/2550
LQ-850+/1050+
LQ-550/1010
LQ-2550
LQ-800/1000
LQ-1500
ESC/P
Tips for Using the Paper Feeder
Following the tips below will give you the best perf or mance
when printing with the paper f eeder.
❏ Load paper into th e pap er feeder before you turn on the
printer and send da ta . W hen t he printer receives data
from the computer, it loads a single sheet automatically
and begins to print.
❏ If the printer runs out of paper during a print job, reload
the paper feeder and then press the LOAD/EJECT button
to continue pr int ing.
❏ Press the LOAD/EJECT button if you need to eject a sheet
of loaded paper.
❏ You can switch to manual loading or to the optional push
tractor witho ut rem ovi ng the paper suppl y fro m the
paper feeder.
❏ You can adju st the loading and print positions with the
printer’s micro feed feature.
❏ Because most software programs take car e of the t op and
bottom margins, you should usually adjust the margins
by using your programs, taking the print er’ s def ault
loading position into account.
❏ The default page length for paper loaded from the paper
feeder is 61 lines (letter -si ze pap e r) and 65 lines (A4-size
paper). You can change it using your software program or
printer commands, if necessary.
❏ If the ink does not dry fast enough, try removing sheets
one at a time as they finish printing.
Adjusting the Loading Position
The loading position is the position of the paper when the
printer loads it. If printing is too high or lo w o n th e page,
change the loading po sitio n with the micro-feed feature.
1. Make sure the printer is t urned on.
2. Load a sheet of paper from the paper feeder by pressing the
LOAD/EJECT button.
3. Open the printer cover and th e paper feeder cover.
4. As soon as the paper is loaded, hold down t he ALT button
and press the ECONOMY/CONDENSED button to move
the loading position up 1/180 inch, or press the FONT
butt on to move the loading pos ition down 1/180 inch.
Continue pres sing the appropriate button until you re ach
the position you wa nt .
5. Close the printer cover and the paper feeder co ver .
6. Send data from the computer to start printing.
Ink Jet Printers 4/26/94 EPSON STYLUS 1000-9
Page 10

EPSON STYLUS 1000
❏ The printer has a minimum and maximum loading
position. If you try to move the loading positi on beyond
these limits, the printer beeps and the paper stops
moving.
❏ When the paper reaches t he fac t ory-set loading positio n,
the printer beeps. Use the factory setting as a reference
point when ad justing the loading pos i tion.
❏ The pointer on the print head indicates the base line of
printed chara ct ers. (You may have to exp erim e nt a few
times to get the results you want.)
ink cartridge
❏ When you adjust th e loading position for si ngle- sheet
paper, the printer remembers the new position only until
you turn off the power. The loading position ret urns to
the factory setting w hen t he po wer is turned on again.
When you insert p aper 420 mm (16.5 inches) wide, align the
right edge of the paper with the right end. The printer
automatically loads the sheet.
Note:
If the sheet does not load straight, press the
to eject it. Then try loading it again.
3. Send data from the computer to the printer to start
printing.
When the printer finishes pr inting, it ejects the sheet
automatically. If the sheet does not com e all the wa y ou t,
press the LOAD/EJECT button.
Press the LOAD/EJECT button or send data to the printer
without insertin g a sheet in t he m anual slot to switch bac k
to the paper feeder. The page eject guides rise
automatically. The printer then loads a sheet of paper
from the paper feeder.
Note:
If the i nk d oes not d ry fast enough, tr y removing sheets one at a
time as they finish printi ng.
LOAD/EJECT
button
Printing on envel o pe s
You can also use the manual feed slot to print on in div idual
envelopes.
1. Turn on the printer and open the printer cov er.
Loading Paper Manually
You ca n load single sh eets of paper o r envelope s from th e
manual feed slot wit ho ut rem oving the paper suppl y from
the paper feeder.
Printing on single sheets
Follow these steps to loa d a single sheet in the manual feed
slot:
1. Turn on the printer. L ow er both sides of the paper ejec t
guide.
2. Insert a single sheet of paper into the slot until it meets
resistance, aligning the right edge of the paper w it h t he
arrow mark on th e printer.
2. Turn the paper-thic kness lever clockwise as far as it will go.
3. Close the printer cover.
4. Lower both sides of the pa per eject guide.
5. Insert an envelope into the manual feed slot with the wide
end entering the printer first, printable side face up, until
it meets resistance. The printer loads the envelope to the
print position automatically.
6. Send data from your compu ter . The printer ejec ts th e
envelope automatically when it is finished printing.
Note:
❏ Make sure your softwar e keeps the printing ent irely wi thin the
printable area of the envelope.
❏ Use envelopes only under normal operating conditions.
❏ If the ink is not drying fast enough, tr y re m ovi ng envelopes on e
at a time as they finish printing.
EPSON STYLUS 1000-10 4/26/94 Ink Jet Printers
Page 11

EPSON STYLUS 1000
7. To switch back to the paper feeder, turn the
paper-thickness lever counterclockwise as far as it will go.
Then press the LOAD/EJECT button to load from the
paper feeder.
Paper Jams
To clear a paper jam fo llow the steps below.
1. Open the printer cover and th e paper feeder cover.
2. Pull the access panel aw ay from the rear of the printe r, as
shown below. When loading conti nuous paper, rem ov e
the push tractor.
Printer Care
Replacing the Ink Cartridge
When the INK OU T light on the control panel flashes, the ink
in the ink cartridge is low. The printer contin ues printing
until the cartridge is completely empt y. When it is out of ink,
the printer stops and the INK O UT light stays on. Printing will
not resume un ti l you insert a new cartridge.
It’s a good idea to keep a sp are ink cartridge on hand . Use
EPSON ink cartridge S020025 to ensure proper operation and
preserve the life of the print head. Other br ands of ink may
clog the print head or damage it.
Follow these steps to remove the empty cartridge:
1. Make sure the printer st op s printing and both the INK OUT
and PAUSE lights stay on. Then op en th e printer cover.
2. Hold down the ALT button for several seco nds and release
the button when the print head moves to the ink cartridge
replace position.
3. Pull the ink cartrid ge clamp toward y ou to release t he
cartridge. (The clamp pushes the ink cartridge up so it is
easy to grasp.)
3. Pull the paper out gently. If the paper tears, make sure you
remove any remaining pieces.
4. If the paper is caught in the paper ejection area, gently pull
it out of the printer.
5. Push the access panel back onto the rear of the pri n te r.
When loading continuous paper, replace the push tractor.
Close the printer cover and the paper f eeder co v er.
Preventing paper feed and paper jam problems
If you have frequent paper feed or paper jam problems, refer
to this checklist of corrective measures:
❏ Use a higher-quality paper, one that is not too thin or
rough. Some types of paper require ma nual feeding.
❏ Fan the stack of paper and then tap it on an edge to align
it before you load it.
❏ Be sure that you do no t lo ad too much paper in the pa per
feeder.
❏ Try turning the stack of paper over in the paper feeder.
Most packag es of paper indicate the best side to print on
with an arrow on the end of the package. Make sure the
best side is loaded face down.
4. Lift the cartridge out of the printer and dispose of it properly.
Do not take the used cart ridge apart or try to refill it.
Warning:
w
The ink cartridge is self-contained to prevent leaks. However,
if ink gets on your hands, wash them thoroughly with soapy
water. If ink gets on your hands, flush them immediately with
water.
5. See “Installing the Ink Cartridge” for step-by-step
instructions on installing the new cartridge.
Note:
When you re pla ce the cartridge, the printer will not r echarge
the ink deliv ery system again. However, the print head may
start moving as the printer perf orms normal main te nance
procedures . This can take up to 40 seconds to complete.
Ink Jet Printers 4/26/94 EPSON STYLUS 1000-11
Page 12

EPSON STYLUS 1000
Cleaning the P r in t Head
If print quality d im inishes, use the printer’s built-in printhead cleaning cycle to ensure that the nozzles are delivering
ink properly. To av oid wasting ink, c lean t he print head only
if print quality declines.
Follow these steps:
1. Make sure the printer is turned on and the PAUSE light is
on. If th e PAUSE light is not on, pres s the PAUSE button to
pause the printer.
2. Hold down the ALT button and press the PAUSE bu tto n fo r
two seconds.
The cleaning cycle ta kes about 40 seconds. The PAUSE light
flashes throughout the cycle and then stay s on w hen th e
cleaning cycle is f inished.
3. Press the PAUSE button to resume printing.
Information Reference List
Engineerin g Chan g e Notices
None
Product Support Bulletins
None
Technical Information Bu lletins
None
Related Documentation
TM-STYLUS 1 STYLUS 1000 Service Manual
PL-STYLU S1 STYLUS 1000 Parts Price List
4002940 STYLUS 1000 User’s Guide
EPSON STYLUS 1000-12 4/26/94 Ink Jet Printers
 Loading...