

Page 1

User’s Guide
NPD3701-00 EN
Page 2

SpectroProofer Mounter 24"/44" User’s Guide
Copyrights and Trademarks
Copyrights and Trademarks
No part of this publication may be reproduced, stored in a retrieval system, or transmitted in any form or by any means, electronic,
mechanical, photocopying, recording, or otherwise, without the prior written permission of Seiko Epson Corporation. The information
contained herein is designed only for use with this Epson printer. Epson is not responsible for any use of this information as applied to
other printers.
Neither Seiko Epson Corporation nor its affiliates shall be liable to the purchaser of this product or third parties for damages, losses, costs,
or expenses incurred by the purchaser or third parties as a result of accident, misuse, or abuse of this product or unauthorized
modifications, repairs, or alterations to this product, or (excluding the U.S.) failure to strictly comply with Seiko Epson Corporation’s
operating and maintenance instructions.
Seiko Epson Corporation shall not be liable for any damages or problems arising from the use of any options or any consumable products
other than those designated as Original Epson Products or Epson Approved Products by Seiko Epson Corporation.
Seiko Epson Corporation shall not be held liable for any damage resulting from electromagnetic interference that occurs from the use of
any interface cables other than those designated as Epson Approved Products by Seiko Epson Corporation.
®
EPSON
Microsoft
Apple
is a registered trademark, and EPSON STYLUS™ and Exceed Your Vision are trademarks of Seiko Epson Corporation.
®
, Windows®, and Windows Vista® are registered trademarks of Microsoft Corporation.
®
and Macintosh® are registered trademarks of Apple Inc.
General Notice: Other product names used herein are for identification purposes only and may be trademarks of their respective owners. Epson disclaims
any and all rights in those marks.
Copyright© 2008 Seiko Epson Corporation. All rights reserved.
2
Page 3

SpectroProofer Mounter 24"/44" User’s Guide
Contents
Contents
Copyrights and Trademarks
Safety Instructions
Important Safety Instructions. . . . . . . . . . . . . . . . .4
Warnings, Cautions, and Notes . . . . . . . . . . . . . . .4
Introduction
Mounter (Front Face) . . . . . . . . . . . . . . . . . . . . . . . .5
Mounter (Bottom Face) . . . . . . . . . . . . . . . . . . . . . .6
Accessories . . . . . . . . . . . . . . . . . . . . . . . . . . . . . . . .6
Color Measurement Device
(ILS20EP/ILS20EPUV) . . . . . . . . . . . . . . . . . . . . . .7
Handling Instructions . . . . . . . . . . . . . . . . . . . . . . .7
Color Measurement Device
(ILS20EP/ILS20EPUV) . . . . . . . . . . . . . . . . . . . .7
Backing . . . . . . . . . . . . . . . . . . . . . . . . . . . . . . . . .8
Mounter . . . . . . . . . . . . . . . . . . . . . . . . . . . . . . . . .8
How To Use
Procedures. . . . . . . . . . . . . . . . . . . . . . . . . . . . . . . . .9
Turning On/Off This Product . . . . . . . . . . . . . . .10
Supported Media . . . . . . . . . . . . . . . . . . . . . . . . . .10
Making Initial Settings. . . . . . . . . . . . . . . . . . . . . .10
Measuring Color. . . . . . . . . . . . . . . . . . . . . . . . . . .11
Starting SpectroProofer Utilities . . . . . . . . . . .11
Color calibration. . . . . . . . . . . . . . . . . . . . . . . . .11
Preparing and executing a color
measurement job . . . . . . . . . . . . . . . . . . . . . . . .12
When Ink Gets on the Front or Back Side
of the Paper . . . . . . . . . . . . . . . . . . . . . . . . . . . . . . .17
When SpectroProofer Utilities Ends with
an Error . . . . . . . . . . . . . . . . . . . . . . . . . . . . . . . . . .19
Something Wrong with Color Measurement
Data . . . . . . . . . . . . . . . . . . . . . . . . . . . . . . . . . . . . .20
Appendix
Uninstalling SpectroProofer Utilities . . . . . . . . .21
Windows 2000/Windows XP. . . . . . . . . . . . . .21
Windows Vista . . . . . . . . . . . . . . . . . . . . . . . . . .21
Mac OS. . . . . . . . . . . . . . . . . . . . . . . . . . . . . . . . .21
System Requirements . . . . . . . . . . . . . . . . . . . . . .22
Specifications . . . . . . . . . . . . . . . . . . . . . . . . . . . . .22
Where To Get Help
Technical Support Web Site . . . . . . . . . . . . . . . . .24
Contacting Customer Support . . . . . . . . . . . . . . .24
Before Contacting Epson. . . . . . . . . . . . . . . . . .24
Help for Users in North America . . . . . . . . . .25
Help for Users in Europe . . . . . . . . . . . . . . . . .25
Help for Users in Australia. . . . . . . . . . . . . . . .25
Help for Users in Singapore . . . . . . . . . . . . . . .26
Help for Users in Thailand . . . . . . . . . . . . . . . .26
Help for Users in Vietnam . . . . . . . . . . . . . . . .26
Help for Users in Indonesia . . . . . . . . . . . . . . .26
Help for Users in Hong Kong . . . . . . . . . . . . .27
Help for Users in Malaysia. . . . . . . . . . . . . . . .28
Help for Users in India . . . . . . . . . . . . . . . . . . .28
Help for Users in the Philippines . . . . . . . . . .29
Maintenance
Cleaning the Associate Parts for
ILS20EP/ILS20EPUV. . . . . . . . . . . . . . . . . . . . . . .13
Cleaning procedures . . . . . . . . . . . . . . . . . . . . .13
Recertification for Color Measurement Device
ILS20EP/ILS20EPUV. . . . . . . . . . . . . . . . . . . . . . .14
Removing the Mounter . . . . . . . . . . . . . . . . . . . . .15
Moving or Transporting the Product . . . . . . . . .16
Troubleshooting
When Error Message Appears in the Printer’s
Control Panel . . . . . . . . . . . . . . . . . . . . . . . . . . . . .17
3
Page 4

SpectroProofer Mounter 24"/44" User’s Guide
Safety Instructions
Safety Instructions
Read all of these instructions before using your
product. Also be sure to follow all warnings and
instructions marked on the product.
Warnings, Cautions, and Notes
Warnings
w
must be followed carefully to avoid bodily injury.
Important Safety Instructions
❏ Do not block or cover the openings in the
product’s cabinet.
❏ Do not insert objects through the slots. Take
care not to spill liquid on the product.
❏ Use only the type of power source indicated
on the product’s label.
❏ Use only the power cord that comes with the
product. Use of another cord may result in
fire or electric shock.
❏ Printer and options each have power systems.
There is a risk of electric shock unless all the
power cables are unplugged during the
maintenance.
❏ Except as specifically explained in your
documentation, do not attempt to service the
product yourself.
Cautions
c
must be observed to avoid damage to your
equipment.
Notes
contain important information and useful tips on the
operation of the product.
❏ Unplug the product and refer servicing to
qualified service personnel under the
following conditions: The power cord or plug
is damaged; liquid has entered the product;
the product has been dropped or the cabinet
damaged; the product does not operate
normally or exhibits a distinct change in
performance.
❏ The product is heavy and unwieldy. Have
two people unpack or carry the product.
4
Page 5
SpectroProofer Mounter 24"/44" User’s Guide
Introduction
Introduction
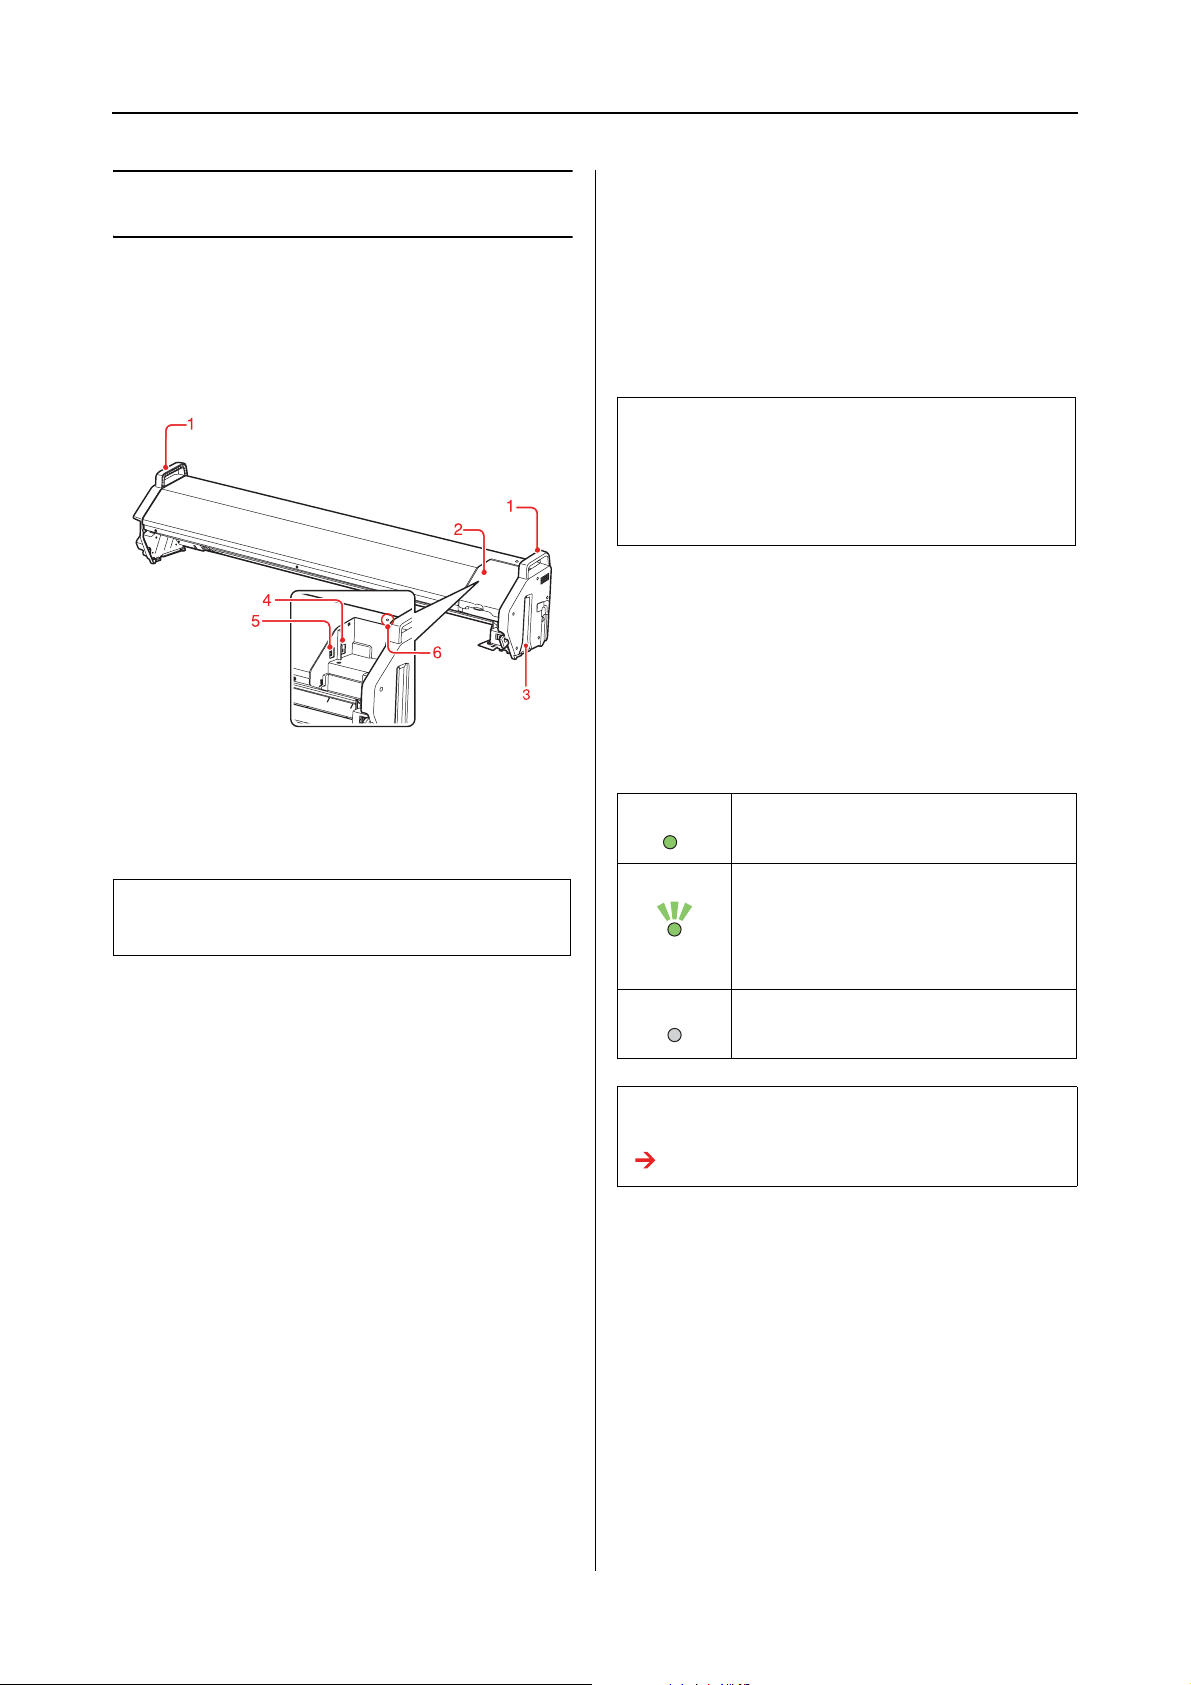
Mounter (Front Face)
4. Auto Take-up Reel Unit connector (for the
SpectroProofer Mounter 44" only)
Connects the Auto Take-up Reel Unit to the
mounter with this connector. It is used when
setting up the Auto Take-up Reel Unit and the
mounter at the same time. A connection cable is
included in the box with your Auto Take-up Reel
Unit.
Note:
The Auto Take-up Reel Unit is optional with Epson
Stylus Pro 9900/9910. The SpectroProofer Mounter
24" for Epson Stylus Pro 7900/7910 does not support
connecting to Auto Take-up Reel Unit.
5. Interface connector to the printer
Connects the mounter to your printer with this
connector. An interface cable is included in the
box with this product.
1. Handles
Use the handles when installing or removing the
mounter.
Caution:
c
Avoid using these handles to move the printer.
2. Cover
Opens the cover when you set or remove
ILS20EP/ILS20EPUV as well as when you
connect the cables.
3. Guide rails (right and left)
Aligns the guide rails with the mounting guides
when attaching to the printer.
6. Light
Indicates the status of the SpectroProofer. See the
following table for the details.
On This product is on and in the ready
state.
Flashing This product is in operation or has an
error.
The error content can be checked
by the messages on the printer’s
control panel.
Off This product is off.
Or, this product is in the Sleep mode.
Note:
This product has no power button.
See “Turning On/Off This Product” on page 10
5
Page 6

SpectroProofer Mounter 24"/44" User’s Guide
Introduction
Mounter (Bottom Face)
1. Color Measurement Device carriage
Moves ILS20EP/ILS20EPUV between right and
left.
2. Mini USB interface cable
Receives data from ILS20EP/ILS20EPUV.
3. DC cable
Supplies power to ILS20EP/ILS20EPUV.
Accessories
1. White calibration tile holder
Holds the white calibration tile.
2. Backing
The backing are plates placed underneath the
paper during color-measuring. Attach either
black or white backing to the printer.
4. Paper Presser
Holds the paper during measuring color.
5. AC inlet
Plug the power cord here.
Note:
The SpectroProofer Mounter 44" comes with two each
of black and white plates. The SpectroProofer
Mounter 24" comes with one each of black and white
plates.
3. Mounting guide
The guide for attaching the mounter to the
printer.
4. Clamp
Attach the clamp on the stand of the printer to fix
the printer connection cable and power cord.
5. Hex socket head bolts
Fix the mounting guide to the printer using the
hex socket head bolts.
6. Hex wrench
The tool used when the hex socket head bolts are
installed.
7. Printer connection cable
This cable is used when connecting the mounter
to the printer.
8. Power cord
This cord is used when connecting the mounter to
the AC inlet.
6
Page 7
SpectroProofer Mounter 24"/44" User’s Guide
Introduction
Color Measurement Device (ILS20EP/ILS20EPUV)
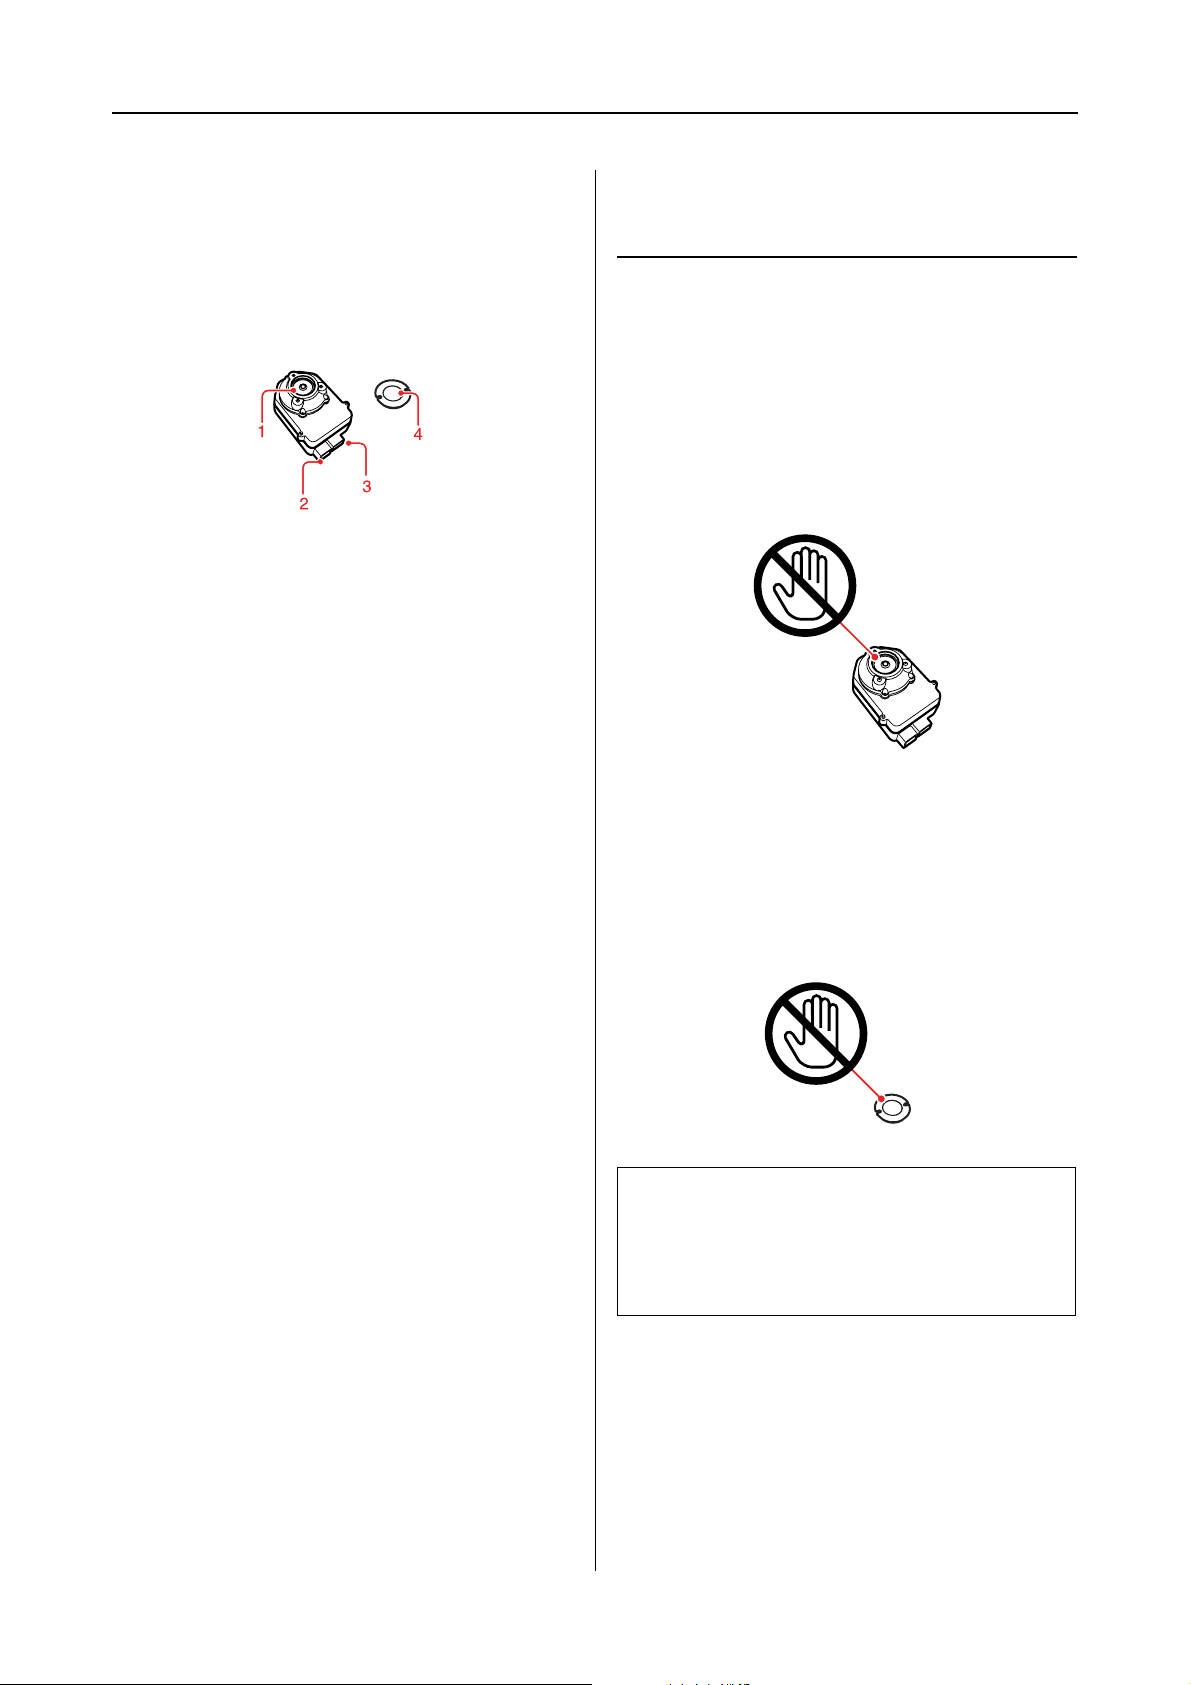
1. Lens
Scans the print when measuring colors.
2. DC connector
Attach the DC connector to the DC cable located
on the Color Measurement Device carriage,
placed at the bottom of the mounter.
Handling Instructions
Color Measurement Device (ILS20EP/ILS20EPUV)
❏ Do not touch the lens directly or place the lens
face down.
If a scratch, dirt or other matter gets on the
lens, it may affect the color measuring result.
3. Mini USB interface connector
Attach the Mini USB interface connector to the
Mini USB interface cable located on the Color
Measurement Device carriage, placed at the
bottom of the mounter.
4. White calibration tile
The white-based tile for color measurement data.
Use this tile by setting the white calibration tile
holder.
❏ Do not touch the white surface of the white
calibration tile.
If a scratch, dirt or other matter gets on the
surface, it may affect the color measuring
result.
Caution:
c
Do not break or lose the white calibration tile.
You cannot buy the white calibration tile by
itself. You need to purchase
ILS20EP/ILS20EPUV set.
7
Page 8
SpectroProofer Mounter 24"/44" User’s Guide
Introduction
❏ Use ILS20EP/ILS20EPUV and the white
calibration tile contained in the set that comes
with this product.
ILS20EP/ILS20EPUV and the white
calibration tile are adjusted to be a set, and
given the same number in the factory. If you
purchase two or more products, make sure
that you use the same numbered devices in
pairs.
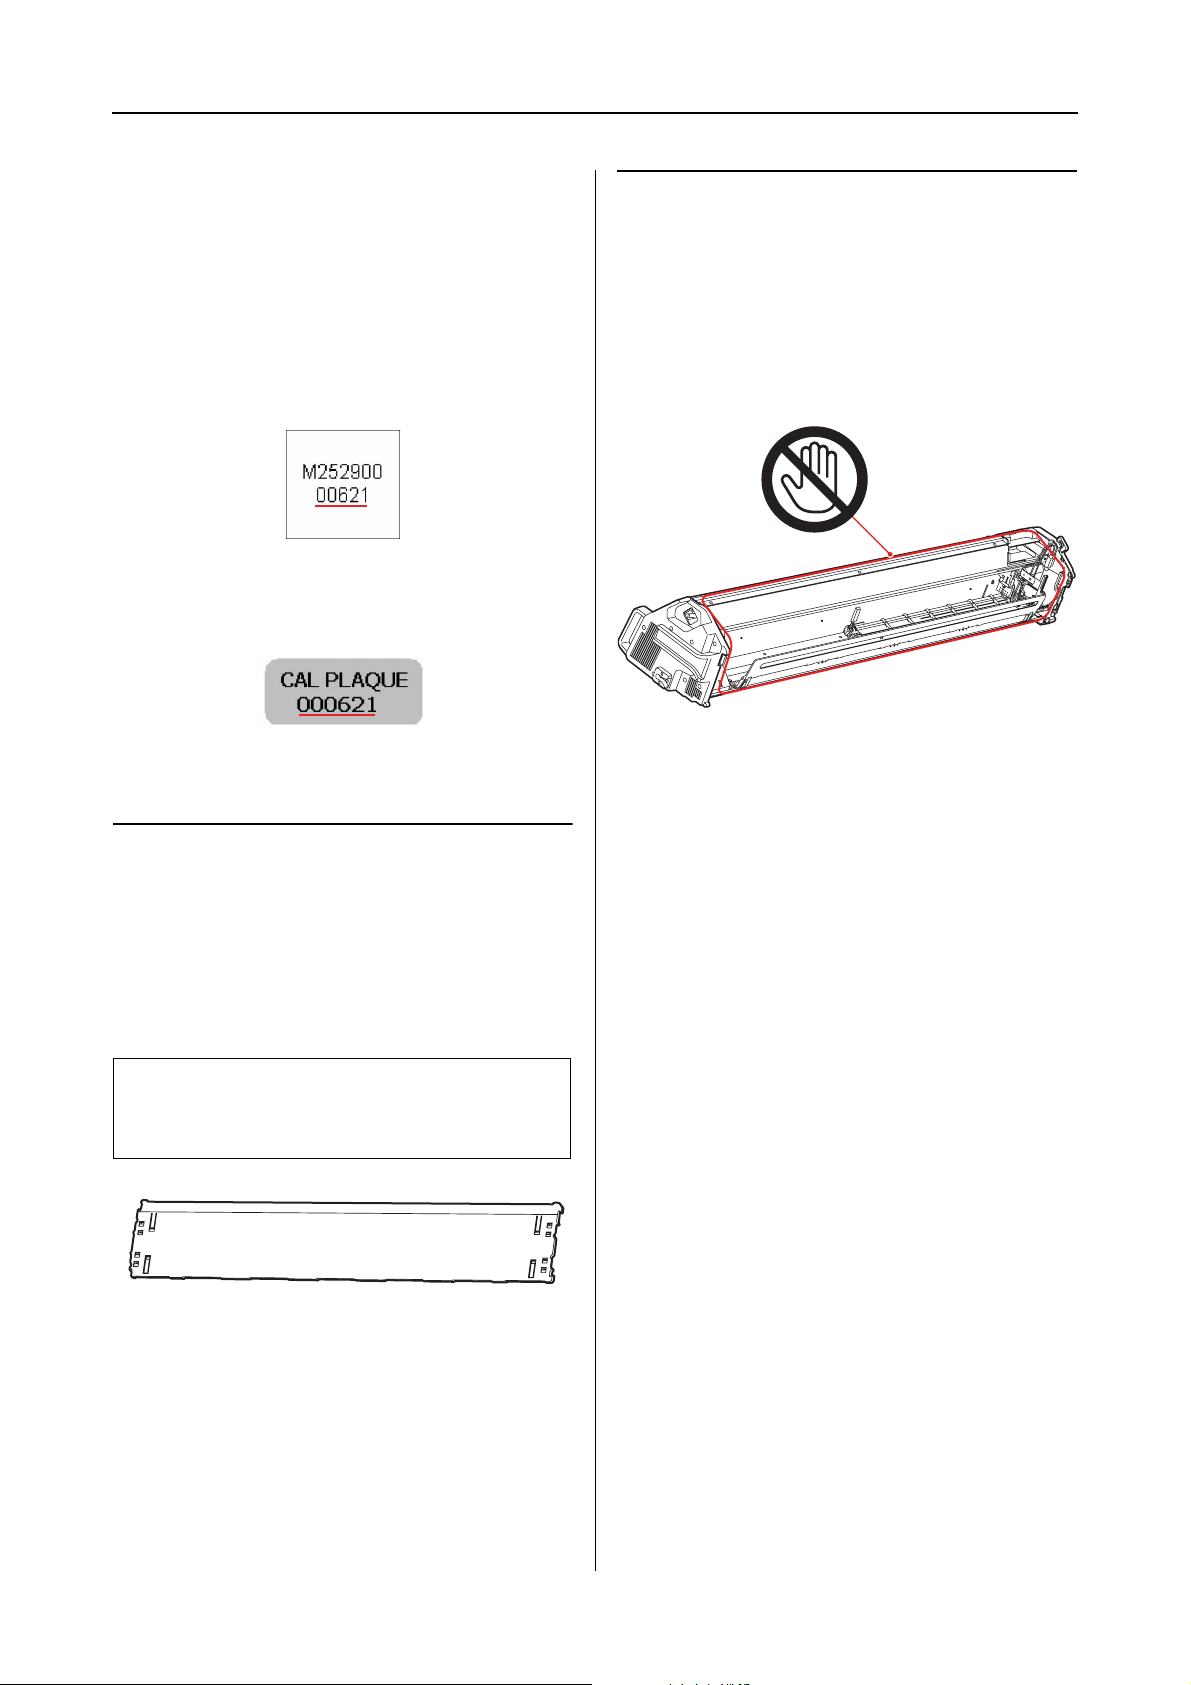
The label of ILS20EP/ILS20EPUV
Mounter
Do not touch the following parts when the power
is on.
Unnecessary touching the inside of the mounter
may damage the product.
The label of the white calibration tile
Backing
Take care to prevent a scratch or dirt getting on
the surface of the backing.
If a scratch, dirt or other matter gets on the
backing, it may affect the color measuring result.
Caution:
c
Do not drop or knock it against hard objects
because the backing is a fragile part.
8
Page 9
SpectroProofer Mounter 24"/44" User’s Guide
How To Use
How To Use
This product is the automated color measurement system used by mounting the Epson Stylus Pro
9900/7900/9910/7910.
The printer driver must be installed on the computer.
To perform color measuring operation, install the SpectroProofer Utilities from the software CD-ROM,
bundled with this product.
Procedures
1. Confirming the printer setup See the SpectroProofer Mounter 24"/44" Setup Guide
Make sure to complete the printer setup (setting up the printer and installing the printer driver). Turn
on the printer and make sure it is in the ready state.
2. Initial settings of SpectroProofer See “Making Initial Settings” on page 10
Performs the initial settings of SpectroProofer.
3. Color calibration See “Color calibration” on page 11
Calibrate your printer using Printer Linearization in the SpectroProofer Utilities.
4. Color measurement See “Preparing and executing a color measurement job” on page 12
Select a job by starting Preparing and executing a color measurement job in the SpectroProofer
Utilities.
When you start Job status confirmation on the SpectroProofer Utilities, you can check the status of the
current job.
See the online help for detailed information.
9
Page 10

SpectroProofer Mounter 24"/44" User’s Guide
How To Use
Turning On/Off This Product
This product has no power button.
The power is on when you plug the power cord
into the outlet (100 V AC).
The power is off when you unplug the power
cord from the wall outlet.
Caution:
c
When using this product, plug this product’s
power cord into the outlet, and then turn on the
printer. This product does not work correctly if
you turn on the printer beforehand.
Supported Media
Some of the media supported by Epson Stylus Pro
9900/7900/9910/7910 cannot be used with this
product. See the SpectroProofer Utilities online
help for the supported media.
Making Initial Settings
After setting up this product on the printer, make
the initial settings before using.
The initial settings should be performed once.
You do not need to make the initial settings for
each installation or removal of the mounter.
Follow the procedures below.
Set the roll paper on the printer.
A
See the SpectroProofer Utilities online help
for the supported media.
Select OPTIONS SETUP, SpectroProofer,
B
DEVICE ALIGNMENT and EXECUTE, and then
press the OK button on the printer’s control
panel.
The printer automatically prints out and
measures the adjustment pattern to
perform the setup. This process takes about
one minute to complete.
When the initial settings is complete, READY
is displayed on the printer’s control panel.
10
Page 11

SpectroProofer Mounter 24"/44" User’s Guide
How To Use
Measuring Color
This section introduces the color measuring
procedures using SpectroProofer Utilities which
is the operation tool for this product.
See the online help of the SpectroProofer Utilities
for detailed information.
Starting SpectroProofer Utilities
Follow the instructions below to start
SpectroProofer Utilities.
Windows
Click Start, point to All Programs, point to
SpectroProofer Utilities, and then click
SpectroProofer Utilities.
Color calibration
You can perform the color calibration to keep
high print quality with reduced color difference.
We recommend you perform the color calibration
once every two weeks or once a month.
Start the SpectroProofer Utilities.
A
See “Starting SpectroProofer Utilities”
on page 11
Click Printer Linearization.
B
Mac OS X
Double-click the hard disk icon, the Applications
folder, the SpectroProofer Utilities folder, and
then the SpectroProofer Utilities icon.
Follow the wizard to perform color
C
calibration.
Click the Help button to see the online help for
detailed information.
11
Page 12

SpectroProofer Mounter 24"/44" User’s Guide
How To Use
Preparing and executing a color measurement job
This section introduces the color measuring
procedures using Preparing and executing a
color measurement job.
See the online help for detailed information.
Turn on the printer. Make sure the printer
A
and this product are both in the ready state.
Make the initial settings when you use this
product for the first time.
Select the job you want to perform.
E
Follow the wizard to complete the settings.
See “Making Initial Settings” on page 10
Perform maintenance if necessary.
See “Cleaning the Associate Parts for
ILS20EP/ILS20EPUV” on page 13
Set the paper in the printer.
B
See the SpectroProofer Utilities online help
for the supported media.
Please refer to the User’s Guide of the printer
when you set the paper.
Start the SpectroProofer Utilities.
C
See “Starting SpectroProofer Utilities”
on page 11
Click Preparing and executing a color
D
measurement job.
Click the Help button to see the online help
for detailed information.
Note:
The ICC profile cannot be created by the
SpectroProofer Utilities alone. You need a
creation software separately.
12
Page 13

SpectroProofer Mounter 24"/44" User’s Guide
Maintenance
Maintenance
Cleaning the Associate Parts for ILS20EP/ILS20EPUV
If the color measurement value indicates
abnormal value, clean the product. To maintain a
good condition of the product, we recommend
you to care for once a month.
Remove the white calibration tile from the
C
white calibration tile holder.
Remove the backing from the printer.
D
Cleaning procedures
Clean the following three parts:
❏ the backing surface
❏ the surface of the white calibration tile
❏ the lens of ILS20EP/ILS20EPUV
The procedures are as follows.
Remove ILS20EP/ILS20EPUV and the
A
mounter from the printer.
See “Removing the Mounter” on page 15
Remove the white calibration tile holder
B
from the printer.
Caution:
c
Because the backing is a fragile part, do
not drop the backing while removing it.
Use a dry, soft cloth to carefully remove any
E
dust or dirt from the surface of the white
calibration tile or the surface of the backing.
If the dirt does not come off, clean it using a
soft, clean cloth dampened with water.
Then, wipe it with a dry, soft cloth.
13
Page 14

SpectroProofer Mounter 24"/44" User’s Guide
Maintenance
Use an air spray for OA equipment to blow
F
the dust off the lens in
ILS20EP/ILS20EPUV.
Caution:
c
Do not touch the lens directly in
ILS20EP/ILS20EPUV.
Attach the backing to the printer.
G
See the SpectroProofer Mounter 24"/44"
Setup Guide
Set the white calibration tile to the white
H
calibration tile holder, and then attach it to
the printer.
See the SpectroProofer Mounter 24"/44"
Setup Guide
Install the mounter to the printer.
I
See the SpectroProofer Mounter 24"/44"
Setup Guide
Install ILS20EP/ILS20EPUV to the
J
mounter.
Recertification for Color Measurement Device ILS20EP/ILS20EPUV
We recommend to inspect ILS20EP/ILS20EPUV
once a year.
For detailed information, contact customer
support services for assistance. If customer
support for your area is not listed below, contact
the dealer where you purchased your product.
See “Where To Get Help” on page 24
See the instructions below to send
ILS20EP/ILS20EPUV for recertification.
❏ When sending for recertification, make sure
that the white calibration tile and
ILS20EP/ILS20EPUV are in the set.
Caution:
c
ILS20EP/ILS20EPUV and the white
calibration tile are adjusted to be a set, and
given the same number in the factory.
When sending for recertification, make
sure to send the same numbered devices in
pairs.
❏ Use the original box to pack the devices.
See the SpectroProofer Mounter 24"/44"
Setup Guide
14
Page 15

SpectroProofer Mounter 24"/44" User’s Guide
Maintenance
Removing the Mounter
When transporting or maintaining the printer and
mounter, follow the steps below to remove the
mounter from the printer.
Turn off the printer.
A
Unplug the power cord from the mounter.
B
Open the cover, and unplug the printer
C
connection cable and the Auto Take-up
Reel Unit connection cable.
Caution:
c
❏ Remove ILS20EP/ILS20EPUV from
the mounter before removing the
mounter. Leaving
ILS20EP/ILS20EPUV inside the
mounter may result in damage to the
lens when placing the mounter on the
floor.
❏ Do not touch the lens in
ILS20EP/ILS20EPUV.
Note:
The Auto Take-up Reel Unit is optional with
Epson Stylus Pro 9900/9910. The
SpectroProofer Mounter 24" for Epson Stylus
Pro 7900/7910 does not support connecting to
Auto Take-up Reel Unit.
Unplug the two interface cables connected
D
with ILS20EP/ILS20EPUV.
15
Page 16

SpectroProofer Mounter 24"/44" User’s Guide
Maintenance
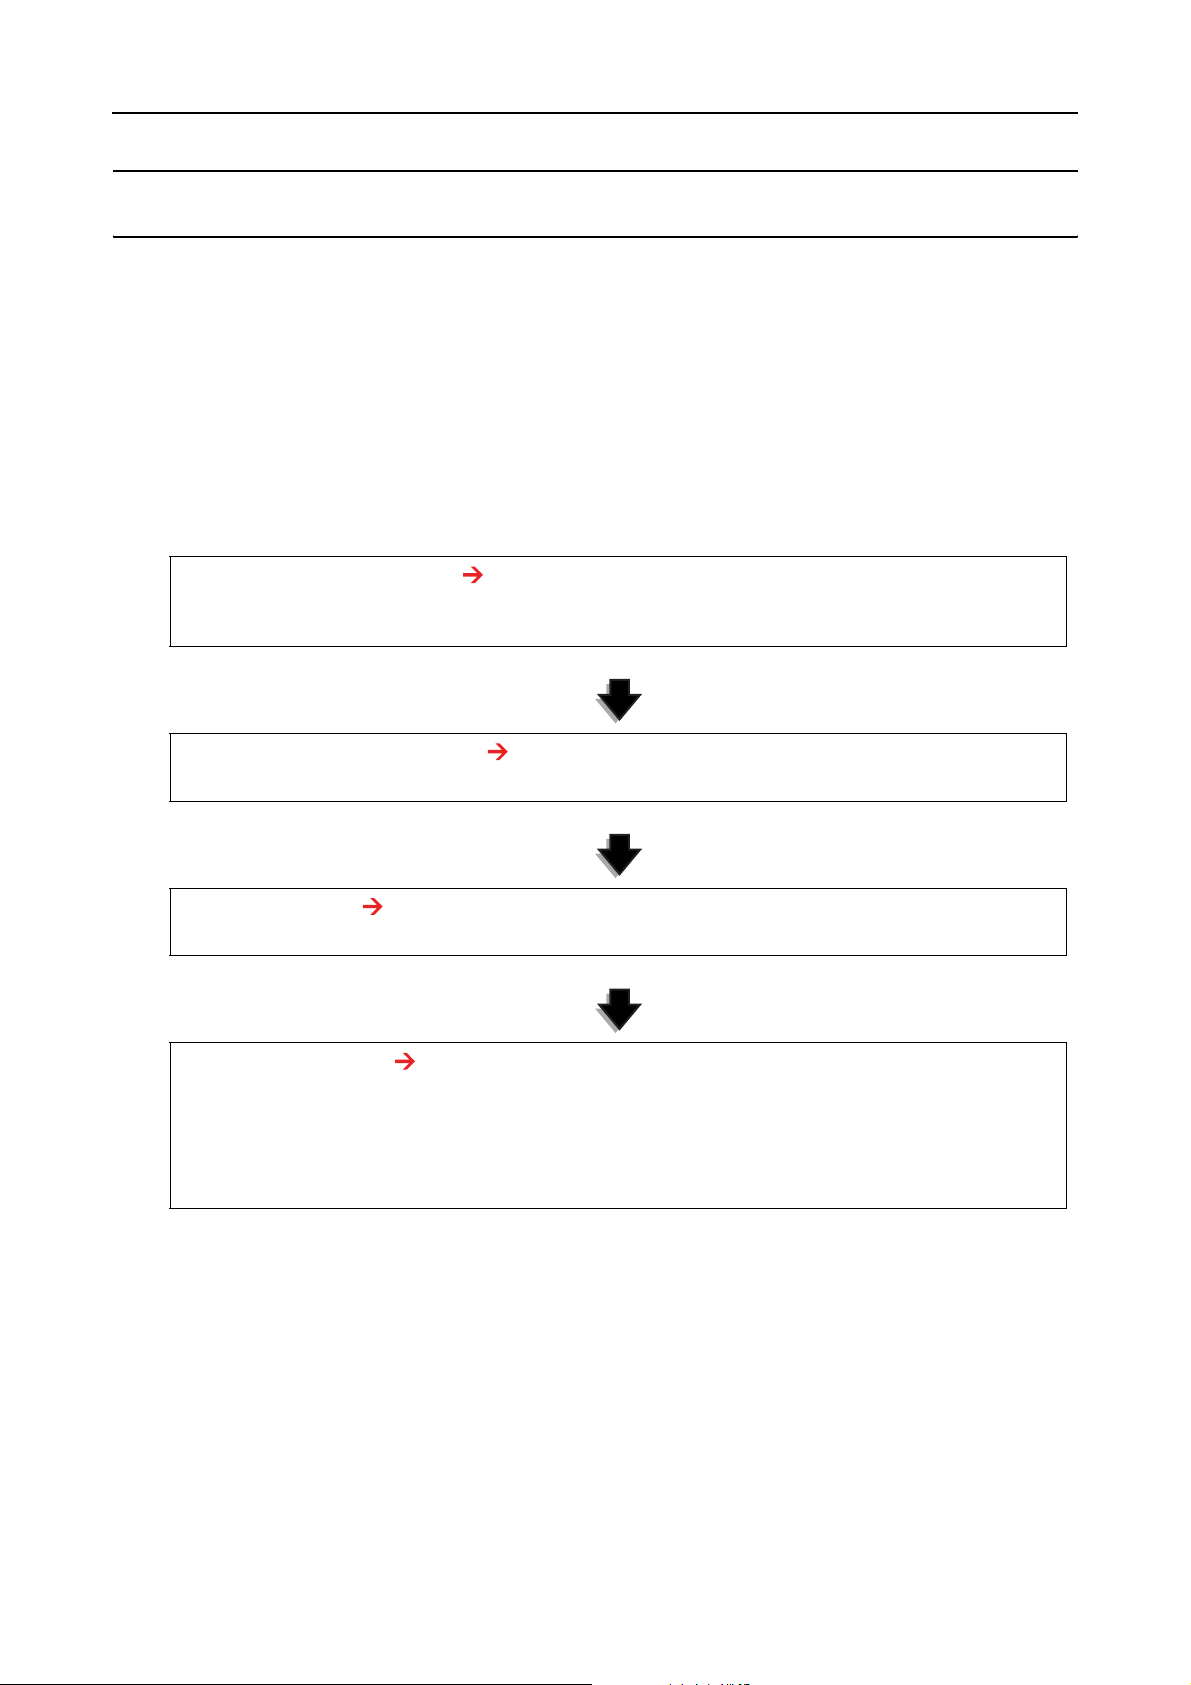
Hold the rear of ILS20EP/ILS20EPUV and
E
lift it a little toward you, and then remove
it.
Close the cover and remove the mounter
F
from the printer.
The mounter is heavy so have two people
hold it by handles of the mounter.
Warning:
w
❏ Lift the product by the correct
positions as shown in the User’s
Guide.
If you lift the product incorrectly, you
could drop it and cause injury.
❏ When lifting the product, please work
with appropriate posture.
You may be injured if lifting it with
inappropriate posture.
Caution:
c
Do not drop ILS20EP/ILS20EPUV on the
floor. The lens may be scratched or
ILS20EP/ILS20EPUV may be damaged.
Moving or Transporting the Product
When you transport the product, see the Setup
Guide and be sure to repack the product using the
original box and packing materials.
See the SpectroProofer Mounter 24"/44" Setup
Guide
See the following section for removing a mounter
and ILS20EP/ILS20EPUV from the printer.
See “Removing the Mounter” on page 15
16
Page 17

SpectroProofer Mounter 24"/44" User’s Guide
Troubleshooting
Troubleshooting
When Error Message Appears in the Printer’s Control Panel
The error message will appear on the printer’s
control panel when an error has occurred in this
product. Please refer to the User’s Guide of the
printer for the error content and how to solve the
problem.
Clean the Paper Presser using a soft, clean
C
cloth dampened with a mild detergent.
Wipe it as illustrated below.
Then, wipe it with a dry, soft cloth.
Push back the Paper Presser fully, and slide
D
the Color Measurement Device carriage to
the left until it touches the Paper Presser.
When Ink Gets on the Front or Back Side of the Paper
Ink attached to the Paper Presser or the backing
could have been transferred to the paper. Follow
the steps below to clean the Paper Presser and the
backing.
Remove the mounter from the printer, and
A
put the mounter with the base face toward
you.
See “Removing the Mounter” on page
15
Move the Color Measurement Device
B
carriage to the far right, and raise the Paper
Presser toward you.
This enables the Paper Presser to be fixed
and prevents the plate from falling when
lifting the mounter.
Remove the white calibration tile holder
E
from the printer.
17
Page 18

SpectroProofer Mounter 24"/44" User’s Guide
Troubleshooting
Remove the backing from the printer.
F
Caution:
c
Because the backing is a fragile part, do
not drop the backing while removing it.
Remove any dust or dirt from the surface of
G
the backing.
Clean it using a soft, clean cloth dampened
with a mild detergent. Then, wipe it with a
dry, soft cloth.
Install ILS20EP/ILS20EPUV to the
K
mounter.
See the SpectroProofer Mounter 24"/44"
Setup Guide
Attach the backing to the printer.
H
See the SpectroProofer Mounter 24"/44"
Setup Guide
Attach the white calibration tile holder to
I
the printer.
See the SpectroProofer Mounter 24"/44"
Setup Guide
Install the mounter to the printer.
J
See the SpectroProofer Mounter 24"/44"
Setup Guide
18
Page 19

SpectroProofer Mounter 24"/44" User’s Guide
Troubleshooting
When SpectroProofer Utilities Ends with an Error
You need to check the error message using Job status confirmation if the status of the job becomes Error
completion.
You can check the error messages as described below.
In the work screen, select Job, and then select Property.
A
Click the Error log tab.
B
Confirm the message displayed in the Error log.
C
19
Page 20

SpectroProofer Mounter 24"/44" User’s Guide
Troubleshooting
See the following messages to solve the problems.
Note:
An error message also appears when the job has been cancelled or the printer has an error.
Error messages What to do
A communication error has occurred. Turn off the printer, and then confirm the status of the
interface cable.
If the cable is unplugged or in the wrong input, connect
it correctly and then turn on the printer again.
Color measurement has failed. Confirm if there is any problem or missing dots on the
print.
When having a problem, confirm the status of the
printer.
See the User’s Guide of the Epson Stylus Pro
9900/7900/9910/7910
Canceled due to a printer error. Confirm the message on the printer’s control panel, and
clear the printer error.
See the User’s Guide of the Epson Stylus Pro
9900/7900/9910/7910
Canceled due to a SpectroProofer error. Confirm the status of the product, and perform the
maintenance if necessary.
“Maintenance” on page 13
The results of the color measurement could not
be saved.
Increase the memory if the computer has not enough
memory to save the data.
When saving the data, make sure that the attribute of a
file is writable.
Something Wrong with Color Measurement Data
If the color measurement data is something wrong, confirm the status of SpectroProofer, and perform the
maintenance if necessary.
“Maintenance” on page 13
For detailed information on the recertification of ILS20EP/ILS20EPUV, contact customer support
services for assistance. If customer support for your area is not listed below, contact the dealer where you
purchased your product.
“Where To Get Help” on page 24
20
Page 21

SpectroProofer Mounter 24"/44" User’s Guide
Appendix
Appendix
Uninstalling SpectroProofer Utilities
Follow the steps below to uninstall the
SpectroProofer Utilities.
Windows 2000/Windows XP
Exit SpectroProofer Utilities.
A
Click Control Panel from the Start menu,
B
and then click Add or Remove Programs
(or Add/Remove Programs).
Mac OS
Quit SpectroProofer Utilities.
A
Insert the Software CD-ROM to the
B
computer.
Double-click the Setup icon.
C
Follow the on-screen instructions to
D
uninstall the software.
In the Setup dialog, select Uninstall, and
E
then click Uninstall.
Follow the on-screen instructions to
F
complete uninstallation.
Click SpectroProofer Utilities, and then
C
click Change/Remove.
Follow the on-screen instructions to
complete uninstallation.
Windows Vista
Exit SpectroProofer Utilities.
A
Click Start, and then click Control Panel.
B
Click Programs.
C
Click Programs and Features.
D
Click SpectroProofer Utilities, and then
E
click Uninstall/Change.
Caution:
c
❏ When uninstalling the software on
Windows XP/Vista, make sure to log on to
the computer as Computer Administrator
user account. When uninstalling the
software on Windows Vista, you may be
asked the password of Administrator. If so,
enter the password to continue the
operation.
❏ When uninstalling the software on
Windows 2000, make sure to log on to the
computer as a user with administrator
rights (a user belonging to the
Administrator group).
Follow the on-screen instructions to
complete uninstallation.
21
Page 22

SpectroProofer Mounter 24"/44" User’s Guide
Appendix
System Requirements
Refer to the ReadMe.txt of your software for the
minimum and recommended computer system
requirements necessary to use this product.
Caution:
c
To use this product, you need to install the
printer driver and SpectroProofer Utilities on
your computer.
Specifications
Specifications
Temperature Operation: 10 to 35°C (50 to
95°F)
Storage (packed): -20 to 60°C
(-4 to 140°F)
(Less than 120 hours at 60°C
[140°F]. Less than 1 month at
40°C [104°F])
Storage (unpacked): -20 to
40°C (-4 to 104°F)
(Less than 1 month at 40°C
[104°F])
Humidity Operation: 30 to 80% (without
condensation)
Storage (packed): 5 to 85%
(without condensation)
Storage (unpacked): 5 to 85%
(without condensation)
ILS20EP/ILS20EPUV specifications
Product model X-Rite ILS20EP, ILS20EPUV
Measurement
geometry
condition
Measurement
aperture
Source of light Tungsten lamp 2850°K
Spectrum Measurement: 16 points
Angle of field 2°/ 10°
Source of light
type
Spectrum
wavelength
area
Measurement
range
Repetition
precision
Instrument error Ave 0.5 dE cmc / 12BCRA tile
Recommended
recertification
frequency
0°/ 45° ANSI / ISO 5.4
3.55 mm diameter
Output: 31 points
A, C, D50, D55, D65, D75, F2,
F7, F11, F12
400-700nm
0-150% R (reflection)
Max 0.2 dE cmc / White tile
Max 0.8 dE cmc / Black tile
ILS20EP Standard
Ave 1.0 dE cmc /12BCRA tile
ILS20EP Standard
Once a year
Quality
Guarantee
Weight For SpectroProofer Mounter 44":
Dimensions For SpectroProofer Mounter 44":
Temperature: 20 to 26°C (68 to
78.8°F)
Humidity: 35 to 65%
Approx. 13.5 Kg (without
accessories and
ILS20EP/ILS20EPUV)
For SpectroProofer Mounter 24":
Approx. 9.0 Kg (without
accessories and
ILS20EP/ILS20EPUV)
1295(W) × 199(D) × 267(H) mm
For SpectroProofer Mounter 24":
787(W) × 199(D) × 267(H) mm
22
Page 23

SpectroProofer Mounter 24"/44" User’s Guide
Appendix
Electrical
Rated voltage AC 100 to 240 V
Input voltage
range
DC output
(the power for
ILS20EP/ILS20EP
UV)
Rated
frequency
range
Input
frequency
range
Rated current SpectroProofer
Power
consumption
AC 90 to 264 V
5.5 V 1.0 A
50 to 60 Hz
49.5 to 60.5 Hz
Mounter 44" :
SpectroProofer
Mounter 24" :
SpectroProofer
Mounter 44" :
0.3 A/100 V
0.25 A/100 V
Approx.
10.5 W
Approx.
5.0 W in
Ready Mode
Approx.
3.5 W in
Sleep Mode
Standards and approvals
U.S. model:
Safety UL60950-1
CAN/CSA-C22.2 No.60950-1
EMC FCC Part 15 Subpart B Class B
CAN/CSA-CEI/IEC CISPR 22 Class B
European model:
Low voltage
directive
2006/95/EC
EMC
directive
2004/108/EC
Australian model:
EMC AS/NZS CISPR22 Class B
EN60950-1
EN55022 Class B
EN61000-3-2
EN61000-3-3
EN55024
SpectroProofer
Mounter 24" :
Approx.
8.5 W
Approx.
5.0 W in
Ready Mode
Approx.
3.5 W in
Sleep Mode
23
Page 24

SpectroProofer Mounter 24"/44" User’s Guide
Where To Get Help
Where To Get Help
Contacting Customer Support
New :See comments to select sections you need. The word "other" indicates products except for inkjet, SPC, Page, and SIDM.
Technical Support Web Site
Epson’s Technical Support Web Site provides
help with problems that cannot be solved using
the troubleshooting information in your product
documentation. If you have a Web browser and
can connect to the Internet, access the site at:
http://support.epson.net/
If you need the latest drivers, FAQs, manuals, or
other downloadables, access the site at:
http://www.epson.com
Then, select the support section of your local
Epson Web site.
New :Only inkjet, SPC, and Scanner products are used in this section.
New :For All products
Before Contacting Epson
If your Epson product is not operating properly
and you cannot solve the problem using the
troubleshooting information in your product
documentation, contact customer support
services for assistance. If customer support for
your area is not listed below, contact the dealer
where you purchased your product.
Customer support will be able to help you much
more quickly if you give them the following
information:
❏ Product serial number
(The serial number label is usually on the back
of the product.)
❏ Product model
❏ Product software version
(Click About, Version Info, or similar button
in the product software.)
❏ Brand and model of your computer
❏ Your computer operating system name and
version
❏ Names and versions of the software
applications you normally use with your
product
24
Page 25

SpectroProofer Mounter 24"/44" User’s Guide
Where To Get Help
Help for Users in North America
Epson provides the technical support services
listed below.
Internet Support
Visit Epson’s support website at
http://epson.com/support and select your
product for solutions to common problems. You
can download drivers and documentation, get
FAQs and troubleshooting advice, or e-mail
Epson with your questions.
Speak to a Support
Representative
New :Use Inkjet, SPC, and "o ther" products Only.( general)
Purchase Supplies and
Accessories
You can purchase genuine Epson ink cartridges,
ribbon cartridges, paper, and accessories from an
Epson authorized reseller. To find the nearest
reseller, call 800-GO-EPSON (800-463-7766). Or
you can purchase online at
http://www.epsonstore.com (U.S. sales) or
http://www.epson.ca (Canadian sales).
Help for Users in Europe
Check your Pan-European Warranty Document
for information on how to contact EPSON
Customer support.
Dial: (562) 276-1300 (U.S.), or (905) 709-9475
(Canada), 6 am to 6 pm, Pacific Time, Monday
through Friday. Days and hours of support are
subject to change without notice. Toll or long
distance charges may apply.
Before you call Epson for support, please have the
following information ready:
❏ Product name
❏ Product serial number
❏ Proof of purchase (such as a store receipt) and
date of purchase
❏ Computer configuration
❏ Description of the problem
Note:
For help using any other software on your system, see the
documentation for that software for technical support
information.
Help for Users in Australia
Epson Australia wishes to provide you with a
high level of customer service. In addition to your
product documentation, we provide the
following sources for obtaining information:
Your Dealer
Don’t forget that your dealer can often help
identify and resolve problems. The dealer should
always be the first call for advise on problems;
they can often solve problems quickly and easily
as well as give advise on the next step to take.
Internet URL
http://www.epson.com.au
Access the Epson Australia World Wide Web
pages. Worth taking your modem here for the
occasional surf! The site provides a download
area for drivers, Epson contact points, new
product information and technical support
(e-mail).
New :For all products
25
Page 26

SpectroProofer Mounter 24"/44" User’s Guide
Where To Get Help
Epson Helpdesk
Epson Helpdesk is provided as a final backup to
make sure our clients have access to advice.
Operators on the Helpdesk can aid you in
installing, configuring and operating your Epson
product. Our Pre-sales Helpdesk staff can
provide literature on new Epson products and
advise where the nearest dealer or service agent is
located. Many types of queries are answered here.
The Helpdesk numbers are:
Phone: 1300 361 054
Help for Users in Thailand
Contacts for information, support, and services
are:
World Wide Web
(http://www.epson.co.th)
Information on product specifications, drivers for
download, Frequently Asked Questions (FAQ),
and e-mail are available.
New :For all products
Fax: (02) 8899 3789
We encourage you to have all the relevant
information on hand when you ring. The more
information you prepare, the faster we can help
solve the problem. This information includes
your Epson product documentation, type of
computer, operating system, application
programs, and any information you feel is
required.
Help for Users in Singapore
Sources of information, support, and services
available from Epson Singapore are:
World Wide Web
(http://www.epson.com.sg)
Information on product specifications, drivers for
download, Frequently Asked Questions (FAQ),
Sales Enquiries, and Technical Support via e-mail
are available.
New :For All products
Epson Hotline (Phone:
(66)2685-9899)
Our Hotline team can help you with the following
over the phone:
❏ Sales enquiries and product information
❏ Product usage questions or problems
❏ Enquiries on repair service and warranty
Help for Users in Vietnam
Contacts for information, support, and services
are:
Epson Hotline (Phone): 84-8-823-9239
Service Center: 80 Truong Dinh Street,
District 1, Hochiminh City
Vietnam
New :For all products
Help for Users in Indonesia
Epson HelpDesk (Phone: (65) 6586
3111)
Our HelpDesk team can help you with the
following over the phone:
❏ Sales enquiries and product information
❏ Product usage questions or problems
❏ Enquiries on repair service and warranty
Contacts for information, support, and services
are:
World Wide Web
(http://www.epson.co.id)
❏ Information on product specifications,
drivers for download
❏ Frequently Asked Questions (FAQ), Sales
Enquiries, questions through e-mail
26
New :For all products
Page 27

SpectroProofer Mounter 24"/44" User’s Guide
Where To Get Help
Epson Hotline
❏ Sales enquiries and product information
❏ Technical support
Phone (62) 21-572 4350
Help for Users in Hong Kong
To obtain technical support as well as other
after-sales services, users are welcome to contact
Epson Hong Kong Limited.
New :For All products
Fax (62) 21-572 4357
Epson Service Center
Jakarta Mangga Dua Mall 3rd floor No 3A/B
Jl. Arteri Mangga Dua,
Jakarta
Phone/Fax: (62) 21-62301104
Bandung Lippo Center 8th floor
Jl. Gatot Subroto No.2
Bandung
Phone/Fax: (62) 22-7303766
Surabaya Hitech Mall lt IIB No. 12
Jl. Kusuma Bangsa 116 – 118
Surabaya
Phone: (62) 31-5355035
Fax: (62)31-5477837
Yogyakarta Hotel Natour Garuda
Jl. Malioboro No. 60
Yogyakarta
Phone: (62) 274-565478
Internet Home Page
Epson Hong Kong has established a local home
page in both Chinese and English on the Internet
to provide users with the following information:
❏ Product information
❏ Answers to Frequently Asked Questions
(FAQs)
❏ Latest versions of Epson product drivers
Users can access our World Wide Web home page
at:
http://www.epson.com.hk
Technical Support Hotline
You can also contact our technical staff at the
following telephone and fax numbers:
Medan Wisma HSBC 4th floor
Jl. Diponegoro No. 11
Medan
Phone/Fax: (62) 61-4516173
Makassar MTC Karebosi Lt. Ill Kav. P7-8
JI. Ahmad Yani No.49
Makassar
Phone: (62)411-350147/411-350148
Phone: (852) 2827-8911
Fax: (852) 2827-4383
27
Page 28

SpectroProofer Mounter 24"/44" User’s Guide
Where To Get Help
Help for Users in Malaysia
Contacts for information, support, and services
are:
World Wide Web
(http://www.epson.com.my)
❏ Information on product specifications,
drivers for download
❏ Frequently Asked Questions (FAQ), Sales
Enquiries, questions through e-mail
Epson Trading (M) Sdn. Bhd.
Head Office.
Phone: 603-56288288
Fax: 603-56288388/399
New :For All products
Help for Users in India
Contacts for information, support, and services
are:
World Wide Web
(http://www.epson.co.in)
Information on product specifications, drivers for
download, and products enquiry are available.
Epson India Head Office Bangalore
Phone: 080-30515000
Fax: 30515005
Epson India Regional Offices:
New :For all products
Epson Helpdesk
❏ Sales enquiries and product information
(Infoline)
Phone: 603-56288222
❏ Enquiries on repair services & warranty,
product usage and technical support
(Techline)
Phone: 603-56288333
Location Telephone
number
Mumbai 022-28261515
/16/17
Delhi 011-30615000 011-30615005
Chennai 044-30277500 044-30277575
Kolkata 033-22831589 / 90 033-22831591
Hyderabad 040-66331738/ 39 040-66328633
Cochin 0484-2357950 0484-2357950
Coimbatore 0422-2380002 NA
Pune 020-30286000
/30286001
/30286002
Ahmedabad 079-26407176 / 77 079-26407347
Fax number
022-28257287
020-30286000
Helpline
For Service, Product info or to order a cartridge 18004250011 (9AM - 9PM) - This is a Toll-free
number.
For Service (CDMA & Mobile Users) - 3900 1600
(9AM - 6PM) Prefix local STD code
28
Page 29

SpectroProofer Mounter 24"/44" User’s Guide
Where To Get Help
Help for Users in the Philippines
To obtain technical support as well as other after
New :For All products
sales services, users are welcome to contact the
Epson Philippines Corporation at the telephone
and fax numbers and e-mail address below:
Trunk Line: (63-2) 706 2609
Fax: (63-2) 706 2665
Helpdesk Direct Line: (63-2) 706 2625
E-mail: epchelpdesk@epc.epson.com.ph
World Wide Web (http://www.epson.com.ph)
Information on product specifications, drivers for
download, Frequently Asked Questions (FAQ),
and E-mail Enquiries are available.
Toll-Free No. 1800-1069-EPSON(37766)
Our Hotline team can help you with the following
over the phone:
❏ Sales enquiries and product information
❏ Product usage questions or problems
❏ Enquiries on repair service and warranty
29
 Loading...