

Page 1
EPSON Stylus®Pro 4000
Start Here
Start Here
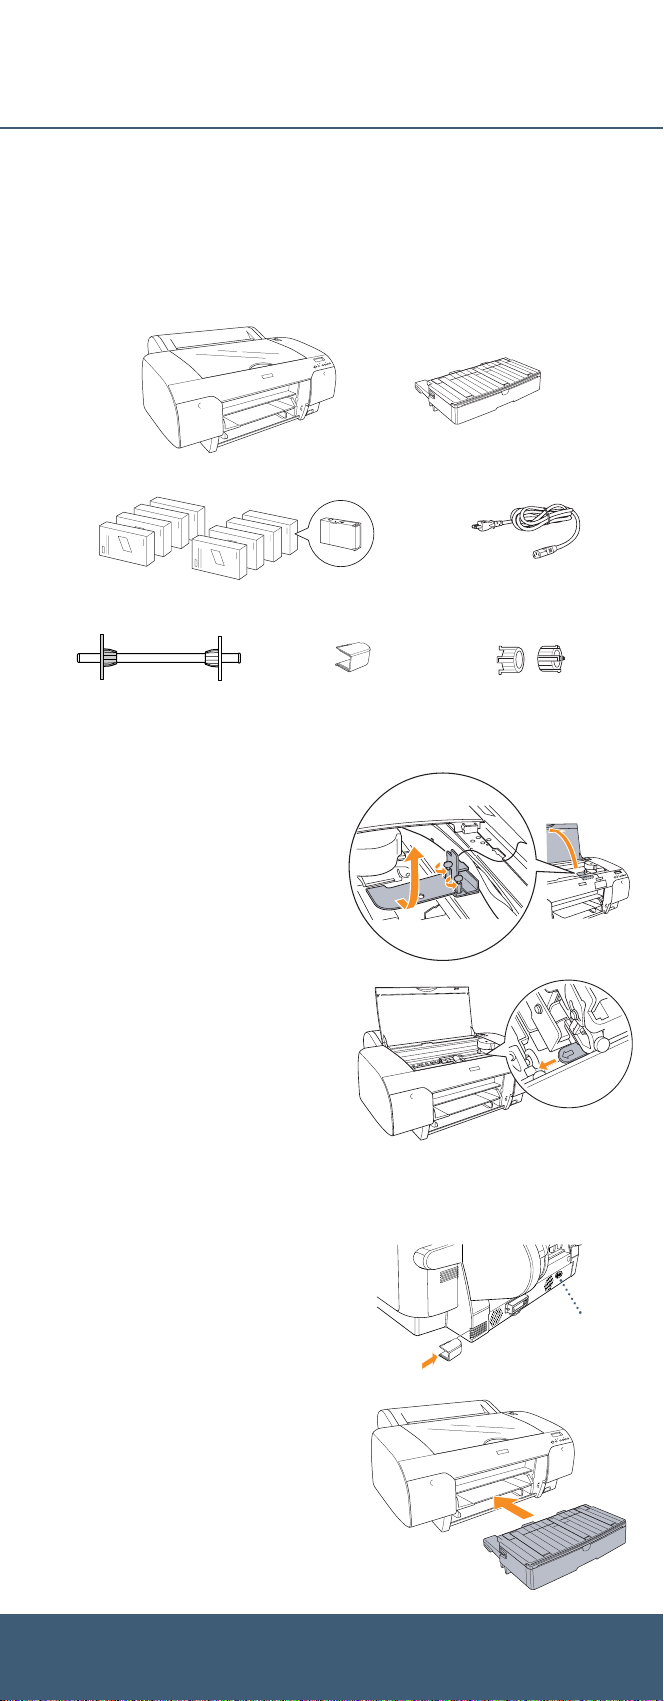
Unpack
1 Make sure you have all the parts shown below for your EPSON Stylus Pro 4000:
Printer
Ink cartridges
Roll paper spindle
Warning: The printer weighs about 85 pounds, and should be lifted by two people.
Exhaust port cover
Paper tray
(attached to spindle)
2 Remove all the packing materials and
tape. Save the box and packaging in case
you need to ship the printer.
3 Loosen the two screws and remove the
carriage retainer bracket.
4 Unlock the print head carriage by
pulling the green tab to the left. Do
not remove the tab.
Power cord
Spindle adapters
Note: To lock the print head carriage
for transportation, push the green tab to
the right.
Set Up and Plug In
1 Connect the power cord to the AC
inlet on the back of the printer.
2 Plug the other end of the power
cord into a properly grounded
electrical outlet.
3 Attach the exhaust port cover by sliding it
along the slots on the back of the printer.
4 Insert the paper tray into the slots at
the front of the printer.
AC inlet
Page 2
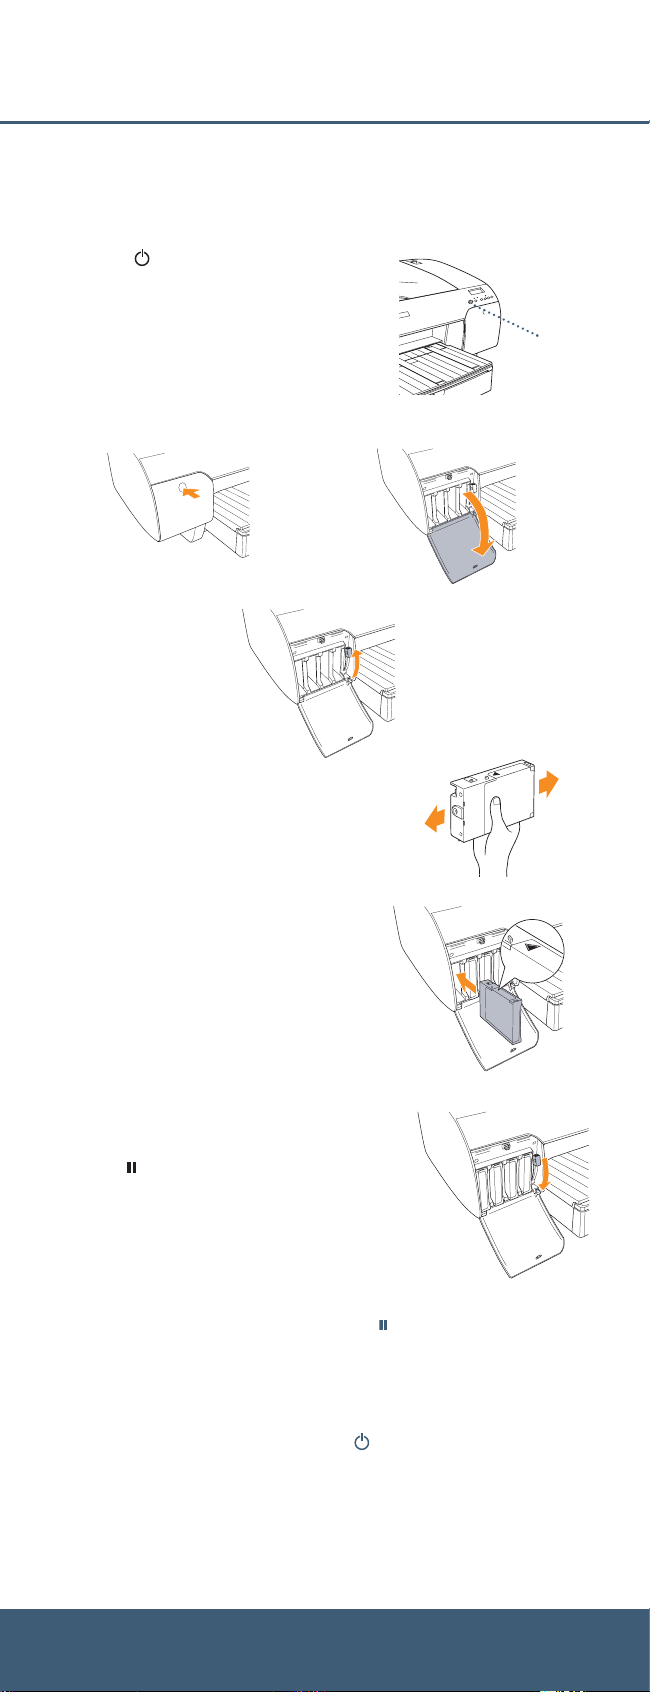
Install Ink
Use the ink cartridges that came with your printer for initial ink charging. During the initial
installation process, it is normal for up to one-third of the ink in each cartridge to be used.
1 Press the Power button to turn on the printer.
Power button
2 Press both ink compartment covers to open them.
3 Raise both ink levers.
4 Remove each ink cartridge from its package and
gently shake the cartridge.
5 Install the ink cartridges in the printer. Hold
each cartridge with the arrow pointing toward
the printer, then insert it into its slot. Make sure
you insert each cartridge in the correct slot.
6 After installing all 8 cartridges, lower the ink levers.
The printer begins charging the ink delivery system
and the Pause light flashes.
7 After approximately 2 minutes, ink lever messages
appear on the LCD. follow the instruction to raise
or lower the ink levers.
Caution: Charging takes about 8 minutes. Never turn off the printer,
release the paper lever, or open the cover while the Pause light is flashing,
or you may damage the printer.
8 When READY appears on the LCD display, charging is complete. Close the ink
compartment covers.
Caution: Always turn off the printer using the Power button. Then wait until
the LCD display turns off. This ensures that the print head is safely capped.
Page 3

Load Roll Paper
1 Slide the black paper stop off the end of
the spindle.
2 If the paper has a 2-inch core, remove the adapters
by pressing the four tabs.
Note: Make sure your hands are clean, and avoid touching the printable surface of the paper.
Try to handle paper by the edges. Make sure you don’t rub or scratch the coating or dent the
edges of the paper.
3 Position the roll so the paper unwinds as shown,
then slide it onto the spindle.
4 Slide the black paper stop back onto the spindle.
Insert it firmly into the end of the roll.
5 Open the roll paper cover.
6 Place the paper and spindle in the printer as
shown, with the gray end on the right.
7 Make sure the printer is powered on and
ready. Press the Paper Source button until
the or roll paper icon appears.
8 Release the paper lever.
9 Hold both sides of the paper and feed it into the slot until the paper
is aligned with the OTHER mark and the vertical line on the paper tray
cover. Then move the paper lever to the secured position.
10 Raise the roll paper support on top of the
paper tray. Then close the roll paper cover.
Paper
Source
button
Roll paper cover
vertical line
OTHER mark
Page 4

Load Cut Sheet Paper
When you are ready to print on cut sheet paper, make sure you release the paper lever and
wind up the roll paper. Then return the paper lever to the secured position and close the roll
paper cover.
Note: Some papers cannot be used with the paper tray. You need to load them through the front or top
manual feed slots. See the Printer Guide for details.
1 Make sure the printer is on and ready
to print.
2 Pull out the paper tray and cover,
then remove the cover. Flip up the
paper guide roller.
Paper guide
roller
3 Slide the edge guide all the way to the left.
4 Thumb through a stack of paper, then gently tap
it on a flat surface to even the edges.
5 Load the sheets in the portrait
orientation, with the whiter or glossier
printable side face down. Place the paper
all the way back, against the right side of
the tray.
Don’t load paper above the arrow mark
inside the edge guide.
6 Adjust the paper tray and edge guide
according to the paper size. For small
sheets, raise the paper guide and move
it to the edge of the stack.
7 Flip down the paper guide roller, then
replace the paper tray cover and adjust
its length.
Note: Make sure the roll paper support
is not raised.
8 Press the Paper Source button until you see the cut sheet icon.
Page 5

Connect to Your System
You can use either of the following connections. Make sure your system has the appropriate
port, and you have a standard, shielded cable 10 feet long or less:
USB cable
®
IEEE FireWire
If you have the optional EpsonNet Ethernet card,
you can connect the printer directly to your
network. You’ll need a standard RJ-45 network
cable.
cable
1 Make sure that both the printer and the
computer are off.
2 Plug the interface cable into the
appropriate port on the printer.
IEEE FireWire connector
USB connector
3 Plug the other end of the cable into the appropriate connector on your
computer or network hub.
Install the Software
Follow the steps below for Macintosh®or Windows.
®
Macintosh
1
Turn on your Macintosh and your printer.
2 Insert the printer software CD-ROM. If necessary, double-click the EPSON
CD-ROM to open its window.
3 Double-click the EPSON OS X Installer.
If you are using Mac®OS 9, double-click the EPSON OS 9 Installer.
4 Double-click Install Reference
Guide and wait while the guide
is installed.
5 Double-click Install Printer Driver
and Utilities. Enter your password
if necessary.
6 Follow the on-screen instructions to
install your software. When you see a
message informing you that installation
was successful, click Restart to restart
your Macintosh.
7 If you’re using OS X, continue with step 8.
If you’re using OS 9, open the
Chooser from the Apple®menu.
Select SPro 4000, then select your
port and turn on background printing.
Your installation is complete.
8 Open the Applications folder, then
open the Utilities folder and open the
Print Center or Printer Setup utility.
9 Click the Add icon at the top of the Printer List window.
Continue
▲
Page 6

10 Pull down the menu and select the
connection you are using—either
EPSON USB, EPSON FireWire, or
EPSON TCP/IP. The Stylus Pro 4000
appears on the Printer List screen.
11 Click Stylus Pro 4000, then open
the Page Setup pull-down menu.
12 Select All, then click Add.
Windows
1
Make sure your printer is turned off.
2 Turn on your computer.
3 Insert the printer software CD-ROM in your computer. The installer starts
automatically. If it doesn’t start, double-click My Computer or click
Start > My Computer. Then double-click your CD-ROM icon.
4 Double-click Install Printer Driver and Utilities.
5 When you see a window asking you
to turn on your printer, press the
Power button.
6 When you see a message that setup is
complete, click OK.
7 Double-click Install Reference
Guide and wait while the guide is
installed.
8 If you need the ZEHPlot or EPSON
HDI driver, double-click the icon and
follow the instructions on the screen.
9 Click to close the installer, then remove the CD-ROM.
Any Questions?
Here’s where to look for answers:
Mastering Your Printer Video Workshop
Insert the Mastering Your Printer CD-ROM and select the video you want to watch.
You’ll get expert advice on optimizing print quality, printing from Photoshop,
and basic printer operations.
Printer Guide
Refer to this book for complete instructions on using and maintaining your printer,
as well as problem-solving tips and specifications.
Quick Reference Guide
Keep this booklet handy for instructions on loading paper, replacing ink cartridges
and other components, changing and aligning the print head, and what to do
when you see a printer error message.
®
Electronic Reference Guide
Double-click the SP4000 Reference Guide icon on your desktop. If you didn’t install
the guide, insert the printer software CD-ROM in your CD-ROM or DVD drive. Then
double-click Install Reference Guide.
EPSON Technical Support
• World Wide Web
http://support.epson.com
• Call (888) 377-6611. Make sure you have your EPSON PreferredSMUnit ID number. If
you have any difficulty with this service, call (562) 276-1305.
EPSON and EPSON Stylus are registered trademarks of SEIKO EPSON CORPORATION. EPSON Preferred is a
service mark of Epson America, Inc.
General Notice: Other product names used herein are for identification purposes only and may be trademarks of their
respective owners. EPSON disclaims any and all rights in those marks.
Printed on recycled paper
© 2004 by Epson America, Inc. 9/04
Printed in USA CPD-17011R1
 Loading...